hp elitebook user guide - hewlett packard
TRANSCRIPT

HP EliteBook User Guide

© Copyright 2010 Hewlett-PackardDevelopment Company, L.P.
Bluetooth is a trademark owned by itsproprietor and used by Hewlett-PackardCompany under license. Intel is a trademarkof Intel Corporation in the U.S. and othercountries or regions. Java is a U.S.trademark of Sun Microsystems, Inc.Microsoft, Windows, and Windows Vista areU.S. registered trademarks of MicrosoftCorporation. SD Logo is a trademark of itsproprietor.
The information contained herein is subjectto change without notice. The onlywarranties for HP products and services areset forth in the express warranty statementsaccompanying such products and services.Nothing herein should be construed asconstituting an additional warranty. HP shallnot be liable for technical or editorial errorsor omissions contained herein.
First Edition: January 2010
Document Part Number: 590177-001
Product notice
This user guide describes features that arecommon to most models. Some featuresmay not be available on your computer.

Safety warning noticeWARNING! To reduce the possibility of heat-related injuries or of overheating the computer, do notplace the computer directly on your lap or obstruct the computer air vents. Use the computer only on ahard, flat surface. Do not allow another hard surface, such as an adjoining optional printer, or a softsurface, such as pillows or rugs or clothing, to block airflow. Also, do not allow the AC adapter to contactthe skin or a soft surface, such as pillows or rugs or clothing, during operation. The computer and theAC adapter comply with the user-accessible surface temperature limits defined by the InternationalStandard for Safety of Information Technology Equipment (IEC 60950).
iii

iv Safety warning notice

Table of contents
1 FeaturesIdentifying hardware ............................................................................................................................. 1
Top components .................................................................................................................. 1Pointing devices .................................................................................................. 1Lights ................................................................................................................... 3Buttons, switches, and fingerprint reader ............................................................ 5Keys .................................................................................................................... 7
Front components ................................................................................................................ 7Right-side components ........................................................................................................ 9Left-side components .......................................................................................................... 9Rear components .............................................................................................................. 10Bottom components ........................................................................................................... 11Display .............................................................................................................................. 12Wireless antennas (select models only) ............................................................................ 12Additional hardware components ...................................................................................... 13
Identifying the labels ........................................................................................................................... 14
2 Wireless, modem, and local area networkUsing wireless devices (select models only) ...................................................................................... 16
Identifying wireless and network icons .............................................................................. 17Using the wireless controls ................................................................................................ 17Using the wireless button ................................................................................................... 17Using Wireless Assistant software (select models only) .................................................... 18Using HP Connection Manager (select models only) ........................................................ 18Using operating system controls ........................................................................................ 19
Using a WLAN .................................................................................................................................... 20Setting up a WLAN ............................................................................................................ 20Protecting your WLAN ....................................................................................................... 20Connecting to a WLAN ...................................................................................................... 21Roaming to another network .............................................................................................. 22
Using HP Mobile Broadband (select models only) ............................................................................. 23Inserting a SIM ................................................................................................................... 23Removing a SIM ................................................................................................................ 24
Using Bluetooth wireless devices (select models only) ...................................................................... 26
v
Bluetooth and Internet Connection Sharing (ICS) ............................................................. 26Troubleshooting wireless connection problems ................................................................................. 27
Cannot create a WLAN connection ................................................................................... 27Cannot connect to a preferred network ............................................................................. 28Network icon is not displayed ............................................................................................ 28Current network security codes are unavailable ................................................................ 28WLAN connection is very weak ......................................................................................... 29Cannot connect to the wireless router ............................................................................... 29
Using the modem (select models only) .............................................................................................. 30Connecting a modem cable ............................................................................................... 30Connecting a country-specific modem cable adapter ........................................................ 31Selecting a location setting ................................................................................................ 31
Viewing the current location selection ............................................................... 31Adding new locations when traveling ................................................................ 32Solving travel connection problems .................................................................. 33
Connecting to a local area network (LAN) .......................................................................................... 34
3 Pointing devices and keyboardUsing pointing devices ....................................................................................................................... 35
Setting pointing device preferences ................................................................................... 35Using the TouchPad .......................................................................................................... 35Using the pointing stick ...................................................................................................... 35Connecting an external mouse .......................................................................................... 35
Using the keyboard ............................................................................................................................ 35Using hotkeys .................................................................................................................... 35
Displaying system information .......................................................................... 36Initiating Sleep ................................................................................................... 37Switching the screen image .............................................................................. 38Viewing battery charge information ................................................................... 39Decreasing screen brightness ........................................................................... 40Increasing screen brightness ............................................................................ 40Activating the ambient light sensor .................................................................. 40
Using HP Quick Launch Buttons ........................................................................................................ 41Opening the Quick Launch Buttons control panel .............................................................................. 42Using HP QuickLook .......................................................................................................................... 43Using HP QuickWeb ........................................................................................................................... 44Using the integrated numeric keypad ................................................................................................. 44
Using an optional external numeric keypad ....................................................................... 44Cleaning the TouchPad and keyboard ............................................................................................... 45
4 MultimediaMultimedia features ............................................................................................................................ 46
Adjusting the volume ......................................................................................................... 46
vi

Multimedia software ........................................................................................................................... 47Accessing your preinstalled multimedia software .............................................................. 48Installing your preloaded multimedia software ................................................................... 48Installing multimedia software from a disc ......................................................................... 48
Audio .................................................................................................................................................. 49Connecting external audio devices .................................................................................... 49Checking your audio functions ........................................................................................... 49
Video .................................................................................................................................................. 51Connecting an external monitor or projector ...................................................................... 51
Using the external monitor port ......................................................................... 51Using the DisplayPort ........................................................................................ 51Using the DreamColor display (select models only) ......................................... 52
Optical drive (select models only) ...................................................................................................... 53Identifying the installed optical drive .................................................................................. 53Using optical discs (CDs, DVDs, and BDs) ....................................................................... 53Selecting the right disc (CDs, DVDs, and BDs) ................................................................. 53
CD-R discs ........................................................................................................ 54CD-RW discs ..................................................................................................... 54DVD±R discs ..................................................................................................... 54DVD±RW discs ................................................................................................. 54LightScribe DVD+R discs .................................................................................. 54Blu-ray Discs (BDs) ........................................................................................... 54
Playing a CD, DVD, or BD ................................................................................................. 55Configuring AutoPlay ......................................................................................................... 56Changing DVD region settings .......................................................................................... 56Observing the copyright warning ....................................................................................... 56Copying a CD, DVD, or BD ................................................................................................ 57Creating (burning) a CD, DVD, or BD ................................................................................ 57Removing an optical disc (CD, DVD, or BD) ..................................................................... 58Troubleshooting ................................................................................................................. 58
The optical disc tray does not open for removal of a CD, DVD, or BD ............. 58The computer does not detect the optical drive ................................................ 59A disc does not play .......................................................................................... 60A disc does not play automatically .................................................................... 61A movie stops, skips, or plays erratically .......................................................... 61A movie is not visible on an external display ..................................................... 61The process of burning a disc does not begin, or it stops beforecompletion ......................................................................................................... 61A device driver must be reinstalled ................................................................... 62
Obtaining the latest HP device drivers ............................................. 62Obtaining Microsoft device drivers ................................................... 62
Webcam ............................................................................................................................................. 64Webcam tips ...................................................................................................................... 64Adjusting webcam properties ............................................................................................. 64
vii

Capturing business card images ....................................................................................... 65
5 Power managementSetting power options ......................................................................................................................... 67
Using power-saving states ................................................................................................. 67Initiating and exiting Sleep ................................................................................ 67Initiating and exiting Hibernation ....................................................................... 68
Using the battery meter ..................................................................................................... 68Using power plans ............................................................................................................. 68
Viewing the current power plan ......................................................................... 69Selecting a different power plan ........................................................................ 69Customizing power plans .................................................................................. 69
Setting password protection on wakeup ............................................................................ 69Using external AC power .................................................................................................................... 70
Connecting the AC adapter ............................................................................................... 70Using battery power ........................................................................................................................... 71
Finding battery information in Help and Support ............................................................... 71Using Battery Check .......................................................................................................... 72Displaying the remaining battery charge ........................................................................... 72Inserting or removing the battery ....................................................................................... 72Charging a battery ............................................................................................................. 73Maximizing battery discharge time .................................................................................... 74Managing low battery levels .............................................................................................. 74
Identifying low battery levels ............................................................................. 74Resolving a low battery level ............................................................................. 76
Resolving a low battery level when external power is available ....... 76Resolving a low battery level when a charged battery isavailable ........................................................................................... 76Resolving a low battery level when no power source isavailable ........................................................................................... 76Resolving a low battery level when the computer cannot exitHibernation ....................................................................................... 76
Calibrating a battery ........................................................................................................... 76Step 1: Fully charge the battery ........................................................................ 76Step 2: Disable Hibernation and Sleep ............................................................. 77Step 3: Discharge the battery ............................................................................ 77Step 4: Fully recharge the battery ..................................................................... 79Step 5: Reenable Hibernation and Sleep .......................................................... 79
Conserving battery power .................................................................................................. 79Storing a battery ................................................................................................................ 80Disposing of a used battery ............................................................................................... 80Replacing the battery ........................................................................................................ 80
Testing an AC adapter ....................................................................................................................... 81Shutting down the computer ............................................................................................................... 81
viii

6 DrivesIdentifying installed drives .................................................................................................................. 83Handling drives ................................................................................................................................... 83Improving hard drive performance ..................................................................................................... 85
Using Disk Defragmenter ................................................................................................... 85Using Disk Cleanup ........................................................................................................... 85
Using HP 3D DriveGuard .................................................................................................................. 86Identifying HP 3D DriveGuard status ................................................................................. 86Using HP 3D DriveGuard software .................................................................................... 87
Replacing the hard drive in the hard drive bay ................................................................................... 88Replacing a drive in the upgrade bay ................................................................................................. 91
Replacing a hard drive ....................................................................................................... 91Replacing an optical drive .................................................................................................. 94
7 External devicesUsing a USB device ........................................................................................................................... 97
Connecting a USB device .................................................................................................. 97Stopping and removing a USB device ............................................................................... 97Using USB legacy support ................................................................................................. 98
Using a 1394 device ........................................................................................................................... 99Connecting a 1394 device ................................................................................................. 99Stopping and removing a 1394 device .............................................................................. 99
Using an eSATA device ................................................................................................................... 100Connecting an eSATA device .......................................................................................... 100Stopping and removing an eSATA device ....................................................................... 100
Using external drives ........................................................................................................................ 101Using optional external devices ....................................................................................... 101
Using the docking connector ........................................................................................................... 102
8 External media cardsUsing Media Card Reader cards ...................................................................................................... 103
Inserting a digital card ...................................................................................................... 103Stopping and removing a digital card .............................................................................. 104
Using ExpressCards (select models only) ........................................................................................ 105Configuring an ExpressCard ............................................................................................ 105Inserting an ExpressCard ................................................................................................ 105Stopping and removing an ExpressCard ......................................................................... 106
Using Smart Cards (select models only) .......................................................................................... 107Inserting a smart card ...................................................................................................... 107Removing a smart card .................................................................................................... 107
9 Memory modulesAdding or replacing a memory module in the expansion memory module slot ................................ 110
ix

Upgrading a memory module in the primary memory module slot ................................................... 113
10 SecurityProtecting the computer ................................................................................................................... 117Using passwords .............................................................................................................................. 118
Setting passwords in Windows ........................................................................................ 118Setting passwords in Computer Setup ............................................................................ 118BIOS administrator password .......................................................................................... 119
Managing a BIOS administrator password ...................................................... 120Entering a BIOS administrator password ........................................................ 121
Using Computer Setup DriveLock ................................................................................... 121Setting a DriveLock password ......................................................................... 122Entering a DriveLock password ...................................................................... 123Changing a DriveLock password .................................................................... 124Removing DriveLock protection ...................................................................... 125
Using Computer Setup Auto DriveLock ........................................................................... 125Entering an Automatic DriveLock password ................................................... 125Removing Automatic DriveLock protection ..................................................... 126
Using Computer Setup security features .......................................................................................... 127Securing system devices ................................................................................................. 127Viewing Computer Setup System Information ................................................................. 127Using Computer Setup System IDs ................................................................................. 128
Using antivirus software ................................................................................................................... 129Using firewall software ..................................................................................................................... 130Installing critical updates .................................................................................................................. 131Using HP ProtectTools Security Manager (select models only) ....................................................... 132Installing a security cable ................................................................................................................. 133
11 Software updatesUpdating software ............................................................................................................................ 134Updating the BIOS ........................................................................................................................... 136
Determining the BIOS version ......................................................................................... 136Downloading a BIOS update ........................................................................................... 137
Updating programs and drivers ........................................................................................................ 139Using SoftPaq Download Manager .................................................................................................. 140
12 Backup and recoveryBacking up your information ............................................................................................................. 142Performing a recovery ...................................................................................................................... 144
Using the Windows recovery tools ................................................................................... 144Using f11 .......................................................................................................................... 145Using a Windows 7 operating system DVD (purchased separately) .............................. 145
x

13 Computer SetupStarting Computer Setup .................................................................................................................. 147Using Computer Setup ..................................................................................................................... 147
Navigating and selecting in Computer Setup ................................................................... 147Restoring factory settings in Computer Setup ................................................................. 148
Computer Setup menus ................................................................................................................... 148File menu ......................................................................................................................... 149Security menu .................................................................................................................. 149System Configuration menu ............................................................................................ 150
14 MultiBootAbout the boot device order ............................................................................................................. 155Enabling boot devices in Computer Setup ....................................................................................... 157Considering boot order changes ...................................................................................................... 158Choosing MultiBoot preferences ...................................................................................................... 159
Setting a new boot order in Computer Setup ................................................................... 159Dynamically choosing a boot device using the F9 prompt ............................................... 159Setting a MultiBoot Express prompt ................................................................................ 160Entering MultiBoot Express preferences ......................................................................... 160
15 Management and printingUsing Client Management Solutions ................................................................................................ 161
Configuring and deploying a software image ................................................................... 161Managing and updating software ..................................................................................... 162
HP Client Manager for Altiris (select models only) .......................................... 162HP CCM (Client Configuration Manager) (select models only) ....................... 164HP SSM (System Software Manager) ............................................................. 165
Using Intel Active Management Technology (select models only) ................................................... 166Enabling the iAMT solution .............................................................................................. 166Using the MEBx setup utility menus ................................................................................ 166
Using the HP Universal Print Driver (select models only) ................................................................ 168
Index ................................................................................................................................................................. 169
xi

xii

1 Features
Identifying hardwareTo see a list of hardware installed in the computer, follow these steps:
1. Select Start > Computer > System properties.
2. In the left pane, click Device Manager.
You can also add hardware or modify device configurations using Device Manager.
NOTE: Windows® includes the User Account Control feature to improve the security of your computer.You may be prompted for your permission or password for tasks such as installing software, runningutilities, or changing Windows settings. Refer to Windows Help and Support for more information.
Top components
Pointing devices
Component Description
(1) Pointing stick* Moves the pointer and selects or activates items on the screen.
Identifying hardware 1

Component Description
(2) Center pointing stick button* Functions like the center button on an external mouse.
(3) Right pointing stick button* Functions like the right button on an external mouse.
(4) TouchPad scroll zone Scrolls up or down.
(5) Right TouchPad button* Functions like the right button on an external mouse.
(6) Center TouchPad button* Functions like the center button on an external mouse.
(7) Left TouchPad button* Functions like the left button on an external mouse.
(8) TouchPad* Moves the pointer and selects or activates items on the screen.
(9) Left pointing stick button* Functions like the left button on an external mouse.
*This table describes factory settings. To view or change pointing device preferences, select Start > Control Panel > Hardwareand Sound > Mouse.
2 Chapter 1 Features

Lights
Component Description
(1) Wireless lights (2)† ● Blue: An integrated wireless device, such as a wireless localarea network (WLAN) device and/or a Bluetooth® device, ison.
● Amber: All wireless devices are off.
(2) Power lights (2)* ● On: The computer is on.
● Blinking: The computer is in the Sleep state.
● Off: The computer is off or in Hibernation.
(3) Battery light ● Amber: A battery is charging.
● Turquoise: A battery is close to full charge capacity.
● Blinking amber: A battery that is the only available powersource has reached a low battery level. When the batteryreaches a critical battery level, the battery light begins blinkingrapidly.
● Off: If the computer is plugged into an external power source,the light turns off when all batteries in the computer are fullycharged. If the computer is not plugged into an external powersource, the light stays off until the battery reaches a lowbattery level.
(4) Drive light ● Blinking turquoise: The hard drive or optical drive is beingaccessed.
● Amber: HP 3D DriveGuard has temporarily parked the harddrive.
(5) QuickLook light ● On: The computer is on.
● Off: The computer is off or in the Sleep or Hibernation state.
(6) HP QuickWeb light ● On: The Web browser is in use.
Identifying hardware 3

Component Description
(7) TouchPad light ● Blue: TouchPad is on.
● Amber: TouchPad is off.
(8) Caps lock light On: Caps lock is on.
(9) Num lock light On: Num lock is on.
(10) Volume mute light ● On: Computer sound is on.
● Amber: Computer sound is off.
(11) Volume down light Blinking: The volume scroll zone is being used to decrease speakervolume.
(12) Volume up light Blinking: The volume scroll zone is being used to increase speakervolume.
(13) Calculator light ● On: The Windows calculator function is on.
● Blinking: The Windows calculator is in use.
*The two power lights display the same information. The light on the power button is visible only when the computer is open.The power light on the front of the computer is visible whether the computer is open or closed.
†The two wireless lights display the same information. The light on the wireless button is visible only when the computer is open.The wireless light on the front of the computer is visible whether the computer is open or closed.
4 Chapter 1 Features

Buttons, switches, and fingerprint reader
Component Description
(1) Power button ● When the computer is off, press the button to turn onthe computer.
● When the computer is on, press the button to shutdown the computer.
● When the computer is in the Sleep state, press thebutton briefly to exit Sleep.
● When the computer is in Hibernation, press thebutton briefly to exit Hibernation.
If the computer has stopped responding and Windowsshutdown procedures are ineffective, press and hold thepower button for at least 5 seconds to turn off thecomputer.
To learn more about your power settings, select Start >Control Panel > Performance and Maintenance >Power Options.
(2) QuickLook button ● When the computer is off, press the button to openHP QuickLook.
● When the computer is on, press the button to openSoftware Setup.
NOTE: If Software Setup is not available, thedefault Web browser opens.
Identifying hardware 5

Component Description
(3) QuickWeb button ● When the computer is off, press the button to openHP QuickWeb.
● When the computer is on, press the button to openthe default Web browser.
(4) Wireless button Turns the wireless feature on or off but does not establisha wireless connection.
(5) TouchPad button Enables/disables the TouchPad.
(6) Volume mute button Mutes and restores speaker sound.
(7) Volume down button Decreases computer volume.
(8) Volume up button Increases computer volume.
(9) Calculator button Turns on the Windows calculator function.
(10) Fingerprint reader Allows a fingerprint logon to Windows, instead of apassword logon.
6 Chapter 1 Features

Keys
Component Description
(1) esc key Displays system information when pressed in combination with thefn key.
(2) fn key Executes frequently used system functions when pressed incombination with a function key or the esc key.
(3) Windows logo key Displays the Windows Start menu.
(4) Windows applications key Displays a shortcut menu for items beneath the pointer.
(5) Integrated numeric keypad keys Can be used like the keys on an external numeric keypad.
(6) Function keys Execute frequently used system functions when pressed incombination with the fn key.
Front components
Identifying hardware 7

Component Description
(1) Wireless light ● Blue: An integrated wireless device, such as a WLAN device,the HP Mobile Broadband Module (select models only), and/or a Bluetooth device, is on.
● Amber: All wireless devices are off.
(2) Power light ● On: The computer is on.
● Blinking: The computer is in the Sleep state.
● Off: The computer is off or in Hibernation.
(3) Battery light ● Amber: A battery is charging.
● Turquoise: A battery is close to full charge capacity.
● Blinking amber: A battery that is the only available powersource has reached a low battery level. When the batteryreaches a critical battery level, the battery light begins blinkingrapidly.
● Off: If the computer is plugged into an external power source,the light turns off when all batteries in the computer are fullycharged. If the computer is not plugged into an external powersource, the light stays off until the battery reaches a lowbattery level.
(4) Drive light ● Blinking turquoise: The hard drive or optical drive is beingaccessed.
● Amber: HP 3D DriveGuard has temporarily parked the harddrive.
(5) Speakers (2) Produce sound.
(6) Media Card Reader Supports the following optional digital card formats:
● Memory Stick
● Memory Stick Duo (adapter required)
● Memory Stick Pro (adapter required)
● MultiMediaCard
● Secure Digital (SD) Memory Card
● xD-Picture Card
● xD-Picture Card Type H
● xD-Picture Card Type M
(7) Display release button Opens the computer.
(8) Business card slot Holds a business card in position so that the webcam can capturean image.
8 Chapter 1 Features

Right-side components
Component Description
(1) Smart card reader Supports optional smart cards and Java™ Cards.
(2) Upgrade bay Supports an optical drive or hard drive.
(3) 3.0 SuperSpeed USB ports (2) Connect optional USB devices and transfer data at a higher speedthan a 2.0 USB device.
(4) RJ-45 (network) jack Connects a network cable.
(5) RJ-11 (modem) jack Connects a modem cable.
(6) Security cable slot Attaches an optional security cable to the computer.
NOTE: The security cable is designed to act as a deterrent, butit may not prevent the computer from being mishandled or stolen.
Left-side components
Component Description
(1) USB ports (3) Connect optional USB devices.
(2) Vent Enables airflow to cool internal components.
NOTE: The computer fan starts up automatically to cool internalcomponents and prevent overheating. It is normal for the internalfan to cycle on and off during routine operation.
(3) DisplayPort Connects an optional digital display device, such as a high-performance monitor or projector.
(4) eSATA port Connects high-performance eSATA components, such as aneSATA external hard drive.
(5) 1394 port Connects an optional IEEE 1394 or 1394a device, such as acamcorder.
Identifying hardware 9
Component Description
(6) Audio-in (microphone) jack Connects an optional computer headset microphone, stereo arraymicrophone, or monaural microphone.
(7) Audio-out (headphone) jack Produces sound when connected to optional powered stereospeakers, headphones, ear buds, a headset, or television audio.
NOTE: When a device is connected to the headphone jack, thecomputer speakers are disabled.
(8) ExpressCard slot Supports optional ExpressCards.
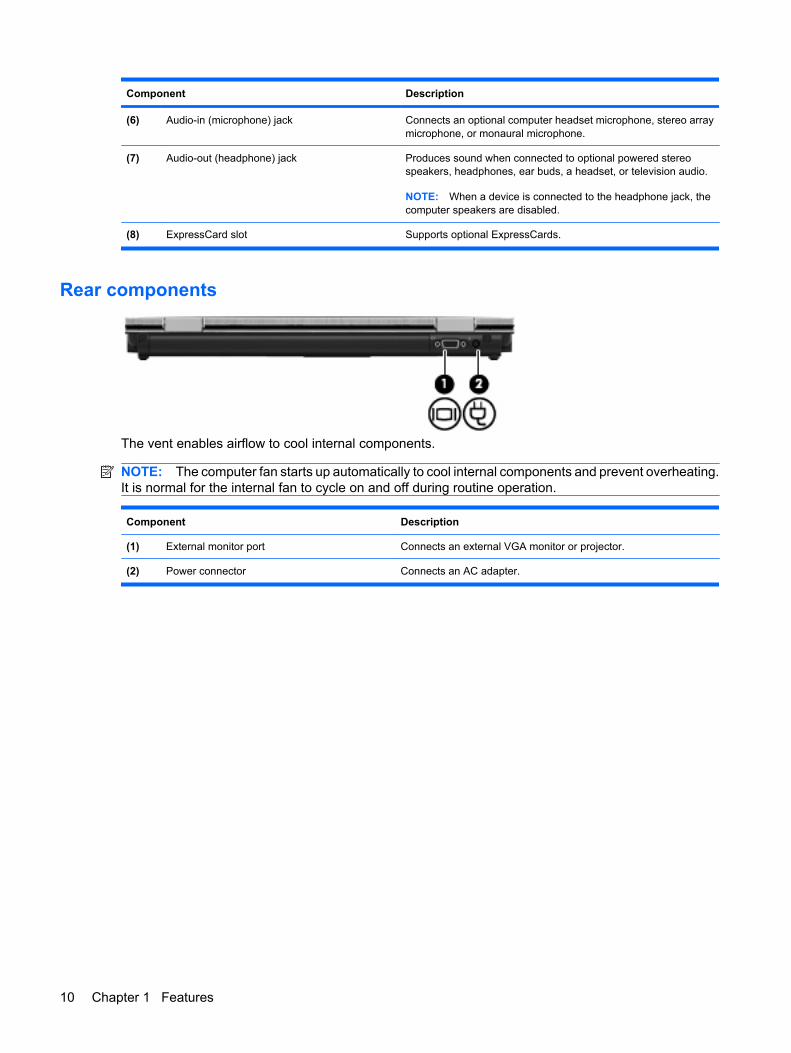
Rear components
The vent enables airflow to cool internal components.
NOTE: The computer fan starts up automatically to cool internal components and prevent overheating.It is normal for the internal fan to cycle on and off during routine operation.
Component Description
(1) External monitor port Connects an external VGA monitor or projector.
(2) Power connector Connects an AC adapter.
10 Chapter 1 Features

Bottom components
Component Description
(1) SIM slot Contains a wireless subscriber identity module (SIM) (selectmodels only). The SIM slot is located inside the battery bay.
(2) Battery bay Holds the battery.
(3) Docking connector Connects an optional docking device.
(4) Vents (6) Enable airflow to cool internal components.
NOTE: The computer fan starts up automatically to cool internalcomponents and prevent overheating. It is normal for the internalfan to cycle on and off during routine operation.
(5) Accessory battery connector Connects an optional accessory battery.
(6) Memory module compartment Contains two expansion memory module slots.
(7) Hard drive bay Holds the hard drive.
(8) Bluetooth compartment Contains a Bluetooth device.
(9) Wireless module compartment Contains an HP Mobile Broadband Module.
NOTE: To prevent an unresponsive system, replace the wirelessmodule only with a wireless module authorized for use in thecomputer by the governmental agency that regulates wirelessdevices in your country or region. If you replace the module andthen receive a warning message, remove the module to restorecomputer functionality, and then contact technical support throughHelp and Support.
(10) Battery release latch Releases the battery from the battery bay.
Identifying hardware 11

Display
Component Description
(1) Internal display switch Turns off the display if the display is closed while the power is on.
(2) Internal microphones (2) Record sound.
(3) Webcam light On: The webcam is in use.
(4) Webcam Records audio and video and captures still photographs.
(5) Keyboard light Illuminates the keyboard in low-light conditions when the keyboardlight button is pressed.
(6) Keyboard light button Turns on the keyboard light.
(7) Ambient light sensor Automatically adjusts the display brightness based on the lightingconditions in your environment.
Wireless antennas (select models only)The antennas send and receive signals from one or more wireless devices. These antennas are notvisible from the outside of the computer.
12 Chapter 1 Features

Component Description
(1) WWAN antennas (2)* Send and receive wireless signals to communicate with wirelesswide area networks (WWANs).
(2) WLAN antennas (2)* Send and receive wireless signals to communicate with wirelesslocal area networks (WLANs).
*The antennas are not visible from the outside of the computer. For optimal transmission, keep the areas immediately aroundthe antennas free from obstructions.
To see wireless regulatory notices, refer to the section of the Regulatory, Safety and EnvironmentalNotices that applies to your country or region. These notices are located in Help and Support.
Additional hardware components
Identifying hardware 13

Component Description
(1) Power cord* Connects an AC adapter to an AC outlet.
(2) Battery* Powers the computer when the computer is not plugged into anexternal power source.
(3) AC adapter Converts AC power to DC power.
(4) Modem cable (select models only)* Connects the internal modem to an RJ-11 telephone jack or to acountry- or region-specific modem cable adapter.
(5) Country- or region-specific modem cable adapter(select models only)*
Adapts the modem cable to a non-RJ-11 telephone jack.
*Modem cables, batteries, modem cable adapters, and power cords vary in appearance by country or region.
Identifying the labelsThe labels affixed to the computer provide information you may need when you troubleshoot systemproblems or travel internationally with the computer:
● Service tag—Provides important information, including the following:
◦ Product Name (1). This is the product name affixed to the front of your computer.
◦ Serial Number (s/n) (2). This is an alphanumeric identifier that is unique to each product.
◦ Part number/Product number (p/n) (3). This number provides specific information about theproduct's hardware components. The part number helps a service technician to determinewhat components and parts are needed.
◦ Model description (4). This is an alphanumeric identifier used to locate documents, drivers,and support for your computer.
◦ Warranty period (5). This number describes the duration (in years) of the warranty period forthis computer.
Have this information available when you contact technical support. The service tag label is affixedto the bottom of the computer.
● Microsoft® Certificate of Authenticity—Contains the Windows Product Key. You may need theProduct Key to update or troubleshoot the operating system. This certificate is affixed to the bottomof the computer.
● Regulatory label—Provides regulatory information about the computer. The regulatory label isaffixed inside the battery bay.
● Modem approval label—Provides regulatory information about the modem and lists the agencyapproval markings required by some of the countries in which the modem has been approved foruse. You may need this information when traveling internationally. The modem approval label isaffixed inside the memory module compartment.
14 Chapter 1 Features

● Wireless certification label(s) (select models only)—Provide information about optional wirelessdevices and the approval markings of some of the countries or regions in which the devices havebeen approved for use. An optional device may be a WLAN device or a Bluetooth device. If yourcomputer model includes one or more wireless devices, one or more certification labels areincluded with your computer. You may need this information when traveling internationally.Wireless certification labels are affixed to the bottom of the computer.
● SIM (subscriber identity module) label (select models only)—Provides the ICCID (Integrated CircuitCard Identifier) of your SIM. This label is located inside the battery bay.
● HP Mobile Broadband Module serial number label (select models only)—Provides the serialnumber of your HP Mobile Broadband Module. This label is located inside the battery bay.
Identifying the labels 15

2 Wireless, modem, and local areanetwork
Using wireless devices (select models only)Wireless technology transfers data across radio waves instead of wires. Your computer may beequipped with one or more of the following wireless devices:
● WLAN device—Connects the computer to wireless local area networks (commonly referred to asWi-Fi networks, wireless LANs, or WLANs) in corporate offices, your home, and public places suchas airports, restaurants, coffee shops, hotels, and universities. In a WLAN, each mobile wirelessdevice communicates with a wireless router or a wireless access point.
● HP Mobile Broadband Module—A wireless wide area network (WWAN) device that providesaccess to information wherever mobile network operator service is available. In a WWAN, eachmobile device communicates to a mobile network operator’s base station. Mobile network operatorsinstall networks of base stations (similar to cell phone towers) throughout large geographic areas,effectively providing coverage across entire states, regions, or even countries.
● Bluetooth device—Creates a personal area network (PAN) to connect to other Bluetooth-enableddevices such as computers, phones, printers, headsets, speakers, and cameras. In a PAN, eachdevice communicates directly with other devices, and devices must be relatively close together—typically within 10 meters (approximately 33 feet) of each other.
Computers with WLAN devices support one or more of the following IEEE industry standards:
● 802.11b, the first popular standard, supports data rates of up to 11 Mbps and operates at afrequency of 2.4 GHz.
● 802.11g supports data rates of up to 54 Mbps and operates at a frequency of 2.4 GHz. An 802.11gWLAN device is backward compatible with 802.11b devices, so they can operate on the samenetwork.
● 802.11a supports data rates of up to 54 Mbps and operates at a frequency of 5 GHz.
NOTE: 802.11a is not compatible with 802.11b and 802.11g.
● 802.11n supports data rates of up to 450 Mbps and may operate at 2.4 GHz or 5 GHz, making itbackward compatible with 802.11a, b, and g.
NOTE: The specifications for the 802.11n WLAN are draft specifications and are not final. If thefinal specifications differ from the draft specifications, it may affect the ability of the computer tocommunicate with other 802.11n WLAN devices.
For more information on wireless technology, refer to the information and Web site links provided inHelp and Support.
16 Chapter 2 Wireless, modem, and local area network

Identifying wireless and network icons
Icon Name Description
Wireless (connected) Identifies the location of the wireless lights and the wireless buttons onthe computer. Also identifies the Wireless Assistant software on thecomputer and indicates that one or more of the wireless devices areon.
Wireless(disconnected)
Identifies the Wireless Assistant software on the computer andindicates that all of the wireless devices are off.
HP ConnectionManager
Opens HP Connection Manager, which enables you to create aconnection with an HP Mobile Broadband device (select models only).
Wired network(connected)
Indicates that one or more of your network drivers are installed and oneor more network devices are connected to the network.
Network (connected) Indicates that one or more of your network drivers are installed, one ormore network devices are connected to a wireless network, and oneor more network devices may be connected to a wired network.
Network(disconnected)
Indicates that one or more of your network drivers are installed andwireless connections are available, but no network devices areconnected to a wired or wireless network.
Network (disabled/disconnected)
Indicates that one or more of your network drivers are installed, nowireless connections are available or all wireless network devices aredisabled by the wireless button or Wireless Assistant, and no networkdevices are connected to a wired network.
Wired network(disabled/disconnected)
Indicates that one or more of your network drivers are installed, allnetwork devices or all wireless devices are disabled in WindowsControl Panel, and no network devices are connected to a wirednetwork.
Using the wireless controlsYou can control the wireless devices in your computer using these features:
● Wireless button or wireless switch (referred to in this guide as the wireless button)
● Wireless Assistant software (select models only)
● HP Connection Manager software (select models only)
● Operating system controls
Using the wireless buttonThe computer has a wireless button, one or more wireless devices, and one or two wireless lights,depending on the model. All of the wireless devices on your computer are enabled at the factory, so thewireless light is on (blue) when you turn on the computer.
The wireless light indicates the overall power state of your wireless devices, not the status of individualdevices. If the wireless light is blue, at least one wireless device is on. If the wireless light is off, allwireless devices are off.
Using wireless devices (select models only) 17

NOTE: On some models, the wireless light is amber when all wireless devices are off.
Because the wireless devices are enabled at the factory, you can use the wireless button to turn on orturn off the wireless devices simultaneously. Individual wireless devices can be controlled throughWireless Assistant software (select models only) or through Computer Setup.
NOTE: If the wireless devices are disabled by Computer Setup, the wireless button will not work untilyou reenable your devices.
Using Wireless Assistant software (select models only)A wireless device can be turned on or off using the Wireless Assistant software. If a wireless device isdisabled by Computer Setup, it must be reenabled by Computer Setup before it can be turned on or offusing Wireless Assistant.
NOTE: Enabling or turning on a wireless device does not automatically connect the computer to anetwork or a Bluetooth-enabled device.
To view the state of the wireless devices, click the Show hidden icons icon, the arrow at the left of thenotification area, and position the cursor over the wireless icon.
If the wireless icon is not displayed in the notification area, complete the following steps to change theWireless Assistant properties:
1. Select Start > Control Panel > Hardware and Sound > Windows Mobility Center.
2. Click the wireless icon in the Wireless Assistant tile, which is located in the bottom row of WindowsMobility Center.
3. Click Properties.
4. Select the check box next to HP Wireless Assistant icon in notification area.
5. Click Apply.
6. Click Close.
For more information, refer to the Wireless Assistant software Help:
1. Open Wireless Assistant by clicking the wireless icon in Windows Mobility Center.
2. Click the Help button.
Using HP Connection Manager (select models only)You can use HP Connection Manager to connect to WWANs using the HP Mobile Broadband device inyour computer (select models only).
To start Connection Manager, click the Connection Manager icon in the notification area, at the farright of the taskbar.
– or –
Select Start > All Programs > HP > HP Connection Manager.
For more details about using Connection Manager, refer to the Connection Manager software Help.
18 Chapter 2 Wireless, modem, and local area network

Using operating system controlsSome operating systems also offer a way to manage integrated wireless devices and the wirelessconnection. For example, Windows provides the Network and Sharing Center that allows you to set upa connection or network, connect to a network, manage wireless networks, and diagnose and repairnetwork problems.
To access the Network and Sharing Center, select Start > Control Panel > Network and Internet >Network and Sharing Center.
For more information, refer to Windows Help and Support. Select Start > Help and Support.
Using wireless devices (select models only) 19

Using a WLANWith a WLAN device, you can access a WLAN, which is composed of other computers and accessoriesthat are linked by a wireless router or a wireless access point.
NOTE: The terms wireless router and wireless access point are often used interchangeably.
● A large-scale WLAN, such as a corporate or public WLAN, typically uses wireless access pointsthat can accommodate a large number of computers and accessories and can separate criticalnetwork functions.
● A home or small office WLAN typically uses a wireless router, which allows several wireless andwired computers to share an Internet connection, a printer, and files without requiring additionalpieces of hardware or software.
To use the WLAN device in your computer, you must connect to a WLAN infrastructure (provided througha service provider or a public or corporate network).
Setting up a WLANTo set up a WLAN and connect to the Internet, you need the following equipment:
● A broadband modem (either DSL or cable) (1) and high-speed Internet service purchased from anInternet service provider (ISP)
● A wireless router (purchased separately) (2)
● The wireless computer (3)
The illustration below shows an example of a wireless network installation that is connected to theInternet.
As your network grows, additional wireless and wired computers can be connected to the network toaccess the Internet.
For help in setting up your WLAN, refer to the information provided by your router manufacturer or yourISP.
Protecting your WLANBecause the WLAN standard was designed with only limited security capabilities—basically to foil casualeavesdropping rather than more powerful forms of attack—it is essential to understand that WLANs arevulnerable to well-known and well-documented security weaknesses.
WLANs in public areas, or “hotspots,” like coffee shops and airports, may not provide any security. Newtechnologies are being developed by wireless manufacturers and hotspot service providers that makethe public environment more secure and anonymous. If you are concerned about the security of yourcomputer in a hotspot, limit your network activities to noncritical e-mail and basic Internet surfing.
20 Chapter 2 Wireless, modem, and local area network

When you set up a WLAN or access an existing WLAN, always enable security features to protect yournetwork from unauthorized access. The common security levels are Wi-Fi Protected Access (WPA) andWired Equivalent Privacy (WEP). Because wireless radio signals travel outside the network, other WLANdevices can pick up unprotected signals and either connect to your network (uninvited) or captureinformation being sent across it. However, you can take precautions to protect your WLAN:
● Use a wireless transmitter with built-in security
Many wireless base stations, gateways, and routers provide built-in security features such aswireless security protocols and firewalls. With the correct wireless transmitter, you can protect yournetwork from the most common wireless security risks.
● Work behind a firewall
A firewall is a barrier that checks both data and requests for data that are sent to your network andthen discards any suspicious items. Firewalls are available in many varieties, both software andhardware. Some networks use a combination of both types.
● Use wireless encryption
A variety of sophisticated encryption protocols is available for your WLAN. Find the solution thatworks best for your network security:
◦ Wired Equivalent Privacy (WEP) is a wireless security protocol that uses a WEP key toencode or encrypt all network data before it is transmitted. Usually, you can allow the networkto assign the WEP key. Alternatively, you can set up your own key, generate a different key,or choose other advanced options. Without the correct key, others will not be able to use theWLAN.
◦ WPA (Wi-Fi Protected Access), like WEP, uses security settings to encrypt and decrypt datathat is transmitted over the network. However, instead of using one static security key forencryptions as WEP does, WPA uses temporal key integrity protocol (TKIP) to dynamicallygenerate a new key for every packet. It also generates different sets of keys for each computeron the network.
Connecting to a WLANTo connect to the WLAN, follow these steps:
1. Be sure that the WLAN device is on. If it is on, the wireless light is on (blue). If the wireless light isoff, press the wireless button.
NOTE: On some models, the wireless light is amber when all wireless devices are off.
2. Click the network icon in the notification area, at the far right of the taskbar.
3. Select your WLAN from the list.
4. Click Connect.
If the network is a security-enabled WLAN, you are prompted to enter a network security key, whichis a security code. Type the code, and then click OK to complete the connection.
NOTE: If no WLANs are listed, you are out of range of a wireless router or access point.
NOTE: If you do not see the network you want to connect to, click Open Network and SharingCenter, and then click Set up a new connection or network. A list of options is displayed. Youcan choose to manually search for and connect to a network or to set up a new network connection.
Using a WLAN 21

After the connection is made, place the mouse pointer over the network icon in the notification area, atthe far right of the taskbar, to verify the name and status of the connection.
NOTE: The functional range (how far your wireless signals travel) depends on WLAN implementation,router manufacturer, and interference from other electronic devices or structural barriers such as wallsand floors.
More information about using a WLAN is available through the following resources:
● Information from your ISP and the manufacturer's instructions included with your wireless routerand other WLAN equipment
● Information and Web site links provided in Help and Support
For a list of public WLANs near you, contact your ISP or search the Web. Web sites that list publicWLANs include Cisco Internet Mobile Office Wireless Locations, Hotspotlist, and Geektools. Check witheach public WLAN location for cost and connection requirements.
For additional information on connecting your computer to a corporate WLAN, contact your networkadministrator or IT department.
Roaming to another networkWhen you move your computer within range of another WLAN, Windows attempts to connect to thatnetwork. If the attempt is successful, your computer is automatically connected to the new network. IfWindows does not recognize the new network, follow the same procedure you used initially to connectto your WLAN.
22 Chapter 2 Wireless, modem, and local area network

Using HP Mobile Broadband (select models only)HP Mobile Broadband enables your computer to use wireless wide area networks (WWANs) to accessthe Internet from more places and over larger areas than it can by using WLANs. Using HP MobileBroadband requires a network service provider (called a mobile network operator), which in most casesis a mobile phone network operator. Coverage for HP Mobile Broadband is similar to mobile phone voicecoverage.
When used with mobile network operator service, HP Mobile Broadband gives you the freedom to stayconnected to the Internet, send e-mail, or connect to your corporate network whether you are on theroad or outside the range of Wi-Fi hotspots.
HP supports the following technologies:
● HSPA (High Speed Packet Access), which provides access to networks based on the GlobalSystem for Mobile Communications (GSM) telecommunications standard.
● EV-DO (Evolution Data Optimized), which provides access to networks based on the code divisionmultiple access (CDMA) telecommunications standard.
You may need the HP Mobile Broadband Module serial number to activate mobile broadband service.The serial number is printed on a label inside the battery bay of your computer.
Some mobile network operators require the use of a subscriber identity module (SIM). A SIM containsbasic information about you, such as a PIN, as well as network information. Some computers include aSIM that is preinstalled in the battery bay. If the SIM is not preinstalled, it may be provided in the HPMobile Broadband information provided with your computer or the mobile network operator may provideit separately from the computer.
For information on inserting and removing the SIM, refer to the “Inserting a SIM” and “Removing a SIM”sections in this chapter.
For information on HP Mobile Broadband and how to activate service with a preferred mobile networkoperator, refer to the mobile broadband information included with your computer. For additionalinformation, see the HP Web site at http://www.hp.com/go/mobilebroadband (US only).
Inserting a SIMCAUTION: To prevent damage to the connectors, use minimal force when inserting a SIM.
To insert a SIM:
1. Shut down the computer. If you are not sure whether the computer is off or in Hibernation, turn thecomputer on by pressing the power button. Then shut down the computer through the operatingsystem.
2. Close the display.
3. Disconnect all external devices connected to the computer.
4. Unplug the power cord from the AC outlet.
5. Turn the computer upside down on a flat surface, with the battery bay toward you.
6. Remove the battery.
Using HP Mobile Broadband (select models only) 23

7. Insert the SIM into the SIM slot, and gently push the SIM into the slot until it is firmly seated.
8. Replace the battery.
NOTE: HP Mobile Broadband will be disabled if the battery is not replaced.
9. Reconnect external power.
10. Reconnect external devices.
11. Turn on the computer.
Removing a SIMTo remove a SIM:
1. Shut down the computer. If you are not sure whether the computer is off or in Hibernation, turn thecomputer on by pressing the power button. Then shut down the computer through the operatingsystem.
2. Close the display.
3. Disconnect all external devices connected to the computer.
4. Unplug the power cord from the AC outlet.
5. Turn the computer upside down on a flat surface, with the battery bay toward you.
6. Remove the battery.
24 Chapter 2 Wireless, modem, and local area network

7. Press in on the SIM (1), and then remove it from the slot (2).
8. Replace the battery.
9. Reconnect external power.
10. Reconnect external devices.
11. Turn on the computer.
Using HP Mobile Broadband (select models only) 25
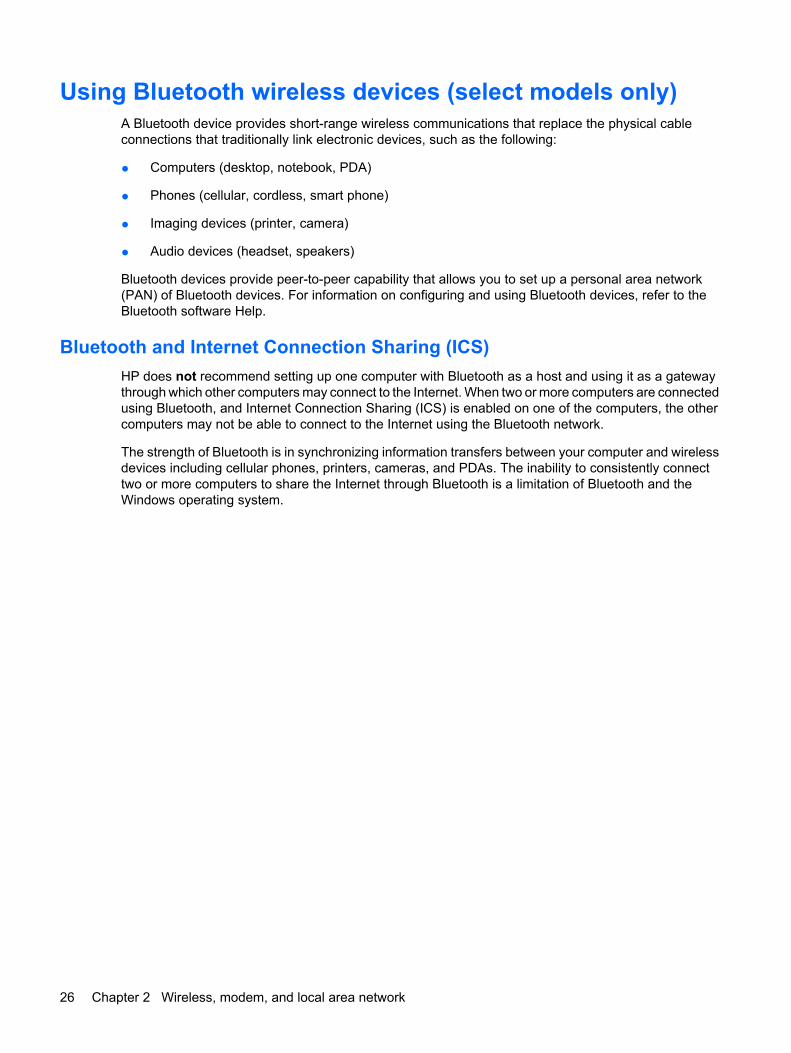
Using Bluetooth wireless devices (select models only)A Bluetooth device provides short-range wireless communications that replace the physical cableconnections that traditionally link electronic devices, such as the following:
● Computers (desktop, notebook, PDA)
● Phones (cellular, cordless, smart phone)
● Imaging devices (printer, camera)
● Audio devices (headset, speakers)
Bluetooth devices provide peer-to-peer capability that allows you to set up a personal area network(PAN) of Bluetooth devices. For information on configuring and using Bluetooth devices, refer to theBluetooth software Help.
Bluetooth and Internet Connection Sharing (ICS)HP does not recommend setting up one computer with Bluetooth as a host and using it as a gatewaythrough which other computers may connect to the Internet. When two or more computers are connectedusing Bluetooth, and Internet Connection Sharing (ICS) is enabled on one of the computers, the othercomputers may not be able to connect to the Internet using the Bluetooth network.
The strength of Bluetooth is in synchronizing information transfers between your computer and wirelessdevices including cellular phones, printers, cameras, and PDAs. The inability to consistently connecttwo or more computers to share the Internet through Bluetooth is a limitation of Bluetooth and theWindows operating system.
26 Chapter 2 Wireless, modem, and local area network

Troubleshooting wireless connection problemsSome possible causes for wireless connection problems include the following:
● Wireless device is not installed correctly or has been disabled.
● Wireless device or router hardware has failed.
● Network configuration (SSID or security) has been changed.
● Wireless device encountered interference from other devices.
NOTE: Wireless networking devices are included with select computer models only. If wirelessnetworking is not listed in the feature list on the side of the original computer package, you may addwireless networking capability to the computer by purchasing a wireless networking device.
Before working your way through the sequence of possible solutions to your network connectionproblem, be sure that device drivers are installed for all wireless devices.
Use the procedures in this chapter to diagnose and repair a computer that does not connect to thenetwork you want to use.
Cannot create a WLAN connectionIf you have a problem connecting to a WLAN, confirm that the integrated WLAN device is properlyinstalled on your computer:
NOTE: Windows includes the User Account Control feature to improve the security of your computer.You may be prompted for your permission or password for tasks such as installing software, runningutilities, or changing Windows settings. Refer to Windows Help and Support for more information.
1. Select Start > Control Panel > System and Security.
2. In the System area, click Device Manager.
3. Click the arrow next to Network adapters to expand the list and show all adapters.
4. Identify the WLAN device from the Network adapters list. The listing for a WLAN device may includethe term wireless, wireless LAN, WLAN, Wi-Fi, or 802.11.
If no WLAN device is listed, either your computer does not have an integrated WLAN device, orthe driver for the WLAN device is not properly installed.
For more information on troubleshooting WLANs, refer to the Web site links provided in Help andSupport.
Troubleshooting wireless connection problems 27

Cannot connect to a preferred networkWindows can automatically repair a corrupted WLAN connection:
● If there is a network icon in the notification area, at the far right of the taskbar, right-click the icon,and then click Troubleshoot problems.
Windows resets your network device and attempts to reconnect to one of the preferred networks.
● If there is no network icon in the notification area, follow these steps:
1. Select Start > Control Panel > Network and Internet > Network and Sharing Center.
2. Click Troubleshoot problems and select the network you wish to repair.
Network icon is not displayedIf the network icon is not displayed in the notification area after you configure the WLAN, the softwaredriver is either missing or corrupted. A Windows “Device not Found” error message may also bedisplayed. The driver must be reinstalled.
To get the latest version of the WLAN device software for your computer, follow these steps:
1. Open your Internet browser and go to http://www.hp.com/support.
2. Select your country or region.
3. Click the option for software and driver downloads, and then type your computer model number inthe search box.
4. Press enter, and then follow the on-screen instructions.
NOTE: If the WLAN device you are using was purchased separately, consult the manufacturer's Website for the latest software.
Current network security codes are unavailableIf you are prompted for a network key or a name (SSID) when connecting to a WLAN, the network isprotected by security. You must have the current codes to make a connection on a secure network. TheSSID and network key are alphanumeric codes that you enter into your computer to identify yourcomputer to the network.
● For a network connected to your personal wireless router, review the router user guide forinstructions on setting up the same codes on both the router and the WLAN device.
● For a private network, such as a network in an office or at a public Internet chat room, contact thenetwork administrator to obtain the codes, and then enter the codes when prompted to do so.
Some networks change the SSID or network keys used in their routers or access points on a regularbasis to improve security. You must change the corresponding code in your computer accordingly.
28 Chapter 2 Wireless, modem, and local area network

If you are provided with new wireless network keys and SSID for a network, and if you have previouslyconnected to that network, follow the steps below to connect to the network:
1. Select Start > Control Panel > Network and Internet > Network and Sharing Center.
2. Click Manage wireless networks in the left panel.
A list showing the available WLANs is displayed. If you are in a hotspot where several WLANs areactive, several will be displayed.
3. Select the network in the list, right-click the network, and then click Properties.
NOTE: If the network you want is not listed, check with the network administrator to be sure thatthe router or access point is operating.
4. Click the Security tab, and then enter the correct wireless encryption data into the Networksecurity key field.
5. Click OK to save these settings.
WLAN connection is very weakIf the connection is very weak, or if your computer cannot make a connection to a WLAN, minimizeinterference from other devices, as follows:
● Move your computer closer to the wireless router or access point.
● Temporarily disconnect other wireless devices such as a microwave, cordless phone, or cellularphone to be sure that they are not interfering.
If the connection does not improve, try forcing the device to reestablish all connection values:
1. Select Start > Control Panel > Network and Internet > Network and Sharing Center.
2. Click Manage wireless networks in the left panel.
A list showing the available WLANs is displayed. If you are in a hotspot where several WLANs areactive, several will be displayed.
3. Click a network, and then click Remove.
Cannot connect to the wireless routerIf you are trying to connect to the wireless router and are unsuccessful, reset the wireless router byremoving power from the router for 10 to 15 seconds.
If the computer still cannot make a connection to a WLAN, restart the wireless router. For details, referto the router manufacturer's instructions.
Troubleshooting wireless connection problems 29

Using the modem (select models only)The modem must be connected to an analog telephone line using a 6-pin, RJ-11 modem cable (includedwith select models only). In some countries, a country-specific modem cable adapter (included withselect models only) is also required. Jacks for digital PBX systems may resemble analog telephonejacks, but they are not compatible with the modem.
WARNING! Connecting the internal analog modem to a digital line can permanently damage themodem. Immediately disconnect the modem cable if you accidentally connect it to a digital line.
If the modem cable contains noise suppression circuitry (1), which prevents interference from TV andradio reception, orient the circuitry end (2) of the cable toward the computer.
Connecting a modem cableWARNING! To reduce the risk of electric shock, fire, or damage to the equipment, do not plug a modemcable (included with select models only) or telephone cable into the RJ-45 (network) jack.
To connect a modem cable:
1. Plug the modem cable into the modem jack (1) on the computer.
2. Plug the modem cable into the RJ-11 telephone wall jack (2).
30 Chapter 2 Wireless, modem, and local area network

Connecting a country-specific modem cable adapterTelephone jacks vary by country. To use the modem and the modem cable (included with select modelsonly) outside the country in which you purchased the computer, you must obtain a country-specificmodem cable adapter (included with select models only).
To connect the modem to an analog telephone line that does not have an RJ-11 telephone jack, followthese steps:
1. Plug the modem cable into the modem jack (1) on the computer.
2. Plug the modem cable into the country-specific modem cable adapter (2).
3. Plug the country-specific modem cable adapter (3) into the telephone wall jack.
Selecting a location setting
Viewing the current location selectionTo view the current location setting for the modem, follow these steps:
1. Select Start > Control Panel.
2. Click Clock, Language, and Region.
3. Click Region and Language.
4. Click the Location tab to display your location.
Using the modem (select models only) 31

Adding new locations when travelingBy default, the only location setting available to the modem is a location setting for the country in whichyou purchased the computer. As you travel to different countries, set the internal modem to a locationsetting that meets the operating standards of the country in which you are using the modem.
As you add new location settings, they are saved by the computer so that you can switch among settingsat any time. You can add multiple location settings for any country.
CAUTION: To prevent losing your home country settings, do not delete your current modem countrysettings. To enable modem use in other countries while preserving your home country configuration,add a new configuration for each location in which you will use the modem.
CAUTION: To prevent configuring the modem in a way that violates the telecommunicationsregulations and laws of the country you are visiting, select the country in which the computer is located.The modem may not function properly if the correct country selection is not made.
To add a location setting for the modem, follow these steps:
1. Select Start > Devices and Printers.
2. Right-click the device that represents your computer, and click Modem settings.
NOTE: You must set up an initial (current) location area code before you can view the DialingRules tab. If you do not have a location set up, you will be prompted to enter the location when youclick Modem settings.
3. Click the Dialing Rules tab.
4. Click New. (The New Location window is displayed.)
5. In the Location name box, type a name (such as “home” or “work”) for the new location setting.
6. Select a country or region from the Country/region drop-down list. (If you select a country or regionthat is not supported by the modem, the Country/region selection for USA or UK is displayed bydefault.)
7. Enter the area code, a carrier code (if necessary), and the number to access an outside line (ifnecessary).
8. Next to Dial using, click Tone or Pulse.
9. Click OK to save your new location setting. (The Phone and Modem window is displayed.)
10. Do one of the following:
● To set your new location setting as the current location, click OK.
● To select another location setting as the current location setting, select your preference fromthe settings in the Location list, and then click OK.
NOTE: You can use the preceding procedure to add location settings for places within your owncountry as well as in other countries. For example, you could add a setting named “Work” thatincludes dialing rules for accessing an outside line.
32 Chapter 2 Wireless, modem, and local area network

Solving travel connection problemsIf you experience modem connection problems when using the computer outside of the country in whichyou purchased it, try the following suggestions:
● Check the telephone line type.
The modem requires an analog, not a digital, telephone line. A line described as a PBX line isusually a digital line. A telephone line described as a data line, fax machine line, modem line, orstandard telephone line is usually an analog line.
● Check for pulse or tone dialing.
An analog telephone line supports one of two dialing modes: pulse dialing or tone dialing. Thesedialing mode options are selected in the Phone and Modem settings. The dialing mode optionselected must match the dialing mode supported by the telephone line in your location.
To determine the dialing mode supported by a telephone line, dial a few digits on the telephone,and then listen for clicks (pulses) or tones. Clicks indicate that the telephone line supports pulsedialing. Tones indicate that the telephone line supports tone dialing.
To change the dialing mode in your current modem location setting, follow these steps:
1. Select Start > Devices and Printers.
2. Right-click the device that represents your computer, and click Modem settings.
3. Click the Dialing Rules tab.
4. Select your modem location setting.
5. Click Edit.
6. Click either Tone or Pulse.
7. Click OK twice.
● Check the telephone number you are dialing and the response of the remote modem.
Dial a telephone number, make sure there is a response from the remote modem, and then hangup.
● Set the modem to ignore dial tones.
If the modem receives a dial tone it does not recognize, it does not dial and displays a “No DialTone” error message.
To set the modem to ignore all dial tones before dialing, follow these steps:
1. Select Start > Devices and Printers.
2. Right-click the device that represents your computer, and click Modem settings.
3. Click the Modems tab.
4. Click the listing for the modem.
5. Click Properties.
6. Click Modem.
Using the modem (select models only) 33

7. Clear the check box for Wait for dial tone before dialing.
8. Click OK twice.
Connecting to a local area network (LAN)Connecting to a local area network (LAN) requires an 8-pin, RJ-45 network cable (purchasedseparately). If the network cable contains noise suppression circuitry (1), which prevents interferencefrom TV and radio reception, orient the circuitry end of the cable (2) toward the computer.
To connect the network cable:
1. Plug the network cable into the network jack (1) on the computer.
2. Plug the other end of the cable into a network wall jack (2).
WARNING! To reduce the risk of electric shock, fire, or damage to the equipment, do not plug amodem or telephone cable into the RJ-45 (network) jack.
34 Chapter 2 Wireless, modem, and local area network

3 Pointing devices and keyboard
Using pointing devicesSetting pointing device preferences
Use Mouse Properties in Windows to customize settings for pointing devices, such as buttonconfiguration, click speed, and pointer options.
To access Mouse Properties, select Start > Control Panel > Hardware and Sound > Mouse.
Using the TouchPadTo move the pointer, slide your finger across the TouchPad surface in the direction you want the pointerto go. Use the TouchPad buttons like the corresponding buttons on an external mouse. To scroll up anddown using the TouchPad vertical scroll zone, slide your finger up or down over the lines.
NOTE: If you are using the TouchPad to move the pointer, you must lift your finger off the TouchPadbefore moving it to the scroll zone. Simply sliding your finger from the TouchPad to the scroll zone willnot activate the scrolling function.
Using the pointing stickPress the pointing stick in the direction you want to move the pointer on the screen. Use the left andright pointing stick buttons as you would the left and right buttons on an external mouse.
Connecting an external mouseYou can connect an external USB mouse to the computer using one of the USB ports on the computer.A USB mouse can also be connected to the system using the ports on an optional docking device.
Using the keyboardUsing hotkeys
Hotkeys are combinations of the fn key (1) and either the esc key (2) or one of the function keys (3).
The icons on the f3, f4, and f8 through f11 keys represent the hotkey functions. Hotkey functions andprocedures are discussed in the following sections.
Using pointing devices 35
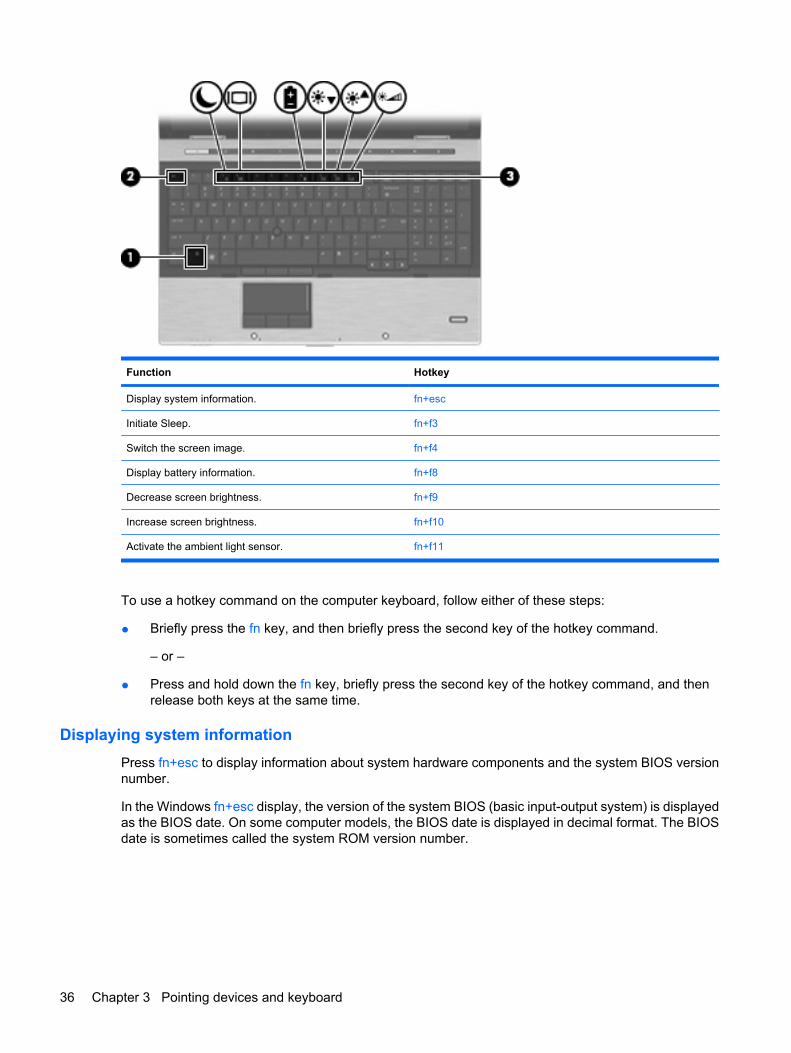
Function Hotkey
Display system information. fn+esc
Initiate Sleep. fn+f3
Switch the screen image. fn+f4
Display battery information. fn+f8
Decrease screen brightness. fn+f9
Increase screen brightness. fn+f10
Activate the ambient light sensor. fn+f11
To use a hotkey command on the computer keyboard, follow either of these steps:
● Briefly press the fn key, and then briefly press the second key of the hotkey command.
– or –
● Press and hold down the fn key, briefly press the second key of the hotkey command, and thenrelease both keys at the same time.
Displaying system informationPress fn+esc to display information about system hardware components and the system BIOS versionnumber.
In the Windows fn+esc display, the version of the system BIOS (basic input-output system) is displayedas the BIOS date. On some computer models, the BIOS date is displayed in decimal format. The BIOSdate is sometimes called the system ROM version number.
36 Chapter 3 Pointing devices and keyboard

Initiating SleepCAUTION: To reduce the risk of information loss, save your work before initiating Sleep.
Press fn+f3 to initiate Sleep.
When Sleep is initiated, your information is stored in system memory, the screen is cleared, and poweris conserved. While the computer is in the Sleep state, the power lights blink.
The computer must be on before you can initiate Sleep.
NOTE: If a critical battery level occurs while the computer is in the Sleep state, the computer initiatesHibernation and the information stored in memory is saved to the hard drive. The factory setting forcritical battery action is Hibernate, but this setting can be changed using Power Options in WindowsControl Panel.
To exit Sleep, briefly press the power button
The function of the fn+f3 hotkey can be changed. For example, you can set the fn+f3 hotkey to initiateHibernation instead of Sleep.
NOTE: In all Windows operating system windows, references to the sleep button apply to the fn+f3hotkey.
Using the keyboard 37

Switching the screen imagePress fn+f4 to switch the screen image among display devices connected to the system. For example,if a monitor is connected to the computer, pressing fn+f4 alternates the screen image from computerdisplay to monitor display to simultaneous display on both the computer and the monitor.
Most external monitors receive video information from the computer using the external VGA videostandard. The fn+f4 hotkey can also alternate images among other devices receiving video informationfrom the computer.
The following video transmission types, with examples of devices that use them, are supported by thefn+f4 hotkey:
● LCD (computer display)
● External VGA (most external monitors)
● HDMI (televisions, camcorders, DVD players, VCRs, and video capture cards with HDMI ports)
● Composite video (televisions, camcorders, DVD players, VCRs, and video capture cards withcomposite-video-in jacks)
NOTE: Composite video devices can be connected to the system only by using an optionaldocking device.
38 Chapter 3 Pointing devices and keyboard

Viewing battery charge informationPress fn+f8 to display charge information for all installed batteries. The display indicates which batteriesare charging and reports the amount of charge remaining in each battery.
Using the keyboard 39

Decreasing screen brightnessPress fn+f9 to decrease screen brightness. Hold down the hotkey to decrease the brightness levelincrementally.
Increasing screen brightnessPress fn+f10 to increase screen brightness. Hold down the hotkey to increase the brightness levelincrementally.
Activating the ambient light sensor Press fn+f11 to activate and deactivate the ambient light sensor.
40 Chapter 3 Pointing devices and keyboard

Using HP Quick Launch ButtonsThe HP Quick Launch Buttons enable you to quickly open programs, files, or Web sites you usefrequently. You can use the factory settings, which are described in the following table. Or you canreprogram the buttons by opening the Q Menu in the Quick Launch Buttons control panel.
The Quick Launch Buttons include the QuickLook button (1), the QuickWeb button (2), and the calculatorbutton (3).
The following table describes the factory settings for the Quick Launch Buttons.
NOTE: Button functions vary, depending on the software installed on your computer.
Component Description
(1) QuickLook button ● When the computer is powered off, pressing the QuickLookbutton will launch HP QuickLook.
● When the computer is powered on, pressing the QuickLookbutton will launch Software Setup. If Software Setup is notavailable, the default e-mail client will be launched.
(2) QuickWeb button ● When the computer is powered off, pressing the QuickWebbutton will launch QuickWeb.
● When the computer is powered on, pressing the QuickWebbutton will launch the default Web browser.
(3) Calculator button Launches the Windows calculator.
Using HP Quick Launch Buttons 41

Opening the Quick Launch Buttons control panelYou can open the HP Quick Launch Buttons control panel in any of the following ways:
● Select Start > Control Panel > Hardware and Sound > Quick Launch Buttons.
● Double-click the HP Quick Launch Buttons icon in the notification area, at the far right of thetaskbar.
● Right-click the HP Quick Launch Buttons icon in the notification area, and click Adjust HP QuickLaunch Buttons Properties.
NOTE: On some models, an icon is displayed on the desktop.
42 Chapter 3 Pointing devices and keyboard

Using HP QuickLookQuickLook allows you to save calendar, contact, inbox, and task information from Microsoft Outlook tothe hard drive of your computer. Then, when the computer is off, you can press the QuickLook buttonon the computer to view this information without waiting for the operating system to restart.
Use QuickLook to manage contact information, calendar events, e-mail information, and tasks withoutrestarting your computer.
For more information about setting up and using QuickLook, refer to the QuickLook software Help.
Using HP QuickLook 43

Using HP QuickWebQuickWeb is an instant-on environment that is separate from your Windows operating system.QuickWeb allows you to rapidly access a Web browser without the need to start Windows. Forinformation about setting up and using QuickWeb, refer to the QuickWeb software Help.
Using the integrated numeric keypadUsing an optional external numeric keypad
Keys on most external numeric keypads function differently according to whether num lock is on or off.(Num lock is turned off at the factory.) For example:
● When num lock is on, most keypad keys type numbers.
● When num lock is off, most keypad keys function like the arrow, page up, or page down keys.
When num lock on an external keypad is turned on, the num lock light on the computer is turned on.When num lock on an external keypad is turned off, the num lock light on the computer is turned off.
To turn num lock on or off on an external keypad as you work:
▲ Press the num lk key on the external keypad, not on the computer.
44 Chapter 3 Pointing devices and keyboard

Cleaning the TouchPad and keyboardDirt and grease on the TouchPad can cause the pointer to jump around on the screen. To avoid this,clean the TouchPad with a damp cloth, and wash your hands frequently when using the computer.
WARNING! To reduce the risk of electric shock or damage to internal components, do not use avacuum cleaner attachment to clean the keyboard. A vacuum cleaner can deposit household debris onthe keyboard surface.
Clean the keyboard regularly to prevent keys from sticking and to remove dust, lint, and particles thatcan become trapped beneath the keys. A can of compressed air with a straw extension can be used toblow air around and under the keys to loosen and remove debris.
Cleaning the TouchPad and keyboard 45

4 Multimedia
Multimedia featuresYour computer includes multimedia features that allow you to listen to music, watch movies, and viewpictures. Your computer may include the following multimedia components:
● Optical drive for playing audio and video discs
● Integrated speakers for listening to music
● Integrated microphone for recording your own audio
● Integrated webcam that allows you to capture and share video
● Preinstalled multimedia software that allows you to play and manage your music, movies, andpictures
● Hotkeys that provide fast access to multimedia tasks
NOTE: Your computer may not include all of the components listed.
The following sections explain how to identify and use the multimedia components included with yourcomputer.
Adjusting the volumeYou can adjust the volume using the following controls:
● Computer volume buttons:
◦ To mute or restore volume, press the mute button (1).
◦ To decrease volume, press and hold or tap the volume down button (2) until the desiredvolume level is reached.
46 Chapter 4 Multimedia

◦ To increase volume, press and hold or tap the volume up button (3) until the desired volumelevel is reached.
● Windows volume control:
a. Click the Speakers icon in the notification area, at the far right of the taskbar.
b. Increase or decrease the volume by moving the slider up or down. Click the MuteSpeakers icon to mute the volume.
– or –
a. Right-click the Speakers icon in the notification area, and then click Open Volume Mixer.
b. In the Speakers column, you can increase or decrease the volume by moving the Volumeslider up or down. You can also mute the volume by clicking the Mute Speakers icon.
If the Speakers icon is not displayed in the notification area, follow these steps to add it:
a. Right-click the Show hidden icons icon (the arrow at far left of the notification area).
b. Click Customize notification icons.
c. Under Behaviors, select Show icon and notifications for the Volume icon.
d. Click OK.
● Program volume control:
Volume can also be adjusted within some programs.
Multimedia softwareThe computer includes preinstalled multimedia software. Some computer models also include additionalmultimedia software on an optical disc.
Multimedia software 47

Depending on the hardware and software included with the computer, the following multimedia tasksmay be supported:
● Playing digital media, including audio and video CDs, audio and video DVDs, and Internet radio
● Creating or copying data CDs
● Creating, editing, and burning audio CDs
● Creating, editing, and burning a video or movie to a DVD or video CD
CAUTION: To prevent loss of information or damage to a disc, observe the following guidelines:
Before writing to a disc, connect the computer to a reliable external power source. Do not write to a discwhile the computer is running on battery power.
Before writing to a disc, close all open programs except the disc software you are using.
Do not copy directly from a source disc to a destination disc or from a network drive to a destinationdisc. Instead, copy from a source disc or network drive to your hard drive, and then copy from your harddrive to the destination disc.
Do not use the computer keyboard or move the computer while the computer is writing to a disc. Thewrite process is sensitive to vibration.
NOTE: For information about using software included with the computer, refer to the softwaremanufacturer's instructions that may be provided on disc, as online Help files, or on the softwaremanufacturer's Web site.
Accessing your preinstalled multimedia softwareTo access your preinstalled multimedia software:
▲ Select Start > All Programs, and then open the multimedia program you want to use.
NOTE: Some programs may be located in subfolders.
NOTE: For details about using software included with the computer, refer to the softwaremanufacturer’s instructions, which may be provided with the software, on disc, or on the manufacturer’sWeb site.
Installing your preloaded multimedia softwareTo install your preloaded software from your hard drive, select Start > All Programs > HP SoftwareSetup, and then follow the instructions on the screen.
Installing multimedia software from a disc1. Insert the disc into the optical drive.
2. When the installation wizard opens, follow the on-screen instructions.
3. Restart the computer if prompted to do so.
48 Chapter 4 Multimedia

AudioYour computer enables you to use a variety of audio features:
● Play music using your computer speakers and/or connected external speakers
● Record sound using the internal microphone or connect an external microphone
● Download music from the Internet
● Create multimedia presentations using audio and images
● Transmit sound and images with instant messaging programs
● Stream radio programs (select models only) or receive FM radio signals
● Create or “burn” audio CDs (select models only)
Connecting external audio devicesWARNING! To reduce the risk of personal injury, adjust the volume before putting on headphones,earbuds, or a headset. For additional safety information, refer to the Regulatory, Safety andEnvironmental Notices.
To connect external devices such as external speakers, headphones, or a microphone, refer to theinformation provided with the device. For best results, remember the following tips:
● Be sure that the device cable is securely connected to the correct jack on your computer. (Cableconnectors are normally color-coded to match the corresponding jacks on the computer.)
● Be sure to install any drivers required by the external device.
NOTE: A driver is a required program that acts like a translator between the device and theprograms that use the device.
Checking your audio functionsTo check the system sound on your computer, follow these steps:
1. Right-click the Volume icon on the taskbar, and then select Sounds.
– or –
Select Start > Control Panel > Hardware and Sound > Sound.
2. When the Sound window opens, click the Sounds tab. Under Program Events, select any soundevent, such as a beep or alarm, and click the Test button.
You should hear sound through the speakers or through connected headphones.
To check the record functions of the computer, follow these steps:
1. Select Start > All Programs > Accessories > Sound Recorder.
2. Click Start Recording and speak into the microphone. Save the file to your desktop.
3. Open Windows Media Player and play back the sound.
Audio 49

NOTE: For best results when recording, speak directly into the microphone and record sound in asetting free of background noise.
To confirm or change the audio settings on your computer, select Start > Control Panel > Hardwareand Sound > Sound.
50 Chapter 4 Multimedia

VideoYour computer enables you to use a variety of video features:
● Watch movies
● Play games over the Internet
● Edit pictures and video to create presentations
● Connect external video devices
Connecting an external monitor or projectorYour computer has both an external monitor port and a DisplayPort that allow you to connect externalmonitors and projectors.
Using the external monitor portThe external monitor port connects an external display device, such as an external monitor or a projector,to the computer.
▲ To connect a display device, connect the device cable to the external monitor port.
NOTE: If a properly connected external display device does not display an image, press fn+f4 totransfer the image to the device. Repeatedly pressing fn+f4 alternates the screen image between thecomputer display and the device.
Using the DisplayPortThe DisplayPort connects a digital display device such as a high-performance monitor or projector. TheDisplayPort delivers higher performance over the VGA external monitor port and improves digitalconnectivity.
Video 51

▲ To connect a digital display device, connect the device cable to the DisplayPort.
NOTE: If a properly connected external display device does not display an image, press fn+f4 totransfer the image to the device. Repeatedly pressing fn+f4 alternates the screen image betweenthe computer display and the device.
▲ To disconnect a digital display device, press the release button.
Using the DreamColor display (select models only)Computer models with the HP DreamColor display include the preinstalled HP Mobile Display Assistantsoftware. You can use this program to adjust display color settings such as preset color space, whitepoint/color temperature, and luminance/brightness.
▲ To access Mobile Display Assistant, click the Mobile Display Assistant icon in the notification area,at the far right of the taskbar, or select Start > All Programs > HP > Mobile Display Assistant.
For more information on using Mobile Display Assistant, refer to the software Help.
52 Chapter 4 Multimedia

Optical drive (select models only)Depending on the type of optical drive and software installed in your computer, the optical drive plays,copies, and creates CDs or DVDs.
Identifying the installed optical drive▲ Select Start > Computer.
Using optical discs (CDs, DVDs, and BDs)An optical drive, such as a DVD-ROM drive, supports optical discs (CDs and DVDs). These discs storeinformation, such as music, photos, and movies. DVDs have a higher storage capacity than CDs.
Your optical drive can read standard CD and DVD discs. If your optical drive is a Blu-ray Disc (BD) drive,it can also read BDs.
NOTE: Some of the optical drives listed may not be supported by your computer. The listed drives arenot necessarily all of the supported optical drives.
Some optical drives can also write to optical discs as described in the following table.
Optical drive type Write to CD-RW
Write to DVD±RW/R
Write to DVD±R DL Write label toLightScribe CD orDVD ±RW/R
Write to BD R/RE
DVD-ROM Drive No No No No No
DVD±R SuperMultiDL LightScribeDrive*†
Yes Yes Yes Yes No
Blu-ray ROM DVD±R SuperMulti DLDrive*
Yes Yes Yes No No
Blu-ray R/RE DVD+/-RW SuperMultiDL Drive*
Yes Yes Yes No Yes
*Double-layer discs can store more data than single-layer discs. However, double-layer discs burned with this drive may notbe compatible with many single-layer DVD drivers and players.
†LightScribe discs must be purchased separately. LightScribe creates a grayscale image similar to black-and-whitephotography.
CAUTION: To prevent possible audio and video degradation, loss of information, or loss of audio orvideo playback functionality, do not initiate Sleep or Hibernation while reading a CD, DVD, or BD, orwriting to a CD or DVD.
Selecting the right disc (CDs, DVDs, and BDs)An optical drive supports optical discs (CDs, DVDs, and BDs). CDs, used to store digital data, are alsoused for commercial audio recordings and are convenient for your personal storage needs. DVDs andBDs are used primarily for movies, software, and data backup purposes. DVDs and BDs are the sameform factor as CDs, but have a much higher storage capacity.
Optical drive (select models only) 53

NOTE: The optical drive on your computer may not support all the types of optical discs discussed inthis section.
CD-R discsUse CD-R (write-once) discs to create permanent archives and to share files with virtually anyone.Typical uses include the following:
● Distributing large presentations
● Sharing scanned and digital photos, video clips, and written data
● Making your own music CDs
● Keeping permanent archives of computer files and scanned home records
● Offloading files from your hard drive to free up disk space
After data is recorded, it cannot be erased or written over.
CD-RW discsUse a CD-RW disc (a rewritable version of a CD) to store large projects that must be updated frequently.Typical uses include the following:
● Developing and maintaining large documents and project files
● Transporting work files
● Making weekly backups of hard drive files
● Updating photos, video, audio, and data continuously
DVD±R discsUse blank DVD±R discs to permanently store large amounts of information. After data is recorded, itcannot be erased or written over.
DVD±RW discsUse DVD±RW discs if you want to be able to erase or write over data that you saved earlier. This typeof disc is ideal for testing audio or video recordings before you burn them to a CD or DVD that cannotbe changed.
LightScribe DVD+R discsUse LightScribe DVD+R discs for sharing and storing data, home videos, and photos. These discs areread-compatible with most DVD-ROM drives and DVD video players. With a LightScribe-enabled driveand LightScribe software, you can write data to the disc and then add a designer label to the outside ofthe disc.
Blu-ray Discs (BDs)BD is a high-density optical disc format for the storage of digital information, including high-definitionvideo. A single-layer Blu-ray Disc can store 25 GB, over 5 times the storage capacity of a single-layerDVD at 4.7 GB. A dual-layer Blu-ray Disc can store 50 GB, almost 6 times the storage capacity of adual-layer DVD at 8.5 GB.
54 Chapter 4 Multimedia

Typical uses include the following:
● Storage of large amounts of data
● High-definition video playback and storage
● Video games
Your computer may have either a BD ROM drive or a BD R/RE drive. BD ROM is a read-only format,while the BD R/RE formats allow you to write to BDs.
NOTE: As Blu-ray is a new format containing new technologies, certain disc, digital connection,compatibility and/or performance issues may arise, and do not constitute defects in the product. Flawlessplayback on all systems is not guaranteed.
Playing a CD, DVD, or BD1. Turn on the computer.
2. Press the release button (1) on the drive bezel to release the disc tray.
3. Pull out the tray (2).
4. Hold the disc by the edges to avoid touching the flat surfaces and position the disc label-side upover the tray spindle.
NOTE: If the tray is not fully accessible, tilt the disc carefully to position it over the spindle.
5. Gently press the disc (3) down onto the tray spindle until the disc snaps into place.
6. Close the disc tray.
If you have not yet configured AutoPlay, as described in the following section, an AutoPlay dialog boxopens. It prompts you to select how you want to use the media content.
NOTE: For best results, be sure that your AC adapter is plugged into an external power source whileplaying a BD.
Optical drive (select models only) 55

Configuring AutoPlay1. Select Start > Default Programs > Change AutoPlay settings.
2. Confirm that the Use AutoPlay for all media and devices check box is selected.
3. Click Choose a default, and then select one of the available options for each media type listed.
NOTE: Choose WinDVD to play DVDs.
4. Click Save.
NOTE: For more information about AutoPlay, refer to Help and Support.
Changing DVD region settingsMost DVDs that contain copyrighted files also contain region codes. The region codes help protectcopyrights internationally.
You can play a DVD containing a region code only if the region code on the DVD matches the regionsetting on your DVD drive.
CAUTION: The region settings on your DVD drive can be changed only 5 times.
The region setting you select the fifth time becomes the permanent region setting on the DVD drive.
The number of region changes remaining is displayed on the DVD Region tab.
To change settings through the operating system:
1. Select Start > Computer > System properties.
2. In the left pane, click Device Manager.
NOTE: Windows includes the User Account Control feature to improve the security of yourcomputer. You may be prompted for your permission or password for tasks such as installingsoftware, running utilities, or changing Windows settings. Refer to Windows Help and Support formore information.
3. Click the plus sign (+) next to DVD/CD-ROM drives.
4. Right-click the DVD drive for which you want to change region settings, and then clickProperties.
5. Make the desired changes on the DVD Region tab.
6. Click OK.
Observing the copyright warningIt is a criminal offense, under applicable copyright laws, to make unauthorized copies of copyright-protected material, including computer programs, films, broadcasts, and sound recordings. Do not usethis computer for such purposes.
56 Chapter 4 Multimedia

Copying a CD, DVD, or BD1. Select Start > All Programs > Roxio > Creator Business.
NOTE: If this is the first time you have used Roxio, you must accept the program licenseagreement before you can complete this process.
2. In the right pane, click Copy Disc.
3. Insert the disc you want to copy into the optical drive.
4. Click Copy Disc at the bottom right of the screen.
Creator Business reads the source disc and copies the data to a temporary folder on your harddrive.
5. When prompted, remove the source disc from the optical drive and insert a blank disc into the drive.
After the information is copied, the disc you created is ejected automatically.
Creating (burning) a CD, DVD, or BDCAUTION: Observe the copyright warning. It is a criminal offense, under applicable copyright laws,to make unauthorized copies of copyright-protected material, including computer programs, films,broadcasts, and sound recordings. Do not use this computer for such purposes.
If your optical drive is a CD-RW, DVD-RW, or DVD±RW optical drive, you can use software such asWindows Media Player to burn data and audio files, including MP3 and WAV music files.
Observe the following guidelines when burning a CD, DVD, or BD:
● Before burning a disc, save and close any open files and close all programs.
● A CD-R or DVD-R is usually best for burning audio files because after the information is copied, itcannot be changed.
● Because some home and car stereos will not play CD-RWs, use CD-Rs to burn music CDs.
● A CD-RW or DVD-RW is generally best for burning data files or for testing audio or video recordingsbefore you burn them to a CD or DVD that cannot be changed.
● DVD players used in home systems usually do not support all DVD formats. Refer to the user guidethat came with your DVD player for a list of supported formats.
● An MP3 file uses less space than other music file formats, and the process for creating an MP3disc is the same as the process for creating a data file. MP3 files can be played only on MP3 playersor on computers with MP3 software installed.
To burn a CD, DVD, or BD, follow these steps:
1. Download or copy the source files into a folder on your hard drive.
2. Insert a blank disc into the optical drive.
3. Select Start > All Programs and the name of the software you want to use.
4. Select the kind of disc you want to create—data, audio, or video.
5. Right-click Start, click Open Windows Explorer, and then navigate to the folder where the sourcefiles are stored.
Optical drive (select models only) 57

6. Open the folder, and then drag the files to the drive that contains the blank disc.
7. Initiate the burning process as directed by the program you have selected.
For specific instructions, refer to the software manufacturer's instructions. These instructions may beprovided with the software, on disc, or on the manufacturer's Web site.
Removing an optical disc (CD, DVD, or BD)1. Press the release button (1) on the drive bezel to release the disc tray, and then gently pull out the
tray (2) until it stops.
2. Remove the disc (3) from the tray by gently pressing down on the spindle while lifting the outeredges of the disc. Hold the disc by the edges and avoid touching the flat surfaces.
NOTE: If the tray is not fully accessible, tilt the disc carefully as you remove it.
3. Close the disc tray and place the disc in a protective case.
TroubleshootingThe following sections describe several common issues and resolutions.
The optical disc tray does not open for removal of a CD, DVD, or BD1. Insert the end of a paper clip (1) into the release access in the front bezel of the drive.
2. Press in gently on the paper clip until the disc tray is released, and then pull out the tray (2) until itstops.
58 Chapter 4 Multimedia

3. Remove the disc (3) from the tray by gently pressing down on the spindle while lifting the outeredges of the disc. Hold the disc by the edges and avoid touching the flat surfaces.
NOTE: If the tray is not fully accessible, tilt the disc carefully as you remove it.
4. Close the disc tray and place the disc in a protective case.
The computer does not detect the optical driveIf Windows does not detect an attached device, the device driver software may be missing or corrupted.If you suspect that the DVD/CD-ROM drive is not being detected, verify that the optical drive is listed inthe Device Manager utility.
1. Remove any discs from the optical drive.
2. Select Start > Control Panel > System and Security. Then in the System area, click DeviceManager.
3. In the Device Manager window, click the plus sign (+) next to DVD/CD-ROM drives, unless a minussign (-) is already showing. Look for an optical drive listing.
4. Right-click the optical device listing to perform the following tasks:
● Update driver software
● Disable
● Uninstall
Optical drive (select models only) 59
● Scan for hardware changes. Windows scans your system for installed hardware and installsany required drivers.
● Click Properties to see if the device is working properly.
◦ The Properties window provides details about the device to help you troubleshoot issues.
◦ Click the Driver tab to update, disable, or uninstall drivers for this device.
A disc does not play
● Save your work and close all open programs before playing a CD, DVD, or BD.
● Log off the Internet before playing a CD, DVD, or BD.
● Be sure that you insert the disc properly.
● Be sure that the disc is clean. If necessary, clean the disc with filtered water and a lint-free cloth.Wipe from the center of the disc to the outer edge.
● Check the disc for scratches. If you find scratches, treat the disc with an optical disc repair kitavailable at many electronics stores.
● Disable Sleep mode before playing the disc.
Do not initiate Hibernation or Sleep while playing a disc. Otherwise, you may see a warningmessage asking if you want to continue. If this message is displayed, click No. After you click No,the computer may behave in either of the following ways:
◦ Playback may resume.
– or –
◦ The playback window in the multimedia program may close. To return to playing the disc, clickthe Play button in your multimedia program to restart the disc. In rare cases, you may needto exit the program and then restart it.
● Increase system resources:
Turn off external devices such as printers and scanners. Disconnecting these devices frees upvaluable system resources and results in better playback performance.
Change desktop color properties. Because the human eye cannot easily tell the difference betweencolors beyond 16 bits, you should not notice any loss of color while watching a movie if you lower systemcolor properties to 16-bit color, as follows:
1. Right-click anywhere on the desktop except on an icon, and then select Screen resolution.
2. Click Advanced Settings > Monitor tab.
3. Click High Color (16 bit), if this setting is not already selected.
4. Click OK.
60 Chapter 4 Multimedia
A disc does not play automatically1. Select Start > Default Programs > Change AutoPlay settings.
2. Confirm that the Use AutoPlay for all media and devices check box is selected.
3. Click Save.
A CD, DVD, or BD should now start automatically when it is inserted into the optical drive.
A movie stops, skips, or plays erratically
● Clean the disc.
● Conserve system resources by trying the following suggestions:
◦ Log off the Internet.
◦ Change the color properties of the desktop:
1. Right-click on a blank area of the computer desktop, and select Screen resolution.
2. Click Advanced Settings > Monitor tab.
3. Click High Color (16 bit), if this setting is not already selected.
4. Click OK.
◦ Disconnect external devices, such as a printer, scanner, camera, or handheld device.
A movie is not visible on an external display1. If both the computer display and an external display are turned on, press fn+f4 one or more times
to switch between the two displays.
2. Configure the monitor settings to make the external display primary:
a. Right-click on a blank area of the computer desktop, and select Screen resolution.
b. Specify a primary display and a secondary display.
NOTE: When using both displays, the DVD image will not appear on any display designated asthe secondary display.
To get information about a multimedia question not covered in this guide, select Start > Help andSupport.
The process of burning a disc does not begin, or it stops before completion
● Be sure that all other programs are closed.
● Turn off Sleep mode and Hibernation.
● Be sure that you are using the right kind of disc for your drive. See your user guides for moreinformation about disc types.
● Be sure that the disc is inserted properly.
● Select a slower write speed and try again.
Optical drive (select models only) 61

● If you are copying a disc, save the information on the source disc to your hard drive before tryingto burn the contents to a new disc, and then burn from your hard drive.
● Reinstall the disc-burning device driver located in the DVD/CD-ROM drives category in DeviceManager.
A device driver must be reinstalled1. Remove any discs from the optical drive.
2. Select Start > Control Panel > System and Security > Device Manager.
3. In the Device Manager window, click the plus sign (+) next to the type of driver you want to uninstalland reinstall (for example, DVD/CD-ROMs, Modems, and so on), unless a minus sign (-) is alreadyshowing.
4. Right-click the device listing and click Uninstall. When prompted, confirm that you want to deletethe device, but do not restart the computer. Repeat for any other drivers you want to delete.
5. In the Device Manager window, click Action, and then click Scan for hardware changes.Windows scans your system for installed hardware and installs default drivers for anything requiringdrivers.
NOTE: If you are prompted to restart the computer, save all open files, and then continue withthe restart.
6. Reopen Device Manager, if necessary, and then verify that the drivers are once again listed.
7. Try to use your device.
If uninstalling and reinstalling the device drivers does not correct the problem, you may need to updateyour drivers using the procedures in the following section.
Obtaining the latest HP device drivers
To use the HP Web site to obtain HP device drivers:
1. Open your Internet browser, go to http://www.hp.com/support, and select your country or region.
2. Click the option for software and driver downloads, and then type your computer model number inthe product box.
3. Press enter, and then follow the on-screen instructions.
Obtaining Microsoft device drivers
You can obtain the latest Windows device drivers by using Windows Update. This feature can be set toautomatically check for and install updates for your hardware drivers, as well as for the Windowsoperating system and other Microsoft products.
62 Chapter 4 Multimedia

To use Windows Update:
1. Click Start > All Programs > Windows Update.
NOTE: If you have not previously set up windows update, you will be prompted to enter settingsbefore you can check for updates.
2. Click Check for updates.
3. Follow the on-screen instructions.
Optical drive (select models only) 63

WebcamNOTE: This section describes features that are common to most models. Some features may not beavailable on your computer.
Your computer includes an integrated webcam, located at the top of the display. With the preinstalledsoftware, you can use the webcam to take a photo, record a video, or make an audio recording. Youcan preview the photo, video recording, or audio recording, and save it on your computer hard drive.
To access the webcam and HP Webcam software, select Start > All Programs > HP > HP Webcam.
The webcam software enables you to experiment with the following features:
● Video—Record and play back webcam video.
● Audio—Record and play back audio.
● Streaming video—Use with instant message software solutions that support UVC (Universal VideoClass) cameras.
● Snapshots—Take still photos.
● HP Business Card Reader (select models only)—Use to transform business cards into a usabledatabase of contact information.
Webcam tipsFor optimum performance, observe the following guidelines while using the webcam:
● Be sure that you have the latest version of an instant message program before starting a videoconversation.
● The webcam may not work properly across some network firewalls.
NOTE: If you are having trouble viewing or sending multimedia files to someone on another LANor outside your network firewall, temporarily disable the firewall, perform the task you want toperform, and then reenable the firewall. To permanently resolve the problem, reconfigure thefirewall as necessary, and adjust the policies and settings of other intrusion detection systems. Foradditional information, contact your network administrator or IT department.
● Whenever possible, place bright light sources behind the webcam and out of the picture area.
NOTE: For details about using your webcam, refer to the webcam software Help.
Adjusting webcam propertiesYou can adjust webcam properties using the Properties dialog box, which is accessible from variousprograms that use the integrated webcam, usually from a configuration, settings, or properties menu:
● Brightness—Controls the amount of light that is incorporated into the image. A higher brightnesssetting creates a brighter image; a lower brightness setting creates a darker image.
● Contrast—Controls the difference between lighter and darker areas on the image. A highercontrast setting intensifies the image; a lower contrast setting maintains more of the originalinformation’s dynamic range, but leads to a flatter image.
● Hue—Controls the aspect of color that distinguishes it from another color (what makes a color red,green, or blue). Hue is distinct from saturation, which measures the intensity of the hue.
64 Chapter 4 Multimedia

● Saturation—Controls the strength of color in the final image. A higher saturation setting creates abolder image; a lower saturation setting creates a more subtle image.
● Sharpness—Controls the definition of edges in an image. A higher sharpness setting creates amore defined image; a lower sharpness setting creates a softer image.
● Gamma—Controls the contrast affecting the mid-level grays or midtones of an image. Adjustingthe gamma of an image allows you to change the brightness values of the middle range of graytones without dramatically altering the shadows and highlights. A lower gamma setting makesgrays look black, and makes dark colors even darker.
For information about using the webcam, select Start > Help and Support.
Capturing business card imagesYou can use the webcam with the HP Business Card Reader program to capture business card imagesand export the text to many types of address book software, such as Microsoft® Outlook Contacts.
To capture a business card image:
1. Select Start > All Programs > HP > HP Business Card Reader.
2. To capture one business card, select Single Scan.
– or –
To capture multiple business cards, select Multi Scan.
The Preview window opens.
3. Insert a business card into the business card slot on the front of the computer (1) and slide the cardto the right (2) to center it under the webcam.
NOTE: If any text is obscured by the slot, rotate the card 180 degrees, with the text facing thewebcam.
Webcam 65

4. Slowly lower the display (1) until the webcam light (2) blinks and you hear a sound, which indicatesthat the webcam is now in focus.
The webcam turns on, and the scanning process starts immediately. You will hear a camera shuttersound when the image is captured, and the information from the card is filled in the fieldsautomatically.
5. If you are capturing multiple business card images, remove the business card and insert anotherone. The webcam light turns on when the card is in focus. The webcam then captures the businesscard image and the webcam light turns off.
Repeat this step for additional business cards.
NOTE: Do not move or raise the display until you have finished capturing all of the businesscards.
6. When you have finished capturing one or more business card images, remove the business cardfrom the slot and raise the display.
7. Review the data captured by Business Card Reader to be sure that it is complete.
For more information on using the Business Card Reader, refer to the software Help.
66 Chapter 4 Multimedia

5 Power management
Setting power optionsUsing power-saving states
The computer has two power-saving states enabled at the factory: Sleep and Hibernation.
When Sleep is initiated, the power lights blink and the screen clears. Your work is saved to memory.Exiting Sleep is faster than exiting Hibernation. If the computer is in the Sleep state for an extendedperiod or if the battery reaches a critical battery level while in the Sleep state, the computer initiatesHibernation.
When Hibernation is initiated, your work is saved to a hibernation file on the hard drive and the computerturns off.
CAUTION: To prevent possible audio and video degradation, loss of audio or video playbackfunctionality, or loss of information, do not initiate Sleep or Hibernation while reading from or writing toa disc or an external media card.
NOTE: You cannot initiate any type of networking connection or perform any computer functions whilethe computer is in the Sleep state or in Hibernation.
NOTE: When HP 3D DriveGuard has parked a drive, the computer will not initiate Sleep or Hibernation,and the display will be turned off.
Initiating and exiting SleepThe system is set at the factory to initiate Sleep after 15 minutes of inactivity when running on batterypower and 30 minutes of inactivity when running on external power.
Power settings and timeouts can be changed using Power Options in Windows Control Panel.
With the computer on, you can initiate Sleep in any of the following ways:
● Press fn+f3.
● Click Start, and then click the Power button.
● Click Start, click the arrow next to the Lock button, and then click Sleep.
To exit Sleep:
▲ Briefly press the power button.
When the computer exits Sleep, the power lights turn on and your work returns to the screen whereyou stopped working.
Setting power options 67

NOTE: If you have set a password to be required when the computer exits Sleep, you must enter yourWindows password before your work will return to the screen.
Initiating and exiting HibernationThe system is set at the factory to initiate Hibernation after 1080 minutes (18 hours) of inactivity whenrunning on battery power, 1080 minutes (18 hours) of inactivity when running on external power, or whenthe battery reaches a critical battery level.
Power settings and timeouts can be changed using Power Options in Windows Control Panel.
To initiate Hibernation:
1. Click Start, and then click the arrow next to the Lock button.
2. Click Hibernate.
To exit Hibernation:
▲ Briefly press the power button
The power lights turn on and your work returns to the screen where you stopped working.
NOTE: If you have set a password to be required when the computer exits Hibernation, you must enteryour Windows password before your work will return to the screen.
Using the battery meterThe battery meter is located in the notification area, at the far right of the taskbar. The battery meterallows you to quickly access power settings, view remaining battery charge, and select a different powerplan.
● To display the percentage of remaining battery charge and the current power plan, move the pointerover the battery meter icon.
● To access Power Options, or to change the power plan, click the battery meter icon and select anitem from the list.
Different battery meter icons indicate whether the computer is running on battery or external power. Theicon also displays a message if the battery has reached a critical battery level.
To hide or display the battery meter icon:
1. Right-click the taskbar, and then click Properties.
2. Click the Notification Area tab.
3. Under System icons, clear the Power check box to hide the battery meter icon, or select thePower check box to display the battery meter icon.
4. Click OK.
Using power plansA power plan is a collection of system settings that manages how the computer uses power. Powerplans can help you conserve power or maximize performance.
You can change power plan settings or create your own power plan.
68 Chapter 5 Power management

Viewing the current power plan
▲ Move the pointer over the battery meter icon in the notification area, at the far right of the taskbar.
– or –
Select Start > Control Panel > System and Maintenance > Power Options.
Selecting a different power plan
▲ Click the battery meter icon in the notification area, and then select a power plan from the list.
– or –
Select Start > Control Panel > System and Maintenance > Power Options, and then select apower plan from the list.
Customizing power plans1. Click the battery meter icon in the notification area and then click More power options.
– or –
Select Start > Control Panel > System and Maintenance > Power Options.
2. Select a power plan, and then click Change plan settings.
3. Change the Turn off the display and Put the computer to sleep timeout settings, as needed.
4. To change additional settings, click Change advanced power settings and make your changes.
Setting password protection on wakeupTo set the computer to prompt for a password when the computer exits Sleep or Hibernation, followthese steps:
1. Select Start > Control Panel > System and Maintenance > Power Options.
2. In the left pane, click Require a password on wakeup.
3. Click Change Settings that are currently unavailable.
4. Click Require a password (recommended).
5. Click Save changes.
Setting power options 69

Using external AC powerExternal AC power is supplied through one of the following devices:
WARNING! To reduce potential safety issues, use only the AC adapter provided with the computer,a replacement AC adapter provided by HP, or a compatible AC adapter purchased from HP.
● Approved AC adapter
● Optional docking device
Connect the computer to external AC power under any of the following conditions:
WARNING! Do not charge the computer battery while you are onboard aircraft.
● When you are charging or calibrating a battery
● When you are installing or modifying system software
● When you are writing information to a CD or DVD
When you connect the computer to external AC power, the following events occur:
● The battery begins to charge.
● If the computer is turned on, the battery meter icon in the notification area changes appearance.
When you disconnect external AC power, the following events occur:
● The computer switches to battery power.
● The display brightness is automatically decreased to save battery life. To increase displaybrightness, press the fn+f10 hotkey or reconnect the AC adapter.
Connecting the AC adapterWARNING! To reduce the risk of electric shock or damage to the equipment:
Plug the power cord into an AC outlet that is easily accessible at all times.
Disconnect power from the computer by unplugging the power cord from the AC outlet (not byunplugging the power cord from the computer).
If provided with a 3-pin attachment plug on the power cord, plug the cord into a grounded (earthed) 3-pin outlet. Do not disable the power cord grounding pin, for example, by attaching a 2-pin adapter. Thegrounding pin is an important safety feature.
To connect the computer to external AC power:
1. Plug the AC adapter into the power connector (1) on the computer.
2. Plug the power cord into the AC adapter (2).
70 Chapter 5 Power management

3. Plug the other end of the power cord into an AC outlet (3).
Using battery powerWhen a charged battery is in the computer and the computer is not plugged into external power, thecomputer runs on battery power. When the computer is plugged into external AC power, the computerruns on AC power.
If the computer contains a charged battery and is running on external AC power supplied through theAC adapter, the computer switches to battery power if the AC adapter is disconnected from thecomputer.
NOTE: The display brightness is decreased to save battery life when you disconnect AC power. Toincrease display brightness, use the fn+f10 hotkey or reconnect the AC adapter.
You can keep a battery in the computer or in storage, depending on how you work. Keeping the batteryin the computer whenever the computer is plugged into AC power charges the battery and also protectsyour work in case of a power outage. However, a battery in the computer slowly discharges when thecomputer is off and unplugged from external power.
WARNING! To reduce potential safety issues, use only the battery provided with the computer, areplacement battery provided by HP, or a compatible battery purchased from HP.
Computer battery life varies, depending on power management settings, programs running on thecomputer, display brightness, external devices connected to the computer, and other factors.
Finding battery information in Help and SupportThe Battery information section of the Help and Support Learning Center provides the following toolsand information:
● Battery Check tool to test battery performance
● Information on calibration, power management, and proper care and storage to maximize batterylife
● Information on battery types, specifications, life cycles, and capacity
Using battery power 71

To access Battery information:
▲ Select Start > Help and Support > Learning centers. Scroll to the battery information once HPSupport Assistant opens.
Using Battery CheckBattery Check provides information on the status of the battery installed in the computer.
To run Battery Check:
1. Connect the AC adapter to the computer.
NOTE: The computer must be connected to external power for Battery Check to function properly.
2. Select Start > Help and Support > Troubleshoot > Power, Thermal and Mechanical, and thenclick the Power tab.
Battery Check examines the battery and its cells to see if they are functioning properly, and then reportsthe results of the examination.
Displaying the remaining battery charge▲ Move the pointer over the battery meter icon in the notification area, at the far right of the taskbar.
– or –
View the estimated number of minutes of battery charge remaining in Windows Mobility Center:
▲ Click the battery meter icon, and then click Windows Mobility Center.
– or –
Select Start > Control Panel > Mobile PC > Windows Mobility Center.
The time shown indicates the approximate running time remaining on the battery if the batterycontinues to provide power at the current level. For example, the time remaining will decreasewhen a DVD is playing and will increase when a DVD stops playing.
Inserting or removing the batteryCAUTION: Removing a battery that is the sole power source can cause loss of information. To preventloss of information, save your work, and initiate Hibernation or shut down the computer through Windowsbefore removing the battery.
To insert the battery:
1. Turn the computer upside down on a flat surface, with the battery bay toward you.
72 Chapter 5 Power management

2. Insert the battery into the battery bay (1) until it is seated.
The battery release latch (2) automatically locks the battery into place.
To remove the battery:
1. Turn the computer upside down on a flat surface, with the battery bay toward you.
2. Slide the battery release latch (1) to release the battery.
3. Remove the battery (2).
Charging a batteryWARNING! Do not charge the computer battery while you are onboard aircraft.
The battery charges whenever the computer is plugged into external power through an AC adapter, anoptional power adapter, an optional expansion product, or an optional docking device.
Using battery power 73

The battery charges whether the computer is off or in use, but it charges faster when the computer isoff.
Charging may take longer if a battery is new, has been unused for 2 weeks or more, or is much warmeror cooler than room temperature.
To prolong battery life and optimize the accuracy of battery charge displays, follow theserecommendations:
● If you are charging a new battery, charge it fully before turning on the computer.
● Charge the battery until the battery light turns off.
NOTE: If the computer is on while the battery is charging, the battery meter in the notificationarea may show 100 percent charge before the battery is fully charged.
● Allow the battery to discharge below 5 percent of a full charge through normal use before chargingit.
● If the battery has been unused for one month or more, calibrate the battery instead of simplycharging it.
The battery light displays charge status:
● On: The battery is charging.
● Blinking: The battery has reached a low battery level or critical battery level and is not charging.
● Off: The battery is fully charged, in use, or not installed.
Maximizing battery discharge timeBattery discharge time varies, depending on the features you use while on battery power. Maximumdischarge time gradually shortens as the battery storage capacity naturally degrades.
Tips for maximizing battery discharge time:
● Lower the brightness on the display.
● Check the Power saver setting in Power Options.
● Remove the battery from the computer when it is not being used or charged.
● Store the battery in a cool, dry location.
Managing low battery levelsThe information in this section describes the alerts and system responses set at the factory. Some low-battery alerts and system responses can be changed using Power Options in Windows Control Panel.Preferences set using Power Options do not affect lights.
Identifying low battery levelsWhen a battery that is the sole power source for the computer reaches a low battery level, the batterylight blinks.
If a low battery level is not resolved, the computer enters a critical battery level, and the battery lightblinks rapidly.
74 Chapter 5 Power management

The computer takes the following actions for a critical battery level:
● If Hibernation is enabled and the computer is on or in the Sleep state, the computer initiatesHibernation.
● If Hibernation is disabled and the computer is on or in the Sleep state, the computer remains brieflyin the Sleep state, and then shuts down and loses any unsaved information.
Using battery power 75

Resolving a low battery levelCAUTION: To reduce the risk of losing information when the computer reaches a critical battery leveland has initiated Hibernation, do not restore power until the power lights turn off.
Resolving a low battery level when external power is available
▲ Connect one of the following devices:
● AC adapter
● Optional expansion product or docking device
● Optional power adapter
Resolving a low battery level when a charged battery is available
1. Turn off the computer or initiate Hibernation.
2. Remove the discharged battery, and then insert a charged battery.
3. Turn on the computer.
Resolving a low battery level when no power source is available
▲ Initiate Hibernation.
– or –
Save your work and shut down the computer.
Resolving a low battery level when the computer cannot exit Hibernation
When the computer lacks sufficient power to exit Hibernation, follow these steps:
1. Insert a charged battery or plug the computer into external power.
2. Exit Hibernation by briefly pressing the power button.
Calibrating a batteryCalibrate a battery under the following conditions:
● When battery charge displays seem inaccurate
● When you observe a significant change in battery run time
Even if a battery is heavily used, it should not need to be calibrated more than once a month. It is alsonot necessary to calibrate a new battery.
Step 1: Fully charge the batteryWARNING! Do not charge the computer battery while you are onboard aircraft.
NOTE: The battery charges whether the computer is off or in use, but it charges faster when thecomputer is off.
76 Chapter 5 Power management

To fully charge the battery:
1. Insert the battery into the computer.
2. Connect the computer to an AC adapter, optional power adapter, optional expansion product, oroptional docking device, and then plug the adapter or device into external power.
The battery light on the computer turns on.
3. Leave the computer plugged into external power until the battery is fully charged.
The battery light on the computer turns off.
Step 2: Disable Hibernation and Sleep1. Click the battery meter icon in the notification area, and then click More power options.
– or –
Select Start > Control Panel > System and Security > Power Options.
2. Under the current power plan, click Change plan settings.
3. Record the Turn off the display and Put the computer to sleep settings listed in the Onbattery column so that you can reset them after the calibration.
4. Change the Turn off the display and Put the computer to sleep settings to Never.
5. Click Change advanced power settings.
6. Click the plus sign (+) next to Sleep, and then click the plus sign (+) next to Hibernate after.
7. Record the On battery setting under Hibernate after so that you can reset it after the calibration.
8. Change the On battery setting to Never.
9. Click OK.
10. Click Save changes.
Step 3: Discharge the batteryThe computer must remain on while the battery is being discharged. The battery can discharge whetheror not you are using the computer, but the battery will discharge faster while you are using it.
● If you plan to leave the computer unattended during the discharge, save your information beforebeginning the discharge procedure.
● If you use the computer occasionally during the discharge procedure and have set energy-savingtimeouts, expect the following performance from the system during the discharge process:
◦ The monitor will not turn off automatically.
◦ Hard drive speed will not decrease automatically when the computer is idle.
◦ System-initiated Hibernation will not occur.
Using battery power 77

To discharge a battery:
1. Unplug the computer from its external power source, but do not turn off the computer.
2. Run the computer on battery power until the battery is discharged. The battery light begins to blinkwhen the battery has discharged to a low battery level. When the battery is discharged, the batterylight turns off and the computer shuts down.
78 Chapter 5 Power management

Step 4: Fully recharge the batteryTo recharge the battery:
1. Plug the computer into external power and maintain external power until the battery is fullyrecharged. When the battery is recharged, the battery light on the computer turns off.
You can use the computer while the battery is recharging, but the battery will charge faster if thecomputer is off.
2. If the computer is off, turn it on when the battery is fully charged and the battery light has turnedoff.
Step 5: Reenable Hibernation and SleepCAUTION: Failure to reenable Hibernation after calibration may result in a full battery discharge andinformation loss if the computer reaches a critical battery level.
1. Click the battery meter icon in the notification area, and then click More power options.
– or –
Select Start > Control Panel > System and Security > Power Options.
2. Under the current power plan, click Change plan settings.
3. Reenter the settings that you recorded for the items in the On battery column.
– or –
Click Restore default settings for this plan, and then follow the on-screen instructions.
NOTE: If you restore default settings, omit steps 4 through 8.
4. Click Change advanced power settings.
5. Click the plus sign (+) next to Sleep, and then click the plus sign (+) next to Hibernate after.
6. Reenter the setting that you recorded for On battery.
7. Click OK.
8. Click Save changes.
Conserving battery power● Select low power-use settings through Power Options in Windows Control Panel.
● Turn off wireless and local area network (LAN) connections and exit modem applications when youare not using them.
● Disconnect external devices that are not plugged into an external power source, when you are notusing them.
● Stop, disable, or remove any external media cards that you are not using.
● Use the fn+f9 and fn+f10 hotkeys to adjust screen brightness as needed.
● If you leave your work, initiate Sleep or Hibernation, or shut down the computer.
Using battery power 79

Storing a batteryCAUTION: To prevent damage to a battery, do not expose it to high temperatures for extended periodsof time.
If a computer will be unused and unplugged from external power for more than two weeks, remove thebattery and store it separately.
To prolong the charge of a stored battery, place it in a cool, dry place.
NOTE: A stored battery should be checked every six months. If the capacity is less than 50 percent,recharge the battery before returning it to storage.
Calibrate a battery before using it if it has been stored for one month or more.
Disposing of a used batteryWARNING! To reduce the risk of fire or burns, do not disassemble, crush, or puncture a battery; shortthe external contacts on a battery; or dispose of a battery in fire or water. Do not expose a battery totemperatures above 60˚C (140˚F). Replace the battery only with a battery approved for this computer.
Refer to the Regulatory, Safety and Environmental Notices for battery disposal information.
Replacing the battery Computer battery life varies, depending on the power management settings, programs running on thecomputer, display brightness, external devices connected to the computer, and other factors.
Battery Check notifies you to replace the battery when an internal cell is not charging properly, or whenthe battery storage capacity has reached a “weak” condition. A message refers you to the HP Web sitefor more information about ordering a replacement battery. If the battery is possibly covered by an HPwarranty, instructions include a warranty ID.
NOTE: To ensure that you always have battery power when you need it, HP recommends purchasinga new battery when the storage capacity indicator turns green-yellow.
80 Chapter 5 Power management
Testing an AC adapterTest the AC adapter if the computer exhibits any of the following symptoms:
● The computer will not turn on when connected to the AC adapter.
● The display does not turn on when the computer is connected to the AC adapter and externalpower.
● The power light is off when the computer is connected to the AC adapter.
To test the AC adapter:
1. Remove the battery from the computer.
2. Connect the AC adapter to the computer and to an AC outlet.
3. Turn on the computer.
● If the power light turns on, the AC adapter is functioning properly.
● If the power light remains off, the AC adapter is not functioning and should be replaced.
Contact technical support for information on obtaining a replacement AC power adapter. SelectStart > Help and Support > Get assistance.
Shutting down the computerCAUTION: Unsaved information will be lost when the computer is shut down.
The Shut down command closes all open programs, including the operating system, and then turns offthe display and computer.
Shut down the computer under any of the following conditions:
● When you need to replace the battery or access components inside the computer
● When you are connecting an external hardware device that does not connect to a USB port
● When the computer will be unused and disconnected from external power for an extended period
Although you can shut down the computer with the power button, the recommended procedure is to usethe Windows Shut down command.
To shut down the computer, follow these steps:
NOTE: If the computer is in the Sleep state or in Hibernation, you must first exit Sleep or Hibernationbefore shutdown is possible.
1. Save your work and close all open programs.
2. Click Start.
3. Click Shut down.
Testing an AC adapter 81

If the computer is unresponsive and you are unable to use the preceding shutdown procedures, try thefollowing emergency procedures in the sequence provided:
● Press and hold the power button for at least 5 seconds.
● Disconnect the computer from external power and remove the battery.
82 Chapter 5 Power management

6 Drives
Identifying installed drivesYour computer includes a hard drive (with a rotating disc) or a solid-state drive (SSD) with solid-statememory. Because it has no moving parts, an SSD does not generate as much heat as a hard drive.
To view the drives installed on the computer, select Start > Computer.
NOTE: Windows includes the User Account Control feature to improve the security of your computer.You may be prompted for your permission or password for tasks such as installing software, runningutilities, or changing Windows settings. Refer to Windows Help and Support for more information.
Handling drivesDrives are fragile computer components that must be handled with care. Refer to the following cautionsbefore handling drives. Additional cautions are included with the procedures to which they apply.
Identifying installed drives 83

CAUTION: To reduce the risk of damage to the computer, damage to a drive, or loss of information,observe these precautions:
Before you move a computer or external hard drive from one location, initiate Sleep, and allow the screento clear.
Before handling a drive, discharge static electricity by touching the unpainted metal surface of the drive.
Do not touch the connector pins on a removable drive or on the computer.
Handle a drive carefully; do not drop a drive or place items on it.
Before removing or inserting a drive, shut down the computer. If you are unsure whether the computeris off or in Hibernation, turn the computer on and then shut it down through the operating system.
Do not use excessive force when inserting a drive into a drive bay.
Do not type on the keyboard or move the computer while the optical drive is writing to a disc. The writeprocess is sensitive to vibration.
When the battery is the only source of power, be sure that the battery is sufficiently charged beforewriting to media.
Avoid exposing a drive to temperature or humidity extremes.
Avoid exposing a drive to liquids. Do not spray the drive with cleaning products.
Remove media from a drive before removing the drive from the drive bay, or traveling with, shipping, orstoring a drive.
If a drive must be mailed, place the drive in a bubble-pack mailer or other suitable protective packagingand label the package “FRAGILE.”
Avoid exposing a drive to magnetic fields. Security devices with magnetic fields include airport walk-through devices and security wands. The airport security devices that check carry-on luggage, such asconveyor belts, use X-rays instead of magnetism and will not damage a drive.
84 Chapter 6 Drives

Improving hard drive performanceUsing Disk Defragmenter
As you use the computer, files on the hard drive become fragmented. Disk Defragmenter consolidatesthe fragmented files and folders on the hard drive so that the system can run more efficiently.
After you start Disk Defragmenter, it works without supervision. Depending on the size of your hard driveand the number of fragmented files, Disk Defragmenter may take more than an hour to complete. Youmay want to set it to run during the night or another time when you do not need access to your computer.
HP recommends defragmenting your hard drive at least once a month. You may set Disk Defragmenterto run on a monthly schedule, but you can defragment your computer manually at any time.
To run Disk Defragmenter:
1. Select Start > All Programs > Accessories > System Tools > Disk Defragmenter.
2. Click Defragment disk.
NOTE: Windows includes the User Account Control feature to improve the security of yourcomputer. You may be prompted for your permission or password for tasks such as installingsoftware, running utilities, or changing Windows settings. Refer to Windows Help and Support formore information.
For additional information, access the Disk Defragmenter software Help.
Using Disk CleanupDisk Cleanup searches the hard drive for unnecessary files that you can safely delete to free up diskspace and help the computer to run more efficiently.
To run Disk Cleanup:
1. Select Start > All Programs > Accessories > System Tools > Disk Cleanup.
2. Follow the on-screen instructions.
Improving hard drive performance 85

Using HP 3D DriveGuard HP 3D DriveGuard protects the hard drive by parking the drive and halting I/O requests under either ofthe following conditions:
● You drop the computer.
● You move the computer with the display closed while the computer is running on battery power.
A short time after the end of one of these events, HP 3D DriveGuard returns the hard drive to normaloperation.
NOTE: If the upgrade bay contains a hard drive, the hard drive is protected by HP 3D DriveGuard.Hard drives installed in optional docking devices or connected to USB ports are not protected by HP 3DDriveGuard.
Because solid-state drives lack rotating parts, protection by HP 3D DriveGuard is unnecessary.
For more information, refer to the HP 3D DriveGuard software Help.
Identifying HP 3D DriveGuard statusThe drive light on the computer changes to an amber color to show that the drive is parked. To determinewhether drives are currently protected or whether a drive is parked, select Start > Control Panel >Hardware and Sound > Windows Mobility Center:
● If the software is enabled, a green check mark is superimposed over the hard drive icon.
● If the software is disabled, a white diagonal line is superimposed over the hard drive icon.
● If the drives are parked, a yellow moon is superimposed over the hard drive icon.
NOTE: The icon in the Mobility Center may not show the most up-to-date status for the drive. Forimmediate updates after a change in status, you need to enable the notification area icon.
To enable the notification area icon:
1. Select Start > Control Panel > Hardware and Sound > HP 3D DriveGuard.
NOTE: If prompted by User Account Control, click Yes.
2. On the Icon in system tray row, click Show.
3. Click OK.
If HP 3D DriveGuard has parked the drive, the computer will behave in the following ways:
● The computer will not shut down.
● The computer will not initiate Sleep or Hibernation, except as described in the following Note.
NOTE: If the computer is running on battery power and reaches a critical battery level, HP 3DDriveGuard allows the computer to initiate Hibernation.
Before you move the computer, HP recommends that you either shut it down, or initiate Sleep orHibernation.
86 Chapter 6 Drives

Using HP 3D DriveGuard softwareThe HP 3D DriveGuard software enables you to perform the following tasks:
● Enable and disable HP 3D DriveGuard.
NOTE: Permission to enable or disable HP 3D DriveGuard is dependent on certain userprivileges. Members of an Administrator group can change privileges for non-Administrator users.
● Determine whether a drive in the system is supported.
To open the software and change settings, follow these steps:
1. In Mobility Center, click the hard drive icon to open the HP 3D DriveGuard window.
– or –
Select Start > Control Panel > Hardware and Sound > HP 3D DriveGuard.
NOTE: If prompted by User Account Control, click Yes.
2. Click the appropriate button to change settings.
3. Click OK.
Using HP 3D DriveGuard 87

Replacing the hard drive in the hard drive bayCAUTION: To prevent information loss or an unresponsive system:
Shut down the computer before removing the hard drive from the hard drive bay. Do not remove thehard drive while the computer is on, in the Sleep state, or in Hibernation.
If you are not sure whether the computer is off or in Hibernation, turn the computer on by pressing thepower button. Then shut down the computer through the operating system.
To remove a hard drive:
1. Save your work.
2. Shut down the computer and close the display.
3. Disconnect all external hardware devices connected to the computer.
4. Unplug the power cord from the AC outlet.
5. Turn the computer upside down on a flat surface, with the hard drive bay toward you.
6. Remove the battery from the computer.
7. Loosen the hard drive cover screws (1).
8. Remove the hard drive cover (2).
9. Loosen the hard drive screw (1).
10. Pull the hard drive tab to the right (2) to disconnect the hard drive.
88 Chapter 6 Drives
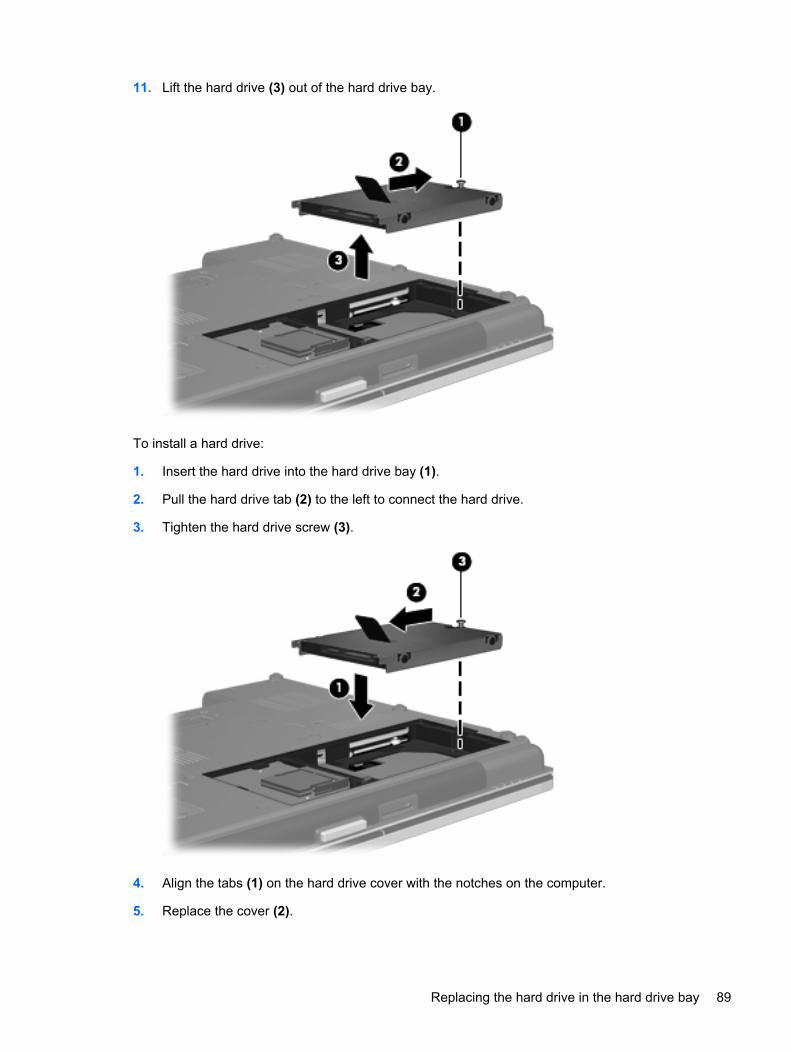
11. Lift the hard drive (3) out of the hard drive bay.
To install a hard drive:
1. Insert the hard drive into the hard drive bay (1).
2. Pull the hard drive tab (2) to the left to connect the hard drive.
3. Tighten the hard drive screw (3).
4. Align the tabs (1) on the hard drive cover with the notches on the computer.
5. Replace the cover (2).
Replacing the hard drive in the hard drive bay 89

6. Tighten the hard drive cover screws (3).
7. Replace the battery.
8. Turn the computer right-side up, and then reconnect external power and external devices.
9. Turn on the computer.
90 Chapter 6 Drives

Replacing a drive in the upgrade bayThe upgrade bay can hold either a hard drive or an optical drive.
Replacing a hard driveCAUTION: To prevent information loss or an unresponsive system:
Shut down the computer before removing the hard drive from the upgrade bay. Do not remove the harddrive while the computer is on, in the Sleep state, or in Hibernation.
If you are not sure whether the computer is off or in Hibernation, turn the computer on by pressing thepower button. Then shut down the computer through the operating system.
To remove a hard drive from the upgrade bay:
1. Save your work.
2. Shut down the computer and close the display.
3. Disconnect all external hardware devices connected to the computer.
4. Unplug the power cord from the AC outlet.
5. Turn the computer upside down on a flat surface, with the upgrade bay toward you.
6. Remove the battery from the computer.
7. Remove the protective screw caps (1), and then remove the hard drive screws (2) from the upgradebay.
8. Loosen the upgrade bay screw (1).
Replacing a drive in the upgrade bay 91

9. Using a flat-bladed screwdriver, gently push the tab to release the hard drive (2).
10. Remove the hard drive from the upgrade bay.
92 Chapter 6 Drives
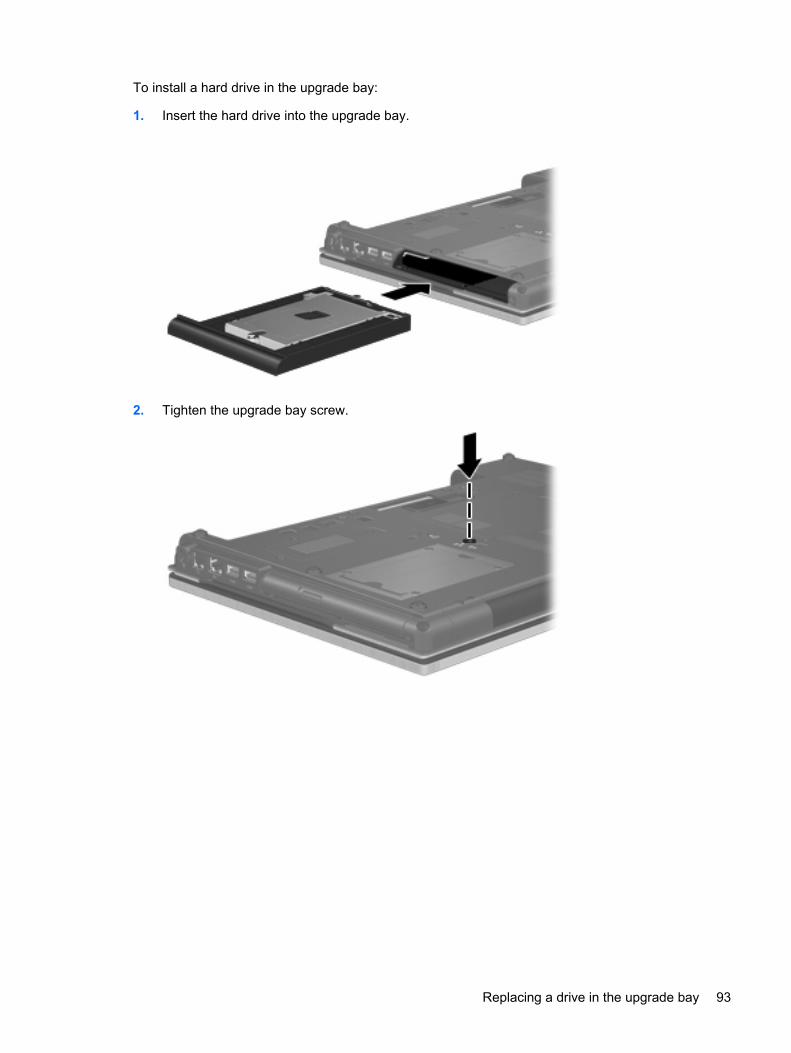
To install a hard drive in the upgrade bay:
1. Insert the hard drive into the upgrade bay.
2. Tighten the upgrade bay screw.
Replacing a drive in the upgrade bay 93

3. Replace the hard drive screws (1), and then replace the protective screw caps (2).
4. Replace the battery.
5. Turn the computer right-side up, and then reconnect external power and external devices.
6. Turn on the computer.
Replacing an optical driveCAUTION: To prevent information loss or an unresponsive system:
Shut down the computer before removing the optical drive from the upgrade bay. Do not remove theoptical drive while the computer is on, in the Sleep state, or in Hibernation.
If you are not sure whether the computer is off or in Hibernation, turn the computer on by pressing thepower button. Then shut down the computer through the operating system.
To remove an optical drive from the upgrade bay:
1. Save your work.
2. Shut down the computer and close the display.
3. Disconnect all external hardware devices connected to the computer.
4. Unplug the power cord from the AC outlet.
5. Turn the computer upside down on a flat surface, with the upgrade bay toward you.
6. Remove the battery from the computer.
7. Loosen the upgrade bay screw (1).
94 Chapter 6 Drives

8. Using a flat-bladed screwdriver, gently push the tab to release the optical drive (2).
9. Remove the optical drive from the upgrade bay.
Replacing a drive in the upgrade bay 95

To install an optical drive in the upgrade bay:
1. Insert the optical drive into the upgrade bay.
2. Tighten the upgrade bay screw.
3. Replace the battery.
4. Turn the computer right-side up, and then reconnect external power and external devices.
5. Turn on the computer.
96 Chapter 6 Drives
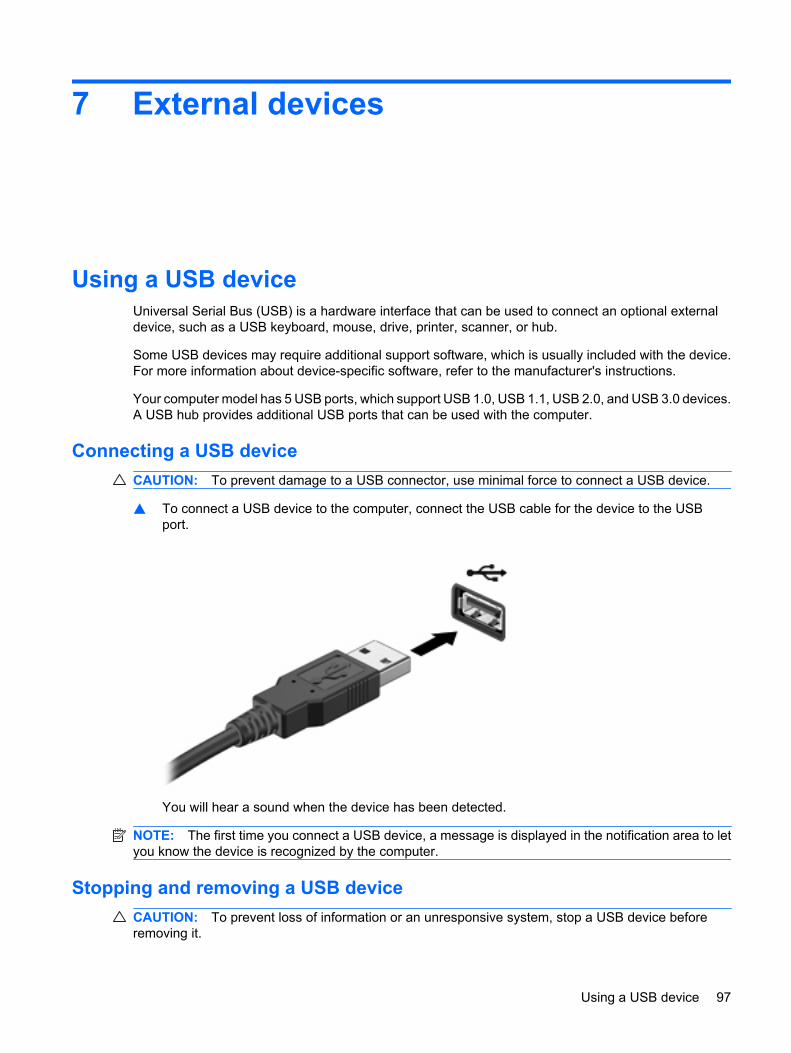
7 External devices
Using a USB deviceUniversal Serial Bus (USB) is a hardware interface that can be used to connect an optional externaldevice, such as a USB keyboard, mouse, drive, printer, scanner, or hub.
Some USB devices may require additional support software, which is usually included with the device.For more information about device-specific software, refer to the manufacturer's instructions.
Your computer model has 5 USB ports, which support USB 1.0, USB 1.1, USB 2.0, and USB 3.0 devices.A USB hub provides additional USB ports that can be used with the computer.
Connecting a USB deviceCAUTION: To prevent damage to a USB connector, use minimal force to connect a USB device.
▲ To connect a USB device to the computer, connect the USB cable for the device to the USBport.
You will hear a sound when the device has been detected.
NOTE: The first time you connect a USB device, a message is displayed in the notification area to letyou know the device is recognized by the computer.
Stopping and removing a USB deviceCAUTION: To prevent loss of information or an unresponsive system, stop a USB device beforeremoving it.
Using a USB device 97

CAUTION: To prevent damage to a USB connector, do not pull on the cable to remove the USB device.
To stop and remove a USB device:
1. Double-click the Safely Remove Hardware icon in the notification area, at the far right of thetaskbar.
NOTE: To display the Safely Remove Hardware icon, click the Show Hidden Icons icon (< or<<) in the notification area.
2. Click the name of the device in the list.
NOTE: If the USB device is not listed, you do not have to stop the device before you remove it.
3. Click Stop, and then click OK.
4. Remove the device.
Using USB legacy supportUSB legacy support (enabled at the factory) permits the following actions:
● Using a USB keyboard, mouse, or hub connected to a USB port on the computer during startup orin an MS-DOS-based program or utility
● Starting or restarting from an optional external MultiBay or an optional USB bootable device
To disable or reenable USB legacy support in Computer Setup, follow these steps:
1. Turn on or restart the computer, and then press esc while the “Press the ESC key for Startup Menu”message is displayed at the bottom of the screen.
2. Press f10 to enter the BIOS Setup.
3. Use a pointing device or the arrow keys to select System Configuration, and then select DeviceConfigurations.
4. To disable USB legacy support, click Disabled next to USB legacy support. To reenable USBlegacy support, click Enabled next to USB legacy support.
5. To save your changes and exit Computer Setup, click Save in the lower-left corner of the screen,and then follow the on-screen instructions.
– or –
Use the arrow keys to select File > Save changes and exit, and then follow the on-screeninstructions.
Your changes go into effect when the computer restarts.
98 Chapter 7 External devices

Using a 1394 deviceIEEE 1394 is a hardware interface that connects a high-speed multimedia or data storage device to thecomputer. Scanners, digital cameras, and digital camcorders often require a 1394 connection.
Some 1394 devices may require additional support software, which is usually included with the device.For more information about device-specific software, refer to the manufacturer's instructions.
The 1394 port also supports IEEE 1394a devices.
Connecting a 1394 deviceCAUTION: To prevent damage to a 1394 port connector, use minimal force when connecting a 1394device.
▲ To connect a 1394 device to the computer, connect the 1394 cable for the device to the 1394port.
You will hear a sound when the device has been detected.
Stopping and removing a 1394 deviceCAUTION: To prevent loss of information or an unresponsive system, stop the 1394 device beforeremoving it.
CAUTION: To prevent damage to a 1394 connector, do not pull on the cable to remove the 1394device.
1. Double-click the Safely Remove Hardware icon in the notification area, at the far right of thetaskbar.
NOTE: To display the Safely Remove Hardware icon, click the Show Hidden Icons icon (< or<<) in the notification area.
2. Click the name of the device in the list.
NOTE: If the device is not listed, you do not have to stop the device before you remove it.
3. Click Stop, and then click OK.
4. Remove the device.
Using a 1394 device 99
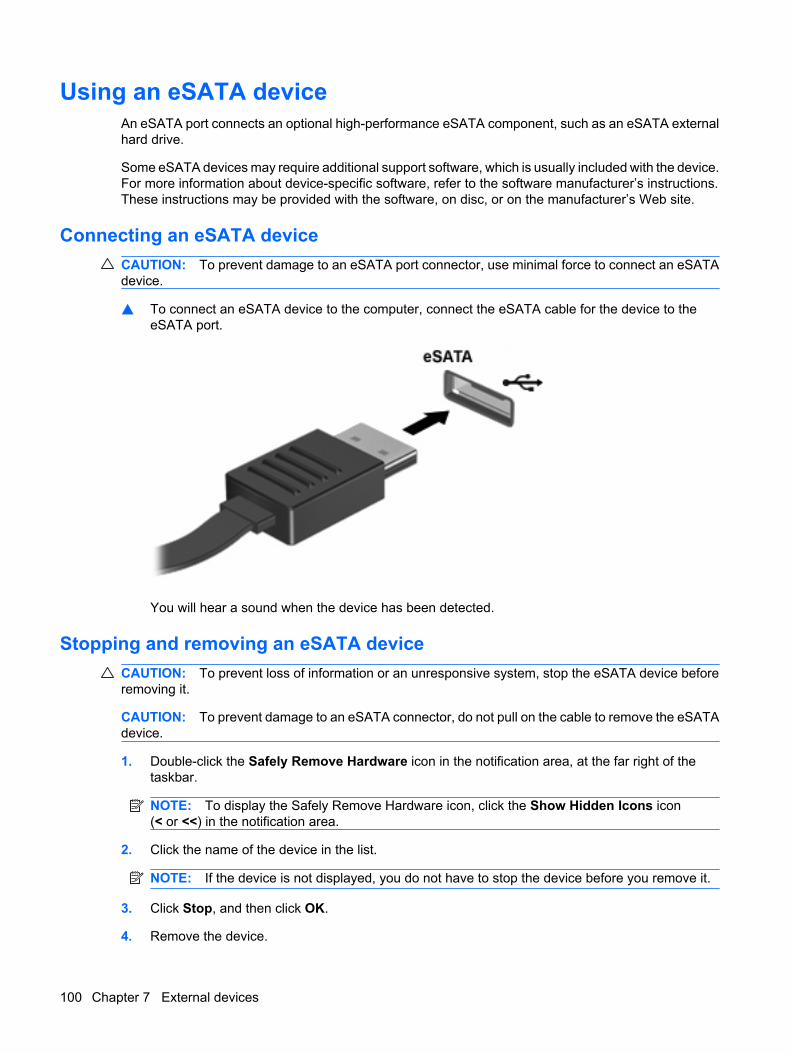
Using an eSATA deviceAn eSATA port connects an optional high-performance eSATA component, such as an eSATA externalhard drive.
Some eSATA devices may require additional support software, which is usually included with the device.For more information about device-specific software, refer to the software manufacturer’s instructions.These instructions may be provided with the software, on disc, or on the manufacturer’s Web site.
Connecting an eSATA deviceCAUTION: To prevent damage to an eSATA port connector, use minimal force to connect an eSATAdevice.
▲ To connect an eSATA device to the computer, connect the eSATA cable for the device to theeSATA port.
You will hear a sound when the device has been detected.
Stopping and removing an eSATA deviceCAUTION: To prevent loss of information or an unresponsive system, stop the eSATA device beforeremoving it.
CAUTION: To prevent damage to an eSATA connector, do not pull on the cable to remove the eSATAdevice.
1. Double-click the Safely Remove Hardware icon in the notification area, at the far right of thetaskbar.
NOTE: To display the Safely Remove Hardware icon, click the Show Hidden Icons icon(< or <<) in the notification area.
2. Click the name of the device in the list.
NOTE: If the device is not displayed, you do not have to stop the device before you remove it.
3. Click Stop, and then click OK.
4. Remove the device.
100 Chapter 7 External devices

Using external drivesRemovable external drives expand your options for storing and accessing information. A USB drive canbe added by connecting the drive to a USB port on the computer.
USB drives include the following types:
● 1.44-megabyte diskette drive
● Hard drive module (a hard drive with an adapter attached)
● DVD-ROM Drive
● DVD/CD-RW Combo Drive
● DVD±RW/CD-RW Combo Drive
Using optional external devicesNOTE: For more information about required software and drivers, or to learn which computer port touse, refer to the manufacturer's instructions.
To connect an external device to the computer:
CAUTION: To reduce the risk of damage to the equipment when connecting a powered device, besure that the device is turned off and the AC power cord is unplugged.
1. Connect the device to the computer.
2. If you are connecting a powered device, plug the device power cord into a grounded AC outlet.
3. Turn on the device.
To disconnect an unpowered external device, turn off the device, and then disconnect it from thecomputer. To disconnect a powered external device, turn off the device, disconnect it from the computer,and then unplug the AC power cord.
Using external drives 101

Using the docking connector The docking connector connects the computer to an optional docking device. An optional docking deviceprovides additional ports and connectors that can be used with the computer.
102 Chapter 7 External devices

8 External media cards
Using Media Card Reader cardsOptional digital cards provide secure data storage and convenient data sharing. These cards are oftenused with digital media–equipped cameras and PDAs as well as with other computers.
The Digital Media Slot supports the following digital card formats:
● Memory Stick (MS)
● Memory Stick Pro (MSP)
● MultiMediaCard (MMC)
● Secure Digital Input/Output (SD I/O)
● Secure Digital (SD) Memory Card
● xD-Picture Card (XD)
● xD-Picture Card (XD) Type H
● xD-Picture Card (XD) Type M
Inserting a digital cardCAUTION: To avoid damaging the digital card or the computer, do not insert any type of adapter intothe SD Card Reader.
CAUTION: To prevent damage to the digital card connectors, use minimal force to insert a digital card.
1. Hold the digital card label-side up, with the connectors facing the computer.
Using Media Card Reader cards 103

2. Insert the card into the Media Card Reader, and then push in on the card until it is firmly seated.
You will hear a sound when the device has been detected, and a menu of available options maybe displayed.
Stopping and removing a digital cardCAUTION: To prevent loss of data or an unresponsive system, stop a digital card before removing it.
1. Save your information and close all programs associated with the digital card.
NOTE: To stop a data transfer, click Cancel in the operating system Copying window.
2. Stop the digital card:
a. Double-click the Safely Remove Hardware icon in the notification area, at the far right of thetaskbar.
NOTE: To display the Safely Remove Hardware icon, click the Show Hidden Icons icon(< or <<) in the notification area.
b. Click the name of the digital card in the list.
c. Click Stop, and then click OK.
3. Press in on the digital card (1), and then remove the card from the slot (2).
104 Chapter 8 External media cards
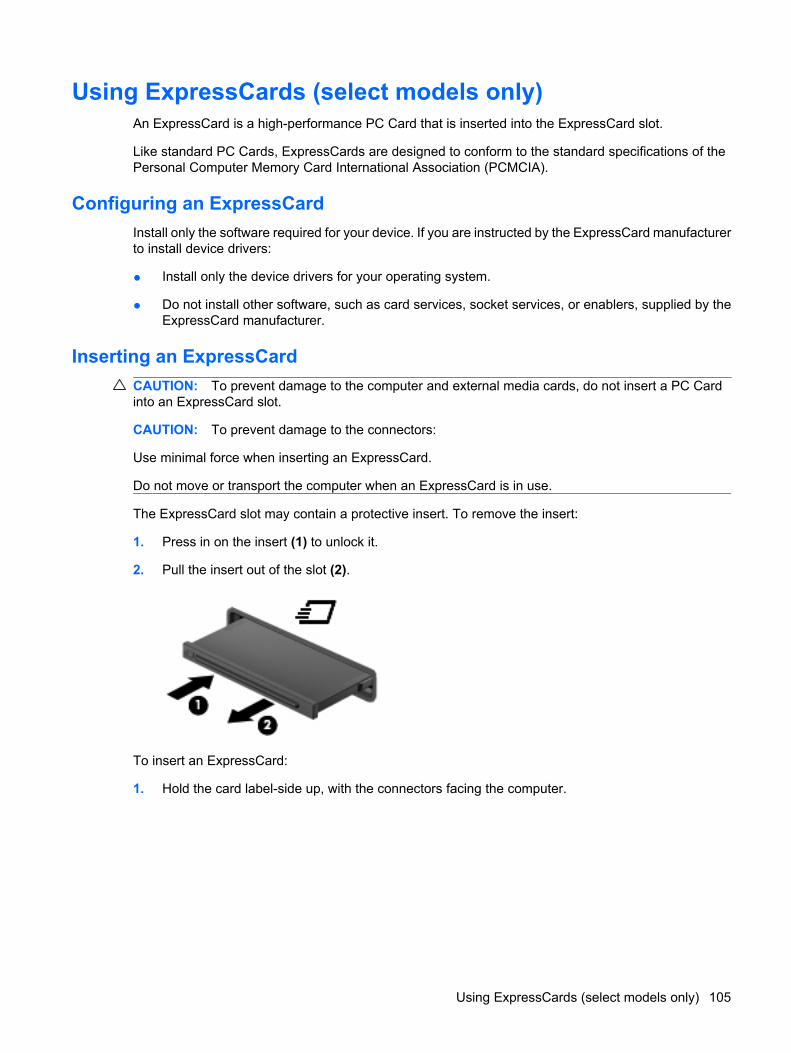
Using ExpressCards (select models only)An ExpressCard is a high-performance PC Card that is inserted into the ExpressCard slot.
Like standard PC Cards, ExpressCards are designed to conform to the standard specifications of thePersonal Computer Memory Card International Association (PCMCIA).
Configuring an ExpressCardInstall only the software required for your device. If you are instructed by the ExpressCard manufacturerto install device drivers:
● Install only the device drivers for your operating system.
● Do not install other software, such as card services, socket services, or enablers, supplied by theExpressCard manufacturer.
Inserting an ExpressCardCAUTION: To prevent damage to the computer and external media cards, do not insert a PC Cardinto an ExpressCard slot.
CAUTION: To prevent damage to the connectors:
Use minimal force when inserting an ExpressCard.
Do not move or transport the computer when an ExpressCard is in use.
The ExpressCard slot may contain a protective insert. To remove the insert:
1. Press in on the insert (1) to unlock it.
2. Pull the insert out of the slot (2).
To insert an ExpressCard:
1. Hold the card label-side up, with the connectors facing the computer.
Using ExpressCards (select models only) 105

2. Insert the card into the ExpressCard slot, and then push in on the card until it is firmly seated.
You will hear a sound when the device has been detected, and a menu of options may be displayed.
NOTE: The first time you insert an ExpressCard, a message is displayed in the notification areato let you know the device is recognized by the computer.
NOTE: An inserted ExpressCard uses power even when idle. To conserve power, stop or remove anExpressCard when it is not in use.
Stopping and removing an ExpressCardCAUTION: To prevent loss of data or an unresponsive system, stop an ExpressCard before removingit.
1. Save your information and close all programs associated with the ExpressCard.
NOTE: To stop a data transfer, click Cancel in the operating system Copying window.
2. Stop the ExpressCard:
a. Double-click the Safely Remove Hardware icon in the notification area, at the far right of thetaskbar.
NOTE: To display the Safely Remove Hardware icon, click the Show Hidden Icons icon(< or <<) in the notification area.
b. Click the name of the ExpressCard in the list.
c. Click Stop, and then click OK.
3. Release and remove the ExpressCard:
a. Gently press in on the ExpressCard (1) to unlock it.
b. Pull the ExpressCard out of the slot (2).
106 Chapter 8 External media cards
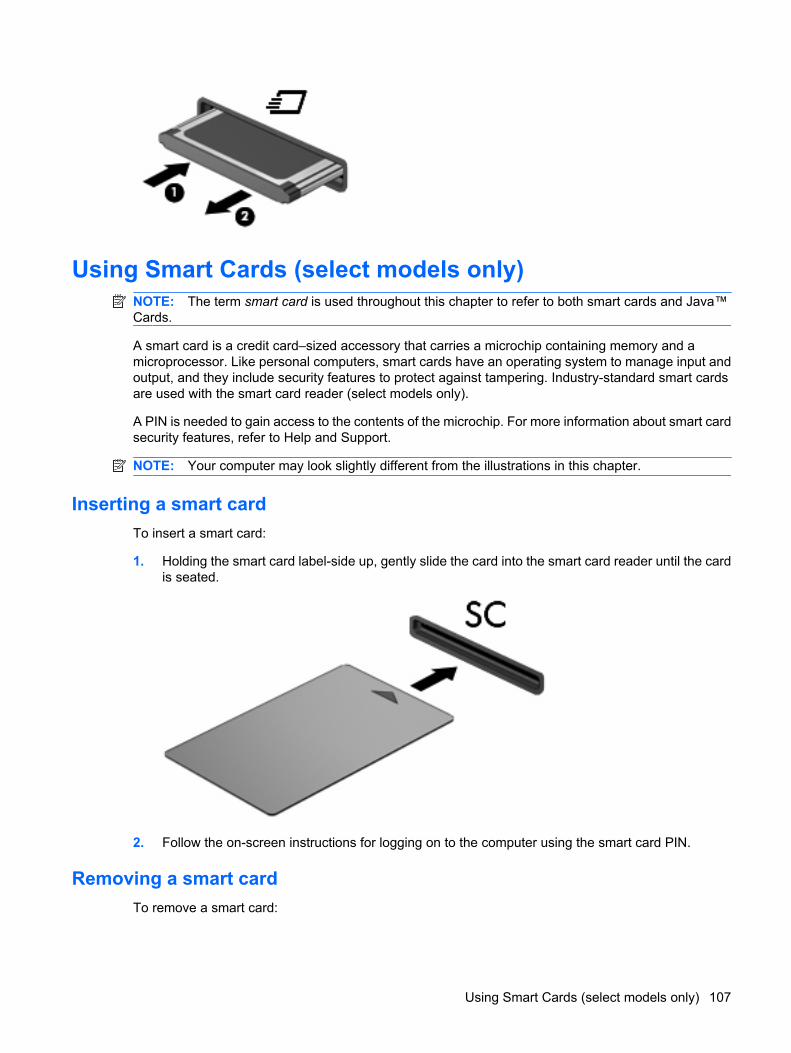
Using Smart Cards (select models only)NOTE: The term smart card is used throughout this chapter to refer to both smart cards and Java™Cards.
A smart card is a credit card–sized accessory that carries a microchip containing memory and amicroprocessor. Like personal computers, smart cards have an operating system to manage input andoutput, and they include security features to protect against tampering. Industry-standard smart cardsare used with the smart card reader (select models only).
A PIN is needed to gain access to the contents of the microchip. For more information about smart cardsecurity features, refer to Help and Support.
NOTE: Your computer may look slightly different from the illustrations in this chapter.
Inserting a smart cardTo insert a smart card:
1. Holding the smart card label-side up, gently slide the card into the smart card reader until the cardis seated.
2. Follow the on-screen instructions for logging on to the computer using the smart card PIN.
Removing a smart cardTo remove a smart card:
Using Smart Cards (select models only) 107

▲ Grasp the edge of the smart card, and pull it out of the smart card reader.
108 Chapter 8 External media cards

9 Memory modules
The computer has two memory module compartments. The primary memory module compartment islocated under the keyboard. The expansion memory module compartment is located on the bottom ofthe computer.
The memory capacity of the computer can be upgraded by adding a memory module to the vacantexpansion memory module slot or by upgrading the existing memory module in the primary memorymodule slot.
WARNING! To reduce the risk of electric shock and damage to the equipment, unplug the power cordand remove all batteries before installing a memory module.
CAUTION: Electrostatic discharge (ESD) can damage electronic components. Before beginning anyprocedure, touch a grounded metal object to be sure that you are discharged of static electricity.
109

Adding or replacing a memory module in the expansionmemory module slot
To add or replace a memory module in the expansion memory module slot, follow these steps:
1. Save your work.
2. Shut down the computer and close the display.
If you are not sure whether the computer is off or in Hibernation, turn the computer on by pressingthe power button. Then shut down the computer through the operating system.
3. Disconnect all external devices connected to the computer.
4. Unplug the power cord from the AC outlet.
5. Turn the computer upside down on a flat surface.
6. Remove all batteries from the computer.
7. Loosen the memory module compartment cover screws (1).
8. Lift the memory module compartment cover (2) away from the computer.
9. Remove the memory module:
110 Chapter 9 Memory modules

NOTE: If the expansion memory module slot is not populated, bypass step 9 and proceed to step10.
a. Pull away the retention clips (1) on each side of the memory module.
The memory module tilts up.
CAUTION: To prevent damage to the memory module, hold the memory module by theedges only. Do not touch the components on the memory module.
b. Grasp the edge of the memory module (2), and gently pull the module out of the memorymodule slot.
To protect a memory module after removal, place it in an electrostatic-safe container.
NOTE: Depending on the memory configuration of your computer, the left DIMM connectormay not be populated.
10. Insert a memory module:
a. Align the notched edge (1) of the memory module with the tab in the memory module slot.
CAUTION: To prevent damage to the memory module, hold the memory module by theedges only. Do not touch the components on the memory module and do not bend the memorymodule.
b. With the memory module at a 45-degree angle from the surface of the memory modulecompartment, press the module (2) into the memory module slot until it is seated.
Adding or replacing a memory module in the expansion memory module slot 111

c. Gently press the memory module (3) down, applying pressure to both the left and right edgesof the memory module, until the retention clips snap into place.
NOTE: Depending on the memory configuration of your computer, the left DIMM connectormay not be populated.
11. Align the tabs (1) on the memory module compartment cover with the notches on the computer.
12. Close the cover (2).
13. Tighten the memory module compartment cover screws (3).
14. Replace the battery.
15. Turn the computer right-side up, and then reconnect external power and external devices.
16. Turn on the computer.
112 Chapter 9 Memory modules
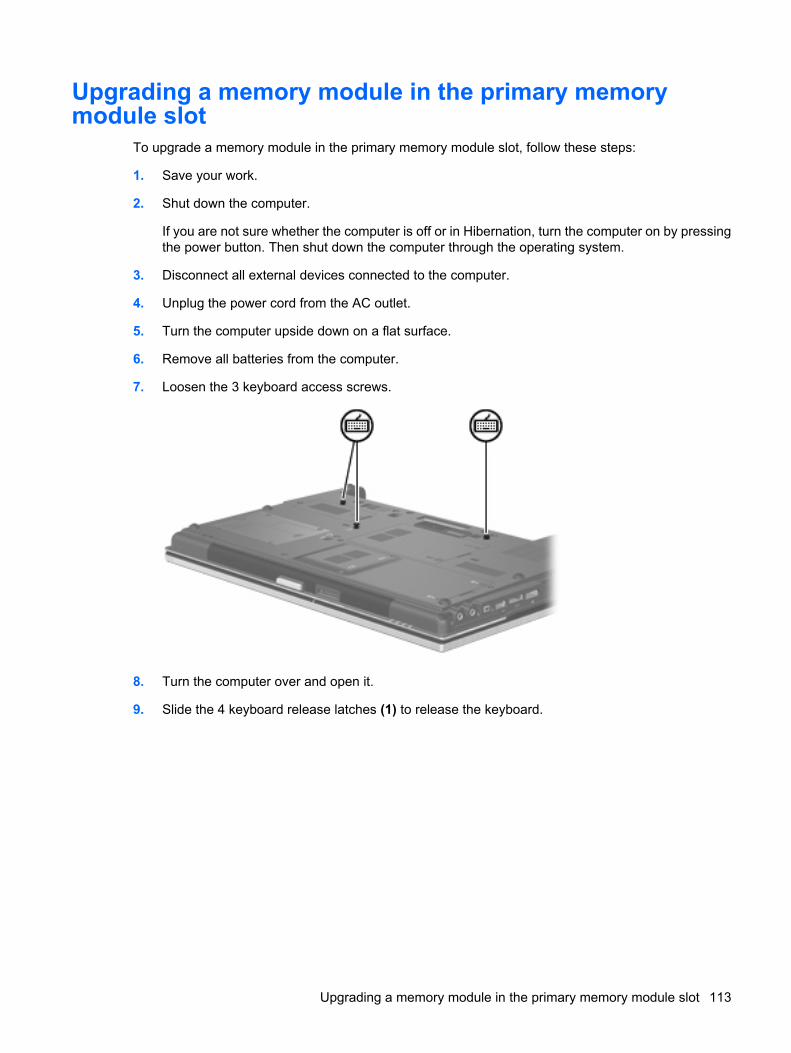
Upgrading a memory module in the primary memorymodule slot
To upgrade a memory module in the primary memory module slot, follow these steps:
1. Save your work.
2. Shut down the computer.
If you are not sure whether the computer is off or in Hibernation, turn the computer on by pressingthe power button. Then shut down the computer through the operating system.
3. Disconnect all external devices connected to the computer.
4. Unplug the power cord from the AC outlet.
5. Turn the computer upside down on a flat surface.
6. Remove all batteries from the computer.
7. Loosen the 3 keyboard access screws.
8. Turn the computer over and open it.
9. Slide the 4 keyboard release latches (1) to release the keyboard.
Upgrading a memory module in the primary memory module slot 113
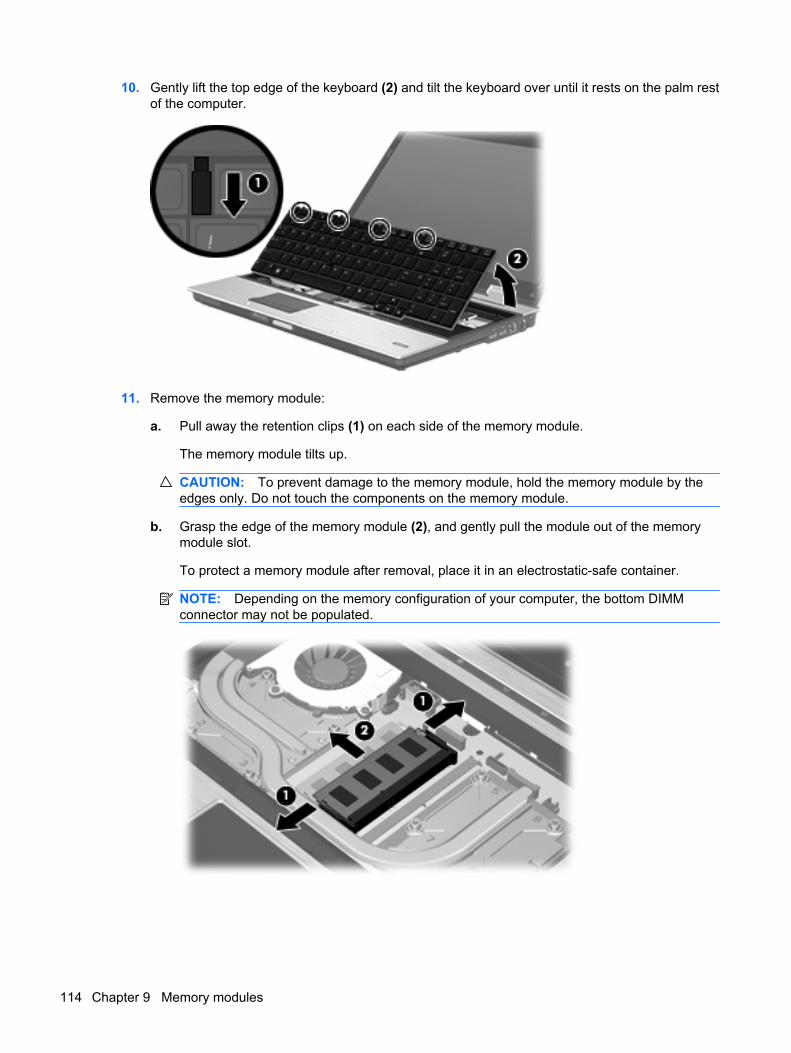
10. Gently lift the top edge of the keyboard (2) and tilt the keyboard over until it rests on the palm restof the computer.
11. Remove the memory module:
a. Pull away the retention clips (1) on each side of the memory module.
The memory module tilts up.
CAUTION: To prevent damage to the memory module, hold the memory module by theedges only. Do not touch the components on the memory module.
b. Grasp the edge of the memory module (2), and gently pull the module out of the memorymodule slot.
To protect a memory module after removal, place it in an electrostatic-safe container.
NOTE: Depending on the memory configuration of your computer, the bottom DIMMconnector may not be populated.
114 Chapter 9 Memory modules

12. Insert a memory module:
a. Align the notched edge (1) of the memory module with the tab in the memory module slot.
CAUTION: To prevent damage to the memory module, hold the memory module by theedges only. Do not touch the components on the memory module and do not bend the memorymodule.
b. With the memory module at a 45-degree angle from the surface of the memory modulecompartment, press the module (2) into the memory module slot until it is seated.
c. Gently press the memory module (3) down, applying pressure to both the left and right edgesof the memory module, until the retention clips snap into place.
NOTE: Depending on the memory configuration of your computer, the bottom DIMMconnector may not be populated.
13. Replace the keyboard (1).
14. Slide the 4 keyboard release latches (2) to lock the keyboard.
15. Close the cover.
16. Turn the computer upside down on a flat surface.
Upgrading a memory module in the primary memory module slot 115

17. Tighten the 3 keyboard access screws.
18. Replace the battery.
19. Turn the computer right-side up, and then reconnect external power and external devices.
20. Turn on the computer.
116 Chapter 9 Memory modules

10 Security
Protecting the computerNOTE: Security solutions are designed to act as deterrents. These deterrents may not prevent aproduct from being mishandled or stolen.
NOTE: Your computer supports CompuTrace, which is an online security-based tracking and recoveryservice available in select regions. If the computer is stolen, CompuTrace can track the computer if theunauthorized user accesses the Internet. You must purchase the software and subscribe to the servicein order to use CompuTrace. For information about ordering the CompuTrace software, go to the HPWeb site at http://www.hpshopping.com.
Security features provided with your computer can protect the computer, personal information, and datafrom a variety of risks. The way you use your computer will determine which security features you needto use.
The Windows operating system offers certain security features. Additional security features are listedin the following table. Most of these additional security features can be configured in the Computer Setuputility (referred to hereafter as Computer Setup).
To protect against Use this security feature
Unauthorized use of the computer HP ProtectTools Security Manager, in combination with apassword, smart card, and/or fingerprint reader
Unauthorized access to Computer Setup (f10) BIOS administrator password in Computer Setup*
Unauthorized access to the contents of a hard drive DriveLock password in Computer Setup*
Unauthorized startup from an optical drive, diskette drive, orinternal network adapter
Boot options feature in Computer Setup*
Unauthorized access to a Windows user account HP ProtectTools Security Manager
Unauthorized access to data ● Firewall software
● Windows updates
● Drive encryption for HP ProtectTools
Unauthorized access to Computer Setup settings and othersystem identification information
BIOS administrator password in Computer Setup*
Unauthorized removal of the computer Security cable slot (used with an optional security cable)
*Computer Setup is a preinstalled, ROM-based utility that can be used even when the operating system is not working or willnot load. You can use either a pointing device (TouchPad, pointing stick, or USB mouse) or the keyboard to navigate and makeselections in Computer Setup.
Protecting the computer 117

Using passwordsMost security features use passwords. Whenever you set a password, write down the password andstore it in a secure location away from the computer. Note the following password considerations:
● Setup and DriveLock passwords are set in Computer Setup and are managed by the system BIOS.
● The embedded security password, which is an HP ProtectTools Security Manager password, canbe enabled in Computer Setup to provide BIOS password protection in addition to their normal HPProtectTools functions. The embedded security password is used with the optional embeddedsecurity chip.
● Windows passwords are set only in the Windows operating system.
● If you forget the BIOS administrator password set in Computer Setup, you can use HP SpareKeyto access the utility.
● If you forget both the DriveLock user password and the DriveLock master password set in ComputerSetup, the hard drive that is protected by the passwords is permanently locked and can no longerbe used.
You can use the same password for a Computer Setup feature and for a Windows security feature. Youcan also use the same password for more than one Computer Setup feature.
Use the following tips for creating and saving passwords:
● When creating passwords, follow requirements set by the program.
● Write down your passwords and store them in a secure place away from the computer.
● Do not store passwords in a file on the computer.
The following tables list commonly used Windows and BIOS administrator passwords and describe theirfunctions.
Setting passwords in Windows
Windows passwords Function
Administrator password* Protects access to a Windows administrator-level account.
User password* Protects access to a Windows user account.
*For information about setting a Windows administrator password or a Windows user password, select Start > Help andSupport.
Setting passwords in Computer Setup
BIOS administrator passwords Function
BIOS administrator password Protects access to Computer Setup.
DriveLock master password Protects access to the internal hard drive that is protected byDriveLock. It is also used to remove DriveLock protection. Thispassword is set under DriveLock Passwords during the enableprocess.
118 Chapter 10 Security

BIOS administrator passwords Function
DriveLock user password Protects access to the internal hard drive that is protected byDriveLock, and is set under DriveLock Passwords during theenable process.
TPM embedded security password When enabled as a BIOS administrator password, protectsaccess to the computer contents when the computer turns on,restarts, or exits Hibernation.
This password requires the optional embedded security chipto support this security feature.
BIOS administrator passwordThe Computer Setup BIOS administrator password protects the configuration settings and systemidentification information in Computer Setup. After this password is set, it must be entered to accessComputer Setup and to make changes using Computer Setup.
Note the following characteristics of the BIOS administrator password:
● It is not interchangeable with a Windows administrator password, although both passwords can beidentical.
● It is not displayed as it is set, entered, changed, or deleted.
● It must be set and entered with the same keys. For example, a BIOS administrator password setwith keyboard number keys will not be recognized if you enter it thereafter with embedded numerickeypad number keys.
● It can include any combination of up to 32 letters and numbers and is not case sensitive unlessmandated by the administrator.
Using passwords 119

Managing a BIOS administrator passwordA BIOS administrator password is set, changed, and deleted in Computer Setup.
To set or change this password in Computer Setup, follow these steps:
1. Turn on or restart the computer, and then press esc while the “Press the ESC key for Startup Menu”message is displayed at the bottom of the screen.
2. Press f10 to enter BIOS Setup.
3. Use a pointing device or the arrow keys to select Security > Change Password, and then pressenter.
4. When prompted, type your current password.
5. When prompted, type your new password.
6. When prompted, type your new password again to confirm.
7. To save your changes and exit Computer Setup, click Save in the lower-left corner of the screen,and then follow the on-screen instructions.
– or –
Use the arrow keys to select File > Save changes and exit, and then press enter.
Your changes go into effect when the computer restarts.
To delete this password in Computer Setup, follow these steps:
1. Turn on or restart the computer, and then press esc while the “Press the ESC key for Startup Menu”message is displayed at the bottom of the screen.
2. Press f10 to enter BIOS Setup.
3. Use a pointing device or the arrow keys to select Security > Change Password, and then pressenter.
4. When prompted, type your current password.
5. When prompted for the new password, leave the field empty, and then press enter.
6. Read the warning. To continue, select YES.
7. When prompted to type your new password again, leave the field empty, and then press enter.
8. To save your changes and exit Computer Setup, click Save in the lower-left corner of the screen,and then follow the on-screen instructions.
– or –
Use the arrow keys to select File > Save changes and exit, and then press enter.
Your changes go into effect when the computer restarts.
120 Chapter 10 Security

Entering a BIOS administrator passwordAt the BIOS administrator password prompt, type your password (using the same kind of keys youused to set the password), and then press enter. After three unsuccessful attempts to enter the BIOSadministrator password, you must restart the computer and try again.
Using Computer Setup DriveLockCAUTION: To prevent the DriveLock-protected hard drive from becoming permanently unusable,record the DriveLock user password and the DriveLock master password in a safe place away from yourcomputer. If you forget both DriveLock passwords, the hard drive will be permanently locked and canno longer be used.
DriveLock protection prevents unauthorized access to the contents of a hard drive. DriveLock can beapplied only to the internal hard drive(s) of the computer. After DriveLock protection is applied to a drive,a password must be entered to access the drive. The drive must be inserted into the computer or anadvanced port replicator in order for it to be accessed by the DriveLock passwords.
To apply DriveLock protection to an internal hard drive, a user password and a master password mustbe set in Computer Setup. Note the following considerations about using DriveLock protection:
● After DriveLock protection is applied to a hard drive, the hard drive can be accessed only by enteringeither the user password or the master password.
● The owner of the user password should be the day-to-day user of the protected hard drive. Theowner of the master password may be either a system administrator or the day-to-day user.
● The user password and the master password can be identical.
● You can delete a user password or master password only by removing DriveLock protection fromthe drive. DriveLock protection can be removed from the drive only with the master password.
Using passwords 121

Setting a DriveLock passwordTo set a DriveLock password in Computer Setup, follow these steps:
1. Turn on the computer, and then press esc while the “Press the ESC key for Startup Menu” messageis displayed at the bottom of the screen.
2. Press f10 to enter BIOS Setup.
3. Use a pointing device or the arrow keys to select Security > DriveLock passwords, and thenpress enter.
4. Use a pointing device to click the hard drive you want to protect.
– or –
Use the arrow keys to select the hard drive you want to protect, and then press enter.
5. Read the warning. To continue, select YES.
6. Type your master password in the New password and Verify new password fields, and thenpress enter.
7. Type your user password in the New password and Verify new password fields, and then pressenter.
8. To confirm DriveLock protection on the drive you have selected, type DriveLock in theconfirmation field, and then press enter.
NOTE: The DriveLock confirmation is case sensitive.
9. To save your changes and exit Computer Setup, click Save in the lower-left corner of the screen,and then follow the on-screen instructions.
– or –
Use the arrow keys to select File > Save changes and exit, and then press enter.
Your changes go into effect when the computer restarts.
122 Chapter 10 Security

Entering a DriveLock passwordBe sure that the hard drive is inserted into the computer (not into an optional docking device or externalMultiBay).
At the DriveLock Password prompt, type your user or master password (using the same kind of keysyou used to set the password), and then press enter.
After two incorrect attempts to enter the password, you must shut down the computer and try again.
Using passwords 123

Changing a DriveLock passwordTo change a DriveLock password in Computer Setup, follow these steps:
1. Turn on the computer, and then press esc while the “Press the ESC key for Startup Menu” messageis displayed at the bottom of the screen.
2. Press f10 to enter BIOS Setup.
3. Use a pointing device or the arrow keys to select Security > DriveLock passwords, and thenpress enter.
4. Use a pointing device to select an internal hard drive.
– or –
Use the arrow keys to select an internal hard drive, and then press enter.
5. Use a pointing device or the arrow keys to select the password you want to change.
6. Type your current password in the Old password field, type a new password in the Newpassword and Verify new password fields, and then press enter.
7. To save your changes and exit Computer Setup, click Save in the lower-left corner of the screen,and then follow the on-screen instructions.
– or –
Use the arrow keys to select File > Save changes and exit, and then press enter.
Your changes go into effect when the computer restarts.
124 Chapter 10 Security

Removing DriveLock protectionTo remove DriveLock protection in Computer Setup, follow these steps:
1. Turn on the computer, and then press esc while the “Press the ESC key for Startup Menu” messageis displayed at the bottom of the screen.
2. Press f10 to enter BIOS Setup.
3. Use a pointing device or the arrow keys to select Security > DriveLock password, and then pressenter.
4. Use a pointing device or the arrow keys to select an internal hard drive, and then press enter.
5. Use a pointing device or the arrow keys to select Disable protection.
6. Type your master password, and then press enter.
7. To save your changes and exit Computer Setup, click Save in the lower-left corner of the screen,and then follow the on-screen instructions.
– or –
Use the arrow keys to select File > Save changes and exit, and then press enter.
Your changes go into effect when the computer restarts.
Using Computer Setup Auto DriveLockIn a multiple-user environment, you can set an Automatic DriveLock password. When the AutomaticDriveLock password is enabled, a random user password and a DriveLock master password will becreated for you. When any user passes the password credential, the same random user and DriveLockmaster password will be used to unlock the drive.
NOTE: You must have a BIOS administrator password before you can access the AutomaticDriveLock features.
Entering an Automatic DriveLock passwordTo enable an Automatic DriveLock password in Computer Setup, follow these steps:
1. Turn on or restart the computer, and then press esc while the “Press the ESC key for Startup Menu”message is displayed at the bottom of the screen.
2. Press f10 to enter BIOS Setup.
3. Use a pointing device or the arrow keys to select Security > Automatic DriveLock, and then pressenter.
4. Use a pointing device or the arrow keys to select an internal hard drive, and then press enter.
5. Read the warning. To continue, select YES.
6. To save your changes and exit Computer Setup, click Save in the lower-left corner of the screen,and then follow the on-screen instructions.
– or –
Use the arrow keys to select File > Save changes and exit, and then press enter.
Using passwords 125

Removing Automatic DriveLock protectionTo remove DriveLock protection in Computer Setup, follow these steps:
1. Turn on or restart the computer, and then press esc while the “Press the ESC key for Startup Menu”message is displayed at the bottom of the screen.
2. Press f10 to enter BIOS Setup.
3. Use a pointing device or the arrow keys to select Security > Automatic DriveLock, and then pressenter.
4. Use a pointing device or the arrow keys to select an internal hard drive, and then press enter.
5. Use a pointing device or the arrow keys to select Disable protection.
6. To save your changes and exit Computer Setup, click Save in the lower-left corner of the screen,and then follow the on-screen instructions.
– or –
Use the arrow keys to select File > Save changes and exit, and then press enter.
126 Chapter 10 Security

Using Computer Setup security featuresSecuring system devices
You can disable or enable system devices from the following menus in Computer Setup:
● Boot Options
● Device Configurations
● Built-In Device Options
● Port Options
To disable or reenable system devices in Computer Setup, follow these steps:
1. Turn on or restart the computer, and then press esc while the “Press the ESC key for Startup Menu”message is displayed at the bottom of the screen.
2. Press f10 to enter BIOS Setup.
3. Use a pointing device or the arrow keys to select System Configuration > Boot Options, orSystem Configuration > Device Configurations, or System Configuration > Built-In DeviceOptions, or System Configuration > Port Options.
4. Press enter.
5. To disable an option, use a pointing device to click Disabled next to the option.
– or –
Use the arrow keys to select Disabled next to the option, and then press enter.
6. To reenable an option, use a pointing device to click Enabled next to the option.
– or –
Use the arrow keys to select Enabled next to the option, and then press enter.
7. To save your changes and exit Computer Setup, click Save in the lower-left corner of the screen,and then follow the on-screen instructions.
– or –
Use the arrow keys to select File > Save changes and exit, and then press enter.
Your changes go into effect when the computer restarts.
Viewing Computer Setup System InformationThe System Information feature in Computer Setup provides two types of system information:
● Identification information about the computer model and the batteries
● Specification information about the processor, cache, memory, ROM, video revision, and keyboardcontroller revision
Using Computer Setup security features 127

To view this general system information in Computer Setup, follow these steps:
1. Turn on or restart the computer, and then press esc while the “Press the ESC key for Startup Menu”message is displayed at the bottom of the screen.
2. Press f10 to enter BIOS Setup.
3. Use a pointing device or the arrow keys to select File > System Information, and then pressenter.
NOTE: To prevent unauthorized access to this information, you must create a BIOS administratorpassword in Computer Setup.
Using Computer Setup System IDsThe System IDs feature in Computer Setup allows you to display or enter the computer asset tag andownership tag.
NOTE: To prevent unauthorized access to this information, you must create a BIOS administratorpassword in Computer Setup.
To manage this feature in Computer Setup, follow these steps:
1. Turn on or restart the computer, and then press esc while the “Press the ESC key for Startup Menu”message is displayed at the bottom of the screen.
2. Press f10 to enter BIOS Setup.
3. Use a pointing device or the arrow keys to select Security > System IDs, and then press enter.
4. Use a pointing device or the arrow keys to select Notebook Asset Tag or Notebook OwnershipTag, and then enter the information.
5. Press enter when finished.
6. To save your changes and exit Computer Setup, click Save in the lower-left corner of the screen,and then follow the on-screen instructions.
– or –
Use the arrow keys to select File > Save changes and exit, and then press enter.
Your changes go into effect when the computer restarts.
128 Chapter 10 Security
Using antivirus softwareWhen you use the computer to access e-mail, a network, or the Internet, you expose the computer tocomputer viruses. Computer viruses can disable the operating system, programs, or utilities, or causethem to function abnormally.
Antivirus software can detect most viruses, destroy them, and in most cases, repair any damage theyhave caused. To provide ongoing protection against newly discovered viruses, antivirus software mustbe kept up to date.
McAfee Total Protection antivirus software is either preinstalled or preloaded on the computer.
If the antivirus software is preinstalled, select Start > All Programs > McAfee > ManagedServices > Total Protection.
If the software is preloaded, select Start > All Programs > HP Software Setup, and then follow theinstructions on the screen to load the McAfee Total Protection software.
For more information about computer viruses, type viruses in the Search box in Help and Support.
Using antivirus software 129

Using firewall softwareWhen you use the computer to access e-mail, a network, or the Internet, unauthorized persons may beable to gain access to the computer, your personal files, and information about you. Use the firewallsoftware preinstalled on the computer to protect your privacy. McAfee Total Protection antivirus softwareis preinstalled on the computer. To access your software, select Start > All Programs > McAfee >Managing Services > Total Protection.
Firewall features include logging and reporting of network activity, and automatic monitoring of allincoming and outgoing traffic. For more information, refer to the software manufacturer’s instructions.These instructions may be provided with the software, on disc, or on the manufacturer’s Web site.
NOTE: Under some circumstances a firewall can block access to Internet games, interfere with printeror file sharing on a network, or block authorized e-mail attachments. To temporarily resolve the problem,disable the firewall, perform the task that you want to perform, and then reenable the firewall. Topermanently resolve the problem, reconfigure the firewall as necessary, and adjust the policies andsettings of other intrusion detection systems. For additional information, contact your networkadministrator or IT department.
130 Chapter 10 Security

Installing critical updatesCAUTION: Microsoft sends alerts regarding critical updates. To protect the computer from securitybreaches and computer viruses, install all critical updates from Microsoft as soon as you receive analert.
Updates to the operating system and other software may have become available after the computerwas shipped. To be sure that all available updates are installed on the computer, observe theseguidelines:
● Run Windows Update monthly to install the latest software from Microsoft.
● Obtain updates, as they are released, from the Microsoft Web site and through the updates link inHelp and Support.
Installing critical updates 131

Using HP ProtectTools Security Manager (select modelsonly)
HP ProtectTools Security Manager software is preinstalled on select computer models. This softwarecan be accessed through Windows Control Panel. It provides security features that help protect againstunauthorized access to the computer, networks, and critical data. For more information, refer to the HPProtectTools online Help.
132 Chapter 10 Security

Installing a security cableNOTE: A security cable is designed to act as a deterrent, but it may not prevent the computer frombeing mishandled or stolen.
1. Loop the security cable around a secured object.
2. Insert the key (1) into the cable lock (2).
3. Insert the cable lock into the security cable slot on the computer (3), and then lock the cable lockwith the key.
NOTE: The location of the security cable slot varies by computer model.
Installing a security cable 133

11 Software updates
Updating softwareUpdated versions of the software provided with your computer are available either through the HPAssistant utility or on the HP Web site.
HP Assistant automatically checks for updates from HP. The utility runs at a specified interval andprovides a list of support alerts, such as security enhancements, and optional software and driverupdates.
You can manually check for updates at any time by selecting Start > Help and Support > Maintain,and then follow the on-screen instructions.
Most software on the HP Web site is packaged in compressed files called SoftPaqs. Some BIOS updatesmay be packaged in compressed files called ROMPaqs.
Some download packages contain a file named Readme.txt, which contains information regardinginstalling and troubleshooting the file. (Readme.txt files included with ROMPaqs are provided in Englishonly.)
You can also access software updates by obtaining the Support Software disc (purchased separately).This disc includes device drivers, BIOS updates, and utilities.
To purchase the current Support Software disc or a subscription that provides both the current versionand future versions of the disc, follow these steps:
1. Open your Internet browser, and go to http://www.hp.com/support.
2. Select your country or region.
3. Click the option for software and driver downloads, and then type your computer model number inthe product box.
4. Press enter.
5. Follow the on-screen instructions.
To update the software using a Support Software disc, follow these steps:
1. Insert the Support Software disc into the optical drive.
2. Follow the on-screen instructions.
134 Chapter 11 Software updates

To update the software using the HP Web site, follow these steps:
1. Identify your computer model, product category, and series or family. Prepare for a system BIOSupdate by identifying the BIOS version currently installed on the computer. For details, refer to the"Determining the BIOS version" section.
If your computer is connected to a network, consult the network administrator before installing anysoftware updates, especially system BIOS updates.
NOTE: The computer system BIOS is stored on the system ROM. The BIOS initializes theoperating system, determines how the computer will interact with the hardware devices, andprovides for data transfer among hardware devices, including the time and date.
NOTE: Windows includes the User Account Control feature to improve the security of yourcomputer. You may be prompted for your permission or password for tasks such as installingsoftware, running utilities, or changing Windows settings. Refer to Windows Help and Support formore information.
2. Open your Internet browser, and go to http://www.hp.com/support.
3. Select your country or region.
4. Click the option for software and driver downloads, and then type your computer model number inthe product box.
5. Press enter.
6. Follow the on-screen instructions.
Updating software 135

Updating the BIOSTo update the BIOS, first determine what BIOS version you currently have, and then download andinstall the new BIOS.
Determining the BIOS versionBIOS version information (also known as ROM date and System BIOS) can be displayed by pressingfn+esc (if you are already in Windows) or by using Computer Setup.
To use Computer Setup for displaying BIOS information, follow these steps:
1. Turn on or restart the computer, and then press esc while the “Press the ESC key for Startup Menu”message is displayed at the bottom of the screen.
2. Press f10 to enter BIOS Setup.
3. Use a pointing device or the arrow keys to select File > System Information.
4. Press esc to return to the File menu.
5. Click Exit in the lower-left corner of the screen, and then follow the on-screen instructions.
– or –
Use the arrow keys to select File > Ignore changes and exit, and then press enter.
136 Chapter 11 Software updates

Downloading a BIOS updateCAUTION: To prevent damage to the computer or an unsuccessful installation, download and installa BIOS update only when the computer is connected to reliable external power using the AC adapter.Do not download or install a BIOS update while the computer is running on battery power, docked in anoptional docking device, or connected to an optional power source. During the download and installation,follow these guidelines:
Do not disconnect power from the computer by unplugging the power cord from the AC outlet.
Do not shut down the computer or initiate Sleep or Hibernation.
Do not insert, remove, connect, or disconnect any device, cable, or cord.
To download a BIOS update:
NOTE: BIOS updates are posted as needed. A newer BIOS update may not be available for yourcomputer. It is recommended that you check the HP Web site periodically for BIOS updates.
1. Open your Internet browser, go to http://www.hp.com/support, and then select your country orregion.
2. Click the option for software and driver downloads, type your computer model number in the productbox, and then press enter.
3. Click your specific product from the models listed.
4. Click your operating system.
5. Follow the on-screen instructions to access the BIOS update you want to download. Make a noteof the download date, name, or other identifier. You may need this information to locate the updatelater, after it has been downloaded to your hard drive.
6. At the download area, perform these steps:
a. Identify the BIOS update that is newer than the BIOS version currently installed on yourcomputer.
b. Follow the instructions on the screen to download your selection to the hard drive.
Make a note of the path to the location on your hard drive where the BIOS update will bedownloaded. You will need to access this path when you are ready to install the update.
NOTE: If you connect your computer to a network, consult the network administrator before installingany software updates, especially system BIOS updates.
BIOS installation procedures vary. Follow any instructions that are displayed on the screen after thedownload is complete. If no instructions are displayed, follow these steps:
1. Open Windows Explorer by selecting Start > Computer.
2. Double-click your hard drive designation. The hard drive designation is typically Local Disk (C:).
3. Using the hard drive path you recorded earlier, open the folder on your hard drive that contains theupdate.
4. Double-click the file that has an .exe extension (for example, filename.exe).
The BIOS installation begins.
Updating the BIOS 137

NOTE: Windows includes the User Account Control feature to improve the security of yourcomputer. You may be prompted for your permission or password for tasks such as installingsoftware, running utilities, or changing Windows settings. Refer to Windows Help and Support formore information.
5. Complete the installation by following the on-screen instructions.
NOTE: After a message on the screen reports a successful installation, you may delete thedownloaded file from your hard drive.
138 Chapter 11 Software updates

Updating programs and drivers1. Open your Internet browser, go to http://www.hp.com/support, and then select your country or
region.
2. Click the option for software and driver downloads, type your computer model number in the productbox, and then press enter.
– or –
If you want a specific SoftPaq, type the SoftPaq number in the Search box, at the top-right cornerof the screen. Then press enter, and follow the instructions provided. Proceed to step 6.
3. Click your specific product from the models listed.
4. Click your operating system.
5. When the list of updates is displayed, click an update to open a window containing additionalinformation.
6. Click Download.
7. Click Run to install the updated software without downloading the file.
– or –
Click Save to save the file to your computer. When prompted, select a storage location on yourhard drive.
After the file is downloaded, navigate to the folder where the file was stored, and then double-clickthe file to install the update.
8. If prompted to do so, restart your computer after the installation is complete.
Updating programs and drivers 139

Using SoftPaq Download ManagerHP SoftPaq Download Manager (SDM) is a tool that provides quick access to SoftPaq information forHP business computers without requiring the SoftPaq number. Using this tool, you can easily searchfor SoftPaqs and then download and unpack them.
SoftPaq Download Manager works by reading and downloading, from the HP FTP site, a publisheddatabase file containing computer model and SoftPaq information. SoftPaq Download Manager allowsyou to specify one or more computer models to determine which SoftPaqs are available for download.
SoftPaq Download Manager checks the HP FTP site for updates to the database and software. Ifupdates are found, they are downloaded and applied automatically.
SoftPaq Download Manager is available on the HP Web site. To use SoftPaq Download Manager todownload SoftPaqs, you must first download and install the program. Go to the HP Web site athttp://www.hp.com/go/sdm, and follow the instructions to download and install SoftPaq DownloadManager.
To download SoftPaqs:
1. Select Start > All Programs > HP Software Setup > HP SoftPaq Download Manager.
2. When the SoftPaq Download Manager opens for the first time, a window is displayed asking if youwant to show only software for the computer you are using or to show the software for all supportedmodels. Select Show software for all supported models. If you have used HP SoftPaq DownloadManager previously, go to Step 3.
a. Select your operating system and language filters in the Configuration Options window. Thefilters limit the number of options that are listed in the Product Catalog pane. For example, ifonly Windows 7 Professional is selected in the operating system filter, the only operatingsystem that is displayed in the Product Catalog is Windows 7 Professional.
b. To add other operating systems, change the filter settings in the Configuration Optionswindow. Refer to the HP SoftPaq Download Manager software Help for more information.
3. In the left pane, click the plus sign (+) to expand the model list, and then select the model or modelsof the products you want to update.
4. Click Find Available SoftPaqs to download a list of available SoftPaqs for the selected computer.
5. Select from the list of available SoftPaqs, and then click Download Only if you have many SoftPaqsto download, because the SoftPaq selection and Internet connection speed determine how longthe download process will take.
If you want to download only one or two SoftPaqs and have a high-speed Internet connection, clickDownload & Unpack.
6. Right-click Install SoftPaq in the SoftPaq Download Manager software to install the selectedSoftPaqs on the computer.
140 Chapter 11 Software updates

12 Backup and recovery
To protect your information, use Windows Backup and Restore to back up individual files and folders,back up your entire hard drive (select models only), create system repair discs (select models only), orcreate system restore points. In case of system failure, you can use the backup files to restore thecontents of your computer.
Windows Backup and Restore provides the following options:
● Creating a system repair disc (select models only)
● Backing up individual files and folders
● Creating a system image (select models only)
● Scheduling automatic backups (select models only)
● Creating system restore points
● Recovering individual files
● Restoring the computer to a previous state
● Recovering information using recovery tools
NOTE: For detailed instructions, perform a search for these topics in Help and Support.
NOTE: In case of system instability, HP recommends that you print the recovery procedures and savethem for later use.
141

Backing up your informationRecovery after a system failure is as complete as your most current backup. You should create systemrepair discs (select models only) and your initial backup immediately after software setup. As you addnew software and data files, you should continue to back up your system on a regular basis to maintaina reasonably current backup. The system repair discs (select models only) are used to start up (boot)the computer and repair the operating system in case of system instability or failure. Your initial andsubsequent backups allow you to restore your data and settings if a failure occurs.
You can back up your information to an optional external hard drive, a network drive, or discs.
Note the following when backing up:
● Store personal files in the Documents library, and back it up regularly.
● Back up templates that are stored in their associated programs.
● Save customized settings that appear in a window, toolbar, or menu bar by taking a screen shotof your settings. The screen shot can be a time-saver if you have to reset your preferences.
To create a screen shot:
1. Display the screen you want to save.
2. Copy the screen image:
To copy only the active window, press alt+fn+prt sc.
To copy the entire screen, press fn+prt sc.
3. Open a word-processing document, and then select Edit > Paste.
The screen image is added to the document.
4. Save the document.
● When backing up to discs, use any of the following types of discs (purchased separately): CD-R,CD-RW, DVD+R, DVD+R DL, DVD-R, DVD-R DL, or DVD±RW. The discs you use will depend onthe type of optical drive installed in your computer.
NOTE: DVDs and DVDs with double-layer (DL) support store more information than CDs, sousing them for backup reduces the number of recovery discs required.
● When backing up to discs, number each disc before inserting it into the optical drive of the computer.
To create a backup using Backup and Restore, follow these steps:
NOTE: Be sure that the computer is connected to AC power before you start the backup process.
NOTE: The backup process may take over an hour, depending on file size and the speed of thecomputer.
1. Select Start > All Programs > Maintenance > Backup and Restore.
2. Follow the on-screen instructions to set up your backup, create a system image (select modelsonly), or create a system repair disc (select models only).
142 Chapter 12 Backup and recovery

NOTE: Windows includes the User Account Control feature to improve the security of yourcomputer. You may be prompted for your permission or password for tasks such as installingsoftware, running utilities, or changing Windows settings. Refer to Windows Help and Support formore information.
Backing up your information 143

Performing a recoveryIn case of system failure or instability, the computer provides the following tools to recover your files:
● Windows recovery tools: You can use Windows Backup and Restore to recover information youhave previously backed up. You can also use Windows Startup Repair to fix problems that mightprevent Windows from starting correctly.
● f11 recovery tools: You can use the f11 recovery tools to recover your original hard drive image.The image includes the Windows operating system and software programs installed at the factory.
NOTE: If you are unable to boot (start up) your computer and you cannot use the system repair discsyou previously created (select models only), you must purchase a Windows 7 operating system DVDto reboot the computer and repair the operating system. For additional information, refer to the “Usinga Windows 7 operating system DVD (purchased separately)” section in this guide.
Using the Windows recovery toolsTo recover information you previously backed up, follow these steps:
1. Select Start > All Programs > Maintenance > Backup and Restore.
2. Follow the on-screen instructions to recover your system settings, your computer (select modelsonly), or your files.
NOTE: Windows includes the User Account Control feature to improve the security of your computer.You may be prompted for your permission or password for tasks such as installing software, runningutilities, or changing Windows settings. Refer to Windows Help and Support for more information.
To recover your information using Startup Repair, follow these steps:
CAUTION: Using Startup Repair completely erases hard drive contents and reformats the hard drive.All files you have created and any software installed on the computer are permanently removed. Whenreformatting is complete, the recovery process restores the operating system, as well as the drivers,software, and utilities from the backup used for recovery.
1. If possible, back up all personal files.
2. If possible, check for the presence of the Windows partition and the HP Recovery partition.
To check for the Windows partition, select Start > Computer.
To check for the HP Recovery partition, select Start, right-click Computer, click Manage, and thenclick Disk Management.
NOTE: If the Windows partition and the HP Recovery partition are not listed, you must recoveryour operating system and programs using the Windows 7 operating system DVD and the DriverRecovery disc (both purchased separately). For additional information, refer to the “Using aWindows 7 operating system DVD (purchased separately)” section in this guide.
3. If the Windows partition and the HP Recovery partition are listed, restart the computer, and thenpress f8 before the Windows operating system loads.
4. Select Startup Repair.
5. Follow the on-screen instructions.
144 Chapter 12 Backup and recovery

NOTE: For additional information on recovering information using the Windows tools, perform a searchfor these topics in Help and Support.
Using f11CAUTION: Using f11 completely erases hard drive contents and reformats the hard drive. All files youhave created and any software installed on the computer are permanently removed. The f11 recoverytool reinstalls the operating system and HP programs and drivers that were installed at the factory.Software not installed at the factory must be reinstalled.
To recover the original hard drive image using f11, follow these steps:
1. If possible, back up all personal files.
2. If possible, check for the presence of the HP Recovery partition: select Start, right-clickComputer, click Manage, and then click Disk Management.
NOTE: If the HP Recovery partition is not listed, you must recover your operating system andprograms using the Windows 7 operating system DVD and the Driver Recovery disc (bothpurchased separately). For additional information, refer to the “Using a Windows 7 operatingsystem DVD (purchased separately)” section in this guide.
3. If the HP Recovery partition is listed, restart the computer, and then press esc while the “Press theESC key for Startup Menu” message is displayed at the bottom of the screen.
4. Press f11 while the “Press <F11> for recovery” message is displayed on the screen.
5. Follow the on-screen instructions.
Using a Windows 7 operating system DVD (purchased separately)If you are unable to boot (start up) your computer and you cannot use the system repair discs youpreviously created (select models only), you must purchase a Windows 7 operating system DVD toreboot the computer and repair the operating system. Make sure that your most recent backup (storedon discs or on an external drive) is easily accessible. To order a Windows 7 operating system DVD, goto http://www.hp.com/support, select your country or region, and then follow the on-screen instructions.You can also order the DVD by calling technical support. For contact information, refer to the WorldwideTelephone Numbers booklet included with the computer.
CAUTION: Using a Windows 7 operating system DVD completely erases hard drive contents andreformats the hard drive. All files you have created and any software installed on the computer arepermanently removed. When reformatting is complete, the recovery process helps you restore theoperating system, as well as drivers, software, and utilities.
To initiate recovery using a Windows 7 operating system DVD, follow these steps:
NOTE: This process takes several minutes.
1. If possible, back up all personal files.
2. Restart the computer, and then insert the Windows 7 operating system DVD into the optical drivebefore the Windows operating system loads.
3. When prompted, press any keyboard key.
4. Follow the on-screen instructions.
5. Click Next.
Performing a recovery 145

6. Select Repair your computer.
7. Follow the on-screen instructions.
146 Chapter 12 Backup and recovery

13 Computer Setup
Starting Computer SetupComputer Setup is a preinstalled, ROM-based utility that can be used even when the operating systemis not working or will not load.
NOTE: Some of the Computer Setup menu items listed in this guide may not be supported by yourcomputer.
NOTE: An external keyboard or mouse connected to a USB port can be used with Computer Setuponly if USB legacy support is enabled.
To start Computer Setup, follow these steps:
1. Turn on or restart the computer, and then press esc while the “Press the ESC key for Startup Menu”message is displayed at the bottom of the screen.
2. Press f10 to enter BIOS Setup.
Using Computer SetupNavigating and selecting in Computer Setup
The information and settings in Computer Setup are accessed from the File, Security, Diagnostics, andSystem Configuration menus.
To navigate and select in Computer Setup, follow these steps:
1. Turn on or restart the computer, and then press esc while the “Press the ESC key for Startup Menu”message is displayed at the bottom of the screen.
● To select a menu or a menu item, use the tab key and the keyboard arrow keys, and thenpress enter, or use a pointing device to click the item.
● To scroll up and down, click the up arrow or the down arrow in the upper-right corner of thescreen, or use the up arrow key or the down arrow key.
● To close open dialog boxes and return to the main Computer Setup screen, press esc, andthen follow the on-screen instructions.
NOTE: You can use either a pointing device (TouchPad, pointing stick, or USB mouse) or thekeyboard to navigate and make selections in Computer Setup.
2. Press f10 to enter BIOS Setup.
3. Select the File, Security, Diagnostics, or System Configuration menu.
Starting Computer Setup 147

To exit Computer Setup menus, choose one of the following methods:
● To exit Computer Setup menus without saving your changes, click the Exit icon in the lower-leftcorner of the screen, and then follow the on-screen instructions.
– or –
Use the tab key and the arrow keys to select File > Ignore changes and exit, and then pressenter.
– or –
● To save your changes and exit Computer Setup menus, click the Save icon in the lower-left cornerof the screen, and then follow the on-screen instructions.
– or –
Use the tab key and the arrow keys to select File > Save changes and exit, and then pressenter.
Your changes go into effect when the computer restarts.
Restoring factory settings in Computer SetupNOTE: Restoring defaults will not change the hard drive mode.
To return all settings in Computer Setup to the values that were set at the factory, follow these steps:
1. Turn on or restart the computer, and then press esc while the “Press the ESC key for Startup Menu”message is displayed at the bottom of the screen.
2. Press f10 to enter BIOS Setup.
3. Use a pointing device or the arrow keys to select File > Restore defaults.
4. Follow the on-screen instructions.
5. To save your changes and exit, click the Save icon in the lower-left corner of the screen, and thenfollow the on-screen instructions.
– or –
Use the arrow keys to select File > Save changes and exit, and then press enter.
Your changes go into effect when the computer restarts.
NOTE: Your password settings and security settings are not changed when you restore the factorysettings.
Computer Setup menusThe menu tables in this section provide an overview of Computer Setup options.
NOTE: Some of the Computer Setup menu items listed in this chapter may not be supported by yourcomputer.
148 Chapter 13 Computer Setup

File menu
Select To do this
System Information ● View identification information for the computer and thebatteries in the system.
● View specification information for the processor, cacheand memory size, system ROM, video revision, andkeyboard controller version.
Set System Date and Time Set or change the date and time on the computer.
System Diagnostics Displays the following information:
● System Information
◦ Identification information for the computer and thebatteries in the system.
◦ Specification information for the processor, cacheand memory size, system ROM, video revision, andkeyboard controller version.
● Start-up Test—Verifies the system components neededfor starting the computer.
● Run-In Test—Runs a comprehensive check on systemmemory.
● Hard Disk Test—Runs a comprehensive self-test on anyhard drive in the system.
● Memory Test—Runs a comprehensive test on anymemory installed in the computer.
● Battery Test—Runs a comprehensive test on anybatteries installed in the computer.
● Error Log—Displays a log file if any errors have occurred.
Restore defaults Replace the configuration settings in Computer Setup with theoriginal factory settings. (Hard drive mode, password settings,and security settings are not changed when you restore thefactory settings.)
Reset BIOS security to factory default Restore the BIOS security settings to the factory default.
Ignore changes and exit Cancel any changes entered during the current session. Thenexit and restart the computer.
Save changes and exit Save any changes entered during the current session. Thenexit and restart the computer. Your changes go into effectwhen the computer restarts.
Security menuNOTE: Some of the menu items listed in this section may not be supported by your computer.
Select To do this
Administrator Tools
Computer Setup menus 149

Select To do this
Setup BIOS Administrator Password Set up a BIOS administrator password.
User Management (requires a BIOS administrator password)
Create New BIOS User Account ● Select from a list of BIOS users.
● Select from a list of ProtectTools users.
Password Policy (requires a BIOS administrator password) Revise password policy criteria.
HP SpareKey Enable/disable HP SpareKey (enabled by default).
Always Prompt for HP SpareKey Enrollment Enable/disable HP SpareKey enrollment (enabled by default).
Fingerprint Reset on Reboot (if present) Reset/clear the fingerprint reader ownership (select modelsonly; disabled by default).
User Tools
Change Password Enter, change, or delete a BIOS administrator password.
HP SpareKey Enrollment Enroll or reset HP SpareKey, which is a set of securityquestions and answers used if you forget your password.
Anti Theft
AT-p Enable/disable Anti-Theft Protection.
DriveLock Passwords ● Enable/disable DriveLock on any computer hard drive(enabled by default).
● Change a DriveLock user password or master password.
NOTE: DriveLock settings are accessible only when youenter Computer Setup by turning on (not restarting) thecomputer.
Automatic DriveLock Enable/disable Automatic DriveLock support.
TPM Embedded Security Enable/disable support for Trusted Platform Module (TPM)Embedded Security, which protects the computer fromunauthorized access to owner functions available inEmbedded Security for ProtectTools. For more information,refer to the ProtectTools software Help.
NOTE: You must have a setup password to change thissetting.
Disk Sanitizer Run Disk Sanitizer to destroy all existing data on the primaryhard drive or the drive in the upgrade bay.
CAUTION: If you run Disk Sanitizer, the data on the selecteddrive is destroyed permanently.
System IDs Enter a user-defined computer asset tracking number andownership tag.
System Configuration menuNOTE: Some of the listed System Configuration options may not be supported by your computer.
150 Chapter 13 Computer Setup
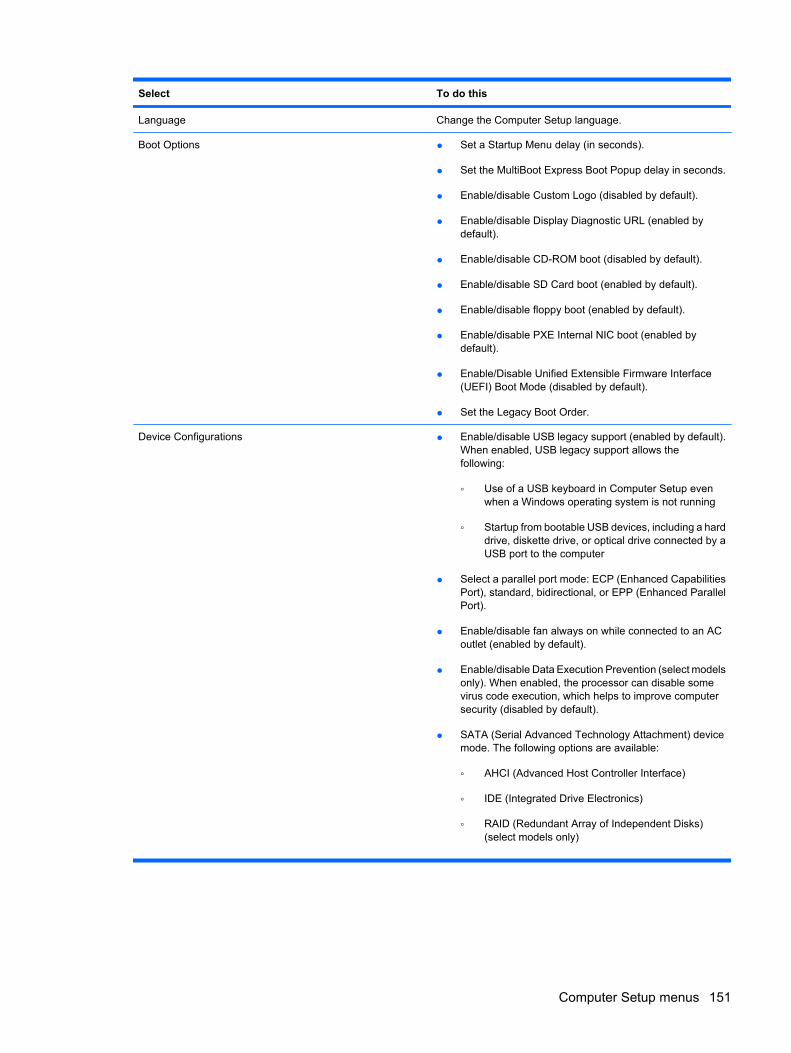
Select To do this
Language Change the Computer Setup language.
Boot Options ● Set a Startup Menu delay (in seconds).
● Set the MultiBoot Express Boot Popup delay in seconds.
● Enable/disable Custom Logo (disabled by default).
● Enable/disable Display Diagnostic URL (enabled bydefault).
● Enable/disable CD-ROM boot (disabled by default).
● Enable/disable SD Card boot (enabled by default).
● Enable/disable floppy boot (enabled by default).
● Enable/disable PXE Internal NIC boot (enabled bydefault).
● Enable/Disable Unified Extensible Firmware Interface(UEFI) Boot Mode (disabled by default).
● Set the Legacy Boot Order.
Device Configurations ● Enable/disable USB legacy support (enabled by default).When enabled, USB legacy support allows thefollowing:
◦ Use of a USB keyboard in Computer Setup evenwhen a Windows operating system is not running
◦ Startup from bootable USB devices, including a harddrive, diskette drive, or optical drive connected by aUSB port to the computer
● Select a parallel port mode: ECP (Enhanced CapabilitiesPort), standard, bidirectional, or EPP (Enhanced ParallelPort).
● Enable/disable fan always on while connected to an ACoutlet (enabled by default).
● Enable/disable Data Execution Prevention (select modelsonly). When enabled, the processor can disable somevirus code execution, which helps to improve computersecurity (disabled by default).
● SATA (Serial Advanced Technology Attachment) devicemode. The following options are available:
◦ AHCI (Advanced Host Controller Interface)
◦ IDE (Integrated Drive Electronics)
◦ RAID (Redundant Array of Independent Disks)(select models only)
Computer Setup menus 151

Select To do this
NOTE: Availability of these options varies by computermodel.
● Enable/disable secondary battery fast charge (enabled bydefault).
● Enable/disable HP QuickLook (enabled by default).
● Enable/disable Preboot Authentication on HP QuickLookBoot (enabled by default).
● Enable/disable HP QuickWeb (enabled by default).
● Enable/disable HP QuickWeb Write Protect (disabled bydefault).
● Enable/disable Virtualization Technology (select modelsonly; disabled by default).
● Enable/disable TXT (Intel Trusted Execution Technology)(select models only; disabled by default).
● Multi Core CPU (enabled by default).
● Intel HT Technology (enabled by default).
● Enable/disable Wake on USB (enabled by default).
● Enable/disable Num lock state at boot (disabled bydefault).
152 Chapter 13 Computer Setup

Select To do this
Built-In Device Options ● Enable/disable the wireless button state (enabled bydefault).
● Enable/disable embedded WLAN device radio (selectmodels only; enabled by default).
● Enable/disable the embedded Bluetooth device radio(enabled by default).
● Enable/disable the Network Interface Controller (LAN)(enabled by default).
● Enable/disable LAN/WLAN switching (disabled bydefault).
● Set the wake on LAN state. Options include thefollowing:
◦ Disabled
◦ Boot to Network
◦ Follow Boot Order
● Enable/disable the Ambient Light Sensor.
● Enable/disable the Notebook Upgrade Bay device(enabled by default).
● Enable/disable the fingerprint device (enabled bydefault).
● Enable/disable the integrated camera (enabled bydefault).
● Enable/disable the Power Monitor Circuit (enabled bydefault).
● Enable/disable the audio device (enabled by default).
● Enable/disable a modem device (enabled by default).
● Enable/disable the microphone (enabled by default).
● Enable/disable the internal speakers (enabled bydefault).
Computer Setup menus 153

Select To do this
Port Options NOTE: All port options are enabled by default.
● Enable/disable the serial port.
● Enable/disable the parallel port.
● Enable/disable the flash media reader.
● Enable/disable the USB port.
CAUTION: Disabling the USB port also disablesMultiBay devices and ExpressCard devices on theadvanced port replicator.
● Enable/disable the 1394 port.
● Enable/disable the ExpressCard slot.
● Enable/disable the Smart Card slot.
● Enable/disable the eSATA port
AMT Options ● Enable/disable Firmware Verbosity.
● Enable/disable AMT Setup Prompt (Ctrl-P).
● Enable/disable USB Key Provisioning Support.
● Enable/disable Unconfigure AMT on next boot.
● Select Terminal Emulation Mode.
◦ ANSI
◦ VT100
● Enable/disable Firmware Progress Event Support.
● Enable/disable Initiate Intel CIRA.
Set Security Level Change, view, or hide security levels for all BIOS menu items.
Restore Security Defaults Restore the default security settings.
154 Chapter 13 Computer Setup

14 MultiBoot
About the boot device orderAs the computer starts, the system attempts to boot from enabled boot devices. The MultiBoot utility,which is enabled at the factory, controls the order in which the system selects a boot device. Boot devicescan include optical drives, diskette drives, a network interface card (NIC), hard drives, and USB devices.Boot devices contain bootable media or files that the computer needs to start and operate properly.
NOTE: Some boot devices must be enabled in Computer Setup before they can be included in theboot order.
The factory setting is for the computer to select the boot device by searching enabled boot devices anddrive bay locations in the following order:
NOTE: Some of the boot devices and drive bay locations listed may not be supported on yourcomputer.
● Notebook MultiBay
● Internal hard drive
● USB diskette drive
● USB CD-ROM
● USB hard drive
● Notebook Ethernet
● Secure Digital (SD) Memory Card
● Docking station MultiBay
● External SATA drive
You can change the order in which the computer searches for a boot device by changing the boot orderin Computer Setup. You can also press esc while the “Press the ESC key for Startup Menu” messageis displayed at the bottom of the screen, and then press f9. Pressing f9 displays a menu that shows thecurrent boot devices and allows you to select a boot device. Or, you can use MultiBoot Express to setthe computer to prompt you for a boot location each time the computer turns on or restarts.
If MultiBoot is disabled, the computer uses a fixed boot order that consists of first searching for a driveA boot device. If none is found, the computer looks for a drive C boot device. Drive A boot devicesinclude optical drives and diskette drives. Drive C boot devices include optical drives and hard drives.
The NIC does not have an assigned drive letter.
About the boot device order 155

NOTE: An optical drive (such as a CD-ROM drive) can boot either as drive A or drive C, dependingon the format of the boot CD.
The following list describes the factory setting for boot order in which drive letters A and C are assignedwhen MultiBoot is disabled. (The actual order varies by configuration.)
● Boot order for drive A boot devices:
1. Optical drive in an optional docking device or in an optional external MultiBay that contains adisc formatted as drive A
2. Optical drive in the internal MultiBay (select models only) that contains a disc formatted asdrive A
3. Diskette drive in an optional docking device or in an optional external MultiBay
● Boot order for drive C boot devices:
1. Optical drive in an optional docking device or in an optional external MultiBay that contains adisc formatted as drive C
2. Optical drive in the internal MultiBay (select models only) that contains a disc formatted asdrive C
3. Hard drive in the computer hard drive bay
4. Hard drive in an optional docking device or in an optional external MultiBay
NOTE: Because no drive letter is associated with the NIC, changing the boot order of a NIC does notaffect the drive letters of the other devices.
156 Chapter 14 MultiBoot

Enabling boot devices in Computer SetupThe computer will boot to a USB device or a NIC device only if the device has first been enabled inComputer Setup.
To start Computer Setup and enable a USB device or a NIC device as a boot device, follow these steps:
1. Turn on or restart the computer, and then press esc while the “Press the ESC key for Startup Menu”message is displayed at the bottom of the screen.
2. Press f10 to enter BIOS Setup.
3. To enable bootable media in USB drives or in drives inserted into an optional docking device (selectmodels only), use a pointing device or the arrow keys to select System Configuration > DeviceConfigurations. Confirm that Enabled is selected next to USB legacy support.
NOTE: The USB Port option must be enabled in order to use USB legacy support. It is enabledat the factory. If the port becomes disabled, reenable it by selecting System Configuration > PortOptions, and then clicking Enabled next to USB Port.
– or –
To enable a NIC device, select System Configuration > Boot Options, and then click Enablednext to PXE Internal NIC boot.
4. To save your changes and exit Computer Setup, click Save in the lower-left corner of the screen,and then follow the on-screen instructions.
– or –
Use the arrow keys to select File > Save changes and exit, and then press enter.
Your changes go into effect when the computer restarts.
NOTE: To connect a NIC to a Preboot eXecution Environment (PXE) or Remote Program Load (RPL)server without using MultiBoot, press esc while the “Press the ESC key for Startup Menu” message isdisplayed at the bottom of the screen, and then quickly press f12.
Enabling boot devices in Computer Setup 157

Considering boot order changesBefore changing the boot order, note the following considerations:
● When the computer restarts after the boot order has been changed, the computer attempts to startusing the new boot order.
● If there is more than one type of boot device, the computer attempts to boot using the first of eachtype of boot device (except for optical devices). For example, if the computer is connected to anoptional docking device (select models only) that contains a hard drive, this hard drive will be shownin the boot order as a USB hard drive. If the system attempts to boot from this USB hard drive andfails, it will not attempt to boot to the hard drive in the hard drive bay. Instead, it will try to boot tothe next type of device in the boot order. However, if there are two optical devices, and the firstoptical device does not boot (either because it does not contain media or the media is not a bootdisc), the system will try to boot to the second optical device.
● Changing the boot order also changes the logical drive designations. For example, if you start upfrom a CD-ROM drive with a disc formatted as drive C, that CD-ROM drive becomes drive C andthe hard drive in the hard drive bay becomes drive D.
● The computer will boot from a NIC device only if the device has been enabled in the Built-In DeviceOptions menu of Computer Setup and if booting from the device has been enabled in the BootOptions menu of Computer Setup. Booting from a NIC does not affect logical drive designationsbecause no drive letter is associated with the NIC.
● Drives in an optional docking device (select models only) are treated like external USB devices inthe boot order.
158 Chapter 14 MultiBoot

Choosing MultiBoot preferencesYou can use MultiBoot in the following ways:
● To set a new boot order that the computer uses each time it is turned on, by changing the bootorder in Computer Setup.
● To dynamically choose the boot device, by pressing esc while the “Press the ESC key for StartupMenu” message is displayed at the bottom of the screen, and then pressing f9 to enter the BootDevice Options menu.
● To use MultiBoot Express to set variable boot orders. This feature prompts you for a boot deviceeach time the computer is turned on or restarted.
Setting a new boot order in Computer SetupTo start Computer Setup and set a boot device order that the computer uses each time it is turned onor restarted, follow these steps:
1. Turn on or restart the computer, and then press esc while the “Press the ESC key for Startup Menu”message is displayed at the bottom of the screen.
2. Press f10 to enter BIOS Setup.
3. Use a pointing device or the arrow keys to select System Configuration > Boot Options > BootOrder. Confirm that Enabled is selected next to MultiBoot.
NOTE: MultiBoot is not enabled at the factory.
4. Use a pointing device or the arrow keys to select a device in the list.
5. To move the device up in the boot order, use a pointing device to click the plus sign (+) or pressthe + key.
– or –
To move the device down in the boot order, click the minus sign (-) or press the - key.
6. To save your changes and exit Computer Setup, click Save in the lower-left corner of the screen,and then follow the on-screen instructions.
– or –
Use the arrow keys to select File > Save changes and exit, and then press enter.
Your changes go into effect when the computer restarts.
Dynamically choosing a boot device using the F9 promptTo dynamically choose a boot device for the current startup sequence, follow these steps:
1. Open the Select Boot Device menu by turning on or restarting the computer, and then pressingesc while the “Press the ESC key for Startup Menu” message is displayed at the bottom of thescreen.
2. Press f9.
3. Use a pointing device or the arrow keys to select a boot device, and then press enter.
Choosing MultiBoot preferences 159
Your changes go into effect immediately.
Setting a MultiBoot Express promptTo start Computer Setup and set the computer to display the MultiBoot startup location menu each timethe computer is started or restarted, follow these steps:
1. Turn on or restart the computer, and then press esc while the “Press the ESC key for Startup Menu”message is displayed at the bottom of the screen.
2. Press f10 to enter BIOS Setup.
3. Use a pointing device or the arrow keys to select System Configuration > Boot Options, andthen press enter.
4. In the Express Boot Popup Delay (Sec) field, enter the length of time in seconds that you wantthe computer to display the startup location menu before it defaults to the current MultiBoot setting.(When 0 is selected, the Express Boot startup location menu is not displayed).
5. To save your changes and exit Computer Setup, click Save in the lower-left corner of the screen,and then follow the on-screen instructions.
– or –
Use the arrow keys to select File > Save changes and exit, and then press enter.
Your changes go into effect when the computer restarts.
Entering MultiBoot Express preferencesWhen the Express Boot menu displays during startup, you have the following choices:
● To specify a boot device from the Express Boot menu, select your preference within the allottedtime, and then press enter.
● To prevent the computer from defaulting to the current MultiBoot setting, press any key before theallotted time expires. The computer will not start until you select a boot device and press enter.
● To allow the computer to start according to the current MultiBoot settings, wait for the allotted timeto expire.
160 Chapter 14 MultiBoot

15 Management and printing
Using Client Management SolutionsClient Management Solutions software provides standards-based solutions for managing client (user)desktop, workstation, notebook, and tablet computers in a networked environment.
Client management includes the following key capabilities and features:
● Initial software image deployment
● Remote system software installation
● Software management and updates
● ROM updates
● Tracking and security of computer assets (the hardware and software installed on the computer)
● Fault notification and recovery of certain system software and hardware components
NOTE: Support for specific features described in this section may vary, depending on computer modeland/or version of management software installed on the computer.
Configuring and deploying a software imageThe computer is shipped with a preinstalled system software image. The initial software image isconfigured during the first-time setup of the computer. After a brief software "unbundling" occurs, thecomputer is ready to be used.
A customized software image can be deployed (distributed) in one of the following ways:
● Installing additional software applications after unbundling the preinstalled software image
● Using software deployment tools, such as Altiris Deployment Solutions, to replace the preinstalledsoftware with a customized software image
● Using a disk-cloning process to copy the contents from one hard drive to another
The deployment method you use depends on your organization's technology environment andprocesses.
NOTE: The Computer Setup utility and other system features provide further assistance withconfiguration management and troubleshooting, power management, and the recovery of systemsoftware.
Using Client Management Solutions 161
Managing and updating softwareHP provides several tools for managing and updating software on client computers:
● HP Client Manager for Altiris (select models only)
NOTE: To download HP Client Manager for Altiris or to obtain more information about HP ClientManager for Altiris, see the HP Web site at http://www.hp.com.
● HP CCM (Client Configuration Manager) (select models only)
● HP SSM (System Software Manager)
HP Client Manager for Altiris (select models only)HP Client Manager for Altiris integrates Intelligent Manageability technology into Altiris software. HPClient Manager for Altiris provides superior hardware management capabilities for HP devices:
● Detailed views of hardware inventory for asset management
● System Checkup monitoring and diagnostics
● Web-accessible reporting of business-critical details such as thermal warnings and memory alerts
● Remote updating of system software such as device drivers and the system BIOS
NOTE: Additional functionality can be added when HP Client Manager for Altiris is used with optionalAltiris Solutions software (purchased separately).
When HP Client Manager for Altiris (installed on a client computer) is used with Altiris Solutions software(installed on an administrator computer), HP Client Manager for Altiris provides increased managementfunctionality and centralized hardware management of client devices for the following IT life-cycle areas:
● Inventory and asset management
◦ Software license compliance
◦ Computer tracking and reporting
◦ Computer lease contract information and fixed asset tracking
● System software deployment and migration
◦ Windows migration
◦ System deployment
◦ Personality (personal user settings) migration
162 Chapter 15 Management and printing

● Help desk and problem resolution
◦ Management of help desk tickets
◦ Remote troubleshooting
◦ Remote problem resolution
◦ Client disaster recovery
● Software and operations management
◦ Ongoing client management
◦ HP system software deployment
◦ Application self-healing (the ability to identify and repair certain application problems)
Altiris Solutions software provides easy-to-use software distribution capabilities. HP Client Manager forAltiris enables communication with the Altiris Solutions software, which can be used to complete newhardware deployment or personality migration to a new operating system using easy-to-follow wizards.HP Client Manager for Altiris is available for download from the HP Web site.
When Altiris Solutions software is used in conjunction with HP System Software Manager or HP ClientManager for Altiris, administrators can also update the system BIOS and device driver software from acentral console.
Using Client Management Solutions 163

HP CCM (Client Configuration Manager) (select models only)HP CCM (Client Configuration Manager) automates the management of software such as operatingsystems, programs, software updates, and content and configuration settings to ensure that eachcomputer is maintained in the correct configuration. With these automated management solutions, youcan manage software throughout the life cycle of the computer.
CCM enables you to perform the following tasks:
● Collect hardware and software inventory across multiple platforms
● Prepare a software package and conduct impact analysis prior to distribution
● Target individual computers, workgroups, or entire populations of computers for deployment andmaintenance of software and content according to policies
● Provision and manage operating systems, applications, and content on distributed computers fromany location
● Integrate CCM with help desks and other system management tools for seamless operations
● Leverage a common infrastructure for management of software and content on standard computingdevices across any network for all enterprise users
● Scale to meet enterprise needs
164 Chapter 15 Management and printing

HP SSM (System Software Manager)HP SSM (System Software Manager) lets you remotely update system-level software on multiplesystems simultaneously. When executed on a client computer, SSM detects versions of both hardwareand software, and then updates designated software from a central repository, known as a file store.Driver versions that are supported by SSM are denoted with a special icon on the HP driver downloadWeb site and on the Support Software CD. To download the SSM utility or to obtain more informationon SSM, see the HP Web site at http://www.hp.com/go/ssm (English only).
Using Client Management Solutions 165

Using Intel Active Management Technology (select modelsonly)
Intel® Active Management Technology (iAMT) allows discovery, repair, and protection of networkedcomputing assets. With iAMT, computers can be managed whether they are on or off. The iAMT solutionis available on computers with Intel Centrino® with vPro mobile technology.
Features of iAMT include:
● Hardware inventory information
● Event notification
● Power management
● Remote diagnosis and repair
● Hardware-based isolation and recovery—limit or cut off computer network access if virus-likeactivity is detected
Enabling the iAMT solutionTo configure iAMT settings:
NOTE: The ctrl+p prompt is visible only if the AMT Setup Prompt option is enabled in Computer Setup.
1. Turn on or restart the computer.
2. Before Windows starts up, press ctrl+p.
NOTE: If you do not press ctrl+p at the appropriate time, you must repeat steps 1 and 2 to accessthe MEBx setup utility.
3. Enter the ME password. The factory setting for the password is admin.
The MEBx setup utility opens. Use the arrow keys to navigate.
4. Choose to configure Intel ME, configure iAMT, or change the Intel ME password.
5. When you have made your selections, select Exit to close the MEBx setup utility.
Using the MEBx setup utility menusNOTE: For more information on iAMT, go to the Intel Web site at http://www.intel.com, and then searchfor iAMT.
Intel ME Configuration
Select To do this
Intel ME State Control Disable/enable the management engine.
Intel ME Firmware Local Update Disable/enable local management of firmware updates.
LAN Controller Disable/enable the integrated network controller.
Intel ME Features Control Enable AMT or none.
Intel ME Power Control Configure the management engine power policies.
166 Chapter 15 Management and printing

iAMT Configuration
Select To do this
Host Name Assign a host name to the computer.
TCP/IP Disable/enable network interface or DHCP (assigns an IPaddress if DHCP has been disabled) or change the domainname.
Provision Model Assign Enterprise or Small Business iAMT model.
Setup and Configuration Set options to control remote configuration of AMT.
Un-Provision Reset the AMT configuration to factory defaults.
SOL/IDE-R Enable remote boot control to IDE diskette or CD-ROM andassign a user name and password.
Password Policy Set options to control requirements for the network passwordand the MEBx password.
Secure Firmware Update Enable or disable updating firmware remotely.
Set PRTC Set the real-time clock.
Idle Timeout Set a time-out value.
Change Intel ME Password
Select To do this
Change ME Password Change the password.
NOTE: The default password is admin.
Using Intel Active Management Technology (select models only) 167

Using the HP Universal Print Driver (select models only)The HP Universal Print Driver Series for Windows is a single intelligent driver that replaces individualdrivers for HP networked printers.
NOTE: The HP Universal Print Driver is preinstalled on select computer models only. To downloadthe HP Universal Print Driver or obtain more information about using it, see the HP Web site athttp://www.hp.com/go/universalprintdriver (English only).
To print using the HP Universal Print Driver:
1. Select File > Print from any application.
2. Select HP Universal Printing PS from the list of printers.
3. Click Print.
4. Enter the printer's IP address or network path.
NOTE: If you cannot identify the printer's IP address or network path, contact your ITadministrator for help.
5. Select the Make a permanent instance of this printer in my Printers folder check box.
6. Click Print.
168 Chapter 15 Management and printing

Index
Symbols/Numerics1394 cable, connecting 991394 devices
connecting 99stopping 99
1394 portidentifying 9
AAC adapter
connecting 70identifying 14
Active Management Technology,Intel 166
administrator password 118airport security devices 84Altiris Deployment Solutions 161ambient light sensor
hotkey 40identifying 12
AMT optionsAMT Setup Prompt (Ctrl-
P) 154Firmware Progress Event
Support 154Firmware Verbosity 154Initiate Intel CIRA 154Terminal Emulation Mode 154Unconfigure AMT on next
boot 154USB Key Provisioning
Support 154antennas
WLAN 13WWAN 13
Anti Theft 150applications key, Windows 7audio devices, connecting
external 49audio functions, checking 49
audio-in (microphone) jack,identifying 10
audio-out (headphone) jack,identifying 10
Automatic DriveLock passwordentering 125removing 126
AutoPlay 56
Bbacking up files 142Backup and Restore 141, 142battery
calibrating 76charging 73, 76conserving power 79disposing 80inserting 72low battery levels 74recharging 79removing 72replacing 80storing 80
battery bay 11, 14battery charge information 39battery charge, maximizing 74battery light 8, 73, 74battery power 71battery release latch 11, 72battery temperature 80battery, identifying 14bays
battery 14hard drive 11
BDcopying 57creating 57playing 55removing 58
BIOS administratorpassword 150
BIOS updatedownloading 137installing 137
Blu-ray Disc (BD) 53Blu-ray R/RE DVD+/-RW
SuperMulti DL Drive 53Blu-ray ROM DVD±R SuperMulti
DL Drive 53Bluetooth
device 16label 15
Bluetooth device 26boot devices, enabling 157boot options 151boot order 151built-in device
Ambient Light Sensor 153audio devices 153Bluetooth device radio 153fingerprint reader 153integrated camera 153internal speakers 153LAN/WLAN switching 153microphone 153modem 153Network Interface Controller
(LAN) 153Notebook Upgrade Bay 153Power Monitor Circuit 153Wake on LAN 153wireless button 153WLAN device radio 153
built-in device options 153business card reader software 65business card slot, identifying 8buttons
display release 8
Index 169

keyboard light 12mute 6pointing stick 2power 5Quick Launch 41QuickLook 5, 41QuickWeb 6, 41TouchPad 2, 6volume 6volume mute 46Wireless 6
Ccable
LAN 34modem 30
cables1394 99eSATA 100USB 97
calibrating battery 76caps lock light, identifying 4CD
copying 57creating 57playing 55protecting 48removing 58writing to 48
CD drive 101Certificate of Authenticity label 14changing boot order 159charging batteries 73, 76checking audio functions 49components
additional hardware 13bottom 11display 12front 7left-side 9rear 10right-side 9top 1
composite video 38computer information 136Computer Setup
BIOS administratorpassword 119
device security 127DriveLock password 121
enabling bootabledevices 157
File menu 149navigating and selecting 147restoring factory settings 148Security menu 149setting boot order 159setting MultiBoot Express
prompt 160System Configuration
menu 150Computer Setup utility 161configuring ExpressCards 105connecting to a LAN 34connecting to a WLAN 21Connection Manager icon 17connection, external power 70connector, power 10conservation, power 79copyright warning 56cord, power 14corporate WLAN connection 21country- or region-specific modem
cable adapter, identifying 14country-specific modem cable
adapter 31creating a backup 142critical battery level 75
Ddeployment, software 161device configurations 151device drivers
HP drivers 62Microsoft drivers 62reinstalling 62
device security 127digital card
inserting 103removing 104stopping 104
Disk Cleanup software 85Disk Defragmenter software 85disk sanitizer 150diskette drive 101display
image, switching 38screen brightness hotkeys 40
display release button,identifying 8
DisplayPort, identifying 9docking connector 102drive light 8, 86drive media 67DriveLock password
changing 124description 121entering 123removing 125setting 122
DriveLock, automatic 150drives
Blu-ray R/RE DVD+/-RWSuperMulti DL Drive 53
Blu-ray ROM DVD±RSuperMulti DL Drive 53
caring for 83diskette 101DVD-ROM 53DVD±R SuperMulti DL
LightScribe Drive 53external 101hard 88, 89, 101optical 101See also hard drive; optical drive
drives, boot order 151, 155DVD
changing region setting 56copying 57creating 57playing 55protecting 48removing 58writing to 48
DVD drive 101DVD region settings 56
Eencryption 21eSATA cable, connecting 100eSATA devices
connecting 100description 100removing 100stopping 100
eSata port, identifying 9esc key, identifying 7Execution Disable 151expansion memory module
inserting 111
170 Index

removing 110replacing 110
ExpressCardconfiguring 105inserting 105removing 106removing insert 105stopping 106
ExpressCard slot, identifying 10external audio devices,
connecting 49external drive 101external monitor port 51external monitor port,
identifying 10
Ff11 recovery 145File menu 149fingerprint reader, identifying 6firewall 21fn key
identifying 7function keys
identifying 7
Hhard disk drive
HP 3D DriveGuard 86installing 89replacing 88
hard driveexternal 101HP 3D DriveGuard 86installing 89replacing 88
hard drive bay 11hard drive recovery 145HDMI 38headphone (audio-out) jack 10Hibernation
exiting 68initiated during critical battery
level 75initiating 68
hotkeysambient light sensor 40battery charge information 39decreasing screen
brightness 40
description 35displaying system
information 36increasing screen
brightness 40initiating Sleep 37switching screen image 38using 36
HP 3D DriveGuard 86HP Client Configuration
Manager 162, 164HP Client Manager for
Altiris 162HP Connection Manager
software 18HP Mobile Broadband
Module 23HP QuickLook 152HP SpareKey enrollment 150HP System Software
Manager 162, 165HP Universal Print Driver,
using 168hubs 97
Iicons
Connection Manager 17network 28network status 17wireless 17
IEEE 1394 portidentifying 9
image, computer 161inserting a memory module
expansion 111primary 115
Intel Centrino Protechnology 166
Intel HT Technology 152interference, minimizing 29internal display switch,
identifying 12internal microphone,
identifying 12Internet connection setup 20
Jjacks
audio-in (microphone) 10
audio-out (headphone) 10RJ-11 (modem) 9RJ-45 (network 9
Java Carddefined 107inserting 107removing 107
Kkeyboard hotkeys, identifying 35keyboard light button,
identifying 12keyboard light, identifying 12keyboard screws
removing 113replacing 116
keypad keys, identifying 7keypad, external
num lock 44using 44
keysesc 7fn 7function 7keypad 7Windows applications 7Windows logo 7
Llabels
Bluetooth 15HP Mobile Broadband
Module 15Microsoft Certificate of
Authenticity 14modem approval 14regulatory 14service tag 14SIM 15wireless certification 15WLAN 15
LAN, connecting 34language, changing in Computer
Setup 151latch, battery release 11legacy support, USB 147, 151light, drive 86lights
battery 8caps lock 4
Index 171

drive 8keyboard 12local area network (LAN) 8mute 4num lock 4power 3, 8QuickLook 3QuickWeb 3TouchPad 4volume down 4volume mute 4volume up 4webcam 12wireless 3, 8
local area network (LAN)cable required 34connecting cable 34
logical drive designations 158low battery level 74
Mmaintenance
Disk Cleanup 85Disk Defragmenter 85
McAfee Total Protection 129,130
Media Card Reader, identifying 8memory module compartment
coverremoving 110replacing 112
microphone (audio-in) jack 10Microsoft Certificate of Authenticity
label 14minimizing interference 29modem approval label 14modem cable
connecting 30country-specific cable
adapter 31identifying 14noise suppression circuitry 30
modem cable adapter,identifying 14
modem softwaresetting/adding location 31travel connection problems 33
monitor port, external 10monitor, connecting 51
mouse, externalconnecting 35setting preferences 35
Multi Core CPU 152MultiBoot Express 155, 160multimedia software
accessing 48mute button
identifying 6mute light, identifying 4
Nnetwork cable
connecting 34noise suppression circuitry 34
network icon 28network key 28network security codes
network key 28SSID 28
Network Service Boot 157network status icon 17NIC boot device 155, 157noise suppression circuitry
modem cable 30network cable 34
num lock light, identifying 4num lock, external keypad 44
Ooperating system
Microsoft Certificate ofAuthenticity label 14
Product Key 14optical disc
removing 58using 53writing to 48
optical driveprotecting 48
Pparallel port mode 151passwords
administrator 118BIOS administrator 119DriveLock 121user 118
pointing devicessetting preferences 35using 35
pointing stickidentifying 1using 35
pointing stick buttons,identifying 2
port options1394 port 154eSATA port 154ExpressCard slot 154flash media reader 154parallel port 154serial port 154Smart Card slot 154USB port 154
ports1394 9, 99DisplayPort 9eSATA 9, 100external monitor 10, 51USB 9, 97
powerconnecting 70conserving 79
power button, identifying 5power connector, identifying 10power cord, identifying 14power lights, identifying 3, 8power plans 68primary memory module
inserting 115removing 114replacing 113upgrading 113
Product Key 14product name and number,
computer 14projector, connecting 51public WLAN connection 21PXE server 157
QQuick Launch Buttons
control panel 41QuickLook button
identifying 5QuickLook light, identifying 3QuickWeb button
identifying 6QuickWeb light, identifying 3
172 Index

Rreadable media 67recovery partition 145region codes, DVD 56regulatory information
modem approval label 14regulatory label 14wireless certification labels 15
release latch, battery 11, 72replacing
a primary memorymodule 113
an expansion memorymodule 110
restore security defaults 154restore the factory settings 149restoring
hard drive 145RJ-11 (modem) jack,
identifying 9RJ-45 (network) jack,
identifying 9
SSATA (Serial Advanced
Technology Attachment) devicesAHCI (Advanced Host Controller
Interface) 151IDE (Integrated Drive
Electronics) 151screen brightness hotkeys 40screen image, switching 38scroll zone, TouchPad 2Secondary Battery Fast
Charge 152security cable slot, identifying 9Security menu
always prompt for HP SpareKeyenrollment 150
Automatic DriveLock 150change password 150Disk Sanitizer 150DriveLock 150fingerprint reader reset 150HP Sparekey 150HP Sparekey enrollment 150password policy 150set up BIOS administrator
password 150System IDs 150
security, wireless 20serial number, computer 14service tag 14set security level 154setup of WLAN 20setup utility
File menu 149navigating and selecting 147restoring factory settings 148Security menu 149System Configuration
menu 150setup, computer 1shutting down 81SIM
inserting 23removing 24
Sleepexiting 67initiating 67
Sleep hotkey 37slots
business card 8ExpressCard 10memory 109security cable 9smart card reader 9
smart carddefined 107inserting 107removing 107
smart card reader, identifying 9SoftPaqs, downloading 139, 140software
BIOS update 137business card reader 65deployment 161Disk Cleanup 85Disk Defragmenter 85HP Connection Manager 18recovery 161updates 162updating programs and
drivers 139Wireless Assistant 18
speaker, identifying 8storing battery 80System Configuration menu 150system date and time 149system diagnostics 149
system fan 151system IDs 150system information 149system information hotkey 36
Ttemperature 80tips, webcam 64TouchPad
identifying 2using 35
TouchPad button, identifying 6TouchPad buttons,
identifying 2TouchPad light, identifying 4TouchPad scroll zone,
identifying 2TPM Embedded Security 150traveling with the computer
modem approval label 14troubleshooting
AutoPlay 61device drivers 62disc burning 61disc does not play 60external display 61HP device drivers 62Microsoft device drivers 62modem 33movie play 61optical disc tray 58optical drive detection 59
turning off the computer 81TXT (IntelTrusted Execution
Technology) 152
UUnified Extensible Firmware
Interface (UEFI) mode 151Universal Print Driver, using 168unresponsive system 81updates, software 162upgrade bay
identifying 9replacing a hard drive 91replacing an optical drive 94
USB cable, connecting 97USB devices
connecting 97description 97
Index 173

removing 97stopping 97
USB hubs 97USB legacy support 98, 147,
151USB ports, identifying 9, 97User management 150user password 118using the webcam 64
Vvents, identifying 9, 11video transmission types 38Virtualization Technology 152volume buttons 46volume down button,
identifying 6volume down light, identifying 4volume mute button
identifying 6volume mute light, identifying 4volume up button, identifying 6volume up light, identifying 4volume, adjusting 46
WWeb sites
HP System SoftwareManager 165
HP Universal Print Driver 168Intel Centrino Pro 166Intel Pro technology for
AMT 166webcam
capturing business cards 65identifying 12tips 64using 64
webcam light, identifying 12webcam properties, adjusting 64Windows 7 operating system
DVD 145Windows applications key,
identifying 7Windows logo key, identifying 7wireless antennas 12Wireless Assistant software 17,
18wireless button
identifying 6
wireless certification label 15wireless controls
button 17Connection Manager
software 17operating system 17Wireless Assistant
software 17wireless devices, types 16wireless icon 17wireless light
identifying 3, 8wireless network (WLAN)
connecting 21corporate WLAN
connection 21described 16equipment needed 20functional range 22public WLAN connection 21security 20using 20
wireless wide area network(WWAN) 23
WLAN antennas, identifying 13WLAN device 15, 16, 20WLAN label 15writable media 67WWAN antennas, identifying 13WWAN device 16, 23
174 Index
