hybrid trunk cable
TRANSCRIPT

Hybrid Trunk cable solution (6RRU) SONGXIN
www.songxin.com.tw SONGXIN TAIPEI TECH SOLUTIONS CO., LTD. [email protected] 1
1 ¼” HYBRID TRUNK CABLE SOLUTION (6RRU)
Hybrid Trunk Cable
Note: Hybrid Junction Box (P/N VAC4036MOBILE02) is sold separately
This 1 ¼” Hybrid trunk cable on drum is pre-terminated as a part of 6RRU Hybrid
junction box. The 6 pair DC power connector is terminated in staggered length with
cable lugs for quick and easy installation to the 6RRU Hybrid junction box. This pre-
terminated solution is specifically designed for connecting up to 6 RRUs and provides a
fast and effective means of adding extra wireless sectors at mobile base station.
Benefits & Features:
• 2 X 12 fibre MTP® Optical connections
• 12x DC copper cables (10mm²)
• Pre-terminated copper cables with lugs for quick and easy installation to Mobile junction box
• Custom trunk cable lengths to suit every site (15m,20m,25m,30m,35m,40m to 200m)

Hybrid Trunk cable solution (6RRU) SONGXIN
www.songxin.com.tw SONGXIN TAIPEI TECH SOLUTIONS CO., LTD. [email protected] 2
Construction:
Conductor
Material Stranded annealed bare copper
Cross section 10mm²
Quantity 12 cores
Standard IEC 60228 class 5
Insulation
Material PVC
Nom. insulation thickness (mm) 0.9
Ref. dia. Of PWR cable (mm) 6.0
Colour Red (Printed with 1 to 6 on the surface, interval ≤ 300mm Blue (Printed with 1 to 6 on the surface, interval ≤ 300mm
Fibre cable
Fibre G657A2, 24 Fibres
Material of fibre cable jacket PVC
Colour of jacket Yellow (Printed with A, B on the surface, interval ≤ 300mm)
Material of fibre cable sheath LSZH
Ref. dia. Of PWR cable (mm) 10.0
Colour of sheath Black
Armour
Material Corrugated aluminium tube
Ripcord Aramid yarn
Placement Two yellows under armour and one red under sheath
Outer sheath
Material LLDPE sheath with 2.5% of carbon black content
Nom. outer jacket thickness (mm) 1.4
Nom. diameter of cable (mm) 38.5±1.0
Colour Black
Reference weight of cable (kg/m) 2.16
Electrical Characteristics
Max. conductor DC resistance at 20°C ≤1.91
Dielectric test (AC 1.0kV, 1 minute) No break
Fibre attenuation (dB/km) Fibre attenuation (dB/km)
1310mm ≤0.5 1550mm ≤0.4
Hybrid Trunk cable solution (6RRU) SONGXIN
www.songxin.com.tw SONGXIN TAIPEI TECH SOLUTIONS CO., LTD. [email protected] 3
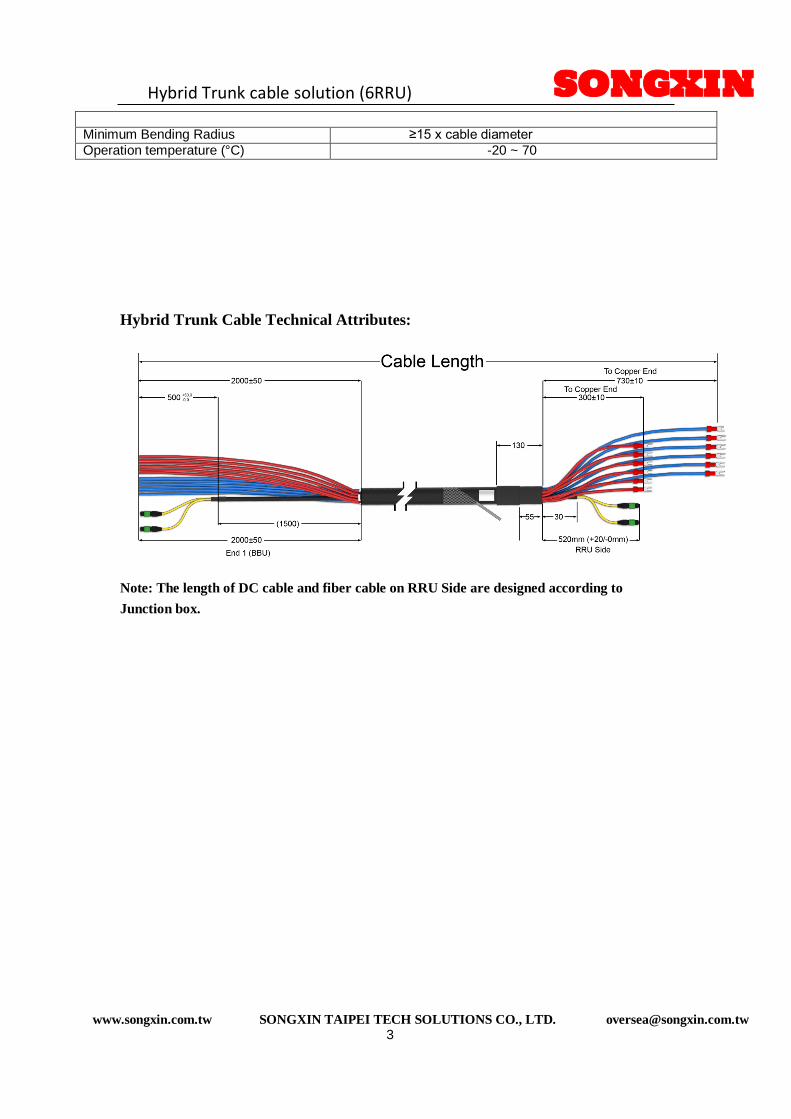
Minimum Bending Radius ≥15 x cable diameter
Operation temperature (°C) -20 ~ 70
Hybrid Trunk Cable Technical Attributes:
Note: The length of DC cable and fiber cable on RRU Side are designed according to
Junction box.
Hybrid Trunk cable solution (6RRU) SONGXIN
www.songxin.com.tw SONGXIN TAIPEI TECH SOLUTIONS CO., LTD. [email protected] 4
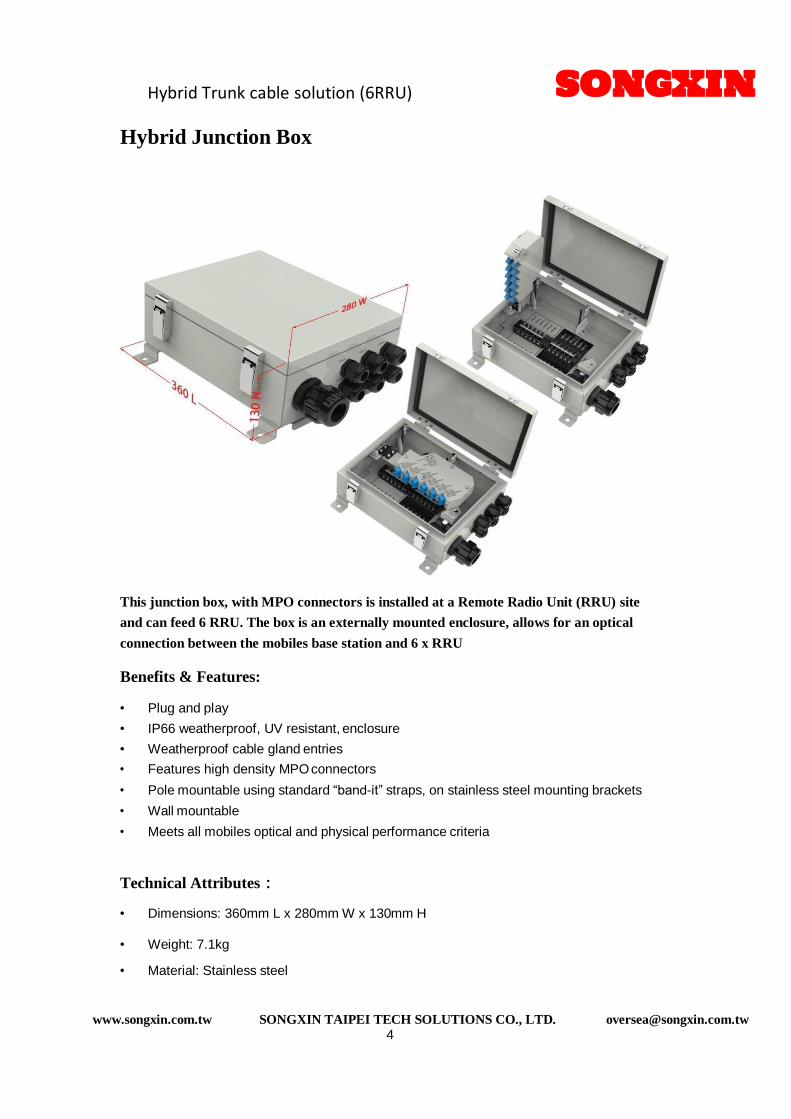
Hybrid Junction Box
This junction box, with MPO connectors is installed at a Remote Radio Unit (RRU) site
and can feed 6 RRU. The box is an externally mounted enclosure, allows for an optical
connection between the mobiles base station and 6 x RRU
Benefits & Features:
• Plug and play
• IP66 weatherproof, UV resistant, enclosure
• Weatherproof cable gland entries
• Features high density MPO connectors
• Pole mountable using standard “band-it” straps, on stainless steel mounting brackets
• Wall mountable
• Meets all mobiles optical and physical performance criteria
Technical Attributes:
• Dimensions: 360mm L x 280mm W x 130mm H
• Weight: 7.1kg
• Material: Stainless steel

Hybrid Trunk cable solution (6RRU) SONGXIN
www.songxin.com.tw SONGXIN TAIPEI TECH SOLUTIONS CO., LTD. [email protected] 5
Performance:
Interface
Fiber Interface MPO*2 to LC*24
Insertion Loss LC: ≤0.40dB/Joint
MPO: ≤0.70dB/Joint
PWR Interface 6P terminal block
Rated Current 20A

Hybrid Trunk cable solution (6RRU) SONGXIN
www.songxin.com.tw SONGXIN TAIPEI TECH SOLUTIONS CO., LTD. [email protected] 6
Hybrid Jumper Cable
Benefits & Features:
• 2 X 2 Optical fiber (G657A2)
• 2x DC copper cables (6mm²)
• Pre-terminated copper cables with lugs for quick and easy installation to Mobile junction box
• Hybrid jumper cable lengths to suit every site (2m,2.5m,3m,3.5m,4m,4.5m to 10m)
Construction:
Conductor
Material Stranded annealed bare copper
Cross section 6mm²
Quantity 2 cores
Standard IEC 60228 class 5
Insulation
Material PVC
Colour Red & Blue
Fibre cable
Fibre G657A2, 4 Fibres
Material of fibre cable jacket PVC
Material of fibre cable sheath LSZH

Hybrid Trunk cable solution (6RRU) SONGXIN
www.songxin.com.tw SONGXIN TAIPEI TECH SOLUTIONS CO., LTD. [email protected] 7
Installation Guidelines
1. Junction Box Installation:
A. Position the junction box’s mounting bracket against the pole. Insert the two stainless
steel clamps into the bracket’s
B. Fasten the stainless steel clamp’s screws, securing the junction box onto the pole.
2. Connecting the Hybrid Trunk Cable (RRU Side) to Junction Box:
A. Open the unit’s cover by undoing the latches.
B. Unscrew and lift open the MTP® cassette.
C. Unscrew the hybrid cable port’s sealing nut, then, once free from the thread, slide it
over the hybrid trunk cable.

Hybrid Trunk cable solution (6RRU) SONGXIN
www.songxin.com.tw SONGXIN TAIPEI TECH SOLUTIONS CO., LTD. [email protected] 8
D. Lift open the hybrid trunk cable clamp; insert the hybrid trunk cable into the hybrid
cable port, push the cable in the box until the tip of the heat-shrink tube reaches the
printed mark. (see photo.)
E. Close the clamp and tighten screw using a flat-head screwdriver.
F. Screw the hybrid cable unit port’s sealing nut back on, tighten using a spanner.
3. Connecting the DC Power Cables to the Junction Box:
A. Route the cables (DC power cables and Optical cables) neatly clockwise around the
unit using the restraint hooks
B. Observe terminal assignments on the junction box’s back panel: Red cables to
unshaded <+>IN and Blue cables to shaded <+>IN. (see photo.)
C. Lift off the transparent terminal protective covers. Insert connectors by matching the
printed numbers on the cables with the corresponding terminals.
D. Secure connections by tightening each screw using a Phillips screwdriver, and press
the transparent protective terminal covers back over the terminals.
4. Connecting the Optical Cables to the Junction Box’s MTP® Cassette:

Hybrid Trunk cable solution (6RRU) SONGXIN
www.songxin.com.tw SONGXIN TAIPEI TECH SOLUTIONS CO., LTD. [email protected] 9
A. Close the MTP® cassette, tighten the screw to secure in place.
B. Carefully remove MTP® fibre connector’s dust caps.
C. Observe the fibre connector’s keyway (keyway must be on top, see photo). Make
sure the orientation is correct before attempting connection.
D. Connect MTP® fibre cables to assigned ports by matching the printed letters (A & B)
on the cables with the corresponding cassette ports. Push connectors in until they
click into place
E. Do a final check making sure there is no loose connection, and that no foreign
objects are left in the unit before closing the cover. Close the unit’s cover and tightly
fasten the latches.
5. Feeding of the 1 ¼” Hybrid Trunk Cable END 2 into the BBU room:

Hybrid Trunk cable solution (6RRU) SONGXIN
www.songxin.com.tw SONGXIN TAIPEI TECH SOLUTIONS CO., LTD. [email protected] 10
A. Unroll the excess hybrid trunk cable END 2 off the drum.
B. Feed through the hybrid trunk cable END 2 into the hut’s cable entry, all the way into
the BBU room.
6. Connecting the DC power cable (Detail A) to the RRU:
A. Open the RRU’s MPO cassette to access the DC power terminals.
B. Unscrew the RRU’s Jumper port gland’s sealing nut (Start with port gland labelled
“RRU1” for the first installation), Once free off the thread, slide the sealing nut over
the Hybrid jumper cable.
C. Insert the Hybrid jumper cable (END 1, Detail A) into the RRU1 port gland, all the
way in until the Hybrid jumper, cable’s heat shrink tube reaches the tip of the port
gland.
D. Tighten the port gland’s nut to secure the connection.

Hybrid Trunk cable solution (6RRU) SONGXIN
www.songxin.com.tw SONGXIN TAIPEI TECH SOLUTIONS CO., LTD. [email protected] 11
E. Lift open the RRU’s MPO cassette to access the DC terminal blocks. Route the DC
power cables neatly anti- clockwise around the unit using the attached restraint
hooks. Lift off the transparent protective terminal cover
F. Connect the DC power cables, observing the terminal assignments on the Junction
box’s back panel: Red cable to RRU1 in the unshaded <+>OUT and Blue cable to
RRU1 in the shaded <+>OUT. (see photo.) Repeat installation process in
chronological arrangement for every succeeding Hybrid jumper cable.
G. Secure connections by tightening each screw using a Phillips screwdriver, and press
the transparent protective terminal covers back over the terminals.
7. Connecting the Optical cable (Detail A) to the RRU:
A. Close the RRU’s MPO Cassette after connecting the DC power cables. Route the
optical cables anti-clockwise around the unit using the cable saddles, making a loop
from the connection point through the other side of the MPO cassette. (See Photo.)
B. Carefully remove dust caps. Observe matching terminal and cable numberings
before attempting connection, cassette terminal block starting with “RRU1” for the
first installation.
C. Connect the LC connectors by pushing each pair into the cassette’s terminal until
the connectors make an audible click.

Hybrid Trunk cable solution (6RRU) SONGXIN
www.songxin.com.tw SONGXIN TAIPEI TECH SOLUTIONS CO., LTD. [email protected] 12
D. Follow the same procedures for every succeeding Hybrid jumper installation
E. Recheck all connections of power and optical cables in terms of labels and
numbering. Arrange cables neatly in the unit.
F. Do a final check making sure there is no loose connection, and that no foreign
objects are left in the unit before, closing the cover. Close the unit’s cover and tightly
fasten the latches.
8. Connecting the Hybrid jumper tail (Detail B) to the RRU:
A. Open the unit’s connection port by unscrewing the cover using a Philipps
screwdriver.
B. Remove the rubber port sealing tabs and unscrew the unit’s clamp using a Philipps
screwdriver. Observe port labels for cable assignments. (See photo.)
C. Carefully remove LC connector’s dust caps.
Hybrid Trunk cable solution (6RRU) SONGXIN
www.songxin.com.tw SONGXIN TAIPEI TECH SOLUTIONS CO., LTD. [email protected] 13
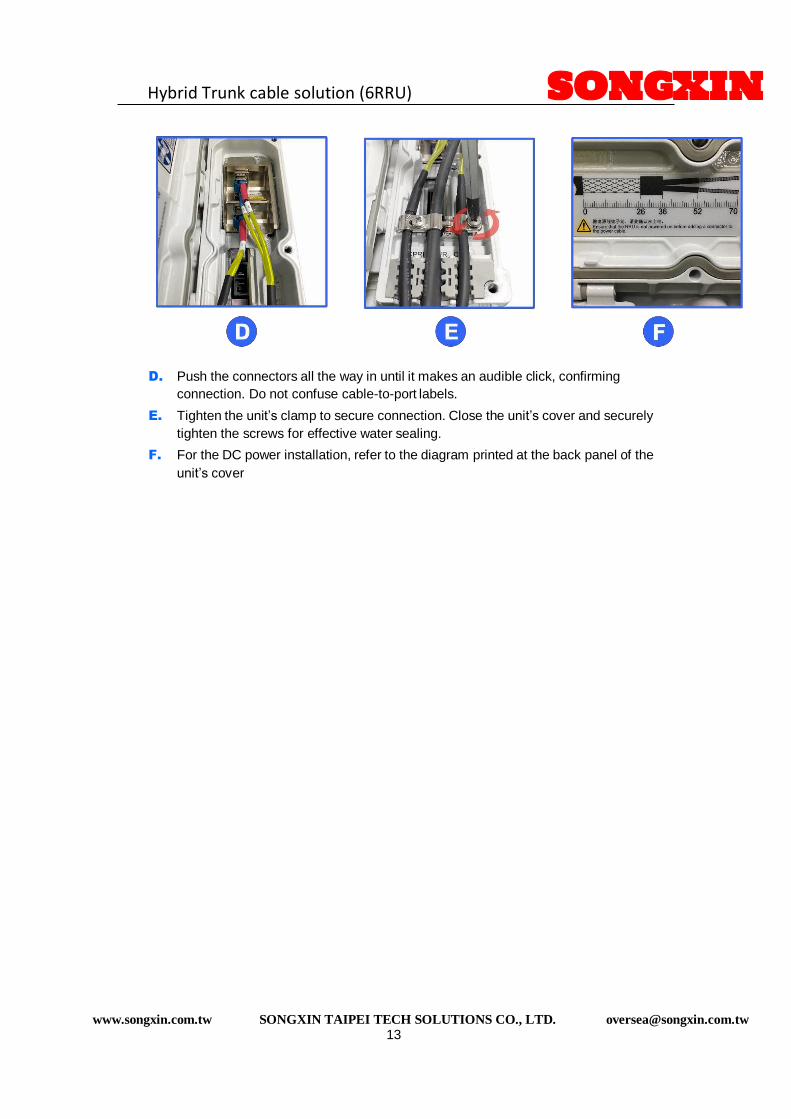
D. Push the connectors all the way in until it makes an audible click, confirming
connection. Do not confuse cable-to-port labels.
E. Tighten the unit’s clamp to secure connection. Close the unit’s cover and securely
tighten the screws for effective water sealing.
F. For the DC power installation, refer to the diagram printed at the back panel of the
unit’s cover