improving solar food dryers
TRANSCRIPT
8/8/2019 Improving Solar Food Dryers
http://slidepdf.com/reader/full/improving-solar-food-dryers 1/11
24 Home Power #69 • February / March 1999
his articledescribes a series of
experiments
conducted over the last
year and a half with
three solar food dryers.
The food dryers were
constructed at
Appalachian State
University (ASU) using
plans published in
HP57 . The goal of this
research program was
to improve the design
and to determine the
most effective ways to
use the dryer.
Dennis Scanlin,
Marcus Renner,David Domermuth, &
Heath Moody
Above, Photo 1: Three identical solar food dryers for testing against a control.
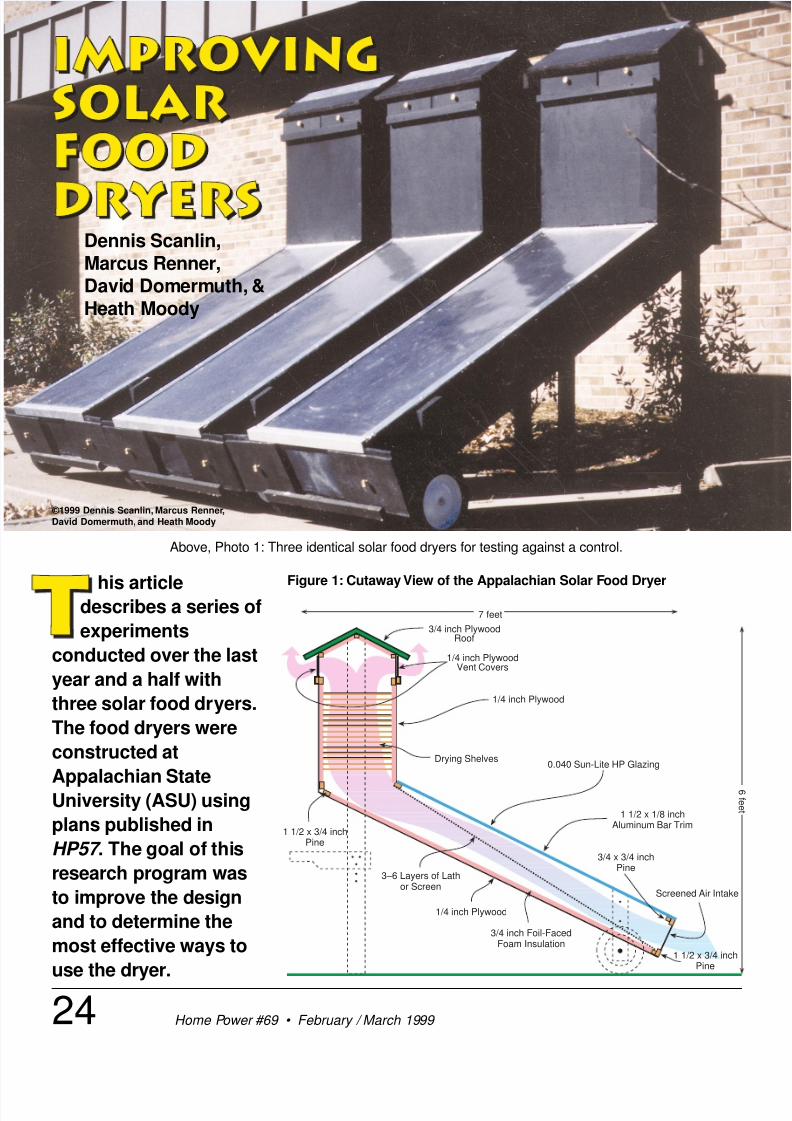
1 1/2 x 3/4 inchPine
1/4 inch PlywoodVent Covers
0.040 Sun-Lite HP Glazing
Screened Air Intake
3/4 inch Foil-FacedFoam Insulation
Drying Shelves
1/4 inch Plywood
1 1/2 x 3/4 inchPine
3/4 x 3/4 inchPine
1/4 inch Plywood
1 1/2 x 1/8 inchAluminum Bar Trim
3/4 inch PlywoodRoof
3–6 Layers of Lathor Screen
7 feet
6 f e e t
Figure 1: Cutaway View of the Appalachian Solar Food Dryer
©1999 Dennis Scanlin, Marcus Renner,
David Domermuth, and Heath Moody
8/8/2019 Improving Solar Food Dryers
http://slidepdf.com/reader/full/improving-solar-food-dryers 2/11
25Home Power #69 • February / March 1999
Solar Dehydration
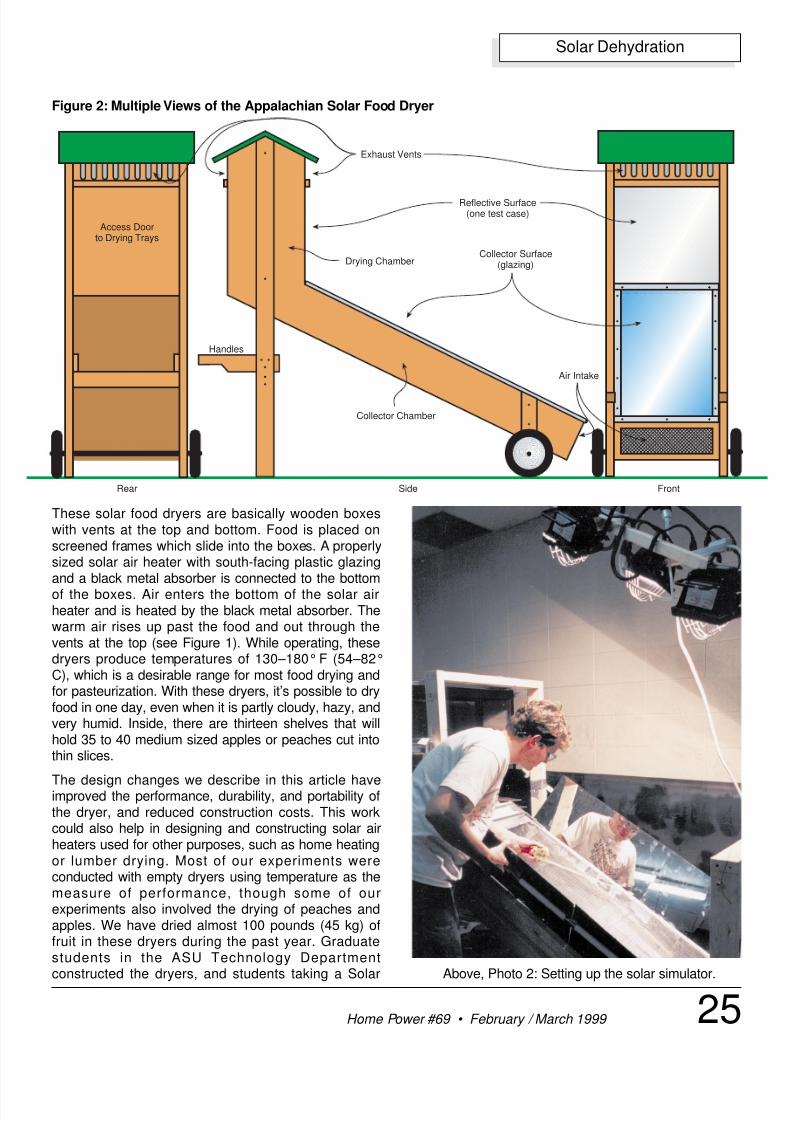
These solar food dryers are basically wooden boxeswith vents at the top and bottom. Food is placed onscreened frames which slide into the boxes. A properlysized solar air heater with south-facing plastic glazingand a black metal absorber is connected to the bottom
of the boxes. Air enters the bottom of the solar airheater and is heated by the black metal absorber. Thewarm air rises up past the food and out through thevents at the top (see Figure 1). While operating, thesedryers produce temperatures of 130–180°F (54–82°C), which is a desirable range for most food drying andfor pasteurization. With these dryers, it’s possible to dryfood in one day, even when it is partly cloudy, hazy, andvery humid. Inside, there are thirteen shelves that willhold 35 to 40 medium sized apples or peaches cut intothin slices.
The design changes we describe in this article haveimproved the performance, durability, and portability ofthe dryer, and reduced construction costs. This workcould also help in designing and constructing solar airheaters used for other purposes, such as home heatingor lumber drying. Most of our experiments wereconducted with empty dryers using temperature as themeasure of performance, though some of ourexperiments also involved the drying of peaches andapples. We have dried almost 100 pounds (45 kg) offruit in these dryers during the past year. Graduatestudents in the ASU Technology Departmentconstructed the dryers, and students taking a Solar
Access Doorto Drying Trays
Handles
Exhaust Vents
Collector Surface(glazing)
Air Intake
Reflective Surface(one test case)
Rear Side Front
Collector Chamber
Drying Chamber
Figure 2: Multiple Views of the Appalachian Solar Food Dryer
Above, Photo 2: Setting up the solar simulator.
8/8/2019 Improving Solar Food Dryers
http://slidepdf.com/reader/full/improving-solar-food-dryers 3/11
26 Home Power #69 • February / March 1999
Solar Dehydration
Energy Technology course modified them for individualexperiments.
MethodologyWe began by constructing three identical food dryers.Having three dryers allowed us to test two hypothesesat one time. For example, to examine three versus sixlayers of absorber mesh and single versus doubleglazing, Dryer One might have three layers of blackaluminum window screening as an absorber with singleglazing; Dryer Two, six layers of the same absorberscreen with single glazing; and Dryer Three, six layersof the same absorber screen with two layers of glazing.
Once we set up an experiment, we collect data. Thislasts from several days to a couple of weeks until weare confident that the data is reliable. Then we trysomething different.
Using three food dryers also allows us to offer morestudents hands-on experiences with solar air heaters.Each semester, students take apart the dryers’ solarcollectors and rebuild them using different materials orstrategies. This classwork was supplemented withexperiments set up and completed by several graduatestudents.
Equipment for Data CollectionWe have two systems for measuring temperature. Thefirst system uses inexpensive indoor/outdoor digitalthermometers. One temperature sensor is placed insidethe dryer and the other one outside. Different locationsare used for the sensor inside the dryer. If food is beingdried, we normally place it under the bottom tray of foodand out of direct sunlight. This temperature data isrecorded on a data collection form every half hour orwhenever possible.
The other system uses a $600 data logger from PaceScientific to record temperature data. It is capable of
measuring temperature, relative humidity, AC current,voltage, light, and pressure. The logger does not have adisplay, but it’s possible to download the data to acomputer. The software that comes with the loggerallows us to see and graph the data. The data can alsobe exported to a spreadsheet for statistical analysis.
We measure air flows with a Kurz 490 series mini-anemometer. We weigh the food before placing it in thedryer, sometimes during the test, and at the end of eachday. We use an Ohaus portable electronic scale,purchased from Thomas Scientific for $111. Wemeasure humidity with a Micronta hygrometerpurchased from Radio Shack for about $20.
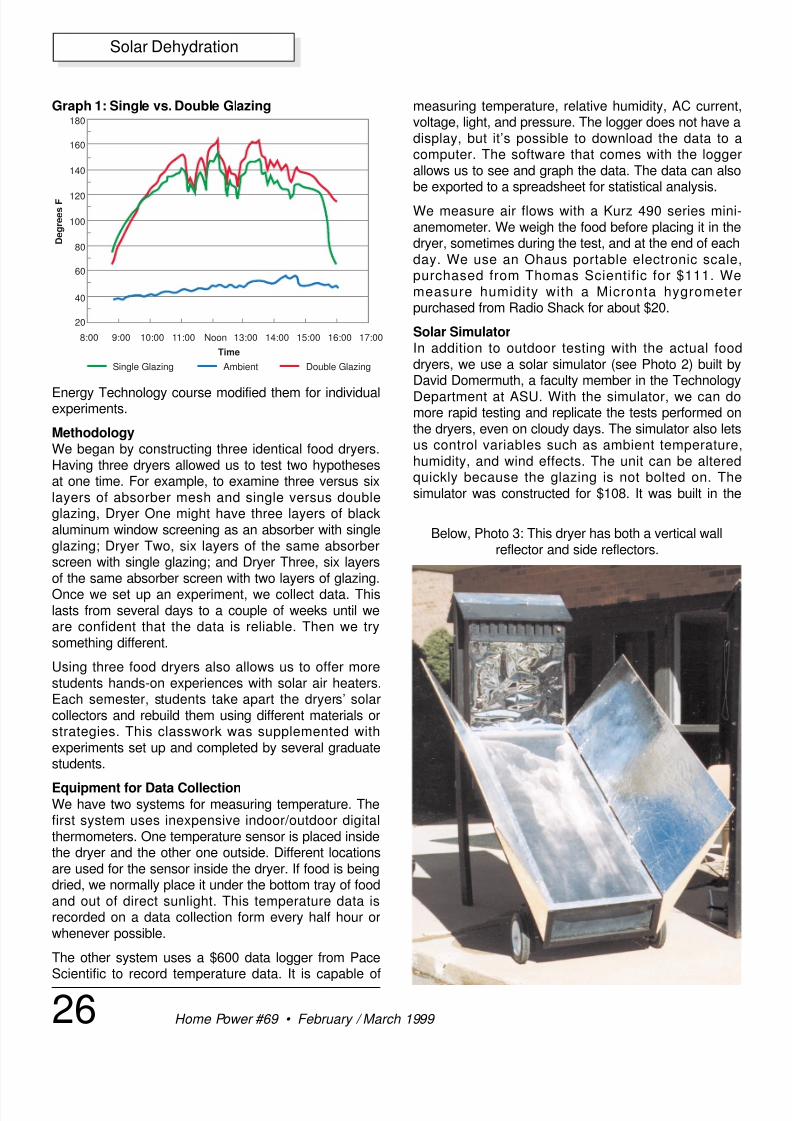
Solar SimulatorIn addition to outdoor testing with the actual fooddryers, we use a solar simulator (see Photo 2) built byDavid Domermuth, a faculty member in the Technology
Department at ASU. With the simulator, we can domore rapid testing and replicate the tests performed onthe dryers, even on cloudy days. The simulator also letsus control variables such as ambient temperature,humidity, and wind effects. The unit can be alteredquickly because the glazing is not bolted on. Thesimulator was constructed for $108. It was built in the
Time
Single Glazing Ambient Double Glazing
D e g r e e s F
20
40
60
80
100
120
140
160
180
8:00 9:00 10:00 11:00 Noon 13:00 14:00 15:00 16:00 17:00
Graph 1: Single vs. Double Glazing
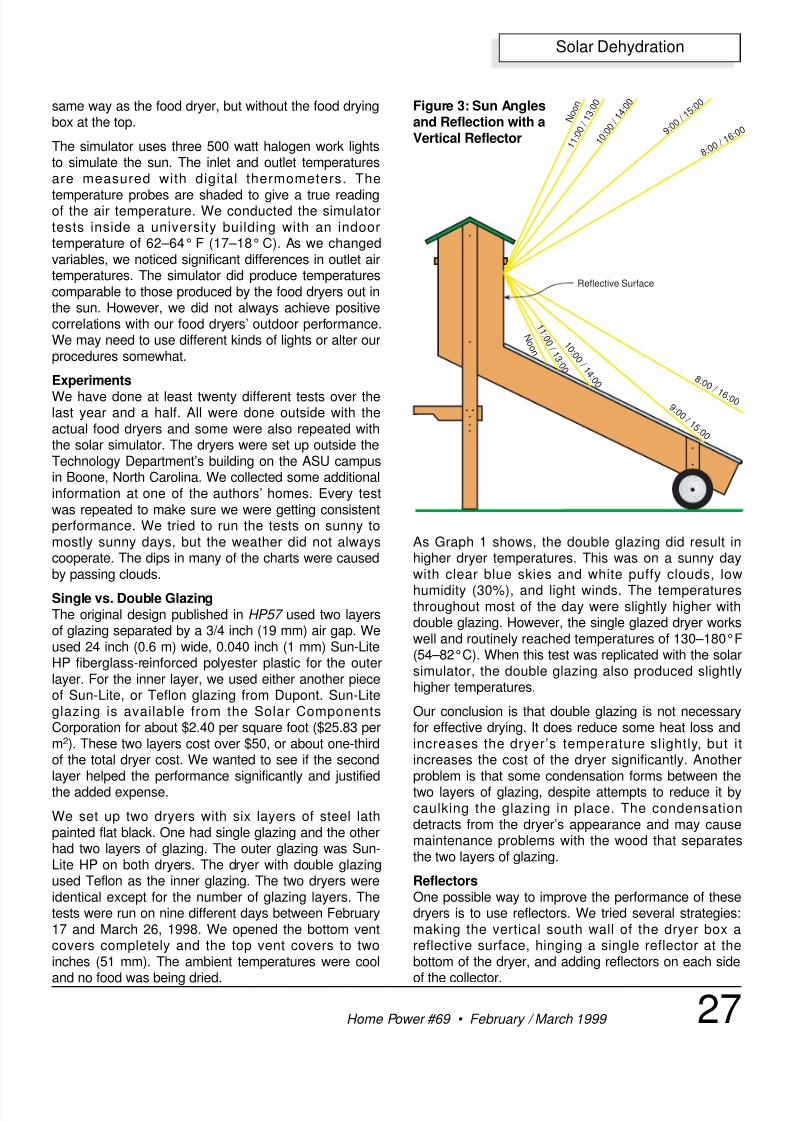
Below, Photo 3: This dryer has both a vertical wallreflector and side reflectors.
8/8/2019 Improving Solar Food Dryers
http://slidepdf.com/reader/full/improving-solar-food-dryers 4/11
27Home Power #69 • February / March 1999
Solar Dehydration
same way as the food dryer, but without the food dryingbox at the top.
The simulator uses three 500 watt halogen work lightsto simulate the sun. The inlet and outlet temperaturesare measured with digital thermometers. The
temperature probes are shaded to give a true readingof the air temperature. We conducted the simulatortests inside a university building with an indoortemperature of 62–64° F (17–18° C). As we changedvariables, we noticed significant differences in outlet airtemperatures. The simulator did produce temperaturescomparable to those produced by the food dryers out inthe sun. However, we did not always achieve positivecorrelations with our food dryers’ outdoor performance.We may need to use different kinds of lights or alter ourprocedures somewhat.
Experiments
We have done at least twenty different tests over thelast year and a half. All were done outside with theactual food dryers and some were also repeated withthe solar simulator. The dryers were set up outside theTechnology Department’s building on the ASU campusin Boone, North Carolina. We collected some additionalinformation at one of the authors’ homes. Every testwas repeated to make sure we were getting consistentperformance. We tried to run the tests on sunny tomostly sunny days, but the weather did not alwayscooperate. The dips in many of the charts were causedby passing clouds.
Single vs. Double GlazingThe original design published in HP57 used two layersof glazing separated by a 3/4 inch (19 mm) air gap. Weused 24 inch (0.6 m) wide, 0.040 inch (1 mm) Sun-LiteHP fiberglass-reinforced polyester plastic for the outerlayer. For the inner layer, we used either another pieceof Sun-Lite, or Teflon glazing from Dupont. Sun-Liteglazing is available from the Solar ComponentsCorporation for about $2.40 per square foot ($25.83 perm2). These two layers cost over $50, or about one-thirdof the total dryer cost. We wanted to see if the secondlayer helped the performance significantly and justifiedthe added expense.
We set up two dryers with six layers of steel lathpainted flat black. One had single glazing and the otherhad two layers of glazing. The outer glazing was Sun-Lite HP on both dryers. The dryer with double glazingused Teflon as the inner glazing. The two dryers wereidentical except for the number of glazing layers. Thetests were run on nine different days between February17 and March 26, 1998. We opened the bottom ventcovers completely and the top vent covers to twoinches (51 mm). The ambient temperatures were cool
and no food was being dried.
As Graph 1 shows, the double glazing did result inhigher dryer temperatures. This was on a sunny daywith clear blue skies and white puffy clouds, low
humidity (30%), and light winds. The temperaturesthroughout most of the day were slightly higher withdouble glazing. However, the single glazed dryer workswell and routinely reached temperatures of 130–180°F(54–82°C). When this test was replicated with the solarsimulator, the double glazing also produced slightlyhigher temperatures.
Our conclusion is that double glazing is not necessaryfor effective drying. It does reduce some heat loss andincreases the dryer’s temperature slightly, but itincreases the cost of the dryer significantly. Anotherproblem is that some condensation forms between thetwo layers of glazing, despite attempts to reduce it bycaulking the glazing in place. The condensationdetracts from the dryer’s appearance and may causemaintenance problems with the wood that separatesthe two layers of glazing.
ReflectorsOne possible way to improve the performance of thesedryers is to use reflectors. We tried several strategies:making the vertical south wall of the dryer box areflective surface, hinging a single reflector at thebottom of the dryer, and adding reflectors on each side
of the collector.
8 : 0 0 / 1 6 : 0 0
N o o n
8 : 0 0 /
1 6 : 0 0
1 1 : 0 0 / 1
3 : 0 0
9 : 0 0
/ 1 5
: 0 0
9 : 0 0 / 1 5 : 0 0
1 0 : 0
0 / 1 4 : 0 0
1 0 : 0
0 / 1
4 : 0 0
1 1
: 0 0
/ 1 3
: 0 0
N o o n
Reflective Surface
Figure 3: Sun Anglesand Reflection with aVertical Reflector
8/8/2019 Improving Solar Food Dryers
http://slidepdf.com/reader/full/improving-solar-food-dryers 5/11
28 Home Power #69 • February / March 1999
Solar Dehydration
Vertical Wall ReflectorWe realized that the vertical southwall of the dryer box could bepainted a light color or coated withaluminum foil, a mirror, or reflectiveMylar (see Photo 3). A verticalsouth-facing wall reflector wouldreflect some additional energy intothe dryer’s collector, protect thewood from cracking, and preventdeterioration from UV radiation.Considering the fact that the angleof reflection equals the angle ofincidence, we were able to modelthe performance of this reflector,using a protractor and a chart of sunaltitude angles (see Figure 3). If thedryer is moved several t imesthroughout the day to track the sun’sazimuth angle, then the reflectorconcentrates some additional solarenergy onto the dryer’s collectorduring most of the day.
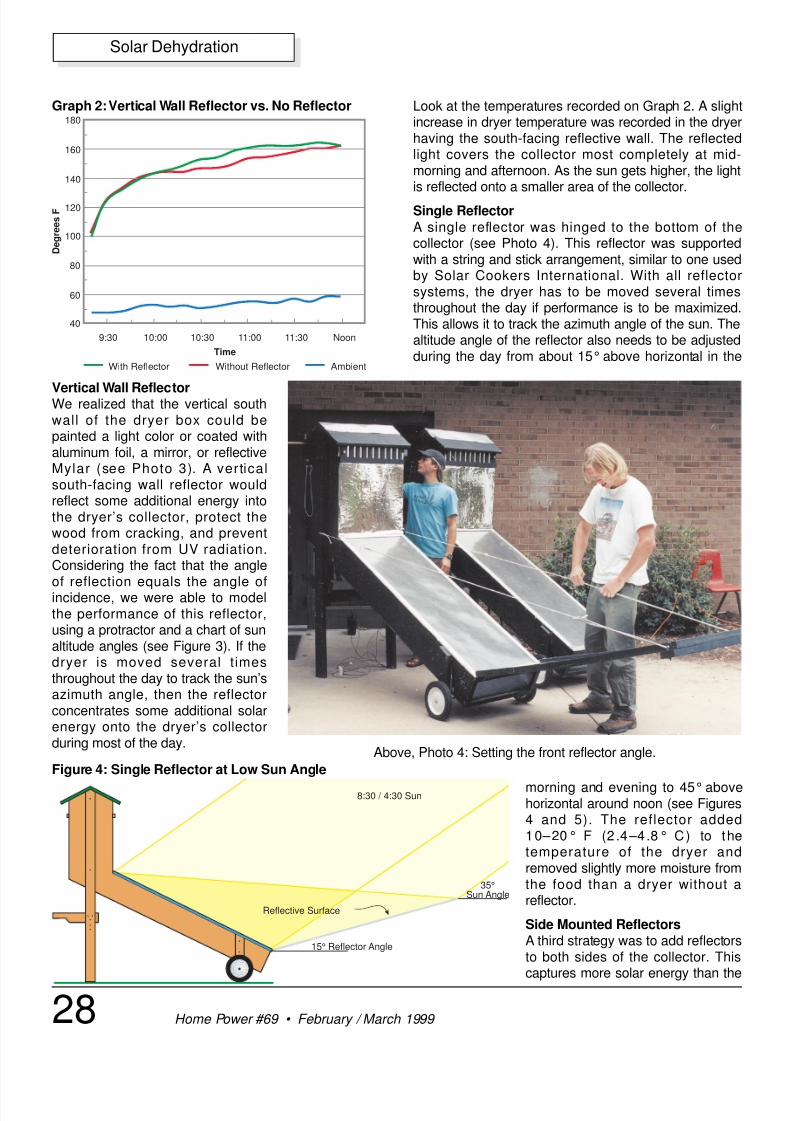
Look at the temperatures recorded on Graph 2. A slightincrease in dryer temperature was recorded in the dryerhaving the south-facing reflective wall. The reflectedlight covers the collector most completely at mid-morning and afternoon. As the sun gets higher, the lightis reflected onto a smaller area of the collector.
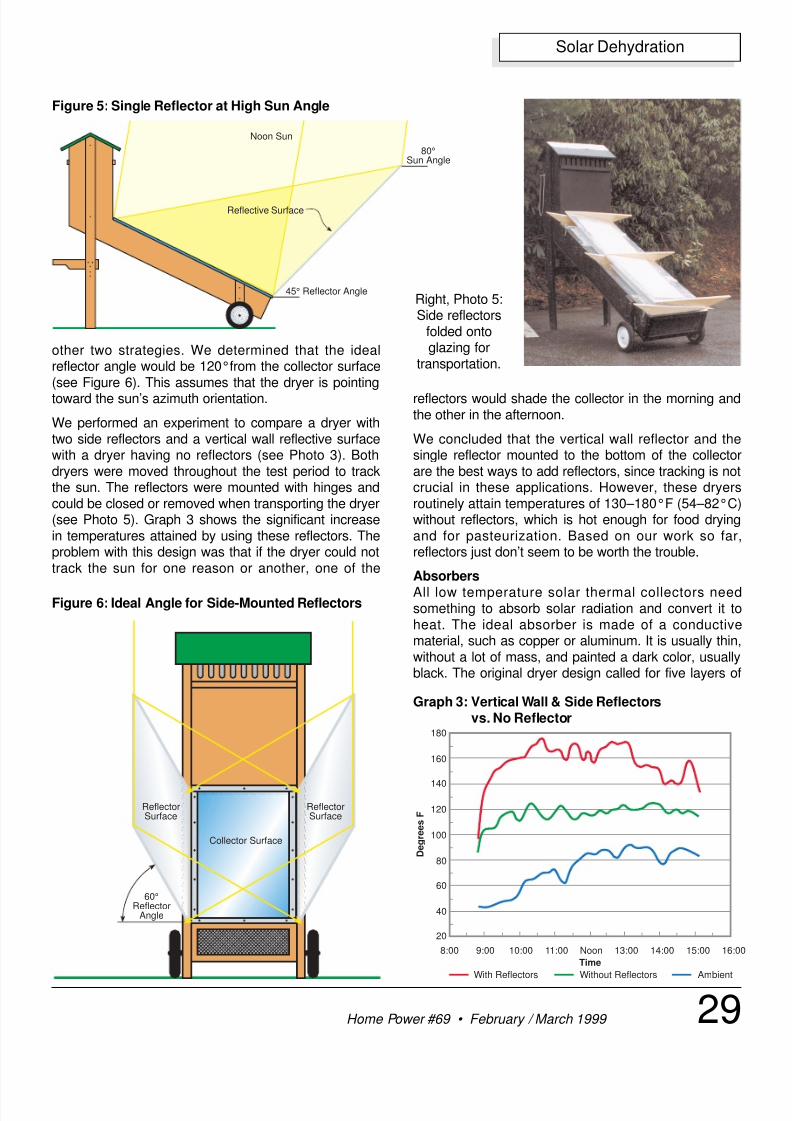
Single Reflector
A single reflector was hinged to the bottom of thecollector (see Photo 4). This reflector was supportedwith a string and stick arrangement, similar to one usedby Solar Cookers International. With all reflectorsystems, the dryer has to be moved several timesthroughout the day if performance is to be maximized.This allows it to track the azimuth angle of the sun. Thealtitude angle of the reflector also needs to be adjustedduring the day from about 15° above horizontal in the
Reflective Surface
15° Reflector Angle
35°Sun Angle
8:30 / 4:30 Sun
Figure 4: Single Reflector at Low Sun Angle
40
60
80
100
120
140
160
180
9:30 10:00 10:30 11:00 11:30 Noon
Time
D e g r e e s F
With Reflector Without Reflector Ambient
Graph 2:Vertical Wall Reflector vs. No Reflector
Above, Photo 4: Setting the front reflector angle.
morning and evening to 45° abovehorizontal around noon (see Figures4 and 5). The reflector added10–20° F (2 .4–4.8° C) to thetemperature of the dryer andremoved slightly more moisture fromthe food than a dryer without areflector.
Side Mounted ReflectorsA third strategy was to add reflectorsto both sides of the collector. Thiscaptures more solar energy than the
8/8/2019 Improving Solar Food Dryers
http://slidepdf.com/reader/full/improving-solar-food-dryers 6/11
29Home Power #69 • February / March 1999
Solar Dehydration
reflectors would shade the collector in the morning andthe other in the afternoon.
We concluded that the vertical wall reflector and thesingle reflector mounted to the bottom of the collectorare the best ways to add reflectors, since tracking is notcrucial in these applications. However, these dryersroutinely attain temperatures of 130–180°F (54–82°C)without reflectors, which is hot enough for food dryingand for pasteurization. Based on our work so far,reflectors just don’t seem to be worth the trouble.
Absorbers
All low temperature solar thermal collectors needsomething to absorb solar radiation and convert it toheat. The ideal absorber is made of a conductivematerial, such as copper or aluminum. It is usually thin,without a lot of mass, and painted a dark color, usuallyblack. The original dryer design called for five layers of
Reflective Surface
45° Reflector Angle
80°Sun Angle
Noon Sun
Figure 5: Single Reflector at High Sun Angle
60°Reflector
Angle
Collector Surface
ReflectorSurface
ReflectorSurface
Figure 6: Ideal Angle for Side-Mounted Reflectors
20
40
60
80
100
120
140
160
180
8:00 9:00 10:00 11:00 Noon 13:00 14:00 15:00 16:00
Time
With Reflectors Without Reflectors Ambient
D e g r e e s F
Graph 3: Vertical Wall & Side Reflectorsvs. No Reflector
Right, Photo 5:Side reflectors
folded ontoglazing for
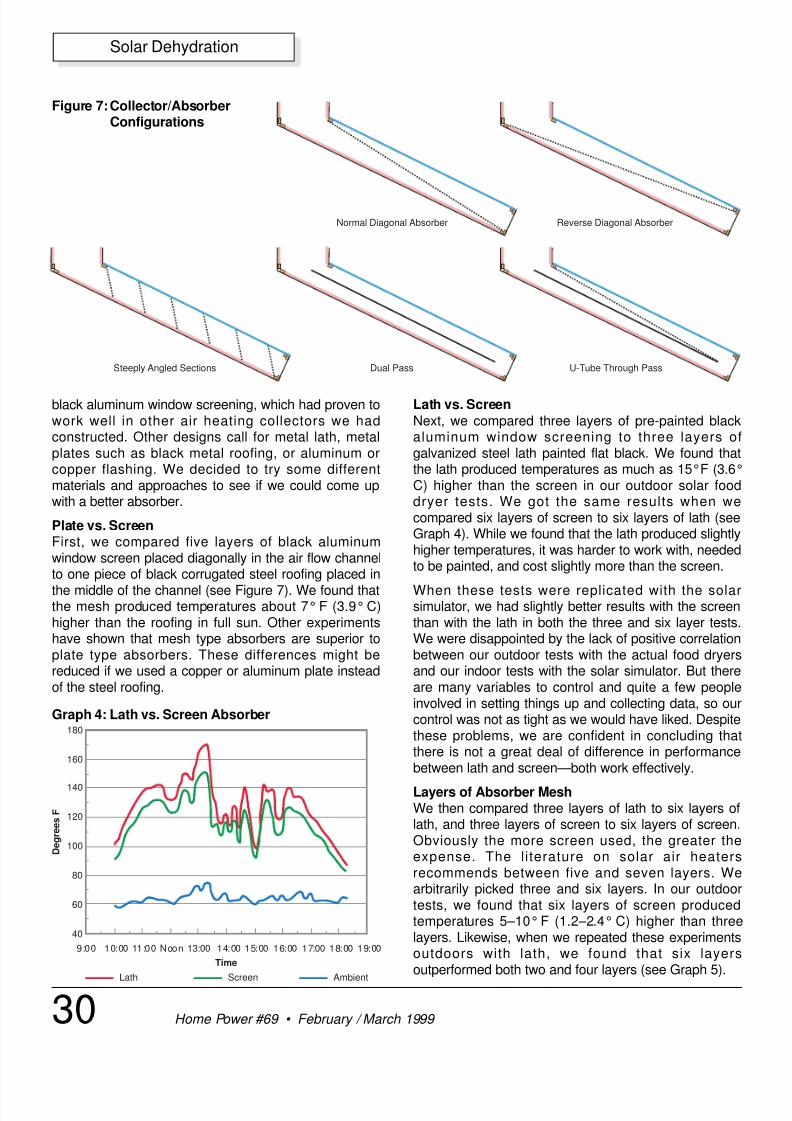
transportation.other two strategies. We determined that the idealreflector angle would be 120°from the collector surface(see Figure 6). This assumes that the dryer is pointingtoward the sun’s azimuth orientation.
We performed an experiment to compare a dryer withtwo side reflectors and a vertical wall reflective surfacewith a dryer having no reflectors (see Photo 3). Bothdryers were moved throughout the test period to trackthe sun. The reflectors were mounted with hinges andcould be closed or removed when transporting the dryer(see Photo 5). Graph 3 shows the significant increasein temperatures attained by using these reflectors. Theproblem with this design was that if the dryer could nottrack the sun for one reason or another, one of the
8/8/2019 Improving Solar Food Dryers
http://slidepdf.com/reader/full/improving-solar-food-dryers 7/11
30 Home Power #69 • February / March 1999
Solar Dehydration
black aluminum window screening, which had proven towork well in other air heating collectors we hadconstructed. Other designs call for metal lath, metalplates such as black metal roofing, or aluminum orcopper flashing. We decided to try some differentmaterials and approaches to see if we could come upwith a better absorber.
Plate vs. ScreenFirst, we compared five layers of black aluminumwindow screen placed diagonally in the air flow channelto one piece of black corrugated steel roofing placed in
the middle of the channel (see Figure 7). We found thatthe mesh produced temperatures about 7° F (3.9° C)higher than the roofing in full sun. Other experimentshave shown that mesh type absorbers are superior toplate type absorbers. These differences might bereduced if we used a copper or aluminum plate insteadof the steel roofing.
Lath vs. Screen
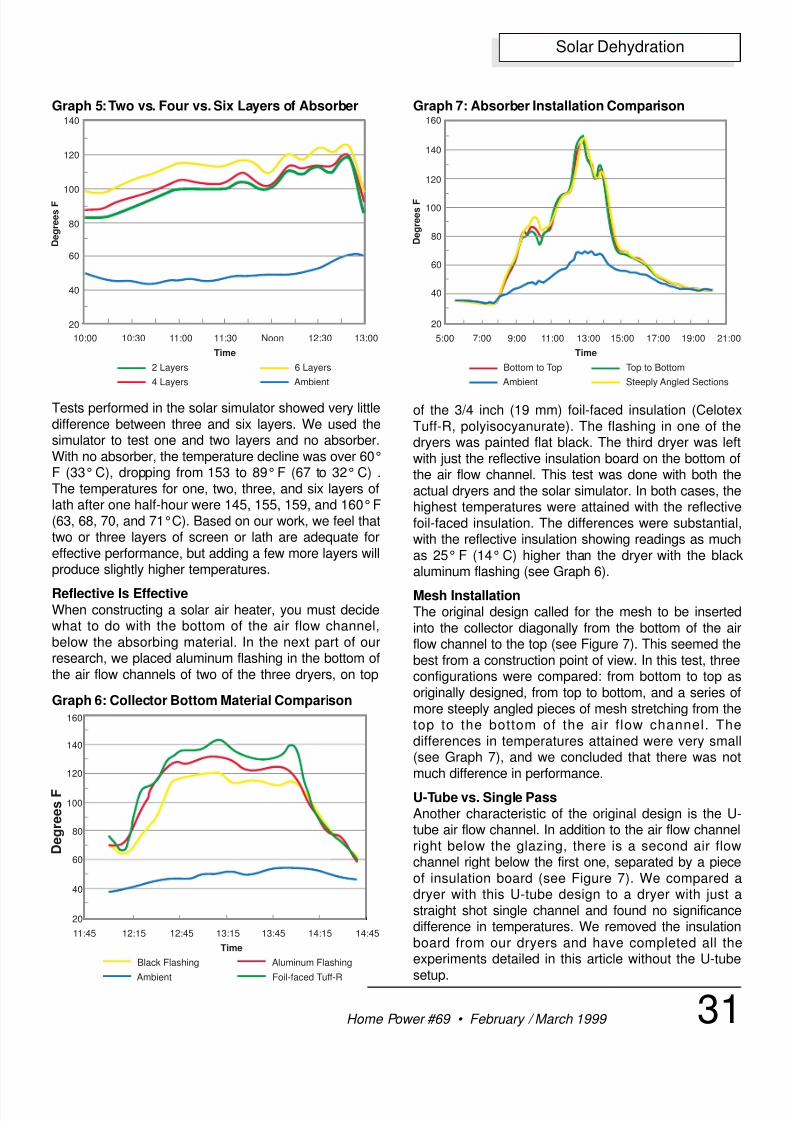
Next, we compared three layers of pre-painted blackaluminum window screening to three layers ofgalvanized steel lath painted flat black. We found thatthe lath produced temperatures as much as 15°F (3.6°C) higher than the screen in our outdoor solar fooddryer tests. We got the same results when wecompared six layers of screen to six layers of lath (seeGraph 4). While we found that the lath produced slightlyhigher temperatures, it was harder to work with, neededto be painted, and cost slightly more than the screen.
When these tests were replicated with the solarsimulator, we had slightly better results with the screenthan with the lath in both the three and six layer tests.We were disappointed by the lack of positive correlationbetween our outdoor tests with the actual food dryersand our indoor tests with the solar simulator. But thereare many variables to control and quite a few peopleinvolved in setting things up and collecting data, so ourcontrol was not as tight as we would have liked. Despitethese problems, we are confident in concluding thatthere is not a great deal of difference in performancebetween lath and screen—both work effectively.
Layers of Absorber MeshWe then compared three layers of lath to six layers oflath, and three layers of screen to six layers of screen.Obviously the more screen used, the greater theexpense. The literature on solar air heatersrecommends between five and seven layers. Wearbitrarily picked three and six layers. In our outdoortests, we found that six layers of screen producedtemperatures 5–10°F (1.2–2.4° C) higher than threelayers. Likewise, when we repeated these experimentsoutdoors with lath, we found that six layersoutperformed both two and four layers (see Graph 5).
Steeply Angled Sections U-Tube Through Pass
Reverse Diagonal AbsorberNormal Diagonal Absorber
Dual Pass
Figure 7:Collector/AbsorberConfigurations
40
60
80
100
120
140
160
180
9:00 10:00 11:00 Noon 13:00 14:00 15:00 16:00 17:00 18:00 19:00
Time
Lath Screen Ambient
D e g r e e s F
Graph 4: Lath vs. Screen Absorber
8/8/2019 Improving Solar Food Dryers
http://slidepdf.com/reader/full/improving-solar-food-dryers 8/11
31Home Power #69 • February / March 1999
Solar Dehydration
Tests performed in the solar simulator showed very littledifference between three and six layers. We used thesimulator to test one and two layers and no absorber.With no absorber, the temperature decline was over 60°F (33°C), dropping from 153 to 89°F (67 to 32° C) .The temperatures for one, two, three, and six layers oflath after one half-hour were 145, 155, 159, and 160°F(63, 68, 70, and 71°C). Based on our work, we feel thattwo or three layers of screen or lath are adequate foreffective performance, but adding a few more layers willproduce slightly higher temperatures.
Reflective Is EffectiveWhen constructing a solar air heater, you must decidewhat to do with the bottom of the air flow channel,below the absorbing material. In the next part of ourresearch, we placed aluminum flashing in the bottom ofthe air flow channels of two of the three dryers, on top
of the 3/4 inch (19 mm) foil-faced insulation (CelotexTuff-R, polyisocyanurate). The flashing in one of thedryers was painted flat black. The third dryer was leftwith just the reflective insulation board on the bottom ofthe air flow channel. This test was done with both theactual dryers and the solar simulator. In both cases, thehighest temperatures were attained with the reflectivefoil-faced insulation. The differences were substantial,with the reflective insulation showing readings as muchas 25° F (14° C) higher than the dryer with the blackaluminum flashing (see Graph 6).
Mesh InstallationThe original design called for the mesh to be insertedinto the collector diagonally from the bottom of the airflow channel to the top (see Figure 7). This seemed thebest from a construction point of view. In this test, threeconfigurations were compared: from bottom to top asoriginally designed, from top to bottom, and a series ofmore steeply angled pieces of mesh stretching from thetop to the bottom of the air f low channel. Thedifferences in temperatures attained were very small(see Graph 7), and we concluded that there was notmuch difference in performance.
U-Tube vs. Single PassAnother characteristic of the original design is the U-tube air flow channel. In addition to the air flow channelright below the glazing, there is a second air flowchannel right below the first one, separated by a pieceof insulation board (see Figure 7). We compared adryer with this U-tube design to a dryer with just astraight shot single channel and found no significancedifference in temperatures. We removed the insulationboard from our dryers and have completed all theexperiments detailed in this article without the U-tube
setup.
20
40
60
80
100
120
140
10:00 11:00 Noon 12:30 13:00
Time
2 Layers
4 Layers
6 Layers
Ambient
D e g r e e s F
11:3010:30
Graph 5:Two vs. Four vs. Six Layers of Absorber
20
40
60
80
100
120
140
160
5:00 7:00 9:00 11:00 13:00 15:00 17:00 19:00 21:00
Time
Bottom to Top Top to Bottom
Ambient Steeply Angled Sections
D e g r e e s F
Graph 7: Absorber Installation Comparison
Black Flashing Aluminum Flashing
Ambient Foil-faced Tuff-R
D e g r e e s F
20
40
60
80
100
120
140
160
11:45 12:15 12:45 13:15 13:45 14:15 14:45
Time
Graph 6: Collector Bottom Material Comparison
8/8/2019 Improving Solar Food Dryers
http://slidepdf.com/reader/full/improving-solar-food-dryers 9/11
32 Home Power #69 • February / March 1999
Solar Dehydration
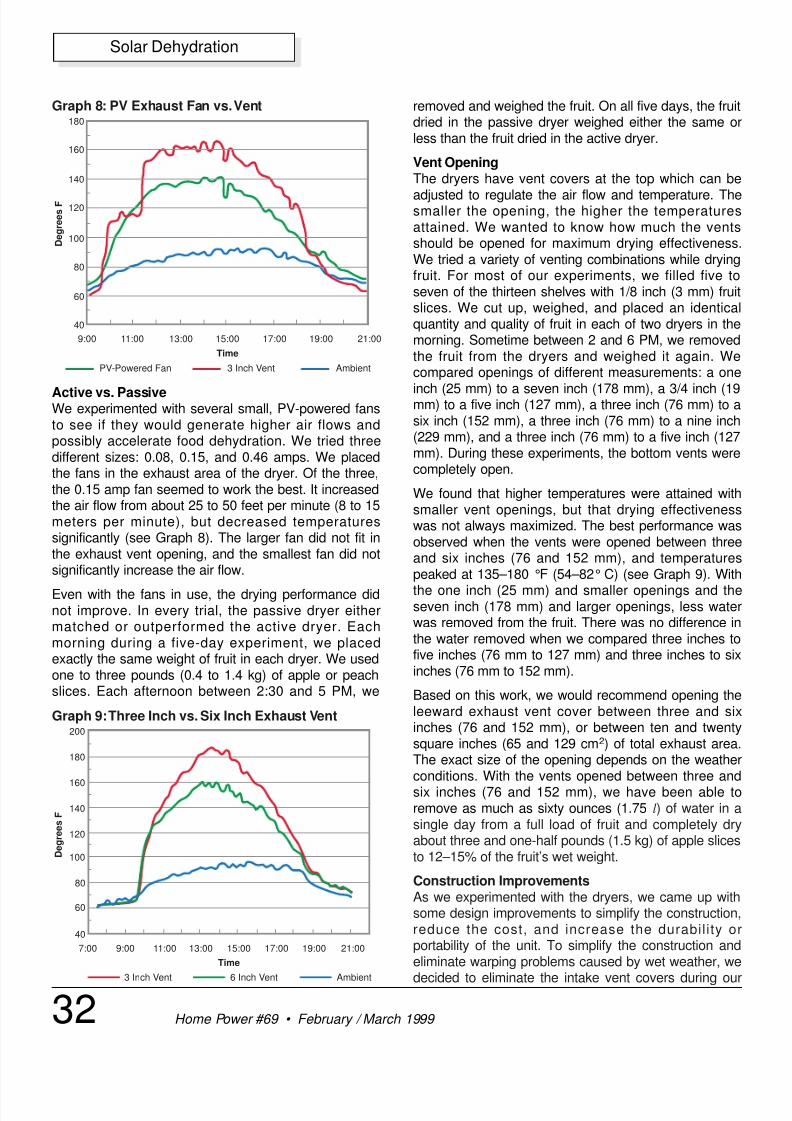
Active vs. PassiveWe experimented with several small, PV-powered fansto see if they would generate higher air flows andpossibly accelerate food dehydration. We tried threedifferent sizes: 0.08, 0.15, and 0.46 amps. We placedthe fans in the exhaust area of the dryer. Of the three,the 0.15 amp fan seemed to work the best. It increasedthe air flow from about 25 to 50 feet per minute (8 to 15meters per minute), but decreased temperaturessignificantly (see Graph 8). The larger fan did not fit inthe exhaust vent opening, and the smallest fan did notsignificantly increase the air flow.
Even with the fans in use, the drying performance didnot improve. In every trial, the passive dryer eithermatched or outperformed the active dryer. Eachmorning during a five-day experiment, we placedexactly the same weight of fruit in each dryer. We usedone to three pounds (0.4 to 1.4 kg) of apple or peachslices. Each afternoon between 2:30 and 5 PM, we
removed and weighed the fruit. On all five days, the fruitdried in the passive dryer weighed either the same orless than the fruit dried in the active dryer.
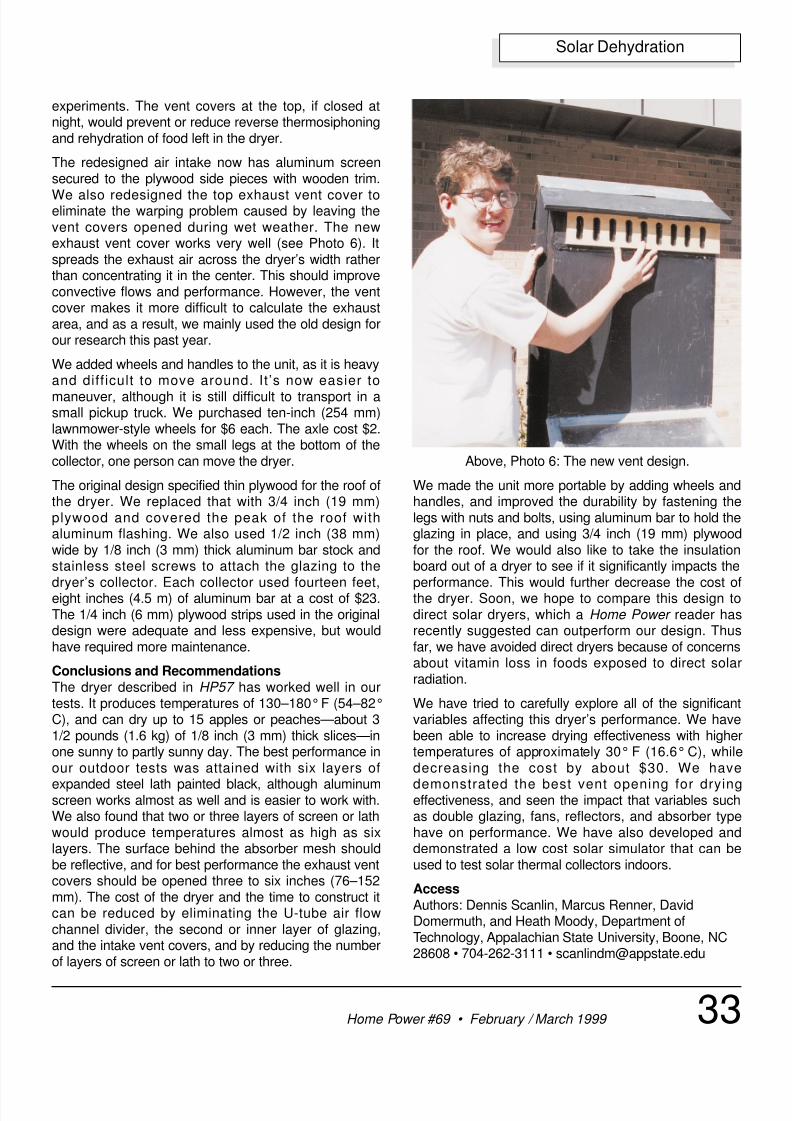
Vent OpeningThe dryers have vent covers at the top which can be
adjusted to regulate the air flow and temperature. Thesmaller the opening, the higher the temperaturesattained. We wanted to know how much the ventsshould be opened for maximum drying effectiveness.We tried a variety of venting combinations while dryingfruit. For most of our experiments, we filled five toseven of the thirteen shelves with 1/8 inch (3 mm) fruitslices. We cut up, weighed, and placed an identicalquantity and quality of fruit in each of two dryers in themorning. Sometime between 2 and 6 PM, we removedthe fruit from the dryers and weighed it again. Wecompared openings of different measurements: a one
inch (25 mm) to a seven inch (178 mm), a 3/4 inch (19mm) to a five inch (127 mm), a three inch (76 mm) to asix inch (152 mm), a three inch (76 mm) to a nine inch(229 mm), and a three inch (76 mm) to a five inch (127mm). During these experiments, the bottom vents werecompletely open.
We found that higher temperatures were attained withsmaller vent openings, but that drying effectivenesswas not always maximized. The best performance wasobserved when the vents were opened between threeand six inches (76 and 152 mm), and temperaturespeaked at 135–180 °F (54–82° C) (see Graph 9). With
the one inch (25 mm) and smaller openings and theseven inch (178 mm) and larger openings, less waterwas removed from the fruit. There was no difference inthe water removed when we compared three inches tofive inches (76 mm to 127 mm) and three inches to sixinches (76 mm to 152 mm).
Based on this work, we would recommend opening theleeward exhaust vent cover between three and sixinches (76 and 152 mm), or between ten and twentysquare inches (65 and 129 cm2) of total exhaust area.The exact size of the opening depends on the weatherconditions. With the vents opened between three andsix inches (76 and 152 mm), we have been able toremove as much as sixty ounces (1.75 l) of water in asingle day from a full load of fruit and completely dryabout three and one-half pounds (1.5 kg) of apple slicesto 12–15% of the fruit’s wet weight.
Construction ImprovementsAs we experimented with the dryers, we came up withsome design improvements to simplify the construction,reduce the cost, and increase the durability orportability of the unit. To simplify the construction andeliminate warping problems caused by wet weather, we
decided to eliminate the intake vent covers during our
40
60
80
100
120
140
160
180
9:00 11:00 13:00 15:00 17:00 19:00 21:00
Time
PV-Powered Fan 3 Inch Vent Ambient
D e g r e e s F
Graph 8: PV Exhaust Fan vs.Vent
40
60
80
100
120
140
160
180
200
7:00 9:00 11:00 13:00 15:00 17:00 19:00 21:00
Time
D e g r e e s F
3 Inch Vent 6 Inch Vent Ambient
Graph 9:Three Inch vs. Six Inch Exhaust Vent
8/8/2019 Improving Solar Food Dryers
http://slidepdf.com/reader/full/improving-solar-food-dryers 10/11
33Home Power #69 • February / March 1999
Solar Dehydration
experiments. The vent covers at the top, if closed atnight, would prevent or reduce reverse thermosiphoningand rehydration of food left in the dryer.
The redesigned air intake now has aluminum screensecured to the plywood side pieces with wooden trim.
We also redesigned the top exhaust vent cover toeliminate the warping problem caused by leaving thevent covers opened during wet weather. The newexhaust vent cover works very well (see Photo 6). Itspreads the exhaust air across the dryer’s width ratherthan concentrating it in the center. This should improveconvective flows and performance. However, the ventcover makes it more difficult to calculate the exhaustarea, and as a result, we mainly used the old design forour research this past year.
We added wheels and handles to the unit, as it is heavyand diff icult to move around. It ’s now easier to
maneuver, although it is still difficult to transport in asmall pickup truck. We purchased ten-inch (254 mm)lawnmower-style wheels for $6 each. The axle cost $2.With the wheels on the small legs at the bottom of thecollector, one person can move the dryer.
The original design specified thin plywood for the roof ofthe dryer. We replaced that with 3/4 inch (19 mm)plywood and covered the peak of the roof withaluminum flashing. We also used 1/2 inch (38 mm)wide by 1/8 inch (3 mm) thick aluminum bar stock andstainless steel screws to attach the glazing to the
dryer’s collector. Each collector used fourteen feet,eight inches (4.5 m) of aluminum bar at a cost of $23.The 1/4 inch (6 mm) plywood strips used in the originaldesign were adequate and less expensive, but wouldhave required more maintenance.
Conclusions and RecommendationsThe dryer described in HP57 has worked well in ourtests. It produces temperatures of 130–180°F (54–82°C), and can dry up to 15 apples or peaches—about 31/2 pounds (1.6 kg) of 1/8 inch (3 mm) thick slices—inone sunny to partly sunny day. The best performance inour outdoor tests was attained with six layers of
expanded steel lath painted black, although aluminumscreen works almost as well and is easier to work with.We also found that two or three layers of screen or lathwould produce temperatures almost as high as sixlayers. The surface behind the absorber mesh shouldbe reflective, and for best performance the exhaust ventcovers should be opened three to six inches (76–152mm). The cost of the dryer and the time to construct itcan be reduced by eliminating the U-tube air flowchannel divider, the second or inner layer of glazing,and the intake vent covers, and by reducing the numberof layers of screen or lath to two or three.
We made the unit more portable by adding wheels andhandles, and improved the durability by fastening thelegs with nuts and bolts, using aluminum bar to hold theglazing in place, and using 3/4 inch (19 mm) plywoodfor the roof. We would also like to take the insulationboard out of a dryer to see if it significantly impacts the
performance. This would further decrease the cost ofthe dryer. Soon, we hope to compare this design todirect solar dryers, which a Home Power reader hasrecently suggested can outperform our design. Thusfar, we have avoided direct dryers because of concernsabout vitamin loss in foods exposed to direct solarradiation.
We have tried to carefully explore all of the significantvariables affecting this dryer’s performance. We havebeen able to increase drying effectiveness with highertemperatures of approximately 30° F (16.6° C), whiledecreasing the cost by about $30. We have
demonstrated the best vent opening for dryingeffectiveness, and seen the impact that variables suchas double glazing, fans, reflectors, and absorber typehave on performance. We have also developed anddemonstrated a low cost solar simulator that can beused to test solar thermal collectors indoors.
AccessAuthors: Dennis Scanlin, Marcus Renner, DavidDomermuth, and Heath Moody, Department ofTechnology, Appalachian State University, Boone, NC28608 • 704-262-3111 • [email protected]
Above, Photo 6: The new vent design.
8/8/2019 Improving Solar Food Dryers
http://slidepdf.com/reader/full/improving-solar-food-dryers 11/11
34 Home Power #69 • February / March 1999
Solar Dehydration
Solar Cookers International (SCI), 1919 21st Street,Sacramento, CA 95814 • 916-455-4499Fax: 916-455-4498 • [email protected]
Sun-Lite HP glazing was purchased from SolarComponents Corporation, 121 Valley Street,
Manchester, NH 03103-6211 • 603-668-8186Fax: 603-668-1783 • [email protected]
Scales, anemometers, and other data collectionequipment were purchased from Thomas Scientific,PO Box 99, Swedesboro, NJ 08085 • 800-345-2100609-467-2000 • Fax: [email protected] • www.thomassci.com
Data logger was purchased from Pace Scientific, Inc.,6407 Idlewild Rd., Suite 2.214, Charlotte, NC 28212704-568-3691 • Fax: 704-568-0278
[email protected] • www.pace-sci.com
Creating Peace
of Mind!
P eace of mind has become apremium in today’s society. The Y2K problem has created unrest, fear andeven panic in the minds of millions of Americans. The global economy isgoing berserk. But while the future isdefinitely uncertain, one thing you cancount on is the fact that no matter
what happens, you will need food and water! Emergency food storage is a wise safeguard against all emergen-cies from floods, earthquakes and
hurricanes to unemployment or illness.Millennium III Foods offers nutritionallybalanced food plans for individuals,families or communities at competitiveprices.
At Millennium III Foods, we don’t justsell storage food…
WE CREATE PEACE OF MIND.
• TWO WEEK SHIPPING• “One Year Supplies” are nutri-
tionally balanced to deliver over
1,900 calories per day• Real food that’s easy to use!• Awarded #1 Best Tasting
• A La Carte ordering or purchase One
Year Units for one, two or four per-
sons. Great value, simple planning!
Call for prices and information
SALES 888•883•1603
FAX 406•388•2603
P.O. Box 10010Bozeman, Montana 59719WWW.M3MFOODS.COM
Fight Global Warming
P.O. Box 1101, Arcata, CA 95518-1101
Phone: 707-822-9095 • Fax: 707-822-6213 • www.sunfrost.com