inessential ltex - mit
TRANSCRIPT

Inessential LATEX ∗
(Revision: 4.4)
The Student Information Processing Board
July 7, 2004
∗Copyright c© 1987–2004 Student Information Processing Board of the Massachusetts Institute of Tech-nology
Inessential LATEX
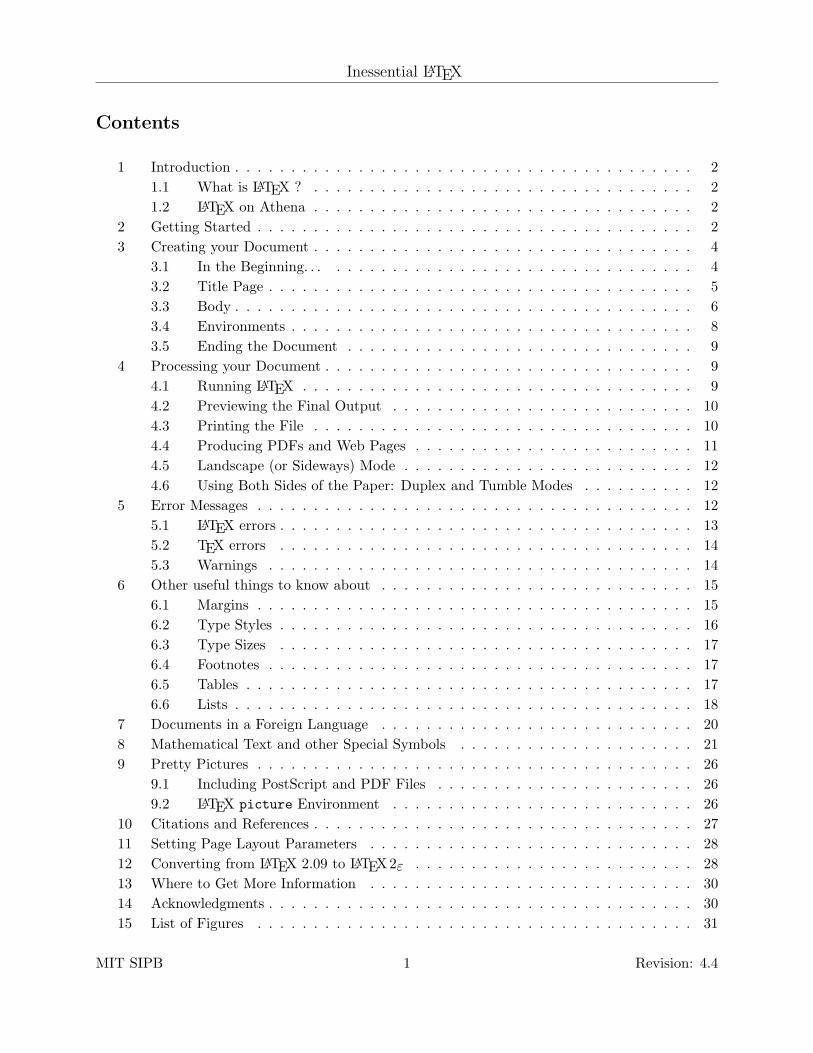
Contents
1 Introduction . . . . . . . . . . . . . . . . . . . . . . . . . . . . . . . . . . . . . . . . . 21.1 What is LATEX ? . . . . . . . . . . . . . . . . . . . . . . . . . . . . . . . . . . 21.2 LATEX on Athena . . . . . . . . . . . . . . . . . . . . . . . . . . . . . . . . . . 2
2 Getting Started . . . . . . . . . . . . . . . . . . . . . . . . . . . . . . . . . . . . . . . 23 Creating your Document . . . . . . . . . . . . . . . . . . . . . . . . . . . . . . . . . . 4
3.1 In the Beginning. . . . . . . . . . . . . . . . . . . . . . . . . . . . . . . . . . . 43.2 Title Page . . . . . . . . . . . . . . . . . . . . . . . . . . . . . . . . . . . . . . 53.3 Body . . . . . . . . . . . . . . . . . . . . . . . . . . . . . . . . . . . . . . . . . 63.4 Environments . . . . . . . . . . . . . . . . . . . . . . . . . . . . . . . . . . . . 83.5 Ending the Document . . . . . . . . . . . . . . . . . . . . . . . . . . . . . . . 9
4 Processing your Document . . . . . . . . . . . . . . . . . . . . . . . . . . . . . . . . . 94.1 Running LATEX . . . . . . . . . . . . . . . . . . . . . . . . . . . . . . . . . . . 94.2 Previewing the Final Output . . . . . . . . . . . . . . . . . . . . . . . . . . . 104.3 Printing the File . . . . . . . . . . . . . . . . . . . . . . . . . . . . . . . . . . 104.4 Producing PDFs and Web Pages . . . . . . . . . . . . . . . . . . . . . . . . . 114.5 Landscape (or Sideways) Mode . . . . . . . . . . . . . . . . . . . . . . . . . . 124.6 Using Both Sides of the Paper: Duplex and Tumble Modes . . . . . . . . . . 12
5 Error Messages . . . . . . . . . . . . . . . . . . . . . . . . . . . . . . . . . . . . . . . 125.1 LATEX errors . . . . . . . . . . . . . . . . . . . . . . . . . . . . . . . . . . . . . 135.2 TEX errors . . . . . . . . . . . . . . . . . . . . . . . . . . . . . . . . . . . . . 145.3 Warnings . . . . . . . . . . . . . . . . . . . . . . . . . . . . . . . . . . . . . . 14
6 Other useful things to know about . . . . . . . . . . . . . . . . . . . . . . . . . . . . 156.1 Margins . . . . . . . . . . . . . . . . . . . . . . . . . . . . . . . . . . . . . . . 156.2 Type Styles . . . . . . . . . . . . . . . . . . . . . . . . . . . . . . . . . . . . . 166.3 Type Sizes . . . . . . . . . . . . . . . . . . . . . . . . . . . . . . . . . . . . . 176.4 Footnotes . . . . . . . . . . . . . . . . . . . . . . . . . . . . . . . . . . . . . . 176.5 Tables . . . . . . . . . . . . . . . . . . . . . . . . . . . . . . . . . . . . . . . . 176.6 Lists . . . . . . . . . . . . . . . . . . . . . . . . . . . . . . . . . . . . . . . . . 18
7 Documents in a Foreign Language . . . . . . . . . . . . . . . . . . . . . . . . . . . . 208 Mathematical Text and other Special Symbols . . . . . . . . . . . . . . . . . . . . . 219 Pretty Pictures . . . . . . . . . . . . . . . . . . . . . . . . . . . . . . . . . . . . . . . 26
9.1 Including PostScript and PDF Files . . . . . . . . . . . . . . . . . . . . . . . 269.2 LATEX picture Environment . . . . . . . . . . . . . . . . . . . . . . . . . . . 26
10 Citations and References . . . . . . . . . . . . . . . . . . . . . . . . . . . . . . . . . . 2711 Setting Page Layout Parameters . . . . . . . . . . . . . . . . . . . . . . . . . . . . . 2812 Converting from LATEX 2.09 to LATEX 2ε . . . . . . . . . . . . . . . . . . . . . . . . . 2813 Where to Get More Information . . . . . . . . . . . . . . . . . . . . . . . . . . . . . 3014 Acknowledgments . . . . . . . . . . . . . . . . . . . . . . . . . . . . . . . . . . . . . . 3015 List of Figures . . . . . . . . . . . . . . . . . . . . . . . . . . . . . . . . . . . . . . . 31
MIT SIPB 1 Revision: 4.4

Inessential LATEX
1 Introduction
1.1 What is LATEX ?
LATEX is a complex text-processing system often recommended by the SIPB and used for scholarlypublishing all over academia, and by many of your professors.
There are LATEX manuals available for use in the SIPB office, and you’re welcome to drop by theoffice with a question. There are also manuals available for short-time loan from the OLC (On-LineConsultants) office (N42) and some available for withdrawal from the MIT Libraries. There is alsoplenty of documentation on the World Wide Web.
If you have any comments, additions or corrections to this manual, please send them [email protected] or drop by the SIPB office (W20-557) and let us know.
1.2 LATEX on Athena
You can run LATEX on any Athena-ized workstation. Instructions for setting up your environmentand running LATEX on these platforms are given in section 4 of this document. To get moreinformation on using other software available on the Athena workstations, see the Getting Startedon Athena document available from MIT Copy Tech, and the Inessential Guide to Athena availablefrom the SIPB office (W20-557).
Versions of LATEX can be obtained many other types of machines. However, many LATEX dis-tributions for popular platforms are commercial packages, and their features and usage may differ.Hopefully, your LATEX package will come with some instructions for setting it up and running it.
The version of LATEX described in this document is version LATEX 2ε, which is the versioncurrently supported by Athena and SIPB. Version 2.09 is still available in the newtex locker underthe name latex209. Section 11 of this document describes the differences between the two versions.
2 Getting Started
This section describes how to typeset a simple paper in the standard way for processing by LATEX.All of the information here is also presented elsewhere in this document, but with a lot more detail;think of this section as “the short form” to using LATEX.
The first thing you need to do is to create your LATEX source file. This file contains all the textfor your paper as well as LATEX commands (to be described shortly). You can use any editor youwish to create the file; documentation on how to use text editors is available from Athena. Emacsincludes special code set up to make using LATEX easier, and is a good first choice. You can nameyour LATEX file anything you wish; the only requirement is that it end with the four characters.tex.
The general format of a LATEX file is shown in the following example.
Revision: 4.4 2 MIT SIPB
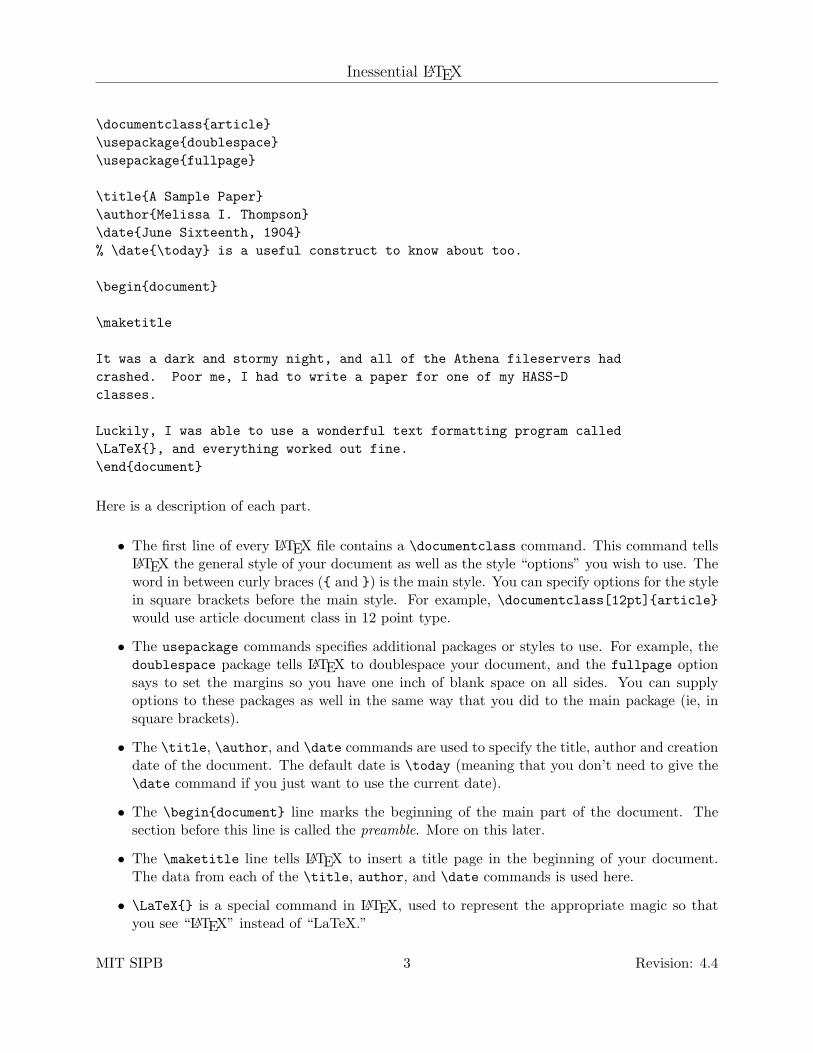
Inessential LATEX
\documentclassarticle\usepackagedoublespace\usepackagefullpage
\titleA Sample Paper\authorMelissa I. Thompson\dateJune Sixteenth, 1904% \date\today is a useful construct to know about too.
\begindocument
\maketitle
It was a dark and stormy night, and all of the Athena fileservers hadcrashed. Poor me, I had to write a paper for one of my HASS-Dclasses.
Luckily, I was able to use a wonderful text formatting program called\LaTeX, and everything worked out fine.\enddocument
Here is a description of each part.
• The first line of every LATEX file contains a \documentclass command. This command tellsLATEX the general style of your document as well as the style “options” you wish to use. Theword in between curly braces ( and ) is the main style. You can specify options for the stylein square brackets before the main style. For example, \documentclass[12pt]articlewould use article document class in 12 point type.
• The usepackage commands specifies additional packages or styles to use. For example, thedoublespace package tells LATEX to doublespace your document, and the fullpage optionsays to set the margins so you have one inch of blank space on all sides. You can supplyoptions to these packages as well in the same way that you did to the main package (ie, insquare brackets).
• The \title, \author, and \date commands are used to specify the title, author and creationdate of the document. The default date is \today (meaning that you don’t need to give the\date command if you just want to use the current date).
• The \begindocument line marks the beginning of the main part of the document. Thesection before this line is called the preamble. More on this later.
• The \maketitle line tells LATEX to insert a title page in the beginning of your document.The data from each of the \title, author, and \date commands is used here.
• \LaTeX is a special command in LATEX, used to represent the appropriate magic so thatyou see “LATEX” instead of “LaTeX.”
MIT SIPB 3 Revision: 4.4

Inessential LATEX
• The \enddocument line marks the end of the main part of the document. In LATEX, some-thing between \beginfoo and \endfoo is said to be in the foo environment (more onenvironments later).
3 Creating your Document
For LATEX to know that you are writing a document, you have to give it some information first.This section describes what you need to have in a file to run it through LATEX.
3.1 In the Beginning. . .
A typical file, such as a term paper, will begin like this:
\documentclassarticle
\begindocument
This tells LATEX the following things:
• This example is an article. The article style may be used for any kind of standard paper.An article is shorter than a report.1 The book style also exists. It is meant for real books.These options control section headings and tables of contents and other things.
• The main text is printed in a 10 point font by default. There are several text sizes available:10, 11, and 12 point. This document is printed in 11 point. The various type sizes withina document are relative to this base size, as described in subsection 6.3. If no base size isspecified, 10 point is assumed. To change to a base size of 11 point or 12 point, change thedocument class with an optional parameter, placed inside square braces immediately afterthe command name, like this:
\documentclass[11pt]article
• There are many other optional parameters which can be used, some of which will be mentionedlater. They are all entered inside the square brackets and are separated by commas, with nospaces in between. For example,
\documentclass[twoside,11pt]report\usepackagedoublespace
sets the document up as an 11-point, double-spaced, double-sided report.1This LATEX guide is a report.
Revision: 4.4 4 MIT SIPB
Inessential LATEX
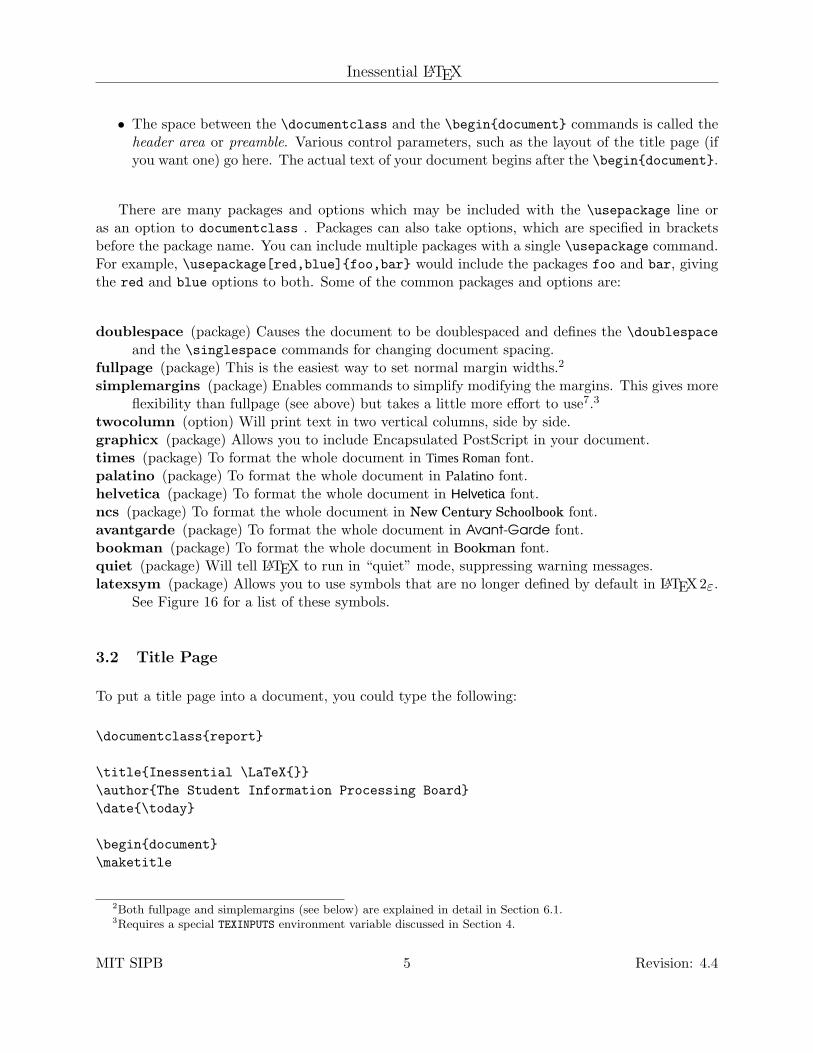
• The space between the \documentclass and the \begindocument commands is called theheader area or preamble. Various control parameters, such as the layout of the title page (ifyou want one) go here. The actual text of your document begins after the \begindocument.
There are many packages and options which may be included with the \usepackage line oras an option to documentclass . Packages can also take options, which are specified in bracketsbefore the package name. You can include multiple packages with a single \usepackage command.For example, \usepackage[red,blue]foo,bar would include the packages foo and bar, givingthe red and blue options to both. Some of the common packages and options are:
doublespace (package) Causes the document to be doublespaced and defines the \doublespaceand the \singlespace commands for changing document spacing.
fullpage (package) This is the easiest way to set normal margin widths.2
simplemargins (package) Enables commands to simplify modifying the margins. This gives moreflexibility than fullpage (see above) but takes a little more effort to use7.3
twocolumn (option) Will print text in two vertical columns, side by side.graphicx (package) Allows you to include Encapsulated PostScript in your document.times (package) To format the whole document in Times Romanfont.palatino (package) To format the whole document in Palatino font.helvetica (package) To format the whole document in Helvetica font.ncs (package) To format the whole document in New Century Schoolbook font.avantgarde (package) To format the whole document in Avant-Garde font.bookman (package) To format the whole document in Bookman font.quiet (package) Will tell LATEX to run in “quiet” mode, suppressing warning messages.latexsym (package) Allows you to use symbols that are no longer defined by default in LATEX 2ε.
See Figure 16 for a list of these symbols.
3.2 Title Page
To put a title page into a document, you could type the following:
\documentclassreport
\titleInessential \LaTeX\authorThe Student Information Processing Board\date\today
\begindocument\maketitle
2Both fullpage and simplemargins (see below) are explained in detail in Section 6.1.3Requires a special TEXINPUTS environment variable discussed in Section 4.
MIT SIPB 5 Revision: 4.4
Inessential LATEX
Creating a title page is a two step process in LATEX. First you give it the information you wantit to put on the title page and then you tell it to make the title page. The \title, \authorand \date commands do not generate text—they merely specify what \maketitle will place onthe title page. If you use \maketitle, you must specify a \title, but any or all of the othersmay be omitted. The \maketitle command generates the title page. You must place it after the\begindocument. In the article document style, the title “page” is at the top of the first pageof the document. To put the title “page” on a page by itself place a \newpage command after the\maketitle. In the report and book styles, it is on a separate page at the beginning.
LATEX will automatically number pages, but often you don’t want a page number on the titlepage. To eliminate the page number on the first page, put \thispagestyleempty before the\maketitle.
It is possible to number pages alphabetically or with roman numerals. It is also possible tochange the current page number. See the section of the LATEX manual on page styles.
You can also generate a title page using the titlepage environment. Anything placed in thisenvironment will be placed on the title page (which will be a separate page even if you are usingthe article document class). Another good way to create a title page is to do it yourself, probablyusing commands like \begincenter, \large, and \newpage. Using this method, LATEX won’tknow the difference between your title page and any other page, but it may be easier to get whatyou want.
3.3 Body
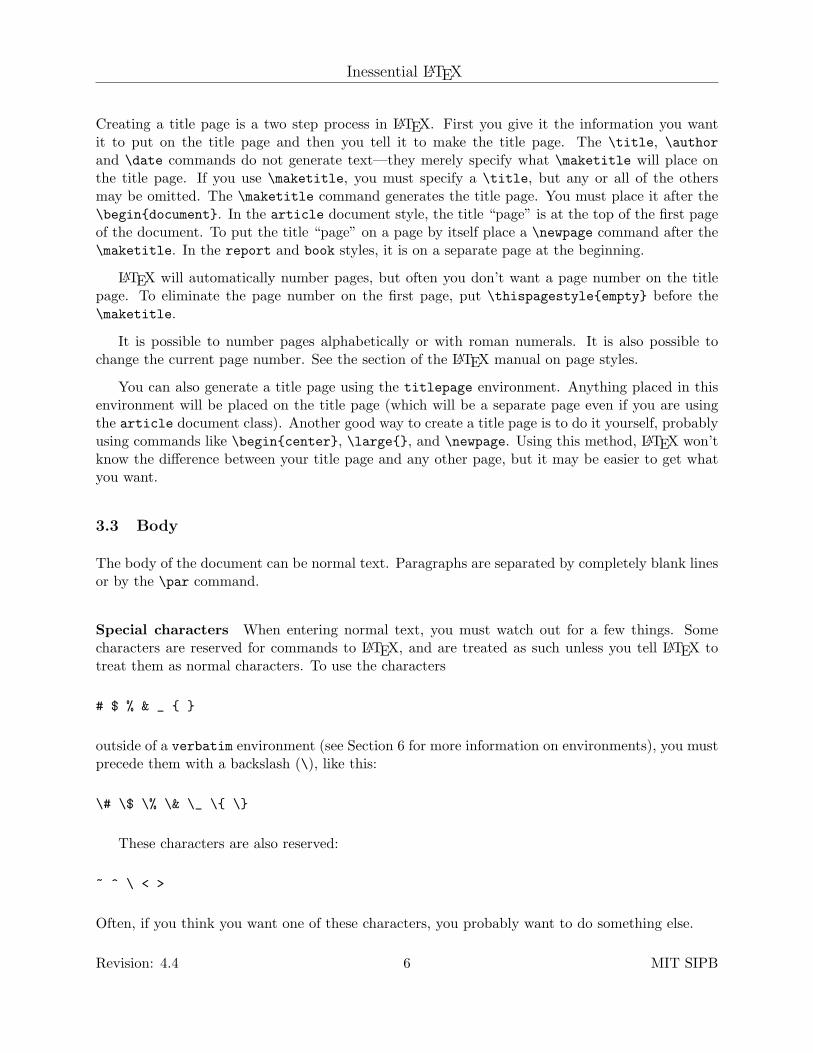
The body of the document can be normal text. Paragraphs are separated by completely blank linesor by the \par command.
Special characters When entering normal text, you must watch out for a few things. Somecharacters are reserved for commands to LATEX, and are treated as such unless you tell LATEX totreat them as normal characters. To use the characters
# $ % & _
outside of a verbatim environment (see Section 6 for more information on environments), you mustprecede them with a backslash (\), like this:
\# \$ \% \& \_ \ \
These characters are also reserved:
~ ^ \ < >
Often, if you think you want one of these characters, you probably want to do something else.
Revision: 4.4 6 MIT SIPB

Inessential LATEX
• ~ can be produced in several ways. If you want a tilde over a character, like n, you can type\~n or \~n. If you want a mathematical ∼ you can type $\sim$ (which stands for similarto). More often you will want the ∼ within another math expression anyhow; for more detailsee Section 8 below.
• ^ can likewise mean circumflex, as in o which is produced with \^o or \^o. In math modeyou would use \hato to indicate a unit vector.
• \ is not used very often in normal writing, but you can type $\backslash$ if you want touse it.
• < and > can be written as $<$ and $>$. If you insert these symbols in your document withoutquoting them as described here, they will appear as upside-down exclamation points (¡) andquestion marks (¿).
Quotation Marks Ever notice how typeset material always has nice quotation marks, for ex-ample, “this” instead of ”this”? LATEX can generate these fancy quotes with just a little efforton your part. The “ character, used to start a quotation, is made by typing ‘‘. Note that theseare reverse quote, or “back-tick” characters, usually found on the upper-left hand side of PC-stylekeyboards (however, the Sun Type 5 keyboard puts it in the upper right). The ” character ismade by typing ’’. In Emacs, the default mode for LATEX files (called tex-mode) will generate theproper characters when you press the ” key. LATEX mode is automatically loaded when you load afile ending in .tex that has a \documentclass command near the top.
Divisions Text can be divided into parts, chapters,4 sections, subsections, subsubsections, para-graphs, and subparagraphs. Each division has its own LATEX command (\section, \subsection,etc.). These commands produce the appropriate headings and entries in the table of contents, aswell as numbering the divisions. For normal use, you probably want to use section, subsection,and paragraph. The section paragraph is different from the command \par. A section commandplaces the title you give it in bold at the beginning of the paragraph. The \par command simplymarks the beginning of the paragraph, as would a blank line.
For example, in this document you are currently reading:
\sectionCreating Your Document... things that are in the section ...\subsectionBody... things that are in the subsection ...\paragraphDivisions... things that are in the paragraph ...
If you don’t want the division to be numbered in the document, include an asterisk (*) afterthe division name (e.g. \subsection*Body).
4Chapters are available within book and report but not in article, so that an article can be included as a chapter.
MIT SIPB 7 Revision: 4.4

Inessential LATEX
Table of Contents Since LATEX already has all of this information about the structure of thedocument, it can easily collect it and build a table of contents. It will only do this if you explicitlytell it to. LATEX will put the table of contents wherever you include the line
\tableofcontents
in your document. To put the table of contents at the beginning (where people expect to findit) just put it in after the \maketitle command. You should run LATEX at least twice after youadd the table of contents, since it takes two or three tries to get the table of contents right—onceto write all the page numbers out to a file5, and a second time to include those numbers at thebeginning of the document, and possibly a third time if the number of pages the table of contentsoccupies changes.
When you make major changes, LATEX may tell you that you need to run it twice. It is always agood idea to do this before you print the final version of a document, just to make sure everythingis correct.
3.4 Environments
If you want to change how LATEX treats a certain section of text (for instance changing the typestyle), you have to specify what text. In LATEX lingo, you need to indicate the scope of the commandyou are using to change the environment. For small sections of text, this is done by starting theenvironment with an open brace () character, followed by the command to change the defaults,and ending with the close brace character.
For example, to make appear in a larger font, you could type \Large larger font. Thislimits the scope of the large command to the environment within the braces.
An environment can also be delimited with a begin–end pair. This is quite useful for largersections of text. For example, to center multiple lines of text,
likethese two,
you could use the following lines:
\begincenterlike\\these two,\endcenter
5This information is stored in the file ending in .aux, which some people remove between invocations of LATEX.Doing this may save space, but it causes LATEX to have to repeat a lot of work, so you should avoid doing this untilyou’re sure that you won’t be re-running LATEX again in the near future.
Revision: 4.4 8 MIT SIPB
Inessential LATEX
Note the \\ following the first line. This is a command which tells LATEX to break the line at thatpoint, rather than filling the text completely between the two margins like it normally does. Thisallows you to force lines to end when you want them to, rather than when LATEX wants them to.
3.5 Ending the Document
The last thing to put in the document is the line
\enddocument
LATEX ignores anything which follows the \enddocument command. The only text after thisshould be comments, since you have now finished your document.
4 Processing your Document
Once you have written your file and entered all the necessary LATEX commands, you have toprocess the file before previewing or printing it. This separation of editing and processing is true foralmost any text formatter, and is the major difference between text formatters and word processingsystems. FrameMaker and EZ both lean more towards the word processing, WYSIWYG6 style ofediting7. A graphical frontend to LATEX named LyX is also available in the outland locker.8
4.1 Running LATEX
If you have used any special .sty files (the optional packages or options mentioned previously)which are only available from SIPB, you must first set an environment variable to let LATEX knowwhere to go to find these files. The command is:
attach sipbsetenv TEXINPUTS .:/mit/sipb/lib/tex/macros/:
These lines can be placed in your .environment file. (See the Athena document “EssentialDotfiles.” for more details). The trailing colon represents a blank path entry, which LATEX replaceswith the default path entries.
You can process a LATEX file by typing6What You See Is What You Get7The problem with WYSIWYG systems is that often what you see isn’t really what you get, and the system
usually doesn’t have any good way to deal with these problems. We prefer to think of it as WYSIRN (What You SeeIs Really Neat) vs. WYSIWYAF (What You See Is What you Asked For) systems.
8The outland locker is maintained by the SIPB and many other contributors and generally holds programs thatare unsupported or in testing. This means that you probably don’t want to be using LyX (or anything else fromoutland for important work. Please read the file /mit/outland/README for more information on the support policy.
MIT SIPB 9 Revision: 4.4

Inessential LATEX
latex filename.tex
where filename.tex is the name of your file that you want to process. LATEX produces an outputfile named filename.dvi (a device independent file), which can be converted and printed onvarious types of printers.
Running Previous Versions of LATEX The supported version of LATEX on Athena is currentlyLATEX 2ε, but there are usually separate installations of older versions available. Currently, LATEX2.09 is available in the newtex locker. You can access it by typing:
add newtexlatex209 filename.tex
at the athena% prompt.
See Section 12 for information on converting LATEX 2.09 documents to LATEX 2ε.
4.2 Previewing the Final Output
It is usually convenient to use the graphic display of your workstation to preview your documentbefore printing it. The command xdvi filename & creates a window which shows you what thefile will look like when it is printed on the printer. After you position the xdvi window on yourscreen, it should show the first page of the document. You can use this like the more command: hitspace to go forward a page, and b to go back a page. This way you can go back and forth betweenthe xdvi previewer and the LATEX source, rerunning LATEX and looking at the xdvi display eachtime. (xdvi automatically notices that you’ve changed something, and displays the newest output.)
4.3 Printing the File
Printing on Athena When you are ready to print out the file, you must convert from dvi formatto the format of the printer you are using. To translate filename.dvi to PostScript9 and send itto your default printer, use the command:
dvips filename.dvi
If you have no default printer10 or you want to send the printout to a specific printer use thecommand:
dvips -Pprintername filename.dvi
replacing printername with the name of the printer to which you want to send your document.9PostScript is the “language” understood by Athena printers, and many others.
10You can check this by typing lpq and noting what printer it lists.
Revision: 4.4 10 MIT SIPB
Inessential LATEX
It is possible to obtain the intermediate PostScript file with the command
dvips -o filename.ps filename.dvi
It is possible to select particular pages out of a document, if you are making changes and wantto see what they will look like on paper (note that xdvi gives a very accurate rendition, and shouldbe enough for most purposes). The command
dvips -pfirst -llast -Pprintername filename.dvi
will print from the page numbered “first” to the page numbered “last.”
To get more information on dvips, consult the manual page (typing man dvips at your athenaprompt). A more detailed document can be found by typing texdoc dvips. Note that the olderdvi2ps program no longer exists on Athena.
4.4 Producing PDFs and Web Pages
The Adobe Portable Document Format is now the lingua franca of much of the world, and LATEXprovides you with a way to produce them. When you are ready to print a document, you are alsoready to make a PDF of it. Typing pdflatex filename.tex will go through a similar processand produce a file named filename.pdf with the same appearance and typesetting as the PostScriptfile the section above showed you how to make. If, however, you run into a bug in pdflatex, youcan bypass it by typing latex filename.tex to produce a DVI file, and then making a PDF fileout of the DVI file. In the ghostscript locker there is the dvipdf utility and among the regularAthena utilities there is dvipdfm. Type dvipdf filename./dvi or dvipdfm filename.dvi toproduce filename.pdf. If the resulting PDF gets a mathematical character wrong (as it may), amore circuitous route is still available: from the DVI, make a PostScript file using dvips -P pdf-G0 file.dvi, and then distill file.ps to make the PDF. (This last utility is available in theacro locker.)
Since the PDF format allows for things that PostScript does not, like active Web links, andforms, you may not be able to use the DVI to PDF routes. So here are some more notes on usingpdflatex. Unlike latex, pdflatex cannot import EPS files for images. To put figures in yourdocument, you can make them available to pdflatex as their own PDFs, using epstopdf. More onthat in Section 9.1. To encode hypertext references in your PDF, you can use the hyperref packageand use the macro \hrefURLtext in the same way you write the equivalent HTML prose. Andfinally, to put in your own PDF bookmarks, use \pdfbookmark[n]titleinternal_label,with internal_label serving as a label for any \ref references you want to put in.
The latex2html program, available on the Web and on Athena in the infoagents locker, is aPerl script that generates a set of HTML pages from a Latex document. It can make a single Webpage, or a set of them, with a page for each section, subsection or so on and so forth. To generatea Web page set based in the directory dstdir, from a document file.tex, type latex2html -ddstdir file.tex. This will generate a whole tree of HTML files for each subsection. The controlhow deep the tree should go, there is the -split option. For a single HTML page, set it as -split0. For more information, type latex2html -help.
MIT SIPB 11 Revision: 4.4
Inessential LATEX
4.5 Landscape (or Sideways) Mode
If you want to print your document “sideways,” with the text running parallel to the long edge ofthe paper, simply include
\speciallandscape
in the preamble of your document. You also need to set the margins to correspond to this newpaper size (11x8.5′′ instead of 8.5x11′′). See Section 6.1 for details on changing them.
4.6 Using Both Sides of the Paper: Duplex and Tumble Modes
With dvips, you can print in duplex or tumble mode by using the -h option:
dvips -h duplex filename.dvi
or
dvips -h tumble filename.dvi
If you always want your document to be printed two-sided, you can include one of the followingcommands in your document preamble:
\specialheader=duplex\specialheader=tumble
The difference between duplex and tumble is whether pages are printed with opposite sidessharing a “top” of the page (duplex), so that turning the page side-to-side leaves both sides correctlyoriented (as in a book), or whether these pages are flipped vertically (tumbled), so that turning thepage up leaves both sides correctly oriented (as in a legal notepad). The orientation will obviouslybe somewhat different if the printout is landscape mode instead of portrait mode. For most uses,the duplex mode is the more fitting.
5 Error Messages
The error messages produced by LATEX are the most confusing part of using it. Most people havetrouble understanding what LATEX is telling them. This section describes some of the more commonerrors, what they mean, and how you can fix the problem.
In general, when an error occurs you should hit return to see if LATEX will keep on going, orenter x to exit. If LATEX is asking for a filename, Control-D will help exit LATEX. If x, ^C, and ^Ddo not return you to your athena% prompt, type ^Z. In order to kill the stopped process you needto do the following (assuming that you use csh or one of its descendants):
Revision: 4.4 12 MIT SIPB

Inessential LATEX
athena% kill %latexathena%[1] + Terminated latexathena%
By hitting <return> when you get your prompt back you should get the message that LATEX wasindeed killed.
5.1 LATEX errors
There are two kinds of errors: LATEX errors and TEX errors. TEX is the language in which LATEXis written, and some of the basic errors come from there. All errors have an error message whichstarts with an exclamation point. A LATEX error can be distinguished from a TEX error by thefollowing:
! LaTeX error: <error message here>
See the LaTeX manual or LaTeX Companion for explanation.Type H <return> for immediate help....
The error message is printed on the next line, which starts with a number and then the text of theline that caused the error. The part of the number after the decimal point is the line number wherethe error occurred. If you cannot figure out what the problem is by looking at the error message,you can go to the offending line in the original document and look at it. The problem may lie afew lines above the one which LATEX complained about. The error message should make more senseafter you have looked at the offending text.
Some of the more common error messages are:
! \begin... ended by \end....
This is usually caused by forgetting to end an environment which was started by a \begin command.
! Can be used only in preamble.
Certain commands can only be entered before the \begindocument statement. This part of thefile is called the “preamble.” Move the offending statement to the preamble and try again.
! Environment ... undefined.
An environment defined in a \begin or \end statement is not recognized. This is usually causedby a spelling error.
MIT SIPB 13 Revision: 4.4

Inessential LATEX
! Missing \begindocument.
All files must have a \begindocument before any text which is intended to be printed.
5.2 TEX errors
! I can’t find file ‘...’.
This often indicates that the file name was mistyped or that you are not in the correct directory.TEX will wait for you to type in a file name. If a mistake was made, and you want to abort thecommand, you will need to hit ^D which will cause an “Emergency stop” when TEX is waiting foryou to type something.
! Missing inserted.! Missing inserted.
! Missing $ inserted.
This usually occurs if a command was typed which can only be used in math mode. LATEX can beallowed to continue, but the output will look strange. The offending command should be put intomath mode.
! Undefined control sequence.l.7 \auhtorThe Student Information Processing Board
The command \auhtor on line seven is misspelled and so LATEX does not recognize it. If LATEXdoes not recognize a command you used, but you think it exists, check the documentation againto make sure you are using the command correctly.
If you cannot figure out what is wrong, give the SIPB office a call,11 or try the Athena Consul-tants.12 The Zephyr help class is also often useful; see the document Inessential Zephyr for moredetails on using zephyr classes and instances.
5.3 Warnings
Warnings do not cause LATEX to stop processing the document, but preview the output beforeprinting your final version to make sure the output is acceptable. Below are some common warnings,followed by explanations. In general, TEX is probably more of a perfectionist about wanting to getyour spacing right than you are, so you shouldn’t worry if it complains about overfull/underfullwhen it looks fine to you.
11Our phone number is 253-7788, or stop by our office in W20-557—just outside the Student Center cluster.12On-line, type olc or call 253-4435.
Revision: 4.4 14 MIT SIPB

Inessential LATEX
Overfull \hbox (24.30751pt too wide) in paragraph at lines 6--9
This occurs whenever a line is too wide to fit between the margins. LATEX will produce a line thatis too wide when it cannot find an acceptable place to insert a line break. Use xdvi to look at theoutput, then change the file if necessary.
Underfull \hbox (badness 10000) in paragraph at lines 6--18
This error is similar to Overfull \hbox. It occurs when LATEX is forced to put lots of space betweenwords to justify the text. This usually happens when a paragraph is not properly ended beforecertain kinds of environments (like forcing a carriage return with \\). Inserting a blank line or a\par command after the offending paragraph should fix it.
LaTeX Warning: Label(s) may have changed. Rerun to get cross-references right.
This occurs when page numbers change from one running of LATEX to another. Simply re-runLATEX to resolve the problem. Occasionally, LATEX will have to be run twice in a row to clear upthe problem.
6 Other useful things to know about
LATEX is very powerful. There are commands to do almost anything. This guide is an attempt toexplain many of the commonly used commands. Below you will find information that should helpyou produce papers with LATEX.
6.1 Margins
LATEX has very large default margins—almost two inches wide on each side. Most people don’t likethem.13 Fortunately, LATEX margins are easy to change. An easy way to use more of the page is touse the fullpage option to documentclass (see Section 3.2).
While most text formatting systems use left and right margins, LATEX keeps track of the leftmargin and the text width. In fact, since LATEX lets you specify different margins for even and oddnumbered pages, it keeps track of two left-hand margins.14 So, to reduce the left hand margin byhalf an inch you would use the commands:
\addtolength\oddsidemargin-.5in\addtolength\evensidemargin-.5in
Then to reduce the “right-hand margin” by the same amount, you would increase text width:13Except for people writing books and theses, who need them.14While this is very useful for double-sided documents, it can make changing the margins a little confusing.
MIT SIPB 15 Revision: 4.4
Inessential LATEX
\addtolength\textwidth1in
If you’ve included the simplemargins package, you can use a set of commands to simplifysetting margins. These commands are perhaps more intuitive:
\setleftmargin1in\setrightmargin1in\settopmargin1in\setbottommargin1in
If you merely want to set all margins to a uniform size, use:
\setallmargins1in
Again, however, you must have included the simplemargins packages and you must thus alsoset the TEXINPUTS variable mentioned in Section 4.
6.2 Type Styles
There are several different type styles available in LATEX: bold (textbf), sans serif (textsf), slanted(textsl), small caps (textsc), typewriter (texttt), italic (textit), and the default, roman (textrm).To use one of these type styles simply, use the appropriate command as shown in the followingexample.
The following lines: Are produced by:This is bold type. \textbfThis is bold type.This is sans serif type. \textsfThis is sans serif type.This is slanted type. \textslThis is slanted type.This is Small Caps type. \textscThis is Small Caps type.This is typewriter type. \textttThis is typewriter type.This is italic type. \textitThis is italic type.This is normal roman type. \textrmThis is normal roman type.
You will notice that there is no underline style. This is intentional, since underlining is not nor-mally used in a typeset document. Titles (and other text normally underlined in hand-written doc-uments) are properly emphasized with the \emph command. If you really want to get underlining,type \underlinetext to be underlined, but note that underlining is “fragile” (which makes itdifficult to use in section titles and a few other places—see the LATEX manual for details).
Revision: 4.4 16 MIT SIPB

Inessential LATEX
6.3 Type Sizes
The type size can be controlled as well. If you want to change the size as well as the style, youmust set the size first, and then the style; to get a large bold type style, type \large\bf text.
The following sizes: Are produced by:This is tiny type. \tiny This is tiny type.This is scriptsize type. \scriptsize This is scriptsize type.This is footnotesize type. \footnotesize This is footnotesize type.This is small type. \small This is small type.This is normalsize type. \normalsize This is normalsize type.This is large type. \large This is large type.This is Large type. \Large This is Large type.
This is LARGE type. \LARGE This is LARGE type.
This is huge type. \huge This is huge type.
This is Huge type. \Huge This is Huge type.
6.4 Footnotes
Footnotes are very easy in LATEX. You simply place the footnote text where you want the referenceto appear and LATEX takes care of everything else. This sentence and footnote15 were created bytyping the following:
This sentence and footnote\footnoteSee? It’s a footnote. were createdby typing the following.
6.5 Tables
LATEX has a simple method for generating all sorts of tables. You give it one command to tell ithow to set up the table and then give it the data. You specify how many columns the table isgoing to have, what to do to the data within each column as well as how to separate each column.When you enter the data you give one row at a time. The character “&” comes after each data fieldand “\\” marks the end of a row. Here are several examples of what is possible and how to createthem.
a b caa bb ccccccaaa bbb ccc
This is a table with three columns. In the first column the data are centered, in the second theyare left justified and in the third they are right justified. This was done by entering clr. Changing
15See? It’s a footnote.
MIT SIPB 17 Revision: 4.4
Inessential LATEX
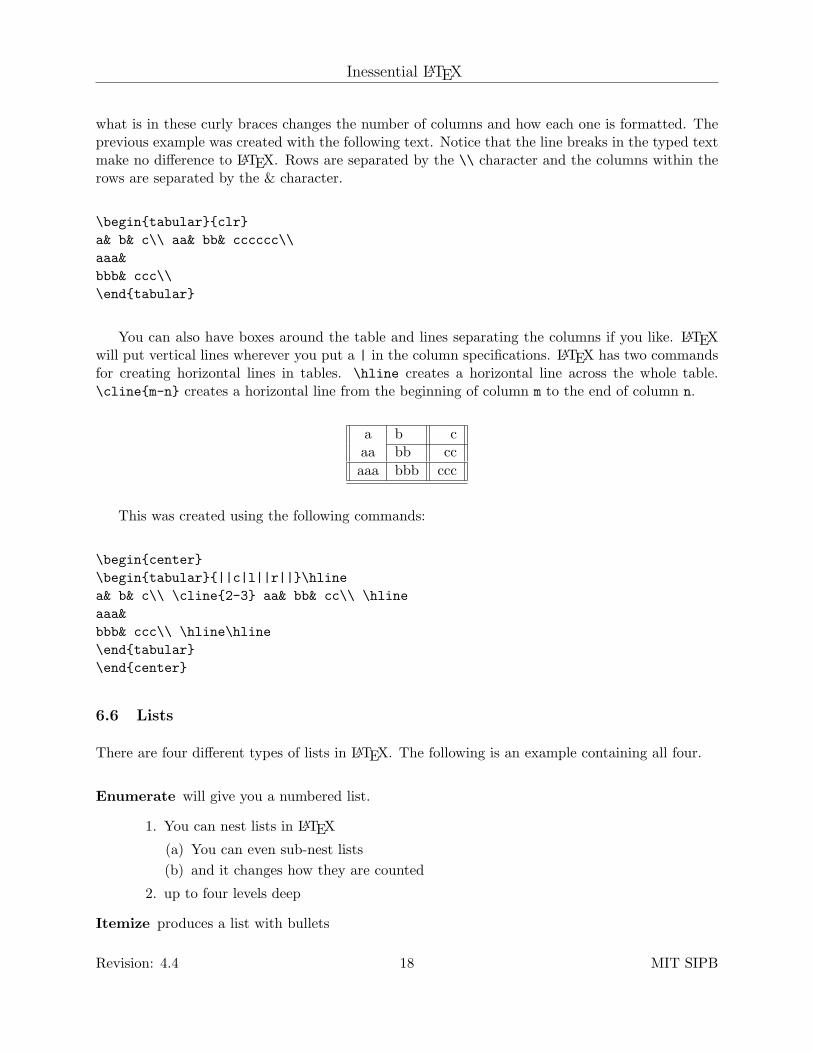
what is in these curly braces changes the number of columns and how each one is formatted. Theprevious example was created with the following text. Notice that the line breaks in the typed textmake no difference to LATEX. Rows are separated by the \\ character and the columns within therows are separated by the & character.
\begintabularclra& b& c\\ aa& bb& cccccc\\aaa&bbb& ccc\\\endtabular
You can also have boxes around the table and lines separating the columns if you like. LATEXwill put vertical lines wherever you put a | in the column specifications. LATEX has two commandsfor creating horizontal lines in tables. \hline creates a horizontal line across the whole table.\clinem-n creates a horizontal line from the beginning of column m to the end of column n.
a b caa bb ccaaa bbb ccc
This was created using the following commands:
\begincenter\begintabular||c|l||r||\hlinea& b& c\\ \cline2-3 aa& bb& cc\\ \hlineaaa&bbb& ccc\\ \hline\hline\endtabular\endcenter
6.6 Lists
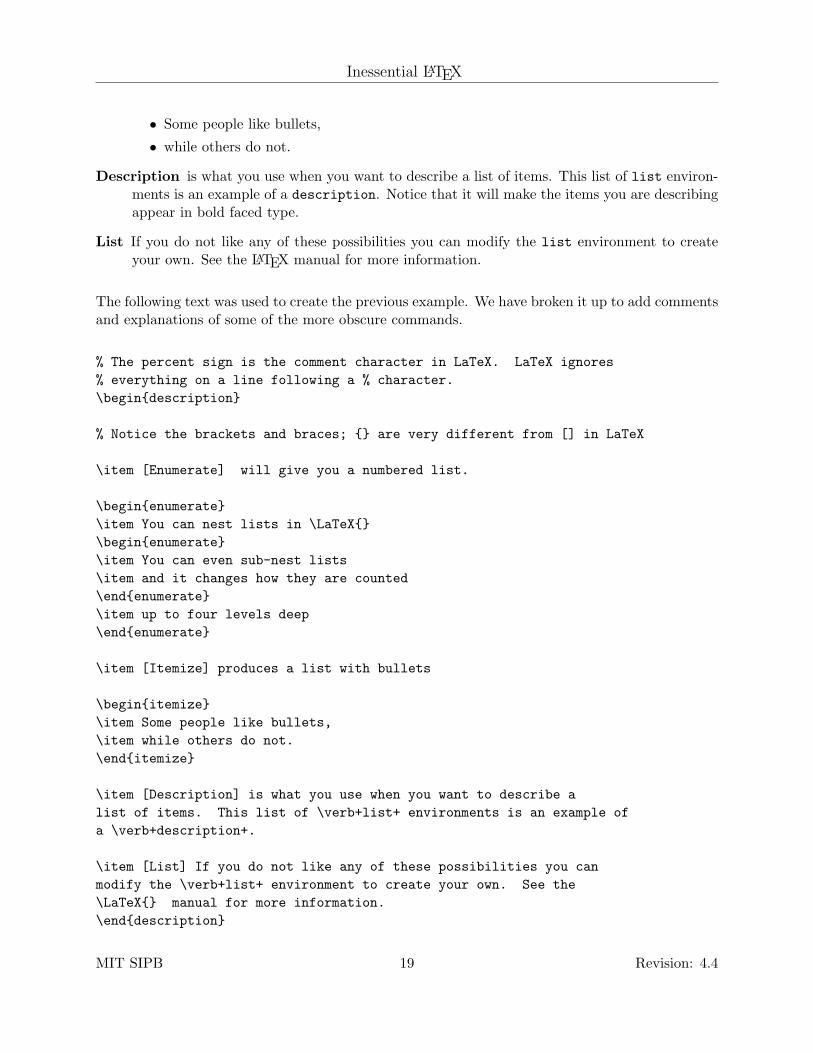
There are four different types of lists in LATEX. The following is an example containing all four.
Enumerate will give you a numbered list.
1. You can nest lists in LATEX
(a) You can even sub-nest lists(b) and it changes how they are counted
2. up to four levels deep
Itemize produces a list with bullets
Revision: 4.4 18 MIT SIPB
Inessential LATEX
• Some people like bullets,
• while others do not.
Description is what you use when you want to describe a list of items. This list of list environ-ments is an example of a description. Notice that it will make the items you are describingappear in bold faced type.
List If you do not like any of these possibilities you can modify the list environment to createyour own. See the LATEX manual for more information.
The following text was used to create the previous example. We have broken it up to add commentsand explanations of some of the more obscure commands.
% The percent sign is the comment character in LaTeX. LaTeX ignores% everything on a line following a % character.\begindescription
% Notice the brackets and braces; are very different from [] in LaTeX
\item [Enumerate] will give you a numbered list.
\beginenumerate\item You can nest lists in \LaTeX\beginenumerate\item You can even sub-nest lists\item and it changes how they are counted\endenumerate\item up to four levels deep\endenumerate
\item [Itemize] produces a list with bullets
\beginitemize\item Some people like bullets,\item while others do not.\enditemize
\item [Description] is what you use when you want to describe alist of items. This list of \verb+list+ environments is an example ofa \verb+description+.
\item [List] If you do not like any of these possibilities you canmodify the \verb+list+ environment to create your own. See the\LaTeX manual for more information.\enddescription
MIT SIPB 19 Revision: 4.4
Inessential LATEX
7 Documents in a Foreign Language
LATEX is very useful for writing documents in a foreign language. LATEX can theoretically supportany language. However, in reality, there is hyphenation support for only a few dozen. The standardversion of LATEX supports the English language, and it can hyphenate most English words correctly.SIPB has a version of LATEX which can hyphenate a document written in German, and we areworking on getting French and Spanish versions. The English version can be used to produceforeign language documents, but be warned that hyphenation will be according to rules of theEnglish language.
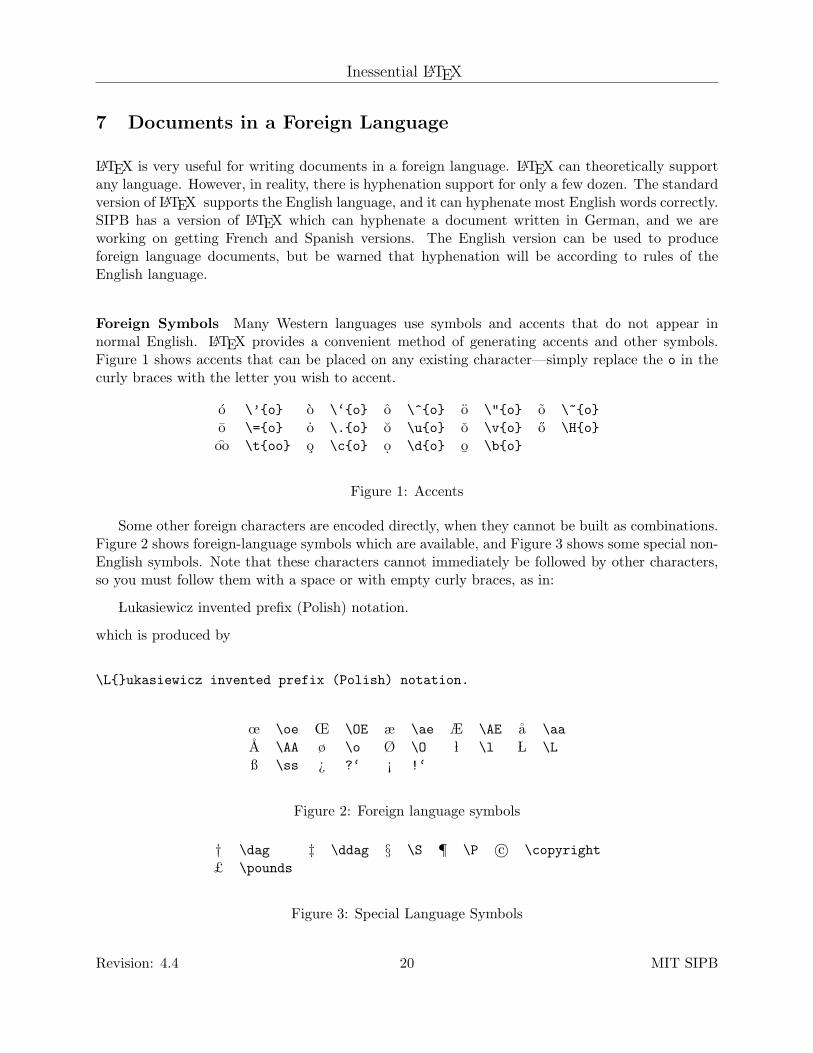
Foreign Symbols Many Western languages use symbols and accents that do not appear innormal English. LATEX provides a convenient method of generating accents and other symbols.Figure 1 shows accents that can be placed on any existing character—simply replace the o in thecurly braces with the letter you wish to accent.
o \’o o \‘o o \^o o \"o o \~oo \=o o \.o o \uo o \vo o \Hooo \too o \co o. \do o
¯\bo
Figure 1: Accents
Some other foreign characters are encoded directly, when they cannot be built as combinations.Figure 2 shows foreign-language symbols which are available, and Figure 3 shows some special non-English symbols. Note that these characters cannot immediately be followed by other characters,so you must follow them with a space or with empty curly braces, as in:
Lukasiewicz invented prefix (Polish) notation.
which is produced by
\Lukasiewicz invented prefix (Polish) notation.
œ \oe Œ \OE æ \ae Æ \AE a \aaA \AA ø \o Ø \O l \l L \Lß \ss ¿ ?‘ ¡ !‘
Figure 2: Foreign language symbols
† \dag ‡ \ddag § \S ¶ \P c© \copyright£ \pounds
Figure 3: Special Language Symbols
Revision: 4.4 20 MIT SIPB
Inessential LATEX
∑ ∑\sum
∏ ∏\prod
∐ ∐\coprod
∫ ∫\int
∮ ∮\oint
∫∫ ∫∫\iint∗
∫∫∫ ∫∫∫\iiint∗
∫· · ·
∫∫···
∫\idotsint∗
⋂ ⋂\bigcap
⋃ ⋃\bigcup
⊔ ⊔\bigsqcup∨ ∨
\bigvee∧ ∧
\bigwedge⊙ ⊙
\bigodot⊗ ⊗
\bigotimes⊕ ⊕\bigoplus
⊎ ⊎\biguplus
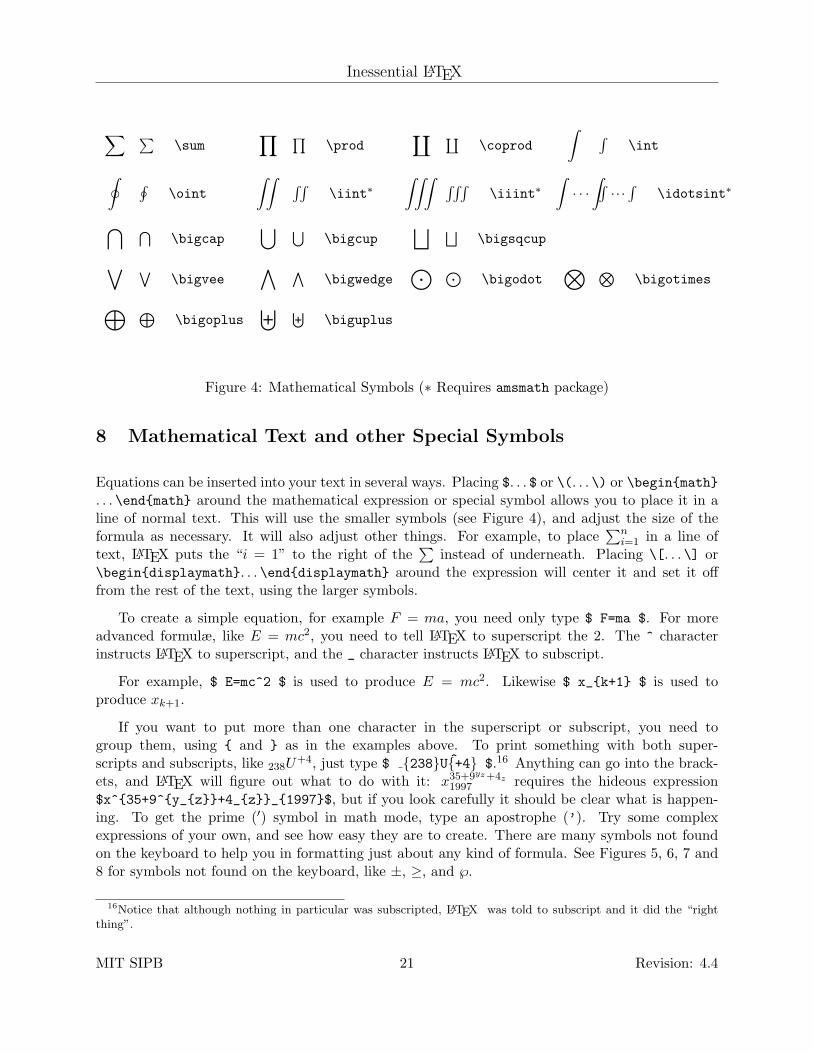
Figure 4: Mathematical Symbols (∗ Requires amsmath package)
8 Mathematical Text and other Special Symbols
Equations can be inserted into your text in several ways. Placing $. . . $ or \(. . . \) or \beginmath. . . \endmath around the mathematical expression or special symbol allows you to place it in aline of normal text. This will use the smaller symbols (see Figure 4), and adjust the size of theformula as necessary. It will also adjust other things. For example, to place
∑ni=1 in a line of
text, LATEX puts the “i = 1” to the right of the∑
instead of underneath. Placing \[. . . \] or\begindisplaymath. . . \enddisplaymath around the expression will center it and set it offfrom the rest of the text, using the larger symbols.
To create a simple equation, for example F = ma, you need only type $ F=ma $. For moreadvanced formulæ, like E = mc2, you need to tell LATEX to superscript the 2. The ^ characterinstructs LATEX to superscript, and the _ character instructs LATEX to subscript.
For example, $ E=mc^2 $ is used to produce E = mc2. Likewise $ x_k+1 $ is used toproduce xk+1.
If you want to put more than one character in the superscript or subscript, you need togroup them, using and as in the examples above. To print something with both super-scripts and subscripts, like 238U
+4, just type $ 238U+4 $.16 Anything can go into the brack-ets, and LATEX will figure out what to do with it: x35+9yz +4z
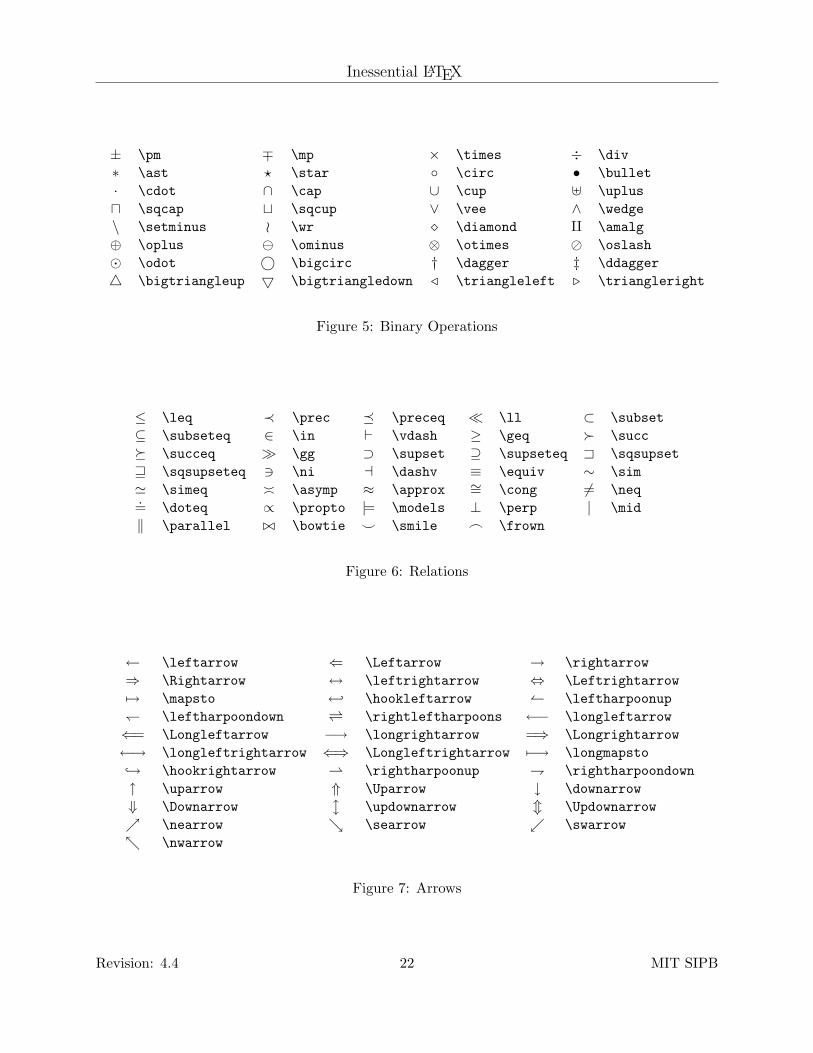
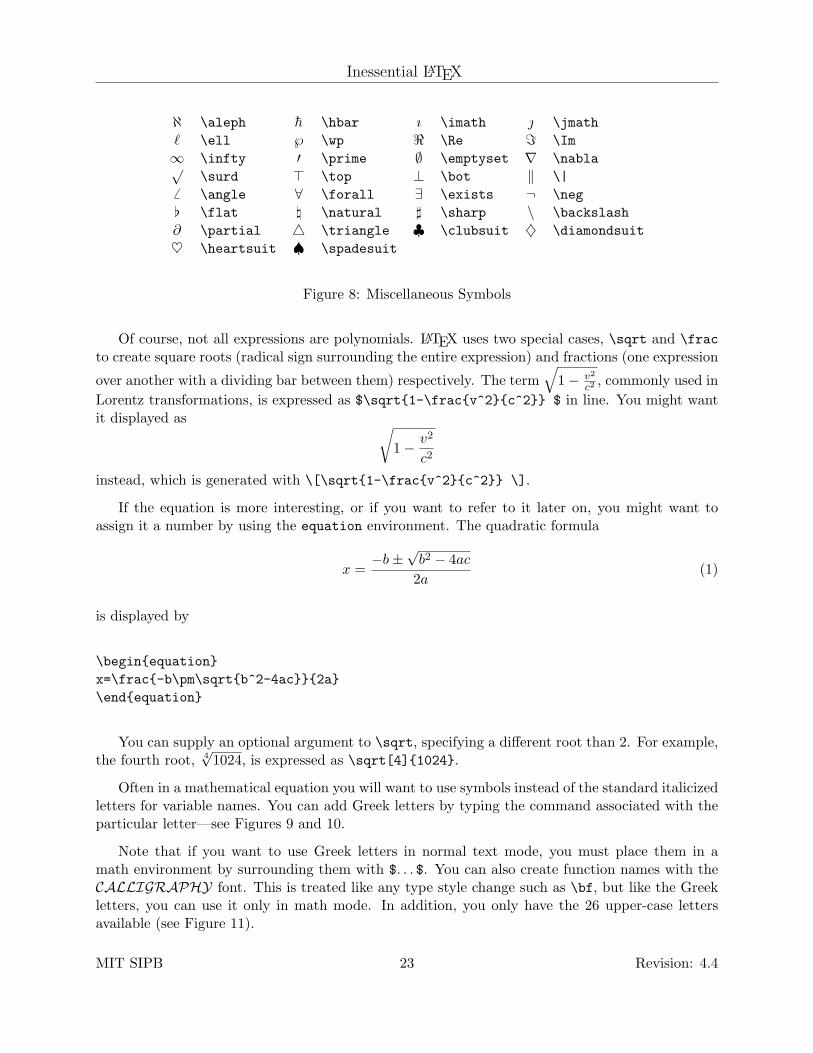
1997 requires the hideous expression$x^35+9^y_z+4_z_1997$, but if you look carefully it should be clear what is happen-ing. To get the prime (′) symbol in math mode, type an apostrophe (’). Try some complexexpressions of your own, and see how easy they are to create. There are many symbols not foundon the keyboard to help you in formatting just about any kind of formula. See Figures 5, 6, 7 and8 for symbols not found on the keyboard, like ±, ≥, and ℘.
16Notice that although nothing in particular was subscripted, LATEX was told to subscript and it did the “rightthing”.
MIT SIPB 21 Revision: 4.4
Inessential LATEX
± \pm ∓ \mp × \times ÷ \div∗ \ast ? \star \circ • \bullet· \cdot ∩ \cap ∪ \cup ] \uplusu \sqcap t \sqcup ∨ \vee ∧ \wedge\ \setminus o \wr \diamond q \amalg⊕ \oplus \ominus ⊗ \otimes \oslash \odot © \bigcirc † \dagger ‡ \ddagger4 \bigtriangleup 5 \bigtriangledown / \triangleleft . \triangleright
Figure 5: Binary Operations
≤ \leq ≺ \prec \preceq \ll ⊂ \subset⊆ \subseteq ∈ \in ` \vdash ≥ \geq \succ \succeq \gg ⊃ \supset ⊇ \supseteq = \sqsupsetw \sqsupseteq 3 \ni a \dashv ≡ \equiv ∼ \sim' \simeq \asymp ≈ \approx ∼= \cong 6= \neq.= \doteq ∝ \propto |= \models ⊥ \perp | \mid‖ \parallel ./ \bowtie ^ \smile _ \frown
Figure 6: Relations
← \leftarrow ⇐ \Leftarrow → \rightarrow⇒ \Rightarrow ↔ \leftrightarrow ⇔ \Leftrightarrow7→ \mapsto ← \hookleftarrow \leftharpoonup \leftharpoondown \rightleftharpoons ←− \longleftarrow⇐= \Longleftarrow −→ \longrightarrow =⇒ \Longrightarrow←→ \longleftrightarrow ⇐⇒ \Longleftrightarrow 7−→ \longmapsto→ \hookrightarrow \rightharpoonup \rightharpoondown↑ \uparrow ⇑ \Uparrow ↓ \downarrow⇓ \Downarrow l \updownarrow m \Updownarrow \nearrow \searrow \swarrow \nwarrow
Figure 7: Arrows
Revision: 4.4 22 MIT SIPB
Inessential LATEX
ℵ \aleph h \hbar ı \imath \jmath` \ell ℘ \wp < \Re = \Im∞ \infty ′ \prime ∅ \emptyset ∇ \nabla√
\surd > \top ⊥ \bot ‖ \|6 \angle ∀ \forall ∃ \exists ¬ \neg[ \flat \ \natural ] \sharp \ \backslash∂ \partial 4 \triangle ♣ \clubsuit ♦ \diamondsuit♥ \heartsuit ♠ \spadesuit
Figure 8: Miscellaneous Symbols
Of course, not all expressions are polynomials. LATEX uses two special cases, \sqrt and \fracto create square roots (radical sign surrounding the entire expression) and fractions (one expression
over another with a dividing bar between them) respectively. The term√
1− v2
c2, commonly used in
Lorentz transformations, is expressed as $\sqrt1-\fracv^2c^2 $ in line. You might wantit displayed as √
1− v2
c2
instead, which is generated with \[\sqrt1-\fracv^2c^2 \].
If the equation is more interesting, or if you want to refer to it later on, you might want toassign it a number by using the equation environment. The quadratic formula
x =−b±
√b2 − 4ac
2a(1)
is displayed by
\beginequationx=\frac-b\pm\sqrtb^2-4ac2a\endequation
You can supply an optional argument to \sqrt, specifying a different root than 2. For example,the fourth root, 4
√1024, is expressed as \sqrt[4]1024.
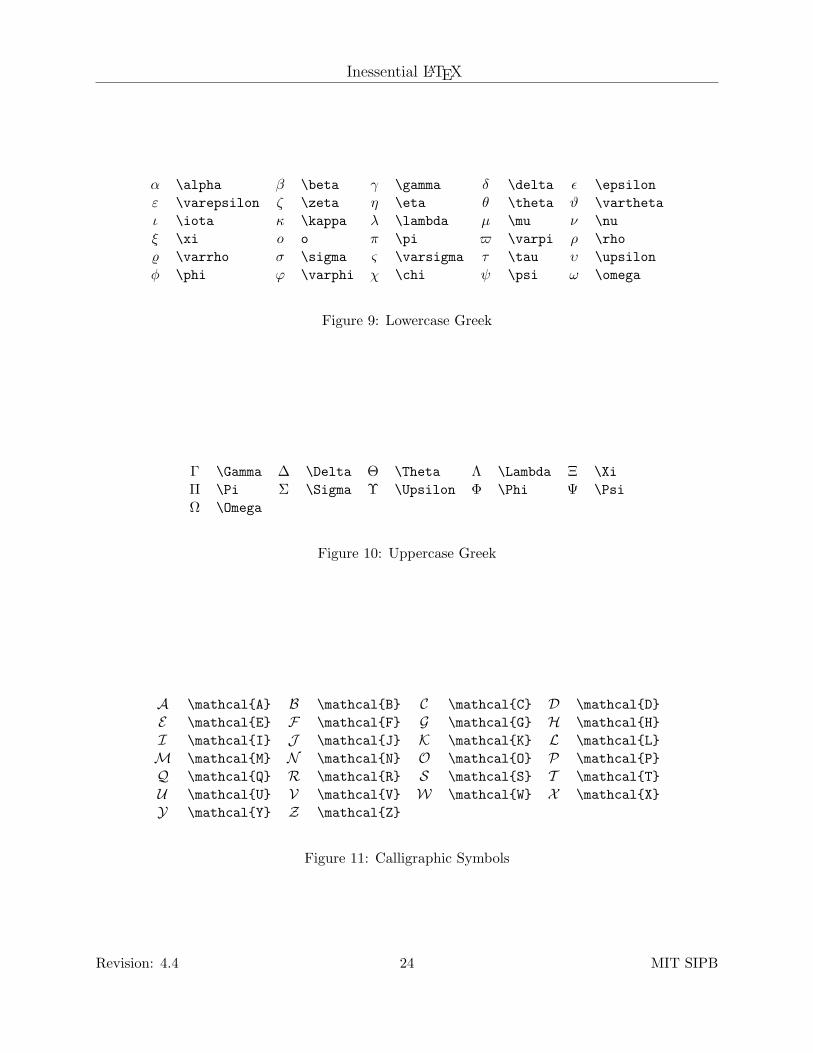
Often in a mathematical equation you will want to use symbols instead of the standard italicizedletters for variable names. You can add Greek letters by typing the command associated with theparticular letter—see Figures 9 and 10.
Note that if you want to use Greek letters in normal text mode, you must place them in amath environment by surrounding them with $. . . $. You can also create function names with theCALLIGRAPHY font. This is treated like any type style change such as \bf, but like the Greekletters, you can use it only in math mode. In addition, you only have the 26 upper-case lettersavailable (see Figure 11).
MIT SIPB 23 Revision: 4.4
Inessential LATEX
α \alpha β \beta γ \gamma δ \delta ε \epsilonε \varepsilon ζ \zeta η \eta θ \theta ϑ \varthetaι \iota κ \kappa λ \lambda µ \mu ν \nuξ \xi o o π \pi $ \varpi ρ \rho% \varrho σ \sigma ς \varsigma τ \tau υ \upsilonφ \phi ϕ \varphi χ \chi ψ \psi ω \omega
Figure 9: Lowercase Greek
Γ \Gamma ∆ \Delta Θ \Theta Λ \Lambda Ξ \XiΠ \Pi Σ \Sigma Υ \Upsilon Φ \Phi Ψ \PsiΩ \Omega
Figure 10: Uppercase Greek
A \mathcalA B \mathcalB C \mathcalC D \mathcalDE \mathcalE F \mathcalF G \mathcalG H \mathcalHI \mathcalI J \mathcalJ K \mathcalK L \mathcalLM \mathcalM N \mathcalN O \mathcalO P \mathcalPQ \mathcalQ R \mathcalR S \mathcalS T \mathcalTU \mathcalU V \mathcalV W \mathcalW X \mathcalXY \mathcalY Z \mathcalZ
Figure 11: Calligraphic Symbols
Revision: 4.4 24 MIT SIPB
Inessential LATEX
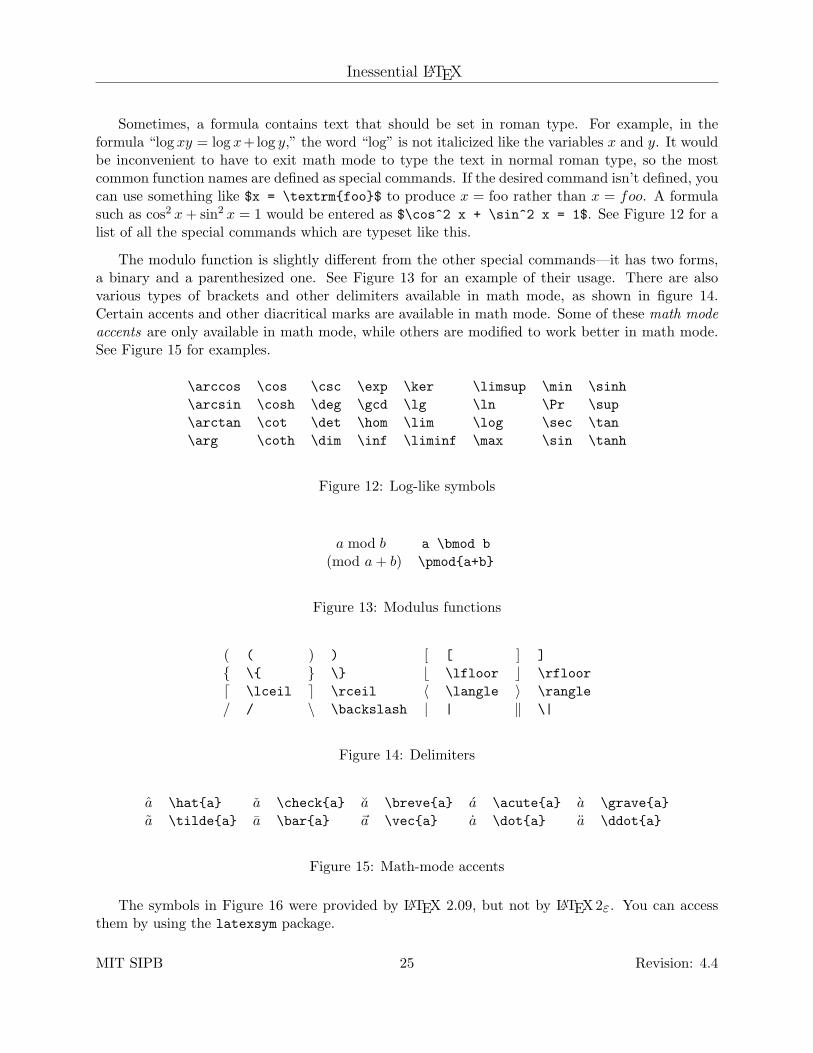
Sometimes, a formula contains text that should be set in roman type. For example, in theformula “log xy = log x+log y,” the word “log” is not italicized like the variables x and y. It wouldbe inconvenient to have to exit math mode to type the text in normal roman type, so the mostcommon function names are defined as special commands. If the desired command isn’t defined, youcan use something like $x = \textrmfoo$ to produce x = foo rather than x = foo. A formulasuch as cos2 x+ sin2 x = 1 would be entered as $\cos^2 x + \sin^2 x = 1$. See Figure 12 for alist of all the special commands which are typeset like this.
The modulo function is slightly different from the other special commands—it has two forms,a binary and a parenthesized one. See Figure 13 for an example of their usage. There are alsovarious types of brackets and other delimiters available in math mode, as shown in figure 14.Certain accents and other diacritical marks are available in math mode. Some of these math modeaccents are only available in math mode, while others are modified to work better in math mode.See Figure 15 for examples.
\arccos \cos \csc \exp \ker \limsup \min \sinh\arcsin \cosh \deg \gcd \lg \ln \Pr \sup\arctan \cot \det \hom \lim \log \sec \tan\arg \coth \dim \inf \liminf \max \sin \tanh
Figure 12: Log-like symbols
a mod b a \bmod b(mod a+ b) \pmoda+b
Figure 13: Modulus functions
( ( ) ) [ [ ] ] \ \ b \lfloor c \rfloord \lceil e \rceil 〈 \langle 〉 \rangle/ / \ \backslash | | ‖ \|
Figure 14: Delimiters
a \hata a \checka a \brevea a \acutea a \graveaa \tildea a \bara ~a \veca a \dota a \ddota
Figure 15: Math-mode accents
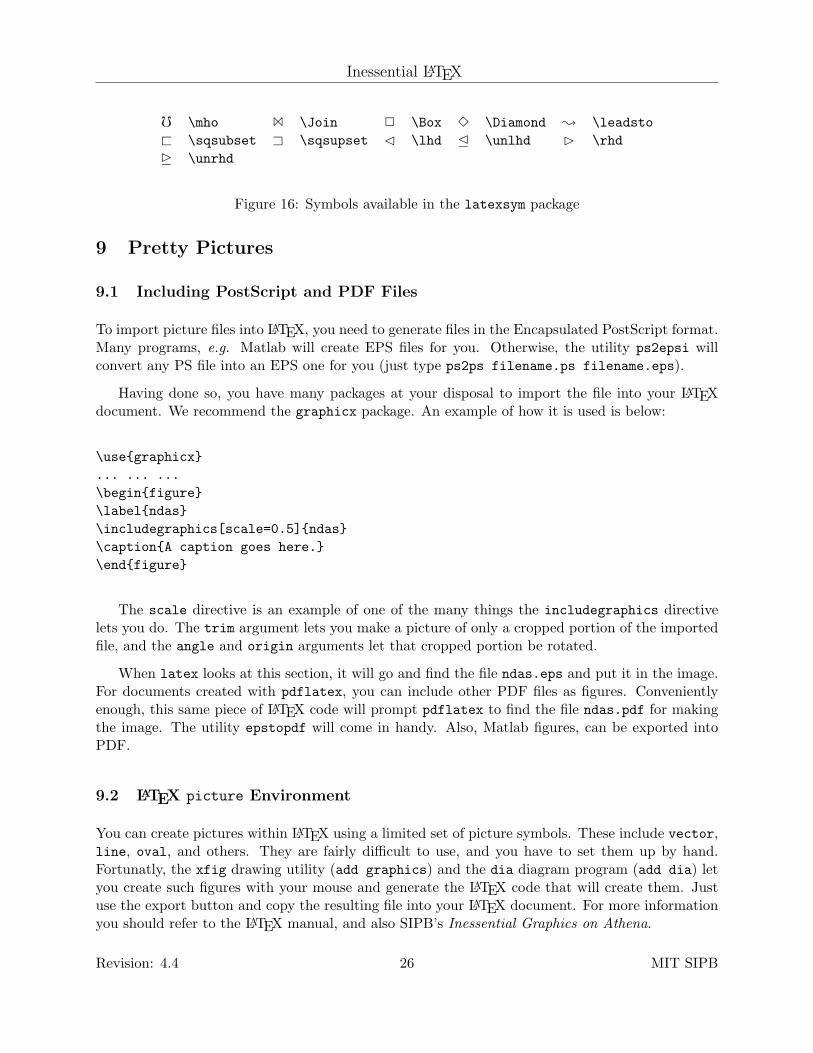
The symbols in Figure 16 were provided by LATEX 2.09, but not by LATEX 2ε. You can accessthem by using the latexsym package.
MIT SIPB 25 Revision: 4.4
Inessential LATEX
0 \mho 1 \Join 2 \Box 3 \Diamond ; \leadsto< \sqsubset = \sqsupset \lhd \unlhd \rhd \unrhd
Figure 16: Symbols available in the latexsym package
9 Pretty Pictures
9.1 Including PostScript and PDF Files
To import picture files into LATEX, you need to generate files in the Encapsulated PostScript format.Many programs, e.g. Matlab will create EPS files for you. Otherwise, the utility ps2epsi willconvert any PS file into an EPS one for you (just type ps2ps filename.ps filename.eps).
Having done so, you have many packages at your disposal to import the file into your LATEXdocument. We recommend the graphicx package. An example of how it is used is below:
\usegraphicx... ... ...\beginfigure\labelndas\includegraphics[scale=0.5]ndas\captionA caption goes here.\endfigure
The scale directive is an example of one of the many things the includegraphics directivelets you do. The trim argument lets you make a picture of only a cropped portion of the importedfile, and the angle and origin arguments let that cropped portion be rotated.
When latex looks at this section, it will go and find the file ndas.eps and put it in the image.For documents created with pdflatex, you can include other PDF files as figures. Convenientlyenough, this same piece of LATEX code will prompt pdflatex to find the file ndas.pdf for makingthe image. The utility epstopdf will come in handy. Also, Matlab figures, can be exported intoPDF.
9.2 LATEX picture Environment
You can create pictures within LATEX using a limited set of picture symbols. These include vector,line, oval, and others. They are fairly difficult to use, and you have to set them up by hand.Fortunatly, the xfig drawing utility (add graphics) and the dia diagram program (add dia) letyou create such figures with your mouse and generate the LATEX code that will create them. Justuse the export button and copy the resulting file into your LATEX document. For more informationyou should refer to the LATEX manual, and also SIPB’s Inessential Graphics on Athena.
Revision: 4.4 26 MIT SIPB
Inessential LATEX
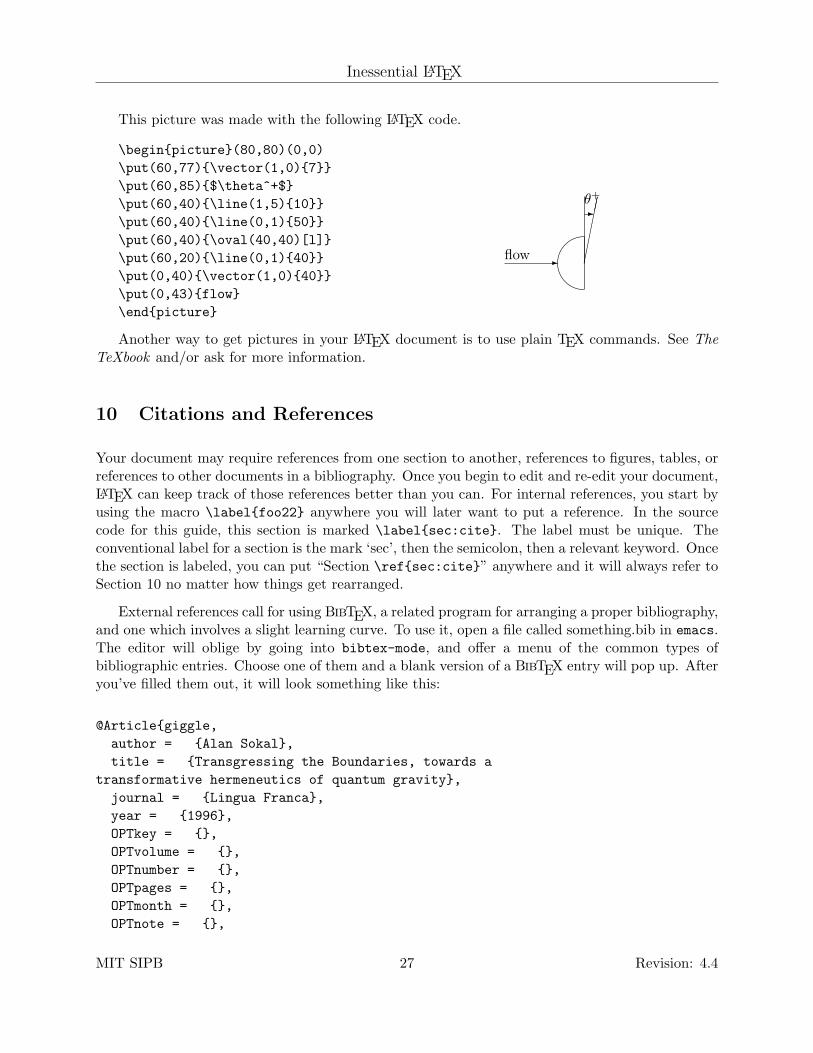
This picture was made with the following LATEX code.
\beginpicture(80,80)(0,0)\put(60,77)\vector(1,0)7\put(60,85)$\theta^+$\put(60,40)\line(1,5)10\put(60,40)\line(0,1)50\put(60,40)\oval(40,40)[l]\put(60,20)\line(0,1)40\put(0,40)\vector(1,0)40\put(0,43)flow\endpicture
-θ+
'
&-flow
Another way to get pictures in your LATEX document is to use plain TEX commands. See TheTeXbook and/or ask for more information.
10 Citations and References
Your document may require references from one section to another, references to figures, tables, orreferences to other documents in a bibliography. Once you begin to edit and re-edit your document,LATEX can keep track of those references better than you can. For internal references, you start byusing the macro \labelfoo22 anywhere you will later want to put a reference. In the sourcecode for this guide, this section is marked \labelsec:cite. The label must be unique. Theconventional label for a section is the mark ‘sec’, then the semicolon, then a relevant keyword. Oncethe section is labeled, you can put “Section \refsec:cite” anywhere and it will always refer toSection 10 no matter how things get rearranged.
External references call for using BibTEX, a related program for arranging a proper bibliography,and one which involves a slight learning curve. To use it, open a file called something.bib in emacs.The editor will oblige by going into bibtex-mode, and offer a menu of the common types ofbibliographic entries. Choose one of them and a blank version of a BibTEX entry will pop up. Afteryou’ve filled them out, it will look something like this:
@Articlegiggle,author = Alan Sokal,title = Transgressing the Boundaries, towards a
transformative hermeneutics of quantum gravity,journal = Lingua Franca,year = 1996,OPTkey = ,OPTvolume = ,OPTnumber = ,OPTpages = ,OPTmonth = ,OPTnote = ,
MIT SIPB 27 Revision: 4.4
Inessential LATEX
OPTannote =
The first four entries are the details that every standard for scholarly publishing requires you tofill. The others are labelled with “OPT” since they are optional. If you fill them in, delete thecharacters OPT. There are some subtleties and conveniences here. One one hand, BibTEX will takecare of proper capitalization for any of these entries. (Acronyms need to go in curly braces to keeptheir capitalization as-is.) On the other hand, the author entry must all the others listed in theform “Ringo Starr and Paul McCartney and John Lennon and George Harrison” with no commas.Complicated surnames are preserved by grouping in curly braces.
Building a BibTeX file is a relatively easy task compared to anything else you do when writinga paper. You can do it even when you are exhausted. So keep at it. Now, notice the word “giggle”at the top of the example entry? It serves the same purpose as the contents of a label, and thusmust be kept unique. At any point in the document where you want a reference to a citation ofSokal’s article, you put \citegiggle. Let’s say you have a doc.tex document pointing to acites.bib file. Then you put the commands
\bibliographycites\bibliographystyleplain
at the right spot in the document and you are ready to generate it.
Now comes the time to generate the bibliography. With the incantation bibtex doc, the bibtexutility uses the cites.bib file to generate a doc.blb file, in which your entries (only the ones that arecited) get translated to a properly organized and TEX formatted file that is then included by latex.The proper incantation to get a full bibliography assembled is latex doc; bibtex doc; bibtexdoc; latex doc; latex doc. This makes sure all of the auxiliary files are properly written. Afterthat, each time you add or remove a citation from your document, bibtex doc; latex doc; willget the final document properly updated.
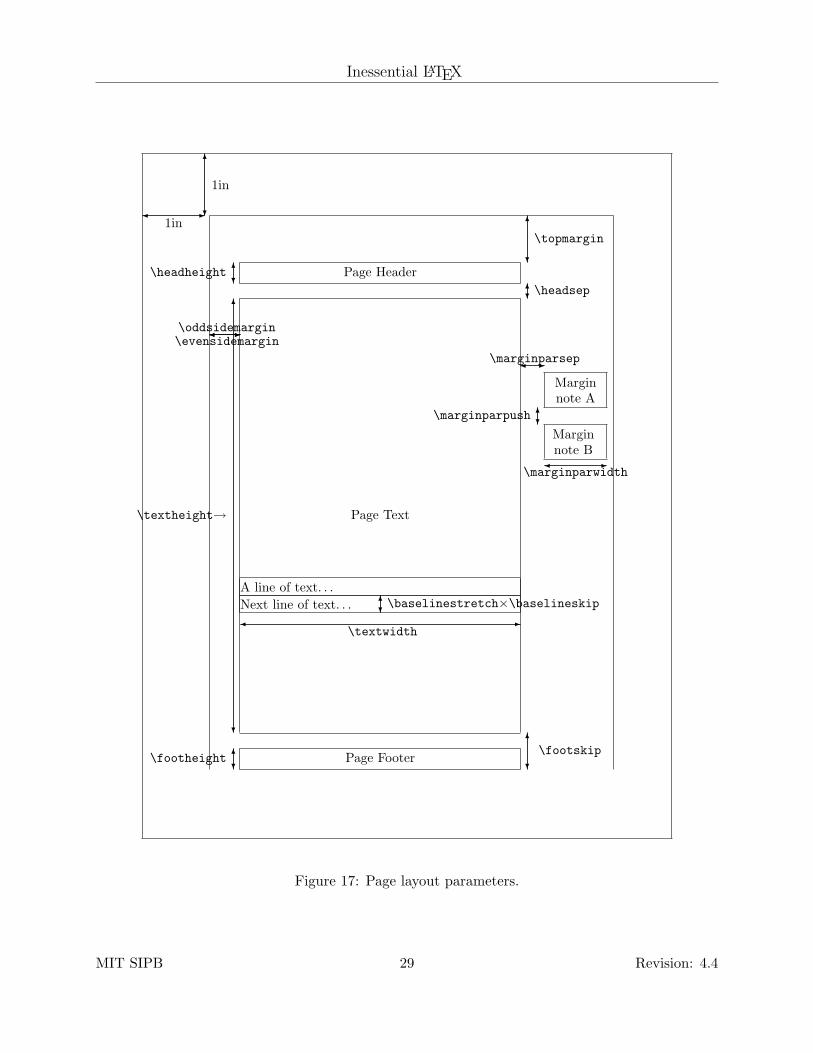
11 Setting Page Layout Parameters
LATEX uses many parameters to layout a page. These parameters set the distance between the maintext and margin notes, headers, and footers, among other things. To change the value of one ofthese parameters, you can use the \addtolength commands described in subsection 6.1. Figure 17shows the layout for a printed page reduced to 65% of full size.
12 Converting from LATEX 2.09 to LATEX2ε
Converting documents from LATEX 2.09 format to LATEX 2εformat is fairly simple. The primarydifferences are that the \documentstyle command has been replaced with the \documentclasscommand and that outside packages are included with the usepackage command. Another change
Revision: 4.4 28 MIT SIPB
Inessential LATEX
-1in
6
?
1in
A line of text. . .Next line of text. . . 6?\baselinestretch×\baselineskip
-\oddsidemargin-\evensidemargin
Page Text
Page Footer6?
\footheight6
?\footskip
-\textwidth
6
?
\textheight→
6?
\headheight
6?\headsep
6
?
\topmargin
Page Header
Marginnote A
6?\marginparpush
Marginnote B
-\marginparwidth
-\marginparsep
Figure 17: Page layout parameters.
MIT SIPB 29 Revision: 4.4
Inessential LATEX
is that the commands such as \tt have been superseded by the commands of the form \texttt.LATEX 2εalso added the \textsuperscript command for use in normal text as an alternative tousing math mode to generate superscripted text. See Section 13 for several additional sources ofinformation which are useful in converting documents.
13 Where to Get More Information
For quick lookups of this LATEX function or that, there is Athena’s texdoc command.
The LATEX User’s Guide & Reference Manual is a very useful book which goes into much moredetail than we have attempted here, for those who wish to delve deeper into the intricacies ofLATEX. It is highly recommended, and not very expensive, at least as far as reference books go.Since Athena officially supports LATEX, you can ask questions about it using olc, and look throughthe OLC Stock Answers for the answers to other commonly asked questions. You may also wish tolook at the online version of the LATEX user’s guide, which is particularly useful when convertingdocuments to LATEX 2ε format. It is found at/usr/athena/share/texmf/doc/latex/base/usrguide.dvi.
Other information is found through the texdoc command. It does not offer an index of the filesit examines, but poking around the directories under /usr/athena/share/texmf/doc/latex/ willtell you what is available.
You can also come by the SIPB office (in W20-557, just outside the Student Center cluster),or call us on the phone (617-253-7788), particularly if you have a more obscure or complicatedquestion. As a last resort, The TEXbook describes the TEX typesetting system, which forms thebasis for LATEX. It is significantly harder to understand than the LATEX manual.
CTAN, the Comprehensive TeX Archive Network, centered at http://www.ctan.org, is anothergood resource for LATEX information, and for such things as the LATEX templates required by variouspublishers and academic organizations.
14 Acknowledgments
The original version of this document was written by Mark Eichin to give people a handy referenceto the many symbols that LATEX supports, especially the math mode symbols. Most of his text andall of his tables were included in the guide that you are holding now.
The rest of the first edition of the guide was written and edited by Nancy Gilman, DavidJedlinsky and Mary Vogt, with lots of comments (flamage) from SIPB members and other peoplewho experimented with the early versions of the guide. Robert French perfected this document toproduce Revision 1.
Later, Chee Chew, added more changes (with more input/flamage from SIPB members) toproduce Revision 2.
Revision: 4.4 30 MIT SIPB
Inessential LATEX
Revision 3 was updated by Mark Eichin to cover the replacement of dvi2ps by the superiordvips, to acknowledge Athena’s support of LATEX, and to include further SIPB member comments.Subsequent changes have been made by Richard Barbalace, bert Dvornik, and Chad Brown, withthe cheerful support of many SIPB members and prospectives.
Revision 4 was updated by Alex Rolfe to reflect the adoption of LATEX 2εas the default versionon Athena.
Thanks to John Kohl and Jean Marie Diaz for getting most of the original TEX and LATEXsystem running on Athena in the first place; without their efforts, this guide would be useless.
And, of course, thanks to Don Knuth, the author of TEX, and Leslie Lamport, the author ofLATEX; they have done an incredible job.
15 List of Figures
1 Accents . . . . . . . . . . . . . . . . . . . . . . . . . . . . . . . . . . . . . . . . . . . 20
2 Foreign language symbols . . . . . . . . . . . . . . . . . . . . . . . . . . . . . . . . . 20
3 Special Language Symbols . . . . . . . . . . . . . . . . . . . . . . . . . . . . . . . . . 20
4 Mathematical Symbols (∗ Requires amsmath package) . . . . . . . . . . . . . . . . . 21
5 Binary Operations . . . . . . . . . . . . . . . . . . . . . . . . . . . . . . . . . . . . . 22
6 Relations . . . . . . . . . . . . . . . . . . . . . . . . . . . . . . . . . . . . . . . . . . 22
7 Arrows . . . . . . . . . . . . . . . . . . . . . . . . . . . . . . . . . . . . . . . . . . . . 22
8 Miscellaneous Symbols . . . . . . . . . . . . . . . . . . . . . . . . . . . . . . . . . . . 23
9 Lowercase Greek . . . . . . . . . . . . . . . . . . . . . . . . . . . . . . . . . . . . . . 24
10 Uppercase Greek . . . . . . . . . . . . . . . . . . . . . . . . . . . . . . . . . . . . . . 24
11 Calligraphic Symbols . . . . . . . . . . . . . . . . . . . . . . . . . . . . . . . . . . . . 24
12 Log-like symbols . . . . . . . . . . . . . . . . . . . . . . . . . . . . . . . . . . . . . . 25
13 Modulus functions . . . . . . . . . . . . . . . . . . . . . . . . . . . . . . . . . . . . . 25
14 Delimiters . . . . . . . . . . . . . . . . . . . . . . . . . . . . . . . . . . . . . . . . . . 25
15 Math-mode accents . . . . . . . . . . . . . . . . . . . . . . . . . . . . . . . . . . . . . 25
16 Symbols available in the latexsym package . . . . . . . . . . . . . . . . . . . . . . . 26
17 Page layout parameters. . . . . . . . . . . . . . . . . . . . . . . . . . . . . . . . . . . 29
MIT SIPB 31 Revision: 4.4