installation instruction for hy-road hydraulic … · hy-road hydraulic disc brake safety warnings...
TRANSCRIPT
HY-ROAD HYDRAULIC DISC BRAKE
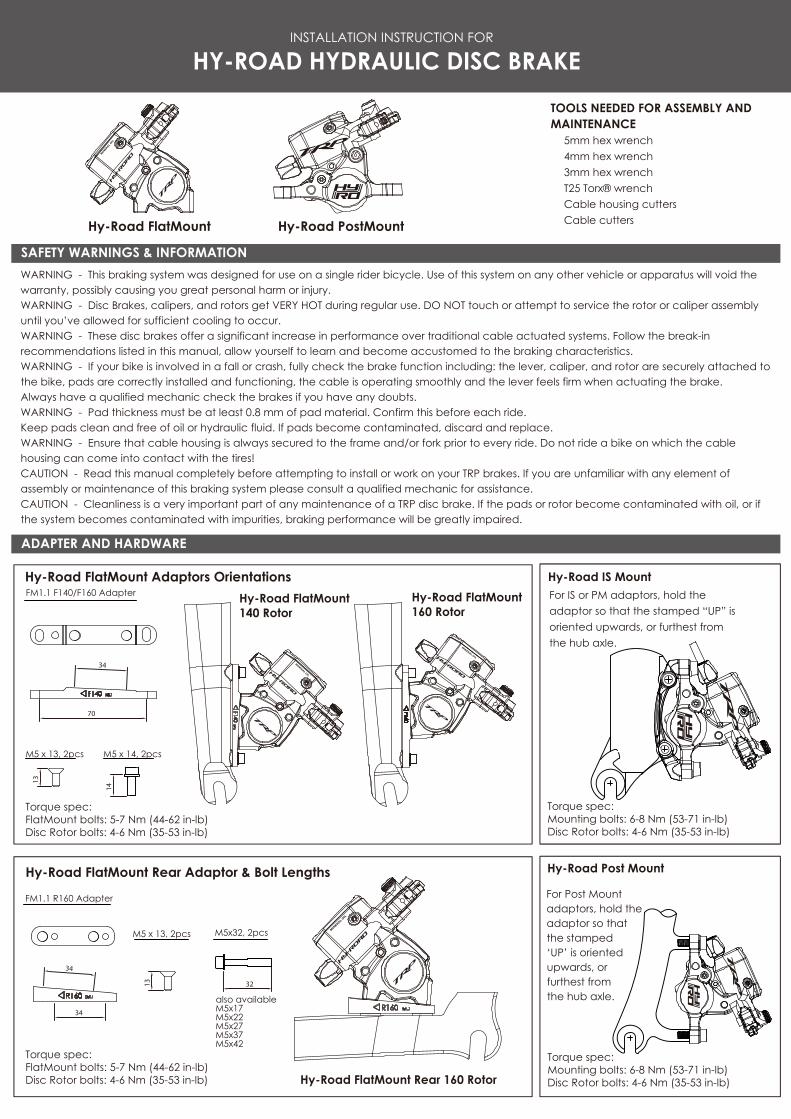
SAFETY WARNINGS & INFORMATION
Hy-Road IS Mount
Hy-Road Post Mount
For Post Mount adaptors, hold the adaptor so that the stamped ‘UP’ is oriented upwards, or furthest from the hub axle.
Hy-Road FlatMount Rear Adaptor & Bolt Lengths
Hy-Road FlatMount Rear 160 Rotor
Hy-Road FlatMount160 Rotor
Hy-Road FlatMount140 Rotor
Hy-Road FlatMount Adaptors Orientations
13 32
34
34
13
14
34
70
Hy-Road FlatMount Hy-Road PostMount
WARNING - This braking system was designed for use on a single rider bicycle. Use of this system on any other vehicle or apparatus will void the warranty, possibly causing you great personal harm or injury. WARNING - Disc Brakes, calipers, and rotors get VERY HOT during regular use. DO NOT touch or attempt to service the rotor or caliper assembly until you’ve allowed for sufficient cooling to occur. WARNING - These disc brakes offer a significant increase in performance over traditional cable actuated systems. Follow the break-in recommendations listed in this manual, allow yourself to learn and become accustomed to the braking characteristics. WARNING - If your bike is involved in a fall or crash, fully check the brake function including: the lever, caliper, and rotor are securely attached to the bike, pads are correctly installed and functioning, the cable is operating smoothly and the lever feels firm when actuating the brake. Always have a qualified mechanic check the brakes if you have any doubts. WARNING - Pad thickness must be at least 0.8 mm of pad material. Confirm this before each ride. Keep pads clean and free of oil or hydraulic fluid. If pads become contaminated, discard and replace. WARNING - Ensure that cable housing is always secured to the frame and/or fork prior to every ride. Do not ride a bike on which the cable housing can come into contact with the tires!CAUTION - Read this manual completely before attempting to install or work on your TRP brakes. If you are unfamiliar with any element of assembly or maintenance of this braking system please consult a qualified mechanic for assistance. CAUTION - Cleanliness is a very important part of any maintenance of a TRP disc brake. If the pads or rotor become contaminated with oil, or if the system becomes contaminated with impurities, braking performance will be greatly impaired.
INSTALLATION INSTRUCTION FOR
ADAPTER AND HARDWARE

000907HR20
E-1 Barrel adjust for fine tune
INSTALLATION
B-1 Check if ferrule is needed on your brand brake lever.
D-2 Pull cable and tighten
D-3 Squeeze lever 10 times
D-4 Check arm return
B-2 Install spiral wound housing for handlebar bend
B-3 Housing min. length
A-1 Rotor Tighten Sequence
SAFETY CHECK Before Every Ride· Spin Wheel to be sure rotor is undamaged and aligned· Check for fluid leaks and/or oil loss· Check brake pad thickness, if pads are less than 0.8mm replace· Check bolt tension, re-torque if necessary · Ensure that all cables are secured to the frame and/or fork and can not contact tires!
Push with thumb
INSTALL ROTORInstall rotor with logo facing outward from spokes and with arrow pointing in the direction of wheel rotation.Tighten the rotor in an alternating sequence. [ref. A-1]
MOUNTING THE CALIPERInstall adaptors as needed either on frame/fork or on caliper. For FlatMount calipers, the M5x13 bolts to attach
an adaptor to the caliper will need to be fully tightened. For PostMount and IS Mount adaptors, fully tighten the bolts to the frame first, then attach the caliper.
Do not fully tighten the caliper or the caliper/adaptor combination, (FlatMount) at this time.
HOUSING INSTALLATIONCompression less housing, (linear strand) is recommended for Hy-Road Disc Brakes to yield the best performance.
Sealed ferrules or other sealing systems are not recommended as they may create excess friction and affect the brake lever return performance. Route housing to minimize tight bends and acute angles.
Install a small section of spiral wound housing into the brake lever body and run inside or outside the first bend of the bar as shown in B-1, B-2. (Not all brake lever bodies need a ferrule installed - check with your brake lever manufacturer’s technical documents to determine if a ferrule is needed. ) The ends should be filed flat and the liner should be open to eliminate friction. Install a double-ended ferrule. [ref. B-1, B-2]
Note: Spiral wound housing can be cut to accommodate bar widths and preferences, such as hiding the double-ended ferrule under the bar wrap. Allow spiral wound housing to extend at least 25mm (1 inch) beyond the handlebar bend. [ref. B-3]
Install the compressionless housing on the remainder of the frame or fork. Cut appropriately to minimize tight bends and acute angles to optimize the brake lever feel.
CONNECTING THE BRAKETurn barrel adjuster so that it is fully threaded in. Install ferrule on the end of the compressionless housing to fit in
the barrel adjuster. Push in the lever arm lock knob (indicated by A on ref. D-1) and thread into the actuator arm. This prevents it
from moving.Run cable through and attach to the Hy-Road actuator arm. Pull cable tightly and tighten with a 5mm hex
wrench. Torque to 6-8 Nm (53-72 in-lb.) [ref.D-2]After cable is tightened release the lever arm lock knob A. [ref. A-1] To align the caliper, re-install the wheel with rotor installed. Pull the brake lever firmly to self-align the caliper on
the rotor. Lightly tighten each bolt, alternating between the two and checking alignment. Continue untiltoque limit is reached, 6 – 8 Nm (53 – 71 in lbs). If you have a pad gap tool, this greatly helps in eliminating pad/rotor noise due to alignment issues.
Release the lever and check that the pads are aligned equally and that the wheel spins freely.Repeat for other wheel.
STRETCH CABLE AND HOUSINGNew cable and housing will stretch after initial instruction. Pull the brake lever 10 times to stretch the cable and
seat housing. Push back on the actuator arm to check that it is fully returning. If your thumb is able to push the arm back into its rest position, this indicates there is too much friction somewhere in the cable routing. It will need to be corrected for best performance. [ref. D-3]
Repeat cable tightening process to eliminate cable slack from the stretching/seating step above. Use barrel adjuster for fine tuning only - the actuating arm needs to return fully to open the reservoir port. [ref D-4]
EACH TIME THE CABLE IS RE-TIGHTENED, THE ACTUATOR ARM LOCK KNOB NEEDS TO BE ENGAGED TO PREVENT ACCIDENTALLY CLOSING OFF THE SYSTEM.
FINE TUNINGThe barrel adjuster is for fine tuning the lever feel and minor adjustments to eliminate slack in the cable. This will
be more evident on levers with less cable pull such as SRAM and Campagnolo. DO NOT REMOVE THE CIRCLIP FROM THE BARREL ADJUSTER. This prevents accidental closure of the hydraulic system. [ref. E-1]
D-1 Push and thread in the knob (A)
A
Hydraulic brakes have a 30-40 cycle break-in period to achieve optimal pad seating and performance. Exercise caution for the first 30-40 cycles each time you replace the brake pads. Your HY-ROAD disc brake is engineered to use TRP/Tektro branded Mineral Oil, which is environmentally friendly and offers increased performance by limiting the absorption of water better than DOT based oils. Use of other manufacturers’ oils will void the warranty and may negatively impact the performance of the brakes leading to injury or death.
2
4
3
5
1
6