intel® pentium® processor on 45-nm process · 45-nm process datasheet for platforms based on...
TRANSCRIPT

Document Number: 322875-001EN
Intel® Pentium® Processor on 45-nm ProcessDatasheet
For Platforms Based on Mobile Intel® 4 Series Express Chipset Family
October 2009

2 Datasheet
INFORMATION IN THIS DOCUMENT IS PROVIDED IN CONNECTION WITH INTEL® PRODUCTS. NO LICENSE, EXPRESS OR IMPLIED, BY ESTOPPEL OR OTHERWISE, TO ANY INTELLECTUAL PROPERTY RIGHTS IS GRANTED BY THIS DOCUMENT. EXCEPT AS PROVIDED IN INTEL'S TERMS AND CONDITIONS OF SALE FOR SUCH PRODUCTS, INTEL ASSUMES NO LIABILITY WHATSOEVER, AND INTEL DISCLAIMS ANY EXPRESS OR IMPLIED WARRANTY, RELATING TO SALE AND/OR USE OF INTEL PRODUCTS INCLUDING LIABILITY OR WARRANTIES RELATING TO FITNESS FOR A PARTICULAR PURPOSE, MERCHANTABILITY, OR INFRINGEMENT OF ANY PATENT, COPYRIGHT OR OTHER INTELLECTUAL PROPERTY RIGHT.
UNLESS OTHERWISE AGREED IN WRITING BY INTEL, THE INTEL PRODUCTS ARE NOT DESIGNED NOR INTENDED FOR ANY APPLICATION IN WHICH THE FAILURE OF THE INTEL PRODUCT COULD CREATE A SITUATION WHERE PERSONAL INJURY OR DEATH MAY OCCUR.
Intel may make changes to specifications and product descriptions at any time, without notice. Designers must not rely on the absence or characteristics of any features or instructions marked “reserved” or “undefined.” Intel reserves these for future definition and shall have no responsibility whatsoever for conflicts or incompatibilities arising from future changes to them. The information here is subject to change without notice. Do not finalize a design with this information.
The products described in this document may contain design defects or errors known as errata which may cause the product to deviate from published specifications. Current characterized errata are available on request.
Contact your local Intel sales office or your distributor to obtain the latest specifications and before placing your product order.
64-bit computing on Intel architecture requires a computer system with a processor, chipset, BIOS, operating system, device drivers and applications enabled for IntelÆ 64 architecture. Performance will vary depending on your hardware and software configurations. Consult with your system vendor for more information.
Enhanced Intel SpeedStep® Technology for specified units of this processor are available. See the Processor Spec Finder at http://processorfinder.intel.com or contact your Intel representative for more information.
Enabling Execute Disable Bit functionality requires a PC with a processor with Execute Disable Bit capability and a supporting operating system. Check with your PC manufacturer on whether your system delivers Execute Disable Bit functionality. Intel® Virtualization Technology requires a computer system with an enabled Intel® processor, BIOS, virtual machine monitor (VMM) and, for some uses, certain platform software enabled for it. Functionality, performance or other benefits will vary depending on hardware and software configurations and may require a BIOS update. Software applications may not be compatible with all operating systems. Please check with your application vendor.
Intel, Pentium, Centrino, Intel Core Duo, Intel SpeedStep, MMX and the Intel logo are trademarks of Intel Corporation in the U.S. and other countries.
*Other names and brands may be claimed as the property of others.
Copyright © 2008-2009, Intel Corporation. All rights reserved.

Datasheet 3
Contents
1 Introduction ..............................................................................................................71.1 Terminology .......................................................................................................81.2 References .........................................................................................................9
2 Low Power Features ................................................................................................ 112.1 Clock Control and Low-Power States .................................................................... 11
2.1.1 Core Low-Power State Descriptions........................................................... 132.1.2 Package Low-power State Descriptions...................................................... 14
2.2 Enhanced Intel SpeedStep® Technology .............................................................. 172.3 Extended Low-Power States................................................................................ 182.4 FSB Low Power Enhancements ............................................................................ 192.5 Processor Power Status Indicator (PSI-2) Signal .................................................... 19
3 Electrical Specifications ........................................................................................... 213.1 Power and Ground Pins ...................................................................................... 213.2 Decoupling Guidelines........................................................................................ 21
3.2.1 VCC Decoupling...................................................................................... 213.2.2 FSB AGTL+ Decoupling ........................................................................... 213.2.3 FSB Clock (BCLK[1:0]) and Processor Clocking........................................... 21
3.3 Voltage Identification and Power Sequencing ........................................................ 223.4 Catastrophic Thermal Protection .......................................................................... 253.5 Reserved and Unused Pins.................................................................................. 253.6 FSB Frequency Select Signals (BSEL[2:0])............................................................ 253.7 FSB Signal Groups............................................................................................. 263.8 CMOS Signals ................................................................................................... 273.9 Maximum Ratings.............................................................................................. 273.10 Processor DC Specifications ................................................................................ 28
4 Package Mechanical Specifications and Pin Information .......................................... 334.1 Package Mechanical Specifications ....................................................................... 334.2 Processor Pinout and Pin List .............................................................................. 364.3 Alphabetical Signals Reference ............................................................................ 59
5 Thermal Specifications and Design Considerations .................................................. 675.1 Monitoring Die Temperature ............................................................................... 69
5.1.1 Thermal Diode ....................................................................................... 695.1.2 Intel® Thermal Monitor........................................................................... 705.1.3 Digital Thermal Sensor............................................................................ 72
5.2 Out of Specification Detection ............................................................................. 735.3 PROCHOT# Signal Pin ........................................................................................ 73
Figures1 Core Low-Power States ............................................................................................. 122 Package Low-Power States ........................................................................................ 133 Active VCC and ICC Loadline for Pentium Processors..................................................... 304 1-MB die Micro-FCPGA Processor Package Drawing (Sheet 1 of 2)................................... 345 1-MB Die Micro-FCPGA Processor Package Drawing (Sheet 2 of 2) .................................. 356 Processor Pinout (Top Package View, Left Side)............................................................ 367 Processor Pinout (Top Package View, Right Side).......................................................... 37

4 Datasheet
Tables1 Coordination of Core Low-Power States at the Package Level..........................................132 Voltage Identification Definition..................................................................................223 BSEL[2:0] Encoding for BCLK Frequency......................................................................254 FSB Pin Groups ........................................................................................................265 Processor Absolute Maximum Ratings..........................................................................276 Voltage and Current Specifications for the Pentium Processors........................................297 AGTL+ Signal Group DC Specifications ........................................................................318 CMOS Signal Group DC Specifications..........................................................................329 Open Drain Signal Group DC Specifications ..................................................................3210 Pin Name Listing ......................................................................................................3811 Pin # Listing ............................................................................................................5112 Signal Description.....................................................................................................5913 Power Specifications for the Pentium Processors ...........................................................6814 Thermal Diode Interface............................................................................................6915 Thermal Diode Parameters Using Transistor Model ........................................................70

Datasheet 5
Revision History
§
Document Number
Revision Number
Description Date
322875 -001 Initial Draft October 2009

6 Datasheet

Datasheet7
Introduction
1 Introduction
This document contains electrical, mechanical and thermal specifications for the following processors:
• The Intel® Pentium® support the Mobile Intel® 4 Series Express Chipset and Intel® ICH9M I/O controller.
Notes: In this document
1. Intel Pentium processor are referred to as the processor
2. Mobile Intel 4 Series Express Chipset is referred as the GMCH.
Key features include:
• Dual-core processor for mobile with enhanced performance
• Supports Intel architecture with Intel® Wide Dynamic Execution
• Supports L1 cache-to-cache (C2C) transfer
• On-die, primary 32-KB instruction cache and 32-KB, write-back data cache in each core
• The processor have an on-die, 1-MB second-level, shared cache with Advanced Transfer Cache architecture
• Streaming SIMD extensions 2 (SSE2), streaming SIMD extensions 3 (SSE3), and supplemental streaming SIMD extensions 3 (SSSE3)
• Enhanced Intel SpeedStep® Technology
• The processors are offered at 800-MHz, source-synchronous front side bus (FSB)
• Digital thermal sensor (DTS)
• Intel® 64 architecture
• Enhanced Multi-Threaded Thermal Management (EMTTM)
• Processor offered in Micro-FCPGA packaging technology
• Execute Disable Bit support for enhanced security
• Half ratio support (N/2) for core to bus ratio

Introduction
8 Datasheet
1.1 Terminology
Term Definition
#
A “#” symbol after a signal name refers to an active low signal, indicating a signal is in the active state when driven to a low level. For example, when RESET# is low, a reset has been requested. Conversely, when NMI is high, a nonmaskable interrupt has occurred. In the case of signals where the name does not imply an active state but describes part of a binary sequence (such as address or data), the “#” symbol implies that the signal is inverted. For example, D[3:0] = “HLHL” refers to a hex “A”, and D[3:0]# = “LHLH” also refers to a hex “A” (H= High logic level, L= Low logic level).
Front Side Bus (FSB)
Refers to the interface between the processor and system core logic (also known as the chipset components).
AGTL+Advanced Gunning Transceiver Logic. Used to refer to Assisted GTL+ signaling technology on some Intel processors.
Storage Conditions
Refers to a non-operational state. The processor may be installed in a platform, in a tray, or loose. Processors may be sealed in packaging or exposed to free air. Under these conditions, processor landings should not be connected to any supply voltages, have any I/Os biased or receive any clocks. Upon exposure to “free air” (i.e., unsealed packaging or a device removed from packaging material) the processor must be handled in accordance with moisture sensitivity labeling (MSL) as indicated on the packaging material.
Processor CoreProcessor core die with integrated L1 and L2 cache. All AC timing and signal integrity specifications are at the pads of the processor core.
Execute Disable Bit
The Execute Disable bit allows memory to be marked as executable or non-executable, when combined with a supporting operating system. If code attempts to run in non-executable memory the processor raises an error to the operating system. This feature can prevent some classes of viruses or worms that exploit buffer overrun vulnerabilities and can thus help improve the overall security of the system. See the Intel® 64 and IA-32 Architectures Software Developer's Manuals for more detailed information.
Intel® 64 Technology
64-bit memory extensions to the IA-32 architecture.
Half ratio support (N/2) for Core to Bus ratio
Intel Core 2 Duo processors and Intel Core 2 Extreme processors support the N/2 feature that allows having fractional core-to-bus ratios. This feature provides the flexibility of having more frequency options and being able to have products with smaller frequency steps.
TDP Thermal Design Power.
VCC The processor core power supply.
VSS The processor ground.

Datasheet9
Introduction
1.2 References
Material and concepts available in the following documents may be beneficial when reading this document.
NOTE: Contact your Intel representative for the latest revision of this document.
§
DocumentDocument Number
Intel® Pentium® Processor on 45-nm Technology Specification Update
Mobile Intel® 4 Series Express Chipset Family Datasheet 320122
Mobile Intel® 4 Series Express Chipset Family Specification Update 320123
Intel® I/O Controller Hub 9 (ICH9)/ I/O Controller Hub 9M (ICH9M) Datasheet
316972
Intel® I/O Controller Hub 9 (ICH9)/ I/O Controller Hub 9M (ICH9M) Specification Update
316973
Intel® 64 and IA-32 Architectures Software Developer's Manuals
Volume 1: Basic Architecture 253665
Volume 2A: Instruction Set Reference, A-M 253666
Volume 2B: Instruction Set Reference, N-Z 253667
Volume 3A: System Programming Guide 253668
Volume 3B: System Programming Guide 253669

Introduction
10 Datasheet

Datasheet11
Low Power Features
2 Low Power Features
2.1 Clock Control and Low-Power States
The processor supports low-power states both at the individual core level and the package level for optimal power management.
A core may independently enter the C1/AutoHALT, C1/MWAIT, C2, C3, low-power states. When both cores coincide in a common core low-power state, the central power management logic ensures the entire processor enters the respective package low-power state by initiating a P_LVLx (P_LVL2, P_LVL3) I/O read to the GMCH.
The processor implements two software interfaces for requesting low-power states: MWAIT instruction extensions with sub-state hints and P_LVLx reads to the ACPI P_BLK register block mapped in the processor’s I/O address space. The P_LVLx I/O reads are converted to equivalent MWAIT C-state requests inside the processor and do not directly result in I/O reads on the processor FSB. The P_LVLx I/O Monitor address does not need to be set up before using the P_LVLx I/O read interface. The sub-state hints used for each P_LVLx read can be configured through the IA32_MISC_ENABLES model specific register (MSR).
If a core encounters a GMCH break event while STPCLK# is asserted, it asserts the PBE# output signal. Assertion of PBE# when STPCLK# is asserted indicates to system logic that individual cores should return to the C0 state and the processor should return to the Normal state.
Figure 1 shows the core low-power states and Figure 2 shows the package low-power states for the processor. Table 1 maps the core low-power states to package low-power states.

Low Power Features
12 Datasheet
Figure 1. Core Low-Power States
C2†
C0
StopGrant
Core statebreak
P_LVL2 orMWAIT(C2)
C3†
Corestatebreak
P_LVL3 orMWAIT(C3)
C1/MWAIT
Core statebreak
MWAIT(C1)
C1/Auto Halt
Halt break
HLT instruction
STPCLK#de-asserted
STPCLK#asserted
STPCLK#de-asserted
STPCLK#asserted
STPCLK#de-asserted
STPCLK#asserted
halt break = A20M# transition, INIT#, INTR, NMI, PREQ#, RESET#, SMI#, or APIC interruptcore state break = (halt break OR Monitor event) AND STPCLK# high (not asserted)† — STPCLK# assertion and de-assertion have no effect if a core is in C2 or C3.

Datasheet13
Low Power Features
NOTE:1. AutoHALT or MWAIT/C1.
2.1.1 Core Low-Power State Descriptions
2.1.1.1 Core C0 State
This is the normal operating state for cores in the processor.
2.1.1.2 Core C1/AutoHALT Powerdown State
C1/AutoHALT is a low-power state entered when a core executes the HALT instruction. The processor core will transition to the C0 state upon occurrence of SMI#, INIT#, LINT[1:0] (NMI, INTR), or FSB interrupt messages. RESET# will cause the processor to immediately initialize itself.
A System Management Interrupt (SMI) handler will return execution to either Normal state or the AutoHALT Powerdown state. See the Intel® 64 and IA-32 Architectures Software Developer's Manuals, Volume 3A/3B: System Programmer's Guide for more information.
The system can generate a STPCLK# while the processor is in the AutoHALT Powerdown state. When the system deasserts the STPCLK# interrupt, the processor will return execution to the HALT state.
Figure 2. Package Low-Power States
Table 1. Coordination of Core Low-Power States at the Package Level
Package State Core1 State
Core0 State C0 C11 C2 C3
C0 Normal Normal Normal Normal
C11 Normal Normal Normal Normal
C2 Normal Normal Stop-Grant Stop-Grant
C3 Normal Normal Stop-Grant Deep Sleep
Stop GrantSnoop
NormalStopGrant
STPCLK# asserted
Snoopserviced
Snoopoccurs
Sleep
SLP# asserted
SLP# de-assertedSTPCLK# de-asserted
Deep Sleep
DPSLP# asserted
DPSLP# de-asserted

Low Power Features
14 Datasheet
While in AutoHALT Powerdown state, the dual-core processor will process bus snoops and snoops from the other core. The processor core will enter a snoopable sub-state (not shown in Figure 1) to process the snoop and then return to the AutoHALT Powerdown state.
2.1.1.3 Core C1/MWAIT Powerdown State
C1/MWAIT is a low-power state entered when the processor core executes the MWAIT(C1) instruction. Processor behavior in the MWAIT state is identical to the AutoHALT state except that Monitor events can cause the processor core to return to the C0 state. See the Intel® 64 and IA-32 Architectures Software Developer's Manuals, Volume 2A: Instruction Set Reference, A-M and Volume 2B: Instruction Set Reference, N-Z, for more information.
2.1.1.4 Core C2 State
Individual cores of the dual-core processor can enter the C2 state by initiating a P_LVL2 I/O read to the P_BLK or an MWAIT(C2) instruction, but the processor will not issue a Stop-Grant Acknowledge special bus cycle unless the STPCLK# pin is also asserted.
While in the C2 state, the dual-core processor will process bus snoops and snoops from the other core. The processor core will enter a snoopable sub-state (not shown in Figure 1) to process the snoop and then return to the C2 state.
2.1.1.5 Core C3 State
Individual cores of the dual-core processor can enter the C3 state by initiating a P_LVL3 I/O read to the P_BLK or an MWAIT(C3) instruction. Before entering C3, the processor core flushes the contents of its L1 caches into the processor’s L2 cache. Except for the caches, the processor core maintains all its architectural states in the C3 state. The Monitor remains armed if it is configured. All of the clocks in the processor core are stopped in the C3 state.
Because the core’s caches are flushed the processor keeps the core in the C3 state when the processor detects a snoop on the FSB or when the other core of the dual-core processor accesses cacheable memory. The processor core will transition to the C0 state upon occurrence of a Monitor event, SMI#, INIT#, LINT[1:0] (NMI, INTR), or FSB interrupt message. RESET# will cause the processor core to immediately initialize itself.
2.1.2 Package Low-power State Descriptions
2.1.2.1 Normal State
This is the normal operating state for the processor. The processor remains in the Normal state when at least one of its cores is in the C0, C1/AutoHALT, or C1/MWAIT state.
2.1.2.2 Stop-Grant State
When the STPCLK# pin is asserted, each core of the dual-core processor enters the Stop-Grant state within 20 bus clocks after the response phase of the processor-issued Stop-Grant Acknowledge special bus cycle. Processor cores that are already in the C2, C3, or C4 state remain in their current low-power state. When the STPCLK# pin is deasserted, each core returns to its previous core low-power state.
Since the AGTL+ signal pins receive power from the FSB, these pins should not be driven (allowing the level to return to VCCP) for minimum power drawn by the termination resistors in this state. In addition, all other input pins on the FSB should be driven to the inactive state.

Datasheet15
Low Power Features
RESET# causes the processor to immediately initialize itself, but the processor will stay in Stop-Grant state. When RESET# is asserted by the system, the STPCLK#, SLP#, DPSLP#, and DPRSTP# pins must be deasserted prior to RESET# deassertion as per AC Specification T45. When re-entering the Stop-Grant state from the Sleep state, STPCLK# should be deasserted after the deassertion of SLP# as per AC Specification T75.
While in Stop-Grant state, the processor will service snoops and latch interrupts delivered on the FSB. The processor will latch SMI#, INIT# and LINT[1:0] interrupts and will service only one of each upon return to the Normal state.
The PBE# signal may be driven when the processor is in Stop-Grant state. PBE# will be asserted if there is any pending interrupt or Monitor event latched within the processor. Pending interrupts that are blocked by the EFLAGS.IF bit being clear will still cause assertion of PBE#. Assertion of PBE# indicates to system logic that the entire processor should return to the Normal state.
A transition to the Stop-Grant Snoop state occurs when the processor detects a snoop on the FSB (see Section 2.1.2.3). A transition to the Sleep state (see Section 2.1.2.4) occurs with the assertion of the SLP# signal.
2.1.2.3 Stop-Grant Snoop State
The processor responds to snoop or interrupt transactions on the FSB while in Stop-Grant state by entering the Stop-Grant Snoop state. The processor will stay in this state until the snoop on the FSB has been serviced (whether by the processor or another agent on the FSB) or the interrupt has been latched. The processor returns to the Stop-Grant state once the snoop has been serviced or the interrupt has been latched.
2.1.2.4 Sleep State
The Sleep state is a low-power state in which the processor maintains its context, maintains the phase-locked loop (PLL), and stops all internal clocks. The Sleep state is entered through assertion of the SLP# signal while in the Stop-Grant state. The SLP# pin should only be asserted when the processor is in the Stop-Grant state. SLP# assertions while the processor is not in the Stop-Grant state is out of specification and may result in unapproved operation.
In the Sleep state, the processor is incapable of responding to snoop transactions or latching interrupt signals. No transitions or assertions of signals (with the exception of SLP#, DPSLP# or RESET#) are allowed on the FSB while the processor is in Sleep state. Snoop events that occur while in Sleep state or during a transition into or out of Sleep state will cause unpredictable behavior. Any transition on an input signal before the processor has returned to the Stop-Grant state will result in unpredictable behavior.
If RESET# is driven active while the processor is in the Sleep state, and held active as specified in the RESET# pin specification, then the processor will reset itself, ignoring the transition through the Stop-Grant state. If RESET# is driven active while the processor is in the Sleep state, the SLP# and STPCLK# signals should be deasserted immediately after RESET# is asserted to ensure the processor correctly executes the Reset sequence.
While in the Sleep state, the processor is capable of entering an even lower power state, the Deep Sleep state, by asserting the DPSLP# pin (See Section 2.1.2.5). While the processor is in the Sleep state, the SLP# pin must be deasserted if another asynchronous FSB event needs to occur.

Low Power Features
16 Datasheet
2.1.2.5 Deep Sleep State
The Deep Sleep state is entered through assertion of the DPSLP# pin while in the Sleep state. BCLK may be stopped during the Deep Sleep state for additional platform-level power savings. BCLK stop/restart timings on appropriate GMCH-based platforms with the CK505 clock chip are as follows:
• Deep Sleep entry: the system clock chip may stop/tristate BCLK within 2 BCLKs of DPSLP# assertion. It is permissible to leave BCLK running during Deep Sleep.
• Deep Sleep exit: the system clock chip must drive BCLK to differential DC levels within 2-3 ns of DPSLP# deassertion and start toggling BCLK within 10 BCLK periods.
To re-enter the Sleep state, the DPSLP# pin must be deasserted. BCLK can be re-started after DPSLP# deassertion as described above. A period of 15 microseconds (to allow for PLL stabilization) must occur before the processor can be considered to be in the Sleep state. Once in the Sleep state, the SLP# pin must be deasserted to re-enter the Stop-Grant state.
While in Deep Sleep state, the processor is incapable of responding to snoop transactions or latching interrupt signals. No transitions of signals are allowed on the FSB while the processor is in Deep Sleep state. When the processor is in Deep Sleep state, it will not respond to interrupts or snoop transactions. Any transition on an input signal before the processor has returned to Stop-Grant state will result in unpredictable behavior.

Datasheet17
Low Power Features
2.2 Enhanced Intel SpeedStep® Technology
The processor features Enhanced Intel SpeedStep Technology. Following are the key features of Enhanced Intel SpeedStep Technology:
• Multiple voltage and frequency operating points provide optimal performance at the lowest power.
• Voltage and frequency selection is software-controlled by writing to processor MSRs:
— If the target frequency is higher than the current frequency, VCC is ramped up in steps by placing new values on the VID pins, and the PLL then locks to the new frequency.
— If the target frequency is lower than the current frequency, the PLL locks to the new frequency and the VCC is changed through the VID pin mechanism.
— Software transitions are accepted at any time. If a previous transition is in progress, the new transition is deferred until the previous transition completes.
• The processor controls voltage ramp rates internally to ensure glitch-free transitions.
• Low transition latency and large number of transitions possible per second:
— Processor core (including L2 cache) is unavailable for up to 10 s during the frequency transition.
— The bus protocol (BNR# mechanism) is used to block snooping.
• Improved Intel® Thermal Monitor mode:
— When the on-die thermal sensor indicates that the die temperature is too high the processor can automatically perform a transition to a lower frequency and voltage specified in a software-programmable MSR.
— The processor waits for a fixed time period. If the die temperature is down to acceptable levels, an up-transition to the previous frequency and voltage point occurs.
— An interrupt is generated for the up and down Intel Thermal Monitor transitions enabling better system-level thermal management.
• Enhanced thermal management features:
— Digital Thermal Sensor and Out of Specification detection.
— Intel Thermal Monitor 1 (TM1) in addition to Intel Thermal Monitor 2 (TM2) in case of unsuccessful TM2 transition.
— Dual-core thermal management synchronization.
Each core in the dual-core processor implements an independent MSR for controlling Enhanced Intel SpeedStep Technology, but both cores must operate at the same frequency and voltage. The processor has performance state coordination logic to resolve frequency and voltage requests from the two cores into a single frequency and voltage request for the package as a whole. If both cores request the same frequency and voltage, then the processor will transition to the requested common frequency and voltage. If the two cores have different frequency and voltage requests, then the processor will take the highest of the two frequencies and voltages as the resolved request and transition to that frequency and voltage.
The processor also supports Dynamic FSB Frequency Switching and Intel Dynamic Acceleration Technology mode on select SKUs. The operating system can take advantage of these features and request a lower operating point called SuperLFM (due to Dynamic FSB Frequency Switching) and a higher operating point Intel Dynamic Acceleration Technology mode.

Low Power Features
18 Datasheet
2.3 Extended Low-Power States
Extended low-power states (CXE) optimize for power by forcibly reducing the performance state of the processor when it enters a package low-power state. Instead of directly transitioning into the package low-power state, the enhanced package low-power state first reduces the performance state of the processor by performing an Enhanced Intel SpeedStep Technology transition down to the lowest operating point. Upon receiving a break event from the package low-power state, control will be returned to software while an Enhanced Intel SpeedStep Technology transition up to the initial operating point occurs. The advantage of this feature is that it significantly reduces leakage while in the Stop-Grant state.
Note: Long-term reliability cannot be assured unless all the Extended Low Power States are enabled.
The processor implements two software interfaces for requesting enhanced package low-power states: MWAIT instruction extensions with sub-state hints and via BIOS by configuring IA32_MISC_ENABLES MSR bits to automatically promote package low-power states to enhanced package low-power states.
Caution: Extended Stop-Grant must be enabled via the BIOS for the processor to remain within specification. As processor technology changes, enabling the extended low power states becomes increasingly crucial when building computer systems. Maintaining the proper BIOS configuration is key to reliable, long-term system operation. Not complying to this guideline may affect the long-term reliability of the processor.
Caution: Enhanced Intel SpeedStep Technology transitions are multistep processes that require clocked control. These transitions cannot occur when the processor is in the Sleep or Deep Sleep package low-power states since processor clocks are not active in these states. The transition to the lowest operating point or back to the original software-requested point may not be instantaneous. Furthermore, upon very frequent transitions between active and idle states, the transitions may lag behind the idle state entry resulting in the processor either executing for a longer time at the lowest operating point or running idle at a high operating point. Observations and analyses show this behavior should not significantly impact total power savings or performance score while providing power benefits in most other cases.

Datasheet19
Low Power Features
2.4 FSB Low Power Enhancements
The processor incorporates FSB low power enhancements:
• Dynamic FSB Power Down
• BPRI# control for address and control input buffers
• Dynamic Bus Parking
• Dynamic On-Die Termination disabling
• Low VCCP (I/O termination voltage)
• Dynamic FSB frequency switching
The processor incorporates the DPWR# signal that controls the data bus input buffers on the processor. The DPWR# signal disables the buffers when not used and activates them only when data bus activity occurs, resulting in significant power savings with no performance impact. BPRI# control also allows the processor address and control input buffers to be turned off when the BPRI# signal is inactive. Dynamic Bus Parking allows a reciprocal power reduction in GMCH address and control input buffers when the processor deasserts its BR0# pin. The On-Die Termination on the processor FSB buffers is disabled when the signals are driven low, resulting in additional power savings. The low I/O termination voltage is on a dedicated voltage plane independent of the core voltage, enabling low I/O switching power at all times.
2.5 Processor Power Status Indicator (PSI-2) Signal
The processor incorporates the PSI# signal that is asserted when the processor is in a reduced power consumption state. PSI# can be used to improve intermediate and light load efficiency of the voltage regulator, resulting in platform power savings and extended battery life. The algorithm that the processor uses for determining when to assert PSI# is different from the algorithm used in previous mobile processors. PSI-2 functionality is expanded further to support three processor states:
• Both cores are in idle state
• Only one core active state
• Both cores are in active state
PSI-2 functionality improves overall voltage regulator efficiency over a wide power range based on the C-state and P-state of the two cores. The combined C-state and P-state of both cores are used to dynamically predict processor power.
The real-time power prediction is compared against a set of predefined and configured values of CHH and CHL. CHH is indicative of the active C-state of both the cores and CHL is indicative that only one core is in active C-state and the other core is in low power core state. PSI-2# output is asserted upon crossing these thresholds indicating that the processor requires lower power. The voltage regulator will adapt its power output accordingly. Additionally the voltage regulator may switch to a single phase and/or asynchronous mode when the processor is idle and fused leakage limit is less than or equal to the BIOS threshold value.
§

Low Power Features
20 Datasheet

Datasheet21
Electrical Specifications
3 Electrical Specifications
3.1 Power and Ground Pins
For clean, on-chip power distribution, the processor will have a large number of VCC (power) and VSS (ground) inputs. All power pins must be connected to VCC power planes while all VSS pins must be connected to system ground planes. Use of multiple power and ground planes is recommended to reduce I*R drop. The processor VCC pins must be supplied the voltage determined by the VID (Voltage ID) pins.
3.2 Decoupling Guidelines
Due to its large number of transistors and high internal clock speeds, the processor is capable of generating large average current swings between low and full power states. This may cause voltages on power planes to sag below their minimum values if bulk decoupling is not adequate. Larger bulk storage, such as electrolytic capacitors, supply current during longer lasting changes in current demand by the component, such as coming out of an idle condition. Similarly, they act as a storage well for current when entering an idle condition from a running condition. Care must be taken in the board design to ensure that the voltage provided to the processor remains within the specifications listed in the tables in Section 3.10. Failure to do so can result in timing violations or reduced lifetime of the component.
3.2.1 VCC Decoupling
VCC regulator solutions need to provide bulk capacitance with a low Effective Series Resistance (ESR) and keep a low interconnect resistance from the regulator to the socket. Bulk decoupling for the large current swings when the part is powering on, or entering/exiting low-power states, should be provided by the voltage regulator solution depending on the specific system design.
3.2.2 FSB AGTL+ Decoupling
The processors integrate signal termination on the die as well as incorporate high frequency decoupling capacitance on the processor package. Decoupling must also be provided by the system motherboard for proper AGTL+ bus operation.
3.2.3 FSB Clock (BCLK[1:0]) and Processor Clocking
BCLK[1:0] directly controls the FSB interface speed as well as the core frequency of the processor. As in previous-generation processors, the processor core frequency is a multiple of the BCLK[1:0] frequency. The processor bus ratio multiplier will be set at its default ratio at manufacturing. The processor uses a differential clocking implementation.

Electrical Specifications
22 Datasheet
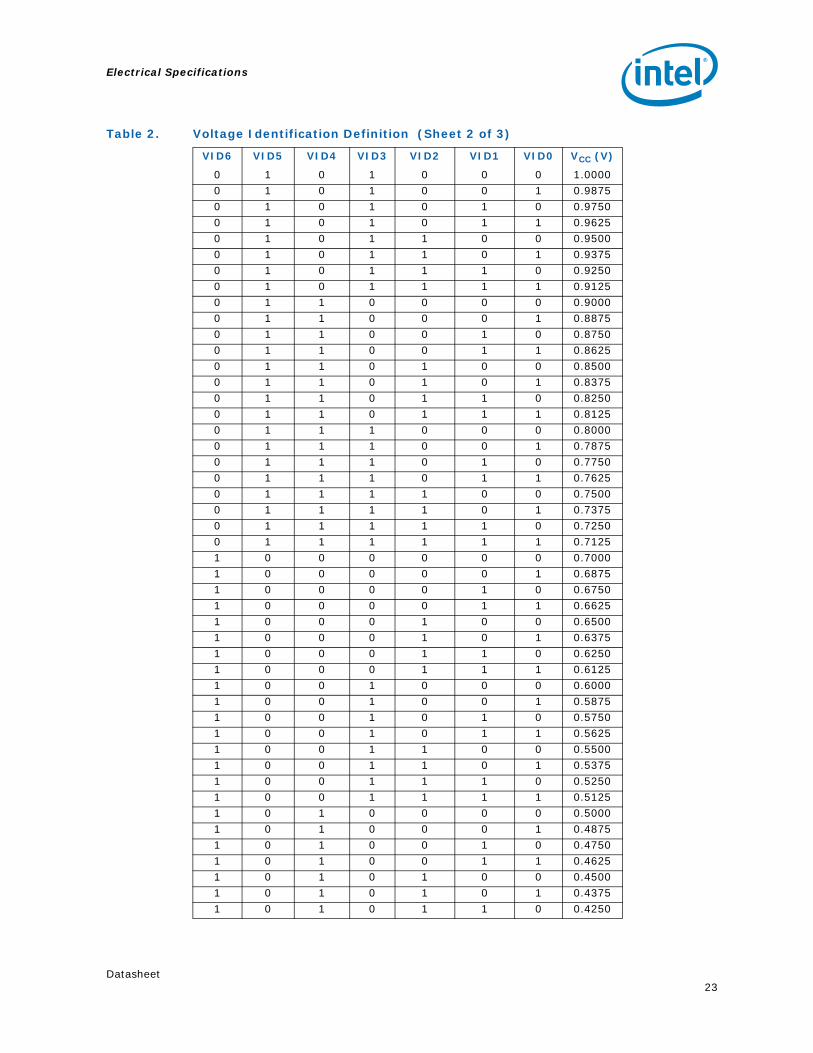
3.3 Voltage Identification and Power Sequencing
The processor uses seven voltage identification pins,VID[6:0], to support automatic selection of power supply voltages. The VID pins for the processor are CMOS outputs driven by the processor VID circuitry. Table 2 specifies the voltage level corresponding to the state of VID[6:0]. A 1 in the table refers to a high-voltage level and a 0 refers to a low-voltage level.
Table 2. Voltage Identification Definition (Sheet 1 of 3)
VID6 VID5 VID4 VID3 VID2 VID1 VID0 VCC (V)
0 0 0 0 0 0 0 1.50000 0 0 0 0 0 1 1.48750 0 0 0 0 1 0 1.47500 0 0 0 0 1 1 1.46250 0 0 0 1 0 0 1.45000 0 0 0 1 0 1 1.43750 0 0 0 1 1 0 1.42500 0 0 0 1 1 1 1.41250 0 0 1 0 0 0 1.40000 0 0 1 0 0 1 1.38750 0 0 1 0 1 0 1.37500 0 0 1 0 1 1 1.36250 0 0 1 1 0 0 1.35000 0 0 1 1 0 1 1.33750 0 0 1 1 1 0 1.32500 0 0 1 1 1 1 1.31250 0 1 0 0 0 0 1.30000 0 1 0 0 0 1 1.28750 0 1 0 0 1 0 1.27500 0 1 0 0 1 1 1.26250 0 1 0 1 0 0 1.25000 0 1 0 1 0 1 1.23750 0 1 0 1 1 0 1.22500 0 1 0 1 1 1 1.21250 0 1 1 0 0 0 1.20000 0 1 1 0 0 1 1.18750 0 1 1 0 1 0 1.17500 0 1 1 0 1 1 1.16250 0 1 1 1 0 0 1.15000 0 1 1 1 0 1 1.13750 0 1 1 1 1 0 1.12500 0 1 1 1 1 1 1.11250 1 0 0 0 0 0 1.10000 1 0 0 0 0 1 1.08750 1 0 0 0 1 0 1.07500 1 0 0 0 1 1 1.06250 1 0 0 1 0 0 1.05000 1 0 0 1 0 1 1.03750 1 0 0 1 1 0 1.02500 1 0 0 1 1 1 1.0125
Datasheet23
Electrical Specifications
0 1 0 1 0 0 0 1.00000 1 0 1 0 0 1 0.98750 1 0 1 0 1 0 0.97500 1 0 1 0 1 1 0.96250 1 0 1 1 0 0 0.95000 1 0 1 1 0 1 0.93750 1 0 1 1 1 0 0.92500 1 0 1 1 1 1 0.91250 1 1 0 0 0 0 0.90000 1 1 0 0 0 1 0.88750 1 1 0 0 1 0 0.87500 1 1 0 0 1 1 0.86250 1 1 0 1 0 0 0.85000 1 1 0 1 0 1 0.83750 1 1 0 1 1 0 0.82500 1 1 0 1 1 1 0.81250 1 1 1 0 0 0 0.80000 1 1 1 0 0 1 0.78750 1 1 1 0 1 0 0.77500 1 1 1 0 1 1 0.76250 1 1 1 1 0 0 0.75000 1 1 1 1 0 1 0.73750 1 1 1 1 1 0 0.72500 1 1 1 1 1 1 0.71251 0 0 0 0 0 0 0.70001 0 0 0 0 0 1 0.68751 0 0 0 0 1 0 0.67501 0 0 0 0 1 1 0.66251 0 0 0 1 0 0 0.65001 0 0 0 1 0 1 0.63751 0 0 0 1 1 0 0.62501 0 0 0 1 1 1 0.61251 0 0 1 0 0 0 0.60001 0 0 1 0 0 1 0.58751 0 0 1 0 1 0 0.57501 0 0 1 0 1 1 0.56251 0 0 1 1 0 0 0.55001 0 0 1 1 0 1 0.53751 0 0 1 1 1 0 0.52501 0 0 1 1 1 1 0.51251 0 1 0 0 0 0 0.50001 0 1 0 0 0 1 0.48751 0 1 0 0 1 0 0.47501 0 1 0 0 1 1 0.46251 0 1 0 1 0 0 0.45001 0 1 0 1 0 1 0.43751 0 1 0 1 1 0 0.4250
Table 2. Voltage Identification Definition (Sheet 2 of 3)
VID6 VID5 VID4 VID3 VID2 VID1 VID0 VCC (V)

Electrical Specifications
24 Datasheet
1 0 1 0 1 1 1 0.41251 0 1 1 0 0 0 0.40001 0 1 1 0 0 1 0.38751 0 1 1 0 1 0 0.37501 0 1 1 0 1 1 0.36251 0 1 1 1 0 0 0.35001 0 1 1 1 0 1 0.33751 0 1 1 1 1 0 0.32501 0 1 1 1 1 1 0.31251 1 0 0 0 0 0 0.30001 1 0 0 0 0 1 0.28751 1 0 0 0 1 0 0.27501 1 0 0 0 1 1 0.26251 1 0 0 1 0 0 0.25001 1 0 0 1 0 1 0.23751 1 0 0 1 1 0 0.22501 1 0 0 1 1 1 0.21251 1 0 1 0 0 0 0.20001 1 0 1 0 0 1 0.18751 1 0 1 0 1 0 0.17501 1 0 1 0 1 1 0.16251 1 0 1 1 0 0 0.15001 1 0 1 1 0 1 0.13751 1 0 1 1 1 0 0.12501 1 0 1 1 1 1 0.11251 1 1 0 0 0 0 0.10001 1 1 0 0 0 1 0.08751 1 1 0 0 1 0 0.07501 1 1 0 0 1 1 0.06251 1 1 0 1 0 0 0.05001 1 1 0 1 0 1 0.03751 1 1 0 1 1 0 0.02501 1 1 0 1 1 1 0.01251 1 1 1 0 0 0 0.00001 1 1 1 0 0 1 0.00001 1 1 1 0 1 0 0.00001 1 1 1 0 1 1 0.00001 1 1 1 1 0 0 0.00001 1 1 1 1 0 1 0.00001 1 1 1 1 1 0 0.00001 1 1 1 1 1 1 0.0000
Table 2. Voltage Identification Definition (Sheet 3 of 3)
VID6 VID5 VID4 VID3 VID2 VID1 VID0 VCC (V)

Datasheet25
Electrical Specifications
3.4 Catastrophic Thermal Protection
The processor supports the THERMTRIP# signal for catastrophic thermal protection. An external thermal sensor should also be used to protect the processor and the system against excessive temperatures. Even with the activation of THERMTRIP#, which halts all processor internal clocks and activity, leakage current can be high enough that the processor cannot be protected in all conditions without the removal of power to the processor. If the external thermal sensor detects a catastrophic processor temperature of approximately 125°C (maximum), or if the THERMTRIP# signal is asserted, the VCC supply to the processor must be turned off within 500 ms to prevent permanent silicon damage due to thermal runaway of the processor. THERMTRIP# functionality is not ensured if the PWRGOOD signal is not asserted, and during Deep Power Down Technology State (C6).
3.5 Reserved and Unused Pins
All RESERVED (RSVD) pins must remain unconnected. Connection of these pins to VCC, VSS, or to any other signal (including each other) can result in component malfunction or incompatibility with future processors. See Section 4.2 for a pin listing of the processor and the location of all RSVD pins.
For reliable operation, always connect unused inputs or bidirectional signals to an appropriate signal level. Unused active low AGTL+ inputs may be left as no-connects if AGTL+ termination is provided on the processor silicon. Unused active high inputs should be connected through a resistor to ground (VSS). Unused outputs can be left unconnected. The TEST1,TEST2,TEST3,TEST4,TEST5,TEST6,TEST7 pins are used for test purposes internally and can be left as “No Connects”.
3.6 FSB Frequency Select Signals (BSEL[2:0])
The BSEL[2:0] signals are used to select the frequency of the processor input clock (BCLK[1:0]). These signals should be connected to the clock chip and the appropriate chipset on the platform. The BSEL encoding for BCLK[1:0] is shown in Table 3.
Table 3. BSEL[2:0] Encoding for BCLK Frequency
BSEL[2] BSEL[1] BSEL[0] BCLK Frequency
L L L RESERVED
L L H RESERVED
L H H RESERVED
L H L 200 MHz
H H L RESERVED
H H H RESERVED
H L H RESERVED
H L L RESERVED

Electrical Specifications
26 Datasheet
3.7 FSB Signal Groups
The FSB signals have been combined into groups by buffer type in the following sections. In this document, the term “AGTL+ Input” refers to the AGTL+ input group as well as the AGTL+ I/O group when receiving. Similarly, “AGTL+ Output” refers to the AGTL+ output group as well as the AGTL+ I/O group when driving.
With the implementation of a source-synchronous data bus, two sets of timing parameters are specified. One set is for common clock signals, which are dependent upon the rising edge of BCLK0 (ADS#, HIT#, HITM#, etc.), and the second set is for the source-synchronous signals which are relative to their respective strobe lines (data and address) as well as the rising edge of BCLK0. Asychronous signals are still present (A20M#, IGNNE#, etc.) and can become active at any time during the clock cycle. Table 4 identifies which signals are common clock, source synchronous, and asynchronous.
NOTES:See next page
Table 4. FSB Pin Groups
Signal Group Type Signals1
AGTL+ Common Clock Input
Synchronous to BCLK[1:0]
BPRI#, DEFER#, PREQ#5, RESET#, RS[2:0]#, TRDY#
AGTL+ Common Clock I/O
Synchronous to BCLK[1:0]
ADS#, BNR#, BPM[3:0]#3, BR0#, DBSY#, DRDY#, HIT#, HITM#, LOCK#, PRDY#3, DPWR#
AGTL+ Source Synchronous I/O
Synchronous to assoc. strobe
AGTL+ StrobesSynchronous to BCLK[1:0]
ADSTB[1:0]#, DSTBP[3:0]#, DSTBN[3:0]#
CMOS Input AsynchronousA20M#, DPRSTP#, DPSLP#, IGNNE#, INIT#, LINT0/INTR, LINT1/NMI, PWRGOOD, SMI#, SLP#, STPCLK#
Open Drain Output
Asynchronous FERR#, IERR#, THERMTRIP#
Open Drain I/O Asynchronous PROCHOT#4
CMOS Output Asynchronous PSI#, VID[6:0], BSEL[2:0]
CMOS Input Synchronous to TCK TCK, TDI, TMS, TRST#
Open Drain Output
Synchronous to TCK TDO
FSB Clock Clock BCLK[1:0]
Power/OtherCOMP[3:0], DBR#2, GTLREF, RSVD, TEST2, TEST1, THERMDA, THERMDC, VCC, VCCA, VCCP, VCC_SENSE, VSS, VSS_SENSE
Signals Associated Strobe
REQ[4:0]#, A[16:3]# ADSTB[0]#
A[35:17]# ADSTB[1]#
D[15:0]#, DINV0# DSTBP0#, DSTBN0#
D[31:16]#, DINV1# DSTBP1#, DSTBN1#
D[47:32]#, DINV2# DSTBP2#, DSTBN2#
D[63:48]#, DINV3# DSTBP3#, DSTBN3#

Datasheet27
Electrical Specifications
1. Refer to Chapter 4 for signal descriptions and termination requirements.2. In processor systems where there is no debug port implemented on the system board,
these signals are used to support a debug port interposer. In systems with the debug port implemented on the system board, these signals are no connects.
3. BPM[2:1]# and PRDY# are AGTL+ output-only signals.4. PROCHOT# signal type is open drain output and CMOS input.5. On-die termination differs from other AGTL+ signals.
3.8 CMOS SignalsCMOS input signals are shown in Table 4. Legacy output FERR#, IERR# and other non-AGTL+ signals (THERMTRIP# and PROCHOT#) use Open Drain output buffers. These signals do not have setup or hold time specifications in relation to BCLK[1:0]. However, all of the CMOS signals are required to be asserted for more than four BCLKs for the processor to recognize them. See Section 3.10 for the DC specifications for the CMOS signal groups.
3.9 Maximum RatingsTable 5 specifies absolute maximum and minimum ratings only, which lie outside the functional limits of the processor. Only within specified operation limits, can functionality and long-term reliability be expected.
At conditions outside functional operation condition limits, but within absolute maximum and minimum ratings, neither functionality nor long-term reliability can be expected. If a device is returned to conditions within functional operation limits after having been subjected to conditions outside these limits, but within the absolute maximum and minimum ratings, the device may be functional, but with its lifetime degraded depending on exposure to conditions exceeding the functional operation condition limits.
At conditions exceeding absolute maximum and minimum ratings, neither functionality nor long-term reliability can be expected. Moreover, if a device is subjected to these conditions for any length of time then, when returned to conditions within the functional operating condition limits, it will either not function, or its reliability will be severely degraded.
Caution: Although the processor contains protective circuitry to resist damage from static electric discharge, precautions should always be taken to avoid high static voltages or electric fields.
NOTES:1. For functional operation, all processor electrical, signal quality, mechanical and thermal
specifications must be satisfied.
Table 5. Processor Absolute Maximum Ratings
Symbol Parameter Min Max Unit Notes1,2
TSTORAGE Processor Storage Temperature -40 85 °C 3,4,5
TSTORAGE Processor Storage Temperature -25 °C 6
VCCAny Processor Supply Voltage with Respect to VSS
-0.3 1.45 V
VinAGTL+AGTL+ Buffer DC Input Voltage with Respect to VSS
-0.1 1.45 V
VinAsynch_CMOSCMOS Buffer DC Input Voltage with Respect to VSS
-0.1 1.45 V

Electrical Specifications
28 Datasheet
2. Excessive overshoot or undershoot on any signal will likely result in permanent damage to the processor.
3. Storage temperature is applicable to storage conditions only. In this scenario, the processor must not receive a clock, and no lands can be connected to a voltage bias. Storage within these limits will not affect the long-term reliability of the device. For functional operation, please refer to the processor case temperature specifications.
4. This rating applies to the processor and does not include any tray or packaging. 5. Failure to adhere to this specification can affect the long-term reliability of the processor.6. For Intel® Pentium® processors in 22x22 mm package.
3.10 Processor DC Specifications
The processor DC specifications in this section are defined at the processor core (pads) unless noted otherwise.
The tables list the DC specifications for the processor and are valid only while meeting specifications for junction temperature, clock frequency, and input voltages. The Highest Frequency Mode (HFM) and Lowest Frequency Mode (LFM) refer to the highest and lowest core operating frequencies supported on the processor. Active mode load line specifications apply in all states except in the Deep Sleep and Deeper Sleep states. VCC,BOOT is the default voltage driven by the voltage regulator at power up in order to set the VID values. Unless specified otherwise, all specifications for the processor are at TJ = 105 C. Read all notes associated with each parameter.

Datasheet29
Electrical Specifications
NOTES:See next page.
Table 6. Voltage and Current Specifications for the Pentium Processors
Symbol Parameter Min Typ Max Unit Notes
VCCHFM VCC at Highest Frequency Mode (HFM) 0.9 1.2 V 1, 2
VCCLFM VCC at Lowest Frequency Mode (LFM) 0.85 — 1.15 V 1, 2
VCC,BOOT Default VCC Voltage for Initial Power Up — 1.2 — V 2, 6
VCCP AGTL+ Termination Voltage 1.0 1.05 1.1 V
VCCA PLL Supply Voltage 1.425 1.5 1.575 V
ICCDES ICC for Processors Recommended Design Target — — 47 A 10
ICC
ICC for Processors — — —
Processor Number
Core Frequency/Voltage — — —
T4500T4400T4300T4200
2.3 GHz & VCCHFM2.2 GHz & VCCHFM2.1 GHz & VCCHFM2.0 GHz & VCCHFM1.2 GHz & VCCLFM
— —
47474747
31.7
A 3, 4
IAH,ISGNT
ICC Auto-Halt & Stop-GrantHFMLFM
— — 25.419.4
A 3, 4
ISLP
ICC SleepHFMLFM
— — 24.719.2
A 3, 4
IDSLP
ICC Deep SleepHFMLFM
— — 22.918.5
A 3, 4
dICC/DTVCC Power Supply Current Slew Rate at Processor Package Pin
— — 600 mA/µs 5, 7
ICCA ICC for VCCA Supply — — 130 mA
ICCPICCC for VCCP Supply before VCC StableICC for VCCP Supply after VCC Stable
— —4.52.5
AA
89

Electrical Specifications
30 Datasheet
1. Each processor is programmed with a maximum valid voltage identification value (VID), which is set at manufacturing and cannot be altered. Individual maximum VID values are calibrated during manufacturing such that two processors at the same frequency may have different settings within the VID range. Note that this differs from the VID employed by the processor during a power management event (Intel Thermal Monitor 2, Enhanced Intel SpeedStep Technology, or Enhanced Halt State).
2. The voltage specifications are assumed to be measured across VCC_SENSE and VSS_SENSE pins at socket with a 100-MHz bandwidth oscilloscope, 1.5-pF maximum probe capacitance, and 1-M minimum impedance. The maximum length of ground wire on the probe should be less than 5 mm. Ensure external noise from the system is not coupled in the scope probe.
3. Specified at 105 °C TJ. 4. Specified at the nominal VCC.5. Measured at the bulk capacitors on the motherboard.6. VCC,BOOT tolerance shown in Figure 7 and Figure 8.7. Based on simulations and averaged over the duration of any change in current. Specified by design/
characterization at nominal VCC. Not 100% tested.8. This is a power-up peak current specification that is applicable when VCCP is high and VCC_CORE is low.9. This is a steady-state ICCcurrent specification that is applicable when both VCCP and VCC_CORE are high.10. Instantaneous current ICC_CORE_INST of 57 A has to be sustained for short time (tINST) of 35 µs. Average
current will be less than maximum specified ICCDES. VR OCP threshold should be high enough to support current levels described herein.
Figure 3. Active VCC and ICC Loadline for Pentium Processors
ICC-CORE max {HFM|LFM}
VCC-CORE [V]
VCC-CORE nom {HFM|LFM}
+/-VCC-CORE Tolerance= VR St. Pt. Error 1/
VCC-CORE, DC min {HFM|LFM}
VCC-CORE, DC max {HFM|LFM}
VCC-CORE max {HFM|LFM}
VCC-CORE min {HFM|LFM}
10mV= RIPPLE
ICC-CORE
[A]0
Slope = -2.1 mV/A at package VccSense, VssSense pins. Differential Remote Sense required.
Note 1/ VC C - C O R E Set Point Error Tolerance is per below :
Tolerance VC C - C O R E VID Vol tage Range--- - -- - - -- - -- - - -- - - -- - - -- - -- - - -- - - -- - - -- - - -- - -- - - -- - - -- - - -- - - -- - -- - - -- - +/-1.5% VC C - C O R E > 0.7500V +/-11.5mV 0.5000V </= Vcc_core </= 0.75000V

Datasheet31
Electrical Specifications
NOTES:1. Unless otherwise noted, all specifications in this table apply to all processor frequencies.2. VIL is defined as the maximum voltage level at a receiving agent that will be interpreted as a logical low
value.3. VIH is defined as the minimum voltage level at a receiving agent that will be interpreted as a logical high
value.4. VIH and VOH may experience excursions above VCCP. However, input signal drivers must comply with the
signal quality specifications.5. This is the pulldown driver resistance. Measured at 0.31*VCCP. RON (min) = 0.418*RTT, RON (typ) =
0.455*RTT, RON (max) = 0.527*RTT. RTT typical value of 55 is used for RON typ/min/max calculations.
6. GTLREF should be generated from VCCP with a 1% tolerance resistor divider. The VCCP referred to in these specifications is the instantaneous VCCP.
7. RTT is the on-die termination resistance measured at VOL of the AGTL+ output driver. Measured at 0.31*VCCP. RTT is connected to VCCP on die. Refer to processor I/O buffer models for I/V characteristics.
8. Specified with on-die RTT and RON turned off. Vin between 0 and VCCP.9. Cpad includes die capacitance only. No package parasitics are included.10. This is the external resistor on the comp pins.11. On-die termination resistance, measured at 0.33*VCCP.12. Applies to Signals A[35:3].13. Applies to Signals D[63:0].14. Applies to Signals BPRI#, DEFER#, PREQ#, PREST#, RS[2:0]#, TRDY#, ADS#, BNR#, BPM[3:0], BR0#,
DBSY#, DRDY#, HIT#, HITM#, LOCK#, PRDY#, DPWR#, DSTB[1:0]#, DSTBP[3:0] and DSTBN[3:0]#.
Table 7. AGTL+ Signal Group DC Specifications
Symbol Parameter Min Typ Max Unit Notes1
VCCP I/O Voltage 1.00 1.05 1.10 V
GTLREF Reference Voltage 0.65 0.70 0.72 V 6
RCOMP Compensation Resistor 27.23 27.5 27.78 10
RODT/A Termination Resistor Address 49 55 63 11, 12
RODT/D Termination Resistor Data 49 55 63 11, 13
RODT/Cntrl Termination Resistor Control 49 55 63 11, 14
VIH Input High Voltage 0.82 1.05 1.20 V 3,6
VIL Input Low Voltage -0.10 0 0.55 V 2,4
VOH Output High Voltage 0.90 VCCP 1.10 V 6
RTT/A Termination Resistance Address 50 55 61 7, 12
RTT/D Termination Resistance Data 50 55 61 7, 13
RTT/Cntrl Termination Resistance Control 50 55 61 7, 14
RON/A Buffer On Resistance Address 23 25 29 5, 12
RON/D Buffer On Resistance Data 23 25 29 5, 13
RON/Cntrl Buffer On Resistance Control 23 25 29 5, 14
ILI Input Leakage Current — — ± 100 µA 8
Cpad Pad Capacitance 1.80 2.30 2.75 pF 9

Electrical Specifications
32 Datasheet
NOTES:1. Unless otherwise noted, all specifications in this table apply to all processor frequencies.2. The VCCP referred to in these specifications refers to instantaneous VCCP.3. Measured at 0.1 *VCCP. 4. Measured at 0.9 *VCCP. 5. For Vin between 0 V and VCCP. Measured when the driver is tristated.6. Cpad1 includes die capacitance only for DPRSTP#, DPSLP#, PWRGOOD. No package parasitics are
included.7. Cpad2 includes die capacitance for all other CMOS input signals. No package parasitics are included.
NOTES:1. Unless otherwise noted, all specifications in this table apply to all processor frequencies.2. Measured at 0.2 V.3. VOH is determined by value of the external pull-up resistor to VCCP. 4. For Vin between 0 V and VOH.5. Cpad includes die capacitance only. No package parasitics are included.
§
Table 8. CMOS Signal Group DC Specifications
Symbol Parameter Min Typ Max Unit Notes1
VCCP I/O Voltage 1.00 1.05 1.10 V
VIL Input Low Voltage CMOS -0.10 0.00 0.3*VCCP V 2
VIH Input High Voltage 0.7*VCCP VCCP VCCP+0.1 V 2
VOL Output Low Voltage -0.10 0 0.1*VCCP V 2
VOH Output High Voltage 0.9*VCCP VCCP VCCP+0.1 V 2
IOL Output Low Current 1.5 — 4.1 mA 3
IOH Output High Current 1.5 — 4.1 mA 4
ILI Input Leakage Current — — ±100 µA 5
Cpad1 Pad Capacitance 1.80 2.30 2.75 pF 6
Cpad2 Pad Capacitance for CMOS Input 0.95 1.2 1.45 pF 7
Table 9. Open Drain Signal Group DC Specifications
Symbol Parameter Min Typ Max Unit Notes1
VOH Output High Voltage VCCP–5% VCCP VCCP+5% V 3
VOL Output Low Voltage 0 — 0.20 V
IOL Output Low Current 16 — 50 mA 2
ILO Output Leakage Current — — ±200 µA 4
Cpad Pad Capacitance 1.80 2.30 2.75 pF 5

Datasheet 33
Package Mechanical Specifications and Pin Information
4 Package Mechanical Specifications and Pin Information
4.1 Package Mechanical SpecificationsThe processor is available in 478-pin Micro-FCPGA packages. The package mechanical dimensions are shown in Figure 9 through Figure 13.
The mechanical package pressure specifications are in a direction normal to the surface of the processor. This protects the processor die from fracture risk due to uneven die pressure distribution under tilt, stack-up tolerances and other similar conditions. These specifications assume that a mechanical attach is designed specifically to load one type of processor.
Moreover, the processor package substrate should not be used as a mechanical reference or load-bearing surface for the thermal or mechanical solution.

Package Mechanical Specifications and Pin Information
34 Datasheet
Figure 4. 1-MB die Micro-FCPGA Processor Package Drawing (Sheet 1 of 2)
��������
������
�������
�������
�� �����
����������
� �
� �
�
����������������
�� ��!"##"�
$
��%�&'�
�
$��
��
��
��
(�
) �
) �
*�
(�
*�
��
��+�
��+�
�+�
�+���
�+���
�+�
�+�
�+�
�,-�./
�.--0'1�
-&//&-0102�
-&'
-$3
��
�+�
��
%+�
��
�+%%
� �
��+��$�&�
*�
��+��$�&�
*�
�+%��$�&�
(�
�+%��$�&�
(� 4�
��
5�6"���"��
$�7$�
�+���$�&�
) �
�+���$�&�
) �� �
øP
0.65
MAX
ø0.6
5 M
AX
ø0.3
7 M
AX
2.03
±0.0
8
1(&�
2$4&'*�.'1$&'�&'10/�.2�.2$1&.'�.'�&0'1&$/&'�.
2-$1&.'+&1
&�&��/.
�0&'
�.'�&0'�0
$'&1��.'10'1�-$,'.1�0&��/.
�0720�2.��07&��/$,0.2-.&�&074&1(.�11(0�2&.2
42&110'�.'�0'1.�&'10/�.2�.2$1&.'+
ø0.3
56C C
AM
Bø0
.254
M
������
��$/0
��

Package Mechanical Specifications and Pin Information
Datasheet 35
Figure 5. 1-MB Die Micro-FCPGA Processor Package Drawing (Sheet 2 of 2)
�������
�
������
�
�������
������
����������
�
���
���
���
��
� ���
���
��
��
���
�� ��
���
����
��
��
���
��
��
� ��
���
���
�����
���
����
����
��
��
��
��
���
� ��
�
���
��
��
���
���
���
�����
�!
���
�
�����
���
��
��
���
���
�
� �
�!
�
�����
��
��
��
��
����
�
���
��
��
���
�� ��
��
CO
RN
ER K
EEP
OU
TZO
NE
4X
EDG
E K
EEP
OU
TZO
NE
4X
4X 7
.00
4X 5
.00
4X 7
.00
13.9
7
6.98
5
13.9
7
6.98
51.
625
1.5
MAX
ALL
OW
ABLE
CO
MPO
NEN
T H
EIG
HT
1.62
5
ø0.
406
C CA
MB
ø0.
254ø0
.305
±0.2
5
M
Package Mechanical Specifications and Pin Information
36 Datasheet
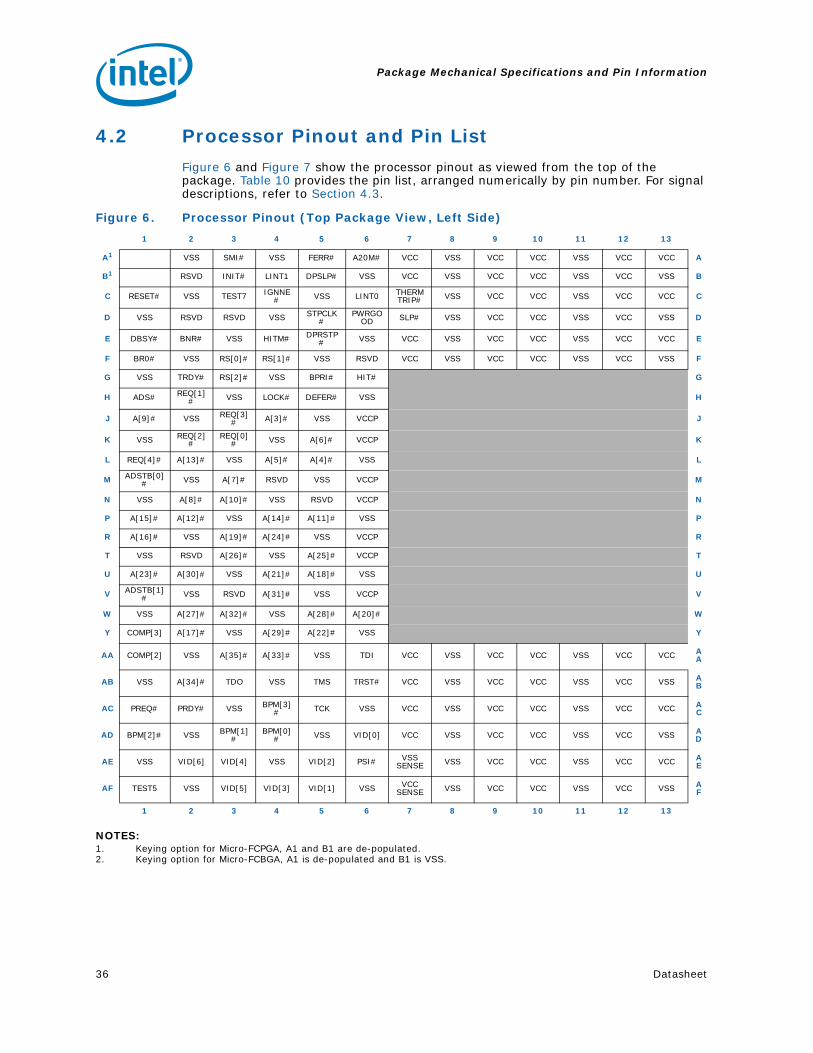
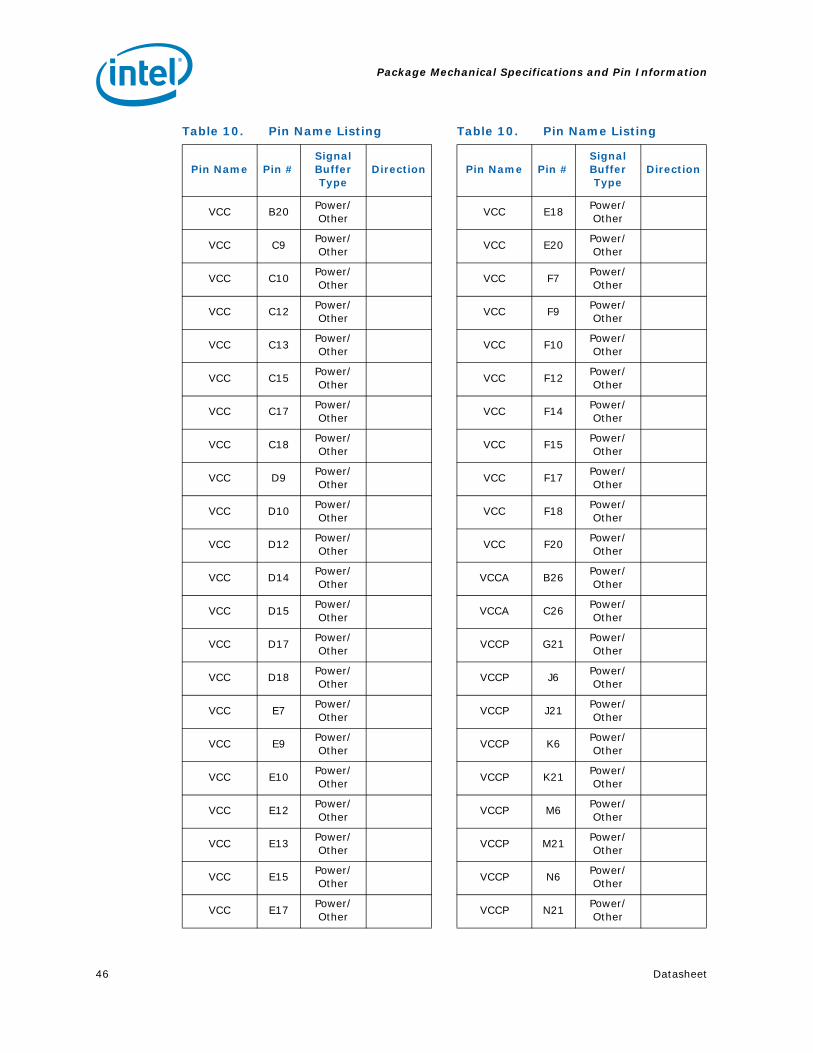
4.2 Processor Pinout and Pin List
Figure 6 and Figure 7 show the processor pinout as viewed from the top of the package. Table 10 provides the pin list, arranged numerically by pin number. For signal descriptions, refer to Section 4.3.
NOTES:1. Keying option for Micro-FCPGA, A1 and B1 are de-populated.2. Keying option for Micro-FCBGA, A1 is de-populated and B1 is VSS.
Figure 6. Processor Pinout (Top Package View, Left Side)
1 2 3 4 5 6 7 8 9 10 11 12 13
A1 VSS SMI# VSS FERR# A20M# VCC VSS VCC VCC VSS VCC VCC A
B1 RSVD INIT# LINT1 DPSLP# VSS VCC VSS VCC VCC VSS VCC VSS B
C RESET# VSS TEST7 IGNNE# VSS LINT0 THERM
TRIP# VSS VCC VCC VSS VCC VCC C
D VSS RSVD RSVD VSS STPCLK#
PWRGOOD SLP# VSS VCC VCC VSS VCC VSS D
E DBSY# BNR# VSS HITM# DPRSTP# VSS VCC VSS VCC VCC VSS VCC VCC E
F BR0# VSS RS[0]# RS[1]# VSS RSVD VCC VSS VCC VCC VSS VCC VSS F
G VSS TRDY# RS[2]# VSS BPRI# HIT# G
H ADS# REQ[1]# VSS LOCK# DEFER# VSS H
J A[9]# VSS REQ[3]# A[3]# VSS VCCP J
K VSS REQ[2]#
REQ[0]# VSS A[6]# VCCP K
L REQ[4]# A[13]# VSS A[5]# A[4]# VSS L
M ADSTB[0]# VSS A[7]# RSVD VSS VCCP M
N VSS A[8]# A[10]# VSS RSVD VCCP N
P A[15]# A[12]# VSS A[14]# A[11]# VSS P
R A[16]# VSS A[19]# A[24]# VSS VCCP R
T VSS RSVD A[26]# VSS A[25]# VCCP T
U A[23]# A[30]# VSS A[21]# A[18]# VSS U
V ADSTB[1]# VSS RSVD A[31]# VSS VCCP V
W VSS A[27]# A[32]# VSS A[28]# A[20]# W
Y COMP[3] A[17]# VSS A[29]# A[22]# VSS Y
AA COMP[2] VSS A[35]# A[33]# VSS TDI VCC VSS VCC VCC VSS VCC VCC AA
AB VSS A[34]# TDO VSS TMS TRST# VCC VSS VCC VCC VSS VCC VSS AB
AC PREQ# PRDY# VSS BPM[3]# TCK VSS VCC VSS VCC VCC VSS VCC VCC A
C
AD BPM[2]# VSS BPM[1]#
BPM[0]# VSS VID[0] VCC VSS VCC VCC VSS VCC VSS A
D
AE VSS VID[6] VID[4] VSS VID[2] PSI# VSSSENSE VSS VCC VCC VSS VCC VCC A
E
AF TEST5 VSS VID[5] VID[3] VID[1] VSS VCCSENSE VSS VCC VCC VSS VCC VSS A
F
1 2 3 4 5 6 7 8 9 10 11 12 13

Package Mechanical Specifications and Pin Information
Datasheet 37
Figure 7. Processor Pinout (Top Package View, Right Side)
14 15 16 17 18 19 20 21 22 23 24 25 26
A VSS VCC VSS VCC VCC VSS VCC BCLK[1] BCLK[0] VSS THRMDA VSS TEST6 A
B VCC VCC VSS VCC VCC VSS VCC VSS BSEL[0] BSEL[1] VSS THRMDC VCCA B
C VSS VCC VSS VCC VCC VSS DBR# BSEL[2] VSS TEST1 TEST3 VSS VCCA C
D VCC VCC VSS VCC VCC VSS IERR# PROCHOT# RSVD VSS DPWR# TEST2 VSS D
E VSS VCC VSS VCC VCC VSS VCC VSS D[0]# D[7]# VSS D[6]# D[2]# E
F VCC VCC VSS VCC VCC VSS VCC DRDY# VSS D[4]# D[1]# VSS D[13]# F
G VCCP D[3]# VSS D[9]# D[5]# VSS G
H VSS D[12]# D[15]# VSS DINV[0]# DSTBP[0]# H
J VCCP VSS D[11]# D[10]# VSS DSTBN[0]# J
K VCCP D[14]# VSS D[8]# D[17]# VSS K
L VSS D[22]# D[20]# VSS D[29]# DSTBN[1]# L
M VCCP VSS D[23]# D[21]# VSS DSTBP[1]# M
N VCCP D[16]# VSS DINV[1]# D[31]# VSS N
P VSS D[26]# D[25]# VSS D[24]# D[18]# P
R VCCP VSS D[19]# D[28]# VSS COMP[0] R
T VCCP D[37]# VSS D[27]# D[30]# VSS T
U VSS DINV[2]# D[39]# VSS D[38]# COMP[1] U
V VCCP VSS D[36]# D[34]# VSS D[35]# V
W VCCP D[41]# VSS D[43]# D[44]# VSS W
Y VSS D[32]# D[42]# VSS D[40]# DSTBN[2]# Y
AA VSS VCC VSS VCC VCC VSS VCC D[50]# VSS D[45]# D[46]# VSS DSTBP[2]#
AA
AB VCC VCC VSS VCC VCC VSS VCC D[52]# D[51]# VSS D[33]# D[47]# VSS AB
AC VSS VCC VSS VCC VCC VSS DINV[3]# VSS D[60]# D[63]# VSS D[57]# D[53]# A
C
AD VCC VCC VSS VCC VCC VSS D[54]# D[59]# VSS D[61]# D[49]# VSS GTLREF A
D
AE VSS VCC VSS VCC VCC VSS VCC D[58]# D[55]# VSS D[48]# DSTBN[3]# VSS A
E
AF VCC VCC VSS VCC VCC VSS VCC VSS D[62]# D[56]# DSTBP[3]# VSS TEST4 A
F
14 15 16 17 18 19 20 21 22 23 24 25 26

Package Mechanical Specifications and Pin Information
38 Datasheet
Table 10. Pin Name Listing
Pin Name Pin #Signal Buffer Type
Direction
A[3]# J4Source Synch
Input/Output
A[4]# L5Source Synch
Input/Output
A[5]# L4Source Synch
Input/Output
A[6]# K5Source Synch
Input/Output
A[7]# M3Source Synch
Input/Output
A[8]# N2Source Synch
Input/Output
A[9]# J1Source Synch
Input/Output
A[10]# N3Source Synch
Input/Output
A[11]# P5Source Synch
Input/Output
A[12]# P2Source Synch
Input/Output
A[13]# L2Source Synch
Input/Output
A[14]# P4Source Synch
Input/Output
A[15]# P1Source Synch
Input/Output
A[16]# R1Source Synch
Input/Output
A[17]# Y2Source Synch
Input/Output
A[18]# U5Source Synch
Input/Output
A[19]# R3Source Synch
Input/Output
A[20]# W6Source Synch
Input/Output
A[21]# U4Source Synch
Input/Output
A[22]# Y5Source Synch
Input/Output
A[23]# U1Source Synch
Input/Output

Datasheet 39
Package Mechanical Specifications and Pin Information
A[24]# R4Source Synch
Input/Output
A[25]# T5Source Synch
Input/Output
A[26]# T3Source Synch
Input/Output
A[27]# W2Source Synch
Input/Output
A[28]# W5Source Synch
Input/Output
A[29]# Y4Source Synch
Input/Output
A[30]# U2Source Synch
Input/Output
A[31]# V4Source Synch
Input/Output
A[32]# W3Source Synch
Input/Output
A[33]# AA4Source Synch
Input/Output
A[34]# AB2Source Synch
Input/Output
A[35]# AA3Source Synch
Input/Output
A20M# A6 CMOS Input
ADS# H1Common
ClockInput/Output
ADSTB[0]# M1Source Synch
Input/Output
ADSTB[1]# V1Source Synch
Input/Output
BCLK[0] A22 Bus Clock Input
BCLK[1] A21 Bus Clock Input
BNR# E2Common
ClockInput/Output
BPM[0]# AD4Common
ClockInput/Output
BPM[1]# AD3Common
ClockOutput
BPM[2]# AD1Common
ClockOutput
BPM[3]# AC4Common
ClockInput/Output
Table 10. Pin Name Listing
Pin Name Pin #Signal Buffer Type
Direction

Package Mechanical Specifications and Pin Information
40 Datasheet
BPRI# G5Common
ClockInput
BR0# F1Common
ClockInput/Output
BSEL[0] B22 CMOS Output
BSEL[1] B23 CMOS Output
BSEL[2] C21 CMOS Output
COMP[0] R26Power/Other
Input/Output
COMP[1] U26Power/Other
Input/Output
COMP[2] AA1Power/Other
Input/Output
COMP[3] Y1Power/Other
Input/Output
D[0]# E22Source Synch
Input/Output
D[1]# F24Source Synch
Input/Output
D[2]# E26Source Synch
Input/Output
D[3]# G22Source Synch
Input/Output
D[4]# F23Source Synch
Input/Output
D[5]# G25Source Synch
Input/Output
D[6]# E25Source Synch
Input/Output
D[7]# E23Source Synch
Input/Output
D[8]# K24Source Synch
Input/Output
D[9]# G24Source Synch
Input/Output
D[10]# J24Source Synch
Input/Output
D[11]# J23Source Synch
Input/Output
D[12]# H22Source Synch
Input/Output
D[13]# F26Source Synch
Input/Output
Table 10. Pin Name Listing
Pin Name Pin #Signal Buffer Type
Direction

Datasheet 41
Package Mechanical Specifications and Pin Information
D[14]# K22Source Synch
Input/Output
D[15]# H23Source Synch
Input/Output
D[16]# N22Source Synch
Input/Output
D[17]# K25Source Synch
Input/Output
D[18]# P26Source Synch
Input/Output
D[19]# R23Source Synch
Input/Output
D[20]# L23Source Synch
Input/Output
D[21]# M24Source Synch
Input/Output
D[22]# L22Source Synch
Input/Output
D[23]# M23Source Synch
Input/Output
D[24]# P25Source Synch
Input/Output
D[25]# P23Source Synch
Input/Output
D[26]# P22Source Synch
Input/Output
D[27]# T24Source Synch
Input/Output
D[28]# R24Source Synch
Input/Output
D[29]# L25Source Synch
Input/Output
D[30]# T25Source Synch
Input/Output
D[31]# N25Source Synch
Input/Output
D[32]# Y22Source Synch
Input/Output
D[33]# AB24Source Synch
Input/Output
D[34]# V24Source Synch
Input/Output
D[35]# V26Source Synch
Input/Output
Table 10. Pin Name Listing
Pin Name Pin #Signal Buffer Type
Direction

Package Mechanical Specifications and Pin Information
42 Datasheet
D[36]# V23Source Synch
Input/Output
D[37]# T22Source Synch
Input/Output
D[38]# U25Source Synch
Input/Output
D[39]# U23Source Synch
Input/Output
D[40]# Y25Source Synch
Input/Output
D[41]# W22Source Synch
Input/Output
D[42]# Y23Source Synch
Input/Output
D[43]# W24Source Synch
Input/Output
D[44]# W25Source Synch
Input/Output
D[45]# AA23Source Synch
Input/Output
D[46]# AA24Source Synch
Input/Output
D[47]# AB25Source Synch
Input/Output
D[48]# AE24Source Synch
Input/Output
D[49]# AD24Source Synch
Input/Output
D[50]# AA21Source Synch
Input/Output
D[51]# AB22Source Synch
Input/Output
D[52]# AB21Source Synch
Input/Output
D[53]# AC26Source Synch
Input/Output
D[54]# AD20Source Synch
Input/Output
D[55]# AE22Source Synch
Input/Output
D[56]# AF23Source Synch
Input/Output
D[57]# AC25Source Synch
Input/Output
Table 10. Pin Name Listing
Pin Name Pin #Signal Buffer Type
Direction

Package Mechanical Specifications and Pin Information
Datasheet 43
D[58]# AE21Source Synch
Input/Output
D[59]# AD21Source Synch
Input/Output
D[60]# AC22Source Synch
Input/Output
D[61]# AD23Source Synch
Input/Output
D[62]# AF22Source Synch
Input/Output
D[63]# AC23Source Synch
Input/Output
DBR# C20 CMOS Output
DBSY# E1Common
ClockInput/Output
DEFER# H5Common
ClockInput
DINV[0]# H25Source Synch
Input/Output
DINV[1]# N24Source Synch
Input/Output
DINV[2]# U22Source Synch
Input/Output
DINV[3]# AC20Source Synch
Input/Output
DPRSTP# E5 CMOS Input
DPSLP# B5 CMOS Input
DPWR# D24Common
ClockInput/Output
DRDY# F21Common
ClockInput/Output
DSTBN[0]# J26Source Synch
Input/Output
DSTBN[1]# L26Source Synch
Input/Output
DSTBN[2]# Y26Source Synch
Input/Output
DSTBN[3]# AE25Source Synch
Input/Output
DSTBP[0]# H26Source Synch
Input/Output
DSTBP[1]# M26Source Synch
Input/Output
Table 10. Pin Name Listing
Pin Name Pin #Signal Buffer Type
Direction
DSTBP[2]# AA26Source Synch
Input/Output
DSTBP[3]# AF24Source Synch
Input/Output
FERR# A5Open Drain
Output
GTLREF AD26Power/Other
Input
HIT# G6Common
ClockInput/Output
HITM# E4Common
ClockInput/Output
IERR# D20Open Drain
Output
IGNNE# C4 CMOS Input
INIT# B3 CMOS Input
LINT0 C6 CMOS Input
LINT1 B4 CMOS Input
LOCK# H4Common
ClockInput/Output
PRDY# AC2Common
ClockOutput
PREQ# AC1Common
ClockInput
PROCHOT# D21Open Drain
Input/Output
PSI# AE6 CMOS Output
PWRGOOD D6 CMOS Input
REQ[0]# K3Source Synch
Input/Output
REQ[1]# H2Source Synch
Input/Output
REQ[2]# K2Source Synch
Input/Output
REQ[3]# J3Source Synch
Input/Output
REQ[4]# L1Source Synch
Input/Output
RESET# C1Common
ClockInput
RS[0]# F3Common
ClockInput
Table 10. Pin Name Listing
Pin Name Pin #Signal Buffer Type
Direction

Package Mechanical Specifications and Pin Information
44 Datasheet
RS[1]# F4Common
ClockInput
RS[2]# G3Common
ClockInput
RSVD B2 Reserved
RSVD D2 Reserved
RSVD D3 Reserved
RSVD D22 Reserved
RSVD F6 Reserved
RSVD M4 Reserved
RSVD N5 Reserved
RSVD T2 Reserved
RSVD V3 Reserved
SLP# D7 CMOS Input
SMI# A3 CMOS Input
STPCLK# D5 CMOS Input
TCK AC5 CMOS Input
TDI AA6 CMOS Input
TDO AB3Open Drain
Output
TEST1 C23 Test
TEST2 D25 Test
TEST3 C24 Test
TEST4 AF26 Test
TEST5 AF1 Test
TEST6 A26 Test
TEST7 C3 Test
THERMTRIP#
C7Open Drain
Output
THRMDA A24Power/Other
THRMDC B25Power/Other
TMS AB5 CMOS Input
TRDY# G2Common
ClockInput
TRST# AB6 CMOS Input
VCC A7Power/Other
Table 10. Pin Name Listing
Pin Name Pin #Signal Buffer Type
Direction
VCC A9Power/Other
VCC A10Power/Other
VCC A12Power/Other
VCC A13Power/Other
VCC A15Power/Other
VCC A17Power/Other
VCC A18Power/Other
VCC A20Power/Other
VCC AA7Power/Other
VCC AA9Power/Other
VCC AA10Power/Other
VCC AA12Power/Other
VCC AA13Power/Other
VCC AA15Power/Other
VCC AA17Power/Other
VCC AA18Power/Other
VCC AA20Power/Other
VCC AB7Power/Other
VCC AB9Power/Other
VCC AB10Power/Other
VCC AB12Power/Other
VCC AB14Power/Other
Table 10. Pin Name Listing
Pin Name Pin #Signal Buffer Type
Direction

Package Mechanical Specifications and Pin Information
Datasheet 45
VCC AB15Power/Other
VCC AB17Power/Other
VCC AB18Power/Other
VCC AB20Power/Other
VCC AC7Power/Other
VCC AC9Power/Other
VCC AC10Power/Other
VCC AC12Power/Other
VCC AC13Power/Other
VCC AC15Power/Other
VCC AC17Power/Other
VCC AC18Power/Other
VCC AD7Power/Other
VCC AD9Power/Other
VCC AD10Power/Other
VCC AD12Power/Other
VCC AD14Power/Other
VCC AD15Power/Other
VCC AD17Power/Other
VCC AD18Power/Other
VCC AE9Power/Other
VCC AE10Power/Other
Table 10. Pin Name Listing
Pin Name Pin #Signal Buffer Type
Direction
VCC AE12Power/Other
VCC AE13Power/Other
VCC AE15Power/Other
VCC AE17Power/Other
VCC AE18Power/Other
VCC AE20Power/Other
VCC AF9Power/Other
VCC AF10Power/Other
VCC AF12Power/Other
VCC AF14Power/Other
VCC AF15Power/Other
VCC AF17Power/Other
VCC AF18Power/Other
VCC AF20Power/Other
VCC B7Power/Other
VCC B9Power/Other
VCC B10Power/Other
VCC B12Power/Other
VCC B14Power/Other
VCC B15Power/Other
VCC B17Power/Other
VCC B18Power/Other
Table 10. Pin Name Listing
Pin Name Pin #Signal Buffer Type
Direction
Package Mechanical Specifications and Pin Information
46 Datasheet
VCC B20Power/Other
VCC C9Power/Other
VCC C10Power/Other
VCC C12Power/Other
VCC C13Power/Other
VCC C15Power/Other
VCC C17Power/Other
VCC C18Power/Other
VCC D9Power/Other
VCC D10Power/Other
VCC D12Power/Other
VCC D14Power/Other
VCC D15Power/Other
VCC D17Power/Other
VCC D18Power/Other
VCC E7Power/Other
VCC E9Power/Other
VCC E10Power/Other
VCC E12Power/Other
VCC E13Power/Other
VCC E15Power/Other
VCC E17Power/Other
Table 10. Pin Name Listing
Pin Name Pin #Signal Buffer Type
Direction
VCC E18Power/Other
VCC E20Power/Other
VCC F7Power/Other
VCC F9Power/Other
VCC F10Power/Other
VCC F12Power/Other
VCC F14Power/Other
VCC F15Power/Other
VCC F17Power/Other
VCC F18Power/Other
VCC F20Power/Other
VCCA B26Power/Other
VCCA C26Power/Other
VCCP G21Power/Other
VCCP J6Power/Other
VCCP J21Power/Other
VCCP K6Power/Other
VCCP K21Power/Other
VCCP M6Power/Other
VCCP M21Power/Other
VCCP N6Power/Other
VCCP N21Power/Other
Table 10. Pin Name Listing
Pin Name Pin #Signal Buffer Type
Direction

Package Mechanical Specifications and Pin Information
Datasheet 47
VCCP R6Power/Other
VCCP R21Power/Other
VCCP T6Power/Other
VCCP T21Power/Other
VCCP V6Power/Other
VCCP V21Power/Other
VCCP W21Power/Other
VCCSENSE AF7Power/Other
VID[0] AD6 CMOS Output
VID[1] AF5 CMOS Output
VID[2] AE5 CMOS Output
VID[3] AF4 CMOS Output
VID[4] AE3 CMOS Output
VID[5] AF3 CMOS Output
VID[6] AE2 CMOS Output
VSS A2Power/Other
VSS A4Power/Other
VSS A8Power/Other
VSS A11Power/Other
VSS A14Power/Other
VSS A16Power/Other
VSS A19Power/Other
VSS A23Power/Other
VSS A25Power/Other
Table 10. Pin Name Listing
Pin Name Pin #Signal Buffer Type
Direction
VSS AA2Power/Other
VSS AA5Power/Other
VSS AA8Power/other
VSS AA11Power/Other
VSS AA14Power/Other
VSS AA16Power/Other
VSS AA19Power/Other
VSS AA22Power/Other
VSS AA25Power/Other
VSS AB1Power/Other
VSS AB4Power/Other
VSS AB8Power/Other
VSS AB11Power/Other
VSS AB13Power/Other
VSS AB16Power/Other
VSS AB19Power/Other
VSS AB23Power/Other
VSS AB26Power/Other
VSS AC3Power/Other
VSS AC6Power/Other
VSS AC8Power/Other
VSS AC11Power/Other
Table 10. Pin Name Listing
Pin Name Pin #Signal Buffer Type
Direction
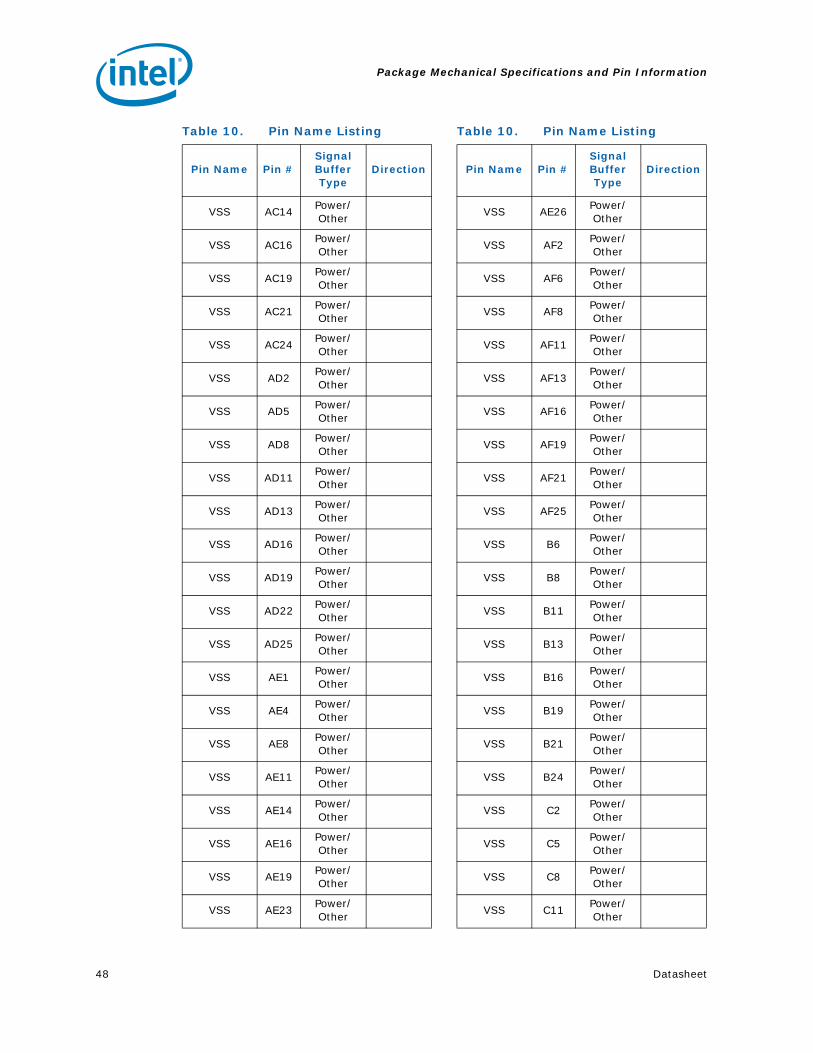
Package Mechanical Specifications and Pin Information
48 Datasheet
VSS AC14Power/Other
VSS AC16Power/Other
VSS AC19Power/Other
VSS AC21Power/Other
VSS AC24Power/Other
VSS AD2Power/Other
VSS AD5Power/Other
VSS AD8Power/Other
VSS AD11Power/Other
VSS AD13Power/Other
VSS AD16Power/Other
VSS AD19Power/Other
VSS AD22Power/Other
VSS AD25Power/Other
VSS AE1Power/Other
VSS AE4Power/Other
VSS AE8Power/Other
VSS AE11Power/Other
VSS AE14Power/Other
VSS AE16Power/Other
VSS AE19Power/Other
VSS AE23Power/Other
Table 10. Pin Name Listing
Pin Name Pin #Signal Buffer Type
Direction
VSS AE26Power/Other
VSS AF2Power/Other
VSS AF6Power/Other
VSS AF8Power/Other
VSS AF11Power/Other
VSS AF13Power/Other
VSS AF16Power/Other
VSS AF19Power/Other
VSS AF21Power/Other
VSS AF25Power/Other
VSS B6Power/Other
VSS B8Power/Other
VSS B11Power/Other
VSS B13Power/Other
VSS B16Power/Other
VSS B19Power/Other
VSS B21Power/Other
VSS B24Power/Other
VSS C2Power/Other
VSS C5Power/Other
VSS C8Power/Other
VSS C11Power/Other
Table 10. Pin Name Listing
Pin Name Pin #Signal Buffer Type
Direction

Package Mechanical Specifications and Pin Information
Datasheet 49
VSS C14Power/Other
VSS C16Power/Other
VSS C19Power/Other
VSS C22Power/Other
VSS C25Power/Other
VSS D1Power/Other
VSS D4Power/Other
VSS D8Power/Other
VSS D11Power/Other
VSS D13Power/Other
VSS D16Power/Other
VSS D19Power/Other
VSS D23Power/Other
VSS D26Power/Other
VSS E3Power/Other
VSS E6Power/Other
VSS E8Power/Other
VSS E11Power/Other
VSS E14Power/Other
VSS E16Power/Other
VSS E19Power/Other
VSS E21Power/Other
Table 10. Pin Name Listing
Pin Name Pin #Signal Buffer Type
Direction
VSS E24Power/Other
VSS F2Power/Other
VSS F5Power/Other
VSS F8Power/Other
VSS F11Power/Other
VSS F13Power/Other
VSS F16Power/Other
VSS F19Power/Other
VSS F22Power/Other
VSS F25Power/Other
VSS G1Power/Other
VSS G4Power/Other
VSS G23Power/Other
VSS G26Power/Other
VSS H3Power/Other
VSS H6Power/Other
VSS H21Power/Other
VSS H24Power/Other
VSS J2Power/Other
VSS J5Power/Other
VSS J22Power/Other
VSS J25Power/Other
Table 10. Pin Name Listing
Pin Name Pin #Signal Buffer Type
Direction

Package Mechanical Specifications and Pin Information
50 Datasheet
VSS K1Power/Other
VSS K4Power/Other
VSS K23Power/Other
VSS K26Power/Other
VSS L3Power/Other
VSS L6Power/Other
VSS L21Power/Other
VSS L24Power/Other
VSS M2Power/Other
VSS M5Power/Other
VSS M22Power/Other
VSS M25Power/Other
VSS N1Power/Other
VSS N4Power/Other
VSS N23Power/Other
VSS N26Power/Other
VSS P3Power/Other
VSS P6Power/Other
VSS P21Power/Other
VSS P24Power/Other
VSS R2Power/Other
VSS R5Power/Other
Table 10. Pin Name Listing
Pin Name Pin #Signal Buffer Type
Direction
VSS R22Power/Other
VSS R25Power/Other
VSS T1Power/Other
VSS T4Power/Other
VSS T23Power/Other
VSS T26Power/Other
VSS U3Power/Other
VSS U6Power/Other
VSS U21Power/Other
VSS U24Power/Other
VSS V2Power/Other
VSS V5Power/Other
VSS V22Power/Other
VSS V25Power/Other
VSS W1Power/Other
VSS W4Power/Other
VSS W23Power/Other
VSS W26Power/Other
VSS Y3Power/Other
VSS Y6Power/Other
Table 10. Pin Name Listing
Pin Name Pin #Signal Buffer Type
Direction

Package Mechanical Specifications and Pin Information
Datasheet 51
VSS Y21Power/Other
VSS Y24Power/Other
VSSSENSE AE7Power/Other
Output
Table 10. Pin Name Listing
Pin Name Pin #Signal Buffer Type
Direction
Table 11. Pin # Listing
Pin # Pin NameSignal Buffer
TypeDirection
A2 VSS Power/Other
A3 SMI# CMOS Input
A4 VSS Power/Other
A5 FERR# Open Drain Output
A6 A20M# CMOS Input
A7 VCC Power/Other
A8 VSS Power/Other
A9 VCC Power/Other
A10 VCC Power/Other
A11 VSS Power/Other
A12 VCC Power/Other
A13 VCC Power/Other
A14 VSS Power/Other
A15 VCC Power/Other
A16 VSS Power/Other
A17 VCC Power/Other
A18 VCC Power/Other
A19 VSS Power/Other
A20 VCC Power/Other
A21 BCLK[1] Bus Clock Input
A22 BCLK[0] Bus Clock Input
A23 VSS Power/Other
A24 THRMDA Power/Other
A25 VSS Power/Other
A26 TEST6 Test
AA1 COMP[2] Power/OtherInput/Output
AA2 VSS Power/Other
AA3 A[35]# Source SynchInput/Output
AA4 A[33]# Source SynchInput/Output
AA5 VSS Power/Other
AA6 TDI CMOS Input
AA7 VCC Power/Other
AA8 VSS Power/other
AA9 VCC Power/Other
AA10 VCC Power/Other
AA11 VSS Power/Other
AA12 VCC Power/Other

Package Mechanical Specifications and Pin Information
52 Datasheet
AA13 VCC Power/Other
AA14 VSS Power/Other
AA15 VCC Power/Other
AA16 VSS Power/Other
AA17 VCC Power/Other
AA18 VCC Power/Other
AA19 VSS Power/Other
AA20 VCC Power/Other
AA21 D[50]# Source SynchInput/Output
AA22 VSS Power/Other
AA23 D[45]# Source SynchInput/Output
AA24 D[46]# Source SynchInput/Output
AA25 VSS Power/Other
AA26DSTBP[2]
#Source Synch
Input/Output
AB1 VSS Power/Other
AB2 A[34]# Source SynchInput/Output
AB3 TDO Open Drain Output
AB4 VSS Power/Other
AB5 TMS CMOS Input
AB6 TRST# CMOS Input
AB7 VCC Power/Other
AB8 VSS Power/Other
AB9 VCC Power/Other
AB10 VCC Power/Other
AB11 VSS Power/Other
AB12 VCC Power/Other
AB13 VSS Power/Other
AB14 VCC Power/Other
AB15 VCC Power/Other
AB16 VSS Power/Other
AB17 VCC Power/Other
AB18 VCC Power/Other
AB19 VSS Power/Other
AB20 VCC Power/Other
AB21 D[52]# Source SynchInput/Output
Table 11. Pin # Listing
Pin # Pin NameSignal Buffer
TypeDirection
AB22 D[51]# Source SynchInput/Output
AB23 VSS Power/Other
AB24 D[33]# Source SynchInput/Output
AB25 D[47]# Source SynchInput/Output
AB26 VSS Power/Other
AC1 PREQ# Common Clock Input
AC2 PRDY# Common Clock Output
AC3 VSS Power/Other
AC4 BPM[3]# Common ClockInput/Output
AC5 TCK CMOS Input
AC6 VSS Power/Other
AC7 VCC Power/Other
AC8 VSS Power/Other
AC9 VCC Power/Other
AC10 VCC Power/Other
AC11 VSS Power/Other
AC12 VCC Power/Other
AC13 VCC Power/Other
AC14 VSS Power/Other
AC15 VCC Power/Other
AC16 VSS Power/Other
AC17 VCC Power/Other
AC18 VCC Power/Other
AC19 VSS Power/Other
AC20 DINV[3]# Source SynchInput/Output
AC21 VSS Power/Other
AC22 D[60]# Source SynchInput/Output
AC23 D[63]# Source SynchInput/Output
AC24 VSS Power/Other
AC25 D[57]# Source SynchInput/Output
AC26 D[53]# Source SynchInput/Output
AD1 BPM[2]# Common Clock Output
AD2 VSS Power/Other
Table 11. Pin # Listing
Pin # Pin NameSignal Buffer
TypeDirection

Package Mechanical Specifications and Pin Information
Datasheet 53
AD3 BPM[1]# Common Clock Output
AD4 BPM[0]# Common ClockInput/Output
AD5 VSS Power/Other
AD6 VID[0] CMOS Output
AD7 VCC Power/Other
AD8 VSS Power/Other
AD9 VCC Power/Other
AD10 VCC Power/Other
AD11 VSS Power/Other
AD12 VCC Power/Other
AD13 VSS Power/Other
AD14 VCC Power/Other
AD15 VCC Power/Other
AD16 VSS Power/Other
AD17 VCC Power/Other
AD18 VCC Power/Other
AD19 VSS Power/Other
AD20 D[54]# Source SynchInput/Output
AD21 D[59]# Source SynchInput/Output
AD22 VSS Power/Other
AD23 D[61]# Source SynchInput/Output
AD24 D[49]# Source SynchInput/Output
AD25 VSS Power/Other
AD26 GTLREF Power/Other Input
AE1 VSS Power/Other
AE2 VID[6] CMOS Output
AE3 VID[4] CMOS Output
AE4 VSS Power/Other
AE5 VID[2] CMOS Output
AE6 PSI# CMOS Output
AE7 VSSSENSE Power/Other Output
AE8 VSS Power/Other
AE9 VCC Power/Other
AE10 VCC Power/Other
AE11 VSS Power/Other
AE12 VCC Power/Other
Table 11. Pin # Listing
Pin # Pin NameSignal Buffer
TypeDirection
AE13 VCC Power/Other
AE14 VSS Power/Other
AE15 VCC Power/Other
AE16 VSS Power/Other
AE17 VCC Power/Other
AE18 VCC Power/Other
AE19 VSS Power/Other
AE20 VCC Power/Other
AE21 D[58]# Source SynchInput/Output
AE22 D[55]# Source SynchInput/Output
AE23 VSS Power/Other
AE24 D[48]# Source SynchInput/Output
AE25DSTBN[3]
#Source Synch
Input/Output
AE26 VSS Power/Other
AF1 TEST5 Test
AF2 VSS Power/Other
AF3 VID[5] CMOS Output
AF4 VID[3] CMOS Output
AF5 VID[1] CMOS Output
AF6 VSS Power/Other
AF7VCCSENS
EPower/Other
AF8 VSS Power/Other
AF9 VCC Power/Other
AF10 VCC Power/Other
AF11 VSS Power/Other
AF12 VCC Power/Other
AF13 VSS Power/Other
AF14 VCC Power/Other
AF15 VCC Power/Other
AF16 VSS Power/Other
AF17 VCC Power/Other
AF18 VCC Power/Other
AF19 VSS Power/Other
AF20 VCC Power/Other
AF21 VSS Power/Other
Table 11. Pin # Listing
Pin # Pin NameSignal Buffer
TypeDirection

Package Mechanical Specifications and Pin Information
54 Datasheet
AF22 D[62]# Source SynchInput/Output
AF23 D[56]# Source SynchInput/Output
AF24DSTBP[3]
#Source Synch
Input/Output
AF25 VSS Power/Other
AF26 TEST4 Test
B2 RSVD Reserved
B3 INIT# CMOS Input
B4 LINT1 CMOS Input
B5 DPSLP# CMOS Input
B6 VSS Power/Other
B7 VCC Power/Other
B8 VSS Power/Other
B9 VCC Power/Other
B10 VCC Power/Other
B11 VSS Power/Other
B12 VCC Power/Other
B13 VSS Power/Other
B14 VCC Power/Other
B15 VCC Power/Other
B16 VSS Power/Other
B17 VCC Power/Other
B18 VCC Power/Other
B19 VSS Power/Other
B20 VCC Power/Other
B21 VSS Power/Other
B22 BSEL[0] CMOS Output
B23 BSEL[1] CMOS Output
B24 VSS Power/Other
B25 THRMDC Power/Other
B26 VCCA Power/Other
C1 RESET# Common Clock Input
C2 VSS Power/Other
C3 TEST7 Test
C4 IGNNE# CMOS Input
C5 VSS Power/Other
C6 LINT0 CMOS Input
C7THERMTRI
P#Open Drain Output
Table 11. Pin # Listing
Pin # Pin NameSignal Buffer
TypeDirection
C8 VSS Power/Other
C9 VCC Power/Other
C10 VCC Power/Other
C11 VSS Power/Other
C12 VCC Power/Other
C13 VCC Power/Other
C14 VSS Power/Other
C15 VCC Power/Other
C16 VSS Power/Other
C17 VCC Power/Other
C18 VCC Power/Other
C19 VSS Power/Other
C20 DBR# CMOS Output
C21 BSEL[2] CMOS Output
C22 VSS Power/Other
C23 TEST1 Test
C24 TEST3 Test
C25 VSS Power/Other
C26 VCCA Power/Other
D1 VSS Power/Other
D2 RSVD Reserved
D3 RSVD Reserved
D4 VSS Power/Other
D5 STPCLK# CMOS Input
D6 PWRGOOD CMOS Input
D7 SLP# CMOS Input
D8 VSS Power/Other
D9 VCC Power/Other
D10 VCC Power/Other
D11 VSS Power/Other
D12 VCC Power/Other
D13 VSS Power/Other
D14 VCC Power/Other
D15 VCC Power/Other
D16 VSS Power/Other
D17 VCC Power/Other
D18 VCC Power/Other
D19 VSS Power/Other
D20 IERR# Open Drain Output
Table 11. Pin # Listing
Pin # Pin NameSignal Buffer
TypeDirection

Package Mechanical Specifications and Pin Information
55 Datasheet
D21PROCHOT
#Open Drain
Input/Output
D22 RSVD Reserved
D23 VSS Power/Other
D24 DPWR# Common ClockInput/Output
D25 TEST2 Test
D26 VSS Power/Other
E1 DBSY# Common ClockInput/Output
E2 BNR# Common ClockInput/Output
E3 VSS Power/Other
E4 HITM# Common ClockInput/Output
E5 DPRSTP# CMOS Input
E6 VSS Power/Other
E7 VCC Power/Other
E8 VSS Power/Other
E9 VCC Power/Other
E10 VCC Power/Other
E11 VSS Power/Other
E12 VCC Power/Other
E13 VCC Power/Other
E14 VSS Power/Other
E15 VCC Power/Other
E16 VSS Power/Other
E17 VCC Power/Other
E18 VCC Power/Other
E19 VSS Power/Other
E20 VCC Power/Other
E21 VSS Power/Other
E22 D[0]# Source SynchInput/Output
E23 D[7]# Source SynchInput/Output
E24 VSS Power/Other
E25 D[6]# Source SynchInput/Output
E26 D[2]# Source SynchInput/Output
F1 BR0# Common ClockInput/Output
Table 11. Pin # Listing
Pin # Pin NameSignal Buffer
TypeDirection
F2 VSS Power/Other
F3 RS[0]# Common Clock Input
F4 RS[1]# Common Clock Input
F5 VSS Power/Other
F6 RSVD Reserved
F7 VCC Power/Other
F8 VSS Power/Other
F9 VCC Power/Other
F10 VCC Power/Other
F11 VSS Power/Other
F12 VCC Power/Other
F13 VSS Power/Other
F14 VCC Power/Other
F15 VCC Power/Other
F16 VSS Power/Other
F17 VCC Power/Other
F18 VCC Power/Other
F19 VSS Power/Other
F20 VCC Power/Other
F21 DRDY# Common ClockInput/Output
F22 VSS Power/Other
F23 D[4]# Source SynchInput/Output
F24 D[1]# Source SynchInput/Output
F25 VSS Power/Other
F26 D[13]# Source SynchInput/Output
G1 VSS Power/Other
G2 TRDY# Common Clock Input
G3 RS[2]# Common Clock Input
G4 VSS Power/Other
G5 BPRI# Common Clock Input
G6 HIT# Common ClockInput/Output
G21 VCCP Power/Other
G22 D[3]# Source SynchInput/Output
G23 VSS Power/Other
G24 D[9]# Source SynchInput/Output
Table 11. Pin # Listing
Pin # Pin NameSignal Buffer
TypeDirection

Package Mechanical Specifications and Pin Information
Datasheet 56
G25 D[5]# Source SynchInput/Output
G26 VSS Power/Other
H1 ADS# Common ClockInput/Output
H2 REQ[1]# Source SynchInput/Output
H3 VSS Power/Other
H4 LOCK# Common ClockInput/Output
H5 DEFER# Common Clock Input
H6 VSS Power/Other
H21 VSS Power/Other
H22 D[12]# Source SynchInput/Output
H23 D[15]# Source SynchInput/Output
H24 VSS Power/Other
H25 DINV[0]# Source SynchInput/Output
H26DSTBP[0]
#Source Synch
Input/Output
J1 A[9]# Source SynchInput/Output
J2 VSS Power/Other
J3 REQ[3]# Source SynchInput/Output
J4 A[3]# Source SynchInput/Output
J5 VSS Power/Other
J6 VCCP Power/Other
J21 VCCP Power/Other
J22 VSS Power/Other
J23 D[11]# Source SynchInput/Output
J24 D[10]# Source SynchInput/Output
J25 VSS Power/Other
J26DSTBN[0]
#Source Synch
Input/Output
K1 VSS Power/Other
K2 REQ[2]# Source SynchInput/Output
Table 11. Pin # Listing
Pin # Pin NameSignal Buffer
TypeDirection
K3 REQ[0]# Source SynchInput/Output
K4 VSS Power/Other
K5 A[6]# Source SynchInput/Output
K6 VCCP Power/Other
K21 VCCP Power/Other
K22 D[14]# Source SynchInput/Output
K23 VSS Power/Other
K24 D[8]# Source SynchInput/Output
K25 D[17]# Source SynchInput/Output
K26 VSS Power/Other
L1 REQ[4]# Source SynchInput/Output
L2 A[13]# Source SynchInput/Output
L3 VSS Power/Other
L4 A[5]# Source SynchInput/Output
L5 A[4]# Source SynchInput/Output
L6 VSS Power/Other
L21 VSS Power/Other
L22 D[22]# Source SynchInput/Output
L23 D[20]# Source SynchInput/Output
L24 VSS Power/Other
L25 D[29]# Source SynchInput/Output
L26DSTBN[1]
#Source Synch
Input/Output
M1ADSTB[0]
#Source Synch
Input/Output
M2 VSS Power/Other
M3 A[7]# Source SynchInput/Output
M4 RSVD Reserved
M5 VSS Power/Other
M6 VCCP Power/Other
M21 VCCP Power/Other
Table 11. Pin # Listing
Pin # Pin NameSignal Buffer
TypeDirection

Package Mechanical Specifications and Pin Information
Datasheet 57
M22 VSS Power/Other
M23 D[23]# Source SynchInput/Output
M24 D[21]# Source SynchInput/Output
M25 VSS Power/Other
M26DSTBP[1]
#Source Synch
Input/Output
N1 VSS Power/Other
N2 A[8]# Source SynchInput/Output
N3 A[10]# Source SynchInput/Output
N4 VSS Power/Other
N5 RSVD Reserved
N6 VCCP Power/Other
N21 VCCP Power/Other
N22 D[16]# Source SynchInput/Output
N23 VSS Power/Other
N24 DINV[1]# Source SynchInput/Output
N25 D[31]# Source SynchInput/Output
N26 VSS Power/Other
P1 A[15]# Source SynchInput/Output
P2 A[12]# Source SynchInput/Output
P3 VSS Power/Other
P4 A[14]# Source SynchInput/Output
P5 A[11]# Source SynchInput/Output
P6 VSS Power/Other
P21 VSS Power/Other
P22 D[26]# Source SynchInput/Output
P23 D[25]# Source SynchInput/Output
P24 VSS Power/Other
P25 D[24]# Source SynchInput/Output
Table 11. Pin # Listing
Pin # Pin NameSignal Buffer
TypeDirection
P26 D[18]# Source SynchInput/Output
R1 A[16]# Source SynchInput/Output
R2 VSS Power/Other
R3 A[19]# Source SynchInput/Output
R4 A[24]# Source SynchInput/Output
R5 VSS Power/Other
R6 VCCP Power/Other
R21 VCCP Power/Other
R22 VSS Power/Other
R23 D[19]# Source SynchInput/Output
R24 D[28]# Source SynchInput/Output
R25 VSS Power/Other
R26 COMP[0] Power/OtherInput/Output
T1 VSS Power/Other
T2 RSVD Reserved
T3 A[26]# Source SynchInput/Output
T4 VSS Power/Other
T5 A[25]# Source SynchInput/Output
T6 VCCP Power/Other
T21 VCCP Power/Other
T22 D[37]# Source SynchInput/Output
T23 VSS Power/Other
T24 D[27]# Source SynchInput/Output
T25 D[30]# Source SynchInput/Output
T26 VSS Power/Other
U1 A[23]# Source SynchInput/Output
U2 A[30]# Source SynchInput/Output
U3 VSS Power/Other
U4 A[21]# Source SynchInput/Output
Table 11. Pin # Listing
Pin # Pin NameSignal Buffer
TypeDirection

Package Mechanical Specifications and Pin Information
58 Datasheet
U5 A[18]# Source SynchInput/Output
U6 VSS Power/Other
U21 VSS Power/Other
U22 DINV[2]# Source SynchInput/Output
U23 D[39]# Source SynchInput/Output
U24 VSS Power/Other
U25 D[38]# Source SynchInput/Output
U26 COMP[1] Power/OtherInput/Output
V1ADSTB[1]
#Source Synch
Input/Output
V2 VSS Power/Other
V3 RSVD Reserved
V4 A[31]# Source SynchInput/Output
V5 VSS Power/Other
V6 VCCP Power/Other
V21 VCCP Power/Other
V22 VSS Power/Other
V23 D[36]# Source SynchInput/Output
V24 D[34]# Source SynchInput/Output
V25 VSS Power/Other
V26 D[35]# Source SynchInput/Output
W1 VSS Power/Other
W2 A[27]# Source SynchInput/Output
W3 A[32]# Source SynchInput/Output
W4 VSS Power/Other
W5 A[28]# Source SynchInput/Output
W6 A[20]# Source SynchInput/Output
W21 VCCP Power/Other
W22 D[41]# Source SynchInput/Output
W23 VSS Power/Other
Table 11. Pin # Listing
Pin # Pin NameSignal Buffer
TypeDirection
W24 D[43]# Source SynchInput/Output
W25 D[44]# Source SynchInput/Output
W26 VSS Power/Other
Y1 COMP[3] Power/OtherInput/Output
Y2 A[17]# Source SynchInput/Output
Y3 VSS Power/Other
Y4 A[29]# Source SynchInput/Output
Y5 A[22]# Source SynchInput/Output
Y6 VSS Power/Other
Y21 VSS Power/Other
Y22 D[32]# Source SynchInput/Output
Y23 D[42]# Source SynchInput/Output
Y24 VSS Power/Other
Y25 D[40]# Source SynchInput/Output
Y26DSTBN[2]
#Source Synch
Input/Output
Table 11. Pin # Listing
Pin # Pin NameSignal Buffer
TypeDirection

Package Mechanical Specifications and Pin Information
Datasheet 59
4.3 Alphabetical Signals Reference
Table 12. Signal Description (Sheet 1 of 8)
Name Type Description
A[35:3]#Input/Output
A[35:3]# (Address) define a 236-byte physical memory address space. In sub-phase 1 of the address phase, these pins transmit the address of a transaction. In sub-phase 2, these pins transmit transaction type information. These signals must connect the appropriate pins of both agents on the processor FSB. A[35:3]# are source-synchronous signals and are latched into the receiving buffers by ADSTB[1:0]#. Address signals are used as straps, which are sampled before RESET# is deasserted.
A20M# Input
If A20M# (Address-20 Mask) is asserted, the processor masks physical address bit 20 (A20#) before looking up a line in any internal cache and before driving a read/write transaction on the bus. Asserting A20M# emulates the 8086 processor's address wrap-around at the 1-MB boundary. Assertion of A20M# is only supported in real mode.A20M# is an asynchronous signal. However, to ensure recognition of this signal following an input/output write instruction, it must be valid along with the TRDY# assertion of the corresponding input/output Write bus transaction.
ADS#Input/Output
ADS# (Address Strobe) is asserted to indicate the validity of the transaction address on the A[35:3]# and REQ[4:0]# pins. All bus agents observe the ADS# activation to begin parity checking, protocol checking, address decode, internal snoop, or deferred reply ID match operations associated with the new transaction.
ADSTB[1:0]#Input/Output
Address strobes are used to latch A[35:3]# and REQ[4:0]# on their rising and falling edges. Strobes are associated with signals as shown below.
BCLK[1:0] Input
The differential pair BCLK (Bus Clock) determines the FSB frequency. All FSB agents must receive these signals to drive their outputs and latch their inputs.All external timing parameters are specified with respect to the rising edge of BCLK0 crossing VCROSS.
BNR#Input/Output
BNR# (Block Next Request) is used to assert a bus stall by any bus agent who is unable to accept new bus transactions. During a bus stall, the current bus owner cannot issue any new transactions.
BPM[2:1]#
BPM[3,0]#
Output
Input/Output
BPM[3:0]# (Breakpoint Monitor) are breakpoint and performance monitor signals. They are outputs from the processor that indicate the status of breakpoints and programmable counters used for monitoring processor performance. BPM[3:0]# should connect the appropriate pins of all processor FSB agents.This includes debug or performance monitoring tools.
Signals Associated Strobe
REQ[4:0]#, A[16:3]# ADSTB[0]#
A[35:17]# ADSTB[1]#

Package Mechanical Specifications and Pin Information
60 Datasheet
BPRI# Input
BPRI# (Bus Priority Request) is used to arbitrate for ownership of the FSB. It must connect the appropriate pins of both FSB agents. Observing BPRI# active (as asserted by the priority agent) causes the other agent to stop issuing new requests, unless such requests are part of an ongoing locked operation. The priority agent keeps BPRI# asserted until all of its requests are completed, then releases the bus by deasserting BPRI#.
BR0#Input/Output
BR0# is used by the processor to request the bus. The arbitration is done between the processor (Symmetric Agent) and GMCH (High Priority Agent).
BSEL[2:0] Output
BSEL[2:0] (Bus Select) are used to select the processor input clock frequency. Table 3 defines the possible combinations of the signals and the frequency associated with each combination. The required frequency is determined by the processor, chipset and clock synthesizer. All agents must operate at the same frequency.
COMP[3:0] AnalogCOMP[3:0] must be terminated on the system board using precision (1% tolerance) resistors.
D[63:0]#Input/Output
D[63:0]# (Data) are the data signals. These signals provide a 64-bit data path between the FSB agents, and must connect the appropriate pins on both agents. The data driver asserts DRDY# to indicate a valid data transfer.D[63:0]# are quad-pumped signals and will thus be driven four times in a common clock period. D[63:0]# are latched off the falling edge of both DSTBP[3:0]# and DSTBN[3:0]#. Each group of 16 data signals correspond to a pair of one DSTBP# and one DSTBN#. The following table shows the grouping of data signals to data strobes and DINV#.
Furthermore, the DINV# pins determine the polarity of the data signals. Each group of 16 data signals corresponds to one DINV# signal. When the DINV# signal is active, the corresponding data group is inverted and therefore sampled active high.
DBR# Output
DBR# (Data Bus Reset) is used only in processor systems where no debug port is implemented on the system board. DBR# is used by a debug port interposer so that an in-target probe can drive system reset. If a debug port is implemented in the system, DBR# is a no connect in the system. DBR# is not a processor signal.
DBSY#Input/Output
DBSY# (Data Bus Busy) is asserted by the agent responsible for driving data on the FSB to indicate that the data bus is in use. The data bus is released after DBSY# is deasserted. This signal must connect the appropriate pins on both FSB agents.
Table 12. Signal Description (Sheet 2 of 8)
Name Type Description
Quad-Pumped Signal Groups
Data GroupDSTBN#/DSTBP#
DINV#
D[15:0]# 0 0
D[31:16]# 1 1
D[47:32]# 2 2
D[63:48]# 3 3

Package Mechanical Specifications and Pin Information
Datasheet 61
DEFER# Input
DEFER# is asserted by an agent to indicate that a transaction cannot be ensured in-order completion. Assertion of DEFER# is normally the responsibility of the addressed memory or input/output agent. This signal must connect the appropriate pins of both FSB agents.
DINV[3:0]#Input/Output
DINV[3:0]# (Data Bus Inversion) are source synchronous and indicate the polarity of the D[63:0]# signals. The DINV[3:0]# signals are activated when the data on the data bus is inverted. The bus agent will invert the data bus signals if more than half the bits, within the covered group, would change level in the next cycle.
DPRSTP# Input
DPRSTP#, when asserted on the platform, causes the processor to transition from the Deep Sleep State to the Deeper Sleep state or Deep Power Down Technology (C6) state. To return to the Deep Sleep State, DPRSTP# must be deasserted. DPRSTP# is driven by the ICH9M.
DPSLP# Input
DPSLP# when asserted on the platform causes the processor to transition from the Sleep State to the Deep Sleep state. To return to the Sleep State, DPSLP# must be deasserted. DPSLP# is driven by the ICH9M.
DPWR#Input/Output
DPWR# is a control signal used by the chipset to reduce power on the processor data bus input buffers. The processor drives this pin during dynamic FSB frequency switching.
DRDY#Input/Output
DRDY# (Data Ready) is asserted by the data driver on each data transfer, indicating valid data on the data bus. In a multi-common clock data transfer, DRDY# may be deasserted to insert idle clocks. This signal must connect the appropriate pins of both FSB agents.
DSTBN[3:0]#Input/Output
Data strobe used to latch in D[63:0]#.
Table 12. Signal Description (Sheet 3 of 8)
Name Type Description
DINV[3:0]# Assignment To Data Bus
Bus Signal Data Bus Signals
DINV[3]# D[63:48]#
DINV[2]# D[47:32]#
DINV[1]# D[31:16]#
DINV[0]# D[15:0]#
Signals Associated Strobe
D[15:0]#, DINV[0]# DSTBN[0]#
D[31:16]#, DINV[1]# DSTBN[1]#
D[47:32]#, DINV[2]# DSTBN[2]#
D[63:48]#, DINV[3]# DSTBN[3]#

Package Mechanical Specifications and Pin Information
62 Datasheet
DSTBP[3:0]#Input/Output
Data strobe used to latch in D[63:0]#.
FERR#/PBE# Output
FERR# (Floating-point Error)/PBE# (Pending Break Event) is a multiplexed signal and its meaning is qualified with STPCLK#. When STPCLK# is not asserted, FERR#/PBE# indicates a floating point when the processor detects an unmasked floating-point error. FERR# is similar to the ERROR# signal on the Intel® 387 coprocessor, and is included for compatibility with systems using Microsoft MS-DOS*-type floating-point error reporting. When STPCLK# is asserted, an assertion of FERR#/PBE# indicates that the processor has a pending break event waiting for service. The assertion of FERR#/PBE# indicates that the processor should be returned to the Normal state. When FERR#/PBE# is asserted, indicating a break event, it will remain asserted until STPCLK# is deasserted. Assertion of PREQ# when STPCLK# is active will also cause an FERR# break event. For additional information on the pending break event functionality, including identification of support of the feature and enable/disable information, refer to Volumes 3A and 3B of the Intel® 64 and IA-32 Architectures Software Developer's Manuals and the Intel®
Processor Identification and CPUID Instruction application note.
GTLREF InputGTLREF determines the signal reference level for AGTL+ input pins. GTLREF should be set at 2/3 VCCP. GTLREF is used by the AGTL+ receivers to determine if a signal is a logical 0 or logical 1.
HIT#
HITM#
Input/OutputInput/Output
HIT# (Snoop Hit) and HITM# (Hit Modified) convey transaction snoop operation results. Either FSB agent may assert both HIT# and HITM# together to indicate that it requires a snoop stall that can be continued by reasserting HIT# and HITM# together.
IERR# Output
IERR# (Internal Error) is asserted by the processor as the result of an internal error. Assertion of IERR# is usually accompanied by a SHUTDOWN transaction on the FSB. This transaction may optionally be converted to an external error signal (e.g., NMI) by system core logic. The processor will keep IERR# asserted until the assertion of RESET#, BINIT#, or INIT#.
IGNNE# Input
IGNNE# (Ignore Numeric Error) is asserted to force the processor to ignore a numeric error and continue to execute non-control floating-point instructions. If IGNNE# is deasserted, the processor generates an exception on a non-control floating-point instruction if a previous floating-point instruction caused an error. IGNNE# has no effect when the NE bit in control register 0 (CR0) is set.IGNNE# is an asynchronous signal. However, to ensure recognition of this signal following an input/output write instruction, it must be valid along with the TRDY# assertion of the corresponding input/output Write bus transaction.
Table 12. Signal Description (Sheet 4 of 8)
Name Type Description
Signals Associated Strobe
D[15:0]#, DINV[0]# DSTBP[0]#
D[31:16]#, DINV[1]# DSTBP[1]#
D[47:32]#, DINV[2]# DSTBP[2]#
D[63:48]#, DINV[3]# DSTBP[3]#

Datasheet 63
Package Mechanical Specifications and Pin Information
INIT# Input
INIT# (Initialization), when asserted, resets integer registers inside the processor without affecting its internal caches or floating-point registers. The processor then begins execution at the power-on Reset vector configured during power-on configuration. The processor continues to handle snoop requests during INIT# assertion. INIT# is an asynchronous signal. However, to ensure recognition of this signal following an input/output write instruction, it must be valid along with the TRDY# assertion of the corresponding input/output write bus transaction. INIT# must connect the appropriate pins of both FSB agents.If INIT# is sampled active on the active-to-inactive transition of RESET#, then the processor executes its Built-in Self-Test (BIST)
LINT[1:0] Input
LINT[1:0] (Local APIC Interrupt) must connect the appropriate pins of all APIC Bus agents. When the APIC is disabled, the LINT0 signal becomes INTR, a maskable interrupt request signal, and LINT1 becomes NMI, a nonmaskable interrupt. INTR and NMI are backward-compatible with the signals of those names on the Pentium processor. Both signals are asynchronous.Both of these signals must be software configured via BIOS programming of the APIC register space to be used either as NMI/INTR or LINT[1:0]. Because the APIC is enabled by default after Reset, operation of these pins as LINT[1:0] is the default configuration.
LOCK#Input/Output
LOCK# indicates to the system that a transaction must occur atomically. This signal must connect the appropriate pins of both FSB agents. For a locked sequence of transactions, LOCK# is asserted from the beginning of the first transaction to the end of the last transaction.When the priority agent asserts BPRI# to arbitrate for ownership of the FSB, it will wait until it observes LOCK# deasserted. This enables symmetric agents to retain ownership of the FSB throughout the bus locked operation and ensure the atomicity of lock.
PRDY# OutputProbe Ready signal used by debug tools to determine processor debug readiness.
PREQ# InputProbe Request signal used by debug tools to request debug operation of the processor.
PROCHOT#Input/Output
As an output, PROCHOT# (Processor Hot) will go active when the processor temperature monitoring sensor detects that the processor has reached its maximum safe operating temperature. This indicates that the processor Thermal Control Circuit (TCC) has been activated, if enabled. As an input, assertion of PROCHOT# by the system will activate the TCC, if enabled. The TCC will remain active until the system deasserts PROCHOT#.By default PROCHOT# is configured as an output. The processor must be enabled via the BIOS for PROCHOT# to be configured as bidirectional.This signal may require voltage translation on the motherboard.
PSI# OutputProcessor Power Status Indicator signal. This signal is asserted when the processor is both in the normal state (HFM to LFM) and in lower power states (Deep Sleep and Deeper Sleep).
Table 12. Signal Description (Sheet 5 of 8)
Name Type Description

Package Mechanical Specifications and Pin Information
64 Datasheet
PWRGOOD Input
PWRGOOD (Power Good) is a processor input. The processor requires this signal to be a clean indication that the clocks and power supplies are stable and within their specifications. ‘Clean’ implies that the signal remains low (capable of sinking leakage current), without glitches, from the time that the power supplies are turned on until they come within specification. The signal must then transition monotonically to a high state. The PWRGOOD signal must be supplied to the processor; it is used to protect internal circuits against voltage sequencing issues. It should be driven high throughout boundary scan operation.
REQ[4:0]#Input/Output
REQ[4:0]# (Request Command) must connect the appropriate pins of both FSB agents. They are asserted by the current bus owner to define the currently active transaction type. These signals are source synchronous to ADSTB[0]#.
RESET# Input
Asserting the RESET# signal resets the processor to a known state and invalidates its internal caches without writing back any of their contents. For a power-on Reset, RESET# must stay active for at least two milliseconds after VCC and BCLK have reached their proper specifications. On observing active RESET#, both FSB agents will deassert their outputs within two clocks. All processor straps must be valid within the specified setup time before RESET# is deasserted.There is a 55 (nominal) on die pull-up resistor on this signal.
RS[2:0]# InputRS[2:0]# (Response Status) are driven by the response agent (the agent responsible for completion of the current transaction), and must connect the appropriate pins of both FSB agents.
RSVDReserved/
No Connect
These pins are RESERVED and must be left unconnected on the board. However, it is recommended that routing channels to these pins on the board be kept open for possible future use.
SLP# Input
SLP# (Sleep), when asserted in Stop-Grant state, causes the processor to enter the Sleep state. During Sleep state, the processor stops providing internal clock signals to all units, leaving only the Phase-Locked Loop (PLL) still operating. Processors in this state will not recognize snoops or interrupts. The processor will recognize only assertion of the RESET# signal, deassertion of SLP#, and removal of the BCLK input while in Sleep state. If SLP# is deasserted, the processor exits Sleep state and returns to Stop-Grant state, restarting its internal clock signals to the bus and processor core units. If DPSLP# is asserted while in the Sleep state, the processor will exit the Sleep state and transition to the Deep Sleep state.
SMI# Input
SMI# (System Management Interrupt) is asserted asynchronously by system logic. On accepting a System Management Interrupt, the processor saves the current state and enters System Management Mode (SMM). An SMI Acknowledge transaction is issued and the processor begins program execution from the SMM handler.If an SMI# is asserted during the deassertion of RESET#, then the processor will tristate its outputs.
Table 12. Signal Description (Sheet 6 of 8)
Name Type Description

Package Mechanical Specifications and Pin Information
Datasheet 65
STPCLK# Input
STPCLK# (Stop Clock), when asserted, causes the processor to enter a low power Stop-Grant state. The processor issues a Stop-Grant Acknowledge transaction, and stops providing internal clock signals to all processor core units except the FSB and APIC units. The processor continues to snoop bus transactions and service interrupts while in Stop-Grant state. When STPCLK# is deasserted, the processor restarts its internal clock to all units and resumes execution. The assertion of STPCLK# has no effect on the bus clock; STPCLK# is an asynchronous input.
TCK InputTCK (Test Clock) provides the clock input for the processor Test Bus (also known as the Test Access Port).
TDI InputTDI (Test Data In) transfers serial test data into the processor. TDI provides the serial input needed for JTAG specification support.
TDO OutputTDO (Test Data Out) transfers serial test data out of the processor. TDO provides the serial output needed for JTAG specification support.
TEST1,TEST2,TEST3,TEST4,TEST5, TEST6 TEST7
InputRefer to the appropriate platform design guide for further TEST1, TEST2, TEST3, TEST4, TEST5, TEST6 and TEST7 termination requirements and implementation details.
THRMDA Other Thermal Diode Anode.
THRMDC Other Thermal Diode Cathode.
THERMTRIP# Output
The processor protects itself from catastrophic overheating by use of an internal thermal sensor. This sensor is set well above the normal operating temperature to ensure that there are no false trips. The processor will stop all execution when the junction temperature exceeds approximately 125 °C. This is signalled to the system by the THERMTRIP# (Thermal Trip) pin.
TMS InputTMS (Test Mode Select) is a JTAG specification support signal used by debug tools.
TRDY# InputTRDY# (Target Ready) is asserted by the target to indicate that it is ready to receive a write or implicit writeback data transfer. TRDY# must connect the appropriate pins of both FSB agents.
TRST# Input TRST# (Test Reset) resets the Test Access Port (TAP) logic. TRST# must be driven low during power on Reset.
VCC Input Processor core power supply.
VSS Input Processor core ground node.
VCCA Input VCCA provides isolated power for the internal processor core PLLs.
VCCP Input Processor I/O Power Supply.
Table 12. Signal Description (Sheet 7 of 8)
Name Type Description

Package Mechanical Specifications and Pin Information
66 Datasheet
§
VCCSENSE OutputVCCSENSE together with VSSSENSE are voltage feedback signals that control the 2.1 m loadline at the processor die. It should be used to sense voltage near the silicon with little noise.
VID[6:0] Output
VID[6:0] (Voltage ID) pins are used to support automatic selection of power supply voltages (VCC). Unlike some previous generations of processors, these are CMOS signals that are driven by the processor. The voltage supply for these pins must be valid before the VR can supply VCC to the processor. Conversely, the VR output must be disabled until the voltage supply for the VID pins becomes valid. The VID pins are needed to support the processor voltage specification variations. See Table 2 for definitions of these pins. The VR must supply the voltage that is requested by the pins, or disable itself.
VSSSENSE OutputVSSSENSE together with VCCSENSE are voltage feedback signals that control the 2.1-m loadline at the processor die. It should be used to sense ground near the silicon with little noise.
Table 12. Signal Description (Sheet 8 of 8)
Name Type Description

Datasheet67
Thermal Specifications and Design Considerations
5 Thermal Specifications and Design ConsiderationsA complete thermal solution includes both component and system-level thermal management features. To allow for the optimal operation and long-term reliability of Intel processor-based systems, the system/processor thermal solution should be designed so the processor remains within the minimum and maximum junction temperature (TJ) specifications at the corresponding thermal design power (TDP) value listed in the tables below
Caution: Operating the processor outside these operating limits may result in permanent damage to the processor and potentially other components in the system.

Thermal Specifications and Design Considerations
68 Datasheet
NOTES:1. The TDP specification should be used to design the processor thermal solution. The TDP is
not the maximum theoretical power the processor can generate. 2. Not 100% tested. These power specifications are determined by characterization of the
processor currents at higher temperatures and extrapolating the values for the temperature indicated.
3. As measured by the activation of the on-die Intel Thermal Monitor. The Intel Thermal Monitor’s automatic mode is used to indicate that the maximum TJ has been reached.
4. The Intel Thermal Monitor automatic mode must be enabled for the processor to operate within specifications.
5. At Tj of 105 oC6. At Tj of 50 oC7. At Tj of 35 oC
Table 13. Power Specifications for the Pentium Processors
SymbolProcessor Number
Core Frequency & VoltageThermal Design
PowerUnit Notes
TDP
T4500T4400T4300T4200
2.30 GHz & VCCHFM2.20 GHz & VCCHFM2.1 GHz & VCCHFM2.0 GHz & VCCHFM1.2 GHz & VCCLFM
35353517
W 1, 4, 5
Symbol Parameter Min Typ Max Unit Notes
PAH,
PSGNT
Auto Halt, Stop Grant Powerat VCCHFM
at VCCLFM
— — 13.97.4
W 2, 6
PSLP
Sleep Power at VCCHFM
at VCCLFM
— — 13.17.1
W 2, 6
PDSLP
Deep Sleep Power at VCCHFM
at VCCLFM
— — 5.53.2
W 2, 5, 7
TJ Junction Temperature 0 — 105 C 3, 4

Datasheet69
Thermal Specifications and Design Considerations
5.1 Monitoring Die Temperature
The processor incorporates three methods of monitoring die temperature:
• Thermal Diode
• Intel® Thermal Monitor
• Digital Thermal Sensor
5.1.1 Thermal Diode
Intel’s processors utilize an SMBus thermal sensor to read back the voltage/current characteristics of a substrate PNP transistor. Since these characteristics are a function of temperature, these parameters can be used to calculate silicon temperature values. For older silicon process technologies, it is possible to simplify the voltage/current and temperature relationships by treating the substrate transistor as though it were a simple diffusion diode. In this case, the assumption is that the beta of the transistor does not impact the calculated temperature values. The resultant “diode” model essentially predicts a quasi linear relationship between the base/emitter voltage differential of the PNP transistor and the applied temperature (one of the proportionality constants in this relationship is processor specific, and is known as the diode ideality factor). Realization of this relationship is accomplished with the SMBus thermal sensor that is connected to the transistor.
The processor, however, is built on Intel’s advanced 45-nm processor technology. Due to this new processor technology, it is no longer possible to model the substrate transistor as a simple diode. To accurately calculate silicon temperature use a full bi-polar junction transistor-type model. In this model, the voltage/current and temperature characteristics include an additional process dependant parameter which is known as the transistor “beta”. System designers should be aware that the current thermal sensors may not be configured to account for “beta” and should work with their SMB thermal sensor vendors to ensure they have a part capable of reading the thermal diode in BJT model.
Offset between the thermal diode-based temperature reading and the Intel Thermal Monitor reading may be characterized using the Intel Thermal Monitor’s Automatic mode activation of the thermal control circuit. This temperature offset must be considered when using the processor thermal diode to implement power management events. This offset is different than the diode Toffset value programmed into the processor Model-Specific Register (MSR).
Table 14 and Table 15 provide the diode interface and transistor model specifications.
Table 14. Thermal Diode Interface
Signal Name Pin/Ball Number Signal Description
THERMDA A24 Thermal diode anode
THERMDC A25 Thermal diode cathode

Thermal Specifications and Design Considerations
70 Datasheet
NOTES:1. Intel does not support or recommend operation of the thermal diode under reverse bias. 2. Characterized across a temperature range of 50-105°C.3. Not 100% tested. Specified by design characterization.4. The ideality factor, nQ, represents the deviation from ideal transistor model behavior as
exemplified by the equation for the collector current:
IC = IS * (e qVBE/nQkT –1)
where IS = saturation current, q = electronic charge, VBE = voltage across the transistor base emitter junction (same nodes as VD), k = Boltzmann Constant, and T = absolute temperature (Kelvin).
5.1.2 Intel® Thermal Monitor
The Intel Thermal Monitor helps control the processor temperature by activating the TCC (Thermal Control Circuit) when the processor silicon reaches its maximum operating temperature. The temperature at which the Intel Thermal Monitor activates the TCC is not user configurable. Bus traffic is snooped in the normal manner and interrupt requests are latched (and serviced during the time that the clocks are on) while the TCC is active.
With a properly designed and characterized thermal solution, the TCC would only be activated for very short periods of time when running the most power-intensive applications. The processor performance impact due to these brief periods of TCC activation is expected to be minor and hence not detectable. An under-designed thermal solution that is not able to prevent excessive activation of the TCC in the anticipated ambient environment may cause a noticeable performance loss and may affect the long-term reliability of the processor. In addition, a thermal solution that is significantly under designed may not be capable of cooling the processor even when the TCC is active continuously.
The Intel Thermal Monitor controls the processor temperature by modulating (starting and stopping) the processor core clocks or by initiating an Enhanced Intel SpeedStep Technology transition when the processor silicon reaches its maximum operating temperature. The Intel Thermal Monitor uses two modes to activate the TCC: automatic mode and on-demand mode. If both modes are activated, automatic mode takes precedence.
There are two automatic modes called Intel Thermal Monitor 1 (TM1) and Intel Thermal Monitor 2 (TM2). These modes are selected by writing values to the MSRs of the processor. After automatic mode is enabled, the TCC will activate only when the internal die temperature reaches the maximum allowed value for operation.
When TM1 is enabled and a high temperature situation exists, the clocks will be modulated by alternately turning the clocks off and on at a 50% duty cycle. Cycle times are processor speed-dependent and will decrease linearly as processor core frequencies increase. Once the temperature has returned to a non-critical level, modulation ceases and TCC goes inactive. A small amount of hysteresis has been included to prevent rapid
Table 15. Thermal Diode Parameters Using Transistor Model
Symbol Parameter Min Typ Max Unit Notes
IFW Forward Bias Current 5 — 200 A 1
IE Emitter Current 5 — 200 A 1
nQ Transistor Ideality 0.997 1.001 1.008 2, 3, 4
Beta 0.1 0.4 0.5 2, 3
RT Series Resistance 3.0 4.5 7.0 2

Datasheet71
Thermal Specifications and Design Considerations
active/inactive transitions of the TCC when the processor temperature is near the trip point. The duty cycle is factory configured and cannot be modified. Also, automatic mode does not require any additional hardware, software drivers, or interrupt handling routines. Processor performance will be decreased by the same amount as the duty cycle when the TCC is active.
When TM2 is enabled and a high temperature situation exists, the processor will perform an Enhanced Intel SpeedStep Technology transition to the LFM. When the processor temperature drops below the critical level, the processor will make an Enhanced Intel SpeedStep Technology transition to the last requested operating point. The processor also supports Enhanced Multi-Threaded Thermal Monitoring (EMTTM). EMTTM is a processor feature that enhances TM2 with a processor throttling algorithm known as Adaptive TM2. Adaptive TM2 transitions to intermediate operating points, rather than directly to the LFM, once the processor has reached its thermal limit and subsequently searches for the highest possible operating point. Please ensure this feature is enabled and supported in the BIOS. Also with EMTTM enabled, the operating system can request the processor to throttling to any point between Intel Dynamic Acceleration Technology frequency and SuperLFM frequency as long as these features are enabled in the BIOS and supported by the processor.
The Intel Thermal Monitor automatic mode and Enhanced Multi-Threaded Thermal Monitoring must be enabled through BIOS for the processor to be operating within specifications. Intel recommends TM1 and TM2 be enabled on the processors.
TM1, TM2 and EMTTM features are collectively referred to as Adaptive Thermal Monitoring features.
TM1 and TM2 can co-exist within the processor. If both TM1 and TM2 bits are enabled in the auto-throttle MSR, TM2 takes precedence over TM1. However, if Force TM1 over TM2 is enabled in MSRs via BIOS and TM2 is not sufficient to cool the processor below the maximum operating temperature, then TM1 will also activate to help cool down the processor.
If a processor load-based Enhanced Intel SpeedStep Technology transition (through MSR write) is initiated when a TM2 period is active, there are two possible results:
1. If the processor load-based Enhanced Intel SpeedStep Technology transition target frequency is higher than the TM2 transition-based target frequency, the processor load-based transition will be deferred until the TM2 event has been completed.
2. If the processor load-based Enhanced Intel SpeedStep Technology transition target frequency is lower than the TM2 transition-based target frequency, the processor will transition to the processor load-based Enhanced Intel SpeedStep Technology target frequency point.
The TCC may also be activated via on-demand mode. If bit 4 of the ACPI Intel Thermal Monitor control register is written to a 1, the TCC will be activated immediately independent of the processor temperature. When using on-demand mode to activate the TCC, the duty cycle of the clock modulation is programmable via bits 3:1 of the same ACPI Intel Thermal Monitor control register. In automatic mode, the duty cycle is fixed at 50% on, 50% off, however in on-demand mode, the duty cycle can be programmed from 12.5% on/ 87.5% off, to 87.5% on/12.5% off in 12.5% increments. On-demand mode may be used at the same time automatic mode is enabled, however, if the system tries to enable the TCC via on-demand mode at the same time automatic mode is enabled and a high temperature condition exists, automatic mode will take precedence.
An external signal, PROCHOT# (processor hot) is asserted when the processor detects that its temperature is above the thermal trip point. Bus snooping and interrupt latching are also active while the TCC is active.

Thermal Specifications and Design Considerations
72 Datasheet
Besides the thermal sensor and thermal control circuit, the Intel Thermal Monitor also includes one ACPI register, one performance counter register, three MSR, and one I/O pin (PROCHOT#). All are available to monitor and control the state of the Intel Thermal Monitor feature. The Intel Thermal Monitor can be configured to generate an interrupt upon the assertion or deassertion of PROCHOT#.
PROCHOT# will not be asserted when the processor is in the Stop Grant, Sleep, Deep Sleep, and Deeper Sleep low-power states, hence the thermal diode reading must be used as a safeguard to maintain the processor junction temperature within maximum specification. If the platform thermal solution is not able to maintain the processor junction temperature within the maximum specification, the system must initiate an orderly shutdown to prevent damage. If the processor enters one of the above low-power states with PROCHOT# already asserted, PROCHOT# will remain asserted until the processor exits the low-power state and the processor junction temperature drops below the thermal trip point. However, PROCHOT# will de-assert for the duration of Deep Power Down Technology state (C6) residency.
If Thermal Monitor automatic mode is disabled, the processor will be operating out of specification. Regardless of enabling the automatic or on-demand modes, in the event of a catastrophic cooling failure, the processor will automatically shut down when the silicon has reached a temperature of approximately 125 °C. At this point the THERMTRIP# signal will go active. THERMTRIP# activation is independent of processor activity and does not generate any bus cycles. When THERMTRIP# is asserted, the processor core voltage must be shut down within the time specified in Chapter 3.
In all cases the Intel Thermal Monitor feature must be enabled for the processor to remain within specification.
5.1.3 Digital Thermal Sensor
The processor also contains an on-die Digital Thermal Sensor (DTS) that can be read via an MSR (no I/O interface). Each core of the processor will have a unique digital thermal sensor whose temperature is accessible via the processor MSRs. The DTS is the preferred method of reading the processor die temperature since it can be located much closer to the hottest portions of the die and can thus more accurately track the die temperature and potential activation of processor core clock modulation via the Thermal Monitor. The DTS is only valid while the processor is in the normal operating state (the Normal package level low-power state).
Unlike traditional thermal devices, the DTS outputs a temperature relative to the maximum supported operating temperature of the processor (TJ,max). It is the responsibility of software to convert the relative temperature to an absolute temperature. The temperature returned by the DTS will always be at or below TJ,max. Catastrophic temperature conditions are detectable via an Out Of Specification status bit. This bit is also part of the DTS MSR. When this bit is set, the processor is operating out of specification and immediate shutdown of the system should occur. The processor operation and code execution is not ensured once the activation of the Out of Specification status bit is set.
The DTS-relative temperature readout corresponds to the Thermal Monitor (TM1/TM2) trigger point. When the DTS indicates maximum processor core temperature has been reached, the TM1 or TM2 hardware thermal control mechanism will activate. The DTS and TM1/TM2 temperature may not correspond to the thermal diode reading since the thermal diode is located in a separate portion of the die and thermal gradient between the individual core DTS. Additionally, the thermal gradient from DTS to thermal diode can vary substantially due to changes in processor power, mechanical and thermal attach, and software application. The system designer is required to use the DTS to ensure proper operation of the processor within its temperature operating specifications.

Datasheet73
Thermal Specifications and Design Considerations
Changes to the temperature can be detected via two programmable thresholds located in the processor MSRs. These thresholds have the capability of generating interrupts via the core's local APIC. Refer to the Intel® 64 and IA-32 Architectures Software Developer's Manuals for specific register and programming details.
5.2 Out of Specification Detection
Overheat detection is performed by monitoring the processor temperature and temperature gradient. This feature is intended for graceful shutdown before the THERMTRIP# is activated. If the processor’s TM1 or TM2 are triggered and the temperature remains high, an Out Of Spec status and sticky bit are latched in the status MSR register and generates a thermal interrupt.
5.3 PROCHOT# Signal Pin
An external signal, PROCHOT# (processor hot), is asserted when the processor die temperature has reached its maximum operating temperature. If TM1 or TM2 is enabled, then the TCC will be active when PROCHOT# is asserted. The processor can be configured to generate an interrupt upon the assertion or deassertion of PROCHOT#. Refer to the an interrupt upon the assertion or deassertion of PROCHOT#. Refer to the Intel® 64 and IA-32 Architectures Software Developer's Manuals for specific register and programming details.
The processor implements a bi-directional PROCHOT# capability to allow system designs to protect various components from overheating situations. The PROCHOT# signal is bi-directional in that it can either signal when the processor has reached its maximum operating temperature or be driven from an external source to activate the TCC. The ability to activate the TCC via PROCHOT# can provide a means for thermal protection of system components.
Only a single PROCHOT# pin exists at a package level of the processor. When either core's thermal sensor trips, PROCHOT# signal will be driven by the processor package. If only TM1 is enabled, PROCHOT# will be asserted regardless of which core is above its TCC temperature trip point, and both cores will have their core clocks modulated. If TM2 is enabled then, regardless of which core(s) are above the TCC temperature trip point, both cores will enter the lowest programmed TM2 performance state. It is important to note that Intel recommends both TM1 and TM2 to be enabled.
When PROCHOT# is driven by an external agent, if only TM1 is enabled on both cores, then both processor cores will have their core clocks modulated. If TM2 is enabled on both cores, then both processor cores will enter the lowest programmed TM2 performance state. It should be noted that Force TM1 on TM2, enabled via BIOS, does not have any effect on external PROCHOT#. If PROCHOT# is driven by an external agent when TM1, TM2, and Force TM1 on TM2 are all enabled, then the processor will still apply only TM2.
PROCHOT# may be used for thermal protection of voltage regulators (VR). System designers can create a circuit to monitor the VR temperature and activate the TCC when the temperature limit of the VR is reached. By asserting PROCHOT# (pulled-low) and activating the TCC, the VR will cool down as a result of reduced processor power consumption. Bi-directional PROCHOT# can allow VR thermal designs to target maximum sustained current instead of maximum current. Systems should still provide proper cooling for the VR and rely on bi-directional PROCHOT# only as a backup in case of system cooling failure. The system thermal design should allow the power delivery circuitry to operate within its temperature specification even while the processor is operating at its TDP. With a properly designed and characterized thermal solution, it is anticipated that bi-directional PROCHOT# would only be asserted for very short periods

Thermal Specifications and Design Considerations
74 Datasheet
of time when running the most power-intensive applications. An under-designed thermal solution that is not able to prevent excessive assertion of PROCHOT# in the anticipated ambient environment may cause a noticeable performance loss.
§