ipam - windowstechprowindowstechpro.com/wp-content/uploads/2014/09/ipam.pdf · what is ipam? ipam...
TRANSCRIPT

IPAM
IP Address Management (IPAM) is one of the New Features
introduced with Windows Server 2012. In this Article I explained
how to install and configure.
By
Radhakrishnan G
What Is IPAM?
IPAM (IP Address Management) is the New Feature in Windows Server 2012.
Enables to Plan, Mange, Deploy, Monitor your IP Address Infrastructure in a Single place.
IPAM automatically discovers IP address infrastructure servers on your network and enables
you to manage them from a central interface.
In this Guide I have focused only on practical Deployment. Hence For more about IPAM and It’s
Features, Please visit http://technet.microsoft.com/en-us/library/jj878331.aspx
IPAM’s Key Components
1. Address Space Management (ASM)
2. Multi Server Management & Monitoring (MSM)
3. Network Audit
1. Address Space Management (ASM)
a. ASM enables you to manage all your IP address Infrastructure in a Single Console.
b. You can Customize and make Multi Level server Hierarchy of address Space.
c. For more about ASM and Features, Please visit http://technet.microsoft.com/en-
us/library/jj878331.aspx
2. Multi Server Management & Monitoring (MSM)
a. MSM is automatically discovering all your DHCP and DNS servers on the network, Monitor
service availability, and centrally manage their Configuration.
b. You can use Group policy based and manual Provisioning modes to IPAM Accessing Settings in
MSM servers.
c. Group Policy based Provisioning is painless as we are making all settings using group policy,
hence no need to anything manually.
d. Manual Method also available and required more manual settings has to be done for
Provisioning.
e. For more about MSM and Features, Please visit http://technet.microsoft.com/en-
us/library/jj878331.aspx
3. Network Audit
a. IPAM’s Network Audit Component provides centralized Repository for all Configuration
changes performed on DHCP Servers and the IPAM Servers.
b. IPAM audit tools enable you to view potential configuration problems on DHCP servers by
actively tracking and reporting all administrative actions
c. Detailed IP address tracking data is also provided, including client IP addresses, client ID, host
name, and user name. Advanced search capabilities enable you to selectively search for events
and obtain results that associate user logons to specific devices and times.
d. For more about Network and Features, Please visit http://technet.microsoft.com/en-
us/library/jj878331.aspx
IPAM Requirements:
Processor Minimum: 1.4 GHz (x64 processor) Recommended: quad-core, 2.66 GHz or faster
Memory Minimum: 2 GB RAM Recommended: 4 GB RAM or greater
OS(IPAM Server) Server 2012
OS(IP Client) Server 2012, Windows 8
Disk Space Minimum: 10 GB Recommended: 80 GB or greater*
Active Directory IPAM Server what you planning to install must be Domain Joined Host
You can’t install IPAM on Workgroup Computer Installing on Domain Controller is not
recommended.
Network The IPAM server must also have network connectivity to all servers that are marked as managed in the server inventory.
IPAM server be configured to provide access to at least one domain controller and authoritative DNS server
IPAM specifications
IPAM Server has the following specifications:
The scope of IPAM server discovery is limited to a single Active Directory forest. The forest itself may be comprised
of a mix of trusted and untrusted domains.
IPAM supports only Microsoft domain controllers, DHCP, DNS, and NPS servers running Windows Server® 2008
and above.
DHCP operational event auditing is supported for DHCP servers running Windows Server® 2008 R2 and above.
IPAM installation on a DHCP server is not recommended. The IPAM server discovery feature will not be able to
discover DHCP roles if DHCP Server is installed on the same computer.
IPAM supports only domain joined DHCP, DNS and NPS servers in a single Active Directory forest.
IPAM does not support management and configuration of non-Microsoft network elements.
IPAM does not support external databases. Only a Windows Internal Database is supported.
A single IPAM server can support up to 150 DHCP servers and 500 DNS servers.
A single IPAM server has been tested to support up to 6000 DHCP scopes and 150 DNS zones.
IPAM stores 3 years of forensics data (IP address leases, host MAC addresses, user login/logoff information) for
100,000 users in a Windows Internal Database. There is no database purge policy provided, and the administrator
must purge data manually as needed.
IP address utilization trends are provided only for IPv4.
IP address reclaiming support is provided only for IPv4.
No special processing is done for IPv6 stateless address auto configuration private extensions.
No special processing for virtualization technology or virtual machine migration.
IPAM does not check for IP address consistency with routers and switches.
IPAM does not support auditing of IPv6 stateless address auto configuration on an unmanaged machine to track
the user.
IPAM users must be logged in using domain credentials. Do not log sign in to the IPAM server using the local
Administrator account or another local user account on the IPAM server.
If you are accessing the IPAM server from a remote IPAM client, you must be a member of the WinRMRemote
WMIUsers group on the IPAM server, in addition to being a member of the appropriate local IPAM security group.
If the Group Policy based provisioning method is used, users must have domain administrator privileges to mark
servers as managed or unmanaged in the server inventory.

IPAM Architecture
IPAM Server-Client Communication
The IPAM client communicates with an IPAM server using the Windows Communication
Foundation (WCF) protocol with TCP as the transport method. By default, TCP binding is performed
on port 48885 on the IPAM server.
IPAM Communication with Server roles:
RPC: Remote Procedure Call (Port Number: 135-TCP)
WMI: Windows Management Instrumentation (Port Number: TCP)
SMB: Session Message Block (Port Number: 445-TCP)
LDAP: Lightweight Directory Access Protocol (Port Number: 389-TCP/UDP)
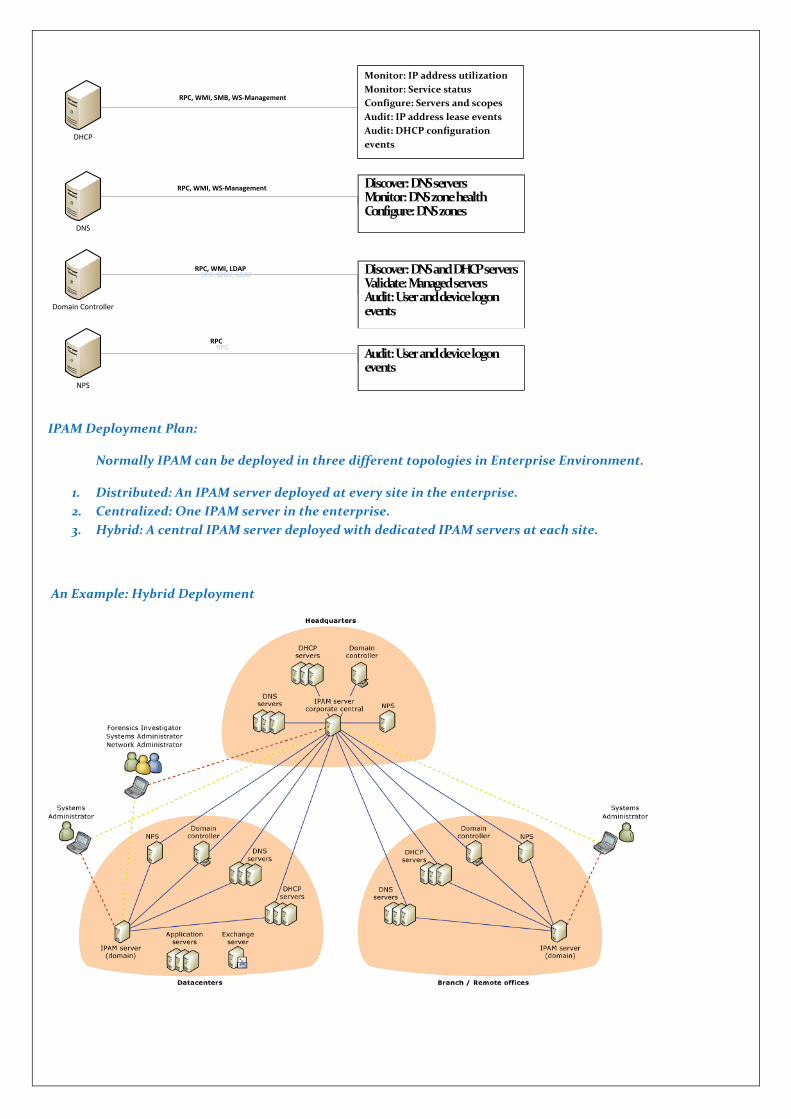
Domain Controller
DHCP
NPS
DNS
Monitor: IP address utilization
Monitor: Service status
Configure: Servers and scopes
Audit: IP address lease events
Audit: DHCP configuration
events
Discover: DNS servers Monitor: DNS zone health Configure: DNS zones
Discover: DNS and DHCP servers Validate: Managed servers Audit: User and device logon events
Audit: User and device logon events
RPC, WMI, SMB, WS-Management
RPC, WMI, WS-Management
RPCRPC
RPC, WMI, LDAPRPC, WMI, LDAP
IPAM Deployment Plan:
Normally IPAM can be deployed in three different topologies in Enterprise Environment.
1. Distributed: An IPAM server deployed at every site in the enterprise.
2. Centralized: One IPAM server in the enterprise.
3. Hybrid: A central IPAM server deployed with dedicated IPAM servers at each site.
An Example: Hybrid Deployment
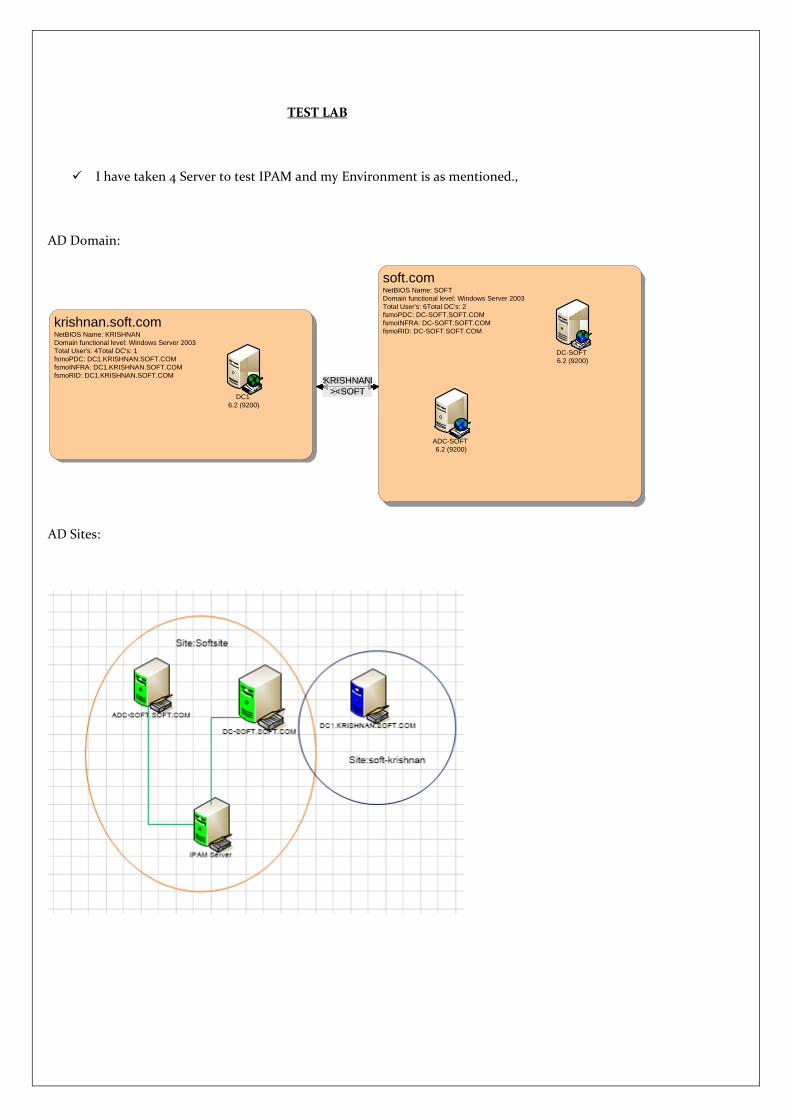
TEST LAB
I have taken 4 Server to test IPAM and my Environment is as mentioned.,
AD Domain:
soft.comNetBIOS Name: SOFT
Domain functional level: Windows Server 2003
Total User's: 6Total DC's: 2
fsmoPDC: DC-SOFT.SOFT.COM
fsmoINFRA: DC-SOFT.SOFT.COM
fsmoRID: DC-SOFT.SOFT.COMkrishnan.soft.comNetBIOS Name: KRISHNAN
Domain functional level: Windows Server 2003
Total User's: 4Total DC's: 1
fsmoPDC: DC1.KRISHNAN.SOFT.COM
fsmoINFRA: DC1.KRISHNAN.SOFT.COM
fsmoRID: DC1.KRISHNAN.SOFT.COMSOFT><KRI
SHNAN
KRISHNAN
><SOFT
DC-SOFT
6.2 (9200)
ADC-SOFT
6.2 (9200)
DC1
6.2 (9200)
AD Sites:
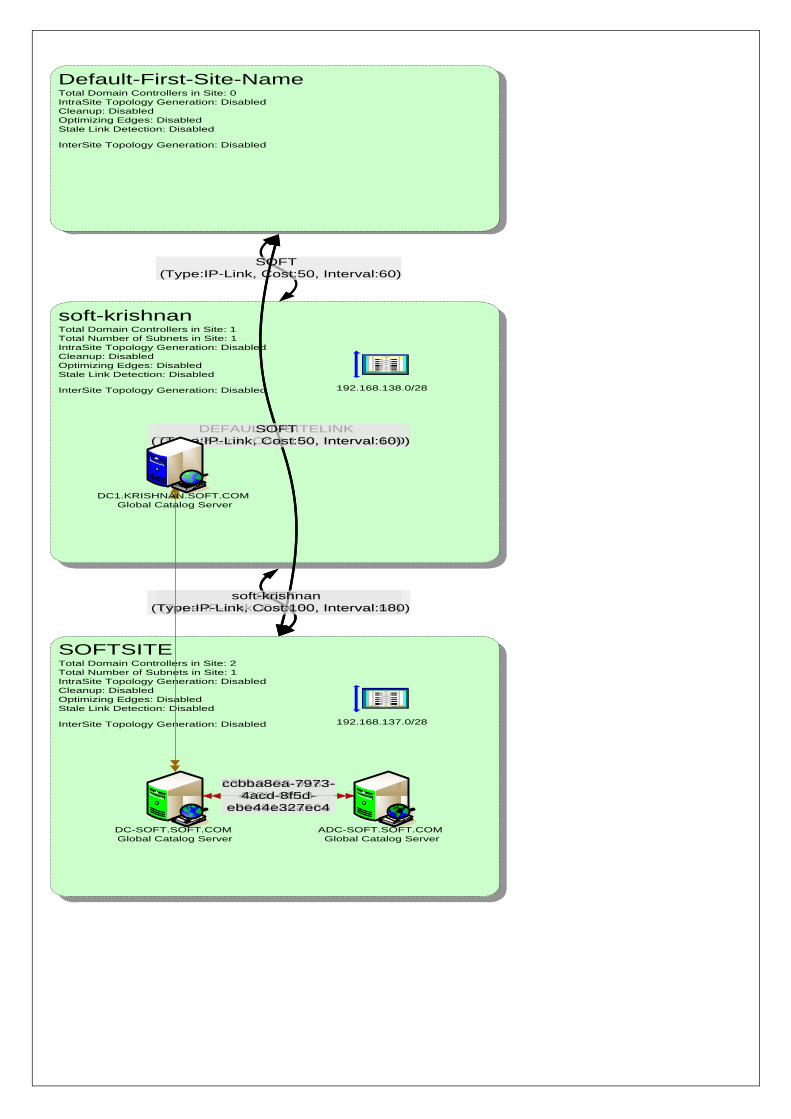
Default-First-Site-NameTotal Domain Controllers in Site: 0
IntraSite Topology Generation: Disabled
Cleanup: Disabled
Optimizing Edges: Disabled
Stale Link Detection: Disabled
InterSite Topology Generation: Disabled
SOFTSITETotal Domain Controllers in Site: 2
Total Number of Subnets in Site: 1
IntraSite Topology Generation: Disabled
Cleanup: Disabled
Optimizing Edges: Disabled
Stale Link Detection: Disabled
InterSite Topology Generation: Disabled
soft-krishnanTotal Domain Controllers in Site: 1
Total Number of Subnets in Site: 1
IntraSite Topology Generation: Disabled
Cleanup: Disabled
Optimizing Edges: Disabled
Stale Link Detection: Disabled
InterSite Topology Generation: Disabled
DEFAULTIPSITELINK
(Type:IP-Link, Cost:100, Interval:180)
SOFT
(Type:IP-Link, Cost:50, Interval:60)
SOFT
(Type:IP-Link, Cost:50, Interval:60)
SOFT
(Type:IP-Link, Cost:50, Interval:60)
soft-krishnan
(Type:IP-Link, Cost:100, Interval:180)
23019598-9a82-
435b-9b13-
e36d91a6a56a
ccbba8ea-7973-
4acd-8f5d-
ebe44e327ec4
192.168.137.0/28
192.168.138.0/28
DC-SOFT.SOFT.COM
Global Catalog Server
ADC-SOFT.SOFT.COM
Global Catalog Server
DC1.KRISHNAN.SOFT.COM
Global Catalog Server
IPAM Installation:
IPAM Installed by using Both Server Manager and PowerShell.
I have explained both methods. You can select anyone method best on your interest and Knowledge.
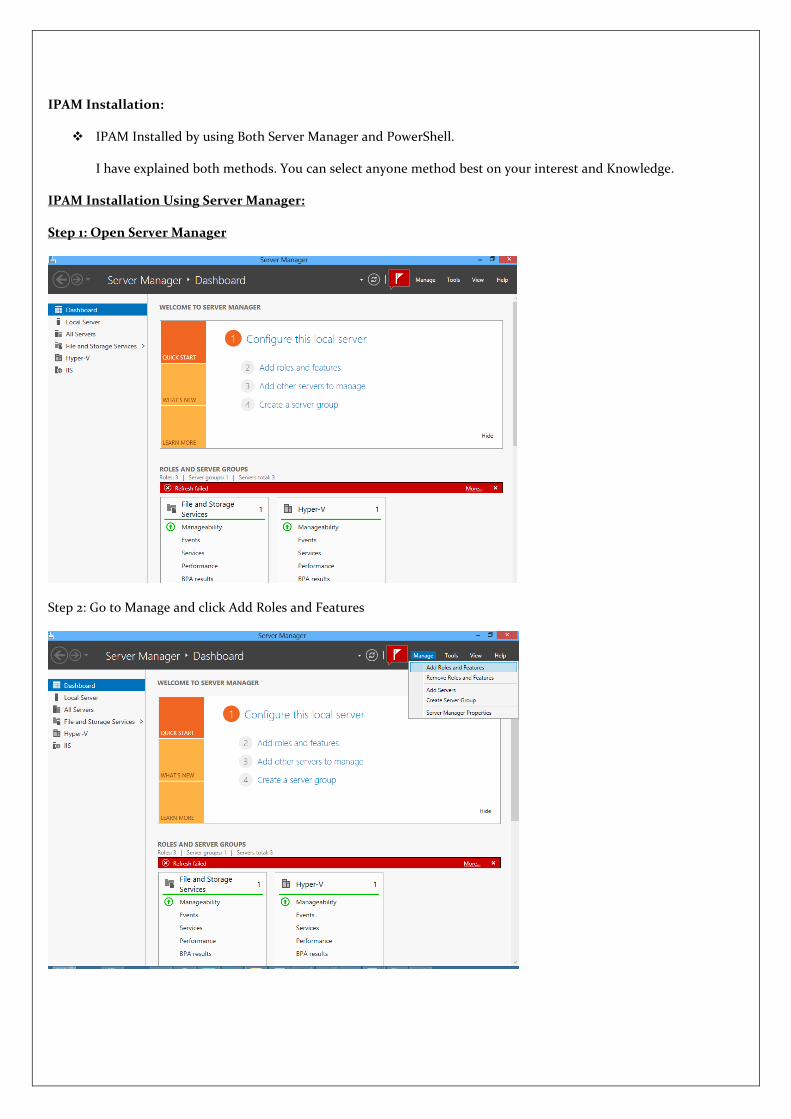
IPAM Installation Using Server Manager:
Step 1: Open Server Manager
Step 2: Go to Manage and click Add Roles and Features
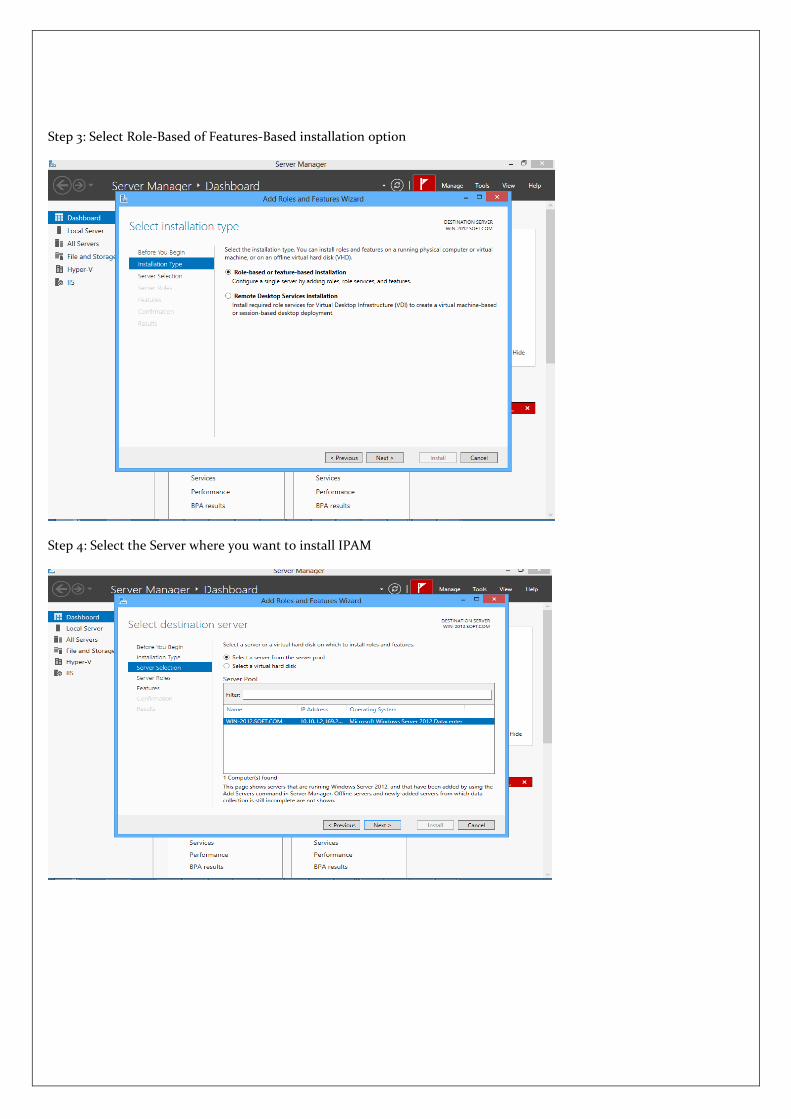
Step 3: Select Role-Based of Features-Based installation option
Step 4: Select the Server where you want to install IPAM
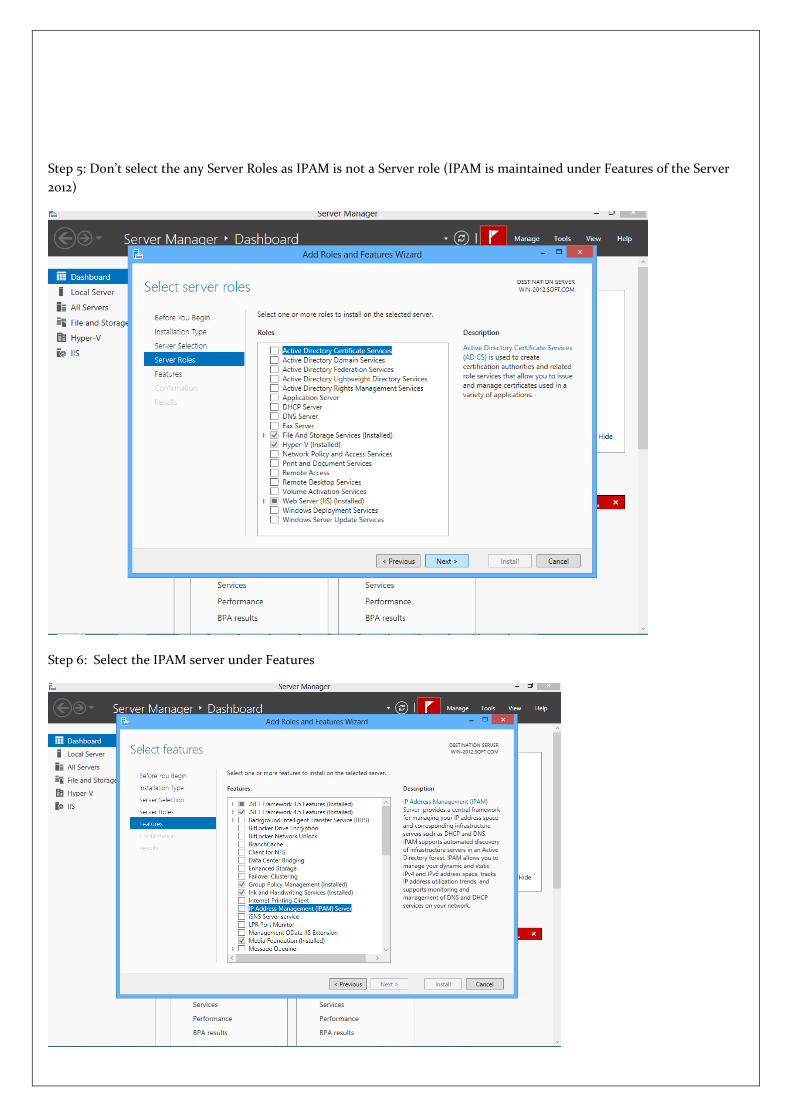
Step 5: Don’t select the any Server Roles as IPAM is not a Server role (IPAM is maintained under Features of the Server
2012)
Step 6: Select the IPAM server under Features
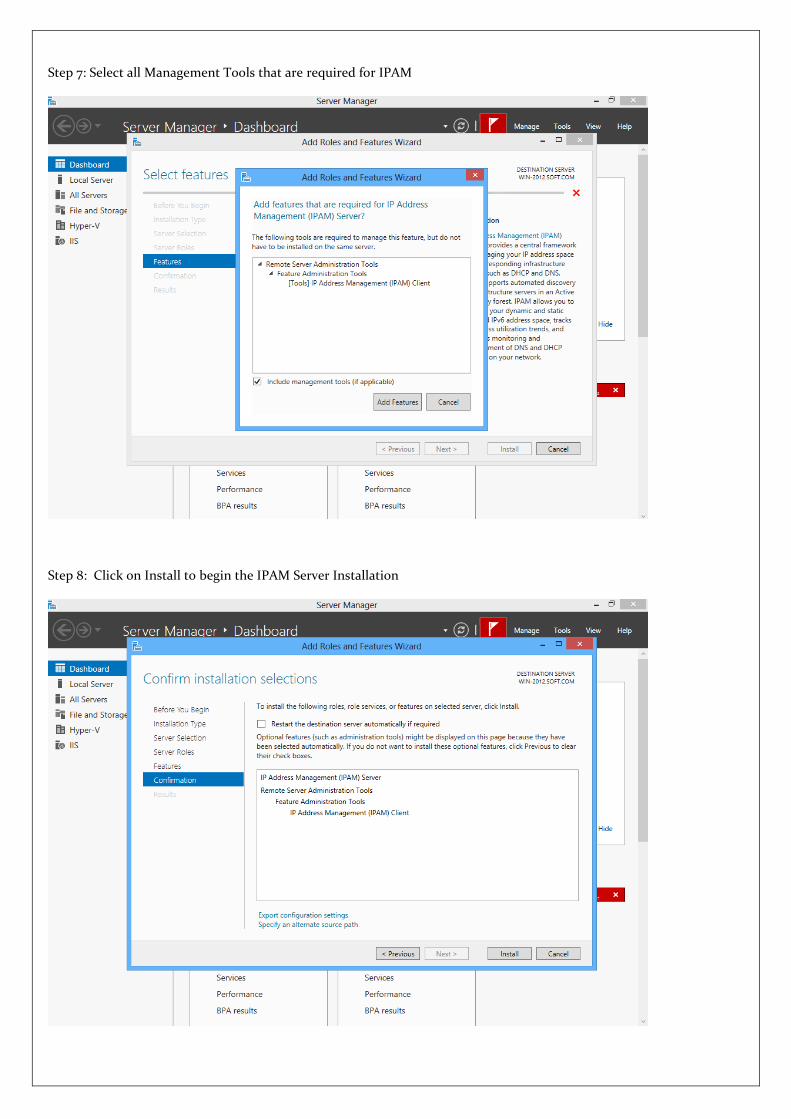
Step 7: Select all Management Tools that are required for IPAM
Step 8: Click on Install to begin the IPAM Server Installation
IPAM Installation Using PowerShell(PS)
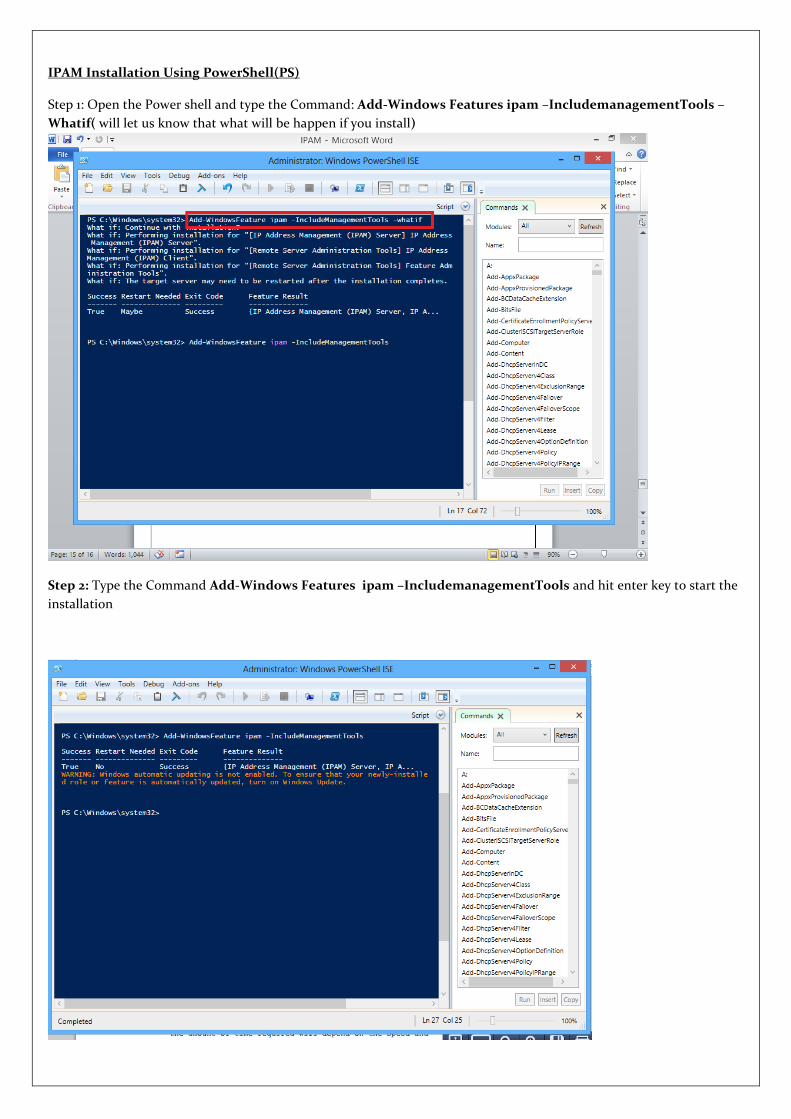
Step 1: Open the Power shell and type the Command: Add-Windows Features ipam –IncludemanagementTools –
Whatif( will let us know that what will be happen if you install)
Step 2: Type the Command Add-Windows Features ipam –IncludemanagementTools and hit enter key to start the
installation
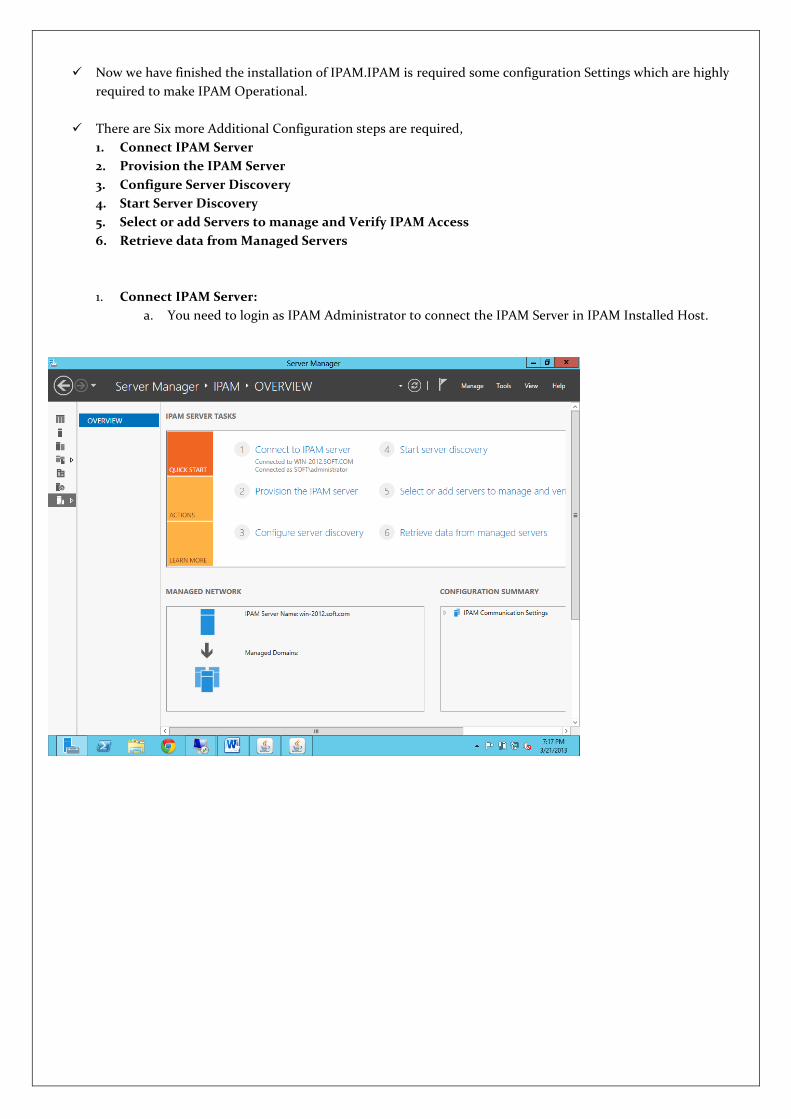
Now we have finished the installation of IPAM.IPAM is required some configuration Settings which are highly
required to make IPAM Operational.
There are Six more Additional Configuration steps are required,
1. Connect IPAM Server
2. Provision the IPAM Server
3. Configure Server Discovery
4. Start Server Discovery
5. Select or add Servers to manage and Verify IPAM Access
6. Retrieve data from Managed Servers
1. Connect IPAM Server:
a. You need to login as IPAM Administrator to connect the IPAM Server in IPAM Installed Host.
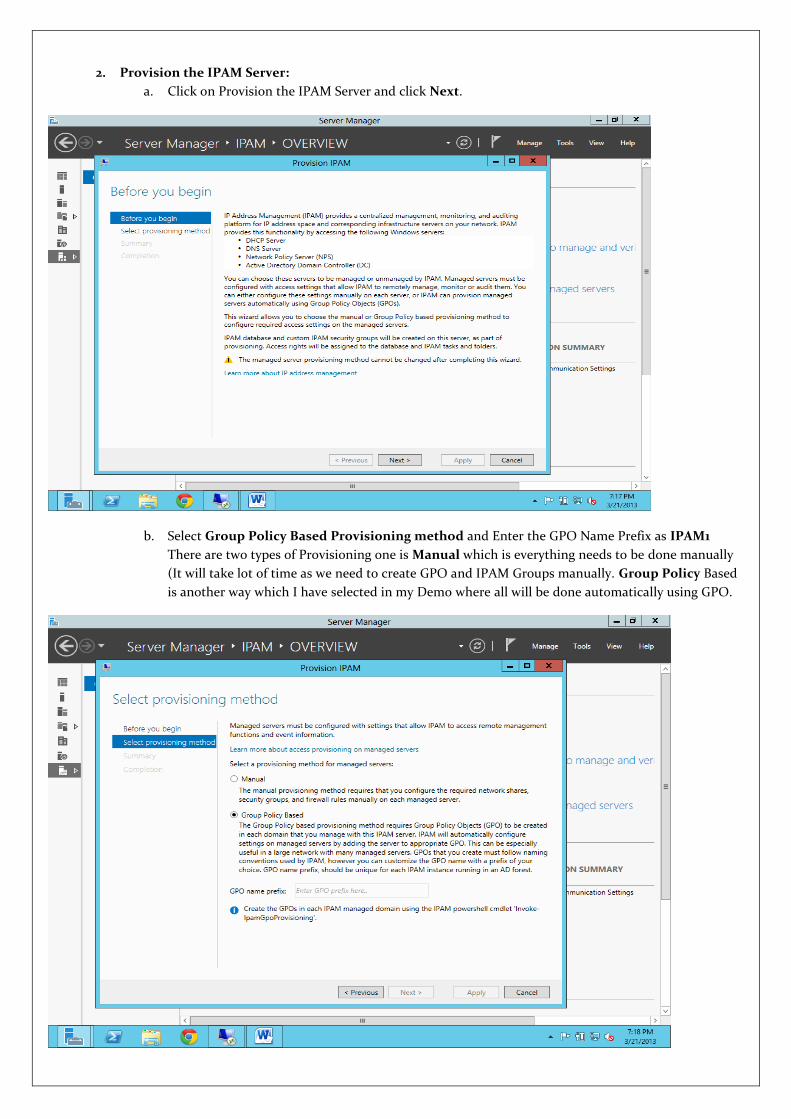
2. Provision the IPAM Server:
a. Click on Provision the IPAM Server and click Next.
b. Select Group Policy Based Provisioning method and Enter the GPO Name Prefix as IPAM1
There are two types of Provisioning one is Manual which is everything needs to be done manually
(It will take lot of time as we need to create GPO and IPAM Groups manually. Group Policy Based
is another way which I have selected in my Demo where all will be done automatically using GPO.
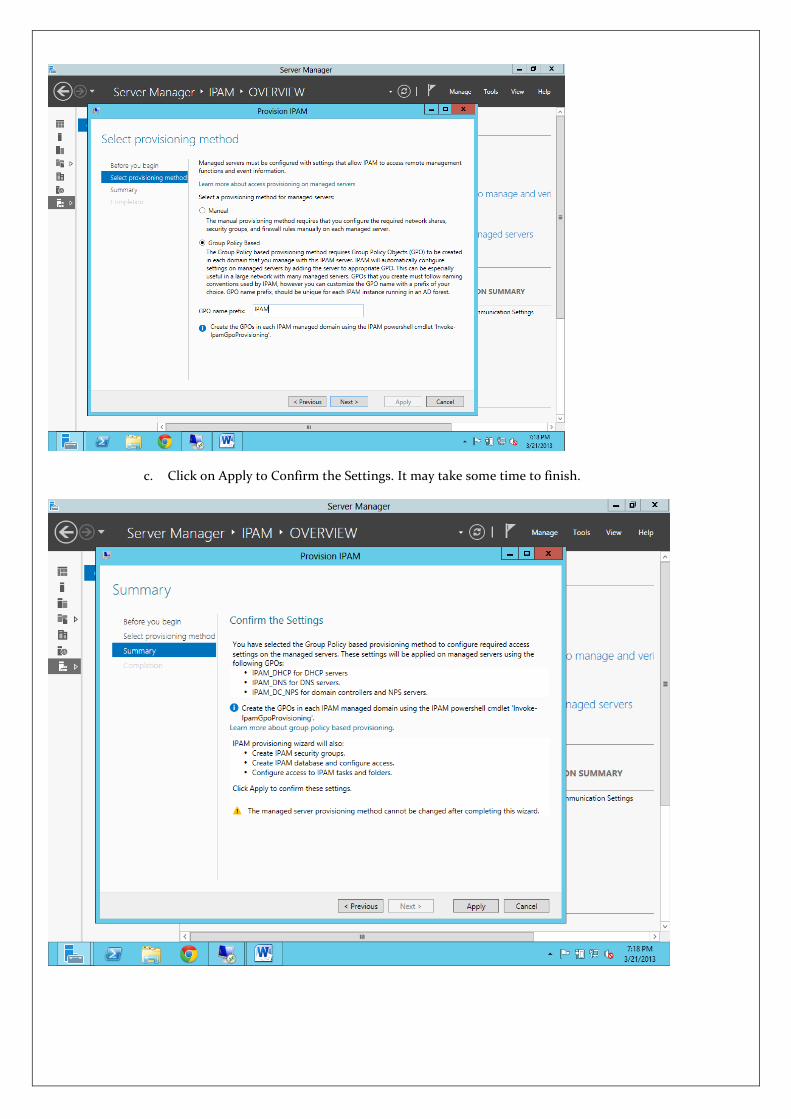
c. Click on Apply to Confirm the Settings. It may take some time to finish.
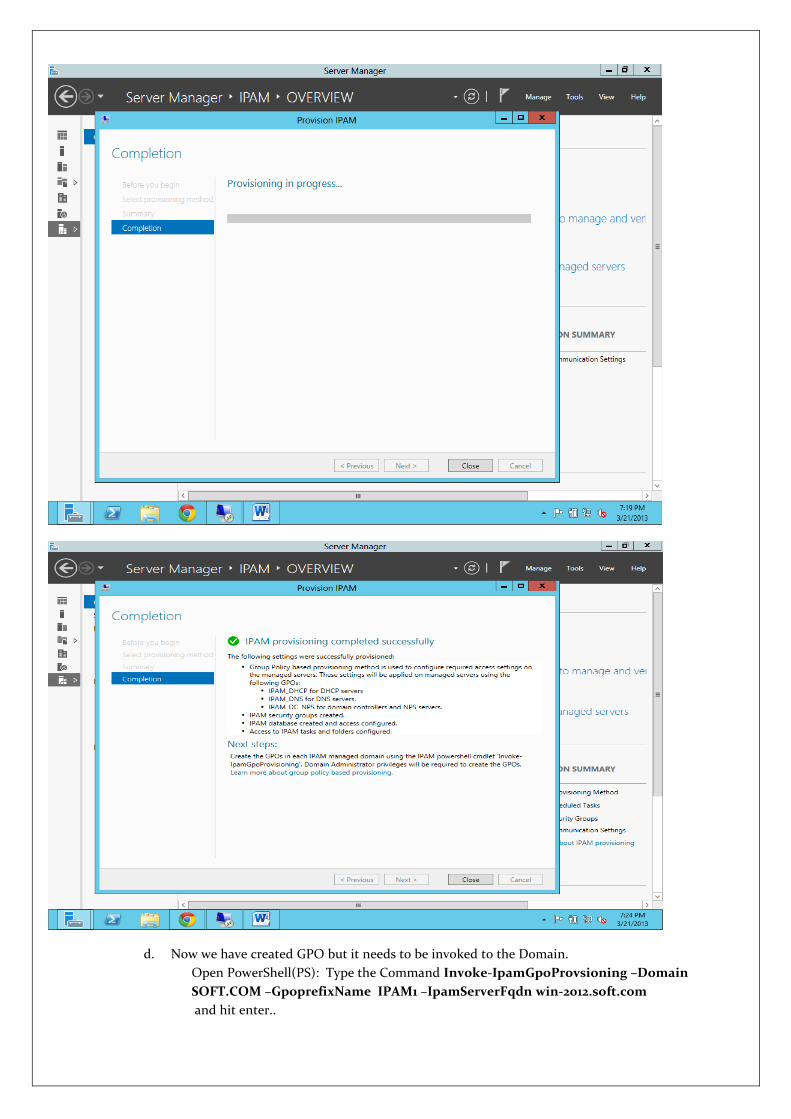
d. Now we have created GPO but it needs to be invoked to the Domain.
Open PowerShell(PS): Type the Command Invoke-IpamGpoProvsioning –Domain
SOFT.COM –GpoprefixName IPAM1 –IpamServerFqdn win-2012.soft.com
and hit enter..
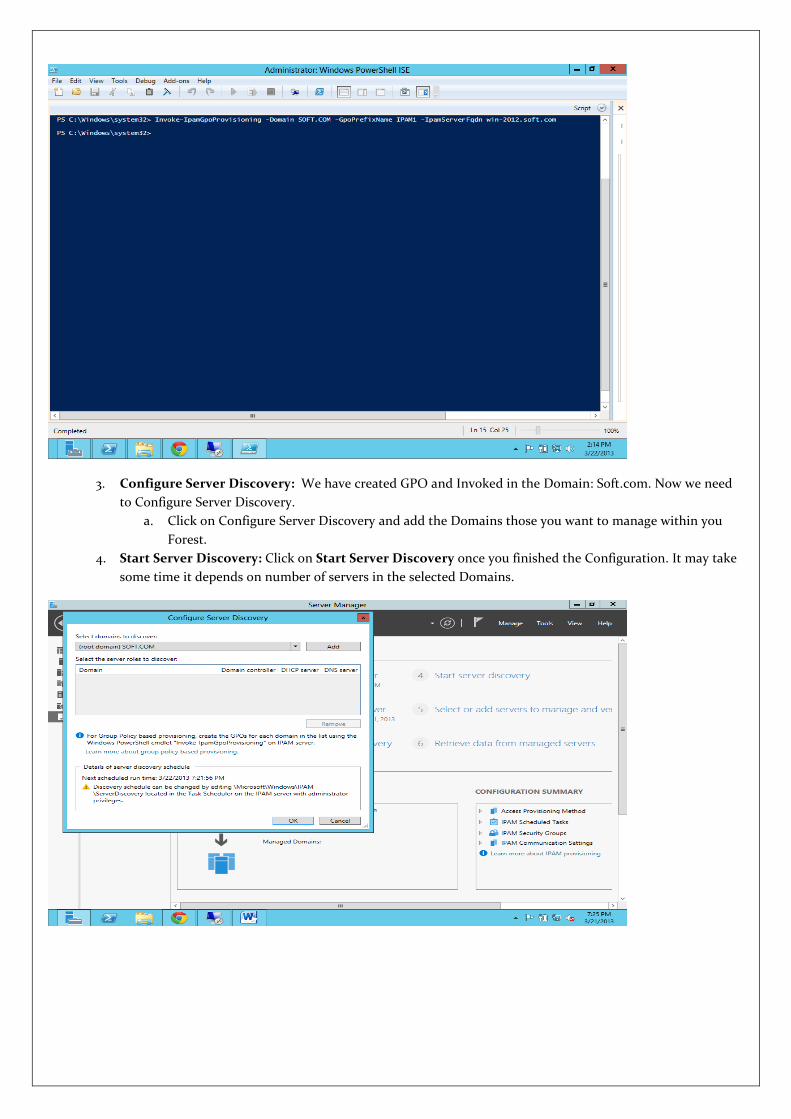
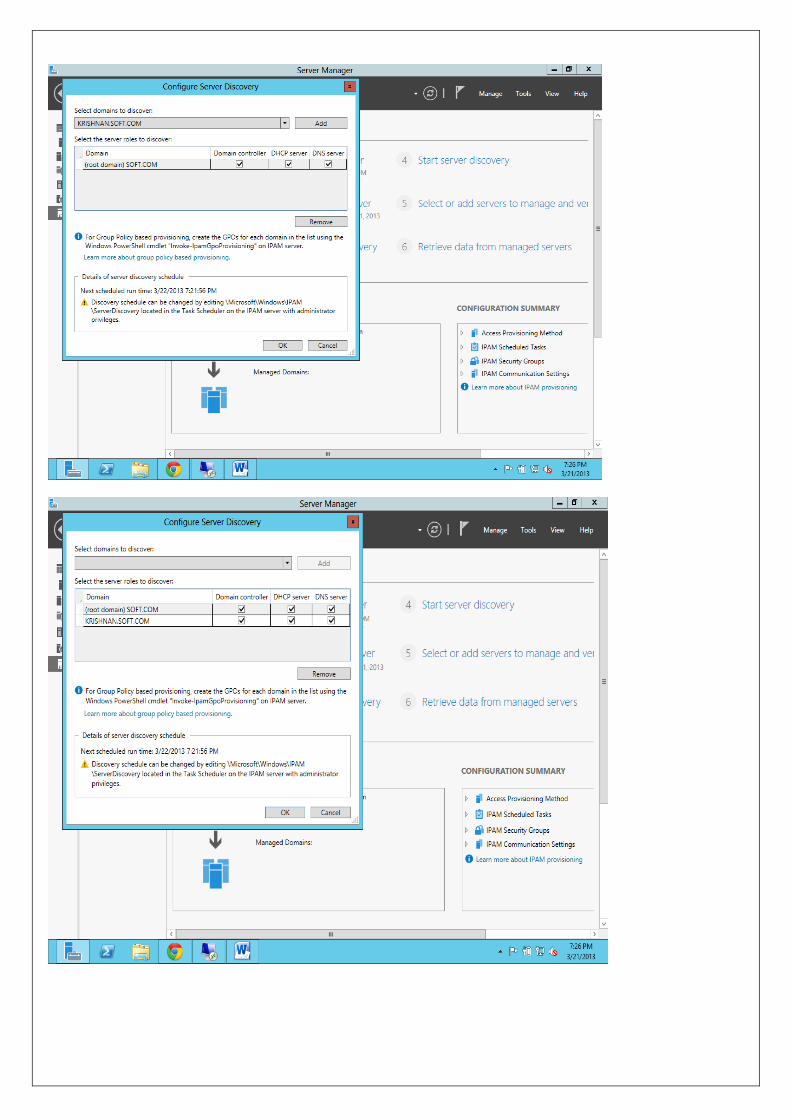
3. Configure Server Discovery: We have created GPO and Invoked in the Domain: Soft.com. Now we need
to Configure Server Discovery.
a. Click on Configure Server Discovery and add the Domains those you want to manage within you
Forest.
4. Start Server Discovery: Click on Start Server Discovery once you finished the Configuration. It may take
some time it depends on number of servers in the selected Domains.
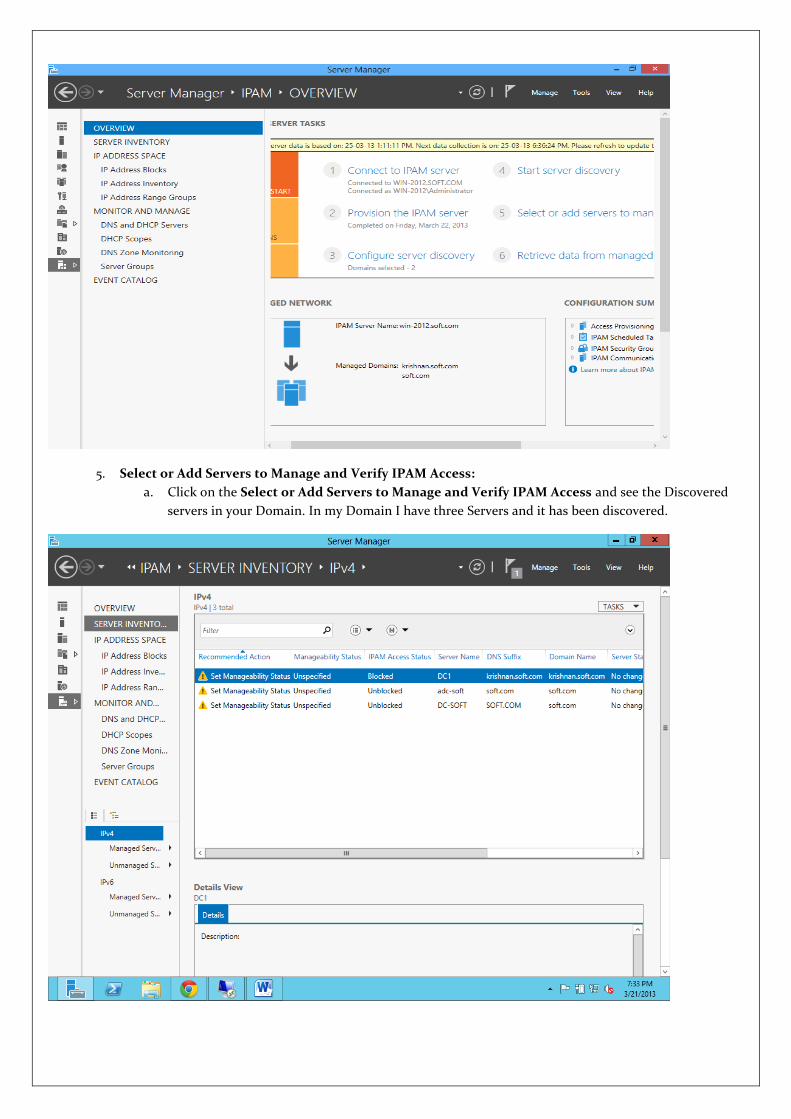
5. Select or Add Servers to Manage and Verify IPAM Access:
a. Click on the Select or Add Servers to Manage and Verify IPAM Access and see the Discovered
servers in your Domain. In my Domain I have three Servers and it has been discovered.
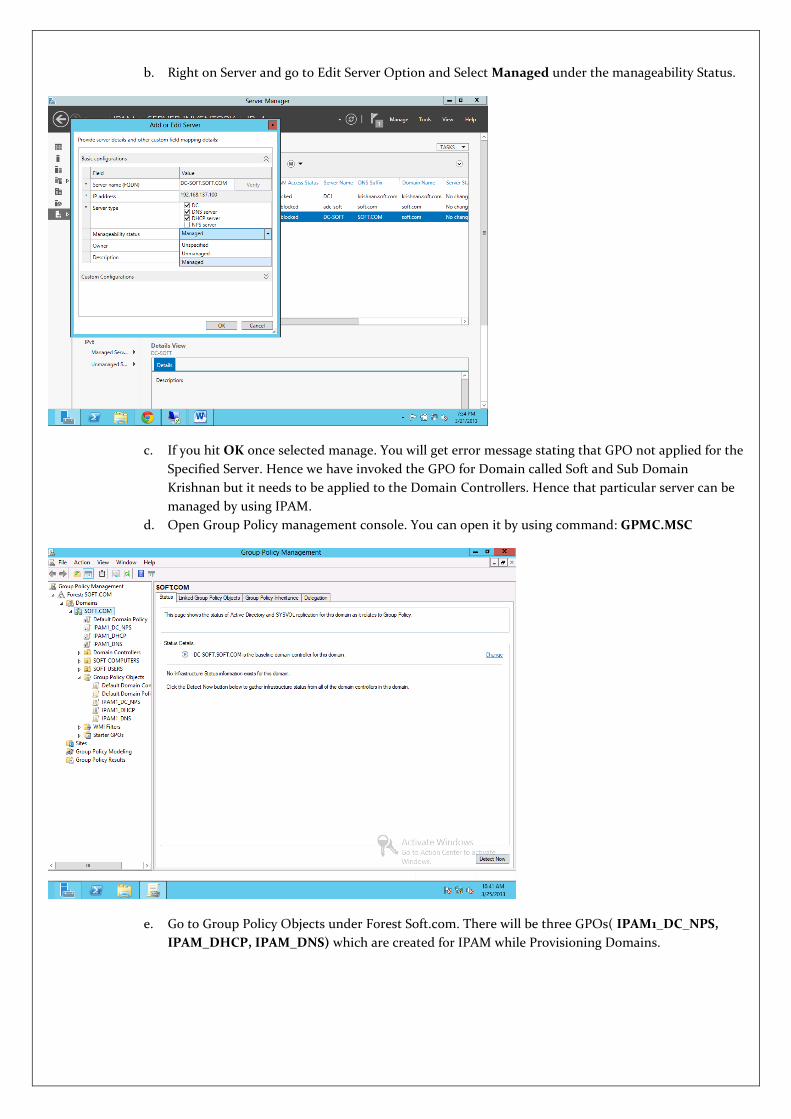
b. Right on Server and go to Edit Server Option and Select Managed under the manageability Status.
c. If you hit OK once selected manage. You will get error message stating that GPO not applied for the
Specified Server. Hence we have invoked the GPO for Domain called Soft and Sub Domain
Krishnan but it needs to be applied to the Domain Controllers. Hence that particular server can be
managed by using IPAM.
d. Open Group Policy management console. You can open it by using command: GPMC.MSC
e. Go to Group Policy Objects under Forest Soft.com. There will be three GPOs( IPAM1_DC_NPS,
IPAM_DHCP, IPAM_DNS) which are created for IPAM while Provisioning Domains.

f. Add Servers which are required to be managed using IPAM under Security Filtering.do the same
for all other GPOs of IPAM as well.

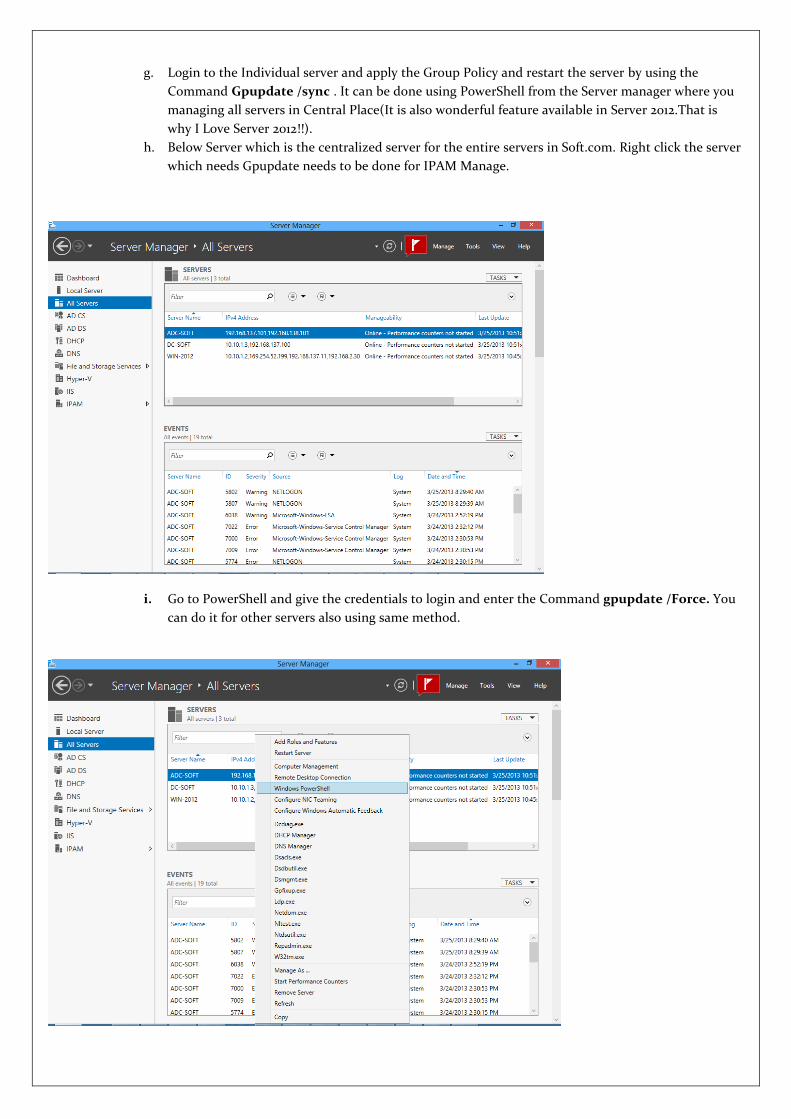
g. Login to the Individual server and apply the Group Policy and restart the server by using the
Command Gpupdate /sync . It can be done using PowerShell from the Server manager where you
managing all servers in Central Place(It is also wonderful feature available in Server 2012.That is
why I Love Server 2012!!).
h. Below Server which is the centralized server for the entire servers in Soft.com. Right click the server
which needs Gpupdate needs to be done for IPAM Manage.
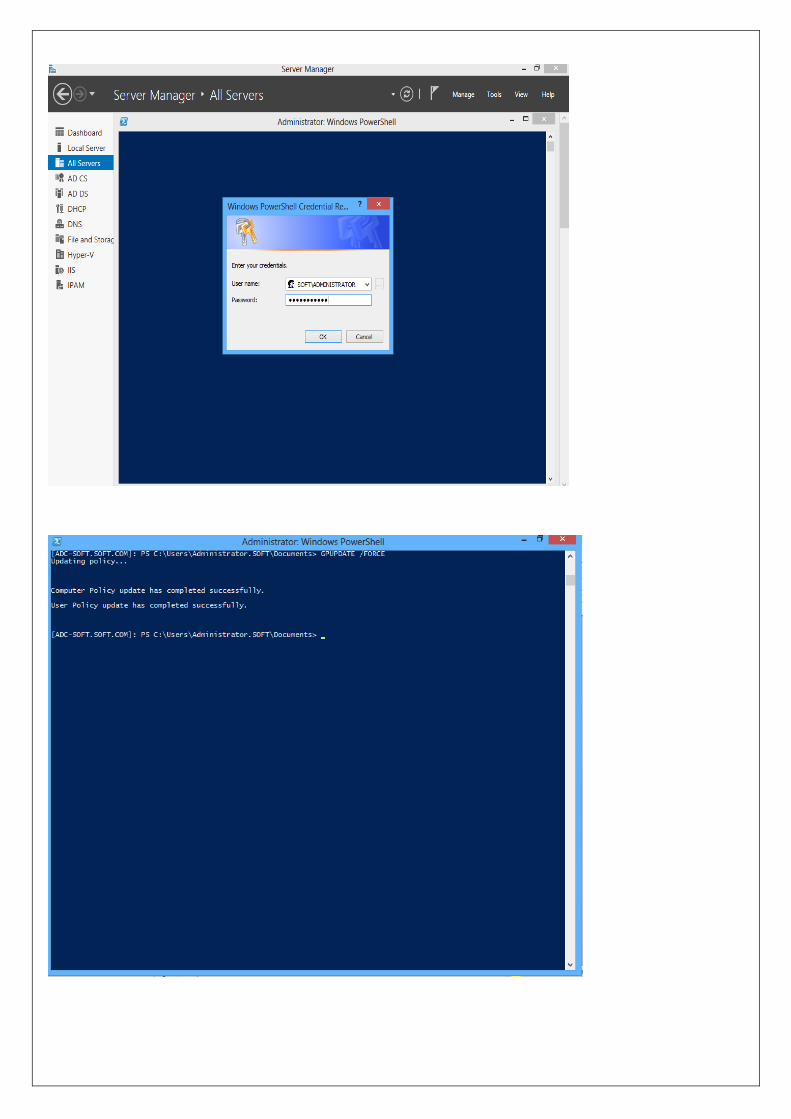
i. Go to PowerShell and give the credentials to login and enter the Command gpupdate /Force. You
can do it for other servers also using same method.

j. If you want to apply the settings in otherway, You can login to the perticular servers and apply the
settings.
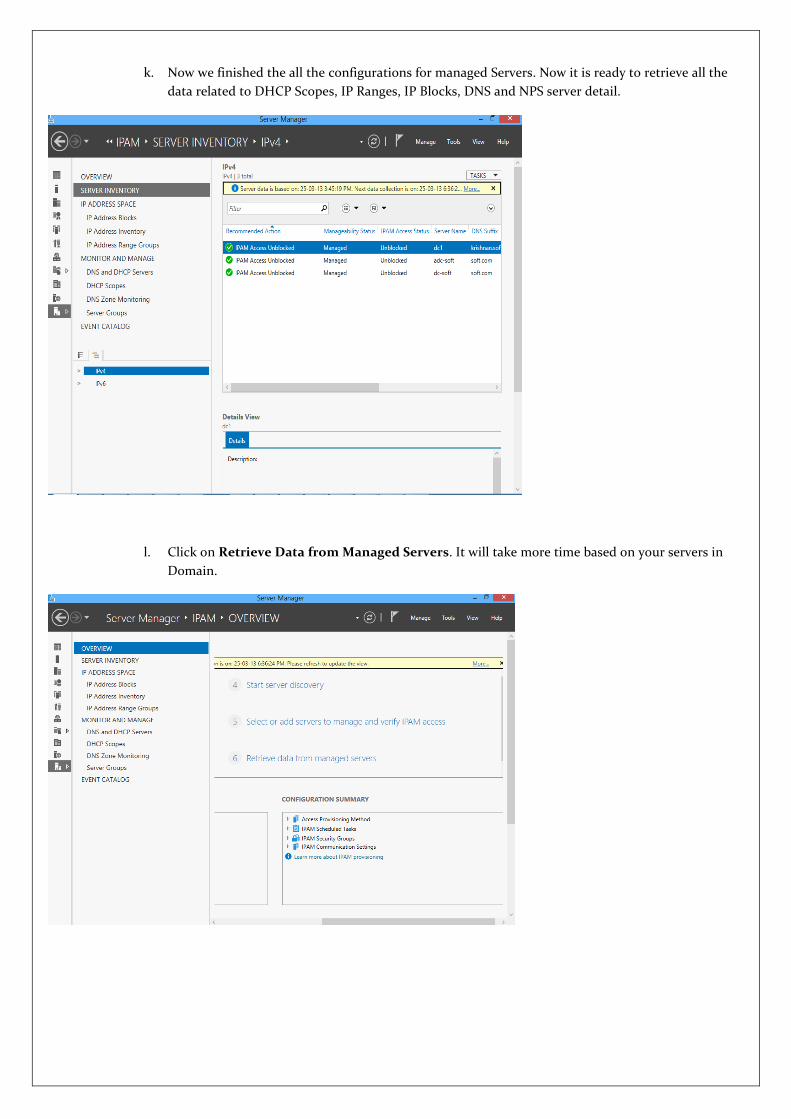
k. Now we finished the all the configurations for managed Servers. Now it is ready to retrieve all the
data related to DHCP Scopes, IP Ranges, IP Blocks, DNS and NPS server detail.
l. Click on Retrieve Data from Managed Servers. It will take more time based on your servers in
Domain.
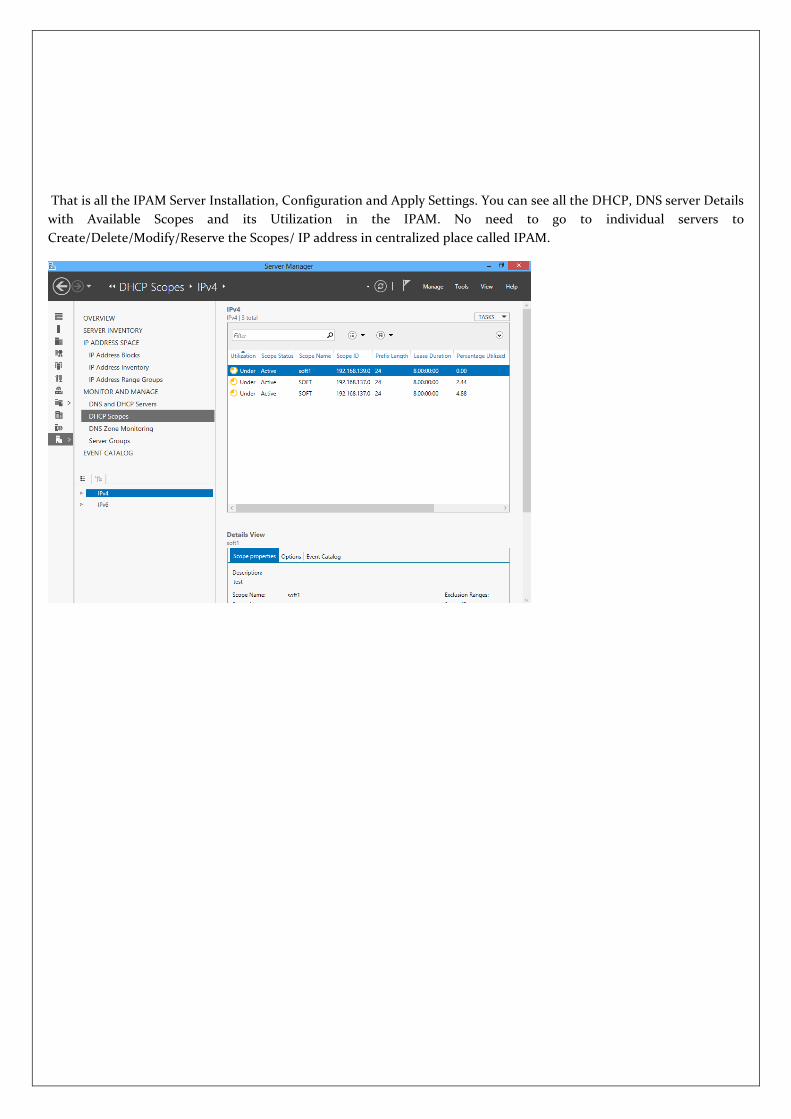
That is all the IPAM Server Installation, Configuration and Apply Settings. You can see all the DHCP, DNS server Details
with Available Scopes and its Utilization in the IPAM. No need to go to individual servers to
Create/Delete/Modify/Reserve the Scopes/ IP address in centralized place called IPAM.