ipswich woodcrafts club newsletter · 3 ipswich woodcrafts club newsletter: january 2016 what i did...
TRANSCRIPT

Ipswich Woodcrafts Club Newsletter: January 2016 1
President’s Report .......................................................... 1
Calendar ......................................................................... 2
New Equipment ............................................................. 2
What I did in my Summer Holidays ............................... 3
Build a Work Bench for Carving ................................... 4
Featured Timber ............................................................ 6
Colouring Timber ............................................................ 7
Instagram @ipswichwoodies ........................................ 8
Puzzles! ............................................................................ 9
Recent Jewellery ........................................................... 9
Sanding of Carvings .................................................... 10
Welcome ...................................................................... 11
For Sale ......................................................................... 11
Useful Templates, Jigs, and Charts ............................ 12
Inspiration ..................................................................... 13
Vector and bit-mapped Graphics ............................ 14
Editorial ......................................................................... 15
Club Details .................................................................. 16
President’s Report
Welcome back to the club for all our members. I hope you had an enjoyable Christmas break. The shed over our new dust extractor is almost finished, and is waiting a coat of paint. Thanks to Bob McKinnon for all his hard work. Our new Vicmarc VL-240 has been installed and is ready for use. The first club event for 2016 is a visit to the Pittsworth Club on 13th February. Members of the Bayside Club will also be attending this social day and sausage sizzle. We have been asked to bring items for show and tell and for sale. Also, if you have special jigs you would like to show, bring those along. On the way home we plan to visit Jeff Wilson’s, to purchase some timber. If you intend going, please write your name on the notice board at the entrance to the club. Let’s continue our safety procedures during 2016, and make it another accident-free year.
NOTE - meeting change: The next club monthly meeting will be Sat 20th Feb.
Ipswich Woodcrafts Club Newsletter
January 2016
Email: [email protected] Editor: Beth Addison-Smith
Phone: 0403 914 014
Chinese New Year 2016 falls on February 8th . This year is
Year of the Monkey. (editor)

Ipswich Woodcrafts Club Newsletter: January 2016 2
Calendar
Trip to Pittsworth Club 13th February
Monthly meeting 20th February
Maleny Wood Expo 30th April - 1st May
Cooroora Wood and Crafts Show/Comp 6th and 7th May
Ipswich Show – Display & Sales 13th – 15th May TBC
Boonah Show & Comp 27th and 28th May
Timber and Working with Wood Show 27th – 29th May
Q-Turn 2016 Camp Moogerah 17th – 19th June
Bribie vs Ipswich Comp 7th August TBC
Ipswich Woodcrafts Club Open Day 3rd September
QLD Woodcrafters Assembly 2016 14th – 16th October
Other dates to watch:
Ipswich Medieval Market and Fantasy Faire Sat 14th May
Ipswich Historical Society Golden Jubilee Sat 8th October
New Equipment
• Thanks to Mayor Pisasale, we have a beautiful new Vicmarc VL-240 lathe. It has a 90 degree swivel
head and electronic variable speed drive. Magnetic switch box can be easily moved to suit operator.
Modeled by Kevin.
• Also check out the new dremel workstation upstairs. Very useful for scroll-saw prep drilling.

Ipswich Woodcrafts Club Newsletter: January 2016 3
What I did in my Summer Holidays Or what I built over Christmas
Pete Neumann
As I’ve gotten older, my ambitions with woodcrafts have gotten smaller. Heavy lifting and standing for long periods have taken their toll on my back. Standing for long periods in particular have had me give up the lathe and was going to park my carving chisels for good. Standing for any length of time bent over a bench or trying to get that carving vice at a comfortable height, left me with a stiff and sore back for days.
A chance read of an article about work benches, had me trawling the internet looking for carving benches that incorporated a seat. Most of the ones I saw, including the professionally built ones were a sandwich short of a good idea.
I am 6’2” and haven’t been below 100kgs for a while. Most designs incorporated some original thinking up to a point, then forgot to finish the job.
The types of carving I prefer are in the round and relief. Ideally they need differing work spaces. No one design adequately addressed the problems associated with both and let you sit down.
By combining the ideas of several benches with a few ideas of my own, I have come up with a design which will allow you to carve either in the round using a carving vice or relief on a sloped bench top while sitting down. I have incorporated an adjustable seat, (my wife is 5’3”and can sit comfortably with feet flat on the floor) the slope angle of the table is adjustable between 45 and 55 degrees and locks solidly with a tool tray that works in 3 different positions for left and right handers. The work table can be removed and fitted in a matter of seconds.
I spent under $50.00 at Bunnings to buy materials, the rest I had at home either offcuts or leftovers from other projects. Not counting the carving vice, if you start from scratch all the materials would be less than $80.00
Bench construction details overleaf

Ipswich Woodcrafts Club Newsletter: January 2016 4
Build a Work Bench for Carving Pete Neumann
I mocked up this project and made measurements based on my needs. So, I suggest you adjust measurements to suit yourself: Feel free to tinker with the design.
1. Make a 2.4 M post by dowelling and gluing 4 of the non structural pine lengths together. With a cross section of 140mm x 70mm. Allow to dry overnight.
2. Cut two lengths. 1 x 500mm and 1 x 900mm. make sure both ends are square on the 500mm length. One end is square and one end has a 45 degree cut across the 70mm side (use photos as a guide)
3. Cut the feet from the last piece of non structural pine. 2x 600mm x 70 x 35mm
4. Cut a 70mm x 35mm notch from the cut post pieces on a square end, the notch should run across the 140mm face. (Refer photos)
5. Glue and screw the feet on to the posts in the notched out area allow equal overhang of the feet
6. Mark up the taller post 500mm from the base on the faces that the feet form a 90 degree angle with. Draw a line across the faces at 500mm
7. Cut 2x 900mm lengths of clear pine making sure each end is square
8. (Using photos as a guide) Glue, dowel and screw 1 length of pine to each post on both sides. The top edge is 500mm from the base of the post.
9. Note make sure the front post is the taller of the two and the angled cut faces rearward.
10. Cut the MDF in two 600mmx 450mm halves, glue and clamp together making sure the edges are aligned.
11. Use the photos and your own judgement as a guide to fit the seat, worktable and carving vice.
12. Position your hinge so you can raise or lower the table without binding on other fixtures 13. The carving vice forms the lower mount for the worktable when fitted and also sets the
work height. Position the toggle clamp under the worktable so it clamps the table solidly in position by clamping under the carving vice mounting plate.
14. There will be enough offcuts to make a seat and most of the tool tray to your needs.
I have covered my table work surface with self-adhesive, 450mm x 450mm vinyl tiles. It also serves as a good drawing table.
Work bench photos overleaf, or view online at http://tinyurl.com/iwcc-bench-photos
Materials list All dimensions in mm
QTY ITEM
5 70 x 35 x 2400 non structural pine
1 182 x 19 x 2400 clear pine board
1 1200 x 450 x 19 MDF
1 pull-apart door hinge 50 or 60 mm long
Packet of wood dowels
Box 30-35 mm wood screws 1 toggle clamp*
2 Knob w/screw*
1 Carving vice*
* Starred items are available from CARBATEC
“Allow a week for construction”

Ipswich Woodcrafts Club Newsletter: January 2016 5
Work Bench Photos
Post x section showing glue pattern
To remove work table from bench:
Unlatch toggle clamp, Lift vertical,
Slide table to the right.
Careful it’s heavy. To replace, reverse order
Bench adjusted for
round carving
Note alternative position for
tool tray
Underside of work table showing toggle clamp and hinge
Ipswich Woodcrafts Club Newsletter: January 2016 6
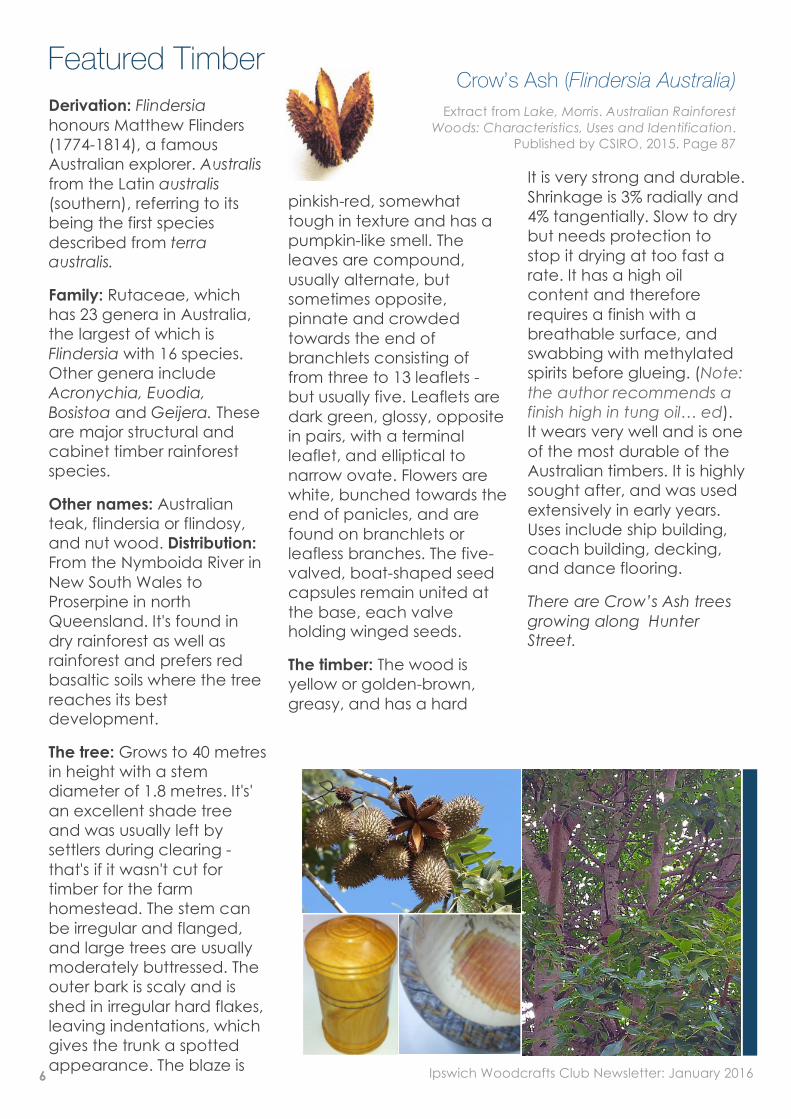
Featured Timber
1
Derivation: Flindersia honours Matthew Flinders (1774-1814), a famous Australian explorer. Australis from the Latin australis (southern), referring to its being the first species described from terra australis.
Family: Rutaceae, which has 23 genera in Australia, the largest of which is Flindersia with 16 species. Other genera include Acronychia, Euodia, Bosistoa and Geijera. These are major structural and cabinet timber rainforest species.
Other names: Australian teak, flindersia or flindosy, and nut wood. Distribution: From the Nymboida River in New South Wales to Proserpine in north Queensland. It's found in dry rainforest as well as rainforest and prefers red basaltic soils where the tree reaches its best development.
The tree: Grows to 40 metres in height with a stem diameter of 1.8 metres. It's' an excellent shade tree and was usually left by settlers during clearing - that's if it wasn't cut for timber for the farm homestead. The stem can be irregular and flanged, and large trees are usually moderately buttressed. The outer bark is scaly and is shed in irregular hard flakes, leaving indentations, which gives the trunk a spotted appearance. The blaze is
2
pinkish-red, somewhat tough in texture and has a pumpkin-like smell. The leaves are compound, usually alternate, but sometimes opposite, pinnate and crowded towards the end of branchlets consisting of from three to 13 leaflets - but usually five. Leaflets are dark green, glossy, opposite in pairs, with a terminal leaflet, and elliptical to narrow ovate. Flowers are white, bunched towards the end of panicles, and are found on branchlets or leafless branches. The five-valved, boat-shaped seed capsules remain united at the base, each valve holding winged seeds.
The timber: The wood is yellow or golden-brown, greasy, and has a hard
It is very strong and durable. Shrinkage is 3% radially and 4% tangentially. Slow to dry but needs protection to stop it drying at too fast a rate. It has a high oil content and therefore requires a finish with a breathable surface, and swabbing with methylated spirits before glueing. (Note: the author recommends a finish high in tung oil… ed). It wears very well and is one of the most durable of the Australian timbers. It is highly sought after, and was used extensively in early years. Uses include ship building, coach building, decking, and dance flooring.
There are Crow’s Ash trees growing along Hunter Street.
Crow’s Ash (Flindersia Australia) Extract from Lake, Morris. Australian Rainforest
Woods: Characteristics, Uses and Identification. Published by CSIRO, 2015. Page 87

Ipswich Woodcrafts Club Newsletter: January 2016 7
Colouring Timber (starting with an from Cubby House News, By Ray Elyard)
Hi I have been experimenting with dyeing of small pieces of timber, I found that soft timber will take the dye all the way through. I have also found that the timber has to be seasoned dry, as green timber won’t colour all way through, it only colours to about 2mm deep. I am using cake food colour and can make lots of different colours and shades by diluting it with water. I put the timber in a glass jar and covered with colour dye, then put in my vacuum chamber, left it under vacuum for about 10 minutes then took it out let dry about 2 hrs on hot day. I got impatient and put it in the oven after cooking tea while the oven was still hot but turned off, the next morning was totally dry, only food colour so won’t affect the food cooked at later times. Don’t get the wood wet or tough with wet or sweaty hands until you have put a finish in the pieces as the colour is water soluble.
I then turned a small finial to see the penetration of the colour it had gone all way through and found it was the same colour on the outside as in the middle. The timber I used was Pine and jacaranda. The food colour was very dark so I then watered it down a little only a very little amount of water at a time as the colour will change a lot.
All the pieces in the picture were dyed at the same time. The two round pieces are pine and the other including the finial is jacaranda. ⌘
The bowls to the left are illustrations from Woodturner magazine, February 2003. Before coloring, the grain lines have been burned with a pyrography tool. Grain lines that are too close have been skipped. The rainbow coloring is translucent inks and the monochromatic scheme uses acrylic paint. ⌘
Sharpies have been well-known for years as excellent indelible markers. More recently they have appeared in a wide range of colours. Joanna reports that sharpies are great for coloring wood, and have the advantage of being waterproof so that finishes applied over the top of the colour won’t cause bleeding and other problems. They are also ASTM non-toxic, and on special around back-to-school. ⌘
Fibre-reactive dyes, used for cold-water dyeing of cotton, may also be used for dyeing wood (cellulosic fibres). Think Rit, Dylon, Jaquard, etc. Dharma procion is my favourite for fabrics - they have a great range and detailed dyeing instructions. For timber dyeing with any of these fabric dyes, a quick-and-easy method appears to be just this: dissolve some dye in water and paint on. The timber will then need sealing. Dharma’s online site includes further instructions about dyeing timber that will not be sealed.
http://www.dharmatrading.com/info/dyeing_wood.html
http://www.dylon.com.au/factsheets/Dylon-DyeingCraft.pdf

Ipswich Woodcrafts Club Newsletter: January 2016 8
Instagram @ipswichwoodies Carmen has been keeping our Instagram up-to-date, and has selected some of that for the newsletter. There’s more and they look much better online - you get all the captions, hashtags, mentions and links to other Instagram sets, not to mention you can watch the videos. So, why not head over to https://www.instagram.com/ipswichwoodies/ and have a look?
What we posted
What we liked

Ipswich Woodcrafts Club Newsletter: January 2016 9
Puzzles! • At the woodcrafts club, Brian said he saw some cake in the fridge and ate one-half of it. John
said he saw some cake in the fridge and ate one-third of it. Beth said she saw some cake in the fridge and ate all of it. It turns out that they all had exactly the same amount of cake. What happened?
• The digits 1,2,3,4 can be arranged to form 24 different 4-digit numbers. What is the sum of those 24 numbers? The trick is to work out the shortcut!
• What ten-digit number is autobiographical? An autobiographical number is a number such that, when you start at the left, the first digit of N counts how many zeroes are in N, the second digit counts how many ones are in N and so on. For example, 1210 is autobiographical because it has 1 zero, 2 ones, 1 two and 0 threes:
Number 1 2 1 0 Position of digits in the number 0 1 2 3
Jack, an older gentleman woodworker, feared his wife, Becky, was getting hard of hearing. So one day Jack called her doctor to make an appointment to have her hearing checked. The Doctor made an appointment for a hearing test in two weeks, and said that meanwhile there's a simple informal test the husband could do to give the doctor some idea of the state of her problem.
Here's what you do, said the Doctor, "Start out about 40 feet away from her, and in a normal conversational speaking tone see if she hears you. If not, go to 30 feet, then 20 feet, and so on until you get a response. That evening, the wife is in the kitchen cooking dinner, and he's in the living room. He thinks to himself that he is about 40 feet away. "Let's see what happens," he mutters. Then in a normal tone he asks, ''Honey, what's for supper?" No response. So Jack moves to the other end of the room, about 30 feet from Becky and repeats, "Honey, what's for supper?" Still no response. Next he moves into the dining room where he is about 20 feet from Becky and asks, "Honey, what's for supper?" Again he gets no response. So he walks up to the kitchen door, only 10 feet away. "Honey, what's for supper?" Again there is no response. So he walks right up behind her. "Honey, what's for supper?" She replies, "For God's sake, Jack! For the FIFTH TIME. CHICKEN!"
from Carmen…
Recent Jewellery
Ipswich Woodcrafts Club Newsletter: January 2016 10
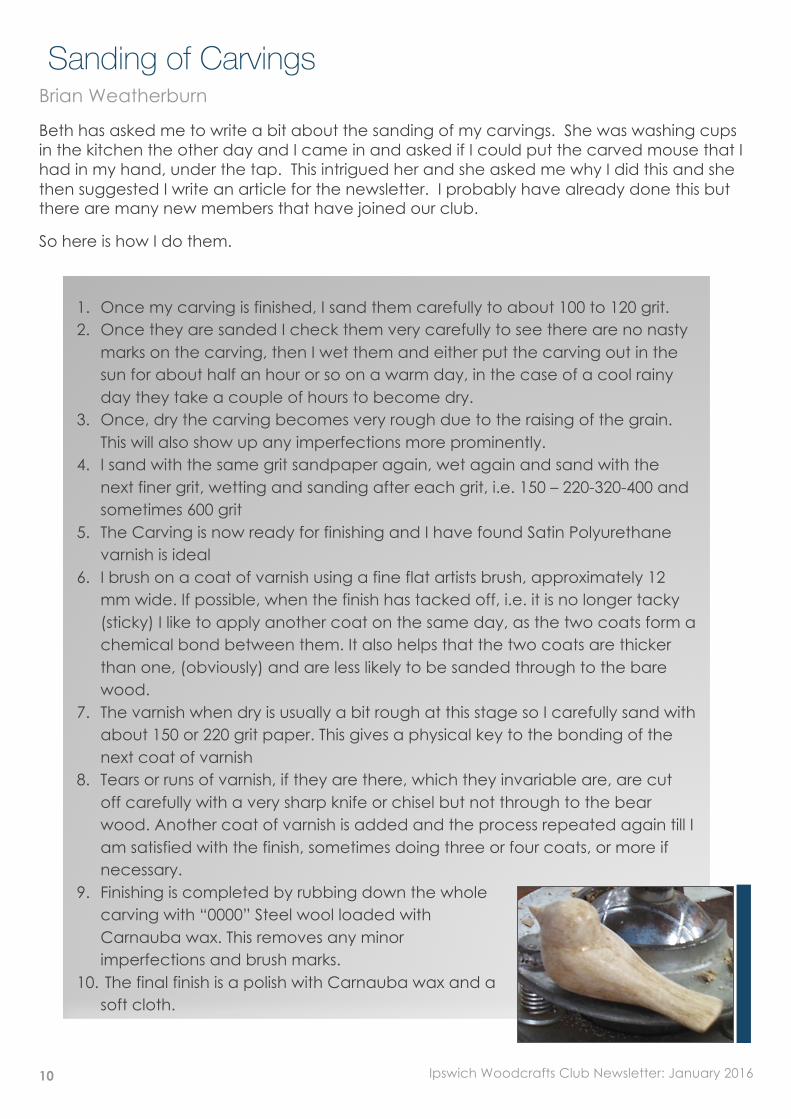
Sanding of Carvings Brian Weatherburn
Beth has asked me to write a bit about the sanding of my carvings. She was washing cups in the kitchen the other day and I came in and asked if I could put the carved mouse that I had in my hand, under the tap. This intrigued her and she asked me why I did this and she then suggested I write an article for the newsletter. I probably have already done this but there are many new members that have joined our club.
So here is how I do them.
1. Once my carving is finished, I sand them carefully to about 100 to 120 grit. 2. Once they are sanded I check them very carefully to see there are no nasty
marks on the carving, then I wet them and either put the carving out in the sun for about half an hour or so on a warm day, in the case of a cool rainy day they take a couple of hours to become dry.
3. Once, dry the carving becomes very rough due to the raising of the grain. This will also show up any imperfections more prominently.
4. I sand with the same grit sandpaper again, wet again and sand with the next finer grit, wetting and sanding after each grit, i.e. 150 – 220-320-400 and sometimes 600 grit
5. The Carving is now ready for finishing and I have found Satin Polyurethane varnish is ideal
6. I brush on a coat of varnish using a fine flat artists brush, approximately 12 mm wide. If possible, when the finish has tacked off, i.e. it is no longer tacky (sticky) I like to apply another coat on the same day, as the two coats form a chemical bond between them. It also helps that the two coats are thicker than one, (obviously) and are less likely to be sanded through to the bare wood.
7. The varnish when dry is usually a bit rough at this stage so I carefully sand with about 150 or 220 grit paper. This gives a physical key to the bonding of the next coat of varnish
8. Tears or runs of varnish, if they are there, which they invariable are, are cut off carefully with a very sharp knife or chisel but not through to the bear wood. Another coat of varnish is added and the process repeated again till I am satisfied with the finish, sometimes doing three or four coats, or more if necessary.
9. Finishing is completed by rubbing down the whole carving with “0000” Steel wool loaded with Carnauba wax. This removes any minor imperfections and brush marks.
10. The final finish is a polish with Carnauba wax and a soft cloth.

Ipswich Woodcrafts Club Newsletter: January 2016 11
Welcome Welcome to our new members, Dale Harris and Allan Nielsen. Dale has started turning with Bob and plans to try carving in a couple of months. Allan was a professional photographer, has scroll-sawing and carving experience, and claims to be disinterested in wood turning. We’ll have to change that!
For Sale - Wood crafts magazines older than 8 years old are being cleared by the club. Older ones are free, and others a bargain at 50c each. Rhonda has given the library has extensive spring clean – thank you Rhonda!
- A wood crafter by the name of Nev Robin is moving and has dressed and raw timber for sale, including Hoop pine, Kwila, Jacaranda, Red Cedar, Teak, Camphor Laurel, Silky oak. If interested, please phone 3282 6710 or 0418 152556 and leave a message.
- The following metal-working items are for sale from Visnja Timkiv, whose husband Joe had a serious stroke and can no longer use the tools. Joe was a highly skilled craftsman – you may have seen his wonderous model steam traction engine at events around Ipswich. Joe and Visnja are moving to Melbourne and so need to sell as much as possible. Visnja (pronounced vish-nya) says there are also a lot of small tools to go. Contact her on mob 0448961393 or email : [email protected]
- COMPLEX MACHINE on stand - Milling,Drilling,Cutting ,Tapping Comes with instructions, and is easy to operate. $ 1500
- PRECISION BENCH LATHE Model CT 1440G All gear head,single phase 1630mm length of bed ,12 speeds , 1 1/2 HP Motor $ 3500 neg
- 3 JAW SELF-CENTRING CHUCK $ 70 - 4 JAW SELF- CENTRING CHUCK $ 100 - HORIZONTAL & VERTICAL CUTTING BAND SAW
length 1029 mm Width 457 mm Height 591 mm Cut Off Height 851 Vertical $ 200
- High quality material-backed sandpaper is available for purchase from the club for $4 per 1m length. Also available is Caltex sealer for the end of freshly cut timber. $5 per litre.
Photos from the clubhouse
Superglue!

Ipswich Woodcrafts Club Newsletter: January 2016 12
Useful Templates, Jigs, and Charts Valentine’s Day, Chinese New Year, and Graph Paper
Valentine’s Day (14th Feb) and Chinese New Year (8th Feb) are approaching so you will find various heart and Year of the Monkey inspiration and etc throughout the newsletter. Find our newsletter templates online at http://tinyurl.com/iwcc-templates
Graph Paper online. Graph paper’s very useful for planning. There are a number of sites online where you can create and print all sorts of graph paper. Here’s a link to one that has fewer options but a nice, easy interface. http://www.printfreegraphpaper.com/
Custom Heart. Here’s an easy way to draw a heart to size. Note that Patrick says the best way to scroll saw a heart shape is freehand. I challenge the wood turners to make a heart!
1. You will need an object with a straight edge and a circular cross-section object e.g.
coin, cup, etc that has a diameter at least half your desired width (see first Figure, above). I think slightly bigger is better.
2. Draw a rectangle that is the width and height of your desired heart. Divide this in half top to bottom.
3. Working on the left half, line up your object with the top and with the left-hand side of your rectangle. Draw around.
4. Now line up your straight edge from the point of the heart, and just passing the left of the circle (technically speaking, at a tangent to the circle)
5. Make a mirror image of these lines and draw around the heart.
More heart inspiration. A scroll saw puzzle box by new member Allan Nielsen.

Ipswich Woodcrafts Club Newsletter: January 2016 13
Inspiration The 3D heart to the left has working gear cogs! It was 3D printed from a thingiverse design. Now there’s a scroll saw challenge. Here’s a link to a video showing how it works: https://www.youtube.com/watch?v=iEiCOOGaxxM
Monkey business for the Year of the Monkey:
These snow monkeys (left) are pyrographied by Julie Blender. See more of Julie’s work at http://www.mymodernmet.com/profiles/blogs/julie-bender-pyrography
To the right we have a painting of gibbons by Jakuchu Ito (1716-1800), a prolific edo-period Japanese painter. Our front page monkey was specifically painted for the Year of the Monkey – in 1800. It is by another edo-period Japanese artist, Mori Sosen, reknowned for his paintings of monkeys and other animals. These japanese ink images would make great pyrography designs.
Here’s an interesting idea for turners – not new, but new to me: There are tools for coring a big timber blank so that the core remains useful rather than getting turned into (that’s a pun) a pile of sawdust. So you can make matching nested bowls, or just reduce waste. Lots of different systems available. An example of the results is to the left.
Wood turners like their videos – understandably – so please send me any YouTube links etc. if you find them. This one’s from Neal, and demonstrates making the capsule box pictured at right.
http://blog.woodturnerscatalog.com/2016/01/turning-a-capsule-box/
The wood turner in the video appeared to be finishing his turning with a lump of honeycombed beeswax. Since I got one of those out of a batch of honey recently, I’ll definitely be trying it out.

Ipswich Woodcrafts Club Newsletter: January 2016 14
%!PS-Adobe-2.0 EPSF-2.0 %%BoundingBox: 0 0 76 76 % half-inch blue circle with spokes /inch {72 mul} def /radius 0.5 inch def radius 2 add dup translate 0 0 radius 0 360 arc 0.2 0.5 0.8 setrgbcolor 4 setlinewidth stroke 4{radius neg 0 moveto radius 0 lineto 60 rotate}repeat 0.5 setgray 1 setlinewidth stroke showpage
Vector and bit-mapped Graphics One of the big divisions in digital graphics is between vector graphics and bit-mapped graphics.
Bit-mapped graphics are found in files such as jpeg (jpg), png, bmp, tiff, gif. The way bit-maps work is to define a rectangular grid and then to specify the colour and sometimes also the transparency of every square in the grid. This is great for graphics such as photos, but zooming in to a bitmap will always eventually show up a grid of colours, and reducing the size usually ends up making a blurry image. Bitmaps can also use up a lot of digital storage space, so most bitmapped files are stored using methods to abbreviate or compress the information.
Vector graphics may be found in files such as pdf, eps, and svg. Vector graphics contain instructions on how to draw and fill shapes (called paths). Vectors are great for templates, line art, and technical drawings, graphs, etc. because they are precise, have clear lines that remain so on scaling (both bigger and smaller), and they don’t take much storage space. However it is difficult to describe things such as photos using vector graphics, so most of these vector-graphics files can store bitmaps as well as vector info.
Below is a comparison of the same image in eps, jpg, and png formats, beside a 5 times enlarged section. At original size they look almost the same. The enlarged section shows the difference in quality. A pdf version would have the same quality as eps, however eps files are usually the smaller: this one is a tiny 295 bytes. Compare with the jpg file at 5000 bytes!
EPS is one of my favourite image formats because you can write them yourself with a text editor. If you like that kind of thing! Here are the contents of the EPS file used to draw our spoked circle:
EPS JPG PNGEPS enlarged JPG enlarged PNG enlarged
Q: Why don’t wood
turners clean up after
themselves?
A: They’re too lathe-y.

Ipswich Woodcrafts Club Newsletter: January 2016 15
Editorial Beth Addison-Smith
Hello everybody! First newsletter for me. Microsoft Word is truly diabolical at times. Please accept my apologies in advance for all the mistakes, omissions, and random selection of photos. I am really beginning to appreciate the amount of effort that Carmen put in to previous newsletters, on top of running her own business, …Carmen, you are awesome. Dorothy has written a short piece about that, which I will include below. Thanks Dorothy!
Content. Hmmm. Carmen warned me that the difficulty would be in getting contributions. So, if I don’t get contributions I will fill the newsletter with stuff that interests me. Be warned! Luckily for everyone, Pete Neumann quietly produced a perfect newsletter feature article complete with pictures. Getting that was like winning the lotto. Pete, you are amazing!
Being relatively new to woodcraft, I cannot pass on any expertise from myself, so I am relying on others to provide material for articles. I’ve found people at this club to be very generous with their expertise and time, and with a wealth of useful information. So now, from time to time, I might ask if those things could be written down. Brian Weatherburn was my first victim in this, and he has come up trumps with an article about finishing carvings. Thank you Brian! Those carvers are certainly a dedicated bunch. I realise that there are many different sanding techniques and would love to hear other wood crafter’s preferred methods.
Geoff has suggested a section about timbers, to tie in with timbers that the club has available. Also he provided the information for our first feature timber (yay Geoff!) – Crow’s Ash. If you’d like to try some of this lovely timber, you’d best be quick.
Neal has kindly forwarded to me the Cubby House Woodies newsletter from which we are permitted to take articles…so I have.
Thanks you to everyone else who contributed. Next newsletter will have an article about finishes – feel free to tell me what you like to use.
Also, I hope you have started on your article for the next issue – yes, YOU!
Thank you Carmen
By Dorothy Weatherburn
I would like to take this opportunity to welcome Beth Addison-Smith who has taken over the club newsletter from Carmen Holloway who did a fantastic job.
As a past editor and having done the newsletter for a few years, I do understand how time consuming it is with many hours sourcing information and articles. Carmen during the time as newsletter editor also ran a successful business of her own, so well done Carmen, we always enjoyed your newsletter with lots of lovely information and photos.
I know Beth will be on our case if we do not help her with articles for the newsletter, the newsletter is only as good as if the members contribute. Don't think you have nothing to say, am sure there are lots of the members who have some amazing tips for everyone, so try and help Beth make this a success.
Once again, good luck Beth and well done and thanks Carmen.
Ipswich Woodcrafts Club Newsletter: January 2016 16
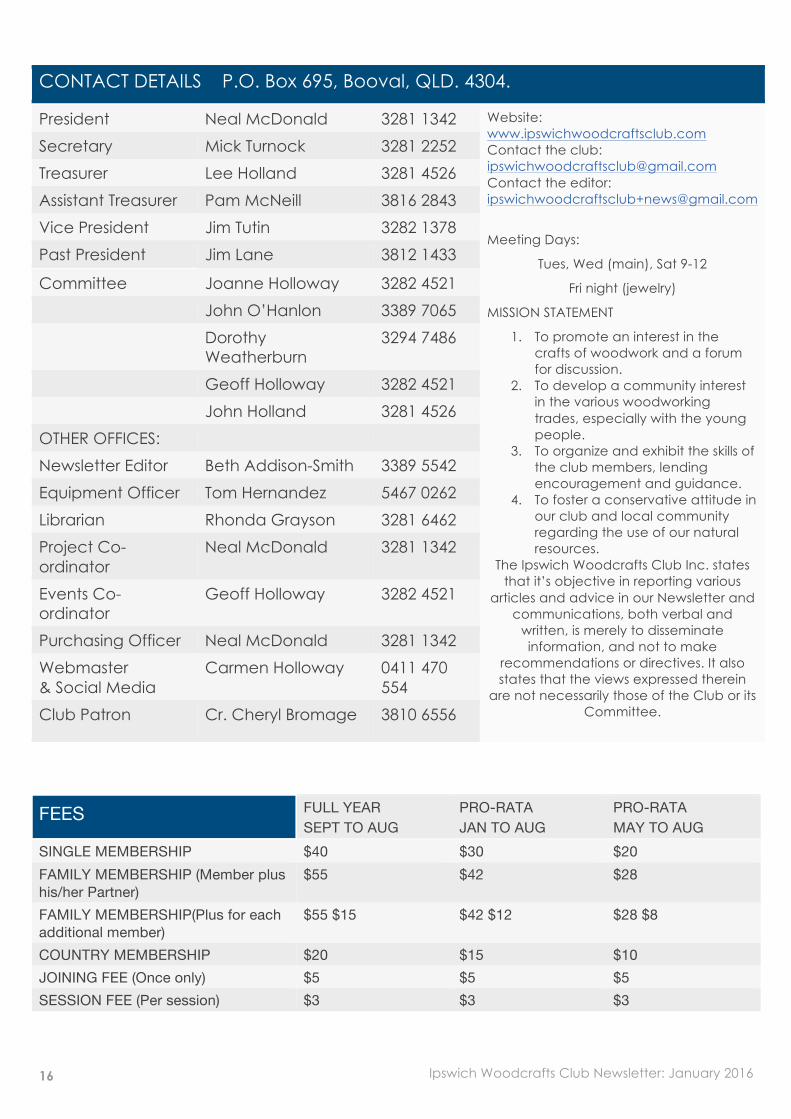
FEES FULL YEAR SEPT TO AUG
PRO-RATA JAN TO AUG
PRO-RATA MAY TO AUG
SINGLE MEMBERSHIP $40 $30 $20 FAMILY MEMBERSHIP (Member plus his/her Partner)
$55 $42 $28
FAMILY MEMBERSHIP (Plus for each additional member)
$55 $15 $42 $12 $28 $8
COUNTRY MEMBERSHIP $20 $15 $10 JOINING FEE (Once only) $5 $5 $5 SESSION FEE (Per session) $3 $3 $3
CONTACT DETAILS P.O. Box 695, Booval, QLD. 4304.
President Neal McDonald 3281 1342 Website: www.ipswichwoodcraftsclub.com Contact the club: [email protected] Contact the editor: [email protected]
Meeting Days:
Tues, Wed (main), Sat 9-12
Fri night (jewelry)
MISSION STATEMENT
1. To promote an interest in the crafts of woodwork and a forum for discussion.
2. To develop a community interest in the various woodworking trades, especially with the young people.
3. To organize and exhibit the skills of the club members, lending encouragement and guidance.
4. To foster a conservative attitude in our club and local community regarding the use of our natural resources.
The Ipswich Woodcrafts Club Inc. states that it’s objective in reporting various
articles and advice in our Newsletter and communications, both verbal and
written, is merely to disseminate information, and not to make
recommendations or directives. It also states that the views expressed therein
are not necessarily those of the Club or its Committee.
Secretary Mick Turnock 3281 2252
Treasurer Lee Holland 3281 4526
Assistant Treasurer Pam McNeill 3816 2843
Vice President Jim Tutin 3282 1378
Past President Jim Lane 3812 1433
Committee Joanne Holloway 3282 4521
John O’Hanlon 3389 7065
Dorothy Weatherburn
3294 7486
Geoff Holloway 3282 4521
John Holland 3281 4526
OTHER OFFICES:
Newsletter Editor Beth Addison-Smith 3389 5542
Equipment Officer Tom Hernandez 5467 0262
Librarian Rhonda Grayson 3281 6462
Project Co-ordinator
Neal McDonald 3281 1342
Events Co-ordinator
Geoff Holloway 3282 4521
Purchasing Officer Neal McDonald 3281 1342
Webmaster & Social Media
Carmen Holloway 0411 470 554
Club Patron Cr. Cheryl Bromage 3810 6556