jaggaer training manual - campus services
TRANSCRIPT

1
Jaggaer Training Manual Last Updated: 11/26/2021 4:40:00 PM
Table of Contents Overview of Jaggaer ................................................................................................................................................ 3
Access .................................................................................................................................................................... 3
Navigation .............................................................................................................................................................. 3
Quick Reference Guides ...................................................................................................................................... 5
Shopping Home Page ...................................................................................................................................... 6
Searching for Carts, Orders and Documents ............................................................................................... 7
Roles ................................................................................................................................................................. 10
Shopping .............................................................................................................................................................. 11
Catalog Shopping ............................................................................................................................................... 11
Hosted Catalog ............................................................................................................................................... 11
Punch-out Catalogs ........................................................................................................................................ 14
Non-Catalog Items .............................................................................................................................................. 17
Assigning a Cart ...................................................................................................................................................... 24
Creating a Requisition ............................................................................................................................................ 26
Assigning a Substitute Requestor .................................................................................................................... 40
Approving a Requisition ......................................................................................................................................... 42
Assigning a Substitute Approver .................................................................................................................. 45
Purchase Order Change Order ............................................................................................................................ 47
Closing a Purchase Order ..................................................................................................................................... 53
Receiving a Good & Services ............................................................................................................................... 55
Quantity Receipt.................................................................................................................................................. 56
Cost Receipt ........................................................................................................................................................ 58
Return Receipt .................................................................................................................................................... 59
Payment Request Form ......................................................................................................................................... 61
Non-PO Invoice / Matching Exception Invoice Approval .................................................................................. 65
Invoice Status (Paid, In Process, Payable?) ...................................................................................................... 68
Request New Supplier ........................................................................................................................................... 70
Sourcing Request (Bid, Request for Proposals, Request for Qualifications) ................................................ 73

2
User Default Settings ............................................................................................................................................. 81
Saved Searches ...................................................................................................................................................... 83
Alternate Procurement Requests ......................................................................................................................... 91
Contract Requests .................................................................................................................................................. 92
When to request a contract ............................................................................................................................... 92
Contracts .................................................................................................................................................................. 93
How to reference an existing contract in a non-catalog order or payment request .................................. 93
How to search for a contract ............................................................................................................................. 94
**NEW** - Order Status and Shipping Information ............................................................................................ 96

3
Overview of Jaggaer Access Jaggaer is a web-based software that can be accessed utilizing the link below. Access will be a single-sign on which uses the user name and password the individual uses to login on their computer. Website Address: www.und.edu/jaggaer
Navigation Top of the Home Page (right side) – Snapshot of the system and items that need to be processed.
The Heart icon is used to access My Bookmarks, useful if there
is a place used frequently
The Flag icon will include the number of Action Items you
have to complete
The Bell icon will include the number of Notifications you have
The Cart icon show the associated dollar value of items
in your Carts
The Quick Search bar is for locating documents by number
The silhouette contains basic user information-Here you can View your
Profile
Enter ndus account & Password Click Sign In
Use drop down arrow to narrow search

4
The Home icon brings you back to the main shopping page The Shop icon provides you
access to the shopping options and carts
The Orders icon allows you to search for documents including requisitions,
purchase orders and invoices The Contract icon allows you to view University Contracts.
The Accounts Payable icon allows you to view invoice information
The Suppliers icon allows you to search for current suppliers
The Sourcing icon allows you to view sourcing events
The Reporting icon allows you access to reports based on role.
Administer & Setup only available to Jaggaer Administrators
TIP: To See Icon Names, click the arrow at the bottom of the Page

5
Quick Reference Guides Jaggaer Quick Reference Guide
Jaggaer RMM Quick Reference Guide

6
Shopping Home Page
catalog setup.
The Shop area is where you will enter goods or services you are purchasing OR you can click on
the Supplier tiles below to search additional products
The Organization Message displays useful information for
the shoppers
The Featured Suppliers shows tiles of the suppliers that have a
catalog setup.
The Request Sourcing Event Form will be utilized when a
Bid/RFP/RFQ, Etc. are required
New Supplier Form will be utilized when you are
working with a new supplier.
The Form and Links section also provide useful tips and
links for training.
The Non-Catalog Purchase Form will be utilized if you
are not able to find your item in a catalog.
The Payment Request Form will be utilized for an invoice
on an order that was not placed through Jaggaer.
TIP: If you do not find the item you are shopping for in the Shop search bar, use the Feature Supplier’s catalog tile to punch out directly on the Supplier’s page to search for your item
The Access Request Form is where you submit request to change or remove user roles
*Note: Shopper is the default role for all of UND
7
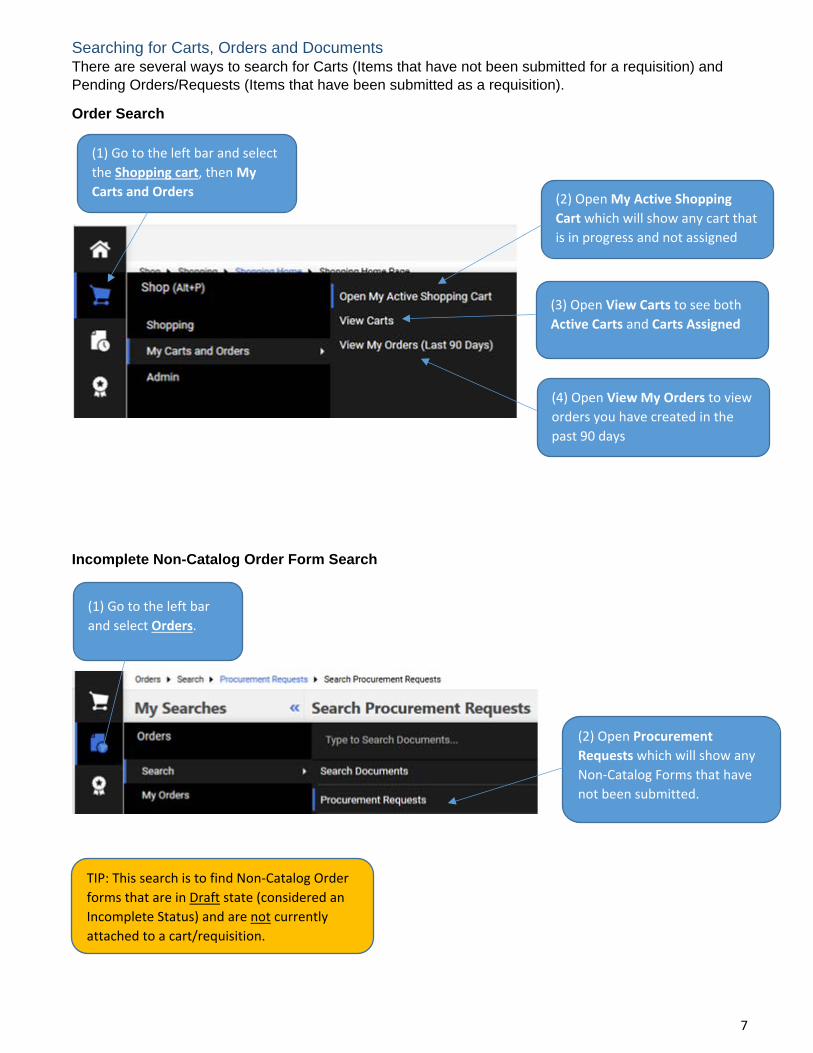
Searching for Carts, Orders and Documents There are several ways to search for Carts (Items that have not been submitted for a requisition) and Pending Orders/Requests (Items that have been submitted as a requisition).
Order Search
Incomplete Non-Catalog Order Form Search
(1) Go to the left bar and select the Shopping cart, then My Carts and Orders (2) Open My Active Shopping
Cart which will show any cart that is in progress and not assigned
(3) Open View Carts to see both Active Carts and Carts Assigned
(4) Open View My Orders to view orders you have created in the past 90 days
(1) Go to the left bar and select Orders.
(2) Open Procurement Requests which will show any Non-Catalog Forms that have not been submitted.
TIP: This search is to find Non-Catalog Order forms that are in Draft state (considered an Incomplete Status) and are not currently attached to a cart/requisition.

8
Orders Search
Search Page Preview
(1) Go to the left bar and select Orders.
(2) Go to the Search which allow you to search for Requisitions, Purchase Orders and Invoices
(1) Filters are in the left column to narrow your search
(2) Another option is available to Add Filter
9
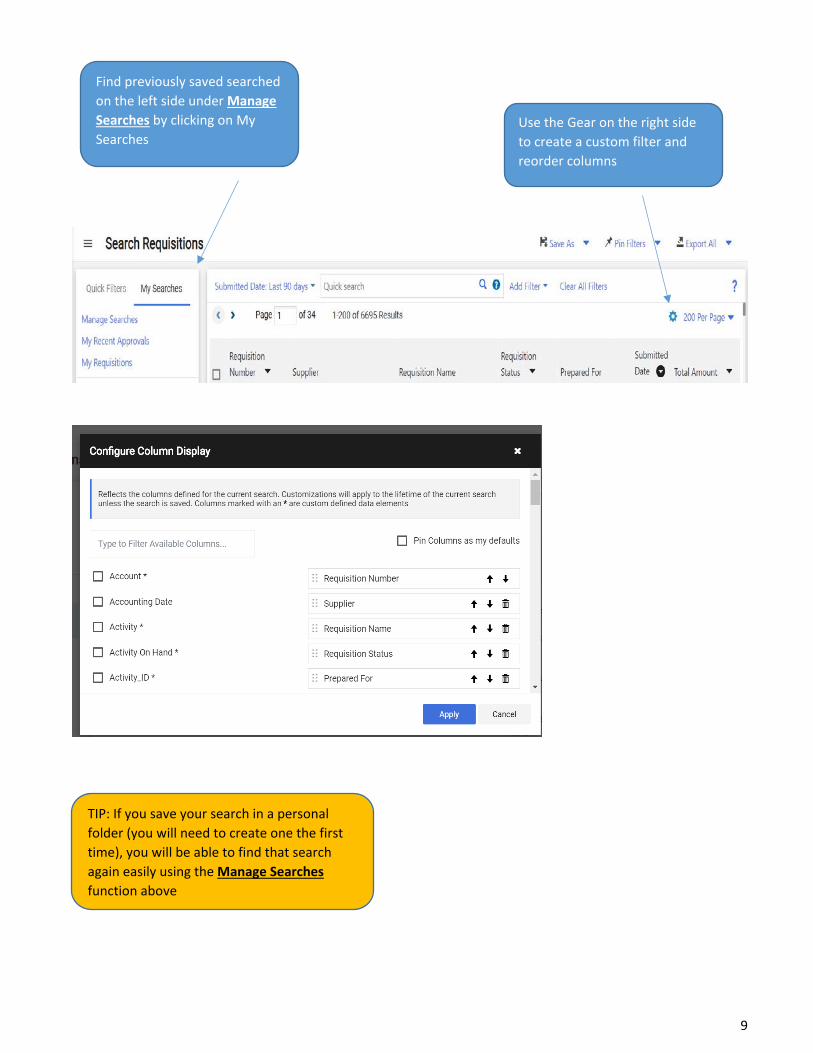
Find previously saved searched on the left side under Manage Searches by clicking on My Searches
Use the Gear on the right side to create a custom filter and reorder columns
TIP: If you save your search in a personal folder (you will need to create one the first time), you will be able to find that search again easily using the Manage Searches function above

10
Roles There are three roles within this Procure to Pay system. Each involves significant automation and role expectations intended to make university policy adherence easier for all those involved. Roles are assigned by the Jaggaer Administrators. Roles can be added or removed to a user utilizing the Access Request Form on the Jaggaer Shopping Home Page.
• Shoppers: All Jaggaer Users are Shoppers. The work involved in this role is described in the Shopping section and includes how to shop using Hosted and Punch-out Catalogs, as well as how to shop for Non-catalog goods or services.
• Requestors: These individuals will be responsible for the financial aspect of the order which includes the proper Accounting Chartfields, Ship to information, and Business Purpose.
• Approvers: There are several types of approvers. o Department Approvers: Department approval is completed on behalf of the funding department. A
department approver cannot be a Requestor. There must be two people in the order process. o Special Approvers: There have been several workflow steps created to automatically route
purchases for approval based on set criteria based on compliance with UND policies. A Special Approver can be a Requestor if needed (by request).
**Special Approvers will evolve as needs of the organization change and necessary items are identified.
Capital Expense Approver • Stops for Accounts between 690000 and 699999
Chemical Approver – CAS Review • Stops for products that are hazardous, radioactive, toxins, as well as certain
commodity codes that are identified as chemicals, explosives, drugs. Export Controls Approver
• **Stops for live plants, animals, chemicals, fuels, machinery, electronics, testing equipment, law enforcement, drug **list will evolve as export controls office has a better understanding of orders.
Facilities Approver • Furniture, facility services, land, HVAC, Fire alarm systems, waste services
Food and Travel Approver • Individuals, Food and Travel commodities or account codes.
Grants Approver • Any grant project over $5000 • Identified account codes based on grants office specifications, regardless of dollar
value IT Director Approver
• **IT Hardware and software commodities for each IT directory. • UND monitors’ computer end points and peripherals and software.
**Dependent on each IT director by college. IT Approver
• CIO approval for software >$5K PI Approver
• All projects require PI approval. Procurement Approval
• Orders >$10K • Alternate Procurement Requests • Change requests
Secondary Department Approvers • **Dependent on each department specifications
Supplier Administration Approver • Any orders when the supplier is “Request New Supplier”.

11
Shopping UND has created a number of catalogs which utilize UND agreed upon pricing. Purchases from catalogs will be the best method to make a purchase.
Catalog Shopping Hosted Catalog Hosted Catalogs provide access to negotiated prices UND maintains with our preferred suppliers. Items in a hosted catalog will show in the shop section or you can access by using the catalog tile.
There are two options to search a Hosted Catalog – see below:
(1) Once logged in, from the Shopping Home Page, go to the Shopping Bar in the Shop section and type in the item to purchase
(2) Click on the Supplier Tile and enter what you are looking for in the search bar and click search
TIP: Clicking on a Punch-our supplier will redirect to their website. Refer to Punch-out Catalogs section for directions.

12
(3) Refine results using multiple filtering options or enter a keyword
(4) Sort the items based on the set criteria under Sort by
(6) Select Add to Cart
(5) Identify the item you wish to purchase and enter the quantity
(7) Select the Cart icon at the top and select View Cart

13
(9) Select Assign Cart
TIP: Requestors who shop can select Proceed to Checkout
(10) Select the appropriate Assignee
(11) Enter a note to assist the requestor if necessary.
(12) Click Assign TIP: If you would like to save the assignee as a default, check Add to Profile

14
Punch-out Catalogs Punch-out Catalogs are maintained on the Supplier’s website. Click on the tile on for the supplier on the dashboard or an item in a shopping list. This will redirect you to the Supplier’s website. The punch-out catalog will provide negotiated prices which are maintained by our suppliers.
Each supplier’s punch-out catalog is slightly different so below is an example of a catalog.
(1) Catalogs can be found under Featured Suppliers
(2) You can enter an item in the shopping Area as well
TIP: This will take you out of Jaggaer temporarily so you can shop on the supplier’s website.

15
(3) When you punch out to a supplier site, enter the search criteria in the appropriate location, such as the suppliers search bar
(4) Add your item to the cart and click the check out or cart button depending on which site you are utilizing
(5) Submit your cart for approval within the Supplier catalog
TIP: The checkout process is different for each supplier so you may need to click through a couple different screens.
TIP: Often Punch out Suppliers require changes in their punch out site. If an item needs to be changed once it is in Jaggaer, you will likely need to restart the shopping process

16
(6) The supplier will return the items to Jaggaer and place it in your Cart at the top.
17
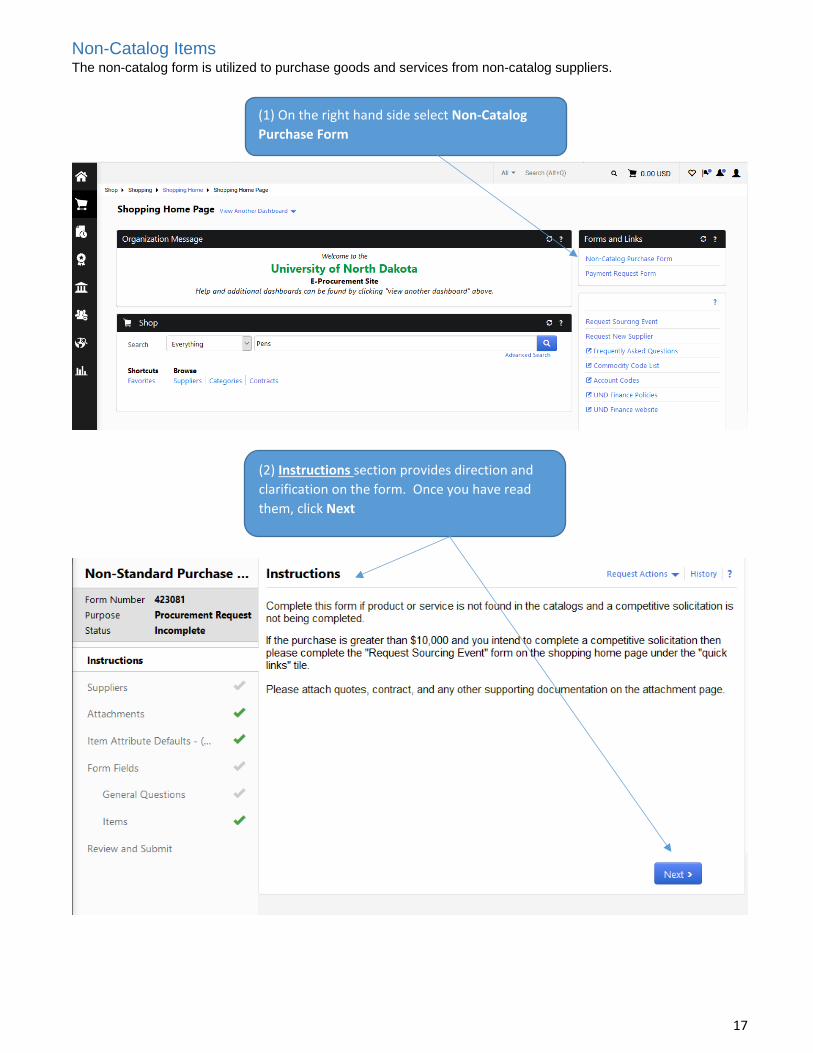
Non-Catalog Items The non-catalog form is utilized to purchase goods and services from non-catalog suppliers.
(1) On the right hand side select Non-Catalog Purchase Form
(2) Instructions section provides direction and clarification on the form. Once you have read them, click Next

18
(3) Suppliers section provides the supplier information. Enter the Supplier name and click Search
(4) Review the results and select the appropriate vendor if applicable. Click Next
TIP: If the supplier does not display in the search, choose “Request New Supplier” as a supplier. (See Supplier Management section of this manual) This will route the order to the Supplier Admin team to review and setup.

19
(5) Attachments section: Attach quotes and supporting documents for this purchase. Click Add Attachments
(6) Select Upload
(7) Input the Title of the document and click Browse or Choose File to find your file location. Then Select Save Changes.
20
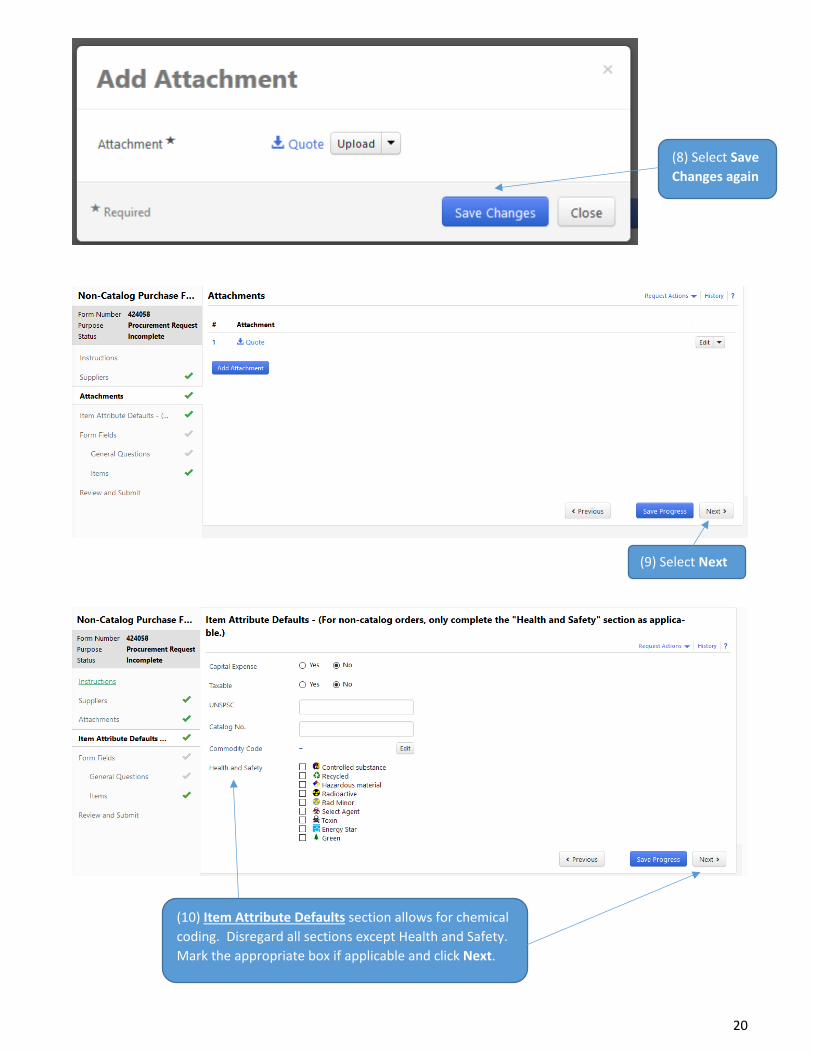
(8) Select Save Changes again
(9) Select Next
(10) Item Attribute Defaults section allows for chemical coding. Disregard all sections except Health and Safety. Mark the appropriate box if applicable and click Next.

21
(11) Form Fields section is a landing page for future questions. Click Next.
(12) General Questions section shows questions which will drive additional tabs to display when necessary. First question asks which Procurement Action was completed. Select the appropriate option.
(13) New Supplier: Select Yes if the supplier did not display in step 4. Then enter the Supplier Name & Email/Phone Information
(14) IT Purchase: If the purchase is for hardware, software or apps, select Yes.
(16) Select Next
TIP: Click the Question Mark by a heading to get additional information about the question.
TIP: These boxes only show when creating a new supplier

22
(20) Items: Enter the item that you are purchasing. - Unit Price & Quantity - Description & Catalog # Be specific as this is what is sent to the supplier to fulfill the order.
(21) Commodity Code: Click the Edit button by Commodity Code, Enter the appropriate description and select the commodity. This is important as it drives the workflow routing.
(22) When complete click Next.
23
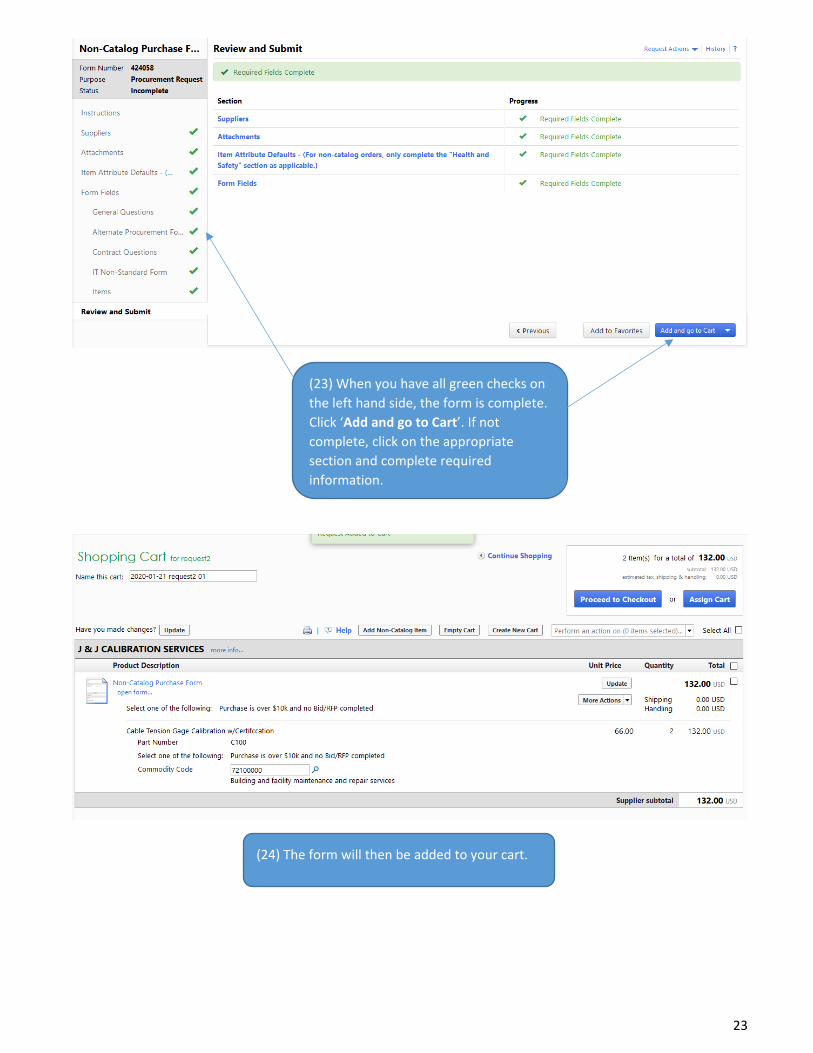
(23) When you have all green checks on the left hand side, the form is complete. Click ‘Add and go to Cart’. If not complete, click on the appropriate section and complete required information.
(24) The form will then be added to your cart.

24
Assigning a Cart
(1) Once you have all the items you are purchasing in your cart and if you do not have the requestor role, you will need to assign the cart to a requestor to complete the requisition. Click ‘Assign Cart’
(2) If you have not set up a default assignee, select ‘Search for an assignee’, enter the requestor’s name and select Search. Then Click Select for the correct requestor.

25
(3) Click ‘Assign’
TIP: If you would like to save the assignee as a default, check Add to Profile.

26
Creating a Requisition The requestor can access the assigned cart through an e-mail notification or the Jaggaer home page.
(1B) From the Home Page, Click the Flag icon and select Action Items, Carts Assigned to Me
(1A) The requestor will receive an email with a link to the shopping cart

27
(2) Choose the appropriate cart
(3) Click Proceed to Checkout
(4) The items at the top of the page show the minimum items that need to be corrected before the order can be placed.
(5) General Section: Click on ‘Required field’ by Business Process

28
(6) General Section: Business Purpose – Enter a descriptive business purpose that can stand alone if an auditor was to review. IT Non-Standard Tracking Number – if applicable, enter the Non-Standard IT tracking number for the form that was submitted to UIT for this purchase. Alternate Procurement Request Number - if applicable, enter the alternate procurement request form number. Work Order Number – If you have a need to track a word order, add that information. Most departments will not populate this field Click Save

29
(7) Shipping Section: Click on Shipping on the left hand side If the user had a default shipping address under their profile, this shipping would be populated. Make sure the information is accurate. If not, click Edit.
(8) Shipping Section: Click on select from org address Enter the department or stop number you are looking for and click Search Select the appropriate stop address

30
(9) Click Save
TIP: If you would like to save the address for future requisitions, check Save this address for future use. This will allow the address to display in the dropdown.
(10) Delivery Options Section: If you would like to supply additional information for the delivery you will add it to this section. To change the section click edit. Input the appropriate information and click Save.
TIP: For Rush orders, make contact with the supplier via phone so they are looking for the order.

31
(11) Billing Section: The billing section will be handled by the payment method within PeopleSoft. DO NOT make any updates to this area.
(12) Accounting Section: The accounting section represents the chart fields that will be used for the purchase. Click on Accounting Codes on the left hand side Account Code: Click required field under Account to enter the information.
TIP: Header vs. Line level account codes Header accounting codes are entered at the top of the page. These funding strings will allocate across every po line. Line level accounting codes are entered at the specific PO line and override any header level accounting. NOTE: Do not use header level account codes with the intention for the software to apply to a specific line. For example, major equipment typically should have specified accounting at the line level.

32
(13) Account Number: If you know the appropriate account number, enter the number. If not, click Select from all values. Enter the appropriate description and click Search Click Select by the correct account number

33
(14) Department Number: If you know the appropriate Department number, enter the number. If not, click Select from all values. Enter the appropriate description and click Search
(15) Fund/Department: If you know the appropriate Fund/Department number, enter the number. If not, click recalculate /validate then Select from all values. Choose the appropriate Fund/Dept from the dropdown
TIP: You must enter a fund department combo.
34
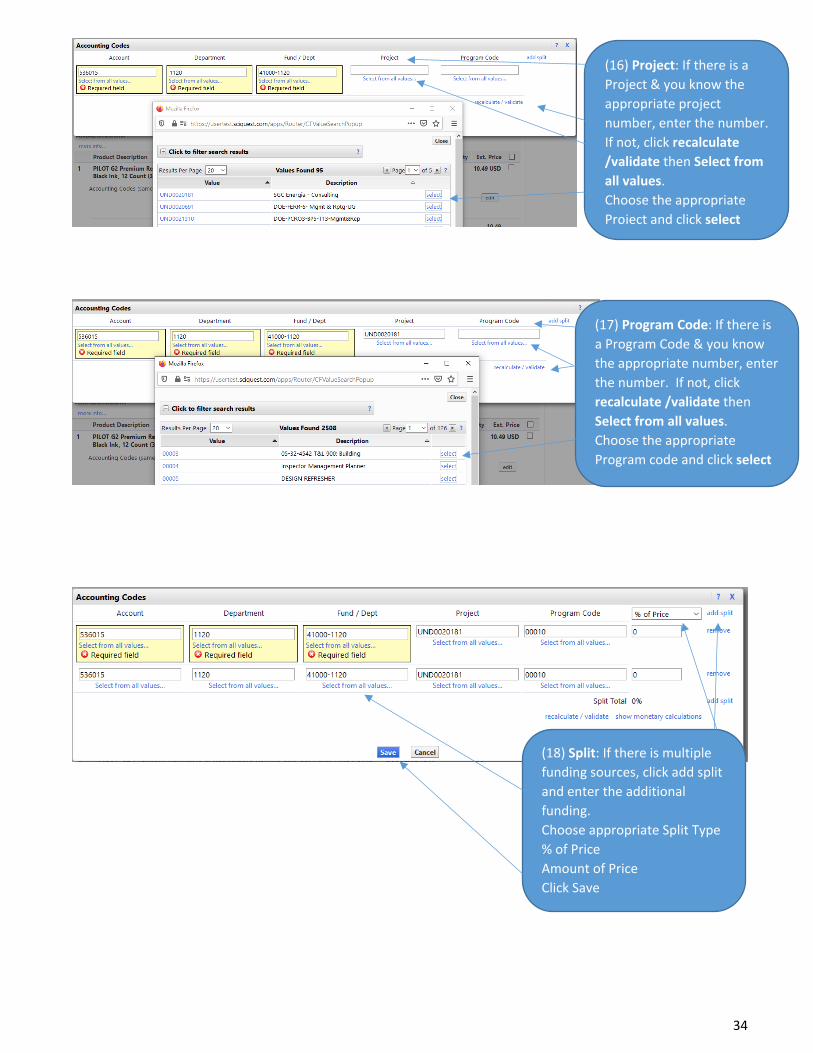
(16) Project: If there is a Project & you know the appropriate project number, enter the number. If not, click recalculate /validate then Select from all values. Choose the appropriate Project and click select
(17) Program Code: If there is a Program Code & you know the appropriate number, enter the number. If not, click recalculate /validate then Select from all values. Choose the appropriate Program code and click select
(18) Split: If there is multiple funding sources, click add split and enter the additional funding. Choose appropriate Split Type % of Price Amount of Price Click Save
35
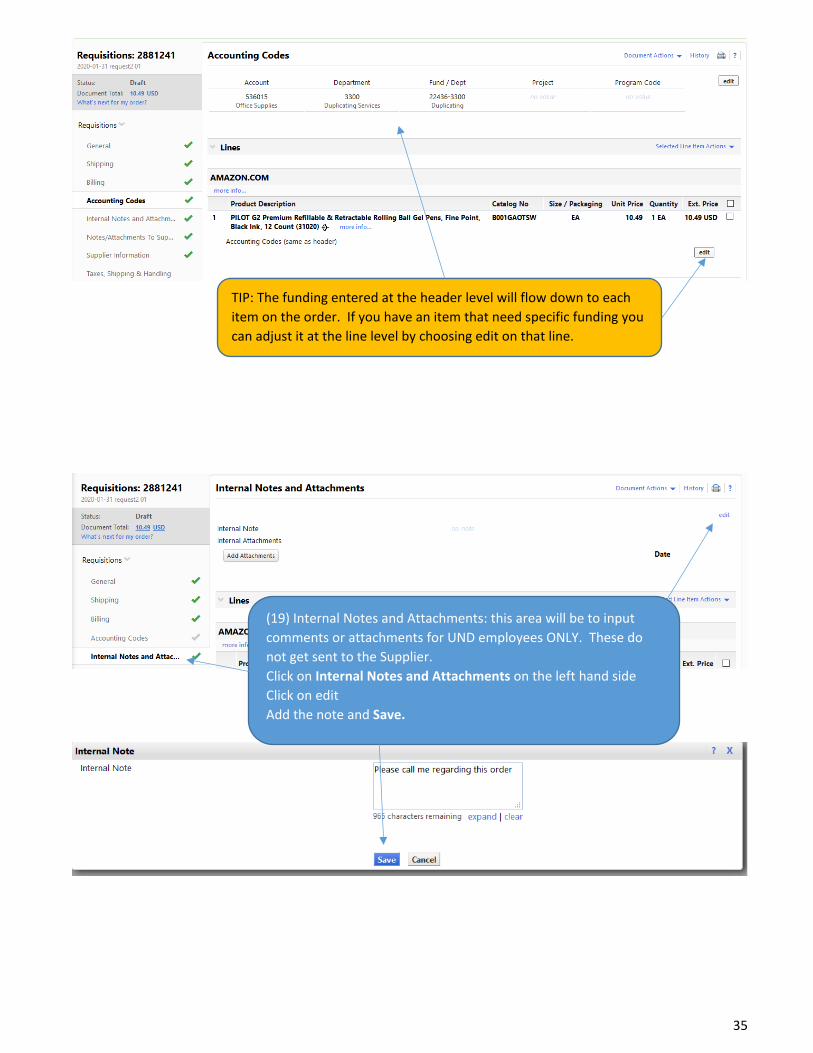
(19) Internal Notes and Attachments: this area will be to input comments or attachments for UND employees ONLY. These do not get sent to the Supplier. Click on Internal Notes and Attachments on the left hand side Click on edit Add the note and Save.
TIP: The funding entered at the header level will flow down to each item on the order. If you have an item that need specific funding you can adjust it at the line level by choosing edit on that line.

36
(20) Notes/Attachments to Suppliers: this area will be comments or attachments for the SUPPLIER. These will get sent to the Supplier. Click on Notes/Attachments to Supplier on the left hand side Click on edit Add the note and Save.
(21) Final Review: Line Section Click on Final Review on the left hand side Review the information and click edit if any updates are necessary

37
TIP: If the item you are ordering came from a catalog, do not make a change in this area. Go back to the catalog to reselect the item and start that process over.
38
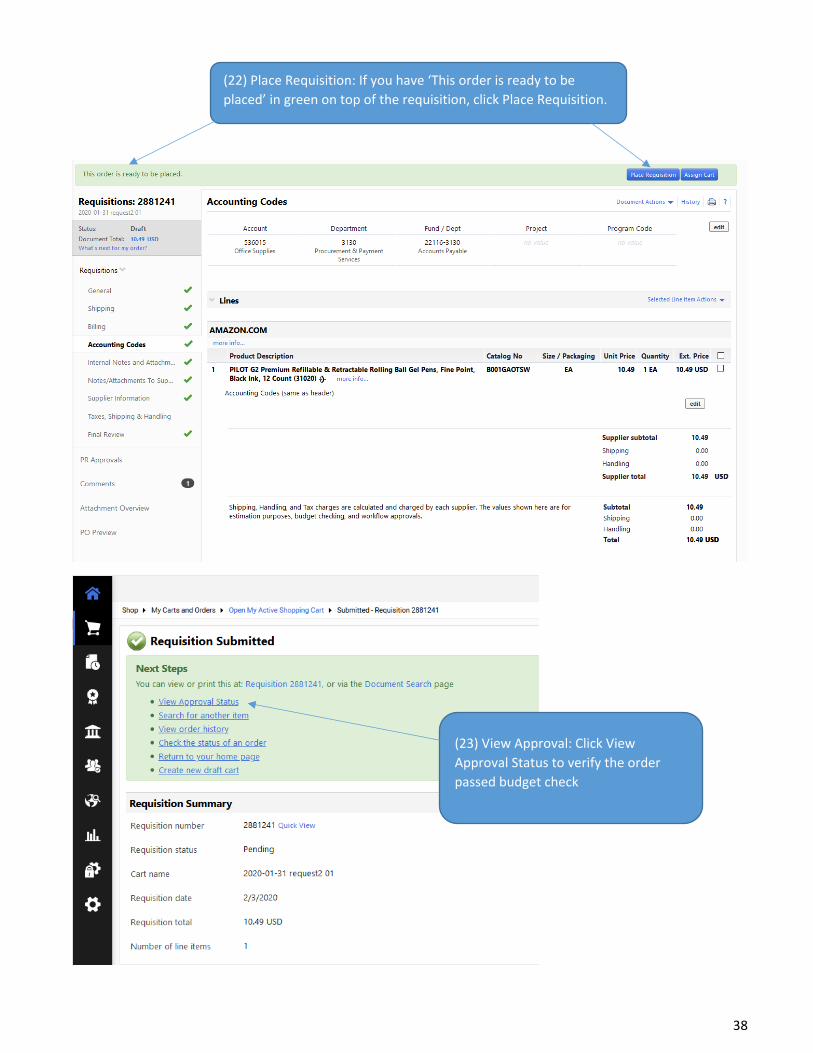
(22) Place Requisition: If you have ‘This order is ready to be placed’ in green on top of the requisition, click Place Requisition.
(23) View Approval: Click View Approval Status to verify the order passed budget check

39
(24) Budget Check review: Look at the Budget Check 1 Response and verify it shows Approved. If it does not click the history button to determine the error.
TIP: To determine who will approve the order, click View Approvers under each approval workflow step.

40
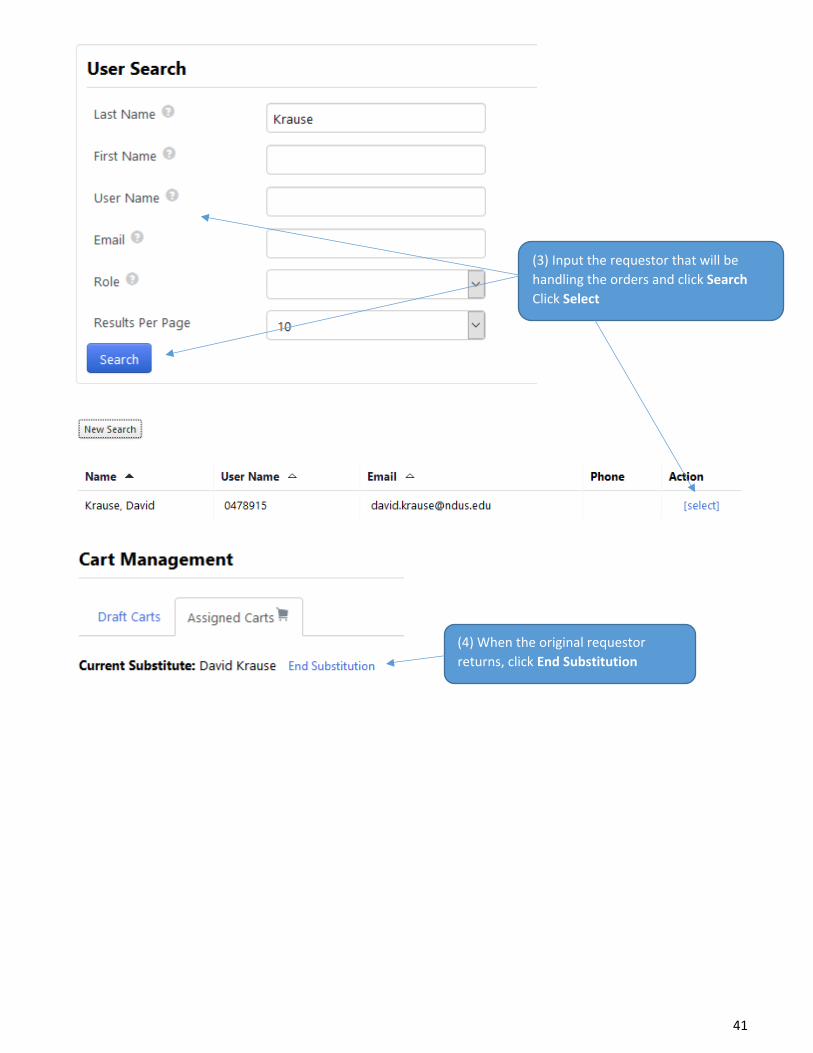
Assigning a Substitute Requestor
If a requestor will be out of the office and unable to complete this role. They have the ability to assign a substitute requestor from those individuals with the requestor role.
(1) Click on the Cart on the left hand side Select My Carts and Orders Select View Carts
(2) Click Assign Substitute
41
(3) Input the requestor that will be handling the orders and click Search Click Select
(4) When the original requestor returns, click End Substitution

42
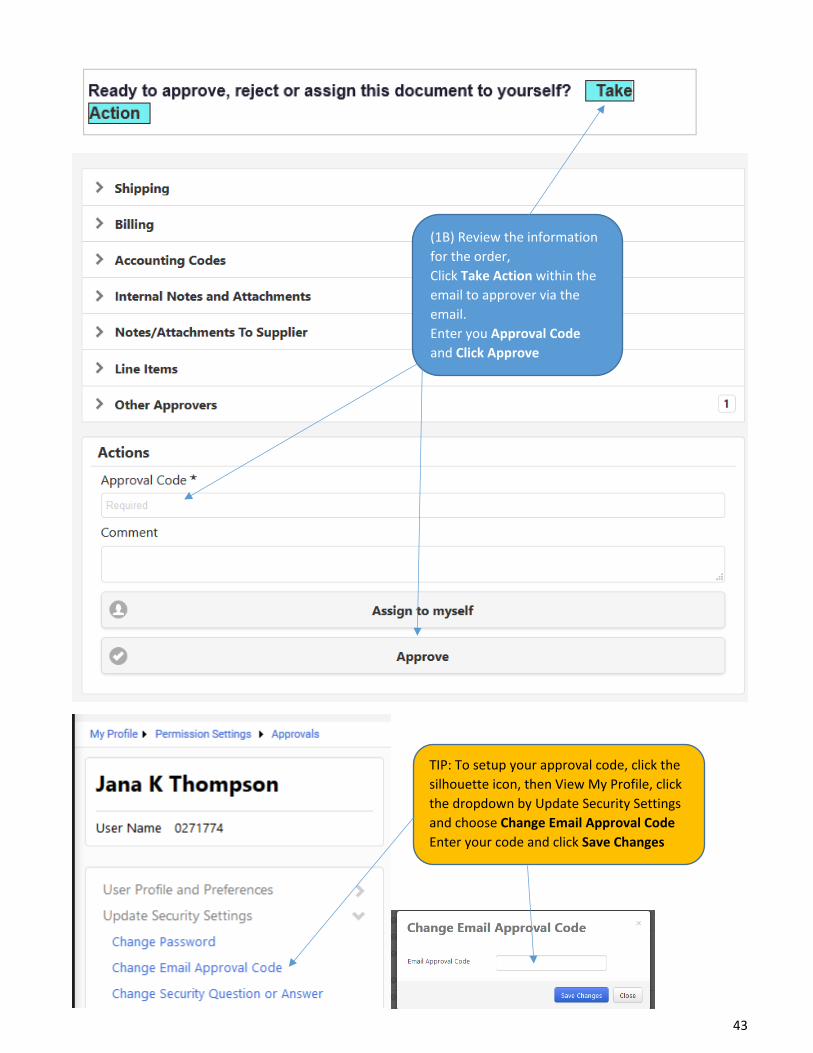
Approving a Requisition The requestor can access the assigned cart through an e-mail notification which takes you into Jaggaer, through the Jaggaer home page or can approve directly through the email with an approval code.
(1A) Click View Requisition Approvals to review the information within Jaggaer.
43
(1B) Review the information for the order, Click Take Action within the email to approver via the email. Enter you Approval Code and Click Approve
TIP: To setup your approval code, click the silhouette icon, then View My Profile, click the dropdown by Update Security Settings and choose Change Email Approval Code Enter your code and click Save Changes

44
(1C) From the Home Page, Click the flag icon and select Action Items, Requisitions under Unassigned Approvals
(2) Click on the Requisition Number to open the order for review
(3) Review the details of the order and make appropriate changes if necessary. When the order is ready to be approved, select the drop down by Document Actions and Choose ‘Approve/complete step’

45
Assigning a Substitute Approver If you will be out of the office, you can setup a substitute approver to cover in your absence. This individual will need to have the approver role and can’t be a requestor.
(1) Click orders in the left hand column Choose Approvals Choose Assign Substitute Approvers-Requisitions.
(2) Options: Click Assign Substitute to All Requisition Folders, or Click Assign on the individual departments, or click multiple boxes, then click Substitution Actions and Assign Substitution to Selected Folders

46
(3) Enter the appropriate Substitute name. If you want to add a date range check the box for include Date Rage for Substitution and enter that information then click Assign.
(4) If you have not entered a date range, you will need to go back and remove the substitution when you return. Click Remove.

47
Purchase Order Change Order
TIP: Change orders should be used for funding changes, pricing updates and reduction in quantity. However change orders can’t be used for a pricing or quantity change for catalog purchases. Best practice is to create a new Purchase Order for additional quantity or new items.
(1) Find the Purchase Order needing to be changed by utilizing the Searching for Carts, Order and Documents step.
(2) Click on Document Actions dropdown Click on Create Change Order Request

48
(3) If you need to notify ad individual of the change, select the correct person. If the individuals is not listed, click add email recipients. Enter the name and click search and Select.

49
TIP: Disregard this notification area
(4) Enter the reason for the change order. If applicable add an attachment Click Create Change Request
50
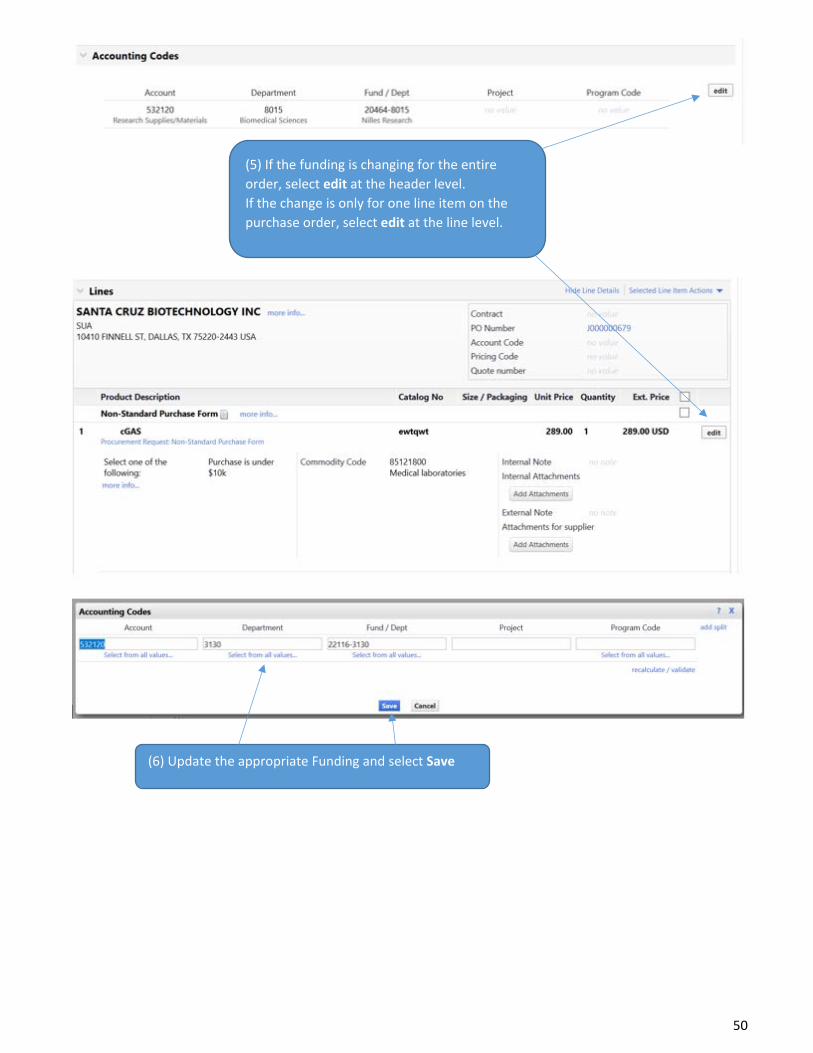
(5) If the funding is changing for the entire order, select edit at the header level. If the change is only for one line item on the purchase order, select edit at the line level.
(6) Update the appropriate Funding and select Save

51
(8) Click Submit Request on the top of the page.
(8) Click View Approval Status to see the approval workflow that the change order will go through. It mirrors the requisition workflow.
(7) Click External Communication Then check the box called “Suppliers on Change Request” to send the change order to the supplier otherwise leave unchecked.

52
(9) Check to make sure the Budget Check 1 Response status is approved. If not, check the history to determine why it failed budget check.
53
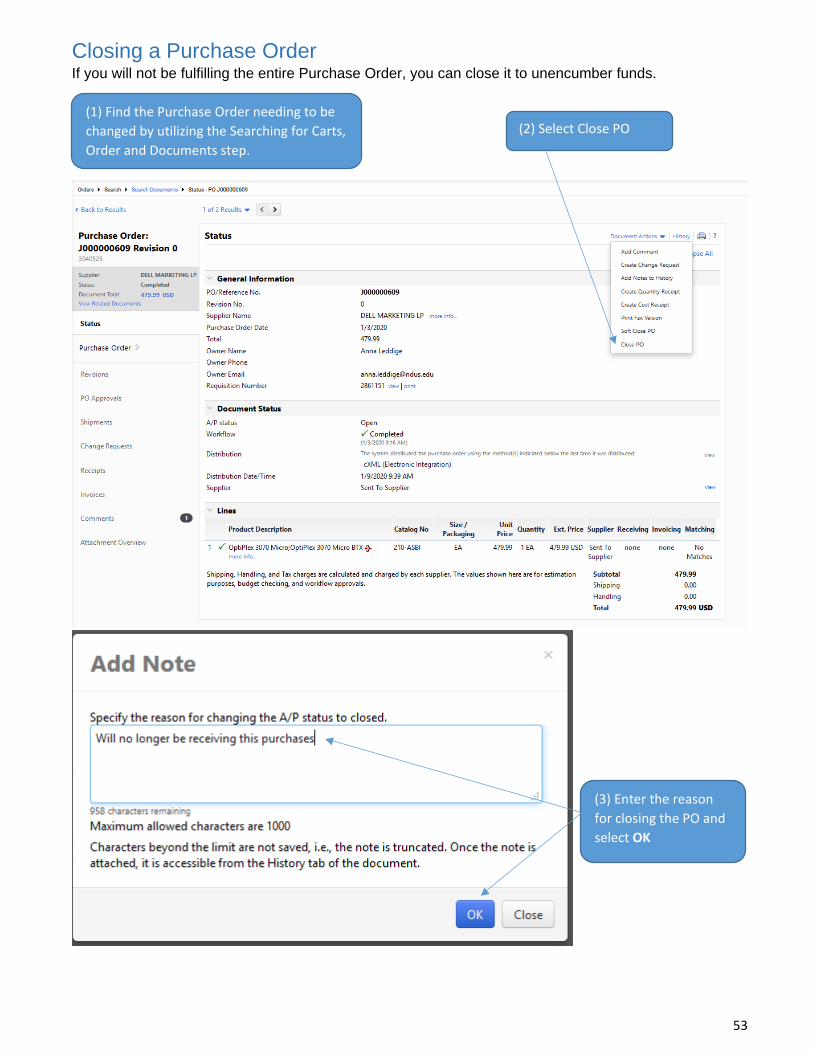
Closing a Purchase Order If you will not be fulfilling the entire Purchase Order, you can close it to unencumber funds.
(1) Find the Purchase Order needing to be changed by utilizing the Searching for Carts, Order and Documents step.
(2) Select Close PO
(3) Enter the reason for closing the PO and select OK

54
(4) Note that the A/P Status has been updated to Closed
55
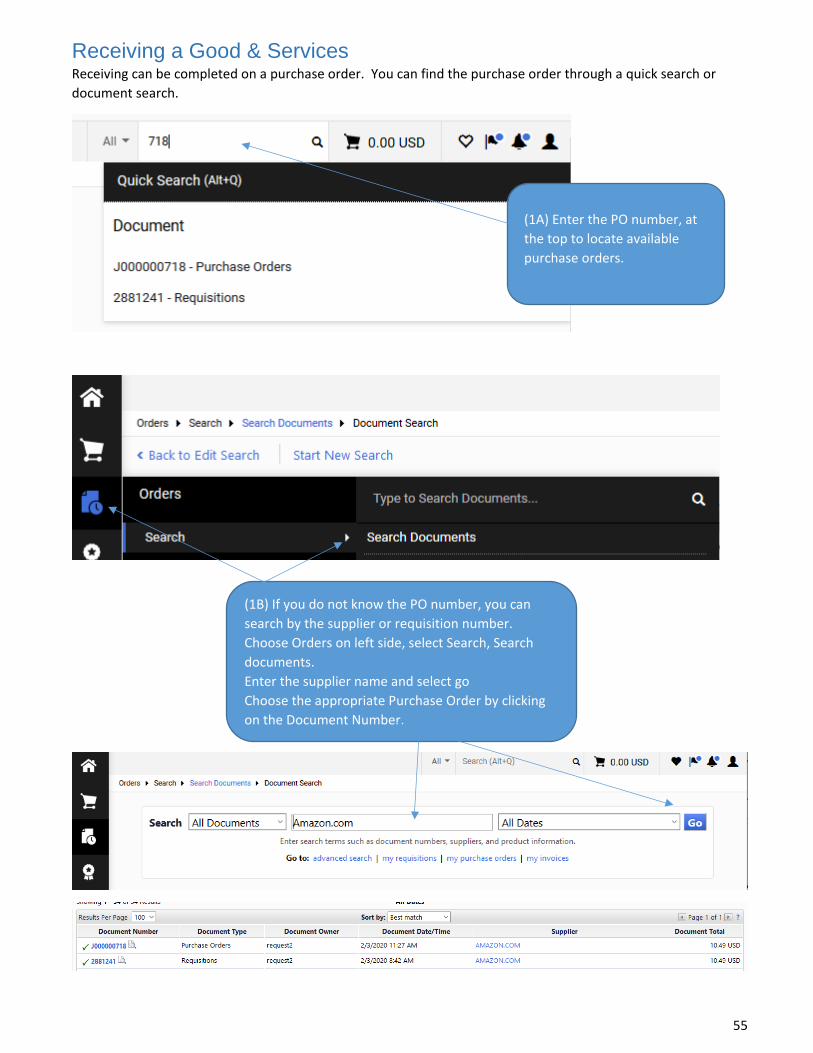
Receiving a Good & Services Receiving can be completed on a purchase order. You can find the purchase order through a quick search or document search.
(1A) Enter the PO number, at the top to locate available purchase orders.
(1B) If you do not know the PO number, you can search by the supplier or requisition number. Choose Orders on left side, select Search, Search documents. Enter the supplier name and select go Choose the appropriate Purchase Order by clicking on the Document Number.

56
Quantity Receipt Quantity receipts are used to receipt commodities
(2) Go to the Receipt tab to determine if there has been a previous receipt. Then click on Document Actions and Create Quantity Receipt

57
(3) Enter the Packing Slip Number and enter appropriate quantity received
(4) Review and click Complete This will create a receipt number

58
Cost Receipt Cost receipts are used to receipt services
(1) Go to the Receipt tab to determine if there has been a previous receipt. Then click on Document Actions and Create Cost Receipt
(2) Enter the dollar amount to be receipted and click Complete

59
Return Receipt
(3) This will create a receipt number
(1) Go to the Receipt tab to determine if there has been a previous receipt. Then click on Document Actions and Create Quantity Receipt

60
(2) Click Show Receipt Details
(4) Enter the Quantity to be returned Select the Dropdown under Line Status and update to Returned Update the reason for the return by clicking the dropdown by Returned For If you have received a Return Material Authorization (RMA) No form the supplier enter that information.
(3) Click Attach/Link to attach any pertinent items Add Notes if appropriate.
(5) Click Complete
(6) This will create a receipt number

61
Payment Request Form
(1) On the Home Page, select Payment Request
TIP: Payment Request Form should be utilized when you already received your commodity or service, have an invoice that needs to be paid and a PO was not previously issued through the Jaggaer requisition process.
(2) Input the supplier or select supplier search Enter the supplier name and click the magnifying glass. Click Select by the correct Supplier.

62
(3) Complete the Invoice Information section
(4) Add a Copy of the suppliers invoice Click add Attachments
(5) Click Select files… Find the file you would like to attach and click Save Changes
(6) Enter the items that were purchased. Click recalculate list total
63
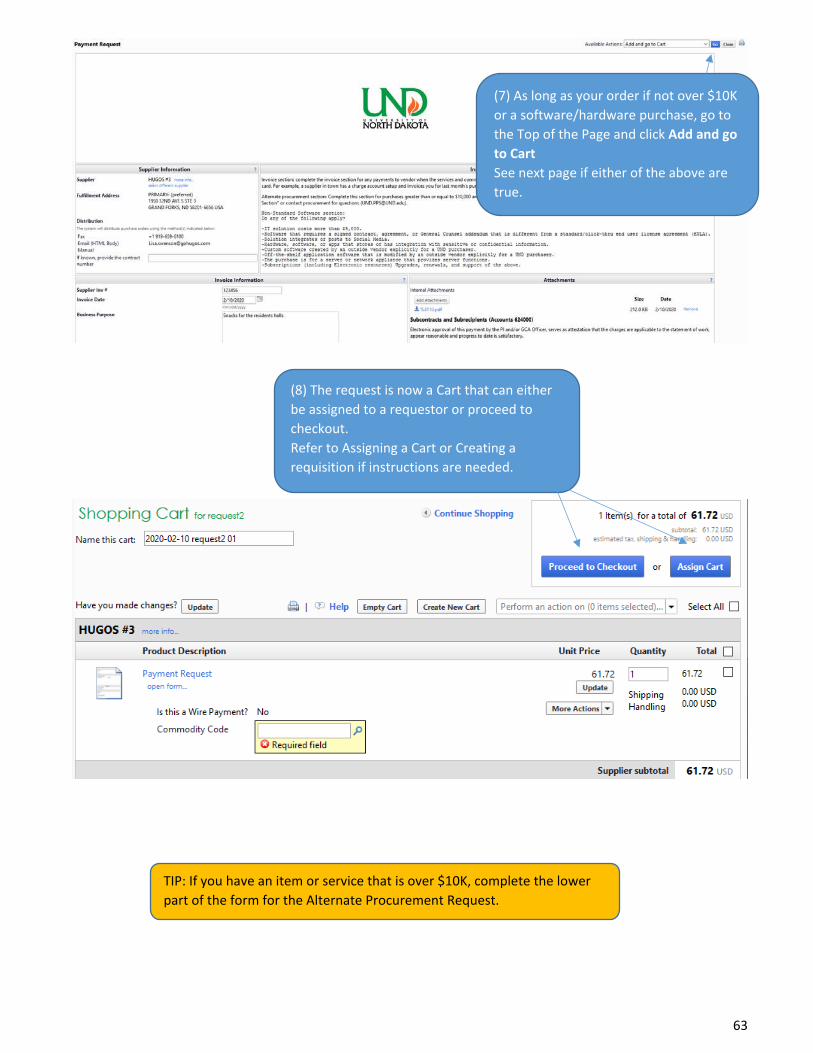
(7) As long as your order if not over $10K or a software/hardware purchase, go to the Top of the Page and click Add and go to Cart See next page if either of the above are true.
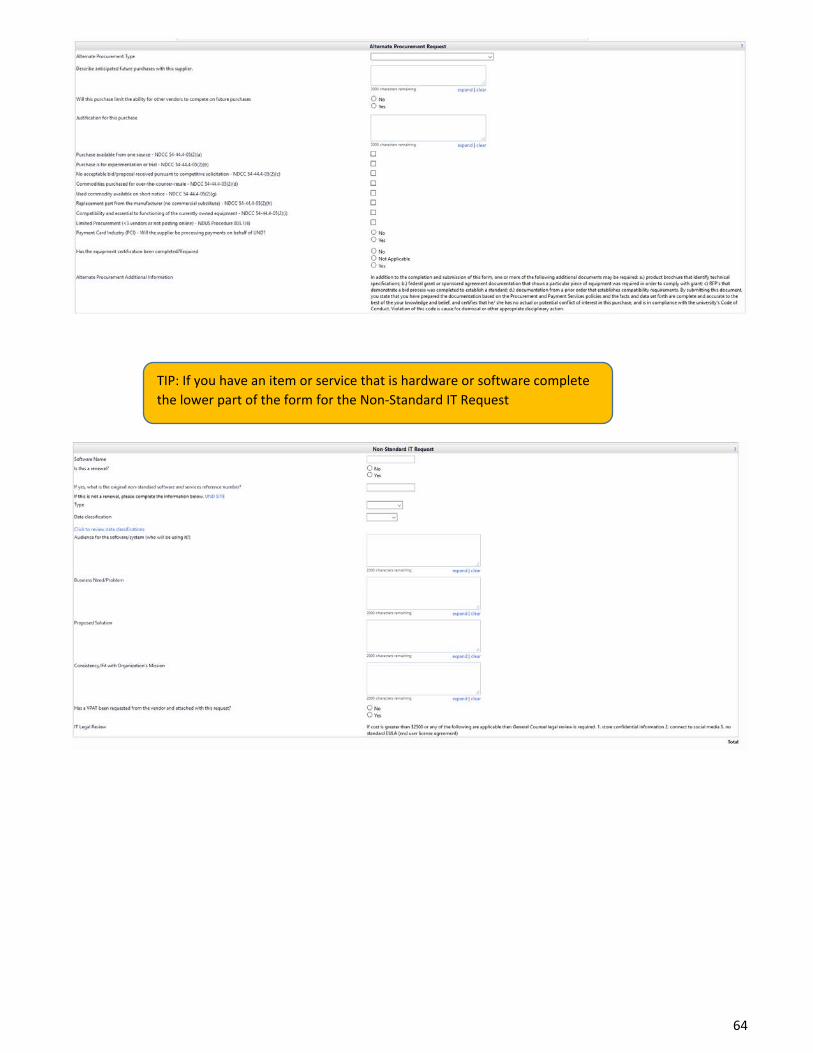
TIP: If you have an item or service that is over $10K, complete the lower part of the form for the Alternate Procurement Request.
(8) The request is now a Cart that can either be assigned to a requestor or proceed to checkout. Refer to Assigning a Cart or Creating a requisition if instructions are needed.
64
TIP: If you have an item or service that is hardware or software complete the lower part of the form for the Non-Standard IT Request
65
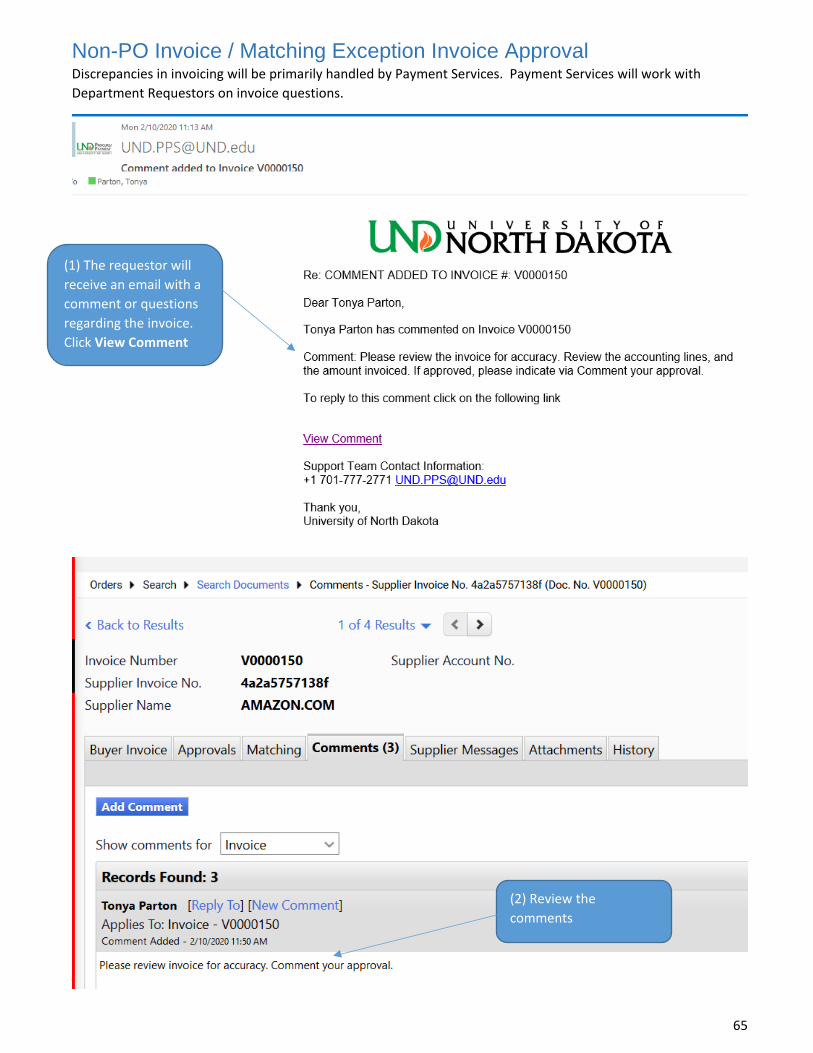
Non-PO Invoice / Matching Exception Invoice Approval Discrepancies in invoicing will be primarily handled by Payment Services. Payment Services will work with Department Requestors on invoice questions.
(1) The requestor will receive an email with a comment or questions regarding the invoice. Click View Comment
(2) Review the comments

66
(3) Click Buyer Invoice tab to review the items on the invoice Once you have reviewed Click Go by Add Comment
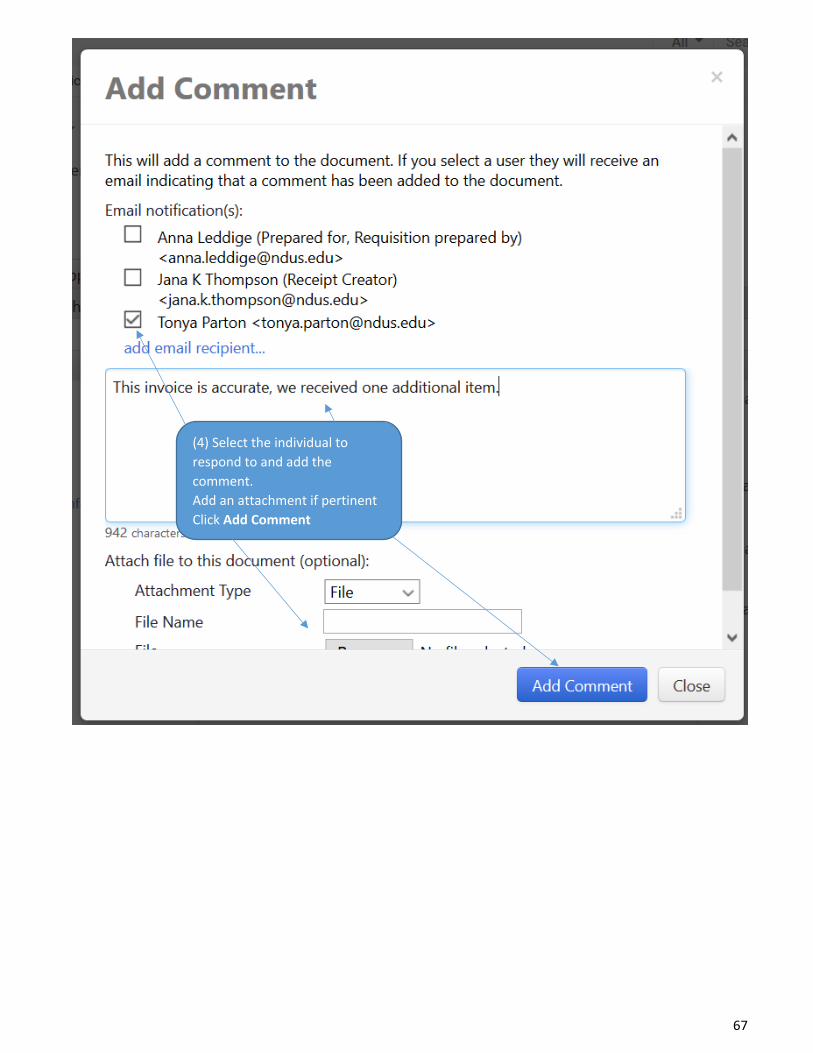
67
(4) Select the individual to respond to and add the comment. Add an attachment if pertinent Click Add Comment
68
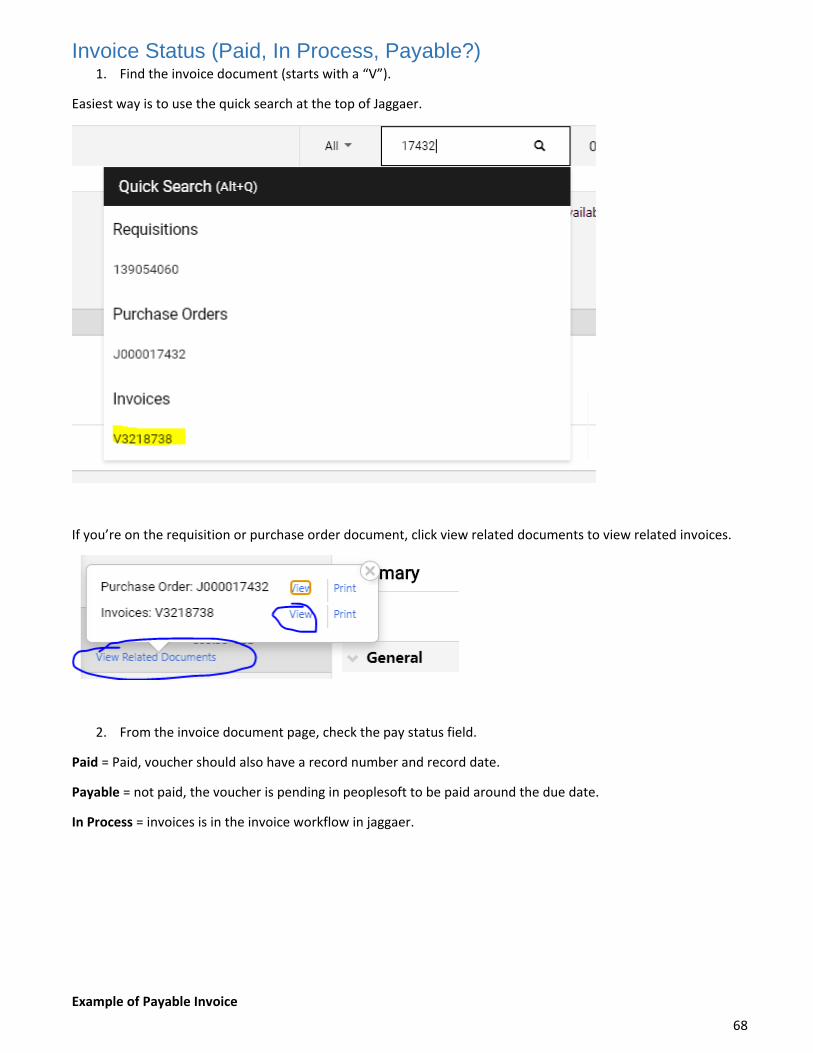
Invoice Status (Paid, In Process, Payable?) 1. Find the invoice document (starts with a “V”).
Easiest way is to use the quick search at the top of Jaggaer.
If you’re on the requisition or purchase order document, click view related documents to view related invoices.
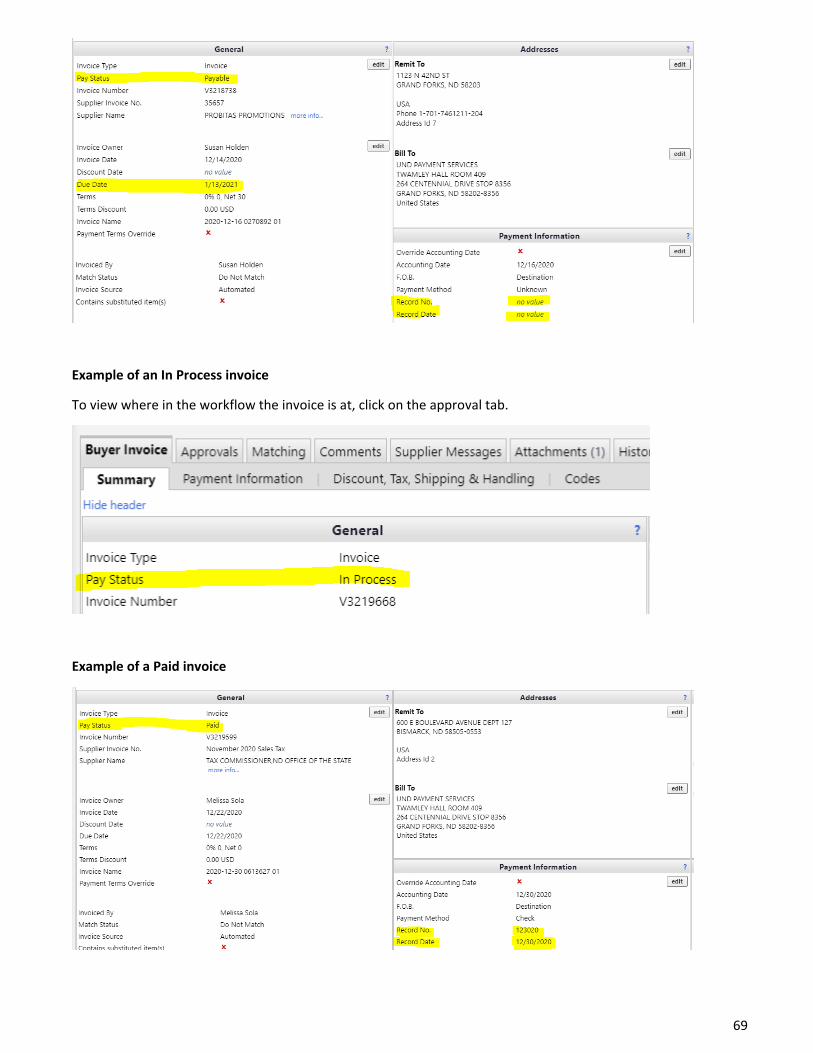
2. From the invoice document page, check the pay status field.
Paid = Paid, voucher should also have a record number and record date.
Payable = not paid, the voucher is pending in peoplesoft to be paid around the due date.
In Process = invoices is in the invoice workflow in jaggaer.
Example of Payable Invoice
69
Example of an In Process invoice
To view where in the workflow the invoice is at, click on the approval tab.
Example of a Paid invoice

70
Request New Supplier
TIP: Utilize this form if you are working with a new supplier and will be purchasing something in the future.
(1) On the Home Page, select Request New Supplier Form
(2) Enter the supplier Name Click Submit
(3) Click Next

71
(4) Enter the Reason for the Request and click Next
(5) Enter the address information

72
(5) Enter the content information and click Next
(6) Click the certification box Click Complete Request
(7) Click Yes

73
Sourcing Request (Bid, Request for Proposals, Request for Qualifications)
TIP: Utilize this form to request a procurement sourcing event for a purchase over $10K.
(1) On the Home Page Click Request Sourcing Event
(2) Enter the Title and click Open Request Form
(3) Click Next
74
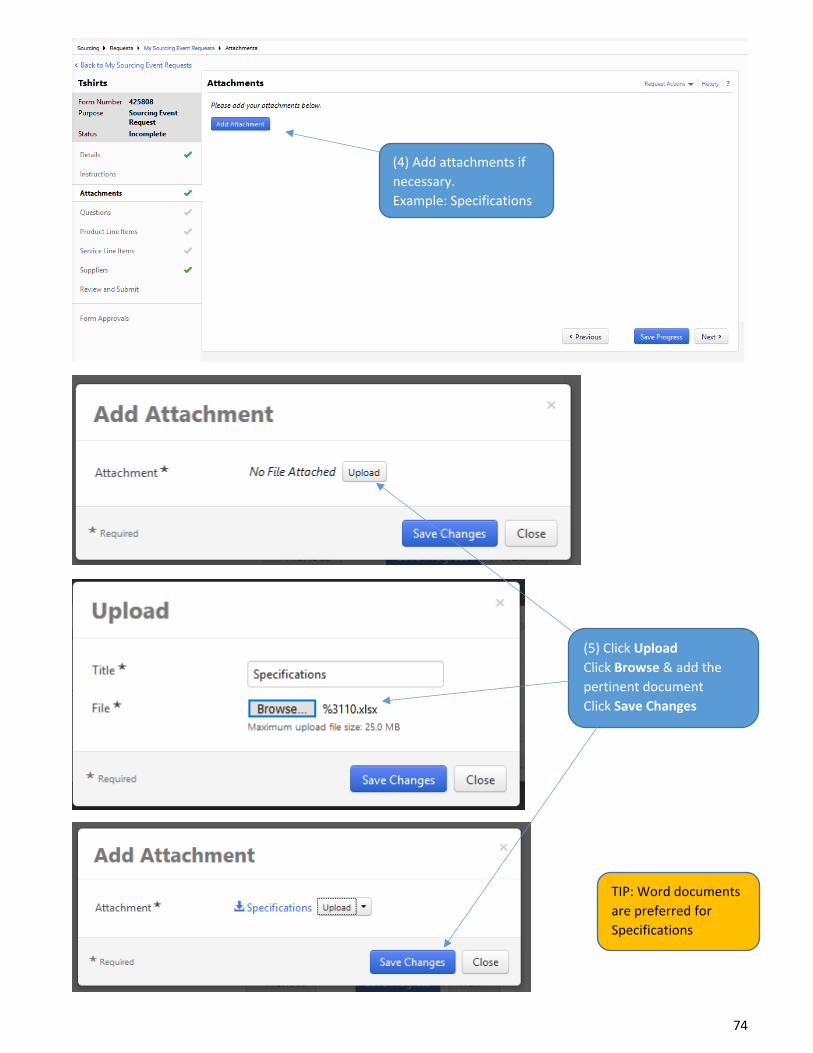
(4) Add attachments if necessary. Example: Specifications
(5) Click Upload Click Browse & add the pertinent document Click Save Changes
TIP: Word documents are preferred for Specifications

75
(4) Click Next
(6) Answer the questions and click Next
TIP: Click on the Question marks to get additional information about the question.

76
(7) Answer the questions and click Next

77
(8) Click either Product Line Items or Service Line Items on the left hand column dependent upon what is being procured. When you are on the right tab, click Add Product Line or Add Service Line
(9) Enter Information and Click Save Changes
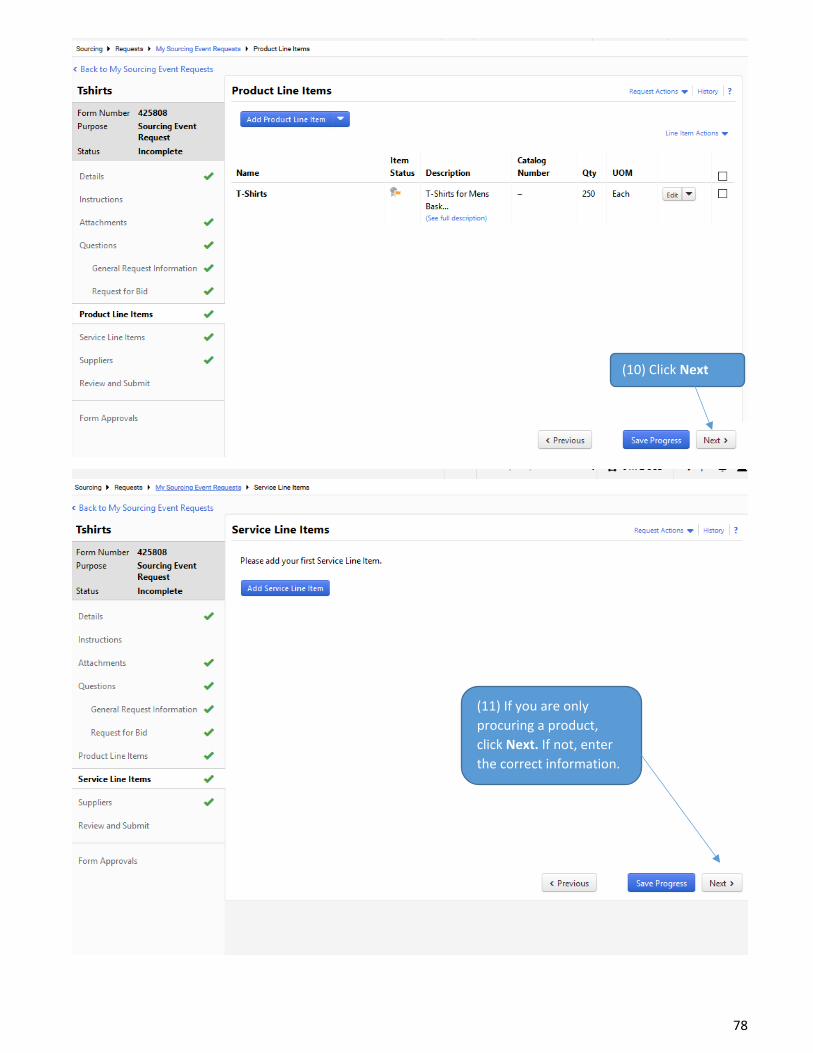
78
(10) Click Next
(11) If you are only procuring a product, click Next. If not, enter the correct information.

79
(12) Disregard this supplier page as you previously entered the potential suppliers under General Request Information. Click Next
(13) Click Next
(14) Click Yes

80
(15) Click Form Approval to see where the form will route

81
User Default Settings There are defaults available for each user that will auto-populate within the current forms.
(1) From the Home Page, click the silhouette in the upper right hand corner Click View My Profile
(2) Click the dropdown by Default User Settings
(3) If you would like to add a department to default, select code in the header and edit under the departments

82
(4) To default a shipping address Click Default Addresses, Select Addresses for Profile
(5) To default a cart assignee, select Cart Assignees Click Add Assignee

83
Saved Searches
(2) Click UND Shared searches
(1) Click on Orders on the right side Search Select View Saved Searches
(3) Click on appropriate report you are looking to run

84
(4) This search can be filtered by all the criteria on the left.
(5) Department may be a common filter to use. Click on Department

85
(6) Enter a specific department or choose a range and click Save
(7) If you want to save the updated search, click the dropdown by Save Changes and select Save New Search

86
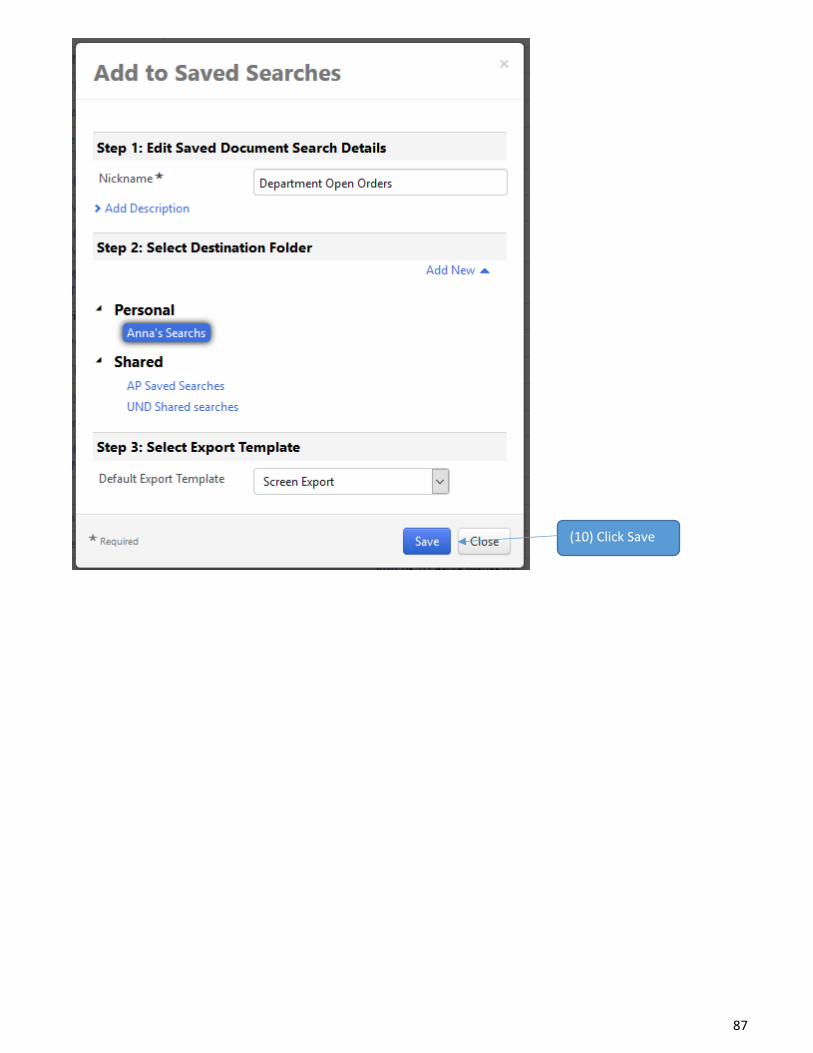
(8) If you want to save the updated search, click the dropdown by Save Changes and select Save New Search Select a personal Folder
(9) Name it as you wish and click Save Changes
87
(10) Click Save
88
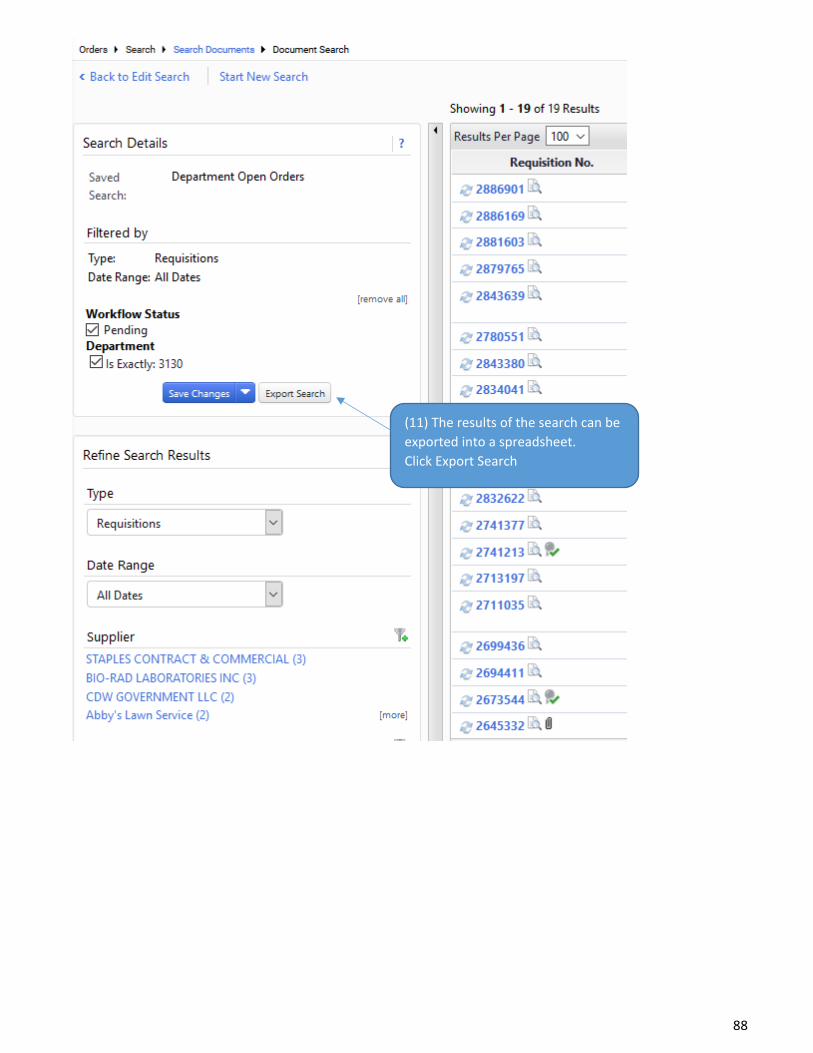
(11) The results of the search can be exported into a spreadsheet. Click Export Search

89
(12) Input a File Name Click Submit
(13) Click Go to Page: Download Export Files
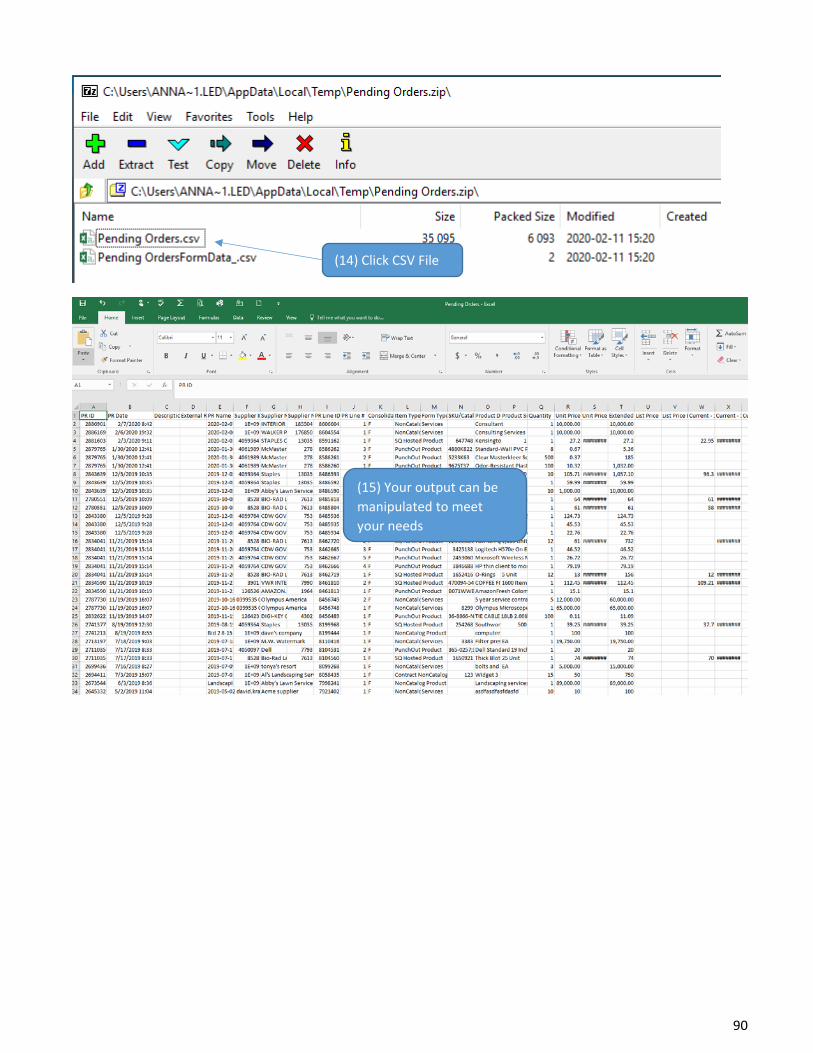
(14) Click the zip file Click OK
90
(14) Click CSV File
(15) Your output can be manipulated to meet your needs

91
Alternate Procurement Requests In-progress

92
Contract Requests In progress
When to request a contract
1. Complete this Contract Request when ALL the following apply:
A. Total Contract Value of the product/service exceeds $10,000 ($5,000 for IT/Software); AND
i. Total Contract Value = initial cost + recurring costs and/or renewals over the life of the contract
B. Purchase is NOT a one-time purchase; AND
C. A procurement method has been completed (one of the following):
i. Solicitation Completed (Bid/RFP/RFQ);
ii. Alternate Procurement Request (APR) has been approved;
iii. NDCC or Policy Exemption allowing purchase without a competitive solicitation; or
iv. Emergency Purchase form has been completed and approved.
2. DO NOT fill this out for:
A. One-time purchases;
B. The Total contract value is less than $10,000 or $5,000 for IT/Software; or
C. Contract Renewals or Contract Amendments.
For one-time purchases, complete a Non-Catalog Order or Payment Request, depending on circumstances surrounding the purchase. See Jaggaer Manual or Videos for more details.
3. IMPORTANT NOTES:
A. If the cost of the order is over $10,000, DO NOT SIGN anything until Procurement has approved the purchase or has directed you to sign;
B. If there is an order form/agreement/contract/or any document requiring a signature or references Terms and Conditions, DO NOT SIGN ANYTHING until you have had them reviewed by General Counsel;
C. Once legal reviews and all parties agree to the terms, and/or if procurement approves, verify the person signing the agreement for UND has authority to do so according to UND’s Contractual Signature Policy.

93
Contracts In progress
How to reference an existing contract in a non-catalog order or payment request
1. Complete the appropriate form (non-catalog or payment request) per usual until you get to the cart. a. If you are unsure on how to get to your cart or place an order, refer to the Jaggaer Manual.
2. Click on, “Select price or contract….” next to the item/form needing a contract reference.
3. Select the appropriate contract and click OK (the contract name is after the number).
a. If you have multiple contract items from multiple contracts (one or multiple suppliers), each contract will need its own form. Likewise, if items are being purchased that are not part of a contract, a separate non-catalog order/payment request will need to be created for the non-contract items.
i. e.g., I have 2 contracts with company A and 1 contract with company B. I will enter one non-catalog order/payment request for each contract with company A and one non-catalog order/payment request for company B. If I wish to order additional items from either company, unrelated to a contract, I will need to submit an additional non-catalog order/payment request with the non-contract items on it.
4. You should now see the contract number referenced on the line level.
5. Continue with your order as usual.
94
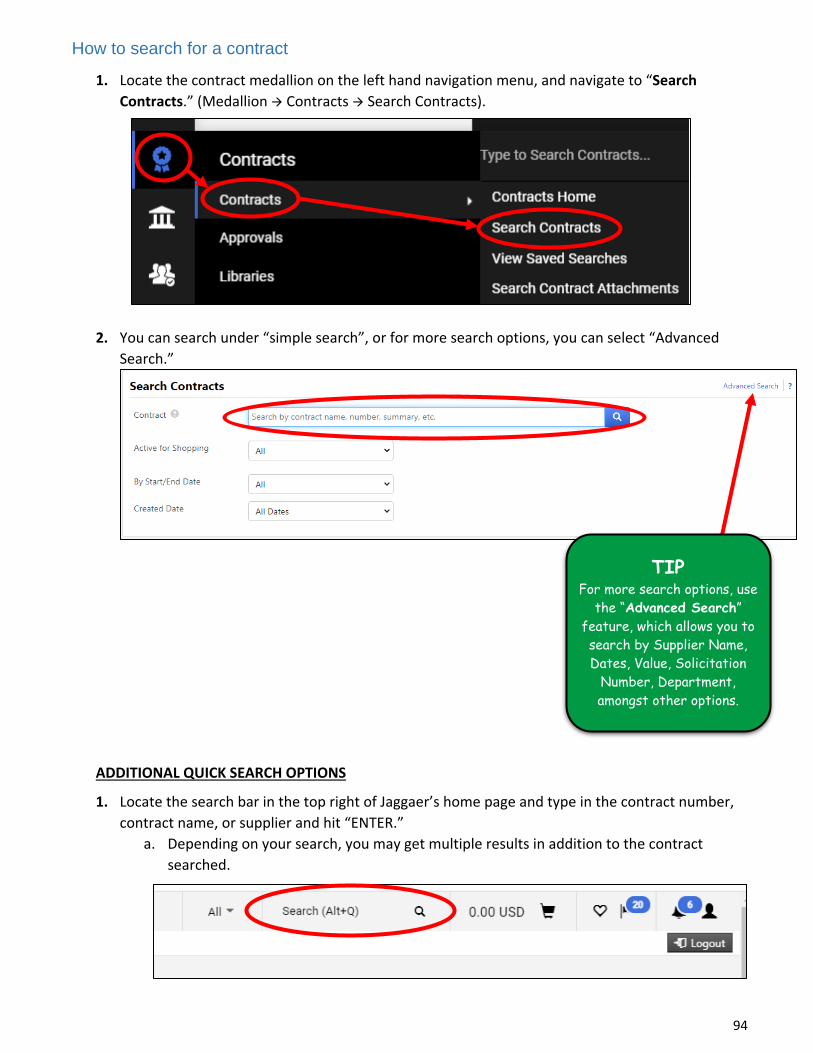
How to search for a contract
1. Locate the contract medallion on the left hand navigation menu, and navigate to “Search Contracts.” (Medallion Contracts Search Contracts).
2. You can search under “simple search”, or for more search options, you can select “Advanced
Search.”
ADDITIONAL QUICK SEARCH OPTIONS
1. Locate the search bar in the top right of Jaggaer’s home page and type in the contract number, contract name, or supplier and hit “ENTER.”
a. Depending on your search, you may get multiple results in addition to the contract searched.
TIP For more search options, use
the “Advanced Search” feature, which allows you to search by Supplier Name, Dates, Value, Solicitation
Number, Department, amongst other options.

95
2. Under the Contracts Medallion, you will find a box that says, “Type to Search Contracts…” where you can type in a search option (Contract name, number, & supplier) similar to the option listed above in #1 and hit “ENTER.”

96
**NEW** - Order Status and Shipping Information Please note, if there is ever a question on your order status, contacting the supplier directly is acceptable and encouraged.
The following suppliers do not have order updates and/or shipping information. You will need to follow up with them directly for order status updates.
• Abcam – contact information is provided on their punchout site • Boeing - contact information is provided on their supplier page in Jaggaer under contacts • Border State Industries – contact information is provided on their punchout site • Cullinex (Plexus) – contact information is provided on their supplier page in Jaggaer under contacts • Norby’s – contact information is provided on their supplier page in Jaggaer under contacts • Qiagen - contact information is provided on their punchout site • Sigma-Aldrich - contact information is provided on their punchout site
97
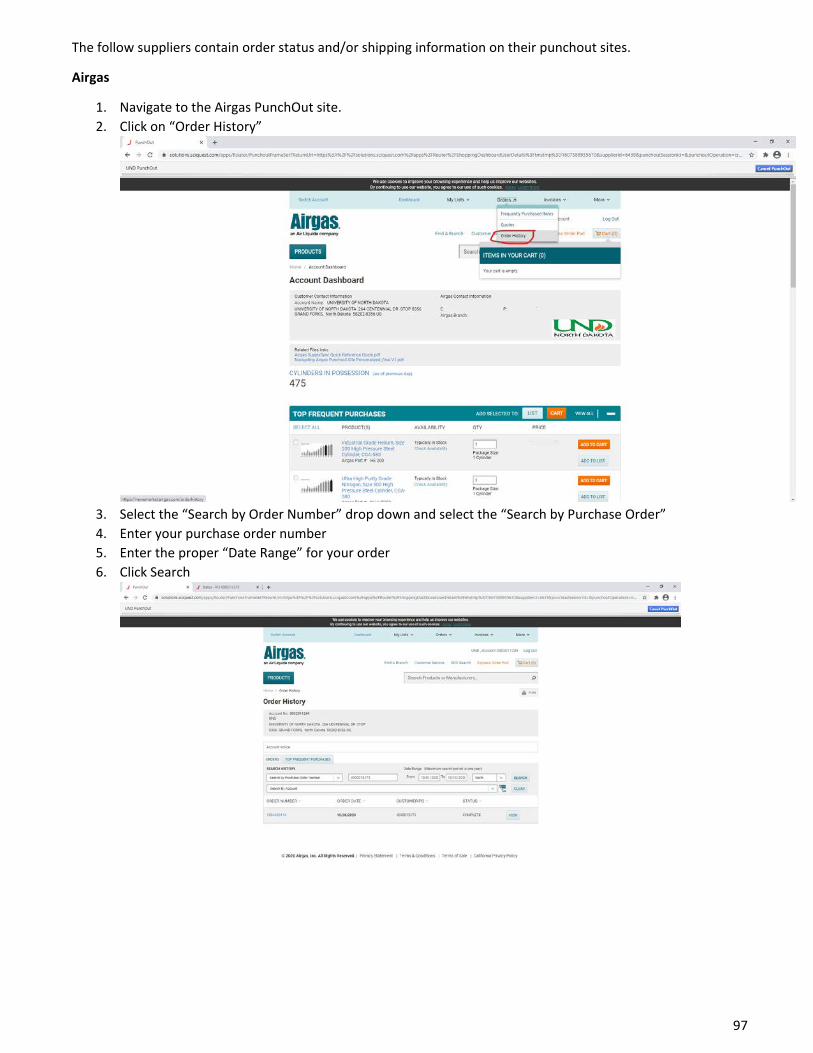
The follow suppliers contain order status and/or shipping information on their punchout sites.
Airgas
1. Navigate to the Airgas PunchOut site. 2. Click on “Order History”
3. Select the “Search by Order Number” drop down and select the “Search by Purchase Order” 4. Enter your purchase order number 5. Enter the proper “Date Range” for your order 6. Click Search

98
Amazon
1. Navigate to the Amazon punchout site 2. Hover over the “Hello (your name)” and click “Your Orders”
3. Enter the correct time range your order was placed and which orders you want to view

99
B&H
1. Navigate to the B&H PunchOut site 2. Click the “Orders & Quotes”
3. Enter your phone number and your Purchase Order number
100
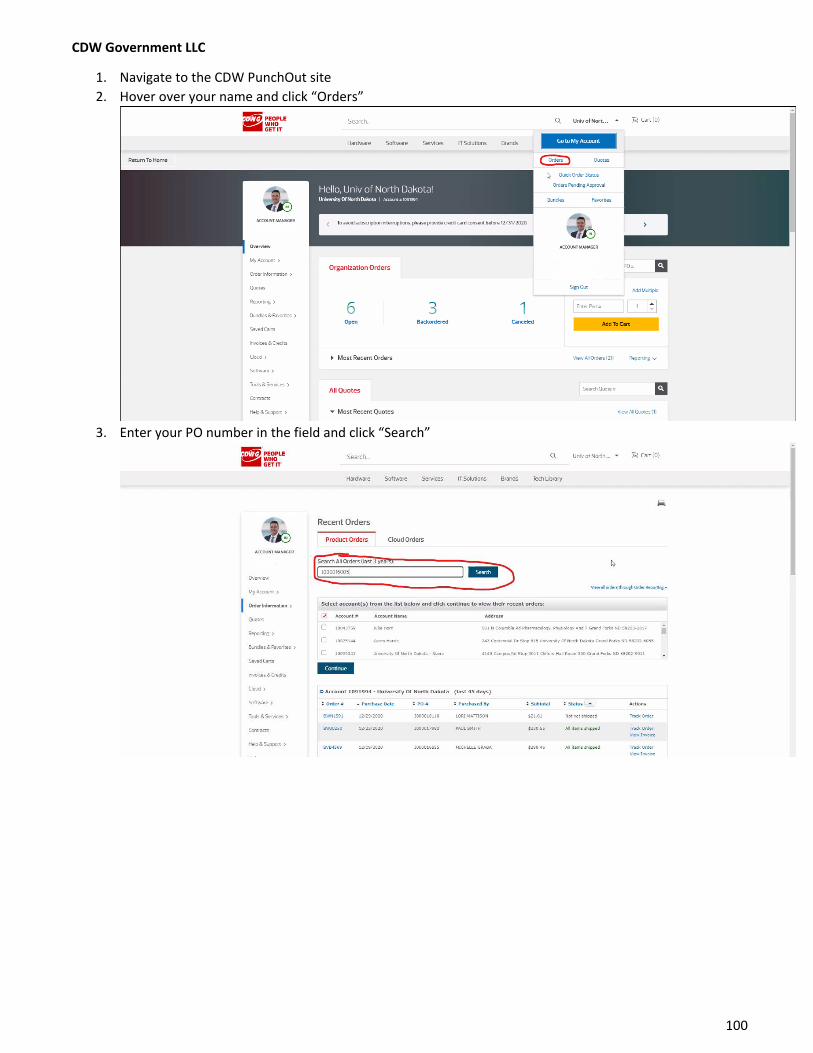
CDW Government LLC
1. Navigate to the CDW PunchOut site 2. Hover over your name and click “Orders”
3. Enter your PO number in the field and click “Search”
101
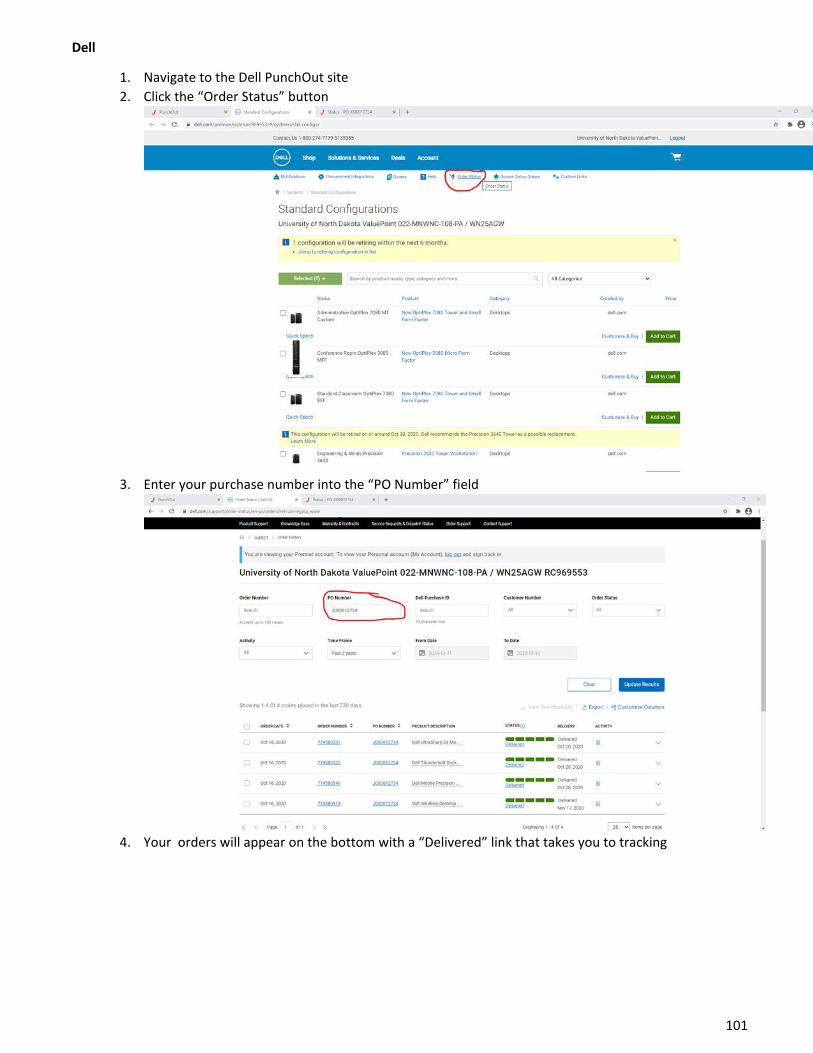
Dell
1. Navigate to the Dell PunchOut site 2. Click the “Order Status” button
3. Enter your purchase number into the “PO Number” field
4. Your orders will appear on the bottom with a “Delivered” link that takes you to tracking

102
Fisher Scientific Industries
1. Click on your PO number in Jaggaer to view the status
2. From there you can click on the “Shipments” button to view shipping
Alternative
1. Navigate to the Fisher Scientific Industries PunchOut site 2. Click the “Order Status” button

103
3. Enter your purchase number in the “Search” field
4. You can click “View Details” to see tracking info
104
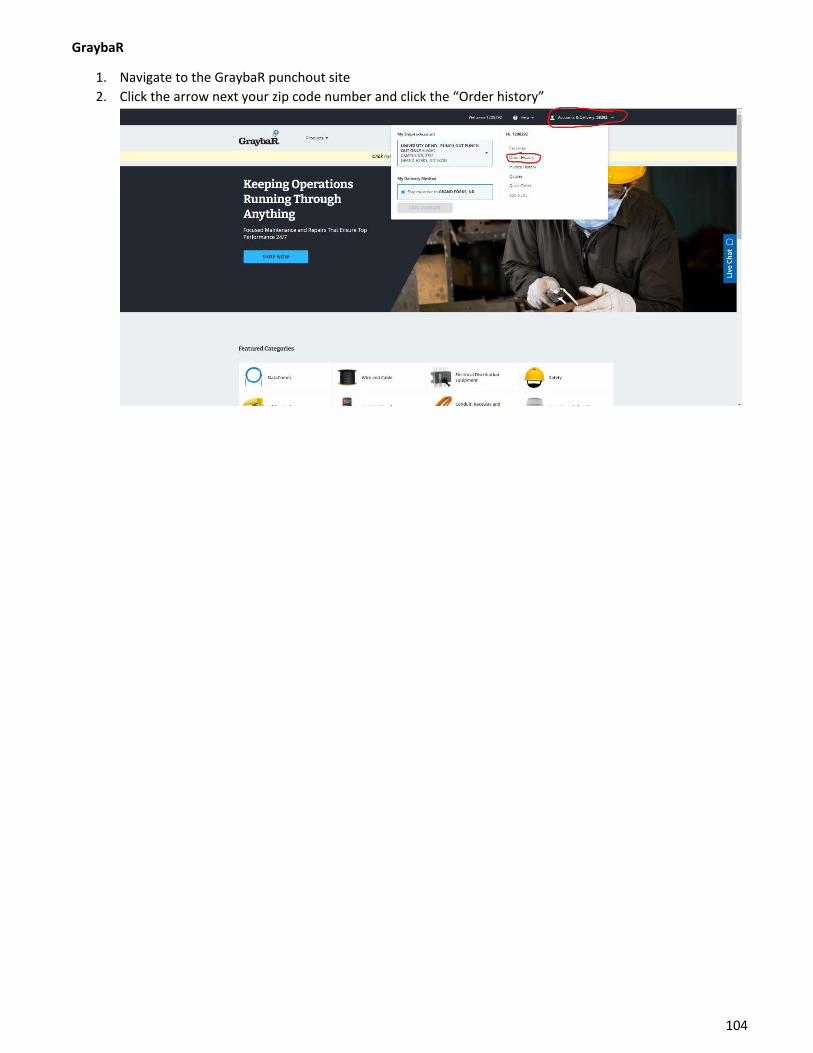
GraybaR
1. Navigate to the GraybaR punchout site 2. Click the arrow next your zip code number and click the “Order history”

105
Innovative Office Solutions LLC
1. Navigate to the Innovative office Solutions PunchOut site. 2. Hover over the “My Account” and click the “My Account” button
3. Click the “View Orders, Invoices & Quotes” button
4. Enter the proper date range and click search
106
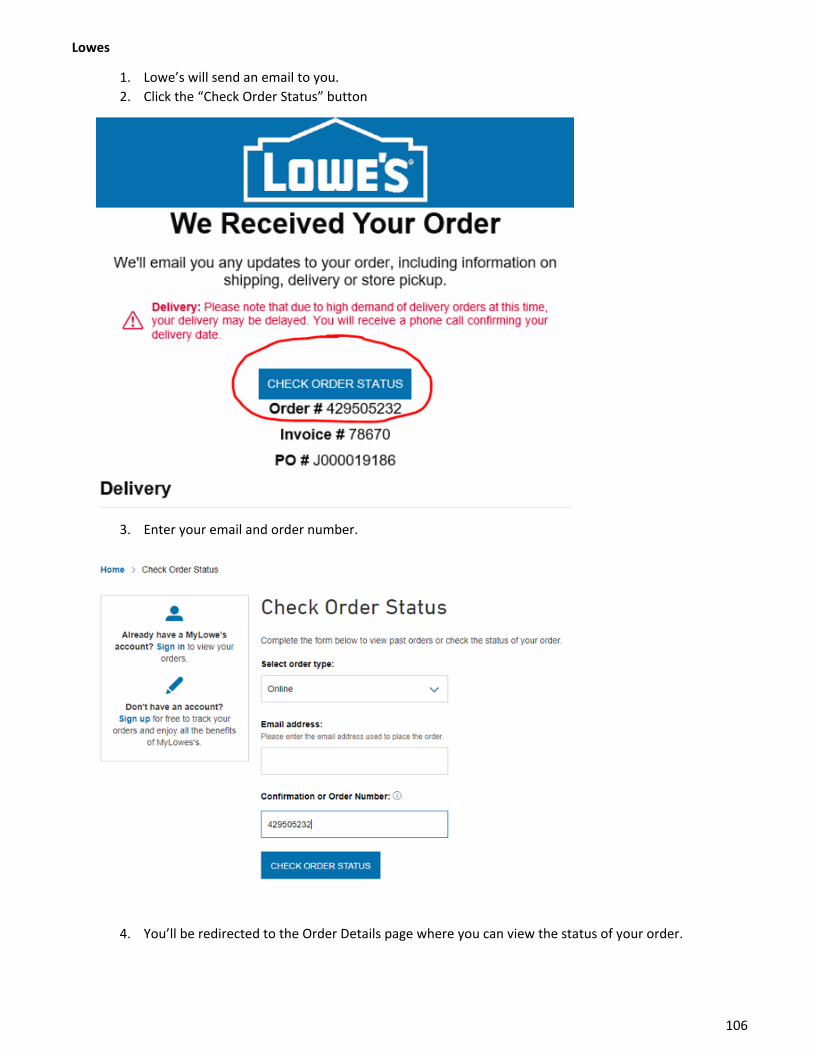
Lowes
1. Lowe’s will send an email to you. 2. Click the “Check Order Status” button
3. Enter your email and order number.
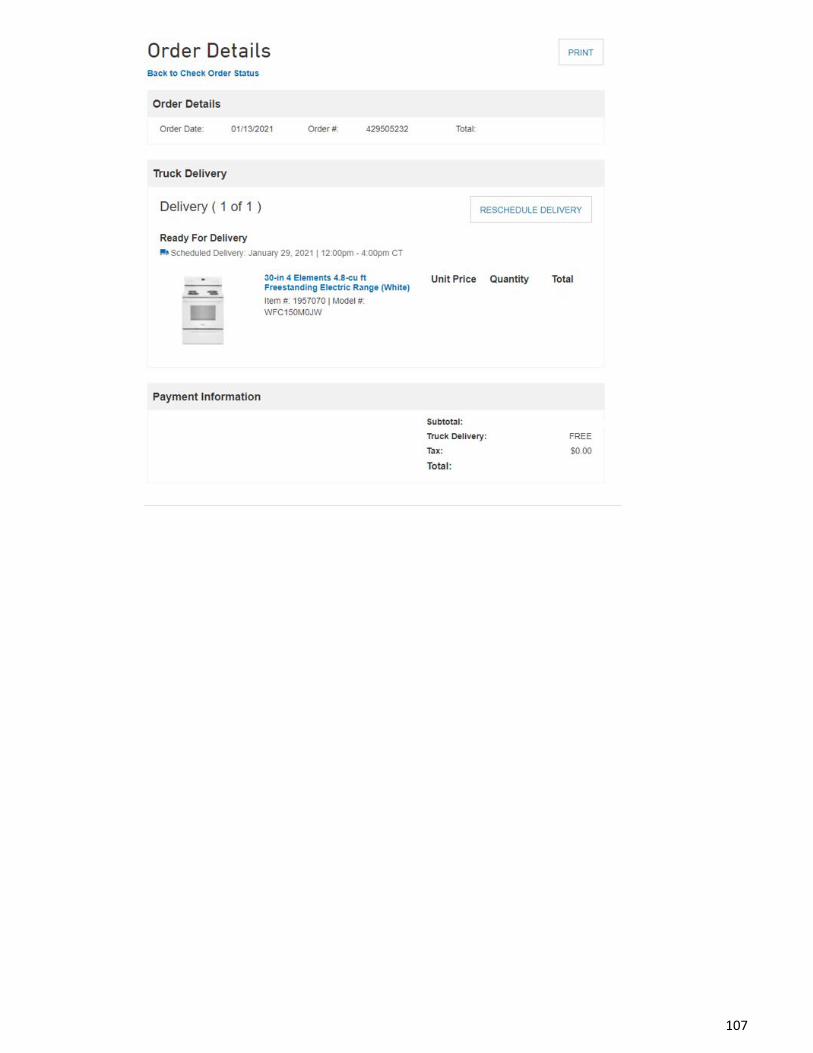
4. You’ll be redirected to the Order Details page where you can view the status of your order.
107
108
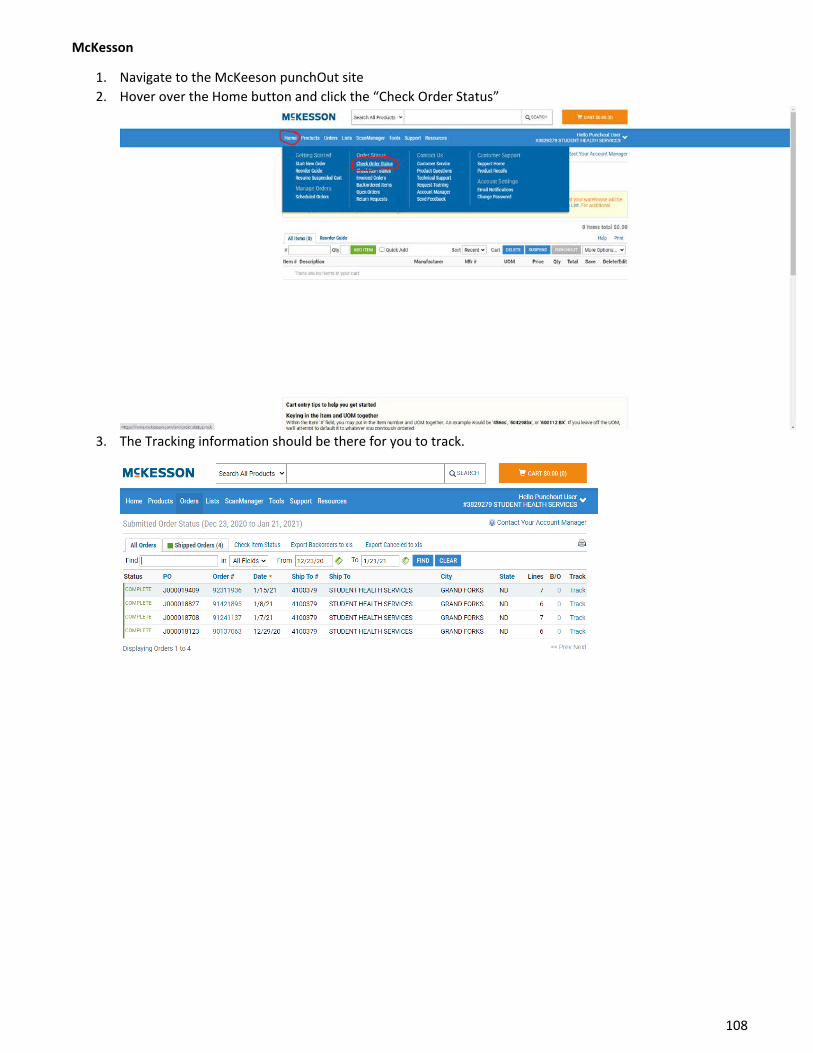
McKesson
1. Navigate to the McKeeson punchOut site 2. Hover over the Home button and click the “Check Order Status”
3. The Tracking information should be there for you to track.

109
McMaster-Carr
1. Login and navigate to the “Activity” button
2. See order details and tracking number on this page.

110
Office Depot
1. Navigate to the Office Depot punchout site 2. Hover over the “1” in the circle, hover over the “orders” button, and click the “Order Tracking” button
3. Scroll down and you can see all of your orders
4. Click on an “Order Number” to view your order information
5. From there you can click “Track Your Shipment”

111

112
Staples
1. Click on your PO number in Jaggaer to view the status
2. Click the “shipments” button
Alternative
3. Navigate to the Staples punchout site 4. Click the person button and click “my order”
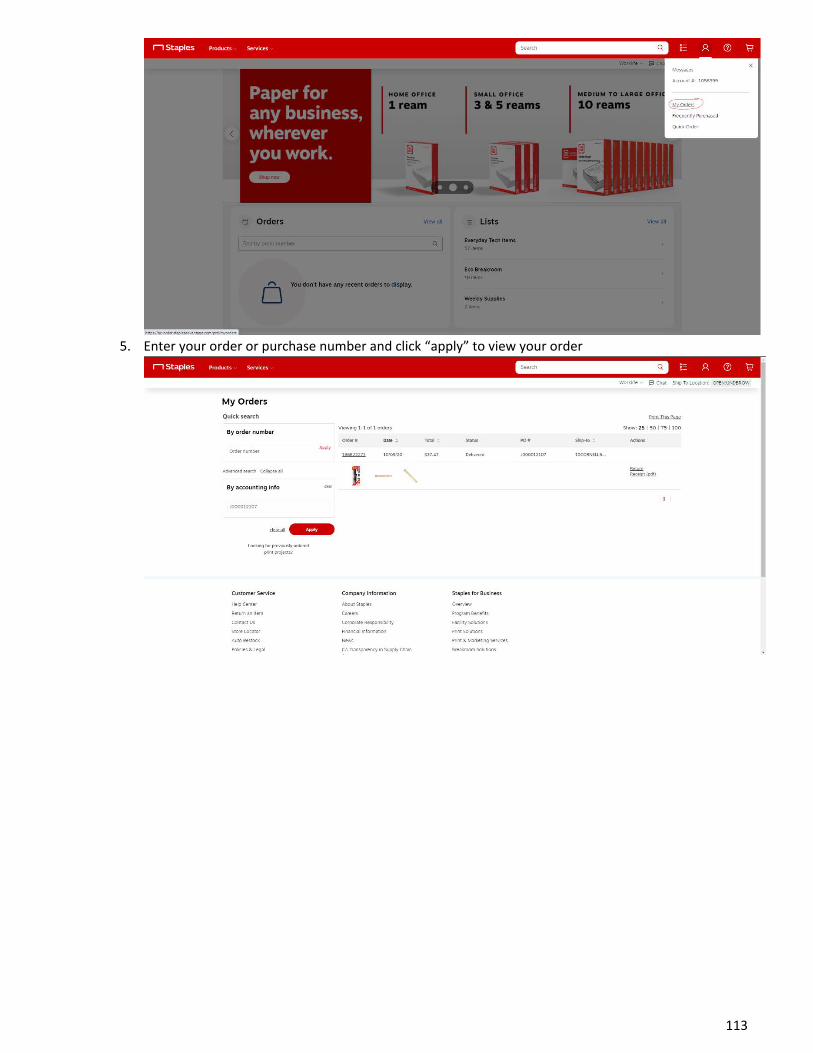
113
5. Enter your order or purchase number and click “apply” to view your order

114
VWR International
1. Navigate to the VWR International punchOut site 2. Click the “Your Orders” button to view all of your previous orders
3. If the button isn’t there for you, hover over the “my account” button and click “my orders”