jeff chauvin redpaper - redbooks.ibm.com
TRANSCRIPT

ibm.com/redbooks Redpaper
Front cover
IBM System Blue Gene Solution: Blue Gene/Q Service Node Failover using Linux High Availability
Jeff ChauvinJohn Fraley
Nick GorackeKiswanto Thayib
Set up a backup service node
Install a cluster resource manager
Configure resources


International Technical Support Organization
IBM System Blue Gene Solution: Blue Gene/Q Service Node Failover using Linux High Availability
May 2013
REDP-4657-00

© Copyright International Business Machines Corporation 2013. All rights reserved.Note to U.S. Government Users Restricted Rights -- Use, duplication or disclosure restricted by GSA ADP ScheduleContract with IBM Corp.
First Edition (May 2013)
This edition applies to Version 1, Release 1, Modification 2 of IBM Blue Gene/Q (product number 5733-BGQ).
Note: Before using this information and the product it supports, read the information in “Notices” on page v.

Contents
Notices . . . . . . . . . . . . . . . . . . . . . . . . . . . . . . . . . . . . . . . . . . . . . . . . . . . . . . . . . . . . . . . . . .vTrademarks . . . . . . . . . . . . . . . . . . . . . . . . . . . . . . . . . . . . . . . . . . . . . . . . . . . . . . . . . . . . . . vi
Preface . . . . . . . . . . . . . . . . . . . . . . . . . . . . . . . . . . . . . . . . . . . . . . . . . . . . . . . . . . . . . . . . . viiAuthors. . . . . . . . . . . . . . . . . . . . . . . . . . . . . . . . . . . . . . . . . . . . . . . . . . . . . . . . . . . . . . . . . . viiNow you can become a published author, too! . . . . . . . . . . . . . . . . . . . . . . . . . . . . . . . . . . viiiComments welcome. . . . . . . . . . . . . . . . . . . . . . . . . . . . . . . . . . . . . . . . . . . . . . . . . . . . . . . viiiStay connected to IBM Redbooks . . . . . . . . . . . . . . . . . . . . . . . . . . . . . . . . . . . . . . . . . . . . viii
Chapter 1. Overview . . . . . . . . . . . . . . . . . . . . . . . . . . . . . . . . . . . . . . . . . . . . . . . . . . . . . . 1
Chapter 2. Configuring high availability on a service node . . . . . . . . . . . . . . . . . . . . . . 52.1 Configuring Secure Shell for high availability . . . . . . . . . . . . . . . . . . . . . . . . . . . . . . . . . 5
2.1.1 Setting up SSH host keys . . . . . . . . . . . . . . . . . . . . . . . . . . . . . . . . . . . . . . . . . . . . 62.2 Setting up a short host name . . . . . . . . . . . . . . . . . . . . . . . . . . . . . . . . . . . . . . . . . . . . . 62.3 Configuring shared storage. . . . . . . . . . . . . . . . . . . . . . . . . . . . . . . . . . . . . . . . . . . . . . . 72.4 Setting up file systems . . . . . . . . . . . . . . . . . . . . . . . . . . . . . . . . . . . . . . . . . . . . . . . . . . 7
2.4.1 Setting up the /dbshare and /dblogs file systems . . . . . . . . . . . . . . . . . . . . . . . . . . 72.4.2 Setting up the /bgsys file system . . . . . . . . . . . . . . . . . . . . . . . . . . . . . . . . . . . . . 10
2.5 Installing Linux-HA packages and TEAL software . . . . . . . . . . . . . . . . . . . . . . . . . . . . 112.5.1 Setting up the installation server . . . . . . . . . . . . . . . . . . . . . . . . . . . . . . . . . . . . . . 122.5.2 Setting up a service node . . . . . . . . . . . . . . . . . . . . . . . . . . . . . . . . . . . . . . . . . . . 122.5.3 Installing the cluster glue software . . . . . . . . . . . . . . . . . . . . . . . . . . . . . . . . . . . . 142.5.4 Installing resource agents . . . . . . . . . . . . . . . . . . . . . . . . . . . . . . . . . . . . . . . . . . . 152.5.5 Installing the Heartbeat package . . . . . . . . . . . . . . . . . . . . . . . . . . . . . . . . . . . . . 152.5.6 Installing the Pacemaker software . . . . . . . . . . . . . . . . . . . . . . . . . . . . . . . . . . . . 152.5.7 Installing TEAL . . . . . . . . . . . . . . . . . . . . . . . . . . . . . . . . . . . . . . . . . . . . . . . . . . . 16
2.6 Configuring the Heartbeat software . . . . . . . . . . . . . . . . . . . . . . . . . . . . . . . . . . . . . . . 172.7 Configuring HA resources . . . . . . . . . . . . . . . . . . . . . . . . . . . . . . . . . . . . . . . . . . . . . . . 20
2.7.1 Configuring file systems . . . . . . . . . . . . . . . . . . . . . . . . . . . . . . . . . . . . . . . . . . . . 202.7.2 Configuring IP address takeover. . . . . . . . . . . . . . . . . . . . . . . . . . . . . . . . . . . . . . 212.7.3 Configuring the database . . . . . . . . . . . . . . . . . . . . . . . . . . . . . . . . . . . . . . . . . . . 212.7.4 Configuring the NFS Server . . . . . . . . . . . . . . . . . . . . . . . . . . . . . . . . . . . . . . . . . 212.7.5 Configuring the HTTP daemon . . . . . . . . . . . . . . . . . . . . . . . . . . . . . . . . . . . . . . . 212.7.6 Configuring Blue Gene resources. . . . . . . . . . . . . . . . . . . . . . . . . . . . . . . . . . . . . 222.7.7 Setting up cluster resource groups . . . . . . . . . . . . . . . . . . . . . . . . . . . . . . . . . . . . 222.7.8 Setting up collocation and order . . . . . . . . . . . . . . . . . . . . . . . . . . . . . . . . . . . . . . 232.7.9 Configuring the STONITH device . . . . . . . . . . . . . . . . . . . . . . . . . . . . . . . . . . . . . 232.7.10 Configuring additional resources. . . . . . . . . . . . . . . . . . . . . . . . . . . . . . . . . . . . . 242.7.11 Configuring bg.properties and bgagent settings . . . . . . . . . . . . . . . . . . . . . . . . . 24
Chapter 3. Active-Active configuration . . . . . . . . . . . . . . . . . . . . . . . . . . . . . . . . . . . . . . 273.1 Configuring DB2 server . . . . . . . . . . . . . . . . . . . . . . . . . . . . . . . . . . . . . . . . . . . . . . . . . 283.2 Configuring IP address takeover for DB2 remote access . . . . . . . . . . . . . . . . . . . . . . . 303.3 Configuring real-time server . . . . . . . . . . . . . . . . . . . . . . . . . . . . . . . . . . . . . . . . . . . . . 303.4 Configuring TEAL servers . . . . . . . . . . . . . . . . . . . . . . . . . . . . . . . . . . . . . . . . . . . . . . . 313.5 Setting up cluster resource groups, order, and collocation . . . . . . . . . . . . . . . . . . . . . . 31
3.5.1 Moving a cluster resource . . . . . . . . . . . . . . . . . . . . . . . . . . . . . . . . . . . . . . . . . . . 32
© Copyright IBM Corp. 2013. All rights reserved. iii

Chapter 4. Additional Linux-HA commands for system administrators . . . . . . . . . . . 334.1 Viewing system status. . . . . . . . . . . . . . . . . . . . . . . . . . . . . . . . . . . . . . . . . . . . . . . . . . 334.2 Starting and stopping bgmaster and bgagent . . . . . . . . . . . . . . . . . . . . . . . . . . . . . . . . 344.3 Placing a node on standby . . . . . . . . . . . . . . . . . . . . . . . . . . . . . . . . . . . . . . . . . . . . . . 354.4 Bringing a node back online after a failure . . . . . . . . . . . . . . . . . . . . . . . . . . . . . . . . . . 354.5 Migrating resources to another system . . . . . . . . . . . . . . . . . . . . . . . . . . . . . . . . . . . . . 354.6 Stopping all resources and manually restarting them . . . . . . . . . . . . . . . . . . . . . . . . . . 354.7 Viewing HA logs for additional debugging information . . . . . . . . . . . . . . . . . . . . . . . . . 36
Chapter 5. Failure modes detected by the Linux-HA software . . . . . . . . . . . . . . . . . . . 375.1 Resources started by init scripts . . . . . . . . . . . . . . . . . . . . . . . . . . . . . . . . . . . . . . . . . . 375.2 File system resources . . . . . . . . . . . . . . . . . . . . . . . . . . . . . . . . . . . . . . . . . . . . . . . . . . 375.3 Network adapters . . . . . . . . . . . . . . . . . . . . . . . . . . . . . . . . . . . . . . . . . . . . . . . . . . . . . 385.4 DB2 server . . . . . . . . . . . . . . . . . . . . . . . . . . . . . . . . . . . . . . . . . . . . . . . . . . . . . . . . . . 385.5 BGMaster . . . . . . . . . . . . . . . . . . . . . . . . . . . . . . . . . . . . . . . . . . . . . . . . . . . . . . . . . . . 39
Chapter 6. Creating a three-node quorum for GPFS configurations . . . . . . . . . . . . . . 41
Abbreviations and acronyms . . . . . . . . . . . . . . . . . . . . . . . . . . . . . . . . . . . . . . . . . . . . . . 43
Related publications . . . . . . . . . . . . . . . . . . . . . . . . . . . . . . . . . . . . . . . . . . . . . . . . . . . . . 45IBM Redbooks . . . . . . . . . . . . . . . . . . . . . . . . . . . . . . . . . . . . . . . . . . . . . . . . . . . . . . . . . . . 45Other publications . . . . . . . . . . . . . . . . . . . . . . . . . . . . . . . . . . . . . . . . . . . . . . . . . . . . . . . . 45Online resources . . . . . . . . . . . . . . . . . . . . . . . . . . . . . . . . . . . . . . . . . . . . . . . . . . . . . . . . . 45Help from IBM . . . . . . . . . . . . . . . . . . . . . . . . . . . . . . . . . . . . . . . . . . . . . . . . . . . . . . . . . . . 46
iv Blue Gene/Q Service Node Failover using Linux High Availability

Notices
This information was developed for products and services offered in the U.S.A.
IBM may not offer the products, services, or features discussed in this document in other countries. Consult your local IBM representative for information on the products and services currently available in your area. Any reference to an IBM product, program, or service is not intended to state or imply that only that IBM product, program, or service may be used. Any functionally equivalent product, program, or service that does not infringe any IBM intellectual property right may be used instead. However, it is the user's responsibility to evaluate and verify the operation of any non-IBM product, program, or service.
IBM may have patents or pending patent applications covering subject matter described in this document. The furnishing of this document does not grant you any license to these patents. You can send license inquiries, in writing, to: IBM Director of Licensing, IBM Corporation, North Castle Drive, Armonk, NY 10504-1785 U.S.A.
The following paragraph does not apply to the United Kingdom or any other country where such provisions are inconsistent with local law: INTERNATIONAL BUSINESS MACHINES CORPORATION PROVIDES THIS PUBLICATION "AS IS" WITHOUT WARRANTY OF ANY KIND, EITHER EXPRESS OR IMPLIED, INCLUDING, BUT NOT LIMITED TO, THE IMPLIED WARRANTIES OF NON-INFRINGEMENT, MERCHANTABILITY OR FITNESS FOR A PARTICULAR PURPOSE. Some states do not allow disclaimer of express or implied warranties in certain transactions, therefore, this statement may not apply to you.
This information could include technical inaccuracies or typographical errors. Changes are periodically made to the information herein; these changes will be incorporated in new editions of the publication. IBM may make improvements and/or changes in the product(s) and/or the program(s) described in this publication at any time without notice.
Any references in this information to non-IBM websites are provided for convenience only and do not in any manner serve as an endorsement of those websites. The materials at those websites are not part of the materials for this IBM product and use of those websites is at your own risk.
IBM may use or distribute any of the information you supply in any way it believes appropriate without incurring any obligation to you.
Any performance data contained herein was determined in a controlled environment. Therefore, the results obtained in other operating environments may vary significantly. Some measurements may have been made on development-level systems and there is no guarantee that these measurements will be the same on generally available systems. Furthermore, some measurements may have been estimated through extrapolation. Actual results may vary. Users of this document should verify the applicable data for their specific environment.
Information concerning non-IBM products was obtained from the suppliers of those products, their published announcements or other publicly available sources. IBM has not tested those products and cannot confirm the accuracy of performance, compatibility or any other claims related to non-IBM products. Questions on the capabilities of non-IBM products should be addressed to the suppliers of those products.
This information contains examples of data and reports used in daily business operations. To illustrate them as completely as possible, the examples include the names of individuals, companies, brands, and products. All of these names are fictitious and any similarity to the names and addresses used by an actual business enterprise is entirely coincidental.
COPYRIGHT LICENSE:
This information contains sample application programs in source language, which illustrate programming techniques on various operating platforms. You may copy, modify, and distribute these sample programs in any form without payment to IBM, for the purposes of developing, using, marketing or distributing application programs conforming to the application programming interface for the operating platform for which the sample programs are written. These examples have not been thoroughly tested under all conditions. IBM, therefore, cannot guarantee or imply reliability, serviceability, or function of these programs.
© Copyright IBM Corp. 2013. All rights reserved. v

Trademarks
IBM, the IBM logo, and ibm.com are trademarks or registered trademarks of International Business Machines Corporation in the United States, other countries, or both. These and other IBM trademarked terms are marked on their first occurrence in this information with the appropriate symbol (® or ™), indicating US registered or common law trademarks owned by IBM at the time this information was published. Such trademarks may also be registered or common law trademarks in other countries. A current list of IBM trademarks is available on the Web at http://www.ibm.com/legal/copytrade.shtml
The following terms are trademarks of the International Business Machines Corporation in the United States, other countries, or both:
Blue Gene/Q®Blue Gene®DB2®
GPFS™IBM®Redbooks®
Redpaper™Redbooks (logo) ®System i®
The following terms are trademarks of other companies:
Linux is a trademark of Linus Torvalds in the United States, other countries, or both.
Other company, product, or service names may be trademarks or service marks of others.
vi Blue Gene/Q Service Node Failover using Linux High Availability

Preface
This IBM® Redpaper™ publication explains how to configure failover for an IBM Blue Gene/Q® service node. This process includes downloading and installing software from the Linux-HA project, configuring clustering and storage, and setting up the Hardware Management Console (HMC) as a Shoot the Other Node in the Head (STONITH) device.
Authors
This paper was produced by a team of specialists from around the world working at the International Technical Support Organization, Rochester Center.
Jeff Chauvin is a Senior Information Technology (IT) Specialist in the ITD division of IBM in Rochester, Minnesota. He specializes in IT support of UNIX and Linux systems across multiple hardware platforms. Jeff has been with the IBM Blue Gene® team since 2004, working on all IT aspects of the project. Prior to Blue Gene he worked with the Rochester AIX/Linux client team. Jeff has been with IBM since 1999.
John Fraley is an IT Specialist in the ITD division of IBM, working out of Ridgefield Washington. He has been with IBM since 1998 and on the Blue Gene team since 2004. He holds degrees in Mechanical and Electrical Engineering from Michigan Technological University. He specializes in cross platform Linux and UNIX IT support, with technical expertise in OS and middleware. Prior to Blue Gene, John worked with the Rochester Linux client/PC server team.
Nick Goracke is a Software Engineer for IBM Rochester. He has been a member of the IBM Blue Gene development team since 2005 and leads the Functional Verification Test team for BG/Q software.
Kiswanto Thayib is an Advisory Software Engineer for IBM Rochester. He has been a member of the IBM Blue Gene development team since 2006. Prior to joining the Blue Gene team, Kiswanto designed and developed High Availability Clustering for IBM System i®.
Thanks to the following people for their contributions to this project:
Megan GilgeInternational Technical Support Organization, Rochester Center
Sam MillerJames Van OostenIBM Systems & Technology Group
© Copyright IBM Corp. 2013. All rights reserved. vii

Now you can become a published author, too!
Here’s an opportunity to spotlight your skills, grow your career, and become a published author—all at the same time! Join an ITSO residency project and help write a book in your area of expertise, while honing your experience using leading-edge technologies. Your efforts will help to increase product acceptance and customer satisfaction, as you expand your network of technical contacts and relationships. Residencies run from two to six weeks in length, and you can participate either in person or as a remote resident working from your home base.
Find out more about the residency program, browse the residency index, and apply online at:
ibm.com/redbooks/residencies.html
Comments welcome
Your comments are important to us!
We want our papers to be as helpful as possible. Send us your comments about this paper or other IBM Redbooks® publications in one of the following ways:
� Use the online Contact us review Redbooks form found at:
ibm.com/redbooks
� Send your comments in an email to:
� Mail your comments to:
IBM Corporation, International Technical Support OrganizationDept. HYTD Mail Station P0992455 South RoadPoughkeepsie, NY 12601-5400
Stay connected to IBM Redbooks
� Find us on Facebook:
http://www.facebook.com/IBMRedbooks
� Follow us on Twitter:
http://twitter.com/ibmredbooks
� Look for us on LinkedIn:
http://www.linkedin.com/groups?home=&gid=2130806
� Explore new Redbooks publications, residencies, and workshops with the IBM Redbooks weekly newsletter:
https://www.redbooks.ibm.com/Redbooks.nsf/subscribe?OpenForm
� Stay current on recent Redbooks publications with RSS Feeds:
http://www.redbooks.ibm.com/rss.html
viii Blue Gene/Q Service Node Failover using Linux High Availability

Chapter 1. Overview
This document explains how to configure failover for an IBM Blue Gene/Q service node using the Linux-HA software. This failover solution provides redundancy with a backup service node. The two service nodes form a cluster that monitors and detects failure of the cluster nodes and resources managed by the cluster. If one service node has a problem, the other service node takes over.
Another type of cluster for an IBM Blue Gene/Q system is for load balancing by distributing processing to multiple service nodes to improve resource utilization. See the IBM System Blue Gene Solution: Blue Gene/Q System Administration, SG24-7869 Redbooks publication for more information about the Distributed Control System feature.
The two solutions (failover and load balancing) can be used separately or combined.
Figure 1-1 on page 2 shows a typical network configuration. In this figure, the thick lines that are connected to the primary service node indicate that it is controlling the resources. If the resources shown in the figure are not available, the primary service node fails.
1
© Copyright IBM Corp. 2013. All rights reserved. 1

Figure 1-1 Normal operation
The failover solution is designed to detect physical hardware problems or logical software problems that prevent Blue Gene/Q software from running. By default, the failover solution is configured to monitor the resources shown in Figure 1-2. If the resources shown in Figure 1-2 are not available, the primary service node fails.
Figure 1-2 Monitored resources
For more information about the problems that can be detected, see Chapter 5, “Failure modes detected by the Linux-HA software” on page 37.
Resource Group: BG_GROUP BGNAV (lsb:httpd): Started bgqsn1 BGAGENT (lsb:bgagent): Started bgqsn1 BGMASTER (ocf::ibm:bgRA): Started bgqsn1 Resource Group: DB_GROUP FS_DBLOGS (ocf::heartbeat:Filesystem): Started bgqsn1 FS_DBSHARE (ocf::heartbeat:Filesystem): Started bgqsn1 DB2 (ocf::heartbeat:db2): Started bgqsn1 Resource Group: COMMON_GROUP IP_SITE_NET (ocf::heartbeat:IPaddr2): Started bgqsn1 IP_FUNC_NET (ocf::heartbeat:IPaddr2): Started bgqsn1 Clone Set: STONITH [HMC-STONITH] Started: [ bgqsn1 bgqsn2 ]
2 Blue Gene/Q Service Node Failover using Linux High Availability
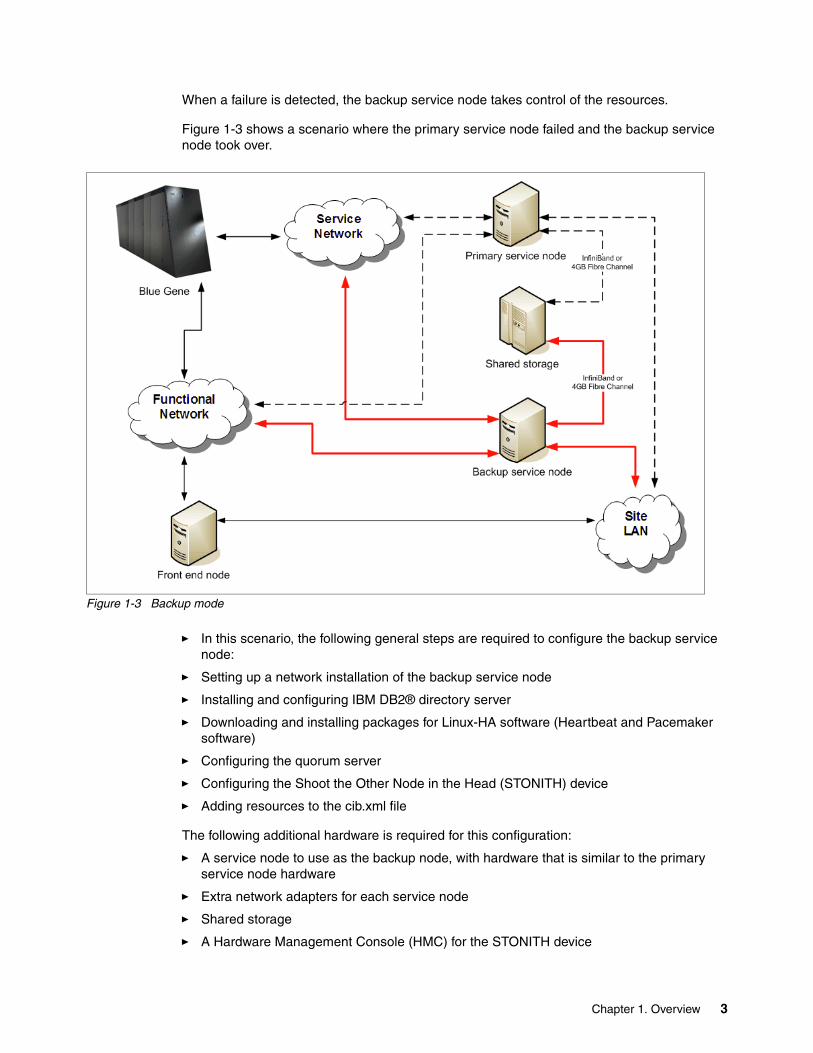
When a failure is detected, the backup service node takes control of the resources.
Figure 1-3 shows a scenario where the primary service node failed and the backup service node took over.
Figure 1-3 Backup mode
� In this scenario, the following general steps are required to configure the backup service node:
� Setting up a network installation of the backup service node
� Installing and configuring IBM DB2® directory server
� Downloading and installing packages for Linux-HA software (Heartbeat and Pacemaker software)
� Configuring the quorum server
� Configuring the Shoot the Other Node in the Head (STONITH) device
� Adding resources to the cib.xml file
The following additional hardware is required for this configuration:
� A service node to use as the backup node, with hardware that is similar to the primary service node hardware
� Extra network adapters for each service node
� Shared storage
� A Hardware Management Console (HMC) for the STONITH device
Chapter 1. Overview 3

The following additional software is required for this configuration:
� Red Hat Enterprise Linux (RHEL) 6.2� Cluster Glue 1.0.7� Resource Agents 3.9.2� Heartbeat 3.0.4� Pacemaker 1.1.5
There are additional requirements for the HA configuration:
� There must already be a service node that is configured to manage a Blue Gene/Q system.
� The backup service node hardware must be similar to the hardware for the primary service node, and both systems must be partitioned in the same way.
� There must be at least one front end node.
� The shared storage hardware must be configured with three devices that can be accessed by either service node. These devices are shared devices that are used by the service nodes to access directories such as /dblogs, /dbshare, and /share.
� Both service nodes must use a common Network Time Protocol (NTP) server.
� Both service nodes must share a common HMC.
Requirement: The customer must acquire all additional IBM or third-party software licensing entitlements that are required to use this functionality at the applicable rate.
4 Blue Gene/Q Service Node Failover using Linux High Availability

Chapter 2. Configuring high availability on a service node
This chapter explains how to configure the Linux-HA software on a service node. This configuration includes the following tasks:
� Configuring Secure Shell for high availability� Setting up a short host name� Configuring shared storage� Setting up file systems� Installing Linux-HA packages and TEAL software� Configuring the Heartbeat software� Configuring HA resources� Configuring additional resources� Configuring bg.properties and bgagent settings
2.1 Configuring Secure Shell for high availability
To prevent Secure Shell (SSH) problems when a failover of the service node occurs, make some of the SSH files common between the primary and backup service node. If the host keys on the two systems are different when a failover occurs, inbound SSH clients receive remote host identification errors when attempting to connect to the service node's shared host name. The same system and root RSA key pairs must be used on both systems to ensure seamless access to other configurations, such as IBM General Parallel File System (GPFS™).
2
© Copyright IBM Corp. 2013. All rights reserved. 5

2.1.1 Setting up SSH host keys
Perform the following steps to set up SSH host keys:
1. Make /etc/ssh and /root/.ssh common between the primary and the backup service node by resynchronizing the two directories. On the primary service node (bqqsn1), run the following commands:
rsync -ave ssh /etc/ssh/ bgqsn2:/etc/ssh/rsync -ave ssh /root/.ssh/ bgqsn2:/root/.ssh/
2. Sign into the backup service node.
Now that the host keys for the backup service node (bgqsn2) are changed, errors, such as the warning message shown in Figure 2-1, might be displayed when you log in to bgqsn2.
Figure 2-1 Warning when the host keys for bgqsn2 are changed
If this warning is displayed, edit the /root/.ssh/known_hosts file on both service nodes and remove the entry for bgqsn2.
2.2 Setting up a short host name
The system is typically configured with a fully-qualified domain name during installation. This name is required by the HMC. See Figure 2-2.
Figure 2-2 Displaying the fully-qualified domain name
The domain name is not required for the basic host details. To obtain the short name, update /etc/sysconfig/network by removing the domain name portion of the name. See Figure 2-3.
Figure 2-3 Extracting the short name from the domain name
After changing the name, use the uname command to verify that the short name is set correctly. See Figure 2-4 on page 7.
@@@@@@@@@@@@@@@@@@@@@@@@@@@@@@@@@@@@@@@@@@@@@@@@@@@@@@@@@@@ @ WARNING: REMOTE HOST IDENTIFICATION HAS CHANGED! @ @@@@@@@@@@@@@@@@@@@@@@@@@@@@@@@@@@@@@@@@@@@@@@@@@@@@@@@@@@@
~ >uname -nbgqsn1.rchland.ibm.com~ >dnsdomainnamerchland.ibm.com
sed -i.gres 's/\.[a-z].*//g' /etc/sysconfig/network source /etc/sysconfig/network hostname $HOSTNAME
6 Blue Gene/Q Service Node Failover using Linux High Availability
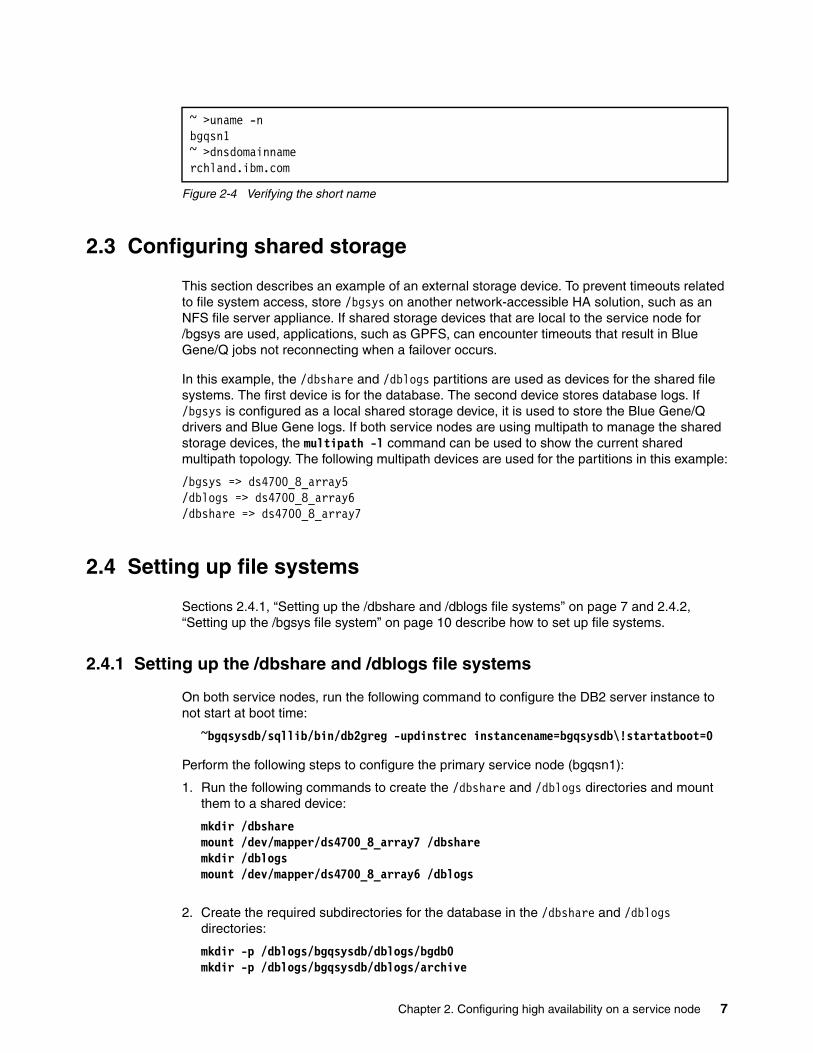
Figure 2-4 Verifying the short name
2.3 Configuring shared storage
This section describes an example of an external storage device. To prevent timeouts related to file system access, store /bgsys on another network-accessible HA solution, such as an NFS file server appliance. If shared storage devices that are local to the service node for /bgsys are used, applications, such as GPFS, can encounter timeouts that result in Blue Gene/Q jobs not reconnecting when a failover occurs.
In this example, the /dbshare and /dblogs partitions are used as devices for the shared file systems. The first device is for the database. The second device stores database logs. If /bgsys is configured as a local shared storage device, it is used to store the Blue Gene/Q drivers and Blue Gene logs. If both service nodes are using multipath to manage the shared storage devices, the multipath -l command can be used to show the current shared multipath topology. The following multipath devices are used for the partitions in this example:
/bgsys => ds4700_8_array5/dblogs => ds4700_8_array6/dbshare => ds4700_8_array7
2.4 Setting up file systems
Sections 2.4.1, “Setting up the /dbshare and /dblogs file systems” on page 7 and 2.4.2, “Setting up the /bgsys file system” on page 10 describe how to set up file systems.
2.4.1 Setting up the /dbshare and /dblogs file systems
On both service nodes, run the following command to configure the DB2 server instance to not start at boot time:
~bgqsysdb/sqllib/bin/db2greg -updinstrec instancename=bgqsysdb\!startatboot=0
Perform the following steps to configure the primary service node (bgqsn1):
1. Run the following commands to create the /dbshare and /dblogs directories and mount them to a shared device:
mkdir /dbshare mount /dev/mapper/ds4700_8_array7 /dbsharemkdir /dblogsmount /dev/mapper/ds4700_8_array6 /dblogs
2. Create the required subdirectories for the database in the /dbshare and /dblogs directories:
mkdir -p /dblogs/bgqsysdb/dblogs/bgdb0 mkdir -p /dblogs/bgqsysdb/dblogs/archive
~ >uname -nbgqsn1~ >dnsdomainnamerchland.ibm.com
Chapter 2. Configuring high availability on a service node 7

mkdir -p /dbshare/bgqsysdb/data/bgdb0 mkdir /dbshare/bgqsysdb/data/ts /dbshare/bgqsysdb/data/tempts chown -R bgqsysdb:db2rasdb /dbshare/bgqsysdbchown -R bgqsysdb:db2rasdb /dbshare/bgqsysdb
3. Update the log path:
su - bgqsysdbdb2 update db cfg for bgdb0 using newlogpath /dblogs/bgqsysdb/dblogs/bgdb0 db2stop db2start
4. Update the archive:
db2 "update database configuration for bgdb0 using logarchmeth1 DISK:/dblogs/bgqsysdb/dblogs/archive/" db2 force applications alldb2stop db2start
5. Update the database configuration to help reduce db2 start and stop times:
db2 update dbm cfg using HEALTH_MON offdb2 update db cfg for bgdb0 using LOCKTIMEOUT 30db2 update db cfg for bgdb0 using AUTO_MAINT off
6. Back up the bgdb0 database to a safe location. In this example, bgdb0 is backed up to the /dbhome/bgqsysdb/backup directory:
mkdir /dbhome/bgqsysdb/backup/ db2 backup db bgdb0 to /dbhome/bgqsysdb/backup/
7. Verify the table space IDs of USERSPACE3 and USERSPACE3TEMP. Run the following commands:
db2 connect to bgdb0db2 list tablespace show detail
Figure 2-5 on page 9 shows example output for table space IDs 3 and 4.
8 Blue Gene/Q Service Node Failover using Linux High Availability

Figure 2-5 Example output for Tablespace ID 3 and 4
8. Restore the bgdb0 database from the backup onto the /dbshare file system:
db2 drop db bgdb0db2 "restore db bgdb0 from '/dbhome/bgqsysdb/backup/' on '/dbshare/bgqsysdb/data/bgdb0' dbpath on '/dbshare/bgqsysdb/data/bgdb0' into bgdb0 redirect without rolling forward"db2 "set tablespace containers for 4 using (path '/dbshare/bgqsysdb/data/tempts' ) "db2 "set tablespace containers for 3 using (path '/dbshare/bgqsysdb/data/ts' ) "db2 restore db bgdb0 continue
9. Unmount the shared storage:
umount /dbshare
....Tablespace ID = 3 Name = USERSPACE3 Type = System managed space Contents = All permanent data. Regular table space. State = 0x0000 Detailed explanation: Normal Total pages = 1167 Useable pages = 1167 Used pages = 1167 Free pages = Not applicable High water mark (pages) = Not applicable Page size (bytes) = 16384 Extent size (pages) = 64 Prefetch size (pages) = 32 Number of containers = 1 Minimum recovery time = 2012-04-13-21.17.39.000000
Tablespace ID = 4 Name = USERSPACE3TEMP Type = System managed space Contents = System Temporary data State = 0x0000 Detailed explanation: Normal Total pages = 1 Useable pages = 1 Used pages = 1 Free pages = Not applicable High water mark (pages) = Not applicable Page size (bytes) = 16384 Extent size (pages) = 64 Prefetch size (pages) = 32 Number of containers = 1
Chapter 2. Configuring high availability on a service node 9

Perform the following steps on the backup service node (bgqsn2):
1. Create the /dbshare and /dblogs directories and mount them to a shared device:
mkdir /dbshare mount /dev/mapper/ds4700_8_array7 /dbsharemkdir /dblogs mount /dev/mapper/ds4700_8_array6 /dblogs
2. Configure the database catalog to /dbshare:
su - bgqsysdb db2 drop database bgdb0 db2 catalog database bgdb0 on /dbshare/bgqsysdb/data/bgdb0
3. Unmount the shared storage:
umount /dbshareumount /dblogs
2.4.2 Setting up the /bgsys file system
This section describes how to configure the /bgsys file system if it is not already set up.
To simplify failover, set up the /bgsys file system as an NFS file server appliance on an additional system (that is, a system that is not one of the two service nodes in the HA environment). When this configuration is used, the file system is available to both service nodes and does not need to be switched during failover.
Use one of the following tasks to configure the /bgsys file system:
� “Configuring the /bgsys file system as an NFS file server appliance”� “Configuring the /bgsys file system as a shared storage device” on page 11
Configuring the /bgsys file system as an NFS file server applianceTasks must be performed on both the primary and backup service nodes to configure the /bgsys file system as an NFS file server appliance.
Perform the following steps on the primary service node (bgqsn1):
1. If there are files in the /bgsys directory, move the directory to another location. In this example, it is moved to the /bgsys.local directory:
mv /bgsys /bgsys.localperl -spi -e "s/bgsys/bgsys.local/" /etc/fstab
2. Add a line to /etc/fstab to mount /bgsys on boot from the NFS file server appliance. See Example 1.
Example 1 Line to add to /etc/fstab
172.16.250.2:/bgsys /bgsys nfs vers=3,hard,bg,tcp,intr,timeo=20,retrans=10,async,wsize=8192,rsize=8192 0 0
3. Create the /bgsys directory and mount it from the NFS file server appliance:
mkdir /bgsysmount /bgsys
4. Resynchronize the existing data from the /bgsys.local directory to the NFS file server appliance:
rsync -a /bgsys.local/ /bgsys/
10 Blue Gene/Q Service Node Failover using Linux High Availability

Perform the following steps to configure the backup service node (bgqsn2):
1. If there are files in the /bgsys directory, move the directory to another location. In this example, it is moved to the /bgsys.local directory:mv /bgsys /bgsys.localperl -spi -e "s/bgsys/bgsys.local/" /etc/fstab
2. Create the /bgsys directory and mount it from the NFS file server appliance:
mkdir /bgsysmount /bgsys
Configuring the /bgsys file system as a shared storage deviceTasks must be performed on both the primary and backup service nodes to configure the /bgsys file system as a shared storage device.
Perform the following steps on the primary service node (bgqsn1):
1. If there are files in the /bgsys directory, move the directory to another location. In this example, it is moved to the /bgsys.local directory:
mv /bgsys /bgsys.localperl -spi -e "s/bgsys/bgsys.local/" /etc/fstab
2. Resynchronize the existing data from the /bgsys.local directory to the shared storage:
rsync -a /bgsys.local/ /bsys/
3. Unmount the shared storage:
umount /bgsys
Perform the following steps to configure the backup service node (bgqsn2):
1. If there are files in the /bgsys directory, move the directory to another location. In this example, it is moved to the /bgsys.local directory:mv /bgsys /bgsys.localperl -spi -e "s/bgsys/bgsys.local/" /etc/fstab
2. Create the /bgsys directory and mount it to a shared storage location:
mkdir /bgsysmount /dev/mapper/ds4700_8_array5 /bgsys
3. Unmount the shared storage:
umount /bgsys
2.5 Installing Linux-HA packages and TEAL software
The Blue Gene/Q high-availability solution uses the building blocks from the Linux-HA project. For more information, see the following website:
http://www.linux-ha.org
This document describes a configuration with the Pacemaker cluster resource manager and the Heartbeat communication layer. For more information about Pacemaker, see the following website:
http://clusterlabs.org
Only the Pacemaker solution has been tested with the Heartbeat cluster stack.
Chapter 2. Configuring high availability on a service node 11

For more information about installing the Pacemaker software, see the following website:
http://clusterlabs.org/wiki/Install#From_Source
Sign on to the system as the root user to perform the installation.
2.5.1 Setting up the installation server
This section describes how to download required software packages to the installation server.
Perform the following steps to download the required software packages:
1. Run the following commands to download the software packages:
mkdir -p /software/HA_Linux
cd /software/HA_Linux/
wget -O cluster-glue.tar.bz2 http://hg.linux-ha.org/glue/archive/glue-1.0.7.tar.bz2
wget -O resource-agents.tar.gz https://github.com/ClusterLabs/resource-agents/tarball/v3.9.2
wget -O heartbeat.tar.bz2 http://hg.linux-ha.org/heartbeat-STABLE_3_0/archive/STABLE-3.0.4.tar.bz2
wget -O pacemaker.tar.gz https://github.com/ClusterLabs/pacemaker/tarball/Pacemaker-1.1.5
2. Download the documentation from the SourceForge website. The documentation files are required to compile the software.
The installation program is configured to use the wget command to download the documentation from the SourceForge website. If internet access is not available, download the files on another system and copy them to the installation server.
Run the following commands to download the documentation:
mkdir -p /srv/www/htdocs/release/xsl
cd /srv/www/htdocs/release/xsl
wget -r -N -np -nH --cut-dirs=2 http://docbook.sourceforge.net/release/xsl/current
2.5.2 Setting up a service node
Perform the following steps to set up a service node:
1. Install the dependency packages:
yum -y install glib2-devel.ppc64 libtool-ltdl-devel.ppc64 libxslt-devel.ppc glib2-devel.ppc libtool-ltdl.ppc libtool-ltdl-devel.ppc libuuid-devel.ppc libuuid-devel.ppc64 libxslt-devel.ppc64 nss-devel.ppc64 nss-devel.ppc perl-Socket6.ppc64 perl-IO-Socket-INET6.noarch perl-MailTools.noarch libtool.ppc64 bzip2-devel gnutls-devel
12 Blue Gene/Q Service Node Failover using Linux High Availability

2. Configure the environment variables for the build process. The following settings are example settings:
export PREFIX=/usr export LCRSODIR=$PREFIX/libexec/lcrso export CLUSTER_USER=hacluster export CLUSTER_GROUP=haclient export PKG_CONFIG_PATH=/usr/lib64/pkgconfig export LDFLAGS="-L/lib64" export CFLAGS="-m64"
3. Create a user and group for the cluster:
getent group ${CLUSTER_GROUP} >/dev/null || groupadd -r ${CLUSTER_GROUP} getent passwd ${CLUSTER_USER} >/dev/null || useradd -r -g ${CLUSTER_GROUP} -d /var/lib/heartbeat/cores/hacluster -s /sbin/nologin -c "cluster user" ${CLUSTER_USER}
4. On each service node where internet access is not available, edit the /etc/hosts file and change the text “docbook.sourceforge.net” to the installation server. The following syntax is an example configuration:
172.16.1.250 install-server.rchland.ibm.com install-server docbook.sourceforge.net
5. Mount the installation server.
mount -o soft install-server:/software /mnt
6. Edit the gatomic.h file.
vi /tmp/glib.patch
Ensure that the text matches Figure 2-6 on page 14.
Chapter 2. Configuring high availability on a service node 13

Figure 2-6 Example gatomic.h file
7. Apply the patch:
patch -N -p0 < /tmp/glib.patch
2.5.3 Installing the cluster glue software
Perform the following steps to install the cluster glue software:
1. Extract the downloaded cluster glue package:
cd /opt tar jxf /mnt/HA_Linux/cluster-glue.tar.bz2 cd Reusable-Cluster-Components-*
2. Configure cluster glue software for the build:
./autogen.sh && ./configure --prefix=$PREFIX --with-daemon-user=${CLUSTER_USER} --with-daemon-group=${CLUSTER_GROUP} --sysconfdir=/etc
3. When the configure utility reports success, compile the cluster glue software:
makemake install
--- /usr/include/glib-2.0/glib/gatomic.h.orig 2010-04-14 18:16:59.853768126 +0000 +++ /usr/include/glib-2.0/glib/gatomic.h 2010-04-14 18:17:39.409810040 +0000 @@ -64,16 +64,16 @@ #else # define g_atomic_int_get(atomic) \ ((void) sizeof (gchar [sizeof (*(atomic)) == sizeof (gint) ? 1 : -1]), \ - (g_atomic_int_get) ((volatile gint G_GNUC_MAY_ALIAS *) (void *) (atomic))) + (g_atomic_int_get) ((volatile gint G_GNUC_MAY_ALIAS *) (volatile void *) (atomic))) # define g_atomic_int_set(atomic, newval) \ ((void) sizeof (gchar [sizeof (*(atomic)) == sizeof (gint) ? 1 : -1]), \ - (g_atomic_int_set) ((volatile gint G_GNUC_MAY_ALIAS *) (void *) (atomic), (newval))) + (g_atomic_int_set) ((volatile gint G_GNUC_MAY_ALIAS *) (volatile void *) (atomic), (newval))) # define g_atomic_pointer_get(atomic) \ ((void) sizeof (gchar [sizeof (*(atomic)) == sizeof (gpointer) ? 1 : -1]), \ - (g_atomic_pointer_get) ((volatile gpointer G_GNUC_MAY_ALIAS *) (void *) (atomic))) + (g_atomic_pointer_get) ((volatile gpointer G_GNUC_MAY_ALIAS *) (volatile void *) (atomic))) # define g_atomic_pointer_set(atomic, newval) \ ((void) sizeof (gchar [sizeof (*(atomic)) == sizeof (gpointer) ? 1 : -1]), \ - (g_atomic_pointer_set) ((volatile gpointer G_GNUC_MAY_ALIAS *) (void *) (atomic), (newval))) + (g_atomic_pointer_set) ((volatile gpointer G_GNUC_MAY_ALIAS *) (volatile void *) (atomic), (newval))) #endif /* G_ATOMIC_OP_MEMORY_BARRIER_NEEDED */ #define g_atomic_int_inc(atomic) (g_atomic_int_add ((atomic), 1))
14 Blue Gene/Q Service Node Failover using Linux High Availability
2.5.4 Installing resource agents
Perform the following steps to install the resource agents:
1. Extract the resource agents package:
cd /opt/tar zxf /mnt/HA_Linux/resource-agents.tar.gzcd ClusterLabs-resource-agents-*
2. Configure the resource agents for the build:
./autogen.sh && ./configure --prefix=$PREFIX --sysconfdir=/etc
3. When the configuration reports success, compile the resource agents.
make make install
2.5.5 Installing the Heartbeat package
Perform the following steps to install the Heartbeat package:
1. Extract the downloaded Heartbeat package:
cd /opt tar jxf /mnt/HA_Linux/heartbeat.tar.bz2 cd Heartbeat-*
2. Configure the Heartbeat software for the build:
./bootstrap && ./configure --prefix=$PREFIX --sysconfdir=/etc --enable-quorumd
3. When the configuration reports success, compile the Heartbeat package:
make make install
2.5.6 Installing the Pacemaker software
Perform the following steps to install the Pacemaker software:
1. Extract the downloaded Pacemaker package:
cd /opt tar zxf /mnt/HA_Linux/pacemaker.tar.gzcd ClusterLabs-pacemaker-*
2. Run the following command to configure the Pacemaker software for the build:
./autogen.sh && ./configure --prefix=$PREFIX --with-lcrso-dir=$LCRSODIR --sysconfdir=/etc
3. When the configure utility reports success, compile the Pacemaker software:
make make install
4. If you installed the Pacemaker software, or any other software, into a nonstandard location, update the LD_LIBRARY_PATH environment variable:
5. Run the ldconfig utility:
ldconfig -v
Chapter 2. Configuring high availability on a service node 15

6. Run the following command to fix /usr/lib/ocf/resource.d/heartbeat/IPaddr2 (this enables IPaddr2 to interact with the IB interface):
perl -spi -e "s/ipoib//g" /usr/lib/ocf/resource.d/heartbeat/IPaddr2
7. Repeat the steps in 2.5.2, “Setting up a service node” on page 12 on the second (or backup) service node.
2.5.7 Installing TEAL
The TEAL software is installed in the /opt directory. All other Blue Gene/Q software is installed in the /bgsys directory. Because the /opt directory is not shared between service nodes, the TEAL RPMs that are included with the Blue Gene/Q driver download must be installed on both service nodes.
If the Blue Gene/Q RPMs are located in the /bgsys/downloads/V1R1M2/rpms directory, run the following command as root on both service nodes:
yum localinstall teal-base-bg-1.1.0.5-1.ppc64.rpm bgq-teal-1.1.2-0.ppc64.rpm
16 Blue Gene/Q Service Node Failover using Linux High Availability

2.6 Configuring the Heartbeat software
This section explains how to configure the Heartbeat software on both service nodes. Three files are required to configure the Heartbeat software: ha.cf, authkeys, and logd.cf.
Perform the following steps to configure the Heartbeat software:
1. Create the configuration files on the primary service node (bgqsn1):
a. Run the following commands as the root user to copy the template or sample configurations from the build directory:
cp /opt/Heartbeat-*/doc/ha.cf /etc/ha.d/ha.cfcp /opt/Heartbeat-*/doc/authkeys /etc/ha.d/authkeyscp /opt/Reusable-Cluster-Components-glue-*/logd/logd.cf /etc/logd.cf
b. Edit the /etc/ha.d/ha.cf configuration file on the primary service node.
This file is the global configuration file for the Heartbeat cluster. Figure 2-7 shows an example ha.cf file.
Figure 2-7 Example ha.cf file
The example in Figure 2-7 uses the following directives:
debug Sets the level of debugging in effect in the system. Valid values of the debug option are 0 - 255. The most useful values are between 0 (off, which is the default) and 3.
use_logd Specifies whether Heartbeat logs its messages through logging daemon. If the logging daemon is used, all log messages are sent through IPC to the logging daemon, which writes them into log files. If the use_logd directive is not used, all log messages are directly written to log files. To simplify debugging, set use_logd to true (on).
bcast Specifies which interface Heartbeat software uses for communications. The possible values for this communication directive are: bcast, mcast, ucast,
# Logging debug 1 use_logd true
# Misc Options compression bz2 coredumps true
# Communications udpport 694 bcast eth0 node bgqsn1 bgqsn2
# Thresholds (in seconds) keepalive 1 warntime 10 deadtime 30 initdead 120
# Enable the Pacemaker (cluster resource manager) crm yes
Chapter 2. Configuring high availability on a service node 17

and serial. For a simple two-node cluster, ucast is typically the best choice because it generates less traffic, though it might be less reliable than other options. Use a minimum of two communication paths for redundant heartbeat communications. The syntax for each communication directive is:
bcast dev [dev2]
ucast dev peer-ip-address
mcast dev mcast-group udp-port ttl loop
serial serial-port-name [serial-port-name2]
node Defines what systems are in the cluster. The node names specified must match the output for the uname -n command on that system. Multiple node names can be specified in one directive:
node node-name1 node-name2
Alternately, multiple node names can be specified multiple times:
node node-name1
node node-name 2
crm Determines whether the Pacemaker (cluster resource manager) is enabled. On newer versions of the Heartbeat software (release 3.0.4 or later), the "crm" keyword is renamed "pacemaker"; crm is retained as a compatibility alias; however, pacemaker is the preferred syntax.
For more information about the ha.cf file, visit the following website:
http://linux-ha.org/wiki/Ha.cf
c. Edit the logd.cf file on the primary service node to configure the log daemon.
Figure 2-8 shows an example logd.cf file.
Figure 2-8 Example logd.cf file
d. Configure the authkeys file on the primary service node.
The authkeys file contains keys for node authentication. It is used to authenticate the members of the cluster. There are three types of authentication methods that can be used:
• Cyclic Redundancy Check (CRC)• Message Digest algorithm 5 (MD5)• Secure Hash Algorithm (SHA-1)
The syntax for the authentication file is:
auth <num><num> <algorithm> <secret-keys>
i. Run the following command to create an authkeys file with generated secret keys:
cat <<-AUTH >/etc/ha.d/authkeys
debugfile /usr/var/ha-debug logfile/usr/var/ha-log logfacility none entity logd
18 Blue Gene/Q Service Node Failover using Linux High Availability
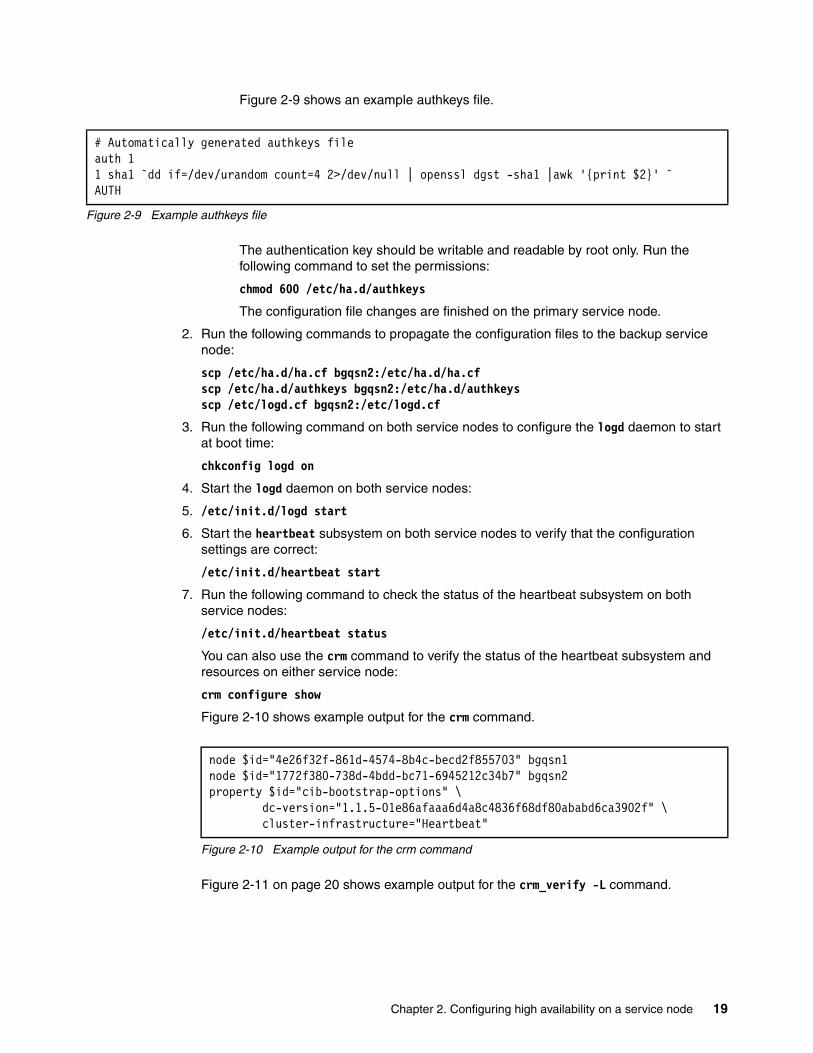
Figure 2-9 shows an example authkeys file.
Figure 2-9 Example authkeys file
The authentication key should be writable and readable by root only. Run the following command to set the permissions:
chmod 600 /etc/ha.d/authkeys
The configuration file changes are finished on the primary service node.
2. Run the following commands to propagate the configuration files to the backup service node:
scp /etc/ha.d/ha.cf bgqsn2:/etc/ha.d/ha.cfscp /etc/ha.d/authkeys bgqsn2:/etc/ha.d/authkeysscp /etc/logd.cf bgqsn2:/etc/logd.cf
3. Run the following command on both service nodes to configure the logd daemon to start at boot time:
chkconfig logd on
4. Start the logd daemon on both service nodes:
5. /etc/init.d/logd start
6. Start the heartbeat subsystem on both service nodes to verify that the configuration settings are correct:
/etc/init.d/heartbeat start
7. Run the following command to check the status of the heartbeat subsystem on both service nodes:
/etc/init.d/heartbeat status
You can also use the crm command to verify the status of the heartbeat subsystem and resources on either service node:
crm configure show
Figure 2-10 shows example output for the crm command.
Figure 2-10 Example output for the crm command
Figure 2-11 on page 20 shows example output for the crm_verify -L command.
# Automatically generated authkeys file auth 1 1 sha1 `dd if=/dev/urandom count=4 2>/dev/null | openssl dgst -sha1 |awk '{print $2}' ` AUTH
node $id="4e26f32f-861d-4574-8b4c-becd2f855703" bgqsn1 node $id="1772f380-738d-4bdd-bc71-6945212c34b7" bgqsn2 property $id="cib-bootstrap-options" \ dc-version="1.1.5-01e86afaaa6d4a8c4836f68df80ababd6ca3902f" \ cluster-infrastructure="Heartbeat"
Chapter 2. Configuring high availability on a service node 19

Figure 2-11 Example output for the crm_verify command
The STONITH device is running, but not defined, which generates an error. Run the following command to disable the STONITH device:
crm configure property stonith-enabled=false
Run the following command to verify the configuration:
crm_verify -L
If the configuration works correctly, nothing is displayed.
8. Run the following command to put one node on standby:
crm node standby bgqsn2
2.7 Configuring HA resources
A resource represents a single physical or logical entity that provides a service. It is identified by a unique name assigned by the system administrator. The system administrator must determine which resources must be managed by the cluster.
The information in this section is example information. You can change the configuration information to fit your environment. The timeout values might need to be adjusted depending on your environment.
See the examples in this section when you configure HA resources.
2.7.1 Configuring file systems
There are two file systems that must be configured: /dblogs and /dbshare.
Add the /bgsys file system as an HA resource only if it is not set up as a network appliance.
The following commands are example configurations:
crm configure primitive FS_BGSYS ocf:heartbeat:Filesystem params device="/dev/mapper/ds4700_8_array5" fstype="ext4" directory="/bgsys" op monitor interval="20" timeout="40"
crm configure primitive FS_DBSHARE ocf:heartbeat:Filesystem params device="/dev/mapper/ds4700_8_array7" fstype="ext4" directory="/dbshare" op monitor interval="20" timeout="40"
crm_verify[15238]: 2011/08/16_20:57:01 ERROR: unpack_resources: Resource start-up disabled since no STONITH resources have been defined crm_verify[15238]: 2011/08/16_20:57:01 ERROR: unpack_resources: Either configure some or disable STONITH with the stonith-enabled option crm_verify[15238]: 2011/08/16_20:57:01 ERROR: unpack_resources: NOTE: Clusters with shared data need STONITH to ensure data integrity Errors found during check: config not valid -V may provide more details
20 Blue Gene/Q Service Node Failover using Linux High Availability
crm configure primitive FS_DBLOGS ocf:heartbeat:Filesystem params device="/dev/mapper/ds4700_8_array6" fstype="ext4" directory="/dblogs" op monitor interval="20" timeout="40"
2.7.2 Configuring IP address takeover
The Linux-HA software does not manage the service network.
The following IP addresses must be configured for IP address takeover:
� IP address for site LAN. This address is the IP address that corresponds to the common host name for both service nodes. Users can use this address to sign on to the service node that currently hosts all resources.
crm configure primitive IP_SITE_NET ocf:heartbeat:IPaddr2 params ip="9.5.45.67" cidr_netmask="24" nic="eth1" op monitor interval="20s" timeout="20s"
� IP address for the functional network.
crm configure primitive IP_FUNC_NET ocf:heartbeat:IPaddr2 params ip="172.20.2.3" cidr_netmask="16" nic="ib0" op monitor interval="20s" timeout="20s"
� IP address for the private network. This address is required if the Distributed Control System is configured.
crm configure primitive IP_PRIV_NET ocf:heartbeat:IPaddr2 params ip="192.169.2.3" cidr_netmask="16" nic="eth3" op monitor interval="20s" timeout="20s"
2.7.3 Configuring the database
The timeout values for the database can be modified to fit your environment. For example, the values might need to be increased if traffic in the network increases.
Here is an example command to configure the database:
crm configure primitive DB2 ocf:heartbeat:db2 params instance="bgqsysdb" op monitor interval="30" timeout="60" op start interval="0" timeout="600" start-delay="5" op stop interval="0" timeout="600"
2.7.4 Configuring the NFS Server
Perform this task only if the /bgsys file system is configured as an HA resource.
Perform the following steps to configure the NFS server:
1. Stop NFS on both service nodes and disable automatic start after boot:
/etc/init.d/nfs stop chkconfig nfs off
2. Add NFS as a cluster resource:
crm configure primitive NFS lsb:nfs op monitor interval="15" timeout="15"
2.7.5 Configuring the HTTP daemon
This daemon is required for the Blue Gene/Q Navigator interface.
Chapter 2. Configuring high availability on a service node 21
Perform the following steps to configure the HTTP daemon:
1. Run the following commands to stop HTTPD on both service nodes and disable automatic start after boot:
/etc/init.d/httpd stopchkconfig httpd off
2. Run the following command to add HTTPD as a cluster resource:
crm configure primitive BGNAV lsb:httpd op monitor interval="15" timeout="30" start-delay="1"
2.7.6 Configuring Blue Gene resources
Perform the following steps to configure Blue Gene/Q resources:
1. Stop bgagent on both service nodes (if started) and disable automatic start after boot:
/etc/init.d/bgagent stopchkconfig bgagent off
2. Stop bgmaster if it is running:
master_stop bgmaster
3. Run the following commands to copy a resource agent script for managing Blue Gene/Q resources:
mkdir -p /usr/lib/ocf/resource.d/ibmcp /bgsys/drivers/ppcfloor/scripts/bgRA /usr/lib/ocf/resource.d/ibm/bgRA
4. Ensure that the root user id is in the bgqadmin group so that it can correctly query bgmaster with master_status. Run the following command on both the primary and backup service node:
usermod -G bgqadmin -a root
5. Run the following commands to add bgagent and bgmaster as cluster resources:
crm configure primitive BGAGENT lsb:bgagent op monitor interval="30" timeout="15"
crm configure primitive BGMASTER ocf:ibm:bgRA op monitor interval="30" timeout="300" op start interval="0" timeout="300" op stop interval="0" timeout="300"
2.7.7 Setting up cluster resource groups
To simplify managing individual resources and implicit dependency, put all cluster resources into three groups. One group is for common system resources that are required by the cluster. Another group is for database-related items, called DB_GROUP. The other group, BG_GROUP, is for the rest of the resources.
If /bgsys is served from an NFS file server appliance, run the following command:
crm configure group COMMON_GROUP IP_SITE_NET IP_FUNC_NET IP_PRIV_NET meta resource-stickiness="100" failure-timeout="60" migration-threshold="3" target-role="Started"
22 Blue Gene/Q Service Node Failover using Linux High Availability

If /bgsys is a local HA shared storage resource, run the following command:
crm configure group COMMON_GROUP IP_SITE_NET IP_FUNC_NET IP_PRIV_NET FS_BGSYS NFS meta resource-stickiness="100" failure-timeout="60" migration-threshold="3" target-role="Started"
Run the following commands to set up the remaining cluster resource groups:
crm configure group DB_GROUP FS_DBSHARE FS_DBLOGS DB2 meta resource-stickiness="100" failure-timeout="60" migration-threshold="3" target-role="Started"
crm configure group BG_GROUP BGNAV BGAGENT BGMASTER meta resource-stickiness="100" failure-timeout="60" migration-threshold="3" target-role="Started"
2.7.8 Setting up collocation and order
Run the following commands to set up collocation and order:
crm configure colocation bgsys-with-db2 inf: BG_GROUP DB_GROUP crm configure colocation db2-with-common inf: COMMON_GROUP DB_GROUP crm configure order bg-after-db inf: DB_GROUP BG_GROUP crm configure order db-after-common inf: COMMON_GROUP DB_GROUP
2.7.9 Configuring the STONITH device
The STONITH device is the IBM HMC.
Perform the following steps to configure the STONITH device:
1. Run the following commands to configure the device:
crm configure primitive HMC-STONITH stonith:ibmhmc params ipaddr="9.5.45.56" params stonith-timeout="600" op start interval="0" timeout="300"
crm configure clone STONITH HMC-STONITH
crm configure property stonith-timeout=900s
2. Ensure that the LPAR name in the HMC matches the output for the uname -n command on the cluster node. This setting is required for the STONITH device to work on the HMC.
3. Run the following command to set up keys on the HMC for STONITH password-less access:
KEY=`cat ~/.ssh/id_rsa.pub` && ssh [email protected] mkauthkeys -a \"$KEY\"
4. When all resources are running, put the standby node online again:
crm node online bgqsn2
5. When the cluster is running, reenable the STONITH device:
crm configure property stonith-enabled=true
6. Configure heartbeat to shut down with the system (but not start when system boots):
chkconfig --level 23456 heartbeat off
Note: The timeout value for monitor and start operations might need to be adjusted, depending on how many systems and LPARS the HMC manages.
Chapter 2. Configuring high availability on a service node 23

2.7.10 Configuring additional resources
It is possible to configure additional resources which run on the Service Node, can be started with an init script, and are integral to Blue Gene/Q operation (for example, schedulers).
Perform the following steps to configure the additional resource:
1. Run the following commands to stop the resource both service nodes and disable automatic start after boot:
/etc/init.d/<resource> stopchkconfig <resource> off
2. Run the following command to add the additional resource as a cluster resource:
crm configure primitive <RESOURCE> lsb:<resource> op monitor interval="15" timeout="15"
When these steps are complete, add the resource to the BG_GROUP cluster resource group as described in 2.7.6, “Configuring Blue Gene resources” on page 22 or create a new resource group as described in 2.7.7, “Setting up cluster resource groups” on page 22, and configure its start order, as described in 2.7.8, “Setting up collocation and order” on page 23.
2.7.11 Configuring bg.properties and bgagent settings
The bg.properties configuration file must be changed when setting up a Linux-HA environment.
On a system with a front end node installed, various Blue Gene servers are configured to listen for connections over the functional network. Similarly, various Blue Gene clients are configured to connect over the functional network.
As part of the Linux-HA installation described in 2.7.2, “Configuring IP address takeover” on page 21, IP takeover is configured for the functional network.
Servers and clients must be configured to listen on and connect over the shared functional network IP instead of the IPs of the primary and backup service node.
Configuring the bg.properties file for failoverExample 2-2 lists sections that are typically configured for listening on or connecting over the functional network. Most of these entries also listen on or connect over 127.0.0.1. No change is required for this configuration.
Example 2-2 Sections that typically listen on or connect over the functional network
[runjob.mux]
host =
[runjob.server]
mux_listen_ports = command_listen_ports =
[runjob.server.commands]
host =
24 Blue Gene/Q Service Node Failover using Linux High Availability

[bg_console] host =
[mmcs]
listen_ports =
[realtime.server]
listen_ports =
command_listen_ports =
[realtime.server.command]
host = 127.0.0.1:32062,172.16.1.1:32062
[master.server]
agent_listen_ports = client_listen_ports =
[master.client]
host =
[bgws]
listen_ports =
[bgws.clients]
base_url =
By default, the bg.properties file is configured to do a full system bringup each time mmcs_server, mc_server or subnet_mc is restarted.
A full system bringup reinitializes all hardware in the system. When the default settings are used, booted blocks and running jobs are lost because a service node failover event causes servers to be stopped on the primary service node and restarted on the backup service node.
The settings in Example 2-3 must be changed to maintain booted blocks and running jobs throughout the failover process.
Example 2-3 Settings to maintain booted blocks and running jobs
[machinecontroller]
bringup = false#bringup = true
[mmcs]
reconnect_blocks = true
Chapter 2. Configuring high availability on a service node 25

#reconnect_blocks = false
As part of the Linux-HA installation that is described in 2.7.2, “Configuring IP address takeover” on page 21, IP takeover is configured for the private network.
Servers and clients must be configured to listen on and connect over the shared private network IP that is configured in this step instead of the IPs of the primary and backup service nodes.
Example 2-4 lists sections that are configured to listen or connect over the private network.
Example 2-4 Sections that are configured to listen or connect over the private network
[machinecontroller] # Low Level Control system (LLCS) configuration parameters for mc_server.
PrimaryMcHostName =
Configuring bgagent initialization scripts for failoverThe bgagent scripts that run on the front end nodes must be configured to connect over the functional network.
The --host parameter in the /etc/init.d/bgagent script on each of the front end nodes must be updated with the shared IP on the function network as appropriate under the OPTIONS, for example:
OPTIONS="--users bgqadmin,bgws,bgqsysdb --workingdir $workingdir --host <ip>:32041"
If subnet service nodes are installed, various Blue Gene servers are configured to listen for connections over the private network. Similarly, various Blue Gene clients must be configured to connect over the private network.
The bgagent scripts that are running on the subnet service nodes must be configured to connect over the private network.
The --host parameter in the /etc/init.d/bgagent file on each of the subnet service nodes must be updated with the shared IP on the private network as appropriate under the OPTIONS, for example:
OPTIONS="--users bgqadmin,bgws,bgqsysdb --workingdir $workingdir --host <ip>:32041"
26 Blue Gene/Q Service Node Failover using Linux High Availability

Chapter 3. Active-Active configuration
The following Active-Active configuration has been tested. However, this type of configuration is not recommended because it can decrease performance between Midplane Management Control Server (MMCS) and the remote DB2 instance.
For Active-Active configurations, run the DB2, real-time, and TEAL servers on the backup service node. Run the other servers on the primary service node.
Typically, the real-time and TEAL servers are managed (started and stopped) by BGMaster. For Active-Active configurations, these servers are managed by the Linux-HA software.
The following tasks are required for an Active-Active configuration:
� Configuring DB2 server� Configuring IP address takeover for DB2 remote access� Configuring real-time server� Configuring TEAL servers� Setting up cluster resource groups, order, and collocation
3
© Copyright IBM Corp. 2013. All rights reserved. 27

3.1 Configuring DB2 server
Perform the following steps on the primary service node (bgqsn1):
1. Run the following commands to create the /dbshare and /dblogs directories and mount them to a shared device:
mkdir /dbshare mount /dev/mapper/ds4700_8_array7 /dbsharemkdir /dblogsmount /dev/mapper/ds4700_8_array6 /dblogs
2. Create the required subdirectories for the database under /dbshare and /dblogs:
mkdir -p /dblogs/bgqsysdb/dblogs/bgdb0 mkdir -p /dblogs/bgqsysdb/dblogs/archive mkdir -p /dbshare/bgqsysdb/data/bgdb0 mkdir /dbshare/bgqsysdb/data/ts /dbshare/bgqsysdb/data/tempts chown -R bgqsysdb:db2rasdb /dbshare/bgqsysdbchown -R bgqsysdb:db2rasdb /dbshare/bgqsysdb
3. Update the log path:
su - bgqsysdb db2 update db cfg for bgdb0 using newlogpath /dblogs/bgqsysdb/dblogs/bgdb0 db2stop db2start
4. Update the archive:
db2 "update database configuration for bgdb0 using logarchmeth1 DISK:/dblogs/bgqsysdb/dblogs/archive/" db2 force applications alldb2stop db2start
5. Update the database configuration to help reduce db2 start and stop times:
db2 update dbm cfg using HEALTH_MON offdb2 update db cfg for bgdb0 using LOCKTIMEOUT 30db2 update db cfg for bgdb0 using AUTO_MAINT off
6. Back up the bgdb0 database to a safe location. In this example, bgdb0 is backed up to the /dbhome/bgqsysdb/backup directory:
mkdir /dbhome/bgqsysdb/backup/ db2 backup db bgdb0 to /dbhome/bgqsysdb/backup/
7. Verify the table space IDs of USERSPACE3 and USERSPACE3TEMP:
db2 connect to bgdb0db2 list tablespace show detail
In Figure 3-1 on page 29, they have table space IDs 3 and 4.
28 Blue Gene/Q Service Node Failover using Linux High Availability

Figure 3-1 Example Tablespace IDs
8. Restore the bgdb0 database from the backup onto the /dbshare file system as bgdb0lcl:
db2 drop db bgdb0db2 "restore db bgdb0 from '/dbhome/bgqsysdb/backup/' on '/dbshare/bgqsysdb/data/bgdb0' dbpath on '/dbshare/bgqsysdb/data/bgdb0' into bgdb0lcl redirect without rolling forward"db2 "set tablespace containers for 4 using (path '/dbshare/bgqsysdb/data/tempts' ) "db2 "set tablespace containers for 3 using (path '/dbshare/bgqsysdb/data/ts' ) "db2 restore db bgdb0 continue
9. Catalog the service node as a TCP/IP db2 node using the IP address for DB2 remote access. In this example, the IP is 192.168.3.1:
db2 catalog tcpip node bgqsn remote 192.168.3.1 server 50001;
10.Catalog a remote database instance of the bgdb0lcl database as bgdb0:
db2 catalog db bgdb0lcl as bgdb0 at node bgqsn authentication server
....Tablespace ID = 3 Name = USERSPACE3 Type = System managed space Contents = All permanent data. Regular table space. State = 0x0000 Detailed explanation: Normal Total pages = 1167 Useable pages = 1167 Used pages = 1167 Free pages = Not applicable High water mark (pages) = Not applicable Page size (bytes) = 16384 Extent size (pages) = 64 Prefetch size (pages) = 32 Number of containers = 1 Minimum recovery time = 2012-04-13-21.17.39.000000
Tablespace ID = 4 Name = USERSPACE3TEMP Type = System managed space Contents = System Temporary data State = 0x0000 Detailed explanation: Normal Total pages = 1 Useable pages = 1 Used pages = 1 Free pages = Not applicable High water mark (pages) = Not applicable Page size (bytes) = 16384 Extent size (pages) = 64 Prefetch size (pages) = 32 Number of containers = 1
Chapter 3. Active-Active configuration 29

11.Unmount the shared storage:
umount /dbshareumount /dblogs
Perform the following steps on the backup service node (bgqsn2):
1. Create the /dbshare and /dblogs directory and mount it to a shared device:
mkdir /dbshare mount /dev/mapper/ds4700_8_array7 /dbsharemkdir /dblogs mount /dev/mapper/ds4700_8_array6 /dblogs
2. Configure the database catalog to /dbshare:
su - bgqsysdb db2 drop database bgdb0 db2 catalog database bgdb0lcl on /dbshare/bgqsysdb/data/bgdb0
3. Catalog the service node as a TCP/IP db2 node using the IP address for DB2 remote access. In this example, the address is 192.168.3.1:
db2 catalog tcpip node bgqsn remote 192.168.3.1 server 50001;
4. Catalog a remote database instance of the bgdb0lcl database as bgdb0:
db2 catalog db bgdb0lcl as bgdb0 at node bgqsn authentication server
5. Unmount the shared storage:
umount /dbshareumount /dblogs
3.2 Configuring IP address takeover for DB2 remote access
Run the following commands to configure IP address takeover:
crm configure primitive IP_DB_NET ocf:heartbeat:IPaddr2 params ip="192.168.3.1" cidr_netmask="24" nic="eth0" op monitor interval="20s" timeout="20s"
3.3 Configuring real-time server
Perform the following steps to configure the real-time server:
1. Stop real-time server if it is currently started by BGMaster:
master_stop realtime_server
2. Update the /bgsys/local/etc/bg.properties file to tell BGMaster not to manage real-time server.
Comment out the "realtime_server =" entries from [master.binmap], [master.binargs], [master.user], [master.policy.host_list], [master.policy.instances], and [master.policy.map]. Remove the "realtime_server," entry from [master.startup].
3. Add the real-time init script to /etc/init.d:
ln -s /bgsys/drivers/ppcfloor/hlcs/etc/init/realtime_server /etc/init.d/chkconfig --add realtime_server
30 Blue Gene/Q Service Node Failover using Linux High Availability

4. Create a configuration file, /etc/sysconfig/bg_realtime_server:
DAEMON_ARGS="--user=bgqsysdb"REALTIME_SERVER_ARGS="--log=/bgsys/logs/BGQ/$HOSTNAME-realtime_server.log"
5. Add real-time server as a cluster resource:
crm configure primitive REALTIME lsb:realtime_server op monitor interval="30" timeout="15"
3.4 Configuring TEAL servers
Perform the following steps to configure the TEAL servers:
1. Run the following commands to stop the TEAL servers (teal_server and teal_bg) if they are currently started by BGMaster:
master_stop teal_servermaster_stop teal_bg
2. Update the /bgsys/local/etc/bg.properties file to tell BGMaster not to manage the TEAL servers.
Comment out the "teal_server =" and "teal_bg =" entries from [master.binmap], [master.binargs], [master.logdirs], [master.policy.host_list], [master.policy.instances], and [master.policy.map]. Remove the "teal_server," and "teal_bg," entry from [master.startup].
3. Add the TEAL init to /etc/init.d:
cp /opt/teal/ibm/bgq/init.d/teal /etc/init.d/cp /opt/teal/ibm/bgq/init.d/teal_bgq /etc/init.d/ln -s /opt/teal/ibm/bgq/bgq.py /opt/teal/bin/teal_bgqchkconfig --add tealchkconfig --add teal_bgq
4. Add the TEAL servers as cluster resources:
crm configure primitive TEAL_SERVER lsb:teal op monitor interval="30" timeout="15"crm configure primitive TEAL_BGQ lsb:teal_bgq op monitor interval="30" timeout="15"
3.5 Setting up cluster resource groups, order, and collocation
Run the following commands to configure cluster resource groups, order, and collocation:
crm configure group BG_GROUP IP_SITE_NET IP_FUNC_NET IP_PRIV_NET BGNAV BGAGENT BGMASTER meta resource-stickiness="100" failure-timeout="60" migration-threshold="3" target-role="Started"
crm configure group DB_GROUP IP_DB_NET FS_DBSHARE DB2 meta resource-stickiness="100"
failure-timeout="60" migration-threshold="3" target-role="Started"
Chapter 3. Active-Active configuration 31

crm configure group RT_GROUP REALTIME TEAL_SERVER TEAL_BGQ meta resource-stickiness="100" failure-timeout="60" migration-threshold="3"
target-role="Started"
crm configure colocation realtime-with-db2 inf: DB_GROUP:Master RT_GROUP
crm configure order bg-after-db inf: DB_GROUP BG_GROUP
crm configure order rt-after-db inf: DB_GROUP RT_GROUP
3.5.1 Moving a cluster resource
Initially all resources can start on the primary service node. To move DB_GROUP (with RT_GROUP) to the backup service node, run the following command:
crm resource move DB_GROUP bgqsn2
The crm resource move command sets the preferred location for DB_GROUP to bgqns2, but it does not provide output. To view the setting for the preferred location, run the following command:
crm resource show
Look for the following information:
location cli-prefer-DB_GROUP DB_GROUP \
rule $id="cli-prefer-rule-DB_GROUP" inf: #uname eq bgqsn2
If the preferred location is set, the Linux-HA software automatically moves the resource to the preferred location when the heartbeat daemon is started (or restarted). To prevent this automatic move, run the following command to remove the preferred location:
crm resource unmove DB_GROUP
32 Blue Gene/Q Service Node Failover using Linux High Availability

Chapter 4. Additional Linux-HA commands for system administrators
This chapter provides a quick reference for commands commonly used for basic system operations. For more information about these commands and the Linux-HA software, visit the following websites:
http://www.linux-ha.org/wiki/Documentation
http://www.clusterlabs.org/doc/
This section contains information about commands for the following tasks:
� Viewing system status� Starting and stopping bgmaster and bgagent� Placing a node on standby� Bringing a node back online after a failure� Migrating resources to another system� Stopping all resources and manually restarting them� Viewing HA logs for additional debugging information
4.1 Viewing system status
This section provides example commands that can be used to view the system status.
To view resource status ordered by resource group, run the following command from either node:
crm_mon
To view resource status ordered by the node the resource is running on, run the following command on either node:
crm_mon -n -1
4
© Copyright IBM Corp. 2013. All rights reserved. 33

To view the resource status with a summary of fail counts, run the following command on either node:
crm_mon --failcounts
If the heartbeat software is not started on the node where a crm_mon command is run, the following message persists until the heartbeat is started:
Attempting connection to the cluster....
4.2 Starting and stopping bgmaster and bgagent
A different set of commands must be used to stop and start BGMaster and bgagent because they are monitored resources. If these resources are not started and stopped correctly, the resources restart until the configured fail count is reached (the default value is 3). When the configured fail count is exceeded, all resources are failed over to the backup service node.
To stop BGMaster, run the following command:
crm resource stop BGMASTER
To stop bgagent, run the following command:
crm resource stop BGAGENT
To start bgagent, run the following command:
crm resource start BGAGENT
To start BGMaster server, run the following command:
crm resource start BGMASTER
If new bg.properties settings are being tested or there is a chance either resource might not start cleanly, the following set of commands can be used to avoid unwanted resource restarts or failovers until all problems are resolved:
� Run the following commands to stop BGMaster and bgagent:
crm resource stop BGMASTERcrm resource stop BGAGENT
� Run the following commands to start BGMaster and bgagent without HA monitoring:
/etc/init.d/bgagent startsu - bgqadmin -c "master_start bgmaster"
� Run the following commands to stop BGMaster server and bgagent when testing is complete:
su - bgqadmin -c "master_stop bgmaster"/etc/init.d/bgagent stop
� Run the following commands to start BGMaster and bgagent as monitored HA resources:
crm resource start BGAGENTcrm resource start BGMASTER
To reset the fail count for BGMaster and bgagent, run the following commands:
crm resource cleanup BGAGENTcrm resource cleanup BGMASTER
34 Blue Gene/Q Service Node Failover using Linux High Availability

4.3 Placing a node on standby
When testing out resource or group configuration changes, the backup service node can be placed on standby to avoid an unwanted failovers until any problems have been resolved.
To place a node on standby, run the following command:
crm node standby bgqsn2
To take a node off standby, run the following command:
crm node online bgqsn2
If any resources are running on a node placed on standby, those resources will fail over to the other node.
4.4 Bringing a node back online after a failure
If a node is shut down, the heartbeat software is not automatically started when it starts.
When the system is confirmed to be healthy and ready to take over resources, the heartbeat can be restarted with the following command:
sudo /etc/init.d/heartbeat start
If resources are configured to prefer running on the node where the heartbeat is started, this command causes those resources to be migrated.
4.5 Migrating resources to another system
Resource groups can be moved from one node to another with the following commands:
crm resource move <resource> <system name>
or
crm resource move <resource group> <system name>
For example, you can use the following command:
crm resource move COMMON_GROUP bgqsn2
4.6 Stopping all resources and manually restarting them
Perform the following steps to stop all resources and manually restart them:
1. Use the crm_mon or crm status command to determine which system is the primary system (that is, the system that controls the resources). In this example, bgqsn1 is the current primary service node, and bgqsn2 is the current backup service node:
crm_mon --one-shotcrm status
Chapter 4. Additional Linux-HA commands for system administrators 35

2. Place the current backup service node in standby. In this example, the backup service node is bgqsn2:
crm node standby bgqsn2
3. Stop the crm resources on the primary service node bgqsn1 by putting it in standby:
crm node standby bgqsn1
4. To display information about logical unit number (LUN) mapping or IP addresses and network adapters, run the following command:
crm configure show
5. Start the network adapters. This step and all the steps that follow can be performed on either service node unless otherwise specified:
ip addr add 9.5.45.67/24 dev eth1ip addr add 172.20.2.3/16 dev ib0ip addr add 192.169.2.3/16 dev eth3
6. Mount the shared storage:
mount /dev/mapper/ds4700_8_array6 /dblogsmount /dev/mapper/ds4700_8_array7 /dbshare
7. If the /bgsys file system is an HA resource and it is not a NFS file server appliance, run the following command on both service nodes to mount it:
mount /dev/mapper/ds4700_8_array5 /bgsys
8. Start the http daemon:
/etc/init.d/httpd start
9. If /bgsys is configured as a local shared storage device on service node, start the nfsd daemon:
/etc/init.d/nfs start
10.Start DB2 server:
su - bgqsysdb -c “db2start”validate you can connect to the bgdb0 database with -su - bgqsysdb -c “db2 connect to bgdb0 ; db2 connect reset”
11.Start the Blue Gene resources:
a. Start bgagent:
/etc/init.d/bgagent start
b. Start bgmaster:
su - bgqadmin -c “master_start bgmaster”
4.7 Viewing HA logs for additional debugging information
HA logs are stored in /var/log/ha-log and /var/log/ha-debug.
36 Blue Gene/Q Service Node Failover using Linux High Availability

Chapter 5. Failure modes detected by the Linux-HA software
By default, five types of resources are configured. Each type of resource has different capabilities for detecting and reporting failures to the Linux-HA software.
This chapter contains information about the following resources:
� Resources started by init scripts� File system resources� Network adapters� DB2 server� BGMaster
5.1 Resources started by init scripts
Resources that are started by init scripts (for example, BGAGENT and HTTPD) are managed by the Linux Standard Base resource class.
For more information about the init script requirements and failure detection, see the following website:
http://www.clusterlabs.org/doc/en-US/Pacemaker/1.0/html/Pacemaker_Explained/s-resource-lsb.html
For testing purposes, ending the service started by the init script such that the status command returns the service is stopped causes the Linux-HA software to detect a failure.
5.2 File system resources
File system resources (for example, FS_DBLOGS and FS_DBSHARE) are managed by the Open Cluster Framework resource class.
5
© Copyright IBM Corp. 2013. All rights reserved. 37

For more information about the application requirements and failure detection, see the following website:
http://www.clusterlabs.org/doc/en-US/Pacemaker/1.0/html/Pacemaker_Explained/s-resource-supported.html#s-resource-ocf
When Linux-HA is successfully installed, the active script can be found at:
/usr/lib/ocf/resource.d/heartbeat/Filesystem
For detailed information about the Linux-HA software, see the following websites:
http://www.linux-ha.org/doc/man-pages/re-ra-Filesystem.htmlhttp://www.linux-ha.org/wiki/Resource_Agents
For testing purposes, taking down the connection to the shared storage causes the Linux-HA software to detect a failure.
5.3 Network adapters
Network Adapter resources (for example, IP_FUNC_NET) are managed by the Open Cluster Framework resource class.
For more information about the application requirements and failure detection, see the following website:
http://www.clusterlabs.org/doc/en-US/Pacemaker/1.0/html/Pacemaker_Explained/s-resource-supported.html#s-resource-ocf
When the Linux-HA is successfully installed, the active script can be found at:
/usr/lib/ocf/resource.d/heartbeat/IPaddr2
For detailed information, see the following website:
http://www.linux-ha.org/doc/man-pages/re-ra-IPaddr2.html
http://www.linux-ha.org/wiki/Resource_Agents
For testing purposes, bringing an adapter down with the sudo ifdown <adapter> command causes the Linux-HA software to detect a failure.
5.4 DB2 server
DB2 server is managed by the Open Cluster Framework resource class.
For more information about the application requirements and failure detection, see the following website:
http://www.clusterlabs.org/doc/en-US/Pacemaker/1.0/html/Pacemaker_Explained/s-resource-supported.html#s-resource-ocf
When the Linux-HA software is successfully installed, the active script can be found at:
/usr/lib/ocf/resource.d/heartbeat/db2
38 Blue Gene/Q Service Node Failover using Linux High Availability

Detailed information about the start, stop, and monitoring functions of the script can be found at:
http://www.linux-ha.org/wiki/Db2_%28resource_agent%29
For testing purposes, stopping the database instance will cause Linux-HA to detect a failure.
5.5 BGMaster
The BGMASTER resource is managed with a customer script that is included as part of the driver installation.
The base version can be found at /bgsys/drivers/ppcfloor/scripts/bgRA.
When Linux-HA is successfully installed, the active script can be found at /usr/lib/ocf/resource.d/ibm/bgRA.
The basic flow of the resource start routine is:
1. Start the ntpd service. If successful, continue. If unsuccessful, return failure.
2. Check if bgmaster is already running. If it is running, return success. If it is not running, continue.
3. Start bgmaster. If successful, continue. If unsuccessful, return failure.
4. Wait 1 second.
5. Check if bgmaster is running. If successful, continue. If unsuccessful, return failure.
6. Check if mc_server is started. If successful, return success:
a. If unsuccessful, retry until the startup timeout for the resource has been reached.b. If the startup timeout has been reached, return failure.
The basic flow of the status routine is:
1. Check if bgmaster is running.2. If it is running, return success. If it is not running, return failure.
The basic flow of the stop is:
1. Check if bgmaster is running. If it is, continue. If it is not, return success.
2. Stop mc_server with a signal to tell it to leave the hardware in a state such that it can be reconnected to.
3. Stop bgmaster_server. If successful, return success. If unsuccessful, retry until the stop timeout for the resource has been reached.
4. If the stop timeout has been reached, return failure.
For testing, killing the bgmaster_server process or running the master_stop bgmaster command causes the linux-HA software to detect a failure.
Killing individual servers managed by bgmaster does not trigger a failover. Failure detection for individual Blue Gene/Q servers is managed by BGMaster and the policies defined in the bg.properties file.
For more information about BGMaster, see the IBM System Blue Gene Solution: Blue Gene/Q System Administration, SG24-7869 Redbooks publication.
Chapter 5. Failure modes detected by the Linux-HA software 39

40 Blue Gene/Q Service Node Failover using Linux High Availability

Chapter 6. Creating a three-node quorum for GPFS configurations
When using the General Parallel File System (GPFS) with the Linux-HA software, use a configuration with three quorum nodes. This configuration can prevent timeouts if one of the service nodes goes down.
The General Parallel File System HOWTO for the IBM System Blue Gene/Q Solution, SC23-6939-00 document provides information about configuring GPFS for a service node and multiple front end nodes.
Some modifications are required to configure a three-node quorum. For example, consider a quorum where bgqsn1 and bgqsn2 are the service node failover pair and bgqfen1 is the front end node that comprise a three-node GPFS quorum.
To modify the configuration, follow the instructions in the HOWTO document to install GPFS HOWTO install and configure GPFS in preparation for creating a cluster. In the section “Creating the clusters and establishing cross-cluster access,” replace step 2 (configuring Blue Gene service node bgservice) with the following task:
Perform the following steps on the Blue Gene service node bgqsn1:
1. Create a file that contains a node descriptor for the service nodes and the front end node:
echo "bgqsn1:quorum" > quorum.nodeecho "bgqsn2:quorum" >> quorum.nodeecho "bgqfen1:quorum" >> quorum.node
2. Create the bgIO cluster with the Blue Gene service node bgqsn1 as the primary and bgqsn2 as the secondary GPFS nodes in the cluster:
mmcrcluster -N quorum.node -p bgqsn1 -s bgqsn2 -C bgIO.domain -A -r /usr/bin/ssh -R /usr/bin/scp
3. Accept the license for the GPFS cluster nodes:
mmchlicense server --accept -N bgqsn1,bgqsn2,bgqfen1
6
© Copyright IBM Corp. 2013. All rights reserved. 41

Continue following the steps in the HOWTO document. No additional modifications are required.
42 Blue Gene/Q Service Node Failover using Linux High Availability

ronyms
API Application programming interface
CRC Cyclic Redundancy Check
HA High Availability
HMC Hardware Management Console
IBM International Business Machines Corporation
ITSO International Technical Support Organization
MD5 Message Digest algorithm 5
NTP Network Time Protocol
RHEL Red Hat Enterprise Linux
SSH Secure Shell
STONITH Shoot the Other Node in the Head
Abbreviations and ac
© Copyright IBM Corp. 2013. All rights reserved.
43
44 Blue Gene/Q Service Node Failover using Linux High Availability

Related publications
The publications listed in this section are considered particularly suitable for a more detailed discussion of the topics covered in this paper.
IBM Redbooks
The following IBM Redbooks publications provide additional information about the topic in this document. Note that some publications referenced in this list might be available in softcopy only.
� IBM System Blue Gene Solution: Blue Gene/Q Safety Considerations, REDP-4656
� IBM System Blue Gene Solution: Blue Gene/Q Hardware Overview, SG24-7872
� IBM System Blue Gene Solution: Blue Gene/Q System Administration, SG24-7869
� IBM System Blue Gene Solution: Blue Gene/Q Code Development and Tools Interface, REDP-4659
� IBM System Blue Gene Solution: Blue Gene/Q Application Development, SG24-7948
You can search for, view, download or order these documents and other Redbooks, Redpapers, Web Docs, draft and additional materials, at the following website:
ibm.com/redbooks
Other publications
This publication is also relevant as a further information source:
� General Parallel File System HOWTO for the IBM System Blue Gene/Q Solution, SC23-6939-00
Online resources
These websites are also relevant as further information sources:
� Linux-HA
http://www.linux-ha.org/wiki/Main_Page
� Pacemaker
http://www.clusterlabs.org/
© Copyright IBM Corp. 2013. All rights reserved. 45

Help from IBM
IBM Support and downloads
ibm.com/support
IBM Global Services
ibm.com/services
46 Blue Gene/Q Service Node Failover using Linux High Availability


®
REDP-4657-00
INTERNATIONAL TECHNICALSUPPORTORGANIZATION
BUILDING TECHNICAL INFORMATION BASED ON PRACTICAL EXPERIENCE
IBM Redbooks are developed by the IBM International Technical Support Organization. Experts from IBM, Customers and Partners from around the world create timely technical information based on realistic scenarios. Specific recommendations are provided to help you implement IT solutions more effectively in your environment.
For more information:ibm.com/redbooks
Redpaper™
IBM System Blue Gene Solution: Blue Gene/Q Service Node Failover using Linux High AvailabilitySet up a backup service node
Install a cluster resource manager
Configure resources
This IBM Redpaper publication explains how to configure failover for an IBM Blue Gene/Q service node. This process includes downloading and installing software from the Linux-HA project, configuring clustering and storage, and setting up the Hardware Management Console (HMC) as a Shoot the Other Node in the Head (STONITH) device.
Back cover