k-12 subsistence lessons—environmental health in...
TRANSCRIPT

1
K-12 Subsistence Lessons—Environmental Health in Rural Communities: Drinking Water and Sanitation Authors: Telida Village Council and the Indian General Assistance Program (IGAP) Grade Level: All Ages Context: Any Time of Year ARSI Region: Upper Kuskokwim Region

2
Unit Outline
Environmental Health: Drinking Water, Sanitation, and Environmental
Issues in Rural Alaska Housing
Unit Outline Lesson 1 – Drinking Water, Sanitation and Housing in Rural Alaska Activity 1 – Elder Shares about Safe Drinking Water in the Community Activity 2 – Provide Safe Drinking Water for an Elder (Math Exercise) Activity 3 – What are the Sources for Drinking Water in the Community? Activity 4 – How are the Drinking Water Sources are Related to the Water Cycle Activity 5 – Take a Walk with an Elder to Learn about Drinking Water in the Community Lesson 2 – What’s in the Water I am Drinking? Activity 1 – Take a Walk with an Elder to Examine Sources that can Pollute the
Community’s Drinking Water Activity 2 – Where Does Your Drinking Water Come From? Activity 3 – Diseases that can Contaminate the Community Drinking Water Activity 4 – What Does Bacteria Look Like and How Quickly Does It Multiply? Activity 5 – Graph Incidences of Diseases in the Community and the Region Activity 6 – Protect Yourself from Diseases while Hunting, Fishing, and Trapping Activity 7 – Keeping the Family Drinking Water Safe Lesson 3 – How to Insure Safe Drinking Water Activity 1 – Take a Walk with an Elder to Examine Rainwater Catchments in the
Community Activity 2 – Measure Rainfall in the Community Activity 3 – How to Read a Rainfall Table Activity 4 – Evaluate Roofs for Collecting Drinking and Cooking Water Activity 5 – Make a Roof Safe for Water Collection
Kuskokwim River Photo by: Teresa Hanson

3
Activity 6 – Purify Drinking Water for the Family Lesson 4 – Honeybuckets, Outhouses and Sewage Lagoons Activity 1 – Take a Walk with an Elder to Investigate the Waste Disposal System in the
Community Activity 2 – Washing Hands Experiment Activity 3 – Glo Germ Kit: See How Well You are Washing your Hands Activity 4 – Center for Disease Control and Prevention-Bam Body and Mind Activity 5 – Visit the Health Clinic to Learn about Sanitation and Disease Prevention Activity 6 – Evaluate the Effectiveness of Hepatitis A Immunization in Alaska Lesson 5 – Insuring Safe Sanitation Activity 1 – Elder Talks about Keeping the Community Safe during a Flood Activity 2 – Drinking Water and Flooding Activity 3 – Food and Flooding Activity 4 – Septic Systems and Flooding Activity 5 – Fuel, Oil, and Hazardous Substances and Flooding Activity 6 – How to Safely Work with Bleach when Sanitizing Lesson 6 – Housing in Rural Alaska Activity 1 – Explore the History of Housing in the Community with an Elder Activity 2 – Tetlin Subsistence Camps Activity 3 – Build Models of Rural Housing to See How It Affects People and the
Environment Activity 4 – Research Old Interior Regional Housing Authority (IRHA) Newsletters Activity 5 – What has the Interior Regional Housing Authority Done in Your
Community? Lesson 7 – Rural Housing-Is Wood Smoke a Problem in Our Homes? Activity 1 – Shelters, Wood Smoke, and Health Effects Activity 2 – What are the Environmental Health Problems from Wood Smoke? Activity 3 – Visit Community Health Aide to See How Wood Smoke Affects People’s
Health Activity 4 – Wood for Burning Clean Activity 5 – Stack Wood for an Elder Activity 6 – New Wood Burning Technologies Activity 7 – Survey of How Much Wood Each Household Burns Activity 8 – Community Assessment of Wood Stoves/Boilers and New Technologies Activity 9 – Research the New Wood Burning Technologies Activity 10 – Should You Purchase a New EPA Certified Woodstove?

4
Lesson 8 – Prevention of Mold and Radon Problems in Rural Housing Activity 1 – Take a Walk with an Elder to Explore Mold Growing in the Natural
Environment Activity 2 – Study the EPA Publication “A Brief Guide to Mold, Moisture and Your
Home” Activity 3 – Survey your Home for Places Mold Can Grow. Activity 4 – Identify Molds Commonly Found Inside Homes Activity 5 – Examine How Moisture is Vented in Your Home Activity 6 – How to Clean Up Mold in Your Home Activity 7 – What is Radon and How Does It Impact Human Health? Activity 8 – How Does Radon Enter Your Home and School? Activity 9 – Test Your Home and School for Radon Activity 10 – What Can You Do if you have a High Level of Radon in your Home and School?

5
Lesson 1 – Drinking Water, Sanitation and Housing in Rural Alaska We cannot live without water. It is a basic human need. Our bodies are made up of 60-70% water. It makes sense then, that we look at the water we drink, and how it is handled from the source to its’ resting place, once it has completed it use throughout our bodies. Back in the old days, we lived a life where we moved from place to place as the seasons changed. We gathered water as we needed, covered up the places where we disposed of our bodily wastes and moved our homes as was needed. Nowadays, we live in one place and most people have running water, sewer and electricity…but that is very recent history. Before there were water pipes, sewer or septic tanks, we used to go down to the river and get water. In the winter we cut holes in the ice until we reached the water for our drinking water. We used to cut and thaw big chunks of ice too for our drinking water. We would scoop or chop them from fresh water lakes. Then we had to pack it up the hill with sleds, birch bark baskets, buckets, or with a big barrel on a snow-machine or 4-wheeler. We also use to catch the rain water as it came off the roofs of our homes. We used outhouses, honey buckets or the great outdoors. There was no good sanitary system for getting rid of honeybuckets and we didn’t have roads in the village. It used to be hard work for us, but now we are taking it easy, with the water and septic put in. But there are disadvantages too. When the water and sewer pipes freeze up, they burst, and we go back to packing water. Nowadays, most people pay bills for water, sewer and electricity.
“The following quote from the testimony that Ms. Anne M. Walker, Executive Director of the Alaska Native Health Board, offered to the House Appropriations Subcommittee on Interior and Related Agencies in May 1993:
“The first issue I wish to bring to your attention is the deplorable sanitation conditions that exist in many Alaska Native villages. There are over 200 Native villages in Alaska, and two-thirds of them are without piped water and sewer systems. Most families do not even have outhouses due to high water tables. Sewage systems instead consist of "honey buckets" — five-gallon buckets with toilet lids on them situated inside the home or business. There is no running water to wash your hands with after you use the honey bucket — this is true even in many of our health
clinics. Everyone agrees that the technology exists to solve this problem, yet our people continue to suffer not just the inconvenience of Third World sanitation conditions but the considerable health risks that accompany poor sanitation. For our people to be subjected to conditions like these in the 1990s is a disgrace, particularly in light of the federal government's trust responsibility for the health and welfare of Native Americans.”
aPhoto: Teresa Hansona

6
(Source of Information: Alaska Natives Commission. (1994). Section One, Alaska Native Physical Health, Report of the Health Task Force. Retrieved from the Alaskool Website @ www.alaskool.org/resources/anc2 /ANC2_sec1.html p.12).
“Sanitation conditions in most Alaska villages have vastly improved. Yet one family in three still does not have access to a sanitary means of sewage disposal or” a good “supply of safe drinking water in their homes. For members of these families, buckets or pit privies are the only methods for disposing of human waste, and water must be hauled by individuals from community watering points or untreated sources such as creeks or rivers.”
(Source of Information: Alaska Department of Environmental Conservation Village Safe Water Program. (2006). VSW Program Description-Alaska Department of Environmental Conservation, [Portable Document File]. Retrieved from State of Alaska Website: @ http://www.dec.state.ak.us /water/vsw /pdfs/vswbrief.pdf ).
There are a couple of sources of water for villages. Some utilities and families get their water from groundwater wells, while others get water from lakes, rivers, or other surface water sources. “A few use both.” It is important that you know what contaminants could get in your water and how they can affect your health. “This is a matter of common sense. What is near your water supply that could contaminate the water? Are any chemicals stored nearby? Is there any fueling of aircraft, snow machines, cars, or machinery nearby? Where is your fuel tank farm in relation to your water supply? How close is your sewage lagoon or wastewater outflow to your water intake? Where are your honey buckets being dumped? How can your water source be protected? If you are using a well, what kind of groundwater contamination might be possible? Was the area used as a dump during the Second World War? Were chemicals ever spilled in the area?” “Because of a limited amount of fresh water in the area, some villages use water from more than one source. If this is the case in your village, you will have to be aware of what each source might mean to your operations. What kind of a water source or sources you use will determine how you test your water. There are three types of water sources defined by Alaska’s Drinking Water and Wastewater Regulations. You need to be aware of all three but realize that the last two are treated exactly the same so it will seem like there are only two types. The water source types regulated by Alaska Department Environmental Conservation (ADEC) are: 1. Groundwater, usually a well. 2. Surface water, such as a river or lake. 3. Groundwater under the direct influenceof surface water, also known as GWUDISW. GWUDISW exists where there is a mixing of groundwater and surface water. For example, perhaps you have a shallow well or spring that is drawing water from a water
Upper Kuskokwim River Photo by T. Hanson

7
table 20 feet below the surface. But the well or spring is very near a wetland, lake, or river. The surface waters could mix with groundwater in the nearby shallow well or spring because the surface water and groundwater are connected underground. Therefore, your well water or spring could be affected by the water quality of the surface water. Remember, GWUDISW is regulated just like surface water, so the more frequent sampling requirements of surface water regulations apply rather than the simpler sampling requirements of true groundwater sources.” (Source of Information: Alaska Department of Community and Economic Development and Alaska Department of Environmental Conservation. (2002). The Updated Plain English Guide to Alaska Drinking Water and Wastewater Regulations, [Portable Document file]. Retrieved from State of Alaska Website @ www.dec.state.ak.us /eh /docs/dw/plainguide.pdf, pp. 47-48). “Types of Systems Used in Rural Alaska Climate, physical conditions, number of residents, how much the community can hold, building costs, operation/maintenance costs, and regulations are among the factors that must be considered in order to decide what is the best type of system for each village. The types of systems commonly found in rural Alaska (and can also be built with assistance through the Village Safe Water Program) include: • ‘Washeterias’: centrally located community buildings with flush toilets, drinking water to haul home, and laundry and shower facilities. • Septic Tanks and Wells. • Piped Systems (both above ground and underground)
• Tank Haul Systems: separate holding tanks provide potable water and store wastewater for each home. Haul vehicles and equipment operated by the city fill the water tanks and remove the waste from sewage tanks.”
(Source of Information: Alaska Department of Environmental Conservation Village Safe Water Program. (2006). VSW Program Description-Alaska Department of Environmental Conservation. Retrieved from State of Alaska Website: @ http://www.dec.state.ak.us /water/vsw /pdfs/vswbrief.pdf ).

8
Lesson One Activities
Drinking Water, Sanitation and Housing in Rural Alaska
Objectives:
• To learn from the Elders about the importance of water and keeping it clean in the community.
• To practice traditional responsibilities to the community by figuring out what it will cost to give an Elder access to clean water.
• To identify the sources of drinking water in the community. • To understand how the drinking water sources in the community are related to the
water cycle. • To work with an Elder to observe and record what happens to the drinking water
in the community. Materials
• Computer for Internet research • Community map • Pencils and pens • Student journals • Student learning logs • Writing paper
Activity 1 – Elder Shares about Safe Drinking Water in the Community In this activity, Elder talks with the students about why water is important to the community and how people have kept it safe to drink.
1. The teacher invites an Elder to the classroom to talk about the importance of water and keeping it clean.
2. The students brainstorm questions to ask the Elder about the importance of
water and keeping it clean. Examples of questions:
o How did people keep the drinking water clean in the past? o What did people collect the water in? o How did the people keep the containers clean?
3. The teacher asks students to discuss why they think water is important to the
community, where they get their water from, and how they keep it clean.
4. When the Elder speaks to the class, the students listen respectfully to what he has to share and take brief notes in their learning logs.

9
5. The teacher and students talk about Athabascan culture, beliefs, and values that the Elder shared with the students during his talk on safe drinking water in the community.
6. The students record their thoughts about what the Elder said in their journals.
7. The students create a thank you note to send to the Elder to show their
appreciation for the time they spent with them. Activity 2 – Provide Safe Drinking Water for an Elder (Math Exercise) In this activity, the students figure out how much money it will cost to buy plumbing parts for an Elder so he can have access to clean water and how many hours they will have to work to raise the money.
1. You are concerned about an Elder in your community who does not have access to clean drinking water in his home. You go to the Elder to see how you can help him. After talking with the Elder, you decide you would like to buy some plumbing parts that he can use so he can have clean drinking water.
2. You call the Village Store to order the plumbing parts and they give you the
following costs for parts and shipping:
o Water tank-$375 o Insulation to keep tank from freezing-$175 o Water filter- $50 o Shipping- $5.00/lb. the plumbing parts weigh 40 pounds altogether.
3. How much money is it going to cost you altogether to buy the water tank, the
insulation, and the water filter, and to ship it to your community?
4. You would like to raise the money for the plumbing parts and the shipping by cutting firewood and helping a neighbor build a woodshed. You want to raise 75 percent of the money by cutting firewood and raise the other 25% by helping a neighbor build a woodshed.
o You make $50/cord. How many cords of firewood will you have to cut? o You make $10/hour building the shed. How many hours will you need to
work? Activity 3 – What are the Sources for Drinking Water in Your Community? In this activity, the students learn about the three sources of drinking water in their community.

10
Information: There are three sources for drinking water in the community, including surface water, ground water, and ground water that is under the influence of surface water called (GWUDISW). Definitions:
A. Surface water: Science-Dictionary.com has a good definition for surface water at (http://www.science-dictionary.com/definition/surface-water.html).
B. Groundwater: Science-Dictionary.com has a good definition for groundwater
@ (http://www.science-dictionary.com/definition/ground-water.html) C. GWUDISW: exists where there is a mixing of groundwater and surface water.
Example: A shallow well whose underground water mixes with water from a nearby river.
1. The teacher has the students write the definition of surface water, ground water, and GWUDISW in their learning logs.
2. The teacher talks with the students about the different kinds of water sources that
are in their community. Activity 4 – How Drinking Water Sources are Related to the Water Cycle In this activity the students learn how the drinking water sources in their community are related to the water cycle. The students watch EPA’s Thirst’ins Water Cycle. Information: The drinking water sources in your community are part of the water cycle. The Environmental Protection Agency has created an animation for kids called Thirst’ins Water Cycle that shows how they all work together.
1. The teacher asks the students go to http://www.epa.gov/safewater/kids/flash/flash_watercycle.html to watch Thirst’ins Water Cycle to watch what happens to the different drinking water sources during the water cycle.
2. The students draw pictures in their learning logs of what happens to surface water
and ground water during the four stages of the water cycle.
3. The teacher has the students discuss what happens to water in their community during the four stages of the water cycle. She has them answer the following questions in their learning logs.
o What happens to rivers when it rains? o If there is a community well where do they think the water is stored? o How does the water cycle create the above and below ground rivers?
11
Activity 5 – Take a Walk with an Elder to Learn about Drinking Water in the Community In this activity, an Elder takes a walk with the students to observe and record what happens to the community’s drinking water as the people use it.
1. The students make a map of the community that they can take with them while they are walking with the Elder to learn about drinking water.
2. Elder, the teacher and the students walk through the community to learn abut the drinking water. While the Elder is talking, the students listen respectfully to what he has to share and take brief notes in their learning logs.
a. The Elder and students identify the drinking water sources the people use
and put them on the map.
b. The students mark down the washeterias, sanitation plants, septic systems, sewage lagoons, etc. everyone in the village who has running water.
c. If the households do not have running water, interview them after the walk
and find out how they gather and dispose of the water.
3. The teacher and students return to the classroom.
4. The teacher and students talk about Athabascan culture, beliefs, and values that the Elder shared about while they were talking about the drinking water in the community.

12
Lesson 2 – What’s in the Water I am Drinking? Now that we have found out where our water comes from, let’s take a look at what could be in that water. “The greatest risks to health are microbiological contamination caused by” germs. “People can get very sick and some may get hepatitis if microbiological contamination is not controlled.” “Underground or sewage lagoon leakage can foul your water. These pollutants show up in your water and can cause cancer and other health problems.” “Minerals like arsenic (a health concern) and iron (a nuisance) from area soils and rock may be dissolved in your water supply. Nitrate, an inorganic chemical that can have very serious health effects on babies, could enter your water from leaking underground septic tanks or leaking sewer lines.” (Source of Information: Alaska Department of Community and Economic Development and Alaska Department of Environmental Conservation. (2002). The Updated Plain English Guide to Alaska Drinking Water and Wastewater Regulations, [Portable Document File]. Retrieved from the State of Alaska Website @ www.dec.state.ak.us/eh /docs/dw /plainguide.pdf page 49). Surface water is especially vulnerable to contamination by germs such as; bacteria, viruses and protozoa. This is because people, birds, and animals usually have easy access to the water. Some diseases caused by these organisms include Cholera, Typhoid fever, Gastroenteritis, Giardiasis (Beaver Fever), and Cryptosporidiosis. Symptoms can include diarrhea, fever, nausea, vomiting, abdominal cramps, and general discomfort. The severity of illness may range from some combination of upset stomach, fever or diarrhea to death. What are Germs?
The term "germs" refers to the microscopic bacteria, viruses, fungi, and protozoa that can cause disease.
Types of Germs “Bacteria: Bacteria are single-celled organisms. Bacteria have the tools to reproduce themselves, by themselves. They are larger than viruses (but still much too small to be seen with the naked eye). They are filled with fluid and may have threadlike structures to move themselves, like a tail.” (Source of Information: Centers for Disease Control and Prevention. (No date). Understanding the Epidemiologic Triangle through Infectious Disease, [Portable Document File]. Retrieved from the Centers for Disease Control and Prevention Website @ http://www.bam.gov/teachers /activities /epi_1_triangle.pdf).

13
“Human and animal wastes are a primary source of bacteria in water. These sources of bacterial contamination include” runoff and seepage from sewage lagoons, outhouses, dog runs, “and other land areas where human and animal wastes are deposited. Additional sources include seepage or discharge from septic tanks, sewage treatment facilities, and naturally occurring soil/plant bacteria found in wetlands, or in the earth. Bacteria from these sources can enter water sources and wells that are either open at the land surface, or do not have water-tight casings or caps.”
“Insects, rodents or animals” defecating in or near water sources, or their waste entering wells are other sources of contamination. Old wells were dug by hand and lined (cased) with rocks or wood. “These wells usually have large openings and casings that often are not well-sealed. This makes it easy for insects, rodents, or animals to enter the well.” Drinking water drawn from rivers and lakes, if not treated, is also a good source of bacterial contamination.
“Another way bacteria can enter a water supply is through flood waters or by surface runoff. Flood waters commonly contain high levels of bacteria.” Sewage lagoons, outhouse pits, landfills and any other small depressions filled with flood water provide an excellent breeding ground for bacteria.” Whenever flood waters or surface runoff occurs, “bacterial contamination is likely.” “Any system with casings or caps that are not water-tight are vulnerable. This is particularly true if a well is located so surface runoff might be able to enter the well.” “Shallow wells and wells that do not have water-tight casings can be contaminated by bacteria infiltrating with the water through the soil near the well, especially in course-textured soils.” “Older water systems, especially, dug wells, spring-fed systems and cistern-type systems are most vulnerable to bacterial contamination.” “During the last five to 10 years, well and water distribution system construction has improved to the point where bacterial contamination is rare in newer wells.” (Source of Information: Wilkes University Center for Environmental Quality Environmental Engineering and Earth Sciences. (No Date). Water Testing Bacteria, Coliform, Nuisance Bacteria, Viruses and Pathogens in Drinking Water. Retrieved from Wilkes University Center for Environmental Quality Environmental Engineering and Earth Sciences Website at http://www.water-research.net/bacteria.htm. Additional related cited links (http://www.wilkes.edu/water and http://www.water-research.net). “Virus: A virus may have a spiny outside layer, called the envelope. Viruses have a core of genetic material, but no way to reproduce it on their own. Viruses infect cells and take over their reproductive machinery to reproduce. Protozoa: Protozoa are very small. Most live in water. They are parasites, which means they live off other organisms, in some cases humans. Malaria is a parasitic protozoan, as is Giardia. Hosts: are organisms, usually humans or animals, which are exposed to and harbor a disease. The host can be the organism that gets sick, as well as any animal carrier

14
(including insects and worms) that may or may not get sick. Although the host may or may not know it has the disease or have any outward signs of illness, the disease does take lodging from the host. The “host” heading also includes symptoms of the disease. Different people may have different reactions to the same agent. For example, adults infected with the virus varicella (chickenpox) are more likely than children to develop serious complications. The Environment: is the favorable surroundings and conditions external to the host that cause or allow the disease to be transmitted. Some diseases live best in dirty water. Others survive in human blood. Still others, like E. coli, thrive in warm temperatures but are killed by high heat. Other environment factors include the season of the year (in the U.S., the peak of the flu season is between November and March, for example).” (Source of Information: Centers for Disease Control and Prevention. (No date). Understanding the Epidemiologic Triangle through Infectious Disease, [Portable Document File]. Retrieved from the Centers for Disease Control and Prevention Website @ http://www.bam.gov/teachers /activities /epi_1_triangle.pdf). . So What Diseases Occur in Drinking Water? Typically occurring diseases that are spread by unclean or scarce drinking water are: Giardiasis (Beaver Fever); Cryptosporidiosis; Cholera; Typhoid fever; Gastrointestinal Illnesses; Avian Influenza; and Respiratory Disease. Giardiasis (Beaver Fever) “Giardia lamblia is found worldwide and is the most commonly reported human intestinal parasite in the United States. The cyst can be transmitted on food and from person to person by physical contact. Frequently, transmission is through surface water that is either untreated or inadequately treated. In treated water, either inadequate chlorination or defective filters or both have been responsible for large outbreaks of the disease nationwide.
The parasite is carried by most mammals, including humans and wild or domestic animals. Beavers and muskrats seem particularly susceptible to Giardia infections and carry large numbers of cysts in their intestines. The feces of carrier animals contain cysts which live outside the host. The cysts reach water drainage systems either by direct deposits into water, as in the case with beavers and muskrats, or indirectly by rain and runoff.
Giardiasis is usually passed between humans as a result of poor sanitary practices. Young children who
become infected may reinfect themselves or others. Typically a child may neglect to wash their hands after bowel movements. Later, their hands reach their mouths while eating or playing, reintroducing the cysts to their intestines.
Alan Dick, Alaska Native Clipart
15
Giardiasis is usually passed between humans as a result of poor sanitary practices. Young children who become infected may reinfect themselves or others. Typically a child may neglect to wash their hands after bowel movements. Later, their hands reach their mouths while eating or playing, reintroducing the cysts to their intestines. Those who handle babies and change diapers, such as day care workers, must also be cautious about washing their hands to avoid passing cysts to others. What are the Symptoms Abdominal bloating, cramps, excessive gas, diarrhea and a vague feeling of physical discomfort are typical. The incubation period after ingesting the cysts is one to four weeks with an average duration of symptoms from10 to 14 days. If you have any combination of the above symptoms, especially if they continue longer than seven days, you should consult your physician and mention the possibility of Giardiasis so that appropriate tests can be done. Diagnosis is confirmed by stool examination. Treatment Treatment for humans involves use of properly prescribed drugs for seven to ten days. The drugs may produce side effects, and care must be observed in their use by pregnant women and elderly. Treatment should be prescribed by a doctor. There is a catch to the treatment of this unpleasant disease. From 85% to 90% of patients are cured with one course of medication. The 10% to 15%, who are not, must take a second course of treatment. Whenever possible, people in the outdoors should carry drinking water of known purity with them. When this is not practical, and water from streams, lakes, ponds and other outdoor sources must be used, time should be taken to boil or disinfect the water before drinking.” (Source of Information: Alaska Department of Environmental Conservation Drinking Water Program. (No Date). Think Before You Drink, [Portable Document File]. Retrieved from the Alaska State Website @ www.dec.state.ak.us/eh/docs/dw/brochures/Think.pdf ). Cryptosporidiosis
“What is cryptosporidiosis?
Cryptosporidiosis is a diarrheal disease caused by microscopic parasites, Crypto- sporidium, that can live in the intestine of humans and animals and is passed in the stool of an infected person or animal. Both the disease and the parasite are commonly known as "Crypto." The parasite is protected by an outer shell that allows it to survive outside the body for long periods of time and makes it very resistant to chlorine-based
16
disinfectants. During the past 2 decades, Crypto has become recognized as one of the most common causes of waterborne disease (recreational water and drinking water) in humans in the United States. The parasite is found in every region of the United States and throughout the world.
How is cryptosporidiosis spread?
Cryptosporidium lives in the intestine of infected humans or animals. An infected person or animal sheds Crypto parasites in the stool. Millions of Crypto germs can be released in a bowel movement from an infected human or animal. Shedding of Crypto in the stool begins when the symptoms begin and can last for weeks after the symptoms (e.g., diarrhea) stop. You can become infected after accidentally swallowing the parasite. Cryptosporidium may be found in soil, food, water, or surfaces that have been contaminated with the feces from infected humans or animals. Crypto is not spread by contact with blood.
What are the symptoms of cryptosporidiosis? The most common symptom of cryptosporidiosis is watery diarrhea. Other symptoms include:
• Stomach cramps or pain • Dehydration • Nausea • Vomiting • Fever • Weight loss
Some people with Crypto will have no symptoms at all. While the small intestine is the site most commonly affected, Crypto infections could possibly affect other areas of the digestive tract or the respiratory tract.
Who is most at risk for getting seriously ill with cryptosporidiosis?
If you have a severely weakened immune system, talk to your health care provider for additional guidance. You can also call CDC INFO toll-free at 1-800-232-4636. Also see CDC's Fact Sheets on Infection and Prevention for Immunocompromised Persons.
Although Crypto can infect all people, some groups are likely to develop more serious illness.
• Young children and pregnant women may be more susceptible to the dehydration resulting from diarrhea and should drink plenty of fluids while ill.
• If you have a severely weakened immune system, you are at risk for more serious disease. Your symptoms may be more severe and could lead to serious or life-threatening illness. Examples of persons with weakened immune systems include

17
those with AIDS; cancer and transplant patients who are taking certain immunosuppressive drugs; and those with inherited diseases that affect the immune system.
What should I do if I think I may have cryptosporidiosis? If you suspect that you have cryptosporidiosis, see your health care provider.” (Source of Information: Centers for Disease Control and Prevention. (2009). Cryptosporidiosis (also known as Crypto.) Retrieved from the Centers for Disease Control and Prevention Website: @ http://www.cdc.gov/crypto/gen_info/infect.html).
Cholera
“Cholera is an acute, diarrheal illness caused by infection of the intestine with the bacterium Vibrio cholerae. You can get cholera by drinking water or eating food that is contaminated with the cholera bacterium. In an epidemic, the source of the contamination is usually the feces of an infected person. The disease can spread rapidly in areas with inadequate treatment of sewage and drinking water.”
The cholera bacterium may also live in the environment in brackish rivers and coastal waters. Shellfish eaten raw have been a source of cholera, and a few persons in the United States have contracted cholera after eating raw or undercooked shellfish from the Gulf of Mexico. The disease is not likely to spread directly from one person to another; therefore, casual contact with an infected person is not a risk for becoming ill.”
Symptoms
“Cholera is an acute, diarrheal illness caused by infection of the intestine with the bacterium Vibrio cholerae. The infection is often mild or without symptoms, but sometimes it can be severe. Approximately one in 20 infected persons has severe disease characterized by: profuse watery diarrhea, vomiting, and leg cramps. In these persons, rapid loss of body fluids leads to dehydration and shock. Without treatment, death can occur within hours.” Treatment
“Cholera can be simply and successfully treated by immediate replacement of the fluid and salts lost through diarrhea. Patients can be treated with oral rehydration solution, a prepackaged mixture of sugar and salts to be mixed with water and drunk in large amounts. This solution is used throughout the world to treat diarrhea. Severe cases also require intravenous fluid replacement. With prompt rehydration, fewer than 1% of cholera patients die.

18
Antibiotics shorten the course and diminish the severity of the illness, but they are not as important as rehydration. Persons who develop severe diarrhea and vomiting in countries where cholera occurs should seek medical attention promptly.”
Prevention
“The risk for cholera is very low for U.S. travelers visiting areas with epidemic cholera. When simple precautions are observed, contracting the disease is unlikely.
When you are traveling to an area where cholera has occurred, you should observe the following recommendations:
• Drink only water that you have boiled or treated with chlorine or iodine. Other safe beverages include tea and coffee made with boiled water and carbonated, bottled beverages with no ice.
• Eat only foods that have been thoroughly cooked and are still hot, or fruit that you have peeled yourself.
• Avoid undercooked or raw fish or shellfish, including ceviche. • Make sure all vegetables are cooked avoid salads. • Avoid foods and beverages from street vendors. • Do not bring perishable seafood back to the United States.
A simple rule of thumb is "Boil it, cook it, peel it, or forget it."”
(Source of Information: National Center for Zoonotic, Vector Borne, and Enteric Diseases. (2009). Cholera. Retrieved from the Centers for Disease Control and Prevention Website @ http://www.cdc.gov /nczved/divisions /dfbmd/diseases/cholera/).
“Cholera in Alaska?
On August 5, a 54-year-old man in previously good health developed fever, chills, and profuse watery diarrhea. Over the next 2 days, the diarrhea increased in severity reaching a frequency of 2-3 bowel movements per hour. The stools were described as "pure water." The patient was unable to work and suspected that his illness was due to medications that he been taking since having heart surgery in February. He tried to contact his cardiologist and regular physician, but both were out of town.
On the advice of his son, a pharmacist, he started drinking large amounts of fluids with glucose and electrolytes to combat dehydration. On August 10, with no decrease in the severity of the diarrhea and still unable to work, the patient made an appointment with another physician. He was treated with doxycycline and within 4 hours, the diarrhea began to improve. On August 13, the patient returned to work. Non-O1 Vibrio cholerae was isolated from a stool specimen.
On August 2, the patient had eaten half a dozen raw oysters at an Anchorage restaurant. No other exposure to raw or undercooked seafood in the week before onset was

19
identified. The oysters had been harvested from an approved site in Puget Sound on July 28. No oysters from the suspected shipment were left for culture.”
(Source of Information: Contributed by Lisa Lee, VMD, Division of Field Services, Epidemiology Program Office, Centers for Disease Control. Reported by Robert Hanek, MD, Northwest Medical Professional Corporation, Anchorage, AK). (1990). Non-O1 Vibrio Cholerae Infection from Raw Oysters. Retrieved from the State of Alaska Website @ www.epi.alaska.gov/bulletins/docs /b1990_20.htm).
No Cholera has been reported in Alaska from contaminated drinking water as it is not warm enough for it to breed.
Typhoid
“Typhoid fever is a life-threatening illness caused by the bacterium Salmonella Typhi. In the United States about 400 cases occur each year, and 75% of these are acquired while traveling internationally. Typhoid fever is still common in the developing world, where it affects about 21.5 million persons each year.”
“Salmonella Typhi lives only in humans. Persons with typhoid fever carry the bacteria in their bloodstream and intestinal tract. In addition, a small number of persons, called carriers, recover from typhoid fever but continue to carry the bacteria. Both ill persons and carriers shed S. Typhi in their feces (stool).
You can get typhoid fever if you eat food or drink beverages that have been handled by a person who is shedding S. Typhi or if sewage contaminated with S. Typhi bacteria gets into the water you use for drinking or washing food. Therefore, typhoid fever is more common in areas of the world where handwashing is less frequent and water is likely to be contaminated with sewage.
Once S. Typhi bacteria are eaten or drunk, they multiply and spread into the bloodstream. The body reacts with fever and other signs and symptoms.”
Symptoms
“Persons with typhoid fever usually have a sustained fever as high as 103° to 104° F (39° to 40° C). They may also feel weak, or have stomach pains, headache, or loss of appetite. In some cases, patients have a rash of flat, rose-colored spots. The only way to know for sure if an illness is typhoid fever is to have samples of stool or blood tested for the presence of S. Typhi.”
Treatment
“If you suspect you have typhoid fever, see a doctor immediately. If you are traveling in a foreign country, you can usually call the U.S. consulate for a list of recommended doctors.

20
You will probably be given an antibiotic to treat the disease. Three commonly prescribed antibiotics are ampicillin, trimethoprim-sulfamethoxazole, and ciprofloxacin. Persons given antibiotics usually begin to feel better within 2 to 3 days, and deaths rarely occur. However, persons who do not get treatment may continue to have fever for weeks or months, and as many as 20% may die from complications of the infection.”
“Even if your symptoms seem to go away, you may still be carrying S. Typhi. If so, the illness could return, or you could pass the disease to other people. In fact, if you work at a job where you handle food or care for small children, you may be barred legally from going back to work until a doctor has determined that you no longer carry any typhoid bacteria.
If you are being treated for typhoid fever, it is important to do the following:
• Keep taking the prescribed antibiotics for as long as the doctor has asked you to take them.
• Wash your hands carefully with soap and water after using the bathroom, and do not prepare or serve food for other people. This will lower the chance that you will pass the infection on to someone else.
• Have your doctor perform a series of stool cultures to ensure that no S. Typhi bacteria remain in your body.”
Prevention “Two basic actions can protect you from typhoid fever:
1. Avoid risky foods and drinks. 2. Get vaccinated against typhoid fever.
It may surprise you, but watching what you eat and drink when you travel is as important as being vaccinated. This is because the vaccines are not completely effective. Avoiding risky foods will also help protect you from other illnesses, including travelers' diarrhea, cholera, dysentery, and hepatitis A.”
“Boil it, cook it, peel it, or forget it"
• “If you drink water, buy it bottled or bring it to a rolling boil for 1 minute before you drink it. Bottled carbonated water is safer than uncarbonated water.
• Ask for drinks without ice unless the ice is made from bottled or boiled water. Avoid popsicles and flavored ices that may have been made with contaminated water.
• Eat foods that have been thoroughly cooked and that are still hot and steaming. • Avoid raw vegetables and fruits that cannot be peeled. Vegetables like lettuce are
easily contaminated and are very hard to wash well. • When you eat raw fruit or vegetables that can be peeled, peel them yourself.
(Wash your hands with soap first.) Do not eat the peelings.

21
• Avoid foods and beverages from street vendors. It is difficult for food to be kept clean on the street, and many travelers get sick from food bought from street vendors.”
(Information: National Center for Zoonotic, Vector-Borne and Enteric Diseases. (2009). Typhoid Fever. Retrieved from the Centers for Disease Control and Prevention Website: @ http: //www.cdc.gov/nczved/divisions/dfbmd/diseases/typhoid_fever/)
Typhoid Fever in Alaska? “In late December, 1982, the State of Alaska Epidemiology Office was informed by Chris Swartz, RN, Infection Control Nurse, Alaska Native Medical Center that an inpatient was passing lots of Salmonella typhi in his urine. This patient was a cousin of a 32-year-old man who died at ANMC six months before with the post-mortem diagnosis of typhoid fever. Both patients were residents of communities in the Kobuk River Valley east of Kotzebue.”
“The usual fatality rate in Alaska was 10% in the era before antibiotic treatment, and with antibiotics is considered to be l% or less. Infection can be transmitted by acute cases, and by the 3-5% of those acute cases who become chronic carriers of Salmonella typhi. The incidence of cases of typhoid fever, and the prevalence of Salmonella typhi carriers have both declined considerably in Alaska in recent years. The last clinical cases of typhoid fever in Alaska were reported in 1973.”
(Source of Information: State of Alaska Epidemiology. (1990). Typhoid Fever-Kobuk River Valley. Retrieved from the State of Alaska Website @ www.epi.alaska.gov /bulletins /docs/b1983_11.htm). Gastrointestinal Illnesses Norovirus “What are Noroviruses? Noroviruses are representative of a larger group of viruses called caliciviruses. Infection with these viruses is a common cause of gastrointestinal illness worldwide. What are the symptoms of an infection with these viruses? The most common symptoms are nausea with vomiting, diarrhea, and cramps. These symptoms occur in all age groups although diarrhea is more common among adults and vomiting is more common in children. Many persons also experience headache, fever, chills and muscle aches. How soon do symptoms appear? The symptoms may appear from 12-72 hours after exposure to the virus, but usually within 24 to 48 hours.

22
How are these viruses spread? Noroviruses are spread by eating or drinking food or water contaminated with feces from an infected person. Food associated outbreaks have been linked to cold prepared, ready to eat foods (e.g., salads, coleslaw, sandwiches) and shellfish harvested in contaminated water. Outbreaks have also been associated with drinking water and recreational water (e.g., swimming ponds, and beaches) where persons may have ingested water contaminated with feces from an infected person. These viruses are easily spread from person-to-person. Some medical reports suggest that the virus can spread through the air during vomiting. For how long is a person infectious? People are infectious while symptoms are present and at least two days after diarrhea or vomiting have stopped. What is the treatment for this illness? There is no treatment for this illness. Most people recover in two to three days after they become ill. Supportive treatment to prevent dehydration may be needed in severe cases. What can be done to help prevent the spread of these viruses? Thorough hand washing following toilet use and prior to handling food is the best way to prevent the spread of these viruses. Persons currently ill with diarrhea or vomiting should not handle food, work in day care centers or care for patients in a health care facility until these symptoms have stopped.” (Source of Information: Alaska Division of Public Health. (No Date). Norovirus Fact Sheet, [Portable Document File]. Retrieved from the State of Alaska Website @ www.epi.hss.state.ak.us /id/dod/norovirus/factsheet.pdf). Novovirus in Alaska?
Norovirus Outbreak Stalks the Iditarod Trail, 2004
Background
“On March 3 2004, an Anchorage physician informed the Alaska Section of Epidemiology (SOE) that several Anchorage-based Iditarod support staff were ill with vomiting and diarrhea during the last week of February. The Municipality of Anchorage Department of Health and Human Services (MOA) investigated this report. Eleven Iditarod race staff attended a pre-race meeting in McGrath on February 25. Within two days, nine persons developed vomiting, cramps, and diarrhea. The first person to become ill began vomiting immediately upon arriving in McGrath, prior to the meeting. Other staff members who stayed in the same bunkhouse as this person developed illness 1-2 days later. The duration of illness was approximately 2 days.
Alan Dick Alaska Native Clipart

23
On March 3, in conjunction with the MOA, SOE staff contacted McGrath Health Clinic personnel, the Iditarod race marshal, and owners of the bunkhouse where Iditarod staff stayed in McGrath, asking them to immediately report anybody who developed acute vomiting and diarrhea. On March 4, SOE and MOA staff presented information about the outbreak, signs and symptoms of viral gastroenteritis, and methods for disease prevention at the Iditarod mandatory musher’s meeting in Anchorage. A fact sheet was provided for race officials, and all persons at the meeting were asked to report new onset of illness to SOE. The ceremonial start of the 32nd Iditarod Race was March 6.
On March 8, the Alaska State Public Health Laboratory in Fairbanks reported that one stool sample from the MOA investigation was positive for norovirus.
Investigation On March 11, a McGrath provider reported that three persons associated with the Iditarod race had developed gastroenteritis. On the morning of March 12, SOE and Alaska Department of Environmental Conservation (DEC) staff flew to McGrath to identify and interview ill persons, inspect local restaurants, and provide information about disease prevention. One member of the team traveled to Ruby and Cripple Creek to establish a surveillance system along the trail.
Results Between February 15 and March 18, 57 persons reported having sudden onset of diarrhea and/or vomiting (Table). Number (%) Comments People Sick Affiliated with Iditarod Mean age of cases Symptoms: Vomiting Diarrhea Abdominal Cramps Fatigue Headache Body Aches Feverish Median Duration of Symptoms Sought Health Care
57 36 (63%)
43
40 (70%) 47 (83%) 34 (60%) 34 (60%) 31 (54%) 31 (54%) 30 (53%)
2 Days 13 (23%)
Range, 1-92
Range, 1-8 Days 1 Hospitalization”
Alan Dick, Alaska Native Clipart Alaska Native Knowledge Network

24
“Recommendations 1. Wash hands carefully using soap and running water for 20 seconds after using the
toilet, and before eating or preparing food.
2. Whenever soap and water are not available, waterless alcohol-based hand sanitizers should be used.
3. In order to prevent further spread of illness, Iditarod spectators and support staff who are acutely ill or within 72 hours of symptom resolution should not progress forward along the Iditarod trail.
4. Food handlers with nausea, vomiting and diarrhea should stop working until symptom-free for 72 hours. Meticulous hand washing should be continued since the virus can be shed in stool for 5-13 days after symptoms resolve.¹
5. Hard surfaces that are frequently touched by people (such as counter tops, bathroom surfaces, doorknobs, handrails, telephones, and floors) should be cleaned using standard cleaners and then disinfected using chlorine bleach at a concentration of 1000 ppm (1/2 cup of bleach/gallon of water).
6. Surfaces contaminated with vomit or stool should first receive an initial cleaning to remove all organic material, and then disinfected with chlorine bleach at a concentration of 5000 ppm (2 ½ cups bleach/gallon of water). Wear gloves when cleaning, and wash hands well afterward.”
(Source of Information: Contributed by Dr. Tim Foote, Colleen Drake-Wilke, PHN. Dr. Bruce Chandler, and Cheryl Roussain, PA. Submitted by Drs. Marc Chimonas, Joe McLaughlin, and Beth Funk; and Julie Serstad, RN. (2004). Norovirus Outbreak Stalks Iditarod Trail, 2004, [Portable Document File]. Retrieved from the State of Alaska Website @ www.epi.hss.state.ak.us /bulletins /docs/b2004_07.pdf)
Avian Influenza “Avian influenza (bird flu) is an infectious disease of birds caused by type A strains of the influenza virus. Avian influenza, especially the H5N1 strain, has become a worldwide concern. Wild birds carry avian influenza in their intestinal tract and can shed the virus in their feces. Avian influenza has been detected in Asia, Africa and Europe and is expected to make its way to North America.” Avian Influenza in Alaska? In 2006, Alaska was expected to be a primary entry point for the virus due to the migration pattern of wild birds from Asia and Europe. State and federal agencies created response plans to be implemented if H5N1 avian influenza is detected in Alaska. Avian influenza does not pose a major threat to drinking water supplies in Alaska. “However, certain water birds can act as hosts for avian influenza by carrying the virus in their intestinal tracts and shedding it in their feces. It is possible that infected birds could land in surface water sources that are used to supply drinking water, such as lakes, rivers,
25
tundra ponds and reservoirs. Avian influenza is a weak virus but it can survive in contaminated surface water for months in colder climates. If local drinking water comes from a surface water source, it is important to make sure your current treatment processes are working good so that the virus is inactivated if it enters your treatment system.” “Filtration and disinfection are very helpful in removing and inactivating the avian influenza virus.” It is also important to remove as much organic material (turbidity) from the raw water as possible. Organic material present in the water can get in the way of the disinfection process. “Filtration processes, which precede the disinfection process, are utilized to Department of Environmental Conservation, Division of Environmental Health, Drinking Water Program remove turbidity from raw water. Optimization of the filtration process will reduce turbidity so that the disinfection process is effective in inactivating bacteria, viruses and other pathogens.” People should not drink untreated water from any surface water source. “Be sure to treat any water used for drinking water or cooking by either boiling the water for at least 3 minutes or disinfecting with chlorine or Ultraviolet (UV) radiation. Portable filtration units alone are not effective in removing or inactivating viruses. It is important to read the manufacturer’s information provided with any portable filtration or disinfection device. The information will explain the percentage of virus inactivation that can be achieved with the device.” (Source of Information: Department of Environmental Conservation, Division of Environmental Health. Drinking Water Program. (2006). Avian Influenza and Public Water System, [Portable Document File]. Retrieved from the State of Alaska Website @ http://www.dec.state.ak.us /eh/docs /AvianInfluenzaAndDrinkingWater.pdf) Respiratory Disease “Respiratory Disease is the term for diseases of the respiratory system. These include diseases of the lung, pleural cavity, bronchial tubes, trachea, and upper respiratory tract and of the nerves and muscles of breathing. Respiratory diseases range from mild and self-limiting such as the common cold to life-threatening such as bacterial pneumonia or pulmonary embolism. They are a common and important cause of illness and death. In the US, people suffer 1 billion colds per year.” (Source of Information: Wikipedia. (2010). Respiratory Disease. Retrieved from the Wikipedia Website @ http://en.wikipedia.org/wiki/Respiratory_disease. Text is available under the Creative Commons Attribution-ShareAlike License). Respiratory Disease in Alaska? April 2, 2008 “Groundbreaking study links respiratory disease with inadequate water service

26
Respiratory problems cause about 75 percent of all hospitalizations for Alaska Native and American Indian children “A study of modern water services and hospitalization yielded surprising results: A lack of running water in the home is linked to severe respiratory infections among Alaska Natives.” “Health professionals have thought the benefits of clean water were primarily gastro-intestinal. This study shows that lung and skin infections among Alaska Native persons are also associated with inadequate water service.” “For decades, there hasn’t been enough money from federal and state sources to address the problem of clean water and sanitation,” said Alaska Native Tribal Health Consortium Chairman and President Don Kashevaroff. “It’s time to build the systems needed throughout rural Alaska.” “The study highlights the need for sanitation infrastructure in rural Alaska, where about one third of the homes lack modern sanitation facilities,” said Alaska Native Tribal Health Consortium Chief Executive Officer Paul Sherry. “It confirms that flush toilets and piped water lead to improved health status.” The study’s findings are important because of the seriousness and rates of respiratory illness among Alaska Native infants and children. About 75 percent of all hospitalizations for Alaska Native and American Indian children are due to respiratory problems. The findings may have international significance as well because acute respiratory infections are the second leading cause of child deaths worldwide where many communities lack adequate sanitation facilities. The study highlights the need for sanitation infrastructure in rural Alaska, where about one third of the homes lack modern sanitation facilities.” “This study, the first of its kind conducted in Alaska, confirms that flush toilets and piped water lead to improved health status.” “They investigated whether availability of in-home water and flush toilets is associated with lower hospitalizations for sanitation-related disease. Investigators compared levels of in-home water service to hospitalization rates for acute respiratory infections, skin infections, and diarrheal disease. They looked at areas with no, low, or limited in-home water service, and compared them to communities with higher rates of modern water service. The study found that lower water services lead to: • Significantly higher hospitalization rates for pneumonia and influenza, skin infection and Respiratory Syncytial Virus • Significantly higher hospitalization rates — up to one third of infants hospitalized annually for pneumonia and RSV • Higher rates of outpatient skin infections and hospitalizations” (Source of Information: Alaska Native Tribal Health Consortium. 2008. Groundbreaking Study Links Respiratory Disease with Inadequate Water Service, [Portable Document File]. Retrieved from the Alaska Native Tribal Health Consortium Website @ www.anthc.org/upload/08-04-03Study_links_respiratory_Disease-2-1.pdf).

27
Lesson Two Activities
What’s in the Water I am Drinking? Objectives:
• To work with an Elder to identify the sources that can pollute the community’s drinking water.
• To examine where the drinking water comes from for the families in the community.
• To learn about the diseases that can contaminate the community’s drinking water. • To make a flip book of the diseases that can contaminate the community’s
drinking water. • To learn what bacteria look like and how fast they multiply. • To graph incidences of diseases in the community and the region. • To learn how to protect yourself from diseases while engaging in subsistence
practices. • To understand how to keep the family drinking water safe.
Materials: Computer for Internet research Community map Flip book materials Pencils and pens Graph paper Student journals Student learning logs Writing paper Activity 1 – Examine Sources that can Pollute Community Drinking Water with an Elder In this activity, students walk with an Elder around the community to take a look at the sources that can pollute the community’s drinking water.
1. The teacher invites the Elder to class to take a walk with the students.
2. The teacher divides the student into teams and gives them a map of the community so they can mark down the sources that can pollute the community’s drinking water.
3. The Elder, the teacher and the students walk through the community to look at the
sources that can pollute the community’s drinking water. While the Elder is talking, the students listen respectfully to what he has to share and take brief notes in their learning logs.
28
4. The class goes to the river where the community gets its drinking water. The Elder talks about the birds and the animals that depend upon the river and the different ways that the people in the community use the river.
a. The teacher asks the students to think about various ways that the drinking
water can become contaminated with bacteria, protozoa, and viruses as the people and wildlife use the river.
b. The students mark down the sources of pollution on the map.
5. The class walks around the community and look at the dog yards, outhouses, septic tanks, and sewage lagoons. The Elder talks about where the surface water goes when the snow melts and the rain falls in the summer.
a. The teacher asks the students to predict whether they think the run off
from the dog yards, outhouses, septic tanks, and sewage lagoons can reach the drinking water and contaminate it with bacteria.
b. The students mark down the sources of pollution on the map.
6. The class examines the wells in the community to see if the casings and caps are
watertight. The Elder talks about the old wells that were dug by hand in the community and how the people kept the insects, rodents, and animals from entering them.
a. The teacher asks the students to compare both the old and the new wells to
decide which one they think will have the safest drinking water. The teacher also asks the students to consider how they could make the old wells safer to use. (www.water-research.net/bacteria.htm)
b. The students mark down the sources of pollution on the map.
7. After the students return to the classroom, they describe the sources of pollution
that are on the map in their learning logs. 8. The teacher and students talk about Athabascan culture, beliefs, and values that
the Elder shared with the students during his talk.
9. The students record their thoughts about what the Elder said in their journals.
10. The students create a thank you note to send to the Elder to show their appreciation for the time he spent with them.
Activity 2 – Where Does Your Drinking Water Come From? In this activity, the students take a look at where the drinking water for their family comes from.

29
1. The teacher asks the students to take a look at where their own drinking water comes from:
o Do the students drink the water straight from the river, lake, etc? o Do the students filter the water? o Do the students think there are any sources in the community that can pollute
their drinking water?
2. The students write down the answers in their learning logs. Activity 3 – Diseases that Contaminate Community Drinking Water In this activity, the students learn about the diseases that can contaminate the community’s drinking water, and make a flipbook of the diseases so they can identify them.
1. The teacher asks the students to read the information in Lesson Two on the following diseases that can contaminate drinking water in the region:
o Giardiasis (Beaver Fever) o Cryptosporidiosis o Cholera o Typhoid fever o Gastrointestinal Illnesses o Avian Influenza o Respiratory Disease
2. The students make a flipbook of the diseases and list each disease by name, the
symptoms, treatment, and prevention. Activity 4 – What Does Bacteria Look Like; How Quickly Does It Multiply In this activity, students learn about what bacteria look like and examine how quick they multiply. What do bacteria look like and how quickly do they multiply? In this activity, students can study a bacteria cell model, look at a photograph of bacteria, and watch a webcam that shows bacteria multiplying. Information: Cells alive.com is a website on microbiology that has a bacteria cell model that shows the internal, the surface structure and the appendages of a bacteria cell.
1. The teacher has the students go to http://www.cellsalive.com/cells/bactcell.htm.

30
a. The students draw the diagram of the bacteria cell model in their learning logs and label the parts.
Information: Suite 101 has a photograph of a colony of bacteria.
2. The teacher has the students go to
http://www.suite101.com/view_image.cfm/216549
a. The students draw the picture of the colony in their learning logs.
Information: Cells alive.com has a webcam that students can watch to see how long it takes for bacteria to multiply.
3. The teacher has the students go to http://www.cellsalive.com/cam2.htm.
a. The students watch the webcam of the bacteria that are multiplying
4. The teacher asks the students the following questions:
o Does unfiltered water have harmful bacteria in it? o How can you come down with diseases when you drink unfiltered water? o How do you prevent disease when you drink filtered water?
Activity 5 – Graph Incidences of Diseases in the Community and the Region In this activity, the students graph incidences of diseases in the community and the region.
1. The teacher contacts the Health Aide to see the number of incidences of the following diseases in the community:
a. Giardiasis (Beaver Fever), Cryptosporidiosis, Cholera, Typhoid fever,
Gastrointestinal Illnesses, Avian Influenza, and Respiratory Disease.
2. If the Health Aide has a history of the problems, the students can graph the incidences (The names must remain anonymous).
3. The teacher contacts the Alaska Native Tribal Health consortium to see the
number of incidences of these diseases in the region.
4. The students graph the number of incidences in the region.
5. The students compare the incidences of the diseases locally and regionally and discuss the results.

31
Activity 6 – Protect yourself from Diseases while Hunting, Fishing, and Trapping In this activity, the students work on ways to protect themselves from disease while they are hunting, fishing, and trapping.
1. The teacher divides the students into teams and has them review the information in their flipbooks on Giardiasis and Cryptosporidiosis.
2. The teacher asks the teams to answer the following questions about Giardiasis and Cryptosporidiosis:
o What are the subsistence animals that carry these diseases? o How can you come in contact with these diseases? o Name two animals that you trap that are susceptible to these diseases.
3. The teacher talks with the students about ways they can protect themselves from
these diseases when they are engaging in subsistence practices. The teacher asks the teams to answer the following questions:
o Is it possible to boil water long enough to kill the diseases when they are
in the wilderness? o What kinds of water filters can they carry with them to destroy the
diseases? Activity 7 – Keep the Family Drinking Water Safe In this activity, students learn the steps they need to take to keep the drinking water safe for their family. 1. The teacher asks the students to review the information on the diseases in their
Environmental Health flip books. 2. The teacher brings in a water filter for the students to look at and explains how it
works. 3. The teacher asks the students to answer the following questions about keeping the
family drinking water safe:
o How can you boil drinking water to keep it safe? o How does using a water filter keep the drinking water safe? o Is it possible to keep a water filter from freezing at fifty-below? o If there is sediment in the drinking water, how long does it need to settle to
protect the water filter? 4. The teacher asks the teams to compare boiling water and filtering to decide which
they think works best. The students write down their choice and the reason for it in their learning logs.

32
Lesson 3 – How to Insure Safe Drinking Water So we have seen that water can become contaminated in many places along the path it travels before you drink it. River and lake water can contain the components that cause disease. Groundwater can contain the same components that rivers and lakes have, plus it can become contaminated with minerals from the soil. Rainwater catchment is simple but what does the water travel over before it runs into a catchment container? Let’s look at: Rainwater Catchment. Rainwater catchment has been used to collect water for longer than we know. Today rainwater catchment is usually caught coming off the roof of a home. Rainwater
catchment avoids the hazards that come with river, lake and ground water, such as contact with animal and human wastes. “Many families throughout Alaska depend on water catchment systems to provide water for washing, cleaning, cooking and drinking purposes. The high quality of rainwater is one reason to use rain as a primary drinking water source. However, once rainwater comes in contact with materials in the catchment system, contaminants can be introduced that adversely affect human health.” (Source of Information: Corriane, H., White, D. (2003). Best Management Practices for Rainwater
Catchment in Alaska, [Portable Document File]. Cold Climate Housing Research Publication. Retrieved from the Cold Climate Housing Research Center Website @: http://www.cchrc.org /docs/best_practices /BMPRWcatchment.pdf). National Sanitation Foundation Protocol P151, ‘Health Effects from Rainwater Catchment System Components,’ is a water protocol, or set of rules, that deal only with the products that are used in rainwater catchment systems. See http://www.nsf.org /consumer/rainwater_collection/index.asp?program=WaterTre. “This Protocol evaluates Environmental Protection Agency’s (EPA) regulated contaminants which could leach from materials used in rainwater catchment systems, like roofing materials, coatings, paints, liners and gutters. Products meeting the requirements of this protocol are required to maintain contaminate levels below those specified in the latest version of the EPA's Drinking Water Regulations and Health Advisories. See http://www.nsf.org. (Source of Information: National Sanitation Foundation International. (No Date). Rain Water Collection. Retrieved from the National Sanitation Foundation Website @ See http://www.nsf.org/consumer /rainwater_collection/index.asp?program=WaterTre). There are lots of different types of materials that are used for roofing in Alaska. The best and safest one to use for collecting rainwater is metal. Metal is smoother, cleaner, doesn’t leak and lasts longer than all other types of roofing materials. It is also the safest to use
Roof with rain catchment drain made of Blazo cans, Telida, Alaska
Photo by: Teresa Hanson

33
for drinking and cooking water. However, there is no metal roofing material that is certified for this. The best practice is to apply a coating or membrane to the top of the roofing material. There is only one coating that is certified under the above protocol that can be used in freezing temperatures. It is called SEALPRO and can be found at http://users.rcn.com/sealproinc/protective_coatings.htm. If the rainwater is for purposes other than drinking or cooking use, many roofing materials can be considered suitable for catchment surfaces. Water running off wood and asphalt roofs can collect bacteria as it runs over those surfaces. If the rain water is acidic then aluminum roofs could react with it and there will be high levels of aluminum in the water. Some sheet metal roofing materials may contain lead. Galvanized metal roofs can be a problem because zinc and other metals can get into the water, “however, in most cases the zinc concentration is below the maximum concentration limit set by the World Health Organization (WHO).” (Source of Information: Corriane, H., White, D. (2003). Best Management Practices for Rainwater Catchment in Alaska, [Portable Document File]. Cold Climate Housing Research Publication. Retrieved from the Cold Climate Housing Research Center Website @: http://www.cchrc.org /docs/best_practices /BMPRWcatchment.pdf). The University of Alaska Fairbanks has a publication titled “Water Cistern Construction for Small Houses,” which can be found at http://www.uaf.edu/ces/publications-db/catalog/eeh/HCM-01557.pdf. Part of the study is reprinted below:
• “In many places along the coast, collecting rainwater is the only realistic method for obtaining useful drinking water. Usually, it is collected from the roof and diverted to a water tank. (pg. 1)
• The rainwater, which is collected and stored under correct conditions, will be
clean and safe as drinking water. The water can be purified, and the taste, color, and appearance can easily be improved. (Pg.1)
• Air pollution from has caused some rainwater to be acidic and to contain soot and
similar particles. However, evidence shows that there is no reason to warn against the use of rainwater. (Pg.1)
• Plant debris, soot, and dirt from the collection surface, will be flushed into the
water tank. This will slowly reduce the quality of the water. A filter can be used to collect some of these contaminants. If the filter is put in front of the water tank it must be large enough to handle all the water that will flow through it. If the filter is placed on the outlet side of the water tank, only the water that is used will be filtered. A filter will last longer if water for washing is diverted and does not go through the filter. The simplest design is to place a filter in front of the drinking water outlet. If a filter is used, be sure that it has enough capacity. If the filter clogs and no one notices, large amounts of water can be lost. Put in an overflow to

34
drain the water away if the filter is clogged. The overflow should empty where it will be noticed. (Pg.1)
• Before choosing a water tank design, select a location where sufficient water can
be collected. It is important to realize ahead of time that a water tank will require regular maintenance in order to provide water of good quality. (Pg.1)
• Birds are the most common source of pollution on roofs. They can be stopped
from landing by putting wires low over the roof surface. Stretch bird wire across straight lines like along the peak of the roof, or around the corners of the chimney. This will protect from birds landing on the roof. Wire should stand about ½ to 1 inch high off the roof. (Pg.2)
• Leaves, spruce needles, pollen, soot and dust will create a constant problem for
the rain water catchment system. Trees that are close to the house can be removed. After long, dry spells and during the flowering periods of plants and trees, let the first rain shower bypass the catchment container until the collection surface has been flushed clean.”
(Source of Information: Norwegian Building Research Institute. (2002). Water Cistern Construction for Small Houses, [Portable document file]. University of Alaska Fairbanks Cooperative Extension Service Publication. Retrieved from the University of Alaska Fairbanks Cooperative Extension Service Website @ http://www.uaf.edu/ces /publications-db/catalog /eeh/HCM-01557.pdf). Disinfecting Surface Water Whenever surface water is used for drinking and household purposes, or if there is a question about the safety of your water supply, then you should purify the water. Disinfecting your drinking water source will make sure that you, and your family, are drinking the safest water possible.
• Method One — “Boil water for two (2) minutes. Allow to cool. If the water has a flat taste, pour it back and forth between two clean containers two or three times.”
• Method Two — “Add one drop of fresh, unscented chlorine bleach, such as
Clorox or Purex (containing 5.25 to 6% available chlorine) to each quart of water. If water is not clear, add three (3) drops to each quart of water. Mix thoroughly and allow it to stand for 30 minutes before drinking. If larger quantities of water are to be disinfected with chlorine bleach, use this table for proper dosage.”
“To Disinfect Surface Water
Gallons of Water 5 10 20 30 40 50 Clear Water ¼ tsp.* ½ tsp. ¾ tsp. 1 tsp. 1 ¼ tsp. 1 ½ tsp. Cloudy Water ½ tsp. 1 tsp. 1 ½ tsp. 2 tsp. 2 ½ tsp 3 tsp.

35
*tsp.— Teaspoon Note: If a tablespoon is used for measuring, use 1 tablespoon for each three teaspoons.” (Source of Information: Alaska Department of Environmental Conservation, Environmental Health Drinking Water Program. (No Date). When You Are Unsure of the Safety of Your Drinking Water Source-Treat It. Retrieved from the State of Alaska Website @ http: //www.dec.state. ak.us/EH/dw /dwmain/Treat.htm). Disinfecting Wells and Small Distribution Systems 1.) When the system needs to be cleaned this way “the water will not be drinkable while it is going on, so plan to disinfect late at night” or at other times when there is little need for water. Get one-half gallon bleach (unscented) which contains 5-6% sodium hypochlorite. Large diameter or very deep wells may require more chlorine. Dilute the chlorine in a large bucket of water.” 2.) Remove the cap or seal, “and pour the chlorine mixture down the well casing.” Use a clean garden hose and run water down the casing “until you smell chlorine in the water from the hose. Turn off the hose and replace the” cap or seal. 3.) Turn the water on at all outlets in your home. Let each one run until you smell the chlorine, then turn off the water. The goal is to get the chlorine solution to all parts of the plumbing. Do the same for hot water taps and flush toilets until chlorinated. If there are any in-line filters, they should be removed, and replaced with new filters after the disinfecting process is completed. (Carbon filters are bad because they breed bacteria.) 4.) “Hold the chlorine in the pipes” for at least two (2) hours, best if overnight. 5.) Turn the water on at each outlet or faucet and flush out the chlorine solution until you can no longer smell it. Your well and distribution system should now be clean. 6.) “Follow-up sampling should be done after all trace of chlorine is gone” to make sure that the disinfecting process worked. “NOTE: Large amounts of chlorine can damage the resin in water softeners, so if there is a softener, it should be by-passed before disinfecting the plumbing. Contact the manufacturer or distributor for the correct method for disinfecting the softener. For more information please contact ADEC at (907) 451-2108 or www.dec.state.ak.us/eh/dw.” (Source of Information: Alaska Department of Environmental Conservation, Environmental Health Drinking Water Program. (No Date). Disinfecting Wells and Small Distribution Systems. Retrieved from the State of Alaska Website @ http://www.dec. state.ak.us/eh/dw/dwmain/disinfection_of_wells.html).

36
Sampling Water Bacteria/Coliform and Pathogen testing
Drinking Water Testing
“Testing for all individual pathogens is impractical and expensive. Instead, the EPA has designated total coliform bacteria as a standard to determine bacterial safety of water. Coliform bacteria originate in the intestinal tract of warm-blooded animals and can be found in their wastes.” “Coliform bacteria can also be found in soil and on vegetation. Coliform bacteria are pretty simple to identify and are present in much larger numbers than more dangerous pathogens. Coliform bacteria react to the natural environment and treatment processes like pathogens. By monitoring coliform bacteria, the increase or decrease of many pathogenic bacteria can be estimated.”
Because these are similar, “bacterial safety of drinking water is monitored by testing for coliform bacteria.” A sampling “kit will contain a sterilized sampling bottle, an information form, sampling instructions, and a return mailing box. Use of the bacterial test kit is necessary to make sure the test is accurate. The bottle in the kit is completely sterilized” so the sample is not contaminated by bacteria in the bottle. Do not use any other container except the one that comes with the kit. “The kit contains detailed instructions on how to collect the water sample. Follow the instructions carefully to avoid outside contamination and to obtain a good representative sample.”
“To avoid unnecessary delays and possibly a need for resampling, mail or carry the sample to the laboratory immediately. The sample must be received at the laboratory within 48 hours after collection or it will not be tested. Be sure the form accompanying the sample is accurate and complete. If there is no date or time of collection on the form, it will be assumed the sample is over 48 hours old. If there is no return address, test results cannot be sent to you.
When a laboratory receives a water sample, it gives the sample a number and the time of arrival is stamped on the accompanying form. One hundred milliliters (ml) (about 3.4 fl. oz.) of the sample is then drawn through a membrane filter. This filter is placed on a nutrient broth culture plate and placed in an incubator for 24 hours at 35°C (95°F) for culturing. The plates then are removed from the incubator and the number of coliform bacteria colonies are counted.”
Interpreting Test Results
“The EPA establishes standards for drinking water which fall into two categories -- Primary Standards and Secondary Standards. Primary Standards are based on health considerations, and are designed to protect people from three classes of toxic pollutants: pathogens, radioactive elements and toxic chemicals.

37
Bacterial contamination falls under the category of pathogens. The EPA Maximum Contaminant Level (MCL) for coliform bacteria in drinking water is zero (or no) total coliform per 100 ml of water. The number of coliform colonies found in the incubated water sample, if any, is reported and the form is checked to indicate whether or not the water meets the EPA bacteriological standard of zero. At times, excessive numbers of other bacteria in a sample can interfere with the counting of coliform types. These samples may be classified as "too numerous to count" or "confluent growth."
If the laboratory report indicates the presence of coliforms, or states "too numerous to count," or "confluent growth," the State Department of Health recommends another sample be analyzed to help evaluate the contamination. If you suspect bacterial contamination in your water supply, use an alternative water supply or disinfect your water supply while waiting for test results.”
Source of Information: Wilkes University Center for Environmental Quality Environmental Engineering and Earth Sciences. (No Date). Water Testing Bacteria, Coliform, Nuisance Bacteria, Viruses and Pathogens in Drinking Water. Retrieved from Wilkes University Center for Environmental Quality Environmental Engineering and Earth Sciences Website at http://www.water-research.net/bacteria.htm. Additional related cited links (http://www.wilkes.edu/water and http://www.water-research.net). Go to the webpage online to view the information on how to sample test for a Total Coliform Bacteria www.dec.state.ak.us/eh/docs/dw/NorthernFlows/sampling.pdf. The file can also be found in the resources section under Lesson 3 called Total Coliform Bacteria Sample. Taking a sample from your system after it has gone through a chlorine cleansing go to: www.dec.state.ak.us/eh/docs/dw/Chlorine%20Residual%20Sample%20Document.pdf. This file can also be found in the resources section under Lesson 3 called Chlorine Residual Sample. Volatile Organic Chemicals (VOCs) “Volatile Organic Chemicals (VOCs) refers to a group of carbon-based chemicals” that evaporate rapidly into the air. They usually come from fuel products or solvents like parts washing fluids or fuel additives like benzene (found in gasoline, paint thinners, solvents, etc.) “These compounds can sometimes enter drinking water sources from leaking fuel storage tanks, improper disposal of fuel, paint, solvents, and other VOC containing products, or solid waste or hazardous waste disposal sites. Currently, there are 21-regulated VOCs for which Class A PublicWater Systems (PWS) must monitor. The regulated VOCs include: benzene, toluene, xylene, carbon tetrachloride, and other compounds.” VOCs can cause cancer and may damage the kidney, liver, circulatory, and nervous system. “All Class A PWS's are required to monitor for VOC's. Systems that use surface water are required to monitor annually. Most systems that use groundwater are required to

38
monitor every three years.” If any of the regulated VOC levels is higher than 0.5 ppb (parts per billion), the system has to be monitored quarterly to track the levels. If the levels of VOC’s go over the Maximum Containment Level (MCL), the system must be treated to remove and reduce the contamination. Usually spreading granular activated carbon (GAC) to absorb the VOC’s and exposing them to air. “It is very important for communities and water system owners” to plan ahead “to protect their drinking water source from VOC contamination. Contamination can come from leaking fuel storage tanks (above and below ground), and improper storage and” throwing away “solvents, paints and paint thinners. Aerosol containers may also leak and contaminate a drinking water source. Proper control and monitoring measures should be” put in place” for fuel storage areas and landfills. If a spill or leak does occur, it should be reported to the DEC right away so that actions can be taken to protect the drinking water source.” (Source of Information: Alaska State Department of Environmental Conservation. (No Date). Northern Flows, Volatile Organic Chemicals, [Portable Document File]. Retrieved from State of Alaska Website @ http://www.dec.state.ak.us /eh/docs /dw /NorthernFlows /voc.pdf.) Go to the webpage online to view the information on how to sample test for volatile organic chemicals www.dec.state.ak.us/eh/docs/dw/NorthernFlows/voc.pdf. The file can also be found in the resources section under Lesson 3 called Volatile Organic Chemicals Sampling. Inorganic Contaminants “Inorganic chemicals, known as IOCs, are metal or mineral elements and their compounds. IOCs have been known, over time, to damage kidneys, liver, heart, intestines, brain, lungs, circulatory systems, and nervous systems. Barium can contribute to high blood pressure. Cyanide can damage the brain, spleen, and liver and can even be fatal.” “IOCs get into water sources by dissolving out of mineral deposits and soil, primarily natural sources. They are also found in areas with mining, manufacturing of fertilizers, and in paint.” “Waivers for testing IOCs are possible. A waiver may be obtained by paying a fee and filling out an ADEC waiver application form (not very hard, call ADEC for help). An IOC waiver can be good for nine years. At least one sample needs to be collected during the waiver period and you must reapply for the waiver every nine years.”

39
“IOC sampling frequency
Water Source Routine Sample Frequency Waiver Possible?
Surface Water Once every year Once per nine years if 3 annual samples show less than MCLs
Groundwater Once every compliance period
Once per nine years if 3 compliance sample show less than
MCLS Collect IOC samples after treatment at the entry point to the distribution system. Several different containers might be used to take the required sample. These might be glass or plastic bottles, or plastic cubitainers. Most of the sample water should be preserved with nitric acid, except the bottles that will be tested for cyanide and mercury. Cyanide sample bottles should contain sodium hydroxide preservative. The lab should add the proper preservative to the sample bottles before they are shipped to you, but it never hurts to ask the lab to do this. Carefully note sample locations on chain of custody forms.” What result triggers a water quality alarm for IOCs? “A sample result that is greater than the maximum contaminant level (MCL) for an IOC chemical should be confirmed by additional sampling and increased sampling frequency. Public notice may be required. Call ADEC if you exceed an MCL.” “Before I take any water samples, I call the airport. If the plane isn’t coming in, I don’t take samples. If I can’t get my samples to the lab they are going to come back, and I’ll have to pay transportation charges for extra samples. My village doesn’t have enough money to waste. So I carefully plan when I am going to take samples.” Source of Information: Alaska Department of Community and Economic Development and Alaska Department of Environmental Conservation. (2002). The Updated Plain English Guide to Alaska Drinking Water and Wastewater Regulations, [Portable Document File]. Retrieved from the State of Alaska Website @ www.dec.state.ak.us/eh /docs/dw /plainguide.pdf pages 97-98). Go to the webpage online to view the information on how to sample test for inorganic chemicals www.dec.state.ak.us/eh/docs/dw/NorthernFlows/phase_2_and_5_sampling_2.pdf. The file can also be found in the resources section under Lesson 3 called Phase 2 and 5 sampling 2.
40
Lesson Three Activities
How to Insure Safe Drinking Water
Objectives:
• To examine rainwater catchments in the community with an Elder • To know how to measure rainfall • To understand how to read a rainfall table • To evaluate roofs for collecting drinking and cooking water • To learn how to make a roof safe for water collection • To know how to purify drinking water for the family
Materials Computer for Internet research Rain gauge Pencils and pens Student journals Student learning logs Writing paper Activity 1 – Examine rainwater catchments with an Elder
In this activity students examine rainwater catchments in the community with an Elder.
1. The teacher invites an Elder to walk with the students to examine rainwater catchments in the community.
2. The teacher has the students brainstorm questions that they can ask the Elder
about rainwater catchments while they are walking. For example:
o What is the history of rainwater catchments in the community? o What kind of rainwater catchments does he recommend? o What do people in the community do with the rainwater?
3. The Elder, teacher, and students walk around the community to examine the
rainwater catchments. While the Elder is talking, the students listen respectfully to what he has to share and take brief notes in their learning logs.
4. The Elder works with the students to draw pictures of the different kinds of
rainwater catchments in their learning logs.
5. The teacher and students return to the classroom. She asks the students to:
41
o Compare and contrast the different kinds of water catchments in the community.
o Decide which rainwater catchments are the most effective and why?
6. The teacher and students talk about Athabascan culture, beliefs, and values that the Elder shared with the students during his talk on rain water catchments.
7. The students record their thoughts about what the Elder said in their journals.
8. The students create a thank you note to send to the Elder to show their
appreciation for the time he spent with them. Activity 2 – Measure Rainfall in the Community In this activity the student learns how to measure rainfall, record it in a table, and then graph the results.
1. The teacher brings in a rain gauge and explains to the students how to use it to measure rainfall.
2. The students pick an area outside the school where the rain can be collected in the
rain gauge, measure the amount of rainfall over a period of time, and enter the results in a table in their learning logs.
3. The students put the rainfall data from the table into a graph.
4. The teacher asks the students why it is important to be able to measure rainfall
and examine the results when they are using a rain catchment system to collect drinking and cooking water.
Activity 3 – Read a Rainfall Table In this activity, the students learn how to read a rainfall table and then determine which region in Alaska is most similar to theirs in rainfall.
1. The teacher downloads the Optimal Storage Volumes for Rainfall Catchment Systems in Alaska @ http://www.uas.alaska.edu/attac/documents/OptimalRainwaterStorageVolumes_Mar08.pdf and copies Appendix A: Design Year Data for Selected Communities for the students.
2. The teacher has the students look at Appendix A: Design Year Data for Selected
Communities and answer the following questions:
A. Which community has the:
o Most available rainfall (inches)? _____________

42
o Least amount of available inches of rainfall (inches)? _____________
o Longest operational seasonal length (days)? _____________
o Least operational seasonal length (days)? _____________
o Earliest operational season begin date? _____________
o Latest operational seasonal end date? _____________
3. The teacher has the students go to the University of Alaska Fairbanks Climate Website http://climate.gi.alaska.edu/Climate/Fairbanks/index.html and look up the amount of rainfall for their region.
4. What is the region in Alaska that is most similar to their region in rainfall? ________
Activity 4 – Evaluate roofs for collecting drinking and cooking water
In this activity the class evaluates roofs in the community for collecting drinking and cooking water and then write a report on what they have found.
1. The teacher talks about the kinds of roofing materials that both safe and unsafe for community members to collect drinking and cooking water from.
2. The class walks around the community to evaluate the different kinds of roofs:
a. The students make a list of all the different kinds of roofs in the
community in their learning logs. b. The class discusses which roofs are safe and unsafe for catching drinking
and cooking water.
3. When the students return to class, they write a report on which roofs in the community are safe and unsafe for collecting drinking and cooking water.
Activity 5 – Make a roof safe for water collection
In this activity, the students learn how to make a roof safe for water collection and then think about how they can make their own roof safe for collecting water.
1. The teacher downloads the PDF Cistern for a Small House, copies the “General
and Collection Surfaces” and asks the students to read it.
2. The teacher asks the students to read the “General and Collection Surfaces” section and look at Diagram 02: Example of a cistern in a local community or in the diagram cistern for a small house.
3. The teacher asks the students to make a poster of a water cistern roof-water tank and then draw:

43
a. The various sources of pollution that can collect on the roof (i.e. plant
debris, soot, and dirt) b. Ways to solve the pollution problems (i.e. put wires up for birds on roof)
4. How can the students make their own roofs safe for collecting drinking and
cooking water? Activity 6 – Purify Drinking Water for the Family
In this activity, the students figure out how much bleach they will need to purify surface water for their family.
1. The teacher explains that when purifying surface water for drinking you need to add two drops of unscented chlorine bleach such as Clorox or Purex (containing 5.5 to 6% available chlorine) to each quart of water.
2. The teacher asks the students to figure out how much bleach they will need to
add to each amount of water to purify it for their family’s drinking water:
o ½ gallon of water ________ o 1 gallon of water ________ o 2.5 gallons of water ________

44
Lesson 4 – Honey buckets, Outhouses and Sewage Lagoons “Several years ago, a honey bucket waste hauler came home from work and hung his work overalls on a hook in his home. When his son rushed over to give his dad a hug, he brushed up against the overalls. As all kids do, the child later put his fingers into his mouth. Without anyone realizing it, he got hepatitis from the germs on the overalls. But before any symptoms appeared, he went to school and spread the disease to 15 other kids. A health inspection traced the outbreak back to the overalls. Now people in that village who work with wastewater or honey buckets are much more careful how they handle waste. Workers now change clothes and wash thoroughly before going home. Clothing and equipment are stored in lockers so other people and animals can’t accidentally touch them. Spilled sewage is cleaned up immediately. This true story illustrates the potential for serious sickness if waste is not dealt with properly. No one wants to endanger his or her family’s health. Training workers to operate a wastewater system is vitally important for any type or size of system. So is setting up your system correctly to begin with—for instance, sewage lagoons should be well fenced to keep animals out and have signs warning people to stay away.” (Source of Information: Alaska Department of Community and Economic Development and Alaska Department of Environmental Conservation.2002). The Updated Plain English Guide to Alaska Drinking Water and Wastewater Regulations, [Portable Document File] Retrieved from the State of Alaska Website @ www.dec.state.ak.us/eh /docs/dw/plainguide.pdf page 129). Honey Buckets
A honey bucket is a bucket that is used in place of a flush toilet in rural situations and communities that lack a water-borne sewage system.
The honey bucket is usually lined with plastic and either sits under a wooden frame affixed with a toilet seat lid, or the toilet seat lid sits right on top of the bucket. The honey bucket gets its name from the actual five–gallon buckets which were once used as containers for honey. These are the same type of plastic buckets used for shipping many paints, cleaners, solvents, oils, lubes, antifreeze, sheetrock mud; as well as institutional quantities of food products.
Honey buckets are common in many villages and rural locations in Alaska, as well as in “dry” (no running water) cabins located near larger population centers. Honey buckets are also used where permafrost makes the installation of septic systems or outhouses impractical.
Photo by: Teresa Hanson
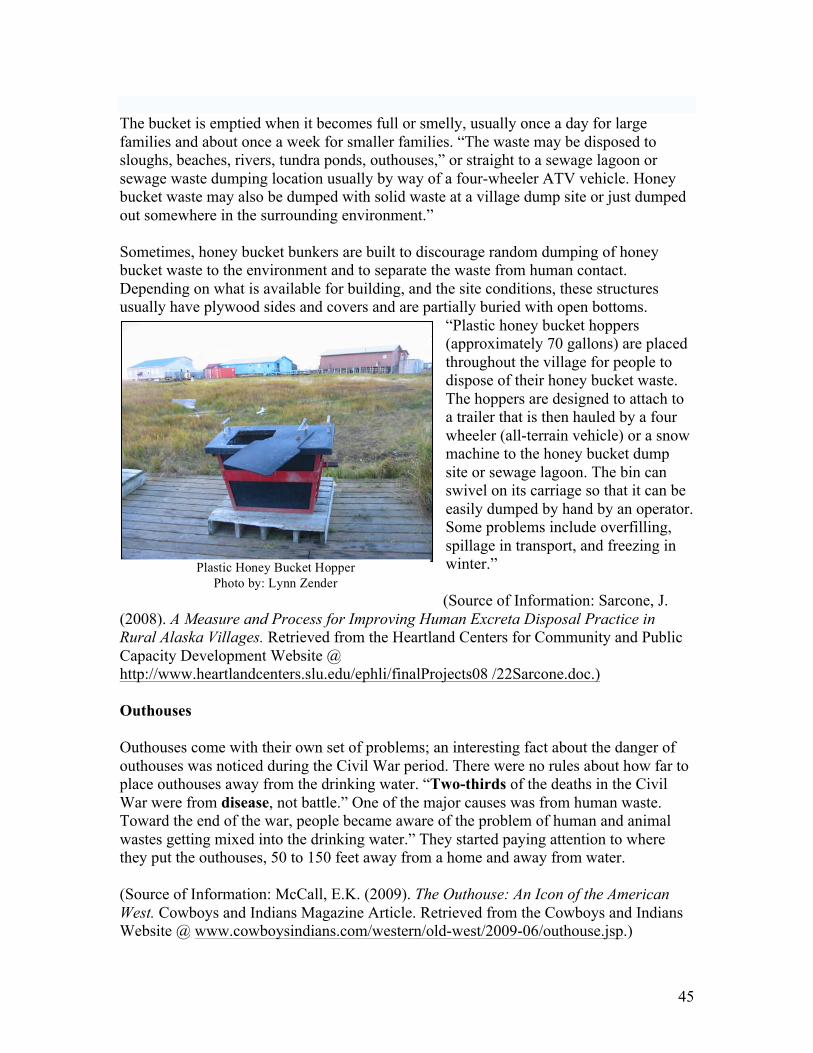
45
The bucket is emptied when it becomes full or smelly, usually once a day for large families and about once a week for smaller families. “The waste may be disposed to sloughs, beaches, rivers, tundra ponds, outhouses,” or straight to a sewage lagoon or sewage waste dumping location usually by way of a four-wheeler ATV vehicle. Honey bucket waste may also be dumped with solid waste at a village dump site or just dumped out somewhere in the surrounding environment.” Sometimes, honey bucket bunkers are built to discourage random dumping of honey bucket waste to the environment and to separate the waste from human contact. Depending on what is available for building, and the site conditions, these structures usually have plywood sides and covers and are partially buried with open bottoms.
“Plastic honey bucket hoppers (approximately 70 gallons) are placed throughout the village for people to dispose of their honey bucket waste. The hoppers are designed to attach to a trailer that is then hauled by a four wheeler (all-terrain vehicle) or a snow machine to the honey bucket dump site or sewage lagoon. The bin can swivel on its carriage so that it can be easily dumped by hand by an operator. Some problems include overfilling, spillage in transport, and freezing in winter.” (Source of Information: Sarcone, J.
(2008). A Measure and Process for Improving Human Excreta Disposal Practice in Rural Alaska Villages. Retrieved from the Heartland Centers for Community and Public Capacity Development Website @ http://www.heartlandcenters.slu.edu/ephli/finalProjects08 /22Sarcone.doc.) Outhouses Outhouses come with their own set of problems; an interesting fact about the danger of outhouses was noticed during the Civil War period. There were no rules about how far to place outhouses away from the drinking water. “Two-thirds of the deaths in the Civil War were from disease, not battle.” One of the major causes was from human waste. Toward the end of the war, people became aware of the problem of human and animal wastes getting mixed into the drinking water.” They started paying attention to where they put the outhouses, 50 to 150 feet away from a home and away from water. (Source of Information: McCall, E.K. (2009). The Outhouse: An Icon of the American West. Cowboys and Indians Magazine Article. Retrieved from the Cowboys and Indians Website @ www.cowboysindians.com/western/old-west/2009-06/outhouse.jsp.)
Plastic Honey Bucket Hopper Photo by: Lynn Zender
46
Insects and Animals
Because the waste in outhouses is open and exposed, the amount of human waste in the environment will be higher and more accessible to insects and animals. It is important to make sure that outhouses are protected against flies and other creatures. “Some types of flying insects such as the housefly are attracted to the odor of decaying material, and will use it for food for their offspring, laying eggs in the decaying material. Other insects such as mosquitoes seek out standing water that may be present in the pit for the breeding of their offspring.”
If bugs like flies or mosquitoes breed near human waste they can carry diseases such as typhoid fever, so it is very important to protect against them. They can be “easily controlled without chemicals by enclosing the top of the pit with tight fitting boards or concrete, using a toilet hole cover that is closed after every use, and by using fine-grid insect screen to cover the inlet and outlet vent holes. This prevents flying insect entry by all possible routes.”
(Source of Information: Wikipedia. 2010. Outhouses. Retrieved from the Wikipedia Website @ http://en.wikipedia.org/wiki /Outhouse. Text is available under the Creative Commons Attribution-ShareAlike License.)
Animals like porcupines are attracted to outhouse waste. Not only will they track fecal matter around the environment with their feet, they are also a pest and a nuisance because they like to eat the wood. Outside Alaska in hot dry places, rattlesnakes take up residence in outhouse waste because it is cool and out of the sun.
Odor
As the solid waste is decayed by organisms they produce gases such as methane and hydrogen sulfide. These gases stay within the pit and are the source of the odor, but the open-pit allows these gases to circulate out of the pit, so concentrations are typically low enough not to cause harm. The odor can be reduced by running pieces of plastic piping (about 4 feet down) inside the outhouse hole and up through the roof. This will help vent methane gas. During the warmest part of the day the vent tube heats up. This produces a slow air convection current that brings fresh air into the hole, and pushes warmed pit gases out the top of the vent tube, which keeps the smell down.
(Source of Information: Wikipedia. 2010. Outhouses. Retrieved from the Wikipedia Website @ http://en.wikipedia.org/wiki /Outhouse. Text is available under the Creative Commons Attribution-ShareAlike License.)
Other methods include throwing a few handfuls of ash down the outhouse pit to reduce odors. Ashes from a fire pit or wood stove also help solids settle to the bottom of the pit faster. Placing a bucket of lime with a scoop in the outhouse is a good idea. Throw a few

47
scoops of lime into the outhouse hole and it will reduce the bad smell, keep bugs away and speed up the breakdown of waste.
Hazardous Waste
Toxic substances such as paint, oil, and chemicals cannot be dumped into outhouse pits. The toxic materials will either kill the organisms that are breaking down the solid waste or the chemicals may not be digestible. Then the toxic waste will seep deeper underground and contaminate groundwater under the pit.
(Source of Information: Wikipedia. 2010. Outhouses. Retrieved from the Wikipedia Website @ http://en.wikipedia.org/wiki /Outhouse. Text is available under the Creative Commons Attribution-ShareAlike License.)
Sewage Lagoons
Sewage Lagoons incorporate all the problems listed with honey buckets and outhouses, but they are dangerous on a much bigger scale. Centralized dumping of human waste or indiscriminant dumping in the environment can seep into groundwater or lakes, streams, rivers, etc. causing many health issues to humans and animals alike.
“Find a place for your sewage lagoon or sewage disposal area that avoids problems. Keep it away from planned housing areas, airport facilities, wetlands, and high use areas, such as subsistence areas, picnic areas, boat launches, playgrounds, or ballparks. You must maintain certain distances between your water utility and other utilities and structures. These distances are bare minimums, so give them a little extra room to avoid problems down the road; some facilities might be expanded later or not end up exactly where you thought they were going to be.” Source of Information: Alaska Department of Community and Economic Development and Alaska Department of Environmental Conservation. (2002). The Updated Plain English Guide to Alaska Drinking Water and Wastewater Regulations, [Portable Document File]. Retrieved from the State of Alaska Website @ www.dec.state.ak.us/eh /docs/dw /plainguide.pdf page 33) Of bigger and very realistic concerns of sewage lagoons is flooding. “Check for any evidence of sewage on the ground. If found, you should disinfect the area using large amounts of lime (finely ground garden lime will work) or a strong solution of water and chlorine bleach. Apply the disinfectant to the ground surface in the affected area. Make sure that you keep people (especially children) and pets away from any contaminated areas prior to and during disinfecting.” (Source of Information: State of Alaska, Department of Environmental Conservation. Division of Spill Prevention and Response, Prevention and Emergency Response Program. (2005). Flood Public Health and the Environment, [Portable Document File]. Retrieved from http://www.dec.state.ak.us/spar /perp/heat/hhot_floods_plan.pdf)

48
Health Effects Associated with Raw Sewage
“Raw sewage contains biological organisms like bacteria, viruses, fungi and parasites that can cause serious illness and even death.” “Always assume that floodwater is contaminated with sewage. Immediate clean up is essential to reduce the risk of infection and/or mould growth.”
“Tetanus is caused by a toxin produced by the bacterium Clostridium tetani that is common in soil and in sewage. The bacterium enters the body via open wounds. There is a high risk of death occurring if infected. Anyone who may be exposed to sewage or soil should have prophylaxis tetanus vaccinations every ten years.
Hepatitis A is caused by the Hepatitis A virus (HAV) that is transmitted primarily by ingestion. The virus must be present in sufficient quantities to cause infection. Infection occurs after an incubation period of three to four weeks. Hepatitis A is often mild, but can be severe or even fatal in some cases. Symptoms are fever, headache, nausea and pain in the abdomen, dark urine and jaundice. People can spread the disease to others in the immediate period before they become ill and while they are ill. Recovery from Hepatitis A can be slow and require several weeks or months of increased rest. A majority of patients make a complete recovery but the disease can be more severe in older patients. Giardia and Cryptosporidium are protozoan parasites, commonly found in sewage and surface waters, that can cause diarrhea, stomach cramps, nausea and sometimes fever. Symptoms may last for only a few days or can last for months or years. Many people, especially children, have no symptoms. Cysts from infected persons or animals enter sewage and if untreated may infect other people who ingest the cysts. Gram-negative Bacteria such as E.coli can cause gastro-intestinal diseases if ingested or airway problems, headache, tiredness and nausea if inhaled. Substances called endotoxins that are released at the time of death of the bacterium have been suggested as the cause of a wide variety of occupational diseases such as mill fever and grain fever.”
(Source of Information: Workers Health Centre. (2005). Worker’s Health Centre Fact Sheet. Retrieved from Worker’s Health Centre Website @ http://www.workershealth .com.au/facts042.html)

49
Lesson Four Activities
Honeybuckets, Outhouses and Sewage Lagoons Objective:
• To learn about the waste disposal system in the community with an Elder • To know what a disease is • To understand how the immune system works • To know what tetanus is, how you can get it, what the symptoms are and how you
can prevent it • To learn about the diseases the community is at risk for • To evaluate the effectiveness of Hepatitis A Immunization in Alaska
Materials Computer for Internet research (Materials listed in Activity 2) Glo Germ Kit Pencils and pens Student journals Student learning logs Writing paper Activity 1 – Investigate the waste disposal system in the community with an Elder In this activity, the students investigate the waste disposal system in the community with an Elder.
1. The teacher invites an Elder to walk through the community with the students to discuss the waste disposal system.
2. The teacher explains that while the Elder is speaking, it is important for the
students to listen respectfully to what he has to share and take brief notes in their learning logs.
3. These are some of the questions the students can ask the Elder:
A. Traditional waste disposal
o How did the community traditionally dispose of waste? o What precautions did the people take to avoid diseases associated with
waste disposal when they were living in the spring and winter camps?
B. Outhouses o How did people protect themselves from the insects that are commonly
found in them? o What did they do to keep the animals out of them?

50
C. Sewage lagoon o What is the history behind the sewage lagoon? o How did the community decide where to put the sewage lagoon?
4. The teacher, Elder and students walk through the community while the Elder talks about the history of waste disposal for the community. While the Elder is talking, the students listen respectfully to what he has to share and take brief notes in their learning logs.
5. The students work with the Elder and the teacher to draw a map of where the
waste disposal process starts in the community all the way through to where it ends.
6. The teacher and the students return to the classroom and discuss the following questions:
o What method of waste disposal in the community is the safest? o How can the community improve its waste disposal system to better
protect the health of the community members?
7. The teacher and students talk about Athabascan culture, beliefs, and values that the Elder shared with the students during his talk on the waste disposal system in the community.
8. The students write down their thoughts about what the Elder said in their journals.
9. The students create a thank you note to send to the Elder to show their
appreciation for the time he spent with them. Activity 2 – Washing Hands Experiment In this activity, the students learn how to wash their hands properly. Materials:
• Cooking oil. • Ground cinnamon in shaker. • Access to a sink with warm water to wash hands. • Measuring spoons – 1 teaspoon and 1 tablespoon. • Soap. • Paper towels. • Timer.

51
Procedure: 1. Teacher explanation of the experiment. 2. The oil on students' hands represents the natural oils in the skin that bacteria cling
to. The cinnamon represents bacteria. The soap and the rubbing action are needed to remove the oils and the bacteria that the cinnamon simulates. Washing with soap and warm water with brisk rubbing of hands for 20 seconds is the most effective way to remove bacteria.
3. Divide class in groups of three. Each student will take turns with the hand washing
demonstration. Student will prepare hands by rubbing a tablespoon of cooking oil all over their hands until completely coated and then sprinkle a teaspoon of cinnamon on their hands and rub it around until it is evenly distributed.
4. The students wash their hands by rubbing them briskly for 20 seconds using timer
or stopwatch, dry hands on paper towels, save towels, and examine hands. Student #1: wash hands with cold water and no soap. Student #2: wash hands with warm water and no soap. Student #3: wash hands with warm water and soap.
5. Students will compare paper towels they dried their hands with and record their observations on sheet of paper.
o The method that removed the most "bacteria". o The method that removed the least "bacteria". o Conclusions about hand washing.
6. Download age appropriate hand washing activity pages located on CD and have students fill them out.
Activity 3 – Glo Germ Kit: See how well you are washing your hands In this activity, students work with Glo Germ to learn how they can avoid spreading germs to others.
1. The teacher orders the low priced Glo Germ kit (http://www.glogerm.com) that uses ultraviolet light to show the students where they miss germs when they are washing their hands.
2. The students watch the Glo Germ episode by Gordon and Stanley on PBS Kids
(http://pbskids.org/dragonflytv/show/glogerm.html) which talks about what kids can do to avoid spreading cold or virus germs to other people.
3. The teacher and the students work with the Glo Germ kits to evaluate how well
the students wash their hands.

52
4. The students write down the steps they need to take to improve washing their hands in their learning logs.
5. The students reflect on the Glo Germ exercise in their journals. Activity 4 – Center for Disease Control and Prevention-Bam Body and Mind In this activity, the students study the Center for Disease Control and Prevention Bam Body and Mind website to learn about preventing and controlling diseases. The Center for Disease Control has created a website called Bam Body and Mind that teaches children about preventing and controlling disease. The website has articles on different kinds of diseases people can contract and how vaccines can be used to prevent them; there is also Immune Platoon—a super hero flash cartoon that teaches children about the immune system and vaccines.
1. The teacher has the students go to Immune Platoon at the Center for Disease Control and Prevention website at:
http://www.bam.gov/sub_diseases/diseases_immuneplatoon.html 2. The teacher has the students watch the Immune Platoon Flash Cartoon to understand how their immune system is like a “super hero team” that helps to fight disease in their bodies. The teacher asks the students to answer the following questions in their learning logs:
o What do the super white cells protect your body from? o Where are the super white cells in your body? o How do the super white cells fight disease? o What is an antigen? Give an example.
3. The teacher has the students go to Microbes in Immune Platoon and read about microbes. She asks them to answer the following questions in their learning logs:
o What is a microbe? o What is the difference between a bacteria and a virus? o How do bacteria and viruses reproduce?
3. The teacher has the students go the Disease Database in the Immune Platoon and look at the “case files” on diseases. She asks them to read the case file on tetanus and answer the following questions in their learning logs:
o What is tetanus? o How can you get tetanus? o What are the symptoms of the disease? o How can you prevent it?
4. The teacher has the students go to Vaccines in the Immune Platoon to understand how vaccines help fight disease. The teacher has the students read the article on vaccines and answers the following questions in their learning logs:
o What is the purpose of a vaccine? o What is a vaccine made of?

53
o How do vaccines fight diseases? o Why is it necessary to get a booster shot?
Activity 5 – Visit the health clinic to learn about sanitation and disease prevention In this activity, the students visit the community health clinic to learn about the diseases that are associated with sanitation in the community and how to prevent them.
1. The teacher arranges for the class to visit the community health clinic. 2. The teacher has the students brainstorm questions to ask the Community Health
Aide Practitioner. 3. Examples:
o What diseases can be caused by germs in sanitation? o How can these diseases be prevented? o What are the vaccines that are available at the health clinic to prevent
these diseases?
4. The class visits the clinic and talks with the Community Health Aide Practitioner. The students take notes in their learning logs about what she says.
5. When the students return to the classroom the teacher asks the students to think
about what steps they can take to protect themselves from the diseases associated
6. When the students return to the classroom, they write down their thoughts about their visit to the health clinic in their journals.
7. The students create a thank you note to send to the Community Health Aide
Practitioner to show their appreciation for the time he spent with them. Activity 6 – Evaluate the Effectiveness of Hepatitis A Immunization in Alaska In this activity, the students study a table created by the Alaska State Epidemiology Department to evaluate the effectiveness of Hepatitis A Immunization in Alaska. 1. The teacher tells the students to go to the Alaska State Epidemiology website at
http://www.epi.hss.state.ak.us/id/hepatitis/cases.htm 2. The teacher asks the students to look at the Annual Reported Cases of Hepatitis in
Alaska Table (1993-2008), read the information underneath it, and then answer the following questions:
o How many cases of hepatitis were reported in 1993? o How many cases of hepatitis were reported in 2008?

54
3. The teacher tells the students to read the information below the table and asks the students:
o What two factors do you think have contributed to the drop in cases of hepatitis?
4. The teacher asks the students to answer the following questions to see how the Universal Hepatitis Immunization Program and Mandatory Hepatitis A and B immunization affected the number of cases of Hepatitis reported in Alaska:
a. The Universal Hepatitis Immunization Program began January 1996:
o How many cases of hepatitis were reported in 1995? o How many cases of hepatitis were reported in 2000? o What is the difference in the number of cases between 1995 and 2000?
b. The Mandatory Hepatitis A and B immunization for children attending Alaska schools and licensed childcare facilities began in fall 2001.
o How many cases of hepatitis were reported in 2008? o How many cases of hepatitis were reported in 2008? o What is the difference in the number of cases between 2000 and 2008?
4. The teacher asks the students to evaluate the effectiveness of Hepatitis A immunization. Why do they think it is effective? 5. The teacher has the students answer the following questions:
o Do they think that people are at risk for Hepatitis A in the community? o What can cause people to contract Hepatitis A in the community? o Is it important for people who are living in the community to be
vaccinated for Hepatitis A?
6. The teacher discusses the answers with the students.

55
Lesson 5 – Insuring Safe Sanitation “Many areas of the state are at risk to flooding from heavy rains, spring ice jams, rapid snow melt, tidal storm surges and wave run-up. Floods account for approximately 40% of the state’s disaster emergencies. Most floods are of the Riverine variety, as defined above. The South-central, Western, and Interior Regions of the state are especially prone to spring flooding. Coastal areas of the state, especially the Western Region, are prone to storm driven waves that can flood a community. Floods can also cause additional natural/environmental emergencies such as erosion and landslides. Many existing populated areas are known to be located within flood vulnerability zones. Consequences to property and people would include a disruption of vital services such as water, sewer, power, gas, communication, transportation, damage or destruction of roadways, buildings, structures, bridges, port and harbor facilities, airports, and vehicles.” (Source of Information: State of Alaska, Department of Environmental Conservation. Division of Spill Prevention and Response, Prevention and Emergency Response Program. Flood: Public Health and the Environment, [Portable Document File]. Retrieved from http://www.dec.state.ak.us/spar /perp/heat/hhot_floods_plan.pdf, page 1) Drinking Water Supply System “If your property has been impacted by flooding, ADEC advises that precautionary measures be taken to disinfect your drinking water system prior to resuming use of the well. ADEC also recommends that your water be tested to ensure that it is safe to drink. Wells that have been flooded may be impacted by contaminants carried by surface waters or saturated soil. Contaminants may include bacteria, viruses, protozoa, and/or petroleum products from fuel spills in nearby areas. These forms of contamination may constitute a hazard to public health. ADEC recommends that homeowners monitor their wells for standing water near the well casing. If this condition exists, as an initial precaution, ADEC advises that water used for drinking, cooking, hand washing, or dish washing, should first be boiled for at least 5 minutes. Sand point wells, or other shallow wells near the river or flood areas, may be at increased risk even when the wellhead itself has not been flooded. Fuel spills from underground or above ground fuel tanks, or from fuel containers that were stored around someone’s property, can flow easily and far in flood waters. A visible sheen and/or fuel odor would indicate fuel in the water. If you detect a fuel spill near your well, contact your local ADEC office to report the spill. You may want to have your well water tested to see if it may be contaminated with petroleum products that could pose a health risk to you and your family. For specific testing of your well water, ADEC recommends that you talk with an independent, state certified laboratory about the
Alan Dick, Alaska Native Clipart

56
problem you suspect and their recommendation for sampling analysis. A standard, and the least expensive, screening test for petroleum hydrocarbons is called TPH (total petroleum hydrocarbons). A TPH analysis could be done if you are unsure of the type of petroleum contamination that may be in your well. If the TPH test indicates the presence of petroleum hydrocarbons, additional testing may be needed to determine if it is gasoline or diesel. If you suspect gasoline contamination, you could have your water tested for VOC’s (volatile organic compounds). If you suspect diesel contamination, you could have your water tested for DRO (diesel range organics). Again, it is best to discuss your suspected problem with a laboratory specialist to determine the best analysis of your water. The United States Environmental Protection Agency (EPA) sets drinking water standards and has determined that the presence of total coliform bacteria indicates a possible health concern. Total coliforms are generally not harmful themselves. The presence of these bacteria in drinking water generally is a result of a problem with water treatment, or with the well or pipes that distribute the water, and indicates that the water may be contaminated with other bacteria, viruses, or protozoa that can cause diseases. Disease symptoms may include diarrhea, cramps, nausea, jaundice, and associated headaches and fatigue. These symptoms, however, are not just associated with disease-causing organisms in drinking water, but also may be caused by a number of factors other than your drinking water.” (Source of Information: State of Alaska, Department of Environmental Conservation. Division of Spill Prevention and Response, Prevention and Emergency Response Program. Flood: Public Health and the Environment, [Portable Document File] Retrieved from http://www.dec.state.ak.us/spar /perp/heat/hhot_floods_plan.pdf, page 2) “Bacterial contamination can enter a well from inadequate pressure in the water lines resulting in backflow contamination from faucets, cracked well casings, waterline leakage, or infiltration of surface water into the well. Once the flooding has subsided, ADEC recommends that homeowners disinfect their well with chlorine bleach, and the water be tested before consuming the water. See the ADEC handout titled, “Disinfection of Wells and Distribution Lines in Small Water Systems”. During the disinfection procedure, the water will not be drinkable; therefore, a 24-hour supply of either bottled or boiled water (boiled for at least 5 minutes) should be on hand before the procedure is started. Plan to disinfect the well late at night or at other times when there is little need for water. After the disinfection procedure is completed, ADEC recommends that you have your water tested for total coliform bacteria, to ensure that it is safe to drink. NOTE: Chlorine disinfection will not eliminate fuel contamination in your well water. Water that is contaminated with coliform bacteria, or other contaminants, should not be used for potable (drinkable) purposes, until it has been adequately disinfected and retested to verify that it is free of contamination. For more information regarding water disinfection procedures, or where to have your water tested, call your local ADEC office.”

57
(Source of Information: State of Alaska, Department of Environmental Conservation. Division of Spill Prevention and Response, Prevention and Emergency Response Program. Flood: Public Health and the Environment, [Portable Document File]. Retrieved from http://www.dec.state.ak.us/spar /perp/heat/hhot_floods_plan.pdf, pages 2-3) “Wastewater Disposal System If flooding has impacted your property, ADEC recommends that precautions be taken to reduce any threats to public health and the environment from onsite sewer systems. Homeowners are advised that onsite sewer systems and holding tanks may be damaged due to flooding and/or high groundwater levels. Homeowners with onsite sewer systems that have been flooded, or are in the vicinity of flood waters, should inspect their system as follows:
1. Check for any evidence of sewage on the ground. If found, you should disinfect the area using large amounts of lime (finely ground garden lime will work) or a strong solution of water and chlorine bleach. Apply the disinfectant to the ground surface in the affected area. Make sure that you keep people (especially children) and pets away from any contaminated areas prior to and during disinfecting.
2. Check for any changes in the ground surface that might indicate movement or
damage to any part of the system. Raised areas may indicate that the septic/holding tank may have floated upward due to buoyant forces. If this has occurred, damage to the tank and/or piping is likely. Depressed areas may indicate a collapsed tank, or that the upper soils have sunk downward into the drain field. The system should be checked for damage by a qualified system installer or a professional engineer. ADEC recommends that for safety reasons, you keep people and pets away from these areas prior to repairs.
3. Floodwaters may have raised the groundwater to levels at or near the ground
surface in many locations. Onsite sewer systems do not provide proper wastewater treatment under these conditions. Use of systems under these conditions may lead to groundwater contamination, surfacing of sewage, and/or sewage backing up into your home. All of these conditions pose a significant health threat. It may take some time for the surrounding ground to dry up enough for the drain field to recover and resume its normal absorption capability. During the time when the groundwater level is above or near the level of the drain field area of your sewer system, your system will not function properly. During this period, avoid discharging wastewater to your onsite sewer system. When use of your sewer system is resumed, ADEC recommends that you closely monitor its performance and limit water use for at least 30 days.
4. Once the flood waters and groundwater levels have receded, the septic tank may
be pumped, which can give the drain field a resting period before introducing additional wastewater to the drain field from the tank. Prior to pumping a septic or holding tank, the homeowner should verify that their tank is anchored down to

58
prevent floatation when pumped, and that groundwater levels have receded enough to prevent further inflow of groundwater into the tank, and/or damage to the tank and piping when pumped out.
5. Cleanout pipes and monitoring tubes should be inspected to assure those joints
and connections have not been damaged, and that caps are in place. For more information regarding disinfection procedures and sewer system monitoring to detect damage, call your local ADEC office.” (Source of Information: State of Alaska, Department of Environmental Conservation. Division of Spill Prevention and Response, Prevention and Emergency Response Program. Flood: Public Health and the Environment, [Portable Document File]. Retrieved from http://www.dec.state.ak.us/spar /perp/heat/hhot_floods_plan.pdf, pages 3-4) “Risks of Exposure to Sewage” The risk to your health depends on what microbes (“bacteria”) are present, how long you are exposed to them and the method of exposure. Bacteria “in raw sewage can enter the body through the nose, mouth, open wounds or by breathing aerosols or dusts. The most common modes of infection are through drinking contaminated water or hand to mouth transmission. Skin contact alone is not threatening unless you have an open wound.” The survival of bacteria depends on a number of factors: location, type of surface contaminated, whether disinfectants are used and environmental conditions. Ultra Violet radiation reduces the survival rate of bacteria. “Mild temperatures and higher humidity increase survival times. The risk of exposure when handling sewage can be reduced drastically by effective and immediate clean-up and by taking proper safety precautions.”
(Source of Information: Workers Health Centre. (2005). Worker’s Health Centre Fact Sheet. Retrieved from Worker’s Health Centre Website @ http://www.workershealth .com.au/facts042.html)
“Safety Precautions to be Followed when Handling Sewage The following safety measures must be observed when handling sewage-contaminated materials:
• Assume anything touched by sewage is contaminated.
• Do not eat or drink or smoke in sewage handling areas.
• Wash hands well with soap and clean water (preferably hot) before eating or smoking and during and after work. Also wash hands after removing gloves to prevent cross-contamination.

59
• Wash hands with soap and clean water (preferably hot) after touching any surfaces or objects that may have been contaminated.
• Do not touch your nose, mouth, eyes or ears with your hands, unless you have just washed.
• Keep fingernails short and clean carefully under nails.
• Always wear gloves when hands are chapped, burned or have a rash or cut. Use a waterproof dressing for additional protection under gloves or clothing.
• Immediately wash and disinfect any wound that comes into contact with sewage.
• Shower and change out of your work clothes before leaving. Do not keep soiled work clothes with your other clothes. Launder work clothes separately or discard.
• Always use the right personal protective equipment: o Eye protection. Goggles are recommended if using a hose and/or any
chemicals o Rubber boots o Rubber gloves o Waterproof coveralls or old clothing that may be discarded after use.
• Ensure vaccinations are up to date for tetanus and diphtheria. Vaccinations are also available for hepatitis A.
• Take care - wet surfaces can be very slippery!
• Do not enter confined spaces that have been contaminated with sewage, as toxic, flammable or asphyxiating gases may be present.
• Be aware of electrical hazards when dealing with floodwater.
• Read labels on chemicals and observe the appropriate safety precautions and follow the manufacturer’s directions.
• Contact a doctor immediately if illness occurs.”
(Source of Information: Workers Health Centre. (2005). Worker’s Health Centre Fact Sheet. Retrieved from Worker’s Health Centre Website @ http://www.workershealth .com.au/facts042.html)
“Cleaning Up after Sewage Spills Remove people from the area immediately.
• “Conduct a risk assessment to determine a safe work procedure. This includes an initial site assessment, confined space monitoring and permitting (if required),
60
electrical hazards, removal of materials, disposal of sewage and contaminated materials, site sanitation, and decontamination of workers.
• Determine whether professional help is required.”
• Clean all contaminated objects and surfaces immediately to reduce the risk of infection and to prevent further bacterial growth. “The longer that contaminated water remains the greater the risk of infection occurring. Cleaning should be carried out before the sewage dries out to avoid contaminated dust being dispersed in the air.”
(Source of Information: Workers Health Centre. (2005). Worker’s Health Centre Fact Sheet. Retrieved from Worker’s Health Centre Website @ http://www.workershealth .com.au/facts042.html)
“Indoors Remove any gross contamination and dispose of in a sewage treatment facility and not into storm drains or landfill. Dehumidifiers should be used when available.
• Open all windows and use fans where available to increase ventilation and reduce humidity.
• Excess water should be removed by pumps, wet vacs or mopping, empty into sewage system and not into storm drains.
• Discard all potentially contaminated food, food containers, cosmetics, medicines and medical supplies, stuffed toys, mattresses and pillows, upholstered furniture, carpet padding, cardboard and other objects that absorb liquids or are difficult to clean.
• Where possible discard large carpets, foam rubber and books and paper products. Otherwise professional cleaning is required.
• Place discarded contaminated materials in plastic bags.”
• Sheetrock, “wooden paneling and skirting should be discarded if they have absorbed water.
• Wash affected areas and furnishings with a detergent solution to remove contamination, then disinfect, rinse with clean water and allow to dry thoroughly, preferably outside where UV light aids decontamination.
• Avoid spreading contamination when moving furniture etc. by placing plastic sheeting on the floor of clean areas.
• Rinse fabrics with clean water then wash in a hot wash cycle with bleach added. Note that non-colorfast items may fade or change color.

61
• Clean all equipment used and personal protective equipment with a detergent then disinfect (or use a combined product) or discard if possible (like mop heads).
• Disinfect clean-up mops, brooms, and brushes with the bleach solution.
• Clean sinks, dishwashers, and other plumbing fixtures that have had sewage back-up with detergent, and then rinse with the bleach solution.
• Ensure surfaces are completely dry before replacing carpeting”, sheetrock, “etc. to prevent mold growth occurring. This may take up to 30 days.”
“Outdoors Remove any gross contamination and dispose of in a sewage treatment facility and not into landfills.
• Clean hard surfaces such as paving, concrete and asphalt with a detergent solution then disinfect. Use only approved disinfectants.”
• Do not allow wastewater to re enter rivers, lakes, etc. For large spills it may be necessary to build a dam of earth, rock or other materials to hold the liquid.
• “Contaminated soil, sand or lawn should be allowed to degrade naturally as bacteria will be inactivated within several days of exposure to UV radiation from sunlight. Bacterial numbers on grasses are generally reduced to background levels within 20 days.” Stay off the contaminated areas and put up “barriers and signs to warn people to stay off during this time.
• Clean all equipment and personal protective equipment used with a detergent then disinfect (or use a combined product) or discard if possible (like mop heads).”
(Source of Information: Workers Health Centre. (2005). Worker’s Health Centre Fact Sheet. Retrieved from Worker’s Health Centre Website @ http://www.workershealth .com.au/facts042.html)
Disinfection Chemical disinfectants kill or inhibit the growth of bacteria. “Many household products are useful disinfectants and should be used following the manufacturers label directions. Bleach (sodium hypochlorite) is the most commonly used disinfectant and should be used as a 1:10 dilution. Do not use undiluted bleach as this can cause severe skin and respiratory problems. Note that normal household detergents do not necessarily kill all microbes. Use only products that are disinfectants. The term anti-bacterial means that it kills bacteria but is not necessarily effective against viruses and parasites.”

62
(Source of Information: Workers Health Centre. (2005). Worker’s Health Centre Fact Sheet. Retrieved from Worker’s Health Centre Website @ http://www.workershealth .com.au/facts042.html)
“Safe handling of disinfectants Chemical detergents and disinfectants can have reactions, “depending upon the active chemicals. These chemicals can affect the skin, eyes and mucous membranes of the user and may affect the airways and lungs.
• Wash surfaces first with warm soapy water and rinse with clean water.
• Wear rubber gloves and goggles when working with cleaning products.
• Read the label carefully before using a disinfectant.
• Only use the disinfectant in well-ventilated areas, and be aware of the required safety measures and first aid procedures.
• Apply disinfectant to all areas of the affected surface and allow for sufficient contact time before rinsing and allow it to dry thoroughly. 15-30 minutes contact time is a good guide when disinfecting with bleach.
• Do not mix bleach with ammonia cleaners. The chlorine fumes are highly toxic.”
(Source of Information: Workers Health Centre. (2005). Worker’s Health Centre Fact Sheet. Retrieved from Worker’s Health Centre Website @ http://www.workershealth .com.au/facts042.html)
Fuel / Oil / Hazardous Substance Spills
“If a flood has caused a release of fuel, oil, or other hazardous substance, report the spill to your local Fire Department or Village Public Safety Officer, and also to ADEC at (907) 269-3063 in Anchorage, 451-2121 in Fairbanks, or 465-5340 in Juneau. Outside normal business hours, call 1-800-478-9300.” (Source of Information: State of Alaska, Department of Environmental Conservation. Division of Spill Prevention and Response, Prevention and Emergency Response Program. Flood: Public Health and the Environment, [Portable Document File]. Retrieved from http://www.dec.state.ak.us/spar /perp/heat/hhot_floods_plan.pdf, page 4) Propane Tanks “Propane suppliers recommend homeowners contact them for an inspection of the tank and fittings prior to reusing the system. The tank may have shifted which can cause fuel lines to kink or weaken, or there may be loosened or damaged fittings that may be unsafe.

63
Valves should be turned off and remain closed until the propane supplier inspects the system.” (Source of Information: State of Alaska, Department of Environmental Conservation. Division of Spill Prevention and Response, Prevention and Emergency Response Program. Flood: Public Health and the Environment, [Portable Document File]. Retrieved from http://www.dec.state.ak.us/spar /perp/heat/hhot_floods_plan.pdf, page 5) “Home Heating Fuel Tanks Heating oil suppliers recommend homeowners contact them for an inspection prior to reusing their system. If you have an above ground fuel tank, the tank may have shifted or fallen from the stand causing fuel lines to kink or weaken, or there may be loosened or damaged fittings and filters. If you have a buried fuel tank, water may have seeped into the tank and contaminated the heating oil. You should contact your fuel supplier to have the contents of the tank checked. If you have questions on the integrity of the tank, fuel lines, tank stand, or the fuel, or need assistance in moving the tank or returning it to service, contact your fuel supplier. If the heating tank spilled and you have soil or water contamination, report the spill to ADEC at (907) 269-3063 in Anchorage, 451-2121 in Fairbanks, or 465-5340 in Juneau. Outside normal business hours, call 1-800-478-9300.” (Source of Information: State of Alaska, Department of Environmental Conservation. Division of Spill Prevention and Response, Prevention and Emergency Response Program. Flood: Public Health and the Environment, [Portable Document File] Retrieved from http://www.dec.state.ak.us/spar /perp/heat/hhot_floods_plan.pdf, page 5) “Food If you have food items that have been in contact with floodwaters, and are not in watertight containers, they should be thrown away. Root vegetables can be used, but they should be thoroughly washed in clean water, peeled and cooked before eating. Canned foods should be checked carefully for leaks. Any questionable cans should be thrown out. Containers with tight seals should be washed first and then disinfected by soaking for approximately 15 minutes in chlorine water or by boiling for 10 minutes, (do not boil cans of carbonated beverages). Adding one tablespoon of household bleach to one gallon of water can make this solution. Chlorine is poisonous, so be careful not to breathe the vapors or swallow any of the chlorine water. After sterilizing the container, be sure to rinse it thoroughly in fresh water. If you have a freezer, either a chest or upright, which was covered with floodwaters, chances are the food inside has been damaged through seepage. All of this food should be thrown away. If the electricity has been cut off, but no floodwater has seeped into the

64
freezer, the food will last for awhile depending on the amount of food in the box. A fairly full freezer should last two or three days without much loss of quality or flavor. Partially thawed meat should be refrozen at once. If meat has been completely thawed, it should be used at once, or may be cooked and refrozen. Any meat, poultry, fish, or containers of fruit and vegetables that show any sign of spoilage should be thrown away.” (Source of Information: State of Alaska, Department of Environmental Conservation. Division of Spill Prevention and Response, Prevention and Emergency Response Program. Flood: Public Health and the Environment, [Portable Document File]. Retrieved from http://www.dec.state.ak.us/spar /perp/heat/hhot_floods_plan.pdf, pages 5- 6)

65
Lesson Five Activities
Insuring Safe Sanitation During and After a Flood Objectives:
• To learn what the people did when the river flooded in the past from an Elder • To understand what the risks are to the community if the river floods now from an
Elder • To know how much clean water a family should store in case of emergency • To know how to deal with food that has been through a flood • To know how treat sewage that has been deposited in the community due to a
flood • To know who to report fuel/oil/hazardous substance spills to after a flood • To know how to sanitize a home after a flood • To understand how to safely work with bleach when sanitizing
Materials Computer for Internet research Pencils and pens Graph paper Student journals Student learning logs Writing paper Activity 1 – Elder talks about keeping the community safe during a flood In this activity, the teacher invites an Elder to walk with the students around the community to share what the people did when the river flooded in the past and what the risks are to the community if the river floods now.
1. The teacher invites an Elder to walk around the community with the class to talk about flooding in the area.
2. The teacher asks the students to brainstorm questions that they can ask the Elder
about flooding. For example:
o What did the community do in the past when they were living in spring and summer subsistence camps and the river flooded?
o What has been the pattern of the river flooding? o How has the Elder helped the people in the community stay safe when the
river has flooded in the past?
3. The Elder and the class walk around the community to examine where the river has flooded, how it has affected the riverbank, and how it has impacted the health

66
of the land and the people. While the Elder is talking, the students listen respectfully to what he has to share and take brief notes in their learning logs.
4. The Elder talks with the class about the risks to the community if the river floods
again, the impact on the people’s drinking water, food, etc., and how the village works together during a flood.
5. The teacher and the students return to the classroom:
a. The teacher and students talk about Athabascan culture, beliefs, and values
that the Elder shared with the students during his talk on insuring safe sanitation in the community.
b. The students record their thoughts about what the Elder said in their journals.
c. The students create a thank you note to send to the Elder to show their
appreciation for the time he spent with them. Activities 2-5 – Safe Sanitation and Flooding During these activities, the teacher divides the students into groups and tells them that they are part of an emergency team that helps people in their community with safe sanitation during flooding. Activity 2 – Drinking water and flooding In this activity, the students learn what to do about drinking water in preparation for a flood and how disinfect the drinking water after a flood. The teacher discusses the teaching section on the drinking water supply system with the students.
A. The teacher downloads the Emergency Water PDF from http://www.uaf.edu /ces/water /pdf/EmergencyWater.pdf, copies it, and asks the students to read it. Afterwards, she discusses the information with them.
B. The students do the following math problems to ensure that a family in their
community has enough safe drinking water after a flood.
1. It is estimated that the average person needs one gallon of water a day. There should be at least 3 days worth of water available for every person in case of emergency (Cooperative Extension Service).
o How many gallons of water should a family of five store in case of
emergency? _____

67
2. ADEC advises that water used for drinking, cooking, hand washing, or dish washing should be boiled for at least five minutes after a flood in case the drinking water is contaminated (Alaska Department of Environmental Conservation).
o Each of the small propane containers that a family has stored for
emergencies will boil 5 gallons of water for five minutes before it is empty. The family has stored 10 propane containers. How many gallons of water can the family boil with the propane they have on hand? _____
3. Once the flooding has subsided, ADEC recommends that the family disinfect their
well with chlorine bleach, and then test the water before drinking it. During the disinfection procedure, the family will need a 24 hour supply of either bottled or boiled water (boiled for at least 5 minutes, Alaska Department of Environmental Conservation).
o The family figures that it will need 20 gallons of water during the 24 hour
period that the well is being disinfected. The family has 8 gallons of bottled water. How many gallons of water will it need to boil during that time? _____
Activity 3 – Food and flooding In this activity, the students learn what to do about food in preparation for a flood and what to do about food that has been through a flood.
1. The teacher discusses the teaching section on food with the students.
2. The teacher downloads Handling Foods Through the Flood PDF @ http://www.ag.ndsu.edu/disaster/documents/handling_food_through_flood_000 .pdf copies it for the students, and asks them to read it. Afterwards, she discusses the information with the students.
3. The teacher asks the groups to determine how much canned food a family should
store in case of a flood.
A. When a family is preparing for a flood it should figure that it will need enough canned food to last for four or five days (NDSU Extension Service).
a. A family of four in the community figures that it needs 4 cans of fruit, 4
cans of vegetables, and 8 cans of meat for one day.
o How many cans of food will the family need for 4 days? _____ o How many cans of food will the family need for 5 days? _____

68
4. There has been a flood in your community. A family comes to you and asks you which foods in their house are safe, as all of them have been in contact with the flood waters. This is the list that they give you. Circle which ones are safe.
Cardboard box of tea
Flour and sugar that is stored in canisters Coffee that has put in glass jars
Undamaged can of beans Blueberries jam sealed with paraffin
Canned foods that are bulging
Mayonnaise with a cardboard seal Moose meat, salmon, and chicken eggs
Undamaged can of salmon Package of opened flour
Food in a freezer Undamaged can of corn
5. The family tells you they want to use the undamaged cans of food but they don’t know how to sanitize them. Answer the following questions and then write down what you will tell them in your learning logs:
o What can the family use to mark the cans? o Why does the family need to remove the labels off the cans? o What steps does the family need to take to wash and bleach the cans?
Activity 4 – Septic systems and flooding In this activity, the students learn what to do about septic systems after a flood.
1. The teacher discusses the wastewater disposal system teaching section with the students.
2. The teacher downloads the Septic Systems after the Flood PDF @ http:
//www.uaf.edu/ces/water/pdf/SepticSystemsAfterFlood.pdf copies it for the students and then asks them to read it. Afterwards, she discusses the information with them.
3. The teacher tells the students that after a flood, people may have problems
with sewage that is on the ground. She asks them to answer the following questions:
A. An Elder comes to you and says that there is sewage near the community
well and he wants to know the dangers associated with it so he can explain it to the community members. What will you tell him?
B. A father comes to you and says that there is sewage on the ground where
the children walk and he wants to know what he can do to safely clean it up.
o How can the Father use lime to disinfect the area? o How can the Father use bleach to disinfect the area?

69
o Can children or pets be allowed near the area while it is being disinfected?
C. A mother comes to you and says that there is sewage in the shower that
the family uses and she wants to know how she can safely clean it up. What will you tell her?
Activity 5 – Fuel, oil, and hazardous substance spills and flooding In this activity, the students learn what to do about fuel, oil, and hazardous substance spills after a flood.
1. The teacher discusses the fuel/oil/hazardous substance spills section of the teaching with the students.
2. The teacher tells the groups that after a flood, people will be having problems
with fuel, oil, and hazardous substance spills. She asks them to answer the following questions:
A. An Elder tells you that there is oil sheen near the community well.
o Who will you report the spill to in the community? o What is the phone number that you should use to contact the
Alaska Department of Environmental Conservation?
B. A family explains that their fuel tank fell off its stand during the flood. They want to know what they should do.
o Who should you tell them to contact about their fuel tank? Why?
C. A couple reports that their propane tank was under water during the flood.
They want to know what steps they should take to make sure that it is still safe to use.
o Who should you tell the couple to contact about their propane
tank? Why?
Activity 6 – How to safely work with bleach when sanitizing In this activity, the teacher talks with the students about the hazards of working with bleach and the ways that they can safely work with the chemical.
1. The teacher downloads the following PDFs and copies them for the students.:

70
o “Kill Germs with Bleach” by the Center for Disease Control and “Prevention @ http://emergency.cdc.gov/disasters/pdf/flyer-clean-with-bleach.pdf.
o Common Cleaning Products May be Dangerous When Mixed” @ by the Division of Epidemiology, Environmental and Occupational Health Consumer and Environmental Health Services PDF @ http: //www.state.nj.us /health /eoh/cehsweb/bleach_fs.pdf.
2. The teacher has the students read the article “Kill Germs with Bleach” that
explains how you can safely work with bleach when you are using it to clean up after a flood and then asks them to answer the following questions in their learning logs:
o How will rubber gloves, boots, and goggles protect you when you are working with bleach to sanitize after a flood?
o Why do you want to open windows and doors when you are using bleach? o Name one household cleaner that you should not mix with bleach?
3. The teacher asks the students to discuss how they can explain to their family what precautions they need to take when working with bleach to sanitize after a flood. 4. The teacher has the students read “Common Cleaning Products May be Dangerous When Mixed.” The teacher and the students discuss products in their homes that may contain:
o Ammonia o Acids
5. The teacher asks the students to write down the health hazards from mixing:
o Mixing bleach with ammonia o Mixing bleach with acids

71
Lesson 6 – Housing in Rural Alaska Traditional Homes
“Winter homes were built in the “old style semi-subterranean house called, nir'yekayih (in-the ground house). The ground was excavated to a depth of three or four feet and a pole frame constructed. The frame was covered with a layer of birch bark, or grass, and then covered over with dirt and sod. There was a smoke hole in the middle of the roof. This is the same type of house that is described in all the old stories where
smoke was seen coming out of the ground and people could walk up on the house and look down through the smoke hole.
Carl Seseui described such a house as "all the same, beaver house".” (Collins 2004, 72) “When staying at the foothills in the summer we made houses out of black spruce with the limbs on (i » yekayih).” Or bark covered houses, which were the “normal summer dwelling before canvas tents became available.” We covered these with canvas tarps after that. We cooked and heated with an open fire near the door. (Collins 2004, 41-42, 80)
The Russians brought about several changes in our lives in the Upper Kuskokwim region. We “began to live in tents made of canvas.” We now had metal axes and saws, so we built Russian style cabins for winter dwellings, replacing the semi-subterranean houses of former years. We needed stoves for the cabins. (Collins 2004, 38, 99)
“It is interesting to note the construction of the houses at this village in a picture taken in 1899 (Herron 1909, 39). The logs used for the walls were tapered but flattened on two sides and the corners dovetailed. This style must have been copied from the Russians after metal axes were obtained. Later cabins were built of round logs with notched corners, which is actually a simpler method of construction. To flatten the logs on the outside would serve no purpose other than to make them look like the dwellings made by the Russians.
The cache, of plank and pole construction, was set on high poles.” (Collins 2004, 46) “Many of those houses
were still occupied when the Americans arrived and were heated with sheet metal stoves instead of the central fire pit located under a hole in the roof.” (Collins 2004, 38)
By the late 1800's more housing changes began to take place. Prospectors entered the Kuskokwim area and trading became increasingly important. By November, when trapping season began we would go to our different trapping sites where we had built cabins or put up a tent camp. (Collins 2004, 99)
Alan Dick Alaska Native Clipart
Old Cabin at McKinley Fork Photo by: Teresa Hanson

72
By 1907 tents had not completely replaced the traditional summer dwellings. A summer encampment on the left bank of the Upper Kuskokwim River was documented back then. It
“consisted of three fairly large brush shelters.” (Gordon 1917:100). (Collins 2004, 49)
We constructed our houses “from locally-cut logs with the help of family and friends. Most builders used round logs. Some older houses were chinked with moss and had birch bark and sod on the roofs for insulation. They were covered with sheet iron or shingles made of flattened Blazo (white gas) cans and later with aluminum roofing.
There was a cache standing near each of the older houses for storing dried fish and other items such as
camp gear, tools, etc., that were not needed in the house. Most caches have disappeared as have the dog teams.” (Collins 2004,113)
(Source of Information: Collins, R. L. (2004). Dichinanek’ hwt’ana, [Portable document file]. Retrieved from the National Park Service website: http://www.nps.gov /dena /historyculture/upload/Dichinanek%20Hwtana.pdf ) Modern Housing We built cabins for many years until around the beginning of the 1970’s. A couple of events happened: Two lawsuits brought high schools to every village that wanted one, and the Interior Housing Regional Authority (IRHA) was created.
In 1971, a lawsuit was brought against the State of Alaska by five students from the village of Kivalina, who wanted to receive their high school education in their village. The state responded by expanding the Kivalina School through the twelfth grade in an out-of-court settlement. The State Board of Education changed their regulations as a result; "every child of school
age shall have the right to a secondary education in his community." A similar suit was filed in 1972 on behalf of 28 rural students. This was the Molly Hootch Case (Hootch v. Alaska State Operated School System). The Alaska State Supreme Court decided that the state was not constitutionally bound to provide secondary education in each student’s village. This case, which dragged on for four years, set into motion a series of events that changed the course of education, and every village in Alaska. (Hanson 2000, 39) (Source of Information: Homeschooling in Alaska: Extreme Experiments in Home Education (Master's Thesis, UAF Fbks., AK 2000)
Roof of birch bark with dirt sod on top Photo by: Teresa Hanson
Telida School Photo by: Teresa Hanson

73
Contractors were hired to build public high schools in every village that wanted one and had enough students to attend the school. These schools were framed buildings built in the modern methods of the day. The Interior Regional Housing Authority (IRHA) was formed in 1974 “along with thirteen other Alaskan housing authorities; IRHA serves the tribes of the Doyon Region which encompasses remote traditional villages and Alaska's second largest city, Fairbanks.”
“Their mission is to work in partnership with Tribes of the Doyon Region to improve rural and urban housing conditions through planning, design and affordable and safe construction and to seek opportunities to promote community self-sufficiency through energy and infrastructure advocacy and community projects.” (http://www.irha.org/index.html)
IRHA builds houses, Elder and Senior centers, clinics and washeterias. They weatherize existing homes and install energy alternatives like solar collectors and
wood gasification boilers. A sampling of the newsletter IRHA puts out reveals the many tasks IRHA does to improve housing and services in the villages. The newsletter of April 2008 states: “Across the region, the buildings that house village clinics have seen years of service. Many are in need of repair or replacement. While there are exceptions, many use too much energy and need to be modernized. Since federal funding is shrinking, this effort supports a needs-based priority list in order to deal with the highest need first. The assessment aims to get a handle on the relative costs of new construction vs. remodel, addition vs. other options. The process evaluation will bear on the most practical and cost effective means to meet facility needs. The information in these assessments will be used by the Denali Commission to determine next steps in addressing facility needs on a case-by-case basis. As construction and energy specialists, IRHA will make recommendations aimed at increasing the building’s efficiency. Reducing the clinics’ operational costs is the goal. As part of the award, IRHA will be conducting the following activities:
IRHA Regional Map http://www.irha.org/MAPS/RegionMap.jpg

74
♦ Assure tribal approval to assess the clinic; meet with local officials. ♦ Get preliminary information (interview staff and others). ♦ Review local utilities capacity: energy, water mains, septic etc. ♦ Write estimate/analysis. ♦ Present recommendations to tribe. ♦ Request a letter of support from tribe or city government. ♦ Assist tribe in applying for Denali Commission funding. ♦ Establish deadlines/timelines for submittal to Denali Commission. ♦ Upon approval, design and build project.
Alaska Summit Enterprises will consult with IRHA staff in bringing technical assistance to Denali Commission applications. In villages where a grant exceeds $100,000, a business plan is required. Assistance in writing a business plan is part of this package. IRHA is negotiating with the Denali Commission about the need to create a “business plan template”, one that is more suited to rehabilitation projects." www.irha.org/PDF/Newsletters/newsletter_Apr08.pdf pg 1
On March 10, 2008 the Alaska Legislature issued a proclamation honoring the Interior Regional Housing Authority. The distinction was sponsored by Rep. Woodie Salmon and Sen. Al Kookesh and signed by the Speaker of the House and the President of the Senate. Fifty two members from both houses joined as cosponsors. The citation highlights IRHA’s 34-year record of success in securing safe and affordable housing for the people of this region. It points to our cooperative work with village and tribal councils, the development of long-term planning and local hire policies. The legislature’s proclamation acknowledges the company’s extensive role in the TCC region by saying, “The services provided by IRHA tremendously benefit entire communities- from rental assistance for the elderly, homeownership for various segments of the population, and emergency assistance, to construction of community buildings and clinics, and contributing to energy conservation by retrofitting buildings for efficiency. IRHA also carries a proud legacy of community service, especially in helping families that suffer the loss of a loved one. IRHA donates the labor and materials needed to build the casket, and often delivers the casket to its destination. The success stories of IRHA have a ripple effect that spreads to the furthest reaches of the communities and villages they serve.” The document also praises IRHA’s staff and the company’s excellent standing with the federal government.” (www.irha.org/PDF/Newsletters/newsletter_Apr08.pdf ) pp 2&4
Telida's solar panel battery bank installed by IRHA Photo by: T. Hanson

75
(Source of Information: Interior Regional Housing Authority. (2003-Present). General Information and Information and Newsletters. Retrieved from the Interior Regional Housing Authority Website @ http://www.irha.org/index.html.)

76
Lesson 6 Activities
Housing in Rural Alaska Objectives:
• To have an Elder share the history of housing with students in the community • To understand how different types of rural housing impacts human health and the
environment • To learn about Tetlin subsistence camps • To understand how subsistence camps impact human health and the environment • To learn about the role that the Interior Regional Housing Authority plays in the
lives of the people living in interior Alaska rural communities • To investigate what the Interior Regional Housing Authority has done in the
student’s community Materials Computer for Internet research Materials for building small models of houses Pencils and pens Student journals Student learning logs Writing paper Activity 1 – Explore the History of Housing in the Community with an Elder In this activity, an Elder works with the teacher/students as they explore the history of housing in the community. 1. The teacher invites an Elder to walk with the students through the community to talk
about the history of housing in the area.
2. The teacher explains that while the Elder is speaking, it is important for the students to listen respectfully to what he has to share and take brief notes in their learning logs.
3. The teacher, Elder, and students look at the subterranean housing in the area:
a. The Elder talks with the students about how the subterranean housing was built and what life was like for people who lived in the houses during the winter.
4. Everyone looks at temporary summer shelters in the area.
a. The Elder talks with the students about how people made temporary summer shelters in the past and how they are different from the ones that they use today.

77
5. Everyone studies the log cabins in the area.
a. The Elder talks with the students about how people built log cabins in the past and how they build them today.
6. Everyone examines the wood frame houses in the area.
a. The Elder talks with the students about how the people built the wood frame houses in the community.
7. The teacher and the students return to the classroom:
a. The teacher asks the students to think about which one of the houses is the safest for the people and the environment.
b. The teacher and students talk about Athabascan culture, beliefs, and values that the Elder shared during his talk with the students on housing in rural Alaska.
c. The students write down their thoughts about what the Elder said in their
journals.
d. The students create a thank you note to send to the Elder to show their appreciation for the time he spent with them.
Activity 2 – Build Models of Rural Housing to See How It Affects People and the Environment In this activity, the students build models of the different kinds of rural housing and look at their impact on human health and the environment.
1. The teacher divides the students into four groups and then asks each group to build one model of rural housing—subterranean, summer shelter, log cabin, and frame house. Each group picks a different model.
2. The teacher invites an Elder to class to help the students evaluate how each kind of house impacts human health and the environment.
3. The teacher asks the students the following questions to evaluate the subterranean housing:
o Is it healthier to live above ground or underground? What kind of health problems do people encounter when they live underground? Is there proper ventilation? Can they stay warm enough?

78
o What happens to the underground houses when the people move in the spring? Do wood, grass and soil break back down into the earth? Is this kind of home environmentally safe?
The students talk with the Elder about their answers and record them in their learning logs.
4. The teacher asks the students the following questions to evaluate the temporary summer shelters housing:
o Which of the materials that are used to make summer shelters—tree limbs for brush houses and canvas and nylon for tents—are biodegradable? Which material will take the shortest amount of time to break down? The longest?
o Which of the materials that is used to make the shelters will offer the best protection for people during a rainstorm? The least?
o If you want to protect the health of the people and the land, which material(s) should you use to build a shelter? Why?
The students talk with the Elder about their answers and record them in their learning logs.
5. The teacher asks the students the following questions to evaluate the log cabin:
o What materials did the people use that were biodegradable? What materials were not biodegradable?
o How long does it take to grow the trees that are used in the log cabins? Is it better for the environment to make a subterranean house that is rebuilt every year than a log cabin which lasts many years?
o Is a wood stove in a cabin healthier for people than a central firepit located under a hole in the roof (Collins) of a subterranean house?
The students talk with the Elder about their answers and record them in their learning logs.
6. The teacher asks the students the following questions to evaluate the wood frame house:
o What materials did the people use that were biodegradable? What materials were not biodegradable?
o Do you think is better for the environment to build a log cabin or a wood frame house?
o Do you think it is healthier for people to live in a log cabin that is made of mostly biodegradable materials or a frame house that has many non-biodegradable materials in it?

79
The students talk with the Elder about their answers and record them in their learning logs.
7. The teacher asks the students the following questions about the houses:
o Which house protects human health the most? The least? o Which house protects the environment the most? The least? o Which house would you recommend building to protect human health and
the environment?
The students talk with the Elder about their answers and record them in their learning logs.
8. The teacher and students talk about Athabascan culture, beliefs, and values that the Elder shared during the activity.
9. The students write down their thoughts about what the Elder said in their journals.
10. The students create a thank you note to send to the Elder to show their appreciation for the time he spent with them.
Activity 3 - Tetlin Subsistence Camps In this activity, the teacher asks the students to read the article Tetlin as I Knew @ http://www.ankn.uaf.edu/curriculum/athabascan/athabascans/tetlin_asiknew_it.html it to learn about the people’s subsistence camps, compare them to their own, and then look at how the camps affected human health and the environment.
1. The teacher asks the students to read the article “Tetlin as I Knew It” and then asks them to draw pictures of the different subsistence camps in the story.
2. The teacher asks the students to answer the following questions for each of the
subsistence camps:
o Name one thing that people did to keep them healthy while they were in the camps?
o What did the people use from the environment for the camp? o What did the environment look like after the people left the camp?
3. The teacher asks the students the following questions so they can compare the
subsistence camps to their own.
o How do the subsistence camps in Tetlin compare to your subsistence camps?
o What do you do to stay healthy at camp? o How do you keep the environment around your camp clean?

80
4. The students write their answers in their learning logs.
5. The students write about subsistence camps in their journals. Activity 4: Research Old Interior Regional Housing Authority (IRHA) Newsletters In this activity students research old Interior Regional Housing Authority newsletters to learn about the work that IRHA does in rural Alaska communities.
1. The teacher has the students go to http://www.irha.org/Newsletters.html to research old IRHA Newsletters to see how they provided safe housing for tribes.
2. The teacher has the students read the newsletters and write a report on what
IRHA did in each of the following areas:
o Building new houses o Rehabilitation for houses o Weatherization o Alternative energy
3. The students share their reports on IRHA with the class.
Activity 5 – What has the Interior Regional Housing Authority Done in Your Community? In this activity, the students talk with a Tribal Council member to learn about what IRHA has done in their community.
1. The teacher invites a Tribal Council member to class to talk about what the Interior Regional Housing Authority has done in the community.
2. The teacher has the students brainstorm questions to ask the Tribal Council
member when they come. For example:
o How many people have been helped by IRHA in the community? o What kinds of projects has IRHA done for people? o Are people healthier because of the work IRHA has done?
3. If the Tribal Council member has time, he can walk with the teacher and the students around the community to look at the different projects that IRHA has done.
4. The students write their thoughts about the Tribal Council member’s visit in
their journals.

81
Lesson 7 – Environmental Problems Associated with Rural Housing – Is Wood Smoke a Problem in our Homes?
In the last several years, there have been a lot of studies that show “that the air within homes and other buildings can be more seriously polluted than the outdoor air, even in the largest and most industrialized cities. Other studies show that people spend approximately 90 percent of their time indoors.” So many people may face greater risks to their health from “air pollution inside their homes than outdoors.”
Also, people “who are exposed to indoor air pollutants for the longest periods of time are usually those who are most at risk to the effects of indoor air pollution. Such groups include the young, the elderly, and the chronically ill, especially those suffering from respiratory or cardiovascular disease.”
“While pollutant levels from individual sources may not cause a large health risk by themselves, most homes have more than one source that adds to indoor air pollution. There can be a serious risk from the” collective “effects of these sources. Fortunately, there are things that most people can do to reduce the risk from current pollutant sources and to prevent new problems from starting (http://www.epa.gov /iaq/pubs /insidest.html.) Wood Smoke “Remember: If you can smell wood smoke, you are breathing wood smoke!” “Smoke from neighborhood wood stoves are a common source of both odor and reduced visibility, and contribute to the air pollution problems people complain about most. There are substantial health-related problems caused by breathing smoke pollutants, and it adds to the health costs of individuals and the community. To be a good neighbor, limit the amount of wood smoke that comes out of your smoke stack.” “Most wood heaters release far more air pollution, both indoors and out, than heaters using other fuels.” In winter, on those cold nights where there is little wind, smoke sits at ground level for long periods of time. “Remember: If you can smell wood smoke, you are breathing wood smoke!” “High levels of smoke pollutants leaking from wood stoves and wood boilers have been measured in some wood burning homes. If you or family members suffer from chronic or repeated respiratory problems like asthma or emphysema, or have heart disease, you should not burn wood at all. If you must burn wood, make sure your wood stove or wood boiler doesn't leak and that you operate it correctly.” (Source of Information: CA/EPA Air Resources Board, Enforcement Division, Compliance Assistance Program. (2005). Wood Burning Handbook, [Portable Document

82
File]. California Air Resources Board Publication. Retrieved from the California EPA Air Resources Board website @ www.arb.ca.gov/cap/handbooks/wood_burning_ handbook.pdf, pg.1) “What Happens when Wood Burns? Complete combustion gives off light, heat, and the gases carbon dioxide and water vapor. Complete combustion does not occur when wood burns so it produces wood smoke, which contains the following major air pollutants, regulated by State and federal rules because of their known health effects:
Carbon Monoxide (CO) – An odorless, colorless gas, produced in large amounts by burning wood without enough air. CO reduces the blood’s ability to supply oxygen to body tissues, and can cause stress on your heart and reduce your ability to exercise. Exposure to CO can cause long-term health problems, dizziness, confusion, severe headache, unconsciousness and even death. Those most at risk from CO poisoning are the unborn child, and people with anemia, heart, circulatory or lung disease. Oxides of Nitrogen (NOx) – NOx impairs the respiratory system and its ability to fight infection. NOx also combines with VOCs to make ozone and with water vapor to form acid rain or acid fog.
Volatile Organic Compounds (VOCs) – Evaporated carbon compounds which react with NOx in sunlight to form ozone (photochemical smog).
Ozone injures the lungs and makes breathing difficult, aaaespecially in children and exercising adults. NOx and VOCs also form particulate matter through reactions in the atmosphere.”
(Source of Information: CA/EPA Air Resources Board, Enforcement Division, Compliance Assistance Program. (2005). Wood Burning Handbook, [Portable Document File]. California Air Resources Board Publication. Retrieved from the California EPA Air Resources Board website @ www.arb.ca.gov/cap/handbooks/wood_burning_ handbook.pdf, pg.2) “Toxic Pollutants - Wood smoke also contains VOCs which include toxic and/or cancer-causing substances, such as benzene, formaldehyde and benzo-a-pyrene, a polycyclic aromatic hydrocarbon (PAH). Manufactured fireplace logs, for instance, are not recommended for burning because they produce toxic fumes, including PCBs (polychlorinated biphenyls). Researchers are now studying these and other smoke products to learn more about their effects on human health.”
Figure 1: CAL/EPA Air Resources Board

83
“Particulate Matter less than 10 microns in diameter (PM10) are very small droplets
of condensed organic vapors of wood tar and gases. These particles are a result of unburned fuel and have a diameter of 10 microns or smaller (the diameter of a human hair is about 50 to 100 microns), which allows them to be inhaled into the lungs. Exposure to PM10 aggravates a number of respiratory illnesses. PM10 includes a smaller group of particles called PM2.5, particles with diameters of 2.5 microns
and less. These finer particles pose an increased health risk because they can lodge deep in the lungs and contain substances that are
particularly harmful to human health. They can cause lung diseases and cancer. Exposure to
PM2.5 may even cause early death in people with existing heart and lung disease.” (Source of Information: CA/EPA Air Resources Board, Enforcement Division, Compliance Assistance Program. (2005). Wood Burning Handbook, [Portable Document File]. California Air Resources Board Publication. Retrieved from the California EPA Air Resources Board website @ www.arb.ca.gov/cap/handbooks/wood_burning_ handbook.pdf, pg.2) Why does wood cause health problems? It is because of the way wood burns – “As the fire temperature rises, different stages occur:
Stage 1 – Water Boils Off As the log heats, moisture contained in the log vaporizes, and escapes through the log's surface as water vapor. More energy is used up vaporizing the moisture than is used to burn the log. That heat energy could be warming your house instead of drying your wood before it burns.
Stage 2 - Vaporizes Wood Gases Before burning, firewood "cooking" creates and releases hundreds of new volatile organic gases, which contain VOCs, tars and charcoal or carbon. Because the log temperature at this stage is too low to burn gases and tars, they escape up the smoke stack. As they cool, some of the gases will combine with water vapor to form highly flammable creosote that sticks to the flue walls; other gases condense into smoke
Figure 2: CA/EPA Air Resources Board
Figure 3: CA/EPA Air Resources Board
Figure 4: CA/EPA Air Resources Board

84
particles.
Stage 3 - Log Charcoal Burns
At temperatures above 600 degrees Fahrenheit the escaping 600° gases start burning ignited by nearby flames. As the temperature reaches 1000 degrees, the log charcoal burns and emits heat. Burning the charcoal produces most of the fire's usable heat.
As you can see, most of your wood goes up in smoke!” And it is not an efficient way to heat your home. (Source of Information: CA/EPA Air Resources Board, Enforcement Division, Compliance Assistance Program. (2005). Wood Burning Handbook, [Portable Document File]. California Air Resources Board Publication. Retrieved from the California EPA Air Resources Board website @ www.arb.ca.gov/cap/handbooks/wood_burning_ handbook.pdf, pg.3) “Where Does Your Heat Go? Warm air is always escaping from your house, and is replaced by unheated outdoor air. The typical house has one-half to two air exchanges per hour, and more on windy and/or very cold days. If your house has little insulation and many air leaks, you are paying to heat the outdoors. And if the outside air is smoky, soon your air inside will be too. Some air exchange is necessary because of the many sources of air pollution in the home (wood heater, gas stove, consumer products, cigarettes, etc.).” Enough fresh air inlets are needed to replace air forced out of the house by exhaust fans, dryers, furnaces, water heaters, or wood fires. Here are some suggestions to minimize excess air exchange:
• Install Ceiling Insulation. When hot air rises, much of the heat is lost through the ceiling and roof. Wall and floor insulation also reduce heat loss. Recommended amounts of insulation have increased in recent years, so be sure your house has all it needs.
• Caulk around all windows, doors, pipes, and any opening into the house.
• Weather-strip all door and window openings. Consider installing double-paned
glass, outdoor or indoor storm windows, and/or insulated curtains.
• Close the damper tightly when the heater is not in use. Stoves and fireplaces allow air to leak out of the house even when they are not operating, unless they are literally airtight.
Figure 5: CA/EPA Air Resources Board
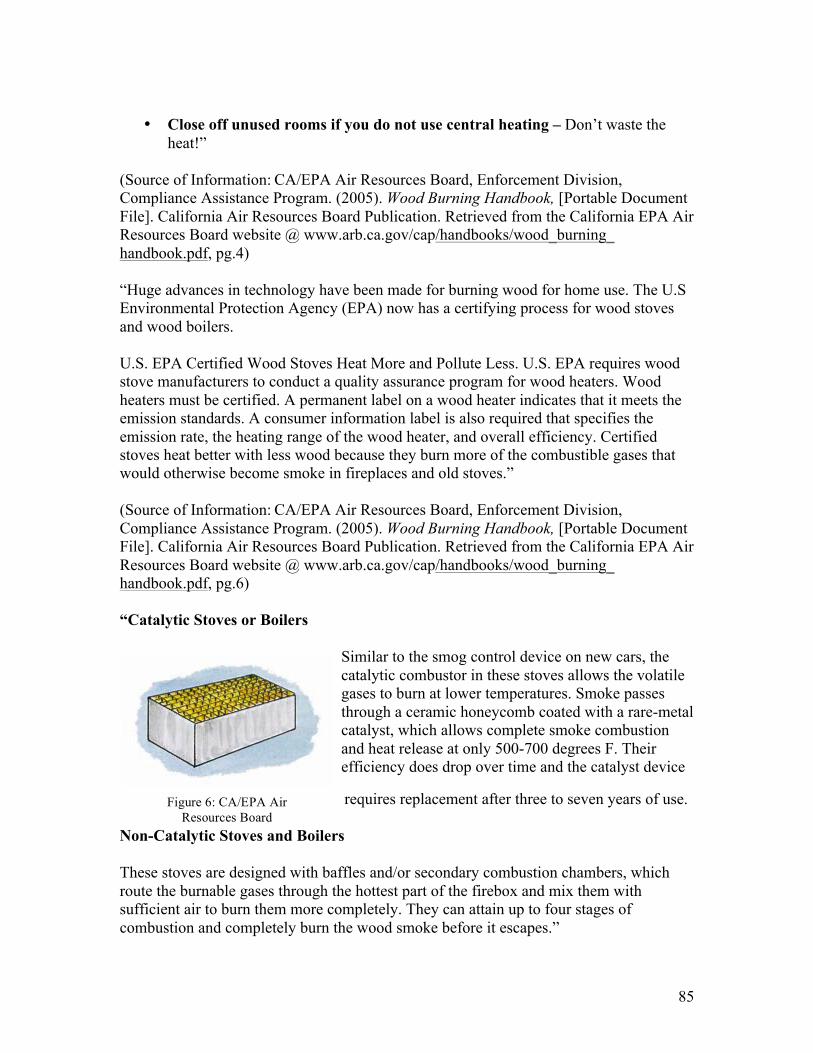
85
• Close off unused rooms if you do not use central heating – Don’t waste the
heat!” (Source of Information: CA/EPA Air Resources Board, Enforcement Division, Compliance Assistance Program. (2005). Wood Burning Handbook, [Portable Document File]. California Air Resources Board Publication. Retrieved from the California EPA Air Resources Board website @ www.arb.ca.gov/cap/handbooks/wood_burning_ handbook.pdf, pg.4) “Huge advances in technology have been made for burning wood for home use. The U.S Environmental Protection Agency (EPA) now has a certifying process for wood stoves and wood boilers. U.S. EPA Certified Wood Stoves Heat More and Pollute Less. U.S. EPA requires wood stove manufacturers to conduct a quality assurance program for wood heaters. Wood heaters must be certified. A permanent label on a wood heater indicates that it meets the emission standards. A consumer information label is also required that specifies the emission rate, the heating range of the wood heater, and overall efficiency. Certified stoves heat better with less wood because they burn more of the combustible gases that would otherwise become smoke in fireplaces and old stoves.” (Source of Information: CA/EPA Air Resources Board, Enforcement Division, Compliance Assistance Program. (2005). Wood Burning Handbook, [Portable Document File]. California Air Resources Board Publication. Retrieved from the California EPA Air Resources Board website @ www.arb.ca.gov/cap/handbooks/wood_burning_ handbook.pdf, pg.6) “Catalytic Stoves or Boilers
Similar to the smog control device on new cars, the catalytic combustor in these stoves allows the volatile gases to burn at lower temperatures. Smoke passes through a ceramic honeycomb coated with a rare-metal catalyst, which allows complete smoke combustion and heat release at only 500-700 degrees F. Their efficiency does drop over time and the catalyst device
requires replacement after three to seven years of use.
Non-Catalytic Stoves and Boilers These stoves are designed with baffles and/or secondary combustion chambers, which route the burnable gases through the hottest part of the firebox and mix them with sufficient air to burn them more completely. They can attain up to four stages of combustion and completely burn the wood smoke before it escapes.”
Figure 6: CA/EPA Air Resources Board

86
“Because of incomplete combustion, old wood stoves can produce up to 50 grams of particulate per hour. EPA Certified fireplace inserts and EPA Certified wood stoves are considerably more efficient, producing only 6 grams per hour. EPA Certified devices create the right conditions for complete combustion; the right amount of air, high temperature, and time to allow the gases to fully burn.” (Source of Information: CA/EPA Air Resources Board, Enforcement Division, Compliance Assistance Program. (2005). Wood Burning Handbook, [Portable Document File]. California Air Resources Board Publication. Retrieved from the California EPA Air Resources Board website @ www.arb.ca.gov/cap/handbooks/wood_burning_ handbook.pdf, pgs. 6-7)
How Wood Boilers Burn Wood
Here is a handout produced by one EPA approved wood boiler dealer in Alaska that explains how the boilers burn wood (www.wooddoctoralaska.net). The Wood Doctor Converter represents the new generation of Outdoor Furnaces. It burns less wood and is environmentally friendly having little smoke emission. This makes it the only legal choice in many urban areas. It converts wood to gas and gas to heat.
Figure 7: How the Wood Doctor Converter works by www.wooddoctoralaska.net.

87
Figure 8: How the Wood Doctor Converter works by www.wooddoctoralaska.net.
Figure 9: How the Wood Doctor Converter works by www.wooddoctoralaska.net.

88
If your woodstove or wood boiler is not U.S. EPA certified, you should consider buying a new certified one. A new U.S. EPA certified stove or boiler will increase combustion efficiency, produce far less smoke and creosote buildup, and reduce air pollution. It uses the latest and best technology available on transfer efficiency, and will provide more heat for your house and less for your flue. If you want to pollute less and save money on fuel, you should insist on an EPA Certified device, which will be clearly labeled as such.” (Source of Information: CA/EPA Air Resources Board, Enforcement Division, Compliance Assistance Program. (2005). Wood Burning Handbook. California Air Resources Board. Retrieved from the California EPA Air Resources Board website @ www.arb.ca.gov/cap/handbooks/wood_burning_handbook.pdf, pg. 6) A list of EPA approved wood stoves can be found at this website: http://www.epa.gov/Compliance/resources/publications/monitoring/caa/woodstoves/certifiedwood.pdf A list of EPA approved wood boilers, also called hydronic heaters, can be found at this website: http://www.epa.gov/burnwise/owhhlist.html “BUILDING IN ALASKA - Woodstoves: A Safety Checklist To protect your family and property, woodstoves must be properly installed and operated. This checklist was developed so that you can review the most important points before you start that first fire in your new woodstove. “CHECKLIST • The stove should have legs at least 4 inches high or the unit should be placed on masonry blocks with the holes to the sides to allow air circulation under the stove. Securing the stove to the floor is advisable in seismic risk areas. • Run a duct from the outside of the building to very near the woodstove to provide combustion air for the heating unit and minimize cold air infiltration to your home. • For clearance requirements, refer to local building codes and manufacturer’s literature. If none are provided in your area or with your stove, consider a 36-inch minimum distance to any wall from the stove. • All open front woodstoves should have a screen.” (Source of Information: University of Alaska Fairbanks Cooperative Extension Service. (2007). Woodstoves: A Safety Checklist Building in Alaska, [Portable Document File]. University of Alaska Fairbanks Cooperative Extension Service Publication. Retrieved from the University of Alaska Fairbanks Website @ www.uaf.edu/ces/publications-db /catalog /eeh/EEM-01350.pdf, pg.1)

89
“Installation: • Read your owner’s manual and follow the recommendations and guidelines. • Make sure the woodstove is not too large for the area it is heating. • Make sure the stove does not have missing parts or large cracks that make it unsafe to use. • Some kind of fire protection material must be used to cover the floor and walls that are close to the stove. Follow building codes and manufacturer’s literature for safe installation. These sources will tell you what materials to use and how to install them.” Chimney Installation: “• Do not reduce the stove pipe diameter between the stove and the chimney flue. Follow manufacturer’s specifications. • Avoid connecting more than one heating device to a single chimney flue because poisonous gases or sparks may pass from one appliance out the other. • A single wall chimney pipe needs 18 inches of clearance to combustibles. Metalbestos or triple wall chimney pipes and masonry chimneys need 2-inches of clearance to combustible materials. If you insulate around the chimney, increase minimum recommended clearances and insulate with mineral wool (rock wool) or other non-combustible insulation. Fiber glass insulation is non-combustible but is held together with a resin that vaporizes at 250°F, so is not an approved material. • Keep combustible forms of polyurethane, styro-foam, cellulose or other insulation away from chimney pipes. • Install a damper on your chimney pipe, even if your stove is equipped with one, so that you can control a chimney fire. • If using a single wall stove pipe, each joint should be secured with at least 3 metal screws. A severe chimney fire can blow unsecured joints apart. • The chimney should extend at least 2 feet higher than any point of the roof within 10 feet of the chimney pipe. It is extremely important to maintain a minimum of a 2-inch clearance between the chimney and combustibles (i.e., support frames and insulation). • Use an insulated metal chimney which is approved by Underwriter's Laboratories or the Alaska D.E.C., where a masonry chimney is not available or practical.” Operations and Maintenance: “• If using an airtight stove, open the intake damper fully before you open the door. Hot, unburned fuel gases can burn explosively if air is introduced too quickly. • Never burn coal and wood in the same stove, unless it is designed to do so. Since coal generates a higher heat, coal stoves are constructed differently. • Burn dry, well seasoned wood, which has dried at least one year. This will reduce creosote deposits, and provide more heat output. Two drying seasons are recommended for hardwoods, such as birch and aspen. • If burning artificial logs never poke or burn more than one at a time. They contain up to 60% wax or sterno and will burn extremely fast if broken up. This will damage your stove and may cause a house fire.
90
• Keep all wood, paper, matches or other combustibles away from the woodstove or chimney pipe. • When you reload a woodstove or start a fire, let it burn with dampers wide open for five minutes. This will burn out creosote deposits in the chimney. Do not start a hot fire if there is an 1⁄8-inch or more thick layer of creosote in the chimney pipe. • Never use flammable or combustible liquids to kindle or rekindle a fire! • Use a metal container with tight fitting lid for ash disposal. • The building or fire inspector should approve the installation. • The company insuring the building should be notified of the installation.” University of Alaska Fairbanks Cooperative Extension Service. (2007). Woodstoves: A Safety Checklist Building in Alaska, [Portable Document File]. University of Alaska Fairbanks Cooperative Extension Service Publication. Retrieved from the University of Alaska Fairbanks Website @ www.uaf.edu/ces/publications-db /catalog /eeh/EEM-01350.pdf, pg.2) “WOOD STOVE SAFETY ISSUES Stoves must be set up and used with great care to avoid serious fire hazards. Safe chimneys are absolutely essential. Flue walls must be sound as occasional chimney fires are almost inevitable when burning wood or soft coal. Safe placement of stoves and proper vent connection are also important. Unlined single brick chimneys found in many older homes are especially hazardous. This type of chimney often was not very safe when it was built and certainly should be suspect now. Mortar in the joints probably has broken down and some bricks may be cracked. The combined action of weather and hot gases causes these conditions most often near the chimney top. However, cracks and openings commonly develop well below the roof in tinder-dry attics. Masonry chimneys also increase risk from collapse during earthquakes. Fireplaces and older model stoves, when fired vigorously from day to day, are usually not as hazardous as the controlled burning stoves common today. Soot and creosote did not build up as small accumulations may have ignited and burned safely. Heavy chimney deposits, once ignited, burn intensely at dangerously high temperatures. Present day building codes and insurance underwriters encourage safe chimney design. Masonry flues are lined with fireclay at least 5⁄8-inch thick or some other approved material. All wood beams, joists, and studs must be kept at least 2 inches away from masonry enclosing a flue. Approved, factory-built chimneys, when correctly installed, are also acceptable. Chimney fires are possible in all but the cleanest chimneys. A safe installation and extra care will help prevent fire, but accept the idea that there could be a fire and be prepared to handle it. Make certain everyone in the house is familiar with the warning signs of a chimney fire (sucking sounds, a loud roar, and shaking pipes). All adults should know how and when to use a fire extinguisher.

91
Place the fire emergency phone stickers on every phone (available at your nearest fire station). If you think you have a chimney fire: 1. Call the fire Department immediately, before doing anything else. 2. Cut off the fire’s air supply by closing all dampers on the woodstove and/or chimney pipe. 3. Get everyone out of the house and put them to work watching for sparks or signs of fire on the roof or nearby. 4. Keep a Class 1A:10BC dry chemical fire extinguisher handy. If the house catches on fire, try to extinguish it if it is safe to do so. Stand back 6 to 8 feet and direct the nozzle to the base of the flames. Stoves, flues and chimneys should be kept clean. If a chimney has a build-up of 1⁄4-inch of creosote, a chimney fire hazard exists. Chimneys serving airtight stoves should be checked frequently, as total blockage has occurred less than 72 hours after installation. Chimney cleaning should be accomplished by a mechanical means. Flue brushes with extendible poles are available for about $25 from most heating dealers. Do not use chemical cleaners, because they can cause corrosion on metal chimneys and sometimes start intense fires caused by accelerated oxidation. Make sure all ashes are completely dead before you throw them out. Ashes make excellent sidewalk de-icers, and soil enhancement. This is not the case however, for coal ashes. Most fire departments will inspect your stove and chimney. Many chimney sweep businesses provided free chimney inspection services as well.” University of Alaska Fairbanks Cooperative Extension Service. (2007). Woodstoves: A Safety Checklist Building in Alaska, [Portable Document File]. University of Alaska Fairbanks Cooperative Extension Service Publication. Retrieved from the University of Alaska Fairbanks Website @ www.uaf.edu/ces/publications-db /catalog /eeh/EEM-01350.pdf, pg.3) For more information on proper installation and maintenance of your wood burning stove, order a copy of the pamphlet entitled Wood Stove Safety, published by the Fairbanks Fire Department. “Backdrafting Research indicates that backdrafting problems are widespread and may pose a health hazard. In addition to backdrafting, many houses suffer spillage during the start-up of furnaces and water heaters. Incidents of chimney spillage are becoming more frequent and hazardous. The spillage occurs when chimneys interact with other parts of the house. Three factors are making houses more prone to pressure-induced spillage: tighter building envelopes; increased exhaust capacity; and, unusually weak chimney draft.

92
Before a house is occupied, a test should be conducted to see if the exhaust appliances are capable of depressurizing the house to unsafe levels. The simplest approach is to turn on all the fans and fireplaces. Then time the duration of spillage when the stove is started up. A smoke pencil or lighter flame can be used to detect spillage. If spillage continues for more than 30 seconds, you have a chimney venting problem. Try to avoid testing on windy days.” University of Alaska Fairbanks Cooperative Extension Service. (2007). Woodstoves: A Safety Checklist Building in Alaska, [Portable Document File]. University of Alaska Fairbanks Cooperative Extension Service Publication. Retrieved from the University of Alaska Fairbanks Website @ www.uaf.edu/ces/publications-db /catalog /eeh/EEM-01350.pdf, pg.4) “Wood for Burning Clean 1. Start Your Fire With Softwood Kindling - Softwoods (spruce) are generally low in
density, ignite easily, burn fast and hot and will heat the firebox and flue quickly. They are ideal for kindling and starting your fires, but form creosote easily due to the high resin (sap) content.
2. Burn Longer and Cleaner With Hardwood - Hardwoods (birch, aspen) are denser and take longer to ignite, but burn slower and more evenly, producing less smoke. They also provide more heat energy than softwood logs of the same size.
3. Burn Only "Seasoned" Firewood - Firewood should dry, or "season" a minimum of 6 to 12 months after splitting. Hardwoods dry more slowly than softwoods and may take over a year to dry. Seasoned firewood by definition contains 20 percent moisture or less by weight. Wood dries faster in a warmer storage area with more air circulation.
4. To Speed Dry: a. Split and Stack – logs dry from the outside in, so
split big logs right away for faster drying. Stack loosely in a crosswise fashion to get good air circulation.
b. Store High and Dry— Stack a foot or more above the ground and away from buildings in a sunny well-ventilated area. Cover the top to keep dew and rain off the wood, but leave the sides open to breezes.”
(Source of Information: CA/EPA Air Resources Board, Enforcement Division, Compliance Assistance Program. (2005). Wood Burning Handbook. California Air Resources Board. Retrieved from the California EPA Air Resources Board Website @ www.arb.ca.gov/cap/handbooks/wood_burning_handbook.pdf, pg.8)
Figure 9: CA/EPA Air Resources Board

93
Lesson Seven Activities
Is Wood Smoke a Problem in Our Homes? Objectives
• To learn about the health problems associated with wood smoke in underground houses, subsistence camps, and log cabins
• To learn how to build a fire that gives off the least amount of wood smoke • To learn about carbon monoxide, how it affects the body, and the symptoms of
carbon monoxide poisoning. • To understand how NOX (Oxides of Nitrogen) what does this stand for?) impacts
people’s health and how acid rain is formed from it • To study Volatile Organic Compounds (VOC’s), how they are formed and what
they do to people’s lungs and their ability to breathe • To learn about toxic pollutants in VOCs and the cancer-causing substances in
them • To understand about particulate matter, where it comes from and why it is
harmful to human health. • To visit the health aide to gain a better understanding of how wood smoke affects
the community. • To learn how to build a fire from wood that burns clean • To understand how to speed dry firewood. • To understand how the new wood burning technologies work. • To figure out how much wood a household uses per year • To assess the type of wood stoves/boilers and new technologies that exist in the
community. • To research the new wood burning technologies to find out how economical they
would be to buy and install in homes. • To decide if the family should buy a new EPA certified woodstove
Materials Computer for Internet research Pencils and pens Student journals Student learning logs Writing paper Activity 1 – Shelters, Wood Smoke, and Health Effects In this activity, the teacher invites an Elder to talk with the class about the wood smoke that comes from the fires people build in the various kinds of shelters they use, and the health problems that are associated with the smoke.
1. The teacher has the students brainstorm questions to ask the Elder when he comes to speak with them. Examples:

94
o What kind of fires do people build in these shelters? o Which kind of fires gives off the most and least amount of smoke? o What are the health issues that people have from breathing smoke in these
shelters?
2. The Elder speaks to the class about the wood smoke from fires that people build in various kinds of shelters and the health problems that are associated with the smoke. When the Elder speaks to the class, the students listen respectfully to what he has to share and take brief notes in their learning logs.
a. When the Elder has finished speaking, the teacher asks the students to
evaluate which kind of fire is the safest to be around. Why?
b. The students record the answers in their learning logs. c. The teacher and students talk about Athabascan culture, beliefs, and values
that the Elder shared during his talk on building fires and health problems associated with them.
3. The students record their thoughts about what the Elder said in their journals.
4. The students create a thank you note to send to the Elder to show their
appreciation for the time they spent with them. Activity 2 – What are the Environmental Health Problems from Wood Smoke? In this activity, students learn about the various environmental health problems that can result from wood smoke in the community and consider which of these problems may be affecting their community.
1. The teacher talks with the students about how wood smoke can affect people’s health and the environment in the community and then asks them to answer the following questions in their learning logs:
A. Carbon Monoxide:
o What is carbon monoxide and when is it produced? o What does it do to the blood supply in the body? o What are the symptoms of carbon monoxide poisoning and who is most at
risk from it in your home?
B. Oxides of Nitrogen:
o How does NOX impact people’s health in the community? o How is acid rain or acid fog formed from NOX?

95
C. Volatile Organic Compounds (VOCs):
o What are VOC’s? How are they formed? o What do VOC’s do to people’s lungs and their ability to breathe?
D. Toxic Pollutants
o What are the toxic pollutants that are in VOCs? o What are the cancer-causing substances in toxic pollutants?
E. Particulate Matter
o What is particulate matter? o Where does particulate matter come from? o Why are Particulate Matter 10 and Particulate Matter 2.5 harmful to
human health?
2. The teacher asks the students to consider which of these problems may be affecting their community.
Activity 3 – Visit Community Health Aide to See How Wood Smoke Affects People’s Health In this activity, the students visit with the local community health aide to see how wood some affects the people’s health. The teacher contacts the Community Health Aide and asks them to talk with the students about how wood smoke affects the people’s health in the community.
1. The students brainstorm questions to ask the Community Health Aide during their visit. Examples:
o What people are most affected by wood smoke in the community? o What health problems are aggravated by wood smoke? o How can the students help Elders and children whose health may be
impacted by wood smoke in the community?
2. The teacher and students visit the clinic and talk with the health aide. The students write down what the Community Health Aide talks about in their learning logs.
3. When the teacher and students return to the classroom, the teacher asks the
students to talk about how they can use their visit to the health clinic to benefit the people living in their community.
4. The teacher asks the students to think about ways they can reduce the wood
smoke that is in their homes and the community to protect the people and the environment.

96
Activity 4 – Wood for Burning Clean
1. In this activity, the teacher talks with the students about wood for burning clean fires.
2. The teacher discusses the wood that the students can use to burn a clean fire and then asks the students to answer the following questions in their learning logs:
o Why are softwood trees such as spruce good for kindling? Where can you
find them in the community? o Why do hardwoods burn longer and cleaner? Does the community have
hardwoods it can burn? o Is it possible for people in the community to burn only seasoned firewood?
Activity 5 – Stack Wood for an Elder In this activity, the students stack firewood for an Elder so that it will dry faster.
1. The teacher talks with the students about the method that can be used to stack firewood so that it will “speed dry.”
2. The students stack firewood for an Elder in the community using the speed dry
method.
3. The Elder discusses with the students how they have carried out their traditional responsibilities to the community.
Activity 6 – New Wood Burning Technologies In this activity, the teacher talks with the students about how the U.S. EPA Certified Wood Stoves and boilers heat more and pollute less.
1. The teacher talks with the students about the certified catalytic stoves and asks the students to draw the following pictures and answer the following questions in their learning logs:
A. Catalytic stoves:
o Draw a picture of the catalytic combustor. o Does the catalytic stove give off more or less wood smoke than an older
stove? o Does the catalytic stove release heat at a higher or lower temperature than
an older wood stove?
B. Non-catalytic stoves: o Draw a picture of a non-catalytic stove o Do the non-catalytic stoves give off more or less smoke than an older
wood stove? Why?

97
The teacher and the students discuss the answers that they have put in their learning log about the new wood burning technologies. Activity 7 – Survey of How Much Wood Each Household Burns In this activity, the students do a survey of how much wood each household burns in the community.
1. The teacher asks the students to do a survey of how much wood each household burns:
o What kind of wood is burned? o When is it cut? o How long does it dry before use?
2. The teacher asks the students to tally the total amount of wood that the household
uses.
Activity 8 – Community Assessment of Wood Stoves/Boilers and New Technologies In this activity, the teacher has the students do an assessment of the type of wood stoves/boilers and new technologies that exist in the community and what kind they are.
1. The teacher asks the students to do an assessment of how many homes have:
o Woodstoves o Boilers o Newer technologies
The students write the information that they receive from the assessment in their learning logs. Activity 9 – Research the New Wood Burning Technologies
In this activity, the teacher has the students research the new wood burning technologies to find out how economical they would be to buy and install in their homes.
1. The teacher has the students work alone or divides them into teams and has them research the new wood burning technologies on the Internet to find out how economical they would be to buy and install in their homes, etc.
2. The students write down the information that they find on the Internet.
3. The teacher and the students discuss whether it would be economical to put the
new wood burning technologies in their homes.

98
Activity 10 – Should You Purchase a New EPA Certified Woodstove? In this activity, students decide whether they would like to help their family buy a new EPA certified woodstove.
1. You want to decide whether you should help your family buy a new EPA certified woodstove. How much wood each stove will burn? How much time it will take you to earn the money to help your family buy the stove?
A. To help make your decision, you decide that you want to compare how much
particulate matter comes out of the certified stove compared to your old stove, B. An EPA certified woodstove will produce 6 grams of particulate matter per
hour while your old woodstove that is not certified produces 50 grams of particulate matter per hour.
o How many grams of particulate will your new stove produce/day? Your old stove/day?
o How many grams of particulate will your new stove produce/week? Your old stove/week?
o How many grams of particulate will your new stove produce/month in a month? Your old stove/month?
o Put your answers in a table so that it will be easy for you to compare how much particulate matter the new and the old stove will give off during the different periods of time.
C. You decide to look at how much wood the new stove will burn. You find out
that the new woodstove will burn 50% less wood than the old woodstove and still give you the same amount of heat.
o How much wood will you need for the new wood stove/week? For the
old wood stove/week? o How much wood will you need for the new wood stove/month? For
the old wood stove/ month? o How much wood will you need for the new wood stove/winter? For
the old wood stove/winter? o Put your answers in a table so that you can compare the differences
between the amount of wood the new and the old stove will use.
D. You decide to take a look at the cost of the wood stove and then figure out how many hours it will take you to earn the money to help your family buy it.
E. The new wood stove that you want to buy costs $1,200. It will cost $600 to
ship it to your community. How much the stove will cost altogether? ____

99
F. Your parents tell you that if you would like to help buy the stove that they will put in $1000 towards it. How much money will you have to earn to buy it? ____
G. You can make $10/hour cutting wood for the teacher in the community. How
many hours will you have to work to earn the money for the new woodstove? ____
H. Now that you have the information for both stoves, what is your decision
about buying the woodstove? Why?

100
Lesson 8 – Environmental Problems Associated with Rural Housing – Are Mold and Radon Problems in our Homes? “With the dramatic increase in heating fuel prices, there has been a flurry of activity from homeowners and contractors to improve insulation values and reduce the air loss in homes. This is a good thing.” When working on home improvements there are a few issues on indoor air quality that you should be aware of. As you make your home tighter, less fresh air gets in through the weaker places in your home. “A poorly sealed home may have been able to provide enough air exchanges that moisture and stale air were able to exit the house naturally.” A tighter home may increase humidity levels in the house and “it may be necessary to introduce fresh air in places” where you never needed to before. Higher humidity levels can create mold in the house. A tighter home can also trap radon gas that may be coming from the earth below the home. Fortunately, introducing a fresh air supply is easy to do. You can just “install an air duct to an appliance and improve exhaust fans.” These can supply your home with fresh air while reducing heat losses. (Source of Information: Benesch, I. (2008). Weatherization and Indoor Air Quality Issues, [Portable Document File]. Cold Climate Housing Research Center Article. Published in Fairbanks Daily Newsminer. Retrieved from the Cold Climate Housing Research Website @ www.cchrc.org/docs/energy_focus/2008-9-4%20Indoor% 20Air%20 Quality.pdf.) Residential Ventilation–Why Do We Need It? “With the emphasis in modern cold climate housing on air-tightness and energy efficiency,” a house usually lacks enough air exchange on its own without adding a form of mechanical ventilation. “In addition, traffic noise, particulate pollution (such as forest fire smoke during the summer), pollen (a problem for asthmatics and highly allergic people),” and maintaining a healthy level of “relative humidity can be better controlled with a form of mechanical ventilation.” A good range of humidity that is possible and healthy in northern housing is between 30% to 50%. “Although relative humidities a bit higher are still considered healthful, our present ability to prevent condensation on colder surfaces is limited by modern window technologies. Keeping windows free of condensation at our most extreme periods of cold is not possible with windows of R-values of 4 or less. Finally, the air quality in homes can often only be maintained by mechanical ventilation that is designed for that home.” (Source of Information: University of Alaska Fairbanks Cooperative Extension Service. (2004). Indoor Air Quality and Ventilation Strategies for Cold Climates Building in Alaska, [Portable Document File]. University of Fairbanks Cooperative Extension Publication. Retrieved from the University of Alaska Fairbanks Website @ www.uaf.edu/ces/publications-db/catalog/eeh/EEM-00450.pdf, pg.1)

101
“COMMON VENTILATION SYSTEMS FOR RESIDENTIAL USE It is appropriate to review the common technologies in use for residential ventilation to understand the options for control that they afford. These systems include: 1. Unbalanced Mechanical Ventilation Systems–Exhaust-Only This type of system typically employs a single fan, intentionally placed, to exhaust air from a home, with air inlets placed in rooms that require supply air, such as bedrooms (Figure 1–supply ducts not shown in figure). Placement of the inlets is important because of the pressure dynamics of the building.” This is really important in cold climates because the temperature differences are larger and the resulting pressure differences across the frame of the house are improved. Exhaust only systems also bring in a constant negative pressure inside the building–“with respect to outdoors–and bring in radon from under grade walls along with other soil gasses. For these important reasons, most building scientists in northern regions have rejected exhaust only technology for cold climate ventilation.”
(Figure 1: Alaska Housing Manual, 2000) “Figure 1: An exhaust-only ventilation system. Although not shown in this figure, exhaust-only systems typically provide for supply air by small inlet vents, like a tubular plastic duct with an external slatted opening (a louvre) to provide incoming air to make up for the air being exhausted. No heat exchange takes place, and the exhaust-only system not only brings air in at the outdoor temperature, but also puts a negative pressure on the entire house, possibly helping to bring into the house some pollutants, such as radon.” (Source of Information: University of Alaska Fairbanks Cooperative Extension Service. (2004). Indoor Air Quality and Ventilation Strategies for Cold Climates Building in Alaska, [Portable Document File]. University of Fairbanks Cooperative Extension Publication. Retrieved from the University of Alaska Fairbanks Website @ www.uaf.edu/ces/publications-db/catalog/eeh/EEM-00450.pdf, pg.2)

102
“A second type of unbalanced mechanical ventilation–supply ventilation with point source exhaust–is shown and described in this figure.”
Figure 2: Non-integrated supply and multi-point exhaust ventilation system that is uncommon in the north, but could be adapted here. Credit: Building Science Corporation,
2004.
(Building America, EEBA Houses That Work Training Guidance, Ventilation, Chapter 14, Midwest Research Institute, National Renewable Energy Laboratory Division, Golden, CO. Prepared by: Building Science Corporation, Westford, MA. Also available on CD.) “Supply Ventilation System with Point Source Exhaust • Supply fan brings in outside air and mixes it with air pulled from a common area
(living room, hallway) to provide circulation and tempering prior to supplying to common area.
• Run time is based on time of when people are there or not. • In supply ventilation systems, and with heat recovery ventilation, pre-filtration is
recommended as debris can affect the ducts and fans ability to reduce air supply.
• Kitchen range hood provides point source exhaust as needed.”
(Source of Information: University of Alaska Fairbanks Cooperative Extension Service. (2004). Indoor Air Quality and Ventilation Strategies for Cold Climates Building in Alaska, [Portable Document File]. University of Fairbanks Cooperative Extension Publication. Retrieved from the University of Alaska Fairbanks Website @ www.uaf.edu/ces/publications-db/catalog/eeh/EEM-00450.pdf, pg.3) “2. Balanced Heat Recovery Ventilation (HRV) For approximately two decades, improvements in balanced heat recovery ventilation” have caused more people to use this option. (Figure 3). A typical cross-sectional view of a heat recovery ventilator (also called an air-to air heat exchanger) is shown in Figure 4.

103
These systems have been really useful in Canada, Alaska and the northern United States. “The biggest barriers to wide adoption seem to be” the cost and a control system that is not too dependable. Cost of outing it in is almost always less for new construction, because the duct distribution system and design integration into the structure is easy to include at the time of construction. But acceptable performance of these systems does not always happen because under developed control technologies. “3. Heat Wheel HRV with latent heat recovery. This third type of heat recovery ventilation system uses a rotating heat transfer surface, which transits between the outgoing exhaust and the incoming cooler, dryer air.” Because of this there “is cross pollution of the air streams. This type of system is not recommended even though it solves the condensation and humidity issues in some instances.”
Figure 3: A Heat Recovery Ventilation System.
Credit: Building Science Corporation, 2004
(Building America, EEBA Houses That Work Training Guidance, Ventilation, Chapter 14, Midwest Research Institute, National Renewable Energy Laboratory Division, Golden, CO. Prepared by: Building Science Corporation, Westford, MA.) CD.) “Balanced Ventilation System with Heat Recovery via an Air-to-Air Heat Exchanger
• The ventilation system has a separate duct system not integrated with the heating
and A/C system. • Run time based on time of occupancy.

104
• Exhausts are typically from bathrooms and supplies are typical to bedrooms. • In supply ventilation system, and with heat recovery ventilation, pre-filtration is
recommended as debris can affect duct and fan performance reducing air supply.”
Figure 4: A cut-away view of a typical Heat Recovery Ventilator, single core. Credit: Alaska Housing Manual, 2000. (Source of Information: University of Alaska Fairbanks Cooperative Extension Service. (2004). Indoor Air Quality and Ventilation Strategies for Cold Climates Building in Alaska, [Portable Document File]. University of Fairbanks Cooperative Extension Publication. Retrieved from the University of Alaska Fairbanks Website @ www.uaf.edu/ces/publications-db/catalog/eeh/EEM-00450.pdf, pgs.4-5) Residential control methods have therefore been developed “to try to keep the relative humidity in the range of 30 to 60 percent. In Alaska we have to slide toward the dry side of this range and not exceed 50 percent relative humidity indoors. Present window technologies do not allow us to tolerate indoor humidity higher than 50 percent.” All cold weather ventilation methods use dehumidification processes. “In a heating climate, warm moist air is being exhausted and replaced by cooler drier outside air.” Another part of indoor air quality affected by ventilation strategy is radioactive radon gas. When present in the soil gas, radon comes into a house by the same methods that bring the cool dry outdoor air into a house. Movement of radon into a house is usually due to air leakage (air containing radon) caused by the degree of different pressures between the house and soil. Infiltration can take place anywhere there are pressure differences and openings in the building envelope. “Houses typically leak air in low and out at the top of the building.” The ventilation rate of a house at any given time is a result of the openings in the structure and the forces causing air to move through the house. The effect of the air buoyancy is often referred to as the stack effect and this effect is significant during the heating season in the Interior. “During the winter of 2000, researchers at the University of Alaska Fairbanks did a series of experiments and research tests to study the results of different ventilation systems and their controlled operation on the indoor air quality of several homes in the Fairbanks area. They recorded indoor radon concentrations, indoor temperatures, and outdoor temperatures at two Fairbanks homes for the period between the spring of 1999 and the spring of 2000. They also measured differential pressures across the basement slab at one

105
of the houses during the winter months.” The purpose was to demonstrate the seasonal changes of indoor radon concentrations, the difference between indoor radon concentrations with outdoor temperature and how effective sub slab depressurization systems are in the Fairbanks area. “TSI instruments were also used to acquire data consisting of relative humidity, carbon monoxide, carbon dioxide, and indoor temperature measurements in twelve different homes in Interior Alaska. In all but a very few periods of measurement, homes were occupied and in routine use. Houses were measured for two-week intervals for each season, typically rotating through a data collection period every 10-12 weeks for nearly three years.” Radon data was usually gathered at the same time with a Sun Nuclear radon monitor and supplemented with various radon test kits for confirmation. “Air leakage tests were typically done during the autumn or winter, and a mix of blower door tests and carbon dioxide dilution tests were utilized to measure air leakage under various outdoor conditions.” (Source of Information: University of Alaska Fairbanks Cooperative Extension Service. (2004). Indoor Air Quality and Ventilation Strategies for Cold Climates Building in Alaska, [Portable Document File]. University of Fairbanks Cooperative Extension Publication. Retrieved from the University of Alaska Fairbanks Website @ www.uaf.edu/ces/publications-db/catalog/eeh/EEM-00450.pdf, pgs.6-7) Conclusions “First, the greater the temperature difference (i.e., the lower the outdoor temperature is), the greater the air leakage (infiltration) rate is likely to be, and a small part of that infiltration will be soil gas that possibly contains radon or other pollutants.” Second, the concentration resulting from radon bearing soil gas coming into a home is very strongly related to the pressure difference across the slab. This shows that air leakage that comes from the pressure difference is an important factor in radon introduction into the home. Blocking air and soil gas entry by limiting leakage from the building can go a long way toward controlling radon and other soil gas pollutants from entering the home. (Source of Information: University of Alaska Fairbanks Cooperative Extension Service. (2004). Indoor Air Quality and Ventilation Strategies for Cold Climates Building in Alaska, [Portable Document File]. University of Fairbanks Cooperative Extension Publication. Retrieved from the University of Alaska Fairbanks Website @ www.uaf.edu/ces/publications-db/catalog/eeh/EEM-00450.pdf, pg.7) “Houses with exhaust-only ventilation can bring radon into the home. So exhaust only ventilation is workable, but has the added risk of possibly introducing radon in dangerous amounts into the home if it is on a radon risk site. For this important reason, we urge caution in using exhaust-only ventilation systems in Alaska.” “The results of this research agree with the progress toward a control strategy for ventilation systems. Very good control of air leakage and resulting control of indoor

106
relative humidity is important. This control of leakage makes the house less receptive to differential pressures across the building. That is what air sealing accomplishes!” Large pressure differences should not be forced on the shell of a building by ventilation systems, because this will bring in soil gas, outdoor air pollutants, and usually limits the ability to control the air flow and pressure difference across the shell. “This is another major reason why most building scientists reject the concept of exhaust-only ventilation in very cold climates.” “Operation of appliances can cause sizeable depressurization,” and this has a bigger impact on a house than houses with greater air leakage rates.” In interior Alaska, the biggest natural force driving air into the house is buoyancy (stack effect, hot air rising) resulting from temperature differences. With our average outdoor temperatures “less than 19.4°F (-7°C) for about five months out of the year,” this is a big concern. “So what can we conclude about ventilation for Alaskan homes and how to control it? Here are some brief statements about ventilation and its control:
• Controlled ventilation REQUIRES an airtight building envelope and ducts.”
• Exhaust ventilation can work, but it is difficult to control and has serious potential for bringing pollutants and bad outdoor air into the house.
• “Balanced ventilation, which can be single point, multi-point (i.e. fans at locations where exhaust is usually needed), included with a central fan system or forced air heating system, or with Heat Recovery Ventilation (HRV) is the preferred approach. Control based on maintaining relative humidity above 25% is recommended.”
“Installation and selection of a ventilation system for your house is not considered unimportant,” and should be done by a skilled ventilation contractor who is able to design the ductwork and verify the system with tests. “Although these services are available in Alaska, there is no certification of ventilation installers. This is regrettable, and the UAF Cooperative Extension, Alaska Building Science Network, and others are working to correct this situation. For the present, look for experienced installers and consult with your contractor, the ABSN (www.absn.com) or local homebuilders association at the time of construction.” (Source of Information: University of Alaska Fairbanks Cooperative Extension Service. (2004). Indoor Air Quality and Ventilation Strategies for Cold Climates Building in Alaska, [Portable Document File]. University of Fairbanks Cooperative Extension Publication. Retrieved from the University of Alaska Fairbanks Website @ www.uaf.edu/ces/publications-db/catalog/eeh/EEM-00450.pdf, pg.8)

107
Two Problems that Affect Air Quality in our Homes – Mold and Radon As we have seen, a tight house uses less energy to heat, and that a good thing. But excessive moisture build up in the form of humidity will put your home at risk for mold growth. There are different types of mold and you don’t want any of them in your home. Mold can affect your health and, if left to grow, it can rot out your home’s structure. This is expensive to fix. Fortunately, preventing mold from growing is pretty easy…Get rid of extra moisture in your home! Getting rid of mold after it is grown is a little more difficult but is can be done. Mold and Your Home Extra moisture build up in your home is caused by many things. We breathe, cook, and take showers or baths. We wash dishes, boil water and maybe have a water leak or two in the house. Water vapor in the home should be between 30% to 45% depending on the temperature of the air. This can be measured by hygrometers, which are not expensive to buy. When moisture rich air cools, it loses its ability to hold water and condensation occurs. This is seen on the bathroom mirror after a hot shower or ice build up on your windows in the winter. When this happens it means there is high humidity and the chances for mold growth increases. However, the condensation that is not seen, like warm air escaping from your house during cold weather that “makes contact with cold air behind your walls or above your ceiling” is the real danger. Mold needs three things in order to grow and moisture is one of them. The other two are temperatures that are above freezing and the nutrients that are found in wood and sheetrock. As mold eats away at the structure of your home it causes rot. Mold also produces spores and other irritants and toxins into the environment. These can cause allergic reactions or worse. A home can even be so full of mold that it is no longer good to live in. Mold is most often found around window frames, bathrooms and kitchens where water is not present and humidity increases. Bathroom fans that do not work are well known for causing mold growth. House foundations and crawl spaces are also popular places to find mold because of humid air moving up through the foundation and filling your house with humidity. If your home lacks a proper vapor barrier or water cannot drain properly away from the foundation then you will find mold. Mold has to have moisture to grow and proper ventilation is the answer. Use your bathroom fan, and check your dryer vent often. Make sure that all vents in your home vent to the outside of the house. Check them regularly in case of ice buildup. If you have

108
moisture coming up through the foundation of your home you may need to repair or install a ground vapor barrier. If you have mold then eliminate sources that bring moisture into the house. This can be an in-depth activity depending on where the mold is found. You may need to remove walls, ceilings or flooring and you should wear gloves, eye protection and maybe even a respirator if it severe. You will never be able to remove all mold completely because it is everywhere in the environment, but if you remove the sources of too much moisture in the house you will control your mold problem. Mold can be removed by a soap solution if the amount is small. Major mold growth may require the removal and replacement of sheetrock or other materials used in building your home. (Source of Information: Adam Wasch. (No Date). Energy Focus Preventing Mold Growth in Your Home Requires Moisture Control, [Portable Document File]. Cold Climate Housing Research Center Publication. Retrieved from the Cold Climate Housing Research Center Website @ www.cchrc.org/docs/energy_focus/2009-02-05%20 Mold. pdf) More information can be found at www.epa.gov/mold
Radon in Alaska
This article appeared in the www.valleymarket.com on March 7, 2007:
RADON Another thing to worry about!
By John C. Hill
Lynne Lake Home Inspections
“Did you know radon is the second largest cause of lung cancer? The Surgeon General and the EPA recommend all homes be tested for radon and reducing radon in homes that have elevated levels. Radon is a naturally occurring radioactive gas produced by the breakdown of uranium in soil, rock, and water. It cannot be seen, smelt, or tasted. The only way to know if you are at risk of exposure is to have it tested. For more specific information concerning about radon refer to the EPA website document entitled “A Citizen’s Guide to Radon” . http://www.epa.gov/radon/pubs/citguide.html
All of us that have been involved in real estate transactions have heard people say we do not have radon in Alaska, therefore we do not need to test for it. Radon is everywhere and there are recorded tests in the Matanuska/Susitna Borough that show this to be false. I have tested my past home in Willow and found elevated levels requiring a

109
mitigation system to be installed. Moving to a new home in Wasilla, this past year found elevated levels of radon in the home.
Once discovered to be above the recommended level, radon presence can be greatly reduced to safe levels by mitigation. Cost can vary by the system used but an average is around $1,000. Further information can be obtained from EPA publication entitled “Consumer’s Guide to Radon Reduction” .
The home in Willow had the radon reduced by the installation of a sub-slab suction device which consisted of an access being made in the slab. It was then sealed to a 4 inch vent that connected to a special radon fan in the attic. The fan was then vented through the roof. This system reduced my radon level well below the recommended level and cost about $850. My new home will be mitigated soon and will be very easy to do. My contractor installed a vent through the center of the home in the walls as the home was being built. This vent will be sealed to my crawl space vapor barrier and connected to an exterior vented fan in the attic. My contractor also installed an electrical outlet in the attic for the future fan if needed. This simple addition to my home will cut my cost to about $300 to complete the system. The cost for the contractor to do at time of construction was very minimal.
Radon exposure in the home can be deadly but does not have to be ignored due to cost. The amount of money I spent to make our home safe was small in comparison to possible life threatening exposure. To find out if you have risk of radon in your home you can contact a radon measurement professional or you can self test with a purchased test kit. I encourage all of you that read this article to take some action toward discovering if you are at risk.
For those of you who are buying, selling, or having a home built, take some time to read the EPA brochure entitled “Home Buyer’s and Seller’s Guide To Radon” for more information.
If you have further questions or you would like to schedule a test, please give me a call at 907-232-5675 or email lynnelake(at sign)att.net”
(Source of Information: Hill, J. C. (2007).Radon: Another Thing to Worry About. Retrieved from the Valley Market.com Website @ http://valleymarket.com/2007/03/07 /radonanother-thing-to-worry-about/) Radon www.uaf.edu/ces/publications-db/catalog/eeh/RAD-01250.pdf “Since radon was first found to be a problem in Alaska in 1986, the interest and awareness of radon as a housing and health problem” has grown. There are four features of a house “that characterize it "at risk" for radon.” “Radon must be able to enter a home in order for it to be a problem.” Riefenstuhl and Kline have analyzed the conditions for radon transport from the ground to inside the home (Personal communication, 1988).
110
“Two of the factors are geological in nature;” the other two factors depend on the structure of the house itself and the way the systems work in that house.
1. There must be enough uranium in the ground in order for radon to get into the house.
2. There must be enough permeability (or “looseness”) in the soil so that rapid gas movement to carry radon from its origin to the inside of the home.
3. The house must have problems where the foundation sits on the ground like; holes, cracks, or intended openings which allow the movement of radon up through the basement or crawl space.
4. “There must be lower pressure inside the house than in the soil so that radon flows into the house.”
All four of these characteristics are necessary for radon to be a problem. If any one of these do not exist, then there probably is not a radon problem in your home. “Through two years of selective testing, it became clear that Interior Alaska - especially the uplands near Fairbanks - is a radon risk area.” In the first year of radon screening tests, 52% of the 353 tests were at or above the EPA set level of being able to correct it. “More than 20% of the tests - or one in five - were above 20 pCi/l (pico Curies/liter), which is five times the EPA recommended corrective action level.” “Obviously, more study needed to be done in the Fairbanks area to see the depth of the problem and ways to deal with it.” Not only is the long heating season in the Interior a factor in radon transport, but throughout the heating season the oil-fired combustion system actually provides the negative pressure to move radon into the house and cause radon concentration. “The heating system in a house tends to act as a pump that sucks air loaded with radon into the bottom of the house, and drives the exhaust out the top.” All of these factors have to do with the geological setting the house is on. “This does not mean that radon cannot be present in areas” which are not as likely to radon, “such as flood plains, highly porous gravel in valleys or deep silts. We have found less of a problem at these sites,” but there are always the occasional and unusual high levels in various places where it is not expected. “The somewhat alarming radon findings in Fairbanks” led caused Alaska to be included in EPA's Ten State Surveys. “The Alaska EPA/DGGS U.S. Environmental Protection Agency/Alaska Division of Geological and Geophysical Surveys) survey was completed in the spring of 1989 and the results explain, among other revelations, the conditions in Fairbanks uplands which constitute an "at risk" home. Seifert, R.D. (2009).Radon in Homes-The Alaska Experience, [Portable Document File]. University of Alaska Fairbanks Cooperative Extension Service Publication. Retrieved from the University of Alaska Fairbanks Website @ www.uaf.edu/ces/publications-db/catalog/eeh/RAD-01250.pdf, pg1.)
• Built high on a hill slope with bedrock consisting of Birch Creek Schist. • Top soil depth less than the basement excavation (eight feet or less) • Standard basement construction for daylight basement notched into hill
111
• Oil-fired combustion heating system • Basement material either concrete or All-Weather Wood (AWW)
The above conditions make up an "at risk" radon home. Any house on a similar site with these conditions and construction styles should be tested for radon.” “The EPA survey also found that Interior Alaska has the highest proportion of homes with elevated radon concentrations. The survey showed that 30 to 35% of homes built in the hills around Fairbanks have elevated radon concentrations. In the Fairbanks area, homes built in the hills surrounding town with concrete slabs or basements in contact with bedrock yielded the highest radon screening levels.” Homes which are built on thick accumulation of windblown glacial silt (loess) appear to be insulated to radon movement. Homes built on river gravels from the Tanana and Chena Rivers are also much less at risk. “High radon concentrations in homes in contact with bedrock are likely to result from high fracture permeability of the bedrock as well as relatively high uranium concentrations in the schist which makes up the local bedrock. Low radon concentrations in homes built on loess (clay) and river gravels may reflect low soil gas permeability, low uranium concentrations of soils, or both." (Nye and Kline, 1990).” So what to do with the information on at-risk sites? The conditions stated earlier that the removal of any of the four characteristics will eliminate radon risk. “The two geological conditions - uranium presence and permeability - are "givens" on a site. Removing either condition would be expensive and impractical. Therefore, the other two conditions, which are structural, leakiness and pressure difference,” are the things we can change. “You have to seal the basement or crawl space, and/or change the pressure differences.” EPA publications show combinations of these two methods as the most common way to do it. That’s what we’ve seen here in Alaska too, “with more dependable results from sub-slab ventilation than from just sealing leaks.” There are climatic as well as geologic reasons why sub-slab depressurization works as opposed to over- pressurizing the slab or house interior. While it may be physically logical to over pressurize the interior of a home to get rid of radon, this method will also push “warm, moist, interior air out of all the nooks, crannies, keyholes and doorsills.” “When the temperature gets very cold, an over pressurized system would freeze doors, windows and fire exits shut.” This is not a good alternative. “Sub-slab depressurization is presently the only option with a consistently high success rate.” Seifert, R.D. (2009).Radon in Homes-The Alaska Experience, [Portable Document File]. University of Alaska Fairbanks Cooperative Extension Service Publication. Retrieved from the University of Alaska Fairbanks Website @ www.uaf.edu/ces/publications-db/catalog/eeh/RAD-01250.pdf , pg.2) Test for Radon Three-Month Radon Test Kits Available Through the UAF Cooperative Extension Service

112
“As a result of the concerns about radon levels in some of the areas in Fairbanks and Interior Alaska, the Cooperative Extension Service makes three-month radon test kits available at the Fairbanks District Office of the Cooperative Extension Service, and at the office of the state specialist at the University of Alaska Fairbanks. The district office is located in the University Park Bldg, 1000 University Avenue, Room 138. For information on radon concerns please call the Cooperative Extension Service district office at 474-1530 or 474-7201, in the Fairbanks area, to reach Rich Seifert, the state radon information specialist.” “The radon test kits available through the Cooperative Extension Service cost $25, or $45 for two, and are for three months of testing. Radon test kits of this type may also be available at your local Cooperative Extension Service office throughout the state. Call them for further information.” “Other test kits for radon, particularly short-term tests which utilize a form of charcoal for radon adsorption, are available from private companies locally. A list of the companies that provide short-term radon tests or other radon-related services is provided in the resource section. It can also be found at this site: http://www.uaf.edu/ces/faculty /seifert/pdf_nuaf/RadonInfoPamphlet.pdf.” (Source of Information: Radon Information: Three-Month Radon Test Kits Available Through the Cooperative Extension Service, [Portable Document File]. University of Alaska Fairbanks Cooperative Extension Service Publication. Retrieved from the State of Alaska Website @ http://www.uaf.edu/ces/faculty /seifert/pdf_nuaf /RadonInfo Pamphlet .pdf, pg. 1)”

113
Lesson Eight Activities
Environmental Problems Associated with Rural Housing – Are Mold and Radon Problems in our Homes? Objectives:
• To work with an Elder to identify different kinds of molds growing in the natural environment
• To study the conditions that mold grows under in the natural environment • To learn about mold, moisture and the home • To have the students survey their homes for places that mold can grow • To identify molds commonly found in homes • To examine how moisture is vented in the students homes • To learn how to clean up mold in the home • To learn about radon and how it affects human health • To understand how radon enters the home and school • To know how to test the home and school for radon • To know who to contact if there is a high level of radon in the home or the school
Materials:
• Computer for Internet research • Paper • Pens and pencils • Radon Test Kit • Student journals • Student learning logs
Activity 1 – Walk with an Elder to Explore Mold Growing in the Natural Environment In this activity, an Elder walks with the students to explore mold growing in the natural environment.
1. The teacher invites an Elder to walk with the students to explore the different kinds of mold that are found in the natural environment around the community.
2. The students brainstorm questions to ask the Elder:
a. Where does mold grow in the natural environment? b. What did the mold look like? Are there different kinds of mold? Where is
the mold found? c. How did people prevent mold from growing on animal skins, food, and
wood in the past?

114
3. The Elder, teacher and students walk through the community to explore the different kinds of mold that grow in the natural environment. While the Elder is talking, the students listen respectfully to what he has to share and take brief notes in their learning logs.
a. The Elder and students identify the different kinds of mold in the natural
environment. b. The Elder and the teacher help the students draw pictures of the mold in
their learning logs. c. The Elder and the teacher help the students draw pictures of the mold in
their learning logs. d. The students describe the conditions each kind of mold is growing in.
4. The teacher and students return to the classroom.
5. The teacher and students talk about Athabascan culture, beliefs, and values that the Elder shared about while they were exploring the different molds in the community.
6. The students record their thoughts about what the Elder said in their journals.
7. The students create a thank you note to send to the Elder to show their
appreciation for the time he spent with them. Activity 2 – Study the EPA Publication “A Brief Guide to Mold, Moisture and Your Home” In this activity, students study the EPA Publication “A Brief Guide to Mold, Moisture and Your Home” as an introduction to the other mold activities.
1. The teacher downloads the EPA Publication “A Brief Guide to Mold, Moisture and Your Home” PDF, copies it and asks the students to read it.
2. The teacher asks the students to answer the following questions about mold in
their learning logs:
a. What is mold? b. What kind of an environment does mold need for growing indoors? c. List three health problems that can be caused by mold. d. How can you get rid of mold in your home? e. What safety equipment should you wear when you are cleaning up mold in
your home? Why?
3. The teacher discusses the answers to the questions with the students.

115
Activity 3 – Survey your Home for Places Mold Can Grow In this activity, students survey their homes for places that mold can grow. 1. Using the guide found at www.epa.gov/mold/pdfs/moldguide.pdf (also found in the resource section under Lesson 8), the teacher asks the students to survey their home for places mold can grow. 2. The students do a survey of their home to see if there are any obvious places where it is usually moist or wet. They check for the following:
a. Condensation on the windows b. Steam on the mirrors after a shower c. Warm air escaping out of the house (this easiest to do in the winter and
will show up on your roof as depressions in the snow) d. Icicles forming outside around windows e. Frost on the outside walls
3. The students enter the results of their survey in their learning logs.
4. The students draw a picture of their home and identify the places where water and moisture can create an environment for mold to live in.
Activity 4 – Identify Molds Commonly Found Inside Homes In this activity, students do a study of the different kinds of molds that are found in homes.
1. The teacher has the students do a study of the different kinds of mold commonly found inside homes. The students can:
a. Go to http://inspectapedia.com/mold/moldatlas.htm and scroll down the
pages to the alphabetic listing of common indoor molds.
b. Also look at http://www.naturallinkmoldlab.com/pdf/NLML-Mycotoxins.pdf for mold descriptions.
2. The teacher has the students pick 5 different kinds of molds and research them
more thoroughly to find out where they are most commonly found in terms of geographic region and where they appear in a home.
Activity 5 – Examine How Moisture is Vented in Your Home In this activity students learn about different ways that moisture is vented in houses in Alaska and examine how moisture is vented in their homes.

116
1. The teacher discusses two ways that houses are vented in Alaska including: a. Unbalanced Mechanical Ventilation Systems–Exhaust-Only b. Supply Ventilation System with Point Source Exhaust
2. The teacher has the students figure out how moisture is vented in their home by
having them take a look at factors such as: a. Is there an exhaust fan in the bathroom? b. A range hood over the stove?
3. The teacher also makes the section on Common Ventilation Systems for
Residential Use available to the students whose houses may be vented differently than the two ways that are listed above.
4. The teacher and students discuss how moisture is vented in their homes.
5. The teacher asks the students to think about how well the ventilation system is
working in their home to prevent mold from growing. Activity 6 – How to Clean Up Mold in Your Home In this activity, students learn how to safely clean up mold in their homes.
1. The teacher has the students go to http://www.epa.gov/mold/. She asks the students to click on the “Basic Mold Cleanup Steps” link and read the article.
2. The teacher asks the students to answer the following questions in their learning
logs:
a. What is the key to mold control in your home? b. How do you take mold off of a hard surface in your home? c. What should you do to prevent mold if you have a plumbing leak? d. What should you do before you paint or caulk a moldy surface? Why? e. What two pieces of safety equipment should you use when you are cleaning
up mold in your house? Optional: If the teacher has access to an N-95 respirator and long rubber gloves he can show them to the students and demonstrate how to safely take mold off of a surface.
Activity 7 – What is Radon and How Does It Impact Human Health?
In this activity, students study about radon and how it affects the human body.
1. The teacher downloads EPA’s A Citizen’s Guide to Radon @ http://www.epa.gov/radon/pubs/citguide.html, copies the article and asks the students to read it.

117
2. The teacher explains that radon is a radioactive gas that is all around us. The teacher then asks the students to go to the article Going Atomic How Science Powers the World Around You @ http://express.howstuffworks.com/exp-nukes.htm so they can understand what radioactive means and how uranium decays and breaks down.
A. How Does Radon Harm the Body?
1. The teacher talks with the students about how radon can become trapped in the lungs, damage the tissue, and cause lung cancer. He asks the students to draw a diagram showing this process. The students can use the picture of lungs at http://www.medicinenet.com/script/main/art.asp?articlekey=106286 to help them.
B. Radon and Lung Cancer
1. The teacher asks the students to take a look at the graph marked “Deaths Per Year” in the article and then answer the following questions in their learning logs:
2. aa a. How many cancer deaths are caused by radon per year? b. Does radon cause more or less deaths than drunk driving, falls in the
homes, drowning and home fires? c. Is there a greater risk or lesser risk of you developing lung cancer if you
smoke and have radon in your home?
Activity 8 – How Does Radon Enter Your Home or School?
In this activity, students learn the different ways that radon can enter their home or school.
1. The teacher asks the students to look at the illustration that shows how radon can enter their home in EPA’s “A Citizen’s Guide to Radon.” He asks the students to:
a. Make a list of the ways that radon can enter a house or building. b. Draw a picture of their home and school and label the points that radon
can enter the school and their home.
2. The teacher and students discuss the various ways that radon can enter their home or the school.
Activity 9 – Test Your Home or School for Radon
In this activity, students learn how to test their homes and school for radon.
1. The teacher downloads the Radon Information Pamphlet @ http://www.uaf.edu /ces/faculty/seifert/pdf_nuaf/RadonInfoPamphlet.pdf that discusses the Three

118
Month Radon Test Kits Available through the Cooperative Extension Service, copies it for the students, and asks them to read it.
2. The teacher asks the students to see if their village is listed as a place that has been tested for radon.
3. If the village hasn’t been tested, the teacher can ask the Tribal Council to order a radon test kit from the Cooperative Extension Service and the students can test the school for radon.
4. The parents in the community can also order a test kit for their homes and work with the students to test their homes for radon.
Activity 10 – What Can You Do if you have a High Level of Radon in your Home or School?
In this activity, the students learn the steps people can take to lower the radon level in the school and the home.
1. The teacher explains that if the level of radon tests high for the student’s school or home, there several ways that the radon problem can be taken care of including putting in a fan and a vent pipe to suction the radon away from the home.
2. The teacher asks the students to look at the illustration that shows how the amount of radon can be lowered in EPA’s “A Citizen’s Guide to Radon.”
3. The teacher asks the students to draw a picture of their home and how they can lower the level of radon by using a fan and a vent pipe.
4. The teacher and students discuss their ideas about how they could put a fan and a vent pipe in their home.
5. The teacher also tells the students that the school or their parents can contact the University of Fairbanks Cooperative Extension Service to learn how they can reduce the radon level in their home. The contact information is:
Radon Contact Richard Seifert [email protected]
Radon Hotline at University of Alaska Fairbanks Cooperative Extension: 1-800-478-8324/ (907) 474-7201.