learning management system learning administrator user guide · pdf filelearning management...
TRANSCRIPT
1
This material is the property of the Learning & Development department of Washington University in St. Louis. Reproduction is expressly prohibited without written authorization from the Learning Management System Administrator.
Learning Management System
Learning Administrator User Guide
September 21, 2016
Learning Administrator User Guide
2
Table of Contents
Glossary ......................................................................................................................................................................... 3
Overview ....................................................................................................................................................................... 4
Accessing Learn@Work ........................................................................................................................................... 4
Logging In ................................................................................................................................................................................ 4
Accessing the Learning Module ................................................................................................................................ 4
Understanding Learning Module Types .................................................................................................................... 5
Importing Content ......................................................................................................................................................... 6
Creating a Certification ......................................................................................................................................................... 7
Creating a Curriculum ........................................................................................................................................................... 7
Creating a Course .......................................................................................................................................................... 8
Course Details ........................................................................................................................................................... 8
Attaching Content ................................................................................................................................................... 10
Creating a Class ........................................................................................................................................................... 12
Web-Based .............................................................................................................................................................. 12
Instructor-Led .......................................................................................................................................................... 12
Session Templates ................................................................................................................................................... 14
Navigating the Instructor’s Desk ................................................................................................................................. 16
Instructor View ....................................................................................................................................................... 16
Assessor View ......................................................................................................................................................... 22
Calendar View ......................................................................................................................................................... 22
List View ................................................................................................................................................................. 22
Navigating the Registrar’s Desk .................................................................................................................................. 24
Order History .......................................................................................................................................................... 24
New Order ............................................................................................................................................................... 26
System Support ............................................................................................................................................................ 28
Learn@Work Administrator ................................................................................................................................... 28
University Help Desks ............................................................................................................................................ 28
Area Specific Compliance Officers (ASCOS) ............................................................................................................. 28

Learning Administrator User Guide
3
Glossary
1. ASCO – Area Specific Compliance Officer responsible for the design of learning objects as well as the reporting of learner completions.
2. Assessments – Quizzes that learners are required to successfully complete for a learning objective to be marked complete. Quizzes for WBT’s are embedded within the computer based tutorial. Quizzes for ILT’s are distributed in the classroom setting.
3. Certificates of Completion – Printable confirmation that a learner has successfully completed a learning objective.
4. Certification – A learning objective that requires a document to prove completion.
5. Class – A single offering of a learning objective that has multiple registration offerings.
6. Completions – Any learning objective that has currently or historically been successfully finished by the learner.
7. Compliance Profile – A content module asking learners to answer job related questions that determine required learning objectives. Upon completion of the compliance profile module, appropriate learning objectives are automatically assigned to the learner where they may be accessed on a learner’s Me page.
8. Content – WBT videos, tutorials and agendas associated with a learning objective.
9. Course – An individual learning opportunity focusing on a single topic. Multiple classes may be offered for registration in a course.
10. Curriculum – A collection of related learning opportunities designed to provide a thorough understanding of a concept. Upon completion of courses and classes included within, the area of expertise is considered completed.
11. ILT – Instructor led training that is taught in a traditional classroom setting with learners and instructors both present. This type of session is held during standard business hours and registration is normally required.
12. Learn@Work – The University’s new learning management system that is available to all faculty, staff and students. All compliance related training activities are initiated and completed through this system.
13. Learning – The opportunity to participate in a WBT or ILT learning objective.
14. Learning Catalog –A comprehensive listing of all learning objectives available in the system for learners to enroll or register for.
15. Learning Objective – A course, class, curriculum or certificate that the learner is either required to complete or has elected to complete.
16. Learning Request – An electronic form requesting that a learning objective be created or scheduled. The form is submitted from the Me page in Learn@Work.
17. LMS – Learning Management System
18. My Plan – The dashboard of activity for a learner. The page provides links to other learner associated functions as well as a customized listing of all learning objectives. It may be filtered to more easily identify assigned, in progress or completed courses.
19. N-ID – A non-employee ID number that is issued to non-employee faculty, staff and student users. It is designed for users needing to complete learning required to collaborate with Wustl departments. The ID allows the user to create a Wustl Key ID and password to gain access to Learn@Work.
20. Resources –Elements of training that are tracked by individual class. Instructors and training locations are considered resources.
21. WBT – Web based training that is electronically generated and participated in online. Learners have the ability to independently complete the learning objective at a time when it is most convenient for them.

Learning Administrator User Guide
4
Overview Learn@Work is the new enterprise wide learning management system at Washington University in St. Louis. This LMS is designed to effectively provide an online repository for learning objectives within the university community. It provides instructor led and web based training module options for learners to log in, register and complete. All compliance related training is now managed within this new technology, along with training modules provided by various departments throughout the Central Fiscal Unit (CFU), the Danforth campus and the Medical School campus.
Accessing Learn@Work
The new university learning management system may be accessed via the website LearnatWork.Wustl.edu. A link to the site is also provided within various Wustl applications. From these locations you will need to click on the provided link to open up the login screen in the new window that appears.
o HRMS: A link is available on the Home Page under Useful Links. o AIS: A link is available under the Main Menu. o Research Gateway: A link is available under the Compliance Tools section of your Menu of Activities. o Other Locations: Links are available under Wustl.edu/Policies and from the compliance.wustl.edu website.
Logging In
University Faculty, Staff and Students who need to complete required or elective training will log into LearnatWork.Wustl.edu with their existing Wustl Key ID and password. If you do not have a Wustl Key ID or password, please contact your department administrator or access the Complianceprofile.Wustl.edu website for information on obtaining a Non-Employee login (N-ID). This ID will allow you to create a Wustl Key ID and password for login purposes.
Accessing the Learning Module
The learning module is available by accessing the Admin=Learning tab to the left of the top green banner. Access to this module requires the proper security authorization form be filled out and submitted for processing. The form may be found on the [email protected]/Training page and must be signed by the authorized signatory person for your department. To access Learning Functions, you will need to select the following roles on the form:
o Assessment Admin: Provides access to tests and surveys. o Content Admin: Provides access to upload content modules, including web based modules and forms. o Learner Admin – Catalog Builder: Provides access to the learning menu options. o Learner Admin – Instructor: Provides access to the instructor’s desk for managing class attendance and
delivery. o Learner Admin – Registrar: Provides access to the registrar’s desk to manage learner registrations.
Learning Administrator User Guide
5
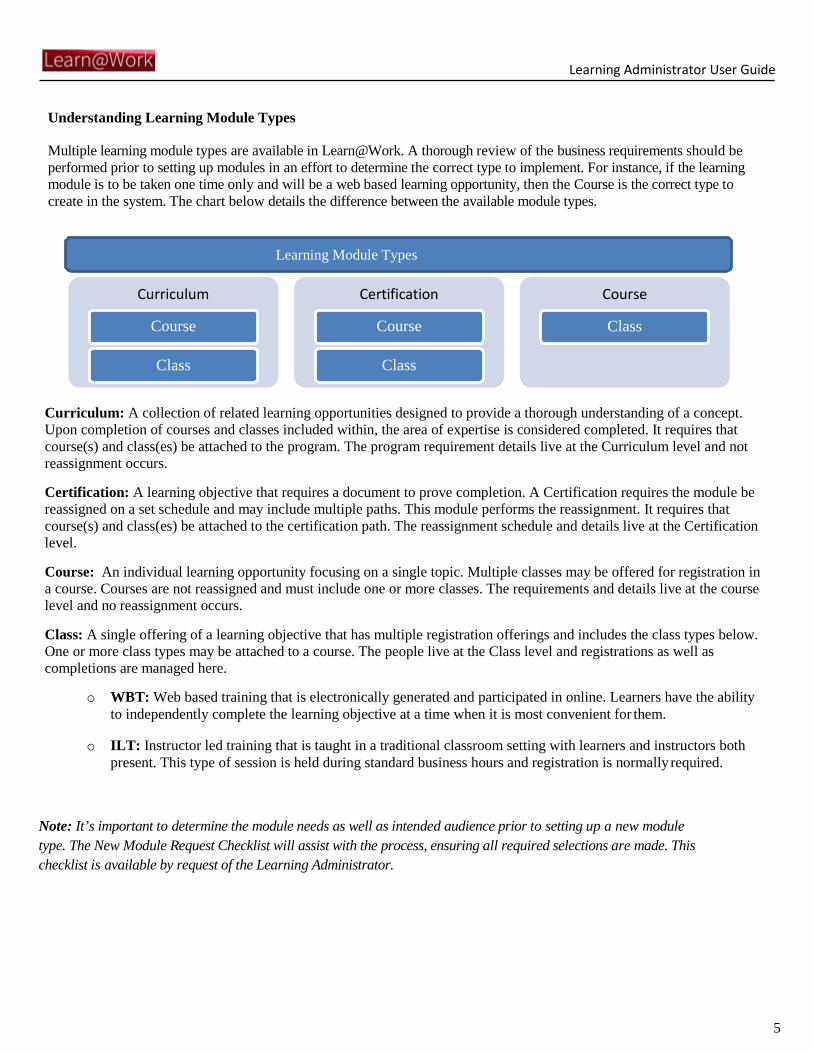
Understanding Learning Module Types
Multiple learning module types are available in Learn@Work. A thorough review of the business requirements should be performed prior to setting up modules in an effort to determine the correct type to implement. For instance, if the learning module is to be taken one time only and will be a web based learning opportunity, then the Course is the correct type to create in the system. The chart below details the difference between the available module types.
Curriculum: A collection of related learning opportunities designed to provide a thorough understanding of a concept. Upon completion of courses and classes included within, the area of expertise is considered completed. It requires that course(s) and class(es) be attached to the program. The program requirement details live at the Curriculum level and not reassignment occurs.
Certification: A learning objective that requires a document to prove completion. A Certification requires the module be reassigned on a set schedule and may include multiple paths. This module performs the reassignment. It requires that course(s) and class(es) be attached to the certification path. The reassignment schedule and details live at the Certification level.
Course: An individual learning opportunity focusing on a single topic. Multiple classes may be offered for registration in a course. Courses are not reassigned and must include one or more classes. The requirements and details live at the course level and no reassignment occurs.
Class: A single offering of a learning objective that has multiple registration offerings and includes the class types below. One or more class types may be attached to a course. The people live at the Class level and registrations as well as completions are managed here.
o WBT: Web based training that is electronically generated and participated in online. Learners have the ability to independently complete the learning objective at a time when it is most convenient for them.
o ILT: Instructor led training that is taught in a traditional classroom setting with learners and instructors both
present. This type of session is held during standard business hours and registration is normally required.
Note: It’s important to determine the module needs as well as intended audience prior to setting up a new module type. The New Module Request Checklist will assist with the process, ensuring all required selections are made. This checklist is available by request of the Learning Administrator.
Learning Module Types
Curriculum
Course
Certification
Course
Course Class
Class Class

Learning Administrator User Guide
6
Importing Content Various types of content may be imported into the system and attached to a course or class. The majority of the content consists of web based training modules authored using Captivate. Additionally, recordings of instructor led sessions may be imported and attached to a course for review by learners. To import content, access the Content Library link following the steps outlined below.
1. Access the Admin=Learning=Manage Content Menu option. 2. Locate and click on the folder designated for your department of business unit. If a folder is not currently available
contact the Learning Administrator asking that one be created. 3. Click on the Import link located above the Actions column on the right side of the page.
4. The content import view will load. Fill in the required fields and click Next.

Learning Administrator User Guide
7
o Name: Type the name of your content using the standard naming convention of ‘Department Acronym – Title of the content’. For example, if your content is a data warehouse training module, your title should be BIDW – Data Warehouse. All content must be prefaced with the department acronym to be approved for release in production.
o Security Domain: Select the Training domain for this field. o Content Format: Various options are available. We are currently using the File and SCORM Package options
only. File should be used if the content is a .PDF document and SCORM package should be used if the content is a web based training module packaged as a .ZIP file from the authoring tool (Captivate).
o Player Template: Select the Standard Player Template option. o Mobile Device Compatibility: If the content is a web based training module and is designed in Captivate
for module viewing on any device, then select All Devices. Any mobile module should be designed for use on any mobile device and not just Android, IPhone or IPad individually.
o Content Type: Select the appropriate type of content from the listing for what you are importing, The options we frequently use at the university are:
i. Images ii. Learning Objects
iii. Documents iv. Audio v. Video
vi. Test vii. Survey
viii. Virtual Class Recording o Version Number: This field is required if you are importing a newer version of an existing content piece.
The best practice is to make the version number the date or fiscal year of import. For example, if you are importing a updated module for the current year, the version should be 2016 or 2016-02-20.
o Expiration Date: This field should only be entered if there is a firm expiration date for the content. Once the expiration date is reached, the content will no longer be available to learners on the course in the catalog.
o Use as Evaluation: Select this option if the module is in fact an evaluation or test.
Creating a Certification A certification is a learning module type that includes one or more courses and needs to be assigned on a scheduled basis. The certification itself stores the details and time line for assignment and reassignment. It must have a course linked to it and include one or more Paths. The path(s) details the steps required to successfully acquire the certification. For instance, if there is an initial and refresher module required for successful certification, then path 1 will assign the initial and on the reassignment date, the refresher will be assigned. The refresher is normally an abbreviated version of the initial modules and is designed to focus on the finer learning objectives necessary for review. One comprehensive printable certificate of completion is provided as proof of completion. Follow the steps below to create a certification.
Creating a Curriculum A curriculum is a program or collection of courses that need to be successfully completed to complete a learning objective. Unlike certifications, they do not designate any reassignment and the included courses are designed to be completed one time only. A curriculum must have one or more courses attached and allows printing of multiple certificates of completion by course as opposed to providing one certificate for the entire program. To create a curriculum, follow the steps outlined below.

Learning Administrator User Guide
8
Creating a Course A course is a stand-alone learning objective designed to be completed one time only. It may include one or more content modules or a combination of .modules, pdf documents, tests and surveys. Each course must have an associated class attached for management of the registrations and completions. A printable certificate of completion is available for a course as proof of completion. Follow the steps outlined below to create a course.
1. Access the Admin=Learning=Manage Learning Catalog Menu option. 2. Select the New Catalog Item link located on the right side of the page.
3. Click on the New Course link under Advanced.
4. To add an image to your course that will display in the catalog, click on Browse, locate the file on the network
and select to add to the course 5. Enter in the additional required fields under the Course Details, as well as additional sections, provided on the
page. Required fields are indicated on the page in red. o Course Details
i. Title: The official course title using the established naming convention. (Dept. Acronym – Title of learning module. Ex. BIDW – Data Warehouse)
ii. Version: The version of the module that being created. The best practice is to put the year or date in this field. (Ex. 2016 or 2016-02-20).
iii. Domain: Always select the Training domain for this field. iv. Abstract: We do not use this field as it doesn’t display for learners. v. Description: Add a description of the course including any information necessary from the
course agenda. This field allows up to 5,000 characters. vi. Is Sensitive: We do not use this field. vii. Hide Score: Hides the transcript score on course completion.
viii. Show custom fields during registration: Select this option. ix. Show custom fields during cancellation: Select this option.
x. Hide Classmates: Prevents learners from seeing others who are registered for the course.
Learning Administrator User Guide
9
xi. Target Days: The number of days the learner has to complete the training module once assigned to them. This is essentially the due date for the course.
o Pricing Information: We are not currently using this section as it pertains to fees associated with course registration.
o Availability Information i. Available From: This is the date that the course will first be available to learners for
registration. ii. Discontinued From: This is the date that the course will last be available to learners for
registration. iii. Display for Call Center: This field must be selected for administrators to manage course
registrations and completions. iv. Display for Learner: This field must be selected for the course to be visible in the catalog.
Learners will not be able to locate the course if this is not selected. v. Consumable only within Certification/Curriculum: This field prevents learners from
registering for the course unless they are already registered for a certification/curriculum that it is attached to. The course itself will not be available from the catalog, but the certification/curriculum will be visible.
vi. Featured: This field should never be selected on the page. It interferes with the highlighted required compliance courses listed on the Home page of the system.
o Registration Information i. Min Count: The minimum number of attendees for the associated instructor led class to be
held. This field should not be filled in for web based trainings or for instructor led classes that will be held in multiple locations with variable capacity.
ii. Max Count: The maximum number of attendees for the associated instructor led class to be held. This field should not be filled in for web based trainings or for instructor led classes that will be held in multiple locations with variable capacity.
iii. Waitlist Max: This fields determines how many users will be allowed on the waitlist if a class is full upon attempt to register. Those on the waitlist may be promoted to attendees as registered learners drop the class. This field should not be filled in for web based trainings or for instructor led classes that will be held in multiple locations with variable capacity.
iv. Vendor: We are not currently using this field. v. Customer Service Representative: We are not currently using this field.
vi. Learning Request Manager: We are not currently using this field. o Other Information
i. Credit Hours: Enter a value for the amount of credit hours earned after completing the course. 6. Click save once all required fields are entered. 7. The full course page will load to the Main tab. Additional tabs will now be visible and additional fields
required by our organization, not already outlined above, and are detailed below. o Main
i. Note: The majority of the fields are completed in the course creation process. ii. Owner: This is the person responsible for answering any questions related to course content
and details. An owner is required to be listed on any course released to production. Multiple owners may be listed on a course.
Learning Administrator User Guide
10
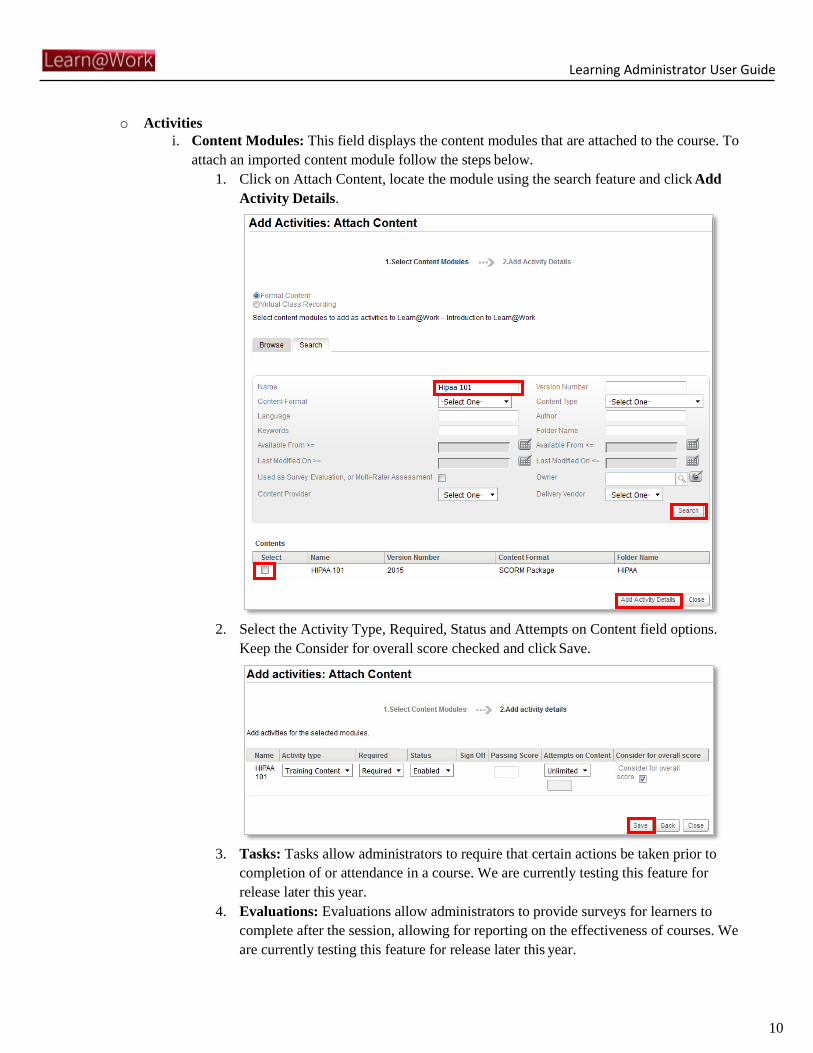
o Activities i. Content Modules: This field displays the content modules that are attached to the course. To
attach an imported content module follow the steps below. 1. Click on Attach Content, locate the module using the search feature and click Add
Activity Details.
2. Select the Activity Type, Required, Status and Attempts on Content field options. Keep the Consider for overall score checked and click Save.
3. Tasks: Tasks allow administrators to require that certain actions be taken prior to
completion of or attendance in a course. We are currently testing this feature for release later this year.
4. Evaluations: Evaluations allow administrators to provide surveys for learners to complete after the session, allowing for reporting on the effectiveness of courses. We are currently testing this feature for release later this year.
Learning Administrator User Guide
11
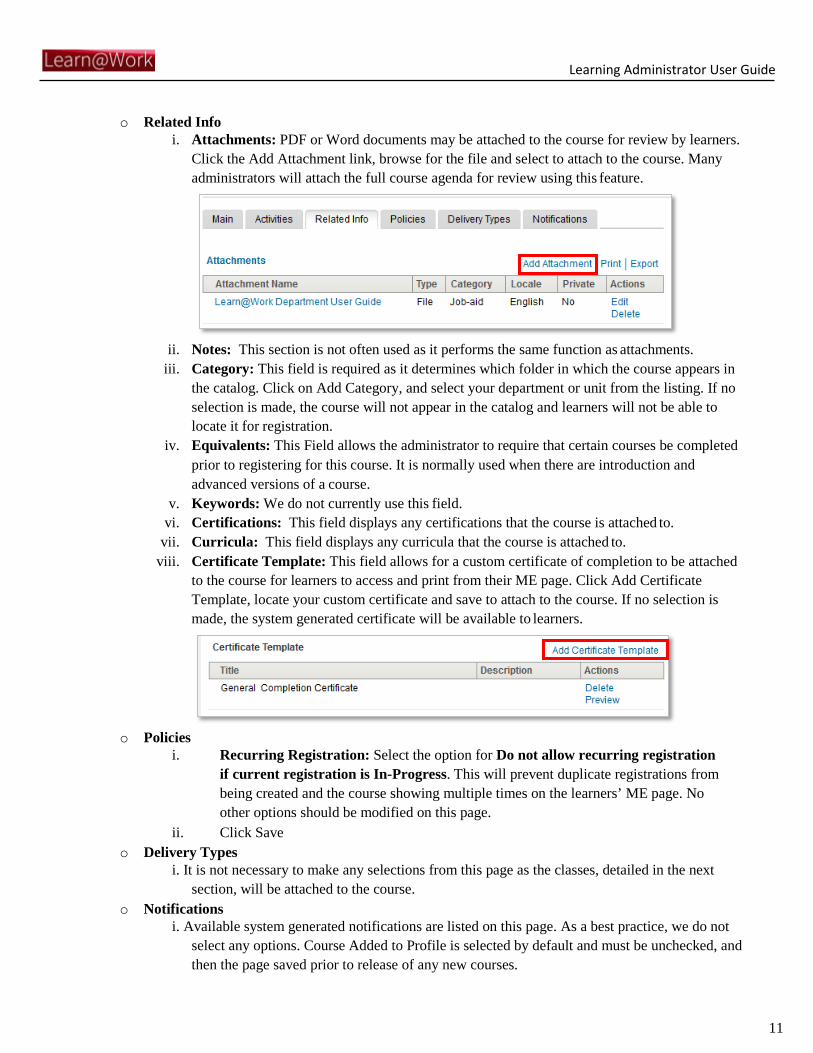
o Related Info i. Attachments: PDF or Word documents may be attached to the course for review by learners.
Click the Add Attachment link, browse for the file and select to attach to the course. Many administrators will attach the full course agenda for review using this feature.
ii. Notes: This section is not often used as it performs the same function as attachments. iii. Category: This field is required as it determines which folder in which the course appears in
the catalog. Click on Add Category, and select your department or unit from the listing. If no selection is made, the course will not appear in the catalog and learners will not be able to locate it for registration.
iv. Equivalents: This Field allows the administrator to require that certain courses be completed prior to registering for this course. It is normally used when there are introduction and advanced versions of a course.
v. Keywords: We do not currently use this field. vi. Certifications: This field displays any certifications that the course is attached to.
vii. Curricula: This field displays any curricula that the course is attached to. viii. Certificate Template: This field allows for a custom certificate of completion to be attached
to the course for learners to access and print from their ME page. Click Add Certificate Template, locate your custom certificate and save to attach to the course. If no selection is made, the system generated certificate will be available to learners.
o Policies i. Recurring Registration: Select the option for Do not allow recurring registration
if current registration is In-Progress. This will prevent duplicate registrations from being created and the course showing multiple times on the learners’ ME page. No other options should be modified on this page.
ii. Click Save o Delivery Types
i. It is not necessary to make any selections from this page as the classes, detailed in the next section, will be attached to the course.
o Notifications i. Available system generated notifications are listed on this page. As a best practice, we do not
select any options. Course Added to Profile is selected by default and must be unchecked, and then the page saved prior to release of any new courses.
Learning Administrator User Guide
12
Creating a Class A class is a learning opportunity associated with a course, certification or curriculum. The class is where the people live for registrations and completions. Classes may be instructor led (ILT) or web based (WBT). A web based and instructor led option may both be available options on a course.
Classes may be created through the Admin=Learning=Manage Classes menu option by clicking on the New Class link. The easiest method of creating a class though is by first locating the course through the steps outlined in the previous section and then clicking on the New Class option located under the Actions column. Follow the steps below to create a class.
Web-Based Class (WBT)
1. Access and click on the New Class link from Admin=Learning=Manage Learning Catalog=Search for course
title in the Based on Course field. 2. Delivery Type: Select the Delivery Type of Web-Based and click Next.
o Blended: We are not currently using blended learning techniques at this time. o Instructor-Led: A session that is held in person and let by a qualified instructor. o Virtual Classroom: We are not currently using virtual classrooms. o Web-Based: A session that is held strictly online and is comprised of viewing an interactive module and
completing the associated quiz. o Click Next.
3. Class Details o Name: Auto-completed o Course Id: Auto-completed o Class ID: Auto-completed o Domain: Verify the Domain is listed as Training. o Class Description: Enter in a class description. This section should specifically highlight the
topics covered in this class which relates to, but does not duplicate the course description. 4. Scheduling Details
o Language: Select the Language. The only option available is English at this time. o Duration: A Duration must be entered in hours and minutes. For instance, if the class is 2 hours in
length, 02:00 should be entered in this field. 5. Pricing Information: We are not currently using this field and no changes should be made. 6. Registration Information: We are not currently using this field for WBT’s and no changes should be made. 7. Availability Information
o Available From: The date that the class is first available for registration by learners. This populates with the current date by default.
o Discontinued From: The date that the class is last available for registration. This field should only be used if there is a set date to end the offering.
o Display for Call Center: This selection should already be checked by default. o Display for Learner: This selection should already be checked by default. o Trigger after Order Date (days): We do not use this field. o Trigger after Completion Date (days): We do not use this field.
8. Other Information o Credit Hours: Enter in the number of credit hours earned for completion of class.
9. Click Finish to create the new class.
Instructor-Led Class (ILT)
1. Complete the steps outlined above with the exception of step 2 where you will select Instructor-led. 2. This type of class also requires scheduling details be completed.
Learning Administrator User Guide
13
o Start Date: If the session is one day only, then the date that the class is being held should be listed in this field. If the session is scheduled for multiple days, then the first date that the class is being held should be listed in this field.
o Session Template: Select the template for the day and time the class is being held. If a session template has not yet been created for this class, then follow the instructions in the next session to do so.
o Location: Enter in the location (building) that the class is being held in using the lookup. University buildings contain a number and then the name. For example, the Farrell building on the medical school campus is named 00098 – Farrell Learning& Teaching Center.
o Facility: Enter in the facility where the class will be held. This should be the room where the session is being held and should be filled in on each instructor led class even though it is not indicated as required. If the facility is not available in the listing, then email [email protected] with the room information asking that one be created.
3. Click Finish to create the new class. 4. Additional details will appear upon class creation.
o Main: This tab displays the general information for a class. i. Owner: An owner is the point of contact for questions related to the content of the class as well as
the requirement to attend. One must be listed on each course. Click the Add Owner link, search for the name of the owner and select to add them to the class.
ii. Registration Information: Details related to attendees of the course. 1. Min Count: The minimum number of registrations required for a class to be held. 2. Max Count: The maximum number of registrations the room can accommodate. 3. Max in Wait List: The maximum number of registrants that will be waitlisted in the event
the class is already full upon registration. o Activities: This tab allows for assigning activities, rooms and instructor resources to the class.
i. Activities: Tasks that are required to successfully complete the class. Training modules, documents, quizzes and tests may be attached to this tab for learners to complete.
ii. Resources: Rooms and Instructors that are to be referenced on the class. 1. Click Add Resource to assign an instructor or room. 2. Select a Resource Type (Room or Person). 3. For a Room, enter in the Purpose (Primary Classroom) and click Next. 4. Use the lookup to locate and select the building the class is being held in for the Location
field. 5. Enter in a Capacity. If you are unsure of the capacity of a particular room, enter in the
number 1. 6. Click Search to view all available rooms for that particular building. 7. Select the room name to add the resource to the class. 8. For an Instructor, enter in the Purpose (Instructor) and click Next. 9. Delete the text in the Location field. 10. Type in the first name, last name or both in the Resource Name field. 11. Make sure the Available Resources Only field is checked and click Search. 12. Select the Instructor’s name from the listing and click Next. 13. Verify the information listed and click Done to add the instructor to the class.
o Expenses: We do not currently provide fee based classes in the system so no changes are necessary on this tab.
Learning Administrator User Guide
14
o Related Info: This tab allows for attaching documents to the class such as a map to the class location or an agenda of topics to be covered.
o Policies: This tab allows for setting drop and registration policies. If users are allowed to register without approval and drop the class if they are unable to make it, then no changes should be made to the tab.
o Notifications: This tab allows you to select the notifications that the system will automatically generate to learners registered for the session. Currently, there only the selections of Instructor-Led Class Reminder (1day) and Instructor-Led Class Reminder (3days) are configured. To prevent any notifications from sending on the class, uncheck both options on page 2 of this tab.
Session Templates
Session Templates are designed to reflect the day of the week and time that the class is being held. Each instructor-led class will require a session template be attached. One template may be used for multiple classes as long as they are on the same day and during the same time frame. It is a best practice to create the session template prior to creating an instructor-led class.
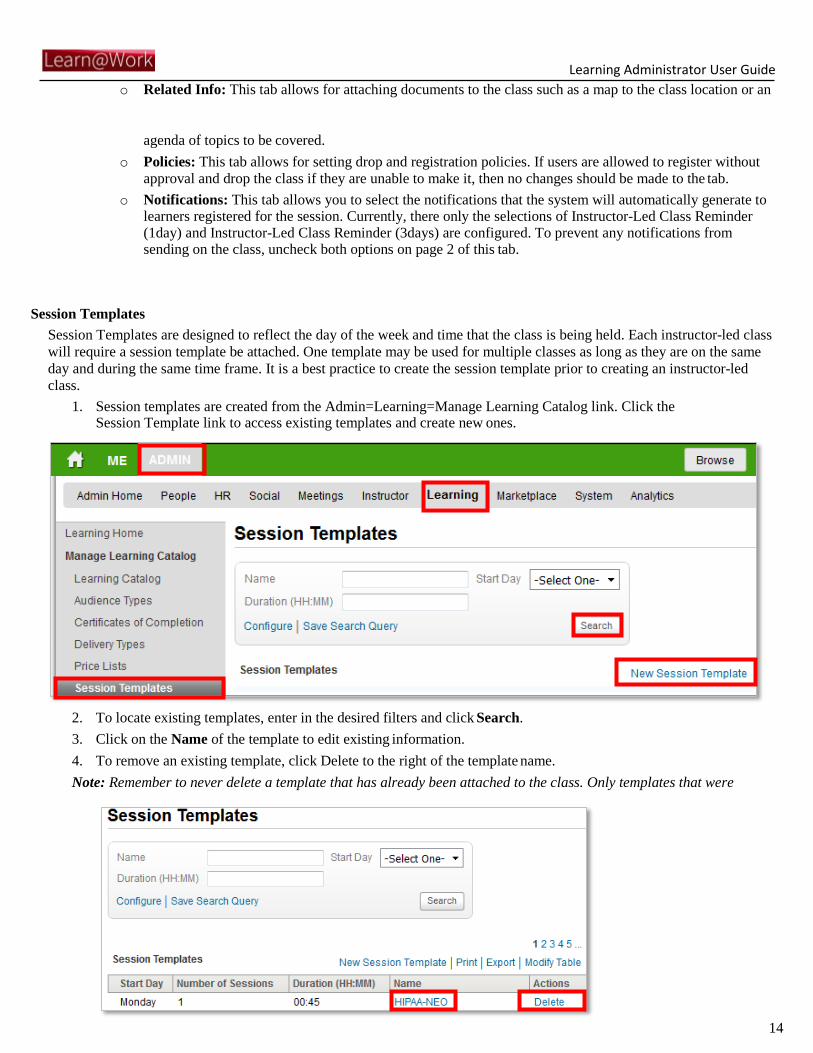
1. Session templates are created from the Admin=Learning=Manage Learning Catalog link. Click the Session Template link to access existing templates and create new ones.
2. To locate existing templates, enter in the desired filters and click Search. 3. Click on the Name of the template to edit existing information. 4. To remove an existing template, click Delete to the right of the template name. Note: Remember to never delete a template that has already been attached to the class. Only templates that were
Learning Administrator User Guide
15
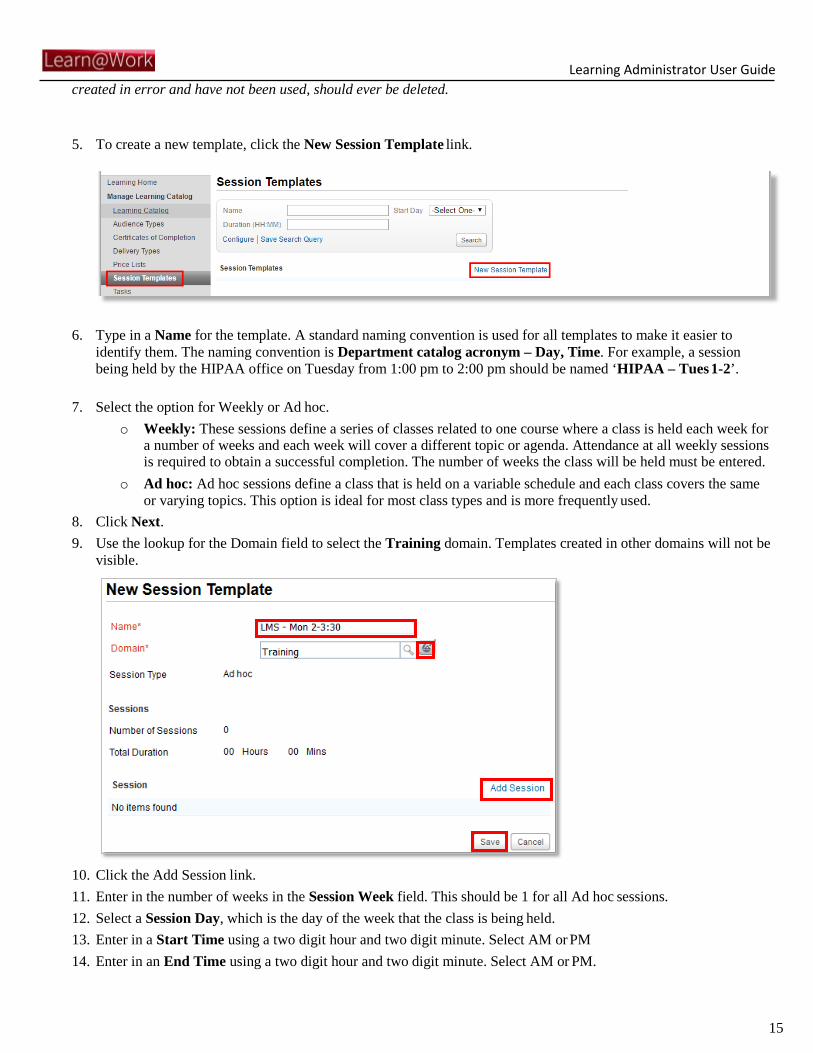
created in error and have not been used, should ever be deleted. 5. To create a new template, click the New Session Template link.
6. Type in a Name for the template. A standard naming convention is used for all templates to make it easier to identify them. The naming convention is Department catalog acronym – Day, Time. For example, a session being held by the HIPAA office on Tuesday from 1:00 pm to 2:00 pm should be named ‘HIPAA – Tues 1-2’.
7. Select the option for Weekly or Ad hoc. o Weekly: These sessions define a series of classes related to one course where a class is held each week for
a number of weeks and each week will cover a different topic or agenda. Attendance at all weekly sessions is required to obtain a successful completion. The number of weeks the class will be held must be entered.
o Ad hoc: Ad hoc sessions define a class that is held on a variable schedule and each class covers the same or varying topics. This option is ideal for most class types and is more frequently used.
8. Click Next. 9. Use the lookup for the Domain field to select the Training domain. Templates created in other domains will not be
visible.
10. Click the Add Session link. 11. Enter in the number of weeks in the Session Week field. This should be 1 for all Ad hoc sessions. 12. Select a Session Day, which is the day of the week that the class is being held. 13. Enter in a Start Time using a two digit hour and two digit minute. Select AM or PM 14. Enter in an End Time using a two digit hour and two digit minute. Select AM or PM.
Learning Administrator User Guide
16
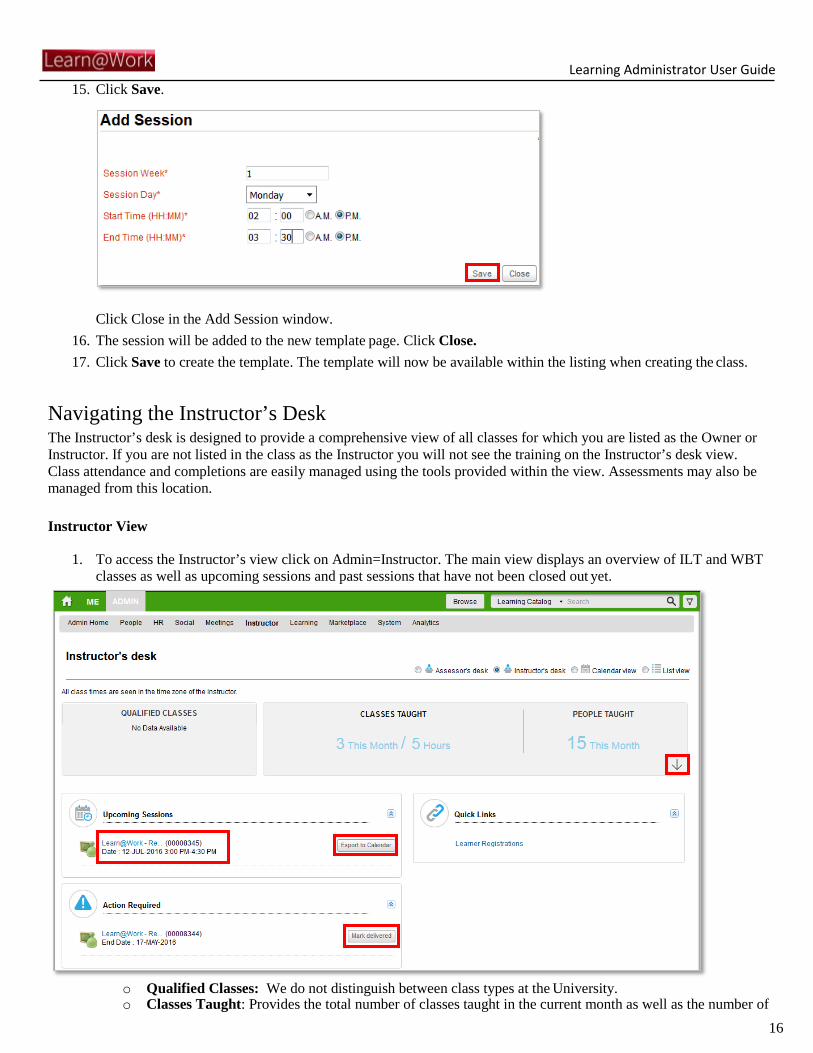
15. Click Save.
Click Close in the Add Session window.
16. The session will be added to the new template page. Click Close. 17. Click Save to create the template. The template will now be available within the listing when creating the class.
Navigating the Instructor’s Desk The Instructor’s desk is designed to provide a comprehensive view of all classes for which you are listed as the Owner or Instructor. If you are not listed in the class as the Instructor you will not see the training on the Instructor’s desk view. Class attendance and completions are easily managed using the tools provided within the view. Assessments may also be managed from this location.
Instructor View
1. To access the Instructor’s view click on Admin=Instructor. The main view displays an overview of ILT and WBT
classes as well as upcoming sessions and past sessions that have not been closed out yet.
o Qualified Classes: We do not distinguish between class types at the University. o Classes Taught: Provides the total number of classes taught in the current month as well as the number of
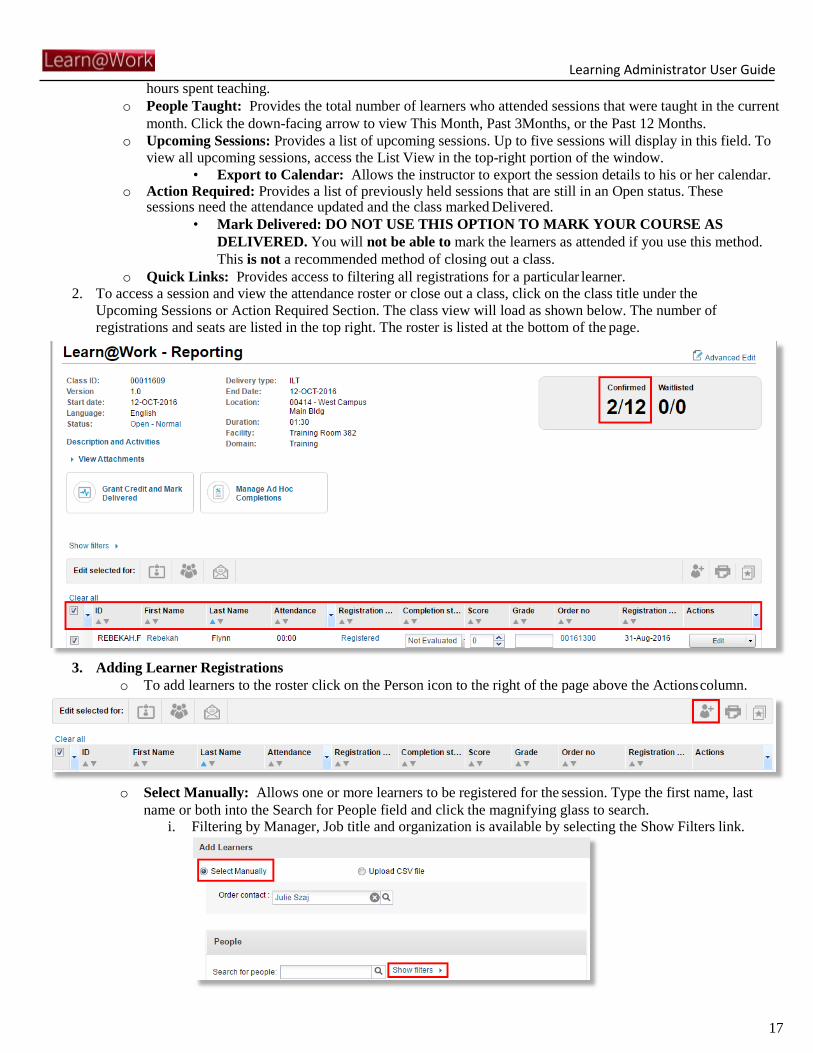
Learning Administrator User Guide
17
hours spent teaching. o People Taught: Provides the total number of learners who attended sessions that were taught in the current
month. Click the down-facing arrow to view This Month, Past 3Months, or the Past 12 Months. o Upcoming Sessions: Provides a list of upcoming sessions. Up to five sessions will display in this field. To
view all upcoming sessions, access the List View in the top-right portion of the window. • Export to Calendar: Allows the instructor to export the session details to his or her calendar.
o Action Required: Provides a list of previously held sessions that are still in an Open status. These sessions need the attendance updated and the class marked Delivered.
• Mark Delivered: DO NOT USE THIS OPTION TO MARK YOUR COURSE AS DELIVERED. You will not be able to mark the learners as attended if you use this method. This is not a recommended method of closing out a class.
o Quick Links: Provides access to filtering all registrations for a particular learner. 2. To access a session and view the attendance roster or close out a class, click on the class title under the
Upcoming Sessions or Action Required Section. The class view will load as shown below. The number of registrations and seats are listed in the top right. The roster is listed at the bottom of the page.
3. Adding Learner Registrations
o To add learners to the roster click on the Person icon to the right of the page above the Actions column.
o Select Manually: Allows one or more learners to be registered for the session. Type the first name, last
name or both into the Search for People field and click the magnifying glass to search. i. Filtering by Manager, Job title and organization is available by selecting the Show Filters link.
Learning Administrator User Guide
18
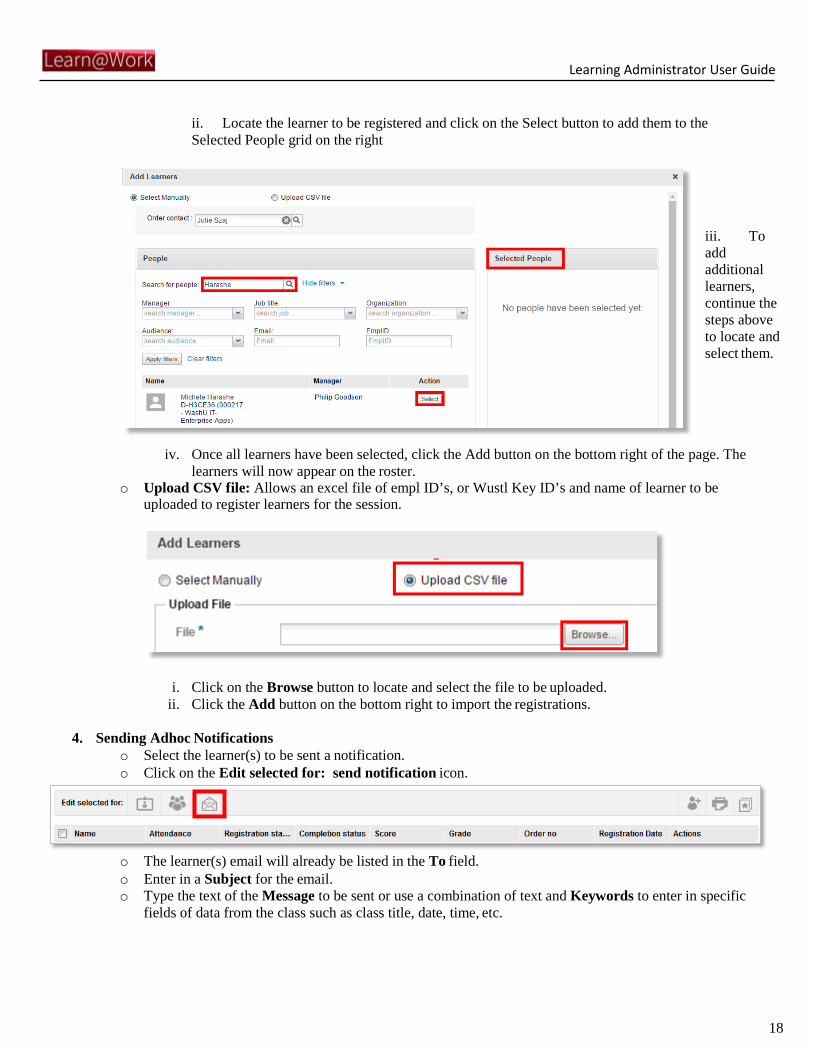
ii. Locate the learner to be registered and click on the Select button to add them to the Selected People grid on the right
iii. To add additional learners, continue the steps above to locate and select them.
iv. Once all learners have been selected, click the Add button on the bottom right of the page. The learners will now appear on the roster.
o Upload CSV file: Allows an excel file of empl ID’s, or Wustl Key ID’s and name of learner to be uploaded to register learners for the session.
i. Click on the Browse button to locate and select the file to be uploaded. ii. Click the Add button on the bottom right to import the registrations.
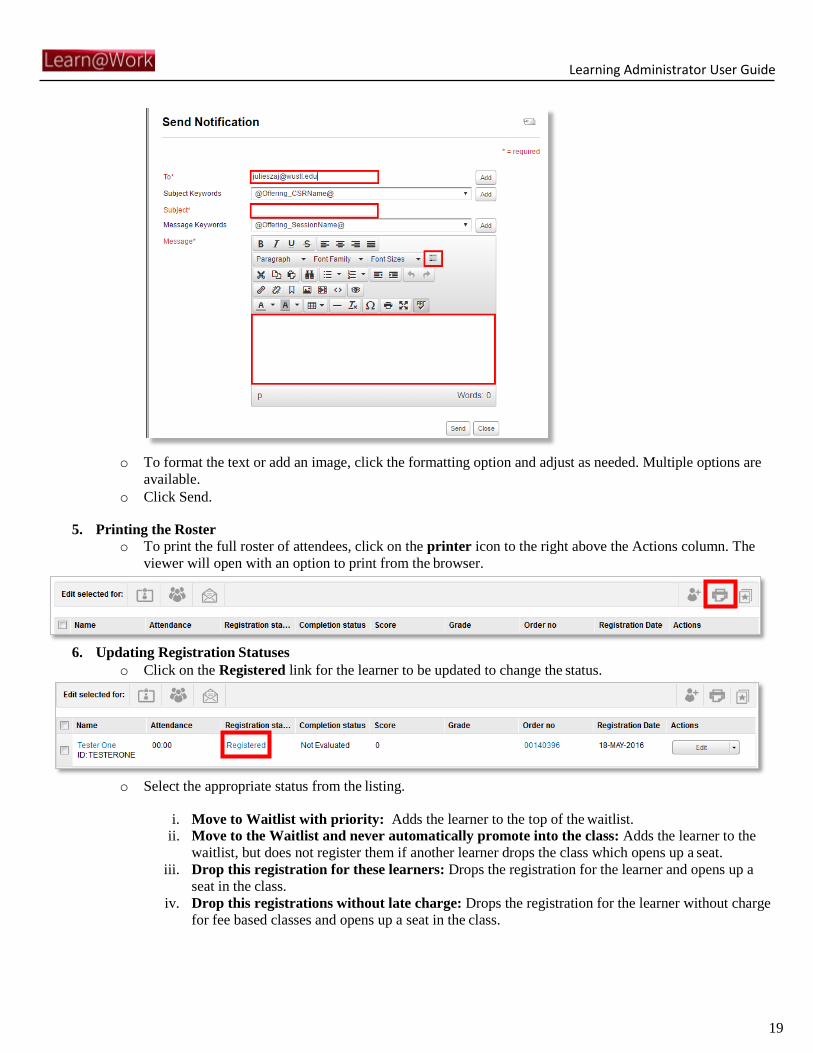
4. Sending Adhoc Notifications
o Select the learner(s) to be sent a notification. o Click on the Edit selected for: send notification icon.
o The learner(s) email will already be listed in the To field. o Enter in a Subject for the email. o Type the text of the Message to be sent or use a combination of text and Keywords to enter in specific
fields of data from the class such as class title, date, time, etc.
Learning Administrator User Guide
19
o To format the text or add an image, click the formatting option and adjust as needed. Multiple options are
available. o Click Send.
5. Printing the Roster
o To print the full roster of attendees, click on the printer icon to the right above the Actions column. The viewer will open with an option to print from the browser.
6. Updating Registration Statuses o Click on the Registered link for the learner to be updated to change the status.
o Select the appropriate status from the listing.
i. Move to Waitlist with priority: Adds the learner to the top of the waitlist.
ii. Move to the Waitlist and never automatically promote into the class: Adds the learner to the waitlist, but does not register them if another learner drops the class which opens up a seat.
iii. Drop this registration for these learners: Drops the registration for the learner and opens up a seat in the class.
iv. Drop this registrations without late charge: Drops the registration for the learner without charge for fee based classes and opens up a seat in the class.
Learning Administrator User Guide
20
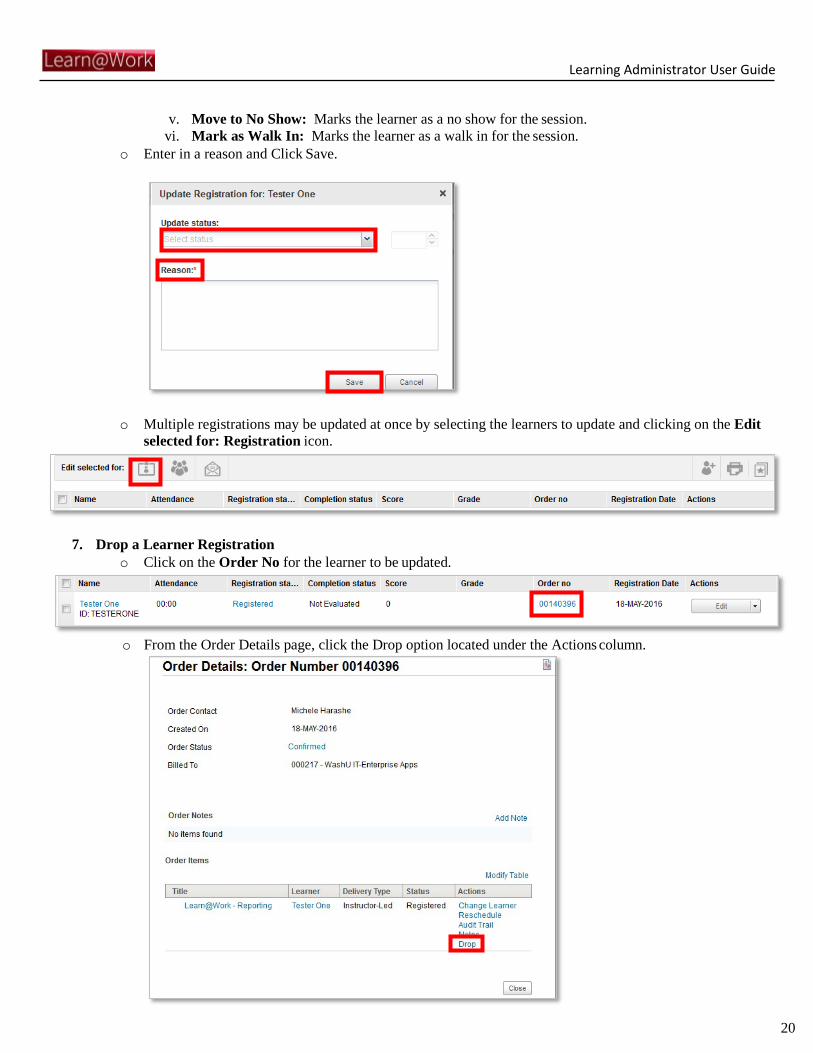
v. Move to No Show: Marks the learner as a no show for the session. vi. Mark as Walk In: Marks the learner as a walk in for the session.
o Enter in a reason and Click Save.
o Multiple registrations may be updated at once by selecting the learners to update and clicking on the Edit selected for: Registration icon.
7. Drop a Learner Registration
o Click on the Order No for the learner to be updated.
o From the Order Details page, click the Drop option located under the Actions column.
Learning Administrator User Guide
21
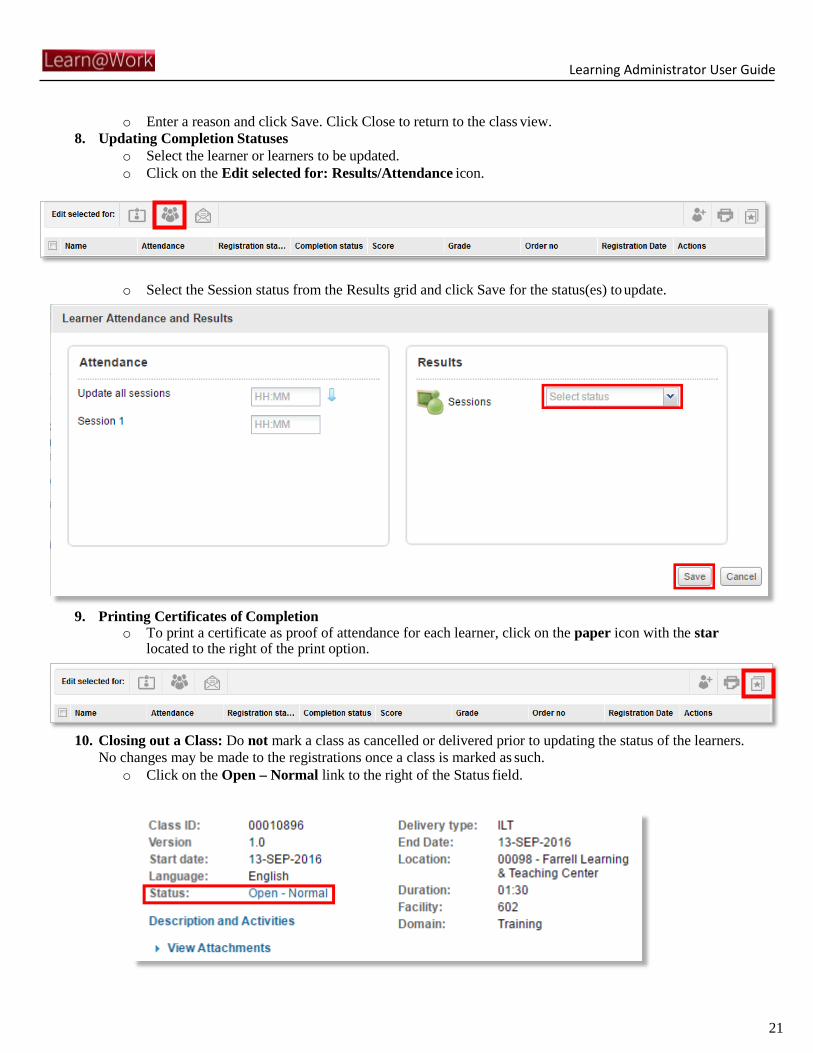
o Enter a reason and click Save. Click Close to return to the class view. 8. Updating Completion Statuses
o Select the learner or learners to be updated. o Click on the Edit selected for: Results/Attendance icon.
o Select the Session status from the Results grid and click Save for the status(es) to update.
9. Printing Certificates of Completion
o To print a certificate as proof of attendance for each learner, click on the paper icon with the star located to the right of the print option.
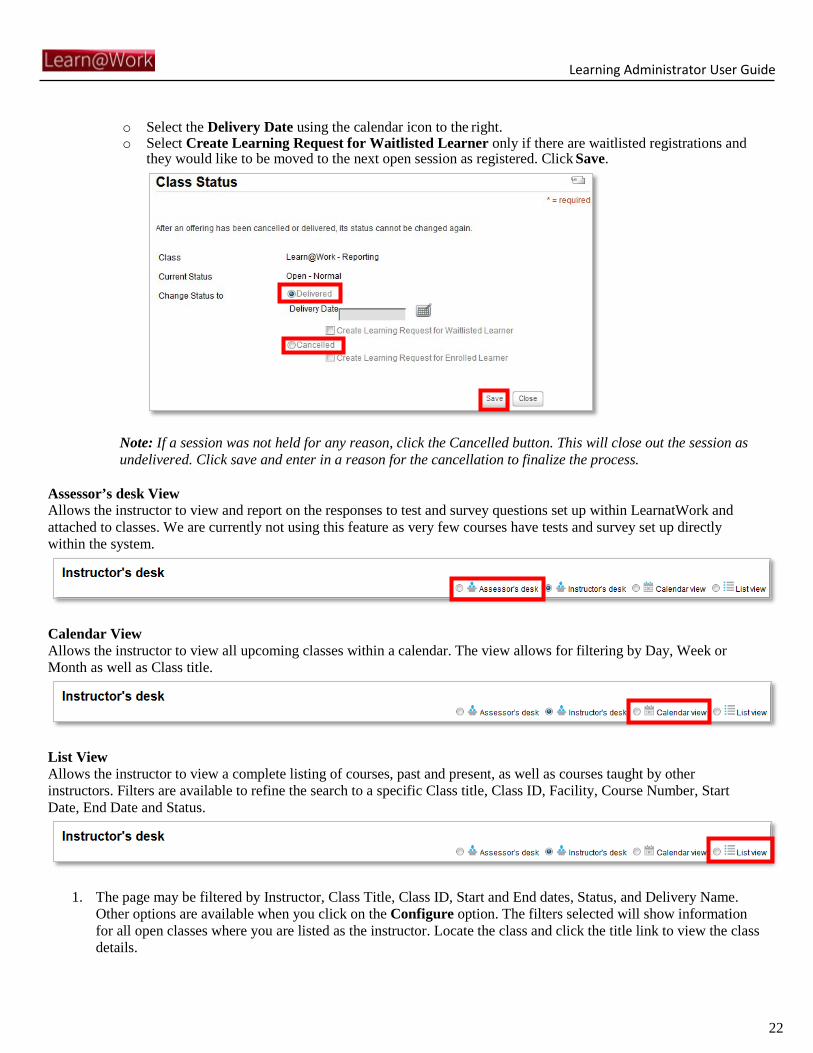
10. Closing out a Class: Do not mark a class as cancelled or delivered prior to updating the status of the learners. No changes may be made to the registrations once a class is marked as such.
o Click on the Open – Normal link to the right of the Status field.
Learning Administrator User Guide
22
o Select the Delivery Date using the calendar icon to the right. o Select Create Learning Request for Waitlisted Learner only if there are waitlisted registrations and
they would like to be moved to the next open session as registered. Click Save.
Note: If a session was not held for any reason, click the Cancelled button. This will close out the session as undelivered. Click save and enter in a reason for the cancellation to finalize the process.
Assessor’s desk View Allows the instructor to view and report on the responses to test and survey questions set up within LearnatWork and attached to classes. We are currently not using this feature as very few courses have tests and survey set up directly within the system.
Calendar View Allows the instructor to view all upcoming classes within a calendar. The view allows for filtering by Day, Week or Month as well as Class title.
List View Allows the instructor to view a complete listing of courses, past and present, as well as courses taught by other instructors. Filters are available to refine the search to a specific Class title, Class ID, Facility, Course Number, Start Date, End Date and Status.
1. The page may be filtered by Instructor, Class Title, Class ID, Start and End dates, Status, and Delivery Name.
Other options are available when you click on the Configure option. The filters selected will show information for all open classes where you are listed as the instructor. Locate the class and click the title link to view the class details.
Learning Administrator User Guide
23
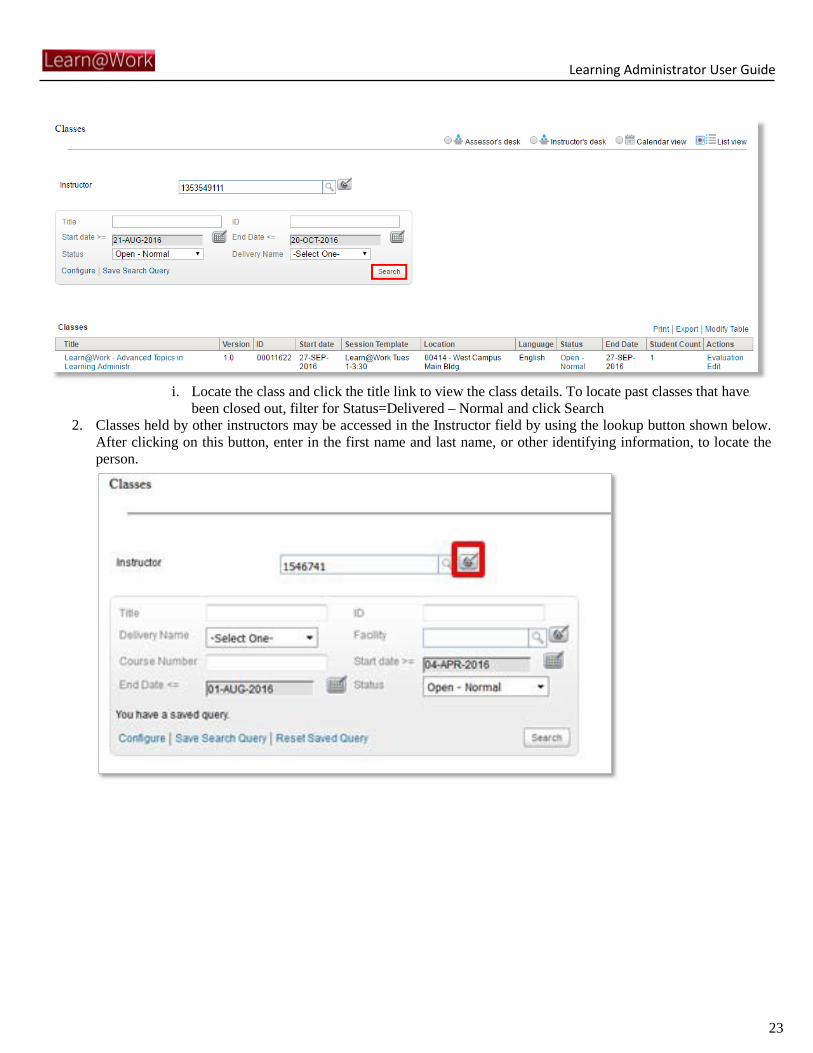
i. Locate the class and click the title link to view the class details. To locate past classes that have
been closed out, filter for Status=Delivered – Normal and click Search 2. Classes held by other instructors may be accessed in the Instructor field by using the lookup button shown below.
After clicking on this button, enter in the first name and last name, or other identifying information, to locate the person.

Learning Administrator User Guide
24
3. Once you click Search, select the person and you will be redirected back to the List View page.
4. Additional filters may be selected at this time for the selected instructor. Click Search to view the requested
results. Click the link for the class Title to access the Instructor’s Desk view for the class.
Navigating the Registrar’s Desk The registrar’s desk is designed to provide a comprehensive view of course registrations. It also provides administrators the opportunity to register learners for courses and classes. This feature may be accessed from the Admin=Learning=Registrars Desktop menu option.
• Order History: Provides a complete historical listing of all course and classes that a learner has
registered for in this system. It does not include items from the previous system. This page provides a maximum of 90 days of history. To review order history for a learner, follow the steps outlined below.
Learning Administrator User Guide
25
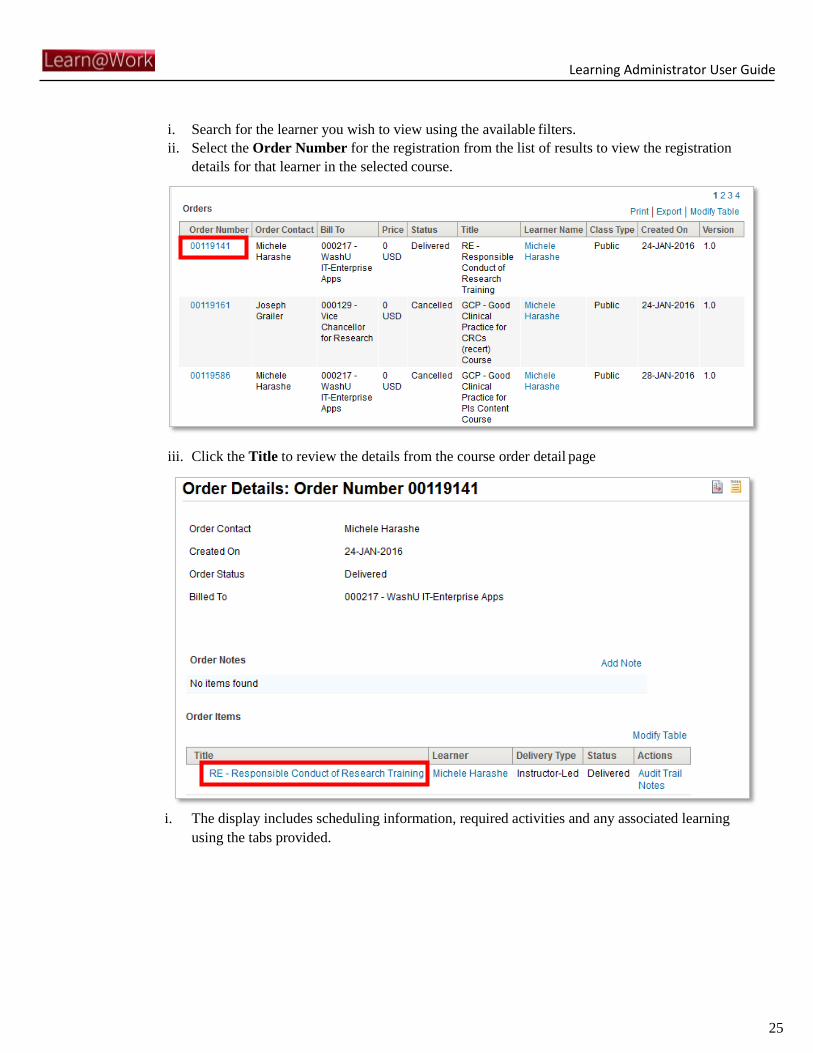
i. Search for the learner you wish to view using the available filters. ii. Select the Order Number for the registration from the list of results to view the registration
details for that learner in the selected course.
iii. Click the Title to review the details from the course order detail page
i. The display includes scheduling information, required activities and any associated learning using the tabs provided.

Learning Administrator User Guide
26
ii. To return to the Order History page click Close.
o New Order: Allows the administrator to register a learner for a course or class. There are three steps required in this process. To add a new order, follow the steps outlined below.
i. Search for the Title of the course to register a user for in the Search Catalog field. Additional search capability is located by clicking on the Show Filters link should you need to narrow the search.
Learning Administrator User Guide
27
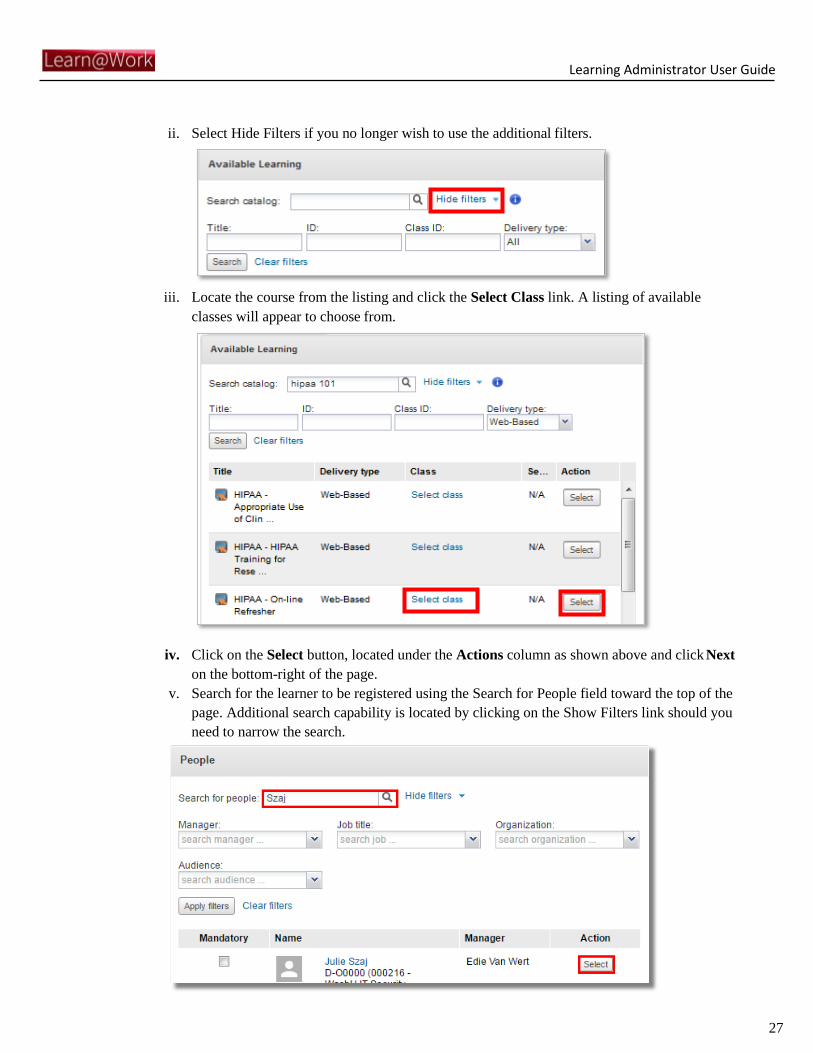
ii. Select Hide Filters if you no longer wish to use the additional filters.
iii. Locate the course from the listing and click the Select Class link. A listing of available
classes will appear to choose from.
iv. Click on the Select button, located under the Actions column as shown above and click Next on the bottom-right of the page.
v. Search for the learner to be registered using the Search for People field toward the top of the page. Additional search capability is located by clicking on the Show Filters link should you need to narrow the search.
Learning Administrator User Guide
28
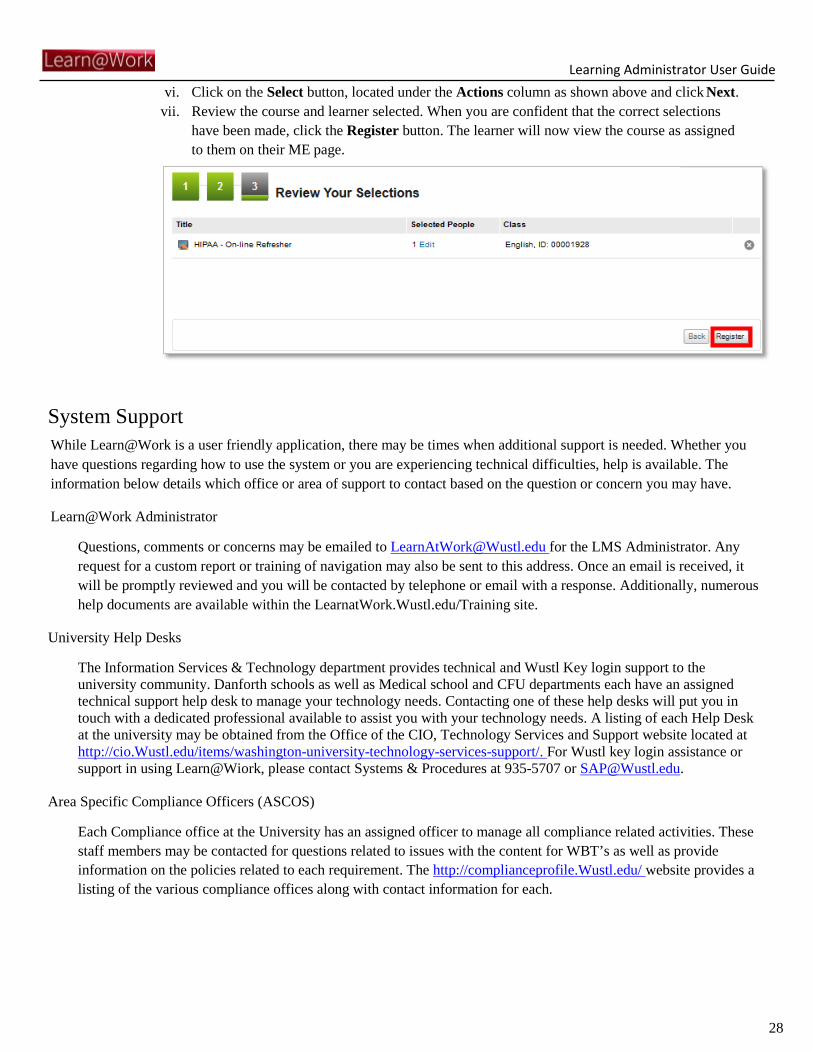
vi. Click on the Select button, located under the Actions column as shown above and click Next. vii. Review the course and learner selected. When you are confident that the correct selections
have been made, click the Register button. The learner will now view the course as assigned to them on their ME page.
System Support While Learn@Work is a user friendly application, there may be times when additional support is needed. Whether you have questions regarding how to use the system or you are experiencing technical difficulties, help is available. The information below details which office or area of support to contact based on the question or concern you may have.
Learn@Work Administrator
Questions, comments or concerns may be emailed to [email protected] for the LMS Administrator. Any request for a custom report or training of navigation may also be sent to this address. Once an email is received, it will be promptly reviewed and you will be contacted by telephone or email with a response. Additionally, numerous help documents are available within the LearnatWork.Wustl.edu/Training site.
University Help Desks
The Information Services & Technology department provides technical and Wustl Key login support to the university community. Danforth schools as well as Medical school and CFU departments each have an assigned technical support help desk to manage your technology needs. Contacting one of these help desks will put you in touch with a dedicated professional available to assist you with your technology needs. A listing of each Help Desk at the university may be obtained from the Office of the CIO, Technology Services and Support website located at http://cio.Wustl.edu/items/washington-university-technology-services-support/. For Wustl key login assistance or support in using Learn@Wiork, please contact Systems & Procedures at 935-5707 or [email protected].
Area Specific Compliance Officers (ASCOS)
Each Compliance office at the University has an assigned officer to manage all compliance related activities. These staff members may be contacted for questions related to issues with the content for WBT’s as well as provide information on the policies related to each requirement. The http://complianceprofile.Wustl.edu/ website provides a listing of the various compliance offices along with contact information for each.