legal disclaimers - basketballforcoaches.com · bad news: you will always have bad offensive games....
TRANSCRIPT


LEGAL DISCLAIMERS
All contents copyright © 2017 by Coach Mac. All rights reserved. No part of this document or
accompanying files may be reproduced or transmitted in any form, electronic or otherwise, by any
means without the prior written permission of the publisher.
This ebook is presented to you for informational purposes only and is not a substitution for any
professional advice. The contents herein are based on the views and opinions of the author and all
associated contributors.
While every effort has been made by the author and all associated contributors to present accurate
and up to date information within this document, it is apparent technologies rapidly change.
Therefore, the author and all associated contributors reserve the right to update the contents and
information provided herein as these changes progress. The author and/or all associated contributors
take no responsibility for any errors or omissions if such discrepancies exist within this document.
The author and all other contributors accept no responsibility for any consequential actions taken,
whether monetary, legal, or otherwise, by any and all readers of the materials provided. It is the
readers sole responsibility to seek professional advice before taking any action on their part.
Readers results will vary based on their skill level and individual perception of the contents herein, and
thus no guarantees, monetarily or otherwise, can be made accurately. Therefore, no guarantees are
made.

TABLE OF CONTENTS 30 TEAM
DEFENSE DRILLS
i
CONTENTS HOW TO READ THE DIAGRAMS .................................................. 1
INTRODUCTION ......................................................................... 2 1-on-1 Clear Out ...................................................................................................................................... 4
1-on-1 Continuous .................................................................................................................................. 6
1-on-1 Finishing Drill ............................................................................................................................... 8
1-on-1 Spirit ............................................................................................................................................. 10
2-on-2 Spread ........................................................................................................................................ 12
4-on-4 Shell Drill .................................................................................................................................... 14
4 Point Close Outs ................................................................................................................................. 16
Bump the Cutter ..................................................................................................................................... 18
Corner Closeouts .................................................................................................................................. 20
Defensive Cutthroat ............................................................................................................................... 22
Defensive Specialist ............................................................................................................................... 25
Deny and Help ........................................................................................................................................ 27
Gladiator ................................................................................................................................................... 29
Gut Check ................................................................................................................................................ 31
Key Defensive Slides .............................................................................................................................. 33
Lane Challenge ....................................................................................................................................... 35
Mass Sliding ............................................................................................................................................. 37
Mirrors ....................................................................................................................................................... 39
No Hands Defense ................................................................................................................................. 41
Partner Closeouts ................................................................................................................................... 43
Pass Denial ............................................................................................................................................... 45
Plug 1-on-1 .............................................................................................................................................. 47
Post Feed 1-on-1 ................................................................................................................................... 49
Post Pathway ........................................................................................................................................... 51
Pressure Finish ........................................................................................................................................ 53
Simple Closeouts .................................................................................................................................... 55
Split Help .................................................................................................................................................. 57
Star Closeouts - Defensive Drill .......................................................................................................... 59

TABLE OF CONTENTS 30 TEAM
DEFENSE DRILLS
ii
Take the Charge ..................................................................................................................................... 61
Zig Zag Slides .......................................................................................................................................... 63
CONCLUSION ........................................................................... 65

HOW TO READ THE DIAGRAMS 30 TEAM
DEFENSE DRILLS
Copyright © 2016 Trevor McLean BasketballForCoaches.com 1
HOW TO READ THE DIAGRAMS
This symbol indicates an offensive player that does not have possession of the basketball. The number will be between 1 and 5.
This symbols indicates an offensive player that does have possession of the basketball. The number will be between 1 and 5.
When a number is surrounded by a black circle this indicates that they are on the defensive team. The number will be between 1 and 5.
A straight, full-coloured line indicates a player is making a cut.
A dotted line indicates a player is making a pass.
A zig-zag line means a player is dribbling the basketball.
A line that ends with another line indicates a player is setting a screen.
This symbol similar to a hash indicates a hand-off between two players.
This symbol will represent either a cone or a chair depending on what you have available to you.

INTRODUCTION 30 TEAM
DEFENSE DRILLS
Copyright © 2016 Trevor McLean BasketballForCoaches.com 2
INTRODUCTION Hey there,
It's great to see you decided to check out the defensive drills part of the program! Many
coaches overlook this end of the floor.
Over the following 64 pages, I'll share with you 30 drills that will improve every aspect of
your team on the defensive end of the floor.
This includes practicing on-ball defense, denying an opposition player, being able to slide
across and help from weak side, and much more.
While you're focusing on defense, there are a few things you should emphasize to your
players throughout the drills and during games...
1. Defense is more about effort and heart than physical gifts. Too often I hear players complaining that they can't be great defenders because their
lack of athleticism holds them back... While athleticism helps, having the desire to be a great defender is much more
important. A player who desires to be a great defender will always be in the correct position, will
always stay down in stance ready to react, and will always sprint back on defense.
2. Your team can have a great defensive game every night. If you've coached before, I bet you've experienced a game like this:
Your team is moving the basketball great on offense...
The players are all making the correct reads and cuts...
It seems like every time down the floor your team is getting a wide
open shot....
But the basketball just won't fall through the rim!
Bad news: You will always have bad offensive games.
Good news: You should never have a bad defensive game.

INTRODUCTION 30 TEAM
DEFENSE DRILLS
Copyright © 2016 Trevor McLean BasketballForCoaches.com 3
The defensive end of the floor comes down to preparation, discipline, and effort.
On a team with dedicated players, these can be there every single night.
I'll end the introduction with this quote...
Defense brings teams together. Offense makes teams feel
good, but the defense is what brings teams together
– Doc Rivers
Good luck!
- Coach Mac
1-on-1 CLEAR OUT 30 TEAM
DEFENSE DRILLS
Copyright © 2016 Trevor McLean BasketballForCoaches.com 4
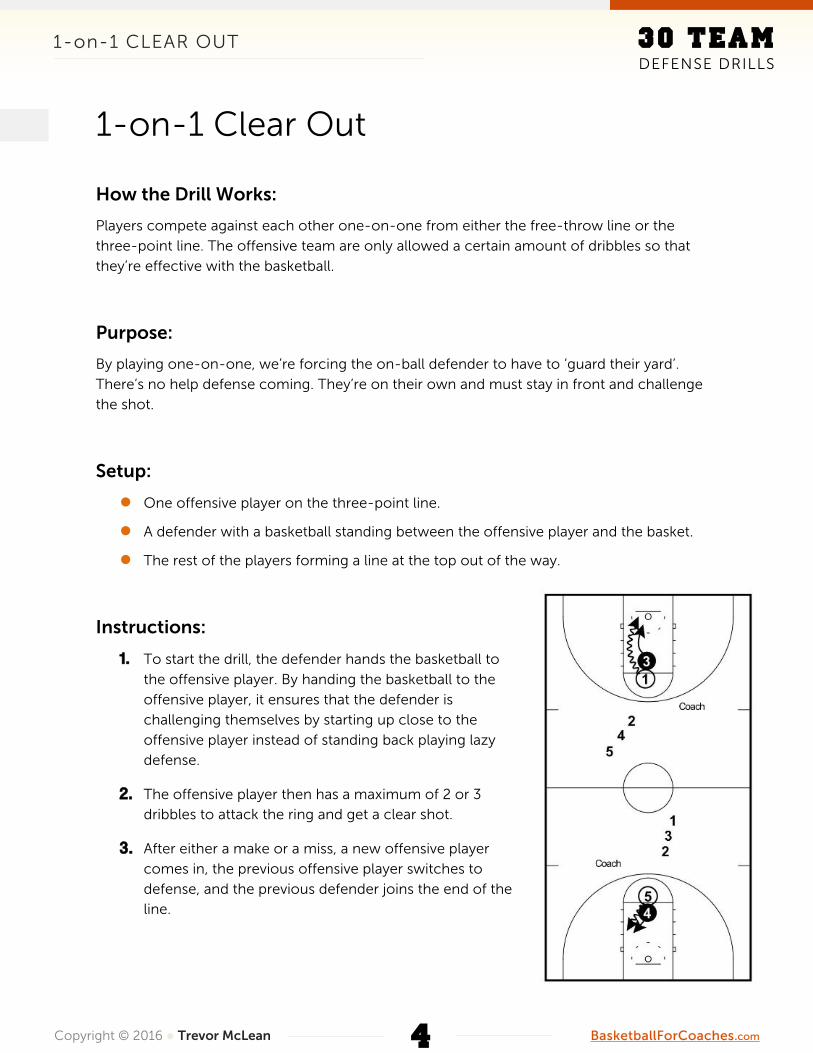
1-on-1 Clear Out
How the Drill Works:
Players compete against each other one-on-one from either the free-throw line or the
three-point line. The offensive team are only allowed a certain amount of dribbles so that
they’re effective with the basketball.
Purpose:
By playing one-on-one, we’re forcing the on-ball defender to have to ‘guard their yard’.
There’s no help defense coming. They’re on their own and must stay in front and challenge
the shot.
Setup:
One offensive player on the three-point line.
A defender with a basketball standing between the offensive player and the basket.
The rest of the players forming a line at the top out of the way.
Instructions:
1 . To start the drill, the defender hands the basketball to
the offensive player. By handing the basketball to the
offensive player, it ensures that the defender is
challenging themselves by starting up close to the
offensive player instead of standing back playing lazy
defense.
2. The offensive player then has a maximum of 2 or 3
dribbles to attack the ring and get a clear shot.
3. After either a make or a miss, a new offensive player
comes in, the previous offensive player switches to
defense, and the previous defender joins the end of the
line.

1-on-1 CLEAR OUT 30 TEAM
DEFENSE DRILLS
Copyright © 2016 Trevor McLean BasketballForCoaches.com 5
Variations:
Distance From Basketball - Whether you start the drill at the three-point line or the free-
throw line will depend on the age of your players. If they can’t shoot three’s yet, start on the
free-throw line.
Coaching Points:
Make sure you enforce the rule of 2 or 3 dribbles maximum depending on which you
decide. We don’t want to allow the offensive player to waste dribbles and time.
Encourage the defensive player to get up close and play hard defense. It doesn’t
matter if they get beat a couple of times while they’re working on defending.
Make sure players are using good footwork and good fakes.

1-on-1 CONTINUOUS 30 TEAM
DEFENSE DRILLS
Copyright © 2016 Trevor McLean BasketballForCoaches.com 6
1-on-1 Continuous
How the Drill Works:
Players form a line at the top of the key and fill the wing spots. An offensive and defensive
player start by playing 1-on-1 from the wing. After the score or defense takes possession, the
offensive player immediately closes out on the opposite wing and they play 1-on-1.
Purpose:
A fast-paced and competitive drill with focus on attacking the defender off a close out and
being able to guard the opposition in isolation. 1-on-1 play is fantastic for development.
Setup:
One offensive player on each wing.
One defender guarding one of the wing player.
The rest of the players form a line at the top of the
key each with a basketball.
Instructions:
1 . On the coach’s call, the offensive player being
defended starts the drill by v-cutting to get open for
the pass from the top and then competing 1-on-1
until a score or change of possession.
2. As soon as they finish, the top line passes to the
opposite wing and then fills the free wing.
3. The offensive player from the previous 1-on-1
immediately closes out and they play compete until a
score or change of possession.
4. This process of the offensive player immediately
transitioning to defending the opposite wing
continues for the amount of time given to the drill.

1-on-1 CONTINUOUS 30 TEAM
DEFENSE DRILLS
Copyright © 2016 Trevor McLean BasketballForCoaches.com 7
Variations:
Wing Starts With Basketball - Instead of receiving the pass from the top and being able to
attack the defense as they’re closing out, both wing players start the drill with a basketball as
well. This means the offense must wait while the defender closes out until the defender
touches their hip before they can attack the rim.
V-Cuts to Start - In this variation the top doesn’t pass immediately to the wing. The offensive player on the wing must wait for the new defender to sprint to them and then the one-on-one starts with the offensive player getting open using a v-cut on the wing.
Loser to Defense - The player that loses the one-on-one battle closes out on the next
defender. This means that if the offense scores, the defender will stay on defense. If the
defense gets a stop, then the offensive player will transition to defense like usual.
Limited Dribbling – Limit the dribbles the offensive player on the wing is allowed to use
before taking their shot. Usually it’s best to allow 3 dribbles for youth players and 2 dribbles
for advanced players.
Coaching Points:
Each game of 1-on-1 can’t cross over to the opposite side of the court. This will
prevent players from dribbling all over the court and ensures they’re attacking in
limited space.
Pay attention to the footwork of both players. Specifically the closeout for the
defender and the footwork off the catch for the offensive player since many will rush
and travel.
The offensive player should be looking to attack immediately on the catch. This
requires them to read the defender before they’ve received the basketball.
For the drill to work effectively, the pass from the top to wing must be made at the
right time. Too early and it gives the offense too much time. Too late and the
offensive player won’t be able to attack on the catch.

1-on-1 FINISHING DRILL 30 TEAM
DEFENSE DRILLS
Copyright © 2016 Trevor McLean BasketballForCoaches.com 8
1-on-1 Finishing Drill
How the Drill Works:
Players find a partner and set up at the half-way line. One player starts on the sideline with a
basketball and the other approximately 2 metres in front. The offensive player chooses a
basket to attack and then must speed dribble into a layup. The defender must challenge the
shot without fouling of the shooter.
Purpose:
This drill teaches players to finish at the rim with pressure and is also teaches players how to
defend shots without fouling. Fantastic youth basketball drill.
Setup:
Players all find a partner and then get one basketball for the two.
Half the partners on each side of the court near half-way.
The first pair has one player (offense) standing on the sideline line with a basketball
and their partner approximately 2 metres in front of
them (defense).
Instructions:
1 . The pairs on each side of the court must alternate
starts so one pair is selected to go first.
2. The offensive player of the starting pair starts
facing the defender and then selects a rim by
exploding in that direction with the dribble and
attacking the rim.
3. The defender must react immediately and attempt
to catch and and defend the shot or get in front of
the offensive player.

1-on-1 FINISHING DRILL 30 TEAM
DEFENSE DRILLS
Copyright © 2016 Trevor McLean BasketballForCoaches.com 9
4. After the layup, the pair switches sides of the court and the next pair from the
opposite sideline can start the drill.
5. This runs continuously for the coach’s desired amount of time.
Variations:
Competitive - Pairs compete against each other and get 1 point for every time they score on
offense. This requires the coach to set a certain amount of offensive possessions for each
player.
Change Partners - Instead of pairing players up, have them find a new player to compete
with from the sideline on each trip. This allows players to practice against a variety of abilities
and make different shots at the rim.
Coaching Points:
The offensive player cannot change directions after committing to one of the
baskets. As soon as they lift a foot and attack in a certain direction, they must
continue that way.
This drill must be run at full speed and simulates a fast-break layup. The offensive
player can’t slow down and then play 1-on-1.
Ensure that the offensive player is attacking the rim and not falling out of bounds as
they throw up a layup. Most players will do this believing they’ll make contact with
the opponent or get their shot blocked.
The defender should do their very best not to foul the offensive player. It will happen
when the defender gets caught out of position, but do your best to minimise this.

1-on-1 SPIRIT 30 TEAM
DEFENSE DRILLS
Copyright © 2016 Trevor McLean BasketballForCoaches.com 10
1-on-1 Spirit
How the Drill Works:
Defensive players will complete defensive slides on one half of the court and then slide
across to defend an offensive player one-on-one to the basket. After the score or defensive
stop, players switch lines.
Purpose:
This is a great team defensive drill if you’ve only got the half-court to practice in. The drill will
practice both offense and defense as well as provide great conditioning work for the players.
Setup:
Split the players into two lines. One line has a basketball and starts on the edge of
half-court (offensive players) and the other line starts
on the baseline corner without basketballs.
One player on offense should be inside the court on
the half-way line.
Place a cone out-of-bounds to show the defenders
when they should start sliding across.
Instructions:
1 . The first defender starts the drill by performing
defensive slides on one half of the half-court until
they reach the cone.
2. When the defender reaches the cone, they slide
parallel across the court until they’re in defensive
position in front of the offensive player.
3. When this position has been established, the two
players will compete one-on-one until a score or a
defensive stop.
1-on-1 SPIRIT 30 TEAM
DEFENSE DRILLS
Copyright © 2016 Trevor McLean BasketballForCoaches.com 11
4. When the first defender reaches the sideline cone, the next defender in line begins
defensive sliding up the court.
5. After the score or stop, the players switch roles. The defender takes the basketball and
joins the half-way line while the offensive player joins the defensive line on the
baseline.
6. This continues for a set amount of time.
Variations:
Full Court - The same drill can be run full-court if your team has enough space. Although I’d
prefer to run it in the half-court at both ends of the floor.
Chase Down - Place a cone in the middle of the court. When the defender slides past that
cone, the offensive player can begin attacking the rim. The defender must turn and sprint to
challenge the shot at the rim.
Limit Dribbles - Limit the amount of dribbles the offensive player is allowed to take when
attacking the rim. I recommend 5 - 6 dribbles.
Coaching Points:
Intentionally create uneven lines of offensive and defensive players. That will ensure
that players are competing against someone different on each possession.
Don’t allow the offensive player at half-court to start too early. The defender must
have established position before one-on-one can occur.
The defender should try to make the offensive player turn multiple times.
Ensure players are in proper defensive stance when they’re on defense.

2-on-2 SPREAD 30 TEAM
DEFENSE DRILLS
Copyright © 2016 Trevor McLean BasketballForCoaches.com 12
2-on-2 Spread
How the Drill Works:
A coach or player starts with the basketball at the top of the key. Two offensive players
starting on the wings must get open for the pass and then attempt to score in a 2-on-2
situation. The focus of the drill is on the defenders denying the pass to these two players and
then getting a defensive stop when the basketball is live.
Purpose:
Great drill for working on the fundamentals of denying the basketball especially their
positioning and the communication with another defender.
Setup:
A coach or player starts at the top of the key with a basketball.
One offensive player starts on each wing.
One defender starts guarding the offensive players on each wing.
Instructions:
1 . The drill starts with the coach slapping the
basketball to signal the players are allowed
to start moving (the coach isn’t allowed to
move from the top of the key).
2. The offensive players can move anywhere
they want on the court below the free-throw
line but aren’t allowed to set screens for
each other.
3. The defenders must do their best to
constantly deny the pass from the coach to
the player they’re defending by keeping a
hand in the passing lane.
2-on-2 SPREAD 30 TEAM
DEFENSE DRILLS
Copyright © 2016 Trevor McLean BasketballForCoaches.com 13
4. When the offensive team is able to receive a pass, they immediately pass the
basketball back to the coach and keep on moving for the first two catches.
5. On the third catch, the basketball is live and the two defenders must attempt to get a
defensive stop.
6. After that, the offense and defense switch positions or a new team joins in if you have
extra players waiting on the baseline.
Variations: 3 Pairs of Players - The maximum I recommend running this drill with is 6 players on the
court at one time. After that, since they have to stay below the free-throw line it will be too
crowded.
Set Screens - The offensive team are allowed to set screens for each other. For this
variations, the defense must communicate and are allowed to switch if necessary.
Transition - If you’re running this drill with a large group of players, have the offense attack
after one catch. On the score or defensive stop, the teams quickly transitions down the court
2-on-2 with the defense becoming the new offensive team.
Coaching Points:
The defenders should keep their chests facing the offensive player, have one hand in
the passing lane at all times, and see the passer over their lead shoulder.
Emphasize to the offensive team that it’s important to utilize quick changes of speed
and direction if they want to get open.
Refrain from throwing lob passes to the offensive players. The drill is focused on
denying the basketball so the lob pass will often be open. There will be a defender to
pick this off during most games.

4-on-4 SHELL DRILL 30 TEAM
DEFENSE DRILLS
Copyright © 2016 Trevor McLean BasketballForCoaches.com 14
4-on-4 Shell Drill
How the Drill Works:
The drill starts with four offensive players and four defensive players. The four offensive
players will pass the basketball around the perimeter while the four defenders constantly
readjust their defensive positioning.
Purpose:
For players to learn proper defensive positioning on the floor. The three positions players will
find themselves in are: on-ball defense, one pass away, and help side defense.
Setup:
Four offensive players all positioned evenly around the three-point arc. Two on the
wings and two at the top of the key.
Four defensive players man up on each of the four offensive players.
Coach starts with a basketball.
Instructions:
1 . The first thing that must happen when using this drill is
a walk-through of the basketball at each offensive
position so that the defense knows where they should
be.
2. When the basketball is on the wing, there should be
one on-ball defender, one defender denying one pass
away, and two defenders playing help side defense on
the split line.
3. When the basketball is with one of the players on the
top of the key, there should be one on-ball defender,
two players denying one pass away, and one player
playing help side defense on the split line.
4-on-4 SHELL DRILL 30 TEAM
DEFENSE DRILLS
Copyright © 2016 Trevor McLean BasketballForCoaches.com 15
4. After walking through each position, get the offensive players to pass the basketball
around the perimeter (holding for about 3 seconds) while the defense adjusts to the
correct positioning.
5. Finally incorporate it into live play. Do this by getting the offensive team to rotate the
basketball around the perimeter twice and then it’s a competitive 4 on 4 game with
focus on defensive positioning.
Variations:
5 on 5 - Instead of 4 on 4, you can run the shell drill 5 on 5 by adding an extra two players to
the top of the key and sliding the top player to the wings and the wing players to the corners.
Coaching Points:
The defenders should not attempt to steal the basketball until live play. The shell drill
is simply to teach correct positioning on the floor.
Players must be down in stance throughout the entire drill and see both the
basketball and their opponent.
4 POINT CLOSE OUTS 30 TEAM
DEFENSE DRILLS
Copyright © 2016 Trevor McLean BasketballForCoaches.com 16
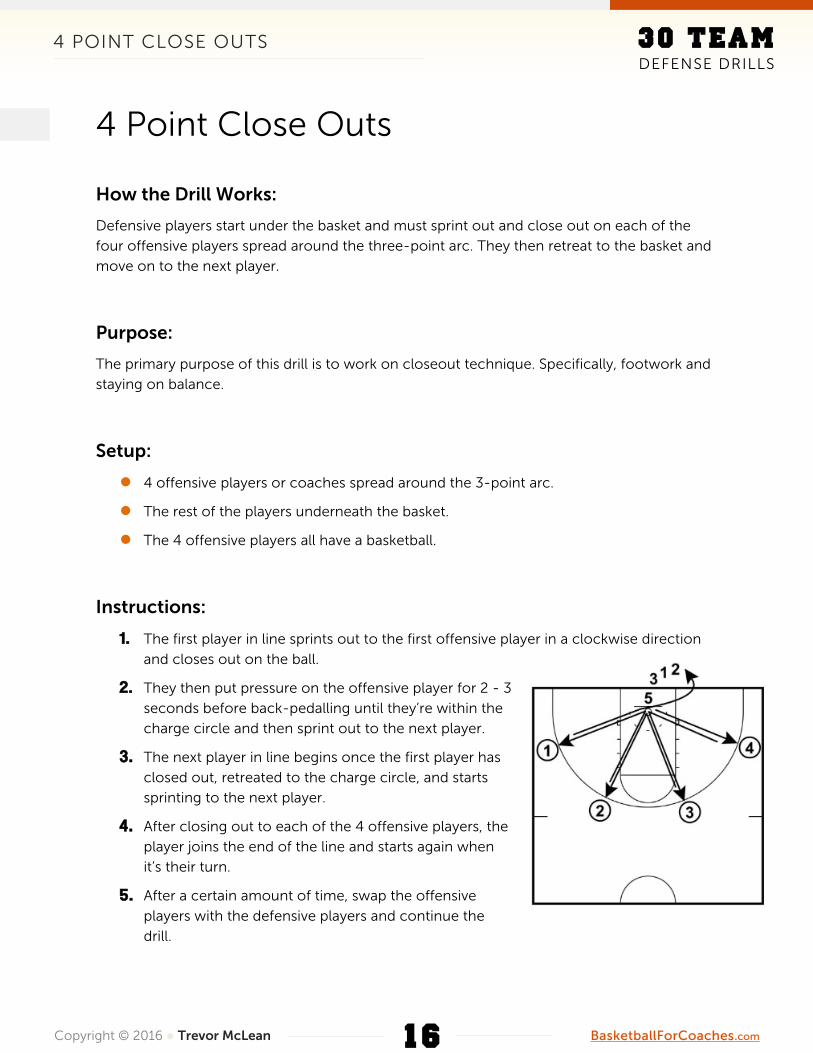
4 Point Close Outs
How the Drill Works:
Defensive players start under the basket and must sprint out and close out on each of the
four offensive players spread around the three-point arc. They then retreat to the basket and
move on to the next player.
Purpose:
The primary purpose of this drill is to work on closeout technique. Specifically, footwork and
staying on balance.
Setup:
4 offensive players or coaches spread around the 3-point arc.
The rest of the players underneath the basket.
The 4 offensive players all have a basketball.
Instructions:
1 . The first player in line sprints out to the first offensive player in a clockwise direction
and closes out on the ball.
2. They then put pressure on the offensive player for 2 - 3
seconds before back-pedalling until they’re within the
charge circle and then sprint out to the next player.
3. The next player in line begins once the first player has
closed out, retreated to the charge circle, and starts
sprinting to the next player.
4. After closing out to each of the 4 offensive players, the
player joins the end of the line and starts again when
it’s their turn.
5. After a certain amount of time, swap the offensive
players with the defensive players and continue the
drill.

4 POINT CLOSE OUTS 30 TEAM
DEFENSE DRILLS
Copyright © 2016 Trevor McLean BasketballForCoaches.com 17
Variations:
Offense Takes 1-2 Dribbles - After closing out and pressuring the basketball, the offensive
player takes one to two dribbles either left or right and the defender must slide with them to
stay in front. After two slides, they back-pedal to the rim.
Cones Instead of Players - If all you’re doing is closing out and retreating, consider using
cones to close out to instead of players.
Opposite Direction - While the drill states to perform it clockwise, throughout the drill you
should change the direction people are rotating at some stage.
Coaching Points:
Offense must be in the triple threat stance and protecting the basketball from the
defender.
On the closeout, the defender should use short, choppy steps, get one hand up to
contest the shot, and ensure balance to absorb the drive.
When pressuring the basketball, the defender should trace the basketball with one
hand and keep the other hand low to poke away a dribble.
This is meant to be a conditioning drill too. Players should be sprinting and back-
pedalling hard on every closeout. Make sure it’s game pace!

BUMP THE CUTTER 30 TEAM
DEFENSE DRILLS
Copyright © 2016 Trevor McLean BasketballForCoaches.com 18
Bump the Cutter
How the Drill Works:
A defensive player starts in ball-you-man position in the middle of the key with an offensive
player in the corner. The offensive player must cut across and establish position on ball-side.
The defender must meet the offensive player and bump them off their line away from the
basket. When the offensive player gets the basketball, they play one-on-one.
Purpose:
The purpose of this drill is to teach players to never allow offensive players to cut across the
key without getting contact. ‘Bumping the cutter’. This is also beneficial because players
compete one-on-one.
Setup:
A coach or player starts outside the three-point line on the wing with a basketball.
An offensive player starts in the corner opposite the passer.
Defensive player in the key in ball-you-man position.
Instructions:
1 . The drill begins with the offensive player cutting
across the key attempting to establish good
position to receive the pass.
2. The defensive player must see the cutter and then
make contact, bump them off their line, and make
it difficult for the offensive player to receive the
pass.
3. The pass is eventually made to the offensive player
and the offense and defense then play a game of
one-on-one.
4. The offensive player then becomes the defender
and the defender joins the end of the line waiting to come in on offense.
BUMP THE CUTTER 30 TEAM
DEFENSE DRILLS
Copyright © 2016 Trevor McLean BasketballForCoaches.com 19
Variations:
Limit the dribbles – As with all one-on-one games, limiting dribbles can be very beneficial
for players. Limit dribbles to 2 or 3.
2 on 2 — A second pair of players can wait at the top of the key or even perform the same
cutting and bumping action as the first pair. When the pass is made, they play two-on-two till
a score.
Coaching Points:
The defender should always be able to see both the basketball and their player.
Encourage players to half-front to deny the pass, but never full-front as they won’t
be able to get back in position to play one-on-one on the catch.
The defensive player should bump the offensive player with a tight arm bar, forcing
the defense away from where they want to go.
If the defensive player ‘pushes’ the offensive player, it’s a defensive foul. Instead, the
defender is aiming to hold their ground when bumping the cutter.

CORNER CLOSEOUTS 30 TEAM
DEFENSE DRILLS
Copyright © 2016 Trevor McLean BasketballForCoaches.com 20
Corner Closeouts
How the Drill Works:
A player in one corner passes to the top and they swing to the opposite corner. The first
passer must sprint corner to corner to closeout and then play defense 1-on-1 against the
receiver. After a score or defensive stop, either player outlets to the nearest corner and the
drill repeats.
Purpose:
A high-intensity drill with a focus on closing out to the basketball and defending one-on-
one. This drill simulates sprinting across to the corner from help position.
Setup:
Divide the players into three lines. One in each corner and one at the top of the key.
The first player in one of the corner lines has a basketball.
Instructions:
1 . The drill starts with the player possessing the
basketball passing to the top of the key and
immediately starting to sprint across to the
opposite corner.
2. The player at the top of the key catches and
immediately passes to the opposite corner. They
then follow the pass and join the end of the
corner line they passed to.
3. The player in the corner will now catch with the
opposite player closing out on them. From here
they must make a decision to shoot or drive the
basketball.
4. From here the two players compete one-on-one until a score or defensive stop.
CORNER CLOSEOUTS 30 TEAM
DEFENSE DRILLS
Copyright © 2016 Trevor McLean BasketballForCoaches.com 21
5. When they’re finished, either player grabs the basketball and immediately passes out
to the closest corner who repeats this process.
6. The defender joins the corner line and the offensive player goes to the end of the line
at the top of the key.
Variations: Set Defense and Offense Lines - The regular way to run this drill is to have set offense and
defense lines. I prefer to not to have this to add variation and to prevent players from flocking
to the offensive line whenever they have a chance. But you can set that up.
Limited Dribbles – If you’re coaching advanced players, limit the amount of dribbles the
offensive player is allowed to take after receiving the pass in the corner. I recommend 2 - 3
dribbles.
Coaching Points:
The fundamentals of the closeout are crucially important. The defender should be
closing out with a high hand and their weight back and low to absorb the drive.
The perimeter passes must be flat and with power. Any lob passes allow the
defensive player too much time to closeout.
The way the defender closes out will depend on your defensive philosophy. Some
coaches like to force the player to the baseline, some prefer to force them to the
middle.
The defender must be sprinting from corner to corner to close out on their
opponent.

DEFENSIVE CUTTHROAT 30 TEAM
DEFENSE DRILLS
Copyright © 2016 Trevor McLean BasketballForCoaches.com 22
Defensive Cutthroat
How the Drill Works:
A continuous defensive drill played with three teams of usually 4 players each. Two teams
compete in the half-court. If the offense scores, they’re rewarded by becoming the defensive
team. If the defense gets a stop, they receive one point. The game is played fast and can
often seem chaotic similar to most games. The losing team must quickly leave the floor and
the new team becomes the offense.
Purpose:
A multipurpose, fast-paced defensive drill that will mimic many in-game situations. The
defensive team is forced to quickly find players and establish correct positions. This defense
will improve offense and defense.
Setup:
You need a minimum of 3 teams preferably with 4 players on each team.
Each team should have their own color jerseys if possible.
4 offensive players begin the drill around the three-point line.
4 defensive players are matched up with the offensive players.
The team sitting out the first position waits behind the 1/3 court line near half-court.
They must be ready to immediately transition from waiting to offense.
Instructions:
1 . This drill can be used to teach all defenses. You must
know and talk to your team about what your team
rules are before starting the drill.
2. The drill begins with the teams playing 4 on 4.
3. If the offensive teams scores, they are rewarded by
rotating onto defense. The previous defensive team
must immediately sprint off the court and the team
that was waiting immediately becomes the new offensive team.

DEFENSIVE CUTTHROAT 30 TEAM
DEFENSE DRILLS
Copyright © 2016 Trevor McLean BasketballForCoaches.com 23
4. If the defensive team gets a stop, they receive one point and continue on defense.
The previous offensive team must sprint off the floor and the team that was waiting
becomes the new offensive team.
5. After every score or stop, the basketball must quickly be passed to the coach at the
top of the key who will then pass to the new offensive team.
Scoring System:
The only way to score a point of the team is to get a stop on defense. This is why
scoring and becoming the defending team is the reward.
Run this drill until one team scores either 3, 5, or 7 points.
The winning team must validate the win with one of their players sinking a free-throw.
If they miss, the team loses 2 points and the game continues.
Variations:
3 Stops to Win - Instead of playing with the points system, you can run the drill where the
first team to get 3 defensive stops in a row is the winner.
Offensive Focus - The same drill except in reverse. Teams rotate into defense and are
rewarded with a defensive stop by becoming the offensive team. Each score on offense is
worth 1 point. For this to flow correctly, the team waiting must wait behind the baseline
instead of near half-court.
Play with Rules - Create rules for the offensive team. For example, on each possession they
must pass it into the post. This will give the defense more time to set up and allow the
offense to practice from different attacking points.
Coaching Points:
It’s important to keep the pace of the drill very high. All players must sprint onto the
court and coming off. It must be a struggle for the defense to quickly pick up the
new offensive players.
Communication is the key for successful defense. Defensive players need to talk, call
man, ball or help, and be loud.
DEFENSIVE CUTTHROAT 30 TEAM
DEFENSE DRILLS
Copyright © 2016 Trevor McLean BasketballForCoaches.com 24
Insist that defensive players have their hands up high on their man, and to keep low
defensive stance at all times.
Sooner or later you’ll have to stop the game to point out the mistakes or give an
advice. Do it, but be brief and efficient in order to keep the drill flowing.
The basketball must immediately be passed back to the coach when there’s a score
or stop. No exceptions.

DEFENSIVE SPECIALIST 30 TEAM
DEFENSE DRILLS
Copyright © 2016 Trevor McLean BasketballForCoaches.com 25
Defensive Specialist
How the Drill Works:
Defensive Specialist is a continuous drill that works on the different defensive movements
players will make on defense including closeouts, defensive sliding, back-pedalling, and
sprinting.
Purpose:
Since this drill covers all the most frequent movements players will make on defense, it’s a
great drill to get them used to these different movements.
Setup:
Since it’s hard to explain where the cones and movements are by writing, I encourage
you to take a look at the image associated with this drill for better comprehension.
You will require four D-men or cones for this drill.
All players begin in a straight line on the baseline.
Instructions:
1 . Players perform this defensive course one-by-one.
2. The first movement is a sprint and then close out to
the cone in front. The player then back-pedals
around a cone directly behind them, and then slides
across to the other side of the court.
3. When the first defender slides past the line, that
triggers the next player in line to start the drill.
4. When the first defender has slid around the cone on
the other side of the court, they again sprint to close
out, and then once again slide to the opposite side
of the court before returning to the end of the line.
5. Depending on the amount of players you have, run this drill for 3 – 5 minutes.

DEFENSIVE SPECIALIST 30 TEAM
DEFENSE DRILLS
Copyright © 2016 Trevor McLean BasketballForCoaches.com 26
Variations:
Different Course - You can easily change the course by differing the placement of the
cones. Make sure to focus on the main defensive movements.
Coaching Points:
Players must be sprinting and sliding at 100% effort throughout the entire drill.
Hold the close out for a second or two before moving on.
Make sure all defensive footwork is done well since this is a very important part of
the drill.

DENY AND HELP 30 TEAM
DEFENSE DRILLS
Copyright © 2016 Trevor McLean BasketballForCoaches.com 27
Deny and Help
How the Drill Works:
With two passers at the slot positions, two offensive players make v-cuts on the wings while
the two defenders guarding them must either be in denial or help position depending on
where the basketball is on the floor. Once a pass is made to an offensive player and the drill
transitions to 2-on-2 until a score or stop.
Purpose:
The main focus of this drill is on defensive positioning and footwork. Players must be quick to
react the movement of the basketball and constantly adjust their where they are. The drill
ends competitive by incorporating 2-on-2 into the drill.
Setup:
One player or coach in each slot position at the top of
the key.
One of the players in the slot should have a basketball.
Two players start on each wing. One on offense and
one on defense.
Instructions:
1 . The drill starts with the defenders in correct position
depending on which side of the court the basketball
starts on.
2. When the player in the slot slaps the basketball, the drill
begins.
3. The defenders must deny the basketball being passed
to their opponent if they’re on ball-side and must be in
help position when they’re weak-side.
DENY AND HELP 30 TEAM
DEFENSE DRILLS
Copyright © 2016 Trevor McLean BasketballForCoaches.com 28
4. Once a pass is successfully made to one of the offensive players, the drill immediately
becomes live 2-on-2 until a score or a stop.
5. The defenders stay on defense until they get three total stops before switching out or
onto offense depending on how many players there are.
Variations:
No Live Game - If you want to put 100% of time and focus onto teaching correct positioning
and technique, run the drill without playing 2-on-2 until your players are competent with
helping and denying.
Three Stops In-a-Row — The defense must record thee consecutive defensive stops before
they can swap from defense to offense.
Coaching Points:
Defenders must be in a low defense stance throughout the drill. It’s critical that you
emphasize the importance of players staying low so that they can react quicker on a
pass.
When denying the basketball, the defenders should have their chest facing the
offensive player and their arm out seeing the player with the basketball over their
shoulder. This allows players to quickly turn if there’s a back-door cut.
Make sure that when the basketball goes live, players are sticking to the defensive
principles being taught. A lot of times players will perfect a drill and then completely
go away from it when live basketball starts.
GLADIATOR 30 TEAM
DEFENSE DRILLS
Copyright © 2016 Trevor McLean BasketballForCoaches.com 29
Gladiator
How the Drill Works:
One defender competes 1-on-1 against 5 offensive players in a row. They start by passing out
to one of the players, closing out, and then defending until a score or a defensive stop. They
must then immediately pass out to the next player and complete the same process until
they’ve defended all 5 players. The goal is to prevent at least 3 out of 5 players from scoring.
Purpose:
A tough defensive drill and great for conditioning. Defensively, the drill focuses on closing
out and the being able to contain the basketball 1-on-1. Offensively, players practice
attacking closeouts.
Setup:
One player starts on defense inside the key.
The defender has a basketball.
5 offensive players spread out around the three-point arc.
Instructions:
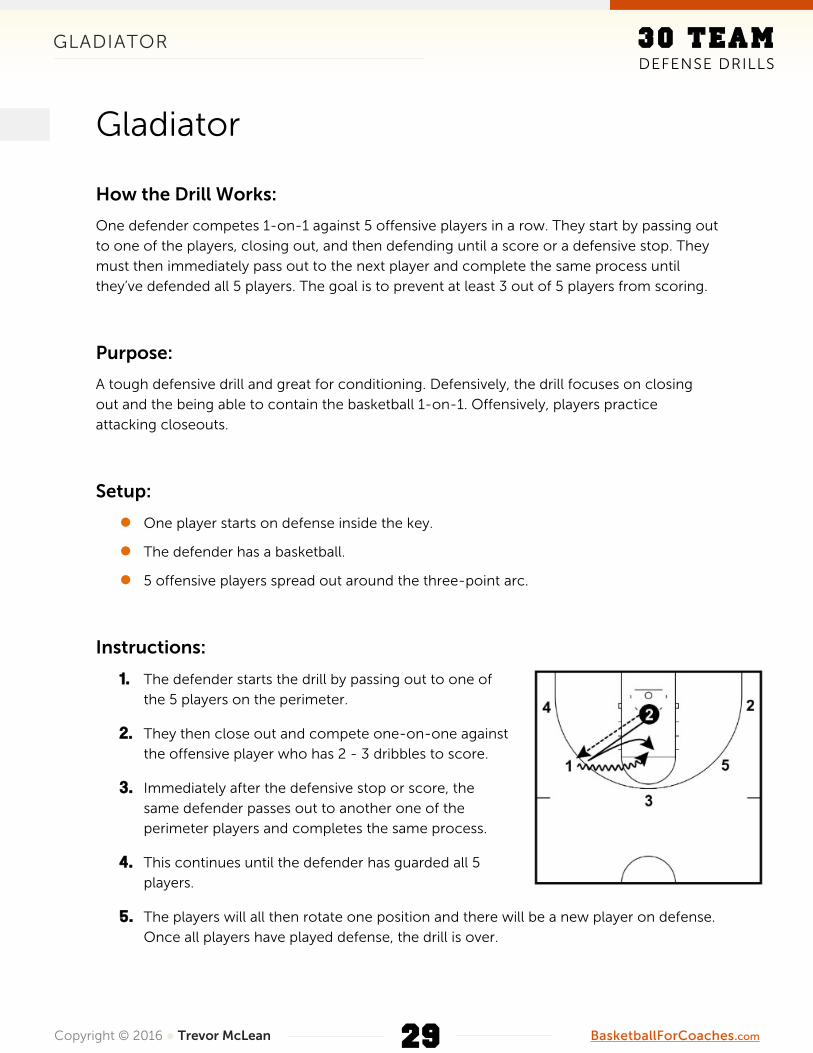
1 . The defender starts the drill by passing out to one of
the 5 players on the perimeter.
2. They then close out and compete one-on-one against
the offensive player who has 2 - 3 dribbles to score.
3. Immediately after the defensive stop or score, the
same defender passes out to another one of the
perimeter players and completes the same process.
4. This continues until the defender has guarded all 5
players.
5. The players will all then rotate one position and there will be a new player on defense.
Once all players have played defense, the drill is over.

GLADIATOR 30 TEAM
DEFENSE DRILLS
Copyright © 2016 Trevor McLean BasketballForCoaches.com 30
Variations:
Number of Players - You could run this drill using as many offensive players as you want. But
to me, the fewer the better. Less people means more active time for the players.
Three Stops In-a-Row - Instead of rotating out after 5 possessions, the defender stays on
defense until they get a defensive stop on three possessions in a row.
Coaching Points:
Use both ends of the court so that you can give all players more active time.
Ensure that the defender is closing out to the basketball correctly. They should have
one hand up to deter the shot, and have their weight back and the get close to
absorb the drive.
Watch the footwork of the offensive player. 2 - 3 dribbles makes it tough for the
offense and they’ll often travel trying to force up a shot attempt.
Encourage players to really compete against each other. One-on-one drills are
fantastic for skill development especially when it includes dribbling restrictions.

GUT CHECK 30 TEAM
DEFENSE DRILLS
Copyright © 2016 Trevor McLean BasketballForCoaches.com 31
Gut Check
How the Drill Works:
A team starts on defense and a team starts on offense. The defensive team must get 3 stops
in a row before they can stop playing defense. When they do, the offensive team they were
competing against becomes the new defenders.
Purpose:
This is a great drill for forcing players to be accountable on defense and to encourage the
defenders to work hard. If they don’t, they’ll continue playing defense for the entire drill.
Setup:
Decide on the number of players on each team (1 on 1, 2 on 2, 3 on 3, 4 on 4, or 5 on
5).
The offensive team starts around the three-point line
with a basketball.
The defensive team matches up with the offensive team.
Instructions:
1 . The drill begins with a regular small-sided game. The
offensive team moves the basketball around and looks to
score.
2. If the defense secures the basketball without the
offensive team scoring (rebound, steal, etc), that equals
one stop. They must get three stops in-a-row to switch
to offense.
3. If the offensive teams scores, the number of stops
automatically becomes 0.
4. Depending on how many players you have, filter them
through the offense on each possession.

GUT CHECK 30 TEAM
DEFENSE DRILLS
Copyright © 2016 Trevor McLean BasketballForCoaches.com 32
5. After every score from the offensive team, the defense must sprint and touch the half-
court line before matching up with the new players.
6. When the defense does get three stops in a row, the offensive team they were
competing against becomes the new defensive team.
Variations:
3 Stops Total - If you find that your team struggles to get three stops in a row, you can change the rule to three stops in total before switching to a new defensive team. 10 Offensive Scores - Occasionally you’ll have a weak defensive team that gets stuck on defense for many possessions in a row. To allow others to defend and give them a break, you can create a rule that after 10 total offensive scores, the defence’s time is up and they must switch.
Coaching Points:
The offensive team should be using smart actions to get open (picks, away screens,
back cuts, etc).
Emphasize to your players that they must ‘guard their yard’. Although it should be
there, don’t rely on help defense to save you from being beaten off the dribble. Lock
the offensive player down yourself!

KEY DEFENSIVE SLIDES 30 TEAM
DEFENSE DRILLS
Copyright © 2016 Trevor McLean BasketballForCoaches.com 33
Key Defensive Slides
How the Drill Works:
Player perform defensive movements in a specific pattern using the key as a guideline. This is
a continuous drill to prevent players from standing around.
Purpose:
This is a great drill for working on different defensive movements and can be used as a
warm-up drill. Players will work on many defensive fundamentals: defensive slides, back-
pedalling, close-outs, drop-steps, and sprinting.
Setup:
A line of players begins behind the baseline on one side of the key.
If available, place d-men or cones on the elbows so that players have a visual to
close-out to.
No basketballs are needed for this drill.
Instructions:
1 . The first player in line starts the drill be sprinting
out and closing out on the elbow.
2. They then drop step and slide to the spot where
the opposite side of the key and baseline meet.
3. Once the first players starts this slide, the next
player in line starts the close-out.
4. The first player then sprints out to the other elbow
and closes-out again.
5. They will then defensive slide across until they
reach the sideline.

KEY DEFENSIVE SLIDES 30 TEAM
DEFENSE DRILLS
Copyright © 2016 Trevor McLean BasketballForCoaches.com 34
6. For the final movement, players will back-pedal to the baseline and then join the end
of the line to repeat again.
7. The drill continues for a set amount of time.
Variations:
Increase the distance – You can increase the distance of the drill by moving the cones
further out. Place them at the three-point line instead of the elbows of the free-throw line.
Opposite side of the floor — Ensure that half-way through the time you set aside for the
drill you get players to switch sides of the floor and perform everything opposite.
Coaching Points:
Players should complete the course as quick as they can while still in control of their
body.
Pay attention to the footwork of the players.
Players must be closing out with short steps and get one hand up. They must stay
on-balance during this.
LANE CHALLENGE 30 TEAM
DEFENSE DRILLS
Copyright © 2016 Trevor McLean BasketballForCoaches.com 35
Lane Challenge
How the Drill Works:
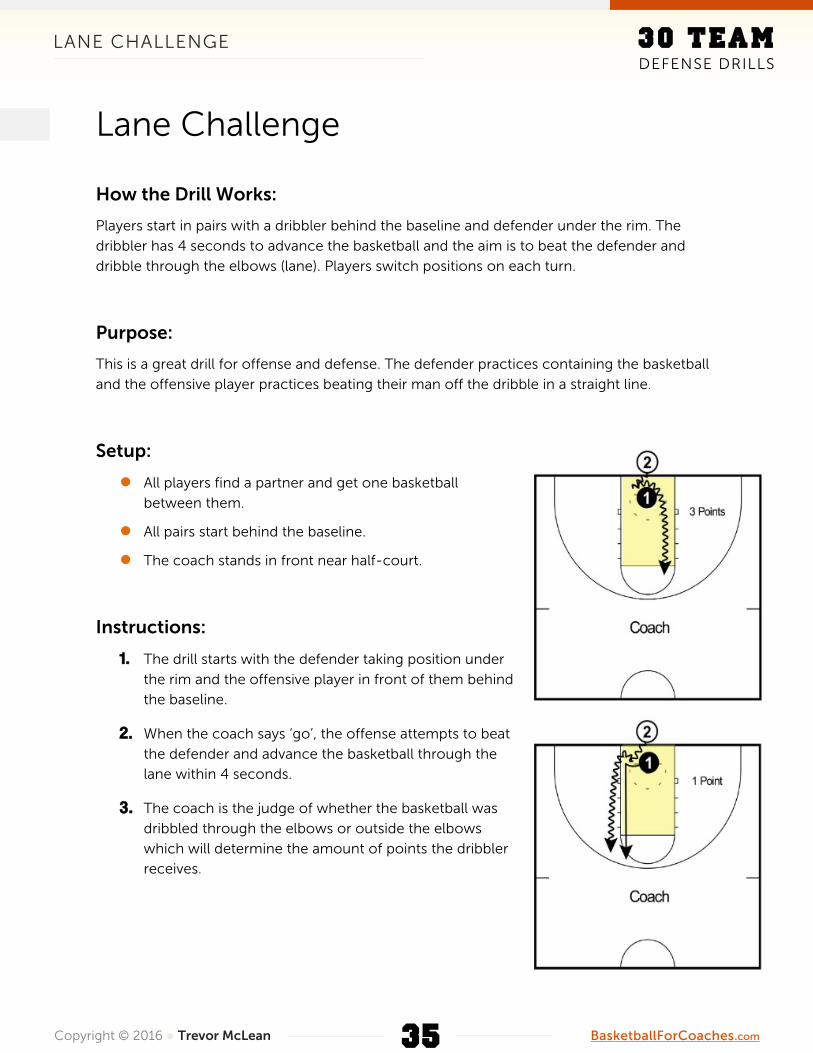
Players start in pairs with a dribbler behind the baseline and defender under the rim. The
dribbler has 4 seconds to advance the basketball and the aim is to beat the defender and
dribble through the elbows (lane). Players switch positions on each turn.
Purpose:
This is a great drill for offense and defense. The defender practices containing the basketball
and the offensive player practices beating their man off the dribble in a straight line.
Setup:
All players find a partner and get one basketball
between them.
All pairs start behind the baseline.
The coach stands in front near half-court.
Instructions:
1 . The drill starts with the defender taking position under
the rim and the offensive player in front of them behind
the baseline.
2. When the coach says ‘go’, the offense attempts to beat
the defender and advance the basketball through the
lane within 4 seconds.
3. The coach is the judge of whether the basketball was
dribbled through the elbows or outside the elbows
which will determine the amount of points the dribbler
receives.

LANE CHALLENGE 30 TEAM
DEFENSE DRILLS
Copyright © 2016 Trevor McLean BasketballForCoaches.com 36
4. As soon as the pair cross the free-throw line they clear out to the sides and join the
end of the group again so that the next pair can start.
5. On the pairs next turn, players switch roles.
Scoring System:
Points are only awarded to the offensive player on each possession.
Dribble through the elbows (lane) = 3 points.
Dribble outside the elbows (lane) = 1 point.
Fail to advance the basketball = 0 points.
First player to score 11 points is the winner.
Variations:
Scoring System - A coach can change the way the game is scored by changing the points
awarded for each accomplishment or changing the target number of points.
Three Pairs - If you have a large number of players, you could split the court up into 3 lanes
and have 3 pairs competing at the same time. This will mean there are no points awarded for
dribbling outside the lane.
Coaching Points:
The defender should be down in a low stance and squaring themselves up to the
dribbler since the goal is to prevent offense advancing the basketball instead of
forcing them to a specific side.
Encourage players to use their feet to stay in front instead of slapping at the
basketball attempting to get a steal. Consider taking points off on each foul if this is
happening too often.
The offense should be doing their best to beat the defender while staying in the lane.
This requires great footwork and protection of the basketball.
The coach is the judge of how many points are awarded to the offensive player. No
arguing from the players.

MASS SLIDING 30 TEAM
DEFENSE DRILLS
Copyright © 2016 Trevor McLean BasketballForCoaches.com 37
Mass Sliding
How the Drill Works:
Players are spread out in the half or full court in a defensive stance an even distance apart
from each other. A coach or another player then instructs the team to complete different
defensive movements that players must follow as a collective group.
Purpose:
A defensive drill that focuses on the fundamentals of individual defense while incorporating
in conditioning. Improves defensive footwork and technique required to successfully guard a
player with or without the ball.
Setup:
Players are spread out in the half or full court depending on how many players are
used.
Players must have enough space between each other.
The coach stands out front of the group to be seen clearly at all times by all of the
players.
Instructions:
1 . The drill begins with all players down in a low
stance and ‘pitter-pattering’ their feet (quick feet).
2. The coach then uses both visual and verbal cues
to instruct players’ to perform defensive
movements.
3. This continues for a usually 2 - 3 minutes.
Incorporate the following defensive movements:
Lateral slides east and west - Point the direction you want them to slide.

MASS SLIDING 30 TEAM
DEFENSE DRILLS
Copyright © 2016 Trevor McLean BasketballForCoaches.com 38
Drop step slides - Point diagonally behind them. Players must drop step and then
slide that direction.
Close-Outs - Point hands in the air. Players sprint 2 - 3 steps forward and then close-
out with high hands while keeping a low base.
Charge - Cross arms at chest. Players fall backwards simulating taking a charge and
then get straight back up into pitter patter.
Rebound - Jump up with two hands. On the rebound call, players must jump up and
down three times as high as they can simulating getting a defensive rebound.
Back-Pedal - Pointing behind the players. Players behind must communicate with the
player in front of them.
Sprint - Motion forward with hands. Players must sprint forward to their starting
position.
Coaching Points:
Players must remain in a low and wide defensive stance during the entire drill.
Pay attention on correct footwork and good balance. Players shouldn’t be leaning
forward when in defensive stance.
Arms must be out to the sides throughout the entire drill. Get used to doing it for
games.
Encourage players to be loud on close-outs, charge calls, when back-pedalling, etc.
Can be a great drill to use when you’ve got a large group of players.
The coach must be enthusiastic while leading the players through the drill. They’re
not going to be enthusiastic if you’re not.

MIRRORS 30 TEAM
DEFENSE DRILLS
Copyright © 2016 Trevor McLean BasketballForCoaches.com 39
Mirrors
How the Drill Works:
Two players line up on two parallel lines and then the defensive player must mimic their
offensive partner’s movements by sliding up and down the line. The offensive players
attempts to evade the defender.
Purpose:
A drill that works on reaction times, will teach your team that they are quicker in a low
defensive stance, and will help them with their defensive footwork.
Setup:
Everyone starts by finding a partner and standing in pairs behind the baseline.
If you have another coach, it’s best to use both ends of the court.
For this example, we’ll use the parallel lines of the key, but if you have two other
parallel lines on your home court, you can use them too.
Coach should have something to keep time during the drill.
Instructions:
1 . The first pair comes out and sets themselves up directly
opposite each other on the two parallel lines of the key.
2. The coach then assigns one of them the offensive
player and the drill begins immediately.
3. The goal of the defensive player is to stay directly in line
with the offensive player. The offensive player must
work hard to try and separate themselves from being in
line with the defender by sliding up and down the line of
the key.
4. After 15 seconds, the coach calls out ‘switch’ and the two players swap roles.
5. After 30 seconds they step behind the baseline and two new players come in.

MIRRORS 30 TEAM
DEFENSE DRILLS
Copyright © 2016 Trevor McLean BasketballForCoaches.com 40
Variations:
Duration - Instead of 15 seconds each, you can make your players slide for more or less
time.
Coaching Points:
Players must stay in a low defensive stance with their hands out wide the entire time
of the drill.
Encourage the offensive player to use head fakes and quick changes of pace to
throw the defender off.
Make sure you cover what good defensive stance is before running this drill.

NO HANDS DEFENSE 30 TEAM
DEFENSE DRILLS
Copyright © 2016 Trevor McLean BasketballForCoaches.com 41
No Hands Defense
How the Drill Works:
In the half-court, two teams play 5-on-5. The difference from a regular game is that the
defenders aren’t allowed to use their hands on defense to steal the basketball. The two teams
rotate offense and defense every 3 - 5 possessions.
Purpose:
By not allowing the defense to use their hands, the defensive focus is entirely on footwork
and correct defensive positioning. This will also get players out of the bad habit of reaching in
and fouling their opponent. A great drill for youth teams.
Setup:
Split the group up into two teams of 5-on-5 in the half-court.
All players have a tennis ball in each hand (optional).
Instructions:
1 . Start by explaining the defensive rules to your
team. They can intercept or deflect passes, but
they’re not allowed to reach in against their
opponent to steal the basketball.
2. The two teams then play 5-on-5 rotating offense
and defense every 3 - 5 possessions.
3. If the defenders aren’t using tennis balls, they are
allowed to rebound the basketball after a missed
shot. If they are holding tennis balls, the
possession is over after the shot.

NO HANDS DEFENSE 30 TEAM
DEFENSE DRILLS
Copyright © 2016 Trevor McLean BasketballForCoaches.com 42
Variations:
No Passing Lane Steals - Some coaches like include the rule that defenders can’t steal or
deflect passes in the passing lane. I don’t like this rule as it allows the offense to make
irresponsible passes that aren’t open and would get stolen during a game.
Fewer Players – Instead of playing 5-on-5, you can set up a 2-on-2, 3-on-3, or 4-on-4
game.
Number of Stops – To challenge the defense, have them get a certain amount of stops
before they’re allowed to change to offense. This will require you implement a shot clock for
the offensive team.
No Tennis Balls – If you don’t have tennis balls available for the defensive team to hold onto
in each hand, they can keep their hands behind their back or you can simply trust them to
not steal the basketball.
Coaching Points: Put a high amount of emphasis on defensive players being in the right position
during this drill. This includes the player on the ball as well as the help defenders.
This can be a great time to have the offensive players run through the offense or set
plays since the defense will be moving realistically but there will be less pressure.
Don’t allow the offense to simply dribble right in front of their defender just because
they can’t steal the basketball. Still have to be realistic.

PARTNER CLOSEOUTS 30 TEAM
DEFENSE DRILLS
Copyright © 2016 Trevor McLean BasketballForCoaches.com 43
Partner Closeouts
How the Drill Works:
Players find a partner and then line up approximately 10 feet away from each other. One
player will pass and then closeout on the other player. After holding for 3 seconds and
tracing the basketball, they backpedal to their starting spot and the other player performs the
same thing.
Purpose:
A very basic drill for teaching young players the technique of closing out on the basketball. A
great drill for completing a lot of repetitions in a short amount of time.
Setup:
All players find a partner.
Each pair has one basketball.
Players line up approximately 10 feet away from each other.
Instructions:
1 . The drill starts with the player with the basketball
making a chest pass to their partner.
2. Immediately upon making the pass, the passer
closes out on the player with the basketball in a
low stance with one hand up.
3. The defender will then stay in a low stance and
trace the basketball with one of their hands for
three seconds.
4. When three seconds is over, they backpedal to
their starting spot and then it’s their partner’s turn
to repeat the same process.
5. This continues for a set amount of time.
PARTNER CLOSEOUTS 30 TEAM
DEFENSE DRILLS
Copyright © 2016 Trevor McLean BasketballForCoaches.com 44
Variations:
One Dribble - Once your players are used to closing out on the basketball, allow the offense
to take one dribble to either the left or right. This ensure that the defender is low in their
stance and teaches them to react quickly to the drive by an offensive player.
Coaching Points:
On the closeout players should sprint 2/3’s of the way and then get in a low stance
with choppy feet for the final 1/3 of the closeout.
All players should be raising one hand up on the closeout to prevent the opponent
from shooting the basketball if it were in a live game.
Players should have their weight back on the closeout to absorb the drive.
Teach players to call out ‘shot!’ on the closeout if the offensive player pump fakes.
During a game, this will let their teammates know to box out their opponent.

PASS DENIAL 30 TEAM
DEFENSE DRILLS
Copyright © 2016 Trevor McLean BasketballForCoaches.com 45
Pass Denial
How the Drill Works:
Two players compete 1-on-1 from the wing. The goal for the defense is to prevent the pass
to the wing player while the offensive player attempts to make 3 catches in a row.
Purpose:
Being able to deny the pass to your opponent is one of the most important skills in a
traditional man-to-man defense. This drill allows players to practice their positioning and
being able to react to the movements of the offensive player.
Setup:
One player with a basketball on the strong-side slot position.
One offensive player on the wing.
One defensive player on the wing guarding the offensive player.
Instructions:
1 . The drill starts with the offensive player walking
the defender in and exploding out looking to
receive the pass from the player in the slot.
2. The defense attempts to constantly deny the
pass to the offensive player on the wing.
3. The offensive player can perform a v-cuts and
utilise changes of speed but must stay on the line
between the wing and the basket.
4. Each time the offensive player catches the
basketball, they immediately pass back to the
player in the slot and the drill continues.
5. After the third catch, the players swap positions.

PASS DENIAL 30 TEAM
DEFENSE DRILLS
Copyright © 2016 Trevor McLean BasketballForCoaches.com 46
Variations:
Live 1-on-1 – After the pass is made, you can allow the players to play one-on-one until a
score or a missed shot. The offensive player has a maximum of 2 - 3 dribbles before
shooting.
Different Spots on the Floor - The drill can also be run making a pass from the wing to the
corner or from the wing to the top of the key.
Both Sides of the Floor - Since there are only 3 players involved at one time in the drill, run it
on both sides of the court and also at the opposite end of the court if you have enough
players.
Coaching Points:
When in denial position, the defender should have their chest facing the offensive
player and have their arm out looking over their shoulder. This allows them to
quickly prevent a backdoor pass instead of having to make a 180 degree turn.
The offensive player can receive the backdoor pass for the layup if the defender is
overplaying them.
The defender should maintain contact with their arm-bar throughout the drill. Warn
players that if they extend their arm-bar and push, it will be a foul.
The offensive players should practice getting open by establishing a higher foot than
the defender and then exploding out to the wing.
This is a very important drill as most offenses start with a top to wing pass. If your
players are good at defending it, it will take a lot of teams out of their offense and
confuse them!

PLUG 1-on-1 30 TEAM
DEFENSE DRILLS
Copyright © 2016 Trevor McLean BasketballForCoaches.com 47
Plug 1-on-1
How the Drill Works:
The drill starts two-on-two with a defender and an offensive player on each wing. One of the
offensive players with a basketball drives towards the middle where a help defender must
‘plug’ the drive. The dribbler will kick the basketball out to the wing and the help defender
must closeout and then get a stop against their opponent who can drive or shoot.
Purpose:
This drill works on the game-like scenario of the help defender needing to plug the lane to
help a teammate and then recover to their player on the kick out. The drill ends with 1-on-1
which is always terrific for development.
Setup:
Two offensive players on each wing.
The offensive player of one pair has a basketball.
The defender who will be closing out and playing defense starts in help position.
Instructions:
1 . The player with the basketball starts the drill by
driving to the middle pas the ‘dummy’ defender
who is guarding them. The dummy defender calls
out ‘Middle! Middle!’
2. The help defender must step across and cut off the
dribblers driving lane and forcing them to pass out
to the offensive player on the wing.
3. When this pass happens, the help defender must
immediately close out on the basketball and then
attempt to get a defensive stop.
4. The offensive player on the wing must attack on the catch and can either shoot the
basketball or drive into the lane for the score.

PLUG 1-on-1 30 TEAM
DEFENSE DRILLS
Copyright © 2016 Trevor McLean BasketballForCoaches.com 48
5. After each turn, everyone rotates one position.
Variations:
Limit Offensive Dribbles - After the pass out the wing, only allow the offensive player 2 - 3
dribbles to get a quality shot attempt. Any more than that are wasted dribbles.
Competitive - To add competition to the drill, give the defender one point for every
defensive stop. When using this rule, players are rewarded with a defensive stop by getting to
stay on defense for another possession.
Coaching Points:
When plugging the driving lane, the help defender must not turn their body to face
the dribbler as then it will be too slow to turn and recover. Instead, they should
retreat backwards into the driving lane so that when the kick out pass is made they
can close out in a straight line.
Ensure correct closeout technique. Players should have a hand up, be in a low
stance, and have their weight back to absorb the drive.
The offensive player should be deciding whether they’ll drive or shoot on the catch
of the basketball so that they can make a quick decision and keep the advantage
over the defender.
Use both ends of the courts if possible to maximise the amount of reps!
POST FEED 1-on-1 30 TEAM
DEFENSE DRILLS
Copyright © 2016 Trevor McLean BasketballForCoaches.com 49
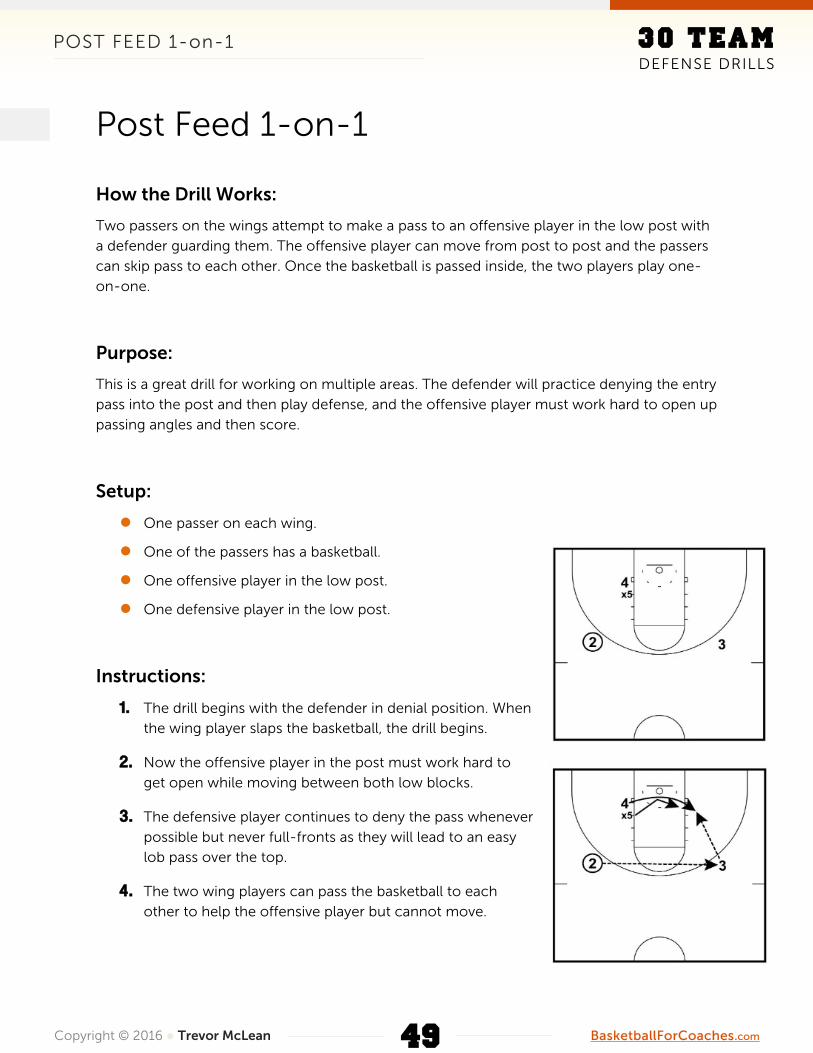
Post Feed 1-on-1
How the Drill Works:
Two passers on the wings attempt to make a pass to an offensive player in the low post with
a defender guarding them. The offensive player can move from post to post and the passers
can skip pass to each other. Once the basketball is passed inside, the two players play one-
on-one.
Purpose:
This is a great drill for working on multiple areas. The defender will practice denying the entry
pass into the post and then play defense, and the offensive player must work hard to open up
passing angles and then score.
Setup:
One passer on each wing.
One of the passers has a basketball.
One offensive player in the low post.
One defensive player in the low post.
Instructions:
1 . The drill begins with the defender in denial position. When
the wing player slaps the basketball, the drill begins.
2. Now the offensive player in the post must work hard to
get open while moving between both low blocks.
3. The defensive player continues to deny the pass whenever
possible but never full-fronts as they will lead to an easy
lob pass over the top.
4. The two wing players can pass the basketball to each
other to help the offensive player but cannot move.

POST FEED 1-on-1 30 TEAM
DEFENSE DRILLS
Copyright © 2016 Trevor McLean BasketballForCoaches.com 50
5. When the basketball is eventually passed inside, the two play one-on-one until a
score.
Variations:
2-on-2 – Start another pair on the opposite low block and then compete two-on-two. The
offensive players can use cross screens and can slide up to the elbow too. Must stay in the
paint area.
Coaching Points:
The defensive player must make sure to not over-deny. They must be able to slide
back behind the offensive player if a pass is made inside.
The defensive player must deny from the high side. Not the baseline.
When the pass is skipped, the defender should quickly slide to the middle and then
see both their player and the basketball. When the offensive player slides across,
make contact and then establish position.

POST PATHWAY 30 TEAM
DEFENSE DRILLS
Copyright © 2016 Trevor McLean BasketballForCoaches.com 51
Post Pathway
How the Drill Works:
Two players start on the low block. A defender and an offensive player. Three players spread
out around the perimeter must attempt to pass the basketball inside after the offensive player
has established good positioning on the defender denying the basketball.
Purpose:
This drill works on multiple areas of post play. The defense must continually adjust their
positioning to deny the pass inside, the offense must attempt to get good position and open
up a passing lane, and the players on the perimeter are practicing making the on-target pass
inside.
Setup:
Three players spread out around the three-point line. One
on each wing and one at the top of the key.
One of these perimeter players has a basketball.
An offensive player positioned on the low block.
A defensive player guarding the low post player.
Instructions:
1 . The drill starts with the offensive low post player on one of
the blocks and the post defender in good defensive
position depending on where the basketball is on the floor.
2. The perimeter players then start passing the basketball
between themselves looking to make a pass inside to the
low post.
3. The offensive player must focus on using their body to
create a good passing lane as they move only between
each low block.

POST PATHWAY 30 TEAM
DEFENSE DRILLS
Copyright © 2016 Trevor McLean BasketballForCoaches.com 52
4. The defender must continually adjust their defensive position to deny the pass inside.
5. When the pass is made inside, if the offensive player doesn’t have an immediate score
the inside players compete 1-on-1 in a post up situation.
6. After three possessions, everyone rotates one spot. The offensive player goes to the
three-point line, defense goes to offense, and one of the perimeter players comes in
to play defense.
Variations:
Pass Defenders - To increase the difficulty of the drill and to work on feeding the basketball
to the low post, add defenders to the perimeter players. These defenders aren’t allowed to
steal passes that are made around the perimeter, but they can pressure and steal passes that
are made inside to the low post.
No Pass Inside - If you’re player aren’t competent with low post defense and you simply
want to practice that, remove the pass inside and have the offense and defense constantly
battle for position for 30 seconds.
Pass Inside too Quickly - If players are making passes inside too quickly, add a minimum
number of passes rule to the perimeter players (5 - 8). This ensures the defender gets time to
work on their defensive positioning.
Coaching Points:
Run through your team’s post defense rules before starting the drill so players are
aware of how they should be denying the pass inside.
If your team fronts the post, practice that during this drill and include the rule that
perimeter players aren’t allowed to lob passes over the top.
If your defenders are 1/2 fronting, they must be able to get back between the
offensive player and the rim when the basketball is in flight.
Footwork is the key to getting good low post positioning. Ensure the offensive post
player is thinking ahead of the play and sealing their defender off when they get a
chance.
Perimeter passes must be on-target and lead the offensive post player to an
advantage. It’s important to put focus on that as well as post play.

PRESSURE FINISH 30 TEAM
DEFENSE DRILLS
Copyright © 2016 Trevor McLean BasketballForCoaches.com 53
Pressure Finish
How the Drill Works:
Two players start on the baseline. An offensive player will dribble up and around a cone and
then attempt to finish at the rim while a defensive player will sprint up and around a cone and
then challenge the offensive player at the rim.
Purpose:
This drill will work on finishing at the rim under pressure (something many youth players
struggle with) and also challenging a shot at the rim without fouling the offensive player.
Setup:
All players form two lines on the baseline.
The offensive line should be closest to the rim on the inside and the defensive line
should be on the outside next to the offensive line.
The players in the offensive line have a basketball.
Two cones are set up directly in front of these cones near the three-point line.
Instructions:
1 . The offensive player makes the first move and must
dribble up and around the cone closest to the
sideline.
2. The defensive player immediately runs behind the
offensive player and around the inside cone.
3. The offensive player drives in and looks to finish the
layup under pressure from the defender who must
contest without fouling.
4. The players then join the end of the opposite line.

PRESSURE FINISH 30 TEAM
DEFENSE DRILLS
Copyright © 2016 Trevor McLean BasketballForCoaches.com 54
Variations:
Cone Distance - You can vary the distance of each of the cones to make it easier or harder
for the offense. Run the drill a couple of times and then adjust since it will depend on age
and skill level of the players.
Side of the Floor - Ensure that you run the drill on both sides of the floor so players are
practicing finishing at the rim with both their right and left hand.
Coaching Points:
Both players must start behind the baseline. Don’t allow any player to cheat.
Encourage the offensive player to vary whether they finish with the outside hand or
inside hand. Be creative at the rim.
The defense must recognise whether they have time to get in front of the offensive
player and establish position or whether they need to contest from behind. Varying
the cones will allow players to experience both.
Players can run around the inside or the outside of the cone.

SIMPLE CLOSEOUTS 30 TEAM
DEFENSE DRILLS
Copyright © 2016 Trevor McLean BasketballForCoaches.com 55
Simple Closeouts
How the Drill Works:
A defender starts with the basketball approximately 3 metres away from their partner. The
defender passes out to the offensive player and then closes out. After going over the
fundamentals of the closeout, pairs play live after the pass.
Purpose:
A very simple drill for players still learning the fundamentals of close out technique. It leads
into a competitive game of 1-on-1 which is very beneficial for player development.
Setup:
Players need to find a partner and get one basketball between the two of them.
One defensive player on each low block with a basketball.
Their partner on offense at the three-point line on the wing.
Instructions:
1 . The drill is player using both sides of the court so
both players on the low post pass out to their partner
and then immediately sprint out to close out on the
basketball.
2. If you’re practicing fundamentals of the closeout, the
defensive player repeats this three times before the
next group replaces them.
3. If players understand the fundamentals, have the
partners compete live off the closeout.
4. After a score or defensive stop, the next pair rotates
in. Players switch roles next time they enter into the drill.

SIMPLE CLOSEOUTS 30 TEAM
DEFENSE DRILLS
Copyright © 2016 Trevor McLean BasketballForCoaches.com 56
Variations:
Defense Stays In – Instead of having partners, line up a group of players on the wing. Each
player must get 3 defensive stops before they’re allowed to change to offense as the other
players rotate through the offensive position.
Limit Dribbles - Limit the offensive player to 2 - 3 dribbles after the catch. This is for more
advanced players as it can be difficult against good defense.
Coaching Points:
As always, closeout technique is of vital importance. Ensure the player closing out
does so with a high hand to prevent the shot, they use choppy steps, and get down
in a low stance with their weight back ready to absorb the drive.
The direction that the defender influences the offensive player on the closeout
should line up with your team’s defensive philosophy.
If a shot is taken from the outside, ensure the defender is making contact and then
pursuing the basketball. If the offense rebounds the play continues.
Use both sides of the court and both ends of the court to ensure maximum
participation from the players and little standing around.
Players must stay on their half of the court. This will prevent players from dribbling
everywhere and focus on driving in a straight line.
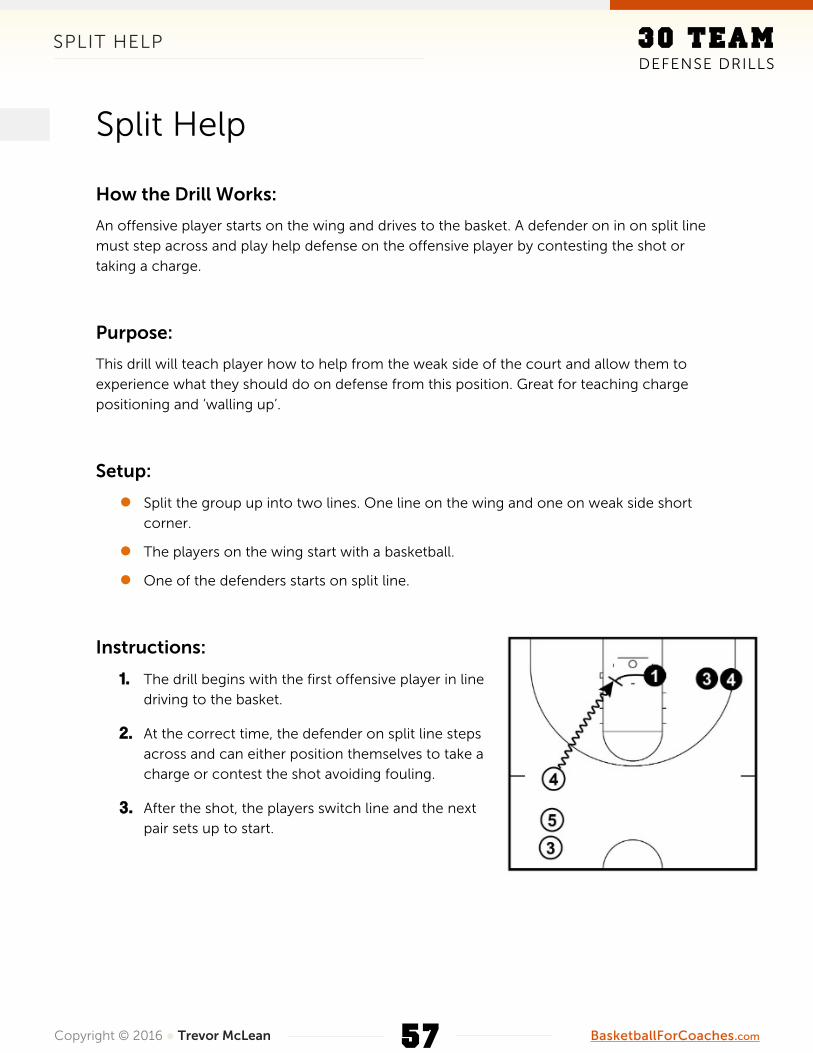
SPLIT HELP 30 TEAM
DEFENSE DRILLS
Copyright © 2016 Trevor McLean BasketballForCoaches.com 57
Split Help
How the Drill Works:
An offensive player starts on the wing and drives to the basket. A defender on in on split line
must step across and play help defense on the offensive player by contesting the shot or
taking a charge.
Purpose:
This drill will teach player how to help from the weak side of the court and allow them to
experience what they should do on defense from this position. Great for teaching charge
positioning and ‘walling up’.
Setup:
Split the group up into two lines. One line on the wing and one on weak side short
corner.
The players on the wing start with a basketball.
One of the defenders starts on split line.
Instructions:
1 . The drill begins with the first offensive player in line
driving to the basket.
2. At the correct time, the defender on split line steps
across and can either position themselves to take a
charge or contest the shot avoiding fouling.
3. After the shot, the players switch line and the next
pair sets up to start.

SPLIT HELP 30 TEAM
DEFENSE DRILLS
Copyright © 2016 Trevor McLean BasketballForCoaches.com 58
Variations:
2-on-1 - If using this variation, start the defenders behind the baseline and replace them with
one offensive player at the short corner position. The offensive player drives hard and the
defender must do their best to prevent the open layup or deflect the pass made to the short
corner.
Both Ends of the Court - Since this drill involves lines of players, I recommend running it on
both ends of the court if you have another coach or parent to help you.
Coaching Points:
The offensive player must attack the rim. The drill is pointless if the offensive player
pulls up for a midrange shot.
The defenders must do their best not to foul the offensive player. Teach them how
to ‘wall up’ on the layup to avoid fouling while still forcing a missed shot.
Make sure players are stepping across from help at the right time. We don’t want
players stepping across too early or too late.

STAR CLOSEOUTS 30 TEAM
DEFENSE DRILLS
Copyright © 2016 Trevor McLean BasketballForCoaches.com 59
Star Closeouts - Defensive Drill
How the Drill Works:
The drill starts with 3 defensive players spread out on the baseline and 3 offensive players
around the three-point line. The basketball is rotated around the 6 players as the defenders
close out diagonally. When the basketball arrives at the final offensive player, the teams play
3 on 3 until a stop or a score.
Purpose:
This is a great drill to combine working on closeouts with a competitive small-sided game.
Setup:
3 defenders evenly spaced out along the baseline.
3 offensive players spaced out around the three-point line.
The rest of the players behind the defenders on the
baseline.
A basketball starts on either one of the side defenders.
Instructions:
1 . The drill begins with the basketball being rotated around
the 6 players. These passes must be quick and accurate.
2. After the first pass, the defender will close out to the
offensive player on the opposite wing.
3. After the second pass, the middle defender will close out to
the offensive player at the top of the key.
4. After the third pass, the defender will close out to the
offensive player on the opposite wing.
5. Competitive 3 on 3 begins on this final closeout. Players will
play until the offense gets a score or the defense gets the
stop.

STAR CLOSEOUTS 30 TEAM
DEFENSE DRILLS
Copyright © 2016 Trevor McLean BasketballForCoaches.com 60
Scoring System:
Teams - A scoring option you have is to create teams of 3 and have them keep their own
score using 2’s and 3’s. Each time the defense gets a stop they become the offensive team.
Random - Or the coach can simply rotate the defenders through at random. Each time the
defenders get a stop, they become the offensive team.
Variations:
4 Players - This drill can be run with 4 players spread out on the baseline and the three-point
line.
Coaching Points:
On the closeouts it’s important for each player to use choppy steps and to get their
weight back to absorb the potential drive.
Don’t allow the defenders to lob their passes to give themselves more time to close
out. Sharp passing!
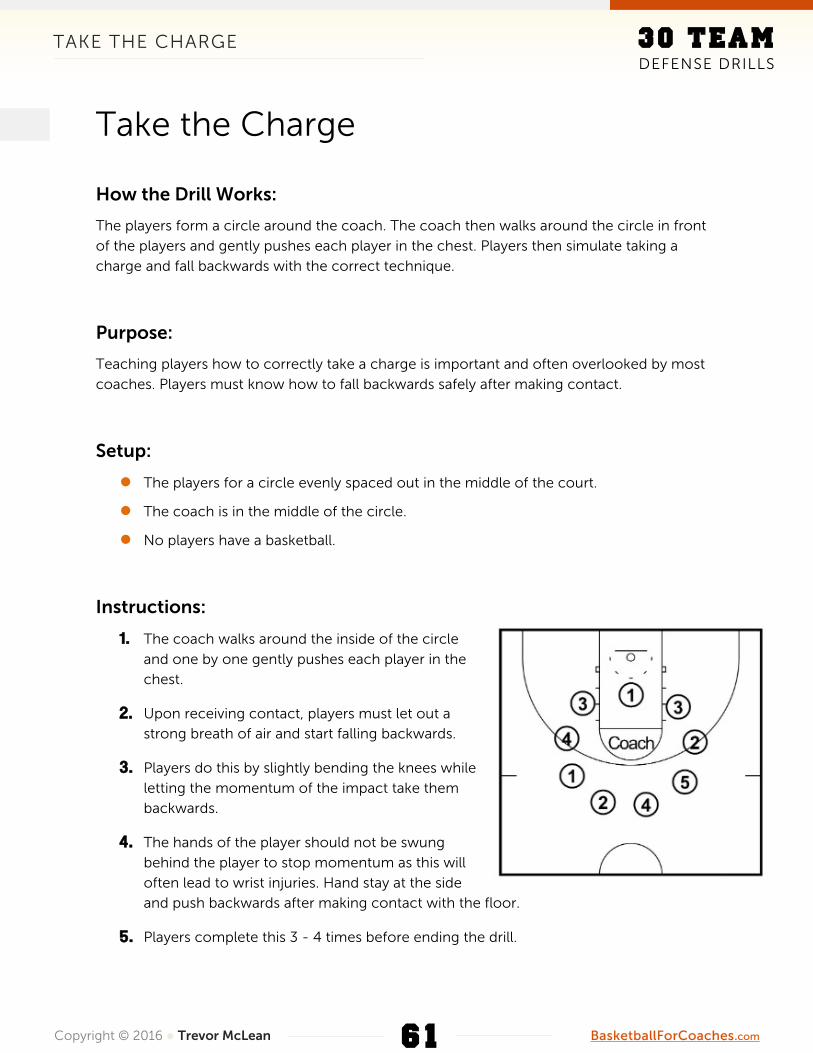
TAKE THE CHARGE 30 TEAM
DEFENSE DRILLS
Copyright © 2016 Trevor McLean BasketballForCoaches.com 61
Take the Charge
How the Drill Works:
The players form a circle around the coach. The coach then walks around the circle in front
of the players and gently pushes each player in the chest. Players then simulate taking a
charge and fall backwards with the correct technique.
Purpose:
Teaching players how to correctly take a charge is important and often overlooked by most
coaches. Players must know how to fall backwards safely after making contact.
Setup:
The players for a circle evenly spaced out in the middle of the court.
The coach is in the middle of the circle.
No players have a basketball.
Instructions:
1 . The coach walks around the inside of the circle
and one by one gently pushes each player in the
chest.
2. Upon receiving contact, players must let out a
strong breath of air and start falling backwards.
3. Players do this by slightly bending the knees while
letting the momentum of the impact take them
backwards.
4. The hands of the player should not be swung
behind the player to stop momentum as this will
often lead to wrist injuries. Hand stay at the side
and push backwards after making contact with the floor.
5. Players complete this 3 - 4 times before ending the drill.

TAKE THE CHARGE 30 TEAM
DEFENSE DRILLS
Copyright © 2016 Trevor McLean BasketballForCoaches.com 62
Coaching Points:
Players must start in a balanced stance. Hands can cover the groin or chest
depending on how players feel comfortable and whether they’re a male or female.
I repeat. Hands should not be flung backwards on contact to make contact with the
ground before the body does. This will lead to injury.
Players should put their chin to chest after contact is made and they’re falling back
to prevent the back of their head from hitting the floor.

ZIG ZAG SLIDES 30 TEAM
DEFENSE DRILLS
Copyright © 2016 Trevor McLean BasketballForCoaches.com 63
Zig Zag Slides
How the Drill Works:
Players are required to slide from side to side up and down the court. They do this using drop
steps and defensive slides.
Purpose:
To teach players the basics of defense. This involves learning how to defensive slide properly
and also using the drop step to change direction.
Setup:
The drill begins with all players on the baseline lining up on one of the corners. No
player should have a basketball.
No player should have a basketball.
Instructions:
1 . The first player will defensive slide from the corner to the
high post and perform a 90-degree drop step so that they
are now sliding back to the opposite sideline.
2. This process of sliding from one side to the other and
drop stepping continues until the player reaches the
opposite baseline.
3. They come back down the opposite side of the court
using the same principles.

ZIG ZAG SLIDES 30 TEAM
DEFENSE DRILLS
Copyright © 2016 Trevor McLean BasketballForCoaches.com 64
Variations:
Add an Offensive Player - To make the slides more game-like, add an offensive player who
must dribble from side-to-side and the defensive player must stay in front of them using
slides and drop steps. They’re not allowed to steal the basketball.
Compete at Half Way - If you do decide to add an offensive player, if the players are used to
sliding and have the correct technique, allow them to play one-on-one from half way. The
defense must use the defensive principles taught in the drill.
Coaching Points:
Teach all players how to defensive slide and drop step at the beginning of the drill.
Make sure players are in a low stance and don’t have their legs straight.
Players should never cross their feet!

CONCLUSION 30 TEAM
DEFENSE DRILLS
Copyright © 2016 Trevor McLean BasketballForCoaches.com 65
CONCLUSION I hope you enjoyed the 30 Team Defense Drills and that they can assist you and your players
to improve on the defensive end of the floor!
Two more things before you go…
1 . If you have any questions, suggestions, or comments, feel free to reach out to me at
[email protected] I welcome all feedback and love hearing
from the readers of BFC.
2. This PDF is part of the ‘Championship Coaching Course’ program from the team at
Basketball For Coaches. If you’re reading this PDF without having purchased the
program, please send us an email at [email protected] and let
us know where you accessed it. We put a lot of work into these PDF’s and would like
to keep them exclusive for those who purchased.
Thanks!
- Coach Mac