m y cm xt5 · 2020-03-07 · gm logo, cadillac, the cadillac emblem, and xt5 are trademarks and/ or...
TRANSCRIPT

2020
XT5
XT5
84290261 A
C
M
Y
CM
MY
CY
CMY
K
20_CAD_XT5_COV_en_US_84290261A_2019JUN07.ai 1 4/18/2019 11:39:34 AM20_CAD_XT5_COV_en_US_84290261A_2019JUN07.ai 1 4/18/2019 11:39:34 AM

Cadillac XT5 Owner Manual (GMNA-Localizing-U.S./Canada/Mexico-13527534) - 2020 - CRC - 5/29/19
Contents Introduction . . . . . . . . . . . . . . . . . . . . . . . . . . 2
Keys, Doors, and Windows . . . . . . . . . . 9
Seats and Restraints . . . . . . . . . . . . . . . 44
Storage . . . . . . . . . . . . . . . . . . . . . . . . . . . . . . 95
Instruments and Controls . . . . . . . . 102
Lighting . . . . . . . . . . . . . . . . . . . . . . . . . . . . 143
Infotainment System . . . . . . . . . . . . . 150
Climate Controls . . . . . . . . . . . . . . . . . . 151
Driving and Operating . . . . . . . . . . . . 160
Vehicle Care . . . . . . . . . . . . . . . . . . . . . . . 250
Service and Maintenance . . . . . . . . . 335
Technical Data . . . . . . . . . . . . . . . . . . . . 349
Customer Information . . . . . . . . . . . . 353
Reporting Safety Defects . . . . . . . . . 363
OnStar . . . . . . . . . . . . . . . . . . . . . . . . . . . . . . 367
Connected Services . . . . . . . . . . . . . . . 374
Index . . . . . . . . . . . . . . . . . . . . . . . . 377

Cadillac XT5 Owner Manual (GMNA-Localizing-U.S./Canada/Mexico-13527534) - 2020 - CRC - 5/29/19
2 INTRODUCTION
Introduction
The names, logos, emblems, slogans,vehicle model names, and vehiclebody designs appearing in this manualincluding, but not limited to, GM, theGM logo, CADILLAC, the CADILLACEmblem, and XT5 are trademarks and/or service marks of General MotorsLLC, its subsidiaries, affiliates,or licensors.
For vehicles first sold in Canada,substitute the name “General Motorsof Canada Company” for CadillacMotor Car Division wherever itappears in this manual.
This manual describes features thatmay or may not be on the vehiclebecause of optional equipment thatwas not purchased on the vehicle,model variants, country specifications,features/applications that may not beavailable in your region, or changessubsequent to the printing of thisowner’s manual.
Refer to the purchase documentationrelating to your specific vehicle toconfirm the features.
Keep this manual in the vehicle forquick reference.
Canadian Vehicle OwnersA French language manual can beobtained from your dealer, atwww.helminc.com, or from:
Propriétaires Canadiens
On peut obtenir un exemplaire de ceguide en français auprès duconcessionnaire ou à l'adressesuivante:
Helm, IncorporatedAttention: Customer Service47911 Halyard DrivePlymouth, MI 48170USA
Using this ManualTo quickly locate information aboutthe vehicle, use the Index in the backof the manual. It is an alphabeticallist of what is in the manual and thepage number where it can be found.
Danger, Warning, andCautionWarning messages found on vehiclelabels and in this manual describehazards and what to do to avoid orreduce them.
{ Danger
Danger indicates a hazard with ahigh level of risk which will resultin serious injury or death.
Litho in U.S.A.Part No. 84290261 A First Printing ©2019 General Motors LLC. All Rights Reserved.

Cadillac XT5 Owner Manual (GMNA-Localizing-U.S./Canada/Mexico-13527534) - 2020 - CRC - 5/29/19
INTRODUCTION 3
{ Warning
Warning indicates a hazard thatcould result in injury or death.
Caution
Caution indicates a hazard thatcould result in property or vehicledamage.
A circle with a slash through it is asafety symbol which means “Do not,”“Do not do this,” or “Do not let thishappen.”
SymbolsThe vehicle has components andlabels that use symbols instead oftext. Symbols are shown along withthe text describing the operation orinformation relating to a specificcomponent, control, message, gauge,or indicator.
M : Shown when the owner’s manualhas additional instructions orinformation.
* : Shown when the service manualhas additional instructions orinformation.
0 : Shown when there is moreinformation on another page —“see page.”
Vehicle Symbol Chart
Here are some additional symbols thatmay be found on the vehicle and whatthey mean. See the features in thismanual for information.
u : Air Conditioning System
G : Air Conditioning Refrigerant Oil
9 : Airbag Readiness Light
! : Antilock Brake System (ABS)
$ : Brake System Warning Light
9 : Dispose of Used ComponentsProperly
P : Do Not Apply High PressureWater
B : Engine Coolant Temperature
_ : Flame/Fire Prohibited
H : Flammable
[ : Forward Collision Alert
R : Fuse Block Cover Lock Location
+ : Fuses
j : ISOFIX/LATCH System ChildRestraints
Q : Keep Fuse Block Covers ProperlyInstalled
| : Lane Change Alert
@ : Lane Departure Warning
A : Lane Keep Assist
* : Malfunction Indicator Lamp
: : Oil Pressure
X : Park Assist

Cadillac XT5 Owner Manual (GMNA-Localizing-U.S./Canada/Mexico-13527534) - 2020 - CRC - 5/29/19
4 INTRODUCTION
~ : Pedestrian Ahead Indicator
O : Power
7 : Rear Cross Traffic Alert
I : Registered Technician
/ : Remote Vehicle Start
> : Seat Belt Reminders
I : Side Blind Zone Alert
h : Stop/Start
7 : Tire Pressure Monitor
d : Traction Control/StabiliTrak/Electronic Stability Control (ESC)
a : Under Pressure
V : Vehicle Ahead Indicator

Cadillac XT5 Owner Manual (GMNA-Localizing-U.S./Canada/Mexico-13527534) - 2020 - CRC - 5/29/19
INTRODUCTION 5
Instrument Panel Overview

Cadillac XT5 Owner Manual (GMNA-Localizing-U.S./Canada/Mexico-13527534) - 2020 - CRC - 5/29/19
6 INTRODUCTION
1. Air Vents 0 158.
2. Exterior Lamp Controls 0 143.
Turn Signal Lever. See Turn andLane-Change Signals 0 147.
IntelliBeam System Button (IfEquipped). See Exterior LampControls 0 143.
3. Tap Shift Controls. See ManualMode 0 191.
4. Instrument Cluster 0 111.
Driver Information Center (DIC)Display. See Driver InformationCenter (DIC) 0 127.
5. Windshield Wiper/Washer 0 104.
Rear Window Wiper/Washer0 106.
6. ENGINE START/STOP Button.See Ignition Positions 0 176.
7. Park Assist Button. SeeAssistance Systems for Parking orBacking 0 211.
Automatic Parking Assist (APA)Button. See Assistance Systemsfor Parking or Backing 0 211.
Stop/Start System 0 179 DisableButton.
8. Light Sensor. See AutomaticHeadlamp System 0 145.
9. Hazard Warning Flashers 0 146.
10. Infotainment 0 150.
11. Heated and Ventilated Front Seats0 51 (If Equipped).
12. MODE Switch. See Driver ModeControl 0 198.
Traction Control/ElectronicStability Control 0 196.
All-Wheel Drive 0 192 (IfEquipped).
13. Dual Automatic Climate ControlSystem 0 151.
14. Wireless Charging 0 108 (IfEquipped).
15. Infotainment 0 150.
16. Shift Lever. See AutomaticTransmission 0 186.
17. Steering Wheel Controls 0 103.
Driver Information Center (DIC)Controls. See Driver InformationCenter (DIC) 0 127.
18. Steering Wheel Controls 0 103.
19. Horn 0 103.
20. Forward Collision Alert (FCA)System 0 220 (If Equipped).
Lane Keep Assist (LKA) 0 231 (IfEquipped).
Heated Steering Wheel 0 103 (IfEquipped).
21. Cruise Control 0 199.
Adaptive Cruise Control 0 201 (IfEquipped).
Phone Button. See Steering WheelControls 0 103.
22. Steering Wheel Adjustment 0 103(Out of View).
23. Head-Up Display (HUD) 0 130 (IfEquipped).

Cadillac XT5 Owner Manual (GMNA-Localizing-U.S./Canada/Mexico-13527534) - 2020 - CRC - 5/29/19
INTRODUCTION 7
24. Hood Release. See Hood 0 253.
Data Link Connector (DLC) (Outof View). See MalfunctionIndicator Lamp (Check EngineLight) 0 118.
25. Instrument Panel IlluminationControl 0 147.
26. Electric Parking Brake 0 194.

Cadillac XT5 Owner Manual (GMNA-Localizing-U.S./Canada/Mexico-13527534) - 2020 - CRC - 5/29/19
8 INTRODUCTION
2 NOTES

Cadillac XT5 Owner Manual (GMNA-Localizing-U.S./Canada/Mexico-13527534) - 2020 - CRC - 5/29/19
KEYS, DOORS, AND WINDOWS 9
Keys, Doors, andWindows
Keys and LocksKeys . . . . . . . . . . . . . . . . . . . . . . . . . . . . . . . . . . 9Remote Keyless Entry (RKE)System . . . . . . . . . . . . . . . . . . . . . . . . . . . . 10
Remote Keyless Entry (RKE)System Operation . . . . . . . . . . . . . . . . 10
Remote Vehicle Start . . . . . . . . . . . . . . 17Door Locks . . . . . . . . . . . . . . . . . . . . . . . . . 18Power Door Locks . . . . . . . . . . . . . . . . . 21Delayed Locking . . . . . . . . . . . . . . . . . . . 21Automatic Door Locks . . . . . . . . . . . . 21Lockout Protection . . . . . . . . . . . . . . . . 22Safety Locks . . . . . . . . . . . . . . . . . . . . . . . . 22
DoorsLiftgate . . . . . . . . . . . . . . . . . . . . . . . . . . . . . 23
Vehicle SecurityVehicle Security . . . . . . . . . . . . . . . . . . . . 31Vehicle Alarm System . . . . . . . . . . . . . 31Steering Column Lock . . . . . . . . . . . . . 32Immobilizer . . . . . . . . . . . . . . . . . . . . . . . . 33Immobilizer Operation . . . . . . . . . . . . 33
Exterior MirrorsConvex Mirrors . . . . . . . . . . . . . . . . . . . . 34Power Mirrors . . . . . . . . . . . . . . . . . . . . . . 35Folding Mirrors . . . . . . . . . . . . . . . . . . . . 35Heated Mirrors . . . . . . . . . . . . . . . . . . . . . 36Automatic Dimming Mirror . . . . . . . 36Reverse Tilt Mirrors . . . . . . . . . . . . . . . 36
Interior MirrorsInterior Rearview Mirrors . . . . . . . . . 37Manual Rearview Mirror . . . . . . . . . . 37Automatic Dimming RearviewMirror . . . . . . . . . . . . . . . . . . . . . . . . . . . . . 37
Rear Camera Mirror . . . . . . . . . . . . . . . 37
WindowsWindows . . . . . . . . . . . . . . . . . . . . . . . . . . . 39Power Windows . . . . . . . . . . . . . . . . . . . . 40Sun Visors . . . . . . . . . . . . . . . . . . . . . . . . . . 41
RoofSunroof . . . . . . . . . . . . . . . . . . . . . . . . . . . . . 42
Keys and Locks
Keys
{ Warning
Leaving children in a vehicle with aRemote Keyless Entry (RKE)transmitter is dangerous andchildren or others could beseriously injured or killed. Theycould operate the power windowsor other controls or make thevehicle move. The windows willfunction with the RKE transmitterin the vehicle, and children orothers could be caught in the pathof a closing window. Do not leavechildren in a vehicle with an RKEtransmitter.

Cadillac XT5 Owner Manual (GMNA-Localizing-U.S./Canada/Mexico-13527534) - 2020 - CRC - 5/29/19
10 KEYS, DOORS, AND WINDOWS
The key, inside the Remote KeylessEntry (RKE) transmitter, can be usedfor all locks.
To remove the key, press the buttonon the side of the transmitter, nearthe bottom, and pull the key out.Never pull the key out withoutpressing the button.
If it becomes difficult to turn the key,inspect the key blade for debris.Periodically, clean with a brush ora pick.
See your dealer if a new key is needed.
Contact Roadside Service if locked outof the vehicle. See Roadside Service0 357.
With an active OnStar or connectedservice plan, an OnStar Advisor mayremotely unlock the vehicle. SeeOnStar Overview 0 367.
Remote Keyless Entry(RKE) SystemSee Radio Frequency Statement 0 363.
If there is a decrease in the RemoteKeyless Entry (RKE) operating range:
. Check the distance. Thetransmitter may be too far fromthe vehicle.
. Check the location. Other vehiclesor objects may be blocking thesignal.
. Check the transmitter's battery.See “Battery Replacement” later inthis section.
. If the transmitter is still notworking correctly, see your dealeror a qualified technician forservice.
Remote Keyless Entry(RKE) System OperationThe Keyless Access system allows forvehicle entry when the RemoteKeyless Entry (RKE) transmitter iswithin 1 m (3 ft). See “Keyless AccessOperation” following.
The RKE transmitter functions maywork up to 60 m (197 ft) away fromthe vehicle.
Other conditions can impact theperformance of the transmitter. SeeRemote Keyless Entry (RKE) System0 10.

Cadillac XT5 Owner Manual (GMNA-Localizing-U.S./Canada/Mexico-13527534) - 2020 - CRC - 5/29/19
KEYS, DOORS, AND WINDOWS 11
Q : Press to lock all doors and ifequipped, the fuel door. The turnsignal indicators may flash and/or thehorn may sound on the second pressto indicate locking. See VehiclePersonalization 0 134.
If the driver door is open when Q is
pressed and Open Door Anti-Lockoutis enabled, all doors will lock and thenthe driver door will immediatelyunlock. See Vehicle Personalization0 134. If the passenger door is open
when Q is pressed, all doors lock.
Pressing Q may also arm the
theft-deterrent system. See VehicleAlarm System 0 31.
If equipped with remote foldingmirrors, press and hold Q for
one second to fold the mirrors,if enabled. See Folding Mirrors 0 35.
K : Press to unlock the driver doorand if equipped, the fuel door. Pressunlock again within five seconds tounlock all doors. The RKE transmittercan be programmed to unlock alldoors on the first button press. SeeVehicle Personalization 0 134. The turnsignal indicators may flash to indicateunlocking. See Vehicle Personalization0 134. When remotely unlocking thevehicle at night, the lights come onbriefly to light your approach to thevehicle.
Pressing K will disarm the
theft-deterrent system. See VehicleAlarm System 0 31.
If equipped with remote foldingmirrors, press and hold K for
one second to unfold the mirrors,if enabled. See Folding Mirrors 0 35.
If equipped with remote windows,press and hold K until the windows
fully open, if enabled. See VehiclePersonalization 0 134.
/ : Press and release Q and then
immediately press and hold / for at
least four seconds to start the enginefrom outside the vehicle using theRKE transmitter. See Remote VehicleStart 0 17.
7 : Press and release one time toinitiate vehicle locator. The exteriorlamps flash and the horn chirps threetimes. Press and hold 7 for
three seconds to sound the panicalarm. The horn sounds and the turnsignal lamps flash for 30 seconds,
or until 7 is pressed again or the
vehicle is started.

Cadillac XT5 Owner Manual (GMNA-Localizing-U.S./Canada/Mexico-13527534) - 2020 - CRC - 5/29/19
12 KEYS, DOORS, AND WINDOWS
b : Press twice quickly to open orclose the liftgate.
Press once to stop the liftgate frommoving.
Keyless Access Operation
With the Keyless Access system, youcan lock and unlock the doors andaccess the liftgate without removingthe RKE transmitter from your pocket,purse, briefcase, etc. The RKEtransmitter should be within 1 m (3 ft)of the liftgate or door being opened.
Keyless Access can be programmed tounlock all doors on the first lock/unlock press from the driver door. SeeVehicle Personalization 0 134.
If equipped with memory seats, RKEtransmitters 1 and 2 are linked toseating positions of memory 1 or 2.See Memory Seats 0 48.
Keyless Unlocking/Locking from theDriver Door
When the doors are locked and theRKE transmitter is within 1 m (3 ft) ofthe driver door handle, pressing thelock/unlock button on the driver door
handle will unlock the driver door.If the lock/unlock button is pressedagain within five seconds, allpassenger doors will unlock.
Driver Shown, Passenger Similar
Pressing the lock/unlock button willcause all doors to lock if any of thefollowing occur:
. It has been more than five secondssince the first lock/unlock buttonpress.
. Two lock/unlock button presseswere used to unlock all doors.
. Any vehicle door has opened andall doors are now closed.
Keyless Unlocking/Locking fromPassenger Doors
When the doors are locked and theRKE transmitter is within 1 m (3 ft) ofthe door handle, pressing the lock/unlock button on that door handlewill unlock all doors. Pressing thelock/unlock button will cause all doorsto lock if any of the following occur:
. The lock/unlock button was usedto unlock all doors.
. Any vehicle door has opened andall doors are now closed.
Passive Locking
This vehicle will lock several secondsafter all doors are closed if the vehicleis off and at least one RKE transmitterhas been removed or none remain inthe interior.
If equipped, the fuel door will lock.
If other electronic devices interferewith the RKE transmitter signal, thevehicle may not detect the RKEtransmitter inside the vehicle.If passive locking is enabled, the doorsmay lock with the RKE transmitter

Cadillac XT5 Owner Manual (GMNA-Localizing-U.S./Canada/Mexico-13527534) - 2020 - CRC - 5/29/19
KEYS, DOORS, AND WINDOWS 13
inside the vehicle. Do not leave theRKE transmitter in an unattendedvehicle.
To customize the doors toautomatically lock when exiting thevehicle, see Vehicle Personalization0 134.
Temporary Disable of PassiveLocking
Temporarily disable passive locking bypressing and holding K on theinterior door switch with a door openfor at least four seconds, or until threechimes are heard. Passive locking willthen remain disabled until Q on theinterior door is pressed, or until thevehicle is turned on.
Remote Left in Vehicle Alert
When the vehicle is turned off and anRKE transmitter is left in the vehicle,the horn will chirp three times afterall doors are closed. To turn on or off,see Vehicle Personalization 0 134.
Remote No Longer in Vehicle Alert
If the vehicle is on with a door open,and then all doors are closed, thevehicle will check for RKEtransmitters inside. If an RKEtransmitter is not detected, the DriverInformation Center (DIC) will displayNO REMOTE DETECTED and the hornwill chirp three times.
This occurs only once each time thevehicle is driven.
To turn on or off, see VehiclePersonalization 0 134.
Keyless Liftgate Opening
Press the touch pad on the liftgatehandle to open the liftgate if the RKEtransmitter is within 1 m (3 ft).
Key Access
To access a vehicle with a weaktransmitter battery, see Door Locks0 18.
Programming Transmitters tothe Vehicle
Only RKE transmitters programmed tothe vehicle will work. If a transmitteris lost or stolen, a replacement can bepurchased and programmed throughyour dealer.
The vehicle can be reprogrammed sothat lost or stolen transmitters nolonger work. Each vehicle can have upto eight transmitters matched to it.
Programming with RecognizedTransmitters
A new transmitter can be programmedto the vehicle when there are tworecognized transmitters.
To program, the vehicle must be offand all of the transmitters, bothcurrently recognized and new, mustbe with you.
1. Place the two recognizedtransmitters in the cupholder.
2. Remove the key lock cylinder capon the driver door handle. SeeDoor Locks 0 18. Insert thevehicle key of the transmitterinto the key lock cylinder on the

Cadillac XT5 Owner Manual (GMNA-Localizing-U.S./Canada/Mexico-13527534) - 2020 - CRC - 5/29/19
14 KEYS, DOORS, AND WINDOWS
driver door and turn the keycounterclockwise, to the unlockposition, five times within10 seconds.
The DIC displays READY FORREMOTE #2, 3, 4, ETC.
3. Place the new transmitter intothe transmitter pocket. Thetransmitter pocket is inside thecenter console storage areabetween the driver and frontpassenger seats. The storage areawill need to be opened and thestorage tray lifted up to accessthe transmitter pocket.
4. Press ENGINE START/STOP.When the transmitter is learnedthe DIC display will show that itis ready to program the nexttransmitter.
5. Remove the transmitter from thetransmitter pocket and press thetransmitter K or Q button.
To program additionaltransmitters, repeat Steps 3–5.
When all additional transmittersare programmed, press and holdENGINE START/STOP for12 seconds to exitprogramming mode.
6. Return the key back into thetransmitter.
7. Replace the key lock cylindercap. See Door Locks 0 18.
Programming without RecognizedTransmitters
If two currently recognizedtransmitters are not available, followthis procedure to program up to eighttransmitters. This feature is notavailable in Canada. This procedurewill take approximately 30 minutes to
complete. The vehicle must be off andall of the transmitters you wish toprogram must be with you.
1. Remove the key lock cylinder capon the driver door handle. SeeDoor Locks 0 18. Insert thevehicle key of the transmitterinto the key lock cylinder on thedriver door handle and turn thekey counterclockwise, to theunlock position, five times within10 seconds.
The DIC displays REMOTELEARN PENDING,PLEASE WAIT.
2. Wait for 10 minutes until theDIC displays PRESS ENGINESTART BUTTON TO LEARN andthen press ENGINESTART/STOP.
The DIC display will again showREMOTE LEARN PENDING,PLEASE WAIT.
3. Repeat Step 2 two additionaltimes. After the third time allpreviously known transmitterswill no longer work with the

Cadillac XT5 Owner Manual (GMNA-Localizing-U.S./Canada/Mexico-13527534) - 2020 - CRC - 5/29/19
KEYS, DOORS, AND WINDOWS 15
vehicle. Remaining transmitterscan be relearned during the nextsteps.
The DIC display should nowshow READY FOR REMOTE # 1.
4. Place the new transmitter intothe transmitter pocket. Thetransmitter pocket is inside thecenter console storage areabetween the driver and frontpassenger seats. The storage areawill need to be opened and thestorage tray lifted up to accessthe transmitter pocket.
5. Press ENGINE START/STOP.When the transmitter is learnedthe DIC display will show that itis ready to program the nexttransmitter.
6. Remove the transmitter from thetransmitter pocket and press thetransmitter K or Q button.
To program additionaltransmitters, repeat Steps 4–6.
When all additional transmittersare programmed, press and holdENGINE START/STOP for12 seconds to exitprogramming mode.
7. Return the key back into thetransmitter.
8. Replace the key lock cylindercap. See Door Locks 0 18.
Starting the Vehicle with a LowTransmitter Battery
When the vehicle is started, if thetransmitter battery is weak, the DICmay display NO REMOTE DETECTEDor NO REMOTE KEY WAS DETECTEDPLACE KEY IN TRANSMITTER
POCKET THEN START YOURVEHICLE. The DIC may also displayREPLACE BATTERY IN REMOTE KEY.
To start the vehicle:
1. Open the center console storagearea and the storage tray.
2. Place the transmitter in thetransmitter pocket.
3. With the vehicle in P (Park) orN (Neutral), press the brake pedaland ENGINE START/STOP.
Replace the transmitter batteryas soon as possible.

Cadillac XT5 Owner Manual (GMNA-Localizing-U.S./Canada/Mexico-13527534) - 2020 - CRC - 5/29/19
16 KEYS, DOORS, AND WINDOWS
Battery Replacement
{ Warning
Never allow children to play withthe RKE transmitter. Thetransmitter contains a smallbattery, which can be a chokinghazard. If swallowed, internal burnscan occur, resulting in severe injuryor death. Seek medical attentionimmediately if a battery isswallowed.
Caution
When replacing the battery, do nottouch any of the circuitry on thetransmitter. Static from your bodycould damage the transmitter.
Caution
Always replace the battery with thecorrect type. Replacing the batterywith an incorrect type couldpotentially create a risk of batteryexplosion. Dispose of used batteriesaccording to instructions and locallaws. Do not attempt to burn,crush, or cut the used battery.
Replace the battery if the DIC displaysREPLACE BATTERY IN REMOTE KEY.
1. Press the button on the side ofthe transmitter near the bottomand pull the key out. Never pullthe key out without pressing thebutton.
2. Separate the two halves of thetransmitter using a flat toolinserted into the bottom centerof the transmitter. Do not usethe key slot.
Cadillac XT5 Owner Manual (GMNA-Localizing-U.S./Canada/Mexico-13527534) - 2020 - CRC - 5/29/19
KEYS, DOORS, AND WINDOWS 17
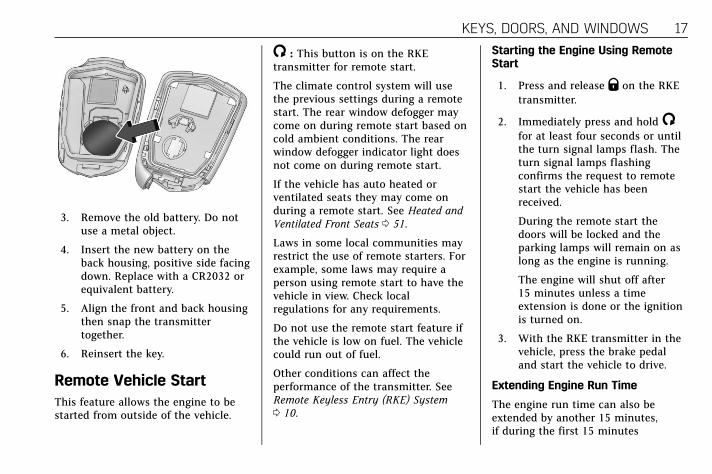
3. Remove the old battery. Do notuse a metal object.
4. Insert the new battery on theback housing, positive side facingdown. Replace with a CR2032 orequivalent battery.
5. Align the front and back housingthen snap the transmittertogether.
6. Reinsert the key.
Remote Vehicle StartThis feature allows the engine to bestarted from outside of the vehicle.
/ : This button is on the RKEtransmitter for remote start.
The climate control system will usethe previous settings during a remotestart. The rear window defogger maycome on during remote start based oncold ambient conditions. The rearwindow defogger indicator light doesnot come on during remote start.
If the vehicle has auto heated orventilated seats they may come onduring a remote start. See Heated andVentilated Front Seats 0 51.
Laws in some local communities mayrestrict the use of remote starters. Forexample, some laws may require aperson using remote start to have thevehicle in view. Check localregulations for any requirements.
Do not use the remote start feature ifthe vehicle is low on fuel. The vehiclecould run out of fuel.
Other conditions can affect theperformance of the transmitter. SeeRemote Keyless Entry (RKE) System0 10.
Starting the Engine Using RemoteStart
1. Press and release Q on the RKEtransmitter.
2. Immediately press and hold /for at least four seconds or untilthe turn signal lamps flash. Theturn signal lamps flashingconfirms the request to remotestart the vehicle has beenreceived.
During the remote start thedoors will be locked and theparking lamps will remain on aslong as the engine is running.
The engine will shut off after15 minutes unless a timeextension is done or the ignitionis turned on.
3. With the RKE transmitter in thevehicle, press the brake pedaland start the vehicle to drive.
Extending Engine Run Time
The engine run time can also beextended by another 15 minutes,if during the first 15 minutes
Cadillac XT5 Owner Manual (GMNA-Localizing-U.S./Canada/Mexico-13527534) - 2020 - CRC - 5/29/19
18 KEYS, DOORS, AND WINDOWS
Steps 1 and 2 are repeated while theengine is still running. An extensioncan be requested 30 seconds afterstarting. This provides a total of30 minutes.
The remote start can only beextended once.
When the remote start is extended,the second 15-minute period is addedon to the first 15 minutes for a totalof 30 minutes.
A maximum of two remote starts, or aremote start with an extension, areallowed between ignition cycles.
The ignition must be turned on andthen off before the remote startprocedure can be used again.
Canceling a Remote Start
To cancel a remote start, do any ofthe following:
. Press and hold/ until theparking lamps turn off.
. Turn on the hazard warningflashers.
. Turn the vehicle on and then off.
Conditions in Which Remote StartWill Not Work
The remote start will not operate ifany of the following occur:
. The RKE transmitter is in thevehicle.
. The ignition is on.
. The hood is not closed.
. The hazard warning flashersare on.
. There is an emission controlsystem malfunction.
. The engine coolant temperature istoo high.
. The oil pressure is low.
. Two remote vehicle starts or astart with an extension havealready been used.
. The vehicle is not in P (Park).
Door Locks
{ Warning
Unlocked doors can be dangerous.
. Passengers, especiallychildren, can easily open thedoors and fall out of a movingvehicle. The doors can beunlocked and opened whilethe vehicle is moving. Thechance of being thrown out ofthe vehicle in a crash isincreased if the doors are notlocked. So, all passengersshould wear seat beltsproperly and the doors shouldbe locked whenever thevehicle is driven.
. Young children who get intounlocked vehicles may beunable to get out. A child canbe overcome by extreme heatand can suffer permanentinjuries or even death fromheat stroke. Always lock thevehicle whenever leaving it.
(Continued)

Cadillac XT5 Owner Manual (GMNA-Localizing-U.S./Canada/Mexico-13527534) - 2020 - CRC - 5/29/19
KEYS, DOORS, AND WINDOWS 19
Warning (Continued)
. Outsiders can easily enterthrough an unlocked doorwhen you slow down or stopthe vehicle. Locking the doorscan help prevent this fromhappening.
To lock/unlock the doors from outsidethe vehicle:
. Press Q or K on the RemoteKeyless Entry (RKE) transmitter.See Remote Keyless Entry (RKE)System Operation 0 10.
. Use the key in the key lockcylinder in the driver door. Thekey lock cylinder is covered witha cap.
To lock/unlock the doors from insidethe vehicle:
. Press Q or K on the power doorlock switch. See Power Door Locks0 21.
. Pull once on the door handle tounlock the door and again to openthe door.
. On the rear doors, push down onthe door lock knob to lock thedoor manually.
Keyless Access
If equipped, the RKE transmitter mustbe within 1 m (3 ft) of the liftgate ordoor being opened.
To lock or unlock the vehicle from thedriver door:
. Press the button on the driverdoor handle once to unlock thedriver door only.
. Press the button again withinfive seconds to unlock all doors.
. Press the button a third time tolock all doors.
When leaving the vehicle, press thebutton on any door handle to lock alldoors.
To lock or unlock the vehicle from anypassenger door:
. Press the button on the passengerdoor handle. This will lock orunlock all doors.
See Remote Keyless Entry (RKE) SystemOperation 0 10.

Cadillac XT5 Owner Manual (GMNA-Localizing-U.S./Canada/Mexico-13527534) - 2020 - CRC - 5/29/19
20 KEYS, DOORS, AND WINDOWS
Driver Door Key Lock CylinderAccess (In Case of Dead Battery)
To access the driver door key lockcylinder:
1. Pull the door handle (1) to theopen position and hold it openuntil the cap removal iscomplete.
2. Insert the key into the slot (3) onthe bottom of the cap (2) and liftthe key upward.
3. Move the cap (2) rearward andremove.
4. Use the key in the cylinder.
To replace the cap:
1. Pull the door handle (1) to theopen position and hold it openuntil the cap installation iscomplete.
2. Insert the two tabs (6) at theback of the cap between theseal (5) and the metal base (4).
3. Slide the cap forward and pressthe forward edge to install thecap in place.

Cadillac XT5 Owner Manual (GMNA-Localizing-U.S./Canada/Mexico-13527534) - 2020 - CRC - 5/29/19
KEYS, DOORS, AND WINDOWS 21
4. Release the door handle.
5. Check that the cap is secure.
Free-Turning Locks
The door key lock cylinder turns freelywhen either the wrong key is used,or the correct key is not fully inserted.The free-turning door lock featureprevents the lock from being forcedopen. To reset the lock, turn it to thevertical position with the correct keyfully inserted. Remove the key andinsert it again. If this does not resetthe lock, turn the key halfway aroundin the cylinder and repeat the resetprocedure.
Power Door Locks
Q : Press to lock the doors.If equipped, the fuel door is alsolocked or unlocked using thesefeatures.
K : Press to unlock the doors.
Delayed LockingThis feature delays the locking of thedoors until five seconds after all doorsare closed.
Delayed locking can only be turned onwhen Open Door Anti Lockout hasbeen turned off.
When Q is pressed on the power doorlock switch while the door is open, achime will sound three timesindicating delayed locking is active.
The doors will lock automaticallyfive seconds after all doors are closed.If a door is reopened before that time,the five-second timer will reset whenall doors are closed again.
Press Q on the door lock switch again
or press Q on the RKE transmitter tolock the doors immediately.
This feature can also be programmed.See Vehicle Personalization 0 134.
Automatic Door LocksThe doors will lock automaticallywhen all doors are closed, the ignitionis on, and the vehicle is shifted out ofP (Park).
If a vehicle door is unlocked and thenopened and closed, the doors will lockeither when your foot is removed fromthe brake or the vehicle speedbecomes faster than 13 km/h (8 mph).

Cadillac XT5 Owner Manual (GMNA-Localizing-U.S./Canada/Mexico-13527534) - 2020 - CRC - 5/29/19
22 KEYS, DOORS, AND WINDOWS
To unlock the doors:
. Press K on the power door lockswitch.
. Shift the transmission intoP (Park).
Automatic door locking cannot bedisabled. Automatic door unlockingcan be programmed. See VehiclePersonalization 0 134.
Lockout ProtectionIf the ignition is on or in ACC/ACCESSORY and the power door lockswitch is pressed with the driver dooropen, all the doors will lock and onlythe driver door will unlock.
If the vehicle is off and locking isrequested while a door is open, whenall doors are closed the vehicle willcheck for RKE transmitters inside.If an RKE transmitter is detected andthe number of RKE transmitters insidehas not reduced, the driver door willunlock and the horn will chirp threetimes.
Lockout Protection can be manuallyoverridden with the driver door openby pressing and holding Q on thepower door lock switch.
Open Door Anti-Lockout
If Open Door Anti Lockout is turnedon and the vehicle is off, the driverdoor is open, and locking is requested,all the doors will lock and the driverdoor will remain unlocked. The OpenDoor Anti Lockout feature can beturned on or off. See VehiclePersonalization 0 134.
Safety LocksThe rear door safety locks preventpassengers from opening the reardoors from inside the vehicle.
Manual Safety Locks
If equipped, the safety lock is on theinside edge of the rear doors. To usethe safety lock:
1. Move the lever down to the lockposition.
2. Close the door.
3. Do the same for the otherrear door.

Cadillac XT5 Owner Manual (GMNA-Localizing-U.S./Canada/Mexico-13527534) - 2020 - CRC - 5/29/19
KEYS, DOORS, AND WINDOWS 23
To open a rear door when the safetylock is on:
1. Unlock the door by activating theinside handle, by pressing thepower door lock switch, or byusing the Remote KeylessEntry (RKE) transmitter.
2. Open the door from the outside.
When the safety lock is enabled,adults and older children will not beable to open the rear door from theinside. Cancel the safety locks toenable the doors to open from theinside.
To cancel the safety lock:
1. Unlock the door and open itfrom the outside.
2. Move the lever up to unlock. Dothe same for the other door.
Doors
Liftgate
{ Warning
Exhaust gases can enter the vehicleif it is driven with the liftgate ortrunk/hatch open, or with anyobjects that pass through the sealbetween the body and the trunk/hatch or liftgate. Engine exhaustcontains carbon monoxide (CO)which cannot be seen or smelled.It can cause unconsciousness andeven death.
If the vehicle must be driven withthe liftgate or trunk/hatch open:
. Close all of the windows.
. Fully open the air outlets onor under the instrumentpanel.
(Continued)
Warning (Continued)
. Adjust the climate controlsystem to a setting thatbrings in only outside air andset the fan speed to thehighest setting. See “ClimateControl Systems” in the Index.
. If the vehicle is equipped witha power liftgate, disable thepower liftgate function.
See Engine Exhaust 0 185.
Caution
To avoid damage to the liftgate orliftgate glass, make sure the areaabove and behind the liftgate isclear before opening it.

Cadillac XT5 Owner Manual (GMNA-Localizing-U.S./Canada/Mexico-13527534) - 2020 - CRC - 5/29/19
24 KEYS, DOORS, AND WINDOWS
Power Liftgate Operation
{ Warning
You or others could be injured ifcaught in the path of the powerliftgate. Make sure there is no onein the way of the liftgate as it isopening and closing.
Caution
Driving with an open andunsecured liftgate may result indamage to the power liftgatecomponents.
The power liftgate switch is on thedriver door. The vehicle must be inP (Park).
The modes are:
MAX : Opens to maximum height.
3/4 : Opens to a reduced height thatcan be set from 3/4 to fully open. Useto prevent the liftgate from openinginto overhead obstructions such as agarage door or roof-mounted cargo.The liftgate can be manually openedall the way.
OFF : Opens manually only.
To power open or close the liftgate,select MAX or 3/4 mode.
. Pressb twice quickly on the RKEtransmitter until the liftgatemoves.
. Press8 on the driver door. Thedriver door must either beunlocked or locked without thesecurity armed.
. Press the touch pad on theunderside of the liftgate handleafter unlocking all doors. A lockedvehicle can be opened if the RKEtransmitter is within 1 m (3 ft) ofthe touch pad.

Cadillac XT5 Owner Manual (GMNA-Localizing-U.S./Canada/Mexico-13527534) - 2020 - CRC - 5/29/19
KEYS, DOORS, AND WINDOWS 25
. Pressl on the bottom of theliftgate next to the pull cup toclose.
Press any liftgate button, the touchpad, orb on the RKE transmitterwhile the liftgate is moving to stop it.Pressing any liftgate buttonor pressingb twice quickly on theRKE transmitter again restarts theoperation in the reverse direction.Pressing the touch pad on the liftgatehandle will restart the motion, butonly in the opening direction.
Caution
Manually forcing the liftgate toopen or close during a power cyclecan damage the vehicle. Allow thepower cycle to complete.
The power liftgate may be temporarilydisabled under extreme lowtemperatures, or after repeated powercycling over a short period of time.If this occurs, the liftgate can still beoperated manually.
If the vehicle is shifted out of P (Park)while the power function is inprogress, the liftgate will continue tocompletion. If the vehicle isaccelerated before the liftgate hascompleted moving, the liftgate maystop or reverse direction. Check forDriver Information Center (DIC)messages and make sure the liftgate isclosed and latched before driving.
Falling Liftgate Detection
If the power liftgate automaticallycloses after a power opening cycle, itindicates that the system is reactingto excess weight on the liftgate or apossible support strut failure.A repetitive chime will sound whilethe falling liftgate detection feature isoperating. Remove any excess weight.If the liftgate continues toautomatically close after opening, seeyour dealer for service before usingthe power liftgate.
Interfering with the power liftgatemotion or manually closing theliftgate too quickly after poweropening may resemble a support strutfailure. This could also activate thefalling liftgate detection feature. Allow
the liftgate to complete its operationand wait a few seconds beforemanually closing the liftgate.
Obstacle Detection Features
If the liftgate encounters an obstacleduring a power open or close cycle,the liftgate will automatically reversedirection and move a short distanceaway from the obstacle. Afterremoving the obstruction, the powerliftgate operation can be used again.If the liftgate encounters multipleobstacles on the same power cycle,the power function will deactivate.After removing the obstructions,manually close the liftgate. This willallow normal power operationfunctions to resume.
If the vehicle is locked while theliftgate is closing, and an obstacle isencountered that prevents the liftgatefrom completely closing, the horn willsound as an alert that the liftgate didnot close.
Pinch sensors are on the side edges ofthe liftgate. If an object is caughtbetween the liftgate and the vehicleand presses against a sensor, the

Cadillac XT5 Owner Manual (GMNA-Localizing-U.S./Canada/Mexico-13527534) - 2020 - CRC - 5/29/19
26 KEYS, DOORS, AND WINDOWS
liftgate will reverse direction and openfully. The liftgate will remain openuntil it is activated again or closedmanually.
Setting the 3/4 Mode
To change the position the liftgatestops at when opening:
1. Select MAX or 3/4 mode andpower open the liftgate.
2. Stop the liftgate movement atthe desired height by pressingany liftgate button. Manuallyadjust the liftgate position ifneeded.
3. Press and holdl next to thepull cup on the outside of theliftgate until the turn signalsflash and a beep sounds. Thisindicates the setting has beenrecorded.
The liftgate cannot be set below aminimum programmable height.If there is no light flash or sound,then the height adjustment may betoo low.
Manual Operation
Select OFF to manually operate theliftgate.
Caution
Attempting to move the liftgate tooquickly and with excessive forcemay result in damage to thevehicle.
Operate the liftgate manually with asmooth motion and moderate speed.The system includes a feature whichlimits the manual closing speed toprotect the components.
To unlock the liftgate, press K on the
power door lock switch or press K onthe Remote Keyless Entry (RKE)transmitter twice within five seconds.See Remote Keyless Entry (RKE) SystemOperation 0 10.
To open the liftgate, press the touchpad under the liftgate handle andlift up.
Use the pull cup to lower and closethe liftgate. Do not press the touchpad while closing the liftgate. Thismay cause the liftgate to beunlatched.
If equipped with Keyless Access, theliftgate can be opened when locked ifthe RKE transmitter is within 1 m(3 ft) of the touch pad. See RemoteKeyless Entry (RKE) System Operation0 10.

Cadillac XT5 Owner Manual (GMNA-Localizing-U.S./Canada/Mexico-13527534) - 2020 - CRC - 5/29/19
KEYS, DOORS, AND WINDOWS 27
The liftgate has an electric latch.If the battery is disconnected or haslow voltage, the liftgate will not open.The liftgate will resume operationwhen the battery is reconnected andcharged.
Always close the liftgate beforedriving.
Hands-Free Operation
If equipped, the liftgate may beoperated with a kicking motion underthe left side of the rear bumper.
The RKE transmitter must be within1 m (3 ft) of the rear bumper tooperate the power liftgate hands-free.
The hands-free feature will not workwhile the liftgate is moving. To stopthe liftgate while in motion use one ofthe liftgate switches.
The hands-free feature can becustomized. See Vehicle Personalization0 134. Choose from the following:
On-Open and Close : The kickingmotion is activated to both open andclose the liftgate.
On-Open Only : The kicking motion isactivated to only open the liftgate.
Off : The feature is disabled.
Kick Zone
To operate, move your foot in aforward kicking motion under the leftside of the rear bumper, at thelocation of the projected logo, thenpull it back. Then step back. The kickmust come within 14 cm (6 in) of therear bumper to activate.
Caution
Splashing water may cause theliftgate to open. Keep the RKEtransmitter away from the rearbumper detection area or turn theliftgate mode to OFF when cleaningor working near the rear bumper toavoid accidental opening.
. Do not sweep your foot sideto side.
. Do not keep your foot under thebumper; the liftgate will notactivate.
. Do not touch the liftgate until ithas stopped moving.
. This feature may be temporarilydisabled under some conditions.If the liftgate does not respond tothe kick, open or close the liftgateby another method or start thevehicle. The feature will bere-enabled.

Cadillac XT5 Owner Manual (GMNA-Localizing-U.S./Canada/Mexico-13527534) - 2020 - CRC - 5/29/19
28 KEYS, DOORS, AND WINDOWS
When closing the liftgate using thisfeature, there will be a short delay.The taillamps will flash and a chimewill sound. Step away from the liftgatebefore it starts moving.
Projected Logo
If equipped with this feature, a vehiclelogo will be projected for one minuteonto the ground near the rear bumperwhen an RKE transmitter is detectedwithin approximately 2 m (6 ft). Theprojected logo may not be visibleunder brighter daytime conditions.
1. 1 m (3 ft) Hands-FreeOperation Detection Zone
2. 2 m (6 ft) Projected LogoDetection Zone
The projected logo shows where thekicking motion is to take place.
The projected logo will only beavailable for this RKE transmitter afterit has been out of range for at least20 seconds.
If an RKE transmitter is againdetected within approximately 2 m(6 ft) of the liftgate, or anotherhands-free operation has beendetected, the one-minute timer will bereset.
The projected logo will not workunder these conditions:
. The vehicle battery is low.
. The transmission is not inP (Park).
. Hands Free Liftgate Control is setto Off in vehicle personalization.See Vehicle Personalization 0 134.
. The power liftgate is turned off.
. The vehicle remains parked for72 hours or more, with no RKEtransmitter use or Keyless Accessoperation. To re-enable, press anybutton on the RKE transmitter oropen and close a vehicle door.
The projected logo will not work for asingle RKE transmitter when atransmitter:
. Has been left withinapproximately 5 m (15 ft) of theliftgate for several minutes.
. Has been left inside the vehicleand all vehicle doors are closed.
. Has approached the area outsideof the liftgate five times within10 minutes.

Cadillac XT5 Owner Manual (GMNA-Localizing-U.S./Canada/Mexico-13527534) - 2020 - CRC - 5/29/19
KEYS, DOORS, AND WINDOWS 29
Lens Cleaning
Use a soft, damp cloth to clean therecessed lens.
Cadillac XT5 Owner Manual (GMNA-Localizing-U.S./Canada/Mexico-13527534) - 2020 - CRC - 5/29/19
30 KEYS, DOORS, AND WINDOWS
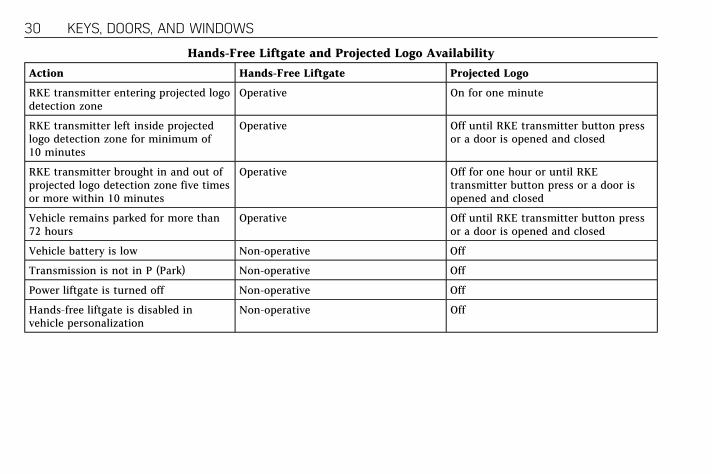
Hands-Free Liftgate and Projected Logo Availability
Action Hands-Free Liftgate Projected Logo
RKE transmitter entering projected logodetection zone
Operative On for one minute
RKE transmitter left inside projectedlogo detection zone for minimum of10 minutes
Operative Off until RKE transmitter button pressor a door is opened and closed
RKE transmitter brought in and out ofprojected logo detection zone five timesor more within 10 minutes
Operative Off for one hour or until RKEtransmitter button press or a door isopened and closed
Vehicle remains parked for more than72 hours
Operative Off until RKE transmitter button pressor a door is opened and closed
Vehicle battery is low Non-operative Off
Transmission is not in P (Park) Non-operative Off
Power liftgate is turned off Non-operative Off
Hands-free liftgate is disabled invehicle personalization
Non-operative Off

Cadillac XT5 Owner Manual (GMNA-Localizing-U.S./Canada/Mexico-13527534) - 2020 - CRC - 5/29/19
KEYS, DOORS, AND WINDOWS 31
Vehicle SecurityThis vehicle has theft-deterrentfeatures; however, they do not makethe vehicle impossible to steal.
Vehicle Alarm SystemThis vehicle has an anti-theft alarmsystem.
The indicator light, on the instrumentpanel near the windshield, indicatesthe status of the system.
Off : Alarm system is disarmed.
On Solid : Vehicle is secured duringthe delay to arm the system.
Fast Flash : Vehicle is unsecured.A door, the hood, or the liftgateis open.
Slow Flash : Alarm system is armed.
Arming the Alarm System
1. Close the liftgate and the hood.Turn off the vehicle.
2. Lock the vehicle in one ofthree ways:
. Use the RKE transmitter.
. Use the Keyless Accesssystem.
. With a door open, press theinside Q.
3. After 30 seconds the alarmsystem will arm, and theindicator light will begin toslowly flash indicating the alarmsystem is operating. Pressing Qon the RKE transmitter a secondtime will bypass the 30-seconddelay and immediately arm thealarm system.
The vehicle alarm system will not armif the doors are locked with the key.
If the driver door is opened withoutfirst unlocking with the RKEtransmitter, the horn will chirp andthe lights will flash to indicatepre-alarm. If the vehicle is not started,or the door is not unlocked bypressing K on the RKE transmitterduring the 10-second pre-alarm, thealarm will be activated.
The alarm will also be activated if apassenger door, the liftgate, or thehood is opened without firstdisarming the system. When thealarm is activated, the turn signalsflash and the horn sounds for about30 seconds. The alarm system willthen re-arm to monitor for the nextunauthorized event.
Disarming the Alarm System
To disarm the alarm system or turnoff the alarm if it has been activated:
. Press K on the RKE transmitter.
. Unlock the vehicle using theKeyless Access system.
. Start the vehicle.

Cadillac XT5 Owner Manual (GMNA-Localizing-U.S./Canada/Mexico-13527534) - 2020 - CRC - 5/29/19
32 KEYS, DOORS, AND WINDOWS
To avoid setting off the alarm byaccident:
. Lock the vehicle after alloccupants have left the vehicleand all doors are closed.
. Always unlock a door with theRKE transmitter or use the KeylessAccess system.
Unlocking the driver door with the keywill not disarm the system or turn offthe alarm.
How to Detect a TamperCondition
If K is pressed and the horn chirpsand the lights flash three times, thealarm was activated while the alarmsystem was armed.
If the alarm system has beenactivated, a message will appear onthe DIC.
Power Sounder, InclinationSensor, and Intrusion Sensor
In addition to the standardtheft-deterrent system features, thissystem may also have an inclinationsensor, an intrusion sensor, and powersounder.
The power sounder provides anaudible alarm that is different fromthe vehicle’s horn. It has its ownpower source, and can sound an alarmwhen the vehicle’s battery iscompromised.
The inclination sensor can set off thealarm if it senses movement of thevehicle, such as a change in vehicleorientation.
The intrusion sensor monitors thevehicle interior, and can set off thealarm if it senses an unauthorizedentry into the vehicle’s interior. Donot allow passengers or pets to remainin the vehicle when the intrusionsensor is activated.
Before arming the theft-deterrentsystem and activating the intrusionsensor:
. Make sure all doors and windowsare completely closed.
. Secure any loose items such as asunshades.
. Make sure there are noobstructions blocking the sensorsin the front overhead console.
Inclination and IntrusionSensors Disable Switch
It is recommended that the inclinationand intrusion sensors be deactivated ifpets are left in the vehicle or if thevehicle is being transported.
With the vehicle turned off, pressoin the overhead console. The indicatorlight will come on momentarily,indicating that the sensor has beendisabled until the next time the alarmsystem is armed.
Steering Column LockIf equipped, the steering column lockis a theft-deterrent device. Thisfeature locks the steering columnwhen the vehicle is turned off and thedriver door is opened, or when thedriver door is opened and then the

Cadillac XT5 Owner Manual (GMNA-Localizing-U.S./Canada/Mexico-13527534) - 2020 - CRC - 5/29/19
KEYS, DOORS, AND WINDOWS 33
vehicle is turned off. The steeringcolumn unlocks when the vehicle isturned on.
The Driver Information Center (DIC)may display one of these messages:
. A message to service the steeringcolumn lock indicates that anissue has been detected with thecolumn lock feature and thevehicle should be serviced.
. A message that the steeringcolumn is locked indicates thatthe engine is running, but thesteering column is still locked. It isnormal for the column to belocked during a remote start, butthe column should unlock afterthe brake pedal is pressed and thevehicle is started. No message willdisplay during a remote start.
. A message that the steering wheelmust be turned and the vehiclemust be started again indicatesthat the column lock mechanismis bound, the column lockingdevice was unable to unlock thesteering column, and the vehicledid not start. If this happens,
immediately turn the steeringwheel from side to side to unbindthe column lock. If this does notunlock the steering column, turnthe vehicle off and open the driverdoor to reset the system. Thenturn the vehicle on andimmediately turn the steeringwheel side to side for about15 seconds. In some cases, it maytake significant force to unbindthe column.
To keep the steering column frombinding, straighten the front wheelsbefore turning off the vehicle.
ImmobilizerSee Radio Frequency Statement 0 363.
Immobilizer OperationThis vehicle has a passivetheft-deterrent system.
The system does not have to bemanually armed or disarmed.
The vehicle is automaticallyimmobilized when the vehicle isturned off.
The immobilization system isdisarmed when the ignition is on or inACC/ACCESSORY and a validtransmitter is present in the vehicle.
The security light, in the instrumentcluster, comes on if there is a problemwith arming or disarming thetheft-deterrent system.
The system has one or more RKEtransmitters matched to animmobilizer control unit in yourvehicle. Only a correctly matched RKEtransmitter will start the vehicle.If the transmitter is ever damaged,you may not be able to start yourvehicle.
When trying to start the vehicle, thesecurity light may come on brieflywhen the ignition is turned on.

Cadillac XT5 Owner Manual (GMNA-Localizing-U.S./Canada/Mexico-13527534) - 2020 - CRC - 5/29/19
34 KEYS, DOORS, AND WINDOWS
If the engine does not start and thesecurity light stays on, there is aproblem with the system. Turn theignition off and try again.
If the vehicle will not change ignitionmodes (ACC/ACCESSORY, on, off), andthe RKE transmitter appears to beundamaged, try another transmitter.Or, you may try placing thetransmitter in the transmitter pocketlocated in the center console. SeeRemote Keyless Entry (RKE) SystemOperation 0 10.
If the ignition mode will not changewith the other transmitter or in thetransmitter pocket, your vehicle needsservice. If the ignition does changemodes, the first transmitter may befaulty. See your dealer who can servicethe theft-deterrent system and have anew RKE transmitter programmed tothe vehicle.
It is possible for the immobilizersystem to learn new or replacementRKE transmitters. Up to eighttransmitters can be programmed forthe vehicle. To program additionaltransmitters, see “ProgrammingTransmitters to the Vehicle” underRemote Keyless Entry (RKE) SystemOperation 0 10.
Do not leave the key or device thatdisarms or deactivates thetheft-deterrent system in the vehicle.
Exterior Mirrors
Convex Mirrors
{ Warning
A convex mirror can make things,like other vehicles, look fartheraway than they really are. If you cuttoo sharply into the right lane, youcould hit a vehicle on the right.Check the inside mirror or glanceover your shoulder before changinglanes.
The passenger side mirror is convexshaped. A convex mirror's surface iscurved so more can be seen from thedriver seat.
Cadillac XT5 Owner Manual (GMNA-Localizing-U.S./Canada/Mexico-13527534) - 2020 - CRC - 5/29/19
KEYS, DOORS, AND WINDOWS 35
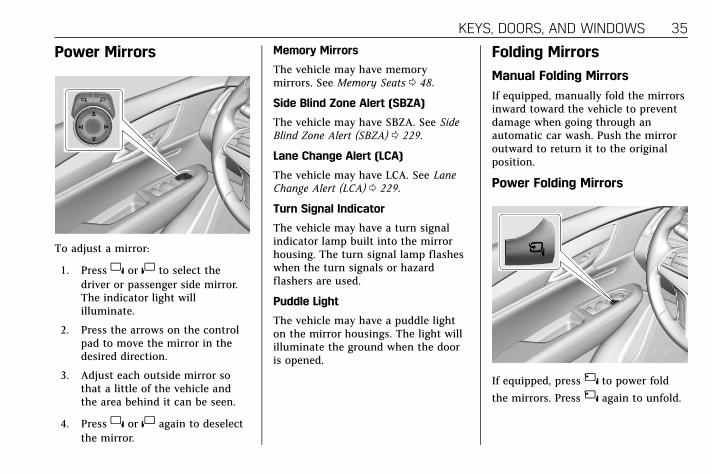
Power Mirrors
To adjust a mirror:
1. Press} or| to select thedriver or passenger side mirror.The indicator light willilluminate.
2. Press the arrows on the controlpad to move the mirror in thedesired direction.
3. Adjust each outside mirror sothat a little of the vehicle andthe area behind it can be seen.
4. Press} or| again to deselectthe mirror.
Memory Mirrors
The vehicle may have memorymirrors. See Memory Seats 0 48.
Side Blind Zone Alert (SBZA)
The vehicle may have SBZA. See SideBlind Zone Alert (SBZA) 0 229.
Lane Change Alert (LCA)
The vehicle may have LCA. See LaneChange Alert (LCA) 0 229.
Turn Signal Indicator
The vehicle may have a turn signalindicator lamp built into the mirrorhousing. The turn signal lamp flasheswhen the turn signals or hazardflashers are used.
Puddle Light
The vehicle may have a puddle lighton the mirror housings. The light willilluminate the ground when the dooris opened.
Folding Mirrors
Manual Folding Mirrors
If equipped, manually fold the mirrorsinward toward the vehicle to preventdamage when going through anautomatic car wash. Push the mirroroutward to return it to the originalposition.
Power Folding Mirrors
If equipped, press{ to power fold
the mirrors. Press{ again to unfold.

Cadillac XT5 Owner Manual (GMNA-Localizing-U.S./Canada/Mexico-13527534) - 2020 - CRC - 5/29/19
36 KEYS, DOORS, AND WINDOWS
Resetting the Power FoldingMirrors
Reset the power folding mirrors if:
. The mirrors are accidentallyobstructed while folding.
. They are accidentally manuallyfolded/unfolded.
. The mirrors do not stay in theunfolded position.
. The mirrors vibrate at normaldriving speeds.
Fold and unfold the mirrors one timeusing the mirror controls to resetthem to their normal position. A noisemay be heard during the resetting ofthe power folding mirrors. This soundis normal after a manual foldingoperation.
Remote Folding Mirror
If equipped, press and hold Q on theRKE transmitter for approximatelyone second to automatically fold theexterior mirrors. Press and hold K onthe RKE transmitter for approximately
one second to unfold. See RemoteKeyless Entry (RKE) System Operation0 10.
This feature is turned on or offthrough vehicle personalization. SeeVehicle Personalization 0 134.
Heated MirrorsK : Press to heat the mirrors.
See “Rear Window Defogger” underDual Automatic Climate Control System0 151.
Automatic Dimming MirrorIf the vehicle has the automaticdimming mirror, the driver outsidemirror automatically adjusts for theglare of headlamps behind you.
Reverse Tilt MirrorsIf equipped with memory seats, thepassenger and/or driver mirror tilts toa preselected position when thevehicle is in R (Reverse). This allowsthe curb to be seen when parallelparking.
The mirror(s) return to the originalposition when:
. The vehicle is shifted out ofR (Reverse), or remains inR (Reverse) for about 30 seconds.
. The ignition is turned off.
. The vehicle is driven inR (Reverse) above a set speed.
To turn this feature on or off, seeVehicle Personalization 0 134.

Cadillac XT5 Owner Manual (GMNA-Localizing-U.S./Canada/Mexico-13527534) - 2020 - CRC - 5/29/19
KEYS, DOORS, AND WINDOWS 37
Interior Mirrors
Interior Rearview MirrorsAdjust the rearview mirror for a clearview of the area behind the vehicle.
Do not spray glass cleaner directly onthe mirror. Use a soft towel dampenedwith water.
Manual Rearview MirrorPush the tab forward for daytime useand pull it rearward for nighttime useto avoid glare of the headlamps frombehind.
Automatic DimmingRearview MirrorIf equipped, automatic dimmingreduces the glare of headlamps frombehind. The dimming feature comeson when the vehicle is started.
Rear Camera MirrorIf equipped, this automatic dimmingmirror provides a wide angle cameraview of the area behind the vehicle.
Pull the tab to turn on the display.Push the tab to turn it off. When offthe mirror is automatic dimming.Adjust the mirror for a clear view ofthe area behind the vehicle while thedisplay is off.
Press V to scroll through theadjustment options.
Presst andu to adjust the settingsusing the indicators on the mirror.The indicators will remain visible forfive seconds after the last buttonactivation, and the settings willremain saved.

Cadillac XT5 Owner Manual (GMNA-Localizing-U.S./Canada/Mexico-13527534) - 2020 - CRC - 5/29/19
38 KEYS, DOORS, AND WINDOWS
The adjustment options are:
. Brightness
. Zoom
. Tilt
{ Warning
The Rear Camera Mirror (RCM) hasa limited view. Portions of the road,vehicles, and other objects may notbe seen. Do not drive or park thevehicle using only this camera.Objects may appear closer thanthey are. Check the outside mirrorsor glance over your shoulder whenmaking lane changes or merging.Failure to use proper care mayresult in injury, death, or vehicledamage.

Cadillac XT5 Owner Manual (GMNA-Localizing-U.S./Canada/Mexico-13527534) - 2020 - CRC - 5/29/19
KEYS, DOORS, AND WINDOWS 39
Troubleshooting
See your dealer for service if a bluescreen and3 are displayed in themirror, and the display shuts off. Also,push the tab as indicated to return tothe automatic dimming mode.
The Rear Camera Mirror may not workproperly or display a clear image if:
. There is glare from the sun orheadlamps. This may obstructobjects from view. If needed, pushthe tab to turn off the display.
. Dirt, snow, or other debris blocksthe camera lens. Clean the lenswith a soft damp cloth, or if
equipped, with the Rear CameraWasher. See Rear Window Wiper/Washer 0 106.
. The camera’s mounting on thevehicle has been damaged, and/orthe position or the mounting angleof the camera has changed.
Windows
{ Warning
Never leave a child, a helpless adult,or a pet alone in a vehicle,especially with the windows closedin warm or hot weather. They canbe overcome by the extreme heatand suffer permanent injuries oreven death from heat stroke.
The vehicle aerodynamics aredesigned to improve fuel economyperformance. This may result in a

Cadillac XT5 Owner Manual (GMNA-Localizing-U.S./Canada/Mexico-13527534) - 2020 - CRC - 5/29/19
40 KEYS, DOORS, AND WINDOWS
pulsing sound when either rearwindow is down and the frontwindows are up. To reduce the sound,open either a front window or thesunroof, if equipped.
Power Windows
{ Warning
Children could be seriously injuredor killed if caught in the path of aclosing window. Never leave theRemote Keyless Entry (RKE)transmitter in a vehicle withchildren. When there are children inthe rear seat, use the windowlockout switch to prevent operationof the windows. See Keys 0 9.
The power windows work when theignition is on, in ACC/ACCESSORY,or when Retained Accessory Power(RAP) is active. See Retained AccessoryPower (RAP) 0 182.
Using the window switch, press toopen or pull to close the window.
The windows may be temporarilydisabled if they are used repeatedlywithin a short time.
Window Lockout
This feature stops the rear passengerwindow switches from working.
. Press2 to engage the rearwindow lockout feature. Theindicator light is on when engaged.
. Press2 again to disengage.
Window Express Movement
All windows can be opened withoutholding the window switch. Press theswitch down fully and quickly releaseto express open the window.
Cadillac XT5 Owner Manual (GMNA-Localizing-U.S./Canada/Mexico-13527534) - 2020 - CRC - 5/29/19
KEYS, DOORS, AND WINDOWS 41
If equipped, pull the window switchup fully and quickly release to expressclose the window.
Briefly press or pull the windowswitch in the same direction to stopthat window’s express movement.
Window Automatic ReversalSystem
The express-close feature will reversewindow movement if it comes incontact with an object. Extreme coldor ice could cause the window toauto-reverse. The window will operatenormally after the object or conditionis removed.
Automatic Reversal SystemOverride
{ Warning
If automatic reversal systemoverride is active, the window willnot reverse automatically. You orothers could be injured and thewindow could be damaged. Beforeusing automatic reversal system
(Continued)
Warning (Continued)
override, make sure that all peopleand obstructions are clear of thewindow path.
When the engine is on, override theautomatic reversal system by pullingand holding the window switch ifconditions prevent it from closing.
Programming the PowerWindows
Programming may be necessary if thevehicle battery has been disconnectedor discharged. If the window is unableto express-up, program eachexpress-close window:
1. Close all doors.
2. Turn the ignition on or to ACC/ACCESSORY.
3. Partially open the window to beprogrammed. Then close it andcontinue to pull the switchbriefly after the window has fullyclosed.
4. Open the window and continueto press the switch briefly afterthe window has fully opened.
Remote Window Operation
If equipped, this feature allows allwindows to be opened remotely.If enabled in vehicle personalization,press and hold K on the RKEtransmitter. See Vehicle Personalization0 134.
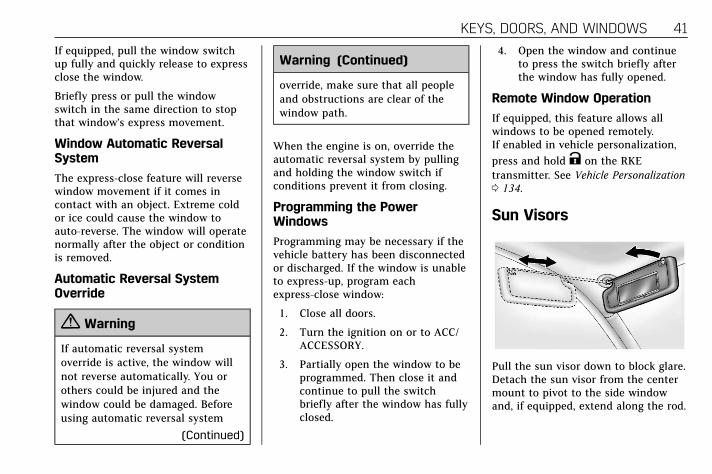
Sun Visors
Pull the sun visor down to block glare.Detach the sun visor from the centermount to pivot to the side windowand, if equipped, extend along the rod.

Cadillac XT5 Owner Manual (GMNA-Localizing-U.S./Canada/Mexico-13527534) - 2020 - CRC - 5/29/19
42 KEYS, DOORS, AND WINDOWS
Roof
SunroofIf equipped, the ignition must be onor in ACC/ACCESSORY, or RetainedAccessory Power (RAP) must be activeto operate the sunroof. See IgnitionPositions 0 176 andRetained Accessory Power (RAP) 0 182.
1. Sunroof Switch2. Sunshade Switch
Sunroof Express Operation : Pressand releasee (1) to vent. Press and
release again to move to the partially
opened comfort stop position. Pressand release again to express-open tothe fully opened position. Press and
releasee (1) at any time to stop
movement. Press and releaseg (1)
to express-close. Press and releaseg (1) at any time to stopmovement.
Sunroof Manual Operation : Thesunroof can change to manual modeby holdinge (1) while opening. The
sunroof will now open as long ase(1) is held. Press and releasee (1)
again to change back to expressoperation.
Power Sunshade ExpressOperation : Press and releaseC (2)
to express-open the sunshade. Press
and releaseC (2) at any time to stop
movement. Press and releaseQ (2)
to express-close the sunshade. Press
and releaseQ (2) at any time to
stop movement.
Power Sunshade ManualOperation : The sunshade can changeto manual mode by holdingC (2)
while opening. The sunroof will now
open as long asC (2) is held. Press
and releaseC (2) again to change
back to express operation.
The sunroof cannot be opened orclosed if the vehicle has an electricalfailure.
Automatic Reversal System
The sunroof and power sunshade havean automatic reversal system that isonly active when the sunroof andpower sunshade, if equipped, areoperated in express-close mode.
If an object is in the path whileexpress-closing, the reversal systemwill detect an object, stop, and openthe sunroof or power sunshade again.
If frost or other conditions preventclosing, override the feature by closingthe sunroof or power sunshade inmanual mode. To stop movement,release the switch.

Cadillac XT5 Owner Manual (GMNA-Localizing-U.S./Canada/Mexico-13527534) - 2020 - CRC - 5/29/19
KEYS, DOORS, AND WINDOWS 43
Dirt and debris may collect on thesunroof seal or in the track. Thiscould cause an issue with sunroofoperation or noise. It could also plugthe water drainage system.Periodically open the sunroof andremove any obstacles or loose debris.Wipe the sunroof seal and roof sealingarea using a clean cloth, mild soap,and water. Do not remove grease fromthe sunroof.
If water is seen dripping into thewater drainage system, this is normal.

Cadillac XT5 Owner Manual (GMNA-Localizing-U.S./Canada/Mexico-13527534) - 2020 - CRC - 5/29/19
44 SEATS AND RESTRAINTS
Seats and Restraints
Head RestraintsHead Restraints . . . . . . . . . . . . . . . . . . . . 45
Front SeatsSeat Adjustment . . . . . . . . . . . . . . . . . . . 46Lumbar Adjustment . . . . . . . . . . . . . . . 47Reclining Seatbacks . . . . . . . . . . . . . . . 47Memory Seats . . . . . . . . . . . . . . . . . . . . . . 48Heated and Ventilated FrontSeats . . . . . . . . . . . . . . . . . . . . . . . . . . . . . . 51
Rear SeatsRear Seats . . . . . . . . . . . . . . . . . . . . . . . . . . 52Rear Seat Armrest . . . . . . . . . . . . . . . . . 55Heated Rear Seats . . . . . . . . . . . . . . . . . 55
Seat BeltsSeat Belts . . . . . . . . . . . . . . . . . . . . . . . . . . . 56How to Wear Seat BeltsProperly . . . . . . . . . . . . . . . . . . . . . . . . . . . 57
Lap-Shoulder Belt . . . . . . . . . . . . . . . . . . 59Seat Belt Use DuringPregnancy . . . . . . . . . . . . . . . . . . . . . . . . . 62
Seat Belt Extender . . . . . . . . . . . . . . . . . 62Safety System Check . . . . . . . . . . . . . . 62Seat Belt Care . . . . . . . . . . . . . . . . . . . . . . 63Replacing Seat Belt System Partsafter a Crash . . . . . . . . . . . . . . . . . . . . . . 63
Airbag SystemAirbag System . . . . . . . . . . . . . . . . . . . . . 64Where Are the Airbags? . . . . . . . . . . . 66When Should an AirbagInflate? . . . . . . . . . . . . . . . . . . . . . . . . . . . 67
What Makes an Airbag Inflate? . . . 68How Does an Airbag Restrain? . . . 68What Will You See after an AirbagInflates? . . . . . . . . . . . . . . . . . . . . . . . . . . 68
Passenger Sensing System . . . . . . . . 70Servicing the Airbag-EquippedVehicle . . . . . . . . . . . . . . . . . . . . . . . . . . . . 74
Adding Equipment to theAirbag-Equipped Vehicle . . . . . . . . 74
Airbag System Check . . . . . . . . . . . . . . 75Replacing Airbag System Partsafter a Crash . . . . . . . . . . . . . . . . . . . . . . 75
Child RestraintsOlder Children . . . . . . . . . . . . . . . . . . . . . 76Infants and Young Children . . . . . . 77Child Restraint Systems . . . . . . . . . . . 80Where to Put the Restraint . . . . . . . 81Lower Anchors and Tethers forChildren (LATCH System) . . . . . . . 83
Replacing LATCH System PartsAfter a Crash . . . . . . . . . . . . . . . . . . . . . 89
Securing Child Restraints (Withthe Seat Belt in theRear Seat) . . . . . . . . . . . . . . . . . . . . . . . . 89
Securing Child Restraints (Withthe Seat Belt in theFront Seat) . . . . . . . . . . . . . . . . . . . . . . . 91

Cadillac XT5 Owner Manual (GMNA-Localizing-U.S./Canada/Mexico-13527534) - 2020 - CRC - 5/29/19
SEATS AND RESTRAINTS 45
Head RestraintsThe vehicle’s front seats haveadjustable head restraints in theoutboard seating positions.
{ Warning
With head restraints that are notinstalled and adjusted properly,there is a greater chance thatoccupants will suffer a neck/spinalinjury in a crash. Do not drive untilthe head restraints for all occupantsare installed and adjusted properly.
If your vehicle has rear headrestraints that fold down, alwaysreturn them to the full uprightposition whenever an occupant isseated in the seat.
Adjust the head restraint so that thetop of the restraint is at the sameheight as the top of the occupant'shead. This position reduces thechance of a neck injury in a crash.
Front Seats
The vehicle's front seats haveadjustable head restraints in theoutboard seating positions.
The height of the head restraint canbe adjusted.
To raise or lower the head restraint,press the button located on the side ofthe head restraint and pull up or pushthe head restraint down, and releasethe button. Pull and push on the headrestraint after the button is releasedto make sure that it is locked in place.
The front seat outboard headrestraints are not removable.

Cadillac XT5 Owner Manual (GMNA-Localizing-U.S./Canada/Mexico-13527534) - 2020 - CRC - 5/29/19
46 SEATS AND RESTRAINTS
Rear Seats
Rear Head Restraint Adjustment
The vehicle's rear seats haveadjustable head restraints in theoutboard seating positions.
The height of the head restraint canbe adjusted. Pull the head restraint upto raise it. Try to move the headrestraint to make sure that it is lockedin place.
To lower the head restraint, press thebutton, located on the top of theseatback, and push the head restraint
down. Try to move the head restraintafter the button is released to makesure that it is locked in place.
Always adjust the head restraint sothat the top of the restraint is at thesame height as the top of theoccupant's head.
Rear outboard head restraints are notremovable.
If you are installing a child restraintin the rear seat, see “Securing a ChildRestraint Designed for the LATCHSystem” under Lower Anchors andTethers for Children (LATCH System)0 83.
Front Seats
Seat Adjustment
{ Warning
You can lose control of the vehicleif you try to adjust a driver seatwhile the vehicle is moving. Adjustthe driver seat only when thevehicle is not moving.
{ Warning
The power seats will work with theignition off. Children could operatethe power seats and be injured.Never leave children alone in thevehicle.

Cadillac XT5 Owner Manual (GMNA-Localizing-U.S./Canada/Mexico-13527534) - 2020 - CRC - 5/29/19
SEATS AND RESTRAINTS 47
To adjust a power seat:
. Move the seat forward or rearwardby sliding the control forward orrearward.
. Raise or lower the front part of theseat cushion by moving the frontof the control up or down.
. Raise or lower the entire seat bymoving the rear of the control upor down.
To adjust the seatback, see RecliningSeatbacks 0 47.
To adjust the lumbar support, seeLumbar Adjustment 0 47.
Some vehicles are equipped with afeature that activates a vibration inthe driver seat to help the driver avoidcrashes. See Driver Assistance Systems0 210.
Lumbar Adjustment
Press and hold the control forward toincrease or rearward to decreasesupport.
Reclining Seatbacks
{ Warning
Sitting in a reclined position whenthe vehicle is in motion can bedangerous. Even when buckled up,the seat belts cannot do their job.
The shoulder belt will not beagainst your body. Instead, it will bein front of you. In a crash, youcould go into it, receiving neck orother injuries.
The lap belt could go up over yourabdomen. The belt forces would bethere, not at your pelvic bones. Thiscould cause serious internalinjuries.
For proper protection when thevehicle is in motion, have theseatback upright. Then sit well backin the seat and wear the seat beltproperly.

Cadillac XT5 Owner Manual (GMNA-Localizing-U.S./Canada/Mexico-13527534) - 2020 - CRC - 5/29/19
48 SEATS AND RESTRAINTS
Do not have a seatback reclined if thevehicle is moving.
To adjust:
. Tilt the top of the controlrearward to recline.
. Tilt the top of the control forwardto raise.
Memory Seats
If equipped, memory seats allow twodrivers to save and recall their uniqueseat positions for driving the vehicle,and a shared exit position for gettingout of the vehicle. Other featurepositions may also be saved, such aspower mirrors and power steeringwheel, if equipped. Memory positionsare linked to RKE transmitter 1 or 2for automatic memory recalls.
Before saving, adjust all availablememory feature positions. Turn thevehicle on and then press and releaseSET; a beep will sound. Thenimmediately press and hold 1, 2,orB (Exit) until two beeps sound.To manually recall these positions,press and hold 1, 2, orB until thesaved position is reached. Follow theinstructions under “Saving MemoryPositions.”
The vehicle identifies the currentdriver’s RKE transmitter number(1–8). See Remote Keyless Entry (RKE)System Operation 0 10. Only RKEtransmitters 1 and 2 can be used forautomatic memory recalls. A DriverInformation Center (DIC) welcomemessage indicating the transmitternumber may display for the first fewignition cycles following a transmitterchange. For Seat Entry Memory towork properly, save the positions tothe memory button (1 or 2) matchingthe RKE transmitter number displayedin the DIC welcome message. Carrythe linked RKE transmitter whenentering the vehicle.

Cadillac XT5 Owner Manual (GMNA-Localizing-U.S./Canada/Mexico-13527534) - 2020 - CRC - 5/29/19
SEATS AND RESTRAINTS 49
Vehicle Personalization Settings
. To have the Seat Entry Memorymovement begin when the vehicleis started, select the Settingsmenu, then Vehicle, then SeatingPosition, and then Seat EntryMemory. Select On or Off. See“Seat Entry Memory” later in thissection.
. To begin Seat Exit Memorymovement when the vehicle isturned off and the driver door isopened, or when the vehicle isturned off with the driver dooralready opened, select the Settingsmenu, then Vehicle, then SeatingPosition, and then Seat ExitMemory. Select On or Off. See“Seat Exit Memory” later in thissection.
. See Vehicle Personalization 0 134for additional setting information.
Identifying Driver Number
To identify the driver number:
1. Move your RKE transmitter awayfrom the vehicle.
2. Start the vehicle with anotherkey or RKE transmitter. The DICshould display the driver numberfor the other RKE transmitter.Turn the vehicle off and removethe key or RKE transmitter fromthe vehicle.
3. Start the vehicle with the initialkey or RKE transmitter. The DICshould display the driver numberof your RKE transmitter.
Saving Memory Positions
Read these instructions completelybefore saving memory positions.
To save preferred driving positions1 and 2:
1. Turn the vehicle on or to ACC/ACCESSORY.
A DIC welcome message mayindicate driver number 1 or 2.
2. Adjust all available memoryfeatures to the desired drivingposition.
3. Press and release SET; a beepwill sound.
4. Immediately press and hold the1 or 2 memory button matchingthe above DIC welcome messageuntil two beeps sound.
If too much time passes betweenreleasing SET and pressing 1, thememory position will not besaved and two beeps will notsound. Repeat Steps 3 and 4.
1 or 2 corresponds to the drivernumber. See “Identifying DriverNumber” previously in thissection.
5. Repeat Steps 1–4 for a seconddriver using 1 or 2.
To save the position forB and SeatExit Memory features, repeat Steps 1–4 usingB. This saves the positionfor getting out of the vehicle.
Save preferred memory featurepositions to both 1 and 2 if you arethe only driver.

Cadillac XT5 Owner Manual (GMNA-Localizing-U.S./Canada/Mexico-13527534) - 2020 - CRC - 5/29/19
50 SEATS AND RESTRAINTS
Manually Recalling MemoryPositions
Press and hold 1, 2, orB to recallthe previously saved memorypositions if you are driver 1 or 2identified in the DIC welcomemessage.
To stop Manual Memory recallmovement, release 1, 2, orB or pressany of the following controls:
. Power seat
. Memory SET
. Power mirror, with the driver orpassenger side mirror selected
. Power steering wheel, if equipped
Seat Entry Memory
The vehicle identifies the number ofthe current driver’s RKE transmitter(1–8). See Remote Keyless Entry (RKE)System Operation 0 10. If the RKEtransmitter is 1 or 2, and Seat EntryMemory is enabled in vehiclepersonalization, the positions saved tothe same memory button number 1 or2 are automatically recalled when thevehicle is turned on, or turned from
off to ACC/ACCESSORY. RKEtransmitters 3–8 will not provideautomatic memory recalls.
To turn Seat Entry Memory on or off,see “Vehicle Personalization Settings”previously in this section and VehiclePersonalization 0 134.
The shift lever must be in P (Park) tostart Seat Entry Memory. Seat EntryMemory recall will complete if thevehicle is shifted out of P (Park) priorto reaching the saved memoryposition.
To stop Seat Entry Memory recallmovement, turn the vehicle off orpress any of the following controls:
. Power seat
. Memory SET, 1, 2, orB
. Power mirror, with the driver orpassenger side mirror selected
. Power steering wheel, if equipped
If the saved memory seat positiondoes not automatically recall or recallsto the wrong positions, the driver’sRKE transmitter number (1 or 2) maynot match the memory button
number that positions were saved to.Try storing the position to the othermemory button or try the other RKEtransmitter.
Seat Exit Memory
Seat Exit Memory is not linked to anRKE transmitter. The position saved toB is used for all drivers. To turn SeatExit Memory on or off, see "VehiclePersonalization Settings" previously inthis section and Vehicle Personalization0 134.
If turned on, the position saved toBis automatically recalled when one ofthe following occurs:
. The vehicle is turned off and thedriver door is opened within ashort time.
. The vehicle is turned off with thedriver door open.
To stop Seat Exit Memory movement,press any of the following memorycontrols:
. Power seat
. Memory SET, 1, 2, orB

Cadillac XT5 Owner Manual (GMNA-Localizing-U.S./Canada/Mexico-13527534) - 2020 - CRC - 5/29/19
SEATS AND RESTRAINTS 51. Power mirror, with the driver or
passenger side mirror selected
. Power steering wheel, if equipped
Obstructions
If something has blocked the driverseat and/or power steering wheelwhile recalling a memory position, therecall may stop. Remove theobstruction and try the recall again.If the memory position still does notrecall, see your dealer.
Heated and VentilatedFront Seats
{ Warning
If temperature change or pain tothe skin cannot be felt, the seatheater may cause burns. To reducethe risk of burns, use care whenusing the seat heater, especially forlong periods of time. Do not placeanything on the seat that insulatesagainst heat, such as a blanket,cushion, cover, or similar item. This
(Continued)
Warning (Continued)
may cause the seat heater tooverheat. An overheated seat heatermay cause a burn or may damagethe seat.
If equipped, the buttons are near theclimate controls on the center stack.To operate, the engine must berunning.
Press M or L to heat the driver orpassenger seat cushion.
PressC or { to ventilate the driveror passenger seat.
Press the button once for the highestsetting. With each press of the button,the seat will change to the next lowersetting, and then to the off setting.The indicator lights next to thebuttons indicate three for the highestsetting and one for the lowest. If thefront heated seats are on high, thelevel may automatically be loweredafter approximately 30 minutes.
When this feature is off, the heatedand ventilated seat symbols on thebuttons are white. A ventilated seathas a fan that pulls or pushes airthrough the seat. The air is notcooled. When a heated seat is turnedon, the symbol turns red. When aventilated seat is turned on, thesymbol turns blue.
The passenger seat may take longer toheat up.
Auto Heated and Ventilated Seats
If the vehicle is equipped with autoheated or ventilated seats, and theengine is running, this feature will

Cadillac XT5 Owner Manual (GMNA-Localizing-U.S./Canada/Mexico-13527534) - 2020 - CRC - 5/29/19
52 SEATS AND RESTRAINTS
automatically activate the heated orventilated seats at the level requiredby the vehicle's interior temperature.
The active high, medium, low, or offheated or ventilated seat level will beindicated by the manual heated andventilated seat buttons on the centerstack. Use the manual heated andventilated seat buttons on the centerstack to turn auto heated or ventilatedseats off. If the passenger seat isunoccupied, the auto heated orventilated seats feature will notactivate that seat. The auto heatedand ventilated seats feature can beprogrammed to always be enabledwhen the vehicle is on. If equippedwith a heated steering wheel, the autoheated steering wheel activation willfollow the heated seat auto activationand the heated wheel indicator willfollow the state of the steeringwheel heat.
See Vehicle Personalization 0 134.
Remote Start Heated and VentilatedSeats
If equipped, the heated seats will turnon automatically during a remotestart if it is cold outside and theventilated seats will turn onautomatically if it is hot outside.If equipped, the heated steering wheelwill turn on automatically during aremote start if it is cold outside. Theheated and ventilated seat indicatorsand heated steering wheel indicatormay not come on during thisoperation.
The heated and ventilated seats andheated steering wheel may cancelwhen the vehicle is started. Thesefeatures can be manually selectedafter the engine is running.
The temperature performance of anunoccupied seat may be reduced. Thisis normal.
The heated or ventilated seats will notturn on during a remote start unlessthey are enabled in the vehiclepersonalization menu. See RemoteVehicle Start 0 17 andVehicle Personalization 0 134.
Rear SeatsRear Seat Reminder
If equipped, the message REAR SEATREMINDER LOOK IN REAR SEATdisplays under certain conditionsindicating there may be an item orpassenger in the rear seat. Checkbefore exiting the vehicle.
This feature will activate when asecond row door is opened while thevehicle is on or up to 10 minutesbefore the vehicle is turned on. Therewill be an alert when the vehicle isturned off. The alert does not directlydetect objects in the rear seat; instead,under certain conditions, it detectswhen a rear door is opened andclosed, indicating that there may besomething in the rear seat.
The feature is active only once eachtime the vehicle is turned on and off,and will require reactivation byopening and closing the second rowdoors. There may be an alert evenwhen there is nothing in the rear seat;for example, if a child entered the

Cadillac XT5 Owner Manual (GMNA-Localizing-U.S./Canada/Mexico-13527534) - 2020 - CRC - 5/29/19
SEATS AND RESTRAINTS 53
vehicle through the rear door and leftthe vehicle without the vehicle beingshut off.
The feature can be turned on or off.See Vehicle Personalization 0 134.
Rear Seat Adjustment
The second row seats slide forward formore room.
To adjust the seat position, lift thelever below the seat cushion and slidethe seat forward or backward.
Reclining the Seatback
To recline the seatback:
1. Pull the reclining seatbackhandle.
2. Move the seatback to the desiredposition, and then release thehandle to lock the seatback inplace.
3. Push and pull on the seatback tomake sure it is locked.
Folding the Seatback
Either side of the seatback can befolded for more cargo space. Fold aseatback only when the vehicle is notmoving.
Caution
Folding a rear seat with the seatbelts still fastened may causedamage to the seat or the seatbelts. Always unbuckle the seatbelts and return them to theirnormal stowed position beforefolding a rear seat.

Cadillac XT5 Owner Manual (GMNA-Localizing-U.S./Canada/Mexico-13527534) - 2020 - CRC - 5/29/19
54 SEATS AND RESTRAINTS
To fold the seatback:
1. Pull the handle on top of theseatback to unlock it.
2. Fold the seatback forward.
Repeat the steps to fold theother seatback, if desired.
Driver Side Shown, Passenger SideSimilar
The rear seatbacks can also be foldedforward by pulling the levers on eitherside of the rear cargo area.
Raising the Seatback
{ Warning
If either seatback is not locked, itcould move forward in a suddenstop or crash. That could causeinjury to the person sitting there.Always push and pull on theseatbacks to be sure they arelocked.
{ Warning
A seat belt that is improperlyrouted, not properly attached,or twisted will not provide theprotection needed in a crash. Theperson wearing the belt could beseriously injured. After raising therear seatback, always check to besure that the seat belts are properlyrouted and attached, and are nottwisted.
To raise a seatback:
1. Lift the seatback up and push itrearward to lock it in place.
2. Push and pull the top of theseatback to be sure it is lockedinto position.
3. Repeat the steps to raise theother seatback, if necessary.
When the seat is not in use, it shouldbe kept in the upright, locked position.

Cadillac XT5 Owner Manual (GMNA-Localizing-U.S./Canada/Mexico-13527534) - 2020 - CRC - 5/29/19
SEATS AND RESTRAINTS 55
Rear Seat Armrest
The rear seat has an armrest in thecenter of the seatback. Lower thearmrest to access the cupholders.
To fold, lift the armrest up and push itrearward until it is flush with theseatback.
The armrest may also have controlsfor the infotainment system. See theinfotainment manual.
Heated Rear Seats
{ Warning
If temperature change or pain tothe skin cannot be felt, the seatheater may cause burns. See theWarning under Heated andVentilated Front Seats 0 51.
If equipped, the buttons are on therear of the center console.
With the engine running, press M orL to heat the left or right outboardseat cushion. On vehicles without rear
climate controls, an indicator light onthe button will turn on when theheated seat is on. On vehicles withrear climate controls, an indicator onthe climate control display appearswhen this feature is on.
On vehicles without rear climatecontrols but equipped with heatedrear seats, press the button again toturn this feature off. The light on thebutton will turn off. On vehicles withrear climate controls, this featureturns on at the highest setting. Witheach press of the button, the heatedseat changes to the next lower setting,and then the off setting. Three lightsindicate the highest setting, and onelight indicates the lowest. If theheated seats are on high, the levelmay automatically be lowered afterapproximately 30 minutes.

Cadillac XT5 Owner Manual (GMNA-Localizing-U.S./Canada/Mexico-13527534) - 2020 - CRC - 5/29/19
56 SEATS AND RESTRAINTS
Seat BeltsThis section describes how to use seatbelts properly, and some things notto do.
{ Warning
Do not let anyone ride where a seatbelt cannot be worn properly. In acrash, if you or your passenger(s)are not wearing seat belts, injuriescan be much worse than if you arewearing seat belts. You can beseriously injured or killed by hittingthings inside the vehicle harder orby being ejected from the vehicle.In addition, anyone who is notbuckled up can strike otherpassengers in the vehicle.
It is extremely dangerous to ride ina cargo area, inside or outside of avehicle. In a collision, passengersriding in these areas are more likelyto be seriously injured or killed. Do
(Continued)
Warning (Continued)
not allow passengers to ride in anyarea of the vehicle that is notequipped with seats and seat belts.
Always wear a seat belt, and checkthat all passenger(s) are restrainedproperly too.
This vehicle has indicators as areminder to buckle the seat belts. SeeSeat Belt Reminders 0 116.
Why Seat Belts Work
When riding in a vehicle, you travel asfast as the vehicle does. If the vehiclestops suddenly, you keep going untilsomething stops you. It could be thewindshield, the instrument panel,or the seat belts!
When you wear a seat belt, you andthe vehicle slow down together. Thereis more time to stop because you stopover a longer distance and, when wornproperly, your strongest bones takethe forces from the seat belts. That iswhy wearing seat belts makes suchgood sense.
Questions and Answers AboutSeat Belts
Q: Will I be trapped in the vehicleafter a crash if I am wearing aseat belt?
A: You could be— whether you arewearing a seat belt or not. Yourchance of being conscious duringand after a crash, so you canunbuckle and get out, is muchgreater if you are belted.
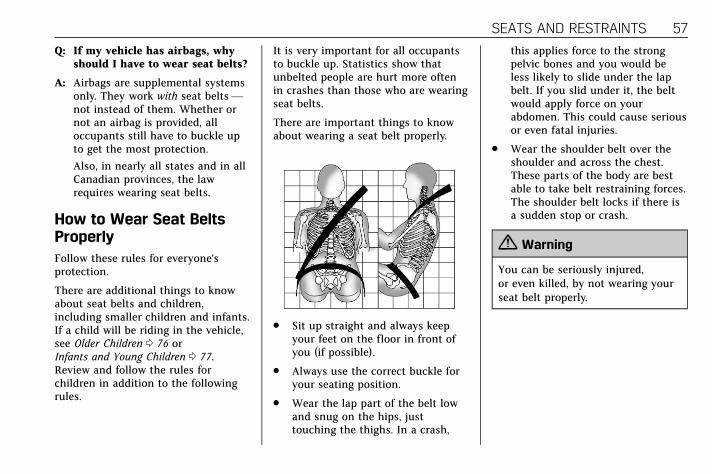
Cadillac XT5 Owner Manual (GMNA-Localizing-U.S./Canada/Mexico-13527534) - 2020 - CRC - 5/29/19
SEATS AND RESTRAINTS 57
Q: If my vehicle has airbags, whyshould I have to wear seat belts?
A: Airbags are supplemental systemsonly. They work with seat belts—not instead of them. Whether ornot an airbag is provided, alloccupants still have to buckle upto get the most protection.
Also, in nearly all states and in allCanadian provinces, the lawrequires wearing seat belts.
How to Wear Seat BeltsProperlyFollow these rules for everyone'sprotection.
There are additional things to knowabout seat belts and children,including smaller children and infants.If a child will be riding in the vehicle,see Older Children 0 76 orInfants and Young Children 0 77.Review and follow the rules forchildren in addition to the followingrules.
It is very important for all occupantsto buckle up. Statistics show thatunbelted people are hurt more oftenin crashes than those who are wearingseat belts.
There are important things to knowabout wearing a seat belt properly.
. Sit up straight and always keepyour feet on the floor in front ofyou (if possible).
. Always use the correct buckle foryour seating position.
. Wear the lap part of the belt lowand snug on the hips, justtouching the thighs. In a crash,
this applies force to the strongpelvic bones and you would beless likely to slide under the lapbelt. If you slid under it, the beltwould apply force on yourabdomen. This could cause seriousor even fatal injuries.
. Wear the shoulder belt over theshoulder and across the chest.These parts of the body are bestable to take belt restraining forces.The shoulder belt locks if there isa sudden stop or crash.
{ Warning
You can be seriously injured,or even killed, by not wearing yourseat belt properly.

Cadillac XT5 Owner Manual (GMNA-Localizing-U.S./Canada/Mexico-13527534) - 2020 - CRC - 5/29/19
58 SEATS AND RESTRAINTS
Never allow the lap or shoulder belt tobecome loose or twisted.
Never wear the shoulder belt underboth arms or behind your back.
Always use the correct buckle for yourseating position.
Never route the lap or shoulder beltover an armrest.

Cadillac XT5 Owner Manual (GMNA-Localizing-U.S./Canada/Mexico-13527534) - 2020 - CRC - 5/29/19
SEATS AND RESTRAINTS 59
{ Warning
The seat belt can be pinched if it isrouted under plastic trim on theseat, such as trim around the rearseatback folding handle or sideairbag. In a crash, pinched seatbelts might not be able to provideadequate protection. Never allowseat belts to be routed under plastictrim pieces.
Lap-Shoulder BeltAll seating positions in the vehiclehave a lap-shoulder belt.
The following instructions explainhow to wear a lap-shoulder beltproperly.
1. Adjust the seat, if the seat isadjustable, so you can sit upstraight. To see how, see “Seats”in the Index.
2. Pick up the latch plate and pullthe belt across you. Do not let itget twisted.
The lap-shoulder belt may lock ifyou pull the belt across you veryquickly. If this happens, let thebelt go back slightly to unlock it.Then pull the belt across youmore slowly.
If the shoulder portion of apassenger belt is pulled out allthe way, the child restraintlocking feature may be engaged.See Child Restraint Systems 0 80.If this occurs, let the belt go backall the way and start again. If thelocking feature stays engaged
after letting the belt go back tostowed position on the seat,move the seat rearward or reclinethe seat until the shoulder beltretractor lock releases.
Engaging the child restraintlocking feature in the frontoutboard seating position mayaffect the passenger sensingsystem. See Passenger SensingSystem 0 70.
If the webbing locks in the latchplate before it reaches thebuckle, tilt the latch plate flat tounlock.

Cadillac XT5 Owner Manual (GMNA-Localizing-U.S./Canada/Mexico-13527534) - 2020 - CRC - 5/29/19
60 SEATS AND RESTRAINTS
3. Push the latch plate into thebuckle until it clicks.
Pull up on the latch plate tomake sure it is secure. If the beltis not long enough, see Seat BeltExtender 0 62.
Position the release button onthe buckle so that the seat beltcould be quickly unbuckled ifnecessary.
4. If equipped with a shoulder beltheight adjuster, move it to theheight that is right for you. See“Shoulder Belt Height Adjuster”
later in this section forinstructions on use andimportant safety information.
5. To make the lap part tight, pullup on the shoulder belt.
To unlatch the belt, push the buttonon the buckle. The belt should returnto its stowed position.
Always stow the seat belt slowly. If theseat belt webbing returns quickly tothe stowed position, the retractor maylock and cannot be pulled out. If thishappens, pull the seat belt straight outfirmly to unlock the webbing, andthen release it. If the webbing is stilllocked in the retractor, see yourdealer.
Before a door is closed, be sure theseat belt is out of the way. If a door isslammed against a seat belt, damagecan occur to both the seat belt andthe vehicle.

Cadillac XT5 Owner Manual (GMNA-Localizing-U.S./Canada/Mexico-13527534) - 2020 - CRC - 5/29/19
SEATS AND RESTRAINTS 61
Shoulder Belt Height Adjuster
The vehicle has a shoulder belt heightadjuster for the driver and frontoutboard passenger seating positions.
Adjust the height so that the shoulderportion of the belt is on the shoulderand not falling off of it. The beltshould be close to, but not contacting,the neck. Improper shoulder beltheight adjustment could reduce theeffectiveness of the seat belt in acrash. See How to Wear Seat BeltsProperly 0 57.
Press and hold the release buttonwhile raising or lowering the heightadjuster to the desired position.
After the height adjuster is set to thedesired position, try to move it downwithout pressing the release button tomake sure it has locked into position.
Automatic Seat Belt TighteningSystem
The vehicle may have the AutomaticSeat Belt Tightening System.
Each time the front seat belts arebuckled while the vehicle is in P (Park)or D (Drive) and the engine is runningor in Auto Stop (if equipped), thesystem may activate to tighten theseat belts.
The system also activates duringemergency braking and/or suddendriving maneuvers and releases whendriving conditions return to normal.
The system will not activate if theTraction Control/Electronic StabilityControl system is not functioningproperly. See Traction Control/Electronic Stability Control 0 196.If there is a problem with the
Automatic Seat Belt TighteningSystem, a message displays on theDriver Information Center (DIC). If asystem unavailable message displaysrepeatedly or if a service messagedisplays, see your dealer. Other seatbelt functions are not affected by theAutomatic Seat Belt TighteningSystem.
Seat Belt Pretensioners
This vehicle has seat beltpretensioners for the front outboardoccupants. Although the seat beltpretensioners cannot be seen, they arepart of the seat belt assembly. Theycan help tighten the seat belts duringthe early stages of a moderate tosevere frontal, near frontal, or rearcrash if the threshold conditions forpretensioner activation are met. Seatbelt pretensioners can also helptighten the seat belts in a side crashor a rollover event.
Pretensioners work only once. If thepretensioners activate in a crash, thepretensioners and probably otherparts of the vehicle’s seat belt system

Cadillac XT5 Owner Manual (GMNA-Localizing-U.S./Canada/Mexico-13527534) - 2020 - CRC - 5/29/19
62 SEATS AND RESTRAINTS
will need to be replaced. See ReplacingSeat Belt System Parts after a Crash0 63.
Do not sit on the outboard seat beltwhile entering or exiting the vehicle orat any time while sitting in the seat.Sitting on the seat belt can damagethe webbing and hardware.
Rear Seat Belt Comfort Guides
Rear seat belt comfort guides mayprovide added seat belt comfort forolder children who have outgrownbooster seats and for some adults.When installed on a shoulder belt, thecomfort guide positions the shoulderbelt away from the neck and head.
Comfort guides for the second rowoutboard seating positions may beprovided in a package in the gloveboxor cargo area, or they are availablethrough your dealer. Instructions areincluded with the guides.
Seat Belt Use DuringPregnancySeat belts work for everyone,including pregnant women. Like alloccupants, they are more likely to beseriously injured if they do not wearseat belts.
A pregnant woman should wear alap-shoulder belt, and the lap portionshould be worn as low as possible,below the rounding, throughout thepregnancy.
The best way to protect the fetus is toprotect the mother. When a seat beltis worn properly, it is more likely that
the fetus will not be hurt in a crash.For pregnant women, as for anyone,the key to making seat belts effectiveis wearing them properly.
Seat Belt ExtenderIf the vehicle's seat belt will fastenaround you, you should use it.
But if a seat belt is not long enough,your dealer will order you an extender.When you go in to order it, take theheaviest coat you will wear, so theextender will be long enough for you.To help avoid personal injury, do notlet someone else use it, and use itonly for the seat it is made to fit. Theextender has been designed for adults.Never use it for securing childrestraints. For more information onthe proper use and fit of seat beltextenders see the instruction sheetthat comes with the extender.
Safety System CheckPeriodically check the seat beltreminder, seat belts, buckles, latchplates, retractors, shoulder belt heightadjusters (if equipped), and seat belt

Cadillac XT5 Owner Manual (GMNA-Localizing-U.S./Canada/Mexico-13527534) - 2020 - CRC - 5/29/19
SEATS AND RESTRAINTS 63
anchorages to make sure they are allin working order. Look for any otherloose or damaged seat belt systemparts that might keep a seat beltsystem from performing properly. Seeyour dealer to have it repaired. Torn,frayed, or twisted seat belts may notprotect you in a crash. Torn or frayedseat belts can rip apart under impactforces. If a belt is torn or frayed, haveit replaced immediately. If a belt istwisted, it may be possible to untwistby reversing the latch plate on thewebbing. If the twist cannot becorrected, ask your dealer to fix it.
Make sure the seat belt reminder lightis working. See Seat Belt Reminders0 116.
Keep seat belts clean and dry. See SeatBelt Care 0 63.
Seat Belt CareKeep belts clean and dry.
Seat belts should be properly cared forand maintained.
Seat belt hardware should be kept dryand free of dust or debris. Asnecessary, exterior hard surfaces and
seat belt webbing may be lightlycleaned with mild soap and water.Ensure there is not excessive dust ordebris in the mechanism. If dust ordebris exists in the system please seethe dealer. Parts may need to bereplaced to ensure properfunctionality of the system.
{ Warning
Do not bleach or dye seat beltwebbing. It may severely weakenthe webbing. In a crash, they mightnot be able to provide adequateprotection. Clean and rinse seat beltwebbing only with mild soap andlukewarm water. Allow the webbingto dry.
Replacing Seat BeltSystem Parts after a Crash
{ Warning
A crash can damage the seat beltsystem in the vehicle. A damagedseat belt system may not properlyprotect the person using it,resulting in serious injury or evendeath in a crash. To help make surethe seat belt systems are workingproperly after a crash, have theminspected and any necessaryreplacements made as soon aspossible.
Cadillac XT5 Owner Manual (GMNA-Localizing-U.S./Canada/Mexico-13527534) - 2020 - CRC - 5/29/19
64 SEATS AND RESTRAINTS
After a minor crash, replacement ofseat belts may not be necessary. Butthe seat belt assemblies that wereused during any crash may have beenstressed or damaged. See your dealerto have the seat belt assembliesinspected or replaced.
New parts and repairs may benecessary even if the seat belt systemwas not being used at the time of thecrash.
Have the seat belt pretensionerschecked if the vehicle has been in acrash, or if the airbag readiness lightstays on after you start the vehicle orwhile you are driving. See AirbagReadiness Light 0 117.
Airbag SystemThe vehicle has the following airbags:
. A frontal airbag for the driver
. A frontal airbag for the frontoutboard passenger
. A knee airbag for the driver
. A seat-mounted side impact airbagfor the driver
. A seat-mounted side impact airbagfor the front outboard passenger
. A roof-rail airbag for the driverand the passenger seated directlybehind the driver
. A roof-rail airbag for the frontoutboard passenger and thepassenger seated directly behindthe front outboard passenger
All vehicle airbags have the wordAIRBAG on the trim or on a label nearthe deployment opening.
For frontal airbags, the word AIRBAGis on the center of the steering wheelfor the driver and on the instrumentpanel for the front outboardpassenger.
For knee airbags, the word AIRBAG ison the lower part of the instrumentpanel.
For seat-mounted side impact airbags,the word AIRBAG is on the side of theseatback or side of the seat closest tothe door.
For roof-rail airbags, the word AIRBAGis on the ceiling or trim.
Airbags are designed to supplementthe protection provided by seat belts.Even though today's airbags are alsodesigned to help reduce the risk ofinjury from the force of an inflatingbag, all airbags must inflate veryquickly to do their job.
Here are the most important things toknow about the airbag system:
{ Warning
You can be severely injured orkilled in a crash if you are notwearing your seat belt, even withairbags. Airbags are designed towork with seat belts, not replace
(Continued)

Cadillac XT5 Owner Manual (GMNA-Localizing-U.S./Canada/Mexico-13527534) - 2020 - CRC - 5/29/19
SEATS AND RESTRAINTS 65
Warning (Continued)
them. Also, airbags are not designedto inflate in every crash. In somecrashes seat belts are the onlyrestraint. See When Should anAirbag Inflate? 0 67.
Wearing your seat belt during acrash helps reduce your chance ofhitting things inside the vehicle orbeing ejected from it. Airbags are“supplemental restraints” to theseat belts. Everyone in the vehicleshould wear a seat belt properly,whether or not there is an airbagfor that person.
{ Warning
Because airbags inflate with greatforce and faster than the blink of aneye, anyone who is up against,or very close to, any airbag when itinflates can be seriously injured orkilled. Do not sit unnecessarily
(Continued)
Warning (Continued)
close to any airbag, as you would beif sitting on the edge of the seat orleaning forward. Seat belts helpkeep you in position before andduring a crash. Always wear a seatbelt, even with airbags. The drivershould sit as far back as possiblewhile still maintaining control ofthe vehicle. The seat belts and thefront outboard passenger airbagsare most effective when you aresitting well back and upright in theseat with both feet on the floor.
Occupants should not lean on orsleep against the door or sidewindows in seating positions withseat-mounted side impact airbagsand/or roof-rail airbags.
{ Warning
Children who are up against,or very close to, any airbag when itinflates can be seriously injured orkilled. Always secure childrenproperly in the vehicle. To readhow, see Older Children 0 76 orInfants and Young Children 0 77.
There is an airbag readiness light onthe instrument cluster, which showsthe airbag symbol. The system checksthe airbag electrical system formalfunctions. The light tells you ifthere is an electrical problem. SeeAirbag Readiness Light 0 117 for moreinformation.

Cadillac XT5 Owner Manual (GMNA-Localizing-U.S./Canada/Mexico-13527534) - 2020 - CRC - 5/29/19
66 SEATS AND RESTRAINTS
Where Are the Airbags?
The driver frontal airbag is in thecenter of the steering wheel.
The front outboard passenger frontalairbag is in the passenger sideinstrument panel.
The driver knee airbag is below thesteering column.
Driver Side Shown, Passenger SideSimilar
The seat-mounted side impact airbagsfor the driver and front outboardpassenger are in the sides of theseatbacks closest to the door.
The roof-rail airbags for the driver,front outboard passenger, and secondrow outboard passengers are in theceiling above the side windows.

Cadillac XT5 Owner Manual (GMNA-Localizing-U.S./Canada/Mexico-13527534) - 2020 - CRC - 5/29/19
SEATS AND RESTRAINTS 67
{ Warning
If something is between anoccupant and an airbag, the airbagmight not inflate properly or itmight force the object into thatperson causing severe injury oreven death. The path of an inflatingairbag must be kept clear. Do notput anything between an occupantand an airbag, and do not attach orput anything on the steering wheelhub or on or near any other airbagcovering.
Do not use seat accessories thatblock the inflation path of aseat-mounted side impact airbag.
Never secure anything to the roof ofa vehicle with roof-rail airbags byrouting a rope or tie‐down throughany door or window opening. If youdo, the path of an inflating roof-railairbag will be blocked.
When Should an AirbagInflate?This vehicle is equipped with airbags.See Airbag System 0 64. Airbags aredesigned to inflate if the impactexceeds the specific airbag system'sdeployment threshold. Deploymentthresholds are used to predict howsevere a crash is likely to be in timefor the airbags to inflate and helprestrain the occupants. The vehiclehas electronic sensors that help theairbag system determine the severityof the impact. Deployment thresholdscan vary with specific vehicle design.
Frontal airbags are designed to inflatein moderate to severe frontal or nearfrontal crashes to help reduce thepotential for severe injuries, mainly tothe driver's or front outboardpassenger's head and chest.
Whether the frontal airbags will orshould inflate is not based primarilyon how fast the vehicle is traveling.It depends on what is hit, thedirection of the impact, and howquickly the vehicle slows down.
Frontal airbags may inflate atdifferent crash speeds depending onwhether the vehicle hits an objectstraight on or at an angle, andwhether the object is fixed or moving,rigid or deformable, narrow or wide.
Frontal airbags are not intended toinflate during vehicle rollovers, in rearimpacts, or in many side impacts.
In addition, the vehicle has advancedtechnology frontal airbags. Advancedtechnology frontal airbags adjust therestraint according to either crashseverity or occupant interaction.
Knee airbags are designed to inflate inmoderate to severe frontal or nearfrontal impacts. Knee airbags are notdesigned to inflate during vehiclerollovers, in rear impacts, or in manyside impacts.
Seat-mounted side impact airbags aredesigned to inflate in moderate tosevere side crashes, depending on thelocation of the impact. These airbagsare also designed to inflate in somemoderate to severe frontal ornear-frontal impacts that could resultin the occupant moving toward the
Cadillac XT5 Owner Manual (GMNA-Localizing-U.S./Canada/Mexico-13527534) - 2020 - CRC - 5/29/19
68 SEATS AND RESTRAINTS
side of the vehicle. Seat-mounted sideimpact airbags are not designed toinflate in rollovers, or rear impacts.A seat-mounted side impact airbag isdesigned to inflate on the side of thevehicle that is struck.
Roof-rail airbags are designed toinflate in moderate to severe sidecrashes depending on the location ofthe impact. In addition, these roof-railairbags are designed to inflate duringa rollover or in a severe frontalimpact. Roof-rail airbags are notdesigned to inflate in rear impacts.Both roof-rail airbags will inflate wheneither side of the vehicle is struck,if the sensing system predicts that thevehicle is about to roll over on itsside, or in a severe frontal impact.
In any particular crash, no one cansay whether an airbag should haveinflated simply because of the vehicledamage or repair costs.
What Makes an AirbagInflate?In a deployment event, the sensingsystem sends an electrical signaltriggering a release of gas from theinflator. Gas from the inflator fills theairbag causing the bag to break out ofthe cover. The inflator, the airbag, andrelated hardware are all part of theairbag module.
For airbag locations, see Where Are theAirbags? 0 66.
How Does an AirbagRestrain?In moderate to severe frontal or nearfrontal collisions, even beltedoccupants can contact the steeringwheel or the instrument panel. Inmoderate to severe side collisions,even belted occupants can contact theinside of the vehicle.
Airbags supplement the protectionprovided by seat belts by distributingthe force of the impact more evenlyover the occupant's body.
Rollover capable roof-rail airbags aredesigned to help contain the head andchest of occupants in the outboardseating positions in the first andsecond rows. The rollover capableroof-rail airbags are designed to helpreduce the risk of full or partialejection in rollover events, althoughno system can prevent all suchejections.
But airbags would not help in manytypes of collisions, primarily becausethe occupant's motion is not towardthose airbags. See When Should anAirbag Inflate? 0 67.
Airbags should never be regarded asanything more than a supplement toseat belts.
What Will You See after anAirbag Inflates?After frontal, knee, and seat-mountedside impact airbags inflate, theyquickly deflate, so quickly that somepeople may not even realize theairbags inflated. Roof-rail airbags maystill be at least partially inflated forsome time after they inflate. Some

Cadillac XT5 Owner Manual (GMNA-Localizing-U.S./Canada/Mexico-13527534) - 2020 - CRC - 5/29/19
SEATS AND RESTRAINTS 69
components of the airbag module maybe hot for several minutes. Forlocation of the airbags, see Where Arethe Airbags? 0 66.
The parts of the airbag that come intocontact with you may be warm, butnot too hot to touch. There may besome smoke and dust coming fromthe vents in the deflated airbags.Airbag inflation does not prevent thedriver from seeing out of thewindshield or being able to steer thevehicle, nor does it prevent peoplefrom leaving the vehicle.
{ Warning
When an airbag inflates, there maybe dust in the air. This dust couldcause breathing problems forpeople with a history of asthma orother breathing trouble. To avoidthis, everyone in the vehicle shouldget out as soon as it is safe to doso. If you have breathing problemsbut cannot get out of the vehicleafter an airbag inflates, then get
(Continued)
Warning (Continued)
fresh air by opening a window or adoor. If you experience breathingproblems following an airbagdeployment, you should seekmedical attention.
The vehicle has a feature that mayautomatically unlock the doors, turnon the interior lamps and hazardwarning flashers, and shut off the fuelsystem after the airbags inflate. Thefeature may also activate, withoutairbag inflation, after an event thatexceeds a predetermined threshold.After turning the ignition off and thenon again, the fuel system will returnto normal operation; the doors can belocked, the interior lamps can beturned off, and the hazard warningflashers can be turned off using thecontrols for those features. If any ofthese systems are damaged in thecrash they may not operate as normal.
{ Warning
A crash severe enough to inflate theairbags may have also damagedimportant functions in the vehicle,such as the fuel system, brake andsteering systems, etc. Even if thevehicle appears to be drivable aftera moderate crash, there may beconcealed damage that could makeit difficult to safely operate thevehicle.
Use caution if you should attemptto restart the engine after a crashhas occurred.
In many crashes severe enough toinflate the airbag, windshields arebroken by vehicle deformation.Additional windshield breakage mayalso occur from the front outboardpassenger airbag.
. Airbags are designed to inflateonly once. After an airbag inflates,you will need some new parts forthe airbag system. If you do notget them, the airbag system will

Cadillac XT5 Owner Manual (GMNA-Localizing-U.S./Canada/Mexico-13527534) - 2020 - CRC - 5/29/19
70 SEATS AND RESTRAINTS
not be there to help protect you inanother crash. A new system willinclude airbag modules andpossibly other parts. The servicemanual for the vehicle covers theneed to replace other parts.
. The vehicle has a crash sensingand diagnostic module whichrecords information after a crash.See Vehicle Data Recording andPrivacy 0 364 andEvent Data Recorders 0 365.
. Let only qualified technicianswork on the airbag systems.Improper service can mean thatan airbag system will not workproperly. See your dealer forservice.
Passenger Sensing SystemThe vehicle has a passenger sensingsystem for the front outboardpassenger position. The passengerairbag status indicator will light onthe overhead console when the vehicleis started.
United States and Canada
Mexico
The words ON and OFF, or thesymbols for on and off, will be visibleduring the system check. When thesystem check is complete, either theword ON or OFF, or the symbol for onor off, will be visible. See PassengerAirbag Status Indicator 0 117.
The passenger sensing system turnsoff the front outboard passengerfrontal airbag under certainconditions. No other airbag is affectedby the passenger sensing system.
The passenger sensing system workswith sensors that are part of the frontoutboard passenger seat and seat belt.The sensors are designed to detect thepresence of a properly seatedoccupant and determine if the frontoutboard passenger frontal airbagshould be allowed to inflate or not.
According to accident statistics,children are safer when properlysecured in a rear seat in the correctchild restraint for their weightand size.
Whenever possible, children aged12 and under should be secured in arear seating position.
Never put a rear-facing child seat inthe front. This is because the risk tothe rear-facing child is so great, if theairbag inflates.
{ Warning
A child in a rear-facing childrestraint can be seriously injured orkilled if the passenger frontal airbaginflates. This is because the back of
(Continued)

Cadillac XT5 Owner Manual (GMNA-Localizing-U.S./Canada/Mexico-13527534) - 2020 - CRC - 5/29/19
SEATS AND RESTRAINTS 71
Warning (Continued)
the rear-facing child restraint wouldbe very close to the inflating airbag.A child in a forward-facing childrestraint can be seriously injured orkilled if the passenger frontal airbaginflates and the passenger seat is ina forward position.
Even if the passenger sensingsystem has turned off the passengerfrontal airbag, no system is fail-safe.No one can guarantee that anairbag will not deploy under someunusual circumstance, even thoughthe airbag is turned off.
Never put a rear-facing childrestraint in the front seat, even ifthe airbag is off. If securing aforward-facing child restraint in thefront outboard passenger seat,always move the seat as far back asit will go. It is better to secure childrestraints in the rear seat. Considerusing another vehicle to transportthe child when a rear seat is notavailable.
The passenger sensing system isdesigned to turn off the frontoutboard passenger frontal airbag if:
. The front outboard passenger seatis unoccupied.
. The system determines an infantis present in a child restraint.
. A front outboard passenger takeshis/her weight off of the seat for aperiod of time.
. There is a critical problem withthe airbag system or the passengersensing system.
When the passenger sensing systemhas turned off the front outboardpassenger frontal airbag, the OFFindicator will light and stay lit as areminder that the airbag is off. SeePassenger Airbag Status Indicator0 117.
The passenger sensing system isdesigned to turn on the frontoutboard passenger frontal airbaganytime the system senses that aperson of adult size is sitting properlyin the front outboard passenger seat.
When the passenger sensing systemhas allowed the airbag to be enabled,the ON indicator will light and stay litas a reminder that the airbag is active.
For some children, including childrenin child restraints, and for very smalladults, the passenger sensing systemmay or may not turn off the frontoutboard passenger frontal airbag,depending upon the person's seatingposture and body build. Everyone inthe vehicle who has outgrown childrestraints should wear a seat beltproperly— whether or not there is anairbag for that person.
{ Warning
If the airbag readiness light evercomes on and stays on, it meansthat something may be wrong withthe airbag system. To help avoidinjury to yourself or others, havethe vehicle serviced right away. SeeAirbag Readiness Light 0 117 formore information, includingimportant safety information.

Cadillac XT5 Owner Manual (GMNA-Localizing-U.S./Canada/Mexico-13527534) - 2020 - CRC - 5/29/19
72 SEATS AND RESTRAINTS
If the On Indicator Is Lit for aChild Restraint
The passenger sensing system isdesigned to turn off the frontoutboard passenger frontal airbag ifthe system determines that an infantis present in a child restraint. If achild restraint has been installed andthe ON indicator is lit:
1. Turn the vehicle off.
2. Remove the child restraint fromthe vehicle.
3. Remove any additional itemsfrom the seat such as blankets,cushions, seat covers, seatheaters, or seat massagers.
4. Reinstall the child restraintfollowing the directions providedby the child restraintmanufacturer and refer toSecuring Child Restraints (With theSeat Belt in the Rear Seat) 0 89 orSecuring Child Restraints (With theSeat Belt in the Front Seat) 0 91.
Make sure the seat belt retractoris locked by pulling the shoulderbelt all the way out of the
retractor when installing thechild restraint, even if the childrestraint is equipped with a seatbelt lock off. When the retractorlock is set, the belt can betightened but not pulled out ofthe retractor.
5. If, after reinstalling the childrestraint and restarting thevehicle, the ON indicator is stilllit, turn the vehicle off. Thenslightly recline the vehicleseatback and adjust the seatcushion, if adjustable, to makesure that the vehicle seatback isnot pushing the child restraintinto the seat cushion.
Also make sure the childrestraint is not trapped under thevehicle head restraint. If thishappens, adjust the headrestraint. See Head Restraints0 45.
6. Restart the vehicle.
The passenger sensing system may ormay not turn off the airbag for a childin a child restraint depending uponthe child’s size. It is better to secure
the child restraint in a rear seat. Neverput a rear-facing child restraint in thefront seat, even if the ON indicator isnot lit.
If the Off Indicator Is Lit for anAdult-Sized Occupant
If a person of adult size is sitting inthe front outboard passenger seat, butthe OFF indicator is lit, it could bebecause that person is not sittingproperly in the seat or that the childrestraint locking feature is engaged.Use the following steps to allow thesystem to detect that person andenable the front outboard passengerfrontal airbag:

Cadillac XT5 Owner Manual (GMNA-Localizing-U.S./Canada/Mexico-13527534) - 2020 - CRC - 5/29/19
SEATS AND RESTRAINTS 73
1. Turn the vehicle off.
2. Remove any additional materialfrom the seat, such as blankets,cushions, seat covers, seatheaters, or seat massagers.
3. Place the seatback in the fullyupright position.
4. Have the person sit upright inthe seat, centered on the seatcushion, with legs comfortablyextended.
5. If the shoulder portion of thebelt is pulled out all the way, thechild restraint locking featurewill be engaged. This mayunintentionally cause thepassenger sensing system to turnthe airbag off for someadult-sized occupants. If thishappens, unbuckle the belt, letthe belt go back all the way, andthen buckle the belt againwithout pulling the belt out allthe way.
6. Restart the vehicle and have theperson remain in this positionfor two to three minutes after theON indicator is lit.
{ Warning
If the front outboard passengerairbag is turned off for anadult-sized occupant, the airbag willnot be able to inflate and helpprotect that person in a crash,resulting in an increased risk ofserious injury or even death. Anadult-sized occupant should notride in the front outboard passengerseat, if the passenger airbag OFFindicator is lit.
Additional Factors AffectingSystem Operation
Seat belts help keep the passenger inposition on the seat during vehiclemaneuvers and braking, which helpsthe passenger sensing systemmaintain the passenger airbag status.See “Seat Belts” and “Child Restraints”in the Index for additionalinformation about the importance ofproper restraint use.
A thick layer of additional material,such as a blanket or cushion,or aftermarket equipment such as seatcovers, seat heaters, and seatmassagers can affect how well thepassenger sensing system operates.We recommend that you not use seatcovers or other aftermarket equipmentexcept when approved by GM for yourspecific vehicle. See Adding Equipmentto the Airbag-Equipped Vehicle 0 74 formore information about modificationsthat can affect how the systemoperates.
The ON indicator may be lit if anobject, such as a briefcase, handbag,grocery bag, laptop, or other electronicdevice, is put on an unoccupied seat.If this is not desired, remove theobject from the seat.
{ Warning
Stowing articles under thepassenger seat or between thepassenger seat cushion andseatback may interfere with theproper operation of the passengersensing system.

Cadillac XT5 Owner Manual (GMNA-Localizing-U.S./Canada/Mexico-13527534) - 2020 - CRC - 5/29/19
74 SEATS AND RESTRAINTS
Servicing theAirbag-Equipped VehicleAirbags affect how the vehicle shouldbe serviced. There are parts of theairbag system in several places aroundthe vehicle. Your dealer and theservice manual have informationabout servicing the vehicle and theairbag system. To purchase a servicemanual, see Publication OrderingInformation 0 362.
{ Warning
For up to 10 seconds after thevehicle is turned off and the batteryis disconnected, an airbag can stillinflate during improper service. Youcan be injured if you are close to anairbag when it inflates. Avoidyellow connectors. They areprobably part of the airbag system.Be sure to follow proper serviceprocedures, and make sure theperson performing work for you isqualified to do so.
Adding Equipment to theAirbag-Equipped VehicleAdding accessories that change thevehicle's frame, bumper system,height, front end, or side sheet metalmay keep the airbag system fromworking properly.
The operation of the airbag systemcan also be affected by changing,including improperly repairing orreplacing, any parts of the following:
. Airbag system, including airbagmodules, front or side impactsensors, sensing and diagnosticmodule, or airbag wiring
. Front seats, including stitching,seams or zippers
. Seat belts
. Steering wheel, instrument panel,overhead console, ceiling trim,or pillar garnish trim
. Inner door seals, includingspeakers
Your dealer and the service manualhave information about the location ofthe airbag modules and sensors,sensing and diagnostic module, andairbag wiring along with the properreplacement procedures.
In addition, the vehicle has apassenger sensing system for the frontoutboard passenger position, whichincludes sensors that are part of thepassenger seat. The passenger sensingsystem may not operate properly ifthe original seat trim is replaced withnon-GM covers, upholstery, or trim; orwith GM covers, upholstery, or trimdesigned for a different vehicle. Anyobject, such as an aftermarket seatheater or a comfort-enhancing pad ordevice, installed under or on top ofthe seat fabric, could also interferewith the operation of the passengersensing system. This could eitherprevent proper deployment of thepassenger airbag(s) or prevent thepassenger sensing system fromproperly turning off the passengerairbag(s). See Passenger SensingSystem 0 70.
Cadillac XT5 Owner Manual (GMNA-Localizing-U.S./Canada/Mexico-13527534) - 2020 - CRC - 5/29/19
SEATS AND RESTRAINTS 75
If the vehicle has rollover roof-railairbags, see Different Size Tires andWheels 0 302 for additional importantinformation.
If the vehicle must be modifiedbecause you have a disability and havequestions about whether themodifications will affect the vehicle'sairbag system, or if you havequestions about whether the airbagsystem will be affected if the vehicle ismodified for any other reason, callCustomer Assistance. See CustomerAssistance Offices 0 355.
Airbag System CheckThe airbag system does not needregularly scheduled maintenance orreplacement. Make sure the airbagreadiness light is working. See AirbagReadiness Light 0 117.
Caution
If an airbag covering is damaged,opened, or broken, the airbag maynot work properly. Do not open orbreak the airbag coverings. If thereare any opened or broken airbagcoverings, have the airbag coveringand/or airbag module replaced. Forthe location of the airbags, seeWhere Are the Airbags? 0 66. Seeyour dealer for service.
Replacing Airbag SystemParts after a Crash
{ Warning
A crash can damage the airbagsystems in the vehicle. A damagedairbag system may not properlyprotect you and your passenger(s)in a crash, resulting in seriousinjury or even death. To help makesure the airbag systems are workingproperly after a crash, have theminspected and any necessaryreplacements made as soon aspossible.
If an airbag inflates, you will need toreplace airbag system parts. See yourdealer for service.
If the airbag readiness light stays onafter the vehicle is started or comeson when you are driving, the airbagsystem may not work properly. Havethe vehicle serviced right away. SeeAirbag Readiness Light 0 117.

Cadillac XT5 Owner Manual (GMNA-Localizing-U.S./Canada/Mexico-13527534) - 2020 - CRC - 5/29/19
76 SEATS AND RESTRAINTS
Child Restraints
Older Children
Older children who have outgrownbooster seats should wear the vehicle’sseat belts.
The manufacturer instructions thatcome with the booster seat state theweight and height limitations for thatbooster. Use a booster seat with alap-shoulder belt until the childpasses the fit test below:
. Sit all the way back on the seat.Do the knees bend at the seatedge? If yes, continue. If no, returnto the booster seat.
. Buckle the lap-shoulder belt. Doesthe shoulder belt rest on theshoulder? If yes, continue. If no,try using the rear seat beltcomfort guide, if available. See“Rear Seat Belt Comfort Guides”under Lap-Shoulder Belt 0 59. If acomfort guide is not available, or ifthe shoulder belt still does not reston the shoulder, then return to thebooster seat.
. Does the lap belt fit low and snugon the hips, touching the thighs?If yes, continue. If no, return tothe booster seat.
. Can proper seat belt fit bemaintained for the length of thetrip? If yes, continue. If no, returnto the booster seat.
Q: What is the proper way to wearseat belts?
A: An older child should wear alap-shoulder belt and get theadditional restraint a shoulder belt
can provide. The shoulder beltshould not cross the face or neck.The lap belt should fit snuglybelow the hips, just touching thetop of the thighs. This applies beltforce to the child's pelvic bones ina crash. It should never be wornover the abdomen, which couldcause severe or even fatal internalinjuries in a crash.
Also see “Rear Seat Belt ComfortGuides” under Lap-Shoulder Belt 0 59.
According to accident statistics,children are safer when properlyrestrained in a rear seating position.
In a crash, children who are notbuckled up can strike other peoplewho are buckled up, or can be thrownout of the vehicle. Older children needto use seat belts properly.
{ Warning
Never allow more than one child towear the same seat belt. The seatbelt cannot properly spread theimpact forces. In a crash, they can
(Continued)

Cadillac XT5 Owner Manual (GMNA-Localizing-U.S./Canada/Mexico-13527534) - 2020 - CRC - 5/29/19
SEATS AND RESTRAINTS 77
Warning (Continued)
be crushed together and seriouslyinjured. A seat belt must be used byonly one person at a time.
{ Warning
Never allow a child to wear the seatbelt with the shoulder belt behindtheir back. A child can be seriouslyinjured by not wearing thelap-shoulder belt properly. In a
(Continued)
Warning (Continued)
crash, the child would not berestrained by the shoulder belt. Thechild could move too far forwardincreasing the chance of head andneck injury. The child might alsoslide under the lap belt. The beltforce would then be applied righton the abdomen. That could causeserious or fatal injuries. Theshoulder belt should go over theshoulder and across the chest.
Infants and Young ChildrenEveryone in a vehicle needsprotection! This includes infants andall other children. Neither the distancetraveled nor the age and size of thetraveler changes the need, foreveryone, to use safety restraints. Infact, the law in every state in theUnited States and in every Canadianprovince says children up to some agemust be restrained while in a vehicle.
{ Warning
Children can be seriously injured orstrangled if a shoulder belt iswrapped around their neck. Theshoulder belt can tighten butcannot be loosened if it is locked.The shoulder belt locks when it ispulled all the way out of theretractor. It unlocks when theshoulder belt is allowed to go allthe way back into the retractor, butit cannot do this if it is wrappedaround a child’s neck. If theshoulder belt is locked and
(Continued)

Cadillac XT5 Owner Manual (GMNA-Localizing-U.S./Canada/Mexico-13527534) - 2020 - CRC - 5/29/19
78 SEATS AND RESTRAINTS
Warning (Continued)
tightened around a child’s neck, theonly way to loosen the belt is tocut it.
Never leave children unattended ina vehicle and never allow childrento play with the seat belts.
Every time infants and young childrenride in vehicles, they should have theprotection provided by appropriatechild restraints. Neither the vehicle'sseat belt system nor its airbag systemis designed for them.
Children who are not restrainedproperly can strike other people,or can be thrown out of the vehicle.
{ Warning
Never hold an infant or a childwhile riding in a vehicle. Due tocrash forces, an infant or a childwill become so heavy it is notpossible to hold it during a crash.
(Continued)
Warning (Continued)
For example, in a crash at only40 km/h (25 mph), a 5.5 kg (12 lb)infant will suddenly become a110 kg (240 lb) force on a person'sarms. An infant or child should besecured in an appropriate childrestraint.
{ Warning
Children who are up against,or very close to, any airbag when itinflates can be seriously injured orkilled. Never put a rear-facing childrestraint in the front outboard seat.Secure a rear-facing child restraintin a rear seat. It is also better tosecure a forward-facing childrestraint in a rear seat. If you mustsecure a forward-facing childrestraint in the front outboard seat,always move the front passengerseat as far back as it will go.

Cadillac XT5 Owner Manual (GMNA-Localizing-U.S./Canada/Mexico-13527534) - 2020 - CRC - 5/29/19
SEATS AND RESTRAINTS 79
Child restraints are devices used torestrain, seat, or position children inthe vehicle and are sometimes calledchild seats or car seats.
There are three basic types of childrestraints:
. Forward-facing child restraints
. Rear-facing child restraints
. Belt-positioning booster seats
The proper child restraint for yourchild depends on their size, weight,and age, and also on whether thechild restraint is compatible with thevehicle in which it will be used.
For each type of child restraint, thereare many different models available.When purchasing a child restraint, besure it is designed to be used in amotor vehicle. If it is, the childrestraint will have a label saying thatit meets federal motor vehicle safetystandards.
The instruction manual that isprovided with the child restraintstates the weight and heightlimitations for that particular childrestraint. In addition, there are manykinds of child restraints available forchildren with special needs.
{ Warning
To reduce the risk of neck and headinjury in a crash, infants andtoddlers should be secured in arear-facing child restraint until agetwo, or until they reach themaximum height and weight limitsof their child restraint.
{ Warning
A young child's hip bones are stillso small that the vehicle seat beltmay not remain low on the hipbones, as it should. Instead, it maysettle up around the child'sabdomen. In a crash, the belt wouldapply force on a body area that isunprotected by any bony structure.This alone could cause serious orfatal injuries. To reduce the risk ofserious or fatal injuries during acrash, young children should alwaysbe secured in an appropriate childrestraint.

Cadillac XT5 Owner Manual (GMNA-Localizing-U.S./Canada/Mexico-13527534) - 2020 - CRC - 5/29/19
80 SEATS AND RESTRAINTS
Child Restraint Systems
Rear-Facing Infant Restraint
A rear-facing child restraint providesrestraint with the seating surfaceagainst the back of the infant.
The harness system holds the infantin place and, in a crash, acts to keepthe infant positioned in the restraint.
Forward-Facing Child Restraint
A forward-facing child restraintprovides restraint for the child's bodywith the harness.
Booster Seats
A belt-positioning booster seat is usedfor children who have outgrown theirforward-facing child restraint.Boosters are designed to improve thefit of the vehicle's seat belt systemuntil the child is large enough for thevehicle seat belts to fit properlywithout a booster seat. See the seatbelt fit test in Older Children 0 76.
Cadillac XT5 Owner Manual (GMNA-Localizing-U.S./Canada/Mexico-13527534) - 2020 - CRC - 5/29/19
SEATS AND RESTRAINTS 81
Securing an Add-On ChildRestraint in the Vehicle
{ Warning
A child can be seriously injured orkilled in a crash if the childrestraint is not properly secured inthe vehicle. Secure the childrestraint properly in the vehicleusing the vehicle seat belt orLATCH system, following theinstructions that came with thatchild restraint and the instructionsin this manual.
To help reduce the chance of injury,the child restraint must be secured inthe vehicle. Child restraints must besecured in vehicle seats by lap belts orthe lap belt portion of a lap-shoulderbelt, or by the LATCH system. SeeLower Anchors and Tethers for Children(LATCH System) 0 83 for moreinformation. Children can beendangered in a crash if the childrestraint is not properly secured in thevehicle.
When securing an add-on childrestraint, refer to the following:
1. Instruction labels provided onthe child restraint
2. Instruction manual providedwith the child restraint
3. This vehicle owner's manual
The child restraint instructions areimportant, so if they are not available,obtain a replacement copy from themanufacturer.
Keep in mind that an unsecured childrestraint can move around in acollision or sudden stop and injurepeople in the vehicle. Be sure toproperly secure any child restraint inthe vehicle— even when no child isin it.
In some areas Certified ChildPassenger Safety Technicians (CPSTs)are available to inspect anddemonstrate how to correctly use andinstall child restraints. In the U.S.,refer to the National Highway TrafficSafety Administration (NHTSA)website to locate the nearest childsafety seat inspection station. For
CPST availability in Canada, checkwith Transport Canada or theProvincial Ministry of Transportationoffice.
Securing the Child Within theChild Restraint
{ Warning
A child can be seriously injured orkilled in a crash if the child is notproperly secured in the childrestraint. Secure the child properlyfollowing the instructions thatcame with that child restraint.
Where to Put the RestraintAccording to accident statistics,children and infants are safer whenproperly restrained in an appropriatechild restraint secured in a rearseating position.
Whenever possible, children aged12 and under should be secured in arear seating position.
Cadillac XT5 Owner Manual (GMNA-Localizing-U.S./Canada/Mexico-13527534) - 2020 - CRC - 5/29/19
82 SEATS AND RESTRAINTS
Never put a rear-facing child restraintin the front. This is because the riskto the rear-facing child is so great ifthe airbag deploys.
{ Warning
A child in a rear-facing childrestraint can be seriously injured orkilled if the front passenger airbaginflates. This is because the back ofthe rear-facing child restraint wouldbe very close to the inflating airbag.A child in a forward-facing childrestraint can be seriously injured orkilled if the front passenger airbaginflates and the passenger seat is ina forward position.
Even if the passenger sensingsystem has turned off the frontpassenger frontal airbag, no systemis fail-safe. No one can guaranteethat an airbag will not deploy undersome unusual circumstance, eventhough it is turned off.
(Continued)
Warning (Continued)
Secure rear-facing child restraintsin a rear seat, even if the airbag isoff. If you secure a forward-facingchild restraint in the front seat,always move the front passengerseat as far back as it will go. It isbetter to secure the child restraintin a rear seat.
See Passenger Sensing System 0 70for additional information.
When securing a child restraint withthe seat belts in a rear seat position,study the instructions that came withthe child restraint to make sure it iscompatible with this vehicle.
Child restraints and booster seats varyconsiderably in size, and some may fitin certain seating positions betterthan others.
Depending on where you place thechild restraint and the size of thechild restraint, you may not be able toaccess adjacent seat belts or LATCHanchors for additional passengers orchild restraints. Adjacent seatingpositions should not be used if thechild restraint prevents access to orinterferes with the routing of theseat belt.
Wherever a child restraint is installed,be sure to follow the instructions thatcame with the child restraint andsecure the child restraint properly.
Keep in mind that an unsecured childrestraint can move around in acollision or sudden stop and injurepeople in the vehicle. Be sure toproperly secure any child restraint inthe vehicle — even when no child isin it.

Cadillac XT5 Owner Manual (GMNA-Localizing-U.S./Canada/Mexico-13527534) - 2020 - CRC - 5/29/19
SEATS AND RESTRAINTS 83
Lower Anchors andTethers for Children(LATCH System)The LATCH system secures a childrestraint during driving or in a crash.LATCH attachments on the childrestraint are used to attach the childrestraint to the anchors in the vehicle.This system is designed to makeinstallation of a child restraint easier.
In order to use the LATCH system inyour vehicle, you need a childrestraint that has LATCHattachments. LATCH-compatiblerear-facing and forward-facing childseats can be properly installed usingeither the LATCH anchors or thevehicle’s seat belts. Do not use boththe seat belts and the LATCHanchorage system to secure arear-facing or forward-facingchild seat.
Booster seats use the vehicle’s seatbelts to secure the child and thebooster seat. If the manufacturerrecommends that the booster seat besecured with the LATCH system, thiscan be done as long as the boosterseat can be positioned properly andthere is no interference with theproper positioning of the lap-shoulderbelt on the child.
Make sure to follow the instructionsthat came with the child restraint, andalso the instructions in this manual.
When installing a child restraint witha top tether, you must also use eitherthe lower anchors or the seat belts toproperly secure the child restraint.A child restraint must never beattached using only the top tether.
For a forward-facing 5-pt harnesschild restraint where the combinedweight of the child and restraint areup to 29.5 kg (65 lb), use either thelower LATCH anchorages with the toptether anchorage, or the seat belt withthe top tether anchorage. Where thecombined weight of the child andrestraint are greater than29.5 kg (65 lb), use the seat belt withthe top tether anchorage only.

Cadillac XT5 Owner Manual (GMNA-Localizing-U.S./Canada/Mexico-13527534) - 2020 - CRC - 5/29/19
84 SEATS AND RESTRAINTS
Recommended Methods for Attaching Child Restraints
Restraint Type Combined Weightof the Child +Child Restraint
Use Only Approved Attachment Methods Shown with an X
LATCH – LowerAnchors Only
Seat Belt Only LATCH – LowerAnchors and TopTether Anchor
Seat Belt and TopTether Anchor
Rear-Facing ChildRestraint
Up to29.5 kg (65 lb)
X X
Rear-Facing ChildRestraint
Greater than29.5 kg (65 lb)
X
Forward-FacingChild Restraint
Up to29.5 kg (65 lb)
X X
Forward-FacingChild Restraint
Greater than29.5 kg (65 lb)
X
See Securing Child Restraints (With theSeat Belt in the Rear Seat) 0 89 orSecuring Child Restraints (With the SeatBelt in the Front Seat) 0 91.
Child restraints built after March 2014will be labeled with the specific childweight up to which the LATCH systemcan be used to install the restraint.
The following explains how to attacha child restraint with theseattachments in the vehicle.
Not all vehicle seating positions havelower anchors. In this case, the seatbelt must be used (with top tetherwhere available) to secure the childrestraint. See Securing Child Restraints(With the Seat Belt in the Rear Seat)0 89 orSecuring Child Restraints (With the SeatBelt in the Front Seat) 0 91.

Cadillac XT5 Owner Manual (GMNA-Localizing-U.S./Canada/Mexico-13527534) - 2020 - CRC - 5/29/19
SEATS AND RESTRAINTS 85
Lower Anchors
Lower anchors (1) are metal bars builtinto the vehicle. There are two loweranchors for each LATCH seatingposition that will accommodate achild restraint with lowerattachments (2).
Top Tether Anchor
A top tether (3, 4) is used to securethe top of the child restraint to thevehicle. A top tether anchor is builtinto the vehicle. The top tetherattachment hook (2) on the childrestraint connects to the top tetheranchor in the vehicle in order toreduce the forward movement androtation of the child restraint duringdriving or in a crash.
The child restraint may have a singletether (3) or a dual tether (4). Eitherwill have a single attachment hook (2)to secure the top tether to the anchor.
Some child restraints that have a toptether are designed for use with orwithout the top tether being attached.Others require the top tether always tobe attached. In Canada, the lawrequires that forward-facing childrestraints have a top tether, and thatthe tether be attached. Be sure to readand follow the instructions for yourchild restraint.
Lower Anchor and Top TetherAnchor Locations
Rear Seat
I : Seating positions with top tetheranchors.

Cadillac XT5 Owner Manual (GMNA-Localizing-U.S./Canada/Mexico-13527534) - 2020 - CRC - 5/29/19
86 SEATS AND RESTRAINTS
H : Seating positions with two loweranchors.
To assist in locating the loweranchors, each seating position withlower anchors has two labels, near thecrease between the seatback and theseat cushion.
To assist in locating the top tetheranchors, the top tether anchor symbolis near the anchor.
Top Tether Anchors
The top tether anchors for each rearseating position are located on theback of the rear seatback. Be sure touse an anchor located directly behindthe seating position where the childrestraint will be placed.
Do not secure a child restraint in aposition without a top tether anchor ifa national or local law requires thatthe top tether be attached, or if theinstructions that come with the childrestraint say that the top tether mustbe attached.
According to accident statistics,children and infants are safer whenproperly restrained in a child restraintsystem or infant restraint systemsecured in a rear seating position. SeeWhere to Put the Restraint 0 81 foradditional information.
Securing a Child RestraintDesigned for the LATCH System
{ Warning
A child could be seriously injured orkilled in a crash if the childrestraint is not properly attached tothe vehicle using either the LATCHanchors or the vehicle seat belt.Follow the instructions that camewith the child restraint and theinstructions in this manual.

Cadillac XT5 Owner Manual (GMNA-Localizing-U.S./Canada/Mexico-13527534) - 2020 - CRC - 5/29/19
SEATS AND RESTRAINTS 87
{ Warning
To reduce the risk of serious orfatal injuries during a crash, do notattach more than one childrestraint to a single anchor.Attaching more than one childrestraint to a single anchor couldcause the anchor or attachment tocome loose or even break during acrash. A child or others could beinjured.
{ Warning
Children can be seriously injured orstrangled if a shoulder belt iswrapped around their neck. Theshoulder belt can tighten butcannot be loosened if it is locked.The shoulder belt locks when it ispulled all the way out of theretractor. It unlocks when theshoulder belt is allowed to go allthe way back into the retractor, but
(Continued)
Warning (Continued)
it cannot do this if it is wrappedaround a child’s neck. If theshoulder belt is locked andtightened around a child’s neck, theonly way to loosen the belt is tocut it.
Buckle any unused seat beltsbehind the child restraint sochildren cannot reach them. Pullthe shoulder belt all the way out ofthe retractor to set the lock, andtighten the belt behind the childrestraint after the child restrainthas been installed.
Caution
Do not let the LATCH attachmentsrub against the vehicle’s seat belts.This may damage these parts.If necessary, move buckled seatbelts to avoid rubbing the LATCHattachments.
(Continued)
Caution (Continued)
Do not fold the rear seatback whenthe seat is occupied. Do not fold theempty rear seat with a seat beltbuckled. This could damage theseat belt or the seat. Unbuckle andreturn the seat belt to its stowedposition, before folding the seat.
Do not attach more than one childrestraint to a single anchor. Attachingmore than one child restraint to asingle anchor could cause the anchoror attachment to come loose or evenbreak during a crash. A child or otherscould be injured. To reduce the risk ofserious or fatal injuries during a crash,attach only one child restraint peranchor.
If you need to secure more than onechild restraint in the rear seat, seeWhere to Put the Restraint 0 81.
1. Attach and tighten the lowerattachments to the loweranchors. If the child restraintdoes not have lower attachmentsor the desired seating position
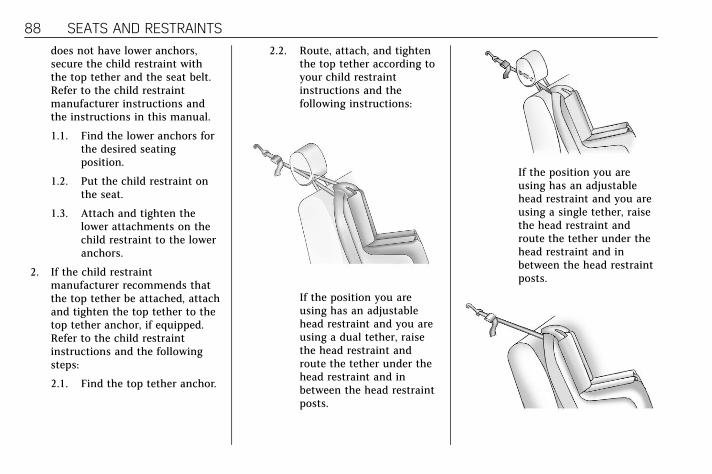
Cadillac XT5 Owner Manual (GMNA-Localizing-U.S./Canada/Mexico-13527534) - 2020 - CRC - 5/29/19
88 SEATS AND RESTRAINTS
does not have lower anchors,secure the child restraint withthe top tether and the seat belt.Refer to the child restraintmanufacturer instructions andthe instructions in this manual.
1.1. Find the lower anchors forthe desired seatingposition.
1.2. Put the child restraint onthe seat.
1.3. Attach and tighten thelower attachments on thechild restraint to the loweranchors.
2. If the child restraintmanufacturer recommends thatthe top tether be attached, attachand tighten the top tether to thetop tether anchor, if equipped.Refer to the child restraintinstructions and the followingsteps:
2.1. Find the top tether anchor.
2.2. Route, attach, and tightenthe top tether according toyour child restraintinstructions and thefollowing instructions:
If the position you areusing has an adjustablehead restraint and you areusing a dual tether, raisethe head restraint androute the tether under thehead restraint and inbetween the head restraintposts.
If the position you areusing has an adjustablehead restraint and you areusing a single tether, raisethe head restraint androute the tether under thehead restraint and inbetween the head restraintposts.
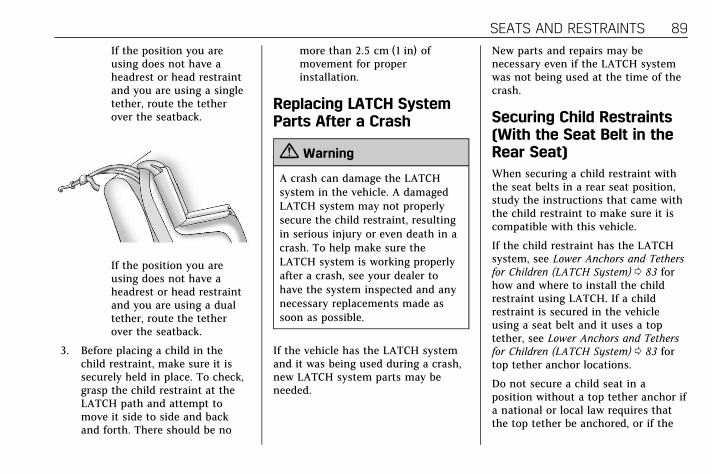
Cadillac XT5 Owner Manual (GMNA-Localizing-U.S./Canada/Mexico-13527534) - 2020 - CRC - 5/29/19
SEATS AND RESTRAINTS 89
If the position you areusing does not have aheadrest or head restraintand you are using a singletether, route the tetherover the seatback.
If the position you areusing does not have aheadrest or head restraintand you are using a dualtether, route the tetherover the seatback.
3. Before placing a child in thechild restraint, make sure it issecurely held in place. To check,grasp the child restraint at theLATCH path and attempt tomove it side to side and backand forth. There should be no
more than 2.5 cm (1 in) ofmovement for properinstallation.
Replacing LATCH SystemParts After a Crash
{ Warning
A crash can damage the LATCHsystem in the vehicle. A damagedLATCH system may not properlysecure the child restraint, resultingin serious injury or even death in acrash. To help make sure theLATCH system is working properlyafter a crash, see your dealer tohave the system inspected and anynecessary replacements made assoon as possible.
If the vehicle has the LATCH systemand it was being used during a crash,new LATCH system parts may beneeded.
New parts and repairs may benecessary even if the LATCH systemwas not being used at the time of thecrash.
Securing Child Restraints(With the Seat Belt in theRear Seat)When securing a child restraint withthe seat belts in a rear seat position,study the instructions that came withthe child restraint to make sure it iscompatible with this vehicle.
If the child restraint has the LATCHsystem, see Lower Anchors and Tethersfor Children (LATCH System) 0 83 forhow and where to install the childrestraint using LATCH. If a childrestraint is secured in the vehicleusing a seat belt and it uses a toptether, see Lower Anchors and Tethersfor Children (LATCH System) 0 83 fortop tether anchor locations.
Do not secure a child seat in aposition without a top tether anchor ifa national or local law requires thatthe top tether be anchored, or if the
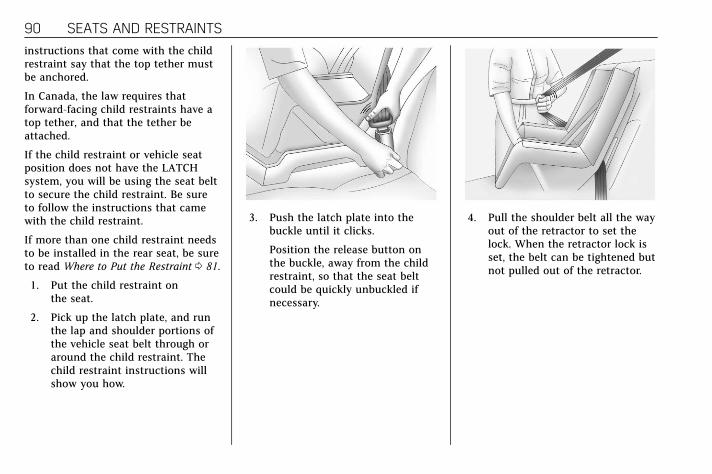
Cadillac XT5 Owner Manual (GMNA-Localizing-U.S./Canada/Mexico-13527534) - 2020 - CRC - 5/29/19
90 SEATS AND RESTRAINTS
instructions that come with the childrestraint say that the top tether mustbe anchored.
In Canada, the law requires thatforward-facing child restraints have atop tether, and that the tether beattached.
If the child restraint or vehicle seatposition does not have the LATCHsystem, you will be using the seat beltto secure the child restraint. Be sureto follow the instructions that camewith the child restraint.
If more than one child restraint needsto be installed in the rear seat, be sureto read Where to Put the Restraint 0 81.
1. Put the child restraint onthe seat.
2. Pick up the latch plate, and runthe lap and shoulder portions ofthe vehicle seat belt through oraround the child restraint. Thechild restraint instructions willshow you how.
3. Push the latch plate into thebuckle until it clicks.
Position the release button onthe buckle, away from the childrestraint, so that the seat beltcould be quickly unbuckled ifnecessary.
4. Pull the shoulder belt all the wayout of the retractor to set thelock. When the retractor lock isset, the belt can be tightened butnot pulled out of the retractor.

Cadillac XT5 Owner Manual (GMNA-Localizing-U.S./Canada/Mexico-13527534) - 2020 - CRC - 5/29/19
SEATS AND RESTRAINTS 91
5. To tighten the belt, push downon the child restraint, pull theshoulder portion of the belt totighten the lap portion of thebelt, and feed the shoulder beltback into the retractor. Wheninstalling a forward-facing childrestraint, it may be helpful to useyour knee to push down on thechild restraint as you tightenthe belt.
Try to pull the belt out of theretractor to make sure theretractor is locked. If theretractor is not locked, repeatSteps 4 and 5.
6. If the child restraint has a toptether, follow the child restraintmanufacturer's instructionsregarding the use of the toptether. See Lower Anchors andTethers for Children (LATCHSystem) 0 83.
7. Before placing a child in thechild restraint, make sure it issecurely held in place. To check,grasp the child restraint at theseat belt path and attempt tomove it side to side and backand forth. When the childrestraint is properly installed,there should be no more than2.5 cm (1 in) of movement.
To remove the child restraint,unbuckle the vehicle seat belt and letit return to the stowed position. If thetop tether is attached to a top tetheranchor, disconnect it.
Securing Child Restraints(With the Seat Belt in theFront Seat)This vehicle has airbags. A rear seat isa safer place to secure aforward-facing child restraint. SeeWhere to Put the Restraint 0 81.
In addition, the vehicle has apassenger sensing system which isdesigned to turn off the frontoutboard passenger frontal airbagunder certain conditions. SeePassenger Sensing System 0 70 andPassenger Airbag Status Indicator 0 117for more information, includingimportant safety information.
Never put a rear-facing child seat inthe front. This is because the risk tothe rear-facing child is so great, if theairbag deploys.
{ Warning
A child in a rear-facing childrestraint can be seriously injured orkilled if the front outboard
(Continued)

Cadillac XT5 Owner Manual (GMNA-Localizing-U.S./Canada/Mexico-13527534) - 2020 - CRC - 5/29/19
92 SEATS AND RESTRAINTS
Warning (Continued)
passenger frontal airbag inflates.This is because the back of therear-facing child restraint would bevery close to the inflating airbag.A child in a forward-facing childrestraint can be seriously injured orkilled if the front outboardpassenger frontal airbag inflatesand the passenger seat is in aforward position.
Even if the passenger sensingsystem has turned off the frontoutboard passenger frontal airbag,no system is fail-safe. No one canguarantee that an airbag will notdeploy under some unusualcircumstance, even though it isturned off.
Secure rear-facing child restraintsin a rear seat, even if the airbag isoff. If you secure a forward-facingchild restraint in the front outboardpassenger seat, always move the
(Continued)
Warning (Continued)
seat as far back as it will go. It isbetter to secure the child restraintin a rear seat.
See Passenger Sensing System 0 70for additional information.
If the child restraint uses a top tether,see Lower Anchors and Tethers forChildren (LATCH System) 0 83 for toptether anchor locations.
Do not secure a child seat in aposition without a top tether anchor ifa national or local law requires thatthe top tether be anchored, or if theinstructions that come with the childrestraint say that the top tether mustbe anchored.
In Canada, the law requires thatforward-facing child restraints have atop tether, and that the tether beattached.
When using the lap-shoulder belt tosecure the child restraint in thisposition, follow the instructions thatcame with the child restraint and thefollowing instructions:
1. Move the seat as far back as itwill go before securing theforward-facing child restraint.Move the seat upward or theseatback to an upright position,if needed, to get a tightinstallation of the child restraint.
When the passenger sensingsystem has turned off the frontoutboard passenger frontalairbag, the OFF indicator on thepassenger airbag status indicatorshould light and stay lit whenyou start the vehicle. SeePassenger Airbag Status Indicator0 117.
2. Put the child restraint onthe seat.
3. Pick up the latch plate, and runthe lap and shoulder portions ofthe vehicle seat belt through or

Cadillac XT5 Owner Manual (GMNA-Localizing-U.S./Canada/Mexico-13527534) - 2020 - CRC - 5/29/19
SEATS AND RESTRAINTS 93
around the child restraint. Thechild restraint instructions willshow you how.
Tilt the latch plate to adjust thebelt if needed.
4. Push the latch plate into thebuckle until it clicks.
Position the release button onthe buckle, away from the childrestraint, so that the seat beltcould be quickly unbuckled ifnecessary.
5. Pull the shoulder belt all the wayout of the retractor to set thelock. When the retractor lock isset, the belt can be tightened butnot pulled out of the retractor.

Cadillac XT5 Owner Manual (GMNA-Localizing-U.S./Canada/Mexico-13527534) - 2020 - CRC - 5/29/19
94 SEATS AND RESTRAINTS
6. To tighten the belt, push downon the child restraint, pull theshoulder portion of the belt totighten the lap portion of thebelt, and feed the shoulder beltback into the retractor. Wheninstalling a forward-facing childrestraint, it may be helpful to useyour knee to push down on thechild restraint as you tightenthe belt.
Try to pull the belt out of theretractor to make sure theretractor is locked. If theretractor is not locked, repeatSteps 5 and 6.
7. Before placing a child in thechild restraint, make sure it issecurely held in place. To check,grasp the child restraint at theseat belt path and attempt tomove it side to side and backand forth. When the childrestraint is properly installed,there should be no more than2.5 cm (1 in) of movement.
If the airbag is off, the OFF indicatorin the passenger airbag statusindicator will come on and stay onwhen the vehicle is started.
If a child restraint has been installedand the ON indicator is lit, see “If theOn Indicator Is Lit for a ChildRestraint” under Passenger SensingSystem 0 70.
To remove the child restraint,unbuckle the vehicle seat belt and letit return to the stowed position.

Cadillac XT5 Owner Manual (GMNA-Localizing-U.S./Canada/Mexico-13527534) - 2020 - CRC - 5/29/19
STORAGE 95
Storage
Storage CompartmentsStorage Compartments . . . . . . . . . . . . 95Glove Box . . . . . . . . . . . . . . . . . . . . . . . . . . 95Cupholders . . . . . . . . . . . . . . . . . . . . . . . . . 95Sunglasses Storage . . . . . . . . . . . . . . . . 96Armrest Storage . . . . . . . . . . . . . . . . . . . 96Rear Storage . . . . . . . . . . . . . . . . . . . . . . . 96Center Console Storage . . . . . . . . . . . . 97
Additional Storage FeaturesCargo Cover . . . . . . . . . . . . . . . . . . . . . . . . 98Cargo Tie-Downs . . . . . . . . . . . . . . . . . . . 99Cargo Management System . . . . . . . 99Convenience Net . . . . . . . . . . . . . . . . . 100
Roof Rack SystemRoof Rack System . . . . . . . . . . . . . . . . 101
Storage Compartments
{ Warning
Do not store heavy or sharp objectsin storage compartments. In acrash, these objects may cause thecover to open and could result ininjury.
Glove Box
Lift the handle to open the glove box.Close until it latches. Use the vehiclekey to lock or unlock.
CupholdersCupholders in the center console areunder a cover. Do not place items onthe cover.
To open, slide the cover forward.

Cadillac XT5 Owner Manual (GMNA-Localizing-U.S./Canada/Mexico-13527534) - 2020 - CRC - 5/29/19
96 STORAGE
To close, push the button and thecover will close automatically.
Sunglasses Storage
If equipped, sunglasses storage is onthe overhead console. Press the fixedbutton on the cover and release toaccess.
Armrest StorageFor vehicles with a rear seat armrest,pull the rear seat armrest forward toaccess the cupholders with removableliner.
Rear Storage
There is storage in the floor of therear cargo area. Lift the handle toaccess.
Remove the load floor hook from theholder and hook to the weatherstripabove.
When done, return the load floor hookto the holder.

Cadillac XT5 Owner Manual (GMNA-Localizing-U.S./Canada/Mexico-13527534) - 2020 - CRC - 5/29/19
STORAGE 97
To install the load floor hook into theholder:
1. Insert one side of the load floorhook into the holder.
2. Push down on the other side ofthe load floor hook to lock intoplace.
Center Console Storage
Press the button to access the storagearea under the armrest.
There are two USB ports inside.
If equipped, there are two charge-onlyUSB ports and an auxiliary poweroutlet on the rear of the centerconsole.

Cadillac XT5 Owner Manual (GMNA-Localizing-U.S./Canada/Mexico-13527534) - 2020 - CRC - 5/29/19
98 STORAGE
Additional StorageFeatures
Cargo Cover
{ Warning
An unsecured cargo cover couldstrike people in a sudden stop orturn, or in a crash. Store the cargocover securely or remove it fromthe vehicle.
{ Warning
Do not place objects on the cargocover. Sudden stops or turns cancause objects to be thrown in thevehicle. You or others could beinjured.
If equipped, the cargo cover can beused to cover items in the cargo area.
Install the Cargo Cover
1. Hold the cartridge so that theretracted cargo cover faces therear of the vehicle.
2. Align the cartridge over the slotson the trim panels of the vehicle.
3. Place one end of the cartridgeinto the slot and then compressto fit the other end into theremaining slot.
4. Unroll the cargo cover towardthe rear of the vehicle. The cargocover can be half open orfully open.

Cadillac XT5 Owner Manual (GMNA-Localizing-U.S./Canada/Mexico-13527534) - 2020 - CRC - 5/29/19
STORAGE 99
5. Insert the cargo cover pins intothe channels on both sides.
Remove the Cargo Cover
Remove the cargo cover pins from thechannels and let the cover retract.Compress the ends of the cartridge toremove it from the slots.
Cargo Tie-Downs
The vehicle has two cargo tie-downsin the rear compartment.
Cargo ManagementSystem
Cargo Management System

Cadillac XT5 Owner Manual (GMNA-Localizing-U.S./Canada/Mexico-13527534) - 2020 - CRC - 5/29/19
100 STORAGE
Cargo Management System Unlock
Cargo Management SystemInstallation
1. Turn both knobs to the unlockposition.
2. Slide the divider along the rail tothe desired position until itclicks into place.
3. Make sure the divider is lockedinto place in the rail grooves.
4. Turn both knobs to the lockposition.
Cargo Management SystemRemoval
1. Turn both knobs to the unlockposition.
2. Press the buttons and pull up toremove the divider.
3. Remove the knobs prior tostoring the divider. Failure to doso will cause interference.
Vehicle with Spare Tire
Vehicle with Tire Inflator Kit
4. Store the divider appropriately.
Convenience NetThis vehicle may have a conveniencenet in the rear of the vehicle. Attach itto the cargo tie-downs for storingsmall loads.
Do not use the net to store heavyloads.

Cadillac XT5 Owner Manual (GMNA-Localizing-U.S./Canada/Mexico-13527534) - 2020 - CRC - 5/29/19
STORAGE 101
Roof Rack System
{ Warning
If something is carried on top ofthe vehicle that is longer or widerthan the roof rack— like paneling,plywood, or a mattress— the windcan catch it while the vehicle isbeing driven. The item being carriedcould be violently torn off, and thiscould cause a collision and damagethe vehicle. Never carry somethinglonger or wider than the roof rackon top of the vehicle unless using aGM certified accessory carrier.
If equipped, the roof rack can be usedto load items. For roof racks that donot have crossrails included, GMcertified crossrails can be purchasedas an accessory. See your dealer.
Caution
Loading cargo on the roof rack thatweighs more than 100 kg (220 lb) orhangs over the rear or sides of thevehicle may damage the vehicle. Donot load cargo exceeding 100 kg(220 lbs) and always load cargo sothat it rests evenly between thecrossrails and does not block thevehicle lamps or windows. Fastenthe cargo securely.
To prevent damage or loss of cargowhen driving, check to make surecrossrails and cargo are securelyfastened. Loading cargo on the roofrack will make the vehicle’s center ofgravity higher. Avoid high speeds,sudden starts, sharp turns, suddenbraking, or abrupt maneuvers;otherwise it may result in loss ofcontrol. If driving for a long distance,on rough roads, or at high speeds,occasionally stop the vehicle to makesure the cargo remains in its place. Donot exceed the maximum vehiclecapacity when loading the vehicle. Formore information on vehicle capacityand loading, see Vehicle Load Limits0 172.

Cadillac XT5 Owner Manual (GMNA-Localizing-U.S./Canada/Mexico-13527534) - 2020 - CRC - 5/29/19
102 INSTRUMENTS AND CONTROLS
Instruments andControls
ControlsSteering Wheel Adjustment . . . . . 103Steering Wheel Controls . . . . . . . . . 103Heated Steering Wheel . . . . . . . . . . 103Horn . . . . . . . . . . . . . . . . . . . . . . . . . . . . . . . 103Windshield Wiper/Washer . . . . . . . 104Rear Window Wiper/Washer . . . . 106Compass . . . . . . . . . . . . . . . . . . . . . . . . . . 107Clock . . . . . . . . . . . . . . . . . . . . . . . . . . . . . . 107Power Outlets . . . . . . . . . . . . . . . . . . . . . 107Wireless Charging . . . . . . . . . . . . . . . . 108
Warning Lights, Gauges, andIndicatorsWarning Lights, Gauges, andIndicators . . . . . . . . . . . . . . . . . . . . . . . 110
Instrument Cluster . . . . . . . . . . . . . . . 111Speedometer . . . . . . . . . . . . . . . . . . . . . . 114Odometer . . . . . . . . . . . . . . . . . . . . . . . . . 114Trip Odometer . . . . . . . . . . . . . . . . . . . . 114Tachometer . . . . . . . . . . . . . . . . . . . . . . . 114Fuel Gauge . . . . . . . . . . . . . . . . . . . . . . . . 115Engine Coolant TemperatureGauge . . . . . . . . . . . . . . . . . . . . . . . . . . . . 115
Seat Belt Reminders . . . . . . . . . . . . . . 116
Airbag Readiness Light . . . . . . . . . . 117Passenger Airbag StatusIndicator . . . . . . . . . . . . . . . . . . . . . . . . . 117
Charging System Light . . . . . . . . . . . 118Malfunction Indicator Lamp(Check Engine Light) . . . . . . . . . . . 118
Brake System Warning Light . . . . 120Electric Parking Brake Light . . . . . 121Service Electric Parking BrakeLight . . . . . . . . . . . . . . . . . . . . . . . . . . . . . 121
Antilock Brake System (ABS)Warning Light . . . . . . . . . . . . . . . . . . 121
Gear Shifting Light . . . . . . . . . . . . . . . 122All-Wheel-Drive Light . . . . . . . . . . . . 122Lane Keep Assist (LKA) Light . . . 122Vehicle Ahead Indicator . . . . . . . . . 122Pedestrian Ahead Indicator . . . . . . 123Traction Off Light . . . . . . . . . . . . . . . . 123StabiliTrak OFF Light . . . . . . . . . . . . 123Traction Control System (TCS)/StabiliTrak Light . . . . . . . . . . . . . . . . 124
Engine Coolant TemperatureWarning Light . . . . . . . . . . . . . . . . . . 124
Driver Mode Control Light . . . . . . . 124Tire Pressure Light . . . . . . . . . . . . . . . 125Engine Oil Pressure Light . . . . . . . . 125Low Fuel Warning Light . . . . . . . . . 126Security Light . . . . . . . . . . . . . . . . . . . . . 126High-Beam On Light . . . . . . . . . . . . . 126Lamps On Reminder . . . . . . . . . . . . . 126
Cruise Control Light . . . . . . . . . . . . . . 127Door Ajar Light . . . . . . . . . . . . . . . . . . . 127
Information DisplaysDriver InformationCenter (DIC) . . . . . . . . . . . . . . . . . . . . . 127
Head-Up Display (HUD) . . . . . . . . . 130
Vehicle MessagesVehicle Messages . . . . . . . . . . . . . . . . . 133Engine Power Messages . . . . . . . . . . 134Vehicle Speed Messages . . . . . . . . . 134
Vehicle PersonalizationVehicle Personalization . . . . . . . . . . 134
Universal Remote SystemUniversal Remote System . . . . . . . . 140Universal Remote SystemProgramming . . . . . . . . . . . . . . . . . . . 140
Universal Remote SystemOperation . . . . . . . . . . . . . . . . . . . . . . . . 142

Cadillac XT5 Owner Manual (GMNA-Localizing-U.S./Canada/Mexico-13527534) - 2020 - CRC - 5/29/19
INSTRUMENTS AND CONTROLS 103
Controls
Steering Wheel AdjustmentPower Tilt and Telescoping SteeringWheel
Press the control to move the tilt andtelescoping steering wheel up anddown or forward and rearward.
Do not adjust the steering wheel whiledriving.
Steering Wheel ControlsThe infotainment system can beoperated by using the steering wheelcontrols. See "Steering WheelControls" in the infotainment manual.
Heated Steering Wheel
( : If equipped with a heated steeringwheel, press to turn on or off. Anindicator light next to the button is litwhen the feature is turned on.
The steering wheel takes aboutthree minutes to start heating.
Automatic Heated Steering Wheel
If equipped with a remote start, theheated steering wheel will turn onautomatically during a remote startalong with the heated seats when it iscold outside. The heated steeringwheel indicator light may notcome on.
If equipped with auto heated seats,the heated steering wheel will turn onwhen the auto heated seat isactivated. The heated steering wheelindicator will display the state of thesteering wheel heat.
See Heated and Ventilated Front Seats0 51.
Horn
Pressa on the steering wheel pad tosound the horn.

Cadillac XT5 Owner Manual (GMNA-Localizing-U.S./Canada/Mexico-13527534) - 2020 - CRC - 5/29/19
104 INSTRUMENTS AND CONTROLS
Windshield Wiper/Washer
Windshield Wiper with Rainsense(AUTO Shown), If Equipped
Windshield Wiper without Rainsense(INT Shown)
With the ignition on or in ACC/ACCESSORY, move the windshieldwiper lever to select the wiper speed.
HI : Use for fast wipes.
LO : Use for slow wipes.
AUTO : If equipped with Rainsense,use this setting for intermittent wipeswhen Rainsense is disabled,or Rainsense wipes when Rainsense isenabled. For intermittent wipes, movethe windshield wiper lever to AUTO,then turn the band up for morefrequent wipes or down for lessfrequent wipes. If Rainsense is turnedon, see “Rainsense” later in thissection.
INT : If equipped with intermittentwipers only, move the windshieldwiper lever to INT. Turn the band upfor more frequent wipes or down forless frequent wipes.
OFF : Use to turn the wipers off.
1X : For a single wipe, briefly movethe wiper lever down. For severalwipes, hold the wiper lever down.
f : Pull the windshield wiper levertoward you to spray windshieldwasher fluid and activate the wipers.The wipers will continue until thelever is released or the maximumwash time is reached. When thewindshield wiper lever is released,additional wipes may occur dependingon how long the windshield washer

Cadillac XT5 Owner Manual (GMNA-Localizing-U.S./Canada/Mexico-13527534) - 2020 - CRC - 5/29/19
INSTRUMENTS AND CONTROLS 105
has been activated. See Washer Fluid0 269 for information on filling thewindshield washer fluid reservoir.
{ Warning
In freezing weather, do not use thewasher until the windshield iswarmed. Otherwise the washer fluidcan form ice on the windshield,blocking your vision.
{ Warning
Before driving the vehicle, alwaysclear snow and ice from the hood,windshield, roof, and rear of thevehicle, including all lamps andwindows. Reduced visibility fromsnow and ice buildup could lead toa crash.
Clear snow and ice from the wiperblades and windshield before usingthem. If frozen to the windshield,
carefully loosen or thaw them.Damaged blades should be replaced.See Wiper Blade Replacement 0 273.
Heavy snow or ice can overload thewiper motor. See Electrical SystemOverload 0 277.
Wiper Parking
If the ignition is turned off while thewipers are on LO, HI, or AUTO withRainsense turned off, they willimmediately stop.
If the windshield wiper lever is thenmoved to OFF before the driver door isopened or within 10 minutes, thewipers will restart and move to thebase of the windshield.
If the ignition is turned off while thewipers are performing wipes due towindshield washing or Rainsense, thewipers continue to run until theyreach the base of the windshield.
Rainsense
If equipped with Rainsense and thefeature is turned on, a sensor near thetop center of the windshield detectsthe amount of water on the
windshield and controls the frequencyof the windshield wiper based on thecurrent sensitivity setting.
Keep this area of the windshield clearof debris to allow for best systemperformance.
AUTO : Move the windshield wiperlever to AUTO. Turn the band on thewiper lever to adjust the sensitivity.
. Turn the band up for moresensitivity to moisture.
. Turn the band down for lesssensitivity to moisture.
. Move the windshield wiper leverout of the AUTO position todeactivate Rainsense.

Cadillac XT5 Owner Manual (GMNA-Localizing-U.S./Canada/Mexico-13527534) - 2020 - CRC - 5/29/19
106 INSTRUMENTS AND CONTROLS
To turn the Rainsense feature on oroff, see “Rain Sense Wipers” underVehicle Personalization 0 134.
Wiper Arm Assembly Protection
When using an automatic car wash,move the windshield wiper lever toOFF. This disables the automaticRainsense windshield wipers.
With Rainsense, if the transmission isin N (Neutral) and the vehicle speed isvery slow, the wipers willautomatically stop at the base of thewindshield.
The wiper operations return to normalwhen the transmission is no longer inN (Neutral) or the vehicle speed hasincreased.
Rear Window Wiper/Washer
The rear window wiper/washercontrols are on the end of thewindshield wiper lever.
Turn the controls to adjust thesetting.
OFF : Turns the wiper off.
INT : Turns on the rear wiper with adelay between wipes.
ON : Turns on the rear wiper.
1 : Push the windshield wiperlever forward to spray washer fluid onthe rear window and the Rear MirrorCamera Lens, if equipped. See RearCamera Mirror 0 37. The wipers willclear the rear window and either stop
or return to your preset speed. Formore washer cycles, push and holdthe lever.
The rear window wiper/washer willnot operate if the liftgate is open orajar. If the liftgate is opened while therear wiper is on, the wiper returns tothe parked position and stops.
Rear Wiper Arm AssemblyProtection
When using an automatic car wash,move the rear wiper control to OFF todisable the rear wiper. In somevehicles, if the transmission is inN (Neutral) and the vehicle speed isvery slow, the rear wiper willautomatically park under the rearspoiler.
The wiper operations return to normalwhen the transmission is no longer inN (Neutral) or the vehicle speed hasincreased.
Auto Wipe in Reverse Gear
If the rear wiper control is off, the rearwiper will automatically operatecontinuously when the transmission isin R (Reverse), and the front

Cadillac XT5 Owner Manual (GMNA-Localizing-U.S./Canada/Mexico-13527534) - 2020 - CRC - 5/29/19
INSTRUMENTS AND CONTROLS 107
windshield wiper is performing low orhigh speed wipes. If the rear wipercontrol is off, the transmission is inR (Reverse), and the front windshieldwiper is performing INT wipes, thenthe rear wiper automatically performsINT wipes.
This feature can be turned on or off.See Vehicle Personalization 0 134.
The windshield washer reservoir isused for the windshield, rear window,and rear mirror camera, if equipped.See Rear Camera Mirror 0 37. Checkthe fluid level in the reservoir if eitherwasher is not working. See WasherFluid 0 269.
Rear Camera Washer
If equipped, push the windshieldwiper lever forward to spray washerfluid on the rear camera and theNight Vision camera lens. The leverreturns to its starting position whenreleased. See Rear Camera Mirror 0 37.
CompassThe vehicle may have a compassdisplay on the Driver InformationCenter (DIC). The compass receives itsheading and other information fromthe Global Positioning System (GPS)antenna, StabiliTrak/ElectronicStability Control (ESC), and vehiclespeed information.
The compass system is designed tooperate for a certain number of milesor degrees of turn before needing asignal from the GPS satellites. Whenthe compass display shows CAL, drivethe vehicle for a short distance in anopen area where it can receive a GPSsignal. The compass system willautomatically determine when a GPSsignal is restored and provide aheading again.
ClockThe time and date for the clock can beset using the infotainment system. See“Time/Date” in “System” under“Settings” in the infotainment manual.
Power OutletsThe accessory power outlet can beused to plug in electrical equipment,such as a cell phone or MP3 player.
The vehicle has two accessory poweroutlets: one on the lower center floorconsole and one in the rearcargo area.

Cadillac XT5 Owner Manual (GMNA-Localizing-U.S./Canada/Mexico-13527534) - 2020 - CRC - 5/29/19
108 INSTRUMENTS AND CONTROLS
Lift the cover to access the accessorypower outlet.
Certain accessory power plugs maynot be compatible with the accessorypower outlet and could overloadvehicle or adapter fuses. If a problemis experienced, see your dealer.
When adding electrical equipment, besure to follow the proper installationinstructions included with theequipment. See Add-On ElectricalEquipment 0 249.
Caution
Hanging heavy equipment from thepower outlet can cause damage notcovered by the vehicle warranty.The power outlets are designed foraccessory power plugs only, such ascell phone charge cords.
Always unplug electrical equipmentwhen not in use and do not plug inequipment that exceeds the maximum15 amps rating.
Wireless ChargingThe vehicle may have wirelesscharging in the storage under thearmrest. The system operates at 145kHz and wirelessly charges one Qicompatible smartphone. The poweroutput of the system is capable ofcharging at a rate up to 3 amp (15W),as requested by the compatiblesmartphone. See Radio FrequencyStatement 0 363.
{ Warning
Wireless charging can affect theoperation of an implantedpacemaker or other medical devices.If you have one, it is recommendedto consult with your doctor beforeusing the wireless charging system.
The vehicle must be on, in ACC/ACCESSORY, or Retained AccessoryPower (RAP) must be active. Thewireless charging feature may notcorrectly indicate charging when thevehicle is in RAP. See RetainedAccessory Power (RAP) 0 182.
The operating temperature is −20 °C(−4 °F) to 60 °C (140 °F) for thecharging system and 0 °C (32 °F) to35 °C (95 °F) for the smartphone.
{ Warning
Remove all objects from thecharging pocket before chargingyour compatible smartphone.Objects, such as coins, keys, rings,paper clips, or cards, between thesmartphone and the charger willbecome very hot. On the rareoccasion that the charging systemdoes not detect an object, and theobject gets wedged between thesmartphone and the charger,remove the smartphone and allowthe object to cool before removingit from the charging pocket, toprevent burns.

Cadillac XT5 Owner Manual (GMNA-Localizing-U.S./Canada/Mexico-13527534) - 2020 - CRC - 5/29/19
INSTRUMENTS AND CONTROLS 109
To charge a compatible smartphone:
1. Remove all objects from thecharging pocket. The system maynot charge if there are anyobjects between the smartphoneand charging pocket.
2. Insert the phone in the chargingpocket until it rests on thebottom of the pocket.
To maximize the charge rate,ensure the smartphone is fullyseated and centered in the holderwith nothing under it. A thicksmartphone case may preventthe wireless charger from
working, or may reduce thecharging performance. See yourdealer for additional information.
3. If properly positioned andcharging, a green} will appear
next toV on the infotainment
display. If} turns yellow,ensure that the charging pad isclear of any objects and that thesmartphone is capable ofwireless charging beforerepositioning it. If} does notilluminate, the smartphone mayneed to be repositioned.
The smartphone may becomewarm during charging. This isnormal. In warmer temperatures,the speed of charging may bereduced.
Software Acknowledgements
Certain Wireless Charging Moduleproduct from LG Electronics, Inc.("LGE") contains the open sourcesoftware detailed below. Refer to theindicated open source licenses (as areincluded following this notice) for theterms and conditions of their use.
OSS Notice Information
To obtain the source code that iscontained in this product, please visithttp://opensource.lge.com. In additionto the source code, all referred licenseterms, warranty disclaimers andcopyright notices are available fordownload. LG Electronics will alsoprovide open source code to you onCD-ROM for a charge covering thecost of performing such distribution(such as the cost of media, shipping,and handling) upon email request [email protected]. This offer isvalid for three (3) years from the dateon which you purchased the product.
Freescale-WCT library
Copyright (c) 2012-2014 FreescaleSemiconductor, Inc.. All rightsreserved.
1. Redistributions of source codemust retain the above copyrightnotice, this list of conditions andthe following disclaimer.
2. Redistributions in binary formmust reproduce the abovecopyright notice, this list ofconditions and the following

Cadillac XT5 Owner Manual (GMNA-Localizing-U.S./Canada/Mexico-13527534) - 2020 - CRC - 5/29/19
110 INSTRUMENTS AND CONTROLS
disclaimer in the documentationand/or other materials providedwith the distribution.
3. Neither the name of thecopyright holder nor the namesof its contributors may be usedto endorse or promote productsderived from this softwarewithout specific prior writtenpermission.
THIS SOFTWARE IS PROVIDED BYTHE COPYRIGHT HOLDERS ANDCONTRIBUTORS "AS IS" AND ANYEXPRESS OR IMPLIED WARRANTIES,INCLUDING, BUT NOT LIMITED TO,THE IMPLIED WARRANTIES OFMERCHANTABILITY AND FITNESSFOR A PARTICULAR PURPOSE AREDISCLAIMED. IN NO EVENT SHALL
THE COPYRIGHT HOLDER ORCONTRIBUTORS BE LIABLE FOR ANYDIRECT, INDIRECT, INCIDENTAL,SPECIAL, EXEMPLARY, ORCONSEQUENTIAL DAMAGES(INCLUDING, BUT NOT LIMITED TO,PROCUREMENT OF SUBSTITUTEGOODS OR SERVICES; LOSS OF USE,DATA, OR PROFITS; OR BUSINESSINTERRUPTION) HOWEVER CAUSEDAND ON ANY THEORY OF LIABILITY,WHETHER IN CONTRACT, STRICTLIABILITY, OR TORT (INCLUDINGNEGLIGENCE OR OTHERWISE)ARISING IN ANY WAY OUT OF THEUSE OF THIS SOFTWARE, EVEN IFADVISED OF THE POSSIBILITY OFSUCH DAMAGE.
Warning Lights, Gauges,and IndicatorsWarning lights and gauges can signalthat something is wrong before itbecomes serious enough to cause anexpensive repair or replacement.Paying attention to the warning lightsand gauges could prevent injury.
Some warning lights come on brieflywhen the engine is started to indicatethey are working. When one of thewarning lights comes on and stays onwhile driving, or when one of thegauges shows there may be a problem,check the section that explains whatto do. Waiting to do repairs can becostly and even dangerous.

Cadillac XT5 Owner Manual (GMNA-Localizing-U.S./Canada/Mexico-13527534) - 2020 - CRC - 5/29/19
INSTRUMENTS AND CONTROLS 111
Instrument Cluster
English Base Level Cluster Shown, Metric Similar
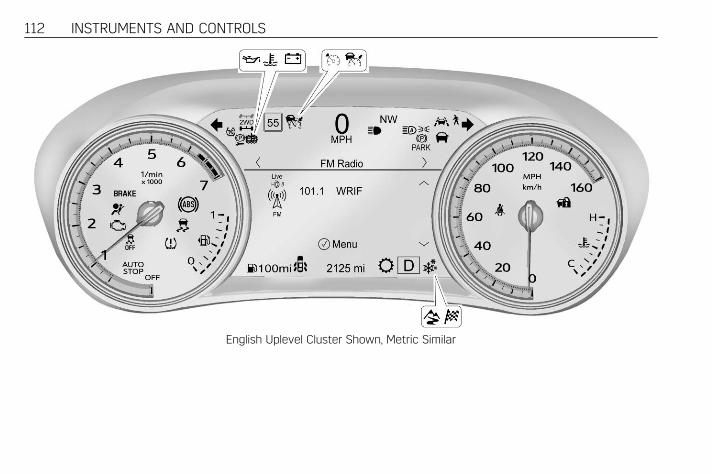
Cadillac XT5 Owner Manual (GMNA-Localizing-U.S./Canada/Mexico-13527534) - 2020 - CRC - 5/29/19
112 INSTRUMENTS AND CONTROLS
English Uplevel Cluster Shown, Metric Similar
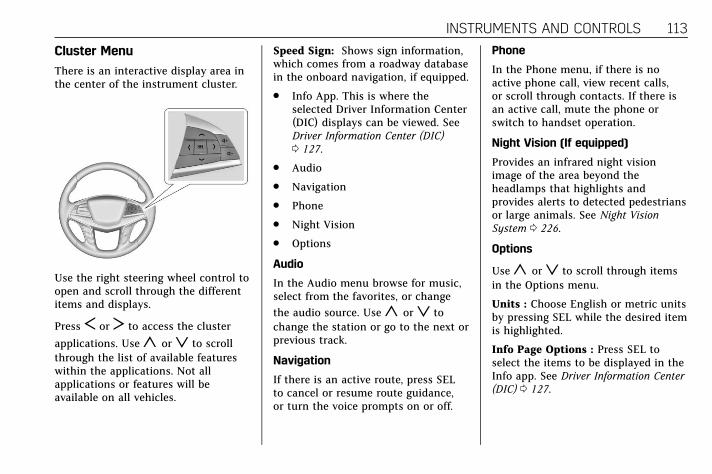
Cadillac XT5 Owner Manual (GMNA-Localizing-U.S./Canada/Mexico-13527534) - 2020 - CRC - 5/29/19
INSTRUMENTS AND CONTROLS 113
Cluster Menu
There is an interactive display area inthe center of the instrument cluster.
Use the right steering wheel control toopen and scroll through the differentitems and displays.
Press S or T to access the cluster
applications. Usey orz to scrollthrough the list of available featureswithin the applications. Not allapplications or features will beavailable on all vehicles.
Speed Sign: Shows sign information,which comes from a roadway databasein the onboard navigation, if equipped.
. Info App. This is where theselected Driver Information Center(DIC) displays can be viewed. SeeDriver Information Center (DIC)0 127.
. Audio
. Navigation
. Phone
. Night Vision
. Options
Audio
In the Audio menu browse for music,select from the favorites, or changethe audio source. Usey orz tochange the station or go to the next orprevious track.
Navigation
If there is an active route, press SELto cancel or resume route guidance,or turn the voice prompts on or off.
Phone
In the Phone menu, if there is noactive phone call, view recent calls,or scroll through contacts. If there isan active call, mute the phone orswitch to handset operation.
Night Vision (If equipped)
Provides an infrared night visionimage of the area beyond theheadlamps that highlights andprovides alerts to detected pedestriansor large animals. See Night VisionSystem 0 226.
Options
Usey orz to scroll through itemsin the Options menu.
Units : Choose English or metric unitsby pressing SEL while the desired itemis highlighted.
Info Page Options : Press SEL toselect the items to be displayed in theInfo app. See Driver Information Center(DIC) 0 127.

Cadillac XT5 Owner Manual (GMNA-Localizing-U.S./Canada/Mexico-13527534) - 2020 - CRC - 5/29/19
114 INSTRUMENTS AND CONTROLS
Display : Press SEL to enter theDisplay menu. Select to turn on or offthe speedometer, time, fuel range, or,if equipped, compass or speed sign.
Speed Warning : The Speed Warningdisplay allows the driver to set awarning at a speed that they do notwant to exceed. To set the SpeedWarning press SEL when SpeedWarning is displayed. Use the y or
z to adjust the value and press SELto set the speed.
Once the speed is set, this feature canbe turned off by pressing the SELwhile viewing this page. If the selectedspeed limit is exceeded, a pop-upwarning is displayed with a chime.
Head-Up Display (HUD) (Uplevel) :If equipped, this feature allows foradjusting the angle of the HUD imageand changing or turning off the SpeedLimit Sign.
HUD Rotation (Uplevel): Press SELwhile Adjust Rotation is highlighted toenter Adjust Mode. Scroll to adjust theangle of the HUD display. Press the
SEL to confirm and save the setting.This feature may only be available inP (Park).
Speed Sign: If equipped, press SELwhile Speed Sign is highlighted toturn it on or off.
Software Information : Displays opensource software information.
SpeedometerThe speedometer shows the vehicle'sspeed in either kilometers per hour(km/h) or miles per hour (mph).
OdometerThe odometer shows how far thevehicle has been driven, in eitherkilometers or miles.
Trip OdometerThe trip odometer shows how far thevehicle has been driven since the tripodometer was last reset.
The trip odometer is accessed andreset through the Driver InformationCenter (DIC). See Driver InformationCenter (DIC) 0 127.
TachometerThe tachometer displays the enginespeed in revolutions per minute (rpm).
For vehicles with the Stop/Startsystem, when the ignition is on, thetachometer indicates the vehiclestatus. When pointing to AUTO STOP,the engine is off but the vehicle is onand can move. The engine could autostart at any time. When the indicatorpoints to OFF, the vehicle is off.
When the engine is on, thetachometer will indicate the engine’srevolutions per minute (rpm). Thetachometer may vary by severalhundred rpm’s, during Auto Stopmode, when the engine is shutting offand restarting.

Cadillac XT5 Owner Manual (GMNA-Localizing-U.S./Canada/Mexico-13527534) - 2020 - CRC - 5/29/19
INSTRUMENTS AND CONTROLS 115
Fuel Gauge
When the ignition is on, the fuelgauge indicates about how much fuelis left in the tank.
There is an arrow near the fuel gaugepointing to the side of the vehicle thefuel door is on.
When the indicator nears empty, thelow fuel light comes on. There still isa little fuel left, but the vehicle shouldbe refueled soon.
Here are four things that some ownersask about. None of these show aproblem with the fuel gauge:
. At the service station, the fuelpump shuts off before the gaugereads full.
. It takes a little more or less fuel tofill up than the gauge indicated.For example, the gauge may haveindicated the tank was half full,but it actually took a little more orless than half the tank's capacityto fill the tank.
. The gauge moves a little whileturning a corner or speeding up.
. The gauge takes a few seconds tostabilize after the ignition isturned on, and goes back to emptywhen the ignition is turned off.
Engine CoolantTemperature Gauge
English

Cadillac XT5 Owner Manual (GMNA-Localizing-U.S./Canada/Mexico-13527534) - 2020 - CRC - 5/29/19
116 INSTRUMENTS AND CONTROLS
Metric
This gauge measures the temperatureof the vehicle's engine.
While driving under normal operatingconditions, if the red LED isilluminated, the engine is too hot. Pulloff the road, stop the vehicle, and turnoff the engine as soon as possible.
Seat Belt Reminders
Driver Seat Belt Reminder Light
There is a driver seat belt reminderlight on the instrument cluster.
When the vehicle is started, this lightflashes and a chime may come on toremind the driver to fasten their seatbelt. Then the light stays on soliduntil the belt is buckled. This cyclemay continue several times if thedriver remains or becomes unbuckledwhile the vehicle is moving.
If the driver seat belt is buckled,neither the light nor the chimecomes on.
Passenger Seat Belt ReminderLight
There is a passenger seat beltreminder light near the passengerairbag status indicator. See PassengerSensing System 0 70.
When the vehicle is started, this lightflashes and a chime may come on toremind passengers to fasten their seatbelt. Then the light stays on soliduntil the belt is buckled. This cyclecontinues several times if thepassenger remains or becomesunbuckled while the vehicle is moving.
If the passenger seat belt is buckled,neither the chime nor the lightcomes on.
The front passenger seat belt reminderlight and chime may turn on if anobject is put on the seat such as abriefcase, handbag, grocery bag,laptop, or other electronic device. Toturn off the reminder light and/orchime, remove the object from theseat or buckle the seat belt.

Cadillac XT5 Owner Manual (GMNA-Localizing-U.S./Canada/Mexico-13527534) - 2020 - CRC - 5/29/19
INSTRUMENTS AND CONTROLS 117
Airbag Readiness LightThis light shows if there is anelectrical problem with the airbagsystem. The system check includesthe airbag sensor(s), the passengersensing system, the pretensioners, theairbag modules, the wiring, and thecrash sensing and diagnostic module.For more information on the airbagsystem, see Airbag System 0 64.
The airbag readiness light comes onfor several seconds when the vehicle isstarted. If the light does not come onthen, have it fixed immediately.
{ Warning
If the airbag readiness light stayson after the vehicle is started orcomes on while driving, it means
(Continued)
Warning (Continued)
the airbag system might not beworking properly. The airbags in thevehicle might not inflate in a crash,or they could even inflate without acrash. To help avoid injury, havethe vehicle serviced right away.
If there is a problem with the airbagsystem, a Driver Information Center(DIC) message may also come on.
Passenger Airbag StatusIndicatorThe vehicle has a passenger sensingsystem. See Passenger Sensing System0 70 for important safety information.The overhead console has a passengerairbag status indicator.
United States and Canada
Mexico
When the vehicle is started, thepassenger airbag status indicator willlight ON and OFF, or the symbol foron and off, for several seconds as asystem check. Then, after several moreseconds, the status indicator will lighteither ON or OFF, or either the on oroff symbol, to let you know the statusof the front outboard passengerfrontal airbag.

Cadillac XT5 Owner Manual (GMNA-Localizing-U.S./Canada/Mexico-13527534) - 2020 - CRC - 5/29/19
118 INSTRUMENTS AND CONTROLS
If the word ON, or the on symbol, islit on the passenger airbag statusindicator, it means that the frontoutboard passenger frontal airbag isallowed to inflate.
If the word OFF, or the off symbol, islit on the passenger airbag statusindicator, it means that the passengersensing system has turned off thefront outboard passenger frontalairbag.
If, after several seconds, both statusindicator lights remain on, or if thereare no lights at all, there may be aproblem with the lights or thepassenger sensing system. See yourdealer for service.
{ Warning
If the airbag readiness light evercomes on and stays on, it meansthat something may be wrong withthe airbag system. To help avoidinjury to yourself or others, have
(Continued)
Warning (Continued)
the vehicle serviced right away. SeeAirbag Readiness Light 0 117 formore information, includingimportant safety information.
Charging System Light
The charging system light comes onbriefly when the ignition is turned on,but the engine is not running, as acheck to show the light is working.It should go out when the engine isstarted.
If the light stays on, or comes onwhile driving, there may be a problemwith the electrical charging system.Have it checked by your dealer.Driving while this light is on coulddrain the battery.
When this light comes on, or isflashing, the Driver InformationCenter (DIC) also displays a message.
If a short distance must be drivenwith the light on, be sure to turn offall accessories, such as the radio andair conditioner.
Malfunction Indicator Lamp(Check Engine Light)This light is part of the vehicle’semission control on-board diagnosticsystem. If this light is on while theengine is running, a malfunction hasbeen detected and the vehicle mayrequire service. The light should comeon to show that it is working whenthe ignition is in Service Mode. SeeIgnition Positions 0 176.
Cadillac XT5 Owner Manual (GMNA-Localizing-U.S./Canada/Mexico-13527534) - 2020 - CRC - 5/29/19
INSTRUMENTS AND CONTROLS 119
Malfunctions are often indicated bythe system before any problem isnoticeable. Being aware of the lightand seeking service promptly when itcomes on may prevent damage.
Caution
If the vehicle is driven continuallywith this light on, the emissioncontrol system may not work aswell, the fuel economy may belower, and the vehicle may not runsmoothly. This could lead to costlyrepairs that might not be coveredby the vehicle warranty.
Caution
Modifications to the engine,transmission, exhaust, intake,or fuel system, or the use ofreplacement tires that do not meetthe original tire specifications, cancause this light to come on. Thiscould lead to costly repairs not
(Continued)
Caution (Continued)
covered by the vehicle warranty.This could also affect the vehicle’sability to pass an EmissionsInspection/Maintenance test. SeeAccessories and Modifications 0 252.
If the light is flashing : Amalfunction has been detected thatcould damage the emission controlsystem and increase vehicleemissions. Diagnosis and service maybe required.
To help prevent damage, reducevehicle speed and avoid hardaccelerations and uphill grades.If towing a trailer, reduce the amountof cargo being hauled as soon aspossible.
If the light continues to flash, find asafe place to park. Turn the vehicle offand wait at least 10 seconds beforerestarting the engine. If the light isstill flashing, follow the previousguidelines and see your dealer forservice as soon as possible.
If the light is on steady : Amalfunction has been detected.Diagnosis and service may berequired.
Check the following:
. If fuel has been added to thevehicle using the capless fuelfunnel adapter, make sure that ithas been removed. See “Filling theTank with a Portable Gas Can”under Filling the Tank 0 235. Thediagnostic system can detect if theadapter has been left installed inthe vehicle, allowing fuel toevaporate into the atmosphere.A few driving trips with theadapter removed may turn off thelight.
. Poor fuel quality can causeinefficient engine operation andpoor driveability, which may goaway once the engine is warmedup. If this occurs, change the fuelbrand. It may require at least onefull tank of the proper fuel to turnthe light off. See RecommendedFuel (3.6L V6 Engine) 0 234 orRecommended Fuel (2.0L L4 Engine)0 233.

Cadillac XT5 Owner Manual (GMNA-Localizing-U.S./Canada/Mexico-13527534) - 2020 - CRC - 5/29/19
120 INSTRUMENTS AND CONTROLS
If the light remains on, see yourdealer.
Emissions Inspection andMaintenance Programs
If the vehicle requires an EmissionsInspection/Maintenance test, the testequipment will likely connect to thevehicle's Data Link Connector (DLC).
The DLC is under the instrumentpanel to the left of the steering wheel.Connecting devices that are not usedto perform an Emissions Inspection/Maintenance test or to service thevehicle may affect vehicle operation.See Add-On Electrical Equipment 0 249.See your dealer if assistance is needed.
The vehicle may not passinspection if:
. The light is on when the engine isrunning.
. The light does not come on whenthe ignition is in Service Mode.
. Critical emission control systemshave not been completelydiagnosed. If this happens, thevehicle would not be ready forinspection and might requireseveral days of routine drivingbefore the system is ready forinspection. This can happen if the12-volt battery has recently beenreplaced or run down, or if thevehicle has been recently serviced.
See your dealer if the vehicle will notpass or cannot be made ready forthe test.
Brake System WarningLight
Metric English
This light should come on brieflywhen the vehicle is turned on. If itdoes not come on then, have it fixedso it will be ready to warn you if thereis a problem.
If the light comes on and stays on atstart up, there is a brake problem.Have the brake system inspectedright away.
If the light comes on while driving,pull off the road and stop carefully.The brake pedal might be harder topush, or the brake pedal may go closerto the floor. It could take longer tostop. If the light is still on, have thevehicle towed for service. See Towingthe Vehicle 0 323.
{ Warning
The brake system might not beworking properly if the brakesystem warning light is on. Drivingwith the brake system warning lighton can lead to a crash. If the light isstill on after the vehicle has been
(Continued)

Cadillac XT5 Owner Manual (GMNA-Localizing-U.S./Canada/Mexico-13527534) - 2020 - CRC - 5/29/19
INSTRUMENTS AND CONTROLS 121
Warning (Continued)
pulled off the road and carefullystopped, have the vehicle towed forservice.
Electric Parking BrakeLight
Metric English Base Level
English Uplevel
The Electric Parking Brake (EPB)status light comes on when theparking brake is applied. If the lightcontinues flashing after the EPB isreleased, or while driving, there is a
problem with the EPB system.A message may also display on theDriver Information Center (DIC).
If the light does not come on,or remains flashing, see your dealer.
Service Electric ParkingBrake Light
The service electric parking brake lightshould come on briefly when thevehicle is started. If it does not comeon, have it fixed so it will be ready towarn if there is a problem. Forvehicles with the reconfigurablecluster, this light may not come onwhen the vehicle is started.
If this light stays on, the vehicleshould be taken to a dealer as soon aspossible. See Electric Parking Brake0 194. A message may also display inthe Driver Information Center (DIC).
Antilock Brake System(ABS) Warning Light
This warning light should come onbriefly when the vehicle is turned on.If the light does not come on, have itfixed so it will be ready to warn ifthere is a problem.
If the light comes on while driving,safely stop as soon as it is possibleand turn off the vehicle. Then turn onthe vehicle again to reset the system.
If the ABS warning light stays on,or comes on again while driving, thevehicle needs service. A chime mayalso sound when the light stays on.
If the ABS warning light is the onlylight on, the vehicle has regularbrakes, but ABS is not functioning.

Cadillac XT5 Owner Manual (GMNA-Localizing-U.S./Canada/Mexico-13527534) - 2020 - CRC - 5/29/19
122 INSTRUMENTS AND CONTROLS
If both the ABS warning light and thebrake system warning light are on,ABS is not functioning and there is aproblem with the regular brakes. Seeyour dealer for service.
See Brake System Warning Light 0 120.
Gear Shifting Light
If equipped, this light will displaywhen Performance Algorithm Liftfoot(PAL) is activated. See Driver ModeControl 0 198.
All-Wheel-Drive Light
All-Wheel-DriveLight
Front-Wheel-DriveLight
If equipped, the corresponding lightcomes on when an All-Wheel Drive(AWD) mode or Front-Wheel-Drivemode is selected. See Driver ModeControl 0 198.
If the light turns amber, there may bea malfunction. See your dealer.
Lane Keep Assist (LKA)Light
After the vehicle is started, this lightturns off and stays off if LKA has notbeen turned on or is unavailable.
If available, this light is white if LKAis turned on, but not ready to assist.This light is green if LKA is turned onand is ready to assist.
LKA may assist by gently turning thesteering wheel if the vehicleapproaches a detected lane marking.The LKA light is amber whenassisting.
This light flashes amber as a LaneDeparture Warning (LDW) alert, toindicate that the lane marking hasbeen crossed.
LKA will not assist or alert if the turnsignal is active in the direction of lanedeparture, or if LKA detects that youare accelerating, braking, or activelysteering.
See Lane Keep Assist (LKA) 0 231.
Vehicle Ahead Indicator

Cadillac XT5 Owner Manual (GMNA-Localizing-U.S./Canada/Mexico-13527534) - 2020 - CRC - 5/29/19
INSTRUMENTS AND CONTROLS 123
If equipped, this indicator will displaygreen when a vehicle is detectedahead and amber when you arefollowing a vehicle ahead much tooclosely.
See Forward Collision Alert (FCA)System 0 220.
Pedestrian Ahead Indicator
If equipped, this indicator will displayamber when a nearby pedestrian isdetected in front of the vehicle.
See Front Pedestrian Braking (FPB)System 0 224.
Traction Off Light
This light comes on briefly whilestarting the engine. If it does not,have the vehicle serviced by yourdealer. If the system is workingnormally, the indicator light thenturns off.
The traction off light comes on whenthe Traction Control System (TCS) hasbeen turned off by pressing andreleasing the TCS/StabiliTrak/Electronic Stability Control (ESC)button.
This light and the StabiliTrak OFFlight come on when StabiliTrak/ESC isturned off.
If the TCS is off, wheel speed will belimited when necessary to protect thedriveline from damage. Adjust drivingaccordingly.
See Traction Control/Electronic StabilityControl 0 196.
StabiliTrak OFF Light
This light comes on briefly whilestarting the engine. If it does not,have the vehicle serviced by yourdealer.
This light comes on when theStabiliTrak/Electronic Stability Control(ESC) system is turned off.If StabiliTrak/ESC is off, the TractionControl System (TCS) is also off.
If StabiliTrak/ESC and TCS are off, thesystem does not assist in controllingthe vehicle. Turn on the TCS and theStabiliTrak/ESC systems, and thewarning light turns off.
See Traction Control/Electronic StabilityControl 0 196.

Cadillac XT5 Owner Manual (GMNA-Localizing-U.S./Canada/Mexico-13527534) - 2020 - CRC - 5/29/19
124 INSTRUMENTS AND CONTROLS
Traction Control System(TCS)/StabiliTrak Light
This light comes on briefly when theengine is started.
If the light does not come on, havethe vehicle serviced by your dealer.If the system is working normally, theindicator light turns off.
If the light is on and not flashing, theTCS and potentially the StabiliTrak/ESC system have been disabled.A Driver Information Center (DIC)message may display. Check the DICmessages to determine whichfeature(s) is no longer functioning andwhether the vehicle requires service.
If the light is on and flashing, the TCSand/or the StabiliTrak/ESC system isactively working.
See Traction Control/Electronic StabilityControl 0 196.
Engine CoolantTemperature Warning Light
This light comes on briefly whilestarting the vehicle.
If it does not, have the vehicleserviced by your dealer. If the systemis working normally the indicator lightgoes off.
Caution
The engine coolant temperaturewarning light indicates that thevehicle has overheated. Driving withthis light on can damage the engineand it may not be covered by thevehicle warranty. See EngineOverheating 0 268.
The engine coolant temperaturewarning light comes on when theengine has overheated.
If this happens, pull over and turn offthe engine as soon as possible. SeeEngine Overheating 0 268.
Driver Mode Control Light
This light comes on when Sport Modeis selected.
This light comes on when Snow/IceMode is selected.

Cadillac XT5 Owner Manual (GMNA-Localizing-U.S./Canada/Mexico-13527534) - 2020 - CRC - 5/29/19
INSTRUMENTS AND CONTROLS 125
This light comes on when Off-RoadMode is selected.
See Driver Mode Control 0 198.
Tire Pressure Light
For vehicles with the Tire PressureMonitor System (TPMS), this lightcomes on briefly when the engine isstarted. It provides information abouttire pressures and the TPMS.
When the Light Is On Steady
This indicates that one or more of thetires are significantly underinflated.
A Driver Information Center (DIC) tirepressure message may also display.Stop as soon as possible, and inflatethe tires to the pressure value shownon the Tire and Loading Informationlabel. See Tire Pressure 0 292.
When the Light Flashes First andThen Is On Steady
If the light flashes for about a minuteand then stays on, there may be aproblem with the TPMS. If theproblem is not corrected, the light willcome on at every ignition cycle. SeeTire Pressure Monitor Operation 0 295.
Engine Oil Pressure Light
Caution
Lack of proper engine oilmaintenance can damage theengine. Driving with the engine oillow can also damage the engine.The repairs would not be coveredby the vehicle warranty. Check theoil level as soon as possible. Add oilif required, but if the oil level is
(Continued)
Caution (Continued)
within the operating range and theoil pressure is still low, have thevehicle serviced. Always follow themaintenance schedule for changingengine oil.
This light should come on briefly asthe engine is started. If it does notcome on, have the vehicle serviced byyour dealer.
If the light comes on and stays on, itmeans that oil is not flowing throughthe engine properly. The vehicle couldbe low on oil and might have someother system problem. See your dealer.

Cadillac XT5 Owner Manual (GMNA-Localizing-U.S./Canada/Mexico-13527534) - 2020 - CRC - 5/29/19
126 INSTRUMENTS AND CONTROLS
Low Fuel Warning Light
This light is near the fuel gauge andcomes on briefly when the ignition isturned on as a check to show it isworking.
It also comes on when the fuel tank islow on fuel. The light turns off whenfuel is added. If it does not, have thevehicle serviced.
Security Light
The security light should come onbriefly as the engine is started. If itdoes not come on, have the vehicle
serviced by your dealer. If the systemis working normally, the indicatorlight turns off.
If the light stays on and the enginedoes not start, there could be aproblem with the theft-deterrentsystem. See Immobilizer Operation0 33.
High-Beam On Light
This light comes on when thehigh-beam headlamps are in use. SeeHeadlamp High/Low-Beam Changer0 145.
IntelliBeam Light
This light comes on when theIntelliBeam system, if equipped, isenabled. See Exterior Lamp Controls0 143.
Lamps On Reminder
This light comes on when the exteriorlamps are in use, except when onlythe Daytime Running Lamps (DRL)are active. See Exterior Lamp Controls0 143.
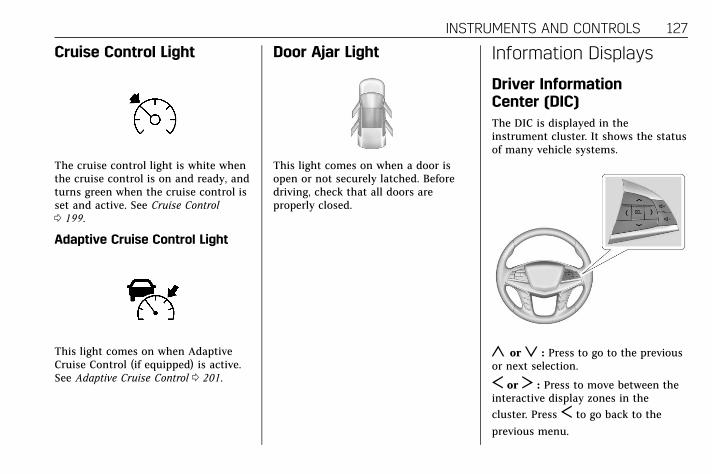
Cadillac XT5 Owner Manual (GMNA-Localizing-U.S./Canada/Mexico-13527534) - 2020 - CRC - 5/29/19
INSTRUMENTS AND CONTROLS 127
Cruise Control Light
The cruise control light is white whenthe cruise control is on and ready, andturns green when the cruise control isset and active. See Cruise Control0 199.
Adaptive Cruise Control Light
This light comes on when AdaptiveCruise Control (if equipped) is active.See Adaptive Cruise Control 0 201.
Door Ajar Light
This light comes on when a door isopen or not securely latched. Beforedriving, check that all doors areproperly closed.
Information Displays
Driver InformationCenter (DIC)The DIC is displayed in theinstrument cluster. It shows the statusof many vehicle systems.
y orz : Press to go to the previousor next selection.
S or T : Press to move between theinteractive display zones in thecluster. Press S to go back to the
previous menu.

Cadillac XT5 Owner Manual (GMNA-Localizing-U.S./Canada/Mexico-13527534) - 2020 - CRC - 5/29/19
128 INSTRUMENTS AND CONTROLS
SEL : Press to open a menu or select amenu item. Press and hold to resetvalues on certain screens.
Info Page Options
The info displays on the DIC can beturned on or off through theOptions menu.
1. Press SEL while viewing theOptions page in one of theinteractive display zones on thecluster.
2. Scroll to Info Pages and press T.
3. Pressy orz to move throughthe list of possible info displays.
4. Press SEL while an item ishighlighted to select or deselectthat item.
The info pages can also be turned onor off through the DIC page Info PageOptions.
DIC Information Displays
The following is the list of all possibleDIC information displays. Some of theinformation displays may not beavailable for your particular vehicle.
While in the Info Page Options menu,the info pages can be restored to thedefault factory settings by pressingand holdingR on the left steeringwheel controls and SEL on the rightsteering wheel controls at thesame time.
Speed : Shows the vehicle speed ineither kilometers per hour (km/h) ormiles per hour (mph).
Trip 1 or Trip 2 and Average FuelEconomy : The Trip display shows thecurrent distance traveled, in eitherkilometers (km) or miles (mi), sincethe trip odometer was last reset. Thetrip odometer can be reset throughthe Trip display, or by pressing SELand selecting yes or no while thisdisplay is active.
Shows the approximate fuel economyin kilometers per liter (km/L), litersper 100 kilometers (L/100km), or milesper gallon (mpg).. This number iscalculated based on the number of L/100 km (mpg) recorded since the lasttime this menu item was reset. Thisnumber reflects only the approximateaverage fuel economy that the vehicle
has right now, and will change asdriving conditions change. TheAverage Fuel Economy can be reset bypressing SEL and selecting yes or nowhile this display is active.
Fuel Range : Shows the approximatedistance the vehicle can be drivenwithout refueling. LOW will bedisplayed when the vehicle is low onfuel. The fuel range estimate is basedon an average of the vehicle's fueleconomy over recent driving historyand the amount of fuel remaining inthe fuel tank.
Oil Life : Shows an estimate of theoil's remaining useful life.If REMAINING OIL LIFE 99% isdisplayed, that means 99% of thecurrent oil life remains.
When the remaining oil life is low, theCHANGE ENGINE OIL SOON messagewill appear on the display. The oilshould be changed as soon aspossible. See Engine Oil 0 258. Inaddition to the engine oil life systemmonitoring the oil life, additionalmaintenance is recommended. SeeMaintenance Schedule 0 337.

Cadillac XT5 Owner Manual (GMNA-Localizing-U.S./Canada/Mexico-13527534) - 2020 - CRC - 5/29/19
INSTRUMENTS AND CONTROLS 129
The Oil Life display must be resetafter each oil change. It will not resetitself. Do not reset the Oil Life displayaccidentally at any time other thanwhen the oil has just been changed.It cannot be reset accurately until thenext oil change. To reset the engineoil life system, press SEL and thenselect yes or no. See Engine Oil LifeSystem 0 260.
Tire Pressure : Shows theapproximate pressures of all four tires.Tire pressure is displayed in eitherkilopascal (kPa) or in pounds persquare inch (psi). If the pressure islow, the value for that tire is shown inamber. See Tire Pressure MonitorSystem 0 294 andTire Pressure Monitor Operation 0 295.
Air Filter Life : Shows an estimate ofthe engine air filter’s remaining usefullife and the state of the system.Engine Air Filter Life 95% means 95%of the current air filter life remains.Messages will display based on theengine air filter life and the state ofthe system. When the REPLACE ATNEXT OIL CHANGE message displays,the engine air filter should be replaced
at the time of the next oil change.When the REPLACE SOON messagedisplays, the engine air filter shouldbe replaced at the earliestconvenience.
The Air Filter Life display must bereset after the engine air filterreplacement. To reset, see Engine AirFilter Life System 0 262.
Fuel Economy : Displays average fueleconomy, the best fuel economy overthe selected distance, and a bar graphshowing instantaneous fuel economy.
Average Speed : Displays the averagevehicle speed of the vehicle inkilometers per hour (km/h) or milesper hour (mph). This average is basedon the various vehicle speeds recordedsince the last reset. Reset the averagespeed by pressing SEL while thisdisplay is active to show aconfirmation window to select yesor no.
Timer : This display can be used as atimer. To start the timer, press SELwhile this display is active. Thedisplay will show the amount of timethat has passed since the timer was
last reset. To stop the timer, press SELbriefly while this display is active andthe timer is running.
Press SEL while this display is activeto reset the timer.
Follow Distance/Gap Setting : WhenAdaptive Cruise Control (ACC) is notengaged, the current follow time tothe vehicle ahead is displayed as atime value on this page. When ACChas been engaged, the displayswitches to the gap setting page. Thispage shows the current gap settingalong with the vehicle ahead telltale.
Driver Assistance : If equipped,shows information for Lane KeepAssist (LKA) and Forward CollisionAlert (FCA).
Battery Voltage : Shows the currentbattery voltage.
Coolant Temperature : Shows theengine coolant temperature in eitherdegrees Celsius (°C) or degreesFahrenheit (°F).
Oil Temperature : Shows the engineoil temperature in either degreesCelsius (°C) or degrees Fahrenheit (°F).

Cadillac XT5 Owner Manual (GMNA-Localizing-U.S./Canada/Mexico-13527534) - 2020 - CRC - 5/29/19
130 INSTRUMENTS AND CONTROLS
Transmission Fluid Temperature :Shows the temperature of theautomatic transmission fluid in eitherdegrees Celsius (°C) or degreesFahrenheit (°F).
Off Road : Displays vehicle pitch androll information, road wheel angle,and four-wheel drive (4WD) status.
Engine Boost : Displays enginemanifold pressure relative to ambientair pressure. It will display boostpressure generated by theturbocharging system.
Info Page Options : Scroll to choosewhich info pages appear on the DIC.Press SEL to select or deselect.
Blank Page : Allows for noinformation to be displayed in thecluster info display areas.
Head-Up Display (HUD)
{ Warning
If the HUD image is too bright ortoo high in your field of view, itmay take you more time to seethings you need to see when it isdark outside. Be sure to keep theHUD image dim and placed low inyour field of view.
If equipped with HUD, someinformation concerning the operationof the vehicle is projected onto thewindshield. The image is projectedthrough the HUD lens on top of theinstrument panel. The informationappears as an image focused outtoward the front of the vehicle.
Caution
If you try to use the HUD image asa parking aid, you may misjudgethe distance and damage yourvehicle. Do not use the HUD imageas a parking aid.
The HUD information can bedisplayed in various languages. Thespeedometer reading and othernumerical values can be displayed ineither English or metric units.
The language selection is changedthrough the radio and the units ofmeasurement is changed through theinstrument cluster. See VehiclePersonalization 0 134 and "Options"under Instrument Cluster 0 111.
HUD Display on the Windshield
The HUD may display some of thefollowing vehicle information andvehicle messages or alerts:
. Speed

Cadillac XT5 Owner Manual (GMNA-Localizing-U.S./Canada/Mexico-13527534) - 2020 - CRC - 5/29/19
INSTRUMENTS AND CONTROLS 131. Tachometer
. Audio
. Phone
. Navigation
. Collision Alert
. Adaptive Cruise Control and setspeed
. Lane Departure
. Low Fuel
Some vehicle messages or alertsdisplayed in the HUD may be clearedby using the steering wheel controls.See Vehicle Messages 0 133.
Some information shown may not beavailable on your vehicle if it is notequipped with these features.
The HUD control is to the left of thesteering wheel.
To adjust the HUD image:
1. Adjust the driver seat.
2. Start the engine.
3. Use the following settings toadjust the HUD.
$ : Press or lift to center the HUDimage. The HUD image can only beadjusted up and down, not sideto side.
! : Press to select the display view.Each press will change thedisplay view.
D : Lift and hold to brighten thedisplay. Press and hold to dim thedisplay. Continue to hold to turn thedisplay off.
The HUD image will automaticallydim and brighten to compensate foroutside lighting. The HUD brightnesscontrol can also be adjusted asneeded.
The HUD image can temporarily lightup depending on the angle andposition of sunlight on the HUDdisplay. This is normal.
Polarized sunglasses could make theHUD image harder to see.
Head-Up Display (HUD) RotationOption
This feature allows for adjusting theangle of the HUD image.
Press SEL on the steering wheelcontrols while Head-Up DisplayRotation is highlighted to enter AdjustMode. Pressy orz to adjust the
angle of the HUD display. Press S orT to highlight OK, then press SEL tosave the setting. CANCEL can also beselected to cancel the setting. Thevehicle must be in P (Park). SeeInstrument Cluster 0 111.
HUD Views
There are four views in the HUD.Some vehicle information and vehiclemessages or alerts may be displayedin any view.

Cadillac XT5 Owner Manual (GMNA-Localizing-U.S./Canada/Mexico-13527534) - 2020 - CRC - 5/29/19
132 INSTRUMENTS AND CONTROLS
Metric
English
Speed View : This displays digitalspeed in English or metric units,speed limit, vehicle ahead indicator,Lane Departure Warning/Lane KeepAssist, and Adaptive Cruise Controland set speed. Some information onlyappears on vehicles that have thesefeatures, and when they are active.
Metric
English
Audio/Phone View : This displaysdigital speed, indicators from speedview along with audio/phoneinformation. The current radio station,media type, and incoming calls will bedisplayed.
All HUD views may briefly displayaudio information when the driveruses the steering wheel controls toadjust the audio settings appearing inthe instrument cluster.
Incoming phone calls appearing in theinstrument cluster may also display inany HUD view.
Metric
English
Navigation View : This displaysdigital speed, indicators from speedview along with Turn-by-TurnNavigation information in somevehicles. The compass heading isdisplayed when navigation routing isnot active.
Navigation Turn-by-Turn Alertsshown in the instrument cluster mayalso be displayed in any HUD view.
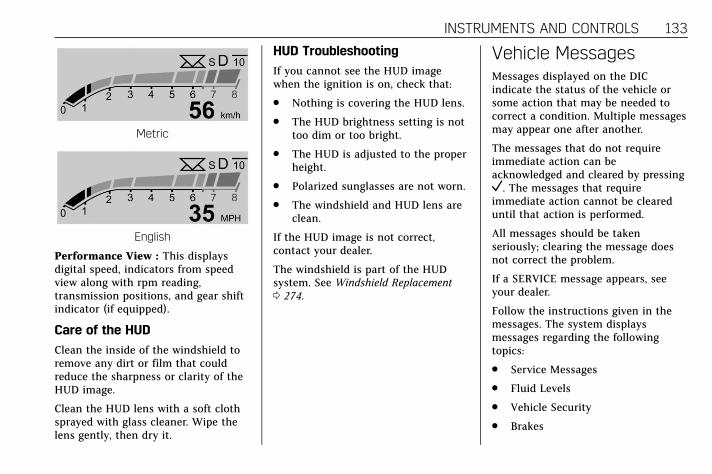
Cadillac XT5 Owner Manual (GMNA-Localizing-U.S./Canada/Mexico-13527534) - 2020 - CRC - 5/29/19
INSTRUMENTS AND CONTROLS 133
Metric
English
Performance View : This displaysdigital speed, indicators from speedview along with rpm reading,transmission positions, and gear shiftindicator (if equipped).
Care of the HUD
Clean the inside of the windshield toremove any dirt or film that couldreduce the sharpness or clarity of theHUD image.
Clean the HUD lens with a soft clothsprayed with glass cleaner. Wipe thelens gently, then dry it.
HUD Troubleshooting
If you cannot see the HUD imagewhen the ignition is on, check that:
. Nothing is covering the HUD lens.
. The HUD brightness setting is nottoo dim or too bright.
. The HUD is adjusted to the properheight.
. Polarized sunglasses are not worn.
. The windshield and HUD lens areclean.
If the HUD image is not correct,contact your dealer.
The windshield is part of the HUDsystem. See Windshield Replacement0 274.
Vehicle MessagesMessages displayed on the DICindicate the status of the vehicle orsome action that may be needed tocorrect a condition. Multiple messagesmay appear one after another.
The messages that do not requireimmediate action can beacknowledged and cleared by pressingV. The messages that requireimmediate action cannot be cleareduntil that action is performed.
All messages should be takenseriously; clearing the message doesnot correct the problem.
If a SERVICE message appears, seeyour dealer.
Follow the instructions given in themessages. The system displaysmessages regarding the followingtopics:
. Service Messages
. Fluid Levels
. Vehicle Security
. Brakes

Cadillac XT5 Owner Manual (GMNA-Localizing-U.S./Canada/Mexico-13527534) - 2020 - CRC - 5/29/19
134 INSTRUMENTS AND CONTROLS. Steering
. Ride Control Systems
. Driver Assistance Systems
. Cruise Control
. Lighting and Bulb Replacement
. Wiper/Washer Systems
. Doors and Windows
. Seat Belts
. Airbag Systems
. Engine and Transmission
. Tire Pressure
. Battery
Engine Power Messages
ENGINE POWER IS REDUCED
This message displays when thevehicle's propulsion power is reduced.A reduction in propulsion power canaffect the vehicle's ability toaccelerate. If this message is on, butthere is no observed reduction inperformance, proceed to yourdestination. The performance may bereduced the next time the vehicle is
driven. The vehicle may be drivenwhile this message is on, butmaximum acceleration and speed maybe reduced. Anytime this messagestays on, or displays repeatedly, thevehicle should be taken to your dealerfor service as soon as possible.
Under certain operating conditions,propulsion will be disabled. Tryrestarting after the vehicle has beenoff for 30 seconds.
Vehicle Speed Messages
SPEED LIMITED TO XXXKM/H (MPH)
This message shows that the vehiclespeed has been limited to the speeddisplayed. The limited speed is aprotection for various propulsion andvehicle systems, such as lubrication,thermal, brakes, suspension, TeenDriver if equipped, or tires.
Vehicle PersonalizationThe following are all possible vehiclepersonalization features. Dependingon the vehicle, some may not beavailable.
For System, Apps, and Personalfeatures and functions, see “Settings”in the infotainment manual.
To access the vehiclepersonalization menu:
1. Touch the Settings icon on theHome Page of the infotainmentdisplay.
2. Touch Vehicle to display a list ofavailable options.
3. Touch to select the desiredfeature setting.
4. Touch9 or R to turn a featureoff or on.
5. Touch z to go to the top level ofthe Settings menu.

Cadillac XT5 Owner Manual (GMNA-Localizing-U.S./Canada/Mexico-13527534) - 2020 - CRC - 5/29/19
INSTRUMENTS AND CONTROLS 135
The menu may contain the following:
Rear Seat Reminder
This allows for a chime and a messagewhen the rear door has been openedbefore or during operation of thevehicle.
Touch Off or On.
Climate and Air Quality
Touch and the following may display:
. Auto Fan Speed
. Auto Cooled Seats
. Auto Heated Seats
. Auto Defog
. Auto Rear Defog
. Ionizer
Auto Fan Speed
This setting specifies the amount ofairflow when the climate control fansetting is Auto Fan.
Touch Low, Medium, or High.
Auto Cooled Seats
This setting automatically turns onand regulates the ventilated seatswhen the cabin temperature is warm.See Heated and Ventilated Front Seats0 51.
Touch Off or On.
Auto Heated Seats
This setting automatically turns onand regulates the heated seats whenthe cabin temperature is cool. Theauto heated seats can be turned off byusing the heated seat buttons on thecenter stack. See Heated and VentilatedFront Seats 0 51.
If equipped with Auto Heated SteeringWheel, this feature will turn on whenthe Auto Heated Seats turn on.
Touch Off or On.
Auto Defog
This setting automatically turns thefront defogger on when the engine isstarted.
Touch Off or On.
Auto Rear Defog
Auto Rear Defog turns on the rearwindow defogger based ontemperature and humidity conditions.
Touch Off or On.
Ionizer
If equipped and on, this feature helpsto clean the air inside the vehicle andremove contaminants such as pollen,odors, and dust. See Dual AutomaticClimate Control System 0 151.
Touch Off or On.
Collision / Detection Systems
Touch and the following may display:
. Alert Type
. Forward Collision System
. Front Pedestrian Detection
. Rear Pedestrian Detection
. Rear Camera Park Assist Symbols
. Rear Cross Traffic Alert
. Adaptive Cruise Go Notifier
. Lane Change Alert

Cadillac XT5 Owner Manual (GMNA-Localizing-U.S./Canada/Mexico-13527534) - 2020 - CRC - 5/29/19
136 INSTRUMENTS AND CONTROLS
Alert Type
This setting specifies the type ofvehicle feedback provided, either abeep or seat vibration, when you arein danger of colliding with an object.
Touch Beeps or Safety Alert Seat.
Forward Collision System
This setting controls the vehicleresponse when detecting a vehicleahead of you. The Off setting disablesall FCA and AEB functions. With theAlert and Brake setting, both FCA andAEB are available. The Alert settingdisables AEB. See AutomaticEmergency Braking (AEB) 0 223.
Touch Off, Alert, or Alert and Brake.
Front Pedestrian Detection
This feature may help avoid or reducethe harm caused by front-end crasheswith nearby pedestrians.
See Front Pedestrian Braking (FPB)System 0 224.
Select Off, Alert, or Alert and Brake.
Rear Pedestrian Detection
This setting specifies if alerts willdisplay when the vehicle detectspedestrians behind when inR (Reverse). See Rear Pedestrian Alert0 219.
Touch Off, Alert, or Alert and Brake.
Rear Camera Park Assist Symbols
This setting enables the Rear CameraPark Assist Symbols. See AssistanceSystems for Parking or Backing 0 211.
Touch Off or On.
Rear Cross Traffic Alert
This setting specifies if an alert willdisplay when the vehicle detectsapproaching rear cross traffic when inR (Reverse). See Assistance Systems forParking or Backing 0 211.
Touch Off or On.
Adaptive Cruise Go Notifier
This setting determines if an alert willappear when Adaptive Cruise Controlbrings the vehicle to a complete stop
and the vehicle ahead of you startsmoving again. See Adaptive CruiseControl 0 201.
Touch Off or On.
Lane Change Alert
This setting specifies if an alert willdisplay on the outside mirror to helpyou avoid crashing into a vehicle inyour blind spot, or rapidlyapproaching your blind spot, during alane change maneuver. See LaneChange Alert (LCA) 0 229.
When Lane Change Alert is disabled,Side Blind Zone Alert is also disabled.
Touch Off or On.
Comfort and Convenience
Touch and the following may display:
. Chime Volume
. Hands Free Liftgate/Trunk Control
. Reverse Tilt Mirror
. Remote Mirror Folding
. Rain Sense Wipers
. Auto Wipe in Reverse Gear

Cadillac XT5 Owner Manual (GMNA-Localizing-U.S./Canada/Mexico-13527534) - 2020 - CRC - 5/29/19
INSTRUMENTS AND CONTROLS 137
Chime Volume
This setting determines the chimevolume level.
Touch the controls on theinfotainment display to adjust thevolume.
Hands Free Liftgate/Trunk Control
The liftgate may be operated with akicking motion under the left cornerof the rear bumper. See Liftgate 0 23.
Select Off, On-Open and Close,or On-Open Only.
Reverse Tilt Mirror
When on, both the driver andpassenger, driver, or passenger outsidemirrors will tilt downward when thevehicle is shifted to R (Reverse) toimprove visibility of the ground nearthe rear wheels. They will return totheir previous driving position whenthe vehicle is shifted out ofR (Reverse) or the engine is turned off.See Reverse Tilt Mirrors 0 36.
Touch Off, On - Driver and Passenger,On - Driver, or On - Passenger.
Remote Mirror Folding
When on, the outside mirrors willautomatically fold or unfold when theRemote Keyless Entry (RKE)transmitter Q or K button is pressedand held. See Folding Mirrors 0 35.
Touch Off or On.
Rain Sense Wipers
This setting automatically turns onthe wipers when moisture is detectedand the wiper switch is inintermittent mode.
Touch Disabled or Enabled.
Auto Wipe in Reverse Gear
When on and the front wiper is on,the rear wiper will automaticallyactivate when the vehicle is shifted toR (Reverse).
Select Off or On.
Lighting
Touch and the following may display:
. Vehicle Locator Lights
. Exit Lighting
Vehicle Locator Lights
This setting flashes the headlamps ofyour vehicle when you press K on theRemote Keyless Entry (RKE)transmitter.
Touch Off or On.
Exit Lighting
This setting specifies how long theheadlamps stay on after the vehicle isturned off and exited.
Touch Off, 30 Seconds, 60 Seconds,or 120 Seconds.
Power Door Locks
Touch and the following may display:
. Open Door Anti Lock Out
. Auto Door Unlock
. Delayed Door Lock
Open Door Anti Lock Out
This setting prevents the driver doorfrom locking when the door is open.If this setting is on, the Delayed DoorLock menu will not be available.
Touch Off or On.

Cadillac XT5 Owner Manual (GMNA-Localizing-U.S./Canada/Mexico-13527534) - 2020 - CRC - 5/29/19
138 INSTRUMENTS AND CONTROLS
Auto Door Unlock
This setting allows selection of whichdoors will automatically unlock whenthe vehicle is shifted into P (Park).
Touch Off, All Doors, or Driver Door.
Delayed Door Lock
This setting delays the locking of thevehicle’s doors.
Touch Off or On.
Remote Lock, Unlock, Start
Touch and the following may display:
. Remote Unlock Light Feedback
. Remote Lock Feedback
. Remote Door Unlock
. Remote Start Auto Cool Seats
. Remote Start Auto Heat Seats
. Remote Window Operation
. Passive Door Unlock
. Passive Door Lock
. Remote Left in Vehicle Alert
Remote Unlock Light Feedback
This setting flashes the exterior lampswhen the vehicle is unlocked with theRKE transmitter.
Touch Off or Flash Lights.
Remote Lock Feedback
This setting specifies how the vehicleresponds when the vehicle is lockedwith the RKE transmitter.
Touch Off, Lights and Horn, LightsOnly, or Horn Only.
Remote Door Unlock
This setting specifies whether alldoors, or just the driver door, unlockwhen pressing K on the RKEtransmitter.
Touch All Doors or Driver Door.
Remote Start Auto Cool Seats
This setting automatically turns onthe ventilated seats when using theremote start function on warm days.See Heated and Ventilated Front Seats0 51 andRemote Vehicle Start 0 17.
Touch Off or On.
Remote Start Auto Heat Seats
This setting automatically turns onthe heated seats when using theremote start function on cold days.See Heated and Ventilated Front Seats0 51 andRemote Vehicle Start 0 17.
If equipped with Auto Heated SteeringWheel, this feature will turn on whenthe Remote Start Auto Heated Seatsturn on.
Touch Off or On.
Remote Window Operation
If equipped, this feature enablesremote operation of the windows withthe RKE transmitter. See RemoteKeyless Entry (RKE) System Operation0 10.
Touch Off or On.
Passive Door Unlock
This setting specifies which doorsunlock when using the button on thedriver door handle to unlock thevehicle.
Touch All Doors or Driver Door Only.
Cadillac XT5 Owner Manual (GMNA-Localizing-U.S./Canada/Mexico-13527534) - 2020 - CRC - 5/29/19
INSTRUMENTS AND CONTROLS 139
Passive Door Lock
This setting specifies if the vehicle willautomatically lock, or lock andprovide an alert after all the doors areclosed, and you walk away from thevehicle with the RKE transmitter. SeeRemote Keyless Entry (RKE) SystemOperation 0 10.
Touch Off, On with Horn Chirp, or On.
Remote Left in Vehicle Alert
This feature sounds an alert when theRKE transmitter is left in the vehicle.This menu also enables Remote NoLonger in Vehicle Alert.
Touch Off or On.
Seating Position
Touch and the following may display:
. Seat Entry Memory
. Seat Exit Memory
Seat Entry Memory
This feature automatically recalls thepreviously stored 1 or 2 buttonpositions when the ignition is changedfrom off to on or ACC/ACCESSORY.See Memory Seats 0 48.
Touch Off or On.
Seat Exit Memory
This feature automatically recalls thepreviously stored exit button positionswhen the ignition is changed from onor ACC/ACCESSORY to off if the driverdoor is open or opened. See MemorySeats 0 48.
Touch Off or On.
Teen Driver
See “Teen Driver” under “Settings” inthe infotainment manual.
Valet Mode
This will lock the infotainment systemand steering wheel controls. It mayalso limit access to vehicle storagelocations, if equipped.
To enable valet mode:
1. Enter a four-digit code on thekeypad.
2. Touch Enter to go to theconfirmation screen.
3. Re-enter the four-digit code.
Touch Lock or Unlock to lock orunlock the system. Touch Back to goback to the previous menu.

Cadillac XT5 Owner Manual (GMNA-Localizing-U.S./Canada/Mexico-13527534) - 2020 - CRC - 5/29/19
140 INSTRUMENTS AND CONTROLS
Universal RemoteSystemSee Radio Frequency Statement 0 363.
Universal Remote SystemProgramming
If equipped, these buttons are in theoverhead console.
This system can replace up to threeremote control transmitters used toactivate devices such as garage dooropeners, security systems, and homeautomation devices. These
instructions refer to a garage dooropener, but can be used for otherdevices.
Do not use the Universal Remotesystem with any garage door openerthat does not have the stop andreverse feature. This includes anygarage door opener modelmanufactured before April 1, 1982.
Read these instructions completelybefore programming the UniversalRemote system. It may help to haveanother person assist with theprogramming process.
Keep the original hand-heldtransmitter for use in other vehiclesas well as for future programming.Erase the programming when vehicleownership is terminated. See “ErasingUniversal Remote System Buttons”later in this section.
To program a garage door opener,park outside directly in line with andfacing the garage door opener receiver.Clear all people and objects near thegarage door.
Make sure the hand-held transmitterhas a new battery for quicker andmore accurate transmission of theradio-frequency signal.
Programming the UniversalRemote System
For questions or programming help,see www.homelink.com/gm or call1-800-355-3515. For calls placedoutside the U.S., Canada, or PuertoRico, international rates will apply andmay differ based on landline or mobilephone.
Programming involves time-sensitiveactions, and may time out causing theprocedure to be repeated.
To program up to three devices:
1. Hold the end of the hand-heldtransmitter about 3 to 8 cm (1 to3 in) away from the UniversalRemote system buttons with theindicator light in view. Thehand-held transmitter wassupplied by the manufacturer ofthe garage door opener receiver.
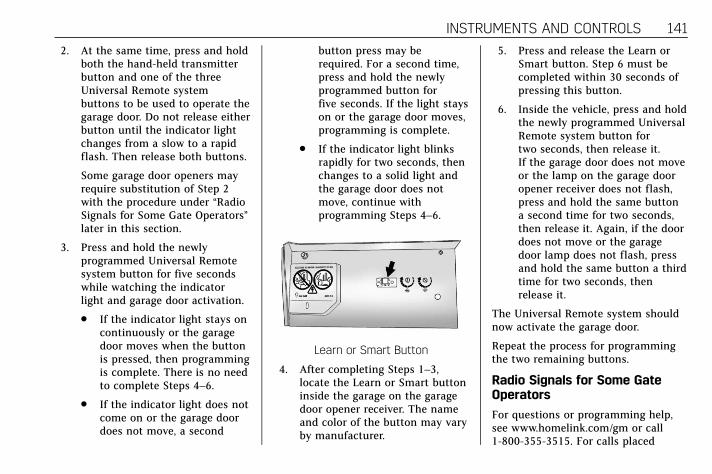
Cadillac XT5 Owner Manual (GMNA-Localizing-U.S./Canada/Mexico-13527534) - 2020 - CRC - 5/29/19
INSTRUMENTS AND CONTROLS 141
2. At the same time, press and holdboth the hand-held transmitterbutton and one of the threeUniversal Remote systembuttons to be used to operate thegarage door. Do not release eitherbutton until the indicator lightchanges from a slow to a rapidflash. Then release both buttons.
Some garage door openers mayrequire substitution of Step 2with the procedure under “RadioSignals for Some Gate Operators”later in this section.
3. Press and hold the newlyprogrammed Universal Remotesystem button for five secondswhile watching the indicatorlight and garage door activation.
. If the indicator light stays oncontinuously or the garagedoor moves when the buttonis pressed, then programmingis complete. There is no needto complete Steps 4–6.
. If the indicator light does notcome on or the garage doordoes not move, a second
button press may berequired. For a second time,press and hold the newlyprogrammed button forfive seconds. If the light stayson or the garage door moves,programming is complete.
. If the indicator light blinksrapidly for two seconds, thenchanges to a solid light andthe garage door does notmove, continue withprogramming Steps 4–6.
Learn or Smart Button
4. After completing Steps 1–3,locate the Learn or Smart buttoninside the garage on the garagedoor opener receiver. The nameand color of the button may varyby manufacturer.
5. Press and release the Learn orSmart button. Step 6 must becompleted within 30 seconds ofpressing this button.
6. Inside the vehicle, press and holdthe newly programmed UniversalRemote system button fortwo seconds, then release it.If the garage door does not moveor the lamp on the garage dooropener receiver does not flash,press and hold the same buttona second time for two seconds,then release it. Again, if the doordoes not move or the garagedoor lamp does not flash, pressand hold the same button a thirdtime for two seconds, thenrelease it.
The Universal Remote system shouldnow activate the garage door.
Repeat the process for programmingthe two remaining buttons.
Radio Signals for Some GateOperators
For questions or programming help,see www.homelink.com/gm or call1-800-355-3515. For calls placed

Cadillac XT5 Owner Manual (GMNA-Localizing-U.S./Canada/Mexico-13527534) - 2020 - CRC - 5/29/19
142 INSTRUMENTS AND CONTROLS
outside the U.S., Canada, or PuertoRico, international rates will apply andmay differ based on landline or mobilephone.
Some radio-frequency laws and gateoperators require transmitter signalsto time out or quit after severalseconds of transmission. This may notbe long enough for the UniversalRemote system to pick up the signalduring programming.
If the programming did not work,replace Step 2 under “Programmingthe Universal Remote System” withthe following:
Press and hold the Universal Remotesystem button while pressing andreleasing the hand-held transmitterbutton every two seconds until thesignal has been successfully acceptedby the Universal Remote system. TheUniversal Remote system indicatorlight will flash slowly at first and thenrapidly. Proceed with Step 3 under“Programming the Universal RemoteSystem” to complete.
Universal Remote SystemOperation
Using the Universal RemoteSystem
Press and hold the appropriateUniversal Remote system button for atleast one-half second. The indicatorlight will come on while the signal isbeing transmitted.
Erasing Universal RemoteSystem Buttons
Erase all programmed buttons whenvehicle ownership is terminated.
To erase:
1. Press and hold the two outsidebuttons until the indicator lightbegins to flash. This should takeabout 10 seconds.
2. Release both buttons.
Reprogramming a SingleUniversal Remote SystemButton
To reprogram any of the systembuttons:
1. Press and hold any one of thebuttons. Do not release thebutton.
2. The indicator light will begin toflash after 20 seconds. Withoutreleasing the button, proceedwith Step 1 under “Programmingthe Universal Remote System.”

Cadillac XT5 Owner Manual (GMNA-Localizing-U.S./Canada/Mexico-13527534) - 2020 - CRC - 5/29/19
LIGHTING 143
Lighting
Exterior LightingExterior Lamp Controls . . . . . . . . . . 143Exterior Lamps Off Reminder . . . 145Headlamp High/Low-BeamChanger . . . . . . . . . . . . . . . . . . . . . . . . . . 145
Flash-to-Pass . . . . . . . . . . . . . . . . . . . . . 145Daytime RunningLamps (DRL) . . . . . . . . . . . . . . . . . . . . 145
Automatic Headlamp System . . . 145Hazard Warning Flashers . . . . . . . . 146Turn and Lane-ChangeSignals . . . . . . . . . . . . . . . . . . . . . . . . . . . 147
Cornering Lamps . . . . . . . . . . . . . . . . . 147
Interior LightingInstrument Panel IlluminationControl . . . . . . . . . . . . . . . . . . . . . . . . . . 147
Courtesy Lamps . . . . . . . . . . . . . . . . . . 148Dome Lamps . . . . . . . . . . . . . . . . . . . . . 148Reading Lamps . . . . . . . . . . . . . . . . . . . 148
Lighting FeaturesEntry Lighting . . . . . . . . . . . . . . . . . . . . 149Exit Lighting . . . . . . . . . . . . . . . . . . . . . . 149Battery Power Protection . . . . . . . . 149Exterior Lighting BatterySaver . . . . . . . . . . . . . . . . . . . . . . . . . . . . . 149
Exterior Lighting
Exterior Lamp Controls
The exterior lamp control is on theturn signal lever.
Turn the control to the followingpositions:
O : Turns the exterior lamps off anddeactivates the AUTO mode. Turn toO again to reactivate the AUTO mode.
In Canada, the headlamps willautomatically reactivate when thevehicle is shifted out of P (Park).
AUTO : Automatically turns theexterior lamps on and off, dependingon outside lighting.
; : Turns on the parking lampsincluding all lamps, except theheadlamps.
2 : Turns on the headlamps togetherwith the parking lamps andinstrument panel lights.
IntelliBeam System
If equipped, this system turns thevehicle's high-beam headlamps on andoff according to surrounding trafficconditions.
The system turns the high-beamheadlamps on when it is dark enoughand there is no other traffic present.
This lightb comes on in theinstrument cluster when theIntelliBeam system is enabled.

Cadillac XT5 Owner Manual (GMNA-Localizing-U.S./Canada/Mexico-13527534) - 2020 - CRC - 5/29/19
144 LIGHTING
Turning On and Enabling IntelliBeam
To enable the IntelliBeam system,press the button on the end of theturn signal lever when the exteriorlamp control is in the AUTO or2position.
Driving with IntelliBeam
The system only activates the highbeams when driving over 40 km/h(25 mph).
The blue high-beam on light appearson the instrument cluster when thehigh beams are on.
There is a sensor near the top centerof the windshield that automaticallycontrols the system. Keep this area ofthe windshield clear of debris to allowfor best system performance.
The high-beam headlamps remain on,under the automatic control, until oneof the following situations occurs:
. The system detects anapproaching vehicle's headlamps.
. The system detects a precedingvehicle's taillamps.
. The outside light is bright enoughthat high-beam headlamps are notrequired.
. The vehicle's speed drops below20 km/h (12 mph).
. The IntelliBeam system is disabledby the button on the turn signallever. If this happens, press thebutton on the end of the turnsignal lever when the exteriorlamp control is in the AUTO or2position to reactivate theIntelliBeam system. The
instrument cluster light will comeon to indicate the IntelliBeam isreactivated.
The high beams may not turn offautomatically if the system cannotdetect another vehicle's lamps becauseof any of the following:
. The other vehicle's lamps aremissing, damaged, obstructed fromview, or otherwise undetected.
. The other vehicle's lamps arecovered with dirt, snow, and/orroad spray.
. The other vehicle's lamps cannotbe detected due to dense exhaust,smoke, fog, snow, road spray, mist,or other airborne obstructions.
. The vehicle's windshield is dirty,cracked, or obstructed bysomething that blocks the view ofthe light sensor.
. The vehicle is loaded such that thefront end points upward, causingthe light sensor to aim high andnot detect headlamps andtaillamps.

Cadillac XT5 Owner Manual (GMNA-Localizing-U.S./Canada/Mexico-13527534) - 2020 - CRC - 5/29/19
LIGHTING 145. The vehicle is being driven on
winding or hilly roads.
The automatic high-beam headlampsmay need to be disabled if any of theabove conditions exist.
Exterior Lamps OffReminderA warning chime sounds if the driverdoor is opened while the ignition is offand the exterior lamps are on.
Headlamp High/Low-BeamChanger3 : Push the turn signal lever awayfrom you and release, to turn the highbeams on. To return to low beams,push the lever again or pull it towardyou and release.
This indicator light turns on in theinstrument cluster when thehigh-beam headlamps are on.
Flash-to-PassTo flash the high beams, pull the turnsignal lever toward you, and release.
Daytime RunningLamps (DRL)DRL can make it easier for others tosee the front of your vehicle duringthe day. Fully functional DRL arerequired on all vehicles first sold inCanada.
The dedicated DRL will come on whenall of the following conditions are met:
. The ignition is on.
. The exterior lamp control isin AUTO.
. The light sensor determines it isdaytime.
. The parking brake is released orthe vehicle is not in P (Park).
When the DRL are on, the taillamps,sidemarker lamps, and other lampswill not be on.
The DRL turn off when the headlampsare turned to O or the ignition is off.For vehicles first sold in Canada, theDRL can only be turned off when thevehicle is parked.
Automatic HeadlampSystemWhen the exterior lamp control is setto AUTO and it is dark enoughoutside, the headlamps come onautomatically.

Cadillac XT5 Owner Manual (GMNA-Localizing-U.S./Canada/Mexico-13527534) - 2020 - CRC - 5/29/19
146 LIGHTING
There is a light sensor on top of theinstrument panel. Do not cover thesensor.
The system may also turn on theheadlamps when driving through aparking garage or tunnel.
If the vehicle is started in a darkgarage, the automatic headlampsystem comes on immediately. If it islight outside when the vehicle leavesthe garage, there is a slight delaybefore the automatic headlampsystem changes to the DaytimeRunning Lamps (DRL). During thatdelay, the instrument cluster may notbe as bright as usual. Make sure theinstrument panel brightness control isin the full bright position. SeeInstrument Panel Illumination Control0 147.
When it is bright enough outside, theheadlamps will turn off or may changeto DRL.
The automatic headlamp system turnsoff when the exterior lamp control isturned to O or the ignition is off.
For vehicles sold in Canada, thiscontrol only works when thetransmission is in P (Park).
Lights On with Wipers
If the windshield wipers are activatedin daylight with the engine on, andthe exterior lamp control is in AUTO,the headlamps, parking lamps, andother exterior lamps come on. Thetransition time for the lamps comingon varies based on wiper speed. Whenthe wipers are not operating, theselamps turn off. Move the exteriorlamp control to O or; to disablethis feature.
Hazard Warning Flashers
| : Touch| on the center stack tomake the front and rear turn signallamps flash on and off. Touch again toturn the flashers off.
The hazard warning flashers turn onautomatically if the airbags deploy.

Cadillac XT5 Owner Manual (GMNA-Localizing-U.S./Canada/Mexico-13527534) - 2020 - CRC - 5/29/19
LIGHTING 147
Turn and Lane-ChangeSignals
Move the lever all the way up or downto signal a turn.
An arrow on the instrument clusterflashes in the direction of the turn orlane change.
Raise or lower the lever until thearrow starts to flash to signal a lanechange. Hold it there until the lanechange is completed. If the lever isbriefly pressed and released, the turnsignal flashes three times.
The turn and lane-change signal canbe turned off manually by moving thelever back to its original position.
If after signaling a turn or lanechange, the arrow flashes rapidly ordoes not come on, a signal bulb maybe burned out.
Replace any burned out bulbs. If abulb is not burned out, check the fuse.See Fuses and Circuit Breakers 0 277.
Cornering LampsCornering lamps automatically comeon when all of the following occur:
. The low-beam headlamps are on.
. The turn signals are activated orthe steering wheel is at a turningangle.
. The vehicle speed is below 40 kph(25 mph).
Interior Lighting
Instrument PanelIllumination Control
The brightness of the instrumentpanel lighting and steering wheelcontrols can be adjusted.
D : Move the thumbwheel up ordown to brighten or dim the lights.
The brightness of the displaysautomatically adjusts based onoutdoor lighting. The instrument
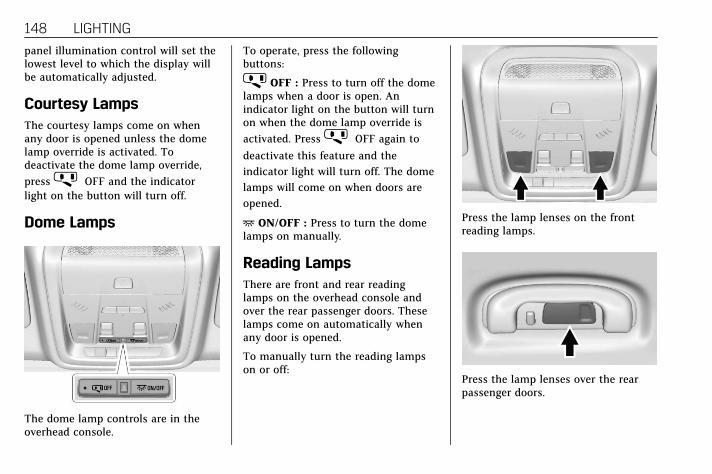
Cadillac XT5 Owner Manual (GMNA-Localizing-U.S./Canada/Mexico-13527534) - 2020 - CRC - 5/29/19
148 LIGHTING
panel illumination control will set thelowest level to which the display willbe automatically adjusted.
Courtesy LampsThe courtesy lamps come on whenany door is opened unless the domelamp override is activated. Todeactivate the dome lamp override,pressj OFF and the indicatorlight on the button will turn off.
Dome Lamps
The dome lamp controls are in theoverhead console.
To operate, press the followingbuttons:
j OFF : Press to turn off the domelamps when a door is open. Anindicator light on the button will turnon when the dome lamp override isactivated. Pressj OFF again to
deactivate this feature and theindicator light will turn off. The domelamps will come on when doors areopened.
+ ON/OFF : Press to turn the domelamps on manually.
Reading LampsThere are front and rear readinglamps on the overhead console andover the rear passenger doors. Theselamps come on automatically whenany door is opened.
To manually turn the reading lampson or off:
Press the lamp lenses on the frontreading lamps.
Press the lamp lenses over the rearpassenger doors.

Cadillac XT5 Owner Manual (GMNA-Localizing-U.S./Canada/Mexico-13527534) - 2020 - CRC - 5/29/19
LIGHTING 149
Lighting Features
Entry LightingSome exterior lamps and most of theinterior lights turn on briefly at night,or in areas of limited lighting when Kis pressed on the Remote KeylessEntry (RKE) transmitter. See RemoteKeyless Entry (RKE) System Operation0 10. When the driver door is opened,all control lights, Driver InformationCenter (DIC) lights, and door pocketlights turn on. After about 30 secondsthe exterior lamps turn off, then theremaining interior lights dim to off.Entry lighting can be disabledmanually by turning the ignition on orto ACC/ACCESSORY, or by pressing Qon the RKE transmitter.
This feature can be changed. See“Vehicle Locator Lights” under VehiclePersonalization 0 134.
Exit LightingSome exterior lamps and interiorlights come on at night, or in areaswith limited lighting, when the driverdoor is opened after the ignition isturned off. The dome lamp comes onafter the ignition is turned off. Theexterior lamps and dome lamp remainon for a set amount of time, thenautomatically turn off.
The exterior lamps turn offimmediately by turning the exteriorlamp control off.
This feature can be changed. SeeVehicle Personalization 0 134.
Battery Power ProtectionThe battery saver feature is designedto protect the vehicle's battery.
If some interior lamps are left on andthe ignition is turned off, the batteryrundown protection systemautomatically turns the lamp off aftersome time.
Exterior Lighting BatterySaverThe exterior lamps turn off about10 minutes after the ignition is turnedoff, if the parking lamps or headlampshave been manually left on. Thisprotects against draining the battery.To restart the 10-minute timer, turnthe exterior lamp control to the offposition and then back to the parkinglamp or headlamp position.
To keep the lamps on for more than10 minutes, the ignition must be on orin ACC/ACCESSORY.
Cadillac XT5 Owner Manual (GMNA-Localizing-U.S./Canada/Mexico-13527534) - 2020 - CRC - 5/29/19
150 INFOTAINMENT SYSTEM
Infotainment System
IntroductionInfotainment . . . . . . . . . . . . . . . . . . . . . 150
Introduction
InfotainmentSee the infotainment manual forinformation on the radio, audioplayers, phone, navigation system,and voice or speech recognition.It also includes information onsettings.
Active Noise Cancellation (ANC)
If equipped, ANC reduces engine noisein the vehicle’s interior. ANC requiresthe factory-installed audio system,radio, speakers, amplifier (ifequipped), induction system, andexhaust system to work properly.Deactivation is required by your dealerif related aftermarket equipment isinstalled.

Cadillac XT5 Owner Manual (GMNA-Localizing-U.S./Canada/Mexico-13527534) - 2020 - CRC - 5/29/19
CLIMATE CONTROLS 151
Climate Controls
Climate Control SystemsDual Automatic Climate ControlSystem . . . . . . . . . . . . . . . . . . . . . . . . . . 151
Rear Climate Control System . . . . 156
Air VentsAir Vents . . . . . . . . . . . . . . . . . . . . . . . . . . 158
MaintenancePassenger Compartment AirFilter . . . . . . . . . . . . . . . . . . . . . . . . . . . . . 159
Service . . . . . . . . . . . . . . . . . . . . . . . . . . . . 159
Climate Control Systems
Dual Automatic Climate Control SystemThe climate control buttons on the center stack and on the climate controldisplay are used to adjust the heating, cooling, and ventilation.
Center Stack Climate Controls
1. Driver and PassengerTemperature Controls
2. Fan Control
3. Driver and Passenger Heated andVentilated Seats (If Equipped)
4. Rear Window Defogger
5. Defrost
6. OFF (Fan)
7. Recirculation
8. AUTO (Automatic Operation)

Cadillac XT5 Owner Manual (GMNA-Localizing-U.S./Canada/Mexico-13527534) - 2020 - CRC - 5/29/19
152 CLIMATE CONTROLS
Climate Control Display
1. Outside Temperature Display
2. Driver and PassengerTemperature Controls
3. Fan Control
4. Rear (Rear Climate Display)
5. A/C Mode (Air Conditioning)
6. SYNC (SynchronizedTemperature)
7. Climate Control Selection(Application Tray Button)
8. Driver and Passenger AirDelivery Mode Controls
The fan, air delivery mode, airconditioning, driver and passengertemperatures, and SYNC settings canbe controlled by touching CLIMATEon the infotainment Home Page or theclimate button in the infotainmentdisplay application tray. A selectioncan then be made on the front climatecontrol page displayed. See theinfotainment manual.
Climate Control Status Display
The climate control status displayappears briefly when the climatecontrol buttons on the center stack
are adjusted. The air delivery modecan be adjusted on the climate controlstatus display.
Automatic Operation
The system automatically controls thefan speed, air delivery, airconditioning, and recirculation inorder to heat or cool the vehicle to thedesired temperature:
When AUTO is lit, all four functionsoperate automatically. Each functioncan also be manually set and thesetting is displayed. Functions notmanually set will continue to beautomatically controlled, even if theAUTO indicator is not lit.
For automatic operation:
1. Touch or press AUTO on thedisplay or the center stack.
2. Set the temperature. Allow thesystem time to stabilize. Thenadjust the temperature as neededfor best comfort.
To improve fuel efficiency and to coolthe vehicle faster, recirculation may beautomatically selected in warmweather. The recirculation light will

Cadillac XT5 Owner Manual (GMNA-Localizing-U.S./Canada/Mexico-13527534) - 2020 - CRC - 5/29/19
CLIMATE CONTROLS 153
not come on. Press@ to selectrecirculation; press it again to selectoutside air.
English units can be changed tometric units through the instrumentcluster. See “Cluster ApplicationDisplays” under Instrument Cluster0 111.
OFF : Press to turn the fan on or off.The front and rear climate displaysturn off when the fan is turned offand the system will stop air fromflowing into the cabin. If on isselected, or any other buttons arepressed, the climate control systemwill turn on and operate at thecurrent setting. The temperaturecontrol and air delivery mode can stillbe adjusted.
w /x : The temperature can beadjusted separately for the driver andthe passenger. Press to increase ordecrease the temperature. Press andhold to rapidly increase or decreasethe temperature.
The driver and passengertemperatures can also be adjusted bytouching the buttons on the climatecontrol display.
SYNC : Touch SYNC on the climatecontrol display to link all climate zonesettings to the driver settings. Adjustthe driver side temperature control tochange the linked temperature. Whenthe front or rear passenger settingsare adjusted, the SYNC indicator lightturns off when the temperatures areunlinked.
Rear : If equipped, touch Rear on thefront climate control display to openthe rear climate control display. Therear climate control settings can nowbe adjusted from the front passengerarea. See Rear Climate Control System0 156.
Manual Operation
Q9 R : Press the fan controls on thecenter stack or the climate controldisplay to increase or decrease the fanspeed. Press and hold the controls toadjust speed more quickly. The fanspeed setting displays. Pressing eitherbutton cancels automatic fan control
and the fan can be controlledmanually. Press AUTO to return toautomatic operation. To turn off thefan and climate control system, pressand hold the fan down control on thecenter stack or the climate controldisplay until it goes off.
Air Delivery Mode Control : Whenthe climate information is displayed,touch the desired air delivery mode onthe climate control display to changethe direction of the airflow. Theselected air delivery mode button islit. Touching any of the air deliverybuttons cancels automatic air deliverycontrol and the direction of theairflow can be controlled manually.Press AUTO to return to automaticoperation.
To change the current mode, selectone of the following:
Y : Air is directed to the instrumentpanel outlets.
\ : Air is divided between theinstrument panel outlets and the flooroutlets.
[ : Air is directed to the flooroutlets.

Cadillac XT5 Owner Manual (GMNA-Localizing-U.S./Canada/Mexico-13527534) - 2020 - CRC - 5/29/19
154 CLIMATE CONTROLS
- : Clears the windows of fog ormoisture. Air is directed to thewindshield and floor outlets.
0 : Clears the windshield of fog orfrost more quickly. Air is directed tothe windshield. Press0 to turn on or
off. Changing the air delivery modealso turns the defrost off.
A/C : Touch A/C Mode on the climatecontrol display to turn the automaticair conditioning on or off. If the fan isturned off or the outside temperaturefalls below freezing, the airconditioner will not run.
Press AUTO to return to automaticoperation and the air conditioner runsas needed.
@ : Press to alternate betweenrecirculating air inside the vehicle orpulling in outside air. The indicatorlight on the button is lit whenrecirculation mode is active. Thishelps to quickly cool the air inside thevehicle or reduce the outside air andodors that might enter.
Pressing this control cancelsautomatic recirculation. Press AUTOto return to automatic operation;recirculation runs automatically asneeded.
Manual recirculation mode is notavailable when in Defrost or Defogmodes.
Auto Defog : The climate controlsystem may have a sensor toautomatically detect high humidityinside the vehicle. When highhumidity is detected, the climatecontrol system may adjust to outsideair supply and turn on the airconditioner. If the climate controlsystem does not detect possiblewindow fogging, it returns to normaloperation. To turn Auto Defog off oron, see “Climate and Air Quality”under Vehicle Personalization 0 134.
Ionizer : If equipped with an ionizer,this feature helps to clean the airinside the vehicle and removecontaminants such as pollen, odors,and dust. If the climate controlsystem is on and the ionizer isenabled, the ionizer status indicatorwill be lit on the climate control
display. To turn the ionizer on or off,see “Climate and Air Quality” underVehicle Personalization 0 134.
Rear Window Defogger
K : Press to turn the rear windowdefogger on or off. An indicator lighton the button comes on to show thatthe rear window defogger is on.
The defogger only works when theignition is on. The defogger turns offif the ignition is in off or ACC/ACCESSORY.
The rear window defogger can be setto automatic operation. See “Climateand Air Quality” under VehiclePersonalization 0 134. When Auto RearDefog is selected, the rear windowdefogger turns on automatically whenthe interior temperature is cold andthe outside temperature is about 4 °C(40 °F) and below.
The upper grid lines on the rearwindow are antenna lines and are notintended to heat when the defogger isactivated.

Cadillac XT5 Owner Manual (GMNA-Localizing-U.S./Canada/Mexico-13527534) - 2020 - CRC - 5/29/19
CLIMATE CONTROLS 155
The heated outside mirrors turn onwhen the rear window defoggerbutton is on and help to clear fog orfrost from the surface of the mirrors.
Caution
Do not try to clear frost or othermaterial from the inside of thefront windshield and rear windowwith a razor blade or anything elsethat is sharp. This may damage therear window defogger grid andaffect the radio's ability to pick upstations clearly. The repairs wouldnot be covered by the vehiclewarranty.
Driver and Passenger Heated andVentilated Seats (If Equipped) :Press M or L to heat the driver or
passenger seat cushion.
PressC or { to ventilate the driver
or passenger seat. See Heated andVentilated Front Seats 0 51.
Auto Heated and Ventilated Seats :When the vehicle is on, this featurewill automatically activate the heatedor ventilated seats at the levelrequired by the vehicle's interiortemperature. The active high, medium,low, or off heated or ventilated seatlevel will be indicated by the manualheated and ventilated seat buttons onthe center stack. Use the manualheated and ventilated seat buttons onthe center stack to turn auto heatedor ventilated seats off. If thepassenger seat is unoccupied, the autoheated or ventilated seats feature willnot activate that seat. The auto heatedand ventilated seats feature can beprogrammed to always be enabledwhen the vehicle is on. If equippedwith a heated steering wheel, the autoheated steering wheel activation willfollow the heated seat auto activationand the heated wheel indicator willfollow the state of the steering wheelheat. See Heated and Ventilated FrontSeats 0 51 andVehicle Personalization 0 134.
Remote Start Climate ControlOperation : If equipped with theremote start feature, the climatecontrol system may run when thevehicle is started remotely. The systemuses the driver’s previous settings toheat or cool the inside of the vehicle.The rear window defogger may comeon during remote start based on coldambient conditions. The rear windowdefogger indicator light does not comeon during a remote start.
If equipped, the heated seats will turnon if it is cold outside or theventilated seats will turn on if it is hotoutside. The heated and ventilatedseat indicator lights may not come onduring a remote start. If equipped, theheated steering wheel will come on ina remote start if it is cold outside. Theheated steering wheel indicator lightmay not come on. See Remote VehicleStart 0 17 andHeated and Ventilated Front Seats 0 51.
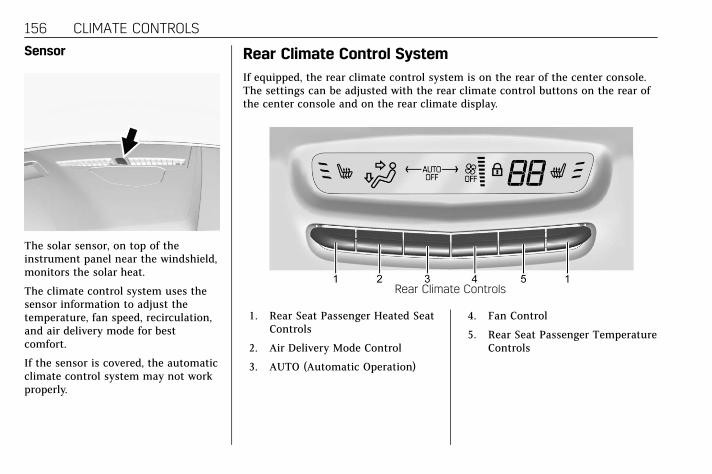
Cadillac XT5 Owner Manual (GMNA-Localizing-U.S./Canada/Mexico-13527534) - 2020 - CRC - 5/29/19
156 CLIMATE CONTROLS
Sensor
The solar sensor, on top of theinstrument panel near the windshield,monitors the solar heat.
The climate control system uses thesensor information to adjust thetemperature, fan speed, recirculation,and air delivery mode for bestcomfort.
If the sensor is covered, the automaticclimate control system may not workproperly.
Rear Climate Control SystemIf equipped, the rear climate control system is on the rear of the center console.The settings can be adjusted with the rear climate control buttons on the rear ofthe center console and on the rear climate display.
Rear Climate Controls
1. Rear Seat Passenger Heated SeatControls
2. Air Delivery Mode Control
3. AUTO (Automatic Operation)
4. Fan Control
5. Rear Seat Passenger TemperatureControls

Cadillac XT5 Owner Manual (GMNA-Localizing-U.S./Canada/Mexico-13527534) - 2020 - CRC - 5/29/19
CLIMATE CONTROLS 157
Rear Climate Display
1. Outside Temperature Display
2. Rear Climate TemperatureControl
3. Front (Front Climate ControlDisplay)
4. SYNC (SynchronizedTemperatures)
5. REAR O (On/Off)
6. Rear AUTO (AutomaticOperation)
7. Rear Control Lockout
8. Rear Fan Controls
9. Air Delivery Mode Control
Rear : Touch Rear on the frontclimate control display to open therear climate control display. The rearclimate control settings can now beadjusted from the frontpassenger area.
REAR O : Touch REAR O on the rear
climate display to turn the rearclimate control on or off.
SYNC : Touch SYNC on the rearclimate display to match the rearclimate control temperature to thefront climate control drivertemperature. The SYNC button willbe lit.
Rear Control Lockout : Touch to lockor unlock control of the rear climatecontrol system from the rear seatpassengers. When locked, the rearclimate control can only be adjustedfrom the front seat.
Automatic Operation
AUTO : Press to turn on or off. Theair delivery is controlledautomatically. The AUTO indicatorappears on the display. If the air
delivery mode or fan speed ismanually adjusted, this cancels fullautomatic operation.
Manual Operation
] : Press the rear fan control up ordown to increase or decrease theairflow to the rear panel outlets. Therear climate airflow can also beadjusted by touchingª or« on the
rear climate display.
Temperature Controls : Press up ordown to adjust the rear passengertemperature. The rear passengertemperature can also be adjusted bytouching Q for warmer air or R for
cooler air on the rear climate display.
Air Delivery Mode Control : Press upor down to select the desired airdelivery mode. The air delivery modecan also be changed by touching[,
\, orY on the rear climate display.This changes the direction of theairflow in the rear seating area.

Cadillac XT5 Owner Manual (GMNA-Localizing-U.S./Canada/Mexico-13527534) - 2020 - CRC - 5/29/19
158 CLIMATE CONTROLS
If the rear floor air delivery mode isselected, the rear fan speed indicatorwill change when adjusted, but theairflow amount directed to the floorwill not. This is normal operation forthe system.
To activate the rear floor air deliverymode, touch[ on the rear climate
display.
Air Vents
Adjustable air vents are in the centerand on the sides of the instrumentpanel, and on the rear of the centerconsole storage.
Move the slider knobs to change thedirection of or to close off the airflow.
Operation Tips
. Clear away any ice, snow, or leavesfrom air inlets at the base of thewindshield that could block theflow of air into the vehicle.
. Clear snow off the hood toimprove visibility and helpdecrease moisture drawn into thevehicle.
. Keep the path under the frontseats clear of objects to helpcirculate the air inside of thevehicle more effectively.
. Use of non-GM approved hooddeflectors can adversely affect theperformance of the system. Checkwith your dealer before addingequipment to the outside of thevehicle.
. Do not attach any devices to theair vent slats. This restricts airflowand may cause damage to the airvents.

Cadillac XT5 Owner Manual (GMNA-Localizing-U.S./Canada/Mexico-13527534) - 2020 - CRC - 5/29/19
CLIMATE CONTROLS 159
Maintenance
Passenger CompartmentAir FilterThe filter reduces dust, pollen, andother airborne irritants from outsideair that is pulled into the vehicle. Thefilter should be replaced as part ofroutine scheduled maintenance. SeeMaintenance Schedule 0 337.
See your dealer regarding replacementof the filter.
ServiceAll vehicles have a label underhoodthat identifies the refrigerant used inthe vehicle. The refrigerant systemshould only be serviced by trained andcertified technicians. The airconditioning evaporator should neverbe repaired or replaced by one from asalvage vehicle. It should only bereplaced by a new evaporator toensure proper and safe operation.
During service, all refrigerants shouldbe reclaimed with proper equipment.Venting refrigerants directly to the
atmosphere is harmful to theenvironment and may also createunsafe conditions based on inhalation,combustion, frostbite, or otherhealth-based concerns.
The air conditioning system requiresperiodic maintenance. SeeMaintenance Schedule 0 337.
Cadillac XT5 Owner Manual (GMNA-Localizing-U.S./Canada/Mexico-13527534) - 2020 - CRC - 5/29/19
160 DRIVING AND OPERATING
Driving andOperating
Driving InformationDriving for Better FuelEconomy . . . . . . . . . . . . . . . . . . . . . . . . 161
Distracted Driving . . . . . . . . . . . . . . . . 161Defensive Driving . . . . . . . . . . . . . . . . 162Drunk Driving . . . . . . . . . . . . . . . . . . . . 162Control of a Vehicle . . . . . . . . . . . . . . 162Braking . . . . . . . . . . . . . . . . . . . . . . . . . . . . 163Steering . . . . . . . . . . . . . . . . . . . . . . . . . . . 163Off-Road Recovery . . . . . . . . . . . . . . . . 164Loss of Control . . . . . . . . . . . . . . . . . . . 164Off-Road Driving . . . . . . . . . . . . . . . . . 165Driving on Wet Roads . . . . . . . . . . . 169Hill and Mountain Roads . . . . . . . . 170Winter Driving . . . . . . . . . . . . . . . . . . . . 170If the Vehicle Is Stuck . . . . . . . . . . . 172Vehicle Load Limits . . . . . . . . . . . . . . 172
Starting and OperatingNew Vehicle Break-In . . . . . . . . . . . . 176Ignition Positions . . . . . . . . . . . . . . . . 176Starting the Engine . . . . . . . . . . . . . . 178Stop/Start System . . . . . . . . . . . . . . . . 179Engine Heater . . . . . . . . . . . . . . . . . . . . 180
Retained AccessoryPower (RAP) . . . . . . . . . . . . . . . . . . . . 182
Shifting Into Park . . . . . . . . . . . . . . . . 182Shifting out of Park . . . . . . . . . . . . . . 182Parking over ThingsThat Burn . . . . . . . . . . . . . . . . . . . . . . . 184
Active Fuel Management . . . . . . . . 184Extended Parking . . . . . . . . . . . . . . . . . 185
Engine ExhaustEngine Exhaust . . . . . . . . . . . . . . . . . . . 185Running the Vehicle WhileParked . . . . . . . . . . . . . . . . . . . . . . . . . . . 186
Automatic TransmissionAutomatic Transmission . . . . . . . . . 186Manual Mode . . . . . . . . . . . . . . . . . . . . . 191
Drive SystemsAll-Wheel Drive . . . . . . . . . . . . . . . . . . 192
BrakesElectric Brake Boost . . . . . . . . . . . . . . 193Antilock Brake System (ABS) . . . . 193Electric Parking Brake . . . . . . . . . . . . 194Brake Assist . . . . . . . . . . . . . . . . . . . . . . . 195Hill Start Assist (HSA) . . . . . . . . . . . 195
Ride Control SystemsTraction Control/ElectronicStability Control . . . . . . . . . . . . . . . . 196
Driver Mode Control . . . . . . . . . . . . . 198
Cruise ControlCruise Control . . . . . . . . . . . . . . . . . . . . 199Adaptive Cruise Control . . . . . . . . . 201
Driver Assistance SystemsDriver Assistance Systems . . . . . . . 210Assistance Systems for Parkingor Backing . . . . . . . . . . . . . . . . . . . . . . . 211
Rear Pedestrian Alert . . . . . . . . . . . . 219Assistance Systems forDriving . . . . . . . . . . . . . . . . . . . . . . . . . . 220
Forward Collision Alert (FCA)System . . . . . . . . . . . . . . . . . . . . . . . . . . 220
Automatic EmergencyBraking (AEB) . . . . . . . . . . . . . . . . . . . 223
Front Pedestrian Braking (FPB)System . . . . . . . . . . . . . . . . . . . . . . . . . . 224
Night Vision System . . . . . . . . . . . . . 226Side Blind Zone Alert (SBZA) . . . . 229Lane Change Alert (LCA) . . . . . . . . 229Lane Keep Assist (LKA) . . . . . . . . . . 231
FuelTop Tier Fuel . . . . . . . . . . . . . . . . . . . . . 233Recommended Fuel (2.0L L4Engine) . . . . . . . . . . . . . . . . . . . . . . . . . . 233
Recommended Fuel (3.6LV6 Engine) . . . . . . . . . . . . . . . . . . . . . . 234
Prohibited Fuels . . . . . . . . . . . . . . . . . . 234Fuels in Foreign Countries . . . . . . . 234Fuel Additives . . . . . . . . . . . . . . . . . . . . 234

Cadillac XT5 Owner Manual (GMNA-Localizing-U.S./Canada/Mexico-13527534) - 2020 - CRC - 5/29/19
DRIVING AND OPERATING 161
Filling the Tank . . . . . . . . . . . . . . . . . . 235Filling a Portable FuelContainer . . . . . . . . . . . . . . . . . . . . . . . . 236
Trailer TowingGeneral Towing Information . . . . 237Driving Characteristics andTowing Tips . . . . . . . . . . . . . . . . . . . . . 237
Trailer Towing . . . . . . . . . . . . . . . . . . . . 241Towing Equipment . . . . . . . . . . . . . . . 244Trailer Sway Control (TSC) . . . . . . 247
Conversions and Add-OnsAdd-On Electrical Equipment . . . 249
Driving Information
Driving for Better FuelEconomyDriving habits can affect fuel mileage.Here are some driving tips to get thebest fuel economy possible.
. Set the climate controls to thedesired temperature after theengine is started, or turn them offwhen not required.
. On AWD vehicles, use Tour Modewhen conditions permit.
. Avoid fast starts and acceleratesmoothly.
. Brake gradually and avoid abruptstops.
. Avoid idling the engine for longperiods of time.
. When road and weatherconditions are appropriate, usecruise control.
. Always follow posted speed limitsor drive more slowly whenconditions require.
. Keep vehicle tires properlyinflated.
. Combine several trips into asingle trip.
. Replace the vehicle's tires with thesame TPC Spec number moldedinto the tire's sidewall nearthe size.
. Follow recommended scheduledmaintenance.
Distracted DrivingDistraction comes in many forms andcan take your focus from the task ofdriving. Exercise good judgment anddo not let other activities divert yourattention away from the road. Manylocal governments have enacted lawsregarding driver distraction. Becomefamiliar with the local laws inyour area.
To avoid distracted driving, keep youreyes on the road, keep your hands onthe steering wheel, and focus yourattention on driving.

Cadillac XT5 Owner Manual (GMNA-Localizing-U.S./Canada/Mexico-13527534) - 2020 - CRC - 5/29/19
162 DRIVING AND OPERATING. Do not use a phone in demanding
driving situations. Use ahands-free method to place orreceive necessary phone calls.
. Watch the road. Do not read, takenotes, or look up information onphones or other electronic devices.
. Designate a front seat passengerto handle potential distractions.
. Become familiar with vehiclefeatures before driving, such asprogramming favorite radiostations and adjusting climatecontrol and seat settings. Programall trip information into anynavigation device prior to driving.
. Wait until the vehicle is parked toretrieve items that have fallen tothe floor.
. Stop or park the vehicle to tend tochildren.
. Keep pets in an appropriate carrieror restraint.
. Avoid stressful conversationswhile driving, whether with apassenger or on a cell phone.
{ Warning
Taking your eyes off the road toolong or too often could cause acrash resulting in injury or death.Focus your attention on driving.
Refer to the infotainment manual formore information on using thatsystem and the navigation system,if equipped, including pairing andusing a cell phone.
Defensive DrivingDefensive driving means “alwaysexpect the unexpected.” The first stepin driving defensively is to wear theseat belt. See Seat Belts 0 56.
. Assume that other road users(pedestrians, bicyclists, and otherdrivers) are going to be carelessand make mistakes. Anticipatewhat they may do and be ready.
. Allow enough following distancebetween you and the driver infront of you.
. Focus on the task of driving.
Drunk DrivingDeath and injury associated withdrinking and driving is a globaltragedy.
{ Warning
Drinking and then driving is verydangerous. Your reflexes,perceptions, attentiveness, andjudgment can be affected by even asmall amount of alcohol. You canhave a serious — or even fatal —collision if you drive after drinking.
Do not drink and drive or ride witha driver who has been drinking.Ride home in a cab; or if you arewith a group, designate a driverwho will not drink.
Control of a VehicleBraking, steering, and accelerating areimportant factors in helping to controla vehicle while driving.

Cadillac XT5 Owner Manual (GMNA-Localizing-U.S./Canada/Mexico-13527534) - 2020 - CRC - 5/29/19
DRIVING AND OPERATING 163
BrakingBraking action involves perceptiontime and reaction time. Deciding topush the brake pedal is perceptiontime. Actually doing it isreaction time.
Average driver reaction time is aboutthree-quarters of a second. In thattime, a vehicle moving at 100 km/h(60 mph) travels 20 m (66 ft), whichcould be a lot of distance in anemergency.
Helpful braking tips to keep in mindinclude:
. Keep enough distance betweenyou and the vehicle in frontof you.
. Avoid needless heavy braking.
. Keep pace with traffic.
If the engine ever stops while thevehicle is being driven, brake normallybut do not pump the brakes. Doing socould make the pedal harder to pushdown. If the engine stops, there willbe some power brake assist but it willbe used when the brake is applied.
Once the power assist is used up, itcan take longer to stop and the brakepedal will be harder to push.
Steering
Electric Power Steering
Caution
To avoid damage to the steeringsystem, do not drive over curbs,parking barriers, or similar objectsat speeds greater than 3 km/h(1 mph). Use care when driving overother objects such as lane dividersand speed bumps. Damage causedby misuse of the vehicle is notcovered by the vehicle warranty.
The vehicle has electric powersteering. It does not have powersteering fluid. Regular maintenance isnot required.
If power steering assist is lost due to asystem malfunction, the vehicle canbe steered, but may require increasedeffort.
If the steering assist is used for anextended period of time while thevehicle is not moving, power assistmay be reduced.

Cadillac XT5 Owner Manual (GMNA-Localizing-U.S./Canada/Mexico-13527534) - 2020 - CRC - 5/29/19
164 DRIVING AND OPERATING
If the steering wheel is turned until itreaches the end of its travel and isheld against that position for anextended period of time, powersteering assist may be reduced.
Normal use of the power steeringassist should return when the systemcools down.
See your dealer if there is a problem.
Curve Tips. Take curves at a reasonable speed.
. Reduce speed before entering acurve.
. Maintain a reasonable steadyspeed through the curve.
. Wait until the vehicle is out of thecurve before accelerating gentlyinto the straightaway.
Steering in Emergencies. There are some situations when
steering around a problem may bemore effective than braking.
. Holding both sides of the steeringwheel allows you to turn180 degrees without removinga hand.
. The Antilock Brake System (ABS)allows steering while braking.
Off-Road Recovery
The vehicle's right wheels can drop offthe edge of a road onto the shoulderwhile driving. Follow these tips:
1. Ease off the accelerator and then,if there is nothing in the way,steer the vehicle so that itstraddles the edge of thepavement.
2. Turn the steering wheel aboutone-eighth of a turn, until theright front tire contacts thepavement edge.
3. Turn the steering wheel to gostraight down the roadway.
Loss of Control
Skidding
There are three types of skids thatcorrespond to the vehicle's threecontrol systems:
. Braking Skid — wheels are notrolling.
. Steering or Cornering Skid — toomuch speed or steering in a curvecauses tires to slip and losecornering force.
. Acceleration Skid — too muchthrottle causes the driving wheelsto spin.

Cadillac XT5 Owner Manual (GMNA-Localizing-U.S./Canada/Mexico-13527534) - 2020 - CRC - 5/29/19
DRIVING AND OPERATING 165
Defensive drivers avoid most skids bytaking reasonable care suited toexisting conditions, and by notoverdriving those conditions. Butskids are always possible.
If the vehicle starts to slide, followthese suggestions:
. Ease your foot off the acceleratorpedal and steer the way you wantthe vehicle to go. The vehicle maystraighten out. Be ready for asecond skid if it occurs.
. Slow down and adjust your drivingaccording to weather conditions.Stopping distance can be longerand vehicle control can be affectedwhen traction is reduced by water,snow, ice, gravel, or other materialon the road. Learn to recognizewarning clues — such as enoughwater, ice, or packed snow on theroad to make a mirrored surface— and slow down when you haveany doubt.
. Try to avoid sudden steering,acceleration, or braking, includingreducing vehicle speed by shifting
to a lower gear. Any suddenchanges could cause the tires toslide.
Remember: Antilock brakes help avoidonly the braking skid.
Off-Road DrivingAll-wheel-drive vehicles can be usedfor off-road driving. Vehicles withoutall-wheel drive and vehicles notequipped with All Terrain (AT) orOn-Off Road (OOR) tires must not bedriven off-road except on a level, solidsurface. To contact the tiremanufacturer for more informationabout the original equipment tires, seethe Limited Warranty and OwnerAssistance Information manual.
Controlling the vehicle is the key tosuccessful off-road driving. One of thebest ways to control the vehicle is tocontrol the speed.
{ Warning
When driving off-road, bouncingand quick changes in direction caneasily throw you out of position.This could cause you to lose controland crash. You and your passengersshould always wear seat belts.
Before Driving Off-Road. Have all necessary maintenance
and service work completed.
. Fuel the vehicle, fill fluid levels,and check inflation pressure in alltires, including the spare,if equipped.
. Read all the information aboutall-wheel-drive vehicles in thismanual.
. Make sure all underbody shields,if equipped, are properly attached.
. Know the local laws that apply tooff-road driving.

Cadillac XT5 Owner Manual (GMNA-Localizing-U.S./Canada/Mexico-13527534) - 2020 - CRC - 5/29/19
166 DRIVING AND OPERATING
To gain more ground clearance ifneeded, it may be necessary to removethe front fascia lower air dam.However, driving without the air damreduces fuel economy.
Caution
Operating the vehicle for extendedperiods without the front fascialower air dam installed can causeimproper airflow to the engine.Reattach the front fascia air damafter off-road driving.
Loading the Vehicle for Off-RoadDriving
{ Warning
. Unsecured cargo on the loadfloor can be tossed aboutwhen driving over roughterrain. You or yourpassengers can be struck byflying objects. Secure thecargo properly.
(Continued)
Warning (Continued)
. Keep cargo in the cargo areaas far forward and as low aspossible. The heaviest thingsshould be on the floor,forward of the rear axle.
. Heavy loads on the roof raisethe vehicle's center of gravity,making it more likely to rollover. You can be seriously orfatally injured if the vehiclerolls over. Put heavy loadsinside the cargo area, not onthe roof.
For more information about loadingthe vehicle, see Vehicle Load Limits0 172.
Environmental Concerns. Always use established trails,
roads, and areas that have beenset aside for public off-roadrecreational driving and obey allposted regulations.
. Do not damage shrubs, flowers,trees, or grasses or disturb wildlife.
. Do not park over things that burn.See Parking over Things That Burn0 184.
Driving on Hills
Driving safely on hills requires goodjudgment and an understanding ofwhat the vehicle can and cannot do.
{ Warning
Many hills are simply too steep forany vehicle. Driving up hills cancause the vehicle to stall. Drivingdown hills can cause loss of control.Driving across hills can cause arollover. You could be injured orkilled. Do not drive on steep hills.
Before driving on a hill, assess thesteepness, traction, and obstructions.If the terrain ahead cannot be seen,get out of the vehicle and walk the hillbefore driving further.
When driving on hills:
. Use a low gear and keep a firmgrip on the steering wheel.
. Maintain a slow speed.
Cadillac XT5 Owner Manual (GMNA-Localizing-U.S./Canada/Mexico-13527534) - 2020 - CRC - 5/29/19
DRIVING AND OPERATING 167. When possible, drive straight up
or down the hill.
. Slow down when approaching thetop of the hill.
. Use headlamps even during theday to make the vehicle morevisible.
{ Warning
Driving to the top of a hill at highspeed can cause a crash. Therecould be a drop-off, embankment,cliff, or even another vehicle. Youcould be seriously injured or killed.As you near the top of a hill, slowdown and stay alert.
. Never go downhill forward orbackward with the transmission inN (Neutral). The brakes couldoverheat and you could losecontrol.
. When driving down a hill, keepthe vehicle headed straight down.Use a low gear because the engine
will work with the brakes to slowthe vehicle and help keep thevehicle under control.
{ Warning
Heavy braking when going down ahill can cause your brakes tooverheat and fade. This could causeloss of control and you or otherscould be injured or killed. Apply thebrakes lightly when descending ahill and use a low gear to keepvehicle speed under control.
If the vehicle stalls on a hill:
1. Apply the brakes to stop thevehicle, and then apply theparking brake.
2. Shift into P (Park) and thenrestart the engine.
. If driving uphill when thevehicle stalls, shift toR (Reverse), release theparking brake, and backstraight down.
. Never try to turn the vehiclearound. If the hill is steepenough to stall the vehicle, itis steep enough to cause it toroll over.
. If you cannot make it up thehill, back straight downthe hill.
. Never back down a hill inN (Neutral) using only thebrake.
. The vehicle can roll backwardquickly and you could losecontrol.
. If driving downhill when thevehicle stalls, shift to a lowergear, release the parkingbrake, and drive straightdown the hill.
3. If the vehicle cannot be restartedafter stalling, set the parkingbrake, shift into P (Park), andturn the vehicle off.
3.1. Leave the vehicle andseek help.

Cadillac XT5 Owner Manual (GMNA-Localizing-U.S./Canada/Mexico-13527534) - 2020 - CRC - 5/29/19
168 DRIVING AND OPERATING
3.2. Stay clear of the path thevehicle would take if itrolled downhill.
. Avoid turns that take the vehicleacross the incline of the hill. A hillthat can be driven straight up ordown might be too steep to driveacross. Driving across an inclineputs more weight on the downhillwheels which could cause adownhill slide or a rollover.
. Surface conditions can be aproblem. Loose gravel, muddyspots, or even wet grass can causethe tires to slip sideways, downhill.If the vehicle slips sideways, it canhit something that will trip it – arock, a rut, etc. – and roll over.
. Hidden obstacles can make thesteepness of the incline moresevere. If a rock is driven acrosswith the uphill wheels, or if thedownhill wheels drop into a rut ordepression, the vehicle can tilteven more.
. If an incline must be drivenacross, and the vehicle starts toslide, turn downhill. This shouldhelp straighten out the vehicle andprevent the side slipping.
{ Warning
Getting out of the vehicle on thedownhill side when stopped acrossan incline is dangerous. If thevehicle rolls over, you could becrushed or killed. Always get out onthe uphill side of the vehicle andstay well clear of the rollover path.
Driving in Mud, Sand, Snow,or Ice
Use a low gear when driving in mud –the deeper the mud, the lower thegear. Keep the vehicle moving to avoidgetting stuck.
Traction changes when driving onsand. On loose sand, such as onbeaches or sand dunes, the tires tendto sink into the sand. This affects
steering, accelerating, and braking.Drive at a reduced speed and avoidsharp turns or abrupt maneuvers.
Traction is reduced on hard packedsnow and ice and it is easy to losecontrol. Reduce vehicle speed whendriving on hard packed snow and ice.
{ Warning
Driving on frozen lakes, ponds,or rivers can be dangerous. Iceconditions vary greatly and thevehicle could fall through the ice;you and your passengers coulddrown. Drive your vehicle on safesurfaces only.
Driving in Water
{ Warning
Driving through rushing water canbe dangerous. Deep water cansweep your vehicle downstream andyou and your passengers coulddrown. If it is only shallow water, it
(Continued)

Cadillac XT5 Owner Manual (GMNA-Localizing-U.S./Canada/Mexico-13527534) - 2020 - CRC - 5/29/19
DRIVING AND OPERATING 169
Warning (Continued)
can still wash away the groundfrom under your tires. Tractioncould be lost, and the vehicle couldroll over. Do not drive throughrushing water.
Caution
Do not drive through standingwater if it is deep enough to coverthe wheel hubs, axles, or exhaustpipe. Deep water can damage theaxle and other vehicle parts.
If the standing water is not too deep,drive slowly through it. At fasterspeeds, water splashes on the ignitionsystem and the vehicle can stall.Stalling can also occur if you get theexhaust pipe under water. While theexhaust pipe is under water, you willnot be able to start the engine. Whengoing through water, the brakes getwet, and it might take longer to stop.See Driving on Wet Roads 0 169.
After Off-Road Driving
Remove any brush or debris that hascollected on the underbody or chassis,or under the hood. Theseaccumulations can be a fire hazard.
After operation in mud or sand, havethe brake linings cleaned and checked.These substances can cause glazingand uneven braking. Check the bodystructure, steering, suspension,wheels, tires, and exhaust system fordamage and check the fuel lines andcooling system for any leakage.
Driving on Wet RoadsRain and wet roads can reduce vehicletraction and affect your ability to stopand accelerate. Always drive slower inthese types of driving conditions andavoid driving through large puddlesand deep-standing or flowing water.
{ Warning
Wet brakes can cause crashes. Theymight not work as well in a quickstop and could cause pulling to oneside. You could lose control of thevehicle.
After driving through a large puddleof water or a car/vehicle wash,lightly apply the brake pedal untilthe brakes work normally.
Flowing or rushing water createsstrong forces. Driving throughflowing water could cause thevehicle to be carried away. If thishappens, you and other vehicleoccupants could drown. Do notignore police warnings and be verycautious about trying to drivethrough flowing water.
Hydroplaning
Hydroplaning is dangerous. Water canbuild up under the vehicle's tires sothey actually ride on the water. Thiscan happen if the road is wet enough

Cadillac XT5 Owner Manual (GMNA-Localizing-U.S./Canada/Mexico-13527534) - 2020 - CRC - 5/29/19
170 DRIVING AND OPERATING
and you are going fast enough. Whenthe vehicle is hydroplaning, it haslittle or no contact with the road.
There is no hard and fast rule abouthydroplaning. The best advice is toslow down when the road is wet.
Other Rainy Weather Tips
Besides slowing down, other wetweather driving tips include:
. Allow extra following distance.
. Pass with caution.
. Keep windshield wiping equipmentin good shape.
. Keep the windshield washer fluidreservoir filled.
. Have good tires with proper treaddepth. See Tires 0 285.
. Turn off cruise control.
Hill and Mountain RoadsDriving on steep hills or throughmountains is different than driving onflat or rolling terrain. Tips include:
. Keep the vehicle serviced and ingood shape.
. Check all fluid levels, brakes, tires,cooling system, and transmission.
. Shift to a lower gear when goingdown steep or long hills.
{ Warning
Using the brakes to slow the vehicleon a long downhill slope can causebrake overheating, can reduce brakeperformance, and could result in aloss of braking. Shift thetransmission to a lower gear to letthe engine assist the brakes on asteep downhill slope.
{ Warning
Coasting downhill in N (Neutral) orwith the ignition off is dangerous.This can cause overheating of thebrakes and loss of steering assist.Always have the engine runningand the vehicle in gear.
. Drive at speeds that keep thevehicle in its own lane. Do notswing wide or cross thecenter line.
. Be alert on top of hills; somethingcould be in your lane (e.g., stalledcar, crash).
. Pay attention to special road signs(e.g., falling rocks area, windingroads, long grades, passing orno-passing zones) and takeappropriate action.
Winter Driving
Driving on Snow or Ice
Snow or ice between the tires and theroad creates less traction or grip, sodrive carefully. Wet ice can occur atabout 0 °C (32 °F) when freezing rainbegins to fall. Avoid driving on wet iceor in freezing rain until roads can betreated.
For Slippery Road Driving:
. Accelerate gently. Accelerating tooquickly causes the wheels to spinand makes the surface under thetires slick.

Cadillac XT5 Owner Manual (GMNA-Localizing-U.S./Canada/Mexico-13527534) - 2020 - CRC - 5/29/19
DRIVING AND OPERATING 171. Turn on Traction Control. See
Traction Control/Electronic StabilityControl 0 196.
. Antilock Brake System (ABS)improves vehicle stability duringhard stops, but the brakes shouldbe applied sooner than when ondry pavement. See Antilock BrakeSystem (ABS) 0 193.
. Allow greater following distanceand watch for slippery spots. Icypatches can occur on otherwiseclear roads in shaded areas. Thesurface of a curve or an overpasscan remain icy when thesurrounding roads are clear. Avoidsudden steering maneuvers andbraking while on ice.
. Turn off cruise control.
. Select All-Wheel Drive (AWD)Mode for vehicles equipped withAWD. Select Snow/Ice Mode forFWD only vehicles. See DriverMode Control 0 198 andAll-Wheel Drive 0 192.
Blizzard Conditions
Stop the vehicle in a safe place andsignal for help. Stay with the vehicleunless there is help nearby. If possible,use Roadside Service. See RoadsideService 0 357. To get help and keepeveryone in the vehicle safe:
. Turn on the hazard warningflashers.
. Tie a red cloth to an outsidemirror.
{ Warning
Snow can trap engine exhaustunder the vehicle. This may causeexhaust gases to get inside. Engineexhaust contains carbon monoxide(CO), which cannot be seen orsmelled. It can causeunconsciousness and even death.
If the vehicle is stuck in snow:
. Clear snow from the base ofthe vehicle, especially anyblocking the exhaust pipe.
(Continued)
Warning (Continued)
. Open a window about 5 cm(2 in) on the vehicle side thatis away from the wind, tobring in fresh air.
. Fully open the air outlets onor under the instrumentpanel.
. Adjust the climate controlsystem to circulate the airinside the vehicle and set thefan speed to the highestsetting. See “Climate ControlSystems.”
For more information about CO, seeEngine Exhaust 0 185.
To save fuel, run the engine for shortperiods to warm the vehicle and thenshut the engine off and partially closethe window. Moving about to keepwarm also helps.
If it takes time for help to arrive,when running the engine, push theaccelerator pedal slightly so theengine runs faster than the idle speed.

Cadillac XT5 Owner Manual (GMNA-Localizing-U.S./Canada/Mexico-13527534) - 2020 - CRC - 5/29/19
172 DRIVING AND OPERATING
This keeps the battery charged torestart the vehicle and to signal forhelp with the headlamps. Do this aslittle as possible, to save fuel.
If the Vehicle Is StuckSlowly and cautiously spin the wheelsto free the vehicle when stuck in sand,mud, ice, or snow.
If stuck too severely for the tractionsystem to free the vehicle, turn thetraction system off and use therocking method. See Traction Control/Electronic Stability Control 0 196.
{ Warning
If the vehicle's tires spin at highspeed, they can explode, and you orothers could be injured. The vehiclecan overheat, causing an enginecompartment fire or other damage.Spin the wheels as little as possibleand avoid going above 56 km/h(35 mph).
For All-Wheel Drive (AWD), selectOff-Road or AWD mode. See DriverMode Control 0 198 andAll-Wheel Drive 0 192.
Rocking the Vehicle to Get it Out
Turn the steering wheel left and rightto clear the area around the frontwheels. Turn off any traction system.Shift back and forth betweenR (Reverse) and a low forward gear,spinning the wheels as little aspossible. To prevent transmissionwear, wait until the wheels stopspinning before shifting gears. Releasethe accelerator pedal while shifting,and press lightly on the acceleratorpedal when the transmission is ingear. Slowly spinning the wheels inthe forward and reverse directionscauses a rocking motion that couldfree the vehicle. If that does not getthe vehicle out after a few tries, itmight need to be towed out. If thevehicle does need to be towed out, seeTowing the Vehicle 0 323.
Vehicle Load LimitsIt is very important to know howmuch weight the vehicle can carry.This weight is called the vehiclecapacity weight and includes theweight of all occupants, cargo, andall nonfactory-installed options.Two labels on the vehicle mayshow how much weight it mayproperly carry, the Tire andLoading Information label and theCertification/Tire label.
{ Warning
Do not load the vehicle anyheavier than the Gross VehicleWeight Rating (GVWR),or either the maximum front orrear Gross Axle Weight Rating(GAWR). This can causesystems to break and changethe way the vehicle handles.This could cause loss of controland a crash. Overloading can
(Continued)

Cadillac XT5 Owner Manual (GMNA-Localizing-U.S./Canada/Mexico-13527534) - 2020 - CRC - 5/29/19
DRIVING AND OPERATING 173
Warning (Continued)
also reduce stopping distance,damage the tires, and shortenthe life of the vehicle.
Tire and Loading Information Label
Example Label
A vehicle-specific Tire andLoading Information label isattached to the center pillar(B-pillar). The tire and loadinginformation label shows thenumber of occupant seating
positions (1), and the maximumvehicle capacity weight (2) inkilograms and pounds.
The Tire and Loading Informationlabel also shows the size of theoriginal equipment tires (3) andthe recommended cold tireinflation pressures (4). For moreinformation on tires and inflationsee Tires 0 285 andTire Pressure 0 292.
There is also important loadinginformation on the vehicleCertification/Tire label. It mayshow the Gross Vehicle WeightRating (GVWR) and the Gross AxleWeight Rating (GAWR) for thefront and rear axle. See“Certification/Tire Label” later inthis section.
“Steps for Determining Correct LoadLimit–
1. Locate the statement "Thecombined weight ofoccupants and cargo should
never exceed XXX kg orXXX lbs." on your vehicle’splacard.
2. Determine the combinedweight of the driver andpassengers that will be ridingin your vehicle.
3. Subtract the combined weightof the driver and passengersfrom XXX kg or XXX lbs.
4. The resulting figure equalsthe available amount of cargoand luggage load capacity. Forexample, if the "XXX" amountequals 1400 lbs. and therewill be five 150 lb passengersin your vehicle, the amountof available cargo and luggageload capacity is 650 lbs.(1400-750 (5 x 150) =650 lbs.)
5. Determine the combinedweight of luggage and cargobeing loaded on the vehicle.That weight may not safely

Cadillac XT5 Owner Manual (GMNA-Localizing-U.S./Canada/Mexico-13527534) - 2020 - CRC - 5/29/19
174 DRIVING AND OPERATING
exceed the available cargoand luggage load capacitycalculated in Step 4.
6. If your vehicle will be towinga trailer, load from yourtrailer will be transferred toyour vehicle. Consult thismanual to determine howthis reduces the availablecargo and luggage loadcapacity of your vehicle.”
See Trailer Towing 0 241 forimportant information on towinga trailer, towing safety rules andtrailering tips.
Example 1
1. Vehicle Capacity Weightfor Example 1 = 453 kg(1,000 lbs).
2. Subtract Occupant Weight@ 68 kg (150 lbs) × 2 =136 kg (300 lbs).
3. Available Occupant andCargo Weight = 317 kg(700 lbs).
Example 2
1. Vehicle Capacity Weightfor Example 2 = 453 kg(1,000 lbs).
2. Subtract Occupant Weight@ 68 kg (150 lbs) × 5 =340 kg (750 lbs).
3. Available Cargo Weight =113 kg (250 lbs).

Cadillac XT5 Owner Manual (GMNA-Localizing-U.S./Canada/Mexico-13527534) - 2020 - CRC - 5/29/19
DRIVING AND OPERATING 175
Example 3
1. Vehicle Capacity Weightfor Example 3 = 453 kg(1,000 lbs).
2. Subtract Occupant Weight@ 91 kg (200 lbs) × 5 =453 kg (1,000 lbs).
3. Available Cargo Weight =0 kg (0 lbs).
Refer to the vehicle's tire andloading information label forspecific information about thevehicle's capacity weight andseating positions. The combined
weight of the driver, passengers,and cargo should never exceed thevehicle's capacity weight.
Certification/Tire Label
Label Example
A vehicle-specific Certification/Tire label is attached to the centerpillar (B-pillar).
The label may show the size of thevehicle's original tires and theinflation pressures needed toobtain the gross weight capacityof the vehicle. The label shows thegross weight capacity of thevehicle. This is called the Gross
Vehicle Weight Rating (GVWR).The GVWR includes the weight ofthe vehicle, all occupants, fuel,and cargo.
The Certification/Tire label mayalso show the maximum weightsfor the front and rear axles, calledthe Gross Axle Weight Rating(GAWR). To find out the actualloads on the front and rear axles,weigh the vehicle at a weighstation. Your dealer can help withthis. Be sure to spread the loadequally on both sides of thecenterline.
Caution
Overloading the vehicle may causedamage. Repairs would not becovered by the vehicle warranty. Donot overload the vehicle.

Cadillac XT5 Owner Manual (GMNA-Localizing-U.S./Canada/Mexico-13527534) - 2020 - CRC - 5/29/19
176 DRIVING AND OPERATING
{ Warning
Things inside the vehicle canstrike and injure people in asudden stop or turn, or in acrash.
. Put things in the cargoarea of the vehicle. In thecargo area, put them as farforward as possible. Try tospread the weight evenly.
. Never stack heavier things,like suitcases, inside thevehicle so that some ofthem are above the tops ofthe seats.
. Do not leave an unsecuredchild restraint in thevehicle.
. Secure loose items in thevehicle.
. Do not leave a seat foldeddown unless needed.
Starting and Operating
New Vehicle Break-In
Caution
The vehicle does not need anelaborate break-in. But it willperform better in the long run ifyou follow these guidelines:
. Do not drive at any oneconstant speed, fast or slow,for the first 800 km (500 mi).Do not make full-throttlestarts. Avoid downshifting tobrake or slow the vehicle.
. Avoid making hard stops forthe first 300 km (200 mi) orso. During this time the newbrake linings are not yetbroken in. Hard stops withnew linings can meanpremature wear and earlierreplacement. Follow this
(Continued)
Caution (Continued)
breaking-in guideline everytime you get new brakelinings.
Following break-in, engine speedand load can be graduallyincreased.
Ignition Positions
The vehicle has an electronic keylessignition with pushbutton start.

Cadillac XT5 Owner Manual (GMNA-Localizing-U.S./Canada/Mexico-13527534) - 2020 - CRC - 5/29/19
DRIVING AND OPERATING 177
If the pushbutton start is not working,the vehicle may be near a strong radioantenna signal causing interference tothe Remote Keyless Entry (RKE)system. See Remote Keyless Entry(RKE) System Operation 0 10.
To shift out of P (Park), the vehiclemust be turned on and the brakepedal must be applied.
Stopping the Engine/OFF (NoIndicator Light) : When the vehicle isstopped, press ENGINE START/STOPonce to turn the engine off.
If the vehicle is in P (Park), theignition will turn off, and RetainedAccessory Power (RAP) will remainactive. See Retained Accessory Power(RAP) 0 182.
If the vehicle is in R (Reverse),D (Drive) or M (Manual Mode), thevehicle will shift to P (Park), theignition will turn off, and RetainedAccessory Power (RAP) will remainactive. See Retained Accessory Power(RAP) 0 182.
If the vehicle is in N (Neutral), theignition will return to ACC/ACCESSORY and display the message
SHIFT TO PARK in the DriverInformation Center (DIC). When thevehicle is shifted into P (Park), theignition will turn off.
{ Warning
Turning off the vehicle whilemoving may cause loss of powerassist in the brake and steeringsystems and disable the airbags.While driving, only shut the vehicleoff in an emergency.
If the vehicle must be shut off in anemergency:
1. Brake using a firm and steadypressure. Do not pump thebrakes repeatedly. This maydeplete power assist, requiringincreased brake pedal force.
2. Shift the vehicle to N (Neutral).This can be done while thevehicle is moving. After shiftingto N (Neutral), firmly apply thebrakes and steer the vehicle to asafe location.
3. Come to a complete stop andshift to P (Park).
4. Set the parking brake. SeeElectric Parking Brake 0 194.Press ENGINE START/STOP toturn the vehicle off.
If the vehicle cannot be pulled overand must be shut off while driving,press and hold ENGINE START/STOPfor longer than two seconds, or presstwice in five seconds.
ACC/ACCESSORY (Amber IndicatorLight) : This mode allows you to usesome electrical accessories when theengine is off.
With the ignition off, pressingENGINE START/STOP once withoutthe brake pedal applied will place theignition system in ACC/ACCESSORY.
The ignition will switch from ACC/ACCESSORY to OFF after 10 minutesto prevent battery rundown.
ON/RUN/START (Green IndicatorLight) : This mode is for driving andstarting. With the ignition off and thebrake pedal applied, pressing ENGINESTART/STOP once will place the

Cadillac XT5 Owner Manual (GMNA-Localizing-U.S./Canada/Mexico-13527534) - 2020 - CRC - 5/29/19
178 DRIVING AND OPERATING
ignition system in ON/RUN/START.Once engine cranking begins, releasethe button. Engine cranking willcontinue until the engine starts. Theignition will then remain on. SeeStarting the Engine 0 178.
Service Mode
This mode is available to verify theproper operation of the malfunctionindicator lamp as may be required foremissions inspection purposes and forservice and diagnostics. See AutomaticTransmission 0 186.
With the vehicle off, and the brakepedal not applied, pressing andholding ENGINE START/STOP formore than five seconds will place thevehicle in Service Mode. Theinstruments and audio systems willoperate as they do in ON/RUN, butthe vehicle will not be able to bedriven. The engine will not start inService Mode. Press ENGINE START/STOP again to turn the vehicle off.
Starting the EnginePlace the transmission in the propergear, P (Park) or N (Neutral). To restartthe engine when the vehicle is alreadymoving, use N (Neutral).
Caution
Do not try to shift to P (Park) if thevehicle is moving. If you do, youcould damage the transmission.Shift to P (Park) only when thevehicle is stopped.
Caution
If you add electrical parts oraccessories, you could change theway the engine operates. Anyresulting damage would not becovered by the vehicle warranty. SeeAdd-On Electrical Equipment 0 249.
To start the vehicle:
1. With the Keyless Access system,the RKE transmitter must be inthe vehicle. Press ENGINESTART/STOP with the brakepedal applied. When the enginebegins cranking, let go of thebutton. The idle speed will godown as the engine warms up.Do not race the engineimmediately after starting it.
If the RKE transmitter is not inthe vehicle, if there isinterference, or if the RKEbattery is low, a DriverInformation Center (DIC)message will display. See RemoteKeyless Entry (RKE) SystemOperation 0 10.
Caution
Cranking the engine for longperiods of time, by pressingENGINE START/STOP immediatelyafter cranking has ended, canoverheat and damage the cranking
(Continued)

Cadillac XT5 Owner Manual (GMNA-Localizing-U.S./Canada/Mexico-13527534) - 2020 - CRC - 5/29/19
DRIVING AND OPERATING 179
Caution (Continued)
motor, and drain the battery. Waitat least 15 seconds between eachtry, to let the cranking motorcool down.
2. If the engine does not start afterfive to 10 seconds, especially invery cold weather (below −18 °Cor 0 °F), it could be flooded withtoo much gasoline. Try pushingthe accelerator pedal all the wayto the floor and hold it there,then press ENGINE START/STOPfor up to a maximum of15 seconds. Wait at least15 seconds between each try, toallow the cranking motor to cooldown. When the engine starts,let go of the button and theaccelerator. If the vehicle startsbriefly but then stops again, dothe same thing. This clears theextra gasoline from the engine.Do not race the engineimmediately after starting it.Operate the engine and
transmission gently until the oilwarms up and lubricates allmoving parts.
Stop/Start SystemThe Stop/Start system will shut offthe engine to help conserve fuel.It has components designed for theincreased number of starts.
{ Warning
The automatic engine Stop/Startfeature causes the engine to shutoff while the vehicle is still on. Donot exit the vehicle before shiftingto P (Park). The vehicle may restartand move unexpectedly. Alwaysshift to P (Park), and then turn theignition off before exiting thevehicle.
Auto Engine Stop/Start
When the brakes are applied and thevehicle is at a complete stop, theengine may turn off. When stopped,the tachometer displays AUTO STOP.See Tachometer 0 114. When the brake
pedal is released or the acceleratorpedal is pressed, the engine willrestart.
To maintain vehicle performance,other conditions may cause the engineto automatically restart before thebrake pedal is released.
Auto Stops may not occur and/or AutoStarts may occur because:
. The climate control settingsrequire the engine to be runningto cool or heat the vehicle interior.
. The vehicle battery charge is low.
. The vehicle battery has recentlybeen disconnected.
. Minimum vehicle speed has notbeen reached since the lastAuto Stop.
. The accelerator pedal is pressed.
. The engine or transmission is notat the required operatingtemperature.
. The outside temperature is not inthe required operating range.
. The vehicle is in any gear otherthan D (Drive).

Cadillac XT5 Owner Manual (GMNA-Localizing-U.S./Canada/Mexico-13527534) - 2020 - CRC - 5/29/19
180 DRIVING AND OPERATING. Driver modes have been selected.
. The vehicle is on a steep hill orgrade.
. The driver door has been openedor the driver seat belt has beenunbuckled.
. The hood has been opened.
. The Auto Stop has reached themaximum allowed time.
Auto Stop Disable Switch
The automatic engine Stop/Startfeature can be disabled and enabledby touching theh symbol on thecenter stack. Auto Stop is enabledeach time you start the vehicle.
When the light next to theh isilluminated, the system is enabled.
Engine HeaterThe engine heater can provide easierstarting and better fuel economyduring engine warm-up in coldweather conditions at or below−18 °C (0 °F). Vehicles with an engineheater should be plugged in at leastfour hours before starting. An internalthermostat in the plug-end of the cordmay exist, which will prevent engineheater operation at temperaturesabove −18 °C (0 °F).
{ Warning
Do not plug in the engine blockheater while the vehicle is parked ina garage or under a carport.
(Continued)
Warning (Continued)
Property damage or personal injurymay result. Always park the vehiclein a clear open area away frombuildings or structures.
To Use the Engine Heater
1. Turn off the engine.
2. Check the heater cord fordamage. If it is damaged, do notuse it. See your dealer for areplacement. Inspect the cord fordamage yearly.

Cadillac XT5 Owner Manual (GMNA-Localizing-U.S./Canada/Mexico-13527534) - 2020 - CRC - 5/29/19
DRIVING AND OPERATING 181
3. Remove the engine heaterconnector cover by gently pryingwith a flat blade tool.
4. Plug the heater cord into theconnector in the front fascia.
5. Plug the cord into a grounded110-volt AC outlet that isprotected by a ground faultdetection function.
{ Warning
Improper use of the heater cord oran extension cord can damage thecord and may result in overheatingand fire.
. Plug the cord into athree-prong electrical utilityreceptacle that is protected bya ground fault detectionfunction. An ungroundedoutlet could cause an electricshock.
. Use a weatherproof,heavy-duty, 15 amp-ratedextension cord if needed.Failure to use therecommended extension cordin good operating condition,or using a damaged heater or
(Continued)
Warning (Continued)
extension cord, could make itoverheat and cause a fire,property damage, electricshock, and injury.
. Do not operate the vehiclewith the heater cordpermanently attached to thevehicle. Possible heater cordand thermostat damage couldoccur.
. While in use, do not let theheater cord touch vehicleparts or sharp edges.
. Before starting the vehicle,unplug the cord. Keep thecord away from any movingparts.
6. Before starting the engine, besure to unplug and storethe cord.
7. Install the engine heaterconnector cover.

Cadillac XT5 Owner Manual (GMNA-Localizing-U.S./Canada/Mexico-13527534) - 2020 - CRC - 5/29/19
182 DRIVING AND OPERATING
The length of time the heater shouldremain plugged in depends on severalfactors. Ask a dealer in the area whereyou will be parking the vehicle for thebest advice on this.
Retained AccessoryPower (RAP)When the ignition is turned from onto off, the following features (ifequipped) will continue to functionfor up to 10 minutes, or until thedriver door is opened. These featureswill also work when the ignition is inRUN or ACC/ACCESSORY:
. Infotainment System
. Power Windows (during RAP thisfunctionality will be lost when anydoor is opened)
. Sunroof (during RAP thisfunctionality will be lost when anydoor is opened)
. Auxiliary Power Outlet
. Audio System
. OnStar System
Shifting Into ParkTo shift into P (Park):
1. Hold the brake pedal down andset the parking brake. See ElectricParking Brake 0 194.
2. Press the button on top of theshift lever to shift into P (Park).See Automatic Transmission0 186.
3. The P indicator on the shift leverwill turn red when the vehicle isin P (Park).
Leaving the Vehicle with theEngine Running
{ Warning
It can be dangerous to leave thevehicle with the engine running.It could overheat and catch fire.
It is dangerous to get out of thevehicle if the vehicle is not inP (Park) with the parking brake set.The vehicle can roll.
(Continued)
Warning (Continued)
Do not leave the vehicle when theengine is running. If you have leftthe engine running, the vehiclecan move suddenly. You or otherscould be injured. To be sure thevehicle will not move, even whenyou are on fairly level ground,always set the parking brake andshift to P (Park). See Shifting IntoPark 0 182. If you are towing atrailer, see Driving Characteristicsand Towing Tips 0 237.
If you have to leave the vehicle withthe engine running, be sure thevehicle is in P (Park) and the parkingbrake is set before you leave it.
If you are towing a trailer and parkingon a hill, see Driving Characteristicsand Towing Tips 0 237.
Shifting out of ParkThis vehicle is equipped with anelectronic transmission. The shift lockrelease button is designed to prevent

Cadillac XT5 Owner Manual (GMNA-Localizing-U.S./Canada/Mexico-13527534) - 2020 - CRC - 5/29/19
DRIVING AND OPERATING 183
inadvertent shifting out of P (Park)unless the ignition is on, the brakepedal is applied, and the shift lockrelease button is pressed.
The shift lock control is alwaysfunctional except in the case of anuncharged or low voltage (less than9-volt) battery.
If the vehicle has an unchargedbattery or a battery with low voltage,try charging or jump starting thebattery. See Jump Starting - NorthAmerica 0 320.
To shift out of P (Park):
1. Ensure the engine is running.
2. Apply the brake pedal.
3. Press the shift lock releasebutton.
4. Move the shift lever to thedesired position.
5. The P indicator will turn whiteand the gear indicator on theshift lever will turn red when thevehicle is no longer in P (Park).
6. After releasing the shift lever, itwill return to the center position.
If the vehicle cannot shift fromP (Park), a Driver InformationCenter (DIC) message will bedisplayed. See your dealer for service.
Manual Park Release
{ Warning
The transmission will be placed inN (Neutral) when the manual parkrelease is pulled. The vehicle canroll and you or others could beinjured. Ensure the vehicle is onlevel ground.
Caution
The manual park release is notintended to be used for towing.Damage may result from using themanual park release in this way.The repairs would not be coveredby the vehicle warranty.
This vehicle includes a manual parkrelease that can be used to shift thevehicle into N (Neutral) when theengine is not running.
Pulling the manual park release whilethe vehicle is on or turning theignition on while the manual parkrelease is pulled, will cause a DICmessage to display.
To place the vehicle in N (Neutral)using the manual park release:
1. Ensure the vehicle is on levelground and set the parkingbrake. Release the brake pedal.
2. Turn the vehicle off.
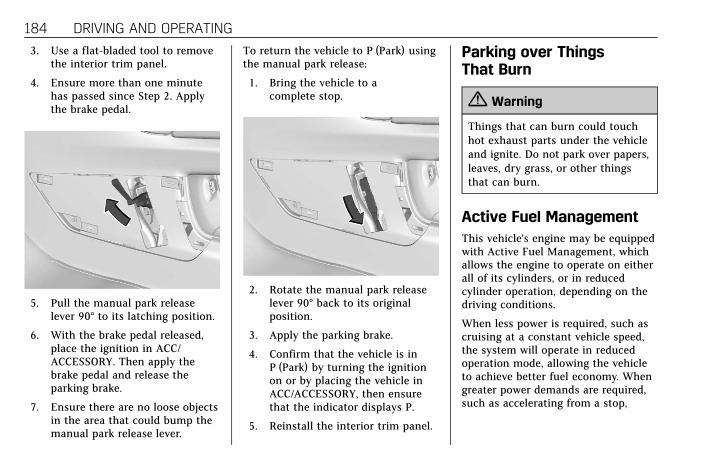
Cadillac XT5 Owner Manual (GMNA-Localizing-U.S./Canada/Mexico-13527534) - 2020 - CRC - 5/29/19
184 DRIVING AND OPERATING
3. Use a flat-bladed tool to removethe interior trim panel.
4. Ensure more than one minutehas passed since Step 2. Applythe brake pedal.
5. Pull the manual park releaselever 90° to its latching position.
6. With the brake pedal released,place the ignition in ACC/ACCESSORY. Then apply thebrake pedal and release theparking brake.
7. Ensure there are no loose objectsin the area that could bump themanual park release lever.
To return the vehicle to P (Park) usingthe manual park release:
1. Bring the vehicle to acomplete stop.
2. Rotate the manual park releaselever 90° back to its originalposition.
3. Apply the parking brake.
4. Confirm that the vehicle is inP (Park) by turning the ignitionon or by placing the vehicle inACC/ACCESSORY, then ensurethat the indicator displays P.
5. Reinstall the interior trim panel.
Parking over ThingsThat Burn
{ Warning
Things that can burn could touchhot exhaust parts under the vehicleand ignite. Do not park over papers,leaves, dry grass, or other thingsthat can burn.
Active Fuel ManagementThis vehicle's engine may be equippedwith Active Fuel Management, whichallows the engine to operate on eitherall of its cylinders, or in reducedcylinder operation, depending on thedriving conditions.
When less power is required, such ascruising at a constant vehicle speed,the system will operate in reducedoperation mode, allowing the vehicleto achieve better fuel economy. Whengreater power demands are required,such as accelerating from a stop,

Cadillac XT5 Owner Manual (GMNA-Localizing-U.S./Canada/Mexico-13527534) - 2020 - CRC - 5/29/19
DRIVING AND OPERATING 185
passing, or merging onto a freeway,the system will maintain full-cylinderoperation.
If the vehicle has an Active FuelManagement indicator, see DriverInformation Center (DIC) for moreinformation on using this display.
Extended ParkingIt is best not to park with the vehiclerunning. If the vehicle is left running,be sure it will not move and there isadequate ventilation.
See Shifting Into Park 0 182 andEngine Exhaust 0 185.
If the vehicle is left parked andrunning with the RKE transmitteroutside the vehicle, it will continue torun for up to half an hour.
If the vehicle is left parked andrunning with the RKE transmitterinside the vehicle, it will continue torun for up to an hour.
The vehicle could turn off sooner if itis parked on a hill, due to lack ofavailable fuel.
The timer will reset if the vehicle istaken out of P (Park) while it isrunning.
Engine Exhaust
{ Warning
Engine exhaust contains carbonmonoxide (CO), which cannot beseen or smelled. Exposure to COcan cause unconsciousness andeven death.
Exhaust may enter the vehicle if:
. The vehicle idles in areas withpoor ventilation (parkinggarages, tunnels, deep snowthat may block underbodyairflow or tail pipes).
. The exhaust smells or soundsstrange or different.
. The exhaust system leaks dueto corrosion or damage.
. The vehicle exhaust systemhas been modified, damaged,or improperly repaired.
(Continued)

Cadillac XT5 Owner Manual (GMNA-Localizing-U.S./Canada/Mexico-13527534) - 2020 - CRC - 5/29/19
186 DRIVING AND OPERATING
Warning (Continued)
. There are holes or openingsin the vehicle body fromdamage or aftermarketmodifications that are notcompletely sealed.
If unusual fumes are detected or ifit is suspected that exhaust iscoming into the vehicle:
. Drive it only with thewindows completely down.
. Have the vehicle repairedimmediately.
Never park the vehicle with theengine running in an enclosed areasuch as a garage or a building thathas no fresh air ventilation.
Running the Vehicle WhileParkedIt is better not to park with the enginerunning.
If the vehicle is left with the enginerunning, follow the proper steps to besure the vehicle will not move. SeeShifting Into Park 0 182 andEngine Exhaust 0 185.
If parking on a hill and pulling atrailer, see Driving Characteristics andTowing Tips 0 237.
Automatic Transmission
The shift pattern is displayed in thetop of the shift lever. The selectedgear position will illuminate red onthe shift lever, while all others will bedisplayed in white. If the shift is notimmediate, as in very cold conditions,the indicator on the shift lever mayflash until it is fully engaged.
The shift lever always starts from acenter position, represented by an up/down arrow on the shift pattern. Afterreleasing the shift lever, it will returnto the center position.

Cadillac XT5 Owner Manual (GMNA-Localizing-U.S./Canada/Mexico-13527534) - 2020 - CRC - 5/29/19
DRIVING AND OPERATING 187
The transmission does not operatewhen the vehicle is off.
If the vehicle is in ACC/ACCESSORY,the transmission can be shifted intoP (Park).
If the vehicle is turned off while at arelatively high vehicle speed, thetransmission will automatically shiftto N (Neutral). Once the vehicle isstopped, P (Park) is automaticallyselected.
P : This position locks the drivewheels. Use P (Park) when starting thevehicle to ensure the vehicle doesnot move.
{ Warning
It is dangerous to get out of thevehicle if the transmission is not inP (Park) with the parking brake set.The vehicle can roll.
Do not leave the vehicle when theengine is running. If the engine hasbeen left running, the vehicle canmove suddenly. You or others couldbe injured. To be sure the vehiclewill not move, even when on fairlylevel ground, always set the parkingbrake and place the transmissioninto P (Park). See Shifting Into Park0 182 andElectric Parking Brake 0 194.
This vehicle is equipped with anelectronically controlled transmission.The shift lock release button isdesigned to prevent inadvertentshifting out of P (Park) unless theignition is on, the brake pedal isapplied, and the shift lock releasebutton is pressed.
When the vehicle is stopped, pressENGINE START/STOP to turn off thevehicle. The transmission will shift toP (Park) automatically unless thevehicle is in N (Neutral), See “CarWash Mode” later in this section.
The vehicle will not shift into P (Park)if it is moving too fast. Stop thevehicle and shift into P (Park).

Cadillac XT5 Owner Manual (GMNA-Localizing-U.S./Canada/Mexico-13527534) - 2020 - CRC - 5/29/19
188 DRIVING AND OPERATING
To shift into and out of P (Park), seeShifting Into Park 0 182 andShifting out of Park 0 182.
Service Shift Lever Message
If the message SERVICE SHIFTER SEEOWNER’S MANUAL appears in theDriver Information Center (DIC), theshift lever needs service. Have thevehicle serviced as soon as possible.If the vehicle is automatically shiftinginto P (Park), check to see if theP (Park) button on top of the shiftlever is stuck. To operate the vehicle,hold the shift lever in the desired gear,R (Reverse) or D (Drive), until vehiclespeed exceeds 15 km/h (10 mph), thenrelease the shift lever.
R : Use this gear to back up.
If the vehicle is shifted from eitherR (Reverse) to D (Drive) or M (ManualMode), or M (Manual Mode) orD (Drive) to R (Reverse) while thespeed is too high, the vehicle will shiftto N (Neutral). Reduce the vehiclespeed and try the shift again.
To shift into R (Reverse):
1. Bring the vehicle to acomplete stop.
2. Press and hold the shift lockrelease button on the side of theshift lever.
3. From the center position, movethe shift lever forward throughthe first detent to the end oftravel. R is illuminated in red.
4. After releasing the shift lever, itwill return to the center position.
To shift out of R (Reverse):
1. Bring the vehicle to acomplete stop.
2. Shift to the desired gear.
3. After releasing the shift lever, itwill return to the center position.
At low vehicle speeds, R (Reverse) canbe used to rock the vehicle back andforth to get out of snow, ice, or sandwithout damaging the transmission.See If the Vehicle Is Stuck 0 172.
N : In this position, the engine doesnot connect with the wheels. Torestart the engine when the vehicle isalready moving, use N (Neutral) only.
{ Warning
Shifting into a drive gear while theengine is running at high speed isdangerous. Unless your foot isfirmly on the brake pedal, thevehicle could move very rapidly.You could lose control and hitpeople or objects. Do not shift intoa drive gear while the engine isrunning at high speed.
Caution
Shifting out of P (Park) orN (Neutral) with the engine runningat high speed may damage thetransmission. The repairs would notbe covered by the vehicle warranty.Be sure the engine is not running athigh speed when shifting thevehicle.
The vehicle is not designed to stay inN (Neutral) for more thanfive minutes. It may automaticallyshift into P (Park). N (Neutral) is not
Cadillac XT5 Owner Manual (GMNA-Localizing-U.S./Canada/Mexico-13527534) - 2020 - CRC - 5/29/19
DRIVING AND OPERATING 189
intended for towing. If the vehicleneeds to be towed, see Towing theVehicle 0 323.
To shift into N (Neutral):
1. Move the shift lever forward tothe first detent from the centerposition.
. If the vehicle is in P (Park),apply the brake pedal andpress the shift lock releasebutton while moving the shiftlever forward.
. N will illuminate in red.
2. After releasing the shift lever, itwill return to the center position.
To shift out of N (Neutral):
1. Bring the vehicle to acomplete stop.
2. Shift to the desired gear.If shifting from N (Neutral) toR (Reverse), press the shift lockrelease button.
3. After releasing the shift lever, itwill return to the center position.
Car Wash Mode
This vehicle includes a Car WashMode that allows the vehicle toremain in N (Neutral) for use inautomatic car washes.
Car Wash Mode (Engine Off – Driverin Vehicle)
To place the vehicle in N (Neutral)with the engine off and the vehicleoccupied:
1. Drive to the entrance of thecar wash.
2. Apply the brake pedal.
3. Shift to N (Neutral).
4. Turn off the engine and releasethe brake pedal.
5. The indicator should continue toshow N. If it does not, repeatSteps 2–4.
6. The vehicle is now ready for thecar wash.
Car Wash Mode (Engine Off – Driverout of Vehicle)
To place the vehicle in N (Neutral)with the engine off and the vehicleunoccupied:
1. Drive to the entrance of thecar wash.
2. Apply the brake pedal.
3. Open the door.
4. Shift to N (Neutral).
5. Turn off the engine and releasethe brake pedal.
6. The indicator should continue toshow N. If it does not, repeatSteps 2–5.
7. Exit the vehicle and close thedoor. The vehicle is now readyfor the car wash.
8. The vehicle may automaticallyshift to P (Park) when the door isopened.

Cadillac XT5 Owner Manual (GMNA-Localizing-U.S./Canada/Mexico-13527534) - 2020 - CRC - 5/29/19
190 DRIVING AND OPERATING
Car Wash Mode (Engine On – Driverin Vehicle)
To place the vehicle in N (Neutral)with the engine on and the vehicleoccupied:
1. Drive to the entrance of thecar wash.
2. Apply the brake pedal.
3. Shift to N (Neutral).
4. Release the brake pedal. Thevehicle is now ready for thecar wash.
Car Wash Mode (Engine On – Driverout of Vehicle)
To place the vehicle in N (Neutral)with the engine on and the vehicleunoccupied:
1. Drive to the entrance of thecar wash.
2. Apply the brake pedal.
3. Open the door.
4. Shift to N (Neutral), then releasethe brake pedal.
5. The indicator should continue toshow N. If it does not, repeatSteps 2–4.
6. Exit the vehicle and close thedoor. The vehicle is now readyfor the car wash.
7. The vehicle may automaticallyshift to P (Park) when the door isopened.
Caution
A transmission hot message maydisplay if the automatictransmission fluid is too hot.Driving under this condition candamage the vehicle. Stop and idlethe engine to cool the automatictransmission fluid. This messageclears when the transmission fluidhas cooled sufficiently.
D : This position is for normal driving.If more power is needed for passing,press the accelerator pedal down.
To shift into D (Drive):
1. Bring the vehicle to acomplete stop.
2. From the center position, movethe shift lever back.
. If the vehicle is in P (Park),press the shift lock releasebutton while pulling the shiftlever back.
. D will illuminate in red.
. After releasing the shift lever,it will return to the centerposition.
To shift out of D (Drive):
1. Bring the vehicle to acomplete stop.
2. Shift to the desired gear.If shifting from D (Drive) toR (Reverse) the shift lock releasebutton will need to be pressed.
3. After releasing the shift lever, itwill return to the center position.
Downshifting the transmission inslippery road conditions could resultin skidding. See “Skidding” under Lossof Control 0 164.

Cadillac XT5 Owner Manual (GMNA-Localizing-U.S./Canada/Mexico-13527534) - 2020 - CRC - 5/29/19
DRIVING AND OPERATING 191
Caution
Spinning the tires or holding thevehicle in one place on a hill usingonly the accelerator pedal maydamage the transmission. Therepair will not be covered by thevehicle warranty. If the vehicle isstuck, do not spin the tires. Whenstopping on a hill, use the brakes tohold the vehicle in place.
If equipped with the 2.0L L4 engine,engine speeds may be increased whiledriving at highway speeds while theengine is still warming up.
Manual Mode
Tap Shift
Caution
Driving with the engine at a highrpm without upshifting while usingTap Shift, could damage the vehicle.Always upshift when necessarywhile using Tap Shift.
Vehicles with Tap Shift have controlson the back of the steering wheel tomanually shift the automatictransmission.
Permanent Tap Shift Mode
To enter Permanent Tap Shift Mode:
1. With the vehicle in D (Drive),pull back on the shift lever toactivate M (Manual Mode). TheM in the shift pattern willilluminate in red, and the D willswitch to white.
2. After releasing the shift lever, itwill return to the center position.
3. Press the back of the control toshift. Use the left steering wheelcontrol to downshift, and theright control to upshift. To shiftto the lowest available gear,press and hold the left control.
To exit Permanent Tap Shift Mode:
1. To exit M (Manual Mode) andreturn to D (Drive), pull back onthe shift lever. The D in the shiftpattern will illuminate in red,and the M will switch to white.
2. After releasing the shift lever, itwill return to the center position.
Manual Mode (M) can be exited toreturn to D (Drive) at any speed bypulling the lever rearward from thecenter position. It is not necessary tostop the vehicle or shift to N (Neutral)or P (Park) prior to shifting back toD (Drive).

Cadillac XT5 Owner Manual (GMNA-Localizing-U.S./Canada/Mexico-13527534) - 2020 - CRC - 5/29/19
192 DRIVING AND OPERATING
Temporary Tap Manual Shift Mode
To enter Temporary Tap Shift Mode:
1. With transmission in D (Drive)and not in Permanent Tap ShiftMode, the Tap Shift controls willactivate a temporary tap manualshift mode, allowing thetransmission to be manuallyshifted.
2. To shift to the lowest availablegear, press and hold the leftcontrol.
3. To deactivate, hold the rightcontrol briefly. Automatic shiftsreturn after no manual shiftshave been done for seven to10 seconds.
While using Tap Shift, the vehicle willhave firmer, quicker shifting. This canbe used for sport driving or whenclimbing or descending hills, to stay ingear longer, or to downshift for morepower or engine braking.
The transmission will only allowshifting into gears appropriate for thevehicle speed and engine revolutionsper minute (rpm). If shifting isprevented for any reason, a SHIFTDENIED message will be displayed inthe instrument cluster. Thetransmission will not automaticallyshift to the next higher gear if theengine rpm is too high. It will onlyautomatically shift to the next lowergear if the engine rpm is too low.
Drive Systems
All-Wheel DriveVehicles with this feature can operatein All-Wheel Drive (AWD) Mode. SeeDriver Mode Control 0 198.
Press MODE to activate AWD. AWD isactive in AWD, Sport, and Off-RoadModes.

Cadillac XT5 Owner Manual (GMNA-Localizing-U.S./Canada/Mexico-13527534) - 2020 - CRC - 5/29/19
DRIVING AND OPERATING 193
The AWD system delivers power to allfour wheels and the system adjusts asneeded to improve traction.
The AWD Mode will stay selecteduntil the mode is changed. If thevehicle is placed in Sport Mode, seeDriver Mode Control 0 198.
Sport Mode and Off-Road Mode arecanceled with each ignition cycle. SeeDriver Mode Control 0 198.
When operated in Tour Mode, thevehicle will deliver power to the frontwheels only and may provide betterfuel economy.
If Tour Mode is selected see DriverMode Control 0 198.
Brakes
Electric Brake BoostVehicles equipped with electric brakeboost have hydraulic brake circuitsthat are electronically controlled whenthe brake pedal is applied duringnormal operation. The systemperforms routine tests and turns offwithin a few minutes after the vehicleis shutdown. Noise may be heardduring this time. If the brake pedal ispressed during the tests or when theelectric brake boost system is off, anoticeable change in pedal force andtravel may be felt. This is normal.
Antilock BrakeSystem (ABS)The Antilock Brake System (ABS)helps prevent a braking skid andmaintain steering while braking hard.
ABS performs a system check whenthe vehicle is first driven.A momentary motor or clicking noise
may be heard while this test is goingon, and the brake pedal may moveslightly. This is normal.
If there is a problem with ABS, thiswarning light stays on. See AntilockBrake System (ABS) Warning Light0 121.
ABS does not change the time neededto get a foot on the brake pedal anddoes not always decrease stoppingdistance. If you get too close to thevehicle ahead, there will not beenough time to apply the brakes ifthat vehicle suddenly slows or stops.Always leave enough room ahead tostop, even with ABS.
Using ABS
Do not pump the brakes. Just hold thebrake pedal down firmly. Hearing orfeeling ABS operate is normal.
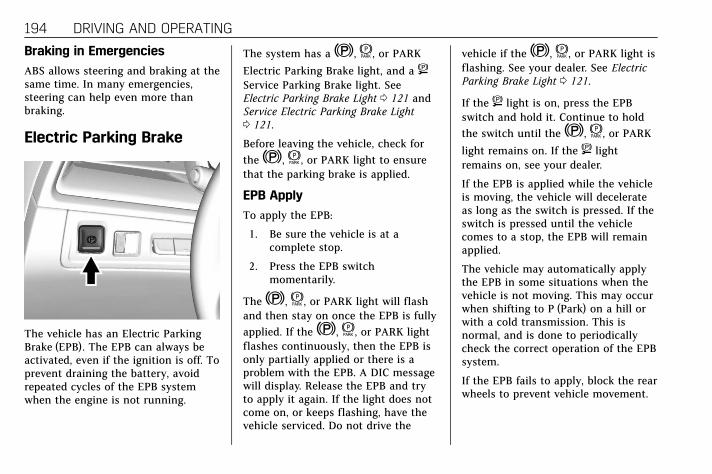
Cadillac XT5 Owner Manual (GMNA-Localizing-U.S./Canada/Mexico-13527534) - 2020 - CRC - 5/29/19
194 DRIVING AND OPERATING
Braking in Emergencies
ABS allows steering and braking at thesame time. In many emergencies,steering can help even more thanbraking.
Electric Parking Brake
The vehicle has an Electric ParkingBrake (EPB). The EPB can always beactivated, even if the ignition is off. Toprevent draining the battery, avoidrepeated cycles of the EPB systemwhen the engine is not running.
The system has aY,f, or PARK
Electric Parking Brake light, and a 8Service Parking Brake light. SeeElectric Parking Brake Light 0 121 andService Electric Parking Brake Light0 121.
Before leaving the vehicle, check fortheY, f, or PARK light to ensurethat the parking brake is applied.
EPB Apply
To apply the EPB:
1. Be sure the vehicle is at acomplete stop.
2. Press the EPB switchmomentarily.
TheY, f, or PARK light will flashand then stay on once the EPB is fullyapplied. If theY, f, or PARK lightflashes continuously, then the EPB isonly partially applied or there is aproblem with the EPB. A DIC messagewill display. Release the EPB and tryto apply it again. If the light does notcome on, or keeps flashing, have thevehicle serviced. Do not drive the
vehicle if theY, f, or PARK light isflashing. See your dealer. See ElectricParking Brake Light 0 121.
If the 8 light is on, press the EPBswitch and hold it. Continue to holdthe switch until theY, f, or PARK
light remains on. If the 8 lightremains on, see your dealer.
If the EPB is applied while the vehicleis moving, the vehicle will decelerateas long as the switch is pressed. If theswitch is pressed until the vehiclecomes to a stop, the EPB will remainapplied.
The vehicle may automatically applythe EPB in some situations when thevehicle is not moving. This may occurwhen shifting to P (Park) on a hill orwith a cold transmission. This isnormal, and is done to periodicallycheck the correct operation of the EPBsystem.
If the EPB fails to apply, block the rearwheels to prevent vehicle movement.

Cadillac XT5 Owner Manual (GMNA-Localizing-U.S./Canada/Mexico-13527534) - 2020 - CRC - 5/29/19
DRIVING AND OPERATING 195
EPB Release
To release the EPB:
1. Turn the ignition on or to ACC/ACCESSORY.
2. Apply and hold the brake pedal.
3. Press the EPB switchmomentarily.
The EPB is released when theY, f,or PARK light is off.
If the 8 light is on, release the EPB bypressing and holding the EPB switch.Continue to hold the switch untiltheY, f, or PARK light is off.If either light stays on after release isattempted, see your dealer.
Caution
Driving with the parking brake oncan overheat the brake system andcause premature wear or damage tobrake system parts. Make sure thatthe parking brake is fully releasedand the brake warning light is offbefore driving.
Automatic EPB Release
The EPB will automatically release ifthe vehicle is running, placed intogear, and an attempt is made to driveaway. Avoid rapid acceleration whenthe EPB is applied, to preserve parkingbrake lining life.
If parking on a hill, or if the vehicle ispulling a trailer, see DrivingCharacteristics and Towing Tips 0 237.
Brake AssistBrake Assist detects rapid brake pedalapplications due to emergency brakingsituations and provides additionalbraking to activate the Antilock BrakeSystem (ABS) if the brake pedal is notpushed hard enough to activate ABSnormally. Minor noise, brake pedalpulsation, and/or pedal movementduring this time may occur. Continueto apply the brake pedal as the drivingsituation dictates. Brake Assistdisengages when the brake pedal isreleased.
Hill Start Assist (HSA)
{ Warning
Do not rely on the HSA feature.HSA does not replace the need topay attention and drive safely. Youmay not hear or feel alerts orwarnings provided by this system.Failure to use proper care whendriving may result in injury, death,or vehicle damage. See DefensiveDriving 0 162.

Cadillac XT5 Owner Manual (GMNA-Localizing-U.S./Canada/Mexico-13527534) - 2020 - CRC - 5/29/19
196 DRIVING AND OPERATING
When the vehicle is stopped on agrade, Hill Start Assist (HSA) preventsthe vehicle from rolling in anunintended direction during thetransition from brake pedal release toaccelerator pedal apply. The brakesrelease when the accelerator pedal isapplied. If the accelerator pedal is notapplied within a few minutes, theElectric Parking Brake will apply. Thebrakes may also release under otherconditions. Do not rely on HSA tohold the vehicle.
HSA is available when the vehicle isfacing uphill in a forward gear,or when facing downhill inR (Reverse). The vehicle must come toa complete stop on a grade for HSA toactivate.
Ride Control Systems
Traction Control/ElectronicStability Control
System Operation
The vehicle has a Traction ControlSystem (TCS) and StabiliTrak/Electronic Stability Control (ESC), anelectronic stability control system.These systems help limit wheel spinand assist the driver in maintainingcontrol, especially on slippery roadconditions.
TCS activates if it senses that any ofthe drive wheels are spinning orbeginning to lose traction. On anAll-Wheel Drive (AWD) vehicle inAWD or Sport Mode, the system willoperate if it senses that any of thewheels are spinning or beginning tolose traction. When this happens, TCSapplies the brakes to the spinningwheels and reduces engine power tolimit wheel spin.
StabiliTrak/ESC activates when thesystem senses a discrepancy betweenthe intended path and the direction
the vehicle is actually traveling.StabiliTrak/ESC selectively appliesbraking pressure at any one of thevehicle's brakes to help steer thevehicle in the direction which you aresteering.
If cruise control is being used andtraction control or StabiliTrak/ESCbegins to limit wheel spin, cruisecontrol will disengage. Cruise controlmay be turned back on when roadconditions allow. TCS and StabiliTrak/ESC will automatically turn on whencruise control is set.
Both systems come on automaticallywhen the vehicle is started and beginsto move. The systems may be heard orfelt while they are operating or whileperforming diagnostic checks. This isnormal and does not mean there is aproblem with the vehicle.
It is recommended to leave bothsystems on for normal drivingconditions, but it may be necessary toturn TCS off if the vehicle gets stuckin sand, mud, ice, or snow. See If theVehicle Is Stuck 0 172 and “Turningthe Systems Off and On” later in thissection.

Cadillac XT5 Owner Manual (GMNA-Localizing-U.S./Canada/Mexico-13527534) - 2020 - CRC - 5/29/19
DRIVING AND OPERATING 197
The indicator light for both systems isin the instrument cluster. Thislight will:
. Flash when TCS is limitingwheel spin
. Flash when StabiliTrak/ESC isactivated
. Turn on and stay on when eithersystem is not working
If either system fails to turn on or toactivate, a message may display in theDriver Information Center (DIC),and d comes on and stays on toindicate that the system is inactiveand is not assisting the driver inmaintaining control. The vehicle issafe to drive, but driving should beadjusted accordingly.
If d comes on and stays on:
1. Stop the vehicle.
2. Turn the engine off and wait15 seconds.
3. Start the engine.
Drive the vehicle. If d comes on andstays on, the vehicle may need moretime to diagnose the problem. If thecondition persists, see your dealer.
Turning the Systems Off and On
Caution
Do not repeatedly brake oraccelerate heavily when TCS is off.The vehicle driveline could bedamaged.
To turn off only TCS, press andrelease g. The Traction Off light idisplays in the instrument cluster anda DIC message may display. To turnTCS on again, press and release g.
The Traction Off light i displayed inthe instrument cluster will turn offand a DIC message may display.
If TCS is limiting wheel spin when gis pressed, the system will not turn offuntil the wheels stop spinning.
To turn off both TCS and StabiliTrak/ESC, press and hold g until the
Traction Off light i and StabiliTrak/
ESC Off light g come on and stay onin the instrument cluster. A DICmessage may display. To turn TCS andStabiliTrak/ESC on again, press andrelease g. The Traction Off light i

Cadillac XT5 Owner Manual (GMNA-Localizing-U.S./Canada/Mexico-13527534) - 2020 - CRC - 5/29/19
198 DRIVING AND OPERATING
and StabiliTrak/ESC Off light g in theinstrument cluster turn off and a DICmessage may display.
StabiliTrak will automatically turn onif the vehicle exceeds 56 km/h(36 mph). Traction control willremain off.
Adding accessories can affect vehicleperformance. See Accessories andModifications 0 252.
Driver Mode ControlIf equipped, the Driver Mode Controlhas the following modes: Tour, Sport,All-Wheel Drive (AWD), Snow/Ice(Front-Wheel Drive vehicles only), andOff-Road (AWD vehicles only). PressMODE on the center console to makea mode selection. The first press ofthe switch will show the current modein the instrument cluster. Continuepressing through the available modes.
If the vehicle is put in AWD Mode, itwill remain in AWD through futureignition cycles, until a different modeis selected.
If the vehicle is in Tour, Sport,or Off-Road Mode when the engine isturned off, Driver Mode Control willcome on in Tour Mode at the nextignition cycle.
When AWD Mode or Sport Mode isselected, the light will come on in theAWD indicator below the MODEswitch. The indicator light will turnoff when Tour Mode is selected. Formore information on AWD Mode, seeAll-Wheel Drive 0 192.
Driver Mode Control Switch
Tour : Tour Mode operates in FWD toimprove fuel economy. Use this modeduring normal driving operations.
Sport : Sport Mode improves vehiclehandling and acceleration on drypavement. When active, Sport Modemodifies steering efforts, transmissionshifting, AWD torque, and suspensiontuning, if equipped.
The Performance Algorithm Liftfoot(PAL) feature is enabled in SportMode. PAL allows the transmission tohold the current gear after a quickrelease of a heavily applied acceleratorpedal. This provides greater enginebraking and enhanced vehicle control.
When PAL is activated, there may bean additional green gear symbol whichappears in the instrument clusterdisplay. See Gear Shifting Light 0 122.

Cadillac XT5 Owner Manual (GMNA-Localizing-U.S./Canada/Mexico-13527534) - 2020 - CRC - 5/29/19
DRIVING AND OPERATING 199
AWD : AWD Mode provides drivetorque to all four wheels. Select AWDto improve traction and control onslippery road surfaces, such as gravel,sand, wet pavement, snow, and ice.When in AWD Mode, the AWD Modeindicator light will be on. For moreinformation on AWD Mode, seeAll-Wheel Drive 0 192.
Snow/Ice (FWD Vehicles Only) :Snow/Ice Mode improves vehicleacceleration on snow and ice coveredroads.
Off-Road (AWD Vehicles Only) : Usethis mode for off-road recreationaldriving. Choosing Off-Road Mode alsoengages AWD Mode. For moreinformation on Off-Road Mode, seeOff-Road Driving.
Cruise Control
{ Warning
Cruise control can be dangerouswhere you cannot drive safely at asteady speed. Do not use cruisecontrol on winding roads or inheavy traffic.
Cruise control can be dangerous onslippery roads. On such roads, fastchanges in tire traction can causeexcessive wheel slip, and you couldlose control. Do not use cruisecontrol on slippery roads.
With cruise control, a speed of about40 km/h (25 mph) or more can bemaintained without keeping your footon the accelerator. Cruise control doesnot work at speeds below about40 km/h (25 mph).
If the Traction Control/StabiliTrak/Electronic Stability Control (ESC)system begins to limit wheel spinwhile using cruise control, the cruise
control automatically disengages. SeeTraction Control/Electronic StabilityControl 0 196. If a collision alertoccurs when cruise control isactivated, cruise control is disengaged.See Forward Collision Alert (FCA)System 0 220. When road conditionsallow cruise control to be safely used,it can be turned back on.
Cruise control will disengage if eitherTCS or StabiliTrak/ESC is turned off.
If the brakes are applied, cruisecontrol disengages.

Cadillac XT5 Owner Manual (GMNA-Localizing-U.S./Canada/Mexico-13527534) - 2020 - CRC - 5/29/19
200 DRIVING AND OPERATING
J : Press to turn the system on andoff. A white indicator appears in theinstrument cluster when cruise isturned on.
RES+ : If there is a set speed inmemory, press briefly to resume tothat speed or press and hold toaccelerate. If the cruise control isalready active, use to increase vehiclespeed. To increase speed by 1 km/h(1 mph), press RES+ to the first detent.To increase speed to the next 5 km/h(5 mph) mark on the speedometer,press RES+ to the second detent.
SET− : Press briefly to set the speedand activate cruise control. If thecruise control is already active, use todecrease vehicle speed. To decreasespeed by 1 km/h (1 mph), press SET−to the first detent. To decrease speedto the next 5 km/h (5 mph) mark onthe speedometer, press SET− to thesecond detent.
* : Press to disengage cruise controlwithout erasing the set speed frommemory.
Setting Cruise Control
IfJ is on when not in use, SET− orRES+ could get pressed and go intocruise when not desired. KeepJ offwhen cruise is not being used.
1. PressJ.
2. Get up to the desired speed.
3. Press and release SET−. Thedesired set speed briefly appearsin the instrument cluster.
4. Remove your foot from theaccelerator.
When the cruise control has been setto the desired speed, a green cruisecontrol indicator appears on theinstrument cluster and a cruise setspeed message appears on theHead-Up Display (HUD), if equipped.
Resuming a Set Speed
If the cruise control is set at a desiredspeed and then the brakes are appliedor* is pressed, the cruise control isdisengaged without erasing the setspeed from memory.
Once the vehicle speed reaches about40 km/h (25 mph) or more, press RES+briefly. The vehicle returns to theprevious set speed.
Increasing Speed While UsingCruise Control
If the cruise control system is alreadyactivated:
. Press and hold RES+ until thedesired speed is reached, thenrelease it.
. To increase vehicle speed in smallincrements, briefly press RES+ tothe first detent. For each press, thevehicle goes about 1 km/h (1 mph)faster.
. To increase vehicle speed in largerincrements, briefly press RES+ tothe second detent. For each press,the vehicle speed increases to thenext 5 km/h (5 mph) mark on thespeedometer.
The speedometer reading can bedisplayed in either English or metricunits. See Instrument Cluster 0 111.The increment value used depends onthe units displayed.

Cadillac XT5 Owner Manual (GMNA-Localizing-U.S./Canada/Mexico-13527534) - 2020 - CRC - 5/29/19
DRIVING AND OPERATING 201
Reducing Speed While Using CruiseControl
If the cruise control system is alreadyactivated:
. Press and hold SET− until thedesired lower speed is reached,then release it.
. To decrease the vehicle speed insmall increments, briefly pressSET− to the first detent. For eachpress, the vehicle goes about1 km/h (1 mph) slower.
. To decrease the vehicle speed inlarger increments, briefly pressSET− to the second detent. Foreach press, the vehicle speeddecreases to the next 5 km/h(5 mph) mark on the speedometer.
The cruise control system mayautomatically brake to slow thevehicle down.
The speedometer reading can bedisplayed in either English or metricunits. See Instrument Cluster 0 111.The increment value used depends onthe units displayed.
Passing Another Vehicle WhileUsing Cruise Control
Use the accelerator pedal to increasethe vehicle speed. When you take yourfoot off the pedal, the vehicle will slowdown to the previous set cruise speed.
While pressing the accelerator pedalor shortly following the release tooverride cruise, briefly applying SET−will result in cruise set to the currentvehicle speed.
Using Cruise Control on Hills
How well the cruise control will workon hills depends upon the vehiclespeed, load, and the steepness of thehills. When going up steep hills, youmight have to step on the acceleratorpedal to maintain your speed. Whengoing downhill, the cruise controlsystem may automatically brake toslow the vehicle down. Also, you mayhave to brake or shift to a lower gearto keep your speed down. If the brakepedal is applied, cruise controldisengages.
Ending Cruise Control
There are four ways to end cruisecontrol:
. Step lightly on the brake pedal.
. Press*.
. Shift the transmission toN (Neutral).
. PressJ.
Erasing Speed Memory
The cruise control set speed is erasedfrom memory ifJ is pressed or ifthe ignition is turned off.
Adaptive Cruise ControlIf equipped with Adaptive CruiseControl (ACC), it allows the driver toselect the cruise control set speed andfollowing gap. Read this entire sectionbefore using this system. Thefollowing gap is the following timebetween your vehicle and a vehicledetected directly ahead in your path,moving in the same direction. If novehicle is detected in your path, ACC

Cadillac XT5 Owner Manual (GMNA-Localizing-U.S./Canada/Mexico-13527534) - 2020 - CRC - 5/29/19
202 DRIVING AND OPERATING
works like regular cruise control. ACCuses camera and radar sensors. SeeRadio Frequency Statement 0 363.
If a vehicle is detected in your path,ACC can apply acceleration or limited,moderate braking to maintain theselected following gap. To disengageACC, apply the brake. If ACC iscontrolling your vehicle speed whenthe traction control system (TCS) orStabiliTrak/Electronic Stability Control(ESC) system activates, the ACC mayautomatically disengage. See TractionControl/Electronic Stability Control0 196. When road conditions allowACC to be safely used, the ACC can beturned back on.
ACC will not engage if the TCS orStabiliTrak/ESC system is disabled.
{ Warning
ACC has limited braking ability andmay not have time to slow thevehicle down enough to avoid acollision with another vehicle youare following. This can occur when
(Continued)
Warning (Continued)
vehicles suddenly slow or stopahead, or enter your lane. Also see“Alerting the Driver” in this section.Complete attention is alwaysrequired while driving and youshould be ready to take action andapply the brakes. See DefensiveDriving 0 162.
{ Warning
ACC will not detect or brake forchildren, pedestrians, animals,or other objects.
Do not use ACC when:
. On winding and hilly roads orwhen the sensors are blockedby snow, ice, or dirt. Thesystem may not detect avehicle ahead. Keep the entirefront of the vehicle clean.
(Continued)
Warning (Continued)
. Visibility is low, such as infog, rain, or snow conditions.ACC performance is limitedunder these conditions.
. On slippery roads where fastchanges in tire traction cancause excessive wheel slip.
J : Press to turn the system on oroff. The indicator turns white on theinstrument cluster when ACC isturned on.

Cadillac XT5 Owner Manual (GMNA-Localizing-U.S./Canada/Mexico-13527534) - 2020 - CRC - 5/29/19
DRIVING AND OPERATING 203
RES+ : Press briefly to resume theprevious set speed or to increasevehicle speed if ACC is alreadyactivated. To increase speed by 1 km/h(1 mph), briefly press RES+. Toincrease speed to the next 5 km/h(5 mph) mark on the speedometer,press and hold RES+, then release.
SET– : Press briefly to set the speedand activate ACC or to decreasevehicle speed if ACC is alreadyactivated. To decrease speed by1 km/h (1 mph), briefly press SET−. Todecrease speed to the next 5 km/h(5 mph) mark on the speedometer,press and hold SET−, then release.
* : Press to disengage ACC withouterasing the selected set speed.
[ : Press to select a following gaptime (or distance) setting for ACC ofFar, Medium, or Near.
Switching Between ACC andRegular Cruise Control
To switch between ACC and regularcruise control, press and hold*.A Driver Information Display (DIC)message displays. See Vehicle Messages0 133.
ACC Indicator Regular CruiseControl Indicator
When ACC is engaged, a greenoindicator will be lit on the instrumentcluster and the following gap will bedisplayed. When the regular cruisecontrol is engaged, a greenJindicator will be lit on the instrumentcluster; the following gap will notdisplay.
When the vehicle is turned on, thecruise control mode will be set to thelast mode used before the vehicle wasturned off.
{ Warning
Always check the cruise controlindicator on the instrument clusterto determine which mode cruisecontrol is in before using thefeature. If ACC is not active, thevehicle will not automatically brakefor other vehicles, which couldcause a crash if the brakes are notapplied manually. You and otherscould be seriously injured or killed.
Setting Adaptive Cruise Control
IfJ is on when not in use, it couldget pressed and go into cruise whennot desired. KeepJ off when cruiseis not being used.
Select the set speed desired for cruise.This is the vehicle speed when novehicle is detected in its path.
ACC will not set at a speed less than25 km/h (15 mph), although it can beresumed when driving at lowerspeeds.

Cadillac XT5 Owner Manual (GMNA-Localizing-U.S./Canada/Mexico-13527534) - 2020 - CRC - 5/29/19
204 DRIVING AND OPERATING
To set ACC while moving:
1. PressJ.
2. Get up to the desired speed.
3. Press and release SET–.
4. Remove foot from theaccelerator.
After ACC is set, it may immediatelyapply the brakes if a vehicle ahead isdetected closer than the selectedfollowing gap.
ACC can also be set while the vehicleis stopped if ACC is on and the brakepedal is applied.
The ACC indicator displays on theinstrument cluster and Head-UpDisplay (HUD), if equipped. When ACCis turned on, the indicator will be litwhite. When ACC is engaged, theindicator will turn green.
Be mindful of speed limits,surrounding traffic speeds, andweather conditions when selecting theset speed.
Resuming a Set Speed
If the ACC is set at a desired speedand then the brakes are applied, ACCis disengaged without erasing the setspeed from memory.
To begin using ACC again, press RES+up briefly. The vehicle returns to theprevious set speed.
. If the vehicle is moving, it returnsto the previous set speed.
. If the vehicle is stopped with thebrake pedal applied, press RES+and release the brake pedal. ACCwill hold the vehicle until RES+ orthe accelerator pedal is pressed.
A green ACC indicator and the setspeed display on the instrumentcluster. The vehicle ahead indicatormay be flashing if a vehicle ahead waspresent and moved. See “Approachingand Following a Vehicle” later in thissection.
Once ACC has resumed, if there is novehicle ahead, if the vehicle ahead isbeyond the selected following gap,or if the vehicle has exited a sharpcurve, then the vehicle speed willincrease to the set speed.
Increasing Speed While ACC is at aSet Speed
If ACC is already activated, do one ofthe following:
. Use the accelerator to get to thehigher speed. Press SET– . Releasethe control and the acceleratorpedal. The vehicle will now cruiseat the higher speed.
When the accelerator pedal ispressed, ACC will not brakebecause it is overridden. The ACCindicator will turn blue on theinstrument panel and heads updisplay, if equipped. See VehicleMessages 0 133.
. Press and hold RES+ until thedesired set speed appears on thedisplay, then release it.

Cadillac XT5 Owner Manual (GMNA-Localizing-U.S./Canada/Mexico-13527534) - 2020 - CRC - 5/29/19
DRIVING AND OPERATING 205. To increase vehicle speed in small
increments, briefly press RES+. Foreach press, the vehicle goes1 km/h (1 mph) faster.
. To increase vehicle speed in largerincrements, hold RES+. Whileholding RES+, the vehicle speedincreases to the next 5 km/h(5 mph) step, then continues toincrease by 5 km/h (5 mph) ata time.
The set speed can also be increasedwhile the vehicle is stopped.
. If stopped with the brake applied,press RES+ until the desired setspeed is displayed.
. If ACC is holding the vehicle at astop and there is another vehicledirectly ahead, pressing RES+ willincrease the set speed. PressingRES+ when there is no longer avehicle ahead will cause the ACCto resume.
When it is determined that there is novehicle ahead or the vehicle ahead isbeyond the selected following gap,then the vehicle speed will increase tothe set speed.
The speedometer reading can bedisplayed in either English or metricunits. See Instrument Cluster 0 111.The increment value used depends onthe units displayed.
Reducing Speed While ACC is at aSet Speed
If ACC is already activated, do one ofthe following:
. Use the brake to get to the desiredlower speed. Release the brake andpress SET– . The vehicle will nowcruise at the lower speed.
. Press and hold SET– until thedesired lower speed is reached,then release it.
. To decrease the vehicle speed insmaller increments, briefly pressSET− to the first detent. For eachpress, the vehicle goes about1 km/h (1 mph) slower.
. To decrease the vehicle speed inlarger increments, press and holdSET−. While holding SET−, thevehicle speed decreases to the
next 5 km/h (5 mph) step, thencontinues to decrease by 5 km/h(5 mph) at a time.
. To decrease speed while thevehicle is stopped, press SET−until the desired set speed isdisplayed.
The speedometer reading can bedisplayed in either English or metricunits. See Instrument Cluster 0 111.The increment value used depends onthe units displayed.
Selecting the Follow Distance Gap
When a slower moving vehicle isdetected ahead within the selectedfollowing gap, ACC will adjust thevehicle's speed and attempt tomaintain the follow distance gapselected.
Press[ on the steering wheel toadjust the following gap. Each presscycles the gap button through threesettings: Far, Medium, or Near.
When pressed, the current gap settingdisplays briefly on the instrumentcluster and HUD. The gap setting willbe maintained until it is changed.
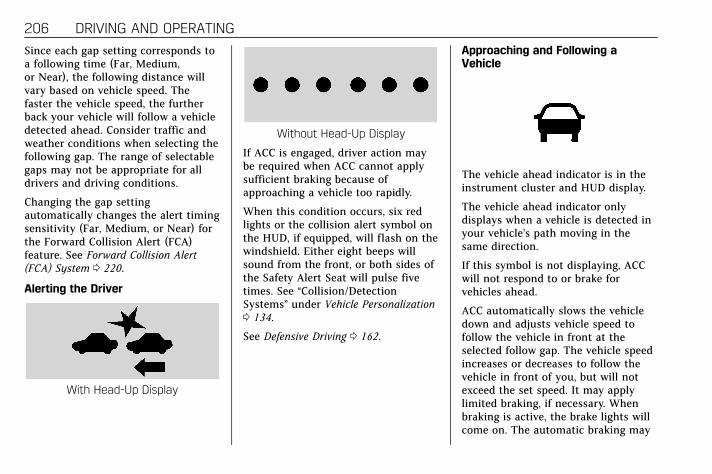
Cadillac XT5 Owner Manual (GMNA-Localizing-U.S./Canada/Mexico-13527534) - 2020 - CRC - 5/29/19
206 DRIVING AND OPERATING
Since each gap setting corresponds toa following time (Far, Medium,or Near), the following distance willvary based on vehicle speed. Thefaster the vehicle speed, the furtherback your vehicle will follow a vehicledetected ahead. Consider traffic andweather conditions when selecting thefollowing gap. The range of selectablegaps may not be appropriate for alldrivers and driving conditions.
Changing the gap settingautomatically changes the alert timingsensitivity (Far, Medium, or Near) forthe Forward Collision Alert (FCA)feature. See Forward Collision Alert(FCA) System 0 220.
Alerting the Driver
With Head-Up Display
Without Head-Up Display
If ACC is engaged, driver action maybe required when ACC cannot applysufficient braking because ofapproaching a vehicle too rapidly.
When this condition occurs, six redlights or the collision alert symbol onthe HUD, if equipped, will flash on thewindshield. Either eight beeps willsound from the front, or both sides ofthe Safety Alert Seat will pulse fivetimes. See “Collision/DetectionSystems” under Vehicle Personalization0 134.
See Defensive Driving 0 162.
Approaching and Following aVehicle
The vehicle ahead indicator is in theinstrument cluster and HUD display.
The vehicle ahead indicator onlydisplays when a vehicle is detected inyour vehicle’s path moving in thesame direction.
If this symbol is not displaying, ACCwill not respond to or brake forvehicles ahead.
ACC automatically slows the vehicledown and adjusts vehicle speed tofollow the vehicle in front at theselected follow gap. The vehicle speedincreases or decreases to follow thevehicle in front of you, but will notexceed the set speed. It may applylimited braking, if necessary. Whenbraking is active, the brake lights willcome on. The automatic braking may

Cadillac XT5 Owner Manual (GMNA-Localizing-U.S./Canada/Mexico-13527534) - 2020 - CRC - 5/29/19
DRIVING AND OPERATING 207
feel or sound different than if thebrakes were applied manually. This isnormal.
Stationary or Very Slow-MovingObjects
{ Warning
ACC may not detect and react tostopped or slow-moving vehiclesahead of you. For example, thesystem may not brake for a vehicleit has never detected moving. Thiscan occur in stop-and-go traffic orwhen a vehicle suddenly appearsdue to a vehicle ahead changinglanes. Your vehicle may not stopand could cause a crash. Usecaution when using ACC. Yourcomplete attention is alwaysrequired while driving and youshould be ready to take action andapply the brakes.
ACC Automatically Disengages
ACC may automatically disengage andthe driver will need to manually applythe brakes to slow the vehicle when:
. The sensors are blocked.
. The Traction Control System (TCS)or StabiliTrak/ESC system hasactivated or been disabled.
. There is a fault in the system.
. The radar falsely reports blockagewhen driving in a desert or remotearea with no other vehicles orroadside objects. A DIC messagemay display to indicate that ACCis temporarily unavailable.
The ACC indicator will turn whitewhen ACC is no longer active.
Notification to Resume ACC
ACC will maintain a follow gap behinda detected vehicle and slow yourvehicle to a stop behind that vehicle.
If the stopped vehicle ahead hasdriven away and ACC has notresumed, the vehicle ahead indicatorwill flash as a reminder to checktraffic ahead before proceeding. Inaddition, the left and right sides of theSafety Alert Seat will pulse threetimes, or three beeps will sound. See”Alert Type” and “Adaptive Cruise Go
Notifier” in “Collision/DetectionSystems” under Vehicle Personalization0 134.
When the vehicle ahead drives away,press RES+ or the accelerator pedal toresume cruise control. If stopped formore than two minutes or if the driverdoor is opened and the driver seat beltis unbuckled, the ACC automaticallyapplies the Electric Parking Brake(EPB) to hold the vehicle. The EPBstatus light will turn on. See ElectricParking Brake 0 194. To release theEPB, press the accelerator pedal.
A DIC warning message may displayindicating to shift to P (Park) beforeexiting the vehicle. See VehicleMessages 0 133.
{ Warning
If ACC has stopped the vehicle, andif ACC is disengaged, turned off,or canceled, the vehicle will nolonger be held at a stop. The vehiclecan move. When ACC is holding the
(Continued)

Cadillac XT5 Owner Manual (GMNA-Localizing-U.S./Canada/Mexico-13527534) - 2020 - CRC - 5/29/19
208 DRIVING AND OPERATING
Warning (Continued)
vehicle at a stop, always beprepared to manually apply thebrakes.
{ Warning
Leaving the vehicle without placingit in P (Park) can be dangerous. Donot leave the vehicle while it isbeing held at a stop by ACC. Alwaysplace the vehicle in P (Park) andturn off the ignition before leavingthe vehicle.
ACC Override
If using the accelerator pedal whileACC is active, the ACC indicator turnsblue on the instrument cluster and inthe HUD (if equipped) to indicate thatautomatic braking will not occur. ACCwill resume operation when theaccelerator pedal is not being pressed.
{ Warning
The ACC will not automaticallyapply the brakes if your foot isresting on the accelerator pedal.You could crash into a vehicleahead of you.
Curves in the Road
{ Warning
On curves, ACC may not detect avehicle ahead in your lane. Youcould be startled if the vehicleaccelerates up to the set speed,especially when following a vehicleexiting or entering exit ramps. Youcould lose control of the vehicle orcrash. Do not use ACC while drivingon an entrance or exit ramp. Alwaysbe ready to use the brakes ifnecessary.
{ Warning
On curves, ACC may respond to avehicle in another lane, or may nothave time to react to a vehicle inyour lane. You could crash into avehicle ahead of you, or lose controlof your vehicle. Give extra attentionin curves and be ready to use thebrakes if necessary. Select anappropriate speed while driving incurves.
ACC may operate differently in asharp curve. It may reduce the vehiclespeed if the curve is too sharp.

Cadillac XT5 Owner Manual (GMNA-Localizing-U.S./Canada/Mexico-13527534) - 2020 - CRC - 5/29/19
DRIVING AND OPERATING 209
When following a vehicle and enteringa curve, ACC may not detect thevehicle ahead and may accelerate tothe set speed. When this happens, thevehicle ahead indicator will notappear.
ACC may detect a vehicle that is notin your lane and apply the brakes.
ACC may occasionally provide an alertand/or braking that is consideredunnecessary. It could respond tovehicles in different lanes, signs,guardrails, and other stationaryobjects when entering or exiting acurve. This is normal operation. Thevehicle does not need service.
Other Vehicle Lane Changes
ACC will not detect a vehicle aheaduntil it is completely in the lane. Thebrakes may need to be manuallyapplied.
Do Not Use ACC on Hills and WhenTowing a Trailer
Do not use ACC when driving on steephills or when towing a trailer. ACC willnot detect a vehicle in the lane whiledriving on steep hills. The driver willoften need to take over accelerationand braking on steep hills, especiallywhen towing a trailer. If the brakes areapplied, the ACC disengages.
Disengaging ACC
There are three ways todisengage ACC:
. Step lightly on the brake pedal.
. Press*.
. PressJ.
Erasing Speed Memory
The cruise control set speed is erasedfrom memory ifJ is pressed or ifthe ignition is turned off.
Cadillac XT5 Owner Manual (GMNA-Localizing-U.S./Canada/Mexico-13527534) - 2020 - CRC - 5/29/19
210 DRIVING AND OPERATING
Cleaning the Sensing System
The camera sensor on the windshieldbehind the rearview mirror and theradar sensors on the front of thevehicle can become blocked by snow,ice, dirt, or mud. These areas need tobe cleaned for ACC to operateproperly.
For cleaning instructions, see“Washing the Vehicle” under ExteriorCare 0 326.
System operation may also be limitedunder snow, heavy rain, or road sprayconditions.
Driver AssistanceSystemsThis vehicle may have features thatwork together to help avoid crashes orreduce crash damage while driving,backing, and parking. Read this entiresection before using these systems.
{ Warning
Do not rely on the DriverAssistance Systems. These systemsdo not replace the need for payingattention and driving safely. Youmay not hear or feel alerts orwarnings provided by thesesystems. Failure to use proper carewhen driving may result in injury,death, or vehicle damage. SeeDefensive Driving 0 162.
Under many conditions, thesesystems will not:
. Detect children, pedestrians,bicyclists, or animals.
(Continued)
Warning (Continued)
. Detect vehicles or objectsoutside the area monitored bythe system.
. Work at all driving speeds.
. Warn you or provide you withenough time to avoid a crash.
. Work under poor visibility orbad weather conditions.
. Work if the detection sensoris not cleaned or is coveredby ice, snow, mud, or dirt.
. Work if the detection sensoris covered up, such as with asticker, magnet, or metalplate.
. Work if the area surroundingthe detection sensor isdamaged or not properlyrepaired.
Complete attention is alwaysrequired while driving, and youshould be ready to take action andapply the brakes and/or steer thevehicle to avoid crashes.

Cadillac XT5 Owner Manual (GMNA-Localizing-U.S./Canada/Mexico-13527534) - 2020 - CRC - 5/29/19
DRIVING AND OPERATING 211
Audible or Safety Alert Seat
Some driver assistance features alertthe driver of obstacles by beeping. Tochange the volume of the warningchime, see “Comfort and Convenience”under Vehicle Personalization 0 134.
If equipped with the Safety Alert Seat,the driver seat cushion may provide avibrating pulse alert instead ofbeeping. To change this, see“Collision/Detection Systems” underVehicle Personalization 0 134.
Cleaning
Depending on vehicle options, keepthese areas of the vehicle clean toensure the best driver assistancefeature performance. DriverInformation Center (DIC) messagesmay display when the systems areunavailable or blocked.
. Front and rear bumpers and thearea below the bumpers
. Front grille and headlamps
. Front camera lens in the frontgrille or near the front emblem
. Front side and rear side panels
. Outside of the windshield in frontof the rearview mirror
. Side camera lens on the bottom ofthe outside mirrors
. Rear side corner bumpers
. Rear Vision Camera above thelicense plate
Assistance Systems forParking or BackingIf equipped, the Rear Vision Camera(RVC), Rear Park Assist (RPA), FrontPark Assist (FPA), Surround Vision,Reverse Automatic Braking (RAB) andBacking Warning System, Rear CrossTraffic Alert (RCTA), and AutomaticParking Assist (APA) may help thedriver park or avoid objects. Alwayscheck around the vehicle whenparking or backing.

Cadillac XT5 Owner Manual (GMNA-Localizing-U.S./Canada/Mexico-13527534) - 2020 - CRC - 5/29/19
212 DRIVING AND OPERATING
Rear Vision Camera (RVC)
When the vehicle is shifted intoR (Reverse), the RVC displays animage of the area behind the vehiclein the infotainment display. Theprevious screen displays when thevehicle is shifted out of R (Reverse)after a short delay. To return to theprevious screen sooner, press anybutton on the infotainment system,shift into P (Park), or reach a vehiclespeed of approximately 12 km/h(8 mph).
1. View Displayed by theCamera
1. View Displayed by theCamera
2. Corners of the Rear Bumper
Displayed images may be farther orcloser than they appear. The areadisplayed is limited and objects thatare close to either corner of thebumper or under the bumper do notdisplay.
A warning triangle may appear on theinfotainment display to show thatRPA has detected an object. Thistriangle changes from amber to redand increases in size the closer theobject.
Surround Vision
If equipped, Surround Vision shows animage of the area surrounding thevehicle, along with the front or rear
camera views on the infotainmentdisplay. The front camera is in thegrille or near the front emblem, theside cameras are on the bottom of theoutside mirrors, and the rear camerais above the license plate.
The Surround Vision system can beaccessed by selecting CAMERA in theinfotainment display or when thevehicle is shifted into R (Reverse). Toreturn to the previous screen sooner,press any button on the infotainmentsystem, shift into P (Park), or reach avehicle speed of approximately12 km/h (8 mph).
{ Warning
The Surround Vision cameras haveblind spots and will not display allobjects near the corners of thevehicle. Folding outside mirrors thatare out of position may not displaysurround view correctly. Alwayscheck around the vehicle whenparking or backing.
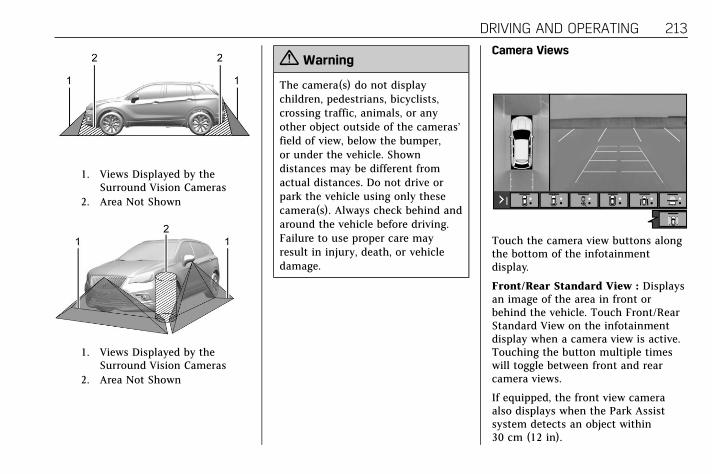
Cadillac XT5 Owner Manual (GMNA-Localizing-U.S./Canada/Mexico-13527534) - 2020 - CRC - 5/29/19
DRIVING AND OPERATING 213
1. Views Displayed by theSurround Vision Cameras
2. Area Not Shown
1. Views Displayed by theSurround Vision Cameras
2. Area Not Shown
{ Warning
The camera(s) do not displaychildren, pedestrians, bicyclists,crossing traffic, animals, or anyother object outside of the cameras’field of view, below the bumper,or under the vehicle. Showndistances may be different fromactual distances. Do not drive orpark the vehicle using only thesecamera(s). Always check behind andaround the vehicle before driving.Failure to use proper care mayresult in injury, death, or vehicledamage.
Camera Views
Touch the camera view buttons alongthe bottom of the infotainmentdisplay.
Front/Rear Standard View : Displaysan image of the area in front orbehind the vehicle. Touch Front/RearStandard View on the infotainmentdisplay when a camera view is active.Touching the button multiple timeswill toggle between front and rearcamera views.
If equipped, the front view cameraalso displays when the Park Assistsystem detects an object within30 cm (12 in).
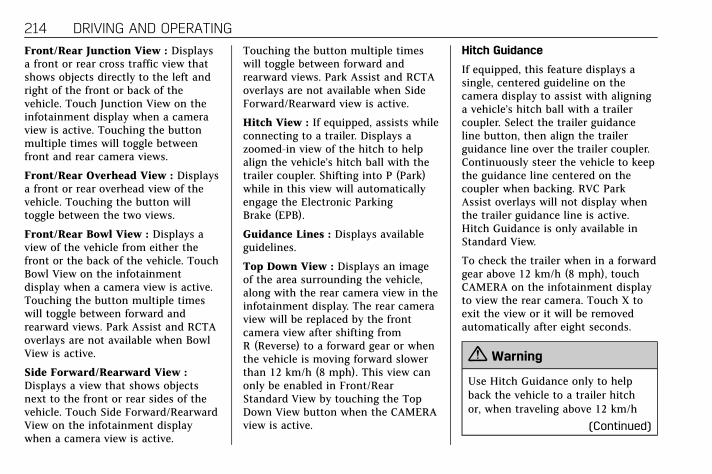
Cadillac XT5 Owner Manual (GMNA-Localizing-U.S./Canada/Mexico-13527534) - 2020 - CRC - 5/29/19
214 DRIVING AND OPERATING
Front/Rear Junction View : Displaysa front or rear cross traffic view thatshows objects directly to the left andright of the front or back of thevehicle. Touch Junction View on theinfotainment display when a cameraview is active. Touching the buttonmultiple times will toggle betweenfront and rear camera views.
Front/Rear Overhead View : Displaysa front or rear overhead view of thevehicle. Touching the button willtoggle between the two views.
Front/Rear Bowl View : Displays aview of the vehicle from either thefront or the back of the vehicle. TouchBowl View on the infotainmentdisplay when a camera view is active.Touching the button multiple timeswill toggle between forward andrearward views. Park Assist and RCTAoverlays are not available when BowlView is active.
Side Forward/Rearward View :Displays a view that shows objectsnext to the front or rear sides of thevehicle. Touch Side Forward/RearwardView on the infotainment displaywhen a camera view is active.
Touching the button multiple timeswill toggle between forward andrearward views. Park Assist and RCTAoverlays are not available when SideForward/Rearward view is active.
Hitch View : If equipped, assists whileconnecting to a trailer. Displays azoomed-in view of the hitch to helpalign the vehicle’s hitch ball with thetrailer coupler. Shifting into P (Park)while in this view will automaticallyengage the Electronic ParkingBrake (EPB).
Guidance Lines : Displays availableguidelines.
Top Down View : Displays an imageof the area surrounding the vehicle,along with the rear camera view in theinfotainment display. The rear cameraview will be replaced by the frontcamera view after shifting fromR (Reverse) to a forward gear or whenthe vehicle is moving forward slowerthan 12 km/h (8 mph). This view canonly be enabled in Front/RearStandard View by touching the TopDown View button when the CAMERAview is active.
Hitch Guidance
If equipped, this feature displays asingle, centered guideline on thecamera display to assist with aligninga vehicle’s hitch ball with a trailercoupler. Select the trailer guidanceline button, then align the trailerguidance line over the trailer coupler.Continuously steer the vehicle to keepthe guidance line centered on thecoupler when backing. RVC ParkAssist overlays will not display whenthe trailer guidance line is active.Hitch Guidance is only available inStandard View.
To check the trailer when in a forwardgear above 12 km/h (8 mph), touchCAMERA on the infotainment displayto view the rear camera. Touch X toexit the view or it will be removedautomatically after eight seconds.
{ Warning
Use Hitch Guidance only to helpback the vehicle to a trailer hitchor, when traveling above 12 km/h
(Continued)

Cadillac XT5 Owner Manual (GMNA-Localizing-U.S./Canada/Mexico-13527534) - 2020 - CRC - 5/29/19
DRIVING AND OPERATING 215
Warning (Continued)
(8 mph), to briefly check the statusof your trailer. Do not use for anyother purpose, such as making lanechange decisions. Before making alane change, always check themirrors and glance over yourshoulder. Improper use could resultin serious injury to you or others.
Park Assist
With Front and Rear Park Assist, asthe vehicle moves at speeds of lessthan 8 km/h (5 mph) the sensors onthe bumpers may detect objects up to1.2 m (4 ft) in front and 2.5 m (8 ft)behind the vehicle within a zone25 cm (10 in) high off the ground andbelow bumper level. These detectiondistances may be shorter duringwarmer or humid weather. Blockedsensors will not detect objects andcan also cause false detections. Keepthe sensors clean of mud, dirt, snow,ice, and slush; and clean sensors aftera car wash in freezing temperatures.
{ Warning
The Park Assist system does notdetect children, pedestrians,bicyclists, animals, or objectslocated below the bumper or thatare too close or too far from thevehicle. It is not available at speedsgreater than 8 km/h (5 mph). Toprevent injury, death, or vehicledamage, even with Park Assist,always check the area around thevehicle and check all mirrors beforemoving forward or backing.
The instrument cluster may have apark assist display with bars thatshow “distance to object” and objectlocation information for the Park
Assist system. As the object getscloser, more bars light up and the barschange color from yellow to amber tored. An obstacle is also indicated byaudible beeps. The interval betweenthe beeps becomes shorter as thevehicle gets closer to the obstacle.
When an object is first detected in therear, one beep will be heard from therear, or both sides of the Safety AlertSeat will pulse two times. When anobject is very close (<0.6 m (2 ft) in thevehicle rear, or <0.3 m (1 ft) in thevehicle front), five beeps will soundfrom the front or rear depending onobject location, or both sides of theSafety Alert Seat will pulse five times.Beeps for FPA are higher pitched thanfor RPA.
Backing Warning and ReverseAutomatic Braking (RAB)
Vehicles with Adaptive Cruise Control(ACC) have the Backing WarningSystem and Reverse AutomaticBraking (RAB) system. When inR (Reverse), Backing Warning alerts ofrear objects at vehicle speeds greater

Cadillac XT5 Owner Manual (GMNA-Localizing-U.S./Canada/Mexico-13527534) - 2020 - CRC - 5/29/19
216 DRIVING AND OPERATING
than 8 km/h (5 mph), and RAB mayautomatically brake hard at speedsbetween 1–32 km/h (0.5–20 mph).
The Backing Warning System willbeep once from the rear when anobject is first detected, or pulse twiceon both sides of the Safety Alert Seat.When the system detects a potentialcrash, beeps will be heard from therear, or five pulses will be felt on bothsides of the Safety Alert Seat. Theremay also be a brief, sharp applicationof the brakes.
{ Warning
The Backing Warning System onlyoperates at speeds greater than8 km/h (5 mph). It does not detectchildren, pedestrians, bicyclists,animals, or objects below thebumper or that are too close or toofar from the vehicle. In somesituations, such as at higherbacking speeds, there may not beenough time for the short, sharpapplication of the vehicle brake
(Continued)
Warning (Continued)
system to occur. To prevent injury,death, or vehicle damage, even withthe Backing Warning System,always check the area around thevehicle and check all mirrors beforebacking.
When the vehicle is in R (Reverse),if the system detects the vehicle isbacking too fast to avoid a crash witha detected object behind your vehiclein your path, it may automaticallybrake hard to a stop to help avoid orreduce the harm caused by a backingcrash.
{ Warning
RAB may not avoid many types ofbacking crashes. Do not wait for theautomatic braking to apply. Thissystem is not designed to replacedriver braking and only works inR (Reverse) when an object isdetected directly behind the vehicle.
(Continued)
Warning (Continued)
It may not brake or stop in time toavoid a crash. It will not brake forobjects when the vehicle is movingat very low speeds. It does notdetect children, pedestrians,bicyclists, animals, or objects belowthe bumper or that are too close ortoo far from the vehicle. To preventinjury, death, or vehicle damage,even with RAB, always check thearea around the vehicle before andwhile backing.
Pressing the brake pedal after thevehicle comes to a stop will releaseRAB. If the brake pedal is not pressedsoon after the stop, the ElectricParking Brake (EPB) may be set. Whenit is safe, press the accelerator pedalfirmly at any time to override RAB.

Cadillac XT5 Owner Manual (GMNA-Localizing-U.S./Canada/Mexico-13527534) - 2020 - CRC - 5/29/19
DRIVING AND OPERATING 217
{ Warning
There may be instances whereunexpected or undesired automaticbraking occurs. If this happens,either press the brake pedal orfirmly press the accelerator pedal torelease the brakes from the RABsystem. Before releasing the brakes,check the RVC and check the areaaround the vehicle to make sure itis safe to proceed.
Rear Cross Traffic Alert (RCTA)
If equipped, RCTA displays a redwarning triangle with a left or rightpointing arrow on the infotainmentdisplay to warn of traffic coming fromthe left or right. This system detectsobjects coming from up to 20 m (65 ft)from the left or right side of thevehicle. When an object is detected,either three beeps sound from the leftor right or three Safety Alert Seatpulses occur on the left or right side,depending on the direction of thedetected vehicle.
Use caution while backing up whentowing a trailer, as the RCTAdetection zones that extend out fromthe back of the vehicle do not movefurther back when a trailer is towed.
See Radio Frequency Statement 0 363.
Turning the Features On or Off
PressX on the center stack to turnon or off the Front and Rear ParkAssist, Reverse Automatic Braking(RAB), and the Backing WarningSystem at the same time. Theindicator light next to the buttoncomes on when the features are onand turns off when the features havebeen disabled.
Turn off Park Assist, RCTA, and RABwhen towing a trailer.
RCTA can be turned on or off throughvehicle personalization. See “Collision/Detection Systems” under VehiclePersonalization 0 134.
Automatic Parking Assist (APA)with Braking
If equipped, APA searches for andsteers the vehicle into parallel andperpendicular parking spots. Whenusing APA, you must still shift gears,while the system applies the brakesand accelerator. A display and audiblebeeps help to guide parkingmaneuvers.
Do not use APA when towing a trailer.
{ Warning
APA may not detect objects in theparking space, objects that are softor narrow, objects high off theground such as flatbed trucks,objects below ground level such aslarge potholes, or moving objects(e.g. pedestrians). Always verify thatthe parking space is appropriate forparking a vehicle. APA does notrespond to changes in the parkingspace, such as movement of anadjacent vehicle, or a person orobject entering the parking space.
(Continued)

Cadillac XT5 Owner Manual (GMNA-Localizing-U.S./Canada/Mexico-13527534) - 2020 - CRC - 5/29/19
218 DRIVING AND OPERATING
Warning (Continued)
APA does not detect or avoid trafficthat is behind or alongside of thevehicle. Always be prepared to stopthe vehicle during the parkingmaneuver.
PressO on the center stack toenable the system to search for aparking space that is large enough andwithin 1.5 m (5 ft) of the vehicle. Thevehicle speed must be below30 km/h (18 mph). The system cannot:
. Detect whether it is a legal parkingspace.
. Park exactly lined up with thevehicle next to it if the spot isapproached at an angle or if theparking space is angled.
. Park exactly centered in a spotthat is marked too large.
. Always detect short curbs.
When enabled, APA searches forparallel parking spaces to the right ofthe vehicle. To search for a parking
space to the left, turn on the left turnsignal or, if available, change the sideselection in the infotainment display.To switch the parking mode betweenparallel and perpendicular, press andholdO during the search process or,if available, change the parking modein the infotainment display.
After completely passing a largeenough space, an audible beep occurs.A red stop symbol and a shift toreverse message are displayed.
If the vehicle is in R (Reverse), butdoes not steer into the expectedspace, this may be because the systemis maneuvering the vehicle into apreviously detected space. The APAsystem does not need service.
APA will instruct the vehicle to stoponce a large enough space is found.Follow the displayed instructions.Shift to R (Reverse) to engageautomatic steering. The steering wheelwill vibrate briefly as a reminder toremove hands from the steeringwheel. APA uses idle speed andbraking to park. If idle speed is notsufficient, gently press the accelerator.Check surroundings and be preparedto stop to avoid vehicles, pedestrians,or objects not detected by the system.In case the driver brakes, APA will notdisengage. Manual steering by thedriver automatically disengages APA.Vehicle speed is limited to amaximum of 5 km/h (3 mph) duringthe parking maneuver.
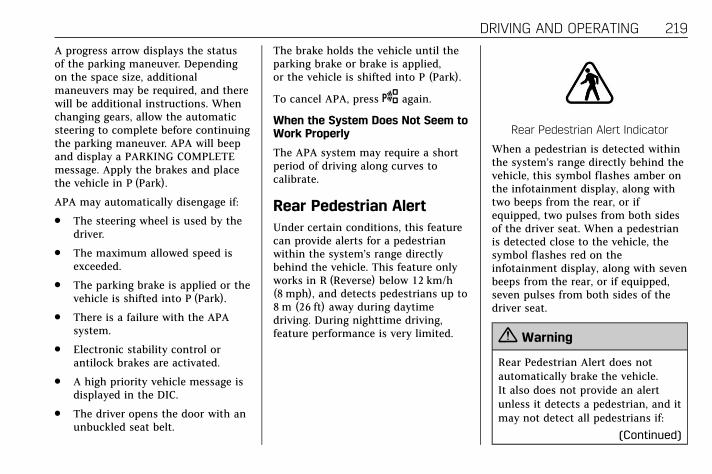
Cadillac XT5 Owner Manual (GMNA-Localizing-U.S./Canada/Mexico-13527534) - 2020 - CRC - 5/29/19
DRIVING AND OPERATING 219
A progress arrow displays the statusof the parking maneuver. Dependingon the space size, additionalmaneuvers may be required, and therewill be additional instructions. Whenchanging gears, allow the automaticsteering to complete before continuingthe parking maneuver. APA will beepand display a PARKING COMPLETEmessage. Apply the brakes and placethe vehicle in P (Park).
APA may automatically disengage if:
. The steering wheel is used by thedriver.
. The maximum allowed speed isexceeded.
. The parking brake is applied or thevehicle is shifted into P (Park).
. There is a failure with the APAsystem.
. Electronic stability control orantilock brakes are activated.
. A high priority vehicle message isdisplayed in the DIC.
. The driver opens the door with anunbuckled seat belt.
The brake holds the vehicle until theparking brake or brake is applied,or the vehicle is shifted into P (Park).
To cancel APA, pressO again.
When the System Does Not Seem toWork Properly
The APA system may require a shortperiod of driving along curves tocalibrate.
Rear Pedestrian AlertUnder certain conditions, this featurecan provide alerts for a pedestrianwithin the system’s range directlybehind the vehicle. This feature onlyworks in R (Reverse) below 12 km/h(8 mph), and detects pedestrians up to8 m (26 ft) away during daytimedriving. During nighttime driving,feature performance is very limited.
Rear Pedestrian Alert Indicator
When a pedestrian is detected withinthe system’s range directly behind thevehicle, this symbol flashes amber onthe infotainment display, along withtwo beeps from the rear, or ifequipped, two pulses from both sidesof the driver seat. When a pedestrianis detected close to the vehicle, thesymbol flashes red on theinfotainment display, along with sevenbeeps from the rear, or if equipped,seven pulses from both sides of thedriver seat.
{ Warning
Rear Pedestrian Alert does notautomatically brake the vehicle.It also does not provide an alertunless it detects a pedestrian, and itmay not detect all pedestrians if:
(Continued)

Cadillac XT5 Owner Manual (GMNA-Localizing-U.S./Canada/Mexico-13527534) - 2020 - CRC - 5/29/19
220 DRIVING AND OPERATING
Warning (Continued)
. The pedestrian is not directlybehind the vehicle, fullyvisible to the Rear VisionCamera (RVC), or standingupright.
. The pedestrian is part of agroup.
. The pedestrian is a child.
. Visibility is poor, includingnighttime conditions, fog,rain, or snow.
. The RVC is blocked by dirt,snow, or ice.
. The RVC, taillamps,or back-up lamps are notcleaned or in proper workingcondition.
. The vehicle is not inR (Reverse).
To help avoid death or injury,always check for pedestriansaround the vehicle before backingup. Be ready to take action and
(Continued)
Warning (Continued)
apply the brakes. See DefensiveDriving 0 162. Keep the RVC,taillamps, and back-up lamps cleanand in good repair.
Rear Pedestrian Alert can be set to Offor Alert. See “Rear PedestrianDetection” in “Collision/DetectionSystems” under Vehicle Personalization0 134. If equipped, alerts can be set tobeeps or seat pulses. See “Alert Type”in “Collision/Detection Systems” underVehicle Personalization 0 134.
Assistance Systems forDrivingIf equipped, when driving the vehiclein a forward gear, Forward CollisionAlert (FCA), Lane Departure Warning(LDW), Lane Keep Assist (LKA), SideBlind Zone Alert (SBZA), Lane ChangeAlert (LCA), Automatic EmergencyBraking (AEB), and/or the FrontPedestrian Braking (FPB) System canhelp to avoid a crash or reduce crashdamage.
Forward Collision Alert(FCA) SystemIf equipped, the FCA system may helpto avoid or reduce the harm caused byfront-end crashes. When approachinga vehicle ahead too quickly, FCAprovides a red flashing alert on thewindshield and rapidly beeps or pulsesthe driver seat. FCA also lights anamber visual alert if following anothervehicle much too closely.
FCA detects vehicles within a distanceof approximately 60 m (197 ft) andoperates at speeds above 8 km/h(5 mph). If the vehicle has AdaptiveCruise Control (ACC), it can detectvehicles to distances of approximately110 m (360 ft) and operates at allspeeds. See Adaptive Cruise Control0 201.
{ Warning
FCA is a warning system and doesnot apply the brakes. Whenapproaching a slower-moving orstopped vehicle ahead too rapidly,
(Continued)

Cadillac XT5 Owner Manual (GMNA-Localizing-U.S./Canada/Mexico-13527534) - 2020 - CRC - 5/29/19
DRIVING AND OPERATING 221
Warning (Continued)
or when following a vehicle tooclosely, FCA may not provide awarning with enough time to helpavoid a crash. It also may notprovide any warning at all. FCAdoes not warn of pedestrians,animals, signs, guardrails, bridges,construction barrels, or otherobjects. Be ready to take action andapply the brakes. See DefensiveDriving 0 162.
FCA can be disabled with either theFCA steering wheel control or,if equipped, through vehiclepersonalization. See “Collision/Detection Systems” under VehiclePersonalization 0 134.
Detecting the Vehicle Ahead
FCA warnings will not occur unlessthe FCA system detects a vehicleahead. When a vehicle is detected, thevehicle ahead indicator will displaygreen. Vehicles may not be detectedon curves, highway exit ramps,or hills, due to poor visibility; or if avehicle ahead is partially blocked bypedestrians or other objects. FCA willnot detect another vehicle ahead untilit is completely in the driving lane.
{ Warning
FCA does not provide a warning tohelp avoid a crash, unless it detectsa vehicle. FCA may not detect avehicle ahead if the FCA sensor isblocked by dirt, snow, or ice, or if
(Continued)
Warning (Continued)
the windshield is damaged. It mayalso not detect a vehicle on windingor hilly roads, or in conditions thatcan limit visibility such as fog, rain,or snow, or if the headlamps orwindshield are not cleaned or inproper condition. Keep thewindshield, headlamps, and FCAsensors clean and in good repair.
Collision Alert
With Head-Up Display

Cadillac XT5 Owner Manual (GMNA-Localizing-U.S./Canada/Mexico-13527534) - 2020 - CRC - 5/29/19
222 DRIVING AND OPERATING
Without Head-Up Display
When your vehicle approachesanother detected vehicle too rapidly,the red FCA display will flash on thewindshield. Also, eight rapidhigh-pitched beeps will sound fromthe front, or both sides of the SafetyAlert Seat will pulse five times. Whenthis Collision Alert occurs, the brakesystem may prepare for driver brakingto occur more rapidly which can causea brief, mild deceleration. Continue toapply the brake pedal as needed.Cruise control may be disengagedwhen the Collision Alert occurs.
Tailgating Alert
The vehicle ahead indicator willdisplay amber when you are followinga vehicle ahead much too closely.
Selecting the Alert Timing
The Collision Alert control is on thesteering wheel. Press[ to set theFCA timing to Far, Medium, or Near,
or on some vehicles, Off. The firstbutton press shows the current settingon the DIC. Additional button presseswill change this setting. The chosensetting will remain until it is changedand will affect the timing of both theCollision Alert and the TailgatingAlert features. The timing of bothalerts will vary based on vehicle speed.The faster the vehicle speed, thefarther away the alert will occur.Consider traffic and weatherconditions when selecting the alerttiming. The range of selectable alerttimings may not be appropriate for alldrivers and driving conditions.
If your vehicle is equipped withAdaptive Cruise Control (ACC),changing the FCA timing settingautomatically changes the followinggap setting (Far, Medium, or Near).
Following Distance Indicator
The following distance to a movingvehicle ahead in your path is indicatedin following time in seconds on theDriver Information Center (DIC). SeeDriver Information Center (DIC) 0 127.The minimum following time is

Cadillac XT5 Owner Manual (GMNA-Localizing-U.S./Canada/Mexico-13527534) - 2020 - CRC - 5/29/19
DRIVING AND OPERATING 223
0.5 seconds away. If there is no vehicledetected ahead, or the vehicle ahead isout of sensor range, dashes will bedisplayed.
Unnecessary Alerts
FCA may provide unnecessary alertsfor turning vehicles, vehicles in otherlanes, objects that are not vehicles,or shadows. These alerts are normaloperation and the vehicle does notneed service.
Cleaning the System
If the FCA system does not seem tooperate properly, this may correct theissue:
. Clean the outside of thewindshield in front of the rearviewmirror.
. Clean the entire front of thevehicle.
. Clean the headlamps.
Automatic EmergencyBraking (AEB)If the vehicle has Forward CollisionAlert (FCA), it also has AEB, whichincludes Intelligent Brake Assist (IBA).When the system detects a vehicleahead in your path that is traveling inthe same direction that you may beabout to crash into, it can provide aboost to braking or automaticallybrake the vehicle. This can help avoidor lessen the severity of crashes whendriving in a forward gear. Dependingon the situation, the vehicle mayautomatically brake moderately orhard. This automatic emergencybraking can only occur if a vehicle isdetected. This is shown by the FCAvehicle ahead indicator being lit. SeeForward Collision Alert (FCA) System0 220.
The system works when driving in aforward gear between 8 km/h (5 mph)and 80 km/h (50 mph), or on vehicleswith Adaptive Cruise Control (ACC),above 4 km/h (2 mph). It can detectvehicles up to approximately 60 m(197 ft).
{ Warning
AEB is an emergency crashpreparation feature and is notdesigned to avoid crashes. Do notrely on AEB to brake the vehicle.AEB will not brake outside of itsoperating speed range and onlyresponds to detected vehicles.
AEB may not:
. Detect a vehicle ahead onwinding or hilly roads.
. Detect all vehicles, especiallyvehicles with a trailer,tractors, muddy vehicles, etc.
. Detect a vehicle whenweather limits visibility, suchas in fog, rain, or snow.
. Detect a vehicle ahead if it ispartially blocked bypedestrians or other objects.
Complete attention is alwaysrequired while driving, and youshould be ready to take action andapply the brakes and/or steer thevehicle to avoid crashes.

Cadillac XT5 Owner Manual (GMNA-Localizing-U.S./Canada/Mexico-13527534) - 2020 - CRC - 5/29/19
224 DRIVING AND OPERATING
AEB may slow the vehicle to acomplete stop to try to avoid apotential crash. If this happens, AEBmay engage the Electric Parking Brake(EPB) to hold the vehicle at a stop.Release the EPB or firmly press theaccelerator pedal.
{ Warning
AEB may automatically brake thevehicle suddenly in situationswhere it is unexpected andundesired. It could respond to aturning vehicle ahead, guardrails,signs, and other non-movingobjects. To override AEB, firmlypress the accelerator pedal, if it issafe to do so.
Intelligent Brake Assist (IBA)
IBA may activate when the brakepedal is applied quickly by providing aboost to braking based on the speedof approach and distance to a vehicleahead.
Minor brake pedal pulsations or pedalmovement during this time is normaland the brake pedal should continueto be applied as needed. IBA willautomatically disengage only whenthe brake pedal is released.
{ Warning
IBA may increase vehicle braking insituations when it may not benecessary. You could block the flowof traffic. If this occurs, take yourfoot off the brake pedal and thenapply the brakes as needed.
AEB and IBA can be disabled throughvehicle personalization. See “Collision/Detection Systems” under VehiclePersonalization 0 134.
{ Warning
Using AEB or IBA while towing atrailer could cause you to losecontrol of the vehicle and crash.
(Continued)
Warning (Continued)
Turn the system to Alert, or if thevehicle has ACC to Off, whentowing a trailer.
A system unavailable message maydisplay if:
. The front of the vehicle orwindshield is not clean.
. Heavy rain or snow is interferingwith object detection.
. There is a problem with theStabiliTrak/Electronic StabilityControl (ESC) system.
The AEB system does not needservice.
Front Pedestrian Braking(FPB) SystemIf equipped, the FPB system may helpavoid or reduce the harm caused byfront-end crashes with nearbypedestrians when driving in a forwardgear. FPB displays an amber indicator,~, when a nearby pedestrian is
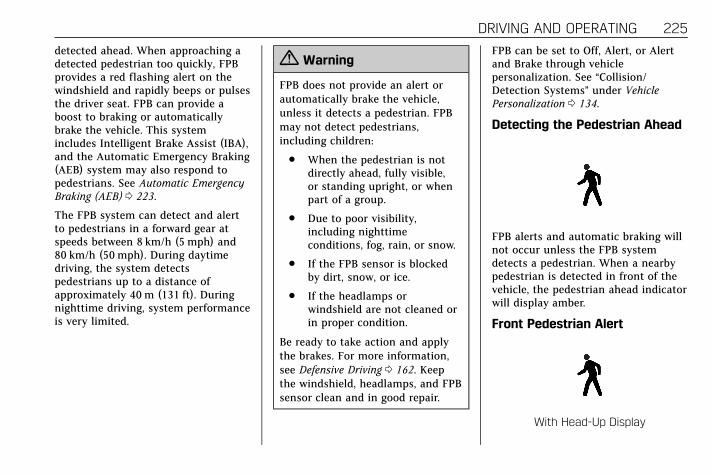
Cadillac XT5 Owner Manual (GMNA-Localizing-U.S./Canada/Mexico-13527534) - 2020 - CRC - 5/29/19
DRIVING AND OPERATING 225
detected ahead. When approaching adetected pedestrian too quickly, FPBprovides a red flashing alert on thewindshield and rapidly beeps or pulsesthe driver seat. FPB can provide aboost to braking or automaticallybrake the vehicle. This systemincludes Intelligent Brake Assist (IBA),and the Automatic Emergency Braking(AEB) system may also respond topedestrians. See Automatic EmergencyBraking (AEB) 0 223.
The FPB system can detect and alertto pedestrians in a forward gear atspeeds between 8 km/h (5 mph) and80 km/h (50 mph). During daytimedriving, the system detectspedestrians up to a distance ofapproximately 40 m (131 ft). Duringnighttime driving, system performanceis very limited.
{ Warning
FPB does not provide an alert orautomatically brake the vehicle,unless it detects a pedestrian. FPBmay not detect pedestrians,including children:
. When the pedestrian is notdirectly ahead, fully visible,or standing upright, or whenpart of a group.
. Due to poor visibility,including nighttimeconditions, fog, rain, or snow.
. If the FPB sensor is blockedby dirt, snow, or ice.
. If the headlamps orwindshield are not cleaned orin proper condition.
Be ready to take action and applythe brakes. For more information,see Defensive Driving 0 162. Keepthe windshield, headlamps, and FPBsensor clean and in good repair.
FPB can be set to Off, Alert, or Alertand Brake through vehiclepersonalization. See “Collision/Detection Systems” under VehiclePersonalization 0 134.
Detecting the Pedestrian Ahead
FPB alerts and automatic braking willnot occur unless the FPB systemdetects a pedestrian. When a nearbypedestrian is detected in front of thevehicle, the pedestrian ahead indicatorwill display amber.
Front Pedestrian Alert
With Head-Up Display

Cadillac XT5 Owner Manual (GMNA-Localizing-U.S./Canada/Mexico-13527534) - 2020 - CRC - 5/29/19
226 DRIVING AND OPERATING
Without Head-Up Display
When the vehicle approaches apedestrian ahead too rapidly, the redFPB alert display will flash on thewindshield. Eight rapid high-pitchedbeeps will sound from the front,or both sides of the Safety Alert Seatwill pulse five times. When thisPedestrian Alert occurs, the brakesystem may prepare for driver brakingto occur more rapidly which can causea brief, mild deceleration. Continue toapply the brake pedal as needed.Cruise control may be disengagedwhen the Front Pedestrian Alertoccurs.
Automatic Braking
If FPB detects it is about to crash intoa pedestrian ahead, and the brakeshave not been applied, FPB mayautomatically brake moderately orbrake hard. This can help to avoid
some very low speed pedestriancrashes or reduce pedestrian injury.FPB can automatically brake todetected pedestrians between 8 km/h(5 mph) and 80 km/h (50 mph).Automatic braking levels may bereduced under certain conditions,such as higher speeds.
If this happens, Automatic Brakingmay engage the Electric Parking Brake(EPB) to hold the vehicle at a stop.Release the EPB. A firm press of theaccelerator pedal will also releaseAutomatic Braking and the EPB.
{ Warning
FPB may alert or automaticallybrake the vehicle suddenly insituations where it is unexpectedand undesired. It could falsely alertor brake for objects similar in shapeor size to pedestrians, includingshadows. This is normal operationand the vehicle does not needservice. To override AutomaticBraking, firmly press the acceleratorpedal, if it is safe to do so.
Automatic Braking can be disabledthrough vehicle personalization. See“Front Pedestrian Detection” in“Collision/Detection Systems” underVehicle Personalization 0 134.
{ Warning
Using the Front Pedestrian Brakingsystem while towing a trailer couldcause you to lose control of thevehicle and crash. Turn the systemto Alert or Off when towing atrailer.
Cleaning the System
If FPB does not seem to operateproperly, cleaning the outside of thewindshield in front of the rearviewmirror may correct the issue.
Night Vision SystemIf equipped, this system can help thedriver see and alert the driver topedestrians or large animals ahead ofthe vehicle beyond the area lit by theheadlamps. A thermal heat image ofthe view ahead is displayed when it is

Cadillac XT5 Owner Manual (GMNA-Localizing-U.S./Canada/Mexico-13527534) - 2020 - CRC - 5/29/19
DRIVING AND OPERATING 227
dark enough outside. If a pedestrianor large animal is detected more than25 m (82 ft) away, an amberpedestrian or animal icon displays anda box appears around the pedestrianor animal. When the system detectsthat the vehicle is approaching apedestrian ahead much too quickly,the box changes to red.
With the Front Pedestrian Brakingsystem turned on, Night Visionprovides a red Head-Up Display (HUD)alert when the system detects that thevehicle is approaching a pedestrianahead much too quickly. In addition,an alert beeps or the Safety Alert Seatpulses, if equipped. See FrontPedestrian Braking (FPB) System 0 224.
{ Warning
The system does not detect allobjects or the vehicle distance fromobjects. The system may notprovide a warning with enough timeto help avoid a crash.
1. Low-Beam Headlamps2. High-Beam Headlamps3. Night Vision System
By selecting a view on the instrumentcluster, the Night Vision image can bedisplayed. See Instrument Cluster 0 111. The Night Vision system can operateonly if:
. The ignition is on.
. The vehicle is in P (Park) or aforward gear.
. It is dark enough outside.
. The headlamps are on, exceptwhen parked.
Adjust the instrument panelbrightness to make the image nobrighter than necessary. Turn theimage off by selecting another viewon the instrument cluster.
Warm objects, such as pedestrians,animals, and other moving vehicles,should appear whiter on the NightVision display. Cold objects, such asthe sky, signs, and parked vehicles,should appear darker. Night Visiononly shows objects that are warmer orcolder than the surroundings. It doesnot detect brake lamps, turn signals,emergency flashers, traffic lights,or sign information.

Cadillac XT5 Owner Manual (GMNA-Localizing-U.S./Canada/Mexico-13527534) - 2020 - CRC - 5/29/19
228 DRIVING AND OPERATING
Use this system as an aid byoccasionally glancing at the image. Donot stare at the image or use theimage under well-lit conditions.
{ Warning
Do not stare at the image whiledriving as this might causeimportant objects ahead not to beseen. You could crash, and you orothers could be injured.
When a pedestrian or large animal isdetected, an amber box displaysaround the pedestrian or animal onthe Night Vision display and anamber pedestrian icon, ~, oranimal icon,!, displays on theinstrument cluster. This pedestrianicon is also shown on the Head-UpDisplay (HUD). When the systemdetects the vehicle is approaching apedestrian much too quickly, theamber pedestrian icon and box turnsred, and a red flashing icon, ~,
displays on the HUD with rapidbeeping or pulsing of the Safety AlertSeat, if equipped.
System pedestrian icons, beeps, and(if equipped) Safety Alert Seat pulsescan be set to Off through vehiclepersonalization by turning off theFront Pedestrian Braking system. See“Front Pedestrian Detection” in“Collision/Detection Systems” underVehicle Personalization 0 134.
{ Warning
The Night Vision system does notautomatically brake the vehicle.It does not provide alerts unless itdetects a pedestrian or largeanimal. The system may not detectpedestrians, including children,or animals:
. If they are less than 25 m(82 ft) away.
. If they are not directly aheadin the sensor coverage area,fully visible, standing upright,or part of a group.
(Continued)
Warning (Continued)
. If the person or animal ismoving too quickly throughthe field of view, such as abicyclist.
. If the pedestrian is wearingcertain types of clothing.
. If headlamps are off, exceptwhen parked.
. If the outside temperature ishigher than 30 °C (86 °F).
. Due to poor visibility,including in heavy fog, rain,or snow.
. If the sensor is blocked bydirt, snow, rain, or ice.
Be ready to take action and applythe brakes. For more information,see Defensive Driving 0 162. Keepthe Night Vision sensor clean andin good repair.

Cadillac XT5 Owner Manual (GMNA-Localizing-U.S./Canada/Mexico-13527534) - 2020 - CRC - 5/29/19
DRIVING AND OPERATING 229
Pedestrian detection may not beavailable in high outside temperatures.An amber icon,*, displays. Thesystem does not need service.
In rain, snow, or fog the image maynot be clear and the direction of theroad ahead may not be seen. In moresevere weather conditions, the imagemay be unclear and unusable. Thesystem does not need service.
Keep the system sensor clean byactivating the rear window washerwhen it is dark enough for the systemto operate. If the Night Vision imagestill looks blurry, use a soft wet clothto gently clean the sensor camera lensand dry thoroughly. The sensor isbehind the lower front grille below thedriver side headlamp.
The camera must also be aligned towork correctly. If the camera needsadjustment, see your dealer. Do notattempt to adjust the camera yourself.
Side Blind ZoneAlert (SBZA)If equipped, the SBZA system is alane-changing aid that assists driverswith avoiding crashes that occur withmoving vehicles in the side blind zone(or spot) areas. When the vehicle is ina forward gear, the left or right sidemirror display will light up if a movingvehicle is detected in that blind zone.If the turn signal is activated and avehicle is also detected on the sameside, the display will flash as an extrawarning not to change lanes. Sincethis system is part of the Lane ChangeAlert (LCA) system, read the entireLCA section before using this feature.
Lane Change Alert (LCA)If equipped, the LCA system is alane-changing aid that assists driverswith avoiding lane change crashesthat occur with moving vehicles in theside blind zone (or spot) areas or withvehicles rapidly approaching theseareas from behind. The LCA warning
display will light up in thecorresponding outside side mirror andwill flash if the turn signal is on.
{ Warning
LCA does not alert the driver tovehicles outside of the systemdetection zones, pedestrians,bicyclists, or animals. It may notprovide alerts when changing lanesunder all driving conditions. Failureto use proper care when changinglanes may result in injury, death,or vehicle damage. Before making alane change, always check mirrors,glance over your shoulder, and usethe turn signals.

Cadillac XT5 Owner Manual (GMNA-Localizing-U.S./Canada/Mexico-13527534) - 2020 - CRC - 5/29/19
230 DRIVING AND OPERATING
LCA Detection Zones
1. SBZA Detection Zone2. LCA Detection Zone
The LCA sensor covers a zone ofapproximately one lane over fromboth sides of the vehicle, or 3.5 m(11 ft). The height of the zone isapproximately between 0.5 m (1.5 ft)and 2 m (6 ft) off the ground. The SideBlind Zone Alert (SBZA) warning areastarts at approximately the middle ofthe vehicle and goes back 5 m (16 ft).Drivers are also warned of vehiclesrapidly approaching from up to 70 m(230 ft) behind the vehicle.
How the System Works
The LCA symbol lights up in the sidemirrors when the system detects amoving vehicle in the next lane overthat is in the side blind zone orrapidly approaching that zone frombehind. A lit LCA symbol indicates itmay be unsafe to change lanes. Beforemaking a lane change, check the LCAdisplay, check mirrors, glance overyour shoulder, and use the turnsignals.
Left Side MirrorDisplay
Right Side MirrorDisplay
When the vehicle is started, bothoutside mirror LCA displays willbriefly come on to indicate the systemis operating. When the vehicle is in aforward gear, the left or right sidemirror display will light up if a movingvehicle is detected in the next laneover in that blind zone or rapidlyapproaching that zone. If the turn
signal is activated in the samedirection as a detected vehicle, thisdisplay will flash as an extra warningnot to change lanes.
LCA can be disabled through vehiclepersonalization. See VehiclePersonalization 0 134. If LCA isdisabled by the driver, the LCA mirrordisplays will not light up.
When the System Does NotSeem to Work Properly
The LCA system requires some drivingfor the system to calibrate tomaximum performance. Thiscalibration may occur more quickly ifthe vehicle is driving on a straighthighway road with traffic and roadsideobjects (e.g., guardrails, barriers).
LCA displays may not come on whenpassing a vehicle quickly, for astopped vehicle, or when towing atrailer. The LCA detection zones thatextend back from the side of thevehicle do not move further backwhen a trailer is towed. Use cautionwhile changing lanes when towing atrailer. LCA may alert to objectsattached to the vehicle, such as a

Cadillac XT5 Owner Manual (GMNA-Localizing-U.S./Canada/Mexico-13527534) - 2020 - CRC - 5/29/19
DRIVING AND OPERATING 231
trailer, bicycle, or object extending outto either side of the vehicle. Attachedobjects may also interfere with thedetection of vehicles. This is normalsystem operation; the vehicle does notneed service.
LCA may not always alert the driver tovehicles in the next lane over,especially in wet conditions or whendriving on sharp curves. The systemdoes not need to be serviced. Thesystem may light up due to guardrails,signs, trees, shrubs, and othernon-moving objects. This is normalsystem operation; the vehicle does notneed service.
LCA may not operate when the LCAsensors in the left or right corners ofthe rear bumper are covered withmud, dirt, snow, ice, or slush, or inheavy rainstorms. For cleaninginstructions, see "Washing theVehicle" under Exterior Care 0 326.If the DIC still displays the systemunavailable message after cleaningboth sides of the vehicle toward therear corners of the vehicle, see yourdealer.
If the LCA displays do not light upwhen moving vehicles are in the sideblind zone or are rapidly approachingthis zone and the system is clean, thesystem may need service. Take thevehicle to your dealer.
Radio Frequency Information
See Radio Frequency Statement 0 363.
Lane Keep Assist (LKA)If equipped, LKA may help avoidcrashes due to unintentional lanedepartures. This system uses a camerato detect lane markings between60 km/h (37 mph) and 180 km/h(112 mph). It may assist by gentlyturning the steering wheel if thevehicle approaches a detected lanemarking. It may also provide a LaneDeparture Warning (LDW) alert if thevehicle crosses a detected lanemarking. LKA can be overridden byturning the steering wheel. Thissystem is not intended to keep thevehicle centered in the lane. LKA willnot assist and alert if the turn signalis active in the direction of lane
departure, or if it detects that you areaccelerating, braking, or activelysteering.
{ Warning
The LKA system does notcontinuously steer the vehicle.It may not keep the vehicle in thelane or give a Lane DepartureWarning (LDW) alert, even if a lanemarking is detected.
The LKA and LDW systemsmay not:
. Provide an alert or enoughsteering assist to avoid a lanedeparture or crash.
. Detect lane markings underpoor weather or visibilityconditions. This can occur ifthe windshield or headlampsare blocked by dirt, snow,or ice; if they are not inproper condition; or if the sunshines directly into thecamera.
(Continued)

Cadillac XT5 Owner Manual (GMNA-Localizing-U.S./Canada/Mexico-13527534) - 2020 - CRC - 5/29/19
232 DRIVING AND OPERATING
Warning (Continued)
. Detect road edges.
. Detect lanes on winding orhilly roads.
If LKA only detects lane markingson one side of the road, it will onlyassist or provide an LDW alertwhen approaching the lane on theside where it has detected a lanemarking. Even with LKA and LDW,you must steer the vehicle. Alwayskeep your attention on the road andmaintain proper vehicle positionwithin the lane, or vehicle damage,injury, or death could occur. Alwayskeep the windshield, headlamps,and camera sensors clean and ingood repair. Do not use LKA in badweather conditions or on roads withunclear lane markings, such asconstruction zones.
{ Warning
Using LKA while towing a trailer oron slippery roads could cause lossof control of the vehicle and acrash. Turn the system off.
How the System Works
LKA uses a camera sensor installed onthe windshield ahead of the rearviewmirror to detect lane markings. It mayprovide brief steering assist if itdetects an unintended lane departure.It may further provide an audible alertor the driver seat may pulse indicatingthat a lane marking has been crossed.
To turn LKA on and off, pressAon the steering wheel. If equipped, theindicator light on the button comeson when LKA is on and turns offwhen LKA is disabled.
When on,A is white, if equipped,indicating that the system is not readyto assist.A is green if LKA is readyto assist. LKA may assist by gentlyturning the steering wheel if the
vehicle approaches a detected lanemarking.A is amber whenassisting. It may also provide a LaneDeparture Warning (LDW) alert byflashingA amber if the vehiclecrosses a detected lane marking.Additionally, there may be threebeeps, or the driver seat may pulsethree times, on the right or left,depending on the lane departuredirection.
Take Steering
The LKA system does notcontinuously steer the vehicle. If LKAdoes not detect active driver steering,an alert and chime may be provided.Steer the vehicle to dismiss. LKA maybecome temporarily unavailable afterrepeated take steering alerts.
When the System Does NotSeem to Work Properly
The system performance may beaffected by:
. Close vehicles ahead.
. Sudden lighting changes, such aswhen driving through tunnels.

Cadillac XT5 Owner Manual (GMNA-Localizing-U.S./Canada/Mexico-13527534) - 2020 - CRC - 5/29/19
DRIVING AND OPERATING 233. Banked roads.
. Roads with poor lane markings,such as two-lane roads.
A camera blocked message maydisplay if the camera is blocked. Somedriver assistance systems may havereduced performance or not work atall. An LKA or LDW unavailablemessage may display if the systemsare temporarily unavailable. Thismessage could be due to a blockedcamera. The LKA system does notneed service. Clean the outside of thewindshield behind the rearview mirror.
LKA assistance and/or LDW alertsmay occur due to tar marks, shadows,cracks in the road, temporary orconstruction lane markings, or otherroad imperfections. This is normalsystem operation; the vehicle does notneed service. Turn LKA off if theseconditions continue.
Fuel
Top Tier FuelGM recommends the use of TOP TIERDetergent Gasoline to keep the engineclean, reduce engine deposits, andmaintain optimal vehicle performance.Look for the TOP TIER Logo or seewww.toptiergas.com for a list of TOPTIER Detergent Gasoline marketersand applicable countries.
Recommended Fuel (2.0LL4 Engine)
Premium unleaded gasoline meetingASTM specification D4814 with aposted octane rating of 93 — (R+M)/2— is highly recommended for bestperformance and fuel economy.Unleaded gasoline with an octanerated as low as 87 can be used. Usingunleaded gasoline rated below93 octane, however, will lead toreduced acceleration and fueleconomy. If knocking occurs, use agasoline rated at 93 octane as soon aspossible, otherwise, the engine couldbe damaged. If heavy knocking isheard when using gasoline with a93 octane rating, the engine needsservice.

Cadillac XT5 Owner Manual (GMNA-Localizing-U.S./Canada/Mexico-13527534) - 2020 - CRC - 5/29/19
234 DRIVING AND OPERATING
Do not use any fuel labeled E85 orFlexFuel. Do not use gasoline withethanol levels greater than 15% byvolume.
Recommended Fuel (3.6LV6 Engine)
Use regular unleaded gasoline meetingASTM specification D4814 with aposted octane rating of 87 — (R+M)/2— or higher. Do not use gasoline witha posted octane rating of less than 87,as this may cause engine knock andwill lower fuel economy.
Do not use any fuel labeled E85 orFlexFuel. Do not use gasoline withethanol levels greater than 15% byvolume.
Prohibited Fuels
Caution
Do not use fuels with any of thefollowing conditions; doing so maydamage the vehicle and void itswarranty:
. For vehicles that are notFlexFuel, fuel labeled greaterthan 15% ethanol by volume,such as mid-level ethanolblends (16–50% ethanol), E85,or FlexFuel.
. Fuel with any amount ofmethanol, methylal, ferrocene,and aniline. These fuels cancorrode metal fuel systemparts or damage plastic andrubber parts.
. Fuel containing metals suchas methylcyclopentadienylmanganese tricarbonyl(MMT), which can damagethe emissions control systemand spark plugs.
(Continued)
Caution (Continued)
. Fuel with a posted octanerating of less than therecommended fuel. Using thisfuel will lower fuel economyand performance, and maydecrease the life of theemissions catalyst.
Fuels in Foreign CountriesThe U.S., Canada, and Mexico postfuel octane ratings in anti-knock index(AKI). For fuel not to use in a foreigncountry, see Prohibited Fuels 0 234.
Fuel AdditivesTOP TIER Detergent Gasoline is highlyrecommended for use with yourvehicle. If your country does not haveTOP TIER Detergent Gasoline, addACDelco Fuel System Treatment Plus−Gasoline to the vehicle’s gasoline fueltank at every oil change or 15 000 km(9,000 mi), whichever occurs first. TOPTIER Detergent Gasoline and ACDelcoFuel System Treatment Plus−Gasoline

Cadillac XT5 Owner Manual (GMNA-Localizing-U.S./Canada/Mexico-13527534) - 2020 - CRC - 5/29/19
DRIVING AND OPERATING 235
will help keep your vehicle’s enginefuel deposit free and performingoptimally.
Filling the TankAn arrow on the fuel gauge indicateswhich side of the vehicle the fuel dooris on. See Fuel Gauge 0 115.
{ Warning
Fuel vapors and fuel fires burnviolently and can cause injury ordeath.
Follow these guidelines to helpavoid injuries to you and others:
. Read and follow all theinstructions on the fuel pumpisland.
. Turn off the engine whenrefueling.
. Keep sparks, flames, andsmoking materials awayfrom fuel.
(Continued)
Warning (Continued)
. Do not leave the fuel pumpunattended.
. Avoid using electronic deviceswhile refueling.
. Do not re-enter the vehiclewhile pumping fuel.
. Keep children away from thefuel pump and never letchildren pump fuel.
. Before touching the fillnozzle, touch a metallicobject to discharge staticelectricity from your body.
. Fuel can spray out if the fillnozzle is inserted too quickly.This spray can happen if thetank is nearly full, and ismore likely in hot weather.Insert the fill nozzle slowlyand wait for any hiss noise tostop before beginning toflow fuel.
If equipped, the fuel door unlockswhen the vehicle doors are unlocked.See Remote Keyless Entry (RKE) SystemOperation 0 10.
To open the fuel door, push andrelease the rearward center edge ofthe door.
The capless refueling system does nothave a fuel cap. Fully insert and latchthe fill nozzle, then begin fueling.

Cadillac XT5 Owner Manual (GMNA-Localizing-U.S./Canada/Mexico-13527534) - 2020 - CRC - 5/29/19
236 DRIVING AND OPERATING
{ Warning
Overfilling the fuel tank by morethan three clicks of a standard fillnozzle may cause:
. Vehicle performance issues,including engine stalling anddamage to the fuel system.
. Fuel spills.
. Under certain conditions, fuelfires.
Be careful not to spill fuel. Waitfive seconds after you have finishedpumping before removing the fillnozzle. Clean fuel from paintedsurfaces as soon as possible. SeeExterior Care 0 326. Push the fuel doorclosed until it latches.
{ Warning
If a fire starts while you arerefueling, do not remove the fillnozzle. Shut off the flow of fuel by
(Continued)
Warning (Continued)
shutting off the pump or bynotifying the station attendant.Leave the area immediately.
Filling the Tank with a Portable FuelContainer
If the vehicle runs out of fuel andmust be filled from a portable fuelcontainer:
1. Locate the capless funneladapter in the rear cargo areaunder the load floor tray.
2. Insert and latch the funnel intothe capless fuel system.
{ Warning
Attempting to refuel from aportable fuel container withoutusing the funnel adapter may causefuel spillage and damage thecapless fuel system. This couldcause a fire. You or others could bebadly burned and the vehicle couldbe damaged.
3. Remove and clean the funneladapter and return it to thestorage location.
Filling a Portable FuelContainer
{ Warning
Never fill a portable fuel containerwhile it is in the vehicle. Staticelectricity discharge from thecontainer can ignite the fuel vapor.You or others could be badly
(Continued)
Cadillac XT5 Owner Manual (GMNA-Localizing-U.S./Canada/Mexico-13527534) - 2020 - CRC - 5/29/19
DRIVING AND OPERATING 237
Warning (Continued)
burned and the vehicle could bedamaged. To help avoid injury toyou and others:
. Dispense fuel only intoapproved containers.
. Do not fill a container whileit is inside a vehicle, in avehicle's trunk, in a pickupbed, or on any surface otherthan the ground.
. Bring the fill nozzle incontact with the inside of thefill opening before operatingthe nozzle. Maintain contactuntil filling is complete.
. Keep sparks, flames, andsmoking materials awayfrom fuel.
. Do not use electronic deviceswhile pumping fuel.
Trailer Towing
General TowingInformationOnly use towing equipment that hasbeen designed for the vehicle. Contactyour dealer or trailering dealer forassistance with preparing the vehicleto tow a trailer. Read the entiresection before towing a trailer.
To tow a disabled vehicle, see Towingthe Vehicle 0 323. To tow the vehiclebehind another vehicle such as amotor home, see Recreational VehicleTowing 0 324.
Driving Characteristics andTowing Tips
{ Warning
You can lose control when towing atrailer if the correct equipment isnot used or the vehicle is not drivenproperly. For example, if the traileris too heavy or the trailer brakes are
(Continued)
Warning (Continued)
inadequate for the load, the vehiclemay not stop as expected. You andothers could be seriously injured.The vehicle may also be damaged,and the repairs would not becovered by the vehicle warranty.Pull a trailer only if all the steps inthis section have been followed. Askyour dealer for advice andinformation about towing a trailerwith the vehicle.
Driving with a Trailer
Trailering is different than just drivingthe vehicle by itself. Trailering meanschanges in handling, acceleration,braking, durability, and fuel economy.Successful, safe trailering takes correctequipment, and it has to be usedproperly.
The following information has manytime-tested, important trailering tipsand safety rules. Many of these are
Cadillac XT5 Owner Manual (GMNA-Localizing-U.S./Canada/Mexico-13527534) - 2020 - CRC - 5/29/19
238 DRIVING AND OPERATING
important for your safety and that ofyour passengers. Read this sectioncarefully before pulling a trailer.
When towing a trailer:
. Become familiar with and followall state and local laws that applyto trailer towing. Theserequirements vary from state tostate.
. State laws may require the use ofextended side view mirrors. Even ifnot required, you should installextended side view mirrors if yourvisibility is limited or restrictedwhile towing.
. Do not tow a trailer during thefirst 800 km (500 mi) of vehicleuse to prevent damage to theengine, axle, or other parts.
. It is recommended to perform thefirst oil change before heavytowing.
. During the first 800 km (500 mi)of trailer towing, do not drive over80 km/h (50 mph) and do notmake starts at full throttle.
. Vehicles can tow in D (Drive).If the transmission downshifts toooften, a lower gear may beselected using Manual Mode SeeManual Mode 0 191.
If equipped, the following driverassistance features should be turnedoff when towing a trailer:
. Adaptive Cruise Control (ACC)
. Super Cruise Control
. Lane Keep Assist (LKA)
. Park Assist
. Automatic Parking Assist (APA)
. Reverse Automatic Braking (RAB)
If equipped, the following driverassistance features should be turnedto alert or off when towing a trailer:
. Automatic EmergencyBraking (AEB)
. Intelligent Brake Assist (IBA)
. Front Pedestrian Braking (FPB)
If equipped with Lane Change Alert(LCA), the LCA detection zones thatextend back from the side of thevehicle do not move further back
when a trailer is towed. Use cautionwhile changing lanes when towing atrailer.
If equipped with Rear Cross TrafficAlert (RCTA), use caution whilebacking up when towing a trailer, asthe RCTA detection zones that extendout from the back of the vehicle donot move further back when a traileris towed.
{ Warning
To prevent serious injury or deathfrom carbon monoxide (CO), whentowing a trailer:
. Do not drive with the liftgate,trunk/hatch, or rear-mostwindow open.
. Fully open the air outlets onor under the instrumentpanel.
(Continued)

Cadillac XT5 Owner Manual (GMNA-Localizing-U.S./Canada/Mexico-13527534) - 2020 - CRC - 5/29/19
DRIVING AND OPERATING 239
Warning (Continued)
. Adjust the climate controlsystem to a setting thatbrings in only outside air. See“Climate Control Systems” inthe Index.
For more information about carbonmonoxide, see Engine Exhaust0 185.
Towing a trailer requires experience.The combination of the vehicle andtrailer is longer and not as responsiveas the vehicle itself. Get used to thehandling and braking of thecombination by driving on a level roadsurface before driving on public roads.
The trailer structure, the tires, and thebrakes must be all be rated to carrythe intended cargo. Inadequate trailerequipment can cause the combinationto operate in an unexpected or unsafemanner. Before driving, inspect alltrailer hitch parts and attachments,safety chains, electrical connectors,lamps, tires, and mirrors. See TowingEquipment 0 244. If the trailer has
electric brakes, start the combinationmoving and then manually apply thetrailer brake controller to check thetrailer brakes work. During the trip,occasionally check that the cargo andtrailer are secure and that the lampsand any trailer brakes are working.
Towing with a Stability ControlSystem
When towing, the stability controlsystem might be heard. The systemreacts to vehicle movement caused bythe trailer, which mainly occursduring cornering. This is normal whentowing heavier trailers.
Following Distance
Stay at least twice as far behind thevehicle ahead as you would whendriving without a trailer. This can helpto avoid heavy braking and suddenturns.
Passing
More passing distance is needed whentowing a trailer. The combination willnot accelerate as quickly and is muchlonger so it is necessary to go muchfarther beyond the passed vehicle
before returning to the lane. Pass onlevel roadways. Avoid passing on hillsif possible.
Backing Up
Hold the bottom of the steering wheelwith one hand. To move the trailer tothe left, move that hand to the left. Tomove the trailer to the right, movethat hand to the right. Always back upslowly and, if possible, have someoneguide you.
Making Turns
Caution
Turn more slowly and make widerarcs when towing a trailer toprevent damage to your vehicle.Making very sharp turns couldcause the trailer to contact thevehicle.
Make wider turns than normal whentowing, so trailer will not go over softshoulders, over curbs, or strike road
Cadillac XT5 Owner Manual (GMNA-Localizing-U.S./Canada/Mexico-13527534) - 2020 - CRC - 5/29/19
240 DRIVING AND OPERATING
signs, trees, or other objects. Alwayssignal turns well in advance. Do notsteer or brake suddenly.
Driving on Grades
Reduce speed and shift to a lower gearbefore starting down a long or steepdownhill grade. If the transmission isnot shifted down, the brakes mayoverheat and result in reduced brakingefficiency.
The vehicle can tow in D (Drive). Shiftthe transmission to a lower gear if thetransmission shifts too often underheavy loads and/or hilly conditions.
When towing at higher altitudes,engine coolant will boil at a lowertemperature than at lower altitudes.If the engine is turned off immediatelyafter towing at high altitude on steepuphill grades, the vehicle could showsigns similar to engine overheating. Toavoid this, let the engine run,preferably on level ground, with thetransmission in P (Park) for a fewminutes before turning the engine off.If the overheat warning comes on, seeEngine Overheating 0 268.
Parking on Hills
{ Warning
To prevent serious injury or death,always park your vehicle and traileron a level surface when possible.
When parking your vehicle and yourtrailer on a hill:
1. Press the brake pedal, but do notshift into P (Park) yet. Turn thewheels into the curb if facingdownhill or into traffic if facinguphill.
2. Have someone place chocksunder the trailer wheels.
3. When the wheel chocks are inplace, gradually release the brakepedal to allow the chocks toabsorb the load of the trailer.
4. Reapply the brake pedal. Thenapply the parking brake and shiftinto P (Park).
5. Release the brake pedal.
Leaving After Parking on a Hill
1. Apply and hold the brake pedal.
. Start the engine.
. Shift into a gear.
. Release the parking brake.
2. Let up on the brake pedal.
3. Drive slowly until the trailer isclear of the chocks.
4. Stop and have someone pick upand store the chocks.
Maintenance When TrailerTowing
The vehicle needs service more oftenwhen used to tow trailers. SeeMaintenance Schedule 0 337. It isespecially important to check theengine oil, axle lubricant, belts,cooling system, and brake systembefore and during each trip.
Check periodically that all nuts andbolts on the trailer hitch are tight.

Cadillac XT5 Owner Manual (GMNA-Localizing-U.S./Canada/Mexico-13527534) - 2020 - CRC - 5/29/19
DRIVING AND OPERATING 241
Engine Cooling When TrailerTowing
The cooling system may temporarilyoverheat during severe operatingconditions. See Engine Overheating0 268.
Trailer Towing
Caution
Towing a trailer improperly candamage the vehicle and result incostly repairs not covered by thevehicle warranty. To tow a trailercorrectly, follow the directions inthis section and see your dealer forimportant information abouttowing a trailer with the vehicle.
Trailer Weight
{ Warning
Never exceed the towing capacityfor your vehicle.
Safe trailering requires monitoring theweight, speed, altitude, road grades,outside temperature, dimensions ofthe front of the trailer, and howfrequently the vehicle is used to tow atrailer.
Trailer Weight Ratings
When towing a trailer, the combinedweight of the vehicle, vehicle contents,trailer, and trailer contents must bebelow all of the maximum weightratings for the vehicle, including:
. GCWR: Gross Combined WeightRating
. GVWR: Gross Vehicle WeightRating
. Maximum Trailer Weight Rating
. Maximum Trailer Tongue WeightRating
The only way to be sure the weight isnot exceeding any of these ratings isto weigh the tow vehicle and trailercombination, fully loaded for the trip,getting individual weights for each ofthese items.
{ Warning
You and others could be seriouslyinjured or killed if the trailer is tooheavy or the trailer brakes areinadequate for the load. The vehiclemay be damaged, and the repairswould not be covered by the vehiclewarranty.
Only tow a trailer if all the steps inthis section have been followed. Askyour dealer for advice andinformation about towing a trailer.
Gross Combined WeightRating (GCWR)
GCWR is the total allowable weight ofthe completely loaded vehicle andtrailer including any fuel, passengers,cargo, equipment, and accessories. Donot exceed the GCWR for your vehicle.The GCWR for the vehicle is on theTow Rating Chart following.
To check that the weight of thevehicle and trailer are within theGCWR for the vehicle, follow thesesteps:

Cadillac XT5 Owner Manual (GMNA-Localizing-U.S./Canada/Mexico-13527534) - 2020 - CRC - 5/29/19
242 DRIVING AND OPERATING. Start with the “curb weight” fro the
Trailering Information Label
. Add the weight of the trailerloaded with cargo and ready forthe trip
. Add the weight of all passengers
. Add the weight of all cargo in thevehicle
. Add the weight of hitch hardwaresuch as a draw bar, ball, loadequalizer bars, or sway bars
. Add the weight of any accessoriesor aftermarket equipment addedto the vehicle
The resulting weight cannot exceedthe GCWR value shown on theTrailering Information Label.
The gross combined weight can alsobe confirmed by weighing the truckand trailer on a public scale. The truckand trailer should be loaded for thetrip with passengers and cargo.
Gross Vehicle WeightRating (GVWR)
For information about the vehicle'smaximum load capacity, see VehicleLoad Limits 0 172. When calculatingthe GVWR with a trailer attached, thetrailer tongue weight must beincluded as part of the weight thevehicle is carrying.
Maximum Trailer Weight Rating
The maximum trailer weight rating iscalculated assuming the tow vehiclehas a driver, a front seat passenger,and all required trailering equipment.This value represents the heaviesttrailer the vehicle can tow, but it maybe necessary to reduce the trailerweight to stay within the GCW,GVWR, maximum trailer tongue load,or GAWR-RR for the vehicle.
Use the tow rating chart to determinehow much the trailer can weigh, basedon the vehicle model, powertrain andtrailering options.
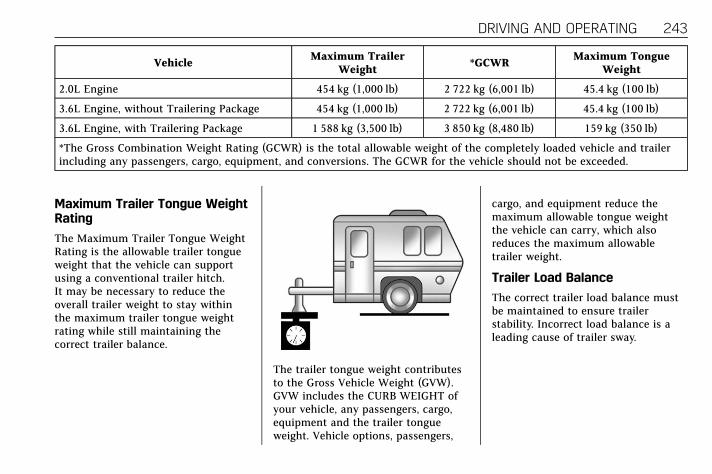
Cadillac XT5 Owner Manual (GMNA-Localizing-U.S./Canada/Mexico-13527534) - 2020 - CRC - 5/29/19
DRIVING AND OPERATING 243
Vehicle Maximum TrailerWeight *GCWR Maximum Tongue
Weight
2.0L Engine 454 kg (1,000 lb) 2 722 kg (6,001 lb) 45.4 kg (100 lb)
3.6L Engine, without Trailering Package 454 kg (1,000 lb) 2 722 kg (6,001 lb) 45.4 kg (100 lb)
3.6L Engine, with Trailering Package 1 588 kg (3,500 lb) 3 850 kg (8,480 lb) 159 kg (350 lb)
*The Gross Combination Weight Rating (GCWR) is the total allowable weight of the completely loaded vehicle and trailerincluding any passengers, cargo, equipment, and conversions. The GCWR for the vehicle should not be exceeded.
Maximum Trailer Tongue WeightRating
The Maximum Trailer Tongue WeightRating is the allowable trailer tongueweight that the vehicle can supportusing a conventional trailer hitch.It may be necessary to reduce theoverall trailer weight to stay withinthe maximum trailer tongue weightrating while still maintaining thecorrect trailer balance.
The trailer tongue weight contributesto the Gross Vehicle Weight (GVW).GVW includes the CURB WEIGHT ofyour vehicle, any passengers, cargo,equipment and the trailer tongueweight. Vehicle options, passengers,
cargo, and equipment reduce themaximum allowable tongue weightthe vehicle can carry, which alsoreduces the maximum allowabletrailer weight.
Trailer Load Balance
The correct trailer load balance mustbe maintained to ensure trailerstability. Incorrect load balance is aleading cause of trailer sway.

Cadillac XT5 Owner Manual (GMNA-Localizing-U.S./Canada/Mexico-13527534) - 2020 - CRC - 5/29/19
244 DRIVING AND OPERATING
The trailer tongue weight (1) shouldbe 10–15% of the loaded trailerweight (2). Some specific trailer types,such as boat trailers, fall outside ofthis range. Always refer to the trailerowner’s manual for the recommendedtrailer tongue weight for each trailer.Never exceed the maximum loads foryour vehicle, hitch and trailer.
After loading the trailer, separatelyweigh the trailer and then the trailertongue and calculate the trailer loadbalance percentage to see if theweights and distribution areappropriate for your vehicle. If thetrailer weight is too high, it may bepossible to transfer some of the cargo
into your vehicle. If the trailer tongueweight is too high or too low, it maybe possible to rearrange some of thecargo inside of the trailer.
Do not exceed the maximumallowable tongue weight for yourvehicle. Use the shortest hitchextension available to position thehitch ball closer to your vehicle. Thiswill help reduce the effect of thetrailer tongue weight on the trailerhitch and rear axle.
If a cargo carrier is used in the trailerhitch receiver, choose a carrier thatpositions the load as close to thevehicle as possible. Make sure thetotal weight, including the carrier, isno more than half of the maximumallowable tongue weight for thevehicle or 227 kg (500 lb), whicheveris less.
Ask your dealer for traileringinformation or assistance.
Towing Equipment
Hitches
Always use the correct hitchequipment for your vehicle.Crosswinds, large trucks going by, andrough roads can affect the trailer andthe hitch.
Never attach rental hitches or otherbumper-type hitches. Only useframe-mounted hitches that do notattach to the bumper.
Always seal any holes in your vehicleif the trailer hitch is removed. If notsealed, dirt, water, and carbonmonoxide (CO) from the exhaust mayenter your vehicle. See Engine Exhaust0 185.

Cadillac XT5 Owner Manual (GMNA-Localizing-U.S./Canada/Mexico-13527534) - 2020 - CRC - 5/29/19
DRIVING AND OPERATING 245
Hitch Cover
To remove hitch cover, if equipped:
1. Remove the two fasteners on thelower tabs.
2. Pull the lower edge of the coverto about a 45 degree angle.
3. Pull the cover downward todisengage the upperattachments.
To reinstall hitch cover:
1. Hold cover at a 45 degree angleto the vehicle and push theupper tabs into the slots in thebumper.
2. Push the bottom of the coverforward until the lower tabs lineup with the lower slots.
3. Snap the hitch cover into placeby pushing the upper cornersforward.
4. Reinstall the two fasteners onthe lower tabs.
Consider using mechanical swaycontrols with any trailer. Ask atrailering professional about swaycontrols or refer to the trailermanufacturer's recommendations andinstructions.
Weight-Distributing HitchAdjustment
1. Front of Vehicle
2. Body to Ground Distance
When using a weight-distributinghitch, measure the front fender heightdistance (2) before connecting thetrailer. Adjust the spring bars until thefront fender height distance (2) is thesame height before the trailer wasconnected. Do not reduce the frontfender height below the initialdistance (2).

Cadillac XT5 Owner Manual (GMNA-Localizing-U.S./Canada/Mexico-13527534) - 2020 - CRC - 5/29/19
246 DRIVING AND OPERATING
Tires. Do not tow a trailer while using a
compact spare tire on the vehicle.
. Tires must be properly inflated tosupport loads while towing atrailer. See Tires 0 285 forinstructions on proper tireinflation.
Safety Chains
Always attach chains between thevehicle and the trailer, and attach thechains to the holes on the trailer hitchplatform. Instructions about safetychains may be provided by the hitchmanufacturer or by the trailermanufacturer.
Cross the safety chains under thetongue of the trailer to help preventthe tongue from contacting the road ifit becomes separated from the hitch.Always leave just enough slack so thecombination can turn. Never allowsafety chains to drag on the ground.
Trailer Brakes
Loaded trailers over 450 kg (1,000 lb)must be equipped with brake systemsand with brakes for each axle. Trailerbraking equipment conforming toCanadian Standards Association (CSA)requirement CAN3-D313, or itsequivalent, is recommended.
State or local regulations may requiretrailers to have their own brakingsystem if the loaded weight of thetrailer exceeds certain requirementsthat can vary from state to state.
Read and follow the instructions forthe trailer brakes so they are installed,adjusted, and maintained properly.
Never attempt to tap into yourvehicle's hydraulic brake system.If you do, both the vehicle anti-lockbrakes and the trailer brakes may notfunction and could result in a crash.
Trailer Wiring
The trailer wiring harness (ifequipped), with a 7-pin connector islocated at the rear of the vehicle, andit is tied to the vehicle's frame.
If the vehicle is not equipped with a7-pin trailer connector, the bodyharness has provisions to connect atrailer harness and a 7-pin trailerconnector which is available throughyour dealer.
Use only a round, seven-wireconnector with flat blade terminalsmeeting SAE J2863 specifications forproper electrical connectivity.
The seven-wire harness contains thefollowing trailer circuits:
Stop/TurnSignal Left
Yellow/Blue

Cadillac XT5 Owner Manual (GMNA-Localizing-U.S./Canada/Mexico-13527534) - 2020 - CRC - 5/29/19
DRIVING AND OPERATING 247
Stop/Turn SignalRight
Green/Brown
Tail/ParkingLamps
Gray/Brown
Reverse Lamps White/Green
Battery Feed Red/Green
Ground Black
Electric TrailerBrake*
Blue
* Circuit powered by electric trailerbrake control wiring provisions.
Electric Trailer Brake ControlWiring Provisions
Wiring provisions for an aftermarketelectric trailer brake controller areincluded with the vehicle as part ofthe trailer wiring package. Theharness contains the followingcircuits:
Electric TrailerBrakes
Blue
Battery FeedRed/Green orRed/Blue
Brake ApplySignal
White/Blue
Ground Black
Refer to the aftermarket electric trailerbrake controller owner's manual todetermine wire color coding of theelectric trailer brake controller. Thewire colors on the brake controllermay be different from the vehicle. Theelectric trailer brake controller shouldbe installed by your dealer or aqualified service center.
If equipped, there are four blunt cutwires inside the front driver sideinstrument panel. It will be necessaryto have a technician connect the12-volt power to the enginecompartment fuse block.
Trailer Lamps
Always check all trailer lamps areworking at the beginning of each trip,and periodically on longer trips.
Turn Signals When Towing aTrailer
When properly connected, the trailerturn signals will illuminate to indicatethe vehicle is turning, changing lanes,or stopping. When towing a trailer,the arrows on the instrument clusterwill illuminate even if the trailer is notproperly connected or the bulbs areburned out.
Always check all trailer lamps areworking at the beginning of each trip,and periodically on longer trips.
Trailer Sway Control (TSC)Vehicles with StabiliTrak/ElectronicStability Control (ESC) have a TrailerSway Control (TSC) feature. Trailersway is unintended side-to-sidemotion of a trailer while towing. If thevehicle is towing a trailer and the TSCdetects that sway is increasing, thevehicle brakes are selectively appliedat each wheel, to help reduceexcessive trailer sway. If equipped withthe Integrated Trailer Brake Control

Cadillac XT5 Owner Manual (GMNA-Localizing-U.S./Canada/Mexico-13527534) - 2020 - CRC - 5/29/19
248 DRIVING AND OPERATING
(ITBC) system, and the trailer has anelectric brake system, StabiliTrak/ESCmay also apply the trailer brakes.
If TSC is enabled, the Traction ControlSystem (TCS)/StabiliTrak/ESC warninglight will flash on the instrumentcluster. Reduce vehicle speed bygradually removing your foot from theaccelerator. If trailer sway continues,StabiliTrak/ESC can reduce enginetorque to help slow the vehicle. TSCwill not function if StabiliTrak/ESC isturned off. See Traction Control/Electronic Stability Control 0 196.
{ Warning
Trailer sway can result in a crashand in serious injury or death, evenif the vehicle is equipped with TSC.
(Continued)
Warning (Continued)
If the trailer begins to sway, reducevehicle speed by gradually removingyour foot from the accelerator. Thenpull over to check the trailer andvehicle to help correct possiblecauses, including an improperly oroverloaded trailer, unrestrainedcargo, improper trailer hitchconfiguration, or improperlyinflated or incorrect vehicle ortrailer tires. See Towing Equipment0 244 for trailer ratings and hitchsetup recommendations.
Trailer Tires
Special Trailer (ST) tires differ fromvehicle tires. Trailer tires are designedwith stiff sidewalls to help preventsway and to support heavy loads.These features can make it difficult todetermine if the trailer tire pressuresare low only based on a visualinspection.
Always check all trailer tire pressuresbefore each trip when the tires arecool. Low trailer tire pressure is aleading cause of trailer tire blow-outs.
Trailer tires deteriorate over time. Thetrailer tire sidewall will show the weekand year the tire was manufactured.Many trailer tire manufacturersrecommend replacing tires more thansix years old.
Overloading is another leading causeof trailer tire blow-outs. Never loadyour trailer with more weight than thetires are designed to support. The loadrating is located on the trailer tiresidewall.
Always know the maximum speedrating for the trailer tires beforedriving. This may be significantlylower than the vehicle tire speedrating. The speed rating may be onthe trailer tire sidewall. If the speedrating is not shown, the default trailertire speed rating is 105 km/h(65 mph).

Cadillac XT5 Owner Manual (GMNA-Localizing-U.S./Canada/Mexico-13527534) - 2020 - CRC - 5/29/19
DRIVING AND OPERATING 249
Conversions andAdd-Ons
Add-On ElectricalEquipment
{ Warning
The Data Link Connector (DLC) isused for vehicle service andEmission Inspection/Maintenancetesting. See Malfunction IndicatorLamp (Check Engine Light) 0 118.A device connected to the DLC —such as an aftermarket fleet ordriver-behavior tracking device —may interfere with vehicle systems.This could affect vehicle operationand cause a crash. Such devicesmay also access information storedin the vehicle’s systems.
Caution
Some electrical equipment candamage the vehicle or causecomponents to not work and wouldnot be covered by the vehiclewarranty. Always check with yourdealer before adding electricalequipment.
Add-on equipment can drain thevehicle's 12-volt battery, even if thevehicle is not operating.
The vehicle has an airbag system.Before attempting to add anythingelectrical to the vehicle, see Servicingthe Airbag-Equipped Vehicle 0 74 andAdding Equipment to theAirbag-Equipped Vehicle 0 74.

Cadillac XT5 Owner Manual (GMNA-Localizing-U.S./Canada/Mexico-13527534) - 2020 - CRC - 6/4/19
250 VEHICLE CARE
Vehicle Care
General InformationGeneral Information . . . . . . . . . . . . . 251California Proposition65 Warning . . . . . . . . . . . . . . . . . . . . . 251
California Perchlorate MaterialsRequirements . . . . . . . . . . . . . . . . . . . 252
Accessories andModifications . . . . . . . . . . . . . . . . . . . 252
Vehicle ChecksDoing Your OwnService Work . . . . . . . . . . . . . . . . . . . . 252
Hood . . . . . . . . . . . . . . . . . . . . . . . . . . . . . . 253Engine CompartmentOverview . . . . . . . . . . . . . . . . . . . . . . . . . 255
Engine Oil . . . . . . . . . . . . . . . . . . . . . . . . . 258Engine Oil Life System . . . . . . . . . . . 260Automatic TransmissionFluid . . . . . . . . . . . . . . . . . . . . . . . . . . . . . 261
Engine Air Filter Life System . . . . 262Engine Air Cleaner/Filter . . . . . . . . . 262Cooling System . . . . . . . . . . . . . . . . . . . 264Engine Overheating . . . . . . . . . . . . . . 268Washer Fluid . . . . . . . . . . . . . . . . . . . . . 269Brakes . . . . . . . . . . . . . . . . . . . . . . . . . . . . . 269Brake Fluid . . . . . . . . . . . . . . . . . . . . . . . 270Battery - North America . . . . . . . . . 271
All-Wheel Drive . . . . . . . . . . . . . . . . . . 272Starter Switch Check . . . . . . . . . . . . . 272Park Brake and P (Park)Mechanism Check . . . . . . . . . . . . . . 273
Wiper Blade Replacement . . . . . . . 273Windshield Replacement . . . . . . . . 274Gas Strut(s) . . . . . . . . . . . . . . . . . . . . . . . 274
Headlamp AimingFront Headlamp Aiming . . . . . . . . . 276
Bulb ReplacementBulb Replacement . . . . . . . . . . . . . . . . 276Halogen Bulbs . . . . . . . . . . . . . . . . . . . . 276LED Lighting . . . . . . . . . . . . . . . . . . . . . 276
Electrical SystemElectrical System Overload . . . . . . 277Fuses and Circuit Breakers . . . . . . 277Engine Compartment FuseBlock . . . . . . . . . . . . . . . . . . . . . . . . . . . . 278
Instrument Panel Fuse Block . . . . 281Rear Compartment FuseBlock . . . . . . . . . . . . . . . . . . . . . . . . . . . . 283
Wheels and TiresTires . . . . . . . . . . . . . . . . . . . . . . . . . . . . . . . 285All-Season Tires . . . . . . . . . . . . . . . . . . 286Winter Tires . . . . . . . . . . . . . . . . . . . . . . 286Summer Tires . . . . . . . . . . . . . . . . . . . . 287Tire Sidewall Labeling . . . . . . . . . . . 287Tire Designations . . . . . . . . . . . . . . . . . 289
Tire Terminology andDefinitions . . . . . . . . . . . . . . . . . . . . . . 290
Tire Pressure . . . . . . . . . . . . . . . . . . . . . . 292Tire Pressure for High-SpeedOperation . . . . . . . . . . . . . . . . . . . . . . . . 294
Tire Pressure Monitor System . . . 294Tire Pressure MonitorOperation . . . . . . . . . . . . . . . . . . . . . . . . 295
Tire Inspection . . . . . . . . . . . . . . . . . . . 299Tire Rotation . . . . . . . . . . . . . . . . . . . . . 299When It Is Time for NewTires . . . . . . . . . . . . . . . . . . . . . . . . . . . . . 300
Buying New Tires . . . . . . . . . . . . . . . . 301Different Size Tires andWheels . . . . . . . . . . . . . . . . . . . . . . . . . . 302
Uniform Tire Quality Grading . . . 303Wheel Alignment and TireBalance . . . . . . . . . . . . . . . . . . . . . . . . . . 304
Wheel Replacement . . . . . . . . . . . . . . 304Tire Chains . . . . . . . . . . . . . . . . . . . . . . . 305If a Tire Goes Flat . . . . . . . . . . . . . . . . 306Tire Sealant andCompressor Kit . . . . . . . . . . . . . . . . . 307
Storing the Tire Sealant andCompressor Kit . . . . . . . . . . . . . . . . . 314
Tire Changing . . . . . . . . . . . . . . . . . . . . . 314Compact Spare Tire . . . . . . . . . . . . . . 319
Jump StartingJump Starting - NorthAmerica . . . . . . . . . . . . . . . . . . . . . . . . . 320

Cadillac XT5 Owner Manual (GMNA-Localizing-U.S./Canada/Mexico-13527534) - 2020 - CRC - 6/4/19
VEHICLE CARE 251
Towing the VehicleTowing the Vehicle . . . . . . . . . . . . . . . 323Recreational Vehicle Towing . . . . 324
Appearance CareExterior Care . . . . . . . . . . . . . . . . . . . . . . 326Interior Care . . . . . . . . . . . . . . . . . . . . . . 331Floor Mats . . . . . . . . . . . . . . . . . . . . . . . . 333
General InformationFor service and parts needs, visit yourdealer. You will receive genuine GMparts and GM-trained and supportedservice people.
Genuine GM parts have one of thesemarks:
California Proposition65 Warning
{ Warning
Most motor vehicles, including thisone, as well as many of its serviceparts and fluids, contain and/oremit chemicals known to the Stateof California to cause cancer andbirth defects or other reproductiveharm. Engine exhaust, many partsand systems, many fluids, andsome component wear by-productscontain and/or emit thesechemicals. For more information goto www.P65Warnings.ca.gov/passenger-vehicle.
See Battery - North America 0 271 andJump Starting - North America 0 320and the back cover.
Cadillac XT5 Owner Manual (GMNA-Localizing-U.S./Canada/Mexico-13527534) - 2020 - CRC - 6/4/19
252 VEHICLE CARE
California PerchlorateMaterials RequirementsCertain types of automotiveapplications, such as airbag initiators,seat belt pretensioners, and lithiumbatteries contained in electronic keys,may contain perchlorate materials.Perchlorate Material – specialhandling may apply. Seewww.dtsc.ca.gov/hazardouswaste/perchlorate.
Accessories andModificationsAdding non-dealer accessories ormaking modifications to the vehiclecan affect vehicle performance andsafety, including such things asairbags, braking, stability, ride andhandling, emissions systems,aerodynamics, durability, andelectronic systems like antilockbrakes, traction control, and stabilitycontrol. These accessories ormodifications could even causemalfunction or damage not covered bythe vehicle warranty.
Damage to suspension componentscaused by modifying vehicle heightoutside of factory settings will not becovered by the vehicle warranty.
Damage to vehicle componentsresulting from modifications or theinstallation or use of non-GM certifiedparts, including control module orsoftware modifications, is not coveredunder the terms of the vehiclewarranty and may affect remainingwarranty coverage for affected parts.
GM Accessories are designed tocomplement and function with othersystems on the vehicle. See yourdealer to accessorize the vehicle usinggenuine GM Accessories installed by adealer technician.
Also, see Adding Equipment to theAirbag-Equipped Vehicle 0 74.
Vehicle Checks
Doing Your OwnService Work
{ Warning
It can be dangerous to work onyour vehicle if you do not have theproper knowledge, service manual,tools, or parts. Always followowner’s manual procedures andconsult the service manual for yourvehicle before doing anyservice work.
If doing some of your own servicework, use the proper service manual.It tells you much more about how toservice the vehicle than this manualcan. To order the proper servicemanual, see Publication OrderingInformation 0 362.

Cadillac XT5 Owner Manual (GMNA-Localizing-U.S./Canada/Mexico-13527534) - 2020 - CRC - 6/4/19
VEHICLE CARE 253
This vehicle has an airbag system.Before attempting to do your ownservice work, see Servicing theAirbag-Equipped Vehicle 0 74.
If equipped with remote vehicle start,open the hood before performing anyservice work to prevent remotestarting the vehicle accidentally. SeeRemote Vehicle Start 0 17.
Keep a record with all parts receiptsand list the mileage and the date ofany service work performed. SeeMaintenance Records 0 348.
Caution
Even small amounts ofcontamination can cause damage tovehicle systems. Do not allowcontaminants to contact the fluids,reservoir caps, or dipsticks.
Hood
{ Warning
For vehicles with auto engine stop/start, turn the vehicle off beforeopening the hood. If the vehicle ison, the engine will start when thehood is opened. You or others couldbe injured.
{ Warning
Components under the hood canget hot from running the engine. Tohelp avoid the risk of burningunprotected skin, never touch thesecomponents until they have cooled,and always use a glove or towel toavoid direct skin contact.
Clear any snow from the hood beforeopening.
To open the hood:
1. Pull the hood release handle withthei symbol. It is on thelower left side of the instrumentpanel.
2. Go to the front of the vehicle andlocate the secondary releaselever under the front center ofthe hood. Push the secondaryhood release lever to the right torelease.
3. After you have partially lifted thehood, the gas strut system willautomatically lift the hood andhold it in the fully open position.

Cadillac XT5 Owner Manual (GMNA-Localizing-U.S./Canada/Mexico-13527534) - 2020 - CRC - 6/4/19
254 VEHICLE CARE
To close the hood:
1. Before closing the hood, be sureall filler caps are on properly,and all tools are removed.
2. Pull the hood down until thestrut system is no longer holdingup the hood.
3. Allow the hood to fall. Check tomake sure the hood is latchedcompletely. Repeat this processwith additional force if necessary.
{ Warning
Do not drive the vehicle if the hoodis not latched completely. The hoodcould open fully, block your vision,and cause a crash. You or otherscould be injured. Always close thehood completely before driving.

Cadillac XT5 Owner Manual (GMNA-Localizing-U.S./Canada/Mexico-13527534) - 2020 - CRC - 6/4/19
VEHICLE CARE 255
Engine Compartment Overview
2.0L L4 Engine

Cadillac XT5 Owner Manual (GMNA-Localizing-U.S./Canada/Mexico-13527534) - 2020 - CRC - 6/4/19
256 VEHICLE CARE
1. Engine Air Cleaner/Filter 0 262.
2. Engine Oil Fill Cap. See Engine Oil0 258.
3. Engine Oil Dipstick. See EngineOil 0 258.
4. Engine Cooling Fan (Out ofView). See Cooling System 0 264.
5. Brake Fluid Reservoir. See BrakeFluid 0 270.
6. Battery - North America 0 271.
7. Engine Coolant Surge Tank andPressure Cap. See Cooling System0 264.
8. Positive (+) Battery Terminal(Under Cover). See Jump Starting- North America 0 320.
9. Windshield Washer FluidReservoir. See Washer Fluid0 269.
10. Engine Compartment Fuse Block0 278.
11. Remote Negative (-) BatteryTerminal. See Jump Starting -North America 0 320.
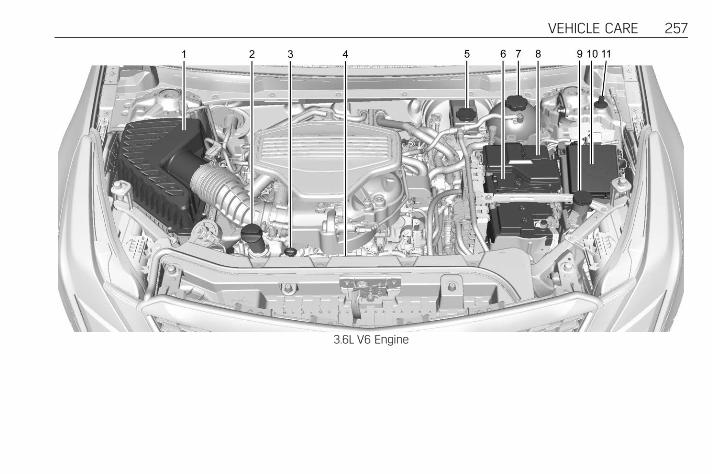
Cadillac XT5 Owner Manual (GMNA-Localizing-U.S./Canada/Mexico-13527534) - 2020 - CRC - 6/4/19
VEHICLE CARE 257
3.6L V6 Engine

Cadillac XT5 Owner Manual (GMNA-Localizing-U.S./Canada/Mexico-13527534) - 2020 - CRC - 6/4/19
258 VEHICLE CARE
1. Engine Air Cleaner/Filter 0 262.
2. Engine Oil Fill Cap. See Engine Oil0 258.
3. Engine Oil Dipstick. See EngineOil 0 258.
4. Engine Cooling Fan (Out ofView). See Cooling System 0 264.
5. Brake Fluid Reservoir. See BrakeFluid 0 270.
6. Battery - North America 0 271.
7. Engine Coolant Surge Tank andPressure Cap. See Cooling System0 264.
8. Positive (+) Battery Terminal(Under Cover). See Jump Starting- North America 0 320.
9. Windshield Washer FluidReservoir. See Washer Fluid0 269.
10. Engine Compartment Fuse Block0 278.
11. Remote Negative (-) BatteryTerminal. See Jump Starting -North America 0 320.
Engine OilTo ensure proper engine performanceand long life, careful attention mustbe paid to engine oil. Following thesesimple, but important steps will helpprotect your investment:
. Use engine oil approved to theproper specification and of theproper viscosity grade. See“Selecting the Right Engine Oil” inthis section.
. Check the engine oil level regularlyand maintain the proper oil level.See “Checking Engine Oil” and“When to Add Engine Oil” in thissection.
. Change the engine oil at theappropriate time. See Engine OilLife System 0 260.
. Always dispose of engine oilproperly. See “What to Do withUsed Oil” in this section.
Checking Engine Oil
Check the engine oil level regularly,every 650 km (400 mi), especially priorto a long trip. The engine oil dipstick
handle is a loop. See EngineCompartment Overview 0 255 for thelocation.
{ Warning
The engine oil dipstick handle maybe hot; it could burn you. Use atowel or glove to touch the dipstickhandle.
If a low oil Driver Information Center(DIC) message displays, check the oillevel.
Follow these guidelines:
. To get an accurate reading, parkthe vehicle on level ground. Checkthe engine oil level after theengine has been off for at leasttwo hours. Checking the engine oillevel on steep grades or too soonafter engine shutoff can result inincorrect readings. Accuracyimproves when checking a coldengine prior to starting. Removethe dipstick and check the level.

Cadillac XT5 Owner Manual (GMNA-Localizing-U.S./Canada/Mexico-13527534) - 2020 - CRC - 6/4/19
VEHICLE CARE 259. If unable to wait two hours, the
engine must be off for at least15 minutes if the engine is warm,or at least 30 minutes if theengine is not warm. Pull out thedipstick, wipe it with a clean papertowel or cloth, then push it backin all the way. Remove it again,keeping the tip down, and checkthe level.
When to Add Engine Oil
2.0L L4 Engine
3.6L V6 Engine
If the oil is below the cross-hatchedarea at the tip of the dipstick and theengine has been off for at least15 minutes, add 1 L (1 qt) of therecommended oil and then recheckthe level. See “Selecting the RightEngine Oil” later in this section for anexplanation of what kind of oil to use.For engine oil crankcase capacity, seeCapacities and Specifications 0 350.
Caution
Do not add too much oil. Oil levelsabove or below the acceptableoperating range shown on thedipstick are harmful to the engine.If the oil level is above theoperating range (i.e., the engine hasso much oil that the oil level gets
(Continued)
Caution (Continued)
above the cross-hatched area thatshows the proper operating range),the engine could be damaged. Drainthe excess oil or limit driving of thevehicle, and seek a serviceprofessional to remove theexcess oil.
See Engine Compartment Overview0 255 for the location of the engine oilfill cap.
Add enough oil to put the levelsomewhere in the proper operatingrange. Push the dipstick all the wayback in when finished.
Selecting the Right Engine Oil
Selecting the right engine oil dependson both the proper oil specificationand viscosity grade. See RecommendedFluids and Lubricants 0 346.
Specification
Use full synthetic engine oils thatmeet the dexos1 specification. Engineoils that have been approved by GM
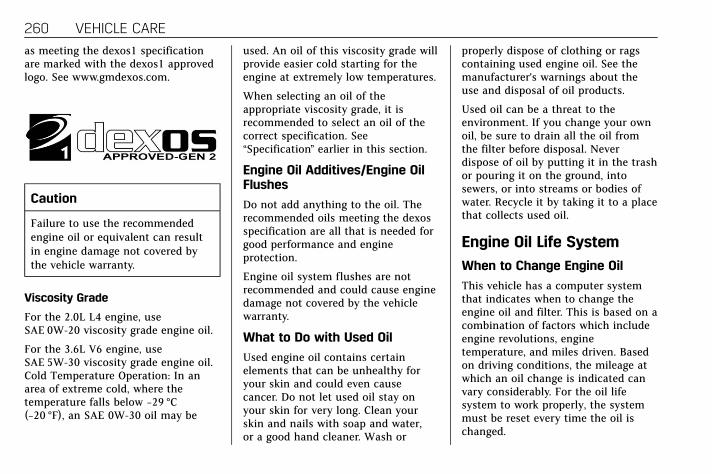
Cadillac XT5 Owner Manual (GMNA-Localizing-U.S./Canada/Mexico-13527534) - 2020 - CRC - 6/4/19
260 VEHICLE CARE
as meeting the dexos1 specificationare marked with the dexos1 approvedlogo. See www.gmdexos.com.
Caution
Failure to use the recommendedengine oil or equivalent can resultin engine damage not covered bythe vehicle warranty.
Viscosity Grade
For the 2.0L L4 engine, useSAE 0W-20 viscosity grade engine oil.
For the 3.6L V6 engine, useSAE 5W-30 viscosity grade engine oil.Cold Temperature Operation: In anarea of extreme cold, where thetemperature falls below −29 °C(−20 °F), an SAE 0W-30 oil may be
used. An oil of this viscosity grade willprovide easier cold starting for theengine at extremely low temperatures.
When selecting an oil of theappropriate viscosity grade, it isrecommended to select an oil of thecorrect specification. See“Specification” earlier in this section.
Engine Oil Additives/Engine OilFlushes
Do not add anything to the oil. Therecommended oils meeting the dexosspecification are all that is needed forgood performance and engineprotection.
Engine oil system flushes are notrecommended and could cause enginedamage not covered by the vehiclewarranty.
What to Do with Used Oil
Used engine oil contains certainelements that can be unhealthy foryour skin and could even causecancer. Do not let used oil stay onyour skin for very long. Clean yourskin and nails with soap and water,or a good hand cleaner. Wash or
properly dispose of clothing or ragscontaining used engine oil. See themanufacturer's warnings about theuse and disposal of oil products.
Used oil can be a threat to theenvironment. If you change your ownoil, be sure to drain all the oil fromthe filter before disposal. Neverdispose of oil by putting it in the trashor pouring it on the ground, intosewers, or into streams or bodies ofwater. Recycle it by taking it to a placethat collects used oil.
Engine Oil Life System
When to Change Engine Oil
This vehicle has a computer systemthat indicates when to change theengine oil and filter. This is based on acombination of factors which includeengine revolutions, enginetemperature, and miles driven. Basedon driving conditions, the mileage atwhich an oil change is indicated canvary considerably. For the oil lifesystem to work properly, the systemmust be reset every time the oil ischanged.

Cadillac XT5 Owner Manual (GMNA-Localizing-U.S./Canada/Mexico-13527534) - 2020 - CRC - 6/4/19
VEHICLE CARE 261
When the system has calculated thatoil life has been diminished, itindicates that an oil change isnecessary. A CHANGE ENGINE OILSOON message comes on. Change theoil as soon as possible within the next1 000 km (600 mi). It is possible that,if driving under the best conditions,the oil life system might indicate thatan oil change is not necessary for upto a year. The engine oil and filtermust be changed at least once a yearand at this time the system must bereset. Your dealer has trained servicepeople who will perform this work andreset the system. It is also importantto check the oil regularly over thecourse of an oil drain interval andkeep it at the proper level.
If the system is ever reset accidentally,the oil must be changed at 5 000 km(3,000 mi) since the last oil change.Remember to reset the oil life systemwhenever the oil is changed.
How to Reset the Engine Oil LifeSystem
Reset the system whenever the engineoil is changed so that the system cancalculate the next engine oil change.To reset the system:
1. Using the DIC controls on theright side of the steering wheel,display REMAINING OIL LIFE onthe DIC. See Driver InformationCenter (DIC) 0 127. Whenremaining oil life is low, theCHANGE ENGINE OIL SOONmessage will appear on thedisplay.
2. Press SEL on the DIC controlsand hold SEL down for a fewseconds to clear the CHANGEENGINE OIL SOON message andreset the oil life at 100%.
Be careful not to reset the oil lifedisplay accidentally at any timeother than after the oil ischanged. It cannot be resetaccurately until the next oilchange.
The oil life system can also be reset asfollows:
1. Display REMAINING OIL LIFE onthe DIC. See Driver InformationCenter (DIC) 0 127.
2. Fully press and release theaccelerator pedal three timeswithin five seconds.
If the CHANGE ENGINE OILSOON message is not on, thesystem is reset.
The system is reset when theCHANGE ENGINE OIL SOON messageis off.
If the CHANGE ENGINE OIL SOONmessage comes back on when thevehicle is started, the engine oil lifesystem has not been reset. Repeat theprocedure.
Automatic TransmissionFluidA transmission fluid leak is the onlyreason for fluid loss. If a leak occurs,take the vehicle to your dealer andhave it repaired as soon as possible.

Cadillac XT5 Owner Manual (GMNA-Localizing-U.S./Canada/Mexico-13527534) - 2020 - CRC - 6/4/19
262 VEHICLE CARE
Caution
Use of the incorrect automatictransmission fluid may damage thevehicle, and the damage may not becovered by the vehicle warranty.Always use the correct automatictransmission fluid. SeeRecommended Fluids and Lubricants0 346.
See your dealer to have the fluid andfilter changed at the intervals listed inthe Maintenance Schedule 0 337.
Engine Air Filter LifeSystemIf equipped, this feature provides theengine air filter’s remaining life andbest timing for a change. The timingto change an engine air filter dependson driving and environmentalconditions.
When to Change the Engine AirFilter
When the Driver Information Center(DIC) displays a message to replacethe engine air filter at the next oilchange, follow this timing.
When the DIC displays a message toreplace the engine air filter soon,replace the engine air filter at theearliest convenience.
The system must be reset after theengine air filter is changed.
If the DIC displays a message to checkthe engine air filter system, see yourdealer.
How to Reset the Engine AirFilter Life System
To reset:
1. Place the vehicle in P (Park).
2. Display the Air Filter Life on theDIC. See Driver Information Center(DIC) 0 127.
3. Press T on the steering wheel tomove to the Reset/Disabledisplay area. Select Reset thenpress SEL.
4. Press SEL to confirm the reset.
Engine Air Cleaner/FilterThe engine air cleaner/filter is in theengine compartment on the passengerside of the vehicle. See EngineCompartment Overview 0 255.
When to Inspect/Replace theEngine Air Cleaner/Filter
If the vehicle is not equipped with theengine air filter life system, seeMaintenance Schedule 0 337.
How to Inspect/Replace theEngine Air Cleaner/Filter
Do not start the engine or have theengine running with the engine aircleaner/filter housing open. Beforeremoving the engine air cleaner/filter,make sure that the engine air cleaner/filter housing and nearby componentsare free of dirt and debris. Remove theengine air cleaner/filter. Do not clean

Cadillac XT5 Owner Manual (GMNA-Localizing-U.S./Canada/Mexico-13527534) - 2020 - CRC - 6/4/19
VEHICLE CARE 263
the engine air cleaner/filter orcomponents with water orcompressed air.
To inspect or replace the engine aircleaner/filter:
2.0L L4 Engine
1. Remove the five screws on top ofthe engine air cleaner/filterhousing.
2. Lift the air cleaner/filter coverhousing away from the engine.
3. Pull out the filter.
4. Inspect or replace the engine aircleaner/filter.
5. Reverse Steps 1–3 to reinstall thefilter cover housing.
6. If equipped, reset the engine airfilter life system after replacingthe engine air filter. See EngineAir Filter Life System 0 262.
3.6L V6 Engine
1. Remove the five screws on top ofthe engine air cleaner/filterhousing.
2. Lift the air cleaner/filter coverhousing away from the engine.
3. Pull out the filter.
4. Inspect or replace the engine aircleaner/filter.
5. Reverse Steps 1–3 to reinstall thefilter cover housing.
6. If equipped, reset the engine airfilter life system after replacingthe engine air filter. See EngineAir Filter Life System 0 262.
{ Warning
Operating the engine with the aircleaner/filter off can cause you orothers to be burned. Use cautionwhen working on the engine. Donot start the engine or drive thevehicle with the air cleaner/filteroff, as flames may be present if theengine backfires.
Caution
If the air cleaner/filter is off, dirtcan easily get into the engine,which could damage it. Always havethe air cleaner/filter in place whendriving.
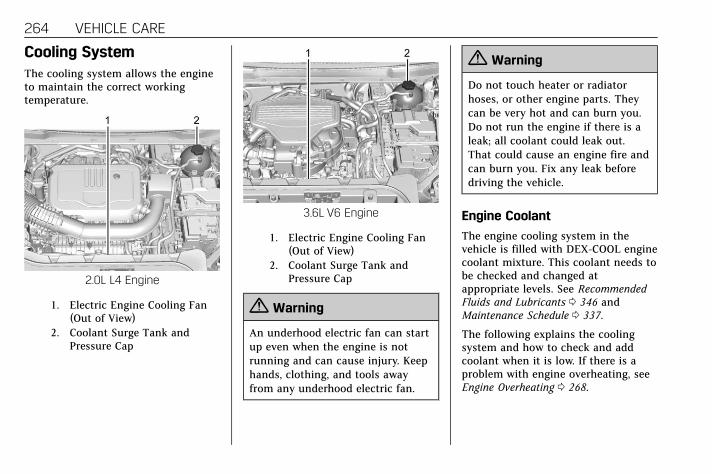
Cadillac XT5 Owner Manual (GMNA-Localizing-U.S./Canada/Mexico-13527534) - 2020 - CRC - 6/4/19
264 VEHICLE CARE
Cooling SystemThe cooling system allows the engineto maintain the correct workingtemperature.
2.0L L4 Engine
1. Electric Engine Cooling Fan(Out of View)
2. Coolant Surge Tank andPressure Cap
3.6L V6 Engine
1. Electric Engine Cooling Fan(Out of View)
2. Coolant Surge Tank andPressure Cap
{ Warning
An underhood electric fan can startup even when the engine is notrunning and can cause injury. Keephands, clothing, and tools awayfrom any underhood electric fan.
{ Warning
Do not touch heater or radiatorhoses, or other engine parts. Theycan be very hot and can burn you.Do not run the engine if there is aleak; all coolant could leak out.That could cause an engine fire andcan burn you. Fix any leak beforedriving the vehicle.
Engine Coolant
The engine cooling system in thevehicle is filled with DEX-COOL enginecoolant mixture. This coolant needs tobe checked and changed atappropriate levels. See RecommendedFluids and Lubricants 0 346 andMaintenance Schedule 0 337.
The following explains the coolingsystem and how to check and addcoolant when it is low. If there is aproblem with engine overheating, seeEngine Overheating 0 268.
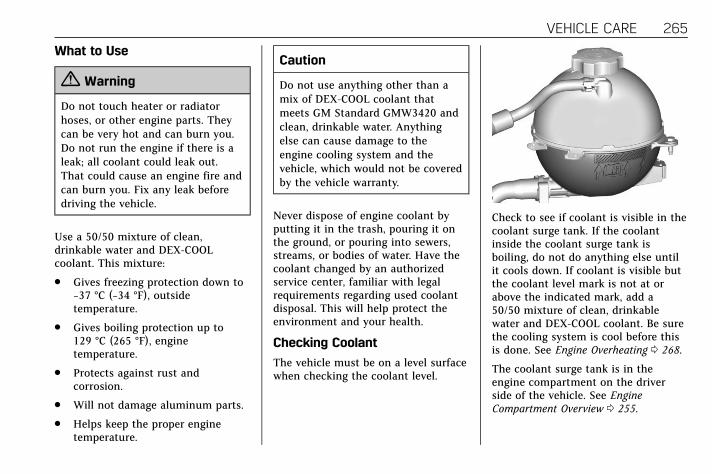
Cadillac XT5 Owner Manual (GMNA-Localizing-U.S./Canada/Mexico-13527534) - 2020 - CRC - 6/4/19
VEHICLE CARE 265
What to Use
{ Warning
Do not touch heater or radiatorhoses, or other engine parts. Theycan be very hot and can burn you.Do not run the engine if there is aleak; all coolant could leak out.That could cause an engine fire andcan burn you. Fix any leak beforedriving the vehicle.
Use a 50/50 mixture of clean,drinkable water and DEX-COOLcoolant. This mixture:
. Gives freezing protection down to−37 °C (−34 °F), outsidetemperature.
. Gives boiling protection up to129 °C (265 °F), enginetemperature.
. Protects against rust andcorrosion.
. Will not damage aluminum parts.
. Helps keep the proper enginetemperature.
Caution
Do not use anything other than amix of DEX-COOL coolant thatmeets GM Standard GMW3420 andclean, drinkable water. Anythingelse can cause damage to theengine cooling system and thevehicle, which would not be coveredby the vehicle warranty.
Never dispose of engine coolant byputting it in the trash, pouring it onthe ground, or pouring into sewers,streams, or bodies of water. Have thecoolant changed by an authorizedservice center, familiar with legalrequirements regarding used coolantdisposal. This will help protect theenvironment and your health.
Checking Coolant
The vehicle must be on a level surfacewhen checking the coolant level.
Check to see if coolant is visible in thecoolant surge tank. If the coolantinside the coolant surge tank isboiling, do not do anything else untilit cools down. If coolant is visible butthe coolant level mark is not at orabove the indicated mark, add a50/50 mixture of clean, drinkablewater and DEX-COOL coolant. Be surethe cooling system is cool before thisis done. See Engine Overheating 0 268.
The coolant surge tank is in theengine compartment on the driverside of the vehicle. See EngineCompartment Overview 0 255.

Cadillac XT5 Owner Manual (GMNA-Localizing-U.S./Canada/Mexico-13527534) - 2020 - CRC - 6/4/19
266 VEHICLE CARE
How to Add Coolant to theSurge Tank
{ Warning
Spilling coolant on hot engine partscan burn you. Coolant containsethylene glycol and it will burn ifthe engine parts are hot enough.
{ Warning
Steam and scalding liquids from ahot cooling system are underpressure. Turning the pressure cap,even a little, can cause them tocome out at high speed and youcould be burned. Never turn the capwhen the cooling system, includingthe pressure cap, is hot. Wait forthe cooling system and pressurecap to cool.
Caution
Failure to follow the specificcoolant fill procedure could causethe engine to overheat and couldcause system damage. If coolant isnot visible in the surge tank,contact your dealer.
The coolant surge tank pressure capcan be removed when the coolingsystem, including the surge tankpressure cap and upper radiator hose,is no longer hot.
Coolant Fill Instructions (3.6LEngine Only)
1. Turn the pressure cap slowlycounterclockwise. If a hiss isheard, wait for that to stop.A hiss means there is still somepressure left.
2. Keep turning the pressure capslowly and remove it.
3. Fill the coolant surge tank withthe proper mixture to the markpointed to on the front of thecoolant surge tank.
4. With the coolant surge tankpressure cap off, start the engineand let it run until you can feelthe upper radiator hose gettinghot. Watch out for the engine

Cadillac XT5 Owner Manual (GMNA-Localizing-U.S./Canada/Mexico-13527534) - 2020 - CRC - 6/4/19
VEHICLE CARE 267
cooling fans. By this time, thecoolant level inside the coolantsurge tank may be lower. If thelevel is lower, add more of theproper mixture to the coolantsurge tank until the level reachesthe mark pointed to on the frontof the coolant surge tank.
5. Replace the pressure cap tightly.
6. Verify coolant level after theengine is shut off and thecoolant is cold. If necessary,repeat coolant fill procedureStep 1–6.
Caution
If the pressure cap is not tightlyinstalled, coolant loss and enginedamage may occur. Be sure the capis properly and tightly secured.
Automatic Coolant Service FillInstructions (2.0L Engine Only)
If equipped, this feature assists infilling and removing air from thecooling system after service ofcomponents or when coolant is addedafter being too low.
To activate the fill and air removalprocess:
1. With a cold system, disconnectthe vent line from the port nearthe cap on the surge tank. Addcoolant to the indicated mark onthe surge tank.
2. Reconnect the vent line to thesurge tank and replace the capon the surge tank.
3. Connect the vehicle to a batterycharger.
4. Put the vehicle in Service Mode.See Ignition Positions 0 176.
5. Turn off the air conditioning.
6. Set the parking brake.
7. At the same time, press theaccelerator and the brake forautomatic transmission vehiclesfor two seconds, then release.
At the end of the cycle, check thecoolant level in the surge tank andadd coolant, if it is low. Turn off thevehicle, allow the Engine ControlModule (ECM) to go to sleep, abouttwo minutes, and repeat steps 3-7.
Listen for pump activation andmovement of the control valves whilewatching the level of the tank. If thetank empties, turn the ignition off,carefully remove the surge tank cap,refill to the indicated mark and repeat

Cadillac XT5 Owner Manual (GMNA-Localizing-U.S./Canada/Mexico-13527534) - 2020 - CRC - 6/4/19
268 VEHICLE CARE
steps 3-6. The fill and air removalprocess will run for approximately10 minutes.
Engine OverheatingThe vehicle has several indicators towarn of the engine overheating.
There is an engine coolanttemperature gauge on the instrumentcluster. See Engine Coolant TemperatureGauge 0 115. The vehicle may alsodisplay a message on the DriverInformation Center (DIC).
If the decision is made not to lift thehood when this warning appears, getservice help right away. See RoadsideService 0 357.
If the decision is made to lift thehood, make sure the vehicle is parkedon a level surface. Then check to see ifthe engine cooling fan is running.If the engine is overheating, the fanshould be running. If it is not, do notcontinue to run the engine. Have thevehicle serviced.
Caution
Do not run the engine if there is aleak in the engine cooling system.This can cause a loss of all coolantand can damage the system andvehicle. Have any leaks fixedright away.
If Steam Is Coming from theEngine Compartment
{ Warning
Steam and scalding liquids from ahot cooling system are underpressure. Turning the pressure cap,even a little, can cause them tocome out at high speed and youcould be burned. Never turn the capwhen the cooling system, includingthe pressure cap, is hot. Wait forthe cooling system and pressurecap to cool.
If No Steam Is Coming from theEngine Compartment
If an engine overheat warning isdisplayed but no steam can be seen orheard, the problem may not be tooserious. Sometimes the engine can geta little too hot when the vehicle:
. Climbs a long hill on a hot day.
. Stops after high-speed driving.
. Idles for long periods in traffic.
If the overheat warning is displayedwith no sign of steam:
1. Turn the air conditioning off.
2. Turn the heater on to the highesttemperature and to the highestfan speed. Open the windows asnecessary.
3. When it is safe to do so, pull offthe road, shift to P (Park) orN (Neutral), and let theengine idle.
If the engine coolant temperaturegauge is no longer in the overheatedarea or the engine coolanttemperature warning light no longerdisplays, the vehicle can be driven.

Cadillac XT5 Owner Manual (GMNA-Localizing-U.S./Canada/Mexico-13527534) - 2020 - CRC - 6/4/19
VEHICLE CARE 269
Continue to drive the vehicle slowlyfor about 10 minutes. Keep a safedistance from the vehicle in front.If the warning does not come back on,continue to drive normally and havethe cooling system checked for properfill and function.
If the warning continues, pull over,stop, and park the vehicle right away.
If there is no sign of steam, idle theengine for three minutes while parked.If the warning is still displayed, turnoff the engine until it cools down.
Washer Fluid
What to Use
When windshield washer fluid isneeded, be sure to read themanufacturer's instructions beforeuse. If operating the vehicle in an areawhere the temperature may fall belowfreezing, use a fluid that has sufficientprotection against freezing.
Adding Washer Fluid
The appropriate message will appearin the Driver Information Center (DIC)when the fluid level is low.
Open the cap with the washer symbolon it. Add washer fluid until the tankis full. See Engine CompartmentOverview 0 255 for reservoir location.
Caution
. Do not use washer fluid thatcontains any type of waterrepellent coating. This cancause the wiper blades tochatter or skip.
. Do not use engine coolant(antifreeze) in the windshieldwasher. It can damage thewindshield washer systemand paint.
. Do not mix water withready-to-use washer fluid.Water can cause the solution
(Continued)
Caution (Continued)
to freeze and damage thewasher fluid tank and otherparts of the washer system.
. When using concentratedwasher fluid, follow themanufacturer instructions foradding water.
. Fill the washer fluid tank onlythree-quarters full when it isvery cold. This allows forfluid expansion if freezingoccurs, which could damagethe tank if it iscompletely full.
BrakesDisc brake pads have built-in wearindicators that make a high-pitchedwarning sound when the brake padsare worn and new pads are needed.The sound can come and go or can beheard all the time when the vehicle ismoving, except when applying thebrake pedal firmly.

Cadillac XT5 Owner Manual (GMNA-Localizing-U.S./Canada/Mexico-13527534) - 2020 - CRC - 6/4/19
270 VEHICLE CARE
{ Warning
The brake wear warning soundmeans that soon the brakes will notwork well. That could lead to acrash. When the brake wearwarning sound is heard, have thevehicle serviced.
Caution
Continuing to drive with worn-outbrake pads could result in costlybrake repair.
Some driving conditions or climatescan cause a brake squeal when thebrakes are first applied or lightlyapplied. This does not meansomething is wrong with the brakes.
Properly torqued wheel nuts arenecessary to help prevent brakepulsation. When tires are rotated,inspect brake pads for wear andevenly tighten wheel nuts in the
proper sequence to torquespecifications. See Capacities andSpecifications 0 350.
Brake pads should be replaced ascomplete sets.
Brake Pedal Travel
See your dealer if the brake pedal doesnot return to normal height, or ifthere is a rapid increase in pedaltravel. This could be a sign that brakeservice may be required.
Replacing Brake System Parts
Always replace brake system partswith new, approved replacement parts.If this is not done, the brakes may notwork properly. The brakingperformance expected can change inmany other ways if the wrongreplacement brake parts are installedor if parts are improperly installed.
Brake Fluid
The brake master cylinder reservoir isfilled with GM approved DOT 3 brakefluid as indicated on the reservoir cap.See Engine Compartment Overview0 255 for the location of the reservoir.
Checking Brake Fluid
With the vehicle in P (Park) on a levelsurface, the brake fluid level should bebetween the minimum and maximummarks on the brake fluid reservoir.
There are only two reasons why thebrake fluid level in the reservoir maygo down:
. Normal brake lining wear. Whennew linings are installed, the fluidlevel goes back up.

Cadillac XT5 Owner Manual (GMNA-Localizing-U.S./Canada/Mexico-13527534) - 2020 - CRC - 6/4/19
VEHICLE CARE 271. A fluid leak in the brake hydraulic
system. Have the brake hydraulicsystem fixed. With a leak, thebrakes will not work well.
Always clean the brake fluid reservoircap and the area around the capbefore removing it.
Do not top off the brake fluid. Addingfluid does not correct a leak. If fluid isadded when the linings are worn,there will be too much fluid whennew brake linings are installed. Add orremove fluid, as necessary, only whenwork is done on the brake hydraulicsystem.
{ Warning
If too much brake fluid is added, itcan spill on the engine and burn,if the engine is hot enough. You orothers could be burned, and thevehicle could be damaged. Addbrake fluid only when work is doneon the brake hydraulic system.
When the brake fluid falls to a lowlevel, the brake warning light comeson. See Brake System Warning Light0 120.
Brake fluid absorbs water over timewhich degrades the effectiveness ofthe brake fluid. Replace brake fluid atthe specified intervals to preventincreased stopping distance. SeeMaintenance Schedule 0 337.
What to Add
Use only GM approved DOT 3 brakefluid from a clean, sealed container.See Recommended Fluids andLubricants 0 346.
{ Warning
The wrong or contaminated brakefluid could result in damage to thebrake system. This could result inthe loss of braking leading to apossible injury. Always use theproper GM approved brake fluid.
Caution
If brake fluid is spilled on thevehicle's painted surfaces, the paintfinish can be damaged. Immediatelywash off any painted surface.
Battery - North AmericaThe original equipment battery ismaintenance free. Do not remove thecap and do not add fluid.
Refer to the replacement number onthe original battery label when a newbattery is needed. For replacement ofthe battery, see your dealer.
The vehicle has an Absorbed GlassMat (AGM) 12-volt battery.Installation of a standard 12-voltbattery will result in reduced 12-voltbattery life.
When using a 12-volt battery chargeron the 12-volt AGM battery, somechargers have an AGM battery settingon the charger. If available, use theAGM setting on the charger, to limitcharge voltage to 14.8 volts.

Cadillac XT5 Owner Manual (GMNA-Localizing-U.S./Canada/Mexico-13527534) - 2020 - CRC - 6/4/19
272 VEHICLE CARE
Stop/Start System
This vehicle has a Stop/Start systemto shut off the engine to helpconserve fuel. See Stop/Start System0 179.
{ Warning
WARNING: Battery posts,terminals, and related accessoriescontain lead and lead compounds,chemicals known to the State ofCalifornia to cause cancer and birthdefects or other reproductive harm.Batteries also contain otherchemicals known to the State ofCalifornia to cause cancer. WASHHANDS AFTER HANDLING. Formore information go towww.P65Warnings.ca.gov/passenger-vehicle.
See California Proposition 65 Warning0 251 and the back cover.
Vehicle Storage
{ Warning
Batteries have acid that can burnyou and gas that can explode. Youcan be badly hurt if you are notcareful. See Jump Starting - NorthAmerica 0 320 for tips on workingaround a battery withoutgetting hurt.
Infrequent Usage: Remove the black,negative (−) cable from the battery tokeep the battery from running down.
Extended Storage: Remove the black,negative (−) cable from the battery oruse a battery trickle charger.
All-Wheel Drive
Transfer Case
Under normal driving conditions,transfer case fluid does not requiremaintenance unless there is a fluidleak or unusual noise. If required,have the transfer case serviced byyour dealer.
Starter Switch Check
{ Warning
When you are doing this inspection,the vehicle could move suddenly.If the vehicle moves, you or otherscould be injured.
1. Before starting this check, besure there is enough roomaround the vehicle.
2. Apply both the parking brakeand the regular brake.
Do not use the accelerator pedal,and be ready to turn off theengine immediately if it starts.
3. Try to start the engine in eachgear. The vehicle should startonly in P (Park) or N (Neutral).If the vehicle starts in any otherposition, contact your dealer forservice.

Cadillac XT5 Owner Manual (GMNA-Localizing-U.S./Canada/Mexico-13527534) - 2020 - CRC - 6/4/19
VEHICLE CARE 273
Park Brake and P (Park)Mechanism Check
{ Warning
When you are doing this check, thevehicle could begin to move. You orothers could be injured andproperty could be damaged. Makesure there is room in front of thevehicle in case it begins to roll. Beready to apply the regular brake atonce should the vehicle beginto move.
Park on a fairly steep hill, with thevehicle facing downhill. Keeping yourfoot on the regular brake, set theparking brake.
. To check the parking brake'sholding ability: With the enginerunning and the transmission inN (Neutral), slowly remove footpressure from the regular brakepedal. Do this until the vehicle isheld by the parking brake only.
. To check the P (Park) mechanism'sholding ability: With the enginerunning, shift to P (Park). Thenrelease the parking brake followedby the regular brake.
Contact your dealer if service isrequired.
Wiper Blade ReplacementWindshield wiper blades should beinspected for wear or cracking.
It is a good idea to clean or replacethe wiper blade assembly on a regularbasis or when worn. For properwindshield wiper blade length andtype, see Maintenance ReplacementParts 0 347.
Caution
Allowing the wiper arm to touchthe windshield when no wiper bladeis installed could damage thewindshield. Any damage that occurswould not be covered by the vehiclewarranty. Do not allow the wiperarm to touch the windshield.
Front Wiper Blade Replacement
To replace the wiper blade assembly:
1. Pull the windshield wiperassembly away from thewindshield.
2. Lift up on the latch in the middleof the wiper blade where thewiper arm attaches.
3. With the latch open, pull thewiper blade down toward thewindshield far enough to releaseit from the J-hooked end of thewiper arm.
4. Remove the wiper blade.

Cadillac XT5 Owner Manual (GMNA-Localizing-U.S./Canada/Mexico-13527534) - 2020 - CRC - 6/4/19
274 VEHICLE CARE
5. Reverse Steps 1–3 for wiperblade replacement.
Rear Wiper Blade Replacement
To remove the wiper blade:
1. Put the vehicle in ACC/ACCESSORY and turn on the rearwindshield wiper. The wiper willstop pointing down. See RearWindow Wiper/Washer 0 106.
2. Push ENGINE START/STOP toturn the vehicle off.
3. Lift the wiper arm away from thewindow.
4. Push the release lever (2) todisengage the hook and push thewiper arm (1) out of the bladeassembly (3).
5. Push the new blade assemblysecurely on the wiper arm untilthe release lever clicks into place.
6. Start the engine and the rearwiper will return to its normalposition.
Windshield Replacement
HUD System
The windshield is part of the HUDsystem. If the windshield needs to bereplaced, be sure to get one that isdesigned for HUD or the HUD imagemay look out of focus.
Driver Assistance Systems
If the windshield needs to be replacedand the vehicle is equipped with afront camera sensor for the DriverAssistance Systems, a GMreplacement windshield isrecommended. The replacementwindshield must be installedaccording to GM specifications forproper alignment. If it is not, thesesystems may not work properly, they
may display messages, or they maynot work at all. See your dealer forproper windshield replacement.
Acoustic Windshield
The vehicle is equipped with anacoustic windshield. If the windshieldneeds to be replaced be sure to get anacoustic windshield so you willcontinue to have the benefits anacoustic windshield can provide.
Gas Strut(s)This vehicle is equipped with gasstrut(s) to provide assistance in liftingand holding open the hood/trunk/liftgate system in full open position.
{ Warning
If the gas struts that hold open thehood, trunk, and/or liftgate fail, youor others could be seriously injured.Take the vehicle to your dealer forservice immediately. Visuallyinspect the gas struts for signs ofwear, cracks, or other damage
(Continued)

Cadillac XT5 Owner Manual (GMNA-Localizing-U.S./Canada/Mexico-13527534) - 2020 - CRC - 6/4/19
VEHICLE CARE 275
Warning (Continued)
periodically. Check to make sure thehood/trunk/liftgate is held openwith enough force. If struts arefailing to hold the hood/trunk/liftgate, do not operate. Have thevehicle serviced.
Caution
Do not apply tape or hang anyobjects from gas struts. Also do notpush down or pull on gas struts.This may cause damage to thevehicle.
See Maintenance Schedule 0 337.
Hood
Trunk
Liftgate

Cadillac XT5 Owner Manual (GMNA-Localizing-U.S./Canada/Mexico-13527534) - 2020 - CRC - 6/4/19
276 VEHICLE CARE
Headlamp Aiming
Front Headlamp AimingHeadlamp aim has been preset andshould need no further adjustment.
If the vehicle is damaged in a crash,the headlamp aim may be affected.If adjustment to the headlamps isnecessary, see your dealer.
Bulb ReplacementFor the proper type of replacementbulbs, or any bulb changing procedurenot listed in this section, contact yourdealer.
Caution
Do not replace incandescent bulbswith aftermarket LED replacementbulbs. This can cause damage tothe vehicle electrical system.
Halogen Bulbs
{ Warning
Halogen bulbs have pressurized gasinside and can burst if you drop orscratch the bulb. You or otherscould be injured. Be sure to readand follow the instructions on thebulb package.
LED LightingThis vehicle has several LED lamps.For replacement of any LED lightingassembly, contact your dealer.

Cadillac XT5 Owner Manual (GMNA-Localizing-U.S./Canada/Mexico-13527534) - 2020 - CRC - 6/4/19
VEHICLE CARE 277
Electrical System
Electrical System OverloadThe vehicle has fuses and circuitbreakers to protect against anelectrical system overload.
When the current electrical load is tooheavy, the circuit breaker opens andcloses, protecting the circuit until thecurrent load returns to normal or theproblem is fixed. This greatly reducesthe chance of circuit overload and firecaused by electrical problems.
Fuses and circuit breakers protectpower devices in the vehicle.
Replace a bad fuse with a new one ofthe identical size and rating.
If there is a problem on the road anda fuse needs to be replaced, thesame amperage fuse can be borrowed.Choose some feature of the vehiclethat is not needed to use and replaceit as soon as possible.
Headlamp Wiring
An electrical overload may cause thelamps to go on and off, or in somecases to remain off. Have theheadlamp wiring checked right away ifthe lamps go on and off or remain off.
Windshield Wipers
If the wiper motor overheats due toheavy snow or ice, the windshieldwipers will stop until the motor coolsand will then restart.
Although the circuit is protected fromelectrical overload, overload due toheavy snow or ice may cause wiperlinkage damage. Always clear ice andheavy snow from the windshieldbefore using the windshield wipers.
If the overload is caused by anelectrical problem and not snow orice, be sure to get it fixed.
Fuses and Circuit BreakersThe wiring circuits in the vehicle areprotected from short circuits by acombination of fuses and circuitbreakers. This greatly reduces thechance of damage caused by electricalproblems.
{ Danger
Fuses and circuit breakers aremarked with their ampere rating.Do not exceed thespecified amperage rating whenreplacing fuses and circuit breakers.Use of an oversized fuse or circuitbreaker can result in a vehicle fire.You and others could be seriouslyinjured or killed.

Cadillac XT5 Owner Manual (GMNA-Localizing-U.S./Canada/Mexico-13527534) - 2020 - CRC - 6/4/19
278 VEHICLE CARE
To check a fuse, look at thesilver-colored band inside the fuse.If the band is broken or melted,replace the fuse. Be sure to replace abad fuse with a new one of theidentical size and rating.
Fuses of the same amperage can betemporarily borrowed from anotherfuse location, if a fuse goes out.Replace the fuse as soon as possible.
Engine Compartment FuseBlockThe underhood fuse block is in theengine compartment, on the driverside of the vehicle.
Caution
Do not pull the enginecompartment fuse block lever, sinceit is intended only for servicepurposes. If pulled, vehiclemalfunction may occur.
Caution
Spilling liquid on any electricalcomponent on the vehicle maydamage it. Always keep the coverson any electrical component.
To remove the fuse block cover, pressthe clips on the cover and lift itstraight up.
The vehicle may not be equipped withall of the fuses, relays, and featuresshown.

Cadillac XT5 Owner Manual (GMNA-Localizing-U.S./Canada/Mexico-13527534) - 2020 - CRC - 6/4/19
VEHICLE CARE 279
Fuses Usage
F1 Antilock brake system
F2 Starter 1
Fuses Usage
F3 DC DC transformer 1
F4 –
Fuses Usage
F5 DC DC transformer 2
F6 Amplifier 1
F7 Front blower
F8 Starter 3
F9 –
F10 –
F11 –
F12 Front wiper
F13 Starter 2
F14 LED/Automaticheadlamp leveling
F15 Rear wiper 1
F16 –
F17 –
F18 Automatic headlampleveling module
F19 –
F20 –
F21 –
F22 Electronic brakecontrol module
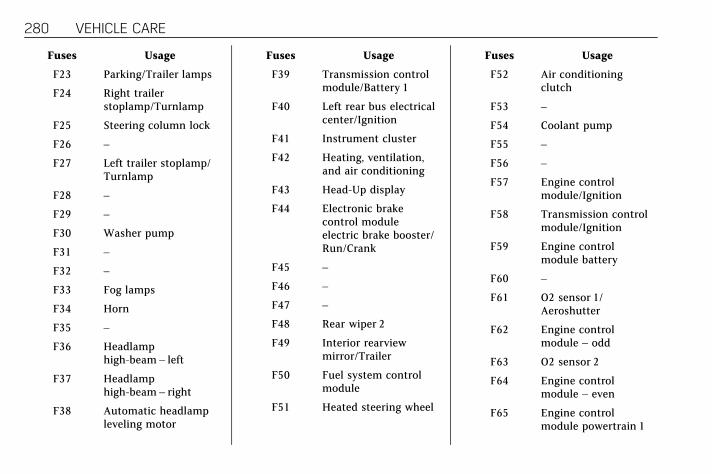
Cadillac XT5 Owner Manual (GMNA-Localizing-U.S./Canada/Mexico-13527534) - 2020 - CRC - 6/4/19
280 VEHICLE CARE
Fuses Usage
F23 Parking/Trailer lamps
F24 Right trailerstoplamp/Turnlamp
F25 Steering column lock
F26 –
F27 Left trailer stoplamp/Turnlamp
F28 –
F29 –
F30 Washer pump
F31 –
F32 –
F33 Fog lamps
F34 Horn
F35 –
F36 Headlamphigh-beam – left
F37 Headlamphigh-beam – right
F38 Automatic headlampleveling motor
Fuses Usage
F39 Transmission controlmodule/Battery 1
F40 Left rear bus electricalcenter/Ignition
F41 Instrument cluster
F42 Heating, ventilation,and air conditioning
F43 Head-Up display
F44 Electronic brakecontrol moduleelectric brake booster/Run/Crank
F45 –
F46 –
F47 –
F48 Rear wiper 2
F49 Interior rearviewmirror/Trailer
F50 Fuel system controlmodule
F51 Heated steering wheel
Fuses Usage
F52 Air conditioningclutch
F53 –
F54 Coolant pump
F55 –
F56 –
F57 Engine controlmodule/Ignition
F58 Transmission controlmodule/Ignition
F59 Engine controlmodule battery
F60 –
F61 O2 sensor 1/Aeroshutter
F62 Engine controlmodule – odd
F63 O2 sensor 2
F64 Engine controlmodule – even
F65 Engine controlmodule powertrain 1

Cadillac XT5 Owner Manual (GMNA-Localizing-U.S./Canada/Mexico-13527534) - 2020 - CRC - 6/4/19
VEHICLE CARE 281
Fuses Usage
F66 Engine controlmodule powertrain 2
F67 Engine controlmodule powertrain 3
F68 –
F69 –
F70 –
F71 –
F72 –
F73 –
F74 –
F75 –
F76 –
F77 –
Relays Usage
K1 Starter 1
K2 Run/Crank
K3 Starter 3
K4 LED/Automaticheadlamps
Relays Usage
K5 –
K6 Coolant pump
K7 Engine controlmodule
K8 Air conditioning
K9 –
K10 Starter 2
Instrument Panel FuseBlock
The instrument panel fuse block is inthe center console between the driverand passenger seats. To access thefuses, open the fuse panel door,or remove the panel from thepassenger side by pulling it out.
To reinstall the door, push the doorback into its original location.
The vehicle may not be equipped withall of the fuses, relays, and featuresshown.

Cadillac XT5 Owner Manual (GMNA-Localizing-U.S./Canada/Mexico-13527534) - 2020 - CRC - 6/4/19
282 VEHICLE CARE
Fuses Usage
F1 Body controlmodule 6
Fuses Usage
F2 Diagnostic link/Central gatewaymodule
F3 Electric steeringcolumn lock
F4 –
F5 Logistics
F6 Heating, ventilation,and air conditioning
F7 Body controlmodule 3
F8 –
F9 Right frontheated seat
F10 Airbag
F11 –
F12 Amplifier 2
F13 Body controlmodule 7
F14 Left frontheated seat
Fuses Usage
F15 Instrument panelswitch bank
F16 Sunroof
F17 Body controlmodule 1
F18 Instrument cluster
F19 –
F20 Rear seatentertainment
F21 Body controlmodule 4
F22 Infotainment/USBdata/Aux jack
F23 Body controlmodule 2
F24 USB charger/Wireless charging
F25 Park aid/electronictransmission rangesystem
F26 Communicationsintegration module
F27 Video

Cadillac XT5 Owner Manual (GMNA-Localizing-U.S./Canada/Mexico-13527534) - 2020 - CRC - 6/4/19
VEHICLE CARE 283
Fuses Usage
F28 Heating, ventilation,and air conditioningdisplay
F29 Radio
F30 Steering wheeladjustment controls
F31 Electronic brakecontrol moduleelectric brakebooster
F32 DC AC inverter
F33 Driver power seat
F34 Passengerpower seat
F35 Battery IEC 1 feed
F36 Electric powersteering
F37 Rear seatentertainment/USBcharge/Wirelesscharging module
F38 Body controlmodule 8
Fuses Usage
F39 –
CircuitBreakers
Usage
F40 –
F41 –
F42 Auxiliary poweroutlet/Lighter
Rear Compartment FuseBlock
The rear compartment fuse block is inthe cargo area, on the driver side ofthe vehicle behind the lower trimpanel. To open, turn the latch with aflat-bladed tool and pull the trimpanel from the edges to fold it down.
The label for this fuse block is in thespare tire area, on the foam under thecargo floor.
The vehicle may not be equipped withall of the fuses, relays, and featuresshown.

Cadillac XT5 Owner Manual (GMNA-Localizing-U.S./Canada/Mexico-13527534) - 2020 - CRC - 6/4/19
284 VEHICLE CARE
Fuses Usage
F1 –
F2 Trailer battery 1
Fuses Usage
F3 Driver seat belt motor
F4 Rear blower
F5 Rear drive control
F6 Passenger seat beltmotor
F7 Right window
F8 Rear window defogger
F9 Left window
F10 –
F11 Trailer reverse
F12 –
F13 –
F14 –
F15 –
F16 –
F17 Camera/Spare
F18 Trailer module
F19 Ventilated seats
F20 –
F21 Trailer connector
Fuses Usage
F22 –
F23 –
F24 Passenger windowswitch
F25 –
F26 Trailer brake
F27 Driver ventilated seat/Lumbar
F28 Passive entry/Passivestart
F29 –
F30 Canister vent
F31 –
F32 Heated mirror
F33 –
F34 Liftgate module
F35 Fuel system controlmodule
F36 Passenger ventilatedseat/Lumbar
F37 –

Cadillac XT5 Owner Manual (GMNA-Localizing-U.S./Canada/Mexico-13527534) - 2020 - CRC - 6/4/19
VEHICLE CARE 285
Fuses Usage
F38 Window module
F39 Rear closure
F40 Memory seat module
F41 Automatic occupancysensor
F42 Trailer battery 2
F43 –
F44 –
F45 Liftgate motor
F46 Rear heated seats
F47 –
F48 Glass break sensor
F49 –
F50 –
F51 –
F52 Active dampeningsystem module
F53 Rear parking aidmodule/Video/USB/Spare
Fuses Usage
F54 External objectcalculating/Side blindzone alert
F55 –
F56 Universal garage dooropener/Rain sensor
F57 Theft deterrent
CircuitBreakers
Usage
CB1 –
CB2 –
CB3 Rear auxiliary poweroutlet
Relays Usage
K1 –
K2 –
Wheels and Tires
TiresEvery new GM vehicle hashigh-quality tires made by aleading tire manufacturer. See thewarranty manual for informationregarding the tire warranty andwhere to get service. Foradditional information refer to thetire manufacturer.
{ Warning
. Poorly maintained andimproperly used tires aredangerous.
. Overloading the tires cancause overheating as aresult of too much flexing.There could be a blowoutand a serious crash. SeeVehicle Load Limits 0 172.
(Continued)

Cadillac XT5 Owner Manual (GMNA-Localizing-U.S./Canada/Mexico-13527534) - 2020 - CRC - 6/4/19
286 VEHICLE CARE
Warning (Continued)
. Underinflated tires posethe same danger asoverloaded tires. Theresulting crash could causeserious injury. Check alltires frequently tomaintain therecommended pressure.Tire pressure should bechecked when the tiresare cold.
. Overinflated tires are morelikely to be cut, punctured,or broken by a suddenimpact — such as whenhitting a pothole. Keeptires at the recommendedpressure.
. Worn or old tires cancause a crash. If the treadis badly worn,replace them.
(Continued)
Warning (Continued)
. Replace any tires that havebeen damaged by impactswith potholes, curbs, etc.
. Improperly repaired tirescan cause a crash. Onlythe dealer or an authorizedtire service center shouldrepair, replace, dismount,and mount the tires.
. Do not spin the tires inexcess of 56 km/h(35 mph) on slipperysurfaces such as snow,mud, ice, etc. Excessivespinning may cause thetires to explode.
See Tire Pressure for High-SpeedOperation 0 294 for inflationpressure adjustment forhigh-speed driving.
All-Season TiresThis vehicle may come with all-seasontires. These tires are designed toprovide good overall performance onmost road surfaces and weatherconditions. Original equipment tiresdesigned to GM's specific tireperformance criteria have a TPCspecification code molded onto thesidewall. Original equipmentall-season tires can be identified bythe last two characters of this TPCcode, which will be “MS.”
Consider installing winter tires on thevehicle if frequent driving on snow orice-covered roads is expected.All-season tires provide adequateperformance for most winter drivingconditions, but they may not offer thesame level of traction or performanceas winter tires on snow or ice-coveredroads. See Winter Tires 0 286.
Winter TiresThis vehicle was not originallyequipped with winter tires. Wintertires are designed for increasedtraction on snow and ice-covered
Cadillac XT5 Owner Manual (GMNA-Localizing-U.S./Canada/Mexico-13527534) - 2020 - CRC - 6/4/19
VEHICLE CARE 287
roads. Consider installing winter tireson the vehicle if frequent driving onice or snow covered roads is expected.See your dealer for details regardingwinter tire availability and proper tireselection. Also, see Buying New Tires0 301.
With winter tires, there may bedecreased dry road traction, increasedroad noise, and shorter tread life.After changing to winter tires, be alertfor changes in vehicle handling andbraking.
If using winter tires:
. Use tires of the same brand andtread type on all four wheelpositions.
. Use only radial ply tires of thesame size, load range, and speedrating as the original equipmenttires.
Winter tires with the same speedrating as the original equipment tiresmay not be available for H, V, W, Y,and ZR speed rated tires. If wintertires with a lower speed rating arechosen, never exceed the tire'smaximum speed capability.
Summer TiresThis vehicle may come with 235/65R18 or 235/55R20 high performancesummer tires. These tires have aspecial tread and compound that areoptimized for maximum dry and wetroad performance. This special treadand compound will have decreasedperformance in cold climates, and onice and snow. It is recommended thatwinter tires be installed on the vehicleif frequent driving at temperaturesbelow approximately 5 °C (40 °F) or onice or snow covered roads is expected.See Winter Tires 0 286.
Caution
High performance summer tireshave rubber compounds that loseflexibility and may develop surfacecracks in the tread area attemperatures below −7 °C (20 °F).Always store high performancesummer tires indoors and attemperatures above −7 °C (20 °F)when not in use. If the tires have
(Continued)
Caution (Continued)
been subjected to −7 °C (20 °F) orless, let them warm up in a heatedspace to at least 5 °C (40 °F) for24 hours or more before beinginstalled or driving a vehicle onwhich they are installed. Do notapply heat or blow heated airdirectly on the tires. Always inspecttires before use. See Tire Inspection0 299.
Tire Sidewall LabelingUseful information about a tire ismolded into its sidewall. Theexamples show a typical passengervehicle tire and a compact sparetire sidewall.

Cadillac XT5 Owner Manual (GMNA-Localizing-U.S./Canada/Mexico-13527534) - 2020 - CRC - 6/4/19
288 VEHICLE CARE
Passenger (P-Metric) Tire Example
(1) Tire Size : The tire size is acombination of letters andnumbers used to define aparticular tire's width, height,aspect ratio, construction type,and service description. See the“Tire Size” illustration later in thissection.
(2) TPC Spec (Tire PerformanceCriteria Specification) : Originalequipment tires designed to GM'sspecific tire performance criteriahave a TPC specification code
molded onto the sidewall. GM'sTPC specifications meet or exceedall federal safety guidelines.
(3) DOT (Department ofTransportation) : TheDepartment of Transportation(DOT) code indicates that the tireis in compliance with the U.S.Department of TransportationMotor Vehicle Safety Standards.
DOT Tire Date of Manufacture :The last four digits of the TINindicate the tire manufactureddate. The first two digits representthe week (01–52) and the last twodigits, the year. For example, thethird week of the year 2010 wouldhave a four-digit DOT dateof 0310.
(4) Tire Identification Number(TIN) : The letters and numbersfollowing the DOT (Department ofTransportation) code are the TireIdentification Number (TIN). TheTIN shows the manufacturer andplant code, tire size, and date the
tire was manufactured. The TIN ismolded onto both sides of the tire,although only one side may havethe date of manufacture.
(5) Tire Ply Material : The typeof cord and number of plies in thesidewall and under the tread.
(6) Uniform Tire QualityGrading (UTQG) : Tiremanufacturers are required tograde tires based on threeperformance factors: treadwear,traction, and temperatureresistance. For more informationsee Uniform Tire Quality Grading0 303.
(7) Maximum Cold InflationLoad Limit : Maximum load thatcan be carried and the maximumpressure needed to supportthat load.

Cadillac XT5 Owner Manual (GMNA-Localizing-U.S./Canada/Mexico-13527534) - 2020 - CRC - 6/4/19
VEHICLE CARE 289
Compact Spare Tire Example
(1) Tire Ply Material : The typeof cord and number of plies in thesidewall and under the tread.
(2) Temporary Use Only : Thecompact spare tire or temporaryuse tire should not be driven atspeeds over 80 km/h (50 mph).The compact spare tire is foremergency use when a regularroad tire has lost air and goneflat. If the vehicle has acompact spare tire, see CompactSpare Tire 0 319 andIf a Tire Goes Flat 0 306.
(3) Tire Identification Number(TIN) : The letters and numbersfollowing the DOT (Department ofTransportation) code are the TireIdentification Number (TIN). TheTIN shows the manufacturer andplant code, tire size, and date thetire was manufactured. The TIN ismolded onto both sides of the tire,although only one side may havethe date of manufacture.
(4) Maximum Cold InflationLoad Limit : Maximum load thatcan be carried and the maximumpressure needed to supportthat load.
(5) Tire Inflation : The temporaryuse tire or compact spare tireshould be inflated to 420 kPa(60 psi). For more information ontire pressure and inflation see TirePressure 0 292.
(6) Tire Size : A combination ofletters and numbers define a tire'swidth, height, aspect ratio,construction type, and service
description. The letter “T” as thefirst character in the tire sizemeans the tire is for temporaryuse only.
(7) TPC Spec (Tire PerformanceCriteria Specification) : Originalequipment tires designed to GM'sspecific tire performance criteriahave a TPC specification codemolded onto the sidewall. GM'sTPC specifications meet or exceedall federal safety guidelines.
Tire Designations
Tire Size
The example shows a typicalpassenger vehicle tire size.

Cadillac XT5 Owner Manual (GMNA-Localizing-U.S./Canada/Mexico-13527534) - 2020 - CRC - 6/4/19
290 VEHICLE CARE
(1) Passenger (P-Metric) Tire :The United States version of ametric tire sizing system. Theletter “P” as the first character inthe tire size means a passengervehicle tire engineered tostandards set by the U.S. Tire andRim Association.
(2) Tire Width : The 3-digitnumber indicates the tire sectionwidth in millimeters from sidewallto sidewall.
(3) Aspect Ratio : A 2-digitnumber that indicates the tireheight-to-width measurements.For example, if the tire size aspectratio is 60, as shown in item (3) ofthe illustration, it would meanthat the tire's sidewall is60 percent as high as it is wide.
(4) Construction Code : A lettercode is used to indicate the typeof ply construction in the tire. Theletter “R” means radial plyconstruction; the letter “D” meansdiagonal or bias ply construction.
(5) Rim Diameter : Diameter ofthe wheel in inches.
(6) Service Description : Thesecharacters represent the loadindex and speed rating of the tire.The load index represents the loadcarrying capacity a tire is certifiedto carry. The speed rating is themaximum speed a tire is certifiedto carry a load.
Tire Terminology andDefinitionsAir Pressure : The amount of airinside the tire pressing outwardon each square inch of the tire.Air pressure is expressed in kPa(kilopascal) or psi (pounds persquare inch).
Accessory Weight : The combinedweight of optional accessories.Some examples of optionalaccessories are automatictransmission, power windows,power seats, and air conditioning.
Aspect Ratio : The relationship ofa tire's height to its width.
Belt : A rubber coated layer ofcords between the plies and thetread. Cords may be made fromsteel or other reinforcingmaterials.
Bead : The tire bead contains steelwires wrapped by steel cords thathold the tire onto the rim.
Bias Ply Tire : A pneumatic tire inwhich the plies are laid atalternate angles less than90 degrees to the centerline of thetread.
Cold Tire Pressure : The amountof air pressure in a tire, measuredin kPa (kilopascal) or psi (poundsper square inch) before a tire hasbuilt up heat from driving. SeeTire Pressure 0 292.
Curb Weight : The weight of amotor vehicle with standard andoptional equipment including the

Cadillac XT5 Owner Manual (GMNA-Localizing-U.S./Canada/Mexico-13527534) - 2020 - CRC - 6/4/19
VEHICLE CARE 291
maximum capacity of fuel, oil, andcoolant, but without passengersand cargo.
DOT Markings : A code moldedinto the sidewall of a tiresignifying that the tire is incompliance with the U.S.Department of Transportation(DOT) Motor Vehicle SafetyStandards. The DOT code includesthe Tire Identification Number(TIN), an alphanumeric designatorwhich can also identify the tiremanufacturer, production plant,brand, and date of production.
GVWR : Gross Vehicle WeightRating. See Vehicle Load Limits0 172.
GAWR FRT : Gross Axle WeightRating for the front axle. SeeVehicle Load Limits 0 172.
GAWR RR : Gross Axle WeightRating for the rear axle. SeeVehicle Load Limits 0 172.
Intended Outboard Sidewall :The side of an asymmetrical tirethat must always face outwardwhen mounted on a vehicle.
Kilopascal (kPa) : The metric unitfor air pressure.
Light Truck (LT-Metric) Tire : Atire used on light duty trucks andsome multipurpose passengervehicles.
Load Index : An assigned numberranging from 1 to 279 thatcorresponds to the load carryingcapacity of a tire.
Maximum Inflation Pressure :The maximum air pressure towhich a cold tire can be inflated.The maximum air pressure ismolded onto the sidewall.
Maximum Load Rating : The loadrating for a tire at the maximumpermissible inflation pressure forthat tire.
Maximum Loaded VehicleWeight : The sum of curb weight,accessory weight, vehicle capacityweight, and production optionsweight.
Normal Occupant Weight : Thenumber of occupants a vehicle isdesigned to seat multiplied by68 kg (150 lb). See Vehicle LoadLimits 0 172.
Occupant Distribution :Designated seating positions.
Outward Facing Sidewall : Theside of an asymmetrical tire thathas a particular side that facesoutward when mounted on avehicle. The side of the tire thatcontains a whitewall, bears whitelettering, or bears manufacturer,brand, and/or model namemolding that is higher or deeperthan the same moldings on theother sidewall of the tire.

Cadillac XT5 Owner Manual (GMNA-Localizing-U.S./Canada/Mexico-13527534) - 2020 - CRC - 6/4/19
292 VEHICLE CARE
Passenger (P-Metric) Tire : A tireused on passenger cars and somelight duty trucks andmultipurpose vehicles.
Recommended InflationPressure : Vehicle manufacturer'srecommended tire inflationpressure as shown on the tireplacard. See Tire Pressure 0 292andVehicle Load Limits 0 172.
Radial Ply Tire : A pneumatic tirein which the ply cords that extendto the beads are laid at 90 degreesto the centerline of the tread.
Rim : A metal support for a tireand upon which the tire beads areseated.
Sidewall : The portion of a tirebetween the tread and the bead.
Speed Rating : An alphanumericcode assigned to a tire indicatingthe maximum speed at which atire can operate.
Traction : The friction betweenthe tire and the road surface. Theamount of grip provided.
Tread : The portion of a tire thatcomes into contact with the road.
Treadwear Indicators : Narrowbands, sometimes called wearbars, that show across the tread ofa tire when only 1.6 mm (1/16 in)of tread remains. See When It IsTime for New Tires 0 300.
UTQGS (Uniform Tire QualityGrading Standards) : A tireinformation system that providesconsumers with ratings for a tire'straction, temperature, andtreadwear. Ratings are determinedby tire manufacturers usinggovernment testing procedures.The ratings are molded into thesidewall of the tire. See UniformTire Quality Grading 0 303.
Vehicle Capacity Weight : Thenumber of designated seatingpositions multiplied by68 kg (150 lb) plus the rated cargoload. See Vehicle Load Limits 0 172.
Vehicle Maximum Load on theTire : Load on an individual tiredue to curb weight, accessoryweight, occupant weight, andcargo weight.
Vehicle Placard : A labelpermanently attached to a vehicleshowing the vehicle capacityweight and the original equipmenttire size and recommendedinflation pressure. See “Tire andLoading Information Label” underVehicle Load Limits 0 172.
Tire PressureTires need the correct amount ofair pressure to operate effectively.

Cadillac XT5 Owner Manual (GMNA-Localizing-U.S./Canada/Mexico-13527534) - 2020 - CRC - 6/4/19
VEHICLE CARE 293
{ Warning
Neither tire underinflation noroverinflation is good.Underinflated tires, or tires thatdo not have enough air, canresult in:
. Tire overloading andoverheating which couldlead to a blowout.
. Premature orirregular wear.
. Poor handling.
. Reduced fuel economy.
Overinflated tires, or tires thathave too much air, can result in:
. Unusual wear.
. Poor handling.
. Rough ride.
. Needless damage fromroad hazards.
The Tire and Loading Informationlabel on the vehicle indicates theoriginal equipment tires and thecorrect cold tire inflationpressures. The recommendedpressure is the minimum airpressure needed to support thevehicle's maximum load carryingcapacity. See Vehicle Load Limits0 172.
How the vehicle is loaded affectsvehicle handling and ride comfort.Never load the vehicle with moreweight than it was designed tocarry.
When to Check
Check the pressure of the tiresonce a month or more. Do notforget the compact spare, if thevehicle has one. The cold compactspare tire pressure should be at420 kPa (60 psi). See CompactSpare Tire 0 319.
How to Check
Use a good quality pocket-typegauge to check tire pressure.Proper tire inflation cannot bedetermined by looking at the tire.Check the tire inflation pressurewhen the tires are cold, meaningthe vehicle has not been driven forat least three hours or no morethan 1.6 km (1 mi).
Remove the valve cap from thetire valve stem. Press the tiregauge firmly onto the valve to geta pressure measurement. If thecold tire inflation pressurematches the recommendedpressure on the Tire and LoadingInformation label, no furtheradjustment is necessary. If theinflation pressure is low, add airuntil the recommended pressure isreached. If the inflation pressureis high, press on the metal stem inthe center of the tire valve torelease air.

Cadillac XT5 Owner Manual (GMNA-Localizing-U.S./Canada/Mexico-13527534) - 2020 - CRC - 6/4/19
294 VEHICLE CARE
Recheck the tire pressure with thetire gauge.
Put the valve caps back on thevalve stems to keep out dirt andmoisture and prevent leaks. Useonly valve caps designed for thevehicle by GM. TPMS sensorscould be damaged and would notbe covered by the vehiclewarranty.
Tire Pressure forHigh-Speed Operation
{ Warning
Driving at high speeds, 160 km/h(100 mph) or higher, puts additionalstrain on tires. Sustainedhigh-speed driving causes excessiveheat buildup and can cause suddentire failure. This could cause acrash, and you or others could bekilled. Some high-speed rated tiresrequire inflation pressureadjustment for high-speed
(Continued)
Warning (Continued)
operation. When speed limits androad conditions allow the vehicle tobe driven at high speeds, make surethe tires are rated for high-speedoperation, are in excellentcondition, and are set to the correctcold tire inflation pressure for thevehicle load.
Vehicles with 235/65R18 or 235/55R20size tires require inflation pressureadjustment when driving the vehicleat speeds of 160 km/h (100 mph) orhigher. Set the cold inflation pressureto the maximum inflation pressureshown on the tire sidewall, or 280 kPa(41 psi), whichever is lower. Returnthe tires to the recommended cold tireinflation pressure when high-speeddriving has ended. See Vehicle LoadLimits 0 172 andTire Pressure 0 292.
The maximum load and inflationpressure is molded on the tiresidewall, in small letters, near the rim
flange. It will read something like this:Maximum load 690 kg (1,521 lbs)300 kPa (44 psi) Max. Press.
Tire Pressure MonitorSystemThe Tire Pressure Monitor System(TPMS) uses radio and sensortechnology to check tire pressurelevels. The TPMS sensors monitor theair pressure in your tires and transmittire pressure readings to a receiverlocated in the vehicle.
Each tire, including the spare (ifprovided), should be checked monthlywhen cold and inflated to theinflation pressure recommended bythe vehicle manufacturer on thevehicle placard or tire inflationpressure label. (If your vehicle hastires of a different size than the sizeindicated on the vehicle placard or tireinflation pressure label, you shoulddetermine the proper tire inflationpressure for those tires.)
As an added safety feature, yourvehicle has been equipped with a tirepressure monitoring system (TPMS)
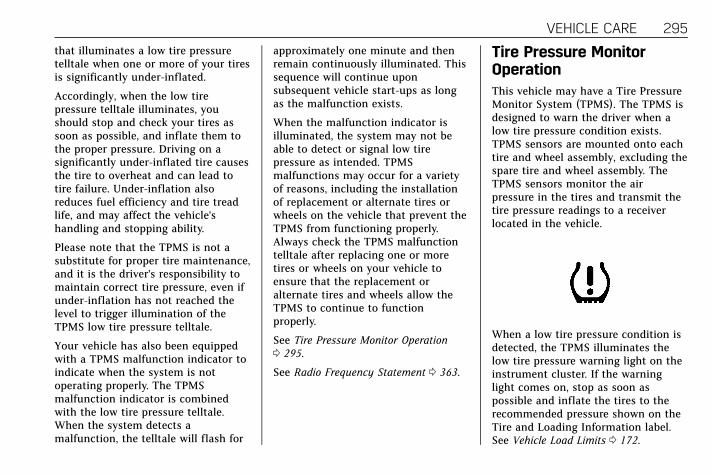
Cadillac XT5 Owner Manual (GMNA-Localizing-U.S./Canada/Mexico-13527534) - 2020 - CRC - 6/4/19
VEHICLE CARE 295
that illuminates a low tire pressuretelltale when one or more of your tiresis significantly under-inflated.
Accordingly, when the low tirepressure telltale illuminates, youshould stop and check your tires assoon as possible, and inflate them tothe proper pressure. Driving on asignificantly under-inflated tire causesthe tire to overheat and can lead totire failure. Under-inflation alsoreduces fuel efficiency and tire treadlife, and may affect the vehicle'shandling and stopping ability.
Please note that the TPMS is not asubstitute for proper tire maintenance,and it is the driver's responsibility tomaintain correct tire pressure, even ifunder-inflation has not reached thelevel to trigger illumination of theTPMS low tire pressure telltale.
Your vehicle has also been equippedwith a TPMS malfunction indicator toindicate when the system is notoperating properly. The TPMSmalfunction indicator is combinedwith the low tire pressure telltale.When the system detects amalfunction, the telltale will flash for
approximately one minute and thenremain continuously illuminated. Thissequence will continue uponsubsequent vehicle start-ups as longas the malfunction exists.
When the malfunction indicator isilluminated, the system may not beable to detect or signal low tirepressure as intended. TPMSmalfunctions may occur for a varietyof reasons, including the installationof replacement or alternate tires orwheels on the vehicle that prevent theTPMS from functioning properly.Always check the TPMS malfunctiontelltale after replacing one or moretires or wheels on your vehicle toensure that the replacement oralternate tires and wheels allow theTPMS to continue to functionproperly.
See Tire Pressure Monitor Operation0 295.
See Radio Frequency Statement 0 363.
Tire Pressure MonitorOperationThis vehicle may have a Tire PressureMonitor System (TPMS). The TPMS isdesigned to warn the driver when alow tire pressure condition exists.TPMS sensors are mounted onto eachtire and wheel assembly, excluding thespare tire and wheel assembly. TheTPMS sensors monitor the airpressure in the tires and transmit thetire pressure readings to a receiverlocated in the vehicle.
When a low tire pressure condition isdetected, the TPMS illuminates thelow tire pressure warning light on theinstrument cluster. If the warninglight comes on, stop as soon aspossible and inflate the tires to therecommended pressure shown on theTire and Loading Information label.See Vehicle Load Limits 0 172.

Cadillac XT5 Owner Manual (GMNA-Localizing-U.S./Canada/Mexico-13527534) - 2020 - CRC - 6/4/19
296 VEHICLE CARE
A message to check the pressure in aspecific tire displays in the DriverInformation Center (DIC). The low tirepressure warning light and the DICwarning message come on at eachignition cycle until the tires areinflated to the correct inflationpressure. Using the DIC, tire pressurelevels can be viewed. For additionalinformation and details about the DICoperation and displays see DriverInformation Center (DIC) 0 127.
The low tire pressure warning lightmay come on in cool weather whenthe vehicle is first started, and thenturn off as the vehicle is driven. Thiscould be an early indicator that the airpressure is getting low and needs tobe inflated to the proper pressure.
A Tire and Loading Information label,attached to your vehicle, shows thesize of the original equipment tiresand the correct inflation pressure forthe tires when they are cold. SeeVehicle Load Limits 0 172, for anexample of the Tire and LoadingInformation label and its location.Also see Tire Pressure 0 292.
The TPMS can warn about a low tirepressure condition but it does notreplace normal tire maintenance. SeeTire Inspection 0 299, Tire Rotation0 299 and Tires 0 285.
Caution
Tire sealant materials are not allthe same. A non-approved tiresealant could damage the TPMSsensors. TPMS sensor damagecaused by using an incorrect tiresealant is not covered by thevehicle warranty. Always use onlythe GM approved tire sealantavailable through your dealer orincluded in the vehicle.
Factory-installed Tire Inflator Kits usea GM approved liquid tire sealant.Using non-approved tire sealantscould damage the TPMS sensors. SeeTire Sealant and Compressor Kit 0 307for information regarding the inflatorkit materials and instructions.
TPMS Malfunction Light andMessage
The TPMS will not function properly ifone or more of the TPMS sensors aremissing or inoperable. When thesystem detects a malfunction, the lowtire pressure warning light flashes forabout one minute and then stays onfor the remainder of the ignition cycle.A DIC warning message also displays.The malfunction light and DICwarning message come on at eachignition cycle until the problem iscorrected. Some of the conditions thatcan cause these to come on are:
. One of the road tires has beenreplaced with the spare tire. Thespare tire does not have a TPMSsensor. The malfunction light andDIC message should go off afterthe road tire is replaced and thesensor matching process isperformed successfully. See “TPMSSensor Matching Process” later inthis section.
. The TPMS sensor matchingprocess was not done or notcompleted successfully afterrotating the tires. The malfunction
Cadillac XT5 Owner Manual (GMNA-Localizing-U.S./Canada/Mexico-13527534) - 2020 - CRC - 6/4/19
VEHICLE CARE 297
light and the DIC message shouldgo off after successfullycompleting the sensor matchingprocess. See "TPMS SensorMatching Process" later in thissection.
. One or more TPMS sensors aremissing or damaged. Themalfunction light and the DICmessage should go off when theTPMS sensors are installed andthe sensor matching process isperformed successfully. See yourdealer for service.
. Replacement tires or wheels donot match the original equipmenttires or wheels. Tires and wheelsother than those recommendedcould prevent the TPMS fromfunctioning properly. See BuyingNew Tires 0 301.
. Operating electronic devices orbeing near facilities using radiowave frequencies similar to theTPMS could cause the TPMSsensors to malfunction.
If the TPMS is not functioningproperly it cannot detect or signal alow tire pressure condition. See yourdealer for service if the TPMSmalfunction light and DIC messagecome on and stay on.
Tire Fill Alert (If Equipped)
This feature provides visual andaudible alerts outside the vehicle tohelp when inflating an underinflatedtire to the recommended cold tirepressure.
When the low tire pressure warninglight comes on:
1. Park the vehicle in a safe, levelplace.
2. Set the parking brake firmly.
3. Place the vehicle in P (Park).
4. Add air to the tire that isunderinflated. The turn signallamp will flash.
When the recommendedpressure is reached, the hornsounds once and the turn signallamp will stop flashing andbriefly turn solid.
Repeat these steps for allunderinflated tires that haveilluminated the low tire pressurewarning light.
{ Warning
Overinflating a tire could cause thetire to rupture and you or otherscould be injured. Do not exceed themaximum pressure listed on thetire sidewall. See Tire SidewallLabeling 0 287 andVehicle Load Limits 0 172.
If the tire is overinflated by more than35 kPa (5 psi), the horn will soundmultiple times and the turn signallamp will continue to flash for severalseconds after filling stops. To releaseand correct the pressure, while theturn signal lamp is still flashing,briefly press the center of the valvestem. When the recommendedpressure is reached, the hornsounds once.

Cadillac XT5 Owner Manual (GMNA-Localizing-U.S./Canada/Mexico-13527534) - 2020 - CRC - 6/4/19
298 VEHICLE CARE
If the turn signal lamp does not flashwithin 15 seconds after starting toinflate the tire, the tire fill alert hasnot been activated or is not working.
If the hazard warning flashers are on,the tire fill alert visual feedback willnot work properly.
The TPMS will not activate the tire fillalert properly under the followingconditions:
. There is interference from anexternal device or transmitter.
. The air pressure from the inflationdevice is not sufficient to inflatethe tire.
. There is a malfunction inthe TPMS.
. There is a malfunction in the hornor turn signal lamps.
. The identification code of theTPMS sensor is not registered tothe system.
. The battery of the TPMS sensoris low.
If the tire fill alert does not operatedue to TPMS interference, move thevehicle about 1 m (3 ft) back orforward and try again. If the tire fillalert feature is not working, use a tirepressure gauge.
TPMS Sensor Matching Process
Each TPMS sensor has a uniqueidentification code. The identificationcode needs to be matched to a newtire/wheel position after rotating thevehicle’s tires or replacing one or moreof the TPMS sensors. The TPMSsensor matching process should alsobe performed after replacing a sparetire with a road tire containing theTPMS sensor. The malfunction lightand the DIC message should go off atthe next ignition cycle. The sensorsare matched to the tire/wheelpositions, using a TPMS relearn tool,in the following order: driver sidefront tire, passenger side front tire,passenger side rear tire, and driverside rear. See your dealer for service orto purchase a relearn tool. A TPMSrelearn tool can also be purchased.See Tire Pressure Monitor SensorActivation Tool at
www.gmtoolsandequipment.com orcall 1-800-GM TOOLS(1-800-468-6657).
There are two minutes to match thefirst tire/wheel position, andfive minutes overall to match all fourtire/wheel positions. If it takes longer,the matching process stops and mustbe restarted.
The TPMS sensor matching process is:
1. Set the parking brake.
2. Place the vehicle in ServiceMode. See Ignition Positions0 176.
3. Make sure the Tire Pressure infodisplay option is turned on. Theinfo displays on the DIC can beturned on and off through theOptions menu. See DriverInformation Center (DIC) 0 127.
4. Use the five-way DIC control onthe right side of the steeringwheel to scroll to the TirePressure screen under the DICinfo page. See Driver InformationCenter (DIC) 0 127.

Cadillac XT5 Owner Manual (GMNA-Localizing-U.S./Canada/Mexico-13527534) - 2020 - CRC - 6/4/19
VEHICLE CARE 299
5. Press and hold SEL in the centerof the five-way DIC control.
The horn sounds twice to signalthe receiver is in relearn modeand the TIRE LEARNING ACTIVEmessage displays on the DICscreen.
6. Start with the driver sidefront tire.
7. Place the relearn tool against thetire sidewall, near the valve stem.Then press the button to activatethe TPMS sensor. A horn chirpconfirms that the sensoridentification code has beenmatched to this tire and wheelposition.
8. Proceed to the passenger sidefront tire, and repeat Step 7.
9. Proceed to the passenger siderear tire, and repeat Step 7.
10. Proceed to the driver side reartire, and repeat Step 7. The hornsounds two times to indicate thesensor identification code hasbeen matched to the driver siderear tire, and the TPMS sensor
matching process is no longeractive. The TIRE LEARNINGACTIVE message on the DICdisplay screen goes off.
11. Turn the vehicle off.
12. Set all four tires to therecommended air pressure levelas indicated on the Tire andLoading Information label.
Tire InspectionWe recommend that the tires,including the spare tire, if thevehicle has one, be inspected forsigns of wear or damage at leastonce a month.
Replace the tire if:
. The indicators at three or moreplaces around the tire canbe seen.
. There is cord or fabric showingthrough the tire's rubber.
. The tread or sidewall iscracked, cut, or snagged deepenough to show cord or fabric.
. The tire has a bump, bulge,or split.
. The tire has a puncture, cut,or other damage that cannotbe repaired well because of thesize or location of the damage.
Tire RotationTires should be rotated every12 000 km (7,500 mi). SeeMaintenance Schedule 0 337.
Tires are rotated to achieve amore uniform wear for all tires.The first rotation is the mostimportant.
Anytime unusual wear is noticed,rotate the tires as soon aspossible, check for proper tireinflation pressure, and check fordamaged tires or wheels. If theunusual wear continues after therotation, check the wheelalignment. See When It Is Time forNew Tires 0 300 andWheel Replacement 0 304.

Cadillac XT5 Owner Manual (GMNA-Localizing-U.S./Canada/Mexico-13527534) - 2020 - CRC - 6/4/19
300 VEHICLE CARE
Use this rotation pattern whenrotating the tires.
Do not include the compact sparetire in the tire rotation.
Adjust the front and rear tires tothe recommended inflationpressure on the Tire and LoadingInformation label after the tireshave been rotated. See TirePressure 0 292 andVehicle Load Limits 0 172.
Reset the Tire Pressure MonitorSystem. See Tire Pressure MonitorOperation 0 295.
Check that all wheel nuts areproperly tightened. See “WheelNut Torque” under Capacities andSpecifications 0 350, and“Removing the Flat Tire andInstalling the Spare Tire” underTire Changing 0 314.
{ Warning
Rust or dirt on a wheel, or on theparts to which it is fastened, canmake wheel nuts become looseafter time. The wheel could comeoff and cause a crash. Whenchanging a wheel, remove any rustor dirt from places where the wheelattaches to the vehicle. In anemergency, a cloth or a paper towelcan be used; however, use a scraperor wire brush later to remove allrust or dirt.
Lightly coat the inner diameter ofthe wheel hub opening with wheelbearing grease after a wheelchange or tire rotation to preventcorrosion or rust buildup. Do not
get grease on the wheel mountingsurface or on the wheel nuts orbolts.
When It Is Time for NewTiresFactors such as maintenance,temperatures, driving speeds, vehicleloading, and road conditions affect thewear rate of the tires.
Treadwear indicators are one way totell when it is time for new tires.Treadwear indicators appear when thetires have only 1.6 mm (1/16 in) or

Cadillac XT5 Owner Manual (GMNA-Localizing-U.S./Canada/Mexico-13527534) - 2020 - CRC - 6/4/19
VEHICLE CARE 301
less of tread remaining. See TireInspection 0 299 andTire Rotation 0 299.
The rubber in tires ages over time.This also applies to the spare tire,if the vehicle has one, even if it isnever used. Multiple factors includingtemperatures, loading conditions, andinflation pressure maintenance affecthow fast aging takes place. GMrecommends that tires, including thespare if equipped, be replaced after sixyears, regardless of tread wear. Toidentify the age of a tire, use the tiremanufacture date which is the lastfour digits of the DOT TireIdentification Number (TIN) which ismolded into one side of the tiresidewall. The first two digits representthe week (01–52) and the last twodigits, the year. For example, the thirdweek of the year 2010 would have afour-digit DOT date of 0310.
Vehicle Storage
Tires age when stored normallymounted on a parked vehicle. Park avehicle that will be stored for at leasta month in a cool, dry, clean area
away from direct sunlight to slowaging. This area should be free ofgrease, gasoline, or other substancesthat can deteriorate rubber.
Parking for an extended period cancause flat spots on the tires that mayresult in vibrations while driving.When storing a vehicle for at least amonth, remove the tires or raise thevehicle to reduce the weight from thetires.
Buying New TiresGM has developed and matchedspecific tires for the vehicle. Theoriginal equipment tires installedwere designed to meet GeneralMotors Tire Performance CriteriaSpecification (TPC Spec) systemrating. When replacement tires areneeded, GM strongly recommendsbuying tires with the same TPCSpec rating.
GM's exclusive TPC Spec systemconsiders over a dozen criticalspecifications that impact theoverall performance of the vehicle,
including brake systemperformance, ride and handling,traction control, and tire pressuremonitoring performance. GM'sTPC Spec number is molded ontothe tire's sidewall near the tiresize. If the tires have an all-seasontread design, the TPC Specnumber will be followed by MS formud and snow. See Tire SidewallLabeling 0 287.
GM recommends replacing worntires in complete sets of four.Uniform tread depth on all tireswill help to maintain theperformance of the vehicle.Braking and handling performancemay be adversely affected if all thetires are not replaced at the sametime. If proper rotation andmaintenance have been done, allfour tires should wear out atabout the same time. See TireRotation 0 299 for information onproper tire rotation. However, if it

Cadillac XT5 Owner Manual (GMNA-Localizing-U.S./Canada/Mexico-13527534) - 2020 - CRC - 6/4/19
302 VEHICLE CARE
is necessary to replace only oneaxle set of worn tires, place thenew tires on the rear axle.
Winter tires with the same speedrating as the original equipmenttires may not be available for H, V,W, Y, and ZR speed rated tires.Never exceed the winter tire'smaximum speed capability whenusing winter tires with a lowerspeed rating.
{ Warning
Tires could explode duringimproper service. Attempting tomount or dismount a tire couldcause injury or death. Only yourdealer or authorized tire servicecenter should mount ordismount the tires.
{ Warning
Mixing tires of different sizes,tread patterns, or types on thesame axle may cause loss ofcontrol of the vehicle, resultingin a crash or other vehicledamage. Use the same size, loadrange, and type of tires as theoriginal tires.
{ Warning
Using bias-ply tires on thevehicle may cause the wheel rimflanges to develop cracks aftermany miles of driving. A tireand/or wheel could fail suddenlyand cause a crash. Use onlyradial-ply tires with the wheelson the vehicle.
If the vehicle tires must bereplaced with a tire that does nothave a TPC Spec number, make
sure they are the same size, loadrange, speed rating, andconstruction (radial) as theoriginal tires.
Vehicles that have a tire pressuremonitoring system could give aninaccurate low-pressure warning ifnon-TPC Spec rated tires areinstalled. See Tire Pressure MonitorSystem 0 294.
The Tire and Loading Informationlabel indicates the originalequipment tires on the vehicle.See Vehicle Load Limits 0 172 forthe label location and moreinformation about the Tire andLoading Information label.
Different Size Tires andWheelsIf wheels or tires are installed that area different size than the originalequipment wheels and tires, vehicleperformance, including its braking,ride and handling characteristics,stability, and resistance to rollover

Cadillac XT5 Owner Manual (GMNA-Localizing-U.S./Canada/Mexico-13527534) - 2020 - CRC - 6/4/19
VEHICLE CARE 303
may be affected. If the vehicle haselectronic systems such as antilockbrakes, rollover airbags, tractioncontrol, electronic stability control,or All-Wheel Drive, the performanceof these systems can also be affected.
{ Warning
If different sized wheels are used,there may not be an acceptablelevel of performance and safety iftires not recommended for thosewheels are selected. This increasesthe chance of a crash and seriousinjury. Only use GM specific wheeland tire systems developed for thevehicle, and have them properlyinstalled by a GM certifiedtechnician.
See Buying New Tires 0 301 andAccessories and Modifications 0 252.
Uniform Tire QualityGradingThe following information relatesto the system developed by theUnited States National HighwayTraffic Safety Administration(NHTSA), which grades tires bytreadwear, traction, andtemperature performance. Thisapplies only to vehicles sold in theUnited States. The grades aremolded on the sidewalls of mostpassenger car tires. The UniformTire Quality Grading (UTQG)system does not apply to deeptread, winter tires, compact sparetires, tires with nominal rimdiameters of 10 to 12 inches(25 to 30 cm), or to somelimited-production tires.
While the tires available onGeneral Motors passenger carsand light trucks may vary withrespect to these grades, they mustalso conform to federal safety
requirements and additionalGeneral Motors Tire PerformanceCriteria (TPC) standards.
Quality grades can be found whereapplicable on the tire sidewallbetween tread shoulder andmaximum section width. Forexample:
Treadwear 200 Traction AATemperature A
All Passenger Car Tires MustConform to Federal SafetyRequirements In Addition ToThese Grades.
Treadwear
The treadwear grade is acomparative rating based on thewear rate of the tire when testedunder controlled conditions on aspecified government test course.For example, a tire graded150 would wear one and one-half(1½) times as well on thegovernment course as a tiregraded 100. The relative

Cadillac XT5 Owner Manual (GMNA-Localizing-U.S./Canada/Mexico-13527534) - 2020 - CRC - 6/4/19
304 VEHICLE CARE
performance of tires dependsupon the actual conditions oftheir use, however, and maydepart significantly from the normdue to variations in driving habits,service practices and differencesin road characteristics andclimate.
Traction
The traction grades, from highestto lowest, are AA, A, B, and C.Those grades represent the tire'sability to stop on wet pavement asmeasured under controlledconditions on specifiedgovernment test surfaces ofasphalt and concrete. A tiremarked C may have poor tractionperformance. Warning: Thetraction grade assigned to this tireis based on straight-ahead brakingtraction tests, and does notinclude acceleration, cornering,hydroplaning, or peak tractioncharacteristics.
Temperature
The temperature grades are A (thehighest), B, and C, representingthe tire's resistance to thegeneration of heat and its abilityto dissipate heat when testedunder controlled conditions on aspecified indoor laboratory testwheel. Sustained high temperaturecan cause the material of the tireto degenerate and reduce tire life,and excessive temperature canlead to sudden tire failure. Thegrade C corresponds to a level ofperformance which all passengercar tires must meet under theFederal Motor Safety StandardNo. 109. Grades B and A representhigher levels of performance onthe laboratory test wheel than theminimum required by law.Warning: The temperature gradefor this tire is established for a tirethat is properly inflated and notoverloaded. Excessive speed,underinflation, or excessive
loading, either separately or incombination, can cause heatbuildup and possible tire failure.
Wheel Alignment and TireBalanceThe tires and wheels were aligned andbalanced at the factory to provide thelongest tire life and best overallperformance. Adjustments to wheelalignment and tire balancing are notnecessary on a regular basis. Consideran alignment check if there is unusualtire wear or the vehicle is significantlypulling to one side or the other. Someslight pull to the left or right,depending on the crown of the roadand/or other road surface variationssuch as troughs or ruts, is normal.If the vehicle is vibrating when drivingon a smooth road, the tires andwheels may need to be rebalanced.See your dealer for proper diagnosis.
Wheel ReplacementReplace any wheel that is bent,cracked, or badly rusted or corroded.If wheel nuts keep coming loose, the
Cadillac XT5 Owner Manual (GMNA-Localizing-U.S./Canada/Mexico-13527534) - 2020 - CRC - 6/4/19
VEHICLE CARE 305
wheel, wheel bolts, and wheel nutsshould be replaced. If the wheel leaksair, replace it. Some aluminum wheelscan be repaired. See your dealer if anyof these conditions exist.
Your dealer will know the kind ofwheel that is needed.
Each new wheel should have the sameload-carrying capacity, diameter,width, offset, and be mounted thesame way as the one it replaces.
Replace wheels, wheel bolts, wheelnuts, or Tire Pressure Monitor System(TPMS) sensors with new GM originalequipment parts.
{ Warning
Using the wrong replacementwheels, wheel bolts, or wheel nutscan be dangerous. It could affectthe braking and handling of thevehicle. Tires can lose air, andcause loss of control, causing acrash. Always use the correct wheel,wheel bolts, and wheel nuts forreplacement.
Caution
The wrong wheel can also causeproblems with bearing life, brakecooling, speedometer or odometercalibration, headlamp aim, bumperheight, vehicle ground clearance,and tire or tire chain clearance tothe body and chassis.
Used Replacement Wheels
{ Warning
Replacing a wheel with a used oneis dangerous. How it has been usedor how far it has been driven maybe unknown. It could fail suddenlyand cause a crash. When replacingwheels, use a new GM originalequipment wheel.
Tire Chains
{ Warning
If the vehicle has 235/55R20 tiresizes, do not use tire chains. Thereis not enough clearance. Tire chainsused on a vehicle without theproper amount of clearance cancause damage to the brakes,suspension, or other vehicle parts.The area damaged by the tirechains could cause loss of controland a crash. Use another type oftraction device only if itsmanufacturer recommends it forthe vehicle's tire size combinationand road conditions. Follow thatmanufacturer's instructions. Toavoid vehicle damage, drive slowand readjust or remove the tractiondevice if it contacts the vehicle. Donot spin the wheels. If tractiondevices are used, install them onthe front tires.

Cadillac XT5 Owner Manual (GMNA-Localizing-U.S./Canada/Mexico-13527534) - 2020 - CRC - 6/4/19
306 VEHICLE CARE
Caution
If the vehicle is equipped with a tiresize other than 235/55R20, use tirechains only where legal and onlywhen necessary. Use low profilechains that add no more than12 mm thickness to the tire treadand inner sidewall. Use chains thatare the proper size for the tires.Install them on the tires of thefront axle. Do not use chains on thetires of the rear axle. Tighten themas tightly as possible with the endssecurely fastened. Drive slowly andfollow the chain manufacturer'sinstructions. If the chains contactthe vehicle, stop and retightenthem. If the contact continues, slowdown until it stops. Driving too fastor spinning the wheels with chainson will damage the vehicle.
If a Tire Goes FlatIt is unusual for a tire to blow outwhile driving, especially if the tires aremaintained properly. See Tires 0 285.
If air goes out of a tire, it is muchmore likely to leak out slowly. But ifthere is ever a blowout, here are a fewtips about what to expect and whatto do:
If a front tire fails, the flat tire createsa drag that pulls the vehicle towardthat side. Take your foot off theaccelerator pedal and grip the steeringwheel firmly. Steer to maintain laneposition, and then gently brake to astop, well off the road, if possible.
A rear blowout, particularly on acurve, acts much like a skid and mayrequire the same correction as used ina skid. Stop pressing the acceleratorpedal and steer to straighten thevehicle. It may be very bumpy andnoisy. Gently brake to a stop, well offthe road, if possible.
{ Warning
Driving on a flat tire will causepermanent damage to the tire.Re-inflating a tire after it has beendriven on while severely
(Continued)
Warning (Continued)
underinflated or flat may cause ablowout and a serious crash. Neverattempt to re-inflate a tire that hasbeen driven on while severelyunderinflated or flat. Have yourdealer or an authorized tire servicecenter repair or replace the flat tireas soon as possible.
{ Warning
Lifting a vehicle and getting underit to do maintenance or repairs isdangerous without the appropriatesafety equipment and training. If ajack is provided with the vehicle, itis designed only for changing a flattire. If it is used for anything else,you or others could be badly injuredor killed if the vehicle slips off thejack. If a jack is provided with thevehicle, only use it for changing aflat tire.

Cadillac XT5 Owner Manual (GMNA-Localizing-U.S./Canada/Mexico-13527534) - 2020 - CRC - 6/4/19
VEHICLE CARE 307
If a tire goes flat, avoid further tireand wheel damage by driving slowlyto a level place, well off the road,if possible. Turn on the hazardwarning flashers. See Hazard WarningFlashers 0 146.
{ Warning
Changing a tire can be dangerous.The vehicle can slip off the jack androll over or fall causing injury ordeath. Find a level place to changethe tire. To help prevent the vehiclefrom moving:
1. Set the parking brake firmly.
2. Put an automatictransmission in P (Park) or amanual transmission in1 (First) or R (Reverse).
3. Turn off the engine and donot restart while the vehicleis raised.
4. Do not allow passengers toremain in the vehicle.
(Continued)
Warning (Continued)
5. Place wheel blocks,if equipped, on both sides ofthe tire at the opposite cornerof the tire being changed.
This vehicle may come with a jackand spare tire or a tire sealant andcompressor kit. To use the jackingequipment to change a spare tiresafely, follow the instructions below.Then see Tire Changing 0 314. To usethe tire sealant and compressor kit,see Tire Sealant and Compressor Kit0 307.
When the vehicle has a flat tire (2),use the following example as a guideto assist you in the placement ofwheel blocks (1), if equipped.
1. Wheel Block (If Equipped)2. Flat Tire
The following information explainshow to repair or change a tire.
Tire Sealant andCompressor Kit
{ Warning
Idling a vehicle in an enclosed areawith poor ventilation is dangerous.Engine exhaust may enter thevehicle. Engine exhaust containscarbon monoxide (CO) whichcannot be seen or smelled. It cancause unconsciousness and even
(Continued)

Cadillac XT5 Owner Manual (GMNA-Localizing-U.S./Canada/Mexico-13527534) - 2020 - CRC - 6/4/19
308 VEHICLE CARE
Warning (Continued)
death. Never run the engine in anenclosed area that has no fresh airventilation. For more information,see Engine Exhaust 0 185.
{ Warning
Overinflating a tire could cause thetire to rupture and you or otherscould be injured. Be sure to readand follow the tire sealant andcompressor kit instructions andinflate the tire to its recommendedpressure. Do not exceed therecommended pressure.
{ Warning
Storing the tire sealant andcompressor kit or other equipmentin the passenger compartment ofthe vehicle could cause injury. In a
(Continued)
Warning (Continued)
sudden stop or collision, looseequipment could strike someone.Store the tire sealant andcompressor kit in its originallocation.
If this vehicle has a tire sealant andcompressor kit, there may not be aspare tire or tire changing equipment,and on some vehicles there may notbe a place to store a tire.
The tire sealant and compressor canbe used to temporarily seal puncturesup to 6 mm (0.25 in) in the tread areaof the tire. It can also be used toinflate an underinflated tire.
If the tire has been separated from thewheel, has damaged sidewalls, or hasa large puncture, the tire is tooseverely damaged for the tire sealantand compressor kit to be effective. SeeRoadside Service 0 357.
Read and follow all of the tire sealantand compressor kit instructions.
The kit includes:
1. Sealant Canister Inlet Valve2. Sealant/Air Hose3. Base of Sealant Canister4. Tire Sealant Canister5. On/Off Button6. Slot on Top of Compressor7. Pressure Deflation Button8. Pressure Gauge
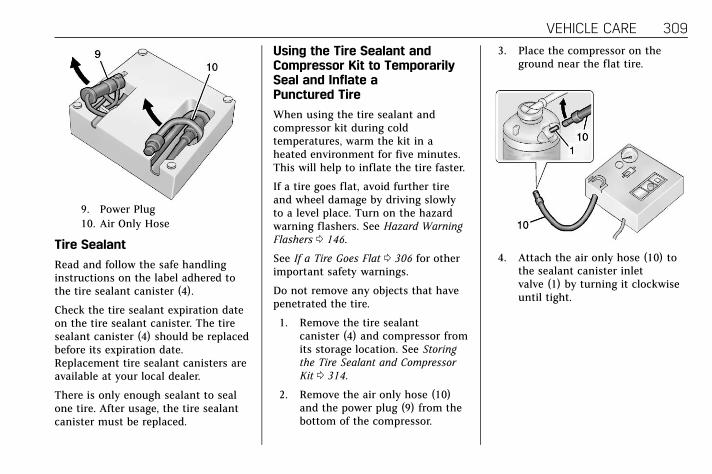
Cadillac XT5 Owner Manual (GMNA-Localizing-U.S./Canada/Mexico-13527534) - 2020 - CRC - 6/4/19
VEHICLE CARE 309
9. Power Plug10. Air Only Hose
Tire Sealant
Read and follow the safe handlinginstructions on the label adhered tothe tire sealant canister (4).
Check the tire sealant expiration dateon the tire sealant canister. The tiresealant canister (4) should be replacedbefore its expiration date.Replacement tire sealant canisters areavailable at your local dealer.
There is only enough sealant to sealone tire. After usage, the tire sealantcanister must be replaced.
Using the Tire Sealant andCompressor Kit to TemporarilySeal and Inflate aPunctured Tire
When using the tire sealant andcompressor kit during coldtemperatures, warm the kit in aheated environment for five minutes.This will help to inflate the tire faster.
If a tire goes flat, avoid further tireand wheel damage by driving slowlyto a level place. Turn on the hazardwarning flashers. See Hazard WarningFlashers 0 146.
See If a Tire Goes Flat 0 306 for otherimportant safety warnings.
Do not remove any objects that havepenetrated the tire.
1. Remove the tire sealantcanister (4) and compressor fromits storage location. See Storingthe Tire Sealant and CompressorKit 0 314.
2. Remove the air only hose (10)and the power plug (9) from thebottom of the compressor.
3. Place the compressor on theground near the flat tire.
4. Attach the air only hose (10) tothe sealant canister inletvalve (1) by turning it clockwiseuntil tight.

Cadillac XT5 Owner Manual (GMNA-Localizing-U.S./Canada/Mexico-13527534) - 2020 - CRC - 6/4/19
310 VEHICLE CARE
5. Slide the base of the tire sealantcanister (3) into the slot on thetop of the compressor (6) to holdit upright.
Make sure the tire valve stem ispositioned close to the ground sothe hose will reach it.
6. Remove the valve stem cap fromthe flat tire by turning itcounterclockwise.
7. Attach the sealant/air hose (2) tothe tire valve stem by turning itclockwise until tight.
8. Plug the power plug (9) into theaccessory power outlet in thevehicle. Unplug all items fromother accessory power outlets.See Power Outlets 0 107.
If the vehicle has an accessorypower outlet, do not use thecigarette lighter.
If the vehicle only has a cigarettelighter, use the cigarette lighter.
Do not pinch the power plugcord in the door or window.
9. Start the vehicle. The vehiclemust be running while using theair compressor.
10. Press the on/off button (5) toturn the tire sealant andcompressor kit on.
The compressor will injectsealant and air into the tire.
The pressure gauge (8) willinitially show a high pressurewhile the compressor pushes thesealant into the tire. Once thesealant is completely dispersedinto the tire, the pressure willquickly drop and start to riseagain as the tire inflates withair only.
11. Inflate the tire to therecommended inflation pressureusing the pressure gauge (8). Therecommended inflation pressurecan be found on the Tire andLoading Information label. SeeTire Pressure 0 292.
The pressure gauge (8) may readhigher than the actual tirepressure while the compressor ison. Turn the compressor off to

Cadillac XT5 Owner Manual (GMNA-Localizing-U.S./Canada/Mexico-13527534) - 2020 - CRC - 6/4/19
VEHICLE CARE 311
get an accurate pressure reading.The compressor may be turnedon/off until the correct pressureis reached.
Caution
If the recommended pressurecannot be reached afterapproximately 25 minutes, thevehicle should not be driven farther.The tire is too severely damagedand the tire sealant and compressorkit cannot inflate the tire. Removethe power plug from the accessorypower outlet and unscrew theinflating hose from the tire valve.See Roadside Service 0 357.
12. Press the on/off button (5) toturn the tire sealant andcompressor kit off.
The tire is not sealed and willcontinue to leak air until thevehicle is driven and the sealantis distributed in the tire.Therefore, Steps 13–21 must bedone immediately after Step 12.
Be careful while handling the tiresealant and compressor kit as itcould be warm after usage.
13. Unplug the power plug (9) fromthe accessory power outlet in thevehicle.
14. Turn the sealant/air hose (2)counterclockwise to remove itfrom the tire valve stem.
15. Replace the tire valve stem cap.
16. Remove the tire sealantcanister (4) from the slot on topof the compressor (6).
17. Turn the air only hose (10)counterclockwise to remove itfrom the tire sealant canisterinlet valve (1).
18. Turn the sealant/air hose (2)clockwise onto the sealantcanister inlet valve (1) to preventsealant leakage.
19. Return the air only hose (10) andpower plug (9) back to theiroriginal storage location.
20. If the flat tire was able to inflateto the recommended inflationpressure, remove the maximumspeed label from the sealantcanister and place it in a highlyvisible location.
Do not exceed the speed on thislabel until the damaged tire isrepaired or replaced.
21. Return the equipment to itsoriginal storage location in thevehicle.
22. Immediately drive the vehicle8 km (5 mi) to distribute thesealant in the tire.
23. Stop at a safe location and checkthe tire pressure. Refer toSteps 1–10 under “Using the TireSealant and Compressor Kitwithout Sealant to Inflate a Tire(Not Punctured).”

Cadillac XT5 Owner Manual (GMNA-Localizing-U.S./Canada/Mexico-13527534) - 2020 - CRC - 6/4/19
312 VEHICLE CARE
If the tire pressure has fallenmore than 68 kPa (10 psi) belowthe recommended inflationpressure, stop driving the vehicle.The tire is too severely damagedand the tire sealant cannot sealthe tire. See Roadside Service0 357.
If the tire pressure has notdropped more than 68 kPa(10 psi) from the recommendedinflation pressure, inflate the tireto the recommended inflationpressure.
24. Wipe off any sealant from thewheel, tire, or vehicle.
25. Dispose of the used tire sealantcanister (4) at a local dealer or inaccordance with local state codesand practices.
26. Replace it with a new canisteravailable from your dealer.
27. After temporarily sealing a tireusing the tire sealant andcompressor kit, take the vehicleto an authorized dealer within
161 km (100 mi) of driving tohave the tire repaired orreplaced.
Using the Tire Sealant andCompressor Kit without Sealantto Inflate a Tire (Not Punctured)
The kit includes:
1. Sealant Canister Inlet Valve2. Sealant/Air Hose3. Base of Sealant Canister4. Tire Sealant Canister5. On/Off Button6. Slot on Top of Compressor7. Pressure Deflation Button
8. Pressure Gauge
9. Power Plug10. Air Only Hose
If a tire goes flat, avoid further tireand wheel damage by driving slowlyto a level place. Turn on the hazardwarning flashers. See Hazard WarningFlashers 0 146.
See If a Tire Goes Flat 0 306 for otherimportant safety warnings.
1. Remove the compressor from itsstorage location. See Storing theTire Sealant and Compressor Kit0 314.

Cadillac XT5 Owner Manual (GMNA-Localizing-U.S./Canada/Mexico-13527534) - 2020 - CRC - 6/4/19
VEHICLE CARE 313
2. Remove the air only hose (10)and the power plug (9) from thebottom of the compressor.
3. Place the compressor on theground near the flat tire.
Make sure the tire valve stem ispositioned close to the ground sothe hose will reach it.
4. Remove the valve stem cap fromthe flat tire by turning itcounterclockwise.
5. Attach the air only hose (10) tothe tire valve stem by turning itclockwise until tight.
6. Plug the power plug (9) into theaccessory power outlet in thevehicle. Unplug all items fromother accessory power outlets.See Power Outlets 0 107.
If the vehicle has an accessorypower outlet, do not use thecigarette lighter.
If the vehicle only has a cigarettelighter, use the cigarette lighter.
Do not pinch the power plugcord in the door or window.
7. Start the vehicle. The vehiclemust be running while using theair compressor.
8. Press the on/off button (5) toturn the tire sealant andcompressor kit on.
The compressor will inflate thetire with air only.
9. Inflate the tire to therecommended inflation pressureusing the pressure gauge (8). Therecommended inflation pressurecan be found on the Tire andLoading Information label. SeeTire Pressure 0 292.
The pressure gauge (8) may readhigher than the actual tirepressure while the compressor ison. Turn the compressor off toget an accurate pressure reading.The compressor may be turnedon/off until the correct pressureis reached.
Caution
If the recommended pressurecannot be reached afterapproximately 25 minutes, thevehicle should not be driven farther.The tire is too severely damagedand the tire sealant and compressorkit cannot inflate the tire. Removethe power plug from the accessorypower outlet and unscrew theinflating hose from the tire valve.See Roadside Service 0 357.
10. Press the on/off button (5) toturn the tire sealant andcompressor kit off.
Be careful while handling thecompressor as it could be warmafter usage.
11. Unplug the power plug (9) fromthe accessory power outlet in thevehicle.
12. Turn the air only hose (10)counterclockwise to remove itfrom the tire valve stem.
13. Replace the tire valve stem cap.

Cadillac XT5 Owner Manual (GMNA-Localizing-U.S./Canada/Mexico-13527534) - 2020 - CRC - 6/4/19
314 VEHICLE CARE
14. Return the air only hose (10) andpower plug (9) back to theiroriginal storage location.
15. Return the equipment to itsoriginal storage location in thevehicle.
The tire sealant and compressor kithas accessory adapters located in acompartment on the bottom of itshousing that can be used to inflate airmattresses, balls, etc.
Storing the Tire Sealantand Compressor KitThe tire sealant and compressor kit isin a bag in the rear compartmentstorage area.
1. Open the liftgate.
2. Remove the cargo managementsystem divider. See CargoManagement System 0 99.
3. Lift the load floor. Use the hookto hold the load floor open. SeeRear Storage 0 96.
4. Turn the retainer nutcounterclockwise to remove thetire sealant and compressorkit bag.
5. Remove the tire sealant andcompressor kit from the bag.
To store the tire sealant andcompressor kit, reverse the steps.
Tire Changing
Removing the Spare Tire andTools
To access the spare tire and tools:
1. Open the liftgate. See Liftgate0 23.
2. Remove the cargo managementsystem divider. See CargoManagement System 0 99.
3. Pull up on the handle to lift theload floor. Use the hook to holdthe load floor open. See RearStorage 0 96.

Cadillac XT5 Owner Manual (GMNA-Localizing-U.S./Canada/Mexico-13527534) - 2020 - CRC - 6/4/19
VEHICLE CARE 315
4. Turn the wing nut (4)counterclockwise to remove thejack (1), wheel wrench (2), andstrap (3). Place the tool containernear the tire being changed.
5. Remove the nut retaining thespare tire.
6. Remove the spare tire and placeit next to the tire being changed.
Removing the Flat Tire andInstalling the Spare Tire
1. Do a safety check beforeproceeding. See If a Tire Goes Flat0 306.
2. Turn the wheel wrenchcounterclockwise to loosen allthe wheel nuts, but do notremove them yet.
3. Place the jack near the flat tire.
Caution
Make sure that the jack lift head isin the correct position or you maydamage your vehicle. The repairswould not be covered by yourwarranty.

Cadillac XT5 Owner Manual (GMNA-Localizing-U.S./Canada/Mexico-13527534) - 2020 - CRC - 6/4/19
316 VEHICLE CARE
4. Position the jack lift head at thejack location nearest the flat tire.
The jacking location is indicatedby a half circle notch in themetal flange. The jack must notbe used in any other position.
{ Warning
Getting under a vehicle when it islifted on a jack is dangerous. If thevehicle slips off the jack, you couldbe badly injured or killed. Never getunder a vehicle when it issupported only by a jack.
{ Warning
Raising the vehicle with the jackimproperly positioned can damagethe vehicle and even make thevehicle fall. To help avoid personalinjury and vehicle damage, be sureto fit the jack lift head into theproper location before raising thevehicle.
{ Warning
Lifting a vehicle and getting underit to do maintenance or repairs isdangerous without the appropriatesafety equipment and training. If ajack is provided with the vehicle, itis designed only for changing a flattire. If it is used for anything else,you or others could be badly injuredor killed if the vehicle slips off thejack. If a jack is provided with thevehicle, only use it for changing aflat tire.
Caution
Using a jack to raise the vehiclewithout positioning it correctlycould damage your vehicle. Whenraising your vehicle on a jack, besure to position it correctly underthe frame and avoid contact withthe plastic molding.
5. Turn the wheel wrench clockwiseto raise the jack until the slot inthe jack lift head fits into themetal flange located behind thecut out on the plastic molding.

Cadillac XT5 Owner Manual (GMNA-Localizing-U.S./Canada/Mexico-13527534) - 2020 - CRC - 6/4/19
VEHICLE CARE 317
Do not raise the vehicle yet.
6. Put the compact spare tirenear you.
7. Raise the vehicle by turning thewheel wrench clockwise in thejack. Raise the vehicle far enoughoff the ground so there is enoughroom for the spare tire to fitunder the wheel well.
8. Remove all of the wheel nuts.
9. Remove the flat tire.
{ Warning
Rust or dirt on a wheel, or on theparts to which it is fastened, canmake wheel nuts become looseafter time. The wheel could comeoff and cause a crash. Whenchanging a wheel, remove any rustor dirt from places where the wheelattaches to the vehicle. In anemergency, a cloth or a paper towelcan be used; however, use a scraperor wire brush later to remove allrust or dirt.
10. Remove any rust or dirt from thewheel bolts, mounting surfaces,and spare wheel.
11. Place the compact spare tire onthe wheel-mounting surface.
{ Warning
Never use oil or grease on bolts ornuts because the nuts might comeloose. The vehicle's wheel could falloff, causing a crash.
12. Reinstall the wheel nuts. Tighteneach nut by hand until the wheelis held against the hub.
13. Lower the vehicle by turning thejack handle counterclockwise.
{ Warning
Wheel nuts that are improperly orincorrectly tightened can cause thewheels to become loose or come off.The wheel nuts should be tightenedwith a torque wrench to the proper
(Continued)

Cadillac XT5 Owner Manual (GMNA-Localizing-U.S./Canada/Mexico-13527534) - 2020 - CRC - 6/4/19
318 VEHICLE CARE
Warning (Continued)
torque specification after replacing.Follow the torque specificationsupplied by the aftermarketmanufacturer when using accessorylocking wheel nuts. See Capacitiesand Specifications 0 350 for originalequipment wheel nut torquespecifications.
Caution
Improperly tightened wheel nutscan lead to brake pulsation androtor damage. To avoid expensivebrake repairs, evenly tighten thewheel nuts in the proper sequenceand to the proper torquespecification. See Capacities andSpecifications 0 350 for the wheelnut torque specification.
14. Tighten the wheel nuts firmly ina crisscross sequence, as shown.
15. Lower the jack all the way andremove the jack from under thevehicle.
16. Tighten the wheel nuts firmlywith the wheel wrench.
When reinstalling the wheel cover orcenter cap on the full-size tire, tightenall six plastic caps hand snug with theaid of the wheel wrench and tightenthem with the wheel wrench anadditional one-quarter of a turn.
Caution
Wheel covers will not fit on thevehicle's compact spare. If you tryto put a wheel cover on thecompact spare, the cover or thespare could be damaged.
Storing a Flat or Spare Tire andTools
{ Warning
Storing a jack, a tire, or otherequipment in the passengercompartment of the vehicle couldcause injury. In a sudden stop orcollision, loose equipment couldstrike someone. Store all these inthe proper place.
To store the flat or spare tire andtools:
1. Open the liftgate. See Liftgate0 23.

Cadillac XT5 Owner Manual (GMNA-Localizing-U.S./Canada/Mexico-13527534) - 2020 - CRC - 6/4/19
VEHICLE CARE 319
2. Replace the tools as they werestored in the rear storagecompartment and put thecompartment cover back on.
3. Place the tire, lying flat, in therear storage compartment.
4. Place the loop end of the strapthrough the cargo tie-down.Place the hook end of the strapthrough the loop and pull it untilthe strap is fastened securely tothe tie-down.
5. Route the strap hook through thewheel, as shown.
6. Attach the strap to the othercargo tie-down in the rear of thevehicle.
7. Tighten the strap and secure itusing the buckle.
The compact spare is for temporaryuse only. Replace the compact sparetire with a full-size tire as soon asyou can.
Compact Spare Tire
{ Warning
Driving with more than onecompact spare tire at a time couldresult in loss of braking andhandling. This could lead to a crashand you or others could be injured.Use only one compact spare tire ata time.
If this vehicle has a compact sparetire, it was fully inflated when new;however, it can lose air over time.Check the inflation pressure regularly.It should be 420 kPa (60 psi).
Stop as soon as possible and checkthat the spare tire is correctly inflatedafter being installed on the vehicle.The compact spare tire is designed fortemporary use only. The vehicle willperform differently with the spare tireinstalled and it is recommended thatthe vehicle speed be limited to80 km/h (50 mph). To conserve thetread of the spare tire, have the

Cadillac XT5 Owner Manual (GMNA-Localizing-U.S./Canada/Mexico-13527534) - 2020 - CRC - 6/4/19
320 VEHICLE CARE
standard tire repaired or replaced assoon as convenient and return thespare tire to the storage area.
When using a compact spare tire, theAWD (if equipped), ABS, and TractionControl systems may engage until thespare tire is recognized by the vehicle,especially on slippery roads. Adjustdriving to reduce possible wheel slip.
Caution
When the compact spare isinstalled, do not take the vehiclethrough an automatic car washwith guide rails. The compact sparecan get caught on the rails whichcan damage the tire, wheel, andother parts of the vehicle.
Do not use the compact spare onother vehicles.
Do not mix the compact spare tire orwheel with other wheels or tires. Theywill not fit. Keep the spare tire and itswheel together.
Caution
Tire chains will not fit the compactspare. Using them can damage thevehicle and the chains. Do not usetire chains on the compact spare.
Jump Starting
Jump Starting - NorthAmericaFor more information about thevehicle battery, see Battery - NorthAmerica 0 271.
If the battery has run down, try to useanother vehicle and some jumpercables to start your vehicle. Be sure touse the following steps to do it safely.
{ Warning
WARNING: Battery posts,terminals, and related accessoriescontain lead and lead compounds,chemicals known to the State ofCalifornia to cause cancer and birthdefects or other reproductive harm.Batteries also contain otherchemicals known to the State ofCalifornia to cause cancer. WASHHANDS AFTER HANDLING. Formore information go towww.P65Warnings.ca.gov/passenger-vehicle.

Cadillac XT5 Owner Manual (GMNA-Localizing-U.S./Canada/Mexico-13527534) - 2020 - CRC - 6/4/19
VEHICLE CARE 321
See California Proposition 65 Warning0 251 and the back cover.
{ Warning
Batteries can hurt you. They can bedangerous because:
. They contain acid that canburn you.
. They contain gas that canexplode or ignite.
. They contain enoughelectricity to burn you.
If you do not follow these stepsexactly, some or all of these thingscan hurt you.
Caution
Ignoring these steps could result incostly damage to the vehicle thatwould not be covered by the vehiclewarranty. Trying to start the vehicleby pushing or pulling it will notwork, and it could damage thevehicle.
3.6L V6 Shown, 2.0L L4 Similar
1. Discharged Remote BatteryPositive Terminal
2. Discharged Remote BatteryNegative Ground Terminal
3. Good Battery NegativeTerminal
4. Good Battery PositiveTerminal
The jump start remote positiveterminal (1) and the remote negativeground terminal (2) for the dischargedbattery are on the driver side of thevehicle.
The jump start negative terminal (3)and positive terminal (4) are on thebattery of the vehicle providing thejump start.
The positive jump start connection forthe discharged battery is under acover. Remove the cover to expose theterminal.
1. Check the other vehicle. It musthave a 12-volt battery with anegative ground system.
Caution
If the other vehicle does not have a12-volt system with a negativeground, both vehicles can bedamaged. Only use a vehicle thathas a 12-volt system with anegative ground for jump starting.
2. Position the two vehicles so thatthey are not touching.
3. Set the parking brake firmly andput the transmission in P (Park).See Shifting Into Park 0 182.

Cadillac XT5 Owner Manual (GMNA-Localizing-U.S./Canada/Mexico-13527534) - 2020 - CRC - 6/4/19
322 VEHICLE CARE
Caution
If any accessories are left on orplugged in during the jump startingprocedure, they could be damaged.The repairs would not be coveredby the vehicle warranty. Wheneverpossible, turn off or unplug allaccessories on either vehicle whenjump starting.
4. Turn the ignition off. Turn off alllights and accessories in bothvehicles, except the hazardwarning flashers if needed.
{ Warning
An electric fan can start up evenwhen the engine is not running andcan injure you. Keep hands,clothing, and tools away from anyunderhood electric fan.
{ Warning
Using a match near a battery cancause battery gas to explode. Peoplehave been hurt doing this, andsome have been blinded. Use aflashlight if you need more light.
Battery fluid contains acid that canburn you. Do not get it on you.If you accidentally get it in youreyes or on your skin, flush the placewith water and get medical helpimmediately.
{ Warning
Fans or other moving engine partscan injure you badly. Keep yourhands away from moving partsonce the engine is running.
5. Connect one end of the redpositive (+) cable to the remotepositive (+) terminal on thedischarged battery.
6. Connect the other end of the redpositive (+) cable to thepositive (+) terminal of the goodbattery.
7. Connect one end of the blacknegative (–) cable to thenegative (–) terminal of the goodbattery.
8. Connect the other end of theblack negative (–) cable to theremote negative (–) groundterminal on the driver side shocktower for the discharged battery.
9. Start the engine in the vehiclewith the good battery and runthe engine at idle speed for atleast four minutes.
10. Try to start the vehicle that hadthe dead battery. If it will notstart after a few tries, it probablyneeds service.
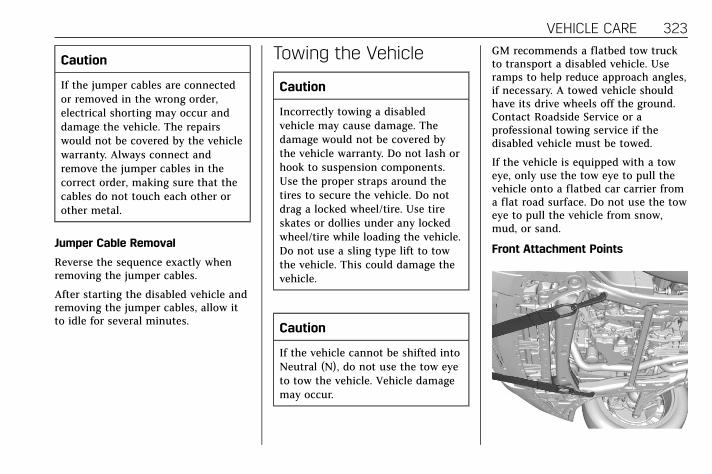
Cadillac XT5 Owner Manual (GMNA-Localizing-U.S./Canada/Mexico-13527534) - 2020 - CRC - 6/4/19
VEHICLE CARE 323
Caution
If the jumper cables are connectedor removed in the wrong order,electrical shorting may occur anddamage the vehicle. The repairswould not be covered by the vehiclewarranty. Always connect andremove the jumper cables in thecorrect order, making sure that thecables do not touch each other orother metal.
Jumper Cable Removal
Reverse the sequence exactly whenremoving the jumper cables.
After starting the disabled vehicle andremoving the jumper cables, allow itto idle for several minutes.
Towing the Vehicle
Caution
Incorrectly towing a disabledvehicle may cause damage. Thedamage would not be covered bythe vehicle warranty. Do not lash orhook to suspension components.Use the proper straps around thetires to secure the vehicle. Do notdrag a locked wheel/tire. Use tireskates or dollies under any lockedwheel/tire while loading the vehicle.Do not use a sling type lift to towthe vehicle. This could damage thevehicle.
Caution
If the vehicle cannot be shifted intoNeutral (N), do not use the tow eyeto tow the vehicle. Vehicle damagemay occur.
GM recommends a flatbed tow truckto transport a disabled vehicle. Useramps to help reduce approach angles,if necessary. A towed vehicle shouldhave its drive wheels off the ground.Contact Roadside Service or aprofessional towing service if thedisabled vehicle must be towed.
If the vehicle is equipped with a toweye, only use the tow eye to pull thevehicle onto a flatbed car carrier froma flat road surface. Do not use the toweye to pull the vehicle from snow,mud, or sand.
Front Attachment Points

Cadillac XT5 Owner Manual (GMNA-Localizing-U.S./Canada/Mexico-13527534) - 2020 - CRC - 6/4/19
324 VEHICLE CARE
The vehicle is equipped with specificattachment points to be used by thetowing provider. These holes may beused to pull the vehicle from a flatroad surface onto the flat bed towtruck.
Recreational VehicleTowingRecreational vehicle towing meanstowing the vehicle behind anothervehicle, such as behind a motor home.The two most common types ofrecreational vehicle towing are knownas dinghy towing and dolly towing.Dinghy towing is towing the vehiclewith all four wheels on the ground.Dolly towing is towing the vehiclewith two wheels on the ground andtwo wheels up on a device known as adolly.
Here are some important things toconsider before recreational vehicletowing:
. Become familiar with the locallaws that apply to recreationalvehicle towing. These laws mayvary by region.
. The towing capacity of the towingvehicle. Be sure to read the towvehicle manufacturer'srecommendations.
. How far the vehicle will be towed.Some vehicles have restrictions onhow far and how long they can betowed.
. The proper towing equipment. Seeyour dealer or traileringprofessional for additional adviceand equipment recommendations.
. If the vehicle is ready to be towed.Just as preparing the vehicle for along trip, make sure the vehicle isprepared to be towed.
Caution
Use of a shield mounted in front ofthe vehicle grille could restrictairflow and cause damage to thetransmission. The repairs would notbe covered by the vehicle warranty.If using a shield, only use one thatattaches to the towing vehicle.
Dinghy Towing
Caution
If the vehicle is towed with all fourwheels on the ground, thedrivetrain components could bedamaged. The repairs would not becovered by the vehicle warranty. Donot tow the vehicle with all fourwheels on the ground.

Cadillac XT5 Owner Manual (GMNA-Localizing-U.S./Canada/Mexico-13527534) - 2020 - CRC - 6/4/19
VEHICLE CARE 325
The vehicle is not designed to betowed with all four wheels on theground. If the vehicle must be towed,a dolly should be used. See thefollowing information on dolly towing.
Dolly Towing
Driving onto a Dolly
1. Park the vehicle on level groundin front of the dolly and turn thevehicle off.
2. Make sure the parking brake isreleased.
3. Press and hold ENGINE START/STOP with your foot off thebrake for five seconds.
4. Hold the brake pedal and pressthe parking brake switch for15 seconds until the serviceparking brake light flashes.
5. While the service parking brakelight is still flashing, removeyour foot from the brake pedaland release the parking brakeswitch.
6. Immediately press and releasethe parking brake switch againwhile the service park brake lightis still flashing.
7. Start the vehicle and drive ontothe dolly.
8. Place the vehicle in P (Park).
9. Turn off the vehicle.
10. Open the hood.
11. Exit the vehicle and secure thevehicle onto the dolly.
12. Disconnect the negative (–)terminal connector from the12-volt battery.
13. Close the hood of the vehicle.
Removing the Vehicle from a Dolly
1. Make sure the vehicle is securedto the dolly.
2. Open the door and open thehood of the vehicle.
3. Connect the negative (–)terminal connector from the12-volt battery.
4. Press and hold ENGINE START/STOP with your foot off thebrake for five seconds.
5. Hold the brake pedal and pressthe parking brake switch forfive seconds until the parkingbrake light flashes.
6. Turn the vehicle off.
7. Unsecure the vehicle and removeit from the dolly.
8. Do not drive in Service Modewith the parking brake set

Cadillac XT5 Owner Manual (GMNA-Localizing-U.S./Canada/Mexico-13527534) - 2020 - CRC - 6/4/19
326 VEHICLE CARE
Towing the Vehicle fromthe Rear Caution
Towing the vehicle from the rearcould damage it. Also, repairs wouldnot be covered by the vehiclewarranty. Never have the vehicletowed from the rear.
Do not tow the vehicle from the rear.
Appearance Care
Exterior Care
Locks
Locks are lubricated at the factory.Use a de-icing agent only whenabsolutely necessary, and have thelocks greased after using. SeeRecommended Fluids and Lubricants0 346.
Washing the Vehicle
To preserve the vehicle's finish, washit often and out of direct sunlight.
Caution
Do not use petroleum-based, acidic,or abrasive cleaning agents as theycan damage the vehicle's paint,metal, or plastic parts. If damageoccurs, it would not be covered bythe vehicle warranty. Approvedcleaning products can be obtainedfrom your dealer. Follow allmanufacturer directions regarding
(Continued)

Cadillac XT5 Owner Manual (GMNA-Localizing-U.S./Canada/Mexico-13527534) - 2020 - CRC - 6/4/19
VEHICLE CARE 327
Caution (Continued)
correct product usage, necessarysafety precautions, and appropriatedisposal of any vehicle careproduct.
Caution
Avoid using high-pressure washescloser than 30 cm (12 in) to thesurface of the vehicle. Use of powerwashers exceeding 8 274 kPa(1,200 psi) can result in damage orremoval of paint and decals.
Caution
Do not power wash any component
under the hood that has thisesymbol.
This could cause damage thatwould not be covered by the vehiclewarranty.
If using an automatic car wash, followthe car wash instructions. Thewindshield wiper and rear windowwiper, if equipped, must be off.Remove any accessories that may bedamaged or interfere with the carwash equipment.
Rinse the vehicle well, before washingand after, to remove all cleaningagents completely. If they are allowedto dry on the surface, they could stain.
Dry the finish with a soft, cleanchamois or an all-cotton towel toavoid surface scratches and waterspotting.
Finish Care
Application of aftermarket clearcoatsealant/wax materials is notrecommended. If painted surfaces aredamaged, see your dealer to have thedamage assessed and repaired. Foreignmaterials such as calcium chlorideand other salts, ice melting agents,road oil and tar, tree sap, birddroppings, chemicals from industrialchimneys, etc., can damage thevehicle's finish if they remain onpainted surfaces. Wash the vehicle as
soon as possible. If necessary, usenon-abrasive cleaners that are markedsafe for painted surfaces to removeforeign matter.
Occasional hand waxing or mildpolishing should be done to removeresidue from the paint finish. See yourdealer for approved cleaning products.
Do not apply waxes or polishes touncoated plastic, vinyl, rubber, decals,simulated wood, or flat paint asdamage can occur.
Caution
Machine compounding oraggressive polishing on a basecoat/clearcoat paint finish may damageit. Use only non-abrasive waxes andpolishes that are made for abasecoat/clearcoat paint finish onthe vehicle.
To keep the paint finish looking new,keep the vehicle garaged or coveredwhenever possible.

Cadillac XT5 Owner Manual (GMNA-Localizing-U.S./Canada/Mexico-13527534) - 2020 - CRC - 6/4/19
328 VEHICLE CARE
Protecting Exterior Bright MetalMoldings
Caution
Failure to clean and protect thebright metal moldings can result ina hazy white finish or pitting. Thisdamage would not be covered bythe vehicle warranty.
The bright metal moldings on thevehicle are aluminum, chrome,or stainless steel. To prevent damagealways follow these cleaninginstructions:
. Be sure the molding is cool to thetouch before applying any cleaningsolution.
. Use only approved cleaningsolutions for aluminum, chrome,or stainless steel. Some cleanersare highly acidic or containalkaline substances and candamage the moldings.
. Always dilute a concentratedcleaner according to themanufacturer’s instructions.
. Do not use cleaners that are notintended for automotive use.
. Use a nonabrasive wax on thevehicle after washing to protectand extend the molding finish.
Cleaning Exterior Lamps/Lenses,Emblems, Decals, and Stripes
Use only lukewarm or cold water, asoft cloth, and a car washing soap toclean exterior lamps, lenses, emblems,decals, and stripes. Follow instructionsunder "Washing the Vehicle"previously in this section.
Lamp covers are made of plastic, andsome have a UV protective coating. Donot clean or wipe them when dry.
Do not use any of the following onlamp covers:
. Abrasive or caustic agents.
. Washer fluids and other cleaningagents in higher concentrationsthan suggested by themanufacturer.
. Solvents, alcohols, fuels, or otherharsh cleaners.
. Ice scrapers or other hard items.
. Aftermarket appearance caps orcovers while the lamps areilluminated, due to excessive heatgenerated.
Caution
Failure to clean lamps properly cancause damage to the lamp coverthat would not be covered by thevehicle warranty.
Caution
Using wax on low gloss black finishstripes can increase the gloss leveland create a non-uniform finish.Clean low gloss stripes with soapand water only.
Air Intakes
Clear debris from the air intakes,between the hood and windshield,when washing the vehicle.

Cadillac XT5 Owner Manual (GMNA-Localizing-U.S./Canada/Mexico-13527534) - 2020 - CRC - 6/4/19
VEHICLE CARE 329
Shutter System
The vehicle may have a shuttersystem designed to help increase fueleconomy. Keep the shutter systemclean for proper operation.
Windshield and Wiper Blades
Clean the outside of the windshieldwith glass cleaner.
Clean rubber blades using a lint-freecloth or paper towel soaked withwindshield washer fluid or a milddetergent. Wash the windshieldthoroughly when cleaning the blades.
Bugs, road grime, sap, and a buildupof vehicle wash/wax treatments maycause wiper streaking.
Replace the wiper blades if they areworn or damaged. Damage can becaused by extreme dusty conditions,sand, salt, heat, sun, snow, and ice.
Weatherstrips
Apply weatherstrip lubricant onweatherstrips to make them lastlonger, seal better, and not stick orsqueak. Lubricate weatherstrips atleast once a year. Hot, dry climatesmay require more frequentapplication. Black marks from rubbermaterial on painted surfaces can beremoved by rubbing with a cleancloth. See Recommended Fluids andLubricants 0 346.
Tires
Use a stiff brush with tire cleaner toclean the tires.
Caution
Using petroleum-based tire dressingproducts on the vehicle maydamage the paint finish and/ortires. When applying a tire dressing,always wipe off any overspray fromall painted surfaces on the vehicle.
Wheels and Wheel Trim
Use a soft, clean cloth with mild soapand water to clean the wheels. Afterrinsing thoroughly with clean water,dry with a soft, clean towel. A waxmay then be applied.
Caution
Chrome wheels and chrome wheeltrim may be damaged if the vehicleis not washed after driving on roadsthat have been sprayed withmagnesium chloride or calciumchloride. These are used on roadsfor conditions such as dust and ice.Always wash the chrome with soapand water after exposure.

Cadillac XT5 Owner Manual (GMNA-Localizing-U.S./Canada/Mexico-13527534) - 2020 - CRC - 6/4/19
330 VEHICLE CARE
Caution
To avoid surface damage on wheelsand wheel trim, do not use strongsoaps, chemicals, abrasive polishes,cleaners, or brushes. Use only GMapproved cleaners. Do not drive thevehicle through an automatic carwash that uses silicon carbide tire/wheel cleaning brushes. Damagecould occur and the repairs wouldnot be covered by the vehiclewarranty.
Brake System
Visually inspect brake lines and hosesfor proper hook-up, binding, leaks,cracks, chafing, etc. Inspect disc brakepads for wear and rotors for surfacecondition. Inspect all other brakeparts.
Steering, Suspension, andChassis Components
Visually inspect steering, suspension,and chassis components for damaged,loose, or missing parts or signs ofwear at least once a year.
Inspect power steering for properelectrical connections, binding, cracks,chafing, etc.
Visually check constant velocity jointboots and axle seals for leaks.
Body Component Lubrication
Lubricate all key lock cylinders, hoodhinges, liftgate hinges, and the steelfuel door hinges, unless thecomponents are plastic. Applyingsilicone grease on weatherstrips with aclean cloth will make them lastlonger, seal better, and not stick orsqueak.
Underbody Maintenance
At least twice a year, spring and fall,use plain water to flush any corrosivematerials from the underbody. Takecare to thoroughly clean any areaswhere mud and other debris cancollect.
Do not directly power wash thetransfer case and/or front/rear axleoutput seals. High pressure water canovercome the seals and contaminate
the fluid. Contaminated fluid willdecrease the life of the transfer caseand/or axles and should be replaced.
Sheet Metal Damage
If the vehicle is damaged and requiressheet metal repair or replacement,make sure the body repair shopapplies anti-corrosion material toparts repaired or replaced to restorecorrosion protection.
Original manufacturer replacementparts will provide the corrosionprotection while maintaining thevehicle warranty.
Finish Damage
Quickly repair minor chips andscratches with touch-up materialsavailable from your dealer to avoidcorrosion. Larger areas of finishdamage can be corrected in yourdealer's body and paint shop.
Chemical Paint Spotting
Airborne pollutants can fall upon andattack painted vehicle surfacescausing blotchy, ring-shapeddiscolorations, and small, irregular

Cadillac XT5 Owner Manual (GMNA-Localizing-U.S./Canada/Mexico-13527534) - 2020 - CRC - 6/4/19
VEHICLE CARE 331
dark spots etched into the paintsurface. See “Finish Care” previously inthis section.
Interior CareTo prevent dirt particle abrasions,regularly clean the vehicle's interior.Immediately remove any soils.Newspapers or dark garments cantransfer color to the vehicle’s interior.
Use a soft bristle brush to removedust from knobs and crevices on theinstrument cluster. Using a mild soapsolution, immediately remove handlotions, sunscreen, and insectrepellent from all interior surfaces orpermanent damage may result.
Use cleaners specifically designed forthe surfaces being cleaned to preventpermanent damage. Apply all cleanersdirectly to the cleaning cloth. Do notspray cleaners on any switches orcontrols. Remove cleaners quickly.
Before using cleaners, read and followall safety instructions on the label.While cleaning the interior, open thedoors and windows to get properventilation.
To prevent damage, do not clean theinterior using the following cleanersor techniques:
. Never use a razor or any othersharp object to remove soil fromany interior surface.
. Never use a brush with stiffbristles.
. Never rub any surface aggressivelyor with too much pressure.
. Do not use laundry detergents ordishwashing soaps withdegreasers. For liquid cleaners, useapproximately 20 drops per 3.8 L(1 gal) of water. A concentratedsoap solution will create streaksand attract dirt. Do not usesolutions that contain strong orcaustic soap.
. Do not heavily saturate theupholstery when cleaning.
. Do not use solvents or cleanerscontaining solvents.
Interior Glass
To clean, use a terry cloth fabricdampened with water. Wipe dropletsleft behind with a clean dry cloth.If necessary, use a commercial glasscleaner after cleaning with plain water.
Caution
To prevent scratching, never useabrasive cleaners on automotiveglass. Abrasive cleaners oraggressive cleaning may damagethe rear window defogger.
Cleaning the windshield with waterduring the first three to six months ofownership will reduce tendency to fog.
Speaker Covers
Vacuum around a speaker covergently, so that the speaker will not bedamaged. Clean spots with water andmild soap.

Cadillac XT5 Owner Manual (GMNA-Localizing-U.S./Canada/Mexico-13527534) - 2020 - CRC - 6/4/19
332 VEHICLE CARE
Coated Moldings
Coated moldings should be cleaned.
. When lightly soiled, wipe with asponge or soft, lint-free clothdampened with water.
. When heavily soiled, use warmsoapy water.
Fabric/Carpet/Suede
Start by vacuuming the surface usinga soft brush attachment. If a rotatingvacuum brush attachment is beingused, only use it on the floor carpet.Before cleaning, gently remove asmuch of the soil as possible:
. Gently blot liquids with a papertowel. Continue blotting until nomore soil can be removed.
. For solid soils, remove as much aspossible prior to vacuuming.
To clean:
1. Saturate a clean, lint-freecolorfast cloth with water.Microfiber cloth is recommendedto prevent lint transfer to thefabric or carpet.
2. Remove excess moisture bygently wringing until water doesnot drip from the cleaning cloth.
3. Start on the outside edge of thesoil and gently rub toward thecenter. Fold the cleaning cloth toa clean area frequently toprevent forcing the soil in to thefabric.
4. Continue gently rubbing thesoiled area until there is nolonger any color transfer fromthe soil to the cleaning cloth.
5. If the soil is not completelyremoved, use a mild soapsolution followed only by plainwater.
If the soil is not completely removed,it may be necessary to use acommercial upholstery cleaner or spotlifter. Test a small hidden area forcolorfastness before using acommercial upholstery cleaner or spotlifter. If ring formation occurs, cleanthe entire fabric or carpet.
After cleaning, use a paper towel toblot excess moisture.
Cleaning High Gloss Surfacesand Vehicle Information andRadio Displays
Use a microfiber cloth on high glosssurfaces or vehicle displays. First, usea soft bristle brush to remove dirt thatcan scratch the surface. Then gentlyclean by rubbing with a microfibercloth. Never use window cleaners orsolvents. Periodically hand wash themicrofiber cloth separately, using mildsoap. Do not use bleach or fabricsoftener. Rinse thoroughly and air drybefore next use.
Caution
Do not attach a device with asuction cup to the display. This maycause damage and would not becovered by the vehicle warranty.

Cadillac XT5 Owner Manual (GMNA-Localizing-U.S./Canada/Mexico-13527534) - 2020 - CRC - 6/4/19
VEHICLE CARE 333
Instrument Panel, Leather, Vinyl,Other Plastic Surfaces, LowGloss Paint Surfaces, andNatural Open Pore WoodSurfaces
Use a soft microfiber cloth dampenedwith water to remove dust and loosedirt. For a more thorough cleaning,use a soft microfiber cloth dampenedwith a mild soap solution.
Caution
Soaking or saturating leather,especially perforated leather, as wellas other interior surfaces, maycause permanent damage. Wipeexcess moisture from these surfacesafter cleaning and allow them todry naturally. Never use heat,steam, or spot removers. Do not usecleaners that contain silicone orwax-based products. Cleanerscontaining these solvents canpermanently change the appearanceand feel of leather or soft trim, andare not recommended.
Do not use cleaners that increasegloss, especially on the instrumentpanel. Reflected glare can decreasevisibility through the windshieldunder certain conditions.
Caution
Use of air fresheners may causepermanent damage to plastics andpainted surfaces. If an air freshenercomes in contact with any plasticor painted surface in the vehicle,blot immediately and clean with asoft cloth dampened with a mildsoap solution. Damage caused byair fresheners would not be coveredby the vehicle warranty.
Cargo Cover andConvenience Net
If equipped, wash with warm waterand mild detergent. Do not usechlorine bleach. Rinse with cold water,and then dry completely.
Care of Seat Belts
Keep belts clean and dry.
{ Warning
Do not bleach or dye seat beltwebbing. It may severely weakenthe webbing. In a crash, they mightnot be able to provide adequateprotection. Clean and rinse seat beltwebbing only with mild soap andlukewarm water. Allow the webbingto dry.
Floor Mats
{ Warning
If a floor mat is the wrong size or isnot properly installed, it caninterfere with the pedals.Interference with the pedals cancause unintended acceleration and/or increased stopping distancewhich can cause a crash and injury.Make sure the floor mat does notinterfere with the pedals.

Cadillac XT5 Owner Manual (GMNA-Localizing-U.S./Canada/Mexico-13527534) - 2020 - CRC - 6/4/19
334 VEHICLE CARE
Use the following guidelines forproper floor mat usage.
. The original equipment floor matswere designed for your vehicle.If the floor mats need replacing, itis recommended that GM certifiedfloor mats be purchased. Non-GMfloor mats may not fit properlyand may interfere with the pedals.Always check that the floor matsdo not interfere with the pedals.
. Do not use a floor mat if thevehicle is not equipped with afloor mat retainer on the driverside floor.
. Use the floor mat with the correctside up. Do not turn it over.
. Do not place anything on top ofthe driver side floor mat.
. Use only a single floor mat on thedriver side.
. Do not place one floor mat on topof another.
Removing and Replacing theFloor Mats
The driver side floor mat is held inplace by two button-type retainers.
1. Pull up on the rear of the driverside floor mat to unlock eachretainer and remove.
2. Reinstall by lining up the floormat retainer openings over thecarpet retainers and snappinginto position.
3. Make sure the floor mat isproperly secured in place. Verifythe floor mat does not interferewith the pedals.

Cadillac XT5 Owner Manual (GMNA-Localizing-U.S./Canada/Mexico-13527534) - 2020 - CRC - 5/29/19
SERVICE AND MAINTENANCE 335
Service andMaintenance
General InformationGeneral Information . . . . . . . . . . . . . 335
Maintenance ScheduleMaintenance Schedule . . . . . . . . . . . 337
Special Application ServicesSpecial Application Services . . . . . 342
Additional Maintenanceand CareAdditional Maintenanceand Care . . . . . . . . . . . . . . . . . . . . . . . . . 343
Recommended Fluids,Lubricants, and PartsRecommended Fluids andLubricants . . . . . . . . . . . . . . . . . . . . . . . 346
Maintenance ReplacementParts . . . . . . . . . . . . . . . . . . . . . . . . . . . . . 347
Maintenance RecordsMaintenance Records . . . . . . . . . . . . 348
General InformationYour vehicle is an importantinvestment. This section describes therequired maintenance for the vehicle.Follow this schedule to help protectagainst major repair expensesresulting from neglect or inadequatemaintenance. It may also help tomaintain the value of the vehicle if itis sold. It is the responsibility of theowner to have all requiredmaintenance performed.
Your dealer has trained technicianswho can perform requiredmaintenance using genuinereplacement parts. They haveup-to-date tools and equipment forfast and accurate diagnostics. Manydealers have extended evening andSaturday hours, courtesytransportation, and online schedulingto assist with service needs.
Your dealer recognizes the importanceof providing competitively pricedmaintenance and repair services. Withtrained technicians, the dealer is the
place for routine maintenance such asoil changes and tire rotations andadditional maintenance items liketires, brakes, batteries, and wiperblades.
Caution
Damage caused by impropermaintenance can lead to costlyrepairs and may not be covered bythe vehicle warranty. Maintenanceintervals, checks, inspections,recommended fluids, and lubricantsare important to keep the vehicle ingood working condition.
Do not have chemical flushes thatare not approved by GM performedon the vehicle. The use of flushes,solvents, cleaners, or lubricants thatare not approved by GM coulddamage the vehicle, requiringexpensive repairs that are notcovered by the vehicle warranty.
Cadillac XT5 Owner Manual (GMNA-Localizing-U.S./Canada/Mexico-13527534) - 2020 - CRC - 5/29/19
336 SERVICE AND MAINTENANCE
The Tire Rotation and RequiredServices are the responsibility of thevehicle owner. It is recommended tohave your dealer perform theseservices every 12 000 km/7,500 mi.Proper vehicle maintenance helps tokeep the vehicle in good workingcondition, improves fuel economy, andreduces vehicle emissions.
Because of the way people usevehicles, maintenance needs vary.There may need to be more frequentchecks and services. The AdditionalRequired Services - Normal are forvehicles that:
. Carry passengers and cargo withinrecommended limits on the Tireand Loading Information label. SeeVehicle Load Limits 0 172.
. Are driven on reasonable roadsurfaces within legal driving limits.
. Use the recommended fuel. SeeRecommended Fuel (3.6L V6 Engine)0 234 orRecommended Fuel (2.0L L4 Engine)0 233.
Refer to the information in theMaintenance Schedule AdditionalRequired Services - Normal chart.
The Additional Required Services -Severe are for vehicles that are:
. Mainly driven in heavy city trafficin hot weather.
. Mainly driven in hilly ormountainous terrain.
. Frequently towing a trailer.
. Used for high speed or competitivedriving.
. Used for taxi, police, or deliveryservice.
Refer to the information in theMaintenance Schedule AdditionalRequired Services - Severe chart.
{ Warning
Performing maintenance work canbe dangerous and can cause seriousinjury. Perform maintenance workonly if the required information,proper tools, and equipment areavailable. If they are not, see yourdealer to have a trained techniciando the work. See Doing Your OwnService Work 0 252.
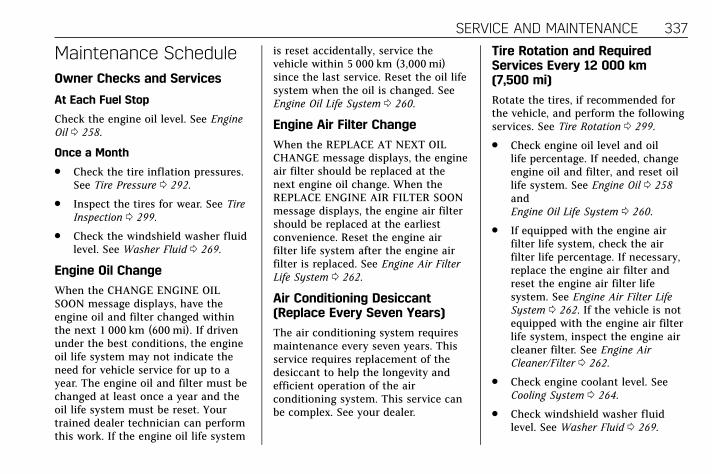
Cadillac XT5 Owner Manual (GMNA-Localizing-U.S./Canada/Mexico-13527534) - 2020 - CRC - 5/29/19
SERVICE AND MAINTENANCE 337
Maintenance ScheduleOwner Checks and Services
At Each Fuel Stop
Check the engine oil level. See EngineOil 0 258.
Once a Month
. Check the tire inflation pressures.See Tire Pressure 0 292.
. Inspect the tires for wear. See TireInspection 0 299.
. Check the windshield washer fluidlevel. See Washer Fluid 0 269.
Engine Oil Change
When the CHANGE ENGINE OILSOON message displays, have theengine oil and filter changed withinthe next 1 000 km (600 mi). If drivenunder the best conditions, the engineoil life system may not indicate theneed for vehicle service for up to ayear. The engine oil and filter must bechanged at least once a year and theoil life system must be reset. Yourtrained dealer technician can performthis work. If the engine oil life system
is reset accidentally, service thevehicle within 5 000 km (3,000 mi)since the last service. Reset the oil lifesystem when the oil is changed. SeeEngine Oil Life System 0 260.
Engine Air Filter Change
When the REPLACE AT NEXT OILCHANGE message displays, the engineair filter should be replaced at thenext engine oil change. When theREPLACE ENGINE AIR FILTER SOONmessage displays, the engine air filtershould be replaced at the earliestconvenience. Reset the engine airfilter life system after the engine airfilter is replaced. See Engine Air FilterLife System 0 262.
Air Conditioning Desiccant(Replace Every Seven Years)
The air conditioning system requiresmaintenance every seven years. Thisservice requires replacement of thedesiccant to help the longevity andefficient operation of the airconditioning system. This service canbe complex. See your dealer.
Tire Rotation and RequiredServices Every 12 000 km(7,500 mi)
Rotate the tires, if recommended forthe vehicle, and perform the followingservices. See Tire Rotation 0 299.
. Check engine oil level and oillife percentage. If needed, changeengine oil and filter, and reset oillife system. See Engine Oil 0 258andEngine Oil Life System 0 260.
. If equipped with the engine airfilter life system, check the airfilter life percentage. If necessary,replace the engine air filter andreset the engine air filter lifesystem. See Engine Air Filter LifeSystem 0 262. If the vehicle is notequipped with the engine air filterlife system, inspect the engine aircleaner filter. See Engine AirCleaner/Filter 0 262.
. Check engine coolant level. SeeCooling System 0 264.
. Check windshield washer fluidlevel. See Washer Fluid 0 269.
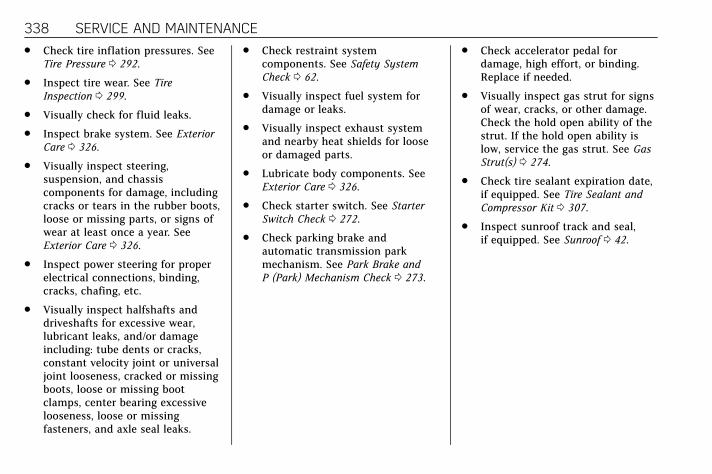
Cadillac XT5 Owner Manual (GMNA-Localizing-U.S./Canada/Mexico-13527534) - 2020 - CRC - 5/29/19
338 SERVICE AND MAINTENANCE. Check tire inflation pressures. See
Tire Pressure 0 292.
. Inspect tire wear. See TireInspection 0 299.
. Visually check for fluid leaks.
. Inspect brake system. See ExteriorCare 0 326.
. Visually inspect steering,suspension, and chassiscomponents for damage, includingcracks or tears in the rubber boots,loose or missing parts, or signs ofwear at least once a year. SeeExterior Care 0 326.
. Inspect power steering for properelectrical connections, binding,cracks, chafing, etc.
. Visually inspect halfshafts anddriveshafts for excessive wear,lubricant leaks, and/or damageincluding: tube dents or cracks,constant velocity joint or universaljoint looseness, cracked or missingboots, loose or missing bootclamps, center bearing excessivelooseness, loose or missingfasteners, and axle seal leaks.
. Check restraint systemcomponents. See Safety SystemCheck 0 62.
. Visually inspect fuel system fordamage or leaks.
. Visually inspect exhaust systemand nearby heat shields for looseor damaged parts.
. Lubricate body components. SeeExterior Care 0 326.
. Check starter switch. See StarterSwitch Check 0 272.
. Check parking brake andautomatic transmission parkmechanism. See Park Brake andP (Park) Mechanism Check 0 273.
. Check accelerator pedal fordamage, high effort, or binding.Replace if needed.
. Visually inspect gas strut for signsof wear, cracks, or other damage.Check the hold open ability of thestrut. If the hold open ability islow, service the gas strut. See GasStrut(s) 0 274.
. Check tire sealant expiration date,if equipped. See Tire Sealant andCompressor Kit 0 307.
. Inspect sunroof track and seal,if equipped. See Sunroof 0 42.

Cadillac XT5 Owner Manual (GMNA-Localizing-U.S./Canada/Mexico-13527534) - 2020 - CRC - 5/29/19
SERVICE AND MAINTENANCE 339
Maintenance ScheduleAdditional Required Services -Normal
12000km/7
,500mi
24000km/1
5,000mi
36000km/2
2,500mi
48000km/3
0,000mi
60000km/3
7,500mi
72000km/4
5,000mi
84000km/5
2,500mi
96000km/6
0,000mi
108000km/6
7,500mi
120000km/7
5,000mi
132000km/8
2,500mi
144000km/9
0,000mi
156000km/9
7,500mi
168000km/1
05,000mi
180000km/1
12,500mi
192000km/1
20,000mi
204000km/1
27,500mi
216000km/1
35,000mi
228000km/1
42,500mi
240000km/1
50,000mi
Rotate tires and perform Required Services. Checkengine oil level and oil life percentage. Changeengine oil and filter, if needed. Check engine airfilter life percentage and status. Change engine airfilter, if needed.
@ @ @ @ @ @ @ @ @ @ @ @ @ @ @ @ @ @ @ @
Replace passenger compartment air filter. (1) @ @ @ @ @ @
Inspect evaporative control system. (2) @ @ @
If the vehicle is not equipped with the engine airfilter life system, replace engine air cleaner filter. (3)
@ @ @
Replace spark plugs, if equipped with 2.0L engine.Inspect spark plug wires and/or boots.
@ @
Replace spark plugs, if equipped with 3.6L engine.Inspect spark plug wires and/or boots.
@
Change rear axle fluid, if equipped with AWD. (4) @
Drain and fill engine cooling system. (5) @
Visually inspect accessory drive belts. (6) @
Replace brake fluid. (7)
Replace windshield wiper blades. (8) @ @ @ @ @ @ @ @ @ @
Replace hood and/or body lift support gas struts. (9) @ @
Replace air conditioning desiccant. (10)

Cadillac XT5 Owner Manual (GMNA-Localizing-U.S./Canada/Mexico-13527534) - 2020 - CRC - 5/29/19
340 SERVICE AND MAINTENANCE
Footnotes — Maintenance ScheduleAdditional Required Services -Normal
(1) Or every two years, whichevercomes first. More frequent passengercompartment air filter replacementmay be needed if driving in areas withheavy traffic, poor air quality, highdust levels, or environmentalallergens. Passenger compartment airfilter replacement may also be neededif there is reduced airflow, windowfogging, or odors. Your GM dealer canhelp determine when to replace thefilter.
(2) Visually check all fuel and vaporlines and hoses for proper attachment,connection, routing, and condition.
(3) Or every four years, whichevercomes first. If driving in dustyconditions, inspect the filter at eachoil change or more often as needed.See Engine Air Cleaner/Filter 0 262.
(4) Do not directly power wash thetransfer case and/or front/rear axleoutput seals. High pressure water canovercome the seals and contaminatethe transfer case fluid. Contaminatedfluid will decrease the life of thetransfer case and/or axles and shouldbe replaced.
(5) Or every five years, whichevercomes first. See Cooling System 0 264.
(6) Or every 10 years, whichevercomes first. Inspect for fraying,excessive cracking, or damage; replace,if needed.
(7) Replace brake fluid every fiveyears. See Brake Fluid 0 270.
(8) Or every 12 months, whichevercomes first. See Wiper BladeReplacement 0 273.
(9) Or every 10 years, whichevercomes first. See Gas Strut(s) 0 274.
(10) Replace air conditioningdesiccant every seven years.

Cadillac XT5 Owner Manual (GMNA-Localizing-U.S./Canada/Mexico-13527534) - 2020 - CRC - 5/29/19
SERVICE AND MAINTENANCE 341
Maintenance ScheduleAdditional Required Services -Severe
12000km/7
,500mi
24000km/1
5,000mi
36000km/2
2,500mi
48000km/3
0,000mi
60000km/3
7,500mi
72000km/4
5,000mi
84000km/5
2,500mi
96000km/6
0,000mi
108000km/6
7,500mi
120000km/7
5,000mi
132000km/8
2,500mi
144000km/9
0,000mi
156000km/9
7,500mi
168000km/1
05,000mi
180000km/1
12,500mi
192000km/1
20,000mi
204000km/1
27,500mi
216000km/1
35,000mi
228000km/1
42,500mi
240000km/1
50,000mi
Rotate tires and perform Required Services. Checkengine oil level and oil life percentage. Changeengine oil and filter, if needed. Check engine airfilter life percentage and status. Change engine airfilter, if needed.
@ @ @ @ @ @ @ @ @ @ @ @ @ @ @ @ @ @ @ @
Replace passenger compartment air filter. (1) @ @ @ @ @ @
Inspect evaporative control system. (2) @ @ @
If the vehicle is not equipped with the engine airfilter life system, replace engine air cleaner filter. (3)
@ @ @
Change automatic transmission fluid. @ @ @
Replace spark plugs, if equipped with 2.0L engine.Inspect spark plug wires and/or boots.
@ @
Replace spark plugs, if equipped with 3.6L engine.Inspect spark plug wires and/or boots.
@
Change rear axle fluid, if equipped with AWD. (4) @ @
Drain and fill engine cooling system. (5) @
Visually inspect accessory drive belts. (6) @
Replace brake fluid. (7)
Replace windshield wiper blades. (8) @ @ @ @ @ @ @ @ @ @
Replace hood and/or body lift support gas struts. (9) @ @
Replace air conditioning desiccant. (10)

Cadillac XT5 Owner Manual (GMNA-Localizing-U.S./Canada/Mexico-13527534) - 2020 - CRC - 5/29/19
342 SERVICE AND MAINTENANCE
Footnotes — Maintenance ScheduleAdditional Required Services -Severe
(1) Or every two years, whichevercomes first. More frequent passengercompartment air filter replacementmay be needed if driving in areas withheavy traffic, poor air quality, highdust levels, or environmentalallergens. Passenger compartment airfilter replacement may also be neededif there is reduced airflow, windowfogging, or odors. Your GM dealer canhelp determine when to replace thefilter.
(2) Visually check all fuel and vaporlines and hoses for proper attachment,connection, routing, and condition.
(3) Or every four years, whichevercomes first. If driving in dustyconditions, inspect the filter at eachoil change or more often as needed.See Engine Air Cleaner/Filter 0 262.
(4) Do not directly power wash thetransfer case and/or front/rear axleoutput seals. High pressure water canovercome the seals and contaminatethe transfer case fluid. Contaminated
fluid will decrease the life of thetransfer case and/or axles and shouldbe replaced.
(5) Or every five years, whichevercomes first. See Cooling System 0 264.
(6) Or every 10 years, whichevercomes first. Inspect for fraying,excessive cracking, or damage; replace,if needed.
(7) Replace brake fluid every fiveyears. See Brake Fluid 0 270.
(8) Or every 12 months, whichevercomes first. See Wiper BladeReplacement 0 273.
(9) Or every 10 years, whichevercomes first. See Gas Strut(s) 0 274.
(10) Replace air conditioningdesiccant every seven years.
Special ApplicationServices. Severe Commercial Use Vehicles
Only: Lubricate chassiscomponents every oil change.
. Have underbody flushing serviceperformed. See "UnderbodyMaintenance" in Exterior Care0 326.
Cadillac XT5 Owner Manual (GMNA-Localizing-U.S./Canada/Mexico-13527534) - 2020 - CRC - 5/29/19
SERVICE AND MAINTENANCE 343
Additional Maintenanceand CareYour vehicle is an importantinvestment and caring for it properlymay help to avoid future costlyrepairs. To maintain vehicleperformance, additional maintenanceservices may be required.
It is recommended that your dealerperform these services — their traineddealer technicians know your vehiclebest. Your dealer can also perform athorough assessment with amulti-point inspection to recommendwhen your vehicle may needattention.
The following list is intended toexplain the services and conditions tolook for that may indicate services arerequired.
Battery
The 12-volt battery supplies power tostart the engine and operate anyadditional electrical accessories.
. To avoid break-down or failure tostart the vehicle, maintain abattery with full cranking power.
. Trained dealer technicians havethe diagnostic equipment to testthe battery and ensure that theconnections and cables arecorrosion-free.
Belts
. Belts may need replacing if theysqueak or show signs of crackingor splitting.
. Trained dealer technicians haveaccess to tools and equipment toinspect the belts and recommendadjustment or replacement whennecessary.
Brakes
Brakes stop the vehicle and are crucialto safe driving.
. Signs of brake wear may includechirping, grinding, or squealingnoises, or difficulty stopping.
. Trained dealer technicians haveaccess to tools and equipment toinspect the brakes and recommendquality parts engineered for thevehicle.
Fluids
Proper fluid levels and approved fluidsprotect the vehicle’s systems andcomponents. See Recommended Fluidsand Lubricants 0 346 for GM approvedfluids.
. Engine oil and windshield washerfluid levels should be checked atevery fuel fill.
. Instrument cluster lights maycome on to indicate that fluidsmay be low and need to be filled.
Cadillac XT5 Owner Manual (GMNA-Localizing-U.S./Canada/Mexico-13527534) - 2020 - CRC - 5/29/19
344 SERVICE AND MAINTENANCE
Hoses
Hoses transport fluids and should beregularly inspected to ensure thatthere are no cracks or leaks. With amulti-point inspection, your dealercan inspect the hoses and advise ifreplacement is needed.
Lamps
Properly working headlamps,taillamps, and brake lamps areimportant to see and be seen onthe road.
. Signs that the headlamps needattention include dimming, failureto light, cracking, or damage. Thebrake lamps need to be checkedperiodically to ensure that theylight when braking.
. With a multi-point inspection,your dealer can check the lampsand note any concerns.
Shocks and Struts
Shocks and struts help aid in controlfor a smoother ride.
. Signs of wear may include steeringwheel vibration, bounce/swaywhile braking, longer stoppingdistance, or uneven tire wear.
. As part of the multi-pointinspection, trained dealertechnicians can visually inspectthe shocks and struts for signs ofleaking, blown seals, or damage,and can advise when service isneeded.
Tires
Tires need to be properly inflated,rotated, and balanced. Maintainingthe tires can save money and fuel, andcan reduce the risk of tire failure.
. Signs that the tires need to bereplaced include three or morevisible treadwear indicators; cordor fabric showing through therubber; cracks or cuts in the treador sidewall; or a bulge or split inthe tire.
. Trained dealer technicians caninspect and recommend the righttires. Your dealer can also providetire/wheel balancing services toensure smooth vehicle operationat all speeds. Your dealer sells andservices name brand tires.
Vehicle Care
To help keep the vehicle looking likenew, vehicle care products areavailable from your dealer. Forinformation on how to clean andprotect the vehicle’s interior andexterior, see Interior Care 0 331 andExterior Care 0 326.
Cadillac XT5 Owner Manual (GMNA-Localizing-U.S./Canada/Mexico-13527534) - 2020 - CRC - 5/29/19
SERVICE AND MAINTENANCE 345
Wheel Alignment
Wheel alignment is critical forensuring that the tires deliver optimalwear and performance.
. Signs that the alignment may needto be adjusted include pulling,improper vehicle handling,or unusual tire wear.
. Your dealer has the requiredequipment to ensure proper wheelalignment.
Windshield
For safety, appearance, and the bestviewing, keep the windshield cleanand clear.
. Signs of damage include scratches,cracks, and chips.
. Trained dealer technicians caninspect the windshield andrecommend proper replacement ifneeded.
Wiper Blades
Wiper blades need to be cleaned andkept in good condition to provide aclear view.
. Signs of wear include streaking,skipping across the windshield,and worn or split rubber.
. Trained dealer technicians cancheck the wiper blades and replacethem when needed.

Cadillac XT5 Owner Manual (GMNA-Localizing-U.S./Canada/Mexico-13527534) - 2020 - CRC - 5/29/19
346 SERVICE AND MAINTENANCE
Recommended Fluids, Lubricants, and Parts
Recommended Fluids and Lubricants
Usage Fluid/Lubricant
Automatic Transmission DEXRON-VI Automatic Transmission Fluid.
Chassis Lubrication Chassis Lubricant (GM Part No. 12377985, in Canada 88901242) or lubricantmeeting requirements of NLGI #2, Category LB or GC-LB.
Engine Coolant 50/50 mixture of clean, drinkable water and use only DEX-COOL Coolant. SeeCooling System 0 264.
Engine Oil Engine oil meeting the dexos1 specification of the proper SAE viscosity grade.ACDelco dexos1 full synthetic is recommended. See Engine Oil 0 258.
Fuel Additive Fuel System Treatment PLUS (Part No. 88865595).
Hood and Door Hinges, Key LockCylinder
Multi-Purpose Lubricant, Superlube (GM Part No. 12346241, inCanada 10953474).
Hydraulic Brake System DOT 3 Hydraulic Brake Fluid (GM Part No. 19353126, in Canada 19353127).
Power Liftgate Actuator Ball Joint, HoodLatch Assembly, Secondary Latch,
Pivots, Spring Anchor, and Release Pawl
Lubriplate Lubricant Aerosol (GM Part No. 89021668, in Canada 89021674) orlubricant meeting requirements of NLGI #2, Category LB or GC-LB.
Weatherstrip Conditioning Weatherstrip lubricant (GM Part No. 3634770, in Canada 10953518) orequivalent.
Windshield Washer Automotive windshield washer fluid that meets regional freeze protectionrequirements.

Cadillac XT5 Owner Manual (GMNA-Localizing-U.S./Canada/Mexico-13527534) - 2020 - CRC - 5/29/19
SERVICE AND MAINTENANCE 347
Maintenance Replacement PartsReplacement parts identified below by name, part number, or specification can be obtained from your dealer.
Part GM Part Number ACDelco Part Number
Engine Air Cleaner/Filter 23321606 A3212C
Engine Oil Filter
2.0L L4 Engine 55495105 PF66
3.6L V6 Engine 12693541 UPF63R
Passenger Compartment Air Filter 13508023 CF185
Spark Plugs
2.0L L4 Engine 55504354 41–103–IP
3.6L V6 Engine 12646780 41-130
Wiper Blades
Driver Side – 60 cm (23.6 in) 23372088 —
Passenger Side – 50 cm (19.7 in) 23360287 —
Rear – 30 cm (11.8 in) 84215609 —

Cadillac XT5 Owner Manual (GMNA-Localizing-U.S./Canada/Mexico-13527534) - 2020 - CRC - 5/29/19
348 SERVICE AND MAINTENANCE
Maintenance RecordsAfter the scheduled services are performed, record the date, odometer reading, who performed the service, and the type ofservices performed in the boxes provided. Retain all maintenance receipts.
Date OdometerReading Serviced By Maintenance Stamp Services Performed

Cadillac XT5 Owner Manual (GMNA-Localizing-U.S./Canada/Mexico-13527534) - 2020 - CRC - 5/29/19
TECHNICAL DATA 349
Technical Data
Vehicle IdentificationVehicle IdentificationNumber (VIN) . . . . . . . . . . . . . . . . . . . 349
Service Parts Identification . . . . . . 349
Vehicle DataCapacities and Specifications . . . . 350Engine Drive Belt Routing . . . . . . . 352
Vehicle Identification
Vehicle IdentificationNumber (VIN)
This legal identifier is in the frontcorner of the instrument panel, on thedriver side of the vehicle. It can beseen through the windshield fromoutside. The Vehicle IdentificationNumber (VIN) also appears on theVehicle Certification and Service Partslabels and certificates of title andregistration.
Engine Identification
The eighth character in the VIN is theengine code. This code identifies thevehicle's engine, specifications, andreplacement parts. See “Engine
Specifications” under Capacities andSpecifications 0 350 for the vehicle'sengine code.
Service Parts IdentificationThere may be a large barcode on thecertification label on the center pillarthat you can scan for the followinginformation:
. Vehicle IdentificationNumber (VIN)
. Model designation
. Paint information
. Production options
If there is not a large barcode on thislabel, then you will find this sameinformation on a label under the loadfloor, inside the cargo storageshelf unit.
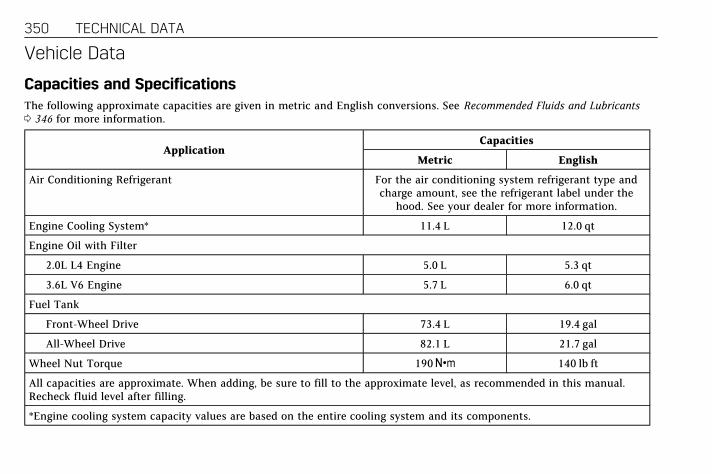
Cadillac XT5 Owner Manual (GMNA-Localizing-U.S./Canada/Mexico-13527534) - 2020 - CRC - 5/29/19
350 TECHNICAL DATA
Vehicle Data
Capacities and SpecificationsThe following approximate capacities are given in metric and English conversions. See Recommended Fluids and Lubricants0 346 for more information.
ApplicationCapacities
Metric English
Air Conditioning Refrigerant For the air conditioning system refrigerant type andcharge amount, see the refrigerant label under the
hood. See your dealer for more information.
Engine Cooling System* 11.4 L 12.0 qt
Engine Oil with Filter
2.0L L4 Engine 5.0 L 5.3 qt
3.6L V6 Engine 5.7 L 6.0 qt
Fuel Tank
Front-Wheel Drive 73.4 L 19.4 gal
All-Wheel Drive 82.1 L 21.7 gal
Wheel Nut Torque 190Y 140 lb ft
All capacities are approximate. When adding, be sure to fill to the approximate level, as recommended in this manual.Recheck fluid level after filling.
*Engine cooling system capacity values are based on the entire cooling system and its components.

Cadillac XT5 Owner Manual (GMNA-Localizing-U.S./Canada/Mexico-13527534) - 2020 - CRC - 5/29/19
TECHNICAL DATA 351
Engine Specifications
Engine VIN Code Transmission Spark Plug Gap
2.0L L4 Engine (LSY) 4 Automatic 0.75–0.90 mm (0.030–0.035 in)
3.6L V6 Engine (LGX) S Automatic 0.80–0.90 mm (0.031–0.035 in)
Spark plug gaps are preset by the manufacturer. Re-gapping the spark plug is not recommended and can damage thespark plug.

Cadillac XT5 Owner Manual (GMNA-Localizing-U.S./Canada/Mexico-13527534) - 2020 - CRC - 5/29/19
352 TECHNICAL DATA
Engine Drive Belt Routing
2.0L L4 Engine
3.6L V6 Engine

Cadillac XT5 Owner Manual (GMNA-Localizing-U.S./Canada/Mexico-13527534) - 2020 - CRC - 5/29/19
CUSTOMER INFORMATION 353
CustomerInformation
Customer InformationCustomer SatisfactionProcedure . . . . . . . . . . . . . . . . . . . . . . . 353
Customer Assistance Offices . . . . 355Customer Assistance for TextTelephone (TTY) Users . . . . . . . . . 355
Online Owner Center . . . . . . . . . . . . . 356GM Mobility ReimbursementProgram . . . . . . . . . . . . . . . . . . . . . . . . . 356
Roadside Service . . . . . . . . . . . . . . . . . 357Scheduling ServiceAppointments . . . . . . . . . . . . . . . . . . . 358
Courtesy TransportationProgram . . . . . . . . . . . . . . . . . . . . . . . . . 359
Collision Damage Repair . . . . . . . . . 360Publication OrderingInformation . . . . . . . . . . . . . . . . . . . . . 362
Radio Frequency Statement . . . . . 363
Reporting Safety DefectsReporting Safety Defects to theUnited States Government . . . . . 363
Reporting Safety Defects to theCanadian Government . . . . . . . . . 364
Reporting Safety Defects toGeneral Motors . . . . . . . . . . . . . . . . . 364
Vehicle Data Recording andPrivacyVehicle Data Recording andPrivacy . . . . . . . . . . . . . . . . . . . . . . . . . . . 364
Cybersecurity . . . . . . . . . . . . . . . . . . . . . 364Event Data Recorders . . . . . . . . . . . . 365OnStar . . . . . . . . . . . . . . . . . . . . . . . . . . . . . 366Infotainment System . . . . . . . . . . . . . 366
Customer Information
Customer SatisfactionProcedureYour satisfaction and goodwill areimportant to your dealer and toCadillac. Normally, any concerns withthe sales transaction or the operationof the vehicle will be resolved by yourdealer's sales or service departments.Sometimes, however, despite the bestintentions of all concerned,misunderstandings can occur. If yourconcern has not been resolved to yoursatisfaction, the following stepsshould be taken:
STEP ONE : Discuss your concernwith a member of dealershipmanagement. Normally, concerns canbe quickly resolved at that level. If thematter has already been reviewed withthe sales, service or parts manager,contact the owner of your dealershipor the general manager.

Cadillac XT5 Owner Manual (GMNA-Localizing-U.S./Canada/Mexico-13527534) - 2020 - CRC - 5/29/19
354 CUSTOMER INFORMATION
STEP TWO : If after contacting amember of dealership management, itappears your concern cannot beresolved by your dealership withoutfurther help, in the U.S., call theCadillac Customer Assistance Centerat 1-800–458–8006. In Canada, callthe Canadian Cadillac Customer CareCentre at 1-888-446-2000.
We encourage you to call the toll-freenumber in order to give your inquiryprompt attention. Have the followinginformation available to give theCustomer Assistance representative:
. Vehicle IdentificationNumber (VIN). This is availablefrom the vehicle registration ortitle, or the plate at the top left ofthe instrument panel and visiblethrough the windshield.
. Dealership name and location.
. Vehicle delivery date and presentmileage.
When contacting Cadillac, rememberthat your concern will likely beresolved at a dealer's facility. That iswhy we suggest following Step Onefirst.
STEP THREE — U.S. Owners : BothGeneral Motors and your dealer arecommitted to making sure you arecompletely satisfied with the newvehicle. However, if you continue toremain unsatisfied after following theprocedure outlined in Steps One andTwo, you can file with the BetterBusiness Bureau (BBB) Auto LineProgram to enforce your rights.
The BBB Auto Line Program is anout-of-court program administered byBBB National Programs, Inc. to settleautomotive disputes regarding vehiclerepairs or the interpretation of theNew Vehicle Limited Warranty.Although you may be required toresort to this informal disputeresolution program prior to filing acourt action, use of the program isfree of charge and your case willgenerally be heard within 40 days.If you do not agree with the decisiongiven in your case, you may reject itand proceed with any other venue forrelief available to you.
You may contact the BBB Auto LineProgram using the toll-free telephonenumber or write them at the followingaddress:
BBB Auto Line ProgramBBB National Programs, Inc.3033 Wilson BoulevardSuite 600Arlington, VA 22201
Telephone: 1-800-955-5100http://www.bbb.org/council/programs-services/dispute-handling-and-resolution/bbb-auto-line
This program is available in all50 states and the District of Columbia.Eligibility is limited by vehicle age,mileage, and other factors. GeneralMotors reserves the right to changeeligibility limitations and/ordiscontinue its participation in thisprogram.
STEP THREE — Canadian Owners :In the event that you do not feel yourconcerns have been addressed afterfollowing the procedure outlined inSteps One and Two, General Motors ofCanada Company wants you to be

Cadillac XT5 Owner Manual (GMNA-Localizing-U.S./Canada/Mexico-13527534) - 2020 - CRC - 5/29/19
CUSTOMER INFORMATION 355
aware of its participation in ano-charge mediation/arbitrationprogram. General Motors of CanadaCompany has committed to bindingarbitration of owner disputes involvingfactory-related vehicle service claims.The program provides for the reviewof the facts involved by an impartialthird party arbiter, and may includean informal hearing before the arbiter.The program is designed so that theentire dispute settlement process,from the time you file your complaintto the final decision, should becompleted in about 70 days. Webelieve our impartial program offersadvantages over courts in mostjurisdictions because it is informal,quick, and free of charge.
For further information concerningeligibility in the Canadian MotorVehicle Arbitration Plan (CAMVAP),call toll-free 1-800-207-0685, or callthe Cadillac Customer Care Centre,1-888-446-2000, or write to:
General Motors Cadillac CustomerCare CentreGeneral Motors of Canada CompanyMail Code: CA1-163-0051908 Colonel Sam DriveOshawa, Ontario L1H 8P7
The inquiry should be accompaniedby the Vehicle IdentificationNumber (VIN).
Customer AssistanceOfficesCadillac encourages customers to callthe toll-free number for assistance.However, if a customer wishes towrite or e-mail Cadillac, the lettershould be addressed to:
United States and Puerto Rico
Cadillac Customer Assistance CenterCadillac Motor Car DivisionP.O. Box 33169Detroit, MI 48232-5169www.Cadillac.com
1-800-458-80061-800-833-2622 (For Text Telephonedevices (TTYs))Roadside Service: 1-800-224-1400
From U.S. Virgin Islands:
1-800-496-9994
Canada
General Motors of Canada CompanyCadillac Customer Care Centre, MailCode: CA1-163-0051908 Colonel Sam DriveOshawa, Ontario L1H 8P7www.gm.ca
1-888-446-2000 (English/French)Cadillac Roadside Service:1-800-882-1112
Overseas
Contact the local General MotorsBusiness Unit.
Customer Assistance forText Telephone (TTY)UsersTo assist customers who are deaf,hard of hearing, or speech-impairedand who use Text Telephones (TTYs),Cadillac has TTY equipment availableat its Customer Assistance Center. AnyTTY user can communicate with

Cadillac XT5 Owner Manual (GMNA-Localizing-U.S./Canada/Mexico-13527534) - 2020 - CRC - 5/29/19
356 CUSTOMER INFORMATION
Cadillac by dialing: 1-800-833-2622.TTY users in Canada can dial1-800-263-3830.
Online Owner Center
Online Owner Experience (U.S.)my.cadillac.com
The Cadillac online owner experienceallows access to videos, articles, andvehicle health specific to your Cadillacas well as your OnStar Accountinformation all in one place.
Membership Benefits
E : Download owner’s manuals andview vehicle-specific how-to videos.
G : View maintenance schedules,alerts, and Vehicle DiagnosticInformation. Schedule serviceappointments.
I : View printable dealer-recordedservice records and self-recordedservice records.
D : Select a dealer and viewlocations, maps, phone numbers, andhours.
r : Track your vehicle’s warrantyinformation.
J : View active recalls or search byVehicle Identification Number (VIN).See Vehicle Identification Number (VIN)0 349.
H : Compare and shop for Cadillacand OnStar plans and services. ViewGM Card and SiriusXM information (ifequipped).
F : Chat with online helprepresentatives.
See my.cadillac.com to register yourvehicle.
Cadillac Owner Centre (Canada)mycadillac.ca
Visit the Cadillac Owner Centre atmycadillac.ca (English) ormy.cadillac.ca (French) to accesssimilar benefits to the U.S. site.
GM MobilityReimbursement Program
This program is available to qualifiedapplicants for cost reimbursement, upto certain limits, of eligibleaftermarket adaptive equipmentrequired for the vehicle, such as handcontrols or a wheelchair/scooter liftfor the vehicle.
To learn about the GM Mobilityprogram, see www.gmmobility.com orcall the GM Mobility AssistanceCenter at 1-800-323-9935. TextTelephone (TTY) users, call1-800-833-9935.
General Motors of Canada also has aMobility program. See www.gm.ca orcall 1-800-GM-DRIVE (800-463-7483)for details. TTY users call1-800-263-3830.

Cadillac XT5 Owner Manual (GMNA-Localizing-U.S./Canada/Mexico-13527534) - 2020 - CRC - 5/29/19
CUSTOMER INFORMATION 357
Roadside ServiceU.S.: 1-800-224-1400.
Canada: 1-800-882-1112.
Text Telephone (TTY) Users (U.S.Only): 1-888-889-2438.
Service is available 24 hours a day,365 days a year.
Calling for Service
When calling Roadside Service, havethe following information ready:
. Your name, home address, andhome telephone number
. Telephone number of yourlocation
. Location of the vehicle
. Model, year, color, and licenseplate number of the vehicle
. Odometer reading, VehicleIdentification Number (VIN), anddelivery date of the vehicle
. Description of the problem
Coverage
Services are provided for the durationof the vehicle’s powertrain warranty.
In the U.S., anyone driving the vehicleis covered. In Canada, a person drivingthe vehicle without permission fromthe owner is not covered.
Roadside Service is not a part of theNew Vehicle Limited Warranty.General Motors North America andCadillac reserve the right to make anychanges or discontinue the RoadsideService program at any time withoutnotification.
General Motors North America andCadillac reserve the right to limitservices or payment to an owner ordriver if they decide the claims aremade too often, or the same type ofclaim is made many times.
Cadillac Owner Privileges™. Emergency Fuel Delivery:
Delivery of enough fuel for thevehicle to get to the nearestservice station.
. Lock-Out Service: Service tounlock the vehicle if you arelocked out. A remote unlock maybe available if you have OnStar.For security reasons, the drivermust present identification beforethis service is given.
. Emergency Tow from a PublicRoad or Highway: Tow to thenearest Cadillac dealer forwarranty service, or if the vehiclewas in a crash and cannot bedriven. Assistance is not givenwhen the vehicle is stuck in thesand, mud, or snow.
. Flat Tire Change: Service tochange a flat tire with a spare tire.The spare tire, if equipped, mustbe in good condition and properlyinflated. It is your responsibilityfor the repair or replacement ofthe tire if it is not covered by thewarranty.
. Battery Jump Start: Service tojump start a dead battery.
. Trip Interruption Benefits andService: If your trip is interrupteddue to a warranty failure,

Cadillac XT5 Owner Manual (GMNA-Localizing-U.S./Canada/Mexico-13527534) - 2020 - CRC - 5/29/19
358 CUSTOMER INFORMATION
incidental expenses may bereimbursed during the Powertrainwarranty period. Items consideredare hotel, meals, and rental car ora vehicle being delivered back tothe customer, up to 500 miles.
Cadillac Technician RoadsideService (U.S. Only)
Cadillac's exceptional Roadside Serviceis more than an auto club or towingservice. It provides every Cadillacowner in the United States with theadvantage of contacting a Cadillacadvisor and, where available, aCadillac trained dealer technician whocan provide on-site service.
A dealer technician will travel to yourlocation within a 30-mile radius of aparticipating Cadillac dealership.If beyond this radius, we will arrangeto have your car towed to the nearestCadillac dealership. Each techniciantravels with a specially equippedservice vehicle complete with thenecessary Cadillac parts and toolsrequired to handle most roadsiderepairs.
Services Not Included inRoadside Service. Impound towing caused by
violation of any laws
. Legal fines
. Mounting, dismounting,or changing of snow tires, chains,or other traction devices
Service is not provided if a vehicle isin an area that is not accessible to theservice vehicle or is not a regularlytraveled or maintained public road,which includes ice and winter roads.Off-road use is not covered.
Services Specific toCanadian-Purchased Vehicles. Fuel delivery: Reimbursement is
up to 7 liters. Diesel fuel deliverymay be restricted. Propane andother fuels are not providedthrough this service.
. Lock-Out Service: Vehicleregistration is required.
. Trip Interruption Benefits andService: Pre-authorization, originaldetailed receipts, and a copy of the
repair orders are required. Onceauthorization has been received,the Roadside Service advisor willhelp you make arrangements andexplain how to receive payment.Items considered are hotel, meals,and rental car or a vehicle beingdelivered back to the customer, upto 800 km.
. Alternative Service: If assistancecannot be provided right away, theRoadside Service advisor may giveyou permission to get localemergency road service. You willreceive payment, up to $100, aftersending the original receipt toRoadside Service. Mechanicalfailures may be covered, howeverany cost for parts and labor forrepairs not covered by thewarranty are the ownerresponsibility.
Scheduling ServiceAppointmentsWhen the vehicle requires warrantyservice, contact your dealer andrequest an appointment. Byscheduling a service appointment and

Cadillac XT5 Owner Manual (GMNA-Localizing-U.S./Canada/Mexico-13527534) - 2020 - CRC - 5/29/19
CUSTOMER INFORMATION 359
advising the service consultant ofyour transportation needs, your dealercan help minimize yourinconvenience.
If the vehicle cannot be scheduledinto the service departmentimmediately, keep driving it until itcan be scheduled for service, unless,of course, the problem is safetyrelated. If it is, please call yourdealership, let them know this, andask for instructions.
If your dealer requests you to bringthe vehicle for service, you are urgedto do so as early in the work day aspossible to allow for same-day repair.
Courtesy TransportationProgramTo enhance your ownershipexperience, we and our participatingdealers are proud to offer CourtesyTransportation, a customer supportprogram for vehicles with theBumper-to-Bumper (Base WarrantyCoverage period in Canada), extended
powertrain, and/or hybrid-specificwarranties in both the U.S. andCanada.
Several Courtesy Transportationoptions are available to assist inreducing inconvenience whenwarranty repairs are required.
Courtesy Transportation is not a partof the New Vehicle Limited Warranty.A separate manual entitled “LimitedWarranty and Owner AssistanceInformation” furnished with each newvehicle provides detailed warrantycoverage information.
Transportation Options
Warranty service can generally becompleted while you wait. However,if you are unable to do so, your dealermay offer the following transportationoptions:
Shuttle Service
This includes one-way or round-tripshuttle service within reasonable timeand distance parameters of yourdealer's area.
Public Transportation or FuelReimbursement
If overnight warranty repairs areneeded, and public transportation isused, the expense must be supportedby original receipts and within themaximum amount allowed by GM.If U.S. customers arrange their owntransportation, limited reimbursementfor reasonable fuel expenses may beavailable. Claim amounts shouldreflect actual costs and be supportedby original receipts. See your dealerfor information.
Courtesy Rental Vehicle
For an overnight warranty repair, thedealer may provide an availablecourtesy rental vehicle or provide forreimbursement of a rental vehicle.Reimbursement is limited and mustbe supported by original receipts aswell as a signed and completed rentalagreement and meet state/provincial,local, and rental vehicle providerrequirements. Requirements vary andmay include minimum agerequirements, insurance coverage,credit card, etc. Additional fees suchas fuel, rental vehicle insurance, taxes,

Cadillac XT5 Owner Manual (GMNA-Localizing-U.S./Canada/Mexico-13527534) - 2020 - CRC - 5/29/19
360 CUSTOMER INFORMATION
levies, usage fees, excessive mileage,or rental usage beyond the completionof the repair are also yourresponsibility.
It may not be possible to provide alike vehicle as a courtesy rental.
Additional Program Information
All program options, such as shuttleservice, may not be available at everydealer. Contact your dealer for specificavailability.
General Motors reserves the right tounilaterally modify, change,or discontinue CourtesyTransportation at any time and toresolve all questions of claimeligibility pursuant to the terms andconditions described herein at its solediscretion.
Collision Damage RepairIf the vehicle is involved in a collisionand it is damaged, have the damagerepaired by a qualified technicianusing the proper equipment andquality replacement parts. Poorlyperformed collision repairs diminish
the vehicle resale value, and safetyperformance can be compromised insubsequent collisions.
Collision Parts
Genuine GM Collision parts are newparts made with the same materialsand construction methods as the partswith which the vehicle was originallybuilt. Genuine GM Collision parts arethe best choice to ensure that thevehicle's designed appearance,durability, and safety are preserved.The use of Genuine GM parts can helpmaintain the GM New Vehicle LimitedWarranty.
Recycled original equipment partsmay also be used for repair. Theseparts are typically removed fromvehicles that were total losses in priorcrashes. In most cases, the parts beingrecycled are from undamaged sectionsof the vehicle. A recycled originalequipment GM part may be anacceptable choice to maintain thevehicle's originally designedappearance and safety performance;however, the history of these parts isnot known. Such parts are not covered
by the GM New Vehicle LimitedWarranty, and any related failures arenot covered by that warranty.
Aftermarket collision parts are alsoavailable. These are made bycompanies other than GM and maynot have been tested for the vehicle.As a result, these parts may fit poorly,exhibit premature durability/corrosionproblems, and may not performproperly in subsequent collisions.Aftermarket parts are not covered bythe GM New Vehicle LimitedWarranty, and any vehicle failurerelated to such parts is not covered bythat warranty.
Repair Facility
GM also recommends that you choosea collision repair facility that meetsyour needs before you ever needcollision repairs. Your dealer may havea collision repair center withGM-trained technicians andstate-of-the-art equipment, or be ableto recommend a collision repair centerthat has GM-trained technicians andcomparable equipment.
Cadillac XT5 Owner Manual (GMNA-Localizing-U.S./Canada/Mexico-13527534) - 2020 - CRC - 5/29/19
CUSTOMER INFORMATION 361
Insuring the Vehicle
Protect your investment in the GMvehicle with comprehensive andcollision insurance coverage. There aresignificant differences in the quality ofcoverage afforded by variousinsurance policy terms. Manyinsurance policies provide reducedprotection to the GM vehicle bylimiting compensation for damagerepairs by using aftermarket collisionparts. Some insurance companies willnot specify aftermarket collision parts.When purchasing insurance, werecommend that you ensure that thevehicle will be repaired with GMoriginal equipment collision parts.If such insurance coverage is notavailable from your current insurancecarrier, consider switching to anotherinsurance carrier.
If the vehicle is leased, the leasingcompany may require you to haveinsurance that ensures repairs withGenuine GM Original EquipmentManufacturer (OEM) parts or GenuineManufacturer replacement parts. Read
the lease carefully, as you may becharged at the end of the lease forpoor quality repairs.
If a Crash Occurs
If there has been an injury, callemergency services for help. Do notleave the scene of a crash until allmatters have been taken care of. Movethe vehicle only if its position putsyou in danger, or you are instructed tomove it by a police officer.
Give only the necessary informationto police and other parties involved inthe crash.
For emergency towing see RoadsideService 0 357.
Gather the following information:
. Driver name, address, andtelephone number
. Driver license number
. Owner name, address, andtelephone number
. Vehicle license plate number
. Vehicle make, model, andmodel year
. Vehicle IdentificationNumber (VIN)
. Insurance company and policynumber
. General description of the damageto the other vehicle
Choose a reputable repair facility thatuses quality replacement parts. See“Collision Parts” earlier in this section.
If the airbag has inflated, see WhatWill You See after an Airbag Inflates?0 68.
Managing the Vehicle DamageRepair Process
In the event that the vehicle requiresdamage repairs, GM recommends thatyou take an active role in its repair.If you have a pre-determined repairfacility of choice, take the vehiclethere, or have it towed there. Specifyto the facility that any requiredreplacement collision parts be originalequipment parts, either new GenuineGM parts or recycled original GMparts. Remember, recycled parts willnot be covered by the GM vehiclewarranty.

Cadillac XT5 Owner Manual (GMNA-Localizing-U.S./Canada/Mexico-13527534) - 2020 - CRC - 5/29/19
362 CUSTOMER INFORMATION
Insurance pays the bill for the repair,but you must live with the repair.Depending on your policy limits, yourinsurance company may initially valuethe repair using aftermarket parts.Discuss this with the repairprofessional, and insist on GenuineGM parts. Remember, if the vehicle isleased, you may be obligated to havethe vehicle repaired with Genuine GMparts, even if your insurance coveragedoes not pay the full cost.
If another party's insurance companyis paying for the repairs, you are notobligated to accept a repair valuationbased on that insurance company'scollision policy repair limits, as youhave no contractual limits with thatcompany. In such cases, you can havecontrol of the repair and parts choicesas long as the cost stays withinreasonable limits.
Publication OrderingInformation
Service Manuals
Service manuals have the diagnosisand repair information on the engine,transmission, axle, suspension, brakes,electrical system, steering system,body, etc.
Customer Literature
Owner’s manuals are writtenspecifically for owners and areintended to provide basic operationalinformation about the vehicle. Theowner’s manual includes theMaintenance Schedule for all models.
Customer literature publicationsavailable for purchase include owner’smanuals, warranty manuals,infotainment manuals, and portfolios.Portfolios include an owner’s manual,warranty manual, infotainmentmanual, if applicable, and zip lock bagor pouch.
Current and Past Models
Service manuals and customerliterature are available for manycurrent and past model year GMvehicles.
To order, call 1-800-551-4123Monday–Friday, 8:00 a.m.–6:00 p.m.eastern time
For credit card orders only (VISA,MasterCard, or Discover), see Helm,Inc. at: www.helminc.com.
To order by mail, write to:
Helm, IncorporatedAttention: Customer Service47911 Halyard DrivePlymouth, MI 48170
Make checks payable in U.S. funds.
Cadillac XT5 Owner Manual (GMNA-Localizing-U.S./Canada/Mexico-13527534) - 2020 - CRC - 5/29/19
CUSTOMER INFORMATION 363
Radio FrequencyStatementThis vehicle has systems that operateon a radio frequency that complieswith Part 15/Part 18 of the FederalCommunications Commission (FCC)rules and with Innovation, Scienceand Economic Development (ISED)Canada's RSP-100 / ICES-GEN.
Operation is subject to the followingtwo conditions:
1. The device may not causeharmful interference.
2. The device must accept anyinterference received, includinginterference that may causeundesired operation of thedevice.
Changes or modifications to any ofthese systems by other than anauthorized service facility could voidauthorization to use this equipment.
Reporting SafetyDefects
Reporting Safety Defectsto the United StatesGovernmentIf you believe that your vehiclehas a defect which could cause acrash or could cause injury ordeath, you should immediatelyinform the National HighwayTraffic Safety Administration(NHTSA) in addition to notifyingGeneral Motors.
If NHTSA receives similarcomplaints, it may open aninvestigation, and if it finds that asafety defect exists in a group ofvehicles, it may order a recall and
remedy campaign. However,NHTSA cannot become involvedin individual problems betweenyou, your dealer, or GeneralMotors.
To contact NHTSA, you maycall the Vehicle Safety Hotlinetoll-free at 1-888-327-4236(TTY: 1-800-424-9153); go tohttp://www.safercar.gov; or write to:
Administrator, NHTSA1200 New Jersey Avenue, S.E.Washington, D.C. 20590
You can also obtain otherinformation about motor vehiclesafety from http://www.safercar.gov.

Cadillac XT5 Owner Manual (GMNA-Localizing-U.S./Canada/Mexico-13527534) - 2020 - CRC - 5/29/19
364 CUSTOMER INFORMATION
Reporting Safety Defectsto the CanadianGovernmentIf you live in Canada, and youbelieve that the vehicle has asafety defect, notify TransportCanada immediately, and notifyGeneral Motors of CanadaCompany. Call Transport Canadaat 1-800-333-0510; go to:
www.tc.gc.ca/recalls (English)
www.tc.gc.ca/rappels (French)
or write to:
Transport CanadaMotor Vehicle Safety DirectorateDefect Investigations and RecallsDivision80 Noel StreetGatineau, QC J8Z 0A1
Reporting Safety Defectsto General MotorsIn addition to notifying NHTSA (orTransport Canada) in a situation likethis, notify General Motors.
In the U.S., call 1-800-458-8006,or write:
Cadillac Customer Assistance CenterCadillac Motor Car DivisionP.O. Box 33169Detroit, MI 48232-5169
In Canada, call 1-888-446-2000,or write:
Canadian Cadillac Customer CareCentre, Mail Code: CA1-163-005General Motors of Canada Company1908 Colonel Sam DriveOshawa, Ontario L1H 8P7
In Mexico, call 01-800-466-0805 or01-800-212-234-5522.
In other Central America andCaribbean Countries, call52-555-901-2369.
Vehicle Data Recordingand PrivacyThe vehicle has a number ofcomputers that record informationabout the vehicle’s performance andhow it is driven or used. For example,the vehicle uses computer modules tomonitor and control engine andtransmission performance, to monitorthe conditions for airbag deploymentand deploy them in a crash, and,if equipped, to provide antilockbraking to help the driver control thevehicle. These modules may store datato help the dealer technician servicethe vehicle or to help GM improvesafety or features. Some modules mayalso store data about how the vehicleis operated, such as rate of fuelconsumption or average speed. Thesemodules may retain personalpreferences, such as radio presets, seatpositions, and temperature settings.
CybersecurityGM collects information about the useof your vehicle including operationaland safety related information. We
Cadillac XT5 Owner Manual (GMNA-Localizing-U.S./Canada/Mexico-13527534) - 2020 - CRC - 5/29/19
CUSTOMER INFORMATION 365
collect this information to provide,evaluate, improve, and troubleshootour products and services and todevelop new products and services.The protection of vehicle electronicssystems and customer data fromunauthorized outside electronic accessor control is important to GM. GMmaintains appropriate securitystandards, practices, guidelines andcontrols aimed at defending thevehicle and the vehicle serviceecosystem against unauthorizedelectronic access, detecting possiblemalicious activity in related networks,and responding to suspectedcybersecurity incidents in a timely,coordinated and effective manner.Security incidents could impact yoursafety or compromise your privatedata. To minimize security risks,please do not connect your vehicleelectronic systems to unauthorizeddevices or connect your vehicle to anyunknown or untrusted networks (suchas Bluetooth, WIFI or similartechnology). In the event you suspectany security incident impacting your
data or the safe operation of yourvehicle, please stop operating yourvehicle and contact your dealer.
Event Data RecordersThis vehicle is equipped with an eventdata recorder (EDR). The mainpurpose of an EDR is to record, incertain crash or near crash-likesituations, such as an air bagdeployment or hitting a road obstacle,data that will assist in understandinghow a vehicle’s systems performed.The EDR is designed to record datarelated to vehicle dynamics and safetysystems for a short period of time,typically 30 seconds or less. The EDRin this vehicle is designed to recordsuch data as:
. How various systems in yourvehicle were operating;
. Whether or not the driver andpassenger safety belts werebuckled/fastened;
. How far (if at all) the driver wasdepressing the accelerator and/orbrake pedal; and,
. How fast the vehicle was traveling.
These data can help provide a betterunderstanding of the circumstances inwhich crashes and injuries occur.
NoteEDR data are recorded by your vehicleonly if a non-trivial crash situationoccurs; no data are recorded by theEDR under normal driving conditionsand no personal data (e.g., name,gender, age, and crash location) arerecorded. However, other parties, suchas law enforcement, could combinethe EDR data with the type ofpersonally identifying data routinelyacquired during a crash investigation.
To read data recorded by an EDR,special equipment is required, andaccess to the vehicle or the EDR isneeded. In addition to the vehiclemanufacturer, other parties, such aslaw enforcement, that have the specialequipment, can read the informationif they have access to the vehicle orthe EDR.
GM will not access these data or shareit with others except: with the consentof the vehicle owner or, if the vehicleis leased, with the consent of thelessee; in response to an official

Cadillac XT5 Owner Manual (GMNA-Localizing-U.S./Canada/Mexico-13527534) - 2020 - CRC - 5/29/19
366 CUSTOMER INFORMATION
request by police or similargovernment office; as part of GM'sdefense of litigation through thediscovery process; or, as required bylaw. Data that GM collects or receivesmay also be used for GM researchneeds or may be made available toothers for research purposes, where aneed is shown and the data is not tiedto a specific vehicle or vehicle owner.
OnStarIf the vehicle is equipped with OnStarand has an active service plan,additional data may be collected andtransmitted through the OnStarsystem. This includes informationabout the vehicle’s operation;collisions involving the vehicle; theuse of the vehicle and its features,including infotainment; and thelocation and approximate GPS speedof the vehicle. Refer to the OnStarTerms and Conditions and PrivacyStatement on the OnStar website.
See OnStar Additional Information0 369.
Infotainment SystemIf the vehicle is equipped with anavigation system as part of theinfotainment system, use of thesystem may result in the storage ofdestinations, addresses, telephonenumbers, and other trip information.See the infotainment manual forinformation on stored data and fordeletion instructions.
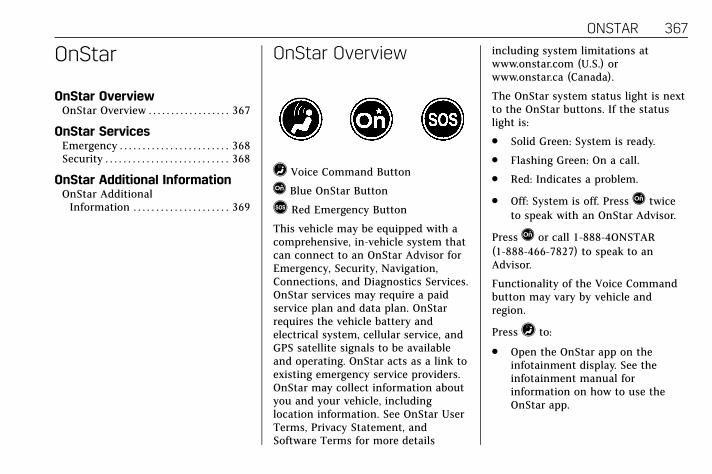
Cadillac XT5 Owner Manual (GMNA-Localizing-U.S./Canada/Mexico-13527534) - 2020 - CRC - 5/29/19
ONSTAR 367
OnStar
OnStar OverviewOnStar Overview . . . . . . . . . . . . . . . . . . 367
OnStar ServicesEmergency . . . . . . . . . . . . . . . . . . . . . . . . 368Security . . . . . . . . . . . . . . . . . . . . . . . . . . . 368
OnStar Additional InformationOnStar AdditionalInformation . . . . . . . . . . . . . . . . . . . . . 369
OnStar Overview
= Voice Command Button
Q Blue OnStar Button
> Red Emergency Button
This vehicle may be equipped with acomprehensive, in-vehicle system thatcan connect to an OnStar Advisor forEmergency, Security, Navigation,Connections, and Diagnostics Services.OnStar services may require a paidservice plan and data plan. OnStarrequires the vehicle battery andelectrical system, cellular service, andGPS satellite signals to be availableand operating. OnStar acts as a link toexisting emergency service providers.OnStar may collect information aboutyou and your vehicle, includinglocation information. See OnStar UserTerms, Privacy Statement, andSoftware Terms for more details
including system limitations atwww.onstar.com (U.S.) orwww.onstar.ca (Canada).
The OnStar system status light is nextto the OnStar buttons. If the statuslight is:
. Solid Green: System is ready.
. Flashing Green: On a call.
. Red: Indicates a problem.
. Off: System is off. PressQ twiceto speak with an OnStar Advisor.
PressQ or call 1-888-4ONSTAR(1-888-466-7827) to speak to anAdvisor.
Functionality of the Voice Commandbutton may vary by vehicle andregion.
Press= to:
. Open the OnStar app on theinfotainment display. See theinfotainment manual forinformation on how to use theOnStar app.

Cadillac XT5 Owner Manual (GMNA-Localizing-U.S./Canada/Mexico-13527534) - 2020 - CRC - 5/29/19
368 ONSTAR
Or
. Give OnStar Turn-by-TurnNavigation voice commands.
. Obtain and customize the Wi-Fihotspot name or SSID andpassword, if equipped.
PressQ to connect to an Advisor to:
. Verify account information orupdate contact information.
. Get driving directions.
. Receive a Diagnostic check of thevehicle's key operating systems.
. Receive Roadside Service.
. Manage Wi-Fi Settings,if equipped.
Press> to get a priority connectionto an OnStar Advisor available 24/7 to:
. Get help for an emergency.
. Be a Good Samaritan or respondto an AMBER Alert.
. Get assistance in severe weatheror other crisis situations and findevacuation routes.
OnStar Services
EmergencyEmergency Services require an activesafety and security plan. WithAutomatic Crash Response, built-insensors can automatically alert aspecially trained OnStar Advisor whois immediately connected in to thevehicle to help.
Press> for a priority connection toan OnStar Advisor who can contactemergency service providers, directthem to your exact location, and relayimportant information.
With OnStar Crisis Assist, speciallytrained Advisors are available24 hours a day, 7 days a week, toprovide a central point of contact,assistance, and information during acrisis.
With Roadside Service, Advisors canlocate a nearby service provider tohelp with a flat tire, a battery jump,or an empty gas tank.
SecurityIf equipped, OnStar provides theseservices:
. With Stolen Vehicle Assistance,OnStar Advisors can use GPS topinpoint the vehicle and helpauthorities quickly recover it.
. With Remote Ignition Block,if equipped, OnStar can block theengine from being restarted.
. With Stolen Vehicle Slowdown,if equipped, OnStar can work withlaw enforcement to gradually slowthe vehicle down.
Theft Alarm Notification
If equipped, if the doors are lockedand the vehicle alarm sounds, anotification by text, e-mail, or phonecall will be sent. If the vehicle isstolen, an OnStar Advisor can workwith authorities to recover the vehicle.

Cadillac XT5 Owner Manual (GMNA-Localizing-U.S./Canada/Mexico-13527534) - 2020 - CRC - 5/29/19
ONSTAR 369
OnStar AdditionalInformationIn-Vehicle Audio Messages
Audio messages may play importantinformation at the following times:
. Prior to vehicle purchase. PressQto set up an account.
. After change in ownership and at90 days.
Transferring Service
PressQ to request account transfereligibility information. The Advisorcan cancel or change accountinformation.
Selling/Transferring the Vehicle
Call 1-888-4ONSTAR (1-888-466-7827)immediately to terminate your OnStaror connected services if the vehicle isdisposed of, sold, transferred, or if thelease ends.
Reactivation for SubsequentOwners
PressQ and follow the prompts tospeak to an Advisor as soon aspossible. The Advisor will updatevehicle records and explain OnStar orconnected service options.
How OnStar Service Works
Automatic Crash Response,Emergency Services, Crisis Assist,Stolen Vehicle Assistance, RemoteServices, and Roadside Service areavailable on most vehicles. Not allOnStar services are availableeverywhere or on all vehicles. Formore information, a full description ofOnStar services, system limitations,and OnStar User Terms, PrivacyStatement, and Software Terms:
. Call 1-888-4ONSTAR(1-888-466-7827).
. See www.onstar.com (U.S.).
. See www.onstar.ca (Canada).
. Call TTY 1-877-248-2080.
. PressQ to speak with an Advisor.
OnStar or connected services cannotwork unless the vehicle is in a placewhere OnStar has an agreement witha wireless service provider for servicein that area. The wireless serviceprovider must also have coverage,network capacity, reception, andtechnology compatible with OnStar orconnected services. Service involvinglocation information about the vehiclecannot work unless GPS signals areavailable, unobstructed, andcompatible with the OnStar hardware.OnStar or connected services may notwork if the OnStar equipment is notproperly installed or it has not beenproperly maintained. If equipment orsoftware is added, connected,or modified, OnStar or connectedservices may not work. Otherproblems beyond the control ofOnStar — such as hills, tall buildings,tunnels, weather, electrical systemdesign and architecture of the vehicle,damage to the vehicle in a crash,or wireless phone network congestionor jamming — may prevent service.
See Radio Frequency Statement 0 363.

Cadillac XT5 Owner Manual (GMNA-Localizing-U.S./Canada/Mexico-13527534) - 2020 - CRC - 5/29/19
370 ONSTAR
Services for People withDisabilities
Advisors provide services to help withphysical disabilities and medicalconditions.
PressQ to help:
. Locate a gas station with anattendant to pump gas.
. Find a hotel, restaurant, etc., thatmeets accessibility needs.
. Provide directions to the closesthospital or pharmacy in urgentsituations.
TTY Users
OnStar has the ability to communicateto deaf, hard-of-hearing,or speech-impaired customers while inthe vehicle. The availabledealer-installed TTY system canprovide in-vehicle access to all OnStarservices, except Virtual Advisor andOnStar Turn-by-Turn Navigation.
If equipped, TTY mode can be turnedon or off by touching Settings, thenApps, and then Phone. When TTY
mode is on, phone calls can be madeor received with OnStar using theinfotainment display.
OnStar Personal IdentificationNumber (PIN)
A PIN is needed to access someOnStar services. The PIN will need tobe changed the first time whenspeaking with an Advisor. To changethe OnStar PIN, contact an OnStarAdvisor by pressingQ or calling1-888-4ONSTAR.
Warranty
OnStar equipment may be warrantedas part of the vehicle warranty.
Languages
The vehicle can be programmed torespond in multiple languages.PressQ and ask for an Advisor.Advisors are available in English,Spanish, and French. Availablelanguages may vary by country.
Potential Issues
OnStar cannot perform Remote DoorUnlock or Stolen Vehicle Assistanceafter the vehicle has been offcontinuously for 10 days without anignition cycle. If the vehicle has notbeen started for 10 days, OnStar cancontact Roadside Service or alocksmith to help gain access to thevehicle.
Global Positioning System (GPS). Obstruction of the GPS can occur
in a large city with tall buildings;in parking garages; aroundairports; in tunnels andunderpasses; or in an area withvery dense trees. If GPS signals arenot available, the OnStar systemshould still operate to call OnStar.However, OnStar could havedifficulty identifying the exactlocation.
. In emergency situations, OnStarcan use the last stored GPSlocation to send to emergencyresponders.

Cadillac XT5 Owner Manual (GMNA-Localizing-U.S./Canada/Mexico-13527534) - 2020 - CRC - 5/29/19
ONSTAR 371
A temporary loss of GPS can causeloss of the ability to send aTurn-by-Turn Navigation route. TheAdvisor may give a verbal route ormay ask for a call back after thevehicle is driven into an open area.
Cellular and GPS Antennas
Cellular reception is required forOnStar to send remote signals to thevehicle. Do not place items over ornear the antenna to prevent blockingcellular and GPS signal reception.
Unable to Connect to OnStarMessage
If there is limited cellular coverage orthe cellular network has reachedmaximum capacity, this message maycome on. PressQ to try the call againor try again after driving a few milesinto another cellular area.
Vehicle and Power Issues
OnStar services require a vehicleelectrical system, wireless service, andGPS satellite technologies to beavailable and operating for features to
function properly. These systems maynot operate if the battery isdischarged or disconnected.
Add-on Electrical Equipment
The OnStar system is integrated intothe electrical architecture of thevehicle. Do not add any electricalequipment. See Add-On ElectricalEquipment 0 249. Added electricalequipment may interfere with theoperation of the OnStar system andcause it to not operate.
Vehicle Software Updates
OnStar or GM may remotely deliversoftware updates or changes to thevehicle without further notice orconsent. These updates or changesmay enhance or maintain safety,security, or the operation of thevehicle or the vehicle systems.Software updates or changes mayaffect or erase data or settings thatare stored in the vehicle, such assaved navigation destinations orpre-set radio stations. Neither OnStarnor GM is responsible for any affectedor erased data or settings. Theseupdates or changes may also collect
personal information. Such collectionis described in the OnStar privacystatement or separately disclosed atthe time of installation. These updatesor changes may also cause a system toautomatically communicate with GMservers to collect information aboutvehicle system status, identifywhether updates or changes areavailable, or deliver updates orchanges. An active OnStar agreementconstitutes consent to these softwareupdates or changes and agreementthat either OnStar or GM mayremotely deliver them to the vehicle.
Privacy
The complete OnStar PrivacyStatement may be found atwww.onstar.com (U.S.),or www.onstar.ca (Canada). Werecommend that you review it. If youhave any questions, call1-888-4ONSTAR (1-888-466-7827) orpressQ to speak with an Advisor.Users of wireless communications arecautioned that the privacy of anyinformation sent via wireless cellularcommunications cannot be assured.
Cadillac XT5 Owner Manual (GMNA-Localizing-U.S./Canada/Mexico-13527534) - 2020 - CRC - 5/29/19
372 ONSTAR
Third parties may unlawfully interceptor access transmissions and privatecommunications without consent.
OnStar - SoftwareAcknowledgements
Certain OnStar components includelibcurl and unzip software and otherthird party software. Below are thenotices and licenses associatedwith libcurl and unzip and for otherthird party software please seehttp://opensource.lge.com/index
www.onstar.com/us/en/
libcurl:
COPYRIGHT AND PERMISSIONNOTICE
Copyright (c) 1996 - 2010, DanielStenberg, <[email protected]>.
All rights reserved.
Permission to use, copy, modify, anddistribute this software for anypurpose with or without fee is herebygranted, provided that the abovecopyright notice and this permissionnotice appear in all copies.
THE SOFTWARE IS PROVIDED “ASIS,” WITHOUT WARRANTY OF ANYKIND, EXPRESS OR IMPLIED,INCLUDING BUT NOT LIMITED TOTHE WARRANTIES OFMERCHANTABILITY, FITNESS FOR APARTICULAR PURPOSE ANDNONINFRINGEMENT OF THIRDPARTY RIGHTS. IN NO EVENT SHALLTHE AUTHORS OR COPYRIGHTHOLDERS BE LIABLE FOR ANYCLAIM, DAMAGES OR OTHERLIABILITY, WHETHER IN AN ACTIONOF CONTRACT, TORT OROTHERWISE, ARISING FROM, OUTOF OR IN CONNECTION WITH THESOFTWARE OR THE USE OR OTHERDEALINGS IN THE SOFTWARE.
Except as contained in this notice, thename of a copyright holder shall notbe used in advertising or otherwise topromote the sale, use or otherdealings in this Software without priorwritten authorization of the copyrightholder.
unzip:
This is version 2005-Feb-10 of theInfo-ZIP copyright and license. Thedefinitive version of this document
should be available atftp://ftp.info-zip.org/pub/infozip/license.html indefinitely.
Copyright (c) 1990-2005 Info-ZIP. Allrights reserved.
For the purposes of this copyright andlicense, “Info-ZIP” is defined as thefollowing set of individuals:
Mark Adler, John Bush, Karl Davis,Harald Denker, Jean-Michel Dubois,Jean-loup Gailly, Hunter Goatley, EdGordon, Ian Gorman, Chris Herborth,Dirk Haase, Greg Hartwig, RobertHeath, Jonathan Hudson, Paul Kienitz,David Kirschbaum, Johnny Lee, Onnovan der Linden, Igor Mandrichenko,Steve P. Miller, Sergio Monesi, KeithOwens, George Petrov, Greg Roelofs,Kai Uwe Rommel, Steve Salisbury,Dave Smith, Steven M. Schweda,Christian Spieler, Cosmin Truta,Antoine Verheijen, Paul von Behren,Rich Wales, Mike White.
This software is provided “as is,”without warranty of any kind, expressor implied. In no event shall Info-ZIPor its contributors be held liable forany direct, indirect, incidental, special

Cadillac XT5 Owner Manual (GMNA-Localizing-U.S./Canada/Mexico-13527534) - 2020 - CRC - 5/29/19
ONSTAR 373
or consequential damages arising outof the use of or inability to use thissoftware.
Permission is granted to anyone touse this software for any purpose,including commercial applications,and to alter it and redistribute itfreely, subject to the followingrestrictions:
1. Redistributions of source codemust retain the above copyrightnotice, definition, disclaimer, andthis list of conditions.
2. Redistributions in binary form(compiled executables) mustreproduce the above copyrightnotice, definition, disclaimer, andthis list of conditions indocumentation and/or othermaterials provided with thedistribution. The sole exceptionto this condition is redistributionof a standard UnZipSFX binary(including SFXWiz) as part of aself-extracting archive; that ispermitted without inclusion ofthis license, as long as the
normal SFX banner has not beenremoved from the binary ordisabled.
3. Altered versions–including, butnot limited to, ports to newoperating systems, existing portswith new graphical interfaces,and dynamic, shared, or staticlibrary versions–must be plainlymarked as such and must not bemisrepresented as being theoriginal source. Such alteredversions also must not bemisrepresented as being Info-ZIPreleases–including, but notlimited to, labeling of the alteredversions with the names“Info-ZIP” (or any variationthereof, including, but notlimited to, differentcapitalizations), “Pocket UnZip,”“WiZ” or “MacZip” without theexplicit permission of Info-ZIP.Such altered versions are furtherprohibited frommisrepresentative use of theZip-Bugs or Info-ZIP e-mailaddresses or of theInfo-ZIP URL(s).
4. Info-ZIP retains the right to usethe names “Info-ZIP,” “Zip,”“UnZip,” “UnZipSFX,” “WiZ,”“Pocket UnZip,” “Pocket Zip,” and“MacZip” for its own source andbinary releases.

Cadillac XT5 Owner Manual (GMNA-Localizing-U.S./Canada/Mexico-13527534) - 2020 - CRC - 5/29/19
374 CONNECTED SERVICES
Connected Services
Connected ServicesNavigation . . . . . . . . . . . . . . . . . . . . . . . . 374Connections . . . . . . . . . . . . . . . . . . . . . . 375Diagnostics . . . . . . . . . . . . . . . . . . . . . . . 376
Connected Services
NavigationNavigation requires a specific OnStaror connected service plan.
PressQ to receive Turn-by-Turndirections or have them sent to thevehicle’s navigation screen,if equipped.
Turn-by-Turn Navigation
1. PressQ to connect to anAdvisor.
2. Request directions to bedownloaded to the vehicle.
3. Follow the voice-guidedcommands.
Using Voice Commands During aPlanned Route
Functionality of the Voice Commandbutton, if equipped, may vary byvehicle and region. For some vehicles,press= to open the OnStar app onthe infotainment display. For othervehicles press= as follows.
Cancel Route
1. Press=. System responds:“OnStar ready,” then a tone.
2. Say “Cancel route.” Systemresponds: “Do you want to canceldirections?”
3. Say “Yes.” System responds: “OK,request completed, thank you,goodbye.”
Route Preview
1. Press=. System responds:“OnStar ready,” then a tone.
2. Say “Route preview.” Systemresponds with the next threemaneuvers.
Repeat
1. Press=. System responds:“OnStar ready,” then a tone.
2. Say “Repeat.” System respondswith the last direction given,then responds with “OnStarready,” then a tone.
Cadillac XT5 Owner Manual (GMNA-Localizing-U.S./Canada/Mexico-13527534) - 2020 - CRC - 5/29/19
CONNECTED SERVICES 375
Get My Destination
1. Press=. System responds:“OnStar ready,” then a tone.
2. Say “Get my destination.” Systemresponds with the address anddistance to the destination, thenresponds with “OnStar ready,”then a tone.
Send Destination to Vehicle
Directions can be sent to the vehicle’snavigation screen, if equipped.
PressQ, then ask the Advisor todownload directions to the vehicle’snavigation system, if equipped. Afterthe call ends, the navigation screenwill provide prompts to begin drivingdirections. Routes that are sent to thenavigation screen can only becanceled through the navigationsystem.
See www.onstar.com (U.S.) orwww.onstar.ca (Canada).
ConnectionsThe following services help withstaying connected.
For coverage maps, seewww.onstar.com (U.S.) orwww.onstar.ca (Canada).
Ensuring Security
. Change the default passwords forthe Wi-Fi hotspot and myCadillacmobile app. Make these passwordsdifferent from each other and usea combination of letters, numbers,and symbols to increase thesecurity.
. Change the default name of theSSID (Service Set Identifier). Thisis your network’s name that isvisible to other wireless devices.Choose a unique name and avoidfamily names or vehicledescriptions.
Wi-Fi Hotspot (If Equipped)
The vehicle may have a built-in Wi-Fihotspot that provides access to theInternet and web content at 4G LTEspeed. Up to seven mobile devices canbe connected. A data plan is required.Use the in-vehicle controls only whenit is safe to do so.
1. To retrieve Wi-Fi hotspotinformation, press= to openthe OnStar app on theinfotainment display, then selectWi-Fi Hotspot. On some vehicles,touch Wi-Fi or Wi-Fi Settings onthe screen.
2. The Wi-Fi settings will displaythe Wi-Fi hotspot name (SSID),password, and on some vehicles,the connection type (no Internetconnection, 3G, 4G, 4G LTE), andsignal quality (poor, good,excellent).
3. To change the SSID or password,pressQ or call 1-888-4ONSTARto connect with an Advisor. Onsome vehicles, the SSID andpassword can be changed in theWi-Fi Hotspot menu.
After initial set-up, your vehicle’sWi-Fi hotspot will connectautomatically to your mobile devices.Manage data usage by turning Wi-Fion or off on your mobile device, byusing the myCadillac mobile app,or by contacting an OnStar Advisor.
Cadillac XT5 Owner Manual (GMNA-Localizing-U.S./Canada/Mexico-13527534) - 2020 - CRC - 5/29/19
376 CONNECTED SERVICES
On some vehicles, Wi-Fi can also bemanaged from the Wi-FiHotspot menu.
MyCadillac Mobile App (If Available)
Download the myCadillac mobile appto compatible Apple and Androidsmartphones. Cadillac users canaccess the following services from asmartphone:
. Remotely start/stop the vehicle,if factory-equipped.
. Lock/unlock doors, if equippedwith automatic locks.
. Activate the horn and lamps.
. Check the vehicle’s fuel level, oillife, or tire pressure,if factory-equipped with the TirePressure Monitor System.
. Send destinations to the vehicle.
. Locate the vehicle on a map (U.S.market only).
. Turn the vehicle's Wi-Fi hotspoton/off, manage settings, andmonitor data consumption,if equipped.
. Locate a dealer and scheduleservice.
. Request Roadside Service.
. Set a parking reminder with pindrop, take a photo, make a note,and set a timer.
. Connect with Cadillac on socialmedia.
Features are subject to change. FormyCadillac mobile app informationand compatibility, see my.cadillac.com.
An active OnStar or connected serviceplan may be required. A compatibledevice, factory-installed remote start,and power locks are required. Datarates apply. See www.onstar.com fordetails and system limitations.
Remote Services
Contact an OnStar Advisor to unlockthe doors or sound the horn and flashthe lamps.
Marketplace
OnStar Advisors can provide offersfrom restaurants and retailers on yourroute, help locate hotels, or book aroom. These services vary by market.
DiagnosticsBy monitoring and reporting on thevehicle’s key systems, OnStarAdvanced Diagnostics, if equipped,provides a way to keep up onmaintenance. Capabilities vary bymodel. See www.onstar.com for detailsand system limitations. Features aresubject to change. For updates onfeature capabilities, seemy.cadillac.com. Message and datarates may apply.

Cadillac XT5 Owner Manual (GMNA-Localizing-U.S./Canada/Mexico-13527534) - 2020 - CRC - 5/29/19
INDEX 377
Index AAccessories and Modifications . . . . . 252Accessory Power . . . . . . . . . . . . . . . . . . . . 182Active Fuel Management . . . . . . . . . . . 184Adaptive Cruise Control . . . . . . . . . . . . 201Add-On Electrical Equipment . . . . . . 249Additional InformationOnStar . . . . . . . . . . . . . . . . . . . . . . . . . . . . . 369
Additional Maintenanceand Care . . . . . . . . . . . . . . . . . . . . . . . . . . . 343
AdjustmentsLumbar, Front Seats . . . . . . . . . . . . . . . .47
Air Cleaner/Filter, Engine . . . . . . . . . . 262Air Conditioning . . . . . . . . . . . . . . .151, 156Air FilterLife System . . . . . . . . . . . . . . . . . . . . . . . . 262
Air Filter, PassengerCompartment . . . . . . . . . . . . . . . . . . . . . 159
Air Vents . . . . . . . . . . . . . . . . . . . . . . . . . . . . 158Airbag SystemCheck . . . . . . . . . . . . . . . . . . . . . . . . . . . . . . . .75How Does an Airbag Restrain? . . . . .68Passenger Sensing System . . . . . . . . .70What Makes an Airbag Inflate? . . . .68What Will You See after anAirbag Inflates? . . . . . . . . . . . . . . . . . . .68
When Should an AirbagInflate? . . . . . . . . . . . . . . . . . . . . . . . . . . . . .67
Airbag System (cont'd)Where Are the Airbags? . . . . . . . . . . . .66
AirbagsAdding Equipment to theVehicle . . . . . . . . . . . . . . . . . . . . . . . . . . . . .74
Passenger Status Indicator . . . . . . . 117Readiness Light . . . . . . . . . . . . . . . . . . . 117Servicing Airbag-EquippedVehicles . . . . . . . . . . . . . . . . . . . . . . . . . . . .74
System Check . . . . . . . . . . . . . . . . . . . . . . .64AlarmVehicle Security . . . . . . . . . . . . . . . . . . . . .31
AlertLane Change . . . . . . . . . . . . . . . . . . . . . . 229Rear Pedestrian . . . . . . . . . . . . . . . . . . . 219Side Blind Zone (SBZA) . . . . . . . . . . 229
All-Season Tires . . . . . . . . . . . . . . . . . . . . . 286All-Wheel Drive . . . . . . . . . . . . . . . .192, 272Light . . . . . . . . . . . . . . . . . . . . . . . . . . . . . . . 122
Antilock Brake System (ABS) . . . . . . 193Warning Light . . . . . . . . . . . . . . . . . . . . 121
Appearance CareExterior . . . . . . . . . . . . . . . . . . . . . . . . . . . . 326Interior . . . . . . . . . . . . . . . . . . . . . . . . . . . . 331
ArmrestRear Seat . . . . . . . . . . . . . . . . . . . . . . . . . . . .55
Armrest Storage . . . . . . . . . . . . . . . . . . . . . . 96Assistance Systems for Driving . . . . 220

Cadillac XT5 Owner Manual (GMNA-Localizing-U.S./Canada/Mexico-13527534) - 2020 - CRC - 5/29/19
378 INDEX
Assistance Systems for Parkingand Backing . . . . . . . . . . . . . . . . . . . . . . . 211
Auto StopStop/Start System . . . . . . . . . . . . . . . . 179
AutomaticDimming Mirrors . . . . . . . . . . . . . . . . . . .36Door Locks . . . . . . . . . . . . . . . . . . . . . . . . . .21Emergency Braking (AEB) . . . . . . . . 223Headlamp System . . . . . . . . . . . . . . . . 145Transmission . . . . . . . . . . . . . . . . . . . . . . 186Transmission Fluid . . . . . . . . . . . . . . . 261
Automatic TransmissionManual Mode . . . . . . . . . . . . . . . . . . . . . 191
BBatteryExterior Lighting BatterySaver . . . . . . . . . . . . . . . . . . . . . . . . . . . . . 149
Power Protection . . . . . . . . . . . . . . . . . . 149Battery - North America . . . . . .271, 320Blade Replacement, Wiper . . . . . . . . . 273BrakeElectric Boost . . . . . . . . . . . . . . . . . . . . . 193Parking, Electric . . . . . . . . . . . . . . . . . . 194System Warning Light . . . . . . . . . . . . 120
Brakes . . . . . . . . . . . . . . . . . . . . . . . . . . . . . . . 269Antilock . . . . . . . . . . . . . . . . . . . . . . . . . . . 193Assist . . . . . . . . . . . . . . . . . . . . . . . . . . . . . . 195
Brakes (cont'd)Fluid . . . . . . . . . . . . . . . . . . . . . . . . . . . . . . . 270
Braking . . . . . . . . . . . . . . . . . . . . . . . . . . . . . . 163Automatic Emergency (AEB) . . . . . 223
Braking SystemFront Pedestrian (FPB) . . . . . . . . . . . 224
Break-In, New Vehicle . . . . . . . . . . . . . . 176Bulb ReplacementHalogen Bulbs . . . . . . . . . . . . . . . . . . . . 276Headlamp Aiming . . . . . . . . . . . . . . . . 276Headlamps . . . . . . . . . . . . . . . . . . . . . . . . 276
Buying New Tires . . . . . . . . . . . . . . . . . . . 301
CCalibration . . . . . . . . . . . . . . . . . . . . . . . . . . 107CaliforniaPerchlorate MaterialsRequirements . . . . . . . . . . . . . . . . . . . 252
California Proposition65 Warning . . . . . . . . . . . . .251, 271, 320,
Back CoverCanadian Vehicle Owners . . . . . . . . . . . . .2Capacities and Specifications . . . . . . 350Carbon MonoxideEngine Exhaust . . . . . . . . . . . . . . . . . . . 185Liftgate . . . . . . . . . . . . . . . . . . . . . . . . . . . . . .23Winter Driving . . . . . . . . . . . . . . . . . . . . 170
CargoCover . . . . . . . . . . . . . . . . . . . . . . . . . . . . . . . .98Management System . . . . . . . . . . . . . . .99Tie-Downs . . . . . . . . . . . . . . . . . . . . . . . . . . .99
Caution, Danger, and Warning . . . . . . . .2Center Console Storage . . . . . . . . . . . . . . 97Chains, Tire . . . . . . . . . . . . . . . . . . . . . . . . . 305ChargingWireless . . . . . . . . . . . . . . . . . . . . . . . . . . . 108
Charging System Light . . . . . . . . . . . . . 118CheckEngine Light (MalfunctionIndicator) . . . . . . . . . . . . . . . . . . . . . . . . 118
Child RestraintsInfants and Young Children . . . . . . . .77Lower Anchors and Tethers forChildren . . . . . . . . . . . . . . . . . . . . . . . . . . .83
Older Children . . . . . . . . . . . . . . . . . . . . . .76Securing . . . . . . . . . . . . . . . . . . . . . . . . .89, 91Systems . . . . . . . . . . . . . . . . . . . . . . . . . . . . .80
Circuit Breakers . . . . . . . . . . . . . . . . . . . . . 277CleaningExterior Care . . . . . . . . . . . . . . . . . . . . . . 326Interior Care . . . . . . . . . . . . . . . . . . . . . . 331
Climate Control SystemsDual Automatic . . . . . . . . . . . . . . . . . . . 151Rear . . . . . . . . . . . . . . . . . . . . . . . . . . . . . . . . 156
Clock . . . . . . . . . . . . . . . . . . . . . . . . . . . . . . . . . 107

Cadillac XT5 Owner Manual (GMNA-Localizing-U.S./Canada/Mexico-13527534) - 2020 - CRC - 5/29/19
INDEX 379
Cluster, Instrument . . . . . . . . . . . . . . . . . 111Collision Damage Repair . . . . . . . . . . . 360Compact Spare Tire . . . . . . . . . . . . . . . . . 319CompartmentsStorage . . . . . . . . . . . . . . . . . . . . . . . . . . . . . .95
Compass . . . . . . . . . . . . . . . . . . . . . . . . . . . . . 107Compressor Kit, Tire Sealant . . . . . . . 307Connected ServicesConnections . . . . . . . . . . . . . . . . . . . . . . . 375Diagnostics . . . . . . . . . . . . . . . . . . . . . . . . 376Navigation . . . . . . . . . . . . . . . . . . . . . . . . . 374
ConnectionsConnected Services . . . . . . . . . . . . . . . 375
ControlTraction and ElectronicStability . . . . . . . . . . . . . . . . . . . . . . . . . . 196
Control of a Vehicle . . . . . . . . . . . . . . . . 162Convenience Net . . . . . . . . . . . . . . . . . . . . 100Convex Mirrors . . . . . . . . . . . . . . . . . . . . . . 34CoolantEngine Temperature Gauge . . . . . . 115Engine Temperature WarningLight . . . . . . . . . . . . . . . . . . . . . . . . . . . . . 124
Cooling . . . . . . . . . . . . . . . . . . . . . . . . .151, 156Cooling System . . . . . . . . . . . . . . . . . . . . . 264Cornering Lamps . . . . . . . . . . . . . . . . . . . 147Courtesy Lamps . . . . . . . . . . . . . . . . . . . . . 148
Courtesy TransportationProgram . . . . . . . . . . . . . . . . . . . . . . . . . . . . 359
CoverCargo . . . . . . . . . . . . . . . . . . . . . . . . . . . . . . . .98
Cruise Control . . . . . . . . . . . . . . . . . . . . . . . 199Light . . . . . . . . . . . . . . . . . . . . . . . . . . . . . . . 127
Cruise Control, Adaptive . . . . . . . . . . . 201Cupholders . . . . . . . . . . . . . . . . . . . . . . . . . . . 95Customer Assistance . . . . . . . . . . . . . . . 355Offices . . . . . . . . . . . . . . . . . . . . . . . . . . . . . 355Text Telephone (TTY) Users . . . . . 355
Customer InformationPublications OrderingInformation . . . . . . . . . . . . . . . . . . . . . . 362
Customer SatisfactionProcedure . . . . . . . . . . . . . . . . . . . . . . . . . . 353
Cybersecurity . . . . . . . . . . . . . . . . . . . . . . . . 364
DDamage Repair, Collision . . . . . . . . . . . 360Danger, Warning, and Caution . . . . . . . .2Data CollectionInfotainment System . . . . . . . . . . . . . 366OnStar . . . . . . . . . . . . . . . . . . . . . . . . . . . . . 366
Data Recorders, Event . . . . . . . . . . . . . . 365Daytime Running Lamps (DRL) . . . 145Defensive Driving . . . . . . . . . . . . . . . . . . . 162Delayed Locking . . . . . . . . . . . . . . . . . . . . . 21
DiagnosticsConnected Services . . . . . . . . . . . . . . . 376
Distracted Driving . . . . . . . . . . . . . . . . . . 161Dome Lamps . . . . . . . . . . . . . . . . . . . . . . . . 148DoorAjar Light . . . . . . . . . . . . . . . . . . . . . . . . . 127Delayed Locking . . . . . . . . . . . . . . . . . . . .21Locks . . . . . . . . . . . . . . . . . . . . . . . . . . . . . . . .18Power Locks . . . . . . . . . . . . . . . . . . . . . . . . .21
Drive Belt Routing, Engine . . . . . . . . . 352Drive SystemsAll-Wheel Drive . . . . . . . . . . . . . . 192, 272
Driver Assistance Systems . . . . . . . . . 210Driver InformationCenter (DIC) . . . . . . . . . . . . . . . . . . . . . . . 127
Driver Mode Control . . . . . . . . . . . . . . . . 198Driver Mode Control Light . . . . . . . . . 124DrivingAssistance Systems . . . . . . . . . . . . . . . 220Better Fuel Economy . . . . . . . . . . . . . 161Characteristics andTowing Tips . . . . . . . . . . . . . . . . . . . . . 237
Defensive . . . . . . . . . . . . . . . . . . . . . . . . . . 162Drunk . . . . . . . . . . . . . . . . . . . . . . . . . . . . . . 162Hill and Mountain Roads . . . . . . . . 170If the Vehicle is Stuck . . . . . . . . . . . . 172Loss of Control . . . . . . . . . . . . . . . . . . . . 164Off-Road . . . . . . . . . . . . . . . . . . . . . . . . . . . 165
Cadillac XT5 Owner Manual (GMNA-Localizing-U.S./Canada/Mexico-13527534) - 2020 - CRC - 5/29/19
380 INDEX
Driving (cont'd)Off-Road Recovery . . . . . . . . . . . . . . . . 164Vehicle Load Limits . . . . . . . . . . . . . . 172Wet Roads . . . . . . . . . . . . . . . . . . . . . . . . . 169Winter . . . . . . . . . . . . . . . . . . . . . . . . . . . . . 170
Dual Automatic ClimateControl System . . . . . . . . . . . . . . . . . . . . 151
EElectric Brake Boost . . . . . . . . . . . . . . . . 193Electric Parking Brake . . . . . . . . . . . . . . 194Electric Parking Brake Light . . . . . . . 121Electrical Equipment, Add-On . . . . . 249Electrical SystemEngine Compartment FuseBlock . . . . . . . . . . . . . . . . . . . . . . . . . . . . . 278
Fuses and Circuit Breakers . . . . . . . 277Instrument Panel Fuse Block . . . . 281Overload . . . . . . . . . . . . . . . . . . . . . . . . . . . 277Rear Compartment FuseBlock . . . . . . . . . . . . . . . . . . . . . . . . . . . . . 283
EmergencyOnStar . . . . . . . . . . . . . . . . . . . . . . . . . . . . . 368
EngineAir Cleaner/Filter . . . . . . . . . . . . . . . . . 262Check Light (MalfunctionIndicator) . . . . . . . . . . . . . . . . . . . . . . . . 118
Compartment Overview . . . . . . . . . . 255
Engine (cont'd)Coolant Temperature Gauge . . . . . 115Coolant TemperatureWarning Light . . . . . . . . . . . . . . . . . . . 124
Cooling System . . . . . . . . . . . . . . . . . . . 264Drive Belt Routing . . . . . . . . . . . . . . . . 352Exhaust . . . . . . . . . . . . . . . . . . . . . . . . . . . . 185Heater . . . . . . . . . . . . . . . . . . . . . . . . . . . . . 180Oil Life System . . . . . . . . . . . . . . . . . . . . 260Oil Pressure Light . . . . . . . . . . . . . . . . . 125Overheating . . . . . . . . . . . . . . . . . . . . . . . 268Power Messages . . . . . . . . . . . . . . . . . . 134Running While Parked . . . . . . . . . . . 186Starting . . . . . . . . . . . . . . . . . . . . . . . . . . . . 178
Engine Air Filter Life System . . . . . . 262Entry Lighting . . . . . . . . . . . . . . . . . . . . . . 149Equipment, Towing . . . . . . . . . . . . . . . . . 244Event Data Recorders . . . . . . . . . . . . . . 365Exit Lighting . . . . . . . . . . . . . . . . . . . . . . . . 149Extended Parking . . . . . . . . . . . . . . . . . . . 185Extender, Seat Belt . . . . . . . . . . . . . . . . . . 62Exterior Lamp Controls . . . . . . . . . . . . 143Exterior Lamps Off Reminder . . . . . . 145Exterior Lighting Battery Saver . . . . 149
FFilter,Engine Air Cleaner . . . . . . . . . . . . . . . . 262
Flash-to-Pass . . . . . . . . . . . . . . . . . . . . . . . . 145Flashers, Hazard Warning . . . . . . . . . . 146Flat Tire . . . . . . . . . . . . . . . . . . . . . . . . . . . . . 306Changing . . . . . . . . . . . . . . . . . . . . . . . . . . 314
Floor Mats . . . . . . . . . . . . . . . . . . . . . . . . . . . 333FluidAutomatic Transmission . . . . . . . . . 261Brakes . . . . . . . . . . . . . . . . . . . . . . . . . . . . . 270Washer . . . . . . . . . . . . . . . . . . . . . . . . . . . . 269
Folding Mirrors . . . . . . . . . . . . . . . . . . . . . . 35Forward Collision Alert (FCA)System . . . . . . . . . . . . . . . . . . . . . . . . . . . . . 220
Frequency StatementRadio . . . . . . . . . . . . . . . . . . . . . . . . . . . . . . 363
Front Pedestrian Braking (FPB)System . . . . . . . . . . . . . . . . . . . . . . . . . . . . . 224
Front SeatsAdjustment . . . . . . . . . . . . . . . . . . . . . . . . . .46Heated and Ventilated . . . . . . . . . . . . .51
FuelAdditives . . . . . . . . . . . . . . . . . . . . . . . . . . 234Economy, Driving for Better . . . . . 161Filling a Portable FuelContainer . . . . . . . . . . . . . . . . . . . . . . . . 236
Filling the Tank . . . . . . . . . . . . . . . . . . . 235Foreign Countries . . . . . . . . . . . . . . . . . 234Gauge . . . . . . . . . . . . . . . . . . . . . . . . . . . . . . 115Low Fuel Warning Light . . . . . . . . . 126

Cadillac XT5 Owner Manual (GMNA-Localizing-U.S./Canada/Mexico-13527534) - 2020 - CRC - 5/29/19
INDEX 381
Fuel (cont'd)Management, Active . . . . . . . . . . . . . . 184Prohibited Fuels . . . . . . . . . . . . . . . . . . 234Recommended . . . . . . . . . . . . . . . 233, 234Top Tier . . . . . . . . . . . . . . . . . . . . . . . . . . . 233
FusesEngine Compartment FuseBlock . . . . . . . . . . . . . . . . . . . . . . . . . . . . . 278
Fuses and Circuit Breakers . . . . . . . 277Instrument Panel Fuse Block . . . . 281Rear Compartment FuseBlock . . . . . . . . . . . . . . . . . . . . . . . . . . . . . 283
GGarage Door Opener . . . . . . . . . . . . . . . . 140Programming . . . . . . . . . . . . . . . . . . . . . . 140
Gas Strut(s) . . . . . . . . . . . . . . . . . . . . . . . . . 274GaugesEngine Coolant Temperature . . . . 115Fuel . . . . . . . . . . . . . . . . . . . . . . . . . . . . . . . . 115Odometer . . . . . . . . . . . . . . . . . . . . . . . . . . 114Speedometer . . . . . . . . . . . . . . . . . . . . . . 114Tachometer . . . . . . . . . . . . . . . . . . . . . . . 114Trip Odometer . . . . . . . . . . . . . . . . . . . . 114Warning Lights andIndicators . . . . . . . . . . . . . . . . . . . . . . . . 110
Gear Shifting Light . . . . . . . . . . . . . . . . . 122
General InformationService and Maintenance . . . . . . . . 335Towing . . . . . . . . . . . . . . . . . . . . . . . . . . . . 237Vehicle Care . . . . . . . . . . . . . . . . . . . . . . . 251
Glove Box . . . . . . . . . . . . . . . . . . . . . . . . . . . . 95GM Mobility ReimbursementProgram . . . . . . . . . . . . . . . . . . . . . . . . . . . . 356
HHalogen Bulbs . . . . . . . . . . . . . . . . . . . . . . 276Hazard Warning Flashers . . . . . . . . . . 146Head Restraints . . . . . . . . . . . . . . . . . . . . . . 45Head-up Display . . . . . . . . . . . . . . . . . . . . 130HeadlampsAiming . . . . . . . . . . . . . . . . . . . . . . . . . . . . . 276Automatic . . . . . . . . . . . . . . . . . . . . . . . . . 145Bulb Replacement . . . . . . . . . . . . . . . . 276Daytime RunningLamps (DRL) . . . . . . . . . . . . . . . . . . . . 145
Flash-to-Pass . . . . . . . . . . . . . . . . . . . . . . 145High-Beam On Light . . . . . . . . . . . . . . 126High/Low Beam Changer . . . . . . . . . 145Lamps On Reminder . . . . . . . . . . . . . . 126
HeatedRear Seats . . . . . . . . . . . . . . . . . . . . . . . . . . .55Steering Wheel . . . . . . . . . . . . . . . . . . . . 103
Heated and Ventilated FrontSeats . . . . . . . . . . . . . . . . . . . . . . . . . . . . . . . . 51
Heated Mirrors . . . . . . . . . . . . . . . . . . . . . . . 36HeaterEngine . . . . . . . . . . . . . . . . . . . . . . . . . . . . . 180
Heating . . . . . . . . . . . . . . . . . . . . . . . . .151, 156High-Beam On Light . . . . . . . . . . . . . . . . 126High-Speed Operation . . . . . . . . . . . . . . 294Hill and Mountain Roads . . . . . . . . . . 170Hill Start Assist (HSA) . . . . . . . . . . . . . 195Hood . . . . . . . . . . . . . . . . . . . . . . . . . . . . . . . . . 253Horn . . . . . . . . . . . . . . . . . . . . . . . . . . . . . . . . . 103How to Wear Seat Belts Properly . . . 57HVAC . . . . . . . . . . . . . . . . . . . . . . . . . . .151, 156
IIgnition Positions . . . . . . . . . . . . . . . . . . . 176Immobilizer . . . . . . . . . . . . . . . . . . . . . . . . . . 33IndicatorPedestrian Ahead . . . . . . . . . . . . . . . . . 123Vehicle Ahead . . . . . . . . . . . . . . . . . . . . . 122
Infants and Young Children,Restraints . . . . . . . . . . . . . . . . . . . . . . . . . . . 77
InformationPublication Ordering . . . . . . . . . . . . . 362
Infotainment . . . . . . . . . . . . . . . . . . . . . . . . 150Infotainment System . . . . . . . . . . . . . . . 366Instrument Cluster . . . . . . . . . . . . . . . . . 111Instrument Panel Overview . . . . . . . . . . .5Interior Rearview Mirrors . . . . . . . . . . . 37
Cadillac XT5 Owner Manual (GMNA-Localizing-U.S./Canada/Mexico-13527534) - 2020 - CRC - 5/29/19
382 INDEX
Introduction . . . . . . . . . . . . . . . . . . . . . . . . . . . .2
JJump Starting - North America . . . . 320
KKeyless EntryRemote (RKE) System . . . . . . . . . . . . . .10
Keys . . . . . . . . . . . . . . . . . . . . . . . . . . . . . . . . . . . .9
LLabeling, Tire Sidewall . . . . . . . . . . . . . 287LampsCornering . . . . . . . . . . . . . . . . . . . . . . . . . . 147Courtesy . . . . . . . . . . . . . . . . . . . . . . . . . . . 148Daytime Running (DRL) . . . . . . . . . . 145Dome . . . . . . . . . . . . . . . . . . . . . . . . . . . . . . 148Exterior Controls . . . . . . . . . . . . . . . . . . 143Exterior Lamps Off Reminder . . . . 145Exterior Lighting BatterySaver . . . . . . . . . . . . . . . . . . . . . . . . . . . . . 149
Malfunction Indicator (CheckEngine) . . . . . . . . . . . . . . . . . . . . . . . . . . 118
On Reminder . . . . . . . . . . . . . . . . . . . . . . 126Reading . . . . . . . . . . . . . . . . . . . . . . . . . . . . 148
Lane Change Alert (LCA) . . . . . . . . . . . 229Lane Keep Assist (LKA) . . . . . . . . . . . . 231Lane Keep Assist Light . . . . . . . . . . . . . 122Lap-Shoulder Belt . . . . . . . . . . . . . . . . . . . . 59
LATCH SystemReplacing Parts after a Crash . . . . . .89
LATCH, Lower Anchors andTethers for Children . . . . . . . . . . . . . . . 83
LED Lighting . . . . . . . . . . . . . . . . . . . . . . . . 276Liftgate . . . . . . . . . . . . . . . . . . . . . . . . . . . . . . . 23LightingEntry . . . . . . . . . . . . . . . . . . . . . . . . . . . . . . 149Exit . . . . . . . . . . . . . . . . . . . . . . . . . . . . . . . . 149Illumination Control . . . . . . . . . . . . . . 147LED . . . . . . . . . . . . . . . . . . . . . . . . . . . . . . . . 276
LightsAirbag Readiness . . . . . . . . . . . . . . . . . 117All-Wheel Drive . . . . . . . . . . . . . . . . . . . 122Antilock Brake System (ABS)Warning . . . . . . . . . . . . . . . . . . . . . . . . . 121
Brake System Warning . . . . . . . . . . . 120Charging System . . . . . . . . . . . . . . . . . . 118Check Engine (MalfunctionIndicator) . . . . . . . . . . . . . . . . . . . . . . . . 118
Cruise Control . . . . . . . . . . . . . . . . . . . . . 127Door Ajar . . . . . . . . . . . . . . . . . . . . . . . . . . 127Driver Mode Control . . . . . . . . . . . . . . 124Electric Parking Brake . . . . . . . . . . . . 121Engine Coolant TemperatureWarning . . . . . . . . . . . . . . . . . . . . . . . . . 124
Engine Oil Pressure . . . . . . . . . . . . . . . 125Flash-to-Pass . . . . . . . . . . . . . . . . . . . . . . 145
Lights (cont'd)Gear Shifting . . . . . . . . . . . . . . . . . . . . . . 122High-Beam On . . . . . . . . . . . . . . . . . . . . 126High/Low Beam Changer . . . . . . . . . 145Lane Keep Assist . . . . . . . . . . . . . . . . . . 122Low Fuel Warning . . . . . . . . . . . . . . . . 126Seat Belt Reminders . . . . . . . . . . . . . . 116Security . . . . . . . . . . . . . . . . . . . . . . . . . . . . 126Service Electric Parking Brake . . . 121StabiliTrak OFF . . . . . . . . . . . . . . . . . . . 123Tire Pressure . . . . . . . . . . . . . . . . . . . . . . 125Traction Control System(TCS)/StabiliTrak . . . . . . . . . . . . . . . . 124
Traction Off . . . . . . . . . . . . . . . . . . . . . . . 123LockSteering Column . . . . . . . . . . . . . . . . . . . .32
LocksAutomatic Door . . . . . . . . . . . . . . . . . . . . .21Delayed Locking . . . . . . . . . . . . . . . . . . . .21Door . . . . . . . . . . . . . . . . . . . . . . . . . . . . . . . . .18Lockout Protection . . . . . . . . . . . . . . . . .22Power Door . . . . . . . . . . . . . . . . . . . . . . . . . .21Safety . . . . . . . . . . . . . . . . . . . . . . . . . . . . . . . .22
Loss of Control . . . . . . . . . . . . . . . . . . . . . . 164Low Fuel Warning Light . . . . . . . . . . . 126Lower Anchors and Tethers forChildren (LATCH System) . . . . . . . . . 83
Lumbar Adjustment . . . . . . . . . . . . . . . . . 47

Cadillac XT5 Owner Manual (GMNA-Localizing-U.S./Canada/Mexico-13527534) - 2020 - CRC - 5/29/19
INDEX 383
Lumbar Adjustment (cont'd)Front Seats . . . . . . . . . . . . . . . . . . . . . . . . . .47
MMaintenanceRecords . . . . . . . . . . . . . . . . . . . . . . . . . . . . 348
Maintenance and CareAdditional . . . . . . . . . . . . . . . . . . . . . . . . . 343
Maintenance Schedule . . . . . . . . . . . . . 337Recommended Fluids andLubricants . . . . . . . . . . . . . . . . . . . . . . . 346
Malfunction Indicator Lamp . . . . . . . 118Manual Mode . . . . . . . . . . . . . . . . . . . . . . . 191Memory Seats . . . . . . . . . . . . . . . . . . . . . . . . 48MessagesEngine Power . . . . . . . . . . . . . . . . . . . . . 134Vehicle . . . . . . . . . . . . . . . . . . . . . . . . . . . . . 133Vehicle Speed . . . . . . . . . . . . . . . . . . . . . 134
MirrorRear Camera . . . . . . . . . . . . . . . . . . . . . . . .37
MirrorsAutomatic Dimming . . . . . . . . . . . . . . . .36Automatic Dimming Rearview . . . . .37Convex . . . . . . . . . . . . . . . . . . . . . . . . . . . . . . .34Folding . . . . . . . . . . . . . . . . . . . . . . . . . . . . . .35Heated . . . . . . . . . . . . . . . . . . . . . . . . . . . . . . .36Manual Rearview . . . . . . . . . . . . . . . . . . .37Power . . . . . . . . . . . . . . . . . . . . . . . . . . . . . . . .35
Mirrors (cont'd)Tilt in Reverse . . . . . . . . . . . . . . . . . . . . . .36
Mirrors, Interior Rearview . . . . . . . . . . . 37Mode . . . . . . . . . . . . . . . . . . . . . . . . . . . . . . . . 198Driver Control . . . . . . . . . . . . . . . . . . . . . 198
Monitor System, Tire Pressure . . . . . 294
NNavigationConnected Services . . . . . . . . . . . . . . . 374
Net, Convenience . . . . . . . . . . . . . . . . . . . 100New Vehicle Break-In . . . . . . . . . . . . . . . 176Night Vision System . . . . . . . . . . . . . . . . 226
OOdometer . . . . . . . . . . . . . . . . . . . . . . . . . . . . 114Trip . . . . . . . . . . . . . . . . . . . . . . . . . . . . . . . . 114
Off-Road . . . . . . . . . . . . . . . . . . . . . . . . . . . . . 165Driving . . . . . . . . . . . . . . . . . . . . . . . . . . . . 165Recovery . . . . . . . . . . . . . . . . . . . . . . . . . . . 164
OilEngine . . . . . . . . . . . . . . . . . . . . . . . . . . . . . 258Engine Oil Life System . . . . . . . . . . . 260Pressure Light . . . . . . . . . . . . . . . . . . . . . 125
Older Children, Restraints . . . . . . . . . . . 76Online Owner Center . . . . . . . . . . . . . . . 356OnStar . . . . . . . . . . . . . . . . . . . . . . . . . . . . . . . 366OnStar Additional Information . . . . 369OnStar Emergency . . . . . . . . . . . . . . . . . . 368
OnStar Overview . . . . . . . . . . . . . . . . . . . . 367OnStar Security . . . . . . . . . . . . . . . . . . . . . 368OutletsPower . . . . . . . . . . . . . . . . . . . . . . . . . . . . . . 107
Overheating, Engine . . . . . . . . . . . . . . . . 268OverviewInstrument Panel . . . . . . . . . . . . . . . . . . . . 5
PParkShifting Out of . . . . . . . . . . . . . . . . . . . . 182
Park Assist . . . . . . . . . . . . . . . . . . . . . . . . . . 211ParkingBrake and P (Park)Mechanism Check . . . . . . . . . . . . . . . 273
Extended . . . . . . . . . . . . . . . . . . . . . . . . . . 185Over Things That Burn . . . . . . . . . . . 184
Parking or BackingAssistance Systems . . . . . . . . . . . . . . . 211
Passenger Airbag StatusIndicator . . . . . . . . . . . . . . . . . . . . . . . . . . . 117
Passenger Compartment AirFilter . . . . . . . . . . . . . . . . . . . . . . . . . . . . . . . 159
Passenger Sensing System . . . . . . . . . . 70Pedestrian Ahead Indicator . . . . . . . . 123Perchlorate MaterialsRequirements, California . . . . . . . . . 252

Cadillac XT5 Owner Manual (GMNA-Localizing-U.S./Canada/Mexico-13527534) - 2020 - CRC - 5/29/19
384 INDEX
PersonalizationVehicle . . . . . . . . . . . . . . . . . . . . . . . . . . . . . 134
PowerDoor Locks . . . . . . . . . . . . . . . . . . . . . . . . . .21Mirrors . . . . . . . . . . . . . . . . . . . . . . . . . . . . . .35Outlets . . . . . . . . . . . . . . . . . . . . . . . . . . . . . 107Protection, Battery . . . . . . . . . . . . . . . . 149Retained Accessory (RAP) . . . . . . . . 182Windows . . . . . . . . . . . . . . . . . . . . . . . . . . . .40
Pregnancy, Using Seat Belts . . . . . . . . . 62PrivacyVehicle Data Recording . . . . . . . . . . 364
ProgramCourtesy Transportation . . . . . . . . . 359
Prohibited Fuels . . . . . . . . . . . . . . . . . . . . 234Proposition65 Warning,California . . . . . . . . . . . . . . .251, 271, 320,
Back CoverPublication OrderingInformation . . . . . . . . . . . . . . . . . . . . . . . . 362
RRadio Frequency Statement . . . . . . . . 363Reading Lamps . . . . . . . . . . . . . . . . . . . . . 148Rear Camera Mirror . . . . . . . . . . . . . . . . . 37Rear Climate Control System . . . . . . 156Rear Pedestrian Alert . . . . . . . . . . . . . . . 219
Rear Seat Armrest . . . . . . . . . . . . . . . . . . . 55Rear Seats . . . . . . . . . . . . . . . . . . . . . . . . . . . . 52Heated . . . . . . . . . . . . . . . . . . . . . . . . . . . . . . .55
Rear Storage . . . . . . . . . . . . . . . . . . . . . . . . . 96Rear Vision Camera (RVC) . . . . . . . . . 211Rear Window Washer/Wiper . . . . . . . 106Rearview Mirrors . . . . . . . . . . . . . . . . . . . . 37Automatic Dimming . . . . . . . . . . . . . . . .37
Reclining Seatbacks . . . . . . . . . . . . . . . . . 47RecommendedFuel . . . . . . . . . . . . . . . . . . . . . . . . . . . 233, 234
Recommended Fluids andLubricants . . . . . . . . . . . . . . . . . . . . . . . . . 346
RecordsMaintenance . . . . . . . . . . . . . . . . . . . . . . 348
Recreational Vehicle Towing . . . . . . . 324Reimbursement Program, GMMobility . . . . . . . . . . . . . . . . . . . . . . . . . . . . 356
Remote Keyless Entry (RKE)System . . . . . . . . . . . . . . . . . . . . . . . . . . . . . . 10
Remote Vehicle Start . . . . . . . . . . . . . . . . 17Replacement PartsAirbags . . . . . . . . . . . . . . . . . . . . . . . . . . . . . .75Maintenance . . . . . . . . . . . . . . . . . . . . . . 347
Replacing Airbag System . . . . . . . . . . . . 75Replacing LATCH System Partsafter a Crash . . . . . . . . . . . . . . . . . . . . . . . . 89
Replacing Seat Belt SystemParts after a Crash . . . . . . . . . . . . . . . . . 63
Reporting Safety DefectsCanadian Government . . . . . . . . . . . . 364General Motors . . . . . . . . . . . . . . . . . . . 364U.S. Government . . . . . . . . . . . . . . . . . . 363
RestraintsWhere to Put . . . . . . . . . . . . . . . . . . . . . . . .81
Retained AccessoryPower (RAP) . . . . . . . . . . . . . . . . . . . . . . . 182
Reverse Tilt Mirrors . . . . . . . . . . . . . . . . . 36RoadsDriving, Wet . . . . . . . . . . . . . . . . . . . . . . . 169
Roadside Service . . . . . . . . . . . . . . . . . . . . 357RoofSunroof . . . . . . . . . . . . . . . . . . . . . . . . . . . . . .42
Roof Rack System . . . . . . . . . . . . . . . . . . 101Rotation, Tires . . . . . . . . . . . . . . . . . . . . . . 299Routing, Engine Drive Belt . . . . . . . . . 352Running the Vehicle WhileParked . . . . . . . . . . . . . . . . . . . . . . . . . . . . . 186
SSafety Defects ReportingCanadian Government . . . . . . . . . . . . 364General Motors . . . . . . . . . . . . . . . . . . . 364
Cadillac XT5 Owner Manual (GMNA-Localizing-U.S./Canada/Mexico-13527534) - 2020 - CRC - 5/29/19
INDEX 385
Safety Defects Reporting (cont'd)U.S. Government . . . . . . . . . . . . . . . . . . 363
Safety Locks . . . . . . . . . . . . . . . . . . . . . . . . . . 22Safety System Check . . . . . . . . . . . . . . . . 62Scheduling Appointments . . . . . . . . . . 358Sealant Kit, Tire . . . . . . . . . . . . . . . . . . . . . 307Seat Belts . . . . . . . . . . . . . . . . . . . . . . . . . . . . . 56Care . . . . . . . . . . . . . . . . . . . . . . . . . . . . . . . . . .63Extender . . . . . . . . . . . . . . . . . . . . . . . . . . . . .62How to Wear Seat BeltsProperly . . . . . . . . . . . . . . . . . . . . . . . . . . . .57
Lap-Shoulder Belt . . . . . . . . . . . . . . . . . . .59Reminders . . . . . . . . . . . . . . . . . . . . . . . . . 116Replacing after a Crash . . . . . . . . . . . . .63Use During Pregnancy . . . . . . . . . . . . . .62
SeatsAdjustment, Front . . . . . . . . . . . . . . . . . .46Head Restraints . . . . . . . . . . . . . . . . . . . . .45Heated and Ventilated Front . . . . . . .51Heated, Rear . . . . . . . . . . . . . . . . . . . . . . . .55Lumbar Adjustment, Front . . . . . . . . .47Memory . . . . . . . . . . . . . . . . . . . . . . . . . . . . .48Rear . . . . . . . . . . . . . . . . . . . . . . . . . . . . . . . . . .52Reclining Seatbacks . . . . . . . . . . . . . . . .47
Securing Child Restraints . . . . . . . 89, 91SecurityLight . . . . . . . . . . . . . . . . . . . . . . . . . . . . . . . 126OnStar . . . . . . . . . . . . . . . . . . . . . . . . . . . . . 368
Security (cont'd)Vehicle . . . . . . . . . . . . . . . . . . . . . . . . . . . . . . .31Vehicle Alarm . . . . . . . . . . . . . . . . . . . . . . .31
Service . . . . . . . . . . . . . . . . . . . . . . . . . . . . . . . 159Accessories andModifications . . . . . . . . . . . . . . . . . . . . 252
Doing Your Own Work . . . . . . . . . . . 252Maintenance Records . . . . . . . . . . . . 348Maintenance, GeneralInformation . . . . . . . . . . . . . . . . . . . . . . 335
Parts Identification . . . . . . . . . . . . . . . 349Scheduling Appointments . . . . . . . . 358
Service Electric Parking BrakeLight . . . . . . . . . . . . . . . . . . . . . . . . . . . . . . . 121
ServicesSpecial Application . . . . . . . . . . . . . . . 342
Servicing the Airbag . . . . . . . . . . . . . . . . . 74ShiftingInto Park . . . . . . . . . . . . . . . . . . . . . . . . . . 182Out of Park . . . . . . . . . . . . . . . . . . . . . . . . 182
Side Blind Zone Alert (SBZA) . . . . . . 229Signals, Turn and Lane-Change . . . . 147Spare TireCompact . . . . . . . . . . . . . . . . . . . . . . . . . . . 319
Special Application Services . . . . . . . 342Specifications and Capacities . . . . . . 350Speedometer . . . . . . . . . . . . . . . . . . . . . . . . 114
StabiliTrakOFF Light . . . . . . . . . . . . . . . . . . . . . . . . . . 123
Start Assist, Hill . . . . . . . . . . . . . . . . . . . . 195Start Vehicle, Remote . . . . . . . . . . . . . . . 17Starter Switch Check . . . . . . . . . . . . . . . 272Starting the Engine . . . . . . . . . . . . . . . . . 178Steering . . . . . . . . . . . . . . . . . . . . . . . . . . . . . . 163Heated Wheel . . . . . . . . . . . . . . . . . . . . . 103Wheel Adjustment . . . . . . . . . . . . . . . . 103Wheel Controls . . . . . . . . . . . . . . . . . . . 103
Steering Column Lock . . . . . . . . . . . . . . . 32Stop/Start System . . . . . . . . . . . . . . . . . . 179StorageRear . . . . . . . . . . . . . . . . . . . . . . . . . . . . . . . . . .96
Storage AreasArmrest . . . . . . . . . . . . . . . . . . . . . . . . . . . . . .96Cargo Cover . . . . . . . . . . . . . . . . . . . . . . . . .98Cargo Management System . . . . . . . .99Center Console . . . . . . . . . . . . . . . . . . . . . .97Convenience Net . . . . . . . . . . . . . . . . . . 100Glove Box . . . . . . . . . . . . . . . . . . . . . . . . . . .95Roof Rack System . . . . . . . . . . . . . . . . 101Sunglasses . . . . . . . . . . . . . . . . . . . . . . . . . . .96
Storage Compartments . . . . . . . . . . . . . . 95Storing the Tire Sealant andCompressor Kit . . . . . . . . . . . . . . . . . . . . 314
StrutsGas . . . . . . . . . . . . . . . . . . . . . . . . . . . . . . . . . 274

Cadillac XT5 Owner Manual (GMNA-Localizing-U.S./Canada/Mexico-13527534) - 2020 - CRC - 5/29/19
386 INDEX
Stuck Vehicle . . . . . . . . . . . . . . . . . . . . . . . 172Summer Tires . . . . . . . . . . . . . . . . . . . . . . . 287Sun Visors . . . . . . . . . . . . . . . . . . . . . . . . . . . . 41Sunglass Storage . . . . . . . . . . . . . . . . . . . . . 96Sunroof . . . . . . . . . . . . . . . . . . . . . . . . . . . . . . . 42Symbols . . . . . . . . . . . . . . . . . . . . . . . . . . . . . . . .3SystemEngine Air Filter Life . . . . . . . . . . . . . 262Forward Collision Alert (FCA) . . . . 220Infotainment . . . . . . . . . . . . . . . . . 150, 366Night Vision . . . . . . . . . . . . . . . . . . . . . . . 226Roof Rack . . . . . . . . . . . . . . . . . . . . . . . . . 101
SystemsDriver Assistance . . . . . . . . . . . . . . . . . 210
TTachometer . . . . . . . . . . . . . . . . . . . . . . . . . 114Text Telephone (TTY) Users . . . . . . . 355Theft-Deterrent Systems . . . . . . . . . . . . 33Immobilizer . . . . . . . . . . . . . . . . . . . . . . . . .33
Time . . . . . . . . . . . . . . . . . . . . . . . . . . . . . . . . . 107Tires . . . . . . . . . . . . . . . . . . . . . . . . . . . . . . . . . 285All-Season . . . . . . . . . . . . . . . . . . . . . . . . . 286Buying New Tires . . . . . . . . . . . . . . . . . 301Chains . . . . . . . . . . . . . . . . . . . . . . . . . . . . . 305Changing . . . . . . . . . . . . . . . . . . . . . . . . . . 314Compact Spare . . . . . . . . . . . . . . . . . . . . 319Designations . . . . . . . . . . . . . . . . . . . . . . 289
Tires (cont'd)Different Size . . . . . . . . . . . . . . . . . . . . . . 302If a Tire Goes Flat . . . . . . . . . . . . . . . . 306Inspection . . . . . . . . . . . . . . . . . . . . . . . . . 299Pressure . . . . . . . . . . . . . . . . . . . . . . 292, 294Pressure Light . . . . . . . . . . . . . . . . . . . . . 125Pressure Monitor Operation . . . . . . 295Pressure Monitor System . . . . . . . . 294Rotation . . . . . . . . . . . . . . . . . . . . . . . . . . . 299Sealant and Compressor Kit . . . . . 307Sealant and Compressor Kit,Storing . . . . . . . . . . . . . . . . . . . . . . . . . . . 314
Sidewall Labeling . . . . . . . . . . . . . . . . . 287Terminology and Definitions . . . . 290Uniform Tire Quality Grading . . . . 303Wheel Alignment and TireBalance . . . . . . . . . . . . . . . . . . . . . . . . . . 304
Wheel Replacement . . . . . . . . . . . . . . 304When It Is Time for NewTires . . . . . . . . . . . . . . . . . . . . . . . . . . . . . 300
Winter . . . . . . . . . . . . . . . . . . . . . . . . . . . . . 286Top Tier Fuel . . . . . . . . . . . . . . . . . . . . . . . . 233TowingDriving Characteristics . . . . . . . . . . . 237Equipment . . . . . . . . . . . . . . . . . . . . . . . . 244General Information . . . . . . . . . . . . . . 237Recreational Vehicle . . . . . . . . . . . . . . 324Trailer . . . . . . . . . . . . . . . . . . . . . . . . . . . . . 241
Towing (cont'd)Trailer Sway Control (TSC) . . . . . . . 247Vehicle . . . . . . . . . . . . . . . . . . . . . . . . . . . . . 323
TractionControl System(TCS)/StabiliTrak Light . . . . . . . . . 124
Off Light . . . . . . . . . . . . . . . . . . . . . . . . . . . 123Traction Control/ElectronicStability Control . . . . . . . . . . . . . . . . . . . 196
TrailerSway Control (TSC) . . . . . . . . . . . . . . . 247Towing . . . . . . . . . . . . . . . . . . . . . . . . . . . . 241
TransmissionAutomatic . . . . . . . . . . . . . . . . . . . . . . . . . 186Fluid, Automatic . . . . . . . . . . . . . . . . . . 261
Transportation Program,Courtesy . . . . . . . . . . . . . . . . . . . . . . . . . . . 359
Trip Odometer . . . . . . . . . . . . . . . . . . . . . . 114Turn and Lane-Change Signals . . . . 147
UUniform Tire Quality Grading . . . . . . 303Universal Remote System . . . . . . . . . . 140Operation . . . . . . . . . . . . . . . . . . . . . . . . . . 142Programming . . . . . . . . . . . . . . . . . . . . . . 140
Using This Manual . . . . . . . . . . . . . . . . . . . .2
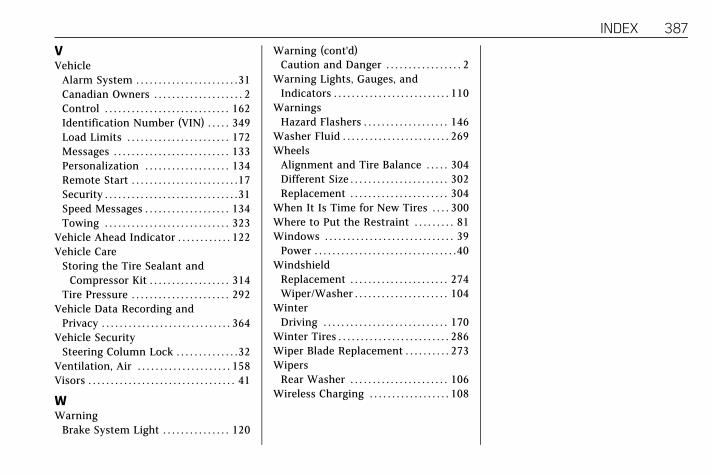
Cadillac XT5 Owner Manual (GMNA-Localizing-U.S./Canada/Mexico-13527534) - 2020 - CRC - 5/29/19
INDEX 387
VVehicleAlarm System . . . . . . . . . . . . . . . . . . . . . . .31Canadian Owners . . . . . . . . . . . . . . . . . . . . 2Control . . . . . . . . . . . . . . . . . . . . . . . . . . . . 162Identification Number (VIN) . . . . . 349Load Limits . . . . . . . . . . . . . . . . . . . . . . . 172Messages . . . . . . . . . . . . . . . . . . . . . . . . . . 133Personalization . . . . . . . . . . . . . . . . . . . 134Remote Start . . . . . . . . . . . . . . . . . . . . . . . .17Security . . . . . . . . . . . . . . . . . . . . . . . . . . . . . .31Speed Messages . . . . . . . . . . . . . . . . . . . 134Towing . . . . . . . . . . . . . . . . . . . . . . . . . . . . 323
Vehicle Ahead Indicator . . . . . . . . . . . . 122Vehicle CareStoring the Tire Sealant andCompressor Kit . . . . . . . . . . . . . . . . . . 314
Tire Pressure . . . . . . . . . . . . . . . . . . . . . . 292Vehicle Data Recording andPrivacy . . . . . . . . . . . . . . . . . . . . . . . . . . . . . 364
Vehicle SecuritySteering Column Lock . . . . . . . . . . . . . .32
Ventilation, Air . . . . . . . . . . . . . . . . . . . . . 158Visors . . . . . . . . . . . . . . . . . . . . . . . . . . . . . . . . . 41
WWarningBrake System Light . . . . . . . . . . . . . . . 120
Warning (cont'd)Caution and Danger . . . . . . . . . . . . . . . . . 2
Warning Lights, Gauges, andIndicators . . . . . . . . . . . . . . . . . . . . . . . . . . 110
WarningsHazard Flashers . . . . . . . . . . . . . . . . . . . 146
Washer Fluid . . . . . . . . . . . . . . . . . . . . . . . . 269WheelsAlignment and Tire Balance . . . . . 304Different Size . . . . . . . . . . . . . . . . . . . . . . 302Replacement . . . . . . . . . . . . . . . . . . . . . . 304
When It Is Time for New Tires . . . . 300Where to Put the Restraint . . . . . . . . . 81Windows . . . . . . . . . . . . . . . . . . . . . . . . . . . . . 39Power . . . . . . . . . . . . . . . . . . . . . . . . . . . . . . . .40
WindshieldReplacement . . . . . . . . . . . . . . . . . . . . . . 274Wiper/Washer . . . . . . . . . . . . . . . . . . . . . 104
WinterDriving . . . . . . . . . . . . . . . . . . . . . . . . . . . . 170
Winter Tires . . . . . . . . . . . . . . . . . . . . . . . . . 286Wiper Blade Replacement . . . . . . . . . . 273WipersRear Washer . . . . . . . . . . . . . . . . . . . . . . 106
Wireless Charging . . . . . . . . . . . . . . . . . . 108
2020
XT5
XT5
84290261 A
C
M
Y
CM
MY
CY
CMY
K
20_CAD_XT5_COV_en_US_84290261A_2019JUN07.ai 1 4/18/2019 11:39:34 AM20_CAD_XT5_COV_en_US_84290261A_2019JUN07.ai 1 4/18/2019 11:39:34 AM