marketo lead management app: installation and synchronization
TRANSCRIPT

MARKETO LEAD MANAGEMENT APP INSTALLATION AND SYNCHRONIZATION WITH SALESFORCE
Installation Guide Version 1.2

© 2011 Marketo, Inc. All rights reserved. Version 1.2 1
CONTENTS
INSTALLATION AND SYNCHRONIZATION OVERVIEW ..................................................................... 2
STEP 1: SET UP REQUIRED PERMISSIONS IN SALESFORCE .............................................................. 3
Create a Profile with Required Permissions ................................................................................ 3
Required Permissions for Marketo Synchronization ............................................................... 4
Create a Dedicated Salesforce User Account .............................................................................. 5
Get a Security Token .................................................................................................................... 6
Block Unneeded Fields from Synchronization with Marketo ...................................................... 7
STEP 2: INSTALL THE MARKETO LEAD MANAGEMENT APP FROM THE APPEXCHANGE ................ 8
Install the Marketo App from the AppExchange ......................................................................... 8
Map Marketo Lead Fields to Corresponding Salesforce Contact Fields .................................... 12
PRO: Display Marketo Lead Fields on Salesforce Lead and Contact Detail Pages .................... 14
PRO: Display Marketo Lead Fields on Salesforce Lead Detail Pages...................................... 15
PRO: Display Marketo Lead Fields on Salesforce Contact Detail Pages ................................. 17
STEP 3: SYNCHRONIZE MARKETO AND SALESFORCE .................................................................... 19
STEP 4: VERIFY THE SYNC .............................................................................................................. 24
OPTIONAL STEPS (SYNC ACTIVITIES) ............................................................................................. 24

© 2011 Marketo, Inc. All rights reserved. Version 1.2 2
INSTALLATION AND SYNCHRONIZATION OVERVIEW
Congratulations! Your organization is now subscribing to Marketo Lead Management. Marketo
Lead Management gives Marketers the power and flexibility to automate demand generation
campaigns and deliver high quality leads with less effort.
Marketo’s robust, bi-directional integration with Salesforce.com keeps both Marketo and
Salesforce in sync all day, every day – providing marketing and sales teams with the power to
drive more revenue at your company.
The Marketo Lead Management App is available from the Salesforce AppExchange. This guide
will step you through installing the Marketo Lead Management App in Salesforce and initiating
the data synchronization between your Salesforce instance and your Marketo instance.
Use the following chart to help you understand what system you are logging into and as what
user during each part of the installation and synchronization process.

© 2011 Marketo, Inc. All rights reserved. Version 1.2 3
STEP 1: SET UP REQUIRED PERMISSIONS IN SALESFORCE
This section provides instructions on how to set up Salesforce permissions so you can sync with
Marketo:
1. Create a Profile with Required Permissions 2. Creating a Dedicated Salesforce User Account 3. Get a Security Token 4. Block Unneeded Fields from Synchronization with Marketo
Note: You must be logged into Salesforce as a system administrator to perform the tasks in this section.
Only one Salesforce user account is used in Marketo for your entire organization, and Marketo
strongly recommends that you create a dedicated Salesforce user account (e.g.,
[email protected]) for this purpose.
As a best practice, in Salesforce, create a new user profile with the required permissions
described in the following instructions, then associate that new user profile with the dedicated
user account. Independent of your company’s staff, this login will help you identify any Marketo
modifications to Lead and Contact records within Salesforce.
CREATE A PROFILE WITH REQUIRED PERMISSIONS
The user login used for synchronization with Marketo must have special permissions for the
sync between Salesforce and Marketo to function properly.
To create a new profile with required Marketo permissions:
1. Navigate to Setup > Administration Setup > Manage Users > Profiles. 2. Click the New Profile button. 3. Create New Profile (e.g. Marketo Sync). 4. From the Profile Detail page, enable the required Marketo permissions called out below.
Note: Refer to your Salesforce documentation for complete details on creating a new profile.
© 2011 Marketo, Inc. All rights reserved. Version 1.2 4
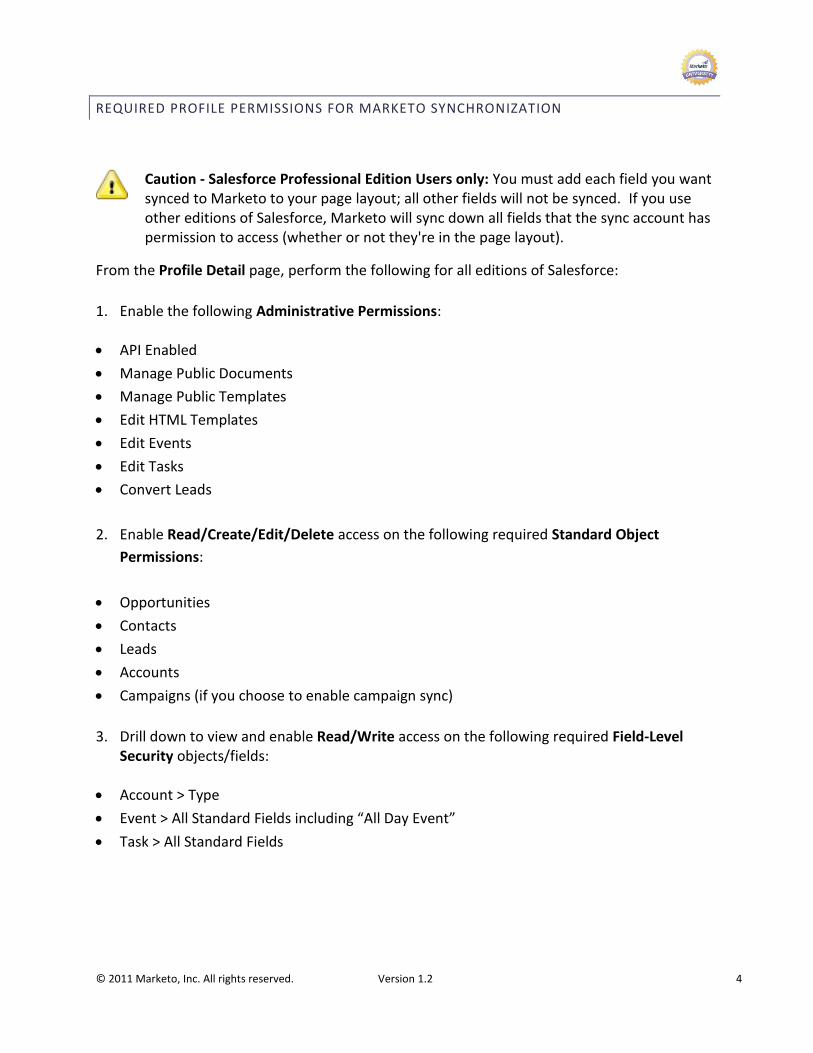
REQUIRED PROFILE PERMISSIONS FOR MARKETO SYNCHRONIZATION
Caution - Salesforce Professional Edition Users only: You must add each field you want synced to Marketo to your page layout; all other fields will not be synced. If you use other editions of Salesforce, Marketo will sync down all fields that the sync account has permission to access (whether or not they're in the page layout).
From the Profile Detail page, perform the following for all editions of Salesforce:
1. Enable the following Administrative Permissions:
API Enabled
Manage Public Documents
Manage Public Templates
Edit HTML Templates
Edit Events
Edit Tasks
Convert Leads
2. Enable Read/Create/Edit/Delete access on the following required Standard Object
Permissions:
Opportunities
Contacts
Leads
Accounts
Campaigns (if you choose to enable campaign sync)
3. Drill down to view and enable Read/Write access on the following required Field-Level Security objects/fields:
Account > Type
Event > All Standard Fields including “All Day Event”
Task > All Standard Fields

© 2011 Marketo, Inc. All rights reserved. Version 1.2 5
4. Enable Read access on any custom objects that you'd like to sync with Marketo.
Caution: Marketo only supports syncing of custom objects associated with leads, contacts, and accounts.
5. For merging leads, this profile needs Edit access on all objects (standard and custom) that your Leads and Contacts use.
CREATE A DEDICATED SALESFORCE USER ACCOUNT
This dedicated Salesforce user account will be used for synchronization with Marketo and must
be associated with the Marketo profile you created.
To create a new user account and assign the correct profile:
1. Navigate to Setup > Administration Setup> Manage Users > Users. 2. Click the New User button. 3. Create a clearly identifiable Salesforce user account for dedicated use with Marketo.
(e.g., [email protected]). 4. From the Profile drop-down, select the new profile you created (e.g. Marketo Sync). 5. Check to enable the Marketing User permission.
Caution: In order to use the full features of Marketo Program to Salesforce Campaign sync, the Salesforce account used to manage Marketo Sync must have the Marketing User permission enabled on the User Detail page in Salesforce.
6. Click Save.
Note: Ensure you have access to and note down the username and password for the dedicated Salesforce user account. In a future step, you will also need to note down the security token for this account. This information will be needed when you launch the sync between Marketo and Salesforce.
Note: Refer to your Salesforce documentation for complete details on creating and managing users and profiles.

© 2011 Marketo, Inc. All rights reserved. Version 1.2 6
GET A SECURITY TOKEN
You need a security token to synchronize Salesforce and Marketo.
To get or reset a security token for your dedicated Salesforce user account:
1. Log in to Salesforce using the Salesforce credentials for your dedicated Salesforce user account for Marketo sync.
2. Go to Setup > My Personal Information > Reset Your Security Token. 3. Click the Reset Security Token. An email containing the security token is sent to the email
address associated with this dedicated Salesforce user account. 4. Copy the token from the email. You will need to paste the Token into Marketo during sync.
Note: Ensure you have access to and note down the username, password, and security token for the dedicated Salesforce user account. This information is required when you launch the sync between Marketo and Salesforce.

© 2011 Marketo, Inc. All rights reserved. Version 1.2 7
BLOCK UNNEEDED FIELDS FROM SYNCHRONIZATION WITH MARKETO
A vast majority of fields in Salesforce are not required for marketing purposes and do not need
to sync with Marketo. Prepare for synchronization with Marketo by identifying and blocking
unneeded fields. Use field-level security within Salesforce to block these unneeded fields.
Typically, fewer than 100 fields are required to sync between Salesforce and Marketo.
Synchronizing too many unnecessary fields can negatively impact sync performance and clutter
the field hierarchy in Marketo.
Caution - The next step in the installation process creates the database structure in Marketo based on the selected fields in Salesforce. Once the database has been created, it cannot be reversed. You cannot remove fields once they are added to the database. You will only be able to add fields at a later time. Do not proceed to the next step until you have selected the fewest number of required fields for your Salesforce/Marketo sync. Start with the fewest number possible and add fields later if required.
Examples of Unneeded Fields:
Fields that update regularly across the database should be blocked from the Marketo sync.
The Jigsaw AppExchange package (Last Sync/Updated date field) gets updated frequently.
This field uses a lot of bandwidth and Marketo recommends that you block it from the sync.
LinkedIn is another you should consider blocking.
To ensure an efficient sync with Marketo, identify and restrict certain types of records from
the sync (e.g., records without an email address).
Caution - Salesforce Professional Edition Users only: Only fields in your page layouts will be synced to Marketo. Ensure all of the Salesforce fields you want in Marketo are in your page layout, and ensure the fields you don’t want are absent from the layout.
© 2011 Marketo, Inc. All rights reserved. Version 1.2 8
STEP 2: INSTALL THE MARKETO LEAD MANAGEMENT APP FROM THE APPEXCHANGE
This section provides instructions on how to install the Marketo Lead Management App into
Salesforce:
1. Install the Marketo App from AppExchange
2. Map Marketo Lead Fields to Corresponding Salesforce Contact Fields
3. PRO: Display Marketo Lead Fields on Salesforce Lead and Contact Detail Pages
This PRO step is for Salesforce Professional Edition users only. If you are on a different
version of Salesforce, skip this PRO step and move to the next section in this guide,
Step 3: Synchronize Marketo and Salesforce.
Installing the Marketo AppExchange application into Salesforce allows you to add Marketo as a
tab to your Salesforce account, and place the Marketo Lead Score and Original Source fields
into your Salesforce page layouts. If you've previously installed our application to get the Lead
Score field, you need to reinstall the package to get the Original Source info fields.
Note: The tasks in this section must be performed by a Salesforce administrator.
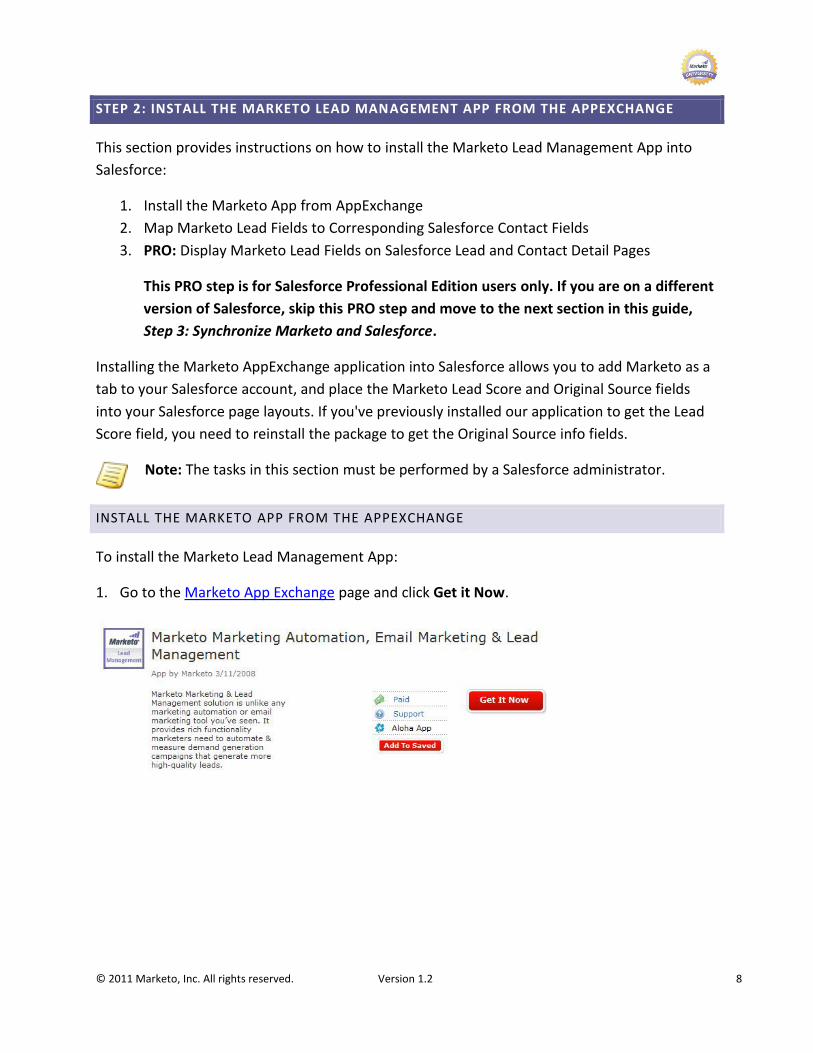
INSTALL THE MARKETO APP FROM THE APPEXCHANGE
To install the Marketo Lead Management App:
1. Go to the Marketo App Exchange page and click Get it Now.
© 2011 Marketo, Inc. All rights reserved. Version 1.2 9
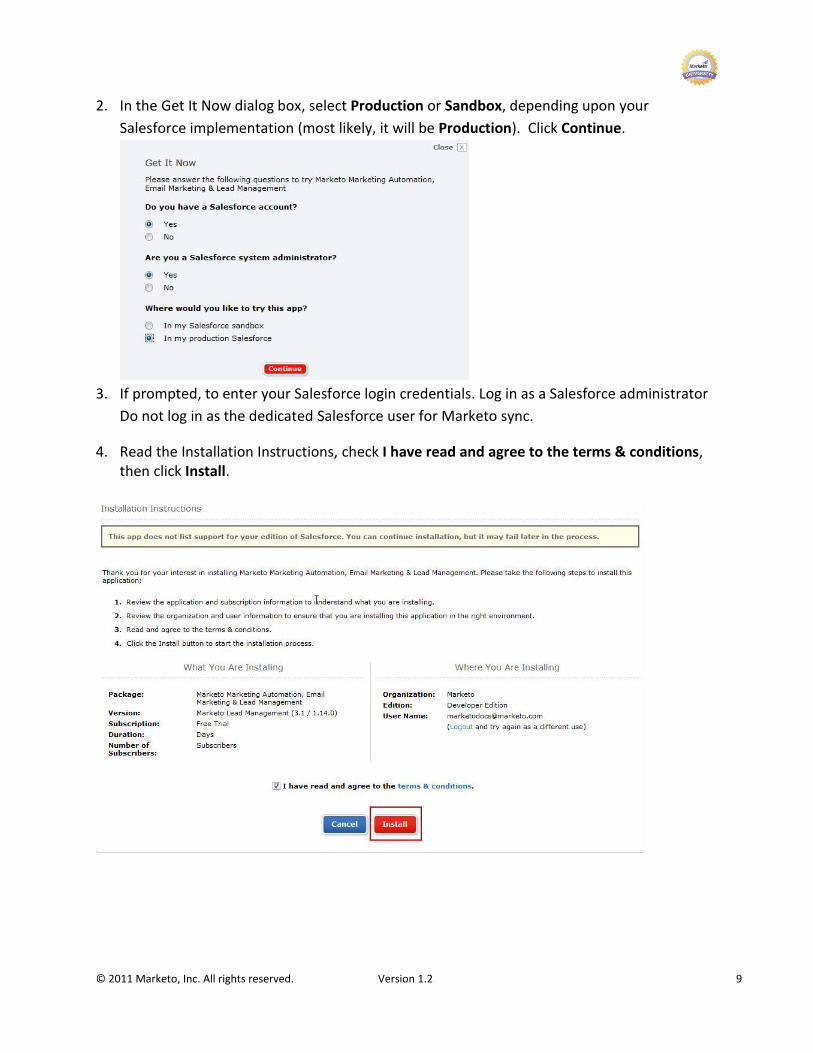
2. In the Get It Now dialog box, select Production or Sandbox, depending upon your
Salesforce implementation (most likely, it will be Production). Click Continue.
3. If prompted, to enter your Salesforce login credentials. Log in as a Salesforce administrator
Do not log in as the dedicated Salesforce user for Marketo sync.
4. Read the Installation Instructions, check I have read and agree to the terms & conditions, then click Install.

© 2011 Marketo, Inc. All rights reserved. Version 1.2 10
5. When prompted, re-enter your Salesforce password and click Submit.
6. The Package Installation Details page displays. Click Continue.
7. Click Next to Approve the Package API Access. This allows Marketo to sync with your Salesforce instance.
© 2011 Marketo, Inc. All rights reserved. Version 1.2 11
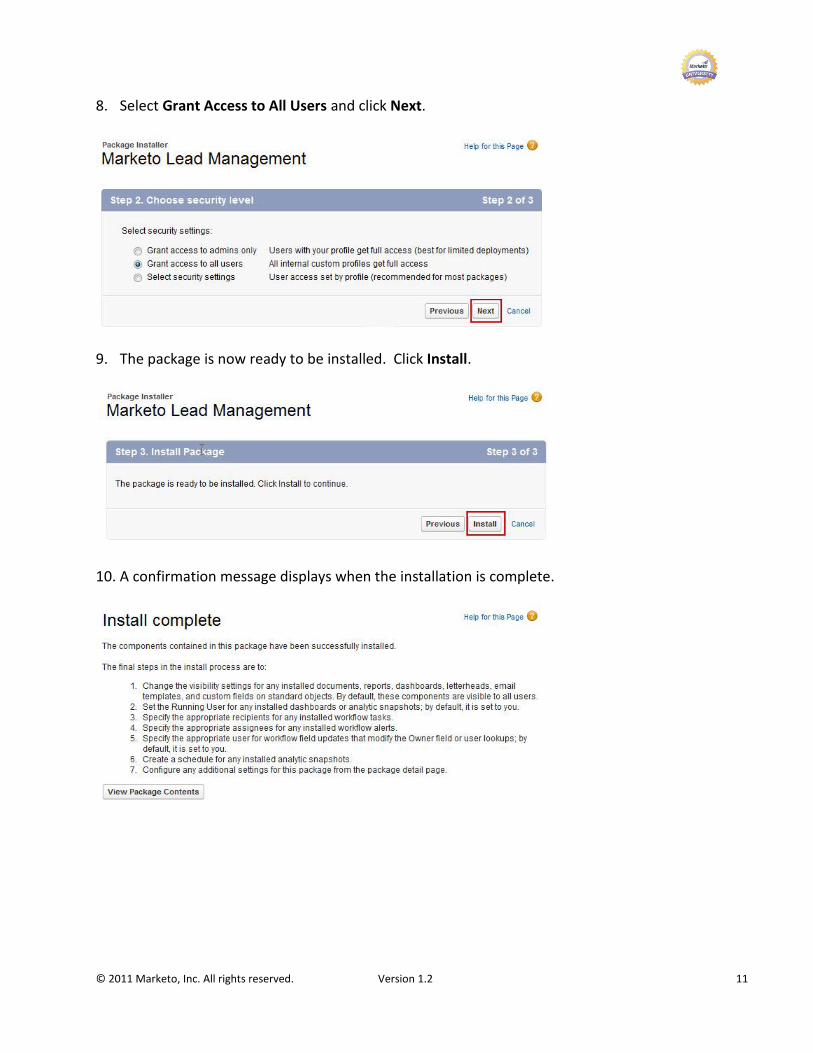
8. Select Grant Access to All Users and click Next.
9. The package is now ready to be installed. Click Install.
10. A confirmation message displays when the installation is complete.

© 2011 Marketo, Inc. All rights reserved. Version 1.2 12
MAP MARKETO LEAD FIELDS TO CORRESPONDING SALESFORCE CONTACT FIELDS
All Salesforce Leads and Contacts are considered “Leads” in Marketo. Salesforce Lead fields will
automatically map over to Marketo Lead fields. However, you must manually map Salesforce
Contact fields to corresponding Marketo Lead fields.
To map Marketo Lead fields to corresponding Salesforce Contact fields:
1. Navigate to Setup > App Setup > Customize > Leads > Fields. 2. Under Lead Custom Fields & Relationships, click Map Lead Fields. The Lead Custom Field
Mapping page displays.
3. Field names listed on the left of the screen are Marketo Lead fields and you will need to map to the corresponding Salesforce Contact fields from the adjacent drop-down menus.
© 2011 Marketo, Inc. All rights reserved. Version 1.2 13
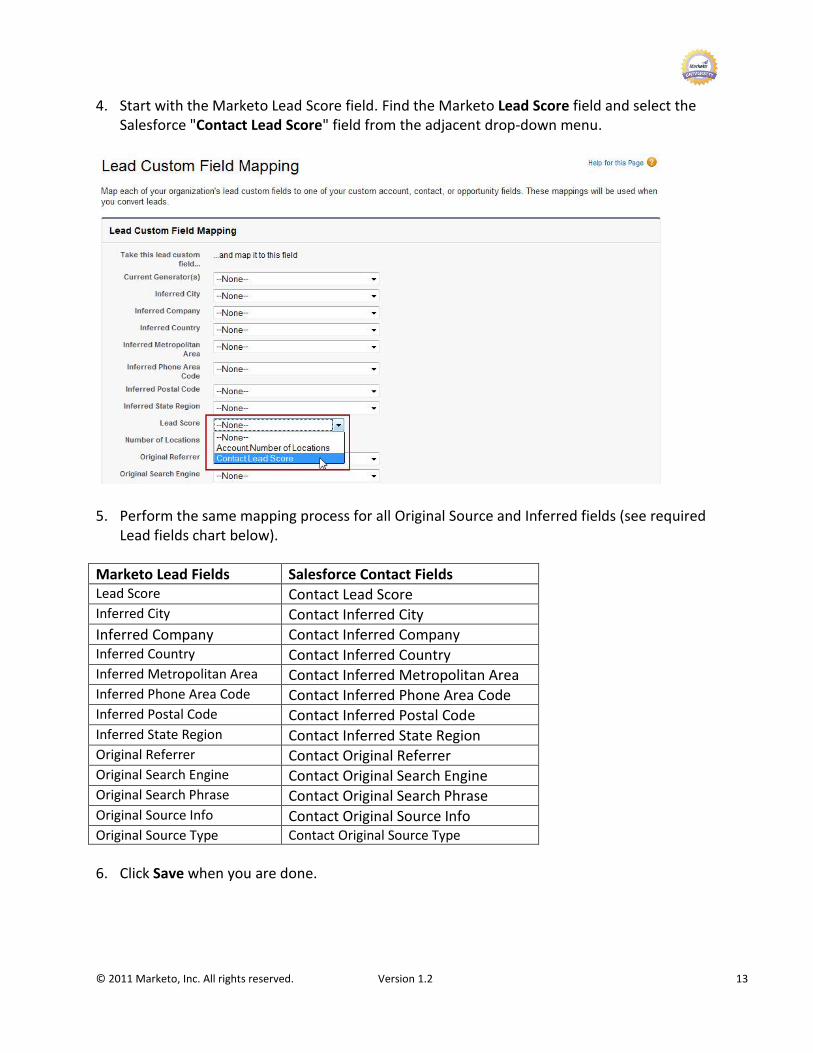
4. Start with the Marketo Lead Score field. Find the Marketo Lead Score field and select the Salesforce "Contact Lead Score" field from the adjacent drop-down menu.
5. Perform the same mapping process for all Original Source and Inferred fields (see required Lead fields chart below).
Marketo Lead Fields Salesforce Contact Fields Lead Score Contact Lead Score Inferred City Contact Inferred City
Inferred Company Contact Inferred Company Inferred Country Contact Inferred Country Inferred Metropolitan Area Contact Inferred Metropolitan Area Inferred Phone Area Code Contact Inferred Phone Area Code Inferred Postal Code Contact Inferred Postal Code Inferred State Region Contact Inferred State Region Original Referrer Contact Original Referrer Original Search Engine Contact Original Search Engine Original Search Phrase Contact Original Search Phrase Original Source Info Contact Original Source Info Original Source Type Contact Original Source Type
6. Click Save when you are done.
© 2011 Marketo, Inc. All rights reserved. Version 1.2 14
PRO: DISPLAY MARKETO LEAD FIELDS ON SALESFORCE LEAD AND CONTACT DETAIL PAGES
To display Marketo Lead fields in your Salesforce instance, add the Marketo Lead fields to the
Salesforce Lead and Contact detail pages in use by your Salesforce instance.
This section steps you through the following:
1. PRO: Display Marketo Lead Fields on Salesforce Lead Detail Pages
2. PRO: Display Marketo Lead Fields on Salesforce Contact Detail Pages
Caution - Salesforce Professional Edition Users: This is a required step -- all Marketo Lead fields listed in this section must be added to your Salesforce Lead and Contact page layouts in order for Marketo to update them. If you do not add these fields to your page layouts, they will not sync with Marketo.
Caution - Salesforce Enterprise or Unlimited Edition users: The Marketo Lead fields listed in this section do not need to be in your Salesforce Lead and Contact page layouts, but they must be accessible by the account you use to sync with Salesforce. If you block access to those fields via permissions, they will not sync with Marketo.

© 2011 Marketo, Inc. All rights reserved. Version 1.2 15
PRO: DISPLAY MARKETO LEAD FIELDS ON SALESFORCE LEAD DETAIL PAGES
Perform these steps to display Marketo Lead fields in your Salesforce Lead Detail pages:
1. Navigate to Setup > App Setup > Customize > Leads > Page Layouts. 2. Select the name of your page layout and click Edit. 3. Under the Lead Layout section at the top of the page, find the Lead Score field in the Fields
box. 4. Drag and drop the Lead Score field to the location where you want it to display on the Lead
Detail page.

© 2011 Marketo, Inc. All rights reserved. Version 1.2 16
5. Repeat this step with any or all of the remaining Marketo Lead fields (original source and inferred) that you want to display within your Salesforce instance.
Marketo Lead Fields:
Lead Score
Original Search Engine
Original Search Phrase
Original Referrer
Original Source Info
Original Source Type
Inferred City
Inferred Company
Inferred Country
Inferred Metropolitan Area
Inferred Phone Area Code
Inferred Postal Code
Inferred State Region
6. Click Save at the top of the page under Lead Layout when you are done.

© 2011 Marketo, Inc. All rights reserved. Version 1.2 17
PRO: DISPLAY MARKETO LEAD FIELDS ON SALESFORCE CONTACT DETAIL PAGES
Perform these steps to display Marketo Lead fields in your Salesforce Contact Detail pages:
1. Navigate to Setup > App Setup > Customize > Contacts > Page Layouts. 2. Select the name of your page layout and click Edit. 3. Under the Contact Layout section at the top of the page, find the Lead Score field in the
Fields box. 4. Drag and drop the Lead Score field to the location where you want it to display on the
Contact Detail page.
© 2011 Marketo, Inc. All rights reserved. Version 1.2 18
5. Repeat this step with any or all of the remaining Marketo Lead fields (original source and inferred) that you want to display within your Salesforce instance.
Marketo Lead Fields:
Lead Score
Original Search Engine
Original Search Phrase
Original Referrer
Original Source Info
Original Source Type
Inferred City
Inferred Company
Inferred Country
Inferred Metropolitan Area
Inferred Phone Area Code
Inferred Postal Code
Inferred State Region
6. Click Save at the top of the page under Contact Layout when you are done.

© 2011 Marketo, Inc. All rights reserved. Version 1.2 19
STEP 3: SYNCHRONIZE MARKETO AND SALESFORCE
Marketo’s robust, bi-directional integration with Salesforce.com keeps both Marketo and
Salesforce in sync all day, every day.
When you launch and run the sync, Marketo pulls down a copy of your Salesforce database,
including objects and custom fields. No changes to the data are made during the initial
synchronization. Marketo simply pulls down a copy of your Salesforce database.
The time required to complete the initial synchronization between Salesforce and Marketo
depends on the size of your database. If you have a large database, the initial sync can take all
day. Once the initial sync is complete, Marketo maintains the sync with your Salesforce
instance with 5 minute intervals between syncs.
If you need help at any point during the synchronization process, please contact Marketo at
Caution: When you synchronize Marketo and Salesforce, you are establishing a unique and forever relationship between “one” Salesforce instance (subscription account) with “one” Marketo instance (subscription account). Once you start the sync, you can associate another user login with the sync, but you cannot sync to a separate Salesforce instance, and you cannot change the Sandbox flag.
To synchronize your Salesforce and Marketo instances:
1. Log in to your Marketo instance as a Marketo administrator. 2. Click the Admin link at the top of the Marketo UI. You must have Administrator permissions
to access this link.

© 2011 Marketo, Inc. All rights reserved. Version 1.2 20
3. Click Salesforce in the tree on the left or on the canvas.

© 2011 Marketo, Inc. All rights reserved. Version 1.2 21
4. Enter the credentials for the dedicated Salesforce user account you created for synchronization with Marketo: Username, Password, and Security Token (see Step 1: Set Up Required Permissions in Salesforce).
Note: If you need to reset the security token for the dedicated Salesforce user account, see Get a Security Token .
Caution: Check the Sandbox option only if you are syncing a Marketo Sandbox to a Salesforce Sandbox. If you are syncing to a Production environment, do not check Sandbox. If you're unsure about this step, please contact your Marketo customer enablement manager.
5. Click Sync Fields.

© 2011 Marketo, Inc. All rights reserved. Version 1.2 22
6. The Sync is Forever Warning dialog box displays. This is a critical step.
What should you click?
Cold Feet: Once you start the sync, you can associate another user login with the sync, but you cannot sync to a separate Salesforce instance, and you cannot change the Sandbox flag. If you are unsure, click Cold Feet and verify the correct credentials are entered in the previous screen.
Confirm Credentials: Click Confirm Credentials only if you are sure the correct credentials for syncing the proper Marketo and Salesforce instances have been entered. When you synchronize Marketo and Salesforce, you are establishing a unique and forever relationship between “one” Salesforce instance (subscription account) with “one” Marketo instance (subscription account).
7. At this point, Marketo pulls down the lead and contact fields you enabled for sync from Salesforce.
Caution: Your sync is not yet complete. You must continue with the remaining steps to complete the sync.
© 2011 Marketo, Inc. All rights reserved. Version 1.2 23
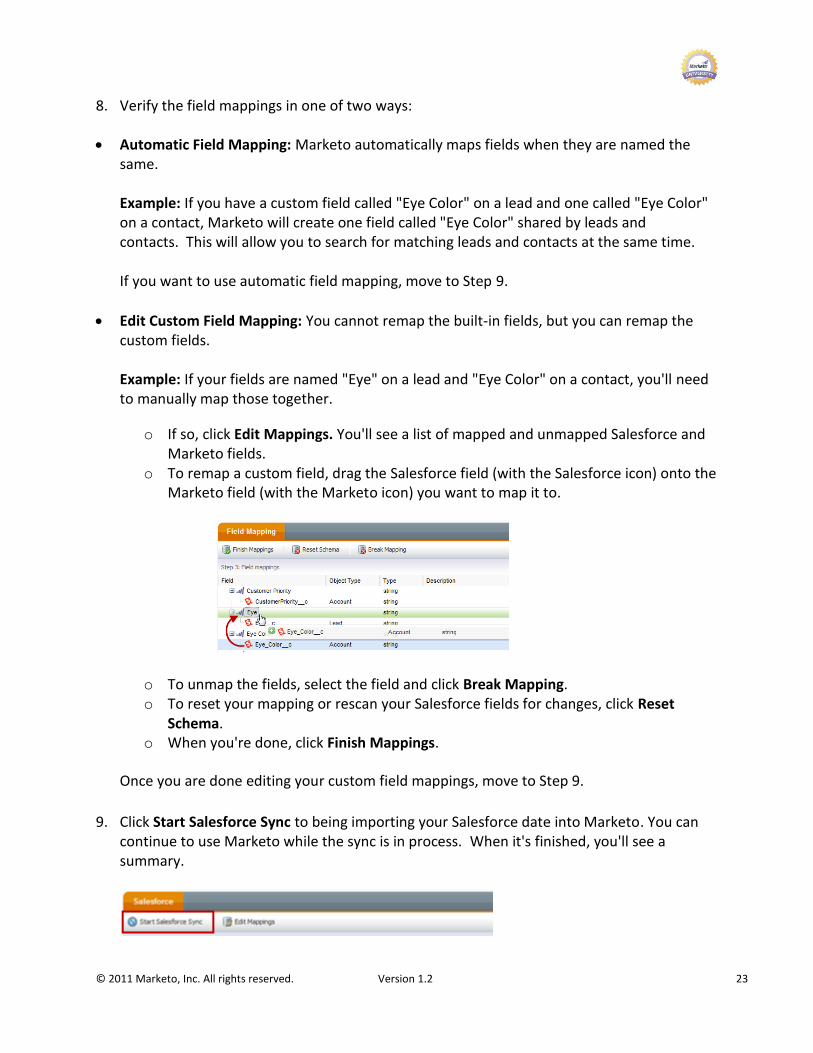
8. Verify the field mappings in one of two ways:
Automatic Field Mapping: Marketo automatically maps fields when they are named the same. Example: If you have a custom field called "Eye Color" on a lead and one called "Eye Color" on a contact, Marketo will create one field called "Eye Color" shared by leads and contacts. This will allow you to search for matching leads and contacts at the same time. If you want to use automatic field mapping, move to Step 9.
Edit Custom Field Mapping: You cannot remap the built-in fields, but you can remap the custom fields. Example: If your fields are named "Eye" on a lead and "Eye Color" on a contact, you'll need to manually map those together.
o If so, click Edit Mappings. You'll see a list of mapped and unmapped Salesforce and Marketo fields.
o To remap a custom field, drag the Salesforce field (with the Salesforce icon) onto the Marketo field (with the Marketo icon) you want to map it to.
o To unmap the fields, select the field and click Break Mapping. o To reset your mapping or rescan your Salesforce fields for changes, click Reset
Schema. o When you're done, click Finish Mappings.
Once you are done editing your custom field mappings, move to Step 9.
9. Click Start Salesforce Sync to being importing your Salesforce date into Marketo. You can continue to use Marketo while the sync is in process. When it's finished, you'll see a summary.
© 2011 Marketo, Inc. All rights reserved. Version 1.2 24
STEP 4: VERIFY THE SYNC
To verify the synchronization between Salesforce and Marketo was successful:
1. Log into your Salesforce account.
2. Review your Lead Detail and Contact Detail pages.
3. If the Marketo Lead fields display on your Salesforce Lead Detail and Contact Detail pages,
the sync was a success!
OPTIONAL STEPS (SYNC ACTIVITIES)
You have the option of pushing certain Marketo events to Salesforce.com. When these
activities happen in Marketo, a Salesforce Activity History record is created for that lead or
contact.
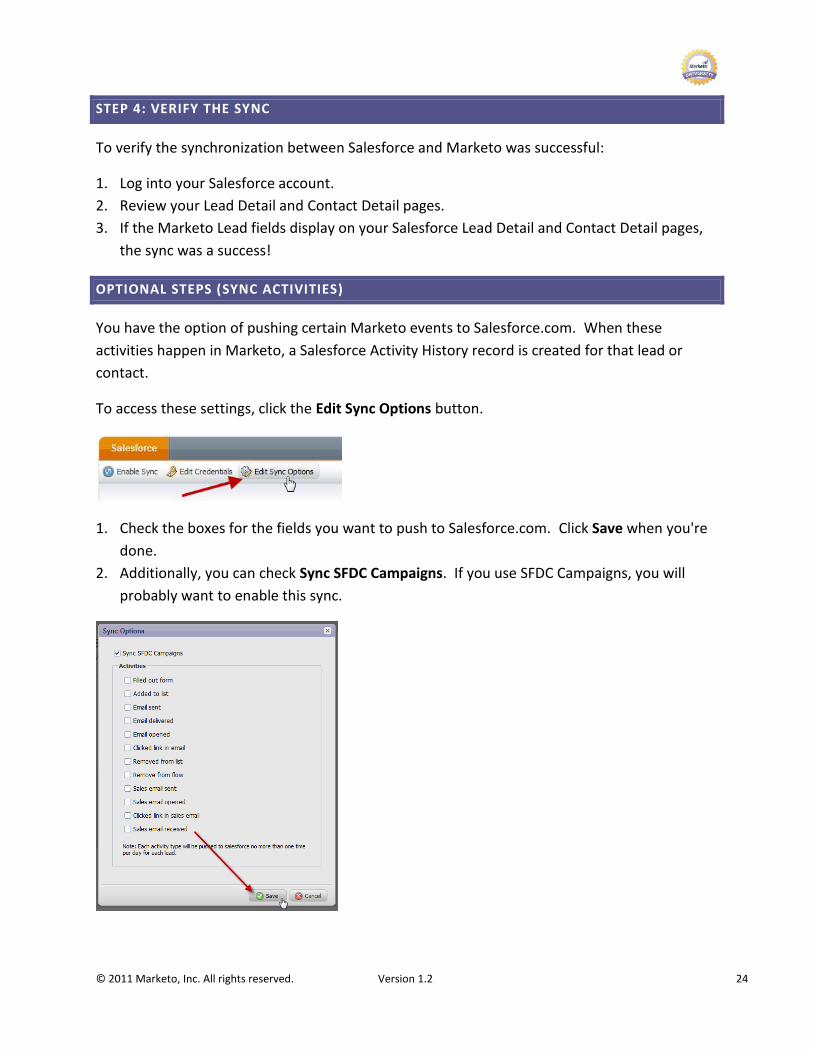
To access these settings, click the Edit Sync Options button.
1. Check the boxes for the fields you want to push to Salesforce.com. Click Save when you're
done.
2. Additionally, you can check Sync SFDC Campaigns. If you use SFDC Campaigns, you will
probably want to enable this sync.

© 2011 Marketo, Inc. All rights reserved. Version 1.2 25
Each activity type is pushed to Salesforce no more than once per day for each lead. This is to
reduce noise for your sales reps and to keep storage use down. If you're interested in getting
more Marketo information into Salesforce, check out our Marketo Sales Insight product.
The ones in bold are ones that Marketo uses in our own account:
Activity Type Description
Filled out form The lead filled out any Marketo form
Added to list The lead was added to a static list
Email sent The lead was sent an email
Email delivered The lead received an email
Email opened The lead opened the email for viewing
Clicked link in email The lead clicked on a link in an email sent by Marketo
Removed from list The lead was removed from a static list
Remove from flow The lead no longer proceeds through a campaign's flow
Sales email sent The lead was sent an email sent through Marketo Sales Insight
Sales email opened The lead opened an email sent through Marketo Sales Insight
Clicked link in sales email The lead clicked a link in an email sent through Marketo Sales Insight
Sales email received The lead received an email sent through Marketo Sales Insight
Note: Email opened is a poor metric to use because email clients often block images. We suggest you use Clicked link in email as a better indicator of interest.
What about other activities?
Enable Add to List notification in SFDC. When leads trigger the activity of interest, add those
leads to the static list; the Add to List event will be created as a task. This is useful for complex
activity criteria.
Events that you push to Salesforce appear in the Activity History for the lead or contact like this:

© 2011 Marketo, Inc. All rights reserved. Version 1.2 26
Please contact your Salesforce administrator for assistance with Salesforce, or contact Marketo
if you encounter any errors or need additional help using the Marketo application.
For the latest and more information, visit the Marketo Customer Community. To give feedback on this User Guide, please send comments to [email protected].