master scheduling: elementary - kansas city public … | page master scheduling: elementary master...
TRANSCRIPT
1 | P a g e
Master Scheduling: Elementary Master Scheduling
Master Scheduling is the process by which schools build their comprehensive schedule for the school year. It is a complex procedure that requires the careful management and direction of a school’s resources. The end goal is of this process is to utilize a school’s assets to the best educational advantage of the students.
Tyler
KCPS utilizes the web based Tyler Student Information System to create and manage the master schedule for each school in the district.
Master Scheduling Task List
1 Log In
2 Become Familiar With Elementary Scheduling Guidelines
3 Adopt New Subjects To Your School If New Subjects Have Been Added
4 Class Sections: Add/Edit/Delete
5 Add New Subjects & Sections To Subject Groups & Section Lists
6 Assign Teachers
7 Assign Students To Classes
2 | P a g e
OPEN & LOG IN TO TYLER
Acces sing Tyle r
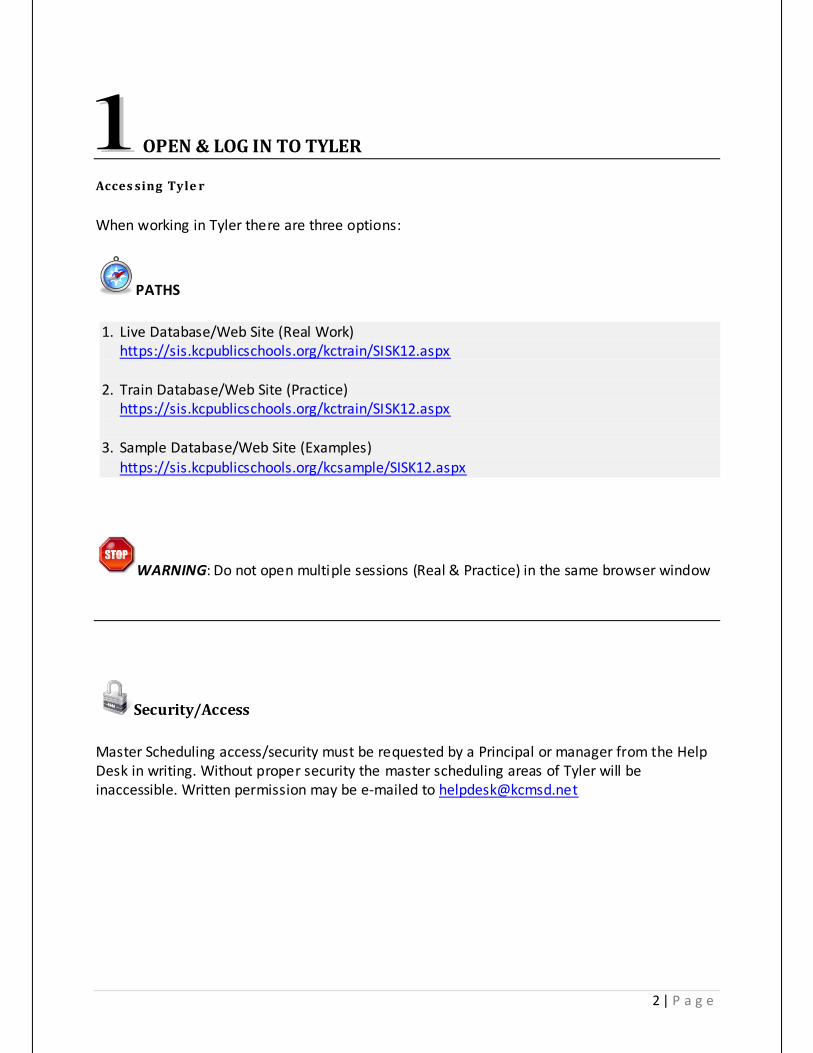
When working in Tyler there are three options:
PATHS
1. Live Database/Web Site (Real Work) https://sis.kcpublicschools.org/kctrain/SISK12.aspx
2. Train Database/Web Site (Practice) https://sis.kcpublicschools.org/kctrain/SISK12.aspx
3. Sample Database/Web Site (Examples) https://sis.kcpublicschools.org/kcsample/SISK12.aspx
WARNING: Do not open multiple sessions (Real & Practice) in the same browser window
Security/Access
Master Scheduling access/security must be requested by a Principal or manager from the Help Desk in writing. Without proper security the master scheduling areas of Tyler will be inaccessible. Written permission may be e-mailed to [email protected]
3 | P a g e
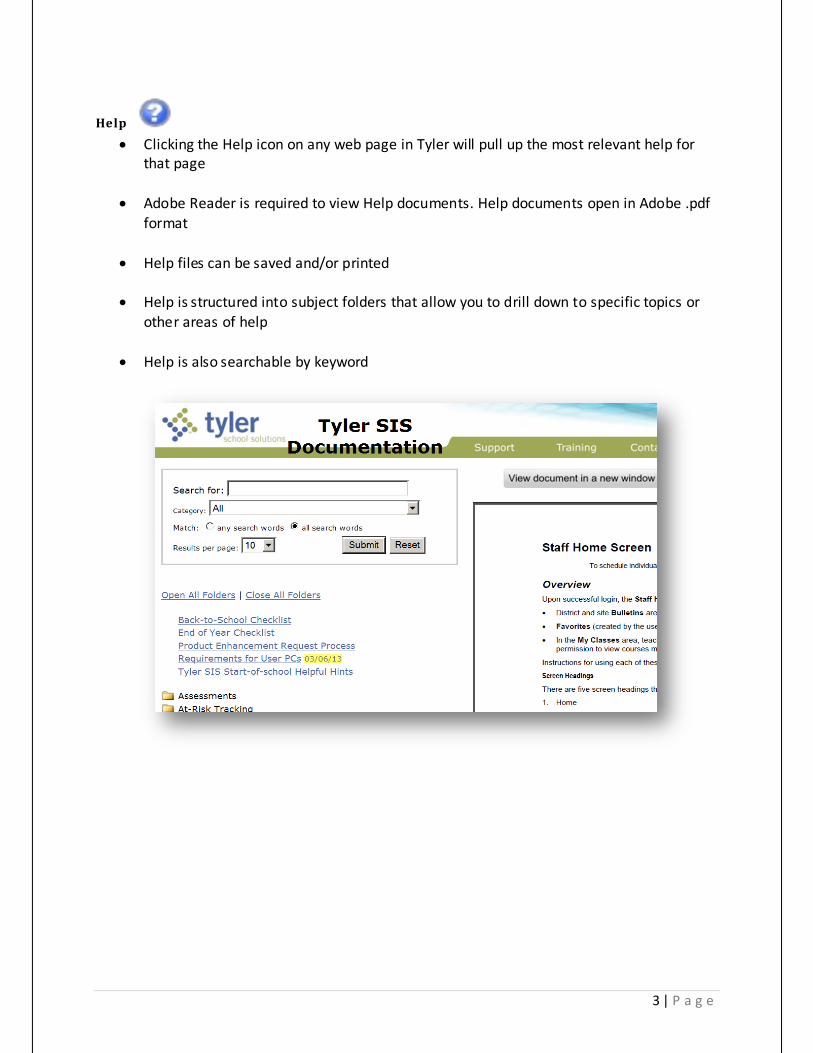
Help
• Clicking the Help icon on any web page in Tyler will pull up the most relevant help for that page
• Adobe Reader is required to view Help documents. Help documents open in Adobe .pdf format
• Help files can be saved and/or printed
• Help is structured into subject folders that allow you to drill down to specific topics or other areas of help
• Help is also searchable by keyword

4 | P a g e
SELECT/LOG IN TO THE FUTURE SCHOOL YEAR
PATH: LOG IN TO SCHOOL & YEAR Actions Menu > My Login Site Year > Select The Year
To work with a future school year you must log into that year. In the example below there are three columns to choose from:
• 1314 – 2013-2014 school year • SS13 – 2013 summer school • 1213 – 2012-2013 school year
Example: Change Logi n Si te-Year Scr een
Note: If the future year is not available the ITCD (Information Technology & Communications Department) has not created it.
5 | P a g e
Master Scheduling Methods
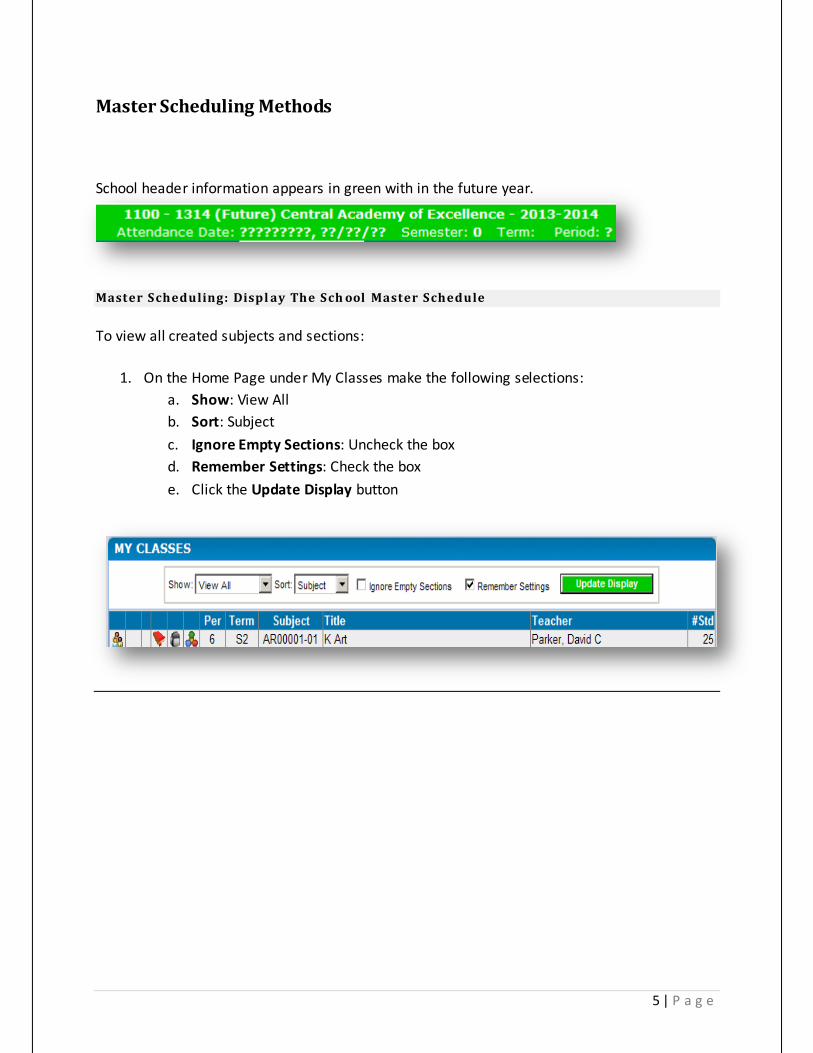
School header information appears in green with in the future year.
Master Scheduling: Displ ay The Sch ool Master Schedule
To view all created subjects and sections:
1. On the Home Page under My Classes make the following selections: a. Show: View All b. Sort: Subject
c. Ignore Empty Sections: Uncheck the box d. Remember Settings: Check the box
e. Click the Update Display button
6 | P a g e
BECOME FAMILIAR WITH ELEMENTARY SCHEDULING GUIDE LINES
E lementary Master Scheduling Fa cts
1. Elementary school Master Schedules are automatically rolled from the previous year. This means that each year the Master Schedule will require editing but not need to be created from scratch
2. Elementary school attendance is taken in the Home Room. It is not taken in any other scheduled subjects or support classes
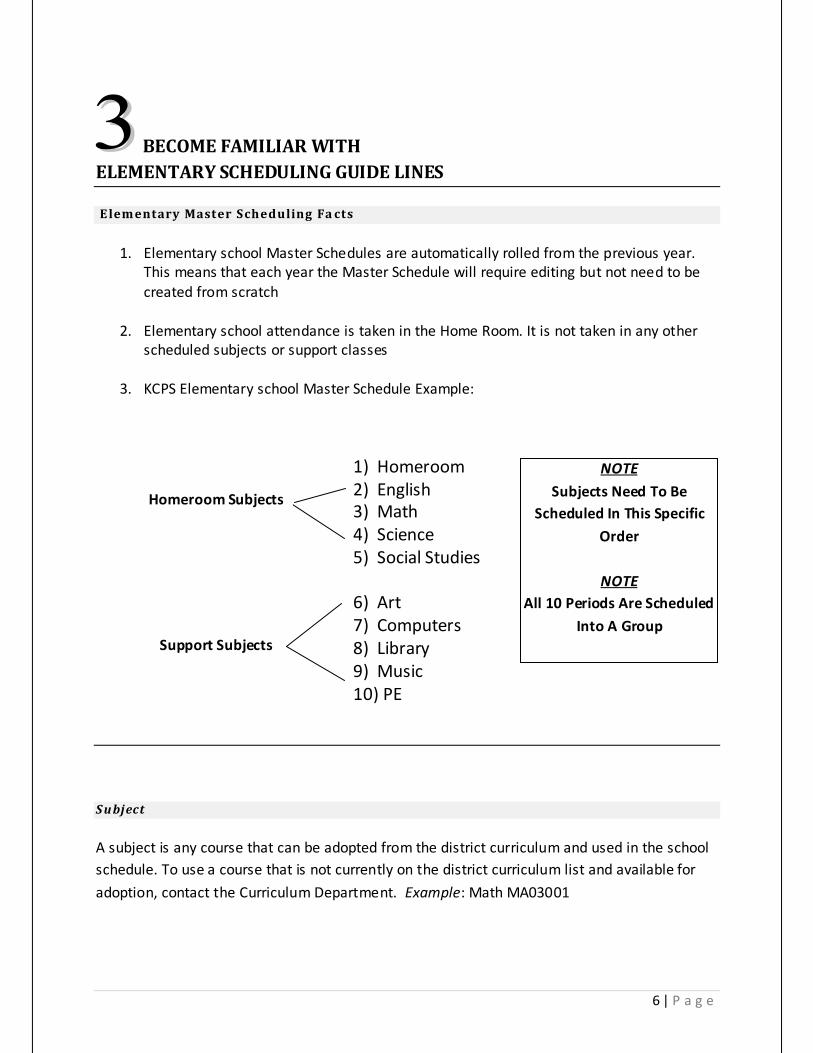
3. KCPS Elementary school Master Schedule Example:
1) Homeroom 2) English 3) Math 4) Science 5) Social Studies
6) Art 7) Computers 8) Library 9) Music 10) PE
S ubject
A subject is any course that can be adopted from the district curriculum and used in the school schedule. To use a course that is not currently on the district curriculum list and available for
adoption, contact the Curriculum Department. Example: Math MA03001
Homeroom Subjects
Support Subjects
NOTE
Subjects Need To Be Scheduled In This Specific
Order
NOTE All 10 Periods Are Scheduled
Into A Group
7 | P a g e
S ection
Once a subject is adopted for a school’s use, sections must be created for it. How many sections are needed is determined by the amount of students or projected students that will require the course
Example: 300 students need third grade math MA03001
Each classroom accommodates 25 students
300 student ÷25 seats per classroom = 12 sections
S ubject Group
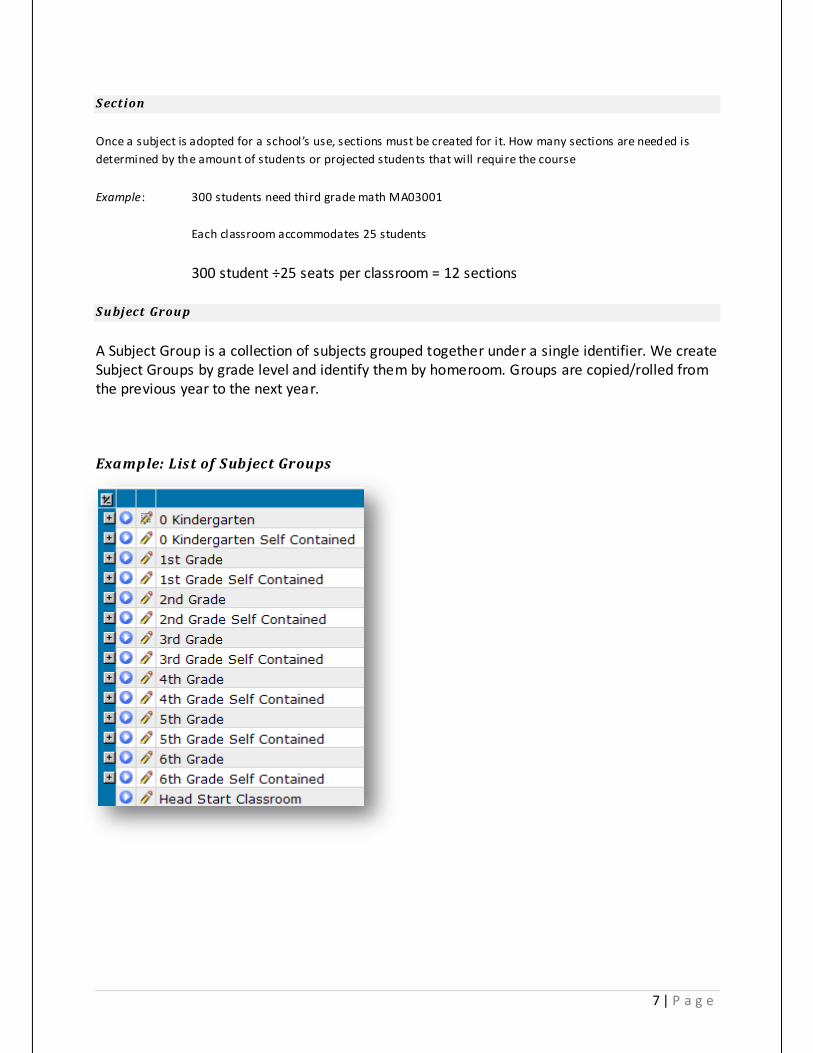
A Subject Group is a collection of subjects grouped together under a single identifier. We create Subject Groups by grade level and identify them by homeroom. Groups are copied/rolled from the previous year to the next year.
Example: List of Subject Groups
8 | P a g e
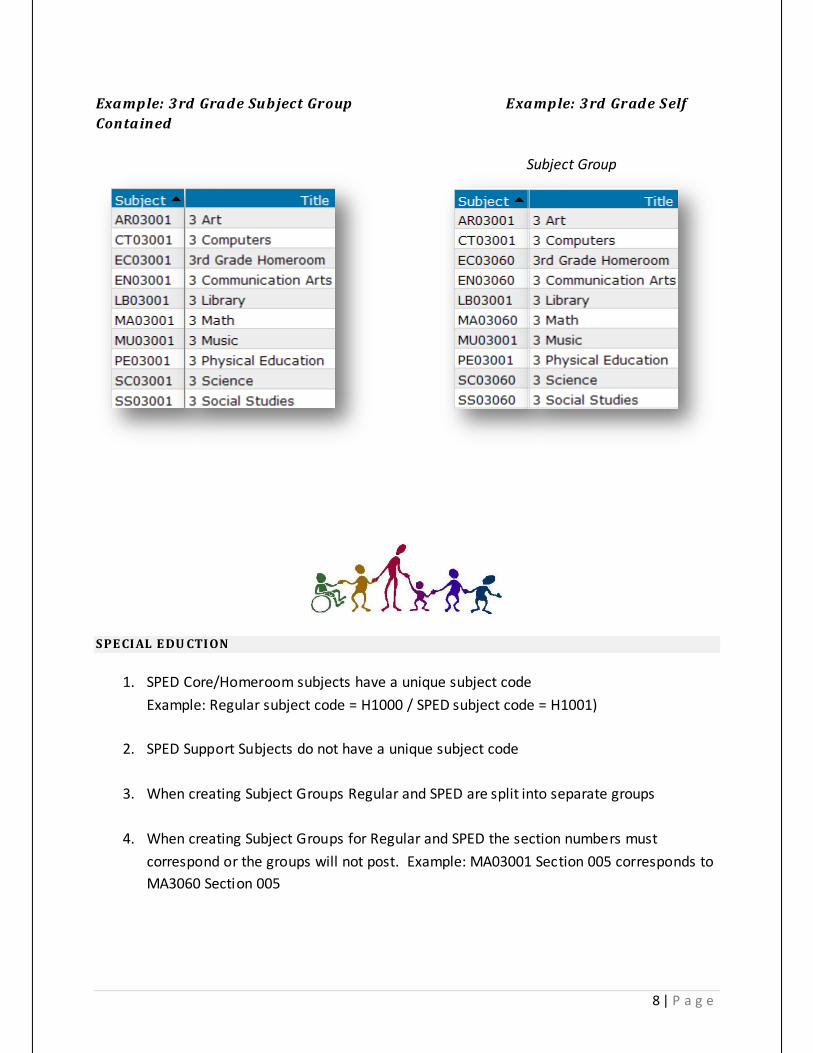
Example: 3rd Grade Subject Group Example: 3rd Grade Self Contained
Subject Group
SPE CI AL E DU CTI ON
1. SPED Core/Homeroom subjects have a unique subject code
Example: Regular subject code = H1000 / SPED subject code = H1001)
2. SPED Support Subjects do not have a unique subject code
3. When creating Subject Groups Regular and SPED are split into separate groups
4. When creating Subject Groups for Regular and SPED the section numbers must
correspond or the groups will not post. Example: MA03001 Section 005 corresponds to MA3060 Section 005
9 | P a g e
ADOPTING SUBJECTS
PATH: ADOPT SUBJECTS
View / Maintain > Site Class Sections > Subjects & Sections Show All SUBJE C TS
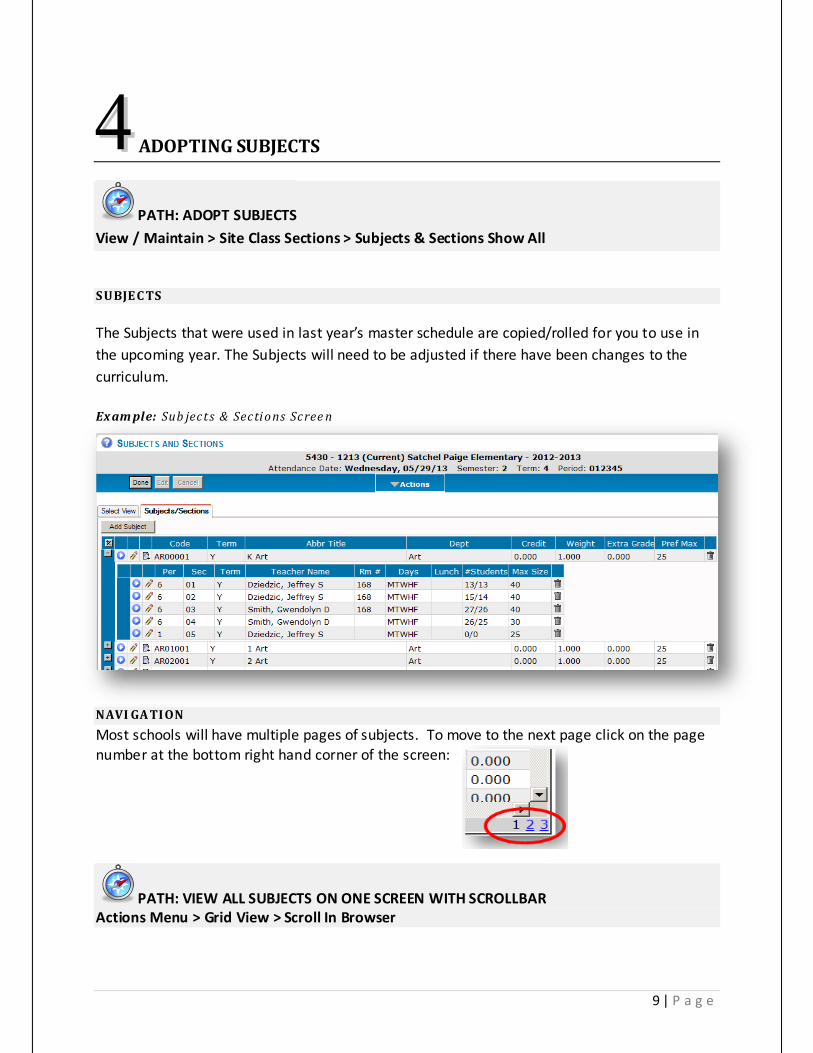
The Subjects that were used in last year’s master schedule are copied/rolled for you to use in the upcoming year. The Subjects will need to be adjusted if there have been changes to the curriculum.
Ex am ple: Sub ject s & Secti ons Scree n
NAVI GA TI ON
Most schools will have multiple pages of subjects. To move to the next page click on the page number at the bottom right hand corner of the screen:
PATH: VIEW ALL SUBJECTS ON ONE SCREEN WITH SCROLLBAR Actions Menu > Grid View > Scroll In Browser
10 | P a g e
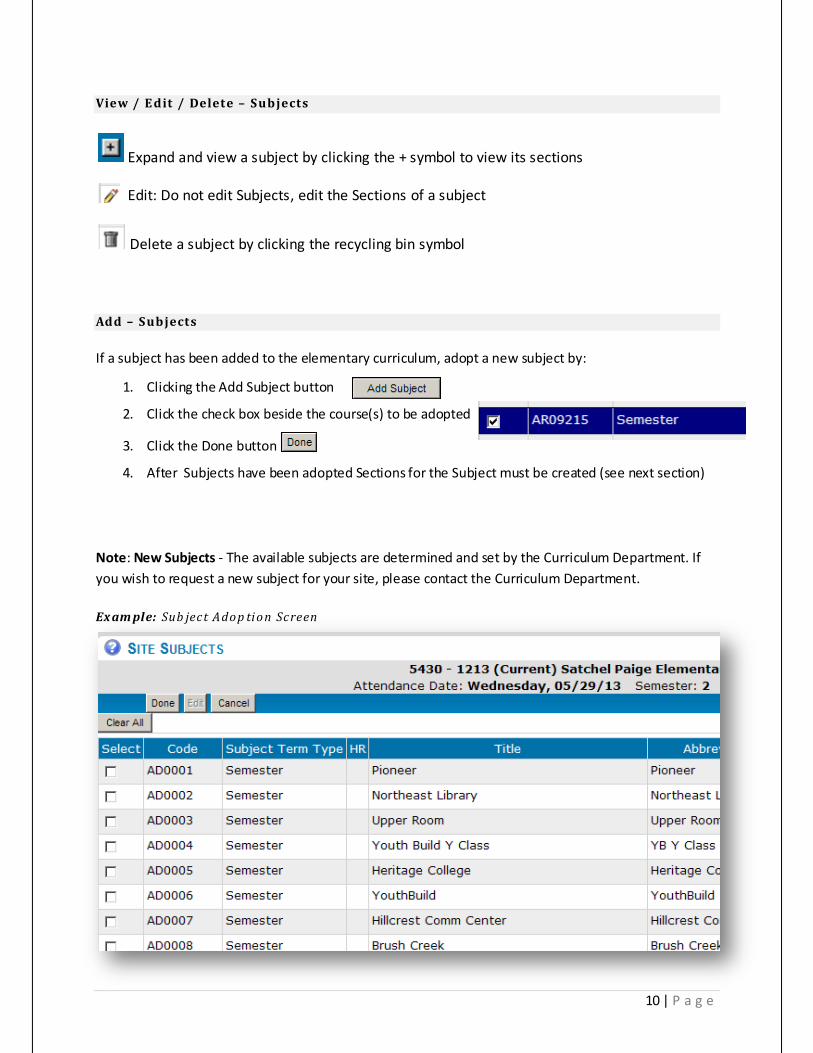
View / E dit / Delete – Subjects
Expand and view a subject by clicking the + symbol to view its sections
Edit: Do not edit Subjects, edit the Sections of a subject
Delete a subject by clicking the recycling bin symbol
Add – Subjects
If a subject has been added to the elementary curriculum, adopt a new subject by:
1. Clicking the Add Subject button
2. Click the check box beside the course(s) to be adopted
3. Click the Done button
4. After Subjects have been adopted Sections for the Subject must be created (see next section)
Note: New Subjects - The available subjects are determined and set by the Curriculum Department. If you wish to request a new subject for your site, please contact the Curriculum Department.
Ex am ple: Sub ject Adop ti on Screen
11 | P a g e
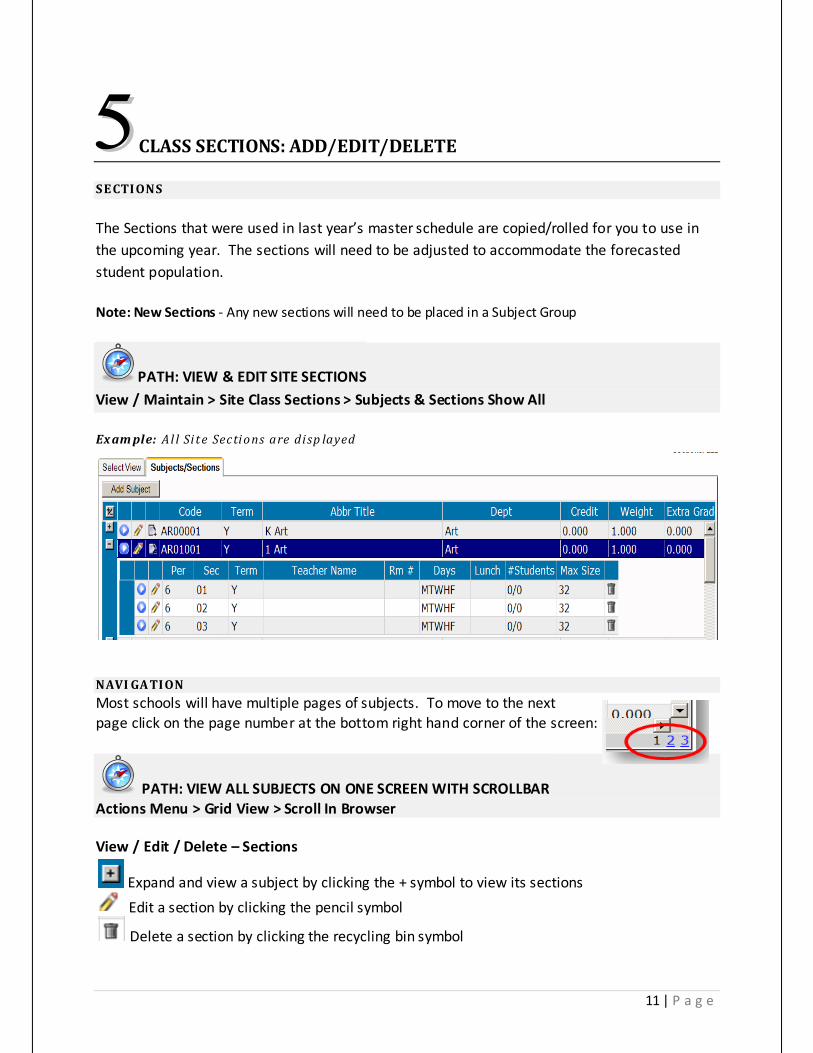
CLASS SECTIONS: ADD/EDIT/DELETE
SE CTI ONS
The Sections that were used in last year’s master schedule are copied/rolled for you to use in the upcoming year. The sections will need to be adjusted to accommodate the forecasted student population.
Note: New Sections - Any new sections will need to be placed in a Subject Group
PATH: VIEW & EDIT SITE SECTIONS
View / Maintain > Site Class Sections > Subjects & Sections Show All
Ex am ple: Al l Si t e Secti ons are di sp layed
NAVI GA TI ON
Most schools will have multiple pages of subjects. To move to the next page click on the page number at the bottom right hand corner of the screen:
PATH: VIEW ALL SUBJECTS ON ONE SCREEN WITH SCROLLBAR Actions Menu > Grid View > Scroll In Browser
View / Edit / Delete – Sections
Expand and view a subject by clicking the + symbol to view its sections
Edit a section by clicking the pencil symbol
Delete a section by clicking the recycling bin symbol
12 | P a g e
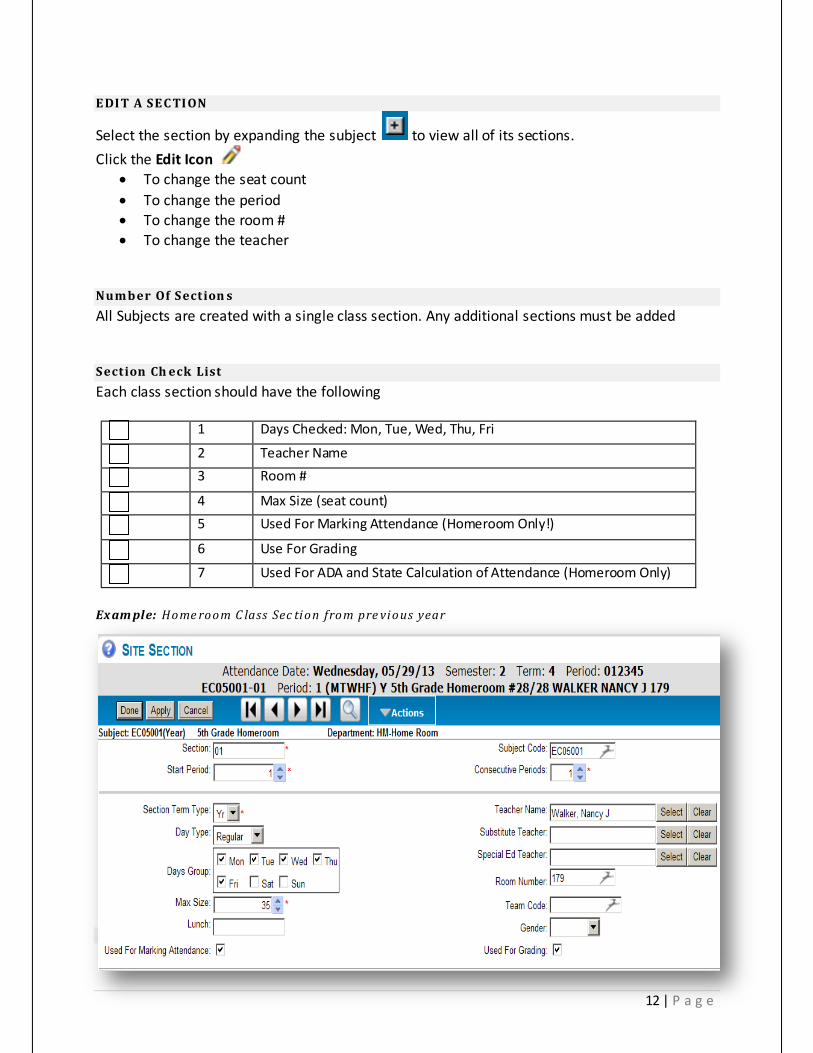
E DI T A SE C TI ON
Select the section by expanding the subject to view all of its sections.
Click the Edit Icon • To change the seat count • To change the period • To change the room # • To change the teacher
Number Of Section s
All Subjects are created with a single class section. Any additional sections must be added
Section Ch eck List
Each class section should have the following
1 Days Checked: Mon, Tue, Wed, Thu, Fri
2 Teacher Name
3 Room #
4 Max Size (seat count)
5 Used For Marking Attendance (Homeroom Only!)
6 Use For Grading
7 Used For ADA and State Calculation of Attendance (Homeroom Only)
Ex am ple: Home room C lass Sec ti on from pre vi ous year
13 | P a g e
APPLY !
Make any necessary changes and click the APPLY button. ALL CHANGES WILL BE LOST if Apply is not clicked.
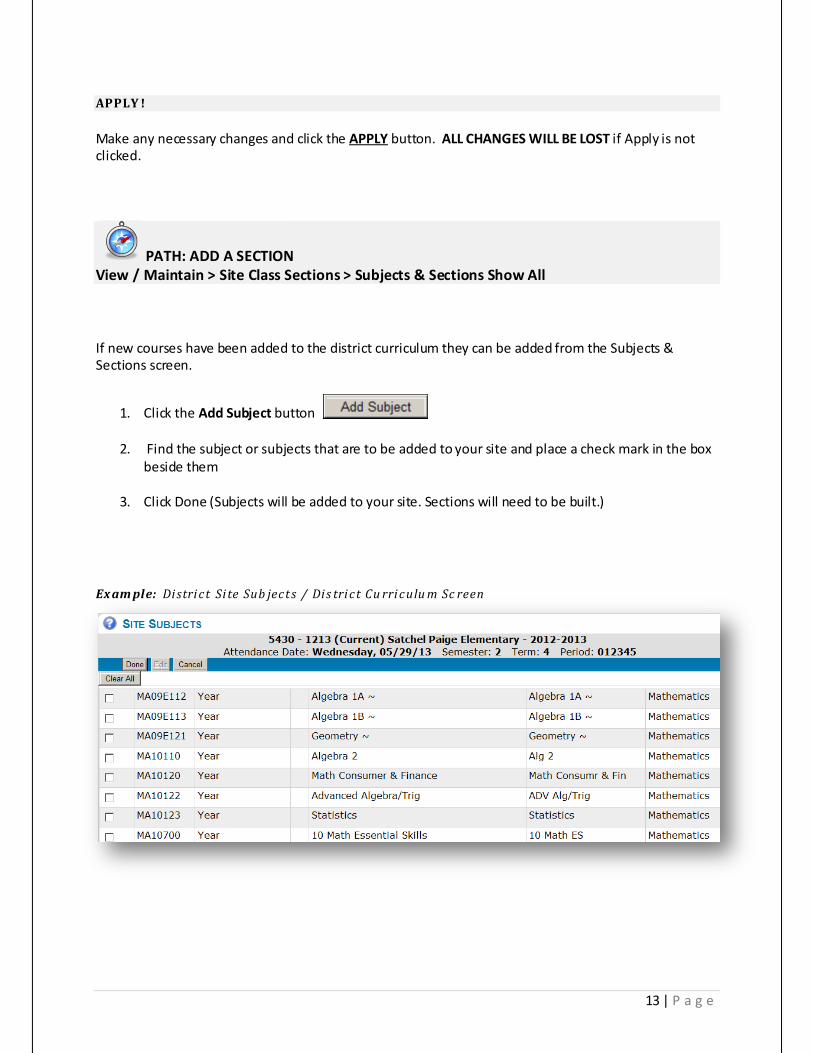
PATH: ADD A SECTION View / Maintain > Site Class Sections > Subjects & Sections Show All
If new courses have been added to the district curriculum they can be added from the Subjects & Sections screen.
1. Click the Add Subject button
2. Find the subject or subjects that are to be added to your site and place a check mark in the box beside them
3. Click Done (Subjects will be added to your site. Sections will need to be built.)
Ex am ple: Di stri ct Si te Sub ject s / Di s tri ct Cu rri culu m Sc reen
14 | P a g e
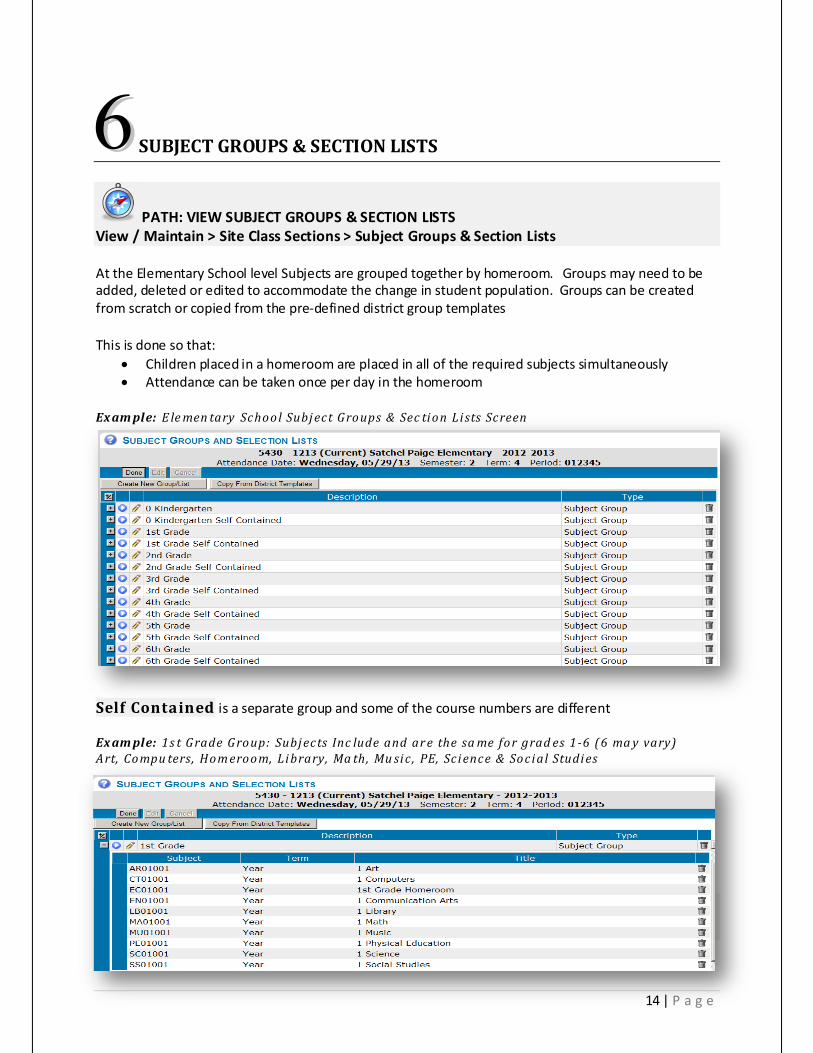
SUBJECT GROUPS & SECTION LISTS
PATH: VIEW SUBJECT GROUPS & SECTION LISTS View / Maintain > Site Class Sections > Subject Groups & Section Lists
At the Elementary School level Subjects are grouped together by homeroom. Groups may need to be added, deleted or edited to accommodate the change in student population. Groups can be created from scratch or copied from the pre-defined district group templates
This is done so that: • Children placed in a homeroom are placed in all of the required subjects simultaneously • Attendance can be taken once per day in the homeroom
Ex am ple: E le men tary School Subj ect Groups & Sec ti on Li sts Screen
Self Contained is a separate group and some of the course numbers are different Ex am ple: 1s t Grade Group: Subj ects Inc lude and ar e the sa me for grad es 1-6 (6 ma y vary) Art, Compu ters, Hom eroom, Li brary, Ma th, Mu si c , PE, Sc i ence & Soci al Studi es
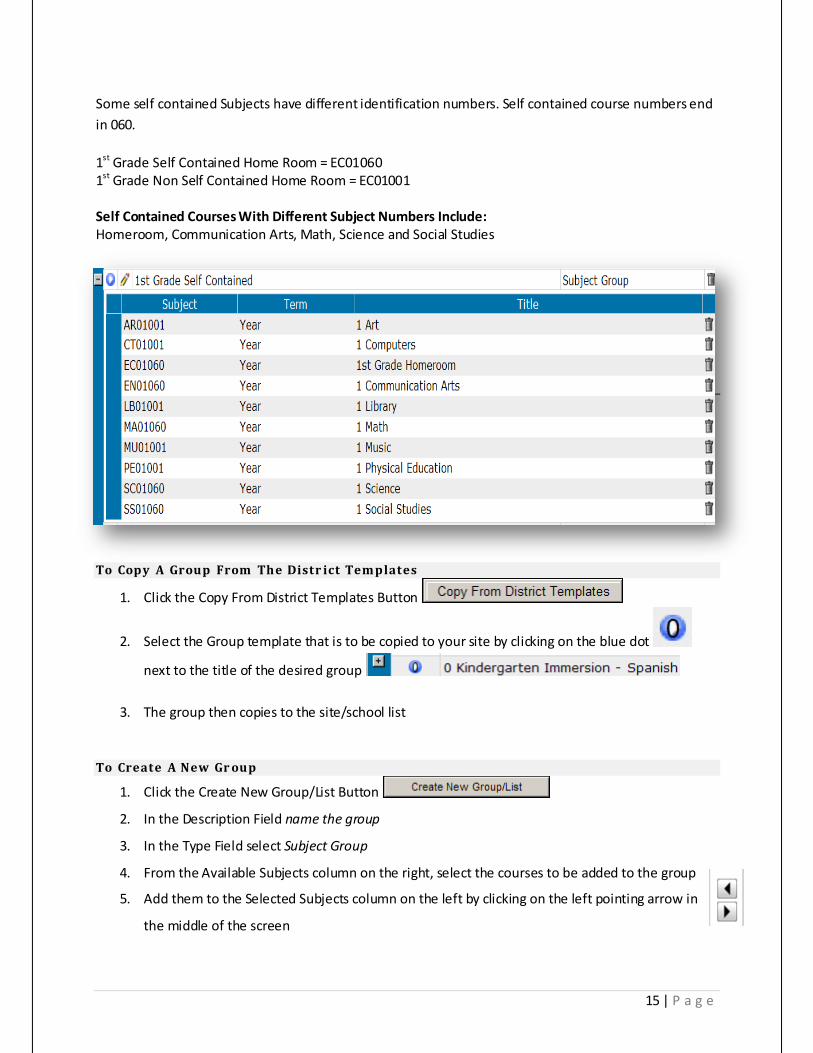
Subject Numbers
15 | P a g e
Some self contained Subjects have different identification numbers. Self contained course numbers end in 060. 1st Grade Self Contained Home Room = EC01060 1st Grade Non Self Contained Home Room = EC01001 Self Contained Courses With Different Subject Numbers Include: Homeroom, Communication Arts, Math, Science and Social Studies
To Copy A Group From The Distr ict Templates
1. Click the Copy From District Templates Button
2. Select the Group template that is to be copied to your site by clicking on the blue dot
next to the title of the desired group
3. The group then copies to the site/school list
To Create A New Gr oup
1. Click the Create New Group/List Button
2. In the Description Field name the group
3. In the Type Field select Subject Group
4. From the Available Subjects column on the right, select the courses to be added to the group
5. Add them to the Selected Subjects column on the left by clicking on the left pointing arrow in
the middle of the screen
16 | P a g e
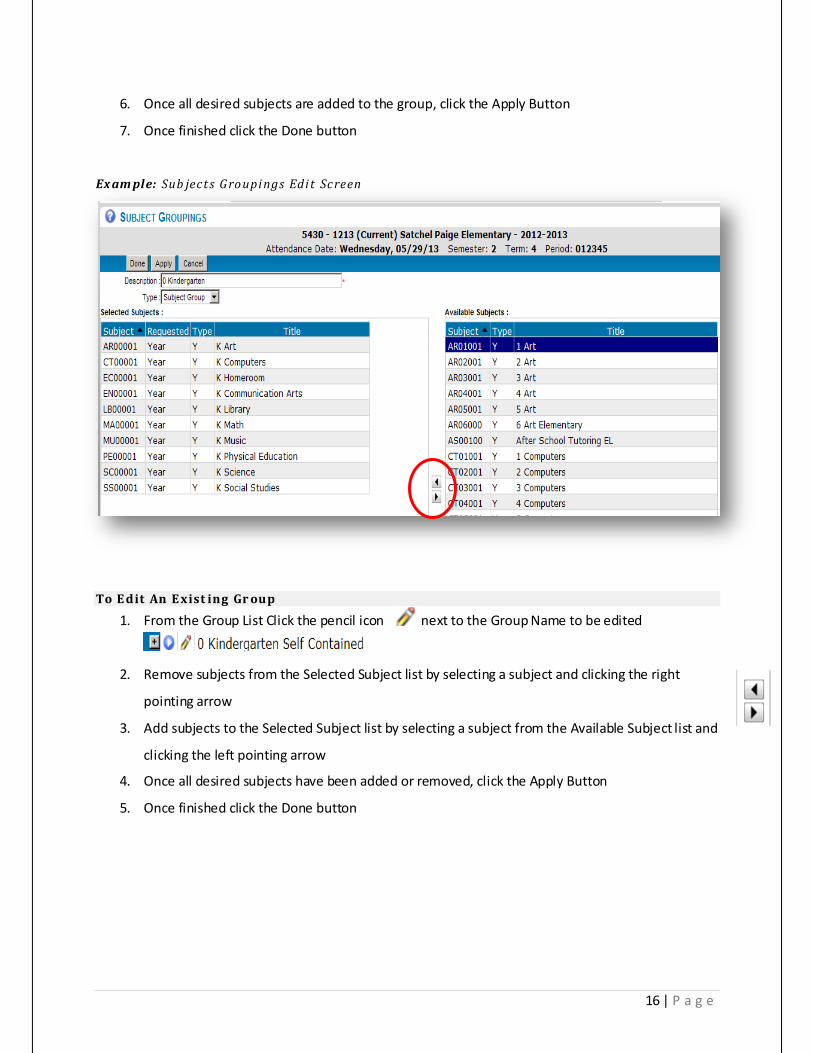
6. Once all desired subjects are added to the group, click the Apply Button
7. Once finished click the Done button
Ex am ple: Sub ject s Groupi ngs Edi t Screen
To E dit An E xist ing Gr oup
1. From the Group List Click the pencil icon next to the Group Name to be edited
2. Remove subjects from the Selected Subject list by selecting a subject and clicking the right
pointing arrow
3. Add subjects to the Selected Subject list by selecting a subject from the Available Subject list and
clicking the left pointing arrow
4. Once all desired subjects have been added or removed, click the Apply Button
5. Once finished click the Done button
17 | P a g e
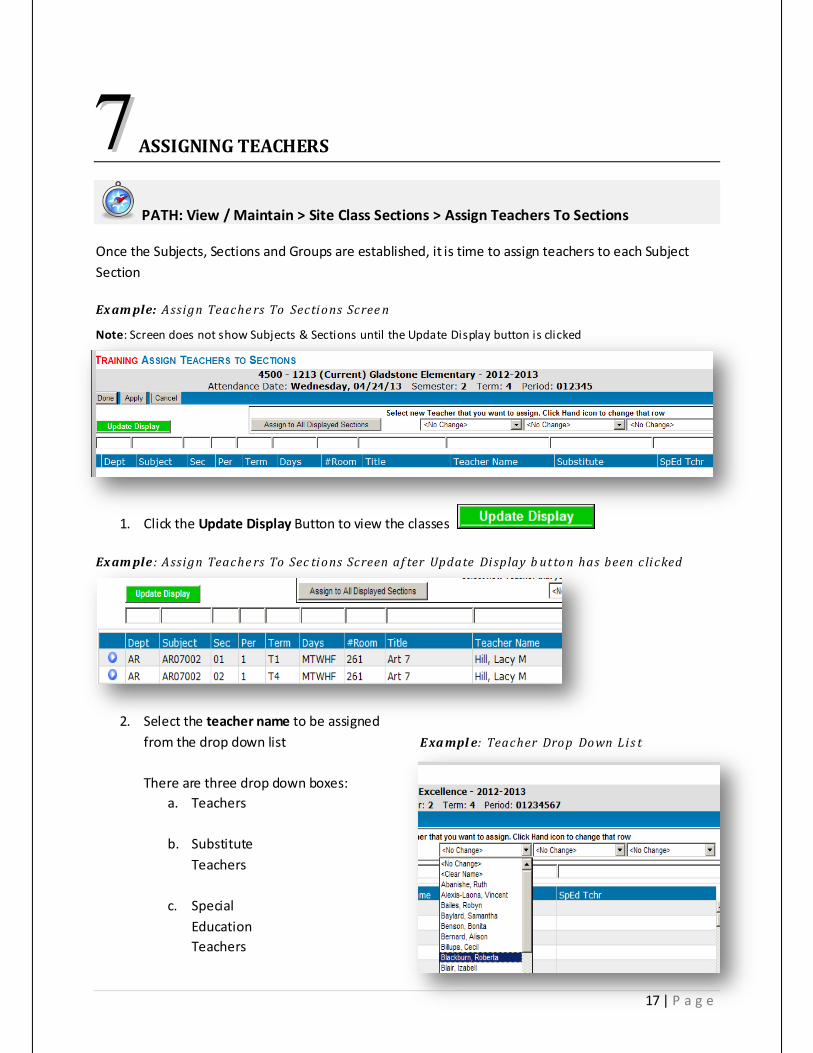
ASSIGNING TEACHERS
PATH: View / Maintain > Site Class Sections > Assign Teachers To Sections
Once the Subjects, Sections and Groups are established, it is time to assign teachers to each Subject Section Ex am ple: Assi gn Teache rs To Secti ons Scree n
Note: Screen does not show Subjects & Sections until the Update Display button is clicked
1. Click the Update Display Button to view the classes
Ex am ple : Assi gn Teache rs To Sec ti ons Screen af ter Update Di splay b ut ton has been c li cked
2. Select the teacher name to be assigned from the drop down list E xa mpl e: Teacher Drop Down Li s t
There are three drop down boxes:
a. Teachers
b. Substitute Teachers
c. Special Education Teachers
18 | P a g e
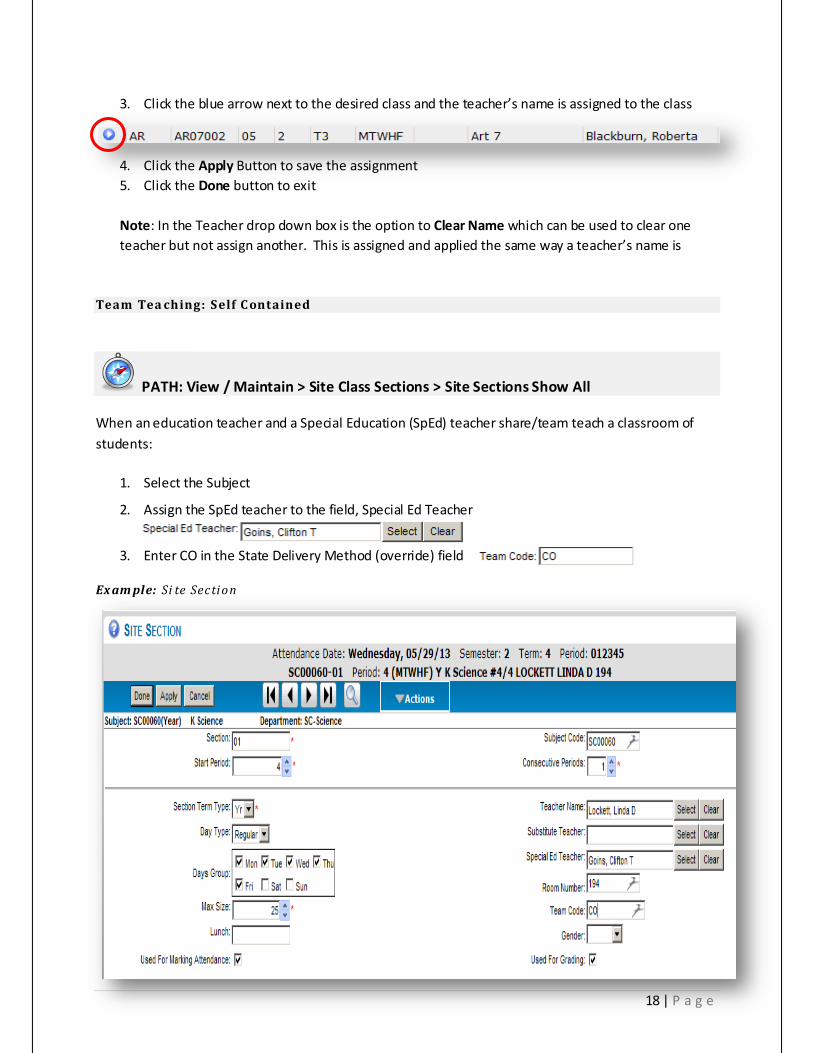
3. Click the blue arrow next to the desired class and the teacher’s name is assigned to the class
4. Click the Apply Button to save the assignment 5. Click the Done button to exit
Note: In the Teacher drop down box is the option to Clear Name which can be used to clear one teacher but not assign another. This is assigned and applied the same way a teacher’s name is
Team Tea ching: Self C ontained
PATH: View / Maintain > Site Class Sections > Site Sections Show All
When an education teacher and a Special Education (SpEd) teacher share/team teach a classroom of students:
1. Select the Subject
2. Assign the SpEd teacher to the field, Special Ed Teacher
3. Enter CO in the State Delivery Method (override) field
Ex am ple: Si te Secti on
19 | P a g e
REASSIGNING TEACHERS
Situations will arise throughout the year that will require the reassignment of teachers to subjects and/or sections, be cautious with this process as reassignment makes the current grade book inaccessible to the teacher
1. Always notify a teacher at least 24 hours prior to reassigning them to a different section or subject! Grade books and Assignments DO NOT automatically transfer when subjects are reassigned.
2. Also be aware that when students are transferred between sections and teachers, grades and assignments DO NOT transfer with the students.
3. How Teachers May Transfer A Student Between Subject Sections (Same Teacher) When transferring a student from one section to another with the same teacher, teachers will need to:
a. Log into the grade book they want to copy scores to b. In the Grade book on the Assignments tab highlight the student they want to
copy scores for c. Go to Actions>Manage Students and Scores>Copy Student Scores for 1 Student
(Current Row) d. In the Copy from Course Section dropdown choose the section to copy scores
from. e. Place a check in the box to the left of the assignment to copy.
f. Click the Start Copy Process. The process used to transfer a student from one section to another for a different teacher is much more involved. It involves creating new assignment
columns and entering bulk scores for the student.
20 | P a g e
ASSIGNING STUDENTS TO CLASSES
There are three methods of scheduling students:
1. Auto-Schedule This allows the system to automatically places students into appropriate classes based on a variety of factors such as age and grade level. This can be done one class at a time, by groups of class or for all classes
2. Manually Schedule An Individual Class Schedule a single class, this allows the schedule to select each student for the class
3. Individual Student Schedule each student one at a time

21 | P a g e
Auto Schedule Class(s)
PATH: View / Maintain > Random Scheduling > Assign Elementary Class Roster Scheduling
1. Click the Auto-Schedule Button, the Elementary Class Roster Scheduling Screen Appears
Ex am ple: E le men tary C lass Roste r Schedu li ng Scree n
2. Select the Class or Classes to be scheduled
3. Click the Assign Student(s) to Class button to schedule the students OR the Preview Run Only Button to see how the software will assign the students before actually committing to the process
4. Click the Start Report Button
22 | P a g e
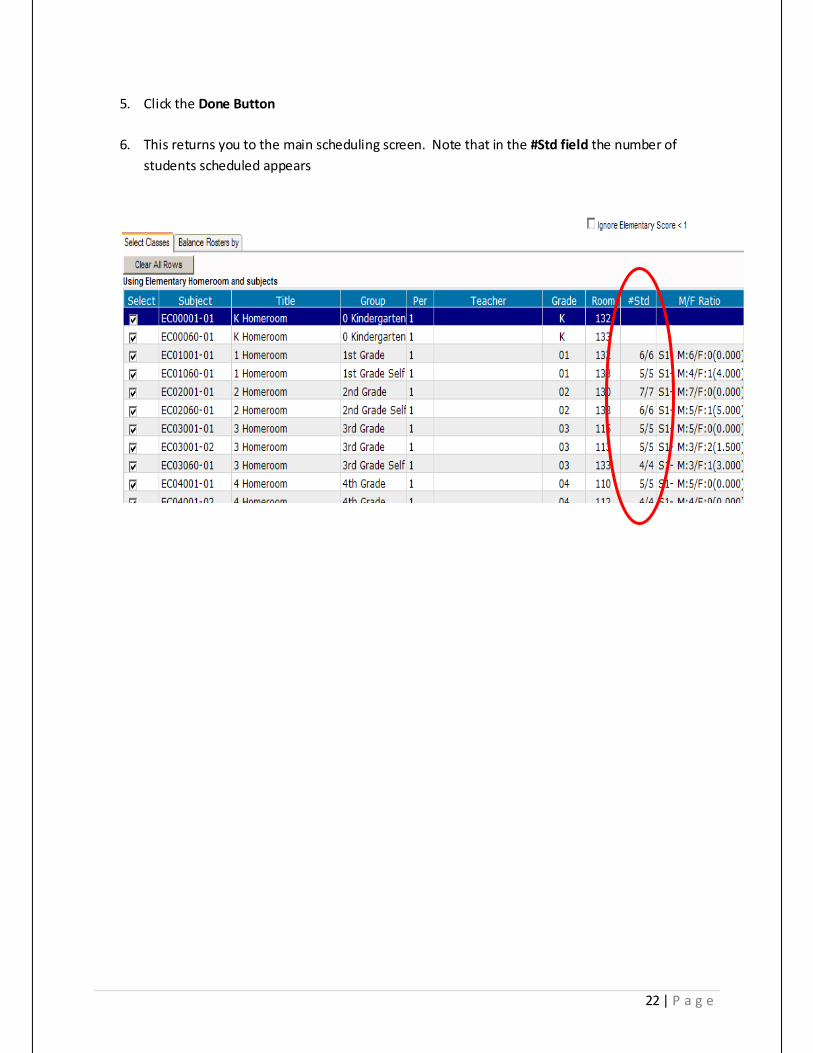
5. Click the Done Button
6. This returns you to the main scheduling screen. Note that in the #Std field the number of students scheduled appears
23 | P a g e
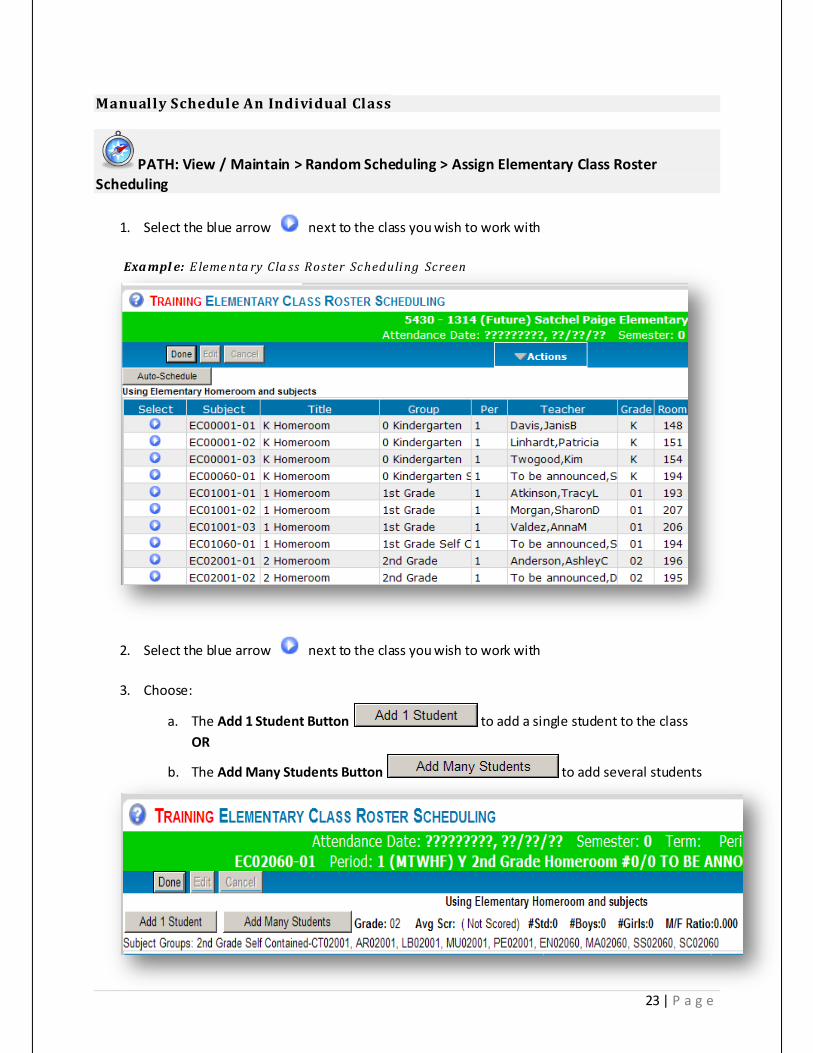
Manually Schedule An Individual Class
PATH: View / Maintain > Random Scheduling > Assign Elementary Class Roster Scheduling
1. Select the blue arrow next to the class you wish to work with
Exa mpl e: E leme nta ry Cla ss Roster Scheduli ng Screen
2. Select the blue arrow next to the class you wish to work with
3. Choose:
a. The Add 1 Student Button to add a single student to the class OR
b. The Add Many Students Button to add several students
24 | P a g e
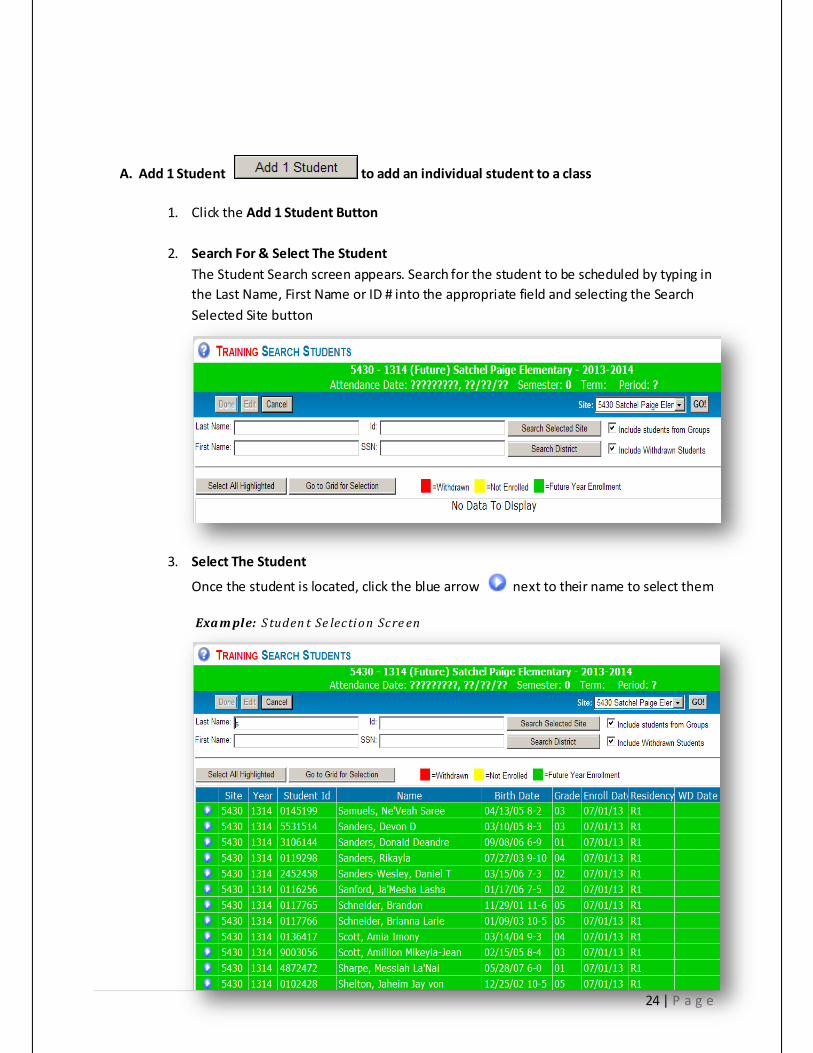
A. Add 1 Student to add an individual student to a class
1. Click the Add 1 Student Button
2. Search For & Select The Student The Student Search screen appears. Search for the student to be scheduled by typing in the Last Name, First Name or ID # into the appropriate field and selecting the Search Selected Site button
3. Select The Student
Once the student is located, click the blue arrow next to their name to select them
Exa m ple: S tuden t Se lecti on Scre en
25 | P a g e
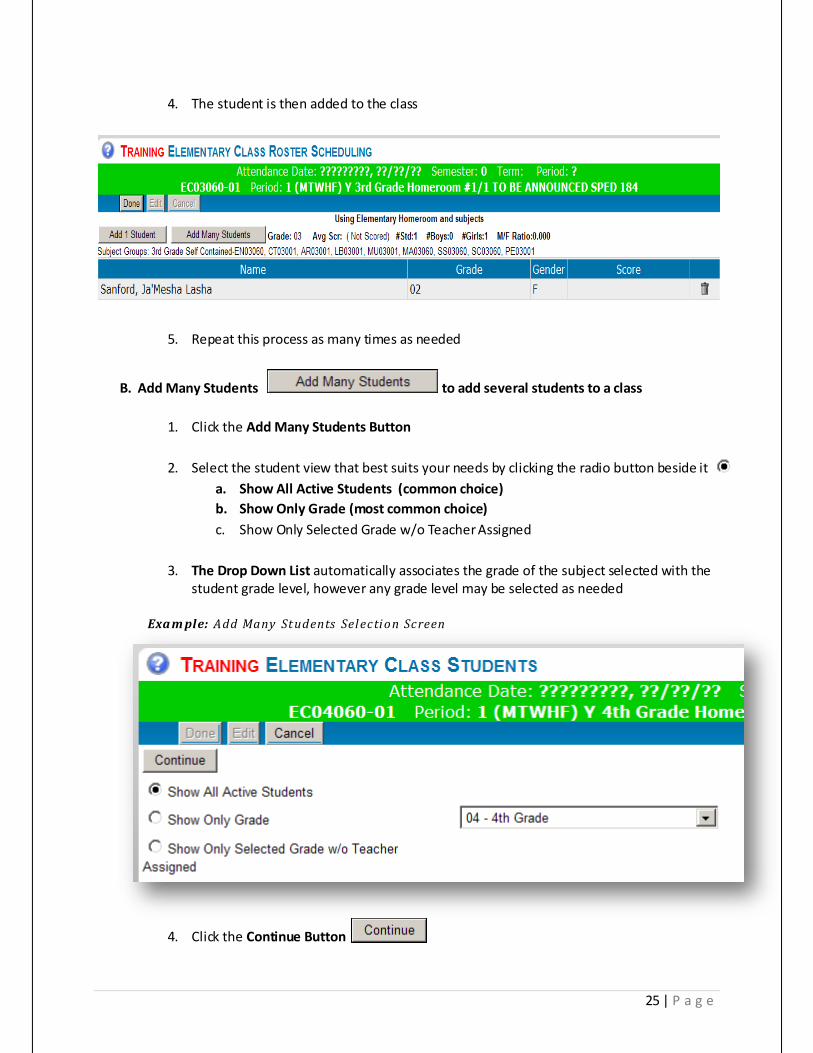
4. The student is then added to the class
5. Repeat this process as many times as needed
B. Add Many Students to add several students to a class
1. Click the Add Many Students Button
2. Select the student view that best suits your needs by clicking the radio button beside it a. Show All Active Students (common choice) b. Show Only Grade (most common choice) c. Show Only Selected Grade w/o Teacher Assigned
3. The Drop Down List automatically associates the grade of the subject selected with the
student grade level, however any grade level may be selected as needed
Exa m ple: Add Many St udents Sel ecti on Screen
4. Click the Continue Button
26 | P a g e
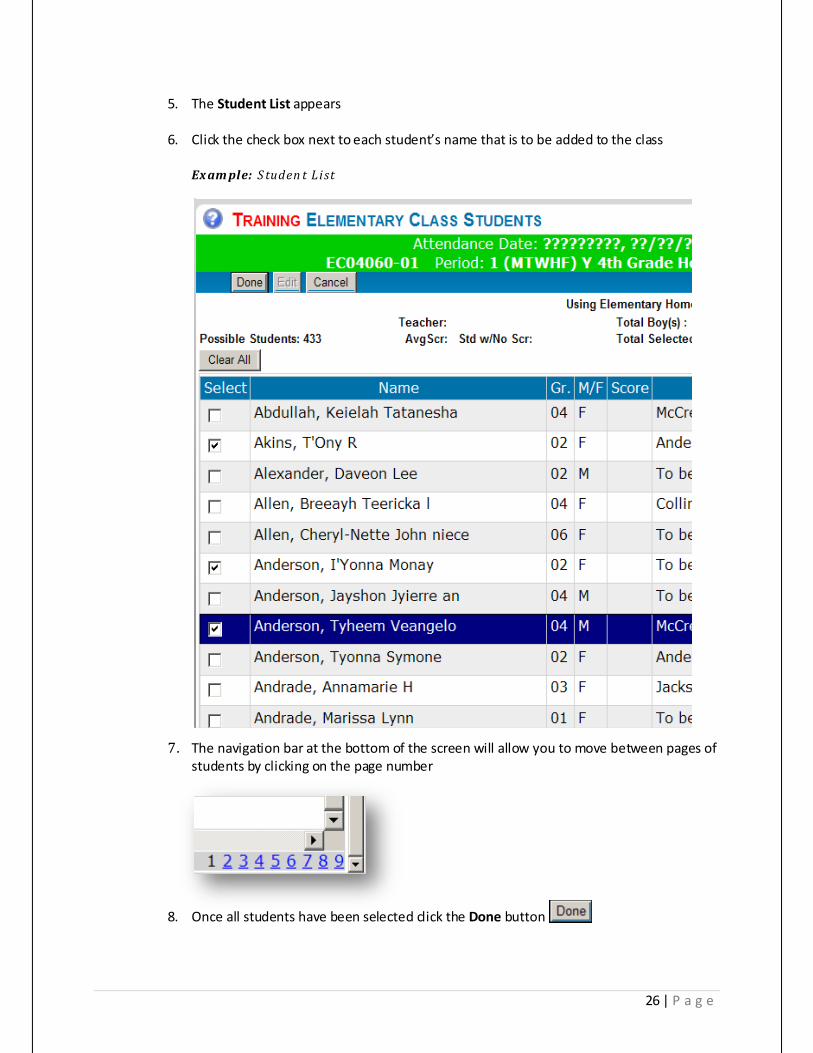
5. The Student List appears
6. Click the check box next to each student’s name that is to be added to the class Ex am ple: S tuden t Li st
7. The navigation bar at the bottom of the screen will allow you to move between pages of
students by clicking on the page number
8. Once all students have been selected click the Done button
27 | P a g e
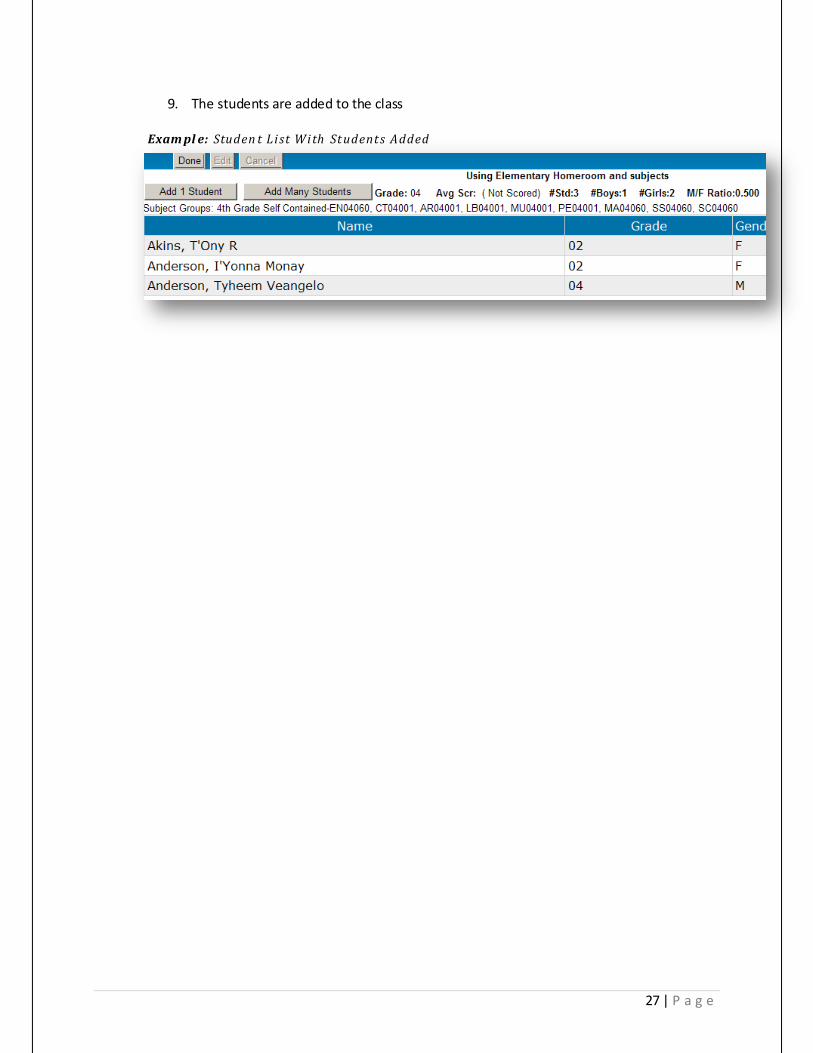
9. The students are added to the class
Exam pl e: Studen t Li st Wi th St udent s Added
28 | P a g e
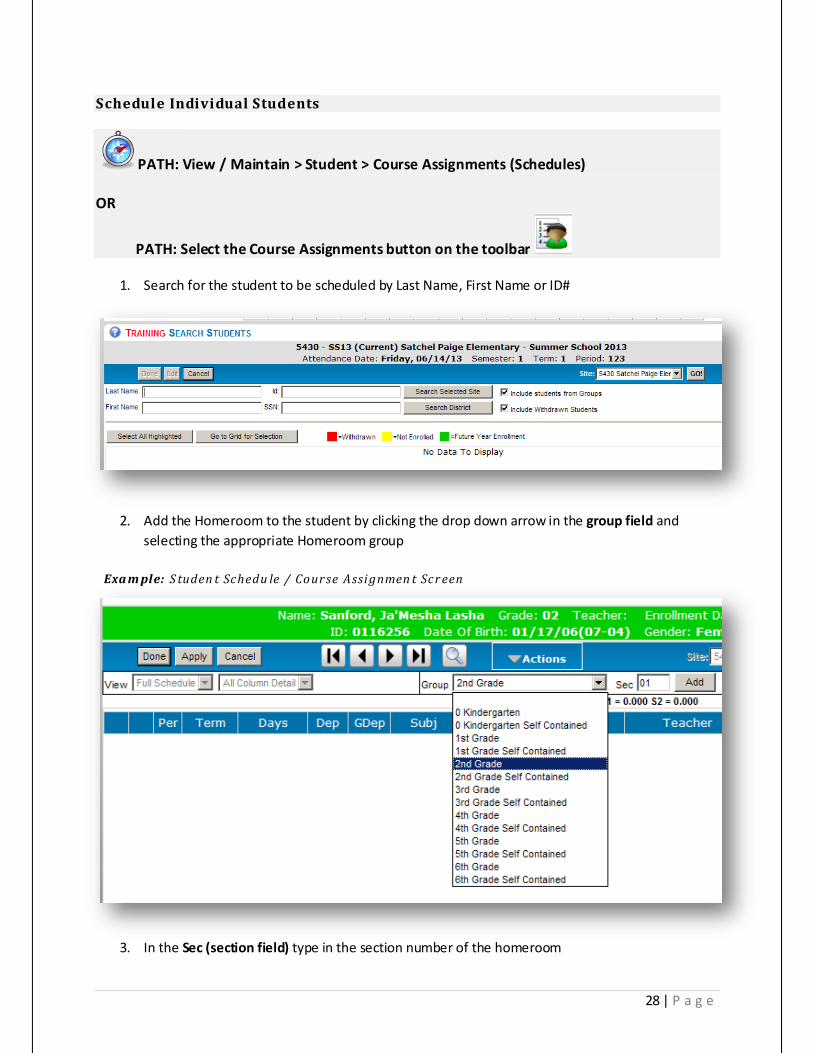
Schedule Individual Students
PATH: View / Maintain > Student > Course Assignments (Schedules) OR
PATH: Select the Course Assignments button on the toolbar
1. Search for the student to be scheduled by Last Name, First Name or ID#
2. Add the Homeroom to the student by clicking the drop down arrow in the group field and selecting the appropriate Homeroom group
Exa m ple: S tuden t Schedu le / Cour se Assi gnmen t Scr een
3. In the Sec (section field) type in the section number of the homeroom
29 | P a g e
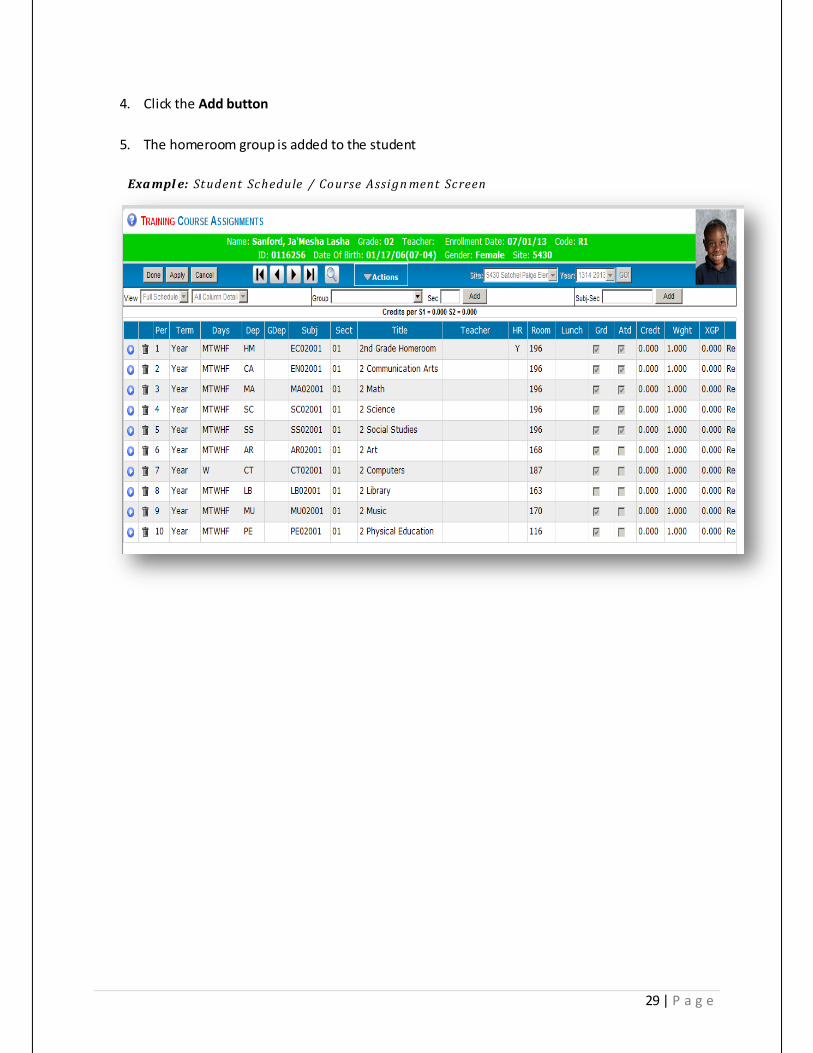
4. Click the Add button
5. The homeroom group is added to the student
Exa mpl e: St udent Schedule / Course Assi gn ment Screen
30 | P a g e
Vocabulary Consecutive Periods Classes that need to span more than one period really needs to be reflected accurately in the subject
Interactive Master Scheduler Builder ( IMSB) An electronic scheduling board which the user interacts with to develop a building’s mater schedule. It mathematically places sections in a period with a teacher, considering student course requests, potential conflicts, and teacher assignments
Master Scheduling Master Scheduling is the process by which schools build their comprehensive schedule for the school year. It is a complex procedure that requires the careful management and direction of a school’s resources. The end goal is of this process is to utilize a school’s assets to the best educational advantage of the students
Max Size View Maintain Menu > Site Class Sections > Subjects & Sections The Max Size of a class tells the Interactive Scheduler Builder the maximum number of seats to allocate to a subject Sections Each subject is broken into sections. The number of sections needed is determined by the number of students who are assigned to or have requested through course requests to take a subject
Example: MA12002 Math12
• 300 students requested Math 12 • Each classroom can hold 30 students • 300 ÷30 = 10 sections
Subject The identifying title and number of a course that is offered at a school Example: AR07002 Art7
Tyler KCPS utilizes the web based Tyler Student Information System to create and manage the master schedule for each school in the district
31 | P a g e
MASTER SCHEDULING 1
TYLER 1
MASTER SCHEDULING TASK LIST 1
OPEN & LOG IN TO TYLER 2
SECURITY/ACCESS 2
SELECT/LOG IN TO THE FUTURE SCHOOL YEAR 4
MASTER SCHEDULING METHODS 5
BECOME FAMILIAR WITH ELEMENTARY SCHEDULING GUIDE LINES 6
ADOPTING SUBJECTS 9
CLASS SECTIONS: ADD/EDIT/DELETE 11
SUBJECT GROUPS & SECTION LISTS 14
ASSIGNING TEACHERS 17
ASSIGNING STUDENTS TO CLASSES 20