megacab xl instructions (1008 5/30/17)
TRANSCRIPT

1
MegaCab XL INSTRUCTIONS (1008 5/30/17)
PRE-INSPECT TRUCK
(You need to know what works before starting to disassemble)
Marker Lights Horn
Speakers Heater
Washer Pump ABS Brake System Rear Utility Lights
Disconnect battery before you do any work on your truck.
Remove and keep these components: Seats
Seat belts File pocket
Back wall panels up to door Remove wires that attach/run around back of cab
Side exterior grab bars Speakers and mounts
Roof horns (you will gain access later) Backwall air vent
This kit comes with a universal conversion panel. The side molded-in step will only match up to a Peterbilt Unibilt cab. All other cabs will require an extra bead of Alumilastic sealant
at that area.
2
1
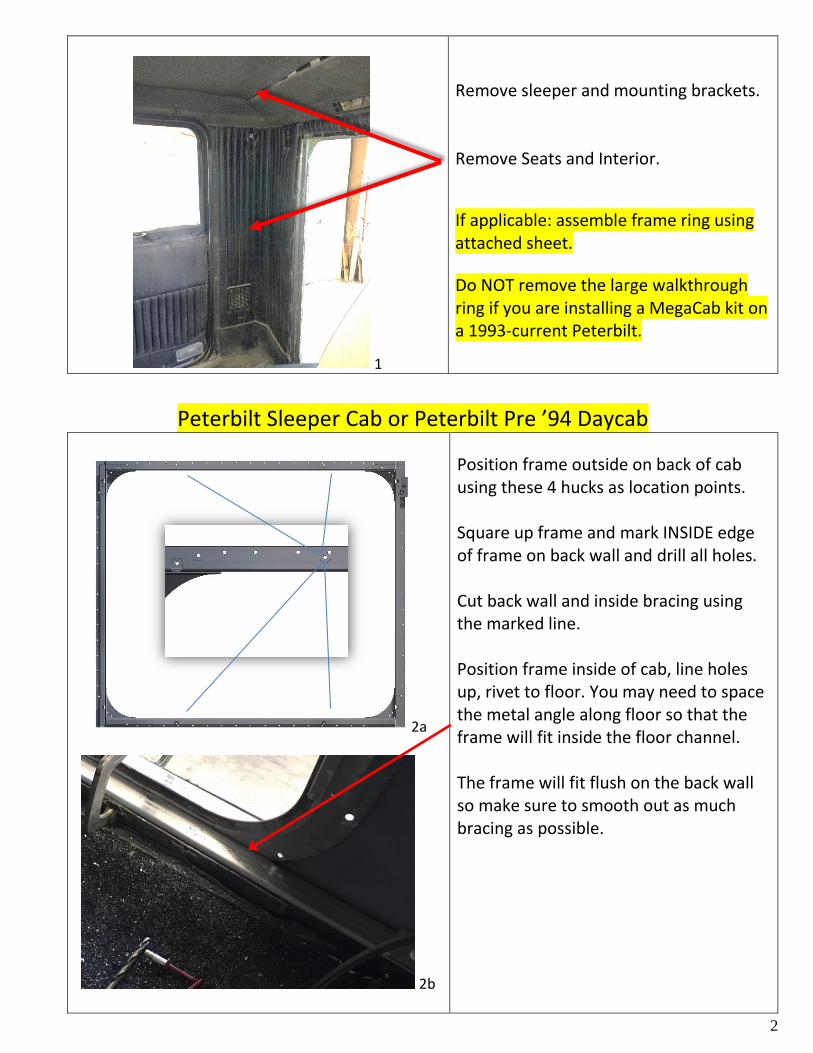
Remove sleeper and mounting brackets. Remove Seats and Interior.
If applicable: assemble frame ring using attached sheet.
Do NOT remove the large walkthrough ring if you are installing a MegaCab kit on a 1993-current Peterbilt.
Peterbilt Sleeper Cab or Peterbilt Pre ’94 Daycab
2a
2b
Position frame outside on back of cab using these 4 hucks as location points. Square up frame and mark INSIDE edge of frame on back wall and drill all holes. Cut back wall and inside bracing using the marked line. Position frame inside of cab, line holes up, rivet to floor. You may need to space the metal angle along floor so that the frame will fit inside the floor channel. The frame will fit flush on the back wall so make sure to smooth out as much bracing as possible.

3
Kenworth
3.1
3.2
3.3
Remove braces from back wall of cab if applicable. (This helps to mark back wall for cutting later.) Place brace ring inside of cab. Mark all brace work that needs to be removed from interior of cab. (Roof area and upper side braces). Trim interior braces. (Do not completely remove braces, just trim them to size.) Mark the ring’s inside perimeter on interior of cab and mark all holes. This will be your opening cut line. Trim the inside perimeter. Once trimmed, drill holes using 13/64” drill bit. Install rivets in “feet” of ring with ring pushed to back of cab and flush on floor.

4
International
4.1
4.2
Locate PANEL on back of cab before you place interior brace. Panel will push up underneath gutter and be centered along back wall. Panel will land on the back wall seams with side edges near flush with outside edge of seam. Mark holes, remove panel and drill. Hold interior brace on outside of back wall. Mark center area for cut. Note: You will not use the lower interior brace on the ring. You will also need to trim the bottoms of the side pieces of the ring to fit.
5
Your cut and drilled back wall will mimic this image.

5
6
Use supplied template to notch the lower section of the panel for air ride clearance if applicable on Peterbilt Conversions. Do this before test fitting panel. (Template is on last page of instructions.)
TEST FIT PANEL NOW.
7
Be sure to remove all aluminum shavings and burrs from cab. Use as many alignment punches as needed to align holes. Make sure all holes line up properly. Remove kit and continue to next step.
Sealer:
When sealing panel, use a small amount of Alumilastic (included) on panel and cab. You
only need a thin coat to achieve a good seal. Do not leave a bead of sealer and then try to rivet as this will dent panel.
To make sure of proper seal, use silicone sealer on the inside of your cab.

6
8.1
8.2
Line up all holes through panel, truck skin,
and interior ring.
Huck Use ¼” pull rivets on the bottom of kit. Use the smaller hucks on the sides and use the larger hucks on the roof. Bracing in cab may prevent use of huck gun in some places. Verify during pre-fit and use rivets for those areas.
Rivet Use the same rivets all of the way around except for the upper corners. Those corners will need the longer rivets because of the thicker bracing.
Caution:
Rivets must fit loose. Rivets must be inserted straight. Be sure to remove all shavings between cab and plug.

7
Interior You will need to loosely install headliner and sides. Mark the areas of interior that overhang over the brace ring. Trim away interior. The boot trim will cover up any rough edges that result.
*You will still have to do this step even if a “Full Cab Interior” was ordered.*
9.1
9.2
Clean up any loose debris before installing interior. It may be necessary to use air to blow debris out of floor brace. (If this is skipped, you may hear rattling in cab.) Peterbilt American Class: Trim speaker box to fit flush with frame and notch for diamond plate to slide through. Install lower back wall carpet. Install diamond plate tool tray. Install speaker box (American Class). Install headliner. Install console. Center boot trim at frame and install. Form boot into back wall contour. Tape/Glue edge to fiberglass back wall to hold in place until upper interior is secured. After interior boot is secured, center and install pocket with backing. Hold upper back wall interior in place and install window ring. Be cautious to screw into bracing of kit otherwise you may screw through fiberglass/gel coat. Do not forget to reinstall speakers, lights, seatbelts, etc.…


9
Paint Process for Fiberglass Parts
1. Wash with a mild, non-abrasive dish soap and water. 2. Sand panel. We recommend using 320 grit sand paper. 3. Wipe down with a wax and grease remover. 4. Wipe with acetone. 5. Your panel is now prepped and ready for paint.
Notes: ____________________________________________________________________________________________________________________________________________________________ ____________________________________________________________________________________________________________________________________________________________ ____________________________________________________________________________________________________________________________________________________________ ____________________________________________________________________________________________________________________________________________________________ ____________________________________________________________________________________________________________________________________________________________

10

11
GASKET-WINDOW INSTALLATION INSTRUCTIONS
1001
You will need a window gasket tool. You can purchase one through your local auto store.
Outside of truck (gelcoat/painted side)
Glass Side Panel Side
1

12
Clean area of debris around window opening.
Start installing the gasket by placing one end in the lower center of the window cutout.
Work your way around the opening.
Window Gasket Installed
Make sure that the two ends meet up and touch flush.
2
13
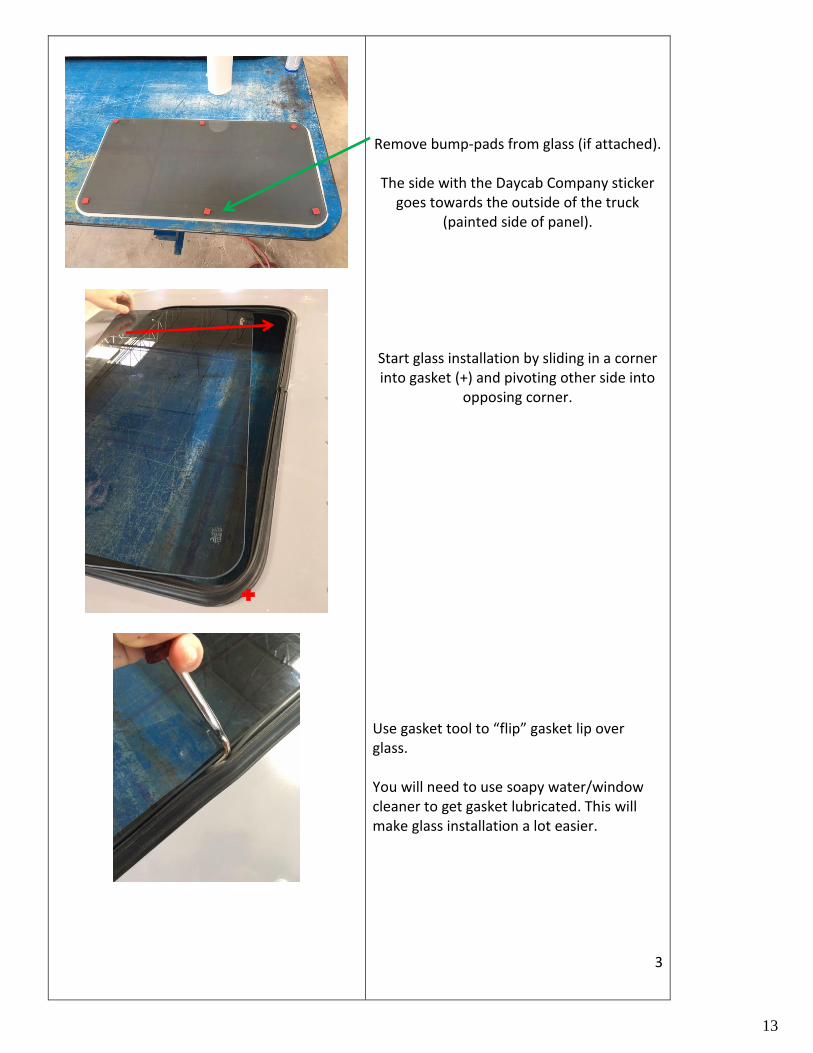
Remove bump-pads from glass (if attached).
The side with the Daycab Company sticker goes towards the outside of the truck
(painted side of panel).
Start glass installation by sliding in a corner into gasket (+) and pivoting other side into
opposing corner.
Use gasket tool to “flip” gasket lip over glass. You will need to use soapy water/window cleaner to get gasket lubricated. This will make glass installation a lot easier.
3

14
Once you get glass fully inserted into gasket, you will need to use the gasket tool to push the locking flap into the gasket around the whole window. This locks the window into place.
Make sure that the gasket ends are forming a tight seam
Inspect the corners to make sure that no wrinkles are visible and that the locking flap is tight.
4
Daycab Company
www.daycabs.com

15