message audit log
TRANSCRIPT

Message Audit Log v4.4.543
Message Audit Log
2
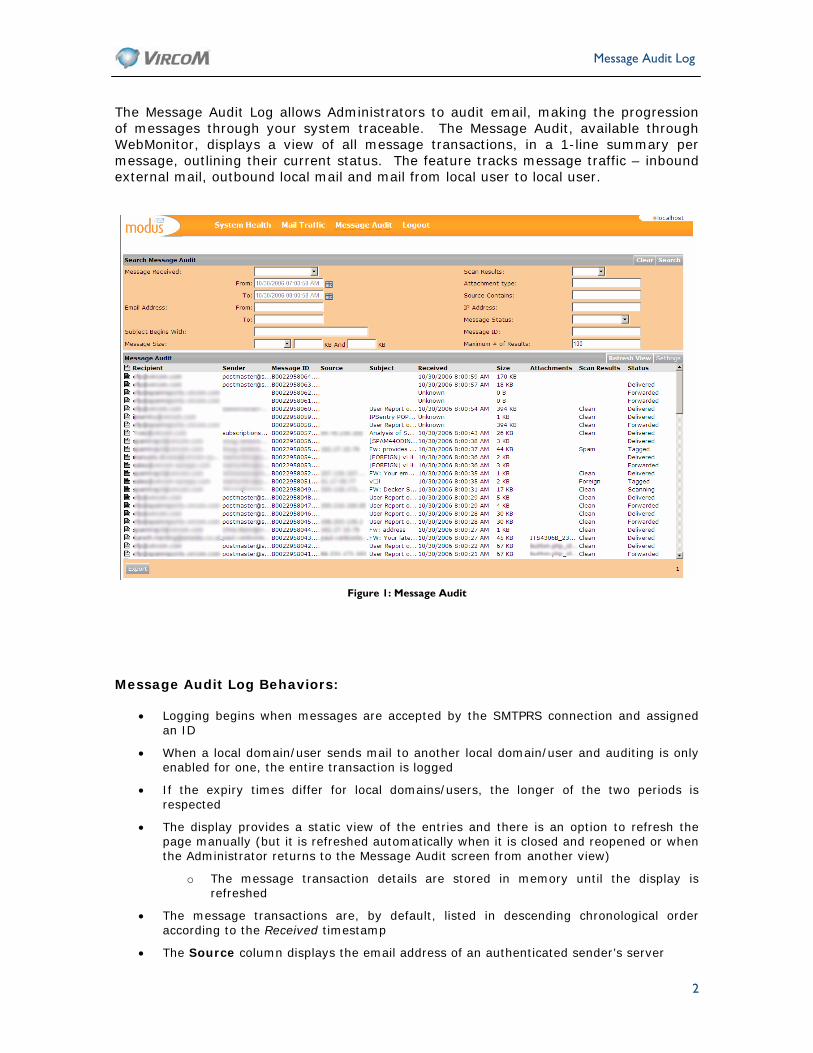
The Message Audit Log allows Administrators to audit email, making the progression of messages through your system traceable. The Message Audit, available through WebMonitor, displays a view of all message transactions, in a 1-line summary per message, outlining their current status. The feature tracks message traffic – inbound external mail, outbound local mail and mail from local user to local user.
Figure 1: Message Audit
Message Audit Log Behaviors:
• Logging begins when messages are accepted by the SMTPRS connection and assigned an ID
• When a local domain/user sends mail to another local domain/user and auditing is only enabled for one, the entire transaction is logged
• If the expiry times differ for local domains/users, the longer of the two periods is respected
• The display provides a static view of the entries and there is an option to refresh the page manually (but it is refreshed automatically when it is closed and reopened or when the Administrator returns to the Message Audit screen from another view)
o The message transaction details are stored in memory until the display is refreshed
• The message transactions are, by default, listed in descending chronological order according to the Received timestamp
• The Source column displays the email address of an authenticated sender’s server

Message Audit Log
3
• When messages are sent to multiple addresses (including cc: addresses and multiple forwards), each address has its own summary line
• When message logs are forwarded through the use of the Forward option in the Audit screens, that transaction is also recorded in the audit log, along with the credentials of the person who initiated it
• Partial message deliveries
o It is possible that some messages are only partially delivered:
One of the addresses in the recipient list is not valid (misspelled or not a valid account)
Account over quota
Mechanical failure – hard disk issue, services are down, etc.
o In situations where the account is over quota or the address is invalid, the message is bounced back and the Status displays Returned to Sender
The reasons why this occurred will be displayed in the Log Detail view
o If delivery fails for any reason, the Status column displays Undelivered and the details about the cause for failure will be displayed in the Log Detail view
Log Detail View
• Message details are displayed by clicking on the message
Figure 2: Log Detail View

Message Audit Log
4
• The Log Detail View displays a header overview which includes the Sender, Message ID, attachment type (if applicable), Recipient, etc.
Figure 3: Message Header
• The lower section of the Log Detail View shows consolidated transaction information of the selected message:
o The full transaction history of the various states it reaches in the delivery process and the timestamps for when each state is reached
Figure 4: Transaction History
o The message disposition: filtered and quarantined or discarded according to the scan settings, delivered successfully to the destination address (local or non-local), or unsuccessful delivery
o If delivery was unsuccessful, full details for the cause are displayed here
o When the message is downloaded via POP or IMAP by the recipient’s mail client, the IP used for the connection is displayed here

Message Audit Log
5
• If a message is quarantined, both the original ID and the quarantine ID numbers are displayed
Figure 5: Quarantined Message
Searching Messages
The search feature allows you to search for specific messages in the message audit log. The following fields are available to perform a search:
Figure 6: Search Message Audit
• Messages Received
o From the pull-down menu, select from:
Today
Within the last week
Between
o Select a date From: and a date To: by clicking on the calendar icon or by manually entering a date
• Email Address
o Enter an email address in From: and/or To:
• Subject Begins With
o Enter the first word of the subject line

Message Audit Log
6
• Message Size
o Use this field to search for messages by size
o From the pull-down menu, select from:
• More than
• Less than
• Between
o Enter the size (in KB)
• Scan Results
o Search messages based on their scan results
o Use the pull-down menu to select from:
Trusted Blocked
Spam Virus
FA Phishing
Clean Custom
Foreign
• Attachment Type
o Search for messages based on attachment type
• Source Contains
o Search for messages based on source addresses
• IP Address
o Search for messages based on senders’ IP addresses
• Message Status
o Search for messages based on their current status
o From the pull-down menu, select from:
Invirus Locked
Scanning Deleted
Tagged Blocked
In Spam Incoming
Released False Positive
Holding Dead
Delivered Undeliverable
Forwarded Relayed
Custom Filter Generated by List
Returned Read
Modified Respooling

Message Audit Log
7
• Message ID
o Search messages by their message ID
o Enter the messages ID based on the file names in the Spool directories
• Maximum # of Results
o Enter the maximum number of search results
• Click on Search to begin the search
• Click on Clear to clear the fields
• Click on Export to export the complete message audit log
o Select either CSV or HTML format
Search Results
• The search results view can be configured to provide up to eight columns of information
o Click on Settings to select which attributes to present in the search results
Figure 7: Search Results Settings
Because of database constraints, the default maximum number of results is 100. This setting limits all searches. Remember to change it when performing searches. Be aware that thehigher the number, the longer the search will take to execute.

Message Audit Log
8
Figure 8: Search Results
• To view the message Audit Log details, click on a particular entry to open the detailed view
o Click on Export to export the log detail for a particular message to a HTML or text file
The file can be opened in a Web browser or saved to any location
o Click on Forward to forward the log
The message is sent from the postmaster account
o Click on Release to release blocked messages to their destined recipients

Message Audit Log
9
Configuring Modus
The following section provides information about configuring the Message Audit feature in the various panels of the Modus Console.
Logs – Properties – Message Audit
Enable the Message Audit feature from this panel.
• Enable Audit Logging
o Select this option to enable the Message Audit feature
• System-wide
o Select this to enable Audit logging for the entire system
o Specify when the log will expire (in days)
Figure 9: Enabling Message Audit

Message Audit Log
10
System – Properties – Message Audit Database
Use this panel to configure ModusMail to communicate with your Microsoft SQL server.
• Server or IP Address
o Enter the IP address of the SQL server
• Database Name
o Enter the name of the message audit database in SQL
• User Name
o Enter the user name for the database
• Password
o Enter the password for the database
Figure 10: Message Audit Database
Message Audit Log and SQL Server
If you plan to use the Message Audit feature, Vircom recommends that the SQL server not be installed on the same machine as ModusMail.
The Message Audit generates large amounts of data. While the feature was designed to improve performance, the data that is generated must be processed and stored. This activity taxes the CPU and IO.
If the SQL server runs on the same machine as ModusMail, you can expect a 60% drop in performance with heavy mail loads.
Our tests have shown that there are few, if any, performance issues if the SQL server is installed on a dedicated machine.

Message Audit Log
11
Creating an SQL Message Audit Database
Use the following to create a new SQL Audit database.
• Go to the SQL Enterprise Manager
• Create a database and name it Audit
• Select Properties and go to Options
o Ensure that Auto update statistics is enabled
o Ensure that Auto shrink is disabled
• Click on OK
• Start the SQL Query Analyzer
• Select your database (Audit)
• Click on File – Open and go to …Vircom\ModusProduct\DBStructures\SQL Server\Audit
• Run the following scripts, in the following order:
o Audit_tables.sql
o Audit_procs.sql
o Audit_jobs.sql
• Once the tables have been created, go to the System – Properties – Message Audit Database in the Console
o Enter the required information
o Click on Apply
• In the Console, go to Logs – Properties – Message Audit
o Enable Audit Logging and System-Wide Logging
o Click on Apply
• Go to System – Properties – Services and stop/start all services
• Go to a Command Prompt and type iisreset <enter> to restart the IIS service
• The Message Audit feature has been configured for use in WebMonitor

Message Audit Log
12
Security Enhancements
To improve security, the audit database user should have minimum privileges.
• No server administrator role
Figure 11: SQL Login Server Roles
• Access granted to the Audit database only
Figure 12: SQL Login Database Access

Message Audit Log
13
• Only db_datareader and db_datawriter permissions for the Audit database
Figure 13: SQL Database User Role
• No permission to create, drop, or alter Audit tables (starting with mt_audit*)
• No permission to use audit tables directly (no select, no insert, no update, no delete)
• Permission to execute all audit DB stored procedures (starting with mp_audit*)
Figure 14: SQL Database User Permissions
Reminder: if the SQL Server is installed on the same machine as ModusMail and the Message Audit is enabled, you will likely experience performance problems.

Message Audit Log
14
Web – WebAdmin – Privileges
You must enable the Message Audit feature for domain Administrators from this panel.
• Allowed Domain properties
o This button lets you specify which properties of the domain a domain administrator has the ability to modify through the WebAdmin console:
• Message Audit
Domains – Preferences – Message Audit
Use this panel to override the system settings for Audit logging.
• Override server default settings
o Enable to override the System properties for Audit logging
• Enable Message Audit Logging
o Use to enable Message Audit logging for a domain
• Log expires in:
o Enter the number of days before the log expires
Figure 15: Domain Configuration

Message Audit Log
15
Users – Preferences – Message Audit
Use this panel to override the system and/or domain settings for Audit logging.
• Override domain default settings
o Enable to override the domain properties for Audit logging
• Enable Message Audit Logging
o Use to enable Message Audit logging for a user
• Log expires in:
o Enter the number of days before the log expires
Figure 16: User Configuration
You may need to add the WebMail/WebQuarantine URL or disable the pop-up blocker in Internet Explorer:
• Go to Internet Options (from the Control Panel or in IE, Tools – Internet Options) • Click on Privacy • Click on Settings • Enter the URL for your WebMail/WebQuarantine in the …to Allow field and click on
Add (then Close) or
• From the Privacy panel, remove the check-mark for Block pop-ups • Click on OK