mi health plan benefits guide for... · 2020-05-13 · march 9, 2020 mi health plan benefits user...
TRANSCRIPT

June 26, 2020 MI Health Plan Benefits User Guide Page 1 of 51
MI Health Plan Benefits
Application User Guide

June 26, 2020 MI Health Plan Benefits User Guide Page 2 of 51
Table of Contents
1 – MI Health Plan Benefits Overview ................................................................................................... 3
2 – Accessing MI Health Plan Benefits ................................................................................................. 3
2.1 – Logging In ................................................................................................................................. 3
2.2 – Forgotten Username ................................................................................................................. 4
2.3 – Forgotten Password .................................................................................................................. 4
3 – How to Become an HPB Domain Administrator .............................................................................. 6
3.1 – Adding a Domain Administrator to Your Provider ID ................................................................. 6
3.2 – Applying to be a Domain Administrator ..................................................................................... 8
3.3 – Application Approval/Denial .................................................................................................... 14
4 – Setting Up Your Account ............................................................................................................... 14
4.1 – Added by Domain Administrator ............................................................................................. 14
4.2 – Create an Account .................................................................................................................. 17
5 – User Profile and Provider IDs ........................................................................................................ 20
5.1 – User Profile Page .................................................................................................................... 20
5.2 – Change Password .................................................................................................................. 22
6 – Provider ID Management .............................................................................................................. 23
6.1 – Adding a New User ................................................................................................................. 26
6.2 - Editing an Existing User .......................................................................................................... 27
6.3 - Removing a User ..................................................................................................................... 29
6.4 – Editing Your Provider ID ......................................................................................................... 31
7 – Confirming Users – Domain Administrator .................................................................................... 32
7.1 - Confirm Users Alert ................................................................................................................. 32
7.2 - Confirm Users Page ................................................................................................................ 32
7.3 – Confirm Users Scheduled Emails ........................................................................................... 33
7.4 – Reactivating Users .................................................................................................................. 34
8 – Review MSA-1038 Status ............................................................................................................. 34
8.1 - MSA-1038 Search ................................................................................................................... 35
8.2 - MSA-1038 Results ................................................................................................................... 37
9 – Individual Eligibility Lookup ........................................................................................................... 37
9.1 – Individual Eligibility Search ..................................................................................................... 37
9.2 – Individual Eligibility Results ..................................................................................................... 39
9.3 – Printing Results ....................................................................................................................... 41

June 26, 2020 MI Health Plan Benefits User Guide Page 3 of 51
9.4 – Benefit Plans Glossary ........................................................................................................... 42
10 – Multiple Eligibility Lookup ............................................................................................................ 44
10.1 – Multiple Eligibility Search ...................................................................................................... 44
10.2 – Multiple Eligibility Results...................................................................................................... 47
10.3 – Printing Results ..................................................................................................................... 50
1 – MI Health Plan Benefits Overview MI Health Plan Benefits is a web application built by and hosted by Michigan Public Health Institute
(MPHI) that allows registered Providers to query patients for Medicaid eligibility.
Providers can have a combination of any of the following roles:
• User – Allows the user to perform Individual and Multiple Eligibility lookups.
• Domain Administrator – Users with the Domain Administrator role manage the organization’s
list of authorized users.
2 – Accessing MI Health Plan Benefits The MI Health Plan Benefits application can be accessed at https://hpb.mihealth.org
2.1 – Logging In
You can log into the MI Health Plan Benefits application from the Login page. Enter a valid Username
and Password combination and select the Log In button to log in to the application.
When you successfully login to the application you will be taken to the Home page.
Note: If you fail 5 consecutive failed login attempts your account will be locked for a 10-minute period.
Every failed attempt thereafter, while the account is already locked, will increase the total lockout
time.

June 26, 2020 MI Health Plan Benefits User Guide Page 4 of 51
2.2 – Forgotten Username
If you have forgotten your MI Health Plan Benefits account username, you can recover it by following
the steps below:
Step 1: Select the “Forgot your username?” button on the Login page.
Step 2: Enter the email address associated with your MI Health Plan Benefits account and select the
Send Email button.
Step 3: MI Health Plan Benefits will send an email to the provided email address. The email will
contain a list of all the usernames associated to the provided email address in MI Health Plan
Benefits.
2.3 – Forgotten Password
If you have forgotten your MI Health Plan Benefits account password, you can reset it by following the
steps below.
Step 1: Select the “Forgot your password?” button on the Login page.

June 26, 2020 MI Health Plan Benefits User Guide Page 5 of 51
Step 2: Enter the username associated with your MI Health Plan Benefits account.
Step 3: An email will be sent to the email address associated with the entered username. Follow the
link provided in the email to navigate to the Reset Password page.
Step 4: Enter the username for your account along with your new password in the Password and
Confirm Password fields. Then, select the Reset button to save the new password.

June 26, 2020 MI Health Plan Benefits User Guide Page 6 of 51
3 – How to Become an HPB Domain Administrator Potential users who intend to manage users for a Provider ID within MI Health Plan Benefits (HPB)
must be set up as a Domain Administrator for that Provider ID. There are two possible ways to
become a Domain Administrator:
1. Have an existing Domain Administrator add you to a Provider ID that they manage, or
2. Fill out an application to become a Domain Administrator.
3.1 – Adding a Domain Administrator to Your Provider ID
A user with Domain Administrator access may add another person to their Provider ID as a Domain
Administrator by completing the following steps.
Step 1: Select the “Update User Profile and Provider IDs” link on the Home page to be taken to
your User Profile page.
Step 2: Scroll to the “Approved Provider IDs” section. Find the Provider ID that you would like to add
the user to and select the View link to navigate to the Provider ID Management page.

June 26, 2020 MI Health Plan Benefits User Guide Page 7 of 51
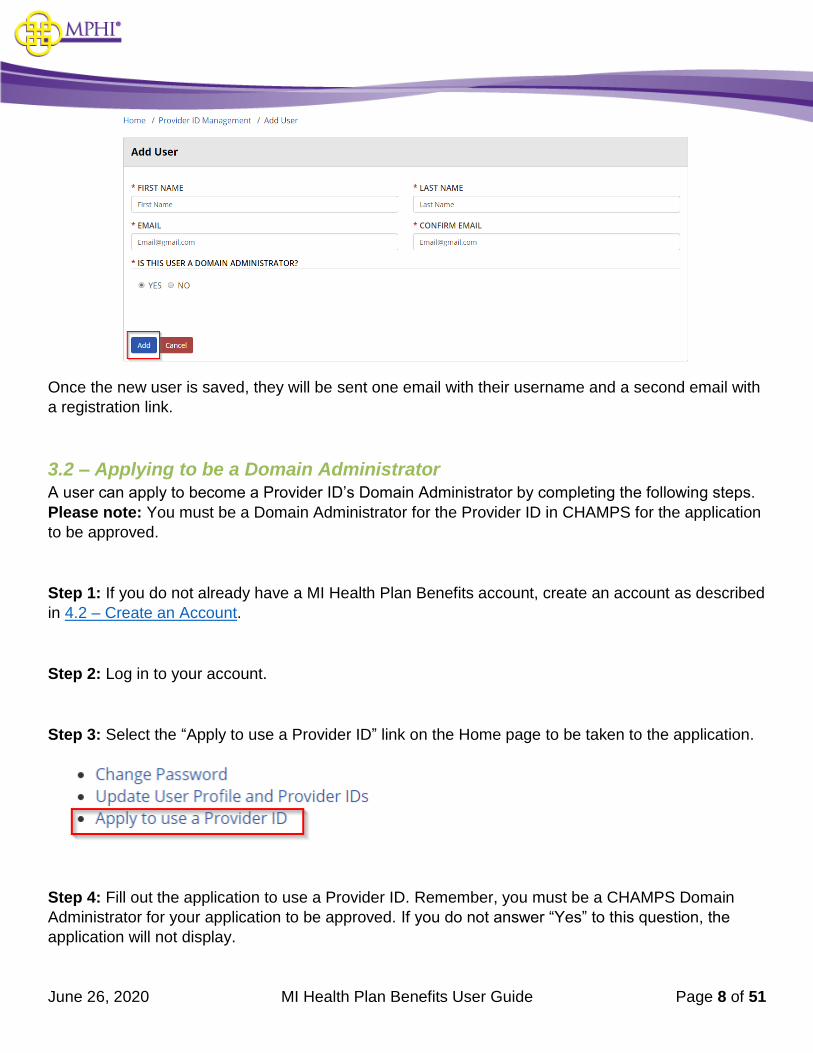
Step 3: Scroll to the Manage Users Section and select “Add User.”
Step 4: Fill out the Add User form and check “Yes” to answer: “Is this user a Domain Administrator?”
Step 5: Select the “Add” button to save the new user.
June 26, 2020 MI Health Plan Benefits User Guide Page 8 of 51
Once the new user is saved, they will be sent one email with their username and a second email with
a registration link.
3.2 – Applying to be a Domain Administrator
A user can apply to become a Provider ID’s Domain Administrator by completing the following steps.
Please note: You must be a Domain Administrator for the Provider ID in CHAMPS for the application
to be approved.
Step 1: If you do not already have a MI Health Plan Benefits account, create an account as described
in 4.2 – Create an Account.
Step 2: Log in to your account.
Step 3: Select the “Apply to use a Provider ID” link on the Home page to be taken to the application.
Step 4: Fill out the application to use a Provider ID. Remember, you must be a CHAMPS Domain
Administrator for your application to be approved. If you do not answer “Yes” to this question, the
application will not display.

June 26, 2020 MI Health Plan Benefits User Guide Page 9 of 51
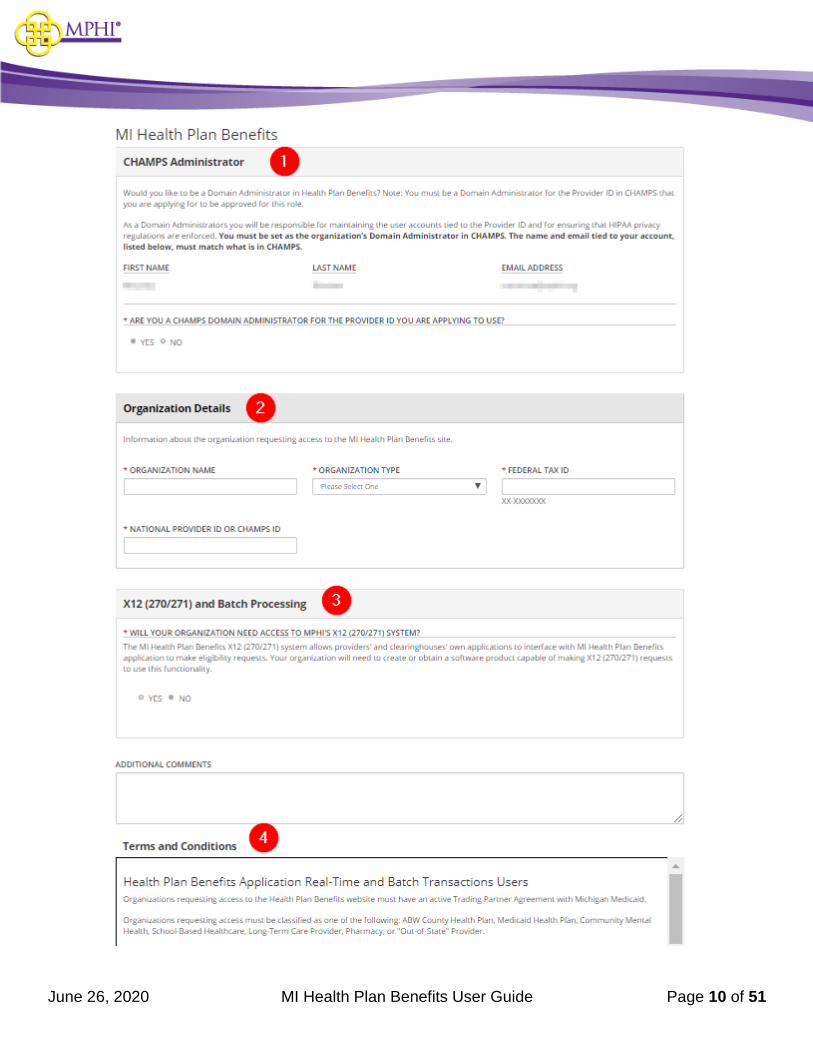
The application is broken into 4 sections:
• CHAMPS Administrator
• Organization Details
• X12 (270/271) and Batch Processing
• Terms and Conditions
June 26, 2020 MI Health Plan Benefits User Guide Page 10 of 51

June 26, 2020 MI Health Plan Benefits User Guide Page 11 of 51
1. CHAMPS Administrator
The First Name, Last Name, and Email Address fields in the CHAMPS Administrator section are
prepopulated with values you entered when creating your account. You are also asked to confirm that
you are a Domain Administrator for the Provider ID in CHAMPS.
2. Organization Details
The following fields are required in the Organization Details section of the application:
• * Organization Name – The name of your organization. This value needs to match the name
of the organization recorded in CHAMPS.
• * Organization Type – The organization’s type. Possible values include:
o ABW County Health Plan
o Community Mental Health
o Long-Term Care Provider
o Medicaid Health Plan
o Out-of-State Provider
o Pharmacy
o School-Based Healthcare
o WIC
o Clearinghouse/Billing Agent
o Other Provider
o Other
• * Federal Tax ID – The organization’s federal tax ID.
• * The National Provider Identifier Or CHAMPS ID – The organization’s Provider ID. This
may be either a National Provider ID or a CHAMPS ID.

June 26, 2020 MI Health Plan Benefits User Guide Page 12 of 51
3. Organization Details, X12 (270/271) and Batch Processing
In the X12 (270/271) and Batch Processing section of the application for access, you must indicate
whether your organization will need access to MPHI’s X12 (270/271) system. The X12 (270/271)
system allows Providers’ and Clearinghouses’ own applications to interface with the MI Health Plan
Benefits application to make eligibility requests. To make use of the X12 (270/271) functionality, your
organization will need to create or obtain a software product capable of making X12 (270/271)
requests.
To request access to MPHI’s X12 (270/271) system, select “Yes” in response to the “Will your
organization need access to MPHI’s X12 (270/271) system?” question. You will be required to provide
the Public IP Addresses that will be making the X12 (270/271) requests.

June 26, 2020 MI Health Plan Benefits User Guide Page 13 of 51
If you have indicated that your organization will need access to MPHI’s X12 (270/271) system, you
will also need to indicate whether your organization needs to submit inquiries on behalf of other
Providers. When the “Yes” response is selected, you will be required to enter the following
information for each of your organization’s clients:
• * The client’s Name/Organization
• * The client’s Federal Tax ID
• * The client’s National Provider ID (NPI) or the client’s CHAMPS ID
4. Terms and Conditions
Before you can submit the application, you must first agree to the terms and conditions shown in the
Terms and Conditions section. Check the “I agree to the terms and conditions” checkbox to agree to
the terms and conditions.
Please Note: The terms and conditions for use of the Real-Time and Batch Transactions are different
than the terms and conditions for use of the X12 270/271 Real-time and Batch Transactions. Both
sets of terms and conditions are included in the Terms and Conditions section.

June 26, 2020 MI Health Plan Benefits User Guide Page 14 of 51
Application Submission
Once you have finished filling in all the required fields, select the Submit button to submit your
application for review. Upon submission, you will receive an email to confirm that your application has
been successfully submitted.
3.3 – Application Approval/Denial
Your application to be the Domain Administrator of a Provider ID in MI Health Plan Benefits site will
be reviewed within 10 days of your submission.
3.3.1 – Application Approval
When your application has been approved, you will be sent an email to inform you of the application’s
approval. This email may also contain attached instructions for how to associate MPHI as a billing
agent in CHAMPS if necessary.
3.3.2 – Application Denial
When your application has been denied, you will be sent an email to inform you of the denial. This
email will also contain the reason for the denial.
4 – Setting Up Your Account There are two different approaches to create a new account in MI Health Plan Benefits: a Domain
Administrator can add you to a Provider ID (see 4.1 – Added by Domain Administrator) or, if you
intend to apply to be a Domain Administrator for a Provider ID in Health Plan Benefits, you can create
a new account by selecting the “Create an Account” button on the Home page (see 4.2 – Create an
Account).
4.1 – Added by Domain Administrator
When a Domain Administrator has granted you access to a Provider ID, you will be sent an email.
Follow the steps listed below to accept access to the Provider ID.
Step 1: Select the link in the email to be taken to the MI Health Plan Benefits page for accepting
access to a Provider ID.
Step 2: If you already have a MI Health Plan Benefits account, log into the account by entering your
username and password then selecting the “Log In” button in the “Already Have an Account?”
section. Upon logging into your account, you will have access to the Provider ID.

June 26, 2020 MI Health Plan Benefits User Guide Page 15 of 51
If you do not already have an account, go to step 3.
Step 3: Fill out the Register New Account section by entering the following information. A red asterisk
(*) indicates a required field.
• * First Name – Your first name.
• * Last Name – Your last name.
• * Job Title – Your job title.
• * Email Address – Your email address. This address is where you will be sent emails
necessary to finalize account setup.
• * Email Confirmation – Re-enter your email address in this field to confirm that it was entered
correctly.
• * Phone Number – Your phone number.
• Extension – Your phone number extension, if necessary.
Step 4: Read through the Terms and Conditions and agree to them by selecting the “I have read and
agree to the Terms and Conditions” checkbox.

June 26, 2020 MI Health Plan Benefits User Guide Page 16 of 51
Step 5: Select the “Create Account” button at the bottom of the page to submit the account
registration form. Upon submission, two emails will be sent to the entered email address: one with the
new account username, and another with a registration link to set up the account password. The
username is system generated.
Step 6: Select the link in the email to be taken to the Setup Account page.
Step 7: On the Setup Account page, you must agree to the Terms and Conditions. Select the
checkbox, enter the username that was emailed to you, then enter and confirm your password.

June 26, 2020 MI Health Plan Benefits User Guide Page 17 of 51
Step 8: Select the “Confirm” button to complete your account setup. You will be taken to the Login
page where you may log in to your new account. (See 2.1 – Logging In) Your new account will have
access to the Provider ID granted by the Domain Administrator.
4.2 – Create an Account
You can create a new MI Health Plan Benefits account that is not linked to a Provider ID. This should
only be done by someone who intends to apply to become the Domain Administrator for a Provider ID
in MI Health Plan Benefits. To do so, follow the steps listed below.
Important: An account created this way will not have access to perform eligibility lookups until it has
been linked with a Provider ID. See 3.2 – Applying to be a Domain Administrator for instructions on
how to apply to become a Domain Administrator or see 4.1 – Added by Domain Administrator for
instructions on how to link your account to a Provider ID once a Domain Administrator has added you.
Step 1: Select the Create an Account button on the Login page.

June 26, 2020 MI Health Plan Benefits User Guide Page 18 of 51
Step 2: Fill out the CHAMPS Administrator and User’s Information sections of the registration form.
Step 3: Read through the Terms and Conditions and agree to them by selecting the “I have read and
agree to the Terms and Conditions” checkbox.

June 26, 2020 MI Health Plan Benefits User Guide Page 19 of 51
Step 4: Select the “Create Account” button at the bottom of the page to submit the account
registration form. Upon submission, two emails will be sent to the entered email address: one with
your new account username and another with a link to set up your account password. The username
is system generated.
Step 5: Select the link in the email to be taken to the Setup Account page.
Step 6: On the Setup Account page, you must agree to the Terms and Conditions. Select the
checkbox, enter the username that was emailed to you, then enter your desired password in the
Password and Confirm Password fields.
June 26, 2020 MI Health Plan Benefits User Guide Page 20 of 51
Step 6: Select the “Confirm” button to complete your account setup. You will be taken to the Login
page where you may log in to your new account. (See 2.1 – Logging In)
5 – User Profile and Provider IDs
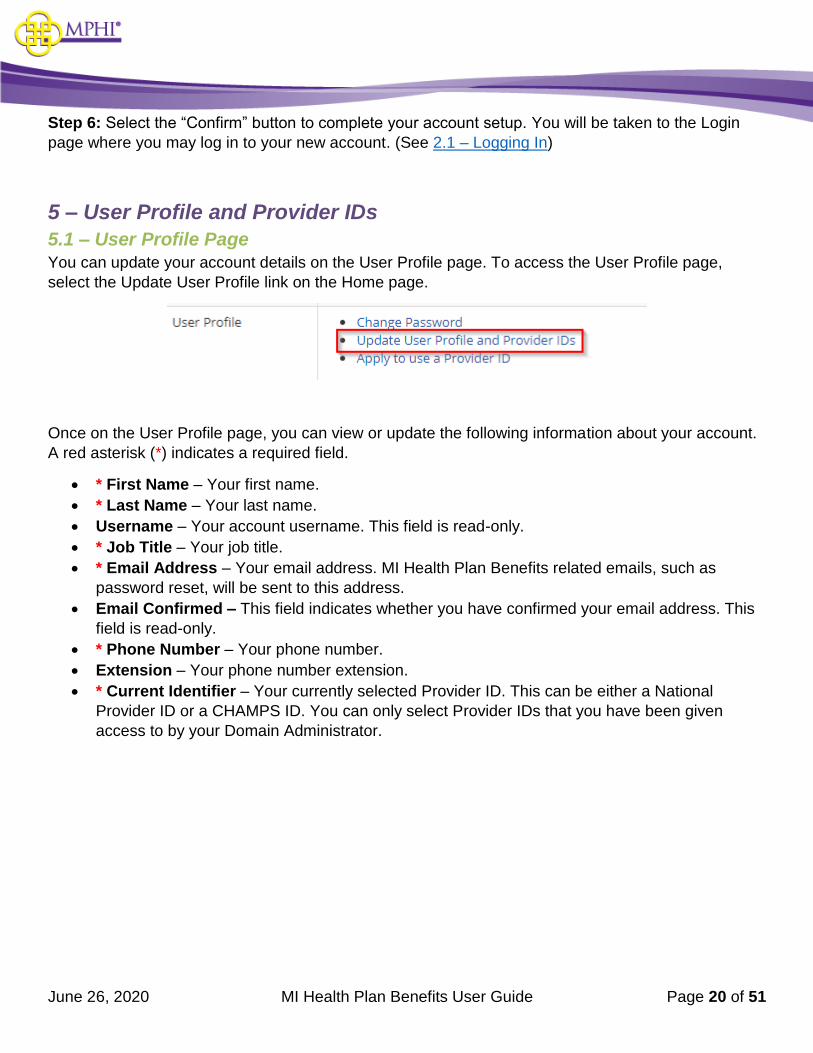
5.1 – User Profile Page
You can update your account details on the User Profile page. To access the User Profile page,
select the Update User Profile link on the Home page.
Once on the User Profile page, you can view or update the following information about your account.
A red asterisk (*) indicates a required field.
• * First Name – Your first name.
• * Last Name – Your last name.
• Username – Your account username. This field is read-only.
• * Job Title – Your job title.
• * Email Address – Your email address. MI Health Plan Benefits related emails, such as
password reset, will be sent to this address.
• Email Confirmed – This field indicates whether you have confirmed your email address. This
field is read-only.
• * Phone Number – Your phone number.
• Extension – Your phone number extension.
• * Current Identifier – Your currently selected Provider ID. This can be either a National
Provider ID or a CHAMPS ID. You can only select Provider IDs that you have been given
access to by your Domain Administrator.

June 26, 2020 MI Health Plan Benefits User Guide Page 21 of 51
At the bottom of your User Profile page are two lists: Provider IDs Pending Review and Approved
Provider IDs.
Provider IDs Pending Review
The Provider IDs Pending Review list shows all of the Provider IDs that you have applied to become
the HPB Domain Administrator for where the application is still pending review. The following fields
are shown in the list:
• Provider ID – The Provider ID the application is for.
• Type – The type of Provider ID the application is for; either NPI or CHAMPS.
• Organization Name – The name of the organization the application is for.
• Role – Your role for the listed Provider ID.
• Actions – An application to become a HPB Domain Administrator for a Provider ID may be
canceled by selecting the Cancel link in the Actions column.
Approved Provider IDs

June 26, 2020 MI Health Plan Benefits User Guide Page 22 of 51
The Approved Provider IDs list shows all of the Provider IDs that you have been given access to as
either a Domain Administrator or a User. The following fields are shown in the list:
• Provider ID – The Provider ID.
• Type – The type of Provider ID; either NPI or CHAMPS.
• Organization Name – The name of the organization.
• Role – Your role for the listed Provider ID (either Domain Administrator or User).
• Actions – Selecting the View link will take you to the Provider ID Management page.
5.2 – Change Password
You can change your account password on the Change Password page. To access the Change
Password page, select the Change Password link on the Home page.
Once on the page, enter your current password in the Current Password field and enter your new
password in the New Password and Confirm New Password fields. Select the Change Password
button to save your new password.

June 26, 2020 MI Health Plan Benefits User Guide Page 23 of 51
6 – Provider ID Management Domain Administrators can view and manage the details and users for their organization on the
Provider ID Management page. To access the Provider ID Management page, select the View link for
the Provider ID in the Approved Provider IDs list on the User Profile page.
The Provider ID Management page is broken into 4 sections: Provider ID Details, Domain
Administrators, Pending Users, and Manage Users.

June 26, 2020 MI Health Plan Benefits User Guide Page 24 of 51
June 26, 2020 MI Health Plan Benefits User Guide Page 25 of 51
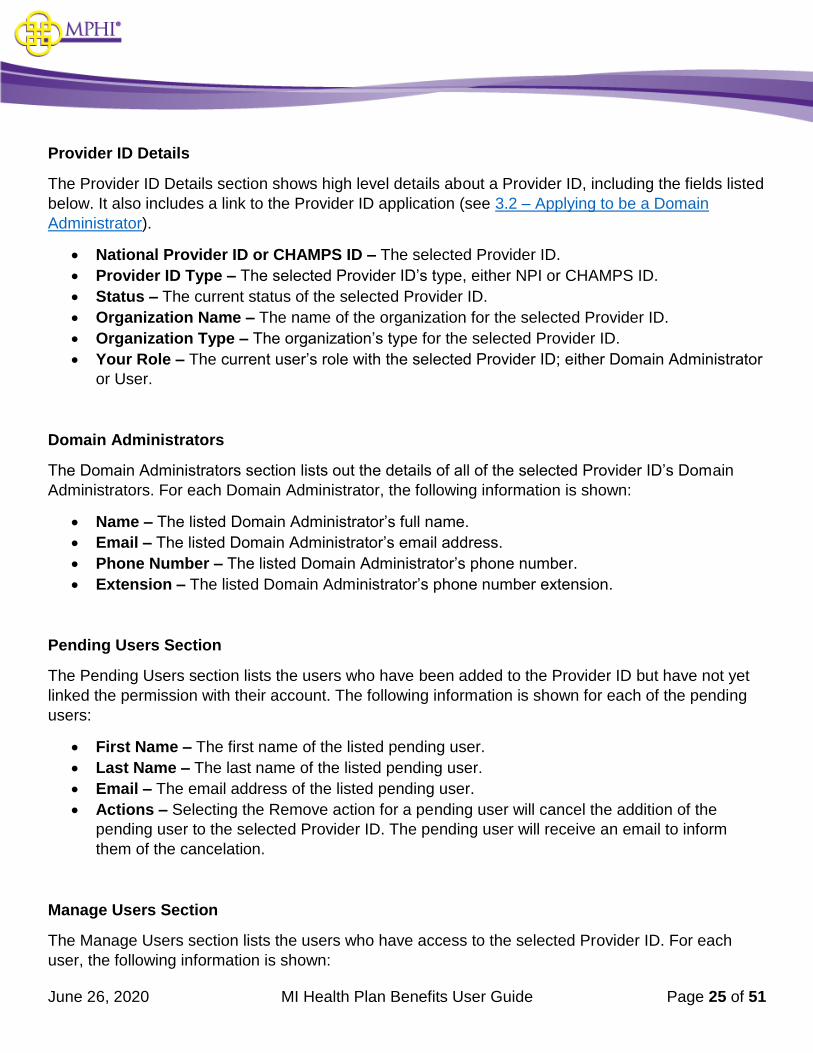
Provider ID Details
The Provider ID Details section shows high level details about a Provider ID, including the fields listed
below. It also includes a link to the Provider ID application (see 3.2 – Applying to be a Domain
Administrator).
• National Provider ID or CHAMPS ID – The selected Provider ID.
• Provider ID Type – The selected Provider ID’s type, either NPI or CHAMPS ID.
• Status – The current status of the selected Provider ID.
• Organization Name – The name of the organization for the selected Provider ID.
• Organization Type – The organization’s type for the selected Provider ID.
• Your Role – The current user’s role with the selected Provider ID; either Domain Administrator
or User.
Domain Administrators
The Domain Administrators section lists out the details of all of the selected Provider ID’s Domain
Administrators. For each Domain Administrator, the following information is shown:
• Name – The listed Domain Administrator’s full name.
• Email – The listed Domain Administrator’s email address.
• Phone Number – The listed Domain Administrator’s phone number.
• Extension – The listed Domain Administrator’s phone number extension.
Pending Users Section
The Pending Users section lists the users who have been added to the Provider ID but have not yet
linked the permission with their account. The following information is shown for each of the pending
users:
• First Name – The first name of the listed pending user.
• Last Name – The last name of the listed pending user.
• Email – The email address of the listed pending user.
• Actions – Selecting the Remove action for a pending user will cancel the addition of the
pending user to the selected Provider ID. The pending user will receive an email to inform
them of the cancelation.
Manage Users Section
The Manage Users section lists the users who have access to the selected Provider ID. For each
user, the following information is shown:

June 26, 2020 MI Health Plan Benefits User Guide Page 26 of 51
• Username – The listed user’s MI Health Plan Benefits account username.
• First Name – The listed user’s first name.
• Last Name – The listed user’s last name.
• Email – The listed user’s email address.
• Phone Number – The listed user’s phone number.
• Extension – The listed user’s phone number extension.
• Actions – When the View action is selected, the current user will be taken to the Update User
page for the selected user (see 6.1 – Adding a New User/Editing an Existing User). When the
Remove action is selected, the current user will be prompted to confirm their decision to
remove the selected user’s access to the selected Provider ID.
6.1 – Adding a New User
As a Domain Administrator, you can add new users to a Provider ID from the Provider ID
Management page. To add a new user, follow the steps listed below.
Step 1: Select the “Update User Profile and Provider IDs” link on the Home page to be taken to
your User Profile page.
Step 2: Scroll to the “Approved Provider IDs” section. Find the Provider ID that you would like to add
the user to and select View to navigate to the Provider ID Management page.
Step 3: Scroll to the Manage Users Section and select “Add User.”
June 26, 2020 MI Health Plan Benefits User Guide Page 27 of 51
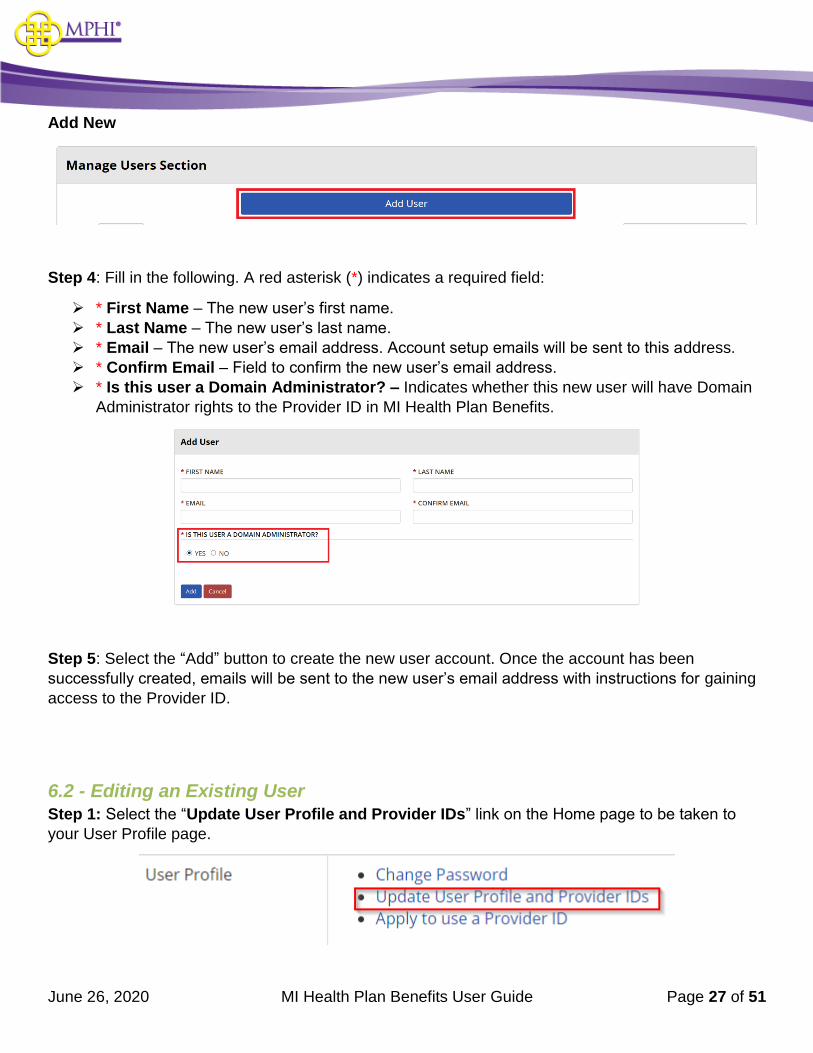
Add New
Step 4: Fill in the following. A red asterisk (*) indicates a required field:
➢ * First Name – The new user’s first name.
➢ * Last Name – The new user’s last name.
➢ * Email – The new user’s email address. Account setup emails will be sent to this address.
➢ * Confirm Email – Field to confirm the new user’s email address.
➢ * Is this user a Domain Administrator? – Indicates whether this new user will have Domain
Administrator rights to the Provider ID in MI Health Plan Benefits.
Step 5: Select the “Add” button to create the new user account. Once the account has been
successfully created, emails will be sent to the new user’s email address with instructions for gaining
access to the Provider ID.
6.2 - Editing an Existing User
Step 1: Select the “Update User Profile and Provider IDs” link on the Home page to be taken to
your User Profile page.

June 26, 2020 MI Health Plan Benefits User Guide Page 28 of 51
Step 2: Scroll to the “Approved Provider IDs” section. Find the Provider ID that you would like to edit
the user from and select View to navigate to the Provider ID Management page.
Step 3: Select View next to the user you would like to edit.
Step 4: When editing an existing user, the only information a Domain Administrator can edit from the
Update User screen is the indicator identifying a user as a Domain Administrator. All other fields will
be read-only.

June 26, 2020 MI Health Plan Benefits User Guide Page 29 of 51
Step 5: Select Save to save your changes.
6.3 - Removing a User
Step 1: Select the “Update User Profile and Provider IDs” link on the Home page to be taken to
your User Profile page.
Step 2: Scroll to the “Approved Provider IDs” section. Find the Provider ID that you would like to edit
the user from and select View to navigate to the Provider ID Management page.

June 26, 2020 MI Health Plan Benefits User Guide Page 30 of 51
Step 3: From the “Manage Users” section, select Remove next to the user you would like to Remove.
Step 4: You will see a confirmation Prompt. Select Yes to continue with removal. Select No to return.

June 26, 2020 MI Health Plan Benefits User Guide Page 31 of 51
6.4 – Editing Your Provider ID
Domain Administrators can make changes to their Provider ID’s details by submitting another
application for the Provider ID (see 3.2 – Applying to be a Domain Administrator for instructions on
how to complete an application).
In addition to the “Apply to use a Provider ID” link on the Home page, Domain Administrators may
access the Provider ID Application by selecting the “Create an Edit Application” link on the Provider
ID Management page. Once the new application is approved, the Provider ID’s details will be updated
with the information that was entered on the application.
Note: The new Provider ID details must match the information in CHAMPS for the Provider ID.

June 26, 2020 MI Health Plan Benefits User Guide Page 32 of 51
7 – Confirming Users – Domain Administrator The Confirm Users feature systematically prompts Domain Administrators to confirm access for users
associated to their Provider IDs. Providers are expected to confirm access every six months to
continue using the system. Domain Administrators will be prompted to confirm users every six
months, but the system will allow them to confirm more frequently if so desired.
7.1 - Confirm Users Alert
This alert will be visible to Domain Administrators when they have users pending confirmation. The
alert includes a link that will navigate the Domain Administrator to review their users.
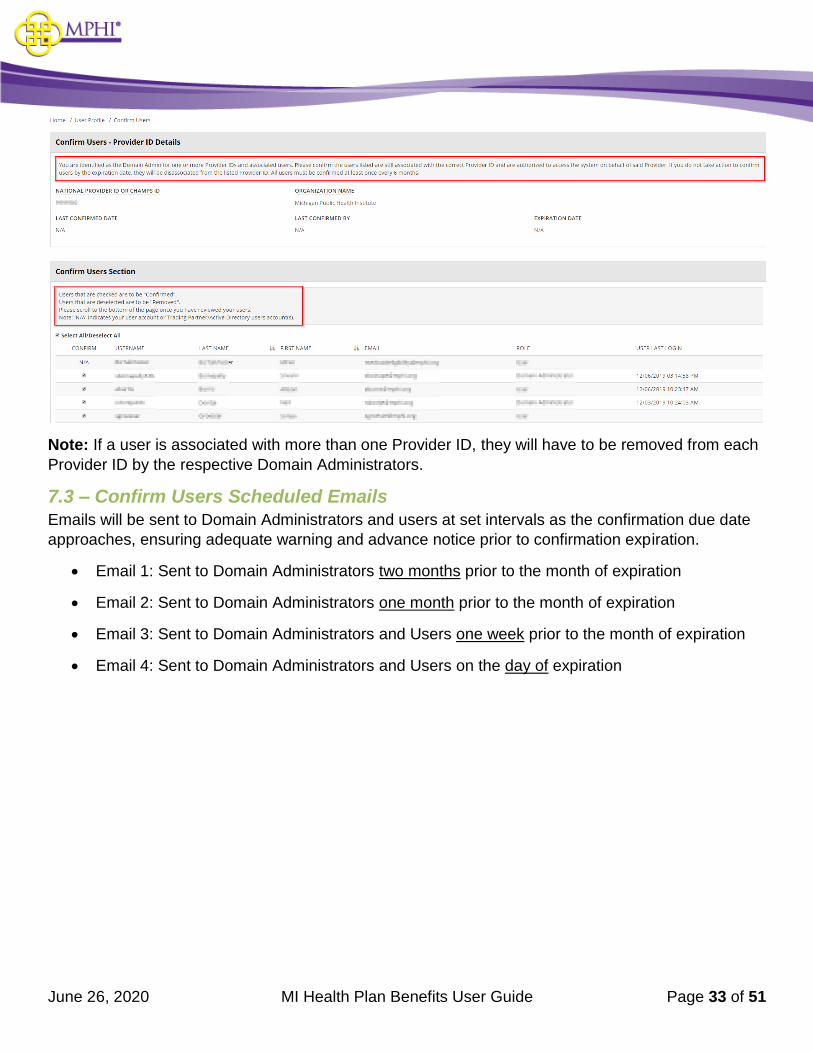
7.2 - Confirm Users Page
The Confirm Users page is accessible at any time if the Domain Administrator chooses to confirm
users outside of the scheduled window.
Navigation: Home→Update User Profile and Provider IDs→Approved Provider IDs (table) → Confirm
Users (link)
June 26, 2020 MI Health Plan Benefits User Guide Page 33 of 51
Note: If a user is associated with more than one Provider ID, they will have to be removed from each
Provider ID by the respective Domain Administrators.
7.3 – Confirm Users Scheduled Emails
Emails will be sent to Domain Administrators and users at set intervals as the confirmation due date
approaches, ensuring adequate warning and advance notice prior to confirmation expiration.
• Email 1: Sent to Domain Administrators two months prior to the month of expiration
• Email 2: Sent to Domain Administrators one month prior to the month of expiration
• Email 3: Sent to Domain Administrators and Users one week prior to the month of expiration
• Email 4: Sent to Domain Administrators and Users on the day of expiration

June 26, 2020 MI Health Plan Benefits User Guide Page 34 of 51
7.4 – Reactivating Users
In the event a Domain Administrator fails to confirm their list of users within the established
timeframe, the users will be disassociated from the Provider ID, and the Provider ID will be placed in
a suspended state. A Domain Administrator can reactivate by going to through the “Confirm Users”
workflow (see 7.2 – Confirm Users Page) for the suspended Provider ID and confirming the users.
This will reactivate the Provider ID and set a new expiration date six months from the date confirmed.
8 – Review MSA-1038 Status
The Review MSA-1038 Status is a tool used to search and review records of all MSA-1038 form
requests for beneficiaries. Any user with authorization to perform Eligibility Lookups can access the
Review MSA-1038 Status page.

June 26, 2020 MI Health Plan Benefits User Guide Page 35 of 51
8.1 - MSA-1038 Search
To perform a search, you must enter the following criteria (exact match):
• Medicaid ID OR
• Last Name AND First Name AND Date of Birth
If the search criteria entered is not valid, the system will indicate this with an error message:

June 26, 2020 MI Health Plan Benefits User Guide Page 36 of 51
If the search criteria entered is valid but no results were found, the system will indicate no match
found:
If results are found, the results will display.
June 26, 2020 MI Health Plan Benefits User Guide Page 37 of 51
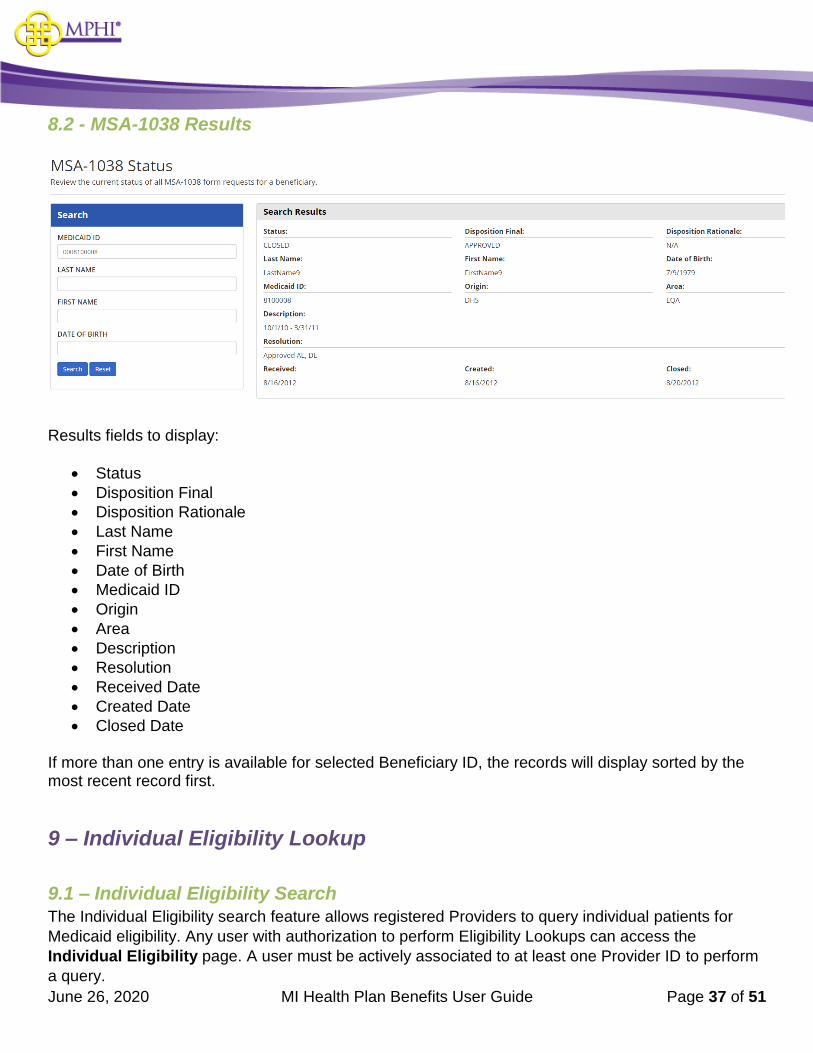
8.2 - MSA-1038 Results
Results fields to display:
• Status
• Disposition Final
• Disposition Rationale
• Last Name
• First Name
• Date of Birth
• Medicaid ID
• Origin
• Area
• Description
• Resolution
• Received Date
• Created Date
• Closed Date
If more than one entry is available for selected Beneficiary ID, the records will display sorted by the most recent record first.
9 – Individual Eligibility Lookup
9.1 – Individual Eligibility Search
The Individual Eligibility search feature allows registered Providers to query individual patients for
Medicaid eligibility. Any user with authorization to perform Eligibility Lookups can access the
Individual Eligibility page. A user must be actively associated to at least one Provider ID to perform
a query.

June 26, 2020 MI Health Plan Benefits User Guide Page 38 of 51
Navigation:
Home → Eligibility → Individual Eligibility or
Menu → Eligibility Lookups → Individual Eligibility
To perform a valid search, you must enter the following criteria (exact match):
• Medicaid ID OR
• Two or more of the following data elements:
o Full Name (Last Name AND First Name)
o Date of Birth
o SSN

June 26, 2020 MI Health Plan Benefits User Guide Page 39 of 51
You are only able to search eligibility from the past 12 months.
You are limited to searching a range of coverage dates over a 3-month period. For example:
• 01/01/2019 - 03/31/2019 OK • 01/01/2019 - 04/01/2019 ERROR
Coverage End Date must not exceed the current month. For example:
• If the month is 08/2019, then the Coverage End Date cannot be 09/01/2019
Click “Search” to perform a query on selected search criteria.
Click “Reset” to clear search criteria.
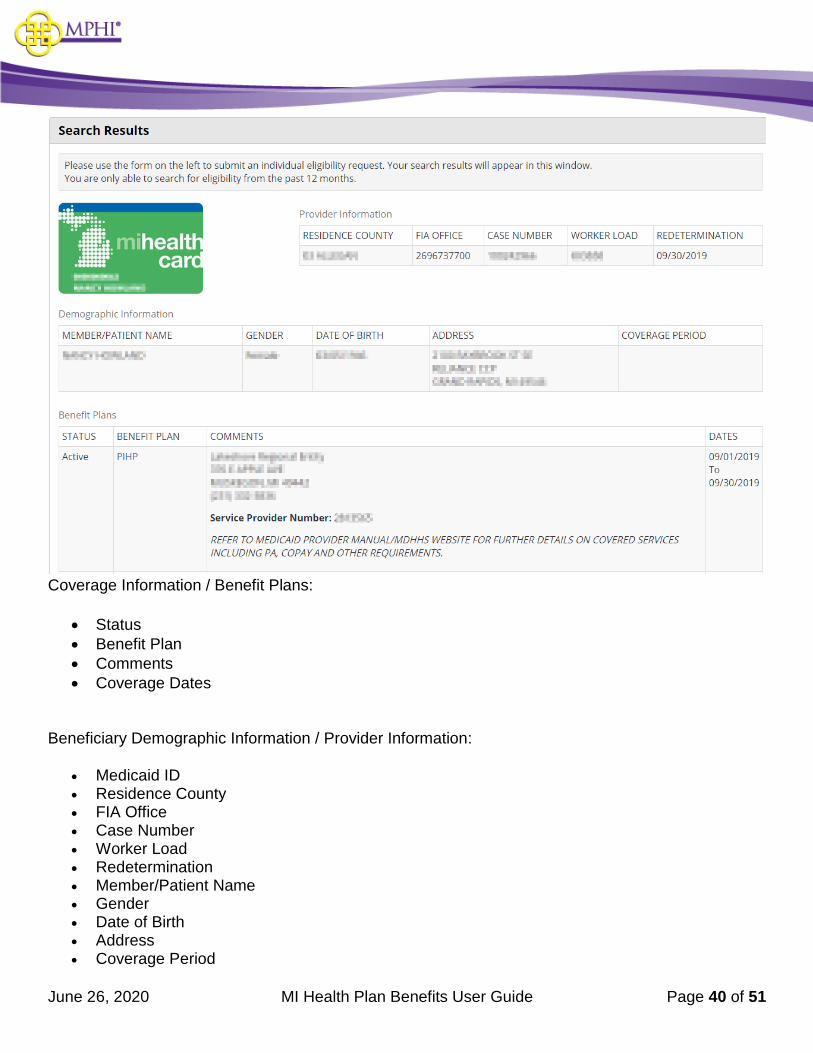
9.2 – Individual Eligibility Results
If a user enters valid search criteria, the results will be displayed:
June 26, 2020 MI Health Plan Benefits User Guide Page 40 of 51
Coverage Information / Benefit Plans:
• Status
• Benefit Plan
• Comments
• Coverage Dates
Beneficiary Demographic Information / Provider Information:
• Medicaid ID • Residence County • FIA Office • Case Number • Worker Load • Redetermination • Member/Patient Name • Gender • Date of Birth • Address • Coverage Period
June 26, 2020 MI Health Plan Benefits User Guide Page 41 of 51
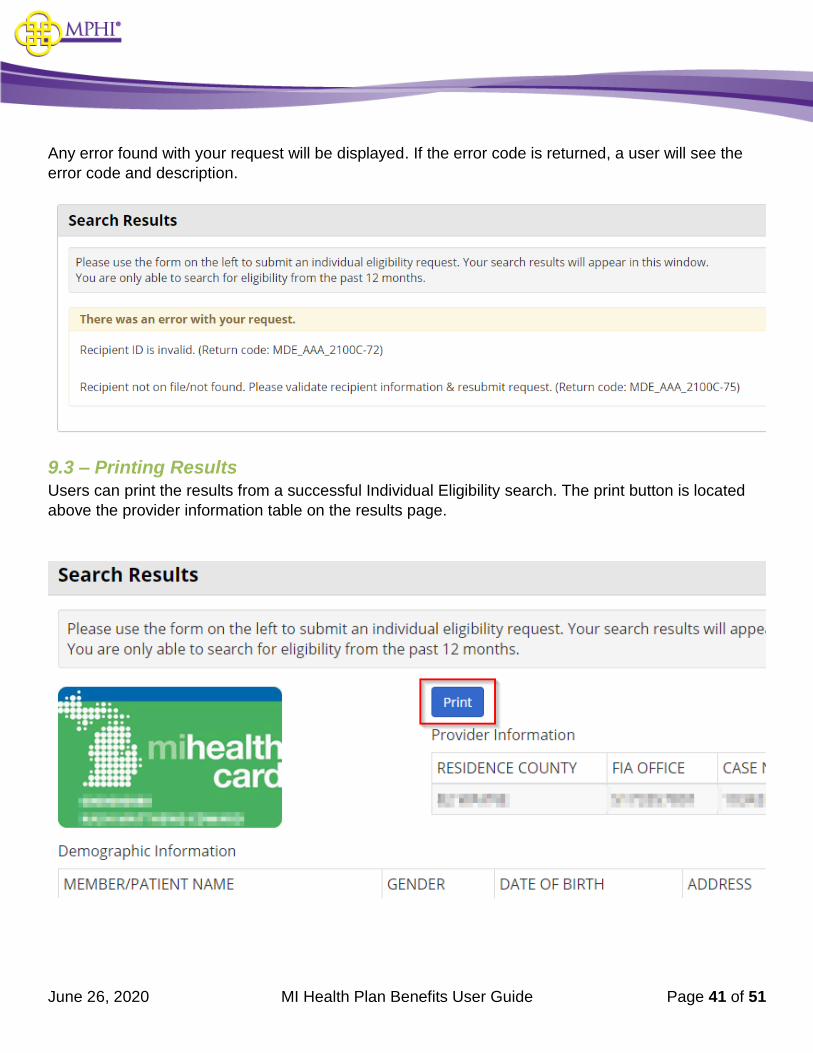
Any error found with your request will be displayed. If the error code is returned, a user will see the
error code and description.
9.3 – Printing Results
Users can print the results from a successful Individual Eligibility search. The print button is located
above the provider information table on the results page.

June 26, 2020 MI Health Plan Benefits User Guide Page 42 of 51
Example print out:
9.4 – Benefit Plans Glossary
The Benefit Plans glossary page contains the following plan related information:
• Plan ID
• Name
• Description

June 26, 2020 MI Health Plan Benefits User Guide Page 43 of 51
• Type
This page can be accessed by clicking the hyperlink from the Benefit Plan name on the search results
page, or by visiting the FAQ page. If accessed from the search results page, the current selection
from the search results page will be displayed first. The entire list of benefit plans will also be listed on
the page for reference.

June 26, 2020 MI Health Plan Benefits User Guide Page 44 of 51
If accessed via the FAQ page, the link to the Benefit Plans page is found under the response to
“What are the Benefit Plans?”
10 – Multiple Eligibility Lookup
10.1 – Multiple Eligibility Search
The Multiple Eligibility search feature allows registered Providers to query a list of patients for
Medicaid eligibility. Any user with authorization to perform Eligibility Lookups can access the Multiple
Eligibility lookup page. The same logic applies when performing an Individual Eligibility lookup;
however, the Multiple Eligibility feature allows a user to enter and search for multiple individuals within
a single search. A user must be actively associated to at least one Provider ID to perform a query.
Navigation:
Home → Eligibility → Multiple Eligibility or
Menu → Eligibility Lookups → Multiple Eligibility

June 26, 2020 MI Health Plan Benefits User Guide Page 45 of 51
If you are associated to more than one Provider ID, you may select another Provider ID from the
dropdown and search on behalf of selected Provider. Otherwise, your default Current Provider ID is
automatically populated. Your default Current Provider ID is configurable within your User Profile (see
section 5.1).
In the lookup table, each row indicates an individual record. Enter the following criteria for each row:
• Medicaid ID OR
• Two or more of the following data elements:
o Full Name (Last Name AND First Name)
o Date of Birth
o SSN
The max number of records you can search for in one lookup is 15:
The default coverage date range for all rows will be set to the start and end dates of the current
month. This can be changed for each row. You may also use the “copy date” function to update all

June 26, 2020 MI Health Plan Benefits User Guide Page 46 of 51
rows with the same date. Clicking the “copy” icon copies the date entered in the first row and inserts
the same date into all subsequent rows.
Notes on coverage dates:
You are only able to search eligibility from the past 12 months.
You are limited to searching a range of coverage dates over a 3-month period. For example:
• 01/01/2019 - 03/31/2019 OK • 01/01/2019 - 04/01/2019 ERROR
Coverage End Date must not exceed the current month. For example:
• If the month is 06/2020, then the Coverage End Date cannot be 07/01/2020
Click “Search” to perform a query on selected search criteria.
Click “Reset” to clear search criteria.
If invalid data is entered on the search/lookup page, an error will display next to each invalid field
when you try to “Search” and retrieve your results. See below:

June 26, 2020 MI Health Plan Benefits User Guide Page 47 of 51
If you enter valid search criteria, the results will display.
10.2 – Multiple Eligibility Results
When a valid search is performed, you will see a summarized list of your Submitted Requests on the
left side of the results page:
From this list, you may perform the following actions:
• Modify Search
o This returns a user to the Multiple Eligibility search page and holds the values that were
originally entered, allowing the user to edit without losing previous information.
• New Search

June 26, 2020 MI Health Plan Benefits User Guide Page 48 of 51
o This returns a user to the Multiple Eligibility search page with values cleared. This is a
complete refresh of the page.
• View
o This shows the detailed Search Results for the selected record. This is the same view
that would result from an Individual Eligibility lookup.
When viewing the Search Results, you will see the following information for each individual record:
Coverage Information / Benefit Plans:
• Status
• Benefit Plan
• Comments
• Coverage Dates
Beneficiary Demographic Information / Provider Information:
• Medicaid ID • Residence County • FIA Office • Case Number • Worker Load • Redetermination • Member/Patient Name • Gender • Date of Birth • Address • Coverage Period
You may navigate between records by clicking Next / Previous:

June 26, 2020 MI Health Plan Benefits User Guide Page 49 of 51
If you choose to View All, all Search Results will display in a single viewing pane and you can scroll
to review each record.
While in “View All” mode, you may choose to Print All or switch back to Single View

June 26, 2020 MI Health Plan Benefits User Guide Page 50 of 51
If any of your submitted requests return an invalid result you will see a warning indicator in the
Submitted Requests, and any error found will display within the Search Results view. If the error code
is returned, you will see the error code and description:
10.3 – Printing Results
Users can print the results from a successful Multiple Eligibility search by clicking Print or Print All.
Print Single View

June 26, 2020 MI Health Plan Benefits User Guide Page 51 of 51
Print All When you Print All, there will be a page break between each individual record. This printout will also include any results that returned an error.