microsoft powerpoint 2010 - level 1 learning guides... · microsoft powerpoint 2010 - level 1 ......
TRANSCRIPT

T r a i n i n g G u i d e
8 – Slide show navigation
Microsoft PowerPoint 2010
- Level 1

Microsoft PowerPoint 2010 - Level 1
© Learning and Development Service Page 2 Slide show navigation
SLIDE SHOW NAVIGATION
Before presenting your show, you should always review it to ensure you have included all content and that the slides will display in the correct order. The ideal view for checking your presentation is Slide Sorter view. From here it is easy to add and modify slides, change slide order, add notes, add slide numbers and so on.
Once you’re happy with your presentation, PowerPoint provides you with many options for navigating the slides during a slide show. You can even insert links in slides to let you navigate to hidden slides, supporting and source documents, web pages and more as necessary.
In this booklet we will show you how to:
use Slide Sorter view
reuse slides from other presentations
add sections to a presentation
add speaker notes to your slides
add and remove slide numbers
gain an understanding of hyperlinks
create a hyperlink to a slide in the presentation
create a hyperlink to another presentation
create a hyperlink to another application
gain an understanding of the keyboard shortcuts you can use during a slide show
present a slide show.
INFOCUS
Microsoft PowerPoint 2010 - Level 1
© Learning and Development Service Page 3 Slide show navigation
USING SLIDE SORTER VIEW
For Your Reference…
To display Slide Sorter view: 1. Click on Slide Sorter in the
Presentation Views group on the View tab or
1. Click on Slide Sorter in the status
bar
Handy to Know…
If you see anything that needs modifying on a slide in Slide Sorter view, you can quickly open the slide in Normal view by double-clicking on its thumbnail and then making the
changes as required.
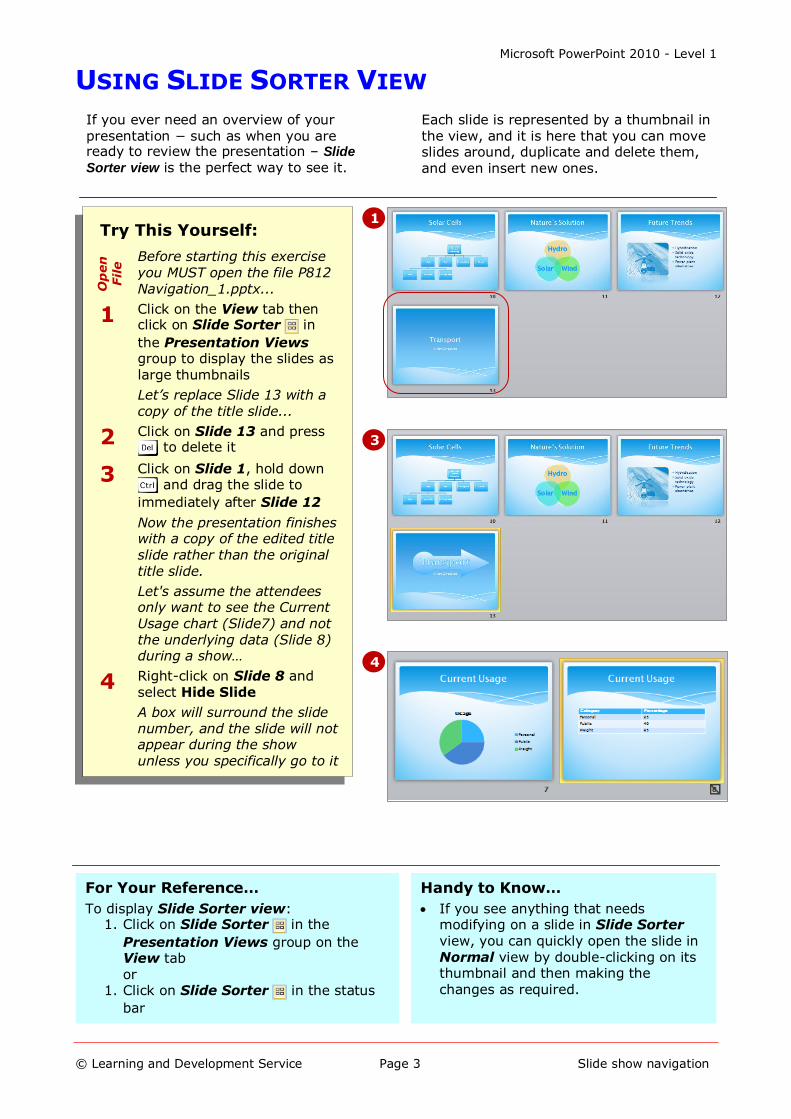
1
3
If you ever need an overview of your presentation − such as when you are ready to review the presentation – Slide
Sorter view is the perfect way to see it.
Each slide is represented by a thumbnail in the view, and it is here that you can move slides around, duplicate and delete them, and even insert new ones.
4
Try This Yourself:
Op
en
Fil
e Before starting this exercise
you MUST open the file P812
Navigation_1.pptx...
1 Click on the View tab then click on Slide Sorter in
the Presentation Views group to display the slides as large thumbnails
Let’s replace Slide 13 with a
copy of the title slide...
2 Click on Slide 13 and press to delete it
3 Click on Slide 1, hold down and drag the slide to
immediately after Slide 12
Now the presentation finishes with a copy of the edited title slide rather than the original title slide.
Let's assume the attendees only want to see the Current Usage chart (Slide7) and not
the underlying data (Slide 8) during a show…
4 Right-click on Slide 8 and select Hide Slide
A box will surround the slide number, and the slide will not appear during the show
unless you specifically go to it

Microsoft PowerPoint 2010 - Level 1
© Learning and Development Service Page 4 Slide show navigation
REUSING SLIDES
Try This Yourself:
Sam
e
Fil
e Continue using the previous
file or open the file P812 Navigation_2.pptx...
1 Ensure you are working in Slide Sorter view and then click on Slide 11
Let’s insert a slide between Slides 11 and 12...
2 Click on the Home tab, then click on the bottom half of New Slide and select
Reuse Slides to open the Reuse Slides task pane
3 Click on [Browse], select Browse File to open the Browse dialog box, then navigate to the Course Files for PowerPoint 2010 folder
4 Double-click on P812 Navigation_3.pptx
The slides in the presentation (which in our case is only one)
will display in the Reuse Slides task pane...
5 Hover over the slide icon to see a preview of its contents
6 Click on the icon to insert it immediately after Slide 11, then click on close to close the task pane
Notice that the new slide’s theme now matches the other slides
For Your Reference…
To reuse slides: 1. Click on the slide after which the slides
are to be inserted 2. Click on the bottom half of New Slide
on the Home tab and select
Reuse Slides 3. Browse to the file and click on the
slides
Handy to Know…
If you right-click on a slide in the Reuse Slides task pane, you can choose to insert the currently-selected slide or all slides. If you want to retain the original formatting for the inserted
slides, click on Keep source formatting before inserting the slides.
1
4
You can quickly and easily insert slides into your current presentation from other PowerPoint files. This is a particularly useful timesaver in instances where
information is the same or similar to slides
that you have previously created. If you are using SharePoint Server, you can also access a Slide Library of shared slides that you can add to your presentations. You can
contribute slides too.
5
6

Microsoft PowerPoint 2010 - Level 1
© Learning and Development Service Page 5 Slide show navigation
ADDING SECTIONS
Try This Yourself:
Sam
e
Fil
e Continue using the previous
file or open the file P812 Navigation_4.pptx...
1 Ensure you are working in Slide Sorter view, then click on Slide 3
Let’s add a section between slides 2 and 3…
2 Click on Section in the
Slides group on the Home tab and select Add Section
A new Untitled Section will be inserted prior to slide 3. All slides from Slide 3 will be included in the new section. A Default Section will also be added before slide 1…
3 Right-click on Untitled Section and select Rename Section to open the Rename Section dialog box
4 Type Current Solutions and
click on [Rename]
Let’s add another section…
5 Right-click between Slides 8 and 9 and select Add Section
6 Repeat steps 3 and 4 to
rename the new section as Renewable Solutions
For Your Reference…
To add a section before a slide:
1. Click on the slide thumbnail
2. Click on Section in the Slides
group on the Home tab
3. Select Add Section
4. Right-click on Untitled Section and
select Rename Section
Handy to Know…
To remove a section, right-click on its name and select Remove Section. Select Remove Section & Slides to delete the slides as well as the section.
To move a section and its slides up or down in the presentation, right-click on its name and select Move Section Up/Down.
2
3
You can insert one or more sections into a presentation to help you organise the slides into logical groupings. You can do this in Normal or Slide Sorter view. As
well as visually grouping your slides, you
can use sections as a means of organising your presentation. For instance, you can change the order of the sections in a presentation (including their slides) by
moving them up or down.
4

Microsoft PowerPoint 2010 - Level 1
© Learning and Development Service Page 6 Slide show navigation
ADDING NOTES TO YOUR SLIDES
Try This Yourself:
Sam
e
Fil
e
Continue using the previous file or open the file P812 Navigation_5.pptx...
1 Double-click on the thumbnail for Slide 6 titled Freight
The slide will appear in Normal view. Notice the Notes pane at the bottom of the window...
2 Click in the Notes pane and type the text as shown
3 Click on the View tab, then click on Notes Page
in the Presentation
Views group to change the view to Notes Page view
The same note appears. Let’s edit it...
4 Click before the full stop and type , via the underground rail without the need for human supervision then click away from the text to see the result
5 Save the presentation
For Your Reference…
To add speaker notes to a selected slide:
1. Type the text in the Notes pane in Normal view
or
Click on Notes Page in the
Presentation Views group on the
View tab and type the text
Handy to Know…
You can insert drawings, pictures and so on in your notes in Notes Page view, but not in Normal view.
You can format notes in much the same way as any other text in
PowerPoint.
1
2
It is quite understandable that while you are reviewing your presentation you may think of additional notes to add to the slides. This might include information that
supports and further explains the content.
You can add speaker notes either in the Notes pane at the bottom of Normal view or in Notes Page view which shows how the notes pages will appear if you print them.
4

Microsoft PowerPoint 2010 - Level 1
© Learning and Development Service Page 7 Slide show navigation
SLIDE NUMBERS
Try This Yourself:
Sam
e
Fil
e Continue using the previous file or
open the file P812 Navigation_6.pptx...
1 Ensure the presentation appears in Notes Page view – notice that the slide number is visible in the lower right corner
2 Click on Normal in the
Presentation Views group to change to Normal view – notice that a slide number does not appear in the lower right corner
Let’s see how you control the slide numbers...
3 Click on the Insert tab, then click on the slide in the Slide window and click on Slide Number in the
Text group to open the Slide tab of the Header and Footer dialog box
4 Click on Slide number and click on [Apply] to insert the slide number
into the current slide
5 Repeat step 3 to re-open the Header and Footer dialog box, click on Slide number to remove the tick, then click on the Notes and Handouts tab – notice that Page number is ticked by default
6 Click on [Apply to All] to remove the slide number from the single slide and retain the page numbers
For Your Reference…
To add/remove slide numbers:
1. Click on Slide Number in the Text
group on the Insert tab
2. Click on the Slide tab and change Slide number or click on the Notes
and Handouts tab and change Page number
3. Click on [Apply to All] or [Apply]
Handy to Know…
As a rule of thumb, use slide numbers when printing a presentation or for kiosk shows, and omit them for presenter-led shows.
[Apply to All] will change all slides in the presentation, while [Apply] will change only the current slide.
1
2
If you are presenting a show in person it is likely that you wouldn’t want slide numbers on the slides. They may detract from the overall appearance of the slides or simply
distract the audience. As a result of this,
PowerPoint doesn’t display them by default. On the contrary, however, page numbers will print by default if you print the slides as either notes pages or handouts.
3
4

Microsoft PowerPoint 2010 - Level 1
© Learning and Development Service Page 8 Slide show navigation
ABOUT HYPERLINKS
A hyperlink is a connection from one slide
to another slide in the same presentation (such as a custom show), a slide in another presentation, a web page or a file.
You can create a hyperlink from a word or
object such as a shape or WordArt. There are four connection types which you create using the Insert Hyperlink dialog box and these are described below.
The Link To Options
The Existing File or Web Page option lets you create a link to another
PowerPoint presentation, file or web page. For example, you can link to
Microsoft Office Word documents for reports or to Microsoft Office Excel
spreadsheets for detailed data. By clicking on [Bookmark], you can
even link directly to a specific slide in another presentation.
The Place in This Document option lets you create a link to a slide in
the same presentation or to a group of slides in the current document,
which is known as a custom show. This is a good way of maintaining
access to hidden slides or for providing a means to bypass slides if you
want to use the same presentation for different audiences.
The Create New Document option will create a new presentation at
the same time as creating a link to it. It is then up to you whether or
not you will edit the new presentation as soon as you have created it or
in the future.
The E-mail Address option lets you create a link to an email address.
To do this, you simply nominate the email address and specify a
subject, and PowerPoint will take care of the rest. This is good for
interactive shows but it relies on the audience having email software on
their computer.

Microsoft PowerPoint 2010 - Level 1
© Learning and Development Service Page 9 Slide show navigation
CREATING AN INTERNAL HYPERLINK
Try This Yourself:
Sam
e
Fil
e Continue using the previous
file or open the file P812 Navigation_7.pptx...
1 Display Slide 7 titled Current Usage and ensure that it appears in Normal view
Let’s create a link to the hidden slide – Slide 8…
2 Click on the Insert tab, then click on Text Box in the
Text group and draw a box below the chart as shown
3 Type Data in the text box, then double-click on it to select the word – this will force Data to appear in Text to display in the Insert Hyperlink dialog box
4 Click on the Insert tab, click on Hyperlink in the Links
group to open the Insert Hyperlink dialog box, then click on Place in This Document under Link to
5 Click on (8) Current Usage
The brackets indicate that the slide is hidden…
6 Click on [OK] to create the
hyperlink, then click away to see the result
The hyperlink will appear with an underline
For Your Reference…
To create internal hyperlinks: 1. Select the object or word to be linked 2. Click on Hyperlink in the Links
group on the Insert tab 3. Click on Place in This Document
4. Click on the slide, then click on [OK]
Handy to Know…
You can even specify the screen tip that will appear when you hover over the hyperlink. Click on [ScreenTip] in the Insert Hyperlink or Edit Hyperlink
dialog box and add the text you want
to display.
2
3
An internal hyperlink is a link from text or an object on one slide to another slide in the same presentation. For example, you may be able to shorten your presentation
by hiding non-essential slides, but what if
the audience wants to see the hidden slides? A hyperlink to a hidden slide means that you can display the slide only if you need to – otherwise, it will remain unseen.
4
6

Microsoft PowerPoint 2010 - Level 1
© Learning and Development Service Page 10 Slide show navigation
CREATING A HYPERLINK TO ANOTHER
PRESENTATION
Try This Yourself:
Sam
e
Fil
e Continue using the previous
file or open P812 Navigation_8.pptx...
1 Display Slide 11 titled Nature’s Solution
Let’s link to the slide in P812 Navigation_3.pptx. We can
then delete Slide 12...
2 Click on the Insert tab, draw a Right Arrow shape near the bottom right corner of the slide and type Details as shown
3 Click on the arrow, click on Hyperlink in the Links
group to open the Insert Hyperlink dialog box, then click on Existing File or Web Page
4 Click on P812 Navigation_3.pptx, then click on [Bookmark] to open the Select Place in Document box
5 Click on 1. Renewable Energy Sources and click on [OK] – notice the Address
6 Click on [OK] to create the hyperlink, then click away to see the result
7 Click on Slide 12 in the Slides pane and press
For Your Reference…
To link to a slide in a different presentation:
1. Select the object or word to be linked 2. Click on Hyperlink on the Insert tab
3. Click on Existing File or Web Page
4. Click on the file then click on [Bookmark]
5. Click on the slide, then click on [OK] twice
Handy to Know…
If the presentation to which you are linking comprises more than one slide, you can only select one slide from the list as the hyperlink destination.
You cannot use a SmartArt graphic as a hyperlink, but you can create
hyperlinks on their text labels.
2
4
As well as being able to create a link to a slide in the same presentation, you can
also create a hyperlink to a slide in another presentation. If the presentation to which
you are linking uses the same theme settings as the first presentation, the
transition between presentations during a show will be seamless.
5
6

Microsoft PowerPoint 2010 - Level 1
© Learning and Development Service Page 11 Slide show navigation
CREATING A HYPERLINK TO ANOTHER
APPLICATION
Try This Yourself:
Sam
e
Fil
e
Continue using the previous file or open P812 Navigation_9.pptx...
1 Display Slide 8 titled Current Usage
Often people who are interested in data want to dig or 'drill' down further. Let’s create a hyperlink to the original spreadsheet in Microsoft Excel…
2 Click on the Insert tab, draw a Text Box towards the bottom centre of the slide and type Details as shown
3 Double-click on Details, then click on Hyperlink on the
Insert tab to open the Insert Hyperlink dialog box
4 Click on Existing File or Web Page, then click on P812
Navigation_10.xlsx
5 Click on [OK] to create the link then click away to view the result
For Your Reference…
To create a hyperlink to another application:
1. Select the object or word to be linked 2. Click on Hyperlink on the Insert
tab
3. Click on Existing File or Web Page 4. Click on the file
5. Click on [OK]
Handy to Know…
If you want to create a hyperlink to a page or file on the web, select Existing File or Web Page in the Insert Hyperlink dialog box, click on Browse the Web , search for the desired page
or file in the browser, then close the browser. Click on [Browsed Pages],
click on the page and click on [OK].
2
4
Often a presentation is a summary of information gathered from other
documents. These supporting documents may have been created in Microsoft Word, Excel or Access, or they may be PDF files
which can be created from many applications. Hyperlinks can be used to
provide links between the data on your slides and the supporting documents in other applications.
5

Microsoft PowerPoint 2010 - Level 1
© Learning and Development Service Page 12 Slide show navigation
KEYBOARD SHORTCUTS FOR NAVIGATING SLIDE
SHOWS
PowerPoint provides you with numerous keyboard shortcuts that can help make
your life easier while presenting a slide show – even if you have set up the slides
to automatically advance after a specified time. These shortcuts are detailed below.
To... Press...
Start a presentation from the beginning
End a presentation
Stop or restart an automatic presentation or
Perform the next animation or advance to the next slide
or or or or or or left-
click
Go to the next slide, if the next slide is
hidden
Perform the previous animation or return to the previous slide
or or or or
Go to slide # # +
Go to the first slide
Go to the final slide
Go to the first or next hyperlink on a slide
Go to the last or previous hyperlink on a slide
+
Display a blank, black slide or return to the presentation from a blank, black slide
or (full stop)
Display a blank, white slide or return to the
presentation from a blank, white slide or (comma)
Redisplay hidden pointer and/or change the pointer to a pen
+
Redisplay hidden pointer and/or change the pointer to an arrow
+
Change pointer to eraser +
Remove all on-screen annotations
Hide the pointer and navigation buttons immediately
+
Hide the pointer and navigation buttons in 15 seconds
+
Set new timings while rehearsing
Use original timings while rehearsing
Use mouse-click to advance while rehearsing

Microsoft PowerPoint 2010 - Level 1
© Learning and Development Service Page 13 Slide show navigation
PRESENTING A SLIDE SHOW
Try This Yourself:
Continue using the previous file or
open P812 Navigation_11.pptx...
1 Click on the Slide Show tab, then click on From Beginning in the
Start Slide Show group
2 Press , then , then , then
click to advance through four slides
You can also use an internal toolbar...
3 Hover over the bottom left corner to display a four button toolbar
4 Click on to move to the next slide
5 Click on to display a menu, select
Go to Slide > 7 Usage Chart
Let’s try out a hyperlink…
6 Click on Data
The hidden slide Current Usage will display…
7 Click on Details to open the Excel
spreadsheet, then click on close to return to the Current Usage slide
8 Click on to display the menu,
select Pen then draw a circle around Public to use an annotation to emphasise the point
9 Press to erase the annotation,
press to return to Slide 1, then
press to end the show
For Your Reference…
To present a slide show: 1. Click on From Beginning in the
Start Slide Show group on the Slide Show tab
2. Click, use the menu icons or keyboard
shortcuts to proceed through the show 3. Press to exit the show
Handy to Know…
The keyboard shortcut to start a slide show from the beginning is .
You can start the slide show from the slide that currently displays in the Slide window by clicking on From
Current Slide in the Start Slide Show group.
3
5
Being in front of an audience can be quite nerve-racking so the last thing you want to do is get lost in the presentation. If you just move forward slide by slide,
everything will probably run smoothly. But
invariably you’ll click just as someone asks about the previous slide. How do you get back to it. PowerPoint provides various
options to help you stay in control.
8
Previous slide or animation
Pointer
icon
Menu Next slide or animation

Microsoft PowerPoint 2010 - Level 1
© Learning and Development Service Page 14 Slide show navigation
CONCLUDING REMARKS
Congratulations!
You have now completed the Slide show navigation booklet. This booklet was designed to get you to the point where you can competently perform a variety of operations as outlined in the task list on page 2.
We have tried to build up your skills and knowledge by having you work through specific tasks. The step by step approach will serve as a reference for you when you need to repeat a task.
Where To From Here…
The following is a little advice about what to do next:
Spend some time playing with what you have learnt. You should reinforce the skills that you have acquired and use some of the application's commands. This will test just how much of the concepts and features have stuck! Don't try a big task just yet if you can avoid it - small is a good way to start.
Some aspects of the course may now be a little vague. Go over some of the points that you may be unclear about. Use the examples and exercises in these notes and have another go - these step-by-step notes were designed to help you in the
classroom and in the work place!
Here are a few techniques and strategies that we've found handy for learning more about technology:
visit CLD’s e-learning zone on the Intranet
read computer magazines - there are often useful articles about specific techniques
if you have the skills and facilities, browse the Internet, specifically the technical
pages of the application that you have just learnt
take an interest in what your work colleagues have done and how they did it - we don't suggest that you plagiarise but you can certainly learn from the techniques of others
if your software came with a manual (which is rare nowadays) spend a bit of time each day reading a few pages. Then try the techniques out straight away - over a period of time you'll learn a lot this way
and of course, there are also more courses and booklets for you to work through
finally, don’t forget to contact CLD’s IT Training Helpdesk on 01243-752100