model o2x1 - panametria cz :: · ge infrastructure sensing model o2x1 oxygen transmitter user’s...
TRANSCRIPT

GE InfrastructureSensing
Model O2X1Oxygen Transmitter
User’s Manual

GE InfrastructureSensing
Model O2X1Oxygen Transmitter
User’s Manual916-048GSeptember 2004

September 2004
Table of ContentsIntroduction . . . . . . . . . . . . . . . . . . . . . . . . . . . . . . . . . . . . . . . . . . . . . . . 1
Mounting the Transmitter . . . . . . . . . . . . . . . . . . . . . . . . . . . . . . . . . . 3
Wiring the Transmitter . . . . . . . . . . . . . . . . . . . . . . . . . . . . . . . . . . . . . 6
Making a Custom Transmitter Cable . . . . . . . . . . . . . . . . . . . . 6
Installing an Oxygen Sensor . . . . . . . . . . . . . . . . . . . . . . . . . . . . . . . . 9
The O2X1 Keypad. . . . . . . . . . . . . . . . . . . . . . . . . . . . . . . . . . . . . . . . 11
The O2X1 Menu Map . . . . . . . . . . . . . . . . . . . . . . . . . . . . . . . . . . . . . 11
Entering and Exiting the User Program. . . . . . . . . . . . . . . . . . . . 13
Programming and Calibrating the O2X1 . . . . . . . . . . . . . . . . . . 14
Selecting the Range . . . . . . . . . . . . . . . . . . . . . . . . . . . . . . . . . . 14
Trimming the Output . . . . . . . . . . . . . . . . . . . . . . . . . . . . . . . . . 15
Span Gas Calibration . . . . . . . . . . . . . . . . . . . . . . . . . . . . . . . . . 16
Air Calibration . . . . . . . . . . . . . . . . . . . . . . . . . . . . . . . . . . . . . . . 18
Specifications . . . . . . . . . . . . . . . . . . . . . . . . . . . . . . . . . . . . . . . . . . . 20
Model Number. . . . . . . . . . . . . . . . . . . . . . . . . . . . . . . . . . . . . . . . . . . 22
Electrical Classification/Certification . . . . . . . . . . . . . . . . . . . . . . 23
Intrinsically Safe Installation . . . . . . . . . . . . . . . . . . . . . . . . . . 24
Non-Hazardous Installation . . . . . . . . . . . . . . . . . . . . . . . . . . 25
I

September 2004
Warranty
Each instrument manufactured by GE Infrastructure Sensing, Inc. is warranted to be free from defects in material and workmanship. Liability under this warranty is limited to restoring the instrument to normal operation or replacing the instrument, at the sole discretion of GE Infrastructure Sensing, Inc. Fuses and batteries are specifically excluded from any liability. This warranty is effective from the date of delivery to the original purchaser. If GE Infrastructure Sensing, Inc. determines that the equipment was defective, the warranty period is:
• one year from delivery for electronic or mechanical failures
• one year from delivery for sensor shelf life
If GE Infrastructure Sensing, Inc. determines that the equipment was damaged by misuse, improper installation, the use of unauthorized replacement parts, or operating conditions outside the guidelines specified by GE Infrastructure Sensing, Inc. , the repairs are not covered under this warranty.
The warranties set forth herein are exclusive and are in lieu of all other warranties whether statutory, express or
implied (including warranties or merchantability and fitness for a particular purpose, and warranties arising from course
of dealing or usage or trade).
III

September 2004
Return Policy
If a GE Infrastructure Sensing, Inc. instrument malfunctions within the warranty period, the following procedure must be completed:
1. Notify GE Infrastructure Sensing, Inc., giving full details of the problem, and provide the model number and serial number of the instrument. If the nature of the problem indicates the need for factory service, GE Infrastructure Sensing, Inc. will issue a RETURN AUTHORIZATION NUMBER (RAN), and shipping instructions for the return of the instrument to a service center will be provided.
2. If GE Infrastructure Sensing, Inc. instructs you to send your instrument to a service center, it must be shipped prepaid to the authorized repair station indicated in the shipping instructions.
3. Upon receipt, GE Infrastructure Sensing, Inc. will evaluate the instrument to determine the cause of the malfunction.
Then, one of the following courses of action will then be taken:
• If the damage is covered under the terms of the warranty, the instrument will be repaired at no cost to the owner and returned.
• If GE Infrastructure Sensing, Inc. determines that the damage is not covered under the terms of the warranty, or if the warranty has expired, an estimate for the cost of the repairs at standard rates will be provided. Upon receipt of the owner’s approval to proceed, the instrument will be repaired and returned.
IV

September 2004
Introduction
The GE Infrastructure Sensing O2X1 oxygen transmitter (Figure 1 below) accurately measures oxygen content in a gas mixture at 0 to 250,000 ppmv (25%), in six ranges. It is loop-powered from a 9-28 VDC power source and provides data readings via a 4-20 mA analog output that is updated once per second. Programmed information is stored in a nonvolatile memory.
Figure 1: The O2X1 Oxygen Transmitter
O2X1 Oxygen Transmitter 1

September 2004
Introduction (cont.)
The O2X1 is available as either an ambient air monitor or as a process unit. The process units are easily installed by completing the following steps:
• insert the oxygen sensor into the O2X1 transmitter
• connect the power to the transmitter
• calibrate the oxygen sensor
• attach the transmitter body to the sensor manifold with the knurled slip nut
A variety of oxygen sensors can be used with the O2X1, but a quick and easy calibration with ambient air must be performed upon startup whenever a new sensor is installed.
This guide shows how to properly mount, wire, calibrate, and adjust the O2X1 oxygen transmitter. Proceed to the appropriate section for information on the following topics:
Note: The installation instructions in this manual apply only to O2X1 process units.
• Mounting the Transmitter
• Wiring the Transmitter
• Installing an Oxygen Sensor
• Entering and Exiting the User Program
• Programming and Calibrating the O2X1
• Specifications
• Electrical Classification/Certification
2 O2X1 Oxygen Transmitter

September 2004
Mounting the Transmitter
To install the O2X1 oxygen transmitter into the process or sample system, refer to Figure 2 below and proceed to the next page.
Figure 2: Outline and Installation Drawing(316 SS and Delrin Process Units)
7.26 [184]
2.75 [70]Black: Return (-)
Red: Signal (+)
Transmitter Module
Connector Key
LEDs
Knurled Nut
Oxygen SensorManifold
1/8 NPT Thread
2.24 [57]
1.00 [25]
0.50 [13]
8-32 UNC-2B.30 Deep, 2 Plcs.
O2X1 Oxygen Transmitter 3

September 2004
Mounting the Transmitter (cont.)
Note: To avoid collecting condensate that may damage the oxygen sensor, mount the O2X1 in an upright position, with the sensor manifold below the electronics module.
Install the O2X1 transmitter by completing the following steps:
1. Remove the O2X1 transmitter and the separately-packaged oxygen sensor (see Figure 3 below) from the shipping container. Keep the shipping container and packaging material for possible future use.
Figure 3: Packaged Oxygen Sensor
4 O2X1 Oxygen Transmitter

September 2004
Mounting the Transmitter (cont.)
2. Using Teflon tape as a sealant, connect the sample gas inlet and outlet to the 1/8” NPT ports on the sensor manifold (see Figure 4 below). Either port may be used as the inlet or the outlet; the direction of flow does not matter.
Figure 4: Sensor Manifold Installation
Sample Inlet Sample Outlet
Sensor ManifoldTeflon Tape
O2X1 Oxygen Transmitter 5
September 2004
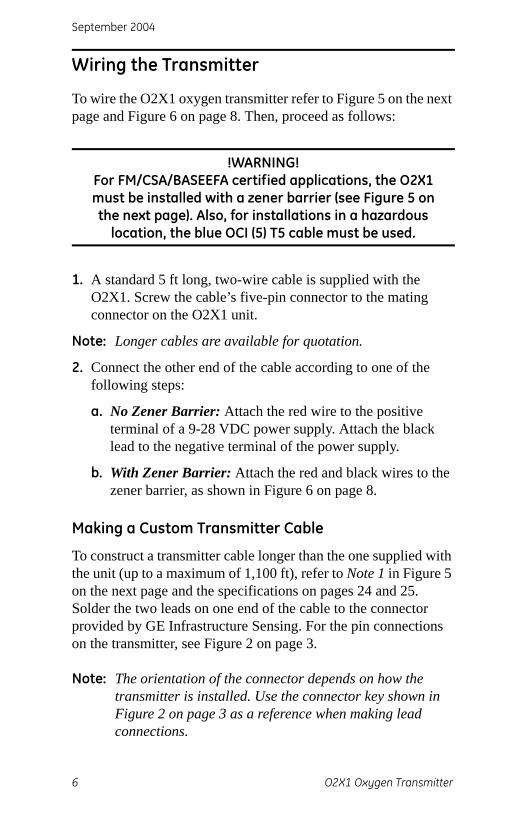
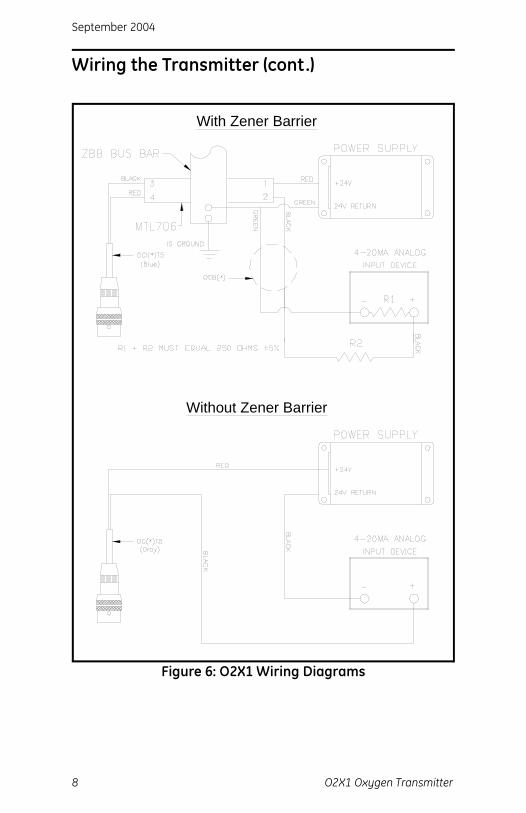
Wiring the Transmitter
To wire the O2X1 oxygen transmitter refer to Figure 5 on the next page and Figure 6 on page 8. Then, proceed as follows:
!WARNING!For FM/CSA/BASEEFA certified applications, the O2X1 must be installed with a zener barrier (see Figure 5 on the next page). Also, for installations in a hazardous
location, the blue OCI (5) T5 cable must be used.
1. A standard 5 ft long, two-wire cable is supplied with the O2X1. Screw the cable’s five-pin connector to the mating connector on the O2X1 unit.
Note: Longer cables are available for quotation.
2. Connect the other end of the cable according to one of the following steps:
a. No Zener Barrier: Attach the red wire to the positive terminal of a 9-28 VDC power supply. Attach the black lead to the negative terminal of the power supply.
b. With Zener Barrier: Attach the red and black wires to the zener barrier, as shown in Figure 6 on page 8.
Making a Custom Transmitter Cable
To construct a transmitter cable longer than the one supplied with the unit (up to a maximum of 1,100 ft), refer to Note 1 in Figure 5 on the next page and the specifications on pages 24 and 25. Solder the two leads on one end of the cable to the connector provided by GE Infrastructure Sensing. For the pin connections on the transmitter, see Figure 2 on page 3.
Note: The orientation of the connector depends on how the transmitter is installed. Use the connector key shown in Figure 2 on page 3 as a reference when making lead connections.
6 O2X1 Oxygen Transmitter

September 2004
Wiring the Transmitter (cont.)
Figure 5: Typical Certification Requirements for316 SS Process Unit Installations
O2X1MTL706
BARRIERSEE
NOTE 4(SEE NOTE 2)
See Note 1
HAZARDOUS LOCATION(CLASS I, II, III, DIV 1, GROUP A, B, C, D, E, F, G)
NON-HAZARDOUS LOCATION
1. Cable RequirementsA.FM Approved Installations - Total cable capacitance and
inductance due to the cable cannot exceed the following values:
B. CSA Installations - Refer to the Canadian Electrical Code for allowable cable parameters and lengths.
2. Barriers must be installed in accordance with the barrier manufacturer’s specifications
3. Installations should be in accordance with ANSI RP12.6, “Installations of Intrinsically Safe Systems for Hazardous (Classified) Locations” and the National Electrical Code(ANSI/NFPA 70).
4. Control room equipment connected to the associated apparatus (barrier inputs) must not use or generate more than 250 V.
5. CSA installations must be installed in accordance with the Canadian Electrical Code, Part 1.
6. WARNING - SUBSTITUTION OF COMPONENTS MAY IMPAIR SAFETY.AVERTISSEMENT - LA SUBSTITUTION DE COMPOSANTS PEUT COMPROMETTRELA SECURITE INTRINSIQUE
(per Drawing #752-099)
Group A, B Group C, E Group D, F, G0.068 µF 0.30 µF 0.90 µF4.0 mH 18 mH 35 mH
O2X1 Oxygen Transmitter 7
September 2004
Wiring the Transmitter (cont.)
Figure 6: O2X1 Wiring Diagrams
With Zener Barrier
Without Zener Barrier
8 O2X1 Oxygen Transmitter

September 2004
Installing an Oxygen Sensor
To install a new or replacement oxygen sensor in the O2X1, refer to Figure 7 below and complete the following steps:
Figure 7: Oxygen Sensor Installation
1. Disconnect the power from the O2X1
2. Loosen the knurled slip nut and remove the O2X1 body from the sensor manifold. If a previous oxygen sensor is already in place, remove it now.
3. Apply power to the unit. The O2X1 initializes in about 15 seconds and then all three LEDs light momentarily.
Oxygen Sensor Ring
Knurled Nut
Sensor Base
Sensor Manifold
O2X1 Oxygen Transmitter 9

September 2004
Installing an Oxygen Sensor (cont.)
Note: Before continuing with the installation, become familiar with the procedures for programming and calibrating the O2X1 oxygen transmitter discussed later in this manual.
4. Trim the 4-20 mA analog output (see page 15) and set the range to 0-25% oxygen (see page 14).
5. Open the airtight package (see Figure 4 on page 5) and remove the oxygen sensor from the package. To maintain the oxygen sensor’s energy level, remove the red grounding tab and immediately proceed to the next step.
6. Orient the sensor so that its gold-plated electrodes are facing the spring-loaded contact pins in the sensor base (see Figure 7 on the previous page). Firmly press the oxygen sensor into the sensor base on the O2X1 transmitter.
7. It is best to perform an air calibration on the new oxygen sensor at this time (see page 18). On the 0-25% oxygen scale, a properly calibrated oxygen sensor generates a current of 17.4 mA at the 4-20 mA analog output terminals.
8. Using the knurled slip nut, attach the transmitter with the calibrated oxygen sensor to the sensor manifold. Rotate the transmitter as desired and hand-tighten the knurled slip nut.
9. Begin the flow of either the process or the calibration gas. The analog output reading should begin to drop as the oxygen sensor adjusts to the reduced oxygen level. During this time, reset the range as required.
10. For improved accuracy in the ppm oxygen ranges, a span gas calibration should now be performed (see page 16).
IMPORTANT: Sensor life is dependent on the application. High oxygen concentrations and/or contaminants such as acid gases shorten sensor life.
10 O2X1 Oxygen Transmitter

September 2004
The O2X1 Keypad
The O2X1 keypad consists of three keys and three light-emitting diodes (LEDs), as shown in see Figure 1 on page 1. Table 1 below lists all of the keypad components and shows the symbols used to represent them in this document.
Note: During programming, all keystrokes must be completed within 60 seconds of the previous keystroke.
The O2X1 Menu Map
As an aid in navigating through the User Program, a complete Menu Map of the program is presented in Figure 8 on the next page. Please refer to this figure as needed, while programming the O2X1 transmitter.
Table 1: The O2X1 Keys and LEDsSymbol Component Name
Mode Set Key
Up Arrow Key
Down Arrow Key
1 LED #1
2 LED #2
3 LED #3
O2X1 Oxygen Transmitter 11

September 2004
Figure 8: O2X1 Menu Map
New Range
= 0-10 ppm
= 0-100 ppm = 0-10,000 ppm
= 0-1,000 ppm
= 0-25%
= 0-10%
RANGE DISPLAYS
Output = 20 mA
20 mA Trim
4 mA Trim
Read Outputwith Ammeter
Wait 5 SecondsAir*
1st & 2nd Cals
Sensor toExpose
Stores Valueas Reference
All Other Cals
Weak
Passed
RANGE SELECT
OUTPUT TRIM
SPAN GAS CALIBRATION
AIR CALIBRATION
(or cut power for 5 sec.)
Stop Pressing Keysfor 60 Seconds
Exit Without Saving Changes
Save Changes and Exit
MAI
N M
ENU
(read with ammeter)
(Press and Hold
= Press Up Arrow Key
= Press Down Arrow Key
= Press Mode Set Key = Instructions for User
= LED Status
= "Blinking" LED= "ON" LED= "OFF" LED
TEXT
MEASUREMENT
(see table at right)
1 2 3
1 2 3
1 2 3
1 2 3
1 32 321
321
321 321 321
321 321 321
Current Range(see table at right)
1 32
1 32
1 32
Output = 4 mA(read with ammeter)
NOTE: All LEDs turn OFF during output trim.Use ammeter to read output value.
1 2 3
1 32
1 2 3
1 2 3
EXIT
1 32
1 32
1 32
1 32
ExposeSensor to
1st & 2nd Cals
All Other Cals
Span Gas*
Stores Valueas Reference* before entering Main Menu
* current <80% of stored valueor <50 microamps.
for 3 seconds)
MODE
MEASUREMENTMODE
Sensor*
Sensor*
Passed
Weak1
1
32
32
12 O2X1 Oxygen Transmitter

September 2004
Entering and Exiting the User Program
Table 2 below shows how to use the O2X1 keypad to navigate through the User Program.
The O2X1 User Program consists of a Main Menu and four submenus. A complete Menu Map of the program is shown in Figure 8 on page 12.
Table 2: O2X1 Menu NavigationOperation Key/LED Sequence
Enter the Main Menu 1. Press and hold the key until 3
turns ON (about 3 seconds).
2. Press the key, and 2 turns ON.
3. Press the key, and 1 starts blinking. This indicates that you have entered the Main Menu.
Note: The O2X1 operates on a 4-20 mA loop current, which varies as the LEDs turn ON and OFF. Therefore, do not take any measurements while in the User Program.
Move to next item in Main
Menu
Press the key until the appropriate LED status is obtained (see Figure 8 on page 12).
Save changes and exit
While in the Main Menu, press and hold
down both the and keys until all three LEDs begin blinking. Then release the keys. After your changes have been saved, all three LEDs will turn OFF.
Note: If any of the LEDs are still blinking, you are still in the Main Menu.
Exit without saving changes
Stop pressing keys and wait until all three LEDs turn OFF (about 60 seconds), or disconnect the power for at least 5 seconds.
O2X1 Oxygen Transmitter 13

September 2004
Programming and Calibrating the O2X1
Upon startup, a five-step adjustment and calibration procedure must be performed on the O2X1:
1. Select the desired measurement range.
2. Trim the low (4 mA) and high (20 mA) analog outputs.
3. Upon installation of a new oxygen sensor, calibrate the unit with air for either a ppm or % sensor.
4. For ppm sensors only, purge the sensor with a low ppm oxygen gas.
5. For all subsequent calibrations, use a span gas that is appropriate for the sensor and range selected.
To begin the above tasks, proceed to the next section.
Selecting the Range
1. Scroll through the Main Menu until 1 is blinking, and
press the key to display the current range. See Table 3 below to determine the current range from the status of the LEDs.
2. To select the desired range, press the or key to scroll through the available options until the desired range is displayed via the LED codes.
3. When done, press the key. The blinking of 1 indicates that you have returned to the Main Menu.
Table 3: LED Range Codes 1 2 3 Range
OFF ON ON 0-10 ppmON OFF OFF 0-100 ppmOFF ON OFF 0-1,000 ppmOFF OFF ON 0-10,000 ppmON ON OFF 0-10%ON ON ON 0-25%
14 O2X1 Oxygen Transmitter
September 2004
Trimming the Output
To trim the analog output, calibrate the low (4 mA) end of the output then the high (20 mA) end of the output.
IMPORTANT: The low and high adjustments interact with each other. Therefore, recheck the calibration after the procedure has been completed.
Preparing to Trim the Output:
Prepare to trim the analog output as follows:
1. Connect an ammeter in series with the positive O2X1 power supply lead, to monitor the analog output.
2. Enter the Main Menu as described in Table 2 on page 13.
3. Press the key repeatedly until 2 blinks. This is the beginning of the Output Trim submenu.
Trimming the Output Low (4 mA) End:
1. Press the key. All LEDs turn OFF and the analog output is driven to approximately 4 mA.
2. Press the or key to adjust the output up or down, until it equals 4.00 ± 0.01 mA.
3. When done, press the key. 2 blinks, indicating that you are back at the Main Menu.
Trimming the Output High (20 mA) End:
1. Press the key. All LEDs turn OFF and the analog output is driven to approximately 20 mA.
2. Press the or key to adjust the output up or down, until it equals 20.00 ± 0.01 mA.
3. When done, press the key. 2 blinks, indicating that you are back at the Main Menu.
O2X1 Oxygen Transmitter 15

September 2004
Trimming the Output (cont.)
Completing the Trim Procedure:
1. Repeat both the low end and high end analog output trimming steps until no further trimming adjustments are required.
2. Exit the Main Menu and Save your changes, as described in Table 2 on page 13.
Span Gas Calibration
Before entering the Main Menu, use a low oxygen content purge gas to prepare the O2X1. Then, start the flow of the span gas to the sensor and wait until the output reading is stable. After initial exposure to the calibration gas, obtaining a stable reading takes a few seconds in the higher ranges (0-1,000 ppm and above) and a minute or more in the lower ranges (0-10 and 0-100 ppm). For accurate calibration, the span gas should have an oxygen content of 70-90% of the range being calibrated.
To perform the calibration, complete the following steps:
1. Use the equation below to calculate the expected mA output that corresponds to the known oxygen content of the span gas:
For example, if the span gas contains 80 ppm oxygen and the0-100 ppm range is being calibrated, the analog output should equal 4 + 16 x (80/100) = 16.8 mA.
2. Start the flow of span gas to the sensor, and allow the 4-20 mA output reading to stabilize.
3. After the reading has stabilized, enter the Main Menu as described on page 13.
4. Press the key until 1 is ON and 3 is blinking.
4.0 16.0 Span Gas ppmFull Range ppm--------------------------------------×+ mA Output=
16 O2X1 Oxygen Transmitter

September 2004
Span Gas Calibration (cont.)
5. For the first two calibrations after installing the transmitter,
use the key to store the calibration value in memory as a reference to detect a weak sensor. For all subsequent
calibrations, press the key to reference this value against the one stored in memory. All LEDs turn OFF after the key is pressed.
6. While using an ammeter to monitor the 4-20 mA output, press
the or key to adjust the analog output until the reading equals the value calculated in Step 1 on the previous page.
7. When done, press the key. If the calibration was successful, 1 should be ON and 3 should be blinking. At this point, the mA output is equal to the calibration setting of Step 5 above and must be saved. Save the calibration by
holding down both the and keys until all three LEDs flash and then turn OFF.
Note: The second calibration after installation should be performed within 1-2 days of the first calibration.
Note: If 1 and 3 blink alternately with 2, the sensor is weak and sensor failure may be imminent.
IMPORTANT: To detect a weak sensor, the same span gas that was used for the first two calibrations must be used for all subsequent calibrations.
If the sensor is weak and a replacement sensor is not immediately
available, repeat the calibration using the key in Step 5 above. This stores a weaker sensor calibration value into memory for temporary use. However, be aware that sensor drift may be increasing, and accuracy cannot be guaranteed. The sensor should be replaced as soon as possible.
O2X1 Oxygen Transmitter 17

September 2004
Air Calibration
An air calibration, as described below, is always recommended upon installation of a new oxygen sensor. However, because of the non-linearity of the oxygen sensor, a span gas calibration (see page 16) should also be performed to ensure more accurate readings in the ppm ranges.
Caution!The useful life of ppm sensors will be extended by
minimizing exposure of the sensor to air.
1. Expose the oxygen sensor to ambient air for about two minutes.
2. In the Main Menu, press the key until 2 is ON and 3 is blinking.
3. For the first two calibrations after installing the transmitter,
use the key to store the sensor current value in memory as
a reference. For all subsequent calibrations, press the key to reference this new value against the one stored in memory. After pressing the key, 2 and 3 will come on for about five seconds, until the calibration is complete.
4. Reconnect the O2X1 transmitter to the process and switch back to a calibration gas of low oxygen content.
5. When 2 is ON and 3 is blinking, you are back at the Main Menu. The new calibration must be saved by holding
down both the and keys until all three LEDs flash and then turn OFF.
18 O2X1 Oxygen Transmitter

September 2004
Air Calibration (cont.)
Note: If 1 and 3 blink alternately with 2, the calibration was rejected because the sensor current was less than50 µA. The sensor is weak and sensor failure may be imminent - replace the sensor as soon as possible.
Note: The second calibration after installation should be performed within 1-2 days of the first calibration.
If the sensor is weak and a replacement sensor is not immediately
available, repeat the calibration using the key in Step 3 on the previous page. If this reading is still less than 50 µA, the reading cannot be stored and the sensor must be replaced immediately.
O2X1 Oxygen Transmitter 19

September 2004
Specifications
ppm Sensor Measurement Ranges(Field-Programmable):
0–10 ppmv O2 (316 SS package only)0–100 ppmv O20–1,000 ppmv O20–10,000 ppmv O2
% Sensor Measurement Ranges(Field-Programmable):
0–1% O20–10% O20–25% O2
Accuracy:
±1% of span at calibration point for all ranges, except ±2% of span at the calibration point for the 0–10 ppmv range(316 SS package only)
Repeatability:
±1% of span or ±2% of span for 0–10 ppmv range(316 SS package only)
Resolution:
±0.1% of span
Linearity:
±2% of span
Operating Temperature:
0–45oC (32–113°F)
Ambient Temperature Effect:
±3% of reading over operating temperature range
20 O2X1 Oxygen Transmitter

September 2004
Specifications (cont.)
Sample Pressure:
atmospheric (during operation and calibration)
Atmospheric Pressure Effect:
±0.13% of reading per mm Hg (directly proportional to absolute pressure). During calibration, pressure and flow rate must be kept constant.
Process Connection:
316 SS & Delrin process units: 1/8” NPT inlet and outletambient air monitoring units: none
Sample Flow Rate:
1.0 SCFH (500 cc/min) recommended
Response Time:
90% step change with standard sensors:
10 seconds from 1–12 ppm O210 seconds from 12–1 ppm O215 seconds from 5–10,000 ppm O210 seconds from 10,000–5 ppm O222 seconds from 0.1–21% O216 seconds from 21–0.1% O2
Process Wetted Materials
316 SS Process Unit: 316 SS, Viton, TeflonDelrin Process Unit: Delrin, Viton, TeflonAmbient Air Monitoring Unit: Delrin, Viton, Teflon
O2X1 Oxygen Transmitter 21

September 2004
Model Number
The model number for the O2X1 oxygen transmitter is constructed as follows:
O2X1 - B C
Where, B (Sensor) = 0 - no sensor1 - standard ppm sensor2 - acid ppm sensor3 - standard percent sensor4 - acid percent sensor
Where, C (Package) = 0 - standard stainless steel1 - Delrin plastic2 - ambient air monitorS - special
For example, an O2X1 with a standard percent sensor and a Delrin plastic package would have the following model number:
O2X1-31
22 O2X1 Oxygen Transmitter

September 2004
Electrical Classification/Certification
Weatherproof (Process Units Only):
NEMA 4X, IP66
Intrinsically Safe (316 SS Units Only):
Class I, II, III, Div. 1, Groups A, B, C, D, E, F, G;FM J.I.2D6A6.AX (3610); CSA LR 44204
II 1 G EEx ia IIC T4 (-20° to +60oC)BAS01ATEX1094 X
CE European Union Compliance:
Note: See the Declaration of Conformity and ATEX Compliance certificates at the back of this manual for additional information.
All O2X1 package options comply with EMC Directive89/336/EEC and Low-Voltage Directive 73/23/EEC (Installation Category II, Pollution Degree 2).
For EN 61000-4-3, the O2X1 meets performance criteria A and, in a limited number of frequencies, performancecriteria B per EN 61326.
IMPORTANT: For CE compliance, the O2X1 cable must be shielded and the shield must be terminated at the supply end.
O2X1 Oxygen Transmitter 23

September 2004
Intrinsically Safe Installation
Intrinsically safe installations require the use of an MTL706 Zener barrier.
Power Requirements with an MTL706:
24–28 VDC, at 50 mA
Cable:
OCI(*)T5 in hazardous area: blue, 2-conductor twisted-pair with connector, 22 AWG, 1,100 ft maximum length(* = length in ft)
OCB(*) in nonhazardous (safe) area:3-conductor, 22 AWG, 0.04 ohms/ft
Note: Cable requirements for certified installations must also comply with Note 1 in Figure 5 on page 7.
Output:
Total load must equal 250 Ω ±5%
24 O2X1 Oxygen Transmitter

September 2004
Non-Hazardous Installation
Non-Hazardous installations do not require the use of an MTL706 Zener barrier.
Power Requirement:
9–28 VDC, loop-powered, 0.6 W max.
Cable:
OC(*)T5: gray, 2-conductor twisted pair with connector,22 AWG, 0.04 ohms/ft (* = length in ft)
Output:
Max. Load (ohms) = [40 x (PSV - 8)] - RCPSV = Power Supply Voltage in VDCRC = Cable Resistance(22 AWG cable has 0.04 ohms/ft)
Example:
Given a 24 VDC power supply and a 1,000 ft, 22 AWG cable
RC = 1,000 ft. x 0.04 ohms/ft = 40 ohmsMax. Load = [40 x (24 - 8)] - 40 = 600 ohms
O2X1 Oxygen Transmitter 25

September 2004
Index
AAir Calibration . . . . . . . . . . . . . . . . . . . . . . . . . . . . . . . . . . . . . . . . . . 1-18
CCable, Custom. . . . . . . . . . . . . . . . . . . . . . . . . . . . . . . . . . . . . . . . . . . 1-6Calibration
Ambient Air . . . . . . . . . . . . . . . . . . . . . . . . . . . . . . . . . . . . . . . . . . 1-18Five-Step Procedure. . . . . . . . . . . . . . . . . . . . . . . . . . . . . . . . . . . 1-14Span Gas . . . . . . . . . . . . . . . . . . . . . . . . . . . . . . . . . . . . . . . . . . . . 1-16
CE Compliance . . . . . . . . . . . . . . . . . . . . . . . . . . . . . . . . . . . . . . . . . 1-23Certification
Data. . . . . . . . . . . . . . . . . . . . . . . . . . . . . . . . . . . . . . . . . . . . . . . . 1-23Drawing . . . . . . . . . . . . . . . . . . . . . . . . . . . . . . . . . . . . . . . . . . . . . 1-7
EElectrical Classification . . . . . . . . . . . . . . . . . . . . . . . . . . . . . . . . . . 1-23
IInstallation Specifications
Intrinsically Safe . . . . . . . . . . . . . . . . . . . . . . . . . . . . . . . . . . . . . . 1-24Non-Hazardous . . . . . . . . . . . . . . . . . . . . . . . . . . . . . . . . . . . . . . 1-25
KKeypad . . . . . . . . . . . . . . . . . . . . . . . . . . . . . . . . . . . . . . . . . . . . . . . 1-11
LLED’s . . . . . . . . . . . . . . . . . . . . . . . . . . . . . . . . . . . . . . . . . . . . . . . . . 1-11
MMenu Map . . . . . . . . . . . . . . . . . . . . . . . . . . . . . . . . . . . . . . . . . . . . . 1-12Model Number . . . . . . . . . . . . . . . . . . . . . . . . . . . . . . . . . . . . . . . . . 1-22
OOutline and Installation Drawing. . . . . . . . . . . . . . . . . . . . . . . . . . . . 1-3Output, Trimming . . . . . . . . . . . . . . . . . . . . . . . . . . . . . . . . . . . . . . . 1-15Oxygen Sensor, Installing . . . . . . . . . . . . . . . . . . . . . . . . . . . . . . . . . . 1-9
RRange, Selecting . . . . . . . . . . . . . . . . . . . . . . . . . . . . . . . . . . . . . . . . 1-14
1

September 2004
Index (cont.)
SSensor Manifold, Installing . . . . . . . . . . . . . . . . . . . . . . . . . . . . . . . . . 1-5Span Gas Calibration . . . . . . . . . . . . . . . . . . . . . . . . . . . . . . . . . . . . 1-16Specifications
Hazardous Locations . . . . . . . . . . . . . . . . . . . . . . . . . . . . . . . . . . 1-24Non-Hazardous Locations. . . . . . . . . . . . . . . . . . . . . . . . . . . . . . 1-25Transmitter . . . . . . . . . . . . . . . . . . . . . . . . . . . . . . . . . . . . . . . . . . 1-20
UUnit Types . . . . . . . . . . . . . . . . . . . . . . . . . . . . . . . . . . . . . . . . . . . . . . 1-2User Program
Entering . . . . . . . . . . . . . . . . . . . . . . . . . . . . . . . . . . . . . . . . . . . . 1-13Exiting . . . . . . . . . . . . . . . . . . . . . . . . . . . . . . . . . . . . . . . . . . . . . . 1-13Navigating . . . . . . . . . . . . . . . . . . . . . . . . . . . . . . . . . . . . . . . . . . 1-13
WWiring Diagram . . . . . . . . . . . . . . . . . . . . . . . . . . . . . . . . . . . . . . . . . 1-8Wiring the Transmitter . . . . . . . . . . . . . . . . . . . . . . . . . . . . . . . . . . . . 1-6
2

GE InfrastructureSensing DECLARATION
OFCONFORMITY
CERT-DOC-H1 August 2004)
TÜV ESSENISO 9001
U.S.
TÜV
We, Panametrics Limited Shannon Industrial Estate
Shannon, County Clare Ireland
declare under our sole responsibility that the
O2X1 Oxygen Transmitter
to which this declaration relates, are in conformity with the following standards:
• EN 50014:1997+A1+A2:1999
• EN 50020:1994
• EN50284:1999
• II 1 G EEx ia IIC T4; BAS01ATEX1094 XBaseefa (2001) Ltd/EECS, Buxton, SK17 9JN, UK
• EN 50104:1998Deviation from Standard: unit not tested from -10°C to 0°C
• EN 61326:1998, Class A, Annex A, Continuous Unmonitored Operation(For EN 61000-4-3, the O2X1 meets performance Criteria A, and in a limited number of frequencies, performance Criteria B per EN 61326.)
• EN 60529:1991+A1:2000IP66
following the provisions of the 89/336/EEC EMC Directive and the 94/9/EC ATEX Directive.
The units listed above and any ancillary sample handling systems supplied with them do not bear CE marking for the Pressure Equipment Directive, as they are supplied in accordance with Article 3, Section 3 (sound engineering practices and codes of good workmanship) of the Pressure Equipment Directive 97/23/EC for DN<25.
Shannon - July 1, 2003Mr. James Gibson
GENERAL MANAGER

GE InfrastructureSensing DECLARATION
DECONFORMITE
CERT-DOC-H1 August 2004)
TÜV ESSENISO 9001
U.S.
TÜV
Nous, Panametrics Limited Shannon Industrial Estate
Shannon, County Clare Ireland
déclarons sous notre propre responsabilité que les
O2X1 Oxygen Transmitter
rélatif á cette déclaration, sont en conformité avec les documents suivants:
• EN 50014:1997+A1+A2:1999
• EN 50020:1994
• EN50284:1999
• II 1 G EEx ia IIC T4; BAS01ATEX1094 XBaseefa (2001) Ltd/EECS, Buxton, SK17 9JN, UK
• EN 50104:1998Deviation from Standard: unit not tested from -10°C to 0°C
• EN 61326:1998, Class A, Annex A, Continuous Unmonitored Operation(For EN 61000-4-3, the O2X1 meets performance Criteria A, and in a limited number of frequencies, performance Criteria B per EN 61326.)
• EN 60529:1991+A1:2000IP66
suivant les régles de la Directive de Compatibilité Electromagnétique 89/336/EEC etd’ATEX 94/9/EC.
Les matériels listés ci-dessus ainsi que les systèmes d'échantillonnages pouvant être livrés avec, ne portent pas le marquage CE de la directive des équipements sous pression, car ils sont fournis en accord avec la directive 97/23/EC des équipements sous pression pour les DN<25, Article 3, section 3 qui concerne les pratiques et les codes de bonne fabrication pour l'ingénierie du son.
Shannon - July 1, 2003Mr. James Gibson
DIRECTEUR GÉNÉRAL

GE InfrastructureSensing KONFORMITÄTS-
ERKLÄRUNG
CERT-DOC-H1 August 2004)
TÜV ESSENISO 9001
U.S.
TÜV
Wir, Panametrics Limited Shannon Industrial Estate
Shannon, County Clare Ireland
erklären, in alleiniger Verantwortung, daß die Produkte
O2X1 Oxygen Transmitter
folgende Normen erfüllen:
• EN 50014:1997+A1+A2:1999
• EN 50020:1994
• EN50284:1999
• II 1 G EEx ia IIC T4; BAS01ATEX1094 XBaseefa (2001) Ltd/EECS, Buxton, SK17 9JN, UK
• EN 50104:1998Deviation from Standard: unit not tested from -10°C to 0°C
• EN 61326:1998, Class A, Annex A, Continuous Unmonitored Operation(For EN 61000-4-3, the O2X1 meets performance Criteria A, and in a limited number of frequencies, performance Criteria B per EN 61326.)
• EN 60529:1991+A1:2000IP66
gemäß den Europäischen Richtlinien, Niederspannungsrichtlinie EMV-RichtlinieNr.: 89/336/EG und ATEX Richtlinie Nr. 94/9/EG.
Die oben aufgeführten Geräte und zugehörige, mitgelieferte Handhabungssysteme tragen keine CE-Kennzeichnung gemäß der Druckgeräte-Richtlinie, da sie in Übereinstimmung mit Artikel 3, Absatz 3 (gute Ingenieurpraxis) der Druckgeräte-Richtlinie 97/23/EG für DN<25 geliefert werden.
Shannon - July 1, 2003Mr. James Gibson
GENERALDIREKTOR

CERT-ATEX-D (Rev. August 2004)
GE InfrastructureSensing ATEX COMPLIANCE
We, GE Infrastructure Sensing, Inc. 1100 Technology Park Drive
Billerica, MA 01821-4111 U.S.A.
as the manufacturer, declare under our sole responsibility that the product
O2X1 Oxygen Transmitter
to which this document relates, in accordance with the provisions of ATEX Directive 94/9/EC Annex II, meets the following specifications:
Furthermore, these additional requirements and specifications apply to the product:
• Having been designed in accordance with EN 50014, EN 50020, and EN 50284, the product meets the fault tolerance requirements of electrical apparatus for category “ia”.
• The product is an electrical apparatus and must be installed in the hazardous area in accordance with the requirements of the EC Type Examination Certificate. The installation must be carried out in accordance with all appropriate international, national and local standard codes and practices and site regulations for flameproof apparatus and in accordance with the instructions contained in the manual. Access to the circuitry must not be made during operation.
• Only trained, competent personnel may install, operate and maintain the equipment.
• The product has been designed so that the protection afforded will not be reduced due to the effects of corrosion of materials, electrical conductivity, impact strength, aging resistance or the effects of temperature variations.
• The product cannot be repaired by the user; it must be replaced by an equivalent certified product. Repairs should only be carried out by the manufacturer or by an approved repairer.
• The product must not be subjected to mechanical or thermal stresses in excess of those permitted in the certification documentation and the instruction manual.
• The product contains no exposed parts which produce surface temperature infrared, electromagnetic ionizing, or non-electrical dangers.
• As a special condition for safe use, the product must not be used to measure oxygen concentrations greater than 21%.
1180 II 1 G EEx ia IIC T4 (-20°C to +60°C)BAS01ATEX1094X

USA1100 Technology Park DriveBillerica, MA 01821-4111Web: www.gesensing.com
IrelandShannon Industrial EstateShannon, County ClareIreland