multi-locale site management with ibm® workplace web content
TRANSCRIPT

Multi-locale Site Management with IBM Workplace Web Content Management October 2007
Multi-locale site management with IBM® Workplace Web Content Management™
Mark Hampton Product Architect, Web Content Management Australia Development Lab, Sydney
David de Vos Lab Product Specialist, Web Content Management Australia Development Lab, Sydney Melissa Howarth Lab Product Specialist, Web Content Management Australia Development Lab, Sydney

Contents
What will this white paper help you achieve? .................................................................................................... 6 What is a multi-locale site? ................................................................................................................................ 8
The base site ..................................................................................................................................... 8 Translated sites ................................................................................................................................. 8 Regional sites .................................................................................................................................... 9 Translated regional sites ................................................................................................................... 9 Mixed-language sites....................................................................................................................... 10
Managing a multi-locale site with Web Content Management......................................................................... 11 Framework for multi-locale site management .................................................................................................. 12
Use one library per locale................................................................................................................ 12 Same site structure in each locale................................................................................................... 12 Use workflow for all modifications ................................................................................................... 13 Use shared templates and components .......................................................................................... 13
Authoring.......................................................................................................................................................... 15 Localization of authoring content ..................................................................................................... 15
Names and Titles ...................................................................................................................... 15 Other fields................................................................................................................................ 15
Authoring Templates ....................................................................................................................... 16 Common Authoring Templates ................................................................................................. 16 Localized Authoring Templates................................................................................................. 16 Single Authoring Templates ...................................................................................................... 17
Preview............................................................................................................................................ 17 Lifecycle and synchronization.......................................................................................................................... 18
Creating/updating/moving localized content.................................................................................... 19 Creating..................................................................................................................................... 19 Updating.................................................................................................................................... 19 Moving....................................................................................................................................... 20
Publishing synchronization .............................................................................................................. 21 Expiry synchronization..................................................................................................................... 21 Deletion synchronization ................................................................................................................. 21
Presentation..................................................................................................................................................... 23 Presentation templates.................................................................................................................... 23 Site / site area elements .................................................................................................................. 24 Dot notation ..................................................................................................................................... 24 Localized navigator components ..................................................................................................... 25 Localized menu components........................................................................................................... 26 Synchronizing components using workflow..................................................................................... 26 Localized site searching .................................................................................................................. 27
Localized rendering.......................................................................................................................................... 29 Auto-localization .............................................................................................................................. 29
3

URL ........................................................................................................................................... 29 Browser preference................................................................................................................... 29 Portal ......................................................................................................................................... 29 Limitations ................................................................................................................................. 30
User-selected localization................................................................................................................ 30 Locale selection page ............................................................................................................... 31 Equivalent page navigation ....................................................................................................... 31
Some suggested options ................................................................................................................. 31 Option 1..................................................................................................................................... 32 Option 2..................................................................................................................................... 32
Encoding.......................................................................................................................................... 32 Font face considerations ................................................................................................................. 33
Deployment...................................................................................................................................................... 34 Centralized deployment ................................................................................................................... 34
Paths option .............................................................................................................................. 34 Multiple domains option ............................................................................................................ 34
Decentralized deployment ............................................................................................................... 35 Item-by-item localization navigation .......................................................................................... 36 Locale home page navigation ................................................................................................... 36
Deployment best practices .............................................................................................................. 37 Administration .................................................................................................................................................. 38 Sample code for authoring, workflow, and rendering ...................................................................................... 39
Installation and configuration........................................................................................................... 39 Required WEB CONTENT MANAGEMENT Version ................................................................ 39 Set up the configuration library ................................................................................................. 40 Install the workflow polling application ...................................................................................... 42
Samples........................................................................................................................................... 45 Edit-time navigation/Creation sample ....................................................................................... 45 Update notification sample........................................................................................................ 48 Publishing synchronization sample ........................................................................................... 50 Expiry synchronization sample.................................................................................................. 50 Deletion synchronization sample .............................................................................................. 51 Servlet Render-time navigation sample .................................................................................... 52 Portlet Render-time navigation sample ..................................................................................... 53 Domain Locale Redirection sample .......................................................................................... 54
Where to go from here..................................................................................................................................... 56 Locale owner decision points .......................................................................................................... 56 Per-locale configuration................................................................................................................... 56 Regional sites synched with multiple translations ........................................................................... 57 Mixed-language site navigation ....................................................................................................... 57 Side-by-side preview ....................................................................................................................... 58 Side-by-side editing ......................................................................................................................... 58 Localization of authoring templates ................................................................................................. 59
4
Adding new localization settings to the Sync-Update sample ......................................................... 59 Writing your own workflow poller ..................................................................................................... 60 Disabling a workflow poller .............................................................................................................. 60 Writing your own Context Processor ............................................................................................... 61
Conclusion ....................................................................................................................................................... 62 Appendix .......................................................................................................................................................... 63
Adding JSPs to the Web Content Management Local Rendering portlet........................................ 63 Adding JSPs to the Web Content Management Authoring UI portlet .............................................. 63 Adding JSPs to the Web Content Management EAR file ................................................................ 64
Resources........................................................................................................................................................ 66 About the authors ............................................................................................................................................ 67
5

What will this white paper help you achieve?
hisWMafra
white paper outlines a framework for using IBM® Workplace eb Content Management™ 6.0 (hereafter called Web Content nagement) to manage and deliver localized Web sites. This mework is based on a data structure that supports storage of
localized sites and the use of extension points in the Web content management system for authoring, workflow, and rendering of localized sites.
T H I G H L I G H T S
Design and build a solution for authoring and synchronizing localized content
Design and build a solution for presenting localized sites
We demonstrate how to use Web Content Management to support the typical scenarios for site localization, scale this up to large numbers of localized sites, and then tailor a solution to meet your authoring, workflow, delivery, and deployment needs.
A set of sample code fragments is provided in the Downloads section of the title page, to accelerate your site rollout. You will be able to install and configure these samples and see a basic but comprehensive multi-locale site implementation in action.
Design and build a deployment and delivery architecture for multi-locale sites
Once you have learned to apply the principals and framework outlined in this paper, you will be able to design and build the following:
An authoring solution that provides your authors and site administrators with the tools they need to create and manage your multi-locale sites
A lifecycle and synchronization solution to tie in with your processes for managing the lifecycle of your multi-locale sites
A presentation solution for presenting content appropriately in each locale
A deployment solution that fits into and supports your enterprise architecture
6
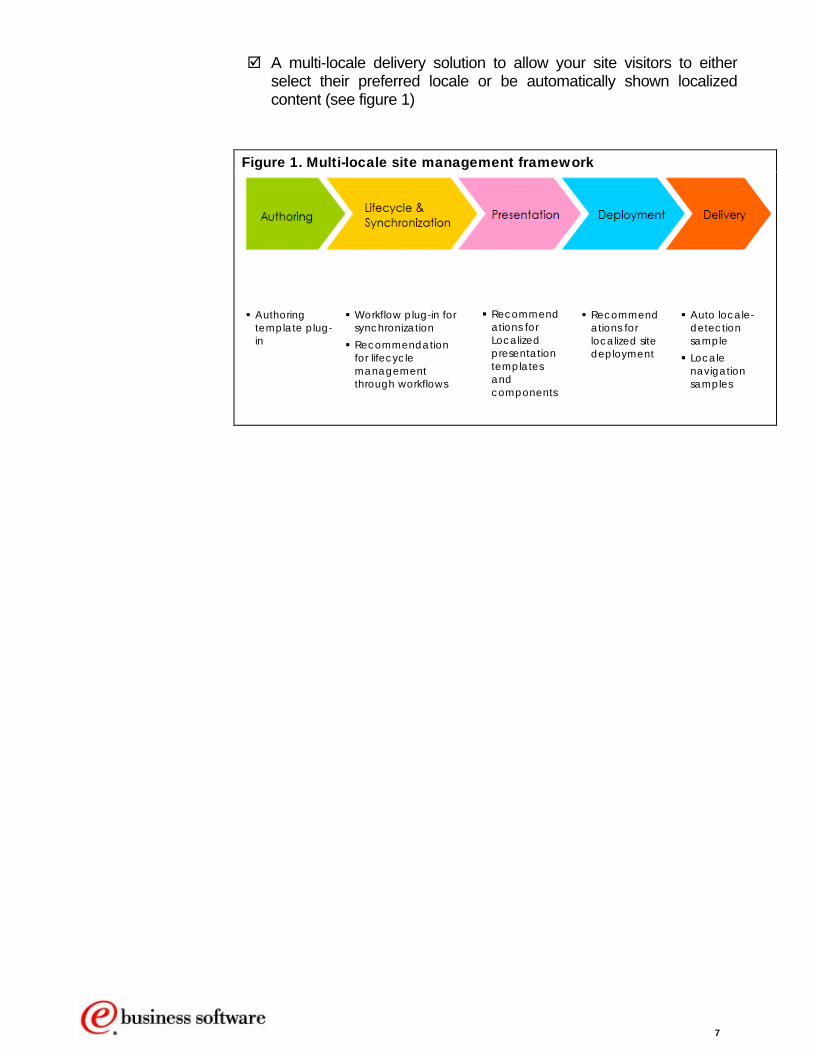
A multi-locale delivery solution to allow your site visitors to either select their preferred locale or be automatically shown localized content (see figure 1)
Figure 1. Multi-locale site management framework
Authoring template plug-in
Workflow plug-in for synchronization
Recommendations for localized site deployment
Auto locale-detection sample
Locale navigation samples
Recommendations for Localized presentation templates and components
Recommendation for lifecycle management through workflows
7

2
What is a multi-locale site? muhalocco
A lti-locale site consists of a base site structure and content set that s been “localized” to support multiple audiences in multiple ales. A locale is defined as a language or a region, or a mbination of both.
H I G H L I G H T S
Base “master” site Translated sites
synchronized with the base
You may be localizing your site to serve a global customer base, or because your site operates in a region where your customers speak a number of different languages.
Typically a site is translated so that each page in your site has an equivalent version in each language. You can cater to regional differences by including only a subset of content that is relevant for the region (country, state, or some other regional division), and by possibly including extra regional-specific content.
Regional sites re-using translated content
The base site The base site is a “master” site structure with content that is either translated or regionally localized, or both. Translation and selective re-use of this structure and content is how localized sites are built and maintained. This is an ongoing process as the base site’s structure and content are modified over time.
A special type of base site exists when a once-off copy is made to create a localized site, and from that point on the localized site never resynchronizes with the base. This may be appropriate especially for a regional site that is managed independently by a local team. The team may want to be very selective about including content from the base site, and so it uses a manual process for including new or updated content.
Translated sites In a typical translated site neither the structure nor the content differs; the content is simply translated one-for-one into multiple languages. By
8

translating the site in its entirety you can navigate backward and forward between equivalent content in each language. In this use case there are often legal and/or ethical reasons for ensuring that the content in each language is truly equivalent and is kept in sync over time.
A partially translated site is a special case in which only parts of the site are translated. This may be due to translation expense; translating the site would simply not make business sense, and so only a subset of the site is translated.
Regional sites In a typical regionally localized site, both the structure and content vary by region. If the regional sites have no common structure or content, they are simply separate sites; in this scenario, there is no “multi-locale site” to manage, and the framework described in this document is not required.
Often, however, there is some commonality, and the majority or even all of the site structure is common, and the majority of the content may be common; that is, it is re-used from the base site. The owners of the regional sites would be responsible for deciding what parts of the base site structure or content would be reused versus built especially for the region.
Translated regional sites This is a combination of the above cases, whereby the regional sites are in various languages and typically some of the regions use the same language. In this case the base site must then be translated, and then the appropriate translation re-used in the appropriate regions along with regional content written in the local regional language.
The sample code supplied with this paper does not attempt to support a two-tiered approach in which base content is translated and then translated content is copied or linked into regional sites. This would be a rudimentary extension to this code.
There may be some regions that require only a single language, and other regions (for example, Canada, Switzerland) that require multiple languages. The workflow samples explained in this paper do not cater to this particular scenario either, but this is also a simple extension (see figure 2).
9

Figure 2. Multi-locale sites
* Note: not covered in sample code
Translated locales – as
many languages as
required to best serve
your customers
Regional locales, some of
which may have multiple
languages
Multiple regions may share
the same set of translated
content *
The base locale
containing the
original site
Mixed-language sites Another type of multi-locale site that can exist is a mixed-language site. In this type of site, there is not a clear distinction between the versions of the Web site, with content in multiple languages pulled in some meaningful way into the base site.
The audience of such a site is likely to be bilingual, but the base language is not their native one. Key content is provided for them in their language, and navigational aids throughout the site help them discover which content has been translated and how to find more information on topics that have not been translated.
The general framework outlined in this document is still useful in these cases; authoring and workflow in particular would be similar to a fully localized site. The differences will be in the presentation system, in which navigation must be built to support the mixed language site. Ideas for how this can be implemented are discussed in the “Where to go from here” section.
1 0

3
Managing a multi-locale site with Web Content Management
ansitproloc
aging a multi-locale site, whether it is a translated site, regional e, or both, requires steps to be built into your site maintenance cess for deploying new localized sites, ongoing authoring of alized sites, and synchronization of shared structure and
content.
M H I G H L I G H T S
Delivery of a multi-locale site requires logic to be built into your presentation layer to provide either automatic or user-driven localized content delivery; that is, you can either detect locale automatically or ask the site visitors to pick.
Manage and deliver translated, regionally localized sites
Web Content Management helps in both management and delivery by allowing you to plug code into the authoring, workflow, and presentation systems to provide a comprehensive multi-locale content management solution.
Automate key areas of management and delivery
1 1

4
Framework for multi-locale site management
he framework in this white paper covers a data model for storing multi-locale sites, the processes for managing multi-locale sites, and a model for delivering multi-locale sites to site visitors.
To accompany the outlined framework, a set of sample code fragments are provided to enable you to get up and running quickly with your multi-locale solution.
TThe key elements of this framework are described below and illustrated in figure 3.
H I G H L I G H T S
Store sites in localized libraries Use one library per locale
Keep localized library structures in sync
Libraries are the partitioning construct in a Web Content Management repository, providing a point where locale assignment, role assignment, and syndication are managed.
Use workflow for all modifications You should create a library for the base site, one library for each localized
site, and a library for shared templates and components (non-localized assets).
Use shared templates and components When creating libraries, ensure that the correct locale is specified during the
creation process, as this locale is used during search and in the multi-lingual samples.
Same site structure in each locale For content to be recognized as being equivalent, it must have the same path in each locale library (display titles can be different, of course).
1 2
Use workflow for all modifications You should perform creating, updating, publishing, expiring, deleting, and even moving content by using workflow. This allows code triggered by the workflow to notify localized site owners, automate parts of the localization process, and synchronize important stages in the workflow.
You can localize workflows by creating an equivalently named workflow in each locale library (see figure 3). Localizing the workflow allows separate approval processes to be executed per locale and is also a requirement for the regional locale / translation process discussed in the “Where to go from here” section. Localizing the workflow is part of synchronization process, and the provided sample code for workflow synchronization has this ability.
Use shared templates and components Authoring templates, presentation templates, and components should be shared across locales as much as possible. You can build in variability by using workflows or workflow code that differ across locales and by using presentation components that are picked up from the current locale.
If necessary, you can make presentation templates different across locales by simply having different mappings in each locales; though it should be avoided to ensure consistency across locales, major differences in layout or branding in some locales may necessitate this.
Authoring templates can be varied across locales too, but this is more difficult to deal with as it complicates querying, creating, copying, etc. of content. This white paper and the accompanying samples assume that the authors in each locale understand the base locale language, and therefore localized templates are not required.
1 3

Figure 3. Framework overview
1 4

5
Authoring early all authoring tasks are initiated in the base site and are then replicated, if appropriate, in all the localized sites. An exception to this rule is regional content that will never be used in another localized site or “fixes” (for example, spelling mistakes or poor
translations) that are applied only in a single localized site.
N Localization of authoring content While the initial creation of both the base locale document and any localizations can be done manually via the Web Content Management Authoring Interface, it’s recommended to use either a custom authoring field (with appropriate logic) or Workflow Synchronization code to automate the initial creation of localized documents (in the base locale language) that can then be translated by the appropriate team.
N A M E S A N D T I T L E S
When you perform the translation, be careful not to translate the Name field in the Identification section as doing so will break the link between the translated document and its base copy.
The translators are free to translate the Display Title field, and this should be encouraged to let links be displayed using the correct translation of the content name.
NOTE: The Edit-time navigation/Creation sample demonstrates how to create the initial localized content (in the base locale language) from a custom authoring field, whereas the Sync Update Workflow Synchronization sample demonstrates the same functionality from a Workflow Synchronization point of view. Both can be used together.
O T H E R F I E L D S
Other fields may be different between locales, but for the purposes of consistency with respect to availability and access, many of the metadata
1 5

fields are typically kept in sync, including authors, categories, publish date, expiry date, security.
The “owner” field may be localized to indicate the owner of the specific localization. This can be used during automated workflow code to notify the appropriate users of updates.
Note that the sample code does not attempt to re-sync fields on updates, nor does it utilize the owner field (assuming that each locale has a single owner). These are rudimentary modifications to make to the sample code.
Authoring Templates There are multiple ways in which authoring templates can be set up in a multi-locale environment, each with their own pros and cons. Each method works, but the common authoring template model is what is recommended.
C O M M O N A U T H O R I N G T E M P L A T E S
Having a common authoring template is the recommended approach to setting up authoring in a multi-locale environment. Common authoring templates should be created in the common library and used for all locales. This means that authors in each locale need to understand the base locale language since element names are not localized. The Help fields could perhaps contain help in multiple languages, if required.
L O C A L I Z E D A U T H O R I N G T E M P L A T E S
Localized authoring templates involve each locale having its own authoring templates with translated element names, Help, etc. This approach is not recommended because of the following:
• Querying content is more complicated; each of the equivalent templates would need to be listed in shared menus or rules
• Creating content is more complicated; the user must choose the appropriate template for the type of content and locale
• The lack of Web Content Management API support for authoring templates means that localized authoring templates can’t be automatically synchronized (although simple workflow processes may still be used to notify template owners of changes)
• We can usually assume that the authors/translators understand the base language
If there is a sufficiently compelling reason to translate the templates, including element names, Help text, default values, etc., then it is recommended that you implement this by putting the localized templates in the appropriately localized libraries. See “Localization of authoring templates” in the Where to go from here section for more details.
1 6

S I N G L E A U T H O R I N G T E M P L A T E S
This approach involves the use of a single authoring template with fields for each locale. This approach is not recommended for the following reasons:
• Not scalable (only a limited number of languages could be supported due to the number of fields on the authoring template)
• Cannot have content authors editing localizations concurrently
• Localizations cannot be syndicated separately
• Only a single workflow can be used
• Localized content cannot be published/expired independently
• Cannot use non-Unicode character sets
Preview To preview how the content will look in the specified locale, including the appropriate encoding, portal themes etc., you should preview from within the appropriate library.
1 7

6
Lifecycle and synchronization orkflow (plus some custom code) can be used to keep the base site and localized sites in sync; specifically, you can synchronize creation, modification, publishing, expiry, deletion, and moving of site areas and content across locales by using workflow (see
figure 4).
WAlthough you can have custom code run when documents enter a workflow stage by periodically calling the Web Content Management API findContentByWorkflowStage method, it’s recommended that any custom code use the Workflow Polling Framework delivered with the sample code,
as it makes this job easy.
Figure 4. Workflow for locale synchronization
Where and when appropriate, a locale owner may of course choose to not utilize some base site areas or content, or may choose to ignore or
1 8

otherwise treat differently any particular update that occurs to the base site. The Workflow Synchronization code should handle this condition.
Creating/updating/moving localized content To keep content synchronized between locales, a special workflow stage to handle the updating, moving, and creation of content in the base library should be created that runs some custom code after the approval stage. If the current content document has already been published, the action should be considered an update or move. It is treated as new content if no published version exists.
C R E A T I N G
When new content is created in the base library, the workflow synchronization code should run one of the following actions (see figure 5) against each configured localized library and then send a notification to all affected localized library owners:
• The content is copied into the library for later translation OR
• The content is linked into the library for non-translated use OR
• The library is ignored (it is neither copied nor linked into the library)
Figure 5. Synchronized creation options
Note: The Sync Update Workflow Synchronization sample demonstrates this functionality.
U P D A T I N G
When content is updated in the base library, the workflow synchronization code should create draft copies of existing published localized content and send a notification to all affected localized library owners (see figure 6).
1 9

Figure 6. Synchronized update
Note: The Sync Update Workflow Synchronization sample demonstrates this functionality
M O V I N G
When moving content in the database library, rather than move the published content, the author/owner should first create a draft copy of the published content and then move the draft to the correct location.
Figure 7. Synchronized move
When the draft content is detected as moved within the base library by the workflow synchronization code (because its associated published version is under a different site area), draft copies of the existing published localized content should be created and moved to the corresponding location in the localized library (see figure 7). A notification should then be sent to all affected localized library owners.
Note: The Sync Update Workflow Synchronization sample does not demonstrate this functionality but could be extended to do so.
2 0

Publishing synchronization To ensure that the base item and localized items are published at the same time, another special workflow stage is required. This workflow stage runs more custom code after the approval and Create/Update/Move synchronization stages and before the actual Publish workflow stage.
When documents are processed in this stage by the workflow synchronization code, they will only be moved to the next stage (which will do the actual publishing) if every draft localized copy is in this stage. A notification should be sent to all affected localized library owners when documents leave this stage.
Note: The Sync Publish Workflow Synchronization sample demonstrates this functionality.
Expiry synchronization To ensure that the base item and localized items are expired at the same time, yet another special workflow stage is required. This workflow stage runs also runs some custom code after the Publish workflow stage.
When documents are processed in this stage by the workflow synchronization code, they will only be moved to the next stage (which will do the actual expiration) if every published localized copy is in this stage. A notification should be sent to all effected localized library owners when documents leave this stage.
Note: The Sync Expire Workflow Synchronization sample demonstrates this functionality
Deletion synchronization If a base item is deleted, the localized content should also be deleted. To handle this, another special workflow stage is required (to run the associated custom code). This stage should be either after the Expiry stage (if content expiration is used) or after the Publish stage (if content expiration isn’t used).
Therefore, to delete an item, you need to push the document to the final workflow stage, which typically only a site administrator or Web Content Management administrator would be able to do.
When the workflow synchronization code processes documents in this stage, if the base item is detected (or no base item exists), then all draft, published, and expired localized copies should be removed and a notification sent to all affected library owners informing them of the deletion. If a localized item is detected and the base item is in another stage, then a “Deletion Request” notification should be sent to the base library owner informing him that various localized copies wish to be deleted.
2 1

Note: The Sync Delete Workflow Synchronization sample demonstrates this functionality.
2 2

7
Presentation ocalizing the presentation layer in your site is a matter of deciding which parts of the presentation layer need to be localized, and then pulling those pieces out into components that can be localized.
Remember to use the Display Title attribute rather than the Name attribute when displaying the name of content as the latter is not localized and will result in information being shown in the wrong locale.
L
Presentation templates In many cases you can use the same presentation templates in all locales, and you can vary fragments of the template by using one of these two options:
• From the current site / site area: Localized components can be referenced from the current site or site area (discussed below).
• Using the dot (“.”) notation when referencing components: This is evaluated to mean “get the named component from the current library” (also discussed below).
In other cases, however, a locale requires such different presentation that you must use an entirely different template; for example, to support locales with languages that read right to left, or for locales with very different branding.
You can use all these strategies together by setting up template mappings appropriately in each localized site and using site / site area elements or dot notation where appropriate.
2 3
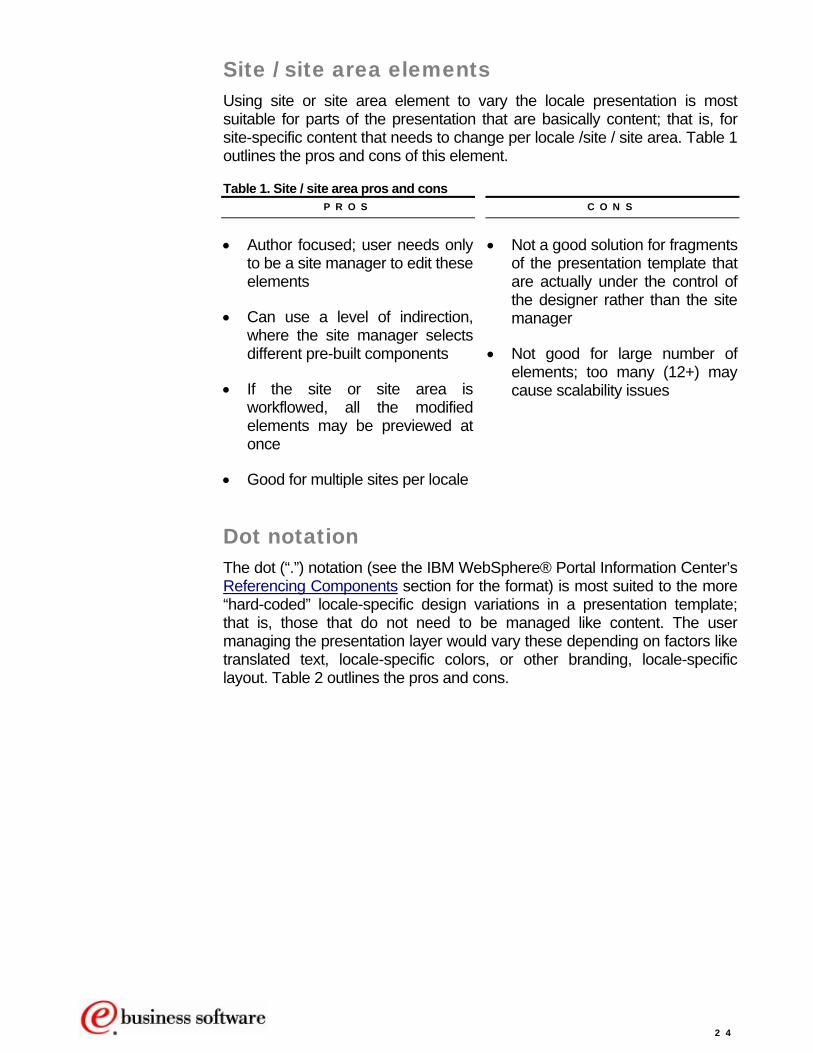
Site / site area elements Using site or site area element to vary the locale presentation is most suitable for parts of the presentation that are basically content; that is, for site-specific content that needs to change per locale /site / site area. Table 1 outlines the pros and cons of this element.
Table 1. Site / site area pros and cons P R O S C O N S
• Author focused; user needs only to be a site manager to edit these elements
• Not a good solution for fragments of the presentation template that are actually under the control of the designer rather than the site manager • Can use a level of indirection,
where the site manager selects different pre-built components
• If the site or site area is workflowed, all the modified elements may be previewed at once
• Not good for large number of elements; too many (12+) may cause scalability issues
• Good for multiple sites per locale
Dot notation The dot (“.”) notation (see the IBM WebSphere® Portal Information Center’s Referencing Components section for the format) is most suited to the more “hard-coded” locale-specific design variations in a presentation template; that is, those that do not need to be managed like content. The user managing the presentation layer would vary these depending on factors like translated text, locale-specific colors, or other branding, locale-specific layout. Table 2 outlines the pros and cons.
2 4

Table 2. Dot notation pros and cons P R O S C O N S
• Designer focused; most likely under the control of the same users managing the presentation templates
• Cannot preview changes easily
• View references not available
• User roles can be used to lock down who may modify components
• Can scale to large number of components (there are many locale points of variance in the template)
Localized navigator components Structural differences between localized sites can be picked up by navigator components.
If you use the “Current site,” “Current site area,” and “Current content” options, you can re-use navigators across sites easily. This typically covers most navigation like Site maps, Breadcrumbs, Current area content, etc.
Navigators that use “Selected” start positions cannot easily be shared across locales; instead, these would need to be pulled in via the dot notation to retrieve localized components. Note that the design elements for these navigators can still be shared appropriately to reduce maintenance.
Another way of localizing a navigator is to use a JSP fragment to set a different context before rendering the navigator. Set the navigator to use the “Current site area” as the starting point, and by changing the context you can manipulate this start area, using code. Because the code uses a path lookup, the same JSP fragment will work in all your localized sites.
In the code snippet in listing 1, the context is set first by use of a path in the current library (“./mySite/mySiteArea”), and then the navigator (“theNavigator”) from the library “theLibrary” is rendered.
Listing 1. Code for setting context and rendering navigator <%@ page import="com.ibm.workplace.wcm.api.*" %> <%@ taglib uri="/WEB-INF/tld/wcm.tld" prefix="wcm" %> <wcm:initworkspace user="<%= request.getUserPrincipal() %>" /> <% RenderingContext context = (RenderingContext)request.getAttribute(Workspace.WCM_RENDERINGCONTEXT_KEY); String currentLibrary = context.getLibrary().getName(); String navStart = currentLibrary+"/mySite/mySiteArea";
2 5

%> <wcm:setExplicitContext path="<%=navStart%>"/> <wcm:libraryComponent name="theNavigator" library="theLibrary" />
Localized menu components Menus should mostly be able to use the “Current content site area” option and include ancestors and descendents where appropriate, enabling you to search the entire current site.
If a menu needs to select site areas specifically, then the menu cannot be shared easily across locales. As for navigators, this means using the dot notation to include the localized menu component, and design elements would be shared wherever possible.
Another method of localizing a menu is to use a JSP fragment to render the menu, allowing the list of site areas to be specified at render time. As the paths in each locale are the same, the same JSP fragment can be used to render a menu across multiple locales.
This code snippet in listing 2 shows how a menu (“theMenu”) from the library “theLibrary” is set up to use a query string parameter to receive site areas (“SiteAreas”) that are built using the current library name.
Listing 2. Code for setting up a menu from the library <%@ page import="com.ibm.workplace.wcm.api.*, java.util.*"%> <%@ taglib uri="/WEB-INF/tld/wcm.tld" prefix="wcm" %> <wcm:initworkspace user="<%= request.getUserPrincipal() %>" /> <% RenderingContext context = (RenderingContext)request.getAttribute(Workspace.WCM_RENDERINGCONTEXT_KEY); String currentPath = context.getPath(); String currentLibrary = context.getLibrary().getName(); Map myparams = new HashMap(); myparams.put("SiteAreas", currentLibrary+"/mySite/mySiteArea1,"+currentLibrary+"/mySite/mySiteArea2"); %> <wcm:setExplicitContext path="<%=currentPath%>" requestParameters="<%=myparams%>"/> <wcm:libraryComponent name="theMenu" library="theLibrary" />
Synchronizing components using workflow You cannot synchronize components using the same automated process as for content because the Web Content Management API does not provide workflow methods for non-content items. Instead, you can set up simple workflow processes using email notifications.
Given that (1) there are typically many times less components than content, (2) a smaller set of users manage them, and (3) they are not updated as often, this is not a serious limitation.
2 6

Localized site searching The following steps are recommended for the searching of multi-locale sites.
1. Create a search collection for each locale specifying the appropriate language (see figure 8).
Figure 8. Create search collection
2. Make each site searchable and select the search collection that has been created for that locale (see figure 9).
Figure 9. Making each site searchable
3. Create a search component for each locale/library, selecting the relevant search collection or using the Search and Browse portlet.
2 7
NOTE: If using a search component, use either the “Site / site area elements” or “Dot notation” method described above to render the component.
2 8

8
Localized rendering ocalized rendering is used to ensure that the appropriately localized content is displayed to site visitors. The two basic strategies from which to choose are to do this automatically by trying to match the user’s locale with the content locale, or to provide a navigation option
in the site to let users choose the locale for themselves. These two strategies may also be used together in some cases.
L Auto-localization In auto-localization, there are several language versions of a page, and a user is automatically redirected to one of them based on their locale. The locale is determined by the following methods:
U R L
The URL may contain the locale, for example, ibm.com.au or ibm.co.uk
B R O W S E R P R E F E R E N C E
Browsers let you specify your language preferences. Language preference information is then sent by the browser in the Accept-Language http header. For example, Accept-Language: en-ca,en-us;q=0.7,en;q=0.3
Note: The Domain Locale Redirection sample demonstrates this functionality at the domain level (for example, www.ibm.com).
P O R T A L
The portal determines the language for rendering the portal content by a search process along the following sequence at log-in time:
1. If the user has logged in, the portal displays the preferred language selected by the user.
2. If no preferred user language can be found, the portal looks for the language defined in the user's browser. If the portal supports that
2 9
language, it displays the content in that language. If the browser has more than one language defined, the portal uses the first language in the list to display the content.
3. If no browser language can be found, for example, if the browser used does not send a language, the portal resorts to its own default language.
4. If the user has a portlet that does not support the language that was determined by the previous steps, that portlet is shown in its own default language.
L I M I T A T I O N S
Auto-localization is evidently a useful thing, but before implementing it across the board, it is important to understand its limits. To illustrate these, we use the example of a site, www.example.be, that offers its content in Finnish, French, and German. It implements auto-localization and defaults to Finnish for all pages. Our visitor, Sylvia, speaks Italian but is able to deal with German. Several situations may arise:
1. Sylvia's browser is correctly configured, expressing preferences for Italian first, German second. If Italian is not available at www.example.be, the pages are returned in German, the visitor is fairly happy, and all is well. This is what language negotiation is for!
2. Sylvia is a non-technical person who has never heard of HTTP language negotiation and has never felt a need to alter the settings of her browser. The browser is an Italian version which (correctly) defaults to expressing a preference for Italian. Hitting www.example.be, Italian is not available and the site-default Finnish is returned, even though German is available. Bad.
3. Sylvia is not using her own browser; she's sitting in an Internet café in Moscow. The browser is configured for (or defaulted to) Russian. She gets Finnish again. Bad.
Despite its limitations, auto-localization is a useful function that is desirable to implement in multilingual sites. However, the shortcomings must be addressed. In short, it is important to provide means for visitors to override the automatic choice of language when it is wrong. This means putting some interface elements in the page that link to the other available languages. These controls must, of course, be clearly visible and understandable by a visitor who has no familiarity with the language of the currently displayed page. Also, these controls should be implemented on all pages and not just the home page.
User-selected localization In user-selected localization, the user selects a language manually from a link or selection list. The selection can then be stored in a cookie for
3 0

subsequent visits to the Web site. There are a couple of different options for letting the user select the locale:
L O C A L E S E L E C T I O N P A G E
In this case, a launch page displays when a user first comes to the site that shows what locales are available, and the user then selects the appropriate one. The navigation device could be links, a drop-down list, a clickable map, or some combination of these. Whatever device is used, the result is a simple redirection to the home page of the selected locale site.
E Q U I V A L E N T P A G E N A V I G A T I O N
On every page in the site, navigation is displayed that lets the user see the same page in a different locale. The navigation device in this case may be links, maps, etc. In this case, you change locales by linking to the equivalent page in another locale (that is, the content on the same relative path in another library).
If your site supports only a handful of localized versions, it is probably better to avoid using a pull-down menu and simply include links directly on the page. This gives you more flexibility to use graphics to represent foreign text, avoids the difficulty of finding a suitable non-linguistic label for the list, and lets users recognize the presence of and link to a page much more quickly.
The key advantage of using pull-downs is to fit the selection into a smaller space. If your pull-down points to more than 20 other sites or pages, you should consider whether it is usable for those Web users who must scroll to the end of the list. If not, you may consider linking to a dedicated global gateway page at the home-page level.
The menu options should be translated into the target language. Instead of including a link on the pull-down menu to a translation that reads, for example, "French," the link should read "Français"; and instead of a link to an alternative country site like "Germany" the link should read "Deutschland".
Note: The Servlet Render-time navigation and Portlet Render-time navigation samples demonstrate this functionality.
Some suggested options Depending on a site’s requirements, a combination of auto-localization and user-selected localization may be the best option.
Here are some options combining the two approaches:
3 1
O P T I O N 1
When a user enters the site for the first time, automatically detect the user’s language preference using one of the methods described in the auto- localization section above.
Provide a manual option on every page for changing the language. If the language is changed, store the selection in a cookie and use it when the user returns to the site.
O P T I O N 2
When a user enters the site for the first time, default to the most common language, for example, English.
Provide a manual option on every page for changing the language. If the language is changed, store the selection in a cookie and use it when the user returns to the site.
Encoding Preferably you use UTF-8 (Unicode) as the encoding for your page since this encoding supports all the characters you need. If you cannot use UTF-8, then you should use escapes to represent characters that are not supported by the encoding of your page. Since all content is stored by Web Content Management in the JCR database with UTF-8 encoding, character data is preserved.
Portal sites should use the encoding that is set up in the Portal Administration section. A servlet-rendered site should use the encoding specified within WebSphere Portal.
3 2
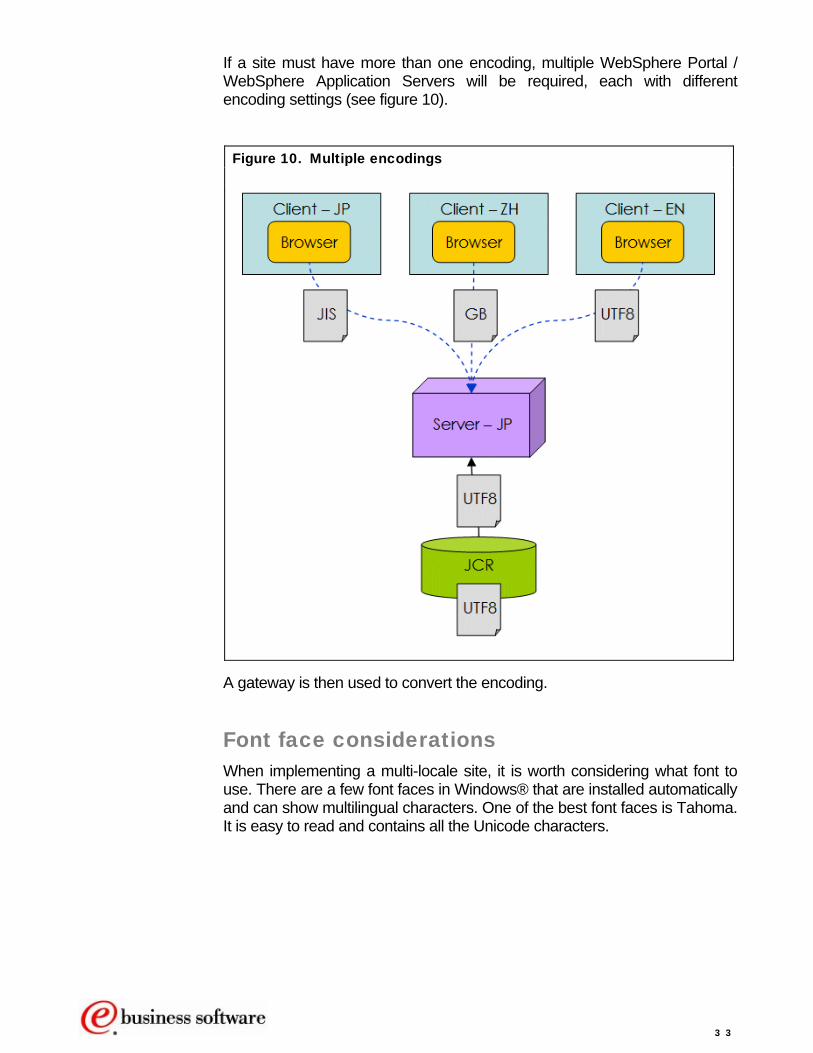
If a site must have more than one encoding, multiple WebSphere Portal / WebSphere Application Servers will be required, each with different encoding settings (see figure 10).
Figure 10. Multiple encodings
A gateway is then used to convert the encoding.
Font face considerations When implementing a multi-locale site, it is worth considering what font to use. There are a few font faces in Windows® that are installed automatically and can show multilingual characters. One of the best font faces is Tahoma. It is easy to read and contains all the Unicode characters.
3 3

Deployment eployment of multi-locale sites can be centralized, running out of single environment, or decentralized, whereby locales are served from different environments.
For decentralized deployments your choice of localized navigation will affect how you need to deploy your content to these environments; that is, whether you provide navigation between equivalents items or simply provide up-front navigation to the appropriately localized site.
D
Note that neither the sample locale navigation code nor the sample locale redirection code supports multiple domains. Multiple domain support is a rudimentary extension in both cases.
Centralized deployment In a centralized deployment all locales are served from the same environment, and all your localized content is syndicated in. This is a simple option that works in most cases and allows full use of hardware.
You will typically want to set up mappings to each locale home page, either as domains or as paths. These mappings provide easily remembered URLs for users to link to a localized version of your site.
P A T H S O P T I O N
Each path is mapped to the home page in a localized library, resulting in URLs like http://mydomain/en, http://mydomain/es.
M U L T I P L E D O M A I N S O P T I O N
Each domain is mapped to the home page in a localized library, resulting in simple URLs like http://mydomain.com, http://mydomain.com.es.
There are some advantages in using multiple domains, including support for domain restrictions in search engines like Google™.
3 4

It is important to remember that, in a multiple-domain solution, your localized navigation links should change the domain, not just the path. This means that the link generation should be a fully qualified path, not a relative path (see figure 11).
Figure 11. Centralized environment
Decentralized deployment In this case, locales are served from separate environments, one per environment, or potentially multiple locales per environment. This is typically done to get the site “closer” to the customer for performance and support reasons.
Multiple domains must be used, whereby each locale or combination of locales is served from its own domain.
The main decision to make when implementing a decentralized deployment is whether you want users to be able to switch between localized content on an item-by-item basis, or whether you can simply ask them which locale they want up front and take them to the home page for that locale.
This decision governs how you need to set up syndication; specifically, whether all localized content is required in each environment, or whether you can split the content and syndicate only the single locale (or combination) appropriate for each environment.
3 5
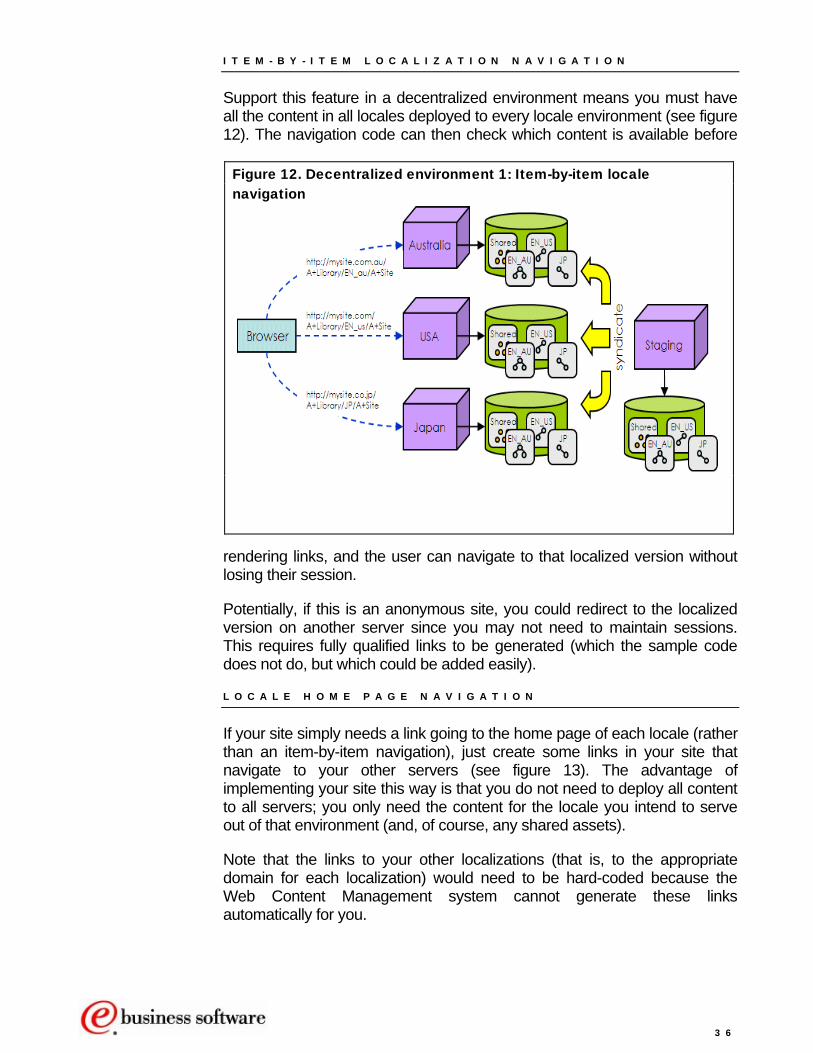
I T E M - B Y - I T E M L O C A L I Z A T I O N N A V I G A T I O N
Support this feature in a decentralized environment means you must have all the content in all locales deployed to every locale environment (see figure 12). The navigation code can then check which content is available before
rendering links, and the user can navigate to that localized version without losing their session.
Figure 12. Decentralized environment 1: Item-by-item locale navigation
Potentially, if this is an anonymous site, you could redirect to the localized version on another server since you may not need to maintain sessions. This requires fully qualified links to be generated (which the sample code does not do, but which could be added easily).
L O C A L E H O M E P A G E N A V I G A T I O N
If your site simply needs a link going to the home page of each locale (rather than an item-by-item navigation), just create some links in your site that navigate to your other servers (see figure 13). The advantage of implementing your site this way is that you do not need to deploy all content to all servers; you only need the content for the locale you intend to serve out of that environment (and, of course, any shared assets).
Note that the links to your other localizations (that is, to the appropriate domain for each localization) would need to be hard-coded because the Web Content Management system cannot generate these links automatically for you.
3 6

Deployment best practices Refer the Deployment section in the white paper, Best practices for using IBM Workplace Web Content Management V6, for more information on deployment of Web Content Management servers.
Figure 13. Decentralized environment 2: Home page navigation
3 7
Administration though in many cases the number of languages or regions you require for a site is fixed, you may need to roll out new locales as your organization expands.
Rolling out a new site is a process you can simplify by using the API features of Web Content Management. The basic process for rolling out a new locale is:
1. Copy the base site
2. Modify structure / content accordingly
3. Translate as required
To copy the site, use the Web Content Management API to crawl the base site and create the equivalent localized site. In that way, templates can be mapped appropriately, components may be copied or shared appropriately, etc.
The copy is now ready for its initial translation and a once-off user acceptance test before being deployed and going into the day-to-day maintenance that is enabled through automated processes.
You may want to temporarily disable the automated syncing of this new site while it is going through its initial translation and testing phases.
10
A
3 8

Sample code for authoring, workflow, and rendering
hisproantab
white paper includes sample code available for download that vides plug-ins for Web Content Management authoring, workflow,
d rendering. In order for the samples to work, the files shown in le 3 below must be downloaded and installed, per the installation
and configuration steps.
Note that the performance of the sample code is a function of the number of localized libraries and the content creation rate. If both the number of localized libraries and the content creation rate is high, then you might need to enhance the samples, for example, by caching the output of the authoring time and rendering time samples, scheduling the workflow pollers to run during off hours, etc.
Installation and configuration R E Q U I R E D W E B C O N T E N T M A N A G E M E N T V E R S I O N
You must be running Web Content Management 6.0.1.2 or later for the sample code to function.
Table 3. Download files F I L E N A M E D E S C R I P T I O N
MLConfigurationLibrary.zip The configuration library that is to be imported
MLAuthorTimeInfo_EditMode.jsp, MLAuthorTimeInfo_ReadMode.jsp, MLAuthorTimeInfo_Init.jsp
Jsps for the Edit-time navigation/Creation sample
MLLocaleNavigator.jsp Jsp for the Servlet Render-time navigation sample
11
T
3 9

MLPortalLocaleSwitcher.jsp Jsp for the Portlet Render-time navigation sample
MLUtils.jsp Utility Jsp used by the edit-time and render-time samples
MLServletHomePageRedirection.jsp Jsp for the Domain Locale Redirection sample
wcm-ml-contextprocessor.jar Jar file for the Portlet Render-time navigation sample
wcm-sample-workflowpolling.ear EAR file that contains the polling framework and example pollers for the Workflow Synchronization samples
S E T U P T H E C O N F I G U R A T I O N L I B R A R Y
You must set up the configuration library before running any of the samples, as follows:
1. Import the ML Configuration Library:
a. Unzip the MLConfigurationLibrary.zip files to a directory.
b. Import the MLConfiguration Web Content Management library. See the Exporting and importing a Web content library section in the InfoCenter for instructions on how to import a library.
c. Restart the WebSphere Portal server.
2. Modify the security of the MLConfiguration library as follows:
a. Create a group (such as “Locale Owners”) to house all users that will own one or more locales (include the Base Locale Owner in this group).
b. Assign “Locale Owners” and the Administrators group the Contributor role on the library.
c. Assign Locale Owners the Editor role on the “Content” Item Type in “Library Resources”.
d. Optional (but recommended), uncheck the Allow Inheritance checkbox for all Item Types except “Content” and “Components” (this hides all sections in the Authoring UI for the MLConfiguration library from Locale Owners except “Content” and “Components”).
e. Assign the Administrators group the Administrator role for all Item Types.
4 0

NOTE: See the Defining roles within a library section of the InfoCenter for additional instructions on modifying roles.
3. Configure the authoring portlet so that the MLConfiguration library is added to the library selection list.
4. Create the content representing the ML Configuration File:
a. From the Web Content Management Authoring portlet, navigate to the MLConfiguration library and create a new piece of content using the ConfigurationFileAT Authoring template.
b. Fill in the fields on the Configuration document as follows (see figure 14):
i. Name: Leave the default value
ii. Display Title: Leave the default value
iii. Base Content Library: Enter the name of the Web Content Management Library that will house content from the default locale.
iv. Content Libraries: Enter the names of all Web Content Management Libraries that will house content (including the Base Content Library), separated by commas.
NOTE: The order in which libraries are entered here affects the output of the render-time and edit-time samples, so it’s recommended to place the Base Content Library first then add the remaining libraries in the order in which you wish them to be displayed.
v. Content Library Owners: For each library mentioned in the Content Libraries, specify the email address of the user who will be the owner for that library, placing each entry on a new line.
Note that the MLConfiguration library must be syndicated to all staging and production servers like any other library.
4 1

Figure 14. Example Configuration document
I N S T A L L T H E W O R K F L O W P O L L I N G A P P L I C A T I O N
The wcm-sample-workflowpolling.ear file must be installed if you want to run any of the workflow polling samples.
1. Install the Workflow Polling Application:
a. Copy the wcm-sample-workflowpolling.ear file to a directory on the server
b. Shutdown your WebSphere Portal server
c. Start the WebSphere Application Server, Server1
d. Open the WebSphere Application Server administration console. Go to Applications > Install New Application
e. Click the Browse button and select the wcm-sample-workflowpolling.ear file
4 2
f. Click Next three times
g. On the “Map modules to servers” screen, map the ear file to the Portal server by selecting the checkbox next to the module, then selecting the WebSphere Portal server in the list of servers, and then clicking Apply and Next.
h. Click Next, and click Finish.
i. Click Save to Master Configuration and click Save.
2. Modify the Workflow Polling Application’s starting weight:
a. From the Applications view of the WebSphere Application Server administration console, locate the “WCM Sample Workflow Polling” application and click the link representing the application’s name.
b. Set the Starting Weight property to 30 and click OK.
c. Click the Save link and click Save.
3. Start the WebSphere Portal Server to activate the application.
4. Optional: Activate Email Notifications for the workflow polling samples
a. From the Web Content Management Authoring portlet, open the content called “ConfigurationFile” under the MLConfiguration library
b. Click the Edit button.
c. Make the following changes to the General Workflow Synchronization Settings section (see figure 15):
i. emailServer: Set this field to the name of your email server
ii. emailFromAddress: The email address entered here will be used to set the ‘From’ address on all email notifications. This field must be set to a valid email address.
iii. authoringUIURL: This field is used to create links to processed content items. It should be set to the URL of your Authoring server, for example, http://localhost:10045/wps/myportal/wcmAuthoring
4 3
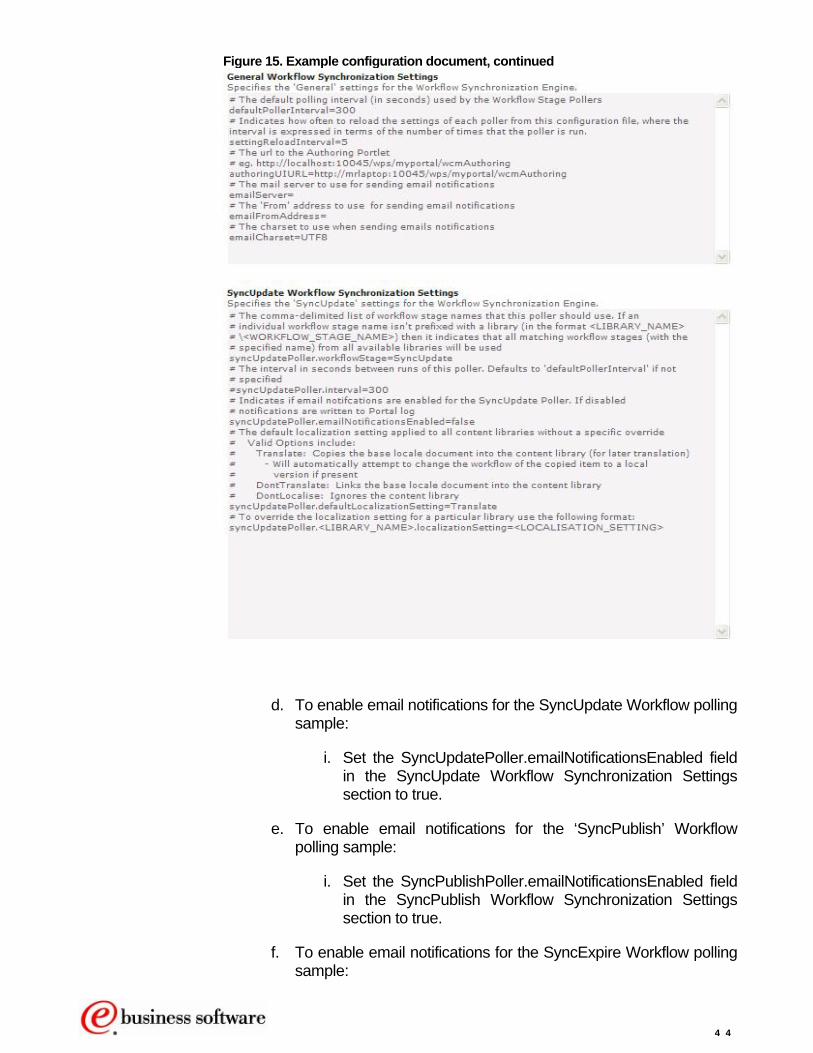
Figure 15. Example configuration document, continued
d. To enable email notifications for the SyncUpdate Workflow polling sample:
i. Set the SyncUpdatePoller.emailNotificationsEnabled field in the SyncUpdate Workflow Synchronization Settings section to true.
e. To enable email notifications for the ‘SyncPublish’ Workflow polling sample:
i. Set the SyncPublishPoller.emailNotificationsEnabled field in the SyncPublish Workflow Synchronization Settings section to true.
f. To enable email notifications for the SyncExpire Workflow polling sample:
4 4
i. Set the SyncExpirePoller.emailNotificationsEnabled field in the SyncExpire Workflow Synchronization Settings section to true.
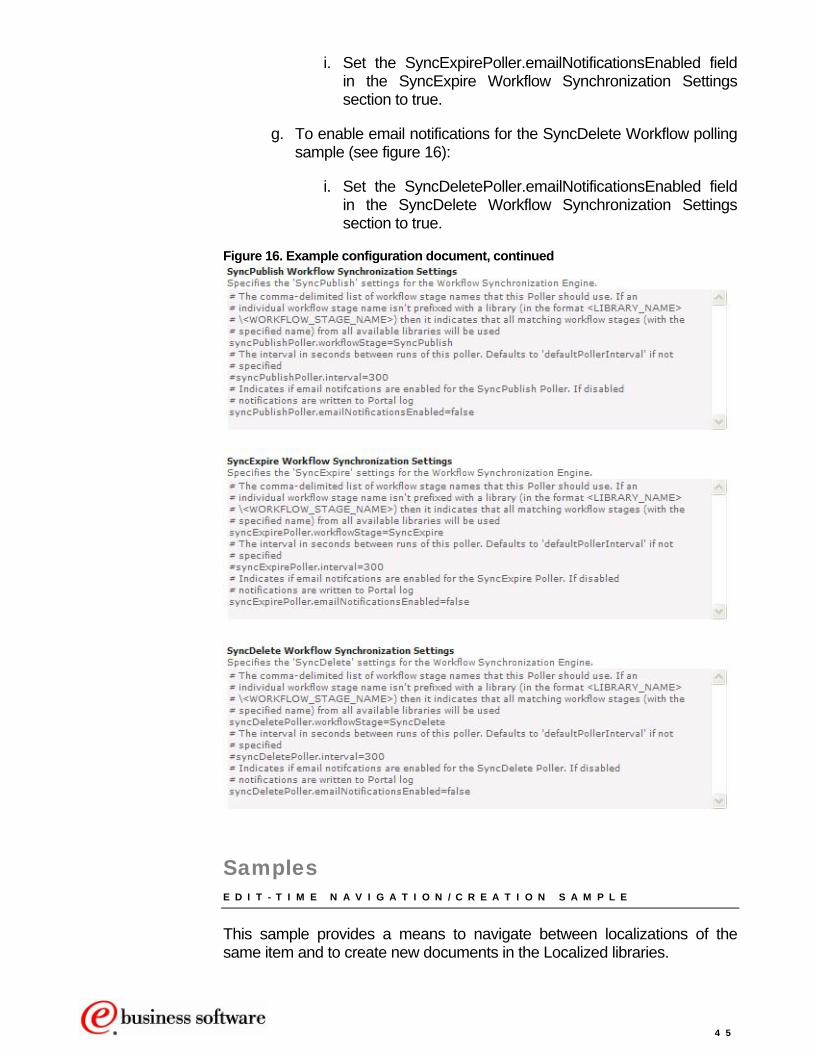
g. To enable email notifications for the SyncDelete Workflow polling sample (see figure 16):
i. Set the SyncDeletePoller.emailNotificationsEnabled field in the SyncDelete Workflow Synchronization Settings section to true.
Figure 16. Example configuration document, continued
Samples E D I T - T I M E N A V I G A T I O N / C R E A T I O N S A M P L E
This sample provides a means to navigate between localizations of the same item and to create new documents in the Localized libraries.
4 5

Follow these steps to install the sample:
1. Follow the steps in the Adding JSPs to the Local Rendering Portlet and Adding JSPs to the Web Content Management Authoring UI Portlet sections of the Appendix, to add the following JSPs to all authoring nodes and any rendering nodes that will use inline-editing:
• MLAuthorTimeInfo_EditMode.jsp • MLAuthorTimeInfo_ReadMode.jsp • MLAuthorTimeInfo_Init.jsp • MLUtils.jsp
NOTE: This process will need to be repeated whenever a fixpack is applied.
2. For all authoring templates on which you want to enable the Navigation/Creation links, add a text component called “ML Translations” to the authoring template, with the following properties:
a. Set the Custom JSP field to the following:
readMode=MLAuthorTimeInfo_ReadMode.jsp,editMode=MLAuthorTimeInfo_EditMode.jsp
TIP: Placing the new text component above any existing components looks better.
3. Save the authoring template and re-apply it to all content that uses it, ensuring the Add new elements option is selected.
How it works
Every time you open content with the Custom JSP on it, all libraries configured in the ML Configuration file are searched for all matching content. To be matching, it must be in the same site area and have the same name (the display titles don’t have to match).
If a matching document is found, then you’ll receive a link to that document (see figures 17 and 18). Clicking the link opens the document within the Authoring portlet in read mode. The link displays Draft, Published, Expired, Published with Draft, or Expired with Draft, as appropriate. If the existing document is a link from the current document, then the text “Linked to this document” will display.
Figure 17. Base Locale document with one localized Draft copy of document
4 6

Figure 18. Localized document with link to Base Locale published document
If no matching documents are found in any of the libraries and you have edit access to the content and the field, then you’ll see some creation buttons. If the content being viewed is in the Base Locale library, then the following buttons display (see figure 19):
• Copy Base Locale as Draft: Uses the “Copy” Remote action to copy the Base Locale document into the Localized library (under the equivalent site area) as a draft document. If there is a workflow in the Localized library with the same name as the workflow on the Base Locale document, then the workflow will be automatically switched to the Localized version.
• Link from Base Locale: Uses the new “Link” Remote action to place a content link to the Base Locale document under the equivalent site area in the Localized library.
Figure 19. No Localized documents exist (with edit access)
If the content being viewed is in a Localized library, then you’ll see the following button (see figure 20):
• Copy This as Draft: Uses the new “Copy” Remote action to copy the current document into another Localized library or Base Locale library (under the equivalent site area) as a draft document.
Figure 20. No Base Locale document exists
If you don’t have edit access to the content or the custom field, then you’ll see the display in figure 21.
Figure 21. No localized documents exist (without edit access)
4 7
U P D A T E N O T I F I C A T I O N S A M P L E
This sample uses the settings in the Workflow Synchronization section of the ML Configuration file (that you created above) to automate the creation of localized documents.
Follow these steps to use the sample:
1. Ensure the Workflow Polling Application has been installed.
2. Create a workflow stage called “SyncUpdate” or whatever name has been configured in syncUpdatePoller.workflowStage in the ML Configuration file.
3. Place this workflow stage after the approval stage.
The configuration settings and processed workflow stages for the “Update Notification Sample” are not reloaded each time the sample is run; instead, they are reloaded based on SettingReloadInterval. This value is set within the General Workflow Syncronization Settings section of the ML Configuration file, where the interval is the number of times that the sample is run before checking for new settings.
If you do not plan to use the Update Notification Sample, then you should follow the instructions in the Disabling a workflow poller section of the Appendix to disable the MLSyncUpdate workflow poller.
How it works
When a document reaches the SyncUpdate workflow stage, the following occurs:
• If one or more localized copies of the current document are found that don’t have a corresponding “Draft” Base Locale document (in any stage of the workflow), then all copies are moved to the next workflow stage and a notification is sent to the Base Locale owner, informing him that changes have occurred to Localized documents without an associated change to the Base Locale document.
• If the Base Locale document is in an earlier stage of the workflow, then nothing will happen.
• If, however, the Base Locale document is in the current stage or a later stage, then each configured library that doesn’t already have a draft document will be processed according to the SyncUpdate Workflow Synchronization Settings within the ML Configuration file and a notification will be sent to the all affected locale owners:
o If the library being processed contains an existing published or expired document, then SyncUpdate Workflow Synchronization Settings will be ignored, and a draft copy of the existing document will be created.
4 8

o If the library being processed doesn’t contain an existing published or expired document, then it will be processed as follows, depending on its configured “Localization setting”:
Translate (the default): Copies the Base Locale document into the localized library and restarts the workflow of the copied item. If the localized library contains a workflow with the same name as that used by the Base Locale document, then the workflow on the copied item will be changed to the identified localized workflow.
DontTranslate: Creates a content link to the Base Locale document in the localized library.
DontLocalize: Skips processing of the localized library
NOTE: If the destination site area does not exist in the localized library, then the Translate and DontTranslate actions will fail with an error.
Modifying the localization setting for a specific library
To modify the localization setting for a library, perform the following steps:
1. From the Web Content Management Authoring portlet, open the content called “ConfigurationFile” under the MLConfiguration library
2. Click the Edit button.
3. Make the following changes to the SyncUpdate Workflow Synchronization Settings section:
a. If there is an existing syncUpdatePoller.<LIBRARY_NAME> .localizationSetting field (where <LIBRARY_NAME> is the name of your localized library), then set its value to the required localization setting.
b. If there isn’t an existing syncUpdatePoller.<LIBRARY_NAME> .localizationSetting field (where <LIBRARY_NAME> is the name of your localized library), then create a new field at the bottom of the SyncUpdate Poller Preferences section named:
syncUpdatePoller.<LIBRARY_NAME>.localizationSetting=<LOCALIZATION_SETTING>
where: • <LIBRARY_NAME> is the name of your localized library • <LOCALIZATION_SETTING> is the required localized setting
for example, syncUpdatePoller.MyLibrary.localizationSetting=
DontTranslate
4 9
P U B L I S H I N G S Y N C H R O N I Z A T I O N S A M P L E
This sample ensures that the base item and any draft Localized items are published at the same time.
Follow these steps to install and use the sample:
1. Ensure the Workflow Polling Application has been installed.
2. Create a workflow stage called “SyncPublish” or whatever name has been configured in syncPublishPoller.workflowStage in the ML Configuration file.
3. Place this workflow stage just before the publish stage.
The configuration settings and processed workflow stages for the Publishing Synchronization Sample are not reloaded each time the sample is run; instead, they are reloaded based on the SettingReloadInterval. This is set within the General Workflow Syncronization Settings section of the ML Configuration file, where the interval is the number of times that the sample is run before checking for new settings.
If you do not plan to use the Publishing Synchronization Sample, then you should follow the instructions in the Disabling a workflow poller section of the Appendix to disable the MLSyncPublish workflow poller.
How it works
When a document reaches the SyncPublish workflow stage, the following occurs:
• If any draft localized copies of the current document aren’t in the SyncPublish workflow stage, then nothing will happen.
• If all draft localized copies of the current document are in the SyncPublish workflow stage, then the current document and its copies will be moved to the next workflow stage and a notification will be sent to the all affected locale owners.
NOTE 1: As this sample processes only existing Draft localized copies of the current document, it’s not necessary for every localized library to have a draft copy present.
NOTE 2: All required localized copies are assumed to have been created by the Sync Update workflow polling sample
E X P I R Y S Y N C H R O N I Z A T I O N S A M P L E
This sample ensures that the base item and any published localized items are expired at the same time.
5 0

Follow the steps below to use the sample:
1. Ensure the Workflow polling application has been installed.
2. Create a workflow action called “SyncExpire” or whatever name has been configured in syncExpirePoller.workflowStage in the ML Configuration file.
3. Place this workflow stage just before the expire stage.
The configuration settings and processed workflow stages for the Expiry Synchronization Sample are not reloaded each time the sample is run; instead, they are reloaded based on the SettingReloadInterval. This is set within the General Workflow Syncronization Settings section of the ML Configuration file, where the interval is the number of times that the sample is run before checking for new settings.
If you do not plan to use the Expiry Synchronization Sample, then you should follow the instructions in the Disabling a workflow poller section of the Appendix to disable the MLSyncExpire workflow poller.
How it works
When a document reaches the SyncExpire workflow stage, the following occurs:
• If any published localized copies of the current document aren’t in the SyncExpire workflow stage, then nothing will happen.
• If all published localized copies of the current document are in the SyncExpire workflow stage, then the current document and its copies will be moved to the next workflow stage and a notification will be sent to the all affected locale owners.
D E L E T I O N S Y N C H R O N I Z A T I O N S A M P L E
This sample ensures that the base item and any draft localized items are deleted at the same time.
Follow the steps below to use the sample:
1. Ensure the Workflow Polling Application has been installed.
2. Create a workflow action called SyncDelete or whatever name has been configured in syncDeletePoller.workflowStage in the ML Configuration file.
3. Place this workflow stage at the end of your workflow.
The configuration settings and processed workflow stages for the Deletion Synchronization Sample are not reloaded each time the sample is run;
5 1

instead, they are reloaded based on the SettingReloadInterval. This is set within the General Workflow Syncronization Settings section of the ML Configuration file, where the interval is the number of times that the sample is run before checking for new settings.
If you do not plan to use the Deletion Synchronization Sample, then you should follow the instructions in the Disabling a workflow poller section of the Appendix to disable the MLSyncDelete workflow poller.
How it works
When a document reaches the SyncDelete workflow stage, the following occurs:
• If there is a Base Locale copy of the current document and it’s not in the SyncDelete workflow stage, then a Deletion Request email will be sent to the Base Locale owner informing him that one or more localized copies are to be removed.
• If there isn’t a Base Locale copy of the current document or it’s in the SyncDelete workflow stage, then all available draft and published localized copies will be removed and a notification sent to all localized library owners, regardless of the workflow stage they are in.
S E R V L E T R E N D E R - T I M E N A V I G A T I O N S A M P L E
This sample JSP provides navigation between equivalent published content in different locales from within a presentation template at rendering time.
Follow these steps to install the sample:
1. Follow the steps in the Adding JSPs to the Local Rendering Portlet and Adding JSPs to the Web Content Management EAR File sections of the Appendix, to add the following JSPs to all authoring nodes and rendering nodes:
• MLLocaleNavigator.jsp • MLUtils.jsp
NOTE: You will need to repeat this process whenever a fixpack is applied.
2. For all content that is enabled, the localized rendering links add the JSP Component “MLConfiguration/JSP - ML Locale Nav” to either the associated presentation template or as a reference within a Rich Text Editor or other field, for example, <Component name="MLConfiguration/JSP - ML Locale Nav"/>
5 2
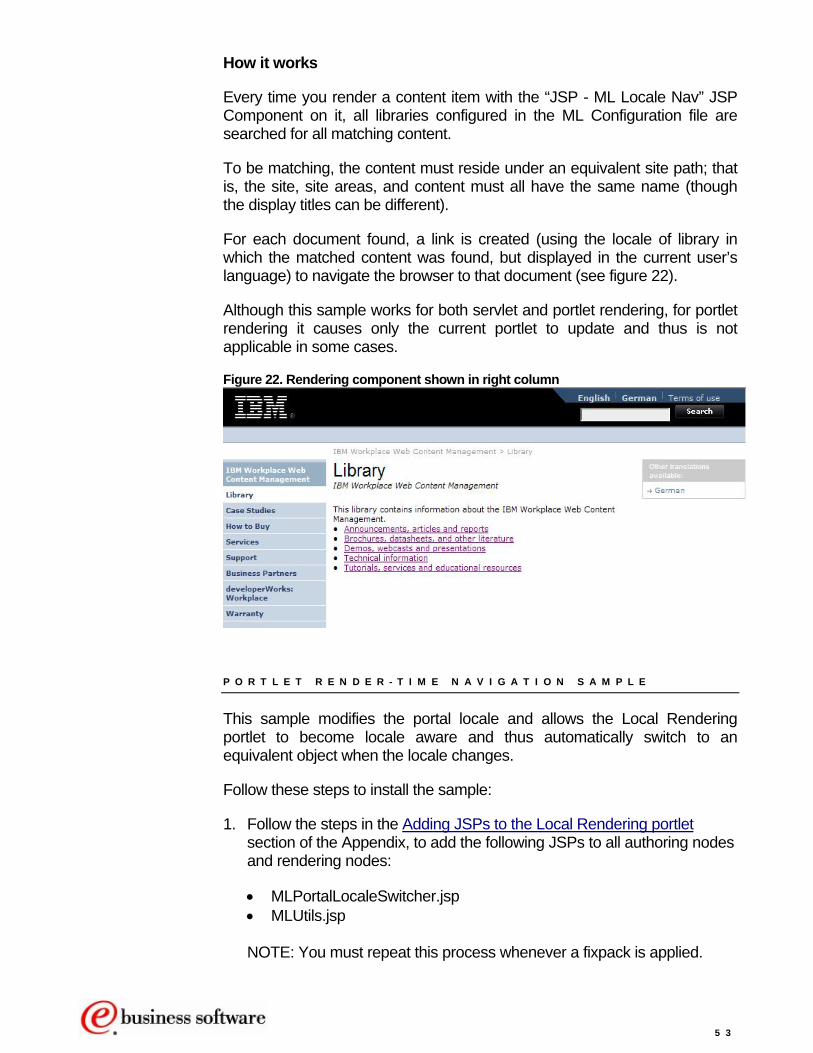
How it works
Every time you render a content item with the “JSP - ML Locale Nav” JSP Component on it, all libraries configured in the ML Configuration file are searched for all matching content.
To be matching, the content must reside under an equivalent site path; that is, the site, site areas, and content must all have the same name (though the display titles can be different).
For each document found, a link is created (using the locale of library in which the matched content was found, but displayed in the current user’s language) to navigate the browser to that document (see figure 22).
Although this sample works for both servlet and portlet rendering, for portlet rendering it causes only the current portlet to update and thus is not applicable in some cases.
Figure 22. Rendering component shown in right column
P O R T L E T R E N D E R - T I M E N A V I G A T I O N S A M P L E
This sample modifies the portal locale and allows the Local Rendering portlet to become locale aware and thus automatically switch to an equivalent object when the locale changes.
Follow these steps to install the sample:
1. Follow the steps in the Adding JSPs to the Local Rendering portlet section of the Appendix, to add the following JSPs to all authoring nodes and rendering nodes:
• MLPortalLocaleSwitcher.jsp • MLUtils.jsp
NOTE: You must repeat this process whenever a fixpack is applied.
5 3
2. Copy the following JAR file to the <WPS_ROOT>\wcm\shared\app directory for all authoring and rendering nodes:
• wcm-ml-contextprocessor.jar
3. Either integrate the MLPortalLocaleSwitcher.jsp into your portal theme or place a Local Rendering portlet on the page configured to show the JSP - ML Portal Locale Switcher Library Component in the MLConfiguration Library.
4. Add the following property to the configuration of the Web Content Viewer / Local Rendering portlet using the WebSphere Portal Administration console:
• ContextProcessorClass =com.ibm.workplace.wcm.sample.contextprocessor.MLContextProcessor
How it works
The ContextProcessorClass setting tells the Local Rendering portlet to call the specified class before rendering each item, and the MLContextProcessor class checks whether the locale changed. If the locale has changed, then it checks whether there is an equivalent item in the new locale and, if so, updates the portlet’s runtime configuration to tell the portlet to show the localized item.
If the Local Rendering portlet has its presentation template overridden via the configuration, then a localized presentation template is also searched for and used, if available.
The MLPortalLocaleSwitcher.jsp provides the ability to switch the WebSphere Portal locale by first detecting the current locale and then using the Portal URL API to create links to switch the locale to other available locales, per the list of configured libraries in the ML Configuration file.
NOTE: This sample works in the Local Rendering portlet only.
D O M A I N L O C A L E R E D I R E C T I O N S A M P L E
This sample JSP redirects the main domain (for example, www.ibm.com) to one of the set of allowable locales (for example, www.ibm.com/en) based on the current user’s locale settings.
Follow these steps to install the sample:
1. Customize the MLServletHomePageRedirection.jsp file as follows:
a. Comment out the lines in the getAvailableLocalesList method, representing those locales that won’t be supported
5 4

b. Optional: Change s_defaultLocale to match the required default locale
2. Copy MLServletHomePageRedirection.jsp to the following location on all rendering nodes:
<WAS_PROFILE_ROOT>\installedApps\<HOST>\wcm.ear\ilwwcm.war\jsp\html
5. Add the following text to the end of the IHS/Apache Web Server configuration file:
LoadModule rewrite_module modules/mod_rewrite.so RewriteEngine on RewriteRule ^/$ /wps/wcm/jsp/html/MLServletHomePageRedirection.jsp [PT]
6. For each locale in the s_availableLocales list, add the following additional text to the IHS/Apache Web Server configuration file (after the entries added above:
RewriteRule ^/<LOCALE>$ /wps/wcm/connect/<LIBRARY>/<SITE> [PT]
where: • <LOCALE> is the string representation of the corresponding
Java Locale object (for example, “fi” for Finnish and “pt_BR” for Brazilian Portuguese),
• <LIBRARY> is the Web Content Management Library associated with the locale, and
• <SITE> is the main Web Content Management site for the specified library; for example, RewriteRule ^/en$ /wps/wcm/connect/english/Internet [PT]
NOTE: Do not map any of the locale redirections to the main domain as this causes an infinite loop. How it works
Every time you request the top-level domain (for example, www.ibm.com), the MLServletHomePageRedirection.jsp runs and looks for the first match of either the current user’s locale, or the ordered list of preferred languages set in the browser, against the list of available locales as defined in the JSP.
The JSP then redirects back to the top-level domain plus the available locale, where the Web server then runs the secondary redirections set up in the Web server to redirect to the correct Web Content Management content based on that locale.
Although this sample is primarly designed for servlet rendering, it could be used with WebSphere Portal if you wanted to render different locales from different servers.
5 5

12
Where to go from here he framework outlined in this document is just the beginning; within its basic outline there are many points of extensibility where you may enhance the solution to suit your specific requirements. Some examples are outlined below.
T Locale owner decision points Allow locale owners to decide to Copy, Link, or Ignore base items on a per-item basis:
Using a new workflow stage that is routed to the locale owners (perhaps using the parallel approval function)
Using a custom form component to provide an interface for soliciting and recording each locale owner’s decision
Another workflow stage may then use the locale owner’s information to create, update, delete, etc. the localized items
Per-locale configuration Extend the configuration to be per locale:
Perhaps by providing an interface for locale owners to configure their locale, including which site to base from, which site areas to copy vs. link, which site areas to ignore, whether to sync publishing or not, etc.
You could build this configuration screen by using a special “library configuration” Authoring template, and the content would then be stored in a hidden “Locale Admin” site area (this is how the sample code’s configuration is stored)
5 6
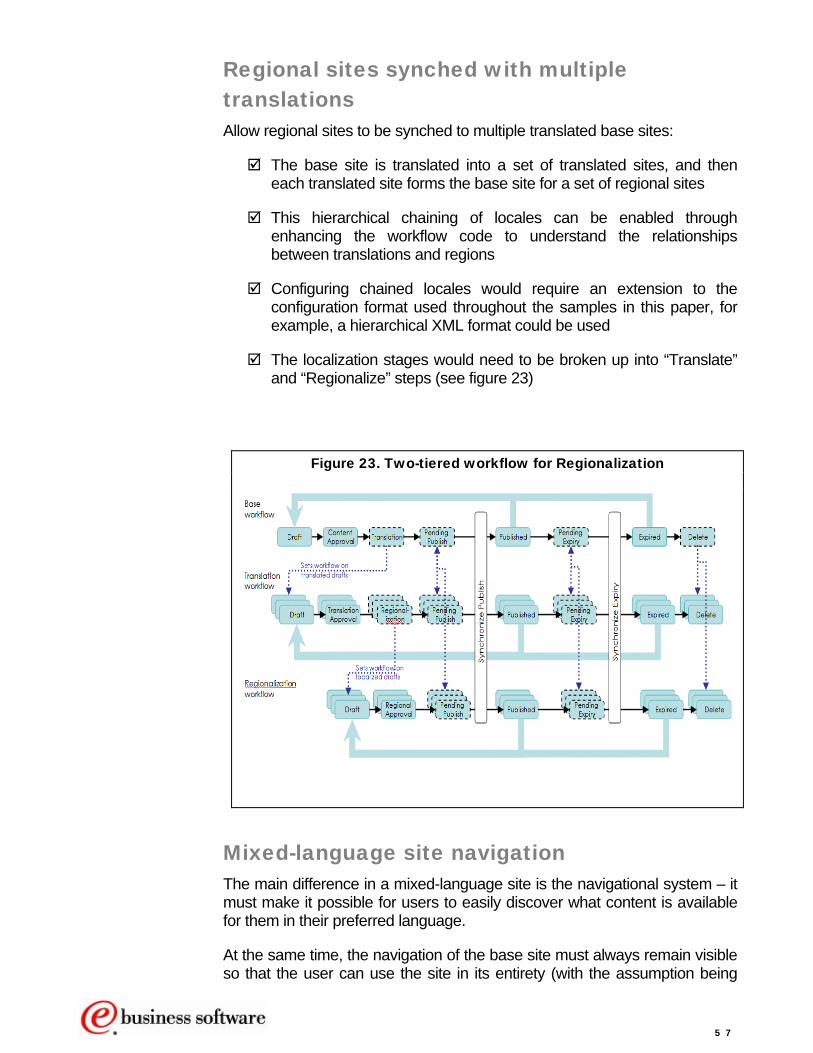
Regional sites synched with multiple translations Allow regional sites to be synched to multiple translated base sites:
The base site is translated into a set of translated sites, and then each translated site forms the base site for a set of regional sites
This hierarchical chaining of locales can be enabled through enhancing the workflow code to understand the relationships between translations and regions
Configuring chained locales would require an extension to the configuration format used throughout the samples in this paper, for example, a hierarchical XML format could be used
The localization stages would need to be broken up into “Translate” and “Regionalize” steps (see figure 23)
Figure 23. Two-tiered workflow for Regionalization
Mixed-language site navigation The main difference in a mixed-language site is the navigational system – it must make it possible for users to easily discover what content is available for them in their preferred language.
At the same time, the navigation of the base site must always remain visible so that the user can use the site in its entirety (with the assumption being
5 7

that they are at least somewhat bi-lingual and have a rudimentary understanding of the base language):
For content that is available in complete translations, the localized navigation code can be used to show a link to the translated content
For content that is not available, a menu can be built to pull in from the translated site in the same area; that is, the menu would show “Translated content in this area”
The reverse can be done for when the user is viewing the translated content; that is, a menu could show “Content in this area that has not been translated”
A site map can be built of each translation to provide a shortcut for users to find translated content by use of a menu or navigator to explicitly pull content in from the translated site
The base site’s navigation can be kept consistent on the page by building navigators that are hard-coded to the base site. Then, even when translated content is being displayed, the presentation template will show the base navigation at all times.
Side-by-side preview You could build side-by-side preview, using a special preview page with two Web Content Management Rendering portlets:
Some custom rendering code would be required to pick up two contexts at once and display both pages – perhaps in a frame
A link to this launch this preview page could be added to the Edit-Time navigation/creation sample
Side-by-side editing You could build side-by-side editing, using a special editing page with one Web Content Management Authoring portlet and one Web Content Management Rendering portlet
A link can be created that combines the URL parameters for displaying content (for example, the base locale item) within the Rendering portlet with the URL parameters for opening another item (for example, a translation) in read/edit mode in the Authoring portlet
A link to this launch this edit page can be added to the Edit-Time navigation/creation sample
5 8
Localization of authoring templates Similar to how workflows have been localized in the sample, a
naming convention could be used to allow localized authoring templates to be picked up
Copying content: As authoring templates on content cannot be modified through the API, instead of a copy, the code would need to create a new content item, using the localized template, and then copy fields across from the base content to the new localized content item
Querying content: Menu components or rules that rely on authoring templates become difficult to manage if there are different authoring templates being used in each site. Either they need to be built so they don’t need an authoring template (for example, use categories only) or else they will need to be updated each time another localized authoring template is created, or the template could be a dynamic parameter on the menu or rule (that is, pass via request parameters).
Adding new localization settings to the Sync-Update sample Provide a custom localization setting to be used for the Sync-Update workflow polling sample:
1. Using the instructions in the Adding JSPs to the Web Content Management EAR file section, unzip the contents of the wcm-sample-workflowpolling.ear file to a temporary directory
2. Locate the java source file SyncUpdateMLWorkflowStagePoller.java in the com/ibm/workplace/wcm/sample/workflowpolling/schedule/ tasks directory
3. Modify the doLibraryUpdate method of SyncUpdateMLWorkflowStagePoller by replacing the text ‘// ADD YOUR CUSTOM LOCALIZATION SETTING HERE’ with:
else if (<NEW_LOCALIZATION_SETTING_NAME>.equals.(localizationSetting)) { returnMessage.append(<NEW_LOCALIZATION_SETTING_METHOD>); }
where:
• <NEW_LOCALIZATION_SETTING_NAME> is the name of your
custom localization setting, in uppercase and • <NEW_LOCALIZATION_SETTING_METHOD> is the name of
the method that performs your custom localization procedure. This method should return a string message that is appended to the overall notification sent by the Sync-Update workflow poller.
5 9

4. Recompile the modified classes
5. Using the instructions in the Adding JSPs to the Web Content Management EAR file section, re-zip the modified contents of the wcm-sample-workflowpolling.ear file
6. Update the modified EAR file using the WebSphere Administration console
Writing your own workflow poller Provide your own processing whenever documents reach a specific workflow stage:
1. Using the instructions in the Adding JSPs to the Web Content Management EAR file section, unzip the contents of the ‘wcm-sample-workflowpolling.ear file to a temporary directory
2. Create a Poller class that implements the interface, com.ibm.workplace.wcm.sample.workflowpolling.schedule.tasks. WorkflowStagePoller
3. Add your poller to the file, WEB-INF\classes\com\ibm\workplace\wcm\ sample\workflowpolling \pollersToLoad.properties
4. Using the instructions in the Adding JSPs to the Web Content Management EAR file section, re-zip the modified contents of the wcm-sample-workflowpolling.ear file
5. Update the modified ear file using the WebSphere Admin Console
Disabling a workflow poller Stop one of the workflow pollers from running:
1. Using the instructions in the Adding JSPs to the Web Content Management EAR file section, unzip the contents of the wcm-sample-workflowpolling.ear file to a temporary directory
2. Edit the file WEB-INF\classes\com\ibm\workplace\wcm\ sample\workflowpolling \pollersToLoad.properties
3. Add the ‘#’ character (without quotes) to the front of the line representing the poller you want to disable, and save the file
4. Using the instructions in the Adding JSPs to the Web Content Management EAR file section, re-zip the modified contents of the wcm-sample-workflowpolling.ear file
6 0
5. Update the modified EAR file using the WebSphere Admin Console
Writing your own Context Processor Provide your own processing whenever the Local Rendering portlet renders items:
1. Create a ContextProcessor class that implements the interface, com. com.ibm.workplace.wcm.api.ContextProcessor
2. Compile the ContextProcessor class into a new jar and place that jar in the <WPS_ROOT>\wcm\shared\app directory
3. Add or modify the ContextProcessorClass configuration setting for one or more Local Rendering portlets to use the full class name and path of your ContextProcessor.
6 1

13
Conclusion ou should now be armed with enough information to build a suitable multi-locale solution for your sites or your customers’ sites.
Wused to bu
e have demonstrated how Web Content Management can be ild and manage a multi-locale solution to meet your needs, how
the extendable and scalable framework outlined in this document enables these solutions, and how the supplied sample code can be used to fast-track the design and development of your solution.
YYour next steps are to:
1. Ensure you understand the localization requirements of your site in detail.
2. Map these requirements onto the multi-locale framework we’ve outlined.
3. Design a solution that meets your requirements – templates, components, workflows, etc. – to support your content structure and your business processes.
Once you have a design, piloting a rudimentary implementation will help prove your design. Using the sample code supplied and manual processes for parts you have not yet automated, run through all of the typical scenarios your users will encounter. By running this pilot realistically you will be able to see which other parts of your solution should be automated, and what changes you need to make to the supplied samples.
6 2
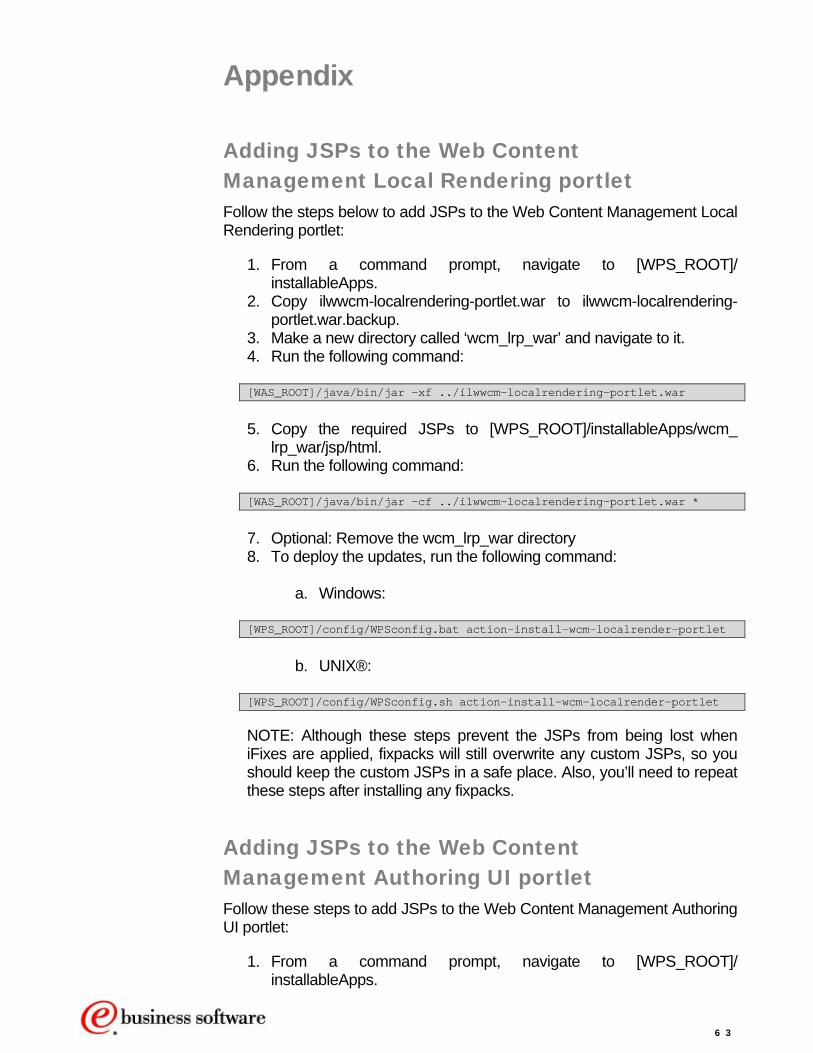
Appendix
Adding JSPs to the Web Content Management Local Rendering portlet Follow the steps below to add JSPs to the Web Content Management Local Rendering portlet:
1. From a command prompt, navigate to [WPS_ROOT]/ installableApps.
2. Copy ilwwcm-localrendering-portlet.war to ilwwcm-localrendering-portlet.war.backup.
3. Make a new directory called ‘wcm_lrp_war’ and navigate to it. 4. Run the following command:
[WAS_ROOT]/java/bin/jar –xf ../ilwwcm-localrendering-portlet.war
5. Copy the required JSPs to [WPS_ROOT]/installableApps/wcm_
lrp_war/jsp/html. 6. Run the following command:
[WAS_ROOT]/java/bin/jar –cf ../ilwwcm-localrendering-portlet.war *
7. Optional: Remove the wcm_lrp_war directory 8. To deploy the updates, run the following command:
a. Windows:
[WPS_ROOT]/config/WPSconfig.bat action-install-wcm-localrender-portlet
b. UNIX®:
[WPS_ROOT]/config/WPSconfig.sh action-install-wcm-localrender-portlet
NOTE: Although these steps prevent the JSPs from being lost when iFixes are applied, fixpacks will still overwrite any custom JSPs, so you should keep the custom JSPs in a safe place. Also, you’ll need to repeat these steps after installing any fixpacks.
Adding JSPs to the Web Content Management Authoring UI portlet Follow these steps to add JSPs to the Web Content Management Authoring UI portlet:
1. From a command prompt, navigate to [WPS_ROOT]/ installableApps.
6 3

2. Copy ilwwcm-authoring-portlet.war to ilwwcm-authoring-portlet.war.backup.
3. Make a new directory called ‘wcm_aui_war’ and navigate to it. 4. Run the following command:
[WAS_ROOT]/java/bin/jar –xf ../ilwwcm-authoring-portlet.war
5. Copy the required JSPs to [WPS_ROOT]/installableApps/wcm_
aui_war/jsp/html. 6. Run the following command:
[WAS_ROOT]/java/bin/jar –cf ../ilwwcm-authoring-portlet.war *
7. Optional: Remove the wcm_aui_war directory 8. To deploy the updates, run the following command:
a. Windows:
[WPS_ROOT]/config/WPSconfig.bat configure-wcm-authoring
b. UNIX:
[WPS_ROOT]/config/WPSconfig.sh configure-wcm-authoring
NOTE: Although these steps prevent the JSPs from being lost when iFixes are applied, fixpacks will still overwrite any custom JSPs, so you should keep the custom JSPs in a safe place. Also, you’ll need to repeat these steps after installing any fixpacks.
Adding JSPs to the Web Content Management EAR file Follow these steps to add JSPs to the Web Content Management EAR file:
1. From a command prompt, navigate to [WPS_ROOT]/wcm/installableApps.
2. Run the following command:
a. Windows:
[WAS_ROOT]/bin/earexpander.bat –ear wcm.ear –operationDir ./wcm_ear –operation expand
b. UNIX:
[WAS_ROOT]/bin/earexpander.sh –ear wcm.ear –operationDir ./wcm_ear –operation expand
3. Rename wcm.ear to wcm.ear.bak.
6 4

4. Copy the required JSPs to [WPS_ROOT]/wcm/installableApps/wcm_ ear/ilwwcm.war/jsp/html.
5. Run the following command:
a. Windows:
[WAS_ROOT]/bin/earexpander.bat –ear wcm.ear –operationDir ./wcm_ear –operation collapse
b. UNIX:
[WAS_ROOT]/bin/earexpander.sh –ear wcm.ear –operationDir ./wcm_ear –operation collapse
6. Optional: Remove the ‘wcm_ear directory. 7. To deploy the updates run the following command:
a. Windows:
[WPS_ROOT]/config/WPSconfig.bat update-wcm-ear
b. UNIX:
[WPS_ROOT]/config/WPSconfig.sh update-wcm-ear
NOTE: Although these steps prevent the JSPs from being lost when iFixes are applied, fixpacks will still overwrite any custom JSPs, so you should keep the custom JSPs in a safe place. Also, you’ll need to repeat these steps after installing any fixpacks.
6 5

Resources For more information
Learn • Best practices for using IBM Workplace Web Content Management V6:
http://www.ibm.com/developerworks/websphere/library/techarticles/0701_devos/0701_devos.html
• WC3 Internationalization (l18n) Activity:
http://www.w3.org/International/ • The Localization Industry Standards Association (LISA):
http://www.lisa.org/
• Workplace Web Content Management V6.0 developerWorks page: http://www.ibm.com/developerworks/lotus/webcontentmanagement/
• IBM WebSphere Portal Version 6.0 Information Center: http://publib.boulder.ibm.com/infocenter/wpdoc/v6r0/index.jsp?topic=/com.ibm.wp.ent.doc/wcm/wcm_dev_referencing_components.html
Discuss • Workplace Web Content Management forum:
http://www.ibm.com/developerworks/forums/dw_forum.jsp?forum=452&cat=41
6 6
About the authors Mark Hampton is the lead technical architect for IBM Workplace Web Content Management. He was the original team lead and architect for the Domino and Java versions of the product and also contributed significantly to the development of code. Now concentrating solely on architecture, he works with customers, business partners, and with IBM marketing, sales, and services to translate requirements from the field into technical designs for the product. You can reach Mark at [email protected] David de Vos has been in application development, specializing in Java development, for the past seven years. He has extensive knowledge of the IBM Workplace Web Content Management product, being one of the original developers of the software prior to IBM’s acquisition of Aptrix. He was the former leader of the Workplace Content Management Level 3 Support team worldwide and now works within the Lab Product Specialist Team based out of the Australian Development Lab, Sydney. He continues to use his knowledge to help customers get the most from their software deployments and to improve the quality of the product. You can reach David at [email protected] Melissa Howarth is an IT consultant specializing in IBM's Web Content Management software (formerly known as Aptrix). She was one of the original developers of the Domino version of the software and has over nine years experience implementing Web sites using Web Content Management. After the acquisition of Aptrix she worked in Software Group Services, implementing Web sites, and now works in the Lab Product Specialist Team based out of the Australia Development Lab in Sydney. She continues to use her knowledge to help educate clients, business partners, and consultants on how to best use the product. You can reach Melissa at [email protected].
6 7

®
© Copyright IBM Corporation 2007 IBM United States of America Produced in the United States of America All Rights Reserved The e-business logo, IBM, the IBM logo, and WebSphere are trademarks of International Business Machines Corporation in the United States, other countries or both. Java and all Java-based trademarks and logos are trademarks of Sun Microsystems, Inc. in the United States, other countries or both. Other company, product and service names may be trademarks or service marks of others. INTERNATIONAL BUSINESS MACHINES CORPORATION PROVIDES THIS PAPER “AS IS” WITHOUT WARRANTY OF ANY KIND, EITHER EXPRESS OR IMPLIED, INCLUDING, BUT NOT LIMITED TO, THE IMPLIED WARRANTIES OF NON-INFRINGEMENT, MERCHANTABILITY OR FITNESS FOR A PARTICULAR PURPOSE. Some states do not allow disclaimer of express or implied warranties in certain transactions, therefore, this statement may not apply to you. Information in this paper as to the availability of products (including portlets) was believed accurate as of the time of publication. IBM cannot guarantee that identified products (including portlets) will continue to be made available by their suppliers. This information could include technical inaccuracies or typographical errors. Changes may be made periodically to the information herein; these changes may be incorporated in subsequent versions of the paper. IBM may make improvements and/or changes in the product(s) and/or the program(s) described in this paper at any time without notice. Any references in this document to non-IBM Web sites are provided for convenience only and do not in any manner serve as an endorsement of those Web sites. The materials at those Web sites are not part of the materials for this IBM product and use of those Web sites is at your own risk. IBM may have patents or pending patent applications covering subject matter described in this document. The furnishing of this document does not give you any license to these patents. You can send license inquiries, in writing, to: IBM Director of Licensing IBM Corporation 4205 South Miami Boulevard Research Triangle Park, NC 27709 U.S.A.
6 8