multiline client (mlc) mobile user’s guide - … · nec that operates with nec sv8100/sv9100, ......
TRANSCRIPT

NEC Corporation of AmericaNEC
Multiline Client (MLC)Mobile User’s Guide
for Android and Apple Devices
December 2016NDA-31749, Issue 2


Liability Disclaimer
NEC Corporation of America reserves the right to change the specifications, functions, or features, at any time, without notice.
NEC Corporation of America has prepared this document for the exclusive use of its employees and customers. The information
contained herein is the property of NEC Corporation of America and shall not be reproduced without prior written approval from
NEC Corporation of America.
© 2016 NEC Corporation of America
NEC MLC is a trademark of BizRTC, LLC.
All other brand or product names are or may be trademarks or registered trademarks of, and are used to identify products or services
of, their respective owners.


i
Multiline Client (MLC) Mobile User’s Guide - Issue 2
Contents
Introduction 1-1
Assumptions and Dependencies. . . . . . . . . . . . . . . . . . . . . . . . . . . . . . . . . . . . 1-1
Overview . . . . . . . . . . . . . . . . . . . . . . . . . . . . . . . . . . . . . . . . . . . . . . . . . . . . . . 1-2
How This Guide is Organized . . . . . . . . . . . . . . . . . . . . . . . . . . . . . . . . . . . . . . 1-2
Installing Multiline Client 2-1
Device Requirements . . . . . . . . . . . . . . . . . . . . . . . . . . . . . . . . . . . . . . . . . . . . 2-1
MLC Requirements . . . . . . . . . . . . . . . . . . . . . . . . . . . . . . . . . . . . . . . . . . . . . . 2-1
Multiline Client Application Screen Layouts 3-1
MLC Dialer . . . . . . . . . . . . . . . . . . . . . . . . . . . . . . . . . . . . . . . . . . . . . . . . . . . . 3-1
Contacts . . . . . . . . . . . . . . . . . . . . . . . . . . . . . . . . . . . . . . . . . . . . . . . . . . . . . . 3-9Calling from Contacts . . . . . . . . . . . . . . . . . . . . . . . . . . . . . . . . . . . . . . . . . . . . 3-9Editing Contacts . . . . . . . . . . . . . . . . . . . . . . . . . . . . . . . . . . . . . . . . . . . . . . . . 3-9
Call Logs . . . . . . . . . . . . . . . . . . . . . . . . . . . . . . . . . . . . . . . . . . . . . . . . . . . . . . 3-9Creating and Saving Call Logs to Contacts . . . . . . . . . . . . . . . . . . . . . . . . . . 3-11Deleting Individual and All Call Logs. . . . . . . . . . . . . . . . . . . . . . . . . . . . . . . . 3-12
UC Client . . . . . . . . . . . . . . . . . . . . . . . . . . . . . . . . . . . . . . . . . . . . . . . . . . . . . 3-13
Multiline Client Operating Procedures 4-1
Pairing Bluetooth® Headset . . . . . . . . . . . . . . . . . . . . . . . . . . . . . . . . . . . . . . . 4-1

ii Contents
Multiline Client (MLC) Mobile User’s Guide - Issue 2
Connecting Wired Headset . . . . . . . . . . . . . . . . . . . . . . . . . . . . . . . . . . . . . . . . 4-1
Audio Source Priorities (using On-hook/ Off-Hook button) . . . . . . . . . . . . . . . . 4-1
Answer Incoming Call . . . . . . . . . . . . . . . . . . . . . . . . . . . . . . . . . . . . . . . . . . . . 4-2With Phone Internal Speaker, Bluetooth or Wired Headset . . . . . . . . . . . . . . . 4-2With Hands-free Speakerphone . . . . . . . . . . . . . . . . . . . . . . . . . . . . . . . . . . . . 4-2
Make Outgoing Call. . . . . . . . . . . . . . . . . . . . . . . . . . . . . . . . . . . . . . . . . . . . . . 4-3With Phone Internal Speaker, Bluetooth or Wired Headset . . . . . . . . . . . . . . . 4-3With Hands-free Speakerphone . . . . . . . . . . . . . . . . . . . . . . . . . . . . . . . . . . . . 4-3
Disconnect Call . . . . . . . . . . . . . . . . . . . . . . . . . . . . . . . . . . . . . . . . . . . . . . . . . 4-4
Mute/Unmute the Mic . . . . . . . . . . . . . . . . . . . . . . . . . . . . . . . . . . . . . . . . . . . . 4-4
Changing the Audio Source . . . . . . . . . . . . . . . . . . . . . . . . . . . . . . . . . . . . . . . 4-5
Multiline Client Application Status 5-1
Android Registration Status Notifications . . . . . . . . . . . . . . . . . . . . . . . . . . . . . 5-1Notification Bar . . . . . . . . . . . . . . . . . . . . . . . . . . . . . . . . . . . . . . . . . . . . . . . . . 5-1MLC Status Bar. . . . . . . . . . . . . . . . . . . . . . . . . . . . . . . . . . . . . . . . . . . . . . . . . 5-2
iPhone/iPad Registration Status Notification . . . . . . . . . . . . . . . . . . . . . . . . . . . 5-2MLC Status Bar. . . . . . . . . . . . . . . . . . . . . . . . . . . . . . . . . . . . . . . . . . . . . . . . . 5-2
Audio Tool (Android Only) 6-1
Android Device™ . . . . . . . . . . . . . . . . . . . . . . . . . . . . . . . . . . . . . . . . . . . . . . . 6-1
More (User Accounts, Activation and About) 7-1
User SIP Accounts . . . . . . . . . . . . . . . . . . . . . . . . . . . . . . . . . . . . . . . . . . . . . . 7-1
Activation. . . . . . . . . . . . . . . . . . . . . . . . . . . . . . . . . . . . . . . . . . . . . . . . . . . . . . 7-4
About (MLC Version Info) . . . . . . . . . . . . . . . . . . . . . . . . . . . . . . . . . . . . . . . . . 7-4

iii
Multiline Client (MLC) Mobile User’s Guide - Issue 2
Figures
Figure Title Page
3-1 Multiline Client Application MLC Dialer Screens (iPhone and Android Phone) . . . . . . . . . . . . . . . . . . . . . . . . . . . . . . . . . . . . . . . . . . . . 3-1
3-2 Audio Controls and Optional Features Screen (A) . . . . . . . . . . . . . . . . . 3-2
3-3 Dial Pad Screen (B) . . . . . . . . . . . . . . . . . . . . . . . . . . . . . . . . . . . . . . . . . 3-3
3-4 System Line/Feature Keys Screen (C) . . . . . . . . . . . . . . . . . . . . . . . . . . 3-4
3-5 Multiline Client Application MLC Dialer Portrait Screen (iPad and Android Tablet) . . . . . . . . . . . . . . . . . . . . . . . . . . . . . . . . . . . . . . . . . . . . 3-5
3-6 Multline Client Application MLC Dialer Landscape Screen (iPad and Android Tablet) . . . . . . . . . . . . . . . . . . . . . . . . . . . . . . . . . . . . . . . . . 3-7
3-7 Multiline Client — Contacts . . . . . . . . . . . . . . . . . . . . . . . . . . . . . . . . . . . 3-9
3-8 Call Logs screen . . . . . . . . . . . . . . . . . . . . . . . . . . . . . . . . . . . . . . . . . . 3-10
3-9 UC Client . . . . . . . . . . . . . . . . . . . . . . . . . . . . . . . . . . . . . . . . . . . . . . . . 3-13
4-1 Android Only Native Dialer . . . . . . . . . . . . . . . . . . . . . . . . . . . . . . . . . . . 4-4
5-1 Multiline Client Application Status Notifications—Notification Bar . . . . . . 5-1
5-2 Multiline Client Application Status Notifications—MLC Status Bar . . . . . 5-2
5-3 Multiline Client Application Status Notification—MLC Status Bar (iPhone/iPad) . . . . . . . . . . . . . . . . . . . . . . . . . . . . . . . . . . . . . . . . . . . . . . 5-2
6-1 Android Device—More... tab . . . . . . . . . . . . . . . . . . . . . . . . . . . . . . . . . . 6-1
6-2 Android Device—Audio Tool tab . . . . . . . . . . . . . . . . . . . . . . . . . . . . . . . 6-2
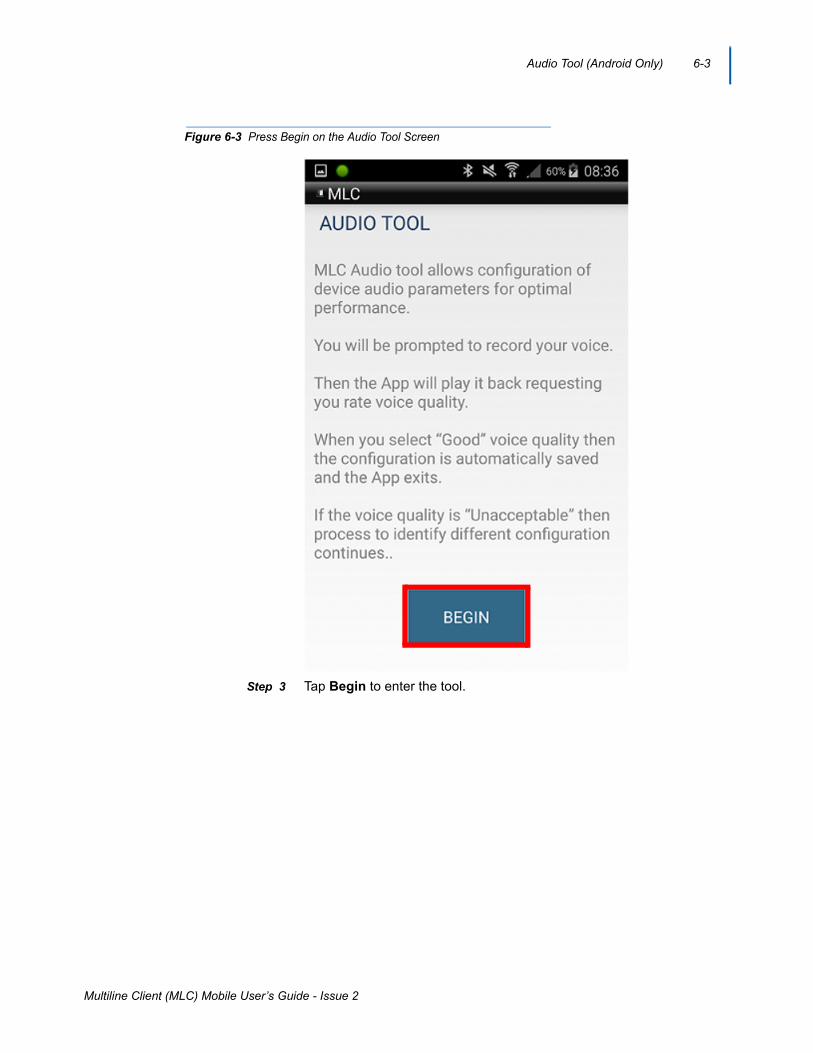
6-3 Press Begin on the Audio Tool Screen . . . . . . . . . . . . . . . . . . . . . . . . . . 6-3
6-4 Start Audio Training . . . . . . . . . . . . . . . . . . . . . . . . . . . . . . . . . . . . . . . . . 6-4
6-5 Recording Audio . . . . . . . . . . . . . . . . . . . . . . . . . . . . . . . . . . . . . . . . . . . 6-5
6-6 Determine if Audio is Acceptable or Unacceptable . . . . . . . . . . . . . . . . . 6-6
6-7 Press the Finish Button to Accept Recorded Audio. . . . . . . . . . . . . . . . . 6-7
6-8 If Audio Recording is Unacceptable. . . . . . . . . . . . . . . . . . . . . . . . . . . . . 6-8
6-9 Restarting the MLC App . . . . . . . . . . . . . . . . . . . . . . . . . . . . . . . . . . . . . 6-9
6-10 Restarting the MLC App . . . . . . . . . . . . . . . . . . . . . . . . . . . . . . . . . . . . 6-10
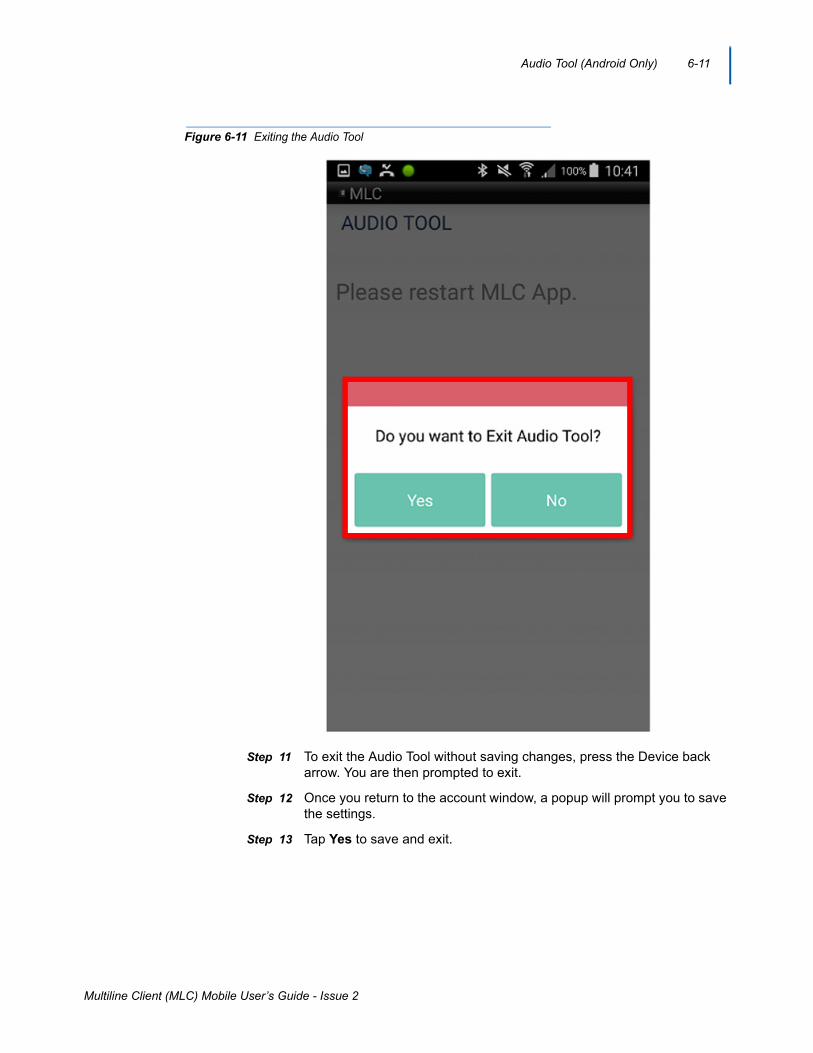
6-11 Exiting the Audio Tool . . . . . . . . . . . . . . . . . . . . . . . . . . . . . . . . . . . . . . 6-11
7-1 Dial Plan . . . . . . . . . . . . . . . . . . . . . . . . . . . . . . . . . . . . . . . . . . . . . . . . . 7-2

iv Figures
Multiline Client (MLC) Mobile User’s Guide - Issue 2

1-1
Multiline Client (MLC) Mobile User’s Guide - Issue 2
1Introduction
The Multiline Client Application is a SIP based application for Android and Apple devices, allowing you to make and receive calls through NEC SV8100/SV9100, SV8300/SV9300 and SV8500/SV9500 PBXs over Wi-Fi network connections in your organization.
The following topics are included in this chapter:
Chapter Topics • Assumptions and Dependencies• Overview• How This Guide is Organized
Assumptions and Dependencies
Ensure the following requirements are met:
• The PBX interoperability with the supported PBXs is completed and the client is configured accordingly by the PBX.
• The PBX and Multiline Client Application are deployed with a trusted relationship where possible.
• Multiline Client Application running on ANDROID Smart Phone devices hardware is compatible with the Android OS.
• The multiple profiles available in the client must be used to connect to one PBX at a time but different PBXs can be connected to the client at different times to allow mobility of the client. The default profile is the only active profile at any given time.
• The wireless network must support QoS for VoIP. QoS for VoIP will improve voice quality and reliability. Refer to your WLAN equipment manufacture for your network settings.

1-2 Introduction
Multiline Client (MLC) Mobile User’s Guide - Issue 2
Overview
Business communication systems play a critical role in the success of interactions in all scenarios, specifically providing required security, privacy, flexibility and cost effectiveness.
Similarly, the revolution of mobile communication resulted in a large ecosystem of applications around both iOS and Android OSes. This specification focuses on voice communication applications available from NEC that operates with NEC SV8100/SV9100, SV8300/SV9300 and SV8500/SV9500.
The Multiline Client Application supports the features expected from an NEC terminal including but not limited to:
• Making extension and trunk calls• Receiving extension and trunk calls• Call hold, direct and consultative transfers• Call conferencingThe Multiline Client Application also provides a number of device driven features.
How This Guide is Organized
Chapter 1 Introduction
This chapter outlines how to use the guide, including the organization and chapter layout for the Multiline Client Application.
Chapter 2 Installing Multiline Client
This chapter describes the process to install the Multiline Client.
Chapter 3 Multiline Client Application
Screen Layouts
This chapter provides information on using the Multiline Client screen layout.
Chapter 4 Multiline Client Operating
Procedures
This chapter provides information on Multiline Client operating procedures.
Chapter 5 Multiline Client Application
Status
This chapter provides information on how to read Multiline Client status.
Chapter 6 Audio Tool (Android Only)
This chapter provides information on how to configure the Audio Tool on the Android device.
Chapter 7 More (User Accounts, Activation and About)
This chapter provides information on account configuration, licensing and application version.

2-1
Multiline Client (MLC) Mobile User’s Guide - Issue 2
2Installing Multiline Client
The Multiline Client Application is installed from the appropriate store for the device (Google Play or iTunes). You must have an account with the store to install this application. If the application is already installed it can be accessed using the Multiline Client icon on the APPS page.
Step 1 To install the NEC Multiline Client application go to the appropriate device store.
Step 2 Search for NEC Multiline Client.
Step 3 Choose to install the NEC Multiline Client and follow the corresponding instructions.
Step 4 Open the application using the Multiline Client icon.
Device Requirements
• Android - Kit Kat 4.4
• Apple - iPhone 5 and above with iOS V9.1 or higher
MLC Requirements
• V2.0.7 or higher for Android devices• V2.0.6 or higher for Apple devices
NOTE
If the connection fails contact your administrator to establish network connectivity
NOTE
All Android devices with Kit Kat 4.4 may not be supported. Due to the many hardware variations in Android devices, the OS may function differently between devices. There is a 7 day trial period to verify your device before purchasing additional devices and licensing. There is also an Audio Tool to optimize the voice quality on Android Devices.

2-2 Installing Multiline Client
Multiline Client (MLC) Mobile User’s Guide - Issue 2

3-1
Multiline Client (MLC) Mobile User’s Guide - Issue 2
3Multiline Client Application Screen Layouts
This chapter provides information on the screen layout, the menu items for easy navigation, and function innovations.
MLC Dialer
The Multiline Client Dialer splits into three screens.
• Audio Controls/Optional Features• Dial Pad• System Line/Feature Keys
Figure 3-1 Multiline Client Application MLC Dialer Screens (iPhone and Android Phone)
Refer to Figure 3-2, Figure 3-3 and Figure 3-4 for more information.

3-2 Multiline Client Application Screen Layouts
Multiline Client (MLC) Mobile User’s Guide - Issue 2
Figure 3-2 Audio Controls and Optional Features Screen (A)
Features in Audio Controls and Optional Features Screen (A):
1. Station Display - Displays call/feature activity information plus date, time and Soft Key operation.
2. Soft Keys - Any feature shown is available. The appropriate feature key is displayed on the screen according to the call handling process. For feature operating procedures refer to your UNIVERGE SV8100/SV9100, SV8300/SV9300 and SV8500/SV9500 System Manuals.
3. Speaker - Answer incoming calls on hands-free speakerphone; disconnect active speakerphone calls and switch audio to your phones' external speaker during active internal speaker, wired headset or Bluetooth® headset calls.
4. Audio Device - During active calls switch audio to your internal phone speaker, Bluetooth® or wired headset.
5. Mute - Mute/Unmute the mic during active calls.
6. Video - During an active call initiate a video call between MLC client users. (Supported in v1.3.1 and higher).
7. UC Client - Provides access to user web client logon. (Refer to your UC server documentation for access and feature support).
8. MLC Menu Bar - Use the Phone (On-Hook/Off-Hook) button to answer incoming calls on your phones' internal speaker, Bluetooth® or wired headset; disconnect active internal speaker, Bluetooth® and wired headset calls and switch audio to your internal speaker, Bluetooth® or wire headset during active hands-free speakerphone calls. Access your Contacts, MLC Dialer, Call Logs and More configuration options.

Multiline Client Application Screen Layouts 3-3
Multiline Client (MLC) Mobile User’s Guide - Issue 2
Figure 3-3 Dial Pad Screen (B)
Features in Dial Pad Screen (B):
1 Status Display - Displays station login, incoming call, license activation and message waiting status information.
2. Dial Pad - Dial outgoing going calls, feature access codes and send digits for accessing dial-in systems.
3. Commonly Used Call Keys
• Hold - Press this key to place an internal or external call on hold.• Answer - When this key is lit, press key to answer a waiting calls.
Refer to your UNIVERGE SV8100/SV9100, SV8300/SV9300 and SV8500/SV9500 system manuals for additional feature operations.
• Speaker - Controls the built-in speaker which can be used for Hands-free dialing/monitoring. Answer incoming calls on hands-free speakerphone; disconnect active speakerphone calls and switch audio to your phones' external speaker during active internal speaker, wired headset or Bluetooth® headset calls. This key lights when speakerphone is active.

3-4 Multiline Client Application Screen Layouts
Multiline Client (MLC) Mobile User’s Guide - Issue 2
Figure 3-4 System Line/Feature Keys Screen (C)
Features in System Line/Feature Keys Screen (B):
1. Exit - The user can exit from the Help mode and other phone options by pressing this key. For additional feature operating procedures refer to your UNIVERGE SV8100/SV9100, SV8300/SV9300 and SV8500/SV9500 System Manuals.
2. Help - Explanations of the Soft Keys can be called up in the station display by pressing this key. For additional feature operating procedures refer to your UNIVERGE SV8100/SV9100, SV8300/SV9300 and SV8500/SV9500 System Manuals.
3. Line/Feature Keys - 32 line/feature keys (4 pages of 8 keys). Access the additional pages by pressing 1-4. These keys can be programmed as flexible Line Keys/Programmable Feature Keys by your system administrator.When Telephony Server Administrator sets “One-Touch Speed Dial key” on the programmable keys, users can assign any numbers (ex. Telephone number, etc.) to the key (up to 24 digits).For additional feature operating procedures refer to your UNIVERGE SV8100/SV9100, SV8300/SV9300 and SV8500/SV9500 System Manuals.
4. Call Control Keys
• Hold - Press this key to place an internal or external call on hold.• Answer - When this key is lit, press key to answer a waiting calls.
Refer to your UNIVERGE SV8100/SV9100, SV8300/SV9300 and SV8500/SV9500 system manuals for additional feature operations.

Multiline Client Application Screen Layouts 3-5
Multiline Client (MLC) Mobile User’s Guide - Issue 2
• Speaker - Controls the built-in speaker which can be used for Hands-free dialing/monitoring. Answer incoming calls on hands-free speakerphone; disconnect active speakerphone calls and switch audio to your phones' external speaker during active internal speaker, wired headset or Bluetooth® headset calls. This key lights when speakerphone is active.
• Recall - Press key to finish the call and hear the dial tone to make another outgoing call.
• Feature - Used to activate any features as terminal setup functions, etc. and to program One-Touch Speed Dial Keys.
• Transfer - Allows the station user to transfer established calls to another station, without attendant assistance.
• Mic - Controls microphone during hands-free speakerphone calls. This key lights indicating mic on/off for speakerphone calls.
• Up/Down Arrows - Volume controls for Android devices. iPhone users must use the hard keys on the device for volume control.
Figure 3-5 Multiline Client Application MLC Dialer Portrait Screen (iPad and Android Tablet)
Portrait Layout
1. Status Display - Displays station login, incoming call and message waiting status information.
2. Line/Feature Keys - 32 line/feature keys (4 pages of 8 keys). Access the additional pages by pressing 1-4. These keys can be programmed as flexible Line Keys/Programmable Feature Keys by your system administrator.When Telephony Server Administrator sets “One-Touch Speed Dial key” on the programmable keys, users can assign any numbers (ex. Telephone number, etc.) to the key (up to 24 digits).For additional feature operating procedures refer to your UNIVERGE SV8100/SV9100, SV8300/SV9300 and SV8500/SV9500 System Manuals.

3-6 Multiline Client Application Screen Layouts
Multiline Client (MLC) Mobile User’s Guide - Issue 2
3. Audio Controls/Optional Features
• Audio Device - During active calls switch audio to your internal tablet speaker, Bluetooth® or wired headset.
• Mute - Mute/Unmute the mic during active calls.• Video - During an active call initiate a video call between MLC
client users. (Supported in v1.3.1 and higher)• UC Client - Provides access to user web client logon. (Refer to your
UC server documentation for access and feature support)
4. Station Display - Displays call/feature activity information plus date, time and Soft Key operation.
5. Soft Keys - Any feature shown is available. The appropriate feature key is displayed on the screen according to the call handling process. For feature operating procedures refer to your UNIVERGE SV8100/SV9100, SV8300/SV9300 and SV8500/SV9500 System Manuals.
6. Help - Explanations of the Soft Keys can be called up in the station display by pressing this key. For additional feature operating procedures refer to your UNIVERGE SV8100/SV9100, SV8300/SV9300 and SV8500/SV9500 System Manuals.
7. Exit - The user can exit from the Help mode and other phone options by pressing this key. For additional feature operating procedures refer to your UNIVERGE SV8100/SV9100, SV8300/SV9300 and SV8500/SV9500 System Manuals.
8. Dial Pad - Dial outgoing going calls, feature access codes and send digits for accessing dial-in systems.
9. Call Control Keys
• Hold - Press this key to place an internal or external call on hold.• Answer - When this key is lit, press key to answer a waiting calls.
Refer to your UNIVERGE SV8100/SV9100, SV8300/SV9300 and SV8500/SV9500 system manuals for additional feature operations.
• Speaker - Controls the built-in speaker which can be used for Hands-free dialing/monitoring. Answer incoming calls on hands-free speakerphone; disconnect active speakerphone calls and switch audio to speakerphone during active internal speaker, wired headset or Bluetooth headset calls. This key lights when speakerphone is active.
• Recall - Press key to finish the call and hear the dial tone to make another outgoing call.
• Feature - Used to activate any features as terminal setup functions, etc. and to program One-Touch Speed Dial Keys.
• Transfer - Allows the station user to transfer established calls to another station, without attendant assistance.
• Mic - Controls microphone during hands-free speakerphone calls. This key lights indicating mic on/off for speakerphone calls.
• Up/Down Arrows - Volume controls for Android devices.iPhone users must use the hard keys on the device for volume control.

Multiline Client Application Screen Layouts 3-7
Multiline Client (MLC) Mobile User’s Guide - Issue 2
10. MLC Menu Bar - Use the Phone (On-Hook/Off-Hook) button to answer incoming calls on your tablets' internal speaker, Bluetooth® or wired headset; disconnect active internal speaker, Bluetooth® and wired headset calls and switch audio to your internal speaker, Bluetooth® or wire headset during active hands-free speakerphone calls. Access your Contacts, MLC Dialer, Call Logs and More configuration options.
Figure 3-6 Multline Client Application MLC Dialer Landscape Screen (iPad and Android Tablet)
Landscape Layout
1. Status Display - Displays station login, incoming call and message waiting status information.
2. Line/Feature Keys - 32 line/feature keys (4 pages of 8 keys). Access the additional pages by pressing 1-4. These keys can be programmed as flexible Line Keys/Programmable Feature Keys by your system administrator.When Telephony Server Administrator sets “One-Touch Speed Dial key” on the programmable keys, users can assign any numbers (ex. Telephone number, etc.) to the key (up to 24 digits).For additional feature operating procedures refer to your UNIVERGE SV8100/SV9100, SV8300/SV9300 and SV8500/SV9500 System Manuals.
3. Audio Controls/Optional Features
• Audio Device - During active calls switch audio to your internal tablet speaker, Bluetooth® or wired headset.
• Mute - Mute/Unmute the mic during active calls.• Video - During an active call initiate a video call between MLC
client users. (Future Release)

3-8 Multiline Client Application Screen Layouts
Multiline Client (MLC) Mobile User’s Guide - Issue 2
• UC Client - Provides access to user web client logon. (Refer to your UC server documentation for access and feature support)
4. Station Display - Displays call/feature activity information plus date, time and Soft Key operation.
5. Soft Keys - Any feature shown is available. The appropriate feature key is displayed on the screen according to the call handling process. For feature operating procedures refer to your UNIVERGE SV8100/SV9100, SV8300/SV9300 and SV8500/SV9500 System Manuals.
6. Help - Explanations of the Soft Keys can be called up in the station display by pressing this key. For additional feature operating procedures refer to your UNIVERGE SV8100/SV9100, SV8300/SV9300 and SV8500/SV9500 System Manuals.
7. Exit - The user can exit from the Help mode and other phone options by pressing this key. For additional feature operating procedures refer to your UNIVERGE SV8100/SV9100, SV8300/SV9300 and SV8500/SV9500 System Manuals.
8. Dial Pad - Dial outgoing going calls, feature access codes and send digits for accessing dial-in systems.
9. Call Control Keys
• Hold - Press this key to place an internal or external call on hold.• Answer - When this key is lit, press key to answer a waiting calls.
Refer to your UNIVERGE SV8100/SV9100, SV8300/SV9300 and SV8500/SV9500 system manuals for additional feature operations.
• Speaker - Controls the built-in speaker which can be used for Hands-free dialing/monitoring. Answer incoming calls on hands-free speakerphone; disconnect active speakerphone calls and switch audio to speakerphone during active internal speaker, wired headset or Bluetooth® headset calls. This key lights when speakerphone is active.
• Recall - Press key to finish the call and hear the dial tone to make another outgoing call.
• Feature - Used to activate any features as terminal setup functions, etc. and to program One-Touch Speed Dial Keys.
• Transfer - Allows the station user to transfer established calls to another station, without attendant assistance.
• Mic - Controls microphone during hands-free speakerphone calls. This key lights indicating mic on/off for speakerphone calls.
• Up/Down Arrows - Volume controls for Android devices. iPhone users must use the hard keys on the device for volume control.
10. MLC Menu Bar - Use the Phone (On-Hook/Off-Hook) button to answer incoming calls on your tablets internal speaker, Bluetooth® or wired headset; disconnect active internal speaker, Bluetooth® and wired headset calls and switch audio to your internal speaker, Bluetooth® or wire headset during active hands-free speakerphone calls. Access your Contacts, MLC Dialer, Call Logs and More configuration options.

Multiline Client Application Screen Layouts 3-9
Multiline Client (MLC) Mobile User’s Guide - Issue 2
Contacts
Clicking the Contact button opens your contacts within the MLC App, as shown Figure 3-7. Device contacts are automatically imported and updated in MLC. Example shown is iPhone, Android devices and tablets function in a similar fashion.
Figure 3-7 Multiline Client — Contacts
Calling from Contacts
Open the desired contact and select number to dial. A dial plain is required to add outside access code (i.e. 9). Refer to Advanced Settings for more details.
Editing Contacts
• Editing Contacts is not supported. Edit exiting contacts through the devices native contacts.
Call Logs
The call logs for incoming, outgoing and missed calls are captured in the call logs.
Selecting the Call Logs Menu item opens the call logs screen, as shown in Figure 3-8. Example shown is iPhone, Android devices and tablets function in a similar fashion.

3-10 Multiline Client Application Screen Layouts
Multiline Client (MLC) Mobile User’s Guide - Issue 2
Figure 3-8 Call Logs screen
As shown above, the user can either display All calls or Missed calls from the Call Logs. Click the number to return missed calls or redial incoming/outgoing calls.
There are three different icons showing the different call log types:
• Incoming Answered Call
• Outgoing Call
• Missed Incoming Call

Multiline Client Application Screen Layouts 3-11
Multiline Client (MLC) Mobile User’s Guide - Issue 2
• Selecting the info icon displays the contact name and number of calls in brackets. It also displays the type of call, time/date and the duration of the call.
• You can also return the call by clicking Call.• A dial plan is required to add outside access code (i.e. 9). Refer to
Advanced Settings for more details.
Creating and Saving Call Logs to Contacts
• Selecting the info icon of an unsaved number displays additional call information and options.
• Select Add to Contacts to create a new contact.• Select Add to Existing Contacts to display a list of all saved
contacts. Then select the contact to add new number.• It also displays the type of call, time/date and the duration of the call.• You can also return the call by clicking Call.• A dial plain is required to add outside access code (i.e. 9). Refer to
Advanced Settings for more details.

3-12 Multiline Client Application Screen Layouts
Multiline Client (MLC) Mobile User’s Guide - Issue 2
Deleting Individual and All Call Logs
• Tap Edit to remove the single entries by selecting the minus key and Delete.
• Delete all calls from the call logs by selecting the trash can then Yes.

Multiline Client Application Screen Layouts 3-13
Multiline Client (MLC) Mobile User’s Guide - Issue 2
UC Client
Selecting the UC icon invokes the UC application available on your PBX platform, as shown in Figure 3-9.
Figure 3-9 UC Client
Refer to UC server documentation for further information.

3-14 Multiline Client Application Screen Layouts
Multiline Client (MLC) Mobile User’s Guide - Issue 2

4-1
Multiline Client (MLC) Mobile User’s Guide - Issue 2
4Multiline Client Operating Procedures
This chapter provides basic call controls, receiving/sending calls, changing audio sources and maintenance procedures.
Pairing Bluetooth® Headset
Follow your device and Bluetooth headset pairing instructions. After a successful pairing your headset is now available during an active call. Tones and sounds may be heard through the headset depending on your device settings.
Connecting Wired Headset
Verify your headset is compatible with your device. Connect the headset to the headphones jack on your device. Your headset is now available during an active call. Tones and sounds may be heard through the headset depending on your device settings.
Audio Source Priorities (using On-hook/ Off-Hook button)
1. Bluetooth Headset
2. Wired Headset
3. Phone Internal Speaker
• The Bluetooth headset has the highest priority, followed by wired headset and internal speaker.
• When a Bluetooth headset is connected during a call, the audio will be set automatically to the Bluetooth headset.
• When a Bluetooth headset is disconnected during a call, the audio will be set to the next highest priority audio source.

4-2 Multiline Client Operating Procedures
Multiline Client (MLC) Mobile User’s Guide - Issue 2
• When a wired headset is connected during a call, the audio will be set automatically to the wired headset regardless of audio source priority.
• When a wired headset is disconnected during a call, the audio will be set to the next highest priority.
• When a wired headset is connected the phone's internal speaker cannot be selected. To switch to the internal speaker simply disconnect the headset.
• If the audio source is changed during a call, the audio source will reset back to the highest priority on the next call.
Answer Incoming Call
With Phone Internal Speaker, Bluetooth or Wired Headset
1. Receive an incoming call (Line Feature Screen is displayed and Status Bar flashes).
• Incoming call indication color is set by UNIVERGE SV8100/SV9100, SV8300/SV9300 and SV8500/SV9500 system setting. Contact your IT department or authorized NEC dealer for support)
2. Press the On-Hook button to answer the call.
With Hands-free Speakerphone
1. Receive an incoming call (Line Feature Screen is displayed and Status Bar flashes).
• Incoming call indication color is set by UNIVERGE SV8100/SV9100, SV8300/SV9300 and SV8500/SV9500 system setting. Contact your IT department or authorized NEC dealer for support)
2. Press the Speaker button to answer the call in hands-free speakerphone mode.
While phone is locked iOS10 with 3D Touchscreen
1. Receive an incoming call (Incoming call notification is displayed).
2. Hard press the notification to accept the call.
While phone is locked iOS10 without 3D Touchscreen
1. Receive an incoming call (Incoming call notification is displayed).
2. Swipe notification to the right to accept the call.

Multiline Client Operating Procedures 4-3
Multiline Client (MLC) Mobile User’s Guide - Issue 2
While phone is locked Android
1. MLC application will appear with full control.
2. When the call ends, the phone returns to locked.
Make Outgoing Call
With Phone Internal Speaker, Bluetooth or Wired Headset
• SV9100/SV9300 Users
1. Dial desired number using the MLC Dialer number pad.
2. Press the On-Hook button to send dialed digits.
• SV9500 Users
3. Press the On-Hook button to receive dial tone.
4. Dial desired number using the MLC Dialer number pad.
With Hands-free Speakerphone
• SV9100/SV9300 Users
1. Dial desired number using the MLC Dialer number pad.
2. Press the Speaker button to send dialed digits.
• SV9500 Users
3. Press the Speaker button to receive dial tone.
4. Dial desired number using the MLC Dialer number pad.
Android Only Native Dialer (Cell Phone Dial Pad)
The Android native dialer can be used to make outgoing calls depending on account settings (see section 6).
1. Always Prompt: Dialer selection popup appears before sending digit. Select MLC to send call with MLC. Select Cellular to send call over cellular service.
2. MLC: When MLC is active all calls made with native dialer will be sent using MLC.
3. Cellular: All calls made with the native dialer are sent over the cellular service.
NOTE
When receiving an incoming cell call while talking on the MLC, you must place the MLC call on hold before answering the cell call. If not, you will hear both calls at the same time.

4-4 Multiline Client Operating Procedures
Multiline Client (MLC) Mobile User’s Guide - Issue 2
Figure 4-1 Android Only Native Dialer
Disconnect Call
While on Phone Internal Speaker, Bluetooth or Wired Headset
• Press the Off-Hook button to disconnect the call.
While on Hands-free Speakerphone
• Press the Speaker button to disconnect the call.
Mute/Unmute the Mic
• Toggle the microphone on/off with the Mute/Unmute buttons .
NOTE
Outgoing calls made through MLC contacts and call logs will be in hands-free speakerphone mode. Pressing the On-Hook button will change the audio source to your phone internal speaker, Bluetooth or wired headset. Refer to changing your audio source for more details.

Multiline Client Operating Procedures 4-5
Multiline Client (MLC) Mobile User’s Guide - Issue 2
Changing the Audio Source
While on Phone Internal Speaker, Bluetooth® or Wired Headset
• Press the Speaker button to switch call to hands-free speakerphone.
• Press the Speaker button to switch the call to hands-free speakerphone.
• Press the Audio Device button to view audio device selection menu.• Select Audio Device (active audio device will be shown in green)
— Phone (only on iPhone and Android Phones)— Bluetooth— Headset— Dismiss (Close audio device menu)
• Press the Off-Hook button to disconnect the call.
While on Hands-free Speakerphone
• Press the On-Hook button to switch to the audio device with the highest priority.
• Press the Audio Device button to view audio device selection menu.• Select Audio Device (active audio device will be shown in green)
— Phone (only on iPhone and Android Phones)— Bluetooth— Headset— Dismiss (Close audio device menu)
• Press the Speaker button to disconnect the call.
• Press the Speaker button to disconnect the call.

4-6 Multiline Client Operating Procedures
Multiline Client (MLC) Mobile User’s Guide - Issue 2

5-1
Multiline Client (MLC) Mobile User’s Guide - Issue 2
5Multiline Client Application Status
This chapter explains user online status notifications.
Android Registration Status Notifications
Notification Bar
Select the Status Notification drop down to display Figure 5-1.
Figure 5-1 Multiline Client Application Status Notifications—Notification Bar
This view provides a quick look at the application status, including Online or Offline state, Call information during an active call, and voice mail indication if there is a pending message.
Notice also that the Notification area shows the call counter during an active call for both the extension and trunk calls.

5-2 Multiline Client Application Status
Multiline Client (MLC) Mobile User’s Guide - Issue 2
MLC Status Bar
The MLC registration Online/Offline status is shown at the top of the MLC application (Figure 5-2).
Figure 5-2 Multiline Client Application Status Notifications—MLC Status Bar
iPhone/iPad Registration Status Notification
This section explains the iPhone/iPad Status Notifications.
MLC Status Bar
The MLC registration Online/Offline status is shown at the top of the MLC application (Figure 5-3).
Figure 5-3 Multiline Client Application Status Notification—MLC Status Bar (iPhone/iPad)

Multiline Client Application Status 5-3
Multiline Client (MLC) Mobile User’s Guide - Issue 2

5-4 Multiline Client Application Status
Multiline Client (MLC) Mobile User’s Guide - Issue 2

6-1
Multiline Client (MLC) Mobile User’s Guide - Issue 2
6Audio Tool (Android Only)
Due to the many types of Android devices, it has become necessary to provide a way to train the device for best Audio settings. This is accomplished with the addition of the Audio tool that is located under the More tab.
Android Device™
Figure 6-1 Android Device—More... tab
Step 1 Press the More... tab.

6-2 Audio Tool (Android Only)
Multiline Client (MLC) Mobile User’s Guide - Issue 2
Figure 6-2 Android Device—Audio Tool tab
Step 2 Press the Audio Tool tab.
Audio Tool (Android Only) 6-3
Multiline Client (MLC) Mobile User’s Guide - Issue 2
Figure 6-3 Press Begin on the Audio Tool Screen
Step 3 Tap Begin to enter the tool.

6-4 Audio Tool (Android Only)
Multiline Client (MLC) Mobile User’s Guide - Issue 2
Figure 6-4 Start Audio Training
Step 4 Tap Start to start the Audio training.

Audio Tool (Android Only) 6-5
Multiline Client (MLC) Mobile User’s Guide - Issue 2
Figure 6-5 Recording Audio
Step 5 Once the recording is started, talk into the mic and listen for the audio through the speaker.
When you have determined the audio is either acceptable or not, press the Stop button.

6-6 Audio Tool (Android Only)
Multiline Client (MLC) Mobile User’s Guide - Issue 2
Figure 6-6 Determine if Audio is Acceptable or Unacceptable
Step 6 If the recording is acceptable, press the Good tab. If it is not, press the Unacceptable tab.

Audio Tool (Android Only) 6-7
Multiline Client (MLC) Mobile User’s Guide - Issue 2
Figure 6-7 Press the Finish Button to Accept Recorded Audio
Step 7 If you choose Good, then press the Finish button.

6-8 Audio Tool (Android Only)
Multiline Client (MLC) Mobile User’s Guide - Issue 2
Figure 6-8 If Audio Recording is Unacceptable
Step 8 If you choose Unacceptable, you will automatically go to the next configuration option. Repeat steps 4, 5 and 6 until there is an acceptable audio setting. There are 12 configuration options and if a suitable Audio setting is not obtained it will default to best settings in the device.

Audio Tool (Android Only) 6-9
Multiline Client (MLC) Mobile User’s Guide - Issue 2
Figure 6-9 Restarting the MLC App
Step 9 If a suitable Audio setting is not found, you will be prompted to restart the MLC App and it will select the best settings.

6-10 Audio Tool (Android Only)
Multiline Client (MLC) Mobile User’s Guide - Issue 2
Figure 6-10 Restarting the MLC App
Step 10 If you chose Good on any of the Audio configurations, you are prompted to press Finish and restart the MLC App.
Audio Tool (Android Only) 6-11
Multiline Client (MLC) Mobile User’s Guide - Issue 2
Figure 6-11 Exiting the Audio Tool
Step 11 To exit the Audio Tool without saving changes, press the Device back arrow. You are then prompted to exit.
Step 12 Once you return to the account window, a popup will prompt you to save the settings.
Step 13 Tap Yes to save and exit.

6-12 Audio Tool (Android Only)
Multiline Client (MLC) Mobile User’s Guide - Issue 2

7-1
Multiline Client (MLC) Mobile User’s Guide - Issue 2
7More (User Accounts, Activation and About)
User SIP Accounts
Accounts - Add, Delete and Edit SIP account settings
• Add New Account• Select Accounts• Select the + sign to add a new account
SIP Account Settings
• Account Name: “Enter the Account Name”• User Name: “Enter Extension Number”• Authentication Name: “Enter Extension Number”• Display Name: “Enter Extension Number”• Password: “Enter Extension Login Password”• Server: “Enter IP Address of VoIP or LAN 1 Port”
• (i.e. 172.24.142.55)• Enable Proxy: “Yes”• Proxy: “Enter IP Address of VoIP or LAN 1 Port and iSIP/nSIP
Port”• (i.e. 172.24.142.55:5080)• SV9100 & SV9300 Default iSIP Port is 5080• SV9500 Default nSIP Port is 5060
• UC Server: “Enter UC Server URL or IP Address”• UC User Name: “Enter UC User Name”• UC Password: “Select UC User Password”• Ringtone: “Select desired Ringtone”• Dial Plan: “Select desired Dial Plan”
WARNING
Advanced user only, contact your IT department or Authorized NEC Dealer before making changes.

7-2 More (User Accounts, Activation and About)
Multiline Client (MLC) Mobile User’s Guide - Issue 2
Advanced Settings (Password: 6633222)
• Dial Plan (Select, Edit and Reset the Custom and Country Dial Plans)• Select Dial Plan.
Figure 7-1 Dial Plan
• United States default outgoing prefix is 9• Edit Dial Plan (if required).
• User Operation• Operation Mode: “Mobile”• Mute Programmable Key: “Assign Mute Key Number”
• SV9100 - Default Not Required for SV9100• SV9300 & SV9500 - Mute Key must be assigned to a Line/
Feature Key• Call Preference: Android Only – Native Dialer Settings
• Always Prompt: Dialer selection popup appears before sending digit. Select MLC to send call with MLC. Select Cellular to send call over cellular service.
• MLC: When MLC is active, all calls made with native dialer will be sent using MLC.
• Cellular: All calls made with the native dialer are sent over the cellular service.
• Audio
WARNING
Setting must match UNIVERGE SV8100/SV9100, SV8300/SV9300, SV8500/SV9500 system settings. Contact your IT department or authorized NEC dealer for support.
More (User Accounts, Activation and About) 7-3
Multiline Client (MLC) Mobile User’s Guide - Issue 2
• Codecs: “Select and Prioritized the Codec list”• First Priority is the top option and the Last Priority is the bottom
option• Codecs can be disabled or enabled
• Packetization Interval (ms): “Assign the RTP Payload Size”• Playback Buffer: “Default: 60ms”• Capture Buffer: “Default: 40ms”• JB prefetch Delay: “Default: 60ms”• JB Max Delay: “Default: 160ms”
• Network
• SIP ToS (Hex): “Enter SIP Control Packet ToS” (Default: C0)• RTP ToS (Hex): “Enter RTP Voice Packet ToS” (Default: A0)
• Miscellaneous• Log Level: “Default: Warning”
Edit Account
• Select Account from More Options• Select Account to edit• See SIP account setting above for option details.
Set Default Account (Default account will be the active account)
• Select Account from More Options• Select and hold account for 2sec. for popup menu to appear• Select 'Set as Default'
Delete Account (Default account cannot be deleted)
• Select Account from More Options• Select and hold account for 2sec. for popup menu to appear• Select 'Delete'
For additional information or support on this NEC Corporation of America product, contact your NEC Corporation of America representative.
WARNING
Setting must match UNIVERGE SV8100/SV9100, SV8300/SV9300, SV8500/SV9500 system settings. Contact your IT department or authorized NEC dealer for support.
WARNING
Contact your IT department or authorized NEC dealer for support.

7-4 More (User Accounts, Activation and About)
Multiline Client (MLC) Mobile User’s Guide - Issue 2
Activation
The MLC has 3 options for activation
• Trial: Seven day trial period. After seven days you must activate the MLC to continue to use.
• Activation: Enter the activation code received from your IT department or contact your dealer for the activation code
• Dismiss: Dismisses the activation and closes the MLC application• When the application is restarted the activation menu will display
again.
About (MLC Version Info)
Enter the More menu and select About. The MLC version information will be displayed.
NOTE
Each account in the MLC Client requires an activation code.When you configure two accounts on the same device, two licenses are required for that device. Always configure the default account first. Then, add additional accounts if needed.

For additional information or support on this NEC Corporation of America product, contact your NEC Corporation
of America representative.

NEC Corporation of AmericaNEC
Multiline Client (MLC) Mobile User’s Guide
NDA-31749, Issue 2