munis employee self service · pdf fileto log into the munis employee self service (ess)...
TRANSCRIPT
MUNIS – Employee Self Service
December 12, 2011
Version 2

Employee Self Service Manual
Version 2 Page 2
Table of Contents
I. Getting Started ............................................................................................. 3
A. Login / Logout ....................................................................................................................... 3
B. Navigation & Available Options ........................................................................................... 6
C. Printing ............................................................................................................................... 10
II. Employee Self Service ................................................................................. 11
A. Screen Details ..................................................................................................................... 11
III. Certifications .............................................................................................. 15
A. Overview & Screen Details ................................................................................................. 15
IV. Pay/Tax Information ................................................................................... 15
A. Overview & Screen Details ................................................................................................. 15
B. YTD Information ................................................................................................................. 16
C. W‐2 and W‐4 ...................................................................................................................... 17
D. Paycheck Simulator ............................................................................................................ 20
E. Direct Deposit ..................................................................................................................... 22
V. Personal Information .................................................................................. 22
A. Overview & Screen Details ................................................................................................. 22
VI. Time Off ...................................................................................................... 25
A. Overview & Screen Details ................................................................................................. 25

Employee Self Service Manual
Version 2 Page 3
I. GettingStarted
Employee Self Service (ESS) provides employees with access to personal information, pay and
tax information, as well as certification and time off information.
A. Login/Logout
A. To log into the MUNIS Employee Self Service (ESS) system, follow these steps:
a. Access to the system is through the following link: (Type this link into your Internet
browser address bar and press Enter.)
http://columbus.munisselfservice.com
Suggestion: For quick access to this link, make it a Favorite within your Internet
browser.
b. Click the “Log in” link (upper right corner of the screen).
c. Then, type your User name and Password. Then, click :
Note: Your “User name” is your employee ID#. The first time you log in, your
password will be the last 4 digits of your Social Security number. You will then be
prompted to change it.

Employee Self Service Manual
Version 2 Page 4
Note: If you have trouble logging in, after 5 attempts, you will be logged out and
will need to contact the Help Desk at 614‐365‐8425.
As mentioned above, when you initially sign on, you will be prompted to
change your password:
1. Current password: Fill in your current password (or the password
you were given).
2. New password: CCS requires that you have 1 numeric character, 1
lowercase and 1 uppercase letter. Passwords must be at least 8
characters.
3. Confirm new password: Retype the password you entered in the
“New password” field.
4. New password hint: Type text that will help you identify your
password.
5. Click .
6. A screen will appear indicating your password has been successfully
changed. Click the “Continue” button.
d. The Columbus City Schools Self Service home page will appear:

Employee Self Service Manual
Version 2 Page 5
e. Note: Once you are logged in, the system will time out if not used.
Log Out:
1. To log out of the system, click the “Log Out” option (top right of screen):
2. You will see the following message: As a security measure, please close any browser
windows that were opened during your session.

Employee Self Service Manual
Version 2 Page 6
B. Navigation&AvailableOptions
Employee Self Service Home Page: After logging in, click on the “Employee Self Service”
option (from the left navigation pane).
The Employee Self Service home page displays personal information, organizational
announcements, time off and pay details. Example:

Employee Self Service Manual
Version 2 Page 7
Available Options: After clicking on the “Employee Self Service” option, additional features will
become available ‐ Certifications, Pay/Tax Information, Personal Information, and Time Off.
Click on the option you want to access:
Certifications: Certifications displays a list of your certifications. This list includes the
certification type, area, level, number, and effective and expiration dates. If you are a
supervisor, you can view certifications of employees who report to you.
The example shown below doesn’t have any certifications:
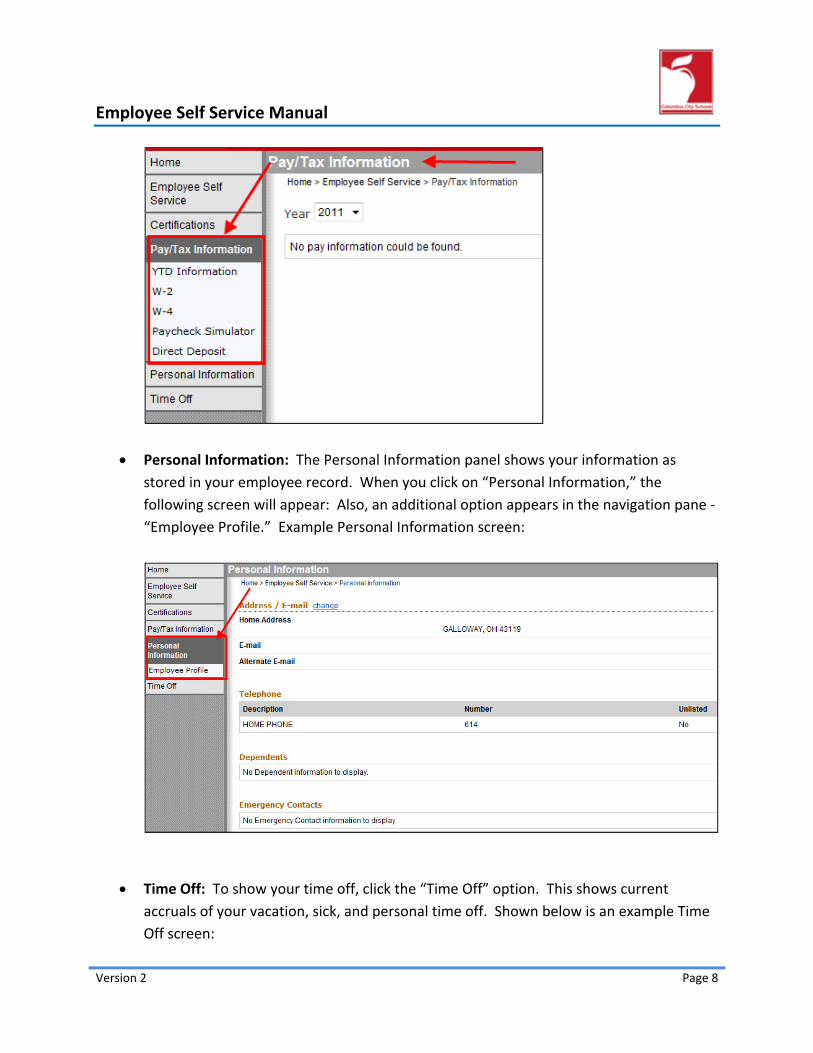
Pay/Tax Information: Click on “Pay/Tax Information” to show current payroll and
payroll history details. The default year is the current year, but you can also view past
years. Notice an additional list appears with other options that are available:
Employee Self Service Manual
Version 2 Page 8
Personal Information: The Personal Information panel shows your information as
stored in your employee record. When you click on “Personal Information,” the
following screen will appear: Also, an additional option appears in the navigation pane ‐
“Employee Profile.” Example Personal Information screen:
Time Off: To show your time off, click the “Time Off” option. This shows current
accruals of your vacation, sick, and personal time off. Shown below is an example Time
Off screen:

Employee Self Service Manual
Version 2 Page 9
Basic Navigation:
Breadcrumb Navigation
Near the top of each page of the Employee Self Service (ESS) application, a breadcrumb
provides a guide for navigating the pages. (Think of a breadcrumb as a way for you to track
where you are within the system.) For each page that you display, the breadcrumb
identifies the path back to previous pages.
The following example shows part of the “Add Telephone Number” screen; you can click on
“Personal Information” to go back to the previous page. You can also click on “Employee
Self Service” to go directly to the Employee Self Service screen. Clicking on any of the
breadcrumb options will take you directly to that page.
Links
Within most screens, there are links allowing you to view or change things. For example,
the Personal Information panel (shown below) provides your information as stored in your
employee record. Click “View Profile” to view your personal profile.

Employee Self Service Manual
Version 2 Page 10
Other sample links that you will see on various screens include:
o
o
o
o
o
C. Printing
There are no print icons within Employee Self Service (ESS). However, since you will be
accessing ESS through your Internet browser, you can use printing capabilities from the
browser.
For example, if you are using Internet Explorer, you can access printing through the menu or
the printer icon, as follows:
1. Within ESS, go to the screen you want to print.
2. Access the print option you want to use. Either use the icon or the menu, as follows:
Printer Icon ‐ : Click the drop‐down arrow and select either “Print Preview”
(to preview what you want to print) or “Print” (to access a pop‐up window where
you can select a printer).

Employee Self Service Manual
Version 2 Page 11
Menu: Select File | Print:
Note: Different Internet browsers might have different ways to print, but it is likely the method
will be similar to the steps mentioned above.
II. EmployeeSelfService
The Employee Self Service screen is considered the home page. It currently shows you a
snapshot of the following information: (Note: At some point, you will see additional options as
other features are installed.)
Personal Information
Announcements
Time Off
Paychecks
A. ScreenDetails
This section will show you sample screen prints (full and partial screen prints) of the applicable
sections that are discussed. Note: Since screen prints from a CCS employee are being used
throughout this manual, parts of the screen will be blanked out to protect personal data.
Personal Information: This shows your name, address, phone number and email
address. You can click on the “View profile” link to go directly to your employee profile.

Employee Self Service Manual
Version 2 Page 12
From within the profile, you will see general information, demographic information, and
race data. A partial screen is shown below (actual data is shown to the right of the
screen, which is not shown in this manual): From this screen you can use the
breadcrumbs to go to “Personal Information” or you can click on .
If you click on the “Personal Information” breadcrumb, you can update various
information including address/e‐mail, telephone numbers, or emergency contacts.
Note: Detailed instruction on this will be reviewed in the “Personal Information” section
of this manual.
Employee Self Service Manual
Version 2 Page 13
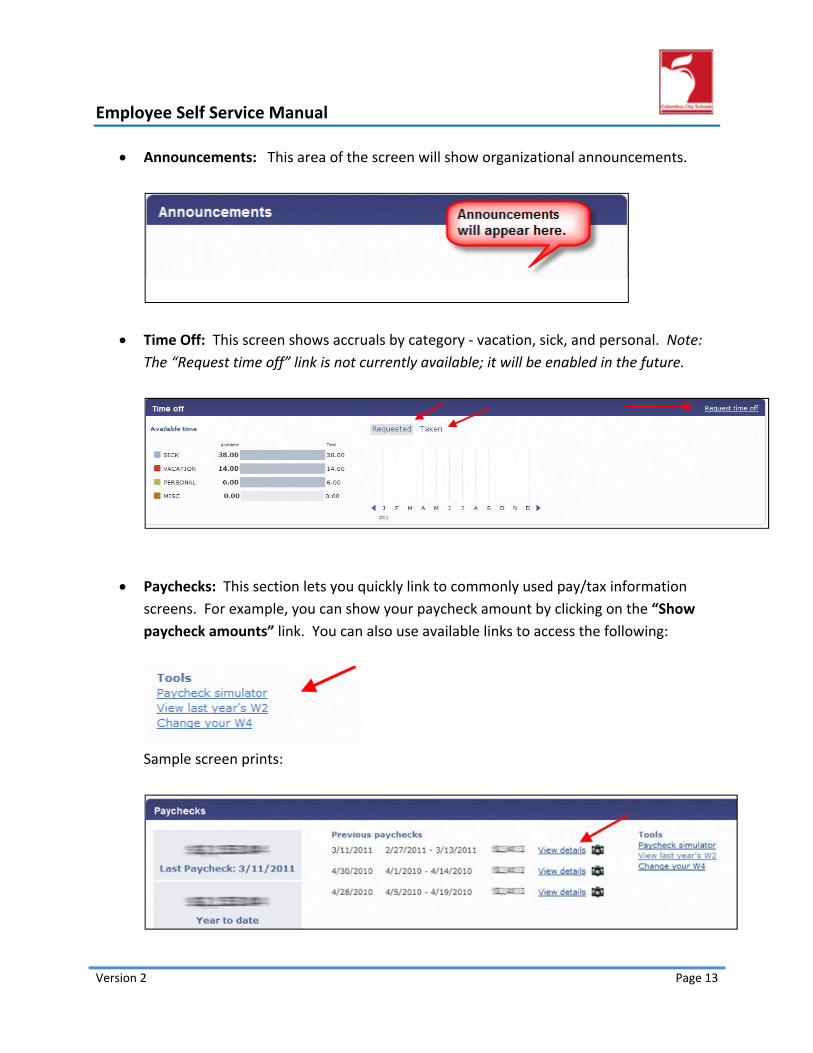
Announcements: This area of the screen will show organizational announcements.
Time Off: This screen shows accruals by category ‐ vacation, sick, and personal. Note:
The “Request time off” link is not currently available; it will be enabled in the future.
Paychecks: This section lets you quickly link to commonly used pay/tax information
screens. For example, you can show your paycheck amount by clicking on the “Show
paycheck amounts” link. You can also use available links to access the following:
Sample screen prints:

Employee Self Service Manual
Version 2 Page 14
Note: will show your pay details. Example:

Employee Self Service Manual
Version 2 Page 15
III. Certifications
A. Overview&ScreenDetails
To view the certifications that are in the system, click on the Certifications link. Example:
IV. Pay/TaxInformation
A. Overview&ScreenDetails
When you click on the Pay/Tax Information option, a box will appear with additional options
that are available:

Employee Self Service Manual
Version 2 Page 16
From the main Pay/Tax Information screen, you can click on the drop‐down arrow by “Year”
and select the year you want to see. It will show all checks for the year selected.
B. YTDInformation
The Year‐to‐Date Information page contains a cumulative view of payroll figures for a specific
year.
Sample YTD screen print:

Employee Self Service Manual
Version 2 Page 17
C. W‐2andW‐4
W‐2:
W‐2 information provides wage and deduction details for a selected year. To view your W‐2
information, click on the W‐2 option and then select the year to view from the “Year” list; the
program will display the details:

Employee Self Service Manual
Version 2 Page 18
Example:
W‐4:
To view your Federal and Ohio W‐4 information, click “W‐4.” Example screen:

Employee Self Service Manual
Version 2 Page 19
To edit this information click (located at the far right of the screen).
The Edit W‐4 Information screen will appear:
Update the above information with the revised data.
Verify that the information is correct by selecting the acknowledgement check box.
Click . (Or click to exit without making changes.)
Note: If you made changes to the edit boxes and want to reset it to the way it was
when you first entered the page, click .
Employee Self Service Manual
Version 2 Page 20
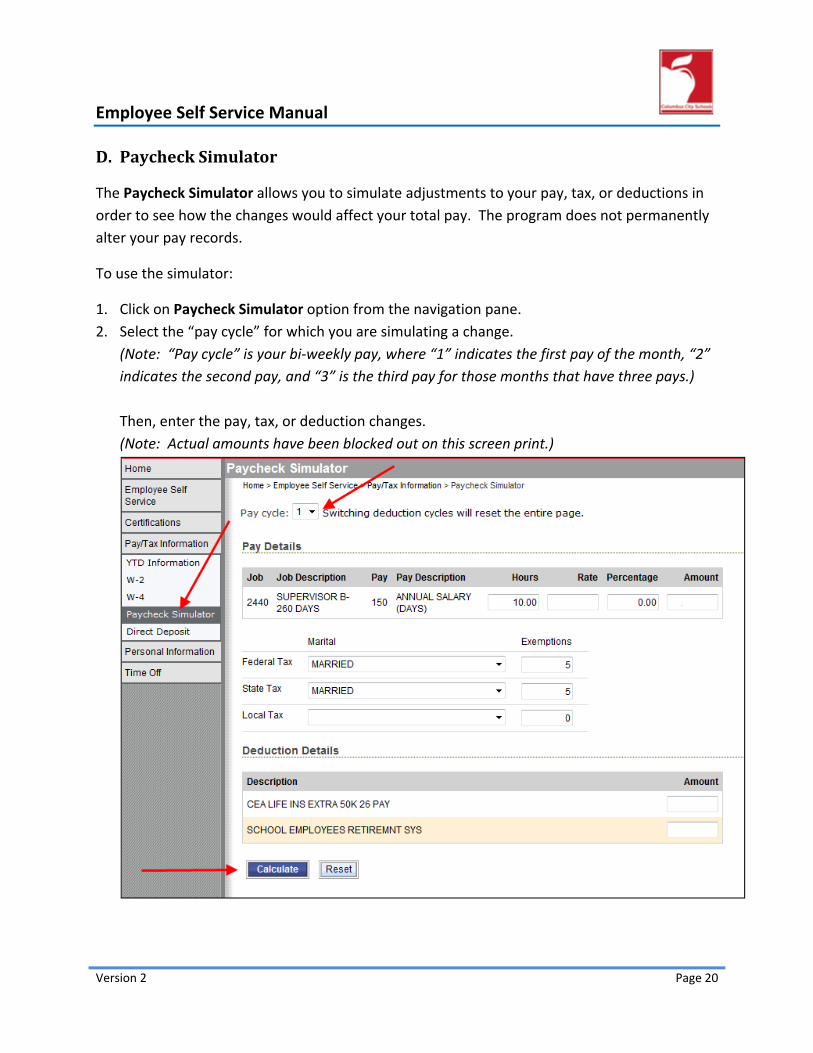
D. PaycheckSimulator
The Paycheck Simulator allows you to simulate adjustments to your pay, tax, or deductions in
order to see how the changes would affect your total pay. The program does not permanently
alter your pay records.
To use the simulator:
1. Click on Paycheck Simulator option from the navigation pane.
2. Select the “pay cycle” for which you are simulating a change.
(Note: “Pay cycle” is your bi‐weekly pay, where “1” indicates the first pay of the month, “2”
indicates the second pay, and “3” is the third pay for those months that have three pays.)
Then, enter the pay, tax, or deduction changes.
(Note: Actual amounts have been blocked out on this screen print.)
Employee Self Service Manual
Version 2 Page 21
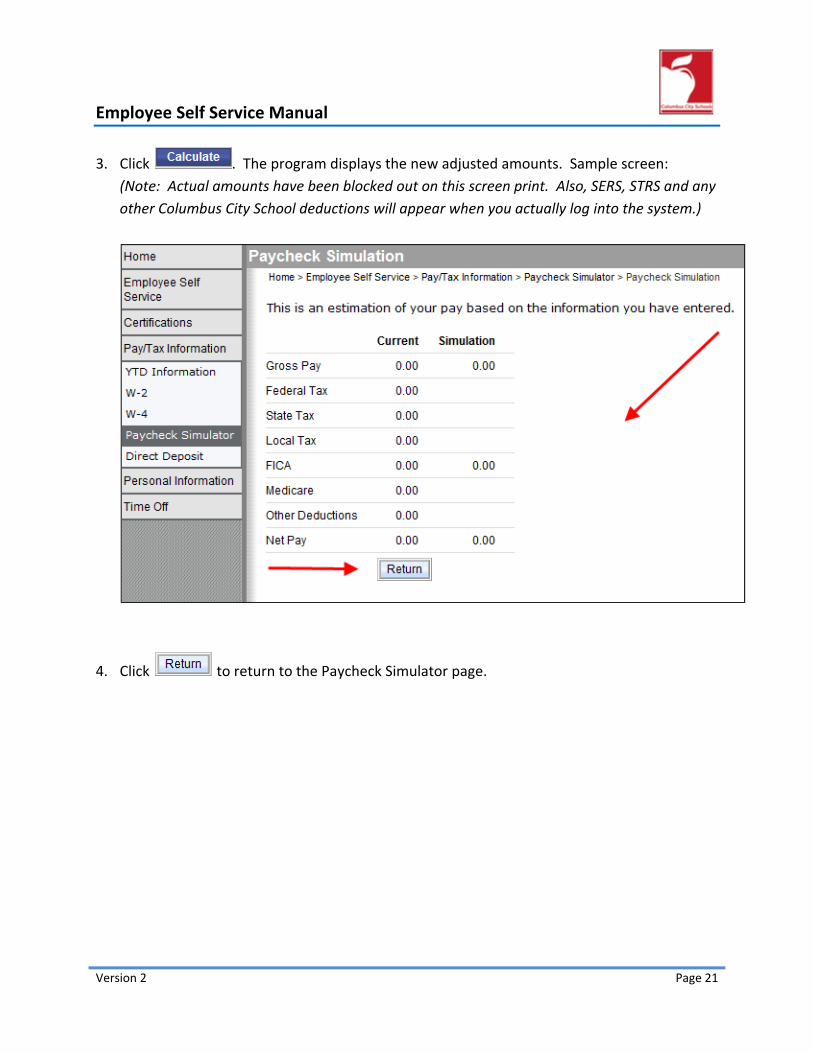
3. Click . The program displays the new adjusted amounts. Sample screen:
(Note: Actual amounts have been blocked out on this screen print. Also, SERS, STRS and any
other Columbus City School deductions will appear when you actually log into the system.)
4. Click to return to the Paycheck Simulator page.

Employee Self Service Manual
Version 2 Page 22
E. DirectDeposit
The Direct Deposit page provides the details for your direct deposit accounts. To view and
update direct deposit information, click on “Direct Deposit” from the navigation pane. See
sample screen print below:
To change banking information, click . Fill in the appropriate information within
the pop‐up box and click OK. Click on .
V. PersonalInformation
The Personal Information page displays your contact information, as well as dependent
information and emergency contacts. When you make updates to any of this information, the
corresponding Employee Master record is updated.
A. Overview&ScreenDetails
Click on the “Personal Information” option located on the left pane of the screen:
Employee Self Service Manual
Version 2 Page 23
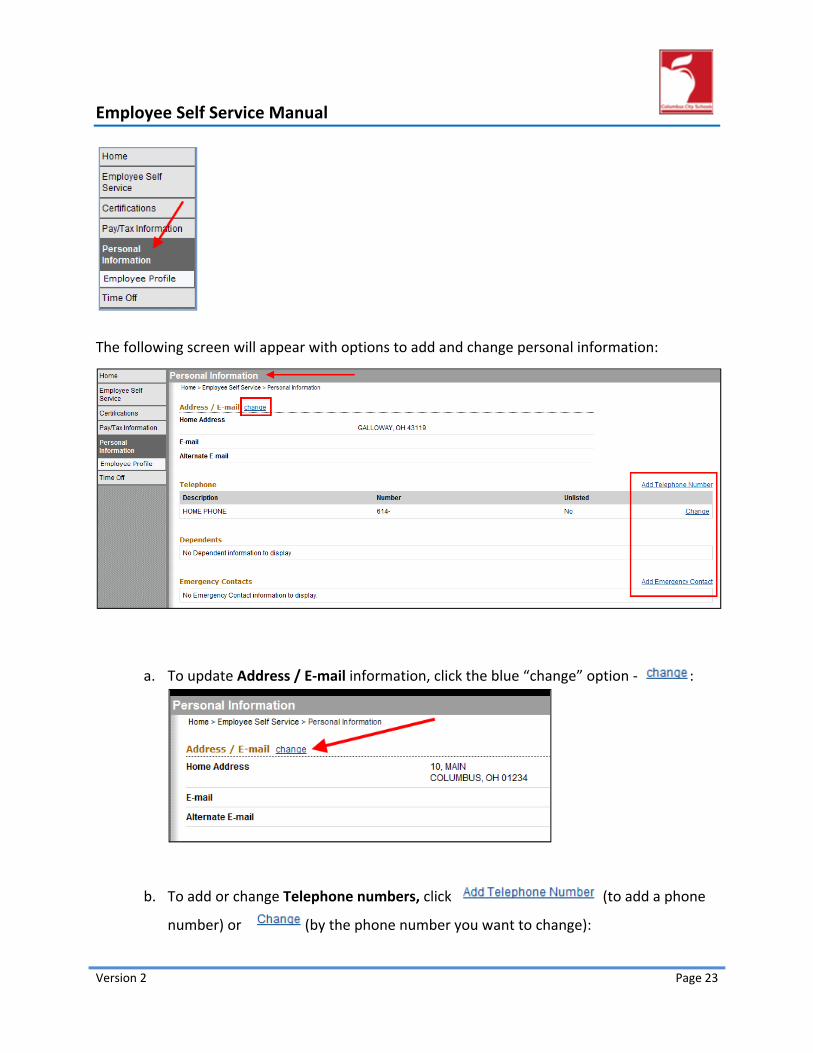
The following screen will appear with options to add and change personal information:
a. To update Address / E‐mail information, click the blue “change” option ‐ :
b. To add or change Telephone numbers, click (to add a phone
number) or (by the phone number you want to change):

Employee Self Service Manual
Version 2 Page 24
c. To change Emergency Contacts, click (to add an emergency
contact) or (to update an existing emergency contact):
Employee Profile: The Employee Profile page displays general information, demographic
information, and DOE race details. (Note: DOE stands for “Department of Education.”)
To access your Employee Profile, click on “Employee Profile” from the left navigation pane:

Employee Self Service Manual
Version 2 Page 25
You can make changes to your “Demographic Information” or “DOE Race” data within
Employee Profile, but you can’t change any of the items in the “General Information” section.
To make updates, select the options you want to change and click . See sample below:
VI. TimeOff
Time Off provides accrual information, allowing you to view your vacation, sick, and personal
time off.
A. Overview&ScreenDetails
To go to the Time Off screen, click “Time Off” from the navigation pane. The following screen
will appear, showing current accruals of the following time off ‐ sick, vacation, and personal:

Employee Self Service Manual
Version 2 Page 26
Clicking on by any of the time off options will give you a summary of what’s
earned and used. This is an example of a vacation time screen:
Note: This screen doesn’t show any vacation time. If time is posted, you will see it here.
Clicking on the calendar view button ‐ ‐ will show you a calendar view of
the time taken. Days taken will be highlighted in the calendar view. Example:
o Time off is highlighted on the specific days it was taken. To return to the
previous screen click .
Note: On the ESS home page, the time off section will show accruals by
category: