munis general ledger orgobject version104 - … · web viewmunis® general ledger, ... a payroll...
TRANSCRIPT

Munis General Ledger ______________________________________________________
Procedural Documentationfor
CONNECT
For more information, visit www.tylertech.com.
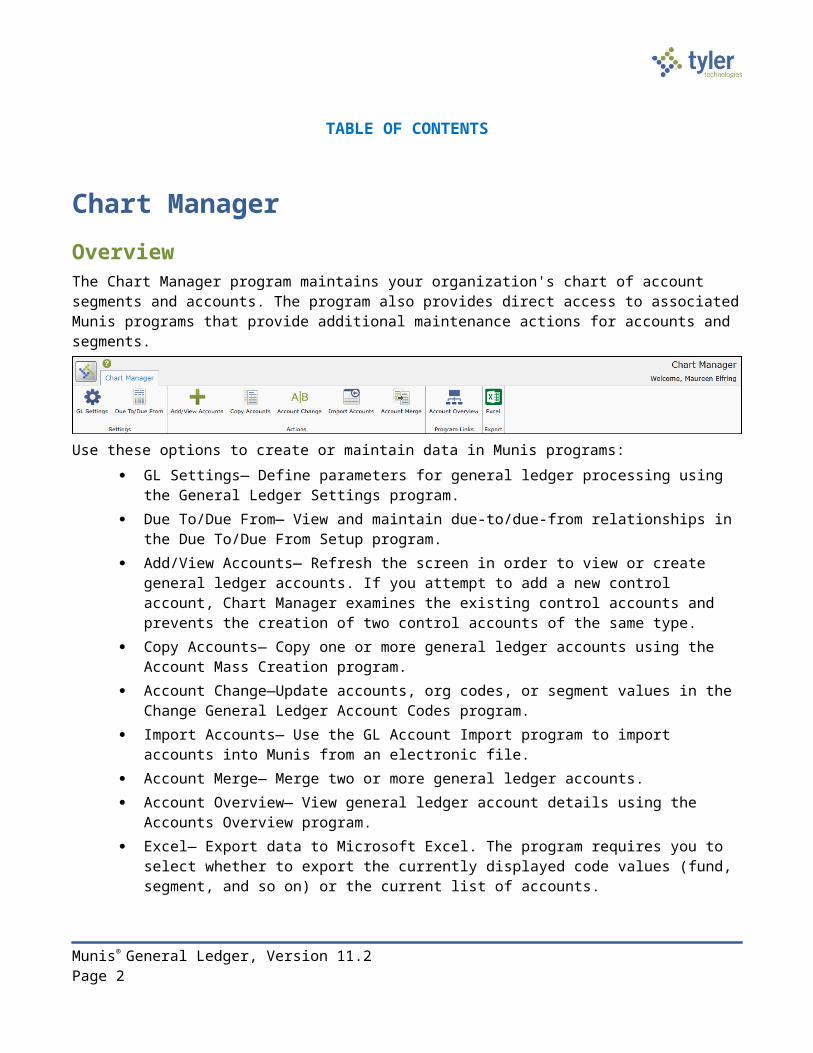
TABLE OF CONTENTS
Chart Manager OverviewThe Chart Manager program maintains your organization's chart of account segments and accounts. The program also provides direct access to associated Munis programs that provide additional maintenance actions for accounts and segments.
Use these options to create or maintain data in Munis programs: GL Settings— Define parameters for general ledger processing using the General Ledger
Settings program. Due To/Due From— View and maintain due-to/due-from relationships in the Due To/Due
From Setup program. Add/View Accounts— Refresh the screen in order to view or create general ledger accounts.
If you attempt to add a new control account, Chart Manager examines the existing control accounts and prevents the creation of two control accounts of the same type.
Copy Accounts— Copy one or more general ledger accounts using the Account Mass Creation program.
Account Change—Update accounts, org codes, or segment values in the Change General Ledger Account Codes program.
Import Accounts— Use the GL Account Import program to import accounts into Munis from an electronic file.
Account Merge— Merge two or more general ledger accounts. Account Overview— View general ledger account details using the Accounts Overview
program. Excel— Export data to Microsoft Excel. The program requires you to select whether to
export the currently displayed code values (fund, segment, and so on) or the current list of accounts.
PrerequisitesBefore you can successfully use this feature, you must ensure that the necessary permissions and settings are in place. If permissions or settings are not set up properly, or if the required programs are not available on the Munis menu, contact the system administrator.
Confirm the following: You have the appropriate permissions for maintaining general ledger accounts.
Munis® General Ledger, Version 11.2 Page 2

All fund and segment codes, as well as your organization, object, and project codes, have been created.
Munis® General Ledger, Version 11.2 Page 3

ProceduresWhen you first open the Chart Manager program, it displays your organization's existing account segments, in segment order.
Click the More (+) button on the segment order header to expand the section to a detailed view. The detailed view displays segment sizes for balance, expense, and revenue accounts, as well as project segment sizes for funding and expense strings.
Munis® General Ledger, Version 11.2 Page 4

To view segment details, click the segment tile to refresh the display with the items specific to that segment. For example, click the Fund tile to view all the available funds.
To then view the details for a segment item, click the item name. For example, click a fund name to view the accounts within that fund.View all rollup codes or org codes in your organization's chart of accounts by clicking the appropriate links in the segment order header. Selecting a segment code from the Segments list causes the Accounts group to display all of the accounts that include that segment.
Munis® General Ledger, Version 11.2 Page 5

Adding an Account1. On the ribbon, click Add/View Accounts.
The program refreshes the screen to display the account information fields.
2. Complete the segment fields in the Account group using existing account segments to define the new account.
3. Enter values in the fields on the Account Info tab. See the Field Descriptions table for details.
4. After completing the fields, click Accept.The program creates the account and displays a confirmation message.
5. Click OK.
6. Click Return to Overview to return to the main program screen.
Field Description [Customer Name]Account DetailFull Description Assigns the name of the account as it should
appear on Munis programs and reports.Short Descriptions
Stores a shortened version of the account description as it should appear on screens and reports where character space is limited.
Account Type Specifies the type of account: balance, revenue, expense, or statistic.Statistic accounts are used with Munis Performance Based Budgeting.
Munis® General Ledger, Version 11.2 Page 6

Field Description [Customer Name]
Status Determines whether the account is included in reports and if transactions can be posted to it.When an account is Inactive, it cannot be used as part of a transaction unless your user role has been assigned the Allow Posting to Inactive Accounts permission in the General Ledger Roles program.In addition, the Data Access fields in the General Ledger Roles program determine the account statuses available to a user role. Access can be granted or restricted for any combination of Active, Inactive, and Closed accounts.
Last Updated Reports the last date the account was updated.Posting Effective DatesBeginning/Ending Effective Dates
Define the time period within which transactions can be posted to the account. To always allow posting to the account, leave both fields blank.
Notes Stores notes or comments for the selected account.
Balance SheetThese fields are only available when you select Balance Sheet from the Account Type list.Balance Type Indicates the type of balance account: asset,
liability, or fund balance.Normal Balance Determines if the normal balance on this
account is a debit or a credit balance.Closing Balance Directs how the program manages balance
sheet accounts at year end closing: zero-out or carry forward. Carry—The balance of the account is carried
to next year. Zero—The account begins the new year at
0. The balance at the end of the year is closed to another account.
SOY Transfer—The balance is transferred to a reference account.
Control Account Indicates if the balance sheet account is a control account and, if so, what kind of control account.Munis programs that require control accounts validate those account entries against this field.
BudgetBudgetary If selected, indicates the account is a budgetary
account. A budgetary account can have next-year budget amounts entered using Next Year Budget Entry on the Budget menu.If this check box is not selected, the account is not a budgetary account and prohibits entry of
Munis® General Ledger, Version 11.2 Page 7

Field Description [Customer Name]next year budget amounts.Balance sheet accounts should not be budgetary.
Auto Encumber If selected, causes the new budget amount to be encumbered immediately so that it is not generally available. For example, you would select this check box this for salary accounts.
Require Budget Detail
If selected, requires that you add budget detail when creating budget projections.
Roll Available Budget Forward
If selected, the Open New Fiscal Year program uses the account's remaining available budget as the new year's original budget. If the check box is cleared, the Open New Fiscal Year program enters a zero-dollar amount as the original budget.This check box is only accessible for annual fund accounts.
AttributesCharacters Code Provides a character code for the account. This
field is for display only. Character codes are maintained in the Chart of Account Segments program.
Grant Associates the account with the entered grant record.Accounts that have been associated with a grant record are used to calculate the amounts on the Application # tab of the Grant Manager program. If the associated account is an expense or revenue account, it also appears on the Associated Accounts/Projects tab in Grant Manager.
Spending Plan Associates the account with a spending plan code, if your organization uses the spending plan feature. The list is not available until at least one spending plan code has been created in the General Ledger Miscellaneous Codes program.
Entity Indicates how Munis programs are shared between two locations:
1 - First entity only2 - Second entity only3 - Always shared
Entity codes are established in System SettingsNext Year Full Provides the Next Year title for the account, if
the name changes by fiscal year.This name is used during budget preparation and becomes the full title in the next fiscal year.
Rollup Code Identifies the budget rollup group code to which the account belongs.
Munis® General Ledger, Version 11.2 Page 8

Field Description [Customer Name]Budget rollup groups are defined in the Budget Rollups program.In order to access this box, your user role must be assigned the General Maintenance to Budget Rollup Codes permission in Budget Roles, as well as the General Maintenance on Accounts permission in General Ledger Roles.
Subrollup Code Identifies a subgroup rollup code to which the account belongs. You must select a subgroup code that has been defined for the rollup group entered in the Budget Rollup Code box.Subrollup groups are defined in the Budget Rollups program.In order to access this field, your user role must be assigned the General Maintenance to Budget Rollup Codes permission in Budget Roles, as well as the General Maintenance on Accounts permission in General Ledger Roles.
Warning Level/Percent
For expense and revenue accounts, warns you when a value is entered that causes the available budget to fall to the percent of the revised budget.For balance accounts, a Cash Account Warning Level warns you when you enter a value that causes the cash level to fall below the warning level. The program displays a warning and workflow notifications are sent.To establish who is notified when cash falls below the warning level, create a business rule in the Business Rules program with a process type of BWA-Budget Warning Notifications.
Contra Account If selected, indicates that the selected account is a contra account. In Next Year Budget Entry, accounts identified as contra accounts show on the Account Info screen as a negative amount in black for expenses and a positive amount in red for revenues.Munis programs do not perform available budget checks for contra accounts.
Requires Project Account on Entry
If selected, indicates that transactions that utilize this account must enter a project string as part of the account detail
Payroll Encumbrance Account
If selected, indicates that the account is used for payroll encumbrance. This check box may be selected automatically if you designate the object code to be used for payroll encumbrance accounts in the Chart of Account Segments program.The check box is only used for salary accounts and not benefit/projection accounts
Munis® General Ledger, Version 11.2 Page 9

Adding a Rollup Code To access Budget Rollups and create a new rollup code:
1. On the Segment Order header, click View Rollup Codes.The program refreshes the screen to display the Rollup Codes list.
2. Click Add from the Rollup Codes list to open the Budget Rollups program.
3. Click Add Group to display a dialog box that contains the fields used to create a rollup group.
4. Complete the fields, and then click Save.The program creates the code.
5. Close the Budget Rollups program to return to the Chart Manager. The Rollup Codes list includes the added code.
Munis® General Ledger, Version 11.2 Page 10

Adding a Segment CodeWhen you use the Chart Manager program to add new segment codes to your organization's chart of accounts structure, the program creates new codes for fund, segments 2-8, orgs, and objects. You can view project codes in Chart Manager, but clicking Add on the Project list opens the Project Master program. You must create new project codes in that program.To add a segment code:
1. From the segment order boxes, click the segment type to add. Alternatively, to add an org code, click View Orgs on the pane header. The program refreshes the screen to display the existing segments of that type.
2. Click Add.The program displays the Segments Attributes group, which contains the fields used to define a segment of that type.
3. Complete the fields in order to define the attributes of the segment code.
4. Click Accept to save the segment code.
Deleting an AccountTo delete an account:
1. Access the account to delete using the Search option or by clicking View/Edit from the Accounts for Segment list.
Munis® General Ledger, Version 11.2 Page 11

The program refreshes the screen to display the account details.
2. Click Delete.
The program ensures that current year amounts do not exist for the account. If amounts exist, the program displays an error message. If amounts do not exist, the program deletes the account and displays a confirmation message.
3. Click OK.
4. Click Return to Overview to return to the main program screen.
If you attempt to delete an account for which the current year amount is not zero, the program displays an error message and does not delete the account.
Exporting to ExcelThe Chart Manager program provides two options to export information to Excel:
Export a list of the currently selected segment codes. Export a list of accounts for a single segment code.
To produce a list of segment codes:
Munis® General Ledger, Version 11.2 Page 12

1. Select the segment code type from the segment order.
2. Click Excel.The program displays the Excel Export dialog box with the Export Code List as the only accessible option.
3. Click Export to generate the Excel file.
To produce a list of accounts:
1. Select the segment code type from the segment order.
2. From the list of segments, select the code for which to list accounts.The program refreshes the screen to display a list of accounts associated with the selected segment code.
3. Click Excel.The program displays the Excel Export dialog box.
4. Select Export Account List from the dialog box.
5. Click Export to generate the Excel file.
Finding an Account To search for accounts:
1. On the ribbon, click Add/View Accounts.The program displays the Account Info page.
Munis® General Ledger, Version 11.2 Page 13

2. Click Advanced.The screen refreshes to include the advanced search fields.
3. Complete one or more of the search fields to define your search criteria.
4. Click Search.The program displays a confirmation message that indicates that the search will cancel any unsaved changes made to an account.
5. Click OK.The program refreshes the screen to display the first account in the search results.
6. If more than one account matched your search criteria, use the navigation buttons to view additional accounts. Clicking Search Results next to the navigation buttons displays a list of all accounts in the
Munis® General Ledger, Version 11.2 Page 14

find set. If you select an account from the list, the program refreshes the screen to display the details of that account.
7. Click Return to Overview to return to the main program screen.
Munis® General Ledger, Version 11.2 Page 15

Account MasterObjectiveThis document provides the procedure for creating general ledger accounts in Munis.
OverviewA Munis account number is constructed using a combination of the organization, object, and project codes. If these components are not linked using the Account Master program, Munis will not recognize them as a valid account during transaction entry, and you will not be able to post transactions.
PrerequisitesBefore you can successfully use this feature, you must ensure that the necessary permissions and settings are in place. If permissions or settings are not set up properly, or if the required programs are not available on the Munis menu, contact the system administrator.
Confirm the following:
You have menu access to the General Ledger Account Master program. You have the appropriate permissions for maintaining general ledger accounts. All fund and segment codes, as well as your organization, object, and project codes, have
been created. A detailed chart of accounts (COA), which helps you to avoid errors such as misplaced or
incorrectly defined accounts, is in place.
Munis® General Ledger, Version 11.2 Page 16

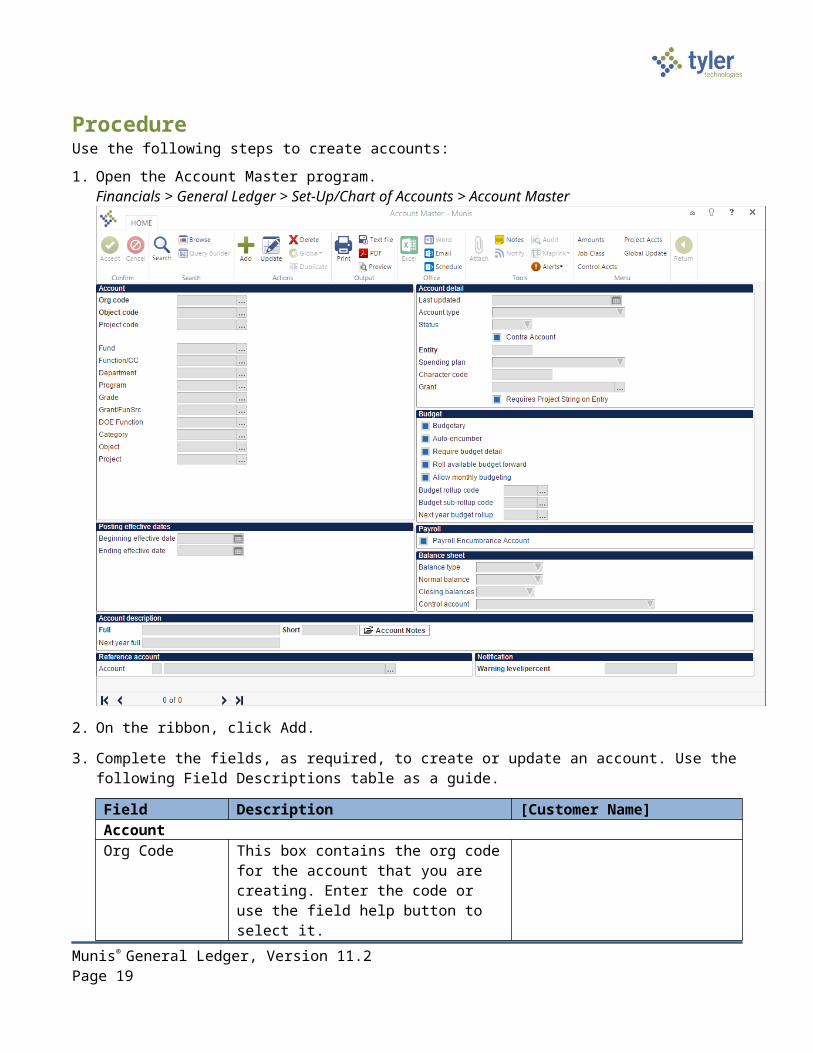
ProcedureUse the following steps to create accounts:
1. Open the Account Master program.Financials > General Ledger > Set-Up/Chart of Accounts > Account Master
2. On the ribbon, click Add.
3. Complete the fields, as required, to create or update an account. Use the following Field Descriptions table as a guide.
Field Description [Customer Name]AccountOrg Code This box contains the org code for the
account that you are creating. Enter the code or use the field help button to select it.
Object Code This box contains the object code for the account. Enter the code or use the field help button to select it.
Project Code This box contains the project code for the account. Project codes are an optional
Munis® General Ledger, Version 11.2 Page 17

Field Description [Customer Name]feature, and are applicable if your organization uses Munis Project Accounting. If applicable, enter the appropriate code or use the field help button to select it.
Fund This box identifies the account fund, which is always the first segment.
Segments 2-8 These boxes identify the account segments. Segment labels and order are assigned in General Ledger Settings.
Object This box specifies the object code of the account being maintained.If you are updating an account record, the default value for the object code is entered from the account being maintained.If you are adding a new record, enter an object code.
Project This is the project code of the account being maintained.If you are updating an account record, the default value for the project code is entered from the account being maintained.If you are adding a new record, you can enter a project code.
Posting Effective DatesBeginning/Ending Effective Dates
These boxes determine the dates within which transactions are allowed to post to this account.Leave both boxes blank to always allow posting to the account.
Account DetailLast Updated This box displays the date that the
account record was most recently updated. The program completes this box; it is a display-only value.This box is accessible as search criteria when you click Search to locate an account record.
Account Type This is the type of account: balance, revenue, expense, or statistic.Statistic accounts are used with Munis Performance Based Budgeting.
Status This list identifies the status of the account. The status determines whether the account can be included in reports and if transactions can be posted to it. When you are adding a record, the default value is Active. The status
Munis® General Ledger, Version 11.2 Page 18
Field Description [Customer Name]options are: Active – Indicates accounts that can
appear on all reports that display account information and are available for posting.
Next – Indicates accounts that are designated as next year accounts. An account with the Next status is only available for next year budget entries and reports. You cannot post current year transactions to an account identified with the Next status. Accounts with the Next status are automatically changed to the Active status when you complete the Year End Close program.
Inactive – Indicates accounts to which you cannot post unless your user ID is assigned to one or more roles for which the General Maintenance on Accounts permission is granted in the General Ledger Roles program. This permission also allows you to include inactive accounts on reports.
Closed – Indicates accounts to which you cannot post. Closed accounts only appear on reports that have the option to print closed accounts. An account cannot be closed if there has been any nonbudgetary activity to it in the current fiscal year.
Contra Account This check box, if selected, designates the account as a contra account. Contra accounts show a negative amount for expenses and a positive amount for revenues. Available budget checks are not performed for contra accounts. This check box is not available for balance sheet accounts.
Entity This box identifies an entity code for the account, if applicable. Entity codes determine how Munis programs are shared between two locations. The following options are available:
1 – First entity access only.2 – Second entity access only.3 – Shared access.
Munis® General Ledger, Version 11.2 Page 19

Field Description [Customer Name]Entity codes are established in the System Settings program, which is accessible from the System Administration menu.
Spending Plan This list contains the spending plan to which the account belongs, if applicable.
Character Code This is the character code for the account. This field is for display only. You cannot edit the character code here. Character codes are altered in Chart of Account Segments.
Grant Entering a grant number in this box associates the account with the entered grant record. This can be done when the account is created, as an update to an existing account, or by using the Global Update feature.Accounts that have been associated with a grant record are used to calculate the amounts on the Application # tab of the Grant Manager program. If the associated account is an expense or revenue account, it also appears on the Associated Accounts/Projects tab in Grant Manager.
Requires Project String on Entry
Selecting this check box indicates that transactions that utilize this account must enter a project string as part of the account detail.
BudgetBudgetary This check box, if selected, determines
how the account’s budget is created. Identifying an account as a budgetary account allows it to have a budget amount entered in the Next Year Budget Entry program. Nonbudgetary accounts usually have a carryforward balance at the end of the year instead of a new budget.This option is not available for balance or statistic accounts.
Auto-encumber This check box, if selected, automatically encumbers the account’s entire budget amount when it is posted for the new fiscal year. This is useful for salary accounts as it ensures that you cannot spend money set aside for employee pay.This option is only available for expense
Munis® General Ledger, Version 11.2 Page 20

Field Description [Customer Name]accounts.
Require Budget Detail
This check box, if selected, requires budget detail when you create budget projections for this account. If the box is not selected, budget entry has no restrictions.This box is not available for statistic accounts.
Roll Available Budget Forward
This check box is only accessible for annual fund accounts.When the checkbox is selected, the Open New Fiscal Year program uses the account's remaining available budget as the new year's original budget. If the check box is cleared, the Open New Fiscal Year program enters a zero-dollar amount as the original budget. The Budget Completion Journal program generates a journal entry for the original budget from the budget projection. The Account Inquiry program displays only the budget completion journal (BUC), not the remaining available budget that was carried from the previous year.
Budget Rollup Code
This box contains the budget rollup code to which the account belongs, if applicable.
Budget Rollup Subcode
This box contains the budget rollup subcode to which the account belongs. The box is only available if a rollup code has been entered in the Budget Rollup Code box.
PayrollPayroll Encumbrance Account
Selecting this check box indicates that the account is used for payroll encumbrance. This check box can also be selected automatically if you designate the object code to be used for payroll encumbrance accounts in the Chart of Account Segments program.The check box is only used for salary accounts and not benefit/projection accounts.
Balance SheetBalance Type This list determines the type of balance
sheet account that you are creating: asset, liability, or fund balance. This option is only available for the balance
Munis® General Ledger, Version 11.2 Page 21

Field Description [Customer Name]account type.
Normal Balance This list identifies the normal balance for this account: debit or credit.
Closing Balances This list determines how Munis manages a balance sheet account at year end: Carry – Causes the account balance
to be carried into the next fiscal year. Zero – Causes the account balance
to be closed to another account at year end, and the balance begins the new year at $0.00. If you choose this option, you must complete the Reference Account field with the account number to which this account closes.
SOY Transfer – Causes the account balance to be closed at the start of the fiscal year. If you choose this option, you must complete the Reference Account field with the account number to which this account closes. The Open New Fiscal Year program transfers all balances to their designated reference accounts.
If you change the value of this field while updating an existing record, the program displays a warning message that informs you of the implications of your changes.
Control Account If you are creating a control account, this list identifies the type of control account. You need to define certain control accounts for each fund or fund/segment combination.See the Control Account Types section of this document for a description of each control account type.
Account DescriptionFull This is the name of the account as it
should appear on Munis programs and reports.The program automatically completes the name with the description of the object code entered, but you can change it.The name can contain up to 30 characters.
Short This is a shortened version of the account description as it should appear
Munis® General Ledger, Version 11.2 Page 22

Field Description [Customer Name]on screens and reports where character space is limited.The short description can be up to 10 characters.The default value for the short description is the first 10 characters of the full description.
Account Notes This button displays a Text screen, where you can maintain notes related to the active account.
Next Year Full If the name of the account changes by fiscal year, this box identifies the name of the account for the next year. This field must be completed if you selected Next as the account status.
Reference AccountAccount These boxes provide the org, object, and
project codes for the reference account of an expense account type with a closing balance method of Zero or SOY Transfer. It can also be used for revenue accounts in Donation fund types. In this case, enter the expenditure account number whose budget should be increased when revenues are posted.
NotificationWarning Level/Percent
This box specifies a warning level for the account. If you do not want to use this feature, set the warning level to 0.00. If you do use this feature, when the account balance reaches the designated warning level or below, a notification is sent.For expense and revenue accounts, the warning level is a percentage.For balance sheet accounts, the warning level is an actual cash amount.To establish a recipient of warning messages, create a business rule in the Workflow Business Rules program with a process type of BWA – Budget Warning Notifications.
4. Click Accept to save the record.
5. Repeat the preceding steps for each account to create.
ResultsThe accounts necessary for your organization’s accounting process are available for use. These accounts are the basis of all Munis accounting transactions.
Munis® General Ledger, Version 11.2 Page 23

Status ChangeAccounts are now active in Munis General Ledger and are available for use in the other modules.
GL ImpactThe general ledger is not directly affected by this action.
Other Munis Modules ImpactThe general ledger accounts are available to use in other Munis modules.
Munis® General Ledger, Version 11.2 Page 24

Control Account TypesThe following table provides descriptions of the different control account types, along with notations as to whether they are required types and what their normal balance types should be.
Account Type
Required?
Normal Balance
Description
AP Cash Yes Debit The AP cash account designates the account from which accounts payable checks are posted. The due-to/due- from table keeps these funds in balance. The AP cash account is typically the general fund or a pooled cash fund. If your organization plans to use distinct AP cash accounts along with corresponding AP check forms, discuss the appropriate setup with your project manager. Otherwise, the AP cash account is the same for all funds.
ACI Liability No Credit An ACI liability account is used in conjunction with the Active Card Integration (ACI) Export program. This program imports files into the Works Fast Track purchase card management system, which allows you to issue payments using the ACI method. Payments made using ACI create a credit to the ACI liability control account, and a debit to the accounts payable account. However, no vendor payment is made. When the vendor submits an invoice, the amount debits from the ACI liability account.
Accounts Payable
Yes Credit An accounts payable account is the unique accounts payable account for each fund. When an AP invoice proof is updated, the expense accounts listed on its invoices are debited and the accounts payable account is credited. The system requires that the account entered for this type be within the same fund that was entered in the Fund field.
Appropriation No Credit An appropriation account type is necessary if you plan to use the Budgetary GL Control option from the General Ledger Settings program. When an amendment (budget transfer) is entered to an expense account within the fund, a balancing debit or credit is made to the appropriation account. It is combined with the estimated revenue balance at year end, and the resulting figure is posted to the budgetary fund balance – unreserved account.
Budgetary Fund Balance - Unreserved
No Debit A budgetary fund balance – unreserved account is posted to once a year when the Close Current Fiscal Year program is run. It receives the amount of the carried forward appropriated fund balance account. This number is the sum of balances from the appropriation and estimated revenue accounts. The budgetary fund balance – unreserved account is the budgetary control account when using the Budgetary GL Control option.
Budgetary Yes Credit The budgetary fund balance – reserved for
Munis® General Ledger, Version 11.2 Page 25

Account Type
Required?
Normal Balance
Description
Fund Balance – Reserved for Encumbrances
encumbrances account is only utilized if your organization uses the Munis Purchase Order module. This account is automatically updated when encumbrances and liquidations are processed. When an encumbrance is created, such as when a purchase order is created, this account is credited. Once the purchase order is liquidated, this account is debited for the amount of the order.
Checks Payable
No Credit The checks payable account type is only used if the Update Cash During Cash Disbursements Journal check box is not selected in the Accounts Payable Settings program. Use this liability account if you do not want checks updated when written, but rather when cleared checks are returned from the bank. You should use this account type if your bank returns cleared checks on a daily basis. Do not use this account type if your checks are returned on a monthly basis. This account will be updated instead of the AP cash account when you run a Cash Disbursements journal. After a cleared check is entered into the Check Reconciliation program, the checks payable and AP cash accounts are updated.
Direct Disbursements Cash
No Debit This account type is optional, and it affects the Direct Disbursements program. If your direct disbursements are drawn from a petty cash account, and not AP cash, enter the petty cash account as the reference account. This causes the system to use this account as a default cash account when an invoice is coded as a direct disbursement.
Due To/Due From
Yes Due-to/due from accounts are required unless you are using a distinct check stock for each checking account, and creating individual warrants by checking account. Coding an account as a due-to/due-from account is not necessary if you are balancing to a fund, as you must still set up the due-to/due-from relationships in the Due To/Due From Setup program. You only need to define an account as a due-to/due-from if you are balancing to a fund-segment combination.
Encumbrances
Yes Debit Encumbrance accounts are only used if your organization utilizes the Munis Purchase Order module. An account of this type is automatically updated as encumbrances and liquidations are processed. Whenever an encumbrance is created, this account is debited by the system. Once liquidation is processed, the account is credited. The balance of this account should be the sum of the total encumbrances within the fund.
Estimated Revenues
No Debit Estimated revenues accounts need to be defined if the Use Budgetary GL Control check box is selected in the General Ledger Settings program. Whenever an
Munis® General Ledger, Version 11.2 Page 26

Account Type
Required?
Normal Balance
Description
amendment (budget transfer) is entered to a revenue account within the fund, a debit or credit is made to this account. It is combined with the appropriation balance at year end, and the total is posted to the budgetary fund balance – unreserved account.
Expenditures Yes Debit For an expenditures account, Munis automatically creates a duplicate journal entry to this account every time a journal entry is made to an expenditure account within this fund. The resulting balance is the year-to-date total of all expenses posted to this fund. This is used by the Close Current Fiscal Year program. At year end, the balance is netted with the revenue control balance. The result is posted to the fund balance – unreserved, undesignated account and a journal entry is made to zero the balance.
Fund Balance – Reserved for Encumbrance
Yes Debit When the value of the Budget Carry Forward Method option in the General Ledger Settings program is 2 – Budgetary, an account with this type is used when carrying forward a budget at year end. This account replaces the original expense accounts for purchase orders that are still open at the end of a year. The Close Fiscal Year program uses this account to reclassify a fund balance.For Budget Carry Forward Methods 1-GAAP, 3-GAAP/Budgetary Combined, and 4-Transfer, the total of liquidated purchase order amounts creates a carry forward budget amount that increases the Fund Balance – Reserved for Encumbrances account, and decreases the Fund Balance – Unreserved account.
Fund Balance – Unreserved, Undesignated
Yes Credit This is the primary fund balance account. This account receives a single posting at year end, which is the net total of the revenue and expenditure control account balances. An account of this type must be created before the Close Current Fiscal Year program can be run for a fund.
Payroll Liability
No Credit A payroll liability account is used when you defer cash posting to the second period for a split payroll. No cash movement takes place during the first period of the split. During the second period, the cash movement for both periods occurs and this account is liquidated.
Revenues Yes Credit A revenues account is a running balance of all revenue posted to the fund for the year to date. Munis creates a duplicate journal entry to this account every time a journal entry is made to a revenue account within the associated fund. The account is used by the Close Current Fiscal Year program, which combines it with the expenditures control account balance. The result is posted to the fund balance – unreserved, undesignated account. As a final step, a journal entry is made to reset
Munis® General Ledger, Version 11.2 Page 27

Account Type
Required?
Normal Balance
Description
the balance of the revenues control account to zero.Use Tax No Credit A use tax account type is used by organizations that
utilize the sales tax feature in Munis Accounts Payable. An account of this type stores accumulated use tax amounts that must be paid to the state. When these payments are sent, they are subtracted from this control account, and expensed to the paying accounts.
General Journal Entry Process
[Insert customized flowchart here Leave the title as-is to include the flowchart in the table of contents.]
Munis® General Ledger, Version 11.2 Page 28

General Journal Entry/ProofObjectiveThis document provides instructions on how to enter a manual general journal entry, update the entry, proof the entry, and release the entry for approval and posting.
OverviewDepartment staff is responsible for entering journal entries, which will be released to the approval process. General ledger posting is centralized to the accountants within your organization’s finance office.
PrerequisitesBefore you can successfully use this feature, you must ensure that the necessary permissions and settings are in place. If permissions or settings are not set up properly, or if the required programs are not available on the Munis menu, contact the system administrator.
Confirm the following: You have the appropriate general ledger permissions for processing journal entries. The chart of accounts (COA) has been created. The Journal Number Control program has been completed to establish journal numbers.
Munis® General Ledger, Version 11.2 Page 29

Procedure Use the following steps to create a manual general journal entry:
1. Open the General Journal Entry/Proof program.Financials >General Ledger > Journal Entry/History> General Journal Entry/Proof
2. Click Add.
3. Complete the fields according to the following table to enter the manual journal. Press Tab to move through the fields.
Field Description [Customer Name]Effective Date This box specifies the date that the
transaction affects programs in Munis.The default value is the current date, but you can change this if necessary. In certain circumstances, you can enter an effective date that is a future date.Type a date or click the calendar button to select a date.
Fiscal Year This box identifies the fiscal year associated with the journal entry. This field is assigned using the year entered in the Default Year/Period boxes in the General Ledger Settings program. This is a required field. Type the fiscal year in the YYYY format.
Period This box identifies the period within the fiscal year associated with the journal
Munis® General Ledger, Version 11.2 Page 30

Field Description [Customer Name]entry. The default value for this period is the value of the Default Year/Period box in the General Ledger Settings program. When you are adding data, you can enter a different period if you have appropriate permissions. Period is part of the journal key for all general ledger transactions.If the default period does not match the effective date, those with the necessary permissions see a warning message and the period is updated automatically to the current period. Those who do not have permission to change the default period are warned that the effective date and period do not match, but the period does not change and entry must be made to the original default period.
Journal This is an automatic sequential number based on the numbering system set up in Journal Number Control. The program completes is number and you cannot change it.
Source Journal This box identifies the source of the journal you are entering. A general journal entry source is typically GEN for general or GCR for cash receipt.If the value is GCR and the fund is a revolving fund, the program updates the following fields in Account Master: Revised Budget (CY), Budget Transfer In (CY), Budget Transfer Out (CY), and Last Updated. If the fund is also a multiyear fund, the program updates the value of the Inception Revised Budget field.
Entity Code This list indicates how Munis is shared between two locations (such as a town and a school):
1 - First entity only2 - Second entity only3 - Always shared
Entity codes are established in the System Settings program, which is available from the System Administration menu.If using entity codes, you must select
Munis® General Ledger, Version 11.2 Page 31

Field Description [Customer Name]an entity code.
Auto Reverse Journal
This box designates the journal as an Auto Reverse Journal (an accrual journal entry), indicating that this journal is to be included when you select the Auto Reverse option in the Journal Reversal program. The default value is N - No.Type Y (Yes) to identify this journal as an auto reverse journal.
Short Description This box contains the user-defined journal reference. Munis programs use this description on screens and reports where journal information is summarized. It occupies the Ref 4 position. This is a required field.
Journal Reference
This box contains the user-defined journal reference code that stays with each transaction throughout its life. It may be a control number, a date, or a note.The journal reference from General Journal Entry/Proof occupies the Ref 1 position on inquiry screens and reports. Entries in the Reference 2 and Reference 3 boxes display in Ref 2 and Ref 3 on screens and in reports. The short description occupies the Ref 4 position on inquiry screens and reports.Information in reference fields varies depending on the program in which the journal is created. For example, if the journal was created during Invoice Entry, it may contain the vendor number.
Journal Type This indicates the type of journal. The default value for this box is blank, but you can add a type code. There are three typical journal type codes: Normal (N), Interfund (I), or Adjustments (A). If you consistently assign type codes, they may be used as search criteria in queries and reports.If the default value for this box is “~” and the value of the Source Code box is GCR, this is an imported journal and you cannot change the type code.
Munis® General Ledger, Version 11.2 Page 32

Field Description [Customer Name]Budget Year Code
This box identifies the budget year code, which can be either 1 for Current Year or 2 for Carry Forward. This box can only be changed from the default of 1 if the value of the Budget Carry Forward Method option in the General Ledger Settings program is 3-GAAP/Budgetary Combined. Setting this option to 2 – Carry Forward adds the gross amount of each transaction to the Carry Forward from Last Year Actual field in Account Master. (It codes the entry as related to last year's budget so it can be excluded from a current year budget report if desired.)
Due to/Due From Fund
This box identifies the target fund to use when you are generating due-to/due from accounts. The default value for these boxes is the due to/due from fund selected in the User Attributes program, but you can change this.Note: Due-to/due-from accounts must be created in the Due-to/Due-From Setup program.
Reference 2, 3 These boxes offer the option for entering more detailed information. The values entered display on screens and reports. Each box contains up to ten characters.
Approval Status This box indicates the current approval status of the entry. If your organization uses Munis Workflow, the program updates this value as the approval process progress. A journal that is initially entered has a status of Held until approved by a designated approver.
WO # This box specifies the work order to which the journal applies. If you enter a work order number, the program creates actual supply detail lines for that work order.This box is applicable if your organization uses Munis Work Orders, Fleet and Facilities.
Task # This box contains the task number or code to which the journal applies. You must enter a task in this box.
Munis® General Ledger, Version 11.2 Page 33

Field Description [Customer Name]This box is applicable if your organization uses Munis Work Orders, Fleet and Facilities, and you have entered a work order number.
Vendor This box identifies the vendor assigned for the work order and task specified. Type a vendor number or click the field help button to select a vendor from a list of available vendors.This box is applicable if your organization uses Munis Work Orders, Fleet and Facilities, and you have entered a work order number.
Project Accounts Apply
This check box, if selected, indicates that project account strings have been applied as part of the journal entry.
Transaction Type
This list indicates how the journal transaction was made: by adjustment or by wire transfer. Select the blank option to omit this value. This information appears in the thirtieth position of the comment field when the journal is posted.
Once you complete the header information, the Journal Lines group is accessible.
4. Complete the fields, using the following table as a guide, to enter the line detail information.
Field Description [Customer Name]Line This field denotes the line number of the
journal entry. The program assigns this number; there is no access to this field.
PA Type If the journal entry applies to a project from the Project Accounting module, this box indicates whether the line is for an expense or funding source.
Project Account This box provides the project string to which the entry applies. Click the field help button to select a string from a list of available options.
TAccount
These boxes specify the type of account and provide the full general ledger account number.
Account This field provides the account description
Munis® General Ledger, Version 11.2 Page 34

Field Description [Customer Name]Description from the Chart of Accounts for the selected
general ledger account.Line Description This field contains the user-defined
description for the individual line posting. The description can contain up to 30 characters.
Ref1 This field provides the user-defined short description of the posting for the individual journal line. The description can contain up to 10 characters.
Effective Date This box provides the date the transaction affects the general ledger.
D/C This box indicates if the line is a debit (D) or credit (C).
Amount This is the amount of the transaction. This should be a positive number. Zeros and negative numbers are not accepted. For this value, the program checks the available budget for expense accounts. The program displays a warning if it detects an over-budget entry; it allows you to continue if you have permissions to make over-budget entries. If you are not authorized to enter over budget amounts, the program does not all you to continue without entry of a supervisor password.
5. To add additional detail lines, press Tab from the last box in a row and the program makes a new detail line accessible. You may enter as many lines as needed in this journal.
The Line Description from the previous line is the default value for a new line. Make necessary changes to default values; as you add details, the program tracks debits and credits in the Journal Totals group at the bottom of the screen.
6. Click Accept when you have completed entering your journal lines.
Munis® General Ledger, Version 11.2 Page 35

Updating a Journal Entry Prior to General Ledger Posting
To update a journal entry:1. Open the General Journal/Entry Proof program.
Financials > General Ledger >Journal Entry/History > General Journal Entry/Proof
2. Use the Search button to find the journal to update.
3. If the period chosen on the batch header needs to be changed, click Period. The program displays the Journal Year and Period Change screen.
4. Complete the New Year/Period boxes, and then click Accept to save the change and return to the main screen. Note: You can only access this option if your permissions allow you to post outside of the default year and period.
5. Click Update to make the necessary changes to the fields in the Journal Information group.
6. When you have completed making the changes to the journal fields, click Accept to save the changes.
7. To change the journal lines, click Modify Lines. This allows you to make changes to the account numbers, descriptions, and dollar amounts in the journal lines.
Munis® General Ledger, Version 11.2 Page 36

8. When you have completed making your changes to the journal lines, click Accept to save the changes.
9. To verify if the funds are in balance, click Summary and the fund balances appear as shown in the following example. If the funds are not in balance, there are discrepancies in the fund between the debits and the credits columns.
Proofing a Journal Entry for General Ledger PostingThis procedure assumes that a journal entry has been created, released for approval, and approved by all approvers.
To proof a journal entry:
1. Open the General Journal Entry/Proof program.Financials > General Ledger >Journal Entry/History > General Journal Entry/Proof
Munis® General Ledger, Version 11.2 Page 37

2. Click Browse .The program displays the Options screen.
Browse Own Journals—Displays only those journals created by your user ID.
Browse All Journals—Displays all available journals.
Browse by Clerk—Displays only those journals for the user ID entered in the Clerk ID box.
3. Select Browse Own Journals and click Accept. The program displays a list of journals.
4. Highlight the journal to proof and then click Accept. The program refreshes to display the selected journal.
5. Click Output-Post on the ribbon.The program displays the following Options screen.
The Current Journal Only—Posts only the journal currently selected.
All of Your Own Journals—Posts all available journals for your user ID.
Munis® General Ledger, Version 11.2 Page 38

All Journals—Posts all available journals.
All Journals for Clerk—Posts only those journals for the user ID entered in the Clerk ID box.
6. Select the appropriate option and then click Accept. The program displays the Output screen, where you can define the journal proof report settings.
7. Select the Save output option, note the file name, and click OK. If the program finds no errors, it displays the Post Journal Confirmation box.
8. Click No.
9. Open the Saved Reports program.
10. Highlight the report to view and click Accept. The program displays the report.
11. Once the Journal has been verified, return to the General Journal Entry/ Proof program and click Output-Post again.
12. Click Yes on the Post Journal Confirmation screen to post the journal.
Munis® General Ledger, Version 11.2 Page 39

General Journal Entry Proof Samples
Munis® General Ledger, Version 11.2 Page 40

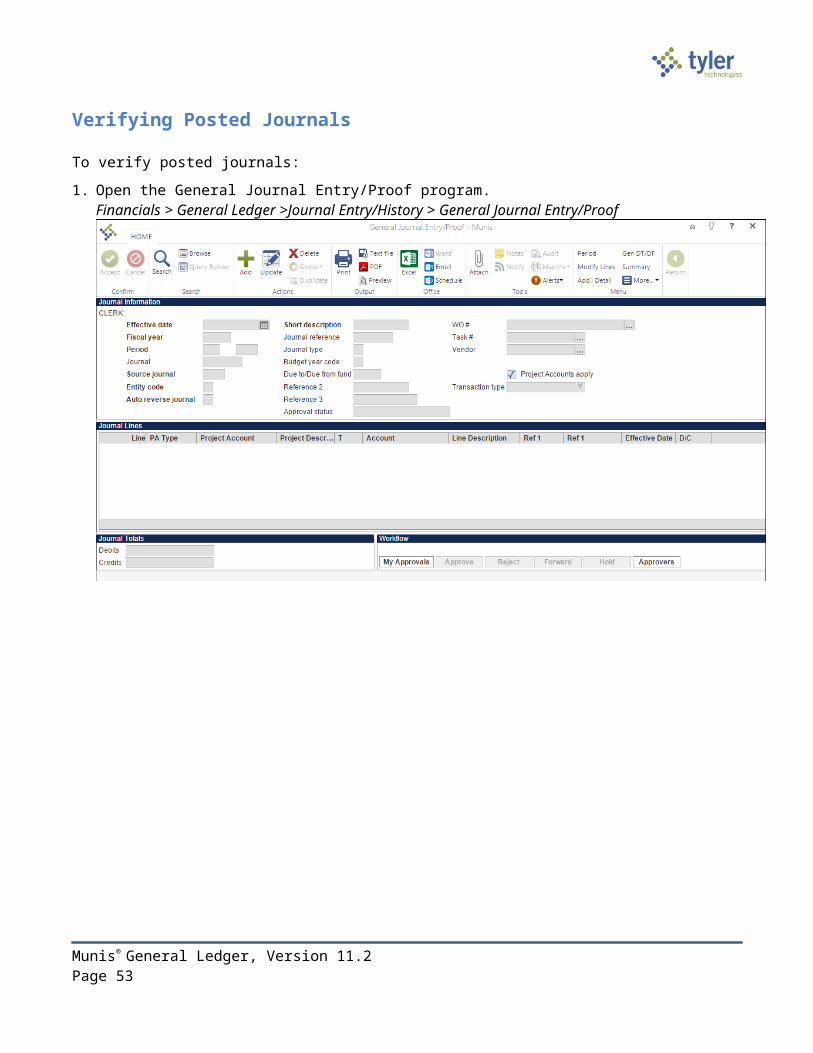
Verifying Posted Journals
To verify posted journals:
1. Open the General Journal Entry/Proof program. Financials > General Ledger >Journal Entry/History > General Journal Entry/Proof
2. Click Posted Find from the Menu group on the ribbon.The program displays the Find Posted Journals screen.
Munis® General Ledger, Version 11.2 Page 41

3. Complete one or more of the fields as search criteria, and then click Accept to execute the search. The program displays a list of journals that meet the search criteria.
4. Highlight the journal to view by clicking it, and then click Accept. The program refreshes the screen to display the Inquiry, Create Journal, and Select options in the Menu group of the ribbon.
5. Click Inquiry.The Journal Inquiry/Print screen displays the journal detail.
6. Click Return on the ribbon to return to the Find Posted Journal program.
7. Click Create Jnl to copy the active journal.The program displays the Define Required Journal Fields screen.
8. Complete the Budget Year, Period, and Effective Date boxes.
Munis® General Ledger, Version 11.2 Page 42

9. Click Accept to create the journal. The journal entry must go through the normal approval process before it is posted to the general ledger.
10. Click Release to submit the journal entry for approval.
ResultsThe journal entry posting has updated the general ledger accounts.
GL ImpactWhen the journal entry is posted, the general ledger accounts are affected by the amounts entered in the journal entry line detail. This impact is reflected in the Actuals box in the Account Inquiry and Account Master programs.
Other Munis Modules ImpactThere is no impact on other Munis modules other than updating the general ledger.
Munis® General Ledger, Version 11.2 Page 43

Recurring General Journal Entry ObjectiveThis document provides instructions for completing the Recurring Journal Entry program in Munis General Ledger.
OverviewThe Recurring Journal Entry program allows for the creation, generation, and maintenance of recurring journal entries. A recurring journal entry is an entry that occurs consistently as to date and amount.You can use this program to create recurring journal entries to manage indirect costs or charge-backs. At month-end, you can distribute an accumulated cost from one account (usually an expense account) to another set of accountsThis program must be accessed on a regular basis to maintain journal debits and credits, and to generate the recurring journals.
PrerequisitesBefore you can successfully use this feature, you must ensure that the necessary permissions and settings are in place. If permissions or settings are not set up properly, or if the required programs are not available on the Munis menu, contact the system administrator.
Confirm the following:
You have access to the Recurring Journal Entry program. All accounts referenced in the recurring journal entry exist in the chart of accounts (COA). The Journal Number Control program has been completed to establish journal numbers.
Munis® General Ledger, Version 11.2 Page 44

ProcedureTo create a recurring journal entry:
1. Open the Munis Recurring Journal Entry/Generate program.Financials > General Ledger > Journal Entry/History >Recurring Journal Entry/Generate
2. Click Add.
3. Complete the fields according to the following table to add a new recurring journal entry.
Field Description [Customer Name]Scheduled RunExecute This Report
This list determines when the recurring journal is created. Now—The report is generated
immediately. Use the options in the Output group of the ribbon to view, print, or save the report.
In Background (Now) or At A Scheduled Time—The report is created using Munis Scheduler. When you complete the Journal Header and Frequency sections, the program displays the Munis Scheduler dialog box, where you can define the processing times, notifications, and establish the recurring setup.
Journal HeaderJournal Code This box stores a unique, user-defined ID
code for the journal. The code should contain six digits.
Munis® General Ledger, Version 11.2 Page 45
Field Description [Customer Name]Hint: To aid in identifying and generating journals, use the first three digits to represent the department creating the journal.
Source Journal This list identifies a source code associated with the journal entry. Recurring journals are manual journal entries and can be either GEN for a general journal or GCR for a cash receipt.
Journal Reference
This box displays a user-defined journal reference code that stays with each transaction throughout its life. This may be a control number, a date, or a note.
Short Description
This box contains a short, user-defined description for this recurring journal entry. This brief description contains up to ten characters.
Journal Type This box stores a user-defined, single-character code that describes the type of journal being created. Use journal type codes that are meaningful to your organization. For example, A for adjustment journal, I for interfund journal, or N for normal.
Entity Code This list signifies the entity (for example, city/town or school) with which the journal is associated. Entity codes are assigned in the System Settings program; typically, this value is 1 for the city/town.
Auto Reverse Journal
This check box indicates if the journal is available for automatic reversal. If selected, this check box indicates that the journal is an auto-reverse journal.
Due To/Due From Fund
This box specifies the target due to/due from fund that keeps the journal entries balanced.DT/DF funds must exist in the Chart of Account Segments program.
Reset after GEN This check box determines whether to reset all amounts to zero after journal generation. The default value is No (cleared). When this check box is selected, the journal resets all amounts entered to zero after generation. If this box is cleared, the journal holds the last amounts that were created.
Effective Dates These boxes define the range of dates for which the recurring journal should be generated. These dates can span the fiscal year or multiple years.
Clerk This box identifies the name of the person who is creating the journal entry. The program completes the value of this field; it is only accessible as search criteria when you click
Munis® General Ledger, Version 11.2 Page 46

Field Description [Customer Name]Search.
Allocated This check box, if selected, directs that amounts are to be allocated by a percentage. If the amounts are allocated, then the Reset After GEN check box is automatically selected and uses the account (segments) values identified in the account fields.
Segments This is the full account number to which the percentage should be allocated.This box is accessible when the Allocated check box is selected.
Object This box identifies the object code to use with the allocation.This box is accessible when the Allocated check box is selected.
Project This box identifies the project code to use with the allocation.This box is accessible when the Allocated check box is selected.
Project Accounts Apply
This check box, if selected, directs the program to include project account strings in the recurring journal entry. Clear the check box to exclude project accounts.
FrequencyMonths These check boxes identify the calendar
months a recurring journal is to be created. For a monthly journal, select the check box for each month.
Weeks These check boxes identify the weeks in which a recurring journal is to be created.
When the above fields are completed, click Lines in the Menu group of the ribbon to display the Journal Entry Detail screen.
Munis® General Ledger, Version 11.2 Page 47

Field Description [Customer Name]Journal LinesPA Type This field identifies the project account type:
expense or funding.Project Account This box identifies the project account string to
which the recurring journal applies.TAccount
These fields identify the account type and the full general ledger account number.
Description This box stores a description of the journal entry. The description entered becomes part of the detail transaction and stays with it throughout the life of the entry. Hint: Make sure that the description clearly identifies the item; this is helpful in the event of an audit.
Percent This box identifies the percentage of the total amount to allocate to this account.
Journal Ref This box stores the user-defined journal reference code that stays with each transaction throughout its life. This code may be a control number, a date, or a note.The default value for this field is entered from the main Recurring Journal Entry/Gen screen.
Perm/Temp This list identifies whether this is a permanent or temporary journal entry.
Debit/Credit This list indicates whether this is a debit or credit journal. Select Debit or Credit from the list; to enter no amount but to add a line of text, select Text. You can enter text in the Description field.
Amount This box identifies the amount of the transaction.Type a value up to 99,999,999,999.99. Do not enter the decimal point and zeros if the transaction is a whole dollar amount. You cannot enter a negative value in this field.Note: When the amount is entered for an expense account, the available budget is instantly reduced. Any subsequent change or deletion makes corresponding adjustments to available budget.
4. When all lines have been completed, click Accept to save the entries.
5. To update line detail, highlight the line and then click Update.
6. Make any necessary changes to the line and then click Accept to save changes.
7. Verify that your journal totals (debits/credits) are in balance.
8. Click Return on the ribbon to return to the Recurring Journal Entry screen. The recurring journal template is complete.
Generating a Recurring Journal
Munis® General Ledger, Version 11.2 Page 48

To generate a recurring journal:
1. Open the Recurring Journal Entry/Generate program.Financials > General Ledger >Journal Entry History > Recurring Journal Entry/Generate
2. Click Search.
3. Enter the search criteria to define the set of journals to generate, and then click Accept.
4. Click Monthly on the ribbon. The program displays the Recurring Journal Quick Entry screen.
5. Click Update to make changes to the lines.
6. To delete a line from the recurring journal entry, highlight the account to remove, and then click Delete. The program displays a confirmation message; click Yes to permanently remove that line from the recurring journal entry.
Munis® General Ledger, Version 11.2 Page 49

7. To add a line to the recurring journal entry, click Add.
8. Select the account to add to the recurring journal entry and indicate if this account will be a permanent or temporary addition to the journal. Click Accept to save the line and return to the Recurring Journal Quick Entry Screen.
9. Click Accept to save your changes to the recurring journal entry and return to the main screen.
10. Once you have returned to the main screen, click Generate on the ribbon to generate the recurring journal entry for your active set of journal entries.The program displays the Generate Journals screen.
11. Enter the appropriate year, period, and effective date, and then click Accept to continue. The program saves your entries and makes the Define, Gen Journals, and Gen Journal options available on the ribbon.
12. Select Generate Journals (all journals in the active set) or Generate Journal (only the current journal).The program displays a confirmation message.
13. Select Yes to create the journal proofs.
ResultsOnce the journal is generated, the journal proof resides in the General Journal Entry/Proof program.
GL Impact The general ledger is not directly affected by the generation of the journal entry. When the journal entry is posted, the general ledger accounts are affected by the amounts entered in the journal entry line detail. This impact is reflected in the Actuals box in the Account Inquiry and Account Master programs.
What’s Next?Proof, and then output post, journals from the General Journal Entry/Proof program.
Munis® General Ledger, Version 11.2 Page 50

General Journal Approval
ObjectiveThis document provides instructions for approving released journal entries.
OverviewOnce a general journal is released, the established workflow business rules route the journal for approval. This is often used where the audit department or outside auditor has established a procedure wherein the person who enters a financial transaction cannot be the same person who approves the transaction.
Journal entries may be routed to one or multiple people. Once the journal has been fully approved by the required users, it may be posted. If a journal is rejected, then the originator of that journal will be notified. At this point, the originator may delete the journal or make corrections to the journal. If the originator makes corrections to the rejected journal, then the journal must be released to go through the approval process again. This document will look at the approval process using Workflow Approvals web part.
PrerequisitesBefore you can successfully use this feature, you must ensure that the necessary permissions and settings are in place. If permissions or settings are not set up properly, or if the required programs are not available on the Munis menu, contact the system administrator.
Confirm the following:
Approvers are established in the Workflow User Attributes program. Workflow business rules have been established. Journals have been completed and released.
Approvers are notified by email or Workflow Assistant of general ledger journals pending approval. This option is determined by the value of the Workflow Delivery list in the User Attributes program.
Munis® General Ledger, Version 11.2 Page 51

ProcedureMunis Workflow transactions are approved using the Approvals web part tile on the Tyler Dashboard.
To approve an item:
1. Double-click the Approvals tile to list all items currently awaiting approval. Use the By Date or By Process Code options to sort the items.
Munis® General Ledger, Version 11.2 Page 52
2. Review the items awaiting approval.
3. To view additional information, click the Detail link to view the item in the applicable Munis program.
4. To approve the item from the Munis program, select the Approve option in the Workflow group.
Munis® General Ledger, Version 11.2 Page 53

5. To approve the item from the Approvals tile, select the item to display the Workflow options, and then select the appropriate action.
When you select Accept, Reject, Forward, or Hold, the web part provides an Optional Comment (Accept) or Required Comment (Reject, Forward, or Hold) box. For required comments, enter the reason for the action.
Button DescriptionApprove Identifies the record as approved, and sends notification to the next approver in
sequence.Reject Rejects the item. You must enter a rejection reason. The program notifies the originator
of the rejection and reason. The originator determines the next course of action (alteration and resubmission or deletion).
Forward Allows you to choose another Munis user to review this pending record.If you are approving an item that has been forwarded to you, the Forward option is not available.
Hold Retains an item in your approval queue for additional review. It will remain here until further action is taken.
ResultsJournals are approved for posting.
GL Impact There is no impact on the general ledger accounts at this time.
What’s Next?Journal entries that have been approved are now ready to be posted to the general ledger. Rejected journal entries may be corrected by the originators and resubmitted through the approval process.
Munis® General Ledger, Version 11.2 Page 54

Accounting EntriesOverviewThe Accounting Entries program displays and maintains general journal entries, budget transfers and amendments, and encumbrance journals.When you open the program, the General Journals tab is the default tab selected, and it displays all of the general ledger journal entries you have permission to view.
The Accounting Entries screen is divided into three tabs: General Journals, Budget Transfers/Amendments, and Encumbrance Journals. Each tab provides entries for the specified type, and the program ribbon provides an option for adding records for each type. Use the Filters pane to refine the displayed list of journals by approval status, journal creator, year, period, and journal number.
Prerequisites Before you can successfully use this feature, you must ensure that the necessary permissions and settings are in place. If permissions or settings are not set up properly, or if the required programs are not available on the Munis menu, contact the system administrator.
Munis® General Ledger, Version 11.2 Page 55

Procedures Maintaining Journal DetailsOn the main screen, click a journal number to display the details. For example, on the General Ledger Journal tab, click a journal number to display the journal details and lines.
On the Journal screen: Click the More (+) button to view or update journal details. Click the Actions button for a journal line to view or add notes for the specific line, or to delete
the line. Click Add Line in the Journal Lines header to add a new journal line. Click Delete Journal to delete the entire journal. Click Return to Recordset to return to the main screen.
Munis® General Ledger, Version 11.2 Page 56

Use the journal screen ribbon to generate due-to/due-from entries, as well as to manage the workflow approval process.
Adding a Journal Entry1. On the ribbon, click Add Budget Amendment, Add General Journal, or Add Encumbrance Journal.
The program displays the applicable entry screen, with the Journal Source, Approval Status, and Entry Clerk fields completed.
2. In the Journal Entry group, complete the Fiscal Year, Period, Effective Date, and Short Description boxes.
3. Select or clear the Project Accounts Apply check box, as appropriate, for the journal. Selecting this check box directs the program to include project accounts when making the entry.
4. Click the More (+) button in the Journal Details section.
5. Complete the Journal Details fields.
Field Description [Customer Name]General Journal DetailAuto Reverse Journal
Indicates if the journal is an Auto Reverse Journal (an accrual journal entry), which means that this journal is to be included when you select the Auto Reverse option in the Journal Reversal program.
Munis® General Ledger, Version 11.2 Page 57

Field Description [Customer Name]Budget Year Code Stores the budget year code.
The budget year code creates budget transfers against either 1-Current year or 2-Carryforward budget amounts.In order to process a budget transfer against a carry forward budget, you must enter against an expense account that is not a multiyear account. In General Ledger Settings, the Budget Carryforward Method option must be 3-GAAP/Budgetary Combined.
Entity Code Determines which location's data you can access if your organization shares data with another entity. Entity codes are established in System Settings:
1 - Name of the first entity (for example, town)
2 - Name of the second entity (for example, school)
3 - SharedJournal Type Indicates the type of journal. The default
value for this box is blank. The most common journal types are Normal (N), Interfund (I), or Adjustments (A). If you consistently assign type codes, they can be used as search criteria in queries and reports.
Reference 1, 2, and 3
These are user-defined reference codes that stay with a transaction throughout its life. A journal reference may be a control number, a date, or a note.
Transaction Type Determines how the journal transaction is made.
Due To/Due From Identifies the target fund to use when you choose the Gen DT/DF option. Note: Accounts must be established in the Due to/Due from Setup program; otherwise the program encounters an error.
Budget Amendment Journal DetailEntity Code Determines which location's data you can
access if your organization shares data with another entity. Entity codes are established in System Settings:
1 - Name of the first entity (for example, town)
2 - Name of the second entity (for example, school)
3 - SharedBudget Year Code Stores the budget year code.
The budget year code creates budget
Munis® General Ledger, Version 11.2 Page 58

Field Description [Customer Name]transfers against either 1-Current year or 2-Carryforward budget amounts.In order to process a budget transfer against a carry forward budget, you must enter against an expense account that is not a multiyear account. In General Ledger Settings, the Budget Carryforward Method option must be 3-GAAP/Budgetary Combined.
Amendment Type Indicates whether the journal is a Budget Journal, Budget Amendment, or Budget Appropriation Change. The default value when you are adding a record is type 1.The possible values are:
1, 4: Expense account to expense account or revenue account to revenue account.
2, 5: Expense account to revenue account.
3, 6: Expense or revenue account; one-sided (taken from Budgetary Fund Balance).
7, 8: Expense or revenue accounts; balance across funds.
Special Condition Indicates if the amendment is temporary or recurring; the value is stored in the General Ledger Hold and History journals.
Temporary—Amendment is not included when the Next Year Budget Entry is updated. Temporary amendments are excluded in budget projections when the Exclude Temporary Budget Amendments check box in Define/Start Budget Projection program is selected.
Recurring—Amendment requires that recurring journal entries are set up that match the budget. When this amendment is posted, the corresponding recurring journal is updated.
Reference 1 and 2 These are user-defined reference codes that stay with a transaction throughout its life. A journal reference may be a control number, a date, or a note.
Encumbrance Journal DetailEntity Code Determines which location's data you can
access if your organization shares data with another entity. Entity codes are established in System Settings:
Munis® General Ledger, Version 11.2 Page 59

Field Description [Customer Name] 1 - Name of the first entity (for
example, town) 2 - Name of the second entity (for
example, school)3 - Shared
Budget Year Code Stores the budget year code.The budget year code creates budget transfers against either 1-Current year or 2-Carryforward budget amounts.In order to process a budget transfer against a carry forward budget, you must enter against an expense account that is not a multiyear account. In General Ledger Settings, the Budget Carryforward Method option must be 3-GAAP/Budgetary Combined.
Reference 1 and 2 These are user-defined reference codes that stay with a transaction throughout its life. A journal reference may be a control number, a date, or a note.
6. Click Add Line on the Journal Lines header.
7. Enter the project string to be used for the journal line, if applicable, and then press Tab to advance to the Account fields.
8. Complete the account combination, and then press Tab to advance to the Line Description column.The program automatically enters the Account Description value.
9. Enter the line description and enter an amount in the Increase or Decrease columns.
10. If the line requires additional notes, click the button in the Actions column, and select Notes.The program displays an Additional Description dialog box.
11. Enter your notes, and click Save.The program saves the notes and returns to the program screen.
12. Click Add Line on the ribbon or in the header of the Journal Lines pane.The program adds a blank line to the Journal Lines pane. If you need to remove a line, click the button in the Actions column and select Delete.
13. Continue entering journal lines until the journal entry is complete.
14. Click Save.The program saves your journal entry and displays a confirmation dialog box.
Munis® General Ledger, Version 11.2 Page 60

15. Click OK.The program returns to the program screen with the newly created journal as the active record.
Creating a Journal Proof Report 1. Select the General Journals, Budget Transfers/Amendments, or Encumbrance Journals tab.
2. In the Journal column, click the journal number for which to generate a proof report.
3. One the ribbon, click Proof Report.The program opens the Journal Proof SSRS Report program, which allows you to generate the report output.
Munis® General Ledger, Version 11.2 Page 61

Journal Import TemplatesOverviewThe Journal Import Templates program creates new journal records by importing ASCII or Excel files into the Munis system. The program creates and maintains journal format templates that are saved for later use. After importing journal entries, you must run the General Journal Entry/Proof program to proof and post the entries.
For users with the default entity code of 0, the Journal Import Templates program automatically sets the default entity code on the journals to 1. This allows the records to be processed successfully.The Journal Import Templates program provides the following stock import formats, which cannot be modified from their original layouts:
Budget Import Format Budget Long Account Import Format Standard Excel Import Format Standard Import Format Standard Long Account Import Format
Procedures Creating a TemplateThe Journal Import Templates program can create new import templates. You can create a new template for one-time use, or for repeated import processes using a standard import file. The template creation process allows you to use any file to produce data usable by the Munis system. To create an import template:
Munis® General Ledger, Version 11.2 Page 62

1. On the ribbon, click Open, and then navigate to the file for which to create the import. The program refreshes the page to display the file name in the File box.
4. Click Create on the ribbon or Create Template next to the Template box.The program displays the Import Template Editor screen.
5. Select a column name from the column list.
6. Click the color box to select a highlight color for the column data. This color does not appear on the import file. It only indicates the data that is included in the column when the import is performed.
7. Click Add Column.
8. Manually enter the starting and ending positions for the column, or use the slider bar to define the start and end positions. Some columns have a predefined value for the start and end positions, or have a maximum or minimum length. If you enter or select a position or size that is incompatible
Munis® General Ledger, Version 11.2 Page 63

with the column, the program displays an error message.
9. Continue to add columns to the template. Remove a column by clicking the red X next to the column name.
10. Click Preview to view an example of the imported data arranged by column.
11. When you have finished entering columns, click Save Template.The program ensures that you have completed all of the required columns for the template. If you have not created all of the required columns, the program displays a warning message that indicates which columns are required and missing.
12. Create any missing columns, and then click Save Template.When all of the required columns exist, the program displays the Save Import Template dialog box, where you can enter a name for the template.
13. Enter a name and click Save. The program displays the main program screen with the newly created template name in the Template box. You can then use the template to perform an import.
Note: If you use an Excel (.xlsx) file as the template source, the program provides the Excel Template Editor for creating the template.
In this case, expand the header field for each column to select a name. The program assigns the name and automatically highlights each column with a unique color. You cannot assign the same column heading more than one time, and you must create a column for each required
Munis® General Ledger, Version 11.2 Page 64

field.
Modifying a TemplateTo modify a template:
1. Click Open, and then navigate to the file for which to update the template.
2. From the Template list, select the template to update.
3. Click Update on the ribbon or Update Template next to the Template box.The program displays the Import Template Editor pane with the template and file data loaded.
Munis® General Ledger, Version 11.2 Page 65

4. Select a column to update from the Columns list.
5. Update the highlight color and column positions, and then click Save Column.The program updates the template with the new values.
6. In order to add a new column to the template, select the column name, color, and positions using the fields.
7. Click Add Column.The program adds the new column to the template.
8. Remove a column from the template by clicking the red X next to the column name in the Columns list.The program refreshes the display to remove the column.
9. When you have finished making changes to the template, click Save Template.The program saves your entries and displays the Save Import Template dialog box.
10. Update the name of the column, if necessary, and then click Save. The program displays the main screen.
Completing an ImportIn addition to the creation of templates, the Journal Import Templates program performs the import process for journal entries. To import journal entries:
1. On the ribbon, click Open and then navigate to the import file.
2. From the Template list, select the template to use for the import.
Munis® General Ledger, Version 11.2 Page 66

3. Click Next.The program refreshes the screen to display the Journal Information group.
4. Complete the fields on the screen, selecting Now from the Execution Time list.
5. Click the More button to display additional fields for completion.
6. After completing the fields, click Validate.The program examines the import file for errors and produces the error report.
7. Revise the file as needed to fix any errors, and then click Import.The program performs the import process. You must run the General Journal Entry/Proof program to post the imported journal entries.
Scheduling an ImportThe Journal Import Templates program is compatible with Munis Scheduler. If Munis Scheduler is in use by your organization, you can schedule the journal import process to run at a specific time. To import journal entries:
1. On the ribbon, click Open and then navigate to the import file.
2. From the Template list, select the template to use for the import.
3. Click Next.The program refreshes the screen to display the Journal Information group.
4. Select Scheduled from the Execution Time list. The program displays the date and time boxes.
5. Complete the remaining fields in the Journal Information group.
Munis® General Ledger, Version 11.2 Page 67

6. Click More Options to display additional report options fields.
7. After completing the fields, click Validate.The program examines the import file for errors and produces the error report.
8. Revise the file as needed to fix any errors, and then click Schedule.The program adds the report to the Scheduler queue and performs the import process at the scheduled time. You must run the General Journal Entry/Proof program to post the imported journal entries.
Munis® General Ledger, Version 11.2 Page 68

Month End Manager The Month End Manager program establishes a closed date for each period. It supports the ability to roll the current period forward upon closing of that period.
The Monthly Amounts table is updated at the time a journal is posted to the general ledger. All journals are posted to the History status and monthly amounts are updated immediately. Monthly budget transfers are initiated through the Monthly Budget Amounts program in Munis Budget Processing and create transactions to represent the transfer between periods.
For each period, the program displays up to four possible inquiry results: Unposted Journal—Provides lists of all unposted transactions by the transaction type.
Unposted transactions are those transactions that are not posted to the general ledger. For example unposted journals, purchase orders, contracts, invoices, requisitions, and so on. All the unposted transactions that are queried in Table Validation are also represented here.
Open Journals—Provides a list of all journals that have been posted after the period’s closed date. If a period has not been closed, then all posted journals show in this inquiry. Once the period has been closed, only journals posted after this date are displayed.
Unbalanced Journals—Provides the inquiries that display journals that are out of balance based on both net debits and credits, as well as expenses to expenditure control or revenues to revenue control. Unbalanced journals display for the entire period regardless of the journal’s posted date with respect to closed date for the period.
Unbalanced Funds—Provides the inquiries that display funds that are out of balance based on both net expense versus revenue, as well expense actuals to expenditure control and revenue actuals to revenue control. This functionality remains in Table Validation, but is replicated here.
Munis® General Ledger, Version 11.2 Page 69

The ribbon for the Month End Manager program provides direct access to associated Munis programs.
Closing journals For open journals, the Actions menu provides the Close and Close and Roll Forward options.
When you close open journals, the program refreshes the screen to remove the Open Journal indicator and to provide the closing date.
Munis® General Ledger, Version 11.2 Page 70

When you select Close and Roll Forward, the program updates the Closing Date field and also updates the Current Fiscal Period to the next period. For example, if you are currently in period 5 and select Close and Roll Forward, the program resets the period to 6 and then highlights period 6 in the display.
Viewing journal and fund details When you click the Unposted Journals, Unbalanced Journals, or Unbalanced Funds option, the program displays the types and the number of items for each. Highlight an item to view the details.
For example, when you click Unposted Journals, the program displays the journal types and the number of journals for each. When highlight a type, the program provides a list of each of the journals for that type.
When you click an item number, the program opens the applicable supporting program. For example, click the journal number for Proof Journals to view the item in Accounting Entries, or for Requisitions, click the requisition number to view the item in Requisition Entry.
Munis® General Ledger, Version 11.2 Page 71

Month-End Processing ChecklistObjectiveThis document provides a checklist to assist in performing the month-end processes in a timely manner.
OverviewThe Munis month-end closing process moves all transactions for a specified period to the history table. Prior to processing the month-end close, a complete reconciliation of the system should be performed, including actuals, encumbrances, control accounts, and memo balances.
This Month End Checklist highlights the reports that are used in the reconciliation process, the tools to assist in the reconciliation, and the processes that are to be followed. Scheduled monthly reconciliation will keep your accounts and funds in balance. It will also reduce the amount of time that is needed at year-end to close out the year.
PrerequisitesBefore you can successfully use this feature, you must ensure that the necessary permissions and settings are in place. If permissions or settings are not set up properly, or if the required programs are not available on the Munis menu, contact the system administrator.
Confirm the following: You have menu access to the End of Period programs. There are no general ledger account access restrictions associated with your user ID.
Munis® General Ledger, Version 11.2 Page 72

Month End ChecklistAs you create reports, save them to the Munis Saved Reports directory so they are archived for future reference.
Initials Date TaskDay 1 of new month – Roll the Accounting Period. (This changes the default period in General Ledger Settings.)Verify General Ledger Settings Default Period is the new period to which end users are posting transactions; this is changed by Roll the Accounting Period process. (Optional)Run the Fixed Assets Monthly Depreciation program, if applicable.Enter and post all month end journal entries.Post all open batches. This is only required for transactions within the period that is being closed and this can be viewed within the Month End Manager program.
Purchase Orders (Financials > Purchasing> PO Processing > PO Entry/Proof > Find Batch)
AP Invoices (Financials > Accounts Payable> Invoice Processing > Invoice Entry/Proof)
General Journals (Financials > General Ledger > Journal Entry/History > General Journal Entry/Proof > Browse)
Encumbrance Journals (Financials > General Ledger > Journal Entry/History > Encumbrance Journal Entry/Proof > Browse)
Budget Transfers/Amendments (Financials > Budget Processing > Budget Transfers and Amendments > Browse)
Fixed Asset Transactions (Financials > Fixed Assets > Fixed Assets Processing > Fixed Asset Transaction Entry/Post > Find for every type of transaction)
Employee Expense Claims (Appear as encumbrances that are liquidated when converted to AP or PR)
Cash Receipts (General Revenues > Payment Processing > Payments Journal)
Run utilities and correct any errors found during the GLENCUTE process.To run GLENCUTE, use the System Update program:System Administration >Miscellaneous Administration >System Update.Select Define Update Options, enter the eight-character program name, and click Run System Update.
GLFIXREQ (fixes errors once you print and process) GLFIXMEM (fixes errors once you print and process) GLENCUTE (may require importing and posting the glencute00x.txt
file, located in the Saved Reports directory; x = a number assigned by Munis)
ReconciliationUse the Full option in the General Ledger Tables Validation program to run a full table validation; correct any errors.If necessary, run GLFIXCTL from the System Update program to correct revenue/expense. This does not sum control errors; these errors are erased from the General Ledger Table Validation report when the month is closed.
Munis® General Ledger, Version 11.2 Page 73

Initials Date TaskImportant! Use this option with caution and with the help of Munis Technical Support personnel.Rerun the Full validation in the General Ledger Tables Validation program until only warnings appearRun the Account Trial Balance for balance sheet accounts in summary and confirm beginning and ending fund balances are zeroRun the Account Trial Balance for all accounts in summary and confirm beginning and ending fund balances are zeroPrint a Balance Sheet report in summary (consolidated) and in detail for each fund through the period being closed:
Confirm each fund’s assets=liabilities + fund balance. Record the AP control account balances. Record the Inventory account balances. Record the FA account balance. Record the expenditure control account balance. Record the revenue control account balance.
Note: Run the Account Trial Balance for all accounts in detail to use if reconciliations below show differences between the modules and the Account Trial Balance totals and export to Microsoft Excel so you can sort by source journal.
Reconcile accounts receivable by: Completing the Detail Receivables by Date report. Comparing the AR/GL Reconciliation Report by Fund to the
Account Trial Balance Accounts Receivable control account for each fund.
Comparing the Invoice Detail Report Summary by Charge Code to the Account Trial Balance Revenue Accounts.
Reconcile accounts payable by comparing the Invoice History by GL Account Report to the Account Trial Balance for the AP Control Account. Reconcile:
History By Fund Invoice Selection–Only Open Invoices Year/Period equals Period Being Closed Last check date is the last day of the month to be closed
Reconcile fixed assets by comparing the Asset History by GL Account report for active assets and capitalized assets to the Account Trial Balance fixed asset account totals.Reconcile inventory by comparing the Perpetual Inventory Report to Account Trial Balance.
Running the GL Table Validation, the Trial Balance for All Accounts, and then Trial Balance for Balance Sheets Accounts completes the prove process for accounts. When you run the Trial Balance for All Accounts, the control accounts are ignored and the subsidiary ledger takes their place. When run the Trial Balance for Balance Sheet Accounts, the control accounts take the place of the subsidiary ledger. If either are out of balance, then there is an issue with control accounts not equaling the subsidiary ledger. The General Ledger Table Validation program, as well as the Month End Manager program, indicate which journals are in error.
Munis® General Ledger, Version 11.2 Page 74

Initials Date TaskPerform the month-end close from the Month End Manager program. (Note that the Monthly Trial Balance by Fund program shows zero information once a period is closed, while the General Ledger Tables Validation program verifies closed period transactions in more detail than open period transactions.)This is the last step in the process. All reconciliation should be performed before the month is closed.
Sample General Ledger Table Validations Report
Munis® General Ledger, Version 11.2 Page 75
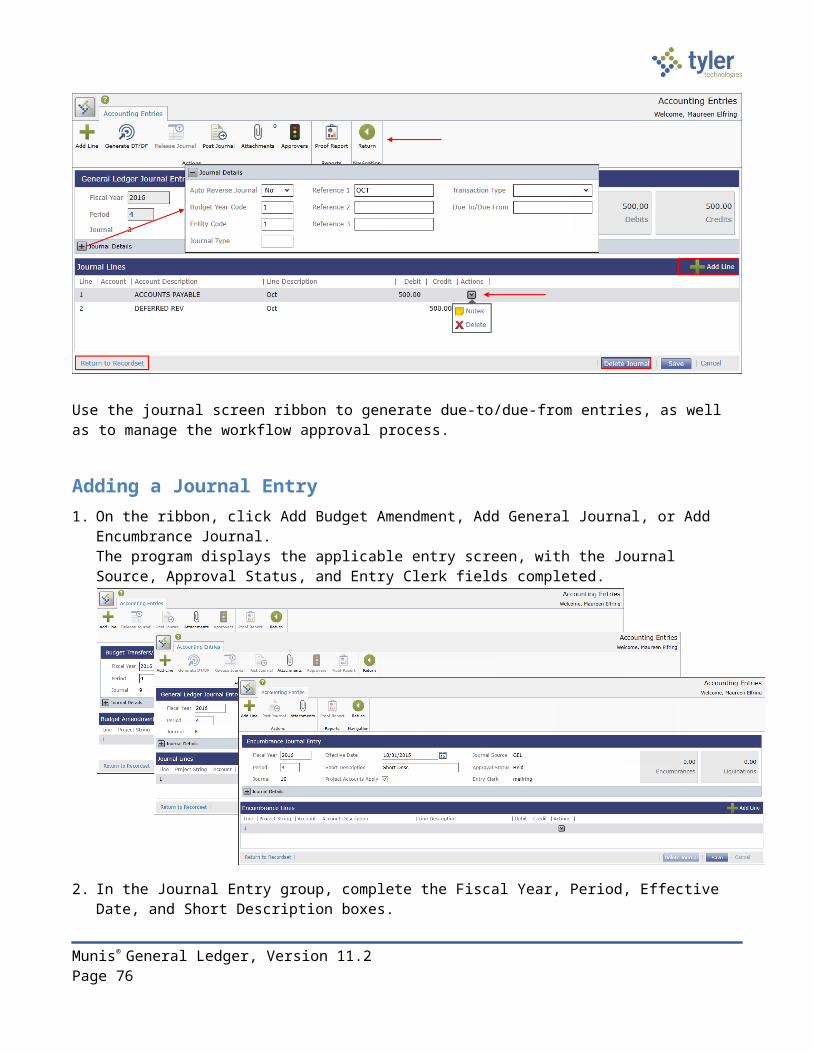
Guide to the Table Validation Report Important! The error list is being researched and will be updated as results are available. The original error numbers are no longer applicable due to the Month End Manager changes. [April 2016]
Number
Group Document/Transactions ID
Error Message
0102 Fund Fund does not net to zero03040506070809 Account Reserved budget amounts exist10 Account CY monthly balance does not sum to
account1112131415 Unposted Purchase orders exist16 Unposted Purchase orders with change orders
exist17 Unposted Contracts exist18 Unposted Change orders exist1920212223 Unposted Unposted AR receipts24 Unposted Unposted EE claims252627 Unposted Open Invoices
Munis® General Ledger, Version 11.2 Page 76

Munis® General Ledger, Version 11.2 Page 77

Guide to Table Validation Error Messages Each line on the Table Validation Report is produced by a specific error test. Review the report carefully as some of the messages look very similar.
Hint: When taking corrective measures, always start from the end of the report and work to the beginning.
Hint: Correcting one error condition may yield positive results on more than one error test. Try to solve errors that have the least impact on the general ledger first: from requisitions, to purchase orders, to journals in proof, to journals still unprocessed through month-end, to funds out of balance, and so on. Solving one error first may result in other errors being relieved. Conversely, correcting an error may result in new errors. Therefore, you may want to run the validation between corrective actions.
Hint: As always, if there are any questions or concerns, please contact Munis Technical Support for assistance.
Munis® General Ledger, Version 11.2 Page 78

Account InquiryObjectiveThis document provides instructions on how to use the Account Inquiry program.
OverviewThe Account Inquiry program provides both summarized and detail history for a selected set of accounts, with a focus on current available budget. You cannot modify data in this program; you can view data and create reports of the collected data. There are options in the Account Inquiry program for consolidating the data into a report-like format, but if you want to report on many accounts in a report format, it may be best to use the YTD Budget Report.The information in the fields displayed throughout the program depends upon your user permissions, which are established in the System Administration General Ledger Roles program.
PrerequisitesBefore you can successfully use this feature, you must ensure that the necessary permissions and settings are in place. If permissions or settings are not set up properly, or if the required programs are not available on the Munis menu, contact the system administrator.
Confirm the following:
You have permissions to view accounts. The chart of accounts (COA) is established. .
Munis® General Ledger, Version 11.2 Page 79

ProceduresFinding AccountsTo find accounts:1. Open the Account Inquiry program.
Financials > General Ledger > Inquiries and Reports > Account Inquiry -or- Departmental Functions > Account Inquiry
2. Click Search or Segment Find from the Search group of the ribbon. When you click Search, complete one or more of the fields to define your search criteria, and then click Accept.
Munis® General Ledger, Version 11.2 Page 80

When you select Segment Find, the program displays the Find by Segment screen.
3. Complete the fields on this screen according to the following table, and then click Accept. For either search method, the program creates an active set of all accounts matching your search criteria.
Field Description [Customer Name]Fund This box contains the first account
segment to include in the report.Segment 1 is always Fund.Click the field help button to select the fund from a list of available funds, or type the fund code directly in the box.
Segments 2 through 8
These boxes contain specific account segments to include in the report. Organizational labels for account segments are determined in the General Ledger Settings program. Examples for common segment labels are program, department, grade, and so on.Click the field help button in each box to select a segment code from a list of available codes, or type the segment code directly in the box
.
Org This box contains the org code for the account.Click the field help button to select the org code from a list of available codes, or type the org code directly in the box.
Munis® General Ledger, Version 11.2 Page 81

Field Description [Customer Name]Object This box contains the object code for
the account.Click the field help button to select the object code from a list of available codes, or type the object code directly in the box.
Project This box contains the project code for the account, if applicable. Project codes are applicable if your organization used Munis® Project Accounting.Click the field help button to select the object code from a list of available codes, or type the object code directly in the box.
Account Type This field indicates the type of account. Account types are expense, revenue, or balance. The blank option includes accounts of all types.
Account Status This field indicates the account status: Active or Inactive. The blank option includes accounts with all status codes.
Rollup Code This box contains the budget rollup group code to which the account belongs.
Character Code This box identifies the character code.Click the field help button to search a list of available character codes.
Percent UsedClick Define Percent Used to access these fields as search criteria.Fiscal Years These boxes contain the minimum
percentage used in the fiscal year. For whole percentages, you do not need to include decimal points; for percentages less than one, use decimal points. For example, for 25%, type 25; type 25.5 for 25½%.
4. Click Accept to save the criteria, and then Browse to view a list of the accounts in the active set of records.
5. Double-click an account to view the details.
Viewing Account Details On the Account Inquiry screen, the Account group provides the basic details for the account (that is, account segments, type, status, and so on).
Munis® General Ledger, Version 11.2 Page 82

Field Description [Customer Name]Fund This box identifies the fund (or account segment
1) to query. Click the field help button to select the fund from a list of available funds.
Org This box specifies the org code for the account to query. Click the field help button to select the org code from a list of available codes.
Object This box specifies the object code for the account to query. Click the field help button to select the object code from a list of available codes.
Project This box specifies the project code for the account to query. Click the field help button to select the project code from a list of available codes. The project code applies if your organization uses Munis Project Accounts.
Acct This box displays the full general ledger account number. Each segment is typically separated with a dash. There is no access to this field.
Acct Name This box displays the name of the account. There is no access to this box.
Type This list specifies the type of account: balance sheet, expense, revenue, or statistic. Select the blank option to select all account types.
Status This list identifies the account status. An account's status determines whether it appears on reports and if transactions can be posted to it. The status is updated using the either Account Master or Account Mass Change/Reset program. Status indicators are: Active – This is the most common status for
accounts. Active accounts can appear on all reports displaying account information and are generally available for posting (according to your defined permissions).
Next Year – This status indicates that a particular account is only available for next year budget entries and reports. No transactions posted to this account are allowed in the current year. The status of the account automatically changes once the Year End Close is processed.
Inactive -- This status prevents all posting to an account without proper permissions. If you
Munis® General Ledger, Version 11.2 Page 83

Field Description [Customer Name]have Amount Maintenance on Accounts permission granted in the Roles – General Ledger program, you have the ability to post transactions to an Inactive account. The Inactive account prints on all reports (provided you have adequate authorization). An account can be rendered inactive at any time in the fiscal year, regardless of the presence of current year transactions. The account can be reactivated at any time.
Closed -- This status indicates that an account is completely closed to all input and only prints on those reports offering the option to print closed accounts. No transactions may be entered against it. An account will be designated as Closed if there has been no activity - other than budget activity if the fund is a multiyear fund - posted to it in the current year.
Rollup This box contains the budget rollup group code to which the account belongs.If the box contains a value, click the folder button to view the group code in the Budget Rollups program.
NY Rollup This box contains the next year budget rollup group code to which the account belongs, if applicable. This field is only available when the Allow Use of Next Year Rollup Groups setting is enabled in General Ledger Settings.If the box contains a value, click the folder button to view the group code in the Budget Rollups program.
Multi Yr Fund This check box, if selected, indicates that the account is a multiyear fund. This check box is not accessible.
Use the Accounts Notes button to view notes associated with the selected account. If notes exist for the selected account, the button is highlighted.
Munis® General Ledger, Version 11.2 Page 84

4 Year Comparison TabThis tab shows the current fiscal year, the previous two fiscal years, and the next fiscal year.
Field Description [Customer Name]Original Budget The adopted budget at the beginning of the
Fiscal Year, as determined by the Budget Completion Journal.
Transfers In Any budget transfers increasing budget if the account. View account detail by selecting the yellow folder.
Transfers Out Any budget transfers decreasing the budget from the account. View account detail by clicking the folder button.
Revised Budget The sum of the Original Budget plus Transfers In less Transfers out.
Actual (Memo) The general ledger balance that includes posted and unposted transactions. View account detail by clicking the folder button.
Encumbrances The sum total of all open purchase orders for the account. View account detail by clicking the folder button.
Requisitions The total amount of requisitions in status 4-Allocated, 6-Released, and 8-Apporved. View account detail by clicking the folder button.
Available The budgeted amount remaining in the account.
Percent Used The percent of the budget that has been spent, transferred out, or encumbered.When you are using this field as Find criteria, enter the smallest percent used you wish to find. For example, if you enter 10, the program finds 10 and everything up to 100 percent.
Current Year TabThis tab displays the Current Year, Carry Forward, and GAAP, if carry forward monies exist. If there are no carry forward monies, the columns display as Current Year and Last Year. The Current Year column shows the current year, as determined by the General Ledger Settings. The Carry Forward column
Munis® General Ledger, Version 11.2 Page 85

shows any purchase orders that have been carried forward from a previous year. The GAAP totals show the combined totals of the Current Year and Carry Forward. The fields change according to the type of account you are viewing.
On the Current Year tab, the CFWD BUA is reported in the CFWD column as Original Appropriation, not Amendments, so it is excluded from the Amendments detail.
The Current Year tab does not display when you view a revenue account. The tab is also hidden if there are balance sheet accounts and other account types in the active set of records. For active sets of records that consist of only expense accounts, the carry forward column always displays, even if the current account does not have carry forward amounts.
Account Descriptions The following tables provide descriptions for the account types that display on the Current Year tab.
Balance Sheet Account
Field Description [Customer Name]Starting Balance The balance at the beginning of the current
fiscal year and last year.Activity The sum of the activity for the current fiscal
year and last year.Ending Balance The most recent account balance, calculated
as follows: Starting Balance – Activity.Memo Balance The general ledger memo balance that
includes posted and unposted items.
Expense Account
Field Description [Customer Name]Original Approp The starting budget in the current fiscal year
and last year.Amendments The sum of any budget transfers in and/or
out for the current fiscal year and last year.Revised Budget The current revised budget, calculated as
follows: Original Approp +/- Amendments.YTD Actual The actual balance at the end of the fiscal
period or year.Encumbrance The sum total of all open purchase orders
Munis® General Ledger, Version 11.2 Page 86

Field Description [Customer Name]as of the current fiscal year and last year.
Requisitions The sum total of all requisitions (status 4, 6, and 8) in the current fiscal year and last year.
Incep to Date The sum total of activity since the inception of the account to the current date. This is only populated for multiyear type 1 accounts.
Available Budget The remaining available budget, calculated as follows: Revised Budget- YTD Actual – Encumbrance – Requisition (- Incept to Date, if multiyear).
% Used The percent of the revised budget that has been used to date.
Revenue Account
Field Description [Customer Name]Original Est Rev The estimated amount of the original
budget for current fiscal year and last year.
Est Rev Adjusted The sum of any budget transfers or amendments for current fiscal year and last year.
Rev Est Rev The revised estimated revenue, calculated as follows: Original Est Rev +/- Est Rev Adjusted.
Incep to Date The sum total of revenue since the inception of the account to the current date. This is only populated for multiyear type 2 accounts.
Actual YTD Rev The actual revenue collected for the identified accounting period.
Remaining Rev The amount of revenue remaining to be collected for the current fiscal year and last year.
Percent Collected The percent of revenue already collected.
Munis® General Ledger, Version 11.2 Page 87
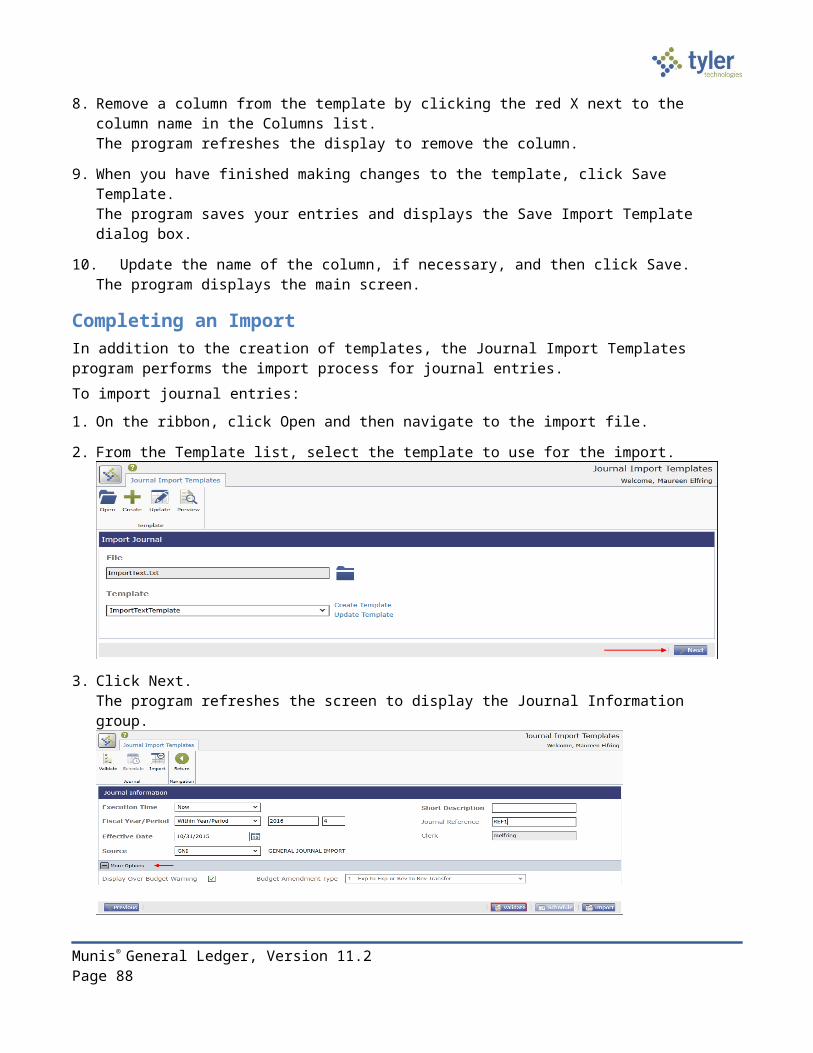
History TabThis tab provides a view of all years in the account's history; click the arrow buttons to scrolls the years.
Note: Expense accounts in multiyear funds that have a budget projection method of 2 have a new budget each year that is the remaining available budget from the previous year. This causes the budget for these accounts to remain in the current year, while all other multiyear account budgets represent the budget from inception.When calculating the percent used on Multiyear 2 accounts, the Incep to SOY field, which contains money spent from the inception of the account, must be ignored in order to get an accurate percentage. For Multiyear 2 accounts only, the program ignores amounts in the Incep to SOY box when calculating the value of the Percent Used box. This is true even when you click the Totals option.
Program Options The Account Inquiry screen provides several options for viewing additional information.
If there are notes associated with this account, the Account Notes button is highlighted; click Account Notes to view the note content.
DetailClick Detail to search for transactions that have been posted to an account using the Journal Selection Criteria screen.
Munis® General Ledger, Version 11.2 Page 88

Enter the search criteria to use, and then click Accept to submit the search. You can search by date range, year/period, source of the journal, or any of the reference fields. If you select the Include Unposted Journals check box, any general ledger journal entries still in the proof file are included.
The Account Detail screen displays the results. Click Detail or Journal on the ribbon for more information on a specific entry.
Clicking Detail on the ribbon displays a single entry from the account. The detail screen varies according to the journal entry source type. For example, APP entries display the AP Check Info screen.
Munis® General Ledger, Version 11.2 Page 89

Clicking Journal provides the Journal Inquiry/Print screen, which displays the entire journal.
Click Unposted Find on the ribbon to view transactions not yet closed to a month. This is different than selecting the Include Unposted Journals check box on the Details screen, which shows transactions not yet posted that are still in the proof stage.
MonthsTo view account monthly data:
Munis® General Ledger, Version 11.2 Page 90

1. On the Account Inquiry screen, click Months.
The program displays a monthly view of all journal transactions that have been closed to a period. If the transactions have not been through a month-end process, they are not included in the monthly data. However, you can view transactions not yet closed in the current month detail. Transactions that are in journal entry/proof and not yet posted are not visible in any screen.
2. Click Curr Month Detail on the ribbon to display all of the posted activity (that has been closed to a period).
3. Click Monthly Totals on the ribbon to show the totals all of the posted activity (that has been closed to a period) for the accounts in the active set by month for the current year.
Munis® General Ledger, Version 11.2 Page 91

TotalsTo view account totals, click Totals on the Account Inquiry screen.
The program refreshes the display to show the combined totals for all accounts in the active set for transactions in closed and unclosed periods. Click Return on the ribbon to return to the previous screen.
2 Year AmountsThis option is available if your organization uses biennial budgeting.Click 2 Year Amounts to show biennial budgeting details. If the biennial year is set to one (1), the current year and next year are summed; otherwise, the current year and last year are totaled.
GL ImpactThe general ledger is not affected by this program as it is inquiry only.
Munis® General Ledger, Version 11.2 Page 92

Year to Date Budget ReportObjectiveThis document provides instructions for generating a Year-to-Date Budget report. The Year-to-Date (YTD) Budget report serves as a primary monthly budget report, but its flexible definition makes it suitable for special analysis purposes.
OverviewThe YTD Budget Report can be run for the following purposes:
Report revenues collected to a specific period. Report expenses to a specific period. Report encumbrances to a specific period. Report current budget, expenditures versus carry forward budget, expenditures, and
encumbrances. Report available budget from posted transactions or available budget from pending
transactions. Report on fund balance position. Proof budget, encumbrance, expenditure, and revenue balances. Proof chart of accounts (COA) conversions and account balance conversions.
This report can also be run for the following years and periods: Three years prior to current fiscal year for periods 1-13. Two years prior to current fiscal year for periods 1-13. Previous fiscal year for periods 1-13 and for 99 (memo balance). Current fiscal year for periods 1-13 and for 99 (memo balance). Next fiscal year for periods 1-13 and 99 (memo balance).
This document covers the available options and how they affect the presentation of the displayed report.
PrerequisitesBefore you can successfully use this feature, you must ensure that the necessary permissions and settings are in place. If permissions or settings are not set up properly, or if the required programs are not available on the Munis menu, contact the system administrator.
Confirm the following:
You have the permissions to view the general ledger accounts and funds for which to report. The chart of accounts (COA) is established. The adopted budget has been posted.
Munis® General Ledger, Version 11.2 Page 93
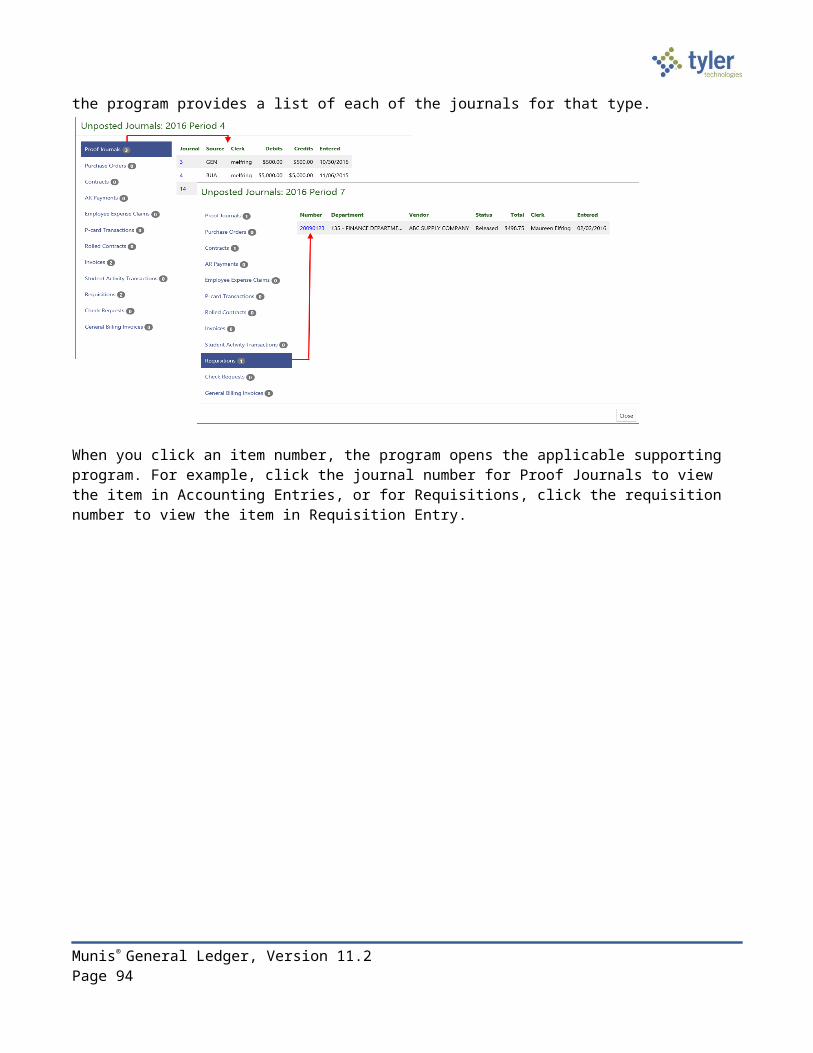
ProcedureTo create a year-to-date budget report:
1. Open the Year to Date Budget program.Financials > General Ledger > Inquiries and Reports > YTD Budget Report -or- Department> YTD Budget Report
2. Click Search or Segment Find from the Search group on the ribbon to identify accounts for the YTD Budget Report. If you click Search, complete the fields according to the following table, and then click Accept on the ribbon.
Field Description [Customer Name]Account RollupOrgObjectProject
These boxes contain the org, object, and project (if applicable) codes that represent the account for which to create a report.
Rollup Code This box stores the budget rollup code for the specified account.To search on a range of budget rollup codes, insert a colon (:) between the first and last codes in the search range. Use the asterisk (*) wildcard character to find all codes.
Account Type/StatusAccount Type This list indicates the type of account:
revenue or expense. You can select the blank option to include all account types.
Account Status This list determines the account status: active or inactive. You can select the blank option to include both active and inactive accounts.
If you select Segment Find, complete the fields on the Segment Find screen, and then click Accept
Munis® General Ledger, Version 11.2 Page 94

on the ribbon.
For either search method, the program displays the number of records found.
3. Click Report Options.The program displays the Report Options screen.
4. Complete the fields according to the following table to define the report settings.
Munis® General Ledger, Version 11.2 Page 95
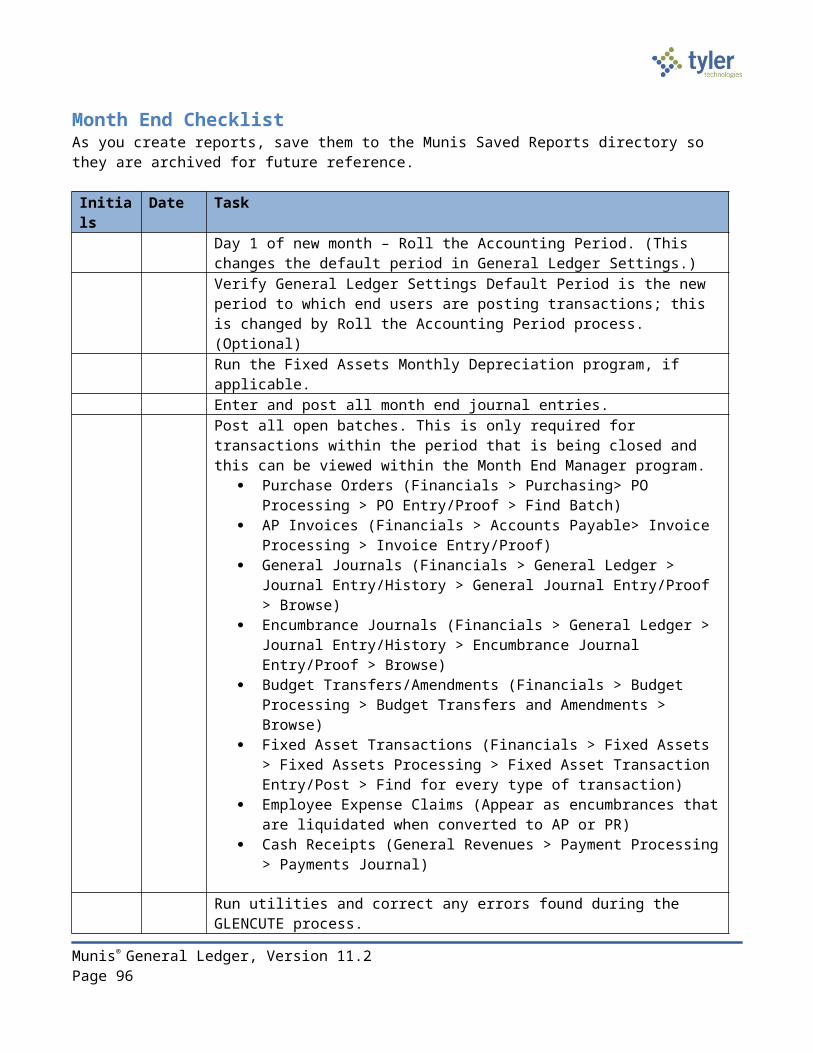
Field Description [Customer Name]Execute This Report
This list allows you to use Munis Scheduler to process the report. If you select Now to process the report
immediately, click the Print, Text File, PDF, or Preview button to print, view, or save the report.
If you select In Background (now) to process the report a single time using the event log and e-mail notification features, or if you select At a Scheduled Time to establish a specific time when the report runs, the program uses Munis Scheduler.
Field # (Sequence 1 to 4)
These lists establish a particular component (segment, org, and object) of the account structure as a sort key for the print sequence.Sequence 1 is the primary sort key for all accounts on the report. Sequence 2 is the secondary sort, and so on.The default sort is by fund, org, character, and object. Object does not need to be defined if it is the lowest level of the report.
Total This check box, if selected, causes the report to print a subtotal line whenever the sequence changes. For example, org code may have been selected as part of the sort sequence so that the system prints a total whenever the org changes. If this check box is not selected, Sequence 1 Total Revenues and Total Expenses are suppressed for this level. If this check box is selected in Sequence 1 and in Sequence 4, there is no label on the last level.
Page Break This check box, if selected, causes the program to start a new page whenever the particular sequence changes. If this check box is not selected in Sequence 1, there is no label in the page header and this level has a header label like all other sequence levels.
Report Title These boxes contain the title for the YTD report. The default value for the first line of the title is Year-to Date Budget Report, but you can change this.You can enter up to 40 characters of text on the two lines of text. The title centers automatically when the report prints.
Munis® General Ledger, Version 11.2 Page 96

Print Options Tab
Field Description [Customer Name]Include Only Accounts That Used _% or Greater of Budget
This option indicates which accounts to include based on the percent of the budget used. For example, if you type 100 in this box, the report includes accounts with a percent used greater than or equal to 100. This includes accounts that have used the entire budget or have exceeded the budget.If the value of this box is 0 or greater, up to 100, the percent used is set to and prints on the report as 100% when the account has a zero revised budget and actual or encumbrance activity.Type a percent or leave this box blank to include all accounts.
Order Accounts By This list allows you to select in what order accounts are sorted: org/object/project or full account.
Totals Only This check box, if selected, causes the report to print totals as described in the Field # Sequence selections. This means that the report does not include any accounts that are not entered in the Sequence boxes and does not include transaction detail. If none of the four sequence groups is selected, the report includes only a Grand Total.
Account Description This list determines the description that prints next to the account: full or short. The full description contains up to 30 characters; the short description contains 10.
Print Full GL Account This check box, if selected, directs the report to print the full account number with each segment separated by a dash. This prints instead of the org/object/project codes.This option is only accessible when the Totals Only check box is not selected.
Munis® General Ledger, Version 11.2 Page 97

Field Description [Customer Name]Roll Projects to Object This check box, if selected, with project
accounting is in use, causes to program to summarize all general ledger accounts that have a project code under their common org and object. Instead of each project account printing with its own descriptions, it is included under the org/object.
Print Report Options This check box, if selected, causes the program to append the Search criteria and report option settings at the end of the report.
Year/Period This list indicates the time period for which information for the budget report is selected.If you select Within Year/Period, you must specify a fiscal year and period: For the fiscal year, you can enter the
current, next year (which must be period 99), the last year, last year 2, or last year 3.
For the fiscal period, you can enter periods 1-13 and 99 (memo balance, which includes posted and pending transactions). For the current, next or last year, the report may be run for any period other than 00 (start-of-year), including memo balance (99). For 2 and 3 years prior, the report may only be run for periods 1-13.
The default value for the period populates from the Current Year/Period field in Roll Accounting Period, but you can enter any period.Notes: Any period includes entries for that period
that have not been closed using Month-End Processing.
Period 99 retrieves up-to-the-minute totals, using the Memo Balance field for actuals, the Encumbrances field for encumbrances, and the Revised Budget field for Budget. Choosing Period 99 aligns the report to Account Inquiry reporting.
Last fiscal year retrieves last-year figures. Next fiscal year retrieves next-year actuals
and encumbrances. If Post to Master for Reports on the Budget menu has been run, next fiscal year also includes next year adopted budget.
If the fund is a multiyear fund, the program calculates and displays the three budget field amounts (original appropriation,
Munis® General Ledger, Version 11.2 Page 98

Field Description [Customer Name]transfers/adjustment, and revised budget) as if the period selected were 99.
If last year and period 13 is requested, current year carry forward budget is used for the encumbrance amount.
Carry Forward This list defines the report output as: Totals (GAAP) - includes current year and
carry forward activity. Current year only - excludes activity
related to encumbrance carry forward. Carry forward only - Includes only activity
related to encumbrance carry forward.The default value is Totals (GAAP), but you can change this option for any period in the entered year.
Print MTD Version This check box, if selected, causes the report to print a month-to-date column on the report. The MTD column is either MTD Expended or Actual MTD Revenue. If the MTD option is chosen, the Transfers/Adjustments column is omitted.
Format Type This list determines the detail format option: Standard or Cents in Budget Amount. When you select Cents in Budget Amount, the Transfers/Adjustments and Revised Budget columns display cents.
Double Space This check box, if selected, causes the report to print in double-spaced format.This option is only accessible when the Totals Only check box is not selected.
Suppress Zero Balance Accounts
This check box, if selected, directs the report to exclude accounts that meet the following conditions: zero original budget, zero budget transfers, zero revised budget, zero actual, zero month-to-date actual, zero encumbrances, zero available budget, and if detail is selected, no detail for the reporting period.
Munis® General Ledger, Version 11.2 Page 99

Additional Options Tab
Field Description [Customer Name]Include Requisition Amounts
This check box, if selected, causes the program to add requisition amounts to the report and to rename the Encumbrances column to Enc/Req to reflect this.This check box is accessible for only current year and next year reporting and when period 99 is chosen. The Available Budget column is affected as it uses the encumbrance amount in its calculation.
Print Revenues - Version Headings
This check box, if selected, causes the program to print the revenue-related column headings versus the standard column headings. Select this check box to print revenues-version headings. There is no encumbrances column.
Print Revenue as Credit
This check box, if selected, causes the report to print revenue accounts as credits. This check box is available when the report is being run for just revenue accounts. If not selected, the report prints revenue account balances without the minus sign.
Print Revenue Budgets as Zero
This check box, if selected, indicates to the program that revenue budget amounts should print as zero.
Include Fund Balance This check box, if selected, indicates to the program that fund balance summary information is included. If you select this option, the fund balance summary prints at the end of each fund.This check box is only accessible if there are both revenue and expense accounts in the active set and the Field # in Sequence 1 is Fund.
Munis® General Ledger, Version 11.2 Page 100

Field Description [Customer Name]Sort/Total Budget Rollup
This check box, if selected, causes the program to display the budget rollup code totals in the report.This check box is only accessible if the Rollup field is completed on the main YTD Budget Report screen.
Print Journal Detail This report, if selected, causes the program to extract detail transactions from the GL Journal Hold and GL History tables and prints these detail lines for each account. When printing journal entry detail, SOY entries are treated like purchase order entries. These SOY entries are the encumbrance entries for purchase orders carried over into the current year from last year. To include the SOY journal entries, you must use a starting period of 0.
Include Budget Entries This check box, if selected, causes transaction type 5 journal entries to be included in the detail of the report.
Include Encumb/Liq Entries
This check box, if selected, causes transaction type 4 (encumbrance) journal entries to be included in the detail of the report.
Sort Option This options determines the sort order if the Print Journal Detail check box is selected; sort options are journal entries or purchase orders.
Detail Format Option This list determines the journal detail format: Standard - A standard report where journal
detail is presented as is. Column Sensitive - The detail line
formatted based on the journal source code of the detail.
For example, AP*, PO*, SOY, and R* source journals have reference 1 labeled "VND" and reference 2 labeled "PO." The detail line also has the vendor's alpha name presented before the journal comment and the detail line ends with the check number where available. In all other journals, only reference 1 is presented with the label REG (reference 2 is omitted) and the line ends with the journal comment.
Include Additional JE Comments
This check box, if selected, directs that journal entry comments print on the report.
Multiyear View This is the default view for multiyear funds. If Default is selected, the program applies the default setting from each account. If one of the other options is selected, the program applies that view to all accounts in the set, regardless of their individual default settings.
Munis® General Ledger, Version 11.2 Page 101

Field Description [Customer Name]Amounts/Totals Exceed 999 Million Dollars
This check box, if selected, directs the program to include amounts that exceed $999,999,999.00 by displaying the account description on a separate line from the totals. If this option is cleared, the report includes the amounts by shortening the description of the account to make room for the dollar amount and display all of the account information on a single line.
From Yr/PeriodTo Yr/Period
These boxes define the range of years and periods for which to include account detail to include on the report. Typically, this would reflect one month's detail, but it could be year-to-date.These boxes are only accessible if the Print Journal Detail check box is selected.
5. Click Accept.
6. Click Return on the ribbon to close the Report Options screen.
7. On the main screen, click Preview to display your report or Print to print the report.
Your report displays according to the report options that you selected.
Munis® General Ledger, Version 11.2 Page 102
ResultsYou can now analyze what transactions have occurred within your search and sequence settings, confirm that a budget was posted correctly, proof your chart of accounts, or look at transactions for a specific period.
GL ImpactThe general ledger is not affected by this action.
Munis® General Ledger, Version 11.2 Page 103

Account Trial Balance ReportObjectiveThis document provides the procedure for completing the Account Trial Balance Report program in its full form to check if a fund is in balance. If the fund is not in balance, the report identifies where and what entries have caused it to go out of balance. This report is an important tool when reconciling funds prior to year-end and month-end closes.
OverviewThe Account Trial Balance report indicates if a fund is out of balance, or by what amount your fund is out of balance. When you create an Account Trial Balance report for all accounts in a fund, both the beginning balance and the ending balance should be zero (debits should equal credits for the fund totals). If a fund is out of balance, use both the All and Balance options to narrow down the type of account in which the discrepancy has occurred. You can also use the Detail option to see every transaction that has occurred within that fund to identify what transactions have caused the discrepancy.
PrerequisitesBefore you can successfully use this feature, you must ensure that the necessary permissions and settings are in place. If permissions or settings are not set up properly, or if the required programs are not available on the Munis menu, contact the system administrator.
Confirm the following:
You have the proper general ledger permissions to view the accounts and funds to be reported.
The chart of accounts (COA) has been established.
Munis® General Ledger, Version 11.2 Page 104
ProcedureUse the following procedures to create trial balance reports:
1. Open the Account Trial Balance program.Financials > General Ledger > Journal Entry/History > Account Trial Balance
2. Click Search. The program displays the GL Segment Find screen.
3. Complete the fields to define the report data. The segment names vary according to the labels assigned by your organization.
4. Click Accept.The program creates an active set of records matching the search criteria and returns to the main screen.
5. Click Report Options on the ribbon. The program makes the reporting criteria fields accessible.
Munis® General Ledger, Version 11.2 Page 105

6. Complete the fields according to the following table to define the report settings.
Field Description [Customer Name]Report OptionsExecute This Report
This list allows you to use Munis Scheduler to process the report. If you select Now to process the
report immediately, use the Print, Text File, PDF, or Preview button to print, view, or save the report.
If you select In Background (now) to process the report a single time using the event log and email notification features, or if you select At a Scheduled Time to establish a specific time when the report runs, the program uses Munis Scheduler.
Print (D)etail or (S)ummary
This box specifies the level of reporting.If you select Detail, the report includes all journal entries for that account whether or not they have been closed to month. By choosing Summary the report will display only totals for each account.
Fiscal Year-to-Date Version
This check box, if selected, causes the report to include fiscal year-to date balances.If you select this check box, the report automatically enters 1 in the Reporting From Period box. If you do not select this check box, you can enter a value in the Reporting From Period box.You cannot run the report for the start-of-year period 00.
Reporting Year This is the year to include in the report.The reporting year must be the current year (the default) or last year.
Reporting from Period
This is the range of fiscal periods in the range of periods to include. If the Fiscal Year-to-Date check box is selected, this field is not available.
Journal Detail from
These boxes contain the first and last dates that define the range of journal dates to include.This box is only accessible if the value of the Print Detail or Summary option is Detail.
(B)alance Sheet or (A)ll Accounts
This box indicates the account types that the report includes.If you select balance sheet accounts, the program includes revenue and expenditure control accounts. If you select All Accounts, then all accounts
Munis® General Ledger, Version 11.2 Page 106

Field Description [Customer Name]except the revenue and expenditure control accounts are included. To ensure that the fund is in balance, run the report for both Balance (B) and All Accounts (A).
Rollup Projects to Object Level
This check box, if selected, causes the program to summarize project accounts.The detail posted to these accounts is rolled up to the org/object level.The ending balance is calculated as the net of all projects associated with the org/object.
Omit Zero Balance Accounts
This check box, if selected, causes the report to omit accounts with zero balances.
Sort By The list establishes the sort sequence of the report.The default value is 1-Fund, Segments.For the Org account entry mode, if All Accounts are selected for account types, the options are 1-Fund, Segments and 3-Org-Obj-Project.For the Org account entry mode, if Balance Sheet accounts are selected for account types, all the options are available.
Print Org Code This check box, if selected, causes the report to display the org code below the account.
Print Fund Header and Org/Obj on Total Line
This check box, if selected, causes the program to print the fund account as the header, and the org/obj in the totals.
Include Page Break Between Funds
This check box, if selected, causes the program to separate fund totals in the printed report.This check box applies to both Detail and Summary reports.The default value for this check box is selected (Yes). This will ensure that a new fund does not start in the middle of a page.
Amounts/Totals Exceed 999 Million Dollars
If selected, this check box indicates that the report contains amounts and/or totals that exceed $999M. The program adjusts the format of the report to adjust for the additional required characters.
Print Report Options
This check box, if selected, directs the program to include a brief summary of the report options used to generate the
Munis® General Ledger, Version 11.2 Page 107

Field Description [Customer Name]report.Clear this check box to exclude the summary.
Include Hold Journals in Beginning Balance
When selected, this check box causes the report to include journals that have not yet been closed to a month.
Include Page Break Between Each Subfund
When this check box is selected, the report includes a page break after each subfund code.
Print Subfund Totals
Selecting this check box directs the program to include the total for each subfund on the report.
7. Click Accept.
8. Click Preview to display the report or Print to print the report to your local printer.
Your report may display differently depending on the report options you have chosen.
Munis® General Ledger, Version 11.2 Page 108

The Display format allows you to display your search results to the screen as you enter the data.To create a Display Format report:
1. Click Display Format.
The program displays the Brief Account Trail Balance Display screen.
2. Complete the fields to define the report accounts and effective dates.
3. Click Accept. The program refreshes the screen to display an active set of records that consists of all of the
Munis® General Ledger, Version 11.2 Page 109

accounts that matched the criteria.
4. Use the navigation buttons to view the accounts.
5. Click Preview to display your report or click Print to print the report to the local printer.
ResultsThe report indicates if a fund is in balance, and if not, what transactions have caused it to be out of balance. When reading the Account Trial Balance Report, remember that both the beginning balances and the ending balances should be zero, and debits should equal credits for the fund totals.
GL ImpactThe general ledger is not affected by this action.
What’s Next?If there are any discrepancies in the report, post the correcting journal entries to bring the fund back into balance.
Munis® General Ledger, Version 11.2 Page 110

GL Import JournalsObjectiveThis document provides instructions on how to import data from ASCII files using the standard Import Journals program. This program is used for journal imports from systems or sources other than Munis.
OverviewWhen you import journal data into Munis, data must be in specific formats and you must understand the various file layouts. The following imports are available in the Import Journals program:
Standard Import Format— This is a fixed length ASCII file layout for importing standard journal entries.
Cayenta Import Format—This is a fixed length ASCII file layout for importing journal entries from a Cayenta system into Munis.
Budget Import Format—This is a fixed length ASCII file layout for importing standard journal entries.
Standard Long Account Format —This is a fixed length ASCII file layout for importing standard journal entries using the Munis long account format.
Standard (Multiple Journals) —This is a fixed length ASCII file layout for importing standard journal entries into multiple journals in Munis.
Faster Import Format— This is a fixed length ASCII file layout for importing journal entries from a FASTER fleet maintenance system into Munis. (Note: FASTER is the name of the software, not an adjective for this import format.)
ISIS Payroll ZF65 Report—Imports data from Microsoft Excel. This import is specific to the Louisiana Department of Education.
Budget Long Account Format —The account type is in position 141 and the long account number is in positions 142 to 176; the remaining format is the same as the Budget Import Format.
Jonas Format—This format is tab-delimited. Oklahoma Benefit Format—This format is intended for use by El Monte and Tulsa,
Oklahoma. Standard Excel Import—This is a standard format for importing via Microsoft Excel file.
When this format is selected, the program displays the Generate Excel Template button. Clicking the button opens Excel with a blank form containing only column headers. This form can be used to create the import file.
Pipe Delimited 1—This format is delimited using pipe characters. When you import using this format, the program examines the org and object codes and determines whether the combination represents an existing Munis account. If the account is valid, the program uses that account. If the account is not valid, the program combines the org and object with a hyphen between the two, and then applies that value to the cross reference table in order to select a cross reference string.
Oklahoma Payroll Import—This format is intended for Oklahoma payroll users.
Munis® General Ledger, Version 11.2 Page 111

PrerequisitesBefore you can successfully use this feature, you must ensure that the necessary permissions and settings are in place. If permissions or settings are not set up properly, or if the required programs are not available on the Munis menu, contact the system administrator.
Confirm the following:
The chart of accounts (COA) has been established and includes all general ledger accounts being imported or referenced in the Account X-Reference program.
The Account X-Reference table has been created, if applicable.
Procedure To import ASCII files from other systems or sources:1. Open the Munis Import Journals program.
Financials > General Ledger > Journal Entry/History > Import Journals
2. Click Define.3. Complete the fields to define the import parameters. Refer to the Field Description table that follows
for specific field details. 4. When you have completed the definition of the screen, press Enter or click Accept on the ribbon. 5. Click the Pre-Edit option to complete the process to find any errors in the file prior to importing the
data.6. Click the Import option to import the journal entries.
Field Description [Customer Name]Import OptionsExecute This Report
This list allows you to use Munis Scheduler to process the report: Select Now to process the report
immediately using the options in the Output group of the ribbon.
Munis® General Ledger, Version 11.2 Page 112

Field Description [Customer Name] Select In Background (now) to process
the report a single time using the event log and email notification features in Munis Scheduler.
Select At a Scheduled Time to establish a specific time when the report runs using Munis Scheduler.
Import Source This list determines the format of the import file.
Import file This box identifies the full path and filename of the import file. For example: c:\jeimport.txt.
Journal InfoFiscal Year/Period
This list identifies the fiscal year and period for the report. Select Within Year/Period to define the
specific year and period to which to post the imported journal.
Select Current Fiscal Month or Prior Fiscal Month to use the appropriate fiscal period according to the Current Year/Period setting in the General Ledger Settings program. The latter options assist in automated processing using the Munis Scheduler.
If you select Within Year/Period, you must specify the year and period. Enter the fiscal year to which the imported journal should post. Otherwise, the current or prior fiscal month will display based on the Current Year/Period setting in the General Ledger Settings program.
Journal Reference
This box contains a user-defined reference. The reference can contain up to six characters of alphanumeric text. This field is optional.
Short Description
This box contains a short journal description. This is a required field. The description can contain up to 10 characters. This is a required field.
Effective Date This list determines the effective date that the transactions in the import file should use for an effective date.Select End of Prior Month or End of Current Month to have Munis set the effective date according to your Current Year/Period settings in the General Ledger Settings program. Using these options assist in automated processing using the Munis Scheduler.
Munis® General Ledger, Version 11.2 Page 113

Field Description [Customer Name]If you select Enter Effective Date, you must enter a specific date in the date box that follows.
Budget Amendment Type
This list identifies the appropriate budget amendment type, if applicable.This option applies to the Budget Import format only. Use 1 or 4 if all entries in this
amendment journal will be balanced within the same account type (expense to expense or revenue to revenue).
Use 2 or 5 if all entries in this amendment journal will be balanced, but across account types (expense to revenue or revenue to expense).
Use 3 or 6 if entries will not be balanced in this amendment journal.
Types 1, 2, or 3 are used when the amount on each line in the import file is the amount that the account’s budget should be increased or decreased.
Types 4, 5 or 6 are used when the amount on each line in the import file is the new budget amount. The amendment will be made for the difference between the amount being imported and the amount currently budgeted on the account.
Display Over Budget Warning
This check box, if selected, causes the program to display a warning for each line in the import journal that is over budget. Otherwise, no budget checking will be done and no warnings will display.
Import Journal Source GCR
This check box, if checked, causes the journal source for these transactions to be GCR for General Cash Receipt. Otherwise, the source code is GNI for General Journal Import.
Remove Import File
This check box, if selected, directs the program to remove the import file from its location after it is successfully imported into the Munis system. This prevents the program from performing duplicate imports.
ResultsThe Import Journals program results in journal entries or budget amendments in the proof stage.
Munis® General Ledger, Version 11.2 Page 114

What’s Next?To affect the general ledger, you must output/post the journals using the Journal Entry/Proof or the Budget Amendments programs. To find the journals, click Browse on the ribbon when you open either of these programs.
Munis® General Ledger, Version 11.2 Page 115

Appendix A—Financial Command CenterOverviewThe Financial Command Center provides a centralized interface for the Munis Financials programs. Use the command center to view and maintain information regarding your organization's financial structure and transactions. In addition, you can use the options provided within the command center to open Munis programs, where you can maintain your organization’s data. The Financial Command Center enforces all of the role-based permissions defined for individual Munis programs.
PrerequisitesBefore you can successfully use this feature, you must ensure that the necessary permissions and settings are in place. If permissions or settings are not set up properly, or if the required programs are not available on the Munis menu, contact the system administrator.
Munis® General Ledger, Version 11.2 Page 116

ProceduresThe Financial Command Center provides information for the Accounts Receivable, Checks, Expenditures, Fixed Assets, General Ledger, and Project Ledger categories.
The program ribbon provides direct access to related Munis programs.
For each category that includes a link to more detailed information, the Settings option determines the detail provided. For example, when the Expenditures category is active, click Settings to define the information panes that display when you select the Details option for a selected expenditure.
On Detail screens, the header of each detail pane provides options for managing the data.
Munis® General Ledger, Version 11.2 Page 117
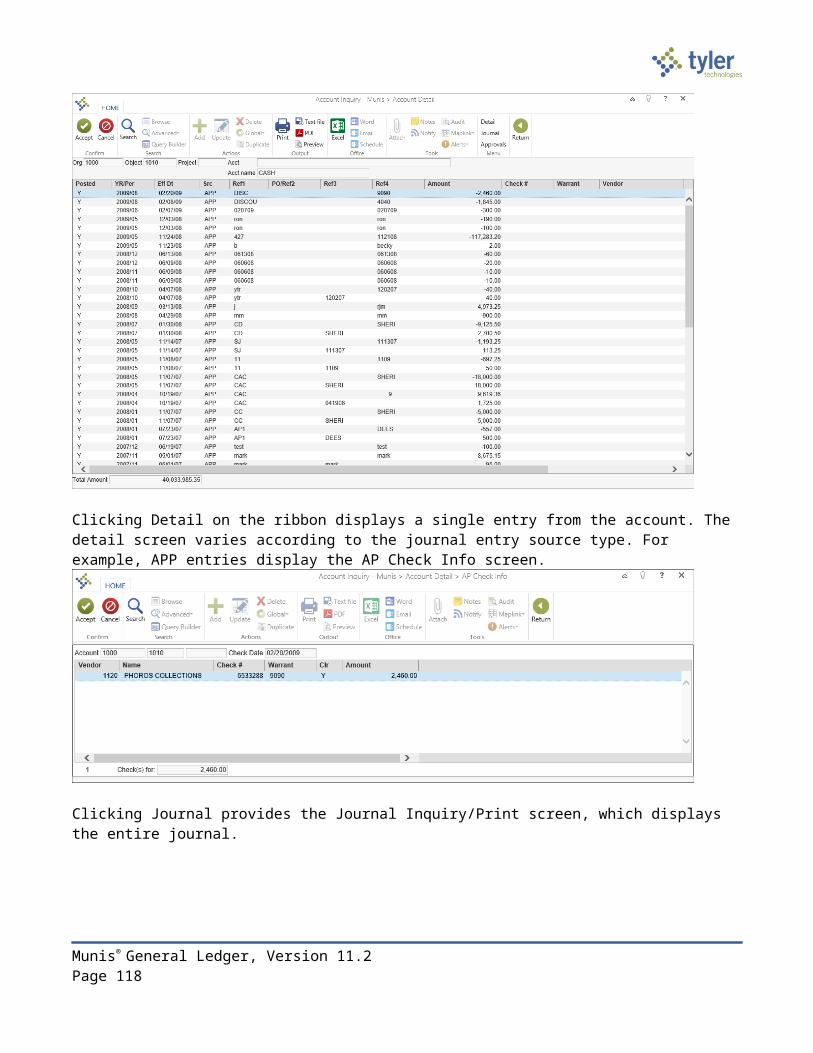
Accounts ReceivableThe Accounts Receivable screen provides access to the Munis programs that process accounts receivable transactions. You can add or reverse payments, process journal entries, view bills and receipts, and generate reports.
Use these options to create or maintain data in Munis programs: Enter Payment— Record payments for receivables and miscellaneous receipts. Reverse Payment— Reverse payments that have posted to the general ledger. Proof— Review, update, and post payment batches in the Payment Journal program. Journal— Review, update, and post payment batches. Post multiple batch types at one
time, such as batches for payments, refunds, write-offs, and so on, or select specific batches within an active set to post.
Receipt Inquiry— Perform inquiries or maintenance on receipts stored in accounts receivable (AR) history records.
Bill Inquiry— Search for bills. The searches allow access to records based on the defined search criteria. If a single record is found, the Single Bill View screen displays. If multiple records are found, the Account View screen displays.
Reports—Create report related to Accounts Receivable activities.
Munis® General Ledger, Version 11.2 Page 118

ChecksChecks contains options for processing of accounts payable, payroll, and networked district checks. Each check type has an individual tab; use the options on each tab to process checks of the type that matches the tab title. For example, the Accounts Payable tab only contains options for processing Accounts Payable checks. The Networked tab is only applicable if you use the Networked District Check Processing programs.
Use the options on the available tabs to create or maintain data in Munis programs.Accounts Payable
Void Check—Void individual vendor checks. In addition to voiding the check, the program reopens the accounts payable invoice that was paid by the check by changing the status of the invoice from Paid to Approved.
Select Items to Pay—Print a report of open invoices that are due for payment by a particular date, or that have been preassigned a specific warrant or group number. The report lists key invoice information by vendor, prints the total amount to be paid to each vendor, and prints the total amount posted to each cash account.
Print Checks— Generate a batch of checks, paying all invoices for a particular warrant number. You can also print single checks and review a record of manual check payments to outstanding invoices.
EFT— Create an electronic file transfer (EFT) file to send to a banking institution. After the program completes its processing, the invoice status is changed to P-Printed so the Cash Disbursements Journal recognizes that the EFT report has been run.
Disbursement Journal— Print a list, or journal, of all checks processed in Print Checks and those created as direct disbursements in the Invoice Entry program. You can also create journal entries to the cash and accounts payable accounts associated with each invoice record created.
Reconciliation—Identify check records as cleared once the check or wire transfer information is returned from the bank.
Munis® General Ledger, Version 11.2 Page 119

Payroll Print Advices—Print or reprint payroll checks and advices for the current payroll. Advice Register/Export —Print or create a file of net pay amounts for all employees who
have 100% of their pay directly deposited. Print Checks—Print or reprint payroll checks and advices for the current payroll. Check Register— Complete the payroll check register process. Reconcile Payroll Checks— Clear payroll checks. This option differs from Manual Check
Reconciliation in that it requires the processing of an input file to clear the checks. Reconcile Manual Checks— Change the status of check records that have been generated
through payroll processing. Clear a single check or an entire group of payroll checks.
Networked(Only applicable if you use the Networked District Check Processing programs.)
Settings— Control each district's custom information for accounts payable and payroll check printing. The program must be run before processing checks for the first time.
Auditor Deposit Summary—Display accounts receivable totals by fund for receipts in an unposted batch.
TC36 Proof— Generate a proof of the TC36 report for review. Generate the report for a specific run number and warrant number.
District Check Processing— Reconcile and process accounts payable and payroll checks for districts in the network.
Central Run Parameters—Define the district codes to use for account reconciliation. At least one district must be entered before central processing can occur.
Automated Checks—Allow the central system to define a network accounts payable check run. Once the run is defined, the program uses web services to perform the printing from the networked system.
EFT Register/Media— Allow a central system to define the electronic file needed for submission of a combined EFT to a county bank. The program runs in a similar manner as the standard EFT Processing program, but it uses a range of districts instead of a defined account.
Retrieve AP Checks—Allow a central system to define a range of departments from which to retrieve accounts payable check information. Once retrieved, the checks can be printed from the central location.
Export AP TC36/TC50—Allow a central system to define the electronic file required for submission to the county treasurer.
AP Check Reconciliation— Allow a central system to define the import format of reconciliation files provided by the county treasurer or bank.
Payroll Check Processing— Allow a central system to define a network payroll check print run, and then use web services to print the checks from the networked system. The program allows both standard print and reprint options.
Advice Register/Media—Allow a central system to define the electronic file needed to submit a combined direct deposit file to a county bank using a range of district codes.
Retrieve PR Checks— Allow a central system to define a network payroll check run, and then use web services to print from the networked system.
Export PR TC36/Warrant Issues— Allow a central system to define the electronic files needed for submission to the county treasurer or bank.
Munis® General Ledger, Version 11.2 Page 120

PR Check Reconciliation— Allow a central system to define the import format of reconciliation files provided by the county treasurer or bank.
Define District Run Parameters—Complete additional setup screens for Central Settings, District Segment Translations, and District Translation Exceptions.
ExpendituresExpenditures provides an overview of expenditure transactions and records. The two program tabs, Expenditures and Overview, display data drawn from the Expenditure Central program.
Use the Excel button on the ribbon of either tab to export the expenditure information to an Excel spreadsheet.
Expenditures Tab
On the Expenditures tab, use the Search fields to define the data that displays. On the ribbon, the Standard PO and Open Invoice options run the Standard PO Reports and Open Invoice Report programs in Munis.
Expenditure Overview Tab
The Expenditure Overview tab provides expenditure detail by category: Open Requisitions, Encumbered Contracts, Open Purchase Orders, Outstanding Invoices, Uncashed Checks, and Paid Invoices. For each category, the program displays the number of items and the total expenditure amount. Use the My Filters options to reset the parameters for display. Once you have set the
Munis® General Ledger, Version 11.2 Page 121

parameters, click the More (+) button to hide the My Filters pane.
Munis® General Ledger, Version 11.2 Page 122

To view a list of items included in a category, click the category tile to expand the More section. Click the Details option for an individual item to display more information.
The detail panes that display are determined by the selections defined in the program settings. When applicable, the View/Maintain option is available to open the associated Munis program. The following table provides a description for each detail option.
Detail Pane DescriptionChecks Displays a list of checks associated with the current expenditure. For example, for
a purchase order record, the data includes all of the checks used to pay the invoices liquidating that purchase order.View/Maintain opens the Checks Detail screen of the Vendors program.
Contracts Displays a list of contracts associated with the expenditure.View/Maintain opens the Contract Inquiry program.
Expenditures Summary
Contains a time line of expenditures associated with the record. The time line displays each expenditure type in a tile, which you can click to display a brief summary of the expenditure.
Invoices Displays a list of invoices associated with the current expenditure.View/Maintain opens the Modify Invoices program.
Purchase Order Lines
Displays a list of purchase order lines associated with the current expenditure.View/Maintain opens the Purchase Order Inquiry program.
Purchase Order Receiving
Displays a list of purchase order receiving records associated with the current expenditure.
Munis® General Ledger, Version 11.2 Page 123

Detail Pane DescriptionPurchase Orders Displays a list of purchase orders associated with the current expenditure.
View/Maintain opens the Purchase Order Inquiry program.Requisitions Displays a list of requisitions associated with the current expenditure.
View/Maintain opens the Requisition Entry program.
Fixed AssetsThe Fixed Assets screen provides a list of fixed asset records that exist in your Munis database, as well as direct access to the Munis programs that provide maintenance and processing of those assets.
Use the Search box or the Advanced Search feature to access fixed asset records.When you first display the Fixed Assets screen, the Search box is available. After you complete a search, the screen refreshes to display data drawn from the Fixed Assets Central program.
Munis® General Ledger, Version 11.2 Page 124

When you click Detail, the program refreshes to display the information detail panes, as defined in the Settings option.
The following table provides a description for each detail option.
Detail Pane DescriptionAccounts Contains a list of general ledger accounts that have been associated with the fixed
asset record. Click a column title to sort the list by that column.Employees Displays employees that have been associated with the asset. Click an employee
name to view the employee record in Employee Central.Fixed Asset Provides general asset information.Funding Sources Lists the asset’s funding sources and percentages.Pending Transactions
Displays a listing of transactions that are pending for the asset. Clicking a link in the Type column opens the Fixed Asset Transaction Entry Post program with the selected transaction as the active record.
Purchases Contains a table that lists the purchases related to the asset. Clicking a vendor name opens the Vendor Central program, where you can view the vendor record. Click a purchase order number to open the Purchase Order Central program with that purchase order as the active Record. If your organization uses Tyler Content Manager (TCM), click the TCM button to view files attached to the purchase order in TCM.
Repairs Displays the history of repair work orders performed on the asset. A work order can be viewed in Work Orders Central by clicking the work order number.
Transactions Contains information regarding all of the transactions that have been entered for the asset.
Use the options on the ribbon to create or maintain Fixed Asset data in Munis programs. New Asset— Add new fixed asset records, modify records, improve, transfer, retire, or
dispose of existing fixed assets. Transaction Entry— Process changes that affect the general ledger.
Munis® General Ledger, Version 11.2 Page 125

Journal Entry—Make journal entries of account transactions within the Fixed Asset General Journal Entry program.
Depreciate—Depreciate a specified group of assets for a specific period of time. Journal entries are made for governmental and proprietary assets.
Depreciation Reversal— Reverse depreciation made to a fixed asset record. Purge—Permanently remove retired asset records from the database. The program only
purges assets that have been retired for two or more years. The program generates an exception report when successfully run.
Year End Process— Update the active fixed asset records by adjusting the replacement costs and the insured values and setting the start-of-year values. An audit record is used to ensure that this program is run only once for each fiscal year, unless errors are encountered while processing. The active fixed asset records are viewed in the Adjustments and Retirements program.
Approvals— Approve or reject fixed asset monetary transactions that were created in the FA Entry Transaction Selection program. After the transaction has been created, it remains pending until the approvers accept or reject it.
Asset Inquiry— To provide a display-only view of the New Assets information. All options accessed from the Asset Inquiry screen are also display only.
Assets— To maintain fixed asset records. The program works with the Fixed Assets Transaction Entry/Post program to process changes that create general ledger journal entries.
Adjustment/Retirements— To modify fixed asset data, improve, transfer, retire, dispose of existing fixed assets or reverse disposals and retirements.
Work File— To create fixed asset work file records from purchase orders, invoices, or a combination of the two. Use this program to add information to these work file records, and then create new fixed asset records or identify improvements to existing assets.
Journal Entry— To make journal entries of account transactions within the Fixed Asset General Journal Entry program.
In addition to the Actions and View/Maintain options, the Tools, Setup, Reports, and Workflow groups provide options for importing or exporting files, reviewing history, creating reports, and managing workflow actions:
Import Export —Create an import or export file to interface with a third-party vendor program to conduct annual inventories of fixed assets and upload any changes to Munis programs. You can also update fixed asset records by importing master files from an electronic file.
Audit—Review information on user activity within specific programs, including date, time, user, action, and so on.
Reports—Create reports related to your organization’s fixed asset activity. Setup— Complete set up for related fixed asset codes, attributes, and fields. Workflow—Access the approval history, business rules, pending actions, and workflow user
attributes details for Fixed Asset processing.
Munis® General Ledger, Version 11.2 Page 126

General LedgerThe General Ledger screen provides the ability to view and maintain general ledger accounts and project strings, as well as create and process journal entries, project codes, grants, and cash management records. The screen is divided into four tabs: Accounts, Journals, Projects, and Cash Management. The options on the ribbon of each tab provide access to programs used in the processing of general ledger transactions of the named type. For example, the Projects tab provides options for processing project accounting transactions.
Accounts TabThe Accounts tab contains a search box that allows you to view general ledger accounts, as well as options used to process general ledger account data. After you perform a search, the screen refreshes to display data drawn from the Account Central program. Use the My Filters options to further define the accounts that display.
The Accounts ribbon offers many options for reviewing or managing data in related Munis programs:
Use these options to create or maintain data in Munis programs:
Munis® General Ledger, Version 11.2 Page 127
Accounts Overview—Review general ledger accounts using the Accounts Overview program.
Roll Period— Change the value of the Default Year/Period box in General Ledger Settings for all users. (This feature requires administrative permissions.)
Monthly Process—Complete the month-end closing procedures. Close Current Fiscal Year— Complete the year end closing procedures. Make sure all year-
end procedures have been completed prior to completing this screen. Open New Year— Complete the open new year process. The Close Current Year must be
completed prior to opening a new year. Set Holding-Year-Open Flag —Set the holding-current-year-open identifier to let other Munis
programs know that the system is preparing to close. The primary purpose of this setting is to allow purchase orders coded as Next Year to be liquidated (invoiced).
Global Update —Change or reset a range of accounts for specified aspects of multiple accounts at one time or create multiple new accounts at one time in the Account Master program. (This feature requires administrative permissions.)
Audit—Display the Account Audit screen, which provides a list of all changes made to the general ledger files.
Import — Include general ledger accounts using an Excel file. Reports—Create reports related to General Ledger processing. Report Writer—Create reports Setup—Create codes and define settings related to General Ledger processing. Other Modules—Access other Munis programs that include account processing that affects
the general ledger. Workflow— Access the approval history, business rules, pending actions, and workflow user
attributes details for General Ledger processing.
Journals TabThe Journals tab allows users to view journal information, as well as options to create and post journals. This tab also offers reports related to the journal entries.
Use these options to create or maintain data in Munis programs: Journal Analysis—Review existing journal entries in the Journal Analysis program. Add Journal— Create a journal entry using the General Journal Entry and Proof program,
which is the most direct way to make journal entries of account transactions within the Munis system.
Reversal— Create a reversal general journal or change the posting period of a general journal. The change period option actually creates both a reversal journal and a new journal with a modified posting period. The Auto-Reverse option creates reversal journals for all journals in GL History that are coded for auto-reversal.
Recurring— Create and maintain recurring journal entries and then generate them on demand. After establishing the recurring journals, access this program on a regular basis to generate the journals
Munis® General Ledger, Version 11.2 Page 128

Post Summary—Print and post accumulated general ledger entries from other Munis functions such as Bill Detail, Fixed Assets, and so on.
Budget Completion Journal Update—Print the Budget Completion Journal and update Account Master current year budget, and for multiyear fund accounts, updates all other budget fields.
Post Last Year Adjustments—Update Account Master, GL History, and GL Journal Entry Hold records for last year period 13, close against expenditure and revenue control accounts to fund balance, and roll the adjustment amounts to current year balance sheet accounts.
NSFY Prior Year Generate Journal—Make journal entries of account transactions within the Munis system for the prior year.
Accounting Entries—Display and maintain general journal entries, budget transfers and amendments, and encumbrance journals.
Journal—Create initial year-to-date account balances at installation, make adjustments to existing journal entries, and add journal entries for transactions that are not automatically created through other programs in the system
Approvals— Approve entries, reject entries, or place entries on hold. Approvers must be set up in Workflow User Attributes and a business rule must be created for those users in Business Rules with a process code of GLJ
Import—Create a single, new, current-year journal using data from an ASCII file as journal entries, or create multiple, current year journals using the data from an ASCII file.
Export—Create an ASCII file using data from existing journals according to the example in file layouts. Several journals can be combined into one export journal. The ASCII file can then be imported into Munis using the program Import Munis JE ASCII File. This is useful when two entities share the Munis system
Account Detail History—Print a report detailing journal entries based on a defined range of accounting periods. Report information is sorted into account number/period/journal number sequence and prints a line for totals with total debits, credits, and the net balance for each account. The Account Detail History Report includes transactions from one-time pay vendors
Versatrans Transportation—Create a report that allows you to view or select journals created by the Munis VersaTrans TripTracker integration process.
Journal Control Number—View the next available journal number for each period of the fiscal year.
Source Maintenance— Define control account journals and due to/due from entries for organizations that balance to a fund or to a fund/segment combination. The journal entries that are created using this program are referred to as automatic journal entries or control account entries.
Projects TabThe Projects tab provides access to Munis programs that maintain Project Accounting journals and grant details.
Use these options to create or maintain data in Munis programs:
Munis® General Ledger, Version 11.2 Page 129

Add Project— Establish and maintain projects via the Project Master/Inquiry screen. Project Master and Project Inquiry contain a series of buttons to view records associated with the project. Click the Work Orders, Contracts, Contract Details, Fixed Assets, General Notes, Comments, Internal Contacts, Milestones, Locations, Task Groups, or Escrow buttons to open a screen that displays records of that type. If the folder displayed on the button is yellow, the project has at least one associated record of that type. A gray folder on the button indicates that no records of that type exist for the project.
Add Grant—Create a grant records using the Grant Manager program. Mass Project Creation—Create new groups of project accounts based on an existing group
of accounts. This is a convenient method of building project accounts in Munis programs or adding accounts when new projects or grants are added
Reimbursement Cost Processing—Create general billing invoices for reimbursements and indirect costs for a specific project or all projects. This reduces the amount of data entry required to create an invoice
Project—Establish and maintain projects using Project Master. Grant—Enter and maintain grant records in the Grant Master program. MTD Project Budget —Print a month-to-date report for a specified set of projects and
account numbers. It includes the status of actuals versus the revised budget from the general ledger account table.
YTD Project Budget—Print a year-to-date report for a specified set of projects and account numbers. It includes the status of actuals versus the revised budget from the general ledger account table.
Funding Source Grant Table—Create funding sources and grantor codes. Use these codes to allocate project contributions to one or more funding sources and track a single grantor's contributions to multiple projects.
Milestone Codes—Maintain user-defined milestones that are organized into three types (work, payment, or meeting) and five categories (contract, bid, grant, project, or work order). These codes assist in planning and completing key due dates for each category.
Miscellaneous Codes—Maintain the various code values used by projects that are managed by the general ledger and project ledger.
Cash Management TabCash Management options allow you to maintain and view cash totals and banking information within Munis.
Use these options to create or maintain data in Munis programs: Cash Flow Adjustments— View store receipts, disbursement, general journal, and
adjustment records that affect a specific cash account, and to generates the Cash Flow Journal Report.
Daily Treasurers Totals— Maintain and report on daily cash and deposit activity. Each day a new report is created. Each record contains receipt and deposit information by date. The receipt records and deposit records are summarized in the display
Munis® General Ledger, Version 11.2 Page 130

Interest Allocation— Establish interest allocation across one or more interest accounts based upon the average daily balance of an associated cash account.
Bank Reconciliation—Facilitate reconciliation between the organization’s bank cash account and the corresponding Munis cash accounts.
ADJ/Deposits Reconciliation—View journal entries made to cash accounts and clear them using this program. Reconciliation items come from journal entries to the cash accounts corresponding to the entered bank code/account. Journals with source CRX or GCR are marked as deposits and all other source journals are adjustments
Reports— Create reports related to Cash Management processing. Setup—Establish and maintain codes and settings to support Cash Management
processing.
Project LedgerThe Project Ledger screen provides project ledger data for viewing and maintenance. The screen is divided into two tabs: Projects, and Journals. The Projects tab includes options used to maintain project codes, parameters, and transactions. Use the options on the Journals tab to create and process project ledger journal entries.The ribbon options for these tabs open Munis programs used to maintain project ledger data. Projects TabThe Projects tab offers direct access to programs for creating and maintaining projects, as well as quick access to reports, setup options, and workflow settings.
Use these options to create or maintain data in Munis programs: Project Central—View projects in the Project Central program, which delivers summary and
detail information about project ledger data that exists in Munis. Add Project Wizard—Create new project records using the Project Builder program, which
provides step-by-step processing assistance. Project Builder defines project parameters and settings, add project segments and expense types, and build project expense and funding source strings.
Add Project— Create new project records using the Project Master program, which establishes and maintains projects. In order to use the program to create projects, first create project codes in the Project Segment Codes program.
Add Grant—Create a new grant record using the Grant Manager program. Allocate Overhead—Create overhead journals for projects, or project strings with defined
overhead percentages. When transactions are posted to a project or project string, the program uses the transaction amounts to determine the overhead amount to apply.
Allocate Revenue—Allocate expenses to their associated funding sources. Funding sources are defined as a funding source string and each string indicates an expense type to be allocated to the funding source.
Reverse Revenue Allocation—Reverse the revenue allocation process performed by the Project Revenue Allocation program. When revenue allocations are reversed, the program
Munis® General Ledger, Version 11.2 Page 131

allows the original expense journals to be eligible for selection in an allocation run again and updates associated funding source string entries by removing the allocation amounts.
Project Year Close—Close the fiscal year for Project Accounting; this is independent of the standard year end close process. A project fiscal year can differ from the standard general ledger fiscal year, so projects must be rolled based on the fiscal year defined in the Project Master program.
Project Ledger Mass Create—Add multiple project strings at once when a new project segment is added. The program requires selection of a model segment and entry of a range of project codes.
Project—Establish and maintain projects using the Project Master/Inquiry programs. Project Master and Project Inquiry contain a series of options to view records associated with a project.
Grant—Enter and maintain grant information using the Grant Master program. Expenses—View the Project Expense Inquiry screen that stores expense source strings, as
well as general ledger accounts, balances, and account information. Use the arrows next to the Project, Phase and Task to roll up the totals to that level.
Funding—Display the Project Funding Inquiry screen that stores funding source strings, as well as general ledger accounts, balances, and account information. Use the arrows next to the Project, Phase and Task to roll up the totals to that level.
Project Export—Export project data to an XML file. Reports—Create reports related to Project Ledger processing. Setup—Define codes and settings required for Project Ledger processing. Workflow— Access the approval history, business rules, pending actions, and workflow user
attributes details for Project Ledger processing.
Journals TabThe Journals tab offers links to Project Journals, reports and additional project setup.
Use these options to create or maintain data in Munis programs: Add Journal—Use the Project Journal Entry/Proof program to make adjustments to the
project ledger using the Project Journal Entry/Proof - Actual Adjustment (PAC) code. Add Encumbrance Journal— Use the Project Encumbrance Entry/Proof program to make
adjustments to the project ledger using the Project Encumbrance Entry/Proof - Encumbrance Adjustment (PAE) code.
Journal—Find and maintain project ledger journal entries in Project Journal Entry/Proof. Encumbrance Journal—Find and maintain the project encumbrance entries in Project
Encumbrance Entry/Proof. Approvals—Manage outstanding approvals using the Workflow Assistant program. The
program checks for pending actions entered in the Project Ledger program, and displays these when the program is opened.
Munis® General Ledger, Version 11.2 Page 132

Transaction Exception— Generate a report of general ledger account transaction that have been defined as having project accounts required, but have not yet had a project account defined.
Project and GL Activity— Create reports that contain posted project ledger amounts and their relationship with the general ledger for a selected date range.
Default GL Account Exception— Find all activity associated with a project account string, and report on all account activity that either matches or does not match the default general ledger account.
Project Journal Control Number— Define the next available journal number for Project Accounting records. Each set of default journal numbers is defined by the fiscal year. Within each fiscal year, define a next available journal number for up to twelve separate date ranges.
Munis® General Ledger, Version 11.2 Page 133