navigation tips 3 - dxr development group€¦ · navigation tips 3 patient information &...
TRANSCRIPT

1
Getting Started - Accessing a Case 2Navigation Tips 3Patient Information & Problem List 3Findings and Possible Diagnoses 3Most Likely Diagnosis(es) and
Supporting Possible Diagnoses 4Preliminary Diagnosis(es) Justification 4Diagnostic Studies (Labs) 5Test Results 5
Select Final Diagnosis(es) 6Diagnosis Justification (final) 6Patient Problems 6Management List 7Other Issues and Case Complete 7Settings that Affect Case Flow 8Possible Diagnoses Preference 8Virtual Patient Preference 8Virtual Interview 8Virtual Physical Exam 8
Contents

2
When the directory opens, click the name of your assigned standardized or virtual patient. (See examplebelow.) On the subsequent screen, click Enter Case.
Launch a compatible browser and type in the URL of your institution’s CCX site:
http://ccx.yourschool.dxrgroup.com
Your school’s site will display a list of available Directories. Click the name of the directory you are assigned
to work in.
Getting Started - Accessing a Case
Verify that the patient name and information on the Sign In screen match your assigned standardized/virtualpatient.
If this is not your assigned case, click Cancel and notify your proctor immediately.•
If this is your assigned case, type in your Name and Password and click Enter. •
3
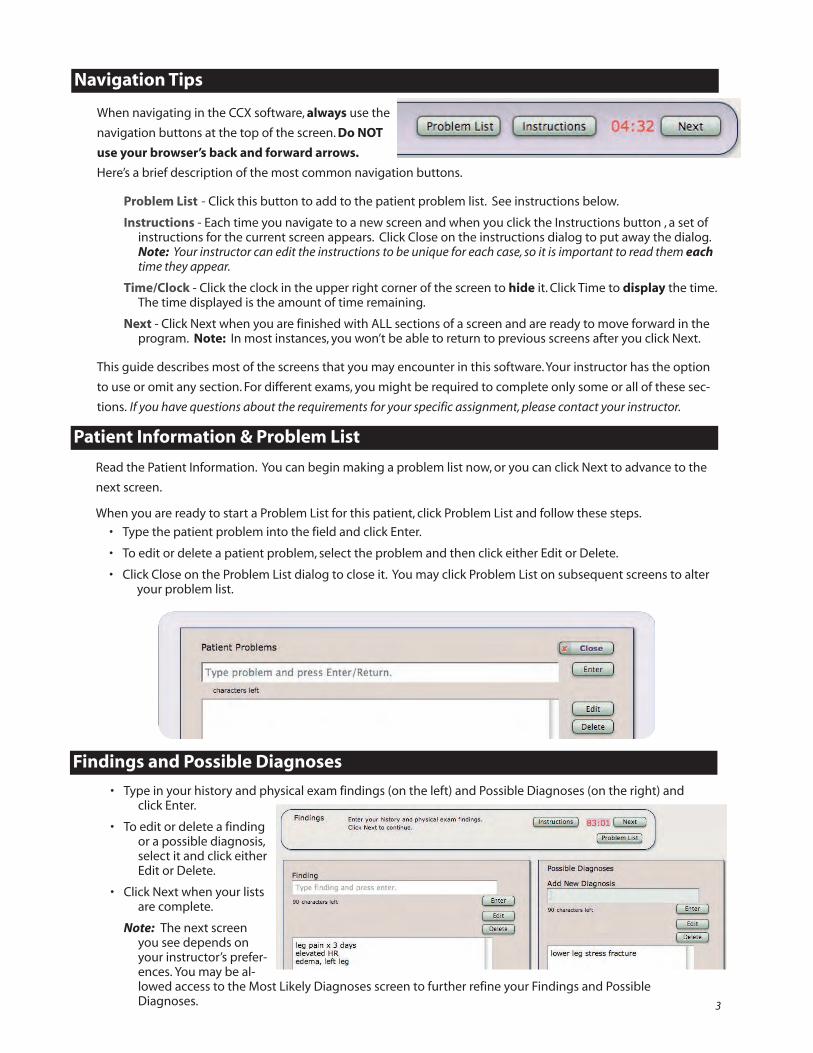
When navigating in the CCX software, always use the
navigation buttons at the top of the screen. Do NOT
use your browser’s back and forward arrows.
Here’s a brief description of the most common navigation buttons.
Problem List - Click this button to add to the patient problem list. See instructions below.
Instructions - Each time you navigate to a new screen and when you click the Instructions button , a set ofinstructions for the current screen appears. Click Close on the instructions dialog to put away the dialog.Note: Your instructor can edit the instructions to be unique for each case, so it is important to read them eachtime they appear.
Time/Clock - Click the clock in the upper right corner of the screen to hide it. Click Time to display the time.The time displayed is the amount of time remaining.
Next - Click Next when you are finished with ALL sections of a screen and are ready to move forward in theprogram. Note: In most instances, you won’t be able to return to previous screens after you click Next.
This guide describes most of the screens that you may encounter in this software. Your instructor has the option
to use or omit any section. For different exams, you might be required to complete only some or all of these sec-
tions. If you have questions about the requirements for your specific assignment, please contact your instructor.
Navigation Tips
Patient Information & Problem List
Read the Patient Information. You can begin making a problem list now, or you can click Next to advance to the
next screen.
When you are ready to start a Problem List for this patient, click Problem List and follow these steps.
Type the patient problem into the field and click Enter.•
To edit or delete a patient problem, select the problem and then click either Edit or Delete. •
Click Close on the Problem List dialog to close it. You may click Problem List on subsequent screens to alter•your problem list.
Findings and Possible Diagnoses
Type in your history and physical exam findings (on the left) and Possible Diagnoses (on the right) and•click Enter.
To edit or delete a finding•or a possible diagnosis,select it and click eitherEdit or Delete.
Click Next when your lists•are complete.
Note: The next screenyou see depends onyour instructor’s prefer-ences. You may be al-lowed access to the Most Likely Diagnoses screen to further refine your Findings and PossibleDiagnoses.

4
Your instructor may ask you to
choose your Most Likely Diagnoses (a limit is set by the instructor on a per-case basis); and 1
pair those diagnoses with supporting or2contradicting findings.
On the Most Likely Diagnoses screen, follow these
steps:
Review your list of Possible Diagnoses.1
Click the Possible Diagnoses you consider ‘most2likely’ to add them to the Most LikelyDiagnoses field. To remove a diagnosis fromthe Most Likely list, click it.
Click Next when you are ready to continue.
Note: If your instructor requires you to associate find-
ings with your possible diagnoses, you can do that on
the screen that appears when you click Next.
Supporting Possible Diagnoses with Findings
To associate findings with one of your Most Likely
Diagnoses:
Select one of the Possible1Diagnoses displayed on the leftside of the screen.
Select the positive findings that2you want to associate with thisdiagnosis.
Press Alt/Option while selecting3the contradicting findings thatyou want to associate with thisdiagnosis.
Most Likely Diagnosis(es) and Supporting Possible Diagnoses
Preliminary Diagnosis(es) Justification
On this screen you will enter a Preliminary Diagnosis Justification based on the patient interview and
physical exam findings.
Your Most Likely Diagnosis list will appear on theleft. Select a Likely Diagnosis to reveal anyassociated findings.
Type your Preliminary Diagnosis Justification intothe field on the right. (You will enter a finalDiagnosis Justification after you make yourFinal Diagnosis.)
NOTE: When writing a narrative such as a Diagnosis
Justification, click Interim Save to save your work. This
field allows you to highlight, delete, and copy and paste
text. If you make a mistake, you can use the Ctrl+z (com-
mand+z on Mac) command to undo your most recent
action.
1
2
1
2

5
On the Diagnostic Studies screen, you will select diagnostic tests to further refine or confirm your diagnoses.
You can order diagnostic studies in three ways: from a list of Common Lab Tests; from a list of Lab Categories;
or by Searching for the Lab test.
Results for your selected lab tests will be available on the next screen after you complete your orders list.
You will be able to return to this screen and order more diagnostic tests by clicking Request More Tests.
Click Next to see your lab test results.
Diagnostic Studies (Labs)
1
2
3
3
Test Results
Click each of the Test Orders to view patient•
and normal results for that test. (Scrolling may
be necessary to see the entire results.)
Click Close to return to the Test Results screen.•
(Optional) You may enter a finding for each•
test result. This field is not required.
Click Request More Labs if you need to return•
to the Diagnostic Tests screen to order more
labs.
When you are done in the lab section, click•
Next.
If you can’t locate your lab, type in
the lab name and click Search.
Select the lab you want from the
search results and click Add to List.
Click a Common Lab Test. Itwill be added to the SelectedDiagnostic Studies list.
2
To add diagnostic tests from thecategories, select a categoryand then select the specific labtest, then click Add to List.
6
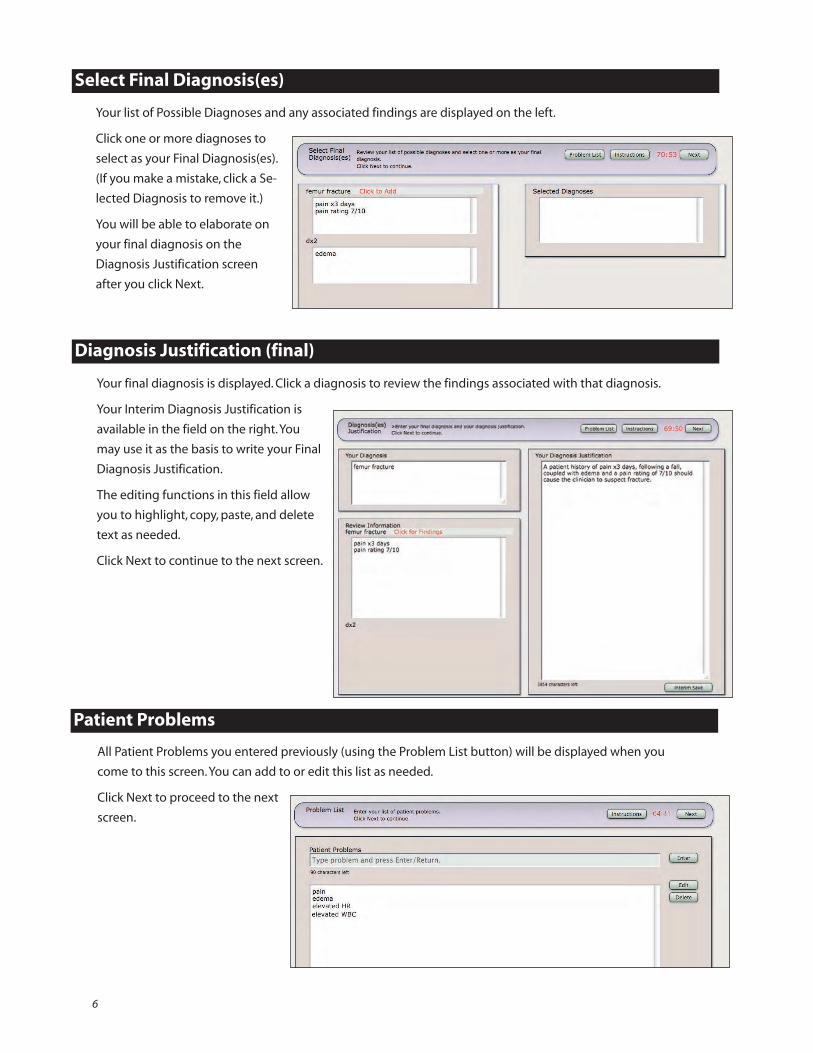
Your list of Possible Diagnoses and any associated findings are displayed on the left.
Click one or more diagnoses to
select as your Final Diagnosis(es).
(If you make a mistake, click a Se-
lected Diagnosis to remove it.)
You will be able to elaborate on
your final diagnosis on the
Diagnosis Justification screen
after you click Next.
Select Final Diagnosis(es)
Diagnosis Justification (final)
Your final diagnosis is displayed. Click a diagnosis to review the findings associated with that diagnosis.
Your Interim Diagnosis Justification is
available in the field on the right. You
may use it as the basis to write your Final
Diagnosis Justification.
The editing functions in this field allow
you to highlight, copy, paste, and delete
text as needed.
Click Next to continue to the next screen.
All Patient Problems you entered previously (using the Problem List button) will be displayed when you
come to this screen. You can add to or edit this list as needed.
Click Next to proceed to the next
screen.
Patient Problems
7
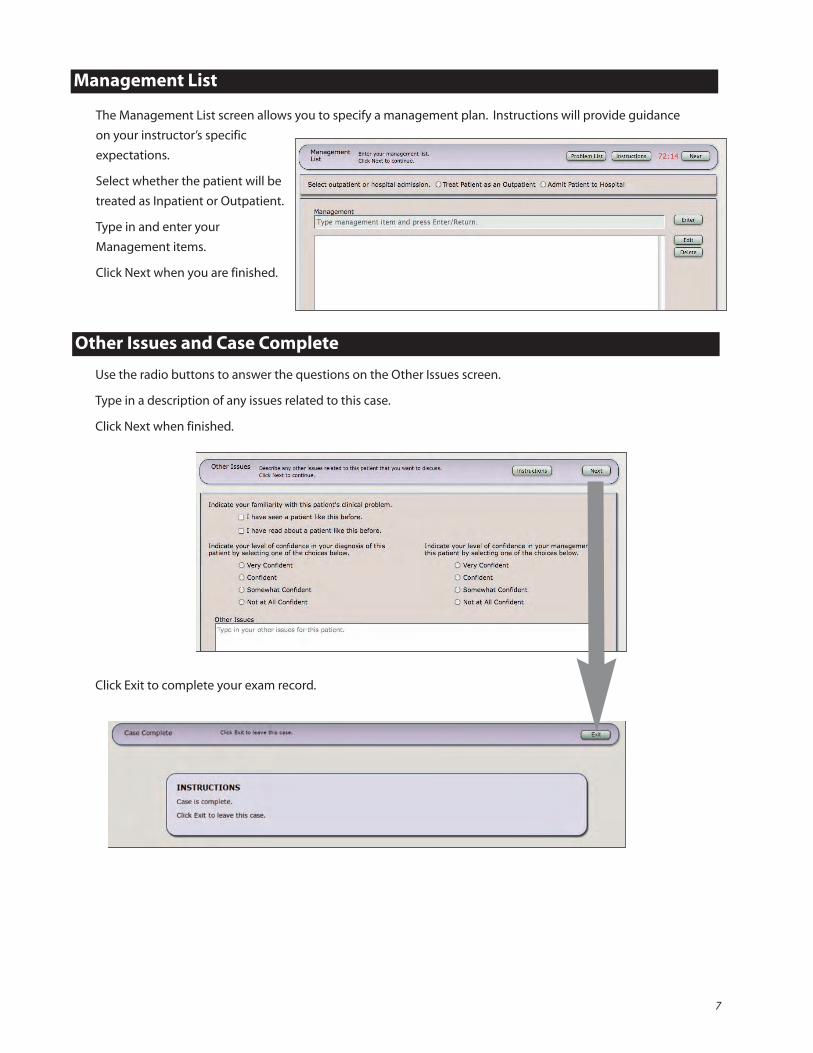
The Management List screen allows you to specify a management plan. Instructions will provide guidance
on your instructor’s specific
expectations.
Select whether the patient will be
treated as Inpatient or Outpatient.
Type in and enter your
Management items.
Click Next when you are finished.
Management List
Other Issues and Case Complete
Use the radio buttons to answer the questions on the Other Issues screen.
Type in a description of any issues related to this case.
Click Next when finished.
Click Exit to complete your exam record.
8
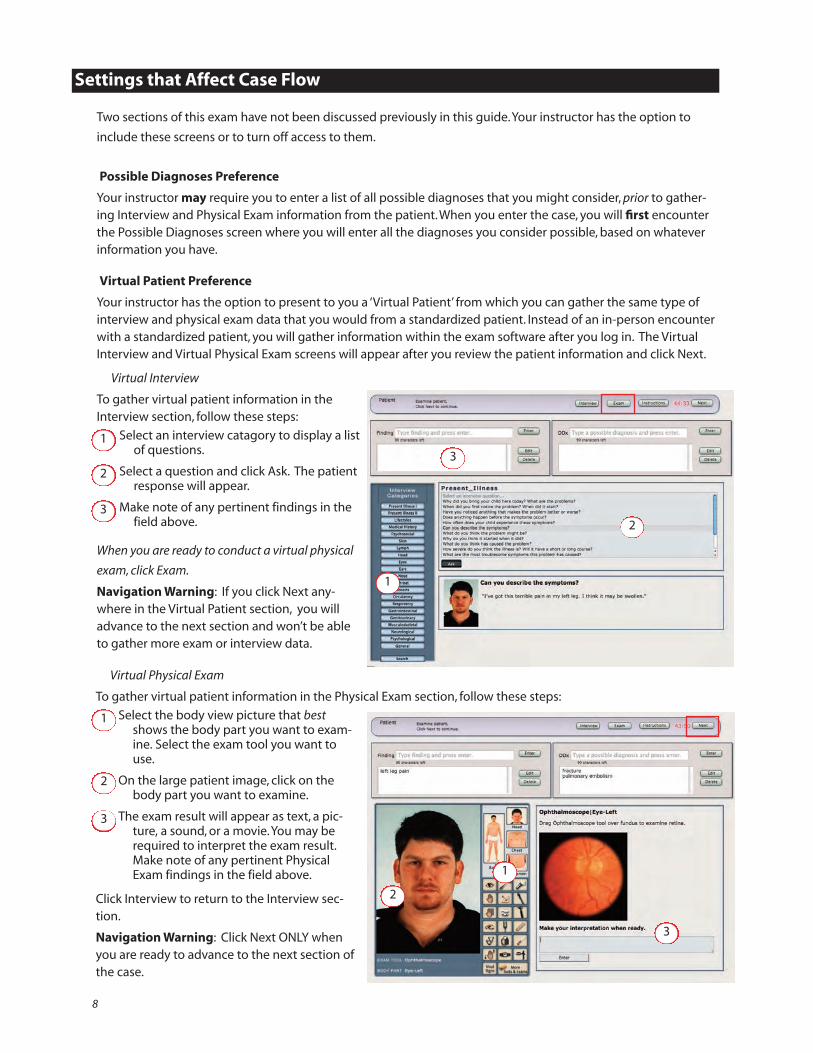
Two sections of this exam have not been discussed previously in this guide. Your instructor has the option to
include these screens or to turn off access to them.
Possible Diagnoses Preference
Your instructor may require you to enter a list of all possible diagnoses that you might consider, prior to gather-ing Interview and Physical Exam information from the patient. When you enter the case, you will first encounterthe Possible Diagnoses screen where you will enter all the diagnoses you consider possible, based on whateverinformation you have.
Virtual Patient Preference
Your instructor has the option to present to you a ‘Virtual Patient’ from which you can gather the same type ofinterview and physical exam data that you would from a standardized patient. Instead of an in-person encounterwith a standardized patient, you will gather information within the exam software after you log in. The VirtualInterview and Virtual Physical Exam screens will appear after you review the patient information and click Next.
Virtual Interview
To gather virtual patient information in theInterview section, follow these steps:
Select an interview catagory to display a listof questions.
Select a question and click Ask. The patientresponse will appear.
Make note of any pertinent findings in thefield above.
When you are ready to conduct a virtual physical
exam, click Exam.
Navigation Warning: If you click Next any-where in the Virtual Patient section, you willadvance to the next section and won’t be ableto gather more exam or interview data.
Settings that Affect Case Flow
1
2
1
2
3
3
Virtual Physical Exam
To gather virtual patient information in the Physical Exam section, follow these steps:
Select the body view picture that bestshows the body part you want to exam-ine. Select the exam tool you want touse.
On the large patient image, click on thebody part you want to examine.
The exam result will appear as text, a pic-ture, a sound, or a movie. You may berequired to interpret the exam result.Make note of any pertinent PhysicalExam findings in the field above.
Click Interview to return to the Interview sec-tion.
Navigation Warning: Click Next ONLY whenyou are ready to advance to the next section ofthe case.
1
2
3
1
2
3