netapp and vmware solution guide solution guide provides guidelines and best practices for...
TRANSCRIPT

Technical Report
NetApp and VMware View Solution Guide Chris Gebhardt, NetApp
February 2012 | TR-3705
Version 5.0.1
BEST PRACTICES FOR DESIGN, ARCHITECTURE, DEPLOYMENT, AND MANAGEMENT
This document provides NetApp® best practices on designing, architecting, deploying, and managing
a scalable VMware® View
™ 5 (VDI) environment on NetApp storage.

2 NetApp and VMware View Solution Guide: Best Practices for Design, Architecture, Deployment, and Management
TABLE OF CONTENTS
1 EXECUTIVE SUMMARY ........................................................................................................................ 5
1.1 IMPLEMENTING BEST PRACTICES ........................................................................................................................ 5
1.2 WHAT’S NEW ............................................................................................................................................................ 5
1.3 AUDIENCE ................................................................................................................................................................ 6
2 SCOPE ................................................................................................................................................... 6
3 INTRODUCTION TO VMWARE VIEW .................................................................................................. 6
4 VMWARE VIEW POOLS ....................................................................................................................... 6
4.1 VMWARE VIEW DESKTOP DELIVERY MODELS .................................................................................................... 7
5 NETAPP SOLUTION AND COMPONENTS .......................................................................................... 8
5.1 SINGLE SCALABLE UNIFIED ARCHITECTURE ...................................................................................................... 9
5.2 STORAGE EFFICIENCY ........................................................................................................................................... 9
5.3 PERFORMANCE ..................................................................................................................................................... 12
5.4 OPERATIONAL AGILITY ........................................................................................................................................ 13
5.5 DATA PROTECTION ............................................................................................................................................... 17
6 NETAPP AND VMWARE VIEW DESKTOP POOLS .......................................................................... 19
6.1 MANUAL DESKTOP POOL ..................................................................................................................................... 20
6.2 AUTOMATED DESKTOP POOL ............................................................................................................................. 21
7 ACCELERATING VMWARE VIEW WITH READ AND WRITE I/O OPTIMIZATION.......................... 24
7.1 CONCEPTS ............................................................................................................................................................. 24
7.2 NETAPP WRITE OPTIMIZATION ............................................................................................................................ 24
7.3 BENEFITS OF VST .................................................................................................................................................. 25
7.4 DEDUPLICATION AND NONDUPLICATION TECHNOLOGIES ............................................................................. 25
7.5 FLASH CACHE ....................................................................................................................................................... 27
7.6 TRADITIONAL AND VIRTUAL STORAGE TIERING ............................................................................................... 27
7.7 SUMMARY OF VST IN A VMWARE VIEW ENVIRONMENT ................................................................................... 32
7.8 SUMMARY............................................................................................................................................................... 33
8 STORAGE SIZING BEST PRACTICES .............................................................................................. 33
8.1 GATHER ESSENTIAL SOLUTION REQUIREMENTS ............................................................................................. 33
8.2 PERFORMANCE-BASED AND CAPACITY-BASED STORAGE ESTIMATION PROCESS .................................... 35
8.3 GETTING RECOMMENDATIONS ON STORAGE SYSTEM PHYSICAL AND LOGICAL CONFIGURATION ......... 44
9 STORAGE ARCHITECTURE BEST PRACTICES .............................................................................. 45
9.1 STORAGE SYSTEM CONFIGURATION BEST PRACTICES .................................................................................. 45
10 CONFIGURING VSC 2.1.1 PROVISIONING AND CLONING............................................................. 47
11 DEPLOYING NETAPP SPACE-EFFICIENT VM CLONES ................................................................. 52
11.1 OVERVIEW OF DEPLOYING NETAPP SPACE-EFFICIENT CLONES ................................................................... 53

3 NetApp and VMware View Solution Guide: Best Practices for Design, Architecture, Deployment, and Management
11.2 DETAILS OF DEPLOYING NETAPP SPACE-EFFICIENT CLONES ....................................................................... 54
12 USING VSC 2.1.1 PROVISIONING AND CLONING REDEPLOY ...................................................... 69
13 VMWARE VIEW OPERATIONAL BEST PRACTICES ....................................................................... 74
13.1 DATA DEDUPLICATION ......................................................................................................................................... 74
13.2 SPACE RECLAMATION .......................................................................................................................................... 77
13.3 ANTIVIRUS OPERATIONS...................................................................................................................................... 79
13.4 MONITORING NETAPP AND VMWARE VIEW INFRASTRUCTURE ...................................................................... 80
13.5 DATA PROTECTION SOLUTION ............................................................................................................................ 81
14 SUMMARY ........................................................................................................................................... 87
15 FEEDBACK .......................................................................................................................................... 88
16 REFERENCES ..................................................................................................................................... 88
17 VERSION HISTORY............................................................................................................................. 90
18 ABOUT THE AUTHOR ........................................................................................................................ 90
19 ACKNOWLEDGEMENTS .................................................................................................................... 91
LIST OF TABLES
Table 1) Typical provisioning, data persistence, and user assignment for each pool type. ......................... 8
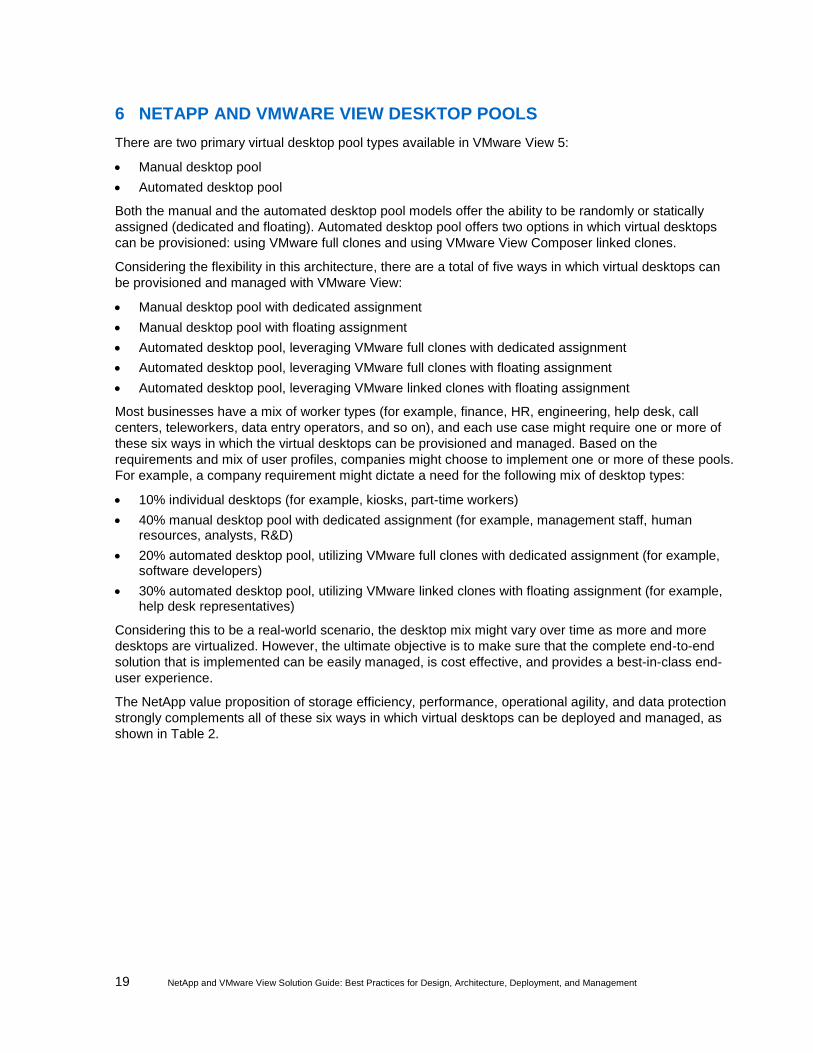
Table 2) NetApp value proposition. ............................................................................................................ 20
Table 3) Manual desktop pool. ................................................................................................................... 21
Table 4) VMware View Composer Full Clone. ............................................................................................ 22
Table 5) VMware View Composer Linked Clones. ..................................................................................... 23
Table 6) Deduplication recommendations for different data types. ............................................................ 26
Table 7) VMware file listing. ........................................................................................................................ 37
Table 8) Summary of storage considerations for desktop delivery models. ............................................... 43
LIST OF FIGURES
Figure 1) VMware View features (graphic supplied by VMware).................................................................. 7
Figure 2) Traditional and thin provisioning. ................................................................................................. 10
Figure 3) Increased disk utilization with NetApp thin provisioning. ............................................................ 10
Figure 4) The life cycle of a thinly provisioned virtual machine. ................................................................. 11
Figure 5) NetApp deduplication. ................................................................................................................. 11
Figure 6) NetApp VSC plug-in. ................................................................................................................... 14
Figure 7) NetApp Provisioning and Cloning plug-in in VMware vCenter. ................................................... 15
Figure 8) NetApp SANscreen VM Insight plug-in in VMware vCenter. ...................................................... 16
Figure 9) NetApp Operations Manager. ...................................................................................................... 17

4 NetApp and VMware View Solution Guide: Best Practices for Design, Architecture, Deployment, and Management
Figure 10) NetApp Backup and Recovery plug-in. ..................................................................................... 18
Figure 11) VMware View linked clone data layout using NetApp VST. ...................................................... 23
Figure 12) Power and heat savings for Flash Cache compared to one FC 15K disk shelf. ....................... 25
Figure 13) NetApp deduplication in VMware environments. ...................................................................... 26
Figure 14) Traditional legacy storage array caching. ................................................................................. 27
Figure 15) Cache and data deduplication with NetApp VST. ..................................................................... 28
Figure 16) VST with data deduplication. ..................................................................................................... 29
Figure 17) Transparent storage array caching with Flash Cache and deduplication. ................................ 29
Figure 18) NetApp Flash Cache without deduplication. ............................................................................. 30
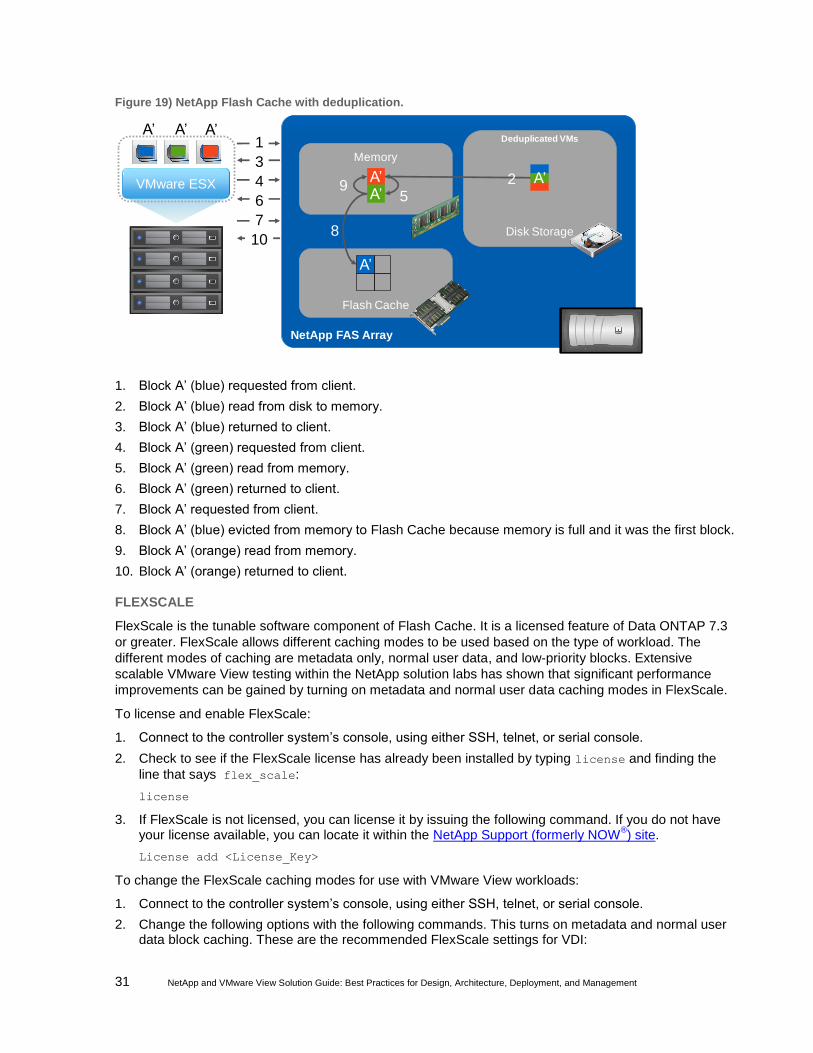
Figure 19) NetApp Flash Cache with deduplication. .................................................................................. 31
Figure 20) Overview of capacity estimation process. ................................................................................. 37
Figure 21) FlexClone scalability. ................................................................................................................. 44
Figure 22) NetApp VSC 2.1.1 Provisioning and Cloning deployment overview. ........................................ 53
Figure 23) Provision NetApp storage. ......................................................................................................... 54
Figure 24) Build template virtual machine. ................................................................................................. 57
Figure 25) Deploy space-efficient clones with VSC 2.1.1. .......................................................................... 58
Figure 26) Provision with NetApp VSC 2.1.1 and redeploy patched VMs with VSC 2.1.1. ........................ 70
5 NetApp and VMware View Solution Guide: Best Practices for Design, Architecture, Deployment, and Management
1 EXECUTIVE SUMMARY
The NetApp solution enables companies to optimize their virtual infrastructures by providing advanced
storage and data management capabilities. NetApp provides industry-leading storage solutions that
simplify virtual machine (VM) provisioning; enable mass VM cloning and redeployment; handle typical
input/output (I/O) bursts such as boot storm, antivirus storms, efficient operating system (OS), application,
and user data management, and so on; provide individual VM backup and restores; deliver simple and
flexible business continuance; and help reduce virtual desktop storage.
This solution guide provides guidelines and best practices for architecting, deploying, and managing
VMware View virtual desktop infrastructure (VDI) solutions on NetApp storage systems. NetApp has been
providing advanced storage features to VMware ESX®-based solutions since the product began shipping
in 2001. During that time, NetApp has continuously enhanced the design, deployment, and operational
guidelines for the storage systems and ESX Server–based VDI solutions. These techniques have been
documented and are referred to as best practices. This guide describes them in detail.
1.1 IMPLEMENTING BEST PRACTICES
The recommendations and practices presented in this document should be considered deployment
requirements unless otherwise stated. Although choosing not to implement all of the best practices
contained in this guide does not affect your ability to obtain support from NetApp and VMware,
disregarding any of these practices commonly results in the need to implement them at a later date, on a
much larger environment, and often with the requirement of application downtime. For this reason,
NetApp advocates that you implement all of the best practices as defined within this document as a part
of initial deployment or migration.
All recommendations in this document apply specifically to deploying vSphere™
on NetApp. Therefore,
the contents of this document supersede all recommendations and best practices expressed in other
versions of TR-3705.
Data ONTAP® Version 7.3.1P2 or greater is required to implement the NetApp vSphere plug-ins.
However, many features discussed in this paper may be available only in newer versions of Data ONTAP.
In addition to this document, NetApp and our partners offer professional services to architect and deploy
the designs contained within this document. These services can be an attractive means to enable optimal
virtual storage architecture for your virtual data center.
This document refers to current software versions from NetApp, VMware, and other software vendors.
The versions listed in this document are supported, but previous versions may no longer be supported.
For official supported versions, consult a NetApp Systems Engineer.
1.2 WHAT’S NEW
This technical report discusses and demonstrates new features of the NetApp Virtual Storage Console
(VSC) 2.1.1, specifically, new features added to the Provisioning and Cloning Capability. These new
features include:
Space reclamation for thin-provisioned virtual machines on Network File System (NFS)
VM misalignment alert and prevention
VMware View credential management for Provisioning and Cloning
Multiple View pool creation
Datastore remote replication
In addition to these updates, VSC now includes support for vSphere 5 and VMware View 5.0.

6 NetApp and VMware View Solution Guide: Best Practices for Design, Architecture, Deployment, and Management
1.3 AUDIENCE
The target audience for this paper is familiar with concepts pertaining to VMware vSphere, including
VMware ESX, VMware vCenter™
Server, and NetApp Data ONTAP 7.3.1.P2 or greater. For high-level
information and an overview of the unique benefits that are available when creating a virtual infrastructure
on NetApp storage, see Comprehensive Virtual Desktop Deployment with VMware and NetApp.
2 SCOPE
The scope of this document is to provide architectural, deployment, and management guidelines for
customers who are planning or have already decided to implement VMware View on NetApp virtualized
storage. It provides a brief overview of the VMware View technology concepts; key solution architecture
considerations for implementing VMware View on NetApp; storage estimation and data layout
recommendations; and solution, deployment, and management guidelines.
3 INTRODUCTION TO VMWARE VIEW
Corporate IT departments are facing a new class of desktop management issues as they strive to provide
end users with the flexibility of accessing corporate IT resources using any device from any network. IT is
also being asked to provide access to corporate resources for an increasingly dispersed and growing
audience that includes workers in off-site facilities, contractors, partners, and outsourcing providers as
well as employees traveling or working from home. All of these groups demand access to sensitive
corporate resources, but IT must enforce strict adherence to corporate security requirements and new
regulatory standards.
VDI enables organizations to increase corporate IT control, manageability, and flexibility of desktop
resources while providing end users with a familiar desktop experience. VMware View is an enterprise-
class solution to deliver corporate PC services to end users. VMware View 5 solution components might
include but are not limited to:
Virtualization hypervisor (VMware ESXi 5)
Tool for centralized management, automation, provisioning, and optimization (VMware vCenter, NetApp VSC 2.1.1, VMware View Composer)
Connection broker and desktop management (VMware View 5.0)
Virtualized desktop images (Windows® XP, Windows Vista
®, Windows 7, and so on)
Enhanced Windows profile and data management solutions (for example, Liquidware Labs ProfileUnity and VMware View)
Thin client/PC (for example, Wyse, Cisco, DevonIT)
VMware View 5, based on the proven VMware vSphere virtualization platform, delivers unique desktop
control and manageability, while providing end users with a familiar desktop experience without any
modifications to the desktop environment or applications.
4 VMWARE VIEW POOLS
VMware groups desktops into discrete management units called pools. Policies and entitlements can be
set for each pool so that all desktops within that pool follow the same provisioning, login/logout behavior,
display, data persistence, and patching rules. The two types of desktops are manual and automatic pools.
For any customer environment, these pooled desktops can be classified as either dedicated or floating.
Dedicated (persistent) desktops. Dedicated desktops can be defined as desktops that are permanently assigned to a single user and are customizable; no other user is entitled to use such a desktop. The user logs into the same desktop every day, and the changes made to the system image
7 NetApp and VMware View Solution Guide: Best Practices for Design, Architecture, Deployment, and Management
(new data, applications, registry changes) are saved across login sessions and reboots. This is exactly like a physical laptop or desktop, with all the customizations and user data stored locally on
the C: drive. This model might, however, include the use of Common Internet File System (CIFS)
protocol home directories and/or profile redirection for better user data and profile management. This is a common type of VDI deployment model that is used today for knowledge workers, mobile workers, and power users and is a major driver for increased shared storage requirement.
Floating (nonpersistent) desktops. Floating desktops can be defined as desktops that are not assigned to a specific user. The user might be assigned to a different virtual desktop at every login. This deployment model might be used for task workers or shift workers (for example, call centers workers, tellers, students, or medical professionals) and some knowledge workers who require little control of their desktops.
One might choose to implement either of these models or a mix based on the business requirements,
types of users, and proportion of users represented by different job functions.
4.1 VMWARE VIEW DESKTOP DELIVERY MODELS
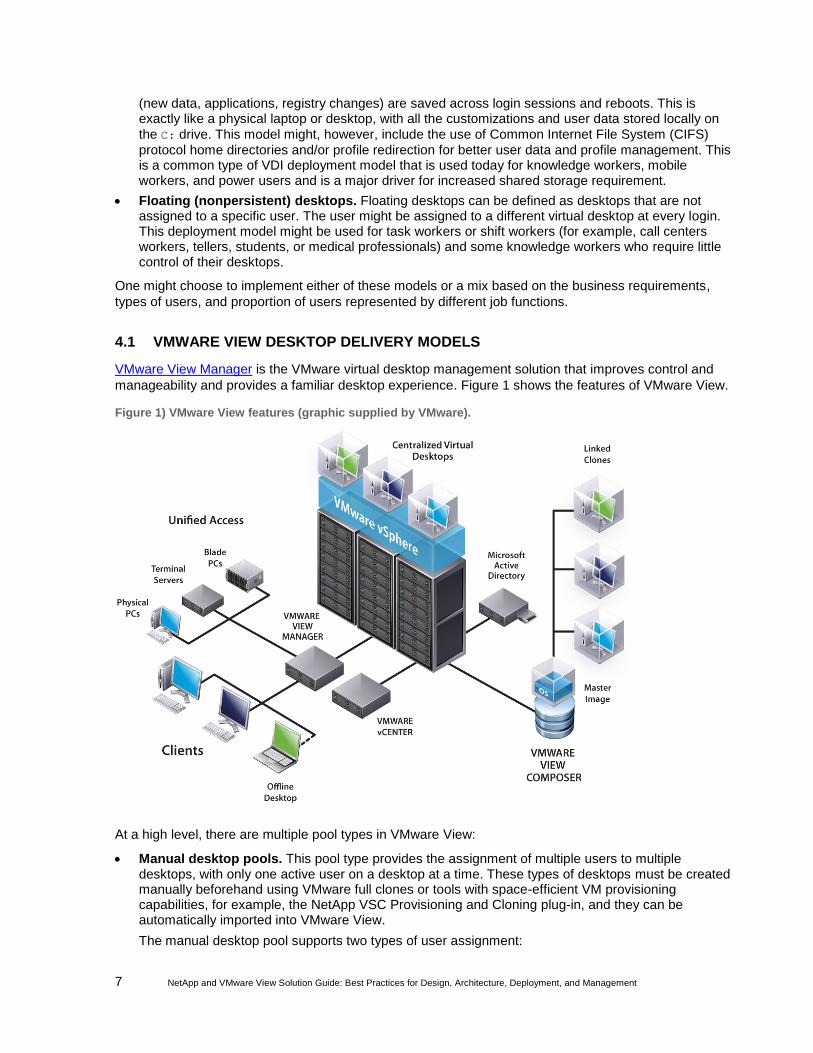
VMware View Manager is the VMware virtual desktop management solution that improves control and
manageability and provides a familiar desktop experience. Figure 1 shows the features of VMware View.
Figure 1) VMware View features (graphic supplied by VMware).
At a high level, there are multiple pool types in VMware View:
Manual desktop pools. This pool type provides the assignment of multiple users to multiple desktops, with only one active user on a desktop at a time. These types of desktops must be created manually beforehand using VMware full clones or tools with space-efficient VM provisioning capabilities, for example, the NetApp VSC Provisioning and Cloning plug-in, and they can be automatically imported into VMware View.
The manual desktop pool supports two types of user assignment:

8 NetApp and VMware View Solution Guide: Best Practices for Design, Architecture, Deployment, and Management
Dedicated assignment. Users are assigned a desktop that can retain all of their documents, applications, and settings between sessions. The desktop is statically assigned the first time the user connects and is then used for all subsequent sessions.
Floating assignment. Users are not assigned to particular desktops and could be connected to a different desktop from the pool each time they connect. Also, there is no data persistence of profile or user data between sessions without using third-party software or roaming profiles.
Automated desktop pools. This pool type provides the assignment of multiple users to multiple desktops, with only one active user on a desktop at a time. The tasks of creating and customizing these types of desktops are performed by VMware View and optionally with VMware View Composer by using either of these two options:
Full clone. Leveraging VMware vCenter virtual machine template to create VMware full clones.
Linked clone. Leveraging VMware View Composer feature in VMware View 5 to create VMware linked clones. Take into account that the use of hypervisor clones backed by hypervisor snapshots increases the number of I/Os to the storage controller.
Both options in automated desktop pools support the two types of user assignment:
Dedicated assignment. Users are assigned a desktop that can retain all of their documents, applications, and settings between sessions. The desktop is statically assigned the first time the user connects and is then used for all subsequent sessions.
Floating assignment. Users are not assigned to particular desktops and could get connected to a different desktop from the pool each time they connect. Also, there is no persistence of environmental or user data between sessions.
Terminal server pool. This is a pool of terminal server desktop sources served by one or more terminal servers. Discussion on the storage best practices for this type of desktop delivery model is outside the scope of this document.
Table 1 identifies the provisioning method, data persistence, and user assignment for both the manual
and the automated desktop pool types.
Table 1) Typical provisioning, data persistence, and user assignment for each pool type.
Pool Type Provisioning Method Desktop Data Persistence
User Assignment
Manual desktop pool
NetApp VSC 2.1.1 Provisioning and Cloning plug-in
Persistent/Nonpersistent Dedicated/Floating
Automated desktop pool
VMware full clones Persistent/Nonpersistent Dedicated/Floating
VMware View Composer linked clones
Nonpersistent Floating
Although each type of clone can be used in all persistence and assignment types, the methods marked in
bold represent the typical and most recommended methods for deployment.
For more details on VMware View desktop pools and user assignment, refer to the VMware View
Administrator‟s Guide.
5 NETAPP SOLUTION AND COMPONENTS
NetApp provides a scalable, unified storage and data management solution for VMware View. The unique
benefits of the NetApp solution are:
Storage efficiency. Significant cost savings with multiple levels of storage efficiency for all of the VM data components

9 NetApp and VMware View Solution Guide: Best Practices for Design, Architecture, Deployment, and Management
Performance. Enhanced user experience with virtual storage tiering (VST) and write I/O optimization that strongly complements NetApp storage efficiency capabilities
Operational agility. Enhanced VMware View solution management with tight partner integration
Data protection. Enhanced protection of both the virtual desktop OS data and the user data, with very low overhead for both cost and operations
5.1 SINGLE SCALABLE UNIFIED ARCHITECTURE
The NetApp unified storage architecture provides customers with an agile and scalable storage platform.
NetApp innovative storage solutions give customers new alternatives and expanded possibilities over
traditional storage vendors. All NetApp storage systems use the Data ONTAP operating system to
provide:
Storage area network (SAN): FCoE, FC, iSCSI
Network-attached storage (NAS): CIFS, NFS
Primary storage
Secondary storage within a single unified platform so that all virtual desktop data components can be hosted on the same storage array
A single process for activities such as installation, provisioning, mirroring, backup, and upgrading is used
throughout the entire product line, from the entry-level to enterprise-class controllers. Having a single set
of software and processes brings great simplicity to even the most complex enterprise data management
challenges. Unifying storage and data management software and processes reduces the complexity of
data ownership, enables companies to adapt to their changing business needs without interruption, and
results in a dramatic reduction in total cost of ownership (TCO).
For large, scalable VMware View environments, the NetApp solution provides the following unique
benefits:
At least 50% savings in storage, power, and cooling requirements
Most agile and operationally efficient storage solutions
Best-in-class data protection and business continuance solutions to address any level of data availability demands
5.2 STORAGE EFFICIENCY
One of the critical barriers to VDI adoption is the increased cost of using shared storage to obtain a highly
available enterprise-quality infrastructure. Virtual desktop deployment creates a high level of data
redundancy, especially for the VM OS data. Using traditional storage, this means that the amount of
storage needed is equal to the sum of the storage required by each VM. For example, if each VM were
20GB in size, and 1,000 VMs were planned in the solution, at least 20TB of usable data would be
required on the shared storage.
Thin provisioning, data deduplication, and FlexClone® are the critical components of the NetApp solution
and offer multiple levels of storage efficiency across the virtual desktop OS data, installed applications,
and user data. This helps customers save, on average, 50% to 90% of the cost associated with shared
storage (based on existing customer deployments and NetApp solutions lab validation). NetApp is the
only storage vendor that offers block-level data deduplication for live virtual machines, without any
negative tradeoffs.
THIN PROVISIONING
Thin provisioning is a way of logically presenting more storage to hosts than is physically available. With
thin provisioning, the storage administrator is able to utilize a pool of physical disks (known as an

10 NetApp and VMware View Solution Guide: Best Practices for Design, Architecture, Deployment, and Management
aggregate) and create logical volumes for different applications to use, while not preallocating space to
those volumes. The space is allocated only when the host needs it. The unused aggregate space is
available for the existing thinly provisioned volumes to expand or for use in creation of new volumes.
Figure 2 and Figure 3 provide overviews of thin provisioning and its impact on disk utilization. For more
details on thin provisioning, review NetApp TR-3563: NetApp Thin Provisioning.
Figure 2) Traditional and thin provisioning.
Figure 3) Increased disk utilization with NetApp thin provisioning.
SPACE RECLAMATION
A virtual machine can be thinly or thickly provisioned. When a VM is thinly provisioned, storage for that
VM is not preallocated on the storage controller. This allows for oversubscription of a storage controller,
which helps increase overall utilization. The drawback to thin provisioning of VMs is that they are storage
efficient only on Day 1. Once a thinly provisioned VM is written to, storage is then allocated in the VM and
thus in the shared storage controller. Even if the data is deleted within the guest, the storage controller
storage continues to be allocated. NetApp VSC 2.1.1 introduces a technology called space reclamation
that can be used on any Windows VM that uses New Technology File System (NTFS) and resides on an
NFS datastore. This technology allows the storage controller to reclaim its storage space that would
otherwise be wasted.
100GB Actual Data
Thin Provisioning
Storage On Demand
100GB Actual Data
Traditional Provisioning
Pre-allocatedPhysical Storage
400 GB Allocated
& Unused
400 GB Available to
Other Applications

11 NetApp and VMware View Solution Guide: Best Practices for Design, Architecture, Deployment, and Management
Figure 4 shows a diagram of the life cycle of a thinly provisioned virtual machine. When a VM is thin
provisioned, the amount of storage used within the guest equals the amount of storage on the storage
controller. When data is added to the virtual machine, it is consumed on the storage controller. When
some of the data is deleted in the virtual machine, nothing happens to the storage. Space reclamation
brings storage efficiency to thin provisioning by returning wasted space back to the storage controller.
Figure 4) The life cycle of a thinly provisioned virtual machine.
NETAPP DEDUPLICATION
NetApp deduplication saves space on primary storage by removing redundant copies of blocks within a
volume hosting hundreds of virtual desktops, as illustrated in Figure 5. This process is transparent to the
application and the user, and it can be enabled and disabled on the fly. In a VMware View environment,
deduplication provides significant space savings, given that each VM is an identical copy of the OS,
applications, and patches. Note that not all data within a VDI environment is ideal for deduplication. Data
such as swap and other transient data should not be deduplicated. Deduplication is also ideal for user
and persona (profile) data stored in CIFS home directories. For more information on NetApp
deduplication, refer to NetApp TR-3505: NetApp Deduplication for FAS and V-Series Deployment and
Implementation Guide.
Figure 5) NetApp deduplication.
Before AfterBefore After

12 NetApp and VMware View Solution Guide: Best Practices for Design, Architecture, Deployment, and Management
FLEXCLONE
NetApp FlexClone technology is hardware-assisted rapid creation of space-efficient, writable, point-in-
time images of individual files, LUNs, or flexible volumes. The use of FlexClone technology in VMware
View deployments provides high levels of scalability and significant cost, space, and time savings. Both
file-level cloning and volume-level cloning are tightly integrated with the VMware vCenter Server using the
NetApp VSC Provisioning and Cloning vCenter plug-in. The VSC provides the flexibility to provision and
redeploy thousands of VMs rapidly with hundreds of VMs in each datastore. Note that from a scalability
and manageability perspective, this allows for very few datastores to provision and manage as compared
to other solutions, which might require one datastore per VM.
FlexClone adds a new level of agility and efficiency to storage operations. FlexClone volumes take only
seconds to create and are nondisruptive to the parent FlexVol® volume or VM. FlexClone copies share
the same physical data space as the source and occupy negligible space (metadata) on the storage
system. FlexClone file-level or volume-level clones use space very efficiently, leveraging the Data ONTAP
architecture to store only data that changes between the source and clone. In addition to all these
benefits, file-level or volume-level FlexClone volumes have the same high performance as other FlexVol
volumes or files hosted on the volumes. Also, FlexClone technology provides significant benefits with
disaster recovery (DR) testing. DR testing with FlexClone is safe, risk free, and can be done during
operational hours at any time. For more information on FlexClone technology concepts, see NetApp TR-
3347: FlexClone Volumes: A Thorough Introduction.
5.3 PERFORMANCE
Another critical barrier to VMware View adoption is performance issues associated with hosting
thousands of VMs on shared storage, specifically performance associated with events that produce a
large influx of simultaneous I/Os, such as login storms, boot storms, and antivirus operations. With
physical desktops, this was not a problem because each machine had its own disks and I/O was
contained within a single desktop. With VMware View using a shared storage infrastructure, significant
performance issues might arise during these critical operations. This essentially means the solution would
require a large number of additional spindles to meet the performance requirements, resulting in
increased overall solution cost.
To solve this problem, the NetApp solution contains VST. VST is a core component of Data ONTAP and
is extended with Flash Cache (formerly PAM II). These solution components save customers money by:
Requiring far fewer disks and much less cache
Not requiring tiers of SSD disk to alleviate boot and login storms
Serving read data from cache, freeing up disk I/O to perform writes
Providing better throughput and system utilization
Providing faster response times and a better overall end-user experience
VIRTUAL STORAGE TIERING
Virtual storage tiering (VST) allows customers to benefit from NetApp storage efficiency and at the same
time significantly increase I/O performance. VST is natively built into the Data ONTAP operating system
and works by leveraging block-sharing technologies such as NetApp primary storage deduplication and
file/volume FlexClone to reduce the amount of cache required and eliminate duplicate disk reads. Only
one instance of any duplicate block is read into cache, thus requiring less cache than traditional storage
solutions. Because VMware View implementations can see as great as 99% initial space savings
(validated in the NetApp solutions lab during a 50,000-seat buildout) using NetApp space-efficient cloning
technologies, this translates into higher cache deduplication and high cache hit rates. VST is especially
effective in addressing the simultaneous system boot or “boot storm” and login of hundreds to thousands
of virtual desktop systems that can overload a traditional legacy storage system.
13 NetApp and VMware View Solution Guide: Best Practices for Design, Architecture, Deployment, and Management
FLASH CACHE
NetApp Flash Cache is a hardware device that extends the native Data ONTAP VST capabilities. Flash
Cache increases the amount of available cache, which helps reduce virtual desktop storm activities. More
details of Flash Cache are discussed later in this document. For more details on NetApp Flash Cache
technology, refer to Flash Cache Technical Specifications.
Note: For the remainder of this document, the use of Flash Cache represents both the Flash Cache and the PAM modules.
FLEXIBLE VOLUMES AND AGGREGATES
Flexible volumes (also known as FlexVol volumes) and aggregates provide pools of storage. This storage
virtualization allows the performance and capacity to be shared by all desktops in the volume or
aggregate. Much in the way VMware virtualizes computing resources, NetApp virtualizes the storage
resources.
5.4 OPERATIONAL AGILITY
Implementation and management complexities associated with deploying a VMware View solution are
another potential barrier to VDI adoption. The NetApp management solution is operationally agile and
provides tight integration with VMware vCenter for rapidly provisioning, managing, configuring, and
backing up a VMware View implementation. This section discusses the components of the NetApp plug-in
framework for vSphere, the Virtual Storage Console.
VIRTUAL STORAGE CONSOLE 2.1.1
The NetApp Virtual Storage Console 2.1.1 (VSC) for VMware vSphere makes it possible to manage ESX
and ESXi servers connected to NetApp storage systems. VSC is a plug-in to the VMware vCenter that is
available to all vSphere clients that connect to the vCenter server. The core function of the VSC allows
VMware administrators the ability to configure best practice host bus adapter (HBA) and converged
network adapter (CAN) timeout values, multipath I/O (MPIO) settings, and NFS settings; monitor storage
capacity and deduplication savings; and collect data for troubleshooting. Figure 6 shows the NetApp VSC
plug-in screen.

14 NetApp and VMware View Solution Guide: Best Practices for Design, Architecture, Deployment, and Management
Figure 6) NetApp VSC plug-in.
PROVISIONING AND CLONING PLUG-IN (V3.2.1)
The NetApp VSC Provisioning and Cloning plug-in v3.2.1 gives customers the ability to rapidly provision,
manage, import, reclaim space of thinly provisioned VMs, and redeploy thousands of VMs. Before cloning
VMs, VSC checks the template VM to confirm that it is configured according to NetApp and VMware best
practices for VM file system alignment. This plug-in leverages file and volume FlexClone technologies,
discussed earlier, to create hardware-assisted clones. It is tightly integrated into VMware vCenter as a
module of the NetApp VSC 2.1.1 and can automatically import VMs directly into VMware View 4 and
higher. Once provisioned, the Provisioning and Cloning plug-in can redeploy VMs after patches have
been applied to the baseline image. The plug-in also allows VMware administrators to initiate, view, and
control deduplication; configure and provision new datastores for NFS, iSCSI, and Fibre Channel and
FCoE protocols; resize existing NFS datastores; and destroy datastores. The Provisioning and Cloning
Capability also allows for datastore remote replication. This feature allows large enterprises or companies
with multiple locations to easily distribute template virtual machines across environments with the use of
the NetApp SnapMirror®
data replication solution. With the provisioning and cloning capabilities of the
VSC 2.1.1, customers can achieve the desired storage efficiency, rapid provisioning, and patch
management associated with both dedicated and floating user assignment and persistent and
nonpersistent desktops, and they are still able to achieve performance acceleration with VST. The screen
in Figure 7 introduces the Provisioning and Cloning plug-in.

15 NetApp and VMware View Solution Guide: Best Practices for Design, Architecture, Deployment, and Management
Figure 7) NetApp Provisioning and Cloning plug-in in VMware vCenter.
BACKUP AND RECOVERY PLUG-IN
The NetApp VSC Backup and Recovery plug-in (formerly SMVI) is a unique, scalable data protection
plug-in for VMware vSphere and the VMware View solution. The Backup and Recovery plug-in is now
distributed as a part of the Virtual Storage Console 2.1.1. It integrates VMware snapshot functionality with
NetApp Snapshot™
functionality to protect VMware View environments. More information is available in
section 5.5, “Data Protection.”
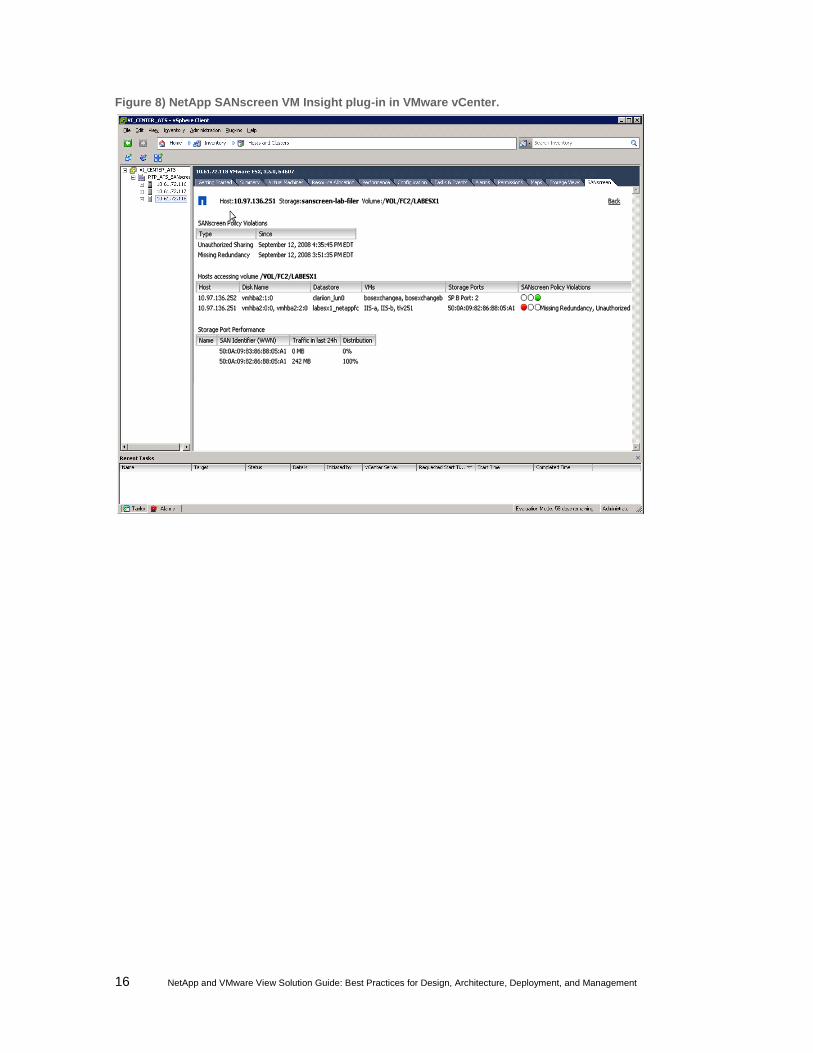
SANSCREEN VM INSIGHT
Also available as a VMware vCenter plug-in, NetApp SANscreen® VM Insight also provides cross-domain
visibility from the VM to the shared storage, allowing both storage and server administration teams to
more easily manage their VMware View storage and server infrastructure. VM Insight provides service-
level information for virtual servers, physical servers, and storage devices, as well as VM volume,
allocated capacity, and datastore information from VMware vCenter. Based on this visibility, VM Insight
shows the actual service paths and server performance information to allow end-to-end monitoring. The
enterprise-class data warehouse enables IT to access, query, and analyze VM data; and, when deployed
with SANscreen Capacity Manager, it enables capacity planning and chargeback for VM environments.
The screen in Figure 8 shows the NetApp SANscreen VM Insight. For further details, see SANscreen VM
Insight.
16 NetApp and VMware View Solution Guide: Best Practices for Design, Architecture, Deployment, and Management
Figure 8) NetApp SANscreen VM Insight plug-in in VMware vCenter.

17 NetApp and VMware View Solution Guide: Best Practices for Design, Architecture, Deployment, and Management
OPERATIONS MANAGER
NetApp Operations Manager provides a comprehensive monitoring and management solution for the
VMware View storage infrastructure. It provides comprehensive reports of utilization and trends for
capacity planning and space usage. It also monitors system performance, storage capacity, and health to
resolve potential problems. Figure 9 shows the Operations Manager screen. For further details on
Operations Manager, visit the Operations Manager solutions page.
Figure 9) NetApp Operations Manager.
5.5 DATA PROTECTION
The availability of thousands of virtual desktops depends on the availability of the shared storage on
which the virtual desktops are hosted. Thus, using the proper RAID technology is very critical. Also, being
able to protect the virtual desktop images and/or user data is very important. RAID-DP®, the VSC 2.1.1
Backup and Recovery plug-in, NetApp SnapMirror, and NetApp Snapshot copies are critical components
of the NetApp solution that help address storage availability.
RAID-DP
With any VMware View deployment, data protection is critical, because any RAID failure could result in
hundreds to thousands of end users being disconnected from their desktops, resulting in lost productivity.
RAID-DP provides performance that is comparable to that of RAID 10, yet requires fewer disks to achieve
equivalent protection. RAID-DP provides protection against double disk failure as compared to RAID 5,

18 NetApp and VMware View Solution Guide: Best Practices for Design, Architecture, Deployment, and Management
which can only protect against one disk failure per RAID group. For more information on RAID-DP, see
NetApp TR-3298: RAID-DP: NetApp Implementation of RAID Double Parity for Data Protection.
BACKUP AND RECOVERY PLUG-IN
The NetApp Backup and Recovery plug-in for VSC 2.1.1 is a unique, scalable, integrated data protection
solution for protecting persistent desktop VMware View environments. The Backup and Recovery plug-in
allows customers to leverage VMware snapshot functionality with NetApp array-based block-level
Snapshot copies to provide consistent backups for the virtual desktops. The Backup and Recovery plug-
in is integrated with NetApp SnapMirror replication technology, which preserves the deduplicated storage
savings from the source to the destination storage array. Deduplication is then not required to be rerun on
the destination storage array. Additionally, when a VMware View environment is replicated with
SnapMirror, the replicated data can be quickly brought online to provide production access in the event of
a site or data center outage. Also, SnapMirror is fully integrated with VMware Site Recovery Manager
(SRM) and NetApp FlexClone technology to instantly create zero-cost writable copies of the replicated
virtual desktops at the remote site that can be used for DR testing or for test and development work. For
more information on SnapMirror, see NetApp TR-3446: SnapMirror Async Overview and Best Practices
Guide. For more information on VMware SRM integration, see NetApp TR-3671: VMware vCenter Site
Recovery Manager in a NetApp Environment. Figure 10 shows the NetApp Backup and Recovery plug-in
screen. For more detailed information on the Backup and Recovery plug-in, see NetApp TR-3737: SMVI
Best Practices.
Figure 10) NetApp Backup and Recovery plug-in.
19 NetApp and VMware View Solution Guide: Best Practices for Design, Architecture, Deployment, and Management
6 NETAPP AND VMWARE VIEW DESKTOP POOLS
There are two primary virtual desktop pool types available in VMware View 5:
Manual desktop pool
Automated desktop pool
Both the manual and the automated desktop pool models offer the ability to be randomly or statically
assigned (dedicated and floating). Automated desktop pool offers two options in which virtual desktops
can be provisioned: using VMware full clones and using VMware View Composer linked clones.
Considering the flexibility in this architecture, there are a total of five ways in which virtual desktops can
be provisioned and managed with VMware View:
Manual desktop pool with dedicated assignment
Manual desktop pool with floating assignment
Automated desktop pool, leveraging VMware full clones with dedicated assignment
Automated desktop pool, leveraging VMware full clones with floating assignment
Automated desktop pool, leveraging VMware linked clones with floating assignment
Most businesses have a mix of worker types (for example, finance, HR, engineering, help desk, call
centers, teleworkers, data entry operators, and so on), and each use case might require one or more of
these six ways in which the virtual desktops can be provisioned and managed. Based on the
requirements and mix of user profiles, companies might choose to implement one or more of these pools.
For example, a company requirement might dictate a need for the following mix of desktop types:
10% individual desktops (for example, kiosks, part-time workers)
40% manual desktop pool with dedicated assignment (for example, management staff, human resources, analysts, R&D)
20% automated desktop pool, utilizing VMware full clones with dedicated assignment (for example, software developers)
30% automated desktop pool, utilizing VMware linked clones with floating assignment (for example, help desk representatives)
Considering this to be a real-world scenario, the desktop mix might vary over time as more and more
desktops are virtualized. However, the ultimate objective is to make sure that the complete end-to-end
solution that is implemented can be easily managed, is cost effective, and provides a best-in-class end-
user experience.
The NetApp value proposition of storage efficiency, performance, operational agility, and data protection
strongly complements all of these six ways in which virtual desktops can be deployed and managed, as
shown in Table 2.
20 NetApp and VMware View Solution Guide: Best Practices for Design, Architecture, Deployment, and Management
Table 2) NetApp value proposition.
VMware View NetApp and VMware Solution
Desktop Pool Type
Provisioning Method
User Assignment
Storage Efficiency
Performance Operational Agility
Data Protection
OS Data
User Data
Manual pool
NetApp VSC Provisioning and Cloning Capability
Dedicated
Floating
Automated pool
VMware View Composer (full clones)
Dedicated
Floating
VMware View Composer (linked clones)
Floating
The following sections provide details about each of the VMware View desktop pool types and user
assignment types and validate how the NetApp solution strongly complements each one of them to
achieve your ultimate goals and objectives. Note that data such as vSwap and the Linked Clone
Datastore, including Disposable File Disk, should not be deduplicated because they contain a
considerable amount of transient data that is created and destroyed frequently.
6.1 MANUAL DESKTOP POOL
If you are planning to implement manual desktop pool as part of the solution, you might choose to
implement either the dedicated or the floating user assignment. For both of these types of user
assignments, the desired storage efficiency for the VM OS data (50% to 90%) and user data (up to 50%)
can be achieved using the NetApp thin provisioning, deduplication, and FlexClone components of the
solution. Note that the NetApp best practice is to store the user data and profile in a CIFS share on a
NetApp NAS volume using a profile management solution. One such solution is Liquidware Labs Profile
Unity. This might also be accomplished with Microsoft® roaming profiles and/or folder redirection. This
allows enhanced data management and protection of the user and profile data. NetApp write I/O
optimization and VST help to achieve the desired end-user experience. Space-efficient VMs can be
rapidly created or redeployed and imported into VMware View using the VSC Provisioning and Cloning
plug-in. Effective solution monitoring, management, and data protection can be achieved using VM
Insight, Operations Manager, VSC Backup and Restore plug-in, SnapVault®, SnapMirror, and RAID-DP,
as shown in Table 3.

21 NetApp and VMware View Solution Guide: Best Practices for Design, Architecture, Deployment, and Management
Table 3) Manual desktop pool.
VMware View NetApp and VMware Solution
Pool Type
Cloning Method
User Assignment
Storage Efficiency Performance Management Data Protection
Clone Datastore
User Data
Manual pool
NetApp VSC Provision-ing and Cloning Capability
Dedicated
Floating
Thin provision-ing
Dedupe
CIFS
Thin provision-ing
Dedupe
Write I/O optimiza-tion
VST
Flash Cache
VSC
VM Insight
Operations Manager
RAID-DP
VSC Backup and Recovery
Snap Mirror
SnapVault
6.2 AUTOMATED DESKTOP POOL
If you are planning to implement automated desktop pools as part of the solution, you might choose to
implement a VMware full clone solution, a VMware linked clone solution, or a mix of the two.
VMWARE FULL CLONE
This solution supports use of both dedicated and floating user assignment. With both of these types of
user assignments, the desired storage efficiency for the VM OS data (50% to 90%) and user data (up to
50%) can be achieved using NetApp thin provisioning and deduplication components of the solution. Note
that the NetApp best practice is to store the user data and profile in a CIFS share on a NetApp NAS
volume using a profile management solution. One such solution is Liquidware Labs Profile Unity. This
might also be accomplished with Microsoft roaming profiles and/or folder redirection. This allows
enhanced data management and protection of the user and profile data. NetApp write I/O optimization
and VST help achieve the desired end-user experience. Effective solution monitoring, management, and
data protection can be achieved using VM Insight, Operations Manager, VSC Backup and Recovery plug-
in, SnapVault, SnapMirror, and RAID-DP, as shown in Table 4.

22 NetApp and VMware View Solution Guide: Best Practices for Design, Architecture, Deployment, and Management
Table 4) VMware View Composer Full Clone.
VMware View NetApp and VMware Solution
Pool Type Cloning Method
User Assignment
Storage Efficiency Performance Management Data Protection
Clone Data Stores
User Data
Automated desktop pool
VMware View Com-poser Full Clone
Dedicated
Floating
Thin provision-ing
Dedupe
CIFS
Thin prov-isioning
Dedupe
User data disk
Write I/O optimiza-tion
VST
Flash Cache
VSC
VM Insight
Operations Manager
RAID-DP
VSC Backup and Recovery
Snap Mirror
Snap Vault
VMWARE LINKED CLONE
The recommended access mode for a VMware linked clone solution is the nonpersistent access mode.
For the nonpersistent access mode, the desired storage efficiency (50% to 90%) for the VM “OS data
disk” can be achieved using VMware linked clones and NetApp thin provisioning components of the
solution. The storage efficiency (up to 50%) for the user data can be achieved using NetApp
deduplication and thin provisioning. Note that the NetApp best practice is to store the user data and
profile in a CIFS share on a NetApp NAS volume using a profile management solution. One such solution
is Liquidware Labs Profile Unity. This might also be accomplished with Microsoft roaming profiles and/or
folder redirection. This allows enhanced data management and protection of the user and profile data.
For the nonpersistent access mode, NetApp write I/O optimization and VST help enhance the end-user
experience. Effective solution monitoring, management, and data protection can be achieved by using
Liquidware Labs Stratusphere UX, VM Insight, Operations Manager, and RAID-DP, as shown in Table 5.

23 NetApp and VMware View Solution Guide: Best Practices for Design, Architecture, Deployment, and Management
Table 5) VMware View Composer Linked Clones.
VMware View NetApp and VMware Solution
Pool Type Cloning Method
User Assignment
Storage Efficiency Performance Management Data Protection
Template or Replica Datastores
User Data
Automated desktop pool
VMware View Com-poser (linked clones)
Floating Thin provision-ing
Dedupe
CIFS
Thin provi-sioning
Dedupe
Write I/O optimiza-tion
VST
Flash Cache
VM Insight
Operations Manager
VSC
RAID-DP
VMware View 4.5 introduced the storage tiering for View Composer linked clones. This technology allows
administrators to separate the replica disk (the C:\ Drive) from the linked clone data (new writes). The
linked clone datastore contains the delta file where new writes are stored and the disposable file disk
where the c:\temp file and c:\pagefile.sys are stored. The linked clone datastores should not be
deduplicated because they contain transient data, which is created and destroyed frequently.
Maintenance is required to achieve storage efficiency and performance of the delta disk. The frequency of
maintenance is determined by the amount of data growth and the performance requirements of the
environment. Additionally, a reboot can be performed to remove the data stored within the disposable file
disk. For more information on how to perform the refresh operations, refer to the VMware View
Administrator‟s Guide.
Using VMware Storage Tiering with NetApp VST, it is not necessary to place each data type on different
physical tiers of storage because VST alleviates the need for physical tiering and allows some or all of the
data to use the Flash Cache and accelerate data access. Linked clone replicas can also be pinned to
Flash Cache using FlexShare® as described in section 7.6 under FlexShare. Figure 11 shows the
VMware View linked clone data layout using NetApp VST.
Figure 11) VMware View linked clone data layout using NetApp VST.
NetApp highly recommends using Disposable File Redirection in a linked clone environment because it
increases solution scalability by removing pagefile and temp directory writes to the delta disk. In addition,
if a profile management solution has not been implemented for storing persona data, the use of the User
Data disk is also highly recommended. Failure to leverage these two technologies can significantly impact
the scalability of a VDI solution and require more shared storage.

24 NetApp and VMware View Solution Guide: Best Practices for Design, Architecture, Deployment, and Management
To summarize, a NetApp solution strongly complements all the desktop delivery models and user access
modes in VMware View to provide a highly cost-effective, high-performing, operationally agile, and
integrated VMware View solution.
7 ACCELERATING VMWARE VIEW WITH READ AND WRITE I/O
OPTIMIZATION
7.1 CONCEPTS
Virtual desktops can be both read and write intensive at different times during the lifecycle of the desktop,
depending on the user activity and the desktop maintenance cycle. The performance-intensive activities
are experienced by most large-scale deployments and are referred to as storm activities, such as:
Boot storms
Login storms
Virus scan or definition update storms
A boot storm is an event in which some or all virtual desktops boot simultaneously, creating a large spike
in I/O. This can happen as a result of rolling out mass OS updates and having to reboot, desktop redeploy
operations, new application installation, maintenance windows, server failures, or any number of practical
issues or interruptions. Daily login storms and virus scan storms also create similar I/O spikes. In the
physical world this was never a problem because each machine had a single disk, and boot, login, and
virus scanning did not affect other users. With virtual desktops using a shared infrastructure, these peaks
in I/O affect the entire desktop environment. The environment must be able to handle both the read- and
write-intensive scenarios in the desktop lifecycle. The typical methods for addressing these peaks are:
Increase cache for both ESX servers and storage devices
Increase the spindle count
Increase the number of storage arrays
The NetApp and VMware View solution addresses these challenges in a unique way, with no negative
tradeoffs to the customer environment. The key components of NetApp VST include the native dedupe
caching capabilities of Data ONTAP, Flash Cache, write I/O optimization by coalescing multiple client
write, FlexClone, and deduplication. NetApp VST helps customers reduce the physical storage
requirement, allowing customers to size their virtual desktop infrastructures for normal operations and not
for the peaks.
NetApp VST eliminates the requirement for a large number of spindles to handle the bursty read-intensive
operations, while NetApp FlexClone and deduplication can further reduce the number of spindles required
to store data, thus allowing customers to reduce capex.
7.2 NETAPP WRITE OPTIMIZATION
Virtual desktop I/O patterns are often very random in nature. Random writes are the most expensive
operation for almost all RAID types because each write operation requires more than one disk operation.
The ratio of VDI client operation to disk operation also depends on the RAID type for the back-end
storage array. In a RAID 5 configuration on a traditional storage array, each client write operation requires
up to four disk operations. Large write cache might help, but traditional storage arrays still require at least
two disk operations. (Some coalescing of requests happens if you have a big enough write cache. Also,
there is a chance that one of the reads might come from read cache.) In a RAID 10 configuration, each
client write operation requires two disk operations. The cost of RAID 10 is very high compared to RAID 5.
However, RAID 5 offers lower resiliency (protection against single disk failure). Imagine dual disk failure in
the middle of the day, making hundreds to thousands of users unproductive.
25 NetApp and VMware View Solution Guide: Best Practices for Design, Architecture, Deployment, and Management
With NetApp, write operations have been optimized for RAID-DP by the core operating system Data
ONTAP and WAFL® since their invention. NetApp arrays coalesce multiple client write operations and
send them to disk as a single IOP. Therefore, the ratio of client operations to disk operations is always
less than 1, as compared to traditional storage arrays with RAID 5 or RAID 10, which require at least 2x
disk operations per client operation. Also, RAID-DP provides the desired resiliency (protection against
dual disk failure) and performance, comparable to RAID 10 but at the cost of RAID 5.
7.3 BENEFITS OF VST
The following are some of the key benefits of VST:
Increased performance. With VST, in combination with FlexClone and deduplication, latencies decrease significantly by a factor of 10x versus serving data from the fastest spinning disks available, giving submillisecond data access. Decreasing the latency results in higher throughput and lower disk utilization, both of which directly translate into fewer disk reads.
Lowering TCO. The improvement of requiring fewer disks and getting better performance allows customers to increase the number of virtual machines on a given storage platform, resulting in a lower total cost of ownership.
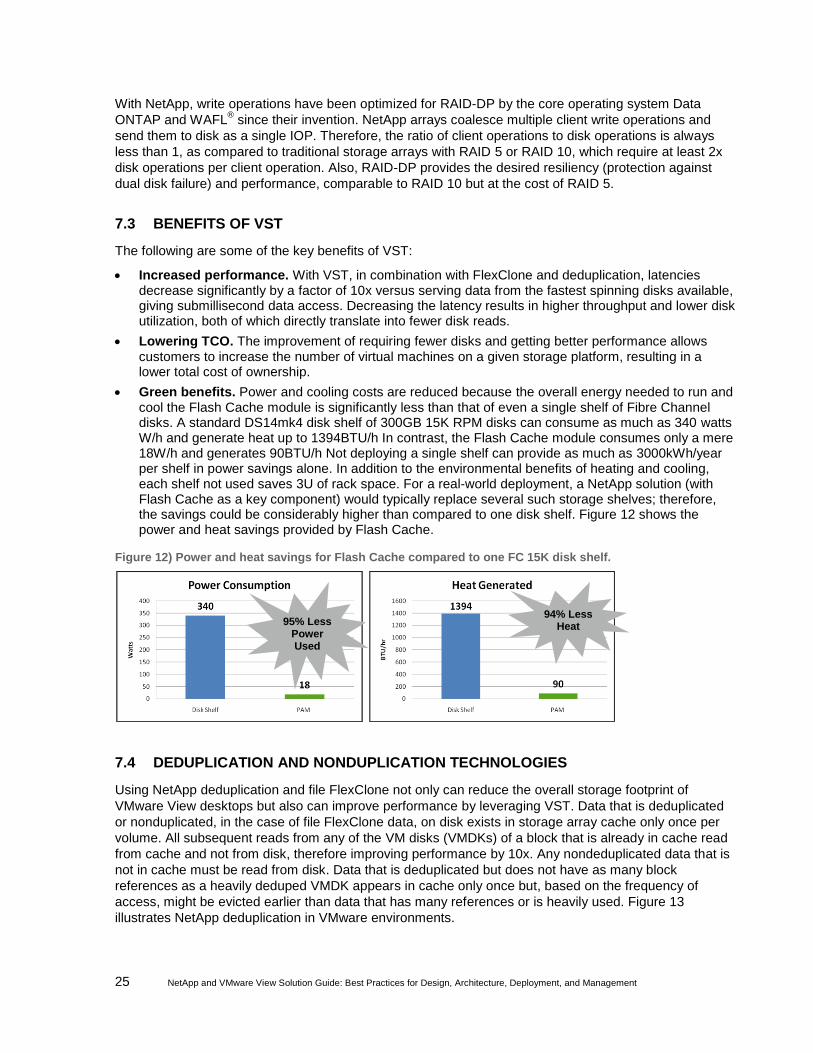
Green benefits. Power and cooling costs are reduced because the overall energy needed to run and cool the Flash Cache module is significantly less than that of even a single shelf of Fibre Channel disks. A standard DS14mk4 disk shelf of 300GB 15K RPM disks can consume as much as 340 watts W/h and generate heat up to 1394BTU/h In contrast, the Flash Cache module consumes only a mere 18W/h and generates 90BTU/h Not deploying a single shelf can provide as much as 3000kWh/year per shelf in power savings alone. In addition to the environmental benefits of heating and cooling, each shelf not used saves 3U of rack space. For a real-world deployment, a NetApp solution (with Flash Cache as a key component) would typically replace several such storage shelves; therefore, the savings could be considerably higher than compared to one disk shelf. Figure 12 shows the power and heat savings provided by Flash Cache.
Figure 12) Power and heat savings for Flash Cache compared to one FC 15K disk shelf.
7.4 DEDUPLICATION AND NONDUPLICATION TECHNOLOGIES
Using NetApp deduplication and file FlexClone not only can reduce the overall storage footprint of
VMware View desktops but also can improve performance by leveraging VST. Data that is deduplicated
or nonduplicated, in the case of file FlexClone data, on disk exists in storage array cache only once per
volume. All subsequent reads from any of the VM disks (VMDKs) of a block that is already in cache read
from cache and not from disk, therefore improving performance by 10x. Any nondeduplicated data that is
not in cache must be read from disk. Data that is deduplicated but does not have as many block
references as a heavily deduped VMDK appears in cache only once but, based on the frequency of
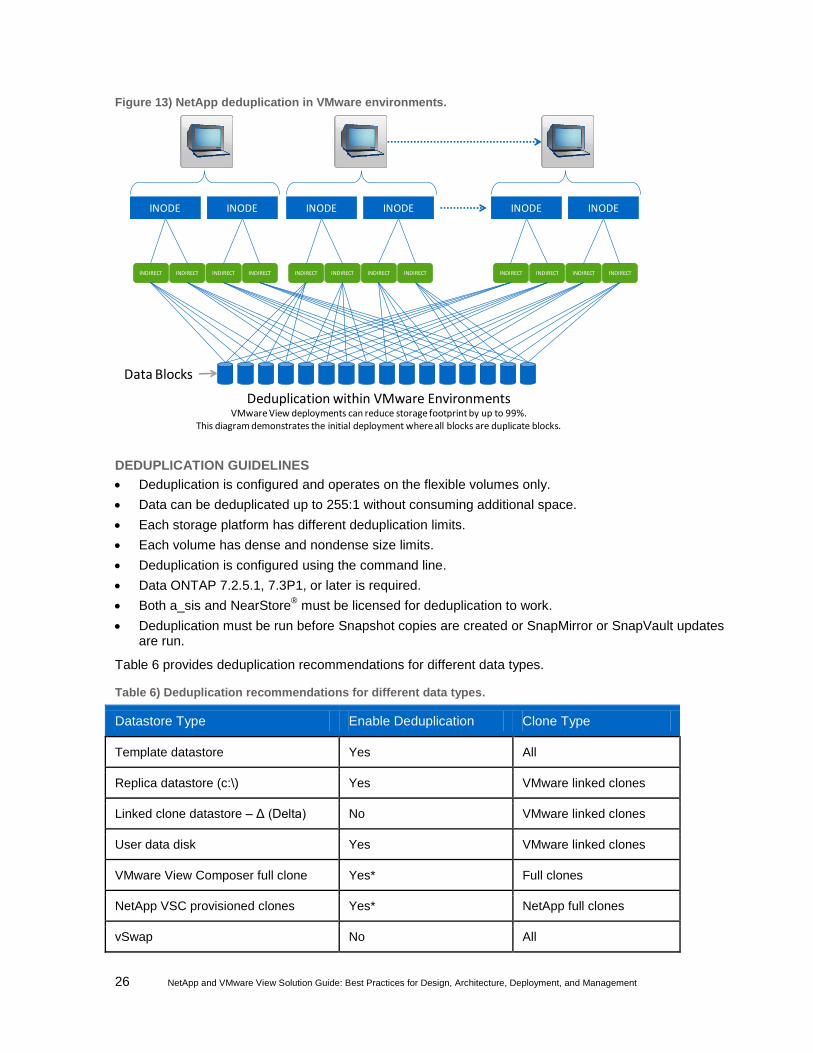
access, might be evicted earlier than data that has many references or is heavily used. Figure 13
illustrates NetApp deduplication in VMware environments.
95% Less Power Used
94% Less Heat
26 NetApp and VMware View Solution Guide: Best Practices for Design, Architecture, Deployment, and Management
Figure 13) NetApp deduplication in VMware environments.
DEDUPLICATION GUIDELINES
Deduplication is configured and operates on the flexible volumes only.
Data can be deduplicated up to 255:1 without consuming additional space.
Each storage platform has different deduplication limits.
Each volume has dense and nondense size limits.
Deduplication is configured using the command line.
Data ONTAP 7.2.5.1, 7.3P1, or later is required.
Both a_sis and NearStore® must be licensed for deduplication to work.
Deduplication must be run before Snapshot copies are created or SnapMirror or SnapVault updates are run.
Table 6 provides deduplication recommendations for different data types.
Table 6) Deduplication recommendations for different data types.
Datastore Type Enable Deduplication Clone Type
Template datastore Yes All
Replica datastore (c:\) Yes VMware linked clones
Linked clone datastore – Δ (Delta) No VMware linked clones
User data disk Yes VMware linked clones
VMware View Composer full clone Yes* Full clones
NetApp VSC provisioned clones Yes* NetApp full clones
vSwap No All
INODE
INDIRECT INDIRECT INDIRECT INDIRECT INDIRECT INDIRECT INDIRECT INDIRECT INDIRECT INDIRECT INDIRECT INDIRECT
INODE INODE INODE INODE INODE
Data Blocks
Deduplication within VMware EnvironmentsVMware View deployments can reduce storage footprint by up to 99%.
This diagram demonstrates the initial deployment where all blocks are duplicate blocks.

27 NetApp and VMware View Solution Guide: Best Practices for Design, Architecture, Deployment, and Management
Note: * In Table 6, the schedule for deduplicating full clones regardless of provisioning method may vary based on the amount of change within the virtual machine. More frequent deduplication may be required to shorten the deduplication process. NetApp recommends that the deduplication process be monitored and adjusted to fit the replication and backup requirements.
For more detailed information on deduplication, refer to NetApp TR-3505: NetApp Deduplication for FAS
and V-Series Deployment and Implementation Guide.
7.5 FLASH CACHE
Flash Cache is a PCI Express card that can be installed many of the current NetApp storage controller
systems. Each module contains either 256GB, 512GB, or 1TB of SLC NAND Flash. In the VMware View
solution on NetApp, NetApp recommends having at least one Flash Cache device per FAS or V-Series
storage cluster. Details on the number of modules per platform and the supported Data ONTAP versions
can be found at Flash Cache Technical Specifications.
7.6 TRADITIONAL AND VIRTUAL STORAGE TIERING
Virtual storage tiering (VST) is performed natively within Data ONTAP and can be extended with the use
of Flash Cache. Flash Cache is the hardware component; the software component is called FlexScale™
.
This section describes these components and the NetApp best practices to use them in a VMware View
environment.
TRADITIONAL LEGACY STORAGE ARRAYS
With traditional legacy storage arrays, there is no data or cache deduplication; therefore, for best
performance the amount of cache needed should be equal to or greater than the working set size. This
leads to requiring either large amounts of cache or more spindles to satisfy peak workloads such as boot,
login, or virus storms. Figure 14 shows traditional legacy storage array caching.
Figure 14) Traditional legacy storage array caching.

28 NetApp and VMware View Solution Guide: Best Practices for Design, Architecture, Deployment, and Management
VST IN DATA ONTAP
Data ONTAP stores only a single block on disk and in cache for up to 255 physical blocks per volume,
thus requiring fewer spindles and less cache than legacy storage arrays. Data ONTAP VST is available in
all versions of Data ONTAP 7.3.1 or higher. This means that VST can be used in every FAS, V-Series,
and IBM N Series that supports Data ONTAP 7.3.1 and block-sharing technologies (for example,
deduplication and FlexClone volumes). Figure 15 shows cache and data deduplication with VST.
Figure 15) Cache and data deduplication with NetApp VST.
HOW DATA ONTAP VST FUNCTIONS
When a data block is requested, Data ONTAP reads the block into main memory (also known as WAFL
buffer cache). If that data block is a deduplicated block, in that it has multiple files referencing the same
physical block, each subsequent read of that same physical block comes from cache as long as it has not
been evicted from cache. Heavily referenced blocks that are frequently read reside in cache longer than
blocks that have fewer references or less frequent access. The effects this has are that since main
memory can be accessed much more quickly than disk, latency is decreased, disk utilization is
decreased, and network throughput is increased, thus improving overall performance and end-user
experience. Figure 16 shows VST with data deduplication.

29 NetApp and VMware View Solution Guide: Best Practices for Design, Architecture, Deployment, and Management
Figure 16) VST with data deduplication.
HOW DATA ONTAP VST FUNCTIONS WITH FLASH CACHE
VST can be extended with the use of Flash Cache. As long as that block has not been evicted from both
caches, all subsequent reads are performed from main memory or Flash Cache, thus improving
performance by not having to go to disk. Again, the more heavily the data is deduplicated and the more
frequently accessed, the longer it stays in cache. Transparent storage array caching combined with
NetApp disk deduplication provides cost savings on many levels. Figure 17 shows transparent storage
array caching with Flash Cache and deduplication.
Figure 17) Transparent storage array caching with Flash Cache and deduplication.
The decision whether to use Flash Cache in addition to Data ONTAP VST is based on the amount of
deduplicated data and the percentage of reads within the environment. As users of the VMware View
environment create more data, the amount of deduplicated data changes, thus affecting the cache hit
rate. Thus, more cache might be needed if the data becomes more unique (even after running regular
deduplication operations on the new data).
NetApp recommends when possible to use Data ONTAP 7.3.1 (Data ONTAP 7.3.2 when using Flash
Cache) or later for VMware View environments. For environments with greater than 500 virtual desktops
per NetApp storage controller, NetApp recommends the use of both Data ONTAP caching and at least
one Flash Cache device per storage controller.
NetApp FAS Array
YES
Is the
deduped
block in
main
memory?
Read data block from
disk
NO
VMware ESX
YES

30 NetApp and VMware View Solution Guide: Best Practices for Design, Architecture, Deployment, and Management
HOW FLASH CACHE FUNCTIONS WITHOUT DEDUPLICATION (TRADITIONAL CACHING)
Flash Cache works by receiving data blocks that have been evicted from main memory. After being
evicted from main memory, if the same block should be requested a second time and that block has not
been evicted from Flash Cache, that block is read from Flash Cache and placed into main memory. Every
block, whether or not it contains the same data as another block, is read first from disk. This is how legacy
storage arrays operate in that the first of all reads must come from disk, and subsequent reads depend on
the size of the cache. This is the reason legacy vendors require large amounts of cache. Figure 18 shows
Flash Cache without deduplication.
Figure 18) NetApp Flash Cache without deduplication.
1. Block A (blue) requested from client.
2. Block A (blue) read from disk to memory.
3. Block A (blue) returned to client.
4. Block B (green) requested from client.
5. Block B (green) read from disk to memory.
6. Block B (green) returned to client.
7. Block A (blue) evicted from memory to Flash Cache because memory is full.
8. Block C (orange) requested from client.
9. Block C (orange) read from disk to memory.
10. Block C (orange) returned to client.
11. Subsequent reads of block A (blue) or B (green) result in the eviction of blocks C (orange) and reads from Flash Cache.
HOW FLASH CACHE FUNCTIONS WITH DEDUPLICATION (TRANSPARENT STORAGE ARRAY CACHING)
Flash Cache receives data blocks that have been evicted from main memory. After eviction from main
memory, if a block should be required for a second time, that block is read from Flash Cache, a cache hit,
and placed into main memory. If the block being requested is a duplicate block that has been
deduplicated (also known as a shared block), the block is read from Flash Cache to main memory. As
long as that block is not evicted from cache, all subsequent reads are performed from Flash Cache, thus
improving performance by not having to go to disk. Transparent storage array cache combined with
NetApp disk deduplication provides cost savings on many levels. Figure 19 shows Flash Cache with
deduplication.
NetApp FAS Array
Flash Cache
Memory
Disk Storage
C
A B C
B
A
A
B
C
1
23
4 56
78
9
1011
VMware ESX
31 NetApp and VMware View Solution Guide: Best Practices for Design, Architecture, Deployment, and Management
Figure 19) NetApp Flash Cache with deduplication.
1. Block A‟ (blue) requested from client.
2. Block A‟ (blue) read from disk to memory.
3. Block A‟ (blue) returned to client.
4. Block A‟ (green) requested from client.
5. Block A‟ (green) read from memory.
6. Block A‟ (green) returned to client.
7. Block A‟ requested from client.
8. Block A‟ (blue) evicted from memory to Flash Cache because memory is full and it was the first block.
9. Block A‟ (orange) read from memory.
10. Block A‟ (orange) returned to client.
FLEXSCALE
FlexScale is the tunable software component of Flash Cache. It is a licensed feature of Data ONTAP 7.3
or greater. FlexScale allows different caching modes to be used based on the type of workload. The
different modes of caching are metadata only, normal user data, and low-priority blocks. Extensive
scalable VMware View testing within the NetApp solution labs has shown that significant performance
improvements can be gained by turning on metadata and normal user data caching modes in FlexScale.
To license and enable FlexScale:
1. Connect to the controller system‟s console, using either SSH, telnet, or serial console.
2. Check to see if the FlexScale license has already been installed by typing license and finding the
line that says flex_scale:
license
3. If FlexScale is not licensed, you can license it by issuing the following command. If you do not have your license available, you can locate it within the NetApp Support (formerly NOW
®) site.
License add <License_Key>
To change the FlexScale caching modes for use with VMware View workloads:
1. Connect to the controller system‟s console, using either SSH, telnet, or serial console.
2. Change the following options with the following commands. This turns on metadata and normal user data block caching. These are the recommended FlexScale settings for VDI:
NetApp FAS Array
Flash Cache
Memory
Disk Storage
A‟ A‟ A‟
2
8
A‟
Deduplicated VMs
59VMware ESX
A‟A‟
A‟
1
3
4
6
7
10

32 NetApp and VMware View Solution Guide: Best Practices for Design, Architecture, Deployment, and Management
Options flexscale.enable on
options flexscale.normal_data_blocks on
3. You can verify these settings have been changed:
options flexscale
FLEXSHARE
FlexShare is a feature of Data ONTAP that allows administrators to set QoS policies on different volumes
and data types. When a NetApp storage controller is being configured in a VMware View linked clone
environment, the FlexShare caching policy of keep should be set on the datastore used to store the
replica disks.
To change the FlexShare caching modes for use with VMware View linked clones:
1. Connect to the controller system‟s console using either SSH, telnet, or serial console.
2. Change the following options with the commands noted. This turns on the FlexShare policy to keep the data from the select volume in Flash Cache. These are the recommended FlexShare settings for VMware View linked clone replica datastores.
Priority set volume replica_datastore cache=keep
To verify these settings have been changed:
priority show volume –v replica_datastore
Volume: replica_datastore
Enabled: on
Level: Medium
System: Medium
Cache: keep
PREDICTIVE CACHE STATISTICS (PCS)
NetApp Predictive Cache Statistics (PCS) offers the ability to emulate large read cache sizes to measure
their effect on system performance. PCS provides a means to approximate the performance gains of
adding one or more Flash Cache modules to a system. PCS is configured in the same manner as Flash
Cache and shares the same options for configuration.
NetApp TR-3801: Introduction to Predictive Cache Statistics describes its configuration and use.
7.7 SUMMARY OF VST IN A VMWARE VIEW ENVIRONMENT
Using NetApp Flash Cache allows customers to size their VMware View environments for normal
operations and have the peaks handled by Flash Cache. Now companies can provide their end users
with a cost effective and high-performing VMware View desktop.
THE VST VALUE
Cache efficiency. Deduplication occurs not only on disk but also in cache. Working sets of data are deduplicated, so larger caches are not needed as in traditional legacy storage solutions.
Performance acceleration. Blocks read from cache are served 10 times more quickly because latency is reduced by a factor of 10.
Storage efficiency. The spindle count can be reduced even further because a large percentage of the read I/O requests are served up directly from VST.
Lower TCO. NetApp VST and deduplication reduce rack space, power, and cooling.

33 NetApp and VMware View Solution Guide: Best Practices for Design, Architecture, Deployment, and Management
NETAPP RECOMMENDATIONS
Since read I/O can be greatly reduced by using VST, NetApp recommends the use of Data ONTAP 7.3.1
or later. This version supports VST across the NetApp unified storage product line. When architecting
large-scale solutions, VST should be used in Data ONTAP and Flash Cache to extend their capabilities.
The net result of VST is that customers can buy less storage because of read cache and allow the disk to
be used for write I/O. Because of deduplication and VST, the end-user experience is greatly enhanced.
7.8 SUMMARY
To summarize, a NetApp solution is very efficient in meeting both capacity and performance
requirements. NetApp storage efficiency capabilities reduce the spindle count required to meet the VDI
capacity needs by 80% to 90%.
From an I/O perspective, VDI is very bursty. Under normal conditions, the read and write ratio varies;
however, there are business-critical operations such as desktop patching, upgrading, and antivirus
scanning that generate I/O bursts on the storage. I/O bursts, along with read and write operations, are the
main deciding factor in VDI sizing. I/O bursts and read operations are handled very effectively by NetApp
Flash Cache and dedupe. The end result is that with NetApp, customers require significantly fewer
spindles to meet the requirements for read operations and I/O bursts as compared to traditional storage
arrays. With read being offloaded by VST, write IOPS become the primarily deciding factor for spindle
requirements on NetApp storage, but the NetApp solution still requires significantly fewer spindles than
traditional storage arrays because of the WAFL and Data ONTAP write I/O optimization discussed earlier.
Also, the same set of spindles can be used to host the user data on CIFS home directories, which do not
have high IOPS requirements. This is possible because NetApp virtualizes disk I/O and capacity into
large high-performing aggregates, which can be used on demand by individual VMs.
8 STORAGE SIZING BEST PRACTICES
Storage estimation for deploying VMware View solutions on NetApp includes the following steps:
1. Gather essential solution requirements.
2. Perform performance-based and capacity-based storage estimation.
3. Get recommendations on storage system physical and logical configuration.
8.1 GATHER ESSENTIAL SOLUTION REQUIREMENTS
The first step of the storage sizing process is to gather the solution requirements. This is essential to
sizing the storage system correctly in terms of the model and the number of required NetApp storage
controllers, type and quantity of disk spindles, software features, and general configuration
recommendations. The key storage sizing elements are:
Total number of VMs for which the system must be designed (for example, 2000 VMs)
Types and percentage of different types of desktops being deployed. For example, if VMware View is used, different desktop delivery models might require special storage considerations.
Size per VM (for example, 20GB C: drive, 2GB data disk)
VM OS (for example, Windows XP, Windows 7, and so on)
Worker workload profile (type of applications on the VM, IOPS requirement, read-write ratio, if known)
Number of years for which the storage growth must be considered
Disaster recovery/business continuance requirements
Size of NAS (CIFS) home directories

34 NetApp and VMware View Solution Guide: Best Practices for Design, Architecture, Deployment, and Management
NetApp strongly recommends storing user data on NAS (CIFS) home drives. Using NAS home drives, companies can more efficiently manage and protect the user data and eliminate the need to back up the virtual desktops.
For most of the VMware View deployments, companies might also plan to implement roaming profiles and/or folder redirection. For detailed information on implementing these technologies, consult the following documentation:
Microsoft Configuring Roaming User Profiles
NetApp TR-3367: NetApp Systems in a Microsoft Windows Environment
Microsoft Configuring Folder Redirection
VMware View considerations: When implementing VMware View, decide on the following:
Determine the types of desktops that are deployed for different user profiles.
Identify the data protection requirements for different data components (OS disk, user data disk, CIFS home directories) for each desktop type being implemented.
For automated desktop pools utilizing full clone in persistent access mode, alternatively the user data and profile can be hosted on a separate “user data disk.” Because this is a vmdk file, it is important to decide on the user data disk size upfront. NetApp thin provisioning, deduplication, and VSC 2.1.1 Backup and Recovery data protection solution components can be leveraged to achieve the desired storage efficiency and data protection for the user data disk.
PERFORMANCE REQUIREMENTS
Estimating Environment Workload
For proper storage sizing, it is critical to determine the IOPS requirement per virtual desktop. This
involves analyzing how busy the virtual desktops are and the percentage of users who are heavy workers
(knowledge workers) versus light workers (for example, data entry workers). Important factors to be
considered are:
Hourly, daily, monthly, and quarterly user workload (best case and worst case scenarios).
Percent reads versus writes (for example, 50% reads/50% writes or 33% reads/67% writes).
Commonality of data and how well the data is deduplicated (because this is directly related to cache efficiency).
Concurrency of user access (how many users are working at the same time).
Effect of antivirus operation, such as scanning and virus definition updates, as well as requirements, including frequency, schedules, and so on. Intelligent virus scan solutions such as McAfee MOVE or Trend Micro Deep Security should be used when designing an efficient and scalable VMware View solution.
Any recommendations specific to VMware on storage performance and IOPS requirements for best-case and worst-case situations for the customer environment. Also, VMware has provided some guidelines on IOPS per heavy and light user in the Storage Considerations for VMware View best practices document.
Performance Data Collection Methods
This performance data can be collected in many ways. If the VMware View environment is not new, one
of the following methods could be used:
NetApp storage data collector and analyzer tool
VMware Capacity Planner data collector, Windows Logman tool, PlateSpin, and TekTools
VDI Environment assessment tools such as Liquidware Labs and Lakeside Software
The NetApp storage data collector and analyzer tool collects storage-specific performance counters from
a range of Windows clients and help analyze the collected data so that they can be effectively used with
the NetApp storage sizing tools. For details on how to obtain and run the tool in your environment, contact

35 NetApp and VMware View Solution Guide: Best Practices for Design, Architecture, Deployment, and Management
your NetApp account team. In addition to the NetApp data collection tool, VMware Capacity Planner,
Windows Logman, Perfmon, PlateSpin, or TekTools can be used to analyze the existing physical
desktops within the environment to understand the I/O requirements.
Any of these methods can produce data that assists in sizing the storage platform and the spindle count
required to service the workload.
Example formula:
Total storage IOPS requirement = (sum of all max IOPS/number of desktops tested) x number of virtual desktops
Example:
During the performance data collection over 30 days, the max number of IOPS for 10 clients totaled 1,327. The customer plans to deploy 100 seats. From this sample, one can calculate the estimated IOPS requirement. From this number, because it is a maximum, one must decide the probability of all the clients reaching the max I/O requirement at the same time and adjusting an acceptable maximum, as architecting a solution for this concurrency might not be necessary. The average of all IOPS on all clients can be used to get a better understanding of the daily load:
13,270 total max IOPS = (1,327 sum of max IOPS/10 desktops tested) x 100 future virtual desktops
8.2 PERFORMANCE-BASED AND CAPACITY-BASED STORAGE ESTIMATION
PROCESS
There are two important considerations for sizing storage for VMware View: The storage system should
be able to meet both the performance and the capacity requirements of the project, and it should be
scalable to account for future growth.
The steps for calculating these storage requirements are:
1. Determine the storage sizing building block.
2. Perform a detailed performance estimation.
3. Perform a detailed capacity estimation.
4. Obtain recommendations on the storage system physical and logical configuration.
DETERMINE STORAGE SIZING BUILDING BLOCK
The purpose of this step involves determining the logical storage building block or POD size. This means
deciding on the following parameters:
Storage building block scope. NetApp recommends basing the VMware View storage sizing building block on the number of datastores required per ESX cluster because it provides benefits of planning and scaling the storage linearly with the number of ESX clusters required for the solution.
Usable storage required. Determine the usable storage required per storage building block (per ESX cluster). For VMFS datastores, there can be multiple LUNs per flexible volume, for which each LUN is a datastore. For NFS datastores, each volume can represent a datastore with more VMs as compared to VMFS datastores.
Flexible volume layout across storage controllers. All of the flexible volumes belonging to an ESX cluster should be evenly split across the two controllers of the hosting NetApp storage cluster. This is recommended for better performance because the VMware View deployment scales out from one HA cluster to multiple ones, from hundreds to thousands to tens of thousands of virtual desktops.
Consider vSphere Configuration Maximums

36 NetApp and VMware View Solution Guide: Best Practices for Design, Architecture, Deployment, and Management
Carefully review the VMware documentation on configuration maximums associated with the various
storage-related parameters critical to the system design. For vSphere, review the VMware Configuration
Maximums document.
The important configuration parameters critical to the design are:
Number of virtual CPUs per server. This information is important to understand the maximum limit on the number of VMs that can be hosted on the physical server, irrespective of the number of cores per server.
Number of virtual CPUs per core for VMware View workloads. This information determines the upper limit on the numbers of VMs that can be supported per physical ESX host, but it cannot be more than the limit on the number of virtual CPUs that can be hosted per server. Consult your VMware Systems Engineer (SE) for a recommendation on the number of VMs that can be supported per ESX Server host.
Number of VMs managed per vCenter instance. This information helps to determine the maximum number of ESX hosts that can be managed by a single vCenter instance.
Number of NAS datastores per cluster. This information is critical for sizing scalable virtual desktops on NFS datastores.
Number of VMFS datastores configured per server (for FcoE/FC/iSCSI). This information is critical for sizing scalable VMware View solutions on VMFS datastores.
Number of VMs per VMFS datastore. This information is critical for sizing scalable VMware View solutions on VMFS datastores. For NFS, there are no VMware recommendations on the maximum number of VMs per datastore.
Number of hosts per HA/DRS cluster
These configuration parameters should help determine the following design parameters:
Proposed number of VMs per ESX host
Proposed number of ESX hosts per ESX cluster
Proposed number of datastores per ESX cluster
Proposed number of VMs per ESX cluster
Number of ESX clusters managed by a vCenter instance
Proposed number of VMs per datastore
Total number of datastores required for the project
Provisioning fewer, denser datastores provides key advantages of ease of system administration, solution
scalability, ease of managing data protection schemes, and effectiveness of NetApp deduplication.
Decide on Storage Protocol
The two shared storage options available for VMware View are:
VMFS-based datastores over FCoE, FC, or iSCSI
NFS-based datastores
NetApp is a true unified multiprotocol storage system that has the capability to serve storage for both
shared storage options from a single storage cluster without the use of additional SAN or NAS gateway
devices.
Both of these are viable and scalable options for VMware View. Consider reading NetApp TR-3808:
VMware vSphere and ESX 3.5 Multiprotocol Performance Comparison Using FC, iSCSI, and NFS for
results from a technical performance study conducted jointly by NetApp and VMware on different storage
protocols. Also, perform a cost benefit analysis for your environment and decide on the storage protocol
to be used. The key NetApp value proposition for VMware View holds true across all the protocols.

37 NetApp and VMware View Solution Guide: Best Practices for Design, Architecture, Deployment, and Management
PERFORM DETAILED PERFORMANCE ESTIMATION
This step involves estimating the total number of disk IOPS and Flash Cache modules required for the
VMware View solution based on the requirements. Write I/O optimization with coalescing multiple write
operations as single IOPS and VST capabilities available in NetApp solution help significantly reduce the
amount of data disks required. The calculations are performed based on the IOPS requirement per VM,
version of Data ONTAP, VST, and customer environment workload characteristics. For getting detailed
estimation on savings achieved for your environment, contact your NetApp account team. The output of
this step includes:
Total number of Flash Cache modules required
Total IOPS required in order to meet the performance needs
Percentage of the total IOPS that require data disks considering the disk savings with write I/O optimization, NetApp VST, and Flash Cache capabilities
VMware View considerations: This step is applicable to all of the six virtual desktop types available in
VMware View 4.5 and can help reduce the total number of spindles required.
PERFORM DETAILED CAPACITY ESTIMATION
Figure 20 describes the various steps involved in the capacity-based storage estimation process. Each of
these steps is discussed in detail in the following sections.
Figure 20) Overview of capacity estimation process.
DETERMINE STORAGE REQUIRED FOR VM FILES
There are several files associated with each VM, and these files require shared storage in addition to the
actual VM. The files are listed in Table 7.
Table 7) VMware file listing.
Files Purpose Storage Required
.vmdk Two VMDK files that make up a VM. The –flat.vmdk file is
the actual data disk, and the .vmdk file is the descriptor file
that describes the disk geometry of the –flat file, (<2K). If
considering using VMware Snapshot copies, the –
delta.vmdk files must be considered as a part of the
storage requirements.
Size of the VM (for example, 20GB)
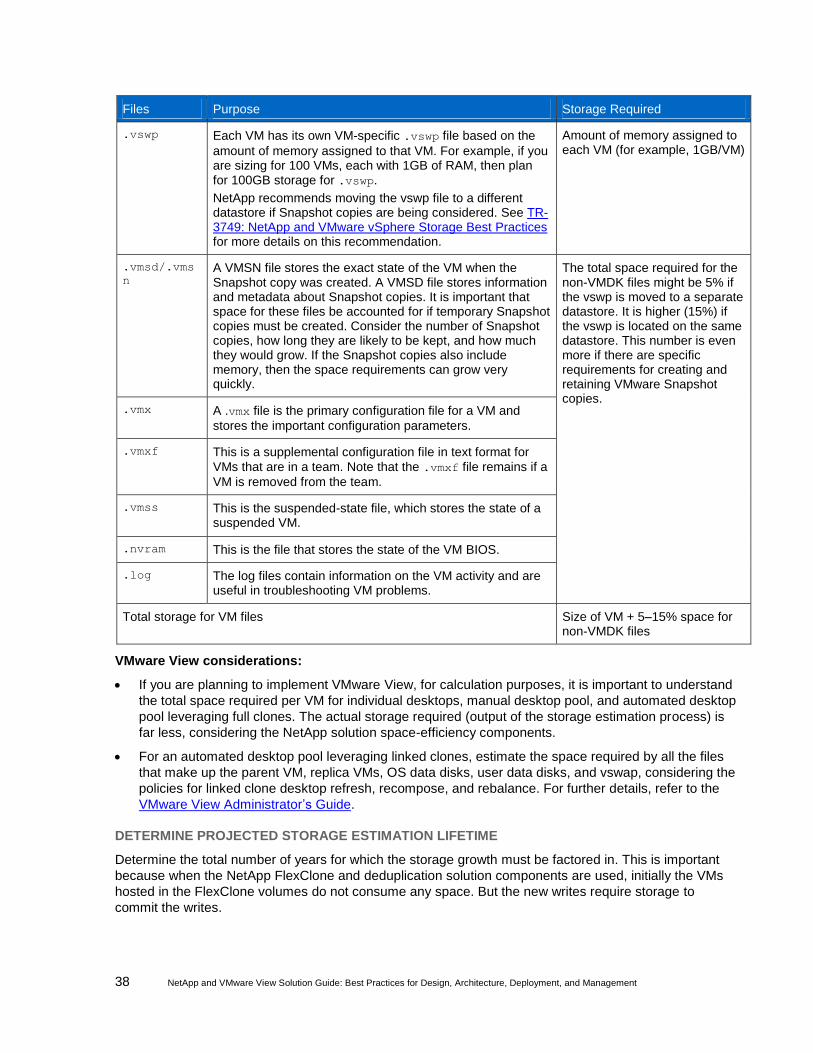
38 NetApp and VMware View Solution Guide: Best Practices for Design, Architecture, Deployment, and Management
Files Purpose Storage Required
.vswp
Each VM has its own VM-specific .vswp file based on the
amount of memory assigned to that VM. For example, if you are sizing for 100 VMs, each with 1GB of RAM, then plan for 100GB storage for .vswp.
NetApp recommends moving the vswp file to a different datastore if Snapshot copies are being considered. See TR-3749: NetApp and VMware vSphere Storage Best Practices for more details on this recommendation.
Amount of memory assigned to each VM (for example, 1GB/VM)
.vmsd/.vms
n
A VMSN file stores the exact state of the VM when the Snapshot copy was created. A VMSD file stores information and metadata about Snapshot copies. It is important that space for these files be accounted for if temporary Snapshot copies must be created. Consider the number of Snapshot copies, how long they are likely to be kept, and how much they would grow. If the Snapshot copies also include memory, then the space requirements can grow very quickly.
The total space required for the non-VMDK files might be 5% if the vswp is moved to a separate datastore. It is higher (15%) if the vswp is located on the same datastore. This number is even more if there are specific requirements for creating and retaining VMware Snapshot copies.
.vmx A .vmx file is the primary configuration file for a VM and
stores the important configuration parameters.
.vmxf This is a supplemental configuration file in text format for
VMs that are in a team. Note that the .vmxf file remains if a
VM is removed from the team.
.vmss
This is the suspended-state file, which stores the state of a suspended VM.
.nvram This is the file that stores the state of the VM BIOS.
.log The log files contain information on the VM activity and are useful in troubleshooting VM problems.
Total storage for VM files Size of VM + 5–15% space for non-VMDK files
VMware View considerations:
If you are planning to implement VMware View, for calculation purposes, it is important to understand
the total space required per VM for individual desktops, manual desktop pool, and automated desktop
pool leveraging full clones. The actual storage required (output of the storage estimation process) is
far less, considering the NetApp solution space-efficiency components.
For an automated desktop pool leveraging linked clones, estimate the space required by all the files
that make up the parent VM, replica VMs, OS data disks, user data disks, and vswap, considering the
policies for linked clone desktop refresh, recompose, and rebalance. For further details, refer to the
VMware View Administrator‟s Guide.
DETERMINE PROJECTED STORAGE ESTIMATION LIFETIME
Determine the total number of years for which the storage growth must be factored in. This is important
because when the NetApp FlexClone and deduplication solution components are used, initially the VMs
hosted in the FlexClone volumes do not consume any space. But the new writes require storage to
commit the writes.

39 NetApp and VMware View Solution Guide: Best Practices for Design, Architecture, Deployment, and Management
PROVISIONING WITH FLEXCLONE
FlexClone provides simple, rapid, space-efficient, zero-upfront cost provisioning of VMware View
datastores using NetApp VSC 2.1.1 and the provisioning and cloning capabilities. FlexClone technology
uses the power of NetApp Snapshot technology to rapidly provision VMFS or NFS datastores. The
process of provisioning with FlexClone involves creating a template datastore and making multiple
FlexClone volumes of the datastore depending on the total number of VMs required. This template
datastore is the base of the FlexClone volumes. For example, if you have an NFS volume with 200 VMs
contained within the volume/datastore, leverage FlexClone to provision additional volumes of 200 VMs
within seconds. Using the power of FlexClone you can eliminate the need to clone each VM sequentially,
which can be a very time-consuming process, especially when provisioning hundreds or thousands of
VMs. For more information on FlexClone technology concepts, see NetApp TR-3347: A Thorough
Introduction to FlexClone Volumes.
VMware View considerations: If you are planning to implement VMware View, the use of NetApp
FlexClone technology is applicable to manual desktop pools. For “automated desktop pool” leveraging full
clones, estimate the space required by each full clone. Automated desktop pools can also benefit from
the use of VMware linked clones.
ESTIMATE TEMPLATE VOLUMES/DATASTORES
The next step is to size the template datastore/volumes appropriately. The template datastore is a
datastore that is used as a base that is cloned quickly and efficiently using FlexClone. Using template
datastores provides the ability to use the provisioning benefits associated with FlexClone. From an overall
management and scalability perspective, consider splitting the datastores for each ESX cluster equally
across the two controllers of the NetApp storage system. This would require two template datastores (one
per NetApp controller) per ESX cluster. It also helps multiple ESX clusters have no dependencies on one
another for sharing storage. When NetApp VSC 2.1.1 provisioning and cloning is used with Data ONTAP
7.3.1 and higher, file-level FlexClone can be leveraged to rapidly make space-efficient clones inside a
template volume.
This example demonstrates the sizing of a template volume for an NFS environment in which we are
creating one datastore with 200 VMs. We have budgeted 10% overhead within the template volume.
Example formula 1 (Data ONTAP 7.3.1 or higher):
Size of template volume = [(space required per VM) x (number of datastores per flexible volume)] + 10% buffer space
Example:
28GB template volume (approx.) = [(25GB per VM) x (1 datastore per volume)] + 10%
Example formula 2 (Data ONTAP 7.3 or earlier):
Size of template volume = [(space required per VM) x (number of VMs per datastore) x (number of datastores per flexible volume)] + 10% buffer space
Example:
5.5TB template volume = [(25GB per VM) x (200 VMs per datastore) x (1 datastore per volume)] + 10%
The buffer space in formula 2 is only a temporary requirement so that the template volume does not get
100% full when all of the VMs are added in the datastore. Set the Snapshot reserve to zero and disable
the default Snapshot schedule.

40 NetApp and VMware View Solution Guide: Best Practices for Design, Architecture, Deployment, and Management
CONSIDER TEMPLATE VOLUME DEDUPLICATION SAVINGS
Once the storage required per template volume is determined, estimate the deduplication savings. For
flexible volumes with multiple identical VMs, the deduplication savings are very high because the OS part
of all of the VMs in the volume is almost identical.
For deployments leveraging Data ONTAP 7.3.1 or higher, the template datastore is already deduplicated
as a result of FlexClone file-level cloning inside the template datastore. Therefore, factoring in
deduplication savings is valid only for deployments with Data ONTAP 7.3 or lower.
For VMware View on NetApp environments, we estimate the initial deduplication savings to be at least
80% to 95% for the template datastores as all virtual machines within the datastore are identical, given
that there are more than eight VMs per template datastore.
For more general information on deduplication, refer to NetApp TR-3505: NetApp Deduplication for FAS,
and V-Series Deployment and Implementation Guide.
The output of this step gives the storage required per template flexible volume after the deduplication
savings have been factored in (for Data ONTAP 7.3 or lower). It might also be necessary to factor in
additional space for Snapshot reserve. The Snapshot reserve can be less for environments in which the
template volume does not change much and few Snapshot copies are retained. Consult a NetApp SE for
recommendations for your data protection requirements.
Example formula:
Deduplicated template volume size = [(size of template FlexVol volume) x (% deduplication)] x % Snapshot reserve space
Example:
121GB template volume size = [(5.5TB FlexVol volume) x (98% savings)] x 10%
VMware View considerations: If you are planning to implement VMware View, the use of NetApp
deduplication for template datastore is applicable to manual desktop pools. Deduplication scenarios for
automated desktop pools leveraging linked clones are discussed later in the document.
ESTIMATE ADDITIONAL STORAGE CONSUMED PER VM
All of the VMs hosted on the flexible volumes provisioned with FlexClone initially access the same data
blocks as the deduplicated template volume. However, the new writes for every VM consume new
storage blocks. Over the years for which the storage growth must be considered, every FlexClone volume
consumes some new storage space.
Calculate the projected storage consumed by each VM over this time period, across all the VM storage
elements (OS/system files, data files on the C: drive) and non-VMDK files in the datastore:
1. Determine projected new storage consumed per year (GB) for OS part of the VM.
2. Determine projected new storage consumed per year (GB) for data part of the VM.
3. Determine projected new storage consumed per VM for non-VMDK files in the datastore.
4. Multiply each of these elements with the total number of years for which the storage estimation is being done.
Example formula:
Total additional storage/VM for OS part of the C drive = (yearly OS delta) x number years
Total additional storage/VM for data part of C drive = (yearly data delta) x number years
Total additional storage/VM for non-VMDK files in the datastore = (yearly non-VDMK files delta) x number years

41 NetApp and VMware View Solution Guide: Best Practices for Design, Architecture, Deployment, and Management
Example:
6GB total additional storage/VM for OS = (2GB OS) x 3 years
15GB total additional storage/VM for data = (5GB data) x 3 years
0.9GB total additional storage/VM for data = (300MB data) x 3 years
VMware View considerations: If you are planning to implement VMware View, be sure to consider each
desktop delivery model.
The method previously described is valid for VMs being used in the “individual desktops” and “manual desktop pool” desktop delivery models.
For automated desktop pools, leveraging linked clone, be sure to consider the linked clone desktop disk usage:
For the VMs provisioned using linked clones in persistent access mode, based on your user profiles, determine the projected growth of the OS data disks between the refresh, recompose, and/or rebalance operations.
Also, for the VMs provisioned using linked clones in persistent access mode, determine the projected growth of the “user data disk” over the lifespan of the user accessing this disk. It is important to decide upfront on the size of the vmdk file representing the user data disk.
For VMs provisioned using linked clones in nonpersistent access mode, based on your user profile, determine the projected OS data disk growth.
For further details, refer to the VMware View Administrator‟s Guide.
ESTIMATE STORAGE REQUIRED FOR FLEXCLONE VOLUMES (CONSIDERING DEDUPE SAVINGS)
The storage required per FlexClone volume can be obtained by multiplying the results of the previous
step with the total number of VMs planned per FlexClone volume and discounting the deduplication
savings. This is also a factor of the number of VMs hosted per FlexClone volume. The deduplication
savings for the OS image part of the C: drive is higher because all the patches and upgrades applied to
each VM are essentially the same. A conservative number for the OS part would be between 50% and
70% (based on existing customer deployments and NetApp solutions lab validation). However, the
deduplication savings for the data part of the C: drive might not be as dense as the OS images because it
is unique to each individual VM. A conservative number for the data part would be between 20% and
50%, as is seen in CIFS home directory deduplication savings for customer deployments.
Example formula:
Per FlexVol volume storage consumption = [(total additional storage per VM for OS) x (number of VMs per FlexClone volume) x deduplication savings] + [(total additional storage per VM for data) x (number of VMs per FlexClone volume) x deduplication savings] + [(total additional storage/VM for non-VMDK files in the datastore) x (number of VMs per FlexClone volume) x deduplication savings]
Example:
1950GB per FlexVol volume storage consumption = (6GB x 200 VMs) x 70% savings + (15GB x 200 VMs) x 50% savings + (0.9GB x 200 VMs) x 50% savings
For environments in which Snapshot and/or mirroring are not used for the VM C: drives, NetApp
recommends setting the Snapshot reserve to 0% and disabling the Snapshot schedule. If Snapshot
copies or SnapMirror are used, the snap reserve should be set to a value that allows for the planned
number of Snapshot copies.

42 NetApp and VMware View Solution Guide: Best Practices for Design, Architecture, Deployment, and Management
To adjust Snapshot reserve and Snapshot schedule:
1. Connect to the controller system‟s console, using either SSH, telnet, or serial console.
2. Set the volume Snapshot reserve:
snap reserve <vol-name> ##
3. Set the volume Snapshot schedule:
snap sched <vol-name> 0 0 0
The output of this step is the total usable storage required by each FlexClone volume. This number can
be extrapolated to calculate the total usable storage required for the template volumes and associated
FlexClone volumes per ESX cluster and ultimately for the entire environment, depending on the total
number of ESX clusters required. Again, NetApp recommends splitting the datastores for each ESX
cluster across the two controllers of the NetApp storage system.
VMware View considerations:
The considerations in this step are valid for VMs provisioned using NetApp VSC Provisioning and
Cloning Capability (leveraging FlexClone technology) configured either as individual desktops or as
part of the manual desktop pool.
For VMs provisioned as part of automated desktop pools using VMware full clones, 50% to 90%
storage savings can be achieved using NetApp deduplication. Consider these savings in the storage
estimation process. After deploying VMware full clones, deduplication should be run to achieve
storage efficiency. By deduplicating the environment prior to booting, VST can significantly improve
performance. Regularly scheduled deduplication jobs can be run to maintain storage efficiency, but
the frequency of deduplication jobs should be determined by the amount of changed data and the
length of the deduplication process.
For VMs provisioned as part of automated desktop pools using VMware linked clones, significant
storage savings can be achieved for the “user data disk” using NetApp deduplication. A conservative
number to consider would be between 20% and 50%, as seen for home directories.
FACTOR IN SCRATCH SPACE STORAGE REQUIREMENTS
If required, factor in additional storage (scratch space) for test and development operations or any other
reason. This step is not mandatory, but NetApp highly recommends it (for future or last-minute design
changes).
SUMMARY OF CAPACITY-BASED STORAGE ESTIMATION PROCESS
The capacity calculations have provided guidance to the following essential storage architecture
elements:
Total number of datastores per template volume
Total number of FlexClone volumes per template volume
Total storage required per template volume
Total storage required per FlexClone volume
Total storage required for each template and FlexClone volume combination
Total number of template and FlexClone volume combinations
Total storage required for all the template and FlexClone volume combinations
All the storage considerations for different desktop delivery models available in VMware View

43 NetApp and VMware View Solution Guide: Best Practices for Design, Architecture, Deployment, and Management
SUMMARY OF STORAGE CONSIDERATIONS FOR DIFFERENT DESKTOP DELIVERY MODELS IN VMWARE VIEW
Table 8 summarizes the storage sizing considerations for different desktop deployment models in
VMware View, specifically with linked clones.
Table 8) Summary of storage considerations for desktop delivery models.
Pool Type Virtual Desktop Provisioning Method
Generic Recommendations
Special Storage Considerations
Manual desktop pool
NetApp VSC Provisioning and Cloning Capability (FlexClone)
Determine the types of desktops that will be deployed for different user profiles
Determine data protection requirements for different data components (OS disk, user data disk, CIFS home directories) for each desktop type
Consider reading the VMware View Administrator‟s Guide
Primary objective of the discussion in this section of the document
Automated desktop pool
VMware View Composer (full clones)
Estimate the space required by each full clone.
Leverage NetApp deduplication to achieve 50% to 90% storage efficiency.
Consider the storage savings in the storage estimation process.
VMware View Composer (linked clones)
Estimate the space required by all of the files that make up the parent VM, replica, OS data disks, user data disks, and vswap, considering the policies for linked clone desktop refresh, recompose, and rebalance.
Consider space in each datastore for different replica(s). The number of replica(s) in a datastore depend on the total number of parent VMs and Snapshot copies to which the active linked clone VMs in each datastore are anchored.
Decide on your storage overcommit policies to determine the number of linked clone VMs that can be hosted in a datastore. For detailed information, refer to the VMware View Administrator‟s Guide.
Give consideration to the linked clone desktop disk usage because, in some instances, the OS data disk can grow to the size of the parent VM (for details, see the VMware View Administrator‟s Guide).
For the persistent access mode, based on your user profiles, determine the projected growth of the OS data disks between the refresh, recompose, and/or rebalance operations.
For persistent access mode, determine the projected growth of the user data disk over the useful lifespan of this disk. This is important to decide in the design phase of the project.

44 NetApp and VMware View Solution Guide: Best Practices for Design, Architecture, Deployment, and Management
Pool Type Virtual Desktop Provisioning Method
Generic Recommendations
Special Storage Considerations
For persistent access mode, significant storage savings can be achieved for the user data disk using NetApp thin provisioning and data deduplication. A conservative number to consider would be between 20% and 50%, as seen for home directories.
For nonpersistent access mode, based on your user profile, determine the growth rate of the OS data disk. Consider policies such as deleting VM after first use to conserve storage space.
The diagram in Figure 21 shows the scalability of FlexClone. NetApp has the ability to create multiple
virtual machines without consuming additional space. First the virtual machine is cloned a number of
times within a datastore, and then the datastore is cloned.
Figure 21) FlexClone scalability.
8.3 GETTING RECOMMENDATIONS ON STORAGE SYSTEM PHYSICAL AND LOGICAL
CONFIGURATION
Provide the total capacity and performance requirements to the NetApp SE and obtain appropriate
storage system configuration. If required, NetApp can help you in each phase of the process previously
discussed. NetApp has detailed sizing tools specific to VMware View that can help architect VMware
View deployments of any scale. The tools are designed to factor in all the NetApp storage efficiency and
performance acceleration components discussed earlier.
This step also involves planning the logical architecture (the total number of template and the associated
FlexClone volumes that should be provisioned per aggregate). The recommendation is to provision fewer
large aggregates over more, smaller aggregates. The advantages to larger aggregates are that the I/O
VMware
datastores
Gold
Flexible
Volume
(X GB)
„n‟ FlexClone
Volumes
(y GB each)
1
n
Storage
required per
building block
One Gold Flexible Volume and associated
zero cost FlexClone combination hosting
1000s of VMs
1 n
‘n’ Gold Flexible Volume and associated zero cost
FlexClone combinations hosting total of 10s of
1000s of VMs
y = Space required for new writes only
1
n
1
n
1
n
45 NetApp and VMware View Solution Guide: Best Practices for Design, Architecture, Deployment, and Management
has more disks to write across, therefore increasing the performance of all volumes contained within the
aggregate. Based on the estimated volume size from the capacity calculations section earlier, determine
the number of template and associated FlexClone volumes that can be hosted in the largest possible
aggregate. It is also a good idea to leave some room to grow the aggregates to handle situations when
unexpected growth occurs. Also, disable scheduled aggregate Snapshot copies and set the aggregate
snap reserve to zero. Make sure the data disk in the aggregate satisfies the performance requirements
for the proposed number of VMs for volumes to be hosted in the aggregate.
9 STORAGE ARCHITECTURE BEST PRACTICES
In a VMware View environment, the availability and performance of the storage infrastructure are very
critical because thousands of users will be affected by storage outages or performance issues. Thus the
storage architecture must provide the level of availability and performance typical for business-critical
applications. NetApp has all the software and hardware solutions that address the availability and
performance for large, scalable VMware View environments. A complete VMware View deployment guide
can be found NetApp TR-3770: VMware View on NetApp Deployment Guide Using NFS.
9.1 STORAGE SYSTEM CONFIGURATION BEST PRACTICES
This section of the solution guide provides a high-level overview of the components and features that
should be considered when deploying a VMware View infrastructure on NetApp. For detailed information
on storage resiliency, refer to the following NetApp technical reports:
NetApp TR-3437: Storage Subsystem Resiliency Guide
NetApp TR-3450: Active-Active Controller Overview and Best Practices Guidelines
BUILDING A RESILIENT STORAGE ARCHITECTURE
Active-active NetApp controllers. The controller in a storage system can be a single point of failure if not designed correctly. Active-active controllers provide controller redundancy and simple automatic transparent failover in the event of a controller failure to deliver enterprise-class availability. Providing transparent recovery from component failure is critical because all desktops rely on the shared storage. For more details, see High Availability on the NetApp solutions page.
Multipath high availability (HA). Multipath HA storage configuration further enhances the resiliency and performance of active-active controller configurations. Multipath HA–configured storage enhances storage resiliency by reducing unnecessary takeover by a partner node due to a storage fault, improving overall system availability and promoting higher performance consistency. Multipath HA provides added protection against various storage faults, including HBA or port failure, controller-to-shelf cable failure, shelf module failure, dual intershelf cable failure, and secondary path failure. Multipath HA helps provide consistent performance in active-active configurations by providing larger aggregate storage loop bandwidth. For more information, visit TR-3437: Storage Subsystem Resiliency Guide.
RAID data protection. Data protection against disk drive failure using RAID is a standard feature of most shared storage devices, but with the capacity and subsequent rebuild times of current hard drives, when exposure to another drive failure can be catastrophic, protection against double disk failure is now essential. NetApp RAID-DP is an advanced RAID technology that is provided as the default RAID level on all FAS systems. RAID-DP provides performance that is comparable to that of RAID 10, with much higher resiliency. It provides protection against double disk failure as compared to RAID 5, which can protect against only one disk failure. NetApp strongly recommends using RAID-DP on all RAID groups that store VMware View data. For more information on RAID-DP, refer to NetApp TR-3298: RAID-DP: NetApp Implementation of RAID Double Parity for Data Protection.
Remote LAN management (RLM) card. The RLM card improves storage system monitoring by providing secure out-of-band access to the storage controllers, which can be used regardless of the state of the controllers. The RLM offers a number of remote management capabilities for NetApp
46 NetApp and VMware View Solution Guide: Best Practices for Design, Architecture, Deployment, and Management
controllers, including remote access, monitoring, troubleshooting, logging, and alerting features. The RLM also extends AutoSupport
™ capabilities of the NetApp controllers by sending alerts or “down
storage system” notification with an AutoSupport message when the controller goes down, regardless of whether the controller can send AutoSupport messages. These AutoSupport messages also provide proactive alerts to NetApp to help provide faster service. For more details on RLM, refer to Remote LAN Module on the NetApp solutions page.
Networking infrastructure design (FCoE, FC, or IP). A network infrastructure (FCoE, FC, or IP) should have no single point of failure. A highly available solution includes having two or more FC/FCoE or IP network switches; two or more CNAs, HBAs, or NICs per host; and two or more target ports or NICs per storage controller. In addition, if Fibre Channel is used, two independent fabrics are required to have a truly redundant architecture.
For additional information on designing, deploying, and configuring vSphere SAN and IP networks, refer
to NetApp TR-3749: NetApp and VMware vSphere Storage Best Practices.
TOP RESILIENCY BEST PRACTICES
Use RAID-DP, the NetApp high-performance implementation of RAID 6, for better data protection.
Use multipath HA with active-active storage configurations to improve overall system availability as well as promote higher performance consistency.
Use the default RAID group size (16) when creating aggregates.
Allow Data ONTAP to select disks automatically when creating aggregates or volumes.
Use the latest Data ONTAP general deployment release available on the NOW site.
Use the latest storage controller, shelf, and disk firmware available on the NOW site.
Disk drive differences are FC, SAS, SATA disk drive types, disk size, and rotational speed (RPM).
Maintain two hot spares for each type of disk drive in the storage system to take advantage of Maintenance Center.
Do not put user data into the root volume.
Replicate data with SnapMirror or SnapVault for disaster recovery (DR) protection.
Replicate to remote locations to increase data protection levels.
Use an active-active storage controller configuration (clustered failover) to eliminate single points of failure (SPOFs).
Deploy SyncMirror® and RAID-DP for the highest level of storage resiliency.
For more details, refer to NetApp TR-3437: Storage Subsystem Resiliency Guide.
BUILDING A HIGH-PERFORMANCE STORAGE ARCHITECTURE
A VMware View workload can be very I/O intensive, especially during the simultaneous boot up, login,
and virus scan within the virtual desktops. These first two workloads are commonly known as a “boot
storm” and “login storms.” A boot storm, depending on how many ESX Servers and guests are attached
to the storage, can create a significant performance effect if the storage is not sized properly. A boot
storm can affect both the speed in which the VMware desktops are available to the customer and overall
customer experience. A “virus scan storm” is similar to a boot storm in I/O but might last longer and can
significantly affect customer experience. A virus scan storm is when a virus scan within the guest is
initiated on all the clients at once.
Due to these factors, it is important to make sure that the storage is architected in such a way as to
eliminate or decrease the effect of these events.
Aggregate sizing. An aggregate is NetApp‟s virtualization layer, which abstracts physical disks from logical datasets, which are referred to as flexible volumes. Aggregates are the means by which the total IOPS available to all of the physical disks are pooled as a resource. This design is well suited to meet the needs of an unpredictable and mixed workload. NetApp recommends that whenever
47 NetApp and VMware View Solution Guide: Best Practices for Design, Architecture, Deployment, and Management
possible a small aggregate should be used as the root aggregate. This aggregate stores the files required for running and providing GUI management tools for the storage system. The remaining storage should be placed into a small number of large aggregates. The overall disk I/O from VMware environments is traditionally random by nature, so this storage design gives optimal performance because a large number of physical spindles are available to service I/O requests. On smaller storage systems, it might not be practical to have more than a single aggregate, due to the restricted number of disk drives on the system. In these cases, it is acceptable to have only a single aggregate.
Disk configuration summary. When sizing your disk solution, consider the number of desktops being served by the storage controller/disk system and the number of IOPS per desktop. This way you can make a calculation to arrive at the number and size of the disks needed to serve the given workload. Remember, keep the aggregates large, spindle count high, and rotational speed fast. When one factor needs to be adjusted, Flash Cache can help eliminate potential bottlenecks to the disk.
Flexible Volumes. Flexible volumes contain either LUNs or virtual disk files that are accessed by VMware ESX Servers. NetApp recommends a one-to-one alignment of VMware datastores to flexible volumes. This design offers an easy means to understand the VMware data layout when viewing the storage configuration from the storage system. This mapping model also makes it easy to implement Snapshot backups and SnapMirror replication policies at the datastore level, because NetApp implements these storage side features at the flexible volume level.
LUNS. LUNs are units of storage provisioned from a NetApp storage controller directly to the ESX Servers. The LUNs presented to the ESX Server are formatted with the VMware File System (VMFS). This shared file system is capable of storing multiple virtual desktops and is shared among all ESX Servers within the HA/DRS cluster. This method of using LUNs with VMFS is referred to as a VMFS datastore. For more information, see the VMware Fibre Channel SAN Configuration Guide for ESX 4.1, ESXi 4.1, and vCenter Server 4.1.
Flash Cache. Flash Cache enables VST and improves read performance and in turn increases throughput and decreases latency. It provides greater system scalability by removing IOPS limitations due to disk bottlenecks and lowers cost by providing the equivalent performance with fewer disks. Leveraging Flash Cache in a dense (deduplicated) volume allows all the shared blocks to be accessed directly from the intelligent, faster Flash Cache versus disk. Flash Cache provides great benefits in a VMware View environment, especially during a boot storm, login storm, or virus storm, because only one copy of deduplicated data must be read from the disk (per volume). Each subsequent access of a shared block is read from Flash Cache and not from disk, increasing performance and decreasing latency and overall disk utilization.
10 CONFIGURING VSC 2.1.1 PROVISIONING AND CLONING
1. Log into vCenter using the vCenter client.

48 NetApp and VMware View Solution Guide: Best Practices for Design, Architecture, Deployment, and Management
2. Select NetApp from the Home screen of the vCenter client.
3. If you are launching VSC 2.1.1 for the first time, accept the security alert by clicking Yes. You also can view and install the certificate at this time.

49 NetApp and VMware View Solution Guide: Best Practices for Design, Architecture, Deployment, and Management
4. Select the storage controllers from the tabs listed.
5. Select the Storage controllers tab and select Add.

50 NetApp and VMware View Solution Guide: Best Practices for Design, Architecture, Deployment, and Management
6. Enter the IP address of the storage controller as well as the user name and password. If SSL has been enabled on the controller, select Use SSL. If you are unsure whether SSL has been enabled, check the box and try to connect. If enabled, it connects; if not, it rejects the connection. Then uncheck the box and try again.
7. By default, the interfaces, volumes, and aggregates are all allowed and are on the right. To prohibit the use of an interface, volume, or aggregate, select it and click the single left arrow. Once you have completed selecting all the appropriate interfaces, select Next.

51 NetApp and VMware View Solution Guide: Best Practices for Design, Architecture, Deployment, and Management
8. After configuring the allowed interfaces, volumes, and aggregates, review the configuration and click Apply. This completes the configuration of the VSC Provisioning and Cloning Capability.
9. Next, select Connection brokers on the side menu of the Provisioning and Cloning submenu and click Add… .

52 NetApp and VMware View Solution Guide: Best Practices for Design, Architecture, Deployment, and Management
10. Select the version of the connection broker you wish to use, the domain of which the view server is a member, the hostname of the VMware View server, and its credentials and click Save.
11. Verify that the VMware View server has been correctly added to VSC and continue to add VMware View servers if necessary. It is not necessary to add servers that are participating as member servers. This is only for unique View instances.
11 DEPLOYING NETAPP SPACE-EFFICIENT VM CLONES
This chapter demonstrates the steps involved in deploying NetApp space-efficient clones using the
NetApp VSC Provisioning and Cloning Capability. The VSC allows administrators to leverage the power
of NetApp FlexClone (both file and volume) and redeploy virtual machines after patching or software
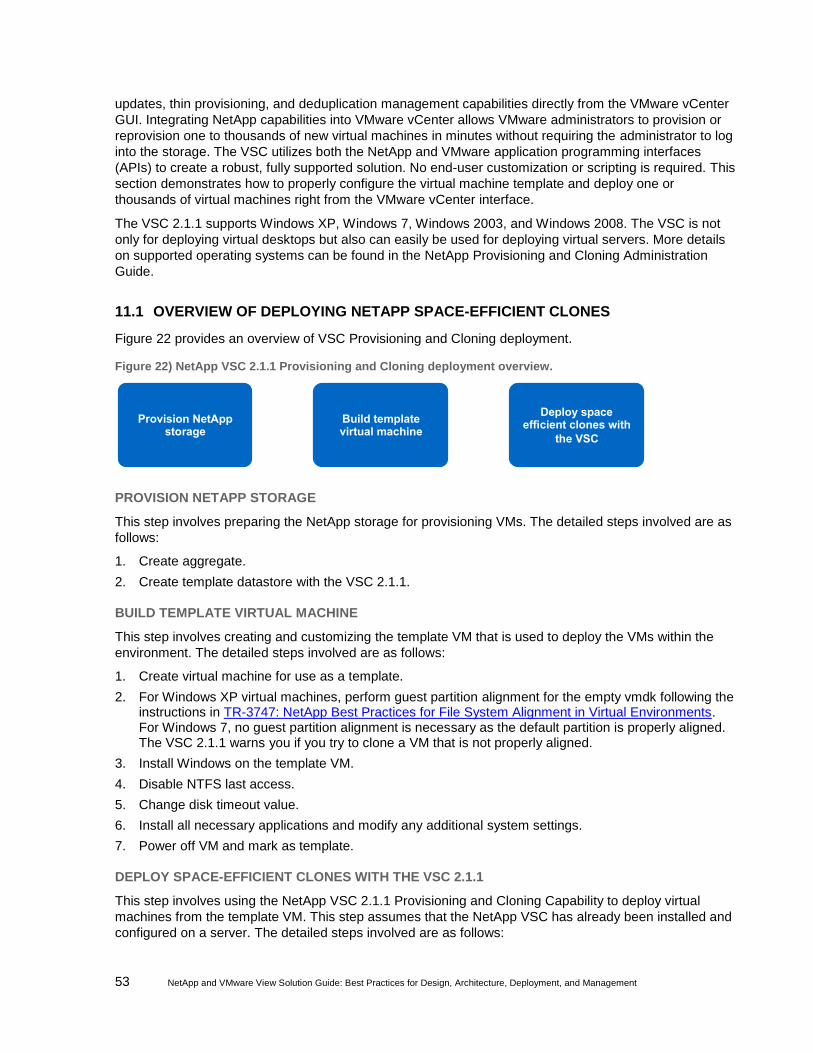
53 NetApp and VMware View Solution Guide: Best Practices for Design, Architecture, Deployment, and Management
updates, thin provisioning, and deduplication management capabilities directly from the VMware vCenter
GUI. Integrating NetApp capabilities into VMware vCenter allows VMware administrators to provision or
reprovision one to thousands of new virtual machines in minutes without requiring the administrator to log
into the storage. The VSC utilizes both the NetApp and VMware application programming interfaces
(APIs) to create a robust, fully supported solution. No end-user customization or scripting is required. This
section demonstrates how to properly configure the virtual machine template and deploy one or
thousands of virtual machines right from the VMware vCenter interface.
The VSC 2.1.1 supports Windows XP, Windows 7, Windows 2003, and Windows 2008. The VSC is not
only for deploying virtual desktops but also can easily be used for deploying virtual servers. More details
on supported operating systems can be found in the NetApp Provisioning and Cloning Administration
Guide.
11.1 OVERVIEW OF DEPLOYING NETAPP SPACE-EFFICIENT CLONES
Figure 22 provides an overview of VSC Provisioning and Cloning deployment.
Figure 22) NetApp VSC 2.1.1 Provisioning and Cloning deployment overview.
PROVISION NETAPP STORAGE
This step involves preparing the NetApp storage for provisioning VMs. The detailed steps involved are as
follows:
1. Create aggregate.
2. Create template datastore with the VSC 2.1.1.
BUILD TEMPLATE VIRTUAL MACHINE
This step involves creating and customizing the template VM that is used to deploy the VMs within the
environment. The detailed steps involved are as follows:
1. Create virtual machine for use as a template.
2. For Windows XP virtual machines, perform guest partition alignment for the empty vmdk following the instructions in TR-3747: NetApp Best Practices for File System Alignment in Virtual Environments. For Windows 7, no guest partition alignment is necessary as the default partition is properly aligned. The VSC 2.1.1 warns you if you try to clone a VM that is not properly aligned.
3. Install Windows on the template VM.
4. Disable NTFS last access.
5. Change disk timeout value.
6. Install all necessary applications and modify any additional system settings.
7. Power off VM and mark as template.
DEPLOY SPACE-EFFICIENT CLONES WITH THE VSC 2.1.1
This step involves using the NetApp VSC 2.1.1 Provisioning and Cloning Capability to deploy virtual
machines from the template VM. This step assumes that the NetApp VSC has already been installed and
configured on a server. The detailed steps involved are as follows:
Provision NetApp storage
Build template virtual machine
Deploy space efficient clones with
the VSC
NetApp Provisioning and Cloning Deployment Overview

54 NetApp and VMware View Solution Guide: Best Practices for Design, Architecture, Deployment, and Management
1. Create a customization specification within VMware vCenter client.
2. Use the NetApp VSC to create the NetApp volumes, attach the datastores, provision the virtual machines, and import into VMware View 4.5.
11.2 DETAILS OF DEPLOYING NETAPP SPACE-EFFICIENT CLONES
PROVISION NETAPP STORAGE
The first step in the VMware View mass deployment process is to provision NetApp storage. Figure 23
shows the process.
Figure 23) Provision NetApp storage.
CREATE AGGREGATE
Create aggregate(s) on the storage system according to the design. The details on storage design
considerations are discussed in chapter 9. Basic recommendations include using RAID-DP and
configuring fewer, larger aggregates but making sure to follow the storage design. This process can be
accomplished very simply using the NetApp System Manager Create Aggregate wizard.
CREATE TEMPLATE DATASTORE USING THE VSC 2.1.1
In keeping with the storage design, create at least one template datastore on one of the storage
controllers. This datastore is used to house the template VM(s). This process can be accomplished by
using the NetApp VSC 2.1.1. For manual configurations, follow the configuration recommendations
mentioned in TR-3749: NetApp and VMware vSphere Storage Best Practices, specifically for thin-
provisioning, automatic Snapshot copies, volume auto grow, Snapshot auto delete, other generic volume
settings (for example, no_atime_update), qtree security style, and so on. If a template datastore already
exists within the environment, verify that the volume has the proper settings.
1. Log into vCenter using the vCenter client.
Create Aggregate
Create Template Datastore Using the
VSC
Provision NetApp Storage
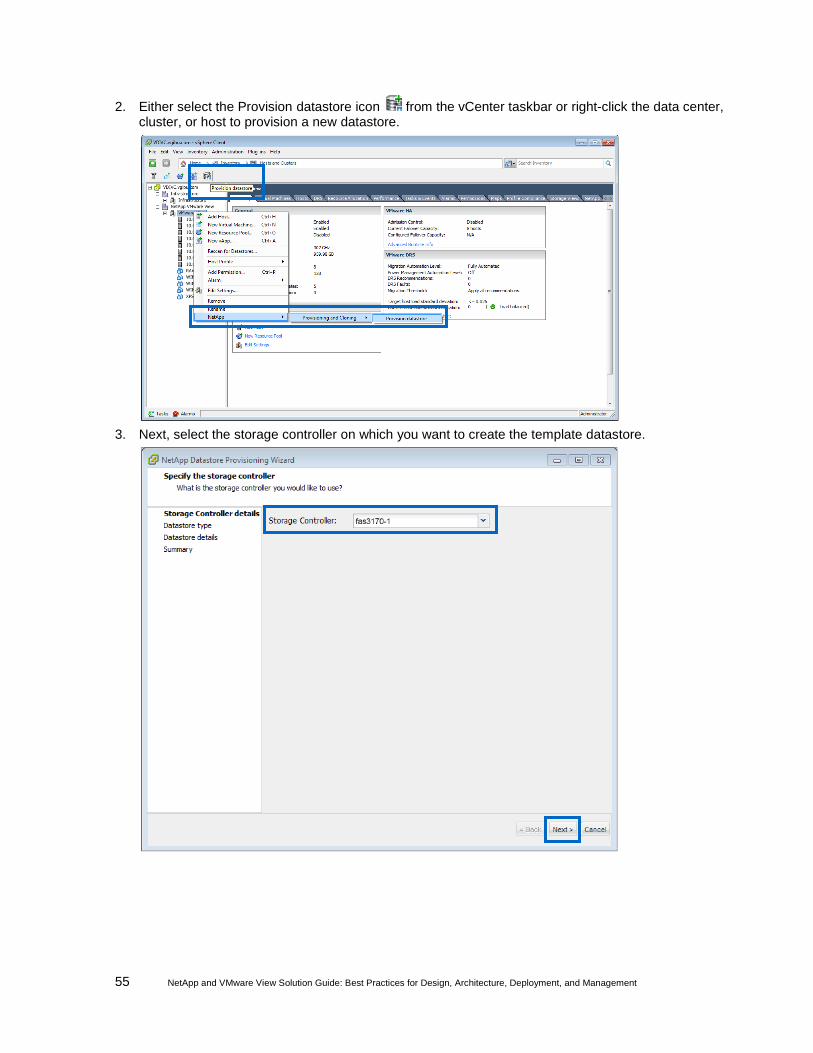
55 NetApp and VMware View Solution Guide: Best Practices for Design, Architecture, Deployment, and Management
2. Either select the Provision datastore icon from the vCenter taskbar or right-click the data center, cluster, or host to provision a new datastore.
3. Next, select the storage controller on which you want to create the template datastore.

56 NetApp and VMware View Solution Guide: Best Practices for Design, Architecture, Deployment, and Management
4. Continue with the steps in the following table, depending on whether you are using NFS or VMFS.
For NFS: For VMFS:
Select NFS and click Next.
Select VMFS for iSCSI or FC and click Next.
Enter in the datastore size and the datastore name; select
the aggregate; if applicable, select thin provisioning; set
the auto-grow policy; and click Next.
Enter in the datastore size and the datastore name; choose
to create a new volume; select the aggregate; if applicable,
select thin provisioning; choose the block size and click Next.
Review the configuration and click Apply.
Review the configuration and click Apply.

57 NetApp and VMware View Solution Guide: Best Practices for Design, Architecture, Deployment, and Management
BUILD TEMPLATE VIRTUAL MACHINE
In this phase, a VM is created that will be the template image for the virtual desktops that you plan to
provision for the end users. This process should be familiar, because it is the same process that VMware
administrators follow when creating virtual server templates. The process includes building a VM,
performing the guest partition alignment if using Windows XP, installing the OS, applying patches,
installing applications and general system settings, and powering off the VM. This process starts by
making sure that the guest OS, required business, and infrastructure applications are installed in the
template VM and that it is in a condition to be duplicated. Figure 24 shows the process for building a
template virtual machine.
Figure 24) Build template virtual machine.
Create New Virtual Machine in vCenter
The first step in building a virtual machine is to create a VM within vCenter. Use your company‟s standard
desktop configuration for creating new VMs. Make sure to attach all virtual hardware, including
networking that will be needed during production. Refer to the VMware recommendations in the Windows
XP Deployment Guide.
Perform Guest Partition Alignment
If you are deploying Windows XP, perform the guest partition alignment for the template VM‟s VMDK
before installation of the guest operating system, as described in TR-3747: NetApp Best Practices for File
System Alignment in Virtual Environments.
Install Operating System
Install Windows XP or Windows 7 on the template VM. For Windows XP desktops, follow VMware
recommendations in the Windows XP Deployment Guide and the VMware View Optimization Guide for
Windows 7.
Install all of the baseline applications and service packs.
Disable NTFS Last Access
It is important to change the value of last access on the template VM, because this reduces the number of
unnecessary I/Os to disk.
1. Log into the template using Remote Desktop or Virtual Center Remote Console.
2. Open a CMD window by going to Start > Run, entering cmd, and pressing Enter.
3. Check the current value for disable last access:
fsutil behavior query disablelastaccess
Perform guest partition alignment
(Win XP Only)
Install guest operating system
Build Template Virtual Machine
Change disk timeout value
Power off virtual machine and mark
as template
Install necessary applications and general system
settings
Disable NTFS last access
Create new virtual machine in vCenter

58 NetApp and VMware View Solution Guide: Best Practices for Design, Architecture, Deployment, and Management
4. If the value is zero, enter the following to disable last access:
fsutil behavior set disablelastaccess 1
For more information, visit Windows Server 2003.
Change Disk Timeout Value
Increasing this value increases the amount of time before a SCSI timeout within the guest OS.
1. Log in to the template using Remote Desktop or Virtual Center Remote Console.
2. Open a regedit by going to Start > Run, typing regedit and pressing Enter.
3. Find the TimeOutValue by following the path [HKEY_LOCAL_MACHINE\SYSTEM\CurrentControlSet\Services\Disk].
4. Change the key TimeOutValue=dword:00000190.
5. Reboot the VM now or at the end of the installation of applications and general system settings.
Install Necessary Applications and General System Settings
Install all of the necessary infrastructure and business applications in the template VM. A few examples
include Microsoft Office, antivirus software, Adobe Acrobat Reader, and a connection broker agent (if
planning to use a connection broker); allow specific users or groups RDP access to the VMs. More
settings can be found in the Windows XP Deployment Guide.
Power Off VM and Convert to Template (Optional)
After performing all of the template customizations and software installations, power off the VM, because
it must be powered off to deploy. Then convert the VM to be a template. This reduces the risk of
accidentally powering-on the VM.
DEPLOY SPACE-EFFICIENT CLONES WITH VSC 2.1.1
This section describes in detail the use of the VSC 2.1.1 Provisioning and Cloning Capability to clone one
to thousands of virtual machines. The VSC 2.1.1 is a VMware vCenter plug-in framework that allows
VMware administrators the ability to provision VMs directly from vCenter without having to leave the
vCenter client.
This section assumes that the NetApp VSC has been installed and registered as outlined in chapter 10.
For further details, consult the VSC 2.1.1 Installation and Administration Guide through the NetApp
Support (formerly NOW®) site.
Figure 25 shows the detailed steps involved in the process.
Figure 25) Deploy space-efficient clones with VSC 2.1.1.
Create Customization Specification
Create a customization specification for use with the deployment of the VMs. The customization
specification creates the information necessary for sysprep to successfully customize a guest OS from
vCenter. It includes information on hostname, network configuration, license information, domain
membership, and other information necessary to customize a guest OS. This procedure can be found in
Create customization
specification
Deploy space efficient clones with
the VSC
Deploy Space Efficient Clones with VSC

59 NetApp and VMware View Solution Guide: Best Practices for Design, Architecture, Deployment, and Management
the vSphere Virtual Machine Administration Guide on page 40. This customization specification can be
used by VSC Provisioning and Cloning to personalize each VM. In addition to creating the customization
specification, sysprep must be downloaded and installed if Windows XP or Windows 2003 is used as the
guest operating system. Procedures to do this can be found in the vSphere Basic System Administration
Guide on page 325.
Deploy Space-Efficient Clones Using VSC 2.1.1
In this example, 2,000 virtual machines are deployed using VSC. VSC has already been installed on
vCenter. It is used to create eight datastores that have 250 VMs each. It uses the following process:
1. Create the clones with file FlexClone.
2. Clone the datastores with volume FlexClone.
3. Mount the datastores to each of the ESX hosts.
4. Create the virtual machines from the cloned vmdk.
5. Customize the virtual machines using the customization specification.
6. Power on the virtual machines.
7. Import virtual machines into VMware View.
Follow these steps to deploy space-efficient clones using VSC 2.1.1:
1. Log into vCenter using the vCenter client.
2. Once storage controllers have been added, select the inventory button to get back to the servers and VMs. Right-click the VM to be cloned and select Create Rapid Clones.

60 NetApp and VMware View Solution Guide: Best Practices for Design, Architecture, Deployment, and Management
3. The VSC checks the guest file system alignment of the template or virtual machine to make sure that it is properly aligned.
4. Choose the storage controller with the drop-down arrow and click Next.

61 NetApp and VMware View Solution Guide: Best Practices for Design, Architecture, Deployment, and Management
5. Select the data center, cluster, or server to which to provision the VMs. If necessary, select Specify the virtual machine folder for the new clones. Then select Next.
6. Select the disk format you want to apply to the VM clones and click Next.
7. In the Specify details of the virtual machine clones screen, select whether you want to create a new datastore and whether you want to import the clones into a connection broker. Then select the version of connection broker you will be using. Next, adjust the vCPU and memory required for the guests. Then enter the number and name prefix of the clones to be created. Then choose a starting number and an increment value, and decide whether you want the VMs to be powered-on right away; if so, select Power on. If you want to customize the virtual machines, which NetApp recommends, select the appropriate customization specification, then Click Next.

62 NetApp and VMware View Solution Guide: Best Practices for Design, Architecture, Deployment, and Management
Note: When large numbers of virtual machines are to be provisioned, NetApp recommends that you avoid automatically powering them on at once. NetApp has encountered issues with guests joining the Active Directory
® domain when over two hundred virtual machines are customizing
at the same time. If you have issues with the guests customizing, NetApp recommends that you manually power on or script a staggered power-on of the virtual machines
8. If no datastores are present, create select Create NFS datastore(s) or Create VMFS datastore(s).

63 NetApp and VMware View Solution Guide: Best Practices for Design, Architecture, Deployment, and Management
9. Select the number of datastores to create and provide the root of the datastore name, the size of the datastore in gigabytes, and the aggregate you want to use for the VMs. Then check the box for thin provisioning if needed. Then, for NFS-based datastores, the option to autogrow the datastore appears. Select the grow increment size, maximum size, and specific datastore names and click Next.
Note: The size and space required in your environment may vary. This is for illustration purposes only.
10. After datastore creation, VSC displays the datastore that was created. If necessary, you can create additional datastores at this time and then click Next.

64 NetApp and VMware View Solution Guide: Best Practices for Design, Architecture, Deployment, and Management
11. Select the datastore where the virtual machine files are to be located and click Next. If you have multiple virtual disks that comprise a single virtual machine, click Advanced to place them in separate datastore locations.
12. If you selected Import into connection broker, the wizard asks for the View server information. If you have already completed the setup of the View server outlined in section 10 “Configuring VSC 2.1.1 Provisioning and Cloning,” then select the View server from the drop down. If not, then you can enter the credentials, create a new or existing desktop pool, change the number and names of the pools, and create them as dedicated or floating desktops. If you want to create multiple desktop pools and distribute the number of VMs per pool unevenly, uncheck Distribute VMs evenly and adjust the number of VMs on the bottom right corner. After this has been completed, click Next.
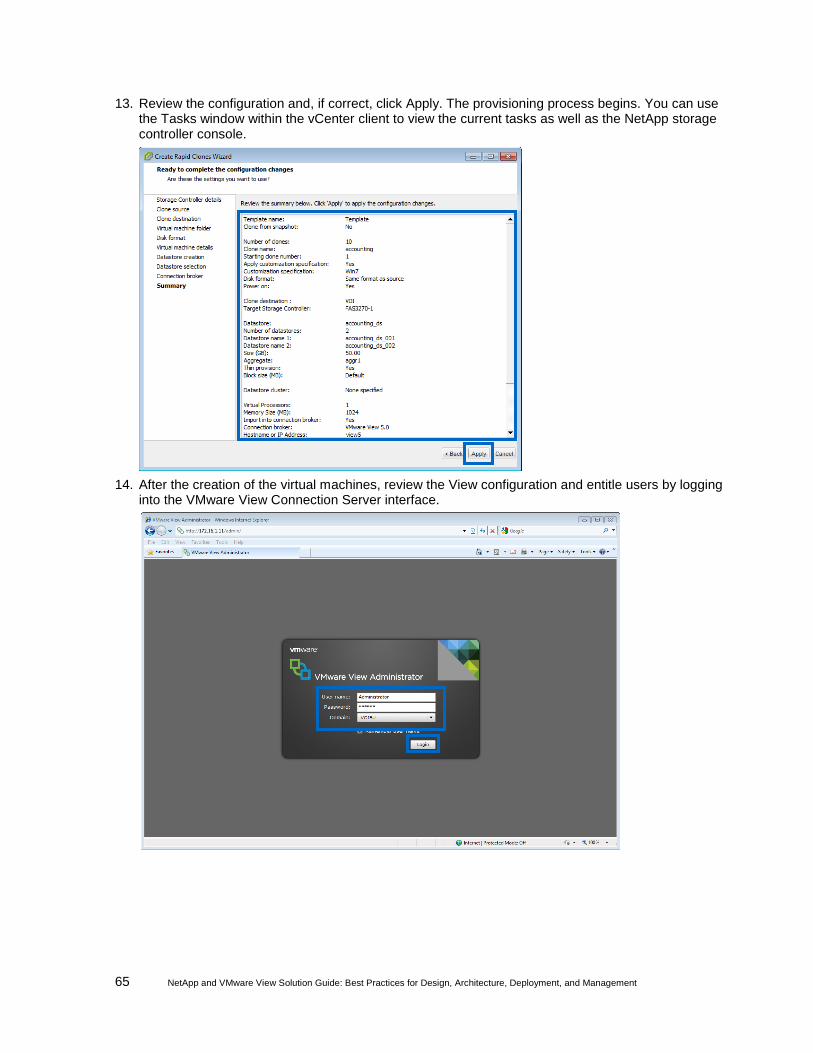
65 NetApp and VMware View Solution Guide: Best Practices for Design, Architecture, Deployment, and Management
13. Review the configuration and, if correct, click Apply. The provisioning process begins. You can use the Tasks window within the vCenter client to view the current tasks as well as the NetApp storage controller console.
14. After the creation of the virtual machines, review the View configuration and entitle users by logging into the VMware View Connection Server interface.

66 NetApp and VMware View Solution Guide: Best Practices for Design, Architecture, Deployment, and Management
15. Select the pool to be entitled (in this case, the manual nonpersistent pool Helpdesk) and click Entitlements…
16. On the Entitlements screen, click Add.

67 NetApp and VMware View Solution Guide: Best Practices for Design, Architecture, Deployment, and Management
17. Select users or groups, enter either a name or a description to narrow down the search, and click Find. Then click the user(s) or group(s) to be entitled. Then click OK.
18. Verify that the users and groups to be added are correct and click OK.

68 NetApp and VMware View Solution Guide: Best Practices for Design, Architecture, Deployment, and Management
19. Verify that the pool is now entitled and enabled.
20. Adjust the pool settings by clicking the pool, editing, and clicking Next until you get to the
desktop/pool settings. Then, after adjusting the pool to your liking, click Finish.
Note: The settings in this example are for demonstration purposes only. Your individual settings might be different. Consult the VMware View Administrator‟s Guide for more information.

69 NetApp and VMware View Solution Guide: Best Practices for Design, Architecture, Deployment, and Management
21. Test the connection by logging into a desktop using the View client.
12 USING VSC 2.1.1 PROVISIONING AND CLONING REDEPLOY
NetApp VSC gives administrators the ability to patch or update template VMs and redeploy virtual
machines based off the original template. When desktops or servers are deployed for the first time, VSC
tracks and maintains the relationship between the desktop and the baseline template. Then, when
requested, the administrator can redeploy clones for one or all of the VMs that were originally created
from the baseline.
The use cases for redeploy include but are not limited to:
Redeploy after applying Windows patches to the VM‟s baseline
Redeploy after upgrading or installing new software to the VM‟s baseline
Redeploy when end user calls helpdesk with issues and providing fresh VM would most easily solve user issues
This model of deployment and redeployment works only when end-user data is not stored on a local
drive. For this model of redeployment, customers should use profile management software (such as
Liquidware Labs Virtual Profiles or VMware Profile Management Solution) and folder redirection to store
user data on CIFS home directories. This way, the virtual machine is stateless and stores no user data
and can easily be replaced without data loss. In addition, the redeployed image does not contain any end-

70 NetApp and VMware View Solution Guide: Best Practices for Design, Architecture, Deployment, and Management
user-installed software, malware, spyware, or viruses, thereby reducing the number of threats to the
company.
At the left of Figure 26, four virtual machines were deployed with VSC from the template on the left in the
template datastore. After the administrator patched the template, it was then redeployed to the virtual
machines. VSC redeploy (see the right graphic in Figure 26) uses NetApp FlexClone to create near
instantaneous clones of the cloned vm1–flat.vmdk file while not disturbing the virtual machine
configuration information. This leaves all View entitlements and Active Directory objects undisturbed.
Figure 26) Provision with NetApp VSC 2.1.1 and redeploy patched VMs with VSC 2.1.1.
Redeploy requires that the vCenter database that was used during the creation of the rapid clones be
used to redeploy the clones. If a new vCenter instance or server is installed and a new database is used,
the link between the parent baseline and the rapid clones will be broken. If this is the case, redeploy will
not work. In addition if vCenter is upgraded or reinstalled, VSC 2.1.1 must be reinstalled as well.
To use VSC redeploy:
1. Install software updates, patches, or changes to the baseline template virtual machine.
2. Log into vCenter using the vCenter client.

71 NetApp and VMware View Solution Guide: Best Practices for Design, Architecture, Deployment, and Management
3. Select the NetApp icon from the Home screen of the vCenter client.
4. Select Redeploy from the Provisioning and Cloning Capability.

72 NetApp and VMware View Solution Guide: Best Practices for Design, Architecture, Deployment, and Management
5. Select the baseline from which to redeploy. If the baseline does not appear, click Update table… . Then select the baseline and click Redeploy… .
6. Select some or all of the virtual machines to redeploy and click Next.
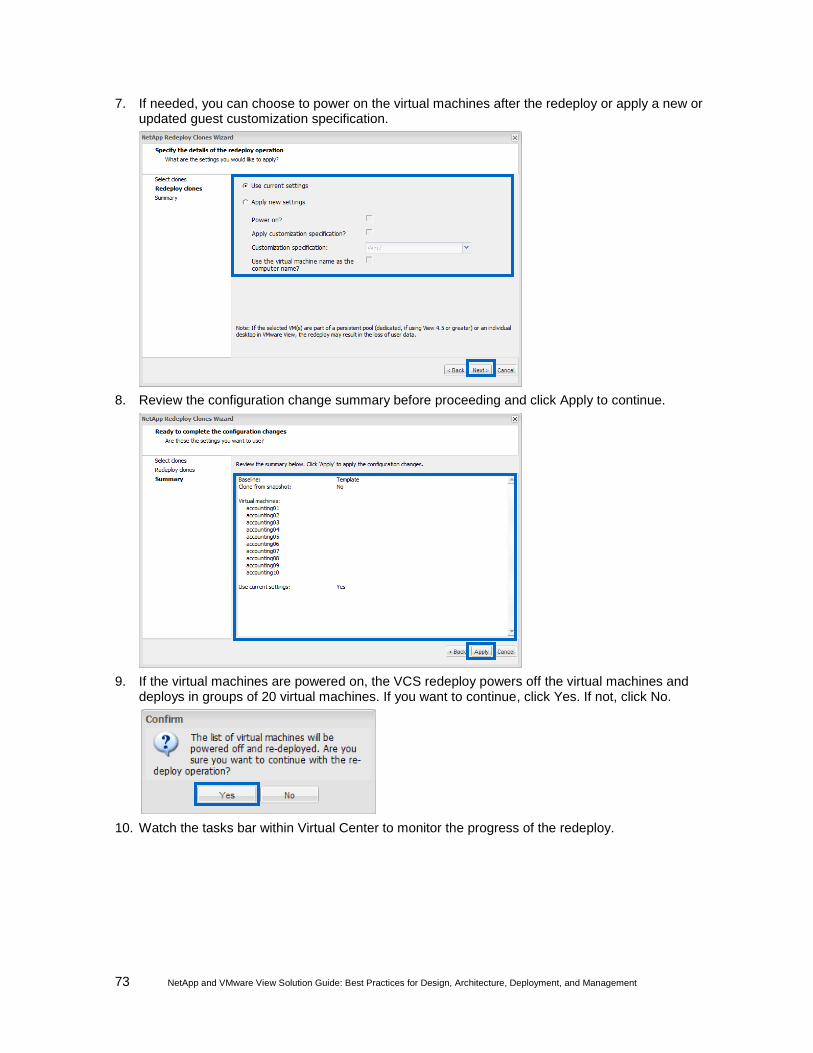
73 NetApp and VMware View Solution Guide: Best Practices for Design, Architecture, Deployment, and Management
7. If needed, you can choose to power on the virtual machines after the redeploy or apply a new or updated guest customization specification.
8. Review the configuration change summary before proceeding and click Apply to continue.
9. If the virtual machines are powered on, the VCS redeploy powers off the virtual machines and deploys in groups of 20 virtual machines. If you want to continue, click Yes. If not, click No.
10. Watch the tasks bar within Virtual Center to monitor the progress of the redeploy.
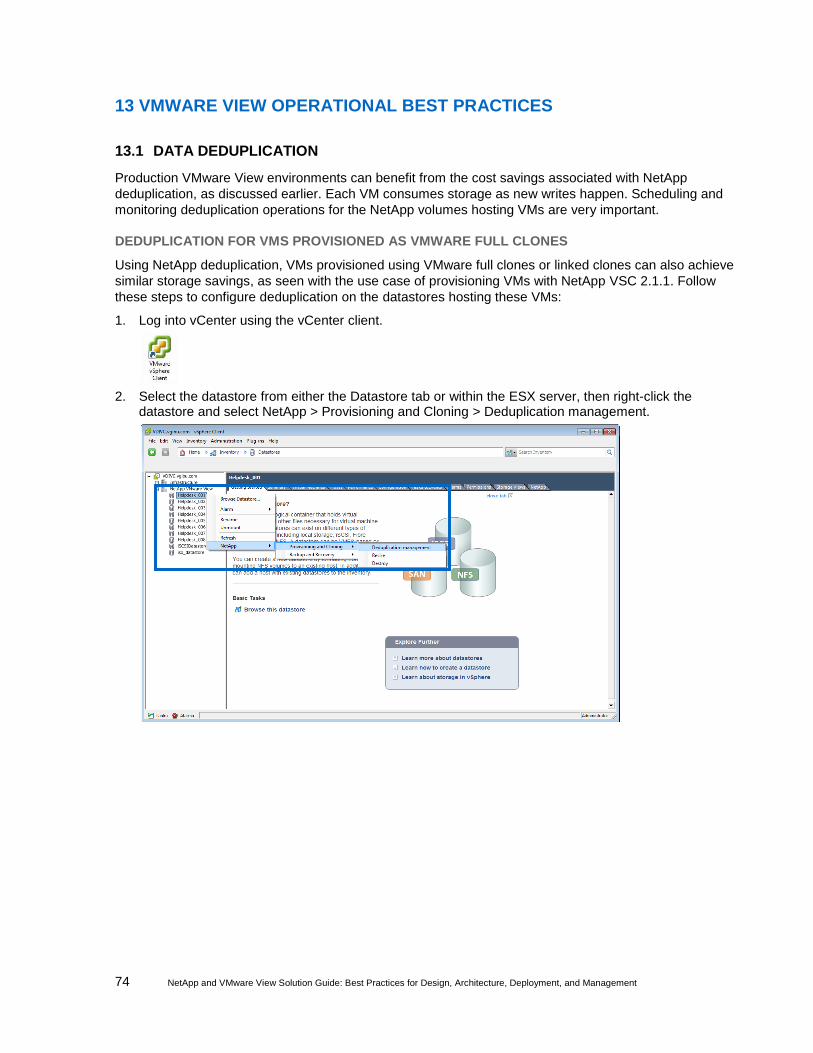
74 NetApp and VMware View Solution Guide: Best Practices for Design, Architecture, Deployment, and Management
13 VMWARE VIEW OPERATIONAL BEST PRACTICES
13.1 DATA DEDUPLICATION
Production VMware View environments can benefit from the cost savings associated with NetApp
deduplication, as discussed earlier. Each VM consumes storage as new writes happen. Scheduling and
monitoring deduplication operations for the NetApp volumes hosting VMs are very important.
DEDUPLICATION FOR VMS PROVISIONED AS VMWARE FULL CLONES
Using NetApp deduplication, VMs provisioned using VMware full clones or linked clones can also achieve
similar storage savings, as seen with the use case of provisioning VMs with NetApp VSC 2.1.1. Follow
these steps to configure deduplication on the datastores hosting these VMs:
1. Log into vCenter using the vCenter client.
2. Select the datastore from either the Datastore tab or within the ESX server, then right-click the datastore and select NetApp > Provisioning and Cloning > Deduplication management.
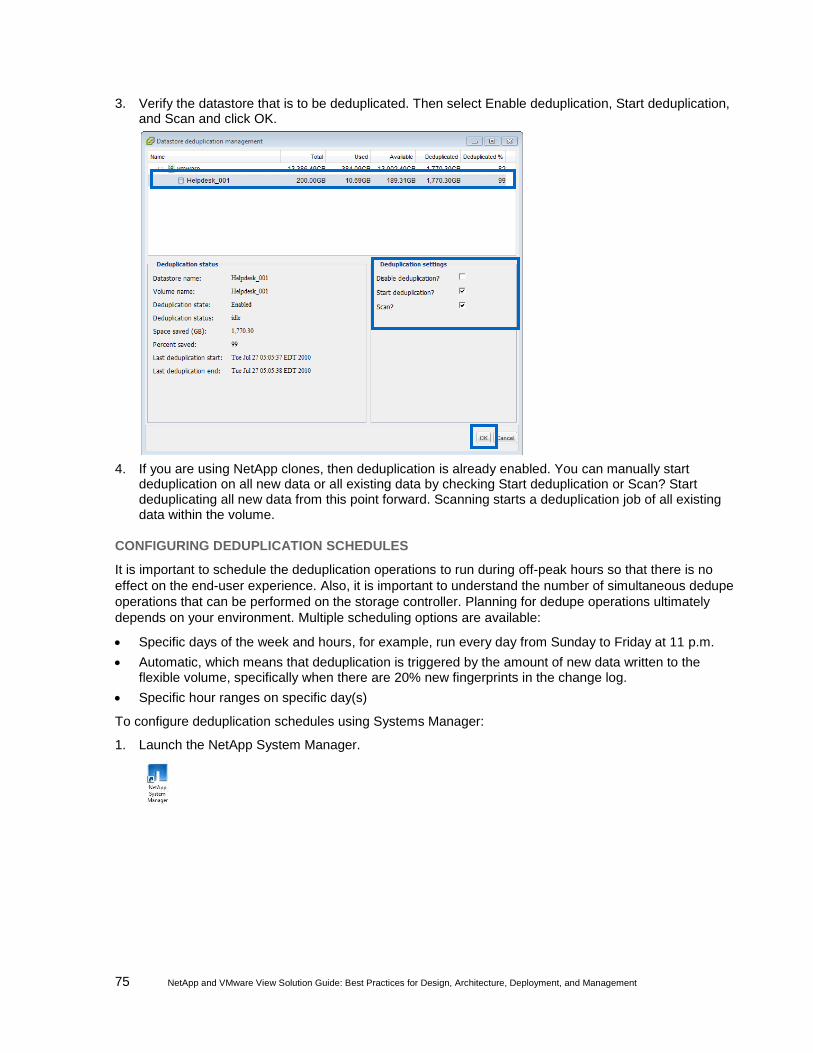
75 NetApp and VMware View Solution Guide: Best Practices for Design, Architecture, Deployment, and Management
3. Verify the datastore that is to be deduplicated. Then select Enable deduplication, Start deduplication, and Scan and click OK.
4. If you are using NetApp clones, then deduplication is already enabled. You can manually start deduplication on all new data or all existing data by checking Start deduplication or Scan? Start deduplicating all new data from this point forward. Scanning starts a deduplication job of all existing data within the volume.
CONFIGURING DEDUPLICATION SCHEDULES
It is important to schedule the deduplication operations to run during off-peak hours so that there is no
effect on the end-user experience. Also, it is important to understand the number of simultaneous dedupe
operations that can be performed on the storage controller. Planning for dedupe operations ultimately
depends on your environment. Multiple scheduling options are available:
Specific days of the week and hours, for example, run every day from Sunday to Friday at 11 p.m.
Automatic, which means that deduplication is triggered by the amount of new data written to the flexible volume, specifically when there are 20% new fingerprints in the change log.
Specific hour ranges on specific day(s)
To configure deduplication schedules using Systems Manager:
1. Launch the NetApp System Manager.

76 NetApp and VMware View Solution Guide: Best Practices for Design, Architecture, Deployment, and Management
2. Select the storage controller > Storage, Volumes, right-click the volume to be scheduled and then click Edit.
3. Change the custom schedule to run at the times or during the ranges desired and click Apply when completed.
MONITORING DEDUPLICATION OPERATIONS
Deduplication operations should be monitored carefully, as readjusting the schedules for multiple reasons
as the environment scales might be required. For example, the deduplication schedule for a new volume
(storage controller on the East Coast) hosting a datastore representing a set of users on the West Coast
starts too early to be running during production hours.
Pooling virtual desktops with similar characteristics on the same datastore(s) makes it easier to manage
dedupe schedules.

77 NetApp and VMware View Solution Guide: Best Practices for Design, Architecture, Deployment, and Management
The status and storage savings of dedupe operations can be monitored using the NetApp System
Manager, VSC Deduplication Management tab, and Virtual Storage Console.
For further details on NetApp deduplication, refer to NetApp TR-3505: NetApp Deduplication for FAS,
Deployment and Implementation Guide.
13.2 SPACE RECLAMATION
When customers deploy a virtual desktop infrastructure using NFS, they can maintain storage efficiency
of thin provisioned virtual machines by using the Virtual Storage Console 2.1.1.
Space reclamation requires that the following conditions be met:
NFS only
NTFS on basic disks only (GPT or MBR partitions)
Data ONTAP 7.3.4 or greater
Data ONTAP 7 Mode for 8.0 or greater
Virtual machine powered off
No virtual machine VMware snapshots
RUNNING SPACE RECLAMATION
1. Log into vCenter using the vCenter client.
2. Select either a virtual machine or the Datastores and Datastore Clusters icon from the Home screen of the vCenter client.

78 NetApp and VMware View Solution Guide: Best Practices for Design, Architecture, Deployment, and Management
3. In the Datastore and Datastore Clusters tab, right-click on a datastore, select the NetApp context menu item, Provisioning and Cloning, Reclaim Space. The datastore that is selected must reside on a NetApp storage controller and must be configured within the Provisioning and Cloning Capability.
4. The Reclaim virtual machine space wizard displays the virtual machines that space reclamation can use. Verify that you want these machines powered off and reclaimed and click OK.

79 NetApp and VMware View Solution Guide: Best Practices for Design, Architecture, Deployment, and Management
5. The Reclaim virtual machine space wizard prompts the user to make sure the user understands that this process requires the virtual machines to be shut down. Click YES to continue.
6. Space Reclamation runs and storage is returned from the guests to the storage controller. At this time when the task has completed, the virtual machines that have had space reclaimed must now be powered back on.
13.3 ANTIVIRUS OPERATIONS
For antivirus (AV) operations, you could either take a performance hit during scheduled AV operations
and affect the end-user experience or design the VMware View solution appropriately to make the AV
operations seamless. The first option is definitely not desirable. The second option can be approached in
two different ways:

80 NetApp and VMware View Solution Guide: Best Practices for Design, Architecture, Deployment, and Management
Optimize the AV operation policies for VMware View. Since VMware View involves moving from a completely distributed CPU (on the end-user desktops) to centralizing much of the processing (in the VMs), the overall AV model should be thought about in a different way. Optimizing the traditional AV policies means better planning the scheduled AV scan and virus definition update so that not all the virtual desktops run AV scan or virus definition updates at the same time, creating CPU contention within the environment. By staggering the scheduled AV operations and distributing the load at different points in time, you can avoid a large percentage of this contention. In addition to modifying the schedules, it is important to verify that these schedules do not interfere with other scheduled events such as backup or replication. In addition, NetApp suggests that AV scanning of CIFS home directories should be done on the storage side, where the storage arrays and AV servers can dedicate processing to this activity. This takes some load off the virtual desktops. For more details, read TR-3107: NetApp Antivirus Scanning Best Practices Guide.
Select intelligent, optimized, low-cost components for the VMware View solution that can effectively deal with the bursty performance requirement (such as AV operations) without increasing the overall cost of the solution.
Optimizing the AV operations for thousands of virtual desktops is not straightforward and requires even
more intelligence, especially from the back-end shared storage. NetApp VST and deduplication add a lot
of value. They not only significantly reduce the storage requirements for the otherwise redundant VMware
View data but also provide the capability to effectively deal with bursty AV operations, without increasing
the overall costs. For more information, visit Anti-Virus Practices for VMware View.
13.4 MONITORING NETAPP AND VMWARE VIEW INFRASTRUCTURE
NETAPP OPERATIONS MANAGER
As discussed earlier, NetApp Operations Manager is a comprehensive monitoring and management
solution for the VMware View storage infrastructure. It provides comprehensive reports of system
utilization and trends for capacity planning, space usage, and so on. It also monitors system performance
and health to resolve potential problems. For further details on Operations Manager, visit the Operations
Manager solutions page.
NETAPP ESUPPORT
The NetApp proactive eSupport suite provides an early warning system that can reduce the number and
severity of technical support cases. Automation tools identify issues early, before they have an effect, and
can initiate a fix without customer burden, before people even know there is a potential problem. Support
automation works 24x7 to benchmark system status, collect diagnostic information behind the scenes,
and issue proactive alerts. You can view the full scope of your NetApp environment on demand, at the
company or device level.
The NetApp eSupport suite of support automation tools includes:
NetApp Remote Support Diagnostics Tool
NetApp Premium AutoSupport
NetApp AutoSupport
For more information on NetApp eSupport, visit www.netapp.com/us/support/esupport.html.
SANScreen VM Insight
As discussed earlier, consider implementing NetApp SANscreen VM Insight. It provides cross-domain
visibility from the VM to the shared storage, allowing both storage and server administration teams to
more easily manage their VMware View storage and server architectures. For further details on
SANscreen VM Insight, visit the SANscreen VM Insight solutions page.

81 NetApp and VMware View Solution Guide: Best Practices for Design, Architecture, Deployment, and Management
13.5 DATA PROTECTION SOLUTION
NETAPP VSC 2.1.1 BACKUP AND RECOVERY (FORMERLY SMVI)
As discussed earlier, NetApp VSC 2.1.1 Backup and Recovery is a unique, scalable, integrated data
protection solution and is an excellent choice for protecting persistent VMware View desktops. However,
it is not recommend for use with nonpersistent VMware View Linked Clone desktops. The refresh and
recompose process treats the “redo log or delta disk” data type as transient; therefore, it is discarded
each time this process is executed. VSC Backup and Recovery integrates VMware snapshots with the
NetApp array-based block-level Snapshot copies to provide consistent backups for the virtual desktops. It
is NetApp primary storage data deduplication aware and also integrates with NetApp SnapMirror
replication technology, which preserves the storage savings across the source and destination storage
arrays. You do not need to rerun dedupe on the destination storage array. The Backup and Recovery
plug-in also provides a user-friendly GUI that can be used to manage the data protection schemes. The
following are some of the important benefits of VSC Backup and Recovery:
VSC Backup and Recovery Snapshot backups are based on the number of 4KB blocks changed since the last backup, as compared to the number of files changed in a traditional backup solutions (which for virtual desktops can be several gigabytes in size). This means that significantly fewer resources are required and the backups can be completed well within the window. Also, since VSC Backup and Recovery is a storage block-based data protection solution, daily full backups of vmdk files are not required, resulting in a lower TCO.
Backup failure rate has always been a concern with traditional, server-based backup solutions because of various moving parts in the solution: for example, backup server farms, CPU and memory limitation per server, network bandwidth, backup agents, and so on. With a NetApp solution, the number of moving parts is significantly less and requires very few policies to manage the backups for thousands of virtual desktops because multiple datastores can be part of the same protection policy, also resulting in higher success rate and not introducing new operational complexities.
There will be significantly less net-new investment for backup infrastructure because VSC Backup and Recovery leverages the inherent capabilities in the NetApp storage array to perform backups and does not require new backup server farms.
VSC Backup and Recovery allows flexible Snapshot retention scheduling that can be hourly, daily, and weekly to allow you to meet your level of RTO and RPO objectives.
With VSC Backup and Recovery, there are no concerns about the growth or existence of the vmdk delta files while the hot VM backups are being performed because VSC Backup and Recovery does not require the existence of the vmdk delta files for the entire duration of backups. They must exist only as part of the preprocessing step before VSC Backup and Recovery invokes the NetApp Snapshot copy on the storage array, which can be a few seconds to a few minutes. Also, you have an option to configure only the NetApp Snapshot copies and ignore performing VMware snapshots.
Also, since the backups are storage array based and only deduplicated data gets transferred from the primary storage array to the secondary array, there are significantly fewer storage requirements on the secondary storage array. Also, the resource utilization on the various solution components (servers, storage, network, and so on) will be significantly less.
Scheduling considerations: Running of data protection policies should be properly planned to make
sure that they don‟t interfere with the deduplication operations. Backup jobs should be scheduled to run
after the deduplication operations so that minimum possible data must be replicated.
VMware View considerations: As discussed earlier, a NetApp data protection solution can be leveraged
for all five virtual desktop types. An excellent use case is the data protection for “user data disk,” where
the user data is encapsulated in a vmdk file. Protecting this data using traditional methods requires
performing full backups of vmdk files every day or every time when the policy is scheduled to run. Another
important consideration for user data change rate is the delta associated with the “rebalance” operations
performed on user data disks.

82 NetApp and VMware View Solution Guide: Best Practices for Design, Architecture, Deployment, and Management
DATASTORE REMOTE REPLICATION
Datastore Remote Replication (DRR) allows administrators to easily distribute their template datastores
across the enterprise. DDR creates a relationship between the source and destination storage and
vCenter environments. DDR first creates a volume on the destination, then configures a SnapMirror
relationship between the source and destination and initializes the SnapMirror. After the SnapMirror
process has completed, the synchronization process occurs. This is not the same thing as a SnapMirror
update because the synchronization process creates a volume FlexClone of the destination volume,
attaches the clone to each host in the cluster, and registers the virtual machines within vCenter. The
SnapMirror schedule is independent of the synchronization process; this means that SnapMirror updates
on a schedule and the synchronization process is on demand.
To configure DRR follow these instructions:
1. Log into vCenter using the vCenter client.
2. Select the NetApp icon from the Home screen of the vCenter client.

83 NetApp and VMware View Solution Guide: Best Practices for Design, Architecture, Deployment, and Management
3. Select the Provisioning and Cloning Capability from the VSC and the DS Remote Replication menu. Then click on Add… .
4. Select the source datastore to be replicated and click Next.

84 NetApp and VMware View Solution Guide: Best Practices for Design, Architecture, Deployment, and Management
5. Enter the vCenter Server address and credentials for the destination vCenter Server and click Add.
6. After the vCenter Credentials have been added, click Next.

85 NetApp and VMware View Solution Guide: Best Practices for Design, Architecture, Deployment, and Management
7. Select the target infrastructure component to which the virtual machine templates will be registered. Then select the storage controller and the aggregate. Only aggregates with sufficient capacity are displayed in the dropdown menu. Next, enter the name of the datastore to be created at the destination. This will also be the volume name on the underlying storage infrastructure.
8. Now select the Source–Destination Network Mapping. This is a list of the networking port groups within the ESX infrastructures. This allows virtual machines with different port group names to be registered with the correct port group for the appropriate network. Select the destination network port group that is the equivalent of the source. Then click Next.
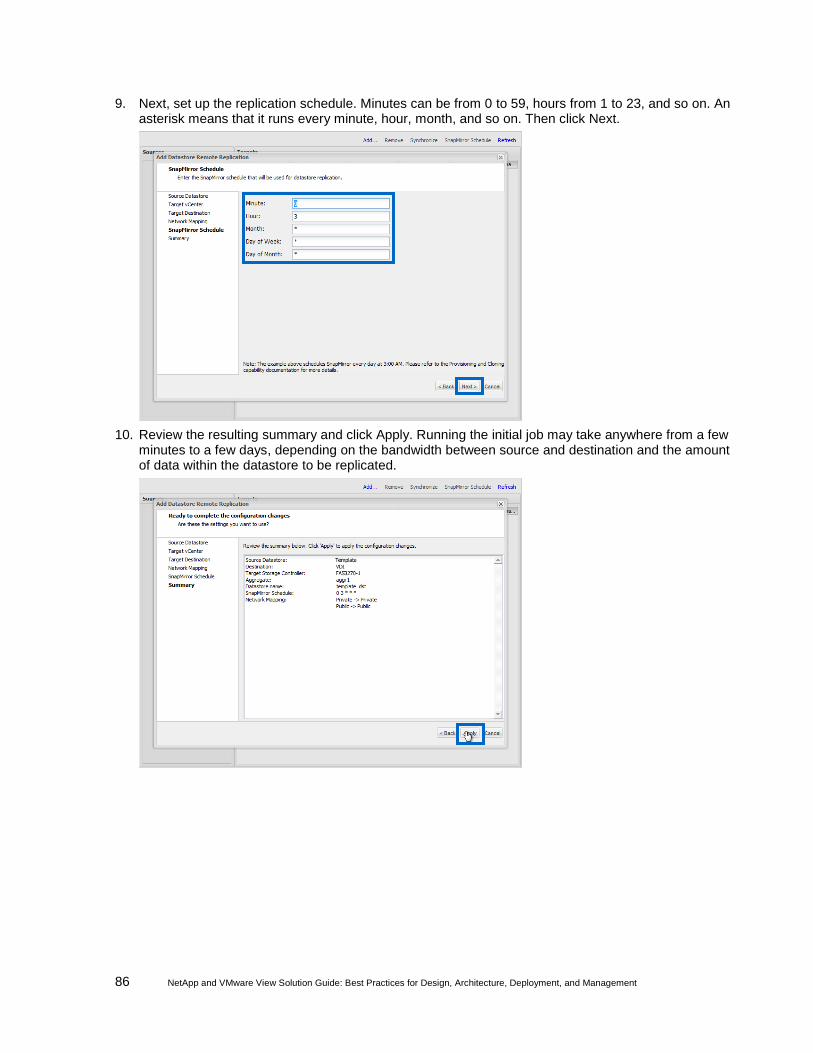
86 NetApp and VMware View Solution Guide: Best Practices for Design, Architecture, Deployment, and Management
9. Next, set up the replication schedule. Minutes can be from 0 to 59, hours from 1 to 23, and so on. An asterisk means that it runs every minute, hour, month, and so on. Then click Next.
10. Review the resulting summary and click Apply. Running the initial job may take anywhere from a few minutes to a few days, depending on the bandwidth between source and destination and the amount of data within the datastore to be replicated.
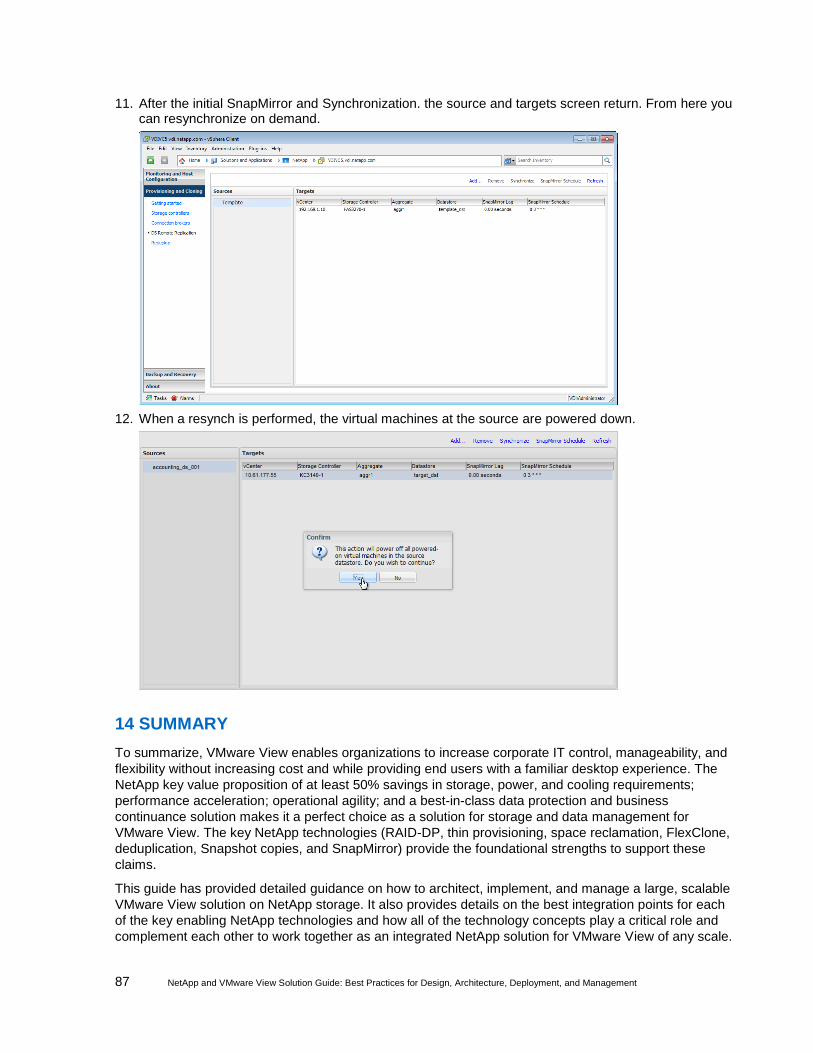
87 NetApp and VMware View Solution Guide: Best Practices for Design, Architecture, Deployment, and Management
11. After the initial SnapMirror and Synchronization. the source and targets screen return. From here you can resynchronize on demand.
12. When a resynch is performed, the virtual machines at the source are powered down.
14 SUMMARY
To summarize, VMware View enables organizations to increase corporate IT control, manageability, and
flexibility without increasing cost and while providing end users with a familiar desktop experience. The
NetApp key value proposition of at least 50% savings in storage, power, and cooling requirements;
performance acceleration; operational agility; and a best-in-class data protection and business
continuance solution makes it a perfect choice as a solution for storage and data management for
VMware View. The key NetApp technologies (RAID-DP, thin provisioning, space reclamation, FlexClone,
deduplication, Snapshot copies, and SnapMirror) provide the foundational strengths to support these
claims.
This guide has provided detailed guidance on how to architect, implement, and manage a large, scalable
VMware View solution on NetApp storage. It also provides details on the best integration points for each
of the key enabling NetApp technologies and how all of the technology concepts play a critical role and
complement each other to work together as an integrated NetApp solution for VMware View of any scale.
88 NetApp and VMware View Solution Guide: Best Practices for Design, Architecture, Deployment, and Management
This guide is not intended to be a definitive implementation or solutions guide. Expertise might be
required to solve issues with specific deployments. Contact your local NetApp representative and make
an appointment to speak with one of our VMware View solutions experts.
15 FEEDBACK
Send an e-mail to [email protected] with questions or comments concerning this document.
16 REFERENCES
New NetApp document:
NetApp TR-3949: NetApp and VMware View 5,000-Seat Performance Report
NetApp documents:
Flash Cache Technical Specifications www.netapp.com/us/products/storage-systems/flash-cache/flash-cache-tech-specs.html
High Availability www.netapp.com/us/products/platform-os/active-active.html
NetApp TR-3001: A Storage Networking Appliance http://media.netapp.com/documents/tr-3001.pdf
NetApp TR-3066: Data Protection Strategies for NetApp Storage Systems http://media.netapp.com/documents/wp_3066.pdf
TR-3107: NetApp Antivirus Scanning Best Practices Guide http://www.netapp.com/us/library/technical-reports/tr-3107.html
NetApp TR-3298: RAID-DP: NetApp Implementation of RAID Double Parity for Data Protection http://media.netapp.com/documents/tr-3298.pdf
NetApp TR-3347: A Thorough Introduction to FlexClone Volumes http://media.netapp.com/documents/tr-3347.pdf
NetApp TR-3348: Block Management with Data ONTAP 7G: FlexVol, FlexClone, and Space Guarantees http://media.netapp.com/documents/tr-3348.pdf
TR-3367: NetApp Systems in a Microsoft Windows Environment http://www.netapp.com/us/library/technical-reports/tr-3367.html
NetApp TR-3437: Storage Subsystem Resiliency Guide http://media.netapp.com/documents/tr-3437.pdf
NetApp TR-3446: SnapMirror Async Overview and Best Practices Guide http://media.netapp.com/documents/tr-3446.pdf
NetApp TR-3450: Active-Active Controller Overview and Best Practices Guidelines http://media.netapp.com/documents/tr-3450.pdf
NetApp TR-3459: FlexShare Design and Implementation Guide http://media.netapp.com/documents/tr-3459.pdf
NetApp TR-3466: Open Systems SnapVault (OSSV) Best Practices Guide http://media.netapp.com/documents/tr-3466.pdf
NetApp TR-3505: NetApp Deduplication for FAS and V-Series Deployment and Implementation Guide http://media.netapp.com/documents/tr-3505.pdf
NetApp TR-3563: NetApp Thin Provisioning http://media.netapp.com/documents/tr-3563.pdf

89 NetApp and VMware View Solution Guide: Best Practices for Design, Architecture, Deployment, and Management
NetApp TR-3671: VMware vCenter Site Recovery Manager in a NetApp Environment http://media.netapp.com/documents/tr-3671.pdf
NetApp TR-3737: SMVI Best Practices http://media.netapp.com/documents/tr-3737.pdf
NetApp TR-3747: NetApp Best Practices for File System Alignment in Virtual Environments http://www.netapp.com/us/library/technical-reports/tr-3747.html
NetApp TR-3749: NetApp and VMware vSphere Storage Best Practices http://media.netapp.com/documents/tr-3749.pdf
NetApp TR-3770: VMware View on NetApp Deployment Guide Using NFS http://media.netapp.com/documents/tr-3770.pdf
NetApp TR-3801: Introduction to Predictive Cache Statistics http://media.netapp.com/documents/tr-3801.pdf
NetApp TR-3808: VMware vSphere and ESX 3.5 Multiprotocol Performance Comparison Using FC, iSCSI, and NFS http://media.netapp.com/documents/tr-3808.pdf
NetApp Virtual Storage Console 2.0 for VMware vSphere Provisioning and Cloning Administration Guide http://now.netapp.com/knowledge/docs/hba/vsc/relvsc20/pdfs/cloning.pdf
Operations Manager www.netapp.com/us/products/management-software/operations-manager.html
Remote LAN Module http://now.netapp.com/NOW/download/tools/rlm_fw/info.shtml
SANscreen VM Insight www.netapp.com/us/products/management-software/sanscreen/sanscreen-vm-insight.html
Total Cost Comparison: IT Decision-Maker Perspectives on EMC and NetApp Storage Solutions in Enterprise Database Environments www.netapp.com/library/ar/ar1038.pdf
VMware documents:
Anti-Virus Practices for VMware View www.vmware.com/files/pdf/VMware-View-AntiVirusDeployment-WP-en.pdf
Comprehensive Virtual Desktop Deployment with VMware and NetApp www.vmware.com/files/pdf/partners/netapp-vmware-view-wp.pdf
Fibre Channel SAN Configuration Guide www.vmware.com/pdf/vsphere4/r41/vsp_41_san_cfg.pdf
Introduction to VMware vSphere www.vmware.com/pdf/vsphere4/r41/vsp_41_intro_vs.pdf
iSCSI SAN Configuration Guide www.vmware.com/pdf/vsphere4/r41/vsp_41_iscsi_san_cfg.pdf
Storage Considerations for VMware View www.vmware.com/files/pdf/view_storage_considerations.pdf
VMware Configuration Maximums www.vmware.com/pdf/vsphere4/r41/vsp_41_config_max.pdf
VMware Recommendations for Aligning VMFS Partitions www.vmware.com/pdf/esx3_partition_align.pdf
VMware View Administrator‟s Guide www.vmware.com/pdf/view45_admin_guide.pdf
VMware View Composer Deployment Guide www.vmware.com/files/pdf/View_Composer_wp.pdf

90 NetApp and VMware View Solution Guide: Best Practices for Design, Architecture, Deployment, and Management
VMware View Manager www.vmware.com/files/pdf/VMware-View-Manager-4-DS-EN.pdf
VMware View Optimization Guide for Windows 7 www.vmware.com/files/pdf/VMware-View-OptimizationGuideWindows7-EN.pdf
VMware VMworld Conference Sessions Overview www.vmworld.com/vmworld/home.jspa
vSphere Virtual Machine Administration Guide www.vmware.com/pdf/vsphere4/r41/vsp_41_vm_admin_guide.pdf
vSphere Basic System Administration Guide www.vmware.com/pdf/vsphere4/r40_u1/vsp_40_u1_admin_guide.pdf
Other references:
Wikipedia RAID Definitions and Explanations http://en.wikipedia.org/wiki/Redundant_array_of_independent_disks
Windows XP Deployment Guide www.vmware.com/files/pdf/XP_guide_vdi.pdf
17 VERSION HISTORY
Version Date Document Version History
Version 1.0 September 2008 Original document
Version 2.0 November 2008 Updates to transparent storage cache sharing with NetApp Flash Cache and deduplication
Version 3.0 March 2009 Update for VMware View Manager, transparent storage cache sharing, sizing, operational best practices, and RCU 2.0
Version 3.0.1 May 2009 Updated FlexScale mode recommendation
Version 4.0 February 2010 Updated to include VMware vSphere 4, VMware View 4.0, RCU 3.0, VSC 1.0, and System Manager 1.0
Version 4.0.1 March 2010 Format and link updates
Version 4.5 August 2010 Update to include NetApp Virtual Storage Console 2.0, View 4.5, vSphere 4.1
Version 4.5.1 June 2011 Update to TSCS to VST,
Version 5 August 2011 Update for VSC 2.1.1, VMware vSphere 5, VMware View 5
Version 5.0.1 February 2012 Removed recommendations on the use of VSC backup and recovery for linked clones. Documented the increase in I/O generated by a linked clone VM.
18 ABOUT THE AUTHOR
Chris Gebhardt has been with NetApp since 2004 and is currently a Desktop Virtualization Architect
leading NetApp VMware VDI virtualization solutions for the NetApp Technical Enablement Solutions
Organization business unit. Chris has coauthored these documents:

91 NetApp and VMware View Solution Guide: Best Practices for Design, Architecture, Deployment, and Management
TR-3705: NetApp and VMware VDI Best Practices
TR-3770: VMware View on NetApp Deployment Guide Using NFS
WP-7108: NetApp FAS2050HA Unified Storage: A Guide to Deploying NetApp FAS2050HA with VMware View and the 50,000-Seat VMware View Deployment Whitepaper
Chris is a contributor to the NetApp Virtualization Blog. He is a VMware vExpert 2010 & 2011, VMware
Certified Professional 3 and 4, Brocade Certified Fabric Professional, Brocade Certified SAN Designer,
and NetApp Certified Implementation Engineer. Prior to joining the Virtualization Business Unit, he was a
Professional Service Consultant with NetApp and was the Central Area Practice Lead for Network
Storage Consolidation and Virtualization Practice, where he authored many deployment guides. Before
joining NetApp, Chris was a UNIX and NetApp administrator for seven years at a worldwide
telecommunications company.
19 ACKNOWLEDGEMENTS
The authors of this solution guide would like to thank George Costea, Eric Forgette, Abhinav Joshi, Peter
Learmonth, Jack McLeod, Mike Slisinger, Vaughn Stewart, and Larry Touchette, for their contributions to
this solutions guide.

92 NetApp and VMware View Solution Guide: Best Practices for Design, Architecture, Deployment, and Management
NetApp provides no representations or warranties regarding the accuracy, reliability or serviceability of any information or recommendations provided in this publication, or with respect to any results that may be obtained by the use of the information or observance of any recommendations provided herein. The information in this document is distributed AS IS, and the use of this information or the implementation of any recommendations or techniques herein is a customer‟s responsibility and depends on the customer‟s ability to evaluate and integrate them into the customer‟s operational environment. This document and the information contained herein may be used solely in connection with the NetApp products discussed in this document.
© 2012 NetApp, Inc. All rights reserved. No portions of this document may be reproduced without prior written consent of NetApp, Inc. Specifications are subject to change without notice. NetApp, the NetApp logo, Go further, faster, AutoSupport, Data ONTAP, FlexClone, FlexScale, FlexShare, FlexVol, NearStore, NOW, RAID-DP, SANscreen, SnapMirror, Snapshot, SnapVault, SyncMirror, and WAFL are trademarks or registered trademarks of NetApp, Inc. in the United States and/or other countries. Active Directory, Microsoft, SharePoint, SQL Server, Windows, and Windows Vista are registered trademarks of Microsoft Corporation. VMware and ESX are registered trademarks and vCenter, View, VMsafe, and vSphere are trademarks of VMware, Inc. All other brands or
products are trademarks or registered trademarks of their respective holders and should be treated as such. TR-3705-0212