neurally adjusted ventilatory assist - home | … adjusted ventilatory assist (nava) 2 | © 2015...
TRANSCRIPT

A snapshot for RNs of Children's Minnesota
Neurally Adjusted Ventilatory Assist (NAVA)

2 | © 2015
What is NAVA
• A new ventilator mode to be used in conjunction with the SERVO-i ventilator
• A mode, where the patient, specifically the brain, not us, decides when and how to breathe
• Can be used invasively or non-invasively
3 | © 2015
Why are we getting it? • Better patient synchrony with the ventilator
• Lower PIP and O2 needs
• Better sleep quality • Brain knows what the body wants at all times • Lung protective- decreased risk for barotrauma and volutrauma • Less sedation is needed and patient is more comfortable • Assess proper PEEP levels • Diaphragm atrophy/dysfunction is reduced • Better able to assess patients WOB post-extubation
4 | © 2015
• Spontaneously breathing patients • Must have a working diaphragm (at least one side with intact phrenic nerve) • Patients greater than 500 grams • Ability to place either an NG or OG catheter
Who can go on it?

5 | © 2015
• Patients with an absent electrical signal from brain to diaphragm • Patients with paralysis/neuromuscular blockade • Esophageal bleeding • Inability to place an NG/OG tube • Actively used cardiac pacemaker- depends on the patient
Who can’t go on it?
6 | © 2015
• The body has lots of sensors that respond to chemical stimuli, such as hypercapnea, acid-base balance, etc…
• The respiratory center receives and interprets all this information • The central nervous system sends electrical signals from the brain to the
diaphragm via 2 phrenic nerves (left and right) • The diaphragm receives the electrical signal and muscle contraction begins • Other nerves stimulate accessory muscles
Let’s review: How do we breathe?

7 | © 2015
• Diaphragm contracts • Chest wall and lungs expand • Pressure gradient changes • Air flows through nose/mouth/trachea into lungs • Lung volume is created • When signals stop, diaphragm relaxes, chest begins to drop, air is exhaled.
Let’s review: How do we breathe? Part 2

8 | © 2015
• Patients are either on an Assist Control (A/C) or Spontaneous Intermittent Mandatory Ventilation (SIMV) mode. − They have a set consistent tidal volume (volume guarantee, PRVC) or a set
pressure (Pressure A/C or Pressure SIMV) for each breath. − I-times are set − Respiratory rate is set (variable)
These breaths are given either automatically or are a patient triggered breath
• Patient triggered breaths are initiated by the last steps of breathing- a change in air flow (flow sensing) or a drop in pressure (pressure triggering) − Last effect to occur during breathing − Lots of artifact from tubing condensation, non-working flow sensors − Ventilator giving breathe after patient wanted a breath, or is still giving a breathe,
when patient is trying to exhale
Current standard ventilation

9 | © 2015
• Room for error − Asynchrony − Giving a breath that is too small or too large, too short or too fast − Increased chance for lung injury
• Flow sensors get wet, coughed on, need re-calibration • Water in tubing creates artifact • We set the inspiratory time
− Patient may be trying to exhale while ventilator is still giving a breath • Pay attention to how you breathe: Who breathes the same tidal volume or
pressure of a breath, every breath? − We sigh, yawn, breathe fast and slow
What we don’t like about current ventilation
10 | © 2015
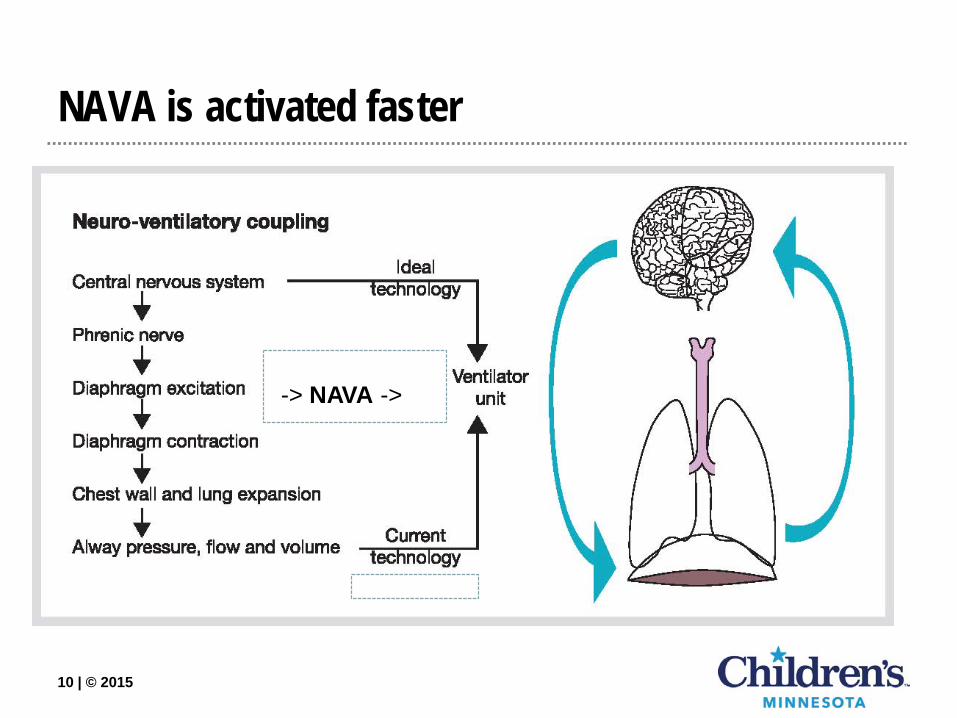
NAVA is activated faster
-> NAVA ->

11 | © 2015
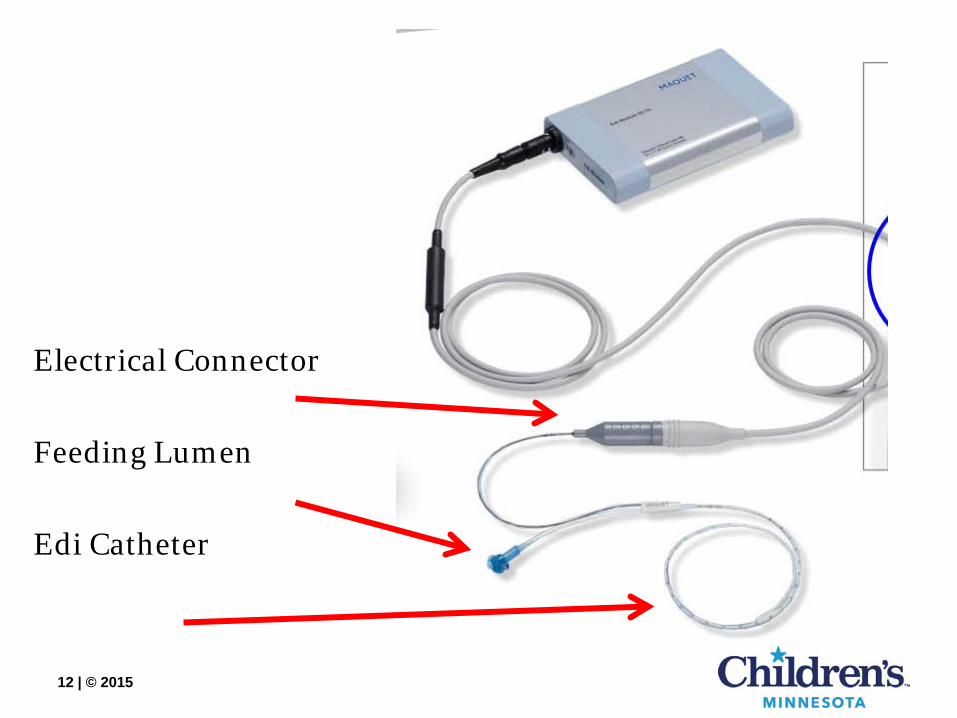
• Special Edi Catheter is placed (Electronic Diaphragm Monitoring) − Can replace your OG/NG tubes − Has 10 electrodes, 9 of which are used to read the electrical activity of the
diaphragm − Searches for changes in electrical activity 62.5 times per second − Follow your units Clinical Standards for OG/NG maintenance. − Yes, you can feed and give meds through this catheter − Yes, you can use this catheter for low intermittent suction − The Edi Catheter needs to be changed every 5 days
How does it work?
12 | © 2015
Electrical Connector Feeding Lumen Edi Catheter

13 | © 2015
How does it work? Part 2
Catheter is placed either nasally or orally, until the diaphragm is in the middle of the 9 electrodes, and is secured per nursing standards

14 | © 2015
Catheter placement
Your RT will monitor catheter placement, by observing QRS waveforms on the ventilator. As catheter goes from above the diaphragm to below, QRS waveforms will dampen As middle of the catheter gets closer to diaphragm, the QRS will turn “Blue” Middle 2 waveforms should be “Blue”
-QRS complex is large on top waveform, small on bottom -Blue QRS complex are middle two waveforms After the Edi Catheter appears in good placement as verified with the RT, the nurse will follow the NG/OG Clinical Standard for verification

15 | © 2015
Edi information captured Converted into Edi waveform
15
Ch8 Ch7 Ch6 Ch5 Ch4 Ch3 Ch2 Ch1
Phasic
Tonic Noise level
Edi signal is averaged 62.5 times per second & transferred to SERVO-i.
Edi Peak
Edi Min
16 | © 2015
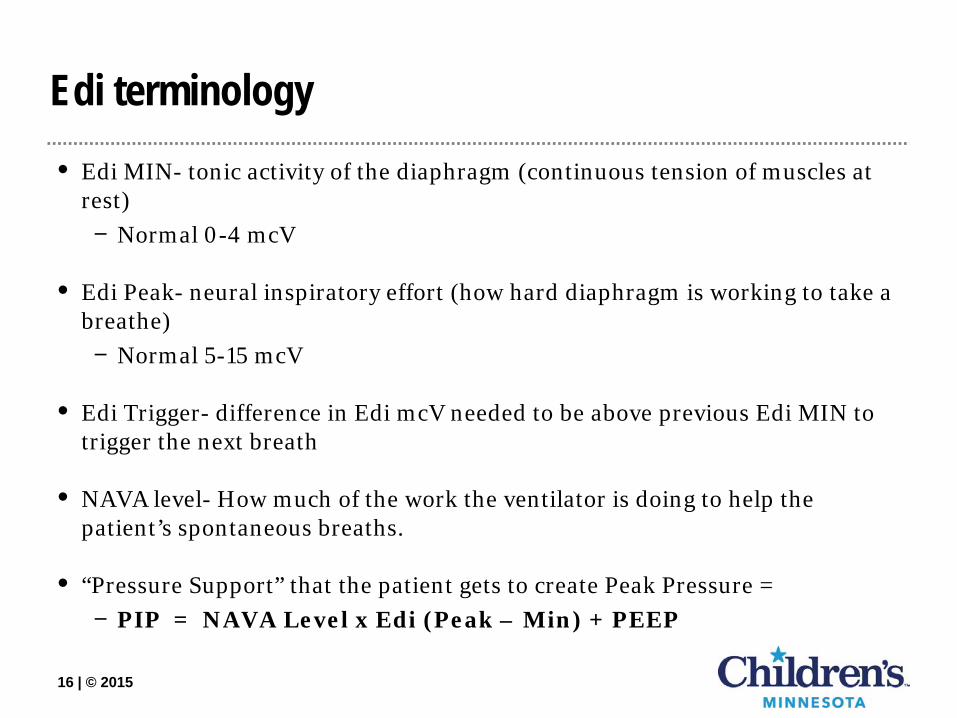
• Edi MIN- tonic activity of the diaphragm (continuous tension of muscles at rest) − Normal 0-4 mcV
• Edi Peak- neural inspiratory effort (how hard diaphragm is working to take a breathe) − Normal 5-15 mcV
• Edi Trigger- difference in Edi mcV needed to be above previous Edi MIN to trigger the next breath
• NAVA level- How much of the work the ventilator is doing to help the patient’s spontaneous breaths.
• “Pressure Support” that the patient gets to create Peak Pressure = − PIP = NAVA Level x Edi (Peak – Min) + PEEP
Edi terminology

17 | © 2015
NAVA screen on SERVO-i • Top 3 waveforms are the same
• Bottom waveform is Edi signal
• Parameters on right are same
• Edi Peak and Edi Min also shown
• Set NAVA level is displayed

18 | © 2015
NAVA Safety • If the catheter falls out
or became ineffective, and the patient is trying to breathe, the ventilator will default to Pressure Support mode and resume NAVA when working again
• If there is no edi signal and no pneumatic effort (pt is apneic) the ventilator will switch to backup ventilation

19 | © 2015
• Safety measures − PS is set in case there becomes interference with the signal, the patient
will be able to have PS breaths, the same as conventional ventilation − Backup PC/Rate, in-case the patient goes apneic, the ventilator will
automatically kick in and ventilate the patient, so they do not become bradycardic and/or hypoxic
− Once the signal is regained, or the patient begins to breathe again, the ventilator will automatically resume NAVA (Your RT is able to tell how often they are going in/out of these modes, if applicable)
Why PS and backup PC

20 | © 2015
NAVA settings • NAVA
− Primary settings NAVA level PEEP FiO2 Trigger Edi
• Pressure Support
− Secondary settings Pressure Support Flow Trigger Cycle off
• Backup Ventilation
− Emergency settings PC above PEEP RR is set in the alarm
menu

21 | © 2015
• You are not setting a volume or a pressure • You are setting a “NAVA support level” based on electrical
activity that the body wants − Unlike conventional ventilation, we can’t force a 20 ml/kg tidal
volume The patient determines their optimal breath by decreasing electrical
activity, which decreases the ventilatory support, and ends the ventilator breath
NAVA settings

22 | © 2015
• There are only 3 Primary settings for NAVA − PEEP − FiO2 − NAVA Level
NAVA trigger (RT charts)
• Then there are Backup settings
− Pressure Support level − Trigger level − Apnea Rate − Apnea Pressure Control − Apnea I-time
Charting (settings)

23 | © 2015
• Chart what you normally chart for what the patient is achieving − Peak inspiratory pressure, Mean Airway Pressure, PEEP − Total respiratory rate (actual) − Tidal volume (Vti [what is inhaled] and Vte [what is exhaled]) − Minute Ventilation
• Edi Catheter size and position along with vent charting should be done the same as current clinical standard ways and intervals
• Optional Charting − Edi Peak and Edi Min
this is a largely variable number as it changes with every breath, therefore RT will be looking at trends and documenting “averages” for these values
If you would like to chart this, please chart the average value
Charting (measurements)
24 | © 2015
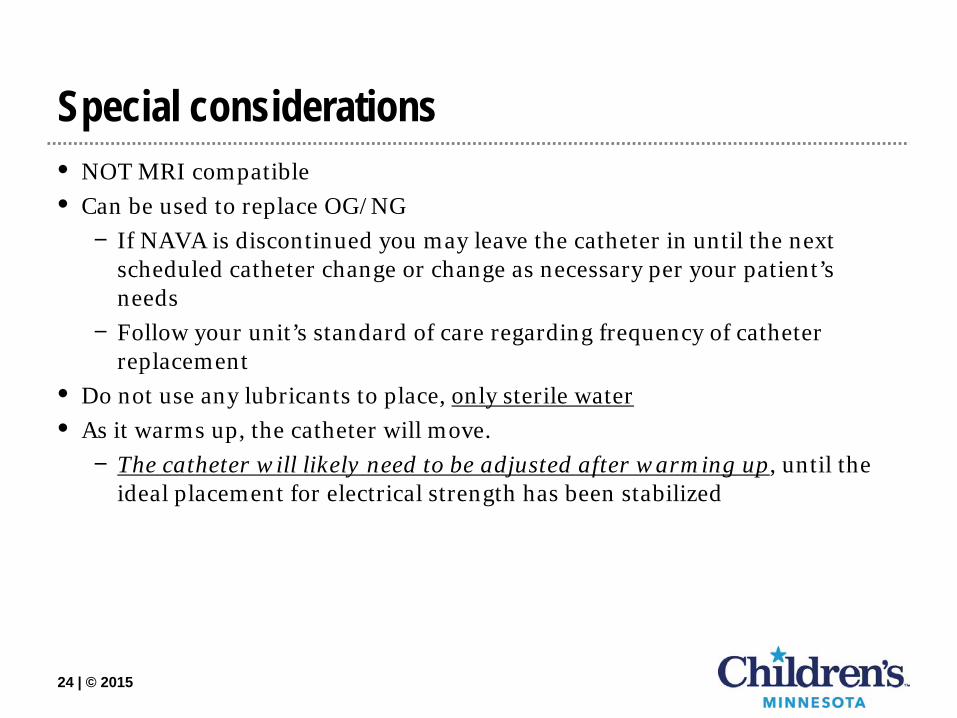
• NOT MRI compatible • Can be used to replace OG/NG
− If NAVA is discontinued you may leave the catheter in until the next scheduled catheter change or change as necessary per your patient’s needs
− Follow your unit’s standard of care regarding frequency of catheter replacement
• Do not use any lubricants to place, only sterile water • As it warms up, the catheter will move.
− The catheter will likely need to be adjusted after warming up, until the ideal placement for electrical strength has been stabilized
Special considerations

25 | © 2015
Issues? When to take action Miscellaneous
If you notice any sudden changes in your patient’s breathing pattern or work of breathing, assess if patient needs suctioning. If your patient is still uncomfortable, contact your RT as the mode may need to be adjusted Call your RT if: •Patient goes apneic •Ventilator goes into apnea ventilation •Ventilator alarms constantly
Your patient can mobilize secretions more efficiently in NAVA mode and may need more frequent suctioning. Some sedation and pain medication may depress the drive to breathe. Monitor respiratory drive closely. You should consider and be able to use less sedation.
26 | © 2015
• This is relatively NEW technology • New to RN, MD, NP, and RT • So new that there is limited published literature, especially in pediatrics or
neonates − Available literature shows promise − Lots of research is being done pushing this farther − Newer = limited support centers to help with new issues that come up
Please be patient