oats® for the foot and ankle - arthrex
TRANSCRIPT
OA
TS
for
the
Foot
& A
nkle
OATS® for the Foot & Ankle
Surgical Technique

1
Outcome of Osteochondral Autograft Transplantation for Type-V Cystic Osteochondral Lesions of the TalusP. E. Scranton, Jr., M.D.; C. C. Frey, M.D.; and K.S. Feder, M.D.Journal of Bone and Joint Surgery. British Volume, Vol 88-B (Issue 5) 2006;614 – 619.
“The treatment of osteochondral lesions of the talus has evolved with the development of improved imaging and arthroscopic techniques. However, the outcome of treatment for large cystic type-V lesions is poor, using conventional grafting, debridement or microfracture techniques. This retrospective study examined the outcomes of 50 patients with a cystic talar defect who were treated with arthroscopically harvested, cored osteochondral graft taken from the ipsilateral knee. Of the 50 patients, 45 (90%) had a mean good-to-excellent score of 80.3 (52 to 90) in the Karlsson-Peterson Ankle Score, at a mean follow-up of 36 months (24 to 83). A malleolar osteotomy for exposure was needed in 26 patients and there were no malleolar mal- or non-unions. One patient had symptoms at the donor site three months after surgery; these were resolved after arthroscopic release of scar tissue. This technique is demanding with or without a malleolar osteotomy, but if properly performed has a high likelihood of success.”
Bone-Cartilage Transplantation from the Ipsilateral Knee for Chondral Lesions of the TalusAxel W. A. Baltzer, M.D.; and Juergen P. Arnold, M.D.Arthroscopy: The Journal of Arthroscopic and Related Surgery. Vol 21 (No 2) 2005;159 – 166.
“Purpose: We present a prospective analysis to review talus dome chondral and osteochondral lesions treated with autogenous bone-cartilage transplantation harvested from the ipsilateral knee since 1998. The clinical outcome of osteochondral defects is investigated by using a method for resurfacing that supplies hyaline cartilage. The outcome analysis also considers defect size and the number of transplanted osteochondral cylinders. Methods: Included in the study were 43 patients with ankle joint pain resulting from osteochondritis dissecans stage III-IV, post-traumatic cartilage defects, and focal osteoarthritis. The Osteochondral Autograft Transfer System (OATS; Arthrex, Naples, FL) was used for transplantation. Results: All grafts showed bony integration in the talus as seen in the radiographs and by magnetic resonance imaging. Second-look arthroscopy found integration of the osteocartilaginous graft with surrounding cartilage within the first year. A series of needle biopsies showed hyaline structure. Conclusion: Autogenous osteochondral transplantation of the talus using ipsilateral knee osteochondral grafts is a very promising surgical procedure to treat local cartilage lesions of the ankle joint.”
Osteoarticular Transplantation of Lesser Metatarsal Articular Deficits: A Preliminary StudyMatthew S. Rockett, DPM, FACFAS; and Keith Jacobson, DPM, FACFAS63rd Annual Scientific Seminar of American College of Foot and Ankle Surgeons. New Orleans, LA.
“Treatment of osteoarticular deficits of the lesser metatarsal heads can be challenging for the foot & ankle surgeon. A ‘joint restorative’ procedure using OATS was developed. A preliminary prospective study on a new technique for the repair of lesser metatarsal head deficits utilizing osteoarticular transplantation between 2 /2003 and 2 /2004. Average preoperative AOFAS score was 44 (range 14 – 77) for the seven patients. Postoperative AOFAS score was an average of 82 (range 49 – 100). Six of the seven patients healed their graft and had a decrease in pain and increase in activity. Average time to radiographic healing was 12 weeks (range 10 – 16 weeks). Six of the seven patients would have the procedure again and would recommend the procedure to a friend or family member. The surgeons rated the success of the procedure as five excellent, one good, and one poor. Early results of this procedure are very favorable and exciting.”
Osteochondral Autograft Transfer of the First Metatarsal Head: A Case ReportMark E. Zelent, DPM, and David J. Neese, DPM, FACFASThe Journal of Foot & Ankle Surgery. Vol 44 (5) 2005;406 – 411.
“A case of an osteochondral autograft transfer performed at the head of the first metatarsal for an acute incidence of traumatic osteochondritis dissecans was presented. The donor site for the osteochondral graft was from the medial and plantar aspect of the talar head, which was found to be composed entirely of articular hyaline cartilage, yet was not part of the functional talonavicular articulation. Six months postoperatively, the graft was well seated at the head of the first metatarsal, as confirmed by magnetic resonance imaging, and the graft donor site was asymptomatic. At 12 months’ follow-up, the patient had a functional metatarsophalangeal joint range of motion.”
OATS for the Foot & Ankle Scientific Support
2
Technique for Osteochondral Autografting Cystic Talar LesionsPierce Scranton, M.D., Seattle, WA; and Mark Easley, M.D., Durham, NC
The patient is supine and the appropriate limb is prepped and draped with a high thigh tourniquet. An arthroscopic leg holder is not necessary. A general or regional (spinal) anesthetic is required.
The lesion size and OATS drill size can be determined from direct measurement or from CT or MRI (these should be used for planning only, with the kit not opened, until the defect size is clinically confirmed). The harvester in the kit will match the drill size exactly. The cyst location on/in the talus will determine whether a medial or lateral approach is necessary. Anteromedial lesions require only an appropriate arthrotomy.
For posteromedial lesions, a curved longitudinal incision is made over the medial malleolus adequate to expose the anteromedial and posteromedial ankle joint. The saphenous vein and anteromedial and posteromedial neurovascular and tendon structures are protected with small Hohmann Retractors. An anteromedial arthrotomy is carried out and the anterior joint inspected. Impingement spurs or loose bodies, if present, are removed. If the lesion can be clearly visualized and accessed by forced plantar flexion, a malleolar osteotomy is not necessary. If not, then a malleolar osteotomy is performed.
In lateral lesions, adequate lateral talar exposure occurs with the release of the anterior talofibular ligament followed by anterior subluxation and forced plantar flexion under anesthesia. Although lateral osteotomies have been described, this osteotomy is often not necessary.
Note: for posteromedial lesions, a malleollar osteotomy is required (refer to page 4).
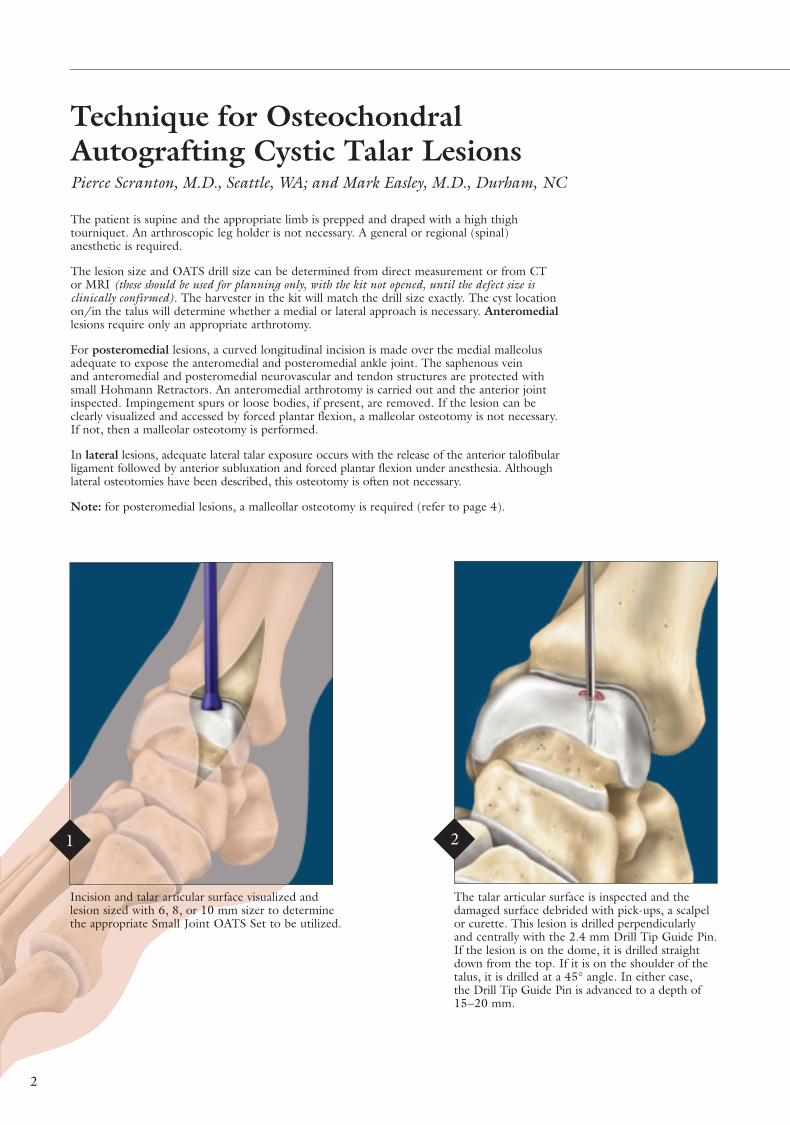
The talar articular surface is inspected and the damaged surface debrided with pick-ups, a scalpel or curette. This lesion is drilled perpendicularly and centrally with the 2.4 mm Drill Tip Guide Pin. If the lesion is on the dome, it is drilled straight down from the top. If it is on the shoulder of the talus, it is drilled at a 45° angle. In either case, the Drill Tip Guide Pin is advanced to a depth of 15 – 20 mm.
Incision and talar articular surface visualized and lesion sized with 6, 8, or 10 mm sizer to determine the appropriate Small Joint OATS Set to be utilized.
21
The cannulated OATS Alignment Rod is introduced over the Drill Tip Guide Pin for a depth measurement. This should be tapped to the base of the drill hole for an accurate depth measurement. Knowing the diameter and depth of the talar hole, the wound is covered with a saline-dampened sponge and attention is directed to the knee.
3
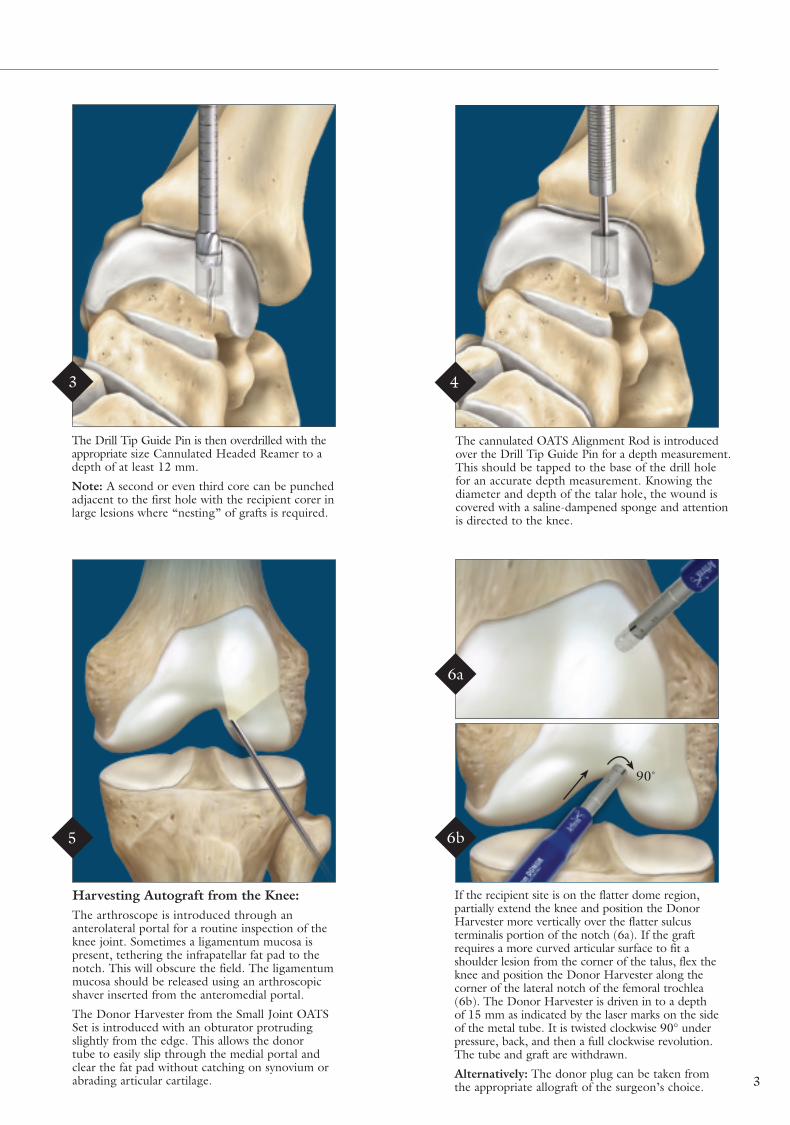
The Drill Tip Guide Pin is then overdrilled with the appropriate size Cannulated Headed Reamer to a depth of at least 12 mm.
Note: A second or even third core can be punched adjacent to the first hole with the recipient corer in large lesions where “nesting” of grafts is required.
3
If the recipient site is on the flatter dome region, partially extend the knee and position the Donor Harvester more vertically over the flatter sulcus terminalis portion of the notch (6a). If the graft requires a more curved articular surface to fit a shoulder lesion from the corner of the talus, flex the knee and position the Donor Harvester along the corner of the lateral notch of the femoral trochlea (6b). The Donor Harvester is driven in to a depth of 15 mm as indicated by the laser marks on the side of the metal tube. It is twisted clockwise 90° under pressure, back, and then a full clockwise revolution. The tube and graft are withdrawn.
Alternatively: The donor plug can be taken from the appropriate allograft of the surgeon’s choice.
6b
6a
90˚
4
Harvesting Autograft from the Knee:The arthroscope is introduced through an anterolateral portal for a routine inspection of the knee joint. Sometimes a ligamentum mucosa is present, tethering the infrapatellar fat pad to the notch. This will obscure the field. The ligamentum mucosa should be released using an arthroscopic shaver inserted from the anteromedial portal.
The Donor Harvester from the Small Joint OATS Set is introduced with an obturator protruding slightly from the edge. This allows the donor tube to easily slip through the medial portal and clear the fat pad without catching on synovium or abrading articular cartilage.
5
4
Osteochondral Autograft Transfer System
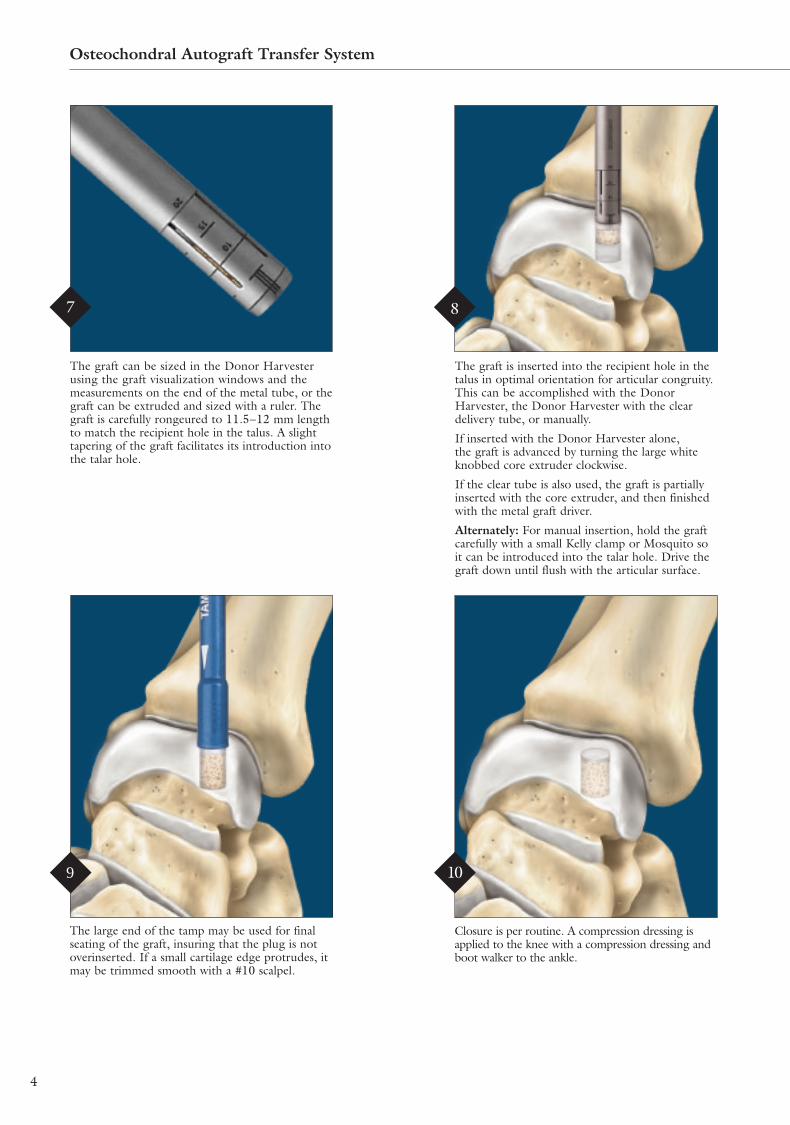
The graft can be sized in the Donor Harvester using the graft visualization windows and the measurements on the end of the metal tube, or the graft can be extruded and sized with a ruler. The graft is carefully rongeured to 11.5 – 12 mm length to match the recipient hole in the talus. A slight tapering of the graft facilitates its introduction into the talar hole.
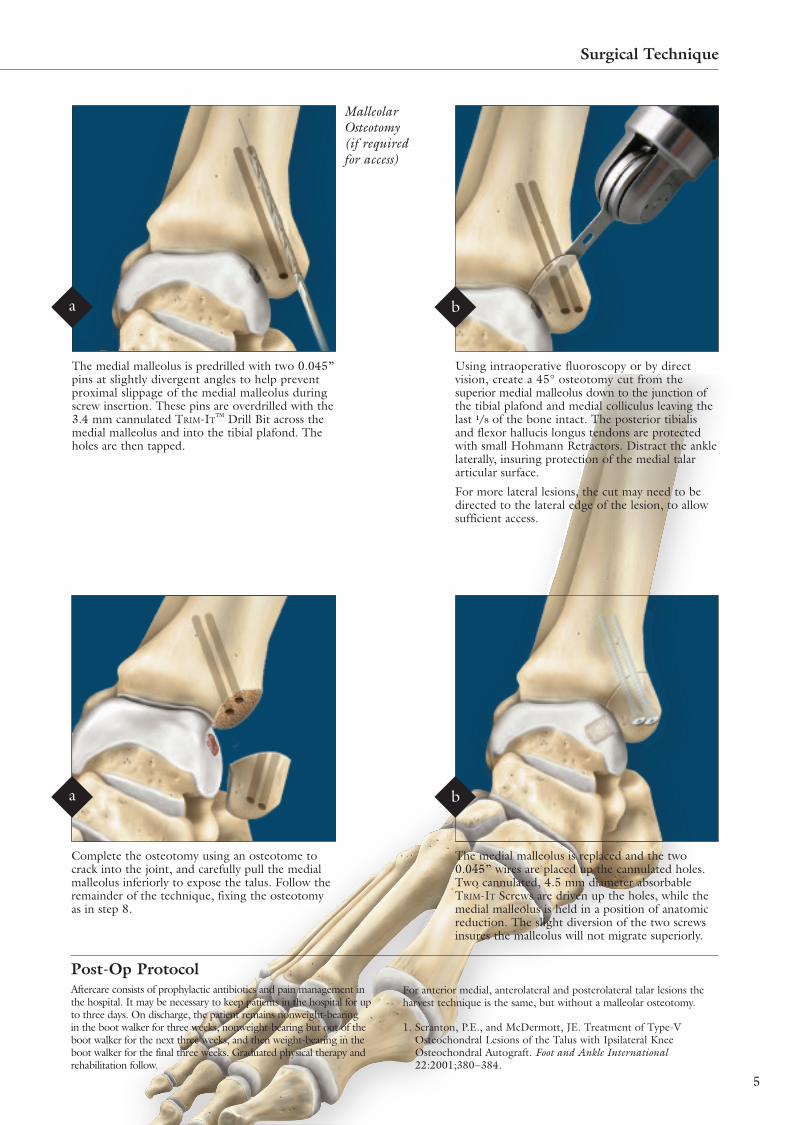
8
The graft is inserted into the recipient hole in the talus in optimal orientation for articular congruity. This can be accomplished with the Donor Harvester, the Donor Harvester with the clear delivery tube, or manually.
If inserted with the Donor Harvester alone, the graft is advanced by turning the large white knobbed core extruder clockwise.
If the clear tube is also used, the graft is partially inserted with the core extruder, and then finished with the metal graft driver.
Alternately: For manual insertion, hold the graft carefully with a small Kelly clamp or Mosquito so it can be introduced into the talar hole. Drive the graft down until flush with the articular surface.
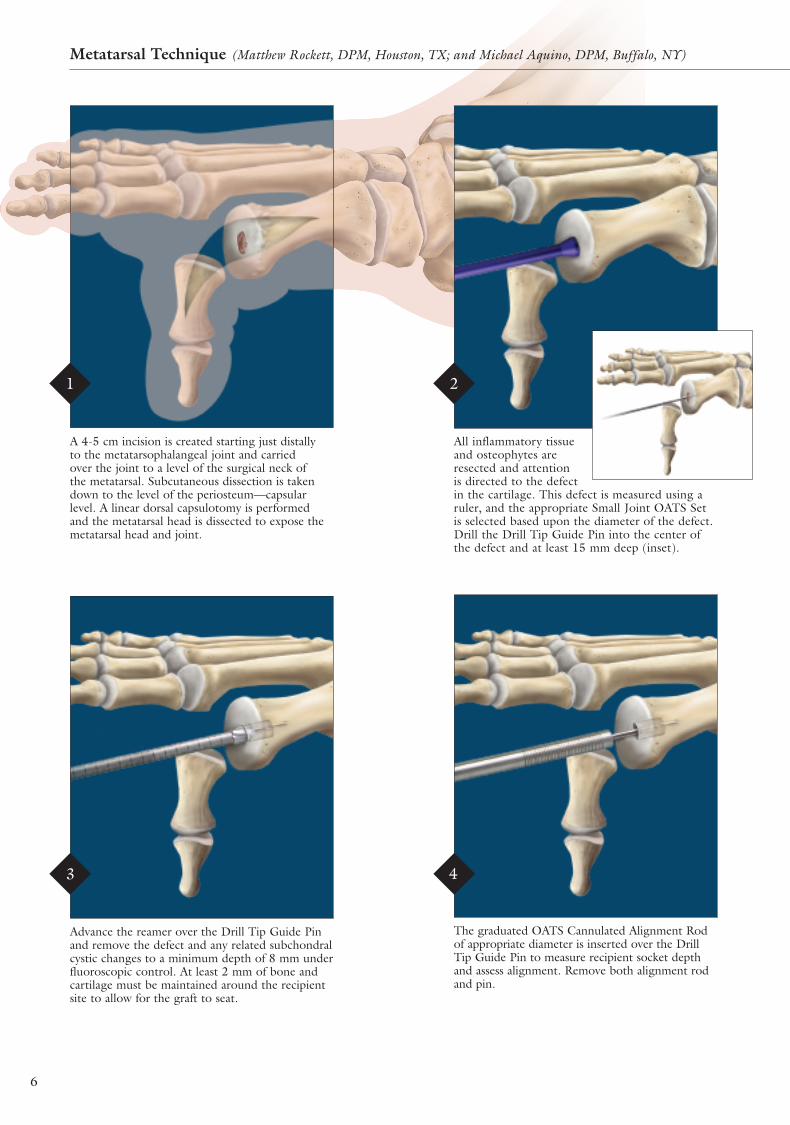
The large end of the tamp may be used for final seating of the graft, insuring that the plug is not overinserted. If a small cartilage edge protrudes, it may be trimmed smooth with a #10 scalpel.
9
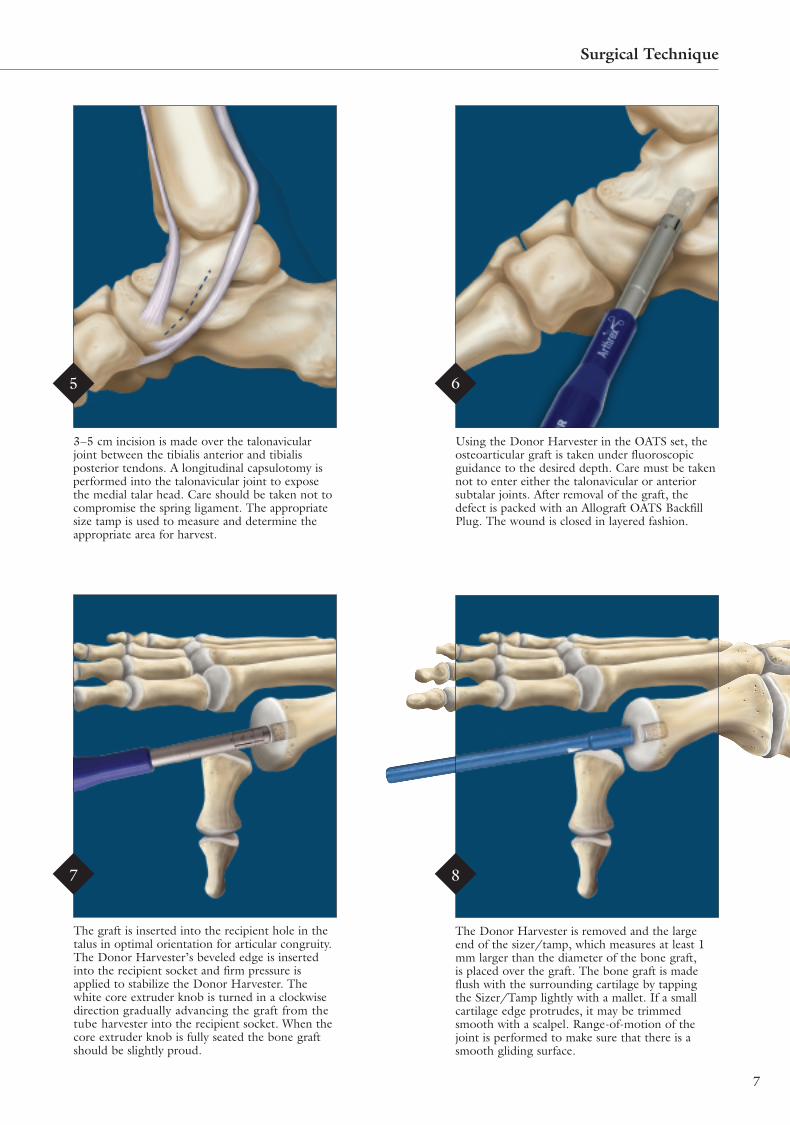
Closure is per routine. A compression dressing is applied to the knee with a compression dressing and boot walker to the ankle.
7
10
5
Surgical Technique
a
a
b
b
Post-Op ProtocolAftercare consists of prophylactic antibiotics and pain management in the hospital. It may be necessary to keep patients in the hospital for up to three days. On discharge, the patient remains nonweight-bearing in the boot walker for three weeks, nonweight-bearing but out of the boot walker for the next three weeks, and then weight-bearing in the boot walker for the final three weeks. Graduated physical therapy and rehabilitation follow.
For anterior medial, anterolateral and posterolateral talar lesions the harvest technique is the same, but without a malleolar osteotomy.
1. Scranton, P.E., and McDermott, JE. Treatment of Type-V Osteochondral Lesions of the Talus with Ipsilateral Knee Osteochondral Autograft. Foot and Ankle International 22:2001;380 – 384.
Malleolar Osteotomy (if required for access)
The medial malleolus is replaced and the two 0.045” wires are placed up the cannulated holes. Two cannulated, 4.5 mm diameter absorbable Trim-iT Screws are driven up the holes, while the medial malleolus is held in a position of anatomic reduction. The slight diversion of the two screws insures the malleolus will not migrate superiorly.
Complete the osteotomy using an osteotome to crack into the joint, and carefully pull the medial malleolus inferiorly to expose the talus. Follow the remainder of the technique, fixing the osteotomy as in step 8.
Using intraoperative fluoroscopy or by direct vision, create a 45° osteotomy cut from the superior medial malleolus down to the junction of the tibial plafond and medial colliculus leaving the last 1/8 of the bone intact. The posterior tibialis and flexor hallucis longus tendons are protected with small Hohmann Retractors. Distract the ankle laterally, insuring protection of the medial talar articular surface.
For more lateral lesions, the cut may need to be directed to the lateral edge of the lesion, to allow sufficient access.
The medial malleolus is predrilled with two 0.045” pins at slightly divergent angles to help prevent proximal slippage of the medial malleolus during screw insertion. These pins are overdrilled with the 3.4 mm cannulated Trim-iT™ Drill Bit across the medial malleolus and into the tibial plafond. The holes are then tapped.
6
Metatarsal Technique (Matthew Rockett, DPM, Houston, TX; and Michael Aquino, DPM, Buffalo, NY)
A 4-5 cm incision is created starting just distally to the metatarsophalangeal joint and carried over the joint to a level of the surgical neck of the metatarsal. Subcutaneous dissection is taken down to the level of the periosteum—capsular level. A linear dorsal capsulotomy is performed and the metatarsal head is dissected to expose the metatarsal head and joint.
All inflammatory tissue and osteophytes are resected and attention is directed to the defect in the cartilage. This defect is measured using a ruler, and the appropriate Small Joint OATS Set is selected based upon the diameter of the defect. Drill the Drill Tip Guide Pin into the center of the defect and at least 15 mm deep (inset).
Advance the reamer over the Drill Tip Guide Pin and remove the defect and any related subchondral cystic changes to a minimum depth of 8 mm under fluoroscopic control. At least 2 mm of bone and cartilage must be maintained around the recipient site to allow for the graft to seat.
The graduated OATS Cannulated Alignment Rod of appropriate diameter is inserted over the Drill Tip Guide Pin to measure recipient socket depth and assess alignment. Remove both alignment rod and pin.
1
3 4
2
7
Surgical Technique
3 – 5 cm incision is made over the talonavicular joint between the tibialis anterior and tibialis posterior tendons. A longitudinal capsulotomy is performed into the talonavicular joint to expose the medial talar head. Care should be taken not to compromise the spring ligament. The appropriate size tamp is used to measure and determine the appropriate area for harvest.
Using the Donor Harvester in the OATS set, the osteoarticular graft is taken under fluoroscopic guidance to the desired depth. Care must be taken not to enter either the talonavicular or anterior subtalar joints. After removal of the graft, the defect is packed with an Allograft OATS Backfill Plug. The wound is closed in layered fashion.
The graft is inserted into the recipient hole in the talus in optimal orientation for articular congruity. The Donor Harvester’s beveled edge is inserted into the recipient socket and firm pressure is applied to stabilize the Donor Harvester. The white core extruder knob is turned in a clockwise direction gradually advancing the graft from the tube harvester into the recipient socket. When the core extruder knob is fully seated the bone graft should be slightly proud.
The Donor Harvester is removed and the large end of the sizer/tamp, which measures at least 1 mm larger than the diameter of the bone graft, is placed over the graft. The bone graft is made flush with the surrounding cartilage by tapping the Sizer/Tamp lightly with a mallet. If a small cartilage edge protrudes, it may be trimmed smooth with a scalpel. Range-of-motion of the joint is performed to make sure that there is a smooth gliding surface.
5 6
7 8

8
ClosureLayered closure is performed with attention given to the capsular closure of the joint to make sure that it is appropriately reapproximated. If a lesser metatarsophalangeal joint is operated upon, the toe is splinted in neutral or slight plantar flexion to allow for the capsule to heal.
Postoperative CareInitially, the patient is placed in a posterior splint nonweight-bearing and instructed to return in two weeks for suture removal. A nonweight-bearing below-the-knee cast is applied at the first postoperative visit and the patient is reappointed for three weeks. At five weeks postoperatively, a radiograph is taken to check the progress of healing of the graft and the patient is either placed in a cast brace or below-the-knee cast, nonweight-bearing for another three weeks. At eight weeks postoperatively, the patient is again x-rayed. If there is radiographic and clinical healing, the patient is allowed to start partial weight-bearing for three weeks followed by two weeks full weight-bearing in a cast brace. This is followed by progression into shoe gear as tolerated. High impact athletic activity, such as running and aerobics, is only allowed after five months postoperative recovery.
Ordering Information
Disposables: Small Joint OATS Set, 6 mm AR-8981-06S Small Joint OATS Set, 8 mm AR-8981-08S Small Joint OATS Set, 10 mm AR-8981-10S
OATS Sets include: Graft Delivery Tube, Graft Driver, Tamp, Cannulated Alignment Rod, Cannulated Headed Reamer, Donor Harvester, Drill Tip Guide Pin, 6" Ruler and Graft Retriever
Talus Allograft OATS Set AR-8900S
OATS Sizer/Tamps Set AR-1985S
OATS Instrumentation Set


U.S. PATENT NOS. 5,919,196; 6,591,581 and 6,592,588
© 2013, Arthrex Inc. All rights reserved. LT1-0414-EN_D
This description of technique is provided as an educational tool and clinical aid to assist properly licensed medical professionals in the usage of specific Arthrex products. As part of this professional usage, the medical
professional must use their professional judgment in making any final determinations in product usage and technique. In doing so, the medical professional should rely on their own training and experience and
should conduct a thorough review of pertinent medical literature and the product’s Directions For Use.
www.arthrex.com...up-to-date technology
just a click away