omron’s nj5 plc’s - automatización industrial - robotica · omron’s nj5 plc’s rev1.0 ......
TRANSCRIPT

G9SP Ethernet IP Communication to
Omron’s NJ5 PLC’s Rev1.0
Mike Wash
www.infoPLC.net

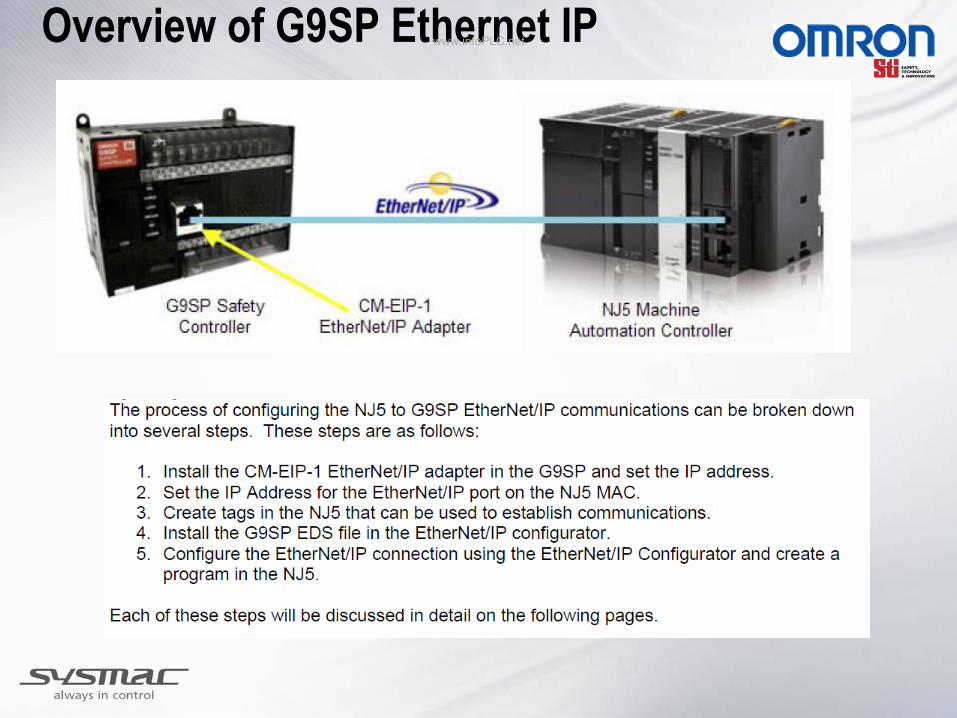
This document will walk you through a step by step setup
for communication from a G9SP to a Omron’s NJ5 PLC
using Ethernet IP communications. This communication
link is used to communicate status of the safety
controller as well as to provide signals from the PLC to
the safety controller for resetting circuits, ect.
Example code for this presentation can be opened using
Omron’s Network Configurator for Safety Devices.
File Name
G9SP_Ethernet_IP_NJ5_Exsample_Rev1.nfc
Summery www.infoPLC.net
Overview of G9SP Ethernet IP www.infoPLC.net
Overview of G9SP Ethernet IP www.infoPLC.net
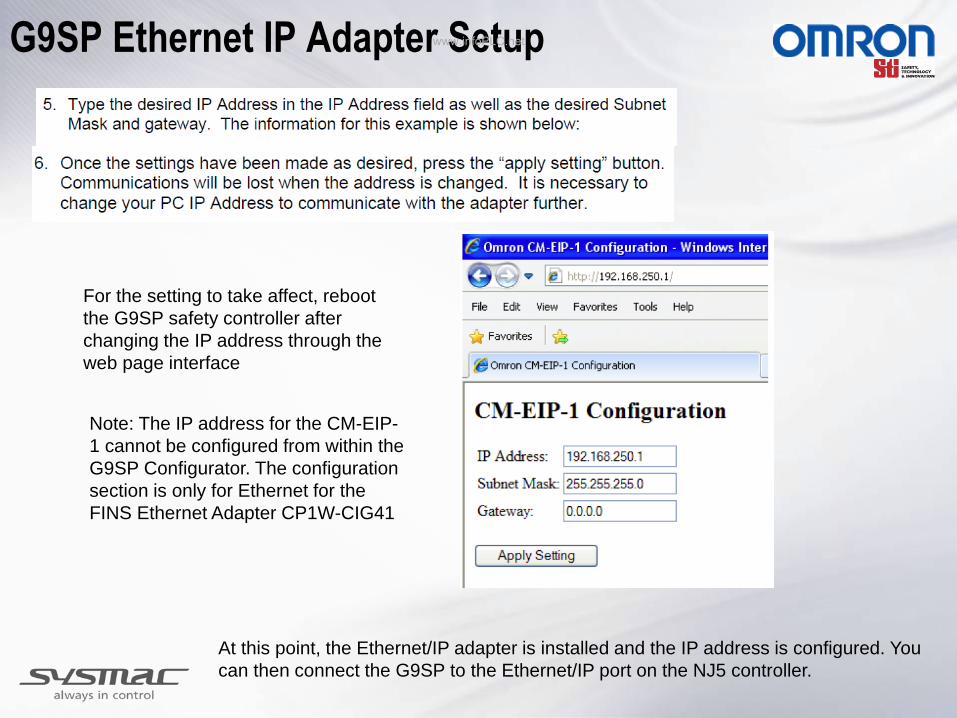
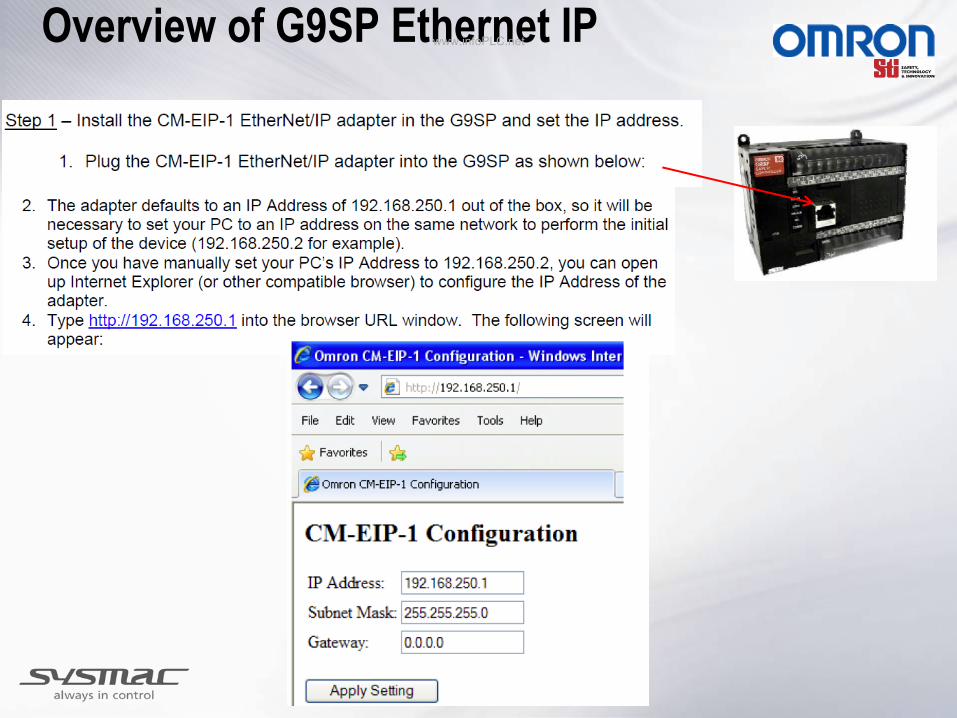
G9SP Ethernet IP Adapter Setup
Note: The IP address for the CM-EIP-
1 cannot be configured from within the
G9SP Configurator. The configuration
section is only for Ethernet for the
FINS Ethernet Adapter CP1W-CIG41
For the setting to take affect, reboot
the G9SP safety controller after
changing the IP address through the
web page interface
At this point, the Ethernet/IP adapter is installed and the IP address is configured. You
can then connect the G9SP to the Ethernet/IP port on the NJ5 controller.
www.infoPLC.net
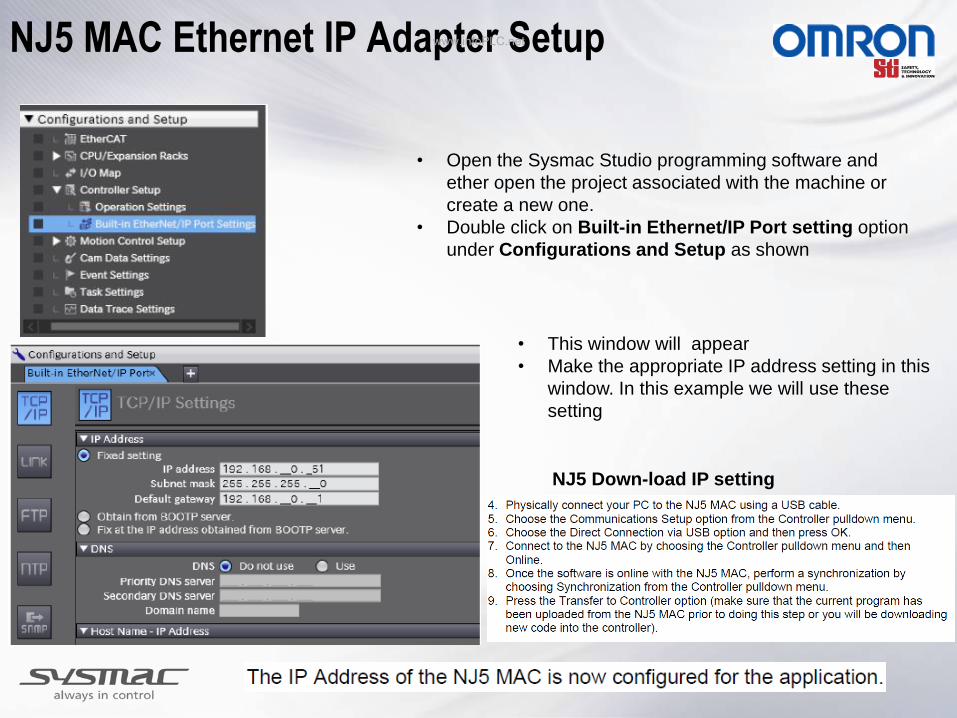
NJ5 MAC Ethernet IP Adapter Setup
• Open the Sysmac Studio programming software and
ether open the project associated with the machine or
create a new one.
• Double click on Built-in Ethernet/IP Port setting option
under Configurations and Setup as shown
• This window will appear
• Make the appropriate IP address setting in this
window. In this example we will use these
setting
NJ5 Down-load IP setting
www.infoPLC.net
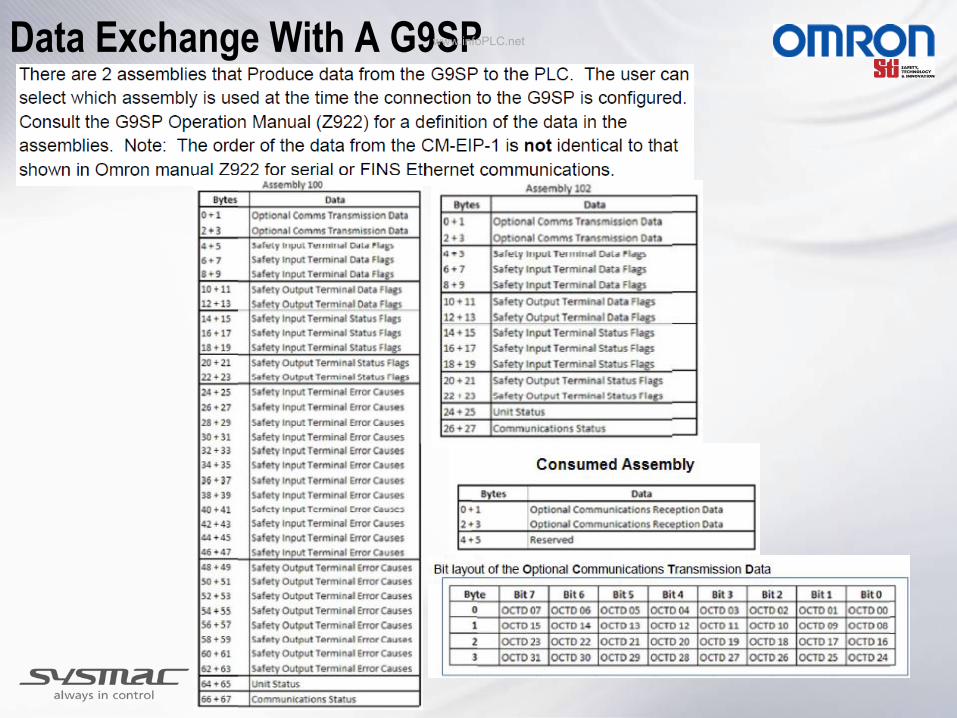
Data Exchange With A G9SP www.infoPLC.net

Data Exchange With A G9SP www.infoPLC.net

Data Exchange With A G9SP www.infoPLC.net

Data Exchange With A G9SP www.infoPLC.net

Setting up Tags In NJ5 Controller
The first step in creating the tags to use for the application is to
bring in the structure necessary to support the tag creation.
Open the provided Excel Spreadsheet and copy the G9SP
Large Produced Structure area as shown
www.infoPLC.net
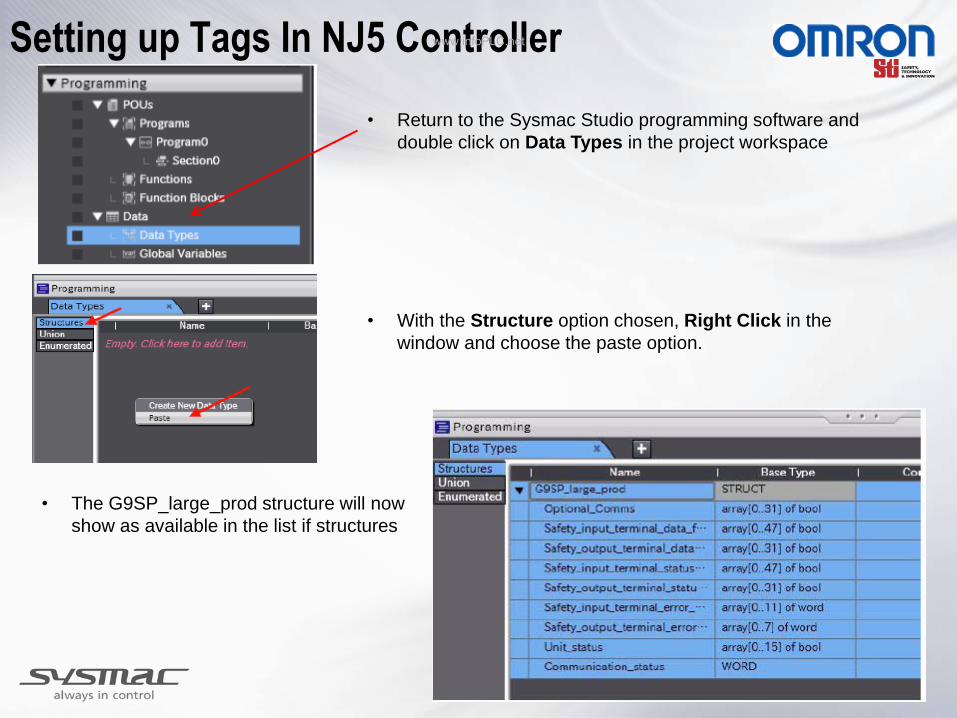
• Return to the Sysmac Studio programming software and
double click on Data Types in the project workspace
• With the Structure option chosen, Right Click in the
window and choose the paste option.
• The G9SP_large_prod structure will now
show as available in the list if structures
Setting up Tags In NJ5 Controller www.infoPLC.net

• Repeat the last process for the Consumed
Structures. The structures should look like
this when you are done.
• Next, double click on Global Variables option in the
project workspace.
• In the global variable window, right click and choose
Create New. A new variable will be created.
Setting up Tags In NJ5 Controller www.infoPLC.net
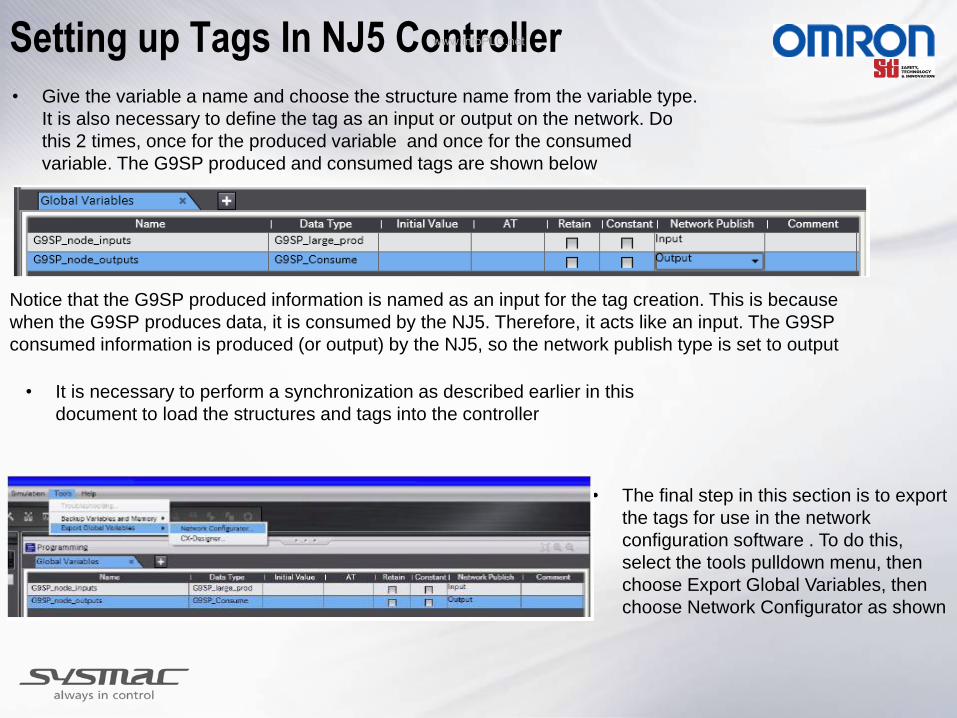
• The final step in this section is to export
the tags for use in the network
configuration software . To do this,
select the tools pulldown menu, then
choose Export Global Variables, then
choose Network Configurator as shown
• Give the variable a name and choose the structure name from the variable type.
It is also necessary to define the tag as an input or output on the network. Do
this 2 times, once for the produced variable and once for the consumed
variable. The G9SP produced and consumed tags are shown below
Notice that the G9SP produced information is named as an input for the tag creation. This is because
when the G9SP produces data, it is consumed by the NJ5. Therefore, it acts like an input. The G9SP
consumed information is produced (or output) by the NJ5, so the network publish type is set to output
• It is necessary to perform a synchronization as described earlier in this
document to load the structures and tags into the controller
Setting up Tags In NJ5 Controller www.infoPLC.net

Install G9SP EDS File
Installing the G9SP EDS file in to network configurator software is necessary if never
done before
• Open the Sysmac Studio Network Configurator for
EtherNet/IP.
• Choose the Install option from the EDS file pulldown
menu and navigate to the CM-EIP-1.eds and select OK.
Cancel the Icon installation.
• The CM-EIP-1 module should show up in the list of
EtherNet/IP hardware as shown.
www.infoPLC.net

To configure the Ethernet/IP connections to the NJ5 open Ethernet/IP Configurator software and
create a new program for the NJ5
• Drag the NJ501-1300 and the CM-EIP-1 from the
EtherNet/IP harare list into your EtherNet/IP truck line in the
Network Configurator as shown
Configure EtherNet IP Network
• The IP addresses are automatically set as you add them to
the network. Right click on each node and choose the
Change Node Address option. Change the NJ5 to
192.168.250.1 and the CM-EIP-1 to 192.168.250.2 to match
that were configured earlier in this document.
www.infoPLC.net
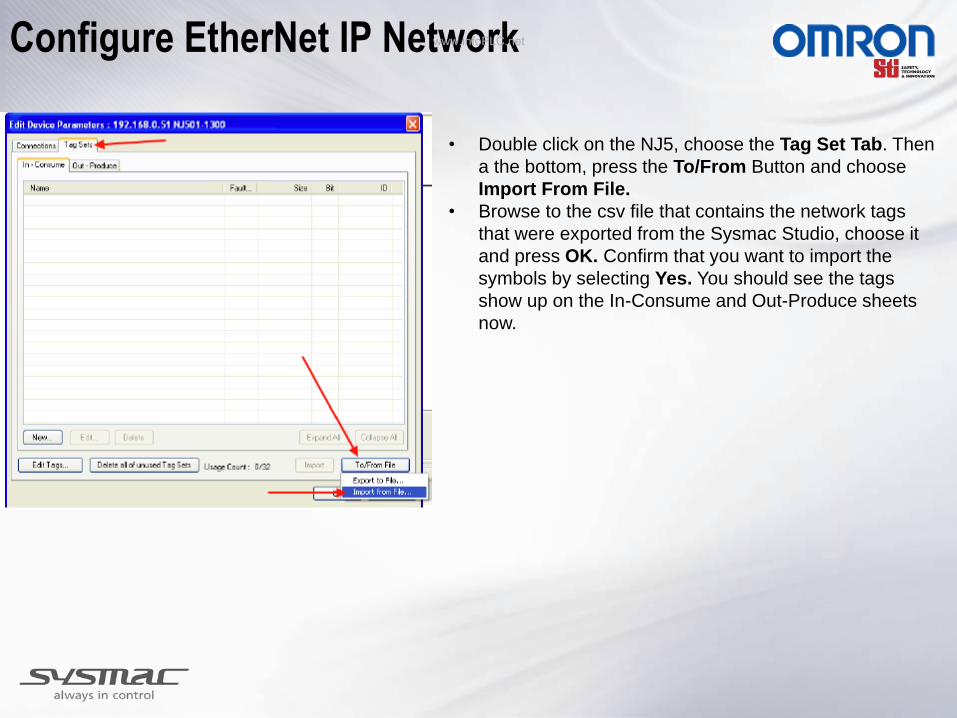
• Double click on the NJ5, choose the Tag Set Tab. Then
a the bottom, press the To/From Button and choose
Import From File.
• Browse to the csv file that contains the network tags
that were exported from the Sysmac Studio, choose it
and press OK. Confirm that you want to import the
symbols by selecting Yes. You should see the tags
show up on the In-Consume and Out-Produce sheets
now.
Configure EtherNet IP Network www.infoPLC.net

• Click on the Connection Tab. The CM-EIP-1
module will show in the list of unregistered
devices. Select CM-EIP-1 module and press
the down arrow to move the adapter from the
unregistered device list to the registered device
list.
• Once the adapter is shown in the registered
device list, double click on adapter, this
window will appear.
Configure EtherNet IP Network
• Make sure to select the 68 bytes inputs as
shown by the red arrow
www.infoPLC.net

• Match the tag names on the left hand side up with the input and the output assemblies on the right hand side.
In this example, only one tag will be in the list for each of the connections. When done, the setting should
look like this:
Configure EtherNet IP Network
• Press the Regist button at the bottom of the window. The press Close button. Lastly press OK
button on the Edit Device Parameters page.
• The Network truck should look like this now.
• The arrow (highlighted in the red box) shows
that the node is now connected to the NJ5
www.infoPLC.net

• Connect the NJ5 to your computer using the USB cable
• In the Network Configuration software, choose the Option Pull-down menu then choose Select
Interface, then choose NJ Series USB Port.,
Down Loading EtherNet IP Network Configuration
• From the Network Pull-down menu, choose Connect.
• Click on TCP:2 and then press OK. Make sure to select
the Use Existing Network Option.
www.infoPLC.net

• Select Use the existing network,
and click OK
• From the Network Pull-down
menu, choose Download
• Click Yes to download the
parameters
Down Loading EtherNet IP Network Configuration www.infoPLC.net

• To download to the EIP module without
changing the PLC to Program mode, click
Download with Current Mode
• When the download is complete, click OK
Down Loading EtherNet IP Network Configuration www.infoPLC.net

Testing Communications www.infoPLC.net

Testing Communications www.infoPLC.net