online reporting system user guide - iread3.portal.airast.org · web viewthis user guide...
TRANSCRIPT

Indiana Assessments: IREAD-3 Focused
Online Reporting SystemUser Guide
2018–2019
Published May 14, 2023
Prepared by the American Institutes for Research®
Descriptions of the operation of the Online Reporting System, and related systems are property of the American Institutes for Research (AIR) and are used with the permission of AIR.

Table of ContentsIntroduction to the User Guide.................................................................................................................
Organization of this User Guide..............................................................................................................
Document Conventions...........................................................................................................................
Intended Audience...................................................................................................................................
Additional Resources...............................................................................................................................
Section I. Overview of the Online Reporting System..............................................................................Understanding User Roles and Permissions...........................................................................................
Section II. Accessing the ORS..................................................................................................................Logging in to the ORS.............................................................................................................................
About Usernames and Passwords..........................................................................................................
Switching Between AIR Online Systems.................................................................................................
Logging out of the ORS...........................................................................................................................
Section III. Understanding the ORS Interface..........................................................................................ORS Welcome Page...............................................................................................................................
Using the ORS Banner............................................................................................................................
Viewing Individual Student Reports.....................................................................................................
About the Individual Student Report.............................................................................................10
Section IV. Viewing Reports & Files.......................................................................................................Retrieving Student Results....................................................................................................................
Generating a Data File or PDF of Individual Student Reports...........................................................
Accessing Files from the Inbox..........................................................................................................
Section V. Working with Student Rosters.............................................................................................Adding a New Roster.............................................................................................................................
Creating Rosters Through File Uploads................................................................................................
Viewing and Modifying a Roster............................................................................................................
Deleting a Roster...................................................................................................................................
Printing a Roster....................................................................................................................................
Appendix A. Printing Reports in the ORS..............................................................................................Appendix B. User Support......................................................................................................................Change Log..............................................................................................................................................
ii
Online Reporting SystemOnline Reporting System User Guide List of Tables
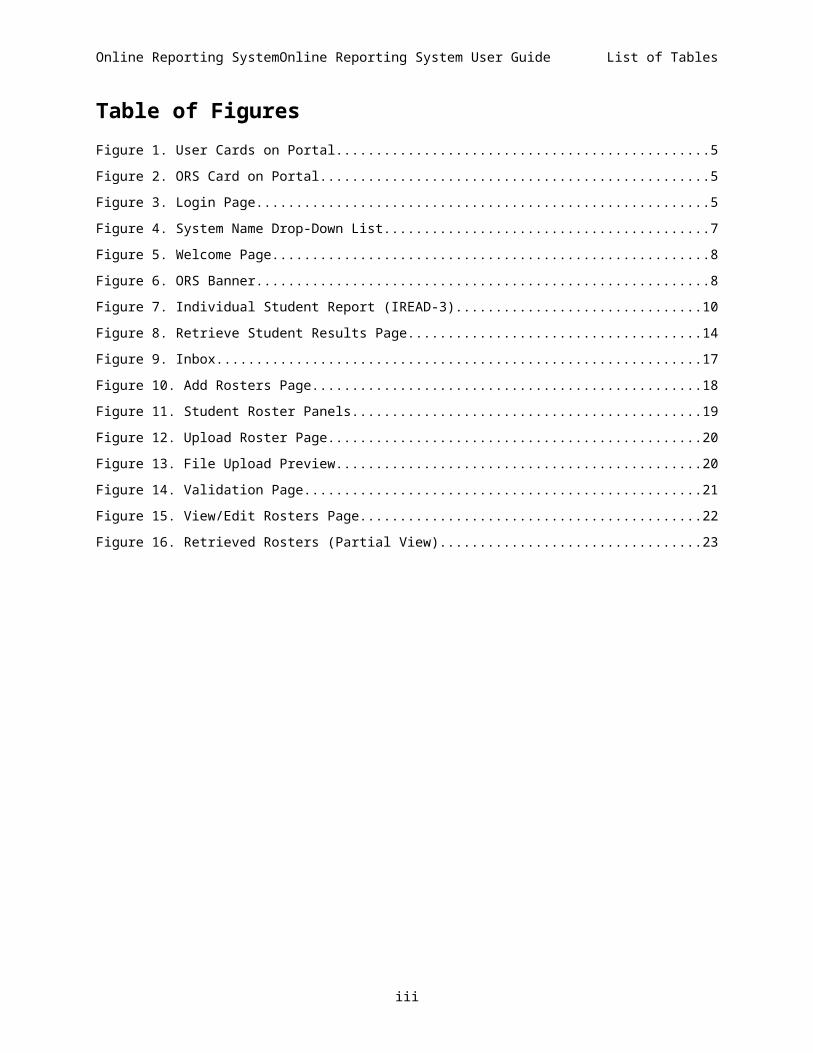
Table of FiguresFigure 1. User Cards on Portal.................................................................................................................... 5
Figure 2. ORS Card on Portal...................................................................................................................... 5
Figure 3. Login Page.................................................................................................................................... 5
Figure 4. System Name Drop-Down List......................................................................................................7
Figure 5. Welcome Page............................................................................................................................. 8
Figure 6. ORS Banner................................................................................................................................. 8
Figure 7. Individual Student Report (IREAD-3)..........................................................................................10
Figure 8. Retrieve Student Results Page...................................................................................................14
Figure 9. Inbox........................................................................................................................................... 17
Figure 10. Add Rosters Page..................................................................................................................... 18
Figure 11. Student Roster Panels..............................................................................................................19
Figure 12. Upload Roster Page................................................................................................................. 20
Figure 13. File Upload Preview..................................................................................................................20
Figure 14. Validation Page......................................................................................................................... 21
Figure 15. View/Edit Rosters Page............................................................................................................22
Figure 16. Retrieved Rosters (Partial View)...............................................................................................23
iii
Online Reporting SystemOnline Reporting System User Guide List of Tables
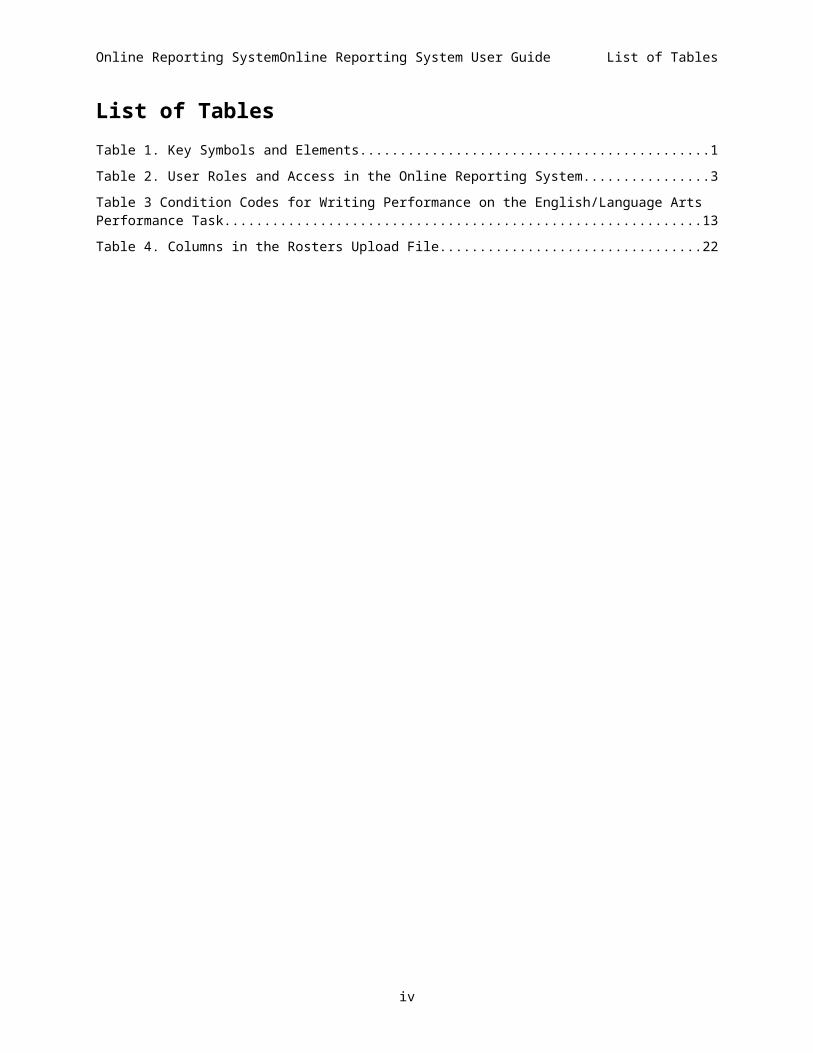
List of TablesTable 1. Key Symbols and Elements...........................................................................................................1
Table 2. User Roles and Access in the Online Reporting System...............................................................3
Table 3 Condition Codes for Writing Performance on the English/Language Arts Performance Task.......13
Table 4. Columns in the Rosters Upload File.............................................................................................22
iv

Introduction to the User GuideThis user guide describes the features of the Online Reporting System (ORS), which provides score reports for each student who takes an ILEARN or IREAD-3 test.
This section describes the structure and organization of the user guide and the stylistic features used in the document.
Organization of this User GuideThis user guide includes the following sections:
Section I , Overview of the Online Reporting System, provides an introduction to the ORS and describes its available user roles.
Section II , Accessing the ORS, includes instructions for logging in and out of the ORS and switching between different AIR systems.
Section III , Understanding the ORS Interface, describes the layout and key features of the ORS interface.
Section IV , Viewing Reports & Files, describes how to download student results and view test statistics.
Section V , Working with Student Rosters, provides instructions for creating and managing student rosters.
Appendix A , Printing Reports in the ORS, explains how to print reports in the ORS.
Appendix B , User Support, provides Help Desk information.
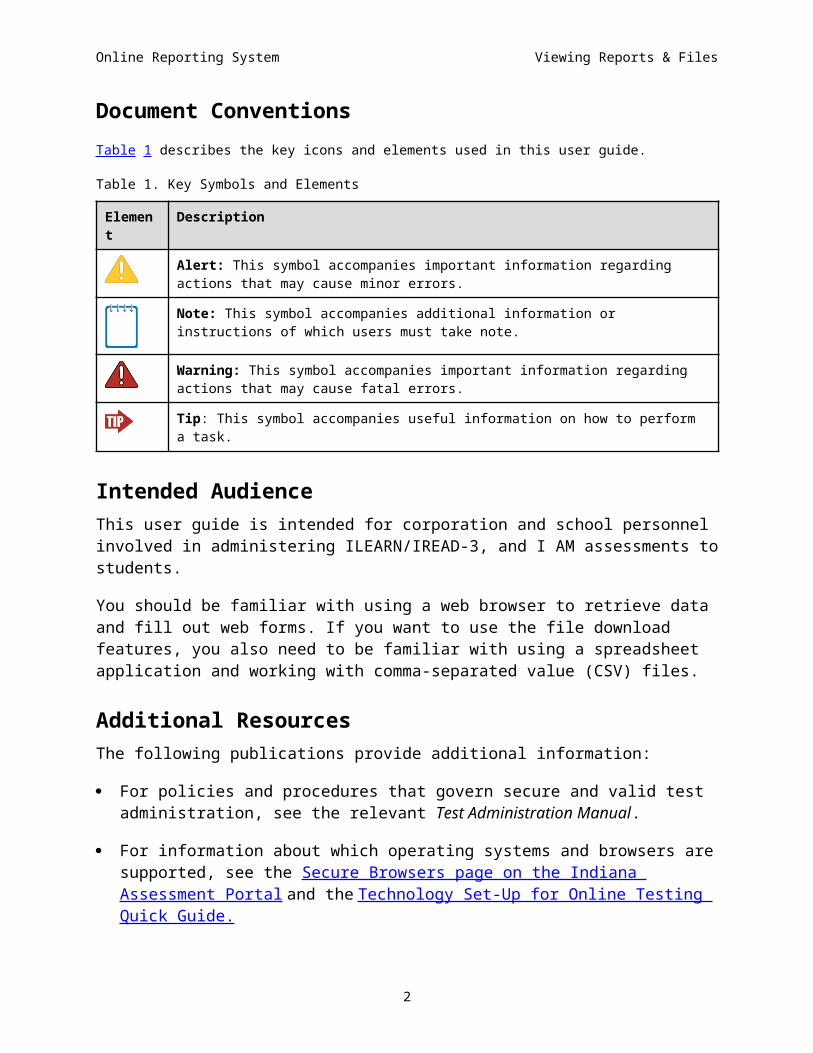
Document ConventionsTable 1 describes the key icons and elements used in this user guide.
Table 1. Key Symbols and Elements
Element Description
Alert: This symbol accompanies important information regarding actions that may cause minor errors.
Note: This symbol accompanies additional information or instructions of which users must take note.
Warning: This symbol accompanies important information regarding actions that may cause fatal errors.
1
Online Reporting System Viewing Reports & Files
Element Description
Tip: This symbol accompanies useful information on how to perform a task.
Intended AudienceThis user guide is intended for corporation and school personnel involved in administering ILEARN, IREAD-3, and I AM assessments to students.
You should be familiar with using a web browser to retrieve data and fill out web forms. If you want to use the file download features, you also need to be familiar with using a spreadsheet application and working with comma-separated value (CSV) files.
Additional ResourcesThe following publications provide additional information:
For policies and procedures that govern secure and valid test administration, see the relevant Test Administration Manual.
For information about which operating systems and browsers are supported, see the Secure Browsers page on the Indiana Assessment Portal and the Technology Set-Up for Online Testing Quick Guide.
For information about student and user management, see the TIDE User Guide.
For information about network and Internet requirements, general peripheral and software requirements, and configuring text-to-speech settings, see the Technology Set-Up for Online Testing Quick Guide and the Additional Configurations and Troubleshooting Guides.
The above resources are available on the Indiana Assessment Portal, https://indiana.portal.airast.org/.
2

Section I. Overview of the Online Reporting SystemThe ORS contains two major features: Score Reports and Reports & Files.
Score Reports: Provide performance data for ILEARN and I AM tests. These reports allow you to compare performance data between students, rosters, and other institutions. Score reports in the ORS provide information about student performance on the overall test subject, as well as the content categories within a subject.
Reports & Files: Provides summary statistics (counts and percentages) of students who tested in a selected subject and grade level for ILEARN, IREAD-3, and I AM tests. You can also download student data files containing test scores and demographic information.
o Users can download student data and zip files of student ISR PDFs for a selected test window by corporation, school, teacher, or roster. The data files will include students’ personal information, such as enrolled school and Corporation and grade level, and score results for the overall test and reporting categories (if applicable). The zip files of the student ISRs will include a manifest of all of the student ISRs included in the file.
The ORS also enables you to create and manage rosters for analyzing score data for specific student groups.
Note: The dynamic data in the ORS can be used to gauge students’ achievement on various assessments but should not be used for official accountability purposes.
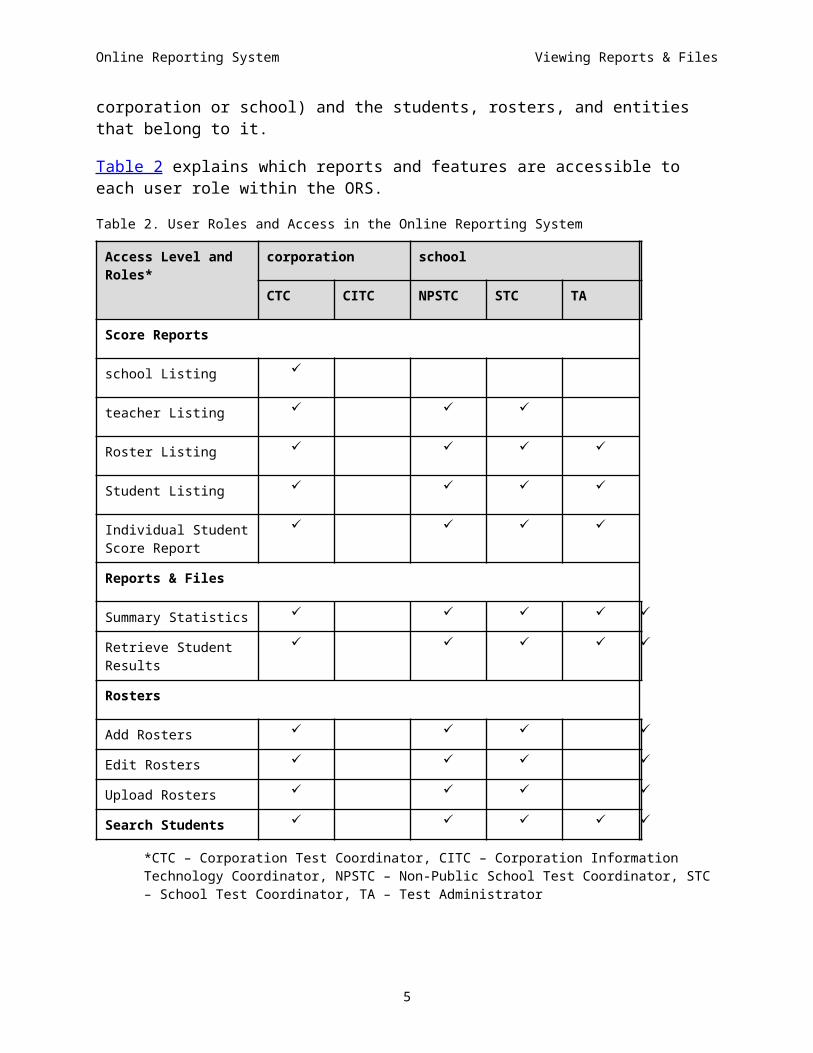
Understanding User Roles and PermissionsAccess to the ORS reports and features depends on your user role. You can only view data for your associated entity (such as a corporation or school) and the students, rosters, and entities that belong to it.
Table 2 explains which reports and features are accessible to each user role within the ORS.
Table 2. User Roles and Access in the Online Reporting System
Access Level and Roles*
Corporation School
CTC CITC NPSTC STC TA
Score Reports
3
Online Reporting System Viewing Reports & Files
Access Level and Roles*
Corporation School
CTC CITC NPSTC STC TA
School Listing
Teacher Listing
Roster Listing
Student Listing
Individual Student Score Report
Reports & Files
Summary Statistics
Retrieve Student Results
Rosters
Add Rosters
Edit Rosters
Upload Rosters
Search Students
*CTC – Corporation Test Coordinator, CITC – Corporation Information Technology Coordinator, NPSTC – Non-Public School Test Coordinator, STC – School Test Coordinator, TA – Test Administrator
4
Section II. Accessing the ORSThis section explains how to log in and out of the ORS and switch between different systems.
Logging in to the ORSTo log in to the ORS, you must have an authorized username and password. The login credentials are the same across AIR systems (TIDE, TA Interface, ORS).
Warning: Do not share your login information with anyone. All AIR systems provide access to student information, which must be protected in accordance with federal privacy laws.
To log in to ORS:
1. Navigate to the Indiana Assessment Portal (https://indiana.portal.airast.org/) and select the appropriate program (ILEARN, I AM, IREAD-3).
2. Select your user role.
Figure 1. User Cards on Portal
3. Click Online Reporting System (ORS). The Login page opens.
Figure 2. ORS Card on Portal
4. Enter your email address and password.
5. Click Secure Login.
a. If the Enter Code page appears, an authentication code is automatically emailed to you. You must enter this code in the Enter Emailed Code field and click Submit within fifteen minutes of receiving the email. (If the code has expired, click Resend Code to request a new code.)
The ORS Welcome page appears.
Figure 3. Login Page
5

Online Reporting System Viewing Reports & Files
About Usernames and PasswordsYour username is the email address associated with your account in TIDE. When your account is created, you receive an activation email containing a temporary link to the Reset Your Password page. To activate your account, you must set your password within 15 minutes of receiving this email.
If your first temporary link expired:
In the activation email you received, click the second link provided and request a new temporary link.
If you forgot your password:
On the Login page, click Forgot Your Password? and then enter your email address in the Email Address field to reset your password. You will receive an email with a new temporary link to reset your password.
If you did not receive an email containing a temporary link or authentication code:
Check your spam folder to make sure your email program did not categorize it as junk mail. If you still do not have an email, contact your School or Corporation Test Coordinator to make sure you are listed in TIDE.
Additional Help
If you are unable to log in, contact the Indiana Assessment Help Desk for assistance. You must provide your name and email address. Contact information is available in the Appendix B , User Support section of this user guide.
Switching Between AIR Online SystemsWhen you are logged in to any AIR online system, you can switch between systems without having to log in again.
Note: Your access to systems depends on your user role. Though you can navigate to TDS from ORS, the navigation menu does not appear in TDS to prevent you from accidentally closing a session.
To switch between the AIR systems:
1. Select a system from the system name drop-down list in the upper-left corner of the ORS.
Figure 4. System Name Drop-Down List
6

Online Reporting System Viewing Reports & Files
Logging out of the ORSWhen you finish using the ORS, be sure to log out so that unauthorized users do not access students’ personally identifying information.
Warning: Logging out of the ORS logs you out of all AIR systems. If you log out of the ORS while administering a test using the TA Interface, your test session stops and all students in the session are logged out of their tests. ORS has a timeout feature that automatically logs you out after 30 minutes of inactivity.
To log out of the ORS:
Click Log Out in the upper-right corner of the page.
7

Section III. Understanding the ORS InterfaceThis section describes the ORS features and layout.
ORS Welcome PageWhen you log in to the ORS, the Welcome page appears. From here, you can select the report you want to view.
Figure 5. Welcome Page
To view the ORS reports:
1. If you are associated with multiple roles or entities, the Select drop-down list appears. From this drop-down list, select the corporation or school whose reports you want to view.
2. Do one of the following:
o To view score reports, click Score Reports (ILEARN and I AM tests only).
o To download student results, click Retrieve Student Results (ILEARN, I AM, IREAD-3 tests).
Using the ORS BannerThe banner provides links to all the ORS reports and features.
Alert: Use the on-screen buttons and tools to navigate within the ORS. Do not use your web browser's back button.
Figure 6. ORS Banner
Score Reports links to the Homepage Dashboard.
8

Online Reporting System Viewing Reports & Files
The Reports & Files drop-down menu provides access to the Reports & Files options listed below. For more information, see Viewing Reports & Files.
o Summary Statistics
o Retrieve Student Results
The Language drop-down list allows you to specify which language to display on the page you are viewing.
o In addition to English, printed ISRs will be translated into Spanish for I AM tests and into Spanish, Burmese, Arabic, Mandarin, and Vietnamese for ILEARN 3-8, ILEARN U.S. Government, ILEARN Biology, and IREAD-3 tests.
Inbox opens the Inbox window, where you can access student performance data files. For more information, see Accessing Files from the Inbox.
Search Students opens a pop-up window where you can search for students to access their test results.
Each of the following roster links only appears for authorized users (for more information, see Working with Student Rosters).
o Add Rosters opens the Add Roster page, where you can create student rosters.
o View/Edit Rosters opens the View/Edit Roster page, where you can view and edit student rosters.
o Upload Rosters opens the Upload Roster page where, you can upload roster files.
Help opens the online version of this user guide.
Print allows you to print the data on the current page. For more information, see Appendix A.
Export allows you to export the data displayed on the page. The data is exported as a Microsoft Excel (.xls) file.
9

Online Reporting System Viewing Reports & Files
Definitions opens a pop-up window that provides definitions for terms on the report you are viewing.
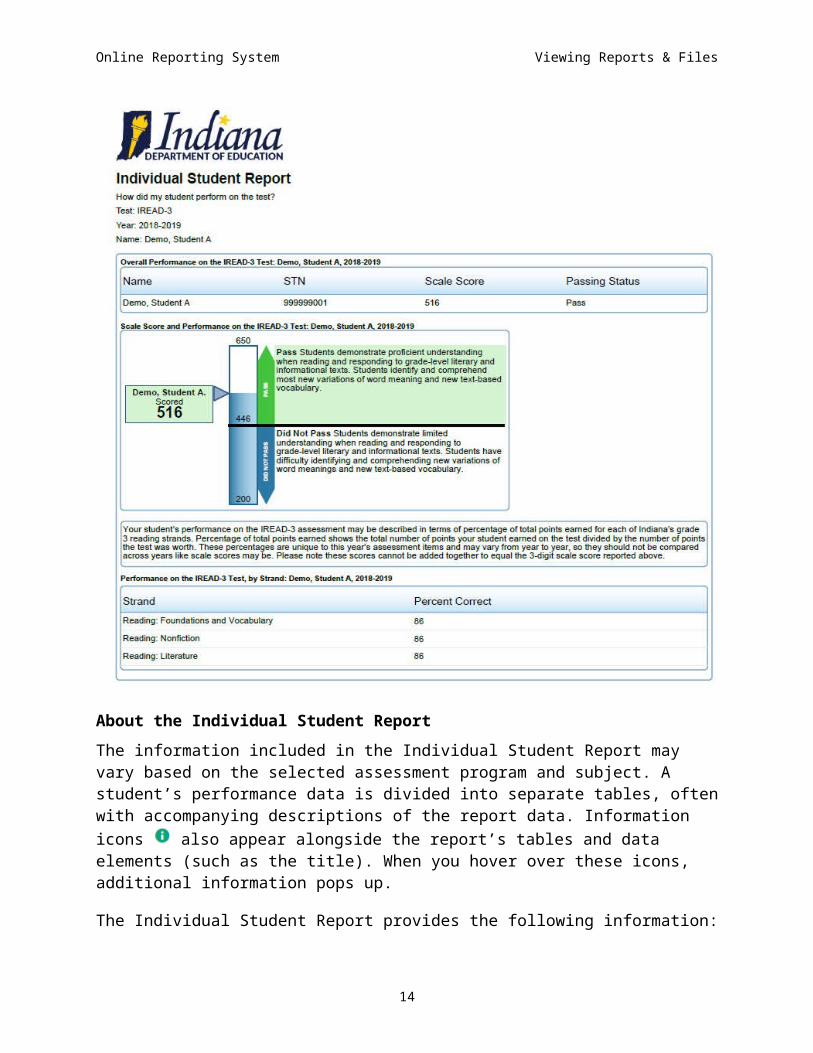
Viewing Individual Student ReportsThe Individual Student Report (ISR) (see Figure 7) provides more specific details about a particular student’s performance on an assessment. Parents and teachers may need guidance on understanding their student’s scores and the various elements that are included in a student report. The ISR will have the following features to assist in understanding:
(1) Interpretive text on the ISR User Interface
(2) Appending an interpretive guide to the Simple ISR PDF
To navigate to IREAD-3 ISRs, see Viewing Reports & Files .
Figure 7. Individual Student Report (IREAD-3)
10

Online Reporting System Viewing Reports & Files
About the Individual Student ReportThe information included in the Individual Student Report may vary based on the selected assessment program and subject. A student’s performance data is divided into separate tables, often with accompanying descriptions of the report data. Information icons also appear alongside the report’s tables and data elements (such as the title). When you hover over these icons, additional information pops up.
The Individual Student Report provides the following information:
Overall Performance on the [Test Name and Details] Test: [Student Name], [Administration]— This table includes the following:
o The student’s name and Student Test Number (STN).
11

Online Reporting System Viewing Reports & Files
o The student’s overall scale score for a test opportunity.
o The proficiency level associated with the student’s score for a test opportunity (ILEARN 3-8, Biology ECA only).
o The passing status associated with the student’s score for a test opportunity (IREAD-3 and ILEARN U.S. Government ECA only).
o The student’s reported Lexile measure, which reflects the student’s reading ability (ILEARN English/Language Arts tests only).
o The student’s reported quantile measure, which reflects the student’s mathematical ability (ILEARN Mathematics tests only).
o College and Career Readiness indicator reflects whether the student is on track to becoming college and career ready (ILEARN Mathematics and ILEARN English/Language Arts only).
Scale Score and Performance on the [Test Name and Details] Test: [Student Name], [Administration]—This barrel chart (IREAD-3) or horizontal bar (ILEARN) depicts the student’s achievement level based on your student’s scale score and where it falls within the assessment’s proficiency levels.
o IREAD-3
Pass: Students demonstrate limited understanding when reading and responding to grade-level literary and informational texts. Students have difficulty identifying and comprehending new variations of word meanings and new text-based vocabulary.
Did Not Pass: Students demonstrate proficient understanding when reading and responding to grade-level literary and informational texts. Students identify and comprehend most new variations of word meaning and new text-based vocabulary.
o ILEARN U.S. Government End-of-Course Assessment
At Proficiency: At Proficiency Indiana students at proficiency have met current grade level standards by demonstrating essential knowledge, application, and analytical skills to be on track for college and career readiness.
Below Proficiency: Indiana students below proficiency have not met current grade level standards. Students may require significant support to develop the knowledge, application, and analytical skills needed to be on track for college and career readiness.
12

Online Reporting System Viewing Reports & Files
o ILEARN 3-8 and ILEARN Biology End-of-Course Assessment
Above Proficiency: Indiana students above proficiency have mastered current grade level standards by demonstrating more complex knowledge, application, and analytical skills to be on track for college and career readiness
At Proficiency: Indiana students at proficiency have met current grade level standards by demonstrating essential knowledge, application, and analytical skills to be on track for college and career readiness.
Approaching Proficiency: Indiana students approaching proficiency have nearly met current grade level standards by demonstrating some basic knowledge, application, and limited analytical skills. Students may require support to be on track for college and career readiness.
Below Proficiency: Indiana students below proficiency have not met current grade level standards. Students may require significant support to develop the knowledge, application, and analytical skills needed to be on track for college and career readiness.
Performance on the [Test Name and Details] Test by Strand: [Student Name], [Administration] (IREAD-3 only)—This table includes:
o Your student’s performance on stands within the subject area.
Strand performance is reported as raw score percent correct for the following stands:
Foundations and Vocabulary
Nonfiction
Literature
Performance on the [Test Name and Details] Test by Reporting Category: [Student Name], [Administration] (ILEARN 3-8, Biology ECA only)—This table includes:
o Your student’s performance on reporting categories within this subject area.
Reporting category performance is reported as: Below ( ), At/Near ( ), or Above ( ).
Bar charts show how your student performed on each reporting category (black bar), relative to the reporting category achievement standard (dashed white line). Green boxes show the score range that your student would likely fall within if they took the test multiple times.
13
Online Reporting System Viewing Reports & Files
Information on the Lexile Measure (ILEARN English/Language Arts only)— This text box provides a description of the Lexile measure. This text box only appears if the Lexile score is included in the Overall Performance table.
Information on the Quantile Measure (ILEARN Mathematics only)— This text box provides a description of the Quantile measure. This text box only appears if the Quantile score is included in the Overall Performance table.
Average Scale Scores on the [Test Name and Details] Test: [Entity] and Comparison Groups, [Administration] (ILEARN 3-8, Biology ECA only)—Allows you to see how your student’s scale score compares with their peers at the school, corporation, and state level.
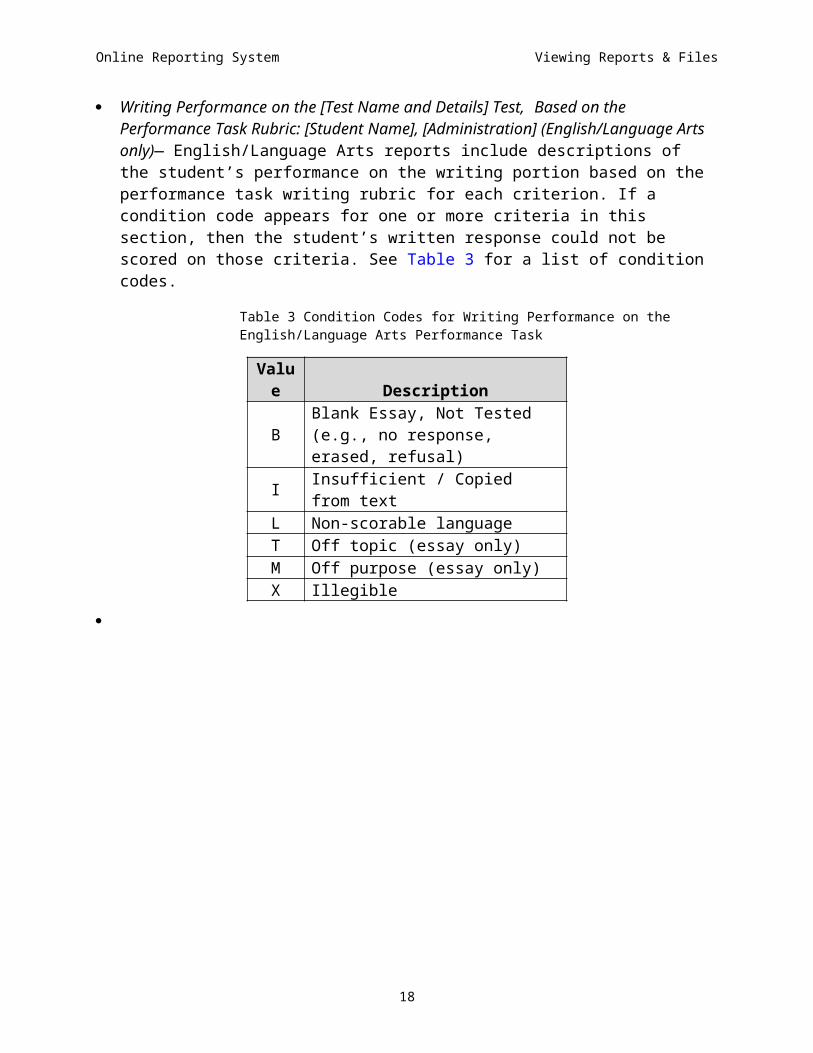
Writing Performance on the [Test Name and Details] Test, Based on the Performance Task Rubric: [Student Name], [Administration] (English/Language Arts only)— English/Language Arts reports include descriptions of the student’s performance on the writing portion based on the performance task writing rubric for each criterion. If a condition code appears for one or more criteria in this section, then the student’s written response could not be scored on those criteria. See Table 3 for a list of condition codes.
Table 3 Condition Codes for Writing Performance on the English/Language Arts Performance Task
Value Description
B Blank Essay, Not Tested (e.g., no response, erased, refusal)
I Insufficient / Copied from textL Non-scorable languageT Off topic (essay only)M Off purpose (essay only)X Illegible
14
Online Reporting System Viewing Reports & Files
Section IV. Viewing Reports & FilesThe Reports & Files feature in the ORS provides test summary statistics and allows you to retrieve student results. This section provides instructions on how to generate and view the available reports and files.
Retrieving Student ResultsYou can download student data for a selected administration by corporation, school, teacher, or roster. The data includes students’ personal information, enrolled school and corporation, grade level, and the selected test scores and reporting category/strand scores (if applicable). You can also generate PDFs of Individual Student Reports in a Zip file and in different languages. On the Printed Individual Student report, you have the option to print the PDF with an interpretive guide page before the student's report.
This section discusses the following:
Generating a Data File or PDF of Individual Student Reports
Accessing Files from the Inbox
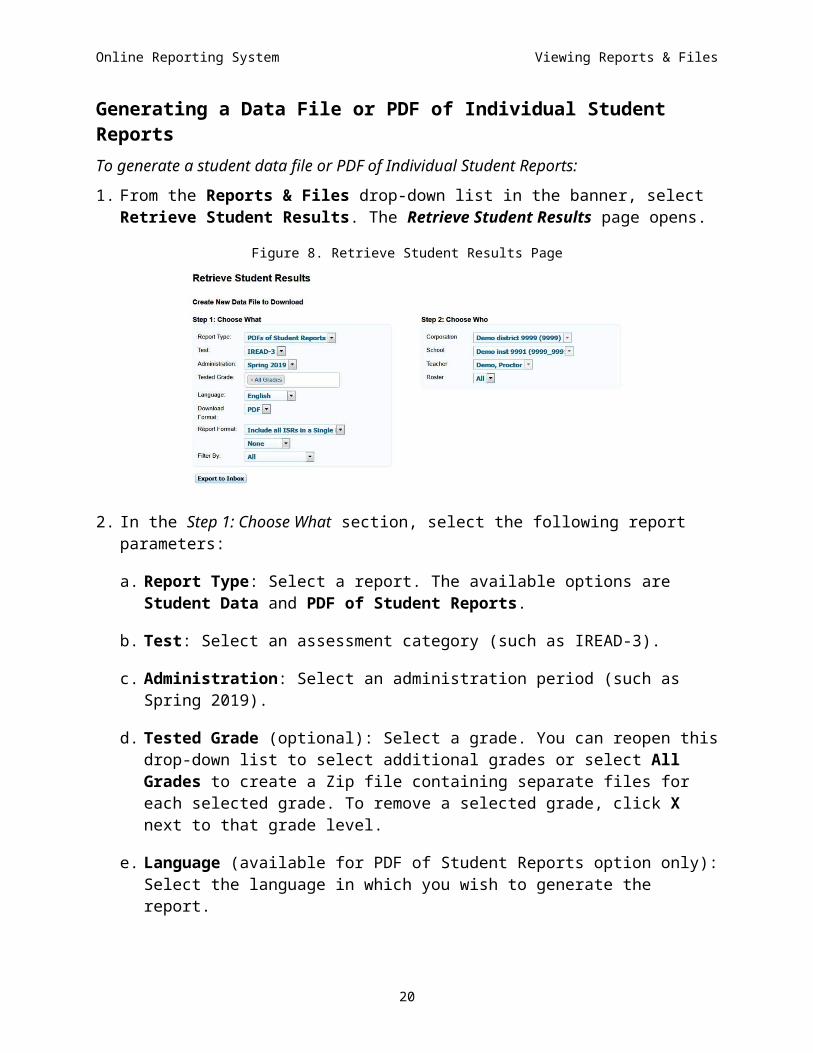
Generating a Data File or PDF of Individual Student ReportsTo generate a student data file or PDF of Individual Student Reports:
1. From the Reports & Files drop-down list in the banner, select Retrieve Student Results. The Retrieve Student Results page opens.
Figure 8. Retrieve Student Results Page
2. In the Step 1: Choose What section, select the following report parameters:
a. Report Type: Select a report. The available options are Student Data and PDF of Student Reports.
15

Online Reporting System Viewing Reports & Files
b. Test: Select an assessment category (such as IREAD-3).
c. Administration: Select an administration period (such as Spring 2019).
d. Tested Grade (optional): Select a grade. You can reopen this drop-down list to select additional grades or select All Grades to create a Zip file containing separate files for each selected grade. To remove a selected grade, click X next to that grade level.
e. Language (available for PDF of Student Reports option only): Select the language in which you wish to generate the report.
i. In addition to English, printed ISRs will be translated into Spanish for I AM tests and into Spanish, Burmese, Arabic, Mandarin, and Vietnamese for ILEARN 3-8, ILEARN Biology, and IREAD-3 tests.
f. Download Format: Select a file format from the options available for the selected report:
Student Data: The default format is an Excel (.xls) spreadsheet file. You can select a different format, such as CSV, if available.
PDF of Student Reports: A PDF file is the only available format.
Note: The PDF of Student Reports option creates a Zip file that contains individual PDFs of each ISR for all the students associated with the selected entity. It also includes a manifest, which is an Excel (csv) file listing all the PDFs included in the Zip file. If multiple schools are selected, separate zip files are created for each school.
g. Report Format (available for the PDF of Student Reports option only): You can select from the following options:
Include All ISRs in a Single PDF: A single PDF will show individual student reports organized by STN.
One PDF per ISR in a Zip File: Each PDF will show individual student reports in separate PDFs. Users will also receive excel (csv) file that shows all the PDFs that were included in the zip file.
Interpretive Guide: Parents and teachers may need guidance on understanding their student’s scores and the various elements that are included in a student report. An interpretive guide can be added to the beginning of each ISR by selecting Interpretive Guide from the dropdown.
16

Online Reporting System Viewing Reports & Files
h. Filter By (optional): Select a specific demographic subgroup.
If you select a demographic subgroup, a Values field appears. Select the required filter criteria from the available options.
3. From the Step 2: Choose Who section, select which entity or individual should be included in the report. For most users, your associated entity is pre-selected. Users associated with multiple corporations or schools must select an entity.
a. Corporation: Select a corporation, if applicable.
b. School: Select a school, if applicable. You can also select All to generate a report that includes all your schools. For the Student Data report, data for all your schools is listed in a single file. For PDFs of Student Reports, separate PDF reports are generated for each of your schools.
c. Teacher (optional): If a school was selected, choose a teacher. The default setting includes all teachers associated with the school. For teacher-level users, the school is already selected.
d. Roster (optional): If a teacher was selected, choose a roster. The default setting includes all rosters associated with the selected teacher.
4. Click Export to Inbox. A confirmation message indicates that your request has been queued and you will be informed via email once the file is ready.
5. Once the file generates, it appears in the Inbox window accessible from the banner. For more information, see the section Accessing Files from the Inbox.
Accessing Files from the InboxThe Inbox lists the student data files and reports that you generate from the Retrieve Student Results page as well as the PDFs of ISRs generated on the Student Listing Report page and Student Search Results page. Inbox files automatically expire after 30 days, unless you archive them.
Note: The Inbox also stores any file exports you create in TIDE, as well as secure files uploaded by admin users. You can also access the Inbox from the Indiana Assessment Portal (https://indiana.portal.airast.org/).
17
Online Reporting System Viewing Reports & Files
Figure 9. Inbox
To access files stored in the Inbox:
1. In the banner, click Inbox. The Inbox window opens, listing available files (see Figure 9).
2. Select a file from the available tabs:
o Inbox: Displays all the files except for those that you have archived.
o Archived: Displays files that you archived.
3. Optional: To filter the files by keyword, enter a search term in the text box above the list of files.
4. Do one of the following:
o To download a file, click the name of that file.
o To archive a file, click .
Note: You cannot archive secure documents that were uploaded to the Inbox by admin users.
18

Online Reporting System Viewing Reports & Files
Section V. Working with Student RostersRosters are groups of students associated with a teacher or other user. Rosters can represent entire classes, individual class periods, and other groups of students within a class or program. Students can belong to multiple rosters.
Rosters allow you to easily analyze aggregate data and track students’ test scores. You can use rosters to organize students into groups based on their accommodations, level of performance, and other criteria. For example, if certain students in a teacher’s class are performing below the standard, that teacher may want to create a custom remedial roster for those students who need more attention.
Note: Rosters may include students from different grades, but score reports display data only for a single subject and grade at a time. If a roster includes students from multiple grades, you will only see scores of those students in the roster who have taken the test you selected on the Homepage Dashboard.
Adding a New RosterIn order for teachers to view their students’ performance data, the students must belong to a roster associated with that teacher. Authorized users can create rosters of students associated with their school. Teachers cannot create rosters for other teachers.
Note: If a group of students has the same teacher for multiple subjects, that teacher can use the same roster to view their students’ performance in each subject. However, if different teachers teach each subject to the same student group, then separate rosters should be created for each teacher.
19
Online Reporting System Viewing Reports & Files
To add a roster:
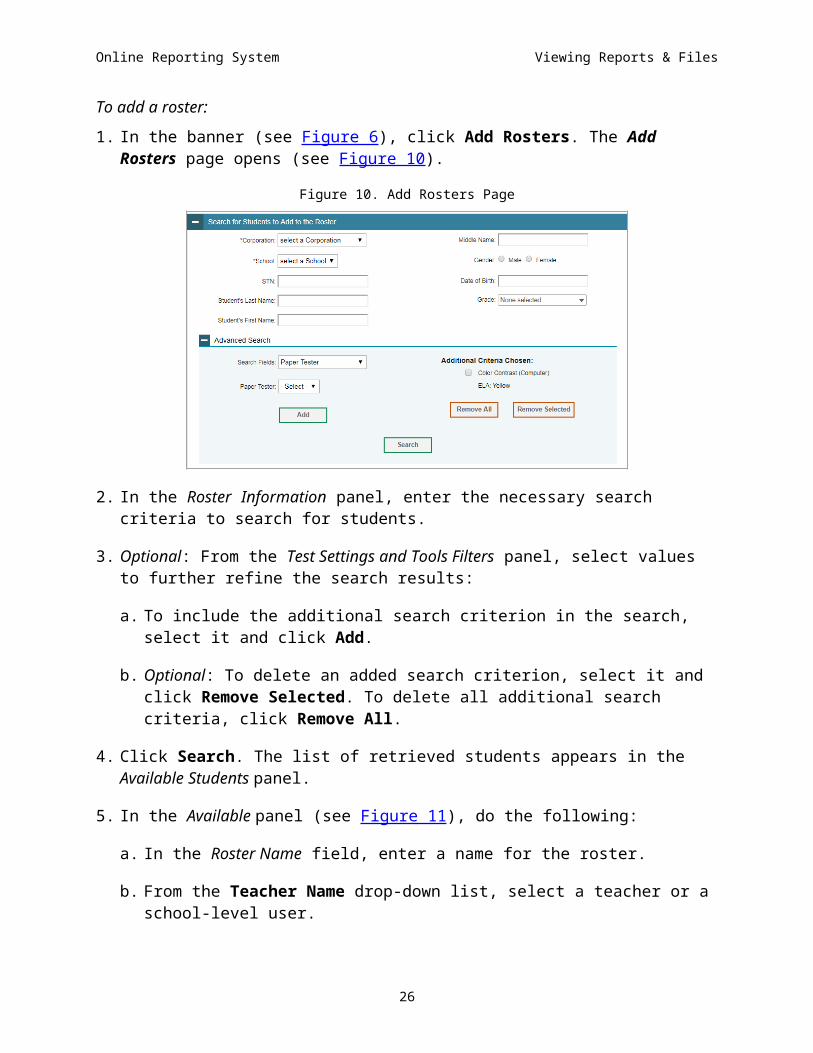
1. In the banner (see Figure 6), click Add Rosters. The Add Rosters page opens (see Figure 10).
Figure 10. Add Rosters Page
2. In the Roster Information panel, enter the necessary search criteria to search for students.
3. Optional: From the Test Settings and Tools Filters panel, select values to further refine the search results:
a. To include the additional search criterion in the search, select it and click Add.
b. Optional: To delete an added search criterion, select it and click Remove Selected. To delete all additional search criteria, click Remove All.
4. Click Search. The list of retrieved students appears in the Available Students panel.
5. In the Available panel (see Figure 11), do the following:
a. In the Roster Name field, enter a name for the roster.
b. From the Teacher Name drop-down list, select a teacher or a school-level user.
c. To add students, from the Available Students list, do one of the following:
To move one student to the roster, click for that student.
To move selected students to the roster, mark the checkboxes for the students you want to add, then click Add Selected.
20

Online Reporting System Viewing Reports & Files
To move all the students in the Available Students list to the roster, click Add All.
Figure 11. Student Roster Panels
d. To remove students from the Selected Students list, do one of the following:
To remove one student from the roster, click for the student.
To remove selected students from the roster, mark the checkboxes for the students you want to remove, then click Remove Selected.
To remove all the students from the roster, click Remove All.
6. Click Save, and in the affirmation dialog box click Continue.
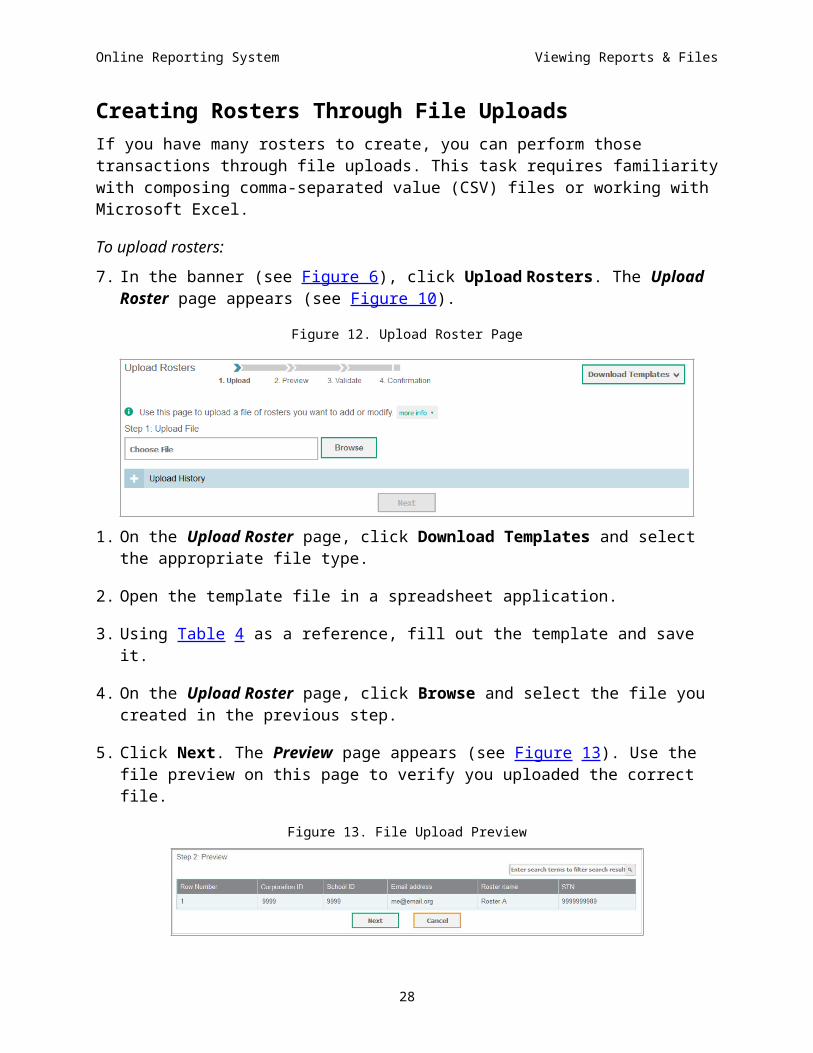
Creating Rosters Through File UploadsIf you have many rosters to create, you can perform those transactions through file uploads. This task requires familiarity with composing comma-separated value (CSV) files or working with Microsoft Excel.
To upload rosters:
1. In the banner (see Figure 6), click Upload Rosters. The Upload Roster page appears (see Figure 10).
21

Online Reporting System Viewing Reports & Files
Figure 12. Upload Roster Page
1. On the Upload Roster page, click Download Templates and select the appropriate file type.
2. Open the template file in a spreadsheet application.
3. Using Table 4 as a reference, fill out the template and save it.
4. On the Upload Roster page, click Browse and select the file you created in the previous step.
5. Click Next. The Preview page appears (see Figure 13). Use the file preview on this page to verify you uploaded the correct file.
Figure 13. File Upload Preview
6. Click Next to validate the file. Any errors ( ) or warnings ( ) are displayed on the Validate page (see Figure 14).
Note: If a record contains an error, that record will not be included in the upload. If a record contains a warning, that record will be uploaded, but the field with the warning will be invalid.
o Optional: Click the error and warning icons in the validation results to view the reason a field is invalid.
o Optional: Click Download Validation Report in the upper-right corner to view a PDF file listing the validation results for the upload file.
22

Online Reporting System Viewing Reports & Files
Figure 14. Validation Page
Note: If your file contains a large number of records, the ORS processes it offline and sends you a confirmation email when complete. While the ORS is validating the file, do not press Cancel, as ORS may have already started processing some of the records.
7. Do one of the following:
o Click Continue with Upload. The ORS commits those records that do not have errors.
o Click Upload Revised File to upload a different file. Follow the prompts on the Upload Revised File page to submit, validate, and commit the file.
The Confirmation page appears, displaying a message that summarizes how many records were committed and excluded.
8. Optional: To upload another roster file, click Upload New File.
Table 4 provides the guidelines for filling out the Roster template that you can download from the Upload Roster page.
Table 4. Columns in the Rosters Upload File
Column Name Description Valid Values
Corporation ID* Corporation associated with the roster.
Corporation ID that exists in TIDE. Up to 20 characters.
School ID* School associated with the roster.
School ID that exists in TIDE. Up to 20 characters. Must be associated with the corporation ID.
User Email ID* Email address of the teacher associated with the roster.
Email address of a teacher existing in the ORS.
23

Online Reporting System Viewing Reports & Files
Column Name Description Valid Values
Roster Name* Name of the roster. Up to 20 characters.
STN* Student’s unique identifier. Up to 30 alphanumeric characters.
*Required field.
Viewing and Modifying a RosterAuthorized users can view and modify rosters associated with their corporation or school.
To view or modify a roster:
1. From the banner (see Figure 6), click View Rosters. The View/Edit Rosters page opens (see Figure 15).
Figure 15. View/Edit Rosters Page
2. In the Search for Rosters to Edit panel, enter the necessary search criteria to search for rosters.
3. Click Search. The list of retrieved rosters appears (see Figure 16).
Figure 16. Retrieved Rosters (Partial View)
4. Optional: To filter the retrieved rosters by keyword, enter a search term in the text box above the search results and click . ORS displays only those rosters containing the entered value.
24

Online Reporting System Viewing Reports & Files
5. Click for the roster whose details you want to view. The Edit Roster pop-up window opens. The pop-up window is similar to the page used to add rosters (see Figure 10).
6. You can change the roster’s name and associated teacher as required.
7. To add students to the roster, do the following:
a. In the Roster Information panel, enter the necessary search criteria to search for students.
b. Click Search. The list of retrieved students appears in the Available Students panel.
c. From the Available Students list, do one of the following:
To move one student to the roster, click for that student.
To move selected students to the roster, mark the checkboxes for the students you want to add, then click Add Selected.
To move all the students in the Available Students list to the roster, click Add All.
8. To remove students from the roster, from the Selected Students list, do one of the following:
To remove one student from the roster, click for the student.
To remove selected students from the roster, mark the checkboxes for the students you want to remove, then click Remove Selected.
To remove all the students from the roster, click Remove All.
9. Click Save, and in the affirmation dialog box click Continue.
Deleting a RosterYou can delete a roster if required. (This feature is not available for system-generated rosters.) The roster will be deleted from ORS and TIDE. Deleting a roster will not delete the student records in that roster.
Alert: This action cannot be undone. Use caution when deleting rosters.
25
Online Reporting System Viewing Reports & Files
To delete a roster:
1. In the banner (see Figure 6), click Edit Rosters. The Edit Rosters page opens (see Figure 15).
2. In the Search for Rosters to Edit panel, enter the necessary search criteria to search for rosters.
3. Click Search. The list of retrieved rosters appears (see Figure 16).
4. Select the rosters that you wish to delete:
o Mark the checkbox next to each roster you wish to delete.
o To select all records, mark the checkbox in the header row.
5. Click above the table of retrieved rosters to delete the selected rosters.
Printing a RosterYou can print one or more rosters.
To print a roster:
1. In the banner (see Figure 6), click Edit Rosters. The Edit Rosters page opens (see Figure 15).
2. In the Search for Rosters to Edit panel, enter the necessary search criteria to search for rosters.
3. Click Search. The list of retrieved rosters appears (see Figure 16).
4. Select the rosters that you wish to print. To select rosters, do one of the following:
o Mark the checkbox next to each roster you wish to print.
o To select all records, mark the checkbox in the header row.
5. Click above the table of retrieved rosters to print the selected rosters.
26

Appendix A. Printing Reports in the ORSThe Print tool in the banner (see Figure 6) allows you to print any report available in the ORS.
Alert: The Family Educational Rights and Privacy Act (FERPA) prohibits the release of any personally identifiable information. Printed reports and exported reports that contain personally identifiable student data must be securely stored or destroyed.
Tip: Depending on the report, you may need to set your print options to landscape or horizontal mode to accommodate the various columns in the report. To preview and adjust the scale of the content, use your browser’s Print Preview feature.
To print a page:
1. From the banner, click Print. A print dialog window appears.
2. From the print dialog window, select the required print settings.
3. Print the page. The printed report will include the data displayed on the page.
27
Appendix B. User Support
For additional information and assistance in using ORS contact the AIR Help Desk.
The Help Desk is open Monday through Friday (with the exception of holidays or otherwise indicated on the Indiana Assessment Portal). Help Desk hours are as follows:
8 a.m. to 6 p.m. ET (7 a.m. to 5 p.m. CT) throughout the school year
7 a.m. to 7 p.m. ET (6 a.m. to 6 p.m. CT) during test administration windows
Indiana Assessment Help Desk
Toll-Free Phone: 1.866.298.4256
Email: [email protected]
Chat: https://indiana.portal.airast.org/chat.stml
Please provide the Help Desk with a detailed description of your problem, as well as the following:
If the issue pertains to a student, provide the STN and associated corporation or school for that student. Do not provide the student’s name.
If the issue pertains to a TIDE user, provide the user’s full name and email address.
Any error messages that appeared.
Operating system and browser information, including version numbers (e.g., Windows 7 and Firefox 13 or Mac OS 10.7 and Safari 5).
28

Change LogLocation Change Date
29