online training for csps brochure - march networks
TRANSCRIPT

Online Training for Certified PartnersMarch Networks’ online training provides our certified solution partners (CSPs) with the knowledge required to install, operate and maintain our industry-leading March Networks® Command™ product families, as well as our peripheral devices for IP video surveillance. All authorized dealers may access our Learning Management System (LMS) to get started with either learning tracks, certifications, courses or simply to view individual product videos on their computers or mobile devices.

2
Command Recording Server Basic ConfigurationTarget Audience: Technicians, System Administrators or IT personnel who must install and provide basic configuration of the Command Recording Server (CRS).Products: Command Recording Server, Command Config, Command ClientPre-Requisite: NoneDuration: ~2.5 HoursExam: YesCEC: Qualifies for BICSI continuing education creditsTasks Covered:Getting Started with Command Recording Server
• Introduction to Command Recording Server• Installing Command Professional• Using the Command Management Console• Accessing Command Config• Licensing the Command Recording Server• Upgrading an existing Command Recording Server
Configuring the CRS: The Minimum Needed to Record• Using the Configuration Wizard to set up the CRS• Configuring storage on the CRS• Configuring cameras• Configuring recording schedules• Creating scheduler sectors
Configuring the CRS: Basic Configuration• Configuring new user accounts• Configuring alarms• Configuring to record on condition• Creating custom conditions• Importing and exporting CRS configuration files
Validating the CRS Install using Command Client• Accessing Command Client for the CRS and 8000 Series NVR
in Command 2.0• Understanding the Command Client interface• Viewing live video• Searching and viewing archived video• Saving log files
Command Recording Server Advanced ConfigurationTarget Audience: Technicians and System Administrators who are interested in the advanced configuration of a Command Recording Server.Products: Command Recording Server, Command ConfigPre-Requisite: Command Recording Server Basic Configuration (recommended)Duration: ~ 2 HoursExam: YesCEC: Qualifies for BICSI continuing education creditsTasks Covered:User Management
• Duplicating user accounts• Applying user account specific conditions• Managing user sessions
Advanced Camera Configuration• Applying privacy patches• Adding compression encoders• Enabling shadow archiving• Creating preset views and preset tours• Creating PTZ tours
Device Configuration• Configuring recorder schedules• Creating and maintaining scheduler sectors• Defining alarm actions• Adding switches• Adding audio channels• Enabling talk channels• Creating custom recording conditions
System Configuration and Management• Configuring your CRS system settings• Updating the CRS software
March Networks Command Available Certifications

3
Command Enterprise ConfigurationTarget Audience: Technicians and System Administrators who must install and maintain a Command Enterprise solution.Products: Command Enterprise, Command Client, Command Recording ServersPre-Requisite: Windows Server Operating SystemDuration: ~ 2 HoursExam: YesCEC: Qualifies for BICSI continuing education creditsTasks Covered:Getting Started with Command Enterprise
• Introduction to Command Enterprise• Installing Command Enterprise• Accessing Command Client for the CES in Command 1.11
and Under• Accessing Command Client for the CES in Command 2.0• Licensing Command Enterprise• Registering devices to Command Enterprise• Managing device licenses• Managing resources
Managing Users in Command Enterprise• Creating user profiles• Adding local users• Adding users from LDAP
Configuring and Managing Devices in Command Enterprise• Managing and configuring recording devices• Importing and exporting device configurations• Applying firmware updates to devices• Using firmware target releases• Marking devices for replacement• Applying scheduled firmware updates
Monitoring System Health• Using the System Overview• Using health alert thresholds• Setting up email notifications for health issues• Accessing CES logs and backing up your CES and Media
Archiver
Command Client ConfigurationTarget Audience: Users who must monitor or maintain a Command-based security system. Technicians who wish to familiarize themselves further with the Command Client functionality.Products: Command ClientPre-Requisite: NoneDuration: ~ 2.5 HoursExam: YesCEC: Qualifies for BICSI continuing education creditsTasks Covered:Getting Started with Command Client
• Accessing Command Client• Accessing Command Client for the CES• Accessing Command Client in Command 1.11 and under• Understanding the Command Client interface• Setting Command Client preferences• Configuring Video Settings in for your Client• Managing resources and working with devices• Creating folders and views• Extending your workspace with floating tabs
Managing Video in Command Client• Viewing live video• Managing video channels• Configuring text overlay• Setting a zoom level as a default view• Managing PTZ dome cameras• Searching and viewing archive video• Synchronizing video grids during playback• Using smart search
Exporting Video in Command Client• Exporting video and images• Exporting video evidence to CDs and DVDs• Exporting video evidence into case files• Exporting video archives into Native Format• Exporting to a remote USB • Using the Command Player
Managing Alarms in Command Client• Managing alarms• Using the Alarms Dashboard• Adding alarm details to alarms
Managing Resources in Command Client• Monitoring the health of the CRS• Managing switches and talk channels• Working with maps• Saving log files

4
March Networks Searchlight™ for Retail and Searchlight for BankingTarget Audience: Sales engineers, Technicians or IT personnel with Windows server OS experience that must install and configure Searchlight for Retail or Banking.Products: Searchlight for Retail/BankingPre-Requisite: Command Enterprise Certification (recommended), Windows Server Operating SystemDuration: ~ 3 HoursExam: YesCEC: NoTasks Covered:Searchlight Installation and Configuration Course
Software Installation• Reviewing the applications to be installed, and their location• Installing the software• Starting and stopping the Searchlight application
Software Licensing• Obtaining licenses• Obtaining the CES Server ID• Generating a license• Understanding the license file type• Knowing which components require a license• Licensing each Site
Software Configuration• Adding the Media Archiver to CES• Configuring the Image Archiver• Adding a site to CES• Adding a POS or ATM/Teller to your site• Adding devices under a site and under a POS/ATM/Teller• Adding a camera for Operations Audits and Business Analytics• Associating an alarm with a site, POS, ATM or teller• Creating Operations Audit zones or time intervals, per camera• Adding Searchlight rights to a CES user• Viewing the rights of each pre-defined Searchlight user• Setting email account info in Searchlight• Setting the overall Searchlight timetable for analytics data
and charts
Searchlight Reports and Audits Configuration Course
Accessing Searchlight• Connecting to CES• Launching the Searchlight application from CES• Setting a default page from the Searchlight main menu
Configuring Transaction Reports• Using default reports to create and save new reports• Customizing the transaction report view• Displaying, hiding, renaming and re-positioning columns• Using filters to manipulate data• Creating different business rules
Using Transactions Summary Dashboards• Adding a report and column to the Transactions Summary
page• Selecting data to appear in the chart panel• Using summary data to filter within transaction report area
Using Transaction Reports• Running a report on a specific date or date range• Playing the transaction’s associated video• Adding case notes• Exporting a case using case management feature• Reviewing a case within the Command Player software• Exporting a transaction report in .csv format
Using Audits• Running the Operation audit for a specific day• Running the Security audit for a specific day• Reviewing items found within the Security audit report.• Exporting an audit report in csv format

5

6
8000 Series Hybrid NVR Target Audience: Technicians who must install and place 8000 Series NVRs on the network before turning them over to a System Administrator.Products: 8000 Series NVRs and NVR’s Provisioning InterfacePre-Requisite: Basic IP networking skills, CCTV knowledge, Windows Operating System familiarity.Duration: ~ 3 HoursExam: YesCEC: Qualifies for BICSI continuing education creditsTasks Covered:Introduction to the Product Suite Course
• Identify the purpose of each software in the suite• Identify the software required for each user based on their
tasks
Recorder Available Models, Mounting and Front Panel LEDs• Identify NVR models and relate them to their respective frame
rates• Identify NVR models and relate them to number of supported
channels• Rack mount NVRs using proper clearances above and below
each unit• Identify correct temperature range within installation area
Recognize normal operation LED pattern• Identify LED group responsible in indicating powering up or
down• Recognize the two LED colors responsible for Health Alert
types Recognize LED or LED group responsible for local data extraction via USB
Identifying External Components and Connecting Peripherals• Connect Analog Cameras to a recorder’s BNC input• Connect IP Cameras to the appropriate port on an NVR• Identify Fuse location on 16 analog channel units• Identify each connector at the rear of NVRs or NVR’s Docking
Station• Identify functionality of the front panel Key Switch on the
16/32 channel recorders• Understand advantages of using an NVR’s IP Camera
Networks Interface
Identifying, Troubleshooting and Replacing Internal Components• Take anti-static measures before working on NVR • Identify the type of hard drive used within each NVR (2.5 or
3.5, PATA or SATA) • Replace a hard drive • Identify the functionality of internal components (fans, NiCad
and Lithium battery) • Identify which components are field replaceable • Identify which Operating System is used on all 8000 Series
Provisioning Interface• Identify the type of software to use to connect to the
Provisioning Interface• Log on to the provisioning interface using appropriate user
account• Set/Showip command• Set/Showdisk command• Set/Showports command• Testnet command • Set/Showces command • Set/Showpass command• Set/Showces command• Set/Showpass command
Visual Intelligence 9000 Series IP Recorder Initial SetupTarget Audience: Technicians who must install and place 9000 Series IP Recorders on the network before turning them over to a System Administrator.Time to Complete: ~ 1.5 HoursProducts Covered: 9000 Series IP RecordersPrerequisite: Basic IP networking skills, CCTV knowledge, Windows Operating System familiarity. Exam: YesCEC: NoTasks Covered:Introduction to the Product Suite Course
• Identify the purpose of each software in the suite• Identify the software required for each user based on their
tasks
Recorder Models and Mounting• Identify NVR models and relate them to number of supported
channels• Identify which Operating System is used on all 9000 Series• Identify available connectors on rear panel• Rack mount NVRs using the provided rails• Identify correct temperature range within installation area• Identify process to add peripherals to recorder (alarms, relay
outputs, etc)
Making Connections, LEDs and Turning on your Recorder• Recognize normal operation LED pattern• Identify LED group responsible in indicating powering up or
down• Recognize the two LED colors responsible for Health Alert
types Recognize LED or LED group responsible for local data extraction via USB
• Connect IP Cameras to the appropriate port on an NVR• Turn on the recorder
Recorders and Visual Intelligence Available Online Certifications
7
Identifying and Replacing Internal Components• Shut down the recorder properly • Taking anti-static measures before working on NVR • Identify the type of hard drive used within each NVR (2.5 or
3.5, PATA or SATA) • Replace a hard drive Identify the functionality of internal
components (fans, NiCad)
Adding IP Devices to your 9000 Series Recorder• Add IP devices using Admin Console and Discovery Browser
integration• Configure the camera network interface with an IP address
Using the Provisioning Interface on your 9000 Series Recorder• Identify the type of software to use to connect to the
Provisioning Interface• Log on to the provisioning interface using appropriate user
account• Set/Showip command• Set/Showdisk command• Set/Showports command• Set/Showces command • Set/Showpass command• Set/Showsecure command • Set/Showagentports command
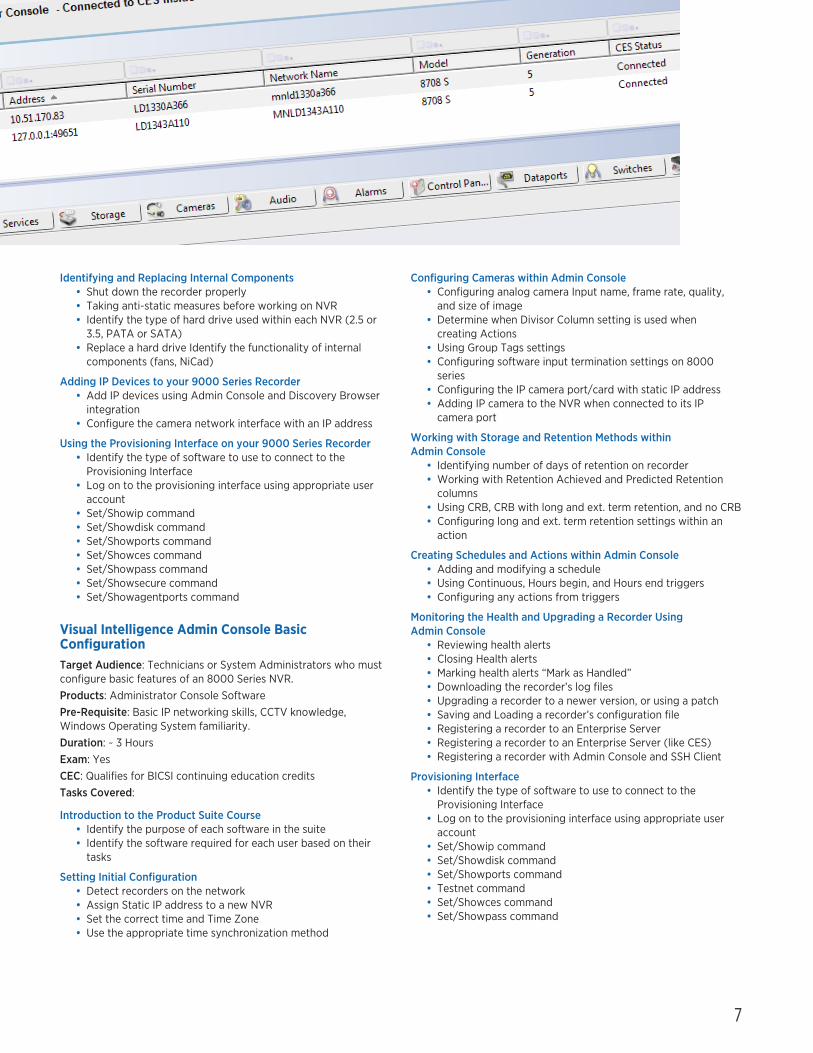
Visual Intelligence Admin Console Basic ConfigurationTarget Audience: Technicians or System Administrators who must configure basic features of an 8000 Series NVR.Products: Administrator Console SoftwarePre-Requisite: Basic IP networking skills, CCTV knowledge, Windows Operating System familiarity.Duration: ~ 3 HoursExam: YesCEC: Qualifies for BICSI continuing education creditsTasks Covered:
Introduction to the Product Suite Course• Identify the purpose of each software in the suite• Identify the software required for each user based on their
tasks
Setting Initial Configuration• Detect recorders on the network• Assign Static IP address to a new NVR• Set the correct time and Time Zone• Use the appropriate time synchronization method
Configuring Cameras within Admin Console• Configuring analog camera Input name, frame rate, quality,
and size of image• Determine when Divisor Column setting is used when
creating Actions• Using Group Tags settings • Configuring software input termination settings on 8000
series• Configuring the IP camera port/card with static IP address• Adding IP camera to the NVR when connected to its IP
camera port
Working with Storage and Retention Methods within Admin Console
• Identifying number of days of retention on recorder• Working with Retention Achieved and Predicted Retention
columns• Using CRB, CRB with long and ext. term retention, and no CRB• Configuring long and ext. term retention settings within an
action
Creating Schedules and Actions within Admin Console• Adding and modifying a schedule• Using Continuous, Hours begin, and Hours end triggers• Configuring any actions from triggers
Monitoring the Health and Upgrading a Recorder Using Admin Console
• Reviewing health alerts• Closing Health alerts• Marking health alerts “Mark as Handled”• Downloading the recorder’s log files• Upgrading a recorder to a newer version, or using a patch• Saving and Loading a recorder’s configuration file• Registering a recorder to an Enterprise Server• Registering a recorder to an Enterprise Server (like CES)• Registering a recorder with Admin Console and SSH Client
Provisioning Interface• Identify the type of software to use to connect to the
Provisioning Interface• Log on to the provisioning interface using appropriate user
account• Set/Showip command• Set/Showdisk command• Set/Showports command• Testnet command• Set/Showces command• Set/Showpass command

8
Visual Intelligence Available Online CertificationsVisual Intelligence Admin Console Advanced ConfigurationTarget Audience: Technicians or System Administrators who must configure the advanced features of an 8000 Series NVR, e.g., alarms and switches, PTZ, text capture devices, public view outputs, motion detection, and much more.Products: Administrator Console SoftwarePre-Requisite: Administrator Console Basic ConfigurationDuration: ~ 2 HoursExam: YesCEC: Qualifies for BICSI continuing education creditsTasks Covered:Configuring Auxiliary Devices
• Configuring the settings of alarm inputs• Configuring the settings of switch outputs• Configuring the settings of audio inputs and outputs• Configuring the settings of data ports (text capture)• Configuring automatic copying of evidence to external media• Configuring the public view outputs with sequences
Configuring Video Motion Detection on analog cameras• Reviewing the 45 seconds of inactivity before a motion reset• Configuring motion detection 24hrs a day or using a schedule• Using the motion activity mask and sensitivity settings• Retaining evidence using motion detection as a trigger
Managing Recorders• Organizing the list of recorders within the Device Selector• Setting bandwidth limit on a recorder, either manually or via a
schedule• Excluding users from a recorder’s bandwidth limit• Generating a recorder audit report• Using the IP tunneling to reach a device on the IP camera
network• Using the troubleshooting tools in various situations
Visual Intelligence LMC and EMI ClientsTarget Audience: Technicians and System Administrators who must provide training to end users (e.g., guards and investigators) on how to use the specific client software.Products: Live Monitoring Console, Evidence Manager and Investigator, Evidence Reviewer SoftwarePre-Requisite: NoneDuration: ~ 1.5 HoursExam: YesCEC: Qualifies for BICSI continuing education creditsTasks Covered:Using Live Monitoring Console Software Features
• Importing the recorder listing file• Logging on to ESM using LMC• Enabling the different menu bars within LMC• Displaying live video within grids and manipulating video cells• Using the timeline and its two buffers• Using direct and buffered archive search playback• Taking control and moving a PTZ camera• Controlling two-way audio and turning on and off switches• Enabling the alarm monitoring• Working with the alarm inbox• Responding, suspending and closing alarms• Using the “pin a cell” feature
Using Investigator and Evidence Manager Software Features• Importing the recorder listing file• Logging on to ESM using Investigator software• Performing a “Quick Investigation” using Investigator software• Burning media• Using the thumbnail feature in Investigator• Using the Video Activities Data Histograms to locate motion• Searching for physical alarms using Investigator• Using the Activity Scan search type in Investigator• Queuing evidence on the recorder and copying it to a USB
media device• Performing a “Full Investigation” using Evidence Manager• Downloading from multiple cameras simultaneously• Transferring searches from Investigator to Evidence Manager• Synchronizing all the videos during playback• Adding case notes and linking them to the video• Burning the entire case to CD/DVD• Reviewing the CD/DVD contents to validate the burning• Authenticating the video• Reviewing evidence using the Evidence Reviewer software
9
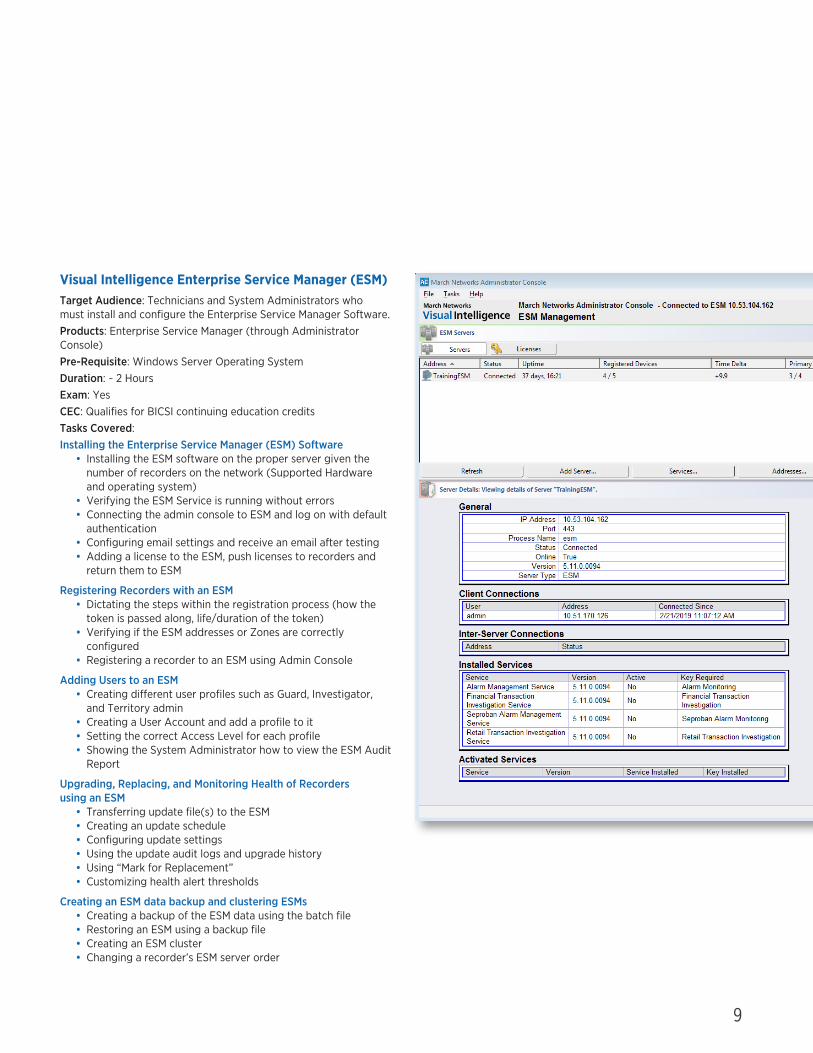
Visual Intelligence Enterprise Service Manager (ESM)Target Audience: Technicians and System Administrators who must install and configure the Enterprise Service Manager Software.Products: Enterprise Service Manager (through Administrator Console)Pre-Requisite: Windows Server Operating SystemDuration: ~ 2 HoursExam: YesCEC: Qualifies for BICSI continuing education creditsTasks Covered:Installing the Enterprise Service Manager (ESM) Software
• Installing the ESM software on the proper server given the number of recorders on the network (Supported Hardware and operating system)
• Verifying the ESM Service is running without errors• Connecting the admin console to ESM and log on with default
authentication• Configuring email settings and receive an email after testing• Adding a license to the ESM, push licenses to recorders and
return them to ESM
Registering Recorders with an ESM• Dictating the steps within the registration process (how the
token is passed along, life/duration of the token)• Verifying if the ESM addresses or Zones are correctly
configured• Registering a recorder to an ESM using Admin Console
Adding Users to an ESM• Creating different user profiles such as Guard, Investigator,
and Territory admin• Creating a User Account and add a profile to it• Setting the correct Access Level for each profile• Showing the System Administrator how to view the ESM Audit
Report
Upgrading, Replacing, and Monitoring Health of Recorders using an ESM
• Transferring update file(s) to the ESM• Creating an update schedule• Configuring update settings• Using the update audit logs and upgrade history• Using “Mark for Replacement”• Customizing health alert thresholds
Creating an ESM data backup and clustering ESMs• Creating a backup of the ESM data using the batch file• Restoring an ESM using a backup file• Creating an ESM cluster• Changing a recorder’s ESM server order

10
Edge Devices Available Online CertificationsMarch Networks Edge DevicesTarget Audience: Technicians who must install and configure March Networks IP cameras and encoders.Products: March Networks IP cameras and encodersPre-Requisite: Administrator Console Basic ConfigurationDuration: ~ 2.5 HoursExam: YesCEC: Qualifies for BICSI continuing education creditsTasks Covered:Introduction to IP Cameras and Encoders
• Identify the functionality of an IP camera’s feature (P-Iris, TDN, WDR, etc.)
• Identify the IP camera families within the March Edge devices portfolio
• Identify the different mounts available for March IP cameras• Identify the URL to use to configure March IP cameras based
on firmware• Identify the default login to use on March IP cameras• Identify the different types of available resolution (CIF, 4CIF,
D1, 1080P, etc)
Working with IP Devices• Identify the minimum equipment/tools needed to service
IP cameras• Adjust the Field of View of a dome camera • Connect to a camera back-to-back using a PoE injector • Use the March Networks Discovery Browser 4.0 to detect
IP devices• Identify the main functionality of the Discovery Browser 4.0
Before adding an IP Device to a Recording Device• Configure minimum Edge OS device settings before adding
to a recording device• Configure minimum Command Edge device settings before
adding to a recording device• Configure minimum Command Edge II device settings before
adding to recording device
Configuring Motion Detection on an IP DeviceConfigure motion detection on the following March Networks devices running:
• Edge OS firmware• Command Edge firmware• Command Edge II firmware

11
Sales Training Available Online CertificationsCommand Solution and Searchlight Sales TrainingTarget Audience: CSP Sales Managers and Sales Engineers who need to know the benefits of the March Networks portfolio.Products: Recorders, IP Peripherals, Command Product Suite, Searchlight for Banking and RetailPre-Requisite: NoneDuration: ~ 2 HoursExam: YesCEC: NoTasks Covered:
• Market strategy• An introduction to the 8000 Series recorders• An introduction to the banking and retail sectors• Command solution in retail• ME4/SE2 Series overview• Complete view of your business with Searchlight
Other Available Online TrainingCertifications
• 6700 Series NVR Initial Setup Certification• RideSafe (Mobile NVRs) Certifications
CoursesSeveral courses, varying in length from 5 min to 45 min, are also available on a number of additional products and topics, such as:
• Oncam Evolution cameras• 8724 V Tribrid NVR• 8000 and 9000 Series RAID recorders• GURU Smartphone App • Command Mobile smartphone app• Command Center• NAT Traversal communications• Using Local Control on a recorder• Using Provisioning Interface commands on your recorders• Product hardening• And much more.

About March NetworksMarch Networks® helps organizations transform video into business intelligence through the integration of surveillance video, analytics, and data from business systems and IoT devices. Companies worldwide use our software solutions to improve efficiency and compliance, reduce losses and risk, enhance customer service and compete more successfully. With deep roots in video security and networking, March Networks is also recognized as the leader in scalable, enterprise-class video management and hosted services. We are proud to work with many of the world’s largest financial institutions, retail brands, cannabis operators and transit authorities, and to deliver our software and systems through an extensive distribution and partner network in more than 70 countries. Founded in 2000, March Networks is headquartered in Ottawa, Ontario, Canada. For more information, please visit marchnetworks.com.
Contact InformationTo find out more about March Networks training services and schedules, please contact us at [email protected], +1.613.591.8181 x5726, or visit our Partner Portal at: https://partners.marchnetworks.com (available to registered users)
North America . . . . . . . . . . . . . . . . . . . . . 1 800 563 5564Latin America . . . . . . . . . . . . . . . . . . . . . +5255 5259 9511Europe . . . . . . . . . . . . . . . . . . . . . . . . . . . . +39 0362 17935Asia . . . . . . . . . . . . . . . . . . . . . . . . . . . . . . . . +65 6818 0963Australia and New Zealand . . . . . . . . .+61 1300 089 419Middle East and Africa . . . . . . . . . . . . . .+971 4 399 5525
© 2019 March Networks. All rights reserved. Information in this document is subject
to change without notice. MARCH NETWORKS, March Networks Command, March
Networks Searchlight, March Networks RideSafe, and the MARCH NETWORKS logo are
trademarks of March Networks Corporation. All other trademarks are the property of
their respective owners. 060-3045-00-G marchnetworks.com
Activate skills and experience with AcceleratorAccelerator is the heartbeat of the March Networks Learning Management System (LMS), where installers and technicians can take pride in accomplishments while building intelligence and expertise on March Networks products and solutions. Points and special badges are earned for every successful certification as well as for reaching certain milestones with installations of our products.
Earn badges on Accelerator and show them proudlyAs you complete certifications, watch training videos or read documents, the LMS records the effort and awards the appropriate badge upon completion of a series of activities. Another way to earn badges is to scan the QR code on our 8000 Series Hybrid NVRs with our GURU Smartphone app upon installation. With every NVR installed, points are earned and appropriate badges are awarded as experience increases. Badges and points are displayed on the Learning Management System on your individual profile page, and can be shared via social media if desired.
Now it’s easy to demonstrate skill and expertise with March Networks solutions. Enjoy some competitive spirit with colleagues and installers worldwide by keeping an eye on the Leaderboard to see rankings globally and within the company.
CERTIFICATIONS8000 Series Hybrid NVRCommand EnterpriseEdge Devices
INSTALLERINSTALLER
INSTALLERINSTALLER
INSTALLER
INSTALLERINSTALLER
INSTALLERINSTALLERINSTALLER
INSTALLERINSTALLERINSTALLER
INSTALLER
INSTALLER
CERTIFICATION
CERTIFICATIO
N
CERTIFICATION
CERT
IFICATION
Admin Console
CERTIFICATION
CERTIFICATIO
N
CERTIFICATION
CERT
IFICATION
CommandEnterprise
CERTIFICATION
CERTIFICATIO
N
CERTIFICATION
CERT
IFICATION
Edge Devices
CERTIFICATION
CERTIFICATIO
N
CERTIFICATION
CERT
IFICATION
Command SalesTraining
CERTIFICATION
CERTIFICATIO
N
CERTIFICATION
CERT
IFICATION
8000 Series
ACTIVITY POINTS AWARDED
Passing an Exam Exam score out of 100 into points (75 and above)
Scanning an NVR 50
Completing a Challenge 30
Watching a Video 5
Watching a Presentation/Tutorial 5
Reading a Training Document 3
Examples
NVR InstallationsFirst install: Apprentice15th install: Warrior40th install: Master Installer
and more badges available