oracle rac with asm - ibm - united states · pdf fileunofficial documentation (ibm internal)...
TRANSCRIPT

Unofficial documentation (IBM Internal) 1/53 IBM Oracle Center (IOC)
Oracle RAC with ASM
IBM Systems and Technology Group IBM Oracle Center
march 2012

Unofficial documentation (IBM Internal) 2/53 IBM Oracle Center (IOC)
I. Table of Contents
I. TABLE OF CONTENTS........................................................................................................................... 2
1 CHANGE HISTORY................................................................. ERROR! BOOKMARK NOT DEFINED.
2 ORACLE 11GR2 RAC BINARIES INSTALLATION........................................................................... 5
2.1 SET PERMISSIONS TO ORACLE USER ........................................................................................................ 5 2.2 START INSTALLATION AS ORACLE USER ................................................................................................. 7
3 ORACLE DATABASE 11GR2 CREATION ......................................................................................... 18
3.1 ORACLE DATABASE LISTENER CONFIGURATION ................................................................................ 18
4 CREATING ORACLE 11GR2 DATABASE ......................................................................................... 25
5 POST INSTALL OPERATIONS (DBCONSOLE, SCAN, LISTENERS,) ......................................... 38
5.1 CHECKING ORACLE GRID AGENT......................................................................................................... 38 5.2 CHECKING DBCONSOLE ........................................................................................................................ 39 1.1 SCAN, LISTENERS AND TNSNAMES CONFIGURATION .......................................................................... 44 1. GETTING BACK TO DBCONTROL............................................................................................................. 52

Unofficial documentation (IBM Internal) 3/53 IBM Oracle Center (IOC)
II. INFORMATION
Authors - - - - - - - - - - - - - - - - - - - - - - - - - - - - - - - - - - - - - - - - - - - - - - - - - - - - - - - - - - François Martin [IBM] – IT Specialist Claire NOIRAULT – Senior Specialist - - - - - - - - - - - - - - - - - - - - - - - - - - - - - - - - - - - - - - - - - - - - - - - - - - - - - - - - - - - Email address - - - - - - - - - - - - - - - - - - - - - - - - - - - - - - - - - - - - - - - - - - - - - - - - - - - - - - - - - [email protected] - - - - - - - - - - - - - - - - - - - - - - - - - - - - - - - - - - - - - - - - - - - - - - - - - - - - - - - - - - - Abstract - - - - - - - - - - - - - - - - - - - - - - - - - - - - - - - - - - - - - - - - - - - - - - - - - - - - - - - - - - This document is designed to help reader to implement Oracle 11gR2 Grid Infrastructure on IBM Power System running AIX 7 - - - - - - - - - - - - - - - - - - - - - - - - - - - - - - - - - - - - - - - - - - - - - - - - - - - - - - - - - - Version 1.0.0 - - - - - - - - - - - - - - - - - - - - - - - - - - - - - - - - - - - - - - - - - - - - - - - - - - - - - - - - - - - Contacts - - - - - - - - - - - - - - - - - - - - - - - - - - - - - - - - - - - - - - - - - - - - - - - - - - - - - - - - - - - IBM Oracle Center (Montpellier- France) - - - - - - - - - - - - - - - - - - - - - - - - - - - - - - - - - - - - - - - - - - - - - - - - - - - - - - - - - - - Change history
The demo described in this document was implemented in October 2010.
We applied the Oracle & IBM recommendations that we have defined for hundred of customers, based on our experience of architecture, IBM Power systems, AIX, PowerVM Virtualization and Oracle clusterware and database components.
Version Date Editor Reviewers Editing description
1.0 03/31/2011 Martin François
NOIRAULT Claire

Unofficial documentation (IBM Internal) 4/53 IBM Oracle Center (IOC)
III. Notice
This document is based on our experiences. This is not an official (IBM) documentation. This document will be constantly updated
and we’re open to any add-on or feedback from your own experiences!
This document is presented “As-Is” and IBM does not assume responsibility for the statements expressed herein. All statements regarding IBM’s future direction and intent are subject to change or withdrawal without notice, represent goals and objectives only. Contact your local IBM office or IBM authorized reseller for the full text of a specific Statement of General Direction. Any performance data contained herein was determined in a controlled environment. Therefore, the results obtained in other operating environments may vary significantly. Some measurements quoted in this document may have been made on development-level systems. There is no guarantee these measurements will be the same on generally available systems. Some measurements quoted in this document may have been estimated through extrapolation. Actual results may vary. Users of this document should verify the applicable data for their specific environment. The information contained in this paper resulted fr om:
• Oracle and IBM documentations • Experiences done in the IBM Oracle Center
Information in this document concerning non-IBM products was obtained from the suppliers of these products, published announcement material or other publicly available sources. IBM has not tested these products and cannot confirm the accuracy of performance, compatibility or any other claims related to non-IBM products. Questions on the capabilities of non-IBM products should be addressed to the suppliers of these products. Your comments are important for us, and we thank th e ones who send us their feedback about how this document did help them in their implementation . We want our technical papers to be as helpful as possible.

Unofficial documentation (IBM Internal) 5/53 IBM Oracle Center (IOC)
1 Oracle 11gR2 RAC Binaries Installation
Before installing RAC binaries, you must prepare your environnement.
1.1 Set permissions to oracle user
You can remove any currently unused modules in kernel and library memory.The slibclean command also removes object files that are no longer used from both the shared library region and in the shared library and kernel text regions by removing object files that are no longer required.
1 On all nodes (demo1, demo2) as root user, execute the following request :
{icc-118a:root}/ # slibclean {icc-119a:root}/ # slibclean {icc-120a:root}/ # slibclean
2 From one node (demo1), as root user:
{icc-118a:root}/ # DISPLAY=icc-118a:1;export DISPLA Y {icc-118a:root}/ # xhost + access control disabled, clients can connect from a ny host {icc-118a:root}/ # Change permissions to allow oracle user to have write access in Oracle Directories. Some of those directories may not exist on demo2 because no Oracle Tools have been run on the node. In this case, we have to create manually the directories and attribute the right permissions.
3 From demo1, as grid user, set permissions to oracle user: { icc-118a:root}/oracle/app/grid # su - grid $ chmod -R g+w /oracle/app/grid/cfgtoollogs $ ls -la /oracle/app/grid/cfgtoollogs total 0 drwxr-xr-x 3 grid oinstall 256 Jul 20 13:50 . drwxr-xr-x 5 grid oinstall 256 Jul 20 13:50 .. drwxr-xr-x 2 grid oinstall 256 Jul 20 13:50 netca $ $ chmod -R g+w /oracle/app/grid/checkpoints $ $ ls -la /oracle/app/grid total 0 total 0 drwxr-xr-x 5 grid oinstall 256 Jul 20 13:50 . drwxr-xr-x 6 root oinstall 256 Jul 20 12:03 .. drwxr-xr-x 3 grid oinstall 256 Jul 20 13:50 cfgtoollogs drwxr-xr-x 2 grid oinstall 256 Jul 20 13:51 checkpoints drwxrwxr-x 3 grid oinstall 256 Jul 20 13:50 diag $
4 Create missing directories and set permissions on demo2. {demo1:root}/oracle/app/grid # su - grid $ id uid=1100(grid) gid=1000(oinstall) groups=1100(asmadmin),1200(dba),1201(oper),1300(asm dba),1301(asmoper) $ $ for node in demo2 > do > ssh $node mkdir -p /oracle/app/grid/cfgtoollogs > ssh $node mkdir -p /oracle/app/grid/checkpoints > ssh $node chmod -R g+w /oracle/app/grid/cfgtoollogs > ssh $node chmod -R g+w /oracle/app/grid/checkpoints > ssh $node ls -la /oracle/app/grid/c* > done

Unofficial documentation (IBM Internal) 6/53 IBM Oracle Center (IOC)
5 Update oracle user .profile file on each node :
{node1:root}/ # su - oracle $ ls -las total 4 drwxr-xr-x 2 oracle oinstall 512 Jun 28 12:21 . drwxr-xr-x 8 bin bin 512 Jun 30 02:56 .. -rwxr----- 1 oracle oinstall 254 Jun 28 12:14 .profile -rw------- 1 oracle oinstall 20 Jun 30 10:24 .sh_history $ $ vi .profile $ ADD the folowing lines : --------------------------------------------------- --- # Oracle Settings AIXTHREAD_SCOPE=S; export AIXTHREAD_SCOPE TMP=/oracle/tmp; export TMP TMPDIR=/oracle/tmp; export TMPDIR TEMPDIR=/oracle/tmp; export TEMPDIR TEMP=/oracle/tmp; export TEMP if [ -t 0 ]; then stty intr ^C fi --------------------------------------------------- --- $ exit {node1:root}/ # Under VNC Client session, or other graphical interface, start Oracle Database Binaries Installation as user oracle .
{node1:root}/ # su - oracle $ export DISPLAY=demo1:0.0
6 Repeat step 3, as oracle user on node demo2.

Unofficial documentation (IBM Internal) 7/53 IBM Oracle Center (IOC)
1.2 Start installation as oracle user
To install Oracle 11gR2 RAC Binaries, follow the steps.
1 From the Oracle Database 11gR2 directory, as user Oracle, enter:
$ cd /Oracle_Database_11gR2/database $./runInstaller *************************************************** ***************************** Your platform requires the root user to perform cer tain pre-installation OS preparation. The root user should run the shell script 'rootpre.sh' before you proceed with Oracle installation. rootpre.sh c an be found at the top level of the CD or the stage area. Answer 'y' if root has run 'rootpre.sh' so you can proceed with Oracle installation. Answer 'n' to abort installation and then ask root to run 'rootpre.sh'. *************************************************** ***************************** Has 'rootpre.sh' been run by root? [y/n] (n) y Starting Oracle Universal Installer... Checking Temp space: must be greater than 190 MB. Actual 3421 MB Passed Checking swap space: must be greater than 150 MB. Actual 512 MB Passed Checking monitor: must be configured to display at least 256 colors. Actual 16777216 Passed Preparing to launch Oracle Universal Installer from /oracle/tmp/OraInstall2010-06-30_10-46-02AM. Please wait ...

Unofficial documentation (IBM Internal) 8/53 IBM Oracle Center (IOC)
2 Uncheck I wish to receive security updates via My Oracle Support, then click Next.
3 Click on Yes.
4 Select Skip software Updates, then click on the Next button.
4 Select Install database software only, then click on the Next button.

Unofficial documentation (IBM Internal) 9/53 IBM Oracle Center (IOC)
5 Select all nodes within the cluster you want to install the Oracle Database Binaries and select Real Application Clusters Database Installation Option.
In our case, we have two nodes : demo1 and demo2.
6 Click on the SSH_Connectivity... button to check or configure SSH Connectivity for the oracle user between all nodes.
7 Click on the Setup button or the Test button to verify connectivity between the selected nodes.

Unofficial documentation (IBM Internal) 10/53 IBM Oracle Center (IOC)
8 Click on the OK button to return on previous screen, then click on the Next button.
9 At the Product Languages screen, select the languages in which the Oracle Grid Infrastructure Product will run and click on the Next button.
In our example, we kept the default language which is English.
10 Select the Database Edition you want to install.
In our case, we will implement an Enterprise Edition.

Unofficial documentation (IBM Internal) 11/53 IBM Oracle Center (IOC)
11 Click on the Select Options... button to customize (Add/Remove) options.
In our case, we will only select Oracle Partitioning and Oracle Real Application Testing.

Unofficial documentation (IBM Internal) 12/53 IBM Oracle Center (IOC)
12 Provide the right Oracle Base Location and also the right Oracle RAC directory Installation and click on
the Next button.
Verify that Oracle Base field and Software location correspond to the environnement variable ORACLE_BASE and ORACLE_HOME, the click on Next.
This location has to exist (read and write) on all nodes that you plan to install the software on.
Unofficial documentation (IBM Internal) 13/53 IBM Oracle Center (IOC)
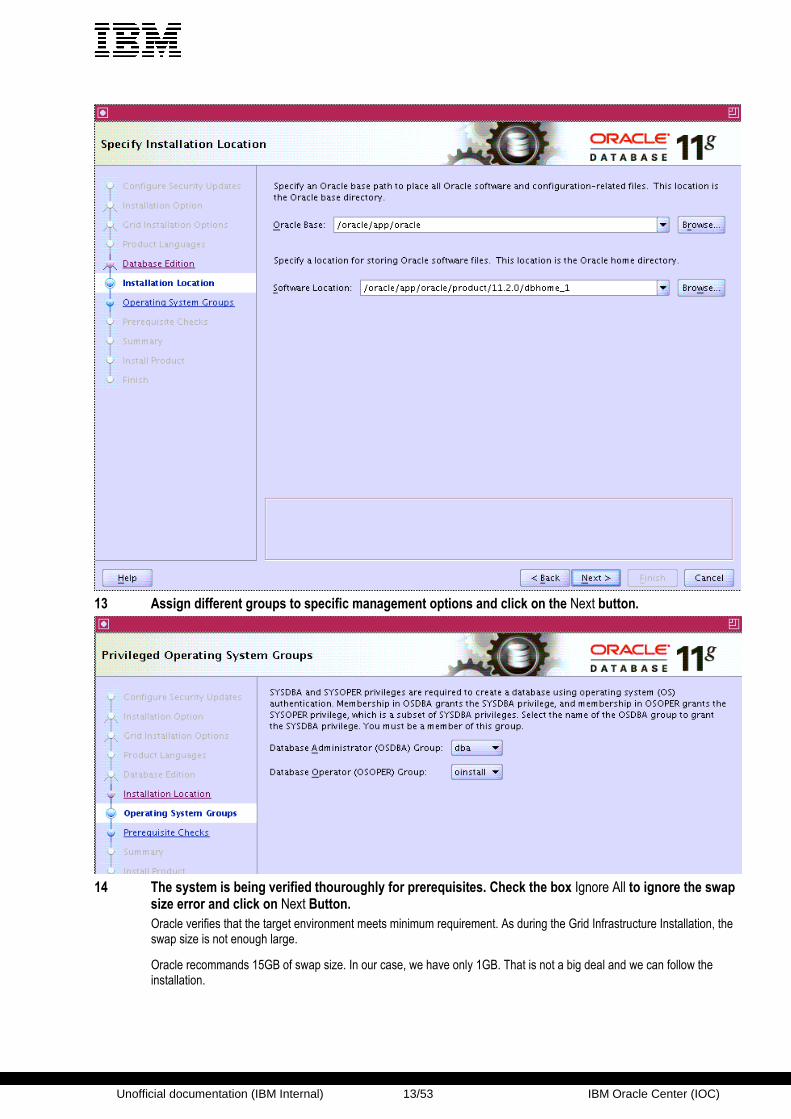
13 Assign different groups to specific management options and click on the Next button.
14 The system is being verified thouroughly for prerequisites. Check the box Ignore All to ignore the swap
size error and click on Next Button.
Oracle verifies that the target environment meets minimum requirement. As during the Grid Infrastructure Installation, the swap size is not enough large.
Oracle recommands 15GB of swap size. In our case, we have only 1GB. That is not a big deal and we can follow the installation.

Unofficial documentation (IBM Internal) 14/53 IBM Oracle Center (IOC)
15 The next screen summarizes all information provided in the previous steps. Click on the Finish Button to start the installation.
16 Check for the state Successed while executing the tasks

Unofficial documentation (IBM Internal) 15/53 IBM Oracle Center (IOC)
17 Run the script rooh.sh on demo1 then on demo2 to finish the installation of Oracle Database.
18 From demo1, as root user, enter:
{icc-118a:root}/ # ./root.sh Performing root user operation for Oracle 11g The following environment variables are set as: ORACLE_OWNER= oracle ORACLE_HOME= /oracle/app/oracle/product/11.2.0 /dbhome_1 Enter the full pathname of the local bin directory: [/usr/local/bin]: The contents of "dbhome" have not changed. No need to overwrite. The contents of "oraenv" have not changed. No need to overwrite.

Unofficial documentation (IBM Internal) 16/53 IBM Oracle Center (IOC)
The contents of "coraenv" have not changed. No need to overwrite. Entries will be added to the /etc/oratab file as ne eded by Database Configuration Assistant when a database is created Finished running generic part of root script. Now product-specific root actions will be performed . Finished product-specific root actions.
19 From node2 and node3 , as root user, enter:
{icc119a:root}/ # ./root.sh Performing root user operation for Oracle 11g The following environment variables are set as: ORACLE_OWNER= oracle ORACLE_HOME= /oracle/app/oracle/product/11.2.0 /dbhome_1 Enter the full pathname of the local bin directory: [/usr/local/bin]: The contents of "dbhome" have not changed. No need to overwrite. The contents of "oraenv" have not changed. No need to overwrite. The contents of "coraenv" have not changed. No need to overwrite. Entries will be added to the /etc/oratab file as ne eded by Database Configuration Assistant when a database is created Finished running generic part of root script. Now product-specific root actions will be performed . Finished product-specific root actions. {icc119a:root}/ # {icc120a:root}/ # ./root.sh Performing root user operation for Oracle 11g The following environment variables are set as: ORACLE_OWNER= oracle ORACLE_HOME= /oracle/app/oracle/product/11.2.0 /dbhome_1 Enter the full pathname of the local bin directory: [/usr/local/bin]: The contents of "dbhome" have not changed. No need to overwrite. The contents of "oraenv" have not changed. No need to overwrite. The contents of "coraenv" have not changed. No need to overwrite. Entries will be added to the /etc/oratab file as ne eded by Database Configuration Assistant when a database is created Finished running generic part of root script. Now product-specific root actions will be performed . Finished product-specific root actions. {icc120a:root}/ #
20 Go back on Installer previous screen, then click on the OK button and wait for the following screen.
21 Then click on the Close button.

Unofficial documentation (IBM Internal) 17/53 IBM Oracle Center (IOC)
22 Update the .profile file for oracle user on each node as follow.
Update the .profile file on demo1 and on demo2.
# Oracle Settings AIXTHREAD_SCOPE=S; export AIXTHREAD_SCOPE TMP=/oracle/tmp; export TMP TMPDIR=/oracle/tmp; export TMPDIR TEMPDIR=/oracle/tmp; export TEMPDIR TEMP=/oracle/tmp; export TEMP ORACLE_HOSTNAME=node1; export ORACLE_HOSTNAME ORA_CRS_HOME=/oracle/grid/app/11.2.0/grid ORACLE_BASE=/oracle/app/oracle; export ORACLE_BASE ORACLE_HOME=/oracle/app/oracle/product/11.2.0/dbhom e_1; export ORACLE_HOME ORACLE_SID=ORA11; export ORACLE_SID ORACLE_TERM=xterm; export ORACLE_TERM PATH=/usr/sbin:$PATH; export PATH PATH=$ORACLE_HOME/bin:$ORACLE_HOME/OPatch:$ORA_CRS_HOME/bin:$PATH; export PATH LD_LIBRARY_PATH=$ORACLE_HOME/lib; export LD_LIBRARY _PATH LIBPATH=$LD_LIBRARY_PAT; export LD_LIBRARY_PATH if [ -t 0 ]; then stty intr ^C fi

Unofficial documentation (IBM Internal) 18/53 IBM Oracle Center (IOC)
2 Oracle Database 11gR2 Creation
2.1 Oracle Database Listener Configuration
Our goal in this step is to create a Listener dedicated to the Oracle RAC Database.
1 Under VNC Client session, or other graphical interface, login as oracle user on node icc-118a: {icc-118a:root}/ # su - oracle $ id uid=1101(oracle) gid=1000(oinstall) groups=1200(dba ),1300(asmdba) $ netca Oracle Net Services Configuration:
2 Select Cluster configuration Option and click on the Next Button.
3 Select Listener Configuration and click on the Next Button.

Unofficial documentation (IBM Internal) 19/53 IBM Oracle Center (IOC)
4 Select Add and click on the Next Button.
5 Provide a Name for this new listener dedicated for the database and click on the Next Button.
In our case, LISTENER_RDBMS is the name of the listener which will be dedicated to the future RAC Database.
Unofficial documentation (IBM Internal) 20/53 IBM Oracle Center (IOC)
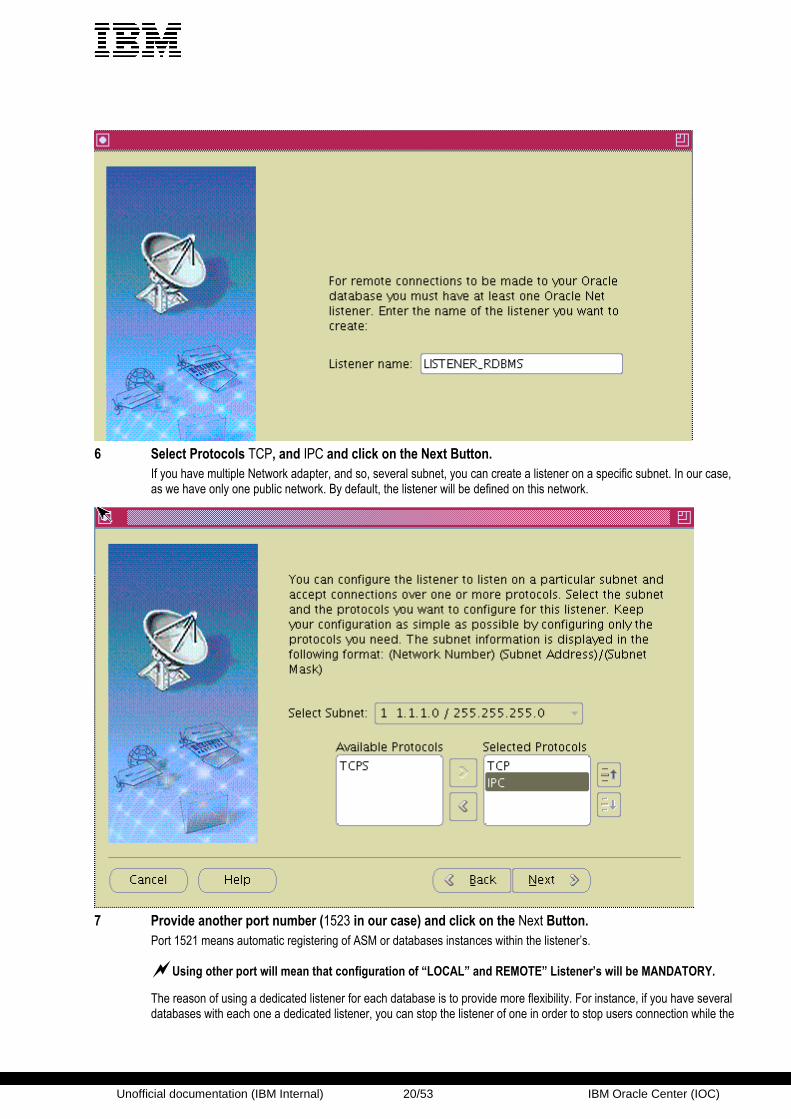
6 Select Protocols TCP, and IPC and click on the Next Button.
If you have multiple Network adapter, and so, several subnet, you can create a listener on a specific subnet. In our case, as we have only one public network. By default, the listener will be defined on this network.
7 Provide another port number (1523 in our case) and click on the Next Button.
Port 1521 means automatic registering of ASM or databases instances within the listener’s.
�Using other port will mean that configuration of “LOCAL” and REMOTE” Listener’s will be MANDATORY.
The reason of using a dedicated listener for each database is to provide more flexibility. For instance, if you have several databases with each one a dedicated listener, you can stop the listener of one in order to stop users connection while the

Unofficial documentation (IBM Internal) 21/53 IBM Oracle Center (IOC)
database administrator runs a maintenance task. So, as the remaining database have their own listeners, end users can still access to them.
Moreover, if we create a listener in a different port than the default one (1521), we do not have to create another listener using the default port. Otherwise, the first one will have no reason to exist anymore. The listener defined on the default port will register all services and the second one (on the non default port) will have no service registered.
8 Enter IPC Key value, for example EXTPROC and click on the Next Button.
9 Click No and click Next to start the listener creation.

Unofficial documentation (IBM Internal) 22/53 IBM Oracle Center (IOC)
10 Wait for the following screen and click on the Next Button.
11 Click on the Finish Button to exit the Oracle Net Configuration Assistant.
Unofficial documentation (IBM Internal) 23/53 IBM Oracle Center (IOC)
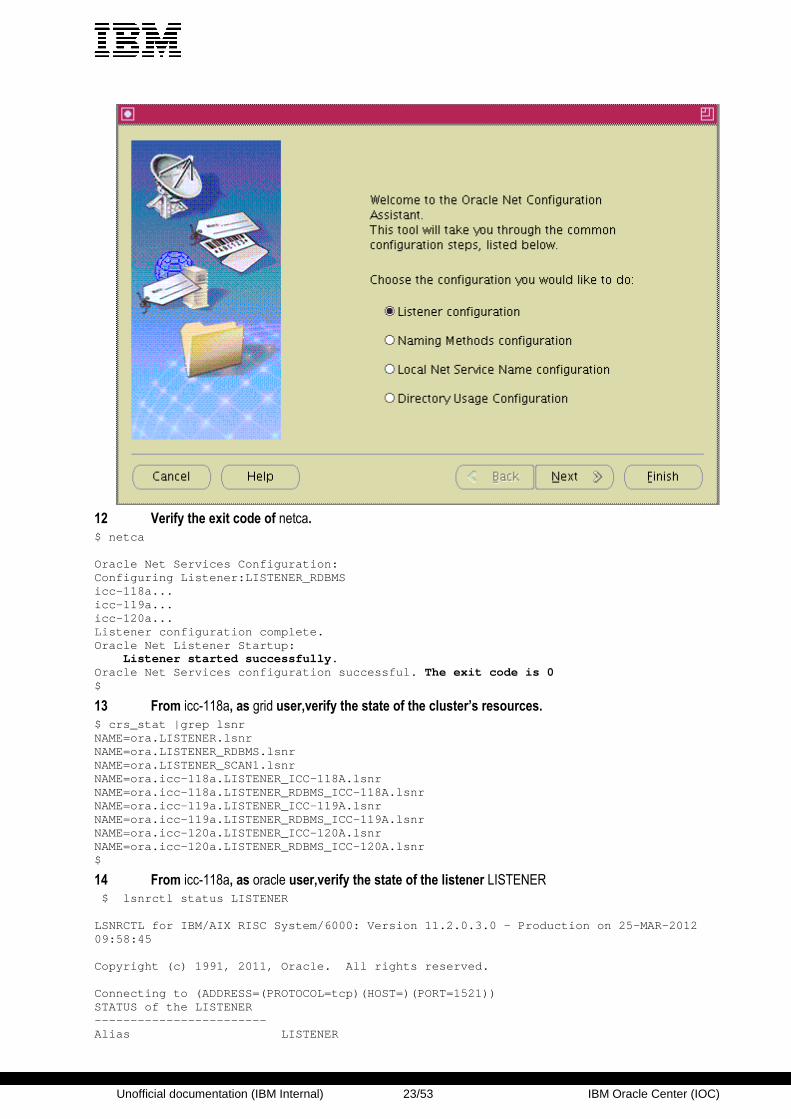
12 Verify the exit code of netca.
$ netca Oracle Net Services Configuration: Configuring Listener:LISTENER_RDBMS icc-118a... icc-119a... icc-120a... Listener configuration complete. Oracle Net Listener Startup: Listener started successfully. Oracle Net Services configuration successful. The exit code is 0 $
13 From icc-118a, as grid user,verify the state of the cluster’s resources.
$ crs_stat |grep lsnr NAME=ora.LISTENER.lsnr NAME=ora.LISTENER_RDBMS.lsnr NAME=ora.LISTENER_SCAN1.lsnr NAME=ora.icc-118a.LISTENER_ICC-118A.lsnr NAME=ora.icc-118a.LISTENER_RDBMS_ICC-118A.lsnr NAME=ora.icc-119a.LISTENER_ICC-119A.lsnr NAME=ora.icc-119a.LISTENER_RDBMS_ICC-119A.lsnr NAME=ora.icc-120a.LISTENER_ICC-120A.lsnr NAME=ora.icc-120a.LISTENER_RDBMS_ICC-120A.lsnr $
14 From icc-118a, as oracle user,verify the state of the listener LISTENER
$ lsnrctl status LISTENER LSNRCTL for IBM/AIX RISC System/6000: Version 11.2. 0.3.0 - Production on 25-MAR-2012 09:58:45 Copyright (c) 1991, 2011, Oracle. All rights reser ved. Connecting to (ADDRESS=(PROTOCOL=tcp)(HOST=)(PORT=1 521)) STATUS of the LISTENER ------------------------ Alias LISTENER

Unofficial documentation (IBM Internal) 24/53 IBM Oracle Center (IOC)
Version TNSLSNR for IBM/AIX RISC System/6000: Version 11.2.0.3.0 - Production Start Date 25-MAR-2012 04:32:55 Uptime 0 days 5 hr. 25 min. 49 s ec Trace Level off Security ON: Local OS Authenticati on SNMP ON Listener Parameter File /oracle/app/11.2.0/grid/n etwork/admin/listener.ora Listener Log File /oracle/app/grid/diag/tns lsnr/icc-118a/listener/alert/log.xml Listening Endpoints Summary... (DESCRIPTION=(ADDRESS=(PROTOCOL=ipc)(KEY=LISTENER ))) (DESCRIPTION=(ADDRESS=(PROTOCOL=tcp)(HOST=1.1.1.1 18)(PORT=1521))) (DESCRIPTION=(ADDRESS=(PROTOCOL=tcp)(HOST=1.1.1.2 18)(PORT=1521))) Services Summary... Service "+ASM" has 1 instance(s). Instance "+ASM1", status READY, has 1 handler(s) for this service... The command completed successfully $
15 From demo1, as oracle user,verify the state of the listener LISTENER_RDBMS
$ lsnrctl status LISTENER_RDBMS LSNRCTL for IBM/AIX RISC System/6000: Version 11.2. 0.3.0 - Production on 25-MAR-2012 09:58:36 Copyright (c) 1991, 2011, Oracle. All rights reser ved. Connecting to (DESCRIPTION=(ADDRESS=(PROTOCOL=IPC)( KEY=LISTENER_RDBMS))) STATUS of the LISTENER ------------------------ Alias LISTENER_RDBMS Version TNSLSNR for IBM/AIX RISC System/6000: Version 11.2.0.3.0 - Production Start Date 25-MAR-2012 09:53:43 Uptime 0 days 0 hr. 4 min. 53 se c Trace Level off Security ON: Local OS Authenticati on SNMP ON Listener Parameter File /oracle/app/oracle/product/11.2.0/dbhome_1/network/ admin/listener.ora Listener Log File /oracle/app/oracle/diag/t nslsnr/icc-118a/listener_rdbms/alert/log.xml Listening Endpoints Summary... (DESCRIPTION=(ADDRESS=(PROTOCOL=ipc)(KEY=LISTENER _RDBMS))) (DESCRIPTION=(ADDRESS=(PROTOCOL=ipc)(KEY=EXTPROC) )) (DESCRIPTION=(ADDRESS=(PROTOCOL=tcp)(HOST=1.1.1.1 18)(PORT=1523))) (DESCRIPTION=(ADDRESS=(PROTOCOL=tcp)(HOST=1.1.1.2 18)(PORT=1523))) The listener supports no services The command completed successfully

Unofficial documentation (IBM Internal) 25/53 IBM Oracle Center (IOC)
3 Creating Oracle 11gR2 Database
1 Under VNC Client session, or other graphical interface, execute from node icc-118a, as oracle user:
$ dbca
2 Select Oracle Real Application Clusters Database and click on the Next Button
3 Select Create a database and click on the Next Button.

Unofficial documentation (IBM Internal) 26/53 IBM Oracle Center (IOC)
4 Select General Purpose or Transaction Processing and click on the Next Button.
Click on Show Details to have more information on the General Purpose Template.
5 Select Admin-Managed Option and enter the Global Database Name and the SID Prefix and click
on the Next Button.. Here you have an option to choose Policy-Managed or Admin-Managed configuration.
If you choose Admin-Managed then the servers are not part of any server pool, and are managed manually by the administrator.
When it is policy-managed, Oracle creates server pools and capacity is added and removed from the server pools based on your server pool definitions. Select “Policy-Managed” Option and provide all requ ired information.
Click on the Help Button to have more information on the options.

Unofficial documentation (IBM Internal) 27/53 IBM Oracle Center (IOC)
6 Check Configure the database with Enterprise Manager if you want to use the Database Control (local administration).
Or don’t check if you plan to administrate the database using the Oracle Entreprise Manager Grid Control.
7 Then click on Automatic Maintenance Tasks tab for more options and click on the Next Button.
8 Provide passwords for all accounts and click on the Next Button.
In our case, we provided the same password for all accounts. If your password not match with Oracle Recommendations, you may click the yes button to continue.

Unofficial documentation (IBM Internal) 28/53 IBM Oracle Center (IOC)
If your password does not satisfy Oracle password policy, the installer displays the following screen. Clic on Yes to continue.
9 Select the storage type and click on the Next Button.
All the Oracle Datafiles will be stored on the GPFS file system created previously.

Unofficial documentation (IBM Internal) 29/53 IBM Oracle Center (IOC)
10 Select the Flash Recovery Area and click on the Next Button.
In our case, we use a GPFS file system. You can use an ASM Diskgroup to play the role of Flash Recovery Area for the Database.
11 Select the options needed and click on the Next Button.

Unofficial documentation (IBM Internal) 30/53 IBM Oracle Center (IOC)
12 Provide the amount of memory you want to set as SGA & PGA for the Database.
13 On the Sizing Tab, Set Processes field to 300.

Unofficial documentation (IBM Internal) 31/53 IBM Oracle Center (IOC)
The All Initialization parameters... button shows all parameter set to create the database.
Unofficial documentation (IBM Internal) 32/53 IBM Oracle Center (IOC)
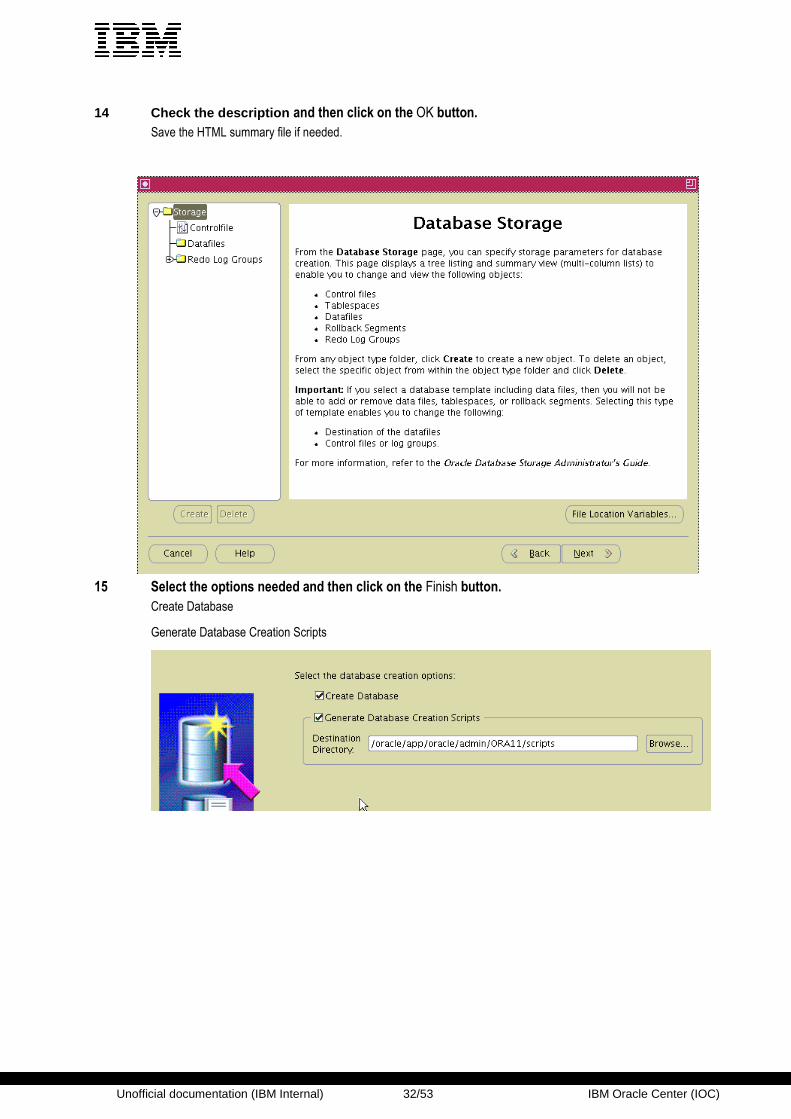
14 Check the description and then click on the OK button. Save the HTML summary file if needed.
15 Select the options needed and then click on the Finish button.
Create Database
Generate Database Creation Scripts

Unofficial documentation (IBM Internal) 33/53 IBM Oracle Center (IOC)
15 Check the description and then click on the OK button. Save the HTML summary file if needed.Wait during Database Creation script generation.
Unofficial documentation (IBM Internal) 34/53 IBM Oracle Center (IOC)
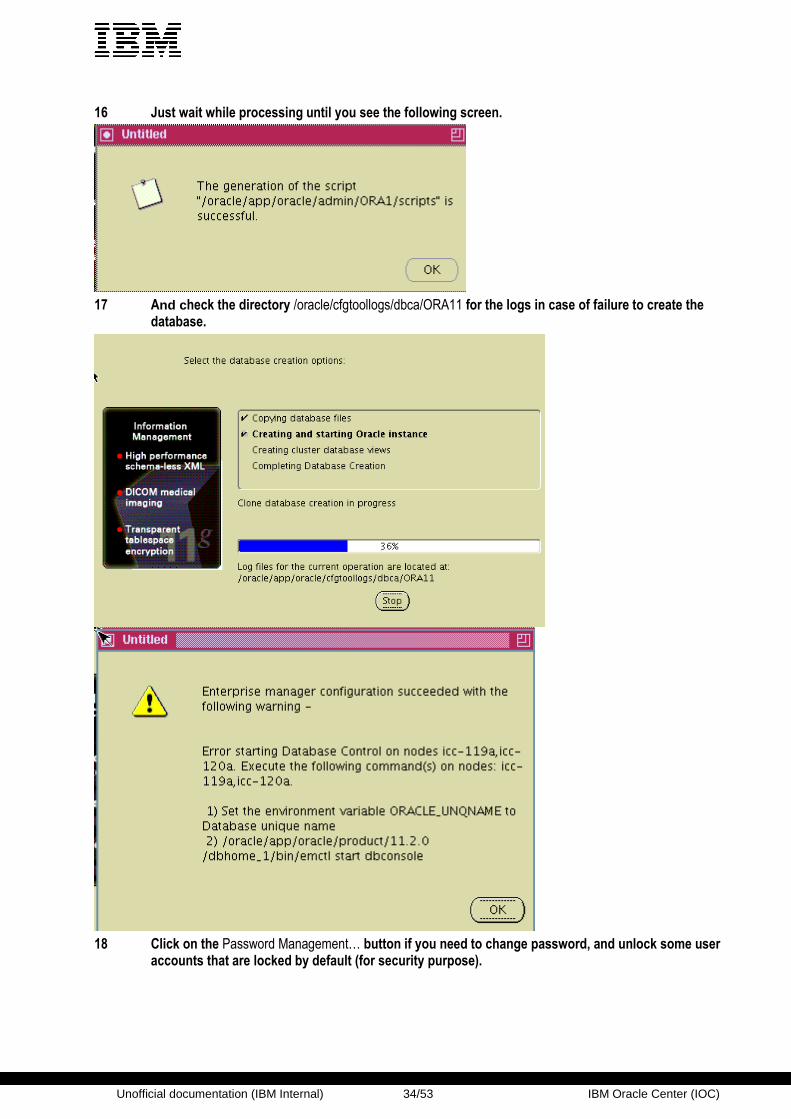
16 Just wait while processing until you see the following screen.
17 And c heck the directory /oracle/cfgtoollogs/dbca/ORA11 for the logs in case of failure to create the database.
18 Click on the Password Management… button if you need to change password, and unlock some user accounts that are locked by default (for security purpose).

Unofficial documentation (IBM Internal) 35/53 IBM Oracle Center (IOC)
19 At the end of the creation, dbca display a short summary with the location of the spfile.
Oracle Database searches for the parameter file in the following order:
1. ORA_ROOT:[ORADATA.db_name]SPFILEsid.ORA
2. ORA_ROOT:[ORADATA.db_name]SPFILE.ORA
3. ORA_ROOT:[DBS]INITsid.ora
The Database Control URL is https://demo1:1158/em
Management Repository has been placed in secure mode where in Enterprise Manager data will be encrypted. The encryption key has been placed in the file: /oracle/app/oracle/product/11.2.0/dbhome_1/node1_ORA1/sysman/config/emkey.ora. Please ensure this file is backed up as the encrypted data will become unusable if this file is lost

Unofficial documentation (IBM Internal) 36/53 IBM Oracle Center (IOC)
19 From one node, as grid user, check that the database is correctly registered in the Grid Infrastructure.
Check the line ora.ora1.db.
$ crs_stat -t Name Type Target State H ost --------------------------------------------------- --------- ora....ATA1.dg ora....up.type ONLINE ONLINE i cc-118a ora.DG_LOG1.dg ora....up.type ONLINE ONLINE i cc-118a ora....RVOT.dg ora....up.type ONLINE ONLINE i cc-118a ora....ER.lsnr ora....er.type ONLINE ONLINE i cc-119a ora....MS.lsnr ora....er.type ONLINE ONLINE i cc-119a ora....N1.lsnr ora....er.type ONLINE UNKNOWN i cc-118a ora.asm ora.asm.type ONLINE ONLINE i cc-118a ora.cvu ora.cvu.type ONLINE UNKNOWN i cc-118a ora.gsd ora.gsd.type OFFLINE OFFLINE ora....SM1.asm application ONLINE ONLINE i cc-118a ora....8A.lsnr application ONLINE UNKNOWN i cc-118a ora....8A.lsnr application ONLINE UNKNOWN i cc-118a ora....18a.gsd application OFFLINE OFFLINE ora....18a.ons application ONLINE UNKNOWN i cc-118a ora....18a.vip ora....t1.type ONLINE ONLINE i cc-118a ora....SM2.asm application ONLINE ONLINE i cc-119a ora....9A.lsnr application ONLINE ONLINE i cc-119a ora....9A.lsnr application ONLINE ONLINE i cc-119a ora....19a.gsd application OFFLINE OFFLINE ora....19a.ons application ONLINE ONLINE i cc-119a ora....19a.vip ora....t1.type ONLINE ONLINE i cc-119a ora....SM3.asm application ONLINE ONLINE i cc-120a

Unofficial documentation (IBM Internal) 37/53 IBM Oracle Center (IOC)
ora....0A.lsnr application ONLINE ONLINE i cc-120a ora....0A.lsnr application ONLINE ONLINE i cc-120a ora....20a.gsd application OFFLINE OFFLINE ora....20a.ons application ONLINE ONLINE i cc-120a ora....20a.vip ora....t1.type ONLINE ONLINE i cc-120a ora....network ora....rk.type ONLINE ONLINE i cc-119a ora.oc4j ora.oc4j.type ONLINE ONLINE i cc-118a ora.ons ora.ons.type ONLINE ONLINE i cc-119a ora.ora11.db ora....se.type ONLINE ONLINE icc-118a ora....ry.acfs ora....fs.type ONLINE ONLINE i cc-118a ora.scan1.vip ora....ip.type ONLINE ONLINE i cc-118a $

Unofficial documentation (IBM Internal) 38/53 IBM Oracle Center (IOC)
4 Post Install Operations (dbconsole, SCAN, Listeners)
4.1 Checking Oracle Grid Agent
1 Check on demo1 the status of Oracle Enterprise Manager agent, as user oracle.
Look at the 2 lines Last successful ... to be sure that agent is able to contact the dbconsole repository (management server).
[oracle@node1 ~]$ export ORACLE_UNQNAME=ORA11 [oracle@node1 ~]$ emctl status agent 11g Database Control Release 11.2.0.1.0 Copyright (c) 1996, 2009 Oracle Corporation. All r ights reserved. --------------------------------------------------- ------------ Agent Version : 10.2.0.4.2 OMS Version : 10.2.0.4.2 Protocol Version : 10.2.0.4.2 Agent Home : /oracle/app/oracle/product/11.2 .0/dbhome_1/node1_ORA1 Agent binaries : /oracle/app/oracle/product/11.2 .0/dbhome_1 Agent Process ID : 24908 Parent Process ID : 24856 Agent URL : https://node1:3938/emd/main Repository URL : https://node1:1158/em/upload/ Started at : 2010-02-11 13:55:15 Started by user : oracle Last Reload : 2010-02-11 14:01:16 Last successful upload : 2010-02-14 18:42:23 Total Megabytes of XML files uploaded so far : 3 7.07 Number of XML files pending upload : 0 Size of XML files pending upload(MB) : 0.00 Available disk space on upload filesystem : 2 4.22% Data channel upload directory : /oracle/app/oracle/product/11.2.0/dbhome_1/node1_OR A1/sysman/recv Last successful heartbeat to OMS : 2010-02-14 18:47:55 --------------------------------------------------- ------------ Agent is Running and Ready [oracle@node1 ~]$
2 Repeat the same check on demo2 to verify that the Agent is Running and Ready
Look at the 2 lines Last successful ... to be sure that agent is abale to contact the dbconsole repository (management server).

Unofficial documentation (IBM Internal) 39/53 IBM Oracle Center (IOC)
4.2 Checking DBConsole
1 Check on demo1 the status of Oracle Enterprise Manager dbconsole, as user oracle.
You must see that Oracle Enterprise Manager 11g is running.
[oracle@node1 ~]$ emctl status dbconsole Oracle Enterprise Manager 11g Database Control Rele ase 11.2.0.1.0 Copyright (c) 1996, 2009 Oracle Corporation. All r ights reserved. https://node1:1158/em/console/aboutApplication Oracle Enterprise Manager 11g is running. --------------------------------------------------- --------------- Logs are generated in directory /oracle/app/oracle/product/11.2.0/dbhome_1/node1_OR A1/sysman/log [oracle@node1 ~]$
2 Check on demo2 the status of Oracle Enterprise Manager dbconsole, as user oracle.
You can see that by default dbconsole is only available from node1 ! For node2 : EM Daemon is running.
[oracle@node2 ~]$ emctl status dbconsole Oracle Enterprise Manager 11g Database Control Rele ase 11.2.0.1.0 Copyright (c) 1996, 2009 Oracle Corporation. All r ights reserved. https://node1:1158/em/console/aboutApplication EM Daemon is running. --------------------------------------------------- --------------- Logs are generated in directory /oracle/app/oracle/product/11.2.0/dbhome_1/node2_OR A1/sysman/log [oracle@node2 ~]$
3 Under your laptop operating system, edit the hosts file and update it as follow :
notepad c:\windows\system32\drivers\etc\hosts for windows
vi /etc/hosts for linux
# ---- Node 1 ---- # Public Network 10.3.10.21 node1 node1 10.3.10.121 node1-vip node1-vip # ---- Node 2 ---- # Public Network 10.3.10.41 node2 node2 10.3.10.141 node2-vip node2-vip # Cluster Single Client Access Name (SCAN) 10.3.10.181 clusterha
4 Nota : On Windows, please issue the foolowing command :
C:\WINDOWS\system32\drivers\etc>nbtstat -R Successful purge and preload of the NBT Remote Cache Name Table. C:\WINDOWS\system32\drivers\etc
5 Now we can access the DBControl for a web browser using http://mycluster1:1158/ :

Unofficial documentation (IBM Internal) 40/53 IBM Oracle Center (IOC)
6 Click on I Understand the Risks to continue.
7 Then click on the Add Exception... button to continue.

Unofficial documentation (IBM Internal) 41/53 IBM Oracle Center (IOC)
8 Click on the Confirm Security Exception button to continue !
9 Now access https://mycluster1:1158/em

Unofficial documentation (IBM Internal) 42/53 IBM Oracle Center (IOC)
10 Enter the username and password and then click on Login to continue.
Connect As Sysdba if you enter user Name sys.

Unofficial documentation (IBM Internal) 43/53 IBM Oracle Center (IOC)
Then you can query the different tabs for the Database and the Cluster !
Click on the Cluster Tab to see information about the cluster
Click on the Database Tab to see information the ORA11 database

Unofficial documentation (IBM Internal) 44/53 IBM Oracle Center (IOC)
1.1 SCAN, listeners and tnsnames configuration To enable load balancing, connections are distributed among local dispatchers. In addition, Oracle RAC provides failover by configuring multiple listeners on multiple nodes to manage client connection requests for the same database service.
Cross-instance registration requires configuring the parameter LOCAL_LISTENER that identifies the local listener, and dynamic parameter REMOTE_LISTENER that identifies the global list of listeners. The local listener, or default listener, is located in the Grid home.
Cross-instance registration in Oracle RAC occurs when the PMON process of an instance registers with the local listener and with all other listeners. This enables all listeners to manage connections across all instances for both load balancing and failover.
Note : If you enable GNS, then you do not have to manually configure the listener.
Port Ressources managed
demo1 demo2
LISTENER_SCAN1 Owned by grid
1521 ORA11 No Yes
LISTENER_SCAN2 Owned by grid
1521 ORA11 Yes No
LISTENER_SCAN3 Owned by grid
1521 ORA11 Yes No
LISTENER Owned by grid
1521 ORA11 Yes
LISTENER_RDBMS Owned by oracle
1523 None Yes
Here are some commands to find the attributes of the various listeners.
1 From demo1, as oracle user, execute the following script to enumerate the various listeners.
for node in demo1 demo2 do echo $node ssh $node ps -ef|grep lsnr done grid 9175150 1 0 Sep 14 - 0:01 /oracl e/app/11.2.0/grid/bin/tnslsnr LISTENER_SCAN3 -inherit oracle 16187580 16121948 0 12:35:42 pts/1 0:0 0 grep lsnr grid 18284578 1 0 Sep 14 - 0:01 /oracl e/app/11.2.0/grid/bin/tnslsnr LISTENER_SCAN2 -inherit grid 19398736 1 0 Sep 14 - 0:00 /oracl e/app/11.2.0/grid/bin/tnslsnr LISTENER -inherit oracle 10813706 1 0 Sep 14 - 0:05 /oracle/app/oracle/product/11.2.0/dbhome_1/bin/tnsl snr LISTENER_RDBMS -inherit demo2 oracle 3604578 1 0 Sep 14 - 0:00 /oracle/app/oracle/product/11.2.0/dbhome_1/bin/tnsl snr LISTENER_RDBMS -inherit grid 9437208 1 0 Sep 14 - 0:02 /oracl e/app/11.2.0/grid/bin/tnslsnr LISTENER_SCAN1 -inherit grid 7405842 1 0 Sep 14 - 0:01 /oracl e/app/11.2.0/grid/bin/tnslsnr LISTENER -inherit
2 From demo1, as grid user, find the port used for each listener.
The listener LISTENER_SCANn is owned by grid user and configured with the GRID Oracle_Home.

Unofficial documentation (IBM Internal) 45/53 IBM Oracle Center (IOC)
{demo1} $ id uid=1100(grid) gid=1000(oinstall) groups=1100(asmadmin),1200(dba),1300(asmdba),1301(a smoper) $ srvctl config scan_listener SCAN Listener LISTENER_SCAN1 exists. Port: TCP:1521 SCAN Listener LISTENER_SCAN2 exists. Port: TCP:1521 SCAN Listener LISTENER_SCAN3 exists. Port: TCP:1521 $
$ srvctl config listener Name: LISTENER Network: 1, Owner: grid Home: <CRS home> End points: TCP:1521 Name: LISTENER_RDBMS Network: 1, Owner: oracle Home: /oracle/app/oracle/product/11.2.0/dbhome_1 End points: TCP:1523/IPC:EXTPROC
$ $ srvctl status scan_listener SCAN Listener LISTENER_SCAN1 is enabled SCAN listener LISTENER_SCAN1 is running on node dem o2 SCAN Listener LISTENER_SCAN2 is enabled SCAN listener LISTENER_SCAN2 is running on node dem o1 SCAN Listener LISTENER_SCAN3 is enabled SCAN listener LISTENER_SCAN3 is running on node dem o1 $ $ lsnrctl status LISTENER_SCAN2 LSNRCTL for IBM/AIX RISC System/6000: Version 11.2. 0.1.0 - Production on 24-JUL-2011 15:59:30 Copyright (c) 1991, 2009, Oracle. All rights reser ved. Connecting to (DESCRIPTION=(ADDRESS=(PROTOCOL=IPC)( KEY=LISTENER_SCAN2))) STATUS of the LISTENER ------------------------ Alias LISTENER_SCAN2 Version TNSLSNR for IBM/AIX RISC System/6000: Version 11.2.0.1.0 - Production Start Date 20-JUL-2011 13:44:21 Uptime 4 days 2 hr. 15 min. 9 se c Trace Level off Security ON: Local OS Authenticati on SNMP ON Listener Parameter File /oracle/app/11.2.0/grid/n etwork/admin/listener.ora Listener Log File /oracle/app/11.2.0/grid/log/diag/tnslsnr/demo1/list ener_scan2/alert/log.xml Listening Endpoints Summary... (DESCRIPTION=(ADDRESS=(PROTOCOL=ipc)(KEY=LISTENER _SCAN2))) (DESCRIPTION=(ADDRESS=(PROTOCOL=tcp)(HOST=10.3.25 .171)(PORT=1521))) Services Summary... Service "ORA11" has 2 instance(s). Instance "ORA111", status READY, has 1 handler(s) for this service... Instance "ORA112", status READY, has 1 handler(s) for this service... Service "ORA11XDB" has 2 instance(s). Instance "ORA111", status READY, has 1 handler(s) for this service... Instance "ORA112", status READY, has 1 handler(s) for this service... The command completed successfully $
The listener LISTENER is owned by grid user and configured with the GRID Oracle_Home.
$ lsnrctl status listener LSNRCTL for IBM/AIX RISC System/6000: Version 11.2. 0.1.0 - Production on 24-JUL-2011 16:00:37 Copyright (c) 1991, 2009, Oracle. All rights reser ved.

Unofficial documentation (IBM Internal) 46/53 IBM Oracle Center (IOC)
Connecting to (DESCRIPTION=(ADDRESS=(PROTOCOL=IPC)( KEY=LISTENER))) STATUS of the LISTENER ------------------------ Alias LISTENER Version TNSLSNR for IBM/AIX RISC System/6000: Version 11.2.0.1.0 - Production Start Date 20-JUL-2011 13:50:22 Uptime 4 days 2 hr. 10 min. 15 s ec Trace Level off Security ON: Local OS Authenticati on SNMP ON Listener Parameter File /oracle/app/11.2.0/grid/n etwork/admin/listener.ora Listener Log File /oracle/app/grid/diag/tns lsnr/demo1/listener/alert/log.xml Listening Endpoints Summary... (DESCRIPTION=(ADDRESS=(PROTOCOL=ipc)(KEY=LISTENER ))) (DESCRIPTION=(ADDRESS=(PROTOCOL=tcp)(HOST=10.3.25 .121)(PORT=1521))) (DESCRIPTION=(ADDRESS=(PROTOCOL=tcp)(HOST=10.3.25 .131)(PORT=1521))) Services Summary... Service "ORA11" has 1 instance(s). Instance "ORA111", status READY, has 1 handler(s) for this service... Service "ORA11XDB" has 1 instance(s). Instance "ORA111", status READY, has 1 handler(s) for this service... The command completed successfully $
The listener LISTENER_RDBMS is owned by oracle user and configured with the oracle database Oracle_Home.
{demo1:root}/ # su - oracle $ lsnrctl status listener_rdbms LSNRCTL for IBM/AIX RISC System/6000: Version 11.2. 0.1.0 - Production on 24-JUL-2011 16:02:10 Copyright (c) 1991, 2009, Oracle. All rights reser ved. Connecting to (DESCRIPTION=(ADDRESS=(PROTOCOL=IPC)( KEY=LISTENER_RDBMS))) STATUS of the LISTENER ------------------------ Alias LISTENER_RDBMS Version TNSLSNR for IBM/AIX RISC System/6000: Version 11.2.0.1.0 - Production Start Date 21-JUL-2011 11:10:52 Uptime 3 days 4 hr. 51 min. 18 s ec Trace Level off Security ON: Local OS Authenticati on SNMP ON Listener Parameter File /oracle/app/oracle/product/11.2.0/dbhome_1/network/ admin/listener.ora Listener Log File /oracle/app/oracle/diag/tnslsnr/demo1/listener_rdbm s/alert/log.xml Listening Endpoints Summary... (DESCRIPTION=(ADDRESS=(PROTOCOL=ipc)(KEY=LISTENER _RDBMS))) (DESCRIPTION=(ADDRESS=(PROTOCOL=ipc)(KEY=EXTPROC) )) (DESCRIPTION=(ADDRESS=(PROTOCOL=tcp)(HOST=10.3.25 .121)(PORT=1523))) (DESCRIPTION=(ADDRESS=(PROTOCOL=tcp)(HOST=10.3.25 .131)(PORT=1523))) The listener supports no services The command completed successfully $
IMPORTANT !!! : By default, if port 1521 is used by one listener, it will take all resources,even so other listeners using other port exists !
To avoid that we have to remove port 1521, and change it to port 1522 by example. {demo1:root}/gpfs1/oracle # su - grid $ echo $DISPLAY demo1:1 $ netca
1 Select Listener configuration an click on the Next button.

Unofficial documentation (IBM Internal) 47/53 IBM Oracle Center (IOC)
2 Select Reconfigure an click on the Next button.
3 Select the listener LISTENER and click on the Next button.

Unofficial documentation (IBM Internal) 48/53 IBM Oracle Center (IOC)
3 Click on the Next button to accept the network address.
4 Select an unused port number and click on the Next button.

Unofficial documentation (IBM Internal) 49/53 IBM Oracle Center (IOC)
5 Click on the Next button to store the new configuration.
3 Check listener.ora files.
Check listener.ora file on node1, node2 and node3 for Grid Infrastructure ORACLE_HOME :
$ cd $ORACLE_HOME/network/admin $ ls -l total 32 -rw-r--r-- 1 oracle oinstall 225 Jul 21 11:10 endpoints_listener.ora -rw-r--r-- 1 oracle oinstall 184 Jul 21 11:10 listener.ora drwxr-xr-x 2 oracle oinstall 256 Jul 21 09:20 samples -rw-r--r-- 1 oracle oinstall 187 May 07 2007 shrept.lst -rw-r----- 1 oracle oinstall 333 Jul 21 11:56 tnsnames.ora $ demo1:root} cd /oracle/app/oracle/product/11.2.0/db home_1/network/admin # demo1:root} cat listener.ora LISTENER_RDBMS=(DESCRIPTION=(ADDRESS_LIST=(ADDRESS=(PROTOCOL=IPC)(KEY=LISTENER_RDBMS)))) # line added by Agent ENABLE_GLOBAL_DYNAMIC_ENDPOINT_LISTENER_RDBMS=ON # line added by Agent demo2:root} cd /oracle/app/oracle/product/11.2.0/db home_1/network/admin #

Unofficial documentation (IBM Internal) 50/53 IBM Oracle Center (IOC)
demo2:root} cat listener.ora LISTENER_RDBMS=(DESCRIPTION=(ADDRESS_LIST=(ADDRESS=(PROTOCOL=IPC)(KEY=LISTENER_RDBMS)))) # line added by Agent ENABLE_GLOBAL_DYNAMIC_ENDPOINT_LISTENER_RDBMS=ON # line added by Agent
4 Check endpoints_listener.ora file on demo1 and demo2: demo1:root} cd /oracle/app/oracle/product/11.2.0/dbhome_1/network/admin demo1:root} cat endpoints_listener.ora LISTENER_RDBMS_DEMO1=(DESCRIPTION=(ADDRESS_LIST=(ADDRESS=(PROTOCOL=TCP)(HOST=demo1-vip)(PORT=1523))(ADDRESS=(PROTOCOL=TCP)(HOST=10.3.2 5.121)(PORT=1523)(IP=FIRST))(ADDRESS=(PROTOCOL=IPC)(KEY=EXTPROC)))) # line a dded by Agent $ demo2:root} cd /oracle/app/oracle/product/11.2.0/db home_1/network/admin demo2:root} cat endpoints_listener.ora LISTENER_RDBMS_DEMO2=(DESCRIPTION=(ADDRESS_LIST=(ADDRESS=(PROTOCOL=TCP)(HOST=demo2-vip)(PORT=1523))(ADDRESS=(PROTOCOL=TCP)(HOST=10.3.2 5.122)(PORT=1523)(IP=FIRST))(ADDRESS=(PROTOCOL=IPC)(KEY=EXTPROC)))) # line a dded by Agent
5 Let’s see where the database instances are running {demo1:root}/ # ps -elf | grep ora_pmon 240001 A oracle 5636342 1 0 60 20 86 4d4d590 178232 Jul 21 - 0:47 ora_pmon_ORA111 ` {demo2:root}/ # ps -elf | grep ora_pmon 240001 A oracle 8323214 1 0 60 20 80 45e1590 178232 Jul 21 - 0:47 ora_pmon_ORA112 {demo2:root}/ # {demo1:root}/ su – oracle $ sqlplus /@ORA11 SQL> show parameter liste NAME TYPE VALUE --------------------------------- ----------- ----- ------------------------- listener_networks string local_listener string (DESCRIP TION=(ADDRESS_LIST=(ADDRESS= (PROTOCO L=TCP)(HOST=demo2-vip)(PORT=1521)))) remote_listener string clusterh a:1521 {demo1:root}/ su – grid $ srvctl status database -d ORA11 Instance ORA111 is running on node demo1 Instance ORA112 is running on node demo2 $
6 Check tnsnames.ora file on demo1 and node2 $ cat tnsnames.ora # tnsnames.ora Network Configuration File: /oracle/app/oracle/product/11.2.0/dbhome_1/network/ admin/tnsnames.ora # Generated by Oracle configuration tools. ORA11 = (DESCRIPTION = (ADDRESS = (PROTOCOL = TCP)(HOST = clusterha)(P ORT = 1521)) (CONNECT_DATA = (SERVER = DEDICATED) (SERVICE_NAME = ORA11) ) )

Unofficial documentation (IBM Internal) 51/53 IBM Oracle Center (IOC)
7 Now connect to the database using SCAN !
For details on SCAN on SCAN_LISTENERS, please following document :
http://www.oracle.com/technology/products/database/clustering/pdf/scan.pdf $ tnsping ora11 TNS Ping Utility for IBM/AIX RISC System/6000: Vers ion 11.2.0.1.0 - Production on 24-JUL-2011 17:15:31 Copyright (c) 1997, 2009, Oracle. All rights reser ved. Used parameter files: Used TNSNAMES adapter to resolve the alias Attempting to contact (DESCRIPTION = (ADDRESS = (PR OTOCOL = TCP)(HOST = clusterha)(PORT = 1521)) (CONNECT_DATA = (SERVER = DEDICATED) (SERVIC E_NAME = ORA11))) OK (0 msec) $ id uid=1101(oracle) gid=1000(oinstall) groups=1200(dba ),1300(asmdba) $ sqlplus sys/mot_de_passe@clusterha/ORA11 as sysdba SQL*Plus: Release 11.2.0.1.0 Production on Sun Jul 24 17:17:52 2011 Copyright (c) 1982, 2009, Oracle. All rights reser ved. Connected to: Oracle Database 11g Enterprise Edition Release 11.2 .0.1.0 - 64bit Production With the Partitioning, Real Application Clusters, O LAP, Data Mining and Real Application Testing options SQL> select * from v$instance; INSTANCE_NUMBER INSTANCE_NAME --------------- ---------------- HOST_NAME --------------------------------------------------- ------------- VERSION STARTUP_T STATUS PAR THR EAD# ARCHIVE LOG_SWITCH_WAIT ----------------- --------- ------------ --- ------ ---- ------- --------------- LOGINS SHU DATABASE_STATUS INSTANCE_ROLE ACTIVE_ST BLO ---------- --- ----------------- ------------------ --------- --- 2 ORA112 demo2 11.2.0.1.0 21-JUL-11 OPEN YES 2 STOPPED ALLOWED NO ACTIVE PRIMARY_INSTANCE NORMAL NO SQL>

Unofficial documentation (IBM Internal) 52/53 IBM Oracle Center (IOC)
1. Getting back to DBControl 1 As oracle user, you may check the status of Oracle Enterprise Manager with the following commands.
{demo1:root}/ # su – oracle To display the configuration
$ emca -displayconfig dbcontrol -cluster STARTED EMCA at Jul 24, 2011 4:41:16 PM EM Configuration Assistant, Version 11.2.0.0.2 Prod uction Copyright (c) 2003, 2005, Oracle. All rights reser ved. Enter the following information: Database unique name: ORA11 Service name: ORA11 Do you wish to continue? [yes(Y)/no(N)]: yes Jul 24, 2011 4:41:35 PM oracle.sysman.emcp.EMConfig perform INFO: This operation is being logged at /oracle/app/oracle/cfgtoollogs/emca/ORA11/emca_2011 _07_24_16_41_15.log. Jul 24, 2011 4:41:40 PM oracle.sysman.emcp.EMDBPost Config showClusterDBCAgentMessage INFO: **************** Current Configuration ********** ****** INSTANCE NODE DBCONTROL_UPLOA D_HOST ---------- ---------- --------------- ------ ORA11 demo1 demo1 ORA11 demo2 demo1
To display the status
$ emctl status dbconsole Oracle Enterprise Manager 11g Database Control Rele ase 11.2.0.1.0 Copyright (c) 1996, 2009 Oracle Corporation. All r ights reserved. https://demo1:1158/em/console/aboutApplication Oracle Enterprise Manager 11g is running. --------------------------------------------------- --------------- Logs are generated in directory /oracle/app/oracle/product/11.2.0/dbhome_1/demo1_OR A11/sysman/log $
To display the properties.
$ emctl status dbconsole Oracle Enterprise Manager 11g Database Control Rele ase 11.2.0.1.0 Copyright (c) 1996, 2009 Oracle Corporation. All r ights reserved. https://demo1:1158/em/console/aboutApplication Oracle Enterprise Manager 11g is running. --------------------------------------------------- --------------- Logs are generated in directory /oracle/app/oracle/product/11.2.0/dbhome_1/demo1_OR A11/sysman/log $
Locate the line “oracle.sysman.eml.mntr.emdRepConnectDescriptor=mycluster1\:1522/ORA11” !
The line “oracle.sysman.eml.mntr.emdRepPort=1521” show the selected port.
$ pwd /oracle/app/oracle/product/11.2.0/dbhome_1/demo1_OR A11/sysman/config $ cat emoms.properties #Sun Jul 24 16:41:39 CEST 2011 oracle.sysman.emSDK.svlt.ConsoleServerName=demo1\:1 158_Management_Service oracle.sysman.eml.mntr.emdRepPwd=9bec76907f4b65cd emdrep.ping.pingCommand=/usr/sbin/ping <hostname> em_oob_shutdown=false LargeRepository=false oracle.sysman.eml.mntr.emdRepPort=1521 oracle.sysman.eml.mntr.emdRepDBName=ORA11 EMD_URL=https\://demo1\:3938/emd/main em_email_address=%EM_EMAIL_ADDRESS% oracle.sysman.eml.mntr.emdRepPwdSeed=68478499215119 82516 oracle.sysman.emSDK.svlt.ConsoleMode=standalone
Unofficial documentation (IBM Internal) 53/53 IBM Oracle Center (IOC)
em_oob_crash=false em.oms.dumpModules=omsThread,repos oracle.sysman.emRep.dbConn.statementCacheSize=50 oracle.sysman.db.isqlplusUrl=http\://demo1\:/isqlpl us/dynamic em_oob_startup=false oracle.sysman.emSDK.svlt.ConsoleServerPort=1158 oracle.sysman.eml.mntr.emdRepRAC=TRUE em_from_email_address=%EM_FROM_EMAIL_ADDRESS% oracle.sysman.eml.mntr.emdRepPwdEncrypted=TRUE oracle.sysman.db.isqlplusWebDBAUrl=http\://demo1\:/ isqlplus/dba/dynamic oracle.sysman.emSDK.svlt.ConsoleServerHost=demo1 oracle.sysman.eml.mntr.emdRepDBID=701021986 oracle.sysman.emSDK.svlt.ConsoleServerHTTPSPort=115 8 em_email_gateway=%EM_EMAIL_GATEWAY% oracle.sysman.eml.mntr.emdRepServer=demo1 oracle.sysman.eml.mntr.emdRepSID=ORA111 oracle.sysman.eml.mntr.emdRepConnectDescriptor=clus terha\:1521/ORA11 oracle.sysman.emSDK.sec.ReuseLogonPassword=true oracle.sysman.emkeyfile=/oracle/app/oracle/product/ 11.2.0/dbhome_1/demo1_ORA11/sysman/config/emkey.ora em.ip.ui.enable=true oracle.sysman.eml.mntr.emdRepUser=SYSMAN oracle.sysman.emSDK.svlt.PublicServletEnabled=true
$
6 If you need to re-configure the dbconsole, it is easier to suppress the repository et then recreate it.
[oracle@demo1 ~]$ emca -deconfig dbcontrol db -repo s drop -cluster [oracle@demo1 ~]$ emca -config dbcontrol db -repos create –cluster