outdoor flash part 1 – lencarta
DESCRIPTION
ÂTRANSCRIPT
63ISSUE 47 ADVANCED PHOTOGRAPHERAdvanced Photographer is also available as a fully interactive magazine – go to iTunes now!
A mastery of your camera can only take you so far – the real skill of portrait photography is in understanding and manipulating the light
falling on your subject. The latter almost always means using flash.
Using flash to light your subject is one of the things that really separates the beginners from the skilled enthusiasts. But using flash to improve the lighting is actually easier than it looks. In this issue’s Lighting Academy, we’ll look at one of the most fundamental portrait lighting techniques – how to balance a burst of flash with ambient light to achieve a perfectly lit outdoor shot.
This is an incredibly versatile and easy-to-use
technique, which will become second nature once you’ve tried it a few times. Better still, the basic principle works whether the flash is on or off camera, and using anything from a cheap manual accessory flashgun to a dedicated flash head on a lighting stand. But, as always, the devil is in the detail, so if you’ve tried it before and not been completely happy with the results, consider this a worthwhile refresher.
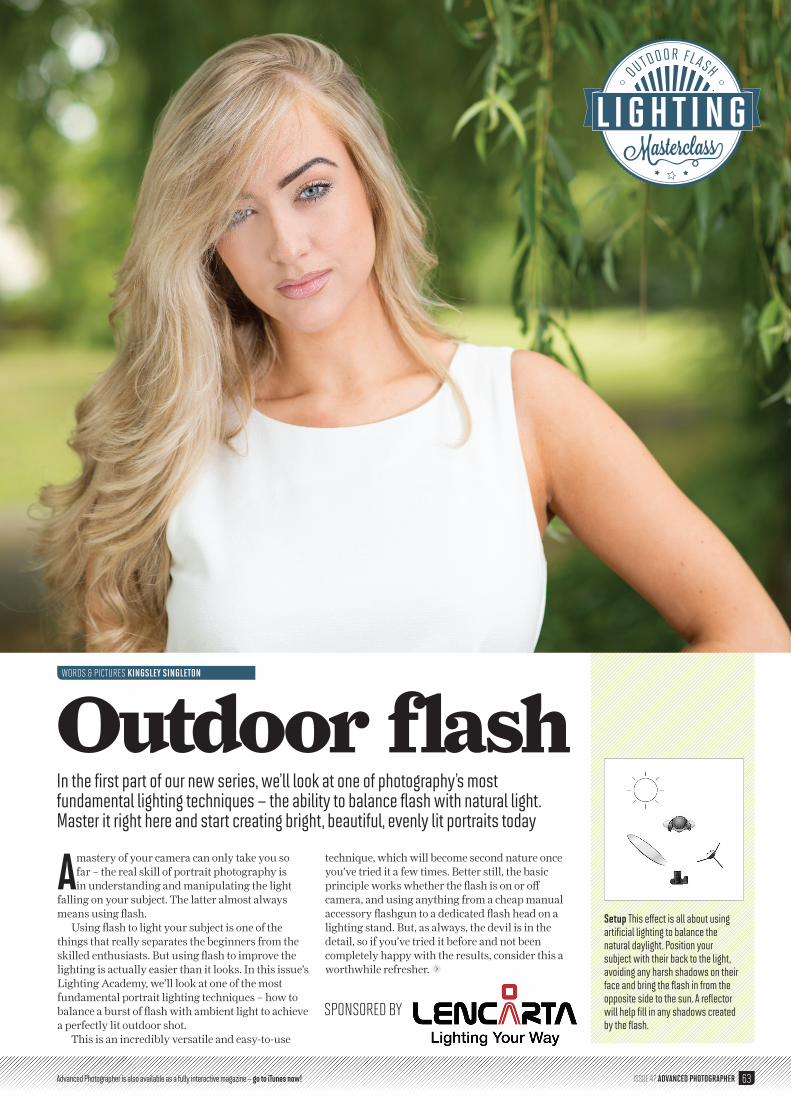
In the first part of our new series, we’ll look at one of photography’s most fundamental lighting techniques – the ability to balance flash with natural light. Master it right here and start creating bright, beautiful, evenly lit portraits today
Outdoor flashWORDS & PICTURES KINGSLEY SINGLETON
Setup This effect is all about using artificial lighting to balance the natural daylight. Position your subject with their back to the light, avoiding any harsh shadows on their face and bring the flash in from the opposite side to the sun. A reflector will help fill in any shadows created by the flash.
SPONSORED BY
ap47-063-066 lighting RP.indd 63 21/07/2014 13:18

64
LIGHTING MASTERCLASS
ADVANCED PHOTOGRAPHER ISSUE 47
OUTDOOR FLASH SPONSORED BY
@advancedphotog [email protected]
Power As you can see, top right, with your ambient exposure set for the background, the subject is quite underexposed. But it’s not just a simple case of throwing the flash in, because the power you use makes a big difference to the feel of the image. At 1/16 power, the flash is starting to fill in the shadows, but it’s still a bit too dark. Conversely, 1/2 power is too strong and the subject is now overexposed – not to the point of losing detail, but so they’re unbalanced with the background. The sweetspot for this shot was 1/8 power, arrived at by checking output with a flashmeter. Like most flashes, the power on the Lencarta Atom 180 flash we used is controllable in thirds of a stop, so can be fine-tuned to any exposure.
NO FLASH
FLASH 1/16 - TOO DARK
FLASH 1/8 - CORRECT
FLASH 1/2 - TOO BRIGHT
ap47-063-066 lighting RP.indd 64 21/07/2014 13:19

65ISSUE 47 ADVANCED PHOTOGRAPHERAdvanced Photographer is also available as a fully interactive magazine – go to iTunes now!
USING FLASH TO BALANCE THE LIGHTING ON LOCATION GIVES YOU MORE FLEXIBILITY THAN A REFLECTOR...
Why you need to use flashHere’s the situation. You’re shooting a subject on a nice bright day and, as is correct, you position them out of direct light and turned away from the sun so that there’s no harsh contrast on their features. You’re then faced with an exposure problem because, in shade, they’re going to be darker than the background. Naturally you’ll then expose for the subject, which will blow-out the background. That’s fine – the exposure on the subject is what’s important – but if you want the best of both you need to take control of the light.
A reflector can help with this, but the effect isn’t all that controllable, you need a second pair of hands to position it (unless you have an accessory like Lencarta’s Reflector Holder Boom) and if the light is strong it can be quite dazzling for the subject, which will affect their look. Flash, on the other hand, can be perfectly tailored to balance the ambient light. It’s also easy (and preferable) to fire your flash off-camera, which gives a more natural look all round than when it’s fired from the hotshoe.
Measure the ambient lightFirst get your ambient exposure correct, so that the background is as bright as you want it. In our example, we framed up in manual mode at ISO 100 and used the camera’s meter to determine the correct exposure of 1/125sec at f/4, giving us a shallow depth-of-field. If you want even less in focus, use a wider aperture (if you can), but the one thing to watch here is that your shutter speed doesn’t exceed the flash-sync speed, for example 1/200sec or 1/250sec – if it does, the flash won’t be visible, or will only light part of the subject. If you’re getting higher shutter speeds you’ll need to lower your ISO, use an ND filter, or simply use a smaller aperture.
If your camera/flashgun/trigger combination has high-speed flash sync, you can use that, but remember that you’ll be losing flash power the faster the sync speed you use.
One of the things that stops people shooting with off-camera flash is triggering the things in the first place – but anyone who’s ever done it will tell you it’s easy. In fact, if you have a fairly modern DSLR or CSC it may have a wireless flash mode built in, allowing it to talk to suitably equipped flashguns (check the flash section in your manual). That said, using separate transmitters and triggers is extremely straightforward and often cheaper than upgrading your kit to include integrated wireless features. We used Lencarta’s Wavesync Commander System, which offers full remote control of Lencarta flash systems, like the featured Atom 180 it comes bundled with.
TRIGGERING THE FLASH
Add in the flashIf you’re using an accessory flash gun, set it to manual mode and position it around 45º to the subject, or directly opposite the angle of the natural light, then make sure it’s triggering correctly (see panel). We used a single Lencarta Atom 180 portable flash head, which isn’t much bigger than an accessory flash gun, has a wealth of easy-to-fit modifiers, comes with a portable powerpack to provide plenty of kick and costs no more than a top-of-the-line Nikon or Canon flash (less in some cases). You can now set the flash power, either starting at a middling 1/16th power and increasing or decreasing by checking your results on screen, or get a more accurate reading with a flashmeter. Either works, but the latter will save time and the lack of faffing is a bonus – we used a Gossen DigiPro F2 at around £200. If shooting and using
Diffusers Attached to the Lencarta Atom 180 we’re using here, is a Hemisphere diffuser, which gives a softer and more natural look to the lighting on the subject. Every time you change diffusers, make sure to reassess your flash power as some leach more juice than others.
ap47-063-066 lighting RP.indd 65 21/07/2014 13:20

66 ADVANCED PHOTOGRAPHER ISSUE 47
SPONSORED BY
@advancedphotog [email protected]
LIGHTING MASTERCLASS OUTDOOR FLASH
@advancedphotog [email protected]
Using flash on location to improve your portraits is straightforward once you get basic set up working, but add another light to your setup and see how this can increase your creative options even further. Next issue we’ll look at how to get two ‘guns firing at once and how their position and modifiers can achieve striking results.
NEXT MONTH
the screen and histogram as a guide, simply lower the power if the subject looks overexposed and increase it if they’re still too shadowed against the brighter background. After a couple of test-fires, we got to a power of 1/8th at the f/4 at ISO 100 we’d set for the ambient light. This is dialled into the flash itself. The Atom is manual output only so this is easy, and with that done we were off and shooting.
Problem solving With the flash balanced against the ambient light, and once you’ve taken a few shots, it’s time to start assessing your results beyond mere exposure. Using a single light, placed at the opposite angle to the natural light you may get still get some shadows on the subject, so a reflector (or a second flash) can be used to fill these in. Bringing the flash closer to the angle of the camera can also help reduce shadows on the subject, and if you have a diffuser then it should be fitted to soften the look further – the Atom has a neat Hemisphere Diffuser (at £14.99) that we used. After changing modifiers, remember to recalculate the flash power as its strength will be affected by what it’s bouncing off or firing through.
If your subject is too bright or dark and you’ve reached the limit of the flash’s power, alter the flash-to-subject distance; moving closer gives more power and further away, less. And remember, you’re not limited by your initial metering of the background; if you want it to be lighter or darker, use a slower or faster (without going beyond the sync speed) shutter speed respectively, and check the flash output.
There comes a time when you need more power, especially if you’re shooting groups, larger subjects using diffusers, like umbrellas or softboxes which require more juice to get the same effect, or if you simply need to position the flash further from the subject for compositional reasons. In that case, you’ll need to upgrade from your accessory flashgun to a more beefy system. The Atom 180 has enough power for full length portraits at small apertures, but if you need more, a system like Lencarta’s Safari 2 has it. Designed to offer studio-lighting wherever it’s needed, the Safari 2 has modelling lamps for more accurate changes in lighting, accepts standard S-fit accessories so you can use a range of modifiers and has faster recycle times via its battery packs, meaning you can fire off more shots in a quicker time. And the great thing is, the technique for using it is just the same!
MORE POWER!
66 ADVANCED PHOTOGRAPHER ISSUE 47
Flashmeter Although it’s quite possible to use your camera’s screen and the histogram function to gauge how much flash power is correct, it’s faster and more accurate to use a flashmeter, like this Gossen DigiPro F2.
ap47-063-066 lighting RP.indd 66 21/07/2014 13:21
AP.indd 1 21/07/2014 11:39