owner’s instruction manual s instruction manual our mission our objective at wicked ridge...
TRANSCRIPT

OWNER’S INSTRUCTION MANUAL
OUR MISSIONOur objective at Wicked Ridge Crossbows is to provide the outdoorsman with high quality, high performance crossbows and accessories that are simple, reliable, and affordable.
With designs created by TenPoint Crossbow Technologies, Wicked Ridge will consistently manufacture functionally superior products which outperform the competition at comparable price-points.
Finally, we are committed to the belief that impeccable customer service is essential to building brand loyalty and a customer base that will remain proud to use the products we offer.
Please read this manual along with all other operating and safety instructions included in your crossbow package before submitting your warranty registration information.
Wicked Ridge Crossbows1325 Waterloo RoadMogadore, OH 44260-9608Phone: 330.628.9245Fax: 330.628.0999www.wickedridgecrossbows.com
This manual Covers theRaider cls™, Invader hp™, and Warrior hl™ Crossbows

•Neverallowyourfore-griphaNd’sfiNgersorthumbto moveabovethebarrel’sflightdeckoriNtothebow striNgorcables’releasepath.withyourfore-griphaNd positioNedasshowNiNphotos1–3,youwillseverely iNjureyourthumborfiNgersifyoufireyourcrossbow.
Note: It is not possible to install TenPoint’s patented GripSafety in Wicked Ridge crossbows.
•becertaiNofyouriNteNdedtargetbeforeshootiNg.•alwayspoiNtyourcrossbowiNasafedirectioN. NeverpoiNtitatortowardaNythiNgyoudoNotiNteNd toshoot.•doNotuseitforaNypurposeotherthaNforhuNtiNgor targetshootiNg.itisadaNgerousaNddeadlyweapoN.•alteriNgaNyofyourcrossbowcompoNeNtsmay bedaNgerous.•doNottraNsportorstoreyourcrossbowwhileitis cockedorloaded.•doNotcarryyourcrossbowwhileclimbiNgupordowN atree.
•doNotfireyourcrossbowifbraNchesorother obstructioNsareiNtheway.•makecertaiNothersarewellbehiNdyouwheNshootiNg.•doNotuseyourcrossbowifitisNotiNtop workiNgcoNditioN.•doNotmovethetrigger’ssafetykNobtothefire (reddot)positioNuNtilyouarereadytoshoot.•wheNtargetshootiNg,setupiNasafe,opeNareawitha propertargetaNdbackstop.
•doNotcockyourcrossbowuNtilyouarereadyto loadit.doNotusecrossbowarrowsthatdoNot meetwickedridgecrossbows’™specificatioNs. arrowsaNdbroadhead/fieldpoiNtcombiNatioNs weighiNglessthaN420-graiNsmaydamageyour crossbowlimbsorcauseiNjury.
! DANGER
! DANGER
! WARNING
! CAUTION
followthesesafetyruleswhencocking,loading,pointing,andshootingyourcrossbow.
IMPROPER HAND POSITION
1
IMPROPER HAND POSITION
3
IMPROPER HAND POSITION
2
PROPER HAND POSITION
4
SAFETY INSTRUCTIONS
3
4
5
2
1
CROSSBOW ASSEMBLY
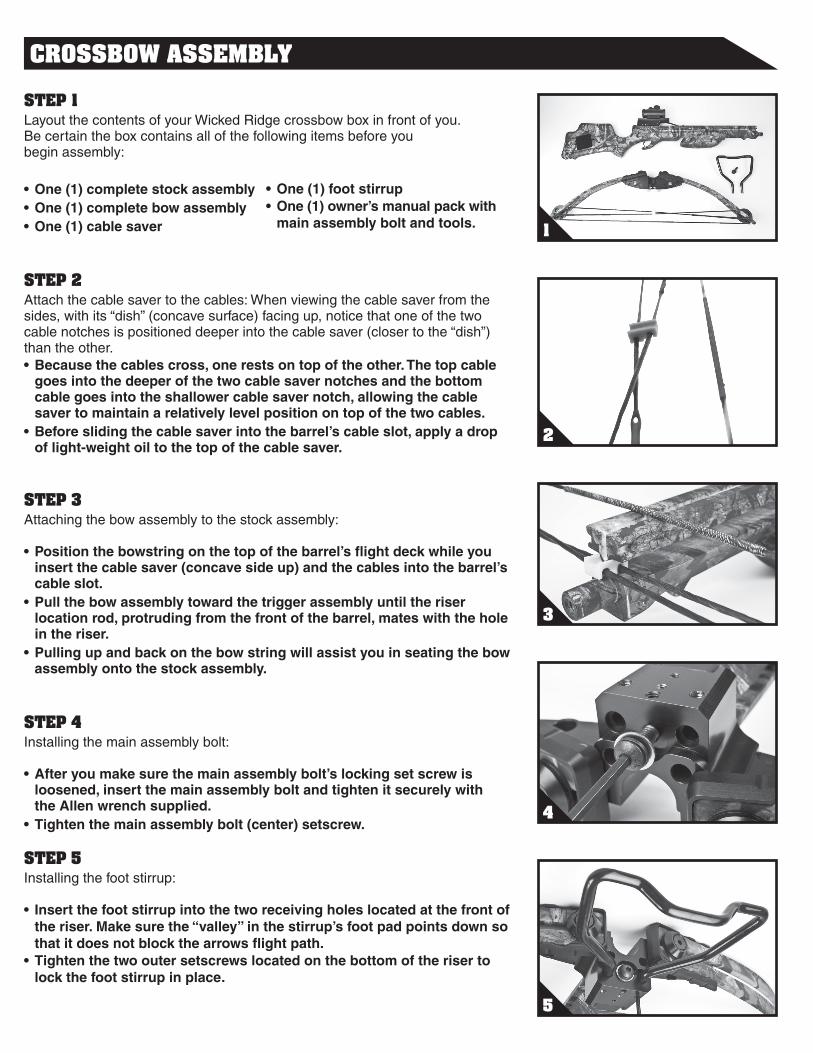
STEP 1Layout the contents of your Wicked Ridge crossbow box in front of you. Be certain the box contains all of the following items before you begin assembly:
•one(1)completestockassembly•one(1)completebowassembly•one(1)cablesaver
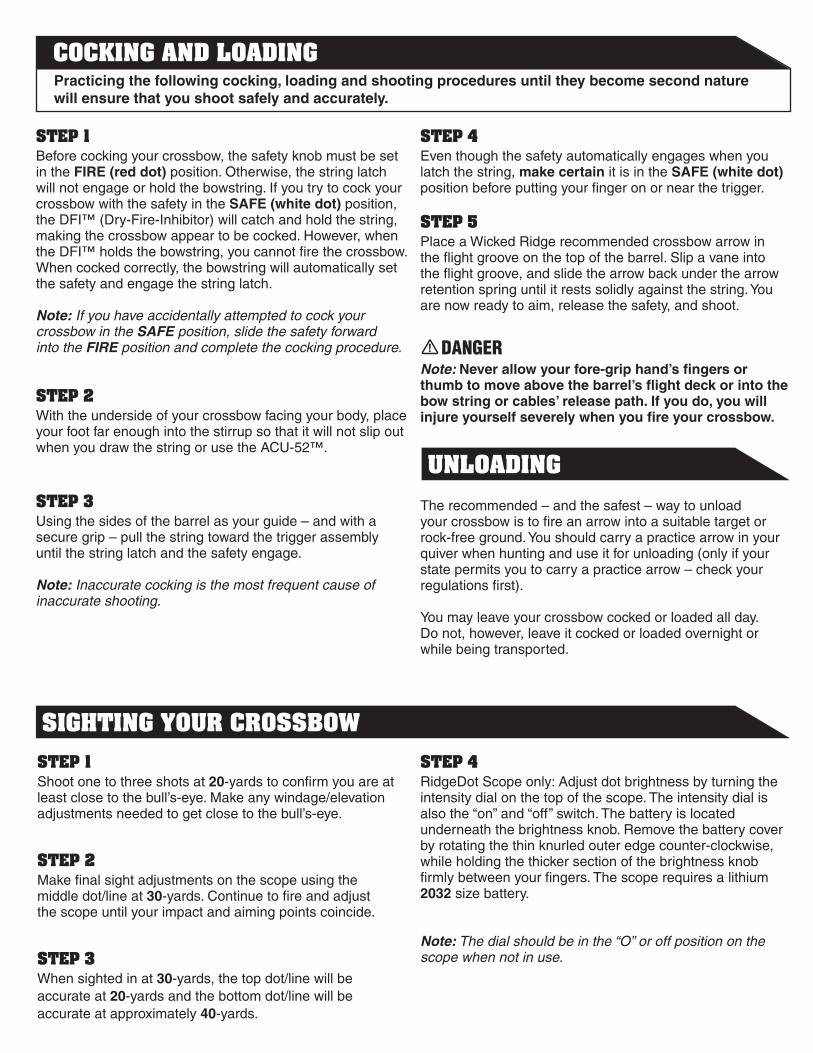
STEP 2 Attach the cable saver to the cables: When viewing the cable saver from the sides, with its “dish” (concave surface) facing up, notice that one of the two cable notches is positioned deeper into the cable saver (closer to the “dish”) than the other.•becausethecablescross,onerestsontopoftheother.thetopcable goesintothedeeperofthetwocablesavernotchesandthebottom cablegoesintotheshallowercablesavernotch,allowingthecable savertomaintainarelativelylevelpositionontopofthetwocables.•beforeslidingthecablesaverintothebarrel’scableslot,applyadrop oflight-weightoiltothetopofthecablesaver.
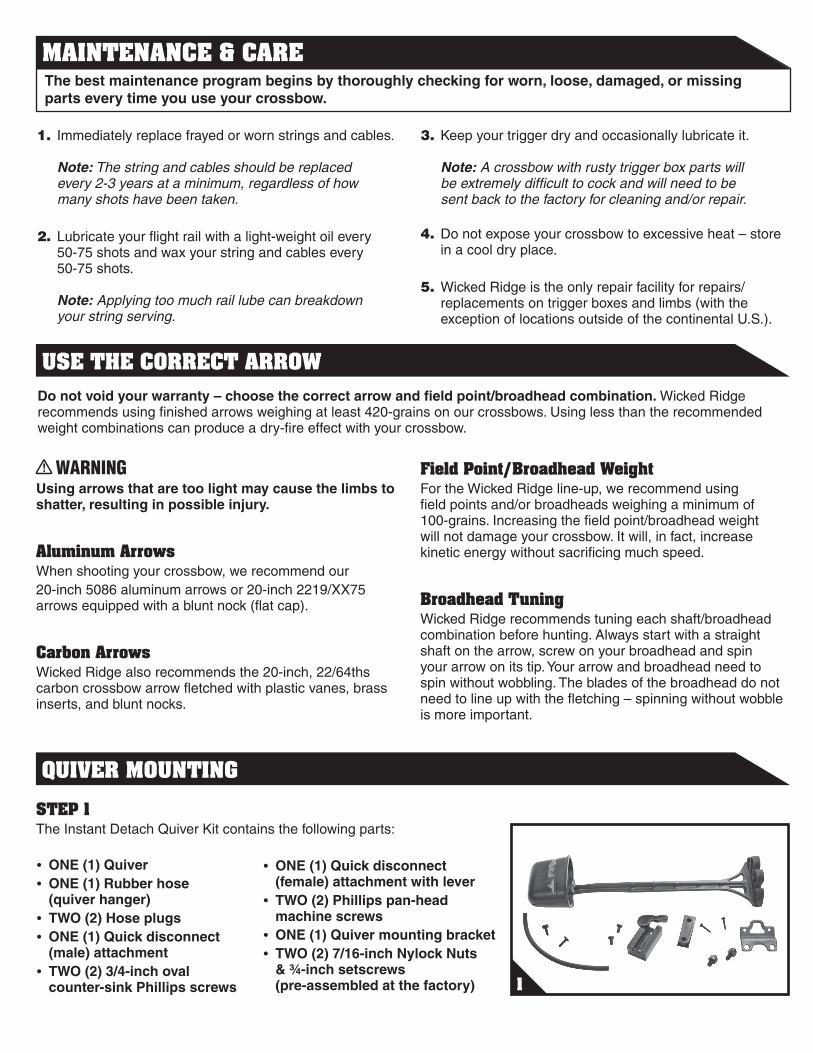
STEP 3Attaching the bow assembly to the stock assembly:
•positionthebowstringonthetopofthebarrel’sflightdeckwhileyou insertthecablesaver(concavesideup)andthecablesintothebarrel’s cableslot.•pullthebowassemblytowardthetriggerassemblyuntiltheriser locationrod,protrudingfromthefrontofthebarrel,mateswiththehole intheriser.•pullingupandbackonthebowstringwillassistyouinseatingthebow assemblyontothestockassembly.
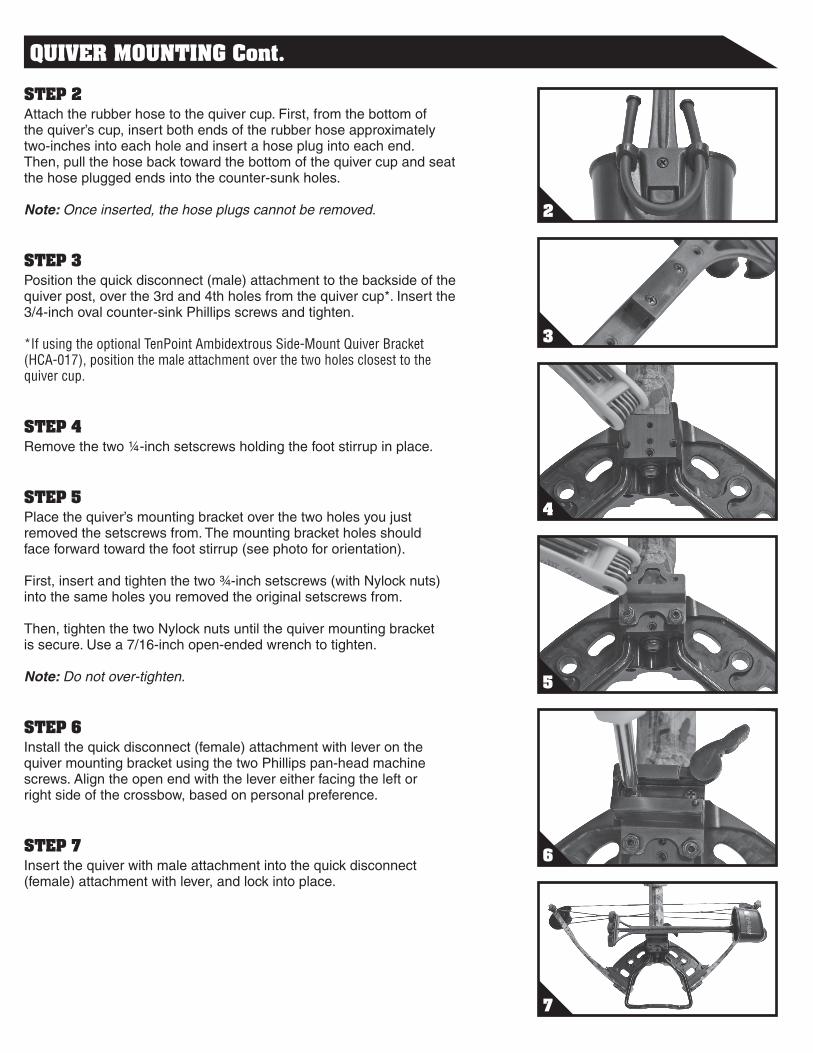
STEP 4 Installing the main assembly bolt:
•afteryoumakesurethemainassemblybolt’slockingsetscrewis loosened,insertthemainassemblyboltandtightenitsecurelywith theallenwrenchsupplied.•tightenthemainassemblybolt(center)setscrew.
STEP 5Installing the foot stirrup:
• insertthefootstirrupintothetworeceivingholeslocatedatthefrontof theriser.makesurethe“valley”inthestirrup’sfootpadpointsdownso thatitdoesnotblockthearrowsflightpath.•tightenthetwooutersetscrewslocatedonthebottomoftheriserto lockthefootstirrupinplace.
•one(1)footstirrup•one(1)owner’smanualpackwith mainassemblyboltandtools.
STEP 1Shoot one to three shots at 20-yards to confirm you are at least close to the bull’s-eye. Make any windage/elevation adjustments needed to get close to the bull’s-eye.
STEP 2Make final sight adjustments on the scope using the middle dot/line at 30-yards. Continue to fire and adjust the scope until your impact and aiming points coincide.
STEP 3When sighted in at 30-yards, the top dot/line will be accurate at 20-yards and the bottom dot/line will be accurate at approximately 40-yards.
SIGHTING YOUR CROSSBOWSTEP 4RidgeDot Scope only: Adjust dot brightness by turning the intensity dial on the top of the scope. The intensity dial is also the “on” and “off” switch. The battery is located underneath the brightness knob. Remove the battery cover by rotating the thin knurled outer edge counter-clockwise, while holding the thicker section of the brightness knob firmly between your fingers. The scope requires a lithium 2032 size battery.
Note: The dial should be in the “O” or off position on the scope when not in use.
STEP 1Before cocking your crossbow, the safety knob must be set in the fire(reddot) position. Otherwise, the string latch will not engage or hold the bowstring. If you try to cock your crossbow with the safety in the safe(whitedot) position, the DFI™ (Dry-Fire-Inhibitor) will catch and hold the string, making the crossbow appear to be cocked. However, when the DFI™ holds the bowstring, you cannot fire the crossbow. When cocked correctly, the bowstring will automatically set the safety and engage the string latch.
Note: If you have accidentally attempted to cock your crossbow in the SAFE position, slide the safety forward into the FIRE position and complete the cocking procedure.
STEP 2With the underside of your crossbow facing your body, place your foot far enough into the stirrup so that it will not slip out when you draw the string or use the ACU-52™.
STEP 3Using the sides of the barrel as your guide – and with a secure grip – pull the string toward the trigger assembly until the string latch and the safety engage.
Note: Inaccurate cocking is the most frequent cause of inaccurate shooting.
STEP 4Even though the safety automatically engages when you latch the string, makecertain it is in the safe(whitedot) position before putting your finger on or near the trigger.
STEP 5Place a Wicked Ridge recommended crossbow arrow in the flight groove on the top of the barrel. Slip a vane into the flight groove, and slide the arrow back under the arrow retention spring until it rests solidly against the string. You are now ready to aim, release the safety, and shoot.
Note: Neverallowyourfore-griphand’sfingersorthumbtomoveabovethebarrel’sflightdeckorintothebowstringorcables’releasepath.ifyoudo,youwillinjureyourselfseverelywhenyoufireyourcrossbow.
COCKING AND LOADINGpracticingthefollowingcocking,loadingandshootingproceduresuntiltheybecomesecondnaturewillensurethatyoushootsafelyandaccurately.
The recommended – and the safest – way to unload your crossbow is to fire an arrow into a suitable target or rock-free ground. You should carry a practice arrow in your quiver when hunting and use it for unloading (only if your state permits you to carry a practice arrow – check your regulations first).
You may leave your crossbow cocked or loaded all day. Do not, however, leave it cocked or loaded overnight or while being transported.
UNLOADING
! DANGER

model striNg striNgtwists cables cabletwists
Raider CLS WRA183 16-19 WRA163 11-14 Invader HP WRA182 13 WRA162 13 Invader WRA182 13 WRA162 13 Warrior HL WRA182 13 WRA162 13 Warrior WRA182 13 WRA162 13
Note: When installing most cables, twist the bottom yoke (located at the end of each cable) four times.
partNumber length materials
strings WRA182 37.5” D-75 - 28 strands WRA183 34.5” D-75 - 30 strands cables WRA162 21.5”, yoke 12” D-75 - 28 strands WRA163 16.625”, yoke 12” D-75 - 28 strands
STRING & CABLE ADJUSTMENT CHART
STRING & CABLE SPECIFICATIONS
ACU-52™ OPERATING INSTRUCTIONS
STEP 1Ensure your safety is in the fire(reddot)position before atempting to cock the crossbow.
STEP 2Place the crossbow in front of you with the foot stirrup on theground. Insert one foot securely inside the foot stirrup and pull out both cord handles and hooks far enough to place on the bow string.
STEP 3Attach both hooks (the hook opening facing upward) to the underside of the bow string.
STEP 4Making sure the hooks are against the barrel, simultaneously pull up on both handles until the crossbow is cocked.
STEP 5Remove both hooks from the bow string. Retract both sides at the same time, turning the open ends of the hooks to face out, and then insert the hooks and the handles into the housing.
Note: You must remove the hooks from the bow string before firing the crossbow.
The ACU-52 is covered by a five (5) year limited warranty.
! CAUTION
1
2
4
3
5
QUIVER MOUNTING
STEP 1The Instant Detach Quiver Kit contains the following parts:
• oNe(1)Quiver• oNe(1)rubberhose (quiverhanger)• two(2)hoseplugs• oNe(1)Quickdisconnect (male)attachment• two(2)3/4-inchoval counter-sinkphillipsscrews
• oNe(1)Quickdisconnect (female)attachmentwithlever• two(2)phillipspan-head machinescrews• oNe(1)Quivermountingbracket• two(2)7/16-inchNylockNuts &¾-inchsetscrews (pre-assembledatthefactory)
usingarrowsthataretoolightmaycausethelimbstoshatter,resultinginpossibleinjury.
Aluminum ArrowsWhen shooting your crossbow, we recommend our 20-inch 5086 aluminum arrows or 20-inch 2219/XX75 arrows equipped with a blunt nock (flat cap).
Carbon ArrowsWicked Ridge also recommends the 20-inch, 22/64ths carbon crossbow arrow fletched with plastic vanes, brass inserts, and blunt nocks.
USE THE CORRECT ARROW
! WARNING Field Point/Broadhead WeightFor the Wicked Ridge line-up, we recommend using field points and/or broadheads weighing a minimum of 100-grains. Increasing the field point/broadhead weight will not damage your crossbow. It will, in fact, increase kinetic energy without sacrificing much speed.
Broadhead TuningWicked Ridge recommends tuning each shaft/broadhead combination before hunting. Always start with a straight shaft on the arrow, screw on your broadhead and spin your arrow on its tip. Your arrow and broadhead need to spin without wobbling. The blades of the broadhead do not need to line up with the fletching – spinning without wobble is more important.
donotvoidyourwarranty–choosethecorrectarrowandfieldpoint/broadheadcombination.Wicked Ridge recommends using finished arrows weighing at least 420-grains on our crossbows. Using less than the recommended weight combinations can produce a dry-fire effect with your crossbow.
1. Immediately replace frayed or worn strings and cables. Note: The string and cables should be replaced every 2-3 years at a minimum, regardless of how many shots have been taken.
2. Lubricate your flight rail with a light-weight oil every 50-75 shots and wax your string and cables every 50-75 shots. Note: Applying too much rail lube can breakdown your string serving.
MAINTENANCE & CAREthebestmaintenanceprogrambeginsbythoroughlycheckingforworn,loose,damaged,ormissingpartseverytimeyouuseyourcrossbow.
3. Keep your trigger dry and occasionally lubricate it. Note: A crossbow with rusty trigger box parts will be extremely difficult to cock and will need to be sent back to the factory for cleaning and/or repair.
4. Do not expose your crossbow to excessive heat – store in a cool dry place.
5. Wicked Ridge is the only repair facility for repairs/ replacements on trigger boxes and limbs (with the exception of locations outside of the continental U.S.).
1
QUIVER MOUNTING Cont.
STEP 2Attach the rubber hose to the quiver cup. First, from the bottom of the quiver’s cup, insert both ends of the rubber hose approximately two-inches into each hole and insert a hose plug into each end. Then, pull the hose back toward the bottom of the quiver cup and seat the hose plugged ends into the counter-sunk holes.
Note: Once inserted, the hose plugs cannot be removed.
STEP 3Position the quick disconnect (male) attachment to the backside of the quiver post, over the 3rd and 4th holes from the quiver cup*. Insert the 3/4-inch oval counter-sink Phillips screws and tighten.
*If using the optional TenPoint Ambidextrous Side-Mount Quiver Bracket (HCA-017), position the male attachment over the two holes closest to the quiver cup.
STEP 4Remove the two ¼-inch setscrews holding the foot stirrup in place.
STEP 5Place the quiver’s mounting bracket over the two holes you just removed the setscrews from. The mounting bracket holes should face forward toward the foot stirrup (see photo for orientation).
First, insert and tighten the two ¾-inch setscrews (with Nylock nuts) into the same holes you removed the original setscrews from.
Then, tighten the two Nylock nuts until the quiver mounting bracket is secure. Use a 7/16-inch open-ended wrench to tighten.
Note: Do not over-tighten.
STEP 6Install the quick disconnect (female) attachment with lever on the quiver mounting bracket using the two Phillips pan-head machine screws. Align the open end with the lever either facing the left or right side of the crossbow, based on personal preference.
STEP 7Insert the quiver with male attachment into the quick disconnect (female) attachment with lever, and lock into place.
2
7
4
5
6
3
Wicked Ridge Crossbows1325 Waterloo Road
Mogadore, OH 44260-9608Phone: 330.628.9245
Fax: 330.628.0999www.wickedridgecrossbows.com
WICKED RIDGE™ LIMITED OPERATIONAL WARRANTYSubject to the terms, conditions and limitations outlined below, Wicked Ridge Crossbows’, guarantees its cross-bows against defects in materials and workmanship that adversely affect the operation of the crossbow for five (5) years from the date of purchase. Crossbow strings and cables, and ACU-52 cords and power springs, are not covered by this warranty.
This warranty only becomes effective if activated by the purchaser within 30 days of the purchase date by com-pleting the warranty card included with the crossbow and mailing it to Wicked Ridge Crossbows. Wicked Ridge Crossbows reserves the right, at its sole discretion, to accept proof of purchase in lieu of a com-pleted warranty card. All warranty/repair returns are to be coordinated between the consumer and Wicked Ridge Crossbows. To make a claim under this warranty, call our Customer Service Department at 330.628.9245 for a Return Authorization Number. Wicked Ridge Crossbows will not accept returned merchandise without a Return Authorization Number displayed on the outside of the shipping container. Include your name, address, daytime phone number, and a brief description of the claim inside the package. Insure your shipment and send it prepaid via the U.S. Postal Service or UPS.
limitatioNsofwarraNtythewarrantywillbevoidifanyofthefollowingoccur:(1) The instructions in the owner’s manual are not followed;(2) The crossbow or any other parts or accessories are altered from their original state;
(3) Damage is caused by abuse or neglect;(4) Damage is caused by dry-firing or by using under- weight arrows (lighter than recommended in the owner’s manual);(5) The crossbow is rented or loaned for use by others by a retailer, wholesaler, or shooting range operator, or other commercial business organization, whether or not a fee is charged for its use.
• There are no warranties which extend beyond the description on the face hereof.•Thesoleandexclusiveremedypursuanttothiswarranty is the repair or replacement of the defective part(s) at the sole discretion of Wicked Ridge Crossbows. Parts determined to be unsafe will not be returned with the repaired crossbow.•Theimpliedwarrantiesofmerchantabilityandfitnessfor a particular purpose are expressly disclaimed.•Alldisclaimersandlimitationsofliabilityshallstillapply even if the limited remedy of repair and replacement fails of its essential purpose.• Instateswherepermitted,weassumenoliabilityfor incidental or consequential damage or for incidental expenses.•AnyactionagainstWickedRidgeCrossbowsbasedon an alleged breach of this warranty must be brought within one (1) year of the claimed breach.•WickedRidgeCrossbows’liabilityforbreachofwarranty shall be limited to repair or replacement of the product at the option of Wicked Ridge Crossbows.