owner’s manual pdf manual to obtain the pdf manual · • it is forbidden by law to make an audio...
TRANSCRIPT

Owner’s Manual (this document)
Read this first. It explains the basic things you need to know in order to use the TR-8S.
PDF Manual (download from the Web)
5 Reference ManualThis provides a detailed explanation of how to use the TR-8S.
5 MIDI ImplementationThis is detailed information about MIDI messages.
To obtain the PDF manual1. Enter the following URL in your computer.
https://www.roland.com/support/
2. On the Support menu, choose “Owner’s Manuals.”
3. Choose “TR-8S” as the product name.
Before using this unit, carefully read “USING THE UNIT SAFELY” and “IMPORTANT NOTES” (the leaflet “USING THE UNIT SAFELY” and the Owner’s Manual (p. 2)). After reading, keep the document(s) where it will be available for immediate reference.
Copyright © 2018 ROLAND CORPORATION
Owner’s Manual

2
USING THE UNIT SAFELY
WARNINGUse only the supplied AC adaptor and the correct voltageBe sure to use only the AC adaptor supplied with the unit. Also, make sure the line voltage at the installation matches the input voltage specified on the AC adaptor’s body. Other AC adaptors may use a different polarity, or be designed for a different voltage, so their use could result in damage, malfunction, or electric shock.
IMPORTANT NOTESPlacement• Depending on the material and
temperature of the surface on which you place the unit, its rubber feet may discolor or mar the surface.
Repairs and Data• Before sending the unit away for repairs, be
sure to make a backup of the data stored within it; or you may prefer to write down the needed information. Although we will do our utmost to preserve the data stored in your unit when we carry out repairs, in some cases, such as when the memory section is physically damaged, restoration of the stored content may be impossible. Roland assumes no liability concerning the restoration of any stored content that has been lost.
Additional Precautions• Any data stored within the unit can be lost
as the result of equipment failure, incorrect operation, etc. To protect yourself against the irretrievable loss of data, try to make a habit of creating regular backups of the data you’ve stored in the unit.
• Roland assumes no liability concerning the restoration of any stored content that has been lost.
• Never strike or apply strong pressure to the display.
• Continuous playing may cause dis-coloration of the pad, but this will not affect the pad’s function.
• Do not use connection cables that contain a built-in resistor.
Using External Memories• Please observe the following precautions
when handling external memory devices. Also, make sure to carefully observe all the precautions that were supplied with the external memory device.• Do not remove the device while reading/
writing is in progress.• To prevent damage from static
electricity, discharge all static electricity from your person before handling the device.
Intellectual Property Right• It is forbidden by law to make an audio
recording, video recording, copy or revision of a third party’s copyrighted work (musical work, video work, broadcast, live performance, or other work), whether in whole or in part, and distribute, sell, lease, perform or broadcast it without the permission of the copyright owner.
• Do not use this product for purposes that could infringe on a copyright held by a third party. We assume no responsibility whatsoever with regard to any infringements of third-party copyrights arising through your use of this product.
• The copyright of content in this product (the sound waveform data, style data, accompaniment patterns, phrase data, audio loops and image data) is reserved by Roland Corporation.
• Purchasers of this product are permitted to utilize said content (except song data such as Demo Songs) for the creating, performing, recording and distributing original musical works.
• Purchasers of this product are NOT permitted to extract said content in original or modified form, for the purpose of distributing recorded medium of said content or making them available on a computer network.
• The SD logo and SDHC logo
are trademarks of SD-3C, LLC.• ASIO is a trademark and software of
Steinberg Media Technologies GmbH.• This product contains eParts integrated
software platform of eSOL Co.,Ltd. eParts is a trademark of eSOL Co., Ltd. in Japan.
• This Product uses the Source Code of μT-Kernel under T-License 2.0 granted by the T-Engine Forum (www.tron.org).
• Roland, SCATTER are either registered trademarks or trademarks of Roland Corporation in the United States and/or other countries.
• Company names and product names appearing in this document are registered trademarks or trademarks of their respective owners.

3
USING THE UNIT SAFELY . . . . . . . . . . . . . . . . . . . . . . . . . . . . . . . . . 2
IMPORTANT NOTES . . . . . . . . . . . . . . . . . . . . . . . . . . . . . . . . . . . . . . 2
Panel Descriptions . . . . . . . . . . . . . . . . . . . . . . . . . . . . . . . . . . . . . . . 4
Top Panel . . . . . . . . . . . . . . . . . . . . . . . . . . . . . . . . . . . . . . . . . . . . . 4Rear Panel (Connecting Your Equipment) . . . . . . . . . . . . . . . . 6
Introduction . . . . . . . . . . . . . . . . . . . . . . . . . . . . . . . . . . . . . . . . . . . . . 7
Turning the TR-8S On . . . . . . . . . . . . . . . . . . . . . . . . . . . . . . . . . . 7Turning Off the Power . . . . . . . . . . . . . . . . . . . . . . . . . . . . . . . . . 7Formatting an SD Card (SD CARD FORMAT) . . . . . . . . . . . . . 7
Overview of the TR-8S . . . . . . . . . . . . . . . . . . . . . . . . . . . . . . . . . . . 8
What Is a “PATTERN”? . . . . . . . . . . . . . . . . . . . . . . . . . . . . . . . . . . 8What Is a “KIT”? . . . . . . . . . . . . . . . . . . . . . . . . . . . . . . . . . . . . . . . . 8
Playing Patterns . . . . . . . . . . . . . . . . . . . . . . . . . . . . . . . . . . . . . . . . . 9
Playing Patterns . . . . . . . . . . . . . . . . . . . . . . . . . . . . . . . . . . . . . . . 9Selecting a Pattern . . . . . . . . . . . . . . . . . . . . . . . . . . . . . . . . . . . . 9Changing the Length of the Variation (Setting the Variation’s Last Step) . . . . . . . . . . . . . . . . . . . . . . . 9
Changing the Length of a Specific Track (Setting the Track’s Last Step) . . . . . . . . . . . . . . . . . . . . . 9
Generating a Random Pattern . . . . . . . . . . . . . . . . . . . . . . . . . . 10Copying a Pattern . . . . . . . . . . . . . . . . . . . . . . . . . . . . . . . . . . . . . 10Deleting a Pattern . . . . . . . . . . . . . . . . . . . . . . . . . . . . . . . . . . . . . 10Copying a Variation . . . . . . . . . . . . . . . . . . . . . . . . . . . . . . . . . . . . 10Selecting a Fill-In Variation . . . . . . . . . . . . . . . . . . . . . . . . . . . . . 10
Inserting a Fill-In (Manual Trigger) . . . . . . . . . . . . . . . . . 10Inserting a Fill-In at Regular Intervals (Auto Fill In) . . 10
Adjusting the Reverb or Delay . . . . . . . . . . . . . . . . . . . . . . . . . . 10Master Effect . . . . . . . . . . . . . . . . . . . . . . . . . . . . . . . . . . . . . . . . . . 10
TR-REC (Step Recording) . . . . . . . . . . . . . . . . . . . . . . . . . . . . . . . . . 11
Inputting Sub Steps . . . . . . . . . . . . . . . . . . . . . . . . . . . . . . . . . . . 11Specifying a Flam . . . . . . . . . . . . . . . . . . . . . . . . . . . . . . . . . . . . . . 11Inputting Weak Beats . . . . . . . . . . . . . . . . . . . . . . . . . . . . . . . . . . 11Inputting Alternate Sounds (ALT INST) . . . . . . . . . . . . . . . . . . 11Specifying Accents . . . . . . . . . . . . . . . . . . . . . . . . . . . . . . . . . . . . 11Deleting a Recorded Step from the Track . . . . . . . . . . . . . . . . 11Recording/Playing MOTION . . . . . . . . . . . . . . . . . . . . . . . . . . . . 11
INST-REC (Realtime Recording) . . . . . . . . . . . . . . . . . . . . . . . . . . 12
Playing Sub Steps . . . . . . . . . . . . . . . . . . . . . . . . . . . . . . . . . . . . . 12Specifying a Flam . . . . . . . . . . . . . . . . . . . . . . . . . . . . . . . . . . . . . . 12Playing Weak Beats . . . . . . . . . . . . . . . . . . . . . . . . . . . . . . . . . . . . 12Playing Alternate Sounds . . . . . . . . . . . . . . . . . . . . . . . . . . . . . . 12Deleting a Recorded Step from the Track . . . . . . . . . . . . . . . . 12Recording/Playing MOTION . . . . . . . . . . . . . . . . . . . . . . . . . . . . 12Using the Inst Pad . . . . . . . . . . . . . . . . . . . . . . . . . . . . . . . . . . . . . 12
Using the Inst Pad to Play Instruments . . . . . . . . . . . . . 12Recording While You Use the Inst Pad to Play Instruments . . . . . . . . . . . . . . . . . . . . . . . . . . . . . . . . . . . . . 12
INST-PLAY (Performing) . . . . . . . . . . . . . . . . . . . . . . . . . . . . . . . . . . 13
Playing Sub Steps . . . . . . . . . . . . . . . . . . . . . . . . . . . . . . . . . . . . . 13Performing a Flam . . . . . . . . . . . . . . . . . . . . . . . . . . . . . . . . . . . . . 13Performing Weak Beats (WEAK BEATS) . . . . . . . . . . . . . . . . . . 13Performing Alternate Sounds (ALT INST) . . . . . . . . . . . . . . . . 13Performing a Roll (ROLL) . . . . . . . . . . . . . . . . . . . . . . . . . . . . . . . 13
Editing the Pattern Settings (Pattern Setting) . . . . . . . . . . . 13
Editing a Kit or Instrument . . . . . . . . . . . . . . . . . . . . . . . . . . . . . . . 14
Selecting Kits (KIT) . . . . . . . . . . . . . . . . . . . . . . . . . . . . . . . . . . . . . 14Editing a Kit’s Settings (KIT Edit) . . . . . . . . . . . . . . . . . . . . . . . . 14
Detailed Reverb Settings . . . . . . . . . . . . . . . . . . . . . . . . . 14Detailed Delay Settings . . . . . . . . . . . . . . . . . . . . . . . . . . . 14
Master Effect (MASTER FX) . . . . . . . . . . . . . . . . . . . . . . . . . . . . . 15Assigning Parameters to the [CTRL] Knobs (CTRL SELECT) 15Assigning a Different Function for Each Instrument to the [CTRL] Knob . . . . . . . . . . . . . . . . . . . . . . . . . . . . . . . . . . . . . . . . . . . 15Playing Multiple Instruments Layered (GROUPING for Layer) . . . . . . . . . . . . . . . . . . . . . . . . . . . . . . . . . . 15
Grouping Instruments . . . . . . . . . . . . . . . . . . . . . . . . . . . . 15Selecting an Instrument’s Tone (INST) . . . . . . . . . . . . . . . . . . . 15Editing an Instrument’s Sound (INST Edit) . . . . . . . . . . . . . . . 16
Changing an Instrument’s Pan . . . . . . . . . . . . . . . . . . . . 16Changing an Instrument’s Gain . . . . . . . . . . . . . . . . . . . 16
Copying a Kit (KIT COPY) . . . . . . . . . . . . . . . . . . . . . . . . . . . . . . . 16Using the LFO to Modify a Parameter . . . . . . . . . . . . . . . . . . . 16
Assigning an Imported User Sample to an Instrument . . . 17
Importing a User Sample (SAMPLE Import) . . . . . . . . . . . . . . 17Selecting a User Sample (SAMPLE) . . . . . . . . . . . . . . . . . . . . . . 17Editing a User Sample’s Settings (SAMPLE Edit) . . . . . . . . . . 17
Various Operations . . . . . . . . . . . . . . . . . . . . . . . . . . . . . . . . . . . . . . 18
Jumping to the Beginning of a Parameter Group. . . . . . . . . 18Entering a Kit Name or Other Characters . . . . . . . . . . . . . . . . 18Saving the Pattern, Kit, or System Settings (WRITE) . . . . . . . 18Copying a Pattern or Kit (COPY) . . . . . . . . . . . . . . . . . . . . . . . . . 19Erasing a Pattern (CLEAR) . . . . . . . . . . . . . . . . . . . . . . . . . . . . . . 19Erasing Motion . . . . . . . . . . . . . . . . . . . . . . . . . . . . . . . . . . . . . . . . 19Playing Weak Beats . . . . . . . . . . . . . . . . . . . . . . . . . . . . . . . . . . . . 19Specifying the Flam Spacing . . . . . . . . . . . . . . . . . . . . . . . . . . . 19Muting a Track (MUTE) . . . . . . . . . . . . . . . . . . . . . . . . . . . . . . . . . 20
Listening to Only the Selected Instrument (SOLO) . . 20Adjusting the Tempo . . . . . . . . . . . . . . . . . . . . . . . . . . . . . . . . . . 20
Tap Tempo . . . . . . . . . . . . . . . . . . . . . . . . . . . . . . . . . . . . . . . 20Marking the Tempo . . . . . . . . . . . . . . . . . . . . . . . . . . . . . . 20
Finely Adjusting the Timing of Notes (Nudge Function) . . 20
Synchronizing/Recording with Other Devices . . . . . . . . . . . 21
Synchronizing with a TB-3 . . . . . . . . . . . . . . . . . . . . . . . . . . . . . . 21Using the TR-8S as a MIDI Controller . . . . . . . . . . . . . . . . . . . . 21Using the ASSIGNABLE OUT/TRIGGER OUT jacks as Trigger Out . . . . . . . . . . . . . . . . . . . . . . . . . . . . . . . . . . . . . . . . . . . 21Assigning an Instrument to the ASSIGNABLE OUT/TRIGGER OUT jacks . . . . . . . . . . . . . . . . . . . . . . . . . . . . . . . . . . . . 21Inputting an External Audio Source (EXT IN) . . . . . . . . . . . . . 21Connecting a Computer via USB . . . . . . . . . . . . . . . . . . . . . . . . 21
Various Settings . . . . . . . . . . . . . . . . . . . . . . . . . . . . . . . . . . . . . . . . . 22
Returning to the Factory Settings (FACTORY RESET) . . . . . . 22Backing Up Data to SD Card (BACKUP) . . . . . . . . . . . . . . . . . . 22Restoring Data That Was Backed Up to SD Card (RESTORE) 23Convenient Functions (UTILITY) . . . . . . . . . . . . . . . . . . . . . . . . 23
Error Messages . . . . . . . . . . . . . . . . . . . . . . . . . . . . . . . . . . . . . . . . . . 24
Main Specifications . . . . . . . . . . . . . . . . . . . . . . . . . . . . . . . . . . . . . . 24
Contents
4
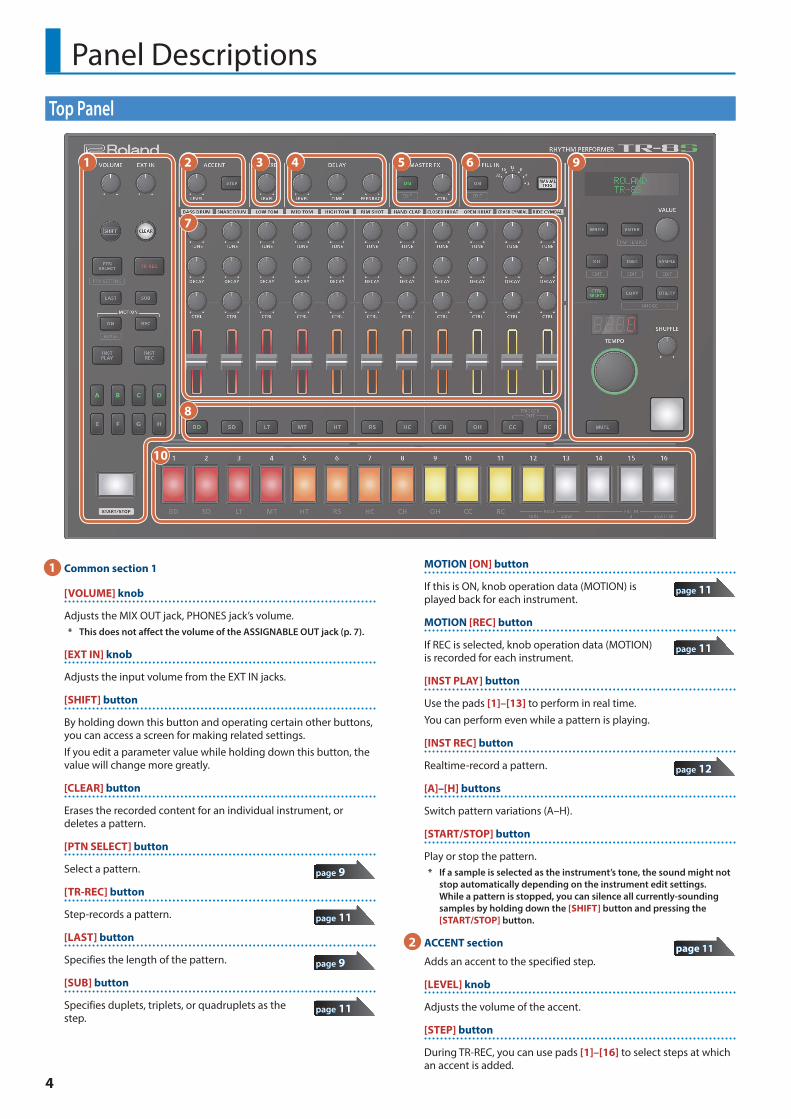
Panel Descriptions
1 Common section 1
[VOLUME] knob
Adjusts the MIX OUT jack, PHONES jack’s volume.* This does not affect the volume of the ASSIGNABLE OUT jack (p. 7).
[EXT IN] knob
Adjusts the input volume from the EXT IN jacks.
[SHIFT] button
By holding down this button and operating certain other buttons, you can access a screen for making related settings.If you edit a parameter value while holding down this button, the value will change more greatly.
[CLEAR] button
Erases the recorded content for an individual instrument, or deletes a pattern.
[PTN SELECT] button
Select a pattern.
[TR-REC] button
Step-records a pattern.
[LAST] button
Specifies the length of the pattern.
[SUB] button
Specifies duplets, triplets, or quadruplets as the step.
MOTION [ON] button
If this is ON, knob operation data (MOTION) is played back for each instrument.
MOTION [REC] button
If REC is selected, knob operation data (MOTION) is recorded for each instrument.
[INST PLAY] button
Use the pads [1]–[13] to perform in real time.You can perform even while a pattern is playing.
[INST REC] button
Realtime-record a pattern.
[A]–[H] buttons
Switch pattern variations (A–H).
[START/STOP] button
Play or stop the pattern.* If a sample is selected as the instrument’s tone, the sound might not
stop automatically depending on the instrument edit settings. While a pattern is stopped, you can silence all currently-sounding samples by holding down the [SHIFT] button and pressing the [START/STOP] button.
2 ACCENT section
Adds an accent to the specified step.
[LEVEL] knob
Adjusts the volume of the accent.
[STEP] button
During TR-REC, you can use pads [1]–[16] to select steps at which an accent is added.
page 9
page 11
page 9
page 11
page 11
page 11
page 12
page 11
Top Panel
1 2
7
8
10
5 6 9 3 4

5
Panel Descriptions
3 REVERB section
[LEVEL] knob
Adjusts the volume of the reverb.
4 DELAY section
[LEVEL] knob
Adjusts the volume of the delay.
[TIME] knob
Adjusts the length of the delay.
[FEEDBACK] knob
Adjusts the amount of delay sound that is returned to the input.
5 MASTER FX section
[ON] button
Turns the master effect on/off.
[CTRL] knob
Controls the content specified by the master effect (p. 15).
6 AUTO FILL IN section
[ON] button
If this is on, a fill-in is inserted at the interval specified by the [AUTO FILL IN] knob.
[AUTO FILL IN] knob
Automatically inserts a fill-in at the specified interval of measures.
[MANUAL TRIG] button
Press this button to insert a fill-in.
7 INST edit section
Here you can adjust the tonal character of the instrument’s tone.
[TUNE] knob
Adjusts the tuning (pitch).
[DECAY] knob
Adjusts the length of the decay.
[CTRL] knob
Controls the content specified by CTRL SELECT (p. 15).* Depending on the tone, there might not be any effect.
Level fader
Adjusts the volume.
8 INST select buttons
During TR-REC, these buttons select the instrument that is recorded.In the INST screen or INST Edit screen, these buttons select the instrument whose settings you want to edit.In [TR-REC] or [INST REC], you can hold down the [CC] button and press the [RC] button to input a pattern at which a trigger is output to the TRIGGER OUT jack (mini jack).* This is not related to the ASSIGNABLE OUT/TRIGGER OUT jacks
(phone jacks).
9 Common section 2
Display
Shows pattern names and various settings.
[WRITE] button
Saves the pattern/kit/system settings.* Parameters of the pattern or kit that you’re editing
are remembered until you turn off the power. Even if you select a different pattern or kit, and then re-select the one you had been editing, it is recalled in the edited state; however, if you turn the power off and on again, it returns to the unedited state. If you want to keep the edits that you made to a pattern or kit, you must save that pattern or kit.
[ENTER] button
Use this button mainly to confirm a value or execute an operation.
[VALUE] knob
This is used to modify values.
[KIT] button
Selects a kit.
[INST] button
Selects a sound (instrument’s tone) for the instrument.
[SAMPLE] button
Selects a sample as the sound (instrument’s tone) for the instrument.
[CTRL SELECT] button
Specifies the item that is controlled by each instrument’s [CTRL] knob.
[COPY] button
Copies a pattern/kit.
[UTILITY] button
Lets you edit or initialize various settings.
TEMPO display
Shows the tempo.
[TEMPO] knob
Specifies the tempo.
[SHUFFLE] knob
Adjusts the amount of shuffle (bounce).
[MUTE] button
Mutes (silences) the selected instrument.
Inst pad
This pad plays the sound of the corresponding instrument.You can use this to perform along with a pattern. The volume changes according to how strongly you strike an inst pad (the pad is velocity-sensitive).
page 10
page 10
page 15
page 10
page 18
page 14
page 15
page 17
page 15
page 19
page 23
page 20

6
Panel Descriptions
10 Pad [1]–[16]
Mode Explanation
TR-REC For each step, specify whether the instrument’s tone will sound.
PTN SELECT
Select a pattern.Hold down the [PTN SELECT] button and use pads [1]–[8] to select a bank.Release the [PTN SELECT] button and use pads [1]–[16] to select a number.
Mode Explanation
INST PLAY
5 Pads [1]–[11](INST) play instrument’s tones.
5 If you hold down either the [12] or [13] (ROLL) pad (or both) and press a [1]–[11] pad, the instrument’s tone plays a roll. There are three types of roll (16th note, 32nd note, 64th note).
INST REC During realtime recording, the pads record the corresponding instrument’s tone.
Rear Panel (Connecting Your Equipment)* To prevent malfunction and equipment failure, always turn down the volume, and turn off all the units before making any connections.
A B D E F C G H I J
COMPUTER
SD card
AC adaptor
TRIGGER OUT MIX OUT HEADPHONES
MIDI EXT IN ASSIGNABLE OUT/TRIGGER OUT
Connect an audio device.
Connect a MIDI device.
A DC IN jack
Connect the included AC adaptor here.* To prevent the inadvertent disruption of power to your unit (should
the plug be pulled out accidentally), and to avoid applying undue stress to the jack, anchor the power cord using the cord hook, as shown in the illustration.
B [POWER] switch
This turns the power on/off.& “Introduction” (p. 7)
C USB port
Use a commercially available USB 2.0 cable to connect this port to your computer. It can be used to transfer USB MIDI and USB audio data. You must install the USB driver before connecting the TR-8S to your computer. Download the USB driver from the Roland website. For details, refer to Readme.htm which is included in the download.& https://www.roland.com/support/
D MIDI (OUT, IN) jacks
Use a commercially available MIDI cable to connect MIDI devices here.
E SD card slot
Insert a commercially available SD card here.* Never turn off the power or remove the memory card while the screen
indicates “Executing.”
* The memory card write protect feature (LOCK) The contents of the memory card can be protected by write protecting it. To write protect a card, slide the write protect switch on the side of the memory card to the “LOCK” position. Unlock write protect to edit data on the card.
* All memory cards eventually wear out. We recommend that you consider the memory card not as a permanent storage site, but as a place to store data temporarily. We also recommend that you back up important data onto other media that is supported by your unit.
Write protect switch

7
Introduction
F TRIGGER OUT jack
A trigger pulse is output from this jack at the timing that is specified in the dedicated trigger out track ([CC] + [RC] button).
G EXT IN (L/MONO, R) jacks
These are audio input jacks.You can apply a side-chain effect at the pattern of the specified track.& For details, refer to “Reference Manual” (PDF).
H ASSIGNABLE OUT/TRIGGER OUT jacks
For each jack 1–6, you can choose whether it operates as ASSIGNABLE OUT or as TRIGGER OUT.Instruments that are output to a jack operating as ASSIGNABLE OUT are not output from the MIX OUT jacks.Instruments that are output to a jack operating as TRIGGER OUT are also output from the MIX OUT jacks.
I MIX OUT (L/MONO, R) jacks
Connect these jacks to your amp or monitor speakers.
J PHONES jack
A set of headphones can be connected to this jack.
Introduction* Before turning the unit on/off, always be sure to turn the volume
down. Even with the volume turned down, you might hear some sound when switching the unit on/off. However, this is normal and does not indicate a malfunction.
Turning the TR-8S On1. Turn on the power in the order of the TR-8S first,
and then the connected system.2. Switch on power to the connected equipment, and
raise the volume to an appropriate level.
Turning Off the Power1. Power-off the connected system first, and then the
TR-8S.
Formatting an SD Card (SD CARD FORMAT)If using an SD card, please format it on the TR-8S.
SD cards are sold separately. Please obtain a SD card separately.
1. Press the [UTILITY] button.The UTILITY screen appears.
2. Use the [VALUE] knob to select “SD CARD:Format.”
3. Press the [ENTER] button.A confirmation message appears.
4. To execute, use the [VALUE] knob to select “OK,” and press the [ENTER] button.If you decide to cancel, use the [VALUE] knob to select “Cancel,” and then press the [ENTER] button.

8
Import
Backup/Restore
PATTERN No. 8-16
PATTERN No. 1-3PATTERN No. 1-2
PATTERN No. 1-1
A
B
H
KIT No. 128
KIT No. 3KIT No. 2
KIT No. 1
INST
INST parameter
INST tone
INST EFFECT
BD
INST parameter
INST tone
INST EFFECT
SD
INST parameter
INST tone
INST EFFECT
RC
MASTER FX
REVERB
DELAY
EFFECT setting
KIT parameter
128 KITs128 patterns
(16 x 8 banks) KITPATTERN
STEP dataMOTION data
LAST STEP setting
STEP dataMOTION data
LAST STEP setting
STEP dataMOTION data
LAST STEP setting
VARIATION
Pattern setting
KITnumber
FILL IN
FILL IN 1 FILL IN 2
ACB tone SAMPLE tone
PRESET PRESET USER
SAMPLE parameter
SYSTEM setting
INST tone
TR-8S
BACKUP data
Samplefiles
SD card
Overview of the TR-8S
What Is a “PATTERN”?The performance data that you record using TR-REC or INST-REC is called a “pattern.”
The TR-8S has 128 patterns (16 patterns x 8 banks); each pattern has eight variations (A–H) and two fill-in patterns.
What Is a “KIT”?The 11 instruments are collectively called a “kit.” The TR-8S has 128 kits.
The pattern plays the instruments of the currently selected kit.
Variation
Pattern 1-1–8-16
A CB D
E GF H
Fill in 1 Fill in 2
Kit 1–128
Instrument x 11
BASS DRUM
A pattern plays the inst of the kit.
Variation
Pattern 1-1–8-16
A CB D
E GF H
Fill in 1 Fill in 2
About saving the pattern and kitParameters of the pattern or kit that you’re editing are remembered until you turn off the power. Even if you select a different pattern or kit, and then re-select the one you had been editing, it is recalled in the edited state; however, if you turn the power off and on again, it returns to the unedited state. If you want to keep the edits that you made to a pattern or kit, you must save that pattern or kit.
Saving the pattern and kit simultaneously (OVERWRITE)
By holding down the [SHIFT] button and pressing the [WRITE] button, you can overwrite-save the selected pattern and kit.
For details on how to save other settings, refer to “Saving the Pattern, Kit, or System Settings (WRITE)” (p. 18).
* If you want to make a backup, save the data (patterns, kits, system settings) before you proceed. The backup will not include the pattern or kit that you’re currently editing (shown by an “*” indication) or system settings that you have not saved.

9
Playing Patterns
Playing Patterns1. Press the [START/STOP] button.2. Use the controllers of the instrument edit section to
modify the sound.MEMO
To return to the beginning of the pattern, hold down the [SHIFT] button and press the [START/STOP] button.
Selecting a Pattern1. Hold down the [PTN SELECT] button and press a
pad [1]–[8].The bank is selected.
2. Release the [PTN SELECT] button.3. Use pads [1]–[16] to select a pattern.
The selected pad blinks. During playback, it is lit.When you select the next pattern during playback, the pad blinks. The pattern switches when playback returns to the first step.You can select a region by pressing two pads simultaneously. The selected patterns play in succession.
4. Use the [A]–[H] buttons to select a variation.You can select multiple instruments by holding down a button and pressing other buttons.The selected variations are lit, and those whose buttons are lit play once each in the order of A 0 H.
Changing the Length of the Variation (Setting the Variation’s Last Step)The overall number of steps used by a variation (the variation’s last step) can be specified individually for each variation.
1. Press the [LAST] button.2. Use the [A]–[H] buttons to select the variation that
you want to change.* You can select multiple variations by holding down a button and
pressing other buttons.
3. Use pads [1]–[16] to select the last step.
Changing the Length of a Specific Track (Setting the Track’s Last Step)
1. Press the [LAST] button.2. Use the instrument select buttons [BD]–[RC] to
select the track that you want to change.* You can select multiple instruments by holding down a button and
pressing other buttons.
3. Use pads [1]–[16] to select the last step.
Clearing a track’s Last Step setting
1. Press the [LAST] button.The [LAST] button is lit.
2. Press the instrument select button [BD]–[RC] of the track whose setting you want to clear.The instrument select button that you pressed blinks.The currently-specified last step is shown by pads [1]–[16].
3. Press the [CLEAR] button.The last step of the selected track is cleared, and pads [1]–[16] go dark; the last step is set to the overall number of steps specified for each variation.
About variationsEach pattern has eight variations, A–H.Press an [A]–[H] button to select the variation A–H that you want to play back or record.If you want to play back multiple variations, hold down one of the [A]–[H] buttons and press the other [A]–[H] buttons that you want to additionally play back.Lit/unlit state of the variation [A]–[H] buttons
Lit green Ready to play
Blinking green Playing
Blinking red During PLAY&REC (TR-REC/INST REC)
Short blinking red
Selected for both PLAY and REC (TR-REC only)
Short blinking orange
Not selected for PLAY but selected for REC (TR-REC only)
Selecting the variation during TR-RECWhile [TR-REC] is lit, pressing an [A]–[H] button makes the [A]–[H] button blink red or briefly blink red, allowing you to select a single variation A–H for TR-REC.
During TR-REC, you can hold down the [TR-REC] button and press an [A]–[H] button to select the recording target while maintaining the variation(s) that you selected for playback. (You can also select a variation that’s not being played back.)
About fill-inEach pattern has two dedicated FILL IN variations. You can also use the Scatter function as a fill-in.
& “Selecting a Fill-In Variation” (p. 10)
What Is Scatter?“Scatter” adds a digital-feeling groove to the loop playback by exchanging individual steps within the loop playback and also by changing the playback direction or gate length.
* The scatter effect will not apply to the first cycle of the loop; the effect will apply to the second and subsequent cycles of the loop.

10
Playing Patterns
Generating a Random PatternYou can automatically generate a random pattern. This modifies the selected pattern.
1. Hold down the [PTN SELECT] button and press the [SAMPLE] button.A random pattern is provisionally generated for the variation.The [TR-REC] button blinks.
2. When you press the [TR-REC] button, the provisionally generated random pattern changes to the current pattern.In this state, the pattern is not yet saved. If you want to save it, execute the WRITE operation.& “Saving the Pattern, Kit, or System Settings (WRITE)”
(p. 18)
Copying a Pattern1. Press the [COPY] button.
The COPY screen appears.
2. Use the [VALUE] knob to select “Pattern,” and then press the [ENTER] button.
3. Use the [VALUE] knob to select the copy-source, and press the [ENTER] button.
4. Use the [VALUE] knob to select the copy-destination, and press the [ENTER] button.A confirmation message appears.
5. To copy, use the [VALUE] knob to select “OK,” and press the [ENTER] button.If you decide to cancel, use the [VALUE] knob to select “Cancel,” and then press the [ENTER] button.
Deleting a Pattern1. Press the [PTN SELECT] button.2. Hold down the [CLEAR] button and use the pads
[1]–[16] to specify the pattern that you want to delete.
Copying a Variation1. Press the [COPY] button.
The COPY screen appears.
2. Use the [VALUE] knob to select “Variation,” and then press the [ENTER] button.
3. Use the [VALUE] knob and the [ENTER] button to select the copy-source.
Pattern number
Variation
4. Use the [VALUE] knob and the [ENTER] button to select the copy-destination.A confirmation message appears.
5. To copy, use the [VALUE] knob to select “OK,” and press the [ENTER] button.If you decide to cancel, use the [VALUE] knob to select “Cancel,” and then press the [ENTER] button.
Selecting a Fill-In Variation1. While holding down the AUTO FILL IN [ON] button,
press a pad [14]–[16] or an [A]–[H] button.You can also use a variation A–H as a FILL IN.Pads [14]–[16] and the [A]–[H] buttons blink. (The selected button is lit.)
MEMO
If FILL IN Type = SCATTER, you can hold down the AUTO FILL IN [MANUAL TRIG] button and use the [VALUE] knob to control SCATTER DEPTH.
Inserting a Fill-In (Manual Trigger)
1. At the moment that you want to insert a fill-in, press the AUTO FILL IN [MANUAL TRIG] button.
Inserting a Fill-In at Regular Intervals (Auto Fill In)Here’s how to automatically insert a fill-in at intervals of the specified number of measures.
1. Turn the AUTO FILL IN [AUTO FILL IN] knob.Value: 32, 16, 12, 8, 4, 2
2. Press the AUTO FILL IN [ON] button.A fill-in is automatically inserted at intervals of the specified number of measures.
Adjusting the Reverb or DelayHere’s how to adjust the reverb or delay.
Target ControllerVolume of the reverb sound REVERB [LEVEL] knob
Reverb length [KIT] button + REVERB [LEVEL] knob
Volume of the delay sound DELAY [LEVEL] knob
Delay time DELAY [TIME] knob
Delay feedback DELAY [FEEDBACK] knob
For detailed reverb and delay settings, refer to “Editing a Kit’s Settings (KIT Edit)” (p. 14).
Master Effect1. Press the MASTER FX [ON] button to make it light.2. Use the MASTER FX [CTRL] knob to adjust the
depth of the effect.& “Master Effect (MASTER FX)” (p. 15)
11
TR-REC (Step Recording)
In this method of recording, you create a pattern by specifying the steps at which each track will sound. You can even play back the pattern while you’re creating it.
* If you want to keep the edits that you made to a pattern or kit, you must save that pattern or kit (p. 18).
1. Press the [TR-REC] button.2. Use the variation buttons to select A–H.3. Press the [START/STOP] button to start recording.4. Press one of the INST select buttons to select the
track that you want to record.5. Press pads [1]–[16] to input the steps at which you
want sound to play.6. Repeat steps 4–5.
MEMO
You can change the scale. For details, refer to “Editing the Pattern Settings (Pattern Setting)” (p. 13).
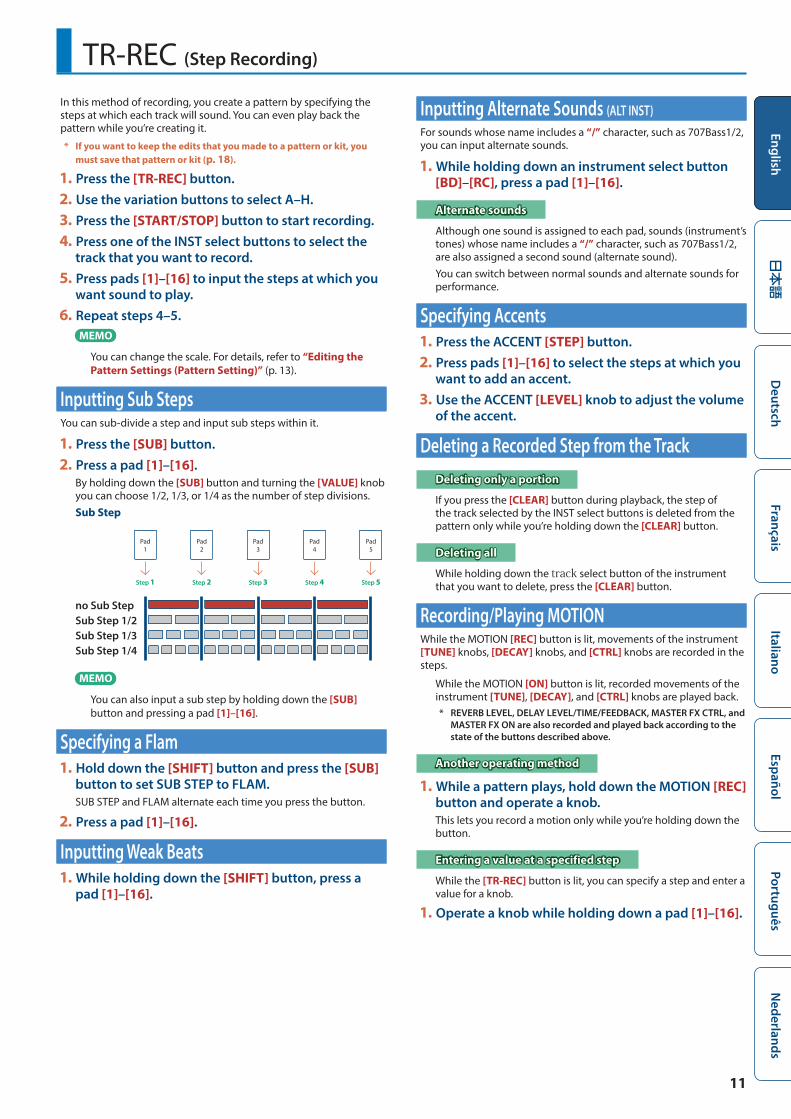
Inputting Sub StepsYou can sub-divide a step and input sub steps within it.
1. Press the [SUB] button.2. Press a pad [1]–[16].
By holding down the [SUB] button and turning the [VALUE] knob you can choose 1/2, 1/3, or 1/4 as the number of step divisions.Sub Step
Pad1
Pad2
Pad3
Pad4
Pad5
Step 1 Step 2 Step 3 Step 4 Step 5
no Sub StepSub Step 1/2Sub Step 1/3Sub Step 1/4
MEMO
You can also input a sub step by holding down the [SUB] button and pressing a pad [1]–[16].
Specifying a Flam1. Hold down the [SHIFT] button and press the [SUB]
button to set SUB STEP to FLAM.SUB STEP and FLAM alternate each time you press the button.
2. Press a pad [1]–[16].
Inputting Weak Beats1. While holding down the [SHIFT] button, press a
pad [1]–[16].
Inputting Alternate Sounds (ALT INST)For sounds whose name includes a “/” character, such as 707Bass1/2, you can input alternate sounds.
1. While holding down an instrument select button [BD]–[RC], press a pad [1]–[16].
Alternate sounds
Although one sound is assigned to each pad, sounds (instrument’s tones) whose name includes a “/” character, such as 707Bass1/2, are also assigned a second sound (alternate sound).You can switch between normal sounds and alternate sounds for performance.
Specifying Accents1. Press the ACCENT [STEP] button.2. Press pads [1]–[16] to select the steps at which you
want to add an accent.3. Use the ACCENT [LEVEL] knob to adjust the volume
of the accent.
Deleting a Recorded Step from the TrackDeleting only a portion
If you press the [CLEAR] button during playback, the step of the track selected by the INST select buttons is deleted from the pattern only while you’re holding down the [CLEAR] button.
Deleting all
While holding down the track select button of the instrument that you want to delete, press the [CLEAR] button.
Recording/Playing MOTIONWhile the MOTION [REC] button is lit, movements of the instrument [TUNE] knobs, [DECAY] knobs, and [CTRL] knobs are recorded in the steps.
While the MOTION [ON] button is lit, recorded movements of the instrument [TUNE], [DECAY], and [CTRL] knobs are played back.* REVERB LEVEL, DELAY LEVEL/TIME/FEEDBACK, MASTER FX CTRL, and
MASTER FX ON are also recorded and played back according to the state of the buttons described above.
Another operating method
1. While a pattern plays, hold down the MOTION [REC] button and operate a knob.This lets you record a motion only while you’re holding down the button.
Entering a value at a specified step
While the [TR-REC] button is lit, you can specify a step and enter a value for a knob.
1. Operate a knob while holding down a pad [1]–[16].

12
INST-REC (Realtime Recording)
In this method of recording, you create a pattern by realtime-recording your performance on pads [1] (BD)–[11] (RC). This modifies the selected pattern.
* If you want to keep the edits that you made to a pattern or kit, you must save that pattern or kit (p. 18).
1. Press the [INST REC] button.2. Press the [START/STOP] button to start recording.3. Use the variation buttons [A]–[H] to select the
variation that you want to record.4. Perform using pads [1] (BD)–[11] (RC).
* Operations in the instrument edit section are not recorded.
Playing Sub StepsHere’s how to play or record sub steps.
1. Press the [SUB] button.2. Press the pad [1]–[16] that will play sub steps.
MEMO
By holding down the [SUB] button and turning the [VALUE] knob you can choose from 1/2, 1/3, or 1/4 as the number of step divisions.
You can also play a sub step by holding down the [SUB] button and pressing a pad [1]–[16].
Specifying a FlamHere’s how to play or record a flam on the instrument’s tone.
1. Hold down the [SHIFT] button and press the [SUB] button to set SUB STEP to FLAM.SUB STEP and FLAM alternate each time you press the button.
2. Press a pad [1] (BD)–[11] (RC).This lets you play or record a flam on the instrument’s tone.
Playing Weak Beats1. While holding down the [SHIFT] button, press a
pad [1] (BD)–[11] (RC).This lets you play or record weak beats.
Playing Alternate SoundsFor sounds whose name includes a “/” character, such as 707Bass1/2, you can play or record alternate sounds.
1. While holding down an instrument select button [BD]–[RC], press a pad [1] (BD)–[11] (RC).
Deleting a Recorded Step from the TrackDeleting only a portion
If you press the [CLEAR] button during playback, the step of the track selected by the instrument select button is deleted from the pattern only while you’re holding down the [CLEAR] button.
Deleting all
While holding down the instrument select button of the track that you want to delete, press the [CLEAR] button.
Recording/Playing MOTIONWhile the MOTION [REC] button is lit, movements of the instrument [TUNE] knobs, [DECAY] knobs, and [CTRL] knobs are recorded in the steps.
While the MOTION [ON] button is lit, recorded movements of the instrument [TUNE], [DECAY], and [CTRL] knobs are played back.* REVERB LEVEL, DELAY LEVEL/TIME/FEEDBACK, MASTER FX CTRL, and
MASTER FX ON are also recorded and played back according to the state of the buttons described above.
Another operating method
1. Operate a knob while holding down the MOTION [REC] button.This lets you record a motion only while you’re holding down the button.
Using the Inst PadYou can use the instrument select buttons to play or record the selected instrument.
The volume changes depending on the strength at which you strike the inst pad.
Using the Inst Pad to Play Instruments
During INST PLAY / During PATTERN SELECT
1. Use the instrument select buttons to select the instrument that you want to play from the inst pad.
2. Press the inst pad to play the instrument that you selected in step 1.
Recording While You Use the Inst Pad to Play Instruments
During TR-REC / During INST REC
1. Press the [TR-REC] button or the [INST REC] button.
2. Press the [START/STOP] button, and start recording.
3. Use the instrument select buttons to select the instrument that you want to play from the inst pad.
4. Press the inst pad to record the instrument that you selected in step 3.

13
INST-PLAY (Performing)
You can use pads [1] (BD)–[11] (RC) to perform in real time.
Your performance does not modify the pattern.
1. Press the [INST PLAY] button.2. Perform using pads [1] (BD)–[11] (RC).
Playing Sub StepsHere’s how to play sub steps.
This lets you play duplets, triplets, and quadruplets.
1. Press the [SUB] button.2. Press the pad [1]–[16] that will play sub steps.
MEMO
By holding down the [SUB] button and turning the [VALUE] knob you can choose from 1/2, 1/3, or 1/4 as the number of step divisions.
You can also play a sub step by holding down the [SUB] button and pressing a pad [1]–[16].
Performing a FlamHere’s how to perform a flam on an instrument’s tone.
1. Hold down the [SHIFT] button and press the [SUB] button to set SUB STEP to FLAM.
2. Press a pad [1] (BD)–[11] (RC).This lets you perform a flam on the instrument’s tone.
Performing Weak Beats (WEAK BEATS)
1. While holding down the [SHIFT] button, press a pad [1] (BD)–[11] (RC).This lets you perform weak beats.
Performing Alternate Sounds (ALT INST)For sounds whose name includes a “/” character, such as 707Bass1/2, you can perform alternate sounds.
1. While holding down an instrument select button [BD]–[RC], press a pad [1] (BD)–[11] (RC).
Performing a Roll (ROLL)Here’s how to perform a roll on an instrument’s tone.
1. While holding down a pad [12]–[13], press a pad [1]–[11].This lets you perform a roll on the instrument’s tone.
Alternate method
1. While holding down the [INST PLAY] button, press a pad [12]–[13].Pad [12]–[13] is lit.
2. Press a pad [1]–[11].This lets you perform a roll on the instrument’s tone.
3. To stop playing the roll, press the pad [12]–[13] once again.
Roll speed
Pad ExplanationPad [12] Sixteenth note
Pad [13] Thirty-second note
Pad [12] + [13] Sixty-fourth note
Editing the Pattern Settings (Pattern Setting)
Here’s how to specify the kit and tempo that are used by a pattern.
1. Hold down the [SHIFT] button and press the [PTN SELECT] button.The PTN SETTING screen appears.
2. Select a parameter.2-1. Use the [VALUE] knob to select a parameter.
2-2. Press the [ENTER] button.
3. Modify values.3-1. Use the [VALUE] knob to edit the parameter value.
3-2. Press the [ENTER] button.Return to the parameter selection (step 2).
4. Press the [PTN SELECT] button.You exit the PTN SETTING screen.
PTN SETTING parameter
Parameter Explanation
KIT:SW Turn this on if you want to use the kit that’s selected by the “KIT:Number” parameter.
KIT:Number Selects the kit used by the pattern.
Tempo Specifies the tempo of the pattern.
Scale Selects the scale.
Shuffle Specifies the amount of shuffle (bounce).
Flam Spacing Specifies the flam spacing.
ScatterType Selects the type of scatter.
ScatterDepth Adjusts the depth of scatter.
NAME Specifies the name of the pattern.
& For details, refer to “Reference Manual” (PDF).

14
Editing a Kit or Instrument
Selecting Kits (KIT)Here’s how to select kits.
1. Press the [KIT] button to make it light.The KIT screen appears.
If the kit is being edited, an “*” is shown at the left side of the kit number.
2. Use the [VALUE] knob to select a kit.3. Press the [KIT] button once again.
Exit the KIT screen.
Editing a Kit’s Settings (KIT Edit)Here’s how to edit the settings of the currently selected kit.
* If you want to keep the edited kit settings, you must save the kit (p. 18).
1. Hold down the [SHIFT] button and press the [KIT] button.The KIT Edit screen appears.
2. Select a parameter.2-1. Use the [VALUE] knob to select a parameter.
2-2. Press the [ENTER] button.Proceed to editing the parameter value (step 3).
3. Modify values.3-1. Use the [VALUE] knob to edit the parameter value.
3-2. Press the [ENTER] button.Return to selecting a parameter (step 2).
4. Press the [KIT] button.Exit the KIT Edit screen.
KIT Edit parameter
Category ExplanationLEVEL Level parameter
REVERBEdit the reverb settings.& “Detailed Reverb Settings” (p. 14)
DELAYEdit the delay settings.& “Detailed Delay Settings” (p. 14)
MASTER FX & “Master Effect (MASTER FX)” (p. 15)
EXT IN& “Inputting an External Audio Source
(EXT IN)” (p. 21)
LFO& “Using the LFO to Modify a Parameter”
(p. 16)
OUTPUTSpecifies the output destination of each instrument.MIX, ASSIGN 1–6 (mono), ASSIGN A–C (stereo)
MUTESpecifies the mute setting of each instrument.Muting occurs when the specified instrument is sounded.
CTRL
Assigns a parameter to the [CTRL] knobs of the instrument edit section.& “Assigning a Different Function for Each
Instrument to the [CTRL] Knob” (p. 15)
Category ExplanationCOLOR Specifies the color of the level fader LEDs.
NAMERename the kit.& “Entering a Kit Name or Other Characters”
(p. 18)
& For details, refer to “Reference Manual” (PDF).
MEMO
5 When you switch kits, the position of the knobs might differ from the values of the kit; for such cases, you can choose whether knob movement changes the sound immediately or only after the knob position matches or passes through the value of the kit. & “UTILITY” 0 “GENERAL” 0 “KnobMode” parameter
5 The parameters of the kit that you are editing are remembered until you turn off the power. If you select a different kit and then re-select the edited kit, it comes back in the edited state; however, if you turn the power off and on again, the kit returns to its state prior to editing. If you want to keep the edited kit settings, you must save the kit. & “Saving the Pattern, Kit, or System Settings (WRITE)”
(p. 18)
Detailed Reverb SettingsIn the KIT Edit screen, select REVERB.
Parameter ExplanationType Type of reverb
TimeTime length of reverberation* You can control this by holding down the [KIT] button
and turning the REVERB [LEVEL] knob.
LevelOutput level of reverberation* You can use the REVERB [LEVEL] knob to control this.
Pre Delay Adjusts the delay time from the direct sound until the reverb sound is heard.
Low Cut Adjusts the frequency below which the low-frequency content of the reverb will be reduced.
High Cut Adjusts the frequency above which the high-frequency content of the reverb will be reduced.
Density Density of reverb
Detailed Delay SettingsIn the KIT Edit screen, select DELAY.
Parameter ExplanationType Type of delay
TempoSync Synchronizes the delay time (Time) to the tempo.
LevelOutput level of delay sound* You can use the DELAY [LEVEL] knob to control this.
TimeAdjusts the delay time from the direct sound until the delay sound is heard.* You can use the DELAY [TIME] knob to control this.
FeedbackAdjusts the amount of delay feedback.* You can use the DELAY [FEEDBACK] knob to control
this.
The editable parameters differ depending on the type of delay.& For details, refer to “Reference Manual” (PDF).

15
Editing a Kit or Instrument
Master Effect (MASTER FX)Here’s how to apply the master effect to the kit.
1. Hold down the [SHIFT] button and press the MASTER FX [ON] button.The KIT EDIT screen’s MASTER EFX items are shown.
2. Select a master effect type.The editable parameters differ for each effect.& For details, refer to “Reference Manual” (PDF).
MEMO
You can use the MASTER FX [CTRL] knob to edit the assigned parameter.
3. Press the [KIT] button.Exit the screen.
Assigning Parameters to the [CTRL] Knobs (CTRL SELECT)You can assign parameters to the [CTRL] knobs of the instrument edit section, and control those parameters while the pattern plays back.
1. Press the [CTRL SELECT] button to make it light.The CTRL SELECT screen appears.
2. Use the [VALUE] knob to select a parameter.The same parameter is selected for all [CTRL] knobs.
3. Press the [CTRL SELECT] button once again.The [CTRL SELECT] button goes dark, and you exit the CTRL SELECT screen.
Assigning a Different Function for Each Instrument to the [CTRL] Knob1. While holding down the [CTRL SELECT] button,
press a [BD]–[RC] button.The parameter that’s assigned to the [CTRL] knob is displayed.
2. Use the [VALUE] knob to select a parameter.3. Press the [CTRL SELECT] button.
The [CTRL SELECT] button goes dark, and you exit the screen.
MEMO
You can also select from the assignable parameters by holding down the [CTRL SELECT] button and directly operating the [CTRL] knob.
5 The assignment that you make is saved in the “User” parameter which you can select in step 2 of “Assigning Parameters to the [CTRL] Knobs (CTRL SELECT)” (p. 15).
Playing Multiple Instruments Layered (GROUPING for Layer)You can create a group of multiple instruments and play their layered sound with a single note.
You can use grouped master instruments in the following ways. The slave instrument follows the master instrument.
5 Pattern input in “TR-REC” 5 Pad performance in “INST PLAY” 5 Pad recording in “INST REC”
Grouping Instruments1. In the KIT Edit screen, long-press the [BD]–[RC]
button that you want to specify as the master instrument.The INST GROUP screen appears.
2. While holding down the button that you pressed in step 1, press the [BD]–[RC] button that you want to specify as the slave instrument.The instruments that you selected as the master instrument and the slave instrument are grouped.
MEMO
5 During TR-REC, when you press a grouped [BD]–[RC] button, the [BD]–[RC] button of the master instrument ( ) lights and the [BD]–[RC] button of the slave instrument ( ) blinks.
5 During INST PLAY/INST REC, pressing a pad [1]–[11] of a grouped slave instrument does not produce sound.
5 If you press the [MUTE] button, the same group’s master instrument’s [BD]–[RC] button lights and the slave instrument’s [BD]–[RC] button blinks.
Selecting an Instrument’s Tone (INST)Instrument’s tones of the currently selected kit are selected individually.
1. Press the [INST] button.The [INST] button and the [BD]–[RC] button (that had been selected for [TR-REC]) are lit, and [the INST screen appears.
2. Use the [VALUE] knob to select the instrument’s tone.MEMO
To switch categories, hold down the [SHIFT] button and turn the [VALUE] knob.
3. Press the [INST] button once again.Exit the INST screen.

16
Editing a Kit or Instrument
Editing an Instrument’s Sound (INST Edit)
1. Hold down the [SHIFT] button and press the [INST] button.The INST Edit screen appears.
2. Select a parameter.2-1. Use the [VALUE] knob to select a parameter.
2-2. Press the [ENTER] button.
3. Modify values.3-1. Use the [VALUE] knob to edit the parameter value.
3-2. Press the [ENTER] button.Return to the parameter selection (step 2).
4. Press the [INST] button.Exit the INST Edit screen.& For details, refer to “Reference Manual” (PDF).
Changing an Instrument’s Pan1. In the INST Edit screen, use the [VALUE] knob to
select the “Pan” parameter.
2. Press the [ENTER] button.3. Use the [VALUE] knob to edit the parameter value.
Value: L127–CENTER–R127
4. Press the [ENTER] button.5. Press the lit [INST] button.
Exit the INST Edit screen.
Changing an Instrument’s Gain1. In the INST Edit screen, use the [VALUE] knob to
select the “Gain” parameter.
2. Press the [ENTER] button.3. Use the [VALUE] knob to edit the parameter value.
Value: -INF, -40.0dB–0.0dB–+40.0dB
4. Press the [ENTER] button.5. Press the lit [INST] button.
Exit the INST Edit screen.
Copying a Kit (KIT COPY)
1. Hold down the [COPY] button and press the [KIT] button.The KIT COPY screen appears.
2. Use the [VALUE] knob to select the copy-source, and press the [ENTER] button.
3. Use the [VALUE] knob to select the copy-destination, and press the [ENTER] button.A confirmation message appears.
4. To copy, use the [VALUE] knob to select “OK,” and press the [ENTER] button.If you decide to cancel, use the [VALUE] knob to select “Cancel,” and then press the [ENTER] button.
Using the LFO to Modify a ParameterYou can select a parameter that you want to modify, and use the LFO to modify the parameter value.
1. In the INST Edit screen, use the [VALUE] knob to select “LFO,” and press the [ENTER] button.
2. Use the [VALUE] knob to select the parameter that you want to modify, and press the [ENTER] button.
3. Use the [VALUE] knob to select “LFO Depth,” and then press the [ENTER] button.
4. Use the [VALUE] knob to specify the depth of change.Value: -128–0–+127
5. Press the [ENTER] button.6. Press the lit [INST] button.
Exit the INST Edit screen.
MEMO
In the KIT Edit screen you can edit the LFO waveform (Waveform), frequency (Rate), and tempo synchronization (TempoSync).
LFOKIT parameter
(Settings for the entire kit)
LFO WaveformLFO RateLFO Tempo Sync
INST parameter(Settings for each instrument)
LFO (Parameter to apply)
LFO Depth

17
Assigning an Imported User Sample to an Instrument
Importing a User Sample (SAMPLE Import)Here’s how an audio file saved on an SD card can be imported as a user sample.
* Use the TR-8S to format the SD card.
* The maximum length of a single audio file that can be imported is approximately 180 seconds (in the case of 44.1 kHz/MONO). Depending on the state of memory usage, the maximum time might be shorter.
1. Using your computer, copy an audio file to the following folder of the SD card.ROLAND\TR-8S\SAMPLE\File formats that can be importedWAV, AIFF
2. Insert the SD card into the TR-8S (p. 6).3. Press the [UTILITY] button.4. Use the [VALUE] knob to select “Sample Import,”
and then press the [ENTER] button.
5. Use the [VALUE] knob to select the audio file that you want to import, and press the [ENTER] button.A confirmation message appears.
6. To execute, use the [VALUE] knob to select “OK,” and press the [ENTER] button.If you decide to cancel, use the [VALUE] knob to select “Cancel,” and then press the [ENTER] button.When the import is completed, the display indicates “Completed!” and you exit the UTILITY screen.
Selecting a User Sample (SAMPLE)
1. Press the [SAMPLE] button.The [SAMPLE] button and the [BD]–[RC] button (that had been selected in [TR-REC]) are lit, and the SAMPLE screen appears.
2. Use the [VALUE] knob to select the user sample that you want to assign as the instrument’s tone.
MEMO
5 Choose from the sample that you imported from the SD card.
5 You can press a [BD]–[RC] button to change the loading-destination.
3. Press the lit [SAMPLE] button.The [SAMPLE] button goes dark, and you exit the SAMPLE screen.
Editing a User Sample’s Settings (SAMPLE Edit)
1. Hold down the [SHIFT] button and press the [SAMPLE] button.The SAMPLE Edit screen appears.
2. Select a parameter.2-1. Use the [VALUE] knob to select a parameter.
2-2. Press the [ENTER] button.
3. Modify values.3-1. Use the [VALUE] knob to edit the parameter value.
3-2. Press the [ENTER] button.Return to the parameter selection (step 2).
NOTE
If the screen indicates “---,” editing is not possible.
4. Press the lit [SAMPLE] button.The [SAMPLE] button goes dark, and you exit the SAMPLE Edit screen.If you had edited the settings, a screen asks whether you want to save the sample.
MEMO
5 The settings you specify here are common to all kits that use the same user sample.
5 ACB tone or preset samples (samples for which the icon is shown) show the parameter values as “---”; these values cannot be edited.

18
Various Operations
Jumping to the Beginning of a Parameter GroupIn each of the edit screens, you can jump to the beginning of a parameter group (category).
1. When selecting a parameter, hold down the [SHIFT] button and turn the [VALUE] knob.
Entering a Kit Name or Other CharactersHere’s how to enter characters such as when naming a kit or pattern.
1. Access the KIT EDIT screen (p. 14) or the PTN SETTING screen (p. 13).
2. Use the [VALUE] knob to select “NAME.”In the case of the KIT Edit screen
3. Press the [ENTER] button to access the character input screen.In the case of the KIT Edit screen
4. Use the [COPY] (left) [UTILITY] (right) buttons to move the cursor.
Button Explanation[UTILITY] button Moves to the right.
[COPY] button Moves to the left.
5. Use the [VALUE] knob to change the character.
Button Explanation[SHIFT] button+ [COPY] button Deletes one character (Erase).
[SHIFT] button + [UTILITY] button Inserts one character (Insert).
[SHIFT] button+ [VALUE] knob
Switches between uppercase/lowercase/numerals.
6. When you’ve finished inputting characters, press the [ENTER] button.You return to the screen of step 2; the name that you input is shown.
Saving the Pattern, Kit, or System Settings (WRITE)Here’s how to save a pattern or kit.
1. Press the [WRITE] button.The WRITE screen appears.
2. Use the [VALUE] knob to select what you want to save, and press the [ENTER] button.The WRITE screens appear in the order of “Pattern” 0 “Kit” 0 “System.”* If “System” is selected, a confirmation screen appears. Proceed to
step 4.
3. Use the [VALUE] knob to select the save-destination, and press the [ENTER] button.A confirmation message appears.
4. To save, use the [VALUE] knob to select “OK,” and press the [ENTER] button.If you decide to cancel, use the [VALUE] knob to select “Cancel,” and then press the [ENTER] button.
Shortcuts for save operations
Function Operating the Unit
Save a pattern(PATTERN WRITE screen)
Hold down the [WRITE] button and press the [PTN SELECT] button.
Save a kit(KIT WRITE screen)
Hold down the [WRITE] button and press the [KIT] button.
Save the pattern and kit simultaneously (OVERWRITE)
Hold down the [SHIFT] button and press the [WRITE] button.* The selected pattern and kit are
overwrite-saved.

19
Various Operations
Copying a Pattern or Kit (COPY)Here’s how to copy a pattern or kit.
1. Press the [COPY] button.The COPY screen appears.
2. Use the [VALUE] knob to select what you want to copy, and press the [ENTER] button.The COPY screens appear in the order of “Pattern” 0 “Variation” 0 “Track” 0 “Kit” 0 “Inst.”
3. Use the [VALUE] knob to select the copy-source, and press the [ENTER] button.
4. Use the [VALUE] knob to select the copy-destination, and press the [ENTER] button.A confirmation message appears.
5. To execute the copy, use the [VALUE] knob to select “OK,” and press the [ENTER] button.If you decide to cancel, use the [VALUE] knob to select “Cancel,” and then press the [ENTER] button.
Shortcuts for copy operations
Function Operating the Unit
Copy a pattern(PATTERN COPY screen)
Hold down the [COPY] button and press the [PTN SELECT] button.
Copy a kit(KIT COPY screen)
Hold down the [COPY] button and press the [KIT] button.
Copy an instrument(INST COPY screen)
Hold down the [COPY] button and press the [INST] button.
Copy a pattern (selected track)(track copy-destination select screen)
Hold down the [COPY] button and press a [BD]–[RC] button.
Copy a variation (selected
variation)(variation copy-destination select screen)
While holding down the [COPY] button, press a variation [A]–[H] button.
Erasing a Pattern (CLEAR)Here’s how to erase a pattern.
1. While holding down an instrument select button, press the [CLEAR] button.This lets you erase the pattern of the selected instrument.Only the selected variation is affected.
If playing back in TR-REC or INST REC
1. During playback, press the [CLEAR] button.The pattern of the instrument that you select by pressing its instrument select button is erased only while you hold down the button.
Erasing MotionErasing all MOTION
Here’s how to erase all MOTION recorded in the variation that is selected for playback.
1. Hold down the MOTION [ON] button and press the [CLEAR] button.
Erasing MOTION for a specific track
Here’s how to erase all MOTION recorded for a specified track in the variation that is selected for playback.
1. Hold down the MOTION [ON] button and press an instrument select button.
Erasing MOTION for only a specific knob
Here’s how to erase all MOTION for a specific knob recorded in the variation that is selected for playback.
1. Hold down the MOTION [ON] button and operate the knob.MEMO
MOTION is also erased when you perform the operation of holding down the [CLEAR] button to erase steps.
Playing Weak BeatsYou can change the way in which weak beats (WEAK BEATS) are entered during TR-REC.
Use “UTILITY” 0 “GENERAL” 0 “WeakBeat” to specify this.
Parameter Explanation
wSHIFT While holding down the [SHIFT] button, press a pad [1]–[16].
PADEach time you press a pad [1]–[16], you alternate between normal sound 0 weak beat 0 off.
Specifying the Flam SpacingYou can use the LCD screen to specify the flam spacing.& “Editing the Pattern Settings (Pattern Setting)” (p. 13)* If you specify “0,” there will be no flam effect.

20
Various Operations
Muting a Track (MUTE)
1. Press the [MUTE] button.2. Use the instrument select buttons to turn each
instrument’s mute on (unlit) or off (lit).The [MUTE] button works in any state: “TR-REC,” “PTN SELECT,” “INST REC,” or “INST PLAY.”
Alternate method1. While holding down the [MUTE] button, press an
instrument select button.
Listening to Only the Selected Instrument (SOLO)Here’s how you can “solo” a selected instrument so that only that instrument is heard.
1. While the [MUTE] button is lit, hold down the [SHIFT] button and press an instrument select button.MEMO
To instantly defeat all muting, hold down the [MUTE] button and press the [CLEAR] button.
Adjusting the Tempo1. Turn the [TEMPO] knob to adjust the tempo.
By holding down the [SHIFT] button and turning the [TEMPO] knob, you can adjust the setting in steps of 0.1 units.The tempo is shown in the TEMPO display.
Tap TempoHere’s how to tap-input the tempo.
1. While holding down the [SHIFT] button, press the [ENTER] button three or more times.The tempo is specified as the average timing at which you press the button.
Marking the TempoYou can temporarily memorize the current tempo value, and recall it later.
MEMO
The marked tempo is not saved.
Marking the tempo
Here’s how to mark the current tempo value.
1. Hold down the [MUTE] button and press the [UTILITY] button.
Recalling the tempo
Here’s how to switch to the marked tempo value.
1. Hold down the [MUTE] button and press the [COPY] button.
Finely Adjusting the Timing of Notes (Nudge Function)The “nudge” function lets you adjust the timing of notes forward or backward.
Using the nudge function changes the playback timing of the entire pattern.
Operation Explanation
[SHIFT] + [COPY] button Moves the playback timing forward.
[SHIFT] + [UTILITY] button Moves the playback timing backward.
MEMO
A system setting lets you choose whether the timing of the MIDI clock will be modified.& “MIDI TX: Tx Nudge”

21
Synchronizing/Recording with Other DevicesThe TR-8S can receive MIDI Clock (F8) data to synchronize its tempo. It can also receive MIDI Start (FA) and MIDI Stop (FC) to start/stop itself.
Synchronizing with a TB-3You can synchronize the TR-8 with a TB-3 by using a commercially available MIDI cable to make connections.
TR-8S TB-3
MIDI OUT
MIDI IN
Using the TR-8S as a MIDI ControllerYou can use the TR-8S as a controller for your computer software without using the sounds of the TR-8S’s internal sound engine.
1. Press the [UTILITY] button.The setting screen appears.
2. Use the [VALUE] knob to select “SOUND: Local Sw,” and press the [ENTER] button.
3. Use the [VALUE] knob to select “SURFACE,” and then press the [ENTER] button.
4. Press the lit [UTILITY] button.The [UTILITY] button goes dark, and you exit the UTILITY screen.* Even if you press pads or if MIDI is received, the TR-8S’s internal
sound engine does not produce sound.
Using the ASSIGNABLE OUT/TRIGGER OUT jacks as Trigger OutBefore you proceed, power-off all devices, and connect the jack that you want to use as TRIGGER out to your device that accepts a trigger input.
1. Press the [UTILITY] button.The setting screen appears.
2. Use the [VALUE] knob to select the ASSIGN OUT 1–6 “Mode” parameter, and press the [ENTER] button.
3. Use the [VALUE] knob to select “TRIGGER,” and then press the [ENTER] button.
4. Press the [UTILITY] button.The [UTILITY] button goes dark, and you exit the UTILITY screen.
Assigning an Instrument to the ASSIGNABLE OUT/TRIGGER OUT jacks1. Hold down the [SHIFT] button and press the [KIT]
button.The setting screen appears.
2. Use the [VALUE] knob to select the KIT:OUTPUT “BD”–“RC” parameter, and press the [ENTER] button.
3. Use the [VALUE] knob to select the jack that you want to assign, and press the [ENTER] button.
4. Press the [KIT] button.Exit the KIT Edit screen.
Inputting an External Audio Source (EXT IN)Connect a mic, synthesizer, or rhythm machine etc. to the EXT IN jacks.
You can do the following things to the audio source that’s input to the EXT IN jacks.
5 Select the input (stereo input x 1 / mono input x 2)
5 Apply a side-chain
5 Apply reverb (Reverb Send)
5 Apply delay (Delay Send)
5 Select the output destination (MIX OUT / ASSIGNABLE OUT)
5 Apply SCATTER (if FILL IN is set to SCATTER, and using MIX OUT output)
5 Apply MASTER FX (if using MIX OUT output)
Connecting a Computer via USBIf you use a commercially available USB 2.0 cable to connect the TR-8S to your computer, you can synchronize the TR-8S with your DAW via USB MIDI, or record individual instruments of the TR-8S onto tracks of your DAW via USB audio.
In order to use the TR-8S, you’ll need to download the driver from the following URL and install it on your computer.
For details on installation, refer to the following URL.& https://www.roland.com/support/
NOTE
Do not connect the TR-8S to your computer before you have finished installing the driver.
If you have already connected the TR-8S, disconnect it, and then reconnect it after driver installation is completed.

22
Various Settings
Returning to the Factory Settings (FACTORY RESET)Here’s how to return the TR-8S to its factory-set state.
1. Press the [UTILITY] button.The UTILITY screen appears.
2. Use the [VALUE] knob to select “UTILITY: Factory Reset.”
3. Press the [ENTER] button.The target selection screen appears.
Target Explanation
ALL Returns all settings including patterns and kits to their factory-set state.
KIT Returns only the kit settings to their factory-set state.
PTN Returns only the patterns to their factory-set state.
4. Use the [VALUE] knob to select the target, and press the [ENTER] button.A confirmation message appears.
5. To execute, use the [VALUE] knob to select “OK,” and press the [ENTER] button.If you decide to cancel, use the [VALUE] knob to select “Cancel,” and then press the [ENTER] button.
6. When the display indicates “Completed. Turn off power.” turn the TR-8S’s power off and on again.
Backing Up Data to SD Card (BACKUP)* If you want to make a backup, save the data (patterns, kits, system
settings) before you proceed. The backup will not include the pattern or kit that you’re currently editing (shown by an “*” indication) or system settings that you have not saved.
1. Press the [UTILITY] button.The UTILITY screen appears.
2. Use the [VALUE] knob to select “UTILITY: Backup.”
3. Press the [ENTER] button.The BACKUP:NAME screen appears.
MEMO
If a backup file already exists, the BACKUP:SELECT screen appears.
To overwrite-save, select the existing backup file and press the [ENTER] button.
If you select Save As and press the [ENTER] button, the BACKUP:NAME screen appears.
4. Edit the name if necessary.5. Press the [ENTER] button.
A confirmation message appears.
6. To execute, use the [VALUE] knob to select “OK,” and press the [ENTER] button.If you decide to cancel, use the [VALUE] knob to select “Cancel,” and then press the [ENTER] button.

23
Various Settings
Restoring Data That Was Backed Up to SD Card (RESTORE)
1. Press the [UTILITY] button.The UTILITY screen appears.
2. Use the [VALUE] knob to select “UTILITY: Restore.”
3. Press the [ENTER] button.The RESTORE screen appears.
4. Use the [VALUE] knob to select the file that you want to restore.
5. Press the [ENTER] button.A confirmation message appears.
6. To execute, use the [VALUE] knob to select “OK,” and press the [ENTER] button.If you decide to cancel, use the [VALUE] knob to select “Cancel,” and then press the [ENTER] button.
Convenient Functions (UTILITY)Here you can make system settings for the TR-8S unit itself, or back-up and restore data.
1. Press the [UTILITY] button.The setting screen appears.
2. Select a parameter.2-1. Use the [VALUE] knob to select a parameter.
2-2. Press the [ENTER] button.
3. These are used to modify values.3-1. Use the [VALUE] knob to edit the parameter value.
3-2. Press the [ENTER] button.Return to the parameter selection (step 2).
4. Press the lit [UTILITY] button.The [UTILITY] button goes dark, and you exit the UTILITY screen.
Utility
Category ExplanationGENERAL Makes overall settings for the entire TR-8S.
RELOAD Returns the selected pattern or kit to the last-saved state.
SAMPLE Imports or deletes samples.
LED Adjusts the brightness of the button or slider LEDs.
SYNC/TEMPO Makes synchronization-related settings.
MIDI Makes MIDI-related settings.
SOUND Specifies the local control setting.
MIX OUT Makes settings for the MIX OUT jack output.
ASSIGN OUT 1–6
Make settings for the ASSIGNABLE OUT/TRIGGER OUT 1–6 jack output.
EXT IN Makes settings for the input signal from the EXT IN jack.
UTILITY Backs-up or restores.
SD CARD Formats an SD card.
INFORMATION Displays the version of the system program.
& For details, refer to “Reference Manual” (PDF).

24
Error MessagesMessage Meaning Action
SDCard NotReady!
The SD card is not inserted, or is inserted incompletely. Turn off the unit, firmly
insert the SD card, and then turn on the unit once again.
The SD card was removed after you selected data that was on the SD card.
The format of the SD card is invalid.
Use the TR-8S to format the SD card (p. 7).
Read Error!Data could not be read from the SD card.
Make sure that the SD card is correctly inserted.
The file is damaged. Do not use this file.
Write Error!
Data could not be written to the SD card.
Make sure that the SD card is correctly inserted.
The format of the SD card is invalid.
Use the TR-8S to format the SD card (p. 7).
SD Card Full!
There is insufficient space on the SD card. Delete unneeded data.
Sys Mem Damaged!
The contents of the TR-8S’s save area may be damaged.
Execute the factory reset operation (p. 22).If this does not solve the problem, contact your dealer or customer support.
Message Meaning Action
MIDI Buff Full!
An unusually large amount of MIDI data was received, and could not be processed.
Reduce the amount of MIDI messages that are being transmitted.
MIDI Offline!
The MIDI IN connection was broken.
Check that there is no problem with the MIDI cable connected to the TR-8S’s MIDI IN, and that the MIDI cable was not disconnected.
Program Error!
The TR-8S was unable to start up. The program could not be read correctly. Alternatively, the system update program may be invalid.
Use the correct program to perform the update once again. If this does not solve the problem, contact your dealer or customer support.
Now Playing!
Since the TR-8S is playing, this operation cannot be executed.
Stop playback before you execute the operation.
NowRecording!
Since the TR-8S is recording, this operation cannot be executed.
Stop recording before you execute the operation.
Not Found! The file was not found on the SD card.
Make sure that the file exists on the SD card.
Main Specifications
Roland TR-8S: RHYTHM PERFORMER
Power Supply AC Adaptor
Current Draw 2,000 mA
Dimensions409 (W) x 263 (D) x 58 (H) mm16-1/8 (W) x 10-3/8 (D) x 2-5/16 (H) inches
Weight 2.1 kg/4 lbs 11 oz
Accessories AC adaptor, Owner’s manual, Leaflet “USING THE UNIT SAFELY”
* This document explains the specifications of the product at the time that the document was issued. For the latest information, refer to the Roland website.