part 1 basic land navigation map scale - on point ... scale • map scale is the relationship...
TRANSCRIPT

Map Scale• Map scale is the relationship between distance on a map and the corresponding distance on the ground.
Scale is expressed as a ratio, such as 1:24,000, and shown graphically by bar scales marked in feet and
miles, or in meters and kilometers. Maps with a small scale for example, 7.5-minute maps, are often called
large-scale maps because they show more detail (by covering less area) than a large bar-scale (30- x 60-
minute) map.
• You must know the scale to determine ground distances between objects or locations on the map, the size
of the area covered, and how the scale may affect the amount of detail being shown.
• The terms ―small scale,‖ ―medium scale,‖ and ―large scale‖ may be confusing when read in conjunction
with the number.
• However, if the number is viewed as a fraction, it quickly becomes apparent that 1:600,000 of something
is smaller than 1:75,000 of the same thing. Therefore, the larger the number after 1:, the smaller the scale
of the map.
• (1) Small. Maps with scales of 1:1,000,000 and smaller are used for general planning and for strategic
studies. The standard small-scale map is 1:1,000,000 (1 inch = 16 miles). This map covers a very large
land area at the expense of less detail.
• (2) Medium. Maps with scales larger than 1:1,000,000 but smaller than 1:75,000 are used for operational
planning. They contain a moderate amount of detail, but terrain analysis is best done with the large-scale
maps. The standard medium-scale map is 1:250,000 (1 inch = 4 miles). Medium-scale maps of
1:100,000 are also frequently encountered.
• (3) Large. Maps with scales of 1:75,000 and larger are used for tactical, administrative, and logistical
planning. These are the maps that you as a Soldier or junior leader are most likely to encounter. The
standard large-scale map is 1:50,000; however, many areas have been mapped at a scale of
1:25,000 (1 inch = 2,000 feet). Lots of detail is shown on this type of map.
PART 1 Basic Land Navigation

Large-scale topo map (1:24,000)
LOTS OF DETAIL
Medium-scale topo map (1:150,000)
SOME DETAIL
Map Scale
PART 1 Basic Land Navigation

Small-scale map (1:100,000,000)
VERY LITTLE DETAIL
Medium-scale map (1:250,000)
MORE DETAIL
Large-scale map (1:24,000)
LOTS OF DETAIL
Map Scale
PART 1 Basic Land Navigation

Any Questions?
PART 1 Basic Land Navigation

Map SymbolsSymbols are used to represent the natural and man-made features of the earth.
cem
PART 1 Basic Land Navigation
It is a map language that is simple to read and understand. BUT you must first know what the map symbols
represent, in order to understand, read and speak map language to others.

Woods
Shrub
Orchard
Vineyard
Mangrove
VEGETATIONMap Symbols
PART 1 Basic Land Navigation

Marsh or swamp
Submerge marsh
or swamp
Wood marsh
or swamp
Submerge wood
marsh or swamp
Rice field
Land subject
to inundation
SUBMERGED AREAS
AND BOGSMap Symbols
PART 1 Basic Land Navigation

RIVERS, LAKES, AND CANALS
Perennial stream
Perennial river
Small falls; small rapids
Large falls; large rapids
Dry lake
Perennial lake or pond
Intermittent lake or pond
Intermittent stream
Dam
Intermittent river
Well or spring
Canal
Map SymbolsPART 1 Basic Land Navigation

MAN-MADE FEATURES and HIGHWAY & LAND GRIDS
Highway
Road
Dirt Road
Trail
Power Lines
Buildings
Built-up Areas
Airports
Landing Strip
School
Church
cemCemetery
Mine
Gravel Pit
Bridge
Foot Bridge
Railroad
Land Grids
12 13 14
15 16 17
18 19 20
Map SymbolsPART 1 Basic Land Navigation

Any Questions?
PART 1 Basic Land Navigation

CONTOUR LINES
Contour Interval ~ The contour interval is the distance
between each contour line. The contour interval is found along
the bottom edge, center of the map.
Intermediate Contour ~ a brown line on a topographic map
and represents a line of equal elevation.
Index Contour ~ a bolder/wider brown line that has the
elevation value marked at various intervals as a part of the line.
Example: contour is 20 feet interval
A=700 ft
B=740 ft
C=770 ft
D=820 ft
PART 1 Basic Land Navigation

CONTOUR LINES• There is a dimension to establishing position which does depend on map reading skills.
• This is the vertical dimension. On a map it is referred to as ―relief‖.
– Knowledge of the relief of an area is extremely important to a wilderness navigator.
• The most graphic technique ever devised to show relief information is the contour line.
– If you were to walk a contour line you would never go down hill and never up hill, and eventually you
would arrive back where you started.
PART 1 Basic Land Navigation

Any Questions?
PART 1 Basic Land Navigation

Terrain Relief Features
Five Major
• Ridge
• Hill
• Saddle
• Valley
• Depression
Three Minor
• Spur
• Draw
• Cliff
Two Supplemental
• Cut
• Fill
PART 1 Basic Land Navigation
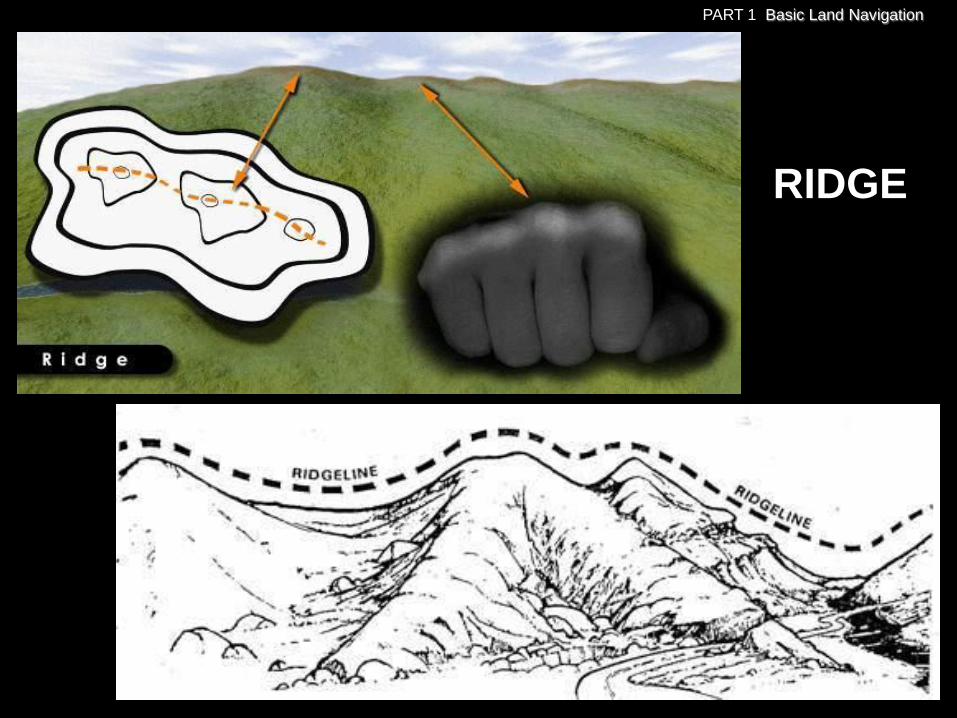
RIDGE
PART 1 Basic Land Navigation

HILL
PART 1 Basic Land Navigation

S
A
D
D
L
E
PART 1 Basic Land Navigation
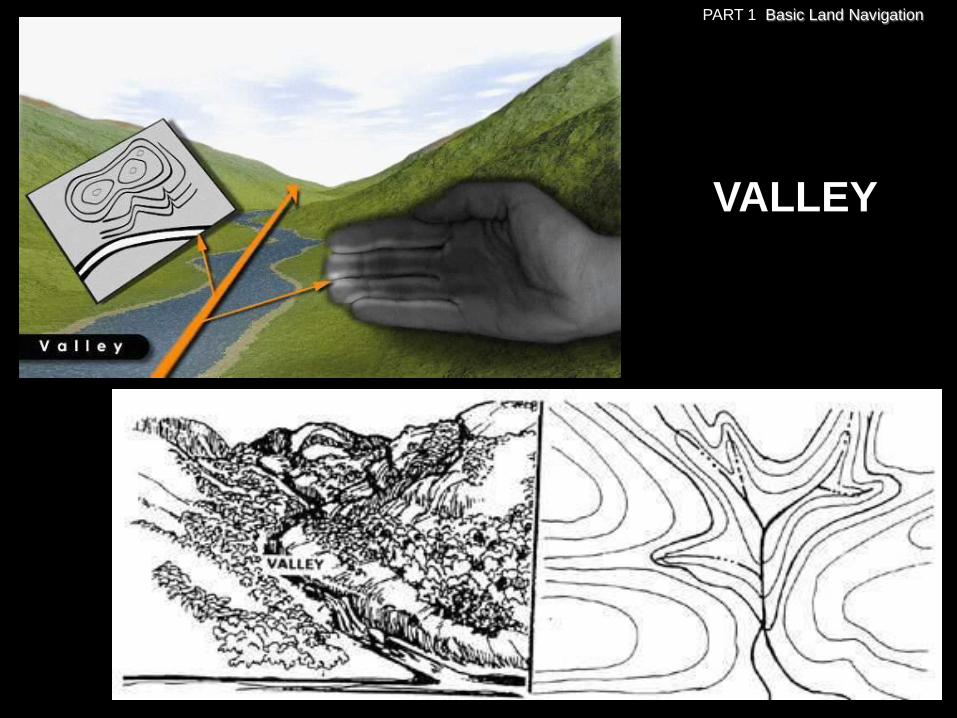
VALLEY
PART 1 Basic Land Navigation

DEPRESSION
PART 1 Basic Land Navigation

SPURS
PART 1 Basic Land Navigation

DRAWS
PART 1 Basic Land Navigation

CLIFF
PART 1 Basic Land Navigation

C
U
T
F
I
L
L
PART 1 Basic Land Navigation

Terrain FeaturesPART 1 Basic Land Navigation

Any Questions?
PART 1 Basic Land Navigation

Map Information – DirectionEXPRESSING DIRECTION
• You need a way of expressing direction that is accurate, is adaptable to any part of the world, and has a common unit of
measure. Directions are expressed as units of angular measure and direction implies a reference point.
• The common reference point for maps is True North, and map direction is figured in degrees from that point.
• Azimuths - The direction from one point to another point (either on the map or on the ground) is called an azimuth.
– Azimuths are given in degrees in a clockwise direction. Since there are 360° in a circle, an azimuth can be any
number up to 360°. East is 90°, South is 180°, West is 270°, and North is 360°.
• Maps are laid out with the top toward the top of the earth – True North (geographic north) and map north. The side edges
of the map are the only lines on the map guaranteed to run true north-south.
• The many north-south lines on a map give grid north. The compass needle points to magnetic north. Grid north and
magnetic north usually have a few degrees difference. Neither points straight at the North Pole; that is called ―true north.‖
• With compass and map you can know what direction you are heading.
PART 1 Basic Land Navigation

• True North. A line from any point on the earth's surface to the north pole. Is represented by a star.
• Magnetic North. The direction to the north magnetic pole, as indicated by the north-seeking needle of a
magnetic compass. The magnetic north is usually symbolized by a line ending with half of an arrowhead.
• Grid North. The north that is established by using the vertical grid lines on the map. Symbolized by the
letters GN. Used for UTM grid by military and rescue teams for its accuracy and simplicity.
G-M ANGLE. The angular difference between GN and MN.
Why do we need to know all this?
So that we can navigate using a map, the ground
(we often forget the ground is important) and compass.
You cannot follow a GN with a compass; nor can you
plot a MN with a protractor. To assist you in making
the conversion from MN to GN, and vice versa, a
declination diagram is placed on the map margin.
Remember the following.
When using a map - use a protractor (next slides) to measure
GRID Bearings. Do not use the compass magnetic needle.(unless map has MN Lines – see Part 2 Intermediate Land Nav)
When using the ground – use a Compass to Measure
MAGNETIC Bearings.
With GN and G-M ANGLE you can find the MN.
With MN and G-M ANGLE you can find the GN.
Map Information – DirectionTHREE TYPES OF DIRECTION
Your
direction
of travel
G - M Angle
14° + 10° = 24°
PART 1 Basic Land Navigation
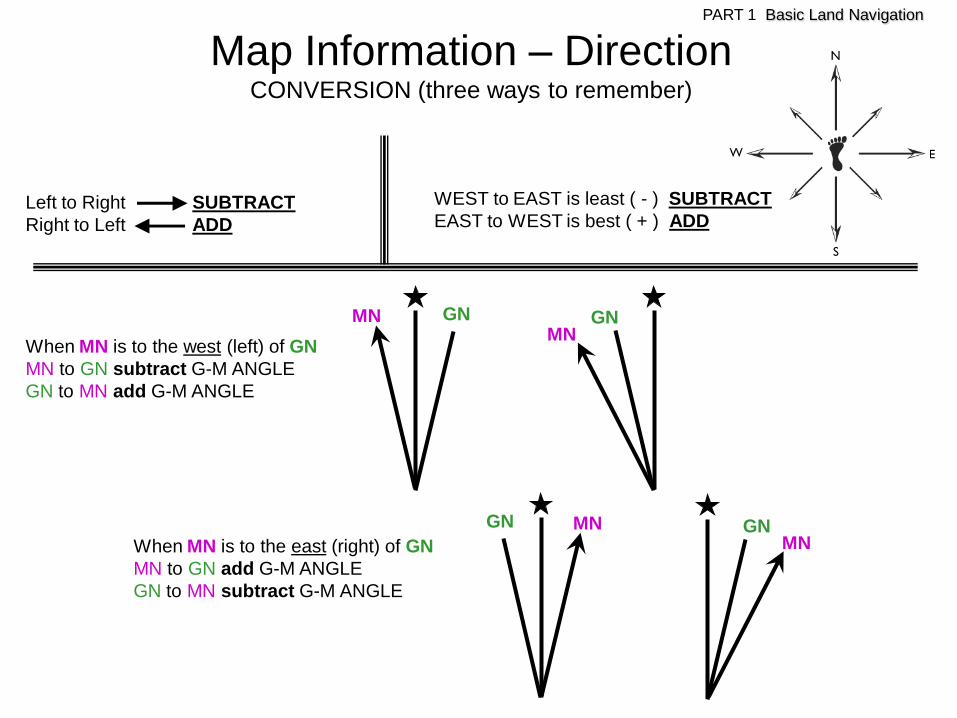
Map Information – DirectionCONVERSION (three ways to remember)
GN MN GNMN
When MN is to the west (left) of GN
MN to GN subtract G-M ANGLE
GN to MN add G-M ANGLE
When MN is to the east (right) of GN
MN to GN add G-M ANGLE
GN to MN subtract G-M ANGLE
GNMN GNMN
Left to Right SUBTRACT
Right to Left ADD
WEST to EAST is least ( - ) SUBTRACT
EAST to WEST is best ( + ) ADD
PART 1 Basic Land Navigation

HOW?
From ground to map.
1. You measure the bearing of a landmark on the ground
with a compass. It is 49° MN.
2. The G-M ANGLE on the Map is 24°
3. So MN to GN SUBTRACT 49°- 24° = 25° GN (Draw this
on your map)
From map to ground.
1. You measure the bearing of a point on the map with a
protractor (next slides). It is 25° GN.
2. The G-M ANGLE on the Map is 24°
3. So GN to MN ADD 25°+ 24° = 49° MN (Put this on your compass)
Map Information – DirectionCONVERSION
(example 1)
G - M Angle
14° + 10° = 24°
Your
direction
of travel
Left to Right SUBTRACT
Right to Left ADD
PART 1 Basic Land Navigation

HOW?
From ground to map.
1. You measure the bearing of a landmark on the ground
with a compass. It is 322° MN.
2. The G-M ANGLE on the Map is 9°
3. So MN to GN ADD 322°+ 9° = 331° GN (Draw this
on your map)
From map to ground.
1. You measure the bearing of a point on the map with a
protractor (next slides). It is 331° GN.
2. The G-M ANGLE on the Map is 9°
3. So GN to MN SUBTRACT 331°- 9° = 322° MN (Put this on your
compass)
Map Information – DirectionCONVERSION
(example 2)
G - M Angle
14° - 5° = 9°
Your
direction
of travel
Left to Right SUBTRACT
Right to Left ADD
PART 1 Basic Land Navigation

Any Questions?
PART 1 Basic Land Navigation

Map Information – DirectionPROTRACTOR
1. With a protractor the map does
NOT have to be oriented.
2. It is used to calculate direction
from map to ground (compass)
by converting the protractor GN to
a MN for the compass.
3. It is used for –
• Plotting azimuths
• Plotting position
• Plotting UTM coordinates
NOTE
If you have MN LINES drawn on the
map, you can align the protractor
to a MN LINE, get the MN azimuth
on the protractor and you DO NOT
have to do any MN conversions.
(see Part 2 Intermediate Land Nav)
PART 1 Basic Land Navigation
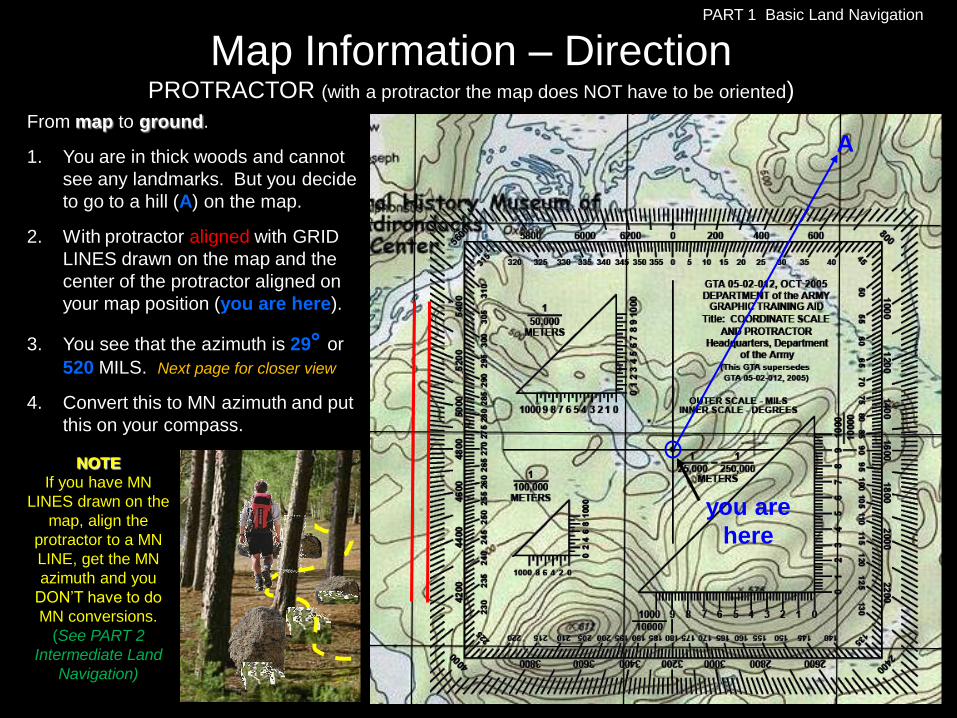
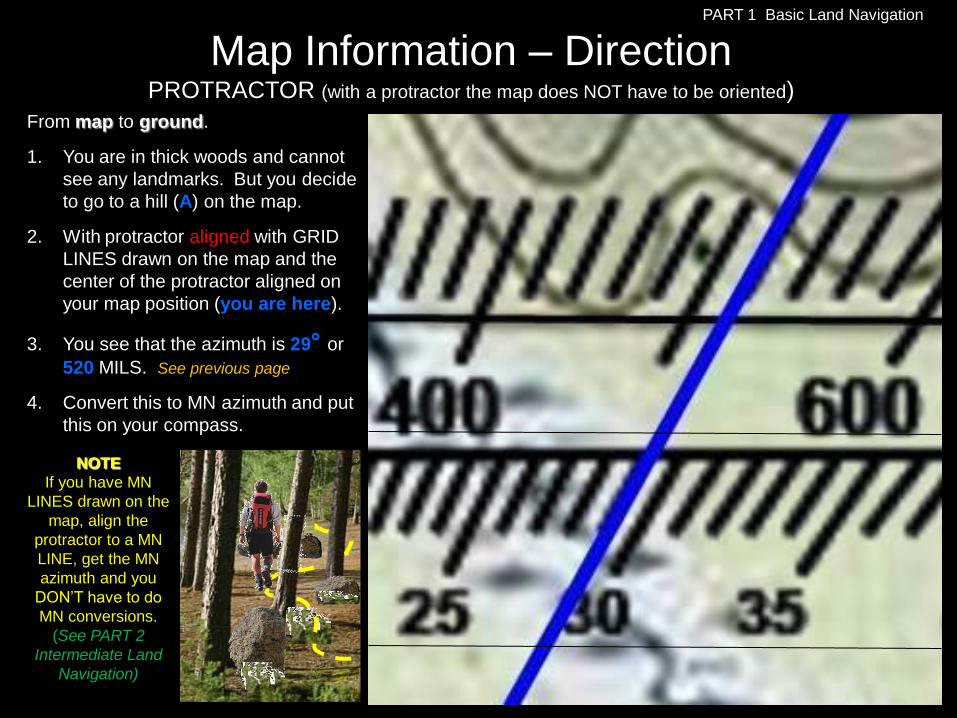
Map Information – DirectionPROTRACTOR (with a protractor the map does NOT have to be oriented)
you are
here
AFrom map to ground.
1. You are in thick woods and cannot
see any landmarks. But you decide
to go to a hill (A) on the map.
2. With protractor aligned with GRID
LINES drawn on the map and the
center of the protractor aligned on
your map position (you are here).
3. You see that the azimuth is 29° or
520 MILS. Next page for closer view
4. Convert this to MN azimuth and put
this on your compass.
NOTE
If you have MN
LINES drawn on the
map, align the
protractor to a MN
LINE, get the MN
azimuth and you
DON’T have to do
MN conversions.
(See PART 2
Intermediate Land
Navigation)
PART 1 Basic Land Navigation
Map Information – DirectionPROTRACTOR (with a protractor the map does NOT have to be oriented)
From map to ground.
1. You are in thick woods and cannot
see any landmarks. But you decide
to go to a hill (A) on the map.
2. With protractor aligned with GRID
LINES drawn on the map and the
center of the protractor aligned on
your map position (you are here).
3. You see that the azimuth is 29° or
520 MILS. See previous page
4. Convert this to MN azimuth and put
this on your compass.
PART 1 Basic Land Navigation
NOTE
If you have MN
LINES drawn on the
map, align the
protractor to a MN
LINE, get the MN
azimuth and you
DON’T have to do
MN conversions.
(See PART 2
Intermediate Land
Navigation)

Any Questions?
PART 1 Basic Land Navigation

Map Information - DirectionOrienting the Map with the Landscape (MN and True North)
TECHNIQUE # 1 (True North)
1. Identify several landmarks on the map and on the terrain.
2. Visually orient the map landmarks with the terrain landmarks.
3. The map is oriented to True North.
TECHNIQUE # 2 (Magnetic North)
With compass & map:
1. Lay the compass on the MN
line on the map.
2. Rotate the map and compass
together until the compass
bearing reads 0° degrees
Magnetic North (compass and
MN line on the map are
aligned / parallel).
3. The map is oriented to MN.
PART 1 Basic Land Navigation

Map Information - DirectionOrienting the Map with the Landscape (True North)
PART 1 Basic Land Navigation
TECHNIQUE # 3
1. Find Magnetic Declination value in the map margin (bottom left corner), example East 11.5°.
2. Place compass edge on edge of map North/South line with front of compass facing top of map.
3. Rotate map and compass together until North Arrow is 11.5° east of Black Index Line.
Note: Black Index Line is aligned with 348.5°(360° – 11.5° = 348.5°), map is oriented to TRUE NORTH.
MN 11.5° East of North correct for 1990
and moves easterly by 0.1° annually.

Map Information - DirectionOrienting the Map with the Landscape (Magnetic North)
PART 1 Basic Land Navigation
TECHNIQUE # 4 – when your position on the map is known.
1. Select a terrain feature on the ground that you can find on the map, example the HILL.
2. With the compass, sight the azimuth to the HILL(295 °) from your position ( ).
3. Align the compass edge through the HILL and your position ( ).
4. Rotate map and compass together until 295° is aligned with the Black Index Line. Map is oriented MN.
HILL
HILL

Any Questions?
PART 1 Basic Land Navigation

Map Information - Distance• The relationship between map and ground distance is the function of the bar scale.
• The bar scale looks like a small ruler and usually has 3 to 4 bar scales; feet, miles, meters, and
kilometers.
• The ability to determine distance on a map, as well as on the earth’s surface, is an important factor in
planning and executing safe, practical routes.
• The map scale of 1:xx,xxx means that one unit of measure on the map is equal to xx,xxx units of the
same measure on the ground.
– Example
• A map scale of 1:25,000 means that one unit of measure on the map is equal to 25,000 units of
the same measure on the ground.
– On map 1 inch = 25,000 inches (2083 feet, 694 yards) on the ground.
– On map 1 cm = 25,000 cm (250 meters, ¼ kilometer) on the ground.
• A map scale of 1:100,000 means that one unit of measure on the map is equal to 100,000 units
of the same measure on the ground.
– On map 1 inch = 100,000 inches (8333 feet, 2778 yards, 1¾ miles) on the ground.
– On map 1 cm = 100,000 cm (1000 meters, 1 kilometer) on the ground.
• A map scale of 1:500,000 means that one unit of measure on the map is equal to 500,000 units
of the same measure on the ground.
– On map 1 inch = 500,000 inches (41667 feet, 13889 yards, 8 miles) on the ground.
– On map 1 cm = 500,000 cm (5000 meters, 5 kilometer) on the ground.
PART 1 Basic Land Navigation
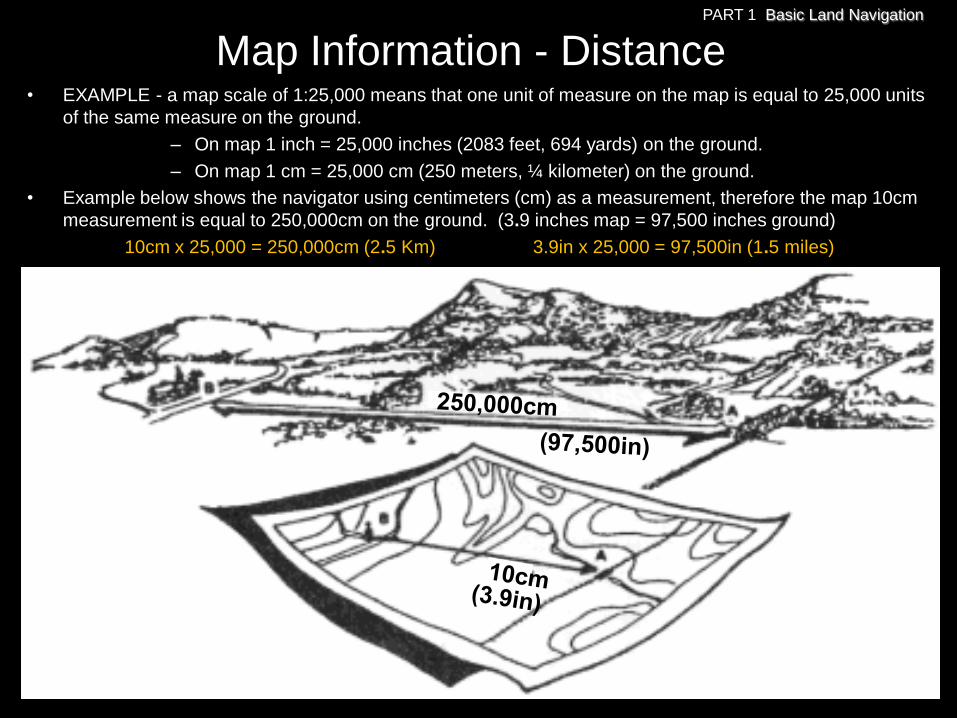
• EXAMPLE - a map scale of 1:25,000 means that one unit of measure on the map is equal to 25,000 units
of the same measure on the ground.
– On map 1 inch = 25,000 inches (2083 feet, 694 yards) on the ground.
– On map 1 cm = 25,000 cm (250 meters, ¼ kilometer) on the ground.
• Example below shows the navigator using centimeters (cm) as a measurement, therefore the map 10cm
measurement is equal to 250,000cm on the ground. (3.9 inches map = 97,500 inches ground)
10cm x 25,000 = 250,000cm (2.5 Km) 3.9in x 25,000 = 97,500in (1.5 miles)
Map Information - DistancePART 1 Basic Land Navigation

Map Information - Position• Finding one’s position on a map in the usual sense, such as at the intersection of two compass bearings,
is more a matter of compass technique than of map reading skills. . . BUT . . .
• It is possible to locate your POSITION on a map without a compass, by land feature and map association.
• It is IMPOSSIBLE TO BE TOTALLY LOST. Finding your location is a process of narrowing down the
options until you can determine a point on a map.
– By determining the lay of the land and finding prominent features, then relating them to your map,
the narrowing-down process will not take long.
– Landmarks can be anything that you recognize as being on the map. Classically these are hill tops,
but you can use the intersection of two roads, a building such as a power grid sub-station, the abrupt
edge of a ridge, the edge of an island, the bend in a trail, anything that you can recognize as being
on the map and that you can see.
• There is a second dimension to establishing position which does depend on map reading skills. This is
the vertical dimension. On a map it is referred to as ―relief‖.
– Knowledge of the relief of an area is extremely important to a wilderness navigator.
– The most graphic technique ever devised to show relief information is the contour line.
– If you were to walk a contour line you would never go down hill and never up hill, and eventually you
would arrive back where you started.
• Navigation is not about finding yourself after you are lost (although that’s what
happens sometimes); navigation is about keeping track of your POSITION as you
move away from a known point. As you move you have to remain cognizant of the
terrain you are leaving, of the terrain you are passing, and of the terrain that is
coming up.
PART 1 Basic Land Navigation

Map Information - Identification• The identification of significant features, both natural and man-made, is partly a matter of knowing the
language of maps.
– One category of map language is lines. In addition to showing contour relief, lines are used to portray
roads, trails, railroads, power lines, and drainage features.
– Another category of map language is composed of various picture symbols.
– A third part of map language is color.
• If part of identification is in knowing the language of maps, the rest is a problem of interpretation. What is
the relationship among certain lines, symbols, and colors?
• Reading contour lines is literally reading between the lines. Contour lines represent the shape of the
terrain only at specified intervals. The user must be aware that what lies between may be quite different.
There could be rugged terrain, vertical bluffs, or deep ravines that might not be shown.
• A river may be drawn some what straight on a map, but the terrains actual river meanders, with many
curves, turns, and with wide and narrow banks.
• What a topographic map shows is as accurate as possible, BUT can give you a false sense of what you
might mentally think what is ahead of you and what actually is shown on an aerial photo map and actual
land features. (see next slides)
PART 1 Basic Land Navigation
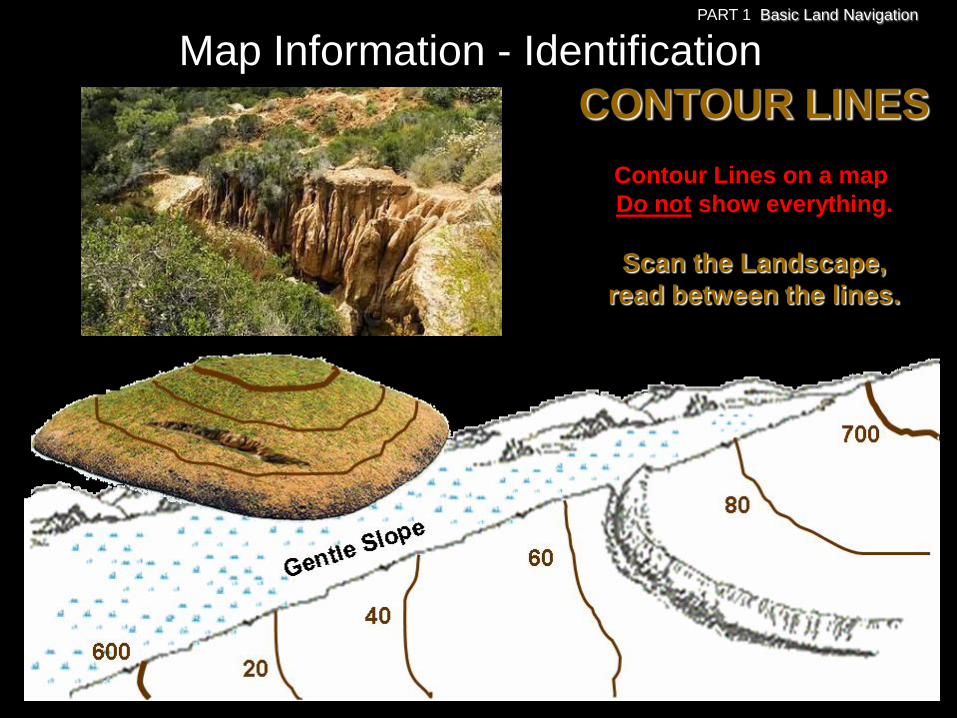
CONTOUR LINES
Contour Lines on a map
Do not show everything.
Scan the Landscape,
read between the lines.
Map Information - IdentificationPART 1 Basic Land Navigation

Any Questions?
PART 1 Basic Land Navigation

What a Topo map,
Aerophoto map,
And actual Land features show
TOPO MAPAERIAL PHOTO
LAND
Map Information –
Identification
PART 1 Basic Land Navigation

What a Topo map
and actual Land features show
Map Information –
Identification
PART 1 Basic Land Navigation

What a Topo map
and actual Land features show
Map Information –
Identification
PART 1 Basic Land Navigation

PART 1 Basic Land Navigation
What a Topo map
and actual Land features show
Map Information –
Identification
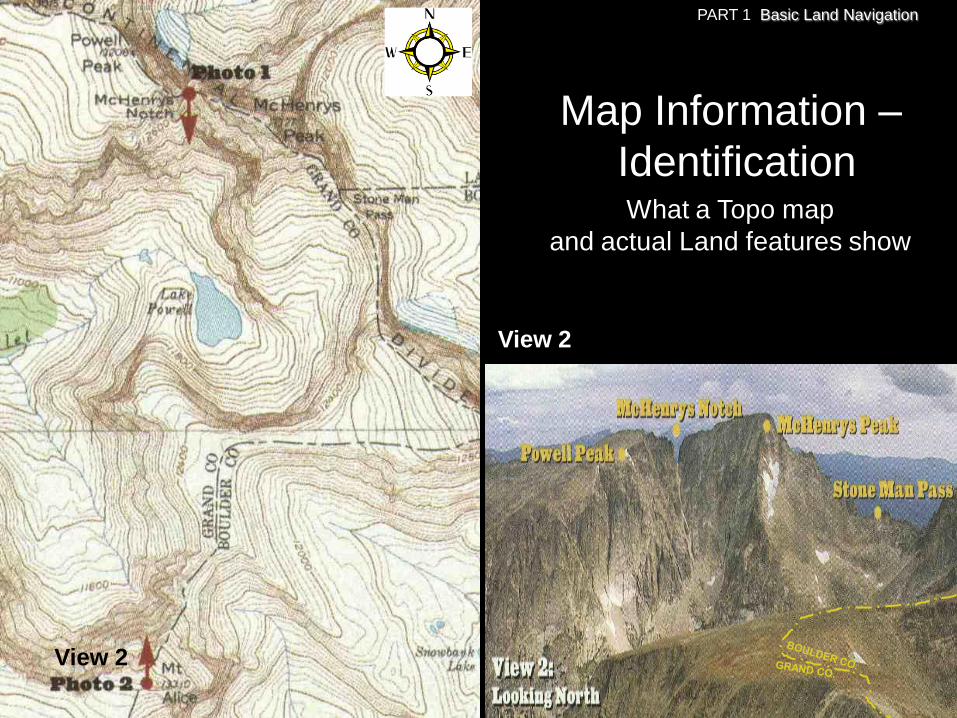
Compare the next five slides
with this map, to get view point
perspective of what you see on
this map and what you see on
the landscape in front of you.
View 1
View 2

PART 1 Basic Land Navigation

PART 1 Basic Land Navigation
View 1
PART 1 Basic Land Navigation
What a Topo map
and actual Land features show
Note: here the map is turned upside down so
you can get a better perspective
Map Information –
Identification
View 1
View 2
PART 1 Basic Land Navigation
What a Topo map
and actual Land features show
Map Information –
Identification
View 2
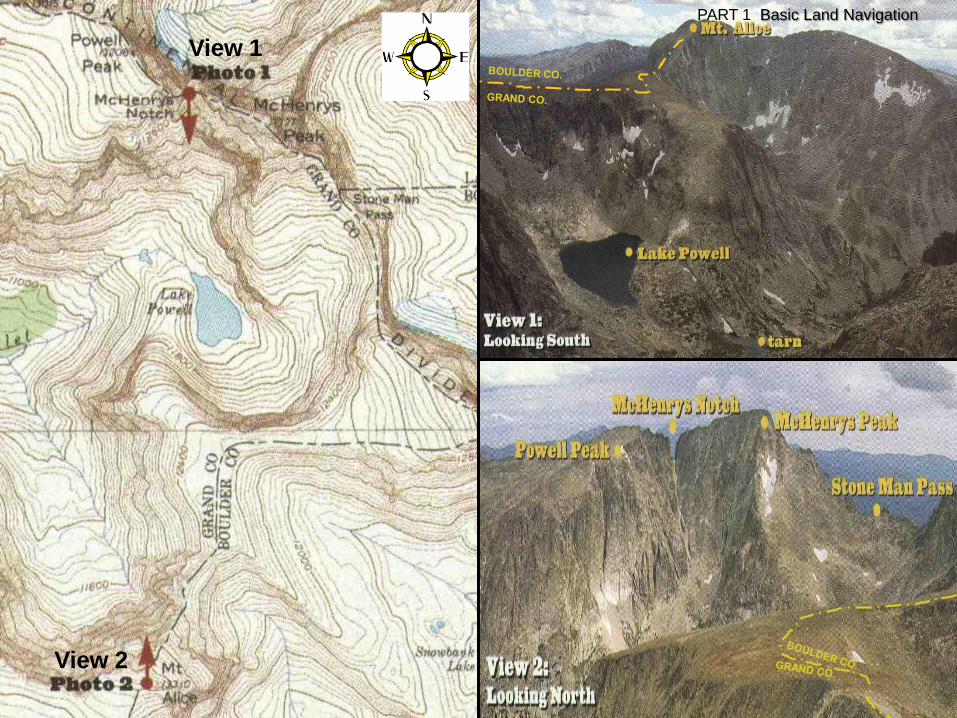
View 1
View 2
PART 1 Basic Land Navigation
Any Questions?
PART 1 Basic Land Navigation

Map Folding and Map Care• Maps should be correctly folded.
– Maps should be folded to make them small enough to be carried and still be available for use
without having to unfold them entirely.
– After a map has been folded it should be placed in a folder for protection. This will prevent the
corners and edges of the map from wearing out and tearing easily when opened.
• It is hard to navigate accurately with a dirty, grimy, wet or damaged map. Take care of your map and it will
take care of you.
– Most maps are printed on paper and require protection from water, mud, weather, and tearing.
– Whenever possible, a map should be carried in a waterproof packet to prolong its life.
– Waterproofing maps.
• Marking a map.
– If it is necessary to mark a map, use light lines so that they may be erased without smearing or
smudging. If the margins of the map must be trimmed note any marginal information which may be
needed, such as grid data or magnetic declination data, on the back of the map.
• Special care should be taken of a map that is being used in any situation, especially in a small group; the
mission may depend on that map.
All members of the group
should know the map’s
location at all times.
PART 1 Basic Land Navigation

Map Folding
Technique # 1 Technique # 3
Technique # 2
PART 1 Basic Land Navigation

Any Questions?
PART 1 Basic Land Navigation

Note:
Prior to being issued any training *equipment, you will
be required to sign a “statement of liability” agreeing
to pay for anything you damage or lose.
All items will be inspected and inventoried prior to
your signature and at the end of the training day too.
If you do not intend to sign this statement, then you
may be denied training.
* You may use your own equipment.
PART 1 Basic Land Navigation

Now it is time for the following . . .
• Written exam
• Hands-on / Outdoors exam
TESTING
PART 1 Basic Land Navigation

THE END OF
LAND NAVIGATION
PRESENTATION
PART 1
PART 1 Basic Land Navigation