betriebsanleitung • operating instructions index page page 1. safety instructions 3 1.1. for your...
TRANSCRIPT

Turbomolecular Drag PumpsWith Electronic Drive Unit TC 600
PM
0496
BE
/K (
0503
)
TMH 521 PTMU 521 P
Betriebsanleitung • Operating Instructions

2
Index
Page Page
1. Safety Instructions .................................. 31.1. For Your Orientation........................................................... 3
1.2. Pictogram Definitions........................................................ 3
2. Understanding The Pumps TMH 521 P/TMU 521 P ............................. 4
2.1. Main Features..................................................................... 4
Proper Use .......................................................................... 4
Improper Use ...................................................................... 5
2.2. Differences Between The Pump Types.......................... 5
2.3. Scope of Delivery............................................................... 5
3. Installation ............................................... 63.1. Preparations For Installation............................................ 6
3.2. Installing The Pump,Connecting The High Vacuum Side ................................ 6
3.3. Connecting The Fore-Vacuum Side ................................ 9
3.4. Connecting The Cooling Unit.......................................... 10
3.5. Connecting The Venting Valve....................................... 10
3.6. Connecting The Casing Heating Unit............................ 10
3.7. Connecting The Sealing Gas Valve............................... 10
3.8. Connecting The Electronic Drive Unit TC 600.............. 11
3.9. Installing The Power Supply .......................................... 11
3.10. Connecting The Remote Control Unit ........................... 12
3.11. Connecting The Serial Interface RS 485 ...................... 13
Connection ........................................................................ 13
Connecting The RS 485 ................................................... 13
3.12. Connections Diagram...................................................... 14
4. Operations .............................................. 154.1. Before Switching ON....................................................... 15
4.2. Switching ON.................................................................... 15
4.3. Switching OFF And Venting............................................ 15
4.4. Gas Type Dependent Operations .................................. 16
4.5. Shutting Down For Longer Periods ............................... 16
4.6. Operations With The DCU 001, DCU 300
or HPU 001......................................................................... 17
4.7. Operations With The Remote Control Unit................... 17
Venting Release (Optional)............................................. 17
Motor, Turbopump ........................................................... 17
Pumping Station ............................................................... 17
Heating/Reset ................................................................... 17
Standby.............................................................................. 17
Rotation Speed Setting Mode Via Input PWM ........................................................................ 18
Switching Outputs............................................................ 18
5. Monitoring Operations .......................... 195.1. Operations Display Via LED............................................ 19
5.2. Turbopump Temperature Management....................... 19
6. What To Do In Case Of Breakdowns ? ........................................ 20
7. Maintenance/Replacement .................. 217.1. Replacing The Lubricant Reservoir............................... 21
7.2. Replacing The Electronic Drive Unit TC 600 .................22
8. Service .................................................... 23
9. Technical Data ....................................... 249.1. Dimensions Diagram ....................................................... 25
10. Spare Parts ............................................. 28
11. Accessories............................................ 29
Declaration of Contamination..................... 30
Manufacturer’s Declaration .......... (last page)
PPlleeaassee nnoottee:: Current operating instructions are available viawww.pfeiffer-vacuum.net.

3
Warning, danger of burns from touching hotparts.
Warning, danger of personal injury.
Caution, danger of damage to the pump or tothe system.
Warning, danger of injury from rotating parts.
Please note, attention to particularly importantinformation on the product, handling theproduct or to a particular part of thedocumentation.
PLEASE NOTE
WARNING
CAUTION
WARNING
WARNING
Read and follow all instructions in this manual. Inform yourself regarding:
– Hazards which can be caused by the pump;– Hazards which can be caused by your system.– Hazards which can be caused by the media being
pumped. Avoid exposing any part of the body to vacuum. Observe the safety and accident prevention regulations. Regularly check that all accident prevention measures are
being complied with. Do not operate the turbopump with open high vacuum
flange. Do not carry out any unauthorised conversions or
alterations to the turbopump with TC 600. When returning the turbopump observe the shipping
instructions. The turbopump must be anchored in accordance with the
installation instructions. Do not disconnect the plug between the TC 600 and
accessory components during operations. Disconnect the voltage supply for the TC 600 before
opening the turbopump. When working on the turbopump, the high vacuum flange
should only be opened once the rotor is at rest. When using sealing gas, the pressure in the hose connec-
tion should be limited to 2 bar via the overpressure valve. If a heater is in use temperatures of up to 120 °C can be
present in the area of the high vacuum flange. Take care toavoid burns !
During operations, temperatures of up to 65 °C can arise inthe lower part of the turbopump. Take care to avoid burns !
Keep leads and cables well away from hot surfaces ( > 70 °C).
Operate the turbopump with TC 600 only in conjunctionwith the relevant power supply (accessory).
Without the cover plate for the TC 600 the unit has beenaccredited protection class IP 30. When the unit isoperated in environments which require other protectionclasses, the necessary measures must be taken. When theturbopump is water cooled a cover plate for the TC 600must be installed by an electrical specialist, in order toattain protection class IP 54 (Sec. 11 Accessories).
The mains connection must be subject to a safeconnection to the PE (protection class 1).
If the turbopump and the TC 600 are operatedindependently of each other (only permissible with theagreement of the manufacturer) the turbopump must beconnected to the PE.
The turbopump and the TC 600 must only bedisconnected from each other when the turbopump iscompletely at rest and the TCP 600 has been disconnectedfrom the power supply. The cause of any operating voltage leakage to earth(red LED flashes) must be eliminated to avoid the danger of anelectric shock. The housing screws do not loosen, pull tight,remove or replace, since otherwise the guarantee for thesecurity of the turbopump expires.
Modifications reserved.
1. Safety Instructions
1.1. For Your Orientation
Instruction in the text Working instruction: here, you have to do something.
Symbols usedThe following symbols are used throughout in all illustrations.
High vacuum flange
Fore-vacuum flange
Venting connection
Air cooling
Electric connection
Sealing gas connection
Abbreviations usedDCU = Display and operating unitHPU = Display and operating unitTC = Electronic drive unit, turbopumpTPS = Power supply
Position numbersThe same pump and accessory parts have the same positionnumbers in all illustrations.
1.2. Pictogram Definitions
4
2.1. Main FeaturesTurbopumps TMH 521 P/TMU 521 P with the TC 600 form anunit. Voltage is supplied by the power supply (see Section 11.Accessories).
On delivery, the pumps have been set up foroperations in remote mode. Remote plug 8dshould therefore be disconnected if operationswith the DCU 001, DCU 300 or HPU 001 arerequired.
PLEASE NOTE
CoolingWater cooling or air cooling is required (”Accessories”).Integrated protective measures against excess temperatures:
The Electronic Drive Unit TC 600 reduces the rotor rotation speed.
BearingsHigh vacuum side: wear free permanent magnetic bearing.Fore-vacuum side: oil circulatory lubricated ball bearing
with ceramic balls.
2. Understanding The Pumps TMH 521 P/TMU 521 P Ambient conditionsThe turbomolecular pump needs to be installed in compliancewith the following ambient conditions:
Installation location: protected against the weather(rooms within buildings)
Temperature: +5 °C to +40 °CRelative humidity of the air: max. 80 % at T ≤ 31 °C
up to max. 50% at T ≤ 40 °CAir pressure: 77 kPa - 106 kPaInstallation altitude: 2000 m max.Pollution degree: 2Overvoltage category: IIConnection voltage: 72 VDC ±5%
Proper Use– The Turbomolecular Pumps TMH 521 P/TMU 521 P may
only be used for the purpose of generating vacuum.– The turbopumps may only be used to pump those media
against which they are chemically resistant. For othermedia the operator is required to qualify the pumps for theprocesses involved.
– If the process produces dust, the maintenance intervalsmust be specified accordingly and sealing gas must beused.If the pump is to be operated with more than 50% of thepermissible gas load then sealing gas should be used toensure rotor cooling.
– The turbopump must be connected to a backing pump inaccordance with Section 3.3.
– Only Pfeiffer Vacuum power supplies may be used tooperate the TC 600. The use of other power supplies requires the express agreement of the manufacturer andequalisation with the valid specification.
– Without the cover plate for the TC 600 the pumps may onlybe operated providing the ambient conditions in compliance with Protection Type IP 30 are observed.
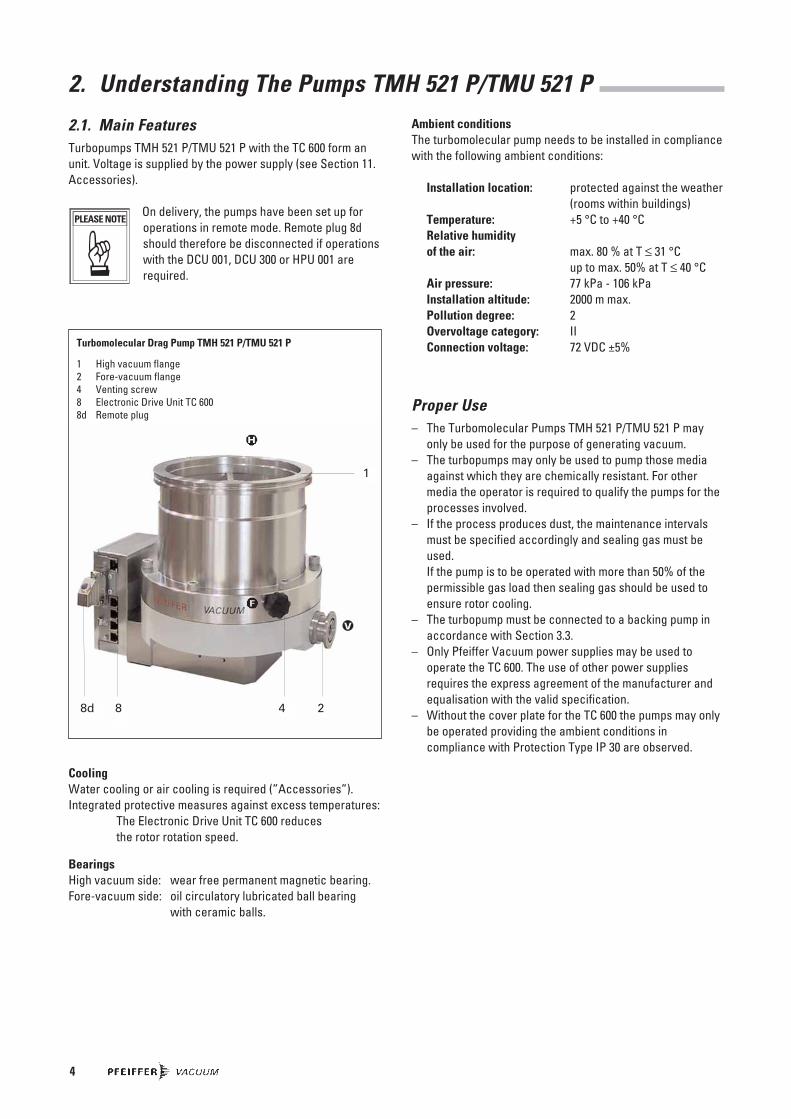
Turbomolecular Drag Pump TMH 521 P/TMU 521 P
1 High vacuum flange2 Fore-vacuum flange4 Venting screw8 Electronic Drive Unit TC 6008d Remote plug
1
248d 8

5
Feature TMH 521 P TMU 521 P
High vacuum flange ISO-K CF-F
High vacuum seal Elastomer Metal
Attainable final < 1 · 10-7 mbar < 5 · 10-10 mbarpressure (without baking-out) (with baking-out)
Abbreviations on the type plate of the pump
Suffix ”P”: Pumps with the designation TMH/TMU 521 Phave been designed for the connection of purge gas (see Section 3.7.).
Improper UseThe following is regarded, inter alia, as improper:– The pumping of explosive or corrosive gases.– Operating the pumps in areas where there is a danger of
explosion.– Operating the pumps in areas where there is a danger of
radioactivity.– The pumping of gases and vapours which attack the mate-
rials of the pumps.– The pumping of corrosive gases without sealing gas.– The pumping of condensating vapours.– Operations involving impermissibly high levels of gas
loads.– Operations with impermissibly high fore-vacuum pressure.– Operations with improper gas modes.– Operations involving too high levels of heat radiation
power (see Section 9. Technical Data).– Venting with rates higher than in Section 4.3. stated.– Operating the pump without the cover plate for the TC 600
in environments which require a protection class superiorto IP 30.Installation of the pumps in systems where the turbomole-cular pumps are subjected to impact-like stress and vibra-tions or the effect of periodically occurring forces.
– The use of other power units or accessories which are notnamed in this manual or which have not been agreed bythe manufacturer.
– The connection to power units with earthing of a directvoltage pole.
The turbomolecular pumps and flange connections must notbe used to tread on when climbing onto the system.
Improper use will cause all claims for liability and guaranteesto be forfeited.
2.2. Differences Between The Pump Types
2.3. Scope Of DeliveryThe turbopump scope of delivery includes:– protective covering for the high vacuum flange and the
fore-vacuum flange.
The 4 screws at the High vacuum flange are notsufficient for the attachment of the pump at arecipient (see Section 3.).
CAUTION

6
3. Installation 3.1. Preparations For Installation
Do not carry out any unauthorised conversionsor alterations to the turbopump.
In case the rotor blocks suddenly, torque levelsup to 66669900 NNmm can occur which need to beabsorbed by the system and the high vacuumflange.
– If the turbopump is to be operated with the DCU 001 orHPU 001, the remote plug 8d (please see Section 2.1.) onthe TC 600 should be disconnected and then proceed inaccordance with the corresponding operating instructions.
– The maximum permissible rotor temperature of the pump is90 °C. If the vacuum chamber or parts in the vacuumchamber are heated, the values stated in the technicaldata relating to the level of heat which may be radiatedinto the pump must not be exceeded. If necessary, suitableshielding must be fitted in the vacuum chamber before theturbopump (constructional suggestions available onrequest).
_ The temperature of the high vacuum flange must not exceed 120 °C.
– Only remove the blank flange from the high and fore-vacuum side immediately before connection.
– On Turbopumps TMH 521 P/TMU 521 P the lubricant reservoir is already fitted and filled.
– Where magnetic fields of > 5.0 mT are involved suitableshielding must be provided (available on request).
– If the pump is baked out, the heating sleeve and the bodyof the pump must be insulated to prevent burns from accidental contact.
– For operating the pump air or water cooling is necessary.
The person responsible for commissioningmust ensure that the installation is carried outin accordance with the legal regulations andthe pertinent industrial standards.
PLEASE NOTE
WARNING
WARNING
3.2. Installing The Pump, Connecting The High Vacuum Side
The utmost cleanliness must be observed whenfitting all high vacuum parts. Uncleancomponents prolong the pumping time.All installations units for the flange must be withinstallation grease-free, dust free and drying.
UUssee aa PPffeeiiffffeerr VVaaccuuuumm sspplliinntteerr sshhiieelldd oorr pprrootteeccttiivvee mmeesshhThe use of a Pfeiffer Vacuum splinter shield or protectivemesh in the high vacuum flange protects the turbopumpagainst foreign bodies coming from the vacuum chamber butdoes reduce the volume flow rate as followed:
Connecting via bellows or Pfeiffer Vacuum vibrationcompensator (Accessory)The high vacuum side can be flanged onto the vacuum cham-ber either directly or via a bellows or a vibration compensator(please see Sec. 11. ”Accessories”).
When using a Pfeiffer Vacuum vibration compensator,suitable securing needs to be introduced capable ofabsorbing the energy of the rotor should it suddenly block,since the vibration compensator itself alone cannot absorbthe occurring forces. Please consult the manufacturer.
The maximum permissible temperature at thevibration compensator is 100 °C.
CAUTION
PLEASE NOTE
Reduced volume flow rate in %
HH22 HHee NN22
Splinter shield DN 100 9 13 22
DN 160 5 7 16
Protective mesh DN 100 2 3 6
DN 160 1 2 4

7
Installing the high vacuum flange– In case the rotor blocks suddenly, torque levels up to
66669900 NNmm can occur which need to be absorbed by thesystem and the high vacuum flange.
– For installing the turbomolecular pumps to the highvacuum flange, the components listed in the followingmmuusstt be used exclusively. Otherwise the turbomolecularpump may twist or tear off. The components for installingthe turbomolecular pumps are special designs fromPfeiffer Vacuum
– The minimum strength of 170 N/mm2 of the flange materialneeds to be observed.
Installation is done as follows.
To reliably prevent the pump from twisting if therotor suddenly blocks, it is absolutely prohibitedto secure a pump with an ISO-K flange on avacuum chamber with an ISO-F flange or viceversa. Both flanges mmuusstt bbee of the same type.Installation with different flange types is carriedout at the user's own risk. Pfeiffer Vacuum shallassume no liability whatsoever for any damageor injuries resulting from this kind ofattachment.
WARNING
ISO-F to an ISO-F flangeFor installing there exist three variants.
VVaarriiaanntt 11 -- HHeexxaaggoonn ssccrreeww wwiitthh bblliinndd hhoollee
CCoonnnneeccttiioonn nnoommiinnaall-- DDeessiiggnnaattiioonn OOrrddeerr--nnuummbbeerrddiiaammeetteerr
DN 100 ISO-K/ Centering ring (coated) PM 016 210 AUDN 100 ISO-K
Centering ring (coated) PM 016 211 AUwith splinter shield
Centering ring (coated) PM 016 212 AUwith protective mesher
Bracket screws PF 300 110 -T(1166 pieces must be used)
DN 160 ISO-K/ Centering ring (coated) PM 016 216 AUDN 160 ISO-K
Centering ring (coated) PM 016 217 AUwith splinter shield
Centering ring (coated) PM 016 218 AUwith protective mesher
Bracket screws PF 300 110 -T(1144 pieces must be used)
CCoonnnneeccttiioonn nnoommiinnaall-- DDeessiiggnnaattiioonn OOrrddeerr--nnuummbbeerrddiiaammeetteerr
DN 100 ISO-F Centering ring (coated) PM 016 210 AU
Centering ring (coated) PM 016 211 AUwith splinter shield
Centering ring (coated) PM 016 212 AUwith protective mesher
Hexagon screws with N 3024 428 1Cwasher N 3502 422 4P(88 pieces each must be used)
DN 160 ISO-K/ Centering ring (coated) PM 016 216 AUDN 160 ISO-K
Centering ring (coated) PM 016 217 AUmit Splitterschutz
Centering ring (coated) PM 016 218 AUmit Schutzgitter
Hexagon screws N 3024 479 1C(88 pieces must be used)
ISO-K to an ISO-K flangeFor installation, the following components are available.
AD oder/or E BC
Bracket screw
A ISO-K flangeB Bracket screwC Centering ring, coatedD Splinter shieldE Protective mesh
The clamps need to be tightened crosswise in three steps.Tightening torque: 5 Nm, 15 Nm, 25 ±2 Nm
1) DN 100 ISO-F with washer
For a flange material having a strength of > 270 N/mm2 andwith a blind hole the hexagon screw 1,5 d must be screwedin. The hexagon screws must be tightened crosswise inthree steps. Tightening torque: DN 100 ISO-F: 5 Nm, 12 Nm, 22 ±2 Nm DN 160 ISO-F: 10 Nm, 20 Nm, 38 ±3 Nm
BAD oder/or E
1.5d
C
Hexagon srew with blind hole
A ISO-F flangeB Hexagon screw1)
C Centering ring, coatedD Splinter shieldE Protective mesh

8
CCoonnnneeccttiioonn nnoommiinnaall-- DDeessiiggnnaattiioonn OOrrddeerr--nnuummbbeerrddiiaammeetteerr
DN 100 ISO-F Centering ring (coated) PM 016 210 AU
Centering ring (coated) PM 016 211 AUwith splinter shield
Centering ring (coated) PM 016 212 AUwith protective mesher
Stud screws N 3169 428 2C(88 pieces must be used)
Nuts N 3433 047 8Pwith washer N 3502 422 4P(88 pieces each must be used)
DN 160 ISO-F Centering ring (coated) PM 016 216 AU
Centering ring (coated) PM 016 217 AUwith splinter shield
Centering ring (coated) PM 016 218 AUwith protective mesher
Stud screws N 3169 485 2C(88 pieces must be used)
Nuts (88 pieces must be used) N 3433 051 8P
BACD oder/or E
2.5d
Stud screw with blind hole
A ISO-F flangeB Stud screw with nutC Centering ring, coatedD Splinter shieldE Protective mesh
For a flange material having a strength of > 170 N/mm2 anda stud screw with clearance hole, the nuts must be tightened crosswise in three steps.Tightening torque: DN 100 ISO-F: 5 Nm, 12 Nm, 22 ±2 Nm DN 160 ISO-F: 10 Nm, 20 Nm, 38 ±3 Nm
BACD oder/or E
Stud screw and clearance hole
A ISO-F flangeB Stud screw with two nutsC Centering ring, coatedD Splinter shieldE Protective mesh
1) DN 100 ISO-F with washer
For a flange material having a strength of 170-270 N/mm2
and a screw-in flange, the stud screw 2,5 d must bescrewed in. The nuts must be tightened crosswise in threesteps.Tightening torque: DN 100 ISO-F: 5 Nm, 12 Nm, 22 ±2 Nm DN 160 ISO-F: 10 Nm, 20 Nm, 38 ±3 Nm
Variant 2 - Stud screw with blind hole Variant 3 - Stud screw and clearance hole(components as for variant 2; 1166 pieces of nuts must be used
CF-F flangeApplications for installing an CF-F to an CF-F flange:
Stud screw with blind hole1166 ((DDNN 110000 CCFF--FF)) or. 2200 ((DDNN 116600 CCFF--FF)) pieces of stud screws(M8) with washers and nuts must be used. The stud screwsneed to be tightened revolving with a tightening torque of 22 ±2 Nm.
BAC
52
Stud screw with blind hole
A CF-F flangeB Stud screw with
washer and nutC Copper seal
BAC
55
Hexagon screw and clearance hole
A CF-F-flangeB Hexagon screw
with washer and nutC Copper seal
Hexagon screw and clearance hole1166 ((DDNN 110000 CCFF--FF)) or 2200 ((DDNN 116600 CCFF--FF)) pieces of hexagonscrews (M8) with washers and nuts must be used. The hexa-gon screws need to be tightened revolving with a tighteningtorque of 22 ±2 Nm.

9
CCoonnnneeccttiioonn nnoommiinnaall-- DDeessiiggnnaattiioonn OOrrddeerr--nnuummbbeerrddiiaammeetteerr
DN 100 CF-F Hexagon screw M8 with PF 505 003 -TDN 160 CF-F washer and nut
(25 pieces)1)
Stud screw M8 with washer and nut(22 pieces)1) PF 507 003 -T
DN 100 CF-F Copper seal (10 pieces)1) PF 501 410 -Torcopper seal silvered PF 501 510 -T(10 pieces)1)
Splinter shield2) PM 016 315
Protective mesh2) PM 016 336
DN 160 CF-F Copper seal (10 pieces)1) PF 501 416 -Todercopper seal silvered PF 501 516 -T(10 pieces)1)
Splinter shield2) PM 016 318
Protective mesh2) PM 016 339
The components for installing to an CF-F flange are to beordered under the following numbers:
1) supplied pieces2) Insert the splinter shield and protective mesh in the high vacuum flange with the clamping lugs
downward.
The maximum loading capacity of the high vacuum flange is 1000 N (equivalent to 100 kg).Assymetric loading on the high vacuum flangemust be avoided.
CAUTION
No forces from the piping system must beallowed to act on the pump where turbopumpsare anchored.Suspend or support all pipes to the turbopump.
CAUTION
Directly flanging the pumpThe turbopump can be flanged onto the vacuum chambervertically (0°) up to an angle of 90° maximum.
The fore-vacuum flange must always pointdownwards.
CAUTION
Permissible installation positions for the turbopump
11 Vacuum chamber
Installation position with oil-sealed backing pump
11 Vacuum chamber
11
11
If the pump is being installed horizontally:The fore-vacuum flange of the turbopump must be alignedvertically downwards (maximum deviation ± 20°),otherwise the turbopump could become dirty and the lubrica-ting pump not properly function.
3.3. Connecting The Fore-Vacuum SideBacking pump: Vacuum pressure ≤ 5 mbarRecommendation: Oil-Free Diaphragm Pump or Rotary
Vane Vacuum Pumps from the Pfeiffer Vacuum range (note installation position,turbopump, see Section 3.2.).
Connecting the backing pumpAll connections of the fore-vacuum line: with the usual smallflange components or hose screw connections.
Be sure to conduct away the exhaust gasesfrom the backing pump. Do not reduce the freecross section of the fore-vacuum flange withfollowing components.
The exhausted process gases and vapours canrepresent a health hazard and can also be environmentally damaging.Comply with all gas manufacture's safetyinstructions.
With rigid pipe connections: fit a bellows in the connectingline to reduce vibration.
The electrical connection of the backing pump is made viaa relay box whose control line is connected to ”FV PUMP”on the TC 600.
Please refer to Operating Instructions PT 0030 BN for detailson the relay box, backing pump and its installation.
WARNING
CAUTION

10
3.4. Connecting The Cooling UnitThe Turbopumps TMH 521 P/TMU 521 P must be water or air cooled.Air cooling may only be used where the ambient temperatureis < 35 °C.
Use and installation:– For water cooling please refer to Operating Instructions
PM 0152 BN.– For air cooling please refer to Operating Instructions
PM 0543 BN.
3.5. Connecting The Venting ValveThe venting valve TVF 005 (see Section 11. Accessories)provides automatic venting in the event of a power failure andswitching off.
Fitting the venting valve Unscrew the venting screw from the venting connection 4
(please refer to Section 2.1.) of the turbopump. Screw in venting valve 42 with seal (USIT ring) on hexago-
nal SW 14.
Electrical connection Plug control lead 42a into the connection ”VENT” of the
TC 600 (8) on the turbopump.
The venting mode of the venting valve is selected via the DCUor Serial Interface RS 485.
The maximum pressure at the venting valve is1.5 bar absolute.
Please refer to Operating Instructions PM 0507 BN for detailson Venting Valve TVF 005.
CAUTION
3.6. Connecting The Casing Heating UnitThe attainment of final pressures is accelerated when turbopumps and vacuum chambers are baked out.The heating duration is dependent on the degree of dirt andon the required final pressure level. The heating durationshould be at least 4 hours.
Where casing heating is involved the turbopumpmust be water cooled.
High temperatures are generated whenturbopumps and vacuum chambers are bakedout. There is a danger of burns resulting fromtouching hot parts, even after the casing heatinghas been switched off.Ideally, the heating sleeve, pump casing andvacuum chamber should be insulated duringinstallation. Do not touch the heating sleeve,pump casing and vacuum chamber during thebaking out process.
Please refer to Operating Instructions PM 0542 BN for detailson the casing heating unit and its installation.
3.7. Connecting The Sealing Gas ValveTo protect the pump, particularly where corrosive or dust producing processes are involved, it is necessary to use sealing gas. Connection is made via the sealing gas valve (please seeSection. 11. Accessories).
WARNING
PLEASE NOTE
Please refer to Operating Instructions PM 0229 BN for detailson installing the sealing gas valve and adjusting the sealinggas flow.
8
8d
VENT
42a
42b
42
Connecting the Venting Valve TVF 005
8 Electronic Drive Unit TC 6008d Remote plug42 Venting Valve TVF 00542a Control lead venting valve/TC 60042b Plug
66 66a
9 15
Connecting the sealing gas valve
9 Locking screw sealing gas connection15 Seal66 Sealing gas valve66a Seal

11
3.9. Installing The Power SupplyVoltage may only be supplied with the PfeifferVacuum power supplies (Accessory). The useof other power supplies requires the expressagreement of the manufacturer andequalization with the valid specification (powersupply specifications available an request).
Please refer to Operating Instructions PM 0521 BN for detailson Power Supply TPS 300.
The mains connection must be freelyaccessible at all times.
CAUTION
CAUTION
3.8. Connecting The Electronic Drive Unit TC 600The turbopump and the Electronic Drive Unit TC 600 are connected and together form asingle unit.Connecting cable 8a has to be ordered in wanted length separately (see Section 11.Accessories).
Unscrew screw with tooth lock 8c from the TC 600 (abovethe connection X4).1)
Plug the plug X4 on connecting cable 8a into theconnection X4 on the TC 600 and screw in screw 8b.
Secure plug X4 on the TC 600 with a screw and tooth lock 8c.1)
Connect plug X2 on connecting cable 8a with Power Supply TPS 300/DCU 300 (Accessories) on connection X2.
Using screws and tooth lock 8c, included with the cableconsigment) secure plug X2 to power supply 105.1)
1) Only with cable PM 051 843 -T
Once operations voltage has been supplied, theTC 600 performs a self test on the supply volta-ge. The supply voltage for TurbomolecularPumps TMH 521 P/TMU 521 P is 72 V DC ±5% inaccordance with EN 60 742.
If the turbopump is being operated with the Display AndOperating Unit DCU 001, DCU 300 or HPU 001, remote plug 8dshould be disconnected. Connection should be carried out inaccordance with the respective operating instructions.
CAUTION
PLEASE NOTE
X4 8
8bX4
8c
8a8c
X2
X1
S1
X2
105
8d
Connecting the TC 600 with Power Supply TPS 300/DCU 300
X1 Mains connectionX2 Connection, power supplyX4 Connection TC 600S1 ON/OFF switch8 Electronic Drive Unit TC 6008a Connecting cable, TC 600 – TPS/DCU8b Screw8c Screw with tooth lock8d Remote plug105 Power supply

12
3.10. Connecting The Remote Control UnitRemote control options for various functions are provided withthe connection "REMOTE" on the TC 600 via the 15-pole D-Sub-Connector. Shielded cable must be used. Shielding is on theplug side of the TC 600 connected to the TC casing.
The inputs 2-6 are activated by connecting them to the + 24 Von pin 1 (active high) (please see Section 3.12. ConnectionsDiagram).
Pin occupancy and remote plug functions(please see following table).
When connecting supply voltage, the turbopumpis started.On delivery: Pin 1, Pin 2, Pin 3 and Pin 4 are bridged in themating plug.
CAUTION
Pin arrangement remote plug
Pin occupancy and remote plug functions
Pin nr. Input open (low) Input closed (high) on + 24V (pin 1)
1 +24 V
2 venting blocked (see Section 3.5.) venting released (see Section 3.5.)
3 motor, turbopump off motor, turbopump on:the turbopump is driven, current flows through the motor coils
4 pumping station off pumping station on:the turbopump is driven, backing pump is started via the relay box
5 heating off heating on:the heating is switched on once the rotation speed switchpoint is attained and off when the rotation speed switchpoint is unattained
optional: sealing gas valve off1) optional: sealing gas valve on1)
5 reset:by supplying a pulse (T < 2s) with an amplitude of 24V a malfunctionacknowledgement can be processed
6 standby off standby on:pump is accelerated to 66% of its nominal rotation speed
7 rotation speed setting mode off the rotation speed can be changed by feeding a PWM signal to this pin or via Serial Interface RS 485 (see Section 4.7. Rotation Speed Setting Mode)
8 Output (low) Output (high)rotation speed switchpoint not attained rotation speed switchpoint attained; output can be loaded with 24 V/50 mA
9 Output (low) Output (high)Collective malfunction message malfunction-free operations;
output can be loaded with 24 V/50 mA
10 Mass (ground) _________
11 Contact contact2) between pin 11 and pin 12 closedOutput 1: Switchpoint attained if the turbopump is above the switchpoint
12 ContactOutput 1: Switchpoint attained
13 Contact contact2) between pin 13 and pin 14 open in the event of a collective malfunctionOutput 2: Collective malfunction message
14 ContactOutput 2: Collective malfunction message
15 Analog output rotation speed proportional output voltage 0 - 10 VDC = 0 - 100 % * fend/load R ≥ 10 kΩ
1) The option must be set via the Serial Interface RS 485 (see Operating Instructions PM 0547 BN, Pumping Operating with DCU
2) The following technical data is applicable for the contacts: Umax = 50 VDCImax = 1 A
13
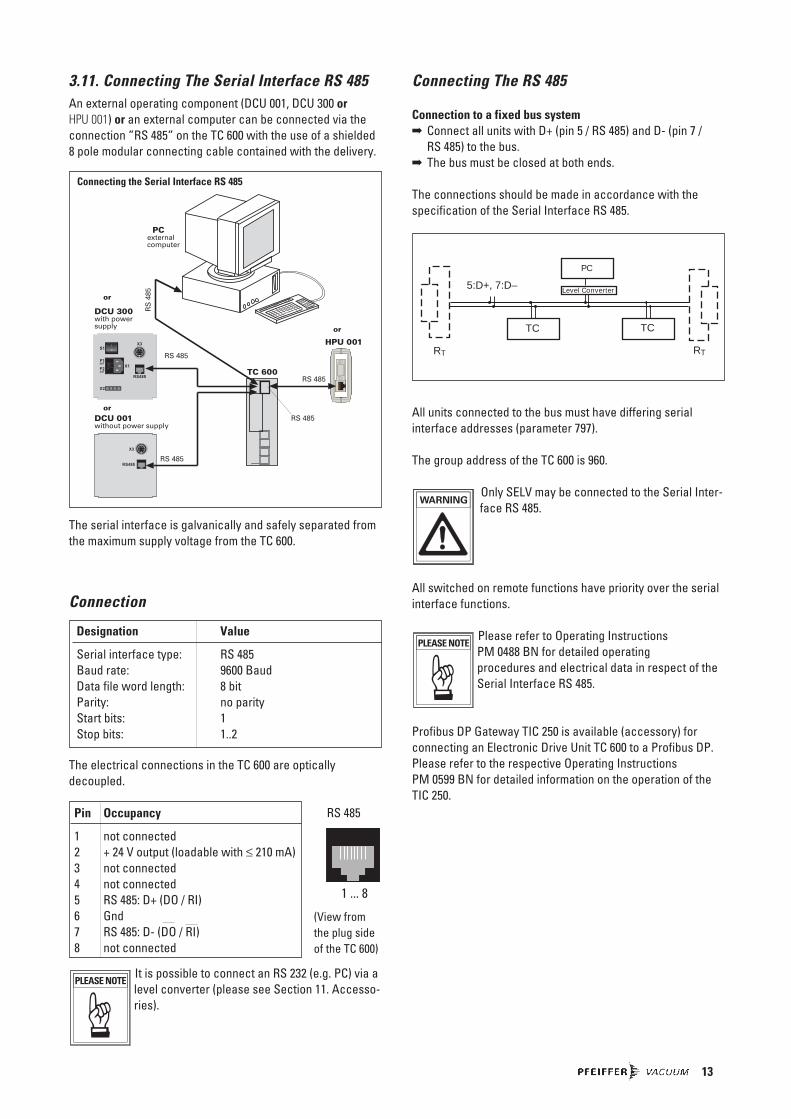
3.11. Connecting The Serial Interface RS 485An external operating component (DCU 001, DCU 300 or HPU 001) or an external computer can be connected via theconnection ”RS 485” on the TC 600 with the use of a shielded8 pole modular connecting cable contained with the delivery.
All units connected to the bus must have differing serial interface addresses (parameter 797).
The group address of the TC 600 is 960.
Only SELV may be connected to the Serial Inter-face RS 485.
All switched on remote functions have priority over the serialinterface functions.
Please refer to Operating Instructions PM 0488 BN for detailed operating procedures and electrical data in respect of theSerial Interface RS 485.
Profibus DP Gateway TIC 250 is available (accessory) forconnecting an Electronic Drive Unit TC 600 to a Profibus DP.Please refer to the respective Operating Instructions PM 0599 BN for detailed information on the operation of theTIC 250.
PLEASE NOTE
WARNING
Designation Value
Serial interface type: RS 485Baud rate: 9600 BaudData file word length: 8 bitParity: no parityStart bits: 1Stop bits: 1..2
The electrical connections in the TC 600 are optically decoupled.
Pin Occupancy
1 not connected2 + 24 V output (loadable with ≤ 210 mA)3 not connected4 not connected5 RS 485: D+ (DO / RI)6 Gnd7 RS 485: D- (DO / RI)8 not connected
RS 485
1 ... 8
Connecting The RS 485
Connection to a fixed bus system Connect all units with D+ (pin 5 / RS 485) and D- (pin 7 /
RS 485) to the bus. The bus must be closed at both ends.
The connections should be made in accordance with the specification of the Serial Interface RS 485.
5:D+, 7:D–
RT RT
PC
Level Converter
TC TC
(View fromthe plug sideof the TC 600)
It is possible to connect an RS 232 (e.g. PC) via alevel converter (please see Section 11. Accesso-ries).
PLEASE NOTE
The serial interface is galvanically and safely separated fromthe maximum supply voltage from the TC 600.
Connection
Connecting the Serial Interface RS 485
14
!""#$%&#'()*+,
-,./ &)'0&*+,1-,
)'0(2)#) )&'&2*'!23&"!"4!"0( ''0&5)'0() )''63$47/'&!82)#'0&1 9,:0'80(&!'"!',:0'80(&!'"!',./
5
/
;4+4
)#$3&
5)'0(
0 0"!'*8)'0(
0 0"!'*"!"0( ''0&,
&)'0&*"!"0( ''0&
)#$3&*
4!"0( ''0&-<,
5-/.
/-/.=;
=/44/=>
=/44/=>
&''&!'"!'? :0'80("&0'
&''&!'"!'?&##)'0%)#@!'0&
#&(&!'"!'1<19@)6ABC
;/
;/
D
D
!"#
$%&
4 .EEFG
FG
&''!22)'&''
0 0"!'"&:)2!0'11,
4DDD+DDD
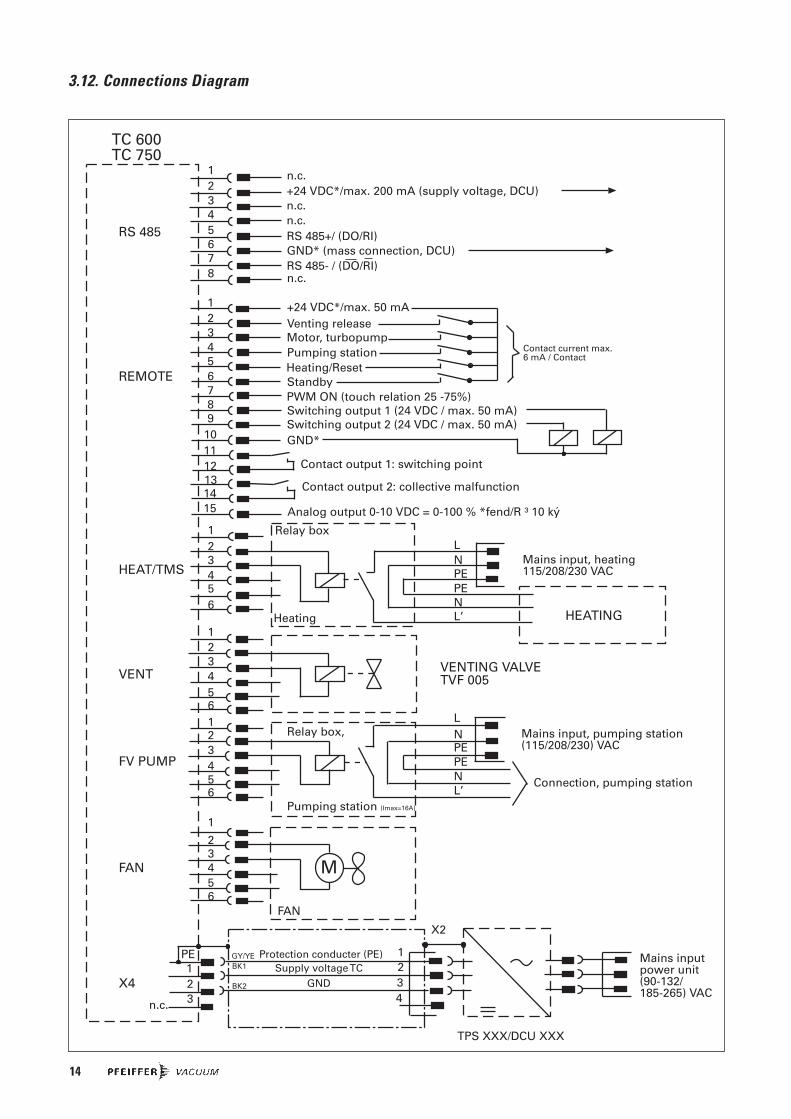
3.12. Connections Diagram

15
4. Operations
4.1. Before Switching ONSections 4.1. to 4.3. refer only to operating the pump in itscondition on delivery, without the DCU operating unit. Thebridges ”venting release”, ”motor, TMP ON” and ”pumpingstation ON” are fitted in the remote control plug.
Turbopump rotors rotate at high speed. Whenthe high vacuum flange is open there is adanger of injury and of damage to the pumpcaused by objects falling into the pump.Therefore never operate the pump with openhigh vacuum flange.
Take care when pumping hazardous gases andobserve the safety precautions of the gas manu-facturer.
With sealing gas: Open the sealing gas supply. With water cooling: Open cooling water supply and check
flow. With connecting cable 8a (see Section 11. Accessories)
connect the TC 600 and Power Supply TPS 300 on X2 (please see Section 3.8.).
Please note:The following pre-settings have been programmed:
– Running up time 8 min– Rotation speed switchpoint 80%– Automatic venting 50%
These settings can only be altered via Serial Interface RS 485(DCU, HPU or PC); please refer to the respective operatinginstructions.
CAUTION
WARNING
Rear panel, TPS 300
S1 ON/OFF switchX1 Mains connectionX2 Connection TC 600F1 FuseF2 Fuse
F1
F2
S1 X1
X2
4.2. Switching ON Switch on the turbopump with switch S1 on the power
supply.– With air cooling the cooling fan is also switched on via
Electronic Drive Unit TC 600.– Once the self test has been successfully completed on the
TC 600 (duration approximately 15 seconds), both theturbopump and the backing pump (if connected) beginoperating.
4.3. Switching OFF And VentingBefore coming to rest after switching off, the turbopump mustbe vented in order to prevent contamination.
Close the fore-vacuum. Switch off both turbopump and backing pump with switch
S1 on the power supply. Venting
There are three possibilities to vent turbopump:– Manual venting with the use of the venting screw
(status on delivery).– Venting with the venting valve which is selectable
via the remote control (please see Section 4.7.), or via the DCU or HPU (see respective operating instructions).
– Venting in two stages when the vacuum chamber should be vented as quickly as possible. First stage: venting with a pressure increase rate of 15 mbar/s for 20 seconds. Second stage: venting with an optionally large venting valve.
The valve cross-section for a venting rate of 15 mbar/smust be compatible with the size of the vacuum chamber.Where small vacuum chambers are involved, the Pfeiffer Vacuum Venting Valve TVF 005 can be used forfirst stage venting.
Shut off water supply.
16
4.4. Gas Type Dependent OperationsWater cooling is required if the pumps are to beoperated with gas load.
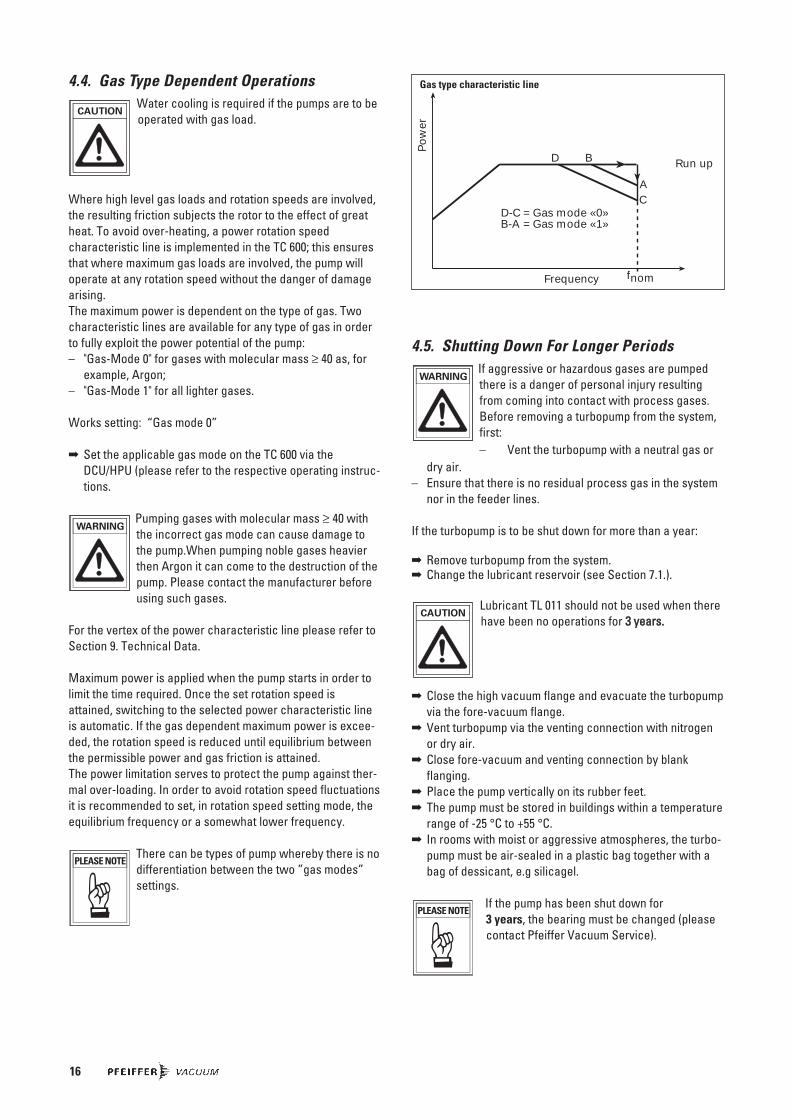
Where high level gas loads and rotation speeds are involved,the resulting friction subjects the rotor to the effect of greatheat. To avoid over-heating, a power rotation speedcharacteristic line is implemented in the TC 600; this ensuresthat where maximum gas loads are involved, the pump willoperate at any rotation speed without the danger of damagearising.The maximum power is dependent on the type of gas. Twocharacteristic lines are available for any type of gas in orderto fully exploit the power potential of the pump:– "Gas-Mode 0" for gases with molecular mass ≥ 40 as, for
example, Argon;– "Gas-Mode 1" for all lighter gases.
Works setting: “Gas mode 0”
Set the applicable gas mode on the TC 600 via theDCU/HPU (please refer to the respective operating instruc-tions.
Pumping gases with molecular mass ≥ 40 withthe incorrect gas mode can cause damage tothe pump.When pumping noble gases heavierthen Argon it can come to the destruction of thepump. Please contact the manufacturer beforeusing such gases.
For the vertex of the power characteristic line please refer toSection 9. Technical Data.
Maximum power is applied when the pump starts in order tolimit the time required. Once the set rotation speed isattained, switching to the selected power characteristic lineis automatic. If the gas dependent maximum power is excee-ded, the rotation speed is reduced until equilibrium betweenthe permissible power and gas friction is attained. The power limitation serves to protect the pump against ther-mal over-loading. In order to avoid rotation speed fluctuationsit is recommended to set, in rotation speed setting mode, theequilibrium frequency or a somewhat lower frequency.
There can be types of pump whereby there is nodifferentiation between the two ”gas modes”settings.
PLEASE NOTE
WARNING
CAUTION
4.5. Shutting Down For Longer PeriodsIf aggressive or hazardous gases are pumpedthere is a danger of personal injury resultingfrom coming into contact with process gases.Before removing a turbopump from the system,first:– Vent the turbopump with a neutral gas or
dry air.– Ensure that there is no residual process gas in the system
nor in the feeder lines.
If the turbopump is to be shut down for more than a year:
Remove turbopump from the system. Change the lubricant reservoir (see Section 7.1.).
Lubricant TL 011 should not be used when therehave been no operations for 33 yyeeaarrss..
Close the high vacuum flange and evacuate the turbopumpvia the fore-vacuum flange.
Vent turbopump via the venting connection with nitrogenor dry air.
Close fore-vacuum and venting connection by blankflanging.
Place the pump vertically on its rubber feet. The pump must be stored in buildings within a temperature
range of -25 °C to +55 °C. In rooms with moist or aggressive atmospheres, the turbo-
pump must be air-sealed in a plastic bag together with abag of dessicant, e.g silicagel.
If the pump has been shut down for 3 years, the bearing must be changed (pleasecontact Pfeiffer Vacuum Service).
PLEASE NOTE
CAUTION
WARNING
Po
wer
Frequency
D B
CA
D-C = Gas mode «0»B-A = Gas mode «1»
Run up
fnom
Gas type characteristic line

17
4.6. Operations With The DCU 001, DCU 300 or HPU 001
Operations with the DCU 001, DCU 300 or HPU 001 should becarried out in accordance with the relevant OperatingInstructions:
PM 0477 BN (DCU description)PM 0547 BN (Operating the pump with the DCU)PT 0101 BN (Display and Operating Unit HPU 001)
Where operations with the DCU or HPU are involved, the remote plug 8d on the TC 600(please refer to Section 2.1.) should bedisconnected.
4.7. Operations With The Remote Control UnitRemote control operations can be performed via the connec-tion with the designation “REMOTE” on the TC 600 via the 15-pole D-Sub-Connector.
Pin occupancy and remote plug functions see Section 3.10.Connecting The Remote Control Unit.
Inputs 2 - 6 are activated if they are connected with the +24 Von pin 1 (active high; please see Section 3.12. ConnectionsDiagram).
On delivery there is a bridge between Pin 1,Pin 2, Pin 3 and Pin 4 on the TC 600 mating plug.Once operating voltage has been supplied andon successful completion of the self-test on theTC 600, the turbopump and any possibleconnected backing pump is started.
Venting Release (Optional)
Automatic venting:
CAUTION
PLEASE NOTE
Motor, TurbopumpWhen the pumping station is switched on and once the self testhas been successfully completed (duration approximately 15seconds), the turbopump is set in operation.During operations, the turbopump can be switched on and offwhile the pumping station is switched on.Thereby the turbopump will not be vented.
Pumping StationAny connected pumping station components are started up(e.g. backing pump, venting valve, air cooling) and with simultaneous activation of the input ”motor, turbopump” theturbopump is set in operation once the self test has beensuccessfully completed (duration approximately 15 seconds).
Heating/ResetHHeeaattiinngg ((ooppttiioonnaall))Once the rotation speed switchpoint is attained the heating unit is switched on; when the rotation speed switchpoint isfallen below the heating unit is switched off.
ResetThe heating input has two functions (please see Section 3.10., point 5 ”Reset”).
StandbyThe pump can be operated optionally at 66% of its nominalrotation speed (standby ON) or at its nominal rotation speed(standby OFF).
VVeennttiinngg SSwwiittcchh ooffff MMaaiinnss ppoowweerr ffaaiilluurree11))ffrreeqquueennccyy tthhee ppuummppiinngg ssttaattiioonn
< 415 Hz venting valve opens venting valve opens and (correspond to 50% for 3600 s (1 h, closes on attainmentof the final rotation (works setting) of approximately 15 % ofspeed) the final rotation speed
1) When mains power is restored the venting procedure is interrupted.
Venting blocked:Venting does not take place.
Other venting modes:Other venting modes can be selected via the DCU or HPU.

18
If no signal is present the pump accelerates up to its finalrotation speed. A PWM adapter box for rotation speed settingoperations for the turbopump is available as an option (pleasesee Section 11. Accessories).
Switching OutputsSwitching outputs 1 and 2 can be loaded with a maximum 24 V / 50 mA per output. The following functions are assignedto the switching outputs:
Switching output 1: Active high when the rotation speed switchpoint is attained. The switchpoint for the turbopump is set at 80% of the nominal rotation speed. It can be used, for example, for a message ”pump ready to operate”.
Switching output 2: Active low with a malfunction -collective malfunction message
The connection of a relay is made between pin 10 (mass) andthe respective switching output pin 8 or pin 9 (see Section3.12. Connections Diagram).
Rotation Speed Setting Mode Via Input PWMThe supply of pulse width modulated signals (PWM) with aground frequency of 100 Hz ±20% with an amplitude of maxi-mum 24 V and a key ratio of 25-75% enables the rotationspeed to be set in the range 20-100% of the nominal rotationspeed.
T0
U 20%*f 100%*fend
max. +33V
min. +13V
max. +7V
min. -33V
T TPWM
*25% *75%
T = 10ms (1±20%)f =100Hz (1±20%)
end
PWM
PWM
PWM

19
5. Monitoring Operations
5.1. Operations Display Via LEDCertain operations modes of the turbopump and the TC 600can be ascertained via the two integrated LEDs located onthe front panel of the TC 600.The following operations modes are displayed:
5.2. Turbopump Temperature ManagementWhere impermissible motor temperatures are involved or thetemperature of the TC 600 casing is too high, the motorcurrent is reduced. This can lead to dipping below the setrotation speed switchpoint and results in the turbomolecularpump being switched off.LED on the TC 600 glows red: Collective malfunction.
LED Cause
green red
Glows – power supply OK– Function ”pumping station ON”
carried out
Flashes short – power supply OK(1/12s active) – Pumping station OFF
Blinks – Mains power supply failure(1/2s active)
Glows – Collective malfunction(for example, run-up time error,over-temperature, turbopumpor TC 600)
– Switching output 2 active (low)
Blinks – Warning(1/2s active) (e.g. supply voltage short
circuit to earth, mainspower supply failure)
Differentiated malfunction and warning signalsare only possible with the use of the DCU orHPU.
PLEASE NOTE

20
6. What To Do In Case Of Breakdowns?
Problem Possible Causes Remedy
Pump doesn't start; • Power supply interrupted • Check fuse in the power supplyNone of the integrated LEDs • Check plug contacts on the power supplyglow on the TC 600 • Check power supply feeder line
• Check voltage on the power supply(72 V DC) at connection X2
• Incorrect operations voltage supplied • Supply correct operations voltage• Pins 1-3 and 1-4 on the remote • Connect pins 1-3 and 1-4 on the
plug not connected remote plug• No supply of operations voltage • Check plug contacts on the power
pack unit• Defect TC 600 • Replace TC 600 (please see Sec. 7.2.)• Reduction in the voltage in the cable • Use suitable cable
Pump doesn't attain nominal • Fore-vacuum pressure too high • Check backing pump functionrotation speed within the set • Leak or too much gas • Check sealsrun-up time • Seek leak and repairPump cuts out during operations • Reduce supply of process gas
• Rotor sluggish caused by • Check bearing (noises?): Informdefective bearing Pfeiffer Vacuum Service
• TC run-up time too short • Set longer start-up time with the DCU or PC• Thermal overloading caused by
– Water flow insufficient • Ensure free flow– Insufficient air supply • Ensure adequate air supply– Fore-vacuum pressure too high • Reduce fore-vacuum pressure– Ambient temperature too high • Reduce ambient temperature
Pump doesn't attain final pressure • Pump dirty • Bake out pump• If seriously contaminated: Request
Pfeiffer Vacuum Service to clean• Leak in vacuum chamber, • Seek leak starting with vacuum chamber
lines or pump • Repair leak
Unusual operating noises • Bearing damaged • Inform Pfeiffer Vacuum Service of need for repair
• Rotor damaged • Inform Pfeiffer Vacuum Service of need for repair
• Splinter shield (if fitted) • Check seat of splinter shield not seated firmly
Red LED on the TC 600 glows • Collective malfunction • Reset via mains OFF/ON or remote pin 5• Different malfunction display with the
DCU or HPU possible1)
Red LED on the TC 600 flashes • Warning through: • Different warning message with the DCU or HPU possible1)
– Mains power failure • Check power supply voltage• Check power supply mains
– Supply voltage short connectioncircuit to earth • Check power supply voltage for short
circuit to earth
• Wrong setting for nominal rotation • Enter 833 Hz for parameter 777 speed (Parameter 777) (see operating instruction PM 0547 BN
“Pumping Operations With DCU”). If there is no DCU/HPU available contact Pfeiffer Vacuum Service .
1) Without a DCU or HPU inform Pfeiffer Vacuum Service to check the cause of trouble.

21
7. Maintenance/Replacement No liability for personal injury nor materialdamage will be accepted for damages andoperational interruptions which have beencaused by improper maintenance; in addition,all guarantees become invalid.
The bearing should be changed every three years (requestPfeiffer Vacuum Service to change). Where extreme operating conditions or unclean processesare involved, the replacement interval should be checkedwith your Pfeiffer Vacuum Service Center.
You can replace the lubricant reservoir and the ElectronicDrive Unit TC 600 yourself.Please contact your local Pfeiffer Vacuum Service for allother maintenance and service work.
Ensure no mechanical forces act on the Electronic Drive Unit TC 600.
7.1. Replacing The Lubricant ReservoirReplace the lubricant reservoir at least every three years.For extreme load conditions or impure processes: discuss thereplacement interval with Pfeiffer Vacuum Service.
Turn off turbopump, vent to atmospheric pressure and allowto cool, if necessary.
If necessary, remove the turbopump from the system. Use the installation tool E (Bestell-Nr. PV M40 569) to
unscrew the screw cap 90 on the base of the turbopump;pay attention to the O-ring 91.
CAUTION
PLEASE NOTE
Use two screwdrivers to lift the lubricant reservoir 92.
90
E
92
91
The lubricant reservoir can contain poisonoussubstances from the pumped media. Dispose ofthe lubricant reservoir in accordance withregulations! A safety data sheet is available upon request.
Remove impurities from the turbopump and screw capwith a clean, lint-free cloth.
Slide new lubricant reservoir 92 up to the O-ring 93 in theturbopump.
The lubricant reservoir comes pre-filled with lubricant TL 011; do not add additionallubricant.
Screw on screw cap 90 with O-ring 91.The screw cap places the lubricant reservoir in the correctaxial position
CAUTION
WARNING
22
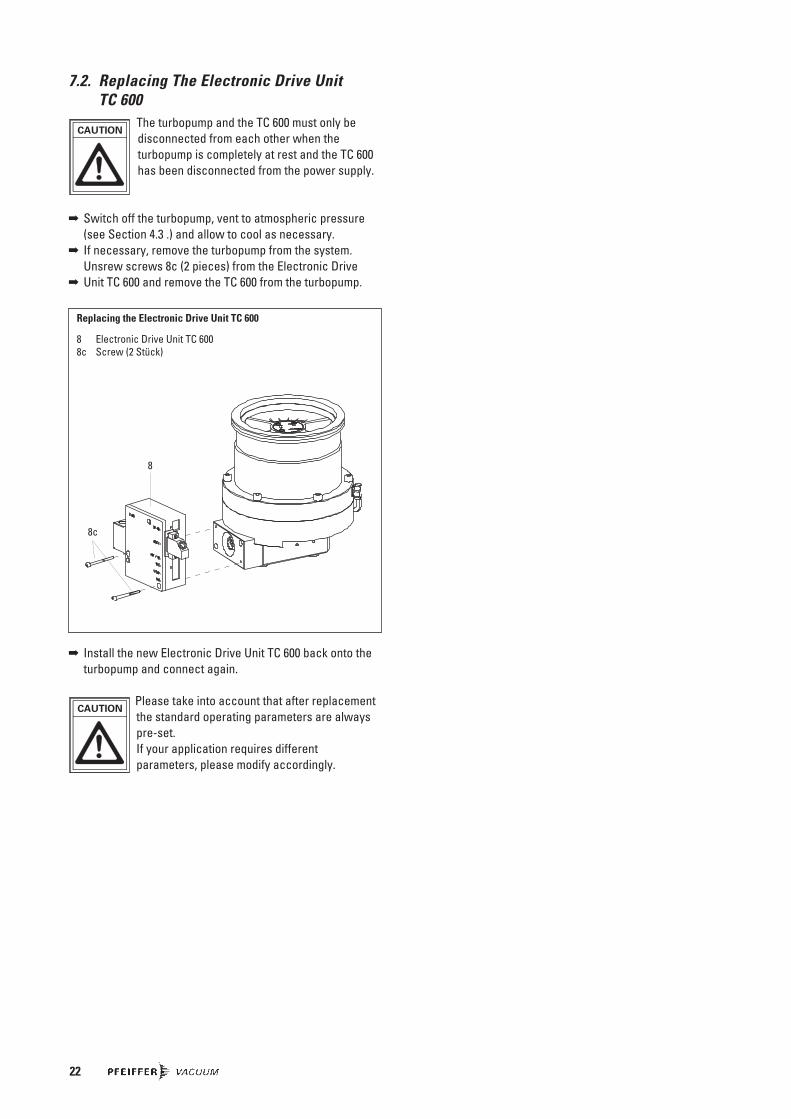
7.2. Replacing The Electronic Drive Unit TC 600
The turbopump and the TC 600 must only bedisconnected from each other when theturbopump is completely at rest and the TC 600has been disconnected from the power supply.
Switch off the turbopump, vent to atmospheric pressure(see Section 4.3 .) and allow to cool as necessary.
If necessary, remove the turbopump from the system.Unsrew screws 8c (2 pieces) from the Electronic Drive
Unit TC 600 and remove the TC 600 from the turbopump.
CAUTION
Install the new Electronic Drive Unit TC 600 back onto theturbopump and connect again.
Please take into account that after replacementthe standard operating parameters are alwayspre-set.If your application requires differentparameters, please modify accordingly.
CAUTION
Replacing the Electronic Drive Unit TC 600
8 Electronic Drive Unit TC 6008c Screw (2 Stück)
8
8c

23
8. Service
Do Make Use Of Our Service FacilitiesIn the event that repairs are necessary a number of optionsare available to you to ensure any system down time is kept toa minimum:– Have the pump repaired on the spot by our Pfeiffer
Vacuum Service Engineers;– Return the pump to the manufacturer for repairs;– Replace the pump.
Local Pfeiffer Vacuum representatives can provide fulldetails.
Please take into account that where PfeifferVacuum Service replacement service is involvedthe standard operating parameters are alwayspresent.If your application requires different parameters,please modify accordingly.
The turbopump and the Electronic Drive Unit TC 600 form a single unit and must therefore bereturned complete for repair purposes. Beforereturning the unit it should be ensured that thepower supply is not the cause of the malfunction (checking the power supply).
Before Returning: Dismantle all accessories. If the unit is free of harmful substances please attach a
clearly visible notice "Free of harmful substances" (both onthe unit and also on the delivery note and any accompany-ing letters).
"Harmful substances" are substances and preparations asdefined in the current, local, dangerous substancesregulations; in the U.S.A. as"materials in accordance with the Code of FederalRegulations (CFR) 49 Part 173.240 Definition and Preparation".We will carry out the decontamination and invoice this workto you if you have not attached this note. This also applieswhere the operator does not have the facilities to carry outthe decontamination work. Units which are contaminatedmicrobiologically, explosively or radioactively cannot beaccepted as a matter of principle.
Fill Out The Declaration Of Contamination In every case the "Declaration of Contamination" must be
completed diligently and truthfully. A copy of the completed declaration must accompany the
unit; any additional copies must be sent to your local Pfeiffer Vacuum Service Center.
Please get in touch with your local Pfeiffer Vacuum represen-tatives if there are any questions regarding contamination.
PLEASE NOTE
CAUTION
Decontaminate units before returning or possible disposal. Do not return any units whichare microbiologically, explosively or radioactively contaminated.
Returning Contaminated UnitsIf contaminated have to be returned for maintenance/repair,the following instructions concerning shipping must be followed: Neutralise the pump by flushing with nitrogen or dry air. Seal all openings to the air. Seal pump or unit in suitable protective foil. Return equipment only in suitable, rugged shipping contai-
ners and by complying with the currently valid shippingregulations.
Repair orders are carried out according to ourgeneral conditions of sale and supply.
If repairs are necessary, please send the pump together witha short damage description to your nearest Pfeiffer VacuumService Center.
PLEASE NOTE
WARNING

24
9. Technical Data
1) Distance from the pump 1 m2) Measured at a helium concentration of 100 %, 10 s measurement time 3) Measured with a rotary vane pump 1.5 m3/h; higher throughputs with reduced rotation speed.4) Rotation speed of pump may drop below the nominal rotation speed.5) For gas characteristics line please refer to Section 4.4.
6) In accordance with German Industrial Standard 28428 the final pressure which is attained in ameasuring dome 48 hours after baking out.
7) Please see type plate.8) At maximum gas throughput9) Protection class IP 54 is afforded for the Electronic Drive Unit TC 600
by refro-fitting a cover plate (please refer to Section 11. Accessories).
Feature Unit TMH 521 P TMU 521 P Connection nominal diameter
Inlet DN 100 ISO-K DN 160 ISO-K DN 100 CF-F DN 160 CF-FDN 100 ISO-F DN 160 ISO-F
Outlet DN 25 ISO-KF/G 1/4“ DN 25 ISO-KF/G 1/4“Venting connection G 1/8” G 1/8”
Nominal rotation speed Hz (1/min) 833 (50 000) 833 (50 000)Standby rotation speed Hz (1/min) 550 (33 000) 550 (33 000)Start-up time min 5,5 5,5Maximum noise level1) dB (A) 50 50Final pressure, backing pump mbar < 5 < 5Integral leak rate (He)2) mbar l/s < 1 · 10-7 < 1 · 10-7
Maximum permissible rotor temperature °C 90 90Permissible heat radiaten power W 14 14
Volum flow rate for:Nitrogen N2 l/s 290 510 290 510Helium He l/s 400 520 400 520Hydrogen H2 l/s 380 450 380 450Argon Ar l/s 260 500 260 500
Compression ration for:N2 > 1012 > 1012He 5 · 107 5 · 107
H2 6,5 · 105 6,5 · 105
Ar > 1012 > 1012
Maximum fore-vacuum pressureN2 mbar 13,0 13,0He mbar 12,5 12,5H2 mbar 9,0 9,0Ar mbar 11,0 11,0
Maximum gas throughput3) with water coolingN2 mbar l/s 4,0 4,0He mbar l/s 8,0 8,0H2 mbar l/s 9,5 9,5Ar mbar l/s 2,0 2,0
Maximum gas throughput at intake pressure of 0.1 mbar4)
N2 mbar l/s 12,0 12,0He mbar l/s 12,0 12,0H2 mbar l/s 8,0 8,0Ar mbar l/s 12,0 12,0
Vertex power characteristics line5)A W / Hz 185/833 185/833B W / Hz 260/485 260/485C W / Hz 160/833 160/833D W / Hz 260/435 260/435
Final pressure6)with rotary vane pumps mbar < 1 · 10-7 < 5 · 10-10
with diaphragm pumps mbar < 1 · 10-7 < 1 · 10-8
Lubricant TL 011 TL 011
Cooling water consumptionwith water at 15 °C7) l/h 100 100Cooling water temperature °C 5 - 25 5 - 25Permissible ambient temperaturewith air cooling °C 0 - 35 0 - 35Heating power consumption W 100 100
Weight kg 14,5 (ISO-K)/ 13,5 (ISO-K)/ 15,0 14,5 kg 15,0 (ISO-F) 14,2 (ISO-F)
Permissible magnetic field mT 5,0 5,0
Operating voltage VDC 72 ±5% 72 ±5%Duration8)- / max. current consumption A 3,2/4,2 3,2/4,2Duration8)- / max. power W 230/300 230/300Protection class9) IP 30 IP 30
Shipping and storage temperature °C -25 to +55 -25 to +55 Relative humidity % 5-85 non condensing 5-85 non condensing

25
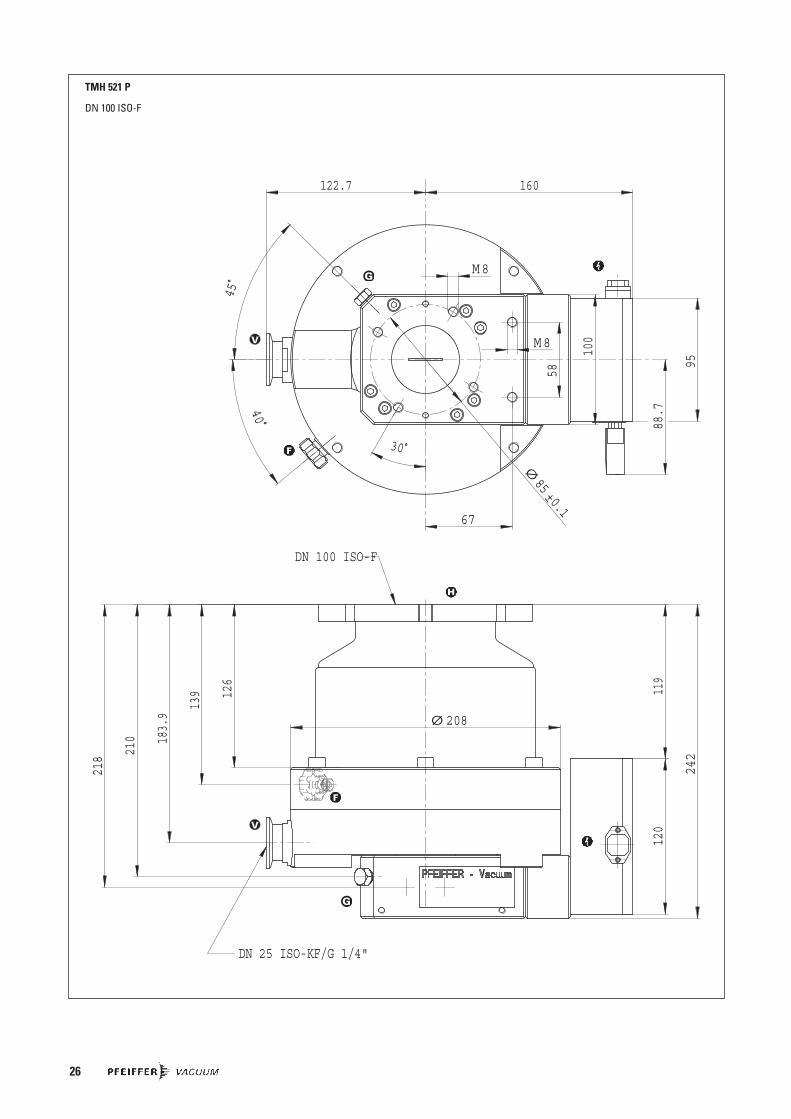
9.1. Dimensions Diagram
/-1G
/-1G
/;1;
/;1;
H
I
H
H
J
J
/-1G;
TMH 521 P/TMU 521 P
DN 100 ISO-K/DN 160 ISO-KDN 100 CF-F/DN 160 CF-F
26
119
242
218 21
0 183.9
139 126
Ø 208
40
95
100
120
58
M 8
M8
67
88.7
45
122.7 160
30
Ø85 ±0.1
DN 25 ISO-KF/G 1/4"
DN 100 ISO-F
TMH 521 P
DN 100 ISO-F

27
40
95
100
Ø 208
110.3
121
165.9
22419
2
120
101
200
58
M 8
M8
67
88.7
45
122.7 160
30
Ø85 ±0.1
DN 25 ISO-KF/G 1/4"
DN 160 ISO-F
TMH 521 P
DN 160 ISO-F

28
Pos. Description Pieces Size Number Comments Ordering Quantity
Spare Parts TMH 521 P/TMU 521 P
6 Blanking plug 4 P 4098 582 FA8 Electronic Device Unit 1 PM C01 720 please see Sec. 7.2.8d Remote plug 1 PM 051 793 -X17 USIT ring 1 P 3529 133 -A91 O-ring 1 38x3 P 4070 621 PV92 Lubricant reservoir 1 PM 063 265-T
10.Spare Parts
Spare parts

29
Description Size Number Comments/ Order QuantityOperating Instructions
Components for cooling
Dirt trap R 3/8” P 4161 300 2RRecycled Water Cooling Unit TZK 400 230 V, 50 Hz PM Z01 245 PM 0369 BNAir cooling 24 V DC PM Z01 251 PM 0543 BNWater cooling PM 016 040 BT PT 0152 BN
Components for venting
Venting Valve TVF 005, without current closed 24 V DC PM Z01 135 PM 0507 BNDrying Unit TTV 001 PM Z00 121 PM 0022 BN (filled with zeolite)Venting flange DN 10 ISO-KF PM 033 737 -T
Components for heating
Casing heating Water cooling required/230 V, Schuko plug PM 051 096 -T PM 0542 BN208 V, UL-plug PM 051 097 -T PM 0542 BN115 V, UL-plug PM 051 098 -T PM 0542 BN
Other accessories
Connecting cable TC 600 – TPS/DCU 3 m PM 051 103 -T Other lengths on requestConnecting cable TC 600 – TPS/DCU, screened 3 m PM 051 843 -T Other lengths on request
Power supply– TPS 300; for fitting to walls
or standard runners PM 041 814 -T PM 0521 BN– TPS 300; 19” insert unit PM 041 820 -T PM 0521 BN– DCU 300; 19” insert unit with
Display and Operating Unit DCU 300 PM C01 696 PM 0477 BN
Mains cableSchuko plug 230 V P 4564 309 ZAUL plug 208 V P 4564 309 ZFUL plug 115 V P 4564 309 ZE
Display and Operating Unit DCU 001 PM 041 816 -T PM 0477 BNDisplay and Operating Unit HPU 001 PM 051 510 -T PT 0101 BN
Relay box, backing pump 5 A PM 041 937 -T PT 0030 BN20 A PM 041 938 -T PT 0030 BN
PWM adapter box PM 051 028 -U PM 0563 BN
Level Converter RS 232/485 PM 051 054 -T PM 0549 BN
Profibus DP Gateway TIC 250 PM 051 257 -T PM 0599 BN
Cover plate for TC 600 (IP 54) PM 051 327 -T PT 0024 BN
Vibration compensator TMH DN 100 ISO-K PM 006 459-XTMH DN 160 ISO-K PM 006 492 -XTMU DN 100 CF-F PM 006 488-XTMU DN 160 CF-F PM 006 493 -X
Sealing gas valve DN 10 ISO-KF PM Z01 142 PM 0229 BN
Hose nipple for the sealing gas valve DN 16 ISO-KF-10 PF 144 020
Fore-Vacuum Safety Valve TVV 001 115 V PM Z01 206 PM 0263 BN230 V PM Z01 205
11.Accessories
When ordering accessories and spare parts please be sure to state the full part number. When ordering spare parts please state additionally the unit type and unit number (see type plate). Please use this list as an order form (by taking a copy).

Tradename Chemical name Danger class Precautions associated Action if spillage or human Product name (or Symbol) with substance contactManufacturer
1.
2.
3.
4.
5.
5. Legally Binding Declaration
I hereby declare that the information supplied on this form is complete and accurate. The despatch of equipment will be inaccordance with the appropriate regulations covering Packaging, Transportation and Labelling of Dangerous Substances.
Name of Organisation: _______________________________________________________________________________
Address: _____________________________________ Post code: _____________________________________
Tel.: ______________________________________________________________________________________
Fax: _____________________________________ Telex: ________________________________________
Name: ______________________________________________________________________________________
Job title: ______________________________________________________________________________________
Date: _____________________________________ Company stamp: ________________________________
Legally binding signature: _____________________________________________________________________________
Declaration of Contamination of Vacuum Equipment and Components
The repair and/or service of vacuum components will only becarried out if a correctly completed declaration has beensubmitted. Non-completion will result in delay.
The manufacturer could refuse to accept any equipmentwithout a declaration.
This declaration can only be completed and signed by authorised and qualified staff:
1. Description of component:
- Equipment type/model: _________________________
- Code No.: __________________________
- Serial No.: __________________________
- Invoice No.: __________________________
- Delivery Date: __________________________
3. Equipment condition
- Has the equipment been used?yes no
- What type of pump oil was used?___________________________________________
- Is the equipment free from potentially harmfulsubstances?
yes (go to section 5)no (go to section 4)
4. Process related contamination
of equipment
- toxic yes no
- corrosive yes no
- microbiological hazard*) yes no
- explosive*) yes no
- radioactive*) yes no
- other harmful substances yes no
*) We will not accept delivery of any equipment that has been radioactively or microbiologically contaminated without writtenevidence of decontamination!
2. Reason for return:
_____________________________________________
_____________________________________________
_____________________________________________
_____________________________________________
_____________________________________________
Please list all substances, gases and by-products which may have come into contact with the equipment:
30

im Sinne folgender EU-Richtlinien:pursuant to the following EU directives:
- Maschinen/Machinery 98/37/EWG (Anhang/Annex II B)- Elektromagnetische Verträglichkeit/Electromagnetic Compatibility89/336/EWG
- Niederspannung/Low Voltage 73/23/EWG
Hiermit erklären wir, dass das unten aufgeführte Produkt zum Einbau in eine Maschine bestimmt ist unddass deren Inbetriebnahme so lange untersagt ist, bis festgestellt wurde, dass das Endprodukt denBestimmungen der EU-Richtlinie 98/37/EWG entspricht.
Das unten aufgeführte Produkt entspricht den Anforderungen der EU-Richtlinien Maschinen98/37EWG, Elektromagnetische Verträglichkeit 89/336/EWG und Niederspannung 73/23/EWG.
We hereby certify that the product specified below is intended for installation in a machine which isforbidden to be put into operation until such time as it has been determined that the end product is inaccordance with the provision of EU Directive 98/37/EEC.
The product specified below is in correspondence to the EU directives Machinery 98/37/EEC, Electro-magnetic Compatibility 89/336/EEC and EU Low Voltage 73/23/EEC.
Produkt/Product:
TMH 521 PTMU 521 P
Angewendete Richtlinien, harmonisierte Normen und angewendete nationale Normen:
Guidelines, harmonised standards, national standards in which have been applied:
EN 12100-1, EN 12100-2, EN 294, EN 1012-2, EN 61010
Unterschrift/Signature:
Unterschriften:
(W. Dondorf)GeschäftsführerManaging Director
Pfeiffer Vacuum GmbHBerliner Str. 4335614 AsslarGermany
HerstellererklärungManufacturer´s Declaration
Herst.I/2003

Pfeiffer Vacuum Technology AG · Headquarters/GermanyTel. +49-(0) 64 41-8 02-0 · Fax +49-(0) 64 41-8 02-2 02 · [email protected] · www.pfeiffer-vacuum.net
Vacuum is nothing, but everything to us!
Turbo Pumps
Rotary Vane Vacuum Pumps
Roots Pumps
Dry Vacuum Pumps
Leak Test Units
Valves
Flanges, Feedthroughs
Vacuum Measurement
Gas Analysis
System Technology
Service