petrol generator - sgs engineering generator page 2 warranty this generator is covered by a 24 month...
TRANSCRIPT

SPG2200, SPG3000, SPG6500
FOR YOUR SAFETYPLEASE READ THESE INSTRUCTIONS CAREFULLYAND RETAIN THEM FOR FUTURE USE.
OWNER’S MANUAL
PETROL GENERATOR
PAGE 2
WARRANTY
This generator is covered by a 24 month warranty from the initial date of purchase. This is a domestic warranty provided directly by SGS Engineering. Please keep a recipt of your pucr-chase as this may be required as proof of purchase.
You will invalidate your warranty if the product is found to have been misused, tampered with, modified, overloaded or used for a commercial application for which it was not de-signed. The warranty will also be rendered invalid if the main-tenance prodcedure has not been followed.
You must contact SGS Engineering prior to returning any product. This warranty does not effect your statutory rights.
WWW.SGS-ENGINEERING.COMCALL FOR ASSISTANCE: 01332 576 850
PAGE 3
TABLE OF CONTENTS
WARRANTY 2TABLE OF CONTENTS 3UNDERSTANDING THE GENERATOR GENERATOR SAFETY 4 EXHAUST GAS PRECAUTIONS 5 EARTHING THE GENERATOR 5 COMPONENTS LOCATION DIAGRAM 6PREPARING YOUR GENERATOR FIXING THE WHEELS 8 FILLING THE GENERATOR WITH OIL 9 FILLING THE GENERATOR WITH PETROL 10 STARTING THE GENERATOR Pull start. 11 Electric start. 12USING THE GENERATOR OPERATING THE GENERATOR 15 SHUTTING DOWN THE GENERATOR 16TROUBLESHOOTING, MAINTENANCE & SERVICING TROUBLESHOOTING STARTING A GENERATOR 17 GENERATOR TROUBLESHOOTING Generator will not start. 18 Generator is difficult to start. 18 No electrical output. 19 Engine making “revving” sounds 19 MAINTENANCE SCHEDULE 20 MAINTENANCE INSTRUCTIONS Spark plug maintenance. 21 Air filter maintenance. 21 Engine oil maintenance. 22 Fuel filter maintenance. 22 Draining the fuel. 23 Draining the oil. 23CERTIFICATE OF CONFORMITY 24

PAGE 4
GENERATOR SAFETY
Only use outdoors.
Never use during wet conditions.
Do not smoke whilst handling fuels.
In emergency, switch engine switch to ‘off’.
Always operate on level ground!
If in doubt about anything, contact us on (+44) 01332 576 850.
Always consult this manual for effective product knowledge.
WWW.SGS-ENGINEERING.COMCALL FOR ASSISTANCE: 01332 576 850
PAGE 5
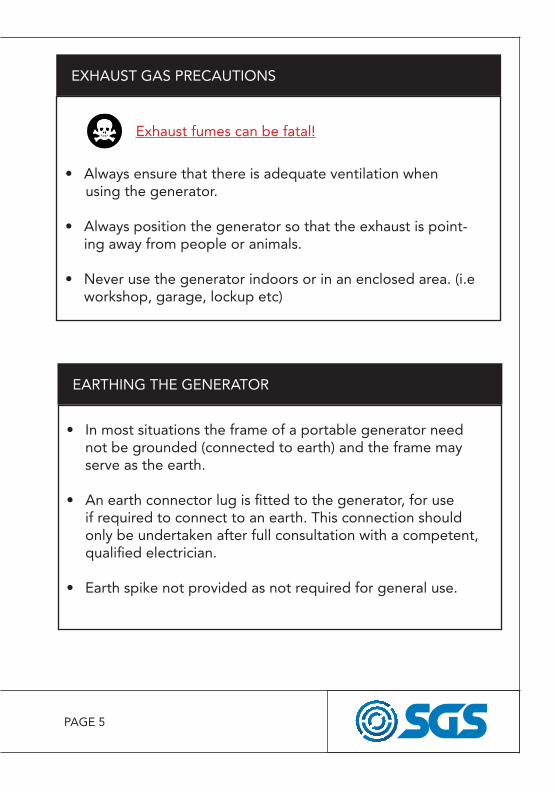
EXHAUST GAS PRECAUTIONS
• Always ensure that there is adequate ventilation when using the generator.
• Always position the generator so that the exhaust is point-ing away from people or animals.
• Never use the generator indoors or in an enclosed area. (i.e workshop, garage, lockup etc)
EARTHING THE GENERATOR
• In most situations the frame of a portable generator need not be grounded (connected to earth) and the frame may serve as the earth.
• An earth connector lug is fitted to the generator, for use if required to connect to an earth. This connection should only be undertaken after full consultation with a competent, qualified electrician.
• Earth spike not provided as not required for general use.
Exhaust fumes can be fatal!
PAGE 6
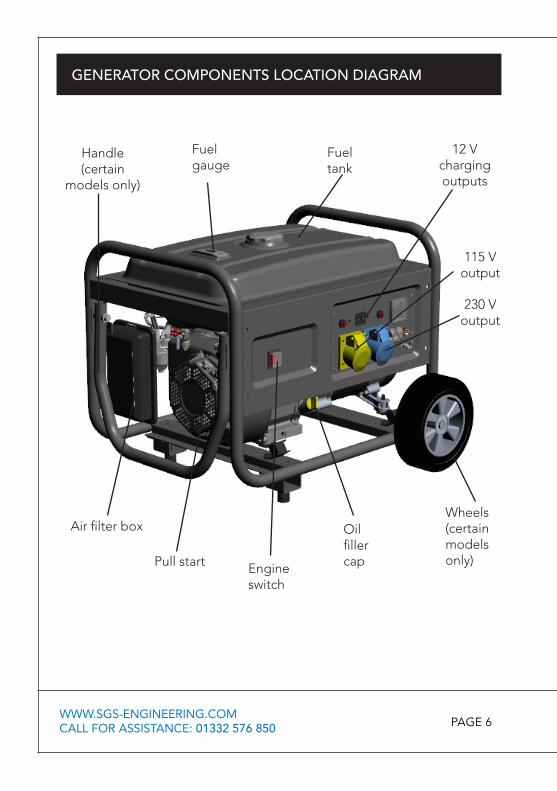
GENERATOR COMPONENTS LOCATION DIAGRAM
230 Voutput
12 V charging outputs
Handle (certain
models only)
Fuel tank
Air filter box
Engine switch
Wheels (certain models only)Pull start
115 Voutput
Oil filler cap
Fuel gauge
WWW.SGS-ENGINEERING.COMCALL FOR ASSISTANCE: 01332 576 850
PAGE 7
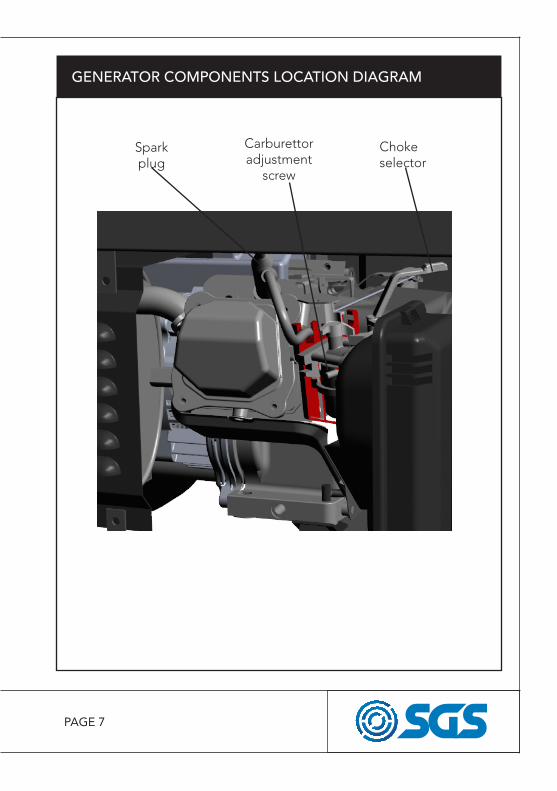
GENERATOR COMPONENTS LOCATION DIAGRAM
Choke selector
Sparkplug
Carburettor adjustment
screw

PAGE 8
FIXING THE WHEELS (SPG3000, SPG6500)
1. Push the axle through the wheel.
2. Slot the wheel and axle on the frame.
3. Insert split pin through axle hole and spread pin.
DO NOT tip the generator on its side to fit the wheels.
WWW.SGS-ENGINEERING.COMCALL FOR ASSISTANCE: 01332 576 850
PAGE 9
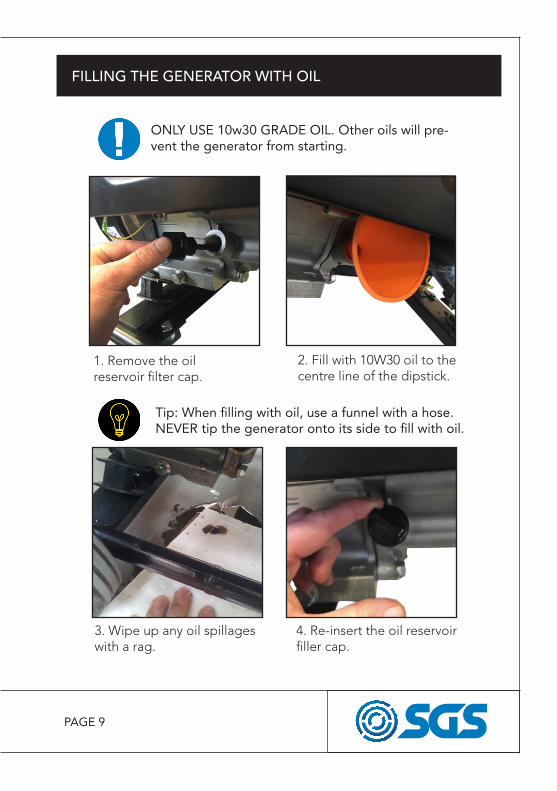
FILLING THE GENERATOR WITH OIL
1. Remove the oil reservoir filter cap.
2. Fill with 10W30 oil to the centre line of the dipstick.
3. Wipe up any oil spillages with a rag.
4. Re-insert the oil reservoir filler cap.
Tip: When filling with oil, use a funnel with a hose. NEVER tip the generator onto its side to fill with oil.
ONLY USE 10w30 GRADE OIL. Other oils will pre-vent the generator from starting.
PAGE 10
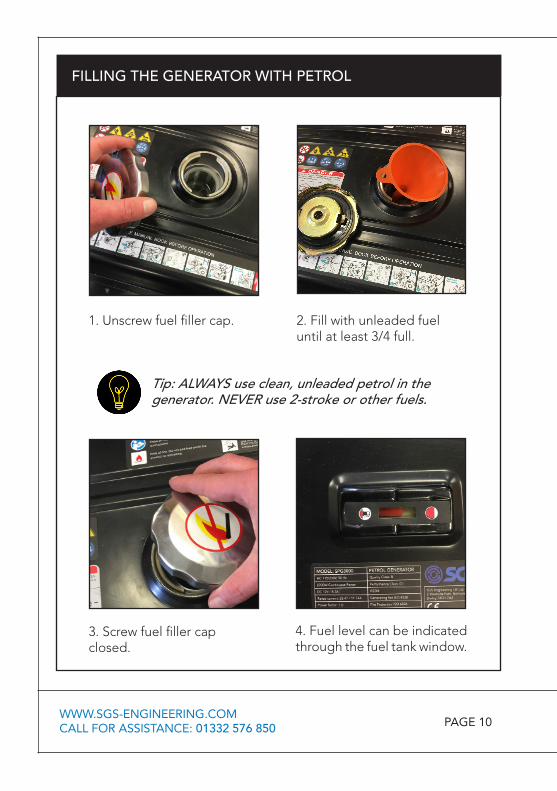
FILLING THE GENERATOR WITH PETROL
1. Unscrew fuel filler cap. 2. Fill with unleaded fuel until at least 3/4 full.
3. Screw fuel filler cap closed.
4. Fuel level can be indicated through the fuel tank window.
Tip: ALWAYS use clean, unleaded petrol in the generator. NEVER use 2-stroke or other fuels.
WWW.SGS-ENGINEERING.COMCALL FOR ASSISTANCE: 01332 576 850
PAGE 11
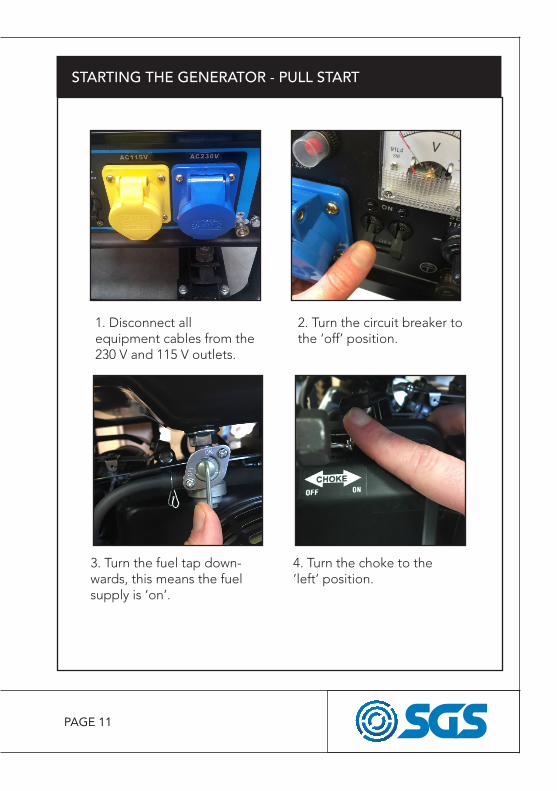
STARTING THE GENERATOR - PULL START
1. Disconnect all equipment cables from the 230 V and 115 V outlets.
2. Turn the circuit breaker to the ‘off’ position.
3. Turn the fuel tap down-wards, this means the fuel supply is ‘on’.
4. Turn the choke to the‘left’ position.
PAGE 12
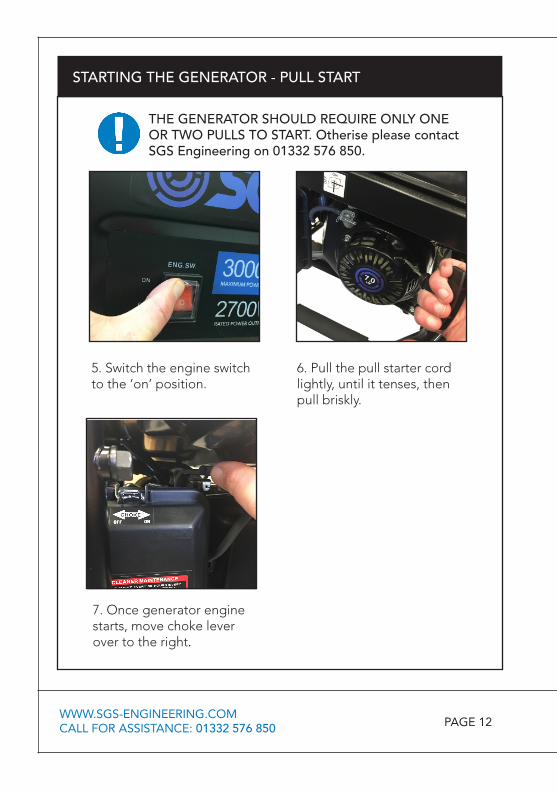
STARTING THE GENERATOR - PULL START
5. Switch the engine switch to the ‘on’ position.
6. Pull the pull starter cord lightly, until it tenses, then pull briskly.
7. Once generator engine starts, move choke lever over to the right.
THE GENERATOR SHOULD REQUIRE ONLY ONE OR TWO PULLS TO START. Otherise please contact SGS Engineering on 01332 576 850.
WWW.SGS-ENGINEERING.COMCALL FOR ASSISTANCE: 01332 576 850
PAGE 13
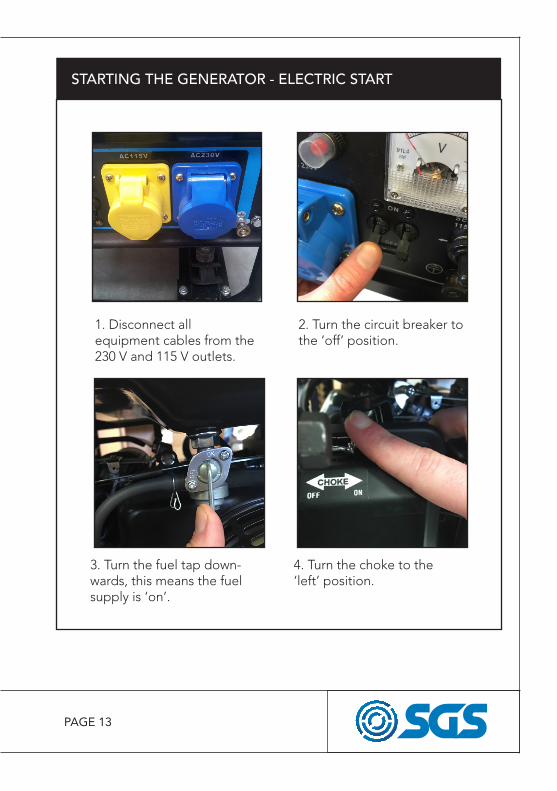
STARTING THE GENERATOR - ELECTRIC START
1. Disconnect all equipment cables from the 230 V and 115 V outlets.
2. Turn the circuit breaker to the ‘off’ position.
3. Turn the fuel tap down-wards, this means the fuel supply is ‘on’.
4. Turn the choke to the‘left’ position.
PAGE 14
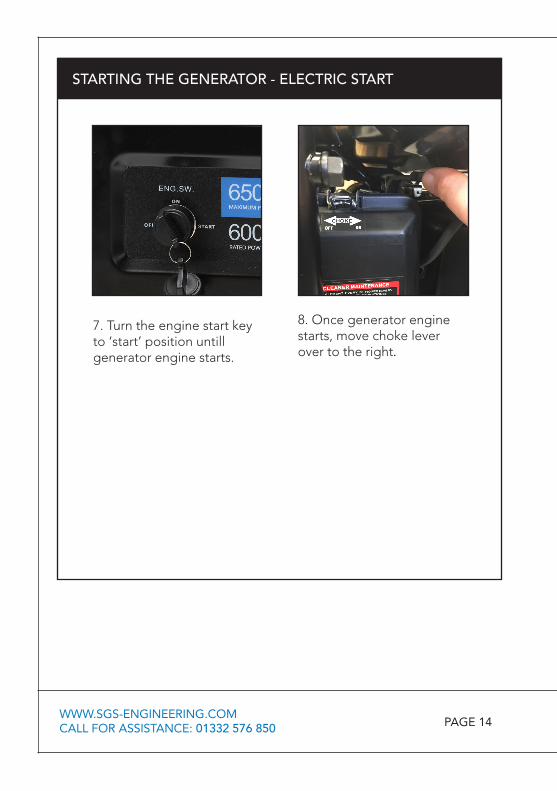
STARTING THE GENERATOR - ELECTRIC START
7. Turn the engine start key to ‘start’ position untill generator engine starts.
8. Once generator engine starts, move choke lever over to the right.
WWW.SGS-ENGINEERING.COMCALL FOR ASSISTANCE: 01332 576 850

PAGE 15
1. Start the engine and allow to run for a few minutes in order for it to warm up.
NEVER have any appliances/tools etc plugged in when starting the generator engine.
2. After engine has warmed up, you can then plug in appli-ances/tools into the generator outlets. As a general rule, switch on appliances/tools etc that you think will take the most power demand first.
3. ALWAYS ENSURE the correct voltage is selected, using the voltage selector.
If the appliance/tool has a standard 3 pin plug it must be used in conjunction with a flylead and plugged into the blue socket.
If the appliance / tool has a blue socket attached then it is 230 V, and must be plugged into the BLUE outlet on the genera-tor.
If the appliance / tool has a yellow socket attached then it is 115 V, and must be plugged into the YELLOW outlet on the generator.
OPERATING THE GENERATOR
PAGE 16
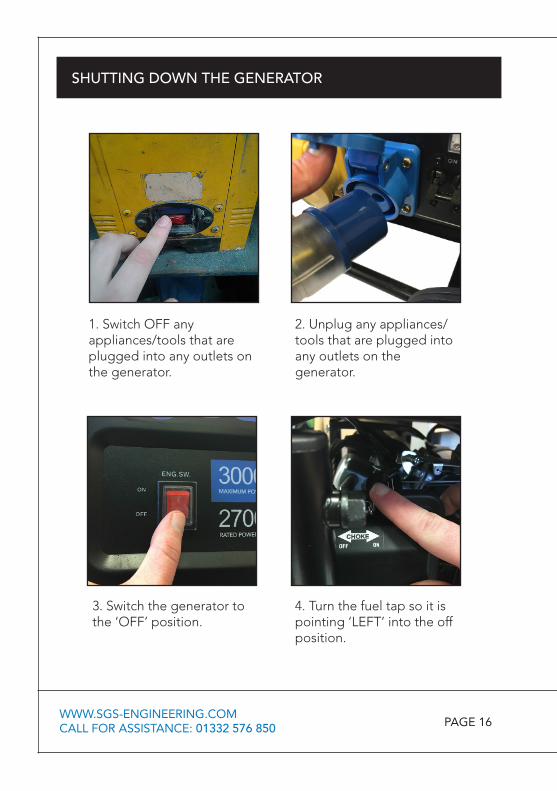
SHUTTING DOWN THE GENERATOR
1. Switch OFF any appliances/tools that are plugged into any outlets on the generator.
2. Unplug any appliances/tools that are plugged into any outlets on the generator.
3. Switch the generator to the ‘OFF’ position.
4. Turn the fuel tap so it is pointing ‘LEFT’ into the off position.
WWW.SGS-ENGINEERING.COMCALL FOR ASSISTANCE: 01332 576 850
PAGE 17
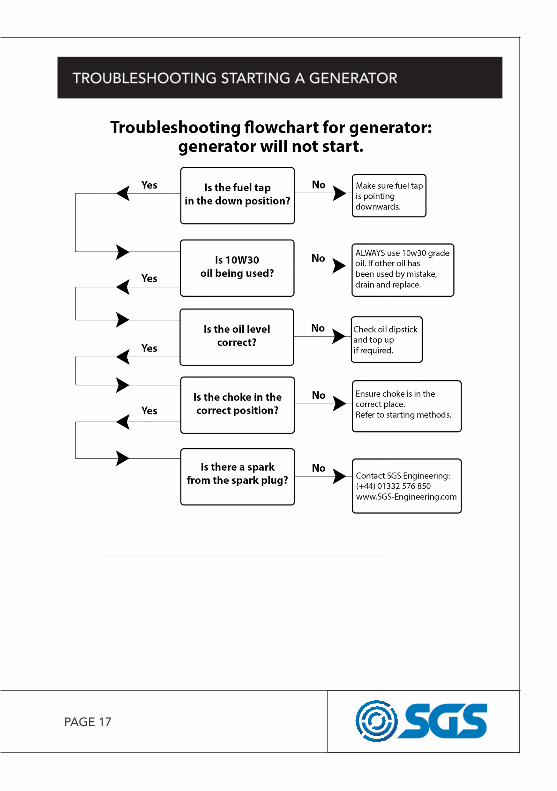
TROUBLESHOOTING STARTING A GENERATOR
PAGE 18
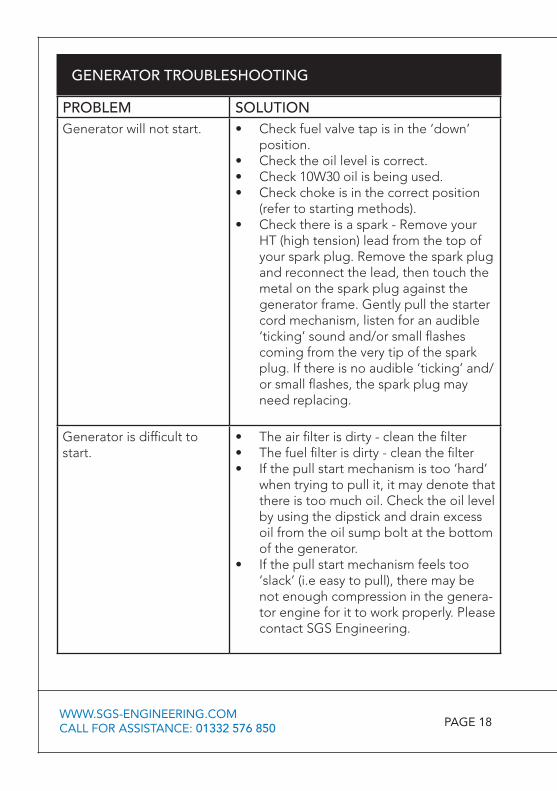
GENERATOR TROUBLESHOOTING
PROBLEM SOLUTIONGenerator will not start. • Check fuel valve tap is in the ‘down’
position.• Check the oil level is correct.• Check 10W30 oil is being used.• Check choke is in the correct position
(refer to starting methods).• Check there is a spark - Remove your
HT (high tension) lead from the top of your spark plug. Remove the spark plug and reconnect the lead, then touch the metal on the spark plug against the generator frame. Gently pull the starter cord mechanism, listen for an audible ‘ticking’ sound and/or small flashes coming from the very tip of the spark plug. If there is no audible ‘ticking’ and/or small flashes, the spark plug may need replacing.
Generator is difficult to start.
• The air filter is dirty - clean the filter• The fuel filter is dirty - clean the filter• If the pull start mechanism is too ‘hard’
when trying to pull it, it may denote that there is too much oil. Check the oil level by using the dipstick and drain excess oil from the oil sump bolt at the bottom of the generator.
• If the pull start mechanism feels too ‘slack’ (i.e easy to pull), there may be not enough compression in the genera-tor engine for it to work properly. Please contact SGS Engineering.
WWW.SGS-ENGINEERING.COMCALL FOR ASSISTANCE: 01332 576 850

PAGE 19
GENERATOR TROUBLESHOOTING
PROBLEM SOLUTIONNo electrical output. • Check the breaker switch is up.
• The device being powered is faulty.• Check that the voltage output switch is set
to 115 or 230V. • Check the connecting lead from the appli-
ance/tool into the generator is physically sound.
Engine making “rev-ving” sounds
• If your generator is ‘hunting’ (surging), it may need a carburettor adjustment. Turn the brass screw on the carburettor clockwise slowly and listen for the engine sound. If it does not improve then try turning the screw anticlockwise.
See our help and advice section for videos and guides on setting up, starting and maintaining your generator.
http://www.sgs-engineering.com/help-advice
PAGE 20
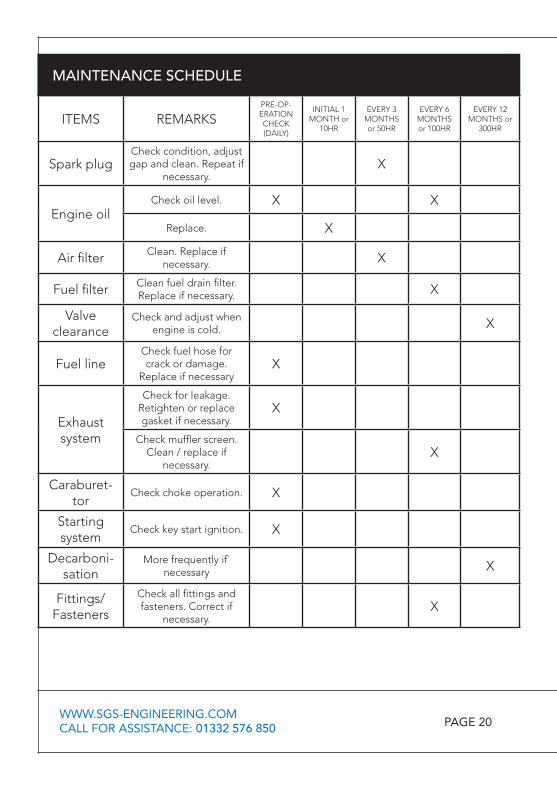
MAINTENANCE SCHEDULE
ITEMS REMARKSPRE-OP-ERATION CHECK (DAILY)
INITIAL 1 MONTH or
10HR
EVERY 3 MONTHS or 50HR
EVERY 6 MONTHS or 100HR
EVERY 12 MONTHS or
300HR
Spark plugCheck condition, adjust gap and clean. Repeat if
necessary.X
Engine oilCheck oil level. X X
Replace. X
Air filter Clean. Replace if necessary. X
Fuel filter Clean fuel drain filter. Replace if necessary. X
Valve clearance
Check and adjust when engine is cold. X
Fuel lineCheck fuel hose for crack or damage.
Replace if necessaryX
Exhaust system
Check for leakage. Retighten or replace gasket if necessary.
X
Check muffler screen. Clean / replace if
necessary.X
Caraburet-tor
Check choke operation. X
Starting system
Check key start ignition. X
Decarboni-sation
More frequently if` necessary X
Fittings/ Fasteners
Check all fittings and fasteners. Correct if
necessary.X
WWW.SGS-ENGINEERING.COMCALL FOR ASSISTANCE: 01332 576 850

PAGE 21
Tip: Parts replacements are only to be carried out by competent persons. If in any doubt, please contact SGS Engineering for help.
Spark plug maintenance. • Remove the spark plug cap from the spark plug.
• Use a spark plug spanner (supplied) to remove the spark plug.
• Check for discoloration and use a wire brush to remove any carbon build up.
• Check the spark plug gap with a feeler gauge, it should be between 0.6 and 0.7 mm. Adjust if necessary.
• Check the overall condition of the spark plug and replace if damaged.
• Reinstall the spark plug and replace the spark plug cap.
• CAUTION: ALLOW THE ENGINE TO COOL BEFORE REMOVING THE SPARK PLUG.
Air filter maintenance. • Remove the air filter element. • Wash it in a solution of warm water and
mild detergent.• Rinse thoroughly and leave it to dry.
Once it is completely dry immerse the filter in clean engine oil and squeeze the filter to remove excess oil.
• Replace the filter into its original posi-tion and replace and secure the cover.
MAINTENANCE INSTRUCTIONS
PAGE 22
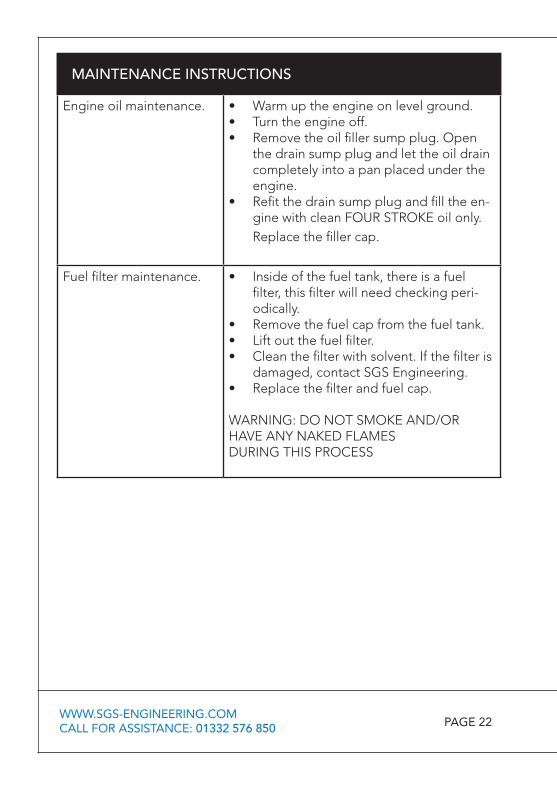
MAINTENANCE INSTRUCTIONS
Engine oil maintenance. • Warm up the engine on level ground.
• Turn the engine off.• Remove the oil filler sump plug. Open
the drain sump plug and let the oil drain completely into a pan placed under the engine.
• Refit the drain sump plug and fill the en-gine with clean FOUR STROKE oil only. Replace the filler cap.
Fuel filter maintenance. • Inside of the fuel tank, there is a fuel filter, this filter will need checking peri-odically.
• Remove the fuel cap from the fuel tank. • Lift out the fuel filter. • Clean the filter with solvent. If the filter is
damaged, contact SGS Engineering. • Replace the filter and fuel cap.
WARNING: DO NOT SMOKE AND/OR HAVE ANY NAKED FLAMES DURING THIS PROCESS
WWW.SGS-ENGINEERING.COMCALL FOR ASSISTANCE: 01332 576 850
PAGE 23
MAINTENANCE INSTRUCTIONS
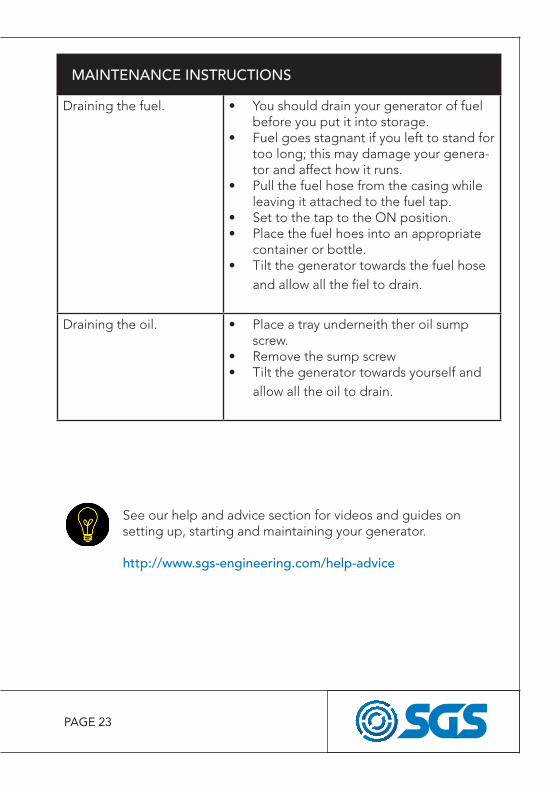
Draining the fuel. • You should drain your generator of fuel before you put it into storage.
• Fuel goes stagnant if you left to stand for too long; this may damage your genera-tor and affect how it runs.
• Pull the fuel hose from the casing while leaving it attached to the fuel tap.
• Set to the tap to the ON position.• Place the fuel hoes into an appropriate
container or bottle.• Tilt the generator towards the fuel hose
and allow all the fiel to drain.
Draining the oil. • Place a tray underneith ther oil sump screw.
• Remove the sump screw• Tilt the generator towards yourself and
allow all the oil to drain.
See our help and advice section for videos and guides on setting up, starting and maintaining your generator.
http://www.sgs-engineering.com/help-advice
PAGE 24WWW.SGS-ENGINEERING.COMCALL FOR ASSISTANCE: 01332 576 850
PAGE 25
PAGE 26WWW.SGS-ENGINEERING.COMCALL FOR ASSISTANCE: 01332 576 850
PAGE 27
PAGE 28WWW.SGS-ENGINEERING.COMCALL FOR ASSISTANCE: 01332 576 850
PAGE 29
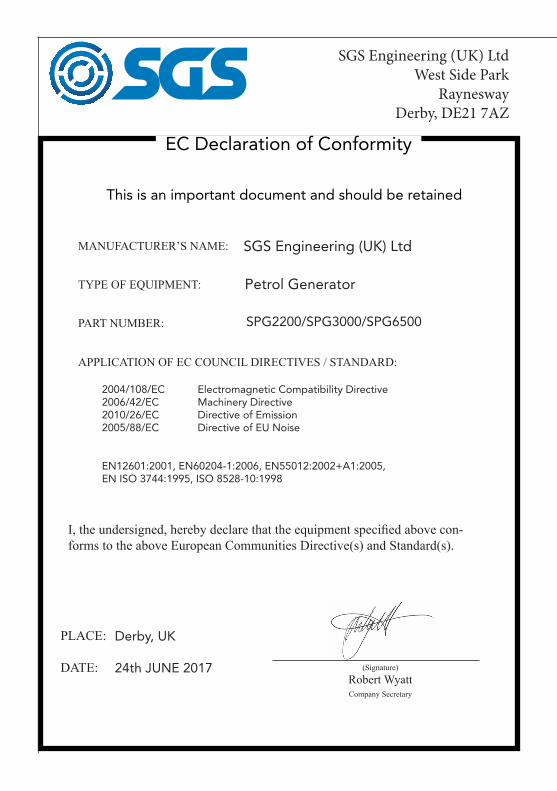
EC Declaration of Conformity
This is an important document and should be retained
MANUFACTURER’S NAME:
TYPE OF EQUIPMENT:
PART NUMBER:
I, the undersigned, hereby declare that the equipment specified above con-forms to the above European Communities Directive(s) and Standard(s).
PLACE:
DATE: (Signature)
Robert WyattCompany Secretary
Derby, UK
24th JUNE 2017
SGS Engineering (UK) Ltd
SGS Engineering (UK) LtdWest Side Park
RayneswayDerby, DE21 7AZ
Petrol Generator
SPG2200/SPG3000/SPG6500
2004/108/EC Electromagnetic Compatibility Directive2006/42/EC Machinery Directive2010/26/EC Directive of Emission2005/88/EC Directive of EU Noise
EN12601:2001, EN60204-1:2006, EN55012:2002+A1:2005, EN ISO 3744:1995, ISO 8528-10:1998
APPLICATION OF EC COUNCIL DIRECTIVES / STANDARD: