q-interactive user guide chapter 3 december 2019
TRANSCRIPT

AnOverviewofQ-interactiveCentral Chapter3
Copyright © 2019 NCS Pearson, Inc. or its affiliate(s). All rights reserved. Pearson and Q-interactive are trademarks in the U.S. and/or other countries, of Pearson Education, Inc., or its affiliates.
1
Chapter 3 An Overview of Q-interactive® Central
Q-interactive® User Guide December 2019

AnOverviewofQ-interactiveCentral Chapter3
Copyright © 2019 NCS Pearson, Inc. or its affiliate(s). All rights reserved. Pearson and Q-interactive are trademarks in the U.S. and/or other countries, of Pearson Education, Inc., or its affiliates.
2
Introduction Q-interactive has two components, Central and Assess. Central is web-based and is your first and last stop when using Q-interactive. It’s a home base, where you will: • Create and manage client profiles. • Select, customize, and archive assessment batteries. • Create practice assessment sessions. • Search and save subtests. • Review scores and item-captured data. • Print and export scores.
Other Resources: The information in this chapter is also presented in a series of tutorial videos found under the Support tab on Central (i.e. qiactive.com).
Using Q-interactive Central Dashboard Tab. After you log in to Central, the Dashboard appears. The Dashboard provides a view of your recent Q-interactive activity. You can also create practice assessment sessions from the Dashboard.
Quick Create: Enter an existing client name, select a favorite battery from the dropdown menu, and click the Quick create button to advance directly to scheduling the assessment. Practice Assessment: Practice the tests before testing clients! Practice assessments are free! Practice assessments have the same functionality as regular ones, but standard/scaled scores, indexes, and reporting functions are disabled. Message Center: The Q-interactive team will communicate important information, including app updates, usage, and license renewal information through the Message Center.

AnOverviewofQ-interactiveCentral Chapter3
Copyright © 2019 NCS Pearson, Inc. or its affiliate(s). All rights reserved. Pearson and Q-interactive are trademarks in the U.S. and/or other countries, of Pearson Education, Inc., or its affiliates.
3
Clients Tab. Clients are entered in to the system one by one. There is not a data upload function within the system currently. Use the following steps to create a new client:
Step 1: From the Clients tab, click the Create new button.
Step 2: Enter the client’s first and last name, client ID, date of birth, and gender. All fields are required. It is extremely important that the date of birth is entered accurately because the system uses the date of birth to calculate norms and to determine the appropriate start point(s) for some tests.
The figure on the right shows a completed profile screen. From this screen you can create an assessment session, archive the client, and view previous assessment data. Admin accounts have the additional ability to delete the client and/or assessment session data.
AnOverviewofQ-interactiveCentral Chapter3
Copyright © 2019 NCS Pearson, Inc. or its affiliate(s). All rights reserved. Pearson and Q-interactive are trademarks in the U.S. and/or other countries, of Pearson Education, Inc., or its affiliates.
4
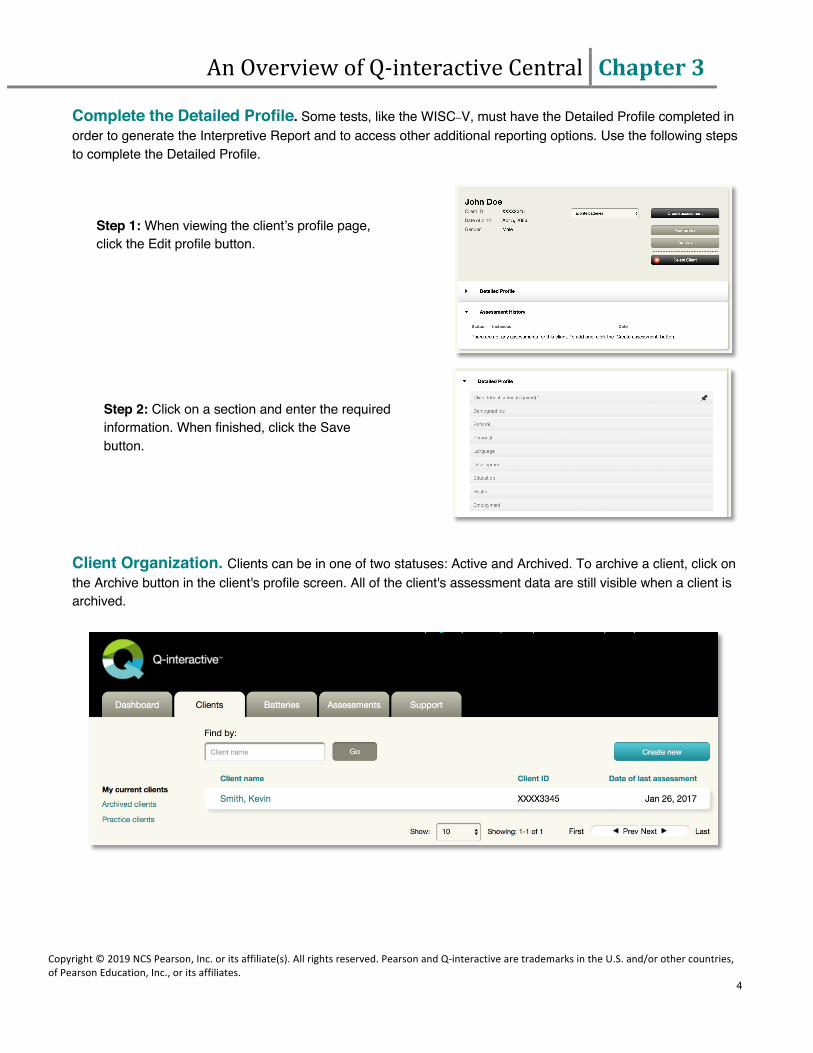
Complete the Detailed Profile. Some tests, like the WISC–V, must have the Detailed Profile completed in order to generate the Interpretive Report and to access other additional reporting options. Use the following steps to complete the Detailed Profile.
Client Organization. Clients can be in one of two statuses: Active and Archived. To archive a client, click on the Archive button in the client's profile screen. All of the client's assessment data are still visible when a client is archived.
Step 1: When viewing the client’s profile page, click the Edit profile button.
Step 2: Click on a section and enter the required information. When finished, click the Save button.

AnOverviewofQ-interactiveCentral Chapter3
Copyright © 2019 NCS Pearson, Inc. or its affiliate(s). All rights reserved. Pearson and Q-interactive are trademarks in the U.S. and/or other countries, of Pearson Education, Inc., or its affiliates.
5
Batteries Tab. Your library of batteries displays here and clicking each one will show the available subtests. Create New Batteries. New batteries can be created from existing batteries. Batteries you create are saved and are found alongside the other batteries within your license. The following steps are specific to Central; however you can adjust a battery within the Assess app as well (see Chapter 4 for more information).
Step 2: Click on a test name (in this image, the CELF-5) to expand. Click the Add button for your selection (i.e., the entire test or only the subtest you selected) and leverage the Composite and Age dropdowns to target specific subtests. Repeat this process to add any additional tests or subtests to your battery, and then click the Configure and save button when you have finished.
Step 3: Selected subtests will list behind the Your Battery button (in the same location as the Create new battery button). Click Configure and Save.
Step 1: From the Batteries tab, click the Create new battery button

AnOverviewofQ-interactiveCentral Chapter3
Copyright © 2019 NCS Pearson, Inc. or its affiliate(s). All rights reserved. Pearson and Q-interactive are trademarks in the U.S. and/or other countries, of Pearson Education, Inc., or its affiliates.
6
Assessments Tab. The Assessment Tab organizes your assessments into four categories: Preparation: Shows all batteries that have been created but have not been sent to the iPad.
Awaiting delivery to the device: Lists all batteries that will automatically download to the Q-interactive Assess app on your Practitioner iPad the next time you log in to the app.
Administration and scoring: Lists all batteries currently being administered and scored within Assess. This includes assessments that have been synced with and removed from Assess.
Reporting and exporting: Shows all batteries that have been completed and have had a report generated.
Note: Administrators in Q-interactive are able to see sessions across all users within the account. These are visible under the Assessments Tab as well as within each client’s profile.
Create an Assessment Session. Use the following steps to create an assessment session for a client. You can select either a fixed battery or a custom battery.
Step 4: Give the battery a name and description and determine its visibility. The All (name of your account) option will allow all other users within your license to see and use the new custom battery. You can change the order of the subtests on the right side by dragging and dropping. Click the Save button when you are done. The new battery will now appear in your fixed battery list.
Step 1: From the Clients Tab, select the client’s name and click Create assessment.

AnOverviewofQ-interactiveCentral Chapter3
Copyright © 2019 NCS Pearson, Inc. or its affiliate(s). All rights reserved. Pearson and Q-interactive are trademarks in the U.S. and/or other countries, of Pearson Education, Inc., or its affiliates.
7
Note: The Assess app is able to hold multiple assessment sessions. You can create several assessment sessions and then push them all to the iPad at one time.
Step 2: Choose a battery by clicking Add then click the Next button at the top of the screen.
Step 3: Enter all of the Assessment Details. All fields on this screen are required. The scheduled assessment date and time are for your scheduling purposes only. Normative data will be based upon the actual date of administration, not the scheduled one.
Step 4: Click the Send to iPad button, and the assessment session will move under the heading “Awaiting delivery to device.” The next time you log in to the Assess app, the assessment session will be available to administer.

AnOverviewofQ-interactiveCentral Chapter3
Copyright © 2019 NCS Pearson, Inc. or its affiliate(s). All rights reserved. Pearson and Q-interactive are trademarks in the U.S. and/or other countries, of Pearson Education, Inc., or its affiliates.
8
Create Practice Assessment Sessions. The Practice Assessment feature allows you to create free assessment sessions in order to learn how to use the system. Practice assessments can be used at any time during your license period. Practice assessments can be administered by clicking the Practice Assessment button on the Dashboard. Although practice assessments are administered in a similar fashion to standard assessments, practice assessments are different in the following ways:
• The Create Report, Export, and Item Level Scores buttons are disabled, and there will be no permanent record of the item responses entered during Practice Mode.
• Even though you can enter scores for each item, the raw scores, standard/scaled scores, and indexes will default to zero.
Use the following steps to create a practice assessment session:
Note: It may be helpful to create multiple practice clients that span a variety of ages. Assess uses the client's date of birth to determine the age-appropriate start point(s), and it is recommended that you use practice clients with dates of birth that fall within the normative age range of the test you want to practice.
Step 1: From the Dashboard Tab, click the Practice Assessment button.
Step 2: To create a new Practice Client, click the Create Practice Client button and enter the client’s first and last name, client ID, date of birth, and gender. All fields are required.

AnOverviewofQ-interactiveCentral Chapter3
Copyright © 2019 NCS Pearson, Inc. or its affiliate(s). All rights reserved. Pearson and Q-interactive are trademarks in the U.S. and/or other countries, of Pearson Education, Inc., or its affiliates.
9
Once a practice client profile has been created, the creation of batteries follows the same workflow as outlined earlier in this document. Practice Assessment sessions are identified on the Assessment tab as shown below.
Deleting Clients and Assessment Sessions From Central. Administrators in Q-interactive can delete clients and/or assessment sessions from Central. This action is permanent and cannot be undone. Be sure to generate reports and save any data associated with the client/assessment before deletion.
The Delete Client button is found within the Client profile. Deleting a client will also delete all assessment sessions associated with that client.
The Delete Assessment button only appears when you are viewing a specific assessment. Clicking it deletes only that specific assessment.