q-power cattle chutes
TRANSCRIPT
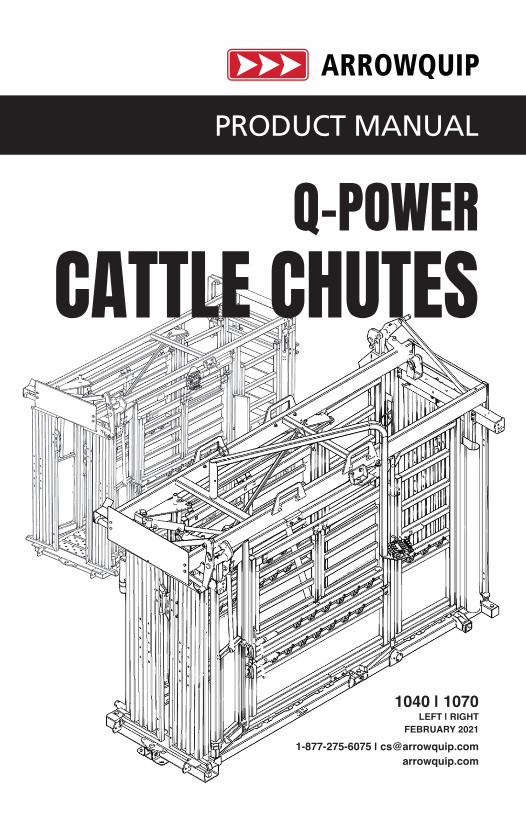
Q-POWERCATTLE CHUTES
1-877-275-6075 | [email protected] arrowquip.com
PRODUCT MANUAL
1040 | 1070LEFT | RIGHT
FEBRUARY 2021
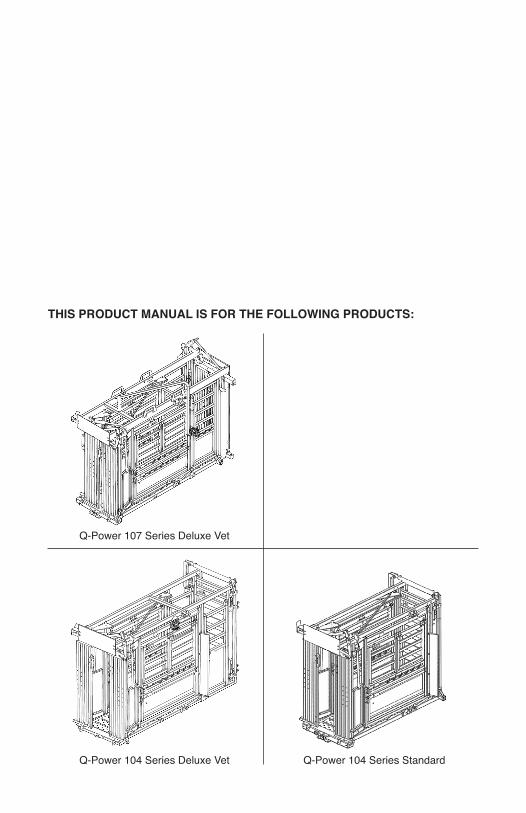
THIS PRODUCT MANUAL IS FOR THE FOLLOWING PRODUCTS:
Q-Power 104 Series Deluxe Vet Q-Power 104 Series Standard
Q-Power 107 Series Deluxe Vet
WARNINGDO NOT REPAIR THE CHUTE OR GO INTO THE CHUTE WHEN HYDRAULICS ARE IN OPERATION. This can result in injury to the worker. Unplug the motor before performing any necessary repairs or inspection.
DO NOT ATTEMPT TO CONNECT THE ELECTRIC POWER PACK IF YOU ARE NOT A CERTIFIED ELECTRICIAN. For your safety, electric power packs must be connected and wired by a fully certified electrician.

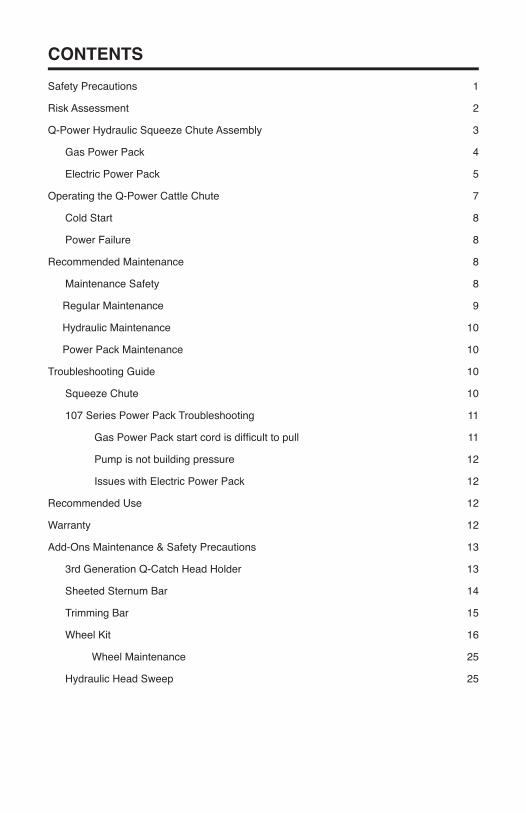
CONTENTSSafety Precautions 1
Risk Assessment 2
Q-Power Hydraulic Squeeze Chute Assembly 3
Gas Power Pack 4
Electric Power Pack 5
Operating the Q-Power Cattle Chute 7
Cold Start 8
Power Failure 8
Recommended Maintenance 8
Maintenance Safety 8
Regular Maintenance 9
Hydraulic Maintenance 10
Power Pack Maintenance 10
Troubleshooting Guide 10
Squeeze Chute 10
107 Series Power Pack Troubleshooting 11
GasPowerPackstartcordisdifficulttopull 11
Pump is not building pressure 12
Issues with Electric Power Pack 12
Recommended Use 12
Warranty 12
Add-Ons Maintenance & Safety Precautions 13
3rd Generation Q-Catch Head Holder 13
Sheeted Sternum Bar 14
Trimming Bar 15
Wheel Kit 16
Wheel Maintenance 25
Hydraulic Head Sweep 25
PLEASE FOLLOW ALL SAFETY INSTRUCTIONS PROVIDED IN THIS MANUAL BEFORE OPERATION. ARROWQUIP DOES NOT ACCEPT RESPONSIBILITY FOR ANY ACCIDENTS OR INJURY WHEN THIS SAFETY MANUAL HAS NOT BEEN READ IN FULL AND KEPT WITH THE PRODUCT AT ALL TIMES. OPERATORS OF THIS PRODUCT TAKE AND ACCEPT RESPONSIBILITY FOR ANY HARM OR INJURY TO THE ANIMAL OR OPERATOR WHEN IT PERTAINS TO HOW THE EQUIPMENT IS USED AND MAINTAINED.
Please keep this manual for frequent reference and to pass on to new users or owners.
SAFETY PRECAUTIONS PLEASE FOLLOW ALL SAFETY PRECAUTIONS OUTLINED HEREIN. ANY HARM TO THE ANIMAL OR INJURY TO THE OPERATOR WHICH OCCURS DUE TO HOW THE PRODUCT IS OPERATED, OR RESULTING FROM A LACK OF SAFETY PRECAUTIONS ARE THE SOLE RESPONSIBILITY OF THE OPERATOR.
All farm machinery and equipment are potentially dangerous. Careless use of any Arrowquip livestock equipment may cause injury or damage to persons, cattle, or property. Arrowquip has taken precautions in the design and manufacturing of this product to ensure that it is safe and user-friendly. Therefore, user must assume all responsibility and risk associated with the possession and use of the equipment.
WARNING: READ BELOW BEFORE OPERATION.
Ensure the operator understands the contents of this manual before using the cattle squeeze chute.
1. DO NOT wearloose-fittedclothing.
2. Ensurethecattlesqueezechuteisonafirm,level,drysurfacethatisfreeofrocksand othertriphazards.Alevelconcretepadflushwiththegroundandwiththechutebolted to the concrete is strongly recommended.
3. DO NOT enter the vet cage until the animal is secured in the head gate and the rump bar has been placed so that the cow cannot back up.
4. DO NOT stand in front of the head gate while operator is moving the cattle through the squeeze chute.
5. DO NOT ALLOW CHILDREN UNDER THE AGE OF 18 NEAR AN OPERATING MACHINE.
1 | SAFETY PRECAUTIONS
6. Follow safe cattle handling procedures in other areas of the yard so that cattle are more docile in the chute.
7. DO NOTmakeanymodificationstoArrowquipequipment.Non-factorymodificationsto the equipment can reduce the safety for the operator & livestock, and void warranty.
8. DO NOT ALLOW CHILDREN UNDER THE AGE OF 18 TO USE THE HYDRAULIC EQUIPMENT.
9. DO NOT OPERATE HYDRAULICS WHILE OPERATORS ARE WORKING WITH THE CATTLE IN THE CHUTE OR ARE TOUCHING THE CHUTE. REACHING OUT OR INTO THE CHUTE WHILE HYDRAULICS ARE IN OPERATION CAN RESULT IN SERIOUS INJURY.
10. Please ensure that all hydraulic hoses and electrical leads are out of the way and safely positioned before moving cattle or using the chute.
11.Keepadistanceofmorethananarm’slengthfromthehydraulicchutewhilehydraulics are in operation.
RISK ASSESSMENT Conduct a risk assessment on procedures regarding the operation of an Arrowquip hydraulic squeeze chute, establishing a safe work procedure.
1. Ensure all users of the equipment have been inducted and comply with safe working procedures.
2. Pleaseensurethatthehydraulicchuteissecuredonfirmground.
3. Please ensure that there are no hazardous hydraulic cords or large objects within or around the chute where cattle and operator will be.
4. Please ensure that all hydraulics work properly before putting cattle through the chute.
5. Please make sure that all hydraulic hoses are properly secured to the hydraulic pump or tractor.
6. Ensurethatthehydrauliccontrolsarefunctioningproperly.Specificallyensurethatthe adjustable side mechanism and the head gate are adjusting smoothly.
7. If hydraulics do not function properly when testing the equipment, DO NOT put cattle through the chute.
8. Ensure that access gates are closed securely before running cattle through the chute.
9. Some chemicals and medicines can damage powder coat. Take all precautions and wash after use.
10. Make sure your chute has been cleared of ALL livestock after use.
RISK ASSESSMENT | 2

3 | Q-POWER HYDRAULIC SQUEEZE CHUTE ASSEMBLY
Q-POWER HYDRAULIC SQUEEZE CHUTE ASSEMBLYYourchutewillcomefullyassembledwiththeoptionsyouhaveorderedalreadyfittedtothechute. However, it will be necessary to connect the hydraulics to a tractor or power pack. The following guide will assist you in properly setting up your chute for use.
SETTING UP THE Q-POWER 104 SERIES 110V ELECTRIC POWER PACK
1. Marret P1 to Line 1 (Positive)
2. Marret T4 (Red), T2 (White) and T8 (Yellow) to Line 2 (Negative)
3. Marret T3, P2 and T5
1. Connect the hydraulic chute to a 110V power source.
2. Proceed to “Operating The Q-Power Hydraulic Chute”
DO NOT ATTEMPT TO CONNECT THE ELECTRIC POWER PACKS IF YOU ARE NOT A CERTIFIED ELECTRICIAN.
MUST BE CONNECTED BY A CERTIFIED ELECTRICIAN. CONTACT 1-877-275-6075 WITH ANY QUESTIONS.
Q-POWER HYDRAULIC SQUEEZE CHUTE ASSEMBLY | 4
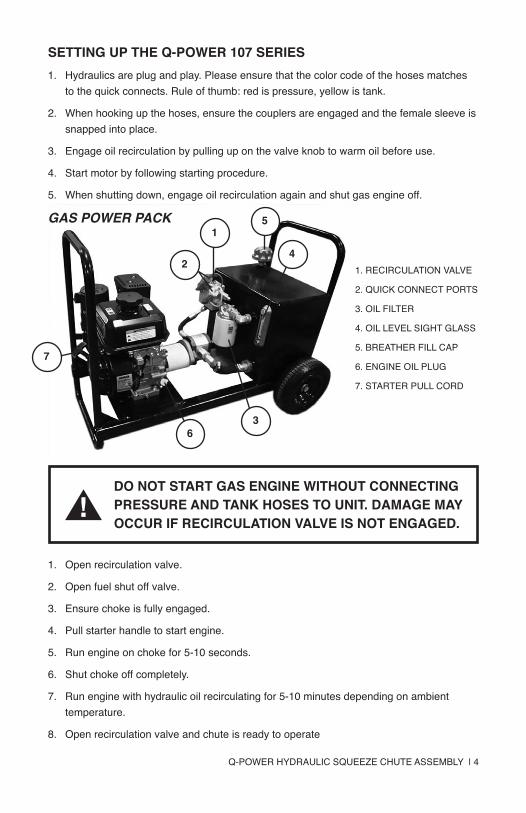
SETTING UP THE Q-POWER 107 SERIES 1. Hydraulics are plug and play. Please ensure that the color code of the hoses matches to the quick connects. Rule of thumb: red is pressure, yellow is tank.
2. When hooking up the hoses, ensure the couplers are engaged and the female sleeve is snapped into place.
3. Engage oil recirculation by pulling up on the valve knob to warm oil before use.
4. Start motor by following starting procedure.
5. When shutting down, engage oil recirculation again and shut gas engine off.
GAS POWER PACK
1. Open recirculation valve.
2. Open fuel shut off valve.
3. Ensure choke is fully engaged.
4. Pull starter handle to start engine.
5. Run engine on choke for 5-10 seconds.
6. Shut choke off completely.
7. Run engine with hydraulic oil recirculating for 5-10 minutes depending on ambient temperature.
8. Open recirculation valve and chute is ready to operate
1. RECIRCULATION VALVE
2. QUICK CONNECT PORTS
3. OIL FILTER
4. OIL LEVEL SIGHT GLASS
5. BREATHER FILL CAP
6. ENGINE OIL PLUG
7. STARTER PULL CORD
DO NOT START GAS ENGINE WITHOUT CONNECTING PRESSURE AND TANK HOSES TO UNIT. DAMAGE MAY OCCUR IF RECIRCULATION VALVE IS NOT ENGAGED.
1
2
3
4
5
6
7

ELECTRIC POWER PACKS
DO NOT ATTEMPT TO CONNECT THE ELECTRIC POWER PACK IF YOU ARE NOT A CERTIFIED ELECTRICIAN. FOR YOUR SAFETY, ELECTRIC POWER PACKS MUST BE CONNECTED AND WIRED BY A FULLY CERTIFIED ELECTRICIAN.
5HP ELECTRIC POWER PACK
5 | Q-POWER HYDRAULIC SQUEEZE CHUTE ASSEMBLY
1
2
4
1. RECIRCULATION VALVE
2. OIL FILTER
3. QUICK CONNECT PORTS
4. BREATHER FILL CAP
3
MUST BE CONNECTED BY A CERTIFIED ELECTRICIAN. CONTACT 1-877-275-6075 WITH ANY QUESTIONS.
Q-POWER HYDRAULIC SQUEEZE CHUTE ASSEMBLY | 6
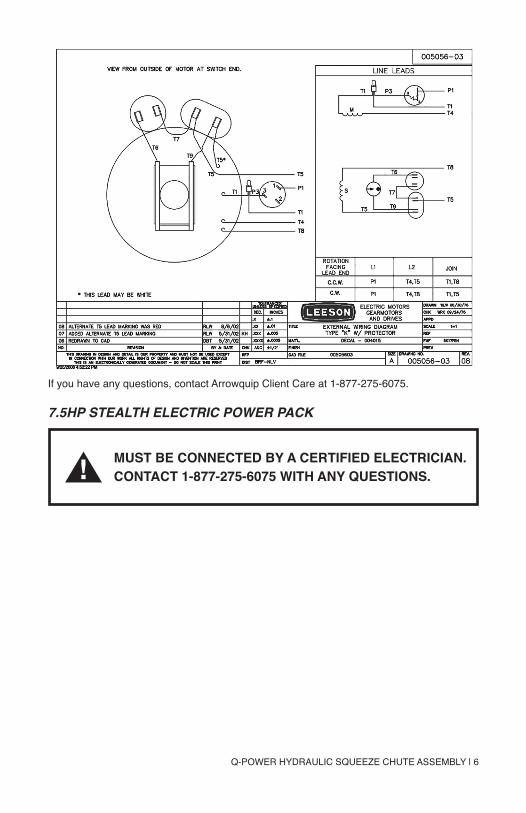
If you have any questions, contact Arrowquip Client Care at 1-877-275-6075.
7.5HP STEALTH ELECTRIC POWER PACK
MUST BE CONNECTED BY A CERTIFIED ELECTRICIAN. CONTACT 1-877-275-6075 WITH ANY QUESTIONS.
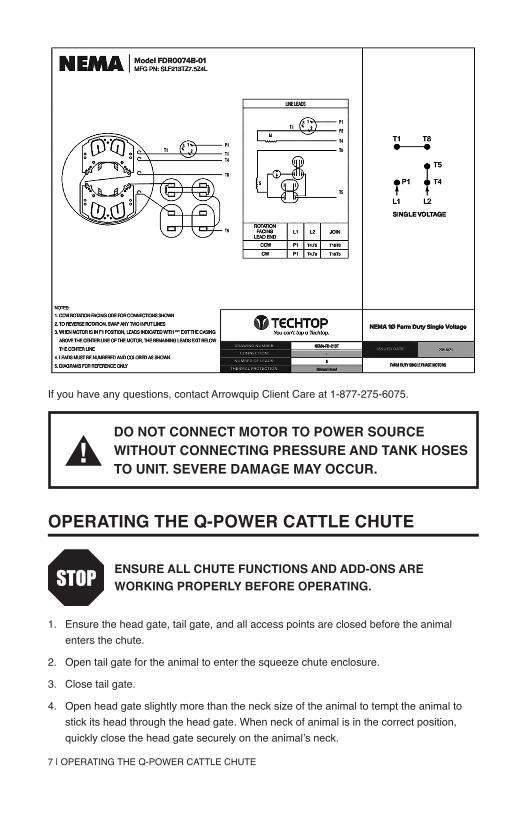
7 | OPERATING THE Q-POWER CATTLE CHUTE
If you have any questions, contact Arrowquip Client Care at 1-877-275-6075.
OPERATING THE Q-POWER CATTLE CHUTE
1. Ensure the head gate, tail gate, and all access points are closed before the animal enters the chute.
2. Open tail gate for the animal to enter the squeeze chute enclosure.
3. Close tail gate.
4. Open head gate slightly more than the neck size of the animal to tempt the animal to stick its head through the head gate. When neck of animal is in the correct position, quicklyclosetheheadgatesecurelyontheanimal’sneck.
DO NOT CONNECT MOTOR TO POWER SOURCE WITHOUT CONNECTING PRESSURE AND TANK HOSES TO UNIT. SEVERE DAMAGE MAY OCCUR.
ENSURE ALL CHUTE FUNCTIONS AND ADD-ONS ARE WORKING PROPERLY BEFORE OPERATING.
COLD START | 8
5. If required, side squeeze animal and engage head restraint to restrain further movement.
6. If the animal applies excessive pulling pressure on head gate, it is recommended to use the anti-backing bar behind cattle rump.
COLD STARTTo cold start the unit it when it is not at operating temperature, follow the below instructions.
1. With recirculation valve locked in the up position, the cold start allows the oil to circulate withinthepowerpacktowarmtheoil,allowingforfasterflowratetothechute.
2. With recirculation valve locked in the down position, it is engaged to run the chute.
POWER FAILUREIf you should experience a loss of power while you have an animal in the chute, please follow the instructions below:
1. Operatethehydraulicleverstoallowfluidtoflowoutofthecylindersandreleasethe pressure on the animal.
2. Check to make sure that the animal is free of any injury.
RECOMMENDED MAINTENANCE
All Arrowquip Products are made with precision parts to require minimal maintenance. However, regular maintenance will keep your equipment running smoothly and safely.
MAINTENANCE SAFETY1. Ensure the area is clear of bystanders, especially children, when doing any maintenance or repair on the hydraulic squeeze chute.
2. Keep all body parts, including hair, hands, feet, etc., away from the machine when hydraulics are in operation.
3. Before carrying out any maintenance on the squeeze chute, please ensure there are no livestock in the chute.
4. DO NOT repair the chute or go into the chute when hydraulics are in operation. This can result in injury to the worker. Unplug the motor before performing any necessary repairs or inspection.
CONFIRM ANIMAL IS SECURELY HELD BEFORE CARRYING OUT ANY HUSBANDRY WORK.
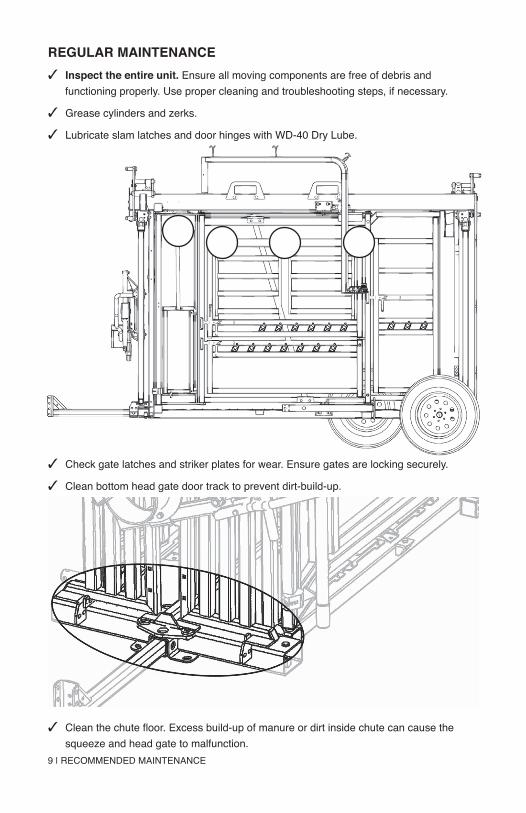
REGULAR MAINTENANCE✓ Inspect the entire unit. Ensure all moving components are free of debris and functioning properly. Use proper cleaning and troubleshooting steps, if necessary.
✓ Grease cylinders and zerks.
✓ Lubricate slam latches and door hinges with WD-40 Dry Lube.
✓ Check gate latches and striker plates for wear. Ensure gates are locking securely.
✓ Clean bottom head gate door track to prevent dirt-build-up.
✓ Cleanthechutefloor.Excessbuild-upofmanureordirtinsidechutecancausethe squeeze and head gate to malfunction. 9 | RECOMMENDED MAINTENANCE
✓ Check mechanism pivot bolts for wear. Lubricate with WD-40 Dry Lube as necessary.
HYDRAULIC MAINTENANCE If you have any issues with your hydraulic chute, contact Arrowquip Client Care at 1-877-275-6075.
1. Replace oil annually, or more frequently as necessary.
a. Dirty oil or oil that has 0.05% of water in it can be catastrophic for hydraulic systems. Replace oil frequently to prevent damage to your hydraulic jacks and keep them working safely and reliably.
POWER PACK MAINTENANCE Inspect the entire unit. Ensure all moving components are free of debris and functioning properly. Use proper cleaning.
TROUBLESHOOTING GUIDEBefore doing ANY work or troubleshooting on your hydraulic chute, contact Arrowquip Client Care at 1-877-275-6075.
SQUEEZE CHUTE1. To ensure proper operation make sure head gate is situated on level ground or base.
2. Make sure head gate door tracks are free of debris.
3. Keepfloorsclean.Excessbuild-upofmanureordirtinsidechutecancausethesqueeze and head gate to malfunction.
4. Lubricate slam latches and pivot points with WD-40 Dry Lube.
TROUBLESHOOTING GUIDE | 10
DO NOT ATTEMPT TO TROUBLESHOOT OR FIX ISSUES WITH THE ELECTRIC POWER PACK UNLESS YOU ARE A CERTIFIED ELECTRICIAN.

11 | TROUBLESHOOTING GUIDE
107 SERIES POWER PACK TROUBLESHOOTING
GAS POWER PACK ISSUES
For detailed instructions on how to remedy these problems, refer to your Gas Power Pack manual.
GAS POWER PACK START CORD IS DIFFICULT TO PULL SOLUTIONS
1. It is possible the motor has been turned on its side at some point, causing oil to get on top of the cylinder. Remove spark plug, hold a rag over spark plug hole, and pull the start cord a couple of times to get rid of the oil. Clean and dry out spark plug hole, then check engine oil.
Possible Cause
Problem No Fuel Improper Fuel
Dirt in Fuel Line
Dirty Debris Screen
Incorrect Oil Level
Engine Overloaded
Dirty Air Cleaner
Faulty Spark Plug
Will Not Start • • • • • • •Hard Starting • • • • • •Stops Suddenly • • • • • • •Lacks Power • • • • • • •Operates Erratically • • • • • •Knocks or Pings • • • •SkipsorMisfires • • • • •Backfires • • • • •Overheats • • • • • •High Fuel Consumption • • •
RECOMMENDED USE | 12
PUMP IS NOT BUILDING PRESSURE SOLUTIONS
1. Try screwing relief on the valve block all the way in and then back out. Keep track of turns and adjust accordingly.
2. Check that the hydraulic oil level is correct in the sight glass. Use HVI22 or AW22 weight oil to fill as needed.
3. Make sure that both couplers are engaged, and the female sleeve is snapped into place.
4. Ensure fan on motor is turning clockwise.
5. If the cold start valve is stuck in the open/up position, turn the valve one quarter turn and pin should slide down deeper.
6. If it sounds like the motor is not laboring, there is a very small possibility that the key on the shaft broke, and it is not turning the pump.
7. If the relief valve has a piece of debris in it, turning the valve in an out it should free it and cause it to by-pass.
8. Make sure hoses are hooked up correctly and align with the P and T on both the power pack and the chute.
a. Note:‘P’isleftand‘T’isright.
ISSUES WITH ELECTRIC POWER PACK Contact your Electrician for assistance with any Power Pack issues.
For additional information, contact Arrowquip Client Care at 1-877-275-6075.
RECOMMENDED USE5000 head of cattle per year.
Follow the recommended use to maximize the lifespan of your equipment. Arrowquip products that have only been used within acceptable tolerance following the recommended use will be eligible to claim warranty.
WARRANTYYour product must be registered to claim warranty, and to ensure that Arrowquip has the required information to contact you in the event of a product or part recall. Any owner who fails to register their product warranty with Arrowquip through their Authorized Arrowquip Dealer voluntarily voids their warranty. Arrowquip will repair or replace products or parts of a product that prove defective due to manufacturer defect during the Warranty Period, at their sole discretion. This excludes defects resulting from normal wear and tear or product misuse. Warrantydoesnotcovercorrosion.NOTE:Anymodification,inanyfashion,toanyArrowquipequipment immediately voids the product warranty. This includes the parts contained therein.
Eg.Ifamodificationismadetothesqueezemechanisminasqueezechute,andthesternum bar is bent afterwards, warranty for the damaged part, the sternum bar, contained in the modifiedequipment,thesqueezechute,isvoid.Inaddition,anyremainingwarrantyforthesqueeze chute and other parts contained therein, including, but not limited to, the head gate, locking system, Q-Catch system, and rollers, is null and void.
REGISTER FOR WARRANTY NOW: Online: arrowquip.com/product-registration
Phone: 1-877-275-6075 | Email: [email protected]
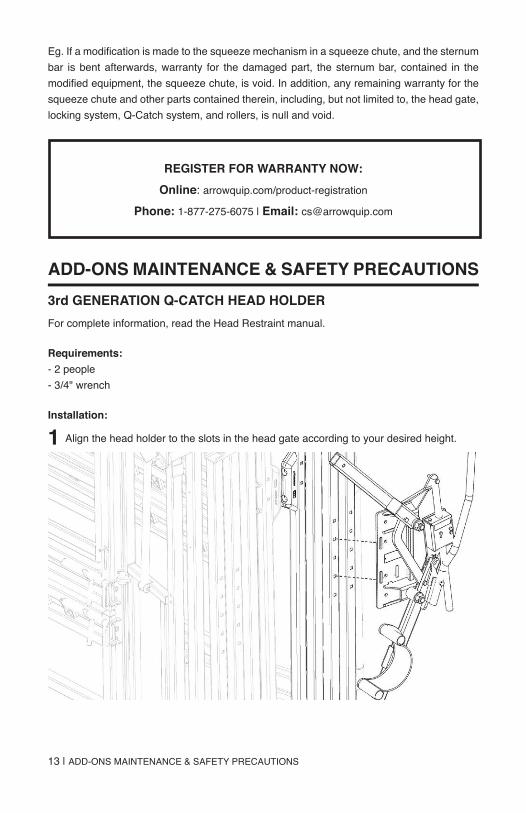
ADD-ONS MAINTENANCE & SAFETY PRECAUTIONS3rd GENERATION Q-CATCH HEAD HOLDERFor complete information, read the Head Restraint manual.
Requirements: - 2 people - 3/4" wrench
Installation:
1 Align the head holder to the slots in the head gate according to your desired height.
13 | ADD-ONS MAINTENANCE & SAFETY PRECAUTIONS
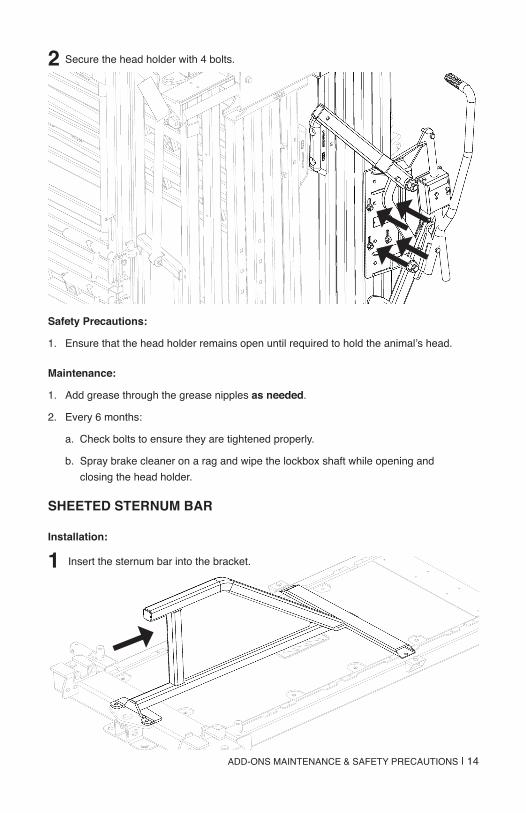
2 Secure the head holder with 4 bolts.
Safety Precautions:
1. Ensurethattheheadholderremainsopenuntilrequiredtoholdtheanimal’shead.
Maintenance:
1. Add grease through the grease nipples as needed.
2. Every 6 months:
a. Check bolts to ensure they are tightened properly.
b. Spray brake cleaner on a rag and wipe the lockbox shaft while opening and closing the head holder.
SHEETED STERNUM BAR
Installation:
1 Insert the sternum bar into the bracket.
ADD-ONS MAINTENANCE & SAFETY PRECAUTIONS | 14

2 Fasten bolts to front plate.
✓ Ensure that the sternum bar is installed correctly before running cattle through the chute.
Safety Precautions:
1. Remove the sternum bar when working calves.
TRIMMING BAR
Installation:
1 Place both brackets on the chute.
SAFETY CHECK:
ADD-ONS MAINTENANCE & SAFETY PRECAUTIONS | 16
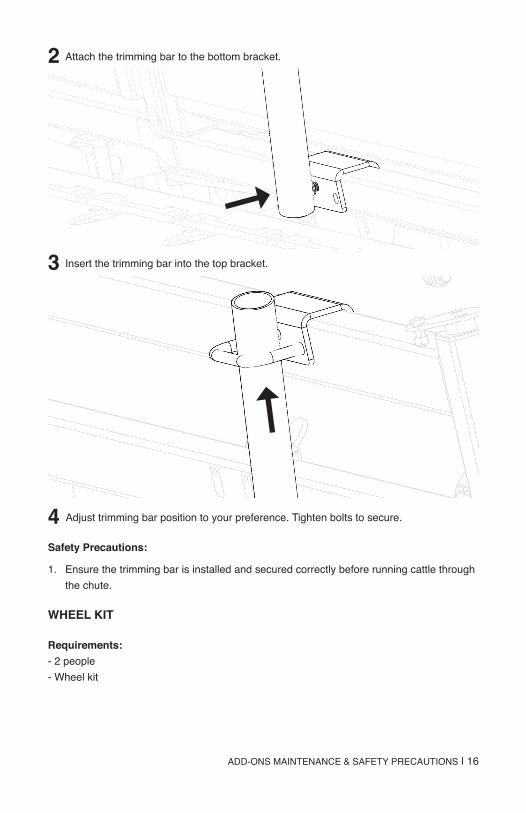
2 Attach the trimming bar to the bottom bracket.
3 Insert the trimming bar into the top bracket.
4 Adjust trimming bar position to your preference. Tighten bolts to secure.
Safety Precautions:
1. Ensure the trimming bar is installed and secured correctly before running cattle through the chute.
WHEEL KIT
Requirements: - 2 people - Wheel kit
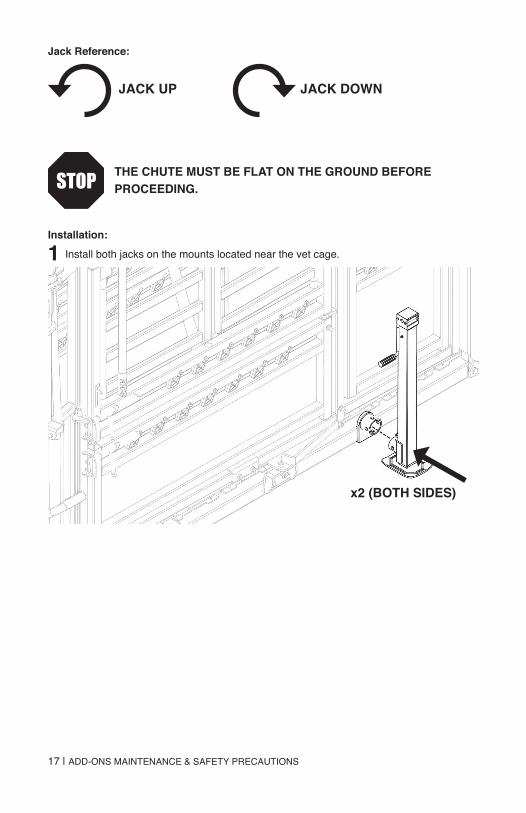
Jack Reference:
Installation:
1 Install both jacks on the mounts located near the vet cage.
17 | ADD-ONS MAINTENANCE & SAFETY PRECAUTIONS
THE CHUTE MUST BE FLAT ON THE GROUND BEFORE PROCEEDING.
JACK UP JACK DOWN
x2 (BOTH SIDES)
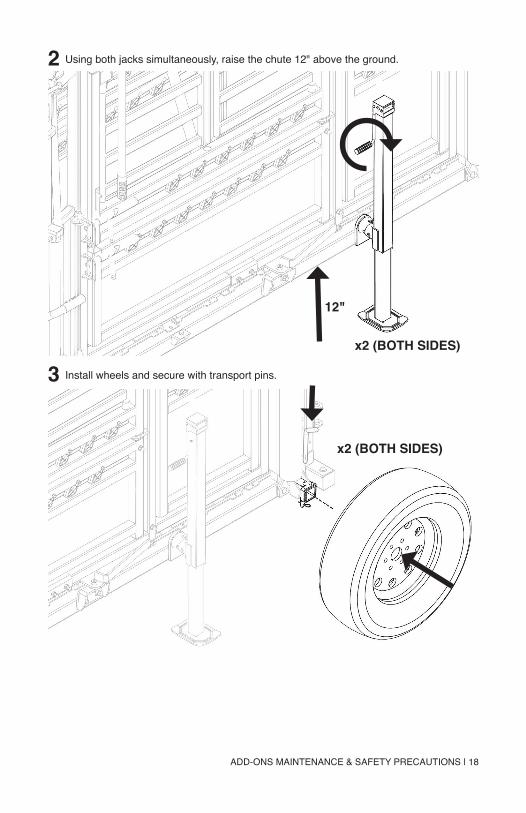
2 Using both jacks simultaneously, raise the chute 12" above the ground.
3 Install wheels and secure with transport pins.
ADD-ONS MAINTENANCE & SAFETY PRECAUTIONS | 18
12"
x2 (BOTH SIDES)
x2 (BOTH SIDES)
19 | ADD-ONS MAINTENANCE & SAFETY PRECAUTIONS
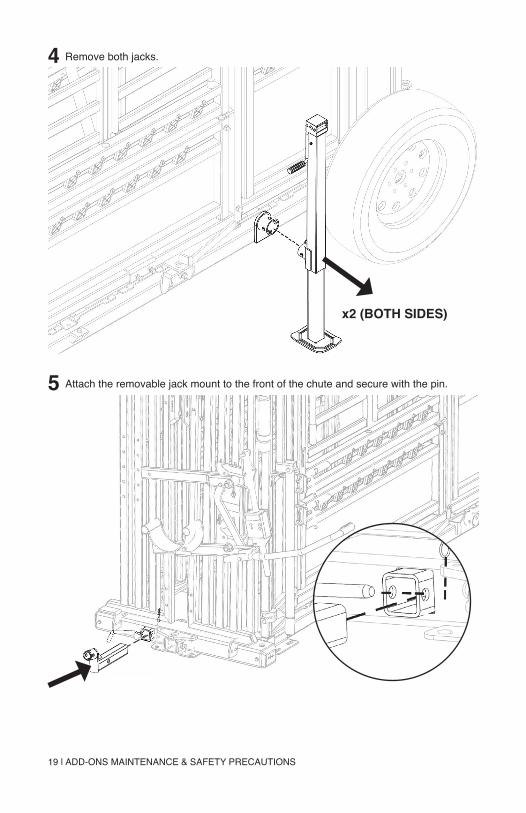
4 Remove both jacks.
5 Attach the removable jack mount to the front of the chute and secure with the pin.
x2 (BOTH SIDES)
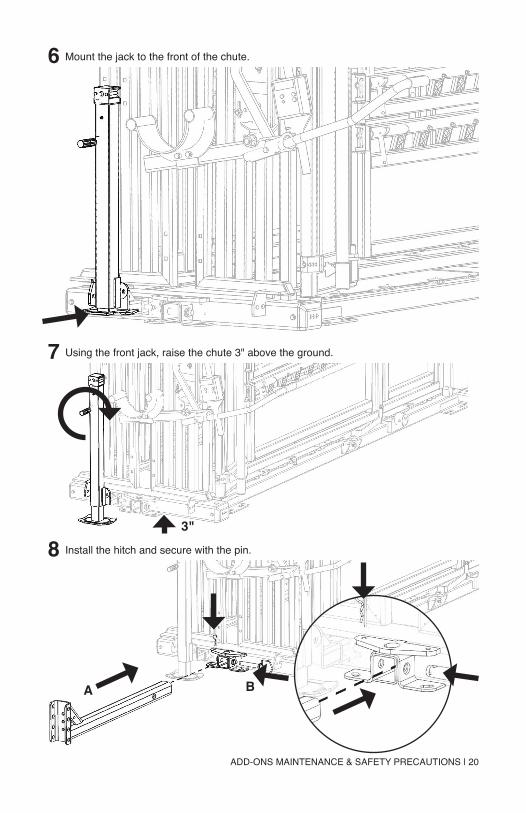
6 Mount the jack to the front of the chute.
7 Using the front jack, raise the chute 3" above the ground.
8 Install the hitch and secure with the pin.
ADD-ONS MAINTENANCE & SAFETY PRECAUTIONS | 20
3"
A B
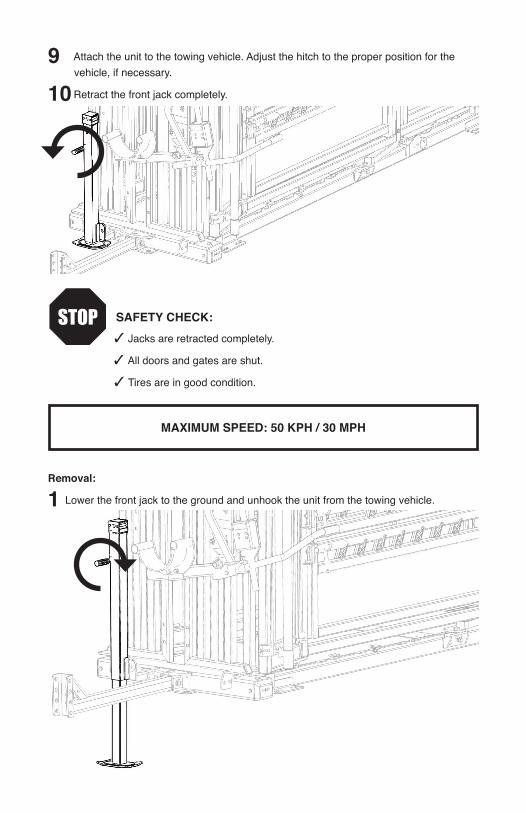
9 Attach the unit to the towing vehicle. Adjust the hitch to the proper position for the vehicle, if necessary.
10 Retract the front jack completely.
✓ Jacks are retracted completely.
✓ All doors and gates are shut.
✓ Tires are in good condition.
Removal:
1 Lower the front jack to the ground and unhook the unit from the towing vehicle.
SAFETY CHECK:
MAXIMUM SPEED: 50 KPH / 30 MPH
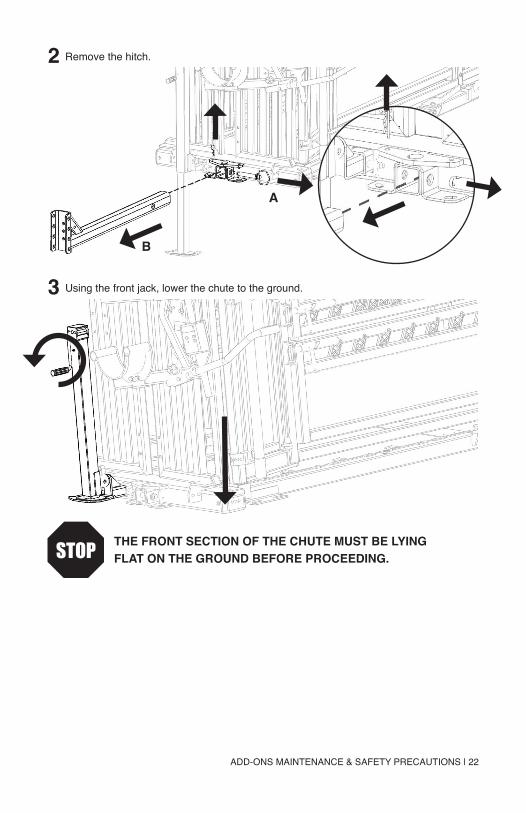
2 Remove the hitch.
3 Using the front jack, lower the chute to the ground.
B
A
ADD-ONS MAINTENANCE & SAFETY PRECAUTIONS | 22
THE FRONT SECTION OF THE CHUTE MUST BE LYING FLAT ON THE GROUND BEFORE PROCEEDING.
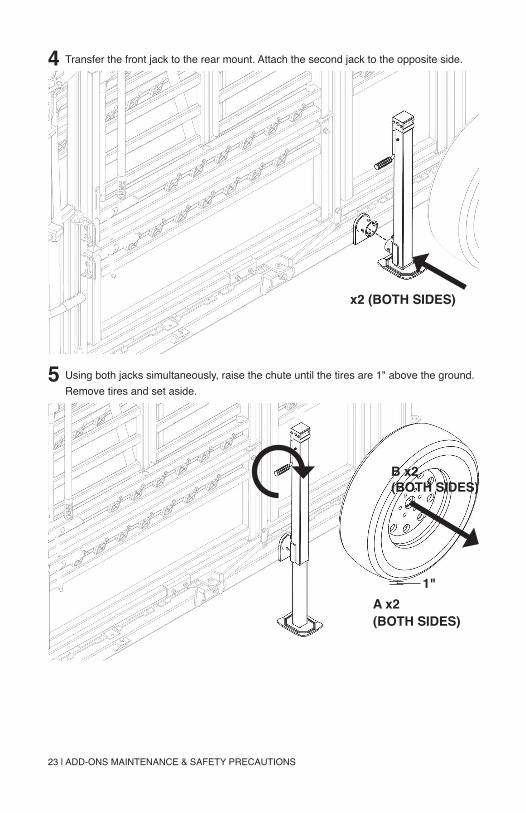
4 Transfer the front jack to the rear mount. Attach the second jack to the opposite side.
5 Using both jacks simultaneously, raise the chute until the tires are 1" above the ground. Remove tires and set aside.
x2 (BOTH SIDES)
23 | ADD-ONS MAINTENANCE & SAFETY PRECAUTIONS
A x2 (BOTH SIDES)
B x2 (BOTH SIDES)
1"

6 Usingbothjackssimultaneously,lowerthechuteuntilitislyingflatontheground.
7 Remove jacks and set aside.
✓ Inspect for damages due to transport
✓ Head gate and squeeze mechanisms are functioning properly
✓ All latches on doors, gates, and panels are functioning properly
✓ When applicable, all add-ons are properly installed and functioning
x2 (BOTH SIDES)
ADD-ONS MAINTENANCE & SAFETY PRECAUTIONS | 24
SAFETY CHECK:
x2 (BOTH SIDES)
WHEEL MAINTENANCE It is extremely important to apply and maintain proper wheel mounting torque on your trailer wheel. Torque is a measure of the amount of tightening applied to a fastener (nut or bolt) and is expressed as length force. For example, a force of 90 pounds applied at the end of a wrench on foot long will yield 90 ft. lbs. of torque. A torque wrench is the best method to assures the proper amount of torque is being applied to a fastener.
Be sure to use only fasteners matched to the cone angle of your wheel – usually 60° or 90°. The proper procedure for attaching your wheels is as follows:
1. Start all bolts or nuts by hand to prevent cross-threading.
2. Tighten bolts or nuts in the sequence shown for wheel torque requirements.
3. The tightening of the fasteners should be done in stages. Following the recommended sequence, tighten fasteners per wheel torque requirements diagram.
4. Wheelnuts/boltsshouldbetorquedbeforefirstroaduseandaftereachwheelremoval. Checkandre-torqueafterthefirst10miles,25miles,andagainat50miles.Check periodically thereafter.
Maximum torque level that can be safely applied to the studs are: Stud Size: .5"-20 UNF, class 2A Maximum Torque: 120ft. lbs.
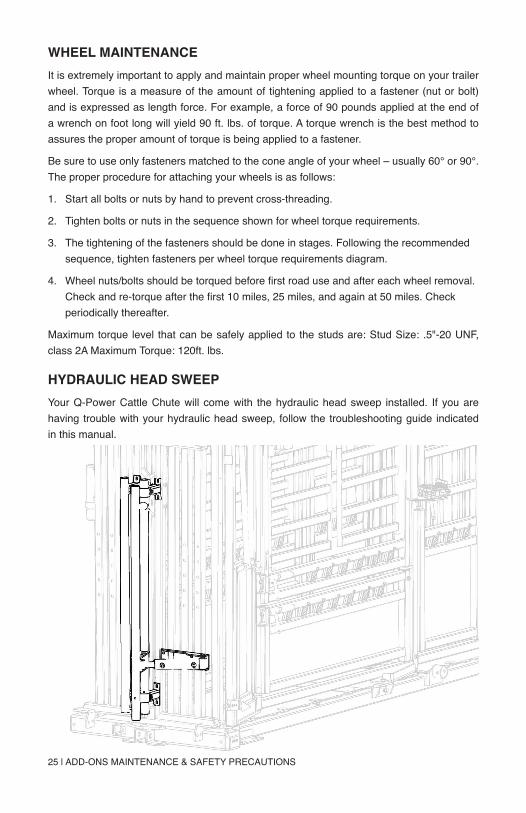
HYDRAULIC HEAD SWEEPYour Q-Power Cattle Chute will come with the hydraulic head sweep installed. If you are having trouble with your hydraulic head sweep, follow the troubleshooting guide indicated in this manual.
25 | ADD-ONS MAINTENANCE & SAFETY PRECAUTIONS


Printed in Canada | February 2021
If you have any questions regarding your product or require assistance, please contact Arrowquip’[email protected].