qbotrobotcarkit usermanual - lewansoul.com · 1 1 introduction 1.1productintroduction...
TRANSCRIPT

Qbot Robot Car Kit
User Manual
Warming tips1. Please charge the battery in time if you find Qbot running slow and the indicator isdimming.
2. Infrared obstacle avoidance sensor, line tracking sensor are sensitive to infraredinterference, they might not work in strong light.
3. The ultrasonic sensor must be installed according to the instructions. Incorrectinstallation can cause damage to the ultrasonic sensor.
4. When using infrared remote control, there should be no object between the remotecontroller and the receiver.
5. Don’t let metal objects touch the circuit board and the electronic component oncircuit board, otherwise the product may be damaged.
6. The product contains small parts, do not let children eat by mistake.
7. Please use the included charger to charge the battery, otherwise it may cause a fireand explosion.
8. Do not short-circuit, dismantle, destroy the battery or throw the battery into the fire,otherwise it may cause dangerous.

CatalogWarming tips.................................................................................................................. 1
Catalog.....................................................................................................................11 Introduction................................................................................................................. 1
1.1 Product introduction..........................................................................................11.2 Features............................................................................................................. 1
2 Main assembly.............................................................................................................22.1 Product list.........................................................................................................22.2 Product parameters............................................................................................32.3 Components.......................................................................................................42.4 Overall component display................................................................................6
3 Installation and Operation........................................................................................... 73.1 Overview........................................................................................................... 73.2 Mobile phone APP............................................................................................ 8
3.2.1 Download Mobile APP.......................................................................... 83.2.2 Mobile phone APP to control the Qbot.................................................9
3.3 Infrared remote controller............................................................................... 163.4 WeMake Software...........................................................................................17
3.4.1 What’s WeMake Software................................................................... 173.4.2 How to install WeMake on your computer.......................................... 173.4.3 How to connect Qbot to WeMake.........................................................203.4.4 Install the driver.....................................................................................203.4.5 How to use WeMake to install firmware...............................................24
4 Troubleshooting.........................................................................................................405 The Historical version of the user manual.................................................................42

1
1 Introduction
1.1 Product introductionLewanSoul-Qbot is an educational robot based on graphical programming and
Arduino platform. This robot is perfect for learning STEAM and robotic knowledge.Perfect choice for robot lovers and beginners to learn robotics, electronics andprogramming. Beside, Qbot is a Smart Robot Car Kit with Ultrasonic Sensor, LightSensor, Line Tracking Sensor, OLED Display Screen, Bluetooth Module, InfraredRemote Control ( Receiver), Free Mobile APP for Arduino. The whole assemblyprocess of Qbot only takes 2 minutes, so that you are no longer bothered by thetedious assembly. The holes in the robot can be compatible with the LEGO bricks andyou can extend its function yourself, this means that Qbot will have infinitepossibilities. ( which means that Qbot will have infinite possibilities for you todiscover. )
Hope that Qbot can be a good partner in your study and life!
1.2 FeaturesA Various electronic modules: Integrated infrared, line tracking, dot matrix,ultrasonic, RGB light ( Indicator), Bluetooth 4.0 module and more than 10 electronicmodules.B Quick assembly: The whole assembly process of Qbot only takes 2 minutes.C Compatible with LEGO bricks: It can be used to expand the compatibility( byusing LEGO) between the hole position and LEGO bricks.D Various ways of mobile phone control: We provide customers with a mobile APP,there are three working modes: Gravity mode, ( Line-drawing control mode) drawingline mode and stick rocker mode to enhance the interest and experience of Qbot.( help you enjoy much fun from Qbot)E Support Scratch programming: It allows us to learn to program and control therobot quickly. ( Easy programming way, help you quick to learn)F Plenty of learning material and gameplay: Rich in courses and play ways; Weprovide users with 16 kinds of Qbot gameplay, each of them has a very detailed videotutorial.

2
2 Main assembly2.1 Product listMotor driven board 1
Upper plate 1
Ultrasonic sensor 1
Charger 1
Lithium battery 2
Infrared remote control 1
Screwdriver 1
Screw and copper pillar kit 1
USB cable 1

3
2.2 Product parametersNet Weight About 0.308 pounds
Material Fiberglass
Bluetooth module Support
Package Dimensions 9.8 x 6.2 x 2.4 inches
Programming software WeMake(based on Scrach2.0)Windows Arduino IDE Support
Input Edge sensor, Button module, Linetracking sensor, Ultrasonic sensor,Infrared receiving module
Output Buzzer, RGB lights, two motor ports
Communication interface USB, Bluetooth
Microprocessor Arduino UNO
Power supply One 3.7V 600mAh Lithium battery
Diameter 85mm

4
2.3 ComponentsName of Component Picture Quantity
Upper Plate 1
Motor Driven board 1
Ultrasonic sensor 1
Infrared remote
controller
1
Copper pillars and
screws Several

5
Lithium battery 2
Flat Cable 1
Charger 1

6
2.4 Overall component display
Tips:The Function Button is the button that If you click it, Qbot will run the built-inprogram on it.

7
3 Installation and Operation3.1 Overview1. Different functions require different code;2. The default installation is Bluetooth and infrared firmware so that you can use thecell phone and infrared remote control to control the Qbot directly. There are 16 kindsof gameplay code in this product, and bluetooth and infrared firmware are one ofthem. There is only one firmware on the Qbot at the same time. If you upload otherfirmware (such as Gesture control code) to Qbot, the mobile APP and infrared remotecontrol cannot be used;3. If you want to control the Qbot through using Bluetooth module or infrared remotecontroller, the programs that we need to download first are the same. You can refer tothe above link or QR code;4. Different parts of Qbot have different functions, you can explore more fun from it;5. When your phone fails to connect to Qbot, please check out whether the Bluetoothfirmware has been already downloaded or not.Here are the icon and link and QR code(Table 1):
Table 1
Icon Link QR code
hhttp://bit.ly/2wCKlz6
6. Here are the link and QR code concerning YouTube and Dropbox of Qbot. (Table2)
Table 2
Learning video Software, mobile app,code, etc.
Link http://bit.ly/2xKMgBl http://bit.ly/2wCKlz6
QR code
8
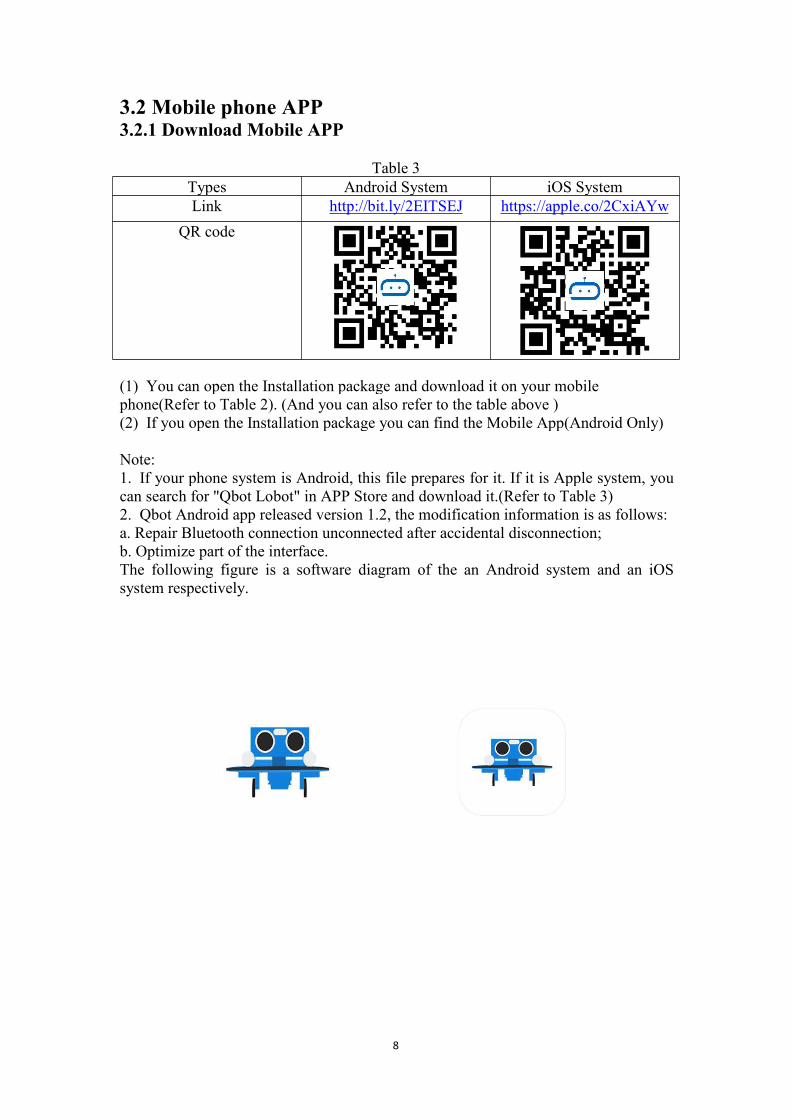
3.2 Mobile phone APP3.2.1 Download Mobile APP
Table 3Types Android System iOS SystemLink http://bit.ly/2EITSEJ https://apple.co/2CxiAYw
QR code
(1) You can open the Installation package and download it on your mobilephone(Refer to Table 2). (And you can also refer to the table above )(2) If you open the Installation package you can find the Mobile App(Android Only)
Note:1. If your phone system is Android, this file prepares for it. If it is Apple system, youcan search for "Qbot Lobot" in APP Store and download it.(Refer to Table 3)2. Qbot Android app released version 1.2, the modification information is as follows:a. Repair Bluetooth connection unconnected after accidental disconnection;b. Optimize part of the interface.The following figure is a software diagram of the an Android system and an iOSsystem respectively.

9
3.2.2 Mobile phone APP to control the Qbot(1)First turn on the switch of the Qbot
(2)Then open the Qbot APP that have been download on your mobile phone.
(3)After connecting the Bluetooth,you can start controlling your Qbot.

10
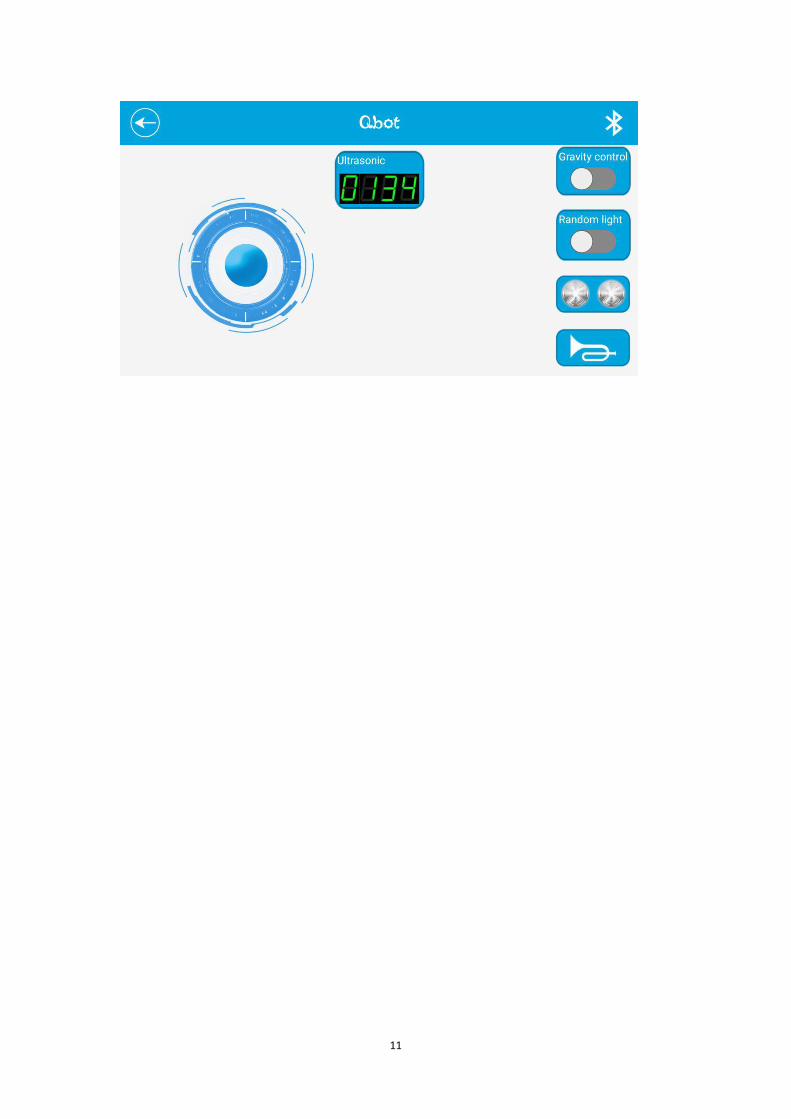
Note:1. The automatic search function of Bluetooth is closed by default.2. If you click the Auto scan button, it will automatically scan Bluetooth itself;3. If you click the icon in the lower right corner,you will see the picture following:
If the connection fails, restart the APP and reconnect several times. (Please rememberusing the Bluetooth inside the phone app rather than the one on your phone system.)If you connect to the Qbot successfully, you can do the following.When you click the Qbot,you will see picture as following:
11
12
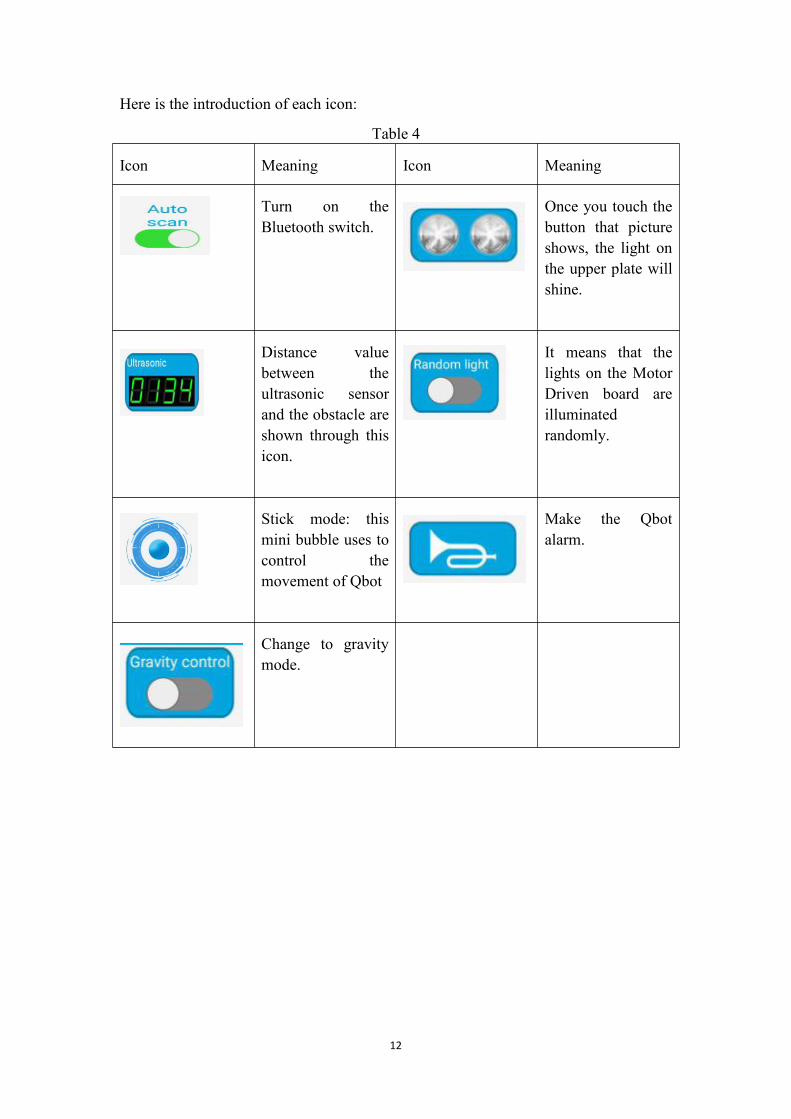
Here is the introduction of each icon:
Table 4
Icon Meaning Icon Meaning
Turn on theBluetooth switch.
Once you touch thebutton that pictureshows, the light onthe upper plate willshine.
Distance valuebetween theultrasonic sensorand the obstacle areshown through thisicon.
It means that thelights on the MotorDriven board areilluminatedrandomly.
Stick mode: thismini bubble uses tocontrol themovement of Qbot
Make the Qbotalarm.
Change to gravitymode.

13
First, you may notice the Numbers on the Ultrasonic section. This number representsthe distance between the Qbot and the object in front of it. The distance will change asthe way it moves.
Then, you can click the Gravity control icon, you can control the movement of Qbotby moving your mobile phone. In fact, we offer two modes to control the movementof Qbot, and the other is stick mode, which means you can operate the Qbot throughthe virtual button on your phone.

14
After that, if you click the Random light, the lights on the Motor Driven board areilluminated randomly. If you click on the third icon, the light on the Upper Plate willlight up.Last, if you click on the fourth icon, the Qbot will alarm.If you click the Dawn line icon, you will see picture as following:

15
You can draw any route you want Qbot in the gray part, then click Play this icon, thenQbot will follow the route you draw, and you can clear the previous route (click Clearscreen icon). As is shown in the picture, if you draw a heart-shape in the gray part, theQbot will go around the shapes that you draw.Here is the function of the icon:
Clear the route youdraw on the screen.
Let Qbot to followthe route you havedrawn.
When you pressthis button, you canstop the Qbot atany time.

16
3.3 Infrared remote controllerOur package contains infrared remote controller, you can use in combination withQbot.
Hardware principle of infrared remote controller: Infrared light is a light that ourhuman eye can not see. We regard the infrared remote controller as a flashlight thatcan emit infrared light, and the infrared receiver module as an eye that can only seethe infrared light.
When we press button 2 on the remote controller. Qbot will move forward and if wepress button 8, it will move backward. Pressing button 4 means turning left, button 6means turning right. (Refer to 3.4.6 Gameplay and Its Corresponding Programs)

17
3.4 WeMake Software3.4.1 What’s WeMake SoftwareWeMake is a graphical programming tool based on Scratch 2.0, which is developedby our company. We can use this software to control. Through WeMakeprogramming we can achieve the interaction between software and the physical worldto make QBot do corresponding response according to the changes in the environment.WeMake's simple operability makes it possible for everyone to build their ownintelligent robots without having to learn esoteric electronic knowledge.
3.4.2 How to install WeMake on your computerYou can download the installation file of WeMake.
Table 5
Icon link QR code
http://bit.ly/2wCKlz6
Open installation file and select installation path.Click “next”
Select destination location.The installer will install WeMake into the following folder.

18
Click next to continue, if you want to select other folder, click”browse”.
The installer is now ready to install WeMake into your computer.Click install to continue with this installer, if you want to review or change thesettings, please click “back”.

19
Installing.The installer is installing WeMake into your computer, please wait.
The WeMake installation wizard finishes.The installer has installed WeMake into your computer, this application can be run byselecting the installed shortcut.Click “finish” exit the installer.Only after QBot is connected to WeMake, we can use WeMake to program QBot.

20
3.4.3 How to connect Qbot to WeMakeFirst, we need to connect Qbot to computer by using mini USB cable, and openWeMake software. Then, you can edit some programs by WeMake.
3.4.4 Install the driverUse the WeMake at the first time, you should install the driver.Select the corresponding path in Menu> Connect> Install Driver
Open the driver installation interface

21
Waiting for installation.Next select the corresponding COM port in Menu> Boards> Qbot

22
Click COM6 to display Connected
Different computers may have different ports(don’t choose COM1), you can open theDeviceManager, expand "Ports (COM & LPT) .

23

24
3.4.5 How to use WeMake to install firmwareThere are two ways for controlling the Qbot, one is using Infrared remote controllerand the other one is through mobile phone App. Different functions require differentfirmware to control. If you use the first way to control the Qbot you can control itdirectly by the Infrared remote control, because the default state of Qbot that thefirmware we have installed. If you use the second way you should install the firmwareby yourself.After connecting the Qbot, then find the firmware that of mobile phone App control,and open it.
Note:
1. The default state is infrared and Bluetooth firmware.
2. The infrared and Bluetooth functions are by default.
Select the corresponding port in Menu> Edit> Ardunio mode.

25
Then click the “ Upload to Ardunio”.

26
When it appears Upload finish, you can start control your Qbot with mobile phone.

27
3.4.6 Gameplay and Its Corresponding ProgramsYou can get gameplay and its corresponding programs on the following.Here is theicon, link and QR code:
Table 6
Icon link QR code
http://bit.ly/2wCKlz6
Here are gameplay and its corresponding programs:
1. Hardware principle of buzzer
A buzzer can send out various tunes of different beats.
Software Command
Script Type Command Comment
Robots Get the distance measured byultrasonic module
Robots The playing tone is 1/8 of the C4beat
Create a target: Ultrasonic detects the distance automatically,the closer the distance is,the higher the alarm frequency of the buzzer. When only 5cm from the wall isdetected, Qbot stops and the buzzer make long sound of beep which indicates that theparking is completed.

28
2. Infrared remote control
Script Type Command Comment
Robot ModuleTo determine whether a button onthe infrared remote controller hasbeen pressed or not.
Robot ModuleTo determine whether a button onthe infrared remote controller hasbeen long pressed.
Create a Target: Qbot controlled by infrared remote controller
Realization: When we press button 2 on the remote controller. Qbot will moveforward and if we press button 8, it will move backward. Pressing button 4 meansturning left, button 6 means turning right.
It is noted that the procedures corresponding to both Bluetooth and infrared remotecontrol are the same.

29
3. Avoid the edge
In this episode, we continue to use the line tracking sensor to achieve some other play.This also allows everyone to know more applications of line tracking sensor in theactual scene.
Software Command:
Script Type Command Comment
Robots Get the status of Edge sensor 1
Robots Get the status of Edge sensor 2
Create a Target: Our map is a large black runway, and Qbot can be placed inside therunway. After turning on the switch, it will run when it touches the black line. Thatmeans the Qbot will continue to move within the black runway.
Realization: We can monitor whether Qbot touch the black line or not through linetracking sensor so as to control the movement of Qbot.

30
4. Follow the Object
In this episode, we continue to use ultrasonic sensor to perform some other gameplay.This also allows you to know more about applications of ultrasonic sensor.
Software Command:
Script Type Command Comment
Robots Get the distance measured by theultrasonic wave
Create a Target: The ultrasonic sensor measures the distance between the Qbot andthe obstacle. If the distance is less than 15 cm, Qbot will move backward, the smallerthe distance, the faster the speed. If the distance is greater than 15 cm, Obot will moveforward, the greater the distance, the faster the speed. Therefore, the distance betweenQbot and the obstacle is about 15cm.

31
5. Tracking
Hardware principle of obstacle avoidance sensor: The basic principle of the obstacleavoidance sensor and the working principle of the tracking sensor are basically thesame. If there is no obstacle in a certain range, the emitted infrared rays graduallyfade away as the distance farther and farther away, and finally disappear. If there is anobstacle, the infrared encounters an obstacle which is reflected to the sensor receiver.The sensor detects this signal and it will know there is an obstacle ahead.
Software Command
Script Type Command Comment
Robots Gets the status of the No.1 obstacleavoidance sensor
Robots Gets the status of the No.2 obstacleavoidance sensor

32
Create a target: Through the obstacle avoidance sensor for the position identificationof the object ahead to achieve automatic tracking.
6. Gesture control
In this episode, we will continue to use obstacle avoidance sensors to achieve newgameplay!
Software Command
Script Type Command Comment
Robots Gets the status of the No.1 obstacleavoidance sensor
Robots Gets the status of the No.2 obstacleavoidance sensor
Creat a target: Using 2 obstacle avoidance sensors at the top of the Qbot to determinethe direction of movement of the object ahead, so as to make a left or right turn.

33
7. Illuminate the night
LED hardware principle: There are two large LED lights with 1cm diameter on theQbot. We can control the situation of lights(off/ on) by programming.
Software Command:
Script Type Command Comment
Robots Turn on or off the Headlight.
Create a target: Qbot travels along the black track which has been marked. Whentraveling to the designated section, 2 LED lights of Qbot open and illuminate the roadahead. When Qbot leaves the specified section , LED lights turn off.
34
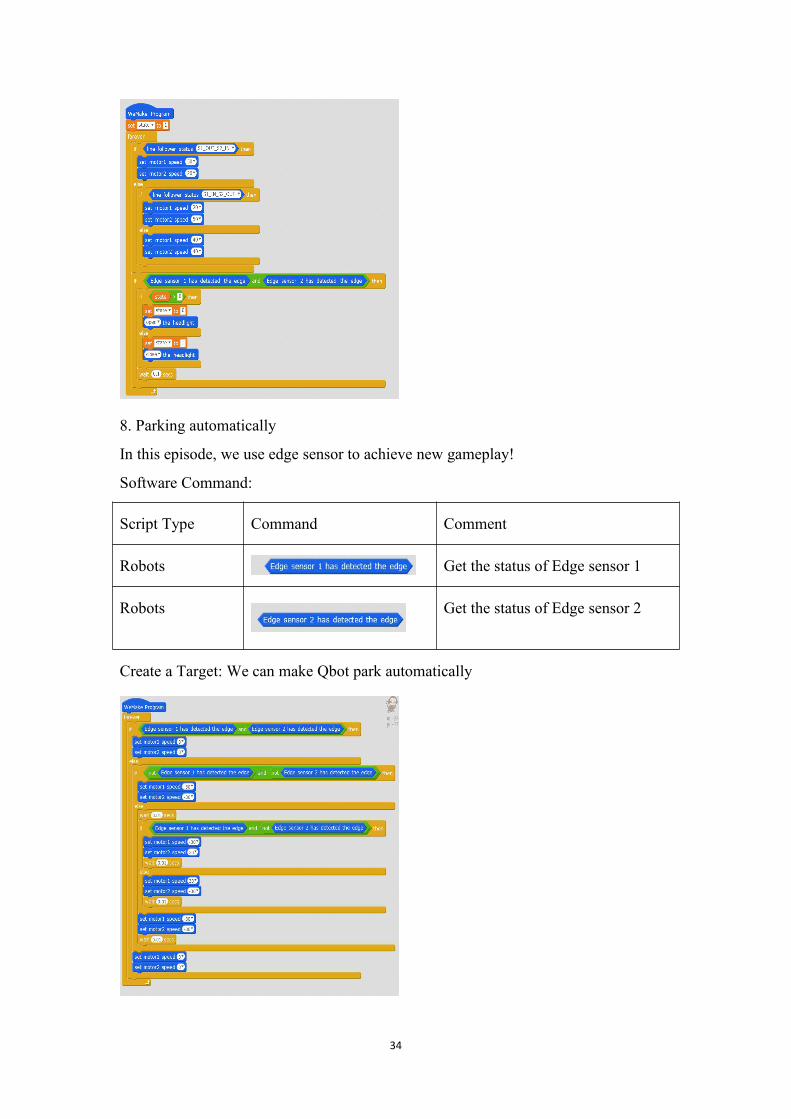
8. Parking automatically
In this episode, we use edge sensor to achieve new gameplay!
Software Command:
Script Type Command Comment
Robots Get the status of Edge sensor 1
Robots Get the status of Edge sensor 2
Create a Target: We can make Qbot park automatically

35
9. RGB lights dancing
Hardware principle of RGB light: There are 2"LED lights" on the LED module. EachLED light is composed of a red LED lamp bead, a green LED lamp bead and a blueLED lamp bead.
Software Command
Script Type Command Comment
RobotsSet the color of the RGB light
“all” : select the light which youwant to control
Create a target: When Qbot moves, RGB lights randomly issued a variety of colors oflight.

36
10. Football match
Have you ever seen robot play football? In this episode, we will show you how ourQbot play this fantastic game!
Create a Target: The Qbot has expanded holes and is compatible with the structurebracket of the Lego blocks. You can expand the mechanical structure of Qbot byyourself!
Realization: Carry out the robot soccer contest with mobile phone.
11. Trajectories control
Game description: You can draw trajectories on your mobile phone APP to controlthe movement of Qbot. Then Qbot will move along the track.
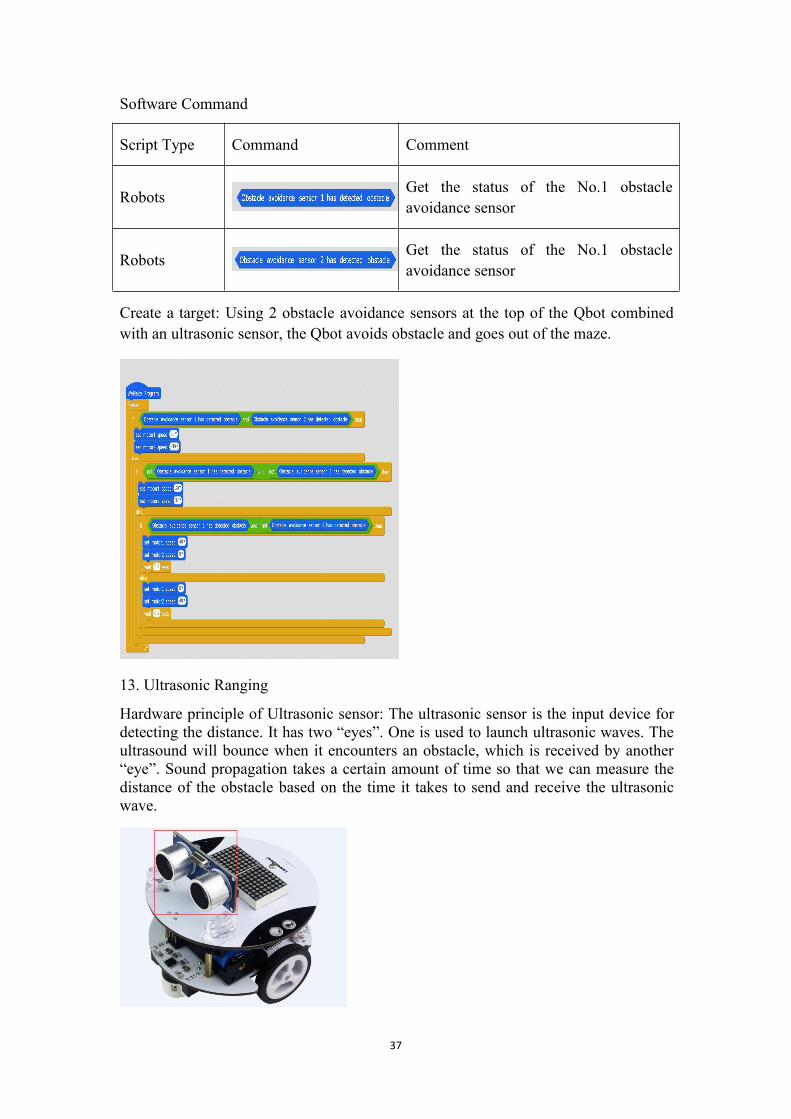
12. Through the maze
How to apply obstacle avoidance sensors to the actual scene? We'll show it in thisepisode!
37
Software Command
Script Type Command Comment
Robots Get the status of the No.1 obstacleavoidance sensor
Robots Get the status of the No.1 obstacleavoidance sensor
Create a target: Using 2 obstacle avoidance sensors at the top of the Qbot combinedwith an ultrasonic sensor, the Qbot avoids obstacle and goes out of the maze.
13. Ultrasonic Ranging
Hardware principle of Ultrasonic sensor: The ultrasonic sensor is the input device fordetecting the distance. It has two “eyes”. One is used to launch ultrasonic waves. Theultrasound will bounce when it encounters an obstacle, which is received by another“eye”. Sound propagation takes a certain amount of time so that we can measure thedistance of the obstacle based on the time it takes to send and receive the ultrasonicwave.

38
For example: you can drag the program “ Alarming and Stopping while facing theobstacle” into the WeMake, then upload it to Qbot, and then Qbot will alarm and thenstop while facing the obstacle.
14. Mobile Phone control
In this episode, we will show you how to use mobile phone to control Qbot? Let meshow you our Bluetooth module 4.0 first!
Create a Target:
Mobile phone APP control Qbot move forward, backward, turn left, turn right.You can control the movement of the Qbot through gravity.Mobile phone APP can control the switch on the front headlight.The distance measured by the battery voltage and the ultrasonic wave can bedisplayed on the mobile phone interface.
15. LED Dot Matric Display
Hardware principle of LED Dot Matric: The dot matrix is made up of many LEDlights, and these LED lights are arranged into a 16*8 matrix, so we can show thenumbers, letters, or simple patterns through the matrix of the LED light.
Software Command:
Script Type Command Comment
Robots Display characters at the specified location( The position is determined by the value of Xand Y)
Create a Target:Show “Hi, I am Qbot! ” on the dot matrix.

39
16. Trajectories control
Game description: You can draw trajectories on your mobile phone APP to controlthe movement of Qbot. Then Qbot will move along the track.

40
4 Troubleshooting
Q1:I buy Qbot for my children, can children learn to use it?
A:The products of our company are suitable for people of all ages. Children under thethird grade are advised to play with the help of parents. In the process of operation,not only can the children exercise ability but also develop the intelligence and developinterest.
Q2:It is unable to maintain a straight line when the car moves forward andbackward,how can i deal with it?
A:Because of the difference in hardware, even if the same power supply standard isgiven, the speed of the two wheels of the car is not necessarily synchronous, whichshould be modified in the program, and which side is slow to give the higher value,which needs to be adjusted by the customer.
Q3: The switch of Qbot is turned on, but it cannot connect the Bluetooth signalanyway,how can i deal with it?Or why should I input PIN in the process of using theBluetooth to connect the Qbot?
A:First,it must be on that mobile phone app, not in the setting.Please check the powerthe battery is sufficient or not, if the Bluetooth is insufficient, the signal will be weakand cause unsuccessful connection.Then,whether the access to the app in the mobilephone is open or not, some permissions limit the normal use of the software;Last,it isdifficult to connect to a few cell phone for Bluetooth chip used by some cell phone isnot very good.(Refer to 3.1 Overview)
Q4: Why can't mobile APP control Qbot?
A: First, confirm your download on the Qbot (mobile + infrared control) .sb2 file(The user can find the associated path through his own document) , Next, checkwhether the cell phone has turned on Bluetooth, and then check whether the car hasopened the switch.
Case one: The APP prompt reads the firmware version timeout.
Find Qbot(mobile phone + infrared control).sb2 file and then drag it into the WeMakemain interface to load, then download to Qbot to ensure that Qbot APP should berestarted.
Case 2: Shortage of electric quantity
When the Qbot is shortage in power, it will make a sound just like”DiDiDi”. Thebattery should be taken out and put into a special charger made by tour company forat least two hours of charging.
Q5: Why did the .sb2 file fail to read?

41
A:When the software display: underwrite or upload failure.
This prompt indicates that you do not select the control panel type. You should selectQbot in the control panel(Just like the picture shown below). Or reconnect the USBport first.
Q6. Why does LED light do not light up?
A: Please check whether the switch of Qbot has turned on first, second check whetherelectric quantity is sufficient.
Q: Why can't I edit Qbot actions on my phone?
A: Only support PC to edit Qbot movement for now.

42
5 The Historical version of the user
manual
Version Modification date Instructions ModifierV1.2 2018.5.11 The new version1.2 cheny