quazer – using the hasp hl · limited warranty and disclaimer sarin technologies warrants this...
TRANSCRIPT

QUAZER™ AUTOMATED DIAMOND CUTTING SYSTEM
SOFTWARE & UPGRADE INSTALLATION GUIDE
by Sarin Technologies Ltd.
DOCUMENT VERSION 1.10.000

Limited Warranty and Disclaimer
Sarin Technologies warrants this product to be free from defects in materials and workmanship under normal use for one year from purchase. All implied warranties and conditions (including any implied warranty of merchantability or fitness for a particular purpose) are disclaimed as to the product and this manual. Your exclusive remedy for
breach of warranty will be the repair or replacement of this product or a refund of the purchase price at our discretion. In no event will Sarin Technologies Ltd. or its directors, officers, employees, or affiliates be liable to you for any consequential, incidental or indirect damages (including damages for loss of business, profits, business interruption, and the like), whether foreseeable or unforeseeable, arising out of the use or inability to use the product of this manual, regardless of the basis of the claim and even if Sarin Technologies Ltd. representative has been advised of the possibility of such damages.
Sarin Technologies Ltd. liability to you for actual damages for any cause whatsoever, and regardless of the form of the action, will be limited to the money paid for the product that caused the damages.
©Sarin Technologies Ltd. 2000-2007. All rights reserved.
This document and the information contained herein belong to Sarin Ltd. (“Sarin”) and may be used only as authorized by Sarin in writing. No part of this publication may be reproduced in any way without the prior written consent of Sarin.
This document is subject to change without notice.
The Sarin® and QUAZER® names are registered trademarks of Sarin Ltd. Other brand and product names referred to herein are the trademarks of their respective owners.
Sarin Technologies Ltd.
Document Version 1.10.000
Catalog No. ------
APRIL 2007
i
Contents
INTRODUCTION ................................................................................... 1
HOW TO CONTACT US ............................................................................... 1
INSTALLING THE SOFTWARE ............................................................... 2
LOADING THE MODAC .......................................................................... 7
SETTING THE MODAC IP ADDRESS .............................................................. 7
CONFIGURING THE MODAC ...................................................................... 10
RESETTING THE PLC .............................................................................. 13

1
INTRODUCTION
This document describes how to install or upgrade your Quazer software.
You need to download the software as a zipped file from the Sarin FTP site.
Contact your local representative for the login information.
How to Contact Us
Please contact your local Sarin representative with any questions or
comments you may have regarding the site preparation procedure.
Headquarters:
Sarin Technologies Ltd.
4 Hahilazon Street
Ramat Gan 52522
ISRAEL
TEL: +972-(0) 3 7515490
FAX: +972-(0) 3 7515485
General Information:
Support
TEL: +972-(0)-3 751 9271
TEL: +972-(0)-3 7515490 EXT 111
Website:
www.sarin.com

2
INSTALLING THE SOFTWARE
Note
When the upgrade files are downloaded read the README file. This
file contains the information of whether or not the MODAC software
needs to be loaded.
1. In case of an upgrade file, download the upgrade executable you want
to install and save it in the folder
C:\Program Files\Sarin Technologies\Quazer.
In case of an upgrade/install through a disk you don’t need saving it to
your hard disk.
2. Open the folder and double-click the Setup.exe file.
The Setup window opens.

Quazer – Using the HASP HL Installing the Software
©Sarin Technologies Ltd. 2000-2006. All rights reserved. 3
3. Click the button.
4. If you accept the terms, click the button.
The message explaining that the frame grabber installation procedure will
take a while will appear.
.
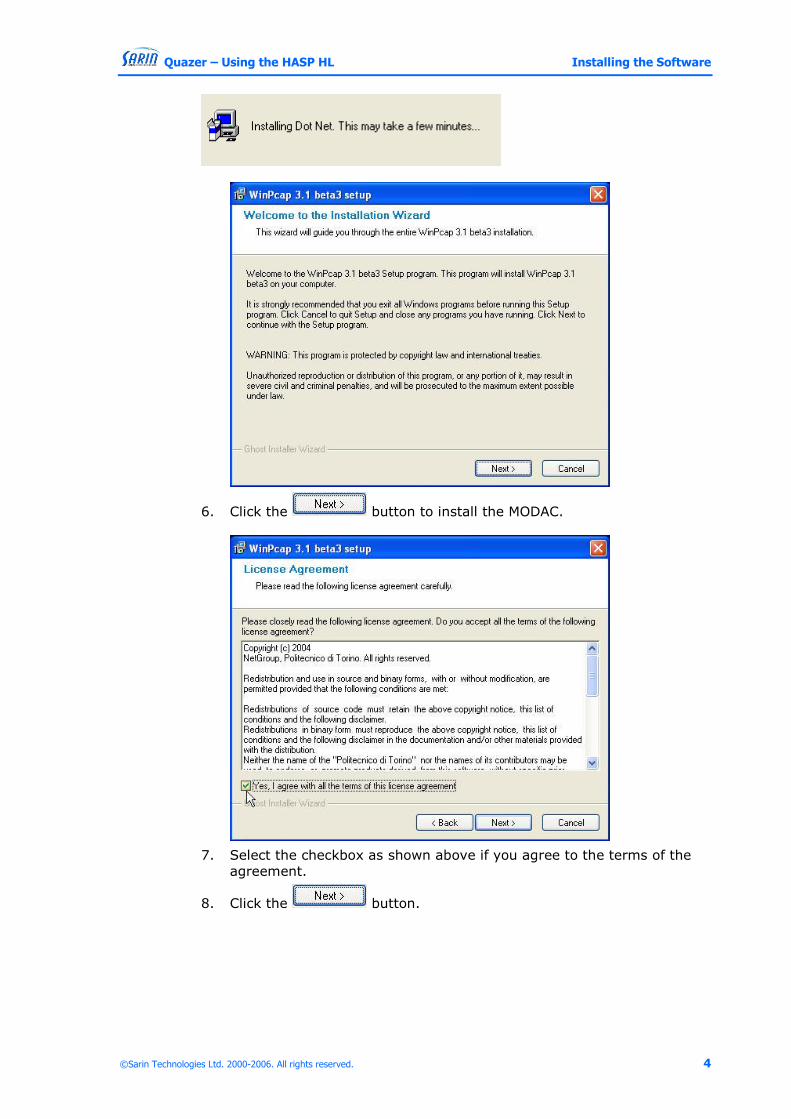
5. Wait while the .NET Framework is installed.
A message explaining that the framework installation procedure will take a
while will appear.
Quazer – Using the HASP HL Installing the Software
©Sarin Technologies Ltd. 2000-2006. All rights reserved. 4
6. Click the button to install the MODAC.
7. Select the checkbox as shown above if you agree to the terms of the
agreement.
8. Click the button.
Quazer – Using the HASP HL Installing the Software
©Sarin Technologies Ltd. 2000-2006. All rights reserved. 5
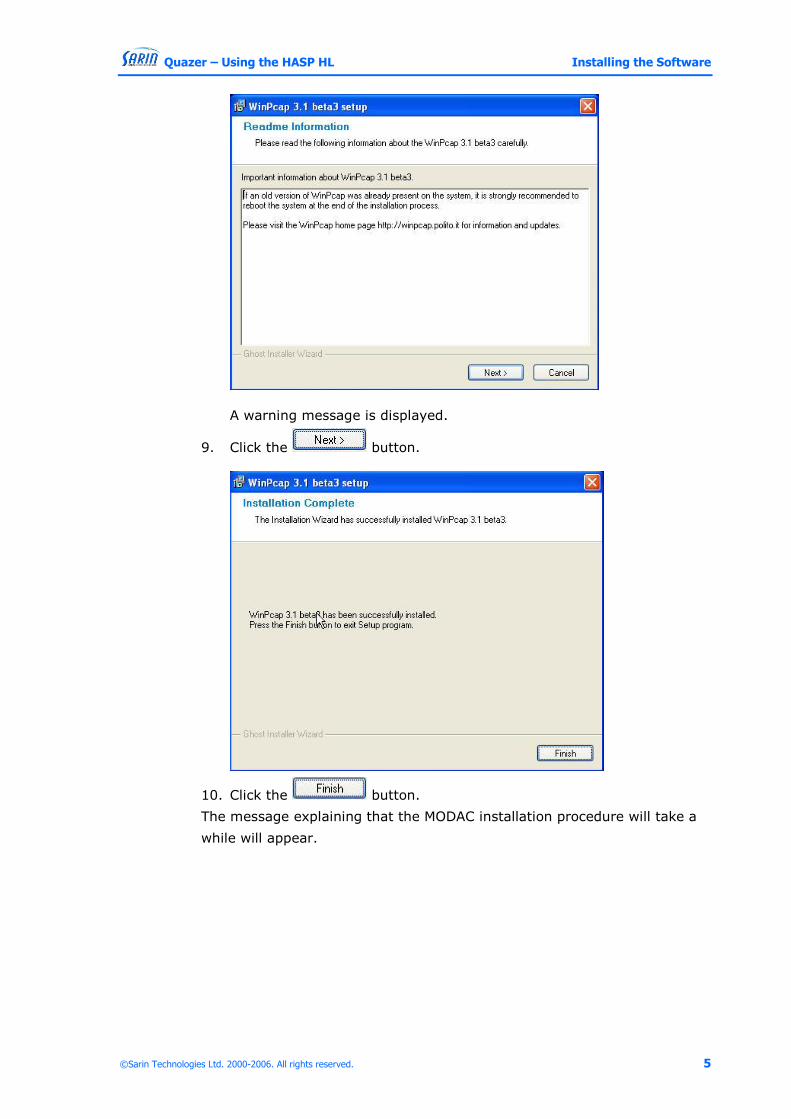
A warning message is displayed.
9. Click the button.
10. Click the button.
The message explaining that the MODAC installation procedure will take a
while will appear.

Quazer – Using the HASP HL Installing the Software
©Sarin Technologies Ltd. 2000-2006. All rights reserved. 6
11. Click the button to restart the computer.
Two icons are now added on the Desktop, they are|:
used as shortcut to load the Quazer control program.
used as a shortcut for loading the MODAC configurator.

7
LOADING THE MODAC
Note: Do this chapter for new installations only
Setting the MODAC IP Address Before we can configure the MODAC we must first set the IP address.
1. Open the MODAC Local Area Connection window.
a. Click the button.
OR:
Right click the icon of network places
Click on the Properties:
b. Click My Network Places.

Quazer – Using the HASP HL Loading the MODAC
©Sarin Technologies Ltd. 2000-2006. All rights reserved. 8
c. Click View network connections.
d. Disconnect the NetWork cable from the back of the PC.
That will help you to identify the Modac Connection
After that reconnect it.
Double-click the MODAC connection icon.
If you are not sure, ask your system administrator.

Quazer – Using the HASP HL Loading the MODAC
©Sarin Technologies Ltd. 2000-2006. All rights reserved. 9
2. Click the button.
3. Select Internet Protocol (TCP/IP).
4. Click the button.
5. Select the Use the following IP address radio button.
Quazer – Using the HASP HL Loading the MODAC
©Sarin Technologies Ltd. 2000-2006. All rights reserved. 10
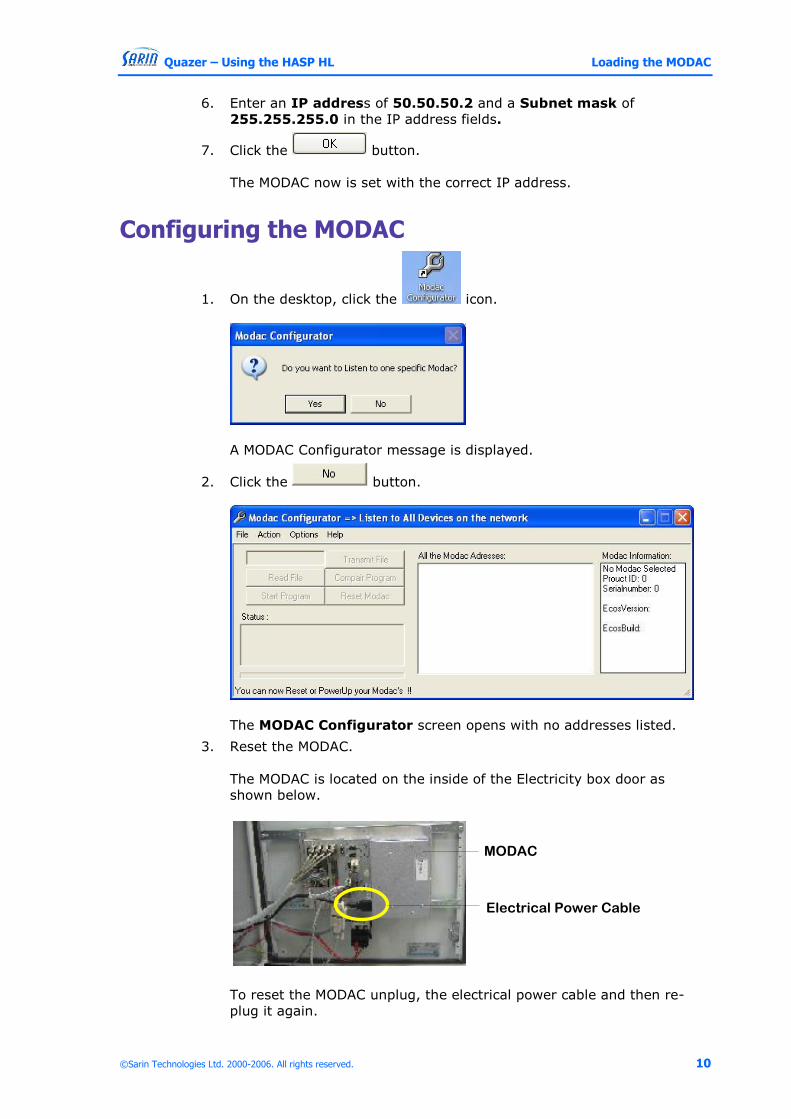
6. Enter an IP address of 50.50.50.2 and a Subnet mask of
255.255.255.0 in the IP address fields.
7. Click the button.
The MODAC now is set with the correct IP address.
Configuring the MODAC
1. On the desktop, click the icon.
A MODAC Configurator message is displayed.
2. Click the button.
The MODAC Configurator screen opens with no addresses listed.
3. Reset the MODAC.
The MODAC is located on the inside of the Electricity box door as
shown below.
Electrical Power Cable
MODAC
To reset the MODAC unplug, the electrical power cable and then re-
plug it again.
Quazer – Using the HASP HL Loading the MODAC
©Sarin Technologies Ltd. 2000-2006. All rights reserved. 11
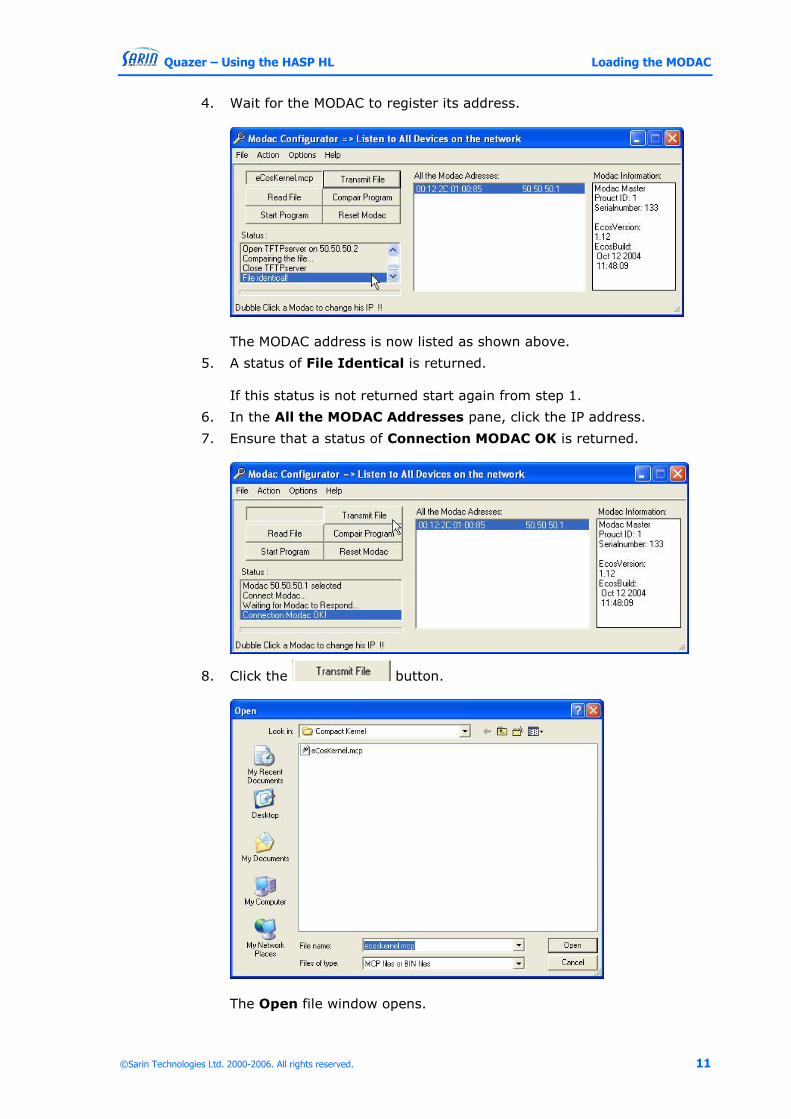
4. Wait for the MODAC to register its address.
The MODAC address is now listed as shown above.
5. A status of File Identical is returned.
If this status is not returned start again from step 1.
6. In the All the MODAC Addresses pane, click the IP address.
7. Ensure that a status of Connection MODAC OK is returned.
8. Click the button.
The Open file window opens.

Quazer – Using the HASP HL Loading the MODAC
©Sarin Technologies Ltd. 2000-2006. All rights reserved. 12
9. Select the eCosKernel.mcp file.
10. Click the button.
The file is transmitted to the MODAC erasing all old program files.
11. When the loaded file is identical click the button.
12. Open the folder; C:\Program Files\Sarin Technologies\Quazer.
13. Double-click the file; PLChandlerRegisteryUpdate.exe.
14. Select the PlcHandler checkbox as shown above.
The MODAC IP address must be as shown above.
15. Click the button.
16. Close the Registry Updater window.

Quazer – Using the HASP HL Loading the MODAC
©Sarin Technologies Ltd. 2000-2006. All rights reserved. 13
17. On the desktop, click the icon.
The Quazer control program loads unless one or more of the files in the
Compact folder have changed. If one of these files were changed a
message is displayed The Plc Does Not Match. If this is the case do
the following steps:
18. Shut down the application and the PC.
19. Switch off the main power on the electrical cabinet, wait few seconds
and switch it on again.
20. Turn on the PC
21. Repeat step 17.
Resetting the PLC 1. When the message The Plc Does Not Match is displayed, click the
button.
A message is displayed; Please Stop the Machine.
Stop Button
Start ButtonEmergency
Power OFF
2. Press the Red stop button.
3. Click the button.
4. A message is displayed; Reset MODAC.
See the step, Reset the MODAC on page 10.
5. Wait 10 seconds.
6. Click the button.
7. Press the Green button to restart the machine.