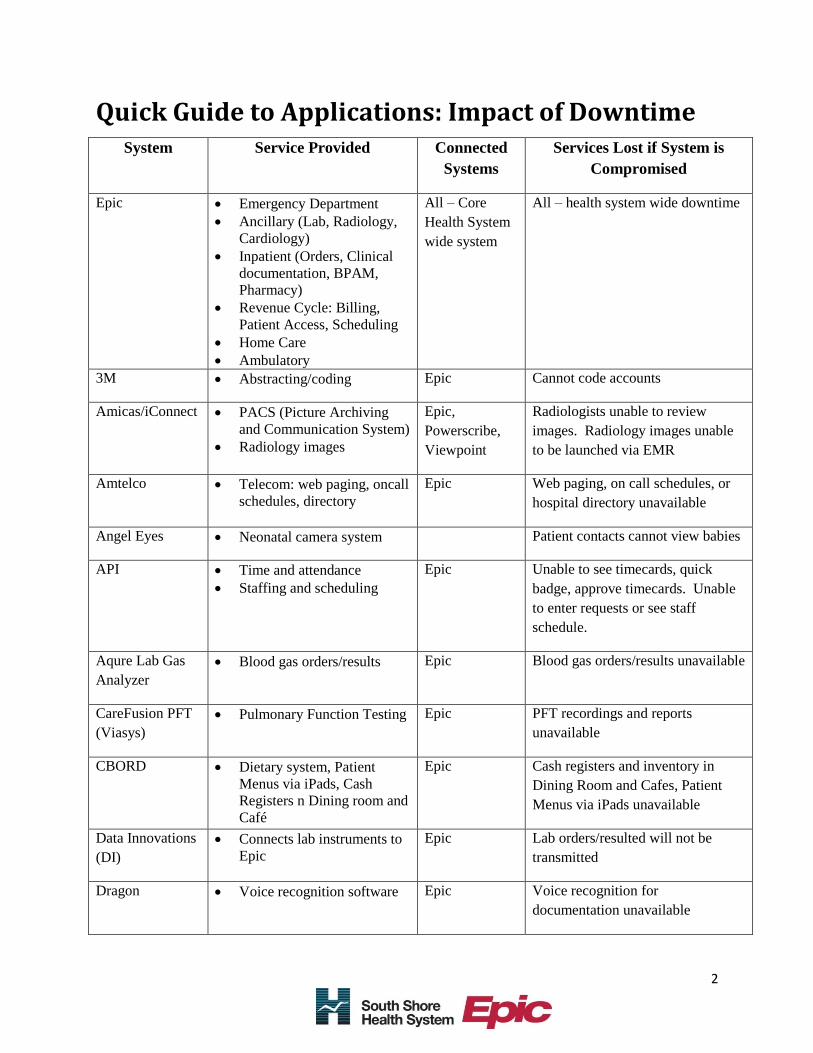
quick guide to applications: impact of downtime · quick guide to applications: impact of downtime...
TRANSCRIPT
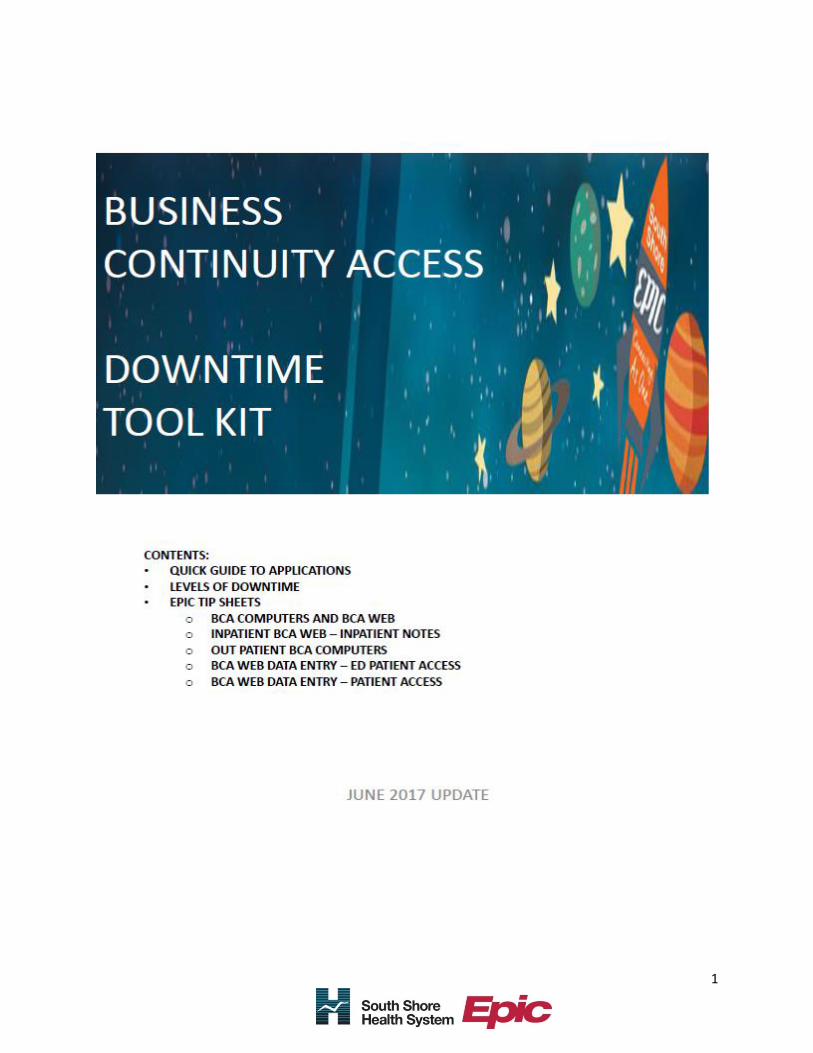
1
2
Quick Guide to Applications: Impact of Downtime System Service Provided Connected
Systems
Services Lost if System is
Compromised
Epic Emergency Department
Ancillary (Lab, Radiology,
Cardiology)
Inpatient (Orders, Clinical
documentation, BPAM,
Pharmacy)
Revenue Cycle: Billing,
Patient Access, Scheduling
Home Care
Ambulatory
All – Core
Health System
wide system
All – health system wide downtime
3M Abstracting/coding Epic Cannot code accounts
Amicas/iConnect PACS (Picture Archiving
and Communication System)
Radiology images
Epic,
Powerscribe,
Viewpoint
Radiologists unable to review
images. Radiology images unable
to be launched via EMR
Amtelco Telecom: web paging, oncall
schedules, directory
Epic Web paging, on call schedules, or
hospital directory unavailable
Angel Eyes Neonatal camera system Patient contacts cannot view babies
API Time and attendance
Staffing and scheduling
Epic Unable to see timecards, quick
badge, approve timecards. Unable
to enter requests or see staff
schedule.
Aqure Lab Gas
Analyzer
Blood gas orders/results Epic Blood gas orders/results unavailable
CareFusion PFT
(Viasys)
Pulmonary Function Testing Epic PFT recordings and reports
unavailable
CBORD Dietary system, Patient
Menus via iPads, Cash
Registers n Dining room and
Café
Epic Cash registers and inventory in
Dining Room and Cafes, Patient
Menus via iPads unavailable
Data Innovations
(DI)
Connects lab instruments to
Epic
Epic Lab orders/resulted will not be
transmitted
Dragon Voice recognition software Epic Voice recognition for
documentation unavailable
3
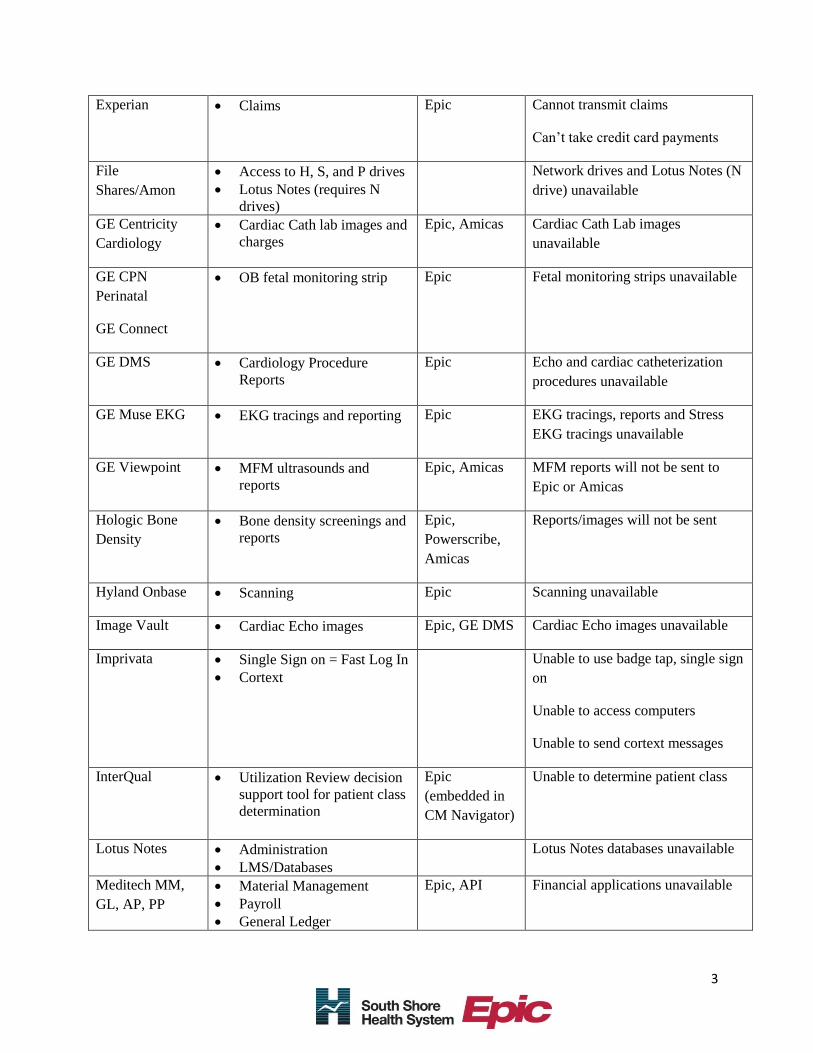
Experian Claims Epic Cannot transmit claims
Can’t take credit card payments
File
Shares/Amon
Access to H, S, and P drives
Lotus Notes (requires N
drives)
Network drives and Lotus Notes (N
drive) unavailable
GE Centricity
Cardiology
Cardiac Cath lab images and
charges
Epic, Amicas Cardiac Cath Lab images
unavailable
GE CPN
Perinatal
GE Connect
OB fetal monitoring strip Epic Fetal monitoring strips unavailable
GE DMS Cardiology Procedure
Reports
Epic Echo and cardiac catheterization
procedures unavailable
GE Muse EKG EKG tracings and reporting Epic EKG tracings, reports and Stress
EKG tracings unavailable
GE Viewpoint MFM ultrasounds and
reports
Epic, Amicas MFM reports will not be sent to
Epic or Amicas
Hologic Bone
Density
Bone density screenings and
reports
Epic,
Powerscribe,
Amicas
Reports/images will not be sent
Hyland Onbase Scanning Epic Scanning unavailable
Image Vault Cardiac Echo images Epic, GE DMS Cardiac Echo images unavailable
Imprivata Single Sign on = Fast Log In
Cortext
Unable to use badge tap, single sign
on
Unable to access computers
Unable to send cortext messages
InterQual Utilization Review decision
support tool for patient class
determination
Epic
(embedded in
CM Navigator)
Unable to determine patient class
Lotus Notes Administration
LMS/Databases
Lotus Notes databases unavailable
Meditech MM,
GL, AP, PP
Material Management
Payroll
General Ledger
Epic, API Financial applications unavailable

4
M Modal Dictation System Epic Dictation system unavailable
Morrisey MSOW Credentialing system Medical staff unable to access
credentialing system
Natus EEG EEG recordings and reports Epic EEG recordings and reports
unavailable
NDD Spirometry Respiratory program used
mostly by SSMC for
spirometry
Epic Unable to take spirometry
recordings
Omnicell Medication Dispensing Epic Medication dispensing unavailable
(can run on override)
Outlook Email
Calendar
Unable to access email or calendars
PenRad Mammography ordering,
reporting, statistics
Epic,
Powerscribe
Mammography orders and reporting
unavailable
Powerscribe Dictation – Radiology Epic, Amicas,
Powerscribe
Unable to send out Radiology
reports
QTEL Cardiac
Rehab
EKG/O2 recordings,
exercise tracking for Cardiac
Rehabilitation
Epic Reports not available to be
launched from Epic, cannot
record/report
QuadraMed Nursing acuity tool Epic Nurses are unable to classify
ICU/NICU patients for acuity levels
Quantros Incident tracking Unable to document incidents
Rhapsody Interface infrastructure Communication between hospital
systems (Epic/PACS, CBord, etc)
and with remote partners (Harbor
Medical, SSOrtho, SSPen, Atrius,
Crown OB, etc.) unavailable
rL Solutions Web based patient feedback
software
Patients are unable to enter
feedback
SnapComms SNAP messaging Snap messages unavailable
Soft Bank/Soft
Lab
Blood bank system Epic Blood bank tests and results
unavailable
Spacelabs/Full
Disclosure
Vital sign monitoring Epic Vital sign monitoring unavailable

5
Stanley RFID RFID tracking of equipment
location, temperature
monitoring
Cannot see locations of equipment,
no alerting mechanism
Surescripts E-prescribing Epic Unable to e-prescribe
UniPOC Glucometers Epic Glucometers unavailable
Zoll – Rescue
Net
EMS EMR – Pre hospital
documentation
EMS EMR – Dispatching
System
Epic Pre hospital EMR information will
not cross. EMS dispatch
unavailable for tracking paper
process

6
3 Levels of Downtime -
7
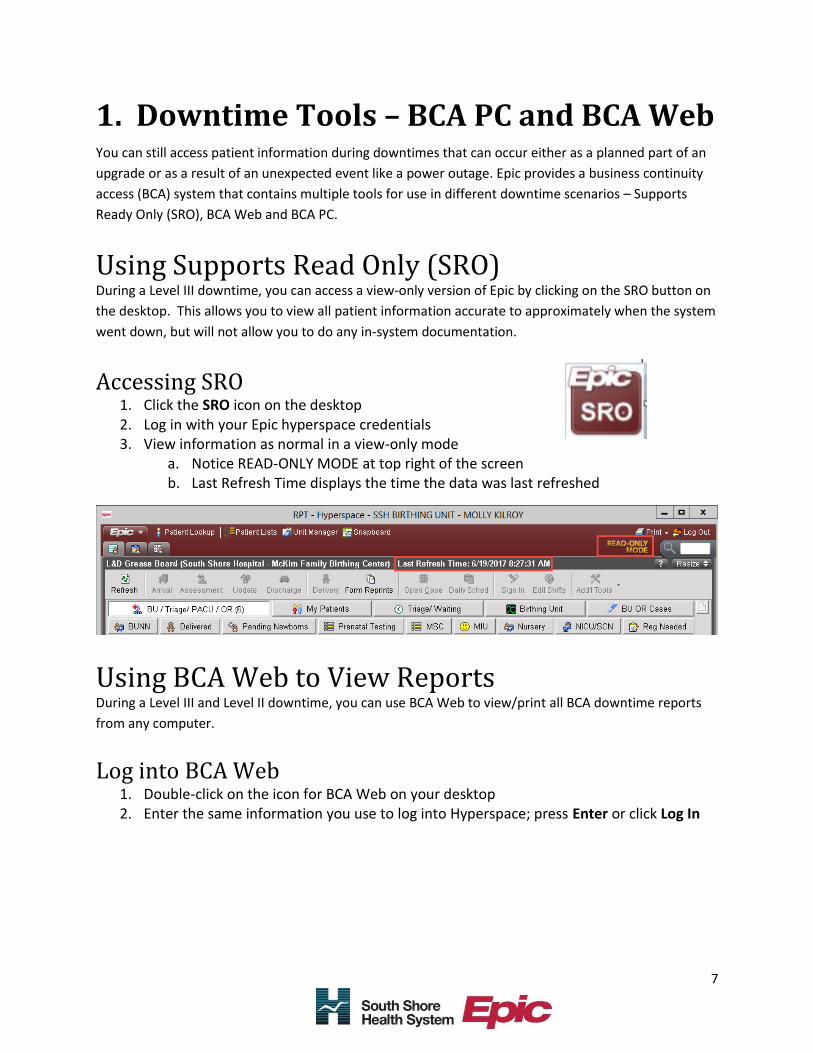
1. Downtime Tools – BCA PC and BCA Web You can still access patient information during downtimes that can occur either as a planned part of an
upgrade or as a result of an unexpected event like a power outage. Epic provides a business continuity
access (BCA) system that contains multiple tools for use in different downtime scenarios – Supports
Ready Only (SRO), BCA Web and BCA PC.
Using Supports Read Only (SRO) During a Level III downtime, you can access a view-only version of Epic by clicking on the SRO button on
the desktop. This allows you to view all patient information accurate to approximately when the system
went down, but will not allow you to do any in-system documentation.
Accessing SRO 1. Click the SRO icon on the desktop 2. Log in with your Epic hyperspace credentials 3. View information as normal in a view-only mode
a. Notice READ-ONLY MODE at top right of the screen b. Last Refresh Time displays the time the data was last refreshed
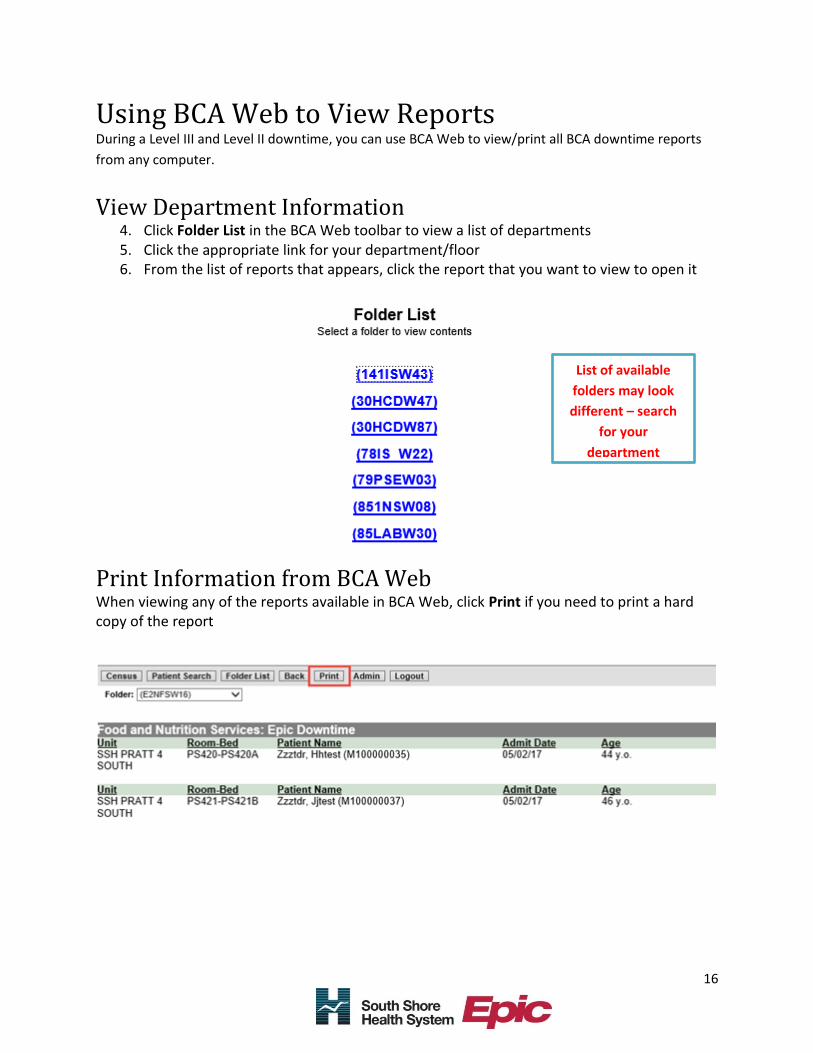
Using BCA Web to View Reports During a Level III and Level II downtime, you can use BCA Web to view/print all BCA downtime reports
from any computer.
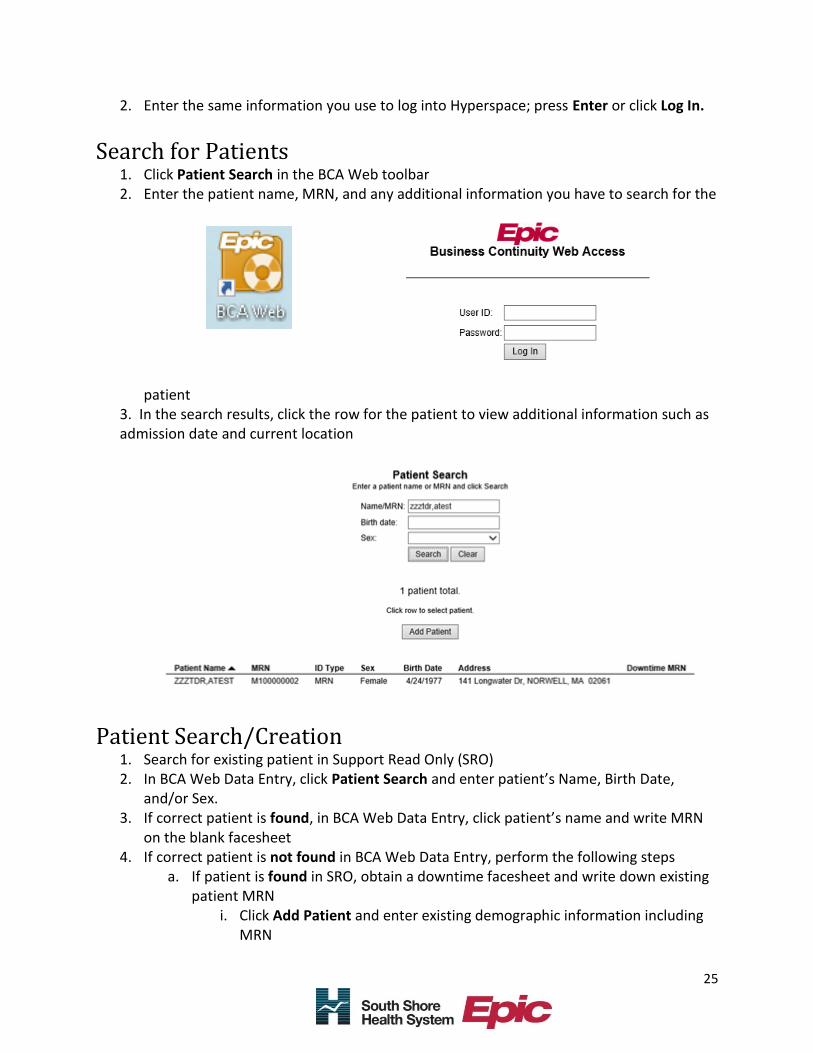
Log into BCA Web 1. Double-click on the icon for BCA Web on your desktop 2. Enter the same information you use to log into Hyperspace; press Enter or click Log In

8
Search for Patients
1. Click Patient Search in the BCA Web toolbar 2. Enter the patient name, MRN, and any additional information you have to search for the
patient 3. In the search results, click the row for the patient to view additional information such as
admission date and current location
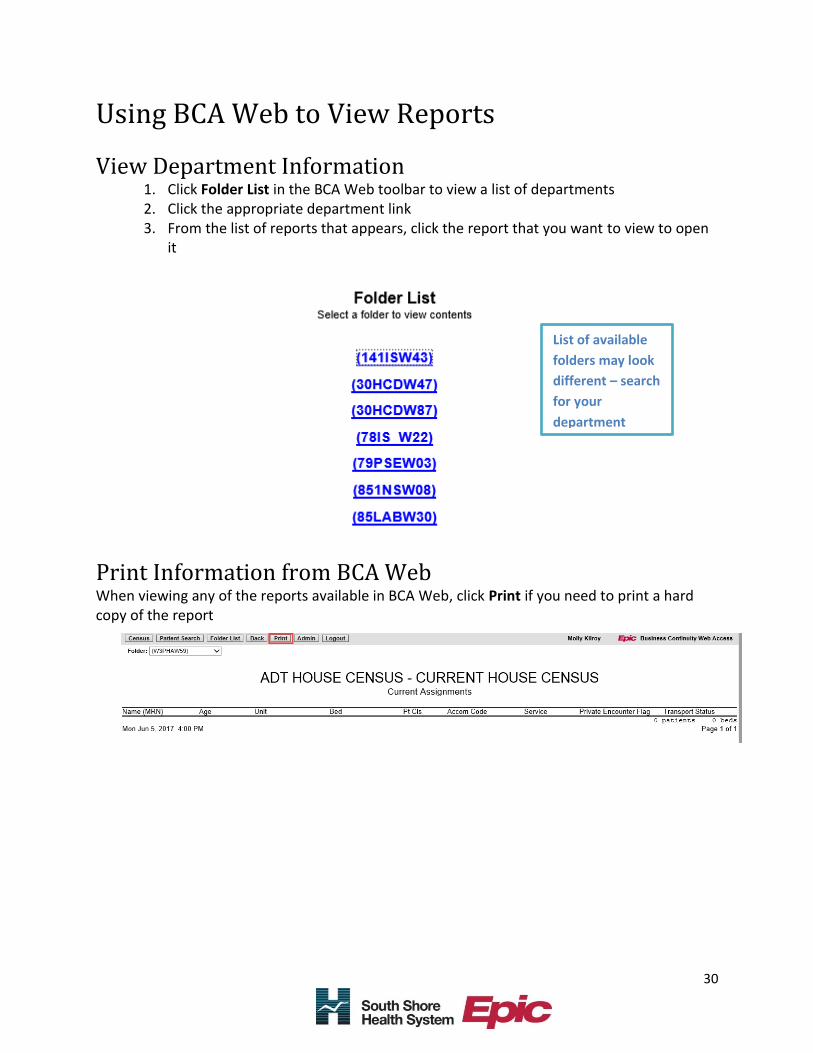
View Department Information 1. Click Folder List in the BCA Web toolbar to view a list of departments 2. Click the appropriate department link 3. From the list of reports that appears, click the report that you want to view to open it
List of available
folders may look
different –
search for your
department

9
Print Information from BCA Web When viewing any of the reports available in BCA Web, click Print if you need to print a hard copy of the report
Using BCA Printing Application to View/Print Reports During a Level I downtime users will access the BCA Printing Application on specified computers to view
and print critical patient information. All designated BCA computers have the BCA printing application
installed. BCA computers have a ‘Downtime BCA Device’ sign attached to the top of the monitor.
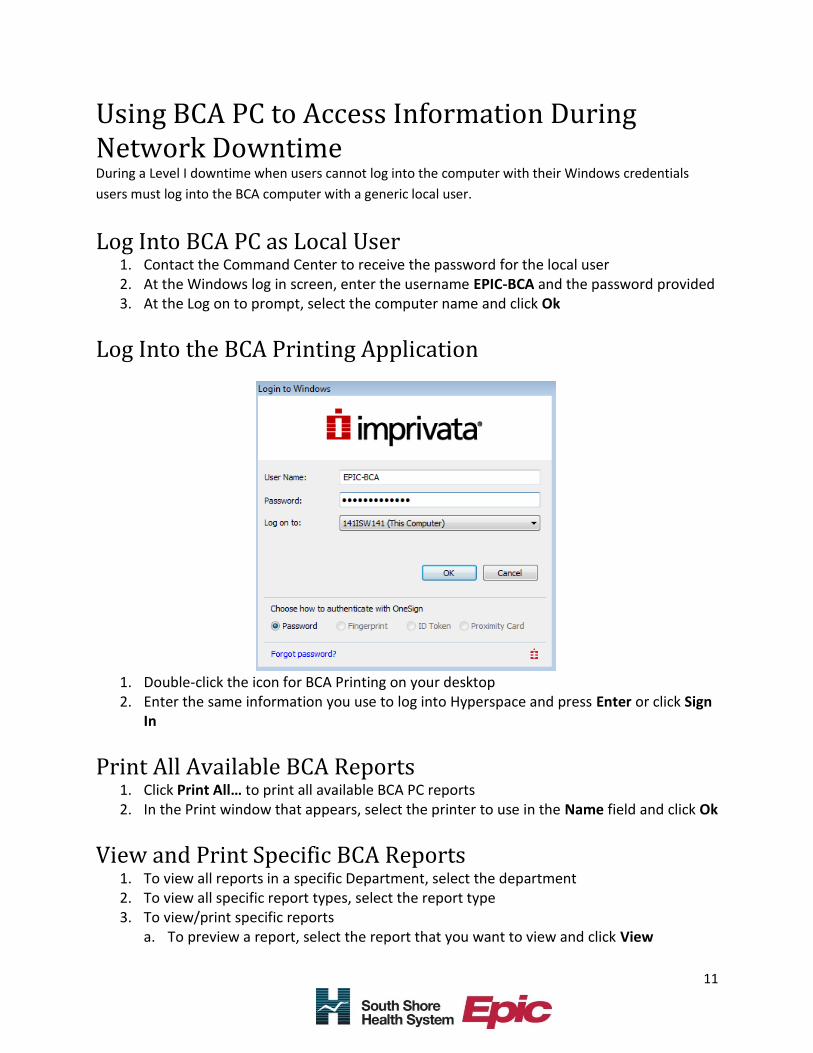
Log Into the BCA Printing Application 1. Double-click the icon for BCA Printing on your desktop 2. Enter the information you use to log into Hyperspace and press Enter or click Sign In
Print All Available BCA Reports

10
1. Click Print and choose to print all reports in the table or on the PC at once 2. In the Print window that appears, select the printer to use in the Name field and click
View and Print Specific BCA Reports 1. To view all reports in a specific Department, select the department 2. To view all specific report types, select the report type 3. To view/print specific reports
a. To preview a report, select the report that you want to view and click View b. To print one or more reports, select the reports and click Print … You can select
multiple reports by using CTRL + click c. Use the tag filters on the left side to choose groups of reports that you want to view
and print
11
Using BCA PC to Access Information During Network Downtime During a Level I downtime when users cannot log into the computer with their Windows credentials
users must log into the BCA computer with a generic local user.
Log Into BCA PC as Local User 1. Contact the Command Center to receive the password for the local user 2. At the Windows log in screen, enter the username EPIC-BCA and the password provided 3. At the Log on to prompt, select the computer name and click Ok
Log Into the BCA Printing Application
1. Double-click the icon for BCA Printing on your desktop 2. Enter the same information you use to log into Hyperspace and press Enter or click Sign
In
Print All Available BCA Reports 1. Click Print All… to print all available BCA PC reports 2. In the Print window that appears, select the printer to use in the Name field and click Ok
View and Print Specific BCA Reports 1. To view all reports in a specific Department, select the department 2. To view all specific report types, select the report type 3. To view/print specific reports
a. To preview a report, select the report that you want to view and click View

12
b. To print one or more reports, select the reports and click Print … You can select multiple reports by using CTRL + click
c. Use the tag filters on the left side to choose groups of reports that you want to view and print

13
2. INPATIENT BCA WEB – INPATIENT NOTES You can still access patient information during downtimes that can occur either as a planned part of an
upgrade or as a result of an unexpected event like a power outage. Epic provides a business continuity
access (BCA) system that contains multiple tools for use in different downtime scenarios – Supports
Ready Only (SRO), BCA Web and BCA PC.
Using Supports Read Only (SRO) During a Level III downtime, you can access a view-only version of Epic by clicking on the SRO button on
the desktop. This allows you to view all patient information accurate to approximately when the system
went down, but will not allow you to do any in-system documentation.
Accessing SRO 4. Click the SRO icon on the desktop 5. Log in with your Epic hyperspace credentials 6. View information as normal in a view-only mode
a. Notice READ-ONLY MODE at top right of the screen b. Last Refresh Time displays the time the data was last refreshed
Using BCA Web Data Entry During a Level III and Level II downtime, you can use BCA Web from any computer to enter Clinical
Notes on patients during the downtime. This data will file back into the patient’s chart in Hyperspace
when the system comes back up.
Log into BCA Web 3. Double-click on the icon for BCA Web on your desktop

14
4. Enter the same information you use to log into Hyperspace; press Enter or click Log In
Search for Patients 4. Click Patient Search in the BCA Web toolbar 5. Enter the patient name, MRN, and any additional information you have to search for the
patient 6. In the search results, click the row for the patient to view additional information such as
admission date and current location
Enter Notes
1. Select patient from a unit census or using Patient Search. 2. Click the Notes Entry link from the patient home page 3. At the Type field, select the type of note. Type in free text field. 4. Click Accept to complete the note.

15
Clinical providers have the ability to enter patient “notes” during
downtime – these notes can be seen by other providers and information
will cross over when systems come up.
16
Using BCA Web to View Reports During a Level III and Level II downtime, you can use BCA Web to view/print all BCA downtime reports
from any computer.
View Department Information 4. Click Folder List in the BCA Web toolbar to view a list of departments 5. Click the appropriate link for your department/floor 6. From the list of reports that appears, click the report that you want to view to open it
Print Information from BCA Web When viewing any of the reports available in BCA Web, click Print if you need to print a hard copy of the report
List of available
folders may look
different – search
for your
department

17
3. Outpatient BCA REPORTS During a network downtime when users are unable to log into the fast log in computers, users will use
the BCA Printing Application to view and print critical patient information from designated BCA
workstations. These workstations have a ‘Downtime BCA Device’ sign on the top of the monitor.
Using BCA Printing Application View/Print Reports
Log Into BCA PC 4. Contact the Comand Center to receive the password for the local user 5. At the Windows log in screen, enter the username EPIC-BCA and the password provided 6. At the Log on to prompt, select the computer name and click Ok
Log Into the BCA Printing Application 3. Double-click the icon for BCA Printing on your desktop

18
4. Enter the same information you use to log into Hyperspace. Click Ok
Print All Available BCA Reports
3. Click Print and choose to print all reports in the table or on the PC at once 4. In the Print window that appears, select the printer to use in the Name field and click
View and Print Specific BCA Reports 4. To view all reports in a specific Department, select the department 5. To view all specific report types, select the report type 6. To view/print specific reports
a. To preview a report, select the report that you want to view and click View b. To print one or more reports, select the reports and click Print … You can select
multiple reports by using CTRL + click c. Use the tag filters on the left side to choose groups of reports that you want to view
and print

19
4. BCA WEB DATA ENTRY – ED Patient Access You can still access patient information during downtimes that can occur either as a planned part of an
upgrade or as a result of an unexpected event like a power outage. Epic provides a business continuity
access (BCA) system that contains multiple tools for use in different downtime scenarios – Supports
Ready Only (SRO), BCA Web and BCA PC.
Using Supports Read Only (SRO) During a Level III downtime, you can access a view-only version of Epic by clicking on the SRO button on
the desktop. This allows you to view all patient information accurate to approximately when the system
went down, but will not allow you to do any in-system documentation.
Accessing SRO
7. Click the SRO icon on the desktop 8. Log in with your Epic hyperspace credentials 9. View information as normal in a view-only mode
a. Notice READ-ONLY MODE at top right of the screen b. Last Refresh Time displays the time the data was last refreshed
Using BCA Web Data Entry During a Level III and Level II downtime, you can use BCA Web to enter new Admissions, Transfers, or
Discharges that occur during the downtime. This data will file back into Hyperspace when the system
comes back up.
Log into BCA Web 5. Double-click on the icon for BCA Web on your desktop

20
6. Enter the same information you use to log into Hyperspace; press Enter or click Log In
Search for Patients 7. Click Patient Search in the BCA Web toolbar 8. Enter the patient name, MRN, and any additional information you have to search for the
patient 9. In the search results, click the row for the patient to view additional information such as
admission date and current location
Patient Search/Creation 1. Search for existing patient in Support Read Only (SRO) 2. In BCA Web Data Entry, click Patient Search and enter patient’s Name, Birth Date,
and/or Sex. 3. If correct patient is found, in BCA Web Data Entry, click patient’s name and write MRN
on the blank facesheet 4. If correct patient is not found in BCA Web Data Entry, perform the following steps
a. If patient is found in SRO, obtain a downtime facesheet and write down existing patient MRN
i. Click Add Patient and enter existing demographic information including MRN
b. If patient is not found in SRO, obtain a downtime facesheet and downtime MRN.

21
i. Click Add Patient and enter demographic information (populate fields that are followed by an * and additional demographic elements); enter downtime MRN; click Add Patient to continue workflow
5. In parallel to the above steps, populate patient’s demographic information on downtime facesheet
6. Once patient is found/created, you are brought to a screen that provides options to create new ED Arrival
Create New ED Arrival 1. Using the patient you just added, click Create New ED Arrival and populate fields to
arrive the patient 2. Downtime CSN will be auto-generated by BCA Web Data Entry
a. Every visit newly created via VCA Web Data Entry will have a downtime CSN auto-assigned from a pre-determined downtime number range
b. Write ato-assigned CSN on downtime facesheet c. Click Room/Admit to room patient
Discharge 1. Select a patient from a unit census or using Patient Search 2. Click Discharge

22
3. Enter the information required to discharge the patient and click Discharge 4. Click Census and select the unit that you just discharged the patient from. Confirm
patient does not appear on the unit census.
Undo ED Arrival, Transfer, or Discharge created in BCA Web Data Entry
1. Select the patient who was just erroneously arrived, transferred and/or discharged using Patient Search or a unit census
2. Click Undo Last Event 3. Click Ok 4. Open the patient’’s home page and confirm that the transfer or discharge is undone.
23
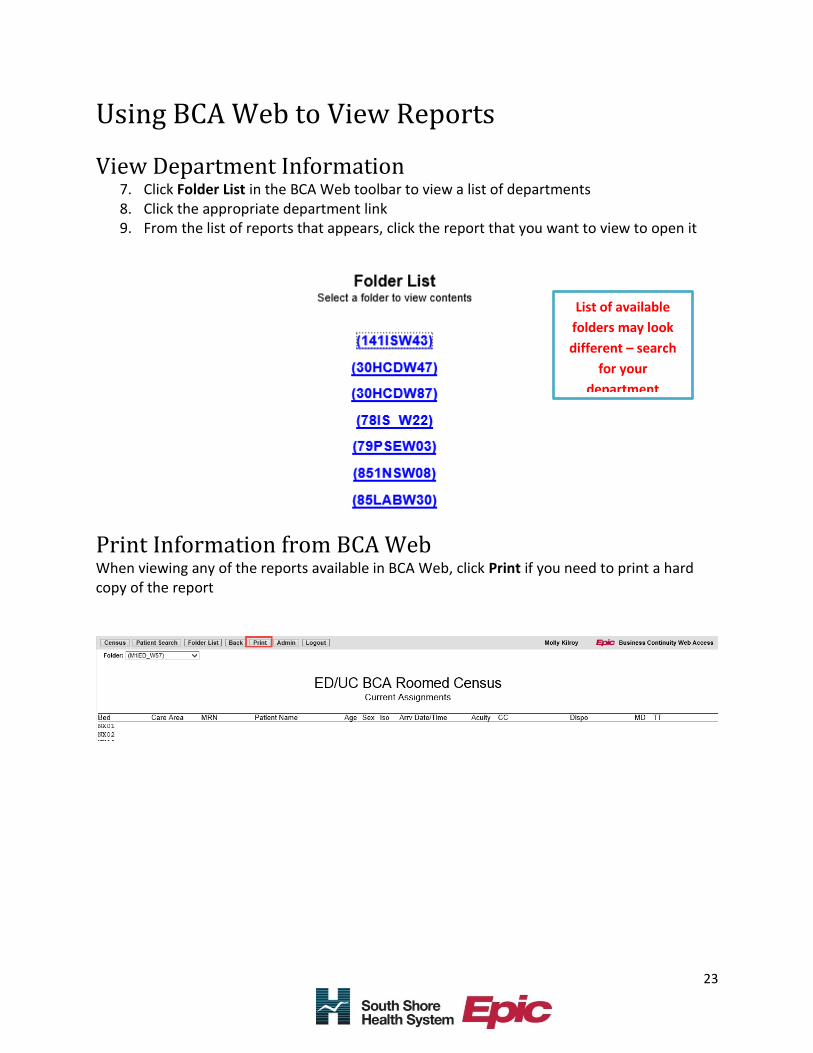
Using BCA Web to View Reports
View Department Information 7. Click Folder List in the BCA Web toolbar to view a list of departments 8. Click the appropriate department link 9. From the list of reports that appears, click the report that you want to view to open it
Print Information from BCA Web When viewing any of the reports available in BCA Web, click Print if you need to print a hard copy of the report
List of available
folders may look
different – search
for your
department

24
5. BCA Web Data Entry – Patient Access You can still access patient information during downtimes that can occur either as a planned part of an
upgrade or as a result of an unexpected event like a power outage. Epic provides a business continuity
access (BCA) system that contains multiple tools for use in different downtime scenarios – Supports
Ready Only (SRO), BCA Web and BCA PC.
Using Supports Read Only (SRO) During a Level III downtime, you can access a view-only version of Epic by clicking on the SRO button on
the desktop. This allows you to view all patient information accurate to approximately when the system
went down, but will not allow you to do any in-system documentation.
Accessing SRO 1. Click the SRO icon on the desktop 2. Log in with your Epic hyperspace credentials 3. View information as normal in a view-only mode
a. Notice READ-ONLY MODE at top right of the screen b. Last Refresh Time displays the time the data was last refreshed
Using BCA Web Data Entry During a Level III and Level II downtime, you can use BCA Web to enter new Admissions, Transfers, and
Discharges that occur during the downtime. This data will file back into Hyperspace when the system
comes back up.
Log into BCA Web 1. Double-click on the icon for BCA Web on your desktop
25
2. Enter the same information you use to log into Hyperspace; press Enter or click Log In.
Search for Patients 1. Click Patient Search in the BCA Web toolbar 2. Enter the patient name, MRN, and any additional information you have to search for the
patient 3. In the search results, click the row for the patient to view additional information such as admission date and current location
Patient Search/Creation 1. Search for existing patient in Support Read Only (SRO) 2. In BCA Web Data Entry, click Patient Search and enter patient’s Name, Birth Date,
and/or Sex. 3. If correct patient is found, in BCA Web Data Entry, click patient’s name and write MRN
on the blank facesheet 4. If correct patient is not found in BCA Web Data Entry, perform the following steps
a. If patient is found in SRO, obtain a downtime facesheet and write down existing patient MRN
i. Click Add Patient and enter existing demographic information including MRN

26
b. If patient is not found in SRO, obtain a downtime facesheet and downtime MRN. i. Click Add Patient and enter demographic information (populate fields
that are followed by an * and additional demographic elements); enter downtime MRN; click Add Patient to continue workflow
5. In parallel to the above steps, populate patient’s demographic information on downtime facesheet
6. Once patient is found/created, you are brought to a screen that provides options to create new Admission
Admit a Patient 1. Search for and select the patient’s record 2. Click Create New Admission 3. Complete information about the patient’s admission and click Admit. The patient is
admitted.
Every visit newly created via BCA Web Data Entry will have a downtime CSN auto-assigned from a pre-determined downtime number range.
4. Click Census and select the unit to which you just admitted the patient to confirm patient appears on unit census as expected
Arrive Existing Pre-Admission 1. Search for and select the patient who had a pending admission prior to downtime. 2. Complete information about the patient’s admission and click Admit
27
3. Click Census and select the unit to which you just admitted the patient to confirm patient appears on unit census as expected.
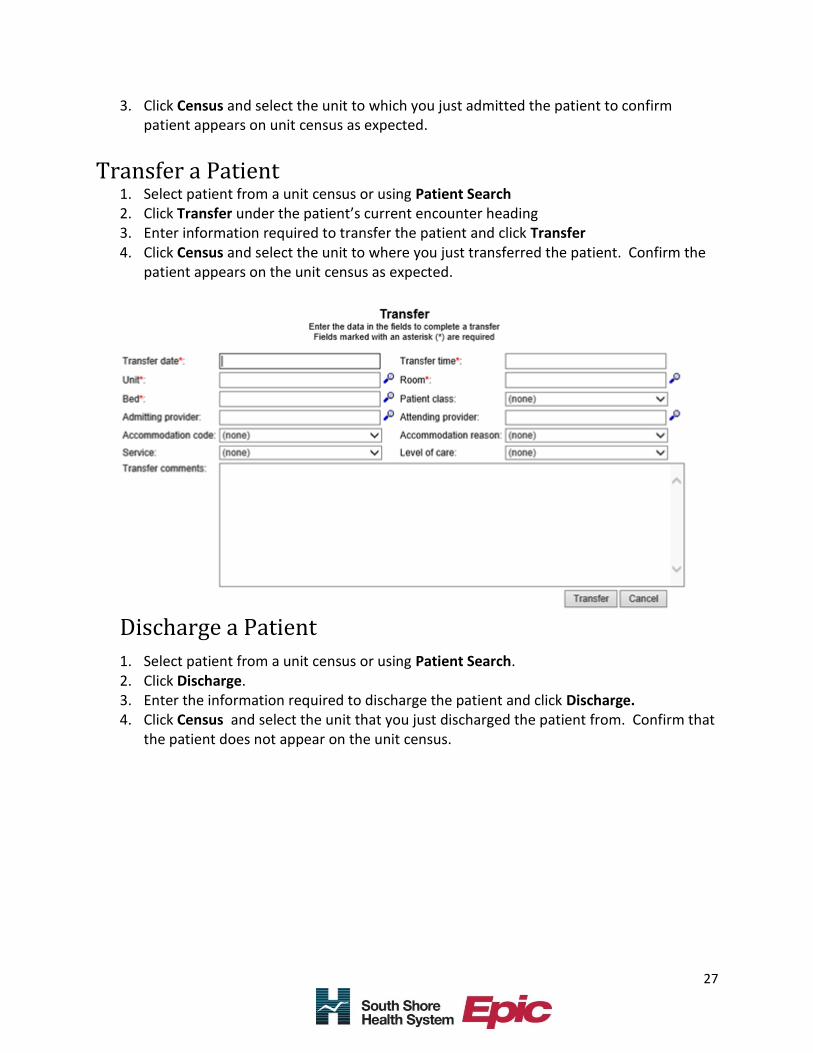
Transfer a Patient 1. Select patient from a unit census or using Patient Search 2. Click Transfer under the patient’s current encounter heading 3. Enter information required to transfer the patient and click Transfer 4. Click Census and select the unit to where you just transferred the patient. Confirm the
patient appears on the unit census as expected.
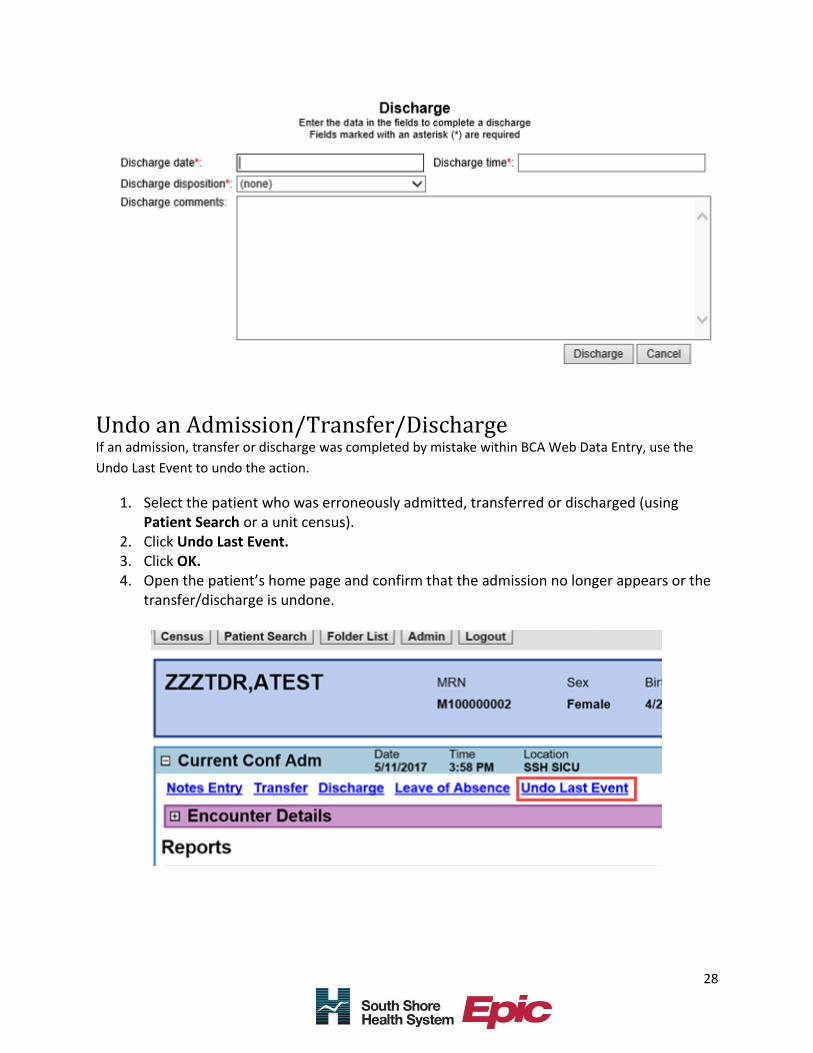
Discharge a Patient
1. Select patient from a unit census or using Patient Search. 2. Click Discharge. 3. Enter the information required to discharge the patient and click Discharge. 4. Click Census and select the unit that you just discharged the patient from. Confirm that
the patient does not appear on the unit census.
28
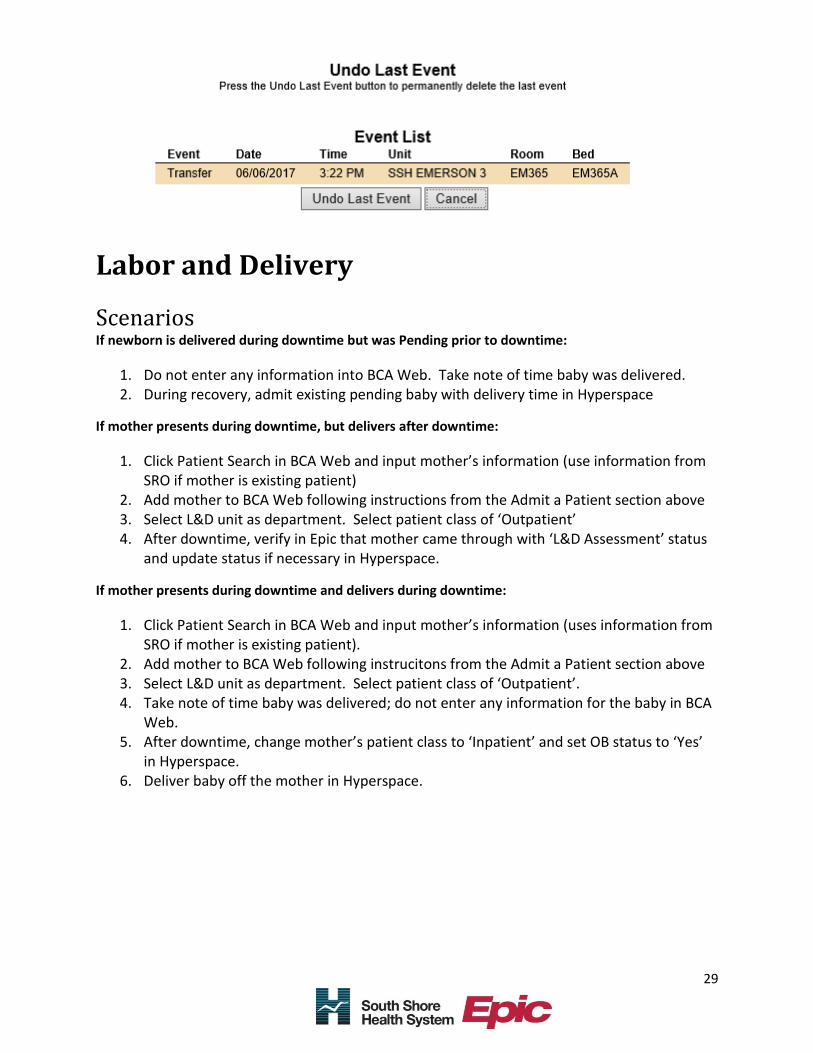
Undo an Admission/Transfer/Discharge If an admission, transfer or discharge was completed by mistake within BCA Web Data Entry, use the
Undo Last Event to undo the action.
1. Select the patient who was erroneously admitted, transferred or discharged (using Patient Search or a unit census).
2. Click Undo Last Event. 3. Click OK. 4. Open the patient’s home page and confirm that the admission no longer appears or the
transfer/discharge is undone.
29
Labor and Delivery
Scenarios If newborn is delivered during downtime but was Pending prior to downtime:
1. Do not enter any information into BCA Web. Take note of time baby was delivered. 2. During recovery, admit existing pending baby with delivery time in Hyperspace
If mother presents during downtime, but delivers after downtime:
1. Click Patient Search in BCA Web and input mother’s information (use information from SRO if mother is existing patient)
2. Add mother to BCA Web following instructions from the Admit a Patient section above 3. Select L&D unit as department. Select patient class of ‘Outpatient’ 4. After downtime, verify in Epic that mother came through with ‘L&D Assessment’ status
and update status if necessary in Hyperspace.
If mother presents during downtime and delivers during downtime:
1. Click Patient Search in BCA Web and input mother’s information (uses information from SRO if mother is existing patient).
2. Add mother to BCA Web following instrucitons from the Admit a Patient section above 3. Select L&D unit as department. Select patient class of ‘Outpatient’. 4. Take note of time baby was delivered; do not enter any information for the baby in BCA
Web. 5. After downtime, change mother’s patient class to ‘Inpatient’ and set OB status to ‘Yes’
in Hyperspace. 6. Deliver baby off the mother in Hyperspace.
30
Using BCA Web to View Reports
View Department Information 1. Click Folder List in the BCA Web toolbar to view a list of departments 2. Click the appropriate department link 3. From the list of reports that appears, click the report that you want to view to open
it
Print Information from BCA Web When viewing any of the reports available in BCA Web, click Print if you need to print a hard copy of the report
List of available
folders may look
different – search
for your
department