raising clownfish step-by-stepfellsman.se/akvarium/raising_clownfish.pdf · raising clownfish...
TRANSCRIPT
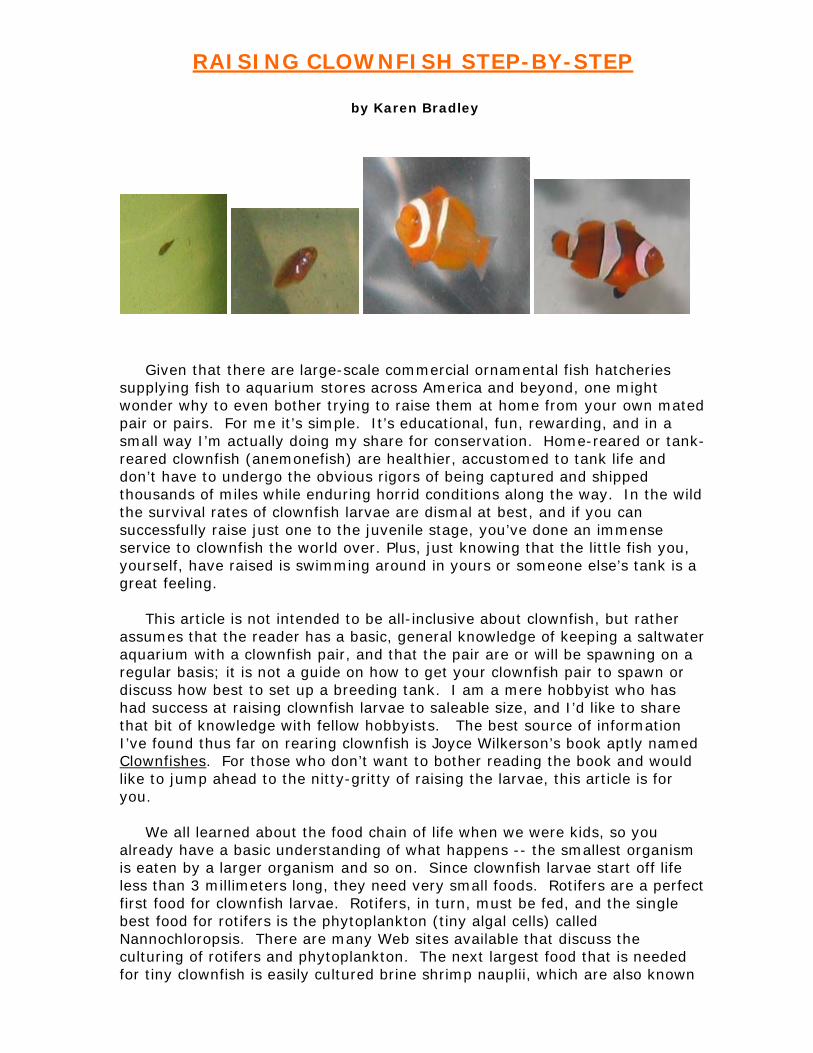
RAISING CLOWNFISH STEP-BY-STEP
by Karen Bradley
Given that there are large-scale commercial ornamental fish hatcheries supplying fish to aquarium stores across America and beyond, one might wonder why to even bother trying to raise them at home from your own mated pair or pairs. For me it’s simple. It’s educational, fun, rewarding, and in a small way I’m actually doing my share for conservation. Home-reared or tank-reared clownfish (anemonefish) are healthier, accustomed to tank life and don’t have to undergo the obvious rigors of being captured and shipped thousands of miles while enduring horrid conditions along the way. In the wild the survival rates of clownfish larvae are dismal at best, and if you can successfully raise just one to the juvenile stage, you’ve done an immense service to clownfish the world over. Plus, just knowing that the little fish you, yourself, have raised is swimming around in yours or someone else’s tank is a great feeling. This article is not intended to be all-inclusive about clownfish, but rather assumes that the reader has a basic, general knowledge of keeping a saltwater aquarium with a clownfish pair, and that the pair are or will be spawning on a regular basis; it is not a guide on how to get your clownfish pair to spawn or discuss how best to set up a breeding tank. I am a mere hobbyist who has had success at raising clownfish larvae to saleable size, and I’d like to share that bit of knowledge with fellow hobbyists. The best source of information I’ve found thus far on rearing clownfish is Joyce Wilkerson’s book aptly named Clownfishes. For those who don’t want to bother reading the book and would like to jump ahead to the nitty-gritty of raising the larvae, this article is for you. We all learned about the food chain of life when we were kids, so you already have a basic understanding of what happens -- the smallest organism is eaten by a larger organism and so on. Since clownfish larvae start off life less than 3 millimeters long, they need very small foods. Rotifers are a perfect first food for clownfish larvae. Rotifers, in turn, must be fed, and the single best food for rotifers is the phytoplankton (tiny algal cells) called Nannochloropsis. There are many Web sites available that discuss the culturing of rotifers and phytoplankton. The next largest food that is needed for tiny clownfish is easily cultured brine shrimp nauplii, which are also known
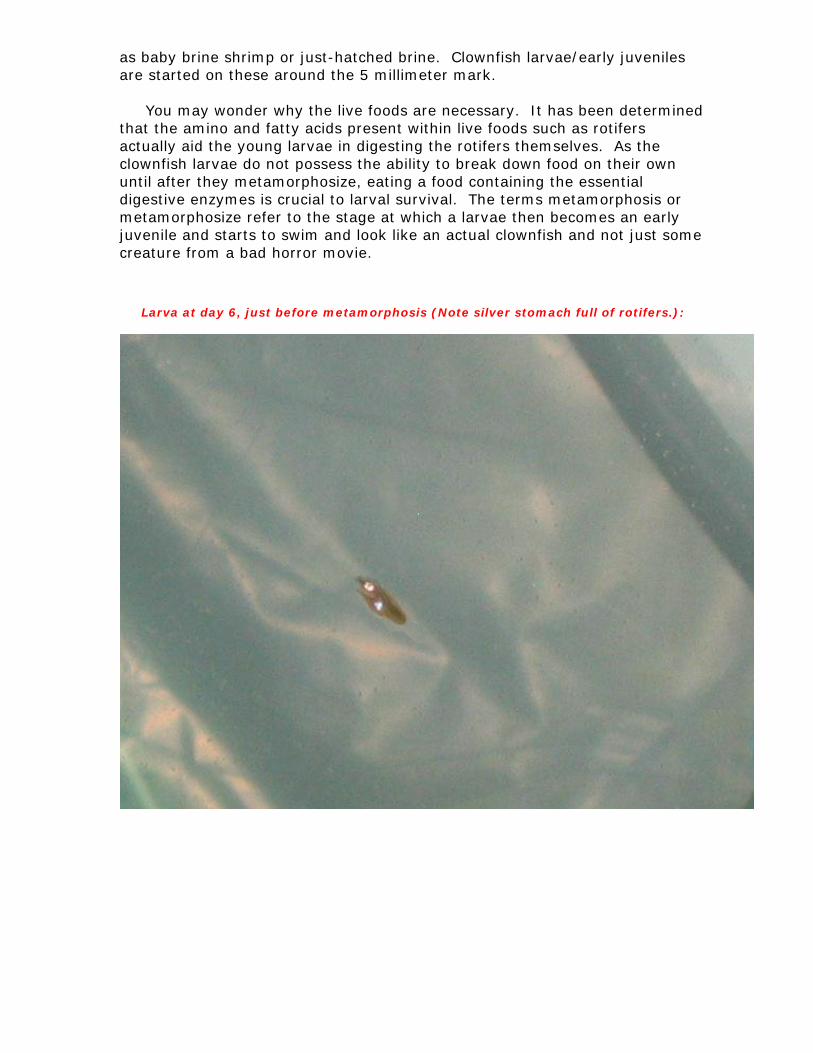
as baby brine shrimp or just-hatched brine. Clownfish larvae/early juveniles are started on these around the 5 millimeter mark. You may wonder why the live foods are necessary. It has been determined that the amino and fatty acids present within live foods such as rotifers actually aid the young larvae in digesting the rotifers themselves. As the clownfish larvae do not possess the ability to break down food on their own until after they metamorphosize, eating a food containing the essential digestive enzymes is crucial to larval survival. The terms metamorphosis or metamorphosize refer to the stage at which a larvae then becomes an early juvenile and starts to swim and look like an actual clownfish and not just some creature from a bad horror movie.
Larva at day 6, just before metamorphosis (Note silver stomach full of rotifers.):
What you will need to get started: • 2 ½, 5, 10 and 20+ gallon tanks
• small heaters (one per tank)
• air pumps (one for larval tanks and one for cultures)
• gang valves (one for larval tanks and one for cultures)
• airline tubing, rigid and flexible
• Ammonia Alert Badges
• thermometers (one per tank)
• phytoplankton cultures (Nannochloropsis preferred) and culture containers for at
least eight cultures, or Instant Algae Rotifer Diet from Reed Mariculture
• rotifers and culture containers for at least four cultures
• light strips for brine shrimp hatching and for larvae tanks
• decapsulated brine shrimp and hatcheries/culture containers
• simple sponge filters and poly filter media (one per tank)
• Hang-on-tank (HOT) filter and media (for 10 gallon tank) • HOT skimmer (for 10 gallon tank)
• algae scraper
• ammonia test kit
• pH test kit
• siphon made from rigid and flexible air line tubing • algae clips to hold air lines in place • small clear bowl • pipettes or syringe for feeding small foods • Selcon/Selco • Iodine supplement • coffee filters to strain rotifers • extra buckets and clear or white plastic or glass jars • marine flake food • mortar and pestle for crushing flakes to appropriate feeding size • magnifying glass (so you can see all those tiny little bodies)
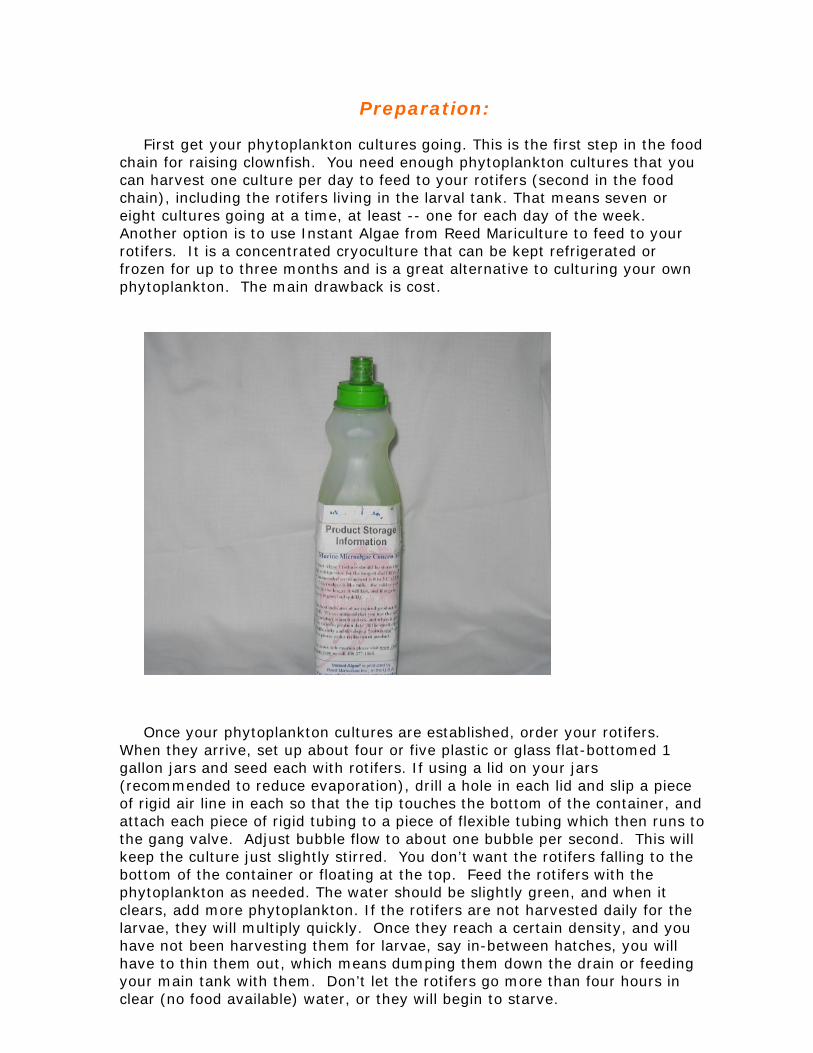
Preparation: First get your phytoplankton cultures going. This is the first step in the food
chain for raising clownfish. You need enough phytoplankton cultures that you can harvest one culture per day to feed to your rotifers (second in the food chain), including the rotifers living in the larval tank. That means seven or eight cultures going at a time, at least -- one for each day of the week. Another option is to use Instant Algae from Reed Mariculture to feed to your rotifers. It is a concentrated cryoculture that can be kept refrigerated or frozen for up to three months and is a great alternative to culturing your own phytoplankton. The main drawback is cost.
Once your phytoplankton cultures are established, order your rotifers.
When they arrive, set up about four or five plastic or glass flat-bottomed 1 gallon jars and seed each with rotifers. If using a lid on your jars (recommended to reduce evaporation), drill a hole in each lid and slip a piece of rigid air line in each so that the tip touches the bottom of the container, and attach each piece of rigid tubing to a piece of flexible tubing which then runs to the gang valve. Adjust bubble flow to about one bubble per second. This will keep the culture just slightly stirred. You don’t want the rotifers falling to the bottom of the container or floating at the top. Feed the rotifers with the phytoplankton as needed. The water should be slightly green, and when it clears, add more phytoplankton. If the rotifers are not harvested daily for the larvae, they will multiply quickly. Once they reach a certain density, and you have not been harvesting them for larvae, say in-between hatches, you will have to thin them out, which means dumping them down the drain or feeding your main tank with them. Don’t let the rotifers go more than four hours in clear (no food available) water, or they will begin to starve.
Day of hatch: This is usually the eighth day. (If the eggs were laid on a Tuesday, they will
hatch Wednesday of the following week using Amphiprion ocellaris as an example. Your fish’s schedule may vary from the eight days, but it will be consistent.) If the rock or other substrate that the eggs are laid on is removable from the parent tank, remove it for hatching and place it into the 2 ½ gallon larval tank before the lights go out on the parent tank. It does not harm the eggs to be subjected to the air for this brief period. You just don’t want the eggs to dry out. Wait as long as possible that evening to transfer the substrate with eggs into the larval tank, since the male clownfish is best at tending to the eggs. Once the substrate is transferred, keep the lights on over the larval tank until you are sure that you have enough air flow on the eggs to keep them in constant motion. Keep in mind that the male clownfish constantly fans them with his fins to keep them clean and aerated and to prevent a fungal infection. Failure to do this adequately with the air bubbles will result in eggs that die due to fungus. Position the air flow under the eggs using a feeding clip to hold the line so that as the bubbles rise to the surface, they agitate the eggs. Make sure that every egg on the substrate is in motion. Use the air flow straight from the tube; an air stone is not necessary. It may be necessary to use more than one air line initially to make sure all the eggs stay in motion. At this point you are ready to cover the tank completely, including the top. Wait at least 30 minutes before checking on them. If you cannot remove the substrate from the parent tank, you will have to try and catch as many larvae as possible for transfer to the larval tank after they hatch. Make sure all power heads and pumps are turned off prior to lights out. Larvae may start hatching as soon as 5 minutes of lights going out, but they will generally wait for at least half an hour.
Newly hatched larvae are attracted to dim light, so have a flashlight or some other small light ready to lure the hatching larvae. Using a clear bowl, scoop as many out at a time as possible. It helps to shine the beam into the bowl. A clear bowl will enable you to see the larvae inside, and it won’t intimidate the larvae, as they won’t be able to see its confines.
Just prior to this you will have set up your little larval tank with heater,
water from the parent tank, a thermometer and airline. The temperature of the water should match that of the parent tank initially. If it is lower than 80 degrees at the time of hatch, that's fine, but the temperature should be slowly increased to at least 80 thereafter and remain constant. This is important, as any temperature below 80 degrees will delay morph.
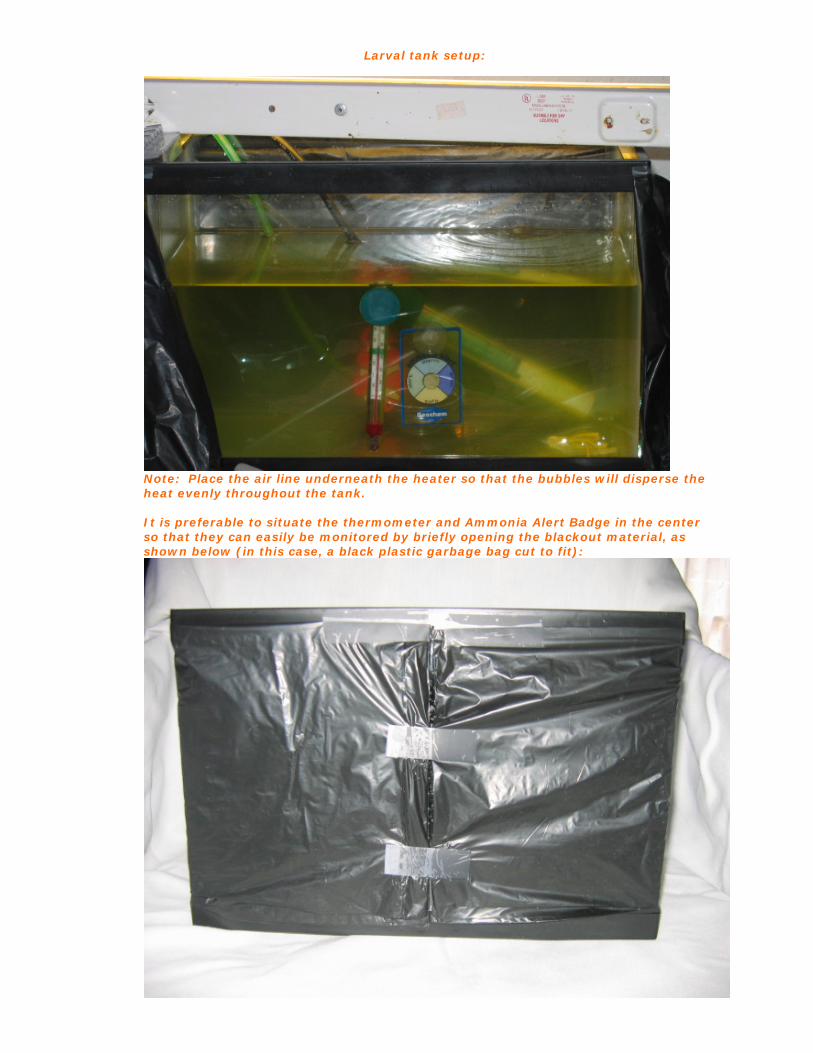
Larval tank setup:
Note: Place the air line underneath the heater so that the bubbles will disperse the heat evenly throughout the tank. It is preferable to situate the thermometer and Ammonia Alert Badge in the center so that they can easily be monitored by briefly opening the blackout material, as shown below (in this case, a black plastic garbage bag cut to fit):
Larval care: Once the larvae hatch out, you can remove the substrate from the rearing
tank and place it back into the parent tank. Sometimes there are a few stragglers that haven't hatched and may hatch later on that night or the next night. It is traumatic on the larvae to have the vigorous bubbles needed to hatch the eggs, so you have to decide when and if you need to transfer the substrate to a second hatching tank or if you can afford to turn down the air bubbles enough to allow the remaining unhatched eggs to continue staying in motion. If possible, keep the substrate and vigorous air flow on one side of the tank so that the newly hatched larvae may escape to the other side away from the air bubbles. A night light or diffused strip light may be placed over the water on the opposite end of the tank from the substrate and air flow to lure the larvae away from it, keeping the hatching end covered with a dark towel. Once all the larvae have hatched and the substrate removed, turn down the air to about one bubble per second. Note: Newly hatched larvae are very delicate, so whether transferring them as they hatch out in the parents’ tank, or using the above method, be GENTLE with them.
Once hatching is complete and you've removed the substrate and turned
down the air, or transferred the larvae from the parent tank, add phytoplankton and rotifers to the larval tank. The rotifer density should be thick so that a larva can run into one at every opportunity. You should have about two rotifers per body length of larva. This is why I start off with a 2 1/2 gallon tank. The phytoplankton will keep rotifers well fed until the larvae can find and consume them. This is known as co-culturing. In a case where there is a poor survival rate of larvae, you may only find it necessary to add rotifers once, as the rotifers will multiply at a rate that keeps up with their consumption by the larvae. In this case, you will only have to add the phytoplankton to keep the rotifers well fed.
The light above the tank initially should be very dim but enough light so
that the larvae can find food. Too bright and the larvae will try and swim to the bottom to get away from the light, which will eventually kill them. A newly hatched larva's eyes are very sensitive to light, and it cannot see beyond about half an inch. Use a towel to diffuse the light, or raise the light if needed. The light can be left on 24/7 for the first four days to give the larvae ample feeding opportunities. Once they've become proficient at hunting rotifers, you can then decrease the rotifer density, and by that time, use full-strength lighting.
Keep your rotifer culture's salinity within .007 points of the larval tank
water. For instance, I keep my rotifers at a specific gravity of 1.018 and the larval tank at a specific gravity of 1.025. Any difference higher than that and the rotifers will go into osmotic shock upon being placed into the larval tank. Dead rotifers are not appealing to larvae.
If for some reason your rotifer cultures are not adequate, and you cannot
keep their density high enough in the larval tank, cover the larval tank and keep it dark for a day until you can culture enough rotifers for feeding. Larvae will constantly hunt for food during light hours, and if there is not enough food present for them to find, the larvae are wasting precious energy. Larvae do
not hunt in the dark, so keeping the larval tank covered will allow your larvae to rest and save what precious reserves they have in their yolk sacs until adequate food is available.
On occasion you will have some thin larvae. These are larvae that have
hatched with very small or no yolk sacs. In this case, and presuming you have plenty of rotifers to offer, you can keep the light on in the larval tank 24/7 for the first few days until you notice that their stomachs are filling and turning silver. I generally do this, anyway, as mentioned before. It gets the larvae to metamorphosis a day or two earlier.
As filtration in a larval tank is not an option, you will need to make daily or twice daily water changes to keep ammonia levels in check. I use an Ammonia Alert Badge on the side of the tank to keep an eye on this, but I also test twice daily with an ammonia test. Try keeping the ammonia below 3 ppm (parts per million). That is high for a reef tank or a fish-only tank, but it is within a safe level for larvae as long as the pH remains low, as well. The lower the pH is, the less toxic the ammonia will be. I generally keep my ammonia level around 1 ppm at a pH of 7.8. Larvae do well with this. Once every couple of days I scrape sediment from the bottom of the tank and siphon it out using the air line tubing. The tank bottom is bare for easy cleaning, and I use a white towel underneath the tank or a white table to sit the tank on so that I can see what's on the bottom. I have fashioned a siphon made simply from airline tubing and a drinking straw, taping the straw to the siphon end to make it stiffer. I then siphon the water into a clear gallon container so that I can see if any larvae get accidentally suctioned up. If they do - and generally it happens - I can then retrieve them by gently scooping them out with a small bowl and then gently transferring them back into their tank. The tank water should remain at a constant 80 to 84 degrees. For each degree below 80, it will delay metamorphosis for up to two days. I have accidentally heated the water to 86 degrees with no ill effects, but I slowly returned it back down to 80 by turning off the heater temporarily and dripping in some cooler saltwater. Once the larvae have increased in size to about 5 mm, you can increase the air flow to 3 or 4 bubbles per second and introduce newly hatched decapsulated brine shrimp. The brine are decapsulated to prevent the larvae from choking on the egg cases. At this point you stop feeding the tank and feed the larvae. Each larva only needs about 25 brine per day. When you introduce the brine, you will still be feeding the rotifers until all the larvae are eating the brine well. You will notice the stomachs of the larvae go from silver to pink, and then you know they are eating the brine well. I usually can discontinue offering the rotifers about three days after introducing the brine. Do avoid placing too many brine in the tank, as the larvae will tend to overeat and can actually rupture their stomachs. They do not realize that one brine shrimp is nutritionally equivalent to about 40 rotifers. I generally offer smaller portions at a time, about three or four times per day. As the larvae grow, you can then feed them larger and older brine. Somewhere along the way, the larvae have started to undergo metamorphosis. Once their body shape changes from tapered to oval,
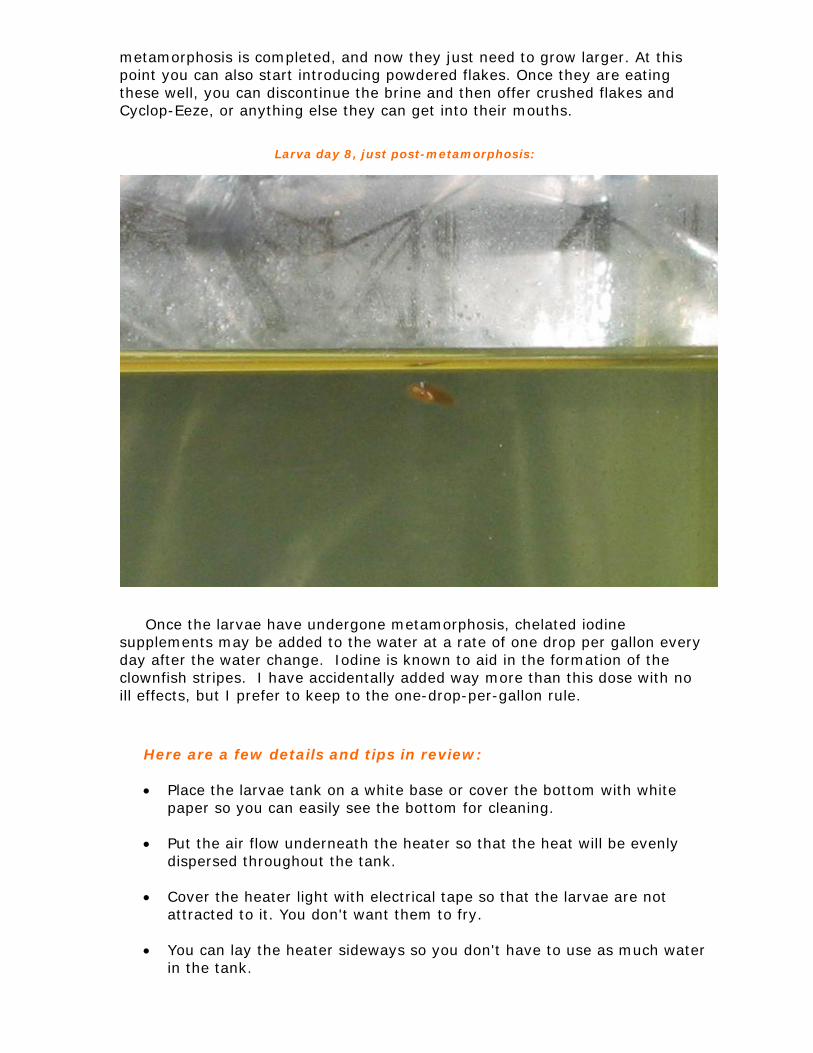
metamorphosis is completed, and now they just need to grow larger. At this point you can also start introducing powdered flakes. Once they are eating these well, you can discontinue the brine and then offer crushed flakes and Cyclop-Eeze, or anything else they can get into their mouths. Larva day 8, just post-metamorphosis:
Once the larvae have undergone metamorphosis, chelated iodine supplements may be added to the water at a rate of one drop per gallon every day after the water change. Iodine is known to aid in the formation of the clownfish stripes. I have accidentally added way more than this dose with no ill effects, but I prefer to keep to the one-drop-per-gallon rule.
Here are a few details and tips in review: • Place the larvae tank on a white base or cover the bottom with white
paper so you can easily see the bottom for cleaning. • Put the air flow underneath the heater so that the heat will be evenly
dispersed throughout the tank.
• Cover the heater light with electrical tape so that the larvae are not attracted to it. You don't want them to fry.
• You can lay the heater sideways so you don't have to use as much water
in the tank.
• Starting off with a 2 1/2 or 5 gallon tank means less rotifers needed and less water needed for the frequent water changes.
• The top of the larvae tank should be open for air exchange and viewing.
The sides should be covered for at least four or five days. On the fifth day, you can open the front so you can see in.
• Make sure the light is not too strong at first. If the larvae go to the
bottom and/or swim in frantic circles, the light is too bright. Either diffuse the light or raise it up until larvae swim normally, until around day 4 or 5.
• Make sure the light is not too dim. If the larvae cannot see their food,
they will starve. Keep an eye on their stomachs to make sure they are getting plenty of food.
• The stomachs should be round and silver. A skinny larvae is in danger of
starvation. After you introduce the brine, the stomachs should change to pink/orange.
• Do not put rotifer culture water into larvae tank water. Filter the rotifers
using a paper coffee filter, and then rinse the rotifers off of the filter and into the larvae tank with the tank water. For the first three days stock rotifers densely so that the larvae can easily find them using their poor eyesight. After the third day, when larvae are adept at hunting and their eyesight has improved, you may then decrease rotifer density by half.
• Add enough phytoplankton to the larval tank to keep the rotifers well
fed until the larvae can eat them. The phytoplankton actually also helps the larvae to better see their food.
• Do not introduce baby brine too early. Wait until larvae have attained at
least 5 mm in size, whether they've undergone metamorphosis or not.
• Keep the temperature constant and at least 80 degrees. For each degree less than 80, metamorphosis will be delayed up to two days. The larvae will not tire of being in this state, but you probably will.
• Siphon the tank at least once daily. Replace water with parent tank
water until after metamorphosis. After larvae have undergone metamorphosis, they are heartier and will be more able to tolerate newly mixed saltwater with a higher pH.
• Keep ammonia below 3 ppm and at a pH of no higher than 8.0. The
lower the pH is, the less toxic the ammonia will be. Do not hesitate to test the water daily or twice daily. Do not use buffers in the water. You want a low pH, anyway.
• After the now juveniles have weaned off of brine, you can introduce a
sponge filter with moderate air flow and transfer them to a 5 gallon or larger tank. If using a 10 gallon, you don't have to fill it all the way up. You will still need to do weekly water changes. I wait until the babies are weaned to put in the filter; otherwise, their food just gets sucked up into the filter. At this point the larvae are about two weeks old.

• At about four weeks old, larvae are placed into a 10 gallon tank, and as soon as they can handle it, I add a HOT filter. They have to be able to handle the extra current that a HOT creates, and be able to surface feed within the current.
• As clownfish are excellent time keepers, the 2 1/2 gallon tank that you
recently transferred the juveniles from is now ready for another batch, so make sure you're keeping an eye on the rotifer cultures that you haven't needed for a week or so.
• When the next hatch is ready for its 5 gallon tank, then is a good time
to transfer the ones in the 5 gallon into the 10 gallon and so on.
Twelve-day-old juvenile (above and below). Note orange stomach full of baby brine shrimp.
Front-on view:

Juveniles at 21 days old:
Juveniles at six weeks old as they take shelter in a manmade anemone. Scale is in inches:
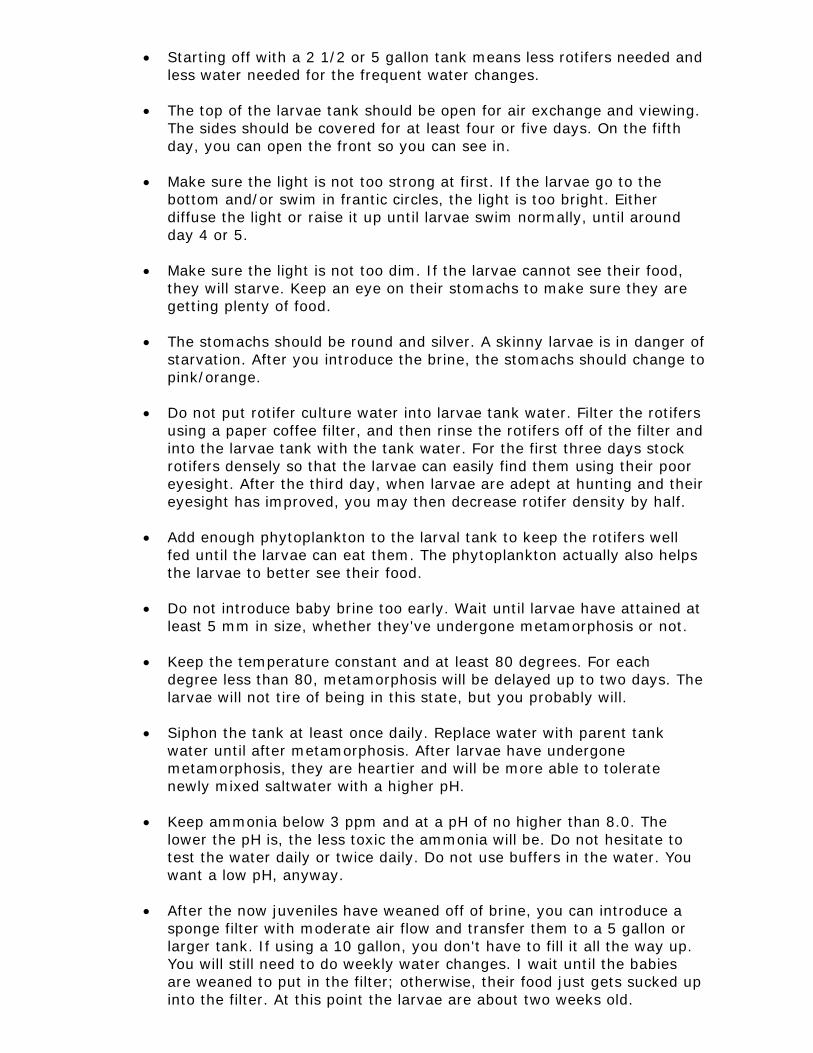
The same juveniles at 15 weeks old and at a marketable length of just over 1 inch long. The black edging will continue to form for another two months:
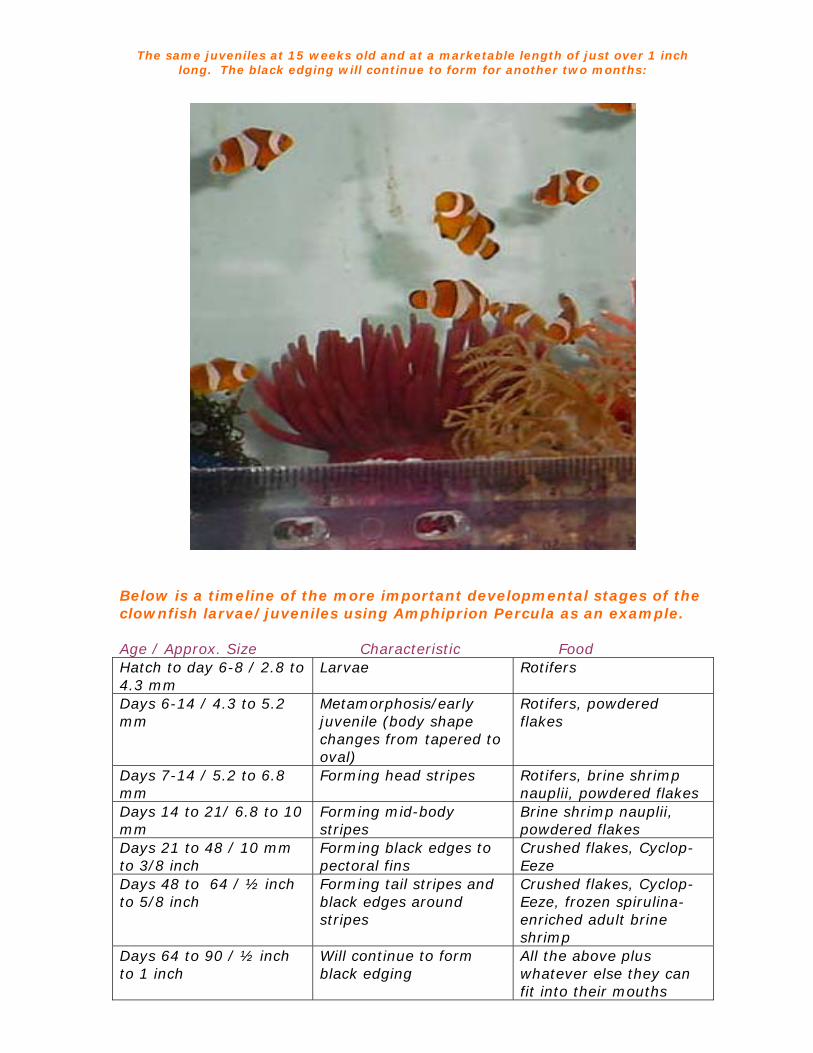
Below is a timeline of the more important developmental stages of the clownfish larvae/juveniles using Amphiprion Percula as an example. Age / Approx. Size Characteristic Food Hatch to day 6-8 / 2.8 to 4.3 mm
Larvae Rotifers
Days 6-14 / 4.3 to 5.2 mm
Metamorphosis/early juvenile (body shape changes from tapered to oval)
Rotifers, powdered flakes
Days 7-14 / 5.2 to 6.8 mm
Forming head stripes Rotifers, brine shrimp nauplii, powdered flakes
Days 14 to 21/ 6.8 to 10 mm
Forming mid-body stripes
Brine shrimp nauplii, powdered flakes
Days 21 to 48 / 10 mm to 3/8 inch
Forming black edges to pectoral fins
Crushed flakes, Cyclop-Eeze
Days 48 to 64 / ½ inch to 5/8 inch
Forming tail stripes and black edges around stripes
Crushed flakes, Cyclop-Eeze, frozen spirulina-enriched adult brine shrimp
Days 64 to 90 / ½ inch to 1 inch
Will continue to form black edging
All the above plus whatever else they can fit into their mouths

I hope you have enjoyed my article and have found it useful, and I wish you the best of luck in your endeavors! _______________________________________________________________ Resources: Joyce Wilkerson’s book Clownfishes Reed Mariculture 408-377-1065 / Fax 408-884-2322 www.Reed-Mariculture.com Brine Shrimp Direct www.brineshrimpdirect.com