recording your screencast using camtasia relay · recording your screencast using camtasia relay...
TRANSCRIPT

Recording Your Screencast using Camtasia Relay
*This is a pilot program which requires that you have an Ensemble Video Account and Camtasia Relay
account. Contact Kim Kenward for more information on these accounts at [email protected]
1. Open the documents or programs you want to appear on your screen as you are recording
(i.e. PowerPoint presentation, your Blackboard site…etc.).
2. Open/Launch Camtasia Relay.
3. Enter your GVSU username and password. Click Log In.
1. Select your Ensemble Profile from the dropdown arrow.
Type a Title for your screencast.
Type a Description for your screencast, if desired.
Check your audio input by clicking Audio.

If you have more than one audio input on your computer, be sure to select the one that you
will be using for your screencast. The audio levels should automatically adjust during your
recording, but you may also use the slider to boost or lower the volume of your
microphone. Note: If you are having difficulty selecting your microphone or adjusting your
volume, you may also need to select and adjust the appropriate audio input via your
computer’s sound manager. We also recommend using a USB wired or wireless
microphone for recording. This type of microphone will produce better quality audio
than your computer’s built-in microphone.
If you are using more than one monitor display, click Display to select which monitor you
would like to record.
If you would like to use your webcam to record video of you during the presentation,
click Camera.
Before officially recording your screencast, click Test to check that your audio levels and
video are indeed recording as desired.
Once you’re ready to record, click the REC (record) button. A 3 second timer will appear,
counting down the time before the recording will actually begin.

The timer will then minimize so that it does not distract from your presentation.
Note: If you are using a headset to record your screencast, you will not hear the audio
through your headset during the actual recording process.
Once you have finished recording your screencast, select the Camtasia Relay Recorder and
click the Stop button. It may take a few moments for Relay to finalize your recording.
Once your screencast has finalized but before submitting it for final processing, you have
the option to trim the beginning and end of your presentation.

Click the Trimming button. Click and drag the marker along the timeline to where you’d
like the presentation to start. Click Set presentation start. Click and drag the marker along
the timeline to where you’d like the presentation to end. Click Set presentation end.
Click the Submit button when ready to publish your screencast and leave your computer
running for a few minutes so that the screencast may upload to the Relay server.
The length of time needed for processing is dependent on how long your presentation is and
how many other users are requesting processing at the same time. We recommend that
your videos never exceed any more than 20 minutes in length. Tip: For quickest processing
results, break your recordings into shorter segments (20 minutes or less). Most recordings
are available within several hours after being submitted. Once your screencast has finished
processing, you should receive an email confirmation in your GVSU email. Please ignore
this email message but instead, log into Ensemble Video to publish your video and then
add your video to your Blackboard site. Ensemble video can be found at:
https://gvsu.ensemblevideo.com/
You will use your GVSU username/password to login into Ensemble.
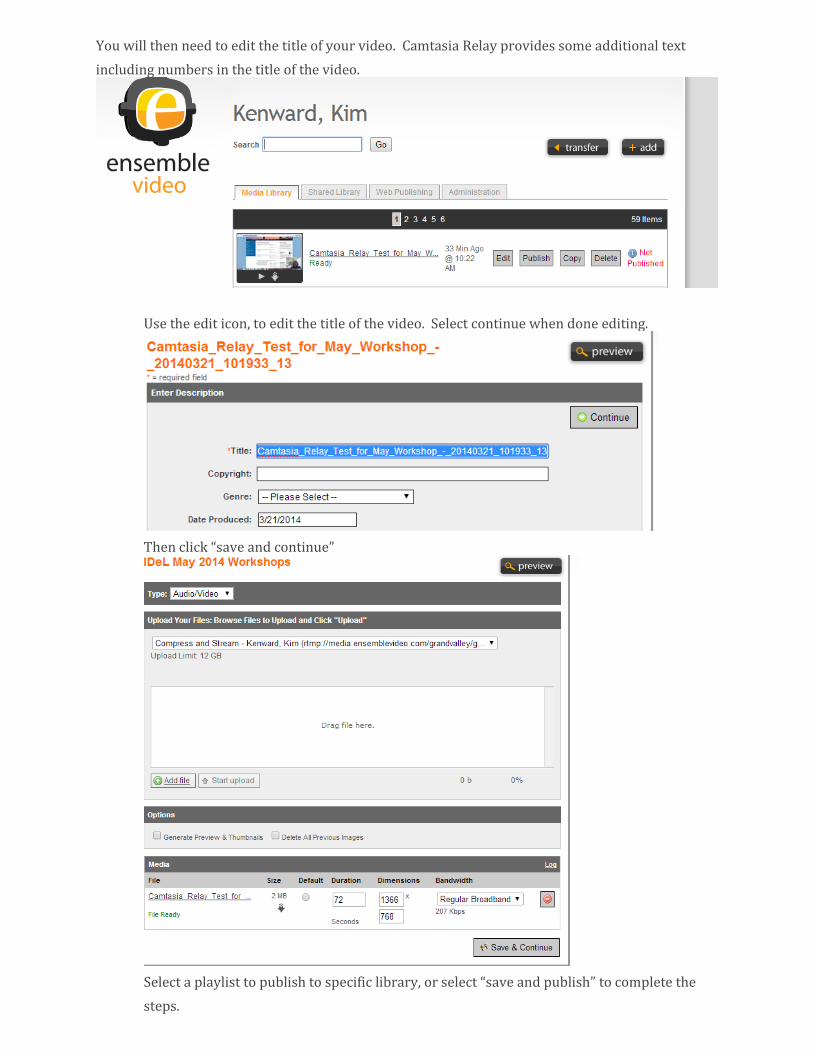
You will then need to edit the title of your video. Camtasia Relay provides some additional text
including numbers in the title of the video.
Use the edit icon, to edit the title of the video. Select continue when done editing.
Then click “save and continue”
Select a playlist to publish to specific library, or select “save and publish” to complete the
steps.

Once you’ve published your video, click “save and publish”.
Once your video is published in Ensemble, you can then log into Blackboard and add your
video to a specific area within your course.

You will find Ensemble video under the “Build Content” toolbar. Select “Build Content” and
then select “Ensemble Video”
Click the “go” button to find your video.
Use the select option and apply any settings that you wish to add the video to Blackboard.