routine maintenance - af
TRANSCRIPT
Routine Maintenance
Motorcycle Mentorship Module 13
Warning: Incorrect or inaccurate information could lead to tragic results on the road. If a question arises that is not covered in the guide and you don’t know the answer from your own experience and training, simply state, “That is a great question, I’ll get back to you with the answer.”
Your Service Safety Center will help with these types of questions should they arise. Their numbers are as follows:
US Army Driving Directorate: 334.255.3039 USMC Safety Division: 703.604.4459 US Navy Shore Safety: 757.444.3520 x7165 US Air Force Safety Center: 505.846.0728 USCG Safety Division: 202.475.5206
Motorcycle Mentorship Module 13 09/12 Routine Maintenance 1
PrefaceAbout: The Defense Safety Oversight Council (DSOC) Motorcycle Mentorship Modules are a set of thirty six (36) facilitation modules designed for the purpose of increasing rider knowledge on various aspects of riding and providing additional capability for self-policing within peer groups. The modules are intended as a mechanism to further decrease motorcycle related mishaps and fatalities within Department of Defense (DoD) by encouraging riders to talk, live, and think about the topic.
Using the Module: The module content enclosed is intended as a facilitation guide to assist you with discussing the topic. However, it is still critical to use your skills and talent to engage participants and develop “buy-in” on this subject from your group. To maximize this, motivate and moderate your participants, control the accuracy of participant feedback, and be mindful of their time.
Page Section
2 Facilitation Guide – A brief overview on conducting a facilitated discussion of a topic
3 Module Overview – This section provides the facilitator a synopsis of the topic, learning objectives, and the suggested environment, props, and handouts for conducting the module
4 Module Discussion Introduction – This section provides guidance to the facilitator in opening up the discussion and getting participants talking about the topic and their relevant experiences
4 Discussion Areas – This section provides various discussion topics, sample facilitation questions, and factual information for the facilitator to lead the discussion
10 Wrap-Up – This section provides guidance to the facilitator on wrapping up the topic discussion
11 Feedback Form – A feedback form to be given to all participants for their feedback on the module discussion
12 Resources – Additional resources and definitions to assist the facilitator in preparing for and conducting the topic facilitation
13 Handouts – Figures, pictures, diagrams, etc. to assist the facilitator to better demonstrate a topic idea
Motorcycle Mentorship Module 13 09/12 Routine Maintenance 2
Facilitation Guide for DSOC Mentorship Modules It is recommended that this Mentorship Module be conducted in a facilitation style. Using the information provided in this Mentorship Module, you, as the facilitator, will lead a discussion on the subject. You should not be conducting a lecture! The facilitator’s role is to help with how the discussion is proceeding. Participants will have much more “buy in” and connectivity with the information if they have input. One of your roles as the facilitator is to control the accuracy of the input and control the time. From the Mentorship Module, generate questions which will lead to group discussion. The more you let the group participate, the more success you will have.
Competencies of a Facilitator:■■ Prepare prior to the event
■■ Make sure everyone gets a chance to participate and help members to express themselves
■■ Ask rather than tell
■■ Honor the group, display respect for the members, and acknowledge participant contributions
■■ Ask for others’ opinions
■■ Listen without interrupting
■■ Demonstrate professionalism and integrity
The key characteristic distinguishing facilitation from other types of leadership, like scripted training, is that the outcomes are never predetermined in a facilitative setting. Although the background information provided with this Module remains the same, the result will depend on the participants, the knowledge and experience they bring, and the information that they feel they need to take away. The group uses the activities provided by the facilitator to unlock expertise, ensure thorough discussion, stay focused and reach decisions that are better than those any individual could come up with alone.
At the beginning of each Mentorship Event, discuss why the participants are there and what they will receive as a result of participating. Adults have limited time and they want to know “What’s in it for me?” A facilitator should make training fun. Encourage humor and laughter in your Mentorship Event.
Principles of Adult Learning:■➙Adult Learners want material that is relevant to them. “What’s in it for me?” “What will I get out of this that will make a difference to me?”
■➙Adult Learners come to training events with varying amounts of experience. They like to share their experiences. If you have minimal or no motorcycle experience, you can still draw from your group.
■➙Even if you have motorcycle experience, you should draw from your group because people tend to remember what “they” said longer than what you said. Information that they “own” is more valuable to them.
■➙ Facilitators are not always subject matter experts; nor do they need to be. Facilitators may draw on the existing knowledge of the participants and the information provided in these Modules.
Motorcycle Mentorship Module 13 09/12 Routine Maintenance 3
Section I: Module OverviewTime Frame: One 30-60 minute facilitator-led discussion
Level of Prior Knowledge: Participants should have a general knowledge of common motorcycle controls to include primary and secondary and general parts of a motorcycle. A motorcycle owner’s manual is very useful in familiarizing oneself with motorcycle controls and parts. Each participant should be encouraged to pull out their Motorcycle’s Owners Manual.
Synopsis: Participant will locate and identify parts of their motorcycle through the use of a motorcycles owner’s manual or maintenance manual. Participant will understand inspection schedules based on mileage and calendar guidelines. Participant will recognize conditions for cleaning, adjustments, and replacement of critical systems, fasteners, and parts.
Learning Objectives:■➙Demonstrate motorcycle parts identification associated with routine maintenance
■➙Define requirements for routine maintenance based on mileage and calendar schedules
■➙Recognize conditions for cleaning, adjustments, and replacement of critical systems, fasteners, and parts
■➙Describe the difference between an owner’s manual and a shop maintenance manual
■➙ Participant explains the importance of routine maintenance and possible consequences of not performing routine motorcycle maintenance
■➙ Participant comprehends presented facts and knowledge (participant may offer alternative perspectives), contributes or supplements accurate statements regarding topic, and may share experiential knowledge
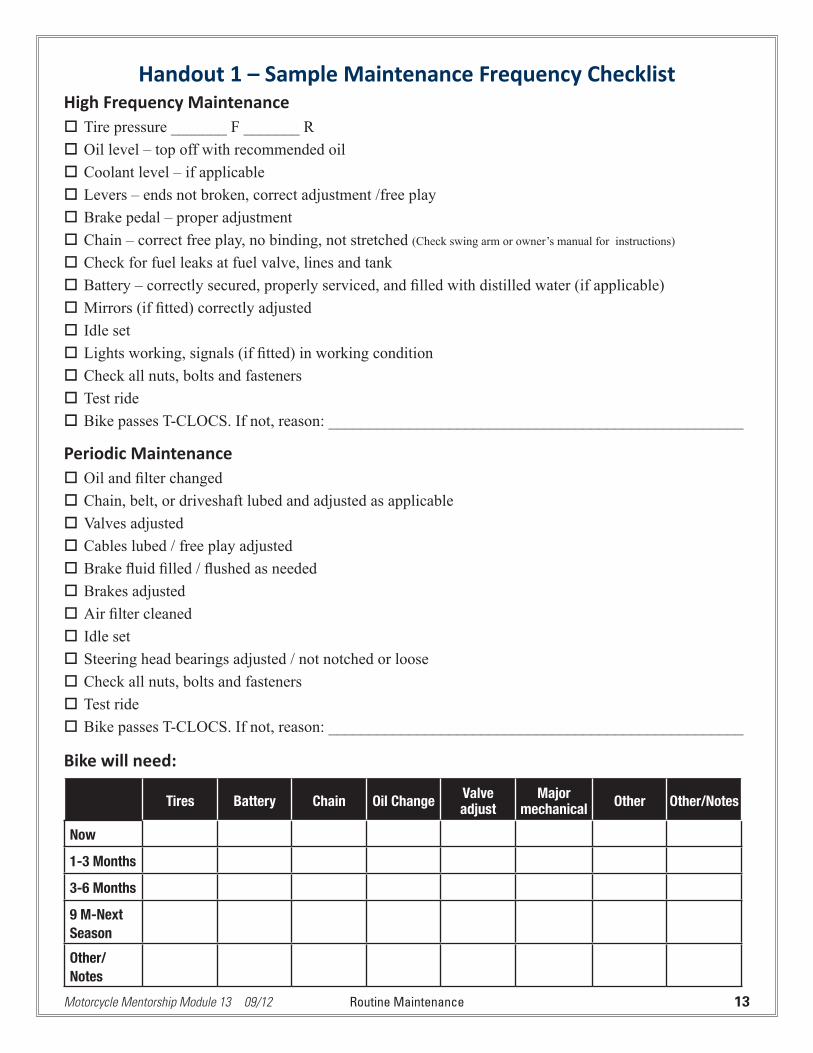
Suggested Environment/Props/Handouts:■➙Handout 1 – Sample Maintenance Frequency Checklist
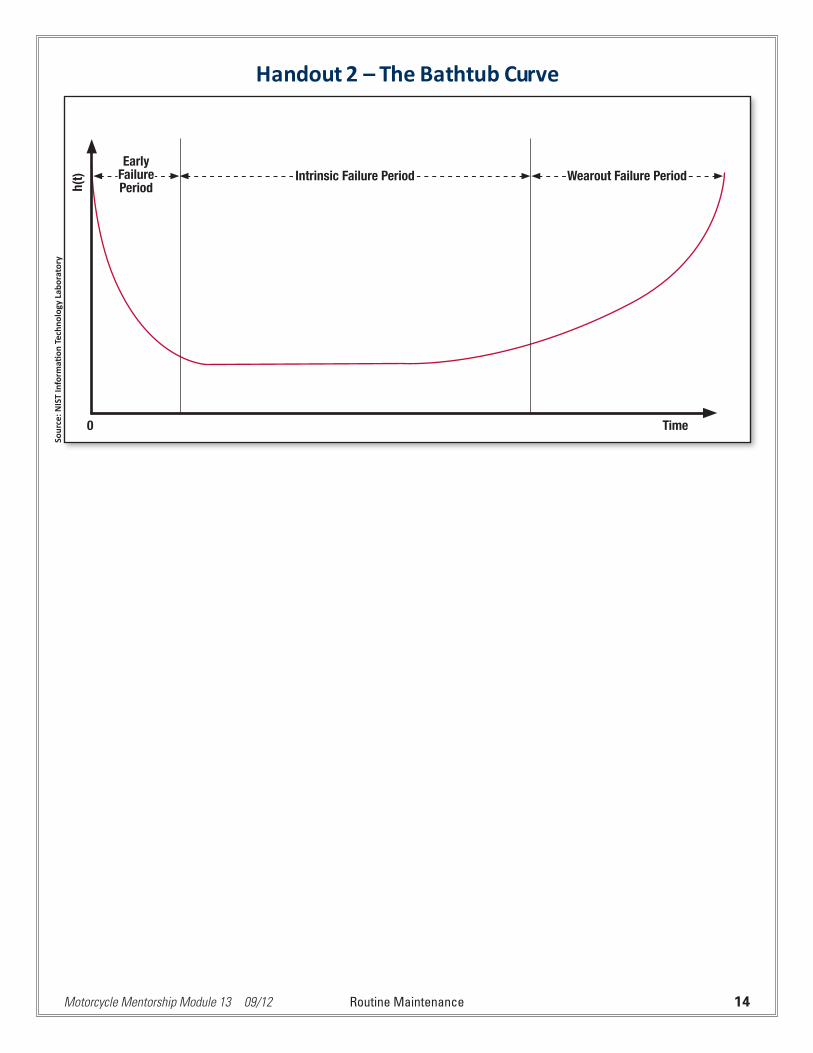
■➙Handout 2 – The Bathtub Curve
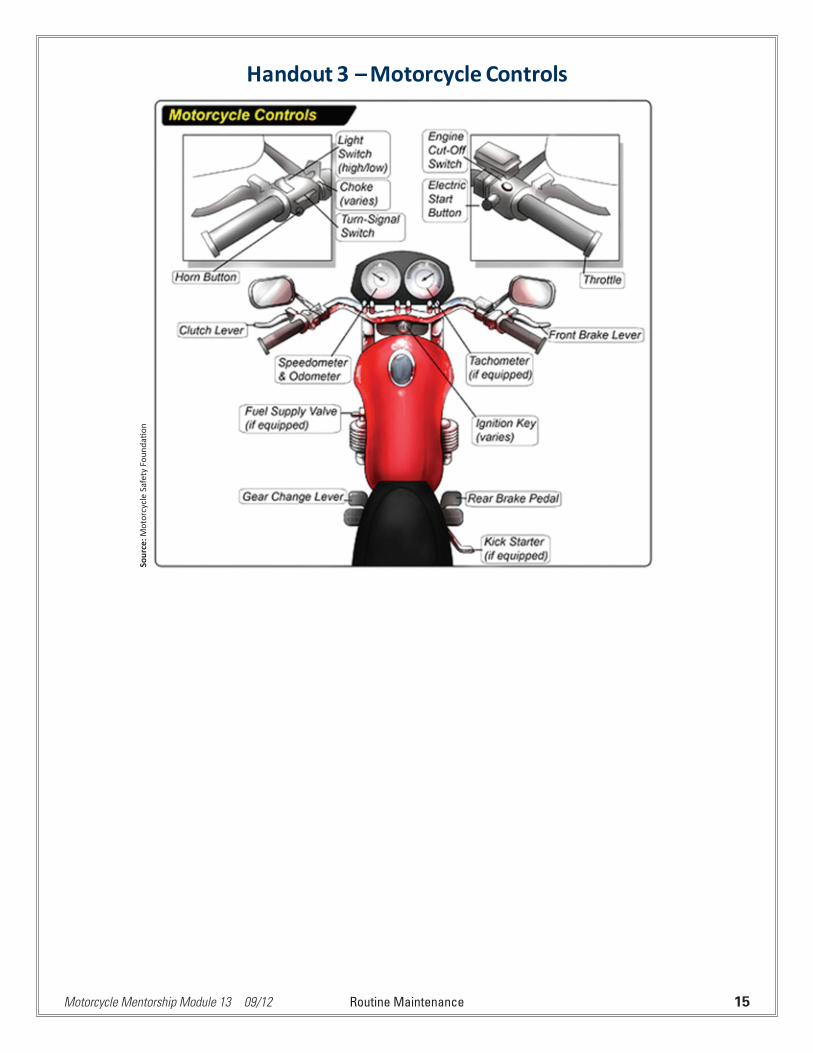
■➙Handout 3 – Parts and Controls Diagram
■➙Handout 4 – MSF T-CLOCS Check list
Utilizing a training motorcycle or a participant’s motorcycle will enhance the Mentorship Module and accelerate the learning with the hands-on approach. The facilitator may conduct the demonstration outdoors or in a motorcycle storage facility – this is a site specific determination.
Note: If you can communicate with students before the demonstration, encourage students to bring their own motorcycle owner’s manual or shop manual.

Motorcycle Mentorship Module 13 09/12 Routine Maintenance 4
Section II: Module DiscussionIntroduction: Why complete routine maintenance within the motorcycle manufacture recommendations?
Definition of Routine Maintenance: Simple to complex maintenance actions usually requiring only minimal skills or training, associated with regular mileage and calendar time frames of general upkeep of equipment and machinery to minimize normal wear and tear. This also is necessary to delay or prevent the failure of critical and non-critical parts and equipment of the motorcycle.
Open discussion with participant focused on why motorcycle manufactures have these requirements and how does this benefit not only the participant but also the manufactures and dealerships. Ask for and encourage participant sharing of experiences related to the module topic.
Suggested Discussion Areas:
Discussion Area 1: Inspection Intervals[Distribute Handout 1 – Sample Motorcycle Inspection Checklist]
Facilitator Facts:
1. Motorcycle inspections are recommended throughout the life of the motorcycle. When and how often to do them is noted in the Motorcycle Owners Manual. It is advised that you learn what to look for but no special tools or skills are required. Routine inspections are recommended so that you get to know your motorcycle, stay on top of any minor adustments or lubrication requirements and help prevent mechanical breakdowns.
2. Many components, systems and parts of the motorcycle are subjected to wear and tear with normal use, exposure to the elements and over time. Inspection intervals are determined by the factory in the Owners Manual. There is typically a specific action required before there is a
Sample questions may include: ■➤ Why is there routine maintenance or scheduled maintenance?
■➤ Does this mean the motorcycle will be more reliable? Why?
■➤ How does cost come into play, long term and short term?
■➤ Why not just wait until there is a problem or failure?
■➤ How could this build a relationship with a particular motorcycle dealership or manufacturer?
Facilitation Questions:
• What is an inspection interval?
• Why do certain parts have specified inspection intervals?
• What are the most common inspection intervals?
Motorcycle Mentorship Module 13 09/12 Routine Maintenance 5
malfunction or failure that could affect the safe operation of the motorcycle. The action could be to adjust, lubricate, clean or replace a part.
3. The inspection interval could be based on mileage or the passage of time. The recommended services at a given number of miles would be referring to the miles on the odometer or in some cases it might be since that part or system was last serviced. References to time (days, months or years that have passed) would be based on when the bike was put into service or the amount of time since the bike was or since the last time that part or system was serviced. For example, a 2006 bike that was not sold until summer of 2007
Additional Facilitator Facts:
Past and current maintenance practices in both the private and government sectors imply maintenance as the actions associated with equipment repair after it is broken. The dictionary defines maintenance as follows: “the work of keeping something in proper condition; upkeep.” This implies that maintenance is action taken to prevent a device or component from failing or to repair normal equipment degradation experienced with the operation of the device to keep it in proper working order.
Unfortunately, data obtained in many studies over the past decade indicates most private and government facilities do not expend the necessary resources to maintain equipment in proper working order. Rather, most organization and individuals wait for equipment failure to occur and then take whatever actions are necessary to repair or replace the equipment. Nothing lasts forever and all equipment has some predefined life expectancy or operational life associated with it. For example, equipment may be designed to operate at full design load for 5,000 hours and may be designed to go through 15,000 start-stop cycles.
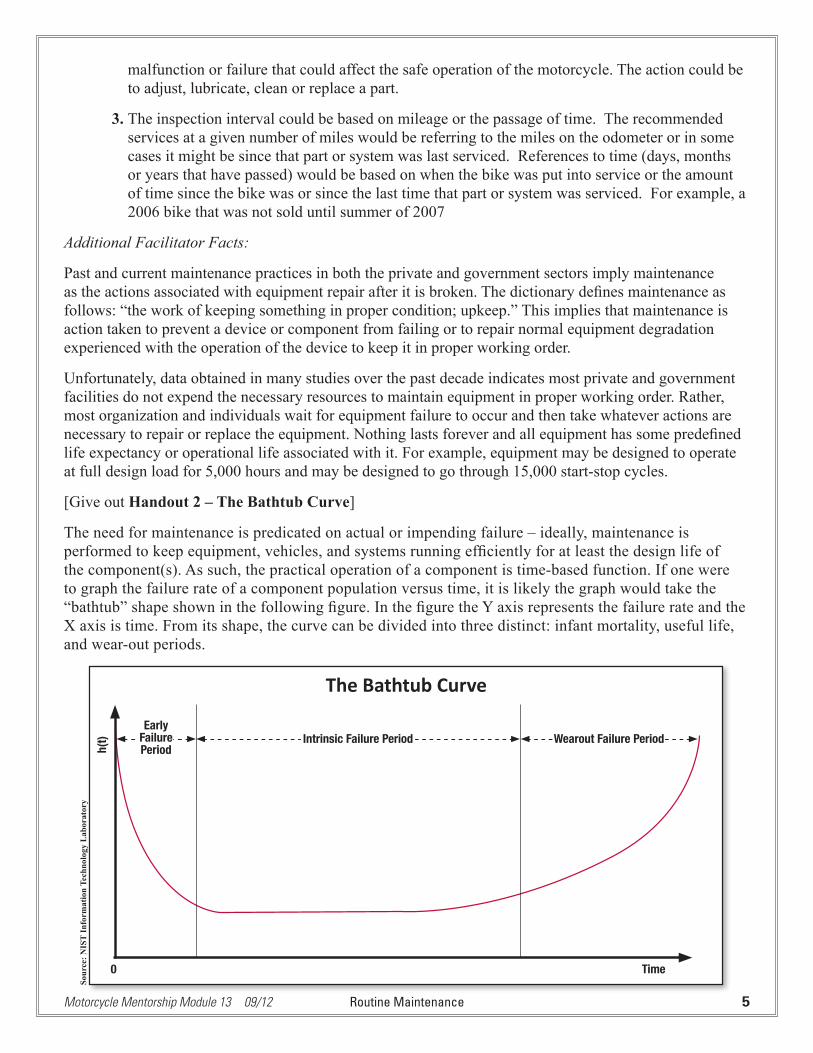
[Give out Handout 2 – The Bathtub Curve]
The need for maintenance is predicated on actual or impending failure – ideally, maintenance is performed to keep equipment, vehicles, and systems running efficiently for at least the design life of the component(s). As such, the practical operation of a component is time-based function. If one were to graph the failure rate of a component population versus time, it is likely the graph would take the “bathtub” shape shown in the following figure. In the figure the Y axis represents the failure rate and the X axis is time. From its shape, the curve can be divided into three distinct: infant mortality, useful life, and wear-out periods.
h(t)
0
Early FailurePeriod
Intrinsic Failure Period Wearout Failure Period
Sour
ce: N
IST
Info
rmat
ion
Tech
nolo
gy L
abor
ator
y
Time
The Bathtub Curve
Motorcycle Mentorship Module 13 09/12 Routine Maintenance 6
The initial infant mortality period of the bathtub curve is characterized by high failure rate followed by a period of decreasing failure. Many of the failures associated with the infant mortality region are linked to poor design, poor installation, or misapplication. The infant mortality period is followed by a nearly constant failure rate period known as useful life. There are many theories on why components fail in this region; most acknowledge that poor operations and maintenance (O&M) often plays a significant role.
Discussion Area 2: Common Parts of a Motorcycle
This is a good time for participants who were able to bring their owner’s manual and shop manuals to use them and share with the other students.
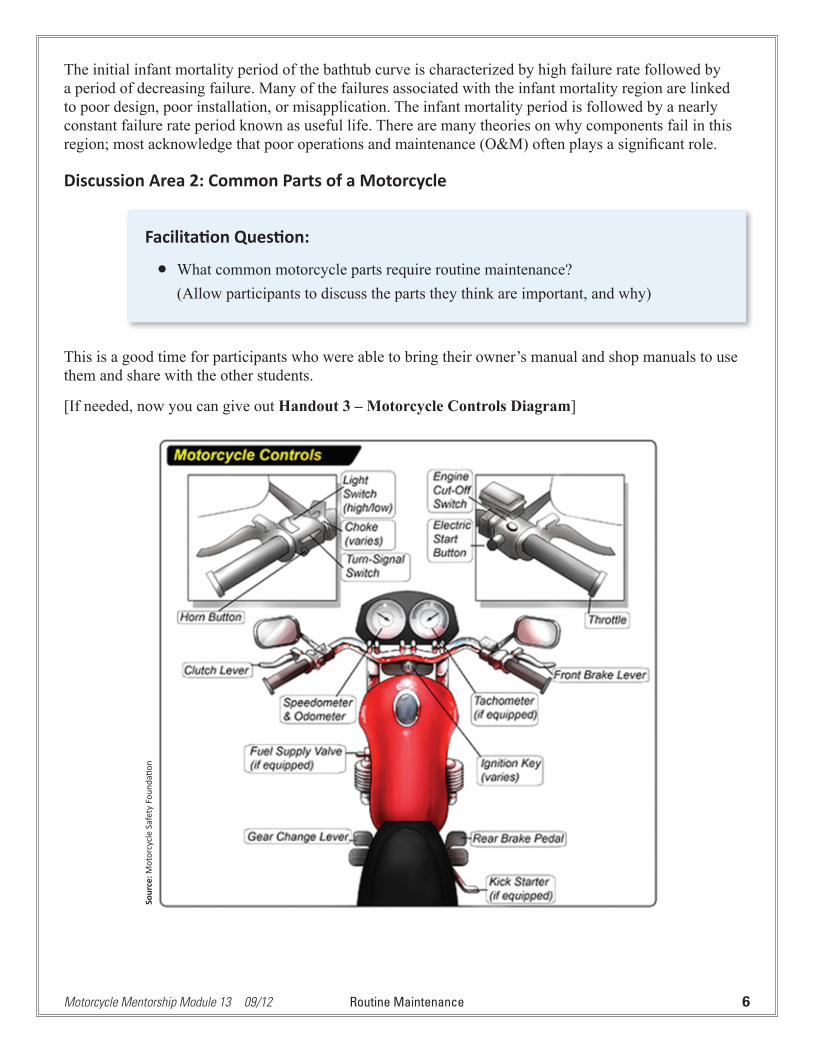
[If needed, now you can give out Handout 3 – Motorcycle Controls Diagram]
Facilitation Question:
• What common motorcycle parts require routine maintenance? (Allow participants to discuss the parts they think are important, and why)
Sour
ce: M
otor
cycl
e Sa
fety
Fou
ndati
on
Motorcycle Mentorship Module 13 09/12 Routine Maintenance 7
Other Suggested Questions:
What is the relationship between safety and primary controls?The primary motorcycle controls are the control devices used by the rider to safely operate the motorcycle. These controls, when manipulated by the rider, accelerate, slow, stop, turn, and swerve the motorcycle at the input of the rider. The handlebar is the most prominent control and is directly related to turning and leaning the motorcycle--several other controls are attached to the handlebar.
The clutch lever controls the clutch plates and is used to control engine power between the transmission and rear wheel – the clutch allows the engine to run while the motorcycle is still. The clutch also assists in smoother gear shifting by separating engine power from the rear wheel.
The front brake lever and rear brake pedal operate the motorcycles independent brake system. Each brake control actuates a brake on the front or rear tire. Some braking systems are partially or wholly dependent by linking and are similar to some car brake systems. The front brake lever is located on the right handle bar grip and the rear brake pedal is located in front of the operator’s foot rest.
The throttle control is part of the right hand-grip and is rotated to increase engine speed – rotating the right hand-grip, towards the rider, will cause the engine to accelerate.
The gearshift lever is located on the left side of the motorcycle near the riders left foot rest. The gearshift lever sets the gear and is a ratchet-type control (i.e. shifting through the gears requires shifting through each gear – shifting into third gear requires shifting into second gear). The shift pattern for most motorcycles is 5 or 6 forward gears where first gear is located by pressing the lever down from neutral – neutral is located between first and second gear and is typically found by lifting the lever half up from first gear.
The rider must understand and comfortably operate all primary controls (without searching or looking for the controls) while riding the motorcycle. Safe riding is contingent on the rider’s ability to operate the primary controls with little or no conscious thought. A well trained, experienced motorcyclist uses well established, faster firing, neural pathways—sometimes known as “muscle memory” to control the motorcycle.
What do we check tire service life for?Tire service life has two important elements for consideration. The first and perhaps most known is tire tread depth. Tire treads are important for riding in the rain or whenever water is present on the roadway. The tire treads allow displaced water to channel into the tread channel and allowing the tire to remain in contact with the road. Whenever the depth of the water exceeds the depth of the tire tread, the tire will hydroplane on top of the water—lifting the motorcycle and tire completely off of the roadway. Whenever tire treads become worn and less than manufacturer determined tolerances, the tire becomes more prone to hydroplaning and requires immediate replacement. Some tires have wear-out indicators within the tire groove and appear as a solid line across the depth of the rain groove when the tire has worn down to that point.
Tire rubber compound age is also a very important safety element. As tires age or undergo heat cycles, the tire compound becomes harder. The harder tire compound becomes the less traction the tire can create through roadway and tire adhesion—hard tires can cause motorcycle skidding and slipping.
How do cables fail or become worn?Cables are mechanical linkages connecting a lever and controlling device. Most cables are made of braided or twisted metal wire strands and are very flexible; however, all metal eventually fatigues and breaks due to flexing, bending, or with constant tension. Hydraulic systems are more prevalent and have somewhat replaced clutch and brake cables. Most all motorcycles use dual cables to operate the throttle.
Motorcycle Mentorship Module 13 09/12 Routine Maintenance 8
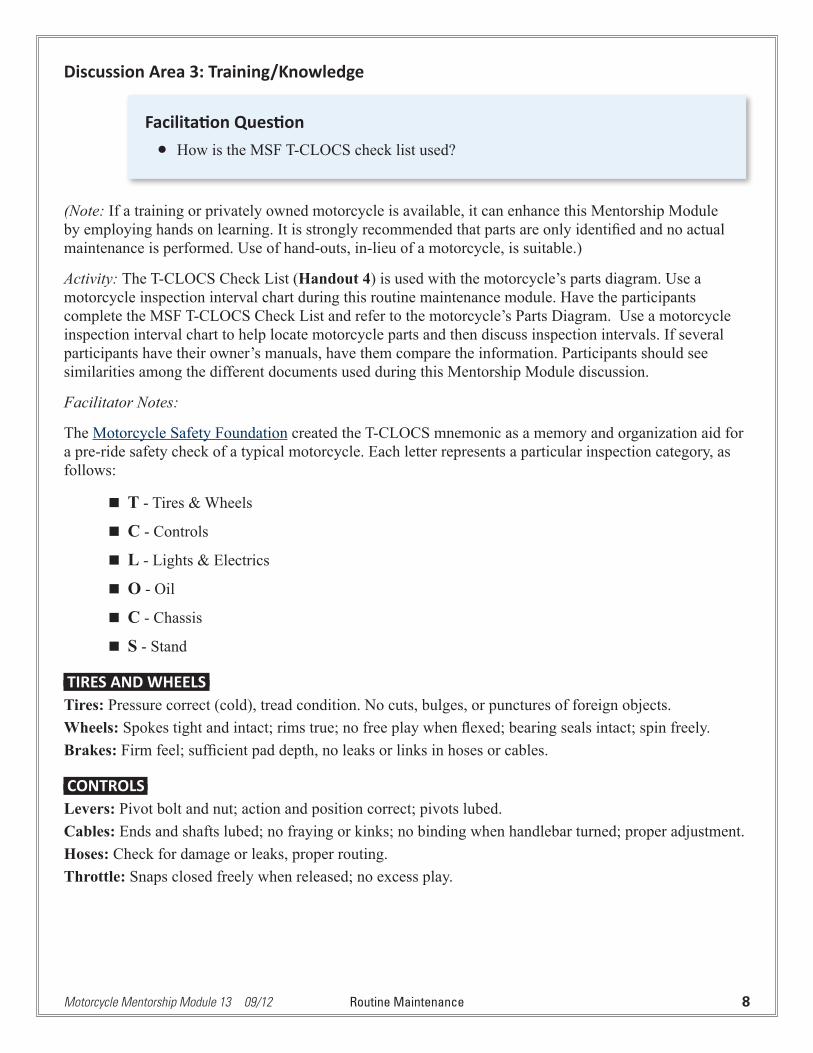
Discussion Area 3: Training/Knowledge
(Note: If a training or privately owned motorcycle is available, it can enhance this Mentorship Module by employing hands on learning. It is strongly recommended that parts are only identified and no actual maintenance is performed. Use of hand-outs, in-lieu of a motorcycle, is suitable.)
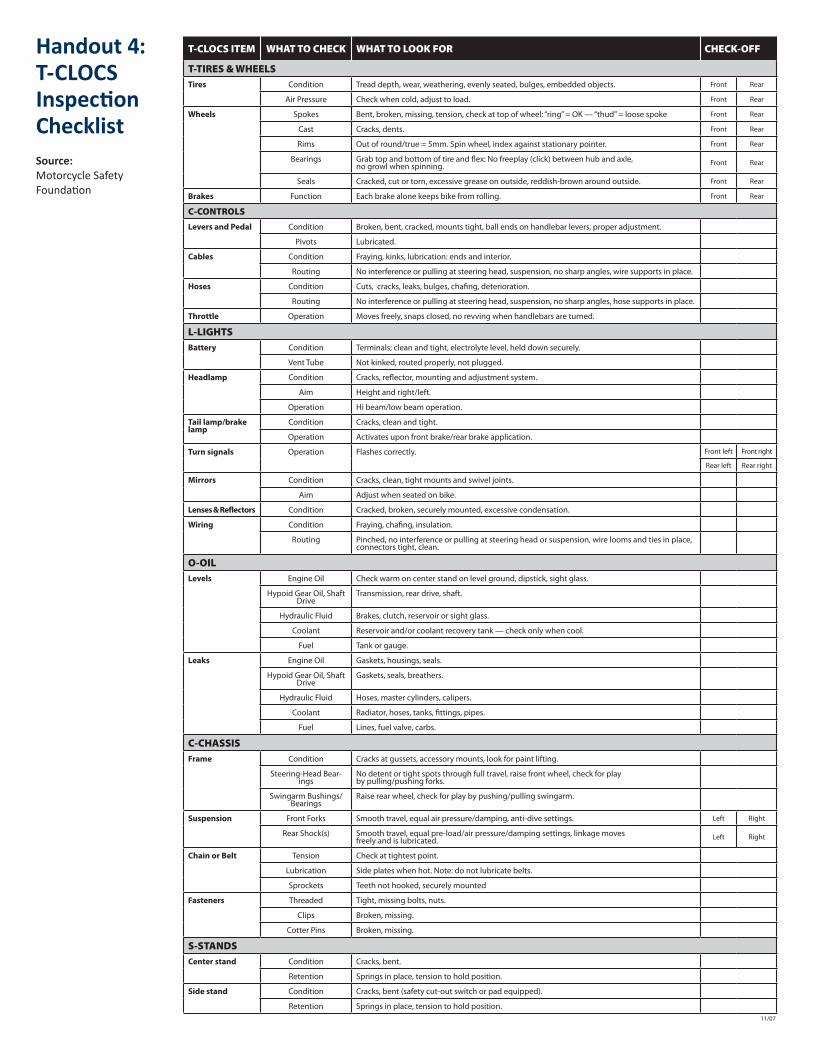
Activity: The T-CLOCS Check List (Handout 4) is used with the motorcycle’s parts diagram. Use a motorcycle inspection interval chart during this routine maintenance module. Have the participants complete the MSF T-CLOCS Check List and refer to the motorcycle’s Parts Diagram. Use a motorcycle inspection interval chart to help locate motorcycle parts and then discuss inspection intervals. If several participants have their owner’s manuals, have them compare the information. Participants should see similarities among the different documents used during this Mentorship Module discussion.
Facilitator Notes:
The Motorcycle Safety Foundation created the T-CLOCS mnemonic as a memory and organization aid for a pre-ride safety check of a typical motorcycle. Each letter represents a particular inspection category, as follows:
■■ T - Tires & Wheels
■■ C - Controls
■■ L - Lights & Electrics
■■ O - Oil
■■ C - Chassis
■■ S - Stand
TIRES AND WHEELSTires: Pressure correct (cold), tread condition. No cuts, bulges, or punctures of foreign objects.Wheels: Spokes tight and intact; rims true; no free play when flexed; bearing seals intact; spin freely.Brakes: Firm feel; sufficient pad depth, no leaks or links in hoses or cables.
CONTROLSLevers: Pivot bolt and nut; action and position correct; pivots lubed.Cables: Ends and shafts lubed; no fraying or kinks; no binding when handlebar turned; proper adjustment.Hoses: Check for damage or leaks, proper routing. Throttle: Snaps closed freely when released; no excess play.
Facilitation Question
• How is the MSF T-CLOCS check list used?
Motorcycle Mentorship Module 13 09/12 Routine Maintenance 9
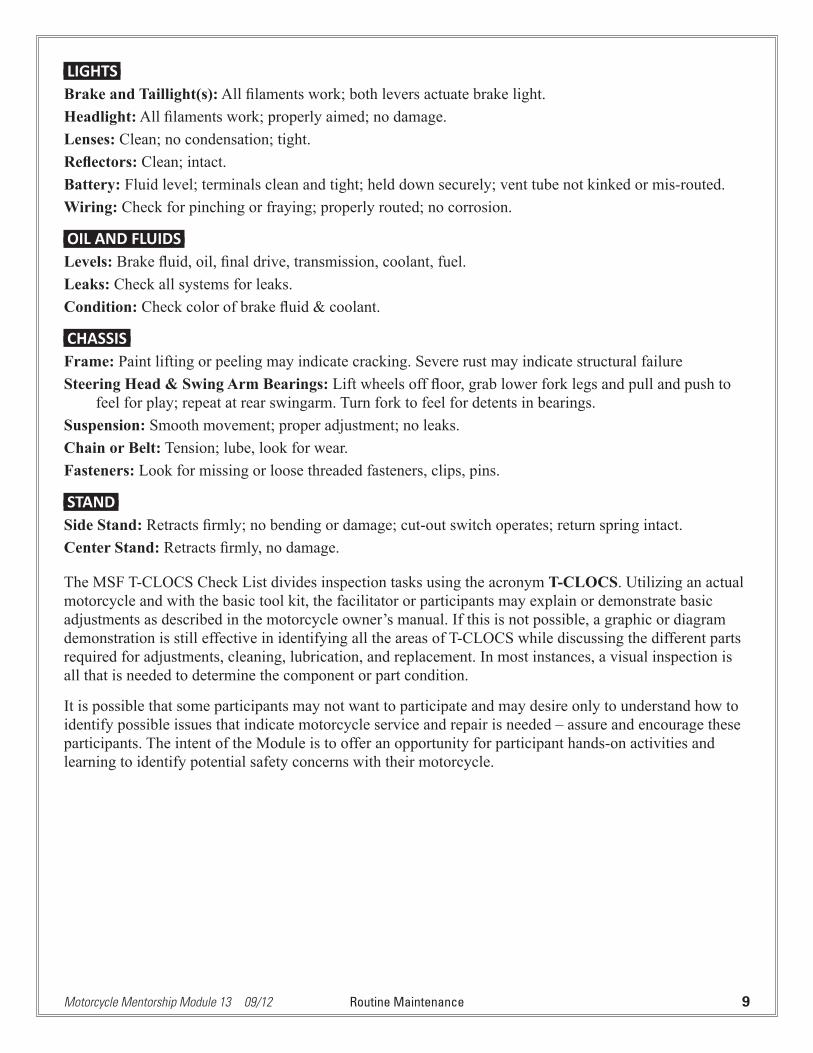
LIGHTSBrake and Taillight(s): All filaments work; both levers actuate brake light.Headlight: All filaments work; properly aimed; no damage.Lenses: Clean; no condensation; tight.Reflectors: Clean; intact.Battery: Fluid level; terminals clean and tight; held down securely; vent tube not kinked or mis-routed.Wiring: Check for pinching or fraying; properly routed; no corrosion.
OIL AND FLUIDSLevels: Brake fluid, oil, final drive, transmission, coolant, fuel.Leaks: Check all systems for leaks.Condition: Check color of brake fluid & coolant.
CHASSISFrame: Paint lifting or peeling may indicate cracking. Severe rust may indicate structural failureSteering Head & Swing Arm Bearings: Lift wheels off floor, grab lower fork legs and pull and push to
feel for play; repeat at rear swingarm. Turn fork to feel for detents in bearings.Suspension: Smooth movement; proper adjustment; no leaks. Chain or Belt: Tension; lube, look for wear.Fasteners: Look for missing or loose threaded fasteners, clips, pins.
STANDSide Stand: Retracts firmly; no bending or damage; cut-out switch operates; return spring intact.Center Stand: Retracts firmly, no damage.
The MSF T-CLOCS Check List divides inspection tasks using the acronym T-CLOCS. Utilizing an actual motorcycle and with the basic tool kit, the facilitator or participants may explain or demonstrate basic adjustments as described in the motorcycle owner’s manual. If this is not possible, a graphic or diagram demonstration is still effective in identifying all the areas of T-CLOCS while discussing the different parts required for adjustments, cleaning, lubrication, and replacement. In most instances, a visual inspection is all that is needed to determine the component or part condition.
It is possible that some participants may not want to participate and may desire only to understand how to identify possible issues that indicate motorcycle service and repair is needed – assure and encourage these participants. The intent of the Module is to offer an opportunity for participant hands-on activities and learning to identify potential safety concerns with their motorcycle.
Motorcycle Mentorship Module 13 09/12 Routine Maintenance 10
Wrap-Up:
Distribute copies of the DSOC Motorcycle Mentorship Module Evaluation form to all participants and request that they deliver or mail the completed form to the Command or Command Safety Office for processing.
Remind everyone to ride safe, and see you at the next Mentorship Meeting.
Suggested Wrap-up Discussion: ■➤ Ask participants how they will apply the knowledge they learned in this Module Topic in the future.
■➤ Does the participant feel they now have the knowledge to perform their own routine maintenance?
■➤ Was the Module Topic what they expected?
■➤ Ask if the knowledge they know now if they feel their motorcycle is in a safe operating condition.
■➤ Was it fun, and did you have a good time with this Module Topic?
Motorcycle Mentorship Module 13 09/12 Routine Maintenance 11
DSOC Motorcycle Mentorship Feedback Form Presenter Name: Date:
Topic/Title: Unit Number:
Please review each statement below and check the response that closely matches your experience in the Mentorship Module today:
1. Please rate the presenter’s performance:
Prepared Not Prepared Engaging Not Engaging Led Discussion Lectured
Comments:
2. I was given opportunities to participate in the module’s discussion
Never Only Once 2-4 Times Many Times Throughout Discussion
Comments:
3. With regard to my personal riding experiences, this discussion was:
Relevant Not Relevant Interesting Not Interesting
Comments:
4. This discussion topic has provided me with specifi c learning points that I can use to be a safer, better informed rider
None One Idea or Fact 2-4 Learning Points 5 or More
Comments:
5. I would be interested in participating in other Motorcycle Mentorship Module discussion topics
Never Again Willing to Try Another Module Would Like to Do Modules Regularly
Comments:
Thank you for your participation. Please make note of any other suggestions or comments below (continue on the back if needed):
Deliver or mail this completed form to the Command or Command Safety Offi ce for processing. Please do not return this form directly to the Module Presenter.
Motorcycle Mentorship Module 13 09/12 Routine Maintenance 12
ResourcesContinued Reading:
Ebeling, Charles E. (1996) An Introduction to Reliability and Maintainability Engineering. New York: McGraw Hill College Division
Higgins, Lindley R.; Brautigam, Dale P.; and Mobley, R. Keith (1994) Maintenance Engineering Handbook, 5th Edition. New York: McGraw Hill
Moubray, John (1997). Reliability-Centered Maintenance, 2nd Edition. New York: Industrial Press
Palmer, Richard D. (1999). Maintenance Planning and Scheduling Handbook. New York: McGraw Hill
Patton, Joseph D. (1994) Maintainability and Maintenance Management. Research Triangle Park, NC: Instrument Society of America
Smith, Anthony M. (1992). Reliability-Centered Maintenanace. New York: McGraw Hill
Williams, John H.; Davies, Alan; and Drake, Paul R. (1994) Condition-Based Maintenance and Machine Diagnostics. New York: Chapman & Hall
Definitions: (As defined for purposes of this module.)
TCLOCS: Checklist for pre-ride motorcycle inspection. Stands for:
Tires and wheels
Cable and controls
Lights and other electrics
Oil and other fluids
Chassis, suspension, frame
Stands, side stand or center stands
Motorcycle Mentorship Module 13 09/12 Routine Maintenance 13
Handout 1 – Sample Maintenance Frequency ChecklistHigh Frequency Maintenance Tire pressure _______ F _______ ROil level – top off with recommended oilCoolant level – if applicableLevers – ends not broken, correct adjustment /free playBrake pedal – proper adjustmentChain – correct free play, no binding, not stretched (Check swing arm or owner’s manual for instructions)
Check for fuel leaks at fuel valve, lines and tankBattery – correctly secured, properly serviced, and filled with distilled water (if applicable)Mirrors (if fitted) correctly adjustedIdle setLights working, signals (if fitted) in working conditionCheck all nuts, bolts and fasteners Test rideBike passes T-CLOCS. If not, reason: ____________________________________________________
Periodic MaintenanceOil and filter changedChain, belt, or driveshaft lubed and adjusted as applicableValves adjustedCables lubed / free play adjustedBrake fluid filled / flushed as neededBrakes adjustedAir filter cleanedIdle setSteering head bearings adjusted / not notched or looseCheck all nuts, bolts and fasteners Test rideBike passes T-CLOCS. If not, reason: ____________________________________________________
Bike will need:
Tires Battery Chain Oil Change Valve adjust
Major mechanical Other Other/Notes
Now
1-3 Months
3-6 Months
9 M-Next SeasonOther/Notes
Motorcycle Mentorship Module 13 09/12 Routine Maintenance 14
Handout 2 – The Bathtub Curveh(
t)
0
Early FailurePeriod
Intrinsic Failure Period Wearout Failure Period
Sour
ce: N
IST
Info
rmati
on T
echn
olog
y La
bora
tory
Time
Motorcycle Mentorship Module 13 09/12 Routine Maintenance 15
Handout 3 – Motorcycle Controls
Sour
ce: M
otor
cycl
e Sa
fety
Fou
ndati
on
T-CLOCS ITEM WHAT TO CHECK WHAT TO LOOK FOR CHECK-OFF
T-TIRES & WHEELSTires Condition Tread depth, wear, weathering, evenly seated, bulges, embedded objects. Front Rear
Air Pressure Check when cold, adjust to load. Front Rear
Wheels Spokes Bent, broken, missing, tension, check at top of wheel: “ring” = OK — “thud” = loose spoke Front Rear
Cast Cracks, dents. Front Rear
Rims Out of round/true = 5mm. Spin wheel, index against stationary pointer. Front Rear
Bearings Grab top and bottom of tire and flex: No freeplay (click) between hub and axle, no growl when spinning. Front Rear
Seals Cracked, cut or torn, excessive grease on outside, reddish-brown around outside. Front Rear
Brakes Function Each brake alone keeps bike from rolling. Front Rear
C-CONTROLSLevers and Pedal Condition Broken, bent, cracked, mounts tight, ball ends on handlebar levers, proper adjustment.
Pivots Lubricated.
Cables Condition Fraying, kinks, lubrication: ends and interior.
Routing No interference or pulling at steering head, suspension, no sharp angles, wire supports in place.
Hoses Condition Cuts, cracks, leaks, bulges, chafing, deterioration.
Routing No interference or pulling at steering head, suspension, no sharp angles, hose supports in place.
Throttle Operation Moves freely, snaps closed, no revving when handlebars are turned.
L-LIGHTSBattery Condition Terminals; clean and tight, electrolyte level, held down securely.
Vent Tube Not kinked, routed properly, not plugged.
Headlamp Condition Cracks, reflector, mounting and adjustment system.
Aim Height and right/left.
Operation Hi beam/low beam operation.
Tail lamp/brake lamp
Condition Cracks, clean and tight.
Operation Activates upon front brake/rear brake application.
Turn signals Operation Flashes correctly. Front left Front right
Rear left Rear right
Mirrors Condition Cracks, clean, tight mounts and swivel joints.
Aim Adjust when seated on bike.
Lenses & Reflectors Condition Cracked, broken, securely mounted, excessive condensation.
Wiring Condition Fraying, chafing, insulation.
Routing Pinched, no interference or pulling at steering head or suspension, wire looms and ties in place, connectors tight, clean.
O-OILLevels Engine Oil Check warm on center stand on level ground, dipstick, sight glass.
Hypoid Gear Oil, Shaft Drive
Transmission, rear drive, shaft.
Hydraulic Fluid Brakes, clutch, reservoir or sight glass.
Coolant Reservoir and/or coolant recovery tank — check only when cool.
Fuel Tank or gauge.
Leaks Engine Oil Gaskets, housings, seals.
Hypoid Gear Oil, Shaft Drive
Gaskets, seals, breathers.
Hydraulic Fluid Hoses, master cylinders, calipers.
Coolant Radiator, hoses, tanks, fittings, pipes.
Fuel Lines, fuel valve, carbs.
C-CHASSISFrame Condition Cracks at gussets, accessory mounts, look for paint lifting.
Steering-Head Bear-ings
No detent or tight spots through full travel, raise front wheel, check for play by pulling/pushing forks.
Swingarm Bushings/Bearings
Raise rear wheel, check for play by pushing/pulling swingarm.
Suspension Front Forks Smooth travel, equal air pressure/damping, anti-dive settings. Left Right
Rear Shock(s) Smooth travel, equal pre-load/air pressure/damping settings, linkage moves freely and is lubricated. Left Right
Chain or Belt Tension Check at tightest point.
Lubrication Side plates when hot. Note: do not lubricate belts.
Sprockets Teeth not hooked, securely mounted
Fasteners Threaded Tight, missing bolts, nuts.
Clips Broken, missing.
Cotter Pins Broken, missing.
S-STANDSCenter stand Condition Cracks, bent.
Retention Springs in place, tension to hold position.
Side stand Condition Cracks, bent (safety cut-out switch or pad equipped).
Retention Springs in place, tension to hold position.
T-CLOCSSM Inspection Checklist
11/07
Handout 4: T-CLOCS Inspection Checklist Source: Motorcycle Safety Foundation
ACKNOWLEDGMENTS This module was developed collaboratively through the Defense Safety Oversight Council’s ( D S O C ) Private Motor Vehicle Accident Reduction Task Force (PMV TF), Service Safety Centers, Line Leaders, Military Riders, National Safety Council, and the Motorcycle Safety Foundation. The DSOC wishes to recognize the organizations and the Service Men and Women who made this Motorcycle Mentoring Module possible. Some of the principal contributors to this effort include the following:
Mr. Joseph J. Angello, Jr., DSOC Executive Secretary Major General Margaret Woodward, USAF, PMV TF Chair Colonel John “Odie” Slocum, USAF, PMV TF Vice-Chair Major Alejandro Ramos, USAF, PMV TF Executive Secretary Mr. Jerry Aslinger, DSOC Program Manager
Captain Richard D. Jones, US Naval Safety Center Mr. Walter Beckman, US Army Ground Driving Task Force Mr. Peter Hill, HQMC SD, PMV-2 Working Group Chair Mr. John Waltman, HQMC SD Mr. Dave Kerrick, US Naval Safety Center Mr. Don Borkowski, US Naval Safety Center Mr. Bill Parsons, USAF Safety Center Mr. Mark Erpelding, USAF Safety Center Mr. William Walkowiak, USAF Safety Center Mr. Arthur Albert, USAF Safety Center Mr. Dale Wisnieski, USCG Traffic and Recreational Safety Ms. Wendy Medley, US Joint Bases Subject Matter Expert Ms. Debra Ann Ferris, National Safety Council Dr. Ray Ochs, Motorcycle Safety Foundation Ms. Karen F. Nelson, Concurrent Technologies Corp. Mr. Robert A. Gardiner, Concurrent Technologies Corp. Mr. Steve Kurtiak, Global Support Services Mr. Zack Sionakides, Cape Fox Professional Services