rules of playkhybergames.com/legionwargames/docs/mws_rules_only.pdf · 2018-11-03 · maori wars...
TRANSCRIPT
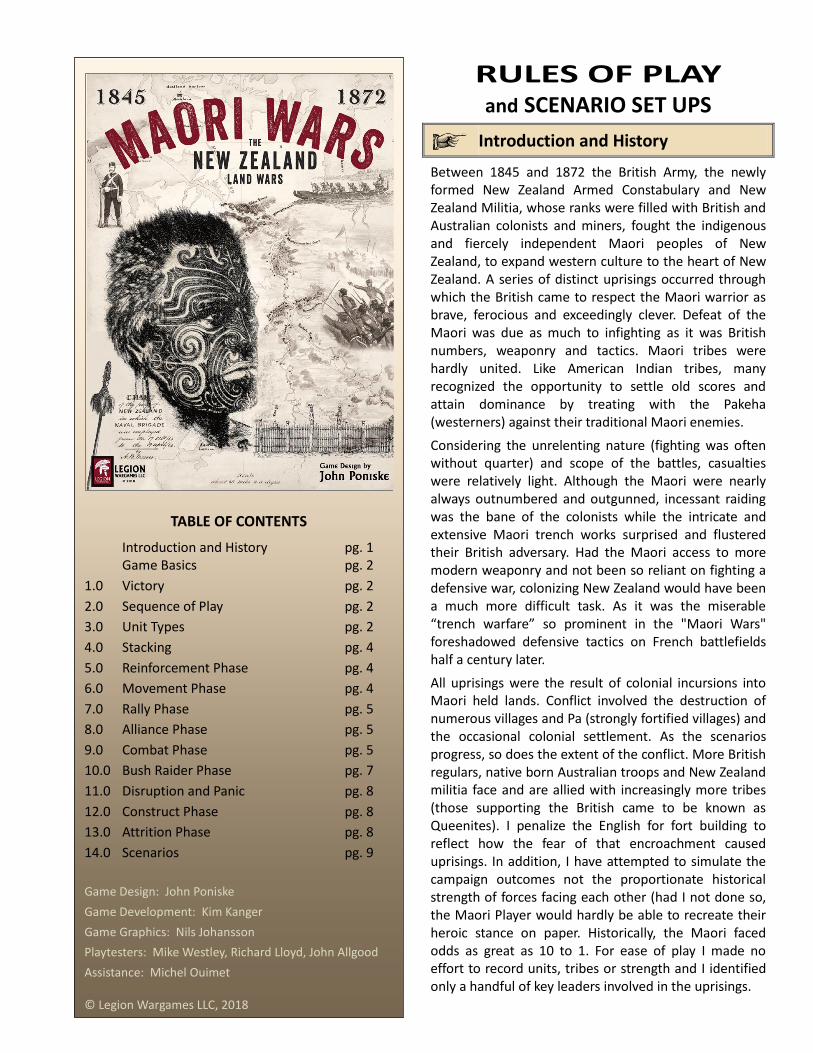
RULES OF PLAY and SCENARIO SET UPS
Introduction and History
Between 1845 and 1872 the British Army, the newly formed New Zealand Armed Constabulary and New Zealand Militia, whose ranks were filled with British and Australian colonists and miners, fought the indigenous and fiercely independent Maori peoples of New Zealand, to expand western culture to the heart of New Zealand. A series of distinct uprisings occurred through which the British came to respect the Maori warrior as brave, ferocious and exceedingly clever. Defeat of the Maori was due as much to infighting as it was British numbers, weaponry and tactics. Maori tribes were hardly united. Like American Indian tribes, many recognized the opportunity to settle old scores and attain dominance by treating with the Pakeha (westerners) against their traditional Maori enemies.
Considering the unrelenting nature (fighting was often without quarter) and scope of the battles, casualties were relatively light. Although the Maori were nearly always outnumbered and outgunned, incessant raiding was the bane of the colonists while the intricate and extensive Maori trench works surprised and flustered their British adversary. Had the Maori access to more modern weaponry and not been so reliant on fighting a defensive war, colonizing New Zealand would have been a much more difficult task. As it was the miserable “trench warfare” so prominent in the "Maori Wars" foreshadowed defensive tactics on French battlefields half a century later.
All uprisings were the result of colonial incursions into Maori held lands. Conflict involved the destruction of numerous villages and Pa (strongly fortified villages) and the occasional colonial settlement. As the scenarios progress, so does the extent of the conflict. More British regulars, native born Australian troops and New Zealand militia face and are allied with increasingly more tribes (those supporting the British came to be known as Queenites). I penalize the English for fort building to reflect how the fear of that encroachment caused uprisings. In addition, I have attempted to simulate the campaign outcomes not the proportionate historical strength of forces facing each other (had I not done so, the Maori Player would hardly be able to recreate their heroic stance on paper. Historically, the Maori faced odds as great as 10 to 1. For ease of play I made no effort to record units, tribes or strength and I identified only a handful of key leaders involved in the uprisings.
TABLE OF CONTENTS
Introduction and History pg. 1 Game Basics pg. 2
1.0 Victory pg. 2
2.0 Sequence of Play pg. 2
3.0 Unit Types pg. 2
4.0 Stacking pg. 4
5.0 Reinforcement Phase pg. 4
6.0 Movement Phase pg. 4
7.0 Rally Phase pg. 5
8.0 Alliance Phase pg. 5
9.0 Combat Phase pg. 5
10.0 Bush Raider Phase pg. 7
11.0 Disruption and Panic pg. 8
12.0 Construct Phase pg. 8
13.0 Attrition Phase pg. 8
14.0 Scenarios pg. 9
Game Design: John Poniske
Game Development: Kim Kanger
Game Graphics: Nils Johansson
Playtesters: Mike Westley, Richard Lloyd, John Allgood
Assistance: Michel Ouimet © Legion Wargames LLC, 2018

MAORI WARS
Page | 2 LEGION WARGAMES, LLC ©2018
Game Basics
One player will represent the British and her allies. The other player will represent hostile Maori. When rules refer to the Maori, it only refers to the hostile side.
Scale is 10 miles (16 km) per hex and about 2 months per Game Turn. Some of the terms being used:
VP = Victory Point
mp = movement point
DRM = Die Roll Modification
BD Chit is a Battle Dispatch Chit
Maori Wars contains the following components:
1 Map (22" x 34")
2 Counter sheets - (.6" x 354 total)
1 Rules/Scenario Booklet
4 Player aid cards
1 Bush Raider Map (8.5" x 11")
1 Game history sheet
1 Die (six-sided)
1.0 Victory
Victory Points (VP)
Set the Victory Point Marker to ”0” on the Victory Point track at the start of each scenario. Victory Points are awarded throughout the game (see Victory Points list). Move the marker towards your side on the track whenever you gain a VP, or whenever your opponent loses a VP.
How do you win?
End the game immediately when…
Either player wins decisively by being the first to reach 9 Victory Points (VP)
The British Player wins decisively by eliminating all Maori Villages and Pa (regardless of any remaining Maori units on the map)
The Maori player wins decisively by eliminating all Settlements (Forts do not matter)
If neither player has won decisively by the end of the last Game Turn, then the player that has Victory Points checks the table below to see the level of victory:
0-1 Point Draw
2-5 Points Minor Victory
6-8 Points Major Victory
2.0 Sequence of Play
Maori Wars is played through a number of Game Turns, divided into phases played in a certain order. Game Turn Phases are:
Maori Player Turn
1) Reinforcement Phase
Set up any automatic reinforcements due to arrive this Game Turn. In addition, one unit from the Reinforcement Box is also received.
2) Movement Phase
All, some or none of Maori units may be moved.
3) Rally Phase
Maori leaders may attempt to rally Disrupted Maori units.
4) Alliance Phase
Maori Player may negotiate with Neutral Villages.
5) Combat Phase:
Maori units may attack enemy units.
6) Bush Raider Phase
The Maori Player may Raid enemy units or move its units between the main map and the Bush Raider Box/Map.
7) Construction Phase:
Maori Player may build one Village, or upgrade one Village to a Pa.
8) Attrition Phase:
Maori units might suffer attrition.
British Player Turn
The British player will then perform the same sequence of phases, but with some minor differences. Upon the completion of both Player Turns, the Game Turn Marker is advanced one space on the Game Turn Track. If it was the last Game Turn, determine victory, if any.
3.0 Unit Types
STRUCTURES Settlements, Villages, Forts, Pa (Maori “Fort”), and Towns printed on the map, will be called Structures when referred to in general. They render VP to the opponent if destroyed by whatever reason.
New Zealand Land Wars
www.legionwargames.com P a g e | 3
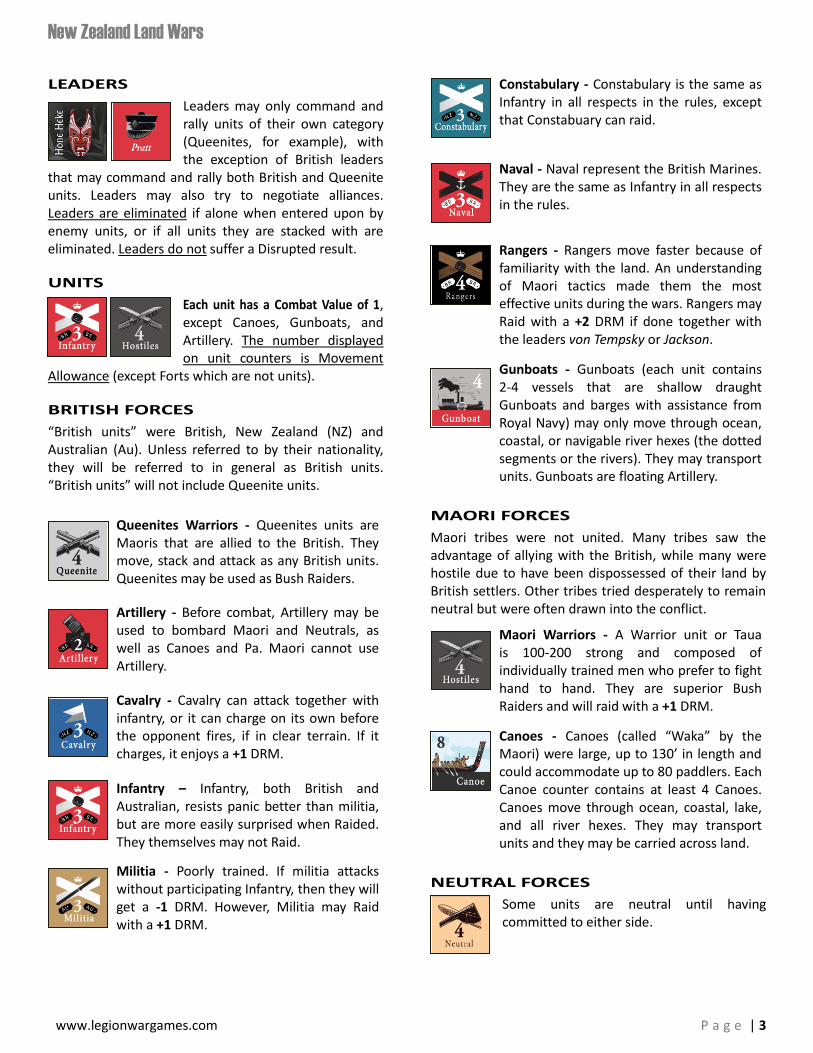
LEADERS
Leaders may only command and rally units of their own category (Queenites, for example), with the exception of British leaders
that may command and rally both British and Queenite units. Leaders may also try to negotiate alliances. Leaders are eliminated if alone when entered upon by enemy units, or if all units they are stacked with are eliminated. Leaders do not suffer a Disrupted result.
UNITS
Each unit has a Combat Value of 1, except Canoes, Gunboats, and Artillery. The number displayed on unit counters is Movement
Allowance (except Forts which are not units).
BRITISH FORCES
“British units” were British, New Zealand (NZ) and Australian (Au). Unless referred to by their nationality, they will be referred to in general as British units. “British units” will not include Queenite units.
Queenites Warriors - Queenites units are Maoris that are allied to the British. They move, stack and attack as any British units. Queenites may be used as Bush Raiders.
Artillery - Before combat, Artillery may be used to bombard Maori and Neutrals, as well as Canoes and Pa. Maori cannot use Artillery.
Cavalry - Cavalry can attack together with infantry, or it can charge on its own before the opponent fires, if in clear terrain. If it charges, it enjoys a +1 DRM.
Infantry – Infantry, both British and Australian, resists panic better than militia, but are more easily surprised when Raided. They themselves may not Raid.
Militia - Poorly trained. If militia attacks without participating Infantry, then they will get a -1 DRM. However, Militia may Raid with a +1 DRM.
Constabulary - Constabulary is the same as Infantry in all respects in the rules, except that Constabuary can raid.
Naval - Naval represent the British Marines. They are the same as Infantry in all respects in the rules.
Rangers - Rangers move faster because of familiarity with the land. An understanding of Maori tactics made them the most effective units during the wars. Rangers may Raid with a +2 DRM if done together with the leaders von Tempsky or Jackson.
Gunboats - Gunboats (each unit contains 2-4 vessels that are shallow draught Gunboats and barges with assistance from Royal Navy) may only move through ocean, coastal, or navigable river hexes (the dotted segments or the rivers). They may transport units. Gunboats are floating Artillery.
MAORI FORCES
Maori tribes were not united. Many tribes saw the advantage of allying with the British, while many were hostile due to have been dispossessed of their land by British settlers. Other tribes tried desperately to remain neutral but were often drawn into the conflict.
Maori Warriors - A Warrior unit or Taua is 100-200 strong and composed of individually trained men who prefer to fight hand to hand. They are superior Bush Raiders and will raid with a +1 DRM.
Canoes - Canoes (called “Waka” by the Maori) were large, up to 130’ in length and could accommodate up to 80 paddlers. Each Canoe counter contains at least 4 Canoes. Canoes move through ocean, coastal, lake, and all river hexes. They may transport units and they may be carried across land.
NEUTRAL FORCES
Some units are neutral until having committed to either side.

MAORI WARS
Page | 4 LEGION WARGAMES, LLC ©2018
4.0 Stacking
You may stack up to 4 units in the same hex. But the British (with or without Queenite units) may only stack up to 2 units if in a rough terrain hex. Structures, Leaders, Canoes, Gunboats, and Artillery units stack for free. Any unit that is carried by a Gunboat or Canoe is not included in the stacking limit. But as soon as they debark, they are.
Stacking restrictions are enforced after each Movement Phase and after each Combat Phase. If a hex is over-stacked, then any unit(s) that exceeds the stacking limit is moved by the opponent into any adjacent hex within stacking limits. The hex may not be occupied by any unit or Structure that belongs to the opponent, or contain a terrain that the unit is not permitted to enter. Eliminate any exceeding unit(s), owner’s choice, if it is not possible to move them.
5.0 Reinforcement Phase
A player may bring in 1 unit (2 units in some scenarios) from the Reinforcement Box during the Reinforcement Phase, unless that unit would be in excess to what the Maori/Queenite can supply (see rule 13.0). If it is, then it cannot be brought in (automatic Reinforcements always arrive though). Extra reinforcements may turn up by playing a "Reinforcements" BD-Chit during combat. In addition, there may also be automatic reinforcements. If a reinforcement must arrive at a designated hex that is fully stacked, then it may be placed in an adjacent hex that is within stacking limit and not adjacent to an enemy unit. If not possible, place it, if British, as close as possible on a coastal hex within stacking limit and not adjacent to an enemy unit, or, if Maori, in the Reinforcement Box. Unless specified, then…
The Maori player places any reinforcements in any friendly Village or Pa, within stacking limit.
The British player places within the designated area of the scenario and within stacking limit, any…
New Zealand units (Militia, Constabulary, Rangers) in any friendly Settlement, Town, or Fort
Queenite units in any Queenite Village or Pa
Remaining British units in any Town
6.0 Movement Phase
The Phasing Player may move all, some or none of its units and leaders. All leaders have a Movement Point Value of 4. A counter’s movement must be completed before moving another one. Movement points (mp) are expended as a counter moves from hex to hex, paying movement cost for the terrain in each hex it enters (see The Effects of Terrain chart). A counter may only enter a hex if it has enough Movement points left to pay for it. Only Canoes and Gunboats (or those transported by them) may cross an all-water hexside (it includes dashed lake hexsides). You may not enter a hex that contains an enemy Structure or unit (e.g. Maori cannot enter Towns, they must attack them). A unit that enters a sole enemy leader will eliminate him (remove him from the game). A sole leader may share the same hex as an enemy sole leader. Both sides may pass through a hex that contains Neutral counters without eliminating anything, but may not end their movement there.
Sappers If the scenario includes the Sap Marker, then it may be placed, at start of a British Movement phase, on any British unit that is adjacent to a Maori Pa. Once placed, it may
not be moved or removed. Turn the arrow towards an adjacent Pa. The Pa is destroyed and replaced with a Village at the start of the next British Movement phase. Any Maori units and leaders in the Pa are not affected. Maori unit(s) that occupies a Sap marker will get +1 DRM in their defense.
Canoes and Gunboats
Canoes and Gunboats can move by themselves. Canoes which have can, by paying 1mp per hex, enter any ocean or coastal
hex, or enter a hex along a river or across a dashed lake hexside. Gunboats can move from a navigable river hex (those that are dotted) to an adjacent such hex along the same river, by paying 1mp per hex. A Gunboat pays 0 mp when moving from a coastal hex to any other such hex on the map. Gunboats and Canoes cannot move by themselves across a land hexside (Canoes can be carried). Gunboats and Canoes may pass through (if moving from a coastal/ocean hex) but not stop in an enemy occupied coastal hex. Gunboats may pass through an enemy occupied navigable river hex, but not stop there. Canoes may not enter an enemy occupied river or lake hex. Gunboats and Canoes cannot end their movement, retreat or evasion in an ocean hex.

New Zealand Land Wars
www.legionwargames.com P a g e | 5
Canoes may be carried by a friendly unit (not by any British unit) across land. A unit's Movement Value is reduced by one (1) if it carries a Canoe. A Canoe in an all-land hex cannot retreat, advance or evade. Destroy the Canoe if there is no carrying unit stacked with the Canoe (no VP for the British player).
A non-Disrupted Gunboat or Canoe that has not moved already, can transport up to 2 friendly units and any number of leaders to any reachable hex and disembark them there. A unit/leader pays 2mp to be transported and disembarked (it must disembark). Any remaining points it has may be used before or after (or both) it is transported.
You may enter a sole enemy Canoe (but not with just another Canoe) and capture it. Exchange the Canoe for one of yours that you have off-map. If a British unit without the presence of a Queenite unit enters a Maori Canoe, then the Canoe is destroyed instead and British player gains 1 VP. Canoes may also be destroyed by its owner anytime during the owner’s movement phase (presence of a unit is not necessary). No VP for the British player in this case.
Maori units may enter a sole Gunboat, but a Gunboat is never captured, it retreats instead. If friendly units retreat or are eliminated, retreat any Gunboat in the same hex.
7.0 Rally Phase
The phasing player may try to rally all its Disrupted units. Remove the “Disrupted Marker” if successful. Regarding Disrupted structures, see rule 12.0. A leader will
increase the chance for a single Disrupted unit to rally if they share the same hex, or the same Territory in the Bush Raider Box/Map (a leader in the Bush Raider Box/ Map will not be able to rally a unit that is still on the main map). Roll a die for each unit:
A Disrupted unit will rally on a die roll of 6
A British leader will rally a single British or Queenite unit on a die roll of 5 or more
Von Tempsky and Jackson will each rally a single Ranger unit on a die roll of 4 or more
A Queenite leader will rally a single Queenite unit on a die roll of 4 or more
A Maori leader will rally a single Maori unit on a die roll of 4 or more
8.0 Alliance Phase
Any leader adjacent to a Neutral Village may attempt an Alliance Negotiation. See the Alliance Negotiation table. For each leader attempting an alliance negotiation, roll one die and read the result from the Negotiation Table. The die roll may be modified as below:
A sole British leader has a +1 DRM (no DRM if there are any units or Structure stacked with the leader)
Maori leaders have +1 DRM (with or without units)
Each leader may negotiate with only one neutral Village per phase, and each neutral Village may only be negotiated with once per phase. If Neutrals ally with you, replace the neutral Structure, its unit(s) and leader with your equivalent (Maori or Queenite). If Neutrals ally with your opponent as a result of your negotiation, then not only do you replace the neutral counters with your opponent’s, but your opponent will also gain 1VP. British player may during Bombardment phase, try to bombard Neutrals into an alliance (see rule 9.0, step 4). After a negotiation, you may move a leader that is itself (sole) in its hex, to any friendly unit within 3 hexes.
9.0 Combat Phase
All units in the game have a strength value of “1”, except Canoes, Gunboats, and Artillery which have no strength and do not participate in any attack. Gunboats and Artillery have their own Bombardment step.
Phasing player may now attack enemy occupied hexes with any adjacent non-Disrupted units. Each attack is referred to as a ”single combat”. No unit is required to attack. Units may combine their strength values against any single hex with enemy unit(s), as long as all are adjacent to that hex. You may attack the same hex several times, but it must be with different units in each single combat. Units stacked together may not attack different hexes.
The total strength on both sides that participate in a single combat (it must include all units in defending hex, including Disrupted units) are compared to determine if the attacking force is the “Lesser Force” or the “Greater Force” on the Combat Results Table. If both sides are equally strong, then use “Equal Force”. An unoccupied Pa will roll on ”Lesser Force” column when defending. A Fort, unoccupied or not, will roll on the table when defending, but never below a strength of 2 when comparing with the attacker. An unoccupied Village/ Settlement/Town has no strength and will not roll.
MAORI WARS
Page | 6 LEGION WARGAMES, LLC ©2018
Elimination
Any eliminated unit is removed and placed in their respective Reinforcement Box. Any eliminated leader is removed from the game. Canoes and Gunboats cannot be taken as a loss to satisfy any combat result.
Retreat
A retreating unit may only retreat into a hex it is allowed to enter. If not possible, then it is eliminated. A unit in a Fort/Pa that gets a retreat result may retreat but is never forced to do so. Leaders may only retreat together with a retreating unit. A retreating Gunboat or Canoe must retreat to the closest eligible hex along a route of hexes it may enter.
Combat Procedure
Each single combat will go through the following steps, in the order shown below:
1) Declaration of an Attack
The phasing player declares a single combat by choosing an enemy occupied hex as target and which attacking units that will participate in the combat. Neither player may attack a neutral Village/unit (except Bombardment, see step 4).
2) Evasion Attempt
Non-Disrupted defending unit(s) may attempt to evade by rolling a single die (per stack). If successful, they will retreat one hex (to different hexes, if so wished). An evading Canoe or Gunboat may retreat to the closest eligible hex along a route of hexes it may enter. The defending player may choose to allow one or more units to remain while others retreat. An Evasion is successful on a result of…
4-6 if the evading units are Maori and there are no Queenites or Rangers units attacking.
5-6 if the evading units are Maori and there are Queenites or Rangers units attacking.
5-6 if the units are Rangers and/or Queenites, or if there is a British leader stacked with any units.
6 if the evading unit is a single non-Ranger British unit (a stack of two or more British units cannot evade).
A unit that successfully evades may not be attacked during the same phase it evades. The participating attacking units may attack whatever remains in the defending hex. If the defending hex is vacant, except perhaps for a Settlement/Village/Town, then they may not attack again this phase, even though there was no combat, but they may advance into the hex.
3) Battle Dispatch Chits (BD-chits)
All BD-chits are placed in a cup, from which the defender picks one and consults the Battle Dispatches Report Chart. Implement the text. Treat a
BD-chit as an “According to Plan” chit if the text cannot be implemented. Once a BD-chit is played, it is put aside unless noted in special instructions. Return all chits that do not have an asterisk to the cup when the cup is empty. If a drawn BD-chit results in a combat situation somewhere else, finish the ongoing combat first before proceeding with the one caused by the chit. But, the combat caused by the chit has to be conducted before you continue with any other combat that you may have in mind.
4) Bombardment
A non-Disrupted Artillery or Gunboat may bombard an adjacent hex, with or without presence of other units. Gunboats can only bombard if there is a “water connection” between target and Gunboat (same river etc). A target river hex may be non-navigable. A hex may only be bombarded once per Combat phase, and there is no advantage if two or more Artillery/Gunboats participate (one is enough). Find the column on Bombardment table that shows your chosen target (you cannot ”mix” different kinds of targets). Roll a die and apply any result. A “Removed” Pa is replaced with a Village.
Britain may bombard Neutral Villages/units to intimidate them into an alliance by rolling on the “Neutral Maori” column. This is not considered an attack. It is just a forceful negotiation.
5) Cavalry Charge
Non-Disrupted attacking Cavalry may opt to charge now instead of joining any attack later in step 7. Total their strength values and compare it with the defending strength. A Cavalry charge will get a +1 DRM. Cavalry may only charge in clear terrain, but not against a Pa, occupied or not (against a Village or Maori-occupied Town is allowed). Any Combat result is immediately applied to the non-phasing player.
6) Defensive Counter-Attack
All non-Disrupted defending units (except Artillery/ Gunboats) may roll on the Combat Results Table in a defensive Counter-Attack. Any defending unoccupied Fort/Pa may do this as well. Defending player may do this before each and every attack declared by phasing player.
New Zealand Land Wars
www.legionwargames.com P a g e | 7
While phasing attacking player may not use the same unit more than once, defending non-phasing player may Counter-Attack with the same unit(s) over and over again as long as it is the target of the phasing player’s repeated attacks. The defender may not split its force like the attacker can. You may not Counter-Attack twice during a single combat. A Counter-attack must be directed against a chosen hex that contains at least one unit that will participate in the declared coming Attack.
When comparing strength, add all phasing units in the chosen hex (even Disrupted units and those that will not participate in the coming Attack). Decide what column. Roll one die and apply any DRM (no DRM from any terrain or Fort/Pa). Any result is immediately applied to the phasing player’s unit(s). Counter-Attacking units may not advance.
7) Attack
Phasing player may attack with all non-Disrupted declared units. Roll one die and apply any DRM. You will not get a DRM for both rough and Fort/Pa. If both exist in a hex, then you will get a DRM for the Fort/Pa only. Apply any Combat results.
An attacker may advance into a defending hex if it becomes vacant, but it may also advance into an unoccupied structure if the result is anything but “No Effect”. If so, remove the structure and do not replace it with anything else (exception: Towns cannot be eliminated). If you advance into a Fort/Pa, not only do you receive 1VP for that, but also 1VP for the Settlement/Village that should have replaced the removed Fort/Pa. So in total, 2VP.
Exception: A Fort on a Town is never replaced by a Settlement. In this case, it will give you 1VP for the Fort plus 2VP for occupying the Town.
An attacker uses the following DRMs when attacking a Fort/Pa:
-2 DRM when the Fort/Pa is occupied
-1 DRM when the Fort/Pa is not occupied.
A defending player may try letting a non-Disrupted Fort/Pa absorb a hit instead of a unit. Roll a die. If the result is 4-6, replace a Fort with a Settlement (or just remove it if on Town), or a Pa with a Village. If result is 1-3, the hit must be taken by a defending unit.
10.0 Bush Raider Phase
The Phasing Player may remove units from the main map and place them in the Bush Raider Box or on the Bush Raider Map. Both options are provided for player's preference
and function the same. Only Queenite, Maori, Militia, Constabulary, and Ranger units may do so. Units in Bush Raider Box are given a Territory Chit, showing which territory they currently occupy. When using the Bush Raider Map simply place the units in the appropriate territory. Any number of leaders may move to the Bush Raider Box/Map, but the maximum number of units allowed at the end of the phase from each side is...
3 units (Maori Player) and …
2 units (British player)
A unit that enters the Bush Raider Box/Map can do nothing further this current phase. Each non-entering unit that is already in the Bush Raider Box/Map has five options to choose between during Bush Raider Phase:
1*) Remain in the Bush Raider Box/Map (take no action)
2*) Remain in the Bush Raider Box/Map but move to an adjacent territory. Replace Territory Chit or move to an adjacent territory if on the Bush Raider Map.
3) Leave the Bush Raider Box/Map and Raid enemy units on the main map.
4) Attempt to Raid enemy unit(s) that currently occupy the same territory in the Bush Raider Box/Map
5*) Leave the Bush Raider Box/Map and enter any hex on the main map within the territory they occupy, observing stacking limits
*Disrupted units may only do options 1, 2 and 5. Raiding
Each friendly unit in the Bush Raider Box/Map may Raid by itself, or together with other units. A Raid is conducted as per normal combat, except that it is done in this Phase. You do not draw any BD-chits, and the target may not Evade. Raiding player also attacks first, and defending player attacks second with those that were Raided. Disregard any retreat result. Some units, when Raiding, receive a positive DRM (but these DRMs are not cumulative in any way). These are:
Rangers receive a +2 DRM if Raiding together with either leader von Tempsky or Jackson.
Maori receive a +1 DRM
Militia receive a +1 DRM
MAORI WARS
Page | 8 LEGION WARGAMES, LLC ©2018
Option #3 - To conduct a Raid from the Bush Raider Box/Map to the main map, simply move the Raiding unit(s) to one or more hexes, observing stacking limits, that meet both of the following criteria:
In the same territory the Raiding unit occupied
on the Bush Raider Map/Box.
Adjacent to an enemy occupied hex that does
not contain a Structure or just a leader.
The Raiding units will not return to the Bush Raider
Box/Map during this phase.
Option #4 - To attempt a Raid of an enemy unit in the same territory but still within the Bush Raider Box/Map, indicate which unit(s) are attempting the Raid and roll one die. If the result is 3 or less, choose a single enemy unit there to Raid. If the Raid attempt fails, then the Raiding unit(s) may not make another Raid attempt during the same Bush Raider phase.
11.0 Disruption and Panic
Units and Structures (except Towns) on both sides might become Disrupted at any time due to Combat results. Mark them with a Disrupted Marker. A result of “all units Disrupted” includes any Structure there as well. If any unit or Structure become Disrupted again then they may panic. Exception: An occupied Structure cannot panic, only unoccupied such might do.
The owning player rolls one die. On a result of 2 or less, the Disrupted unit/Structure panic and is eliminated. An eliminated Fort or Pa is replaced with a Disrupted Settlement or a Disrupted a Village. Exception: a Fort that is removed from a Town is not replaced by anything. Rangers and Infantry panic only on a roll of 1.
12.0 Construct Phase
Both sides can, once per turn, either create one single Structure or make one single upgrade (number of counters is the limitation), or remove one single Disrupted Marker from a friendly Structure.
Neither side may create or upgrade anything that is in the same hex or adjacent to an enemy unit or a non-Disrupted enemy Structure. Neither side is allowed to create anything new outside the Designated area which is defined at the beginning of each scenario.
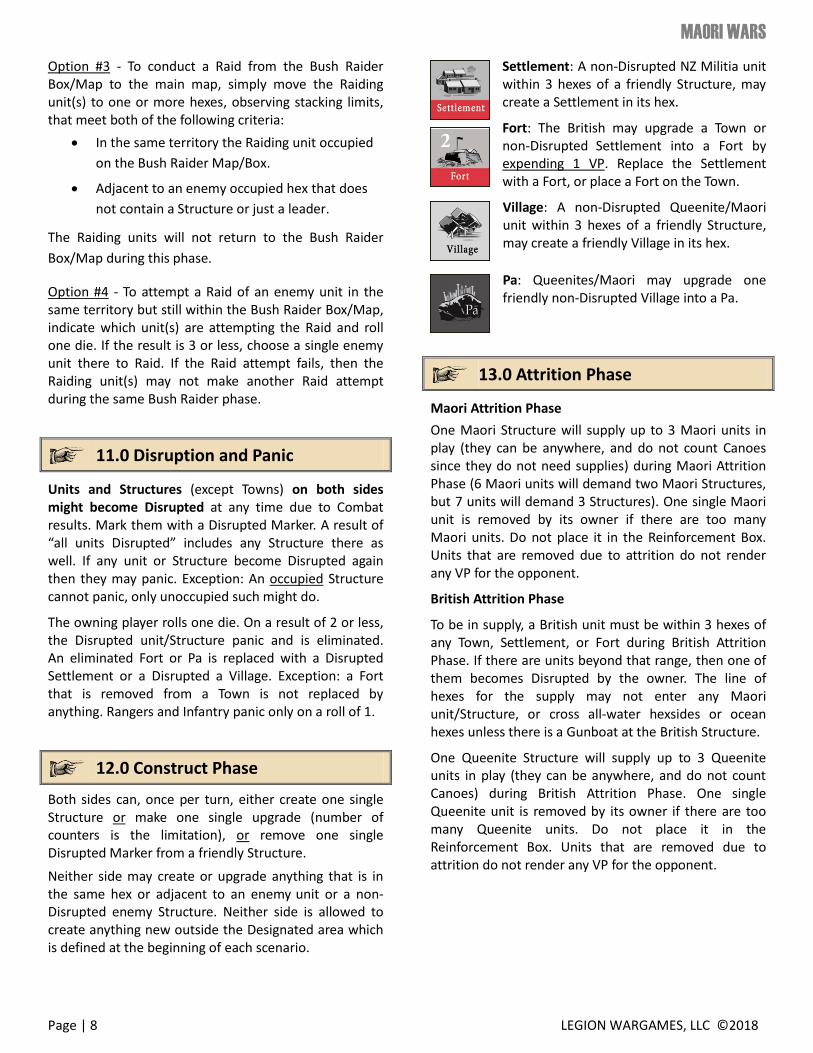
Settlement: A non-Disrupted NZ Militia unit within 3 hexes of a friendly Structure, may create a Settlement in its hex.
Fort: The British may upgrade a Town or non-Disrupted Settlement into a Fort by expending 1 VP. Replace the Settlement with a Fort, or place a Fort on the Town.
Village: A non-Disrupted Queenite/Maori unit within 3 hexes of a friendly Structure, may create a friendly Village in its hex.
Pa: Queenites/Maori may upgrade one friendly non-Disrupted Village into a Pa.
13.0 Attrition Phase
Maori Attrition Phase
One Maori Structure will supply up to 3 Maori units in play (they can be anywhere, and do not count Canoes since they do not need supplies) during Maori Attrition Phase (6 Maori units will demand two Maori Structures, but 7 units will demand 3 Structures). One single Maori unit is removed by its owner if there are too many Maori units. Do not place it in the Reinforcement Box. Units that are removed due to attrition do not render any VP for the opponent.
British Attrition Phase
To be in supply, a British unit must be within 3 hexes of any Town, Settlement, or Fort during British Attrition Phase. If there are units beyond that range, then one of them becomes Disrupted by the owner. The line of hexes for the supply may not enter any Maori unit/Structure, or cross all-water hexsides or ocean hexes unless there is a Gunboat at the British Structure.
One Queenite Structure will supply up to 3 Queenite units in play (they can be anywhere, and do not count Canoes) during British Attrition Phase. One single Queenite unit is removed by its owner if there are too many Queenite units. Do not place it in the Reinforcement Box. Units that are removed due to attrition do not render any VP for the opponent.

New Zealand Land Wars
www.legionwargames.com P a g e | 9
14.0 Scenarios
Each scenario calls for removing specific chits before the beginning of play. Place all BD-chits used in the scenario into a container. You may not set up any…
Unit, leader or Structure in a hex that is occupied by Neutrals or by the enemy.
Structure on any other Structure, except that a Fort may be set up on a Town.
Structure adjacent to any enemy Structure, unless there is a water hexside separating them or if it is permitted in the setup. You may set up a Structure adjacent to a Neutral or a friendly Structure. You may also set up a neutral Structure adjacent to any other Structure, unless the scenario says otherwise
When a specific location is printed…
“X hexes in a direction from location Y”
“X hexes away from location Y”
“adjacent to”
Then you count those hexes across any terrain and hexsides. But the final hex may not contain forbidden terrain or be a small island. If it is printed…
“within X hexes of location Y”
Then you may not enter any mountain or ocean hexes or cross any lake or all-water hexsides when counting. “Within X hexes of location Y” also includes setup on location “Y” (if allowed by the rules). Mark any friendly units in the Bush Raider Box with any chosen Territory Marker, or place the units on the Bush Raider Map.
Set up in the same order as it is listed in the scenario, and within stacking limits. For each setup location(s), set up all Structures first. Each unit is then set up in an empty friendly Structure, if any. If there are none, then in or adjacent to any friendly occupied structure, if possible. Each leader is set up on a friendly unit.
“Designated Area” specifies the area/regions within which you are allowed to create any new Villages or Settlements.
Maori player may only attack Towns in the designated area of the scenario.
Hone Heke's Challenge (The Flagstaff War, 1845-1846)
Like Custer’s Last Stand in U.S. history, Hōne Heke’s felling the British flag at Kororāreka remains an enduring chapter of New Zealand history. Following the signing of the Treaty of Waitangi in 1840 British presence in New Zealand increased as did friction. Several incidents led to chopping down the flagpole, once a gift to the newly arrived Europeans. The sacking of Kororāreka followed the fourth such incident. As the British squared off with the natives, Maori factions who had been traditional enemies also squared off against each other. Much as their American counterparts, the British tended to lump Maori tribes together despite historic tribal differences. In this case Pomare’s neutral pa was needlessly attacked and he himself taken into custody. Heke and Kawiti fought both the Crown and the Ngāpuhi led by Tāmati Wāka Nene who supported the Crown but whom the crown didn’t trust. After 10 months of skirmishing and the pitched battles of Kororāreka, Ohaeawai and Ruapekapeka the fighting ended … but not the ill will.
Scenario Length: 4 Game Turns
Designated Area: Auckland
Special Instructions:
1. Remove BD Chits: 1-4, 10, 11, 16, 24, 27, 36-38, 40.
2. On Game Turn 1, the British player may move the Artillery unit and up to 4 units from Auckland during the Movement Phase. Move them to any single coastal hex that is not adjacent to a Maori unit, Village, or Pa, unless there is a water hexside separating them. The units may not move further that turn (this shipment is in addition to any normal transport that might be made by the Gunboat).
3. British may build only 1 Fort during this scenario.
4. Militia may not be placed in the Bush Raider Box.
Neutrals (sets up first by the British)
Waitangi
1x Pa, 2x units, Pomare
4 hexes NW of Auckland (A)
1x Village, 1x unit