s-class - mercedes-benz usaassets.mbusa.com/vcm/cac_rapmd/14sclassoperatorsmanual.pdf ·...
TRANSCRIPT
S-ClassOperator's Manual
Order no. 6515 2417 13 Part no. 222 584 29 81 Edition C 2014
É2225842981,ËÍ2225842981
S-Clas
sOperat
or'sM
anual
Publication detailsInternet
Further information about Mercedes-Benzvehicles and about Daimler AG can be foundon the following websites:http://www.mbusa.com (USA only)http://www.mercedes-benz.ca (Canadaonly)
Editorial office
©Daimler AG: Not to be reprinted, translatedor otherwise reproduced, in whole or in part,without written permission from Daimler AG.
Vehicle manufacturer
Daimler AGMercedesstraße 13770327 StuttgartGermany
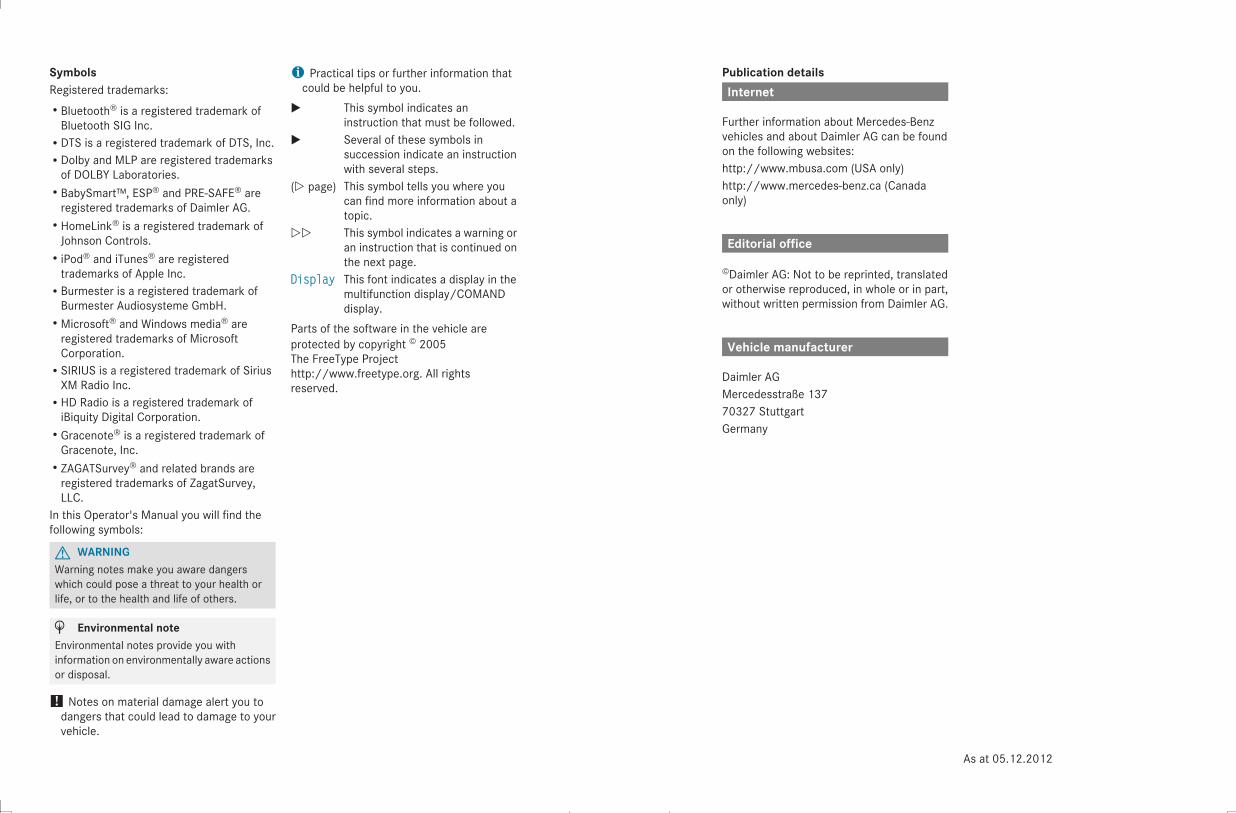
SymbolsRegistered trademarks:RBluetooth® is a registered trademark ofBluetooth SIG Inc.RDTS is a registered trademark of DTS, Inc.RDolby and MLP are registered trademarksof DOLBY Laboratories.RBabySmart™, ESP® and PRE-SAFE® areregistered trademarks of Daimler AG.RHomeLink® is a registered trademark ofJohnson Controls.RiPod® and iTunes® are registeredtrademarks of Apple Inc.RBurmester is a registered trademark ofBurmester Audiosysteme GmbH.RMicrosoft® and Windows media® areregistered trademarks of MicrosoftCorporation.RSIRIUS is a registered trademark of SiriusXM Radio Inc.RHD Radio is a registered trademark ofiBiquity Digital Corporation.RGracenote® is a registered trademark ofGracenote, Inc.RZAGATSurvey® and related brands areregistered trademarks of ZagatSurvey,LLC.
In this Operator's Manual you will find thefollowing symbols:
G WARNINGWarning notes make you aware dangerswhich could pose a threat to your health orlife, or to the health and life of others.
H Environmental noteEnvironmental notes provide you withinformation on environmentally aware actionsor disposal.
! Notes on material damage alert you todangers that could lead to damage to yourvehicle.
i Practical tips or further information thatcould be helpful to you.
X This symbol indicates aninstruction that must be followed.
X Several of these symbols insuccession indicate an instructionwith several steps.
(Y page) This symbol tells you where youcan find more information about atopic.
YY This symbol indicates a warning oran instruction that is continued onthe next page.
DisplayDisplay This font indicates a display in themultifunction display/COMANDdisplay.
Parts of the software in the vehicle areprotected by copyright © 2005The FreeType Projecthttp://www.freetype.org. All rightsreserved.
As at 05.12.2012
Welcome to the world of Mercedes-BenzWe urge you to read this Operator's Manualcarefully and familiarize yourself with thevehicle before driving. For your own safetyand a longer vehicle life, follow theinstructions and warning notices in thismanual. Ignoring them could result in damageto the vehicle or personal injury to you orothers.Vehicle damage caused by failure to followinstructions is not covered by the Mercedes-Benz Limited Warranty.The equipment or product designation of yourvehicle may vary depending on:RmodelRorderRcountry specificationRavailabilityMercedes-Benz therefore reserves the rightto introduce changes in the following areas:RdesignRequipmentRtechnical featuresThe equipment in your vehicle may thereforediffer from that shown in the descriptions andillustrations.The following are integral components of thevehicle:ROperator's ManualRMaintenance BookletREquipment-dependent supplementsKeep printed copies of the documents in thevehicle at all times. If you sell the vehicle,always pass the documents on to the newowner.The technical documentation team atDaimler AG wishes you safe and pleasantmotoring.Mercedes-Benz USA, LLCMercedes-Benz Canada, Inc.A Daimler Company
2225842981 É2225842981,ËÍ


Index ....................................................... 4
Introduction ......................................... 30
At a glance ........................................... 37
Safety ................................................... 47
Opening and closing ........................... 87
Seats, steering wheel and mirrors . . 113
Lights and windshield wipers .......... 141
Climate control ................................. 155
Driving and parking .......................... 173
On-board computer and displays .... 247
COMAND ............................................ 313
Stowage and features ...................... 547
Maintenance and care ...................... 579
Breakdown assistance ..................... 595
Wheels and tires ............................... 615
Technical data ................................... 649
Contents 3
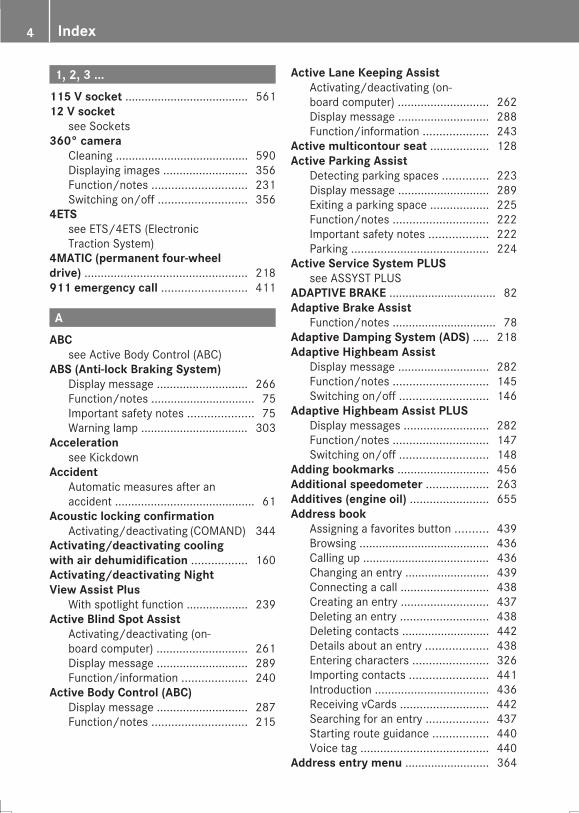
1, 2, 3 ...115 V socket ...................................... 56112 V socket
see Sockets360° camera
Cleaning ......................................... 590Displaying images .......................... 356Function/notes ............................. 231Switching on/off ........................... 356
4ETSsee ETS/4ETS (ElectronicTraction System)
4MATIC (permanent four-wheeldrive) .................................................. 218911 emergency call .......................... 411
AABC
see Active Body Control (ABC)ABS (Anti-lock Braking System)
Display message ............................ 266Function/notes ................................ 75Important safety notes .................... 75Warning lamp ................................. 303
Accelerationsee Kickdown
AccidentAutomatic measures after anaccident ........................................... 61
Acoustic locking confirmationActivating/deactivating (COMAND) 344
Activating/deactivating coolingwith air dehumidification ................. 160Activating/deactivating NightView Assist Plus
With spotlight function ................... 239Active Blind Spot Assist
Activating/deactivating (on-board computer) ............................ 261Display message ............................ 289Function/information .................... 240
Active Body Control (ABC)Display message ............................ 287Function/notes ............................. 215
Active Lane Keeping AssistActivating/deactivating (on-board computer) ............................ 262Display message ............................ 288Function/information .................... 243
Active multicontour seat .................. 128Active Parking Assist
Detecting parking spaces .............. 223Display message ............................ 289Exiting a parking space .................. 225Function/notes ............................. 222Important safety notes .................. 222Parking .......................................... 224
Active Service System PLUSsee ASSYST PLUS
ADAPTIVE BRAKE ................................. 82Adaptive Brake Assist
Function/notes ................................ 78Adaptive Damping System (ADS) ..... 218Adaptive Highbeam Assist
Display message ............................ 282Function/notes ............................. 145Switching on/off ........................... 146
Adaptive Highbeam Assist PLUSDisplay messages .......................... 282Function/notes ............................. 147Switching on/off ........................... 148
Adding bookmarks ............................ 456Additional speedometer ................... 263Additives (engine oil) ........................ 655Address book
Assigning a favorites button .......... 439Browsing ........................................ 436Calling up ....................................... 436Changing an entry .......................... 439Connecting a call ........................... 438Creating an entry ........................... 437Deleting an entry ........................... 438Deleting contacts ........................... 442Details about an entry ................... 438Entering characters ....................... 326Importing contacts ........................ 441Introduction ................................... 436Receiving vCards ........................... 442Searching for an entry ................... 437Starting route guidance ................. 440Voice tag ....................................... 440
Address entry menu .......................... 364
4 Index
Adjusting the volumeCOMAND ....................................... 322Traffic announcements .................. 322
After-sales servicesee ASSYST PLUS
Air bagsBelt bags .......................................... 67Cushion air bags .............................. 54Display message ............................ 278Front air bag (driver, frontpassenger) ....................................... 52Important safety notes .................... 50Knee bag .......................................... 53PASSENGER AIR BAG OFFindicator lamp .................................. 55Safety guidelines ............................. 49Side impact air bag .......................... 53Window curtain air bag .................... 54
Air-conditioning systemsee Climate control
AIRMATICDisplay message ............................ 286Function/notes ............................. 217
Air ventsGlove box ....................................... 171Important safety notes .................. 170Rear ............................................... 171Setting ........................................... 170Setting the center air vents ........... 170Setting the side air vents ............... 171
AlarmATA (Anti-Theft Alarm system) ......... 85Switching off (ATA) .......................... 85Switching the function on/off(ATA) ................................................ 85
Alarm systemsee ATA (Anti-Theft Alarm system)
Alternative route ............................... 386Ambient lighting
Setting (COMAND) ......................... 343Anti-lock braking system
see ABS (Anti-lock Braking System)Anti-theft alarm system
see ATA (Anti-Theft Alarm system)Armrest
Stowage compartment .................. 550Ashtray ............................................... 558
Assistance display (on-boardcomputer) .......................................... 258Assistance menu (on-boardcomputer) .......................................... 260ASSYST PLUS
Displaying a service message ........ 584Hiding a service message .............. 584Notes ............................................. 584Resetting the service intervaldisplay ........................................... 585Service message ............................ 584Special service requirements ......... 585
ATA (Anti-Theft Alarm system)Activating/deactivating ................... 85Function ........................................... 85Switching off the alarm .................... 85
ATTENTION ASSISTActivating/deactivating ................. 261Display message ............................ 286Function/notes ............................. 235
Attention assistance systemsee ATTENTION ASSIST
Audio CD/DVD and MP3 modeActivating ....................................... 475Gracenote® Media Database ......... 478Playback options ........................... 475
Audio CD/DVD or MP3 modeSwitching to (Multi-SeatEntertainment System) .................. 529Switching to (Rear SeatEntertainment System) .................. 529
Authorized Centerssee Qualified specialist workshop
Authorized Mercedes-Benz Centersee Qualified specialist workshop
Authorized workshopssee Qualified specialist workshop
AUTO lightsDisplay message ............................ 281see Lights
Automatic engine start (ECOstart/stop function) .................................... 180Automatic engine switch-off (ECOstart/stop function) .......................... 179Automatic folding mirror function
Activating/deactivating (COMAND) 345Automatic headlamp mode .............. 142
Index 5
Automatic locking featureActivating/deactivating (COMAND) 345
Automatic transmissionAutomatic drive program ............... 186Changing gear ............................... 185DIRECT SELECT lever ..................... 182Display message ............................ 296Driving tips .................................... 185Emergency running mode .............. 188Engaging drive position .................. 183Engaging neutral ............................ 183Engaging park positionautomatically ................................. 182Engaging reverse gear ................... 182Engaging the park position ............ 182Kickdown ....................................... 185Manual drive program .................... 186Overview ........................................ 182Problem (malfunction) ................... 188Program selector button ................ 185Pulling away ................................... 178Starting the engine ........................ 177Steering wheel paddle shifters ...... 186Transmission position display ........ 184Transmission positions .................. 184
Automatic transmissionemergency mode ............................... 188AUX (audio)
Notes/socket ................................ 497Switching to ................................... 498
AUX jacksCD/DVD drive ............................... 519
Avoiding an area ................................ 402
BBack button ....................................... 321BAS (Brake Assist System) ................. 75BAS PLUS (Brake Assist SystemPLUS) with Cross-Traffic Assist
Function/notes ................................ 76BAS PLUS Q (Brake Assist SystemPLUS) with Cross-Traffic Assist
Important safety notes .................... 76Battery (SmartKey)
Checking .......................................... 91Important safety notes .................... 91Replacing ......................................... 91
Battery (vehicle)Charging ........................................ 603Display message ............................ 284Important safety notes .................. 601Jump starting ................................. 605
Belt bag ................................................ 67Belt force limiter
Activation ......................................... 66Function ........................................... 66
Blind Spot Assistsee Active Blind Spot Assist
Blowersee Climate control
Bluetooth®Activating/deactivating ................. 338Activating audio mode ................... 491Conditions (telephone) .................. 411Connecting another mobile phone . 415Connecting audio devices .............. 488De-authorizing (de-registering) adevice ............................................ 491Device list ...................................... 488Entering the passcode ................... 413External authorization .................... 414External authorization (audiodevice) ........................................... 490Increasing the volume usingCOMAND ....................................... 493Interface ........................................ 410Introduction ................................... 410Reconnecting an audio device ....... 490Searching for a mobile phone ........ 412Starting playback if theBluetooth® audio device has beenstopped ......................................... 492Telephone basic menu ................... 417Telephony ...................................... 411Telephony notes ............................ 410
Brake Assistsee BAS (Brake Assist System)
Brake assistancesee BAS (Brake Assist System)
Brake fluidDisplay message ............................ 272Notes ............................................. 655
6 Index
Brake force distribution,electronic
see EBD (electronic brake forcedistribution)
Brake lampsDisplay message ............................ 280
BrakesABS .................................................. 75Adaptive Brake Assist ...................... 78BAS .................................................. 75BAS PLUS with Cross-Traffic Assist . 76Brake fluid (notes) ......................... 655Display message ............................ 266EBD .................................................. 82Hill start assist ............................... 178HOLD function ............................... 213Important safety notes .................. 197Maintenance .................................. 197Parking brake ................................ 193Riding tips ...................................... 197Warning lamp ................................. 302
Breakdownsee Flat tiresee Towing away
Burmester® high-end 3D surroundsound system
Balance/fader ............................... 513Calling up the sound menu ............ 512Equalizer ........................................ 512Equipment ..................................... 512Loudspeaker control ...................... 513Setting the sound profile ............... 514VIP & BAL selection ....................... 514
Burmester® surround soundsystem
Calling up the sound menu ............ 509Equalizer ........................................ 510Equipment ..................................... 509Loudspeaker control ...................... 511Surround sound ............................. 511
Buttons and controller ...................... 321Buttons on the steering wheel ......... 249
CCalifornia
Important notice for retailcustomers and lessees .................... 32
CallAccepting/ending/rejecting .......... 418Connecting .................................... 419see Telephone
Calling up a malfunctionsee Display messages
Call listsDisplaying details ........................... 427Opening and selecting an entry ..... 426Saving an entry in the addressbook .............................................. 427
Camerasee 360° camera
Care360° camera ................................. 590Carpets .......................................... 593Car wash ........................................ 586Display ........................................... 591Exhaust pipe .................................. 591Exterior lights ................................ 589Gear or selector lever .................... 592Interior ........................................... 591Matte finish ................................... 588Night View Assist Plus ................... 591Notes ............................................. 585Paint .............................................. 588Plastic trim .................................... 592Power washer ................................ 587Rear view camera .......................... 590Roof lining ...................................... 593Seat belt ........................................ 593Seat cover ..................................... 593Sensors ......................................... 590Steering wheel ............................... 592Trim pieces .................................... 592Washing by hand ........................... 587Wheels ........................................... 588Windows ........................................ 589Wiper blades .................................. 589Wooden trim .................................. 592
Car keyssee SmartKey
Car pool lanes .................................... 362
Index 7
Car washsee Care
Car wash (care) ................................. 586Category list (music search) ............ 480CD
Inserting ........................................ 472Inserting/loading (DVD changer) ... 473Inserting/loading (Multi-SeatEntertainment System) .................. 528Inserting/loading (Rear SeatEntertainment System) .................. 528Notes on discs ............................... 480Removing/ejecting (Multi-SeatEntertainment System) .................. 528Removing/ejecting (Rear SeatEntertainment System) .................. 528Selecting a track ............................ 477Sound settings (balance, bass,fader, treble) .................................. 507
CD player/CD changer (on-boardcomputer) .......................................... 256Center console
Overview .......................................... 43Stowage space .............................. 549
Center console in the rearcompartment
Stowage compartment .................. 551Central locking
Locking/unlocking (SmartKey) ........ 89Characters
Entering (address book, phonebook) ............................................. 326Entering (navigation) ...................... 329
Chauffeur modeDisplay message ............................ 298Fully reclined position .................... 125General notes ................................ 122Installing the head restraint ........... 124Moving front-passenger seat intothe chauffeur position .................... 122Moving the front-passenger seatinto the normal position ................. 124Removing the head restraint .......... 123
Child-proof locksImportant safety notes .................... 73Rear doors ....................................... 73
ChildrenIn the vehicle ................................... 67Restraint systems ............................ 67Special seat belt retractor ............... 70
Child seatLATCH-type (ISOFIX) child seatanchors ............................................ 71Top Tether ....................................... 71
Cigarette lighter ................................ 559Cleaning
Mirror turn signal ........................... 589Climate control
Automatic climate control ............. 157COMAND ....................................... 351Controlling automatically ............... 161Cooling with air dehumidification . . 160Cooling with air dehumidification(COMAND) ..................................... 352Defrosting the windows ................. 165Defrosting the windshield .............. 165ECO start/stop function ................ 159Important safety notes .................. 156Indicator lamp ................................ 161Ionization ....................................... 170Ionization (COMAND) ..................... 354Notes on using automatic climatecontrol ........................................... 159Overview of systems ...................... 156Perfume atomizer .......................... 168Perfume atomizer (COMAND) ........ 354Problems with cooling with airdehumidification ............................ 161Problem with the rear windowdefroster ........................................ 167Rear-compartment climatecontrol (COMAND) ......................... 352Rear control panel ......................... 157Refrigerant ..................................... 657Refrigerant filling capacity ............. 657Setting the air distribution ............. 164Setting the air distribution(COMAND) ..................................... 353Setting the airflow ......................... 164Setting the airflow (COMAND) ....... 353Setting the air vents ...................... 170Setting the climate mode ............... 163Setting the climate mode(COMAND) ..................................... 353
8 Index
Setting the departure time(COMAND) ..................................... 354Setting the footwell temperature(COMAND) ..................................... 353Setting the temperature ................ 163Setting the temperature(COMAND) ..................................... 352Switching air-recirculation modeon/off ............................................ 167Switching on/off ........................... 159Switching on/off (COMAND) ......... 351Switching residual heat on/off ...... 167Switching the rear windowdefroster on/off ............................ 166Switching the synchronizationfunction on and off ........................ 165Switching the synchronizingfunction on/off (COMAND) ............ 351
CockpitOverview .......................................... 38
Coffee cup symbolsee ATTENTION ASSIST
COLLISION PREVENTION ASSISTActivating/deactivating thedistance warning function .............. 261Display message ............................ 273Operation/notes .............................. 77
COMANDActive multicontour seat ................ 348Basic functions .............................. 322Controller ...................................... 321Display ........................................... 319Multicontour seat .......................... 348Seat functions ............................... 347Settings ......................................... 457Switching on/off ........................... 322Telephone keypad overview ........... 321
COMAND displayAdditional display area ................... 333Cleaning ......................................... 591Cleaning instructions ..................... 320Setting ........................................... 331
COMAND OnlineController ...................................... 321
Combination switch .......................... 144Compartment air
see Climate control
Consumption statistics (on-boardcomputer) .......................................... 251Contacts
Deleting ......................................... 442Importing ....................................... 441
Convenience closing feature ............ 104Convenience opening feature .......... 104Coolant (engine)
Checking the level ......................... 583Display message ............................ 282Filling capacity ............................... 656Important safety notes .................. 655Temperature gauge ........................ 259Warning lamp ................................. 308
Coolbox .............................................. 564Cooling
see Climate controlCopyright ............................................. 36Cordless headphones
Setting the volume ......................... 521Cornering light function
Display message ............................ 279Function/notes ............................. 145
Country-specific information(navigation) ........................................ 401Crash-responsive emergencylighting ............................................... 150Crosswind, driving assistance(vehicles without MAGIC BODYCONTROL) ............................................ 81Crosswind driving assistance(vehicles with Magic BodyControl) .............................................. 215Crosswind driving assistance(vehicles without MAGIC BODYCONTROL) ............................................ 81Cruise control
Cruise control lever ....................... 200Deactivating ................................... 202Display message ............................ 293Driving system ............................... 200Function/notes ............................. 200Important safety notes .................. 200Setting a speed .............................. 201Storing and maintaining currentspeed ............................................. 201
Index 9
Cup holderCenter console .............................. 554Important safety notes .................. 554Rear compartment ......................... 554Temperature controlled ................. 556
Cushion air bags .................................. 54Customer Assistance Center (CAC) ... 35Customer Relations Department ....... 35
DDashboard
see CockpitData
see Technical dataDate format, setting .......................... 334Day design, setting ........................... 332Daytime running lamps
Display message ............................ 281Function/notes ............................. 142Switching on/off (on-boardcomputer) ...................................... 262
Dealershipssee Qualified specialist workshop
Declarations of conformity ................. 34Delayed switch-off time
Setting (COMAND) ......................... 346Deleting
Call lists ......................................... 428Destination
Storing in the address book ........... 393Destination (navigation)
Entering a destination using themap ............................................... 374Entering a point of interest ............ 370Entering using geo-coordinates ..... 377Entering using Mercedes-BenzApps .............................................. 377Keyword search ............................. 368Saving ............................................ 393Selecting an address bookcontact as a destination ................ 370Selecting from the list of lastdestinations ................................... 369
Diagnostics connection ...................... 34Dialing a number (telephone) ........... 419Diesel .................................................. 653Digital speedometer ......................... 252
DIRECT SELECT leversee Automatic transmission
DisplaySelecting the design ...................... 332see Display messagesee Warning and indicator lamps
Display messagesASSYST PLUS ................................ 584Calling up (on-board computer) ..... 265Driving systems ............................. 286Engine ............................................ 282General notes ................................ 265Hiding (on-board computer) ........... 265Introduction ................................... 265Lights ............................................. 279Safety systems .............................. 266SmartKey ....................................... 299Tires ............................................... 294Vehicle ........................................... 296
Distance recordersee Odometer
Distance warning (warning lamp) .... 310Distance warning function
Activating/deactivating ................. 261Function/notes ................................ 77
DISTRONIC PLUSActivating ....................................... 204Activation conditions ..................... 204Cruise control lever ....................... 204Deactivating ................................... 209Display message ............................ 291Displays in the multifunctiondisplay ........................................... 208Driving tips .................................... 209Function/notes ............................. 202Important safety notes .................. 203Setting the specified minimumdistance ......................................... 207
DoorsAutomatic locking (switch) ............... 96Central locking/unlocking(SmartKey) ....................................... 89Control panel ................................... 45Display message ............................ 297Emergency locking ........................... 96Emergency unlocking ....................... 96Important safety notes .................... 94
10 Index
Opening (from inside) ...................... 95Power closing .................................. 96
Drinking and driving ......................... 195Drinks holder
see Cup holderDrive program
Automatic ...................................... 186Manual ........................................... 186
Driver's/front-passenger seatStowage compartment .................. 550
Driver's doorsee Doors
Driver's seatsee Seats
Driving abroadMercedes-Benz Service ................. 585Symmetrical low beam .................. 142
Driving Assistance package ............. 240Driving safety systems
ABS (Anti-lock Braking System) ....... 75ADAPTIVE BRAKE ............................. 82Adaptive Brake Assist ...................... 78BAS (Brake Assist System) .............. 75BAS PLUS with Cross-Traffic Assist . 76COLLISION PREVENTION ASSIST .... 77Distance warning function ............... 77Electronic brake force distribution ... 82ESP® (Electronic Stability Program) . 80ETS/4ETS (Electronic TractionSystem) ........................................... 80Important safety information ........... 74Overview .......................................... 74PRE-SAFE® Brake ............................. 82STEER CONTROL ............................. 84
Driving systems360°camera .................................. 231Active Blind Spot Assist ................. 240Active Body Control ....................... 215Active Lane Keeping Assist ............ 243Active Parking Assist ..................... 222AIRMATIC ...................................... 217ATTENTION ASSIST ........................ 235Cruise control ................................ 200Display message ............................ 286DISTRONIC PLUS ........................... 202DISTRONIC PLUS with SteeringAssist ............................................. 211
Driving Assistance package ........... 240HOLD function ............................... 213Night View Assist Plus ................... 237PARKTRONIC ................................. 219Rear view camera .......................... 227
Driving tipsAutomatic transmission ................. 185Brakes ........................................... 197Break-in period .............................. 174DISTRONIC PLUS ........................... 209Downhill gradient ........................... 197Drinking and driving ....................... 195Driving abroad ............................... 142Driving in winter ............................. 199Driving on flooded roads ................ 199Driving on wet roads ...................... 198Exhaust check ............................... 195Fuel ................................................ 195General .......................................... 194Hydroplaning ................................. 198Icy road surfaces ........................... 199Limited braking efficiency onsalted roads ................................... 197Snow chains .................................. 619Symmetrical low beam .................. 142The first 1000 miles (1500 km) ..... 174Wet road surface ........................... 197
DVDInserting/loading (Multi-SeatEntertainment System) .................. 528Inserting/loading (Rear SeatEntertainment System) .................. 528Notes on discs ............................... 480Removing/ejecting (DVD changer) 474Removing/ejecting (Multi-SeatEntertainment System) .................. 528Removing/ejecting (Rear SeatEntertainment System) .................. 528
DVD videoOperating (on-board computer) ..... 256
Dynamic handling control systemsee ESP® (Electronic Stability Program)
Index 11
EE10
see GasolineEASY-ENTRY/EXIT feature
Activating/deactivating (COMAND) 344EASY-ENTRY feature
Function/notes ............................. 133EASY-EXIT feature
Function/notes ............................. 133EBD (electronic brake forcedistribution)
Display message ............................ 269Function/notes ................................ 82
ECO displayFunction/notes ............................. 196On-board computer ....................... 251
ECO start/stop functionAutomatic engine start .................. 180Automatic engine switch-off .......... 179Climate control .............................. 159Deactivating/activating ................. 180General information ....................... 179Important safety notes .................. 179Introduction ................................... 178
Electronic brake forcedistribution
see EBD (electronic brake forcedistribution)
Electronic Stability Programsee ESP® (Electronic Stability Program)
E-mailDeleting ......................................... 436Information and requirements ....... 430Reading .......................................... 433Saving the sender in the addressbook .............................................. 435Setting reception ........................... 431Storing the sender as a new entryin the address book ....................... 435
E-mailsInbox .............................................. 432
EmergencyAutomatic measures after anaccident ........................................... 61
Emergency brakingsee BAS (Brake Assist System)
Emergency releaseDriver's door .................................... 96Trunk ............................................. 102Vehicle ............................................. 96
Emergency Tensioning DevicesFunction ........................................... 66Safety guidelines ............................. 49
Emissions controlService and warranty information .... 31
EngineCheck Engine warning lamp ........... 307Display message ............................ 282ECO start/stop function ................ 178Engine number ............................... 651Irregular running ............................ 181Jump-starting ................................. 605Starting problems .......................... 181Starting the engine with theSmartKey ....................................... 177Starting with the Start/Stop button 177Switching off .................................. 192Switching off with the Start/Stopbutton ............................................ 192Switching off with the vehicle key .. 192Tow-starting (vehicle) ..................... 610
Engine electronicsProblem (malfunction) ................... 181
Engine emergency stop .................... 613Engine oil
Adding ........................................... 582Additives ........................................ 655Checking the oil level ..................... 581Checking the oil level using thedipstick .......................................... 581Display message ............................ 284Filling capacity ............................... 654Notes about oil grades ................... 654Notes on oil level/consumption .... 581Viscosity ........................................ 655
Entering the address (example) ....... 365Entering the city ................................ 365ESC (Electronic Stability Control)
see ESP® (Electronic Stability Program)ESP® (Electronic StabilityProgram)
Characteristics ................................. 80Deactivating/activating ................... 81
12 Index
Display message ............................ 266ETS/4ETS ........................................ 80Function/notes ................................ 80General notes .................................. 80Important safety information ........... 80Warning lamp ................................. 304
ETS/4ETS (Electronic TractionSystem) ................................................ 80Exhaust
see Exhaust pipeExhaust check ................................... 195Exhaust pipe
Cleaning ......................................... 591Exterior lighting
Cleaning ......................................... 589see Lights
Exterior mirrorsAdjusting ....................................... 135Dipping (automatic) ....................... 136Folding in/out (automatically) ....... 135Folding in/out (electrically) ........... 135Out of position (troubleshooting) ... 136Setting ........................................... 135Storing settings (memory function) 137Storing the parking position .......... 136
Eyeglasses compartment ................. 549
FFactory setting (reset function) ....... 342Favorites (Internet) ........................... 456Favorites button ................................ 339Features ............................................. 554Filler cap
see Fuel filler flapFirst-aid kit ......................................... 596Flat tire
Changing a wheel/mounting thespare wheel ................................... 638MOExtended tires .......................... 597Preparing the vehicle ..................... 597TIREFIT kit ...................................... 598
Floormats ........................................... 577Folding table ...................................... 551Front-passenger seat
Adjusting from the driver's seat ..... 118Adjusting from the rearcompartment ................................. 118
FuelAdditives ........................................ 653Consumption statistics .................. 251Displaying the currentconsumption .................................. 251Displaying the range ...................... 251Driving tips .................................... 195Fuel gauge ....................................... 39Grade (gasoline) ............................ 652Important safety notes .................. 652Low outside temperatures ............. 654Problem (malfunction) ................... 191Quality (diesel) ............................... 653Refueling ........................................ 188Tank content/reserve fuel ............. 652
Fuel filler flapOpening/closing ............................ 189
Fuel levelCalling up the range (on-boardcomputer) ...................................... 251
Fuel tankCapacity ........................................ 652Problem (malfunction) ................... 191
FusesAllocation chart ............................. 612Before changing ............................. 611Dashboard fuse box ....................... 611Engine emergency stop ................. 613Fuse box in the enginecompartment ................................. 612Fuse box in the front-passengerfootwell .......................................... 612Fuse box in the trunk ..................... 612Important safety notes .................. 611
GGarage door opener
Clearing the memory ..................... 577Important safety notes .................. 574Opening/closing the garage door .. 576Programming (button in the rear-view mirror) ................................... 574
Gasoline ............................................. 652Genuine parts ...................................... 30Glove box ........................................... 549
Index 13
Google™ local searchImporting a destination/route ....... 447Popular Searches ........................... 448Search ........................................... 447Search history ............................... 448Selecting a search position ............ 447Using as the destination ................ 447
Google™ Local SearchSelecting options for Local Search 448
GPS reception .................................... 358Gracenote® Media Database ............ 478
HHANDS-FREE ACCESS .......................... 99Hazard warning lamps ...................... 144Head bags
Display message ............................ 276Heading up (navigation) ................... 396Headlamps
Cleaning system (notes) ................ 656Fogging up ..................................... 148see Automatic headlamp mode
HeadphonesChanging batteries ........................ 522
Head restraintEASY ADJUST luxury head restraint 126
Head restraintsAdjusting ....................................... 125Adjusting (manually) ...................... 125Adjusting (rear) .............................. 127Luxury ............................................ 126Supplementary cushion ................. 128
Heatingsee Climate control
High beam flasher ............................. 144High-beam headlamps
Adaptive Highbeam Assist ............. 145Adaptive Highbeam Assist PLUS .... 147Display message ............................ 280Switching on/off ........................... 144
Hill start assist .................................. 178HOLD function
Activating ....................................... 214Deactivating ................................... 214Display message ............................ 291Function/notes ............................. 213
Homesee Home address
Home addressEntering and saving ....................... 366
HoodClosing ........................................... 581Display message ............................ 297Important safety notes .................. 580Opening ......................................... 580
Hydroplaning ..................................... 198
IIgnition lock
see Key positionsImmobilizer .......................................... 84Incident (traffic report) ..................... 389Indicator and warning lamps
COLLISION PREVENTION ASSIST . . 310Indicator lamp
Remote control .............................. 518Indicator lamps
see Warning and indicator lampsInstrument cluster
Overview .......................................... 39Warning and indicator lamps ........... 40
Interior lighting ................................. 149Control ........................................... 149Emergency lighting ........................ 150Overview ........................................ 149Reading lamp ................................. 149
Interior motion sensorActivating/deactivating (COMAND) 346
InternetCalling up the carousel view .......... 453Conditions for access .................... 444Creating favorites .......................... 457Entering the URL ............................ 453Favorites manager ......................... 457Favorites menu .............................. 457Menu functions .............................. 455Options menu ................................ 456Selecting favorites ......................... 454
Internet radioCalling up ....................................... 452Searching for stations .................... 452
14 Index
JJack
Storage location ............................ 596Using ............................................. 640
Jump starting (engine) ...................... 605
KKEYLESS-GO
Convenience closing feature .......... 105Locking ............................................ 89Unlocking ......................................... 89
Key positionsSmartKey ....................................... 175Start/Stop button .......................... 175
KickdownDriving tips .................................... 185
Knee bag .............................................. 53
LLamps
see Warning and indicator lampsLane Keeping Assist
see Active Lane Keeping AssistLane recommendations
Explanation .................................... 381Presentation .................................. 381
LATCH-type (ISOFIX) child seatanchors ................................................ 71License plate lamp (displaymessage) ............................................ 280Light function, active
Display message ............................ 281Lighting
Light switch ................................... 142Lights
Adaptive Highbeam Assist ............. 145Adaptive Highbeam Assist PLUS .... 147Automatic headlamp mode ............ 142Cornering light function ................. 145Driving abroad ............................... 142Fogged up headlamps .................... 148Hazard warning lamps ................... 144High beam flasher .......................... 144High-beam headlamps ................... 144Low-beam headlamps .................... 143Parking lamps ................................ 143
Setting exterior lighting ................. 142Setting the ambient lighting(COMAND) ..................................... 343Standing lamps .............................. 143Switching the daytime runninglamps on/off (on-board computer) 262Switching the spotlight on/off ....... 262Turn signals ................................... 144see Interior lightingsee Replacing bulbs
Light sensor (display message) ....... 281Loading guidelines ............................ 548Locator lighting
Setting (COMAND) ......................... 345Locking
see Central lockingLocking (doors)
Automatic ........................................ 96Emergency locking ........................... 96From inside (central lockingbutton) ............................................. 95
Locking centrallysee Central locking
Low-beam headlampsDisplay message ............................ 279Setting for driving abroad(symmetrical) ................................. 142Switching on/off ........................... 143
Lubricant additivessee Fuel
Lumbar supportAdjusting (COMAND) ..................... 348Adjusting the 4-way lumbarsupport .......................................... 129
Luxury head restraints ..................... 126
MM+S tires ............................................ 618Magic Body Control ........................... 214Malfunction message
see Display messagesMap (navigation)
Adjusting the scale ........................ 396Building images ............................. 400Elevation modeling ........................ 401Heading ......................................... 396Map settings .................................. 396
Index 15
Moving ........................................... 360North orientation ........................... 396Notes ............................................. 396Rotating the 3D map ...................... 399Updating ........................................ 404
Map functions .................................... 396Matte finish (cleaning instructions) 588MBC
see Magic Body Controlmbrace
Call priority .................................... 569Display message ............................ 272Downloading destinations(COMAND) ..................................... 570Downloading routes ....................... 573Emergency call .............................. 567General notes ................................ 565Geo fencing ................................... 573Locating a stolen vehicle ............... 572MB info call button ........................ 569Remote vehicle locking .................. 571Roadside Assistance button .......... 568Search & Send ............................... 570Self-test ......................................... 566Speed alert .................................... 573System .......................................... 566Triggering the vehicle alarm ........... 574Vehicle remote malfunctiondiagnosis ....................................... 572Vehicle remote unlocking .............. 571
Mechanical keyFunction/notes ................................ 90Locking vehicle ................................ 96Removing ......................................... 90Unlocking the driver's door .............. 96
Media InterfaceMode ............................................. 495Playback options ........................... 497Search ........................................... 496Selecting music files ...................... 496Switching to Media Interface ......... 495Video function ............................... 497
Media RegisterBasic display .................................. 484Calling up memory spaceinformation .................................... 487Copying files .................................. 484Deleting all files ............................. 486
Renaming/deleting files ................ 486Selecting a playback mode ............ 487Switching on .................................. 482
Media searchCategory list .................................. 480Current tracklist ............................ 481Keyword search ............................. 482Music genres ................................. 481Selecting by cover ......................... 481Starting the media search .............. 480
Memory card (audio) ......................... 256Memory function
In the rear compartment ................ 138Seats, steering wheel, exteriormirrors ........................................... 137Storing settings (rearcompartment) ................................ 139
Menu overviewCD/DVD audio and MP3 mode ...... 473
Mercedes-Benz Apps ......................... 451Mercedes-Benz Intelligent Drive
360°camera .................................. 231ABS (Anti-lock Brake System) .......... 75Active Blind Spot Assist ................. 240Active Lane Keeping Assist ............ 243Active Parking Assist ..................... 222Attention Assist ............................. 235BAS (Brake Assist) ........................... 75BAS PLUS (Brake Assist PLUS)with Cross-Traffic Assist .................. 76COLLISION PREVENTION ASSIST .... 77Crosswind driving assistance(vehicles with Magic Body Control) 215Crosswind driving assistance(vehicles without MAGIC BODYCONTROL) ....................................... 81Cruise control ................................ 200DISTRONIC PLUS ........................... 202DISTRONIC PLUS with SteeringAssist ............................................. 211ESP® (Electronic Stability Program) . 80General notes ................................ 200Magic Body Control ....................... 214Night View Assist Plus ................... 237PARKTRONIC ................................. 219PRE-SAFE® (anticipatoryoccupant protection) ....................... 60
16 Index
PRE-SAFE® Brake ............................. 82PRE-SAFE® PLUS (anticipatoryoccupant protection PLUS) .............. 60Rear view camera .......................... 227ROAD SURFACE SCAN .................. 216Seat belt buckle extender ................ 65
Message memory (on-boardcomputer) .......................................... 265Messages
Displaying ...................................... 432Forwarding ..................................... 435Replying ......................................... 435Writing ........................................... 433see Display messagessee Warning and indicator lamps
Microphone, switching on/off ......... 420Mirrors
see Exterior mirrorssee Rear-view mirrorsee Vanity mirror (in the sun visor)
Mirror turn signalCleaning ......................................... 589
Mobile phoneAuthorizing .................................... 413Connecting (Bluetooth® interface) . 412De-authorizing ............................... 415External authorization .................... 414Menu (on-board computer) ............ 257Registering (authorizing) ................ 413
Modifying the programming(SmartKey) ........................................... 90MOExtended tires .............................. 597Mounting wheels
Lowering the vehicle ...................... 642Mounting a new wheel ................... 641Preparing the vehicle ..................... 639Raising the vehicle ......................... 640Removing a wheel .......................... 641Securing the vehicle againstrolling away ................................... 639
MP3Copyright ....................................... 480Notes ............................................. 478Operation ....................................... 256Safety notes .................................. 472
MP3 modeStop and playback function ........... 477
Multicontour seat .............................. 128Multifunction display
Function/notes ............................. 250Permanent display ......................... 263
Multifunction steering wheelOperating the on-board computer . 249Overview .......................................... 41
Multimedia systemsee COMAND
Multi-Seat Entertainment SystemAdjusting sound settings ............... 524AUX mode ...................................... 534Changing the picture format .......... 525Cordless headphones .................... 521Overview ........................................ 515Picture settings .............................. 525Replacing batteries ........................ 522Setting the brightness ................... 525Setting the color ............................ 525Setting the contrast ....................... 525System settings ............................. 523Video DVD mode ........................... 530
My address (navigation system)see Home address
NNavigation
Adjusting the volume of thenavigation announcements ............ 322Alternative route ............................ 386Avoiding an area ............................ 402Basic settings ................................ 361Blocking a route section affectedby a traffic jam ............................... 388Calling up the carousel menu ........ 406Calling up the compass display ..... 406Drive Information ........................... 407Entering a destination .................... 364Entering a destination using themap ............................................... 374Entering a point of interest ............ 370Entering characters (character bar) 329GPS reception ................................ 358Important safety notes .................. 357Info on navigation .......................... 407Lane recommendation ................... 381Menu (on-board computer) ............ 252
Index 17
Off-road/off-map (off-roaddestination) .................................... 388Online map display ........................ 406Reading out traffic reports ............. 392Repeating announcements ............ 383Selecting a destination from thelist of last destinations ................... 369Setting options for destination/route download .............................. 450Setting route options (avoiding:highways, toll roads, tunnels,ferries) ........................................... 361Setting the route type (shortroute, fast route, dynamic route oreconomic route) ............................ 361Showing/hiding the menu ............. 359Starting route calculation .............. 367Switching announcements on/off . 383Switching to ................................... 359
Navigation announcementsSwitching off .................................. 322
Night View Assist PlusActivating/deactivating ................. 238Cleaning ......................................... 591Display message ............................ 290Function/notes ............................. 237Problem (malfunction) ................... 240Switching automatic activationon/off ............................................ 260
North orientation (navigation) ......... 396Notes on breaking-in a new vehicle 174
OOccupant Classification System(OCS)
Faults ............................................... 59Operation ......................................... 55System self-test ............................... 58
Occupant safetyAir bags ........................................... 50Automatic measures after anaccident ........................................... 61Children in the vehicle ..................... 67Important safety notes .................... 48PRE-SAFE® (anticipatoryoccupant protection) ....................... 60
Seat belt .......................................... 61SRS (Supplemental RestraintSystem) ........................................... 49
OCSFaults ............................................... 59Operation ......................................... 55System self-test ............................... 58
Octane numbersee Fuel
Odometer ........................................... 250Off-road .............................................. 388Oil
see Engine oilOn-board computer
Assistance graphic menu ............... 258Assistance menu ........................... 260Displaying a service message ........ 584Display messages .......................... 265DISTRONIC PLUS ........................... 208Factory settings ............................. 264Important safety notes .................. 248Instrument cluster menu ............... 262Lights menu ................................... 262Media menu ................................... 255Menu overview .............................. 250Message memory .......................... 265Navigation menu ............................ 252Operation ....................................... 249Radio menu ................................... 255Service menu ................................. 259Settings menu ............................... 259Standard display ............................ 250Telephone menu ............................ 257Trip menu ...................................... 250Video DVD operation ..................... 256
On-board diagnostic interfacesee Diagnostics connection
Online and Internet functionsDestination/routes download ........ 449Ending the connection ................... 446Establishing/ending a connection . 445Further Mercedes-Benz Apps ......... 451General notes ................................ 444Mercedes-Benz Mobile Website ..... 451Options menu ................................ 450Resetting settings .......................... 450Setting options for destination/route download .............................. 450
18 Index
Operating safetyDeclaration of conformity ................ 34Important safety notes .................... 33
Operating systemsee On-board computer
Operator's ManualOverview .......................................... 31Vehicle equipment ........................... 31
Outside temperature display ........... 248Overhead control panel ...................... 44Override feature
Rear side windows ........................... 74
PPaint code number ............................ 650Paintwork (cleaning instructions) . . . 588Panel heating
Activating/deactivating (COMAND) 344Panic alarm .......................................... 48Panorama roof with power tilt/sliding panel
Opening/closing ............................ 107Problem (malfunction) ................... 111Resetting ....................................... 110
Panorama sliding sunroofImportant safety notes .................. 106
Parcel net hooks ............................... 552Parental control
Locking/unlocking rearcompartment displays ................... 355Switching the rear compartmentdisplays on/off .............................. 355
Parking ............................................... 191Important safety notes .................. 191Parking brake ................................ 193Position of exterior mirror, front-passenger side ............................... 136Rear view camera .......................... 227see PARKTRONIC
Parking aidActive Parking Assist ..................... 222see Exterior mirrorssee PARKTRONIC
Parking brakeDisplay message ............................ 269Electric parking brake .................... 193Warning lamp ................................. 306
Parking lampsSwitching on/off ........................... 143
PARKTRONICDeactivating/activating ................. 221Driving system ............................... 219Function/notes ............................. 219Important safety notes .................. 219Problem (malfunction) ................... 222Range of the sensors ..................... 219Warning display ............................. 220
PASSENGER AIR BAG OFFProblem (malfunction) ..................... 59Problems (malfunction) .................. 278
PASSENGER AIR BAGOFF indicatorlamp ...................................................... 55Pause function
Video DVD ..................................... 505Perfume
see Climate controlPerfume atomizer
Operating ....................................... 168Perfume vial ................................... 168Problem (malfunction) ................... 170Setting the perfume intensity(COMAND) ..................................... 354
Phone bookAdding a number to an addressbook entry ..................................... 425Calling up ....................................... 422Creating a new entry ..................... 424Deleting an entry ........................... 424Entering characters ....................... 326Icon overview ................................. 423Searching for an entry ................... 423
Picture viewerChanging view ............................... 506Displaying pictures ........................ 506Exiting the picture viewer .............. 507
Plastic trim (cleaning instructions) . 592POI (navigation)
Category ........................................ 372Defining the position for the POIsearch ............................................ 371Entering ......................................... 370
Power locks ......................................... 96Power washers .................................. 587Power windows
see Side windows
Index 19
PRE-SAFE® (anticipatory occupantprotection)
Display message ............................ 272Operation ......................................... 60
PRE-SAFE® BrakeActivating/deactivating ................. 261Display message ............................ 273Function/notes ................................ 82Important safety notes .................... 82Warning lamp ................................. 310
PRE-SAFE® PLUS (anticipatoryoccupant protection PLUS)
Operation ......................................... 60Previous destinations (navigation) .. 394Program selector button .................. 185Protection of the environment
General notes .................................. 30Pulling away
Automatic transmission ................. 178Hill start assist ............................... 178
QQualified specialist workshop ........... 34
RRadio
Overview ........................................ 460Selecting a station ......................... 255Setting the waveband .................... 461Sound settings (balance, bass,treble) ............................................ 463Storing stations ............................. 462Tagging music tracks(downloading/purchasing tracksfrom the iTunes Store) ................... 462
Radio modeDisplaying radio text ...................... 463
Radio stationStoring ........................................... 462
Radio-wave reception/transmission in the vehicle
Declaration of conformity ................ 34Read-aloud function
Automatic ...................................... 393Read-aloud function for e-mails ....... 433Reading lamp ..................................... 149
Real-time traffic reports ................... 389Rear compartment
Activating/deactivating climatecontrol ........................................... 159Setting the air distribution ............. 164Setting the airflow ......................... 164Setting the air vents ...................... 171Setting the temperature ................ 163Stowage compartment .................. 550
Rear-compartment screens .............. 516Rear lamps
see LightsRear monitors
see Rear-compartment screensRear screens
see Rear-compartment screensRear Seat Entertainment System
Adjusting sound settings ............... 524Adjusting the brightness ................ 525Adjusting the color ........................ 525Adjusting the contrast ................... 525AUX mode ...................................... 534Changing the batteries .................. 522Changing the picture format .......... 525Cordless headphones .................... 521Overview ........................................ 515Picture settings .............................. 525System settings ............................. 523Video DVD mode ........................... 530
Rear seatsAdjusting ....................................... 117Adjusting a rear reclining seat ....... 117Overview .......................................... 46Setting the reclined position .......... 117
Rear view cameraCleaning instructions ..................... 590Displaying the image ..................... 356Function/notes ............................. 227Switching on/off ........................... 228
Rear-view mirrorAnti-glare (manual) ........................ 134Dipping (automatic) ....................... 136
Rear window blind ............................ 557Rear window defroster
Problem (malfunction) ................... 167Switching on/off ........................... 166
Receiving vCards ............................... 442
20 Index
Recyclingsee Protection of the environment
Redialing (telephone) ........................ 419Refrigerant (air-conditioningsystem)
Important safety notes .................. 657Refueling
Fuel gauge ....................................... 39Important safety notes .................. 188Refueling process .......................... 189see Fuel
Remote controlButton lighting ............................... 517Garage door opener ....................... 574Multi-Seat Entertainment System . . 516Programming (garage door opener) 574Rear Seat Entertainment System ... 516
Replacing bulbsGeneral notes ................................ 150
Reporting safety defects .................... 35Reserve (fuel tank)
see FuelReserve fuel
Display message ............................ 285Warning lamp ................................. 307
Reserve fuel levelSwitching the function on/off inCOMAND ....................................... 362
Resetting (factory settings) ............. 342Residual heat (climate control) ........ 167Restraint system
see SRS (Supplemental RestraintSystem)
Reversing featurePanorama sliding sunroof .............. 107Roller sunblinds ............................. 108Side windows ................................. 103Trunk lid ........................................... 97
Reversing lamps (display message) 281Roadside Assistance (breakdown) . . . . 32ROAD SURFACE SCAN ....................... 216Roller sunblind
Panorama roof with power tilt/sliding panel .................................. 108Rear side windows ......................... 557Rear window .................................. 557
Roller sunblind of the panoramaroof with power tilt/sliding panel
Operating (front roller sunblind) .. . . 109Operating (rear roller sunblind) ...... 109
Roof carrier ........................................ 553Roof lining and carpets (cleaningguidelines) ......................................... 593Roof load (maximum) ........................ 657Route (navigation)
Selecting an alternative route ........ 386Setting route options (avoiding:highways, toll roads, tunnels,ferries) ........................................... 361Setting the route type (shortroute, fast route, dynamic route oreconomic route) ............................ 361Starting calculation ........................ 367
Route guidanceContinue ........................................ 385Freeway information ...................... 382General notes ................................ 377Lane recommendations ................. 381Off-road ......................................... 388Traffic reports ................................ 389
SSafety
Children in the vehicle ..................... 67Child restraint systems .................... 67Occupant Classification System(OCS) ............................................... 55see Operating safety
Safety notesAudio CD/DVD and MP3 mode ..... 472Using the telephone ....................... 410Video DVD mode ........................... 500
Safety systemsee Driving safety systems
Satellite radioChannel list updates ...................... 469Memory functions .......................... 468Music and sports alerts ................. 468Selecting a channel ....................... 467Tagging music tracks ..................... 469
SatRadioDisplaying information ................... 469Notes ............................................. 464
Index 21
Registering .................................... 464Selecting a category ...................... 466Switching to ................................... 466
ScreenSelecting for remote operation ...... 517
SD memory cardInserting ........................................ 475
SeatMulticontour seat in the rearcompartment ................................. 129
Seat-belt adjustment functionActivating/deactivating (COMAND) 345
Seat belt buckle extenderDisplay message ............................ 273
Seat belt extenderImportant safety notes .................... 65
Seat beltsAdjusting the driver's and front-passenger seat belt ......................... 64Adjusting the height ......................... 64Belt force limiters ............................ 66Cleaning ......................................... 593Correct usage .................................. 62Emergency Tensioning Devices ........ 66Fastening ......................................... 63Important safety guidelines ............. 61Releasing ......................................... 64Safety guidelines ............................. 49Seat belt extender ........................... 65Warning lamp ................................. 301Warning lamp (function) ................... 65
SeatsActive multicontour seat ................ 128Adjusting (electrically) ................... 116Adjusting (rear compartment) ........ 117Adjusting the 4-way lumbarsupport .......................................... 129Adjusting the head restraint .......... 125Adjusting the lumbar support(COMAND) ..................................... 348Balance (seat heating) ................... 349Chauffeur mode ............................. 121Cleaning the cover ......................... 593Correct driver's seat position ........ 114Display message ............................ 298EASY-ENTRY/EXIT system ............. 133Important safety notes .................. 115Massage function .......................... 349
Multicontour seat .......................... 128Resetting settings .......................... 350Seat functions (COMAND) ............. 347Seat heating .................................. 129Seat heating problem .................... 130Seat ventilation .............................. 130Seat ventilation problem ................ 131Selecting for adjustment(COMAND) ..................................... 347Storing settings (memory function) 137Switching seat heating on/off ....... 129Switching seat ventilation on/off . . 130
Selecting a gearsee Automatic transmission
Selecting stationsRadio ............................................. 461
Selecting the country ....................... 366Selector lever
Cleaning ......................................... 592see Automatic transmission
Sending DTMF tones ......................... 420Sensors (cleaning instructions) ....... 590Service menu (on-board computer) . 259Service products
Brake fluid ..................................... 655Coolant (engine) ............................ 655Engine oil ....................................... 654Fuel ................................................ 651Important safety notes .................. 651Refrigerant (air-conditioningsystem) .......................................... 657Washer fluid ................................... 656
Service worksee ASSYST PLUS
SettingsFactory (on-board computer) ......... 264On-board computer ....................... 259Sound settings ............................... 507
Setting the audio formatMulti-Seat Entertainment System . . 534Rear Seat Entertainment System ... 534
Setting the languageCOMAND ....................................... 339Multi-Seat Entertainment System . . 534Rear Seat Entertainment System ... 534
Setting the night design ................... 332Setting the text reader speed .......... 335
22 Index
Setting the volumeTelephone calls .............................. 322
Side impact air bag ............................. 53Side marker lamp (displaymessage) ............................................ 281Side windows
Cleaning ......................................... 589Convenience closing feature .......... 104Convenience opening feature ........ 104Important safety information ......... 103Opening/closing ............................ 103Problem (malfunction) ................... 106Resetting ....................................... 105
SIRIUS weather display5-day forecast ................................ 535Daily forecast ................................. 535Detail information .......................... 536Information chart ........................... 535Selecting the area for the weatherforecast ......................................... 537Switching on/off ........................... 535Weather map ................................. 538
Sirius weather mapStorm Guide .................................. 546Storm Watch Box ........................... 545
Sliding sunroofsee Panorama roof with powertilt/sliding panel
SmartKeyChanging the battery ....................... 91Changing the programming ............. 90Checking the battery ....................... 91Convenience closing feature .......... 105Convenience opening feature ........ 104Display message ............................ 299Door central locking/unlocking ....... 89Important safety notes .................... 88Loss ................................................. 93Mechanical key ................................ 90Overview .......................................... 88Positions (ignition lock) ................. 175Problem (malfunction) ..................... 93Starting the engine ........................ 177
Snow chains ...................................... 619Sockets
Center console .............................. 560General notes ................................ 560
Rear compartment ......................... 561Trunk ............................................. 561
SoundSwitching on/off ........................... 322
Sound settingsBalance/fader ............................... 508Calling up the sound menu ............ 507Equalizer ........................................ 508Loudspeaker control ...................... 508
Specialist workshop ............................ 34Special seat belt retractor .................. 70Speed, controlling
see Cruise controlSpeed dial list
Deleting an entry/list .................... 430Storing a phone book entry in thespeed dial list ................................ 428
SpeedometerActivating/deactivating theadditional speedometer ................. 263Digital ............................................ 252In the Instrument cluster ................. 39Selecting the unit of measurement 262see Instrument cluster
SRSsee SRS (Supplemental RestraintSystem)
SRS (Supplemental RestraintSystem)
Display message ............................ 274Introduction ..................................... 49Warning lamp ................................. 306Warning lamp (function) ................... 49
Standing lampsDisplay message ............................ 281Switching on/off ........................... 143
Start/Stop buttonStarting the engine ........................ 177
Start/stop functionsee ECO start/stop function
Starting (engine) ................................ 177Station list ......................................... 462STEER CONTROL .................................. 84Steering
Warning lamps ............................... 312Steering (display message) .............. 298
Index 23
Steering Assist (DISTRONIC PLUS)Display message ............................ 292
Steering wheelAdjusting (electrically) ................... 131Button overview ............................... 41Buttons (on-board computer) ......... 249Cleaning ......................................... 592EASY ENTRY/EXIT feature ............. 133Important safety notes .................. 131Paddle shifters ............................... 186Steering wheel heating .................. 132Storing settings (memory function) 137
Steering wheel heatingProblem (malfunction) ................... 133Switching on/off ........................... 132
Steering wheel paddle shifters ........ 186Stop function
Video DVD ..................................... 505Storing stations
Radio ............................................. 462Stowage areas ................................... 548Stowage compartments
Armrest (under) ............................. 550Center console .............................. 549Center console in rearcompartment ................................. 551Cup holders ................................... 554Door ............................................... 550Eyeglasses compartment ............... 549Glove box ....................................... 549Important safety information ......... 548Rear ............................................... 550Rear seat backrest ......................... 551Stowage net ................................... 552Under driver's seat/front-passenger seat .............................. 550
Stowage net ....................................... 552Stowage space
Folding table .................................. 551Parcel net retainers ....................... 552Securing a load .............................. 552Umbrella holder ............................. 552
Stowage well beneath the trunkfloor .................................................... 552Summer opening
see Convenience opening featureSummer tires
In winter ........................................ 618
Sun visor ............................................ 556Suspension tuning
Active Body Control ....................... 215AIRMATIC ...................................... 218
Switching air-recirculation modeon/off ................................................. 167Switching between summer timeand standard time ............................. 335Switching on media mode
Starting at a different seat ............. 471Using the Media button ................. 470Via the device list .......................... 471Via the main function bar ............... 470Via the number keypad .................. 471
Switching the hands-freemicrophone on/off ............................ 420System settings
Bluetooth® ..................................... 338Date ............................................... 334Importing/exporting data .............. 340Language ....................................... 339Text reader speed .......................... 335Time ............................................... 334Time zone ...................................... 335Voice Control System .................... 335
TTachometer ........................................ 248Tail lamps
Display message ............................ 280see Lights
Tank contentFuel gauge ....................................... 39
Technical dataCapacities ...................................... 651Information .................................... 650Tires/wheels ................................. 642Vehicle data ................................... 657
TelephoneAccepting/ending a call ................ 418Accepting a call ............................. 257Adjusting the volume for calls ....... 322Calling (outgoing call) .................... 419Connecting a mobile phone(general information) ..................... 412De-authorizing a mobile phone ...... 415Display message ............................ 299
24 Index

E-mail ............................................. 430Ending an active call ...................... 421Entering a number ......................... 419Entering phone numbers ................ 419External authorization (Bluetooth®) 414Function restrictions ...................... 411General notes ................................ 410Incoming call ................................. 418Introduction ................................... 257Making a call ................................. 421Making a call via speed dial ........... 429Menu (on-board computer) ............ 257Number from the phone book ........ 257Operating options .......................... 410Overview of functions .................... 420Reconnecting a mobile phoneautomatically ................................. 415Redialing ........................................ 258Rejecting/accepting a waiting call 421Rejecting/ending a call ................. 257Rejecting a call .............................. 418Safety notes .................................. 410Sending DTMF tones ...................... 420Single call ...................................... 420Switching hands-free microphoneon/off ............................................ 420Text messages (SMS) .................... 430Toggling ......................................... 421Using the telephone ....................... 418see Bluetooth®
Telephone basic menuBluetooth® interface ...................... 417
Telephone keypad overviewCOMAND ....................................... 321
Telephone modeRedialing ........................................ 419
Telephone numberEntering ......................................... 419
TemperatureCoolant .......................................... 259Outside temperature ...................... 248Setting (climate control) ................ 163
Text messagesInbox .............................................. 432
Text messages (SMS)Calling the sender .......................... 435Deleting ......................................... 436
Information and requirements ....... 430Reading .......................................... 433Reading aloud ................................ 433Setting reception ........................... 431Storing sender in address book ..... 435Storing the sender as a newaddress book entry ........................ 435
Textssee Text messages
Theft deterrent systemsATA (Anti-Theft Alarm system) ......... 85Immobilizer ...................................... 84
TimeSetting ........................................... 334Setting summer/standard time ..... 335Setting the format ......................... 334Setting the time ............................. 334Setting the time/date format ........ 334Setting the time zone ..................... 335
TIREFIT kit .......................................... 598Tire pressure
Calling up (on-board computer) ..... 623Checking manually ........................ 622Display message ............................ 294Important safety notes .................. 623Maximum ....................................... 622Notes ............................................. 621Not reached (TIREFIT) .................... 600Reached (TIREFIT) .......................... 600Recommended ............................... 619
Tire pressure loss warningsystem
General notes ................................ 626Important safety notes .................. 626Restarting ...................................... 626
Tire pressure monitoring systemChecking the tire pressureelectronically ................................. 624Function/notes ............................. 623General notes ................................ 623Important safety notes .................. 623Restarting ...................................... 625Warning lamp ................................. 311Warning message .......................... 625
TiresAspect ratio (definition) ................. 637Average weight of the vehicleoccupants (definition) .................... 636
Index 25
Bar (definition) ............................... 635Changing a wheel .......................... 638Characteristics .............................. 635Checking ........................................ 617Definition of terms ......................... 635Direction of rotation ...................... 638Display message ............................ 294Distribution of the vehicleoccupants (definition) .................... 638DOT, Tire Identification Number(TIN) ............................................... 635DOT (Department ofTransportation) (definition) ............ 636GAWR (Gross Axle Weight Rating)(definition) ..................................... 636GVW (Gross Vehicle Weight)(definition) ..................................... 636GVWR (Gross Vehicle WeightRating) (definition) ......................... 636Important safety notes .................. 616Increased vehicle weight due tooptional equipment (definition) ...... 636Kilopascal (kPa) (definition) ........... 636Labeling (overview) ........................ 632Load bearing index (definition) ...... 637Load index ..................................... 634Load index (definition) ................... 636Maximum loaded vehicle weight(definition) ..................................... 636Maximum load on a tire (definition) 637Maximum permissible tirepressure (definition) ....................... 637Maximum tire load ......................... 634Maximum tire load (definition) ....... 637MOExtended tires .......................... 618Optional equipment weight(definition) ..................................... 637PSI (pounds per square inch)(definition) ..................................... 637Replacing ....................................... 638Service life ..................................... 618Sidewall (definition) ....................... 637Speed rating (definition) ................ 636Storing ........................................... 638Structure and characteristics(definition) ..................................... 635Summer tires in winter .................. 618Temperature .................................. 631
TIN (Tire Identification Number)(definition) ..................................... 637Tire bead (definition) ...................... 637Tire pressure (definition) ................ 637Tire pressures (recommended) ...... 636Tire size (data) ............................... 642Tire size designation, load-bearingcapacity, speed rating .................... 632Tire tread ....................................... 617Tire tread (definition) ..................... 637Total load limit (definition) ............. 638Traction ......................................... 631Traction (definition) ....................... 637Tread wear ..................................... 631Uniform Tire Quality GradingStandards ...................................... 630Uniform Tire Quality GradingStandards (definition) .................... 636Unladen weight (definition) ............ 637Wear indicator (definition) ............. 637Wheel and tire combination ........... 644Wheel rim (definition) .................... 636see Flat tire
Toolsee Vehicle tool kit
Top Tether ............................................ 71Tow-away alarm
Arming/deactivating (COMAND) . . . 346Towing
Important safety guidelines ........... 608Installing the towing eye ................ 609Removing the towing eye ............... 609With the rear axle raised ................ 609
Towing awayWith both axles on the ground ....... 609
Towing eye ......................................... 596Tow-starting
Emergency engine starting ............ 610Important safety notes .................. 608
Track information .............................. 530Traffic jam function ........................... 388Traffic reports
Calling up a list .............................. 391Reading out on route ..................... 392Real-time traffic report .................. 391
Transfer case ..................................... 188Transmission
see Automatic transmission
26 Index
Transporting the vehicle .................. 610Trim pieces (cleaning instructions) . 592Trip computer (on-board computer) 251Trip odometer
Calling up ....................................... 250Resetting (on-board computer) ...... 252
TrunkEmergency release ........................ 102Important safety notes .................... 97Locking separately ......................... 101Opening/closing (automaticallyfrom inside) ................................... 101Opening/closing (automaticallyfrom outside) ................................... 98Opening/closing (from outside,HANDS-FREE ACCESS) .................... 99Opening/closing (manually fromoutside) ............................................ 98Power closing .................................. 96
Trunk lidDisplay message ............................ 297Obstacle recognition ........................ 97Opening/closing .............................. 97Opening dimensions ...................... 657
Trunk lid opening heightrestriction
Activating/deactivating (COMAND) 347Trunk load (maximum) ...................... 657Turn signals
Display message ............................ 279Switching on/off ........................... 144
Two-way radioWindshield (infrared reflective) ...... 577
Type identification platesee Vehicle identification plate
UUmbrella holder ................................. 552Unlocking
Emergency unlocking ....................... 96From inside the vehicle (centralunlocking button) ............................. 95
Updating the digital map .................. 404USB audio mode
Selecting a track ............................ 477USB devices
Connecting to the Media Interface 475
VVanity mirror (in the sun visor) ........ 556Vehicle
Correct use ...................................... 35Data acquisition ....................... 36, 315Display message ............................ 296Equipment ....................................... 31Individual settings .......................... 259Limited Warranty ............................. 35Loading .......................................... 627Locking (in an emergency) ............... 96Locking (SmartKey) .......................... 89Lowering ........................................ 642Maintenance .................................... 32Operating safety .............................. 33Parking for a long period ................ 194Pulling away ................................... 178Raising ........................................... 640Reporting problems ......................... 35Securing from rolling away ............ 639Towing away .................................. 608Transporting .................................. 610Unlocking (in an emergency) ........... 96Unlocking (SmartKey) ...................... 89Vehicle data ................................... 657
Vehicle batterysee Battery (vehicle)
Vehicle dataRoof load (maximum) ..................... 657Trunk load (maximum) ................... 657
Vehicle dimensions ........................... 657Vehicle emergency locking ................ 96Vehicle identification number
see VINVehicle identification plate .............. 650Vehicle level
Active Body Control (ABC) ............. 215Display message .................... 286, 287
Vehicle maintenancesee ASSYST PLUS
Vehicle settings ................................. 343Vehicle tool kit .................................. 596Ventilation
see Climate controlVideo
Operating the DVD ......................... 256see Video DVD
Index 27
Video-AUXConnecting an external videosource ............................................ 499Switching to ................................... 499
Video DVDControl option ................................ 501DVD's control menu ...................... 503DVD functions ............................... 504DVD menu ..................................... 504Function restrictions ...................... 501Menu options ................................. 502Notes on discs ............................... 500Operation ....................................... 500Overview ........................................ 502Pause function ............................... 505Picture settings .............................. 503Playing conditions .......................... 501Safety notes .................................. 500Selecting a scene/chapter ............ 505Stop function ................................. 505Switching to ................................... 501Video menu ................................... 504
VIN ...................................................... 650Voice Control
see Voice Control SystemVoice Control System
Settings ......................................... 335Volume, adjusting
Navigation messages ..................... 322
WWarning and indicator lamps
ABS ................................................ 303Brakes ........................................... 302Check Engine ................................. 307Coolant .......................................... 308Distance warning ........................... 310ESP® .............................................. 304ESP® OFF ....................................... 305Fuel tank ........................................ 307Overview .......................................... 40Parking brake ................................ 306PASSENGER AIRBAG OFF ................ 55Reserve fuel ................................... 307Seat belt ........................................ 301SRS ................................................ 306
Steering ......................................... 312Tire pressure monitor .................... 311
Warranty ............................................ 650Washer fluid
Display message ............................ 299Waypoints
Accepting waypoints for the route . 376Creating ......................................... 374Editing ........................................... 376Entering ......................................... 374Searching for a gas station whenthe fuel level is low ........................ 376
Weather map (SIRIUS)Calling up ....................................... 538Legend ........................................... 544Moving ........................................... 538Showing/hiding layers ................... 539Showing/hiding the menu ............. 539Time stamp .................................... 544
Weather memory (SIRIUS)Selecting an area ........................... 538Storing an area .............................. 538
Wheel and tire combinationsee Tires
Wheel bolt tightening torque ........... 642Wheel chock ...................................... 639Wheels
Changing a wheel .......................... 638Checking ........................................ 617Cleaning ......................................... 588Cleaning (warning) ......................... 638Important safety notes .................. 616Interchanging/changing ................ 638Mounting a new wheel ................... 641Mounting a wheel .......................... 639Removing a wheel .......................... 641Storing ........................................... 638Tightening torque ........................... 642Wheel size/tire size ....................... 642
Window curtain air bagOperation ......................................... 54
Windowssee Side windows
WindshieldDefrosting ...................................... 165Infrared reflective .......................... 577
Windshield washer fluidsee Windshield washer system
28 Index
Windshield washer systemAdding washer fluid ....................... 583Notes ............................................. 656
Windshield wipersProblem (malfunction) ................... 154Replacing the wiper blades ............ 151Switching on/off ........................... 150
Winter drivingImportant safety notes .................. 618Slippery road surfaces ................... 199Snow chains .................................. 619
Winter operationSummer tires ................................. 618
Winter tiresM+S tires ....................................... 618
Wiper bladesCleaning ......................................... 589Important safety notes .................. 151Replacing ....................................... 151
WLANActivating ....................................... 336Connecting the device ................... 336
Wooden trim (cleaning instructions) 592
Index 29
Protection of the environment
General notes
H Environmental noteDaimler's declared policy is one ofcomprehensive environmental protection.The objectives are for the natural resourcesthat form the basis of our existence on thisplanet to be used sparingly and in a mannerthat takes the requirements of both natureand humanity into account.You too can help to protect the environmentby operating your vehicle in anenvironmentally responsible manner.Fuel consumption and the rate of engine,transmission, brake and tire wear are affectedby these factors:Roperating conditions of your vehicleRyour personal driving styleYou can influence both factors. You shouldbear the following in mind:Operating conditions:Ravoid short trips as these increase fuelconsumption.Ralways make sure that the tire pressuresare correct.Rdo not carry any unnecessary weight.Rremove roof racks once you no longer needthem.Ra regularly serviced vehicle will contributeto environmental protection. You shouldtherefore adhere to the service intervals.Ralways have service work carried out at aqualified specialist workshop.
Personal driving style:Rdo not depress the accelerator pedal whenstarting the engine.Rdo notwarmup the enginewhen the vehicleis stationary.Rdrive carefully and maintain a safe distancefrom the vehicle in front.Ravoid frequent, sudden acceleration andbraking.
Rchange gear in good time and use each gearonly up toÔ of its maximum engine speed.Rswitch off the engine in stationary traffic.Rkeep an eye on the vehicle's fuelconsumption.
H Environmental noteHave a defective high-voltage batterydisposed of in an environmentally-responsible manner. Contact a qualifiedspecialist workshop which has the necessaryspecialist knowledge and tools to carry outthe work required. Mercedes-Benzrecommends that you use an authorizedMercedes-Benz Center for this purpose.
Environmental concerns andrecommendationsWherever the operating instructions requireyou to dispose of materials, first try toregenerate or re-use them. Observe therelevant environmental rules and regulationswhen disposing of materials. In this way youwill help to protect the environment.
Genuine Mercedes-Benz parts
H Environmental noteDaimler AG also supplies reconditionedmajorassemblies and parts which are of the samequality as new parts. They are covered by thesame Limited Warranty entitlements as newparts.
! Air bags and Emergency TensioningDevices, as well as control units andsensors for these restraint systems,may beinstalled in the following areas of yourvehicle:RdoorsRdoor pillarsRdoor sillsRseats
30 Introduction
RcockpitRinstrument clusterRcenter consoleDo not install accessories such as audiosystems in these areas. Do not carry outrepairs or welding. You could impair theoperating efficiency of the restraintsystems.Have aftermarket accessories installed ata qualified specialist workshop.
You could jeopardize the operating safety ofyour vehicle if you use parts, tires and wheelsas well as accessories relevant to safetywhich have not been approved by Mercedes.This could lead to malfunctions in safety-relevant systems, e.g. the brake system. Useonly genuine Mercedes-Benz parts or parts ofequal quality. Only use tires, wheels andaccessories that have been specificallyapproved for your vehicle.Genuine Mercedes-Benz parts are subject tostrict quality control. Every part has beenspecifically developed, manufactured orselected for and adapted to Mercedes-Benzvehicles. Only genuine Mercedes-Benz partsshould therefore be used.More than 300,000 different genuineMercedes-Benz parts are available forMercedes-Benz models.All authorized Mercedes-Benz Centersmaintain a supply of genuine Mercedes-Benzparts for necessary service and repair work.In addition, strategically located partsdelivery centers provide quick and reliableparts service.Always specify the vehicle identificationnumber (VIN) when ordering genuineMercedes-Benz parts (Y page 650).
Operator's Manual
Vehicle equipmentThis Operator's Manual describes all modelsand all standard and optional equipment ofyour vehicle available at the time of going to
print. Country-specific differences arepossible. Bear in mind that your vehicle maynot feature all functions described here. Thisalso applies to safety-relevant systems andfunctions. The equipment in your vehicle maytherefore differ from that shown in thedescriptions and illustrations.The original purchase agreement lists allsystems installed in your vehicle.Should you have any questions concerningequipment and operation, please consult anauthorized Mercedes-Benz Center.The Operator's Manual and MaintenanceBooklet are important documents and shouldbe kept in the vehicle.
Service and vehicle operation
Service and literatureYour vehicle is covered under the terms of thewarranties printed in the Service andWarranty Information booklet. Yourauthorized Mercedes-Benz Center willexchange or repair any defective partsoriginally installed in the vehicle inaccordance with the terms of the followingwarranties:RNew Vehicle Limited WarrantyREmission Systems WarrantyREmission Performance WarrantyRCalifornia, Connecticut, Maine,Massachusetts, New York, Pennsylvania,Rhode Island and Vermont EmissionControl Systems WarrantyRState warranty enforcement laws (lemonlaws)
Introduction 31
Z
Information for customers inCaliforniaUnder California law you may be entitled to areplacement of your vehicle or a refund of thepurchase price or lease price, if after areasonable number of repair attemptsMercedes-Benz USA, LLC and/or itsauthorized repair or service facilities fail to fixone or more substantial defects ormalfunctions in the vehicle that are coveredby its express warranty. During the period of18 months from original delivery of thevehicle or the accumulation of 18,000 miles(approximately 29,000 km) on the odometerof the vehicle, whichever occurs first, areasonable number of repair attempts ispresumed for a retail buyer or lessee if one ormore of the following occurs:(1) the same substantial defect or
malfunction results in a condition that islikely to cause death or serious bodilyinjury if the vehicle is driven, that defector malfunction has been subject to repairtwo or more times, and you have directlynotified Mercedes-Benz USA, LLC inwriting of the need for its repair,
(2) the same substantial defect ormalfunction of a less serious nature thancategory (1) has been subject to repairfour or more times and you have directlynotified us in writing of the need for itsrepair, or
(3) the vehicle is out of service by reason ofrepair of the same or different substantialdefects or malfunctions for a cumulativetotal of more than 30 calendar days.
Please send your written notice to:Mercedes-Benz USA, LLCCustomer Assistance CenterOne Mercedes DriveMontvale, NJ 07645-0350
MaintenanceThe Service and Warranty Booklet describesall the necessary maintenance work whichshould be done at regular intervals.Always have the Service and WarrantyBooklet with you when you bring the vehicleto an authorized Mercedes-Benz Center. Theservice advisor will record every service foryou in the Service and Warranty Booklet.
Roadside AssistanceThe Mercedes-Benz Roadside AssistanceProgram offers technical help in the event ofa breakdown. Calls to the toll-free RoadsideAssistance Hotline are answered by ouragents 24 hours a day, 365 days a year.1-800-FOR-MERCedes(1-800-367-6372)(USA)1-800-387-0100 (Canada)For additional information, refer to theMercedes-Benz Roadside AssistanceProgram brochure (USA) or the "RoadsideAssistance" section in the Service andWarranty booklet (Canada). You will find bothin your vehicle literature portfolio.
Change of address or change ofownershipIn the event of a change of address, pleasesend us the "Notification of Address Change"in the Service and Guarantee booklet orsimply call the Mercedes-Benz CustomerAssistance Center (USA) at the hotlinenumber1-800-FOR-MERCedes(1-800-367-6372) orCustomer Service Center (Canada) at1-800-387-0100. This will assist us incontacting you in a timely manner should theneed arise.If you sell your Mercedes, please leave theentire literature in the vehicle so that it isavailable to the next owner.
32 Introduction
If you have purchased a used car, please sendus the "Notification of Used Car Purchase" inthe Service and Guarantee booklet or simplycall the Mercedes-Benz Customer AssistanceCenter (USA) at the hotline number1-800-FOR-MERCedes(1-800-367-6372) orCustomer Service (Canada) at1-800-387-0100.
Vehicle operation outside the USAand CanadaIf you plan to operate your vehicle in foreigncountries, please be aware that:Rservice facilities or replacement parts maynot be readily available.Runleaded fuel for vehicles with a catalyticconvertermay not be available. Leaded fuelmay cause damage to the catalyticconverter.Rthe fuel may have a considerably loweroctane rating. Unsuitable fuel can causeengine damage.
Some Mercedes-Benz models are availablefor delivery in Europe through our EuropeanDelivery Program. For details, consult anauthorized Mercedes-Benz Center or write toone of the following addresses.In the USAMercedes-Benz USA, LLCEuropean Delivery DepartmentOne Mercedes DriveMontvale, NJ 07645-0350In CanadaMercedes-Benz Canada, Inc.European Delivery Department98 Vanderhoof AvenueToronto, Ontario M4G 4C9
Operating safety
Important safety notes
G WARNINGIf you do not have the prescribed service/maintenance work or any required repairscarried out, this can result in malfunctions orsystem failures. There is a risk of an accident.Always have the prescribed service/maintenance work as well as any requiredrepairs carried out at a qualified specialistworkshop.
G WARNINGIf you switch off the ignition while driving,safety-relevant functions are only availablewith limitations, or not at all. This could affect,for example, the power steering and the brakeboosting effect. You will require considerablymore effort to steer and brake. There is a riskof an accident.Do not switch off the ignition while driving.
G WARNINGModifications to electronic components, theirsoftware as well as wiring can impair theirfunction and/or the function of othernetworked components. In particular,systems relevant to safety could also beaffected. As a result, these may no longerfunction as intended and/or jeopardize theoperating safety of the vehicle. There is anincreased risk of an accident and injury.Never tamper with the wiring as well aselectronic components or their software. Youshould have all work to electrical andelectronic equipment carried out at a qualifiedspecialist workshop.
! There is a risk of damage to the vehicle if:Rthe vehicle becomes stuck, e.g. on a highcurb or an unpaved roadRyou drive too fast over an obstacle, e.g.a curb or a hole in the roadRa heavy object strikes the undercarriageor parts of the chassis
Introduction 33
Z
In situations like this, the body, theundercarriage, chassis parts, wheels ortires could be damaged without thedamage being visible. Componentsdamaged in this way can unexpectedly failor, in the case of an accident, no longerwithstand the strain they are designed to.In such cases, have the vehicle checkedand repaired immediately at a qualifiedspecialist workshop. If on continuing yourjourney you notice that driving safety isimpaired, pull over and stop the vehicleimmediately, paying attention to road andtraffic conditions. In such cases, visit aqualified specialist workshop.
Declarations of conformity
Vehicle components which receiveand/or transmit radio wavesUSA: "The wireless devices of this vehiclecomply with Part 15 of the FCC Rules.Operation is subject to the following twoconditions: 1) These devices may not causeharmful interference, and 2) These devicesmust accept any interference received,including interference that may causeundesired operation. Changes ormodifications not expressly approved by theparty responsible for compliance could voidthe user’s authority to operate theequipment."Canada: "The wireless devices of this vehiclecomply with Industry Canada license-exemptRSS standard(s). Operation is subject to thefollowing two conditions: (1) These devicesmay not cause interference, and (2) Thesedevices must accept any interference,including interference that may causeundesired operation of the device."
Diagnostics connectionThe diagnostics connection is only intendedfor the connection of diagnostic equipment ata qualified specialist workshop.
G WARNINGIf you connect equipment to the diagnosticsconnection in the vehicle, it may affect theoperation of the vehicle systems. As a result,the operating safety of the vehicle could beaffected. There is a risk of an accident.Do not connect any equipment to adiagnostics connection in the vehicle.
G WARNINGObjects in the driver's footwell can restrict thepedal travel or obstruct a depressed pedal.The operating and road safety of the vehicleis jeopardized. There is a risk of an accident.Make sure that all objects in the vehicle arestowed correctly, and that they cannot enterthe driver's footwell. Install the floormatssecurely and as specified in order to ensuresufficient clearance for the pedals. Do not useloose floormats and do not place floormats ontop of one another.
! If the engine is switched off andequipment on the diagnostics connectionis used, the starter battery may discharge.
Connecting equipment to the diagnosticsconnection can lead to emissions monitoringinformation being reset, for example. Thismay lead to the vehicle failing to meet therequirements of the next emissions testduring the main inspection.
Qualified specialist workshopAn authorized Mercedes-Benz Center is aqualified specialist workshop. It has thenecessary specialist knowledge, tools andqualifications to correctly carry out the workrequired on your vehicle. This is especially thecase for work relevant to safety.Observe the notes in the MaintenanceBooklet.
34 Introduction

Always have the following work carried out atan authorized Mercedes-Benz Center:Rwork relevant to safetyRservice and maintenance workRrepair workRalterations, installation work andmodificationsRwork on electronic components
Correct useIf you remove any warning stickers, you orothers could fail to recognize certain dangers.Leave warning stickers in position.Observe the following information whendriving your vehicle:Rthe safety notes in this manualRthe Technical Data section in this manualRtraffic rules and regulationsRlaws and safety standards pertaining tomotor vehicles
Problems with your vehicleIf you should experience a problem with yourvehicle, particularly one that you believe mayaffect its safe operation, we urge you tocontact an authorized Mercedes-Benz Centerimmediately to have the problem diagnosedand rectified. If the problem is not resolved toyour satisfaction, please discuss the problemagain with a Mercedes-Benz Center orcontact us at one of the following addresses.In the USACustomer Assistance CenterMercedes-Benz USA, LLCOne Mercedes DriveMontvale, NJ 07645-0350In CanadaCustomer Relations DepartmentMercedes-Benz Canada, Inc.98 Vanderhoof AvenueToronto, Ontario M4G 4C9
Reporting safety defectsUSA only:The following text is published as required ofmanufacturers under Title 49, Code of U.S.Federal Regulations, Part 575 pursuant to the"National Traffic andMotor Vehicle Safety Actof 1966".If you believe that your vehicle has a defectwhich could cause a crash or could causeinjury or death, you should immediatelyinform the National Highway Traffic SafetyAdministration (NHTSA) in addition tonotifying Mercedes-Benz USA, LLC.If NHTSA receives similar complaints, it mayopen an investigation, and if it finds that asafety defect exists in a group of vehicles, itmay order a recall and remedy campaign.However, NHTSA cannot become involved inindividual problems between you, yourdealer, or Mercedes-Benz USA, LLC.To contact NHTSA, you may call the VehicleSafety Hotline toll-free at1-888-327-4236(TTY: 1-800-424-9153); goto http://www.safercar.gov; or write to:Administrator, NHTSA, 400 Seventh Street,SW., Washington, DC 20590.You can also obtain other information aboutmotor vehicle safety fromhttp://www.safercar.gov
Limited Warranty! Follow the instructions in this manualabout the proper operation of your vehicleas well as about possible vehicle damage.Damage to your vehicle that arises fromculpable contraventions against theseinstructions is not covered either by theMercedes-Benz Limited Warranty or by theNew or Used-Vehicle Warranty.
Introduction 35
Z

Data stored in the vehicle
Information about electronic dataacquisition in the vehicle(Including notice pursuant to California Code§ 9951)Please note that your vehicle is equippedwithdevices that can record vehicle systems data.As your vehicle is equippedwithmbrace, datais transmitted in the event of an accident.This information helps, for example, to testvehicle systems after an accident and tocontinually improve vehicle safety.Daimler AG can access these data and submitthem:Rfor safety research or vehicle diagnosispurposesRwith the consent of the vehicle ownerRon the instruction of prosecutingauthoritiesRfor use in arbitration of disputes thatinvolve Daimler AG, its subsidiaries or itssales and service organizationsRas otherwise required or permitted by lawPlease check your mbrace purchaseagreement to find out more about data thatcan be recorded and transmitted by thissystem.This vehicle is equipped with an event datarecorder (EDR). The main purpose of an EDRis to record data that will assist inunderstanding how a vehicle’s systemsperformed in certain crash or near crash-likesituations, such as during air bag deploymentor when hitting a road obstacle. The EDR isdesigned to record data related to vehicledynamics and safety systems for a shortperiod of time, typically 30 seconds or less.The EDR in this vehicle is designed to recordsuch data as:Rhow various systems in your vehicle areoperatingRwhether or not the driver and passengerseat belts are fastened
Rhow far (if at all) the driver is depressing theaccelerator and/or brake pedal andRhow fast the vehicle is travelingThis data can help provide a betterunderstanding of the circumstances in whichcrashes and injuries occur. NOTE: EDR datais recorded by your vehicle only if a non-trivialcrash situation occurs; no data is recorded bythe EDR under normal driving conditions andno personal data (e.g., name, gender, age,and crash location) are recorded. However,other parties, such as law enforcement, cancombine the EDR data with the type ofpersonal identification data routinelyacquired during a crash investigation.To read data recorded by an EDR, specialequipment is required, and access to thevehicle or the EDR is needed. In addition tothe vehicle manufacturer, other parties, suchas law enforcement, who have the specialequipment, can read the information if theyhave access to the vehicle or the EDR.
Information on copyright
General informationInformation on license for free and open-source software used in your vehicle and itselectronic components is available on thefollowing website:http://www.mercedes-benz.com/opensource
36 Introduction
Dashboard ........................................... 38Instrument cluster .............................. 39Multifunction steering wheel ............. 41Center console .................................... 43Overhead control panel ...................... 44Door control panel .............................. 45Rear seats ............................................ 46
37
Ataglance
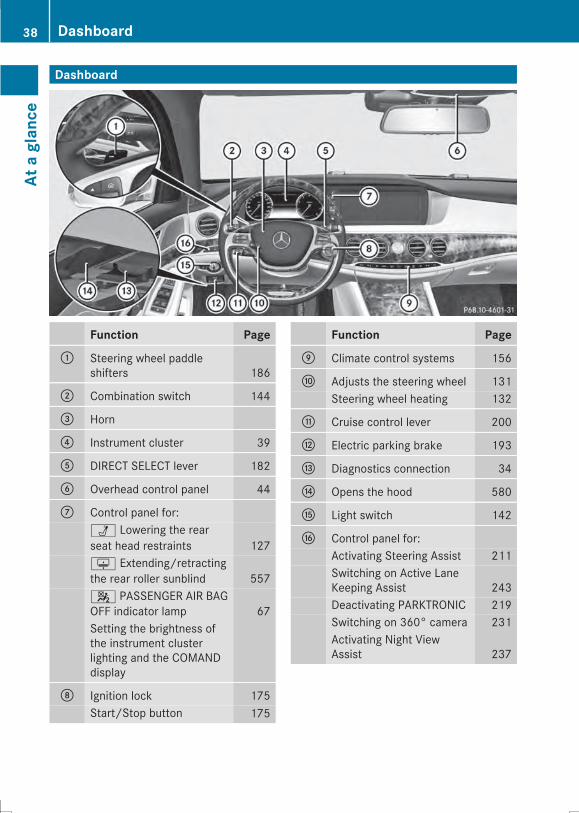
Dashboard
Function Page: Steering wheel paddle
shifters 186
; Combination switch 144
= Horn
? Instrument cluster 39
A DIRECT SELECT lever 182
B Overhead control panel 44
C Control panel for:Ü Lowering the rearseat head restraints 127u Extending/retractingthe rear roller sunblind 5574 PASSENGER AIR BAGOFF indicator lamp 67Setting the brightness ofthe instrument clusterlighting and the COMANDdisplay
D Ignition lock 175Start/Stop button 175
Function PageE Climate control systems 156
F Adjusts the steering wheel 131Steering wheel heating 132
G Cruise control lever 200
H Electric parking brake 193
I Diagnostics connection 34
J Opens the hood 580
K Light switch 142
L Control panel for:Activating Steering Assist 211Switching on Active LaneKeeping Assist 243Deactivating PARKTRONIC 219Switching on 360° camera 231Activating Night ViewAssist 237
38 DashboardAt
aglance
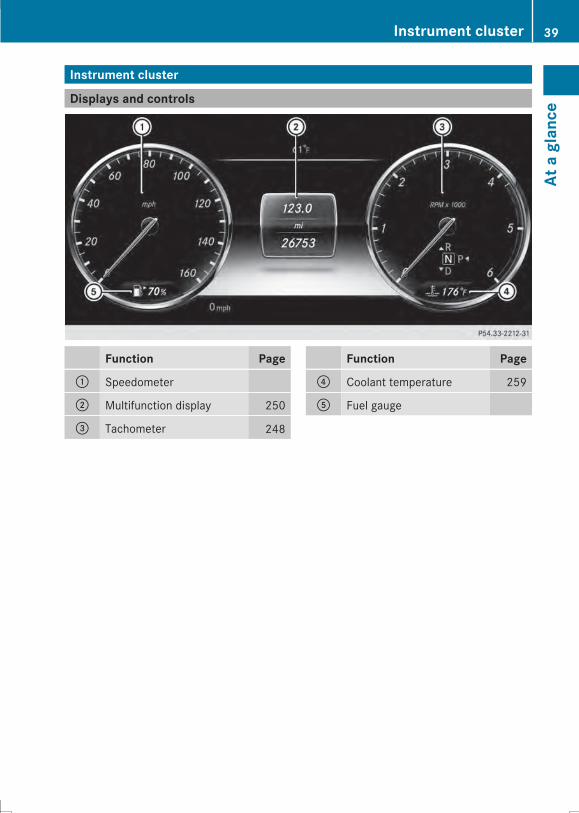
Instrument cluster
Displays and controls
Function Page: Speedometer
; Multifunction display 250
= Tachometer 248
Function Page? Coolant temperature 259
A Fuel gauge
Instrument cluster 39
Ataglance
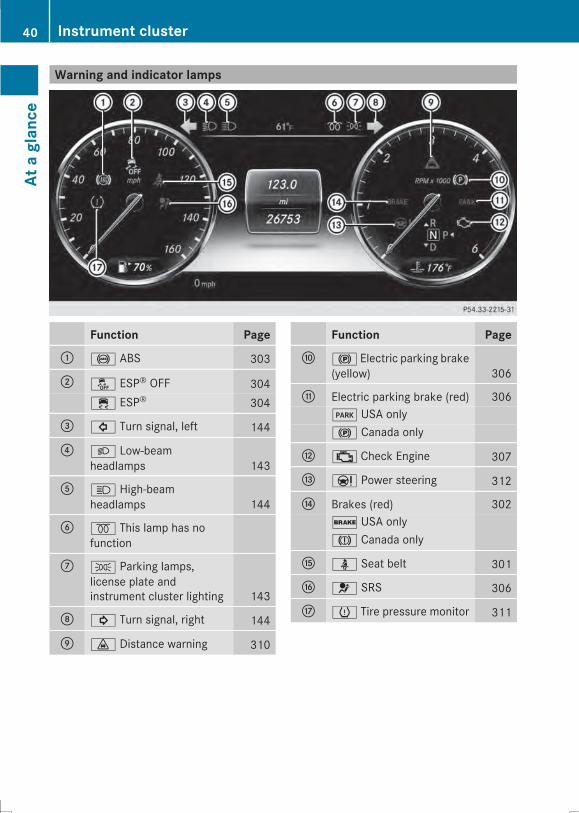
Warning and indicator lamps
Function Page: ! ABS 303
; å ESP® OFF 304÷ ESP® 304
= # Turn signal, left 144
? L Low-beamheadlamps 143
A K High-beamheadlamps 144
B % This lamp has nofunction
C T Parking lamps,license plate andinstrument cluster lighting 143
D ! Turn signal, right 144
E · Distance warning 310
Function PageF ! Electric parking brake
(yellow) 306
G Electric parking brake (red) 306F USA only! Canada only
H ; Check Engine 307
I Ð Power steering 312
J Brakes (red) 302$ USA onlyJ Canada only
K ü Seat belt 301
L 6 SRS 306
M h Tire pressure monitor 311
40 Instrument clusterAt
aglance

Multifunction steering wheel
Function Page: Multifunction display 250
; Sets the brightness of theinstrument cluster lightingand the COMAND display
= COMAND display 319
? CD and DVD player/changer 472
A COMAND controller andbuttons 321
Function PageB ~
Rejects or ends a call 257Exits phone book/redialmemory6
Makes or accepts a callSwitches to the redialmemoryWX
Adjusts the volume8
Muteó
Switches on the VoiceControl System; see theseparate operatinginstructions
Multifunction steering wheel 41
Ataglance
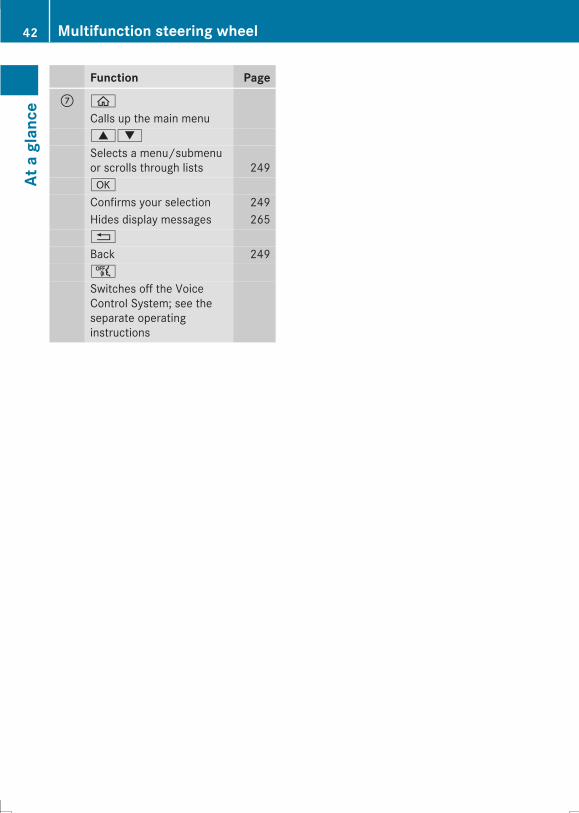
Function PageC ò
Calls up the main menu9:
Selects a menu/submenuor scrolls through lists 249a
Confirms your selection 249Hides display messages 265%
Back 249ñ
Switches off the VoiceControl System; see theseparate operatinginstructions
42 Multifunction steering wheelAt
aglance
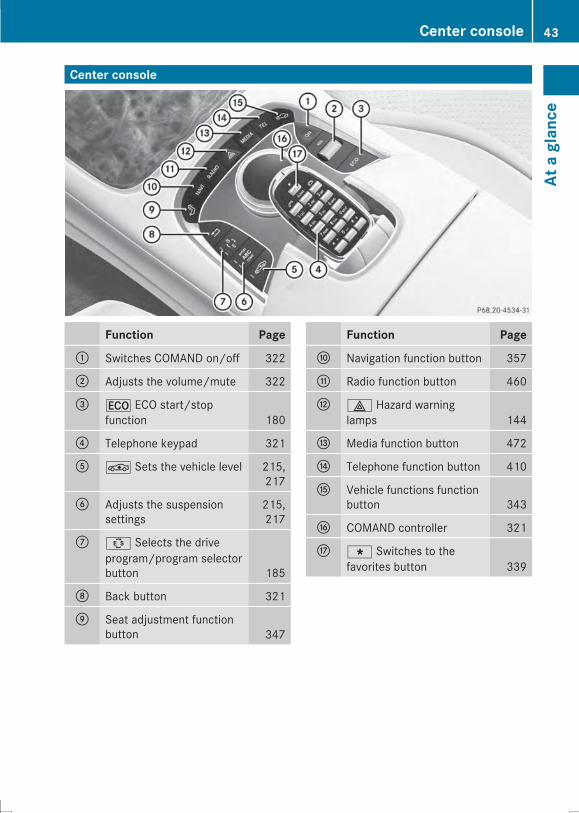
Center console
Function Page: Switches COMAND on/off 322
; Adjusts the volume/mute 322
= ¤ ECO start/stopfunction 180
? Telephone keypad 321
A É Sets the vehicle level 215,217
B Adjusts the suspensionsettings
215,217
C Û Selects the driveprogram/program selectorbutton 185
D Back button 321
E Seat adjustment functionbutton 347
Function PageF Navigation function button 357
G Radio function button 460
H £ Hazard warninglamps 144
I Media function button 472
J Telephone function button 410
K Vehicle functions functionbutton 343
L COMAND controller 321
M g Switches to thefavorites button 339
Center console 43
Ataglance

Overhead control panel
Function Page: p Switches the left-
hand reading lamp on/off 149
; | Switches theautomatic interior lightingcontrol on/off 149
= G SOS button (mbracesystem) 567
? c Switches the frontinterior lighting on/off 149
A u Switches the rearinterior lighting on/off 149
B p Switches the right-hand reading lamp on/off 149
C ï MB Info call button(mbrace system) 569
D Eyeglasses compartment 549
Function PageE 3 Opens/closes the
panorama roof with powertilt/sliding panel 107Opens/closes the frontroller sunblinds 109
F Opens/closes the rearroller sunblind 109
G Buttons for the garage dooropener 574
H Microphone for mbrace(emergency call system),telephone and the VoiceControl System; see theseparate operatinginstructions
I F Roadside Assistancecall button (mbracesystem) 568
44 Overhead control panelAt
aglance
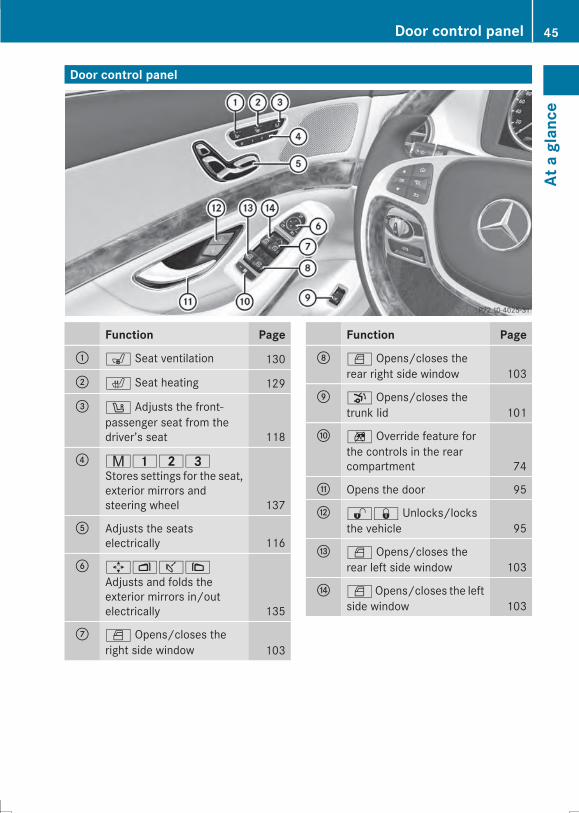
Door control panel
Function Page: s Seat ventilation 130
; c Seat heating 129
= w Adjusts the front-passenger seat from thedriver’s seat 118
? r45=Stores settings for the seat,exterior mirrors andsteering wheel 137
A Adjusts the seatselectrically 116
B 7Zª\Adjusts and folds theexterior mirrors in/outelectrically 135
C W Opens/closes theright side window 103
Function PageD W Opens/closes the
rear right side window 103
E p Opens/closes thetrunk lid 101
F n Override feature forthe controls in the rearcompartment 74
G Opens the door 95
H %& Unlocks/locksthe vehicle 95
I W Opens/closes therear left side window 103
J WOpens/closes the leftside window 103
Door control panel 45
Ataglance
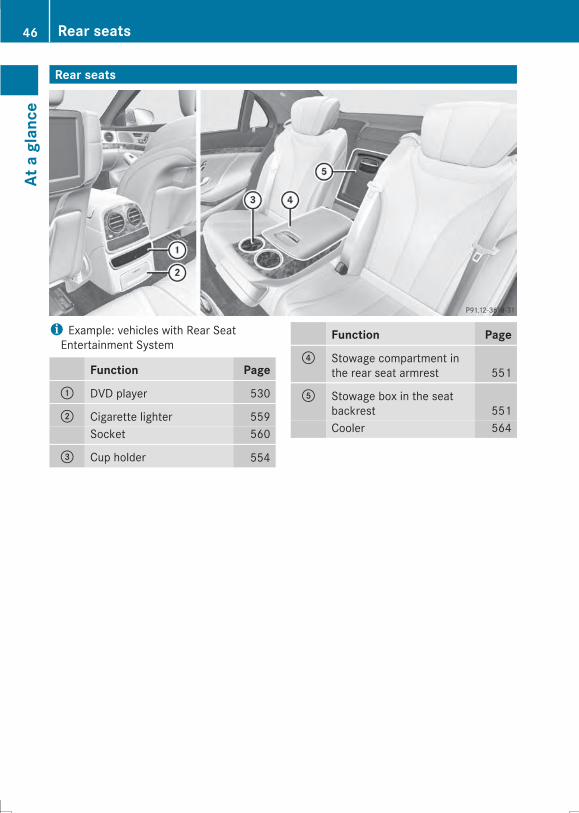
Rear seats
i Example: vehicles with Rear SeatEntertainment System
Function Page: DVD player 530
; Cigarette lighter 559Socket 560
= Cup holder 554
Function Page? Stowage compartment in
the rear seat armrest 551
A Stowage box in the seatbackrest 551Cooler 564
46 Rear seatsAt
aglance
Useful information .............................. 48Panic alarm .......................................... 48Occupant safety .................................. 48Children in the vehicle ........................ 67Driving safety systems ....................... 74Theft deterrent locking system ......... 84
47
Safety
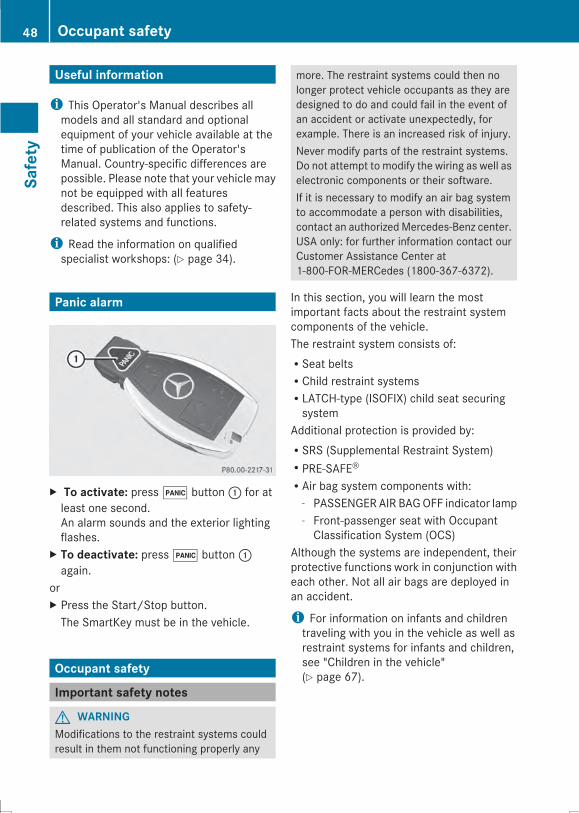
Useful information
i This Operator's Manual describes allmodels and all standard and optionalequipment of your vehicle available at thetime of publication of the Operator'sManual. Country-specific differences arepossible. Please note that your vehicle maynot be equipped with all featuresdescribed. This also applies to safety-related systems and functions.
i Read the information on qualifiedspecialist workshops: (Y page 34).
Panic alarm
X To activate: press! button: for atleast one second.An alarm sounds and the exterior lightingflashes.
X To deactivate: press! button:again.
orX Press the Start/Stop button.The SmartKey must be in the vehicle.
Occupant safety
Important safety notes
G WARNINGModifications to the restraint systems couldresult in them not functioning properly any
more. The restraint systems could then nolonger protect vehicle occupants as they aredesigned to do and could fail in the event ofan accident or activate unexpectedly, forexample. There is an increased risk of injury.Never modify parts of the restraint systems.Do not attempt to modify the wiring as well aselectronic components or their software.If it is necessary to modify an air bag systemto accommodate a person with disabilities,contact an authorized Mercedes-Benz center.USA only: for further information contact ourCustomer Assistance Center at1-800-FOR-MERCedes (1800-367-6372).
In this section, you will learn the mostimportant facts about the restraint systemcomponents of the vehicle.The restraint system consists of:RSeat beltsRChild restraint systemsRLATCH-type (ISOFIX) child seat securingsystem
Additional protection is provided by:RSRS (Supplemental Restraint System)RPRE-SAFE®RAir bag system components with:
- PASSENGER AIR BAGOFF indicator lamp- Front-passenger seat with OccupantClassification System (OCS)
Although the systems are independent, theirprotective functions work in conjunction witheach other. Not all air bags are deployed inan accident.
i For information on infants and childrentraveling with you in the vehicle as well asrestraint systems for infants and children,see "Children in the vehicle"(Y page 67).
48 Occupant safetySafety

SRS (Supplemental Restraint System)
IntroductionSRS consists of:RThe 6 SRS warning lampRAir bagsRThe air bag control unit with crash sensorsREmergency Tensioning DevicesRSeat belt force limiterSRS reduces the risk of occupants cominginto contact with the vehicle's interior in theevent of an accident. It can also reduce theeffect of the forces to which occupants aresubjected during an accident.
SRS warning lamp
G WARNINGIf SRS is malfunctioning, child restraintsystem components may be triggeredunintentionally or might not be triggered at allin the event of an accident with a high rate ofvehicle deceleration. There is an increasedrisk of injury, possibly even fatal.Have SRS checked and repaired immediatelyat a qualified specialist workshop.
SRS functions are checked regularly whenyou switch on the ignition and when theengine is running. Therefore, malfunctionscan be detected in good time.The6 SRSwarning lamp in the instrumentcluster lights up when the ignition is switchedon. It goes out no later than a few secondsafter the engine is started.The SRS components are in operationalreadiness when the 6 SRS indicator lampgoes out while the engine is running.
There is a malfunction if:Rthe 6 SRS warning lamp does not lightup when the ignition is switched onRthe engine is running and the 6 SRSwarning lamp does not go out after a fewsecondsRthe engine is running and the 6 SRSwarning lamp lights up again
Safety guidelines for seat belts,Emergency Tensioning Devices (ETDs)and air bags
G WARNINGRDamaged seat belts or seat belts that havebeen subjected to stress in an accidentmust be replaced. Their anchoring pointsmust also be checked. Only use seat beltsinstalled or supplied by an authorizedMercedes-Benz Center.RAir bags and pyrotechnic EmergencyTensioning Devices (ETDs) containperchlorate material, which may requirespecial handling and regard for theenvironment. Check your national disposalguidelines. California residents, seewww.dtsc.ca.gov/HazardousWaste/Perchlorate/index.cfm.RAir bags and ETDs are designed to functionon a one-time-only basis. An air bag or ETDthat has deployed must be replaced. PRE-SAFE® has electrically operated reversiblebelt tensioners in addition to thepyrotechnic ETDs.RDo not pass seat belts over sharp edges.They could tear.RDo not make any modification that couldchange the effectiveness of the seat belts.RDo not bleach or dye seat belts as this mayseverely weaken them. In a crash they maynot be able to provide adequate protection.RNo modifications of any kind may be madeto any components or wiring of the SRS.RDo not change or remove any componentor part of the SRS.
Occupant safety 49
Safety
Z
RDo not install additional trim material, seatcovers, badges, etc. to the:- padded steering wheel boss- knee bag covers- front-passenger air bag cover- outer side of front seat bolsters- side trim next to the rear seat backrest- roof lining trimRDo not install additional electrical/electronic equipment on or near SRScomponents and wiring.RKeep area between air bags and occupantsfree of objects (e.g. packages, purses,umbrellas, etc.).RDo not hang items such as coat hangersfrom the coat hooks or handles over thedoor. These items may be thrown around inthe vehicle and cause head and otherinjuries when the window curtain air bag isdeployed.RAir bag systemcomponentswill be hot afteran air bag has inflated. Do not touch them.RNever place your feet on the instrumentpanel, dashboard, or on the seat. Alwayskeep both feet on the floor in front of theseat.RImproper repair work on the SRS creates arisk of rendering the SRS inoperative orcausing unintended air bag deployment.Work on the SRS must therefore only beperformed by qualified technicians.Contact an authorized Mercedes-BenzCenter.RFor your protection and the protection ofothers, when scrapping the air bag unit orETD, our safety instructions must befollowed. These instructions are availablefrom any authorized Mercedes-BenzCenter.RGiven the considerable deployment speed,required inflation volume, and the materialof the air bags, there is the possibility ofabrasions or other, potentiallymore seriousinjuries resulting from air bag deployment.
If you sell your vehicle, Mercedes-Benzstrongly recommends that you inform thesubsequent owner that the vehicle isequipped with SRS. Also, refer them to theapplicable section in the Operator's Manual.
Air bags
Important safety notes
G WARNINGUsing unsuitable seat covers could restrict oreven prevent deployment of the air bagsintegrated into the seats. Consequently, theair bags cannot protect vehicle occupants asthey are designed to do. In addition, thefunction of the air bag deactivation systemcould be restricted. This poses an increasedrisk of injury or even fatal injury.You should only use seat covers that havebeen approved for the respective seat byMercedes-Benz.
G WARNINGThe air bag parts are hot after the airbag hasbeen deployed. There is a risk of injury.Do not touch the air bag parts. Have thedeployed air bags replaced at a qualifiedspecialist workshop as soon as possible.
G WARNINGAir bags are designed to reduce the incidenceof injuries and fatalities in certain situations:Rfrontal impacts (driver's and front-passenger front air bags and driver's kneebag)Rside impacts (side impact air bags andwindow curtain air bags)Rrollover (window curtain air bags)However, no system available today cancompletely eliminate injuries and fatalities.When the air bags are deployed, a smallamount of powder is released. The powdergenerally does not constitute a health hazardand does not indicate that there is a fire in the
50 Occupant safetySafety
vehicle. In order to prevent potentialbreathing difficulties, you should leave thevehicle as soon as it is safe to do so. If youhave any breathing difficulty but cannot getout of the vehicle after the air bag inflates,then get fresh air by opening a window ordoor.
G WARNINGIn order to reduce the potential danger ofinjuries caused during the deployment of thefront air bags, the driver and front passengermust always be correctly seated and weartheir seat belts.For maximum protection in the event of acollision, you must always be in the normalseat position with your back against thebackrest. Fasten your seat belt andmake surethat it is correctly positioned on your body.As the air bag inflates with considerablespeed and force, a proper seating positionand correct positioning of the hands on thesteering wheel will help to keep you at a safedistance from the air bag. Occupants who arenot wearing their seat belt, are not seatedproperly or are too close to the air bag can beseriously injured or killed by an air bag, as itinflates with great force instantaneously:Rsit with the seat belt fastened correctly andin a position that is as upright as possiblewith your back against the backrest.Rmove the driver's seat as far back aspossible, still permitting proper operationof vehicle controls. The distance from thecenter of the driver's chest to the center ofthe air bag cover on the steering wheelmust be at least 10 inches (25 cm). Youshould be able to accomplish this byadjusting the seat and steering wheel. Ifyou have any difficulties, please contact anauthorized Mercedes-Benz Center.Rdo not lean your head or chest close to thesteering wheel or dashboard.Ronly hold the steering wheel on the outside.Placing hands and arms inside the rim canincrease the risk and potential severity of
hand/arm injury if the driver front air baginflates.Radjust the front-passenger seat as far backas possible from the dashboard when theseat is occupied.Roccupants, especially children, shouldnever place their bodies or lean their headsin the area of the door where the sideimpact air bag inflates. This could result inserious or fatal injuries should the sideimpact air bag be deployed. Always sit asupright as possible, wear the seat beltproperly and use an appropriately sizedinfant restraint, toddler restraint or boosterseat recommended for the size and weightof the child.
Failure to follow these instructions can resultin severe injuries to you or other occupants.If you sell your vehicle, it is important that youmake the buyer aware of this safetyinformation. Be sure to give the buyer thisOperator's Manual.
If the air bags are deployed, you will hear abang, and a small amount of powder may alsobe released. Only in rare cases will the bangaffect your hearing. The powder that isreleased generally does not constitute ahealth hazard and does not indicate that thereis a fire in the vehicle. The dust might causesome temporary breathing difficulty forpeople with asthma or other breathingtrouble. To avoid this, youmay wish to get outof the vehicle as soon as it is safe to do so.You can also open the window to allow freshair to enter the vehicle interior. The 6 SRSwarning lamp lights up.The air bag installation locations areidentified by the AIR BAG symbol.The air bags are deployed if the air bag controlunit detects the need for deployment. Only inthe event of such a situation will the air bagsprovide their supplemental protection.If the driver and front passenger do not weartheir seat belts, it is not possible for the air
Occupant safety 51
Safety
Z
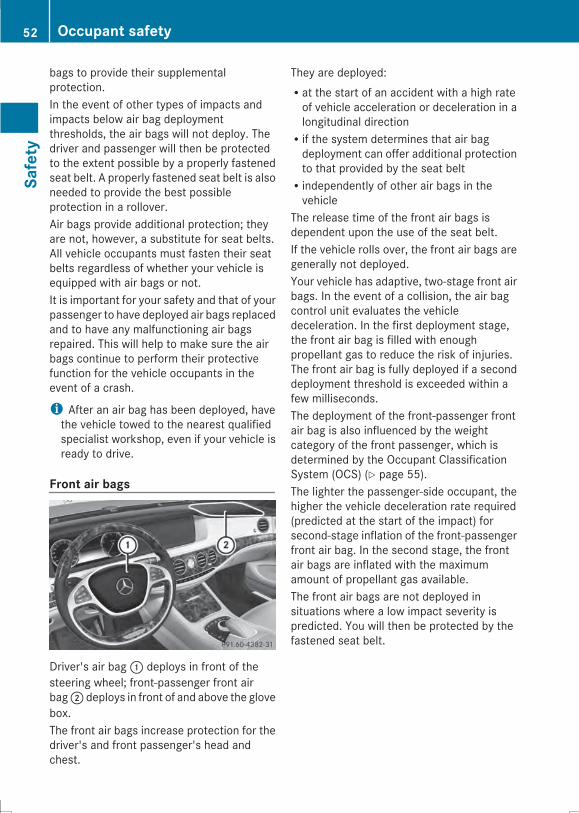
bags to provide their supplementalprotection.In the event of other types of impacts andimpacts below air bag deploymentthresholds, the air bags will not deploy. Thedriver and passenger will then be protectedto the extent possible by a properly fastenedseat belt. A properly fastened seat belt is alsoneeded to provide the best possibleprotection in a rollover.Air bags provide additional protection; theyare not, however, a substitute for seat belts.All vehicle occupants must fasten their seatbelts regardless of whether your vehicle isequipped with air bags or not.It is important for your safety and that of yourpassenger to have deployed air bags replacedand to have any malfunctioning air bagsrepaired. This will help to make sure the airbags continue to perform their protectivefunction for the vehicle occupants in theevent of a crash.
i After an air bag has been deployed, havethe vehicle towed to the nearest qualifiedspecialist workshop, even if your vehicle isready to drive.
Front air bags
Driver's air bag: deploys in front of thesteering wheel; front-passenger front airbag; deploys in front of and above the glovebox.The front air bags increase protection for thedriver's and front passenger's head andchest.
They are deployed:Rat the start of an accident with a high rateof vehicle acceleration or deceleration in alongitudinal directionRif the system determines that air bagdeployment can offer additional protectionto that provided by the seat beltRindependently of other air bags in thevehicle
The release time of the front air bags isdependent upon the use of the seat belt.If the vehicle rolls over, the front air bags aregenerally not deployed.Your vehicle has adaptive, two-stage front airbags. In the event of a collision, the air bagcontrol unit evaluates the vehicledeceleration. In the first deployment stage,the front air bag is filled with enoughpropellant gas to reduce the risk of injuries.The front air bag is fully deployed if a seconddeployment threshold is exceeded within afew milliseconds.The deployment of the front-passenger frontair bag is also influenced by the weightcategory of the front passenger, which isdetermined by the Occupant ClassificationSystem (OCS) (Y page 55).The lighter the passenger-side occupant, thehigher the vehicle deceleration rate required(predicted at the start of the impact) forsecond-stage inflation of the front-passengerfront air bag. In the second stage, the frontair bags are inflated with the maximumamount of propellant gas available.The front air bags are not deployed insituations where a low impact severity ispredicted. You will then be protected by thefastened seat belt.
52 Occupant safetySafety
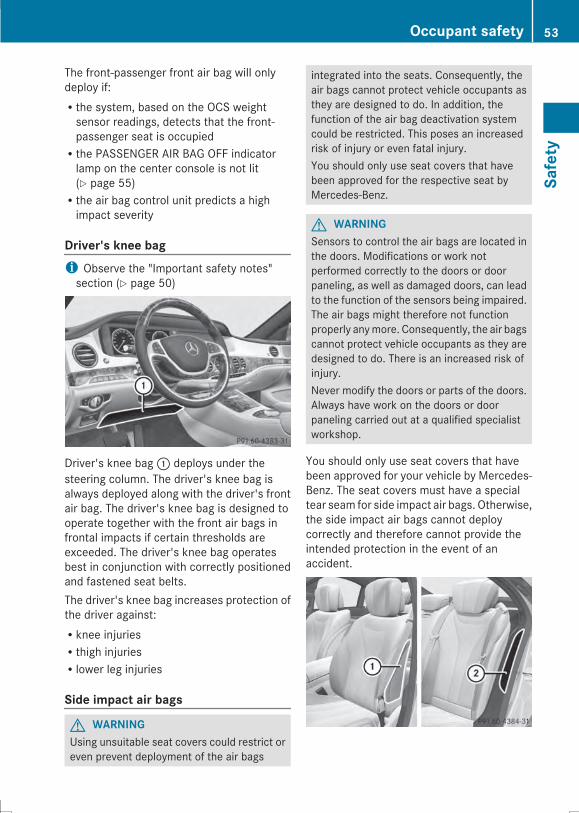
The front-passenger front air bag will onlydeploy if:Rthe system, based on the OCS weightsensor readings, detects that the front-passenger seat is occupiedRthe PASSENGER AIR BAG OFF indicatorlamp on the center console is not lit(Y page 55)Rthe air bag control unit predicts a highimpact severity
Driver's knee bagi Observe the "Important safety notes"section (Y page 50)
Driver's knee bag: deploys under thesteering column. The driver's knee bag isalways deployed along with the driver's frontair bag. The driver's knee bag is designed tooperate together with the front air bags infrontal impacts if certain thresholds areexceeded. The driver's knee bag operatesbest in conjunction with correctly positionedand fastened seat belts.The driver's knee bag increases protection ofthe driver against:Rknee injuriesRthigh injuriesRlower leg injuries
Side impact air bags
G WARNINGUsing unsuitable seat covers could restrict oreven prevent deployment of the air bags
integrated into the seats. Consequently, theair bags cannot protect vehicle occupants asthey are designed to do. In addition, thefunction of the air bag deactivation systemcould be restricted. This poses an increasedrisk of injury or even fatal injury.You should only use seat covers that havebeen approved for the respective seat byMercedes-Benz.
G WARNINGSensors to control the air bags are located inthe doors. Modifications or work notperformed correctly to the doors or doorpaneling, as well as damaged doors, can leadto the function of the sensors being impaired.The air bags might therefore not functionproperly anymore. Consequently, the air bagscannot protect vehicle occupants as they aredesigned to do. There is an increased risk ofinjury.Never modify the doors or parts of the doors.Always have work on the doors or doorpaneling carried out at a qualified specialistworkshop.
You should only use seat covers that havebeen approved for your vehicle by Mercedes-Benz. The seat covers must have a specialtear seam for side impact air bags. Otherwise,the side impact air bags cannot deploycorrectly and therefore cannot provide theintended protection in the event of anaccident.
Occupant safety 53
Safety
Z
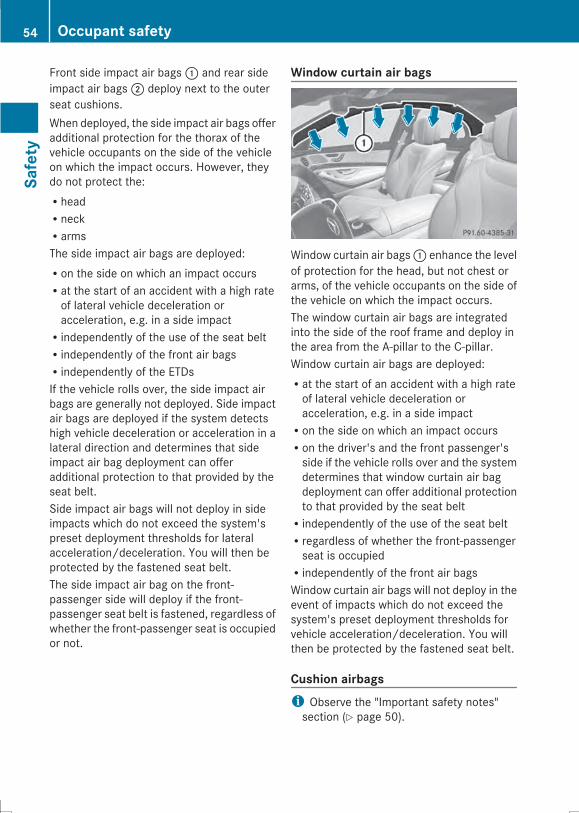
Front side impact air bags: and rear sideimpact air bags; deploy next to the outerseat cushions.When deployed, the side impact air bags offeradditional protection for the thorax of thevehicle occupants on the side of the vehicleon which the impact occurs. However, theydo not protect the:RheadRneckRarmsThe side impact air bags are deployed:Ron the side on which an impact occursRat the start of an accident with a high rateof lateral vehicle deceleration oracceleration, e.g. in a side impactRindependently of the use of the seat beltRindependently of the front air bagsRindependently of the ETDsIf the vehicle rolls over, the side impact airbags are generally not deployed. Side impactair bags are deployed if the system detectshigh vehicle deceleration or acceleration in alateral direction and determines that sideimpact air bag deployment can offeradditional protection to that provided by theseat belt.Side impact air bags will not deploy in sideimpacts which do not exceed the system'spreset deployment thresholds for lateralacceleration/deceleration. You will then beprotected by the fastened seat belt.The side impact air bag on the front-passenger side will deploy if the front-passenger seat belt is fastened, regardless ofwhether the front-passenger seat is occupiedor not.
Window curtain air bags
Window curtain air bags: enhance the levelof protection for the head, but not chest orarms, of the vehicle occupants on the side ofthe vehicle on which the impact occurs.The window curtain air bags are integratedinto the side of the roof frame and deploy inthe area from the A-pillar to the C-pillar.Window curtain air bags are deployed:Rat the start of an accident with a high rateof lateral vehicle deceleration oracceleration, e.g. in a side impactRon the side on which an impact occursRon the driver's and the front passenger'sside if the vehicle rolls over and the systemdetermines that window curtain air bagdeployment can offer additional protectionto that provided by the seat beltRindependently of the use of the seat beltRregardless of whether the front-passengerseat is occupiedRindependently of the front air bagsWindow curtain air bags will not deploy in theevent of impacts which do not exceed thesystem's preset deployment thresholds forvehicle acceleration/deceleration. You willthen be protected by the fastened seat belt.
Cushion airbagsi Observe the "Important safety notes"section (Y page 50).
54 Occupant safetySafety
i When installing a child restraint system,please observe the "Child restraintsystems" section (Y page 67).
G WARNINGIf a child restraint system is installed and theseat backrest is reclined too far backwards,the cushion air bag may deploy by mistake inthe event of an accident. There is an increasedrisk of injury.When using a child restraint system, alwaysensure that the seat is correctly adjusted andthat the backrest is almost vertical.
The rear reclining seat is equipped with acushion air bag. If the seat backrest isreclined, the cushion air bag can provideadditional occupant protection in the event ofa frontal collision. When triggered, thecushion air bag deploys under the seatcushion. This helps prevent the occupantfrom slipping off the seat cushion.
Occupant Classification System(OCS)
Method of operation
G WARNINGIf the 45 indicator lamp illuminateswhen an adult or someone larger than a smallindividual is in the front passenger seat, havethe front passenger reposition himself orherself in the seat until the 45indicator lamp goes out.In the event of a collision, the air bag controlunit will not allow front passenger front air bagdeployment when the OCS has classified thefront passenger seat occupant as weighing asmuch as or less than a typical 12-month-oldchild in a standard child restraint or if the frontpassenger seat is classified as being empty.When the OCS senses that the frontpassenger seat occupant is classified asbeing up to or less than the weight of a typical12-month-old child in a standard childrestraint, the 45 indicator lamp will
illuminate when the engine is started andremain illuminated. This indicates that thefront passenger front air bag is deactivated.When the OCS senses that the frontpassenger seat is classified as being empty,the 45 indicator lamp will illuminatewhen the engine is started and remainilluminated. This indicates that the frontpassenger front air bag is deactivated.When the OCS senses that the frontpassenger seat occupant is classified asbeing heavier than the weight of a typical 12-month-old child seated in a standard childrestraint or as being a small individual (suchas a young teenager or a small adult), the45 indicator lamp will illuminate forapproximately 6 seconds when the engine isstarted. Depending on occupant weightsensor readings from the seat, it will thenremain illuminated or go out. With the45 indicator lamp illuminated, thefront passenger front air bag is deactivated.With the 45 indicator lamp out, thefront passenger front air bag is activated.When the OCS senses that the frontpassenger seat occupant is classified as anadult or someone larger than a smallindividual, the 45 indicator lamp willilluminate for approximately six secondswhen the engine is started and then go out.This indicates that the front passenger frontair bag is activated.If the 45 indicator lamp is illuminated,the front passenger front air bag isdeactivated and will not be deployed.If the 45 indicator lamp is notilluminated, the front passenger front air bagis activated and will be deployedRin the event of certain frontal impactsRif the impact exceeds a predeterminedtriggering thresholdRindependent of the side impact air bag orpelvis air bag
Occupant safety 55
Safety
Z
If the front passenger front air bag isdeployed, the rate of inflation will beinfluenced byRthe rate of vehicle deceleration as assessedby the air bag control unitRthe front passenger's weight category asidentified by the OCS
G WARNINGAccording to accident statistics, children aresafer when properly restrained on the rearseats than on the front-passenger seat. Thus,we strongly recommend that children beplaced in the rear seats whenever possible.Regardless of seating position, children 12years old and under must be seated andproperly secured in an appropriate infantrestraint, toddler restraint, or booster seatrecommended for the size and weight of thechild.The infant or child restraint must be properlysecured with the vehicle's seat belt, the seatbelt and Top Tether strap, or lower anchorsand Top Tether strap, fully in accordance withthe child seat manufacturer's instructions.Occupants, especially children, should alwayssit as upright as possible, wear the seat beltproperly and use an appropriately sized infantrestraint, toddler restraint, or booster seatrecommended for the size and weight of thechild.Children can be killed or seriously injured byan inflating air bag. Note the followingimportant information when circumstancesrequire you to place a child in the front-passenger seat:RYour vehicle is equipped with air bagtechnology designed to deactivate thefront-passenger front air bag in your vehiclewhen the system senses the weight of atypical 12-month-old child or less alongwith the weight of a standard appropriatechild restraint on the front-passenger seat.RA child in a rear-facing child restraint on thefront-passenger seat will be seriously
injured or even killed if the front-passengerfront air bag inflates in a collision whichcould occur under some circumstances,even with the air bag technology installedin your vehicle. The onlymeans to eliminatethis risk completely is never to place a childin a rear-facing child restraint in the front-passenger seat. We therefore stronglyrecommend that you always place a childin a rear-facing child restraint on the rearseat.RIf you install a rear-facing child restraint onthe front-passenger seat, make sure the45 indicator lamp is illuminated,indicating that the front-passenger front airbag is deactivated. Should the 45indicator lampnot illuminate or go outwhilethe restraint is installed, please checkinstallation. Periodically check the45 indicator lamp while driving tomake sure that the 45 indicatorlamp is illuminated. If the 45indicator lamp goes out or remains out, donot transport a child on the front-passengerseat until the system has been repaired.A child in a rear-facing child restraint on thefront-passenger seat will be seriouslyinjured or even killed if the front-passengerfront air bag inflates.RIf you place a child in a forward-facing childrestraint on the front-passenger seat:- move the seat as far back as possible- use the proper child restraintrecommended for the age, size andweight of the child
- secure child restraint with the vehicle'sseat belt according to the child seatmanufacturer's instructions
RFor children larger than the typical 12-month-old child, the front-passenger frontair bag may or may not be activated.
G WARNINGIf the red 6 SRS warning lamp in theinstrument cluster and the 45indicator lamp light up simultaneously, the
56 Occupant safetySafety
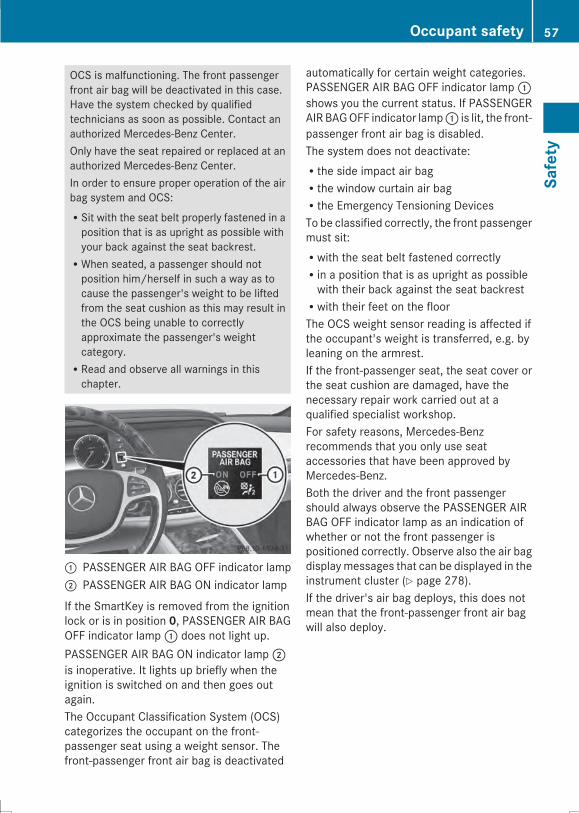
OCS is malfunctioning. The front passengerfront air bag will be deactivated in this case.Have the system checked by qualifiedtechnicians as soon as possible. Contact anauthorized Mercedes-Benz Center.Only have the seat repaired or replaced at anauthorized Mercedes-Benz Center.In order to ensure proper operation of the airbag system and OCS:RSit with the seat belt properly fastened in aposition that is as upright as possible withyour back against the seat backrest.RWhen seated, a passenger should notposition him/herself in such a way as tocause the passenger's weight to be liftedfrom the seat cushion as this may result inthe OCS being unable to correctlyapproximate the passenger's weightcategory.RRead and observe all warnings in thischapter.
: PASSENGER AIR BAG OFF indicator lamp; PASSENGER AIR BAG ON indicator lamp
If the SmartKey is removed from the ignitionlock or is in position 0, PASSENGER AIR BAGOFF indicator lamp: does not light up.PASSENGER AIR BAG ON indicator lamp;is inoperative. It lights up briefly when theignition is switched on and then goes outagain.The Occupant Classification System (OCS)categorizes the occupant on the front-passenger seat using a weight sensor. Thefront-passenger front air bag is deactivated
automatically for certain weight categories.PASSENGER AIR BAG OFF indicator lamp:shows you the current status. If PASSENGERAIR BAGOFF indicator lamp: is lit, the front-passenger front air bag is disabled.The system does not deactivate:Rthe side impact air bagRthe window curtain air bagRthe Emergency Tensioning DevicesTo be classified correctly, the front passengermust sit:Rwith the seat belt fastened correctlyRin a position that is as upright as possiblewith their back against the seat backrestRwith their feet on the floorThe OCS weight sensor reading is affected ifthe occupant's weight is transferred, e.g. byleaning on the armrest.If the front-passenger seat, the seat cover orthe seat cushion are damaged, have thenecessary repair work carried out at aqualified specialist workshop.For safety reasons, Mercedes-Benzrecommends that you only use seataccessories that have been approved byMercedes-Benz.Both the driver and the front passengershould always observe the PASSENGER AIRBAG OFF indicator lamp as an indication ofwhether or not the front passenger ispositioned correctly. Observe also the air bagdisplaymessages that can be displayed in theinstrument cluster (Y page 278).If the driver's air bag deploys, this does notmean that the front-passenger front air bagwill also deploy.
Occupant safety 57
Safety
Z
The OCS may have detected that the seat:Ris empty or occupied by the weight of atypical child up to twelve months old,seated in a child restraint system.Ris occupied by a small individual, such as ayoung teenager or a small adult.Ris occupied by a child in a child restraintsystem whose weight is greater than thatof a typical twelve month old child.
These are examples of when the OCSdeactivates the front-passenger front air bag.Deactivation takes place although thecollision fulfills the criteria for deploying thedriver's air bag.For further information, see "Air bag displaymessages" (Y page 278).
System self-test
G WARNINGIf the 4 5 indicator lamp does notilluminate, the system is not functioning. Youmust contact an authorized Mercedes-BenzCenter before seating any child on the frontpassenger seat.
G WARNINGNever place anything between seat cushionand child seat (e.g. a pillow), since it reducesthe effectiveness of the OCS. The undersideand rear side child restraint system must beplaced entirely on the seat cushion and thebackrest of the front-passenger seatbackrest.If necessary, adjust the tilt of the passengerseat backrest.An incorrectlymounted child seat could causeinjuries to the child in case of an accident,instead of increasing protection for the child.Follow the manufacturer's instructions forinstallation of child restraint systems.
The PASSENGER AIR BAG OFF indicator lamplights up:Rif the Start/Stop button is pressed once ortwice
orRif you turn the SmartKey in the ignition lockto position 1 or 2Rif an adult is seated properly on the front-passenger seat and the OCS classifies theoccupant as an adult
The PASSENGER AIR BAG OFF indicator lampgoes out again after approximately sixseconds.If the seat is not occupied and the OCSdetects that the front-passenger seat isempty, the PASSENGER AIR BAG OFFindicator lamp will continue to light up. ThePASSENGER AIR BAG OFF indicator lamp willnot go out.For more information about the OCS, see"Problems with the Occupant ClassificationSystem" (Y page 59).
58 Occupant safetySafety
Problems with the occupant classification system
G WARNINGIf the 45 indicator lamp illuminates and remains illuminated when the weight of a typicaladult or someone larger than a small individual has been detected on the passenger seat, do notallow any occupant to use the passenger seat until the system has been repaired.
G WARNINGIf the 45 indicator lamp does not illuminate or remains out with the weight of a typical12-month-old child in a standard child restraint or less, or is unoccupied, on the front-passengerseat, do not transport a child on the front-passenger seat until the system has been repaired.
Problem Possible causes/consequences andMM Solutions
The PASSENGER AIRBAG OFF indicatorlights up and remainson.The person on thefront-passenger seat:Rhas the weight of atypical adultRhas been determinedby the system not tobe a child
The OCS is malfunctioning.X Have the OCS checked as soon as possible at a qualifiedspecialist workshop.
X Observe the additional display messages in the multifunctiondisplay (Y page 278).
Problem Possible causes/consequences andMM Solutions
The PASSENGER AIRBAG OFF indicatorlamp does not light upand/or stays on.The front-passengerseat is:RunoccupiedRoccupied with theweight of a child upto twelve months oldin a child restraintsystem
The OCS is malfunctioning.X Make sure there is nothing between the seat cushion and thechild seat.
X Check the installation of the child restraint system.X Make sure that no objects are applying additional weight ontothe seat.
X If the PASSENGERAIR BAGOFF indicator lamp remains off, havethe OCS system checked as soon as possible at a qualifiedspecialist workshop. Do not transport a child on the front-passenger seat until the OCS has been repaired.
X Observe the additional display messages in the multifunctiondisplay (Y page 278).
Occupant safety 59
Safety
Z
PRE-SAFE® (anticipatory occupantprotection system)
IntroductionPRE-SAFE® takes preemptive measures toprotect occupants in certain hazardoussituations.
Important safety notes! Make sure that there are no objects in thefootwell or behind the seats when resettingthe seats. There is a risk that the seatsand/or the objects could be damaged.
Despite your vehicle being equipped with thePRE-SAFE® system, the possibility ofpersonal injuries occurring as a result of anaccident cannot be eliminated.Always adapt your driving style to suit theprevailing road and weather conditions andmaintain a safe distance from the vehicle infront. Drive carefully.
FunctionPRE-SAFE® intervenes:Rin emergency braking situations, e.g. whenBAS is activated.Rin critical driving situations, e.g. whenphysical limits are exceeded and thevehicle understeers or oversteers severely.Rvehicles with the Driving Assistancepackage: when a driver assistance systemintervenes powerfully or the radar sensorsystem detects an imminent danger ofcollision in certain situations
PRE-SAFE® takes the following measuresdepending on the hazardous situationdetected:Rthe front seat belts are pre-tensioned.Rif the vehicle skids, the panorama roof withpower tilt/sliding panel and the sidewindows are closed so that only a small gapremains.Rthe front-passenger seat is adjusted if it isin an unfavorable position.
Rvehicles with electrically adjustablerear seats: the outer rear seats areadjusted if they are in an unfavorableposition.Rvehicles with a multicontour seat: theair pressure in the side bolsters of thebackrest is increased.Rvehicles with seat belt extenders: theseat belts of the outer rear seats are pre-tensioned.
If the hazardous situation passes withoutresulting in an accident, PRE-SAFE® slackensthe belt pre-tensioning. On vehicles withmulticontour seats, the air pressure in theside bolsters is reduced again. All settingsmade by PRE-SAFE® can then be reversed.If the seat belts are not released:X When the vehicle is stationary, move thebackrest or seat back slightly.The seat belt pre-tensioning is reduced andthe locking mechanism is released.
The seat-belt adjustment is an integral part ofthe PRE-SAFE® convenience function. Moreinformation about seat-belt adjustment canbe found under "Seat-belt adjustment"(Y page 64).More information about PRE-SAFE® PLUS(Y page 60).
PRE-SAFE® PLUS (anticipatoryoccupant protection system PLUS)
General informationPRE-SAFE® PLUS is only available in vehicleswith the Driving Assistance package.Using the radar sensor system, PRE-SAFE®PLUS is able to detect that a head-on or rear-end collision is imminent. In certainhazardous situations, PRE-SAFE® PLUS takespre-emptive measures to protect the vehicleoccupants.
60 Occupant safetySafety
Important safety notesThe intervention of PRE-SAFE® PLUS cannotprevent an imminent collision.The driver is not warned when PRE-SAFE®PLUS intervenes.PRE-SAFE® PLUS does not intervene:Rif the vehicle is backing upRwhen the vehicle is towing a trailer andthere is a risk of a rear-end collision
PRE-SAFE® PLUS does not perform brakingactions while the vehicle is in motion or whenParking Guidance is active.
FunctionPRE-SAFE® PLUS intervenes in certainsituations if the radar sensor system detectsan imminent head-on or rear-end collision.PRE-SAFE® PLUS takes the followingmeasures depending on the hazardoussituation detected:RIf the radar sensor system detects that ahead-on collision is imminent, the seatbelts are pre-tensioned.RIf the radar sensor system detects that arear-end collision is imminent:- the brake pressure is increased if thedriver applies the brakes when thevehicle is stationary.
- the seat belts are pre-tensioned.The PRE-SAFE® PLUS braking application iscanceled in the following situations:Rif the accelerator pedal is depressed whena gear is engagedRif the risk of a collision passes or is nolonger detectedRif DISTRONIC PLUS indicates an intentionto pull away
If the hazardous situation passes withoutresulting in an accident, the original settingsare restored.
Automatic measures after anaccidentImmediately after an accident, the followingmeasures are implemented, depending onthe type and severity of the impact:Rby activating the hazard warning lampsRthe emergency lighting is activatedRthe vehicle doors are unlockedRthe front side windows are loweredRthe electrically adjustable steering wheel israisedRthe engine is switched offRvehicles with seat belt extenders: theseat-belt buckles for the outer rear seatsare illuminated and extend forwardsRvehicles with mbrace: automaticemergency callRvehicles with the hybrid drive system:the hybrid system is deactivated
Seat belts
Important safety notes
G WARNINGObjects next to the front seat that block thebelt buckle or the moving belt anchorage onthe front seat impair the function of theEmergency Tensioning Devices. TheEmergency Tensioning Devices may notfunction as intended and the seat belt may nolonger provide the intended protection. Thisposes an increased risk of injury or even fatalinjury.Before starting the journey, make sure thatthere are no objects around the belt buckle orbetween the front seat and door.
G WARNINGThe seat belt does not offer the intended levelof protection if the backrest is not in theupright position. When braking or in the eventof an accident, you could slide underneath theseat belt and sustain abdomen or neck
Occupant safety 61
Safety
Z
injuries, for example. This poses an increasedrisk of injury or even fatal injury.Adjust the seat properly before beginningyour journey. Always make sure that the seatis in the upright position.
G WARNINGSeat belts cannot protect as intended, if:Rthey are damaged, extremely dirty,bleached or dyedRthe seat belt buckle is damaged orextremely dirtyRthe Emergency Tensioning Devices or thebelt anchorage has been modified.
Damage caused to seat belts in an accidentmay not be visible, e.g. by splinters of glass.Modified or damaged seat belts can tear orfail, for example in the event of an accident.Modified Emergency Tensioning Devices maybe deployed unintentionally or fail to bedeployed when required. There is anincreased risk of injury, possibly even fatal.Never modify seat belts, EmergencyTensioning Devices, seat belt anchorages andinertia reels. Ensure that seat belts are notdamaged or worn and are clean.
Only use seat belts that have been approvedfor your vehicle by Mercedes-Benz.The use of seat belts and infant and childrestraint systems is required by law in:Rall 50 statesRthe U.S. territoriesRthe District of ColumbiaRall Canadian provincesEven where this is not required by law, allvehicle occupants should correctly fastentheir seat belts before starting the journey.
i See "Children in the vehicle"(Y page 67) for further information oninfants and children traveling in the vehicleas well as on child restraint systems.
Correct use of the seat belts
G WARNINGUSE SEAT BELTS PROPERLYRSeat belts can only work when usedproperly. Never wear seat belts in any otherway than as described in this section, asthat could result in serious injuries in theevent of an accident.REach occupant should wear their seat beltat all times, because seat belts help reducethe likelihood of and potential severity ofinjuries in accidents, including rollovers.The integrated restraint system includesSRS (driver front air bag, front-passengerfront air bag, side impact air bags, windowcurtain air bags for the side windows),Emergency Tensioning Devices, seat beltforce limiters, and front seat knee bolsters.The system is designed to enhance theprotection offered to properly beltedoccupants in certain frontal (front air bagsand ETDs) and side (side impact air bags,window curtain air bags, and ETDs) impactswhich exceed preset deploymentthresholds and in certain rollovers (windowcurtain air bags and ETDs).RNever wear the shoulder belt under yourarm, across your neck or off your shoulder.In a frontal crash, your body would movetoo far forward. That would increase thechance of head and neck injuries. The seatbelt would also apply too much force to theribs or abdomen, which could severelyinjure internal organs such as your liver orspleen.Adjust the seat belt so that the shouldersection is located as close as possible tothe middle of the shoulder. It should nottouch the neck. Never pass the shoulderportion of the seat belt under your arm. Forthis purpose, you can adjust the height ofthe seat belt outlet.RPosition the lap belt as low as possible onyour hips and not across the abdomen. Ifthe lap belt is positioned across your
62 Occupant safetySafety
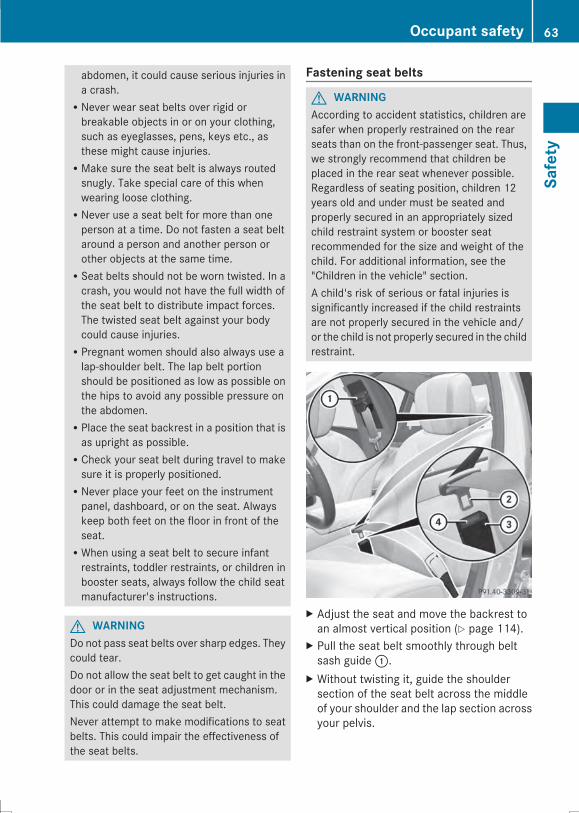
abdomen, it could cause serious injuries ina crash.RNever wear seat belts over rigid orbreakable objects in or on your clothing,such as eyeglasses, pens, keys etc., asthese might cause injuries.RMake sure the seat belt is always routedsnugly. Take special care of this whenwearing loose clothing.RNever use a seat belt for more than oneperson at a time. Do not fasten a seat beltaround a person and another person orother objects at the same time.RSeat belts should not be worn twisted. In acrash, you would not have the full width ofthe seat belt to distribute impact forces.The twisted seat belt against your bodycould cause injuries.RPregnant women should also always use alap-shoulder belt. The lap belt portionshould be positioned as low as possible onthe hips to avoid any possible pressure onthe abdomen.RPlace the seat backrest in a position that isas upright as possible.RCheck your seat belt during travel to makesure it is properly positioned.RNever place your feet on the instrumentpanel, dashboard, or on the seat. Alwayskeep both feet on the floor in front of theseat.RWhen using a seat belt to secure infantrestraints, toddler restraints, or children inbooster seats, always follow the child seatmanufacturer's instructions.
G WARNINGDo not pass seat belts over sharp edges. Theycould tear.Do not allow the seat belt to get caught in thedoor or in the seat adjustment mechanism.This could damage the seat belt.Never attempt to make modifications to seatbelts. This could impair the effectiveness ofthe seat belts.
Fastening seat belts
G WARNINGAccording to accident statistics, children aresafer when properly restrained on the rearseats than on the front-passenger seat. Thus,we strongly recommend that children beplaced in the rear seat whenever possible.Regardless of seating position, children 12years old and under must be seated andproperly secured in an appropriately sizedchild restraint system or booster seatrecommended for the size and weight of thechild. For additional information, see the"Children in the vehicle" section.A child's risk of serious or fatal injuries issignificantly increased if the child restraintsare not properly secured in the vehicle and/or the child is not properly secured in the childrestraint.
X Adjust the seat and move the backrest toan almost vertical position (Y page 114).
X Pull the seat belt smoothly through beltsash guide:.
X Without twisting it, guide the shouldersection of the seat belt across the middleof your shoulder and the lap section acrossyour pelvis.
Occupant safety 63
Safety
Z
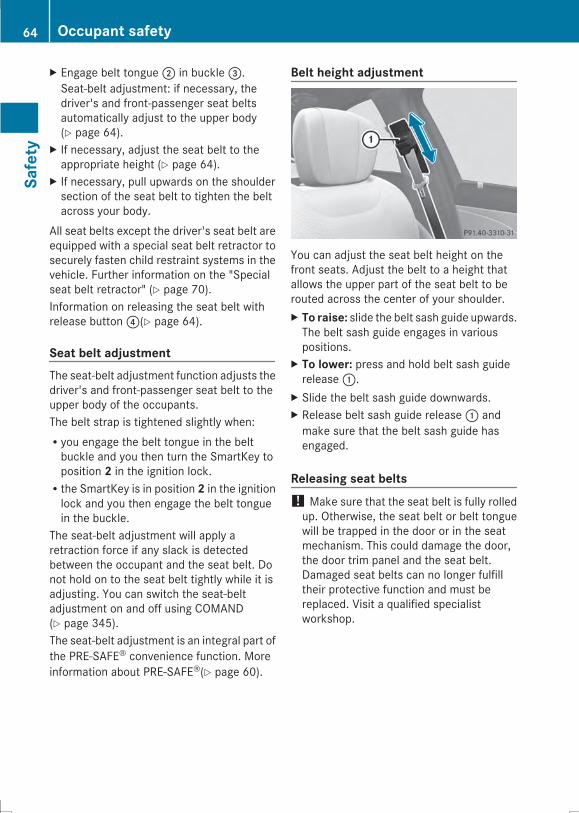
X Engage belt tongue; in buckle=.Seat-belt adjustment: if necessary, thedriver's and front-passenger seat beltsautomatically adjust to the upper body(Y page 64).
X If necessary, adjust the seat belt to theappropriate height (Y page 64).
X If necessary, pull upwards on the shouldersection of the seat belt to tighten the beltacross your body.
All seat belts except the driver's seat belt areequipped with a special seat belt retractor tosecurely fasten child restraint systems in thevehicle. Further information on the "Specialseat belt retractor" (Y page 70).Information on releasing the seat belt withrelease button?(Y page 64).
Seat belt adjustmentThe seat-belt adjustment function adjusts thedriver's and front-passenger seat belt to theupper body of the occupants.The belt strap is tightened slightly when:Ryou engage the belt tongue in the beltbuckle and you then turn the SmartKey toposition 2 in the ignition lock.Rthe SmartKey is in position 2 in the ignitionlock and you then engage the belt tonguein the buckle.
The seat-belt adjustment will apply aretraction force if any slack is detectedbetween the occupant and the seat belt. Donot hold on to the seat belt tightly while it isadjusting. You can switch the seat-beltadjustment on and off using COMAND(Y page 345).The seat-belt adjustment is an integral part ofthe PRE-SAFE® convenience function. Moreinformation about PRE-SAFE®(Y page 60).
Belt height adjustment
You can adjust the seat belt height on thefront seats. Adjust the belt to a height thatallows the upper part of the seat belt to berouted across the center of your shoulder.X To raise: slide the belt sash guide upwards.The belt sash guide engages in variouspositions.
X To lower: press and hold belt sash guiderelease:.
X Slide the belt sash guide downwards.X Release belt sash guide release: andmake sure that the belt sash guide hasengaged.
Releasing seat belts! Make sure that the seat belt is fully rolledup. Otherwise, the seat belt or belt tonguewill be trapped in the door or in the seatmechanism. This could damage the door,the door trim panel and the seat belt.Damaged seat belts can no longer fulfilltheir protective function and must bereplaced. Visit a qualified specialistworkshop.
64 Occupant safetySafety
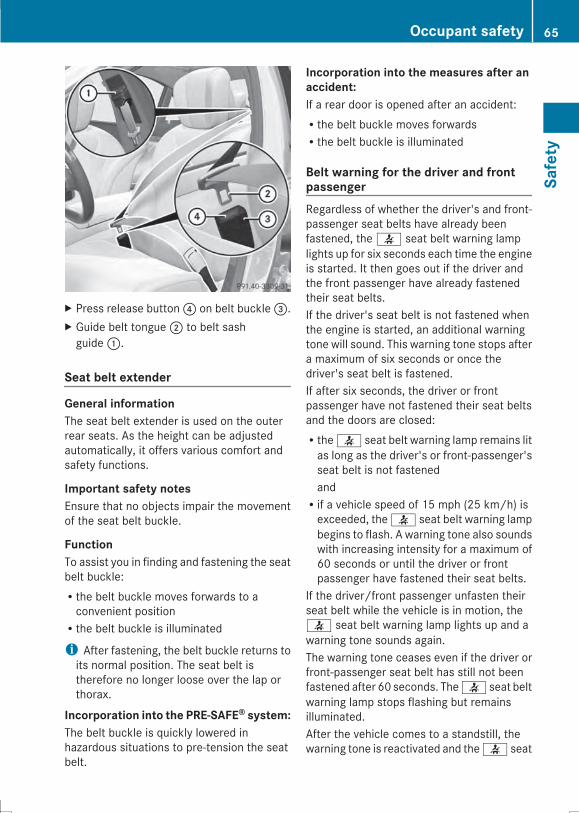
X Press release button? on belt buckle=.X Guide belt tongue; to belt sashguide:.
Seat belt extender
General informationThe seat belt extender is used on the outerrear seats. As the height can be adjustedautomatically, it offers various comfort andsafety functions.
Important safety notesEnsure that no objects impair the movementof the seat belt buckle.
FunctionTo assist you in finding and fastening the seatbelt buckle:Rthe belt buckle moves forwards to aconvenient positionRthe belt buckle is illuminated
i After fastening, the belt buckle returns toits normal position. The seat belt istherefore no longer loose over the lap orthorax.
Incorporation into the PRE-SAFE® system:The belt buckle is quickly lowered inhazardous situations to pre-tension the seatbelt.
Incorporation into the measures after anaccident:If a rear door is opened after an accident:Rthe belt buckle moves forwardsRthe belt buckle is illuminated
Belt warning for the driver and frontpassengerRegardless of whether the driver's and front-passenger seat belts have already beenfastened, the 7 seat belt warning lamplights up for six seconds each time the engineis started. It then goes out if the driver andthe front passenger have already fastenedtheir seat belts.If the driver's seat belt is not fastened whenthe engine is started, an additional warningtone will sound. This warning tone stops aftera maximum of six seconds or once thedriver's seat belt is fastened.If after six seconds, the driver or frontpassenger have not fastened their seat beltsand the doors are closed:Rthe 7 seat belt warning lamp remains litas long as the driver's or front-passenger'sseat belt is not fastenedandRif a vehicle speed of 15 mph (25 km/h) isexceeded, the 7 seat belt warning lampbegins to flash. A warning tone also soundswith increasing intensity for a maximum of60 seconds or until the driver or frontpassenger have fastened their seat belts.
If the driver/front passenger unfasten theirseat belt while the vehicle is in motion, the7 seat belt warning lamp lights up and awarning tone sounds again.The warning tone ceases even if the driver orfront-passenger seat belt has still not beenfastened after 60 seconds. The7 seat beltwarning lamp stops flashing but remainsilluminated.After the vehicle comes to a standstill, thewarning tone is reactivated and the7 seat
Occupant safety 65
Safety
Z
belt warning lamp flashes again if the vehiclespeed again exceeds 15 mph (25 km/h).The 7 seat belt warning lamp only goesout if:Rboth the driver and the front passengerhave fastened their seat belts.orRthe vehicle is stationary and a door is open.
i For more information on the 7 seatbelt warning lamp, see "Warning andindicator lamps in the instrument cluster,seat belts" (Y page 301).
Emergency Tensioning Devices, seatbelt force limiters
G WARNINGPyrotechnic Emergency Tensioning Devicesthat have been deployed are no longeroperational and are unable to perform theirintended protective function. This poses anincreased risk of injury or even fatal injury.Therefore, have pyrotechnic EmergencyTensioning Devices which have beentriggered immediately replaced at a qualifiedspecialist workshop.
! If the front-passenger seat is notoccupied, do not engage the seat belttongue in the buckle on the front-passenger seat. Otherwise, in the event ofan accident the different stages of theEmergency Tensioning Devices could betriggered.
i An electric motor is used by PRE-SAFE®to trigger the tightening of the seat belt inhazardous situations. This procedure isreversible.
The front seat belts and the outer seat beltsin the rear are equipped with EmergencyTensioning Devices and seat belt forcelimiters.The ETDs tighten the seat belts in an accident,pulling them close against the body.
The ETDs do not correct incorrect seatpositions or incorrectly fastened seat belts.The ETDs do not pull vehicle occupants backtowards the backrest.If the seat belt is also equipped with a seatbelt force limiter and this is triggered, theforce exerted by the seat belt on the vehicleoccupant is reduced.When triggered, seat belt force limiters helpto reduce the force exerted by the seat belton the vehicle occupant.The seat belt force limiters for the front seatsare synchronized with the front air bags,which absorb part of the deceleration force.This results in the force exerted on theoccupant being distributed over a greaterarea.The ETDs can only be activated when:Rthe ignition is switched onRthe restraint systems are operational; see"SRS warning lamp" (Y page 49)Rthe front-passenger seat is occupied andthe belt tongue is engaged in the buckle onthe front-passenger sideRthe belt tongue is engaged in the buckle oneach of the three-point seat belts in front
The ETDs on the outside seats in the rearcompartment are triggered independently ofthe lock status of the seat belts.The various stages of the EmergencyTensioning Devices are triggered dependingon the type and severity of an accident:Rin the event of a head-on or rear-endcollision if the vehicle decelerates oraccelerates rapidly in a longitudinaldirection during the initial stages of theimpact.Rin the event of a side impact if the vehicledecelerates or accelerates rapidly in alateral direction on the side opposite to theimpact.Rin certain situations where the vehicle rollsover if the system determines that it canprovide additional protection.
66 Occupant safetySafety
If the ETDs are deployed, you will hear a bang,and a small amount of powder may also bereleased. Only in rare cases will the bangaffect your hearing. The powder that isreleased generally does not constitute ahealth hazard and does not indicate that thereis a fire in the vehicle. The dust might causesome temporary breathing difficulty forpeople with asthma or other breathingtrouble. To avoid this, youmay wish to get outof the vehicle as soon as it is safe to do so.You can also open the window to allow freshair to enter the vehicle interior. The 6 SRSwarning lamp lights up.
Belt bagsi Observe the "Important safety notes"section (Y page 50).
G WARNINGIn an accident, the belt bag may damage anon-approved child restraint system. As aresult, the child restraint system may not beable to provide the intended level ofprotection. There is an increased risk ofinjury.For safety reasons, we recommend that youonly use a child restraint system which hasbeen tested and approved by Mercedes-Benzin combination with a belt bag.
i Further information on child restraintsystems (Y page 67).
The rear seat belts are equipped with beltbags:. These are triggered depending onthe type and severity of the accident. When
triggered, the belt bags open, increasing theprotected area of the occupants' ribcages.
Children in the vehicle
Child restraint systems
Important safety notes
G WARNINGAccording to accident statistics, children aresafer when properly restrained in the rearseating positions than in the front seatingposition. Thus, we strongly recommend thatchildren be placed in the rear seats wheneverpossible. Regardless of seating position,children 12 years old and under must beseated and properly secured in an appropriateinfant restraint, toddler restraint, or boosterseat recommended for the size and weight ofthe child.The infant or child restraint must be properlysecured with the vehicle's seat belt, the seatbelt and top tether strap, or lower anchors andtop tether strap, fully in accordance with thechild seat manufacturer's instructions.Occupants, especially children, should alwayssit as upright as possible, wear the seat beltproperly and use an appropriately sized infantrestraint, toddler restraint, or booster seatrecommended for the size and weight of thechild.Children can be killed or seriously injured byan inflating air bag. Note the followingimportant information when circumstancesrequire you to place a child in the frontpassenger seat:RYour vehicle is equipped with air bagtechnology designed to deactivate the frontpassenger front air bag in your vehiclewhen the system senses the weight of atypical 12-month-old child or less alongwith the weight of a standard appropriatechild restraint on the front passenger seat.RFor children larger than the typical12-month-old child, the front passenger
Children in the vehicle 67
Safety
Z
front air bag may or may not be activated.Always make sure the 4 5 indicatorlamp is illuminated, indicating that the frontpassenger front air bag is deactivated.RA child in a rear-facing child restraint on thefront passenger seat will be seriouslyinjured or even killed if the front passengerfront air bag inflates in a collision whichcould occur under some circumstances,even with the air bag technology installedin your vehicle. The only means tocompletely eliminate this risk is to neverplace a child in a rear-facing child restraintin the front seat. We therefore stronglyrecommend that you always place a childin a rear-facing child restraint in a backseat.RIf you must install a rear-facing childrestraint on the front passenger seatbecause circumstances require you to doso, make sure the 4 5 indicatorlamp is illuminated, indicating that the frontpassenger front air bag is deactivated.Should the 4 5 indicator lamp notilluminate or go out while the restraint isinstalled, please check installation.Periodically check the 4 5 indicatorlamp while driving to make sure the 45 indicator lamp is illuminated. If the4 5 indicator lamp goes out orremains out, do not transport a child on thefront passenger seat until the system hasbeen repaired.A child in a rear-facing child restraint on thefront passenger seat will be seriouslyinjured or even killed if the front passengerfront air bag inflates.RIf you have to place a child in a forward-facing child restraint on the front passengerseat, move the seat as far back as possible,use the proper child restraintrecommended for the age, size and weightof the child, and secure child restraint withthe vehicle's seat belt according to thechild seat manufacturer's instructions.
G WARNINGIf the child restraint system is installedincorrectly on a suitable seat, it cannotprotect as intended. The child cannot then berestrained in the event of an accident, heavybraking or sudden changes of direction. Thereis an increased risk of injury, possibly evenfatal.Make sure that you observe the child restraintsystem manufacturer's installationinstructions and the notes on use. Pleaseensure, that the base of the child restraintsystem is always resting completely on theseat cushion. Never place objects, e.g.cushions, under or behind the child restraintsystem. Only use child restraint systems withthe original cover designed for them. Onlyreplace damaged covers with genuine covers.
G WARNINGIf the child restraint system is installedincorrectly or is not secured, it can comeloose in the event of an accident, heavybraking or a sudden change in direction. Thechild restraint system could be thrown about,striking vehicle occupants. There is anincreased risk of injury, possibly even fatal.Always install child restraint systemsproperly, even if they are not being used.Make sure that you observe the child restraintsystem manufacturer's installationinstructions.
G WARNINGChild restraint systems or their securingsystems which have been damaged orsubjected to a load in an accident can nolonger protect as intended. The child cannotthen be restrained in the event of an accident,heavy braking or sudden changes of direction.There is an increased risk of injury, possiblyeven fatal.Replace child restraint systems which havebeen damaged or subjected to a load in anaccident as soon as possible. Have thesecuring systems on the child restraint
68 Children in the vehicleSafety
system checked at a qualified specialistworkshop, before you install a child restraintsystem again.
G WARNINGInfants and small children should never sharea seat belt with another occupant. In the eventof an accident, they could be crushedbetween the occupant and seat belt.A child's risk of serious or fatal injuries issignificantly increased if the child restraintsare not properly secured in the vehicle and/or the child is not properly secured in the childrestraint.Children that are too large for a child restraintmust travel in seats using normal seat belts.Position the shoulder belt across the chestand shoulder, not the face or neck. A boosterseat may be necessary to achieve proper seatbelt positioning for children over 41 lbs(18 kg) until they reach a height where a lap/shoulder belt fits properly without a boosterseat.When the child restraint is not in use, removeit from the vehicle or secure it with the seatbelt to prevent the child restraint frombecoming a projectile in the event of anaccident.
G WARNINGIf children are left unsupervised in the vehicle,they could:Ropen the doors, thus endangering otherpeople or road users.Rget out and disrupt traffic.Roperate the vehicle's equipment.Additionally, children could set the vehicle inmotion if, for example, they:Rrelease the parking brake.Rshifting the automatic transmission out ofpark position PRStart the engine.There is a risk of an accident and injury.
When leaving the vehicle, always take theSmartKeywith you and lock the vehicle. Neverleave children or animals unattended in thevehicle. Always keep the SmartKey out ofreach of children.
G WARNINGIf persons, particularly children are subjectedto prolonged exposure to extreme heat orcold, there is a risk of injury, possibly evenfatal. Never leave children unattended in thevehicle.
G WARNINGIf the child restraint system is subjected todirect sunlight, parts may get very hot.Childrenmay burn themselves on these parts,particularly on the metal parts of the childrestraint system. There is a risk of injury.If you leave the vehicle, taking the child withyou, always ensure that the child restraintsystem is not exposed to direct sunlight.Protect it with a blanket, for example. If thechild restraint system has been exposed todirect sunlight, let it cool down beforesecuring the child in it. Never leave childrenunattended in the vehicle.
If an infant or child is traveling in the vehicle:RSecure the child with a child or infant seatrestraint system appropriate to the age andweight of the child.RMake sure that the infant or child isproperly secured at all times while thevehicle is in motion.
Mercedes-Benz recommends that you alwaysproperly secure all infants and children witha child or infant seat restraint system for thetrip.The use of seat belts and infant and childrestraint systems is required by law in:Rall 50 statesRthe U.S. territoriesRthe District of ColumbiaRall Canadian provinces
Children in the vehicle 69
Safety
Z
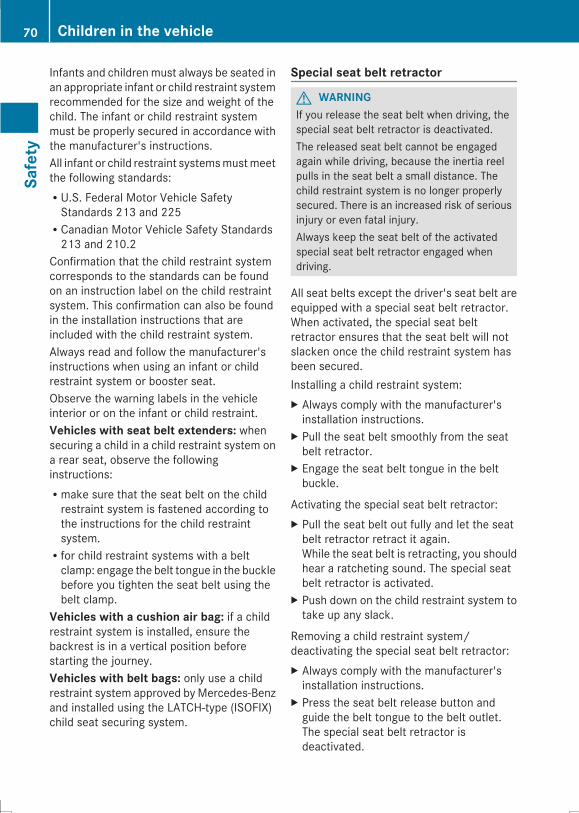
Infants and childrenmust always be seated inan appropriate infant or child restraint systemrecommended for the size and weight of thechild. The infant or child restraint systemmust be properly secured in accordance withthe manufacturer's instructions.All infant or child restraint systemsmustmeetthe following standards:RU.S. Federal Motor Vehicle SafetyStandards 213 and 225RCanadian Motor Vehicle Safety Standards213 and 210.2
Confirmation that the child restraint systemcorresponds to the standards can be foundon an instruction label on the child restraintsystem. This confirmation can also be foundin the installation instructions that areincluded with the child restraint system.Always read and follow the manufacturer'sinstructions when using an infant or childrestraint system or booster seat.Observe the warning labels in the vehicleinterior or on the infant or child restraint.Vehicles with seat belt extenders: whensecuring a child in a child restraint system ona rear seat, observe the followinginstructions:Rmake sure that the seat belt on the childrestraint system is fastened according tothe instructions for the child restraintsystem.Rfor child restraint systems with a beltclamp: engage the belt tongue in the bucklebefore you tighten the seat belt using thebelt clamp.
Vehicles with a cushion air bag: if a childrestraint system is installed, ensure thebackrest is in a vertical position beforestarting the journey.Vehicles with belt bags: only use a childrestraint system approved by Mercedes-Benzand installed using the LATCH-type (ISOFIX)child seat securing system.
Special seat belt retractor
G WARNINGIf you release the seat belt when driving, thespecial seat belt retractor is deactivated.The released seat belt cannot be engagedagain while driving, because the inertia reelpulls in the seat belt a small distance. Thechild restraint system is no longer properlysecured. There is an increased risk of seriousinjury or even fatal injury.Always keep the seat belt of the activatedspecial seat belt retractor engaged whendriving.
All seat belts except the driver's seat belt areequipped with a special seat belt retractor.When activated, the special seat beltretractor ensures that the seat belt will notslacken once the child restraint system hasbeen secured.Installing a child restraint system:X Always comply with the manufacturer'sinstallation instructions.
X Pull the seat belt smoothly from the seatbelt retractor.
X Engage the seat belt tongue in the beltbuckle.
Activating the special seat belt retractor:X Pull the seat belt out fully and let the seatbelt retractor retract it again.While the seat belt is retracting, you shouldhear a ratcheting sound. The special seatbelt retractor is activated.
X Push down on the child restraint system totake up any slack.
Removing a child restraint system/deactivating the special seat belt retractor:X Always comply with the manufacturer'sinstallation instructions.
X Press the seat belt release button andguide the belt tongue to the belt outlet.The special seat belt retractor isdeactivated.
70 Children in the vehicleSafety
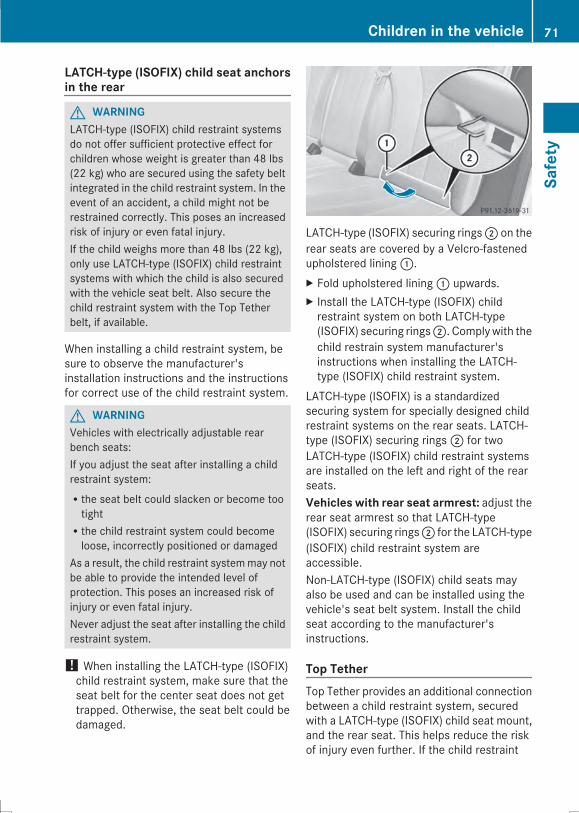
LATCH-type (ISOFIX) child seat anchorsin the rear
G WARNINGLATCH-type (ISOFIX) child restraint systemsdo not offer sufficient protective effect forchildren whose weight is greater than 48 lbs(22 kg) who are secured using the safety beltintegrated in the child restraint system. In theevent of an accident, a child might not berestrained correctly. This poses an increasedrisk of injury or even fatal injury.If the child weighs more than 48 lbs (22 kg),only use LATCH-type (ISOFIX) child restraintsystems with which the child is also securedwith the vehicle seat belt. Also secure thechild restraint system with the Top Tetherbelt, if available.
When installing a child restraint system, besure to observe the manufacturer'sinstallation instructions and the instructionsfor correct use of the child restraint system.
G WARNINGVehicles with electrically adjustable rearbench seats:If you adjust the seat after installing a childrestraint system:Rthe seat belt could slacken or become tootightRthe child restraint system could becomeloose, incorrectly positioned or damaged
As a result, the child restraint systemmay notbe able to provide the intended level ofprotection. This poses an increased risk ofinjury or even fatal injury.Never adjust the seat after installing the childrestraint system.
! When installing the LATCH-type (ISOFIX)child restraint system, make sure that theseat belt for the center seat does not gettrapped. Otherwise, the seat belt could bedamaged.
LATCH-type (ISOFIX) securing rings; on therear seats are covered by a Velcro-fastenedupholstered lining:.X Fold upholstered lining: upwards.X Install the LATCH-type (ISOFIX) childrestraint system on both LATCH-type(ISOFIX) securing rings;. Complywith thechild restrain system manufacturer'sinstructions when installing the LATCH-type (ISOFIX) child restraint system.
LATCH-type (ISOFIX) is a standardizedsecuring system for specially designed childrestraint systems on the rear seats. LATCH-type (ISOFIX) securing rings; for twoLATCH-type (ISOFIX) child restraint systemsare installed on the left and right of the rearseats.Vehicles with rear seat armrest: adjust therear seat armrest so that LATCH-type(ISOFIX) securing rings; for the LATCH-type(ISOFIX) child restraint system areaccessible.Non-LATCH-type (ISOFIX) child seats mayalso be used and can be installed using thevehicle's seat belt system. Install the childseat according to the manufacturer'sinstructions.
Top TetherTop Tether provides an additional connectionbetween a child restraint system, securedwith a LATCH-type (ISOFIX) child seat mount,and the rear seat. This helps reduce the riskof injury even further. If the child restraint
Children in the vehicle 71
Safety
Z

system is equipped with a Top Tether belt,this should always be used.
G WARNINGIf the rear seat backrests are not locked, theycould fold forwards in the event of anaccident, heavy braking or sudden changes ofdirection. As a result, child restraint systemscannot perform their intended protectivefunction. Rear seat backrests that are notlocked can also cause additional injuries, e.g.in the event of an accident. This poses anincreased risk of injury or even fatal injury.Always lock rear seat backrests afterinstalling a Top Tether belt. Observe the lockverification indicator. Adjust the rear seatbackrests so that they are positionedvertically.
If the rear seat backrest is not engaged andlocked, this will be shown in themultifunctiondisplay in the instrument cluster. A warningtone also sounds.
G WARNINGVehicles with electrically adjustable rearbench seats:If you adjust the seat after installing a childrestraint system:Rthe seat belt could slacken or become tootightRthe child restraint system could becomeloose, incorrectly positioned or damaged
As a result, the child restraint systemmay notbe able to provide the intended level ofprotection. This poses an increased risk ofinjury or even fatal injury.Never adjust the seat after installing the childrestraint system.
Top Tether anchorage points: are installedin the rear compartment behind the headrestraints on the parcel shelf.
X Move head restraint upwards(Y page 117).
X Fold up cover: of Top Tether anchorage.X Route Top Tether belt? under the headrestraint between the two head restraintbars.
X Hook Top Tether hook= into Top Tetheranchorage;.
X Make sure that Top Tether belt? is nottwisted.
X Fold down cover: of Top Tetheranchorage.
X Move head restraint back down againslightly if necessary (Y page 127).Make sure that you do not interferewith thecorrect routing of Top Tether belt?.
X Install the LATCH-type (ISOFIX) childrestraint system with Top Tether. Alwayscomply with the child restraint systemmanufacturer's installation instructions
72 Children in the vehicleSafety
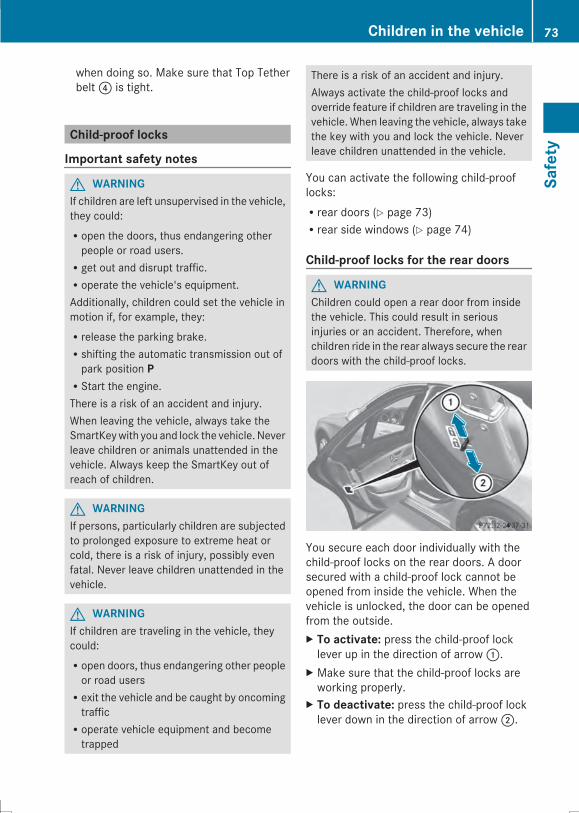
when doing so. Make sure that Top Tetherbelt? is tight.
Child-proof locks
Important safety notes
G WARNINGIf children are left unsupervised in the vehicle,they could:Ropen the doors, thus endangering otherpeople or road users.Rget out and disrupt traffic.Roperate the vehicle's equipment.Additionally, children could set the vehicle inmotion if, for example, they:Rrelease the parking brake.Rshifting the automatic transmission out ofpark position PRStart the engine.There is a risk of an accident and injury.When leaving the vehicle, always take theSmartKeywith you and lock the vehicle. Neverleave children or animals unattended in thevehicle. Always keep the SmartKey out ofreach of children.
G WARNINGIf persons, particularly children are subjectedto prolonged exposure to extreme heat orcold, there is a risk of injury, possibly evenfatal. Never leave children unattended in thevehicle.
G WARNINGIf children are traveling in the vehicle, theycould:Ropen doors, thus endangering other peopleor road usersRexit the vehicle and be caught by oncomingtrafficRoperate vehicle equipment and becometrapped
There is a risk of an accident and injury.Always activate the child-proof locks andoverride feature if children are traveling in thevehicle. When leaving the vehicle, always takethe key with you and lock the vehicle. Neverleave children unattended in the vehicle.
You can activate the following child-prooflocks:Rrear doors (Y page 73)Rrear side windows (Y page 74)
Child-proof locks for the rear doors
G WARNINGChildren could open a rear door from insidethe vehicle. This could result in seriousinjuries or an accident. Therefore, whenchildren ride in the rear always secure the reardoors with the child-proof locks.
You secure each door individually with thechild-proof locks on the rear doors. A doorsecured with a child-proof lock cannot beopened from inside the vehicle. When thevehicle is unlocked, the door can be openedfrom the outside.X To activate: press the child-proof locklever up in the direction of arrow:.
X Make sure that the child-proof locks areworking properly.
X To deactivate: press the child-proof locklever down in the direction of arrow;.
Children in the vehicle 73
Safety
Z
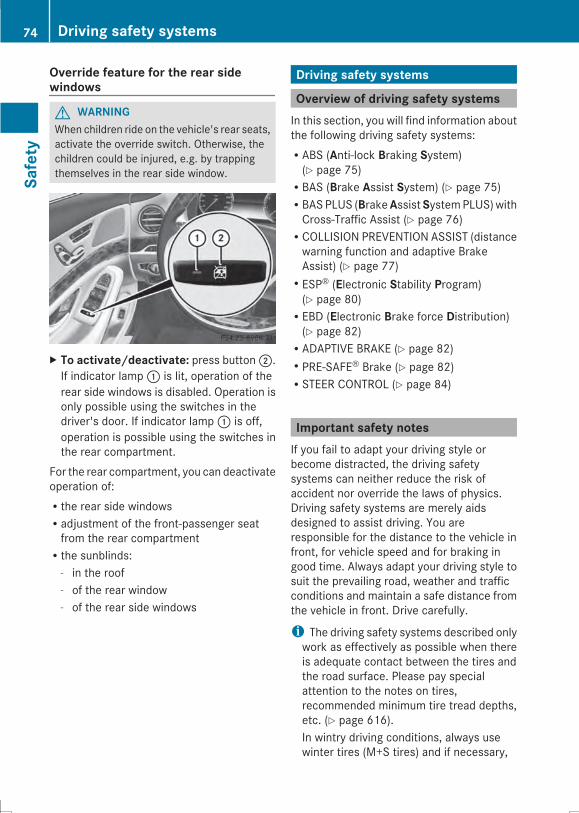
Override feature for the rear sidewindows
G WARNINGWhen children ride on the vehicle's rear seats,activate the override switch. Otherwise, thechildren could be injured, e.g. by trappingthemselves in the rear side window.
X To activate/deactivate: press button;.If indicator lamp: is lit, operation of therear side windows is disabled. Operation isonly possible using the switches in thedriver's door. If indicator lamp: is off,operation is possible using the switches inthe rear compartment.
For the rear compartment, you can deactivateoperation of:Rthe rear side windowsRadjustment of the front-passenger seatfrom the rear compartmentRthe sunblinds:
- in the roof- of the rear window- of the rear side windows
Driving safety systems
Overview of driving safety systemsIn this section, you will find information aboutthe following driving safety systems:RABS (Anti-lock Braking System)(Y page 75)RBAS (Brake Assist System) (Y page 75)RBASPLUS (BrakeAssistSystemPLUS)withCross-Traffic Assist (Y page 76)RCOLLISION PREVENTION ASSIST (distancewarning function and adaptive BrakeAssist) (Y page 77)RESP® (Electronic Stability Program)(Y page 80)REBD (Electronic Brake force Distribution)(Y page 82)RADAPTIVE BRAKE (Y page 82)RPRE-SAFE® Brake (Y page 82)RSTEER CONTROL (Y page 84)
Important safety notesIf you fail to adapt your driving style orbecome distracted, the driving safetysystems can neither reduce the risk ofaccident nor override the laws of physics.Driving safety systems are merely aidsdesigned to assist driving. You areresponsible for the distance to the vehicle infront, for vehicle speed and for braking ingood time. Always adapt your driving style tosuit the prevailing road, weather and trafficconditions and maintain a safe distance fromthe vehicle in front. Drive carefully.
i The driving safety systems described onlywork as effectively as possible when thereis adequate contact between the tires andthe road surface. Please pay specialattention to the notes on tires,recommended minimum tire tread depths,etc. (Y page 616).In wintry driving conditions, always usewinter tires (M+S tires) and if necessary,
74 Driving safety systemsSafety
snow chains. Only in this way will thedriving safety systems described in thissection work as effectively as possible.
ABS (Anti-lock Braking System)
General informationABS regulates brake pressure in such a waythat the wheels do not lock when you brake.This allows you to continue steering thevehicle when braking.The!ABSwarning lamp in the instrumentcluster lights up when the ignition is switchedon. It goes out when the engine is running.
Important safety notesi Observe the "Important safety notes"section (Y page 74).
G WARNINGIf ABS is faulty, the wheels could lock whenbraking. The steerability and brakingcharacteristics may be severely impaired.Additionally, further driving safety systemsare deactivated. There is an increased dangerof skidding and accidents.Drive on carefully. Have ABS checkedimmediately at a qualified specialistworkshop.
When ABS is malfunctioning, other systems,including driving safety systems, will alsobecome inoperative. Observe the informationon the ABS warning lamp (Y page 303) anddisplay messages which may be shown in theinstrument cluster (Y page 266).ABS works from a speed of about 5 mph(8 km/h), regardless of road-surfaceconditions. ABS works on slippery surfaces,even when you only brake gently.
BrakingX If ABS intervenes: continue to depress thebrake pedal vigorously until the brakingsituation is over.
X To make a full brake application:depress the brake pedal with full force.
If ABS intervenes when braking, you will feela pulsing in the brake pedal.The pulsating brake pedal can be anindication of hazardous road conditions, andfunctions as a reminder to take extra carewhile driving.
BAS (Brake Assist System)
General informationBAS operates in emergency brakingsituations. If you depress the brake pedalquickly, BAS automatically boosts the brakingforce, thus shortening the stopping distance.
Important safety notesi Observe the "Important safety notes"section (Y page 74).
G WARNINGIf BAS is malfunctioning, the braking distancein an emergency braking situation isincreased. There is a risk of an accident.In an emergency braking situation, depressthe brake pedal with full force. ABS preventsthe wheels from locking.
BrakingX Keep the brake pedal firmly depressed untilthe emergency braking situation is over.ABS prevents the wheels from locking.
The brakes will function as usual once yourelease the brake pedal. BAS is deactivated.
Driving safety systems 75
Safety
Z
BAS PLUS (Brake Assist SystemPLUS) with Cross-Traffic Assist
General informationi Observe the "Important safety notes"section (Y page 74).
BAS PLUS is only available on vehicles withthe Driving Assistance package.For BAS PLUS to assist you when driving, theradar sensor system and the camera systemmust be operational.With the help of a sensor system and acamera system, BAS PLUS can detectobstacles:Rthat are in the path of your vehicle for anextended period of timeRthat cross the path of your vehicleIn addition, pedestrians in the path of yourvehicle can be detected.BAS PLUS detects pedestrians by usingtypical characteristics such as the bodycontours and posture of a person standingupright.If the radar sensor system or the camerasystem is malfunctioning, BAS PLUSfunctions are restricted or no longeravailable. The brake system is still availablewith complete brake boosting effect and BAS.
i Observe the restrictions described in the"Important safety notes"section“ (Y page 76).
BAS PLUS can help you to minimize the riskof a collision with a vehicle or a pedestrianand reduce the effects of such a collision. IfBAS PLUS detects a danger of collision, youare assisted when braking.
Important safety notes
G WARNINGBAS PLUS cannot always clearly identifyobjects and complex traffic situations.
In such cases, BAS PLUS may:Rintervene unnecessarilyRnot interveneThere is a risk of an accident.Always pay careful attention to the trafficsituation and be ready to brake. Terminate theintervention in a non-critical driving situation.
G WARNINGBAS PLUS does not react:Rto small people, e.g. childrenRto animalsRto oncoming vehiclesRwhen corneringAs a result, BAS PLUSmay not intervene in allcritical situations. There is a risk of anaccident.Always pay careful attention to the trafficsituation and be ready to brake.
In the event of snowfall or heavy rain, therecognition can be impaired.Recognition by the radar sensor system isalso impaired in the event of:Rdirt on the sensors or anything elsecovering the sensorsRinterference by other radar sourcesRthere are strong radar reflections, forexample in parking garagesRa narrow vehicle traveling in front, e.g. amotorbikeRa vehicle traveling in front on a different lineRvehicles quickly moving into the radarsensor system detection range
Recognition by the camera system is alsoimpaired in the event of:Rdirt on the camera or if the camera iscoveredRthere is glare on the camera system, e.g.from the sun being low in the sky
76 Driving safety systemsSafety
RdarknessRif:
- pedestrians move quickly, e.g. into thepath of the vehicle
- the camera system no longer recognizesa pedestrian as a person due to specialclothing or other objects
- a pedestrian is concealed by otherobjects
- the typical outline of a person is notdistinguishable from the background
Following damage to the front end of thevehicle, have the configuration and operationof the radar sensors checked at a qualifiedspecialist workshop. This also applies tocollisions at low speeds where there is novisible damage to the front of the vehicle.Following damage to the windshield, have theconfiguration and operation of the camerasystem checked at a qualified specialistworkshop.
FunctionTo avoid a collision, BAS PLUS calculates thebrake force necessary if:Ryou approach an obstacle, andRBAS PLUS has detected a risk of collisionWhen driving at a speed under 20 mph(30 km/h): if you depress the brake pedal,BAS PLUS is activated. The increase in brakepressure will be carried out at the lastpossible moment.When driving at a speed above 20 mph(30 km/h): if you depress the brake pedalsharply, BAS PLUS automatically raises thebrake pressure to a value adapted to thetraffic situation.BAS PLUS provides braking assistance inhazardous situations with vehicles in frontwithin a speed range between 4 mph(7 km/h) and 155 mph (250 km/h).
At speeds of up to approximately 44 mph(70 km/h), BAS PLUS reacts to:Rstationary objects in the path of yourvehicle, e.g. stopped or parked vehiclesRpedestrians in the path of your vehicleRobjects crossing your path
i If BAS PLUS demands particularly highbraking force, preventative passengerprotection measures (PRE-SAFE®) areactivated simultaneously.
X Keep the brake pedal depressed until theemergency braking situation is over.ABS prevents the wheels from locking.
BAS PLUS is deactivated and the brakesfunction as usual again, if:Ryou release the brake pedal.Rthere is no longer a risk of collision.Rno obstacle is detected in front of yourvehicle.Ryou depress the accelerator pedal.Ryou activate kickdown.
COLLISION PREVENTION ASSIST
General notesCOLLISION PREVENTION ASSIST consists ofAdaptive Brake Assist and the distancewarning function, which are described in thefollowing.
Distance warning function
Important safety notesi Observe the "Important safety notes"section. (Y page 74).
G WARNINGThe distance warning function does not react:Rto people or animalsRto oncoming vehiclesRto crossing trafficRwhen cornering
Driving safety systems 77
Safety
Z
Thus, the distance warning function cannotprovide a warning in all critical situations.There is a risk of an accident.Always pay careful attention to the trafficsituation and be ready to brake.
G WARNINGThe distance warning function cannot alwaysclearly identify objects and complex trafficsituations.In such cases, the distance warning functionmay:Rgive an unnecessary warningRnot give a warningThere is a risk of an accident.Always pay careful attention to the trafficsituation and do not rely solely on the distancewarning function.
FunctionX To activate/deactivate: activate ordeactivate the distance warning function inthe on-board computer (Y page 261).
If the distance warning function is notactivated, theæ symbol appears in theassistance graphics display.The distance warning function can help youto minimize the risk of a front-end collisionwith a vehicle ahead or reduce the effects ofsuch a collision. If the distance warningfunction detects that there is a risk of acollision, you will be warned visually andacoustically. The distance warning functioncannot prevent a collision without yourintervention.Starting at a speed of around 4 mph(7 km/h), the distance warning functionwarns you if you rapidly approach a vehicle infront. An intermittent warning tone will thensound and the· distance warning lampwill light up in the instrument cluster.
X Brake immediately in order to increase thedistance from the vehicle in front.
orX Take evasive action, provided it is safe todo so.
Due to the nature of the system, particularlycomplicated but non-critical drivingconditions may also cause the system todisplay a warning.With the help of the radar sensor system, thedistance warning function can detectobstacles that are in the path of your vehiclefor an extended period of time.From a speed of around 40 mph (70 km/h),the distance warning function can also reactto stationary obstacles, such as stopped orparked vehicles.If you approach an obstacle and the distancewarning function detects a risk of a collision,the system will initially alert you both visuallyand acoustically.In particular, the detection of obstacles canbe impaired if:Rdirt on the sensors or anything elsecovering the sensorsRsnow or heavy rainRinterference by other radar sourcesRthere are strong radar reflections, forexample in parking garagesRa narrow vehicle traveling in front, e.g. amotorbikeRa vehicle traveling in front on a different linerelative to the center of your vehicle
Following damage to the front end of thevehicle, have the configuration and operationof the radar sensor checked at a qualifiedspecialist workshop. This also applies tocollisions at low speeds where there is novisible damage to the front of the vehicle.
Adaptive Brake Assisti Observe the "Important safety notes"section (Y page 74).
78 Driving safety systemsSafety
G WARNINGAdaptive Brake Assist cannot always clearlyidentify objects and complex trafficsituations.In such cases, Adaptive Brake Assist may:Rintervene unnecessarilyRnot interveneThere is a risk of an accident.Always pay careful attention to the trafficsituation and be ready to brake. Terminate theintervention in a non-critical driving situation.
G WARNINGAdaptive Brake Assist does not react:Rto people or animalsRto oncoming vehiclesRto crossing trafficRto stationary obstaclesRwhen corneringAs a result, Adaptive Brake Assist may notintervene in all critical conditions. There is arisk of an accident.Always pay careful attention to the trafficsituation and be ready to brake.
Due to the nature of the system, particularlycomplicated but non-critical drivingconditions may also cause Brake Assist tointervene.Adaptive Brake Assist aids you in brakingduring hazardous situations at speeds above4 mph (7 km/h) and uses the radar sensorsystem to evaluate the traffic situation.With the help of Adaptive Brake Assist, thedistance warning signal can detect obstaclesthat are in the path of your vehicle for anextended period of time.Should you approach an obstacle andAdaptive Brake Assist has detected a risk ofcollision, Adaptive BrakeAssist calculates thebraking force necessary to avoid a rear-endcollision. Should you apply the brakesvigorously, Adaptive Brake Assist will
automatically increase the braking force to alevel suitable for the traffic conditions.X Keep the brake pedal depressed until theemergency braking situation is over.ABS prevents the wheels from locking.
The brakes will work normally again if:Ryou release the brake pedal.Rthere is no longer any danger of a collision.Rno obstacle is detected in front of yourvehicle.
Adaptive Brake Assist is then deactivated.Up to vehicle speeds of around 155 mph(250 km/h), adaptive Brake Assist is capableof reacting to moving objects that havealready been recognized as such at least onceover the period of observation. AdaptiveBrake Assist does not react to stationaryobstacles.If Adaptive Brake Assist is not available dueto a malfunction in the radar sensor system,the brake system remains available with fullbrake boosting effect and BAS.In particular, the detection of obstacles canbe impaired if there is:Rdirt on the sensors or anything elsecovering the sensorsRsnow or heavy rainRinterference by other radar sourcesRthere are strong radar reflections, forexample in parking garagesRa narrow vehicle traveling in front, e.g. amotorbikeRa vehicle traveling in front on a different linerelative to the center of your vehicle
Following damage to the front end of thevehicle, have the configuration and operationof the radar sensor checked at a qualifiedspecialist workshop. This also applies tocollisions at low speeds where there is novisible damage to the front of the vehicle.
Driving safety systems 79
Safety
Z

ESP® (Electronic Stability Program)
General notesi Observe the "Important safety notes"section (Y page 74).
ESP® monitors driving stability and traction,i.e. power transmission between the tires andthe road surface.If ESP® detects that the vehicle is deviatingfrom the direction desired by the driver, oneor more wheels are braked to stabilize thevehicle. The engine output is also modified tokeep the vehicle on the desired course withinphysical limits. ESP® assists the driver whenpulling away on wet or slippery roads. ESP®can also stabilize the vehicle during braking.
ETS/4ETS (Electronic Traction System)i Observe the "Important safety notes"section (Y page 74).
ETS/4ETS traction control is part of ESP®.Traction control brakes the drive wheelsindividually if they spin. This enables you topull away and accelerate on slippery surfaces,for example if the road surface is slippery onone side. In addition, more drive torque istransferred to the wheel or wheels withtraction.Traction control remains active, even if youdeactivate ESP®.
Important safety notes
G WARNINGIf ESP® is malfunctioning, ESP® is unable tostabilize the vehicle. Additionally, furtherdriving safety systems are deactivated. Thisincreases the risk of skidding and an accident.Drive on carefully. Have ESP® checked at aqualified specialist workshop.
! Vehicles with 4MATIC: switch off theignition when the electric parking brake isbeing tested on a brake dynamometer.
Application of the brakes by ESP® mayotherwise destroy the brake system.
Vehicles without 4MATIC: observe the noteson ESP®(Y page 609) when towing thevehicle with a raised rear axle.ESP® is deactivated if the å warning lampin the instrument cluster lights upcontinuously when the engine is running.If the ÷ warning lamp lights upcontinuously, ESP® is not available due to amalfunction.Observe the information on warning lamps(Y page 304) and display messages whichmay be shown in the instrument cluster(Y page 266).
i Only use wheels with the recommendedtire sizes. Only then will ESP® functionproperly.
Characteristics of ESP®
General informationIf the ÷ ESP warning lamp goes out beforebeginning the journey, ESP® is automaticallyactive.If ESP® intervenes, the ÷ ESP® warninglamp flashes in the instrument cluster.If ESP® intervenes:X Do not deactivate ESP® under anycircumstances.
X Only depress the accelerator pedal as faras necessary when pulling away.
X Adapt your driving style to suit theprevailing road and weather conditions.
ECO start/stop functionThe ECO start/stop function switches theengine off automatically when the vehiclestops moving. The engine startsautomatically when the driver wants to pullaway again. ESP® remains in its previouslyselected status. Example: if ESP® wasdeactivated before the engine was switched
80 Driving safety systemsSafety
off, ESP® remains deactivated when theengine is switched on again.
Deactivating/activating ESP®
Important safety notesi Observe the "Important safety notes"section (Y page 74).
You can select between the following statesof ESP®:RESP® is activated.RESP® is deactivated.
G WARNINGIf you deactivate ESP®, ESP® no longerstabilizes the vehicle. There is an increasedrisk of skidding and an accident.Only deactivate ESP® in the situationsdescribed in the following.
It may be best to deactivate ESP® in thefollowing situations:Rwhen using snow chainsRin deep snowRon sand or gravel
i Activate ESP® as soon as the situationsdescribed above no longer apply. ESP® willotherwise not be able to stabilize thevehicle if the vehicle starts to skid or awheel starts to spin.
! Avoid spinning the driven wheels for anextended period with ESP® deactivated.You could otherwise damage the drivetrain.
Deactivating/activating ESP®
You can deactivate or activate ESP® via theon-board computer.X To deactivate:(Y page 81).The å ESP® OFF warning lamp in theinstrument cluster lights up.
X To activate: (Y page 81).The å ESP® OFF warning lamp in theinstrument cluster goes out.
Characteristics when ESP® is deactivatedIf ESP® is deactivated and one ormorewheelsstart to spin, the ÷ ESP® warning lamp inthe instrument cluster flashes. In suchsituations, ESP® will not stabilize the vehicle.If you deactivate ESP®:RESP® no longer improves driving stability.Rengine torque is no longer limited and thedrive wheels are able to spin.The spinning of the wheels results in acutting action for better traction on loosesurfaces.Rtraction control is still activated.RESP® still provides support when youbrake.
Crosswind driving assistance
General informationVehicles with MAGIC BODY CONTROL:information on stabilizing the vehicle in theevent of crosswind (Y page 214).Strong crosswinds can cause your vehicle todeviate from a straight course. The crosswinddriving assistance function integrated intoESP® significantly reduces these effects.ESP® intervenes automatically according tothe direction and intensity of the crosswindsaffecting your vehicle.ESP stabilities the vehicle with brakinginterventions to assist you in keeping thevehicle in the lane.Crosswind driving assistance is active atvehicle speeds above 50 mph (80 km/h)when driving straight ahead or corneringgently.
Important safety notesCrosswind driving assistance does not workif ESP® is deactivated or disabled because ofa malfunction.
Driving safety systems 81
Safety
Z

EBD (electronic brake forcedistribution)
General informationEBD monitors and controls the brakepressure on the rear wheels to improvedriving stability while braking.
Important safety notesi Observe the "Important safety notes"section (Y page 74).
G WARNINGIf EBD hasmalfunctioned, the rear wheels canstill lock, e.g. under full braking. Thisincreases the risk of skidding and an accident.You should therefore adapt your driving styleto the different handling characteristics. Havethe brake system checked at a qualifiedspecialist workshop.
Observe information regarding indicator andwarning lamps (Y page 303) as well asdisplay messages (Y page 269).
ADAPTIVE BRAKEADAPTIVE BRAKE enhances braking safetyand offers increased braking comfort. Inaddition to the braking function, ADAPTIVEBRAKE also has the HOLD function(Y page 213) and hill start assist(Y page 178).
PRE-SAFE® Brake
General informationi Pay attention to the important safetynotes in the "Driving safety systems"section (Y page 74).
PRE-SAFE® Brake is only available forvehicles with the Driving Assistance package.For PRE-SAFE® Brake to assist you whendriving, the radar sensor system and the
camera system must be switched on and beoperational.With the help of the radar sensor system andthe camera system, PRE-SAFE® Brake candetect obstacles that are in front of yourvehicle for an extended period of time.In addition, pedestrians in the path of yourvehicle can be detected.PRE-SAFE® Brake detects pedestrians usingtypical characteristics such as the bodycontours and posture of a person standingupright.
i Observe the restrictions described in the"Important safety notes"section“ (Y page 82).
PRE-SAFE® Brake can help you to minimizethe risk of a collision with a vehicle ahead ora pedestrian, and reduce the effects of sucha collision. If PRE-SAFE® Brake has detecteda risk of collision, you will be warned visuallyand acoustically as well as by automaticbraking.
Important safety notes
G WARNINGPRE-SAFE® Brake will initially brake yourvehicle by a partial application of the brakesif a danger of collision is detected. There maybe a collision unless you brake yourself. Evenafter subsequent full application of the brakesa collision cannot always be avoided,particularly when approaching at too high aspeed. There is a risk of an accident.Always apply the brakes yourself and try totake evasive action, provided it is safe to doso.
G WARNINGPRE-SAFE® Brake cannot always clearlyidentify objects and complex trafficconditions.
82 Driving safety systemsSafety
In these cases, PRE-SAFE® Brake may:Rgive an unnecessary warning and thenbrake the vehicleRnot give a warning or interveneThere is a risk of an accident.Always pay particular attention to the trafficsituation and be ready to brake, especially ifPRE-SAFE® Brake warns you. Terminate theintervention in a non-critical driving situation.
In order to maintain the appropriate distanceto the vehicle in front and thus prevent acollision, you must apply the brakes yourself.
G WARNINGPRE-SAFE® Brake does not react:Rto small people, e.g. childrenRto animalsRto oncoming vehiclesRto crossing trafficRwhen corneringAs a result, PRE-SAFE® Brake may neithergive warnings nor intervene in all criticalsituations. There is a risk of an accident.Always pay careful attention to the trafficsituation and be ready to brake.
In the event of snowfall or heavy rain, therecognition can be impaired.Recognition by the radar sensor system isalso impaired in the event of:Rdirt on the sensors or anything elsecovering the sensorsRinterference by other radar sourcesRthere are strong radar reflections, forexample in parking garagesRa narrow vehicle traveling in front, e.g. amotorbikeRa vehicle traveling in front on a different linerelative to the center of your vehicle
Recognition by the camera system is alsoimpaired in the event of:Rdirt on the camera or if the camera iscoveredRthere is glare on the camera system, e.g.from the sun being low in the skyRdarknessRif:
- pedestrians move quickly, e.g. into thepath of the vehicle
- the camera system no longer recognizesa pedestrian as a person due to specialclothing or other objects
- a pedestrian is concealed by otherobjects
- the typical outline of a person is notdistinguishable from the background
Following damage to the front end of thevehicle, have the configuration and operationof the radar sensors checked at a qualifiedspecialist workshop. This also applies tocollisions at low speeds where there is novisible damage to the front of the vehicle.Following damage to the windshield, have theconfiguration and operation of the camerasystem checked at a qualified specialistworkshop.
FunctionX To activate/deactivate: activate ordeactivate PRE-SAFE® Brake in the on-board computer (Y page 261).If the PRE-SAFE®Brake is not activated, theæ symbol appears in the multifunctiondisplay.
Starting at a speed of around 4 mph(7 km/h), this function warns you if yourapidly approach a vehicle in front. Anintermittent warning tone will then sound andthe· distance warning lamp will light upin the instrument cluster.
Driving safety systems 83
Safety
Z

X Brake immediately to defuse the situation.orX Take evasive action provided it is safe to doso.
PRE-SAFE® Brake can also brake the vehicleautomatically under the following conditions:Rthe driver and front-passenger have theirseat belts fastenedandRthe vehicle speed is betweenapproximately 4 mph (7 km/h) and124 mph (200 km/h)
At a speed of up to approximately 44 mph(70 km/h), PRE-SAFE®Brake can also detect:Rstationary objects in the path of yourvehicle, e.g. stopped or parked vehiclesRpedestrians in the path of your vehicle
i If there is an increased risk of collision,preventive passenger protection measures(PRE-SAFE®) are activated.
If the risk of collision with the vehicle in frontremains and you do not brake, take evasiveaction or accelerate significantly, the vehiclemay perform automatic emergency braking,up to the point of full brake application.Automatic emergency braking is notperformed until immediately prior to animminent accident.You can prevent the intervention of the PRE-SAFE® Brake at any time by:Rdepressing the accelerator pedal further.Ractivating kickdown.Rreleasing the brake pedal.The braking action of PRE-SAFE® Brake isended automatically if:Ryou maneuver to avoid the obstacle.Rthere is no longer a risk of collision.Rthere is no longer an obstacle detected infront of your vehicle.
STEER CONTROL
General informationSTEER CONTROL helps you by transmitting anoticeable steering force to the steeringwheel in the direction required for vehiclestabilization.This steering assistance is provided inparticular if:Rboth right wheels or both left wheels are ona wet or slippery road surface when youbrake.Rthe vehicle starts to skid.
Important safety notesi Observe the "Important safety notes"section (Y page 74).
If ESP® is malfunctioning, you will not receivesteering support from STEER CONTROL.Power steering will, however, continue tofunction.
Theft deterrent locking system
ImmobilizerThe immobilizer prevents your vehicle frombeing started without the correct SmartKey.X To activate with the SmartKey: removethe SmartKey from the ignition lock.
X To activatewith KEYLESS-GO: switch theignition off and open the driver's door.
X To deactivate: switch on the ignition.When leaving the vehicle, always take theSmartKey with you and lock the vehicle.Anyone can start the engine if a validSmartKey has been left inside the vehicle.
i The immobilizer is always deactivatedwhen you start the engine.In the event that the engine cannot bestarted when the starter battery is fullycharged, the immobilizer may be faulty.Contact an authorized Mercedes-Benz
84 Theft deterrent locking systemSafety
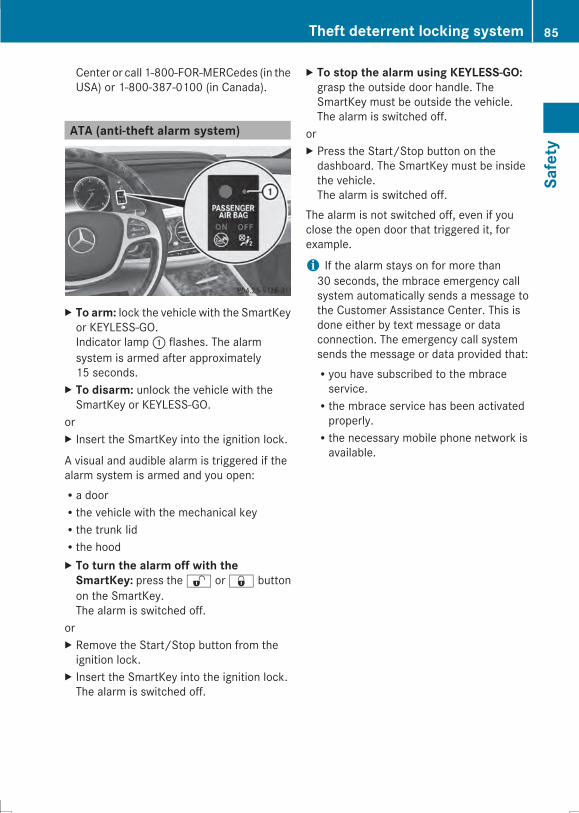
Center or call 1-800-FOR-MERCedes (in theUSA) or 1-800-387-0100 (in Canada).
ATA (anti-theft alarm system)
X To arm: lock the vehicle with the SmartKeyor KEYLESS-GO.Indicator lamp: flashes. The alarmsystem is armed after approximately15 seconds.
X To disarm: unlock the vehicle with theSmartKey or KEYLESS-GO.
orX Insert the SmartKey into the ignition lock.
A visual and audible alarm is triggered if thealarm system is armed and you open:Ra doorRthe vehicle with the mechanical keyRthe trunk lidRthe hoodX To turn the alarm off with theSmartKey: press the% or& buttonon the SmartKey.The alarm is switched off.
orX Remove the Start/Stop button from theignition lock.
X Insert the SmartKey into the ignition lock.The alarm is switched off.
X To stop the alarm using KEYLESS-GO:grasp the outside door handle. TheSmartKey must be outside the vehicle.The alarm is switched off.
orX Press the Start/Stop button on thedashboard. The SmartKey must be insidethe vehicle.The alarm is switched off.
The alarm is not switched off, even if youclose the open door that triggered it, forexample.
i If the alarm stays on for more than30 seconds, the mbrace emergency callsystem automatically sends a message tothe Customer Assistance Center. This isdone either by text message or dataconnection. The emergency call systemsends the message or data provided that:Ryou have subscribed to the mbraceservice.Rthe mbrace service has been activatedproperly.Rthe necessary mobile phone network isavailable.
Theft deterrent locking system 85
Safety
Z

86
Useful information .............................. 88SmartKey ............................................. 88Doors .................................................... 94Trunk .................................................... 97Side windows .................................... 103Panorama roof with power tilt/sliding panel ...................................... 106
87
Openingandclosing
Useful information
i This Operator's Manual describes allmodels and all standard and optionalequipment of your vehicle available at thetime of publication of the Operator'sManual. Country-specific differences arepossible. Please note that your vehicle maynot be equipped with all featuresdescribed. This also applies to safety-related systems and functions.
i Read the information on qualifiedspecialist workshops: (Y page 34).
SmartKey
Important safety notes
G WARNINGIf children are left unsupervised in the vehicle,they could:Ropen the doors, thus endangering otherpeople or road users.Rget out and disrupt traffic.Roperate the vehicle's equipment.Additionally, children could set the vehicle inmotion if, for example, they:Rrelease the parking brake.Rshifting the automatic transmission out ofpark position PRStart the engine.There is a risk of an accident and injury.When leaving the vehicle, always take theSmartKeywith you and lock the vehicle. Neverleave children or animals unattended in thevehicle. Always keep the SmartKey out ofreach of children.
G WARNINGIf persons, particularly children are subjectedto prolonged exposure to extreme heat orcold, there is a risk of injury, possibly evenfatal. Never leave children unattended in thevehicle.
G WARNINGIf you attach heavy or large objects to theSmartKey, the SmartKey could beunintentionally turned in the ignition lock. Thiscould cause the engine to be switched off.There is a risk of an accident.Do not attach any heavy or large objects tothe SmartKey. Remove any bulky key ringsbefore inserting the SmartKey into theignition lock.
! Keep the SmartKey away from strongmagnetic fields. Otherwise, the remotecontrol function could be affected.Strong magnetic fields can occur in thevicinity of powerful electrical installations.
Do not keep the SmartKey:Rwith electronic devices, e.g. a mobilephone or another SmartKeyRwith metallic objects, e.g. coins or metalfoilRinside metallic objects, e.g. a metal caseThis can affect the functionality of theSmartKey.
Do not keep the SmartKey in thetemperature-controlled cup holder(Y page 556). On vehicles without KEYLESS-GO, do not keep it on the parcel shelf or in thetrunk. Otherwise, the SmartKey may not bedetected, e.g. when starting the engine usingthe Start/Stop button.A checkwhich periodically establishes a radioconnection between the vehicle and theSmartKey determines whether a validSmartKey is in the vehicle. This occurs, forexample:Rwhen starting the engineRwhilst drivingRwhen the external door handles aretouchedRduring convenience closing
88 SmartKeyOp
eningandclosing

SmartKey functions
: & To lock the vehicle; F To open/close the trunk lid= % To unlock the vehicleX To unlock centrally: press button=.If you do not open the vehicle withinapproximately 40 seconds of unlocking:Rthe vehicle is locked again.Rthe anti-theft alarm system is armedagain.
X To lock centrally: press button:.
The SmartKey centrally locks/unlocks:Rthe doorsRthe trunk lidRthe fuel filler flapThe turn signals flash once when unlockingand three times when locking.
i You can also set an audible signal toconfirm that the vehicle has been locked.The audible signal can be activated anddeactivated using COMAND (Y page 344).
i When the surround lighting is activated inCOMAND (Y page 345), it comes on whenit is dark after the vehicle is unlocked usingthe remote control.
X To open the trunk lid automaticallyfrom outside the vehicle: press and holdbutton; until the trunk lid opens.
KEYLESS-GO
General notesBear in mind that the engine can be startedby any of the vehicle occupants if there is aSmartKey in the vehicle.
Locking/unlocking centrallyYou can start, lock or unlock the vehicle usingKEYLESS-GO. To do this, you only need carrythe SmartKey with you. You can combine thefunctions of KEYLESS-GO with those of aconventional SmartKey. Unlock the vehicleby using KEYLESS-GO, for instance, and lockit using the& button on the SmartKey.When locking or unlocking with KEYLESS-GO,the distance between the SmartKey and thecorresponding door handle must not begreater than 3 ft (1 m).A checkwhich periodically establishes a radioconnection between the vehicle and theSmartKey determines whether a validSmartKey is in the vehicle. This occurs, forexample:Rwhen starting the engineRwhilst drivingRwhen the external door handles aretouchedRduring convenience closing
X To unlock the vehicle: touch the innersurface of the door handle.
X To lock the vehicle: touch sensorsurface: or;.
SmartKey 89
Openingandclosing
Z
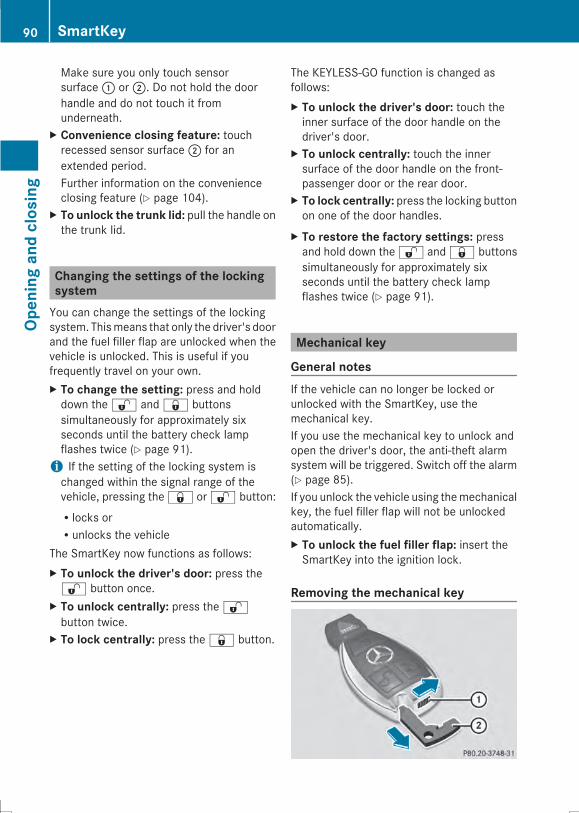
Make sure you only touch sensorsurface: or;. Do not hold the doorhandle and do not touch it fromunderneath.
X Convenience closing feature: touchrecessed sensor surface; for anextended period.Further information on the convenienceclosing feature (Y page 104).
X To unlock the trunk lid: pull the handle onthe trunk lid.
Changing the settings of the lockingsystemYou can change the settings of the lockingsystem. Thismeans that only the driver's doorand the fuel filler flap are unlocked when thevehicle is unlocked. This is useful if youfrequently travel on your own.X To change the setting: press and holddown the% and& buttonssimultaneously for approximately sixseconds until the battery check lampflashes twice (Y page 91).i If the setting of the locking system ischanged within the signal range of thevehicle, pressing the& or% button:Rlocks orRunlocks the vehicle
The SmartKey now functions as follows:X To unlock the driver's door: press the% button once.
X To unlock centrally: press the%button twice.
X To lock centrally: press the& button.
The KEYLESS-GO function is changed asfollows:X To unlock the driver's door: touch theinner surface of the door handle on thedriver's door.
X To unlock centrally: touch the innersurface of the door handle on the front-passenger door or the rear door.
X To lock centrally: press the locking buttonon one of the door handles.
X To restore the factory settings: pressand hold down the% and& buttonssimultaneously for approximately sixseconds until the battery check lampflashes twice (Y page 91).
Mechanical key
General notesIf the vehicle can no longer be locked orunlocked with the SmartKey, use themechanical key.If you use the mechanical key to unlock andopen the driver's door, the anti-theft alarmsystem will be triggered. Switch off the alarm(Y page 85).If you unlock the vehicle using themechanicalkey, the fuel filler flap will not be unlockedautomatically.X To unlock the fuel filler flap: insert theSmartKey into the ignition lock.
Removing the mechanical key
90 SmartKeyOp
eningandclosing
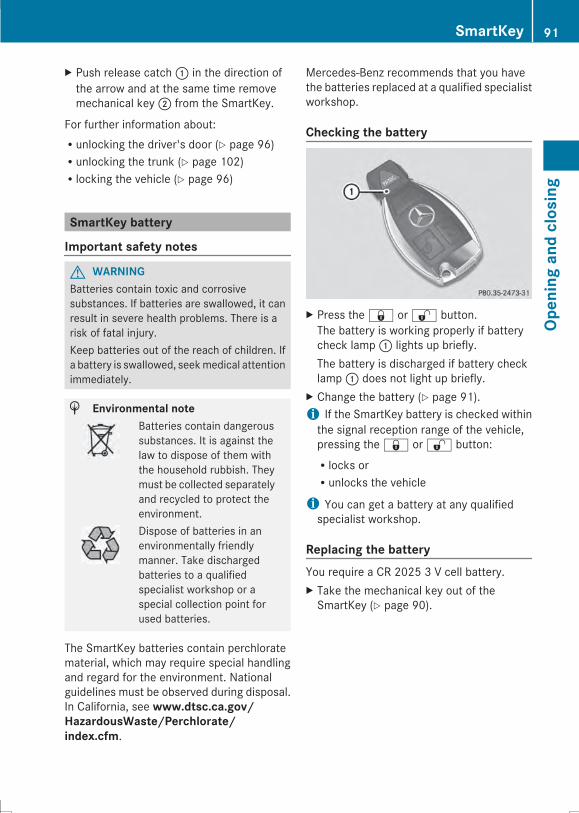
X Push release catch: in the direction ofthe arrow and at the same time removemechanical key; from the SmartKey.
For further information about:Runlocking the driver's door (Y page 96)Runlocking the trunk (Y page 102)Rlocking the vehicle (Y page 96)
SmartKey battery
Important safety notes
G WARNINGBatteries contain toxic and corrosivesubstances. If batteries are swallowed, it canresult in severe health problems. There is arisk of fatal injury.Keep batteries out of the reach of children. Ifa battery is swallowed, seekmedical attentionimmediately.
H Environmental noteBatteries contain dangeroussubstances. It is against thelaw to dispose of them withthe household rubbish. Theymust be collected separatelyand recycled to protect theenvironment.Dispose of batteries in anenvironmentally friendlymanner. Take dischargedbatteries to a qualifiedspecialist workshop or aspecial collection point forused batteries.
The SmartKey batteries contain perchloratematerial, which may require special handlingand regard for the environment. Nationalguidelines must be observed during disposal.In California, see www.dtsc.ca.gov/HazardousWaste/Perchlorate/index.cfm.
Mercedes-Benz recommends that you havethe batteries replaced at a qualified specialistworkshop.
Checking the battery
X Press the& or% button.The battery is working properly if batterycheck lamp: lights up briefly.The battery is discharged if battery checklamp: does not light up briefly.
X Change the battery (Y page 91).i If the SmartKey battery is checked withinthe signal reception range of the vehicle,pressing the& or% button:Rlocks orRunlocks the vehicle
i You can get a battery at any qualifiedspecialist workshop.
Replacing the batteryYou require a CR 2025 3 V cell battery.X Take the mechanical key out of theSmartKey (Y page 90).
SmartKey 91
Openingandclosing
Z

X Press mechanical key; into the openingin the SmartKey in the direction of thearrow until battery compartment cover:opens. Do not hold battery compartmentcover: closed while doing so.
X Remove battery compartment cover:.
X Repeatedly tap the SmartKey against yourpalm until battery= falls out.
X Insert the new battery with the positiveterminal facing upwards. Use a lint-freecloth to do so.
X Make sure that the surface of the battery isfree of lint, grease and other contaminants.
X Insert the front tabs of batterycompartment cover: into the housingfirst and then press to close it.
X Insert mechanical key; into theSmartKey.
X Check the function of all SmartKey buttonson the vehicle.
92 SmartKeyOp
eningandclosing
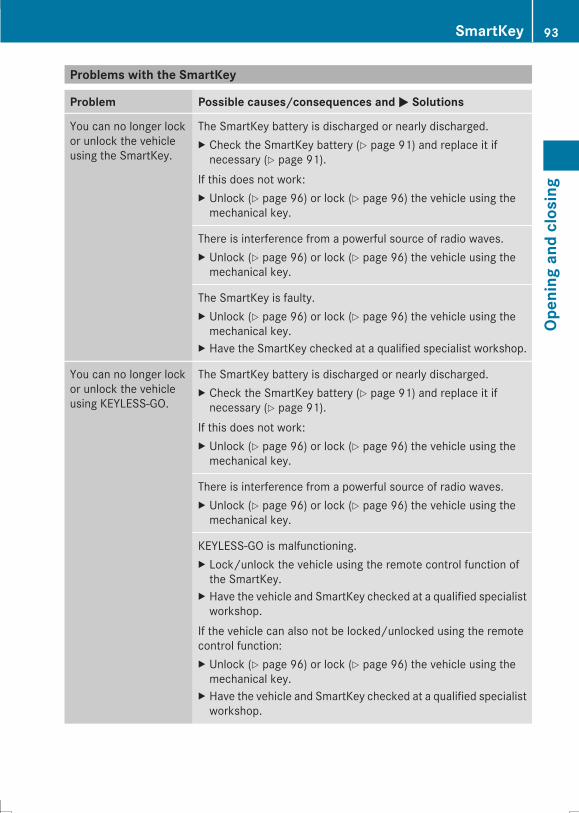
Problems with the SmartKey
Problem Possible causes/consequences andMM Solutions
You can no longer lockor unlock the vehicleusing the SmartKey.
The SmartKey battery is discharged or nearly discharged.X Check the SmartKey battery (Y page 91) and replace it ifnecessary (Y page 91).
If this does not work:X Unlock (Y page 96) or lock (Y page 96) the vehicle using themechanical key.
There is interference from a powerful source of radio waves.X Unlock (Y page 96) or lock (Y page 96) the vehicle using themechanical key.
The SmartKey is faulty.X Unlock (Y page 96) or lock (Y page 96) the vehicle using themechanical key.
X Have the SmartKey checked at a qualified specialist workshop.
You can no longer lockor unlock the vehicleusing KEYLESS-GO.
The SmartKey battery is discharged or nearly discharged.X Check the SmartKey battery (Y page 91) and replace it ifnecessary (Y page 91).
If this does not work:X Unlock (Y page 96) or lock (Y page 96) the vehicle using themechanical key.
There is interference from a powerful source of radio waves.X Unlock (Y page 96) or lock (Y page 96) the vehicle using themechanical key.
KEYLESS-GO is malfunctioning.X Lock/unlock the vehicle using the remote control function ofthe SmartKey.
X Have the vehicle and SmartKey checked at a qualified specialistworkshop.
If the vehicle can also not be locked/unlocked using the remotecontrol function:X Unlock (Y page 96) or lock (Y page 96) the vehicle using themechanical key.
X Have the vehicle and SmartKey checked at a qualified specialistworkshop.
SmartKey 93
Openingandclosing
Z
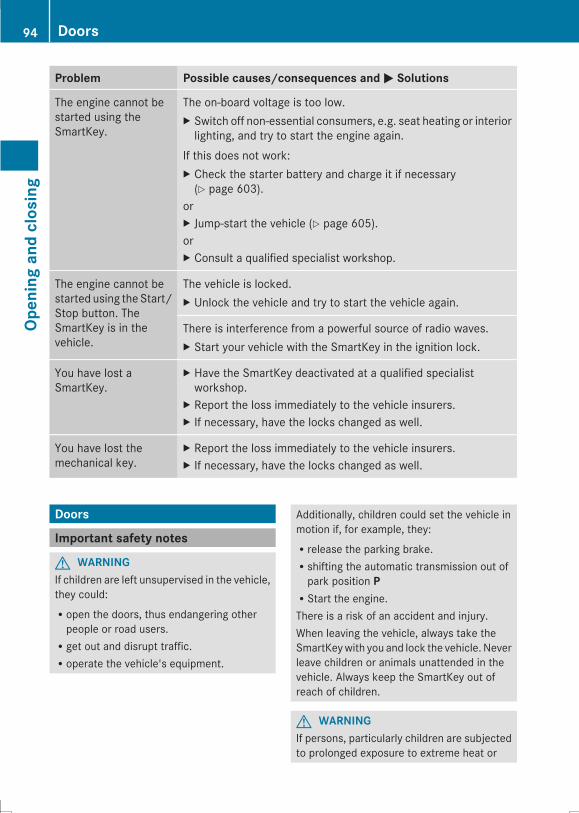
Problem Possible causes/consequences and MM Solutions
The engine cannot bestarted using theSmartKey.
The on-board voltage is too low.X Switch off non-essential consumers, e.g. seat heating or interiorlighting, and try to start the engine again.
If this does not work:X Check the starter battery and charge it if necessary(Y page 603).
orX Jump-start the vehicle (Y page 605).orX Consult a qualified specialist workshop.
The engine cannot bestarted using theStart/Stop button. TheSmartKey is in thevehicle.
The vehicle is locked.X Unlock the vehicle and try to start the vehicle again.
There is interference from a powerful source of radio waves.X Start your vehicle with the SmartKey in the ignition lock.
You have lost aSmartKey.
X Have the SmartKey deactivated at a qualified specialistworkshop.
X Report the loss immediately to the vehicle insurers.X If necessary, have the locks changed as well.
You have lost themechanical key.
X Report the loss immediately to the vehicle insurers.X If necessary, have the locks changed as well.
Doors
Important safety notes
G WARNINGIf children are left unsupervised in the vehicle,they could:Ropen the doors, thus endangering otherpeople or road users.Rget out and disrupt traffic.Roperate the vehicle's equipment.
Additionally, children could set the vehicle inmotion if, for example, they:Rrelease the parking brake.Rshifting the automatic transmission out ofpark position PRStart the engine.There is a risk of an accident and injury.When leaving the vehicle, always take theSmartKeywith you and lock the vehicle. Neverleave children or animals unattended in thevehicle. Always keep the SmartKey out ofreach of children.
G WARNINGIf persons, particularly children are subjectedto prolonged exposure to extreme heat or
94 DoorsOp
eningandclosing
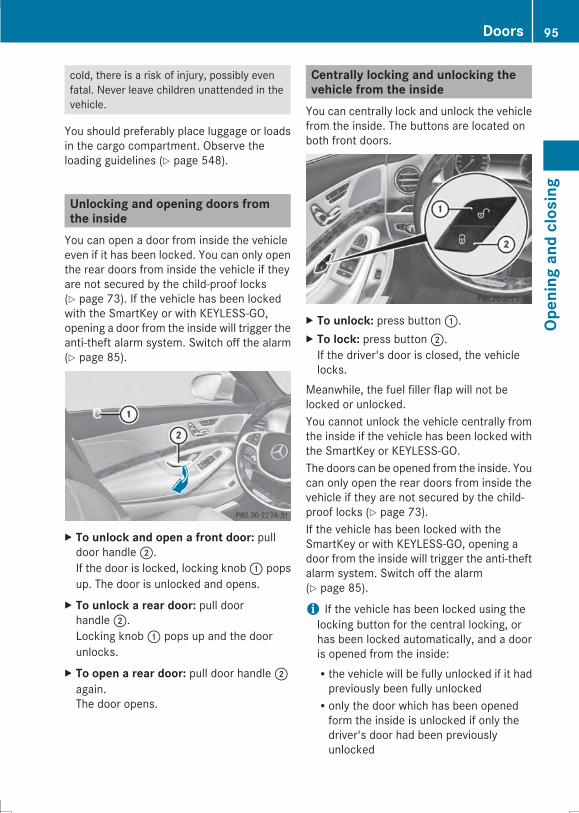
cold, there is a risk of injury, possibly evenfatal. Never leave children unattended in thevehicle.
You should preferably place luggage or loadsin the cargo compartment. Observe theloading guidelines (Y page 548).
Unlocking and opening doors fromthe insideYou can open a door from inside the vehicleeven if it has been locked. You can only openthe rear doors from inside the vehicle if theyare not secured by the child-proof locks(Y page 73). If the vehicle has been lockedwith the SmartKey or with KEYLESS-GO,opening a door from the inside will trigger theanti-theft alarm system. Switch off the alarm(Y page 85).
X To unlock and open a front door: pulldoor handle;.If the door is locked, locking knob: popsup. The door is unlocked and opens.
X To unlock a rear door: pull doorhandle;.Locking knob: pops up and the doorunlocks.
X To open a rear door: pull door handle;again.The door opens.
Centrally locking and unlocking thevehicle from the insideYou can centrally lock and unlock the vehiclefrom the inside. The buttons are located onboth front doors.
X To unlock: press button:.X To lock: press button;.If the driver's door is closed, the vehiclelocks.
Meanwhile, the fuel filler flap will not belocked or unlocked.You cannot unlock the vehicle centrally fromthe inside if the vehicle has been locked withthe SmartKey or KEYLESS-GO.The doors can be opened from the inside. Youcan only open the rear doors from inside thevehicle if they are not secured by the child-proof locks (Y page 73).If the vehicle has been locked with theSmartKey or with KEYLESS-GO, opening adoor from the inside will trigger the anti-theftalarm system. Switch off the alarm(Y page 85).
i If the vehicle has been locked using thelocking button for the central locking, orhas been locked automatically, and a dooris opened from the inside:Rthe vehicle will be fully unlocked if it hadpreviously been fully unlockedRonly the door which has been openedform the inside is unlocked if only thedriver's door had been previouslyunlocked
Doors 95
Openingandclosing
Z
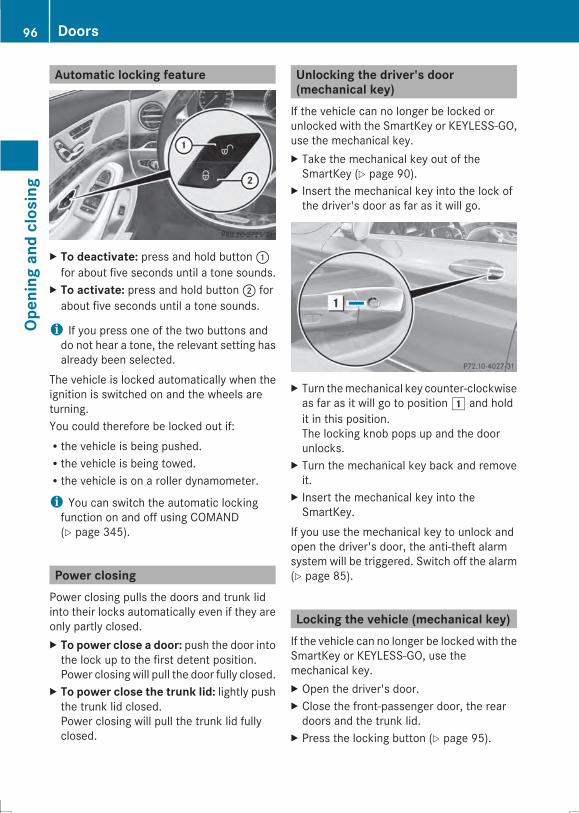
Automatic locking feature
X To deactivate: press and hold button:for about five seconds until a tone sounds.
X To activate: press and hold button; forabout five seconds until a tone sounds.
i If you press one of the two buttons anddo not hear a tone, the relevant setting hasalready been selected.
The vehicle is locked automatically when theignition is switched on and the wheels areturning.You could therefore be locked out if:Rthe vehicle is being pushed.Rthe vehicle is being towed.Rthe vehicle is on a roller dynamometer.
i You can switch the automatic lockingfunction on and off using COMAND(Y page 345).
Power closingPower closing pulls the doors and trunk lidinto their locks automatically even if they areonly partly closed.X To power close a door: push the door intothe lock up to the first detent position.Power closing will pull the door fully closed.
X To power close the trunk lid: lightly pushthe trunk lid closed.Power closing will pull the trunk lid fullyclosed.
Unlocking the driver's door(mechanical key)If the vehicle can no longer be locked orunlocked with the SmartKey or KEYLESS-GO,use the mechanical key.X Take the mechanical key out of theSmartKey (Y page 90).
X Insert the mechanical key into the lock ofthe driver's door as far as it will go.
X Turn themechanical key counter-clockwiseas far as it will go to position1 and holdit in this position.The locking knob pops up and the doorunlocks.
X Turn the mechanical key back and removeit.
X Insert the mechanical key into theSmartKey.
If you use the mechanical key to unlock andopen the driver's door, the anti-theft alarmsystem will be triggered. Switch off the alarm(Y page 85).
Locking the vehicle (mechanical key)If the vehicle can no longer be locked with theSmartKey or KEYLESS-GO, use themechanical key.X Open the driver's door.X Close the front-passenger door, the reardoors and the trunk lid.
X Press the locking button (Y page 95).
96 DoorsOp
eningandclosing
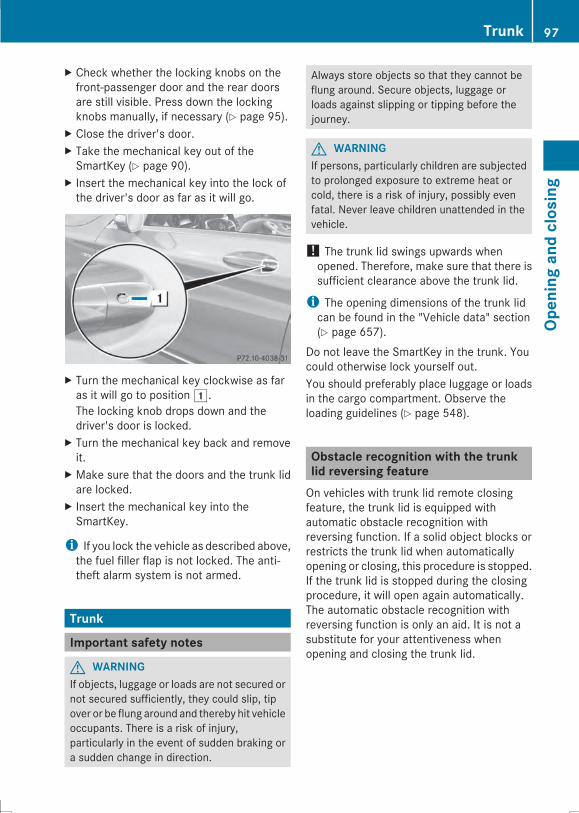
X Check whether the locking knobs on thefront-passenger door and the rear doorsare still visible. Press down the lockingknobs manually, if necessary (Y page 95).
X Close the driver's door.X Take the mechanical key out of theSmartKey (Y page 90).
X Insert the mechanical key into the lock ofthe driver's door as far as it will go.
X Turn the mechanical key clockwise as faras it will go to position1.The locking knob drops down and thedriver's door is locked.
X Turn the mechanical key back and removeit.
X Make sure that the doors and the trunk lidare locked.
X Insert the mechanical key into theSmartKey.
i If you lock the vehicle as described above,the fuel filler flap is not locked. The anti-theft alarm system is not armed.
Trunk
Important safety notes
G WARNINGIf objects, luggage or loads are not secured ornot secured sufficiently, they could slip, tipover or be flung around and thereby hit vehicleoccupants. There is a risk of injury,particularly in the event of sudden braking ora sudden change in direction.
Always store objects so that they cannot beflung around. Secure objects, luggage orloads against slipping or tipping before thejourney.
G WARNINGIf persons, particularly children are subjectedto prolonged exposure to extreme heat orcold, there is a risk of injury, possibly evenfatal. Never leave children unattended in thevehicle.
! The trunk lid swings upwards whenopened. Therefore, make sure that there issufficient clearance above the trunk lid.
i The opening dimensions of the trunk lidcan be found in the "Vehicle data" section(Y page 657).
Do not leave the SmartKey in the trunk. Youcould otherwise lock yourself out.You should preferably place luggage or loadsin the cargo compartment. Observe theloading guidelines (Y page 548).
Obstacle recognition with the trunklid reversing featureOn vehicles with trunk lid remote closingfeature, the trunk lid is equipped withautomatic obstacle recognition withreversing function. If a solid object blocks orrestricts the trunk lid when automaticallyopening or closing, this procedure is stopped.If the trunk lid is stopped during the closingprocedure, it will open again automatically.The automatic obstacle recognition withreversing function is only an aid. It is not asubstitute for your attentiveness whenopening and closing the trunk lid.
Trunk 97
Openingandclosing
Z
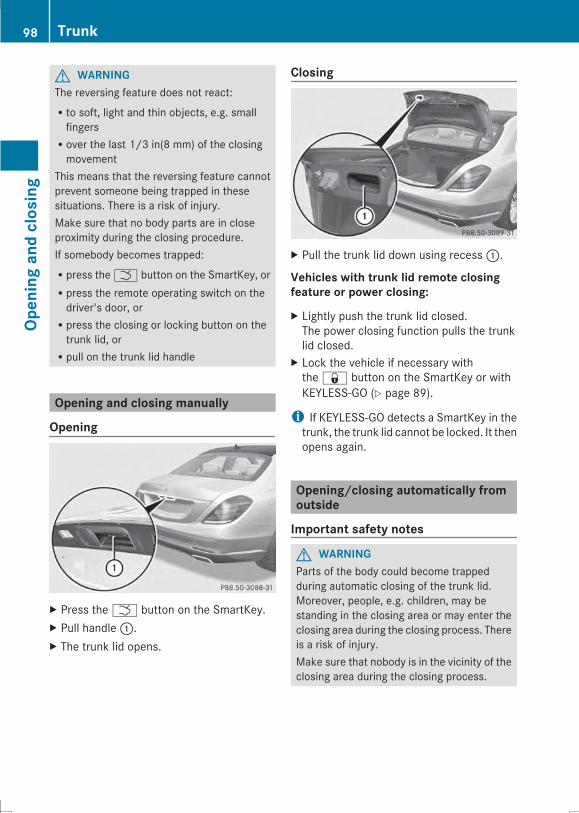
G WARNINGThe reversing feature does not react:Rto soft, light and thin objects, e.g. smallfingersRover the last 1/3 in(8 mm) of the closingmovement
This means that the reversing feature cannotprevent someone being trapped in thesesituations. There is a risk of injury.Make sure that no body parts are in closeproximity during the closing procedure.If somebody becomes trapped:Rpress theF button on the SmartKey, orRpress the remote operating switch on thedriver's door, orRpress the closing or locking button on thetrunk lid, orRpull on the trunk lid handle
Opening and closing manually
Opening
X Press theF button on the SmartKey.X Pull handle:.X The trunk lid opens.
Closing
X Pull the trunk lid down using recess:.
Vehicles with trunk lid remote closingfeature or power closing:
X Lightly push the trunk lid closed.The power closing function pulls the trunklid closed.
X Lock the vehicle if necessary withthe& button on the SmartKey or withKEYLESS-GO (Y page 89).
i If KEYLESS-GO detects a SmartKey in thetrunk, the trunk lid cannot be locked. It thenopens again.
Opening/closing automatically fromoutside
Important safety notes
G WARNINGParts of the body could become trappedduring automatic closing of the trunk lid.Moreover, people, e.g. children, may bestanding in the closing area or may enter theclosing area during the closing process. Thereis a risk of injury.Make sure that nobody is in the vicinity of theclosing area during the closing process.
98 TrunkOp
eningandclosing
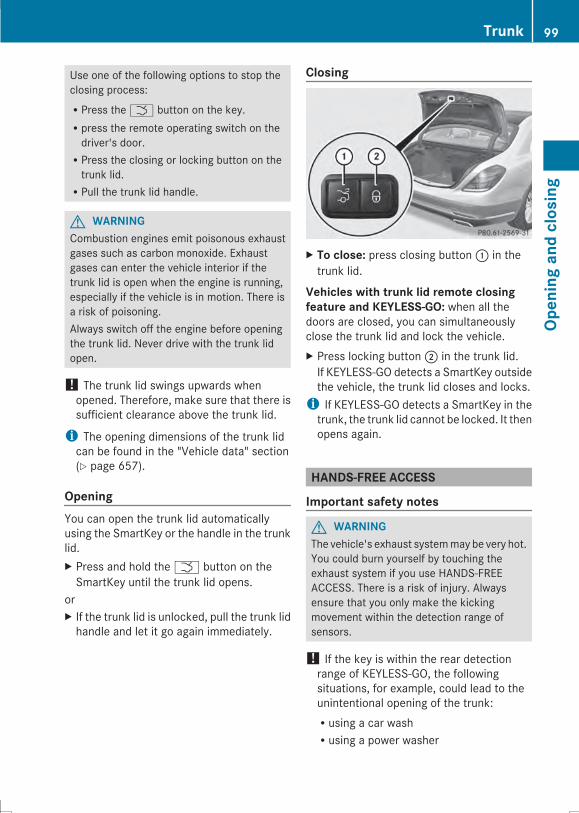
Use one of the following options to stop theclosing process:RPress theF button on the key.Rpress the remote operating switch on thedriver's door.RPress the closing or locking button on thetrunk lid.RPull the trunk lid handle.
G WARNINGCombustion engines emit poisonous exhaustgases such as carbon monoxide. Exhaustgases can enter the vehicle interior if thetrunk lid is open when the engine is running,especially if the vehicle is in motion. There isa risk of poisoning.Always switch off the engine before openingthe trunk lid. Never drive with the trunk lidopen.
! The trunk lid swings upwards whenopened. Therefore, make sure that there issufficient clearance above the trunk lid.
i The opening dimensions of the trunk lidcan be found in the "Vehicle data" section(Y page 657).
OpeningYou can open the trunk lid automaticallyusing the SmartKey or the handle in the trunklid.X Press and hold theF button on theSmartKey until the trunk lid opens.
orX If the trunk lid is unlocked, pull the trunk lidhandle and let it go again immediately.
Closing
X To close: press closing button: in thetrunk lid.
Vehicles with trunk lid remote closingfeature and KEYLESS-GO: when all thedoors are closed, you can simultaneouslyclose the trunk lid and lock the vehicle.X Press locking button; in the trunk lid.If KEYLESS-GO detects a SmartKey outsidethe vehicle, the trunk lid closes and locks.i If KEYLESS-GO detects a SmartKey in thetrunk, the trunk lid cannot be locked. It thenopens again.
HANDS-FREE ACCESS
Important safety notes
G WARNINGThe vehicle's exhaust systemmay be very hot.You could burn yourself by touching theexhaust system if you use HANDS-FREEACCESS. There is a risk of injury. Alwaysensure that you only make the kickingmovement within the detection range ofsensors.
! If the key is within the rear detectionrange of KEYLESS-GO, the followingsituations, for example, could lead to theunintentional opening of the trunk:Rusing a car washRusing a power washer
Trunk 99
Openingandclosing
Z

Make sure that the key is at least 6.5 ft(2 m) away from the vehicle.
General notesWith KEYLESS-GO and HANDS-FREEACCESS, you can open or close the trunk lidor stop the procedure without using yourhands. This is useful if you have your handsfull. To do this, simply move your foot underthe bumper.Observe the following points:RCarry your KEYLESS-GO key about yourperson. The KEYLESS-GO key must be inthe rear detection range of the vehicle.RWhenmaking the kicking movement, makesure that you are standing firmly on theground and that there is sufficientclearance to the rear of the vehicle. Youcould otherwise lose your balance e.g. onice.
RAlways ensure that you only make thekicking movement within the detectionrange of sensors:.RStand at least 12 in (30 cm) away from therear area while doing so.RDo not come into contact with the bumperwhile making the kicking movement.Otherwise, the sensors may not functioncorrectly.RHANDS-FREE ACCESS does not functionwhen the engine is started.RIf a KEYLESS-GO key is within the reardetection range of KEYLESS-GO, HAND-FREEACCESS could be triggered. The trunk
lid could thus be opened or closedunintentionally, for example, if you:- set something down or lift something upbehind the vehicle.
- polish the rear of the vehicle.Do not carry the KEYLESS-GO key aboutyour person in these situations or insituations similar to these. This will preventthe unintentional opening/closing of thetrunk.RDirt caused by road salt aroundsensors: may restrict functionality.RUsing the HANDS-FREE ACCESS with aprosthetic leg may restrict functionality.
Operation
X To open/close: kick into sensor detectionrange: under the bumper with your foot.A warning tone will sound while the trunklid is opening or closing.
X If the trunk lid does not open afterseveral attempts: wait at least tenseconds then move your leg under thebumper once again.i If you hold your foot under the bumper fortoo long, the trunk lid does not open orclose. Repeat the leg movement morequickly if this occurs.
To stop the opening or closing procedure:Rmove your foot in the sensor detectionrange under the bumper orRpull the handle on the outside of the trunklid or
100 TrunkOp
eningandclosing
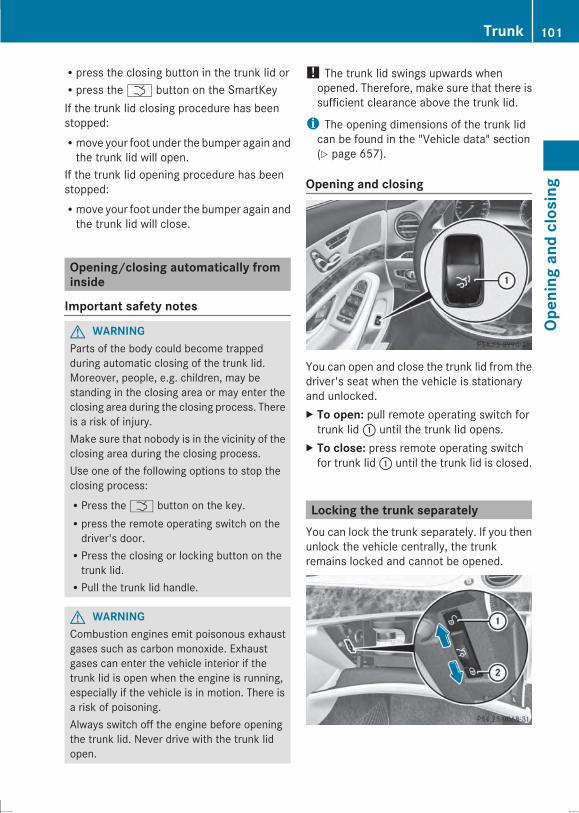
Rpress the closing button in the trunk lid orRpress theF button on the SmartKeyIf the trunk lid closing procedure has beenstopped:Rmove your foot under the bumper again andthe trunk lid will open.
If the trunk lid opening procedure has beenstopped:Rmove your foot under the bumper again andthe trunk lid will close.
Opening/closing automatically frominside
Important safety notes
G WARNINGParts of the body could become trappedduring automatic closing of the trunk lid.Moreover, people, e.g. children, may bestanding in the closing area or may enter theclosing area during the closing process. Thereis a risk of injury.Make sure that nobody is in the vicinity of theclosing area during the closing process.Use one of the following options to stop theclosing process:RPress theF button on the key.Rpress the remote operating switch on thedriver's door.RPress the closing or locking button on thetrunk lid.RPull the trunk lid handle.
G WARNINGCombustion engines emit poisonous exhaustgases such as carbon monoxide. Exhaustgases can enter the vehicle interior if thetrunk lid is open when the engine is running,especially if the vehicle is in motion. There isa risk of poisoning.Always switch off the engine before openingthe trunk lid. Never drive with the trunk lidopen.
! The trunk lid swings upwards whenopened. Therefore, make sure that there issufficient clearance above the trunk lid.
i The opening dimensions of the trunk lidcan be found in the "Vehicle data" section(Y page 657).
Opening and closing
You can open and close the trunk lid from thedriver's seat when the vehicle is stationaryand unlocked.X To open: pull remote operating switch fortrunk lid: until the trunk lid opens.
X To close: press remote operating switchfor trunk lid: until the trunk lid is closed.
Locking the trunk separatelyYou can lock the trunk separately. If you thenunlock the vehicle centrally, the trunkremains locked and cannot be opened.
Trunk 101
Openingandclosing
Z
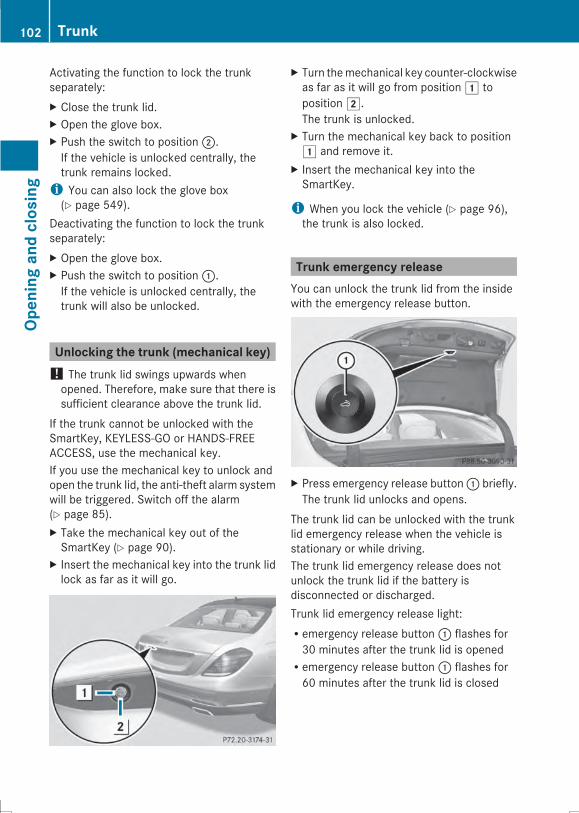
Activating the function to lock the trunkseparately:X Close the trunk lid.X Open the glove box.X Push the switch to position;.If the vehicle is unlocked centrally, thetrunk remains locked.i You can also lock the glove box(Y page 549).
Deactivating the function to lock the trunkseparately:X Open the glove box.X Push the switch to position:.If the vehicle is unlocked centrally, thetrunk will also be unlocked.
Unlocking the trunk (mechanical key)! The trunk lid swings upwards whenopened. Therefore, make sure that there issufficient clearance above the trunk lid.
If the trunk cannot be unlocked with theSmartKey, KEYLESS-GO or HANDS-FREEACCESS, use the mechanical key.If you use the mechanical key to unlock andopen the trunk lid, the anti-theft alarm systemwill be triggered. Switch off the alarm(Y page 85).X Take the mechanical key out of theSmartKey (Y page 90).
X Insert the mechanical key into the trunk lidlock as far as it will go.
X Turn themechanical key counter-clockwiseas far as it will go from position1 toposition2.The trunk is unlocked.
X Turn the mechanical key back to position1 and remove it.
X Insert the mechanical key into theSmartKey.
i When you lock the vehicle (Y page 96),the trunk is also locked.
Trunk emergency releaseYou can unlock the trunk lid from the insidewith the emergency release button.
X Press emergency release button: briefly.The trunk lid unlocks and opens.
The trunk lid can be unlocked with the trunklid emergency release when the vehicle isstationary or while driving.The trunk lid emergency release does notunlock the trunk lid if the battery isdisconnected or discharged.Trunk lid emergency release light:Remergency release button: flashes for30 minutes after the trunk lid is openedRemergency release button: flashes for60 minutes after the trunk lid is closed
102 TrunkOp
eningandclosing
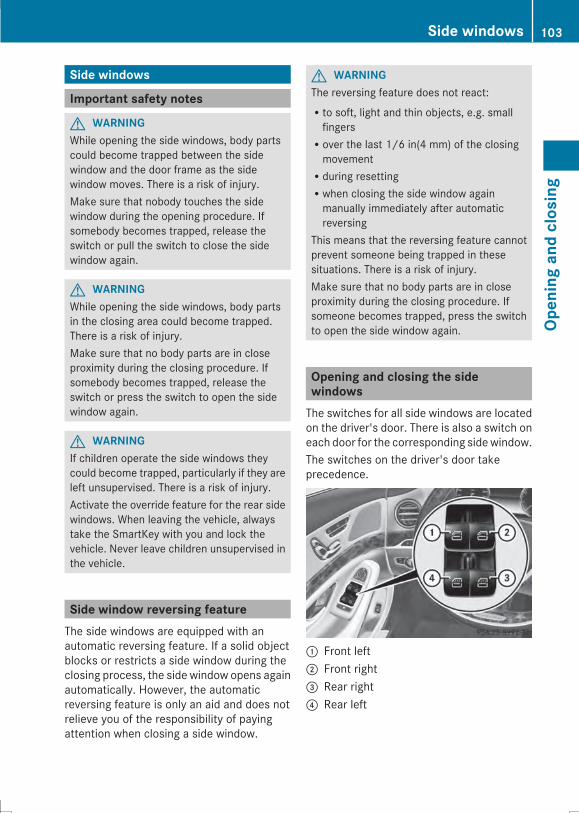
Side windows
Important safety notes
G WARNINGWhile opening the side windows, body partscould become trapped between the sidewindow and the door frame as the sidewindow moves. There is a risk of injury.Make sure that nobody touches the sidewindow during the opening procedure. Ifsomebody becomes trapped, release theswitch or pull the switch to close the sidewindow again.
G WARNINGWhile opening the side windows, body partsin the closing area could become trapped.There is a risk of injury.Make sure that no body parts are in closeproximity during the closing procedure. Ifsomebody becomes trapped, release theswitch or press the switch to open the sidewindow again.
G WARNINGIf children operate the side windows theycould become trapped, particularly if they areleft unsupervised. There is a risk of injury.Activate the override feature for the rear sidewindows. When leaving the vehicle, alwaystake the SmartKey with you and lock thevehicle. Never leave children unsupervised inthe vehicle.
Side window reversing featureThe side windows are equipped with anautomatic reversing feature. If a solid objectblocks or restricts a side window during theclosing process, the side window opens againautomatically. However, the automaticreversing feature is only an aid and does notrelieve you of the responsibility of payingattention when closing a side window.
G WARNINGThe reversing feature does not react:Rto soft, light and thin objects, e.g. smallfingersRover the last 1/6 in(4 mm) of the closingmovementRduring resettingRwhen closing the side window againmanually immediately after automaticreversing
This means that the reversing feature cannotprevent someone being trapped in thesesituations. There is a risk of injury.Make sure that no body parts are in closeproximity during the closing procedure. Ifsomeone becomes trapped, press the switchto open the side window again.
Opening and closing the sidewindowsThe switches for all side windows are locatedon the driver's door. There is also a switch oneach door for the corresponding sidewindow.The switches on the driver's door takeprecedence.
: Front left; Front right= Rear right? Rear left
Side windows 103
Openingandclosing
Z

X Turn the SmartKey to position 1 or 2 in theignition lock.
X To open manually: press thecorresponding switch.
X To open fully: press the correspondingswitch beyond the point of resistance.Automatic closing is started.
X To closemanually: pull the correspondingswitch.
X To close fully: pull the correspondingswitch beyond the pressure point.Automatic closing is started.
X To interrupt the automatic opening/closing: press/pull the correspondingswitch again.i If you press the switch beyond the pointof resistance, an automatic opening/closing process is started in thecorresponding direction. You can stopautomatic operation by operating theswitch again.
i You can continue to operate the sidewindows after you switch off the engine orremove the SmartKey. This functionremains active for five minutes or until youopen a front door.
i When the override feature for the sidewindows is activated (Y page 74), the sidewindows cannot be operated from the rear.
i Information on opening and closing theroller sunblinds on the rear side windows(Y page 557).
Convenience opening
General notesYou can ventilate the vehicle before you startdriving.If the SmartKey is in close proximity to thevehicle, the convenience opening function isavailable.
To do this, the SmartKey is used to carry outthe following functions simultaneously:Runlock the vehicleRopen the side windowsRopen the panorama roof with power tilt/sliding panel and the roller sunblindRswitch on the seat ventilation for thedriver's seat
Convenience openingX Press and hold the% button until theside windows and the panorama roof withpower tilt/sliding panel are in the desiredposition.If the roller sunblinds of the panorama roofwith power tilt/sliding panel are closed, theroller sunblinds are opened first.
X Press and hold the% button again untilthe panorama roof with power tilt/slidingpanel is in the desired position.
X To interrupt convenience opening:release the% button.
Convenience closing feature
Important safety notes
G WARNINGWhen the convenience closing feature isoperating, parts of the body could becometrapped in the closing area of the side windowand the sliding sunroof. There is a risk ofinjury.Observe the complete closing procedurewhen the convenience closing feature isoperating. Make sure that no body parts arein close proximity during the closingprocedure.
When you lock the vehicle, you cansimultaneously:Rclose the side windowsRclose the panorama roof with power tilt/sliding panel
104 Side windowsOp
eningandclosing
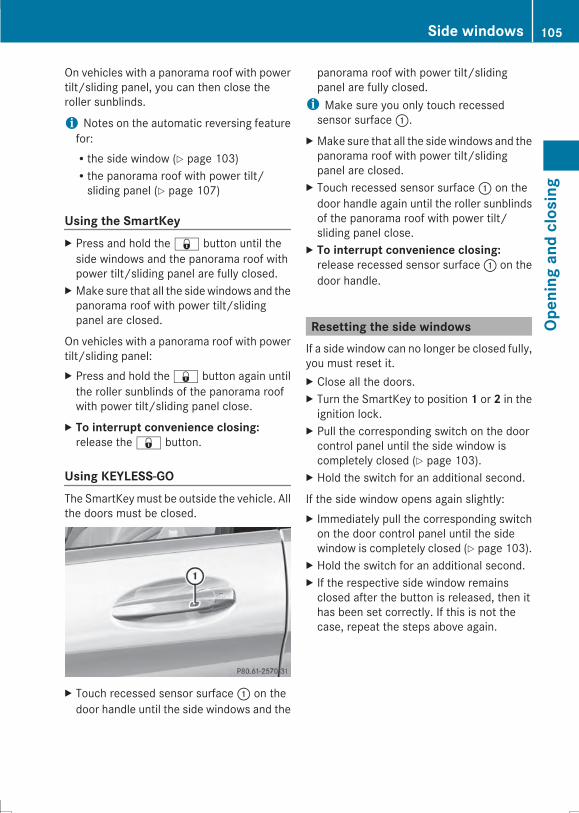
On vehicles with a panorama roof with powertilt/sliding panel, you can then close theroller sunblinds.
i Notes on the automatic reversing featurefor:Rthe side window (Y page 103)Rthe panorama roof with power tilt/sliding panel (Y page 107)
Using the SmartKeyX Press and hold the& button until theside windows and the panorama roof withpower tilt/sliding panel are fully closed.
X Make sure that all the sidewindows and thepanorama roof with power tilt/slidingpanel are closed.
On vehicles with a panorama roof with powertilt/sliding panel:X Press and hold the& button again untilthe roller sunblinds of the panorama roofwith power tilt/sliding panel close.
X To interrupt convenience closing:release the& button.
Using KEYLESS-GOThe SmartKeymust be outside the vehicle. Allthe doors must be closed.
X Touch recessed sensor surface: on thedoor handle until the side windows and the
panorama roof with power tilt/slidingpanel are fully closed.i Make sure you only touch recessedsensor surface:.
X Make sure that all the sidewindows and thepanorama roof with power tilt/slidingpanel are closed.
X Touch recessed sensor surface: on thedoor handle again until the roller sunblindsof the panorama roof with power tilt/sliding panel close.
X To interrupt convenience closing:release recessed sensor surface: on thedoor handle.
Resetting the side windowsIf a side window can no longer be closed fully,you must reset it.X Close all the doors.X Turn the SmartKey to position 1 or 2 in theignition lock.
X Pull the corresponding switch on the doorcontrol panel until the side window iscompletely closed (Y page 103).
X Hold the switch for an additional second.
If the side window opens again slightly:X Immediately pull the corresponding switchon the door control panel until the sidewindow is completely closed (Y page 103).
X Hold the switch for an additional second.X If the respective side window remainsclosed after the button is released, then ithas been set correctly. If this is not thecase, repeat the steps above again.
Side windows 105
Openingandclosing
Z
Problems with the side windows
G WARNINGIf you close a side window again immediately after it has been blocked or reset, the side windowcloses with increased or maximum force. The reversing feature is then not active. Parts of thebody could be trapped in the closing area in the process. This poses an increased risk of injuryor even fatal injury.Make sure that no parts of the body are in the closing area. To stop the closing process, releasethe switch or push the switch again to reopen the side window.
Problem Possible causes/consequences andMM Solutions
A side window cannotbe closed because it isblocked by objects, e.g.leaves in the windowguide.
X Remove the objects.X Close the side window.
A side window cannotbe closed and youcannot see the cause.
If a side window is obstructed during closing and reopens againslightly:X Immediately after the window blocks, pull the correspondingswitch again until the side window has closed.The side window is closed with increased force.
If a side window is obstructed again during closing and reopensagain slightly:X Immediately after the window blocks, pull the correspondingswitch again until the side window has closed.The side window is closed without the anti-entrapment feature.
Panorama roofwith power tilt/slidingpanel
Important safety notesIn the following section, the term "slidingsunroof" refers to the panorama roof withpower tilt/sliding panel.
G WARNINGWhile opening and closing the sliding sunroof,body parts in close proximity could becometrapped. There is a risk of injury.Make sure that no body parts are in closeproximity during the opening and closingprocedures.
If somebody becomes trapped:Rrelease the switch immediately, orRduring automatic operation, push theswitch briefly in any direction
The opening or closing procedure will bestopped.
G WARNINGIf children operate the sliding sunroof theycould become trapped, particularly if they areleft unsupervised. There is a risk of injury.When leaving the vehicle, always take theSmartKeywith you and lock the vehicle. Neverleave children unsupervised in the vehicle.
106 Panorama roof with power tilt/sliding panelOp
eningandclosing
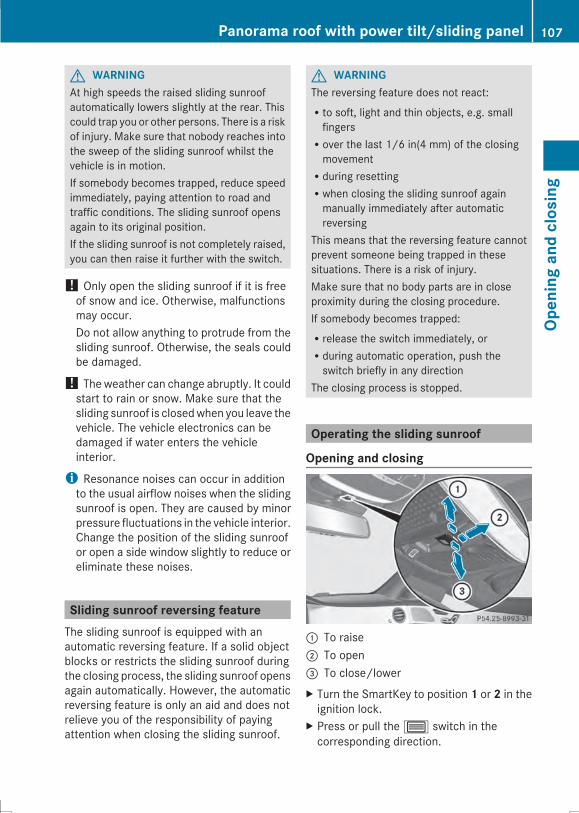
G WARNINGAt high speeds the raised sliding sunroofautomatically lowers slightly at the rear. Thiscould trap you or other persons. There is a riskof injury. Make sure that nobody reaches intothe sweep of the sliding sunroof whilst thevehicle is in motion.If somebody becomes trapped, reduce speedimmediately, paying attention to road andtraffic conditions. The sliding sunroof opensagain to its original position.If the sliding sunroof is not completely raised,you can then raise it further with the switch.
! Only open the sliding sunroof if it is freeof snow and ice. Otherwise, malfunctionsmay occur.Do not allow anything to protrude from thesliding sunroof. Otherwise, the seals couldbe damaged.
! The weather can change abruptly. It couldstart to rain or snow. Make sure that thesliding sunroof is closedwhen you leave thevehicle. The vehicle electronics can bedamaged if water enters the vehicleinterior.
i Resonance noises can occur in additionto the usual airflow noises when the slidingsunroof is open. They are caused by minorpressure fluctuations in the vehicle interior.Change the position of the sliding sunroofor open a side window slightly to reduce oreliminate these noises.
Sliding sunroof reversing featureThe sliding sunroof is equipped with anautomatic reversing feature. If a solid objectblocks or restricts the sliding sunroof duringthe closing process, the sliding sunroof opensagain automatically. However, the automaticreversing feature is only an aid and does notrelieve you of the responsibility of payingattention when closing the sliding sunroof.
G WARNINGThe reversing feature does not react:Rto soft, light and thin objects, e.g. smallfingersRover the last 1/6 in(4 mm) of the closingmovementRduring resettingRwhen closing the sliding sunroof againmanually immediately after automaticreversing
This means that the reversing feature cannotprevent someone being trapped in thesesituations. There is a risk of injury.Make sure that no body parts are in closeproximity during the closing procedure.If somebody becomes trapped:Rrelease the switch immediately, orRduring automatic operation, push theswitch briefly in any direction
The closing process is stopped.
Operating the sliding sunroof
Opening and closing
: To raise; To open= To close/lowerX Turn the SmartKey to position 1 or 2 in theignition lock.
X Press or pull the3 switch in thecorresponding direction.
Panorama roof with power tilt/sliding panel 107
Openingandclosing
Z
i If you press or pull the3 switchbeyond the point of resistance, anautomatic opening/closing process isstarted in the corresponding direction. Youcan stop automatic operation by pressingor pulling again.
i If the sliding sunroof is raised at the rear,it lowers slightly automatically at higherspeeds. The noise level in the vehicleinterior is reduced as a result.At low speeds it raises again automatically.
i You can continue to operate the slidingsunroof after switching off the engine orremoving the SmartKey from the ignitionlock. This function remains active for fiveminutes or until you open a front door.
i The sliding sunroof cannot be opened if aroof carrier is installed. In order to allowventilation of the vehicle interior, you canraise the sliding sunroof.If contact is made with a roof carrierapproved by Mercedes-Benz, the slidingsunroof lowers slightly but remains raisedat the rear.
Rain-closing featureThe raised sliding sunroof automaticallylowers at the rear when driving if it starts torain. The sliding sunroof is lowered dependingon:Rthe road speed andRthe intensity of the rain.You can manually cancel the automaticclosing procedure. Press or pull the3switch in any direction.To raise the sliding sunroof again, press the3 switch in direction:. The rain-closingfeature remains activated.
Operating the roller sunblinds for thesliding sunroof
Important safety notes
G WARNINGWhen opening or closing the roller sunblind,parts of the body could be trapped betweenthe roller sunblind and the frame or slidingsunroof. There is a risk of injury.When opening or closing make sure that noparts of the body are in the sweep of the rollersunblind.If somebody becomes trapped:Rrelease the switch immediately, orRduring automatic operation, push theswitch briefly in any direction
The opening or closing procedure will bestopped.
The roller sunblinds shield the vehicle interiorfrom sunlight. The front roller sunblind canonly be opened and closed when the slidingsunroof is closed.
Roller sunblind reversing featureThe roller sunblinds are equipped with anautomatic reversing feature. If a solid objectblocks or restricts a roller sunblind during theclosing process, the roller sunblind opensagain automatically. However, the automaticreversing feature is only an aid and does notrelieve you of the responsibility of payingattention when closing the roller sunblinds.
G WARNINGThe reversing feature especially does notreact to soft, light and thin objects such assmall fingers. This means that the reversingfeature cannot prevent someone beingtrapped in these situations. There is a risk ofinjury.When closing make sure that no parts of thebody are in the sweep of the roller sunblind.
108 Panorama roof with power tilt/sliding panelOp
eningandclosing
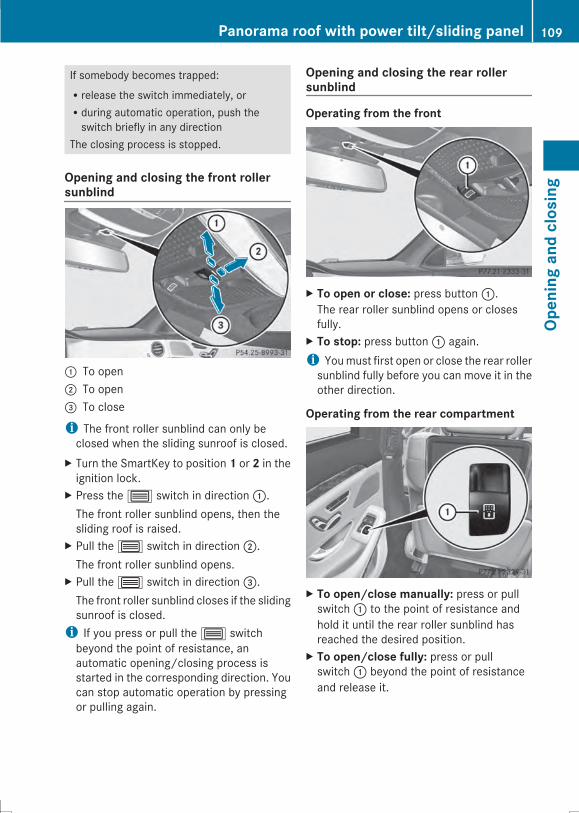
If somebody becomes trapped:Rrelease the switch immediately, orRduring automatic operation, push theswitch briefly in any direction
The closing process is stopped.
Opening and closing the front rollersunblind
: To open; To open= To close
i The front roller sunblind can only beclosed when the sliding sunroof is closed.
X Turn the SmartKey to position 1 or 2 in theignition lock.
X Press the3 switch in direction:.The front roller sunblind opens, then thesliding roof is raised.
X Pull the3 switch in direction;.The front roller sunblind opens.
X Pull the3 switch in direction=.The front roller sunblind closes if the slidingsunroof is closed.i If you press or pull the3 switchbeyond the point of resistance, anautomatic opening/closing process isstarted in the corresponding direction. Youcan stop automatic operation by pressingor pulling again.
Opening and closing the rear rollersunblind
Operating from the front
X To open or close: press button:.The rear roller sunblind opens or closesfully.
X To stop: press button: again.i Youmust first open or close the rear rollersunblind fully before you can move it in theother direction.
Operating from the rear compartment
X To open/close manually: press or pullswitch: to the point of resistance andhold it until the rear roller sunblind hasreached the desired position.
X To open/close fully: press or pullswitch: beyond the point of resistanceand release it.
Panorama roof with power tilt/sliding panel 109
Openingandclosing
Z
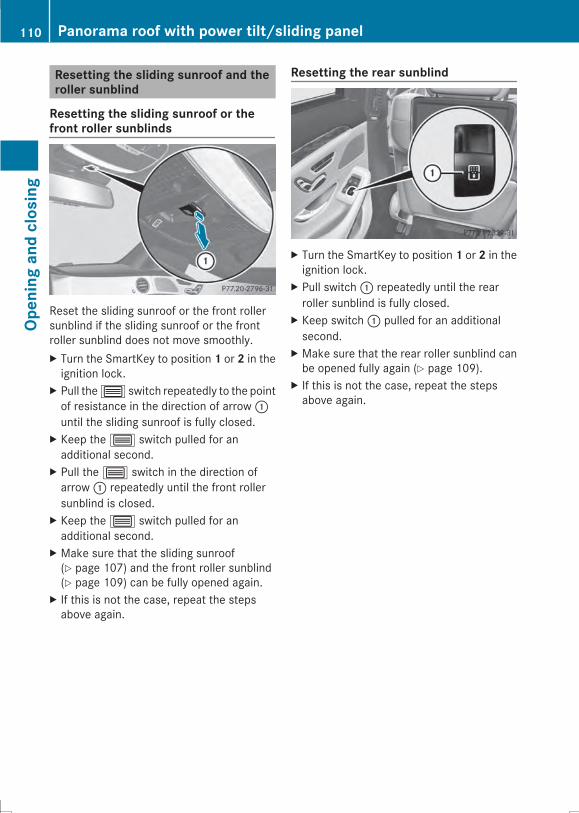
Resetting the sliding sunroof and theroller sunblind
Resetting the sliding sunroof or thefront roller sunblinds
Reset the sliding sunroof or the front rollersunblind if the sliding sunroof or the frontroller sunblind does not move smoothly.X Turn the SmartKey to position 1 or 2 in theignition lock.
X Pull the3 switch repeatedly to the pointof resistance in the direction of arrow:until the sliding sunroof is fully closed.
X Keep the3 switch pulled for anadditional second.
X Pull the3 switch in the direction ofarrow: repeatedly until the front rollersunblind is closed.
X Keep the3 switch pulled for anadditional second.
X Make sure that the sliding sunroof(Y page 107) and the front roller sunblind(Y page 109) can be fully opened again.
X If this is not the case, repeat the stepsabove again.
Resetting the rear sunblind
X Turn the SmartKey to position 1 or 2 in theignition lock.
X Pull switch: repeatedly until the rearroller sunblind is fully closed.
X Keep switch: pulled for an additionalsecond.
X Make sure that the rear roller sunblind canbe opened fully again (Y page 109).
X If this is not the case, repeat the stepsabove again.
110 Panorama roof with power tilt/sliding panelOp
eningandclosing

Problems with the sliding sunroof
G WARNINGIf you close the sliding sunroof again immediately after it has been blocked or reset, the slidingsunroof closes with increased or maximum force. The reversing feature is then not active. Partsof the body could be trapped in the closing area in the process. This poses an increased risk ofinjury or even fatal injury.Make sure that no parts of the body are in the closing area.If somebody becomes trapped:Rrelease the switch immediately, orRduring automatic operation, push the switch briefly in any directionThe closing process is stopped.
! If the sliding sunroof still cannot be opened or closed as a result of a malfunction, contacta qualified specialist workshop.
Problem Possible causes/consequences andMM Solutions
The sliding sunroofcannot be closed andyou cannot see thecause.
If the sliding sunroof is obstructed during closing and reopensagain slightly:X Immediately after it blocks, pull the3 switch down again tothe point of resistance until the sliding sunroof is closedThe sliding sunroof is closed with increased force.
If the sliding sunroof is obstructed again during closing and thenreopens slightly:X Immediately after it blocks, pull the3 switch down again tothe point of resistance until the sliding sunroof is closedThe sliding sunroof is closed without the anti-entrapmentfeature.
Panorama roof with power tilt/sliding panel 111
Openingandclosing
Z

112
Useful information ............................ 114Correct driver's seat position .......... 114Seats .................................................. 115Steering wheel .................................. 131Mirrors ............................................... 134Memory function .............................. 137Memory function in the rear com-partment ............................................ 138
113
Seats,steerin
gwheelandmirrors
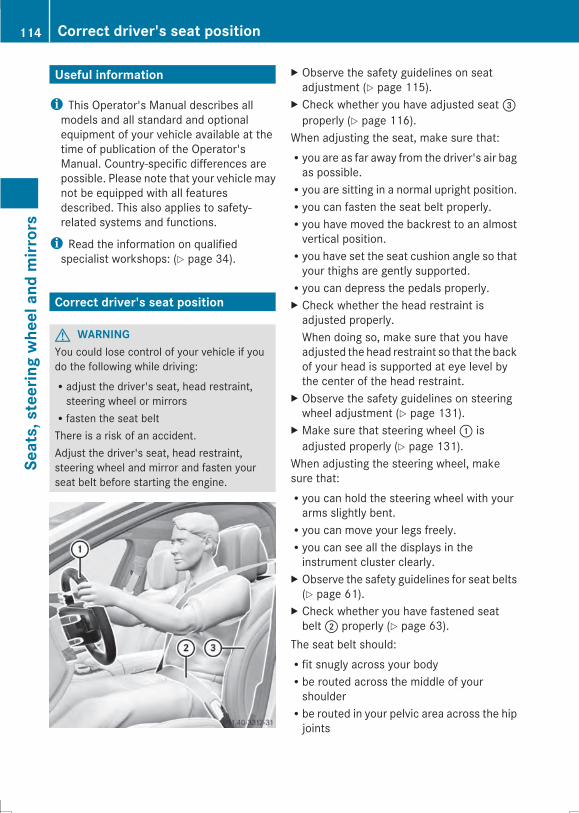
Useful information
i This Operator's Manual describes allmodels and all standard and optionalequipment of your vehicle available at thetime of publication of the Operator'sManual. Country-specific differences arepossible. Please note that your vehicle maynot be equipped with all featuresdescribed. This also applies to safety-related systems and functions.
i Read the information on qualifiedspecialist workshops: (Y page 34).
Correct driver's seat position
G WARNINGYou could lose control of your vehicle if youdo the following while driving:Radjust the driver's seat, head restraint,steering wheel or mirrorsRfasten the seat beltThere is a risk of an accident.Adjust the driver's seat, head restraint,steering wheel and mirror and fasten yourseat belt before starting the engine.
X Observe the safety guidelines on seatadjustment (Y page 115).
X Check whether you have adjusted seat=properly (Y page 116).
When adjusting the seat, make sure that:Ryou are as far away from the driver's air bagas possible.Ryou are sitting in a normal upright position.Ryou can fasten the seat belt properly.Ryou have moved the backrest to an almostvertical position.Ryou have set the seat cushion angle so thatyour thighs are gently supported.Ryou can depress the pedals properly.X Check whether the head restraint isadjusted properly.When doing so, make sure that you haveadjusted the head restraint so that the backof your head is supported at eye level bythe center of the head restraint.
X Observe the safety guidelines on steeringwheel adjustment (Y page 131).
X Make sure that steering wheel: isadjusted properly (Y page 131).
When adjusting the steering wheel, makesure that:Ryou can hold the steering wheel with yourarms slightly bent.Ryou can move your legs freely.Ryou can see all the displays in theinstrument cluster clearly.
X Observe the safety guidelines for seat belts(Y page 61).
X Check whether you have fastened seatbelt; properly (Y page 63).
The seat belt should:Rfit snugly across your bodyRbe routed across the middle of yourshoulderRbe routed in your pelvic area across the hipjoints
114 Correct driver's seat positionSeats,steerin
gwheelandmirrors
X Before starting off, adjust the rear-viewmirror and the exterior mirrors in such away that you have a good view of road andtraffic conditions (Y page 135).
X Vehicles with a memory function: savethe seat, steering wheel and exterior mirrorsettings with the memory function(Y page 137).
Seats
Important safety notes
G WARNINGChildren could become trapped if they adjustthe seats, particularly when unattended.There is a risk of injury.When leaving the vehicle, always take theSmartKeywith you and lock the vehicle. Neverleave children unsupervised in the vehicle.
G WARNINGYou could lose control of your vehicle if youdo the following while driving:Radjust the driver's seat, head restraint,steering wheel or mirrorsRfasten the seat beltThere is a risk of an accident.Adjust the driver's seat, head restraint,steering wheel and mirror and fasten yourseat belt before starting the engine.
G WARNINGIf you adjust the seat height carelessly, you orother vehicle occupants could be trapped andthereby injured. Children in particular couldaccidentally press the electrical seatadjustment buttons and become trapped.There is a risk of injury.While moving the seats, make sure that yourhands or other body parts do not get underthe lever assembly of the seat adjustmentsystem.
G WARNINGWhen you adjust a seat, you or other vehicleoccupants could become trapped, e.g. on theseat guide rail. There is a risk of injury.Make sure when adjusting a seat that no onehas any body parts in the sweep of the seat.
G WARNINGIf head restraints are not installed andadjusted correctly, they cannot provideprotection as intended. There is an increasedrisk of injury in the head and neck area, e.g.in the event of an accident or when braking.Always drive with the head restraintsinstalled. Before driving off, make sure forevery vehicle occupant that the center of thehead restraint supports the back of the headat about eye level.
G WARNINGThe seat belt does not offer the intended levelof protection if you have not moved thebackrest to an almost vertical position. Whenbraking or in the event of an accident, youcould slide underneath the seat belt andsustain abdomen or neck injuries, forexample. This poses an increased risk ofinjury or even fatal injury.Adjust the seat properly before beginningyour journey. Always ensure that the backrestis in an almost vertical position and that theshoulder section of your seat belt is routedacross the center of your shoulder.
! To avoid damage to the seats and the seatheating, observe the following information:Rkeep liquids from spilling on the seats. Ifliquid is spilled on the seats, dry them assoon as possible.Rif the seat covers are damp or wet, do notswitch on the seat heating. The seatheating should also not be used to drythe seats.Rclean the seat covers as recommended;see "Interior care".
Seats 115
Seats,steerin
gwheelandmirrors
Z

Rdo not transport heavy loads on theseats. Do not place sharp objects on theseat cushions, e.g. knives, nails or tools.The seats should only be occupied bypassengers, if possible.Rwhen the seat heating is in operation, donot cover the seats with insulatingmaterials, e.g. blankets, coats, bags,seat covers, child seats or booster seats.
! Make sure that there are no objects in thefootwell or behind the seats when resettingthe seats. There is a risk that the seatsand/or the objects could be damaged.
Adjusting the seats
Vehicles with standard head restraintsor luxury head restraints
: Head restraint height; Head restraint height= Seat height? Seat cushion angleA seat cushion lengthB Seat fore-and-aft adjustmentC Backrest angle
i If PRE-SAFE® is triggered, the front-passenger seat will be moved to a betterposition if it was previously in anunfavorable position (Y page 82).
i You can store the seat settings using thememory function (Y page 137).
i To ensure the largest possible range ofseat settings, certain seat adjustmentfunctions will automatically activate otherseat adjustment functions.
i The head restraint height is adjustedautomatically when you adjust the seatheight or the seat fore-and-aft position.
Vehicles with an EASY ADJUST luxuryhead restraint
: Head restraint height; Head restraint fore-and-aft position= Seat height? Seat cushion angleA seat cushion lengthB Seat fore-and-aft adjustmentC Backrest angle
i If PRE-SAFE® is triggered, the front-passenger seat will be moved to a betterposition if it was previously in anunfavorable position (Y page 82).
i You can store the seat settings using thememory function (Y page 137).
i To ensure the largest possible range ofseat settings, certain seat adjustmentfunctions will automatically activate otherseat adjustment functions.
i The head restraint height is adjustedautomatically when you adjust the seatheight or the seat fore-and-aft position.
116 SeatsSeats,steerin
gwheelandmirrors
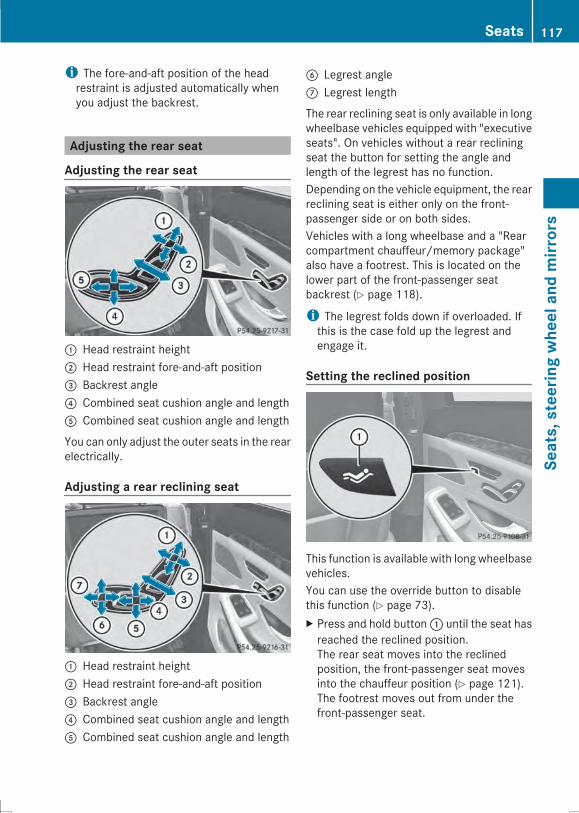
i The fore-and-aft position of the headrestraint is adjusted automatically whenyou adjust the backrest.
Adjusting the rear seat
Adjusting the rear seat
: Head restraint height; Head restraint fore-and-aft position= Backrest angle? Combined seat cushion angle and lengthA Combined seat cushion angle and length
You can only adjust the outer seats in the rearelectrically.
Adjusting a rear reclining seat
: Head restraint height; Head restraint fore-and-aft position= Backrest angle? Combined seat cushion angle and lengthA Combined seat cushion angle and length
B Legrest angleC Legrest length
The rear reclining seat is only available in longwheelbase vehicles equipped with "executiveseats". On vehicles without a rear recliningseat the button for setting the angle andlength of the legrest has no function.Depending on the vehicle equipment, the rearreclining seat is either only on the front-passenger side or on both sides.Vehicles with a long wheelbase and a "Rearcompartment chauffeur/memory package"also have a footrest. This is located on thelower part of the front-passenger seatbackrest (Y page 118).
i The legrest folds down if overloaded. Ifthis is the case fold up the legrest andengage it.
Setting the reclined position
This function is available with long wheelbasevehicles.You can use the override button to disablethis function (Y page 73).X Press and hold button: until the seat hasreached the reclined position.The rear seat moves into the reclinedposition, the front-passenger seat movesinto the chauffeur position (Y page 121).The footrest moves out from under thefront-passenger seat.
Seats 117
Seats,steerin
gwheelandmirrors
Z
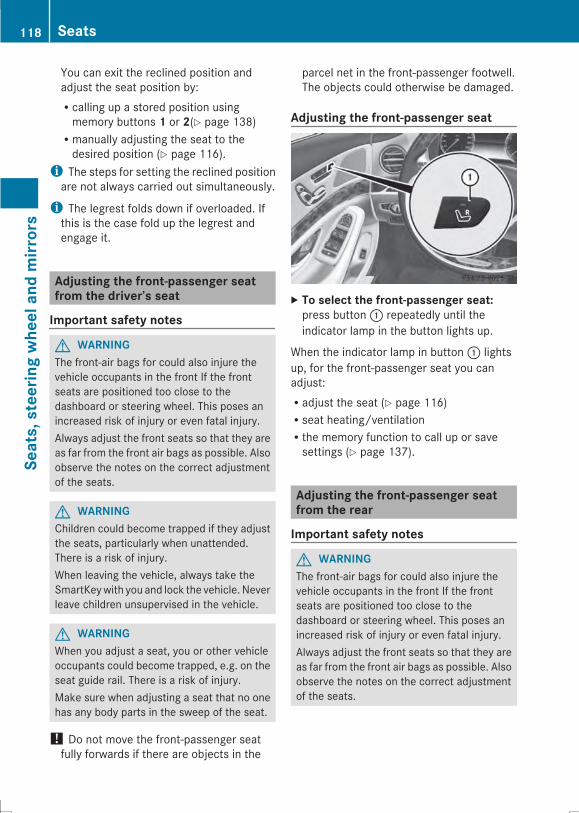
You can exit the reclined position andadjust the seat position by:Rcalling up a stored position usingmemory buttons 1 or 2(Y page 138)Rmanually adjusting the seat to thedesired position (Y page 116).i The steps for setting the reclined positionare not always carried out simultaneously.
i The legrest folds down if overloaded. Ifthis is the case fold up the legrest andengage it.
Adjusting the front-passenger seatfrom the driver’s seat
Important safety notes
G WARNINGThe front-air bags for could also injure thevehicle occupants in the front If the frontseats are positioned too close to thedashboard or steering wheel. This poses anincreased risk of injury or even fatal injury.Always adjust the front seats so that they areas far from the front air bags as possible. Alsoobserve the notes on the correct adjustmentof the seats.
G WARNINGChildren could become trapped if they adjustthe seats, particularly when unattended.There is a risk of injury.When leaving the vehicle, always take theSmartKeywith you and lock the vehicle. Neverleave children unsupervised in the vehicle.
G WARNINGWhen you adjust a seat, you or other vehicleoccupants could become trapped, e.g. on theseat guide rail. There is a risk of injury.Make sure when adjusting a seat that no onehas any body parts in the sweep of the seat.
! Do not move the front-passenger seatfully forwards if there are objects in the
parcel net in the front-passenger footwell.The objects could otherwise be damaged.
Adjusting the front-passenger seat
X To select the front-passenger seat:press button: repeatedly until theindicator lamp in the button lights up.
When the indicator lamp in button: lightsup, for the front-passenger seat you canadjust:Radjust the seat (Y page 116)Rseat heating/ventilationRthe memory function to call up or savesettings (Y page 137).
Adjusting the front-passenger seatfrom the rear
Important safety notes
G WARNINGThe front-air bags for could also injure thevehicle occupants in the front If the frontseats are positioned too close to thedashboard or steering wheel. This poses anincreased risk of injury or even fatal injury.Always adjust the front seats so that they areas far from the front air bags as possible. Alsoobserve the notes on the correct adjustmentof the seats.
118 SeatsSeats,steerin
gwheelandmirrors
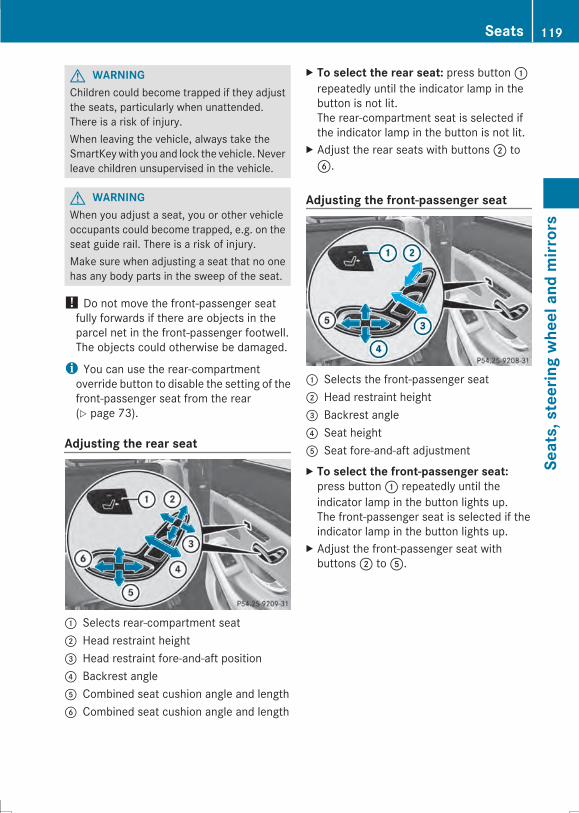
G WARNINGChildren could become trapped if they adjustthe seats, particularly when unattended.There is a risk of injury.When leaving the vehicle, always take theSmartKeywith you and lock the vehicle. Neverleave children unsupervised in the vehicle.
G WARNINGWhen you adjust a seat, you or other vehicleoccupants could become trapped, e.g. on theseat guide rail. There is a risk of injury.Make sure when adjusting a seat that no onehas any body parts in the sweep of the seat.
! Do not move the front-passenger seatfully forwards if there are objects in theparcel net in the front-passenger footwell.The objects could otherwise be damaged.
i You can use the rear-compartmentoverride button to disable the setting of thefront-passenger seat from the rear(Y page 73).
Adjusting the rear seat
: Selects rear-compartment seat; Head restraint height= Head restraint fore-and-aft position? Backrest angleA Combined seat cushion angle and lengthB Combined seat cushion angle and length
X To select the rear seat: press button:repeatedly until the indicator lamp in thebutton is not lit.The rear-compartment seat is selected ifthe indicator lamp in the button is not lit.
X Adjust the rear seats with buttons; toB.
Adjusting the front-passenger seat
: Selects the front-passenger seat; Head restraint height= Backrest angle? Seat heightA Seat fore-and-aft adjustmentX To select the front-passenger seat:press button: repeatedly until theindicator lamp in the button lights up.The front-passenger seat is selected if theindicator lamp in the button lights up.
X Adjust the front-passenger seat withbuttons; toA.
Seats 119
Seats,steerin
gwheelandmirrors
Z
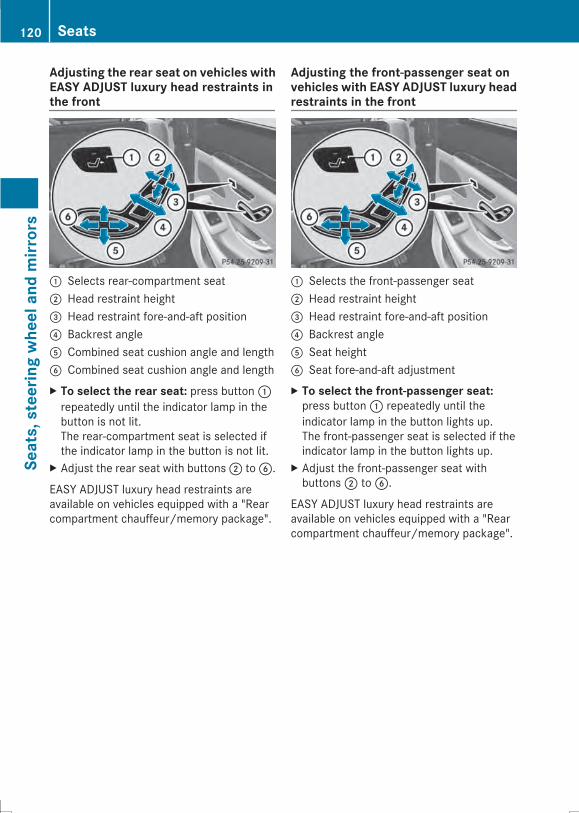
Adjusting the rear seat on vehicles withEASY ADJUST luxury head restraints inthe front
: Selects rear-compartment seat; Head restraint height= Head restraint fore-and-aft position? Backrest angleA Combined seat cushion angle and lengthB Combined seat cushion angle and lengthX To select the rear seat: press button:repeatedly until the indicator lamp in thebutton is not lit.The rear-compartment seat is selected ifthe indicator lamp in the button is not lit.
X Adjust the rear seat with buttons; toB.
EASY ADJUST luxury head restraints areavailable on vehicles equipped with a "Rearcompartment chauffeur/memory package".
Adjusting the front-passenger seat onvehicles with EASY ADJUST luxury headrestraints in the front
: Selects the front-passenger seat; Head restraint height= Head restraint fore-and-aft position? Backrest angleA Seat heightB Seat fore-and-aft adjustmentX To select the front-passenger seat:press button: repeatedly until theindicator lamp in the button lights up.The front-passenger seat is selected if theindicator lamp in the button lights up.
X Adjust the front-passenger seat withbuttons; toB.
EASY ADJUST luxury head restraints areavailable on vehicles equipped with a "Rearcompartment chauffeur/memory package".
120 SeatsSeats,steerin
gwheelandmirrors
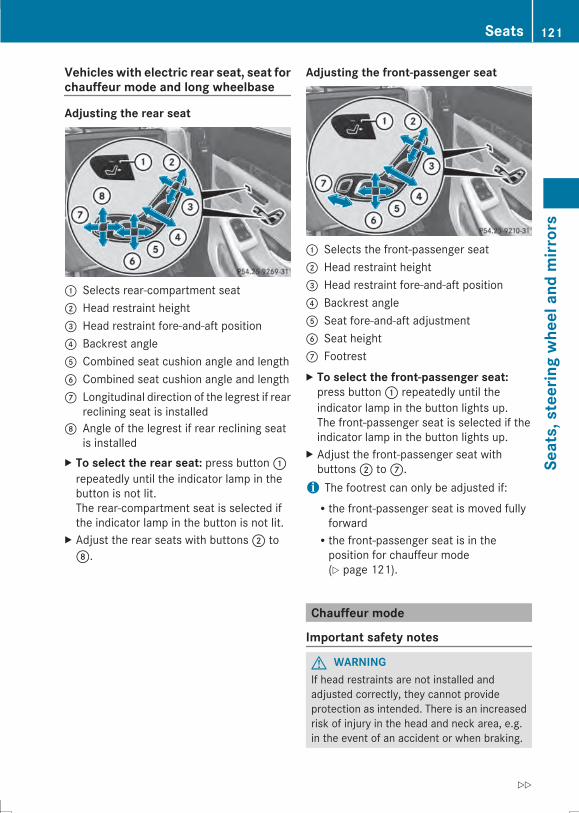
Vehicles with electric rear seat, seat forchauffeur mode and long wheelbase
Adjusting the rear seat
: Selects rear-compartment seat; Head restraint height= Head restraint fore-and-aft position? Backrest angleA Combined seat cushion angle and lengthB Combined seat cushion angle and lengthC Longitudinal direction of the legrest if rear
reclining seat is installedD Angle of the legrest if rear reclining seat
is installedX To select the rear seat: press button:repeatedly until the indicator lamp in thebutton is not lit.The rear-compartment seat is selected ifthe indicator lamp in the button is not lit.
X Adjust the rear seats with buttons; toD.
Adjusting the front-passenger seat
: Selects the front-passenger seat; Head restraint height= Head restraint fore-and-aft position? Backrest angleA Seat fore-and-aft adjustmentB Seat heightC FootrestX To select the front-passenger seat:press button: repeatedly until theindicator lamp in the button lights up.The front-passenger seat is selected if theindicator lamp in the button lights up.
X Adjust the front-passenger seat withbuttons; toC.i The footrest can only be adjusted if:Rthe front-passenger seat is moved fullyforwardRthe front-passenger seat is in theposition for chauffeur mode(Y page 121).
Chauffeur mode
Important safety notes
G WARNINGIf head restraints are not installed andadjusted correctly, they cannot provideprotection as intended. There is an increasedrisk of injury in the head and neck area, e.g.in the event of an accident or when braking.
Seats 121
Seats,steerin
gwheelandmirrors
Z

Always drive with the head restraintsinstalled. Before driving off, make sure forevery vehicle occupant that the center of thehead restraint supports the back of the headat about eye level.
G WARNINGIf the front-passenger seat is in chauffeurmode and the front-passenger head restraintis folded down, the view of the passenger-sideexterior mirror can be impaired. There is a riskof an accident.To have a free view of the exterior mirror,remove the front-passenger head restraint.
! Make sure that there are no objects in thefootwell or behind the seats when resettingthe seats. There is a risk that the seatsand/or the objects could be damaged.
General notesIn chauffeur mode:Rthe front-passenger seat ismoved forwardsRthe backrest is tilted forwardsRthe head restraint is folded forwardsThe front-passenger seat automaticallymoves from the chauffeur position back intothe normal position if:Rthe front-passenger seat is adjusted usingthe seat adjustment switch on the front-passenger doorRthe front-passenger seat belt is fastenedRan occupant is detected on the front-passenger seatRthe front-passenger seat head restraint isinserted and the ignition is switched onRthe front-passenger seat backrest ismovedbackwards or the seat is moved in alongitudinal direction out of the chauffeurarea (Y page 124).
Positioning the front-passenger seat forchauffeur mode
General notesPay attention to the important safety notes(Y page 121). Adjust the seat for chauffeurmode before the journey (Y page 122). Do notremove the front-passenger seat headrestraint during the journey.
Adjusting from the rear compartment
You can use the override button to disablethis function (Y page 73).In order for the front-passenger seat to bepositioned in chauffeur mode:Rthe front-passenger door must be closedRthe SmartKey must be in the ignition lockand in position 1 or 2(Y page 175)Rthe front-passenger seat may not beoccupiedRthe front-passenger seat belt must not beinserted into the buckle
X To select the front-passenger seat:press button: repeatedly until theindicator lamp in the button lights up.The front-passenger seat is selected if theindicator lamp in the button lights up.
X Press button; forwards and hold it in thisposition.The seat moves forward.The seat stops at the threshold of the areafor chauffeur mode.
122 SeatsSeats,steerin
gwheelandmirrors
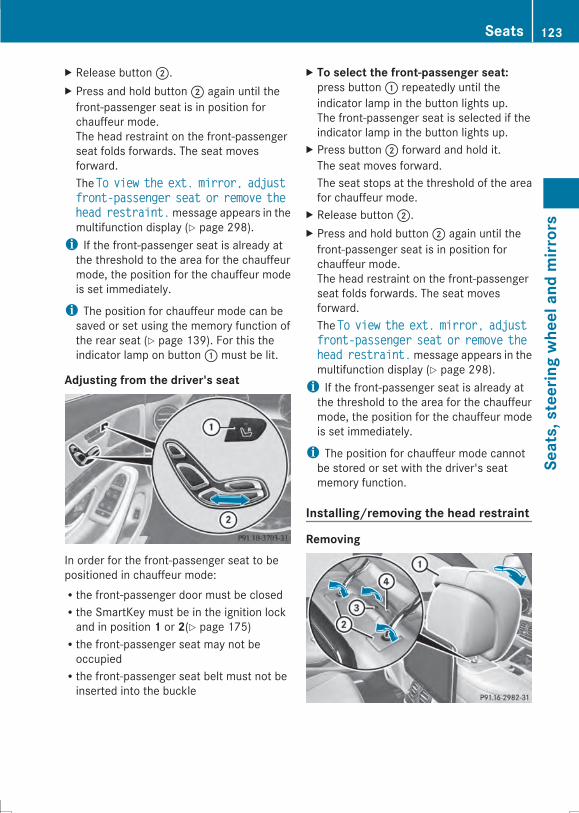
X Release button;.X Press and hold button; again until thefront-passenger seat is in position forchauffeur mode.The head restraint on the front-passengerseat folds forwards. The seat movesforward.The ToTo viewview thethe ext.ext. mirror,mirror, adjustadjustfront-passengerfront-passenger seatseat oror removeremove thetheheadhead restraint.restraint.message appears in themultifunction display (Y page 298).i If the front-passenger seat is already atthe threshold to the area for the chauffeurmode, the position for the chauffeur modeis set immediately.
i The position for chauffeur mode can besaved or set using the memory function ofthe rear seat (Y page 139). For this theindicator lamp on button: must be lit.
Adjusting from the driver's seat
In order for the front-passenger seat to bepositioned in chauffeur mode:Rthe front-passenger door must be closedRthe SmartKey must be in the ignition lockand in position 1 or 2(Y page 175)Rthe front-passenger seat may not beoccupiedRthe front-passenger seat belt must not beinserted into the buckle
X To select the front-passenger seat:press button: repeatedly until theindicator lamp in the button lights up.The front-passenger seat is selected if theindicator lamp in the button lights up.
X Press button; forward and hold it.The seat moves forward.The seat stops at the threshold of the areafor chauffeur mode.
X Release button;.X Press and hold button; again until thefront-passenger seat is in position forchauffeur mode.The head restraint on the front-passengerseat folds forwards. The seat movesforward.The ToTo viewview thethe ext.ext. mirror,mirror, adjustadjustfront-passengerfront-passenger seatseat oror removeremove thetheheadhead restraint.restraint.message appears in themultifunction display (Y page 298).i If the front-passenger seat is already atthe threshold to the area for the chauffeurmode, the position for the chauffeur modeis set immediately.
i The position for chauffeur mode cannotbe stored or set with the driver's seatmemory function.
Installing/removing the head restraint
Removing
Seats 123
Seats,steerin
gwheelandmirrors
Z
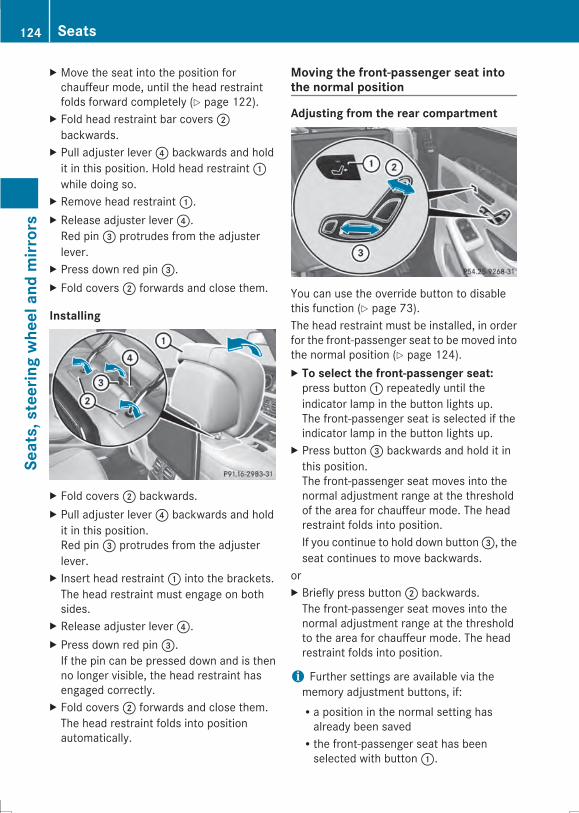
X Move the seat into the position forchauffeur mode, until the head restraintfolds forward completely (Y page 122).
X Fold head restraint bar covers;backwards.
X Pull adjuster lever? backwards and holdit in this position. Hold head restraint:while doing so.
X Remove head restraint:.X Release adjuster lever?.Red pin= protrudes from the adjusterlever.
X Press down red pin=.X Fold covers; forwards and close them.
Installing
X Fold covers; backwards.X Pull adjuster lever? backwards and holdit in this position.Red pin= protrudes from the adjusterlever.
X Insert head restraint: into the brackets.The head restraint must engage on bothsides.
X Release adjuster lever?.X Press down red pin=.If the pin can be pressed down and is thenno longer visible, the head restraint hasengaged correctly.
X Fold covers; forwards and close them.The head restraint folds into positionautomatically.
Moving the front-passenger seat intothe normal position
Adjusting from the rear compartment
You can use the override button to disablethis function (Y page 73).The head restraint must be installed, in orderfor the front-passenger seat to be moved intothe normal position (Y page 124).X To select the front-passenger seat:press button: repeatedly until theindicator lamp in the button lights up.The front-passenger seat is selected if theindicator lamp in the button lights up.
X Press button= backwards and hold it inthis position.The front-passenger seat moves into thenormal adjustment range at the thresholdof the area for chauffeur mode. The headrestraint folds into position.If you continue to hold down button=, theseat continues to move backwards.
orX Briefly press button; backwards.The front-passenger seat moves into thenormal adjustment range at the thresholdto the area for chauffeur mode. The headrestraint folds into position.
i Further settings are available via thememory adjustment buttons, if:Ra position in the normal setting hasalready been savedRthe front-passenger seat has beenselected with button:.
124 SeatsSeats,steerin
gwheelandmirrors
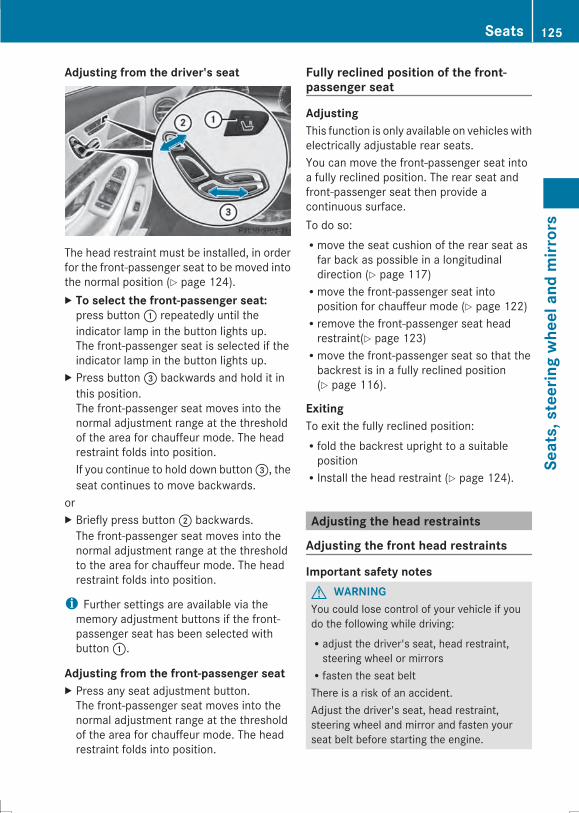
Adjusting from the driver's seat
The head restraint must be installed, in orderfor the front-passenger seat to be moved intothe normal position (Y page 124).X To select the front-passenger seat:press button: repeatedly until theindicator lamp in the button lights up.The front-passenger seat is selected if theindicator lamp in the button lights up.
X Press button= backwards and hold it inthis position.The front-passenger seat moves into thenormal adjustment range at the thresholdof the area for chauffeur mode. The headrestraint folds into position.If you continue to hold down button=, theseat continues to move backwards.
orX Briefly press button; backwards.The front-passenger seat moves into thenormal adjustment range at the thresholdto the area for chauffeur mode. The headrestraint folds into position.
i Further settings are available via thememory adjustment buttons if the front-passenger seat has been selected withbutton:.
Adjusting from the front-passenger seatX Press any seat adjustment button.The front-passenger seat moves into thenormal adjustment range at the thresholdof the area for chauffeur mode. The headrestraint folds into position.
Fully reclined position of the front-passenger seat
AdjustingThis function is only available on vehicles withelectrically adjustable rear seats.You can move the front-passenger seat intoa fully reclined position. The rear seat andfront-passenger seat then provide acontinuous surface.To do so:Rmove the seat cushion of the rear seat asfar back as possible in a longitudinaldirection (Y page 117)Rmove the front-passenger seat intoposition for chauffeur mode (Y page 122)Rremove the front-passenger seat headrestraint(Y page 123)Rmove the front-passenger seat so that thebackrest is in a fully reclined position(Y page 116).
ExitingTo exit the fully reclined position:Rfold the backrest upright to a suitablepositionRInstall the head restraint (Y page 124).
Adjusting the head restraints
Adjusting the front head restraints
Important safety notesG WARNINGYou could lose control of your vehicle if youdo the following while driving:Radjust the driver's seat, head restraint,steering wheel or mirrorsRfasten the seat beltThere is a risk of an accident.Adjust the driver's seat, head restraint,steering wheel and mirror and fasten yourseat belt before starting the engine.
Seats 125
Seats,steerin
gwheelandmirrors
Z
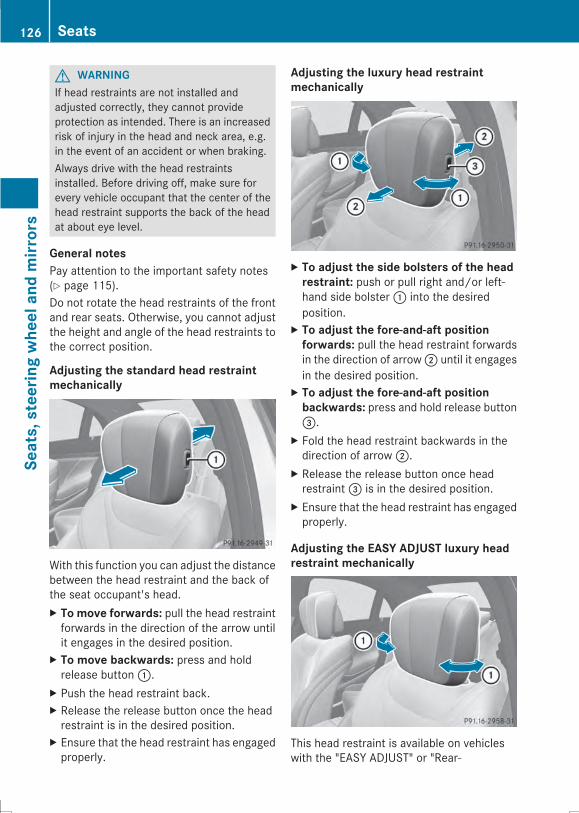
G WARNINGIf head restraints are not installed andadjusted correctly, they cannot provideprotection as intended. There is an increasedrisk of injury in the head and neck area, e.g.in the event of an accident or when braking.Always drive with the head restraintsinstalled. Before driving off, make sure forevery vehicle occupant that the center of thehead restraint supports the back of the headat about eye level.
General notesPay attention to the important safety notes(Y page 115).Do not rotate the head restraints of the frontand rear seats. Otherwise, you cannot adjustthe height and angle of the head restraints tothe correct position.
Adjusting the standard head restraintmechanically
With this function you can adjust the distancebetween the head restraint and the back ofthe seat occupant's head.X To move forwards: pull the head restraintforwards in the direction of the arrow untilit engages in the desired position.
X To move backwards: press and holdrelease button:.
X Push the head restraint back.X Release the release button once the headrestraint is in the desired position.
X Ensure that the head restraint has engagedproperly.
Adjusting the luxury head restraintmechanically
X To adjust the side bolsters of the headrestraint: push or pull right and/or left-hand side bolster: into the desiredposition.
X To adjust the fore-and-aft positionforwards: pull the head restraint forwardsin the direction of arrow; until it engagesin the desired position.
X To adjust the fore-and-aft positionbackwards: press and hold release button=.
X Fold the head restraint backwards in thedirection of arrow;.
X Release the release button once headrestraint= is in the desired position.
X Ensure that the head restraint has engagedproperly.
Adjusting the EASY ADJUST luxury headrestraint mechanically
This head restraint is available on vehicleswith the "EASY ADJUST" or "Rear-
126 SeatsSeats,steerin
gwheelandmirrors

compartment chauffeur/memory package"equipment.X To adjust the side bolsters of the headrestraint: push or pull right and/or left-hand side bolster: into the desiredposition.
X To adjust the fore-and-aft position: slidethe button for head restraint fore-and-aftadjustment forwards or backwards in thedirection of the arrow (Y page 116).
X To adjust the head restraint height: slidethe switch for head restraint adjustment upor down in the direction of the arrow(Y page 116).i The fore-and-aft position of the headrestraint is adjusted automatically whenyou adjust the seat backrest angle usingthe seat switch.
Adjusting the front head restraintselectricallyThe height and fore-and-aft position of thefront head restraints can be adjusted with theseat adjustment switch (Y page 116).
Adjusting the outer rear seat headrestraints
Lowering electrically from the front
X Turn the SmartKey to position 1 or 2 in theignition lock (Y page 175).
X Briefly press button:.The head restraints lower.
i If all outer head restraints are alreadylowered, they will move straight into thelast position.
Extending from the front electricallyThis function is available on vehicles withelectrically adjustable rear seats.X Turn the SmartKey to position 1 or 2 in theignition lock (Y page 175).
X Press button: and hold it down until thehead restraints are fully extended.
Extending the outer rear head restraintsinto the last stored positionX Turn the SmartKey to position 1 or 2 in theignition lock (Y page 175).
X Briefly press button:.The head restraints lower.
X Briefly press button: again.The head restraints move to the last storedposition.
Adjusting the luxury head restraint in therear compartment mechanically
This function is available on vehicles withelectrically adjustable rear seats(Y page 117).X To adjust the side bolsters of the headrestraint: push or pull right and/or left-hand side bolster: into the desiredposition.
X To adjust the angle of the headrestraint: push or pull the head restraint inthe direction of arrow;.
Seats 127
Seats,steerin
gwheelandmirrors
Z
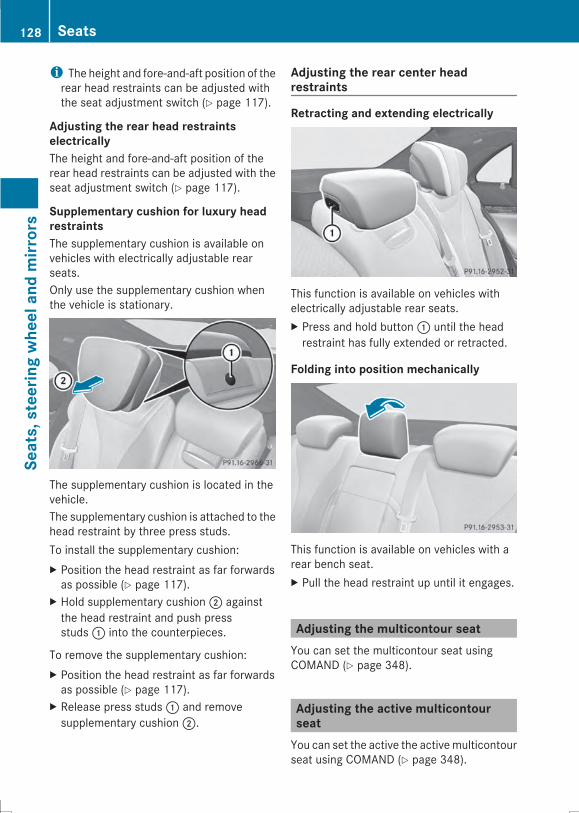
i The height and fore-and-aft position of therear head restraints can be adjusted withthe seat adjustment switch (Y page 117).
Adjusting the rear head restraintselectricallyThe height and fore-and-aft position of therear head restraints can be adjusted with theseat adjustment switch (Y page 117).
Supplementary cushion for luxury headrestraintsThe supplementary cushion is available onvehicles with electrically adjustable rearseats.Only use the supplementary cushion whenthe vehicle is stationary.
The supplementary cushion is located in thevehicle.The supplementary cushion is attached to thehead restraint by three press studs.To install the supplementary cushion:X Position the head restraint as far forwardsas possible (Y page 117).
X Hold supplementary cushion; againstthe head restraint and push pressstuds: into the counterpieces.
To remove the supplementary cushion:X Position the head restraint as far forwardsas possible (Y page 117).
X Release press studs: and removesupplementary cushion;.
Adjusting the rear center headrestraints
Retracting and extending electrically
This function is available on vehicles withelectrically adjustable rear seats.X Press and hold button: until the headrestraint has fully extended or retracted.
Folding into position mechanically
This function is available on vehicles with arear bench seat.X Pull the head restraint up until it engages.
Adjusting the multicontour seatYou can set the multicontour seat usingCOMAND (Y page 348).
Adjusting the active multicontourseatYou can set the active the activemulticontourseat using COMAND (Y page 348).
128 SeatsSeats,steerin
gwheelandmirrors
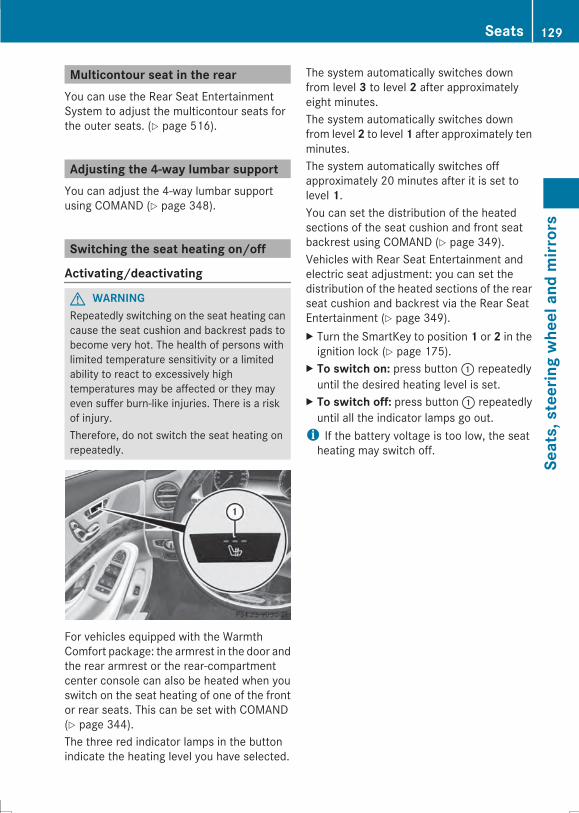
Multicontour seat in the rearYou can use the Rear Seat EntertainmentSystem to adjust the multicontour seats forthe outer seats. (Y page 516).
Adjusting the 4-way lumbar supportYou can adjust the 4-way lumbar supportusing COMAND (Y page 348).
Switching the seat heating on/off
Activating/deactivating
G WARNINGRepeatedly switching on the seat heating cancause the seat cushion and backrest pads tobecome very hot. The health of persons withlimited temperature sensitivity or a limitedability to react to excessively hightemperatures may be affected or they mayeven suffer burn-like injuries. There is a riskof injury.Therefore, do not switch the seat heating onrepeatedly.
For vehicles equipped with the WarmthComfort package: the armrest in the door andthe rear armrest or the rear-compartmentcenter console can also be heated when youswitch on the seat heating of one of the frontor rear seats. This can be set with COMAND(Y page 344).The three red indicator lamps in the buttonindicate the heating level you have selected.
The system automatically switches downfrom level 3 to level 2 after approximatelyeight minutes.The system automatically switches downfrom level 2 to level 1 after approximately tenminutes.The system automatically switches offapproximately 20 minutes after it is set tolevel 1.You can set the distribution of the heatedsections of the seat cushion and front seatbackrest using COMAND (Y page 349).Vehicles with Rear Seat Entertainment andelectric seat adjustment: you can set thedistribution of the heated sections of the rearseat cushion and backrest via the Rear SeatEntertainment (Y page 349).X Turn the SmartKey to position 1 or 2 in theignition lock (Y page 175).
X To switch on: press button: repeatedlyuntil the desired heating level is set.
X To switch off: press button: repeatedlyuntil all the indicator lamps go out.i If the battery voltage is too low, the seatheating may switch off.
Seats 129
Seats,steerin
gwheelandmirrors
Z
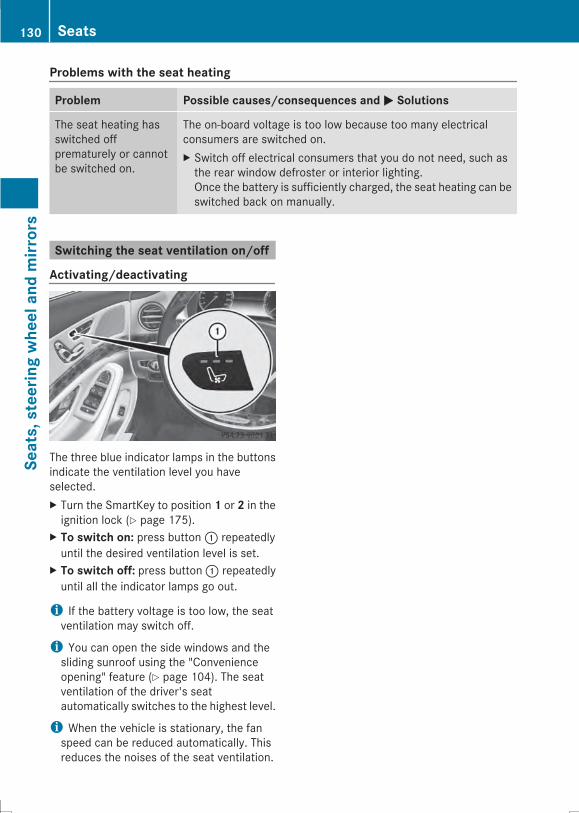
Problems with the seat heating
Problem Possible causes/consequences andMM Solutions
The seat heating hasswitched offprematurely or cannotbe switched on.
The on-board voltage is too low because too many electricalconsumers are switched on.X Switch off electrical consumers that you do not need, such asthe rear window defroster or interior lighting.Once the battery is sufficiently charged, the seat heating can beswitched back on manually.
Switching the seat ventilation on/off
Activating/deactivating
The three blue indicator lamps in the buttonsindicate the ventilation level you haveselected.X Turn the SmartKey to position 1 or 2 in theignition lock (Y page 175).
X To switch on: press button: repeatedlyuntil the desired ventilation level is set.
X To switch off: press button: repeatedlyuntil all the indicator lamps go out.
i If the battery voltage is too low, the seatventilation may switch off.
i You can open the side windows and thesliding sunroof using the "Convenienceopening" feature (Y page 104). The seatventilation of the driver's seatautomatically switches to the highest level.
i When the vehicle is stationary, the fanspeed can be reduced automatically. Thisreduces the noises of the seat ventilation.
130 SeatsSeats,steerin
gwheelandmirrors
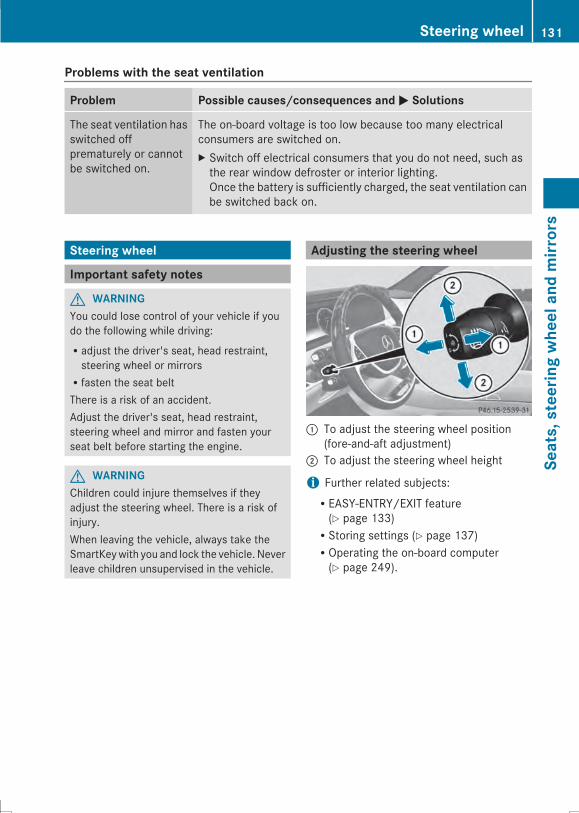
Problems with the seat ventilation
Problem Possible causes/consequences andMM Solutions
The seat ventilation hasswitched offprematurely or cannotbe switched on.
The on-board voltage is too low because too many electricalconsumers are switched on.X Switch off electrical consumers that you do not need, such asthe rear window defroster or interior lighting.Once the battery is sufficiently charged, the seat ventilation canbe switched back on.
Steering wheel
Important safety notes
G WARNINGYou could lose control of your vehicle if youdo the following while driving:Radjust the driver's seat, head restraint,steering wheel or mirrorsRfasten the seat beltThere is a risk of an accident.Adjust the driver's seat, head restraint,steering wheel and mirror and fasten yourseat belt before starting the engine.
G WARNINGChildren could injure themselves if theyadjust the steering wheel. There is a risk ofinjury.When leaving the vehicle, always take theSmartKeywith you and lock the vehicle. Neverleave children unsupervised in the vehicle.
Adjusting the steering wheel
: To adjust the steering wheel position(fore-and-aft adjustment)
; To adjust the steering wheel height
i Further related subjects:REASY-ENTRY/EXIT feature(Y page 133)RStoring settings (Y page 137)ROperating the on-board computer(Y page 249).
Steering wheel 131
Seats,steerin
gwheelandmirrors
Z
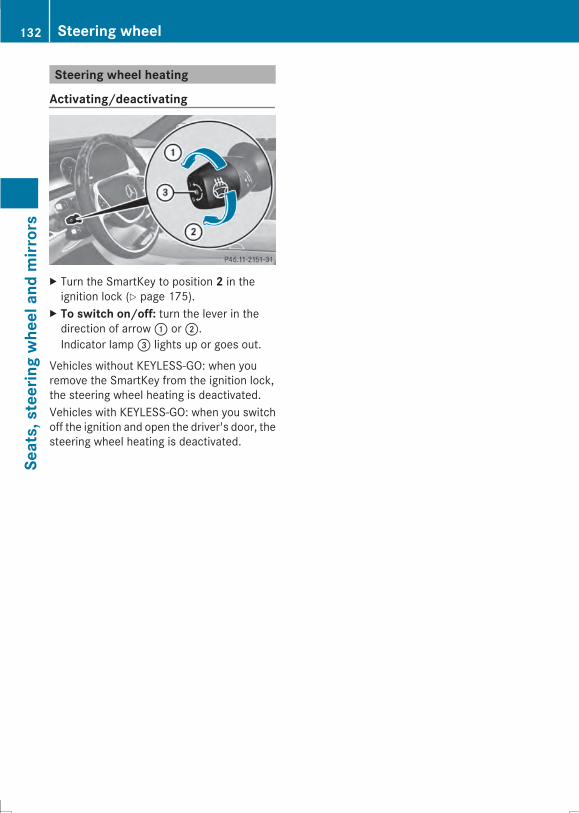
Steering wheel heating
Activating/deactivating
X Turn the SmartKey to position 2 in theignition lock (Y page 175).
X To switch on/off: turn the lever in thedirection of arrow: or;.Indicator lamp= lights up or goes out.
Vehicles without KEYLESS-GO: when youremove the SmartKey from the ignition lock,the steering wheel heating is deactivated.Vehicles with KEYLESS-GO: when you switchoff the ignition and open the driver's door, thesteering wheel heating is deactivated.
132 Steering wheelSeats,steerin
gwheelandmirrors
Problems with the steering wheel heating
Problem Possible causes/consequences andMM Solutions
The steering wheelheating has switchedoff prematurely orcannot be switched on.
The on-board voltage is too low because too many electricalconsumers are switched on.X Switch off electrical consumers that you do not need, such asthe rear window defroster or interior lighting.
EASY-ENTRY/EXIT feature
Important safety notes
G WARNINGWhen the EASY-ENTRY/EXIT feature adjuststhe steering wheel and the driver's seat, youand other vehicle occupants – particularlychildren – could become trapped. There is arisk of injury.While the EASY-ENTRY/EXIT feature ismaking adjustments, make sure that no onehas any body parts in the sweep of the seatand the steering wheel.If there is a danger of entrapment by thesteering column:Rmove the steering wheel adjustment lever.If there is a danger of entrapment by the seat:Rpress the switch for seat adjustment.The adjustment process is stopped.
G WARNINGIf children activate the EASY-ENTRY/EXITfeature, they can become trapped,particularly when unattended. There is a riskof injury.When leaving the vehicle, always take theSmartKeywith you and lock the vehicle. Neverleave children unsupervised in the vehicle.
G WARNINGIf you drive off while the EASY-ENTRY/EXITfeature is making adjustments, you could losecontrol of the vehicle. There is a risk of anaccident.
Always wait until the adjustment process iscomplete before driving off.
The EASY-ENTRY/EXIT feature makes gettingin and out of your vehicle easier.You can activate and deactivate the EASY-ENTRY/EXIT feature using COMAND(Y page 344).
Position of the steering wheel and thedriver's seat when the EASY-ENTRY/EXIT feature is activeThe steering wheel tilts upwards and thedriver's seat moves backwards if you:Rremove the SmartKey from the ignition lockRwith KEYLESS-GO: open the driver's door;KEYLESS-GO must be in position 1Rwith the SmartKey: open the driver'sdoor; the SmartKey must be in position 0or 1 in the ignition lock (Y page 175)Ropen the driver's door when the ignition isswitched off
i The steering wheel only tilts upwards andthe driver's seat only moves backwards ifthe driving position is stored after seat orsteering wheel adjustment (Y page 137).
The last position of the steering wheel or seatis stored if:Rthe ignition is switched off.Rthe setting is stored with the memoryfunction (Y page 137).
i The steering wheel only moves upwards ifit has not already reached the upper endstop. The driver's seat only moves
Steering wheel 133
Seats,steerin
gwheelandmirrors
Z
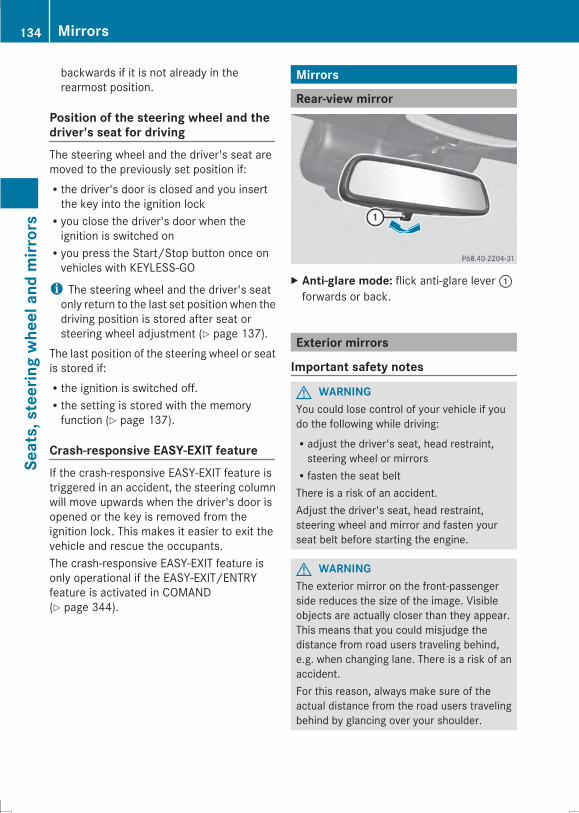
backwards if it is not already in therearmost position.
Position of the steering wheel and thedriver's seat for drivingThe steering wheel and the driver's seat aremoved to the previously set position if:Rthe driver's door is closed and you insertthe key into the ignition lockRyou close the driver's door when theignition is switched onRyou press the Start/Stop button once onvehicles with KEYLESS-GO
i The steering wheel and the driver's seatonly return to the last set position when thedriving position is stored after seat orsteering wheel adjustment (Y page 137).
The last position of the steering wheel or seatis stored if:Rthe ignition is switched off.Rthe setting is stored with the memoryfunction (Y page 137).
Crash-responsive EASY-EXIT featureIf the crash-responsive EASY-EXIT feature istriggered in an accident, the steering columnwill move upwards when the driver's door isopened or the key is removed from theignition lock. This makes it easier to exit thevehicle and rescue the occupants.The crash-responsive EASY-EXIT feature isonly operational if the EASY-EXIT/ENTRYfeature is activated in COMAND(Y page 344).
Mirrors
Rear-view mirror
X Anti-glare mode: flick anti-glare lever:forwards or back.
Exterior mirrors
Important safety notes
G WARNINGYou could lose control of your vehicle if youdo the following while driving:Radjust the driver's seat, head restraint,steering wheel or mirrorsRfasten the seat beltThere is a risk of an accident.Adjust the driver's seat, head restraint,steering wheel and mirror and fasten yourseat belt before starting the engine.
G WARNINGThe exterior mirror on the front-passengerside reduces the size of the image. Visibleobjects are actually closer than they appear.This means that you could misjudge thedistance from road users traveling behind,e.g. when changing lane. There is a risk of anaccident.For this reason, always make sure of theactual distance from the road users travelingbehind by glancing over your shoulder.
134 MirrorsSeats,steerin
gwheelandmirrors
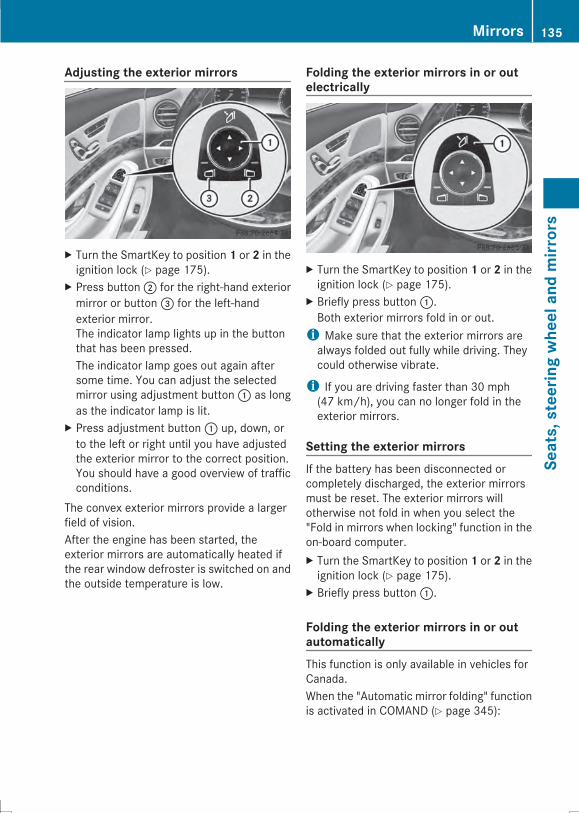
Adjusting the exterior mirrors
X Turn the SmartKey to position 1 or 2 in theignition lock (Y page 175).
X Press button; for the right-hand exteriormirror or button= for the left-handexterior mirror.The indicator lamp lights up in the buttonthat has been pressed.The indicator lamp goes out again aftersome time. You can adjust the selectedmirror using adjustment button: as longas the indicator lamp is lit.
X Press adjustment button: up, down, orto the left or right until you have adjustedthe exterior mirror to the correct position.You should have a good overview of trafficconditions.
The convex exterior mirrors provide a largerfield of vision.After the engine has been started, theexterior mirrors are automatically heated ifthe rear window defroster is switched on andthe outside temperature is low.
Folding the exterior mirrors in or outelectrically
X Turn the SmartKey to position 1 or 2 in theignition lock (Y page 175).
X Briefly press button:.Both exterior mirrors fold in or out.i Make sure that the exterior mirrors arealways folded out fully while driving. Theycould otherwise vibrate.
i If you are driving faster than 30 mph(47 km/h), you can no longer fold in theexterior mirrors.
Setting the exterior mirrorsIf the battery has been disconnected orcompletely discharged, the exterior mirrorsmust be reset. The exterior mirrors willotherwise not fold in when you select the"Fold in mirrors when locking" function in theon-board computer.X Turn the SmartKey to position 1 or 2 in theignition lock (Y page 175).
X Briefly press button:.
Folding the exterior mirrors in or outautomaticallyThis function is only available in vehicles forCanada.When the "Automatic mirror folding" functionis activated in COMAND (Y page 345):
Mirrors 135
Seats,steerin
gwheelandmirrors
Z
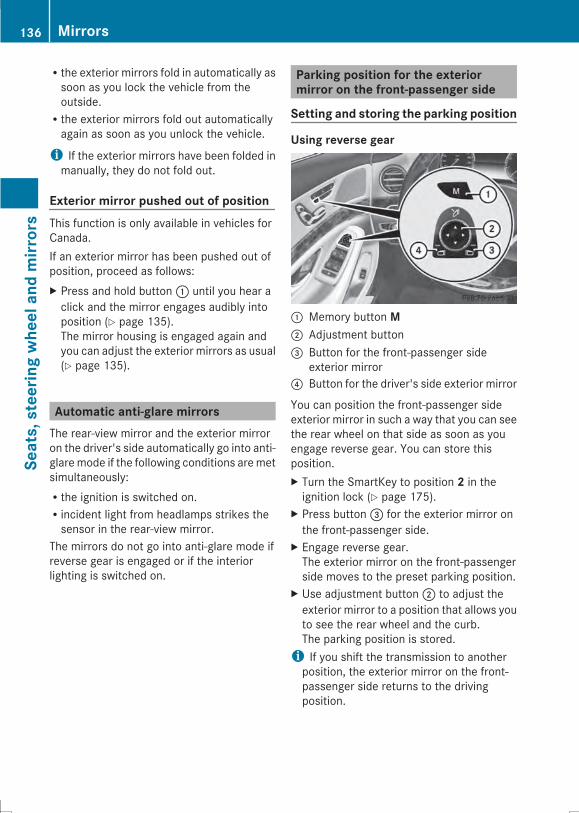
Rthe exterior mirrors fold in automatically assoon as you lock the vehicle from theoutside.Rthe exterior mirrors fold out automaticallyagain as soon as you unlock the vehicle.
i If the exterior mirrors have been folded inmanually, they do not fold out.
Exterior mirror pushed out of positionThis function is only available in vehicles forCanada.If an exterior mirror has been pushed out ofposition, proceed as follows:X Press and hold button: until you hear aclick and the mirror engages audibly intoposition (Y page 135).The mirror housing is engaged again andyou can adjust the exterior mirrors as usual(Y page 135).
Automatic anti-glare mirrorsThe rear-view mirror and the exterior mirroron the driver's side automatically go into anti-glaremode if the following conditions aremetsimultaneously:Rthe ignition is switched on.Rincident light from headlamps strikes thesensor in the rear-view mirror.
The mirrors do not go into anti-glare mode ifreverse gear is engaged or if the interiorlighting is switched on.
Parking position for the exteriormirror on the front-passenger side
Setting and storing the parking position
Using reverse gear
: Memory button M; Adjustment button= Button for the front-passenger side
exterior mirror? Button for the driver's side exterior mirror
You can position the front-passenger sideexterior mirror in such a way that you can seethe rear wheel on that side as soon as youengage reverse gear. You can store thisposition.X Turn the SmartKey to position 2 in theignition lock (Y page 175).
X Press button= for the exterior mirror onthe front-passenger side.
X Engage reverse gear.The exterior mirror on the front-passengerside moves to the preset parking position.
X Use adjustment button; to adjust theexterior mirror to a position that allows youto see the rear wheel and the curb.The parking position is stored.i If you shift the transmission to anotherposition, the exterior mirror on the front-passenger side returns to the drivingposition.
136 MirrorsSeats,steerin
gwheelandmirrors
Using the memory buttonYou can position the front-passenger sideexterior mirror in such a way that you can seethe rear wheel on that side as soon as youengage reverse gear. This setting can bestored using memory button M:.X Turn the SmartKey to position 2 in theignition lock (Y page 175).
X Press button= for the exterior mirror onthe front-passenger side.
X Use adjustment button; to adjust theexterior mirror to a position that allows youto see the rear wheel and the curb.
X Press memory buttonM: and one of thearrows on adjustment button; withinthree seconds.The parking position is stored if the exteriormirror does not move.
X If the mirror moves out of position, repeatthe steps.
Calling up a stored parking positionsettingX Turn the SmartKey to position 2 in theignition lock (Y page 175).
X Adjust the exterior mirror on the front-passenger side using button=.
X Engage reverse gear.The exterior mirror on the front-passengerside moves to the stored parking position.
The exterior mirror on the front-passengerside moves back to its original position:Ras soon as you exceed a speed of 9 mph(15 km/h)Rabout ten seconds after you havedisengaged reverse gearRif you press button? for the exteriormirror on the driver's side
Memory function
Important safety notes
G WARNINGIf you use thememory function on the driver'sside while driving, you could lose control ofthe vehicle as a result of the adjustmentsbeing made. There is a risk of an accident.Only use the memory function on the driver'sside when the vehicle is stationary.
G WARNINGWhen the memory function adjusts the seator steering wheel, you and other vehicleoccupants – particularly children – couldbecome trapped. There is a risk of injury.While the memory function is makingadjustments, make sure that no one has anybody parts in the sweep of the seat or steeringwheel. If somebody becomes trapped,immediately release the memory functionposition button. The adjustment process isstopped.
G WARNINGChildren could become trapped if theyactivate the memory function, particularlywhen unattended. There is a risk of injury.When leaving the vehicle, always take theSmartKeywith you and lock the vehicle. Neverleave children unsupervised in the vehicle.
Storing settingsWith the memory function, you can store upto three different settings, e.g. for threedifferent people.The following settings are stored as a singlememory preset:Rseat, backrest, head restraint position andcontour of the backrest in the lumbarregionRmulticontour seat: the side bolsters of thebackrest as well as the contour of the
Memory function 137
Seats,steerin
gwheelandmirrors
Z
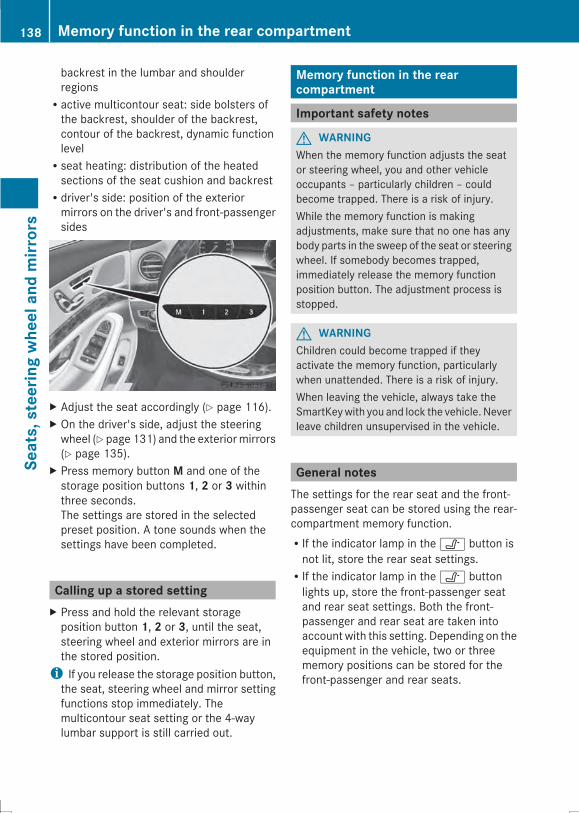
backrest in the lumbar and shoulderregionsRactive multicontour seat: side bolsters ofthe backrest, shoulder of the backrest,contour of the backrest, dynamic functionlevelRseat heating: distribution of the heatedsections of the seat cushion and backrestRdriver's side: position of the exteriormirrors on the driver's and front-passengersides
X Adjust the seat accordingly (Y page 116).X On the driver's side, adjust the steeringwheel (Y page 131) and the exteriormirrors(Y page 135).
X Press memory button M and one of thestorage position buttons 1, 2 or 3 withinthree seconds.The settings are stored in the selectedpreset position. A tone sounds when thesettings have been completed.
Calling up a stored settingX Press and hold the relevant storageposition button 1, 2 or 3, until the seat,steering wheel and exterior mirrors are inthe stored position.i If you release the storage position button,the seat, steering wheel and mirror settingfunctions stop immediately. Themulticontour seat setting or the 4-waylumbar support is still carried out.
Memory function in the rearcompartment
Important safety notes
G WARNINGWhen the memory function adjusts the seator steering wheel, you and other vehicleoccupants – particularly children – couldbecome trapped. There is a risk of injury.While the memory function is makingadjustments, make sure that no one has anybody parts in the sweep of the seat or steeringwheel. If somebody becomes trapped,immediately release the memory functionposition button. The adjustment process isstopped.
G WARNINGChildren could become trapped if theyactivate the memory function, particularlywhen unattended. There is a risk of injury.When leaving the vehicle, always take theSmartKeywith you and lock the vehicle. Neverleave children unsupervised in the vehicle.
General notesThe settings for the rear seat and the front-passenger seat can be stored using the rear-compartment memory function.RIf the indicator lamp in thev button isnot lit, store the rear seat settings.RIf the indicator lamp in thev buttonlights up, store the front-passenger seatand rear seat settings. Both the front-passenger and rear seat are taken intoaccount with this setting. Depending on theequipment in the vehicle, two or threememory positions can be stored for thefront-passenger and rear seats.
138 Memory function in the rear compartmentSeats,steerin
gwheelandmirrors

Storing settings
General notesWith thememory function in the rear, you canstore up to three different settings, e.g. forthree different people.The following settings are stored as a singlememory preset:Rposition of the seat, backrest and headrestraintRmulticontour seat: the side bolsters of thebackrest as well as the contour of thebackrest in the lumbar and shoulderregionsRseat heating: distribution of the heatedsections of the seat cushion and backrestif the indicator lamp in thev button isnot lit.
The following settings are stored to amemoryposition, if the indicator lamp in thevbutton lights up:Rposition of the footrest for the front-passenger seat, if availableRposition of the screen, if available
Vehicles without rear reclining seat
X To select the rear seat: press thevbutton repeatedly until the indicator lampin the button is not lit.The rear-compartment seat is selected ifthe indicator lamp in the button is not lit.
X Adjust the rear seat accordingly(Y page 117).
or
X To select the front-passenger seat:press thev button repeatedly until theindicator lamp lights up.The front-passenger seat is selected if theindicator lamp in the button lights up.
X Adjust the front-passenger seataccordingly (Y page 118).
X Press memory button M and one of thestorage position buttons 1, 2 or 3 withinthree seconds.The settings are stored in the selectedstorage position.
Vehicles with a rear reclining seat
X To select the rear seat: press thevbutton repeatedly until the indicator lampin the button is not lit.The rear-compartment seat is selected ifthe indicator lamp in the button is not lit.
X Adjust the rear seat accordingly(Y page 117).
orX To select the front-passenger seat:press thev button repeatedly until theindicator lamp in the button lights up.The front-passenger seat is selected if theindicator lamp in the button lights up.
X Adjust the front-passenger seataccordingly (Y page 118).
X Press theMmemory button and then presseither the 1 or 2 memory button withinthree seconds.The settings are stored in the selectedstorage position.
Memory function in the rear compartment 139
Seats,steerin
gwheelandmirrors
Z
You cannot store any settings on the buttonfor setting the reclined position.The memory positions in the area for thechauffeur mode can only be set when theconditions for the chauffeurmode are fulfilled(Y page 122).
Calling up a stored setting
Vehicles without rear reclining seatX Press and hold the relevant storageposition button 1, 2 or 3 until the rear seator the front-passenger seat are in thestored position.
i The seat adjustment procedure isinterrupted as soon as you release thestorage position button. The multicontourseat setting or the 4-way lumbar support isstill carried out.
Vehicles with a rear reclining seatX Press and hold the relevant storageposition button 1 or 2 until the rear seat orthe front-passenger seat is in the storedposition.
i The seat adjustment procedure isinterrupted as soon as you release thestorage position button. The multicontourseat setting or the 4-way lumbar support isstill carried out.
140 Memory function in the rear compartmentSeats,steerin
gwheelandmirrors
Useful information ............................ 142Exterior lighting ................................ 142Interior lighting ................................. 149Replacing bulbs ................................. 150Windshield wipers ............................ 150
141
Lightsandwindshieldwipers
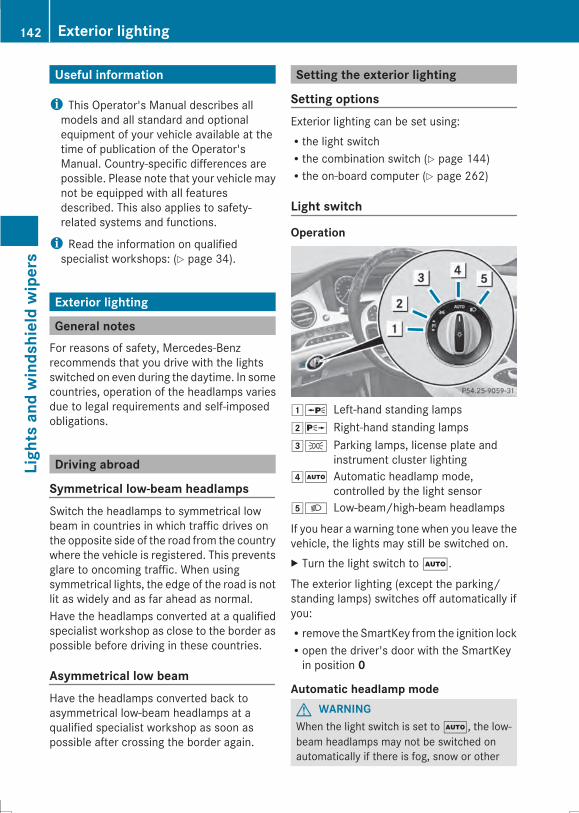
Useful information
i This Operator's Manual describes allmodels and all standard and optionalequipment of your vehicle available at thetime of publication of the Operator'sManual. Country-specific differences arepossible. Please note that your vehicle maynot be equipped with all featuresdescribed. This also applies to safety-related systems and functions.
i Read the information on qualifiedspecialist workshops: (Y page 34).
Exterior lighting
General notesFor reasons of safety, Mercedes-Benzrecommends that you drive with the lightsswitched on even during the daytime. In somecountries, operation of the headlamps variesdue to legal requirements and self-imposedobligations.
Driving abroad
Symmetrical low-beam headlampsSwitch the headlamps to symmetrical lowbeam in countries in which traffic drives onthe opposite side of the road from the countrywhere the vehicle is registered. This preventsglare to oncoming traffic. When usingsymmetrical lights, the edge of the road is notlit as widely and as far ahead as normal.Have the headlamps converted at a qualifiedspecialist workshop as close to the border aspossible before driving in these countries.
Asymmetrical low beamHave the headlamps converted back toasymmetrical low-beam headlamps at aqualified specialist workshop as soon aspossible after crossing the border again.
Setting the exterior lighting
Setting optionsExterior lighting can be set using:Rthe light switchRthe combination switch (Y page 144)Rthe on-board computer (Y page 262)
Light switch
Operation
1W Left-hand standing lamps2X Right-hand standing lamps3T Parking lamps, license plate and
instrument cluster lighting4Ã Automatic headlamp mode,
controlled by the light sensor5L Low-beam/high-beam headlamps
If you hear a warning tone when you leave thevehicle, the lights may still be switched on.X Turn the light switch toÃ.The exterior lighting (except the parking/standing lamps) switches off automatically ifyou:Rremove the SmartKey from the ignition lockRopen the driver's door with the SmartKeyin position 0
Automatic headlamp modeG WARNINGWhen the light switch is set toÃ, the low-beam headlamps may not be switched onautomatically if there is fog, snow or other
142 Exterior lightingLightsandwindshieldwipers
causes of poor visibility due to the weatherconditions such as spray. There is a risk of anaccident.In such situations, turn the light switch toL.
The automatic headlamp feature is only anaid. The driver is responsible for the vehicle'slighting at all times.Only for Canada:The daytime running lamps improve thevisibility of your vehicle during the day. Thedaytime running lamps function is required bylaw in Canada. It cannot therefore bedeactivated.When the engine is running and the vehicle isstationary: if youmove the selector lever froma drive position to P, the daytime runninglamps/low-beam headlamps go out afterthree minutes.When the engine is running, the vehicle isstationary and in bright ambient light: if youturn the light switch to T, the daytimerunning lamps and parking lamps switch on.If the engine is running and you turn the lightswitch to L, the manual settings takeprecedence over the daytime running lamps.USA only:The daytime running lamps improve thevisibility of your vehicle during the day. To dothis, the daytime running lamps functionmustbe switched on using the on-board computer(Y page 262).If the engine is running and you turn the lightswitch to T or L, the manual settingstake precedence over the daytime runninglamps.Ã is the favored light switch setting. Thelight setting is automatically selectedaccording to the brightness of the ambientlight (exception: poor visibility due to weatherconditions such as fog, snow or spray):RSmartKey in position 1 in the ignition lock:the parking lamps are switched on or off
automatically depending on the brightnessof the ambient light.RWith the engine running: if you haveactivated the daytime running lampsfunction via the on-board computer, thedaytime running lamps or the low-beamheadlamps and parking lamps are switchedon or off automatically depending on thebrightness of the ambient light.
X To switch on automatic headlampmode: turn the light switch toÃ.
Low-beam headlampsEven if the light sensor does not detect thatit is dark, the parking lamps and low-beamheadlamps switch on when the ignition isswitched on and the light switch is set to theL position. This is a particularly usefulfunction in the event of rain and fog.X To switch on the low-beam headlamps:turn the SmartKey in the ignition lock toposition 2 or start the engine.
X Turn the light switch to L.The green L indicator lamp in theinstrument cluster lights up.
Parking lamps! If the battery has been excessivelydischarged, the parking lamps or standinglamps are automatically switched off toenable the next engine start. Always parkyour vehicle safely and sufficiently litaccording to legal standards. Avoid thecontinuous use of the T parking lampsfor several hours. If possible, switch on theX right or the W left standing lamp.
X To switch on: turn the light switch toT.The green T indicator lamp in theinstrument cluster lights up.
Standing lampsSwitching on the standing lamps ensures thecorresponding side of the vehicle isilluminated.
Exterior lighting 143
Lightsandwindshieldwipers
Z
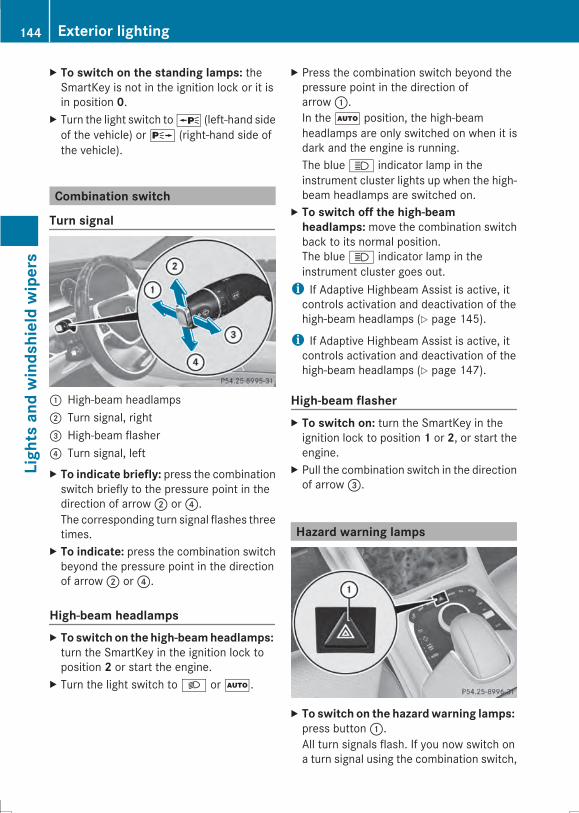
X To switch on the standing lamps: theSmartKey is not in the ignition lock or it isin position 0.
X Turn the light switch toW (left-hand sideof the vehicle) or X (right-hand side ofthe vehicle).
Combination switch
Turn signal
: High-beam headlamps; Turn signal, right= High-beam flasher? Turn signal, leftX To indicate briefly: press the combinationswitch briefly to the pressure point in thedirection of arrow; or?.The corresponding turn signal flashes threetimes.
X To indicate: press the combination switchbeyond the pressure point in the directionof arrow; or?.
High-beam headlampsX To switch on the high-beamheadlamps:turn the SmartKey in the ignition lock toposition 2 or start the engine.
X Turn the light switch to L orÃ.
X Press the combination switch beyond thepressure point in the direction ofarrow:.In theà position, the high-beamheadlamps are only switched on when it isdark and the engine is running.The blue K indicator lamp in theinstrument cluster lights up when the high-beam headlamps are switched on.
X To switch off the high-beamheadlamps:move the combination switchback to its normal position.The blue K indicator lamp in theinstrument cluster goes out.i If Adaptive Highbeam Assist is active, itcontrols activation and deactivation of thehigh-beam headlamps (Y page 145).
i If Adaptive Highbeam Assist is active, itcontrols activation and deactivation of thehigh-beam headlamps (Y page 147).
High-beam flasherX To switch on: turn the SmartKey in theignition lock to position 1 or 2, or start theengine.
X Pull the combination switch in the directionof arrow=.
Hazard warning lamps
X To switch on the hazardwarning lamps:press button:.All turn signals flash. If you now switch ona turn signal using the combination switch,
144 Exterior lightingLightsandwindshieldwipers
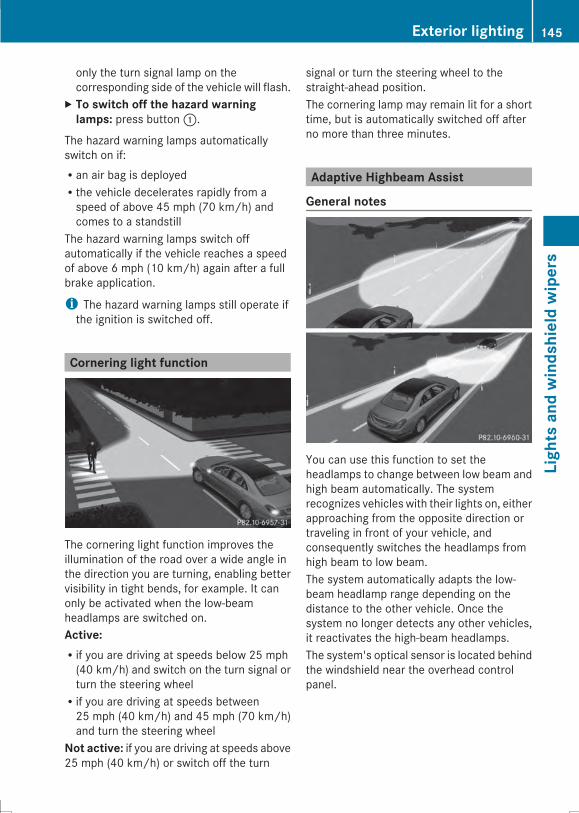
only the turn signal lamp on thecorresponding side of the vehicle will flash.
X To switch off the hazard warninglamps: press button:.
The hazard warning lamps automaticallyswitch on if:Ran air bag is deployedRthe vehicle decelerates rapidly from aspeed of above 45 mph (70 km/h) andcomes to a standstill
The hazard warning lamps switch offautomatically if the vehicle reaches a speedof above 6 mph (10 km/h) again after a fullbrake application.
i The hazard warning lamps still operate ifthe ignition is switched off.
Cornering light function
The cornering light function improves theillumination of the road over a wide angle inthe direction you are turning, enabling bettervisibility in tight bends, for example. It canonly be activated when the low-beamheadlamps are switched on.Active:Rif you are driving at speeds below 25 mph(40 km/h) and switch on the turn signal orturn the steering wheelRif you are driving at speeds between25 mph (40 km/h) and 45 mph (70 km/h)and turn the steering wheel
Not active: if you are driving at speeds above25 mph (40 km/h) or switch off the turn
signal or turn the steering wheel to thestraight-ahead position.The cornering lamp may remain lit for a shorttime, but is automatically switched off afterno more than three minutes.
Adaptive Highbeam Assist
General notes
You can use this function to set theheadlamps to change between low beam andhigh beam automatically. The systemrecognizes vehicles with their lights on, eitherapproaching from the opposite direction ortraveling in front of your vehicle, andconsequently switches the headlamps fromhigh beam to low beam.The system automatically adapts the low-beam headlamp range depending on thedistance to the other vehicle. Once thesystem no longer detects any other vehicles,it reactivates the high-beam headlamps.The system's optical sensor is located behindthe windshield near the overhead controlpanel.
Exterior lighting 145
Lightsandwindshieldwipers
Z

Important safety notes
G WARNINGAdaptive HighbeamAssist does not recognizeroad users:Rwho have no lights, e.g. pedestriansRwho have poor lighting, e.g. cyclistsRwhose lighting is blocked, e.g. by a barrierIn very rare cases, Adaptive Highbeam Assistmay fail to recognize other road users thathave lights, or may recognize them too late.In this or similar situations, the automatichigh-beam headlamps will not be deactivatedor activated regardless. There is a risk of anaccident.Always carefully observe the traffic conditionsand switch off the high-beam headlamps ingood time.
Adaptive Highbeam Assist cannot take intoaccount road, weather or traffic conditions.Adaptive Highbeam Assist is only an aid. Youare responsible for adjusting the vehicle'slighting to the prevailing light, visibility andtraffic conditions.In particular, the detection of obstacles canbe restricted if there is:Rpoor visibility, e.g. due to fog, heavy rain orsnowRdirt on the sensors or the sensors areobscured
Switching Adaptive Highbeam Assiston/off
: High-beam headlamps; Turn signal, right= High-beam flasher? Turn signal, leftX To switch on: turn the light switch toÃ.
X Press the combination switch beyond thepressure point in the direction ofarrow:.The _ indicator lamp in themultifunction display lights up if it is darkand the light sensor activates the low-beamheadlamps.If you are driving at speeds aboveapproximately 16 mph (25 km/h):The headlamp range is set automaticallydepending on the distance between thevehicle and other road users.If you are driving at speeds aboveapproximately 19 mph (30 km/h) and noother road users have been detected:The high-beam headlamps are switched onautomatically. The K indicator lamp inthe instrument cluster also lights up.If you are driving at speeds belowapproximately 16 mph (25 km/h) or otherroad users have been detected or the roadsare adequately lit:The high-beam headlamps are switched offautomatically. The K indicator lamp inthe instrument cluster goes out. The _
146 Exterior lightingLightsandwindshieldwipers
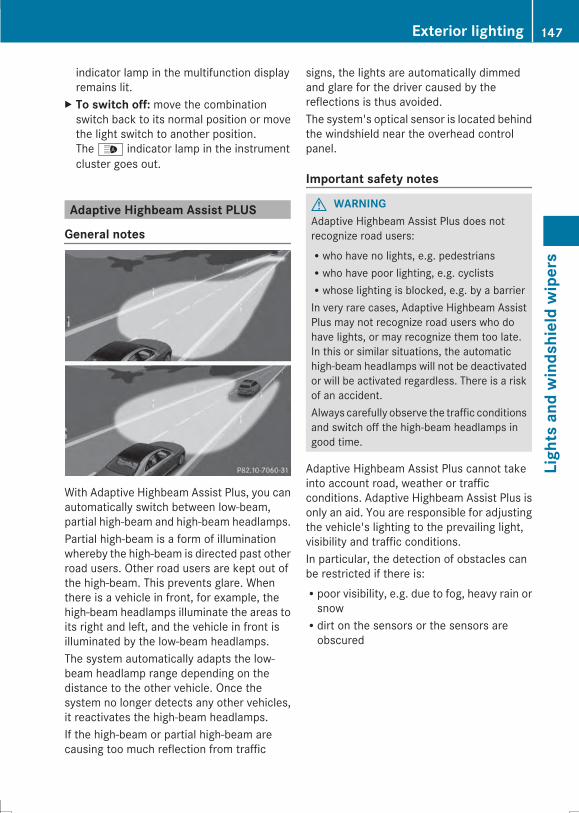
indicator lamp in the multifunction displayremains lit.
X To switch off: move the combinationswitch back to its normal position or movethe light switch to another position.The _ indicator lamp in the instrumentcluster goes out.
Adaptive Highbeam Assist PLUS
General notes
With Adaptive Highbeam Assist Plus, you canautomatically switch between low-beam,partial high-beam and high-beam headlamps.Partial high-beam is a form of illuminationwhereby the high-beam is directed past otherroad users. Other road users are kept out ofthe high-beam. This prevents glare. Whenthere is a vehicle in front, for example, thehigh-beam headlamps illuminate the areas toits right and left, and the vehicle in front isilluminated by the low-beam headlamps.The system automatically adapts the low-beam headlamp range depending on thedistance to the other vehicle. Once thesystem no longer detects any other vehicles,it reactivates the high-beam headlamps.If the high-beam or partial high-beam arecausing too much reflection from traffic
signs, the lights are automatically dimmedand glare for the driver caused by thereflections is thus avoided.The system's optical sensor is located behindthe windshield near the overhead controlpanel.
Important safety notes
G WARNINGAdaptive Highbeam Assist Plus does notrecognize road users:Rwho have no lights, e.g. pedestriansRwho have poor lighting, e.g. cyclistsRwhose lighting is blocked, e.g. by a barrierIn very rare cases, Adaptive Highbeam AssistPlus may not recognize road users who dohave lights, or may recognize them too late.In this or similar situations, the automatichigh-beam headlamps will not be deactivatedor will be activated regardless. There is a riskof an accident.Always carefully observe the traffic conditionsand switch off the high-beam headlamps ingood time.
Adaptive Highbeam Assist Plus cannot takeinto account road, weather or trafficconditions. Adaptive Highbeam Assist Plus isonly an aid. You are responsible for adjustingthe vehicle's lighting to the prevailing light,visibility and traffic conditions.In particular, the detection of obstacles canbe restricted if there is:Rpoor visibility, e.g. due to fog, heavy rain orsnowRdirt on the sensors or the sensors areobscured
Exterior lighting 147
Lightsandwindshieldwipers
Z
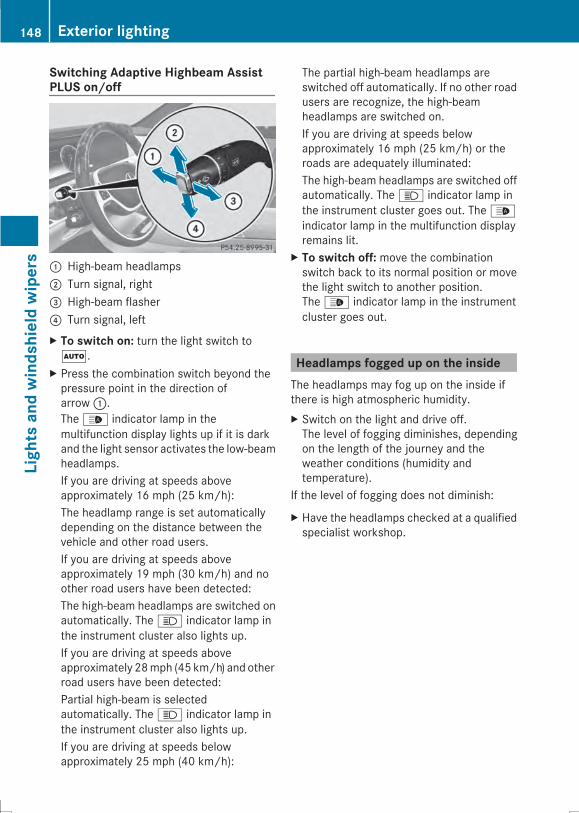
Switching Adaptive Highbeam AssistPLUS on/off
: High-beam headlamps; Turn signal, right= High-beam flasher? Turn signal, leftX To switch on: turn the light switch toÃ.
X Press the combination switch beyond thepressure point in the direction ofarrow:.The _ indicator lamp in themultifunction display lights up if it is darkand the light sensor activates the low-beamheadlamps.If you are driving at speeds aboveapproximately 16 mph (25 km/h):The headlamp range is set automaticallydepending on the distance between thevehicle and other road users.If you are driving at speeds aboveapproximately 19 mph (30 km/h) and noother road users have been detected:The high-beam headlamps are switched onautomatically. The K indicator lamp inthe instrument cluster also lights up.If you are driving at speeds aboveapproximately 28mph (45 km/h) and otherroad users have been detected:Partial high-beam is selectedautomatically. The K indicator lamp inthe instrument cluster also lights up.If you are driving at speeds belowapproximately 25 mph (40 km/h):
The partial high-beam headlamps areswitched off automatically. If no other roadusers are recognize, the high-beamheadlamps are switched on.If you are driving at speeds belowapproximately 16 mph (25 km/h) or theroads are adequately illuminated:The high-beam headlamps are switched offautomatically. The K indicator lamp inthe instrument cluster goes out. The _indicator lamp in the multifunction displayremains lit.
X To switch off: move the combinationswitch back to its normal position or movethe light switch to another position.The _ indicator lamp in the instrumentcluster goes out.
Headlamps fogged up on the insideThe headlamps may fog up on the inside ifthere is high atmospheric humidity.X Switch on the light and drive off.The level of fogging diminishes, dependingon the length of the journey and theweather conditions (humidity andtemperature).
If the level of fogging does not diminish:
X Have the headlamps checked at a qualifiedspecialist workshop.
148 Exterior lightingLightsandwindshieldwipers
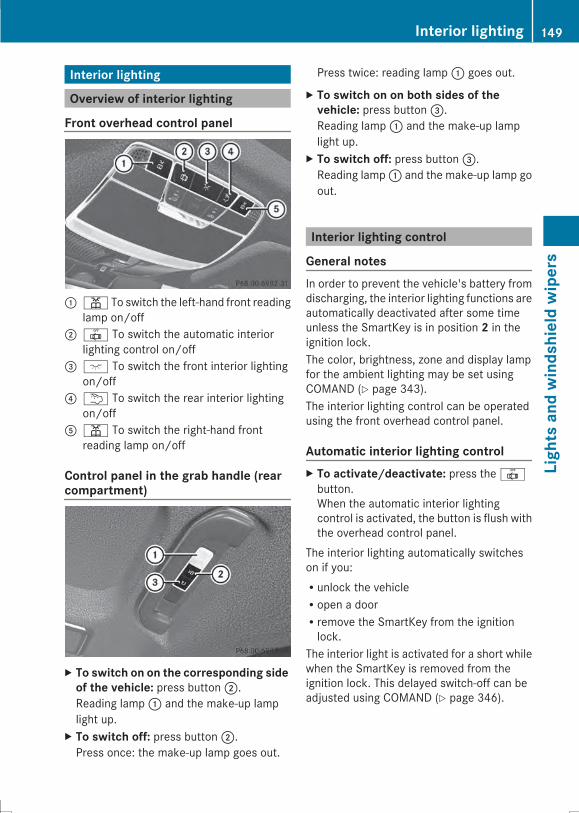
Interior lighting
Overview of interior lighting
Front overhead control panel
: p To switch the left-hand front readinglamp on/off
; | To switch the automatic interiorlighting control on/off
= c To switch the front interior lightingon/off
? u To switch the rear interior lightingon/off
A p To switch the right-hand frontreading lamp on/off
Control panel in the grab handle (rearcompartment)
X To switch on on the corresponding sideof the vehicle: press button;.Reading lamp: and the make-up lamplight up.
X To switch off: press button;.Press once: the make-up lamp goes out.
Press twice: reading lamp: goes out.
X To switch on on both sides of thevehicle: press button=.Reading lamp: and the make-up lamplight up.
X To switch off: press button=.Reading lamp: and the make-up lamp goout.
Interior lighting control
General notesIn order to prevent the vehicle's battery fromdischarging, the interior lighting functions areautomatically deactivated after some timeunless the SmartKey is in position 2 in theignition lock.The color, brightness, zone and display lampfor the ambient lighting may be set usingCOMAND (Y page 343).The interior lighting control can be operatedusing the front overhead control panel.
Automatic interior lighting controlX To activate/deactivate: press the |button.When the automatic interior lightingcontrol is activated, the button is flush withthe overhead control panel.
The interior lighting automatically switcheson if you:Runlock the vehicleRopen a doorRremove the SmartKey from the ignitionlock.
The interior light is activated for a short whilewhen the SmartKey is removed from theignition lock. This delayed switch-off can beadjusted using COMAND (Y page 346).
Interior lighting 149
Lightsandwindshieldwipers
Z
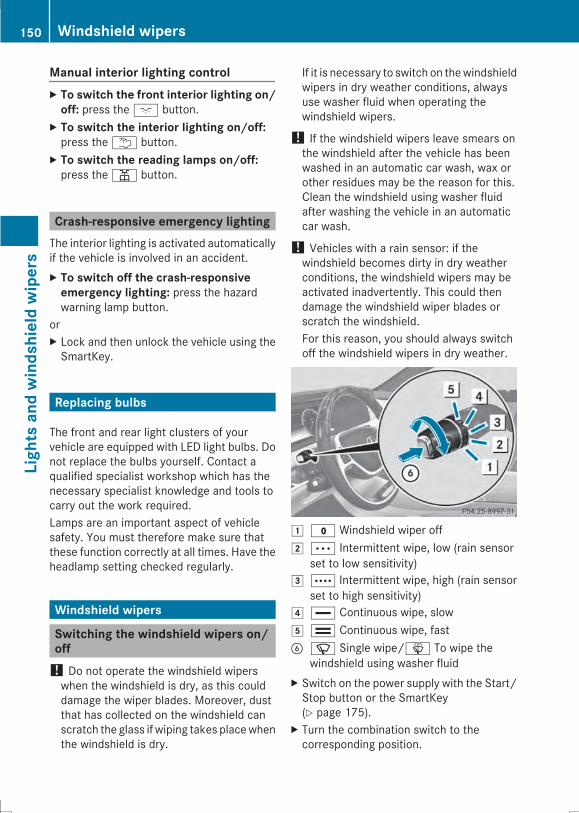
Manual interior lighting controlX To switch the front interior lighting on/off: press the c button.
X To switch the interior lighting on/off:press the u button.
X To switch the reading lamps on/off:press the p button.
Crash-responsive emergency lightingThe interior lighting is activated automaticallyif the vehicle is involved in an accident.X To switch off the crash-responsiveemergency lighting: press the hazardwarning lamp button.
orX Lock and then unlock the vehicle using theSmartKey.
Replacing bulbs
The front and rear light clusters of yourvehicle are equipped with LED light bulbs. Donot replace the bulbs yourself. Contact aqualified specialist workshop which has thenecessary specialist knowledge and tools tocarry out the work required.Lamps are an important aspect of vehiclesafety. You must therefore make sure thatthese function correctly at all times. Have theheadlamp setting checked regularly.
Windshield wipers
Switching the windshield wipers on/off! Do not operate the windshield wiperswhen the windshield is dry, as this coulddamage the wiper blades. Moreover, dustthat has collected on the windshield canscratch the glass if wiping takes placewhenthe windshield is dry.
If it is necessary to switch on thewindshieldwipers in dry weather conditions, alwaysuse washer fluid when operating thewindshield wipers.
! If the windshield wipers leave smears onthe windshield after the vehicle has beenwashed in an automatic car wash, wax orother residues may be the reason for this.Clean the windshield using washer fluidafter washing the vehicle in an automaticcar wash.
! Vehicles with a rain sensor: if thewindshield becomes dirty in dry weatherconditions, the windshield wipers may beactivated inadvertently. This could thendamage the windshield wiper blades orscratch the windshield.For this reason, you should always switchoff the windshield wipers in dry weather.
1 $ Windshield wiper off2 Ä Intermittent wipe, low (rain sensor
set to low sensitivity)3 Å Intermittent wipe, high (rain sensor
set to high sensitivity)4 ° Continuous wipe, slow5 ¯ Continuous wipe, fastB í Single wipe/î To wipe the
windshield using washer fluidX Switch on the power supply with the Start/Stop button or the SmartKey(Y page 175).
X Turn the combination switch to thecorresponding position.
150 Windshield wipersLightsandwindshieldwipers
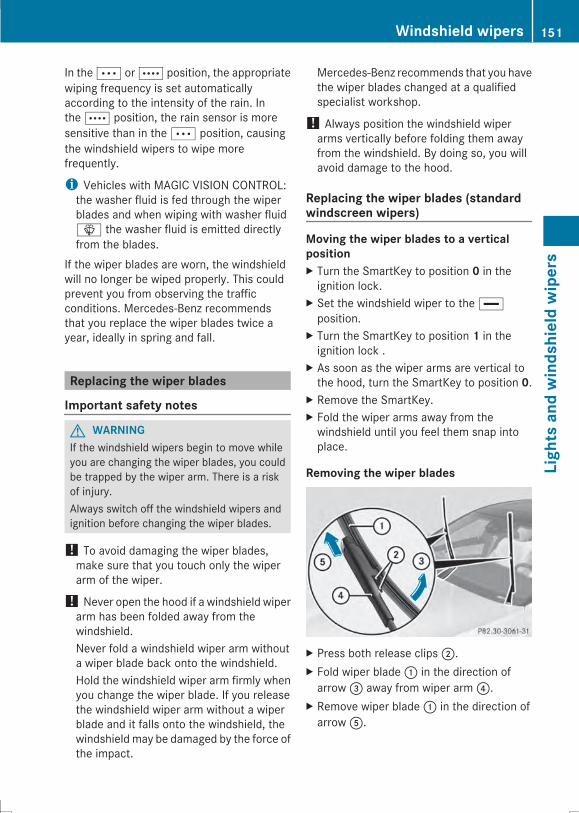
In the Ä or Å position, the appropriatewiping frequency is set automaticallyaccording to the intensity of the rain. Inthe Å position, the rain sensor is moresensitive than in the Ä position, causingthe windshield wipers to wipe morefrequently.
i Vehicles with MAGIC VISION CONTROL:the washer fluid is fed through the wiperblades and when wiping with washer fluidî the washer fluid is emitted directlyfrom the blades.
If the wiper blades are worn, the windshieldwill no longer be wiped properly. This couldprevent you from observing the trafficconditions. Mercedes-Benz recommendsthat you replace the wiper blades twice ayear, ideally in spring and fall.
Replacing the wiper blades
Important safety notes
G WARNINGIf the windshield wipers begin to move whileyou are changing the wiper blades, you couldbe trapped by the wiper arm. There is a riskof injury.Always switch off the windshield wipers andignition before changing the wiper blades.
! To avoid damaging the wiper blades,make sure that you touch only the wiperarm of the wiper.
! Never open the hood if a windshield wiperarm has been folded away from thewindshield.Never fold a windshield wiper arm withouta wiper blade back onto the windshield.Hold the windshield wiper arm firmly whenyou change the wiper blade. If you releasethe windshield wiper arm without a wiperblade and it falls onto the windshield, thewindshield may be damaged by the force ofthe impact.
Mercedes-Benz recommends that you havethe wiper blades changed at a qualifiedspecialist workshop.
! Always position the windshield wiperarms vertically before folding them awayfrom the windshield. By doing so, you willavoid damage to the hood.
Replacing the wiper blades (standardwindscreen wipers)
Moving the wiper blades to a verticalpositionX Turn the SmartKey to position 0 in theignition lock.
X Set the windshield wiper to the °position.
X Turn the SmartKey to position 1 in theignition lock .
X As soon as the wiper arms are vertical tothe hood, turn the SmartKey to position 0.
X Remove the SmartKey.X Fold the wiper arms away from thewindshield until you feel them snap intoplace.
Removing the wiper blades
X Press both release clips;.X Fold wiper blade: in the direction ofarrow= away from wiper arm?.
X Remove wiper blade: in the direction ofarrowA.
Windshield wipers 151
Lightsandwindshieldwipers
Z
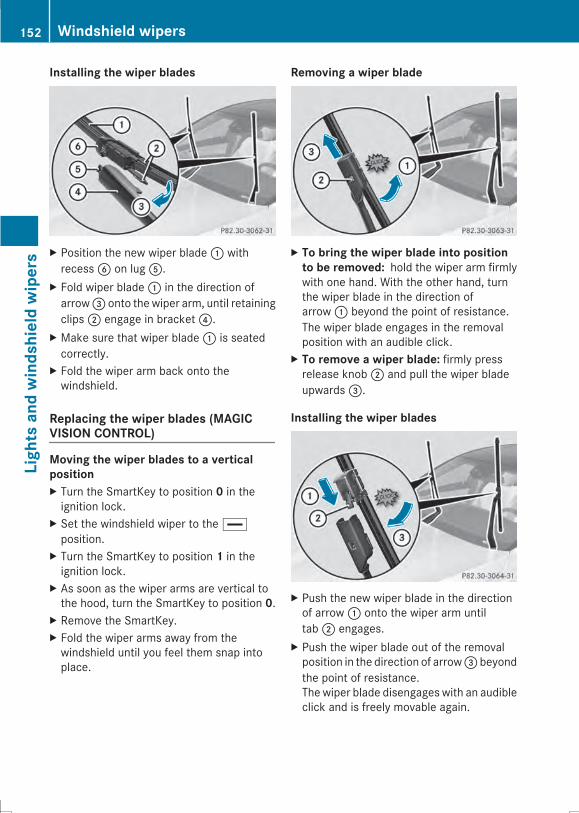
Installing the wiper blades
X Position the new wiper blade: withrecessB on lugA.
X Fold wiper blade: in the direction ofarrow= onto the wiper arm, until retainingclips; engage in bracket?.
X Make sure that wiper blade: is seatedcorrectly.
X Fold the wiper arm back onto thewindshield.
Replacing the wiper blades (MAGICVISION CONTROL)
Moving the wiper blades to a verticalpositionX Turn the SmartKey to position 0 in theignition lock.
X Set the windshield wiper to the °position.
X Turn the SmartKey to position 1 in theignition lock.
X As soon as the wiper arms are vertical tothe hood, turn the SmartKey to position 0.
X Remove the SmartKey.X Fold the wiper arms away from thewindshield until you feel them snap intoplace.
Removing a wiper blade
X To bring the wiper blade into positionto be removed: hold the wiper arm firmlywith one hand. With the other hand, turnthe wiper blade in the direction ofarrow: beyond the point of resistance.The wiper blade engages in the removalposition with an audible click.
X To remove a wiper blade: firmly pressrelease knob; and pull the wiper bladeupwards=.
Installing the wiper blades
X Push the new wiper blade in the directionof arrow: onto the wiper arm untiltab; engages.
X Push the wiper blade out of the removalposition in the direction of arrow= beyondthe point of resistance.The wiper blade disengages with an audibleclick and is freely movable again.
152 Windshield wipersLightsandwindshieldwipers
X Make sure that wiper blade is seatedcorrectly.
X Fold the wiper arm back onto thewindshield.
Windshield wipers 153
Lightsandwindshieldwipers
Z
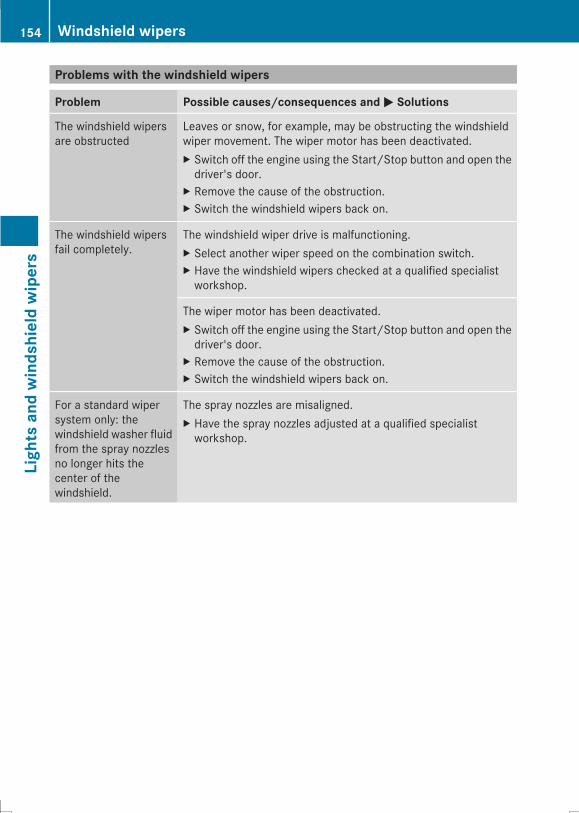
Problems with the windshield wipers
Problem Possible causes/consequences andMM Solutions
The windshield wipersare obstructed
Leaves or snow, for example, may be obstructing the windshieldwiper movement. The wiper motor has been deactivated.X Switch off the engine using the Start/Stop button and open thedriver's door.
X Remove the cause of the obstruction.X Switch the windshield wipers back on.
The windshield wipersfail completely.
The windshield wiper drive is malfunctioning.X Select another wiper speed on the combination switch.X Have the windshield wipers checked at a qualified specialistworkshop.
The wiper motor has been deactivated.X Switch off the engine using the Start/Stop button and open thedriver's door.
X Remove the cause of the obstruction.X Switch the windshield wipers back on.
For a standard wipersystem only: thewindshield washer fluidfrom the spray nozzlesno longer hits thecenter of thewindshield.
The spray nozzles are misaligned.X Have the spray nozzles adjusted at a qualified specialistworkshop.
154 Windshield wipersLightsandwindshieldwipers

Useful information ............................ 156Overview of climate control sys-tems ................................................... 156Operating the climate control sys-tems ................................................... 159Setting the air vents ......................... 170
155
Climatecontrol
Useful information
i This Operator's Manual describes allmodels and all standard and optionalequipment of your vehicle available at thetime of publication of the Operator'sManual. Country-specific differences arepossible. Please note that your vehicle maynot be equipped with all featuresdescribed. This also applies to safety-related systems and functions.
i Read the information on qualifiedspecialist workshops: (Y page 34).
Overview of climate control systems
Important safety notesObserve the settings recommended on thefollowing pages. The windows couldotherwise fog up.To prevent the windows from fogging up:Rswitch off climate control only brieflyRswitch on air-recirculation mode onlybrieflyRswitch on the cooling with airdehumidification functionRswitch on the defrost windshield functionbriefly, if required
Climate control regulates the temperatureand air humidity in the vehicle interior. The airfilter cleans the air, thus improving theinterior climate.The "Cooling with air dehumidification"function is only available when the engine isrunning. Optimum climate control is onlyachieved with the side windows and roofclosed.The residual heat function can only beactivated or deactivated with the ignitionswitched off (Y page 167).
i Ventilate the vehicle for a brief periodduring warm weather, e.g. using theconvenience opening feature(Y page 104). This will speed up the cooling
process and the desired vehicle interiortemperature will be reached more quickly.
i The integrated filter filters out mostparticles of dust and soot and completelyfilters out pollen. It also reduces gaseouspollutants and odors. A clogged filterreduces the amount of air supplied to thevehicle interior. For this reason, you shouldalways observe the interval for replacingthe filter, which is specified in theMaintenance Booklet. As it depends onenvironmental conditions, e.g. heavy airpollution, the interval may be shorter thanstated in the Maintenance Booklet.
i It is possible that the blower may beactivated automatically 60 minutes afterthe key has been removed depending onvarious factors, e.g. the outsidetemperature. The vehicle is then ventilatedfor 30minutes to dry the automatic climatecontrol.
156 Overview of climate control systemsClimatecontrol
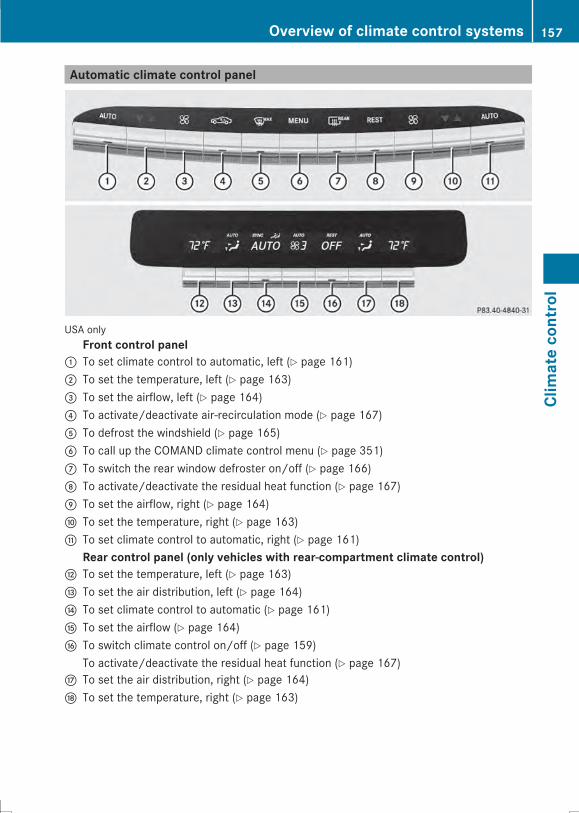
Automatic climate control panel
USA onlyFront control panel
: To set climate control to automatic, left (Y page 161); To set the temperature, left (Y page 163)= To set the airflow, left (Y page 164)? To activate/deactivate air-recirculation mode (Y page 167)A To defrost the windshield (Y page 165)B To call up the COMAND climate control menu (Y page 351)C To switch the rear window defroster on/off (Y page 166)D To activate/deactivate the residual heat function (Y page 167)E To set the airflow, right (Y page 164)F To set the temperature, right (Y page 163)G To set climate control to automatic, right (Y page 161)
Rear control panel (only vehicles with rear-compartment climate control)H To set the temperature, left (Y page 163)I To set the air distribution, left (Y page 164)J To set climate control to automatic (Y page 161)K To set the airflow (Y page 164)L To switch climate control on/off (Y page 159)
To activate/deactivate the residual heat function (Y page 167)M To set the air distribution, right (Y page 164)N To set the temperature, right (Y page 163)
Overview of climate control systems 157
Climatecontrol
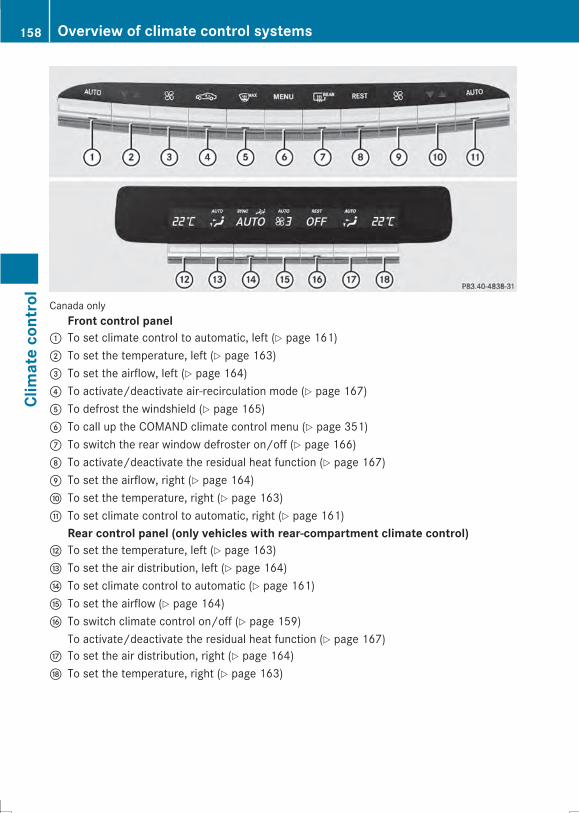
Canada onlyFront control panel
: To set climate control to automatic, left (Y page 161); To set the temperature, left (Y page 163)= To set the airflow, left (Y page 164)? To activate/deactivate air-recirculation mode (Y page 167)A To defrost the windshield (Y page 165)B To call up the COMAND climate control menu (Y page 351)C To switch the rear window defroster on/off (Y page 166)D To activate/deactivate the residual heat function (Y page 167)E To set the airflow, right (Y page 164)F To set the temperature, right (Y page 163)G To set climate control to automatic, right (Y page 161)
Rear control panel (only vehicles with rear-compartment climate control)H To set the temperature, left (Y page 163)I To set the air distribution, left (Y page 164)J To set climate control to automatic (Y page 161)K To set the airflow (Y page 164)L To switch climate control on/off (Y page 159)
To activate/deactivate the residual heat function (Y page 167)M To set the air distribution, right (Y page 164)N To set the temperature, right (Y page 163)
158 Overview of climate control systemsClimatecontrol
Notes on using climate control
Automatic climate controlBelow, you can find a number of notes andrecommendations to help you use climatecontrol optimally.RActivate climate control using theÃrocker switch. The indicator lamp in theà rocker switch lights up.RSet the temperature to 72 ‡ (22 †).ROnly use the "Windshield defrosting"function briefly until the windshield is clearagain.ROnly use air-recirculation mode briefly, e.g.if there are unpleasant outside odors orwhen in a tunnel. The windows couldotherwise fog up, since no fresh air is drawninto the vehicle in air-recirculation mode.RUse the residual heat function if you wantto heat or ventilate the vehicle interiorwhen the ignition is switched off. Theresidual heat function can only be activatedor deactivated with the ignition switchedoff. The residual heat function is switchedoff when the ignition is switched on.
If you are controlling the rear climate controlusing the front control panel, note thefollowing:RIf you set rear-compartment climatecontrol using the front control panel, theY symbol appears in the rear-compartment control panel display.RIf the rear-compartment climate control isset using the front control panel, it cannotbe set at the same time using the rearcontrol panel. If controlling the rear climatecontrol from the front control panel islocked, wait five seconds. You will then beable to control the rear climate controlusing the rear control panel.RAfter selecting the rear compartmentsettings, the front climate control can becontrolled automatically again viaCOMAND after five seconds.
Alternatively, you can select "Cancel rearcompartment" in the COMAND air-conditioning function bar.
ECO start/stop functionDuring automatic engine switch-off, the ECOstart/stop function only operates at areduced capacity. If you require the fullclimate control output, you can switch off theECO start/stop function by pressing the ECObutton (Y page 180).
Operating the climate controlsystems
Switching climate control on/off
General notesWhen the climate control is switched off, theair supply and air circulation are alsoswitched off. The windows could fog up.Therefore, switch off climate control onlybrieflySwitch on climate control primarily using theà rocker switch (Y page 161).
Switching the front climate control onand off using the control panelX Turn the SmartKey to position 2 in theignition lock (Y page 175).
X To activate: press thet rocker switchup or down.The COMAND climate control menu opens.
X Activate climate control via the air-conditioning setting bar in COMAND(Y page 351).
X To deactivate: press thet rockerswitch up or down.The COMAND climate control menu opens.
X Deactivate climate control via the air-conditioning setting bar in COMAND(Y page 351).
Operating the climate control systems 159
Climatecontrol
Switching the front climate control on/off using the control panelObserve the notes on controlling the rear-compartment climate control using the frontcontrol panel (Y page 159).X Turn the SmartKey to position 2 in theignition lock (Y page 175).
X To activate: press thet rocker switchup or down.The COMAND climate control menu opens.
X Select "Rear adjustment" from the air-conditioning setting bar (Y page 352).You can control the rear-compartmentclimate control using the front controlpanel or COMAND.
X Activate rear-compartment climate controlvia the air-conditioning setting bar.
X To deactivate: press thet rockerswitch up or down.The COMAND climate control menu opens.
X Select "Rear adjustment" from the air-conditioning setting bar (Y page 352).
X Deactivate rear-compartment climatecontrol via the air-conditioning setting bar.
Switching rear-compartment climatecontrol on/off using the control panelX Turn the SmartKey to position 2 in theignition lock (Y page 175).
X To activate: press rocker switchL up ordown (Y page 157).The indicator lamp in rocker switchL goesout. All settings are displayed in full in therear-compartment display.
X To deactivate: press rocker switchL upor down (Y page 157).The indicator lamp in rocker switchLlights up. OFFOFF is displayed in the rear-compartment display.
Activating/deactivating cooling withair dehumidification
General notesIf you deactivate the "Cooling with air-dehumidification" function, the air inside thevehicle will not be cooled. The air inside thevehicle will also not be dehumidified. Thewindows can fog up more quickly. Therefore,deactivate the cooling with air-dehumidification function only briefly.The "Cooling with air dehumidification"function is only available when the engine isrunning. The air inside the vehicle is cooledand dehumidified according to thetemperature selected.Condensation may drip from the underside ofthe vehicle when it is in cooling mode. This isnormal and not a sign that there is amalfunction.
Activating/deactivating cooling withair dehumidificationYou can activate or deactivate the "Coolingwith air dehumidification" function usingCOMAND (Y page 352).
160 Operating the climate control systemsClimatecontrol
Problems with the "Cooling with air dehumidification" function
Problem Possible causes/consequences andMM Solutions
Cooling with airdehumidification canno longer be switchedon using COMAND(Y page 352).
Cooling with air dehumidification has been deactivated due to amalfunction.X Visit a qualified specialist workshop.
Setting climate control to automatic
General notesIn automatic mode, the set temperature ismaintained automatically at a constant level.The system automatically regulates thetemperature of the dispensed air, the airflowand the air distribution.The automatic mode functions optimallywhen the "Cooling with air dehumidification"function is activated. If necessary, coolingwith air dehumidification can be deactivated.If you deactivate the "Cooling with air-dehumidification" function, the air inside thevehicle will not be cooled. The air inside thevehicle will also not be dehumidified. Thewindows can fog up more quickly. Therefore,deactivate the cooling with air-dehumidification function only briefly.
Controlling front climate controlautomatically using the front controlpanelX Turn the SmartKey to position 2 in theignition lock (Y page 175).
X Set the desired temperature using thew rocker switch on the front controlunit.
orX Set the desired temperature usingCOMAND (Y page 352).
X To switch on: press theà rockerswitch up or down.The indicator lamp in theà rockerswitch lights up.
X To switch tomanual operation: press theK rocker switch up or down.
orX Set the airflow using COMAND(Y page 353).
orX Set the air distribution using COMAND(Y page 353).The indicator lamp in theà rockerswitch goes out.
In automatic mode, if you adjust the airflowor air distribution manually, the indicatorlamp on theà rocker switch goes out. Thefunction which has not been changedmanually, however, continues to becontrolled automatically. When the manuallyset function switches back to automaticmode, the indicator lamp on theà rockerswitch lights up again.
Controlling rear climate controlautomatically using the front controlpanelObserve the notes on controlling the rear-compartment climate control using the frontcontrol panel (Y page 159).
Operating the climate control systems 161
Climatecontrol
X Turn the SmartKey to position 2 in theignition lock (Y page 175).
X Press the top or bottom section of thet rocker switch.The COMAND climate control menu opens.
X Select "Rear adjustment" from the air-conditioning setting bar (Y page 352).You can control the rear-compartmentclimate control using the front controlpanel or COMAND.
X Set the desired temperature using thew rocker switch on the front controlunit.
orX Set the desired temperature usingCOMAND (Y page 352).
X To activate: press theà rocker switchon the front control unit up or down.
orX Activate automatic mode via the air-conditioning setting bar inCOMAND(Y page 352).The indicator lamp in theà rockerswitch lights up.i Select the temperature and automaticmode immediately thereafter. Otherwise,you will have to select "Rear adjustment"again from the air-conditioning setting barbefore activating automatic mode.
X To switch tomanual operation: press thet rocker switch up or down.The COMAND climate control menu opens.
X Select "Rear adjustment" from the air-conditioning setting bar (Y page 352).
X Use the air-conditioning setting bar todeactivate automatic mode.
orX Set the air distribution using rocker switchI orM on the rear control panel(Y page 157).
orX Set the airflow using rocker switchK onthe rear control panel (Y page 157).The AUTOAUTO indicator on the rear display goesout.
If you adjust the rear airflow or air distributionmanually using COMAND when in automaticmode, the AUTOAUTO indicator on the rear displaygoes out. The function which has not beenchanged manually, however, continues to becontrolled automatically. When the manuallyset function switches back to automaticmode, the AUTOAUTO display reappears in the rear-compartment display.
Controlling rear climate controlautomatically using the rear controlpanelX Turn the SmartKey to position 2 in theignition lock (Y page 175).
X Set the desired temperature using rockerswitchesH andN(Y page 157).
X To activate: press rocker switchJ up ordown (Y page 157).The indicator lamp in rocker switchJlights up.
X To deactivate: press rocker switchJ upor down (Y page 157).The indicator lamp in rocker switchJ goesout.
If you adjust the airflow or air distributionmanually when in automatic mode, the AUTOAUTOdisplay in the rear-compartment display goesout. The functionwhich has not been changedmanually, however, continues to becontrolled automatically. When the manuallyset function switches back to automaticmode, the AUTOAUTO display reappears in the rear-compartment display.
162 Operating the climate control systemsClimatecontrol
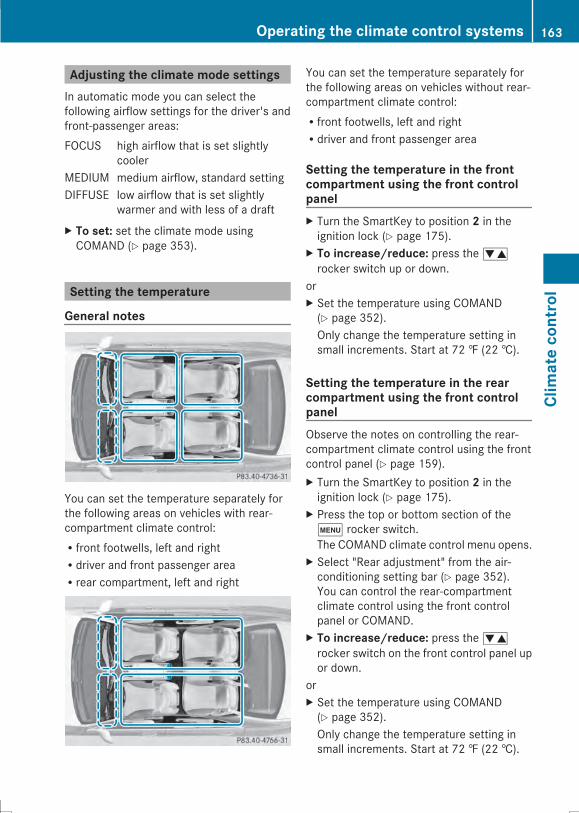
Adjusting the climate mode settingsIn automatic mode you can select thefollowing airflow settings for the driver's andfront-passenger areas:FOCUS high airflow that is set slightly
coolerMEDIUM medium airflow, standard settingDIFFUSE low airflow that is set slightly
warmer and with less of a draftX To set: set the climate mode usingCOMAND (Y page 353).
Setting the temperature
General notes
You can set the temperature separately forthe following areas on vehicles with rear-compartment climate control:Rfront footwells, left and rightRdriver and front passenger areaRrear compartment, left and right
You can set the temperature separately forthe following areas on vehicles without rear-compartment climate control:Rfront footwells, left and rightRdriver and front passenger area
Setting the temperature in the frontcompartment using the front controlpanelX Turn the SmartKey to position 2 in theignition lock (Y page 175).
X To increase/reduce: press thewrocker switch up or down.
orX Set the temperature using COMAND(Y page 352).Only change the temperature setting insmall increments. Start at 72 ‡ (22 †).
Setting the temperature in the rearcompartment using the front controlpanelObserve the notes on controlling the rear-compartment climate control using the frontcontrol panel (Y page 159).X Turn the SmartKey to position 2 in theignition lock (Y page 175).
X Press the top or bottom section of thet rocker switch.The COMAND climate control menu opens.
X Select "Rear adjustment" from the air-conditioning setting bar (Y page 352).You can control the rear-compartmentclimate control using the front controlpanel or COMAND.
X To increase/reduce: press thewrocker switch on the front control panel upor down.
orX Set the temperature using COMAND(Y page 352).Only change the temperature setting insmall increments. Start at 72 ‡ (22 †).
Operating the climate control systems 163
Climatecontrol
Setting the temperature in the rearcompartment using the rear controlpanelX Turn the SmartKey to position 2 in theignition lock (Y page 175).
X To increase/reduce: press rockerswitchH orN up or down (Y page 157).Only change the temperature setting insmall increments. Start at 72 ‡ (22 †).
Setting the footwell temperatureThe footwell temperature for the driver andfront passenger can be set separately usingCOMAND (Y page 353).
Setting the air distribution
Air distribution settings¯ Directs air through the defroster ventsP Directs air through the center and side
air ventsO Directs air through the footwell air
ventsS Directs air through the center, side and
footwell ventsa Directs air through the defroster and
footwell ventsW Sets the air distribution to automatic
Setting the air distribution in the front/rear compartment using COMANDThe air distribution for the left and right sidesof the front and rear compartment can beadjusted using COMAND (Y page 353).
Setting the air distribution in the rearcompartment using the rear controlpanelX Turn the SmartKey to position 2 in theignition lock (Y page 175).
X Press rocker switchI orM up or downrepeatedly (Y page 157) until the desired
air distribution symbol is shown in thedisplay.
Setting the airflow
Setting the front-compartment airflowusing the front control panelYou can select different airflow settings forthe driver's and front-passenger sides as wellas for the rear compartment (only vehicleswith rear compartment climate control).X Turn the SmartKey to position 2 in theignition lock (Y page 175).
X To increase/reduce: press theKrocker switch up or down.
orX Set the airflow using COMAND(Y page 353).
Setting the rear compartment airflowusing the front control panelObserve the notes on controlling the rear-compartment climate control using the frontcontrol panel (Y page 159).X Turn the SmartKey to position 2 in theignition lock (Y page 175).
X Press the top or bottom section of thet rocker switch.The COMAND climate control menu opens.
X Select "Rear adjustment" from the air-conditioning setting bar (Y page 352).You can control the rear-compartmentclimate control using the front controlpanel or COMAND.
X To increase/reduce: press theKrocker switch on the front control panel upor down.
orX Set the airflow using COMAND(Y page 353).
164 Operating the climate control systemsClimatecontrol
Setting the rear compartment airflowusing the rear control panelX Turn the SmartKey to position 2 in theignition lock (Y page 175).
X To increase/reduce: press rocker switchK up or down (Y page 157).
Switching the synchronizationfunction on/offClimate control can be set centrally using thesynchronization function. The settings fortemperature, air distribution and airflow onthe driver's side are adopted for the front-passenger side and the rear compartment.X To activate/deactivate: switch thesynchronization function on or off usingCOMAND (Y page 351).
The synchronization function is deactivated:Rif the settings for the front-passenger sideare changedRif the settings for the rear compartment arechanged
If the settings for temperature, air distributionand airflow on the driver's side are adoptedfor the rear compartment, "Sync" appears onthe rear display.
Defrosting the windshieldYou can use this function to defrost thewindshield or to defrost the inside of thewindshield and the front side windows.Switch off the "Windshield defrosting"function as soon as the windshield is clearagain.X Turn the SmartKey to position 2 in theignition lock (Y page 175).
X To activate: press the¬ rocker switchon the front control unit up or down.The indicator lamp in the¬ rockerswitch lights up.
The climate control system switches to thefollowing functions:Rhigh airflowRhigh temperatureRair distribution to the windshield andfront side windowsRair-recirculation mode offRwindshield heating on
X To deactivate: press the¬ rockerswitch up or down.The indicator lamp in the¬ rockerswitch goes out. The previously selectedsettings are restored. Air-recirculationmode remains deactivated.
orX Press theà rocker switch up or down.orX Use thet rocker switch to call up theCOMAND climate control menu.
Defrosting the windows
Windows fogged up on the insideX Activate the "Cooling with airdehumidification" function via COMAND(Y page 352).
X Switch on automatic mode using theà rocker switch.
X If the windows continue to fog up, activatethe "Windshield defrosting" function usingthe¬ rocker switch. The windshieldheating is switched on.i You should only select this setting untilthe windshield is clear again.
Windows fogged up on the outsideX Activate the windshield wipers.X Switch on automatic mode using theà rocker switch.i If you clean the windows regularly, theydo not fog up so quickly.
Operating the climate control systems 165
Climatecontrol
Rear window defroster
General notesThe rear window defroster has a high currentdraw. You should therefore switch it off assoon as the rear window is clear. Otherwise,the rear window defroster switches offautomatically after several minutes.If the battery voltage is too low, the rearwindow defroster may switch off.
Activating/deactivatingX Turn the SmartKey to position 2 in theignition lock (Y page 175).
X Press the¤ rocker switch up or down.The indicator lamp in the¤ rockerswitch lights up or goes out.
166 Operating the climate control systemsClimatecontrol
Problems with the rear window defroster
Problem Possible causes/consequences andMM Solutions
The rear windowdefroster hasdeactivatedprematurely or cannotbe activated.
The battery has not been sufficiently charged.X Switch off any consumers that are not required, e.g. readinglamps, interior lighting or the seat heating.When the battery is sufficiently charged, the rear windowdefroster can be activated again.
Activating/deactivating air-recirculation mode
General notesYou can also temporarily deactivate the flowof fresh air manually if unpleasant odors areentering the vehicle from outside. The airalready inside the vehicle will then berecirculated.If you switch on air-recirculation mode, thewindows can fog up more quickly, inparticular at low temperatures. Only use air-recirculation mode briefly to prevent thewindows from fogging up.
Activating/deactivatingX Turn the SmartKey to position 2 in theignition lock (Y page 175).
X To activate: press theg rocker switchup or down.The indicator lamp in theg rockerswitch lights up.i Air-recirculation mode is activatedautomatically at high outsidetemperatures. The indicator lamp in theg rocker switch is not lit whenautomatic air-recirculation mode isactivated.Outside air is added after about30 minutes.
X To deactivate: press theg rockerswitch up or down.The indicator lamp in theg rockerswitch goes out.
i Air-recirculation mode deactivatesautomatically:Rafter approximately five minutes atoutside temperatures belowapproximately 41 ‡ (5 †)Rafter approximately five minutes ifcooling with air dehumidification isdeactivatedRafter approximately 30 minutes atoutside temperatures aboveapproximately 41‡ (5 †) if the "Coolingwith air dehumidification" function isactivated
Activating/deactivating the residualheat function
General notesVehicles with rear-compartment climatecontrol: once the engine is switched off, it ispossible to make use of the residual heat ofthe engine to continue heating or ventilatingthe rear and front compartment of the vehiclefor approximately 15minutes. If the "Residualheat" function is set for only the front or onlythe rear compartment, it is possible tocontinue heating or ventilating forapproximately 30 minutes.Vehicles without rear-compartmentclimate control: once the engine is switchedoff, it is possible to make use of the residualheat of the engine to continue heating orventilating the front compartment of thevehicle for approximately 30 minutes.
Operating the climate control systems 167
Climatecontrol
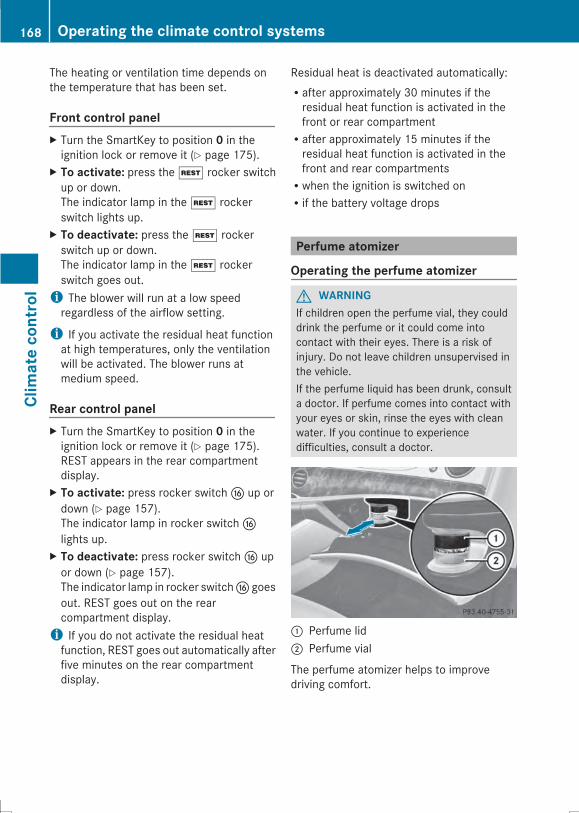
The heating or ventilation time depends onthe temperature that has been set.
Front control panelX Turn the SmartKey to position 0 in theignition lock or remove it (Y page 175).
X To activate: press theÌ rocker switchup or down.The indicator lamp in theÌ rockerswitch lights up.
X To deactivate: press theÌ rockerswitch up or down.The indicator lamp in theÌ rockerswitch goes out.i The blower will run at a low speedregardless of the airflow setting.
i If you activate the residual heat functionat high temperatures, only the ventilationwill be activated. The blower runs atmedium speed.
Rear control panelX Turn the SmartKey to position 0 in theignition lock or remove it (Y page 175).REST appears in the rear compartmentdisplay.
X To activate: press rocker switchL up ordown (Y page 157).The indicator lamp in rocker switchLlights up.
X To deactivate: press rocker switchL upor down (Y page 157).The indicator lamp in rocker switchL goesout. REST goes out on the rearcompartment display.i If you do not activate the residual heatfunction, REST goes out automatically afterfive minutes on the rear compartmentdisplay.
Residual heat is deactivated automatically:Rafter approximately 30 minutes if theresidual heat function is activated in thefront or rear compartmentRafter approximately 15 minutes if theresidual heat function is activated in thefront and rear compartmentsRwhen the ignition is switched onRif the battery voltage drops
Perfume atomizer
Operating the perfume atomizer
G WARNINGIf children open the perfume vial, they coulddrink the perfume or it could come intocontact with their eyes. There is a risk ofinjury. Do not leave children unsupervised inthe vehicle.If the perfume liquid has been drunk, consulta doctor. If perfume comes into contact withyour eyes or skin, rinse the eyes with cleanwater. If you continue to experiencedifficulties, consult a doctor.
: Perfume lid; Perfume vial
The perfume atomizer helps to improvedriving comfort.
168 Operating the climate control systemsClimatecontrol
Using COMAND, you can:Rswitch the perfume atomizer on and off(Y page 354)Rregulate the perfume intensity(Y page 354).
i The following conditions can affect yourperception of the perfume intensity:Roperating mode of the automatic climatecontrolRvehicle interior temperatureRtime of year/dayRair humidityRphysiological condition of occupants,e.g. fatigue or hunger
The perfume atomizer can only be operatedwhen the automatic climate control isswitched on.The perfume atomizer is provided with a pre-filled perfume vial. You can also choose froma variety of filled perfume vials and an emptyvial which you can fill yourself.
! If you do not use genuine Mercedes-Benzinterior perfumes, observe themanufacturers' safety notices on theperfume packaging.
i Do not refill the pre-filled perfume vialwhen it is empty. Dispose of the used vialafter use.
X To insert the perfumevial: open the glovebox (Y page 549).
X Slide the perfume vial into the holder as faras it will go.
X To remove the perfume vial: pull out theperfume vial.
X To refill the perfume vial: unscrew the lidof the empty perfume vial to refill ityourself.
X Refill the vial with a maximum of 15 ml ofthe desired liquid perfume.
X Screw the lid back on to the vial.
! Only refill the vial when you are outsidethe vehicle. Otherwise, liquid perfume
could drip into the interior and contaminateit.
i Always refill the empty refillable vial withthe same perfume. Otherwise, you mightnot achieve optimum results from theperfume atomizer.
Operating the climate control systems 169
Climatecontrol
Z
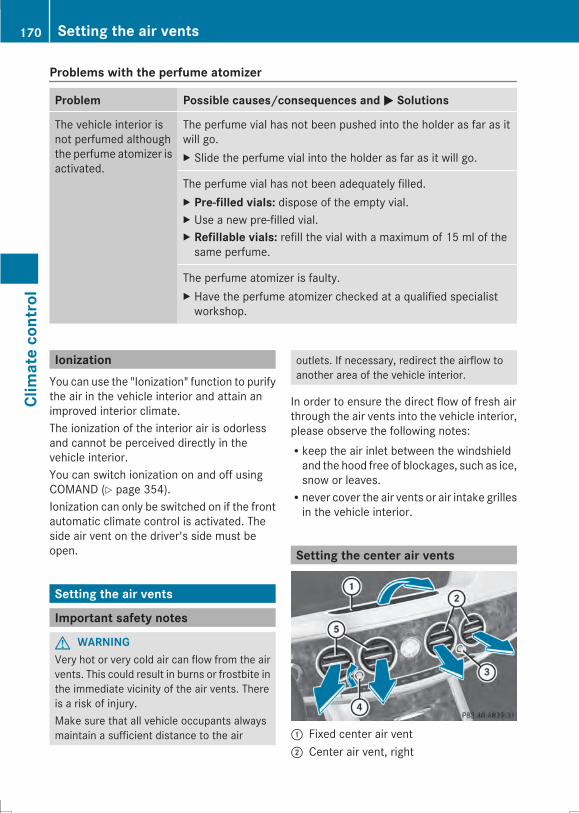
Problems with the perfume atomizer
Problem Possible causes/consequences andMM Solutions
The vehicle interior isnot perfumed althoughthe perfume atomizer isactivated.
The perfume vial has not been pushed into the holder as far as itwill go.X Slide the perfume vial into the holder as far as it will go.
The perfume vial has not been adequately filled.X Pre-filled vials: dispose of the empty vial.X Use a new pre-filled vial.X Refillable vials: refill the vial with a maximum of 15 ml of thesame perfume.
The perfume atomizer is faulty.X Have the perfume atomizer checked at a qualified specialistworkshop.
IonizationYou can use the "Ionization" function to purifythe air in the vehicle interior and attain animproved interior climate.The ionization of the interior air is odorlessand cannot be perceived directly in thevehicle interior.You can switch ionization on and off usingCOMAND (Y page 354).Ionization can only be switched on if the frontautomatic climate control is activated. Theside air vent on the driver's side must beopen.
Setting the air vents
Important safety notes
G WARNINGVery hot or very cold air can flow from the airvents. This could result in burns or frostbite inthe immediate vicinity of the air vents. Thereis a risk of injury.Make sure that all vehicle occupants alwaysmaintain a sufficient distance to the air
outlets. If necessary, redirect the airflow toanother area of the vehicle interior.
In order to ensure the direct flow of fresh airthrough the air vents into the vehicle interior,please observe the following notes:Rkeep the air inlet between the windshieldand the hood free of blockages, such as ice,snow or leaves.Rnever cover the air vents or air intake grillesin the vehicle interior.
Setting the center air vents
: Fixed center air vent; Center air vent, right
170 Setting the air ventsClimatecontrol
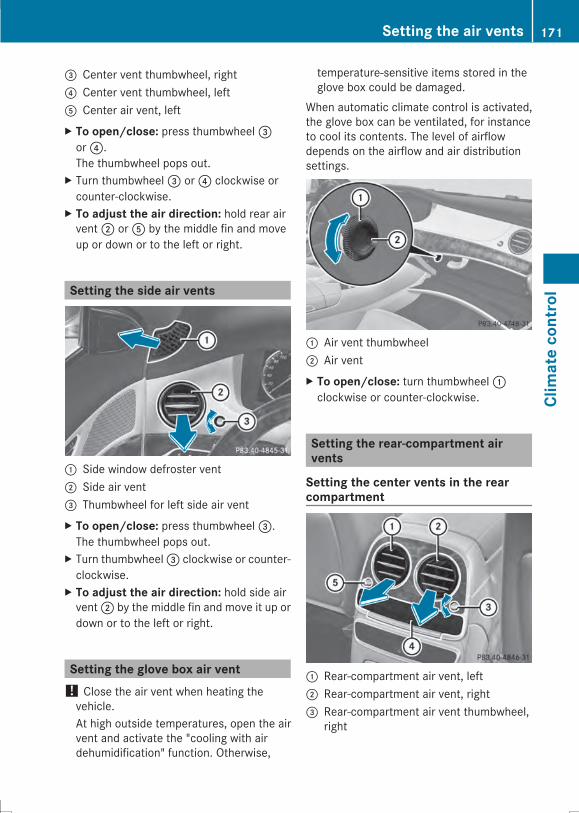
= Center vent thumbwheel, right? Center vent thumbwheel, leftA Center air vent, leftX To open/close: press thumbwheel=or?.The thumbwheel pops out.
X Turn thumbwheel= or? clockwise orcounter-clockwise.
X To adjust the air direction: hold rear airvent; orA by the middle fin and moveup or down or to the left or right.
Setting the side air vents
: Side window defroster vent; Side air vent= Thumbwheel for left side air ventX To open/close: press thumbwheel=.The thumbwheel pops out.
X Turn thumbwheel= clockwise or counter-clockwise.
X To adjust the air direction: hold side airvent; by the middle fin and move it up ordown or to the left or right.
Setting the glove box air vent! Close the air vent when heating thevehicle.At high outside temperatures, open the airvent and activate the "cooling with airdehumidification" function. Otherwise,
temperature-sensitive items stored in theglove box could be damaged.
When automatic climate control is activated,the glove box can be ventilated, for instanceto cool its contents. The level of airflowdepends on the airflow and air distributionsettings.
: Air vent thumbwheel; Air ventX To open/close: turn thumbwheel:clockwise or counter-clockwise.
Setting the rear-compartment airvents
Setting the center vents in the rearcompartment
: Rear-compartment air vent, left; Rear-compartment air vent, right= Rear-compartment air vent thumbwheel,
right
Setting the air vents 171
Climatecontrol
Z
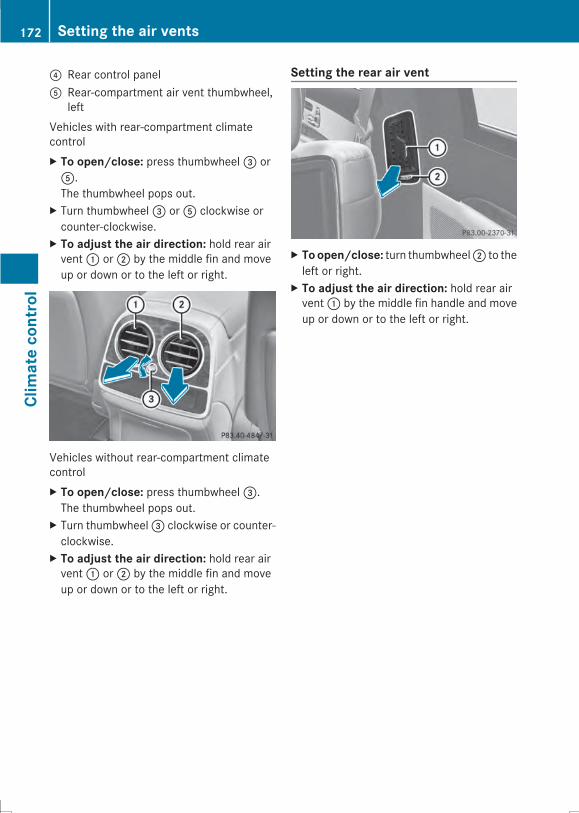
? Rear control panelA Rear-compartment air vent thumbwheel,
leftVehicles with rear-compartment climatecontrolX To open/close: press thumbwheel= orA.The thumbwheel pops out.
X Turn thumbwheel= orA clockwise orcounter-clockwise.
X To adjust the air direction: hold rear airvent: or; by the middle fin and moveup or down or to the left or right.
Vehicles without rear-compartment climatecontrolX To open/close: press thumbwheel=.The thumbwheel pops out.
X Turn thumbwheel= clockwise or counter-clockwise.
X To adjust the air direction: hold rear airvent: or; by the middle fin and moveup or down or to the left or right.
Setting the rear air vent
X Toopen/close: turn thumbwheel; to theleft or right.
X To adjust the air direction: hold rear airvent: by the middle fin handle and moveup or down or to the left or right.
172 Setting the air ventsClimatecontrol
Useful information ............................ 174Notes on breaking-in a new vehicle 174Driving ............................................... 174Automatic transmission ................... 182Refueling ............................................ 188Parking ............................................... 191Driving tips ........................................ 194Driving systems ................................ 200
173
Drivingandparking
Useful information
i This Operator's Manual describes allmodels and all standard and optionalequipment of your vehicle available at thetime of publication of the Operator'sManual. Country-specific differences arepossible. Please note that your vehicle maynot be equipped with all featuresdescribed. This also applies to safety-related systems and functions.
i Read the information on qualifiedspecialist workshops: (Y page 34).
Notes on breaking-in a new vehicle
Important safety notesNew and replaced brake pads and discs onlyreach their optimum braking effect afterseveral hundred kilometers of driving.Compensate for this by applying greater forceto the brake pedal.
The first 1000miles (1500 km)The more you look after the engine when it isnew, the more satisfied you will be with itsperformance in the future.RYou should therefore drive at varyingvehicle and engine speeds for the first1000 miles (1500 km).RAvoid heavy loads, e.g. driving at fullthrottle, during this period.RWhen shifting gears manually, upshift ingood time, before the tachometer needlereachesÔ of the way to the red area of thetachometer.RDo not manually shift to a lower gear tobrake the vehicle.RIf possible, do not depress the acceleratorpedal past the point of resistance(kickdown).RIdeally, for the first 1000 miles (1500 km),drive in program E.
After 1000miles (1500 km), you can increasethe engine speed gradually and acceleratethe vehicle to full speed.
i You should also observe these notes onbreaking in if the engine or parts of the drivetrain on your vehicle have been replaced.
i Always observe the respective speedlimits.
Driving
Important safety notes
G WARNINGObjects in the driver's footwell can restrict thepedal travel or obstruct a depressed pedal.The operating and road safety of the vehicleis jeopardized. There is a risk of an accident.Make sure that all objects in the vehicle arestowed correctly, and that they cannot enterthe driver's footwell. Install the floormatssecurely and as specified in order to ensuresufficient clearance for the pedals. Do not useloose floormats and do not place floormats ontop of one another.
G WARNINGUnsuitable footwear can hinder correct usageof the pedals, e.g.:Rshoes with thick solesRshoes with high heelsRslippersThere is a risk of an accident.Wear suitable footwear to ensure correctusage of the pedals.
G WARNINGIf you switch off the ignition while driving,safety-relevant functions are only availablewith limitations, or not at all. This could affect,for example, the power steering and the brakeboosting effect. You will require considerablymore effort to steer and brake. There is a riskof an accident.
174 DrivingDrivingandparking

Do not switch off the ignition while driving.
G WARNINGIf the parking brake has not been fullyreleased when driving, the parking brake can:Roverheat and cause a fireRlose its hold function.There is a risk of fire and an accident. Releasethe parking brake fully before driving off.
! Warm up the engine quickly. Do not usethe engine's full performance until it hasreached operating temperature.Only shift the automatic transmission tothe desired drive position when the vehicleis stationary.Where possible, avoid spinning the drivewheels when pulling away on slipperyroads. You could otherwise damage thedrive train.
Key positions
SmartKey
g To remove the SmartKey1 Power supply for some consumers, such
as the windshield wipers2 Ignition (power supply for all consumers)
and drive position3 To start the engine
i The SmartKey can be turned in theignition lock even if it is not the correct
SmartKey for the vehicle. The ignition is notswitched on. The engine cannot be started.
Start/Stop button
General notesAll vehicles are equipped with a removableStart/Stop button.A checkwhich periodically establishes a radioconnection between the vehicle and theSmartKey determines whether a validSmartKey is in the vehicle. This occurs, forexample, when starting the engine.To start the vehicle without actively using theSmartKey:Rthe Start/Stop button must be inserted inthe ignition lock.Rthe SmartKey must be in the vehicle.Rthe vehicle must not be locked with theSmartKey or KEYLESS-GO (Y page 89).
Pressing the Start/Stop button several timesin succession corresponds to the differentkey positions in the ignition lock. This is onlythe case if you are not depressing the brakepedal.If you depress the brake pedal and press theStart/Stop button, the engine startsimmediately.Do not keep the SmartKey:Rwith electronic devices, e.g. a mobilephone or another SmartKeyRwith metallic objects, e.g. coins or metalfoilRinside metallic objects, e.g. a metal caseThis can affect the functionality of theSmartKey.Do not keep the SmartKey in thetemperature-controlled cup holder(Y page 556). Otherwise, the SmartKey willnot be detected, e.g. when starting the enginewith the Start/Stop button.The Start/Stop button can be removed fromthe ignition lock. Then, you can insert theSmartKey into the ignition lock.
Driving 175
Drivingandparking
Z

i If you lock the vehiclewith the SmartKey'sremote control or with KEYLESS-GO, aftera short time:Ryou will not be able to switch on theignition with the Start/Stop button.Ryou will not be able to start the engineuntil the vehicle is unlocked again.
If you lock the vehicle centrally using thebutton on the front door (Y page 95), youcan continue to start the engine with theStart/Stop button.
i You do not have to remove the Start/Stopbutton from the ignition lock when youleave the vehicle. You should, however,always take the SmartKey with you whenleaving the vehicle. As long as theSmartKey is in the vehicle:Rthe vehicle can be started using theStart/Stop buttonRthe electrically powered equipment canbe operated
i The engine can be turned off while thevehicle is in motion by pressing and holdingthe Start/Stop button for approximatelythree seconds. This function operatesindependently of the ECO start/stopautomatic engine switch-off function.
SmartKey positions with the Start/Stopbutton
As soon as the ignition is switched on, all theindicator lamps in the instrument cluster lightup. If an indicator lamp does not go out afterstarting the engine or lights up while driving,see (Y page 302).
X Insert Start/Stop button: into ignitionlock;.i When you insert Start/Stop button:into ignition lock;, the system needsapproximately two seconds recognitiontime. You can then use Start/Stopbutton:.
Activating power supplyX If Start/Stop button: has not yet beenpressed, this corresponds to the SmartKeybeing removed from the ignition.
X Press Start/Stop button: once.The power supply is switched on. You cannow activate the windshield wipers, forexample.i The power supply is switched off again if:Rthe driver's door is opened andRyou press Start/Stop button: twicewhen in this position
Switching on the ignitionX Press Start/Stop button: twice.The ignition is switched on.i The power supply is switched off again if:Rthe driver's door is opened andRyou press Start/Stop button: oncewhen in this position
= Start/Stop button USA? Start/Stop button Canada
176 DrivingDrivingandparking
Starting the engine
Important safety notes
G WARNINGIf children are left unsupervised in the vehicle,they could:Ropen the doors, thus endangering otherpeople or road users.Rget out and disrupt traffic.Roperate the vehicle's equipment.Additionally, children could set the vehicle inmotion if, for example, they:Rrelease the parking brake.Rshifting the automatic transmission out ofpark position PRStart the engine.There is a risk of an accident and injury.When leaving the vehicle, always take theSmartKeywith you and lock the vehicle. Neverleave children or animals unattended in thevehicle. Always keep the SmartKey out ofreach of children.
G WARNINGCombustion engines emit poisonous exhaustgases such as carbon monoxide. Inhalingthese exhaust gases leads to poisoning. Thereis a risk of fatal injury. Therefore never leavethe engine running in enclosed spaceswithout sufficient ventilation.
G WARNINGFlammable materials introduced throughenvironmental influence or by animals canignite if in contact with the exhaust system orparts of the engine that heat up. There is a riskof fire.Carry out regular checks to make sure thatthere are no flammable foreign materials inthe engine compartment or in the exhaustsystem.
! Do not depress the accelerator pedalwhen starting the engine.
General notesi During a cold start, the engine runs athigher speeds to enable the catalyticconverter to reach its operatingtemperature. The sound of the engine maychange during this time.
Automatic transmissionX Shift the transmission to positionP(Y page 182).The transmission position display in themultifunction display showsP(Y page 184).
i You can also start the engine when thetransmission is in position N.
Starting procedure with the SmartKeyX Turn the SmartKey to position 3 in theignition lock (Y page 175) and release it assoon as the engine is running.
i To start the engine using the SmartKeyinstead of the Start/Stop button, pull theStart/Stop button out of the ignition lock.
Starting procedure with the Start/StopbuttonYou can start the engine if a valid SmartKeyis in the vehicle. Always take the SmartKeywith you when leaving the vehicle, even if youonly leave it for a short time. Pay attention tothe important safety notes.X Depress the brake pedal and keep itdepressed.
X Press the Start/Stop button once(Y page 175).The engine starts.
i The Start/Stop button can be used tostart the vehicle manually without insertingthe SmartKey into the ignition lock. TheStart/Stop button must be inserted in theignition lock and the SmartKey must be inthe vehicle. This mode for starting the
Driving 177
Drivingandparking
Z
engine operates independently of the ECOstart/stop automatic engine start function.
Pulling away
Automatic transmission
G WARNINGIf the engine speed is above the idling speedand you engage transmission position D orR, the vehicle could pull away suddenly. Thereis a risk of an accident.When engaging transmission position D or R,always firmly depress the brake pedal and donot simultaneously accelerate.
X Depress the brake pedal and keep itdepressed.
X Shift the transmission to position D or R.X Release the brake pedal.X Carefully depress the accelerator pedal.The electric parking brake (Y page 193) isautomatically released.The redF (USA only) or! (Canadaonly) indicator lamp in the instrumentcluster goes out.
i It is only possible to shift the transmissionfrom position P to the desired position ifyou depress the brake pedal. Only then isthe parking lock released. If you do notdepress the brake pedal, you can move theDIRECT SELECT lever but the parking lockremains engaged.
i The vehicle locks centrally once you havepulled away. The locking knobs in the doorsdrop down.You can open the doors from the inside atany time.You can also deactivate the automaticlocking feature (Y page 96).
i Upshifts take place at higher enginespeeds after a cold start. This helps thecatalytic converter to reach its operatingtemperature more quickly.
Hill start assistHill start assist helps you when pulling awayforwards or in reverse on an uphill gradient.It holds the vehicle for a short time after youhave removed your foot from the brake pedal.This gives you enough time to move your footfrom the brake pedal to the accelerator pedaland to depress it before the vehicle begins toroll.
G WARNINGAfter a short time, hill start assist will nolonger brake your vehicle and it could rollaway. There is a risk of an accident and injury.Therefore, quickly move your foot from thebrake pedal to the accelerator pedal. Neverleave the vehicle when it is held by hill startassist.
X Remove your foot from the brake pedal.The vehicle is then held for about a second.
X Pull away.Hill start assist is not active if:Ryou are pulling away on a level road or ona downhill gradient.Rthe transmission is in position N.Rthe electric parking brake is applied.RESP® is malfunctioning.
ECO start/stop function
IntroductionThe ECO start/stop function switches theengine off automatically if the vehicle isstopped under certain conditions.The engine starts automatically when thedriver wants to pull away again. The ECOstart/stop function thereby helps you toreduce the fuel consumption and emissionsof your vehicle.
178 DrivingDrivingandparking

Important safety notes
G WARNINGIf the engine is switched off automatically andyou exit the vehicle, the engine is restartedautomatically. The vehicle may begin moving.There is a risk of accident and injury.If you wish to exit the vehicle, always turn offthe ignition and secure the vehicle againstrolling away.
General notes
: ECO start/stop display
If the¤ symbol is shown in green in themultifunction display, the ECO start/stopfunction switches the engine offautomatically if the vehicle stops moving.Every time you switch on the engine using theSmartKey or the Start/Stop button, the ECOstart/stop function is activated.If the ECO start/stop function has beenmanually deactivated (Y page 180) or amalfunction has caused the system to bedeactivated, the¤ symbol is notdisplayed.The ECO start/stop function is only availablein drive program E.
Automatic engine switch-offIf the vehicle is braked to a standstill in D orN, the ECO start/stop function switches offthe engine automatically.
The ECO start/stop function is operationaland the¤ symbol is displayed in green inthe multifunction display, if:Rthe indicator lamp in the ECO button is litgreen.Rthe outside temperature is within the rangethat is suitable for the system.Rthe engine is at normal operatingtemperature.Rthe set temperature for the vehicle interiorhas been reached.Rthe battery is sufficiently charged.Rthe system detects that the windshield isnot fogged up when the air-conditioningsystem is switched on.Rthe hood is closed.Rthe driver's door is closed and the driver'sseat belt is fastened.
If conditions for automatic engine switch-offhave not been fulfilled, the¤ symbol willbe shown in yellow.
i All of the vehicle's systems remain activewhen the engine has been stoppedautomatically.
i The HOLD function can be activated if theengine has been switched offautomatically. It is then not necessary tocontinue applying the brakes during theautomatic stop phase. When you depressthe accelerator pedal, the engine startsautomatically and the braking effect of theHOLD function is deactivated.
i The engine can be switched offautomatically a maximum of four times(first stop and three subsequent stops) insuccession. The¤ symbol is shown inyellow in the multifunction display after theengine has been started automatically forthe fourth time. The automatic engineswitch-off is available once again when the¤ symbol is shown in green in themultifunction display.
Driving 179
Drivingandparking
Z
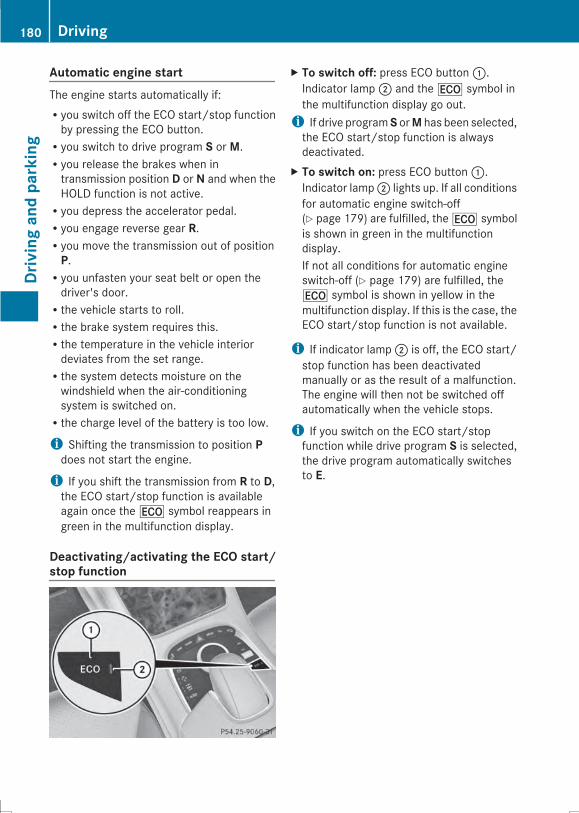
Automatic engine startThe engine starts automatically if:Ryou switch off the ECO start/stop functionby pressing the ECO button.Ryou switch to drive program S or M.Ryou release the brakes when intransmission position D or N and when theHOLD function is not active.Ryou depress the accelerator pedal.Ryou engage reverse gear R.Ryou move the transmission out of positionP.Ryou unfasten your seat belt or open thedriver's door.Rthe vehicle starts to roll.Rthe brake system requires this.Rthe temperature in the vehicle interiordeviates from the set range.Rthe system detects moisture on thewindshield when the air-conditioningsystem is switched on.Rthe charge level of the battery is too low.
i Shifting the transmission to position Pdoes not start the engine.
i If you shift the transmission from R to D,the ECO start/stop function is availableagain once the¤ symbol reappears ingreen in the multifunction display.
Deactivating/activating the ECO start/stop function
X To switch off: press ECO button:.Indicator lamp; and the¤ symbol inthe multifunction display go out.i If drive programS orM has been selected,the ECO start/stop function is alwaysdeactivated.
X To switch on: press ECO button:.Indicator lamp; lights up. If all conditionsfor automatic engine switch-off(Y page 179) are fulfilled, the¤ symbolis shown in green in the multifunctiondisplay.If not all conditions for automatic engineswitch-off (Y page 179) are fulfilled, the¤ symbol is shown in yellow in themultifunction display. If this is the case, theECO start/stop function is not available.
i If indicator lamp; is off, the ECO start/stop function has been deactivatedmanually or as the result of a malfunction.The engine will then not be switched offautomatically when the vehicle stops.
i If you switch on the ECO start/stopfunction while drive program S is selected,the drive program automatically switchesto E.
180 DrivingDrivingandparking
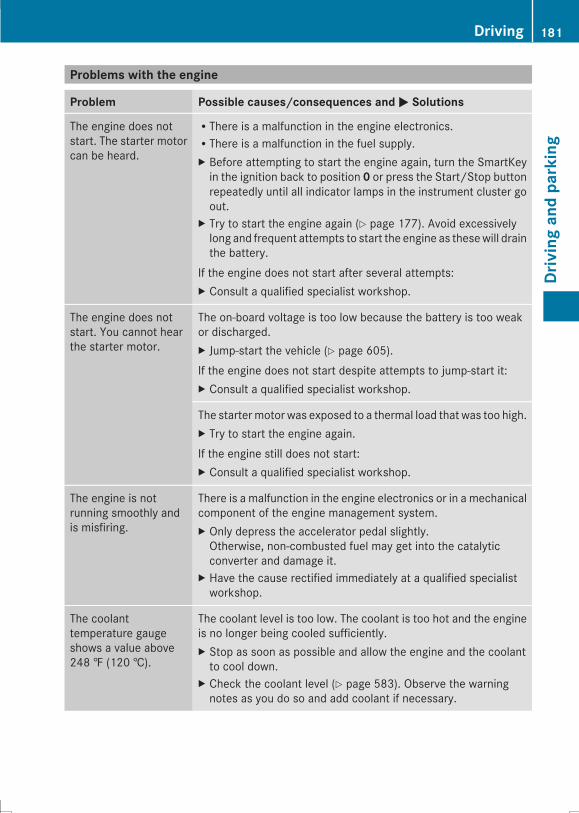
Problems with the engine
Problem Possible causes/consequences andMM Solutions
The engine does notstart. The starter motorcan be heard.
RThere is a malfunction in the engine electronics.RThere is a malfunction in the fuel supply.X Before attempting to start the engine again, turn the SmartKeyin the ignition back to position 0 or press the Start/Stop buttonrepeatedly until all indicator lamps in the instrument cluster goout.
X Try to start the engine again (Y page 177). Avoid excessivelylong and frequent attempts to start the engine as thesewill drainthe battery.
If the engine does not start after several attempts:X Consult a qualified specialist workshop.
The engine does notstart. You cannot hearthe starter motor.
The on-board voltage is too low because the battery is too weakor discharged.X Jump-start the vehicle (Y page 605).If the engine does not start despite attempts to jump-start it:X Consult a qualified specialist workshop.
The startermotor was exposed to a thermal load that was too high.X Try to start the engine again.If the engine still does not start:X Consult a qualified specialist workshop.
The engine is notrunning smoothly andis misfiring.
There is a malfunction in the engine electronics or in a mechanicalcomponent of the engine management system.X Only depress the accelerator pedal slightly.Otherwise, non-combusted fuel may get into the catalyticconverter and damage it.
X Have the cause rectified immediately at a qualified specialistworkshop.
The coolanttemperature gaugeshows a value above248 ‡ (120 †).
The coolant level is too low. The coolant is too hot and the engineis no longer being cooled sufficiently.X Stop as soon as possible and allow the engine and the coolantto cool down.
X Check the coolant level (Y page 583). Observe the warningnotes as you do so and add coolant if necessary.
Driving 181
Drivingandparking
Z
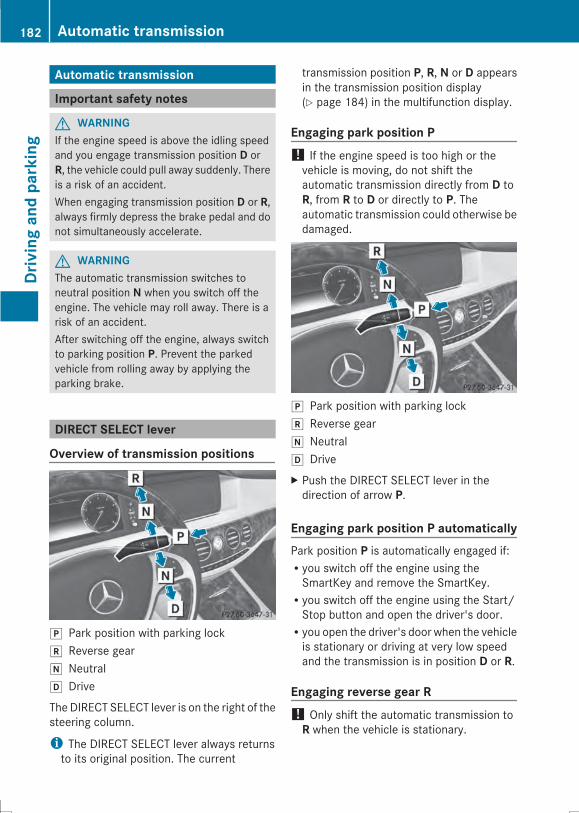
Automatic transmission
Important safety notes
G WARNINGIf the engine speed is above the idling speedand you engage transmission position D orR, the vehicle could pull away suddenly. Thereis a risk of an accident.When engaging transmission position D or R,always firmly depress the brake pedal and donot simultaneously accelerate.
G WARNINGThe automatic transmission switches toneutral position N when you switch off theengine. The vehicle may roll away. There is arisk of an accident.After switching off the engine, always switchto parking position P. Prevent the parkedvehicle from rolling away by applying theparking brake.
DIRECT SELECT lever
Overview of transmission positions
j Park position with parking lockk Reverse geari Neutralh Drive
The DIRECT SELECT lever is on the right of thesteering column.
i The DIRECT SELECT lever always returnsto its original position. The current
transmission position P, R, N or D appearsin the transmission position display(Y page 184) in the multifunction display.
Engaging park position P! If the engine speed is too high or thevehicle is moving, do not shift theautomatic transmission directly from D toR, from R to D or directly to P. Theautomatic transmission could otherwise bedamaged.
j Park position with parking lockk Reverse geari Neutralh DriveX Push the DIRECT SELECT lever in thedirection of arrow P.
Engaging park position P automaticallyPark position P is automatically engaged if:Ryou switch off the engine using theSmartKey and remove the SmartKey.Ryou switch off the engine using the Start/Stop button and open the driver's door.Ryou open the driver's door when the vehicleis stationary or driving at very low speedand the transmission is in position D or R.
Engaging reverse gear R! Only shift the automatic transmission toR when the vehicle is stationary.
182 Automatic transmissionDrivingandparking
X If the transmission is in position D or N:push the DIRECT SELECT lever up past thefirst point of resistance.
X If the transmission is in position P: depressthe brake pedal and push the DIRECTSELECT lever up past the first point ofresistance.
i The ECO start/stop function is notavailable when reverse gear is engaged.Further information on the ECO start/stopfunction (Y page 179).
Shifting to neutral N
G WARNINGIf children are left unsupervised in the vehicle,they could:Ropen the doors, thus endangering otherpeople or road users.Rget out and disrupt traffic.Roperate the vehicle's equipment.Additionally, children could set the vehicle inmotion if, for example, they:Rrelease the parking brake.Rshifting the automatic transmission out ofpark position PRStart the engine.There is a risk of an accident and injury.When leaving the vehicle, always take theSmartKeywith you and lock the vehicle. Neverleave children or animals unattended in thevehicle. Always keep the SmartKey out ofreach of children.
X If the transmission is in position D or R :push the DIRECT SELECT lever up or downto the first point of resistance.
X If the transmission is in position P: depressthe brake pedal and push the DIRECTSELECT lever up or down to the first pointof resistance.
If the engine has been switched off, theautomatic transmission automatically shiftsto N.
If the automatic transmission is to remain inneutral N, e.g. for washing the vehicle in carwashes with a towing device, please observethe following instructions:Using the SmartKey:RMake sure that the ignition is switched on.RWhen the vehicle is stationary, depress thebrake pedal and keep it depressed.RShift to neutral N.RRelease the brake pedal.RIf the electric parking brake is engaged,release it.RSwitch off the ignition and leave theSmartKey in the ignition lock.
With the Start/Stop button:RMake sure that the ignition is switched on.RWhen the vehicle is stationary, depress thebrake pedal and keep it depressed.REngage park position P.RRelease the brake pedal.RPull the Start/Stop button out of theignition.RInsert the SmartKey into the ignition lock.RSwitch on the ignition.RDepress the brake pedal and keep itdepressed.RShift to neutral N.RRelease the brake pedal.RIf the electric parking brake is engaged,release it.RSwitch off the ignition and leave theSmartKey in the ignition lock.
Engaging drive position DX If the transmission is in position R or N:push the DIRECT SELECT lever down pastthe first point of resistance.
X If the transmission is in position P: depressthe brake pedal and push the DIRECTSELECT lever down past the first point ofresistance.
Automatic transmission 183
Drivingandparking
Z
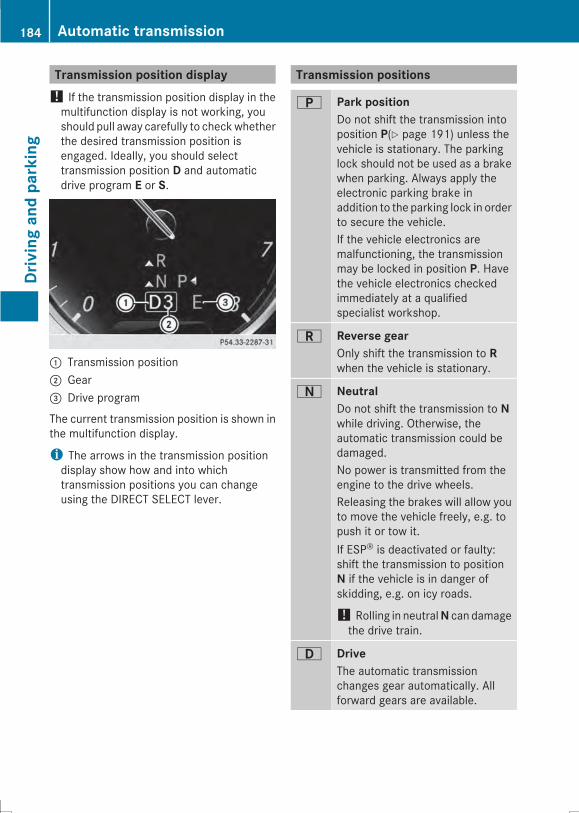
Transmission position display! If the transmission position display in themultifunction display is not working, youshould pull away carefully to checkwhetherthe desired transmission position isengaged. Ideally, you should selecttransmission position D and automaticdrive program E or S.
: Transmission position; Gear= Drive program
The current transmission position is shown inthe multifunction display.
i The arrows in the transmission positiondisplay show how and into whichtransmission positions you can changeusing the DIRECT SELECT lever.
Transmission positions
B Park positionDo not shift the transmission intoposition P(Y page 191) unless thevehicle is stationary. The parkinglock should not be used as a brakewhen parking. Always apply theelectronic parking brake inaddition to the parking lock in orderto secure the vehicle.If the vehicle electronics aremalfunctioning, the transmissionmay be locked in position P. Havethe vehicle electronics checkedimmediately at a qualifiedspecialist workshop.
C Reverse gearOnly shift the transmission to Rwhen the vehicle is stationary.
A NeutralDo not shift the transmission to Nwhile driving. Otherwise, theautomatic transmission could bedamaged.No power is transmitted from theengine to the drive wheels.Releasing the brakes will allow youto move the vehicle freely, e.g. topush it or tow it.If ESP® is deactivated or faulty:shift the transmission to positionN if the vehicle is in danger ofskidding, e.g. on icy roads.
! Rolling in neutralN can damagethe drive train.
7 DriveThe automatic transmissionchanges gear automatically. Allforward gears are available.
184 Automatic transmissionDrivingandparking
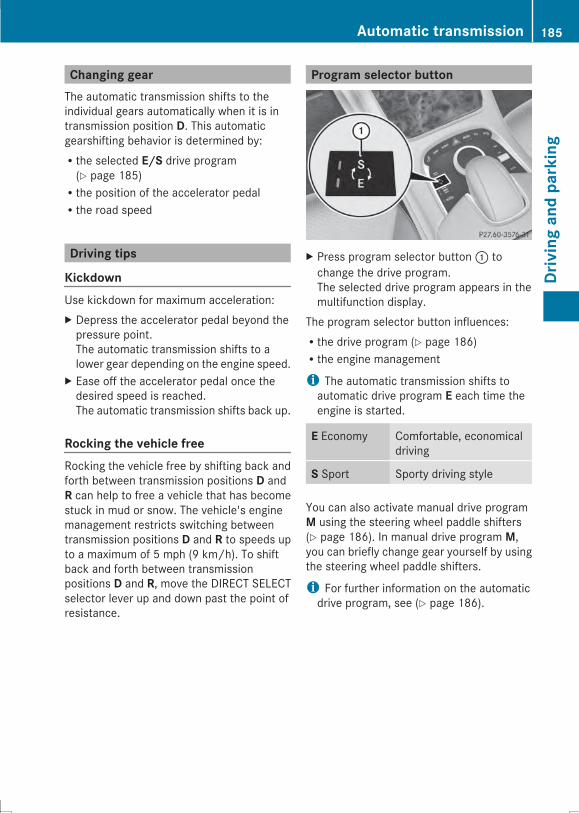
Changing gearThe automatic transmission shifts to theindividual gears automatically when it is intransmission position D. This automaticgearshifting behavior is determined by:Rthe selected E/S drive program(Y page 185)Rthe position of the accelerator pedalRthe road speed
Driving tips
KickdownUse kickdown for maximum acceleration:X Depress the accelerator pedal beyond thepressure point.The automatic transmission shifts to alower gear depending on the engine speed.
X Ease off the accelerator pedal once thedesired speed is reached.The automatic transmission shifts back up.
Rocking the vehicle freeRocking the vehicle free by shifting back andforth between transmission positions D andR can help to free a vehicle that has becomestuck in mud or snow. The vehicle's enginemanagement restricts switching betweentransmission positions D and R to speeds upto a maximum of 5 mph (9 km/h). To shiftback and forth between transmissionpositions D and R, move the DIRECT SELECTselector lever up and down past the point ofresistance.
Program selector button
X Press program selector button: tochange the drive program.The selected drive program appears in themultifunction display.
The program selector button influences:Rthe drive program (Y page 186)Rthe engine management
i The automatic transmission shifts toautomatic drive program E each time theengine is started.
E Economy Comfortable, economicaldriving
S Sport Sporty driving style
You can also activate manual drive programM using the steering wheel paddle shifters(Y page 186). In manual drive program M,you can briefly change gear yourself by usingthe steering wheel paddle shifters.
i For further information on the automaticdrive program, see (Y page 186).
Automatic transmission 185
Drivingandparking
Z
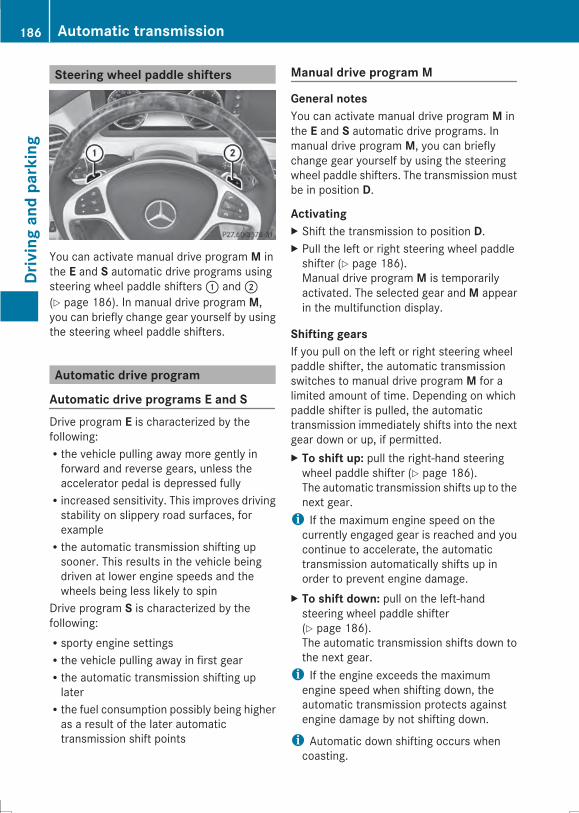
Steering wheel paddle shifters
You can activate manual drive program M inthe E and S automatic drive programs usingsteering wheel paddle shifters: and;(Y page 186). In manual drive program M,you can briefly change gear yourself by usingthe steering wheel paddle shifters.
Automatic drive program
Automatic drive programs E and SDrive program E is characterized by thefollowing:Rthe vehicle pulling away more gently inforward and reverse gears, unless theaccelerator pedal is depressed fullyRincreased sensitivity. This improves drivingstability on slippery road surfaces, forexampleRthe automatic transmission shifting upsooner. This results in the vehicle beingdriven at lower engine speeds and thewheels being less likely to spin
Drive program S is characterized by thefollowing:Rsporty engine settingsRthe vehicle pulling away in first gearRthe automatic transmission shifting uplaterRthe fuel consumption possibly being higheras a result of the later automatictransmission shift points
Manual drive program M
General notesYou can activate manual drive program M inthe E and S automatic drive programs. Inmanual drive program M, you can brieflychange gear yourself by using the steeringwheel paddle shifters. The transmission mustbe in position D.
ActivatingX Shift the transmission to position D.X Pull the left or right steering wheel paddleshifter (Y page 186).Manual drive program M is temporarilyactivated. The selected gear andM appearin the multifunction display.
Shifting gearsIf you pull on the left or right steering wheelpaddle shifter, the automatic transmissionswitches to manual drive program M for alimited amount of time. Depending on whichpaddle shifter is pulled, the automatictransmission immediately shifts into the nextgear down or up, if permitted.X To shift up: pull the right-hand steeringwheel paddle shifter (Y page 186).The automatic transmission shifts up to thenext gear.i If the maximum engine speed on thecurrently engaged gear is reached and youcontinue to accelerate, the automatictransmission automatically shifts up inorder to prevent engine damage.
X To shift down: pull on the left-handsteering wheel paddle shifter(Y page 186).The automatic transmission shifts down tothe next gear.i If the engine exceeds the maximumengine speed when shifting down, theautomatic transmission protects againstengine damage by not shifting down.
i Automatic down shifting occurs whencoasting.
186 Automatic transmissionDrivingandparking
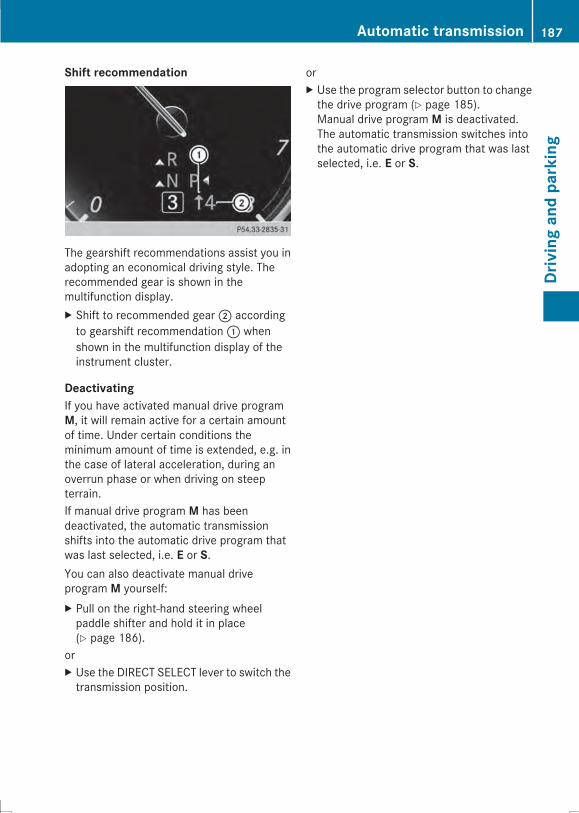
Shift recommendation
The gearshift recommendations assist you inadopting an economical driving style. Therecommended gear is shown in themultifunction display.X Shift to recommended gear; accordingto gearshift recommendation: whenshown in the multifunction display of theinstrument cluster.
DeactivatingIf you have activated manual drive programM, it will remain active for a certain amountof time. Under certain conditions theminimum amount of time is extended, e.g. inthe case of lateral acceleration, during anoverrun phase or when driving on steepterrain.If manual drive program M has beendeactivated, the automatic transmissionshifts into the automatic drive program thatwas last selected, i.e. E or S.You can also deactivate manual driveprogram M yourself:X Pull on the right-hand steering wheelpaddle shifter and hold it in place(Y page 186).
orX Use the DIRECT SELECT lever to switch thetransmission position.
orX Use the program selector button to changethe drive program (Y page 185).Manual drive program M is deactivated.The automatic transmission switches intothe automatic drive program that was lastselected, i.e. E or S.
Automatic transmission 187
Drivingandparking
Z
Problems with the transmission
Problem Possible causes/consequences andMM Solutions
The transmission hasproblems shifting gear.
The transmission is losing oil.X Have the transmission checked at a qualified specialistworkshop immediately.
The acceleration abilityis deteriorating.The transmission nolonger changes gear.
The transmission is in emergency mode.It is only possible to shift into second gear and reverse gear.X Stop the vehicle.X Shift the transmission to position P.X Switch off the engine.X Wait at least ten seconds before restarting the engine.X Shift the transmission to position D or R.If D is selected, the transmission shifts into second gear; if R isselected, the transmission shifts into reverse gear.
X Have the transmission checked at a qualified specialistworkshop immediately.
Transfer case! Performance tests may only be carriedout on a 2-axle dynamometer. The brakesystem or transfer case could otherwise bedamaged. Contact a qualified specialistworkshop for a performance test.
! To prevent ESP® from intervening, theignition must be switched off (SmartKey orthe Start/Stop button in position 0 or 1) if:Rthe electric parking brake is being testedon a brake dynamometer.Rthe vehicle is being towed with only oneaxle raised (not permitted for vehicleswith 4MATIC).
The brake system could otherwise bedamaged.
! Vehicles with 4MATIC must not be towedwith either the front or the rear axle raised,as doing so will damage the transmission.
This section is only valid for vehicles with 4-wheel drive (4MATIC). Power is alwaystransmitted to both axles.
Refueling
Important safety notes
G WARNINGFuel is highly flammable. If you handle fuelincorrectly, there is a risk of fire andexplosion.You must avoid fire, open flames, creatingsparks and smoking. Switch off the engineand, if applicable, the auxiliary heating beforerefueling.
G WARNINGFuel is poisonous and hazardous to health.There is a risk of injury.You must make sure that fuel does not comeinto contact with your skin, eyes or clothingand that it is not swallowed. Do not inhale fuelvapors. Keep fuel away from children.
188 RefuelingDrivingandparking
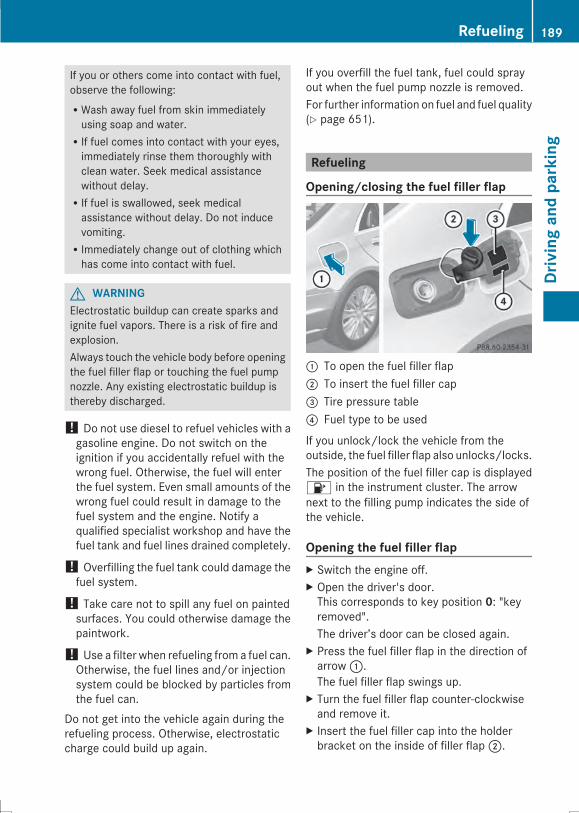
If you or others come into contact with fuel,observe the following:RWash away fuel from skin immediatelyusing soap and water.RIf fuel comes into contact with your eyes,immediately rinse them thoroughly withclean water. Seek medical assistancewithout delay.RIf fuel is swallowed, seek medicalassistance without delay. Do not inducevomiting.RImmediately change out of clothing whichhas come into contact with fuel.
G WARNINGElectrostatic buildup can create sparks andignite fuel vapors. There is a risk of fire andexplosion.Always touch the vehicle body before openingthe fuel filler flap or touching the fuel pumpnozzle. Any existing electrostatic buildup isthereby discharged.
! Do not use diesel to refuel vehicles with agasoline engine. Do not switch on theignition if you accidentally refuel with thewrong fuel. Otherwise, the fuel will enterthe fuel system. Even small amounts of thewrong fuel could result in damage to thefuel system and the engine. Notify aqualified specialist workshop and have thefuel tank and fuel lines drained completely.
! Overfilling the fuel tank could damage thefuel system.
! Take care not to spill any fuel on paintedsurfaces. You could otherwise damage thepaintwork.
! Use a filter when refueling from a fuel can.Otherwise, the fuel lines and/or injectionsystem could be blocked by particles fromthe fuel can.
Do not get into the vehicle again during therefueling process. Otherwise, electrostaticcharge could build up again.
If you overfill the fuel tank, fuel could sprayout when the fuel pump nozzle is removed.For further information on fuel and fuel quality(Y page 651).
Refueling
Opening/closing the fuel filler flap
: To open the fuel filler flap; To insert the fuel filler cap= Tire pressure table? Fuel type to be used
If you unlock/lock the vehicle from theoutside, the fuel filler flap also unlocks/locks.The position of the fuel filler cap is displayed8 in the instrument cluster. The arrownext to the filling pump indicates the side ofthe vehicle.
Opening the fuel filler flapX Switch the engine off.X Open the driver's door.This corresponds to key position 0: "keyremoved".The driver’s door can be closed again.
X Press the fuel filler flap in the direction ofarrow:.The fuel filler flap swings up.
X Turn the fuel filler flap counter-clockwiseand remove it.
X Insert the fuel filler cap into the holderbracket on the inside of filler flap;.
Refueling 189
Drivingandparking
Z
X Completely insert the filler neck of the fuelpump nozzle into the tank, hook in placeand refuel.
X Only fill the tank until the pump nozzleswitches off.i Do not add any more fuel after the pumpstops filling for the first time. Otherwise,fuel may leak out.
Closing the fuel filler flapX Replace the cap on the filler neck and turnclockwise until it engages audibly.
X Close the fuel filler flap.
i Close the fuel filler flap before locking thevehicle.
i If you are driving with the fuel filler capopen, the8 reserve fuel warning lampflashes. A message appears in themultifunction display (Y page 285).In addition, the;Check Enginewarninglamp may light up (Y page 307).For further information on warning andindicator lamps in the instrument cluster,see (Y page 307).
190 RefuelingDrivingandparking
Problems with fuel and the fuel tank
Problem Possible causes/consequences andMM Solutions
Fuel is leaking from thevehicle.
G WARNINGThe fuel line or the fuel tank is faulty.Risk of explosion or fire.X Apply the electric parking brake.X Shift the transmission to position P.X Press the Start/Stop button.The engine stops and all the indicator lamps in the instrumentcluster go out.i When the driver's door is open, this corresponds to SmartKeyposition 0: "SmartKey removed".
X Do not restart the engine under any circumstances.X Consult a qualified specialist workshop.
The fuel filler flapcannot be opened.
The fuel filler flap is not unlocked.orThe SmartKey battery is discharged.X Unlock the vehicle (Y page 89).orX Unlock the vehicle using the mechanical key (Y page 90).
The fuel filler flap is unlocked, but the opening mechanism isjammed.X Consult a qualified specialist workshop.
Parking
Important safety notes
G WARNINGFlammable material such as leaves, grass ortwigsmay ignite if they come into contactwithhot parts of the exhaust system or exhaustgas flow. There is a risk of fire.Park the vehicle so that no flammablematerials come into contact with parts of thevehicle which are hot. Take particular care notto park on dry grassland or harvested grainfields.
G WARNINGIf you leave children unsupervised in thevehicle, they could set it in motion by, forexample:Rrelease the parking brake.Rshift the automatic transmission out of theparking position P.Rstart the engine.In addition, they may operate vehicleequipment and become trapped. There is arisk of an accident and injury.When leaving the vehicle, always take theSmartKeywith you and lock the vehicle. Neverleave children unsupervised in the vehicle.
Parking 191
Drivingandparking
Z
! Always secure the vehicle correctlyagainst rolling away. Otherwise, the vehicleor its drivetrain could be damaged.
To ensure that the vehicle is secured againstrolling away unintentionally:Rthe electric parking brake must be applied.Rthe transmission must be in position P andthe SmartKey must be removed from theignition lock.Rthe front wheels must be turned towardsthe curb on steep uphill or downhillgradients.Rthe empty vehicle must be secured at thefront axle with a wheel chock or similar, forexample, on uphill or downhill gradients.Ra laden vehicle must also be secured at therear axle with a wheel chock or similar, forexample, on uphill or downhill gradients.
Switching off the engine
Important safety notes
G WARNINGThe automatic transmission switches toneutral position N when you switch off theengine. The vehicle may roll away. There is arisk of an accident.After switching off the engine, always switchto parking position P. Prevent the parkedvehicle from rolling away by applying theparking brake.
i If the engine cannot be switched off asdescribed here, see "Emergency enginecutoff" (Y page 613).
Using the SmartKeyX Apply the electric parking brake.X Shift the transmission to position P.X Turn the SmartKey to position 0 in theignition lock and remove it.The immobilizer is activated.
i If you turn off the engine with theSmartKey and then remove it from theignition lock or open a front door, theautomatic transmission shifts to Pautomatically.
With the Start/Stop buttonX Apply the electric parking brake.X Shift the transmission to position P.X Press the Start/Stop button (Y page 175).The engine stops and all the indicatorlamps in the instrument cluster go out.i When the driver's door is closed, thiscorresponds to key position 1. When thedriver's door is open, this corresponds tokey position 0: "Key removed".i If you turn off the engine with the Start/Stop button, the automatic transmissionshifts toN. If you then open one of the frontdoors, the automatic transmission shifts toP.If you drive through a car wash with aconveyor, you can:Rswitch on the ignition using the Start/Stop button and shift the transmission toNRinsert the SmartKey into the ignitionlock, switch on the ignition and shift thetransmission to Ni In the event of an emergency, the enginecan be turned off while the vehicle is inmotion by pressing and holding the Start/Stop button for three seconds. Thisfunction operates independently of theECO start/stop automatic engine switch-off function.
192 ParkingDrivingandparking
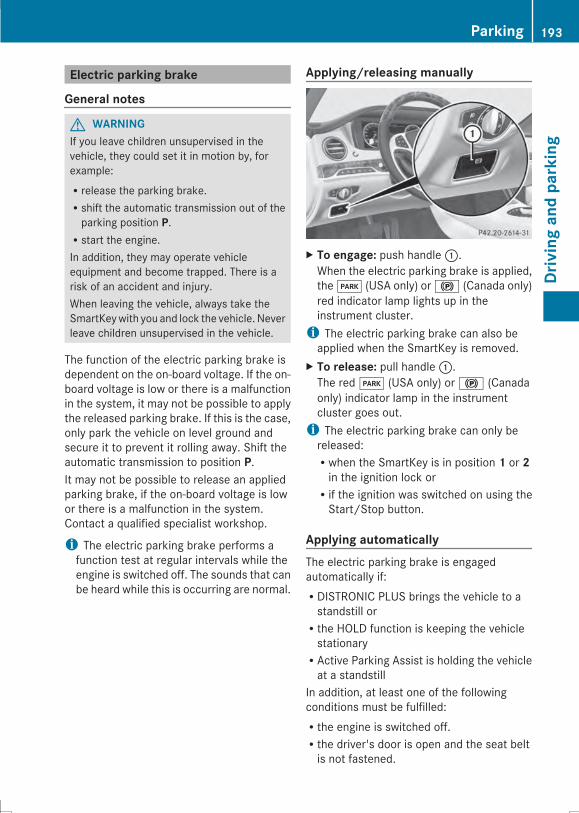
Electric parking brake
General notes
G WARNINGIf you leave children unsupervised in thevehicle, they could set it in motion by, forexample:Rrelease the parking brake.Rshift the automatic transmission out of theparking position P.Rstart the engine.In addition, they may operate vehicleequipment and become trapped. There is arisk of an accident and injury.When leaving the vehicle, always take theSmartKeywith you and lock the vehicle. Neverleave children unsupervised in the vehicle.
The function of the electric parking brake isdependent on the on-board voltage. If the on-board voltage is low or there is a malfunctionin the system, it may not be possible to applythe released parking brake. If this is the case,only park the vehicle on level ground andsecure it to prevent it rolling away. Shift theautomatic transmission to position P.It may not be possible to release an appliedparking brake, if the on-board voltage is lowor there is a malfunction in the system.Contact a qualified specialist workshop.
i The electric parking brake performs afunction test at regular intervals while theengine is switched off. The sounds that canbe heard while this is occurring are normal.
Applying/releasing manually
X To engage: push handle:.When the electric parking brake is applied,theF (USA only) or! (Canada only)red indicator lamp lights up in theinstrument cluster.i The electric parking brake can also beapplied when the SmartKey is removed.
X To release: pull handle:.The redF (USA only) or! (Canadaonly) indicator lamp in the instrumentcluster goes out.i The electric parking brake can only bereleased:Rwhen the SmartKey is in position 1 or 2in the ignition lock orRif the ignition was switched on using theStart/Stop button.
Applying automaticallyThe electric parking brake is engagedautomatically if:RDISTRONIC PLUS brings the vehicle to astandstill orRthe HOLD function is keeping the vehiclestationaryRActive Parking Assist is holding the vehicleat a standstill
In addition, at least one of the followingconditions must be fulfilled:Rthe engine is switched off.Rthe driver's door is open and the seat beltis not fastened.
Parking 193
Drivingandparking
Z
Rthere is a system malfunction.Rthe power supply is insufficient.Rthe vehicle is stationary for a lengthyperiod.
The redF (USA only) or! (Canadaonly) indicator lamp in the instrument clusterlights up.
i The electric parking brake is notautomatically engaged if the engine isswitched off by the ECO start/stopfunction.
Releasing automaticallyThe electric parking brake is releasedautomatically when all of the followingconditions are fulfilled:Rthe engine is running.Rthe transmission is in position D or R.Rthe seat belt has been fastened.Ryou depress the accelerator pedal.If the automatic transmission is in positionR, the trunk lid must be closed.If your seat belt is not fastened, the followingconditions must be fulfilled to automaticallyrelease the electric parking brake:Rthe driver's door is closed.Ryou have shifted out of transmissionposition P or you have previously drivenfaster than 2 mph (3 km/h).
i Ensure that you do not depress theaccelerator pedal unintentionally.Otherwise the parking brake will bereleased and the vehicle will start to move.
Emergency brakingThe vehicle can also be braked during anemergency by using the electric parkingbrake.X While driving, push handle:of the electricparking brake (Y page 193).
i The vehicle is braked as long as you keephandle: of the electric parking brake
pressed. The longer electric parking brakehandle: is depressed, the greater thebraking force.
During braking:Ra warning tone soundsRthe Please Release Parking BrakePlease Release Parking Brakemessage appearsRthe redF (USA only) or! (Canadaonly) indicator lamp in the instrumentcluster flashes
When the vehicle has been braked to astandstill, the electric parking brake isengaged.
Parking the vehicle for a long periodIf you leave the vehicle parked for longer thanfour weeks, the battery may be damaged byexhaustive discharging and further damagedin the event of this occurring again.X Connecting a trickle charger.i You can obtain information about tricklechargers from a qualified specialistworkshop.
If you leave the vehicle parked for longer thansix weeks, the vehicle may suffer damage asa result of lack of use.X Visit a qualified specialist workshop andseek advice.
Driving tips
General driving tips
Important safety notes
G WARNINGIf you switch off the ignition while driving,safety-relevant functions are only availablewith limitations, or not at all. This could affect,for example, the power steering and the brakeboosting effect. You will require considerablymore effort to steer and brake. There is a riskof an accident.
194 Driving tipsDrivingandparking
Do not switch off the ignition while driving.
G WARNINGIf you operate mobile communicationequipment while driving, you will bedistracted from traffic conditions. You couldalso lose control of the vehicle. There is a riskof an accident.Only operate this equipment when the vehicleis stationary.
Observe the legal requirements for thecountry in which you are driving. Somejurisdictions prohibit the driver from using amobile phone while driving a vehicle.If you make a call while driving, always usehands-freemode. Only operate the telephonewhen the traffic situation permits. If you areunsure, pull over to a safe location and stopbefore operating the telephone.Bear in mind that at a speed of only 30 mph(approximately 50 km/h) the vehicle coversa distance of 44 ft (approximately 14 m) persecond.
Drive sensibly – save fuelObserve the following tips to save fuel:X The tires should always be inflated to therecommended tire pressure.
X Remove unnecessary loads.X Remove roof racks when they are notneeded.
X Warm up the engine at low engine speeds.X Avoid frequent acceleration or braking.X Have all maintenance work carried out asindicated by the service intervals in theMaintenance Booklet or by the serviceinterval display.
Fuel consumption also increases whendriving in cold weather, in stop-start trafficand in hilly terrain.
Drinking and driving
G WARNINGDrinking and driving and/or taking drugs anddriving are very dangerous combinations.Even a small amount of alcohol or drugs canaffect your reflexes, perceptions andjudgment.The possibility of a serious or even fatalaccident is greatly increased when you drinkor take drugs and drive.Do not drink or take drugs and drive or allowanyone to drive who has been drinking ortaking drugs.
Emission control
G WARNINGCombustion engines emit poisonous exhaustgases such as carbon monoxide. Inhalingthese exhaust gases leads to poisoning. Thereis a risk of fatal injury. Therefore never leavethe engine running in enclosed spaceswithout sufficient ventilation.
Certain engine systems are designed to keepthe level of poisonous components in exhaustfumes within legal limits.These systems only work at peak efficiency ifthey are serviced exactly in accordance withthe manufacturer's specifications. For thisreason, all work on the enginemust be carriedout by qualified and authorized Mercedes-Benz technicians.The engine settings must not be changedunder any circumstances. Furthermore, allspecific service work must be carried out atregular intervals and in accordance with theMercedes-Benz service requirements. Detailscan be found in the Maintenance Booklet.
Driving tips 195
Drivingandparking
Z
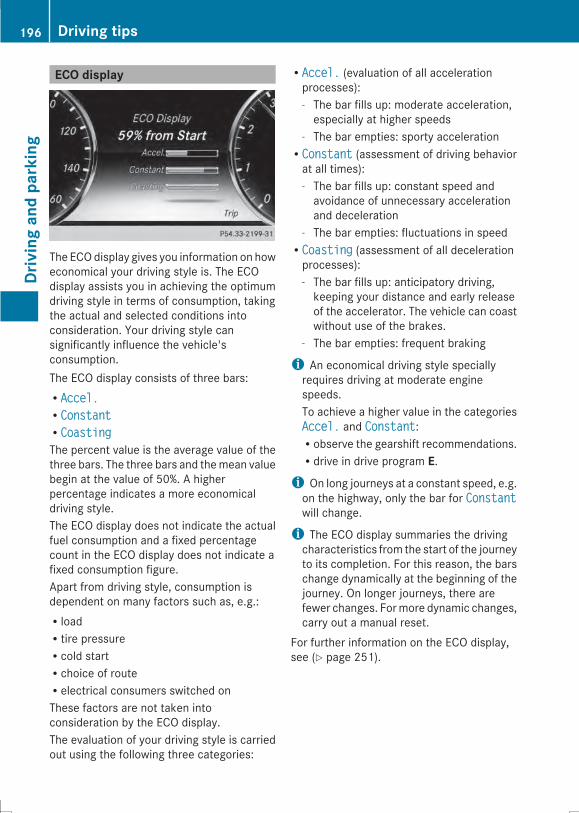
ECO display
The ECOdisplay gives you information on howeconomical your driving style is. The ECOdisplay assists you in achieving the optimumdriving style in terms of consumption, takingthe actual and selected conditions intoconsideration. Your driving style cansignificantly influence the vehicle'sconsumption.The ECO display consists of three bars:RAccel.Accel.RConstantConstantRCoastingCoastingThe percent value is the average value of thethree bars. The three bars and themean valuebegin at the value of 50%. A higherpercentage indicates a more economicaldriving style.The ECO display does not indicate the actualfuel consumption and a fixed percentagecount in the ECO display does not indicate afixed consumption figure.Apart from driving style, consumption isdependent on many factors such as, e.g.:RloadRtire pressureRcold startRchoice of routeRelectrical consumers switched onThese factors are not taken intoconsideration by the ECO display.The evaluation of your driving style is carriedout using the following three categories:
RAccel.Accel. (evaluation of all accelerationprocesses):- The bar fills up: moderate acceleration,especially at higher speeds
- The bar empties: sporty accelerationRConstantConstant (assessment of driving behaviorat all times):- The bar fills up: constant speed andavoidance of unnecessary accelerationand deceleration
- The bar empties: fluctuations in speedRCoastingCoasting (assessment of all decelerationprocesses):- The bar fills up: anticipatory driving,keeping your distance and early releaseof the accelerator. The vehicle can coastwithout use of the brakes.
- The bar empties: frequent braking
i An economical driving style speciallyrequires driving at moderate enginespeeds.To achieve a higher value in the categoriesAccel.Accel. and ConstantConstant:Robserve the gearshift recommendations.Rdrive in drive program E.i On long journeys at a constant speed, e.g.on the highway, only the bar for ConstantConstantwill change.
i The ECO display summaries the drivingcharacteristics from the start of the journeyto its completion. For this reason, the barschange dynamically at the beginning of thejourney. On longer journeys, there arefewer changes. Formore dynamic changes,carry out a manual reset.
For further information on the ECO display,see (Y page 251).
196 Driving tipsDrivingandparking
Braking
Important safety notes
G WARNINGIf you shift down on a slippery road surface inan attempt to increase the engine's brakingeffect, the drive wheels could lose their grip.There is an increased danger of skidding andaccidents.Do not shift down for additional enginebraking on a slippery road surface.
Downhill gradients! On long and steep gradients, you mustreduce the load on the brakes by shiftingearly to a lower gear. This allows you to takeadvantage of the engine braking effect andhelps avoid overheating and excessivewear of the brakes.When you take advantage of the enginebraking effect, a drive wheel may not turnfor some time, e.g. on a slippery roadsurface. This could cause damage to thedrive train. This type of damage is notcovered by the Mercedes-Benz warranty.
Heavy and light loads
G WARNINGIf you rest your foot on the brake pedal whiledriving, the braking system can overheat. Thisincreases the stopping distance and can evencause the braking system to fail. There is arisk of an accident.Never use the brake pedal as a footrest. Neverdepress the brake pedal and the acceleratorpedal at the same time.
! Depressing the brake pedal constantlyresults in excessive and premature wear tothe brake pads.
If the brakes have been subjected to a heavyload, do not stop the vehicle immediately.Drive on for a short while. This allows theairflow to cool the brakes more quickly.
Wet roadsIf you have driven for a long time in heavy rainwithout braking, there may be a delayedreaction from the brakeswhen braking for thefirst time. This may also occur after thevehicle has been washed or driven throughdeep water.You have to depress the brake pedal morefirmly. Maintain a greater distance from thevehicle in front.After driving on a wet road or having thevehicle washed, brake firmly while payingattention to the traffic conditions. This willwarm up the brake discs, thereby drying themmore quickly and protecting them againstcorrosion.
Limited braking performance on salt-treated roadsIf you drive on salted roads, a layer of saltresidue may form on the brake discs andbrake pads. This can result in a significantlylonger braking distance.RIn order to prevent any salt build-up, applythe brakes occasionally while payingattention to the traffic conditions.RCarefully depress the brake pedal and thebeginning and end of a journey.RMaintain a greater distance to the vehicleahead.
Servicing the brakes! If the red brake warning lamp lights up inthe instrument cluster and you hear awarning tone while the engine is running,the brake fluid level may be too low.Observe additional warning messages inthe multifunction display.The brake fluid level may be too low due tobrake pad wear or leaking brake lines.Have the brake system checkedimmediately. This work should be carriedout at a qualified specialist workshop.
Driving tips 197
Drivingandparking
Z
! Vehicles with 4MATIC: function orperformance tests may only be carried outon a 2-axle dynamometer. If you wish tooperate the vehicle on such adynamometer, please consult anauthorized Mercedes-Benz Center inadvance. You could otherwise damage thedrive train or the brake system.
! Vehicleswith 4MATIC: the ESP® systemoperates automatically. The engine and theignitionmust therefore be switched off (theSmartKey must be in position 0 or 1 in theignition lock or the Start/Stop button mustbe in position 0 or 1) if the electric parkingbrake is tested on a brake dynamometer.Braking triggered automatically by ESP®may cause severe damage to the brakesystem.
! Vehicles without 4MATIC: the ESP®system operates automatically. The engineand the ignitionmust therefore be switchedoff (the SmartKey must be in position 0 or1 in the ignition lock or the Start/Stopbutton must be in position 0 or 1) if:Rthe electric parking brake is tested usinga brake dynamometer.Rthe vehicle is towed with one axle raised.Braking triggered automatically by ESP®may cause severe damage to the brakesystem.
All checks and maintenance work on thebrake system must be carried out at aqualified specialist workshop. Consult aqualified specialist workshop to arrange this.Have brake pads installed and brake fluidreplaced at a qualified specialist workshop.If the brake system has only been subject tomoderate loads, you should test thefunctionality of your brakes at regularintervals.Information on BAS (Brake Assist)(Y page 75) and BAS PLUS (Brake AssistPLUS) (Y page 76).
For safety reasons, Mercedes-Benzrecommends only installing the followingbrake disks and brake pads/linings:Rbrake disks that have been approved byMercedes-BenzRbrake pads/linings that have beenapproved by Mercedes-Benz or that are ofan equivalent standard of quality
Other brake disks or brake pads/linings cancompromise the safety of your vehicle.Always replace all brake disks and brakepads/linings on an axle at the same time.Always install new brake pads/linings whenreplacing brake disks.The vehicle is equipped with lightweightbrake disks to which the wheel assembly withrim and threaded connection is matched.The use of brake disks other than thoseapproved by Mercedes-Benz can change thetrack width and is subject to approval, ifapplicable.Shock-type loads when handling the brakedisks, such as when changing wheels, canlead to a reduction in comfort when drivingwith lightweight brake disks. Avoid shock-type loads on the lightweight brake disks,particularly on the brake plate.Mercedes-Benz recommends that you onlyuse brake fluid that has been speciallyapproved for your vehicle by Mercedes-Benz,or which corresponds to an equivalent qualitystandard. Brake fluid which has not beenapproved for Mercedes-Benz vehicles orwhich is not of an equivalent quality couldaffect your vehicle's operating safety.
Driving on wet roads
HydroplaningIf water has accumulated to a certain depthon the road surface, there is a danger ofhydroplaning occurring, even if:Ryou drive at low speeds.Rthe tires have adequate tread depth.
198 Driving tipsDrivingandparking
For this reason, in the event of heavy rain orin conditions in which hydroplaning mayoccur, you must drive in the followingmanner:Rlower your speed.Ravoid ruts.Rbrake carefully.
Driving on flooded roads! Do not drive through flooded areas.Check the depth of anywater before drivingthrough it. Drive slowly through standingwater. Otherwise, water may enter thevehicle interior or the engine compartment.This can damage the electroniccomponents in the engine or the automatictransmission. Water can also be drawn inby the engine's air suction nozzles and thiscan cause engine damage.
Winter driving
General notes
G WARNINGIf you shift down on a slippery road surface inan attempt to increase the engine's brakingeffect, the drive wheels could lose their grip.There is an increased danger of skidding andaccidents.Do not shift down for additional enginebraking on a slippery road surface.
G DANGERIf the exhaust pipe is blocked or adequateventilation is not possible, poisonous gasessuch as carbon monoxide (CO) may enter thevehicle. This is the case, e.g. if the vehiclebecomes trapped in snow. There is a risk offatal injury.If you leave the engine or the auxiliary heatingrunning, make sure the exhaust pipe and areaaround the vehicle are clear of snow. Toensure an adequate supply of fresh air, open
a window on the side of the vehicle that is notfacing into the wind.
Have your vehicle winterproofed at a qualifiedspecialist workshop at the onset of winter.Observe the notes in the "Winter operation"section (Y page 618).
Driving with summer tiresObserve the notes on driving with summertires in the "Winter operation" section(Y page 618).
Slippery road surfaces
G WARNINGIf you shift down on a slippery road surface inan attempt to increase the engine's brakingeffect, the drive wheels could lose their grip.There is an increased danger of skidding andaccidents.Do not shift down for additional enginebraking on a slippery road surface.
If the vehicle threatens to skid or cannot bestopped when moving at low speed:X Shift the transmission to position N.
i For more information on driving withsnow chains, see (Y page 619).
Drive particularly carefully on slippery roadsurfaces. Avoid sudden acceleration, steeringand brakingmaneuvers. Do not use the cruisecontrol or DISTRONIC PLUS.The outside temperature indicator is notdesigned to serve as an ice-warning deviceand is therefore unsuitable for that purpose.Changes in the outside temperature aredisplayed after a short delay.Indicated temperatures just above thefreezing point do not guarantee that the roadsurface is free of ice. The roadmay still be icy,especially in wooded areas or on bridges. Youshould pay special attention to roadconditions when temperatures are aroundthe freezing point.
Driving tips 199
Drivingandparking
Z
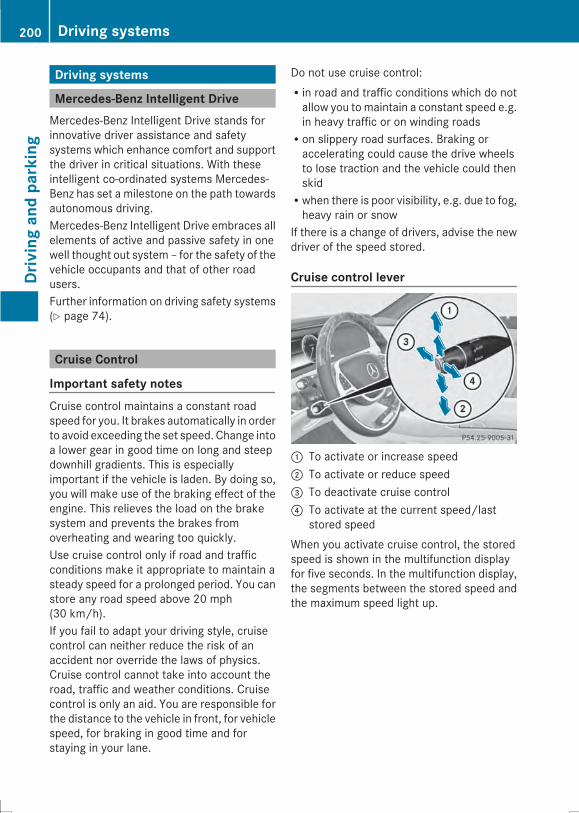
Driving systems
Mercedes-Benz Intelligent DriveMercedes-Benz Intelligent Drive stands forinnovative driver assistance and safetysystems which enhance comfort and supportthe driver in critical situations. With theseintelligent co-ordinated systems Mercedes-Benz has set a milestone on the path towardsautonomous driving.Mercedes-Benz Intelligent Drive embraces allelements of active and passive safety in onewell thought out system – for the safety of thevehicle occupants and that of other roadusers.Further information on driving safety systems(Y page 74).
Cruise Control
Important safety notesCruise control maintains a constant roadspeed for you. It brakes automatically in orderto avoid exceeding the set speed. Change intoa lower gear in good time on long and steepdownhill gradients. This is especiallyimportant if the vehicle is laden. By doing so,you will make use of the braking effect of theengine. This relieves the load on the brakesystem and prevents the brakes fromoverheating and wearing too quickly.Use cruise control only if road and trafficconditions make it appropriate to maintain asteady speed for a prolonged period. You canstore any road speed above 20 mph(30 km/h).If you fail to adapt your driving style, cruisecontrol can neither reduce the risk of anaccident nor override the laws of physics.Cruise control cannot take into account theroad, traffic and weather conditions. Cruisecontrol is only an aid. You are responsible forthe distance to the vehicle in front, for vehiclespeed, for braking in good time and forstaying in your lane.
Do not use cruise control:Rin road and traffic conditions which do notallow you to maintain a constant speed e.g.in heavy traffic or on winding roadsRon slippery road surfaces. Braking oraccelerating could cause the drive wheelsto lose traction and the vehicle could thenskidRwhen there is poor visibility, e.g. due to fog,heavy rain or snow
If there is a change of drivers, advise the newdriver of the speed stored.
Cruise control lever
: To activate or increase speed; To activate or reduce speed= To deactivate cruise control? To activate at the current speed/last
stored speedWhen you activate cruise control, the storedspeed is shown in the multifunction displayfor five seconds. In the multifunction display,the segments between the stored speed andthe maximum speed light up.
200 Driving systemsDrivingandparking
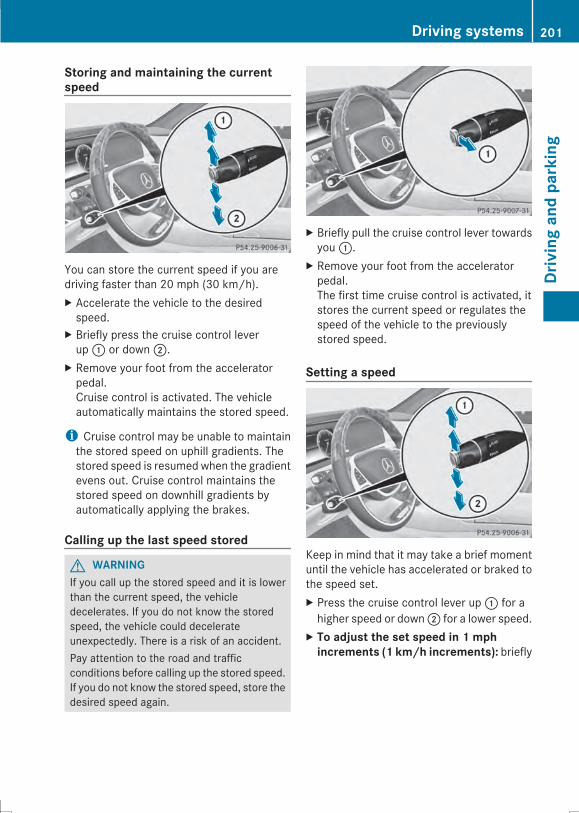
Storing and maintaining the currentspeed
You can store the current speed if you aredriving faster than 20 mph (30 km/h).X Accelerate the vehicle to the desiredspeed.
X Briefly press the cruise control leverup: or down;.
X Remove your foot from the acceleratorpedal.Cruise control is activated. The vehicleautomatically maintains the stored speed.
i Cruise control may be unable to maintainthe stored speed on uphill gradients. Thestored speed is resumed when the gradientevens out. Cruise control maintains thestored speed on downhill gradients byautomatically applying the brakes.
Calling up the last speed stored
G WARNINGIf you call up the stored speed and it is lowerthan the current speed, the vehicledecelerates. If you do not know the storedspeed, the vehicle could decelerateunexpectedly. There is a risk of an accident.Pay attention to the road and trafficconditions before calling up the stored speed.If you do not know the stored speed, store thedesired speed again.
X Briefly pull the cruise control lever towardsyou:.
X Remove your foot from the acceleratorpedal.The first time cruise control is activated, itstores the current speed or regulates thespeed of the vehicle to the previouslystored speed.
Setting a speed
Keep in mind that it may take a brief momentuntil the vehicle has accelerated or braked tothe speed set.X Press the cruise control lever up: for ahigher speed or down; for a lower speed.
X To adjust the set speed in 1 mphincrements (1 km/h increments): briefly
Driving systems 201
Drivingandparking
Z
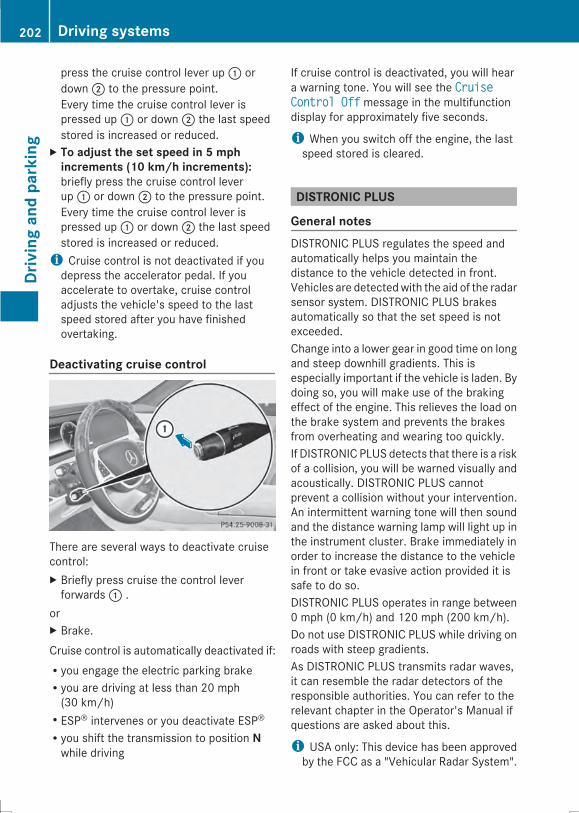
press the cruise control lever up: ordown; to the pressure point.Every time the cruise control lever ispressed up: or down; the last speedstored is increased or reduced.
X To adjust the set speed in 5 mphincrements (10 km/h increments):briefly press the cruise control leverup: or down; to the pressure point.Every time the cruise control lever ispressed up: or down; the last speedstored is increased or reduced.i Cruise control is not deactivated if youdepress the accelerator pedal. If youaccelerate to overtake, cruise controladjusts the vehicle's speed to the lastspeed stored after you have finishedovertaking.
Deactivating cruise control
There are several ways to deactivate cruisecontrol:X Briefly press cruise the control leverforwards: .
orX Brake.Cruise control is automatically deactivated if:Ryou engage the electric parking brakeRyou are driving at less than 20 mph(30 km/h)RESP® intervenes or you deactivate ESP®Ryou shift the transmission to position Nwhile driving
If cruise control is deactivated, you will heara warning tone. You will see the CruiseCruiseControl OffControl Off message in the multifunctiondisplay for approximately five seconds.
i When you switch off the engine, the lastspeed stored is cleared.
DISTRONIC PLUS
General notesDISTRONIC PLUS regulates the speed andautomatically helps you maintain thedistance to the vehicle detected in front.Vehicles are detectedwith the aid of the radarsensor system. DISTRONIC PLUS brakesautomatically so that the set speed is notexceeded.Change into a lower gear in good time on longand steep downhill gradients. This isespecially important if the vehicle is laden. Bydoing so, you will make use of the brakingeffect of the engine. This relieves the load onthe brake system and prevents the brakesfrom overheating and wearing too quickly.If DISTRONIC PLUS detects that there is a riskof a collision, you will be warned visually andacoustically. DISTRONIC PLUS cannotprevent a collision without your intervention.An intermittent warning tone will then soundand the distance warning lamp will light up inthe instrument cluster. Brake immediately inorder to increase the distance to the vehiclein front or take evasive action provided it issafe to do so.DISTRONIC PLUS operates in range between0 mph (0 km/h) and 120 mph (200 km/h).Do not use DISTRONIC PLUS while driving onroads with steep gradients.As DISTRONIC PLUS transmits radar waves,it can resemble the radar detectors of theresponsible authorities. You can refer to therelevant chapter in the Operator's Manual ifquestions are asked about this.
i USA only: This device has been approvedby the FCC as a "Vehicular Radar System".
202 Driving systemsDrivingandparking
The radar sensor is intended for use in anautomotive radar system only. Removal,tampering, or altering of the devicewill voidany warranties, and is not permitted by theFCC. Do not tamper with, alter, or use inany non-approved way.Any unauthorized modification to thisdevice could void the user's authority tooperate the equipment.
i Canada only: This device complies withRSS-210 of Industry Canada. Operation issubject to the following two conditions:1. This device may not cause harmfulinterference, and2. this device must accept any interferencereceived, including interference that maycause undesired operation of the device.Removal, tampering, or altering of thedevice will void any warranties, and is notpermitted. Do not tamper with, alter, or usein any non-approved way.Any unauthorized modification to thisdevice could void the user's authority tooperate the equipment.
Important safety notes
G WARNINGDISTRONIC PLUS does not react to:Rpeople or animalsRstationary obstacles on the road, e.g.stopped or parked vehiclesRoncoming and crossing trafficAs a result, DISTRONIC PLUSmay neither givewarnings nor intervene in such situations.There is a risk of an accident.Always pay careful attention to the trafficsituation and be ready to brake.
G WARNINGDISTRONIC PLUS cannot always clearlyidentify other road users and complex trafficsituations.
In such cases, DISTRONIC PLUS may:Rgive an unnecessary warning and thenbrake the vehicleRneither give a warning nor interveneRaccelerate unexpectedlyThere is a risk of an accident.Continue to drive carefully and be ready tobrake, in particular when warned to do so byDISTRONIC PLUS.
G WARNINGDISTRONIC PLUS brakes your vehicle with upto 50% of themaximumpossible deceleration.If this braking force is insufficient, DISTRONICPLUS warns you visually and audibly. There isa risk of an accident.In such cases, apply the brakes yourself andtry to take evasive action.
! If DISTRONIC PLUS or the HOLD functionis activated, the vehicle brakesautomatically in certain situations. Toprevent damage to the vehicle, deactivateDISTRONIC PLUS and the HOLD function inthe following or other similar situations:Rwhen towing the vehicleRin the car wash
If you fail to adapt your driving style,DISTRONIC PLUS can neither reduce the riskof accident nor override the laws of physics.DISTRONIC PLUS cannot take into accountthe road, traffic and weather conditions.DISTRONIC PLUS is only an aid. You areresponsible for the distance to the vehicle infront, for vehicle speed, for braking in goodtime and for staying in your lane.Do not use DISTRONIC PLUS:Rin road and traffic conditions which do notallow you to maintain a constant speed e.g.in heavy traffic or on winding roadsRon slippery road surfaces. Braking oraccelerating could cause the drive wheels
Driving systems 203
Drivingandparking
Z
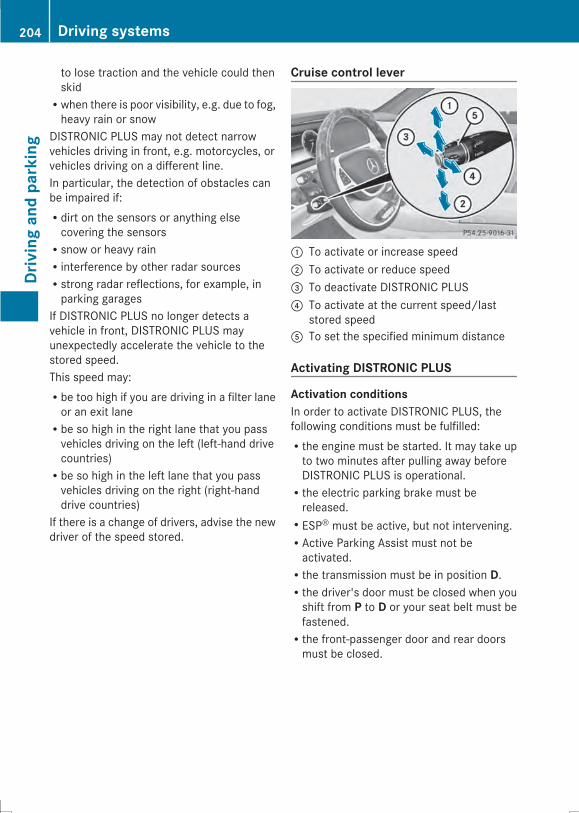
to lose traction and the vehicle could thenskidRwhen there is poor visibility, e.g. due to fog,heavy rain or snow
DISTRONIC PLUS may not detect narrowvehicles driving in front, e.g. motorcycles, orvehicles driving on a different line.In particular, the detection of obstacles canbe impaired if:Rdirt on the sensors or anything elsecovering the sensorsRsnow or heavy rainRinterference by other radar sourcesRstrong radar reflections, for example, inparking garages
If DISTRONIC PLUS no longer detects avehicle in front, DISTRONIC PLUS mayunexpectedly accelerate the vehicle to thestored speed.This speed may:Rbe too high if you are driving in a filter laneor an exit laneRbe so high in the right lane that you passvehicles driving on the left (left-hand drivecountries)Rbe so high in the left lane that you passvehicles driving on the right (right-handdrive countries)
If there is a change of drivers, advise the newdriver of the speed stored.
Cruise control lever
: To activate or increase speed; To activate or reduce speed= To deactivate DISTRONIC PLUS? To activate at the current speed/last
stored speedA To set the specified minimum distance
Activating DISTRONIC PLUS
Activation conditionsIn order to activate DISTRONIC PLUS, thefollowing conditions must be fulfilled:Rthe engine must be started. It may take upto two minutes after pulling away beforeDISTRONIC PLUS is operational.Rthe electric parking brake must bereleased.RESP® must be active, but not intervening.RActive Parking Assist must not beactivated.Rthe transmission must be in position D.Rthe driver's door must be closed when youshift from P to D or your seat belt must befastened.Rthe front-passenger door and rear doorsmust be closed.
204 Driving systemsDrivingandparking
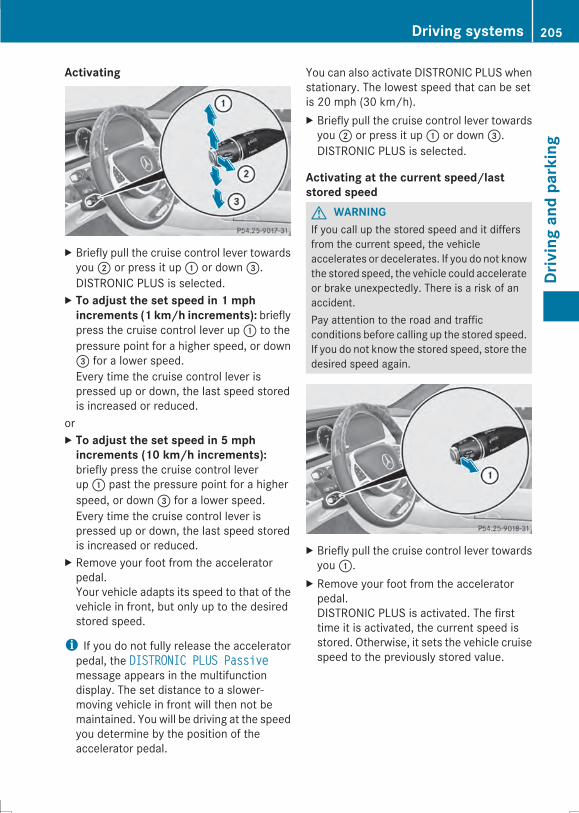
Activating
X Briefly pull the cruise control lever towardsyou; or press it up: or down=.DISTRONIC PLUS is selected.
X To adjust the set speed in 1 mphincrements (1 km/h increments): brieflypress the cruise control lever up: to thepressure point for a higher speed, or down= for a lower speed.Every time the cruise control lever ispressed up or down, the last speed storedis increased or reduced.
orX To adjust the set speed in 5 mphincrements (10 km/h increments):briefly press the cruise control leverup: past the pressure point for a higherspeed, or down= for a lower speed.Every time the cruise control lever ispressed up or down, the last speed storedis increased or reduced.
X Remove your foot from the acceleratorpedal.Your vehicle adapts its speed to that of thevehicle in front, but only up to the desiredstored speed.
i If you do not fully release the acceleratorpedal, the DISTRONIC PLUS PassiveDISTRONIC PLUS Passivemessage appears in the multifunctiondisplay. The set distance to a slower-moving vehicle in front will then not bemaintained. You will be driving at the speedyou determine by the position of theaccelerator pedal.
You can also activate DISTRONIC PLUS whenstationary. The lowest speed that can be setis 20 mph (30 km/h).X Briefly pull the cruise control lever towardsyou; or press it up: or down=.DISTRONIC PLUS is selected.
Activating at the current speed/laststored speedG WARNINGIf you call up the stored speed and it differsfrom the current speed, the vehicleaccelerates or decelerates. If you do not knowthe stored speed, the vehicle could accelerateor brake unexpectedly. There is a risk of anaccident.Pay attention to the road and trafficconditions before calling up the stored speed.If you do not know the stored speed, store thedesired speed again.
X Briefly pull the cruise control lever towardsyou:.
X Remove your foot from the acceleratorpedal.DISTRONIC PLUS is activated. The firsttime it is activated, the current speed isstored. Otherwise, it sets the vehicle cruisespeed to the previously stored value.
Driving systems 205
Drivingandparking
Z
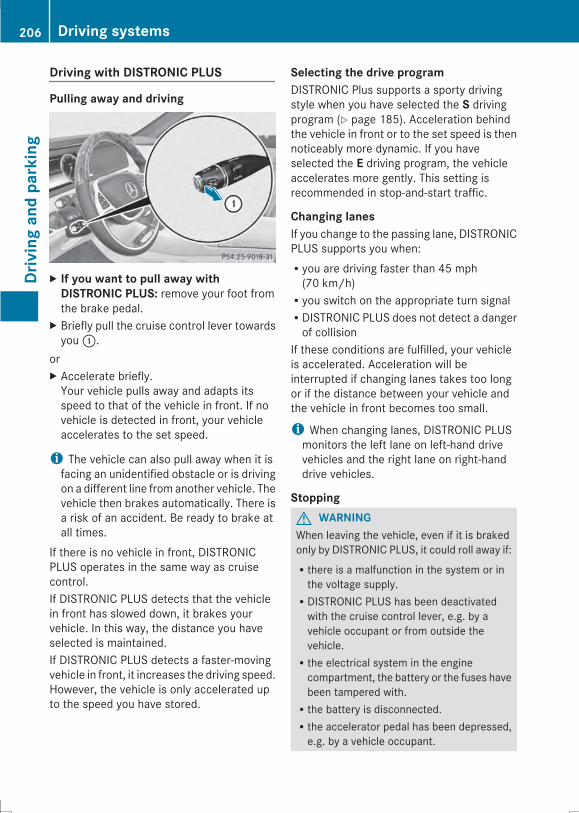
Driving with DISTRONIC PLUS
Pulling away and driving
X If you want to pull away withDISTRONIC PLUS: remove your foot fromthe brake pedal.
X Briefly pull the cruise control lever towardsyou:.
orX Accelerate briefly.Your vehicle pulls away and adapts itsspeed to that of the vehicle in front. If novehicle is detected in front, your vehicleaccelerates to the set speed.
i The vehicle can also pull away when it isfacing an unidentified obstacle or is drivingon a different line from another vehicle. Thevehicle then brakes automatically. There isa risk of an accident. Be ready to brake atall times.
If there is no vehicle in front, DISTRONICPLUS operates in the same way as cruisecontrol.If DISTRONIC PLUS detects that the vehiclein front has slowed down, it brakes yourvehicle. In this way, the distance you haveselected is maintained.If DISTRONIC PLUS detects a faster-movingvehicle in front, it increases the driving speed.However, the vehicle is only accelerated upto the speed you have stored.
Selecting the drive programDISTRONIC Plus supports a sporty drivingstyle when you have selected the S drivingprogram (Y page 185). Acceleration behindthe vehicle in front or to the set speed is thennoticeably more dynamic. If you haveselected the E driving program, the vehicleaccelerates more gently. This setting isrecommended in stop-and-start traffic.
Changing lanesIf you change to the passing lane, DISTRONICPLUS supports you when:Ryou are driving faster than 45 mph(70 km/h)Ryou switch on the appropriate turn signalRDISTRONIC PLUS does not detect a dangerof collision
If these conditions are fulfilled, your vehicleis accelerated. Acceleration will beinterrupted if changing lanes takes too longor if the distance between your vehicle andthe vehicle in front becomes too small.
i When changing lanes, DISTRONIC PLUSmonitors the left lane on left-hand drivevehicles and the right lane on right-handdrive vehicles.
StoppingG WARNINGWhen leaving the vehicle, even if it is brakedonly by DISTRONIC PLUS, it could roll away if:Rthere is a malfunction in the system or inthe voltage supply.RDISTRONIC PLUS has been deactivatedwith the cruise control lever, e.g. by avehicle occupant or from outside thevehicle.Rthe electrical system in the enginecompartment, the battery or the fuses havebeen tampered with.Rthe battery is disconnected.Rthe accelerator pedal has been depressed,e.g. by a vehicle occupant.
206 Driving systemsDrivingandparking
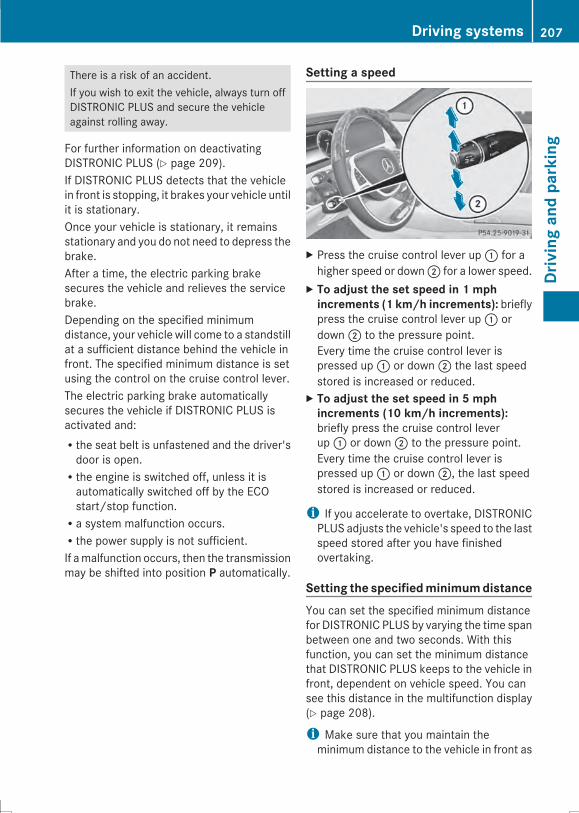
There is a risk of an accident.If you wish to exit the vehicle, always turn offDISTRONIC PLUS and secure the vehicleagainst rolling away.
For further information on deactivatingDISTRONIC PLUS (Y page 209).If DISTRONIC PLUS detects that the vehiclein front is stopping, it brakes your vehicle untilit is stationary.Once your vehicle is stationary, it remainsstationary and you do not need to depress thebrake.After a time, the electric parking brakesecures the vehicle and relieves the servicebrake.Depending on the specified minimumdistance, your vehicle will come to a standstillat a sufficient distance behind the vehicle infront. The specified minimum distance is setusing the control on the cruise control lever.The electric parking brake automaticallysecures the vehicle if DISTRONIC PLUS isactivated and:Rthe seat belt is unfastened and the driver'sdoor is open.Rthe engine is switched off, unless it isautomatically switched off by the ECOstart/stop function.Ra system malfunction occurs.Rthe power supply is not sufficient.If amalfunction occurs, then the transmissionmay be shifted into position P automatically.
Setting a speed
X Press the cruise control lever up: for ahigher speed or down; for a lower speed.
X To adjust the set speed in 1 mphincrements (1 km/h increments): brieflypress the cruise control lever up: ordown; to the pressure point.Every time the cruise control lever ispressed up: or down; the last speedstored is increased or reduced.
X To adjust the set speed in 5 mphincrements (10 km/h increments):briefly press the cruise control leverup: or down; to the pressure point.Every time the cruise control lever ispressed up: or down;, the last speedstored is increased or reduced.
i If you accelerate to overtake, DISTRONICPLUS adjusts the vehicle's speed to the lastspeed stored after you have finishedovertaking.
Setting the specifiedminimumdistanceYou can set the specified minimum distancefor DISTRONIC PLUS by varying the time spanbetween one and two seconds. With thisfunction, you can set the minimum distancethat DISTRONIC PLUS keeps to the vehicle infront, dependent on vehicle speed. You cansee this distance in the multifunction display(Y page 208).
i Make sure that you maintain theminimum distance to the vehicle in front as
Driving systems 207
Drivingandparking
Z
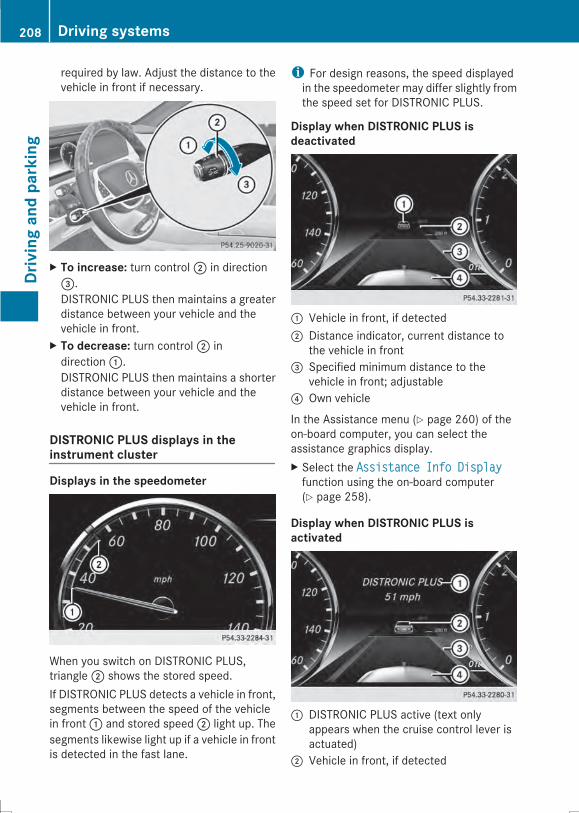
required by law. Adjust the distance to thevehicle in front if necessary.
X To increase: turn control; in direction=.DISTRONIC PLUS then maintains a greaterdistance between your vehicle and thevehicle in front.
X To decrease: turn control; indirection:.DISTRONIC PLUS then maintains a shorterdistance between your vehicle and thevehicle in front.
DISTRONIC PLUS displays in theinstrument cluster
Displays in the speedometer
When you switch on DISTRONIC PLUS,triangle; shows the stored speed.If DISTRONIC PLUS detects a vehicle in front,segments between the speed of the vehiclein front: and stored speed; light up. Thesegments likewise light up if a vehicle in frontis detected in the fast lane.
i For design reasons, the speed displayedin the speedometer may differ slightly fromthe speed set for DISTRONIC PLUS.
Display when DISTRONIC PLUS isdeactivated
: Vehicle in front, if detected; Distance indicator, current distance to
the vehicle in front= Specified minimum distance to the
vehicle in front; adjustable? Own vehicle
In the Assistance menu (Y page 260) of theon-board computer, you can select theassistance graphics display.X Select the Assistance Info DisplayAssistance Info Displayfunction using the on-board computer(Y page 258).
Display when DISTRONIC PLUS isactivated
: DISTRONIC PLUS active (text onlyappears when the cruise control lever isactuated)
; Vehicle in front, if detected
208 Driving systemsDrivingandparking
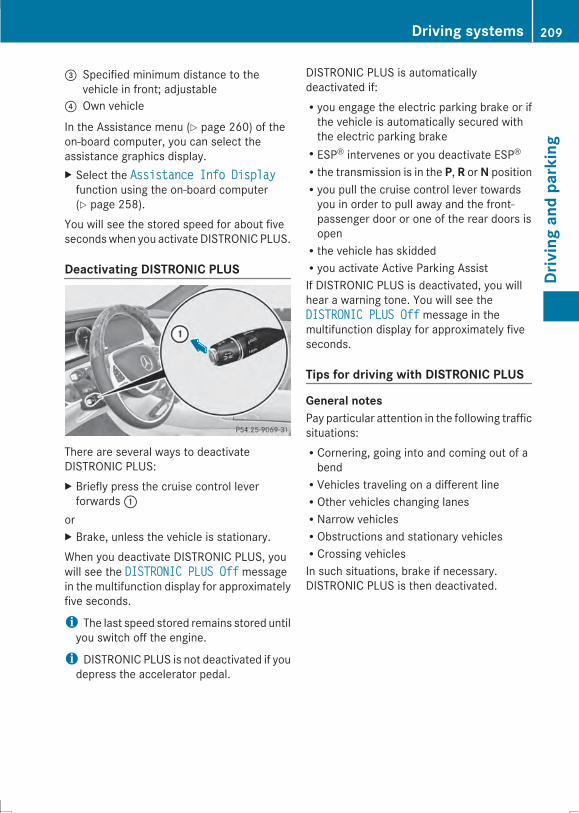
= Specified minimum distance to thevehicle in front; adjustable
? Own vehicle
In the Assistance menu (Y page 260) of theon-board computer, you can select theassistance graphics display.X Select the Assistance Info DisplayAssistance Info Displayfunction using the on-board computer(Y page 258).
You will see the stored speed for about fivesecondswhen you activateDISTRONIC PLUS.
Deactivating DISTRONIC PLUS
There are several ways to deactivateDISTRONIC PLUS:X Briefly press the cruise control leverforwards:
orX Brake, unless the vehicle is stationary.When you deactivate DISTRONIC PLUS, youwill see the DISTRONIC PLUS OffDISTRONIC PLUS Off messagein the multifunction display for approximatelyfive seconds.
i The last speed stored remains stored untilyou switch off the engine.
i DISTRONIC PLUS is not deactivated if youdepress the accelerator pedal.
DISTRONIC PLUS is automaticallydeactivated if:Ryou engage the electric parking brake or ifthe vehicle is automatically secured withthe electric parking brakeRESP® intervenes or you deactivate ESP®Rthe transmission is in the P, R orN positionRyou pull the cruise control lever towardsyou in order to pull away and the front-passenger door or one of the rear doors isopenRthe vehicle has skiddedRyou activate Active Parking AssistIf DISTRONIC PLUS is deactivated, you willhear a warning tone. You will see theDISTRONIC PLUS OffDISTRONIC PLUS Off message in themultifunction display for approximately fiveseconds.
Tips for driving with DISTRONIC PLUS
General notesPay particular attention in the following trafficsituations:RCornering, going into and coming out of abendRVehicles traveling on a different lineROther vehicles changing lanesRNarrow vehiclesRObstructions and stationary vehiclesRCrossing vehiclesIn such situations, brake if necessary.DISTRONIC PLUS is then deactivated.
Driving systems 209
Drivingandparking
Z
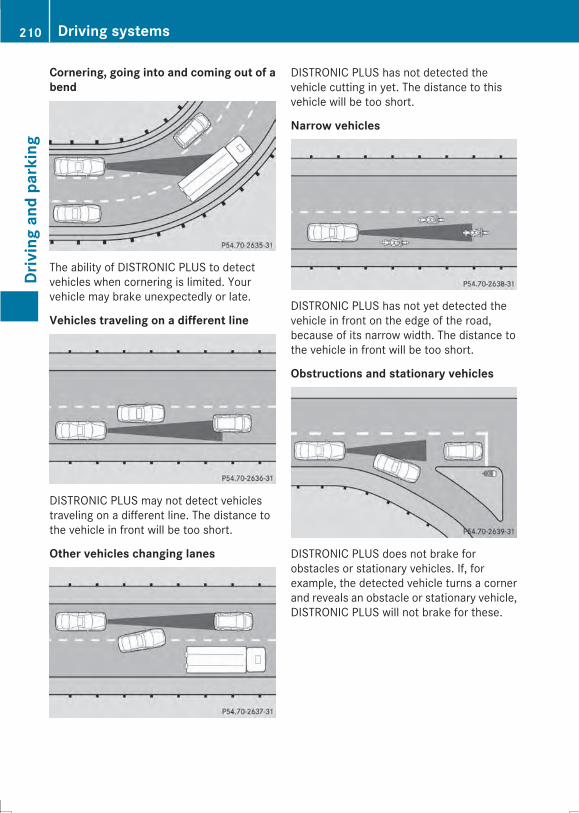
Cornering, going into and coming out of abend
The ability of DISTRONIC PLUS to detectvehicles when cornering is limited. Yourvehicle may brake unexpectedly or late.
Vehicles traveling on a different line
DISTRONIC PLUS may not detect vehiclestraveling on a different line. The distance tothe vehicle in front will be too short.
Other vehicles changing lanes
DISTRONIC PLUS has not detected thevehicle cutting in yet. The distance to thisvehicle will be too short.
Narrow vehicles
DISTRONIC PLUS has not yet detected thevehicle in front on the edge of the road,because of its narrow width. The distance tothe vehicle in front will be too short.
Obstructions and stationary vehicles
DISTRONIC PLUS does not brake forobstacles or stationary vehicles. If, forexample, the detected vehicle turns a cornerand reveals an obstacle or stationary vehicle,DISTRONIC PLUS will not brake for these.
210 Driving systemsDrivingandparking
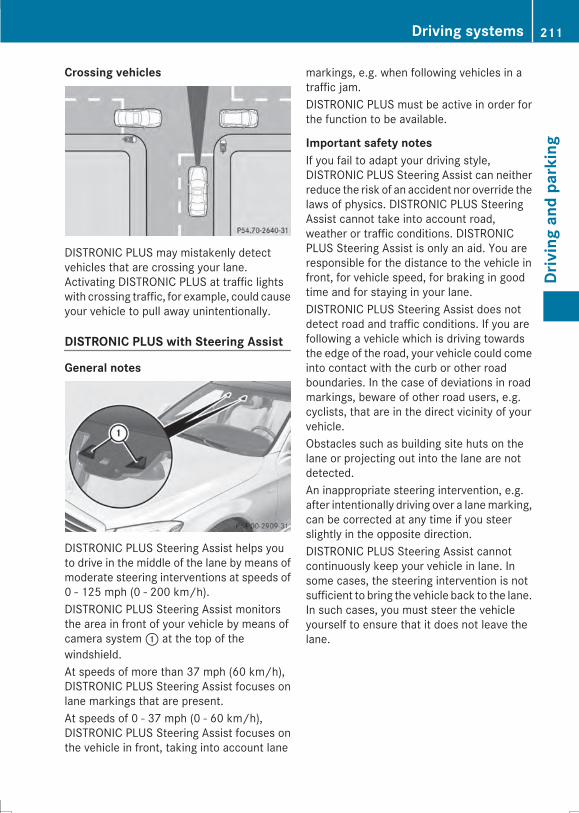
Crossing vehicles
DISTRONIC PLUS may mistakenly detectvehicles that are crossing your lane.Activating DISTRONIC PLUS at traffic lightswith crossing traffic, for example, could causeyour vehicle to pull away unintentionally.
DISTRONIC PLUS with Steering Assist
General notes
DISTRONIC PLUS Steering Assist helps youto drive in the middle of the lane by means ofmoderate steering interventions at speeds of0 - 125 mph (0 - 200 km/h).DISTRONIC PLUS Steering Assist monitorsthe area in front of your vehicle by means ofcamera system: at the top of thewindshield.At speeds of more than 37 mph (60 km/h),DISTRONIC PLUS Steering Assist focuses onlane markings that are present.At speeds of 0 - 37 mph (0 - 60 km/h),DISTRONIC PLUS Steering Assist focuses onthe vehicle in front, taking into account lane
markings, e.g. when following vehicles in atraffic jam.DISTRONIC PLUS must be active in order forthe function to be available.
Important safety notesIf you fail to adapt your driving style,DISTRONIC PLUS Steering Assist can neitherreduce the risk of an accident nor override thelaws of physics. DISTRONIC PLUS SteeringAssist cannot take into account road,weather or traffic conditions. DISTRONICPLUS Steering Assist is only an aid. You areresponsible for the distance to the vehicle infront, for vehicle speed, for braking in goodtime and for staying in your lane.DISTRONIC PLUS Steering Assist does notdetect road and traffic conditions. If you arefollowing a vehicle which is driving towardsthe edge of the road, your vehicle could comeinto contact with the curb or other roadboundaries. In the case of deviations in roadmarkings, beware of other road users, e.g.cyclists, that are in the direct vicinity of yourvehicle.Obstacles such as building site huts on thelane or projecting out into the lane are notdetected.An inappropriate steering intervention, e.g.after intentionally driving over a lanemarking,can be corrected at any time if you steerslightly in the opposite direction.DISTRONIC PLUS Steering Assist cannotcontinuously keep your vehicle in lane. Insome cases, the steering intervention is notsufficient to bring the vehicle back to the lane.In such cases, you must steer the vehicleyourself to ensure that it does not leave thelane.
Driving systems 211
Drivingandparking
Z
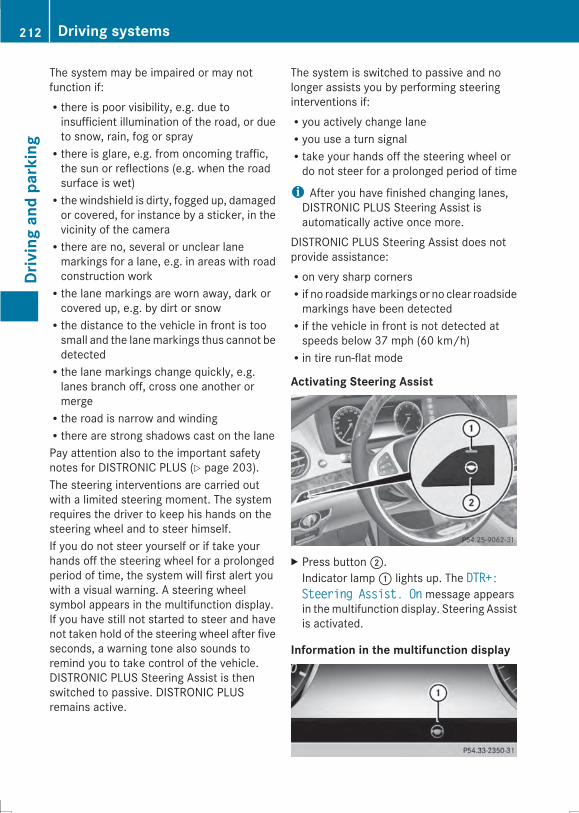
The system may be impaired or may notfunction if:Rthere is poor visibility, e.g. due toinsufficient illumination of the road, or dueto snow, rain, fog or sprayRthere is glare, e.g. from oncoming traffic,the sun or reflections (e.g. when the roadsurface is wet)Rthe windshield is dirty, fogged up, damagedor covered, for instance by a sticker, in thevicinity of the cameraRthere are no, several or unclear lanemarkings for a lane, e.g. in areas with roadconstruction workRthe lane markings are worn away, dark orcovered up, e.g. by dirt or snowRthe distance to the vehicle in front is toosmall and the lanemarkings thus cannot bedetectedRthe lane markings change quickly, e.g.lanes branch off, cross one another ormergeRthe road is narrow and windingRthere are strong shadows cast on the lanePay attention also to the important safetynotes for DISTRONIC PLUS (Y page 203).The steering interventions are carried outwith a limited steering moment. The systemrequires the driver to keep his hands on thesteering wheel and to steer himself.If you do not steer yourself or if take yourhands off the steering wheel for a prolongedperiod of time, the system will first alert youwith a visual warning. A steering wheelsymbol appears in the multifunction display.If you have still not started to steer and havenot taken hold of the steering wheel after fiveseconds, a warning tone also sounds toremind you to take control of the vehicle.DISTRONIC PLUS Steering Assist is thenswitched to passive. DISTRONIC PLUSremains active.
The system is switched to passive and nolonger assists you by performing steeringinterventions if:Ryou actively change laneRyou use a turn signalRtake your hands off the steering wheel ordo not steer for a prolonged period of time
i After you have finished changing lanes,DISTRONIC PLUS Steering Assist isautomatically active once more.
DISTRONIC PLUS Steering Assist does notprovide assistance:Ron very sharp cornersRif no roadsidemarkings or no clear roadsidemarkings have been detectedRif the vehicle in front is not detected atspeeds below 37 mph (60 km/h)Rin tire run-flat mode
Activating Steering Assist
X Press button;.Indicator lamp: lights up. The DTR+:DTR+:Steering Assist. OnSteering Assist. On message appearsin themultifunction display. Steering Assistis activated.
Information in the multifunction display
212 Driving systemsDrivingandparking

If DISTRONIC PLUS Steering Assist isactivated but is not ready for a steeringintervention, steering wheel symbol:appears in gray. If the system provides youwith support by means of steeringinterventions, symbol: is shown in green.
Deactivating Steering Assist
X Press button;.Indicator lamp: goes out. The DTR+:DTR+:SteeringSteering Assist.Assist. OffOffmessage appearsin themultifunction display. Steering Assistis deactivated.
When DISTRONIC PLUS is deactivated,DISTRONIC PLUS Steering Assist isdeactivated automatically.
HOLD function
General notesThe HOLD function can assist the driver in thefollowing situations:Rwhen pulling away, especially on steepslopesRwhen maneuvering on steep slopesRwhen waiting in trafficThe vehicle is kept stationary without thedriver having to depress the brake pedal.The braking effect is canceled and the HOLDfunction deactivated when you depress theaccelerator pedal to pull away.
Important safety notes
G WARNINGWhen leaving the vehicle, it can still roll awaydespite being braked by the HOLD function if:Rthere is a malfunction in the system or inthe voltage supply.Rthe HOLD function has been deactivated bypressing the accelerator pedal or the brakepedal, e.g. by a vehicle occupant.Rthe electrical system in the enginecompartment, the battery or the fuses havebeen tampered with.Rthe battery is disconnectedThere is a risk of an accident.If you wish to exit the vehicle, always turn offthe HOLD function and secure the vehicleagainst rolling away.
! If DISTRONIC PLUS or the HOLD functionis activated, the vehicle brakesautomatically in certain situations. Toprevent damage to the vehicle, deactivateDISTRONIC PLUS and the HOLD function inthe following or other similar situations:Rwhen towing the vehicleRin the car wash
Activation conditionsYou can activate the HOLD function if all ofthe following conditions are fulfilled:Rthe vehicle is stationary.Rthe engine is running or if it has beenautomatically switched off by the ECOstart/stop function.Rthe driver's door is closed or your seat beltis fastened.Rthe electric parking brake is released.Rthe transmission is in position D, R or N.RDISTRONIC PLUS is deactivated.
Driving systems 213
Drivingandparking
Z

Activating the HOLD function
X Make sure that the activation conditionsare met.
X Depress the brake pedal.X Quickly depress the brake pedal furtheruntil: appears in the multifunctiondisplay.The HOLD function is activated. You canrelease the brake pedal.
i If depressing the brake pedal the firsttime does not activate the HOLD function,wait briefly and then try again.
Deactivating the HOLD functionThe HOLD function is deactivatedautomatically if:Ryou accelerate and the transmission is inposition D or R.Ryou shift the transmission to position P.Ryou depress the brake pedal again with acertain amount of pressure untilëdisappears from the multifunction display.Ryou secure the vehicle using the electricparking brake.Ryou activate DISTRONIC PLUS.
i After a time, the electric parking brakesecures the vehicle and relieves the servicebrake. The HOLD function is thendeactivated.
The electric parking brake automaticallysecures the vehicle if the HOLD function isactivated and:Rthe driver's door is open and the driver'sseat belt is unfastened.Rthe engine is switched off, unless it isautomatically switched off by the ECOstart/stop function.Ra system malfunction occurs.Rthe power supply is not sufficient.If amalfunction occurs, then the transmissionmay be shifted into position P automatically.
Magic Body Control
General notesMagic Body Control consists of Active BodyControl (ABC), ROAD SURFACE SCAN as wellas automatic vehicle stabilization in the eventof a crosswind.Your vehicle automatically adjusts its rideheight to improve driving safety and reducefuel consumption. The suspension mode isadjusted according to your selection (sportsor comfort), the road condition and thevehicle load. A multifunction camera detectsbumps in the road surface before the vehicledrives over them. This reduces chassismovements.
Important safety notes
G WARNINGWhen the vehicle is being lowered, peoplecould become trapped if their limbs arebetween the vehicle body and the wheels orunderneath the vehicle. There is a risk ofinjury.Make sure no one is underneath the vehicleor in the immediate vicinity of the wheelarches when the vehicle is being lowered.
! The vehicle is lowered when the engine isswitched off. When parking, position yourvehicle so that it does not make contact
214 Driving systemsDrivingandparking
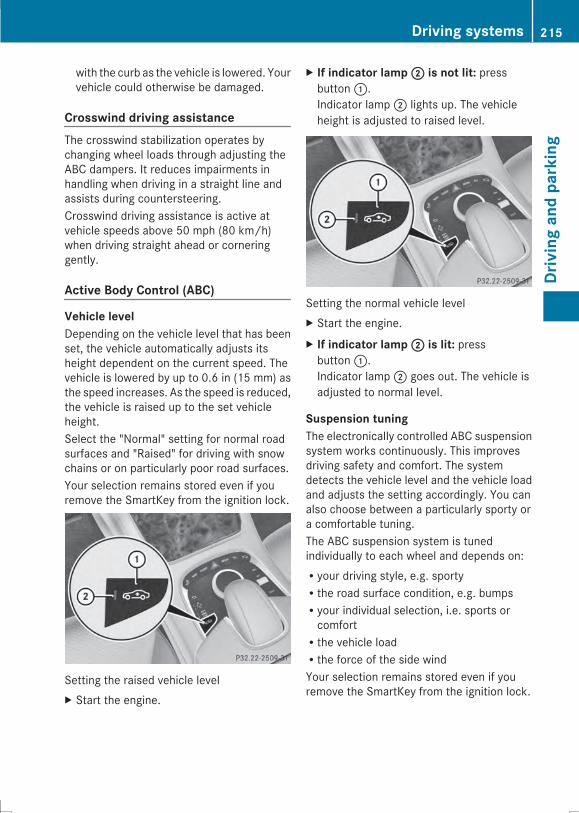
with the curb as the vehicle is lowered. Yourvehicle could otherwise be damaged.
Crosswind driving assistanceThe crosswind stabilization operates bychanging wheel loads through adjusting theABC dampers. It reduces impairments inhandling when driving in a straight line andassists during countersteering.Crosswind driving assistance is active atvehicle speeds above 50 mph (80 km/h)when driving straight ahead or corneringgently.
Active Body Control (ABC)
Vehicle levelDepending on the vehicle level that has beenset, the vehicle automatically adjusts itsheight dependent on the current speed. Thevehicle is lowered by up to 0.6 in (15 mm) asthe speed increases. As the speed is reduced,the vehicle is raised up to the set vehicleheight.Select the "Normal" setting for normal roadsurfaces and "Raised" for driving with snowchains or on particularly poor road surfaces.Your selection remains stored even if youremove the SmartKey from the ignition lock.
Setting the raised vehicle levelX Start the engine.
X If indicator lamp;; is not lit: pressbutton:.Indicator lamp; lights up. The vehicleheight is adjusted to raised level.
Setting the normal vehicle levelX Start the engine.X If indicator lamp;; is lit: pressbutton:.Indicator lamp; goes out. The vehicle isadjusted to normal level.
Suspension tuningThe electronically controlled ABC suspensionsystem works continuously. This improvesdriving safety and comfort. The systemdetects the vehicle level and the vehicle loadand adjusts the setting accordingly. You canalso choose between a particularly sporty ora comfortable tuning.The ABC suspension system is tunedindividually to each wheel and depends on:Ryour driving style, e.g. sportyRthe road surface condition, e.g. bumpsRyour individual selection, i.e. sports orcomfortRthe vehicle loadRthe force of the side windYour selection remains stored even if youremove the SmartKey from the ignition lock.
Driving systems 215
Drivingandparking
Z
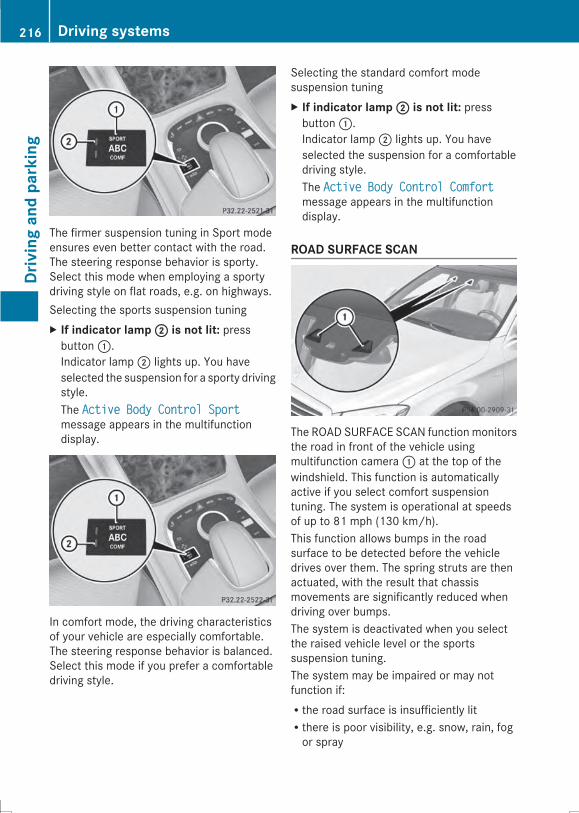
The firmer suspension tuning in Sport modeensures even better contact with the road.The steering response behavior is sporty.Select this mode when employing a sportydriving style on flat roads, e.g. on highways.Selecting the sports suspension tuningX If indicator lamp;; is not lit: pressbutton:.Indicator lamp; lights up. You haveselected the suspension for a sporty drivingstyle.The Active Body Control SportActive Body Control Sportmessage appears in the multifunctiondisplay.
In comfort mode, the driving characteristicsof your vehicle are especially comfortable.The steering response behavior is balanced.Select this mode if you prefer a comfortabledriving style.
Selecting the standard comfort modesuspension tuningX If indicator lamp;; is not lit: pressbutton:.Indicator lamp; lights up. You haveselected the suspension for a comfortabledriving style.The Active Body Control ComfortActive Body Control Comfortmessage appears in the multifunctiondisplay.
ROAD SURFACE SCAN
The ROAD SURFACE SCAN function monitorsthe road in front of the vehicle usingmultifunction camera: at the top of thewindshield. This function is automaticallyactive if you select comfort suspensiontuning. The system is operational at speedsof up to 81 mph (130 km/h).This function allows bumps in the roadsurface to be detected before the vehicledrives over them. The spring struts are thenactuated, with the result that chassismovements are significantly reduced whendriving over bumps.The system is deactivated when you selectthe raised vehicle level or the sportssuspension tuning.The system may be impaired or may notfunction if:Rthe road surface is insufficiently litRthere is poor visibility, e.g. snow, rain, fogor spray
216 Driving systemsDrivingandparking
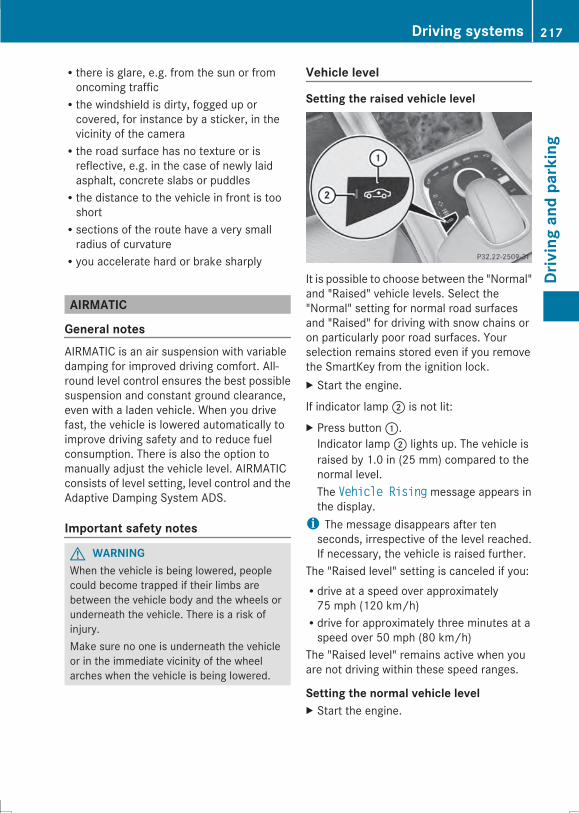
Rthere is glare, e.g. from the sun or fromoncoming trafficRthe windshield is dirty, fogged up orcovered, for instance by a sticker, in thevicinity of the cameraRthe road surface has no texture or isreflective, e.g. in the case of newly laidasphalt, concrete slabs or puddlesRthe distance to the vehicle in front is tooshortRsections of the route have a very smallradius of curvatureRyou accelerate hard or brake sharply
AIRMATIC
General notesAIRMATIC is an air suspension with variabledamping for improved driving comfort. All-round level control ensures the best possiblesuspension and constant ground clearance,even with a laden vehicle. When you drivefast, the vehicle is lowered automatically toimprove driving safety and to reduce fuelconsumption. There is also the option tomanually adjust the vehicle level. AIRMATICconsists of level setting, level control and theAdaptive Damping System ADS.
Important safety notes
G WARNINGWhen the vehicle is being lowered, peoplecould become trapped if their limbs arebetween the vehicle body and the wheels orunderneath the vehicle. There is a risk ofinjury.Make sure no one is underneath the vehicleor in the immediate vicinity of the wheelarches when the vehicle is being lowered.
Vehicle level
Setting the raised vehicle level
It is possible to choose between the "Normal"and "Raised" vehicle levels. Select the"Normal" setting for normal road surfacesand "Raised" for driving with snow chains oron particularly poor road surfaces. Yourselection remains stored even if you removethe SmartKey from the ignition lock.X Start the engine.
If indicator lamp; is not lit:X Press button:.Indicator lamp; lights up. The vehicle israised by 1.0 in (25 mm) compared to thenormal level.The Vehicle RisingVehicle Rising message appears inthe display.i The message disappears after tenseconds, irrespective of the level reached.If necessary, the vehicle is raised further.
The "Raised level" setting is canceled if you:Rdrive at a speed over approximately75 mph (120 km/h)Rdrive for approximately three minutes at aspeed over 50 mph (80 km/h)
The "Raised level" remains active when youare not driving within these speed ranges.
Setting the normal vehicle levelX Start the engine.
Driving systems 217
Drivingandparking
Z
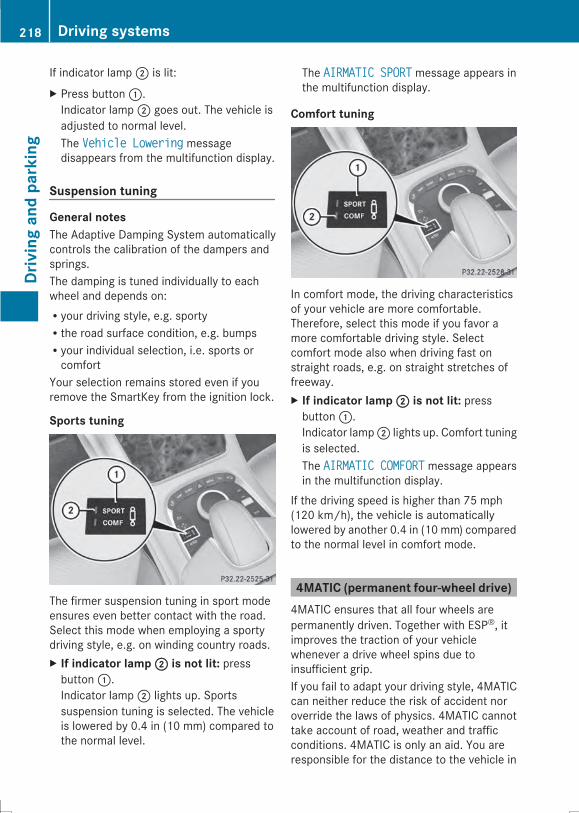
If indicator lamp; is lit:X Press button:.Indicator lamp; goes out. The vehicle isadjusted to normal level.The Vehicle LoweringVehicle Lowering messagedisappears from the multifunction display.
Suspension tuning
General notesThe Adaptive Damping System automaticallycontrols the calibration of the dampers andsprings.The damping is tuned individually to eachwheel and depends on:Ryour driving style, e.g. sportyRthe road surface condition, e.g. bumpsRyour individual selection, i.e. sports orcomfort
Your selection remains stored even if youremove the SmartKey from the ignition lock.
Sports tuning
The firmer suspension tuning in sport modeensures even better contact with the road.Select this mode when employing a sportydriving style, e.g. on winding country roads.X If indicator lamp;; is not lit: pressbutton:.Indicator lamp; lights up. Sportssuspension tuning is selected. The vehicleis lowered by 0.4 in (10 mm) compared tothe normal level.
The AIRMATIC SPORTAIRMATIC SPORT message appears inthe multifunction display.
Comfort tuning
In comfort mode, the driving characteristicsof your vehicle are more comfortable.Therefore, select this mode if you favor amore comfortable driving style. Selectcomfort mode also when driving fast onstraight roads, e.g. on straight stretches offreeway.X If indicator lamp;; is not lit: pressbutton:.Indicator lamp; lights up. Comfort tuningis selected.The AIRMATIC COMFORTAIRMATIC COMFORT message appearsin the multifunction display.
If the driving speed is higher than 75 mph(120 km/h), the vehicle is automaticallylowered by another 0.4 in (10 mm) comparedto the normal level in comfort mode.
4MATIC (permanent four-wheel drive)4MATIC ensures that all four wheels arepermanently driven. Together with ESP®, itimproves the traction of your vehiclewhenever a drive wheel spins due toinsufficient grip.If you fail to adapt your driving style, 4MATICcan neither reduce the risk of accident noroverride the laws of physics. 4MATIC cannottake account of road, weather and trafficconditions. 4MATIC is only an aid. You areresponsible for the distance to the vehicle in
218 Driving systemsDrivingandparking
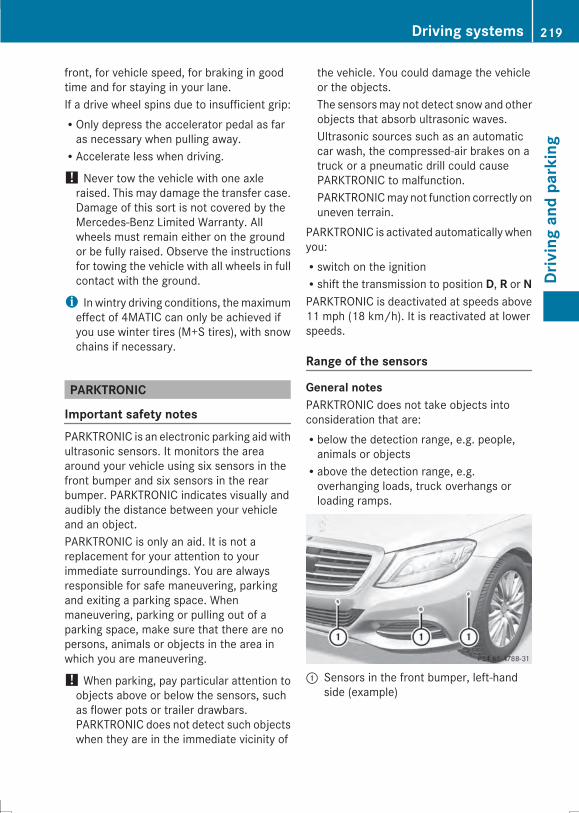
front, for vehicle speed, for braking in goodtime and for staying in your lane.If a drive wheel spins due to insufficient grip:ROnly depress the accelerator pedal as faras necessary when pulling away.RAccelerate less when driving.
! Never tow the vehicle with one axleraised. This may damage the transfer case.Damage of this sort is not covered by theMercedes-Benz Limited Warranty. Allwheels must remain either on the groundor be fully raised. Observe the instructionsfor towing the vehicle with all wheels in fullcontact with the ground.
i In wintry driving conditions, themaximumeffect of 4MATIC can only be achieved ifyou use winter tires (M+S tires), with snowchains if necessary.
PARKTRONIC
Important safety notesPARKTRONIC is an electronic parking aid withultrasonic sensors. It monitors the areaaround your vehicle using six sensors in thefront bumper and six sensors in the rearbumper. PARKTRONIC indicates visually andaudibly the distance between your vehicleand an object.PARKTRONIC is only an aid. It is not areplacement for your attention to yourimmediate surroundings. You are alwaysresponsible for safe maneuvering, parkingand exiting a parking space. Whenmaneuvering, parking or pulling out of aparking space, make sure that there are nopersons, animals or objects in the area inwhich you are maneuvering.
! When parking, pay particular attention toobjects above or below the sensors, suchas flower pots or trailer drawbars.PARKTRONIC does not detect such objectswhen they are in the immediate vicinity of
the vehicle. You could damage the vehicleor the objects.The sensorsmay not detect snow and otherobjects that absorb ultrasonic waves.Ultrasonic sources such as an automaticcar wash, the compressed-air brakes on atruck or a pneumatic drill could causePARKTRONIC to malfunction.PARKTRONICmay not function correctly onuneven terrain.
PARKTRONIC is activated automatically whenyou:Rswitch on the ignitionRshift the transmission to position D, R or NPARKTRONIC is deactivated at speeds above11 mph (18 km/h). It is reactivated at lowerspeeds.
Range of the sensors
General notesPARKTRONIC does not take objects intoconsideration that are:Rbelow the detection range, e.g. people,animals or objectsRabove the detection range, e.g.overhanging loads, truck overhangs orloading ramps.
: Sensors in the front bumper, left-handside (example)
Driving systems 219
Drivingandparking
Z
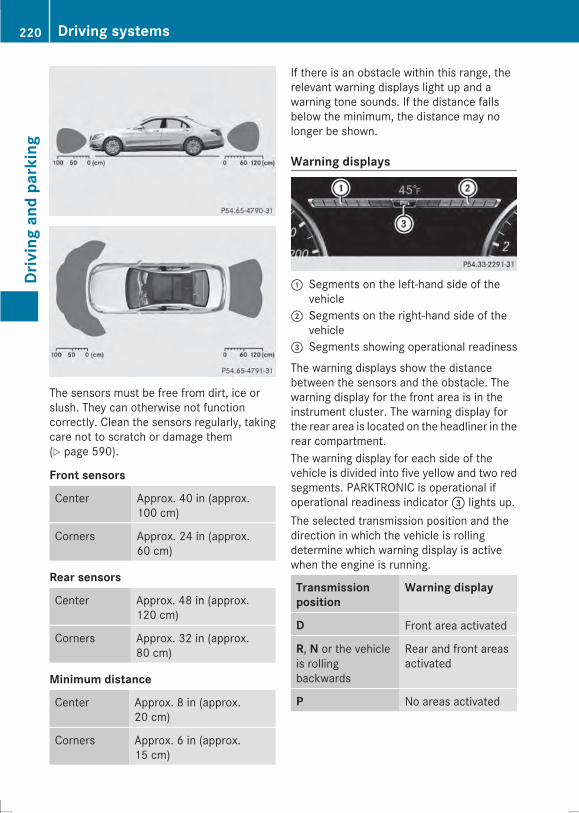
The sensors must be free from dirt, ice orslush. They can otherwise not functioncorrectly. Clean the sensors regularly, takingcare not to scratch or damage them(Y page 590).
Front sensors
Center Approx. 40 in (approx.100 cm)
Corners Approx. 24 in (approx.60 cm)
Rear sensors
Center Approx. 48 in (approx.120 cm)
Corners Approx. 32 in (approx.80 cm)
Minimum distance
Center Approx. 8 in (approx.20 cm)
Corners Approx. 6 in (approx.15 cm)
If there is an obstacle within this range, therelevant warning displays light up and awarning tone sounds. If the distance fallsbelow the minimum, the distance may nolonger be shown.
Warning displays
: Segments on the left-hand side of thevehicle
; Segments on the right-hand side of thevehicle
= Segments showing operational readiness
The warning displays show the distancebetween the sensors and the obstacle. Thewarning display for the front area is in theinstrument cluster. The warning display forthe rear area is located on the headliner in therear compartment.The warning display for each side of thevehicle is divided into five yellow and two redsegments. PARKTRONIC is operational ifoperational readiness indicator= lights up.The selected transmission position and thedirection in which the vehicle is rollingdetermine which warning display is activewhen the engine is running.
Transmissionposition
Warning display
D Front area activated
R, N or the vehicleis rollingbackwards
Rear and front areasactivated
P No areas activated
220 Driving systemsDrivingandparking
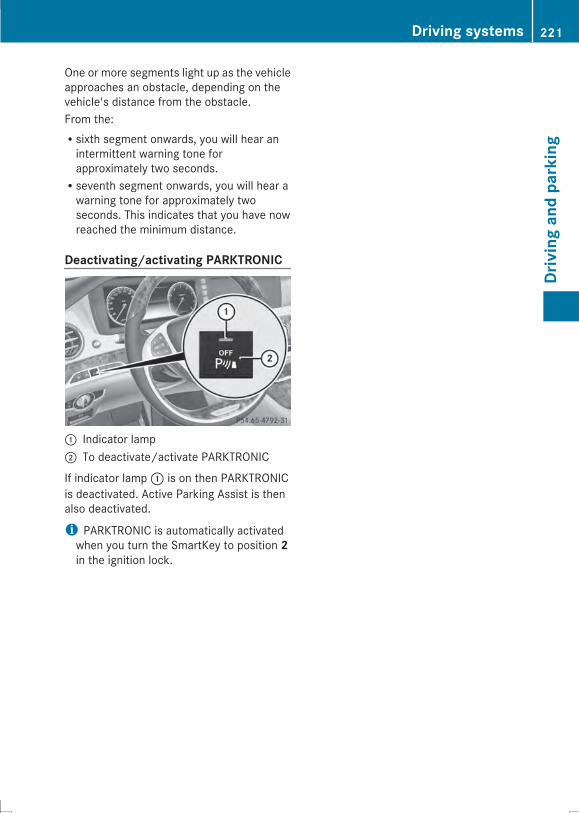
One or more segments light up as the vehicleapproaches an obstacle, depending on thevehicle's distance from the obstacle.From the:Rsixth segment onwards, you will hear anintermittent warning tone forapproximately two seconds.Rseventh segment onwards, you will hear awarning tone for approximately twoseconds. This indicates that you have nowreached the minimum distance.
Deactivating/activating PARKTRONIC
: Indicator lamp; To deactivate/activate PARKTRONIC
If indicator lamp: is on then PARKTRONICis deactivated. Active Parking Assist is thenalso deactivated.
i PARKTRONIC is automatically activatedwhen you turn the SmartKey to position 2in the ignition lock.
Driving systems 221
Drivingandparking
Z
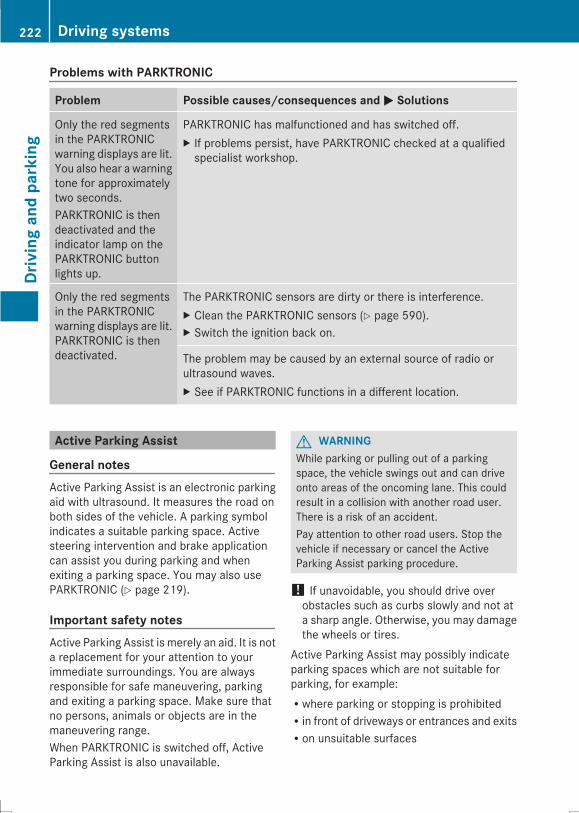
Problems with PARKTRONIC
Problem Possible causes/consequences andMM Solutions
Only the red segmentsin the PARKTRONICwarning displays are lit.You also hear a warningtone for approximatelytwo seconds.PARKTRONIC is thendeactivated and theindicator lamp on thePARKTRONIC buttonlights up.
PARKTRONIC has malfunctioned and has switched off.X If problems persist, have PARKTRONIC checked at a qualifiedspecialist workshop.
Only the red segmentsin the PARKTRONICwarning displays are lit.PARKTRONIC is thendeactivated.
The PARKTRONIC sensors are dirty or there is interference.X Clean the PARKTRONIC sensors (Y page 590).X Switch the ignition back on.
The problem may be caused by an external source of radio orultrasound waves.X See if PARKTRONIC functions in a different location.
Active Parking Assist
General notesActive Parking Assist is an electronic parkingaid with ultrasound. It measures the road onboth sides of the vehicle. A parking symbolindicates a suitable parking space. Activesteering intervention and brake applicationcan assist you during parking and whenexiting a parking space. You may also usePARKTRONIC (Y page 219).
Important safety notesActive Parking Assist is merely an aid. It is nota replacement for your attention to yourimmediate surroundings. You are alwaysresponsible for safe maneuvering, parkingand exiting a parking space. Make sure thatno persons, animals or objects are in themaneuvering range.When PARKTRONIC is switched off, ActiveParking Assist is also unavailable.
G WARNINGWhile parking or pulling out of a parkingspace, the vehicle swings out and can driveonto areas of the oncoming lane. This couldresult in a collision with another road user.There is a risk of an accident.Pay attention to other road users. Stop thevehicle if necessary or cancel the ActiveParking Assist parking procedure.
! If unavoidable, you should drive overobstacles such as curbs slowly and not ata sharp angle. Otherwise, you may damagethe wheels or tires.
Active Parking Assist may possibly indicateparking spaces which are not suitable forparking, for example:Rwhere parking or stopping is prohibitedRin front of driveways or entrances and exitsRon unsuitable surfaces
222 Driving systemsDrivingandparking
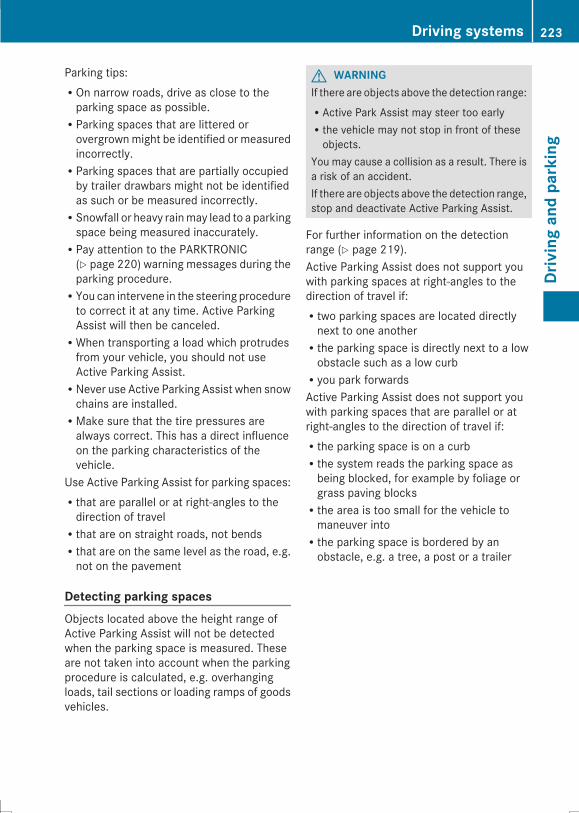
Parking tips:ROn narrow roads, drive as close to theparking space as possible.RParking spaces that are littered orovergrownmight be identified or measuredincorrectly.RParking spaces that are partially occupiedby trailer drawbars might not be identifiedas such or be measured incorrectly.RSnowfall or heavy rainmay lead to a parkingspace being measured inaccurately.RPay attention to the PARKTRONIC(Y page 220) warning messages during theparking procedure.RYou can intervene in the steering procedureto correct it at any time. Active ParkingAssist will then be canceled.RWhen transporting a load which protrudesfrom your vehicle, you should not useActive Parking Assist.RNever use Active Parking Assist when snowchains are installed.RMake sure that the tire pressures arealways correct. This has a direct influenceon the parking characteristics of thevehicle.
Use Active Parking Assist for parking spaces:Rthat are parallel or at right-angles to thedirection of travelRthat are on straight roads, not bendsRthat are on the same level as the road, e.g.not on the pavement
Detecting parking spacesObjects located above the height range ofActive Parking Assist will not be detectedwhen the parking space is measured. Theseare not taken into account when the parkingprocedure is calculated, e.g. overhangingloads, tail sections or loading ramps of goodsvehicles.
G WARNINGIf there are objects above the detection range:RActive Park Assist may steer too earlyRthe vehicle may not stop in front of theseobjects.
You may cause a collision as a result. There isa risk of an accident.If there are objects above the detection range,stop and deactivate Active Parking Assist.
For further information on the detectionrange (Y page 219).Active Parking Assist does not support youwith parking spaces at right-angles to thedirection of travel if:Rtwo parking spaces are located directlynext to one anotherRthe parking space is directly next to a lowobstacle such as a low curbRyou park forwardsActive Parking Assist does not support youwith parking spaces that are parallel or atright-angles to the direction of travel if:Rthe parking space is on a curbRthe system reads the parking space asbeing blocked, for example by foliage orgrass paving blocksRthe area is too small for the vehicle tomaneuver intoRthe parking space is bordered by anobstacle, e.g. a tree, a post or a trailer
Driving systems 223
Drivingandparking
Z
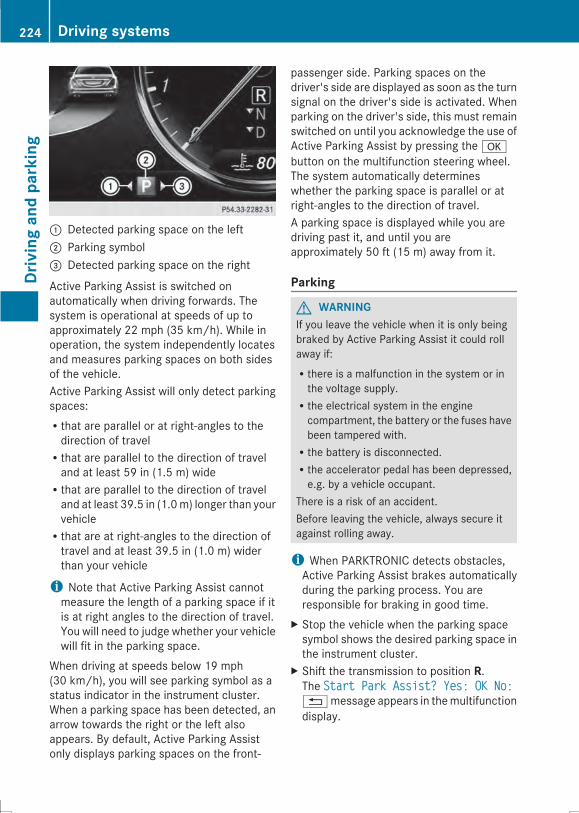
: Detected parking space on the left; Parking symbol= Detected parking space on the right
Active Parking Assist is switched onautomatically when driving forwards. Thesystem is operational at speeds of up toapproximately 22 mph (35 km/h). While inoperation, the system independently locatesand measures parking spaces on both sidesof the vehicle.Active Parking Assist will only detect parkingspaces:Rthat are parallel or at right-angles to thedirection of travelRthat are parallel to the direction of traveland at least 59 in (1.5 m) wideRthat are parallel to the direction of traveland at least 39.5 in (1.0m) longer than yourvehicleRthat are at right-angles to the direction oftravel and at least 39.5 in (1.0 m) widerthan your vehicle
i Note that Active Parking Assist cannotmeasure the length of a parking space if itis at right angles to the direction of travel.You will need to judge whether your vehiclewill fit in the parking space.
When driving at speeds below 19 mph(30 km/h), you will see parking symbol as astatus indicator in the instrument cluster.When a parking space has been detected, anarrow towards the right or the left alsoappears. By default, Active Parking Assistonly displays parking spaces on the front-
passenger side. Parking spaces on thedriver's side are displayed as soon as the turnsignal on the driver's side is activated. Whenparking on the driver's side, this must remainswitched on until you acknowledge the use ofActive Parking Assist by pressing theabutton on the multifunction steering wheel.The system automatically determineswhether the parking space is parallel or atright-angles to the direction of travel.A parking space is displayed while you aredriving past it, and until you areapproximately 50 ft (15 m) away from it.
Parking
G WARNINGIf you leave the vehicle when it is only beingbraked by Active Parking Assist it could rollaway if:Rthere is a malfunction in the system or inthe voltage supply.Rthe electrical system in the enginecompartment, the battery or the fuses havebeen tampered with.Rthe battery is disconnected.Rthe accelerator pedal has been depressed,e.g. by a vehicle occupant.
There is a risk of an accident.Before leaving the vehicle, always secure itagainst rolling away.
i When PARKTRONIC detects obstacles,Active Parking Assist brakes automaticallyduring the parking process. You areresponsible for braking in good time.
X Stop the vehicle when the parking spacesymbol shows the desired parking space inthe instrument cluster.
X Shift the transmission to position R.The Start Park Assist? Yes: OK No:Start Park Assist? Yes: OK No:%message appears in themultifunctiondisplay.
224 Driving systemsDrivingandparking
X To cancel the procedure: press the% button on the multifunction steeringwheel or pull away.
orX To park using Active Parking Assist:press thea button on the multifunctionsteering wheel.The Park Assist Active AcceleratePark Assist Active Accelerateand Brake Observe Surroundingsand Brake Observe Surroundingsmessage appears in the multifunctiondisplay.
X Let go of the multifunction steering wheel.X Back up the vehicle, being ready to brakeat all times. When backing up, drive at aspeed below approximately 6 mph(10 km/h). Otherwise Active Parking Assistwill be canceled.Active Parking Assist brakes the vehicle toa standstill when the vehicle approachesthe rear border of the parking space.Maneuvering may be required in tightparking spaces.
The Park Assist Active Select DPark Assist Active Select DObserveObserve SurroundingsSurroundingsmessage appears inthe multifunction display.X Shift the transmission to position D whilethe vehicle is stationary.Active Parking Assist immediately steers inthe other direction.The Park Assist Active AcceleratePark Assist Active Accelerateand Brake Observe Surroundingsand Brake Observe Surroundingsmessage appears in the multifunctiondisplay.i You will achieve the best results bywaiting for the steering procedure tocomplete before pulling away.
X Drive forwards and be ready to brake at alltimes.Active Parking Assist brakes the vehicle toa standstill.
The Park Assist Active Select RPark Assist Active Select RObserveObserve SurroundingsSurroundingsmessage appears inthe multifunction display.
As soon as the parking procedure iscomplete, the Park Assist FinishedPark Assist Finishedmessage appears in the multifunction displayand awarning tone sounds. The vehicle is nowparked. The vehicle is kept stationary withoutthe driver having to depress the brake pedal.The braking effect is canceled when youdepress the accelerator pedal.Active Parking Assist no longer supports youwith steering interventions and brakeapplications. When Active Parking Assist isfinished, you must steer and brake againyourself. PARKTRONIC is still available.Parking tips:RThe way your vehicle is positioned in theparking space after parking is dependenton various factors. These include theposition and shape of the vehicles parkedin front and behind it and the conditions ofthe location. It may be the case that ActiveParking Assist guides you too far into aparking space, or not far enough into it. Insome cases, it may also lead you across oronto the curb. If necessary, you shouldcancel the parking procedure with ActiveParking Assist.RYou can also select preselect transmissionposition D. The vehicle redirects and doesnot drive as far into the parking space.Should the transmission change take placetoo early, the parking procedure will becanceled. A sensible parking position canno longer be achieved from this position.
Exiting a parking spaceIn order that Active Parking Assist cansupport you when you exit the parking space:Rthe border of the parking space must behigh enough at the front and the rear. Acurb is too small, for example.Rthe border of the parking space must notbe too wide, as the position of the vehiclemust not exceed an angle of 45° to the
Driving systems 225
Drivingandparking
Z

starting position as it is maneuvering intothe parking space.Ra maneuvering distance of at least 3.3 ft(1.0 m) must be available.
Active Parking Assist can only assist you withexiting a parking space if you have parked thevehicle parallel to the direction of travel usingActive Parking Assist.
i If PARKTRONIC detects obstacles, ActiveParking Assist brakes automatically whilstthe vehicle exits the parking space. You areresponsible for braking in good time.
X Start the engine.X Switch on the turn signal in the directionyou are pulling away.
X Shift the transmission to position D or R.The Start Park Assist? Yes: OK No:Start Park Assist? Yes: OK No:%message appears in themultifunctiondisplay.
X To cancel the procedure: press the% button on the multifunction steeringwheel or pull away.
orX To exit a parking space using ActiveParking Assist: press thea button onthe multifunction steering wheel.The Park Assist Active AcceleratePark Assist Active Accelerateand Brake Observe Surroundingsand Brake Observe Surroundingsmessage appears in the multifunctiondisplay.
X Let go of the multifunction steering wheel.X Pull away, being ready to brake at all times.Do not exceed a maximum speed ofapproximately 6 mph (10 km/h) whenexiting a parking space. Otherwise ActiveParking Assist will be canceled.
X Shift the transmission to position D or R asrequired or according to themessage whilethe vehicle is stationary.Active Parking Assist immediately steers inthe other direction. The Park AssistPark AssistActive Accelerate and BrakeActive Accelerate and BrakeObserveObserve SurroundingsSurroundingsmessage appearsin the multifunction display.
i You will achieve the best results bywaiting for the steering procedure tocomplete before pulling away.If you back up after activation, the steeringwheel is moved to the straight-aheadposition.
X Drive forwards and back up as prompted bythe PARKTRONIC warning displays, severaltimes if necessary.
Once you have exited the parking spacecompletely, the steering wheel is moved tothe straight-ahead position. You hear a toneand the Park Assist FinishedPark Assist Finished messageappears in the multifunction display. You willthen have to steer and merge into traffic onyour own. PARKTRONIC is still available. Youcan take over the steering, before the vehiclehas exited the parking space completely. Thisis useful, for example when you recognizethat it is already possible to pull out of theparking space.
Canceling Active Parking AssistX Stop the movement of the multifunctionsteering wheel or steer yourself.Active Parking Assist will be canceled atonce. The Park Assist CanceledPark Assist Canceledmessage appears in the multifunctiondisplay.
orX Press the PARKTRONIC button(Y page 221).PARKTRONIC is switched off and ActiveParking Assist is immediately canceled.The Park Assist CanceledPark Assist Canceled messageappears in the multifunction display.
Active Parking Assist is canceledautomatically if:Rthe electric parking brake is engagedRtransmission position P is selectedRparking using Active Parking Assist is nolonger possible
226 Driving systemsDrivingandparking
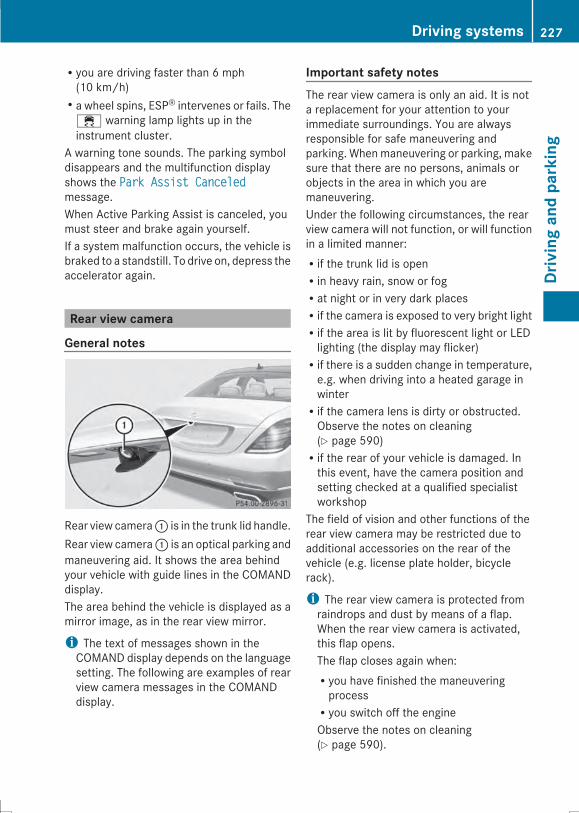
Ryou are driving faster than 6 mph(10 km/h)Ra wheel spins, ESP® intervenes or fails. The
÷ warning lamp lights up in theinstrument cluster.
A warning tone sounds. The parking symboldisappears and the multifunction displayshows the Park Assist CanceledPark Assist Canceledmessage.When Active Parking Assist is canceled, youmust steer and brake again yourself.If a system malfunction occurs, the vehicle isbraked to a standstill. To drive on, depress theaccelerator again.
Rear view camera
General notes
Rear view camera: is in the trunk lid handle.Rear view camera: is an optical parking andmaneuvering aid. It shows the area behindyour vehicle with guide lines in the COMANDdisplay.The area behind the vehicle is displayed as amirror image, as in the rear view mirror.
i The text of messages shown in theCOMAND display depends on the languagesetting. The following are examples of rearview camera messages in the COMANDdisplay.
Important safety notesThe rear view camera is only an aid. It is nota replacement for your attention to yourimmediate surroundings. You are alwaysresponsible for safe maneuvering andparking. Whenmaneuvering or parking, makesure that there are no persons, animals orobjects in the area in which you aremaneuvering.Under the following circumstances, the rearview camera will not function, or will functionin a limited manner:Rif the trunk lid is openRin heavy rain, snow or fogRat night or in very dark placesRif the camera is exposed to very bright lightRif the area is lit by fluorescent light or LEDlighting (the display may flicker)Rif there is a sudden change in temperature,e.g. when driving into a heated garage inwinterRif the camera lens is dirty or obstructed.Observe the notes on cleaning(Y page 590)Rif the rear of your vehicle is damaged. Inthis event, have the camera position andsetting checked at a qualified specialistworkshop
The field of vision and other functions of therear view camera may be restricted due toadditional accessories on the rear of thevehicle (e.g. license plate holder, bicyclerack).
i The rear view camera is protected fromraindrops and dust by means of a flap.When the rear view camera is activated,this flap opens.The flap closes again when:Ryou have finished the maneuveringprocessRyou switch off the engineObserve the notes on cleaning(Y page 590).
Driving systems 227
Drivingandparking
Z
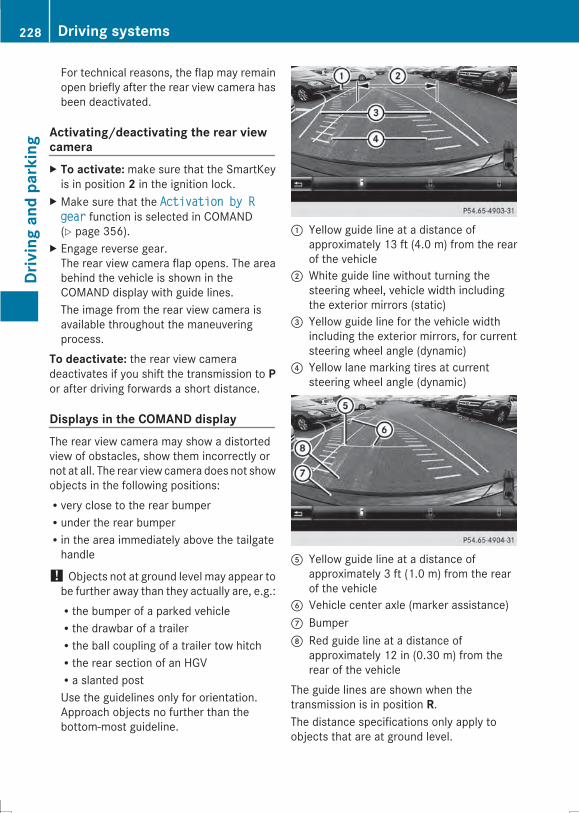
For technical reasons, the flap may remainopen briefly after the rear view camera hasbeen deactivated.
Activating/deactivating the rear viewcameraX To activate:make sure that the SmartKeyis in position 2 in the ignition lock.
X Make sure that the Activation by RActivation by Rgeargear function is selected in COMAND(Y page 356).
X Engage reverse gear.The rear view camera flap opens. The areabehind the vehicle is shown in theCOMAND display with guide lines.The image from the rear view camera isavailable throughout the maneuveringprocess.
To deactivate: the rear view cameradeactivates if you shift the transmission to Por after driving forwards a short distance.
Displays in the COMAND displayThe rear view camera may show a distortedview of obstacles, show them incorrectly ornot at all. The rear view camera does not showobjects in the following positions:Rvery close to the rear bumperRunder the rear bumperRin the area immediately above the tailgatehandle
! Objects not at ground level may appear tobe further away than they actually are, e.g.:Rthe bumper of a parked vehicleRthe drawbar of a trailerRthe ball coupling of a trailer tow hitchRthe rear section of an HGVRa slanted postUse the guidelines only for orientation.Approach objects no further than thebottom-most guideline.
: Yellow guide line at a distance ofapproximately 13 ft (4.0 m) from the rearof the vehicle
; White guide line without turning thesteering wheel, vehicle width includingthe exterior mirrors (static)
= Yellow guide line for the vehicle widthincluding the exterior mirrors, for currentsteering wheel angle (dynamic)
? Yellow lane marking tires at currentsteering wheel angle (dynamic)
A Yellow guide line at a distance ofapproximately 3 ft (1.0 m) from the rearof the vehicle
B Vehicle center axle (marker assistance)C BumperD Red guide line at a distance of
approximately 12 in (0.30 m) from therear of the vehicle
The guide lines are shown when thetransmission is in position R.The distance specifications only apply toobjects that are at ground level.
228 Driving systemsDrivingandparking
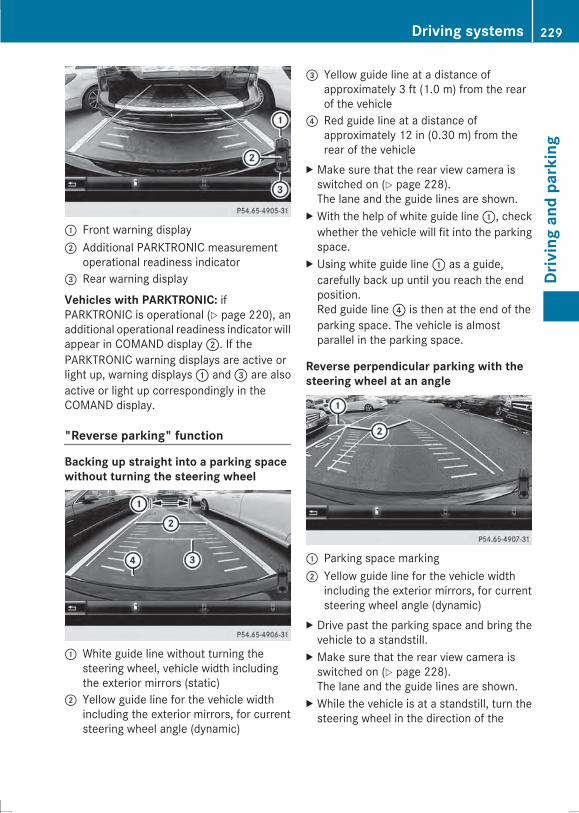
: Front warning display; Additional PARKTRONIC measurement
operational readiness indicator= Rear warning display
Vehicles with PARKTRONIC: ifPARKTRONIC is operational (Y page 220), anadditional operational readiness indicator willappear in COMAND display;. If thePARKTRONIC warning displays are active orlight up, warning displays: and= are alsoactive or light up correspondingly in theCOMAND display.
"Reverse parking" function
Backing up straight into a parking spacewithout turning the steering wheel
: White guide line without turning thesteering wheel, vehicle width includingthe exterior mirrors (static)
; Yellow guide line for the vehicle widthincluding the exterior mirrors, for currentsteering wheel angle (dynamic)
= Yellow guide line at a distance ofapproximately 3 ft (1.0 m) from the rearof the vehicle
? Red guide line at a distance ofapproximately 12 in (0.30 m) from therear of the vehicle
X Make sure that the rear view camera isswitched on (Y page 228).The lane and the guide lines are shown.
X With the help of white guide line:, checkwhether the vehicle will fit into the parkingspace.
X Using white guide line: as a guide,carefully back up until you reach the endposition.Red guide line? is then at the end of theparking space. The vehicle is almostparallel in the parking space.
Reverse perpendicular parking with thesteering wheel at an angle
: Parking space marking; Yellow guide line for the vehicle width
including the exterior mirrors, for currentsteering wheel angle (dynamic)
X Drive past the parking space and bring thevehicle to a standstill.
X Make sure that the rear view camera isswitched on (Y page 228).The lane and the guide lines are shown.
X While the vehicle is at a standstill, turn thesteering wheel in the direction of the
Driving systems 229
Drivingandparking
Z
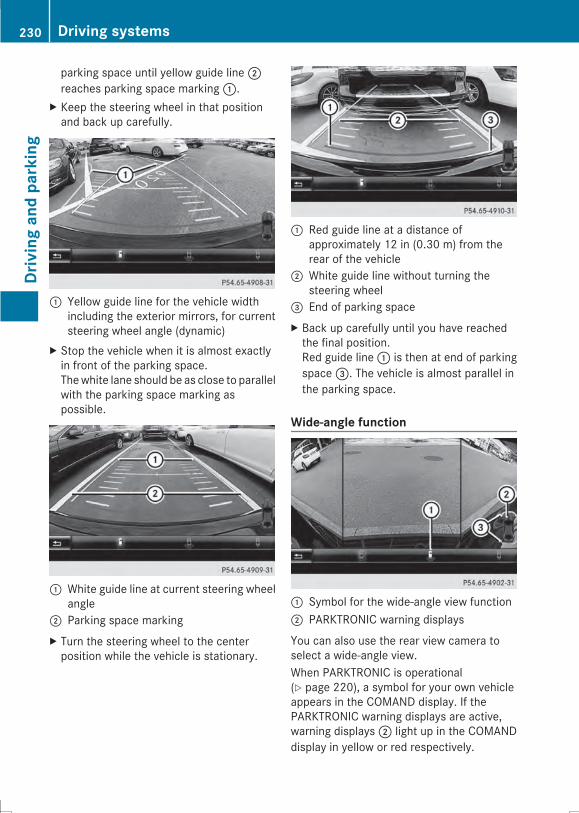
parking space until yellow guide line;reaches parking space marking:.
X Keep the steering wheel in that positionand back up carefully.
: Yellow guide line for the vehicle widthincluding the exterior mirrors, for currentsteering wheel angle (dynamic)
X Stop the vehicle when it is almost exactlyin front of the parking space.Thewhite lane should be as close to parallelwith the parking space marking aspossible.
: White guide line at current steering wheelangle
; Parking space markingX Turn the steering wheel to the centerposition while the vehicle is stationary.
: Red guide line at a distance ofapproximately 12 in (0.30 m) from therear of the vehicle
; White guide line without turning thesteering wheel
= End of parking spaceX Back up carefully until you have reachedthe final position.Red guide line: is then at end of parkingspace=. The vehicle is almost parallel inthe parking space.
Wide-angle function
: Symbol for the wide-angle view function; PARKTRONIC warning displays
You can also use the rear view camera toselect a wide-angle view.When PARKTRONIC is operational(Y page 220), a symbol for your own vehicleappears in the COMAND display. If thePARKTRONIC warning displays are active,warning displays; light up in the COMANDdisplay in yellow or red respectively.
230 Driving systemsDrivingandparking
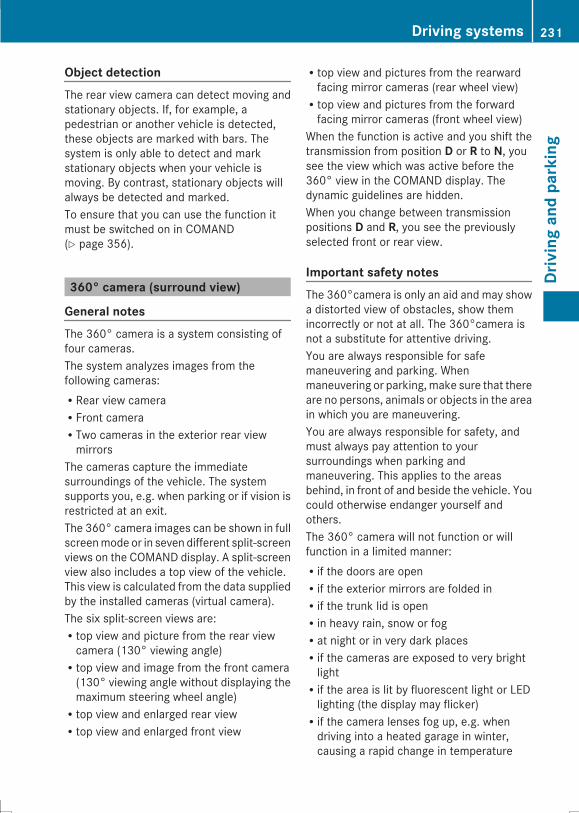
Object detectionThe rear view camera can detect moving andstationary objects. If, for example, apedestrian or another vehicle is detected,these objects are marked with bars. Thesystem is only able to detect and markstationary objects when your vehicle ismoving. By contrast, stationary objects willalways be detected and marked.To ensure that you can use the function itmust be switched on in COMAND(Y page 356).
360° camera (surround view)
General notesThe 360° camera is a system consisting offour cameras.The system analyzes images from thefollowing cameras:RRear view cameraRFront cameraRTwo cameras in the exterior rear viewmirrors
The cameras capture the immediatesurroundings of the vehicle. The systemsupports you, e.g. when parking or if vision isrestricted at an exit.The 360° camera images can be shown in fullscreenmode or in seven different split-screenviews on the COMAND display. A split-screenview also includes a top view of the vehicle.This view is calculated from the data suppliedby the installed cameras (virtual camera).The six split-screen views are:Rtop view and picture from the rear viewcamera (130° viewing angle)Rtop view and image from the front camera(130° viewing angle without displaying themaximum steering wheel angle)Rtop view and enlarged rear viewRtop view and enlarged front view
Rtop view and pictures from the rearwardfacing mirror cameras (rear wheel view)Rtop view and pictures from the forwardfacing mirror cameras (front wheel view)
When the function is active and you shift thetransmission from position D or R to N, yousee the view which was active before the360° view in the COMAND display. Thedynamic guidelines are hidden.When you change between transmissionpositions D and R, you see the previouslyselected front or rear view.
Important safety notesThe 360°camera is only an aid and may showa distorted view of obstacles, show themincorrectly or not at all. The 360°camera isnot a substitute for attentive driving.You are always responsible for safemaneuvering and parking. Whenmaneuvering or parking,make sure that thereare no persons, animals or objects in the areain which you are maneuvering.You are always responsible for safety, andmust always pay attention to yoursurroundings when parking andmaneuvering. This applies to the areasbehind, in front of and beside the vehicle. Youcould otherwise endanger yourself andothers.The 360° camera will not function or willfunction in a limited manner:Rif the doors are openRif the exterior mirrors are folded inRif the trunk lid is openRin heavy rain, snow or fogRat night or in very dark placesRif the cameras are exposed to very brightlightRif the area is lit by fluorescent light or LEDlighting (the display may flicker)Rif the camera lenses fog up, e.g. whendriving into a heated garage in winter,causing a rapid change in temperature
Driving systems 231
Drivingandparking
Z

Rif the camera lenses are dirty or coveredRif the vehicle components in which thecameras are installed are damaged. In thisevent, have the camera position and settingchecked at a qualified specialist workshop.
Do not use the 360° camera in this case. Youcan otherwise injure others or cause damageto objects or the vehicle.Guide lines are always shown at road level.The cameras in the front and in the rear areaare each protected by a flap. These flaps areopened when the 360° camera is activated.Observe the notes on cleaning(Y page 590). For technical reasons, the flapsmay remain open briefly after the 360°camera has been deactivated.
Activation conditionsThe 360° camera image can be displayed if:RCOMAND is switched on (Y page 322)Rthe 360° Camera360° Camera function is activatedi If the 360° camera is activated at speedsabove 19 mph (30 km/h) a warningmessage appears.The warning message disappears if:Rthe vehicle's speed falls below 19 mph(30 km/h). The 360° camera is thenactivated.Rthe message is confirmed with thea button.
Activating the 360° camera using thefunction button
X Press button:.Depending on whether position D or R isengaged, the following is shown:Rfull screen display with the image fromthe front cameraRfull screen display with the image fromthe rear camera
i You can also switch to the split-screenview from the full-screen view.
Activating the 360° camera withCOMANDX To select the 360°360° CameraCamera from the vehiclecarousel: turn and press the controller.Depending on whether position D or R isengaged, the following is shown:Ra split screen with top view and theimage from the front camera orRa split screen with top view and theimage from the rear view camera
For further information about the COMANDcontroller (Y page 321).
Activating the 360° camera usingreverse gearThe 360° camera images can beautomatically displayed by engaging reversegear.X Make sure that the SmartKey is in position2 in the ignition lock.
X Make sure that the Activation by RActivation by Rgeargear function is selected in COMAND(Y page 356).
X To show the360° camera image: engagereverse gear.The area behind the vehicle is shown in theCOMAND display in split-screenmode. Yousee the top view of the vehicle and theimage from the rear view camera.
232 Driving systemsDrivingandparking
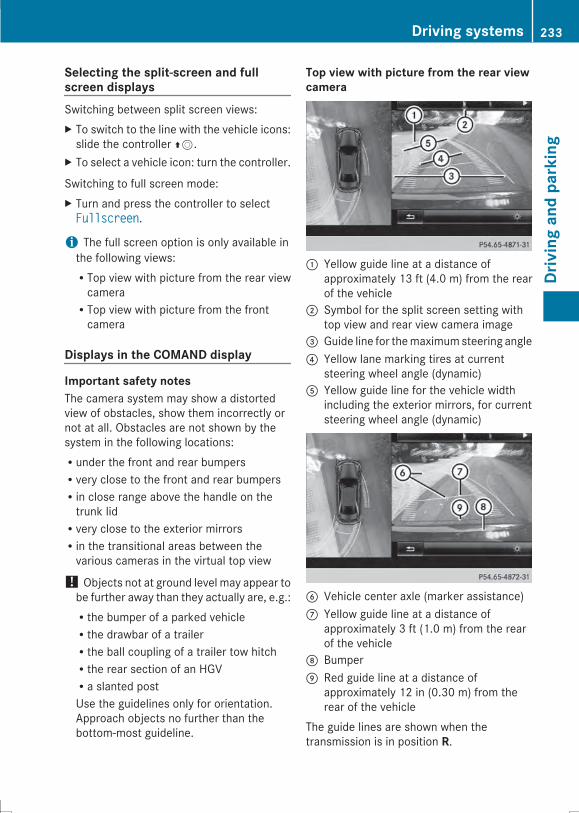
Selecting the split-screen and fullscreen displaysSwitching between split screen views:X To switch to the line with the vehicle icons:slide the controller ZV.
X To select a vehicle icon: turn the controller.
Switching to full screen mode:X Turn and press the controller to selectFullscreenFullscreen.i The full screen option is only available inthe following views:RTop view with picture from the rear viewcameraRTop view with picture from the frontcamera
Displays in the COMAND display
Important safety notesThe camera system may show a distortedview of obstacles, show them incorrectly ornot at all. Obstacles are not shown by thesystem in the following locations:Runder the front and rear bumpersRvery close to the front and rear bumpersRin close range above the handle on thetrunk lidRvery close to the exterior mirrorsRin the transitional areas between thevarious cameras in the virtual top view
! Objects not at ground level may appear tobe further away than they actually are, e.g.:Rthe bumper of a parked vehicleRthe drawbar of a trailerRthe ball coupling of a trailer tow hitchRthe rear section of an HGVRa slanted postUse the guidelines only for orientation.Approach objects no further than thebottom-most guideline.
Top view with picture from the rear viewcamera
: Yellow guide line at a distance ofapproximately 13 ft (4.0 m) from the rearof the vehicle
; Symbol for the split screen setting withtop view and rear view camera image
= Guide line for themaximumsteering angle? Yellow lane marking tires at current
steering wheel angle (dynamic)A Yellow guide line for the vehicle width
including the exterior mirrors, for currentsteering wheel angle (dynamic)
B Vehicle center axle (marker assistance)C Yellow guide line at a distance of
approximately 3 ft (1.0 m) from the rearof the vehicle
D BumperE Red guide line at a distance of
approximately 12 in (0.30 m) from therear of the vehicle
The guide lines are shown when thetransmission is in position R.
Driving systems 233
Drivingandparking
Z
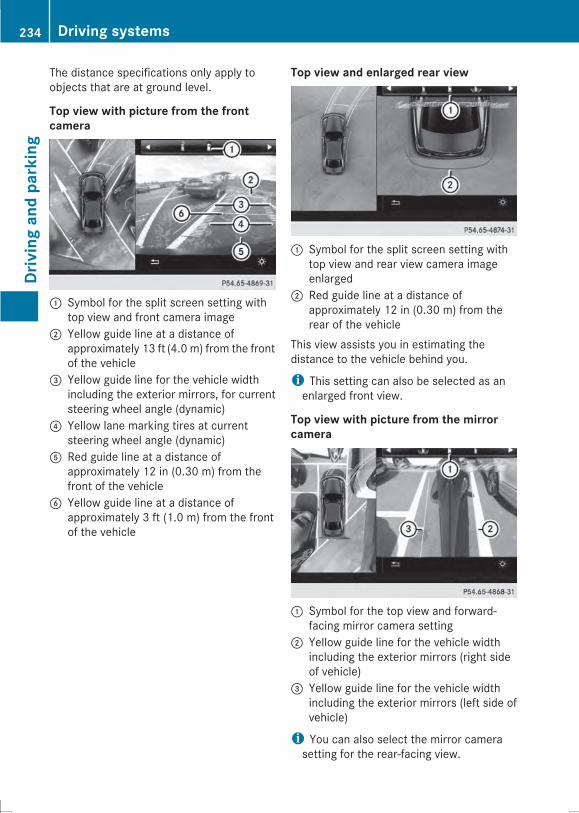
The distance specifications only apply toobjects that are at ground level.
Top view with picture from the frontcamera
: Symbol for the split screen setting withtop view and front camera image
; Yellow guide line at a distance ofapproximately 13 ft (4.0 m) from the frontof the vehicle
= Yellow guide line for the vehicle widthincluding the exterior mirrors, for currentsteering wheel angle (dynamic)
? Yellow lane marking tires at currentsteering wheel angle (dynamic)
A Red guide line at a distance ofapproximately 12 in (0.30 m) from thefront of the vehicle
B Yellow guide line at a distance ofapproximately 3 ft (1.0 m) from the frontof the vehicle
Top view and enlarged rear view
: Symbol for the split screen setting withtop view and rear view camera imageenlarged
; Red guide line at a distance ofapproximately 12 in (0.30 m) from therear of the vehicle
This view assists you in estimating thedistance to the vehicle behind you.
i This setting can also be selected as anenlarged front view.
Top view with picture from the mirrorcamera
: Symbol for the top view and forward-facing mirror camera setting
; Yellow guide line for the vehicle widthincluding the exterior mirrors (right sideof vehicle)
= Yellow guide line for the vehicle widthincluding the exterior mirrors (left side ofvehicle)
i You can also select the mirror camerasetting for the rear-facing view.
234 Driving systemsDrivingandparking

Wide-angle function
: Symbol for the full screen settingwith rearview camera image
; PARKTRONIC warning displays
If the vehicle is equipped with PARKTRONICand the function is active (Y page 221),warning displays; in the COMAND displayare also active or light up accordingly.PARKTRONIC appears:Rin split screen view as red or yellowbrackets around the vehicle icon in the topview, orRin the full screen view, on the right-handside at the bottomas red or yellow bracketsaround the vehicle icon
i The full screen display can also beselected as front view.
Select this view when you are driving out ofan exit and the view of crossing traffic isrestricted, for example.
Exiting 360° camera display modeAs soon as your vehicle exceeds a speed of19 mph (30 km/h) with the functionactivated, the function switches off. The viewwhich was active before the 360° camerawas displayed appears in the COMANDdisplay. You can also stop the display byselecting the% symbol in the display andpressing the COMAND controller to confirm.The 360° camera display is also ended if youselect transmission position P.
ATTENTION ASSIST
General notesATTENTION ASSIST helps you during long,monotonous journeys, such as on highways.It is active in the 37 mph (60 km/h) to125 mph (200 km/h) range. IfATTENTION ASSIST detects typical indicatorsof fatigue or increasing lapses inconcentration on the part of the driver, itsuggests taking a break.
Important safety notesATTENTION ASSIST is only an aid to thedriver. It might not always recognize fatigueor increasing inattentiveness in time or fail torecognize them at all. The system is not asubstitute for a well-rested and attentivedriver.The functionality of ATTENTION ASSIST isrestricted and warnings may be delayed ornot occur at all:Rif the length of the journey is less thanapproximately 30 minutesRif the road condition is poor, e.g. if thesurface is uneven or if there are potholesRif there is a strong side windRif you have adopted a sporty driving stylewith high cornering speeds or high rates ofaccelerationRif you are predominantly driving slowerthan 37 mph (60 km/h) or faster than125 mph (200 km/h)Rif you are driving with the active SteerAssist of DISTRONIC PLUSRif the time has been set incorrectlyRin active driving situations, such as whenyou change lanes or change your speed
Driving systems 235
Drivingandparking
Z
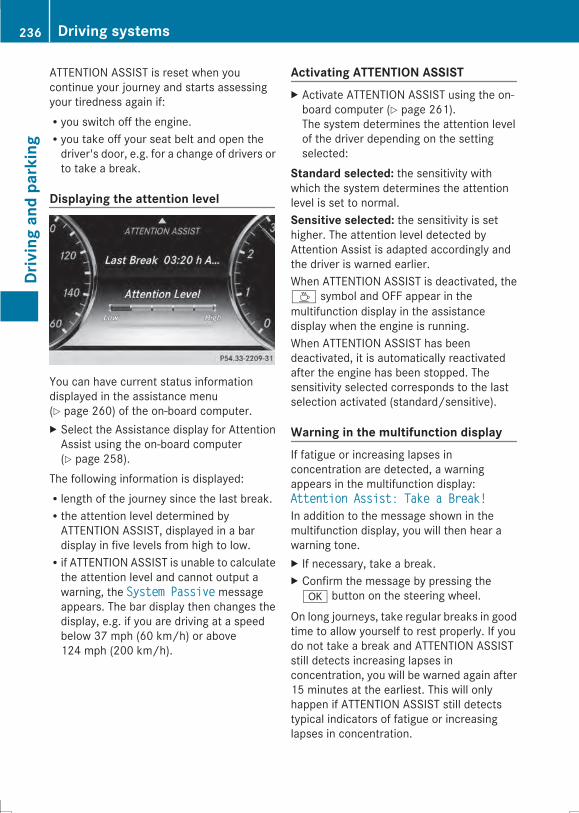
ATTENTION ASSIST is reset when youcontinue your journey and starts assessingyour tiredness again if:Ryou switch off the engine.Ryou take off your seat belt and open thedriver's door, e.g. for a change of drivers orto take a break.
Displaying the attention level
You can have current status informationdisplayed in the assistance menu(Y page 260) of the on-board computer.X Select the Assistance display for AttentionAssist using the on-board computer(Y page 258).
The following information is displayed:Rlength of the journey since the last break.Rthe attention level determined byATTENTION ASSIST, displayed in a bardisplay in five levels from high to low.Rif ATTENTION ASSIST is unable to calculatethe attention level and cannot output awarning, the System PassiveSystem Passive messageappears. The bar display then changes thedisplay, e.g. if you are driving at a speedbelow 37 mph (60 km/h) or above124 mph (200 km/h).
Activating ATTENTION ASSISTX Activate ATTENTION ASSIST using the on-board computer (Y page 261).The system determines the attention levelof the driver depending on the settingselected:
Standard selected: the sensitivity withwhich the system determines the attentionlevel is set to normal.Sensitive selected: the sensitivity is sethigher. The attention level detected byAttention Assist is adapted accordingly andthe driver is warned earlier.When ATTENTION ASSIST is deactivated, theÀ symbol and OFF appear in themultifunction display in the assistancedisplay when the engine is running.When ATTENTION ASSIST has beendeactivated, it is automatically reactivatedafter the engine has been stopped. Thesensitivity selected corresponds to the lastselection activated (standard/sensitive).
Warning in the multifunction displayIf fatigue or increasing lapses inconcentration are detected, a warningappears in the multifunction display:Attention Assist: Take a Break!Attention Assist: Take a Break!In addition to the message shown in themultifunction display, you will then hear awarning tone.X If necessary, take a break.X Confirm the message by pressing thea button on the steering wheel.
On long journeys, take regular breaks in goodtime to allow yourself to rest properly. If youdo not take a break and ATTENTION ASSISTstill detects increasing lapses inconcentration, you will be warned again after15 minutes at the earliest. This will onlyhappen if ATTENTION ASSIST still detectstypical indicators of fatigue or increasinglapses in concentration.
236 Driving systemsDrivingandparking
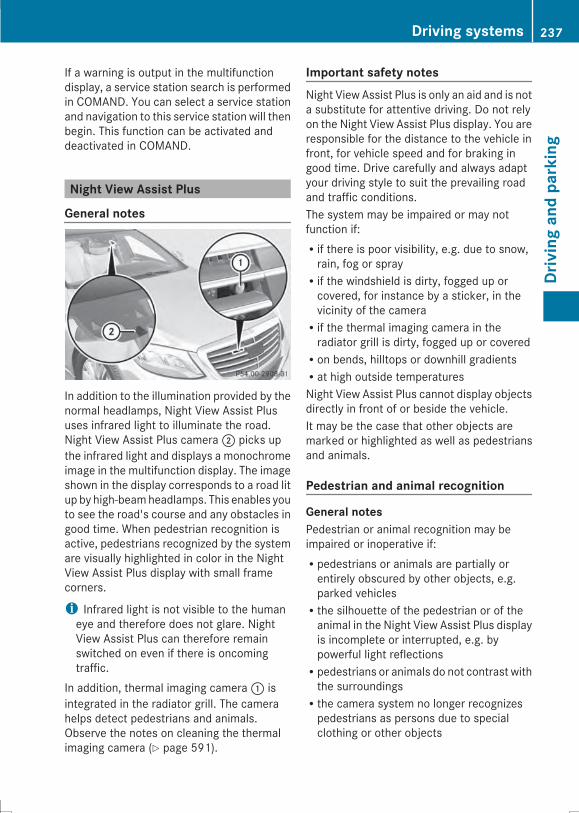
If a warning is output in the multifunctiondisplay, a service station search is performedin COMAND. You can select a service stationand navigation to this service station will thenbegin. This function can be activated anddeactivated in COMAND.
Night View Assist Plus
General notes
In addition to the illumination provided by thenormal headlamps, Night View Assist Plususes infrared light to illuminate the road.Night View Assist Plus camera; picks upthe infrared light and displays a monochromeimage in the multifunction display. The imageshown in the display corresponds to a road litup by high-beamheadlamps. This enables youto see the road's course and any obstacles ingood time. When pedestrian recognition isactive, pedestrians recognized by the systemare visually highlighted in color in the NightView Assist Plus display with small framecorners.
i Infrared light is not visible to the humaneye and therefore does not glare. NightView Assist Plus can therefore remainswitched on even if there is oncomingtraffic.
In addition, thermal imaging camera: isintegrated in the radiator grill. The camerahelps detect pedestrians and animals.Observe the notes on cleaning the thermalimaging camera (Y page 591).
Important safety notesNight View Assist Plus is only an aid and is nota substitute for attentive driving. Do not relyon the Night View Assist Plus display. You areresponsible for the distance to the vehicle infront, for vehicle speed and for braking ingood time. Drive carefully and always adaptyour driving style to suit the prevailing roadand traffic conditions.The system may be impaired or may notfunction if:Rif there is poor visibility, e.g. due to snow,rain, fog or sprayRif the windshield is dirty, fogged up orcovered, for instance by a sticker, in thevicinity of the cameraRif the thermal imaging camera in theradiator grill is dirty, fogged up or coveredRon bends, hilltops or downhill gradientsRat high outside temperaturesNight View Assist Plus cannot display objectsdirectly in front of or beside the vehicle.It may be the case that other objects aremarked or highlighted as well as pedestriansand animals.
Pedestrian and animal recognition
General notesPedestrian or animal recognition may beimpaired or inoperative if:Rpedestrians or animals are partially orentirely obscured by other objects, e.g.parked vehiclesRthe silhouette of the pedestrian or of theanimal in the Night View Assist Plus displayis incomplete or interrupted, e.g. bypowerful light reflectionsRpedestrians or animals do not contrast withthe surroundingsRthe camera system no longer recognizespedestrians as persons due to specialclothing or other objects
Driving systems 237
Drivingandparking
Z
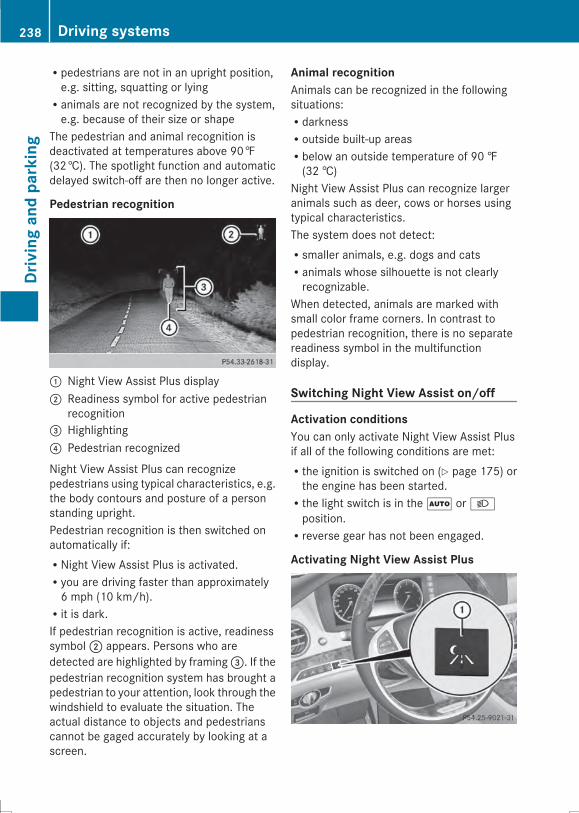
Rpedestrians are not in an upright position,e.g. sitting, squatting or lyingRanimals are not recognized by the system,e.g. because of their size or shape
The pedestrian and animal recognition isdeactivated at temperatures above 90‡(32†). The spotlight function and automaticdelayed switch-off are then no longer active.
Pedestrian recognition
: Night View Assist Plus display; Readiness symbol for active pedestrian
recognition= Highlighting? Pedestrian recognized
Night View Assist Plus can recognizepedestrians using typical characteristics, e.g.the body contours and posture of a personstanding upright.Pedestrian recognition is then switched onautomatically if:RNight View Assist Plus is activated.Ryou are driving faster than approximately6 mph (10 km/h).Rit is dark.If pedestrian recognition is active, readinesssymbol; appears. Persons who aredetected are highlighted by framing=. If thepedestrian recognition system has brought apedestrian to your attention, look through thewindshield to evaluate the situation. Theactual distance to objects and pedestrianscannot be gaged accurately by looking at ascreen.
Animal recognitionAnimals can be recognized in the followingsituations:RdarknessRoutside built-up areasRbelow an outside temperature of 90 ‡(32 †)
Night View Assist Plus can recognize largeranimals such as deer, cows or horses usingtypical characteristics.The system does not detect:Rsmaller animals, e.g. dogs and catsRanimals whose silhouette is not clearlyrecognizable.
When detected, animals are marked withsmall color frame corners. In contrast topedestrian recognition, there is no separatereadiness symbol in the multifunctiondisplay.
Switching Night View Assist on/off
Activation conditionsYou can only activate Night View Assist Plusif all of the following conditions are met:Rthe ignition is switched on (Y page 175) orthe engine has been started.Rthe light switch is in theà or Lposition.Rreverse gear has not been engaged.
Activating Night View Assist Plus
238 Driving systemsDrivingandparking
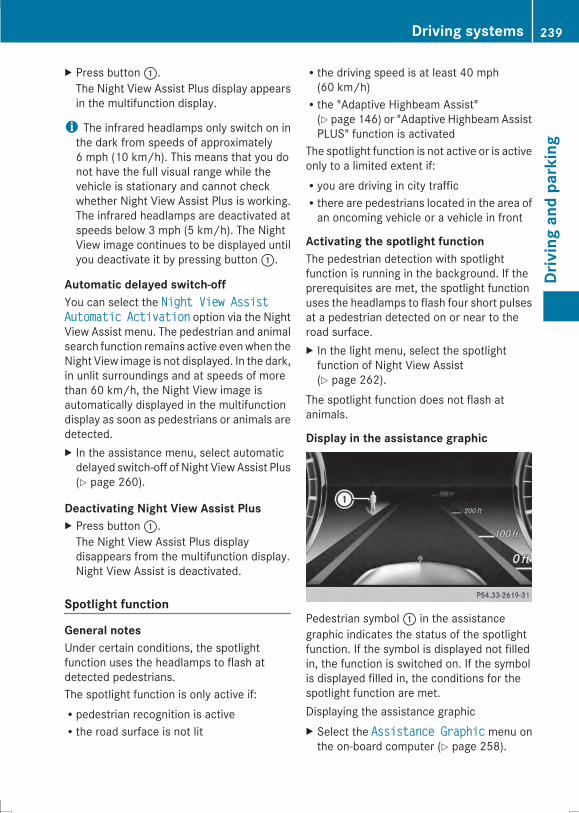
X Press button:.The Night View Assist Plus display appearsin the multifunction display.
i The infrared headlamps only switch on inthe dark from speeds of approximately6 mph (10 km/h). This means that you donot have the full visual range while thevehicle is stationary and cannot checkwhether Night View Assist Plus is working.The infrared headlamps are deactivated atspeeds below 3 mph (5 km/h). The NightView image continues to be displayed untilyou deactivate it by pressing button:.
Automatic delayed switch-offYou can select the Night View AssistNight View AssistAutomaticAutomatic ActivationActivation option via the NightView Assist menu. The pedestrian and animalsearch function remains active evenwhen theNight View image is not displayed. In the dark,in unlit surroundings and at speeds of morethan 60 km/h, the Night View image isautomatically displayed in the multifunctiondisplay as soon as pedestrians or animals aredetected.X In the assistance menu, select automaticdelayed switch-off of Night ViewAssist Plus(Y page 260).
Deactivating Night View Assist PlusX Press button:.The Night View Assist Plus displaydisappears from the multifunction display.Night View Assist is deactivated.
Spotlight function
General notesUnder certain conditions, the spotlightfunction uses the headlamps to flash atdetected pedestrians.The spotlight function is only active if:Rpedestrian recognition is activeRthe road surface is not lit
Rthe driving speed is at least 40 mph(60 km/h)Rthe "Adaptive Highbeam Assist"(Y page 146) or "Adaptive Highbeam AssistPLUS" function is activated
The spotlight function is not active or is activeonly to a limited extent if:Ryou are driving in city trafficRthere are pedestrians located in the area ofan oncoming vehicle or a vehicle in front
Activating the spotlight functionThe pedestrian detection with spotlightfunction is running in the background. If theprerequisites are met, the spotlight functionuses the headlamps to flash four short pulsesat a pedestrian detected on or near to theroad surface.X In the light menu, select the spotlightfunction of Night View Assist(Y page 262).
The spotlight function does not flash atanimals.
Display in the assistance graphic
Pedestrian symbol: in the assistancegraphic indicates the status of the spotlightfunction. If the symbol is displayed not filledin, the function is switched on. If the symbolis displayed filled in, the conditions for thespotlight function are met.Displaying the assistance graphicX Select the Assistance GraphicAssistance Graphic menu onthe on-board computer (Y page 258).
Driving systems 239
Drivingandparking
Z

Problems with Night View Assist
Problem Possible causes/consequences andMM Solutions
The picture quality ofNight View Assist Plushas deteriorated.
The windshield is fogged up on the inside.X Fold down camera cover (Y page 591).X Defrost the windshield (Y page 165).
The windshield is iced up.X De-ice the windshield (Y page 165).
The windshield wipers are smearing the windshield.X Replace the wiper blades (Y page 151).
The windshield is smeared after the vehicle has been cleaned in acar wash.X Clean the windshield (Y page 589).
There is windshield chip damage in the camera's field of vision.X Replace the windshield.
The pedestrian andanimal recognition isnot available.
The infrared camera in the radiator grill is dirty.X Use a soft cloth and water to clean the infrared camera.
Driving Assistance PLUS package
General notesThe Active Driving Assistance PLUS packageconsists of DISTRONIC PLUS (Y page 202),Active Blind Spot Assist (Y page 240) andActive Lane Keeping Assist (Y page 243).
Active Blind Spot Assist
General notesActive Blind Spot Assist uses a radar sensorsystem, pointed toward the rear of thevehicle, tomonitor the area to the sides of thevehicle which the driver is unable to see. Awarning display in the exterior mirrors drawsyour attention to vehicles detected in themonitored area. If you then switch on thecorresponding turn signal to change lane, youwill also receive an optical and audiblewarning. If a risk of lateral collision is
detected, corrective braking may help youavoid a collision. Active Blind Spot Assistevaluates the free space in the direction oftravel and to the side beforemaking a course-correcting brake application. For this, ActiveBlind Spot Assist uses radar sensors whichare pointed in the direction of travel.Active Blind Spot Assist supports you from aspeed of approximately 20 mph (30 km/h).
Important safety notesActive Blind Spot Assist is only an aid and isnot a substitute for attentive driving.
G WARNINGActive Blind Spot Assist does not react to:Rvehicles overtaken too closely on the side,placing them in the blind spot areaRvehicles which approach with a large speeddifferential and overtake your vehicle
240 Driving systemsDrivingandparking
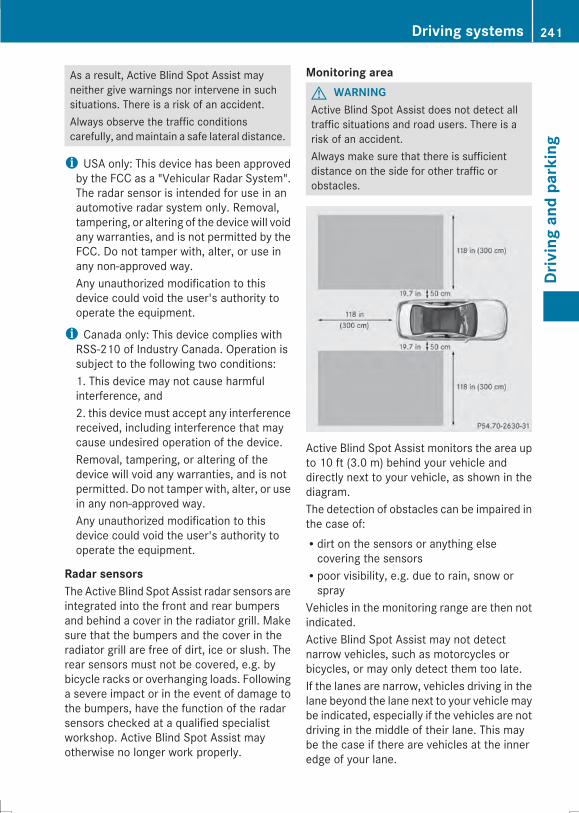
As a result, Active Blind Spot Assist mayneither give warnings nor intervene in suchsituations. There is a risk of an accident.Always observe the traffic conditionscarefully, andmaintain a safe lateral distance.
i USA only: This device has been approvedby the FCC as a "Vehicular Radar System".The radar sensor is intended for use in anautomotive radar system only. Removal,tampering, or altering of the device will voidany warranties, and is not permitted by theFCC. Do not tamper with, alter, or use inany non-approved way.Any unauthorized modification to thisdevice could void the user's authority tooperate the equipment.
i Canada only: This device complies withRSS-210 of Industry Canada. Operation issubject to the following two conditions:1. This device may not cause harmfulinterference, and2. this device must accept any interferencereceived, including interference that maycause undesired operation of the device.Removal, tampering, or altering of thedevice will void any warranties, and is notpermitted. Do not tamper with, alter, or usein any non-approved way.Any unauthorized modification to thisdevice could void the user's authority tooperate the equipment.
Radar sensorsThe Active Blind Spot Assist radar sensors areintegrated into the front and rear bumpersand behind a cover in the radiator grill. Makesure that the bumpers and the cover in theradiator grill are free of dirt, ice or slush. Therear sensors must not be covered, e.g. bybicycle racks or overhanging loads. Followinga severe impact or in the event of damage tothe bumpers, have the function of the radarsensors checked at a qualified specialistworkshop. Active Blind Spot Assist mayotherwise no longer work properly.
Monitoring areaG WARNINGActive Blind Spot Assist does not detect alltraffic situations and road users. There is arisk of an accident.Always make sure that there is sufficientdistance on the side for other traffic orobstacles.
Active Blind Spot Assist monitors the area upto 10 ft (3.0 m) behind your vehicle anddirectly next to your vehicle, as shown in thediagram.The detection of obstacles can be impaired inthe case of:Rdirt on the sensors or anything elsecovering the sensorsRpoor visibility, e.g. due to rain, snow orspray
Vehicles in the monitoring range are then notindicated.Active Blind Spot Assist may not detectnarrow vehicles, such as motorcycles orbicycles, or may only detect them too late.If the lanes are narrow, vehicles driving in thelane beyond the lane next to your vehicle maybe indicated, especially if the vehicles are notdriving in the middle of their lane. This maybe the case if there are vehicles at the inneredge of your lane.
Driving systems 241
Drivingandparking
Z
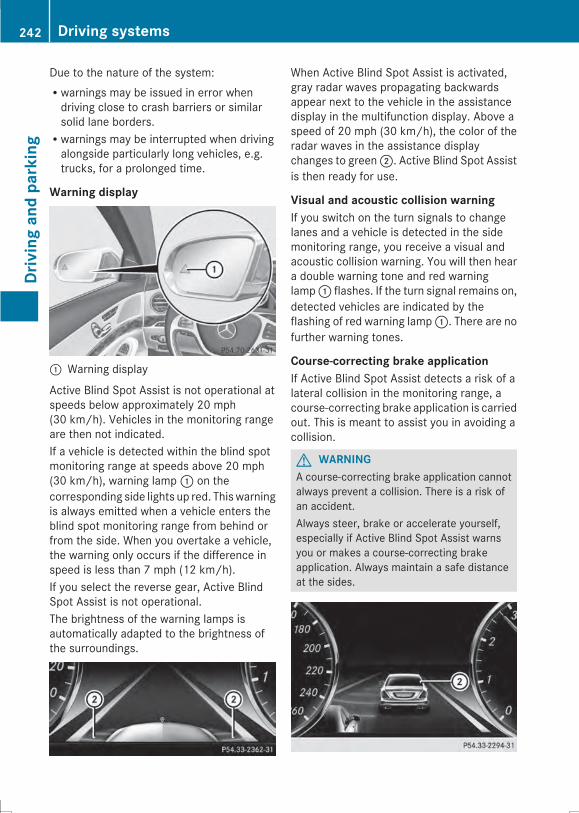
Due to the nature of the system:Rwarnings may be issued in error whendriving close to crash barriers or similarsolid lane borders.Rwarnings may be interrupted when drivingalongside particularly long vehicles, e.g.trucks, for a prolonged time.
Warning display
: Warning display
Active Blind Spot Assist is not operational atspeeds below approximately 20 mph(30 km/h). Vehicles in the monitoring rangeare then not indicated.If a vehicle is detected within the blind spotmonitoring range at speeds above 20 mph(30 km/h), warning lamp: on thecorresponding side lights up red. Thiswarningis always emitted when a vehicle enters theblind spot monitoring range from behind orfrom the side. When you overtake a vehicle,the warning only occurs if the difference inspeed is less than 7 mph (12 km/h).If you select the reverse gear, Active BlindSpot Assist is not operational.The brightness of the warning lamps isautomatically adapted to the brightness ofthe surroundings.
When Active Blind Spot Assist is activated,gray radar waves propagating backwardsappear next to the vehicle in the assistancedisplay in the multifunction display. Above aspeed of 20 mph (30 km/h), the color of theradar waves in the assistance displaychanges to green;. Active Blind Spot Assistis then ready for use.
Visual and acoustic collision warningIf you switch on the turn signals to changelanes and a vehicle is detected in the sidemonitoring range, you receive a visual andacoustic collision warning. You will then heara double warning tone and red warninglamp: flashes. If the turn signal remains on,detected vehicles are indicated by theflashing of red warning lamp:. There are nofurther warning tones.
Course-correcting brake applicationIf Active Blind Spot Assist detects a risk of alateral collision in the monitoring range, acourse-correcting brake application is carriedout. This is meant to assist you in avoiding acollision.
G WARNINGA course-correcting brake application cannotalways prevent a collision. There is a risk ofan accident.Always steer, brake or accelerate yourself,especially if Active Blind Spot Assist warnsyou or makes a course-correcting brakeapplication. Always maintain a safe distanceat the sides.
242 Driving systemsDrivingandparking
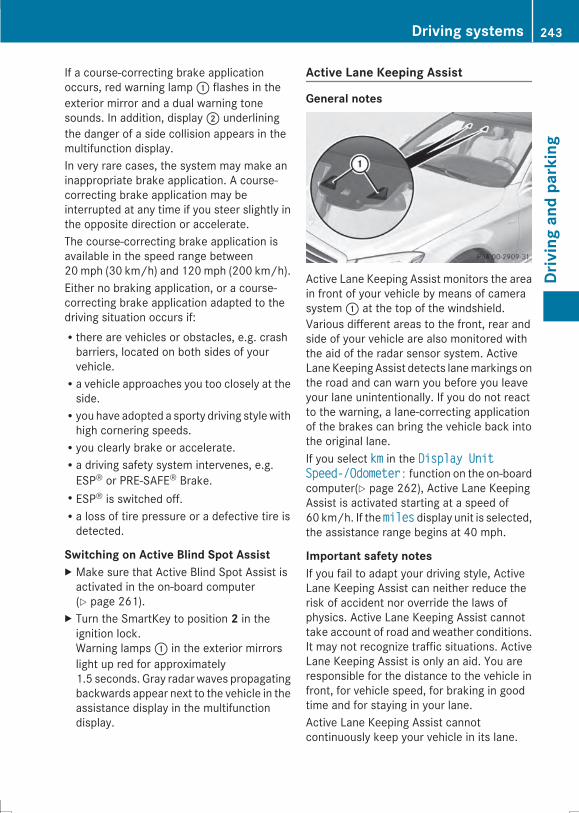
If a course-correcting brake applicationoccurs, red warning lamp: flashes in theexterior mirror and a dual warning tonesounds. In addition, display; underliningthe danger of a side collision appears in themultifunction display.In very rare cases, the system may make aninappropriate brake application. A course-correcting brake application may beinterrupted at any time if you steer slightly inthe opposite direction or accelerate.The course-correcting brake application isavailable in the speed range between20mph (30 km/h) and 120mph (200 km/h).Either no braking application, or a course-correcting brake application adapted to thedriving situation occurs if:Rthere are vehicles or obstacles, e.g. crashbarriers, located on both sides of yourvehicle.Ra vehicle approaches you too closely at theside.Ryou have adopted a sporty driving stylewithhigh cornering speeds.Ryou clearly brake or accelerate.Ra driving safety system intervenes, e.g.ESP® or PRE-SAFE® Brake.RESP® is switched off.Ra loss of tire pressure or a defective tire isdetected.
Switching on Active Blind Spot AssistX Make sure that Active Blind Spot Assist isactivated in the on-board computer(Y page 261).
X Turn the SmartKey to position 2 in theignition lock.Warning lamps: in the exterior mirrorslight up red for approximately1.5 seconds. Gray radar waves propagatingbackwards appear next to the vehicle in theassistance display in the multifunctiondisplay.
Active Lane Keeping Assist
General notes
Active Lane Keeping Assist monitors the areain front of your vehicle by means of camerasystem: at the top of the windshield.Various different areas to the front, rear andside of your vehicle are also monitored withthe aid of the radar sensor system. ActiveLaneKeepingAssist detects lanemarkings onthe road and can warn you before you leaveyour lane unintentionally. If you do not reactto the warning, a lane-correcting applicationof the brakes can bring the vehicle back intothe original lane.If you select kmkm in the Display UnitDisplay UnitSpeed-/Odometer:Speed-/Odometer: function on the on-boardcomputer(Y page 262), Active Lane KeepingAssist is activated starting at a speed of60 km/h. If the milesmiles display unit is selected,the assistance range begins at 40 mph.
Important safety notesIf you fail to adapt your driving style, ActiveLane Keeping Assist can neither reduce therisk of accident nor override the laws ofphysics. Active Lane Keeping Assist cannottake account of road and weather conditions.It may not recognize traffic situations. ActiveLane Keeping Assist is only an aid. You areresponsible for the distance to the vehicle infront, for vehicle speed, for braking in goodtime and for staying in your lane.Active Lane Keeping Assist cannotcontinuously keep your vehicle in its lane.
Driving systems 243
Drivingandparking
Z

G WARNINGActive Lane Keeping Assist cannot alwaysclearly detect lane markings.In such cases, Active Lane Keeping Assistcan:Rgive an unnecessary warning and thenmake a course-correcting brake applicationto the vehicleRnot give a warning or interveneThere is a risk of an accident.Always pay particular attention to the trafficsituation and keep within the lane, especiallyif Active Lane Keeping Assist alerts you.Terminate the intervention in a non-criticaldriving situation.
The system may be impaired or may notfunction if:Rthere is poor visibility, e.g. due toinsufficient illumination of the road, or dueto snow, rain, fog or sprayRthere is glare, e.g. from oncoming traffic,the sun or reflections (e.g. when the roadsurface is wet)Rthe windshield is dirty, fogged up, damagedor covered, for instance by a sticker, in thevicinity of the cameraRthe radar sensors in the front or rearbumpers or the radiator grill are dirty, e.g.obscured by snowRthere are no, several or unclear lanemarkings for a lane, e.g. in areas with roadconstruction workRthe lane markings are worn away, dark orcovered up, e.g. by dirt or snowRthe distance to the vehicle in front is toosmall and the lanemarkings thus cannot bedetectedRthe lane markings change quickly, e.g.lanes branch off, cross one another ormergeRthe road is narrow and windingRthere are strong shadows cast on the lane
If no vehicle is detected in the adjacent laneand there are broken lanemarkings detected,no lane-correcting brake application is made.
Warning vibration in the steering wheelA warning may be given if a front wheelpasses over a lane marking. It will warn youby means of intermittent vibration in thesteering wheel for up to 1.5 seconds.
Lane-correcting brake applicationIf you leave your lane, under certaincircumstances the vehicle will brake brieflyon one side. This is meant to assist you inbringing the vehicle back to the original lane.
G WARNINGA lane-correcting brake application cannotalways bring the vehicle back into the originallane. There is a risk of an accident.Always steer, brake or accelerate yourself,especially if Active Lane Keeping Assist warnsyou or makes a lane-correcting brakeapplication.
If a lane-correcting brake application occurs,display: appears in the multifunctiondisplay. The brake application also slightlyreduces vehicle speed.This function is available in the range between40 mph and 120 mph (60 km/h and200 km/h).A lane-correcting brake application can bemade after driving over a lane markingrecognize as being solid or broken. Beforethis, a warning must be given by means ofintermittent vibration in the steering wheel.
244 Driving systemsDrivingandparking
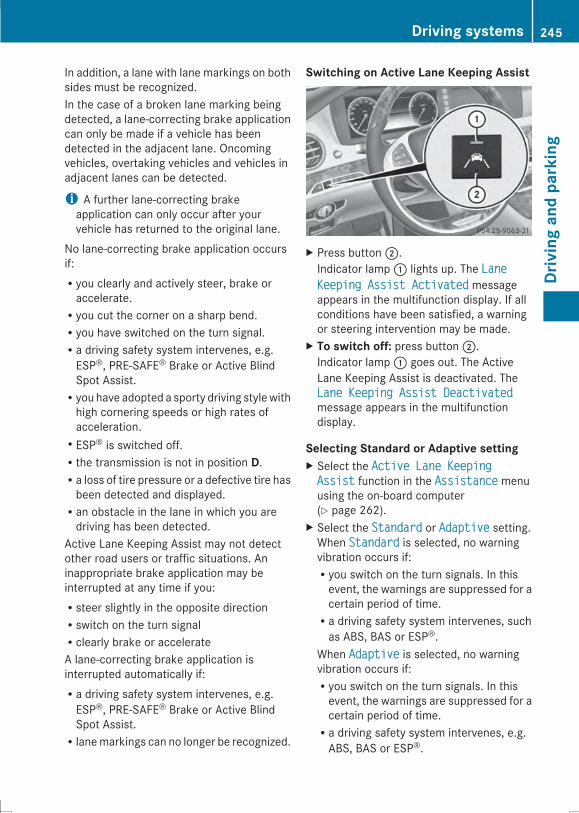
In addition, a lane with lane markings on bothsides must be recognized.In the case of a broken lane marking beingdetected, a lane-correcting brake applicationcan only be made if a vehicle has beendetected in the adjacent lane. Oncomingvehicles, overtaking vehicles and vehicles inadjacent lanes can be detected.
i A further lane-correcting brakeapplication can only occur after yourvehicle has returned to the original lane.
No lane-correcting brake application occursif:Ryou clearly and actively steer, brake oraccelerate.Ryou cut the corner on a sharp bend.Ryou have switched on the turn signal.Ra driving safety system intervenes, e.g.ESP®, PRE-SAFE® Brake or Active BlindSpot Assist.Ryou have adopted a sporty driving stylewithhigh cornering speeds or high rates ofacceleration.RESP® is switched off.Rthe transmission is not in position D.Ra loss of tire pressure or a defective tire hasbeen detected and displayed.Ran obstacle in the lane in which you aredriving has been detected.
Active Lane Keeping Assist may not detectother road users or traffic situations. Aninappropriate brake application may beinterrupted at any time if you:Rsteer slightly in the opposite directionRswitch on the turn signalRclearly brake or accelerateA lane-correcting brake application isinterrupted automatically if:Ra driving safety system intervenes, e.g.ESP®, PRE-SAFE® Brake or Active BlindSpot Assist.Rlanemarkings can no longer be recognized.
Switching on Active Lane Keeping Assist
X Press button;.Indicator lamp: lights up. The LaneLaneKeeping Assist ActivatedKeeping Assist Activated messageappears in the multifunction display. If allconditions have been satisfied, a warningor steering intervention may be made.
X To switch off: press button;.Indicator lamp: goes out. The ActiveLane Keeping Assist is deactivated. TheLane Keeping Assist DeactivatedLane Keeping Assist Deactivatedmessage appears in the multifunctiondisplay.
Selecting Standard or Adaptive settingX Select the Active Lane KeepingActive Lane KeepingAssistAssist function in the AssistanceAssistance menuusing the on-board computer(Y page 262).
X Select the StandardStandard or AdaptiveAdaptive setting.When StandardStandard is selected, no warningvibration occurs if:Ryou switch on the turn signals. In thisevent, the warnings are suppressed for acertain period of time.Ra driving safety system intervenes, suchas ABS, BAS or ESP®.
When AdaptiveAdaptive is selected, no warningvibration occurs if:Ryou switch on the turn signals. In thisevent, the warnings are suppressed for acertain period of time.Ra driving safety system intervenes, e.g.ABS, BAS or ESP®.
Driving systems 245
Drivingandparking
Z
Ryou accelerate hard, e.g. kickdown.Ryou brake hard.Ryou steer actively, e.g. swerve to avoidan obstacle or change lanes quickly.Ryou cut the corner on a sharp bend.
In order that you are warned only whennecessary and in good time if you cross thelane marking, the system recognizes certainconditions and warns you accordingly.The warning vibration occurs earlier if:Ryou approach the outer lane marking on abend.Rthe road has very wide lanes, e.g. ahighway.Rthe system recognizes solid lane markings.The warning vibration occurs later if:Rthe road has narrow lanes.Ryou cut the corner on a bend.
246 Driving systemsDrivingandparking

Useful information ............................ 248Important safety notes .................... 248Displays and operation .................... 248Menus and submenus ...................... 250Display messages ............................. 265Warning and indicator lamps in theinstrument cluster ............................ 301
247
On-board
computerand
displays
Useful information
i This Operator's Manual describes allmodels and all standard and optionalequipment of your vehicle available at thetime of publication of the Operator'sManual. Country-specific differences arepossible. Please note that your vehicle maynot be equipped with all featuresdescribed. This also applies to safety-related systems and functions.
i Read the information on qualifiedspecialist workshops: (Y page 34).
Important safety notes
G WARNINGIf you operate information systems andcommunication equipment integrated in thevehicle while driving, you will be distractedfrom traffic conditions. You could also losecontrol of the vehicle. There is a risk of anaccident.Only operate the equipment when the trafficsituation permits. If you are not sure that thisis possible, park the vehicle paying attentionto traffic conditions and operate theequipment when the vehicle is stationary.
G WARNINGIf the instrument cluster has failed ormalfunctioned, you may not recognizefunction restrictions in systems relevant tosafety. The operating safety of your vehiclemay be impaired. There is a risk of anaccident.Drive on carefully. Have the vehicle checkedat a qualified specialist workshopimmediately.
You must observe the legal requirements forthe country in which you are currently drivingwhen operating the on-board computer.The on-board computer only showsmessagesor warnings from certain systems in the
multifunction display. You should thereforemake sure your vehicle is operating safely atall times. Otherwise, a vehicle that is notoperating safely may cause an accident.For an overview, see the instrument panelillustration (Y page 39).
Displays and operation
Tachometer! Do not drive in the overrevving range, asthis could damage the engine.
The red band in the tachometer indicates theengine's overrevving range.The fuel supply is interrupted to protect theengine when the red band is reached.
Outside temperature displayYou should pay special attention to roadconditions when temperatures are aroundfreezing point.The outside temperature display is in themultifunction display (Y page 250).Changes in the outside temperature aredisplayed after a short delay.
248 Displays and operationOn
-board
computerand
displays
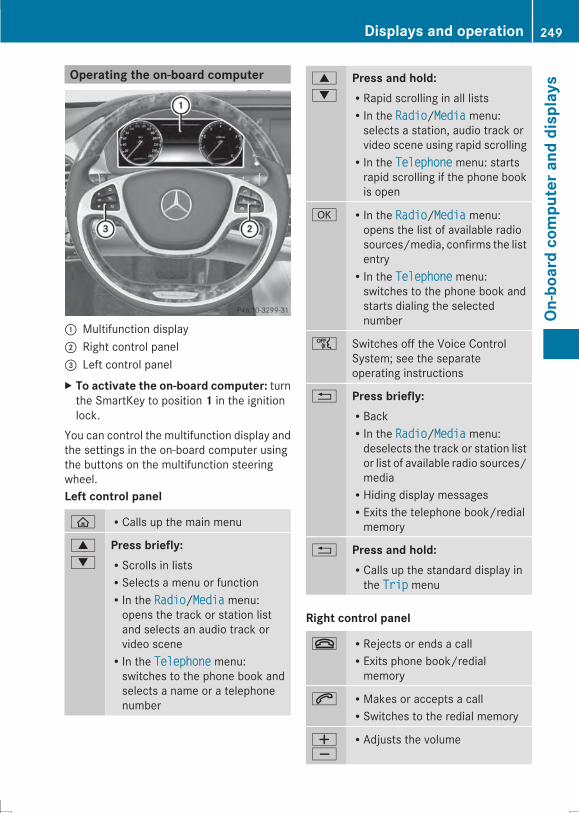
Operating the on-board computer
: Multifunction display; Right control panel= Left control panelX To activate the on-board computer: turnthe SmartKey to position 1 in the ignitionlock.
You can control the multifunction display andthe settings in the on-board computer usingthe buttons on the multifunction steeringwheel.Left control panel
ò RCalls up the main menu
9
:
Press briefly:RScrolls in listsRSelects a menu or functionRIn the RadioRadio/MediaMedia menu:opens the track or station listand selects an audio track orvideo sceneRIn the TelephoneTelephone menu:switches to the phone book andselects a name or a telephonenumber
9
:
Press and hold:RRapid scrolling in all listsRIn the RadioRadio/MediaMedia menu:selects a station, audio track orvideo scene using rapid scrollingRIn the TelephoneTelephone menu: startsrapid scrolling if the phone bookis open
a RIn the RadioRadio/MediaMedia menu:opens the list of available radiosources/media, confirms the listentryRIn the TelephoneTelephone menu:switches to the phone book andstarts dialing the selectednumber
ñ Switches off the Voice ControlSystem; see the separateoperating instructions
% Press briefly:RBackRIn the RadioRadio/MediaMedia menu:deselects the track or station listor list of available radio sources/mediaRHiding display messagesRExits the telephone book/redialmemory
% Press and hold:RCalls up the standard display inthe TripTrip menu
Right control panel
~ RRejects or ends a callRExits phone book/redialmemory
6 RMakes or accepts a callRSwitches to the redial memory
WX
RAdjusts the volume
Displays and operation 249
On-board
computerand
displays
Z
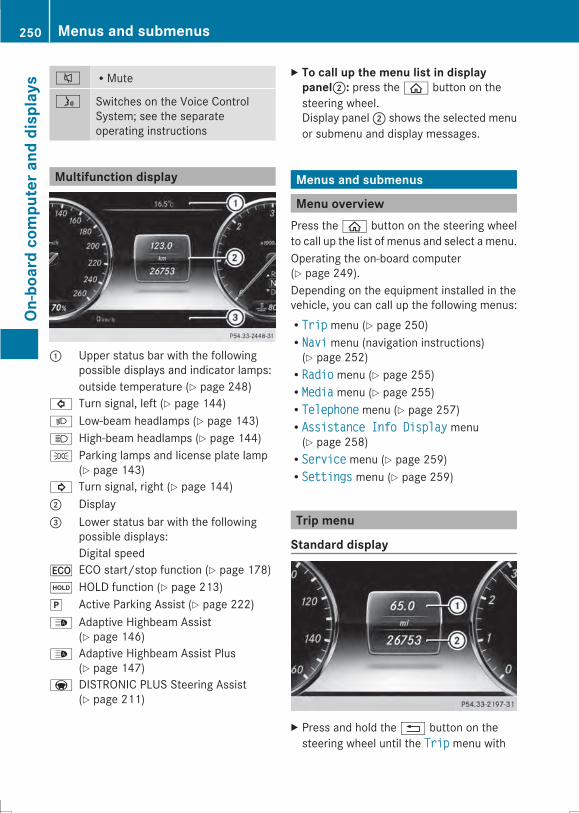
8 RMute
ó Switches on the Voice ControlSystem; see the separateoperating instructions
Multifunction display
: Upper status bar with the followingpossible displays and indicator lamps:outside temperature (Y page 248)
# Turn signal, left (Y page 144)L Low-beam headlamps (Y page 143)K High-beam headlamps (Y page 144)T Parking lamps and license plate lamp
(Y page 143)! Turn signal, right (Y page 144); Display= Lower status bar with the following
possible displays:Digital speed
¤ ECO start/stop function (Y page 178)ë HOLD function (Y page 213)j Active Parking Assist (Y page 222)_ Adaptive Highbeam Assist
(Y page 146)_ Adaptive Highbeam Assist Plus
(Y page 147)a DISTRONIC PLUS Steering Assist
(Y page 211)
X To call up the menu list in displaypanel;: press theò button on thesteering wheel.Display panel; shows the selected menuor submenu and display messages.
Menus and submenus
Menu overviewPress theò button on the steering wheelto call up the list of menus and select a menu.Operating the on-board computer(Y page 249).Depending on the equipment installed in thevehicle, you can call up the following menus:RTripTrip menu (Y page 250)RNaviNavi menu (navigation instructions)(Y page 252)RRadioRadio menu (Y page 255)RMediaMedia menu (Y page 255)RTelephoneTelephone menu (Y page 257)RAssistance Info DisplayAssistance Info Display menu(Y page 258)RServiceService menu (Y page 259)RSettingsSettings menu (Y page 259)
Trip menu
Standard display
X Press and hold the% button on thesteering wheel until the TripTrip menu with
250 Menus and submenusOn
-board
computerand
displays
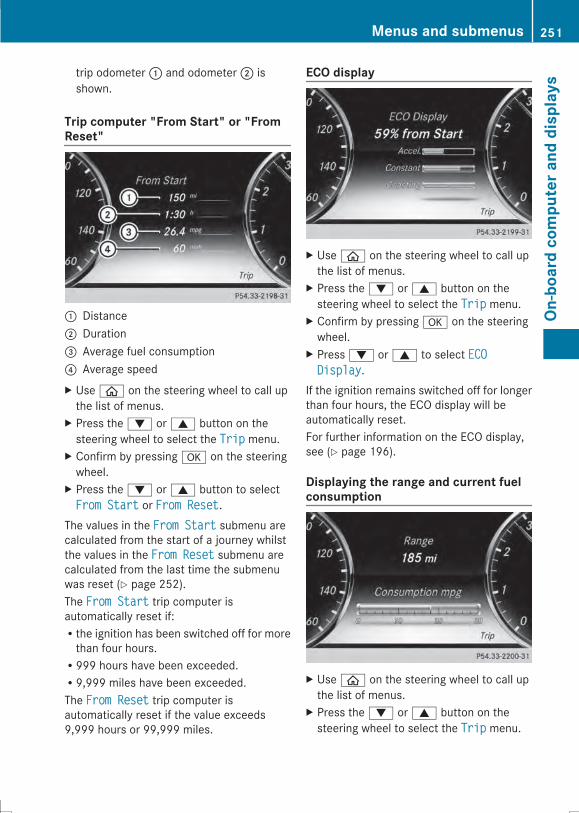
trip odometer: and odometer; isshown.
Trip computer "From Start" or "FromReset"
: Distance; Duration= Average fuel consumption? Average speedX Useò on the steering wheel to call upthe list of menus.
X Press the: or9 button on thesteering wheel to select the TripTrip menu.
X Confirm by pressinga on the steeringwheel.
X Press the: or9 button to selectFrom StartFrom Start or From ResetFrom Reset.
The values in the From StartFrom Start submenu arecalculated from the start of a journey whilstthe values in the From ResetFrom Reset submenu arecalculated from the last time the submenuwas reset (Y page 252).The From StartFrom Start trip computer isautomatically reset if:Rthe ignition has been switched off for morethan four hours.R999 hours have been exceeded.R9,999 miles have been exceeded.The From ResetFrom Reset trip computer isautomatically reset if the value exceeds9,999 hours or 99,999 miles.
ECO display
X Useò on the steering wheel to call upthe list of menus.
X Press the: or9 button on thesteering wheel to select the TripTrip menu.
X Confirm by pressinga on the steeringwheel.
X Press: or9 to select ECOECODisplayDisplay.
If the ignition remains switched off for longerthan four hours, the ECO display will beautomatically reset.For further information on the ECO display,see (Y page 196).
Displaying the range and current fuelconsumption
X Useò on the steering wheel to call upthe list of menus.
X Press the: or9 button on thesteering wheel to select the TripTrip menu.
Menus and submenus 251
On-board
computera
nddisplays
Z
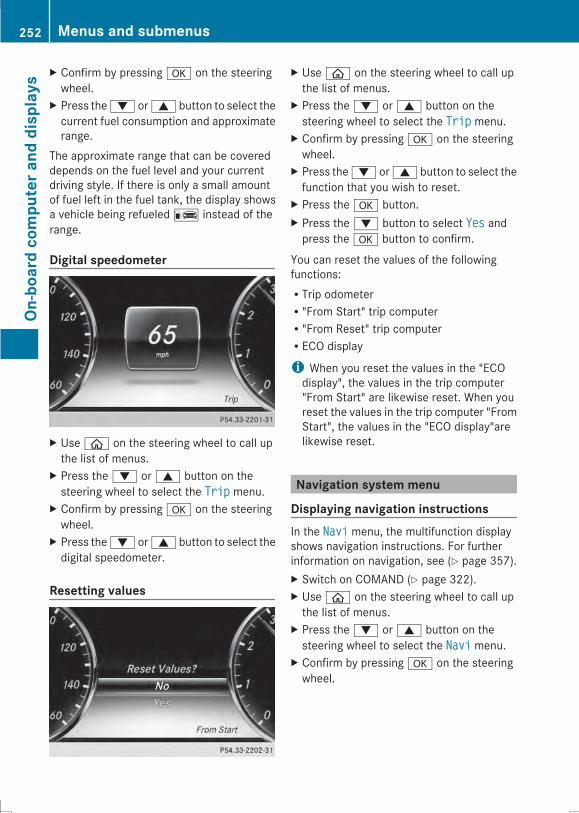
X Confirm by pressinga on the steeringwheel.
X Press the: or9 button to select thecurrent fuel consumption and approximaterange.
The approximate range that can be covereddepends on the fuel level and your currentdriving style. If there is only a small amountof fuel left in the fuel tank, the display showsa vehicle being refueledC instead of therange.
Digital speedometer
X Useò on the steering wheel to call upthe list of menus.
X Press the: or9 button on thesteering wheel to select the TripTrip menu.
X Confirm by pressinga on the steeringwheel.
X Press the: or9 button to select thedigital speedometer.
Resetting values
X Useò on the steering wheel to call upthe list of menus.
X Press the: or9 button on thesteering wheel to select the TripTrip menu.
X Confirm by pressinga on the steeringwheel.
X Press the: or9 button to select thefunction that you wish to reset.
X Press thea button.X Press the: button to select YesYes andpress thea button to confirm.
You can reset the values of the followingfunctions:RTrip odometerR"From Start" trip computerR"From Reset" trip computerRECO display
i When you reset the values in the "ECOdisplay", the values in the trip computer"From Start" are likewise reset. When youreset the values in the trip computer "FromStart", the values in the "ECO display"arelikewise reset.
Navigation system menu
Displaying navigation instructionsIn the NaviNavi menu, the multifunction displayshows navigation instructions. For furtherinformation on navigation, see (Y page 357).X Switch on COMAND (Y page 322).X Useò on the steering wheel to call upthe list of menus.
X Press the: or9 button on thesteering wheel to select the NaviNavi menu.
X Confirm by pressinga on the steeringwheel.
252 Menus and submenusOn
-board
computerand
displays
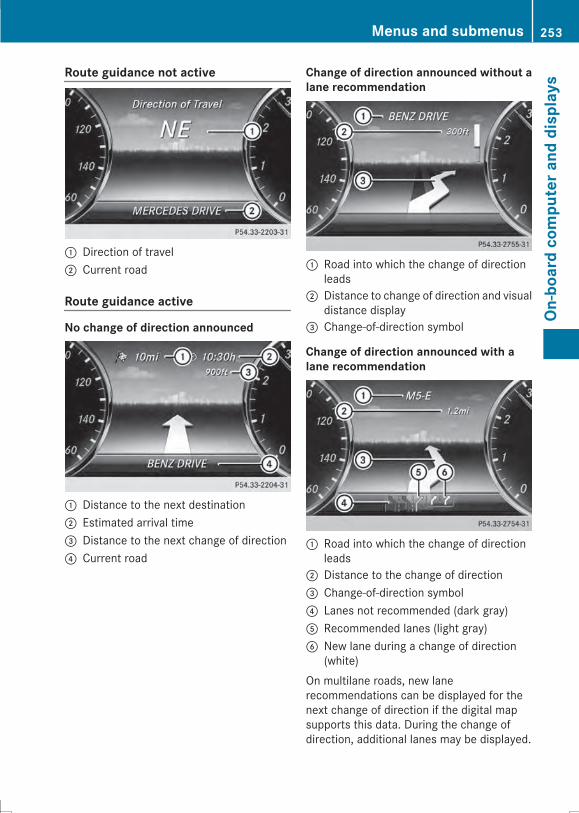
Route guidance not active
: Direction of travel; Current road
Route guidance active
No change of direction announced
: Distance to the next destination; Estimated arrival time= Distance to the next change of direction? Current road
Change of direction announced without alane recommendation
: Road into which the change of directionleads
; Distance to change of direction and visualdistance display
= Change-of-direction symbol
Change of direction announced with alane recommendation
: Road into which the change of directionleads
; Distance to the change of direction= Change-of-direction symbol? Lanes not recommended (dark gray)A Recommended lanes (light gray)B New lane during a change of direction
(white)On multilane roads, new lanerecommendations can be displayed for thenext change of direction if the digital mapsupports this data. During the change ofdirection, additional lanes may be displayed.
Menus and submenus 253
On-board
computera
nddisplays
Z
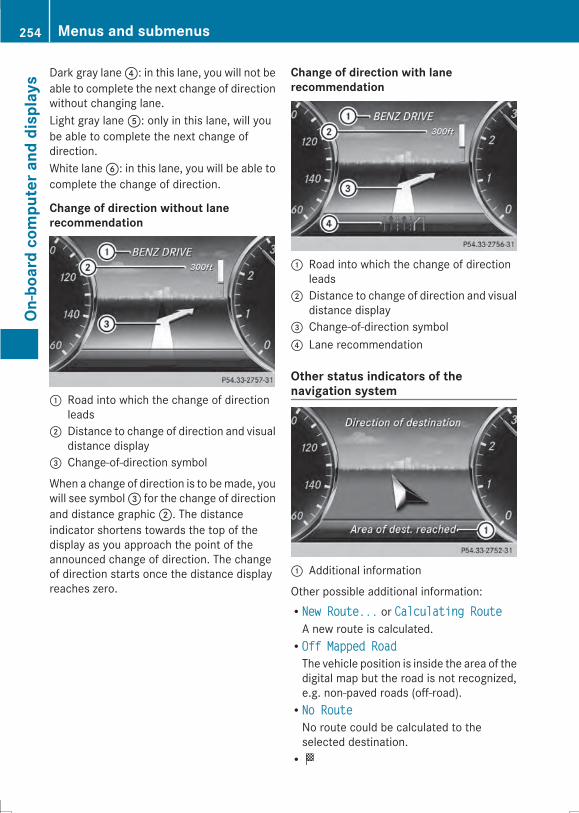
Dark gray lane?: in this lane, you will not beable to complete the next change of directionwithout changing lane.Light gray laneA: only in this lane, will yoube able to complete the next change ofdirection.White laneB: in this lane, you will be able tocomplete the change of direction.
Change of direction without lanerecommendation
: Road into which the change of directionleads
; Distance to change of direction and visualdistance display
= Change-of-direction symbol
When a change of direction is to bemade, youwill see symbol= for the change of directionand distance graphic;. The distanceindicator shortens towards the top of thedisplay as you approach the point of theannounced change of direction. The changeof direction starts once the distance displayreaches zero.
Change of direction with lanerecommendation
: Road into which the change of directionleads
; Distance to change of direction and visualdistance display
= Change-of-direction symbol? Lane recommendation
Other status indicators of thenavigation system
: Additional information
Other possible additional information:RNew Route...New Route... or Calculating RouteCalculating RouteA new route is calculated.ROff Mapped RoadOff Mapped RoadThe vehicle position is inside the area of thedigital map but the road is not recognized,e.g. non-paved roads (off-road).RNo RouteNo RouteNo route could be calculated to theselected destination.RO
254 Menus and submenusOn
-board
computera
nddisplays
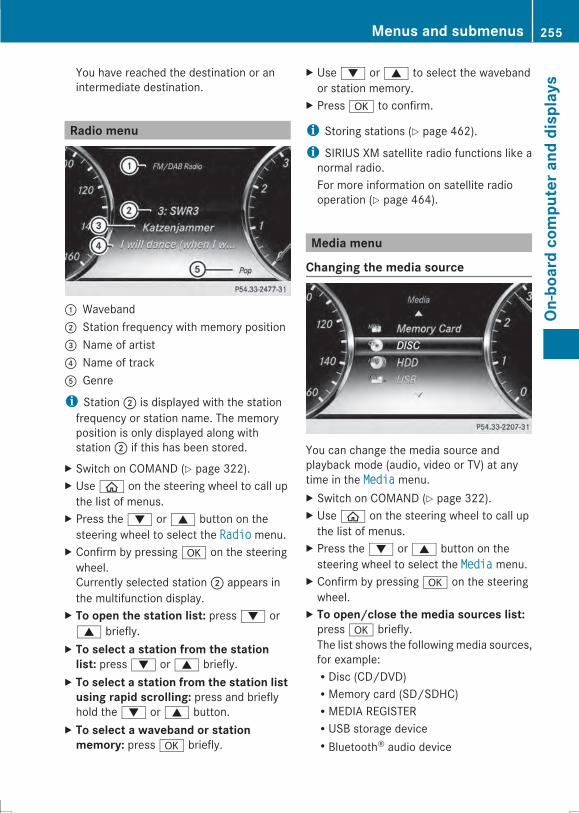
You have reached the destination or anintermediate destination.
Radio menu
: Waveband; Station frequency with memory position= Name of artist? Name of trackA Genre
i Station; is displayed with the stationfrequency or station name. The memoryposition is only displayed along withstation; if this has been stored.
X Switch on COMAND (Y page 322).X Useò on the steering wheel to call upthe list of menus.
X Press the: or9 button on thesteering wheel to select the RadioRadio menu.
X Confirm by pressinga on the steeringwheel.Currently selected station; appears inthe multifunction display.
X To open the station list: press: or9 briefly.
X To select a station from the stationlist: press: or9 briefly.
X To select a station from the station listusing rapid scrolling: press and brieflyhold the: or9 button.
X To select a waveband or stationmemory: pressa briefly.
X Use: or9 to select the wavebandor station memory.
X Pressa to confirm.
i Storing stations (Y page 462).
i SIRIUS XM satellite radio functions like anormal radio.For more information on satellite radiooperation (Y page 464).
Media menu
Changing the media source
You can change the media source andplayback mode (audio, video or TV) at anytime in the MediaMedia menu.X Switch on COMAND (Y page 322).X Useò on the steering wheel to call upthe list of menus.
X Press the: or9 button on thesteering wheel to select the MediaMedia menu.
X Confirm by pressinga on the steeringwheel.
X To open/close the media sources list:pressa briefly.The list shows the followingmedia sources,for example:RDisc (CD/DVD)RMemory card (SD/SDHC)RMEDIA REGISTERRUSB storage deviceRBluetooth® audio device
Menus and submenus 255
On-board
computerand
displays
Z
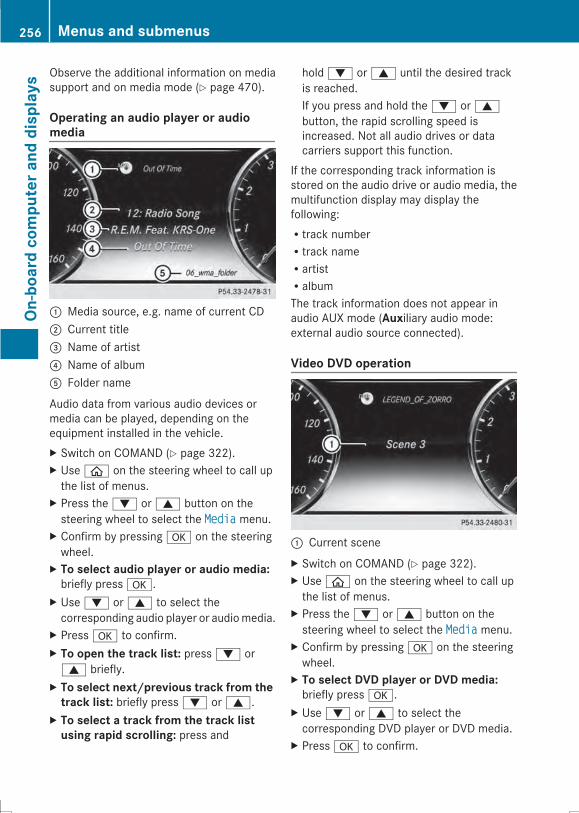
Observe the additional information on mediasupport and on media mode (Y page 470).
Operating an audio player or audiomedia
: Media source, e.g. name of current CD; Current title= Name of artist? Name of albumA Folder name
Audio data from various audio devices ormedia can be played, depending on theequipment installed in the vehicle.X Switch on COMAND (Y page 322).X Useò on the steering wheel to call upthe list of menus.
X Press the: or9 button on thesteering wheel to select the MediaMedia menu.
X Confirm by pressinga on the steeringwheel.
X To select audio player or audio media:briefly pressa.
X Use: or9 to select thecorresponding audio player or audiomedia.
X Pressa to confirm.X To open the track list: press: or9 briefly.
X To select next/previous track from thetrack list: briefly press: or9.
X To select a track from the track listusing rapid scrolling: press and
hold: or9 until the desired trackis reached.If you press and hold the: or9button, the rapid scrolling speed isincreased. Not all audio drives or datacarriers support this function.
If the corresponding track information isstored on the audio drive or audio media, themultifunction display may display thefollowing:Rtrack numberRtrack nameRartistRalbumThe track information does not appear inaudio AUX mode (Auxiliary audio mode:external audio source connected).
Video DVD operation
: Current sceneX Switch on COMAND (Y page 322).X Useò on the steering wheel to call upthe list of menus.
X Press the: or9 button on thesteering wheel to select the MediaMedia menu.
X Confirm by pressinga on the steeringwheel.
X To select DVD player or DVD media:briefly pressa.
X Use: or9 to select thecorresponding DVD player or DVD media.
X Pressa to confirm.
256 Menus and submenusOn
-board
computerand
displays
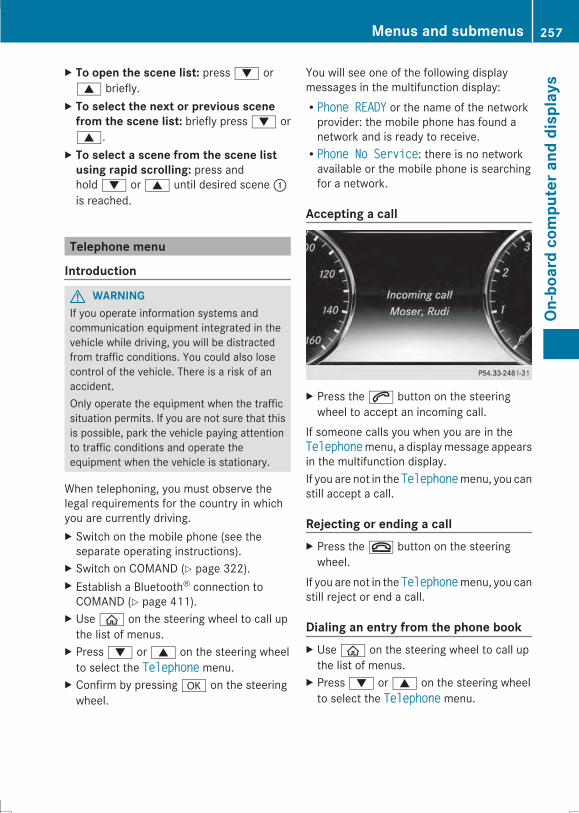
X To open the scene list: press: or9 briefly.
X To select the next or previous scenefrom the scene list: briefly press: or9.
X To select a scene from the scene listusing rapid scrolling: press andhold: or9 until desired scene:is reached.
Telephone menu
Introduction
G WARNINGIf you operate information systems andcommunication equipment integrated in thevehicle while driving, you will be distractedfrom traffic conditions. You could also losecontrol of the vehicle. There is a risk of anaccident.Only operate the equipment when the trafficsituation permits. If you are not sure that thisis possible, park the vehicle paying attentionto traffic conditions and operate theequipment when the vehicle is stationary.
When telephoning, you must observe thelegal requirements for the country in whichyou are currently driving.X Switch on the mobile phone (see theseparate operating instructions).
X Switch on COMAND (Y page 322).X Establish a Bluetooth® connection toCOMAND (Y page 411).
X Useò on the steering wheel to call upthe list of menus.
X Press: or9 on the steering wheelto select the TelephoneTelephone menu.
X Confirm by pressinga on the steeringwheel.
You will see one of the following displaymessages in the multifunction display:RPhone READYPhone READY or the name of the networkprovider: the mobile phone has found anetwork and is ready to receive.RPhone No ServicePhone No Service: there is no networkavailable or the mobile phone is searchingfor a network.
Accepting a call
X Press the6 button on the steeringwheel to accept an incoming call.
If someone calls you when you are in theTelephoneTelephonemenu, a displaymessage appearsin the multifunction display.If you are not in the TelephoneTelephonemenu, you canstill accept a call.
Rejecting or ending a callX Press the~ button on the steeringwheel.
If you are not in the TelephoneTelephonemenu, you canstill reject or end a call.
Dialing an entry from the phone bookX Useò on the steering wheel to call upthe list of menus.
X Press: or9 on the steering wheelto select the TelephoneTelephone menu.
Menus and submenus 257
On-board
computera
nddisplays
Z
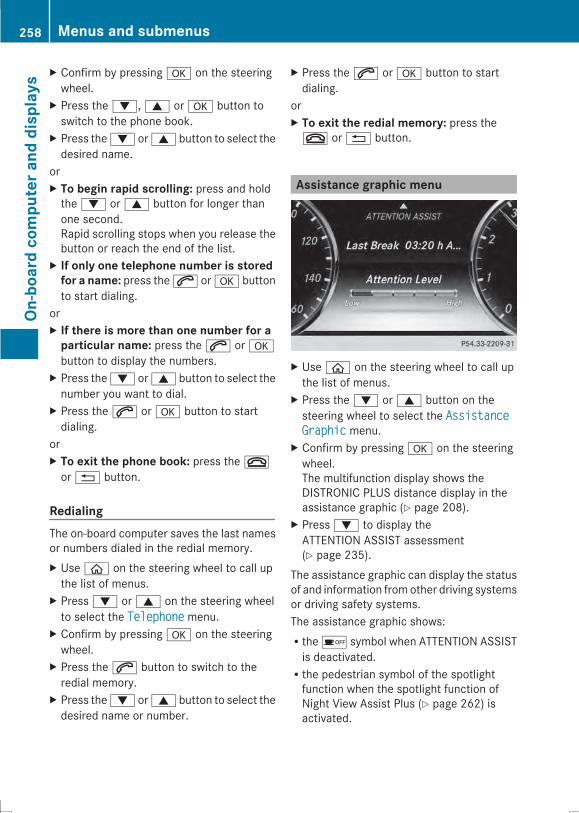
X Confirm by pressinga on the steeringwheel.
X Press the:,9 ora button toswitch to the phone book.
X Press the: or9 button to select thedesired name.
orX To begin rapid scrolling: press and holdthe: or9 button for longer thanone second.Rapid scrolling stops when you release thebutton or reach the end of the list.
X If only one telephone number is storedfor a name: press the6 ora buttonto start dialing.
orX If there is more than one number for aparticular name: press the6 orabutton to display the numbers.
X Press the: or9 button to select thenumber you want to dial.
X Press the6 ora button to startdialing.
orX To exit the phone book: press the~or% button.
RedialingThe on-board computer saves the last namesor numbers dialed in the redial memory.X Useò on the steering wheel to call upthe list of menus.
X Press: or9 on the steering wheelto select the TelephoneTelephone menu.
X Confirm by pressinga on the steeringwheel.
X Press the6 button to switch to theredial memory.
X Press the: or9 button to select thedesired name or number.
X Press the6 ora button to startdialing.
orX To exit the redial memory: press the~ or% button.
Assistance graphic menu
X Useò on the steering wheel to call upthe list of menus.
X Press the: or9 button on thesteering wheel to select the AssistanceAssistanceGraphicGraphic menu.
X Confirm by pressinga on the steeringwheel.The multifunction display shows theDISTRONIC PLUS distance display in theassistance graphic (Y page 208).
X Press: to display theATTENTION ASSIST assessment(Y page 235).
The assistance graphic can display the statusof and information fromother driving systemsor driving safety systems.The assistance graphic shows:Rtheé symbol when ATTENTION ASSISTis deactivated.Rthe pedestrian symbol of the spotlightfunction when the spotlight function ofNight View Assist Plus (Y page 262) isactivated.
258 Menus and submenusOn
-board
computerand
displays
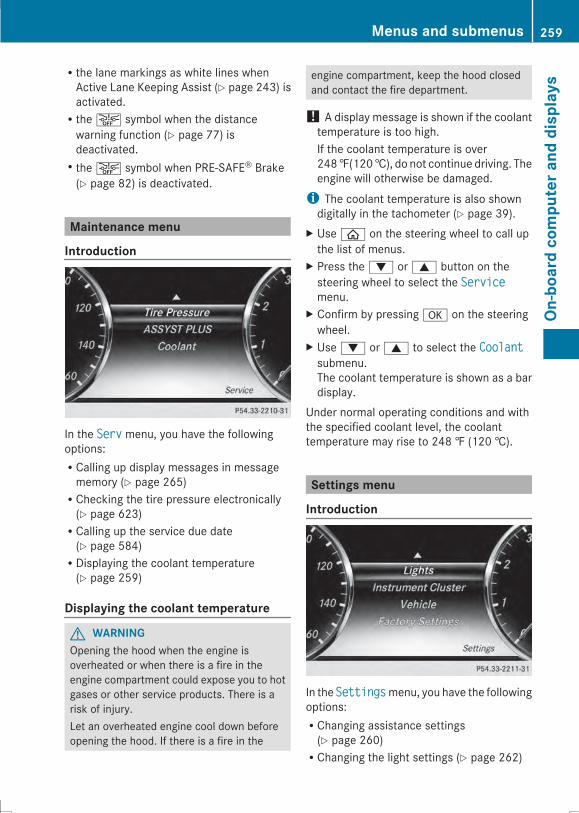
Rthe lane markings as white lines whenActive Lane Keeping Assist (Y page 243) isactivated.Rtheæ symbol when the distancewarning function (Y page 77) isdeactivated.Rtheæ symbol when PRE-SAFE® Brake(Y page 82) is deactivated.
Maintenance menu
Introduction
In the ServServ menu, you have the followingoptions:RCalling up display messages in messagememory (Y page 265)RChecking the tire pressure electronically(Y page 623)RCalling up the service due date(Y page 584)RDisplaying the coolant temperature(Y page 259)
Displaying the coolant temperature
G WARNINGOpening the hood when the engine isoverheated or when there is a fire in theengine compartment could expose you to hotgases or other service products. There is arisk of injury.Let an overheated engine cool down beforeopening the hood. If there is a fire in the
engine compartment, keep the hood closedand contact the fire department.
! A display message is shown if the coolanttemperature is too high.If the coolant temperature is over248‡(120†), do not continue driving. Theengine will otherwise be damaged.i The coolant temperature is also showndigitally in the tachometer (Y page 39).
X Useò on the steering wheel to call upthe list of menus.
X Press the: or9 button on thesteering wheel to select the ServiceServicemenu.
X Confirm by pressinga on the steeringwheel.
X Use: or9 to select the CoolantCoolantsubmenu.The coolant temperature is shown as a bardisplay.
Under normal operating conditions and withthe specified coolant level, the coolanttemperature may rise to 248 ‡ (120 †).
Settings menu
Introduction
In the SettingsSettingsmenu, you have the followingoptions:RChanging assistance settings(Y page 260)RChanging the light settings (Y page 262)
Menus and submenus 259
On-board
computera
nddisplays
Z
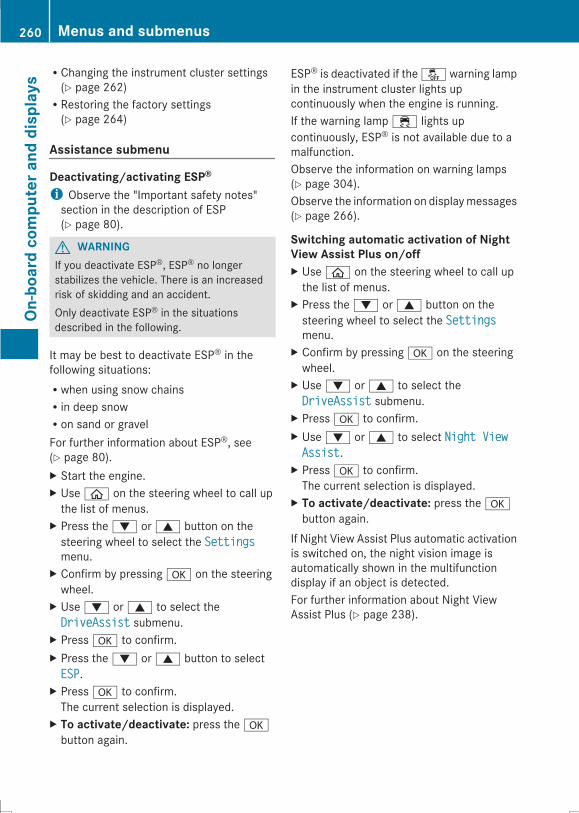
RChanging the instrument cluster settings(Y page 262)RRestoring the factory settings(Y page 264)
Assistance submenu
Deactivating/activating ESP®i Observe the "Important safety notes"section in the description of ESP(Y page 80).
G WARNINGIf you deactivate ESP®, ESP® no longerstabilizes the vehicle. There is an increasedrisk of skidding and an accident.Only deactivate ESP® in the situationsdescribed in the following.
It may be best to deactivate ESP® in thefollowing situations:Rwhen using snow chainsRin deep snowRon sand or gravelFor further information about ESP®, see(Y page 80).X Start the engine.X Useò on the steering wheel to call upthe list of menus.
X Press the: or9 button on thesteering wheel to select the SettingsSettingsmenu.
X Confirm by pressinga on the steeringwheel.
X Use: or9 to select theDriveAssistDriveAssist submenu.
X Pressa to confirm.X Press the: or9 button to selectESPESP.
X Pressa to confirm.The current selection is displayed.
X To activate/deactivate: press theabutton again.
ESP® is deactivated if the å warning lampin the instrument cluster lights upcontinuously when the engine is running.If the warning lamp ÷ lights upcontinuously, ESP® is not available due to amalfunction.Observe the information on warning lamps(Y page 304).Observe the information on displaymessages(Y page 266).
Switching automatic activation of NightView Assist Plus on/offX Useò on the steering wheel to call upthe list of menus.
X Press the: or9 button on thesteering wheel to select the SettingsSettingsmenu.
X Confirm by pressinga on the steeringwheel.
X Use: or9 to select theDriveAssistDriveAssist submenu.
X Pressa to confirm.X Use: or9 to select Night ViewNight ViewAssistAssist.
X Pressa to confirm.The current selection is displayed.
X To activate/deactivate: press theabutton again.
If Night View Assist Plus automatic activationis switched on, the night vision image isautomatically shown in the multifunctiondisplay if an object is detected.For further information about Night ViewAssist Plus (Y page 238).
260 Menus and submenusOn
-board
computerand
displays
Activating/deactivating PRE-SAFE®BrakePRE-SAFE® Brake is only available in vehicleswith DISTRONIC PLUS.X Useò on the steering wheel to call upthe list of menus.
X Press the: or9 button on thesteering wheel to select the SettingsSettingsmenu.
X Confirm by pressinga on the steeringwheel.
X Use: or9 to select theDriveAssistDriveAssist submenu.
X Pressa to confirm.X Press the: or9 button to selectPRE-SAFE BrakePRE-SAFE Brake.
X Pressa to confirm.The current selection is displayed.
X To activate/deactivate: press theabutton again.
When PRE-SAFE® Brake is deactivated, theæ symbol appears in the AssistanceAssistanceInfo DisplayInfo Displaymenu in the multifunctiondisplay.For more information on PRE-SAFE® Brake,see (Y page 82).
Activating/deactivating the distancewarning functionX Useò on the steering wheel to call upthe list of menus.
X Press the: or9 button on thesteering wheel to select the SettingsSettingsmenu.
X Confirm by pressinga on the steeringwheel.
X Use: or9 to select theDriveAssistDriveAssist submenu.
X Pressa to confirm.X Press: or9 to select DistanceDistanceWarningWarning.
X Pressa to confirm.The current selection is displayed.
X To activate/deactivate: press theabutton again.
When the distance warning function isdeactivated, theæ symbol appears in theAssistance Info DisplayAssistance Info Display menu in themultifunction display.Further information on the distance warningfunction (Y page 77).
Activating/deactivating Active Blind SpotAssistX Useò on the steering wheel to call upthe list of menus.
X Press the: or9 button on thesteering wheel to select the SettingsSettingsmenu.
X Confirm by pressinga on the steeringwheel.
X Use: or9 to select theDriveAssistDriveAssist submenu.
X Pressa to confirm.X Press the: or9 button to selectBlind Spot AssistBlind Spot Assist.
X Pressa to confirm.The current selection is displayed.
X To activate/deactivate: press theabutton again.
For further information about Active BlindSpot Assist, see (Y page 240).
Setting ATTENTION ASSISTX Useò on the steering wheel to call upthe list of menus.
X Press the: or9 button on thesteering wheel to select the SettingsSettingsmenu.
X Confirm by pressinga on the steeringwheel.
X Use: or9 to select theDriveAssistDriveAssist submenu.
X Pressa to confirm.
Menus and submenus 261
On-board
computerand
displays
Z
X Press the: or9 button to selectAttention AssistAttention Assist.
X Pressa to confirm.The current selection is displayed.
X Press the: or9 button to set OffOff,StandardStandard or SensitiveSensitive.
X Usea to accept the setting.
When ATTENTION ASSIST is deactivated, theé symbol appears in the AssistanceAssistanceInfo DisplayInfo Display menu in the multifunctiondisplay when the ignition is on.For further information about ATTENTIONASSIST, see (Y page 235).
Activating/deactivating Active LaneKeeping AssistX Useò on the steering wheel to call upthe list of menus.
X Press the: or9 button on thesteering wheel to select the SettingsSettingsmenu.
X Confirm by pressinga on the steeringwheel.
X Use: or9 to select theDriveAssistDriveAssist submenu.
X Pressa to confirm.X Press the: or9 button to selectLane Keeping AssistLane Keeping Assist.
X Pressa to confirm.The current selection StandardStandard orAdaptiveAdaptive is displayed.
X To change the setting: pressa again.
For further information about Active LaneKeeping Assist, see (Y page 243).
Light submenu
Switching the spotlight function on or offX Useò on the steering wheel to call upthe list of menus.
X Press the: or9 button on thesteering wheel to select the SettingsSettingsmenu.
X Confirm by pressinga on the steeringwheel.
X Press the: or9 button to select theLightsLights submenu.
X Pressa to confirm.X Use: or9 to select theSpotlightSpotlight function.
X Press thea button to save the setting.When the spotlight function is activated,the assistance graphic shows thepedestrian symbol.
Further information on the spotlight function(Y page 239).
Switching the daytime running lamps on/offi This function is not available in Canada.X Useò on the steering wheel to call upthe list of menus.
X Press the: or9 button on thesteering wheel to select the SettingsSettingsmenu.
X Confirm by pressinga on the steeringwheel.
X Press the: or9 button to select theLightsLights submenu.
X Pressa to confirm.X Press the: or9 button to select theDaytime Running LightsDaytime Running Lights function.If the Daytime Running LightsDaytime Running Lights functionhas been switched on, the cone of light andtheW symbol in the multifunctiondisplay are shown in white.
X Press thea button to save the setting.
Further information on daytime runninglamps (Y page 142).
Instrument cluster submenu
Selecting the unit of measurement fordistanceThe Display Unit Speed-/Odometer:Display Unit Speed-/Odometer:function allows you to choose whether
262 Menus and submenusOn
-board
computerand
displays
certain displays appear in kilometers or milesin the multifunction display.X Useò on the steering wheel to call upthe list of menus.
X Press the: or9 button on thesteering wheel to select the SettingsSettingsmenu.
X Confirm by pressinga on the steeringwheel.
X Press the: or9 button to select theInstrument ClusterInstrument Cluster submenu.
X Pressa to confirm.X Press the: or9 button to select theDisplay Unit Speed-/OdometerDisplay Unit Speed-/Odometerfunction.You will see the selected setting: kmkm ormilesmiles.
X Press thea button to save the setting.
The selected unit of measurement fordistance applies to:RSpeedometerRDigital speedometer in the TripTrip menuRAdditional speedometer in the status areaon the multi-function displayThe unit in the additional speedometer isdisplayed inversely to the selecteddistance unit.ROdometer and the trip odometerRTrip computerRCurrent consumption and the rangeRNavigation instructions in the NaviNavi menuRCruise controlRSPEEDTRONICRDISTRONIC PLUSRASSYST PLUS service interval display
Selecting the permanent display functionUse the Permanent DisplayPermanent Display function toswitch on the following displays in the statusarea of the multifunction display:Routside temperatureRcoolant temperature
X Useò on the steering wheel to call upthe list of menus.
X Press the: or9 button on thesteering wheel to select the SettingsSettingsmenu.
X Confirm by pressinga on the steeringwheel.
X Press the: or9 button to select theInstrument ClusterInstrument Cluster submenu.
X Pressa to confirm.X Press: or9 to select thePermanent DisplayPermanent Display function.
X Pressa to confirm.The current selection OutsideOutsideTemperatureTemperature or CoolantCoolant TemperatureTemperature isdisplayed.
X To change the setting: pressa again.
Switching the additional speedometeron/offUse the Additional SpeedometerAdditional Speedometer functionto choose whether the status area in themultifunction display shows the speeddigitally.X Useò on the steering wheel to call upthe list of menus.
X Press the: or9 button on thesteering wheel to select the SettingsSettingsmenu.
X Confirm by pressinga on the steeringwheel.
X Press the: or9 button to select theInstrument ClusterInstrument Cluster submenu.
X Pressa to confirm.X Use: or9 to select theAdditional SpeedometerAdditional Speedometer function.The current selection is displayed.
X To activate/deactivate: press theabutton again.
Menus and submenus 263
On-board
computerand
displays
Z
Restoring the factory settingsX Useò on the steering wheel to call upthe list of menus.
X Press the: or9 button on thesteering wheel to select the SettingsSettingsmenu.
X Confirm by pressinga on the steeringwheel.
X Press the: or9 button to select theFactory SettingsFactory Settings submenu.
X Pressa to confirm.The Reset all settings?Reset all settings? messageappears.
X Press the: or9 button to selectNoNo or YesYes.
X Pressa to confirm the selection.If you have selected YesYes, the multifunctiondisplay shows a confirmation message.
For safety reasons, the Daytime RunningDaytime RunningLightsLights function in the LightsLights submenu isonly reset if the vehicle is stationary.
264 Menus and submenusOn
-board
computera
nddisplays
Display messages
Introduction
General notesDisplay messages appear in the multifunction display.Display messages with graphic displays may be shown in simplified form in the Operator'sManual and may therefore differ from the multifunction display.Please respond in accordance with the display messages and follow the additional notes inthis Operator's Manual.With certain display messages, you will also hear a warning tone.You can hide the display messages. The display messages are then stored in the messagememory. Rectify the cause of a display message as soon as possible.When you stop and park the vehicle, please observe the notes on:RHOLD function (Y page 213)RParking (Y page 191)
Hiding display messagesX Press thea or% button on the steering wheel to hide the display message.The display message is cleared.
The multifunction display shows high-priority display messages in red. Some high-prioritydisplay messages cannot be hidden.The multifunction display shows these messages continuously until the causes for themessages have been remedied.
Message memoryThe on-board computer saves certain display messages in the message memory. You cancall up the display messages:X Useò on the steering wheel to call up the list of menus.X Press the: or9 button on the steering wheel to select the ServiceService menu.X Confirm by pressinga on the steering wheel.X Press: or9 to select the message memory.If there are no display messages, you will see No MessagesNo Messages in the multifunction display.If there are display messages, the number of messages stored is shown.
X Pressa to confirm.X Press the: or9 button to scroll through the display messages.
Display messages 265
On-board
computerand
displays
Z

Safety systems
Display messages Possible causes/consequences andMM Solutions
!÷CurrentlyCurrentlyUnavailable SeeUnavailable SeeOperator's ManualOperator's Manual
ABS (Anti-lock Braking System), ESP® (Electronic StabilityProgram), BAS (Brake Assist), PRE-SAFE®, HOLD, hill start assist,crosswind driving assistance and the adaptive brake lights aretemporarily unavailable.BAS PLUS, PRE-SAFE® Brake, PRE-SAFE® PLUS and COLLISIONPREVENTION ASSIST may also have failed.In addition, the ÷ and ! warning lamps light up in theinstrument cluster.ATTENTION ASSIST is deactivated.For example, the on-board voltage may be insufficient.
G WARNINGThe brake system continues to function normally, but without thefunctions listed above. The wheels could therefore lock if youbrake hard, for example.The steerability and braking characteristics may be severelyaffected. The braking distance in an emergency braking situationcan increase.If ESP® is not operational, ESP® is unable to stabilize the vehicle.There is an increased risk of skidding and an accident.X Drive on carefully.Carefully drive a suitable distance, making slight steeringmovements at a speed above 12 mph (20 km/h).If the display message disappears, the functions mentionedabove are available again.
If the display message continues to be displayed:X Drive on carefully.X Visit a qualified specialist workshop.
!÷Inoperative SeeInoperative SeeOperator's ManualOperator's Manual
ABS, ESP®, BAS, PRE-SAFE®, the HOLD function, hill start assistand crosswind driving assistance are unavailable due to amalfunction.BAS PLUS, PRE-SAFE® Brake, PRE-SAFE® PLUS and COLLISIONPREVENTION ASSIST may also have failed.The$ (USA only)/J (Canada only),÷ and!warninglamps in the instrument cluster may also light up.ATTENTION ASSIST is deactivated.
G WARNING
266 Display messagesOn
-board
computerand
displays
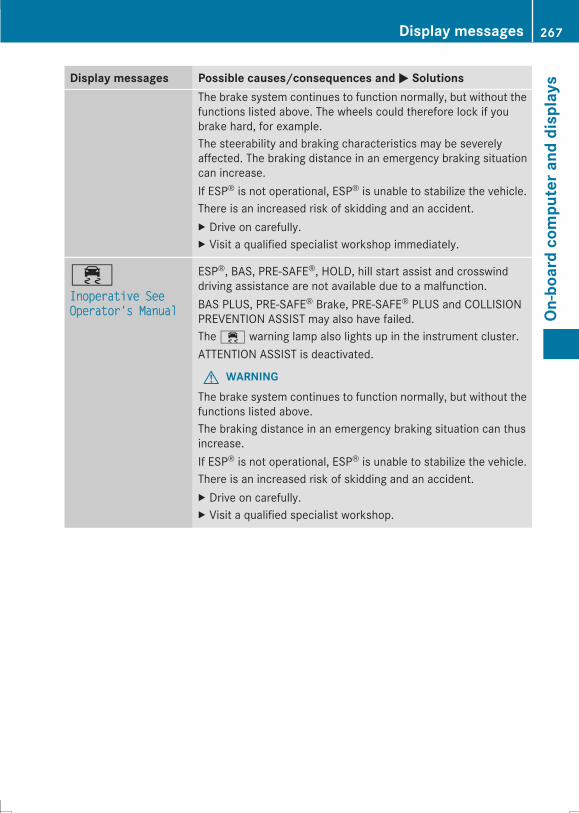
Display messages Possible causes/consequences andMM SolutionsThe brake system continues to function normally, but without thefunctions listed above. The wheels could therefore lock if youbrake hard, for example.The steerability and braking characteristics may be severelyaffected. The braking distance in an emergency braking situationcan increase.If ESP® is not operational, ESP® is unable to stabilize the vehicle.There is an increased risk of skidding and an accident.X Drive on carefully.X Visit a qualified specialist workshop immediately.
÷Inoperative SeeInoperative SeeOperator's ManualOperator's Manual
ESP®, BAS, PRE-SAFE®, HOLD, hill start assist and crosswinddriving assistance are not available due to a malfunction.BAS PLUS, PRE-SAFE® Brake, PRE-SAFE® PLUS and COLLISIONPREVENTION ASSIST may also have failed.The ÷ warning lamp also lights up in the instrument cluster.ATTENTION ASSIST is deactivated.
G WARNINGThe brake system continues to function normally, but without thefunctions listed above.The braking distance in an emergency braking situation can thusincrease.If ESP® is not operational, ESP® is unable to stabilize the vehicle.There is an increased risk of skidding and an accident.X Drive on carefully.X Visit a qualified specialist workshop.
Display messages 267
On-board
computerand
displays
Z
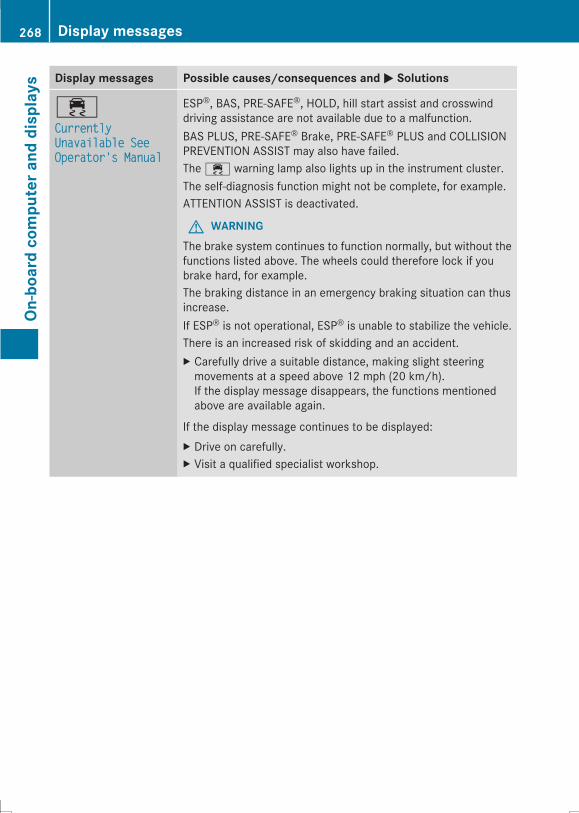
Display messages Possible causes/consequences andMM Solutions
÷CurrentlyCurrentlyUnavailable SeeUnavailable SeeOperator's ManualOperator's Manual
ESP®, BAS, PRE-SAFE®, HOLD, hill start assist and crosswinddriving assistance are not available due to a malfunction.BAS PLUS, PRE-SAFE® Brake, PRE-SAFE® PLUS and COLLISIONPREVENTION ASSIST may also have failed.The ÷ warning lamp also lights up in the instrument cluster.The self-diagnosis function might not be complete, for example.ATTENTION ASSIST is deactivated.
G WARNINGThe brake system continues to function normally, but without thefunctions listed above. The wheels could therefore lock if youbrake hard, for example.The braking distance in an emergency braking situation can thusincrease.If ESP® is not operational, ESP® is unable to stabilize the vehicle.There is an increased risk of skidding and an accident.X Carefully drive a suitable distance, making slight steeringmovements at a speed above 12 mph (20 km/h).If the display message disappears, the functions mentionedabove are available again.
If the display message continues to be displayed:X Drive on carefully.X Visit a qualified specialist workshop.
268 Display messagesOn
-board
computerand
displays
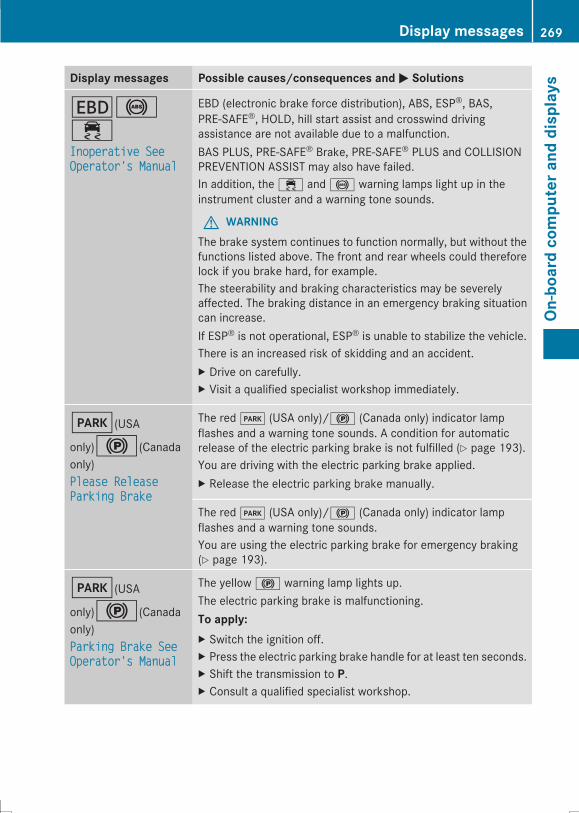
Display messages Possible causes/consequences andMM Solutions
T!÷Inoperative SeeInoperative SeeOperator's ManualOperator's Manual
EBD (electronic brake force distribution), ABS, ESP®, BAS,PRE-SAFE®, HOLD, hill start assist and crosswind drivingassistance are not available due to a malfunction.BAS PLUS, PRE-SAFE® Brake, PRE-SAFE® PLUS and COLLISIONPREVENTION ASSIST may also have failed.In addition, the ÷ and ! warning lamps light up in theinstrument cluster and a warning tone sounds.
G WARNINGThe brake system continues to function normally, but without thefunctions listed above. The front and rear wheels could thereforelock if you brake hard, for example.The steerability and braking characteristics may be severelyaffected. The braking distance in an emergency braking situationcan increase.If ESP® is not operational, ESP® is unable to stabilize the vehicle.There is an increased risk of skidding and an accident.X Drive on carefully.X Visit a qualified specialist workshop immediately.
F(USA
only)!(Canadaonly)Please ReleasePlease ReleaseParking BrakeParking Brake
The redF (USA only)/! (Canada only) indicator lampflashes and a warning tone sounds. A condition for automaticrelease of the electric parking brake is not fulfilled (Y page 193).You are driving with the electric parking brake applied.X Release the electric parking brake manually.
The redF (USA only)/! (Canada only) indicator lampflashes and a warning tone sounds.You are using the electric parking brake for emergency braking(Y page 193).
F(USA
only)!(Canadaonly)Parking Brake SeeParking Brake SeeOperator's ManualOperator's Manual
The yellow! warning lamp lights up.The electric parking brake is malfunctioning.To apply:X Switch the ignition off.X Press the electric parking brake handle for at least ten seconds.X Shift the transmission to P.X Consult a qualified specialist workshop.
Display messages 269
On-board
computerand
displays
Z
Display messages Possible causes/consequences andMM Solutions
The yellow! warning lamp and the redF (USAonly)/! (Canada only) indicator lamp light up.The electric parking brake is malfunctioning.To release:X Switch off the ignition and turn it back on.X Release the electric parking brake manually.orX Release the electric parking brake automatically (Y page 193).
If the electric parking brake still cannot be released:X Do not drive on.X Consult a qualified specialist workshop.
The redF (USA only)/! (Canada only) indicator lampflashes and the yellow! warning lamp lights up.The electric parking brake is malfunctioning.To release:X Switch off the ignition and turn it back on.X Release the electric parking brake manually.
To apply:X Switch off the ignition and turn it back on.X Apply the electric parking brake manually.
If the redF (USA only)/! (Canada only) indicator lampcontinues to flash:X Do not drive on.X Secure the vehicle against rolling away (Y page 639).X Shift the transmission to P.X Turn the front wheels towards the curb.X Consult a qualified specialist workshop.
270 Display messagesOn
-board
computerand
displays
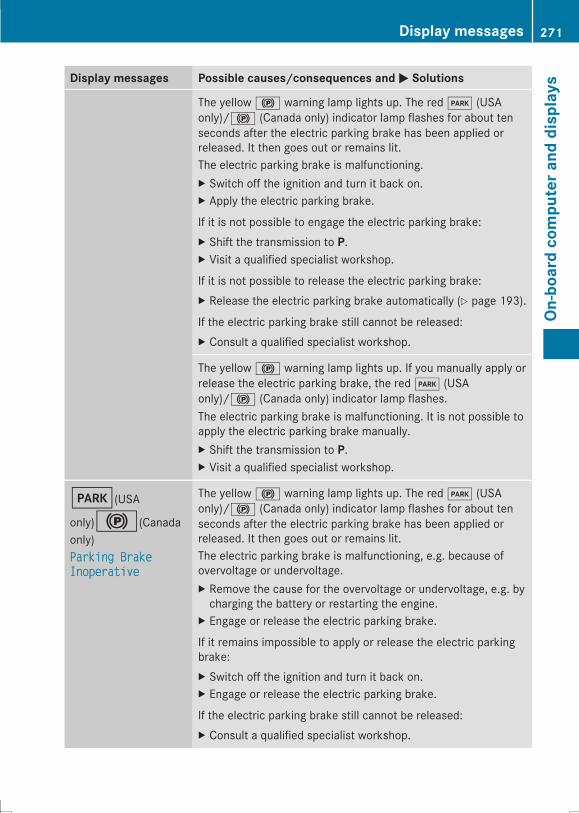
Display messages Possible causes/consequences andMM Solutions
The yellow! warning lamp lights up. The redF (USAonly)/! (Canada only) indicator lamp flashes for about tenseconds after the electric parking brake has been applied orreleased. It then goes out or remains lit.The electric parking brake is malfunctioning.X Switch off the ignition and turn it back on.X Apply the electric parking brake.
If it is not possible to engage the electric parking brake:X Shift the transmission to P.X Visit a qualified specialist workshop.
If it is not possible to release the electric parking brake:X Release the electric parking brake automatically (Y page 193).
If the electric parking brake still cannot be released:X Consult a qualified specialist workshop.
The yellow! warning lamp lights up. If you manually apply orrelease the electric parking brake, the redF (USAonly)/! (Canada only) indicator lamp flashes.The electric parking brake is malfunctioning. It is not possible toapply the electric parking brake manually.X Shift the transmission to P.X Visit a qualified specialist workshop.
F(USA
only)!(Canadaonly)Parking BrakeParking BrakeInoperativeInoperative
The yellow! warning lamp lights up. The redF (USAonly)/! (Canada only) indicator lamp flashes for about tenseconds after the electric parking brake has been applied orreleased. It then goes out or remains lit.The electric parking brake is malfunctioning, e.g. because ofovervoltage or undervoltage.X Remove the cause for the overvoltage or undervoltage, e.g. bycharging the battery or restarting the engine.
X Engage or release the electric parking brake.
If it remains impossible to apply or release the electric parkingbrake:X Switch off the ignition and turn it back on.X Engage or release the electric parking brake.
If the electric parking brake still cannot be released:X Consult a qualified specialist workshop.
Display messages 271
On-board
computerand
displays
Z

Display messages Possible causes/consequences andMM Solutions
The display message is only shown while the vehicle is in motion.The yellow! warning lamp lights up and the redF (USAonly)/! (Canada only) indicator lamp flashes.It is not possible to apply the electric parking brake manually.X Shift the transmission to P.X Visit a qualified specialist workshop.
F(USA
only)!(Canadaonly)Turn On theTurn On theIgnition toIgnition toRelease theRelease theParking BrakeParking Brake
The redF (USA only)/! (Canada only) indicator lamp lightsup.You attempted to release the electric parking brake while theignition was switched off.X Switch on the ignition.
$(USA
only)J(Canadaonly)Check Brake FluidCheck Brake FluidLevelLevel
There is not enough brake fluid in the brake fluid reservoir.In addition, the$ (USA only)/J (Canada only) warninglamp lights up in the instrument cluster and a warning tonesounds.
G WARNINGThe braking effect may be impaired.There is a risk of an accident.X Pull over and stop the vehicle safely as soon as possible, payingattention to road and traffic conditions. Do not continue drivingunder any circumstances.
X Secure the vehicle against rolling away (Y page 191).X Consult a qualified specialist workshop.X Do not add brake fluid. This does not correct the malfunction.
#Check Brake PadCheck Brake PadWearWear
The brake pads/linings have reached their wear limit.X Visit a qualified specialist workshop.
GInoperativeInoperative
One or more main features of the mbrace system aremalfunctioning.X Have the mbrace system checked immediately at a qualifiedspecialist workshop.
PRE-SAFEPRE-SAFEInoperative SeeInoperative SeeOperator's ManualOperator's Manual
Important functions of PRE-SAFE® have failed. All other occupantsafety systems, e.g. air bags, remain available.X Visit a qualified specialist workshop immediately.
272 Display messagesOn
-board
computerand
displays
Display messages Possible causes/consequences andMM Solutions
PRE-SAFEPRE-SAFE FunctionsFunctionsCurrently LimitedCurrently LimitedSee Operator'sSee Operator'sManualManual
PRE-SAFE® PLUS, PRE-SAFE® Brake or Adaptive Brake Assist ofCOLLISION PREVENTION ASSIST is temporarily inoperative.Possible causes are:Rfunction is impaired due to heavy rain or snow.Rthe sensors in the radiator grill and the bumper are dirty.Rthe radar sensor system is temporarily inoperative, e.g. due toelectromagnetic radiation emitted by nearby TV or radiostations or other sources of electromagnetic radiation.Rthe system is outside the operating temperature range.Rthe on-board voltage is too low.When the causes stated above no longer apply, the displaymessage disappears.PRE-SAFE® PLUS and PRE-SAFE® Brake are operational again.If the display message does not disappear:X Pull over and stop the vehicle safely as soon as possible, payingattention to road and traffic conditions.
X Secure the vehicle against rolling away (Y page 191).X Clean the sensors in the following locations (Y page 590):Rin the radiator trimRin the front bumperRin the rear bumper, particularly in the middle of the rearbumper
X Restart the engine.
PRE-SAFEPRE-SAFE FunctionsFunctionsLimited SeeLimited SeeOperator's ManualOperator's Manual
PRE-SAFE® PLUS, PRE-SAFE® Brake or Adaptive Brake Assist ofCOLLISION PREVENTION ASSIST is not available due to amalfunction. BAS PLUS or the distance warning signal may alsohave failed.X Visit a qualified specialist workshop.
Check Left RearCheck Left RearBelt SeeBelt SeeOperator's ManualOperator's Manualor CheckCheck RightRight RearRearBelt SeeBelt SeeOperator's ManualOperator's Manual
The seat belt buckle extender on the right or left of the rearcompartment is not in the predefined position. The belt strap maybe jammed in the belt tongue.X Release the jamming.X Repeat the seat belt fastening procedure.
Display messages 273
On-board
computerand
displays
Z
Display messages Possible causes/consequences andMM Solutions
The seat belt buckle extender on the right or left of the rearcompartment is not in the predefined position. The seat beltbuckle extender may be jammed.X Move the seat cushion forwards (Y page 117) and remove thecause of the jamming.
X Repeat the seat belt fastening procedure.
The seat belt buckle extender on the right or left of the rearcompartment is not in the predefined position. The seat belt maybe locked.X Completely take off your seat belt.X Repeat the seat belt fastening procedure.
The seat belt buckle extender on the right or left of the rearcompartment is not in the predefined position. There is not enoughbelt slack in the system.X Loosen the seat belt.X Repeat the seat belt fastening procedure.
The seat belt buckle extender on the right or left of the rearcompartment is not in the predefined position. The assistancemeasures specified have been carried out. There is still amalfunction.X Visit a qualified specialist workshop.
6SRS MalfunctionSRS MalfunctionService RequiredService Required
There is a malfunction in the SRS (Supplemental RestraintSystem). The 6 warning lamp also lights up in the instrumentcluster.
G WARNINGThe air bags or Emergency Tensioning Devices may either betriggered unintentionally or, in the event of an accident, may notbe triggered.There is an increased risk of injury.X Visit a qualified specialist workshop.For further information about SRS, see (Y page 49).
274 Display messagesOn
-board
computerand
displays
Display messages Possible causes/consequences andMM Solutions
6Front LeftFront LeftMalfunctionMalfunctionService RequiredService Required orFront RightFront RightMalfunctionMalfunctionService RequiredService Required
SRS has malfunctioned at the front on the left or right. The 6warning lamp also lights up in the instrument cluster.
G WARNINGThe air bags or Emergency Tensioning Devices may either betriggered unintentionally or, in the event of an accident, may notbe triggered.There is an increased risk of injury.X Visit a qualified specialist workshop.
6Rear LeftRear LeftMalfunctionMalfunctionService RequiredService Required orRear RightRear RightMalfunctionMalfunctionService RequiredService Required
SRS has malfunctioned at the rear on the left or right. The 6warning lamp also lights up in the instrument cluster.
G WARNINGThe air bags or Emergency Tensioning Devices may either betriggered unintentionally or, in the event of an accident, may notbe triggered.There is an increased risk of injury.X Visit a qualified specialist workshop.
6Rear LeftRear LeftMalfunctionMalfunctionService RequiredService Required orRear RightRear RightMalfunctionMalfunctionService RequiredService Required
You are driving faster than 15 mph and the seat belt buckleextender on the right or left of the rear compartment is not in thepredefined position.
G WARNINGIf the seat belt buckle extender is not in the predefined position,the seat belt cannot provide the intended level of protection.There is an increased risk of injury.X Pull over and stop the vehicle safely as soon as possible, payingattention to road and traffic conditions.
X Perform the specified assistance measures when displaymessage CheckCheck LeftLeft RearRear BeltBelt SeeSee Operator'sOperator's ManualManualor Check Right Rear Belt See Operator's ManualCheck Right Rear Belt See Operator's Manual isshown (Y page 273).
If the display message does not disappear:X Visit a qualified specialist workshop immediately.
Display messages 275
On-board
computerand
displays
Z
Display messages Possible causes/consequences andMM Solutions
6Rear CenterRear CenterMalfunctionMalfunctionService RequiredService Required
SRS has malfunctioned at the rear center. The 6 warning lampalso lights up in the instrument cluster.
G WARNINGThe air bags or Emergency Tensioning Devices may either betriggered unintentionally or, in the event of an accident, may notbe triggered.There is an increased risk of injury.X Visit a qualified specialist workshop.
6Left Side CurtainLeft Side CurtainAirbagAirbag MalfunctionMalfunctionServiceServiceRequiredRequiredorRightRightSide CurtainSide CurtainAirbagAirbag MalfunctionMalfunctionService RequiredService Required
There is a malfunction in the left-hand or right-hand windowcurtain air bag. The 6 warning lamp also lights up in theinstrument cluster.
G WARNINGThe left or right window curtain air bag may either be triggeredunintentionally or, in the event of an accident, may not betriggered.There is an increased risk of injury.X Visit a qualified specialist workshop.
276 Display messagesOn
-board
computerand
displays
Display messages Possible causes/consequences andMM Solutions
Front PassengerFront PassengerAirbag DisabledAirbag DisabledSee Operator'sSee Operator'sManualManual
The front-passenger air bag is disabled during the journey, eventhough:Ran adultorRa person larger than a certain size is occupying the front-passenger seat
If additional forces are applied to the seat, the system mayinterpret the occupant's weight as lower than it actually is.
G WARNINGThe front-passenger air bag does not deploy during an accident.There is an increased risk of injury.X Pull over and stop the vehicle safely as soon as possible, payingattention to road and traffic conditions.
X Secure the vehicle against rolling away (Y page 191).X Switch the ignition off.X Have the occupant get out of the vehicle.X Keep the seat unoccupied, close the front-passenger door andswitch on the ignition.
X Observe the PASSENGER AIR BAG OFF indicator lamp in thecenter console and the multifunction display and check thefollowing:
Seat unoccupied and ignition switched on:Rthe PASSENGER AIR BAG OFF indicator lamp must light up andremain lit. If the indicator lamp is on, OCS has disabled the front-passenger air bag (Y page 55).Rthe display messages Front Passenger Airbag EnabledFront Passenger Airbag EnabledSee Operator's ManualSee Operator's Manual or Front Passenger AirbagFront Passenger AirbagDisabled See Operator's ManualDisabled See Operator's Manual must not appear in themultifunction display.
X Wait for a period of at least 60 seconds until the necessarysystem checks have been completed.
X Make sure that the display messages do not appear in themultifunction display.
If these conditions are fulfilled, the front-passenger seat can beoccupied again. Whether the PASSENGER AIR BAG OFF indicatorlamp remains lit or goes out depends on how OCS classifies theoccupant.If the conditions are not fulfilled, the system is not operatingcorrectly.X Visit a qualified specialist workshop immediately.
Display messages 277
On-board
computerand
displays
Z
Display messages Possible causes/consequences andMM SolutionsFor further information about the Occupant Classification System,see (Y page 55).
Front PassengerFront PassengerAirbagAirbag EnabledEnabled SeeSeeOperator's ManualOperator's Manual
The front-passenger air bag is enabled during the journey, eventhough:Ra child, a small adult or an object weighing less than thesystem's weight threshold is located on the front-passengerseatorRthe front-passenger seat is unoccupiedThe system may detect objects or forces applying additionalweight on the seat.
G WARNINGThe air bag may deploy unintentionally.There is an increased risk of injury.X Pull over and stop the vehicle safely as soon as possible, payingattention to road and traffic conditions.
X Secure the vehicle against rolling away (Y page 191).X Switch the ignition off.X Open the front-passenger door.X Remove the child and the child restraint system from the front-passenger seat.
X Make sure that there are no objects on the seat adding to theweight.The system may otherwise detect the additional weight andinterpret the seat occupant's weight as greater than it actuallyis.
X Keep the seat unoccupied, close the front-passenger door andswitch on the ignition.
X Observe the PASSENGER AIR BAG OFF indicator lamp in thecenter console and the multifunction display and check thefollowing:
Seat unoccupied and ignition switched on:Rthe PASSENGER AIR BAG OFF indicator lamp must light up andremain lit. If the indicator lamp is on, OCS (OccupantClassification System) has disabled the front-passenger air bag(Y page 55).Rthe display messages Front Passenger Airbag EnabledFront Passenger Airbag EnabledSee Operator's ManualSee Operator's Manual or Front Passenger AirbagFront Passenger AirbagDisabled See Operator's ManualDisabled See Operator's Manual must not appear in themultifunction display.
278 Display messagesOn
-board
computerand
displays
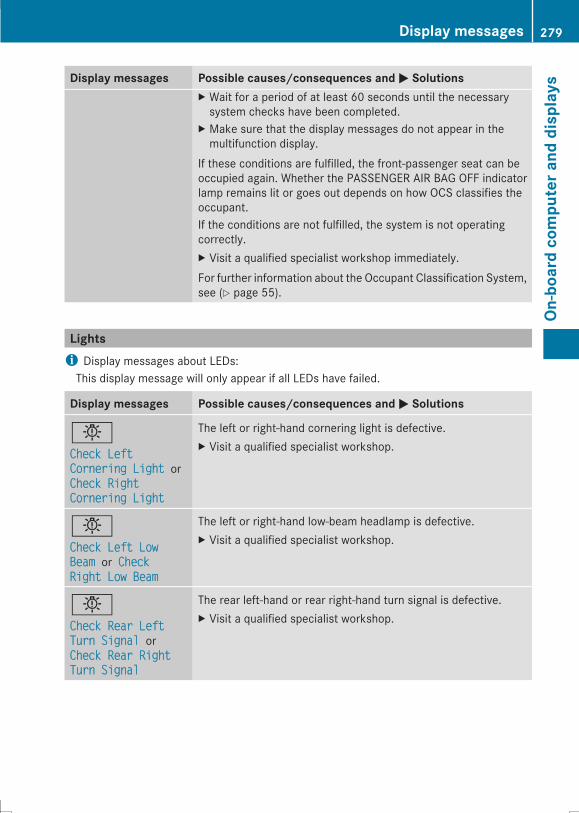
Display messages Possible causes/consequences andMM SolutionsX Wait for a period of at least 60 seconds until the necessarysystem checks have been completed.
X Make sure that the display messages do not appear in themultifunction display.
If these conditions are fulfilled, the front-passenger seat can beoccupied again. Whether the PASSENGER AIR BAG OFF indicatorlamp remains lit or goes out depends on how OCS classifies theoccupant.If the conditions are not fulfilled, the system is not operatingcorrectly.X Visit a qualified specialist workshop immediately.For further information about the Occupant Classification System,see (Y page 55).
Lightsi Display messages about LEDs:This display message will only appear if all LEDs have failed.
Display messages Possible causes/consequences andMM Solutions
bCheck LeftCheck LeftCornering LightCornering Light orCheck RightCheck RightCornering LightCornering Light
The left or right-hand cornering light is defective.X Visit a qualified specialist workshop.
bCheck Left LowCheck Left LowBeamBeam or CheckCheckRight Low BeamRight Low Beam
The left or right-hand low-beam headlamp is defective.X Visit a qualified specialist workshop.
bCheck Rear LeftCheck Rear LeftTurn SignalTurn Signal orCheck Rear RightCheck Rear RightTurn SignalTurn Signal
The rear left-hand or rear right-hand turn signal is defective.X Visit a qualified specialist workshop.
Display messages 279
On-board
computerand
displays
Z
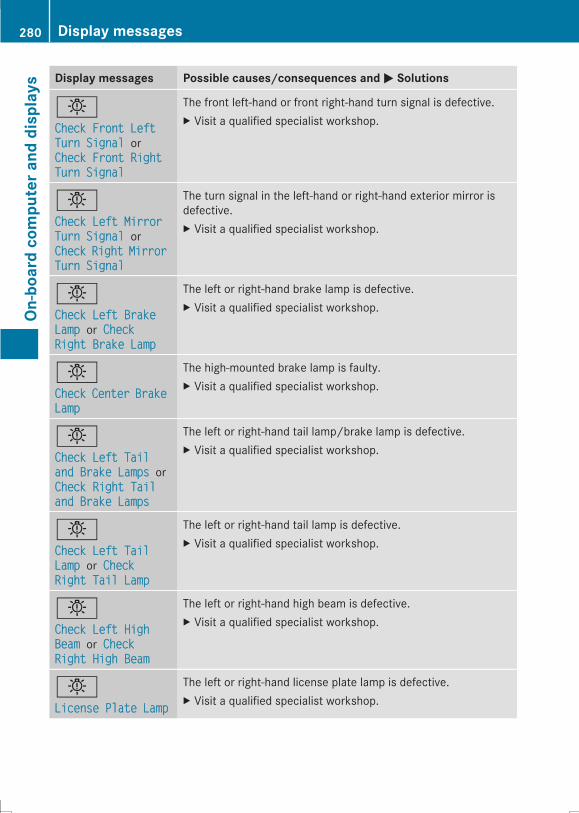
Display messages Possible causes/consequences andMM Solutions
bCheck Front LeftCheck Front LeftTurn SignalTurn Signal orCheck Front RightCheck Front RightTurn SignalTurn Signal
The front left-hand or front right-hand turn signal is defective.X Visit a qualified specialist workshop.
bCheck Left MirrorCheck Left MirrorTurn SignalTurn Signal orCheckCheck RightRight MirrorMirrorTurn SignalTurn Signal
The turn signal in the left-hand or right-hand exterior mirror isdefective.X Visit a qualified specialist workshop.
bCheck Left BrakeCheck Left BrakeLampLamp or CheckCheckRight Brake LampRight Brake Lamp
The left or right-hand brake lamp is defective.X Visit a qualified specialist workshop.
bCheckCheck CenterCenter BrakeBrakeLampLamp
The high-mounted brake lamp is faulty.X Visit a qualified specialist workshop.
bCheck Left TailCheck Left Tailand Brake Lampsand Brake Lamps orCheck Right TailCheck Right Tailand Brake Lampsand Brake Lamps
The left or right-hand tail lamp/brake lamp is defective.X Visit a qualified specialist workshop.
bCheck Left TailCheck Left TailLampLamp or CheckCheckRight Tail LampRight Tail Lamp
The left or right-hand tail lamp is defective.X Visit a qualified specialist workshop.
bCheck Left HighCheck Left HighBeamBeam or CheckCheckRight High BeamRight High Beam
The left or right-hand high beam is defective.X Visit a qualified specialist workshop.
bLicense Plate LampLicense Plate Lamp
The left or right-hand license plate lamp is defective.X Visit a qualified specialist workshop.
280 Display messagesOn
-board
computerand
displays
Display messages Possible causes/consequences andMM Solutions
bCheck Front LeftCheck Front LeftParking LampParking Lamp orCheck Front RightCheck Front RightParking LampParking Lamp
The front left or front right parking or standing lamp is defective.X Visit a qualified specialist workshop.
bBackup LightBackup Light
The left or right-hand backup lamp is defective.X Visit a qualified specialist workshop.
bCheck Front LeftCheck Front LeftSidemarker LampSidemarker Lamp orCheck Front RightCheck Front RightSidemarker LampSidemarker Lamp
The left or right front side marker lamp is defective.X Visit a qualified specialist workshop.
bCheck Rear LeftCheck Rear LeftSidemarker LampSidemarker Lamp orCheck Rear RightCheck Rear RightSidemarker LampSidemarker Lamp
The rear left or right side marker lamp is defective.X Visit a qualified specialist workshop.
bCheckCheck LeftLeft DaytimeDaytimeRunning LightRunning Light orCheck RightCheck RightDaytime RunningDaytime RunningLightLight
The left-hand or right-hand daytime running lamp is faulty.X Visit a qualified specialist workshop.
bActive HeadlampsActive HeadlampsInoperativeInoperative
The active light function is defective.X Visit a qualified specialist workshop.
bMalfunction SeeMalfunction SeeOperator’s ManualOperator’s Manual
The exterior lighting is defective.X Visit a qualified specialist workshop.
bAutoAuto LampLamp FunctionFunctionInoperativeInoperative
The light sensor is defective.X Visit a qualified specialist workshop.
Display messages 281
On-board
computerand
displays
Z
Display messages Possible causes/consequences andMM Solutions
bSwitch Off LightsSwitch Off Lights
The lights are still switched on when you leave the vehicle. Awarning tone also sounds.X Turn the light switch toÃ.
Adaptive HighbeamAdaptive HighbeamAssistAssistInoperativeInoperative orAdaptive HighbeamAdaptive HighbeamAssist PlusAssist PlusInoperativeInoperative
Adaptive Highbeam Assist or Adaptive Highbeam Assist Plus isfaulty.X Visit a qualified specialist workshop.
Adaptive HighbeamAdaptive HighbeamAssist CurrentlyAssist CurrentlyUnavailable SeeUnavailable SeeOperator's ManualOperator's Manualor AdaptiveAdaptiveHighbeam AssistHighbeam AssistPlus CurrentlyPlus CurrentlyUnavailable SeeUnavailable SeeOperator's ManualOperator's Manual
Adaptive Highbeam Assist or Adaptive Highbeam Assist Plus isdeactivated and temporarily not operational. Possible causes are:Rthe windshield in the camera's field of vision is dirty.Rvisibility is impaired due to heavy rain, snow or fog.X Clean the windshield.If the system detects that the camera is fully operational, displaymessage Adaptive Highbeam Assist Now AvailableAdaptive Highbeam Assist Now Available orAdaptive Highbeam Assist Plus Available AgainAdaptive Highbeam Assist Plus Available Again isdisplayed.Adaptive Highbeam Assist or Adaptive Highbeam Assist Plus isoperational again.
Engine
Display messages Possible causes/consequences andMM Solutions
+Check CoolantCheck CoolantLevel SeeLevel SeeOperator's ManualOperator's Manual
The coolant level is too low.
! Avoidmaking long journeys with too little coolant in the enginecooling system. The engine will otherwise be damaged.
X Add coolant, observing the warning notes before doing so(Y page 583).
X If coolant needs to be added more often than usual, have theengine coolant system checked at a qualified specialistworkshop.
?? The fan motor is faulty.X At coolant temperatures below 248 ‡ (120 †), drive to thenearest qualified specialist workshop.
X Avoid subjecting the engine to heavy loads, e.g. driving inmountainous terrain, and stop-and-go traffic.
282 Display messagesOn
-board
computerand
displays
Display messages Possible causes/consequences andMM Solutions
?Coolant Too HotCoolant Too HotStop Vehicle TurnStop Vehicle TurnEngine OffEngine Off
The coolant is too hot.A warning tone also sounds.
G WARNINGDo not drive when your engine is overheated. This can cause somefluids which may have leaked into the engine compartment tocatch fire.Steam from the overheated engine can also cause serious burnswhich can occur just by opening the hood.There is a risk of injury.X Pull over and stop the vehicle safely and switch off the engine,paying attention to road and traffic conditions.
X Secure the vehicle against rolling away (Y page 191).X Wait until the engine has cooled down.X Make sure that the air supply to the engine radiator is notblocked, e.g. by snow, slush or ice.
X Do not start the engine again until the display message goes outand the coolant temperature is below 248 ‡ (120 †).Otherwise, the engine could be damaged.
X Pay attention to the coolant temperature display.X If the temperature increases again, visit a qualified specialistworkshop immediately.
Under normal operating conditions and with the specified coolantlevel, the coolant temperature may rise to 248 ‡ (120 †).
Display messages 283
On-board
computerand
displays
Z
Display messages Possible causes/consequences andMM Solutions
#See Operator'sSee Operator'sManualManual
The battery is not being charged.A warning tone also sounds.Possible causes are:Ra defective alternatorRa torn poly-V-beltRa malfunction in the electronicsX Pull over and stop the vehicle safely and switch off the engine,paying attention to road and traffic conditions.
X Secure the vehicle against rolling away (Y page 191).X Open the hood.X Check whether the poly-V-belt is torn.If the poly-V-belt is torn:! Do not continue driving. The engine could otherwise overheat.X Consult a qualified specialist workshop.If the poly-V-belt is not damaged:X Visit a qualified specialist workshop.
4Check Engine OilCheck Engine OilAt Next RefuelingAt Next Refueling
The engine oil level has dropped to the minimum level.A warning tone also sounds.X Check the oil level when next refueling, at the latest(Y page 581).
X If necessary, add engine oil (Y page 582).X Have the engine checked at a qualified specialist workshop ifengine oil needs to be added more often than usual.
! Avoid long journeys with too little engine oil. The engine willotherwise be damaged.
Information on approved engine oils can be obtained from anyqualified specialist workshop or on the Internet at http://bevo.mercedes-benz.com.
284 Display messagesOn
-board
computerand
displays
Display messages Possible causes/consequences andMM Solutions
4Check Engine OilCheck Engine OilLevelLevel (Add 1(Add 1 quart)quart)
The engine oil level has dropped to the minimum level.X Check the oil level when next refueling, at the latest(Y page 581).
X If necessary, add engine oil (Y page 582).X Have the engine checked at a qualified specialist workshop ifengine oil needs to be added more often than usual.
! Avoid long journeys with too little engine oil. The engine willotherwise be damaged.
Information on approved engine oils can be obtained from anyqualified specialist workshop or on the Internet at http://bevo.mercedes-benz.com.
4Engine Oil LevelEngine Oil LevelLow Stop VehicleLow Stop VehicleTurn Engine OffTurn Engine Off
The oil level is too low. There is a risk of engine damage.X Pull over and stop the vehicle safely and switch off the engine,paying attention to road and traffic conditions.
X Secure the vehicle against rolling away (Y page 191).X Check the engine oil level (Y page 581).X If necessary, add engine oil (Y page 582).
8Fuel Level LowFuel Level Low
The fuel level has dropped into the reserve range.X Refuel at the nearest gas station.
CC There is only a very small amount of fuel in the fuel tank.X Refuel at the nearest gas station without fail.
8Gas Cap LooseGas Cap Loose
The fuel system pressure is too low. The fuel filler cap is not closedcorrectly or the fuel system is leaking.X Check that the fuel filler cap is correctly closed.
If the fuel filler cap is not correctly closed:X Close the fuel filler cap.
If the fuel filler cap is correctly closed:X Visit a qualified specialist workshop.
Display messages 285
On-board
computerand
displays
Z
Driving systems
Display messages Possible causes/consequences and MM Solutions
ÀATTENTION ASSIST:ATTENTION ASSIST:Take a Break!Take a Break!
Based on certain criteria, ATTENTION ASSIST has detected fatigueor a lack of concentration on the part of the driver. A warning tonealso sounds.X If necessary, take a break.During long journeys, take regular breaks in good time so you getenough rest.
ÀAttention AssistAttention AssistInoperativeInoperative
ATTENTION ASSIST is inoperative.X Visit a qualified specialist workshop.
¨Vehicle RisingVehicle Rising
Your vehicle is adjusting to the level you have selected.
¨Vehicle RisingVehicle RisingPlease WaitPlease Wait
The vehicle level is too low when the vehicle is stationary. Awarning tone also sounds.X Do not pull away.The vehicle level is set when the display message disappears.
¨Stop VehicleStop VehicleVehicle Too LowVehicle Too Low
You have pulled away while the vehicle level is still too low.AIRMATIC sets the vehicle to the selected level after a shortperiod.X Pull over and stop the vehicle safely as soon as possible, payingattention to road and traffic conditions.
X Secure the vehicle against rolling away (Y page 191).X Wait until the display message disappears before pulling away.
AIRMATIC is defective. A warning tone also sounds.X Do not drive at speeds above 50 mph (80 km/h).X Make only slight steering movements. Otherwise, the frontfender or the tires could be damaged if the steering movementis too large.
X Listen for scraping sounds.X Pull over and stop the vehicle safely, paying attention to roadand traffic conditions, and select a higher vehicle level.Depending on the malfunction, it may be possible to raise thevehicle.
X Visit a qualified specialist workshop.
286 Display messagesOn
-board
computerand
displays
Display messages Possible causes/consequences andMM Solutions
¨MalfunctionMalfunction
The AIRMATIC function is restricted. The vehicle's handlingcharacteristics may be affected.X Do not drive at speeds above 50 mph (80 km/h).X Visit a qualified specialist workshop.
ABC MalfunctionABC MalfunctionStop VehicleStop Vehicle
The Active Body Control (ABC) vehicle level is too low.X Pull over and stop the vehicle safely as soon as possible, payingattention to road and traffic conditions.After a few seconds, the vehicle level is adjusted and the displaymessage disappears.
The vehicle is leaking oil.The display message is shown continuously.X Pull over and stop the vehicle safely as soon as possible, payingattention to road and traffic conditions. Do not continue drivingunder any circumstances.
X Consult a qualified specialist workshop.
The display message is shown continuously.Active Body Control (ABC) is malfunctioning.X Do not drive at speeds above 50 mph (80 km/h).X Make only slight steering movements. Otherwise, the frontfender or the tires could be damaged if the steering movementis too large.
X Listen for scraping sounds.X Visit a qualified specialist workshop.
ABCABC VehicleVehicle RisingRisingPleasePlease WaitWait BrieflyBriefly
The vehicle level is too low when the vehicle is stationary. Awarning tone also sounds.X Do not pull away.The vehicle level is set when the display message disappears.
ABC MalfunctionABC Malfunction The Active Body Control (ABC) function is restricted. The vehicle'shandling characteristics may be affected.X Do not drive at speeds above 50 mph (80 km/h).X Visit a qualified specialist workshop.
Display messages 287
On-board
computerand
displays
Z
Display messages Possible causes/consequences andMM Solutions
Active LaneActive LaneKeeping AssistKeeping AssistCurrentlyCurrentlyUnavailable SeeUnavailable SeeOperator's ManualOperator's Manual
Active Lane Keeping Assist is deactivated and temporarilyinoperative. Possible causes are:Rthe windshield in the camera's field of vision is dirty.Rthe sensors in the radiator trim and/or in the bumpers are dirty.Rvisibility is impaired due to heavy rain, snow or fog.Rthere are no lane markings for a longer period.Rthe lanemarkings areworn, dark or covered, e.g. by dirt or snow.When the causes stated above no longer apply, the displaymessage disappears.Active Lane Keeping Assist is operational again.If the display message does not disappear:X Pull over and stop the vehicle safely as soon as possible, payingattention to road and traffic conditions.
X Secure the vehicle against rolling away (Y page 191).X Clean the windshield.X Clean the sensors in the following locations:Rin the radiator trimRin the front bumperRin the rear bumper
Active LaneActive LaneKeeping AssistKeeping AssistInoperativeInoperative
Active Lane Keeping Assist is defective.X Visit a qualified specialist workshop.
288 Display messagesOn
-board
computerand
displays
Display messages Possible causes/consequences andMM Solutions
Active Blind SpotActive Blind SpotAssist CurrentlyAssist CurrentlyUnavailable SeeUnavailable SeeOperator's ManualOperator's Manual
Active Blind Spot Assist is temporarily inoperative. Possiblecauses are:Rthe sensors are dirty.Rfunction is impaired due to heavy rain or snow.Rthe radar sensor system is outside the operating temperaturerange.Rthe radar sensor system is temporarily inoperative, e.g. due toelectromagnetic radiation emitted by nearby TV or radiostations or other sources of electromagnetic radiation.
When the causes stated above no longer apply, the displaymessage disappears.Active Blind Spot Assist is operational again.If the display message does not disappear:X Pull over and stop the vehicle safely as soon as possible, payingattention to road and traffic conditions.
X Secure the vehicle against rolling away (Y page 191).X Clean the sensors (Y page 590).X Restart the engine.
Active Blind SpotActive Blind SpotAssist InoperativeAssist Inoperative
Active Blind Spot Assist is defective.X Visit a qualified specialist workshop.
Park AssistPark AssistCanceledCanceled
The driver's door is open.X Repeat the parking gap measurement and parking process withthe driver's door closed.
You touched the multifunction steering wheel while steeringintervention was active.X While steering intervention is active, make sure that themultifunction steering wheel is not touched unintentionally.
The vehicle has started to skid and ESP® has intervened.X Use Active Parking Assist again later (Y page 222).
Park AssistPark AssistInoperativeInoperative
PARKTRONIC is malfunctioning or faulty.X Follow the instructions and helpful hints in the "Problems withPARKTRONIC" section (Y page 222).
If the display message continues to be displayed:X Visit a qualified specialist workshop.
Display messages 289
On-board
computerand
displays
Z
Display messages Possible causes/consequences andMM Solutions
Active Parking Assist is unavailable or faulty.X Switch off the ignition and restart the engine.
If Active Parking Assist continues to be unavailable (thej symbolis not shown in the multifunction display):X Visit a qualified specialist workshop.
Night View AssistNight View AssistCurrentlyCurrentlyUnavailableUnavailable
Night View Assist Plus is deactivated and temporarily inoperative.Possible causes are:Rthe windshield in the camera's field of vision is dirty.Rthe camera in the radiator trim is dirty.Rvisibility is impaired due to heavy rain, snow or fog.Rthe outside temperature is too high.X Clean the windshield.X Clean the camera in the radiator trim.If the system has been switched off due to excessive outsidetemperatures, the system will switch back on automatically onceit has cooled down.If the system detects that the camera is fully operational, thedisplay message disappears.Night View Assist Plus is operational again.
Night View AssistNight View AssistInoperativeInoperative
Night View Assist Plus is faulty.X Visit a qualified specialist workshop.
SpotlightSpotlightInoperativeInoperative
Night View Assist Plus is deactivated and temporarily inoperative.Possible causes are:Rthe windshield in the camera's field of vision is dirty.Rthe camera in the radiator trim is dirty.Rvisibility is impaired due to heavy rain, snow or fog.Rthe outside temperature is too high.X Clean the windshield.X Clean the camera in the radiator trim.If the system has been switched off due to excessive outsidetemperatures, the system will switch back on automatically onceit has cooled down.If the system detects that the camera is fully operational, thedisplay message disappears.Night View Assist Plus is operational again.
290 Display messagesOn
-board
computerand
displays
Display messages Possible causes/consequences andMM Solutions
Night View Assist Plus is faulty.X Visit a qualified specialist workshop.
ëOffOff
The HOLD function is deactivated. the vehicle is skidding.A warning tone also sounds.X Reactivate the HOLD function later (Y page 213).
DISTRONIC PLUS OffDISTRONIC PLUS Off DISTRONIC PLUS has been deactivated (Y page 202).If it was not deactivated by the driver, a warning tone also sounds.
DISTRONICDISTRONIC PLUSPLUS NowNowAvailableAvailable
DISTRONIC PLUS is operational again after having beentemporarily unavailable. You can now reactivate DISTRONIC PLUS(Y page 202).
DISTRONIC PLUSDISTRONIC PLUSCurrentlyCurrentlyUnavailable SeeUnavailable SeeOperator's ManualOperator's Manual
DISTRONIC PLUS is temporarily inoperative.DISTRONIC PLUS Steering Assist is also temporarily inoperative.Possible causes are:Rfunction is impaired due to heavy rain or snow.Rthe sensors in the radiator grill and the bumper are dirty.Rthe radar sensor system is temporarily inoperative, e.g. due toelectromagnetic radiation emitted by nearby TV or radiostations or other sources of electromagnetic radiation.Rthe system is outside the operating temperature range.Rthe on-board voltage is too low.A warning tone also sounds.When the causes stated above no longer apply, the displaymessage disappears.DISTRONIC is operational again.If the display message does not disappear:X Pull over and stop the vehicle safely as soon as possible, payingattention to road and traffic conditions.
X Secure the vehicle against rolling away (Y page 191).X Clean the sensors in the radiator grill and the bumper(Y page 590).
X Restart the engine.
Display messages 291
On-board
computerand
displays
Z
Display messages Possible causes/consequences andMM Solutions
DISTRONIC PLUSDISTRONIC PLUSInoperativeInoperative
DISTRONIC PLUS is defective.The following may have also failed:RBAS PLUSRPRE-SAFE® BrakeRDISTRONIC PLUS Steering AssistA warning tone also sounds.X Visit a qualified specialist workshop.
DISTRONIC PLUSDISTRONIC PLUSPassivePassive
You have depressed the accelerator pedal. DISTRONIC PLUS is nolonger controlling the speed of the vehicle.X Remove your foot from the accelerator pedal.
DISTRONIC PLUSDISTRONIC PLUS- - - mph- - - mph
An activation condition for DISTRONIC PLUS is not fulfilled.X Check the activation conditions for DISTRONIC PLUS(Y page 202).
DTR+: SteeringDTR+: SteeringAssist. CurrentlyAssist. CurrentlyUnavailable SeeUnavailable SeeOperator's ManualOperator's Manual
DISTRONIC PLUS Steering Assist is temporarily inoperative.Possible causes are:Rthe windshield in the camera's field of vision is dirty.Rvisibility is impaired due to heavy rain, snow or fog.Rthere are no lane markings for a longer period.Rthe lanemarkings areworn, dark or covered, e.g. by dirt or snow.When the causes stated above no longer apply, the displaymessage disappears.DISTRONIC PLUS Steering Assist is operational again.If the display message does not disappear:X Pull over and stop the vehicle safely as soon as possible, payingattention to road and traffic conditions.
X Secure the vehicle against rolling away (Y page 191).X Clean the windshield.
DTR+: SteeringDTR+: SteeringAssist.Assist.InoperativeInoperative
DISTRONIC PLUS Steering Assist is faulty.However, the DISTRONIC PLUS functions are still available.A warning tone also sounds.X Visit a qualified specialist workshop.
292 Display messagesOn
-board
computerand
displays
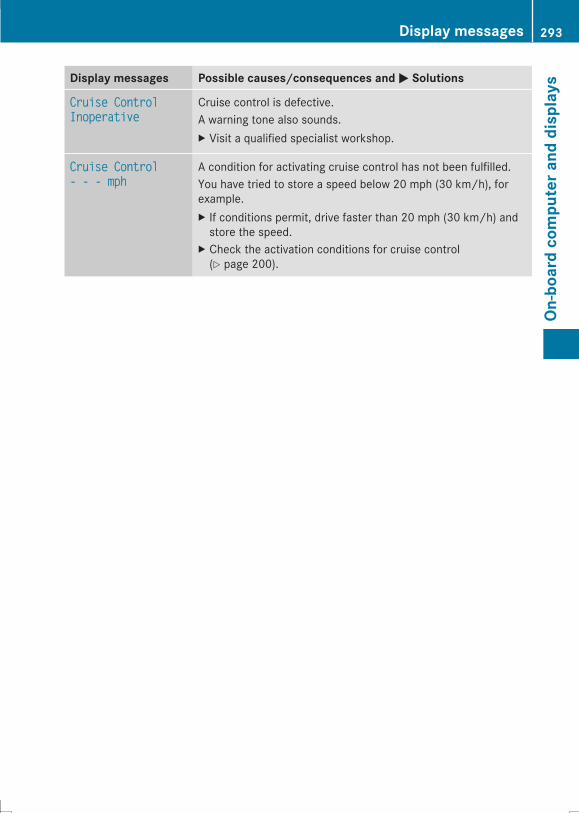
Display messages Possible causes/consequences andMM Solutions
Cruise ControlCruise ControlInoperativeInoperative
Cruise control is defective.A warning tone also sounds.X Visit a qualified specialist workshop.
Cruise ControlCruise Control- - - mph- - - mph
A condition for activating cruise control has not been fulfilled.You have tried to store a speed below 20 mph (30 km/h), forexample.X If conditions permit, drive faster than 20 mph (30 km/h) andstore the speed.
X Check the activation conditions for cruise control(Y page 200).
Display messages 293
On-board
computerand
displays
Z

Tires
Display messages Possible causes/consequences and MM Solutions
Check TireCheck TirePressure SoonPressure Soon
Canada only:The tire pressure loss warning system has detected a significantloss in pressure.A warning tone also sounds.
G WARNINGWith tire pressures which are too low, there is a risk of thefollowing hazards:Rthey may burst, especially as the load and vehicle speedincrease.Rthey may wear excessively and/or unevenly, which may greatlyimpair tire traction.Rthe driving characteristics, as well as steering and braking, maybe greatly impaired.
There is a risk of an accident.X Stop the vehicle without making any sudden steering or brakingmaneuvers. Pay attention to the traffic conditions as you do so.
X Secure the vehicle against rolling away (Y page 191).X Check the tires and, if necessary, follow the instructions for aflat tire (Y page 597).
X Check the tire pressures and, if necessary, correct the tirepressure.
X Restart the tire pressure loss warning system when the tirepressure is correct (Y page 626).
Check TireCheck TirePressure ThenPressure ThenRestart Run FlatRestart Run FlatIndicatorIndicator
Canada only:The tire pressure loss warning system generated a displaymessage and has not been restarted since.X Set the correct tire pressure in all four tires.X Restart the tire pressure loss warning system (Y page 626).
RunRun FlatFlat IndicatorIndicatorInoperativeInoperative
Canada only:The tire pressure loss warning system is faulty.X Visit a qualified specialist workshop.
Please CorrectPlease CorrectTire PressureTire Pressure
The tire pressure is too low in at least one of the tires, or the tirepressure difference between the wheels is too great.X Check the tire pressures at the next opportunity (Y page 623).X If necessary, correct the tire pressure.X Restart the tire pressure monitor (Y page 625).
294 Display messagesOn
-board
computerand
displays

Display messages Possible causes/consequences andMM Solutions
Check TiresCheck Tires The tire pressure in one or more tires has dropped significantly.The wheel position is displayed in the multifunction display.A warning tone also sounds.
G WARNINGWith tire pressures which are too low, there is a risk of thefollowing hazards:Rthey may burst, especially as the load and vehicle speedincrease.Rthey may wear excessively and/or unevenly, which may greatlyimpair tire traction.Rthe driving characteristics, as well as steering and braking, maybe greatly impaired.
There is a risk of an accident.X Stop the vehicle without making any sudden steering or brakingmaneuvers. Pay attention to the traffic conditions as you do so.
X Secure the vehicle against rolling away (Y page 191).X Check the tires and, if necessary, follow the instructions for aflat tire (Y page 597).
X Check the tire pressure (Y page 623).X If necessary, correct the tire pressure.
Warning TireWarning TireMalfunctionMalfunction
The tire pressure in one or more tires has dropped suddenly. Thewheel position is shown in the multifunction display.
G WARNINGIf you drive with a flat tire, there is a risk of the following hazards:Ra flat tire affects the ability to steer or brake the vehicle.RYou could lose control of the vehicle.Rcontinued driving with a flat tire will cause excessive heat build-up and possibly a fire.
There is a risk of an accident.X Stop the vehicle without making any sudden steering or brakingmaneuvers. Pay attention to the traffic conditions as you do so.
X Secure the vehicle against rolling away (Y page 191).X Check the tires and, if necessary, follow the instructions for aflat tire (Y page 597).
Display messages 295
On-board
computerand
displays
Z
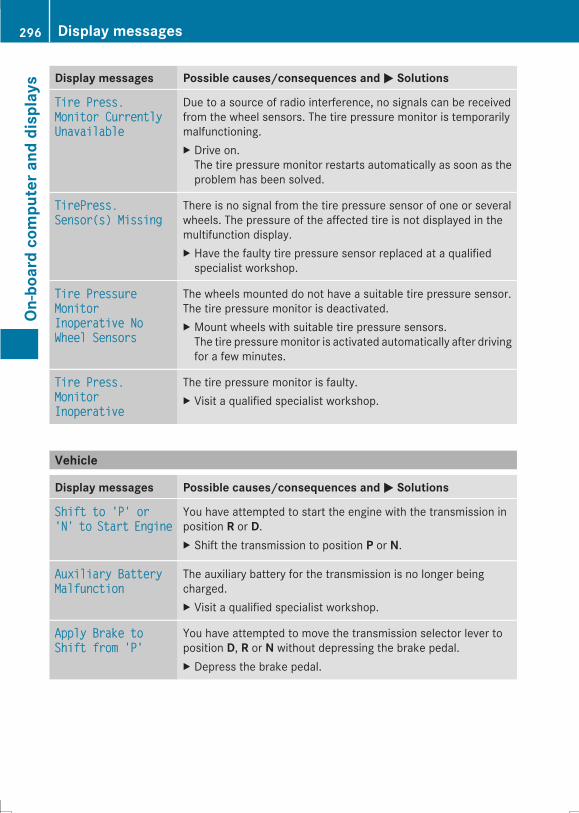
Display messages Possible causes/consequences andMM Solutions
Tire Press.Tire Press.Monitor CurrentlyMonitor CurrentlyUnavailableUnavailable
Due to a source of radio interference, no signals can be receivedfrom the wheel sensors. The tire pressure monitor is temporarilymalfunctioning.X Drive on.The tire pressure monitor restarts automatically as soon as theproblem has been solved.
TirePress.TirePress.Sensor(s) MissingSensor(s) Missing
There is no signal from the tire pressure sensor of one or severalwheels. The pressure of the affected tire is not displayed in themultifunction display.X Have the faulty tire pressure sensor replaced at a qualifiedspecialist workshop.
Tire PressureTire PressureMonitorMonitorInoperative NoInoperative NoWheel SensorsWheel Sensors
The wheels mounted do not have a suitable tire pressure sensor.The tire pressure monitor is deactivated.X Mount wheels with suitable tire pressure sensors.The tire pressuremonitor is activated automatically after drivingfor a few minutes.
Tire Press.Tire Press.MonitorMonitorInoperativeInoperative
The tire pressure monitor is faulty.X Visit a qualified specialist workshop.
Vehicle
Display messages Possible causes/consequences andMM Solutions
Shift to 'P' orShift to 'P' or'N''N' toto StartStart EngineEngine
You have attempted to start the engine with the transmission inposition R or D.X Shift the transmission to position P or N.
Auxiliary BatteryAuxiliary BatteryMalfunctionMalfunction
The auxiliary battery for the transmission is no longer beingcharged.X Visit a qualified specialist workshop.
Apply Brake toApply Brake toShift from 'P'Shift from 'P'
You have attempted to move the transmission selector lever toposition D, R or N without depressing the brake pedal.X Depress the brake pedal.
296 Display messagesOn
-board
computerand
displays
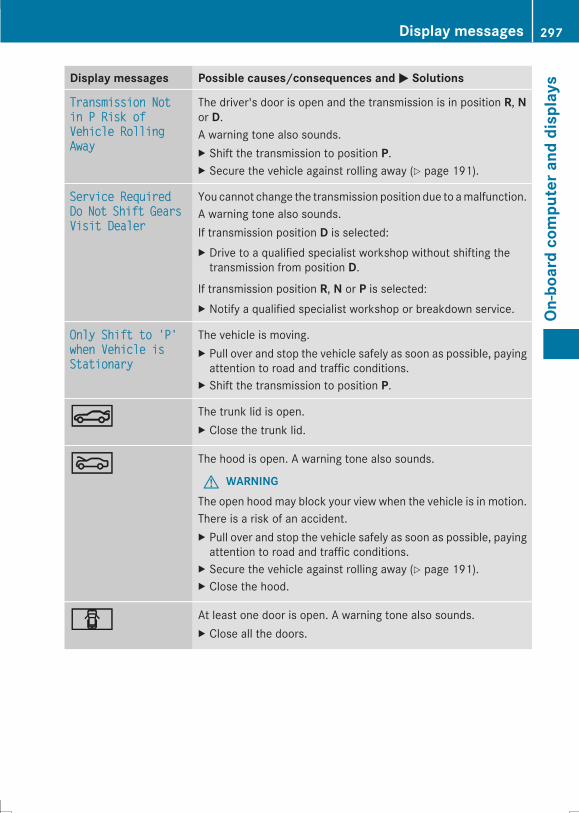
Display messages Possible causes/consequences andMM Solutions
Transmission NotTransmission Notin P Risk ofin P Risk ofVehicle RollingVehicle RollingAwayAway
The driver's door is open and the transmission is in position R, Nor D.A warning tone also sounds.X Shift the transmission to position P.X Secure the vehicle against rolling away (Y page 191).
Service RequiredService RequiredDoDo NotNot ShiftShift GearsGearsVisit DealerVisit Dealer
You cannot change the transmission position due to amalfunction.A warning tone also sounds.If transmission position D is selected:X Drive to a qualified specialist workshop without shifting thetransmission from position D.
If transmission position R, N or P is selected:X Notify a qualified specialist workshop or breakdown service.
Only Shift to 'P'Only Shift to 'P'when Vehicle iswhen Vehicle isStationaryStationary
The vehicle is moving.X Pull over and stop the vehicle safely as soon as possible, payingattention to road and traffic conditions.
X Shift the transmission to position P.
NN The trunk lid is open.X Close the trunk lid.
MM The hood is open. A warning tone also sounds.
G WARNINGThe open hood may block your view when the vehicle is in motion.There is a risk of an accident.X Pull over and stop the vehicle safely as soon as possible, payingattention to road and traffic conditions.
X Secure the vehicle against rolling away (Y page 191).X Close the hood.
CC At least one door is open. A warning tone also sounds.X Close all the doors.
Display messages 297
On-board
computerand
displays
Z

Display messages Possible causes/consequences andMM Solutions
To view the ext.To view the ext.mirror, adjustmirror, adjustfront-passengerfront-passengerseatseat oror removeremove thethehead restraint.head restraint.
The front-passenger seat is in the chauffeur position and the headrestraint is folded down.
G WARNINGIf the front-passenger seat is the chauffeur position and the headrestraint is folded down, the view of the front-passenger exteriormirror can be impaired.There is a risk of an accident.X Remove the head restraint on the front-passenger seat(Y page 123).
orX Move the front-passenger seat into the normal position(Y page 121).
Front-PassengerFront-PassengerSeat Cannot BeSeat Cannot BeUsedUsed VisitVisit WorkshopWorkshop
The front-passenger seat head restraint is folded down and thereis a malfunction. The head restraint can no longer be folded up.
G WARNINGIf head restraints are not adjusted correctly, they cannot provideprotection as intended.There is an increased risk of injury in the head and neck area, e.g.in the event of an accident or when braking.X Do not use the front-passenger seat.X Visit a qualified specialist workshop.
ÐPower SteeringPower SteeringMalfunction SeeMalfunction SeeOperator's ManualOperator's Manual
The power steering is malfunctioning.A warning tone also sounds.
G WARNINGYou will need to use more force to steer.There is a risk of an accident.X Check whether you are able to apply the extra force required.X If you are able to steer safely: carefully drive on to a qualifiedspecialist workshop.
X If you are unable to steer safely: do not drive on. Contact thenearest qualified specialist workshop.
298 Display messagesOn
-board
computerand
displays
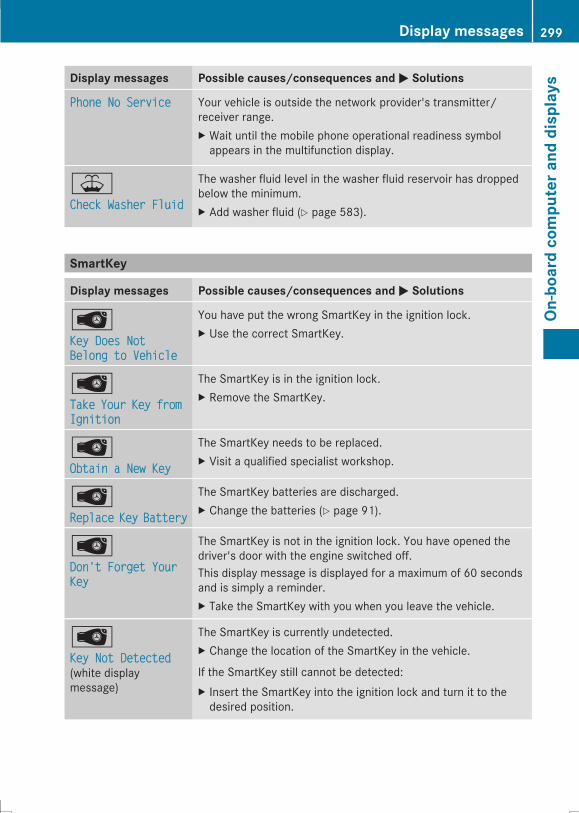
Display messages Possible causes/consequences andMM Solutions
Phone No ServicePhone No Service Your vehicle is outside the network provider's transmitter/receiver range.X Wait until the mobile phone operational readiness symbolappears in the multifunction display.
¥Check Washer FluidCheck Washer Fluid
The washer fluid level in the washer fluid reservoir has droppedbelow the minimum.X Add washer fluid (Y page 583).
SmartKey
Display messages Possible causes/consequences andMM Solutions
ÂKey Does NotKey Does NotBelong to VehicleBelong to Vehicle
You have put the wrong SmartKey in the ignition lock.X Use the correct SmartKey.
ÂTakeTake YourYour KeyKey fromfromIgnitionIgnition
The SmartKey is in the ignition lock.X Remove the SmartKey.
ÂObtain a New KeyObtain a New Key
The SmartKey needs to be replaced.X Visit a qualified specialist workshop.
ÂReplaceReplace KeyKey BatteryBattery
The SmartKey batteries are discharged.X Change the batteries (Y page 91).
ÂDon't Forget YourDon't Forget YourKeyKey
The SmartKey is not in the ignition lock. You have opened thedriver's door with the engine switched off.This display message is displayed for a maximum of 60 secondsand is simply a reminder.X Take the SmartKey with you when you leave the vehicle.
ÂKey Not DetectedKey Not Detected(white displaymessage)
The SmartKey is currently undetected.X Change the location of the SmartKey in the vehicle.
If the SmartKey still cannot be detected:X Insert the SmartKey into the ignition lock and turn it to thedesired position.
Display messages 299
On-board
computerand
displays
Z
Display messages Possible causes/consequences andMM Solutions
ÂKey Not DetectedKey Not Detected(red display message)
The SmartKey is not in the vehicle.A warning tone also sounds.If the engine is switched off, you can no longer lock the vehiclecentrally or start the engine.X Pull over and stop the vehicle safely as soon as possible, payingattention to road and traffic conditions.
X Secure the vehicle against rolling away (Y page 191).X Locate the SmartKey.X Pressa on the steering wheel to confirm the displaymessage.
Because there is interference from a strong source of radio waves,the SmartKey is not detected whilst the engine is running.A warning tone also sounds.X Pull over and stop the vehicle safely as soon as possible, payingattention to road and traffic conditions.
X Secure the vehicle against rolling away (Y page 191).X Operate the vehicle with the SmartKey in the ignition lock.
ÂRemove 'Start'Remove 'Start'Button and InsertButton and InsertKeyKey
The SmartKey is continually undetected.The SmartKey detection function has a temporary malfunction oris faulty. A warning tone also sounds.X Insert the SmartKey into the ignition lock and turn it to thedesired position.
X Visit a qualified specialist workshop.
300 Display messagesOn
-board
computerand
displays
Warning and indicator lamps in the instrument cluster
Safety
Seat belts
Warning/indicatorlamp
NN Signal typePossible causes/consequences andMM Solutions
ü N After starting the engine, the red seat belt warning lamp lights up for6 seconds.The seat belt warning lamp reminds the driver and front passenger to fastentheir seat belts.X Fasten your seat belt (Y page 63).
ü N After starting the engine, the red seat belt warning lamp lights up. Inaddition, a warning tone sounds for up to 6 seconds.The driver's seat belt is not fastened.X Fasten your seat belt (Y page 63).The warning tone ceases.
ü N The red seat belt warning lamp lights up after the engine starts, as soon asthe driver's or the front-passenger door is closed.The driver or front passenger has not fastened their seat belt.X Fasten your seat belt (Y page 63).The warning lamp goes out.
There are objects on the front-passenger seat.X Remove the objects from the front-passenger seat and stow them in asecure place.The warning lamp goes out.
ü N The red seat belt warning lamp flashes and an intermittent audible warningsounds.The driver or front passenger has not fastened their seat belt. The vehicle isbeing driven faster than 15 mph (25 km/h) or has briefly been driven fasterthan 15 mph (25 km/h).X Fasten your seat belt (Y page 63).The warning lamp goes out and the intermittent warning tone ceases.
There are objects on the front-passenger seat. The vehicle is being drivenfaster than 15 mph (25 km/h) or has briefly been driven faster than 15 mph(25 km/h).X Remove the objects from the front-passenger seat and stow them in asecure place.The warning lamp goes out and the intermittent warning tone ceases.
Warning and indicator lamps in the instrument cluster 301
On-board
computerand
displays
Z
Safety systems
Warning/indicatorlamp
NN Signal typePossible causes/consequences andMM Solutions
$J N$ (USA only),J (Canada only): the red brake system warning lampis lit while the engine is running. A warning tone also sounds.
G WARNINGThe brake boosting effect is malfunctioning and the braking characteristicsmay be affected.There is a risk of an accident.X Pull over and stop the vehicle safely as soon as possible, paying attentionto road and traffic conditions. Do not continue driving under anycircumstances.
X Secure the vehicle against rolling away (Y page 191).X Consult a qualified specialist workshop.X Observe the additional display messages in the multifunction display.
$J N$ (USA only),J (Canada only): the red brake system warning lampis lit while the engine is running. A warning tone also sounds.There is not enough brake fluid in the brake fluid reservoir.
G WARNINGThe braking effect may be impaired.There is a risk of an accident.X Pull over and stop the vehicle safely as soon as possible, paying attentionto road and traffic conditions. Do not continue driving under anycircumstances.
X Secure the vehicle against rolling away (Y page 191).X Do not add brake fluid. Adding more will not remedy the malfunction.X Consult a qualified specialist workshop.X Observe the additional display messages in the multifunction display.
302 Warning and indicator lamps in the instrument clusterOn
-board
computerand
displays
Warning/indicatorlamp
NN Signal typePossible causes/consequences and MM Solutions
! N The yellow ABS warning lamp is lit while the engine is running.ABS (Anti-lock Braking System) is deactivated due to amalfunction. Therefore,BAS (Brake Assist), BAS PLUS, COLLISION PREVENTION ASSIST, ESP®(Electronic Stability Program), PRE-SAFE®, PRE-SAFE® PLUS, PRE-SAFE®Brake, the HOLD function, hill start assist and crosswind driving assistance,for example, are also deactivated.ATTENTION ASSIST is deactivated.
G WARNINGThe brake system continues to function normally, but without the functionslisted above. The wheels could therefore lock if you brake hard, for example.The steerability and braking characteristics may be severely affected. Thebraking distance in an emergency braking situation can increase.If ESP® is not operational, ESP® is unable to stabilize the vehicle.There is an increased risk of skidding and an accident.X Observe the additional display messages in the multifunction display.X Drive on carefully.X Visit a qualified specialist workshop.If the ABS control unit is faulty, there is also a possibility that other systems,such as the navigation system or the automatic transmission, will not beavailable.
Warning and indicator lamps in the instrument cluster 303
On-board
computerand
displays
Z
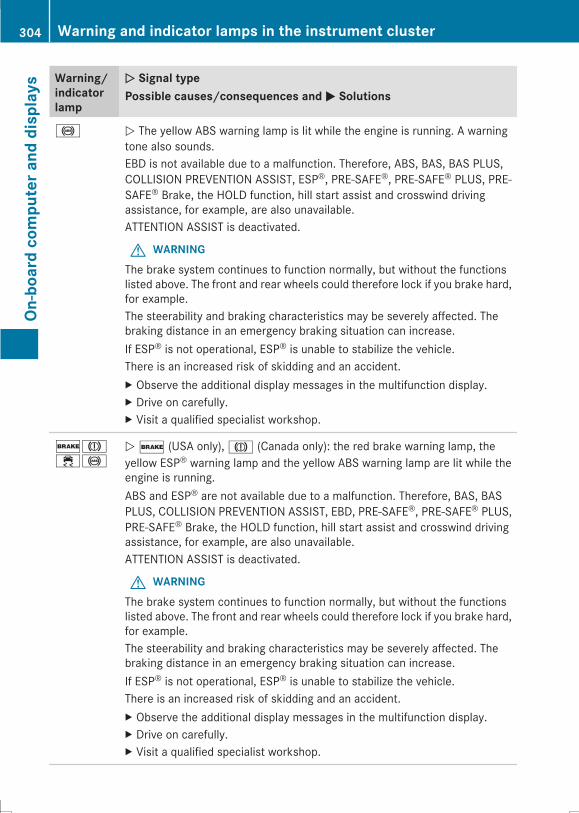
Warning/indicatorlamp
NN Signal typePossible causes/consequences and MM Solutions
! N The yellow ABS warning lamp is lit while the engine is running. A warningtone also sounds.EBD is not available due to a malfunction. Therefore, ABS, BAS, BAS PLUS,COLLISION PREVENTION ASSIST, ESP®, PRE-SAFE®, PRE-SAFE® PLUS, PRE-SAFE® Brake, the HOLD function, hill start assist and crosswind drivingassistance, for example, are also unavailable.ATTENTION ASSIST is deactivated.
G WARNINGThe brake system continues to function normally, but without the functionslisted above. The front and rear wheels could therefore lock if you brake hard,for example.The steerability and braking characteristics may be severely affected. Thebraking distance in an emergency braking situation can increase.If ESP® is not operational, ESP® is unable to stabilize the vehicle.There is an increased risk of skidding and an accident.X Observe the additional display messages in the multifunction display.X Drive on carefully.X Visit a qualified specialist workshop.
$J÷!
N$ (USA only),J (Canada only): the red brake warning lamp, theyellow ESP® warning lamp and the yellow ABS warning lamp are lit while theengine is running.ABS and ESP® are not available due to a malfunction. Therefore, BAS, BASPLUS, COLLISION PREVENTION ASSIST, EBD, PRE-SAFE®, PRE-SAFE® PLUS,PRE-SAFE® Brake, the HOLD function, hill start assist and crosswind drivingassistance, for example, are also unavailable.ATTENTION ASSIST is deactivated.
G WARNINGThe brake system continues to function normally, but without the functionslisted above. The front and rear wheels could therefore lock if you brake hard,for example.The steerability and braking characteristics may be severely affected. Thebraking distance in an emergency braking situation can increase.If ESP® is not operational, ESP® is unable to stabilize the vehicle.There is an increased risk of skidding and an accident.X Observe the additional display messages in the multifunction display.X Drive on carefully.X Visit a qualified specialist workshop.
304 Warning and indicator lamps in the instrument clusterOn
-board
computerand
displays
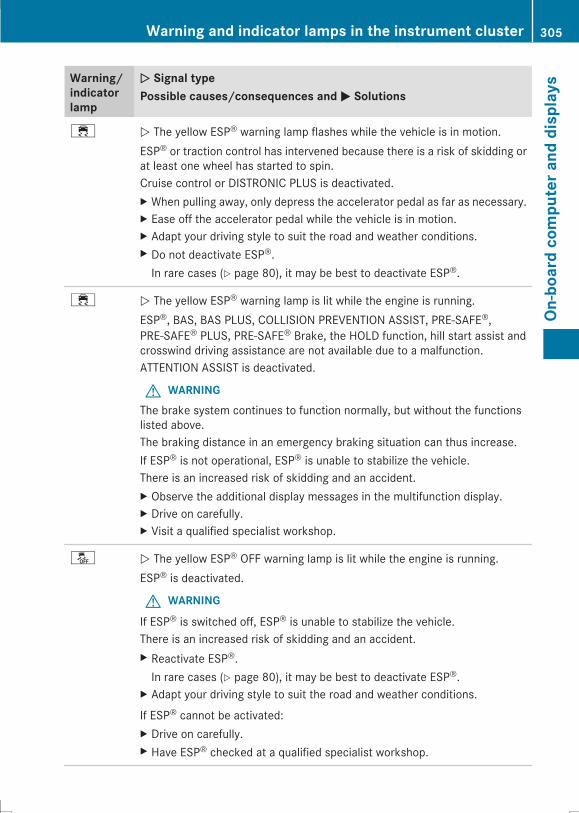
Warning/indicatorlamp
NN Signal typePossible causes/consequences and MM Solutions
÷ N The yellow ESP® warning lamp flashes while the vehicle is in motion.ESP® or traction control has intervened because there is a risk of skidding orat least one wheel has started to spin.Cruise control or DISTRONIC PLUS is deactivated.X When pulling away, only depress the accelerator pedal as far as necessary.X Ease off the accelerator pedal while the vehicle is in motion.X Adapt your driving style to suit the road and weather conditions.X Do not deactivate ESP®.In rare cases (Y page 80), it may be best to deactivate ESP®.
÷ N The yellow ESP® warning lamp is lit while the engine is running.ESP®, BAS, BAS PLUS, COLLISION PREVENTION ASSIST, PRE-SAFE®,PRE-SAFE® PLUS, PRE-SAFE® Brake, the HOLD function, hill start assist andcrosswind driving assistance are not available due to a malfunction.ATTENTION ASSIST is deactivated.
G WARNINGThe brake system continues to function normally, but without the functionslisted above.The braking distance in an emergency braking situation can thus increase.If ESP® is not operational, ESP® is unable to stabilize the vehicle.There is an increased risk of skidding and an accident.X Observe the additional display messages in the multifunction display.X Drive on carefully.X Visit a qualified specialist workshop.
å N The yellow ESP® OFF warning lamp is lit while the engine is running.ESP® is deactivated.
G WARNING
If ESP® is switched off, ESP® is unable to stabilize the vehicle.There is an increased risk of skidding and an accident.X Reactivate ESP®.In rare cases (Y page 80), it may be best to deactivate ESP®.
X Adapt your driving style to suit the road and weather conditions.
If ESP® cannot be activated:X Drive on carefully.X Have ESP® checked at a qualified specialist workshop.
Warning and indicator lamps in the instrument cluster 305
On-board
computerand
displays
Z

Warning/indicatorlamp
NN Signal typePossible causes/consequences and MM Solutions
F! NF (USA only),! (Canada only): the red indicator lamp for the electricparking brake flashes or is lit and/or the yellow warning lamp for the electricparking brake is lit.X Observe the additional display messages in the multifunction display.
6 N The red SRS warning lamp is lit while the engine is running.There is a malfunction in the SRS (Supplemental Restraint System).
G WARNINGThe air bags or Emergency Tensioning Devices may either be triggeredunintentionally or, in the event of an accident, may not be triggered.There is an increased risk of injury.X Drive on carefully.X Have SRS checked at a qualified specialist workshop immediately.For further information about SRS, see (Y page 49).
306 Warning and indicator lamps in the instrument clusterOn
-board
computerand
displays
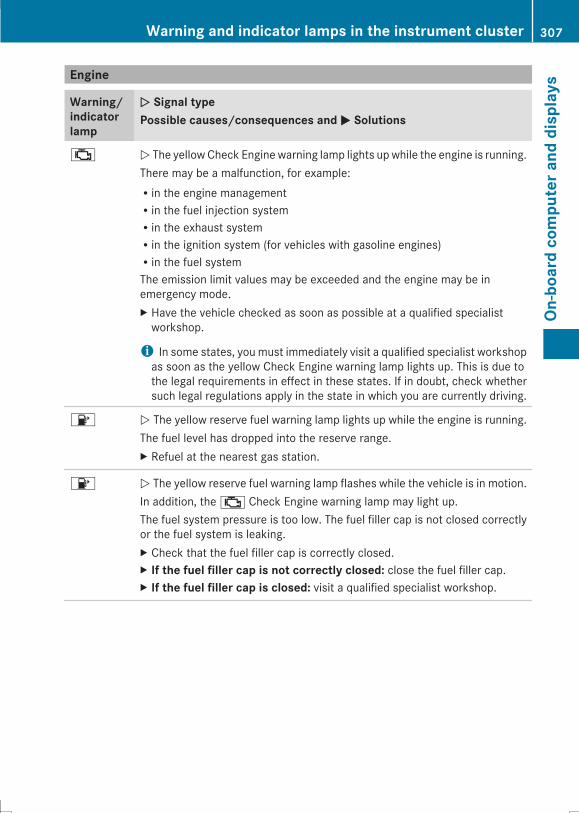
Engine
Warning/indicatorlamp
NN Signal typePossible causes/consequences andMM Solutions
; N The yellowCheck Engine warning lamp lights upwhile the engine is running.There may be a malfunction, for example:Rin the engine managementRin the fuel injection systemRin the exhaust systemRin the ignition system (for vehicles with gasoline engines)Rin the fuel systemThe emission limit values may be exceeded and the engine may be inemergency mode.X Have the vehicle checked as soon as possible at a qualified specialistworkshop.
i In some states, you must immediately visit a qualified specialist workshopas soon as the yellow Check Engine warning lamp lights up. This is due tothe legal requirements in effect in these states. If in doubt, check whethersuch legal regulations apply in the state in which you are currently driving.
8 N The yellow reserve fuel warning lamp lights up while the engine is running.The fuel level has dropped into the reserve range.X Refuel at the nearest gas station.
8 N The yellow reserve fuel warning lamp flashes while the vehicle is in motion.In addition, the; Check Engine warning lamp may light up.The fuel system pressure is too low. The fuel filler cap is not closed correctlyor the fuel system is leaking.X Check that the fuel filler cap is correctly closed.X If the fuel filler cap is not correctly closed: close the fuel filler cap.X If the fuel filler cap is closed: visit a qualified specialist workshop.
Warning and indicator lamps in the instrument cluster 307
On-board
computerand
displays
Z
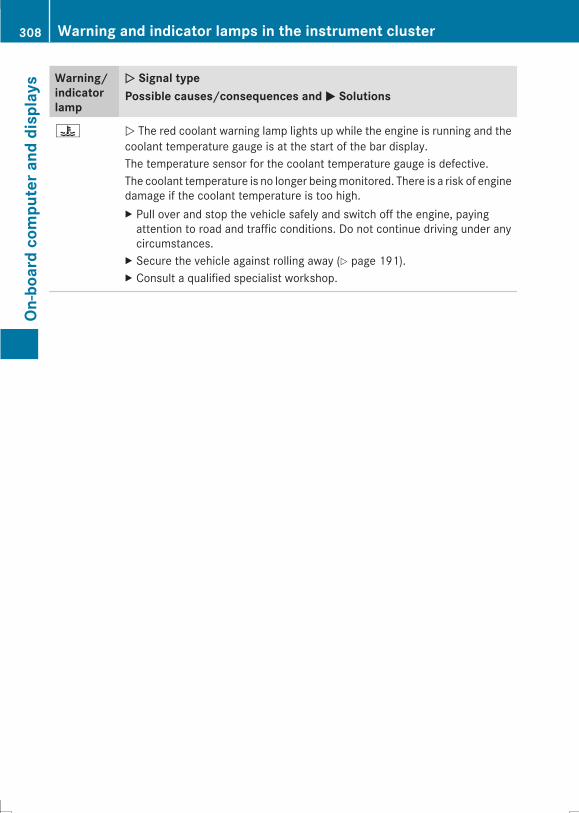
Warning/indicatorlamp
NN Signal typePossible causes/consequences and MM Solutions
? N The red coolant warning lamp lights up while the engine is running and thecoolant temperature gauge is at the start of the bar display.The temperature sensor for the coolant temperature gauge is defective.The coolant temperature is no longer beingmonitored. There is a risk of enginedamage if the coolant temperature is too high.X Pull over and stop the vehicle safely and switch off the engine, payingattention to road and traffic conditions. Do not continue driving under anycircumstances.
X Secure the vehicle against rolling away (Y page 191).X Consult a qualified specialist workshop.
308 Warning and indicator lamps in the instrument clusterOn
-board
computerand
displays
Warning/indicatorlamp
NN Signal typePossible causes/consequences and MM Solutions
? N The red coolant warning lamp comes on while the engine is running.The coolant level is too low.If the coolant level is correct, the airflow to the engine radiatormay be blockedor the electric engine radiator fan may be malfunctioning.The coolant is too hot and the engine is no longer being cooled sufficiently.X Observe the additional display messages in the multifunction display.X Pull over and stop the vehicle safely and switch off the engine, payingattention to road and traffic conditions.
X Secure the vehicle against rolling away (Y page 191).X Leave the vehicle and keep a safe distance from the vehicle until the enginehas cooled down.
X Check the coolant level and add coolant, observing the warning notes(Y page 583).
X If you need to add coolant more often than usual, have the engine coolantsystem checked.
X Make sure that the air supply to the engine radiator is not blocked, e.g. bysnow, slush or ice.
X Do not start the engine again until the coolant temperature is below248 ‡ (120 †). Otherwise, the engine could be damaged.
X Drive to the nearest qualified specialist workshop.X Avoid subjecting the engine to heavy loads, e.g. driving in mountainousterrain, and stop-and-go traffic.
? N The red coolant warning lamp comes on while the engine is running. Awarning tone also sounds.The coolant temperature has exceeded 248 ‡ (120 †). The airflow to theengine radiator may be blocked or the coolant level may be too low.
G WARNINGThe engine is not being cooled sufficiently and may be damaged.Do not drivewhen your engine is overheated. This can cause some fluidswhichmay have leaked into the engine compartment to catch fire.Steam from the overheated engine can also cause serious burns which canoccur just by opening the hood.There is a risk of injury.X Observe the additional display messages in the multifunction display.X Pull over and stop the vehicle safely and switch off the engine, payingattention to road and traffic conditions.
X Secure the vehicle against rolling away (Y page 191).
Warning and indicator lamps in the instrument cluster 309
On-board
computerand
displays
Z
Warning/indicatorlamp
NN Signal typePossible causes/consequences and MM Solutions
X Leave the vehicle and keep a safe distance from the vehicle until the enginehas cooled down.
X Check the coolant level and add coolant, observing the warning notes(Y page 583).
X If you need to add coolant more often than usual, have the engine coolantsystem checked.
X Make sure that the air supply to the engine radiator is not blocked, e.g. bysnow, slush or ice.
X At coolant temperatures below248‡ (120†), drive to the nearest qualifiedspecialist workshop.
X Avoid subjecting the engine to heavy loads, e.g. driving in mountainousterrain, and stop-and-go traffic.
Driving systems
Warning/indicatorlamp
NN Signal typePossible causes/consequences andMM Solutions
· N The red distance warning lamp lights up while the vehicle is in motion.The distance to the vehicle in front is too small for the speed selected.X Increase the distance.
· N The red distance warning lamp lights up while the vehicle is in motion. Awarning tone also sounds.You are approaching a vehicle or a stationary obstacle in your line of travel attoo high a speed.X Be prepared to brake immediately.X Pay careful attention to the traffic situation. You may have to brake or takeevasive action.
Further information on PRE-SAFE® Brake (Y page 82).For further information on the distance warning function of COLLISIONPREVENTION ASSIST: (Y page 77).
310 Warning and indicator lamps in the instrument clusterOn
-board
computerand
displays
Tires
Warning/indicatorlamp
NN Signal typePossible causes/consequences and MM Solutions
h N The yellow tire pressure monitor warning lamp (pressure loss/malfunction)is lit.The tire pressure monitor has detected a loss of pressure in at least one ofthe tires.
G WARNINGWith tire pressures which are too low, there is a risk of the following hazards:Rthey may burst, especially as the load and vehicle speed increase.Rthey may wear excessively and/or unevenly, which may greatly impair tiretraction.Rthe driving characteristics, as well as steering and braking, may be greatlyimpaired.There is a risk of an accident.
X Stop the vehicle withoutmaking any sudden steering or brakingmaneuvers.Pay attention to the traffic conditions as you do so.
X Secure the vehicle against rolling away (Y page 191).X Observe the additional display messages in the multifunction display.X Check the tires and, if necessary, follow the instructions for a flat tire(Y page 597).
X Check the tire pressure (Y page 623).X If necessary, correct the tire pressure.
h N The yellow tire pressure monitor warning lamp (pressure loss/malfunction)flashes for approximately one minute and then remains lit.The tire pressure monitor is faulty.
G WARNINGThe system is possibly unable to recognize or register low tire pressure.There is a risk of an accident.X Observe the additional display messages in the multifunction display.X Visit a qualified specialist workshop.
Warning and indicator lamps in the instrument cluster 311
On-board
computera
nddisplays
Z
Vehicle
Warning/indicatorlamp
NN Signal typePossible causes/consequences andMM Solutions
Ð N The red power steering warning lamp is lit while the engine is running.The power steering is malfunctioning.A warning tone also sounds.
G WARNINGYou will need to use more force to steer.There is a risk of an accident.X Check whether you are able to apply the extra force required.X If you are able to steer safely: carefully drive on to a qualified specialistworkshop.
X If you are unable to steer safely: do not drive on. Contact the nearestqualified specialist workshop.
312 Warning and indicator lamps in the instrument clusterOn
-board
computera
nddisplays
Operating safety ............................... 314At a glance ......................................... 317System settings ................................ 331Vehicle functions .............................. 342Navigation ......................................... 357Telephone .......................................... 409Online and Internet ........................... 443Radio .................................................. 460Media ................................................. 470Sound ................................................. 507Rear Seat Entertainment System .... 515SIRIUS Weather ................................ 535
313
COMAN
D
Operating safety
Important safety notes
G WARNINGModifications to electronic components, theirsoftware as well as wiring can impair theirfunction and/or the function of othernetworked components. In particular,systems relevant to safety could also beaffected. As a result, these may no longerfunction as intended and/or jeopardize theoperating safety of the vehicle. There is anincreased risk of an accident and injury.Never tamper with the wiring as well aselectronic components or their software. Youshould have all work to electrical andelectronic equipment carried out at a qualifiedspecialist workshop.
If you make any changes to the vehicleelectronics, the general operating permit isrendered invalid.
G WARNINGIf you operate information systems andcommunication equipment integrated in thevehicle while driving, you will be distractedfrom traffic conditions. You could also losecontrol of the vehicle. There is a risk of anaccident.Only operate the equipment when the trafficsituation permits. If you are not sure that thisis possible, park the vehicle paying attentionto traffic conditions and operate theequipment when the vehicle is stationary.
You must observe the legal requirements forthe country in which you are currently drivingwhen operating COMAND.COMAND calculates the route to thedestination without taking account of thefollowing, for example:Rtraffic lightsRstop and give way signsRmerging lanes
Rparking or stopping in a no parking/nostopping zoneRother road and traffic rules and regulationsRnarrow bridgesCOMAND can give incorrect navigationcommands if the actual street/trafficsituation does not correspond with the digitalmap's data. Digital maps do not cover allareas nor all routes in an area. For example,a route may have been diverted or thedirection of a one-way street may havechanged.For this reason, you must always observeroad and traffic rules and regulations duringyour journey. Road and traffic rules andregulations always have priority over thesystem's driving recommendations.Navigation announcements are intended todirect you while driving without diverting yourattention from the road and driving.Please always use this feature instead ofconsulting the map display for directions.Looking at the icons or map display candistract you from traffic conditions anddriving, and increase the risk of an accident.Bear in mind that at a speed of only 30 mph(approximately 50 km/h) your vehicle coversa distance of 44 feet (approximately 14 m)per second.This equipment complies with FCC radiationexposure limits set forth for uncontrolledequipment and meets the FCC radiofrequency (RF) Exposure Guidelines inSupplement C to OET65.This equipment has very low levels of RFenergy that is deemed to comply withoutmaximum permissive exposure evaluation(MPE). But it is desirable that it should beinstalled and operated with at least 8 inches(20cm) and more between the radiator and aperson's body (excluding extremities: hands,wrists, feet and legs.)
314 Operating safetyCO
MAN
D
Declarations of conformity
Vehicle components which receiveand/or transmit radio wavesi USA only: The wireless devices of thisvehicle comply with Part 15 of the FCCRules. Operation is subject to the followingtwo conditions:1) These devices may not causeinterference, and2) These devices must accept anyinterference, including interference thatmay cause undesired operation of thedevice.Changes or modifications not expresslyapproved by the party responsible forcompliance could void the user's authorityto operate the equipment.
i Canada only: The wireless devices of thisvehicle comply with Industry Canadalicense-exempt RSS standard(s). Operationis subject to the following two conditions:1) These devices may not causeinterference, and2) These devices must accept anyinterference, including interference thatmay cause undesired operation of thedevice.
Correct useObserve the following informationwhen usingCOMAND:Rthe safety notes in this manualRtraffic rules and regulationsRlaws and safety standards pertaining tomotor vehicles
i Work improperly carried out on electroniccomponents or systems (e.g. radio, DVDchanger) and associated software couldcause them to cease functioning. Evensystems that have not been modified couldbe affected because the electronicsystems are connected. Electronic
malfunctions can seriously jeopardize theoperational safety of your vehicle.
i Roof antenna functionality (telephone,satellite radio, GPS) can be affected by theuse of roof carrier systems.Attaching metalized retrofit film to thewindshield may affect radio reception andhave a negative impact on all otherantennas (e.g. emergency antenna) in thevehicle interior.
i Therefore, have all work on ormodifications to electronic componentscarried out at a qualified specialistworkshop. This workshop should have thenecessary specialist knowledge and toolsto carry out the work required. Mercedes-Benz recommends that you use anauthorized Mercedes-Benz Center for thispurpose. In particular, work relevant tosafety or on safety-related systems mustbe carried out at a qualified specialistworkshop.
i Protection against theft: this device isequipped with technical provisions toprotect it against theft. Further informationon protection against theft can be obtainedfrom an authorized Mercedes-Benz Center.
Data stored in the vehicleA wide range of electronic components inyour vehicle contain data memories.These data memories temporarily orpermanently store technical informationabout:RThe vehicle's operating stateRIncidentsRMalfunctionsIn general, this technical informationdocuments the state of a component, amodule, a system or the surroundings.
Operating safety 315
COMAN
D
Z
These include, for example:Roperating conditions of systemcomponents, e.g. fluid levelsRthe vehicle's status messages and those ofits individual components, e.g. number ofwheel revolutions/speed, deceleration inmovement, lateral acceleration,accelerator pedal positionRmalfunctions and defects in importantsystem components, e.g. lights, brakesRvehicle reactions and operating conditionsin special driving situations, e.g. air bagdeployment, intervention of stabilitycontrol systemsRambient conditions, e.g. outsidetemperature
This data is of an exclusively technical natureand can be used to:Rassist in recognizing and rectifyingmalfunctions and defectsRanalyze vehicle functions, e.g. after anaccidentRoptimize vehicle functionThe data cannot be used to trace the vehicle'smovements.When your vehicle is serviced, technicalinformation can be read from the event datamemory and malfunction data memory.Services include, for example:Rrepair servicesRservice processesRwarrantiesRquality assuranceIt is read by employees of the service network(including manufacturers) using specialdiagnostic devices. More detailedinformation is obtained from it, if required.After a malfunction has been rectified, theinformation is deleted from the malfunctionmemory or is continually overwritten.When operating the vehicle, situations areconceivable in which this technical data, inconnection with other information (ifnecessary, under consultation with an
authorized expert), could be traced to aperson.Examples include:Raccident reportsRdamages to the vehicleRwitness statementsFurther additional functions that have beencontractually agreed upon with the customerallow certain vehicle data to be conveyed bythe vehicle as well. The additional functionsinclude, for example, vehicle location in caseof an emergency.
Qualified specialist workshopRead the information on qualified specialistworkshops in the vehicle Operator's Manual.
Information on copyright
General informationInformation on licenses for free and OpenSource software used in your vehicle and inthe electronic components can be found onthis website: http://www.mercedes-benz.com/opensource.
Registered trademarksRegistered trademarks:RBluetooth® is a registered trademark ofBluetooth® SIG Inc.RDTS is a registered trademark of DTS, Inc.RDolby, DolbyDigital and MLP lossless areregistered trademarks of DOLBYLaboratories.RBabySmart™, ESP® and PRE-SAFE® areregistered trademarks of Daimler AG.RHomeLink® is a registered trademark ofPrince.RiPod® and iTunes® are registeredtrademarks of Apple Inc.RBurmester is a registered trademark ofBurmester Audiosysteme GmbH.
316 Operating safetyCO
MAN
D

RMicrosoft® and Windows media® areregistered trademarks of MicrosoftCorporation.RSIRIUS is a registered trademark of SiriusXM Radio Inc.RHD Radio is a registered trademark ofiBiquity Digital Corporation.RGracenote® is a registered trademark ofGracenote, Inc.RZAGATSurvey® and related brands areregistered trademarks of ZagatSurvey,LLC.RGoogle™, Google™ Street View, Google™Panoramio and Google™ maps areregistered trademarks of Google Inc.Rfacebook® is a registered trademark ofFacebook Inc.Ryelp® is a registered trademark of Yelp Inc.
Your COMAND equipmentThese operating instructions describe allstandard and optional equipment availablefor your COMAND system at the time ofpurchase. Country-specific differences arepossible. Please note that yourCOMAND system may not be equipped withall the features described. This also applies tosafety-relevant systems and functions.Therefore, the equipment on your COMANDsystem may differ from that in thedescriptions and illustrations. Should youhave any questions concerning equipmentand operation, please consult an authorizedMercedes-Benz Center.
Function restrictionsFor safety reasons, some COMAND functionsare restricted or unavailable while the vehicleis in motion. You will notice this, for examplebecause either you will not be able to selectcertain menu items or COMAND will displaya message to this effect.
At a glance
COMAND featuresThese operating instructions describe allstandard and optional equipment availablefor your COMAND system at the time ofpurchase. Country-specific differences arepossible. Please note that yourCOMAND system may not be equipped withall the features described. This also applies tosafety-relevant systems and functions.Therefore, the equipment on your COMANDsystem may differ from that in thedescriptions and illustrations. Should youhave any questions concerning equipmentand operation, please consult an authorizedMercedes-Benz Center.
At a glance 317
COMAN
D
Z
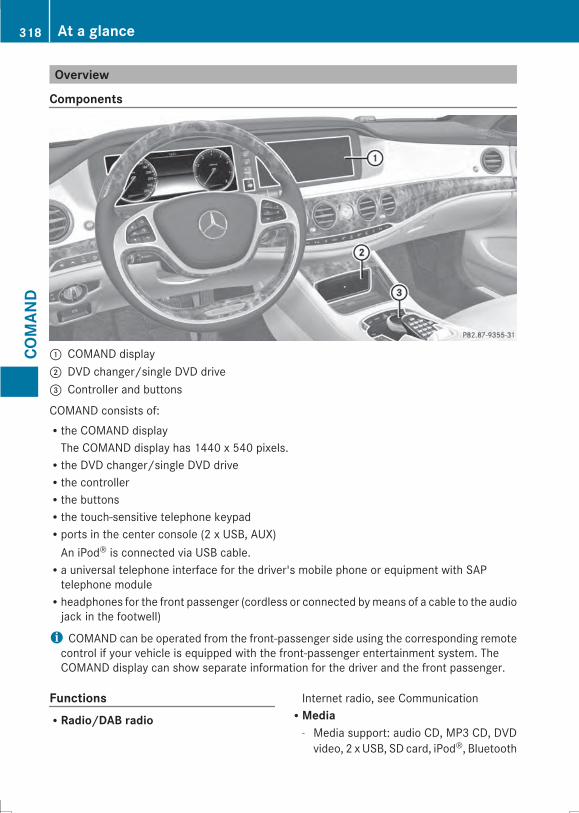
Overview
Components
: COMAND display; DVD changer/single DVD drive= Controller and buttons
COMAND consists of:Rthe COMAND displayThe COMAND display has 1440 x 540 pixels.Rthe DVD changer/single DVD driveRthe controllerRthe buttonsRthe touch-sensitive telephone keypadRports in the center console (2 x USB, AUX)An iPod® is connected via USB cable.Ra universal telephone interface for the driver's mobile phone or equipment with SAPtelephone moduleRheadphones for the front passenger (cordless or connected bymeans of a cable to the audiojack in the footwell)
i COMAND can be operated from the front-passenger side using the corresponding remotecontrol if your vehicle is equipped with the front-passenger entertainment system. TheCOMAND display can show separate information for the driver and the front passenger.
FunctionsRRadio/DAB radio
Internet radio, see CommunicationRMedia
- Media support: audio CD, MP3 CD, DVDvideo, 2 x USB, SD card, iPod®, Bluetooth
318 At a glanceCO
MAN
D
audio, 10 GBMedia Register on the harddrive
-
- Music search using all mediaRSound systemYou can select from three sound systems:- Standard sound system- Burmester® surround sound system- Burmester high-end surround soundsystem for ultimate listening pleasure
RNavigation system- Destination entry using keyword search- Realistic 3D map with textured citymodels
- Navitainment for passengers, e.g.Driveshow, Google Maps
RCommunication- Telephony via Bluetooth interface/SAPtelephone module
- Messaging functions (text messages,email)
- Address book- Internet browser- Mercedes-Benz Apps with Google™Local Search, Destination Download,Weather, Facebook, Google™ StreetView, Internet radio, stock prices, newsand much more
- WLAN interface for the connection of asmartphone to COMAND Online and theoption of remote control for the frontpassenger and the Rear SeatEntertainment System
- WLAN hotspot functionality to connect atablet PC or laptop in order to enableaccess to the Internet using thecustomer's mobile phone
RVehicle functions- Setting the multicontour seat with newmassage program
- Climate control functions- Controlling ambient lighting: severalcolor and brightness level options
- 360° cameraRFavorites buttonFaster access to up to twelve favoritesfunctions using the favorites button and thenumber keys on the telephone keypadRMulti-user entertainment
- All passengers have access toentertainment options via COMAND
- Business telephony in the rearcompartment
- Digital remote control operation anddigital cordless headphones
COMAND display
General notes! Do not use the space in front of thedisplay for storage. Objects placed herecould damage the display or impair itsfunction. Avoid any direct contact with thedisplay surface. Pressure on the displaysurface may result in impairments to thedisplay, which could be irreversible.
Wearing polarized sunglasses may impairyour ability to read the display.The display has an automatic temperature-controlled switch-off feature. The brightnessis automatically reduced if the temperature istoo high. The display may temporarily switchoff completely.
At a glance 319
COMAN
D
Z

Overview
Example: audio CD mode basic display: Status bar with time, can show other displays; Main display field= Climate control status display? Context display in additional display area
Cleaning instructions! Do not touch the COMAND display. Thedisplay has a very sensitive high-glosssurface; there is a risk of scratching. If youhave to clean the screen, however, use amild cleaning agent and a soft, lint-freecloth.
The COMAND display must be switched offand have cooled down before you startcleaning. Clean the display screen, whennecessary, with a commercially availablemicrofiber cloth and cleaning agent for TFT/LCD displays. Do not apply pressure to thedisplay surface when cleaning it, as this couldcause irreversible damage. Then, dry thesurface with a dry microfiber cloth.Avoid using alcoholic thinners, gasoline orabrasive cleaning agents. These coulddamage the display surface.
320 At a glanceCO
MAN
D
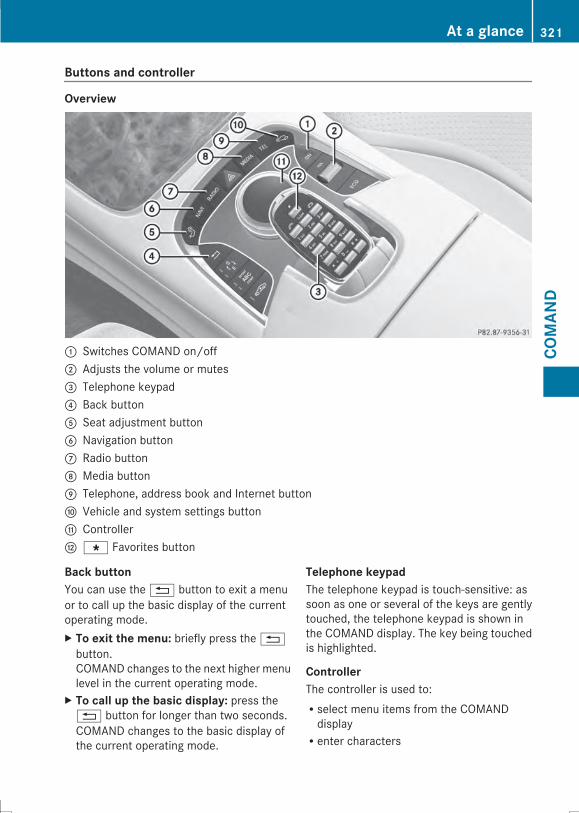
Buttons and controller
Overview
: Switches COMAND on/off; Adjusts the volume or mutes= Telephone keypad? Back buttonA Seat adjustment buttonB Navigation buttonC Radio buttonD Media buttonE Telephone, address book and Internet buttonF Vehicle and system settings buttonG ControllerH g Favorites button
Back buttonYou can use the% button to exit a menuor to call up the basic display of the currentoperating mode.X To exit the menu: briefly press the%button.COMAND changes to the next higher menulevel in the current operating mode.
X To call up the basic display: press the% button for longer than two seconds.COMAND changes to the basic display ofthe current operating mode.
Telephone keypadThe telephone keypad is touch-sensitive: assoon as one or several of the keys are gentlytouched, the telephone keypad is shown inthe COMAND display. The key being touchedis highlighted.
ControllerThe controller is used to:Rselect menu items from the COMANDdisplayRenter characters
At a glance 321
COMAN
D
Z
Renter a destination on the mapRsave entriesThe controller can be:RturnedRslid left or right XVY
Rslid forwards or back ZVÆ
Rslid diagonally aVb
Rpressed briefly or pressed and held
Basic COMAND functions
Switching COMAND on/offX Press theu button on the centerconsole to the right of the controller.When you switch on COMAND, a warningmessage will appear. COMAND calls up thepreviously selected menu.If you switch off COMAND, playback of thecurrent media source will also be switchedoff.
Adjusting the volume
Adjusting the volume for media sourcesX Turn the thumbwheel to the right of thecontroller.
orX Press theW orX button on themultifunction steering wheel.The volume of the media source currentlyselected changes.
Adjusting the volume for trafficannouncements and navigationannouncementsDuring traffic or navigation announcements:X Turn the thumbwheel to the right of thecontroller.
orX Press theW orX button on themultifunction steering wheel.
i You can set the volume for navigationannouncements to be different to thevolume of the respective media source.
Adjusting the volume for phone callsYou can adjust the volume for hands-freemode during a telephone call.X Turn the thumbwheel to the right of thecontroller.
orX Press theW orX button on themultifunction steering wheel.
i Setting the volume for the Voice ControlSystem voice output, see the separateoperating instructions.
Switching the sound on or off
Media source soundX Press the thumbwheel beside thecontroller.
orX Press the8 button on the multifunctionsteering wheel.
i When the sound is switched off, you willsee the, symbol in the status bar. If youchange the media source or change thevolume, the sound is automaticallyswitched on.
i Even if the sound is switched off, you willstill hear navigation systemannouncements.
Switching navigation announcements offand on againX To switch off navigationannouncements: press the thumbwheelbeside the controller during theannouncement.The SpokenSpoken drivingdriving recommendationsrecommendationshave been deactivatedhave been deactivated messageappears.
322 At a glanceCO
MAN
D
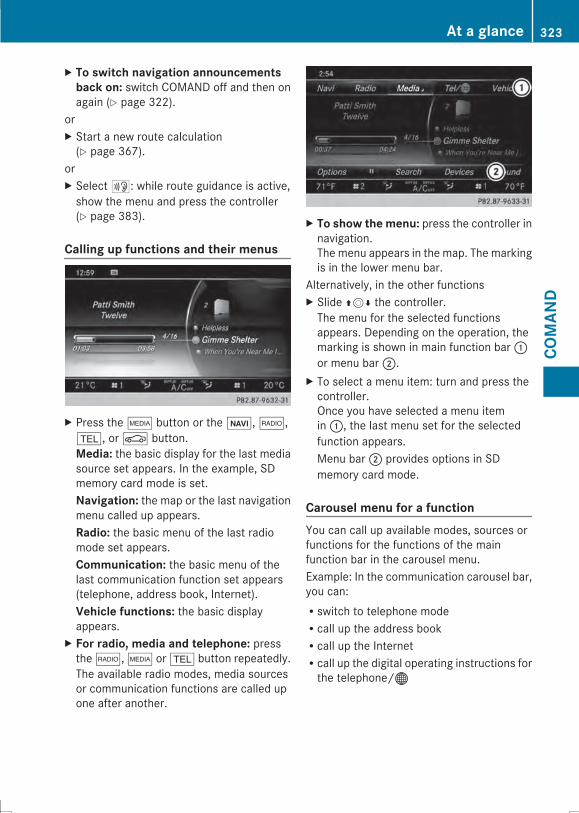
X To switch navigation announcementsback on: switch COMAND off and then onagain (Y page 322).
orX Start a new route calculation(Y page 367).
orX Select+: while route guidance is active,show the menu and press the controller(Y page 383).
Calling up functions and their menus
X Press the Õ button or the ß, $,%, orØ button.Media: the basic display for the last mediasource set appears. In the example, SDmemory card mode is set.Navigation: the map or the last navigationmenu called up appears.Radio: the basic menu of the last radiomode set appears.Communication: the basic menu of thelast communication function set appears(telephone, address book, Internet).Vehicle functions: the basic displayappears.
X For radio, media and telephone: pressthe $, Õ or % button repeatedly.The available radio modes, media sourcesor communication functions are called upone after another.
X To show the menu: press the controller innavigation.The menu appears in the map. The markingis in the lower menu bar.
Alternatively, in the other functionsX Slide ZVÆ the controller.The menu for the selected functionsappears. Depending on the operation, themarking is shown in main function bar:or menu bar;.
X To select a menu item: turn and press thecontroller.Once you have selected a menu itemin:, the last menu set for the selectedfunction appears.Menu bar; provides options in SDmemory card mode.
Carousel menu for a functionYou can call up available modes, sources orfunctions for the functions of the mainfunction bar in the carousel menu.Example: In the communication carousel bar,you can:Rswitch to telephone modeRcall up the address bookRcall up the InternetRcall up the digital operating instructions forthe telephone/®
At a glance 323
COMAN
D
Z
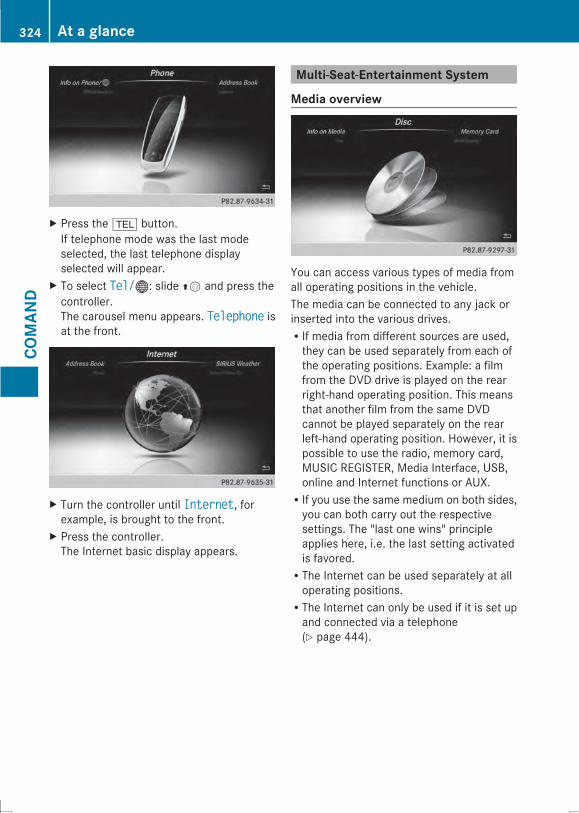
X Press the % button.If telephone mode was the last modeselected, the last telephone displayselected will appear.
X To select Tel/Tel/®: slide ZV and press thecontroller.The carousel menu appears. TelephoneTelephone isat the front.
X Turn the controller until InternetInternet, forexample, is brought to the front.
X Press the controller.The Internet basic display appears.
Multi-Seat-Entertainment System
Media overview
You can access various types of media fromall operating positions in the vehicle.The media can be connected to any jack orinserted into the various drives.RIf media from different sources are used,they can be used separately from each ofthe operating positions. Example: a filmfrom the DVD drive is played on the rearright-hand operating position. This meansthat another film from the same DVDcannot be played separately on the rearleft-hand operating position. However, it ispossible to use the radio, memory card,MUSIC REGISTER, Media Interface, USB,online and Internet functions or AUX.RIf you use the same medium on both sides,you can both carry out the respectivesettings. The "last one wins" principleapplies here, i.e. the last setting activatedis favored.RThe Internet can be used separately at alloperating positions.RThe Internet can only be used if it is set upand connected via a telephone(Y page 444).
324 At a glanceCO
MAN
D
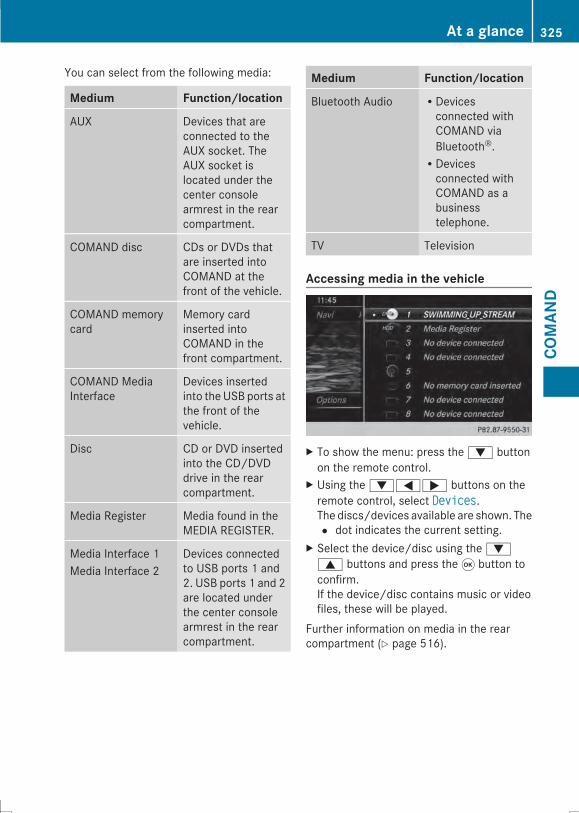
You can select from the following media:
Medium Function/location
AUX Devices that areconnected to theAUX socket. TheAUX socket islocated under thecenter consolearmrest in the rearcompartment.
COMAND disc CDs or DVDs thatare inserted intoCOMAND at thefront of the vehicle.
COMAND memorycard
Memory cardinserted intoCOMAND in thefront compartment.
COMAND MediaInterface
Devices insertedinto the USB ports atthe front of thevehicle.
Disc CD or DVD insertedinto the CD/DVDdrive in the rearcompartment.
Media Register Media found in theMEDIA REGISTER.
Media Interface 1Media Interface 2
Devices connectedto USB ports 1 and2. USB ports 1 and 2are located underthe center consolearmrest in the rearcompartment.
Medium Function/location
Bluetooth Audio RDevicesconnected withCOMAND viaBluetooth®.RDevicesconnected withCOMAND as abusinesstelephone.
TV Television
Accessing media in the vehicle
X To show the menu: press the: buttonon the remote control.
X Using the:=; buttons on theremote control, select DevicesDevices.The discs/devices available are shown. The# dot indicates the current setting.
X Select the device/disc using the:9 buttons and press the 9 button toconfirm.If the device/disc contains music or videofiles, these will be played.
Further information on media in the rearcompartment (Y page 516).
At a glance 325
COMAN
D
Z
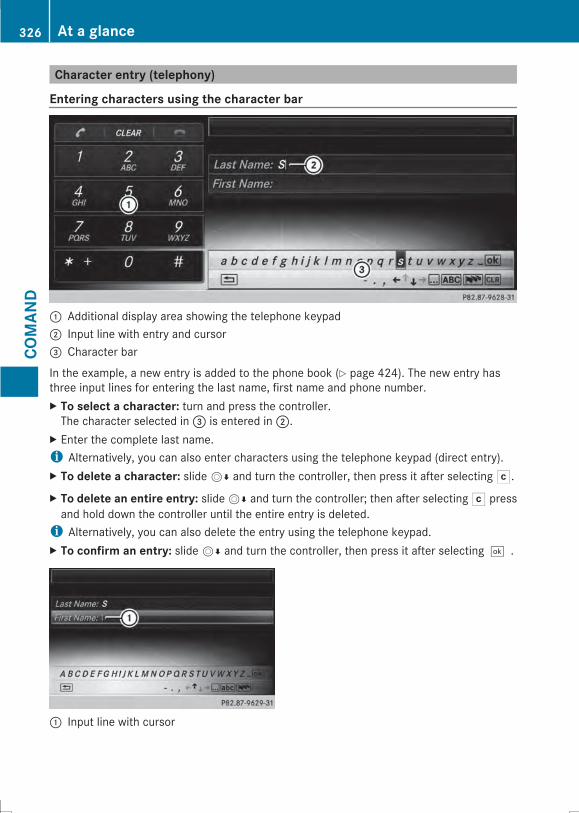
Character entry (telephony)
Entering characters using the character bar
: Additional display area showing the telephone keypad; Input line with entry and cursor= Character bar
In the example, a new entry is added to the phone book (Y page 424). The new entry hasthree input lines for entering the last name, first name and phone number.X To select a character: turn and press the controller.The character selected in= is entered in;.
X Enter the complete last name.i Alternatively, you can also enter characters using the telephone keypad (direct entry).X To delete a character: slideVÆ and turn the controller, then press it after selectingF.
X To delete an entire entry: slideVÆ and turn the controller; then after selectingF pressand hold down the controller until the entire entry is deleted.i Alternatively, you can also delete the entry using the telephone keypad.X To confirm an entry: slideVÆ and turn the controller, then press it after selecting¬.
: Input line with cursor
326 At a glanceCO
MAN
D
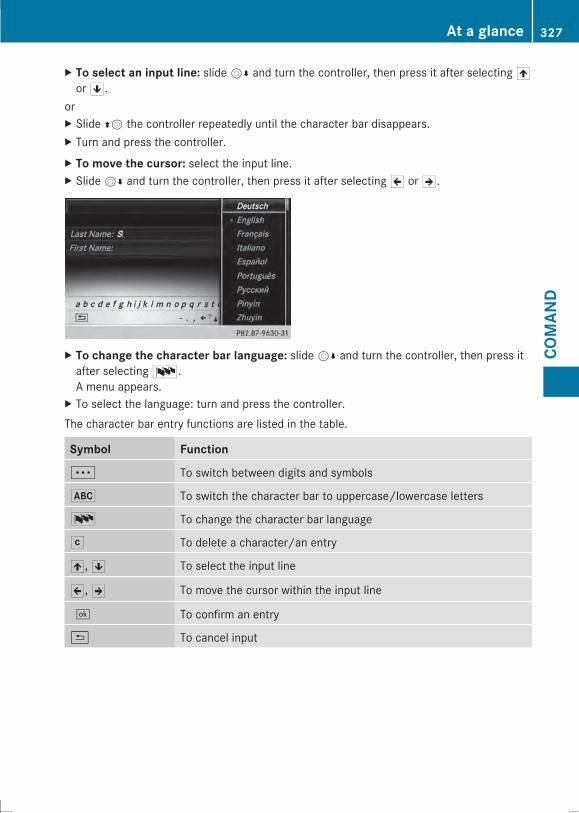
X To select an input line: slideVÆ and turn the controller, then press it after selecting4or5.
orX Slide ZV the controller repeatedly until the character bar disappears.X Turn and press the controller.X To move the cursor: select the input line.X SlideVÆ and turn the controller, then press it after selecting2 or3.
X To change the character bar language: slideVÆ and turn the controller, then press itafter selectingB.A menu appears.
X To select the language: turn and press the controller.The character bar entry functions are listed in the table.
Symbol Function
Ä To switch between digits and symbols
* To switch the character bar to uppercase/lowercase letters
B To change the character bar language
F To delete a character/an entry
4,5 To select the input line
2,3 To move the cursor within the input line
¬ To confirm an entry
& To cancel input
At a glance 327
COMAN
D
Z
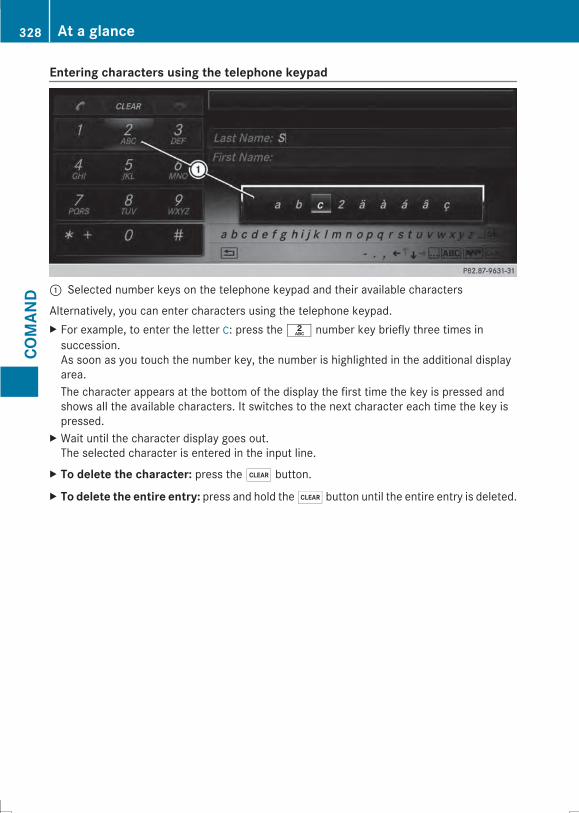
Entering characters using the telephone keypad
: Selected number keys on the telephone keypad and their available characters
Alternatively, you can enter characters using the telephone keypad.X For example, to enter the letter cc: press thel number key briefly three times insuccession.As soon as you touch the number key, the number is highlighted in the additional displayarea.The character appears at the bottom of the display the first time the key is pressed andshows all the available characters. It switches to the next character each time the key ispressed.
X Wait until the character display goes out.The selected character is entered in the input line.
X To delete the character: press the$ button.
X To delete the entire entry: press and hold the$ button until the entire entry is deleted.
328 At a glanceCO
MAN
D
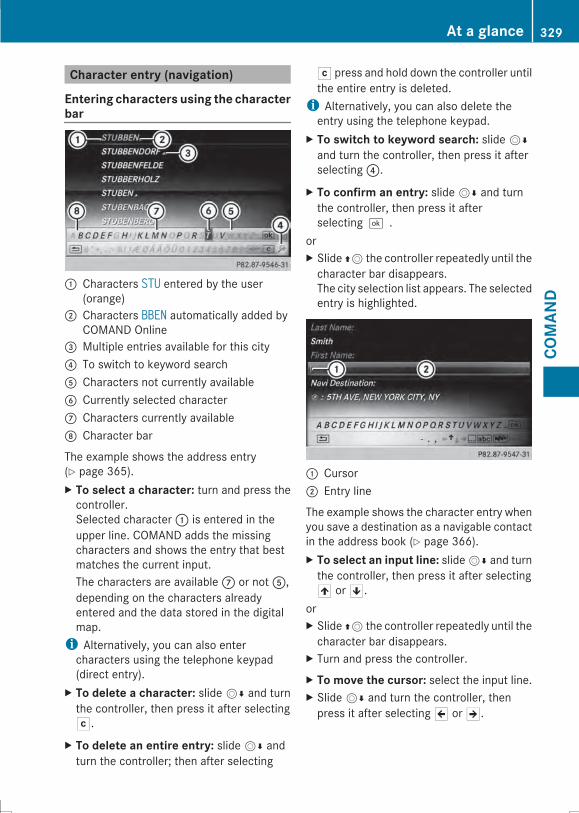
Character entry (navigation)
Entering characters using the characterbar
: Characters STUSTU entered by the user(orange)
; Characters BBENBBEN automatically added byCOMAND Online
= Multiple entries available for this city? To switch to keyword searchA Characters not currently availableB Currently selected characterC Characters currently availableD Character bar
The example shows the address entry(Y page 365).X To select a character: turn and press thecontroller.Selected character: is entered in theupper line. COMAND adds the missingcharacters and shows the entry that bestmatches the current input.The characters are availableC or notA,depending on the characters alreadyentered and the data stored in the digitalmap.i Alternatively, you can also entercharacters using the telephone keypad(direct entry).
X To delete a character: slideVÆ and turnthe controller, then press it after selectingF.
X To delete an entire entry: slideVÆ andturn the controller; then after selecting
F press and hold down the controller untilthe entire entry is deleted.i Alternatively, you can also delete theentry using the telephone keypad.
X To switch to keyword search: slideVÆand turn the controller, then press it afterselecting?.
X To confirm an entry: slideVÆ and turnthe controller, then press it afterselecting¬.
orX Slide ZV the controller repeatedly until thecharacter bar disappears.The city selection list appears. The selectedentry is highlighted.
: Cursor; Entry line
The example shows the character entry whenyou save a destination as a navigable contactin the address book (Y page 366).X To select an input line: slideVÆ and turnthe controller, then press it after selecting4 or5.
orX Slide ZV the controller repeatedly until thecharacter bar disappears.
X Turn and press the controller.X To move the cursor: select the input line.X SlideVÆ and turn the controller, thenpress it after selecting2 or3.
At a glance 329
COMAN
D
Z
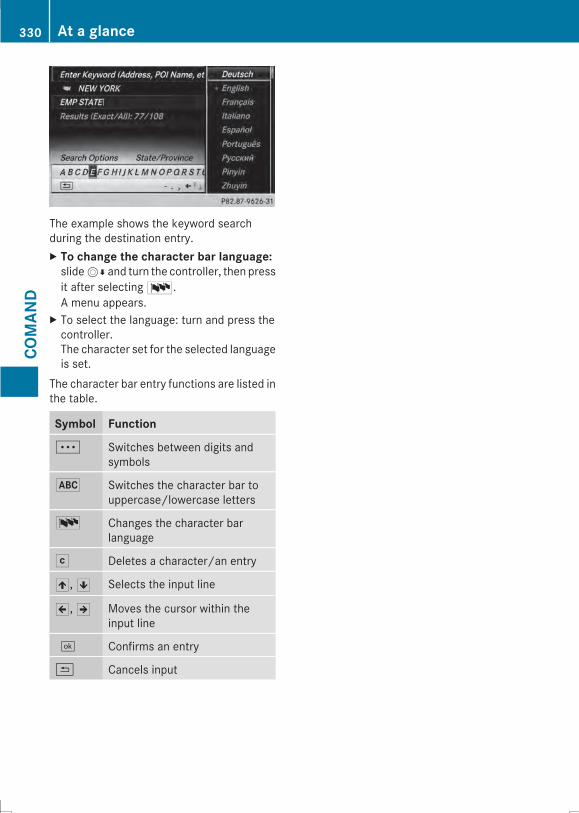
The example shows the keyword searchduring the destination entry.X To change the character bar language:slideVÆ and turn the controller, then pressit after selectingB.A menu appears.
X To select the language: turn and press thecontroller.The character set for the selected languageis set.
The character bar entry functions are listed inthe table.
Symbol Function
Ä Switches between digits andsymbols
* Switches the character bar touppercase/lowercase letters
B Changes the character barlanguage
F Deletes a character/an entry
4,5 Selects the input line
2,3 Moves the cursor within theinput line
¬ Confirms an entry
& Cancels input
330 At a glanceCO
MAN
D
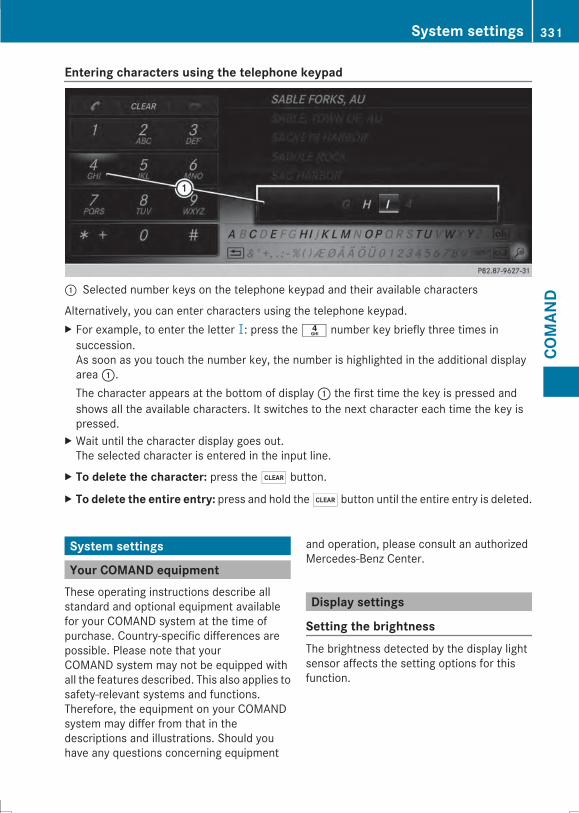
Entering characters using the telephone keypad
: Selected number keys on the telephone keypad and their available characters
Alternatively, you can enter characters using the telephone keypad.X For example, to enter the letter II: press then number key briefly three times insuccession.As soon as you touch the number key, the number is highlighted in the additional displayarea:.The character appears at the bottom of display: the first time the key is pressed andshows all the available characters. It switches to the next character each time the key ispressed.
X Wait until the character display goes out.The selected character is entered in the input line.
X To delete the character: press the$ button.
X To delete the entire entry: press and hold the$ button until the entire entry is deleted.
System settings
Your COMAND equipmentThese operating instructions describe allstandard and optional equipment availablefor your COMAND system at the time ofpurchase. Country-specific differences arepossible. Please note that yourCOMAND system may not be equipped withall the features described. This also applies tosafety-relevant systems and functions.Therefore, the equipment on your COMANDsystem may differ from that in thedescriptions and illustrations. Should youhave any questions concerning equipment
and operation, please consult an authorizedMercedes-Benz Center.
Display settings
Setting the brightnessThe brightness detected by the display lightsensor affects the setting options for thisfunction.
System settings 331
COMAN
D
Z
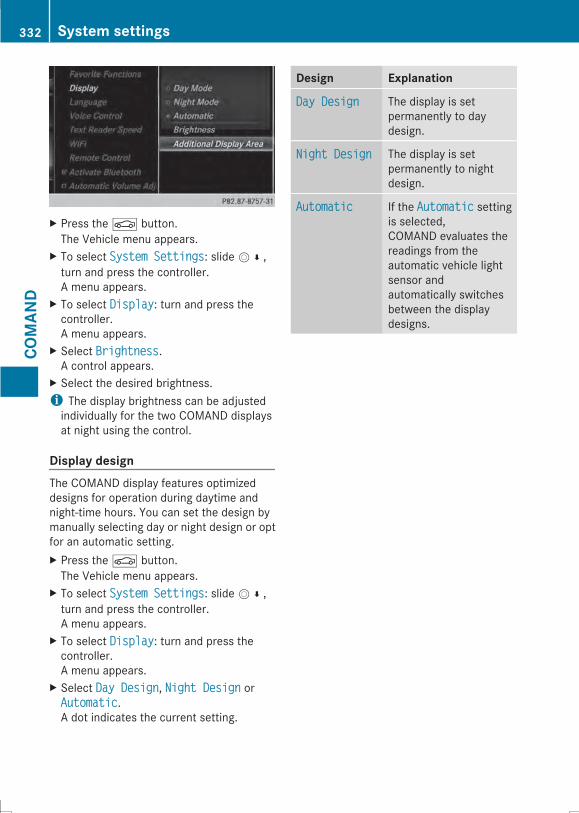
X Press theØ button.The Vehicle menu appears.
X To select System SettingsSystem Settings: slideV¬,turn and press the controller.A menu appears.
X To select DisplayDisplay: turn and press thecontroller.A menu appears.
X Select BrightnessBrightness.A control appears.
X Select the desired brightness.i The display brightness can be adjustedindividually for the two COMAND displaysat night using the control.
Display designThe COMAND display features optimizeddesigns for operation during daytime andnight-time hours. You can set the design bymanually selecting day or night design or optfor an automatic setting.X Press theØ button.The Vehicle menu appears.
X To select System SettingsSystem Settings: slideV¬,turn and press the controller.A menu appears.
X To select DisplayDisplay: turn and press thecontroller.A menu appears.
X Select Day DesignDay Design, Night DesignNight Design orAutomaticAutomatic.A dot indicates the current setting.
Design Explanation
Day DesignDay Design The display is setpermanently to daydesign.
Night DesignNight Design The display is setpermanently to nightdesign.
AutomaticAutomatic If the AutomaticAutomatic settingis selected,COMAND evaluates thereadings from theautomatic vehicle lightsensor andautomatically switchesbetween the displaydesigns.
332 System settingsCO
MAN
D

Additional display area
The additional display area comprises the left-hand third of the COMAND display. For thecontent, you can select between context-dependent information such as an album cover inmedia mode or a permanent display of a small navigation map, for example, in the additionaldisplay area.X Press theØ button.The Vehicle menu appears.
X To select System SettingsSystem Settings: slideV¬, turn and press the controller.A menu appears.
X To select DisplayDisplay: turn and press the controller.A menu appears.
X Select Additional Display AreaAdditional Display Area.A menu appears.
X Select Context-dependentContext-dependent, Navigation MapNavigation Map, Entertainment InformationEntertainment Information, DataDataConnection InformationConnection Information, SIRIUS WeatherSIRIUS Weather or ConsumptionConsumption.A dot indicates the current setting.RContext-dependentContext-dependentThe additional area shows one of the following depending on the context, e.g. album coverin media mode.RNavigation MapNavigation MapThe navigation map is shown in the additional area.REntertainment InformationEntertainment InformationEntertainment information is shown in the additional area, e.g. album cover, artist and track.RData Connection InformationData Connection InformationData connection information is shown in the additional area.RSIRIUS WeatherSIRIUS WeatherSIRIUS weather information is shown in the additional area.RConsumptionConsumption
System settings 333
COMAN
D
Z
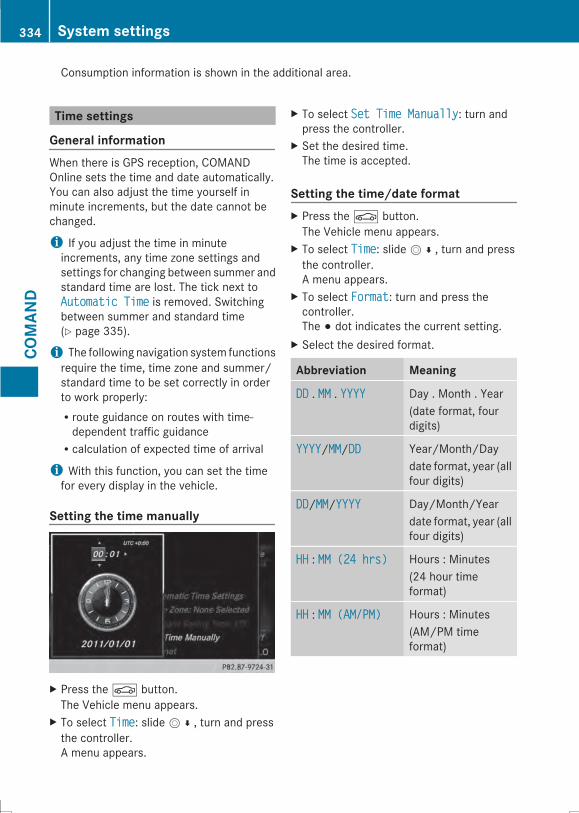
Consumption information is shown in the additional area.
Time settings
General informationWhen there is GPS reception, COMANDOnline sets the time and date automatically.You can also adjust the time yourself inminute increments, but the date cannot bechanged.
i If you adjust the time in minuteincrements, any time zone settings andsettings for changing between summer andstandard time are lost. The tick next toAutomatic TimeAutomatic Time is removed. Switchingbetween summer and standard time(Y page 335).
i The following navigation system functionsrequire the time, time zone and summer/standard time to be set correctly in orderto work properly:Rroute guidance on routes with time-dependent traffic guidanceRcalculation of expected time of arrival
i With this function, you can set the timefor every display in the vehicle.
Setting the time manually
X Press theØ button.The Vehicle menu appears.
X To select TimeTime: slideV¬, turn and pressthe controller.A menu appears.
X To select Set Time ManuallySet Time Manually: turn andpress the controller.
X Set the desired time.The time is accepted.
Setting the time/date formatX Press theØ button.The Vehicle menu appears.
X To select TimeTime: slideV¬, turn and pressthe controller.A menu appears.
X To select FormatFormat: turn and press thecontroller.The # dot indicates the current setting.
X Select the desired format.
Abbreviation Meaning
DDDD . MMMM . YYYYYYYY Day . Month . Year(date format, fourdigits)
YYYYYYYY/MMMM/DDDD Year/Month/Daydate format, year (allfour digits)
DDDD/MMMM/YYYYYYYY Day/Month/Yeardate format, year (allfour digits)
HHHH : MM (24 hrs)MM (24 hrs) Hours : Minutes(24 hour timeformat)
HHHH : MM (AM/PM)MM (AM/PM) Hours : Minutes(AM/PM timeformat)
334 System settingsCO
MAN
D
Adjusting the time zone and switchingto Daylight Savings Time (Summer)X Press theØ button.The Vehicle menu appears.
X To select TimeTime: slideV¬, turn and pressthe controller.A menu appears.
X To select Time ZoneTime Zone: turn and press thecontroller.A list of countries or time zones appears.The # dot indicates the current setting.
X Select a country or a time zone.A time zone list may also be displayed,depending on the country selected.
X Select the desired time zone.The entry for the Automatic TimeAutomatic Time isaccepted.
To activate/deactivate automatic time:X Press theØ button.X To select TimeTime: slideV¬, turn and pressthe controller.A menu appears.
X To select Automatic TimeAutomatic Time: press thecontroller.Checking the box switches the function onO or off ª.To switch on: the menu item is switchedon as the default setting. If AutomaticAutomaticTimeTime is reactivated, the previous settingsfor time zone and summer time changeoverare selected.To switch off: the time zone is deselectedand the summer time is switched off. IfAutomaticAutomatic is set for the summer timechangeover, a prompt will appear askingwhether this should be maintained.
X To select YesYes or NoNo: turn the controller andpress to confirm.If you select YesYes, the settings will not bechanged.If you select NoNo, the settings will beswitched OffOff.i You can set the time manually usingFormatFormat and Set Time ManuallySet Time Manually.
Subsequent operation depends on whetherthe navigation system has GPS reception andwhether the changeover function to summertime is available.To switch manually:X To select OnOn or OffOff: turn and press thecontroller.The # dot indicates the current setting.
To switch automatically:X Select AutomaticAutomatic.The entry for the Automatic TimeAutomatic Time isaccepted.
Text reader settingsX Press theØ button.The Vehicle menu appears.
X To select System SettingsSystem Settings: slideV¬,turn and press the controller.A menu appears.
X To select Text Reader SpeedText Reader Speed: turn thecontroller and press to confirm.A list appears.
X Select FastFast, MediumMedium or SlowSlow.The # dot indicates the current setting.
Voice Control System settings
Opening/closing the help windowThe help window provides information inaddition to the audible instructions duringindividualization and during the subsequentvoice control.X Press theØ button.The Vehicle menu appears.
X To select System SettingsSystem Settings: slideV¬,turn and press the controller.A menu appears.
X To select Voice ControlVoice Control: turn thecontroller and press to confirm.
System settings 335
COMAN
D
Z
X Select Help WindowHelp Window.You have switched the help window onO or off ª.
IndividualizationUsing individualization, you can fine-tune theVoice Control System to your own voice andthus improve voice recognition. See theseparate operating instructions.
WLAN
OverviewConditions:To establish a WLAN connection betweenCOMAND Online and a WLAN-enableddevice, such as a tablet computer orsmartphone:RWLAN must be activated at COMAND andat the device to be connected.
To use COMAND Online as a WLAN hotspot:RCOMAND Online must be connected to anInternet-enabled mobile phone viaBluetooth® or USB.RThe Internet access data for the mobilephone network provider must be selectedor set for COMAND Online.RThere must be an Internet connection toCOMAND Online.
Activating WLAN
X To select VehicleVehicle in the main function bar:turn the controller and press to confirm.
X To switch to the menu bar: slideV¬ thecontroller.
X Select System SettingsSystem Settings.The system settings menu is shown.
X Select WiFiWiFi.The WLAN menu appears.
X Select ActivateActivate.X Press the controller.Switch the connection on O or off ª,depending on the previous setting.
Connecting the device
General notesi The exact WLAN connection proceduremay vary depending on the device to beconnected. Follow the instructions that areshown in the display. Further informationcan be found on the operating instructionsfor the device you wish to connect.
Connecting the device via WPS pin
Prerequisite:For this type of connection, the device to beconnected must support a connection viaWPS pin.X To select VehicleVehicle in the main function bar:turn the controller and press to confirm.
X To switch to the menu bar: slideV¬ thecontroller.
X Select System SettingsSystem Settings.The system settings menu is shown.
336 System settingsCO
MAN
D
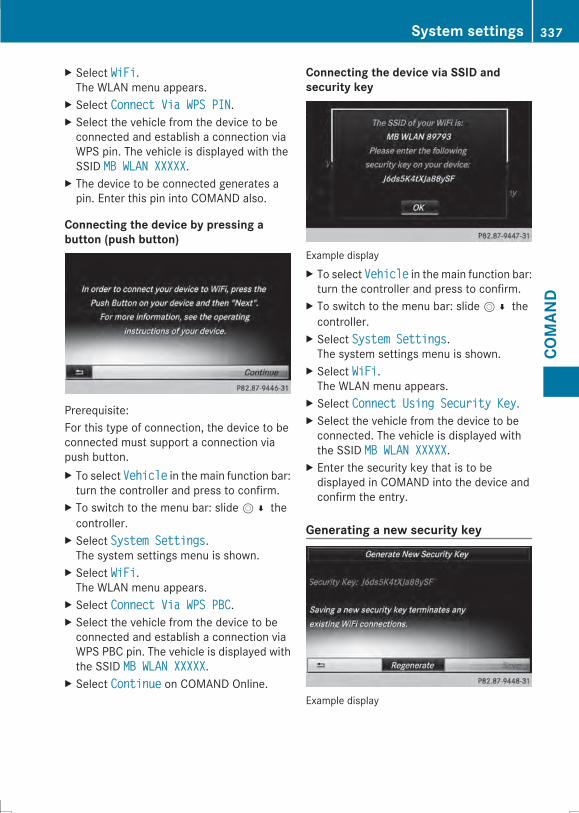
X Select WiFiWiFi.The WLAN menu appears.
X Select Connect Via WPS PINConnect Via WPS PIN.X Select the vehicle from the device to beconnected and establish a connection viaWPS pin. The vehicle is displayed with theSSID MB WLAN XXXXXMB WLAN XXXXX.
X The device to be connected generates apin. Enter this pin into COMAND also.
Connecting the device by pressing abutton (push button)
Prerequisite:For this type of connection, the device to beconnected must support a connection viapush button.X To select VehicleVehicle in the main function bar:turn the controller and press to confirm.
X To switch to the menu bar: slideV¬ thecontroller.
X Select System SettingsSystem Settings.The system settings menu is shown.
X Select WiFiWiFi.The WLAN menu appears.
X Select Connect Via WPS PBCConnect Via WPS PBC.X Select the vehicle from the device to beconnected and establish a connection viaWPS PBC pin. The vehicle is displayed withthe SSID MB WLAN XXXXXMB WLAN XXXXX.
X Select ContinueContinue on COMAND Online.
Connecting the device via SSID andsecurity key
Example displayX To select VehicleVehicle in the main function bar:turn the controller and press to confirm.
X To switch to the menu bar: slideV¬ thecontroller.
X Select System SettingsSystem Settings.The system settings menu is shown.
X Select WiFiWiFi.The WLAN menu appears.
X Select Connect Using Security KeyConnect Using Security Key.X Select the vehicle from the device to beconnected. The vehicle is displayed withthe SSID MB WLAN XXXXXMB WLAN XXXXX.
X Enter the security key that is to bedisplayed in COMAND into the device andconfirm the entry.
Generating a new security key
Example display
System settings 337
COMAN
D
Z
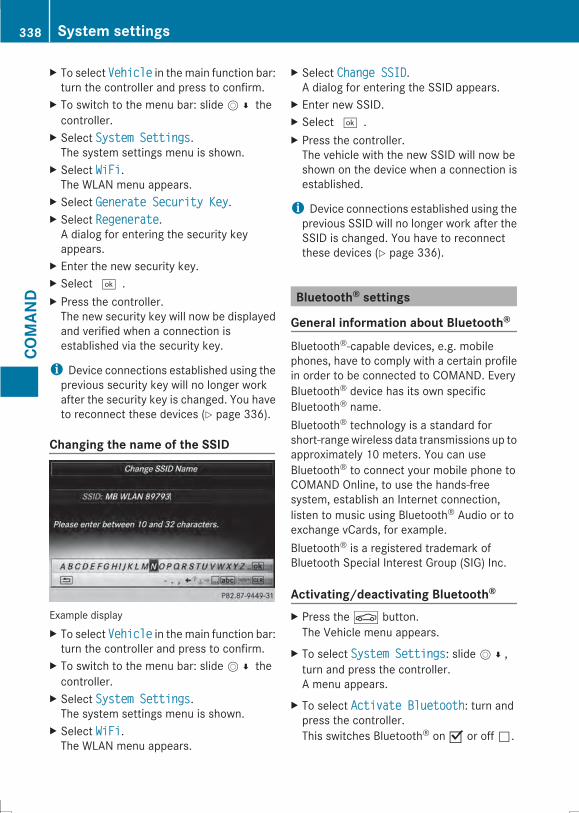
X To select VehicleVehicle in the main function bar:turn the controller and press to confirm.
X To switch to the menu bar: slideV¬ thecontroller.
X Select System SettingsSystem Settings.The system settings menu is shown.
X Select WiFiWiFi.The WLAN menu appears.
X Select Generate Security KeyGenerate Security Key.X Select RegenerateRegenerate.A dialog for entering the security keyappears.
X Enter the new security key.X Select ¬.X Press the controller.The new security key will now be displayedand verified when a connection isestablished via the security key.
i Device connections established using theprevious security key will no longer workafter the security key is changed. You haveto reconnect these devices (Y page 336).
Changing the name of the SSID
Example displayX To select VehicleVehicle in the main function bar:turn the controller and press to confirm.
X To switch to the menu bar: slideV¬ thecontroller.
X Select System SettingsSystem Settings.The system settings menu is shown.
X Select WiFiWiFi.The WLAN menu appears.
X Select Change SSIDChange SSID.A dialog for entering the SSID appears.
X Enter new SSID.X Select ¬.X Press the controller.The vehicle with the new SSID will now beshown on the device when a connection isestablished.
i Device connections established using theprevious SSID will no longer work after theSSID is changed. You have to reconnectthese devices (Y page 336).
Bluetooth® settings
General information about Bluetooth®
Bluetooth®-capable devices, e.g. mobilephones, have to comply with a certain profilein order to be connected to COMAND. EveryBluetooth® device has its own specificBluetooth® name.Bluetooth® technology is a standard forshort-rangewireless data transmissions up toapproximately 10 meters. You can useBluetooth® to connect your mobile phone toCOMAND Online, to use the hands-freesystem, establish an Internet connection,listen to music using Bluetooth® Audio or toexchange vCards, for example.Bluetooth® is a registered trademark ofBluetooth Special Interest Group (SIG) Inc.
Activating/deactivating Bluetooth®
X Press theØ button.The Vehicle menu appears.
X To select System SettingsSystem Settings: slideV¬,turn and press the controller.A menu appears.
X To select Activate BluetoothActivate Bluetooth: turn andpress the controller.This switches Bluetooth® on O or off ª.
338 System settingsCO
MAN
D
Setting the system languageThis function allows you to determine thelanguage for the menu displays and thenavigation messages. The selected languageaffects the characters available for entry.
i The navigation announcements are notavailable in all languages. If a language isnot available, the navigationannouncements will be in English.
i When you set the system language, thelanguage of the Voice Control System willchange accordingly. If the selectedlanguage is not supported by the VoiceControl System, English will be selected.
X Press theØ button.The Vehicle menu appears.
X To select System SettingsSystem Settings: slideV¬,turn and press the controller.A menu appears.
X To select LanguageLanguage: turn and press thecontroller.The list of languages appears. The # dotindicates the current setting.
X Select the desired language.COMAND loads the selected language andsets it.
Assigning a favorites buttonX Press theØ button.The system menu appears.
X To select System SettingsSystem Settings: slideV¬and press the controller.A menu appears.
X To select Favorite FunctionsFavorite Functions: turn andpress the controller.A menu appears.
X To select Assign FunctionAssign Function: press thecontroller.The list of predefined functions appears.
X To select the desired function, e.g.EntertainmentEntertainment: turn and press thecontroller.A menu appears.
X Select the desired function, e.g. PlayPlayMore Like ThisMore Like This.A menu with the prompt Please selectPlease selecta favorites button:a favorites button: appears.
X To select the desired button, e.g.m:turn and press the controller.A message appears stating that the buttonhas been assigned the selected function.i A message appears for certain functions,e.g. Assign station or media sourceAssign station or media source.This explains how you can save the desiredstation directly using the favorites functionmenu in three steps.
i If you are in the favorite functions menu,you can assign a desired favorites buttonby pressing and holding the relevantnumber key, e.g.s, on the telephonekeypad (Y page 321) until you hear a tone.
Overview of all current favorites:X Press theØ button.The system menu appears.
X To select System SettingsSystem Settings: slideV¬and press the controller.A menu appears.
X To select Favorite FunctionsFavorite Functions: turn andpress the controller.A menu appears.
X Select Overview of all currentOverview of all currentfavoritesfavorites.An overview of all the current favoritesappears.
To change the alias:X Press theØ button.The system menu appears.
X To select System SettingsSystem Settings: slideV¬and press the controller.A menu appears.
System settings 339
COMAN
D
Z
X To select Favorite FunctionsFavorite Functions: turn andpress the controller.A menu appears.
X Select Change AliasChange Alias.A menu with the prompt Please selectPlease selecta favorites button:a favorites button: appears.
X Select the desired favorites, e.g.n.X Enter the desired alias and selectb.The alias is changed.i Up to six characters are available for thealias. An entry with fewer characters is alsopossible.
To call up a favorite:X Press theg button.You call up the favorites functions menu.Theg symbol lights up.
X Press a favorites button, e.g.n.This calls up the predefined function.
X To exit the favorites function menu:press theg button.The favorite functions menu is closed.i If you have pressed theg button anddo not press any other buttons, thefavorites functions menu is exitedautomatically after 16 seconds.
To reset favorite(s):X Press theØ button.The system menu appears.
X To select System SettingsSystem Settings: slideV¬and press the controller.A menu appears.
X To select Favorite FunctionsFavorite Functions: turn andpress the controller.A menu appears.
X Select Reset Favorite(s)Reset Favorite(s).A menu with the prompt Please selectPlease selecta favorites button:a favorites button: appears.
X Select the desired favorites, e.g.p orReset AllReset All.A prompt appears asking whether you wishto reset.
X Select YesYes or NoNo.If you select YesYes, the favorite is reset to itspre-installed favorite function.If you select NoNo, the process will becanceled.
You can select the following predefinedfunctions in a menu, for example:
ROff - Spoken DrivingOff - Spoken DrivingRecommendations On/OffRecommendations On/Off: you canswitch the current drivingrecommendations on/off.RSound - Sound MenuSound - Sound Menu: you can call up thesound settings.RApps - Mercedes-Benz AppsApps - Mercedes-Benz Apps: you cancall up the apps for online and Internetfunctions.
i You can also assign the favorites buttondirectly from a relevant function, such as inthe address book (Y page 439) or from theradio menu (Y page 462).
Importing/exporting data
General notes! Never remove the stick or card whenwriting data to the USB stick or thememorycard. You may otherwise lose data.
Using this function, you can:Rtransfer your personal COMAND Onlinedata from one system/vehicle to another.Rmake a backup copy of your personal data(export data) and load it again (importdata).Rprotect your data from unwanted export byactivating a pin prompt (presetting:deactivated ª).
You can either use an SD memory card or aUSB storage device (e.g. a USB stick) astemporary storage.
340 System settingsCO
MAN
D
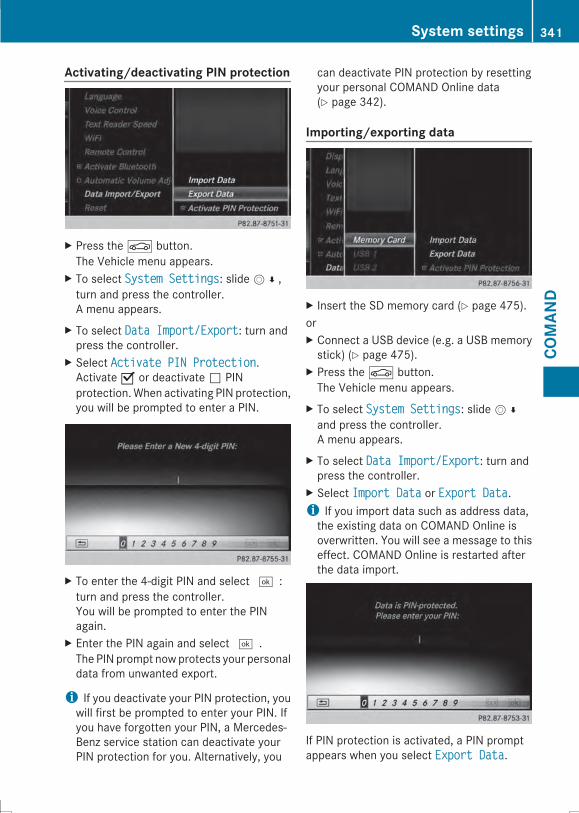
Activating/deactivating PIN protection
X Press theØ button.The Vehicle menu appears.
X To select System SettingsSystem Settings: slideV¬,turn and press the controller.A menu appears.
X To select Data Import/ExportData Import/Export: turn andpress the controller.
X Select Activate PIN ProtectionActivate PIN Protection.Activate O or deactivate ª PINprotection.When activating PIN protection,you will be prompted to enter a PIN.
X To enter the 4-digit PIN and select ¬:turn and press the controller.You will be prompted to enter the PINagain.
X Enter the PIN again and select ¬.The PIN prompt nowprotects your personaldata from unwanted export.
i If you deactivate your PIN protection, youwill first be prompted to enter your PIN. Ifyou have forgotten your PIN, a Mercedes-Benz service station can deactivate yourPIN protection for you. Alternatively, you
can deactivate PIN protection by resettingyour personal COMAND Online data(Y page 342).
Importing/exporting data
X Insert the SD memory card (Y page 475).orX Connect a USB device (e.g. a USB memorystick) (Y page 475).
X Press theØ button.The Vehicle menu appears.
X To select System SettingsSystem Settings: slideV¬and press the controller.A menu appears.
X To select Data Import/ExportData Import/Export: turn andpress the controller.
X Select Import DataImport Data or Export DataExport Data.i If you import data such as address data,the existing data on COMAND Online isoverwritten. You will see a message to thiseffect. COMAND Online is restarted afterthe data import.
If PIN protection is activated, a PIN promptappears when you select Export DataExport Data.
System settings 341
COMAN
D
Z

X To enter the PIN: turn the controller andpress ¬.You can now proceed in the same way as ifPIN protection was not activated.
X To select a preset: select Memory CardMemory Card,USB 1USB 1 or USB 2USB 2.This function exports all the data to theselected disc.A window appears with the message thatthe data has been exported.
i You can export address data, bookmarks,system settings that you have made andradio station lists, for example.Personal music files in the MUSICREGISTER cannot be saved and importedagain using this function.Mercedes-Benz is not liable for any loss ofdata.
Reset functionYou can completely reset COMAND Online tothe factory settings. Amongst other things,this will delete all personal COMAND data.This includes the station presets, entries inthe destination memory and in the list ofprevious destinations in the navigationsystem and address book entries. In addition,an activated PIN protection, which you haveused to protect your data against unwantedexport, will be deactivated. Resetting isrecommended before selling or transferringownership of your vehicle, for example.Data on the internal hard drive, e.g. musicfiles in the MEDIA REGISTER, will be deleted.You can also delete music files from theMEDIA REGISTER using the "Delete all mediafiles" function (Y page 486).Mercedes-Benz is not liable for any loss ofdata.X Press theØ button.The Vehicle menu appears.
X To select System SettingsSystem Settings: slideV¬,turn and press the controller.A menu appears.
X To select ResetReset: turn the controller andpress to confirm.A prompt appears asking whether you wishto reset.
X Select YesYes or NoNo.If you select NoNo, the process will becanceled.If you select YesYes, a promptwill appear againasking whether you really wish to reset.
X Select YesYes or NoNo.If you select YesYes, a message will be shown.COMAND Online is reset to the factorysettings and restarted.If you select NoNo, the process will becanceled.
Vehicle functions
Your COMAND equipmentThese operating instructions describe allstandard and optional equipment availablefor your COMAND system at the time ofpurchase. Country-specific differences arepossible. Please note that yourCOMAND system may not be equipped withall the features described. This also applies tosafety-relevant systems and functions.Therefore, the equipment on your COMANDsystem may differ from that in thedescriptions and illustrations. Should youhave any questions concerning equipmentand operation, please consult an authorizedMercedes-Benz Center.
342 Vehicle functionsCO
MAN
D
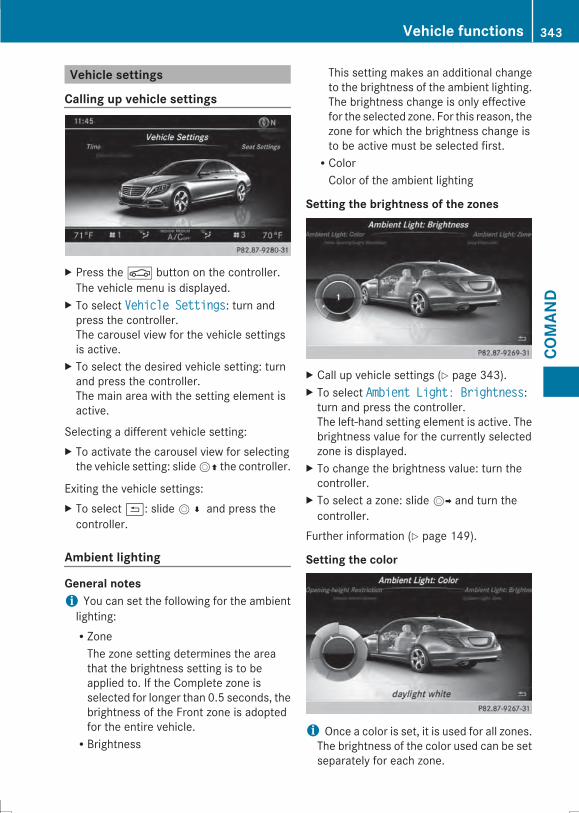
Vehicle settings
Calling up vehicle settings
X Press theØ button on the controller.The vehicle menu is displayed.
X To select Vehicle SettingsVehicle Settings: turn andpress the controller.The carousel view for the vehicle settingsis active.
X To select the desired vehicle setting: turnand press the controller.The main area with the setting element isactive.
Selecting a different vehicle setting:X To activate the carousel view for selectingthe vehicle setting: slideVZ the controller.
Exiting the vehicle settings:X To select&: slideV¬ and press thecontroller.
Ambient lighting
General notesi You can set the following for the ambientlighting:RZoneThe zone setting determines the areathat the brightness setting is to beapplied to. If the Complete zone isselected for longer than 0.5 seconds, thebrightness of the Front zone is adoptedfor the entire vehicle.RBrightness
This setting makes an additional changeto the brightness of the ambient lighting.The brightness change is only effectivefor the selected zone. For this reason, thezone for which the brightness change isto be active must be selected first.RColorColor of the ambient lighting
Setting the brightness of the zones
X Call up vehicle settings (Y page 343).X To select Ambient Light: BrightnessAmbient Light: Brightness:turn and press the controller.The left-hand setting element is active. Thebrightness value for the currently selectedzone is displayed.
X To change the brightness value: turn thecontroller.
X To select a zone: slideVY and turn thecontroller.
Further information (Y page 149).
Setting the color
i Once a color is set, it is used for all zones.The brightness of the color used can be setseparately for each zone.
Vehicle functions 343
COMAN
D
Z
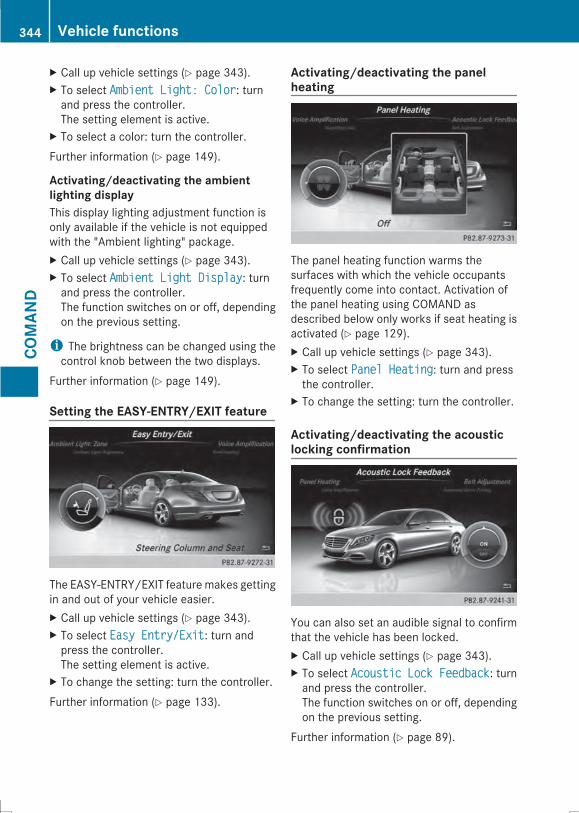
X Call up vehicle settings (Y page 343).X To select Ambient Light: ColorAmbient Light: Color: turnand press the controller.The setting element is active.
X To select a color: turn the controller.Further information (Y page 149).
Activating/deactivating the ambientlighting displayThis display lighting adjustment function isonly available if the vehicle is not equippedwith the "Ambient lighting" package.X Call up vehicle settings (Y page 343).X To select Ambient Light DisplayAmbient Light Display: turnand press the controller.The function switches on or off, dependingon the previous setting.
i The brightness can be changed using thecontrol knob between the two displays.
Further information (Y page 149).
Setting the EASY-ENTRY/EXIT feature
The EASY-ENTRY/EXIT feature makes gettingin and out of your vehicle easier.X Call up vehicle settings (Y page 343).X To select Easy Entry/ExitEasy Entry/Exit: turn andpress the controller.The setting element is active.
X To change the setting: turn the controller.Further information (Y page 133).
Activating/deactivating the panelheating
The panel heating function warms thesurfaces with which the vehicle occupantsfrequently come into contact. Activation ofthe panel heating using COMAND asdescribed below only works if seat heating isactivated (Y page 129).X Call up vehicle settings (Y page 343).X To select Panel HeatingPanel Heating: turn and pressthe controller.
X To change the setting: turn the controller.
Activating/deactivating the acousticlocking confirmation
You can also set an audible signal to confirmthat the vehicle has been locked.X Call up vehicle settings (Y page 343).X To select Acoustic Lock FeedbackAcoustic Lock Feedback: turnand press the controller.The function switches on or off, dependingon the previous setting.
Further information (Y page 89).
344 Vehicle functionsCO
MAN
D
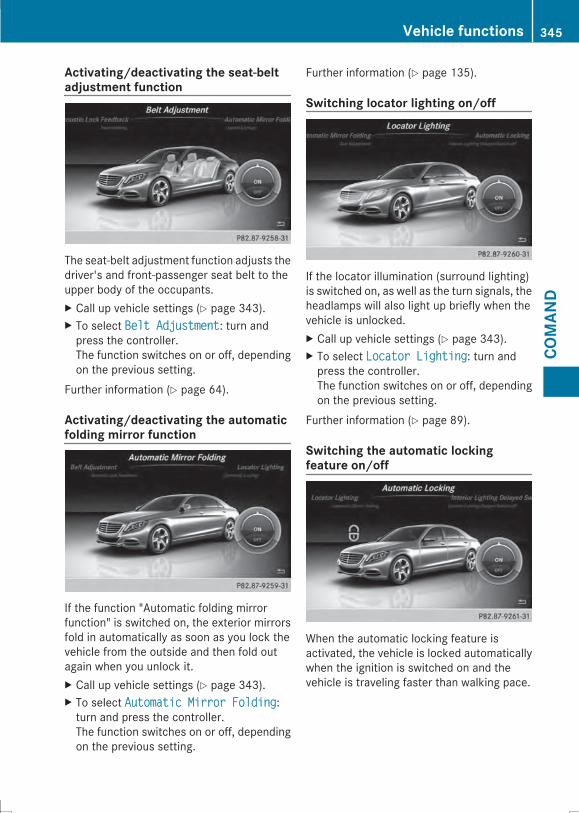
Activating/deactivating the seat-beltadjustment function
The seat-belt adjustment function adjusts thedriver's and front-passenger seat belt to theupper body of the occupants.X Call up vehicle settings (Y page 343).X To select Belt AdjustmentBelt Adjustment: turn andpress the controller.The function switches on or off, dependingon the previous setting.
Further information (Y page 64).
Activating/deactivating the automaticfolding mirror function
If the function "Automatic folding mirrorfunction" is switched on, the exterior mirrorsfold in automatically as soon as you lock thevehicle from the outside and then fold outagain when you unlock it.X Call up vehicle settings (Y page 343).X To select Automatic Mirror FoldingAutomatic Mirror Folding:turn and press the controller.The function switches on or off, dependingon the previous setting.
Further information (Y page 135).
Switching locator lighting on/off
If the locator illumination (surround lighting)is switched on, as well as the turn signals, theheadlamps will also light up briefly when thevehicle is unlocked.X Call up vehicle settings (Y page 343).X To select Locator LightingLocator Lighting: turn andpress the controller.The function switches on or off, dependingon the previous setting.
Further information (Y page 89).
Switching the automatic lockingfeature on/off
When the automatic locking feature isactivated, the vehicle is locked automaticallywhen the ignition is switched on and thevehicle is traveling faster than walking pace.
Vehicle functions 345
COMAN
D
Z
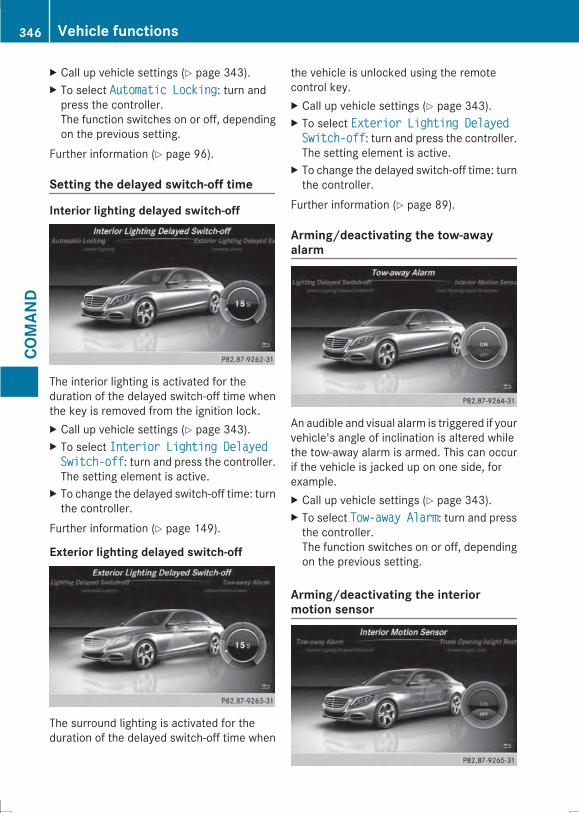
X Call up vehicle settings (Y page 343).X To select Automatic LockingAutomatic Locking: turn andpress the controller.The function switches on or off, dependingon the previous setting.
Further information (Y page 96).
Setting the delayed switch-off time
Interior lighting delayed switch-off
The interior lighting is activated for theduration of the delayed switch-off time whenthe key is removed from the ignition lock.X Call up vehicle settings (Y page 343).X To select Interior Lighting DelayedInterior Lighting DelayedSwitch-offSwitch-off: turn and press the controller.The setting element is active.
X To change the delayed switch-off time: turnthe controller.
Further information (Y page 149).
Exterior lighting delayed switch-off
The surround lighting is activated for theduration of the delayed switch-off time when
the vehicle is unlocked using the remotecontrol key.X Call up vehicle settings (Y page 343).X To select Exterior Lighting DelayedExterior Lighting DelayedSwitch-offSwitch-off: turn and press the controller.The setting element is active.
X To change the delayed switch-off time: turnthe controller.
Further information (Y page 89).
Arming/deactivating the tow-awayalarm
An audible and visual alarm is triggered if yourvehicle's angle of inclination is altered whilethe tow-away alarm is armed. This can occurif the vehicle is jacked up on one side, forexample.X Call up vehicle settings (Y page 343).X To select Tow-away AlarmTow-away Alarm: turn and pressthe controller.The function switches on or off, dependingon the previous setting.
Arming/deactivating the interiormotion sensor
346 Vehicle functionsCO
MAN
D
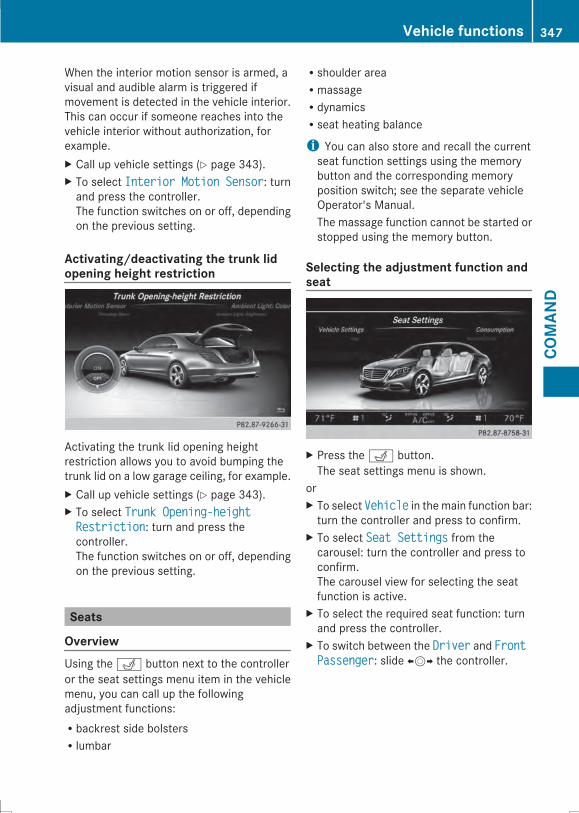
When the interior motion sensor is armed, avisual and audible alarm is triggered ifmovement is detected in the vehicle interior.This can occur if someone reaches into thevehicle interior without authorization, forexample.X Call up vehicle settings (Y page 343).X To select Interior Motion SensorInterior Motion Sensor: turnand press the controller.The function switches on or off, dependingon the previous setting.
Activating/deactivating the trunk lidopening height restriction
Activating the trunk lid opening heightrestriction allows you to avoid bumping thetrunk lid on a low garage ceiling, for example.X Call up vehicle settings (Y page 343).X To select Trunk Opening-heightTrunk Opening-heightRestrictionRestriction: turn and press thecontroller.The function switches on or off, dependingon the previous setting.
Seats
OverviewUsing theT button next to the controlleror the seat settings menu item in the vehiclemenu, you can call up the followingadjustment functions:Rbackrest side bolstersRlumbar
Rshoulder areaRmassageRdynamicsRseat heating balance
i You can also store and recall the currentseat function settings using the memorybutton and the corresponding memoryposition switch; see the separate vehicleOperator's Manual.The massage function cannot be started orstopped using the memory button.
Selecting the adjustment function andseat
X Press theT button.The seat settings menu is shown.
orX To select VehicleVehicle in the main function bar:turn the controller and press to confirm.
X To select Seat SettingsSeat Settings from thecarousel: turn the controller and press toconfirm.The carousel view for selecting the seatfunction is active.
X To select the required seat function: turnand press the controller.
X To switch between the DriverDriver and FrontFrontPassengerPassenger: slide XVY the controller.
Vehicle functions 347
COMAN
D
Z
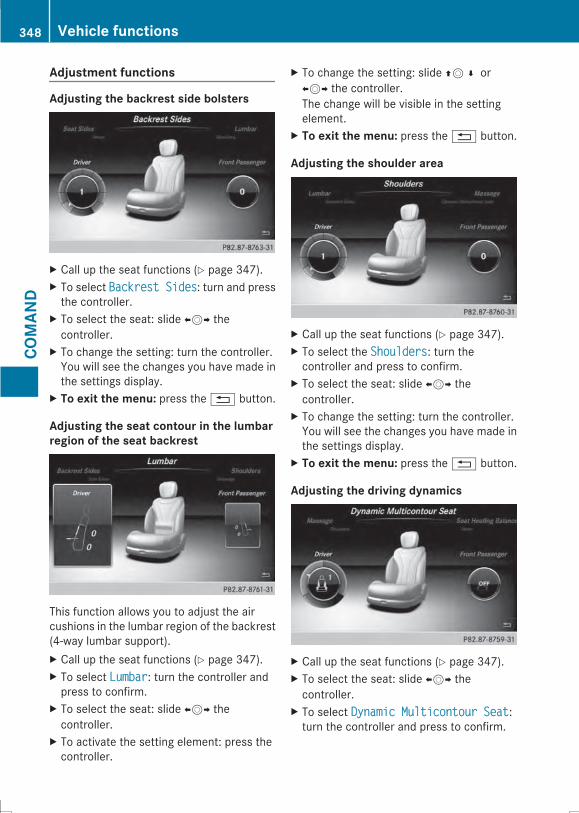
Adjustment functions
Adjusting the backrest side bolsters
X Call up the seat functions (Y page 347).X To select Backrest SidesBackrest Sides: turn and pressthe controller.
X To select the seat: slide XVY thecontroller.
X To change the setting: turn the controller.You will see the changes you have made inthe settings display.
X To exit the menu: press the% button.
Adjusting the seat contour in the lumbarregion of the seat backrest
This function allows you to adjust the aircushions in the lumbar region of the backrest(4-way lumbar support).X Call up the seat functions (Y page 347).X To select LumbarLumbar: turn the controller andpress to confirm.
X To select the seat: slide XVY thecontroller.
X To activate the setting element: press thecontroller.
X To change the setting: slide ZV¬ orXVY the controller.The change will be visible in the settingelement.
X To exit the menu: press the% button.
Adjusting the shoulder area
X Call up the seat functions (Y page 347).X To select the ShouldersShoulders: turn thecontroller and press to confirm.
X To select the seat: slide XVY thecontroller.
X To change the setting: turn the controller.You will see the changes you have made inthe settings display.
X To exit the menu: press the% button.
Adjusting the driving dynamics
X Call up the seat functions (Y page 347).X To select the seat: slide XVY thecontroller.
X To select Dynamic Multicontour SeatDynamic Multicontour Seat:turn the controller and press to confirm.
348 Vehicle functionsCO
MAN
D
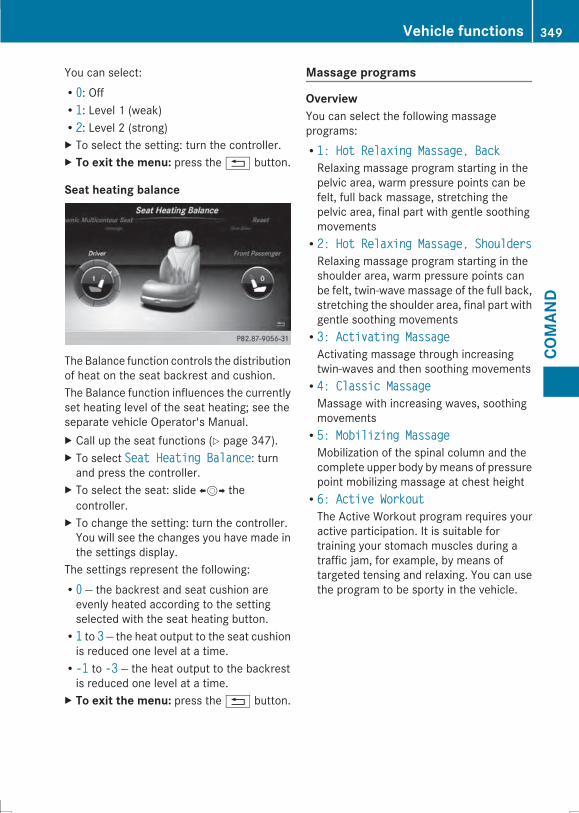
You can select:R00: OffR11: Level 1 (weak)R22: Level 2 (strong)X To select the setting: turn the controller.X To exit the menu: press the% button.
Seat heating balance
The Balance function controls the distributionof heat on the seat backrest and cushion.The Balance function influences the currentlyset heating level of the seat heating; see theseparate vehicle Operator's Manual.X Call up the seat functions (Y page 347).X To select Seat Heating BalanceSeat Heating Balance: turnand press the controller.
X To select the seat: slide XVY thecontroller.
X To change the setting: turn the controller.You will see the changes you have made inthe settings display.
The settings represent the following:R00 — the backrest and seat cushion areevenly heated according to the settingselected with the seat heating button.R11 to 33 — the heat output to the seat cushionis reduced one level at a time.R-1-1 to -3-3 — the heat output to the backrestis reduced one level at a time.
X To exit the menu: press the% button.
Massage programs
OverviewYou can select the following massageprograms:R1: Hot Relaxing Massage, Back1: Hot Relaxing Massage, BackRelaxing massage program starting in thepelvic area, warm pressure points can befelt, full back massage, stretching thepelvic area, final part with gentle soothingmovementsR2: Hot Relaxing Massage, Shoulders2: Hot Relaxing Massage, ShouldersRelaxing massage program starting in theshoulder area, warm pressure points canbe felt, twin-wave massage of the full back,stretching the shoulder area, final part withgentle soothing movementsR3: Activating Massage3: Activating MassageActivating massage through increasingtwin-waves and then soothing movementsR4: Classic Massage4: Classic MassageMassage with increasing waves, soothingmovementsR5: Mobilizing Massage5: Mobilizing MassageMobilization of the spinal column and thecomplete upper body bymeans of pressurepoint mobilizing massage at chest heightR6: Active Workout6: Active WorkoutThe Active Workout program requires youractive participation. It is suitable fortraining your stomach muscles during atraffic jam, for example, by means oftargeted tensing and relaxing. You can usethe program to be sporty in the vehicle.
Vehicle functions 349
COMAN
D
Z
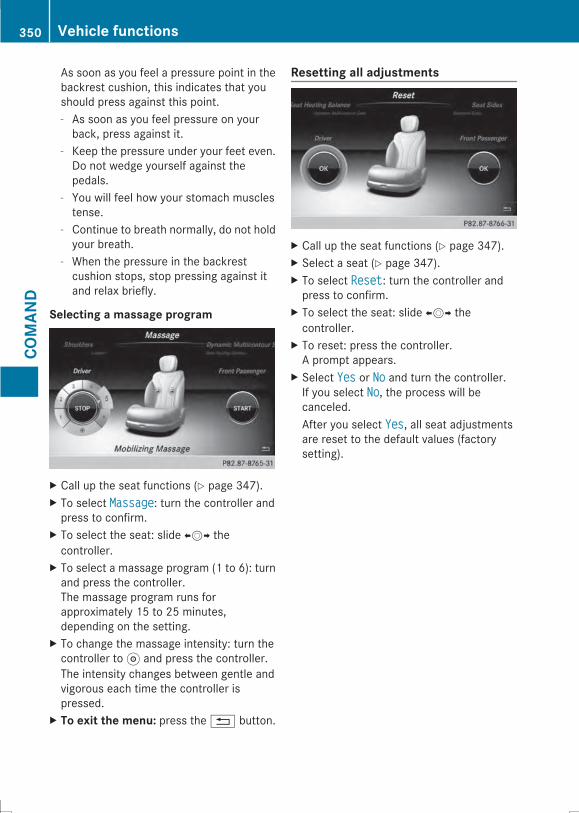
As soon as you feel a pressure point in thebackrest cushion, this indicates that youshould press against this point.- As soon as you feel pressure on yourback, press against it.
- Keep the pressure under your feet even.Do not wedge yourself against thepedals.
- You will feel how your stomach musclestense.
- Continue to breath normally, do not holdyour breath.
- When the pressure in the backrestcushion stops, stop pressing against itand relax briefly.
Selecting a massage program
X Call up the seat functions (Y page 347).X To select MassageMassage: turn the controller andpress to confirm.
X To select the seat: slide XVY thecontroller.
X To select a massage program (1 to 6): turnand press the controller.The massage program runs forapproximately 15 to 25 minutes,depending on the setting.
X To change the massage intensity: turn thecontroller to ? and press the controller.The intensity changes between gentle andvigorous each time the controller ispressed.
X To exit the menu: press the% button.
Resetting all adjustments
X Call up the seat functions (Y page 347).X Select a seat (Y page 347).X To select ResetReset: turn the controller andpress to confirm.
X To select the seat: slide XVY thecontroller.
X To reset: press the controller.A prompt appears.
X Select YesYes or NoNo and turn the controller.If you select NoNo, the process will becanceled.After you select YesYes, all seat adjustmentsare reset to the default values (factorysetting).
350 Vehicle functionsCO
MAN
D
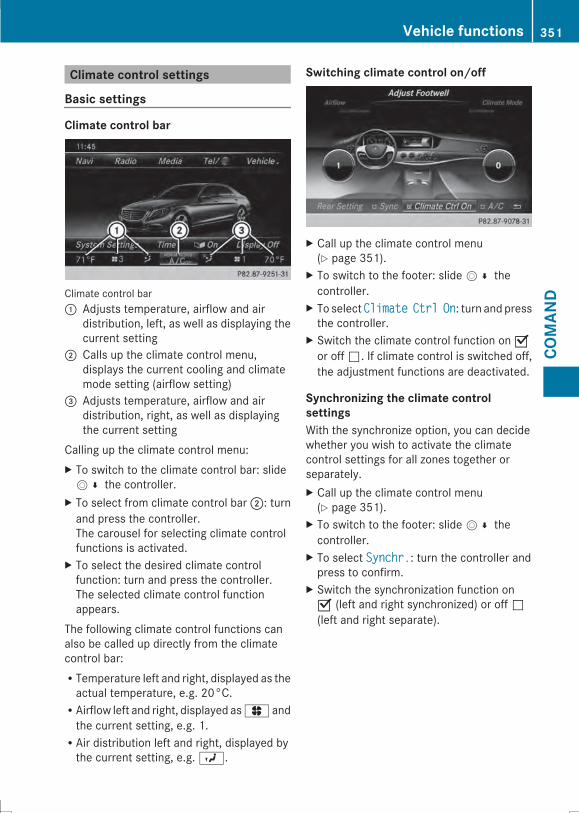
Climate control settings
Basic settings
Climate control bar
Climate control bar: Adjusts temperature, airflow and air
distribution, left, as well as displaying thecurrent setting
; Calls up the climate control menu,displays the current cooling and climatemode setting (airflow setting)
= Adjusts temperature, airflow and airdistribution, right, as well as displayingthe current setting
Calling up the climate control menu:X To switch to the climate control bar: slideV¬ the controller.
X To select from climate control bar;: turnand press the controller.The carousel for selecting climate controlfunctions is activated.
X To select the desired climate controlfunction: turn and press the controller.The selected climate control functionappears.
The following climate control functions canalso be called up directly from the climatecontrol bar:RTemperature left and right, displayed as theactual temperature, e.g. 20°C.RAirflow left and right, displayed asJ andthe current setting, e.g. 1.RAir distribution left and right, displayed bythe current setting, e.g.O.
Switching climate control on/off
X Call up the climate control menu(Y page 351).
X To switch to the footer: slideV¬ thecontroller.
X To selectClimateClimate CtrlCtrl OnOn: turn and pressthe controller.
X Switch the climate control function on Oor off ª. If climate control is switched off,the adjustment functions are deactivated.
Synchronizing the climate controlsettingsWith the synchronize option, you can decidewhether you wish to activate the climatecontrol settings for all zones together orseparately.X Call up the climate control menu(Y page 351).
X To switch to the footer: slideV¬ thecontroller.
X To select Synchr.Synchr.: turn the controller andpress to confirm.
X Switch the synchronization function onO (left and right synchronized) or off ª(left and right separate).
Vehicle functions 351
COMAN
D
Z
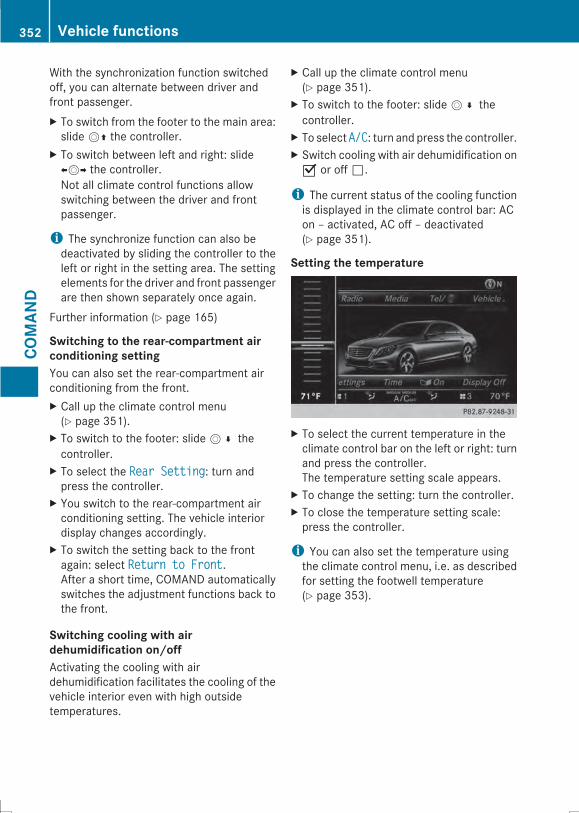
With the synchronization function switchedoff, you can alternate between driver andfront passenger.X To switch from the footer to the main area:slideVZ the controller.
X To switch between left and right: slideXVY the controller.Not all climate control functions allowswitching between the driver and frontpassenger.
i The synchronize function can also bedeactivated by sliding the controller to theleft or right in the setting area. The settingelements for the driver and front passengerare then shown separately once again.
Further information (Y page 165)
Switching to the rear-compartment airconditioning settingYou can also set the rear-compartment airconditioning from the front.X Call up the climate control menu(Y page 351).
X To switch to the footer: slideV¬ thecontroller.
X To select the Rear SettingRear Setting: turn andpress the controller.
X You switch to the rear-compartment airconditioning setting. The vehicle interiordisplay changes accordingly.
X To switch the setting back to the frontagain: select Return to FrontReturn to Front.After a short time, COMAND automaticallyswitches the adjustment functions back tothe front.
Switching cooling with airdehumidification on/offActivating the cooling with airdehumidification facilitates the cooling of thevehicle interior even with high outsidetemperatures.
X Call up the climate control menu(Y page 351).
X To switch to the footer: slideV¬ thecontroller.
X To select A/CA/C: turn and press the controller.X Switch cooling with air dehumidification on
O or off ª.
i The current status of the cooling functionis displayed in the climate control bar: ACon – activated, AC off – deactivated(Y page 351).
Setting the temperature
X To select the current temperature in theclimate control bar on the left or right: turnand press the controller.The temperature setting scale appears.
X To change the setting: turn the controller.X To close the temperature setting scale:press the controller.
i You can also set the temperature usingthe climate control menu, i.e. as describedfor setting the footwell temperature(Y page 353).
352 Vehicle functionsCO
MAN
D
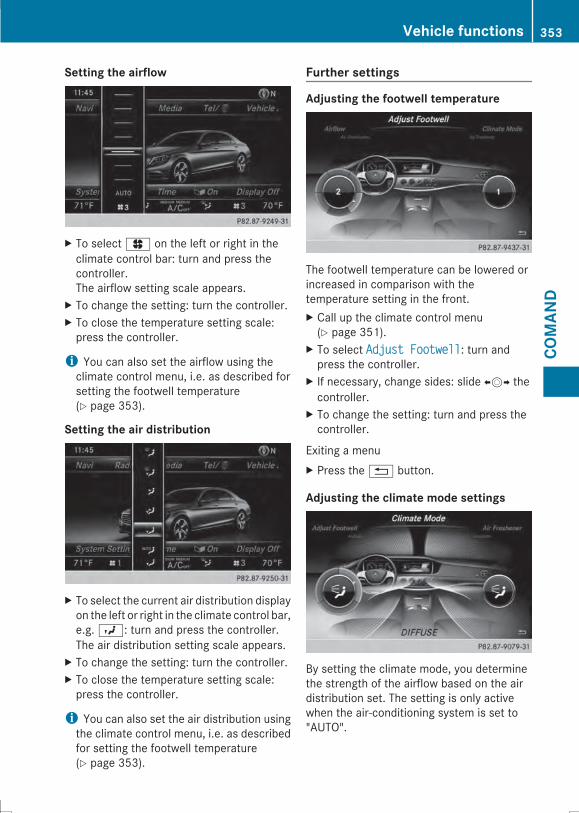
Setting the airflow
X To selectJ on the left or right in theclimate control bar: turn and press thecontroller.The airflow setting scale appears.
X To change the setting: turn the controller.X To close the temperature setting scale:press the controller.
i You can also set the airflow using theclimate control menu, i.e. as described forsetting the footwell temperature(Y page 353).
Setting the air distribution
X To select the current air distribution displayon the left or right in the climate control bar,e.g.O: turn and press the controller.The air distribution setting scale appears.
X To change the setting: turn the controller.X To close the temperature setting scale:press the controller.
i You can also set the air distribution usingthe climate control menu, i.e. as describedfor setting the footwell temperature(Y page 353).
Further settings
Adjusting the footwell temperature
The footwell temperature can be lowered orincreased in comparison with thetemperature setting in the front.X Call up the climate control menu(Y page 351).
X To select Adjust FootwellAdjust Footwell: turn andpress the controller.
X If necessary, change sides: slide XVY thecontroller.
X To change the setting: turn and press thecontroller.
Exiting a menuX Press the% button.
Adjusting the climate mode settings
By setting the climate mode, you determinethe strength of the airflow based on the airdistribution set. The setting is only activewhen the air-conditioning system is set to"AUTO".
Vehicle functions 353
COMAN
D
Z
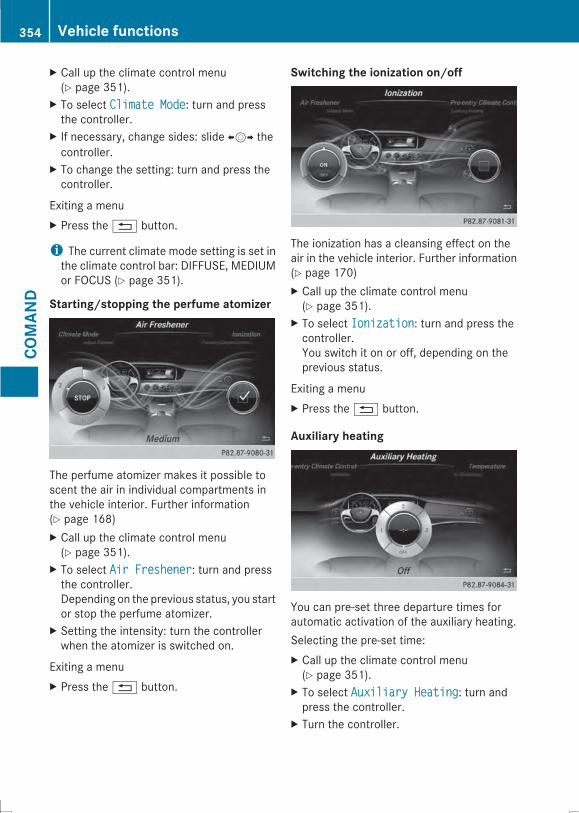
X Call up the climate control menu(Y page 351).
X To select Climate ModeClimate Mode: turn and pressthe controller.
X If necessary, change sides: slide XVY thecontroller.
X To change the setting: turn and press thecontroller.
Exiting a menuX Press the% button.
i The current climate mode setting is set inthe climate control bar: DIFFUSE, MEDIUMor FOCUS (Y page 351).
Starting/stopping the perfume atomizer
The perfume atomizer makes it possible toscent the air in individual compartments inthe vehicle interior. Further information(Y page 168)X Call up the climate control menu(Y page 351).
X To select Air FreshenerAir Freshener: turn and pressthe controller.Depending on the previous status, you startor stop the perfume atomizer.
X Setting the intensity: turn the controllerwhen the atomizer is switched on.
Exiting a menuX Press the% button.
Switching the ionization on/off
The ionization has a cleansing effect on theair in the vehicle interior. Further information(Y page 170)X Call up the climate control menu(Y page 351).
X To select IonizationIonization: turn and press thecontroller.You switch it on or off, depending on theprevious status.
Exiting a menuX Press the% button.
Auxiliary heating
You can pre-set three departure times forautomatic activation of the auxiliary heating.Selecting the pre-set time:X Call up the climate control menu(Y page 351).
X To select Auxiliary HeatingAuxiliary Heating: turn andpress the controller.
X Turn the controller.
354 Vehicle functionsCO
MAN
D
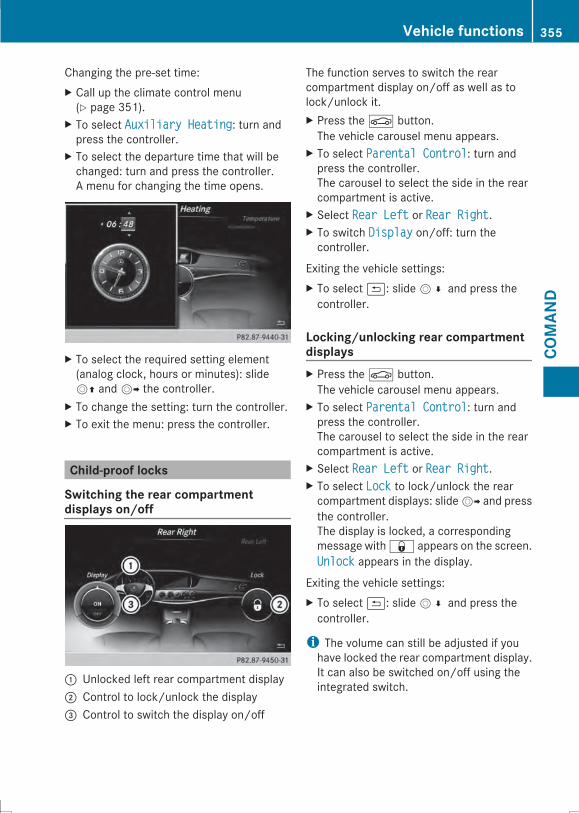
Changing the pre-set time:X Call up the climate control menu(Y page 351).
X To select Auxiliary HeatingAuxiliary Heating: turn andpress the controller.
X To select the departure time that will bechanged: turn and press the controller.A menu for changing the time opens.
X To select the required setting element(analog clock, hours or minutes): slideVZ andVY the controller.
X To change the setting: turn the controller.X To exit the menu: press the controller.
Child-proof locks
Switching the rear compartmentdisplays on/off
: Unlocked left rear compartment display; Control to lock/unlock the display= Control to switch the display on/off
The function serves to switch the rearcompartment display on/off as well as tolock/unlock it.X Press theØ button.The vehicle carousel menu appears.
X To select Parental ControlParental Control: turn andpress the controller.The carousel to select the side in the rearcompartment is active.
X Select Rear LeftRear Left or Rear RightRear Right.X To switch DisplayDisplay on/off: turn thecontroller.
Exiting the vehicle settings:X To select&: slideV¬ and press thecontroller.
Locking/unlocking rear compartmentdisplaysX Press theØ button.The vehicle carousel menu appears.
X To select Parental ControlParental Control: turn andpress the controller.The carousel to select the side in the rearcompartment is active.
X Select Rear LeftRear Left or Rear RightRear Right.X To select LockLock to lock/unlock the rearcompartment displays: slideVY and pressthe controller.The display is locked, a correspondingmessage with& appears on the screen.UnlockUnlock appears in the display.
Exiting the vehicle settings:X To select&: slideV¬ and press thecontroller.
i The volume can still be adjusted if youhave locked the rear compartment display.It can also be switched on/off using theintegrated switch.
Vehicle functions 355
COMAN
D
Z
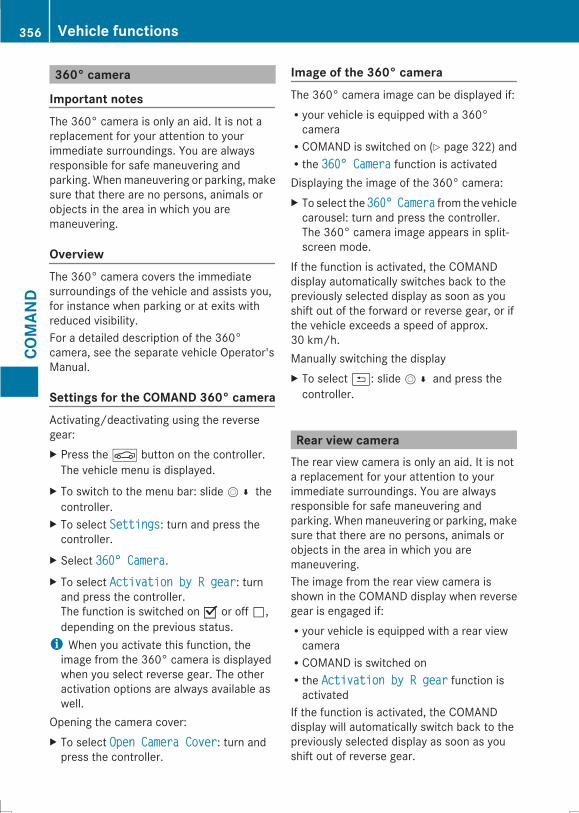
360° camera
Important notesThe 360° camera is only an aid. It is not areplacement for your attention to yourimmediate surroundings. You are alwaysresponsible for safe maneuvering andparking. Whenmaneuvering or parking, makesure that there are no persons, animals orobjects in the area in which you aremaneuvering.
OverviewThe 360° camera covers the immediatesurroundings of the vehicle and assists you,for instance when parking or at exits withreduced visibility.For a detailed description of the 360°camera, see the separate vehicle Operator'sManual.
Settings for the COMAND 360° cameraActivating/deactivating using the reversegear:X Press theØ button on the controller.The vehicle menu is displayed.
X To switch to the menu bar: slideV¬ thecontroller.
X To select SettingsSettings: turn and press thecontroller.
X Select 360° Camera360° Camera.X To select Activation by R gearActivation by R gear: turnand press the controller.The function is switched on O or off ª,depending on the previous status.i When you activate this function, theimage from the 360° camera is displayedwhen you select reverse gear. The otheractivation options are always available aswell.
Opening the camera cover:X To select Open Camera CoverOpen Camera Cover: turn andpress the controller.
Image of the 360° cameraThe 360° camera image can be displayed if:Ryour vehicle is equipped with a 360°cameraRCOMAND is switched on (Y page 322) andRthe 360° Camera360° Camera function is activatedDisplaying the image of the 360° camera:X To select the 360°360° CameraCamera from the vehiclecarousel: turn and press the controller.The 360° camera image appears in split-screen mode.
If the function is activated, the COMANDdisplay automatically switches back to thepreviously selected display as soon as youshift out of the forward or reverse gear, or ifthe vehicle exceeds a speed of approx.30 km/h.Manually switching the displayX To select&: slideV¬ and press thecontroller.
Rear view cameraThe rear view camera is only an aid. It is nota replacement for your attention to yourimmediate surroundings. You are alwaysresponsible for safe maneuvering andparking. Whenmaneuvering or parking, makesure that there are no persons, animals orobjects in the area in which you aremaneuvering.The image from the rear view camera isshown in the COMAND display when reversegear is engaged if:Ryour vehicle is equipped with a rear viewcameraRCOMAND is switched onRthe Activation by R gearActivation by R gear function isactivated
If the function is activated, the COMANDdisplay will automatically switch back to thepreviously selected display as soon as youshift out of reverse gear.
356 Vehicle functionsCO
MAN
D
i For further information on the rear viewcamera, see separate vehicle Operator'sManual.
X Switch on COMAND (Y page 322).X Press theØ button.The vehicle menu is displayed.
X SlideVÆ the controller.X To select System SettingsSystem Settings: turn andpress the controller.
X Select Rear View CameraRear View Camera.The rear view camera menu appears.
X Select Activation by R gearActivation by R gear.The function is switched on O or off ª,depending on the previous status.When you start the vehicle and engagereverse gear, the camera cover opensautomatically if the function is activated.The area behind the vehicle is shown in theCOMAND display with guide lines, see theseparate vehicle Operator's Manual.
The rear view camera can detect moving andstationary objects. If, for example, apedestrian or another vehicle is detected,these objects are marked with bars. Thesystem is only able to detect and markstationary objects when your vehicle ismoving. By contrast, stationary objects willalways be detected and marked.Switching object detection on/offX To select Object DetectionObject Detection in the rearview camera menu: turn and press thecontroller.The function is switched on O or off ª,depending on the previous status.
Opening the camera cover for cleaningX To select Open Camera CoverOpen Camera Cover in the rearview camera menu: turn and press thecontroller.The PleasePlease Wait...Wait...message appears forapproximately three seconds.The camera cover opens. The camera covercloses automatically when you lock thevehicle or pull away.
Navigation
Your COMAND equipmentThese operating instructions describe allstandard and optional equipment availablefor your COMAND system at the time ofpurchase. Country-specific differences arepossible. Please note that yourCOMAND system may not be equipped withall the features described. This also applies tosafety-relevant systems and functions.Therefore, the equipment on your COMANDsystem may differ from that in thedescriptions and illustrations. Should youhave any questions concerning equipmentand operation, please consult an authorizedMercedes-Benz Center.
Introduction
Important safety notes
G WARNINGIf you operate information systems andcommunication equipment integrated in thevehicle while driving, you will be distractedfrom traffic conditions. You could also losecontrol of the vehicle. There is a risk of anaccident.Only operate the equipment when the trafficsituation permits. If you are not sure that thisis possible, park the vehicle paying attentionto traffic conditions and operate theequipment when the vehicle is stationary.
You must observe the legal requirements forthe country in which you are currently drivingwhen operating COMAND.COMAND calculates the route to thedestination without taking account of thefollowing, for example:Rtraffic lightsRstop and give way signsRmerging lanesRparking or stopping in a no parking/nostopping zone
Navigation 357
COMAN
D
Z
Rother road and traffic rules and regulationsRnarrow bridgesCOMAND can give incorrect navigationcommands if the actual street/trafficsituation does not correspond with the digitalmap's data. Digital maps do not cover allareas nor all routes in an area. For example,a route may have been diverted or thedirection of a one-way street may havechanged.For this reason, you must always observeroad and traffic rules and regulations duringyour journey. Road and traffic rules andregulations always have priority over thesystem's driving recommendations.Navigation announcements are intended todirect you while driving without diverting yourattention from the road and driving.Please always use this feature instead ofconsulting the map display for directions.Looking at the icons or map display candistract you from traffic conditions anddriving, and increase the risk of an accident.
General notes
Operational readiness of the navigationsystemThe navigation system must determine theposition of the vehicle before first use orwhenever operational status is restored.Therefore, you may have to drive for a whilebefore precise route guidance is possible.
GPS receptionAmong other things, correct functioning ofthe navigation system depends on GPSreception. In certain situations, GPSreception may be impaired, there may beinterference or there may be no reception atall, e.g. in tunnels or parking garages.
i Using roof carriers may impair the correctfunctioning of a roof antenna (phone,satellite radio, GPS).
Entry restrictionFor vehicles in certain countries, there is adata entry restriction.The restriction is active from a vehicle speedof above approximately 3 mph (5 km/h). Assoon as the speed falls below approximately2 mph (3 km/h), the restriction becomesinactive.When the restriction is active, certain entriescannot be made. This will be indicated by thefact that certain menu items are grayed outand cannot be selected.The following entries are not possible, forexample:Rentering the destination city and streetRentering a destination via the mapRentering POIs in the vicinity of a city or viaa name searchRediting entriesRusing the number keypad for direct entryOther entries are possible, such as enteringpoints of interest in the vicinity of thedestination or current position.
358 NavigationCO
MAN
D
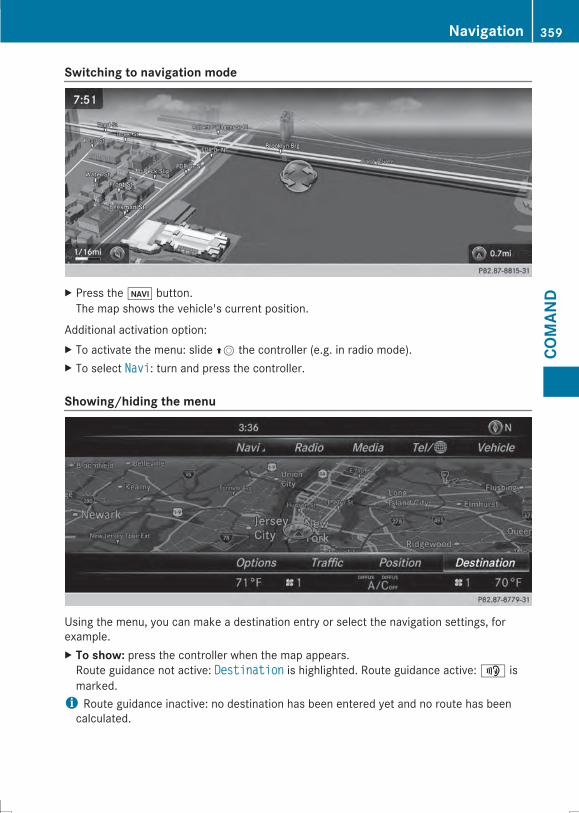
Switching to navigation mode
X Press the ß button.The map shows the vehicle's current position.
Additional activation option:X To activate the menu: slide ZV the controller (e.g. in radio mode).X To select NaviNavi: turn and press the controller.Showing/hiding the menu
Using the menu, you can make a destination entry or select the navigation settings, forexample.X To show: press the controller when the map appears.Route guidance not active: DestinationDestination is highlighted. Route guidance active:y ismarked.i Route guidance inactive: no destination has been entered yet and no route has beencalculated.
Navigation 359
COMAN
D
Z
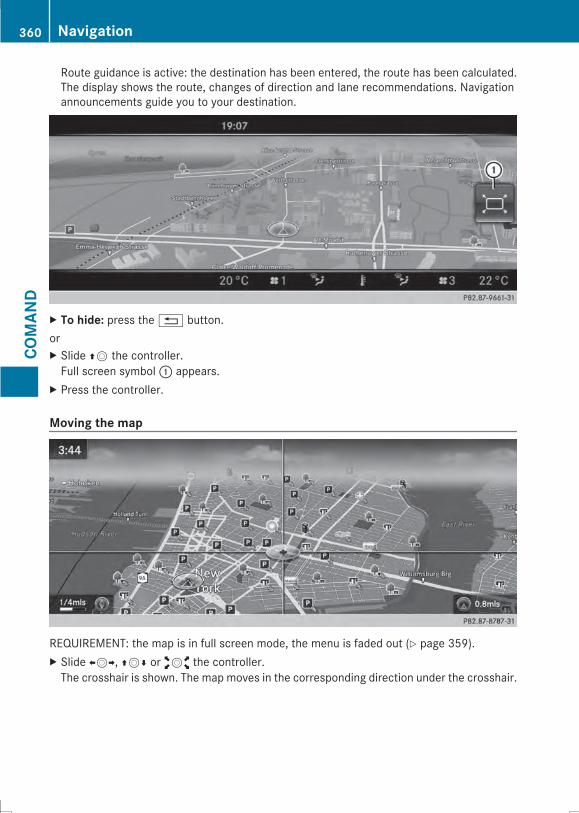
Route guidance is active: the destination has been entered, the route has been calculated.The display shows the route, changes of direction and lane recommendations. Navigationannouncements guide you to your destination.
X To hide: press the% button.orX Slide ZV the controller.Full screen symbol: appears.
X Press the controller.
Moving the map
REQUIREMENT: the map is in full screen mode, the menu is faded out (Y page 359).X Slide XVY, ZVÆ or aVb the controller.The crosshair is shown. The map moves in the corresponding direction under the crosshair.
360 NavigationCO
MAN
D
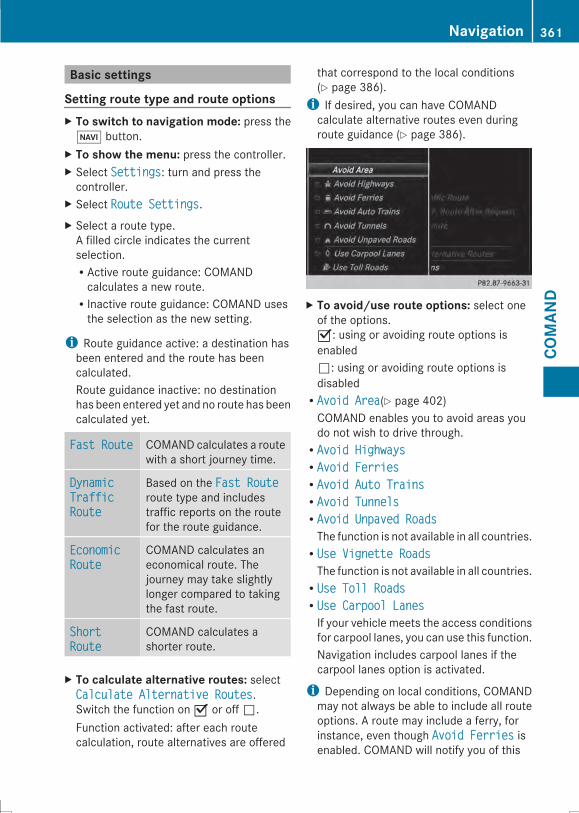
Basic settings
Setting route type and route optionsX To switch to navigation mode: press the
Ø button.X To show the menu: press the controller.X Select SettingsSettings: turn and press thecontroller.
X Select Route SettingsRoute Settings.X Select a route type.A filled circle indicates the currentselection.RActive route guidance: COMANDcalculates a new route.RInactive route guidance: COMAND usesthe selection as the new setting.
i Route guidance active: a destination hasbeen entered and the route has beencalculated.Route guidance inactive: no destinationhas been entered yet and no route has beencalculated yet.
Fast RouteFast Route COMAND calculates a routewith a short journey time.
DynamicDynamicTrafficTrafficRouteRoute
Based on the Fast RouteFast Routeroute type and includestraffic reports on the routefor the route guidance.
EconomicEconomicRouteRoute
COMAND calculates aneconomical route. Thejourney may take slightlylonger compared to takingthe fast route.
ShortShortRouteRoute
COMAND calculates ashorter route.
X To calculate alternative routes: selectCalculate Alternative RoutesCalculate Alternative Routes.Switch the function on O or off ª.Function activated: after each routecalculation, route alternatives are offered
that correspond to the local conditions(Y page 386).i If desired, you can have COMANDcalculate alternative routes even duringroute guidance (Y page 386).
X To avoid/use route options: select oneof the options.O: using or avoiding route options isenabledª: using or avoiding route options isdisabledRAvoid AreaAvoid Area(Y page 402)COMAND enables you to avoid areas youdo not wish to drive through.RAvoid HighwaysAvoid HighwaysRAvoid FerriesAvoid FerriesRAvoid Auto TrainsAvoid Auto TrainsRAvoid TunnelsAvoid TunnelsRAvoid Unpaved RoadsAvoid Unpaved RoadsThe function is not available in all countries.RUse Vignette RoadsUse Vignette RoadsThe function is not available in all countries.RUse Toll RoadsUse Toll RoadsRUse Carpool LanesUse Carpool LanesIf your vehicle meets the access conditionsfor carpool lanes, you can use this function.Navigation includes carpool lanes if thecarpool lanes option is activated.
i Depending on local conditions, COMANDmay not always be able to include all routeoptions. A route may include a ferry, forinstance, even though Avoid FerriesAvoid Ferries isenabled. COMAND will notify you of this
Navigation 361
COMAN
D
Z
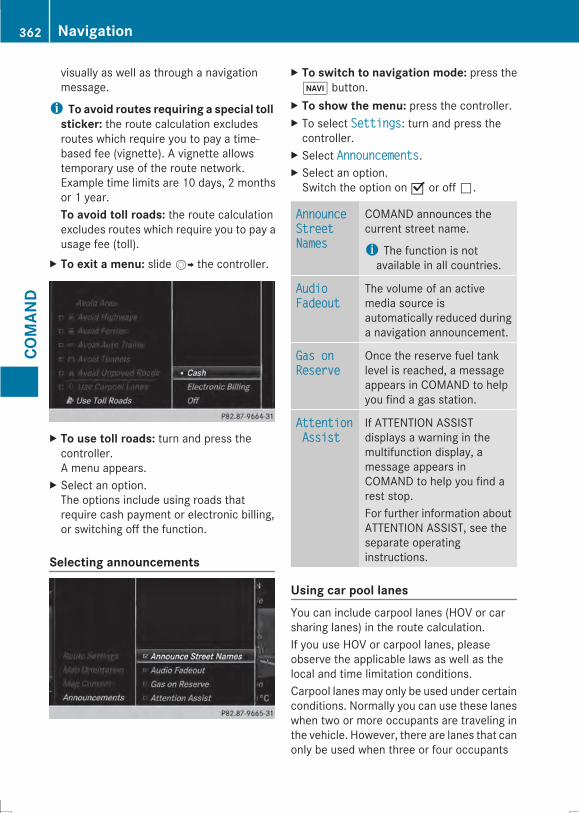
visually as well as through a navigationmessage.
i To avoid routes requiring a special tollsticker: the route calculation excludesroutes which require you to pay a time-based fee (vignette). A vignette allowstemporary use of the route network.Example time limits are 10 days, 2 monthsor 1 year.To avoid toll roads: the route calculationexcludes routes which require you to pay ausage fee (toll).
X To exit a menu: slideVY the controller.
X To use toll roads: turn and press thecontroller.A menu appears.
X Select an option.The options include using roads thatrequire cash payment or electronic billing,or switching off the function.
Selecting announcements
X To switch to navigation mode: press theØ button.
X To show the menu: press the controller.X To select SettingsSettings: turn and press thecontroller.
X Select AnnouncementsAnnouncements.X Select an option.Switch the option on O or off ª.
AnnounceAnnounceStreetStreetNamesNames
COMAND announces thecurrent street name.
i The function is notavailable in all countries.
AudioAudioFadeoutFadeout
The volume of an activemedia source isautomatically reduced duringa navigation announcement.
Gas onGas onReserveReserve
Once the reserve fuel tanklevel is reached, a messageappears in COMAND to helpyou find a gas station.
AttentionAttentionAssistAssist
If ATTENTION ASSISTdisplays a warning in themultifunction display, amessage appears inCOMAND to help you find arest stop.For further information aboutATTENTION ASSIST, see theseparate operatinginstructions.
Using car pool lanesYou can include carpool lanes (HOV or carsharing lanes) in the route calculation.If you use HOV or carpool lanes, pleaseobserve the applicable laws as well as thelocal and time limitation conditions.Carpool lanesmay only be used under certainconditions. Normally you can use these laneswhen two or more occupants are traveling inthe vehicle. However, there are lanes that canonly be used when three or four occupants
362 NavigationCO
MAN
D
(e.g. in New York) travel in the vehicle. InCalifornia, single drivers may also use thecarpool lanes if the vehicle's emission orconsumption values are below the prescribedlevels.Carpool lanes may be reserved for specifictimes (e.g. during the peak period).Carpool lanes are indicated by a diamondsymbol on specific road signs and on the roadsurface. The road signs may also include thedesignation CARPOOL. The lanes arearranged as a separate lane next to the othersor are built as a physically separate lane.Depending on the setting under UseUseCarpool LanesCarpool Lanes, COMAND uses carpoollanes when calculating the route.COMAND Online then guides you in and outof carpool lanes using visual and acousticdriving directions.X To switch to navigation mode: press the
ß button.X To show the menu: press the controller.X To select SettingsSettings: turn and press thecontroller.
X Select Route SettingsRoute Settings.X Select Avoid OptionsAvoid Options.X Select Use Carpool LanesUse Carpool Lanes.Carpool lanes will either be used O oravoided ª when calculating the route.
Navigation 363
COMAN
D
Z
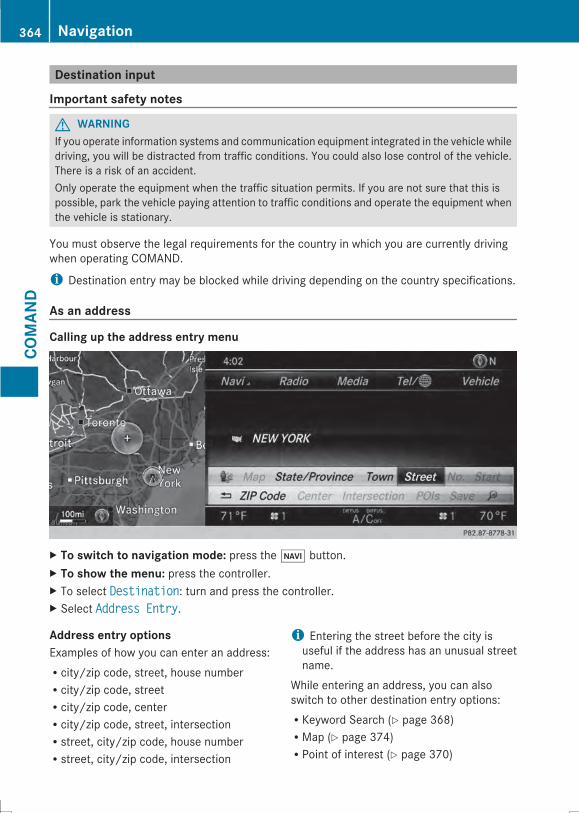
Destination input
Important safety notes
G WARNINGIf you operate information systems and communication equipment integrated in the vehicle whiledriving, you will be distracted from traffic conditions. You could also lose control of the vehicle.There is a risk of an accident.Only operate the equipment when the traffic situation permits. If you are not sure that this ispossible, park the vehicle paying attention to traffic conditions and operate the equipment whenthe vehicle is stationary.
You must observe the legal requirements for the country in which you are currently drivingwhen operating COMAND.
i Destination entry may be blocked while driving depending on the country specifications.
As an address
Calling up the address entry menu
X To switch to navigation mode: press the Ø button.X To show the menu: press the controller.X To select DestinationDestination: turn and press the controller.X Select Address EntryAddress Entry.Address entry optionsExamples of how you can enter an address:Rcity/zip code, street, house numberRcity/zip code, streetRcity/zip code, centerRcity/zip code, street, intersectionRstreet, city/zip code, house numberRstreet, city/zip code, intersection
i Entering the street before the city isuseful if the address has an unusual streetname.
While entering an address, you can alsoswitch to other destination entry options:RKeyword Search (Y page 368)RMap (Y page 374)RPoint of interest (Y page 370)
364 NavigationCO
MAN
D
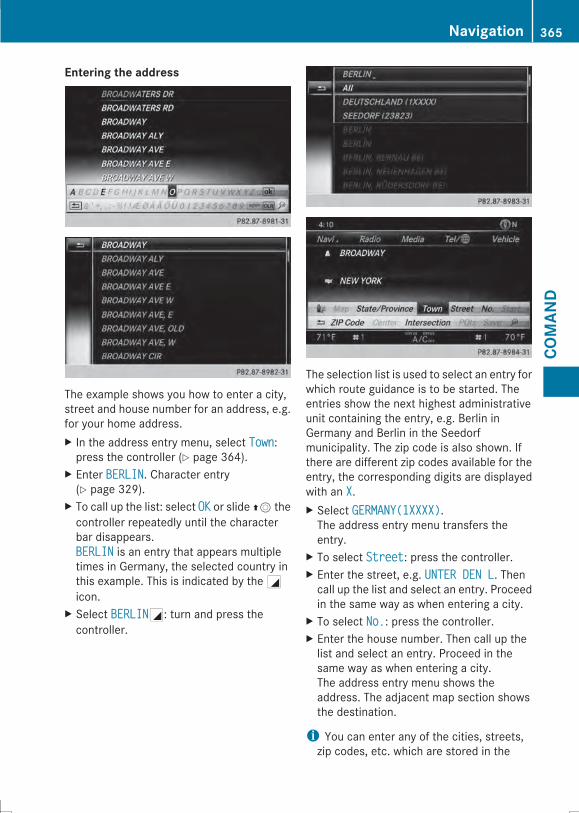
Entering the address
The example shows you how to enter a city,street and house number for an address, e.g.for your home address.X In the address entry menu, select TownTown:press the controller (Y page 364).
X Enter BERLINBERLIN. Character entry(Y page 329).
X To call up the list: select OKOK or slide ZV thecontroller repeatedly until the characterbar disappears.BERLINBERLIN is an entry that appears multipletimes in Germany, the selected country inthis example. This is indicated by theGicon.
X Select BERLINBERLING: turn and press thecontroller.
The selection list is used to select an entry forwhich route guidance is to be started. Theentries show the next highest administrativeunit containing the entry, e.g. Berlin inGermany and Berlin in the Seedorfmunicipality. The zip code is also shown. Ifthere are different zip codes available for theentry, the corresponding digits are displayedwith an XX.X Select GERMANY(1XXXX)GERMANY(1XXXX).The address entry menu transfers theentry.
X To select StreetStreet: press the controller.X Enter the street, e.g. UNTER DEN LUNTER DEN L. Thencall up the list and select an entry. Proceedin the same way as when entering a city.
X To select No.No.: press the controller.X Enter the house number. Then call up thelist and select an entry. Proceed in thesame way as when entering a city.The address entry menu shows theaddress. The adjacent map section showsthe destination.
i You can enter any of the cities, streets,zip codes, etc. which are stored in the
Navigation 365
COMAN
D
Z
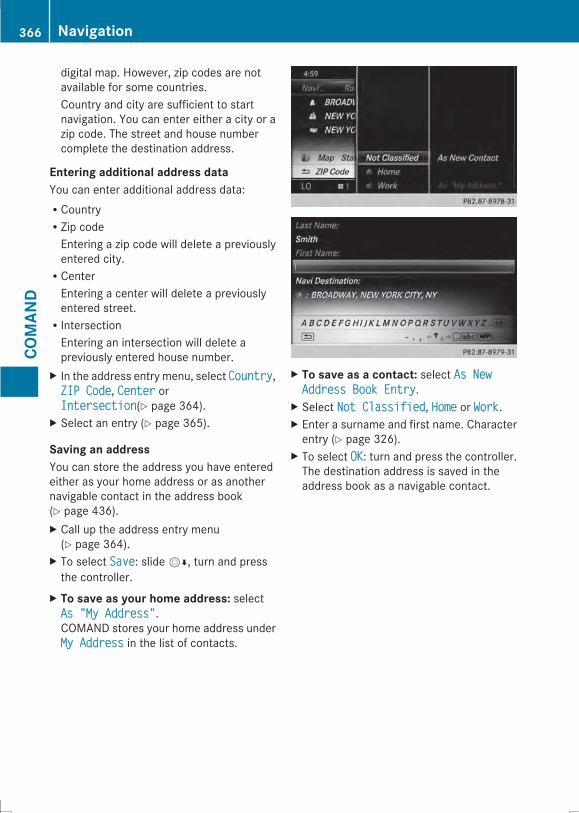
digital map. However, zip codes are notavailable for some countries.Country and city are sufficient to startnavigation. You can enter either a city or azip code. The street and house numbercomplete the destination address.
Entering additional address dataYou can enter additional address data:RCountryRZip codeEntering a zip code will delete a previouslyentered city.RCenterEntering a center will delete a previouslyentered street.RIntersectionEntering an intersection will delete apreviously entered house number.
X In the address entry menu, select CountryCountry,ZIP CodeZIP Code, CenterCenter orIntersectionIntersection(Y page 364).
X Select an entry (Y page 365).
Saving an addressYou can store the address you have enteredeither as your home address or as anothernavigable contact in the address book(Y page 436).X Call up the address entry menu(Y page 364).
X To select SaveSave: slideVÆ, turn and pressthe controller.
X To save as your home address: selectAs "My Address"As "My Address".COMAND stores your home address underMy AddressMy Address in the list of contacts.
X To save as a contact: select As NewAs NewAddress Book EntryAddress Book Entry.
X Select Not ClassifiedNot Classified, HomeHome or WorkWork.X Enter a surname and first name. Characterentry (Y page 326).
X To select OKOK: turn and press the controller.The destination address is saved in theaddress book as a navigable contact.
366 NavigationCO
MAN
D
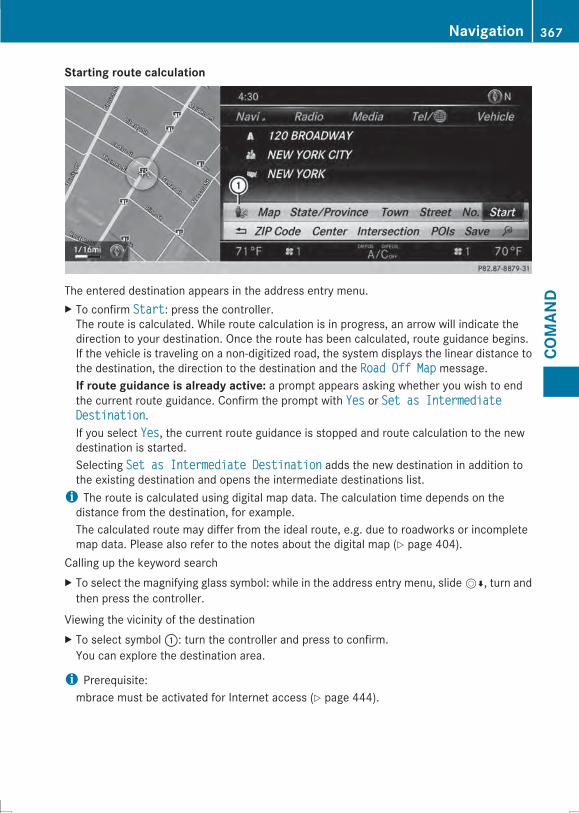
Starting route calculation
The entered destination appears in the address entry menu.X To confirm StartStart: press the controller.The route is calculated. While route calculation is in progress, an arrow will indicate thedirection to your destination. Once the route has been calculated, route guidance begins.If the vehicle is traveling on a non-digitized road, the system displays the linear distance tothe destination, the direction to the destination and the Road Off MapRoad Off Map message.If route guidance is already active: a prompt appears asking whether you wish to endthe current route guidance. Confirm the prompt with YesYes or Set as IntermediateSet as IntermediateDestinationDestination.If you select YesYes, the current route guidance is stopped and route calculation to the newdestination is started.Selecting Set as Intermediate DestinationSet as Intermediate Destination adds the new destination in addition tothe existing destination and opens the intermediate destinations list.i The route is calculated using digital map data. The calculation time depends on thedistance from the destination, for example.The calculated route may differ from the ideal route, e.g. due to roadworks or incompletemap data. Please also refer to the notes about the digital map (Y page 404).
Calling up the keyword searchX To select the magnifying glass symbol: while in the address entry menu, slideVÆ, turn andthen press the controller.
Viewing the vicinity of the destinationX To select symbol:: turn the controller and press to confirm.You can explore the destination area.
i Prerequisite:mbrace must be activated for Internet access (Y page 444).
Navigation 367
COMAN
D
Z
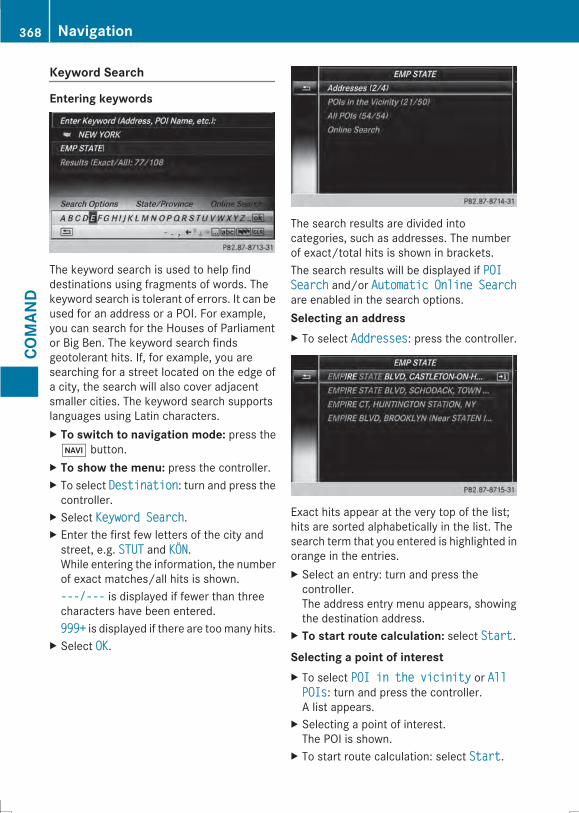
Keyword Search
Entering keywords
The keyword search is used to help finddestinations using fragments of words. Thekeyword search is tolerant of errors. It can beused for an address or a POI. For example,you can search for the Houses of Parliamentor Big Ben. The keyword search findsgeotolerant hits. If, for example, you aresearching for a street located on the edge ofa city, the search will also cover adjacentsmaller cities. The keyword search supportslanguages using Latin characters.X To switch to navigation mode: press the
Ø button.X To show the menu: press the controller.X To select DestinationDestination: turn and press thecontroller.
X Select Keyword SearchKeyword Search.X Enter the first few letters of the city andstreet, e.g. STUTSTUT and KÖNKÖN.While entering the information, the numberof exact matches/all hits is shown.---/------/--- is displayed if fewer than threecharacters have been entered.999+999+ is displayed if there are toomany hits.
X Select OKOK.
The search results are divided intocategories, such as addresses. The numberof exact/total hits is shown in brackets.The search results will be displayed if POIPOISearchSearch and/or Automatic Online SearchAutomatic Online Searchare enabled in the search options.Selecting an addressX To select AddressesAddresses: press the controller.
Exact hits appear at the very top of the list;hits are sorted alphabetically in the list. Thesearch term that you entered is highlighted inorange in the entries.X Select an entry: turn and press thecontroller.The address entry menu appears, showingthe destination address.
X To start route calculation: select StartStart.Selecting a point of interestX To select POI in the vicinityPOI in the vicinity or AllAllPOIsPOIs: turn and press the controller.A list appears.
X Selecting a point of interest.The POI is shown.
X To start route calculation: select StartStart.
368 NavigationCO
MAN
D
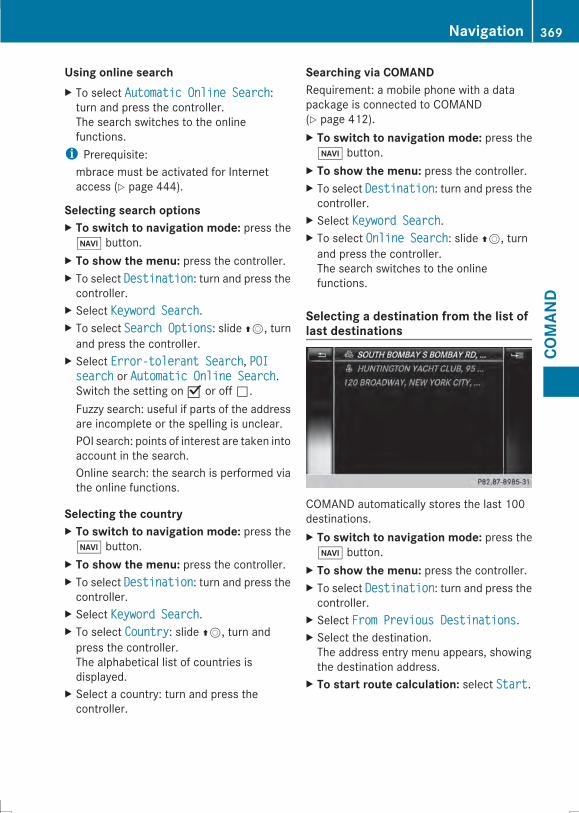
Using online searchX To select Automatic Online SearchAutomatic Online Search:turn and press the controller.The search switches to the onlinefunctions.i Prerequisite:mbrace must be activated for Internetaccess (Y page 444).
Selecting search optionsX To switch to navigation mode: press the
Ø button.X To show the menu: press the controller.X To select DestinationDestination: turn and press thecontroller.
X Select Keyword SearchKeyword Search.X To select Search OptionsSearch Options: slide ZV, turnand press the controller.
X Select Error-tolerant SearchError-tolerant Search, POIPOIsearchsearch or Automatic Online SearchAutomatic Online Search.Switch the setting on O or off ª.Fuzzy search: useful if parts of the addressare incomplete or the spelling is unclear.POI search: points of interest are taken intoaccount in the search.Online search: the search is performed viathe online functions.
Selecting the countryX To switch to navigation mode: press the
Ø button.X To show the menu: press the controller.X To select DestinationDestination: turn and press thecontroller.
X Select Keyword SearchKeyword Search.X To select CountryCountry: slide ZV, turn andpress the controller.The alphabetical list of countries isdisplayed.
X Select a country: turn and press thecontroller.
Searching via COMANDRequirement: a mobile phone with a datapackage is connected to COMAND(Y page 412).X To switch to navigation mode: press the
Ø button.X To show the menu: press the controller.X To select DestinationDestination: turn and press thecontroller.
X Select Keyword SearchKeyword Search.X To select Online SearchOnline Search: slide ZV, turnand press the controller.The search switches to the onlinefunctions.
Selecting a destination from the list oflast destinations
COMAND automatically stores the last 100destinations.X To switch to navigation mode: press the
Ø button.X To show the menu: press the controller.X To select DestinationDestination: turn and press thecontroller.
X Select From Previous DestinationsFrom Previous Destinations.X Select the destination.The address entry menu appears, showingthe destination address.
X To start route calculation: select StartStart.
Navigation 369
COMAN
D
Z
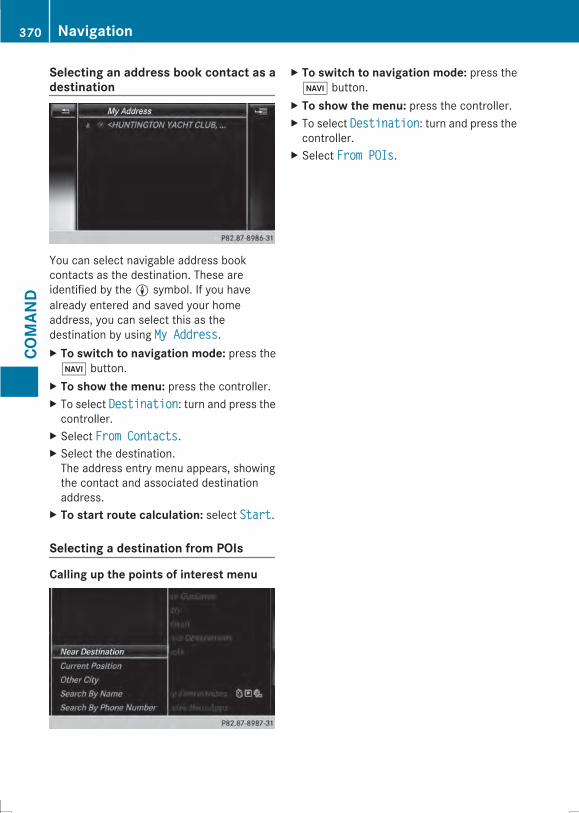
Selecting an address book contact as adestination
You can select navigable address bookcontacts as the destination. These areidentified by theL symbol. If you havealready entered and saved your homeaddress, you can select this as thedestination by using My AddressMy Address.X To switch to navigation mode: press the
Ø button.X To show the menu: press the controller.X To select DestinationDestination: turn and press thecontroller.
X Select From ContactsFrom Contacts.X Select the destination.The address entry menu appears, showingthe contact and associated destinationaddress.
X To start route calculation: select StartStart.Selecting a destination from POIs
Calling up the points of interest menu
X To switch to navigation mode: press theØ button.
X To show the menu: press the controller.X To select DestinationDestination: turn and press thecontroller.
X Select From POIsFrom POIs.
370 NavigationCO
MAN
D
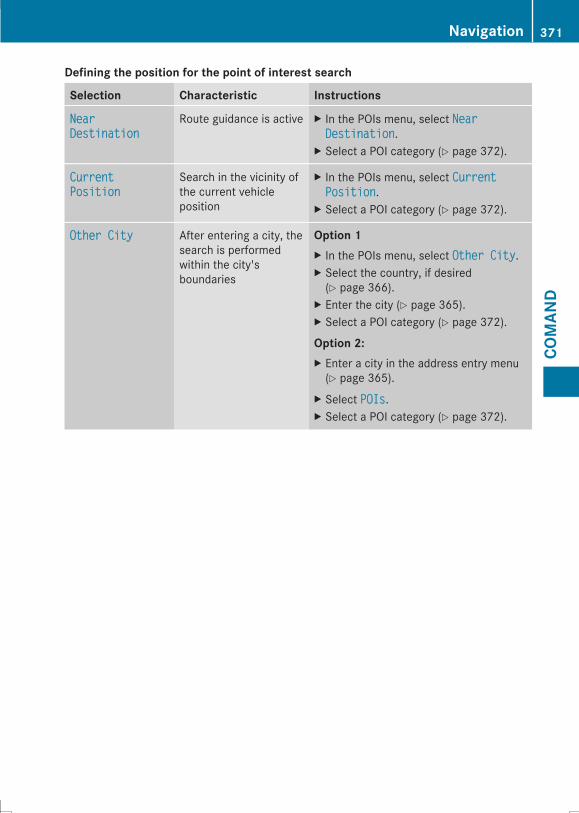
Defining the position for the point of interest search
Selection Characteristic Instructions
NearNearDestinationDestination
Route guidance is active X In the POIs menu, select NearNearDestinationDestination.
X Select a POI category (Y page 372).
CurrentCurrentPositionPosition
Search in the vicinity ofthe current vehicleposition
X In the POIs menu, select CurrentCurrentPositionPosition.
X Select a POI category (Y page 372).
Other CityOther City After entering a city, thesearch is performedwithin the city'sboundaries
Option 1X In the POIs menu, select Other CityOther City.X Select the country, if desired(Y page 366).
X Enter the city (Y page 365).X Select a POI category (Y page 372).
Option 2:X Enter a city in the address entry menu(Y page 365).
X Select POIsPOIs.X Select a POI category (Y page 372).
Navigation 371
COMAN
D
Z
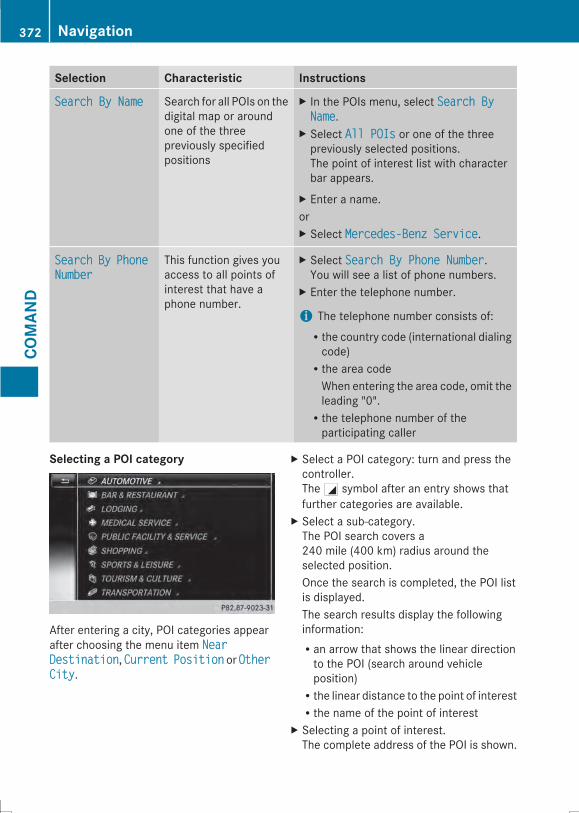
Selection Characteristic Instructions
Search By NameSearch By Name Search for all POIs on thedigital map or aroundone of the threepreviously specifiedpositions
X In the POIs menu, select Search BySearch ByNameName.
X Select All POIsAll POIs or one of the threepreviously selected positions.The point of interest list with characterbar appears.
X Enter a name.orX Select Mercedes-Benz ServiceMercedes-Benz Service.
SearchSearch ByBy PhonePhoneNumberNumber
This function gives youaccess to all points ofinterest that have aphone number.
X Select Search By Phone NumberSearch By Phone Number.You will see a list of phone numbers.
X Enter the telephone number.
i The telephone number consists of:Rthe country code (international dialingcode)Rthe area codeWhen entering the area code, omit theleading "0".Rthe telephone number of theparticipating caller
Selecting a POI category
After entering a city, POI categories appearafter choosing the menu item NearNearDestinationDestination, CurrentCurrent PositionPosition or OtherOtherCityCity.
X Select a POI category: turn and press thecontroller.TheG symbol after an entry shows thatfurther categories are available.
X Select a sub-category.The POI search covers a240 mile (400 km) radius around theselected position.Once the search is completed, the POI listis displayed.The search results display the followinginformation:Ran arrow that shows the linear directionto the POI (search around vehicleposition)Rthe linear distance to the point of interestRthe name of the point of interest
X Selecting a point of interest.The complete address of the POI is shown.
372 NavigationCO
MAN
D
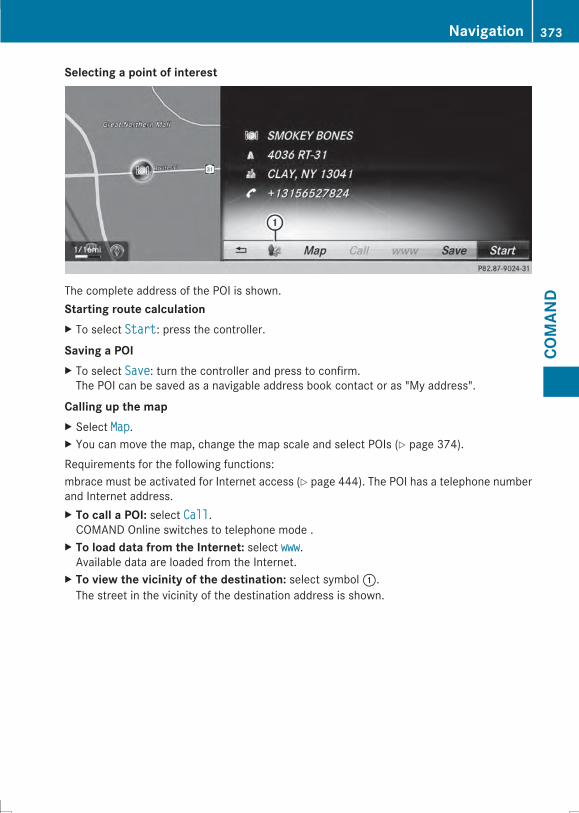
Selecting a point of interest
The complete address of the POI is shown.Starting route calculationX To select StartStart: press the controller.Saving a POIX To select SaveSave: turn the controller and press to confirm.The POI can be saved as a navigable address book contact or as "My address".
Calling up the mapX Select MapMap.X You can move the map, change the map scale and select POIs (Y page 374).Requirements for the following functions:mbrace must be activated for Internet access (Y page 444). The POI has a telephone numberand Internet address.X To call a POI: select CallCall.COMAND Online switches to telephone mode .
X To load data from the Internet: select wwwwww.Available data are loaded from the Internet.
X To view the vicinity of the destination: select symbol:.The street in the vicinity of the destination address is shown.
Navigation 373
COMAN
D
Z
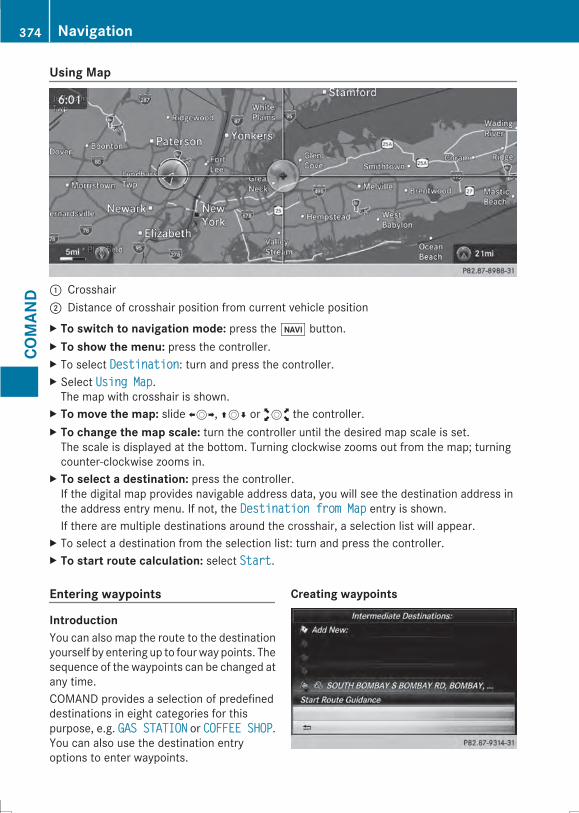
Using Map
: Crosshair; Distance of crosshair position from current vehicle positionX To switch to navigation mode: press the ß button.X To show the menu: press the controller.X To select DestinationDestination: turn and press the controller.X Select Using MapUsing Map.The map with crosshair is shown.
X To move the map: slide XVY, ZVÆ or aVb the controller.X To change the map scale: turn the controller until the desired map scale is set.The scale is displayed at the bottom. Turning clockwise zooms out from the map; turningcounter-clockwise zooms in.
X To select a destination: press the controller.If the digital map provides navigable address data, you will see the destination address inthe address entry menu. If not, the Destination from MapDestination from Map entry is shown.If there are multiple destinations around the crosshair, a selection list will appear.
X To select a destination from the selection list: turn and press the controller.X To start route calculation: select StartStart.Entering waypoints
IntroductionYou can also map the route to the destinationyourself by entering up to fourway points. Thesequence of the waypoints can be changed atany time.COMAND provides a selection of predefineddestinations in eight categories for thispurpose, e.g. GAS STATIONGAS STATION or COFFEE SHOPCOFFEE SHOP.You can also use the destination entryoptions to enter waypoints.
Creating waypoints
374 NavigationCO
MAN
D
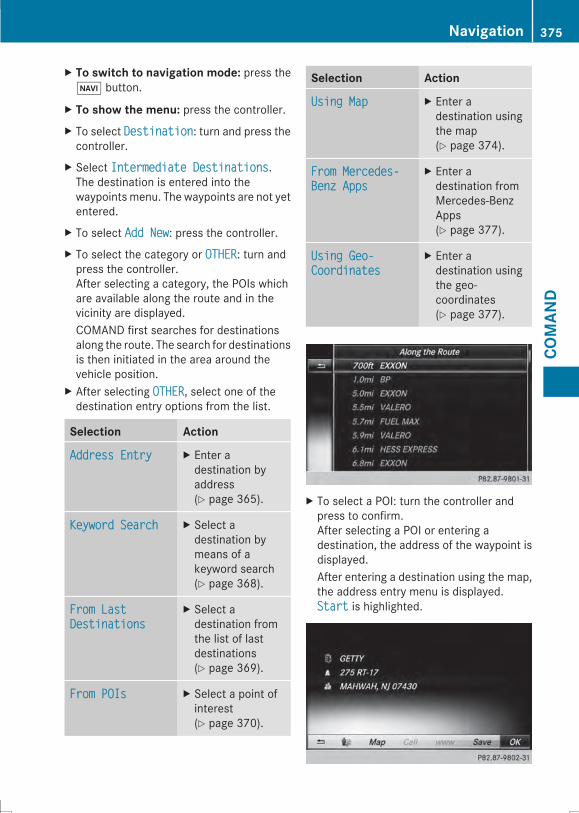
X To switch to navigation mode: press theØ button.
X To show the menu: press the controller.X To select DestinationDestination: turn and press thecontroller.
X Select Intermediate DestinationsIntermediate Destinations.The destination is entered into thewaypoints menu. The waypoints are not yetentered.
X To select Add NewAdd New: press the controller.X To select the category or OTHEROTHER: turn andpress the controller.After selecting a category, the POIs whichare available along the route and in thevicinity are displayed.COMAND first searches for destinationsalong the route. The search for destinationsis then initiated in the area around thevehicle position.
X After selecting OTHEROTHER, select one of thedestination entry options from the list.
Selection Action
Address EntryAddress Entry X Enter adestination byaddress(Y page 365).
Keyword SearchKeyword Search X Select adestination bymeans of akeyword search(Y page 368).
From LastFrom LastDestinationsDestinations
X Select adestination fromthe list of lastdestinations(Y page 369).
From POIsFrom POIs X Select a point ofinterest(Y page 370).
Selection Action
Using MapUsing Map X Enter adestination usingthe map(Y page 374).
From Mercedes-From Mercedes-Benz AppsBenz Apps
X Enter adestination fromMercedes-BenzApps(Y page 377).
Using Geo-Using Geo-CoordinatesCoordinates
X Enter adestination usingthe geo-coordinates(Y page 377).
X To select a POI: turn the controller andpress to confirm.After selecting a POI or entering adestination, the address of the waypoint isdisplayed.After entering a destination using the map,the address entry menu is displayed.StartStart is highlighted.
Navigation 375
COMAN
D
Z
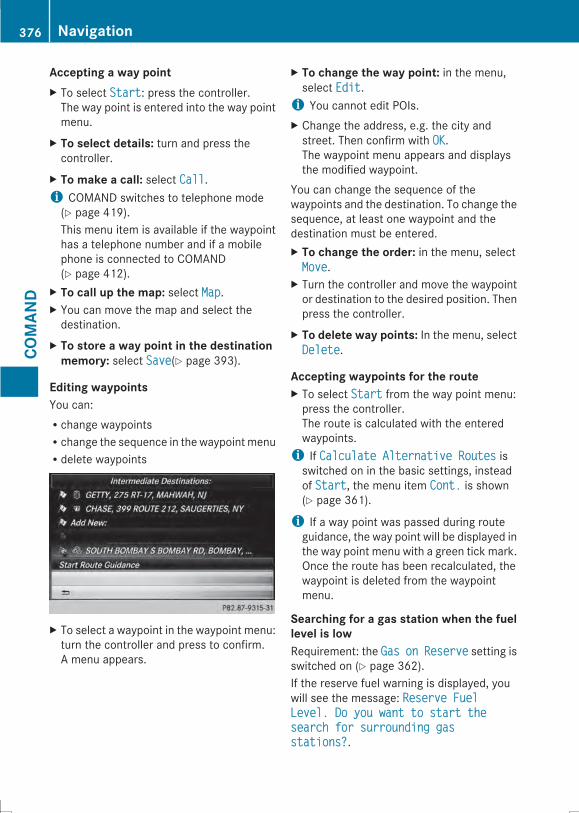
Accepting a way pointX To select StartStart: press the controller.The way point is entered into the way pointmenu.
X To select details: turn and press thecontroller.
X To make a call: select CallCall.i COMAND switches to telephone mode(Y page 419).This menu item is available if the waypointhas a telephone number and if a mobilephone is connected to COMAND(Y page 412).
X To call up the map: select MapMap.X You can move the map and select thedestination.
X To store a way point in the destinationmemory: select SaveSave(Y page 393).
Editing waypointsYou can:Rchange waypointsRchange the sequence in the waypoint menuRdelete waypoints
X To select a waypoint in the waypoint menu:turn the controller and press to confirm.A menu appears.
X To change the way point: in the menu,select EditEdit.i You cannot edit POIs.X Change the address, e.g. the city andstreet. Then confirm with OKOK.The waypoint menu appears and displaysthe modified waypoint.
You can change the sequence of thewaypoints and the destination. To change thesequence, at least one waypoint and thedestination must be entered.X To change the order: in the menu, selectMoveMove.
X Turn the controller and move the waypointor destination to the desired position. Thenpress the controller.
X To delete way points: In the menu, selectDeleteDelete.
Accepting waypoints for the routeX To select StartStart from the way point menu:press the controller.The route is calculated with the enteredwaypoints.i If Calculate Alternative RoutesCalculate Alternative Routes isswitched on in the basic settings, insteadof StartStart, the menu item Cont.Cont. is shown(Y page 361).
i If a way point was passed during routeguidance, the way point will be displayed inthe way point menu with a green tick mark.Once the route has been recalculated, thewaypoint is deleted from the waypointmenu.
Searching for a gas station when the fuellevel is lowRequirement: the GasGas onon ReserveReserve setting isswitched on (Y page 362).If the reserve fuel warning is displayed, youwill see the message: Reserve FuelReserve FuelLevel. Do you want to start theLevel. Do you want to start thesearch for surrounding gassearch for surrounding gasstations?stations?.
376 NavigationCO
MAN
D
X To select YesYes or NoNo: turn and press thecontroller.If you select YesYes, the gas station searchstarts. When the search is complete, a listof the gas stations available along the routeor in the vicinity is displayed.If you select NoNo, the search is canceled.
X Select the gas station.The address of the gas station is displayed.
X To select StartStart: press the controller.The selected gas station is entered intoposition 1 of the waypoints menu. Routeguidance begins.If the waypoints menu already containsfour waypoints, a prompt will be displayed,asking you whether you wish to enter thegas station into position 1. If you selectYesYes, the gas station is transferred into thelist and way point 4 is deleted.
Entering a destination from Mercedes-Benz AppsRequirement: a mobile phone with a datapackage is connected to COMAND(Y page 412).X To switch to navigation mode: press the
Ø button.
X To show the menu: press the controller.X To select DestinationDestination: turn and press thecontroller.
X Select From Mercedes-Benz AppsFrom Mercedes-Benz Apps.A list shows the available destinations thathave been transmitted to the vehicle up tothis point (Y page 449).
Using Geo-CoordinatesX To switch to navigation mode: press the
ß button.X To show the menu: press the controller.
X To select DestinationDestination: turn and press thecontroller.
X Select Using Geo-CoordinatesUsing Geo-Coordinates.Geo-coordinates are entered in degrees,minutes and seconds.
Entering the latitude and longitudecoordinatesX To change the value: turn the controller.X To move the selection within the line: slideXVY the controller.
X To move the selection between lines: slideZVÆ the controller.
X To confirm the value: press the controller.
Save destinationX To select SaveSave: turn the controller andpress to confirm.The destination can be saved as a navigableaddress book contact or as "My address".
Starting route calculationX Select Start Route GuidanceStart Route Guidance.
Route guidance
Important notesFor this reason, you must always observeroad and traffic rules and regulations duringyour journey. Road and traffic rules andregulations always have priority over systemdriving recommendations.COMAND calculates the route to thedestination without taking account of thefollowing, for example:Rtraffic lightsRstop and give way signsRmerging lanesRparking or stopping in a no parking/nostopping zoneRother road and traffic rules and regulationsRnarrow bridgesCOMAND may give differing navigationcommands if the actual street/traffic
Navigation 377
COMAN
D
Z
situation does not correspond with the digitalmap's data. For example, if the road layout orthe direction of a one-way street has beenchanged.For this reason, you must always observeroad and traffic rules and regulations duringyour journey. Road and traffic rules andregulations always have priority over thesystem's driving recommendations.Route guidance begins once a route has beencalculated (Y page 367).COMAND guides you to your destination bymeans of navigation announcements in theform of audible navigation announcementsand route guidance displays.The route guidance displays can be seen if thedisplay is switched to navigation mode.If you do not follow the navigationannouncements or if you leave the calculatedroute, COMAND automatically calculates anew route to the destination.If the digital map contains the correspondinginformation, the following applies:Rduring route guidance, COMAND tries toavoid roads with restricted access. Thoseroads, for example, that are closed tothrough-traffic.Rroads that have time restrictions (e.g.closed on Sundays and public holidays) areconsidered for route guidance on dayswhen they are open. For this purpose, therelevant times must be correctly stored inthe database.
378 NavigationCO
MAN
D

Displays during route guidance
Change of directionChanges of direction have three phases:Rpreparation phaseRannouncement phaseRchange-of-direction phase
i Changes in direction are also shown in the multifunction display (Y page 252).Preparation phase: COMAND prepares you for the upcoming change of direction. Based onthe example display below, the change of direction is announced by the "Prepare to turn rightmessage", for instance. You see the full-screen map.Announcement phase: COMAND announces the imminent change of direction. The changeof direction is announced ahead of time, such as with the announcement "Turn right in200 meters".The display is now split into two sectors. The map is shown on the left side of the display, anda detailed image of the intersection or a 3D image of the imminent change of direction isshown on the right side of the display.
: Next road; Point at which the change of direction takes place (white dot)= Change of direction (turn right here)? Distance to the next change of direction
Change-of-direction phase: COMAND announces the immediate change of direction. Thechange of direction is announced ahead of time, such as with the announcement "Turn rightin 80 meters".The display is split in two like in the announcement phase.
Navigation 379
COMAN
D
Z
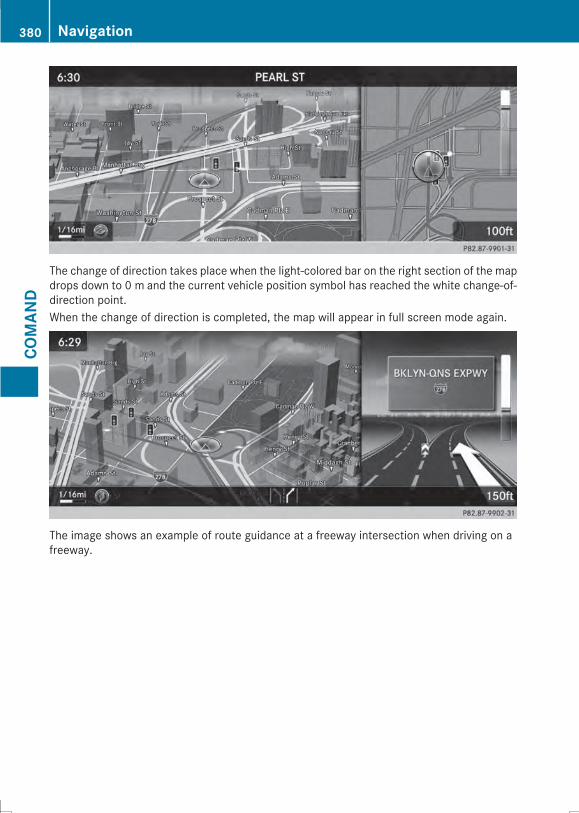
The change of direction takes place when the light-colored bar on the right section of the mapdrops down to 0 m and the current vehicle position symbol has reached the white change-of-direction point.When the change of direction is completed, the map will appear in full screen mode again.
The image shows an example of route guidance at a freeway intersection when driving on afreeway.
380 NavigationCO
MAN
D
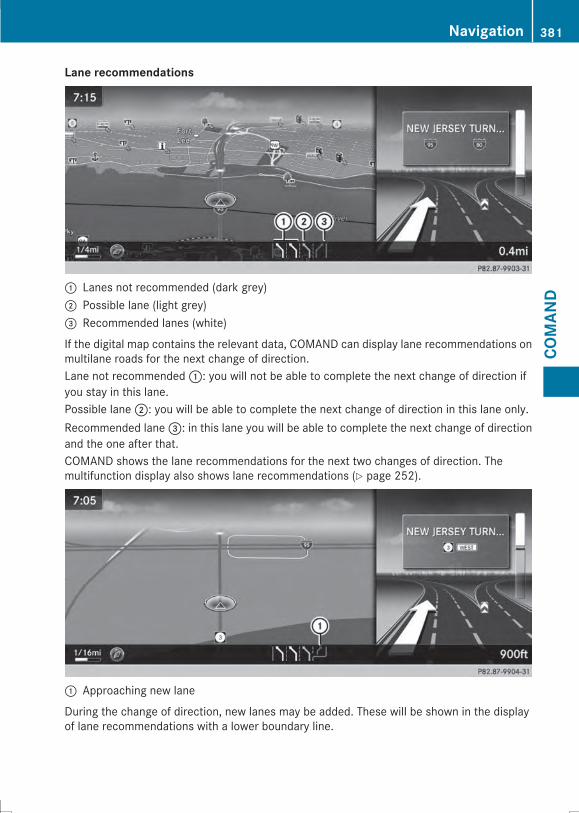
Lane recommendations
: Lanes not recommended (dark grey); Possible lane (light grey)= Recommended lanes (white)
If the digital map contains the relevant data, COMAND can display lane recommendations onmultilane roads for the next change of direction.Lane not recommended:: you will not be able to complete the next change of direction ifyou stay in this lane.Possible lane;: you will be able to complete the next change of direction in this lane only.Recommended lane=: in this lane you will be able to complete the next change of directionand the one after that.COMAND shows the lane recommendations for the next two changes of direction. Themultifunction display also shows lane recommendations (Y page 252).
: Approaching new lane
During the change of direction, new lanes may be added. These will be shown in the displayof lane recommendations with a lower boundary line.
Navigation 381
COMAN
D
Z
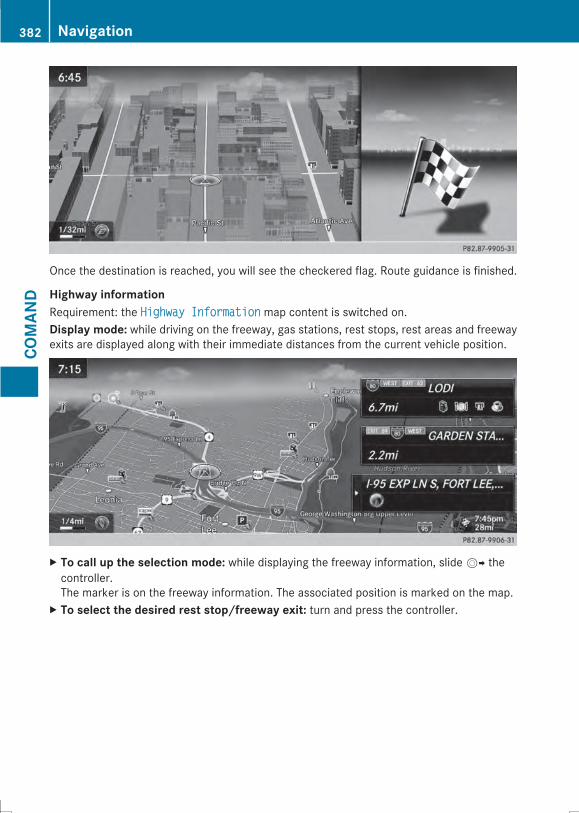
Once the destination is reached, you will see the checkered flag. Route guidance is finished.
Highway informationRequirement: the Highway InformationHighway Information map content is switched on.Display mode: while driving on the freeway, gas stations, rest stops, rest areas and freewayexits are displayed along with their immediate distances from the current vehicle position.
X To call up the selection mode: while displaying the freeway information, slideVY thecontroller.The marker is on the freeway information. The associated position is marked on the map.
X To select the desired rest stop/freeway exit: turn and press the controller.
382 NavigationCO
MAN
D

Freeway information facilitates route guidance to a POI and use of the traffic jam function.The remaining route on the freeway in this case is blocked in the direction of travel from theselected exit.Starting route guidance and using additional functionsX To select a POI: turn the controller and press to confirm.The POI details are displayed.The POI can now be:Rstored in the address book (Y page 393)Rviewed on the map (Y page 400)Rcalled if a phone is connected and a phone number is available (Y page 420).Rselected for route guidance and a route to it calculated (Y page 367).
Using the traffic jam functionX Select DetourDetour: turn and press the controller.The traffic jam function appears (Y page 388).
Navigation announcements
Repeating navigation announcementsIf you missed the current navigationannouncement, you can call it up again.X To switch to navigation mode: press the
Ø button.X To show the menu: press the controller.X Select+: turn and press the controller.
i If you previously assigned the RepeatRepeatSpoken Driving RecommendationsSpoken Driving Recommendationsfunction to the Favorites button, you canselect the function using the Favoritesbutton instead (Y page 339).
Setting the volume manuallyX Set the volume using the thumbwheelduring the navigation announcement.i When you start the engine, the volumewillbe at its lowest setting.
Switching navigation announcementson/offX To switch off navigationannouncements: during a navigation
Navigation 383
COMAN
D
Z
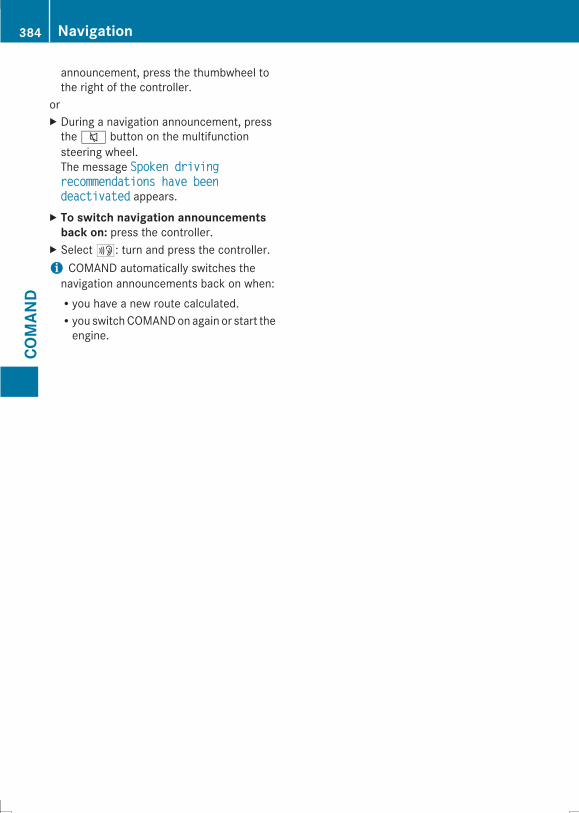
announcement, press the thumbwheel tothe right of the controller.
orX During a navigation announcement, pressthe8 button on the multifunctionsteering wheel.The message Spoken drivingSpoken drivingrecommendations have beenrecommendations have beendeactivateddeactivated appears.
X To switch navigation announcementsback on: press the controller.
X Select+: turn and press the controller.i COMAND automatically switches thenavigation announcements back on when:Ryou have a new route calculated.Ryou switchCOMANDonagain or start theengine.
384 NavigationCO
MAN
D

Cancelling/continuing route guidance
Cancelling route guidanceX Press the controller.The menu is shown.
X To select DestinationDestination: turn and press the controller.X Select Cancel Active Route GuidanceCancel Active Route Guidance.The blue route line is no longer shown on the map.
Continue route guidance
X Press the controller.The menu is shown.
X To select DestinationDestination: turn and press the controller.X Select Continue Route GuidanceContinue Route Guidance.COMAND calculates the route.
Route information
Destination information
Navigation 385
COMAN
D
Z
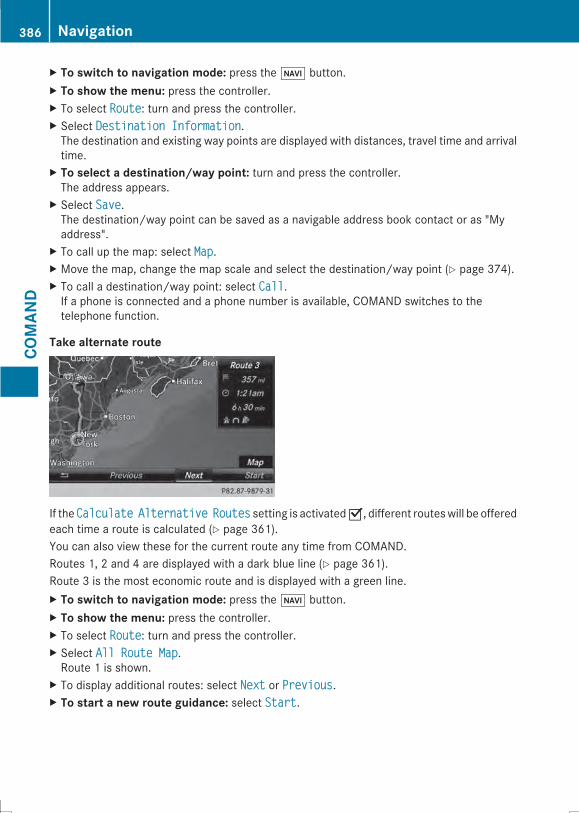
X To switch to navigation mode: press the Ø button.X To show the menu: press the controller.X To select RouteRoute: turn and press the controller.X Select Destination InformationDestination Information.The destination and existing way points are displayed with distances, travel time and arrivaltime.
X To select a destination/way point: turn and press the controller.The address appears.
X Select SaveSave.The destination/way point can be saved as a navigable address book contact or as "Myaddress".
X To call up the map: select MapMap.X Move the map, change the map scale and select the destination/way point (Y page 374).X To call a destination/way point: select CallCall.If a phone is connected and a phone number is available, COMAND switches to thetelephone function.
Take alternate route
If theCalculateCalculate AlternativeAlternative RoutesRoutes setting is activatedO, different routeswill be offeredeach time a route is calculated (Y page 361).You can also view these for the current route any time from COMAND.Routes 1, 2 and 4 are displayed with a dark blue line (Y page 361).Route 3 is the most economic route and is displayed with a green line.X To switch to navigation mode: press the Ø button.X To show the menu: press the controller.X To select RouteRoute: turn and press the controller.X Select All Route MapAll Route Map.Route 1 is shown.
X To display additional routes: select NextNext or PreviousPrevious.X To start a new route guidance: select StartStart.
386 NavigationCO
MAN
D
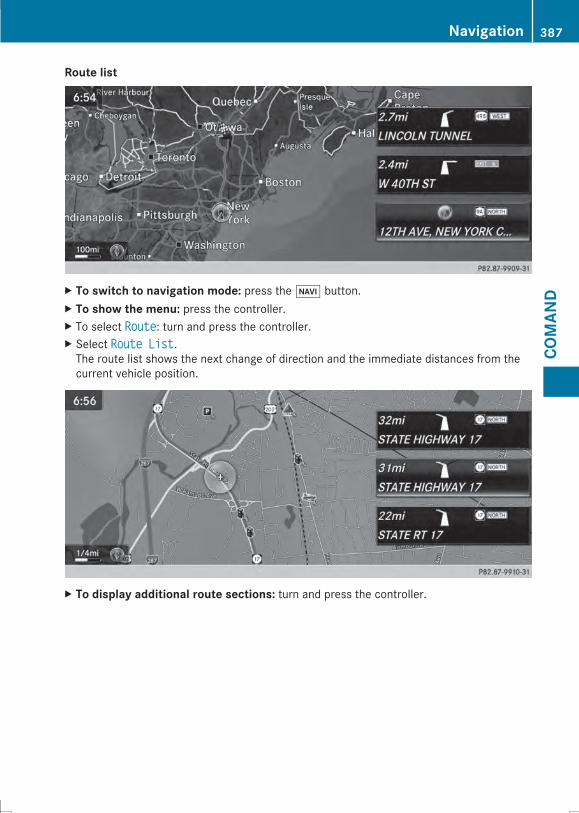
Route list
X To switch to navigation mode: press the Ø button.X To show the menu: press the controller.X To select RouteRoute: turn and press the controller.X Select Route ListRoute List.The route list shows the next change of direction and the immediate distances from thecurrent vehicle position.
X To display additional route sections: turn and press the controller.
Navigation 387
COMAN
D
Z

Where am I?
X To switch to navigation mode: press the Ø button.X To show the menu: press the controller.X To select LocationLocation: turn and press the controller.X Select Where am I?Where am I?.The street you are currently on and the previous and next intersections are displayed.
Traffic jam function
X To switch to navigation mode: press theØ button.
X To show the menu: press the controller.X To select RouteRoute: turn and press thecontroller.
X Select DetourDetour.X To specify the start of the traffic jamsection: select StartStart.The next possible traffic jam sectionstarting point is marked.
X Turn the controller.The marking moves along the route to thenext starting position.
X Press the controller.The start of the traffic jam is set.
X To specify the end of a traffic jamsection: select EndEnd.The next possible traffic jam section endpoint is marked.
X Turn and press the controller.X To calculate the detour: select StartStart.Off-road
Important safety notesG WARNINGThe COMAND navigation system may directyou to off-road routes that your vehicle maynot be capable of traversing through withoutdamaging your tires, wheels or vehicle. It isthe driver's sole responsibility to determinethe suitability of the route. Off-road routesmay be of varying conditions and theirappropriateness for use may be affected byvarious factors such as time of day, time ofyear and immediate weather conditions thatcannot be judged or taken into considerationby the COMAND system.
388 NavigationCO
MAN
D
Route guidance to an off-road destinationCOMAND can guide you to destinationswhich are within the area of the digital map,but which are not themselves on the map.These destinations are known as off-roaddestinations, which you can enter using themap, for example. In these cases, COMANDguides you for as long as possible withnavigation announcements and displays onroads known to the system.If the vehicle reaches an areawhich is not partof the digital map, the display appears as asplit-screen view. On the right, an arrowappears that points to the off-roaddestination. You will hear the announcement:"Please follow the arrow on the display". Asthe vehicle approaches the destination, theArea of destination reachedArea of destination reached messageappears.
Route guidance from an off-road locationto a destinationIf the vehicle position is on the digital map,but themap does not contain any informationabout that location, the vehicle is in an off-road location. COMAND is also able to guideyou to a destination even from an off-roadlocation.At the start of route guidance, you will see theRoad Off MapRoad Off Map message, an arrow and thedistance to the destination. The arrow showsthe compass heading to the actualdestination.As soon as the vehicle is back on a roadknown to the system, route guidancecontinues in the usual way.
Off-road during route guidanceDue to roadworks, for example, there may bedifferences between the data on the digitalmap and the actual course of the road.In such cases, the system will temporarily beunable to locate the vehicle position on thedigital map. The vehicle is therefore in an off-road position.In the display, you will see the Road OffRoad OffMapMap message, an arrow and the distance to
the destination. The direction arrow showsthe compass heading to the destination.As soon as the system can assign the vehicleposition to the map again, route guidancecontinues in the usual way.
Real-time traffic reports
Prerequisitesi This function is currently not available forCanada.
In order to receive real-time traffic reports viasatellite radio, you need to subscribe toSIRIUS XM Satellite Radio Traffic MessageService.Further information on satellite radio(Y page 464).COMAND can receive traffic reports viasatellite radio and take account of these forroute guidance in the navigation system.Received traffic reports are displayed on themap either as text or as symbols.
Navigation 389
COMAN
D
Z
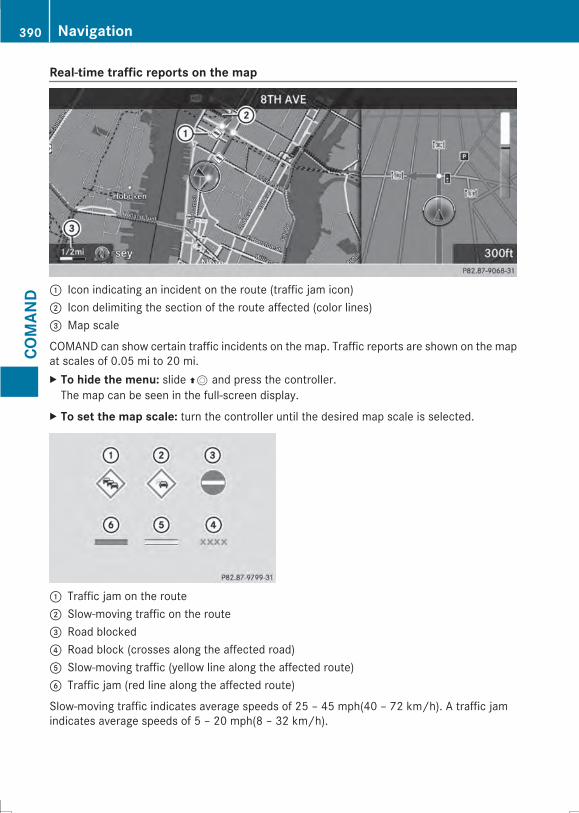
Real-time traffic reports on the map
: Icon indicating an incident on the route (traffic jam icon); Icon delimiting the section of the route affected (color lines)= Map scale
COMAND can show certain traffic incidents on the map. Traffic reports are shown on the mapat scales of 0.05 mi to 20 mi.X To hide the menu: slide ZV and press the controller.The map can be seen in the full-screen display.
X To set the map scale: turn the controller until the desired map scale is selected.
: Traffic jam on the route; Slow-moving traffic on the route= Road blocked? Road block (crosses along the affected road)A Slow-moving traffic (yellow line along the affected route)B Traffic jam (red line along the affected route)
Slow-moving traffic indicates average speeds of 25 – 45 mph(40 – 72 km/h). A traffic jamindicates average speeds of 5 – 20 mph(8 – 32 km/h).
390 NavigationCO
MAN
D
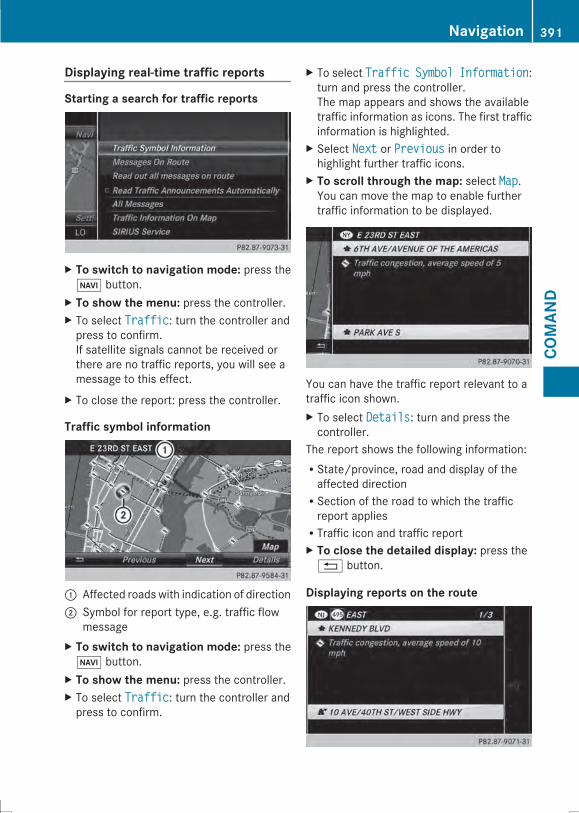
Displaying real-time traffic reports
Starting a search for traffic reports
X To switch to navigation mode: press theØ button.
X To show the menu: press the controller.X To select TrafficTraffic: turn the controller andpress to confirm.If satellite signals cannot be received orthere are no traffic reports, you will see amessage to this effect.
X To close the report: press the controller.
Traffic symbol information
: Affected roads with indication of direction; Symbol for report type, e.g. traffic flow
messageX To switch to navigation mode: press the
Ø button.X To show the menu: press the controller.X To select TrafficTraffic: turn the controller andpress to confirm.
X To select TrafficTraffic SymbolSymbol InformationInformation:turn and press the controller.The map appears and shows the availabletraffic information as icons. The first trafficinformation is highlighted.
X Select NextNext or PreviousPrevious in order tohighlight further traffic icons.
X To scroll through the map: select MapMap.You can move the map to enable furthertraffic information to be displayed.
You can have the traffic report relevant to atraffic icon shown.X To select DetailsDetails: turn and press thecontroller.
The report shows the following information:RState/province, road and display of theaffected directionRSection of the road to which the trafficreport appliesRTraffic icon and traffic reportX To close the detailed display: press the% button.
Displaying reports on the route
Navigation 391
COMAN
D
Z
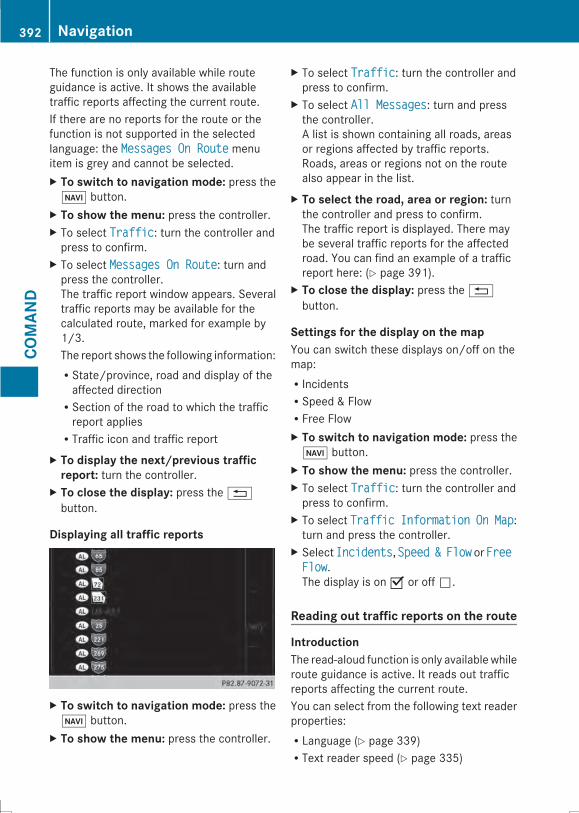
The function is only available while routeguidance is active. It shows the availabletraffic reports affecting the current route.If there are no reports for the route or thefunction is not supported in the selectedlanguage: the Messages On RouteMessages On Route menuitem is grey and cannot be selected.X To switch to navigation mode: press the
Ø button.X To show the menu: press the controller.X To select TrafficTraffic: turn the controller andpress to confirm.
X To select Messages On RouteMessages On Route: turn andpress the controller.The traffic report window appears. Severaltraffic reports may be available for thecalculated route, marked for example by1/3.The report shows the following information:RState/province, road and display of theaffected directionRSection of the road to which the trafficreport appliesRTraffic icon and traffic report
X To display the next/previous trafficreport: turn the controller.
X To close the display: press the%button.
Displaying all traffic reports
X To switch to navigation mode: press theØ button.
X To show the menu: press the controller.
X To select TrafficTraffic: turn the controller andpress to confirm.
X To select All MessagesAll Messages: turn and pressthe controller.A list is shown containing all roads, areasor regions affected by traffic reports.Roads, areas or regions not on the routealso appear in the list.
X To select the road, area or region: turnthe controller and press to confirm.The traffic report is displayed. There maybe several traffic reports for the affectedroad. You can find an example of a trafficreport here: (Y page 391).
X To close the display: press the%button.
Settings for the display on the mapYou can switch these displays on/off on themap:RIncidentsRSpeed & FlowRFree FlowX To switch to navigation mode: press the
Ø button.X To show the menu: press the controller.X To select TrafficTraffic: turn the controller andpress to confirm.
X To select TrafficTraffic InformationInformation OnOn MapMap:turn and press the controller.
X Select IncidentsIncidents, Speed &Speed & FlowFlow or FreeFreeFlowFlow.The display is on O or off ª.
Reading out traffic reports on the route
IntroductionThe read-aloud function is only availablewhileroute guidance is active. It reads out trafficreports affecting the current route.You can select from the following text readerproperties:RLanguage (Y page 339)RText reader speed (Y page 335)
392 NavigationCO
MAN
D
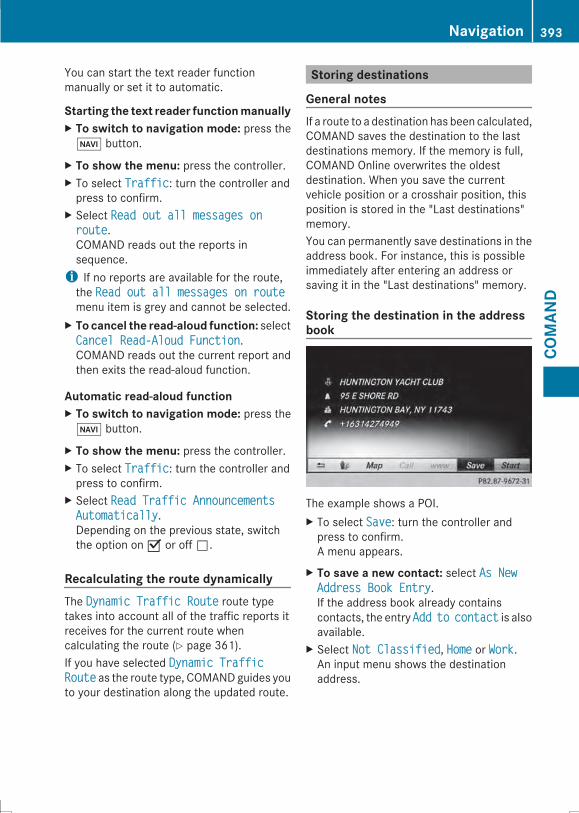
You can start the text reader functionmanually or set it to automatic.
Starting the text reader functionmanuallyX To switch to navigation mode: press the
Ø button.
X To show the menu: press the controller.X To select TrafficTraffic: turn the controller andpress to confirm.
X Select Read out all messages onRead out all messages onrouteroute.COMAND reads out the reports insequence.i If no reports are available for the route,the Read out all messages on routeRead out all messages on routemenu item is grey and cannot be selected.
X To cancel the read-aloud function: selectCancel Read-Aloud FunctionCancel Read-Aloud Function.COMAND reads out the current report andthen exits the read-aloud function.
Automatic read-aloud functionX To switch to navigation mode: press the
Ø button.
X To show the menu: press the controller.X To select TrafficTraffic: turn the controller andpress to confirm.
X Select Read Traffic AnnouncementsRead Traffic AnnouncementsAutomaticallyAutomatically.Depending on the previous state, switchthe option on O or off ª.
Recalculating the route dynamicallyThe Dynamic Traffic RouteDynamic Traffic Route route typetakes into account all of the traffic reports itreceives for the current route whencalculating the route (Y page 361).If you have selected Dynamic TrafficDynamic TrafficRouteRoute as the route type, COMANDguides youto your destination along the updated route.
Storing destinations
General notesIf a route to a destination has been calculated,COMAND saves the destination to the lastdestinations memory. If the memory is full,COMAND Online overwrites the oldestdestination. When you save the currentvehicle position or a crosshair position, thisposition is stored in the "Last destinations"memory.You can permanently save destinations in theaddress book. For instance, this is possibleimmediately after entering an address orsaving it in the "Last destinations" memory.
Storing the destination in the addressbook
The example shows a POI.X To select SaveSave: turn the controller andpress to confirm.A menu appears.
X To save a new contact: select As NewAs NewAddress Book EntryAddress Book Entry.If the address book already containscontacts, the entry AddAdd toto contactcontact is alsoavailable.
X Select Not ClassifiedNot Classified, HomeHome or WorkWork.An input menu shows the destinationaddress.
Navigation 393
COMAN
D
Z
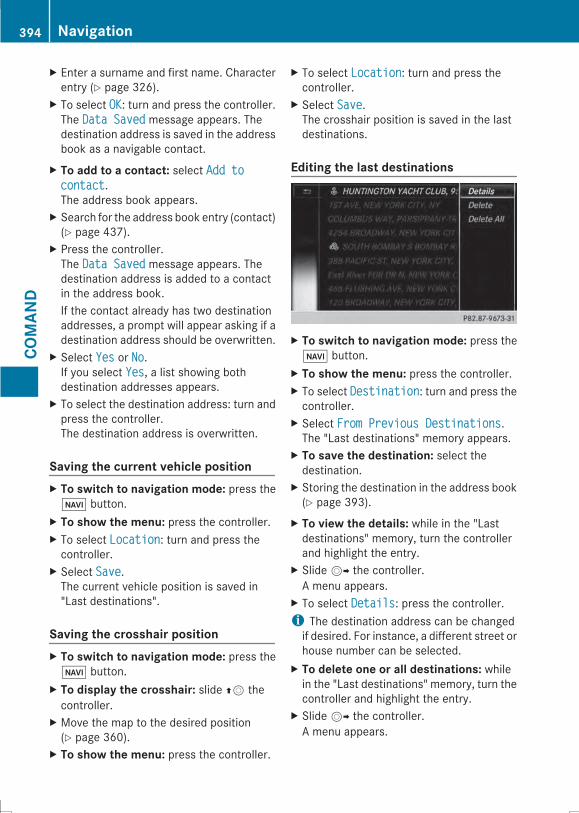
X Enter a surname and first name. Characterentry (Y page 326).
X To select OKOK: turn and press the controller.The Data SavedData Saved message appears. Thedestination address is saved in the addressbook as a navigable contact.
X To add to a contact: select Add toAdd tocontactcontact.The address book appears.
X Search for the address book entry (contact)(Y page 437).
X Press the controller.The Data SavedData Saved message appears. Thedestination address is added to a contactin the address book.If the contact already has two destinationaddresses, a prompt will appear asking if adestination address should be overwritten.
X Select YesYes or NoNo.If you select YesYes, a list showing bothdestination addresses appears.
X To select the destination address: turn andpress the controller.The destination address is overwritten.
Saving the current vehicle positionX To switch to navigation mode: press the
ß button.X To show the menu: press the controller.X To select LocationLocation: turn and press thecontroller.
X Select SaveSave.The current vehicle position is saved in"Last destinations".
Saving the crosshair positionX To switch to navigation mode: press the
ß button.X To display the crosshair: slide ZV thecontroller.
X Move the map to the desired position(Y page 360).
X To show the menu: press the controller.
X To select LocationLocation: turn and press thecontroller.
X Select SaveSave.The crosshair position is saved in the lastdestinations.
Editing the last destinations
X To switch to navigation mode: press theß button.
X To show the menu: press the controller.X To select DestinationDestination: turn and press thecontroller.
X Select From Previous DestinationsFrom Previous Destinations.The "Last destinations" memory appears.
X To save the destination: select thedestination.
X Storing the destination in the address book(Y page 393).
X To view the details: while in the "Lastdestinations" memory, turn the controllerand highlight the entry.
X SlideVY the controller.A menu appears.
X To select DetailsDetails: press the controller.i The destination address can be changedif desired. For instance, a different street orhouse number can be selected.
X To delete one or all destinations: whilein the "Last destinations" memory, turn thecontroller and highlight the entry.
X SlideVY the controller.A menu appears.
394 NavigationCO
MAN
D
X To select DeleteDelete or Delete AllDelete All: turn andpress the controller.A prompt appears.
X Select YesYes or NoNo.Selecting YesYes deletes the selecteddestination or all destinations.
Navigation 395
COMAN
D
Z
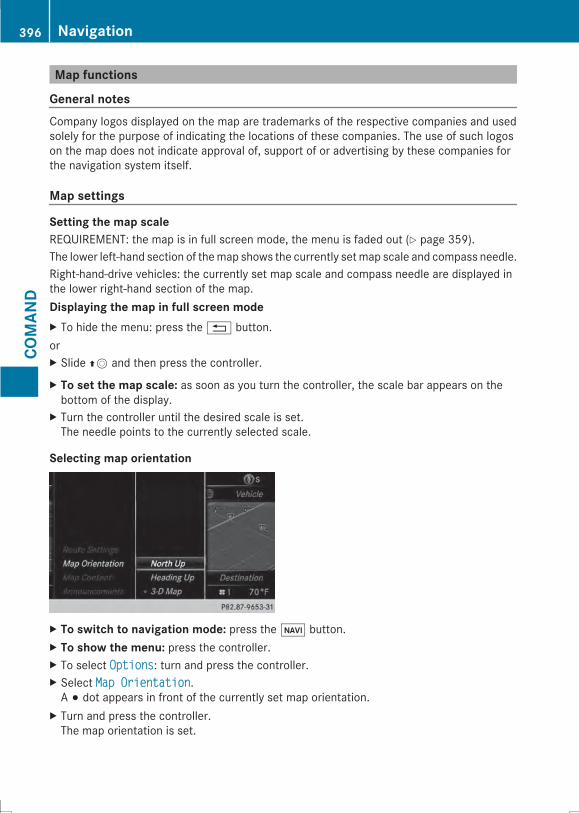
Map functions
General notesCompany logos displayed on the map are trademarks of the respective companies and usedsolely for the purpose of indicating the locations of these companies. The use of such logoson the map does not indicate approval of, support of or advertising by these companies forthe navigation system itself.
Map settings
Setting the map scaleREQUIREMENT: the map is in full screen mode, the menu is faded out (Y page 359).The lower left-hand section of themap shows the currently setmap scale and compass needle.Right-hand-drive vehicles: the currently set map scale and compass needle are displayed inthe lower right-hand section of the map.Displaying the map in full screen modeX To hide the menu: press the% button.orX Slide ZV and then press the controller.
X To set the map scale: as soon as you turn the controller, the scale bar appears on thebottom of the display.
X Turn the controller until the desired scale is set.The needle points to the currently selected scale.
Selecting map orientation
X To switch to navigation mode: press the ß button.X To show the menu: press the controller.X To select OptionsOptions: turn and press the controller.X Select Map OrientationMap Orientation.A # dot appears in front of the currently set map orientation.
X Turn and press the controller.The map orientation is set.
396 NavigationCO
MAN
D

Map orientation Explanation
Map North UpMap North Up 0 The map view is displayed so that north is always up.
Map Heading UpMap Heading Up ¤ The map view is aligned to the direction of travel. The directionof travel is always at the top; the red tip of the symbol points north.
3D Map3D Map ¤ The map view is aligned to the direction of travel. The mapdisplays elevation; the red tip of the symbol points north.
Selecting map contentThe following settings are available:RPoint of interest symbols on the mapPOIs can be displayed as symbols in themap display. POIs include, for example, gas stations,hotels and restaurants.RText information on mapAt the bottom of the display, you can specify whether to display geo-coordinates or not todisplay text information for the street you are currently on.RFreeway informationThe following can be displayed during route guidance:- the nearest gas stations and rest stops- rest areas and freeway exits- and their immediate distances from the vehicle's current positionRNext crossroadsIf route guidance is not active, the next crossroads can be displayed at the upper edge ofthe display.RMap versionThe number of the map data version is shown. Information about new versions of the digitalmap can be obtained from an authorized Mercedes-Benz Center.
Selecting POI symbols on the mapX To switch to navigation mode: press the ß button.X To show the menu: press the controller.X To select OptionsOptions: turn and press the controller.X Select Map ContentMap Content.X POI Symbols On MapPOI Symbols On MapA # dot appears in front of the current setting.
X Turn and press the controller.Default SymbolsDefault Symbols shows symbols of predefined categories in the map.Custom SymbolsCustom Symbols allows symbols to be selected from other/all available categories.
Navigation 397
COMAN
D
Z
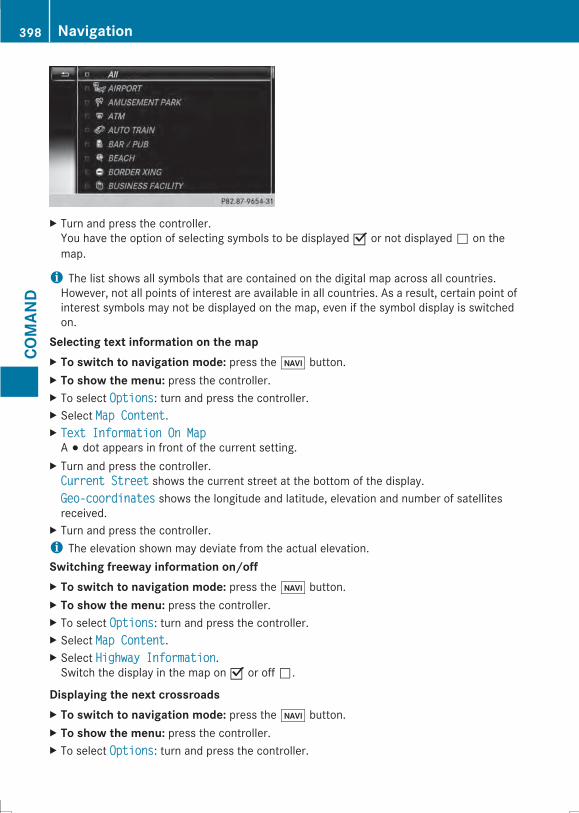
X Turn and press the controller.You have the option of selecting symbols to be displayed O or not displayed ª on themap.
i The list shows all symbols that are contained on the digital map across all countries.However, not all points of interest are available in all countries. As a result, certain point ofinterest symbols may not be displayed on the map, even if the symbol display is switchedon.
Selecting text information on the mapX To switch to navigation mode: press the ß button.X To show the menu: press the controller.X To select OptionsOptions: turn and press the controller.X Select Map ContentMap Content.X Text Information On MapText Information On MapA # dot appears in front of the current setting.
X Turn and press the controller.Current StreetCurrent Street shows the current street at the bottom of the display.Geo-coordinatesGeo-coordinates shows the longitude and latitude, elevation and number of satellitesreceived.
X Turn and press the controller.i The elevation shown may deviate from the actual elevation.Switching freeway information on/offX To switch to navigation mode: press the ß button.X To show the menu: press the controller.X To select OptionsOptions: turn and press the controller.X Select Map ContentMap Content.X Select Highway InformationHighway Information.Switch the display in the map on O or off ª.
Displaying the next crossroadsX To switch to navigation mode: press the ß button.X To show the menu: press the controller.X To select OptionsOptions: turn and press the controller.
398 NavigationCO
MAN
D
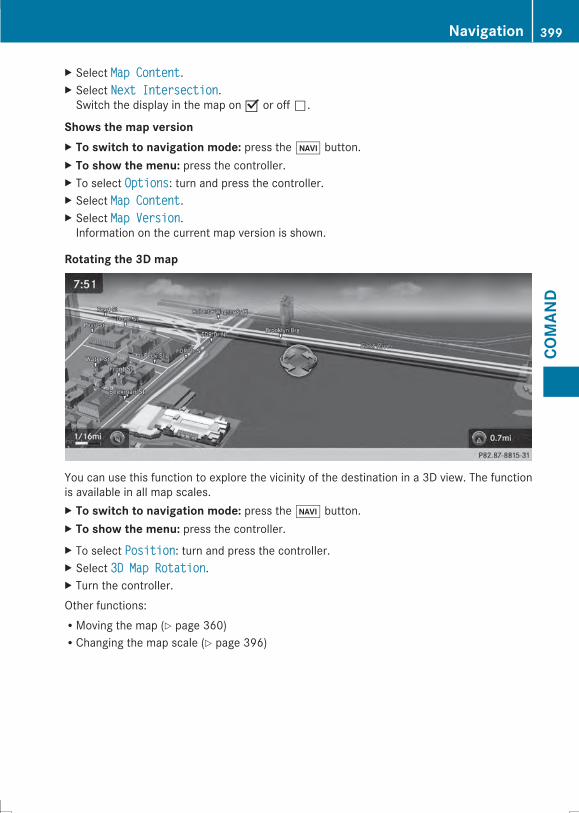
X Select Map ContentMap Content.X Select Next IntersectionNext Intersection.Switch the display in the map on O or off ª.
Shows the map versionX To switch to navigation mode: press the ß button.X To show the menu: press the controller.X To select OptionsOptions: turn and press the controller.X Select Map ContentMap Content.X Select Map VersionMap Version.Information on the current map version is shown.
Rotating the 3D map
You can use this function to explore the vicinity of the destination in a 3D view. The functionis available in all map scales.X To switch to navigation mode: press the Ø button.X To show the menu: press the controller.X To select PositionPosition: turn and press the controller.X Select 3D Map Rotation3D Map Rotation.X Turn the controller.Other functions:RMoving the map (Y page 360)RChanging the map scale (Y page 396)
Navigation 399
COMAN
D
Z
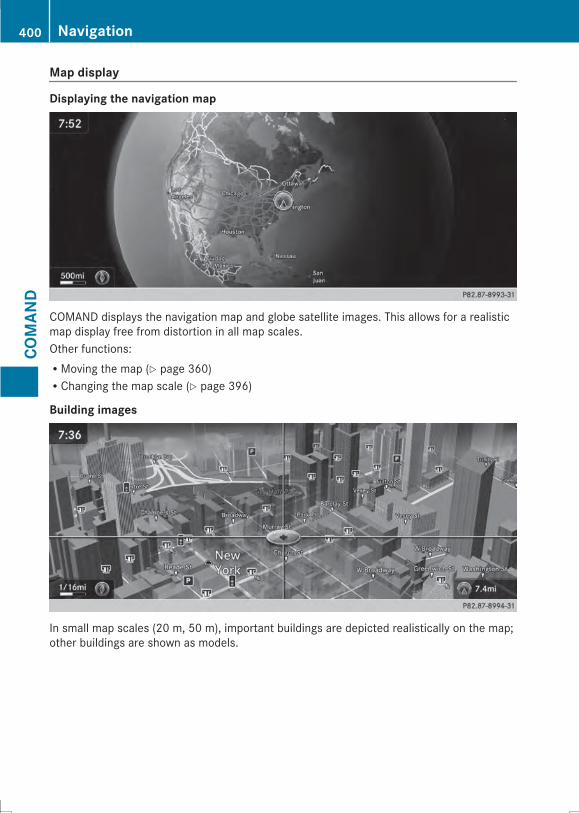
Map display
Displaying the navigation map
COMAND displays the navigation map and globe satellite images. This allows for a realisticmap display free from distortion in all map scales.Other functions:RMoving the map (Y page 360)RChanging the map scale (Y page 396)
Building images
In small map scales (20 m, 50 m), important buildings are depicted realistically on the map;other buildings are shown as models.
400 NavigationCO
MAN
D
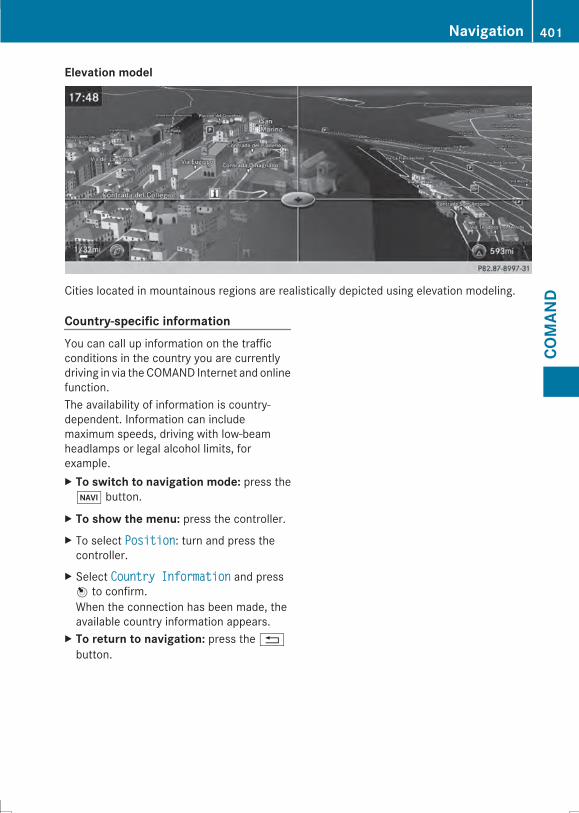
Elevation model
Cities located in mountainous regions are realistically depicted using elevation modeling.
Country-specific informationYou can call up information on the trafficconditions in the country you are currentlydriving in via theCOMAND Internet and onlinefunction.The availability of information is country-dependent. Information can includemaximum speeds, driving with low-beamheadlamps or legal alcohol limits, forexample.X To switch to navigation mode: press the
Ø button.
X To show the menu: press the controller.X To select PositionPosition: turn and press thecontroller.
X Select Country InformationCountry Information and pressW to confirm.When the connection has been made, theavailable country information appears.
X To return to navigation: press the%button.
Navigation 401
COMAN
D
Z
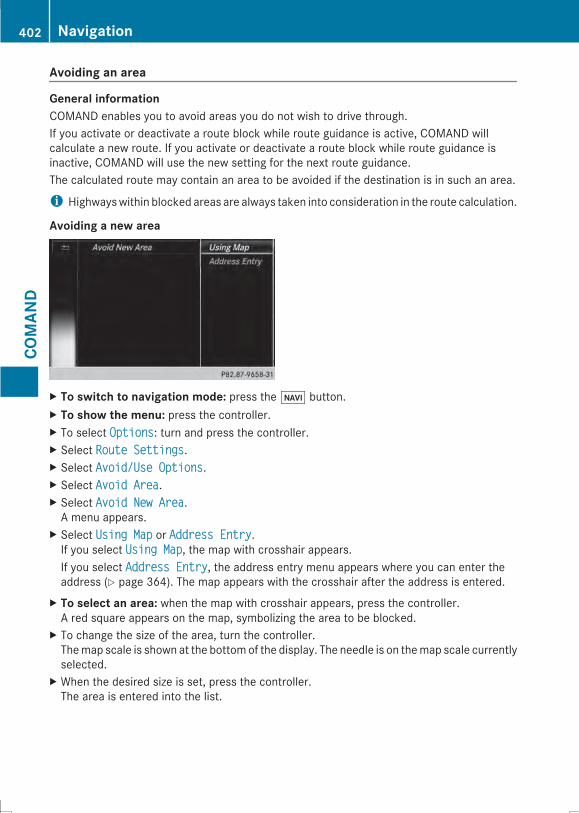
Avoiding an area
General informationCOMAND enables you to avoid areas you do not wish to drive through.If you activate or deactivate a route block while route guidance is active, COMAND willcalculate a new route. If you activate or deactivate a route block while route guidance isinactive, COMAND will use the new setting for the next route guidance.The calculated route may contain an area to be avoided if the destination is in such an area.
i Highwayswithin blocked areas are always taken into consideration in the route calculation.
Avoiding a new area
X To switch to navigation mode: press the ß button.X To show the menu: press the controller.X To select OptionsOptions: turn and press the controller.X Select Route SettingsRoute Settings.X Select Avoid/Use OptionsAvoid/Use Options.X Select Avoid AreaAvoid Area.X Select Avoid New AreaAvoid New Area.A menu appears.
X Select Using MapUsing Map or Address EntryAddress Entry.If you select Using MapUsing Map, the map with crosshair appears.If you select Address EntryAddress Entry, the address entry menu appears where you can enter theaddress (Y page 364). The map appears with the crosshair after the address is entered.
X To select an area: when the map with crosshair appears, press the controller.A red square appears on the map, symbolizing the area to be blocked.
X To change the size of the area, turn the controller.Themap scale is shown at the bottomof the display. The needle is on themap scale currentlyselected.
X When the desired size is set, press the controller.The area is entered into the list.
402 NavigationCO
MAN
D
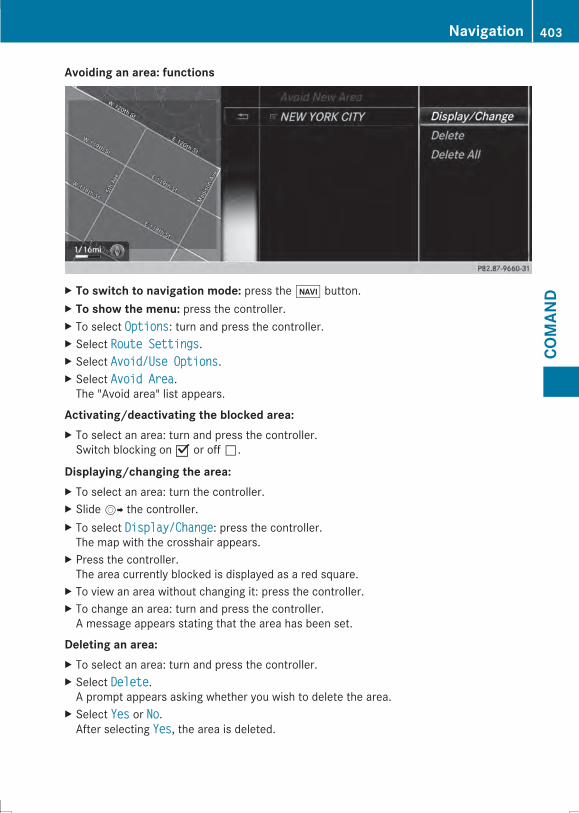
Avoiding an area: functions
X To switch to navigation mode: press the ß button.X To show the menu: press the controller.X To select OptionsOptions: turn and press the controller.X Select Route SettingsRoute Settings.X Select Avoid/Use OptionsAvoid/Use Options.X Select Avoid AreaAvoid Area.The "Avoid area" list appears.
Activating/deactivating the blocked area:X To select an area: turn and press the controller.Switch blocking on O or off ª.
Displaying/changing the area:X To select an area: turn the controller.X SlideVY the controller.X To select Display/ChangeDisplay/Change: press the controller.The map with the crosshair appears.
X Press the controller.The area currently blocked is displayed as a red square.
X To view an area without changing it: press the controller.X To change an area: turn and press the controller.A message appears stating that the area has been set.
Deleting an area:X To select an area: turn and press the controller.X Select DeleteDelete.A prompt appears asking whether you wish to delete the area.
X Select YesYes or NoNo.After selecting YesYes, the area is deleted.
Navigation 403
COMAN
D
Z
Deleting all areas:X SlideVY and press the controller while the list is shown.X Select Delete AllDelete All.A prompt appears asking whether you wish to delete all areas.
X Select YesYes or NoNo.After selecting YesYes, all areas are deleted.
SIRIUS XM service
Displaying SIRIUS XM service informationYou can display the SIRIUS XM serviceinformation.X To switch to navigation mode: press the
Ø button.X To show the menu: press the controller.X To select TrafficTraffic: turn the controller andpress to confirm.
X Select SIRIUS ServiceSIRIUS Service.The window on the right half of the displayshows the telephone number of theprovider (SIRIUS XM) and the serial numberof your service module.
Registering for the SIRIUS XM trafficreport serviceX Call the provider telephone number shownon the COMAND display.i You can also have the satellite serviceactivated online. To do so, visit the SIRIUSXM Radio website athttp://www.sirius.com (USA).
Once the connection has been established:X Follow the service employee's instructions.The activation process may take up to tenminutes.
If registration is not included whenpurchasing the system, your credit carddetails will be required to activate youraccount.
Updating the digital map
IntroductionThe digital maps generated by the mapsoftware become outdated in the same wayas conventional road maps. Optimal routeguidance can only be provided bythe navigation system in conjunction with themost up-to-date map software.Information about new versions of the digitalmap can be obtained from an authorizedMercedes-Benz Center. You can have thedigital map updated there using a datamedium, or you can update it yourself.
Installing the map softwareMap software for COMAND is subject to acharge. Map software can only be used onone vehicle with an activation code and is nottransferable. You can obtain the six-digitactivation code from an authorizedMercedes-Benz Center. If you have lost theactivation code, contact an authorizedMercedes-Benz Center. You should alsocontact an authorized Mercedes-Benz Centerif COMAND does not accept the activationcode that you have received.Your vehicle is delivered from the factory withmap software. Depending on the country,map software for your region is either pre-installed or the map software is supplied ona datamedium. You do not need an activationcode for the map software that is deliveredwith your vehicle.You also do not need to enter an activationcode if map software has already beeninstalled in the vehicle and must be installedagain.
404 NavigationCO
MAN
D
Installation processX Loading a data medium:Rinsert the DVD into the single DVD drive(Y page 472)Rinsert the DVD into the DVD changer(Y page 473)Rinsert an SD memory card(Y page 475)Rconnect USB data medium(Y page 475)
COMAND checks the data medium andshows a corresponding message in thedisplay.If themap softwarematches the navigationsystem and the current system software,COMAND checks whether the map data onthe data medium are already installed.
Map data is not yet installedIn the display, you will see a comparison ofthe version statuses of themap software datamedium and the map software installed inCOMAND. You can then update the mapsoftware.X To select UpdateUpdate or CancelCancel: turn or pressthe controller.If you select UpdateUpdate, the map data isinstalled.If you select CancelCancel, the map software isnot installed.
X To remove the data medium:Rremove the DVD from the single DVDdrive (Y page 472)Rremove the DVD from the DVD changer(Y page 474)RSD memory card (Y page 475)Rdisconnect the USB data mediumIf an activation code is required for themapsoftware, a prompt appears in the displayasking you to enter it.
X Enter the six-digit activation code andconfirm the entry with!.The software is installed. The PerformingPerformingmap update. Navigation system canmap update. Navigation system can
be used during map updatebe used during map update messageappears.If you enter an incorrect activation code, aprompt appears asking you to enter theactivation code again. After the activationcode has been entered incorrectly threetimes, there is a time-delay before theprompt to enter the activation codeappears again. The time delay increasesevery time the activation code is enteredincorrectly, from five minutes up to amaximum of five hours.
During the installation processThe map data is installed in the background.You can use the navigation system during theinstallation process and you can check thestatus of the map update at any time.X To confirm the PerformingPerforming mapmap update.update.Navigation system can be usedNavigation system can be usedduring map updateduring map update message: press thecontroller.The last navigation display used appears.
X Checking the map update status: pressthe ß button.
X To show the menu: press the controller.X To select SettingsSettings: turn and press thecontroller.
X Select Map ContentMap Content.X Select Map VersionMap Version.If the installation process was successful, themessage Map update has beenMap update has beencompleted successfully Restartingcompleted successfully Restartingnavigation system...navigation system... appears. Thenavigation system is restarted. Any existingroute guidance will be recalculated and willresume using the new map data.X To confirm the message: press thecontroller.
X Remove the data medium.The installation process is completed.
X Installation process for multi-DVD mapdata: after the first DVD has been installed,a message appears asking you to insert the
Navigation 405
COMAN
D
Z
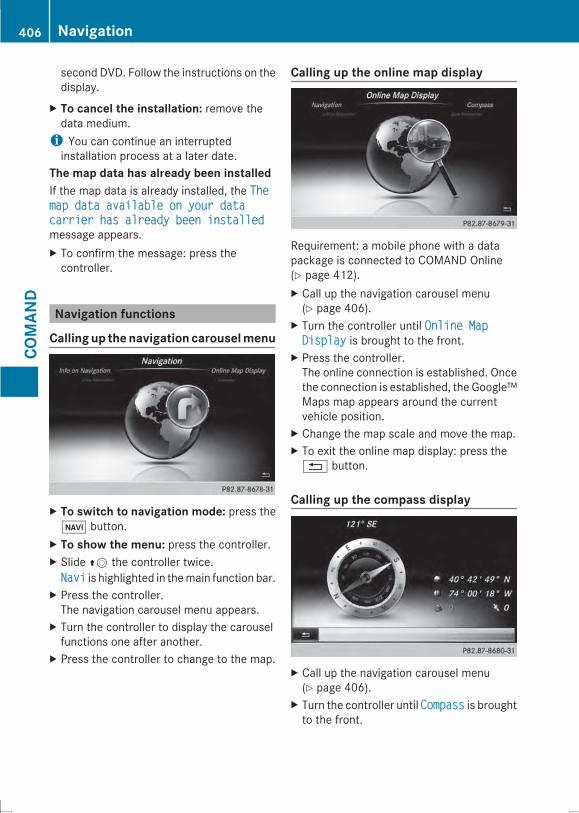
second DVD. Follow the instructions on thedisplay.
X To cancel the installation: remove thedata medium.i You can continue an interruptedinstallation process at a later date.
The map data has already been installedIf the map data is already installed, the TheThemap data available on your datamap data available on your datacarrier has already been installedcarrier has already been installedmessage appears.X To confirm the message: press thecontroller.
Navigation functions
Callingup thenavigation carouselmenu
X To switch to navigation mode: press theß button.
X To show the menu: press the controller.X Slide ZV the controller twice.NaviNavi is highlighted in themain function bar.
X Press the controller.The navigation carousel menu appears.
X Turn the controller to display the carouselfunctions one after another.
X Press the controller to change to the map.
Calling up the online map display
Requirement: a mobile phone with a datapackage is connected to COMAND Online(Y page 412).X Call up the navigation carousel menu(Y page 406).
X Turn the controller until Online MapOnline MapDisplayDisplay is brought to the front.
X Press the controller.The online connection is established. Oncethe connection is established, the Google™Maps map appears around the currentvehicle position.
X Change the map scale and move the map.X To exit the online map display: press the% button.
Calling up the compass display
X Call up the navigation carousel menu(Y page 406).
X Turn the controller until CompassCompass is broughtto the front.
406 NavigationCO
MAN
D
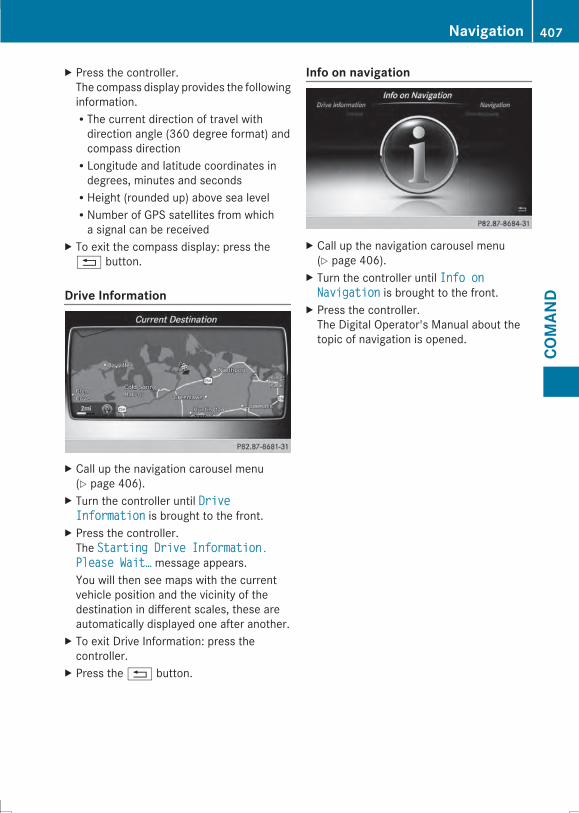
X Press the controller.The compass display provides the followinginformation.RThe current direction of travel withdirection angle (360 degree format) andcompass directionRLongitude and latitude coordinates indegrees, minutes and secondsRHeight (rounded up) above sea levelRNumber of GPS satellites from whicha signal can be received
X To exit the compass display: press the% button.
Drive Information
X Call up the navigation carousel menu(Y page 406).
X Turn the controller until DriveDriveInformationInformation is brought to the front.
X Press the controller.The Starting Drive Information.Starting Drive Information.Please Wait…Please Wait… message appears.You will then see maps with the currentvehicle position and the vicinity of thedestination in different scales, these areautomatically displayed one after another.
X To exit Drive Information: press thecontroller.
X Press the% button.
Info on navigation
X Call up the navigation carousel menu(Y page 406).
X Turn the controller until Info onInfo onNavigationNavigation is brought to the front.
X Press the controller.The Digital Operator's Manual about thetopic of navigation is opened.
Navigation 407
COMAN
D
Z
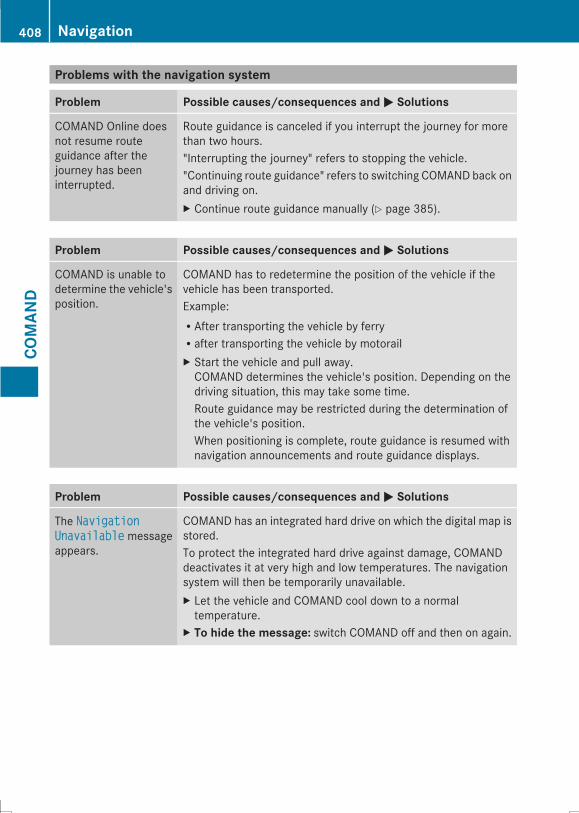
Problems with the navigation system
Problem Possible causes/consequences andMM Solutions
COMAND Online doesnot resume routeguidance after thejourney has beeninterrupted.
Route guidance is canceled if you interrupt the journey for morethan two hours."Interrupting the journey" refers to stopping the vehicle."Continuing route guidance" refers to switching COMAND back onand driving on.X Continue route guidance manually (Y page 385).
Problem Possible causes/consequences andMM Solutions
COMAND is unable todetermine the vehicle'sposition.
COMAND has to redetermine the position of the vehicle if thevehicle has been transported.Example:RAfter transporting the vehicle by ferryRafter transporting the vehicle by motorailX Start the vehicle and pull away.COMAND determines the vehicle's position. Depending on thedriving situation, this may take some time.Route guidance may be restricted during the determination ofthe vehicle's position.When positioning is complete, route guidance is resumed withnavigation announcements and route guidance displays.
Problem Possible causes/consequences andMM Solutions
The NavigationNavigationUnavailableUnavailable messageappears.
COMAND has an integrated hard drive on which the digital map isstored.To protect the integrated hard drive against damage, COMANDdeactivates it at very high and low temperatures. The navigationsystem will then be temporarily unavailable.X Let the vehicle and COMAND cool down to a normaltemperature.
X To hide the message: switch COMAND off and then on again.
408 NavigationCO
MAN
D
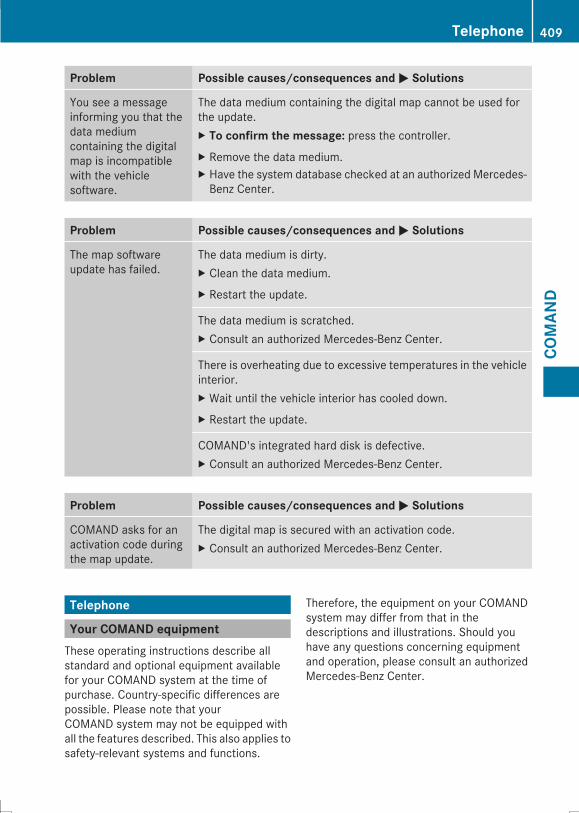
Problem Possible causes/consequences and MM Solutions
You see a messageinforming you that thedata mediumcontaining the digitalmap is incompatiblewith the vehiclesoftware.
The data medium containing the digital map cannot be used forthe update.X To confirm the message: press the controller.X Remove the data medium.X Have the system database checked at an authorized Mercedes-Benz Center.
Problem Possible causes/consequences and MM Solutions
The map softwareupdate has failed.
The data medium is dirty.X Clean the data medium.X Restart the update.
The data medium is scratched.X Consult an authorized Mercedes-Benz Center.
There is overheating due to excessive temperatures in the vehicleinterior.X Wait until the vehicle interior has cooled down.X Restart the update.
COMAND's integrated hard disk is defective.X Consult an authorized Mercedes-Benz Center.
Problem Possible causes/consequences and MM Solutions
COMAND asks for anactivation code duringthe map update.
The digital map is secured with an activation code.X Consult an authorized Mercedes-Benz Center.
Telephone
Your COMAND equipmentThese operating instructions describe allstandard and optional equipment availablefor your COMAND system at the time ofpurchase. Country-specific differences arepossible. Please note that yourCOMAND system may not be equipped withall the features described. This also applies tosafety-relevant systems and functions.
Therefore, the equipment on your COMANDsystem may differ from that in thedescriptions and illustrations. Should youhave any questions concerning equipmentand operation, please consult an authorizedMercedes-Benz Center.
Telephone 409
COMAN
D
Z
General notes
Important safety notes
G WARNINGIf you operate mobile communicationequipment while driving, you will bedistracted from traffic conditions. You couldalso lose control of the vehicle. There is a riskof an accident.Only operate this equipment when the vehicleis stationary.
If you make a call on your mobile phone whiledriving, always use hands-free mode. Onlyuse the mobile phone when road, weatherand traffic conditions permit. Somejurisdictions prohibit the driver from using amobile phone while driving a vehicle.Bear in mind that at a speed of only 30 mph(approximately 50 km/h), the vehicle coversa distance of 44 feet (approximately 14 m)per second.Excessive levels of electromagnetic radiationmay cause damage to your health and thehealth of others.There is scientific discussion surrounding thepossible health risks posed byelectromagnetic fields. You can reduce thisrisk by using an exterior antenna.Therefore, only use mobile communicationequipment if it is connected to the exteriorantenna of the vehicle.
IntroductionCOMAND allows you to use the followingmodes of telephony:RTelephony via the Bluetooth® interfaceusing COMANDRBusiness telephony via the Bluetooth®interface of the Multi-Seat-EntertainmentSystem (handset).
i Business telephony is only available if thevehicle is equipped with a Multi-Seat-
Entertainment System and the businesstelephony option.
When connecting Bluetooth®-capable mobilephones with PBAP (Phone Book AccessProfile), the contacts are automaticallydownloaded to COMAND or the Multi-Seat-Entertainment System.With a suitable mobile phone, you can use thehands-free system and receive vCards via theBluetooth® interface.You can use the text message and e-mailfunctions if the mobile phone supports theMAP Bluetooth® profile (Message AccessProfile).You can obtain more detailed informationabout suitable mobile phones and aboutconnecting Bluetooth®-capable mobilephones to COMAND on the Internet athttp://www.mbusa-mobile.com. Or callthe Mercedes-Benz Customer Assistancecenter at1-800-FOR-MERCedes(1-800-367-6372) forthe USA or at 1-800-387-0100 for Canada.
Call disconnection while the vehicle isin motionA call may be disconnected if:Rthere is insufficient network coverage incertain areas.Ryou move from one transmitter/receiverarea (cell) into another and no channels arefree.Ryou use a SIM card which is not compatiblewith the network available.
Operating optionsYou can operate the telephone by:Rusing the controller:TurnSlide XVY or ZVÆ
PressRusing the6 or~ button and usingthe telephone keypad on COMAND
410 TelephoneCO
MAN
D

Rusing the6 or~ button on themultifunction steering wheelRusing the Voice Control System (see theseparate Voice Control System operatinginstructions)
Unless stated otherwise, the descriptions andillustrations in this section refer to COMAND.
Function restrictionsThe telephone is not ready for use in thefollowing situations:RThe telephone automatically tries to log onto a network. If no network is available, youmay not be able to make a "911"emergency call. If you attempt to make anoutgoing call, the NoNo ServiceServicemessagewillappear for a short while.
"911" emergency call
G WARNINGThe 911 emergency call system is a publicservice. Using it without due cause is acriminal offense.
The following requirements must be fulfilledfor a 911 emergency call:Rthe mobile phone must be switched on.Ra network must be available.Ra valid and operational SIM card must beinserted in the mobile phone.Rthemobile phone is connected toCOMANDvia Bluetooth®.
If you cannot make an emergency call, youmust arrange rescue measures yourself.X Enter the number on COMAND(Y page 419).
X Press6.The telephone makes the connection.
X Wait until the emergency call centeranswers and describe the emergencysituation.
Telephony via the Bluetooth®interface
PrerequisitesFor telephony via COMAND's Bluetooth®interface, a Bluetooth®-capable mobilephone is required.On COMANDX Activate the Bluetooth® function inCOMAND (Y page 338).
On the mobile phoneX Switch on the mobile phone and enter thePIN when prompted to do so (see themobile phone operating instructions).
X Activate Bluetooth® functions and, wherenecessary, Bluetooth® visibility on themobile phone (see the mobile phoneoperating instructions).
The battery of the mobile phone shouldalways be kept sufficiently charged in orderto prevent malfunctions.In preparation for telephoning via theBluetooth® interface, you should check thefollowing items on yourmobile phone (see themobile phone operating instructions):RHands-Free ProfileThe mobile phone must support Hands-Free Profile 1.0 or above.RBluetooth® visibilityOn certain mobile phones, the device itselfmust be made "visible" to other devices, aswell as activating the Bluetooth® function(see the mobile phone operatinginstructions).This visibility is for restricted periods oftime on some mobile phones.RBluetooth® device nameEvery Bluetooth® device has its ownBluetooth® device name. This device nameis freely definable, but can be identical forall devices from the same manufacturer. Itis therefore recommended that you changethis name so that you can easily recognize
Telephone 411
COMAN
D
Z
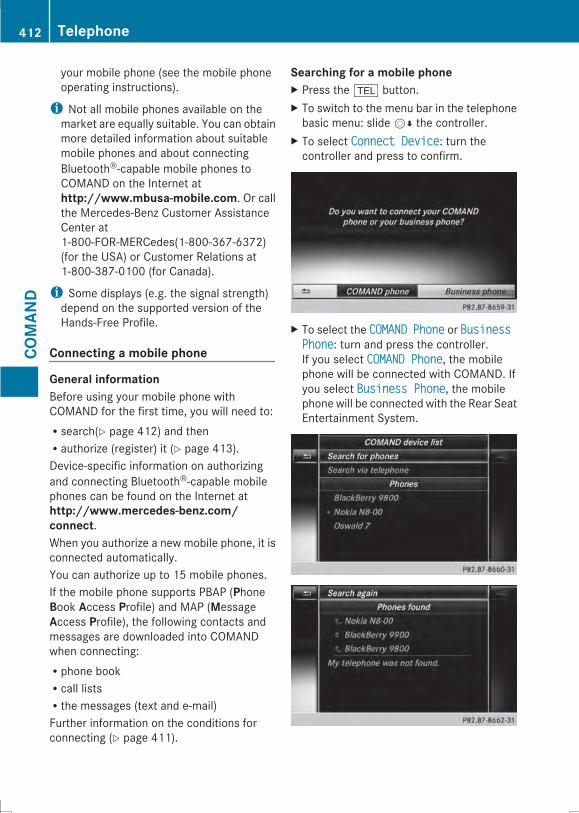
your mobile phone (see the mobile phoneoperating instructions).
i Not all mobile phones available on themarket are equally suitable. You can obtainmore detailed information about suitablemobile phones and about connectingBluetooth®-capable mobile phones toCOMAND on the Internet athttp://www.mbusa-mobile.com. Or callthe Mercedes-Benz Customer AssistanceCenter at1-800-FOR-MERCedes(1-800-367-6372)(for the USA) or Customer Relations at1-800-387-0100 (for Canada).
i Some displays (e.g. the signal strength)depend on the supported version of theHands-Free Profile.
Connecting a mobile phone
General informationBefore using your mobile phone withCOMAND for the first time, you will need to:Rsearch(Y page 412) and thenRauthorize (register) it (Y page 413).Device-specific information on authorizingand connecting Bluetooth®-capable mobilephones can be found on the Internet athttp://www.mercedes-benz.com/connect.When you authorize a new mobile phone, it isconnected automatically.You can authorize up to 15 mobile phones.If the mobile phone supports PBAP (PhoneBook Access Profile) and MAP (MessageAccess Profile), the following contacts andmessages are downloaded into COMANDwhen connecting:Rphone bookRcall listsRthe messages (text and e-mail)Further information on the conditions forconnecting (Y page 411).
Searching for a mobile phoneX Press the % button.X To switch to the menu bar in the telephonebasic menu: slideVÆ the controller.
X To select Connect DeviceConnect Device: turn thecontroller and press to confirm.
X To select the COMANDCOMAND PhonePhone or BusinessBusinessPhonePhone: turn and press the controller.If you select COMAND PhoneCOMAND Phone, the mobilephone will be connected with COMAND. Ifyou select Business PhoneBusiness Phone, the mobilephone will be connected with the Rear SeatEntertainment System.
412 TelephoneCO
MAN
D
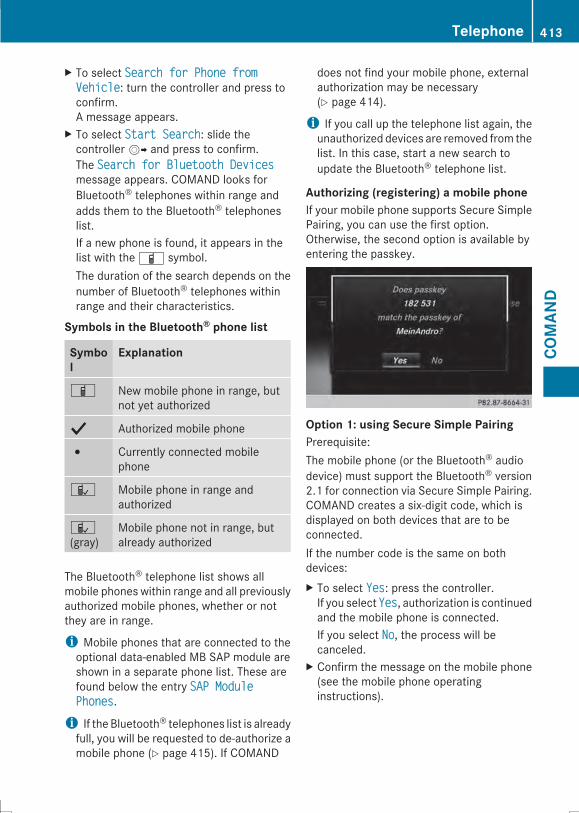
X To select Search for Phone fromSearch for Phone fromVehicleVehicle: turn the controller and press toconfirm.A message appears.
X To select Start SearchStart Search: slide thecontrollerVY and press to confirm.The Search for Bluetooth DevicesSearch for Bluetooth Devicesmessage appears. COMAND looks forBluetooth® telephones within range andadds them to the Bluetooth® telephoneslist.If a new phone is found, it appears in thelist with theÏ symbol.The duration of the search depends on thenumber of Bluetooth® telephones withinrange and their characteristics.
Symbols in the Bluetooth® phone list
Symbol
Explanation
Ï New mobile phone in range, butnot yet authorized
Y Authorized mobile phone
# Currently connected mobilephone
Ñ Mobile phone in range andauthorized
Ñ(gray)
Mobile phone not in range, butalready authorized
The Bluetooth® telephone list shows allmobile phones within range and all previouslyauthorized mobile phones, whether or notthey are in range.
i Mobile phones that are connected to theoptional data-enabled MB SAP module areshown in a separate phone list. These arefound below the entry SAP ModuleSAP ModulePhonesPhones.i If the Bluetooth® telephones list is alreadyfull, you will be requested to de-authorize amobile phone (Y page 415). If COMAND
does not find your mobile phone, externalauthorization may be necessary(Y page 414).
i If you call up the telephone list again, theunauthorized devices are removed from thelist. In this case, start a new search toupdate the Bluetooth® telephone list.
Authorizing (registering) a mobile phoneIf your mobile phone supports Secure SimplePairing, you can use the first option.Otherwise, the second option is available byentering the passkey.
Option 1: using Secure Simple PairingPrerequisite:The mobile phone (or the Bluetooth® audiodevice) must support the Bluetooth® version2.1 for connection via Secure Simple Pairing.COMAND creates a six-digit code, which isdisplayed on both devices that are to beconnected.If the number code is the same on bothdevices:X To select YesYes: press the controller.If you select YesYes, authorization is continuedand the mobile phone is connected.If you select NoNo, the process will becanceled.
X Confirm the message on the mobile phone(see the mobile phone operatinginstructions).
Telephone 413
COMAN
D
Z
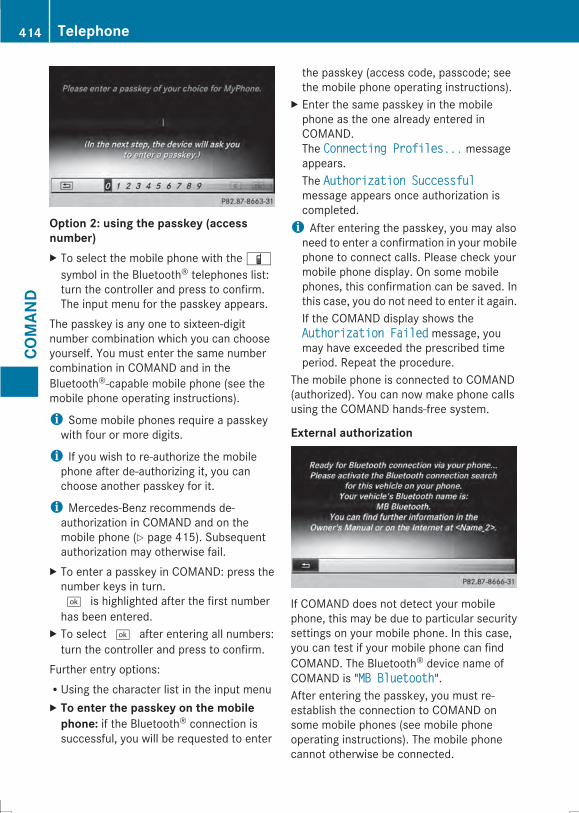
Option 2: using the passkey (accessnumber)X To select the mobile phone with theÏsymbol in the Bluetooth® telephones list:turn the controller and press to confirm.The input menu for the passkey appears.
The passkey is any one to sixteen-digitnumber combination which you can chooseyourself. You must enter the same numbercombination in COMAND and in theBluetooth®-capable mobile phone (see themobile phone operating instructions).
i Some mobile phones require a passkeywith four or more digits.
i If you wish to re-authorize the mobilephone after de-authorizing it, you canchoose another passkey for it.
i Mercedes-Benz recommends de-authorization in COMAND and on themobile phone (Y page 415). Subsequentauthorization may otherwise fail.
X To enter a passkey in COMAND: press thenumber keys in turn.¬ is highlighted after the first numberhas been entered.
X To select ¬ after entering all numbers:turn the controller and press to confirm.
Further entry options:RUsing the character list in the input menuX To enter the passkey on the mobilephone: if the Bluetooth® connection issuccessful, you will be requested to enter
the passkey (access code, passcode; seethe mobile phone operating instructions).
X Enter the same passkey in the mobilephone as the one already entered inCOMAND.The Connecting Profiles...Connecting Profiles... messageappears.The Authorization SuccessfulAuthorization Successfulmessage appears once authorization iscompleted.i After entering the passkey, you may alsoneed to enter a confirmation in your mobilephone to connect calls. Please check yourmobile phone display. On some mobilephones, this confirmation can be saved. Inthis case, you do not need to enter it again.If the COMAND display shows theAuthorization FailedAuthorization Failed message, youmay have exceeded the prescribed timeperiod. Repeat the procedure.
The mobile phone is connected to COMAND(authorized). You can now make phone callsusing the COMAND hands-free system.
External authorization
If COMAND does not detect your mobilephone, this may be due to particular securitysettings on your mobile phone. In this case,you can test if your mobile phone can findCOMAND. The Bluetooth® device name ofCOMAND is "MB BluetoothMB Bluetooth".After entering the passkey, you must re-establish the connection to COMAND onsome mobile phones (see mobile phoneoperating instructions). The mobile phonecannot otherwise be connected.
414 TelephoneCO
MAN
D

X Press the % button on COMAND.X To switch to the menu bar in the telephonebasic menu: slideVÆ the controller.
X To select Connect DeviceConnect Device: turn and pressthe controller.The Bluetooth® telephone list appears.
X To select Connect via PhoneConnect via Phone: turn andpress the controller.A message appears.
X Start the Bluetooth® search on the mobilephone; see the mobile phone operatinginstructions.
X Select COMAND (MB BluetoothMB Bluetooth) on themobile phone.
X Option 1: when requested to do so, enterthe passkey first on the mobile phone andthen in COMAND.
X Option 2: confirm the displayed codes onthe mobile phone and in COMAND (SecureSimple Pairing).With both options, you see the prompt DoDoyou want <Device name> to beyou want <Device name> to beauthorized?authorized? on the COMAND display.
X If you select YesYes, the mobile phone will beauthorized. The messages Waiting forWaiting forConnections from the BluetoothConnections from the BluetoothDevice...Device... and ConnectingConnectingProfiles...Profiles... are displayed. If theconnection is successful, you see thetelephone basic menu and the connectedmobile phone is entered.If you select NoNo, the process will becanceled.
Reconnecting automaticallyCOMAND always searches for the lastconnected mobile phone.If no connection can be made to the mostrecently connectedmobile phone, the systemsearches for the mobile phone that wasconnected before that one.
Switching between mobile phonesIf you have authorized more than one mobilephone, you can switch between the individualphones.X To select the mobile phone in theBluetooth® telephones list: turn and pressthe controller.The selected mobile phone is searched forand connected if it is within Bluetooth®range and if Bluetooth® is activated.Only one mobile phone can be connectedat any one time. The currently connectedmobile phone is indicated by the # dot inthe Bluetooth® telephones list.
i You can only switch to another authorizedmobile phone if you are not currentlymaking a call.
De-authorizing (de-registering) a mobilephoneMercedes-Benz recommends de-authorization in COMAND and on the mobilephone. Subsequent authorization mayotherwise fail.Mercedes-Benz USA, LLC recommends de-authorization in COMAND and on the mobilephone. Subsequent authorization mayotherwise fail.X Press the % button on COMAND.X To switch to the menu bar in the telephonebasic menu: slideVÆ the controller.
X To select Connect DeviceConnect Device: turn and pressthe controller.The Bluetooth® telephone list appears(Y page 412).
X Select the desired mobile phone in theBluetooth® telephones list.
Telephone 415
COMAN
D
Z
X To select the list symbol to the right of theentry: slideVY the controller and press toconfirm.
X To select DeauthorizeDeauthorize: turn the controllerand press to confirm.A prompt appears asking whether youreally wish to de-authorize this device.
X To select YesYes or NoNo: turn the controller andpress to confirm.If you select YesYes, the device will be deletedfrom the Bluetooth® telephones list.If you select NoNo, the process will becanceled.
i Before re-authorizing the mobile phone,you should also delete the device name MBMBBluetoothBluetooth from your mobile phone'sBluetooth® list.
Displaying connection detailsX Press the % button on COMAND.X To switch to the menu bar in the telephonebasic menu: slideVÆ the controller.
X To select Connect DeviceConnect Device: turn thecontroller and press to confirm.The Bluetooth® telephone list appears.
X Select the desired mobile phone in theBluetooth® telephones list.
X To select the list symbol to the right of theentry: slideVY the controller and press toconfirm.
X To select DetailsDetails: turn and press thecontroller.The following information concerning theselected mobile phone is shown:RBluetooth® nameRBluetooth® addressRavailability status (shown after a newsearch)Rauthorization status
X To close the detailed display: slideVYthe controller.
416 TelephoneCO
MAN
D

Telephone basic menu (Bluetooth® interface)
Basic menu display
Telephone basic menu (Bluetooth® interface): Illustration of telephone keypad (button activated is highlighted); To display the COMAND phone book= Character bar? Network provider's name (depends on the connected phone)A Signal strength of mobile phone networkÄB Receiver icon¢ or¡C Bluetooth® name of the currently connected mobile phoneX Press %.When the connected mobile phone is ready for use, the telephone basic menu appears.i Displays? andA are shown, depending on the mobile phone connected.Display; may vary, depending on the mobile phone connected.BarsA show the current signal strength of the mobile phone network. If all bars are filled,you have optimum reception.If no bars are shown, reception is either very poor or there is none at all.If no bars appear and only the antenna icon is shown, you have either very poor or noreception at all.Receiver icon shows whether a call is active/being connected¡ or not¢.
Displaying messages in the telephone basic menuOnly if the Bluetooth® phone supports the MAP Bluetooth® profile (Message Access Profile)is the 0 menu item available. The downloading of messages from the Bluetooth® phonemust have been completed. The menu item is otherwise grayed out. Further information ontext messages and e-mail (Y page 430).If you have an unread text message or e-mail, the 1 mail symbol is displayed in the statusbar. The symbol disappears once you have read the text message or e-mail. Theú symbol
Telephone 417
COMAN
D
Z
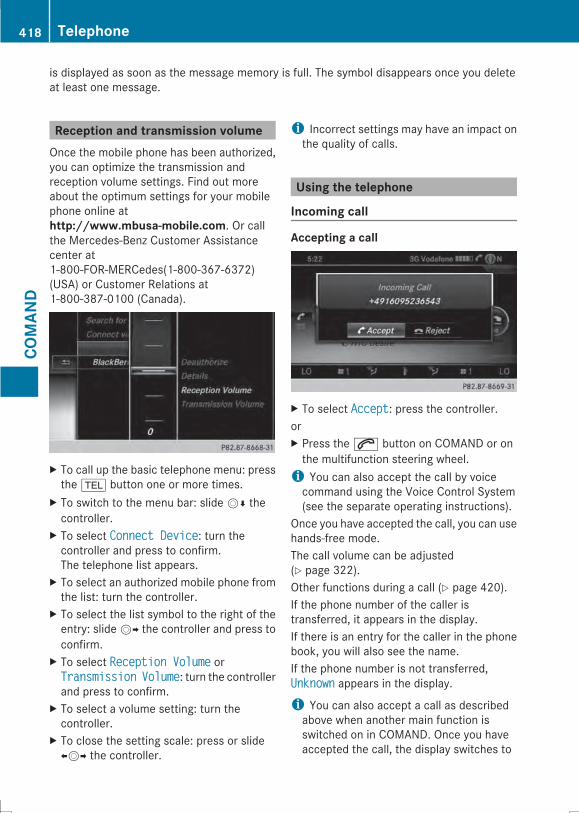
is displayed as soon as the message memory is full. The symbol disappears once you deleteat least one message.
Reception and transmission volumeOnce the mobile phone has been authorized,you can optimize the transmission andreception volume settings. Find out moreabout the optimum settings for your mobilephone online athttp://www.mbusa-mobile.com. Or callthe Mercedes-Benz Customer Assistancecenter at1-800-FOR-MERCedes(1-800-367-6372)(USA) or Customer Relations at1-800-387-0100 (Canada).
X To call up the basic telephone menu: pressthe % button one or more times.
X To switch to the menu bar: slideVÆ thecontroller.
X To select Connect DeviceConnect Device: turn thecontroller and press to confirm.The telephone list appears.
X To select an authorized mobile phone fromthe list: turn the controller.
X To select the list symbol to the right of theentry: slideVY the controller and press toconfirm.
X To select Reception VolumeReception Volume orTransmissionTransmission VolumeVolume: turn the controllerand press to confirm.
X To select a volume setting: turn thecontroller.
X To close the setting scale: press or slideXVY the controller.
i Incorrect settings may have an impact onthe quality of calls.
Using the telephone
Incoming call
Accepting a call
X To select AcceptAccept: press the controller.orX Press the6 button on COMAND or onthe multifunction steering wheel.i You can also accept the call by voicecommand using the Voice Control System(see the separate operating instructions).
Once you have accepted the call, you can usehands-free mode.The call volume can be adjusted(Y page 322).Other functions during a call (Y page 420).If the phone number of the caller istransferred, it appears in the display.If there is an entry for the caller in the phonebook, you will also see the name.If the phone number is not transferred,UnknownUnknown appears in the display.i You can also accept a call as describedabove when another main function isswitched on in COMAND. Once you haveaccepted the call, the display switches to
418 TelephoneCO
MAN
D
the telephone display. After the call isfinished, you see the display of the previousmain application again.The display does not switch to telephonemode if you:Raccept the call via the Voice ControlSystem (see the separate operatinginstructions).Raccept the call using the6 button onthe multifunction steering wheel
Rejecting a callX Press the~ button on COMAND or onthe multifunction steering wheel.
Making a call
Using the number keypadX Call up the telephone basic menu(Y page 417).
X Enter the digits using the number keypad.i As soon as one of the numbers is touched,the corresponding button is highlighted inthe display.
X To connect the call: press the6button on COMAND or on themultifunctionsteering wheel.
Using the telephone basic menuX Call up the telephone basic menu(Y page 417).
X To select all numbers one after the other:turn and press the controller each time.
Dialing a number:X Press the6 button on COMAND or onthe multifunction steering wheel.
RedialX Call up the telephone basic menu(Y page 417).
X To select° from the character list: turnthe controller and press to confirm.
orX If the telephone basic menu is displayed,press the6 button on COMAND.The list of dialed numbers appears. Themost recently dialed number is at the top.
X To select a call: turn the controller.X To make a call: press the controller.
Using the call list or COMAND phone bookX Open a call list and select an entry(Y page 426).
orX Call up the COMAND phone book andselect an entry (Y page 423).
X To make a call: press the controller or the6 button.
Making a call via speed dialYou can save entries from the phone book inthe speed dial list and call them using speeddial numbers (Y page 428).Option 1:X Hold down one of the number keys forlonger than two seconds.The telephone basic menu displays theselected entry. This initiates dialing.
Option 2:X To select a digit from the digit bar in thebasic telephone menu: turn the controller.
X Press the controller for longer than twoseconds.The telephone basic menu displays theselected entry. This initiates dialing.
Option 3:X Call up the telephone basic menu(Y page 417).
X To switch to the menu bar: slideVÆ thecontroller.
X To select Call ListsCall Lists: turn and press thecontroller.A menu appears.
Telephone 419
COMAN
D
Z
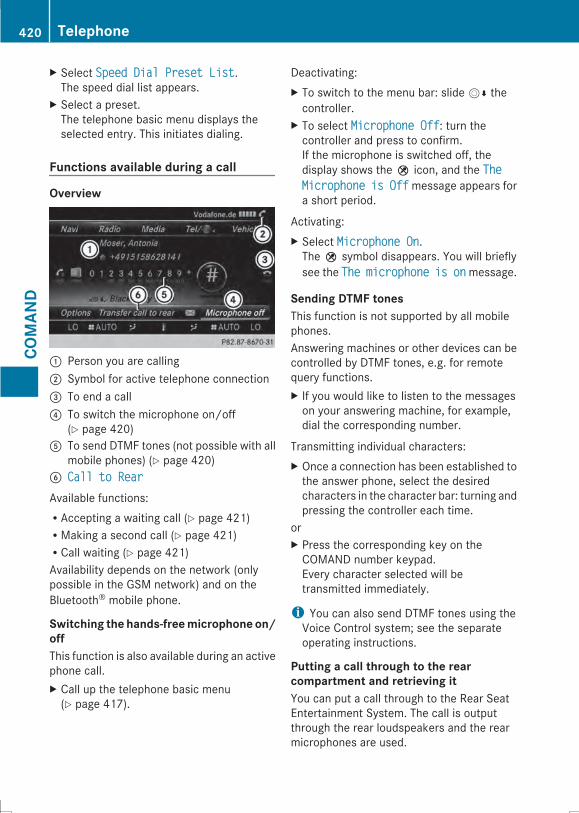
X Select Speed Dial Preset ListSpeed Dial Preset List.The speed dial list appears.
X Select a preset.The telephone basic menu displays theselected entry. This initiates dialing.
Functions available during a call
Overview
: Person you are calling; Symbol for active telephone connection= To end a call? To switch the microphone on/off
(Y page 420)A To send DTMF tones (not possible with all
mobile phones) (Y page 420)B Call to RearCall to RearAvailable functions:RAccepting a waiting call (Y page 421)RMaking a second call (Y page 421)RCall waiting (Y page 421)Availability depends on the network (onlypossible in the GSM network) and on theBluetooth® mobile phone.
Switching the hands-freemicrophone on/offThis function is also available during an activephone call.X Call up the telephone basic menu(Y page 417).
Deactivating:X To switch to the menu bar: slideVÆ thecontroller.
X To select Microphone OffMicrophone Off: turn thecontroller and press to confirm.If the microphone is switched off, thedisplay shows theQ icon, and the TheTheMicrophoneMicrophone isis OffOffmessage appears fora short period.
Activating:X Select Microphone OnMicrophone On.TheQ symbol disappears. You will brieflysee the TheThe microphonemicrophone isis ononmessage.
Sending DTMF tonesThis function is not supported by all mobilephones.Answering machines or other devices can becontrolled by DTMF tones, e.g. for remotequery functions.X If you would like to listen to the messageson your answering machine, for example,dial the corresponding number.
Transmitting individual characters:X Once a connection has been established tothe answer phone, select the desiredcharacters in the character bar: turning andpressing the controller each time.
orX Press the corresponding key on theCOMAND number keypad.Every character selected will betransmitted immediately.
i You can also send DTMF tones using theVoice Control system; see the separateoperating instructions.
Putting a call through to the rearcompartment and retrieving itYou can put a call through to the Rear SeatEntertainment System. The call is outputthrough the rear loudspeakers and the rearmicrophones are used.
420 TelephoneCO
MAN
D
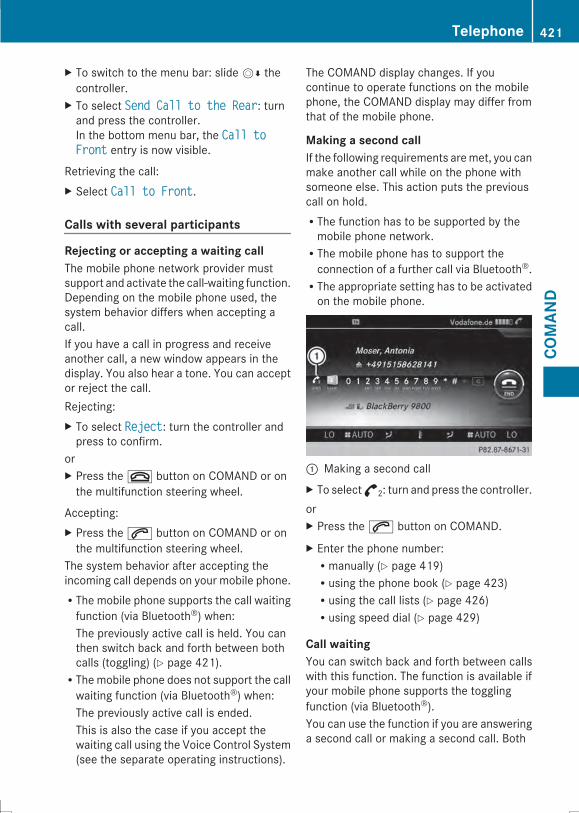
X To switch to the menu bar: slideVÆ thecontroller.
X To select Send Call to the RearSend Call to the Rear: turnand press the controller.In the bottom menu bar, the Call toCall toFrontFront entry is now visible.
Retrieving the call:X Select Call to FrontCall to Front.Calls with several participants
Rejecting or accepting a waiting callThe mobile phone network provider mustsupport and activate the call-waiting function.Depending on the mobile phone used, thesystem behavior differs when accepting acall.If you have a call in progress and receiveanother call, a new window appears in thedisplay. You also hear a tone. You can acceptor reject the call.Rejecting:X To select RejectReject: turn the controller andpress to confirm.
orX Press the~ button on COMAND or onthe multifunction steering wheel.
Accepting:X Press the6 button on COMAND or onthe multifunction steering wheel.
The system behavior after accepting theincoming call depends on your mobile phone.RThe mobile phone supports the call waitingfunction (via Bluetooth®) when:The previously active call is held. You canthen switch back and forth between bothcalls (toggling) (Y page 421).RThe mobile phone does not support the callwaiting function (via Bluetooth®) when:The previously active call is ended.This is also the case if you accept thewaiting call using the Voice Control System(see the separate operating instructions).
The COMAND display changes. If youcontinue to operate functions on the mobilephone, the COMAND display may differ fromthat of the mobile phone.
Making a second callIf the following requirements aremet, you canmake another call while on the phone withsomeone else. This action puts the previouscall on hold.RThe function has to be supported by themobile phone network.RThe mobile phone has to support theconnection of a further call via Bluetooth®.RThe appropriate setting has to be activatedon the mobile phone.
: Making a second callX To select°2: turn and press the controller.orX Press the6 button on COMAND.
X Enter the phone number:Rmanually (Y page 419)Rusing the phone book (Y page 423)Rusing the call lists (Y page 426)Rusing speed dial (Y page 429)
Call waitingYou can switch back and forth between callswith this function. The function is available ifyour mobile phone supports the togglingfunction (via Bluetooth®).You can use the function if you are answeringa second call or making a second call. Both
Telephone 421
COMAN
D
Z
discussions aremarkedwith 1 or 2. The activecall is highlighted.X To select°1 or°2: turn and press thecontroller.
orX Press the6 button on COMAND or onthe multifunction steering wheel.The previous call on hold is activated.
Ending the active call:X Press the~ button on COMAND or onthe multifunction steering wheel.A prompt appears asking whether youwould like to continue the call on hold.
X Select ContinueContinue.The call on hold is activated. If you selectHang UpHang Up, the call on hold is also ended.i On some mobile phones, the call on holdis activated as soon as the active call isended.
Conference callYou can interconnect calls (active and onhold) on COMAND. This permits severalparties to hear one another and speak withone another.X Make a second call (Y page 421).X To switch to the menu bar: slideVÆ thecontroller.
X To select ConferenceConference: turn and press thecontroller.The new participant is included in theconference call.
Using the phone book
IntroductionThe phone book displays the names andphone numbers of all address book entriessaved in the COMAND address book. If anaddress book entry does not have atelephone number, it does not appear in thephone book.
The mobile phone's telephone book isautomatically downloaded into COMAND onconnection (default setting). You candeactivate automatic downloading(Y page 441).In the telephone book, you can:Rsave phone numbers (Y page 424)Rsearch for entries (Y page 423)Rdelete entries (Y page 424)Rimport contacts (Y page 441)Rdelete contacts (Y page 442)Rreceive vCards (Y page 442)
i The stored phone book and the vCardsremain in COMAND even if you useCOMAND with another mobile phone. Theentries can be viewed without a mobilephone. For this reason, you should deleteany phone book entries before handingover or selling the vehicle.
Calling up the phone book
Opening the phone bookX To call up the basic telephone menu: pressthe % button one or more times.
X To select NameName from the telephone basicmenu: turn the controller and press toconfirm.If the phone book contains entries, they willbe displayed in alphabetical order. Thecharacter bar at the bottom of the displayis active.The character bar is used for fast selectionof an entry.Enter the character using the character bar(Y page 326).
422 TelephoneCO
MAN
D
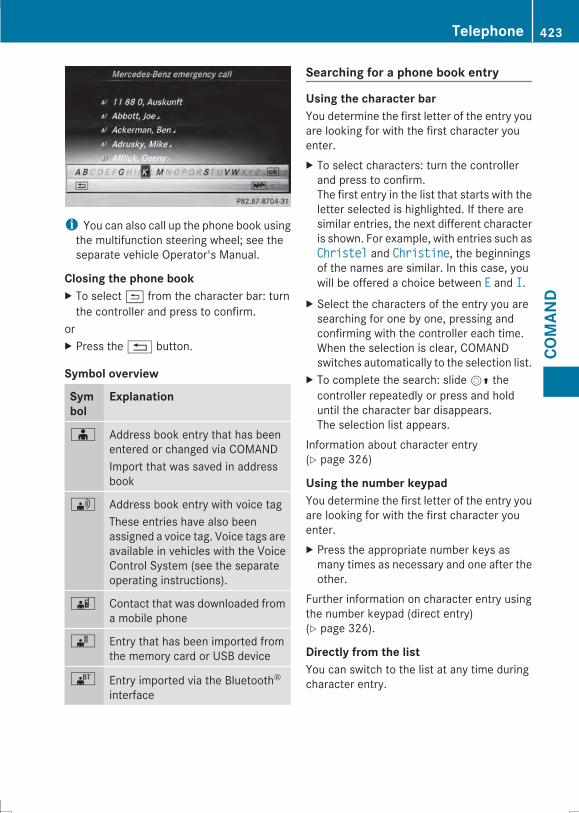
i You can also call up the phone book usingthe multifunction steering wheel; see theseparate vehicle Operator's Manual.
Closing the phone bookX To select& from the character bar: turnthe controller and press to confirm.
orX Press the% button.
Symbol overview
Symbol
Explanation
Æ Address book entry that has beenentered or changed via COMANDImport that was saved in addressbook
\ Address book entry with voice tagThese entries have also beenassigned a voice tag. Voice tags areavailable in vehicles with the VoiceControl System (see the separateoperating instructions).
à Contact that was downloaded froma mobile phone
¯ Entry that has been imported fromthe memory card or USB device
® Entry imported via the Bluetooth®interface
Searching for a phone book entry
Using the character barYou determine the first letter of the entry youare looking for with the first character youenter.X To select characters: turn the controllerand press to confirm.The first entry in the list that starts with theletter selected is highlighted. If there aresimilar entries, the next different characteris shown. For example, with entries such asChristelChristel and ChristineChristine, the beginningsof the names are similar. In this case, youwill be offered a choice between EE and II.
X Select the characters of the entry you aresearching for one by one, pressing andconfirming with the controller each time.When the selection is clear, COMANDswitches automatically to the selection list.
X To complete the search: slideVZ thecontroller repeatedly or press and holduntil the character bar disappears.The selection list appears.
Information about character entry(Y page 326)
Using the number keypadYou determine the first letter of the entry youare looking for with the first character youenter.X Press the appropriate number keys asmany times as necessary and one after theother.
Further information on character entry usingthe number keypad (direct entry)(Y page 326).
Directly from the listYou can switch to the list at any time duringcharacter entry.
Telephone 423
COMAN
D
Z
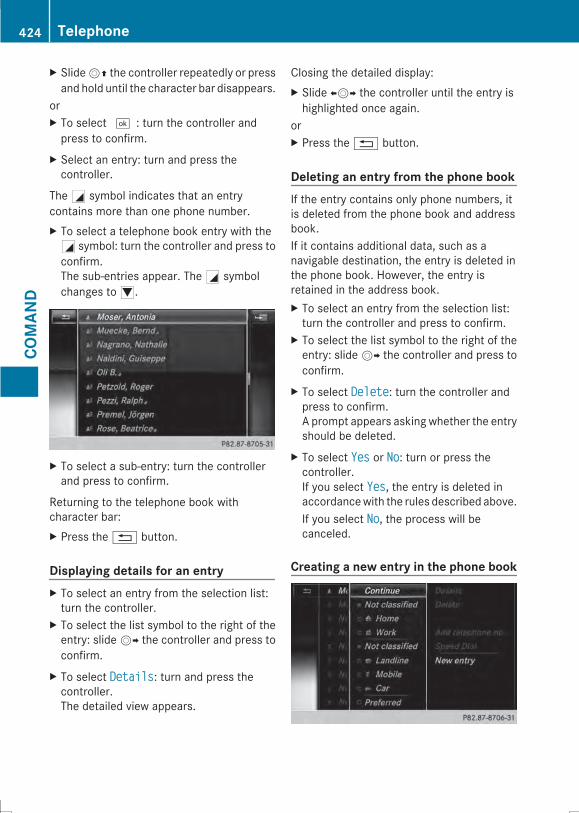
X SlideVZ the controller repeatedly or pressand hold until the character bar disappears.
orX To select ¬: turn the controller andpress to confirm.
X Select an entry: turn and press thecontroller.
TheG symbol indicates that an entrycontains more than one phone number.X To select a telephone book entry with theG symbol: turn the controller and press toconfirm.The sub-entries appear. TheG symbolchanges toI.
X To select a sub-entry: turn the controllerand press to confirm.
Returning to the telephone book withcharacter bar:X Press the% button.
Displaying details for an entryX To select an entry from the selection list:turn the controller.
X To select the list symbol to the right of theentry: slideVY the controller and press toconfirm.
X To select DetailsDetails: turn and press thecontroller.The detailed view appears.
Closing the detailed display:X Slide XVY the controller until the entry ishighlighted once again.
orX Press the% button.
Deleting an entry from the phone bookIf the entry contains only phone numbers, itis deleted from the phone book and addressbook.If it contains additional data, such as anavigable destination, the entry is deleted inthe phone book. However, the entry isretained in the address book.X To select an entry from the selection list:turn the controller and press to confirm.
X To select the list symbol to the right of theentry: slideVY the controller and press toconfirm.
X To select DeleteDelete: turn the controller andpress to confirm.A prompt appears asking whether the entryshould be deleted.
X To select YesYes or NoNo: turn or press thecontroller.If you select YesYes, the entry is deleted inaccordancewith the rules described above.If you select NoNo, the process will becanceled.
Creating a new entry in the phone book
424 TelephoneCO
MAN
D
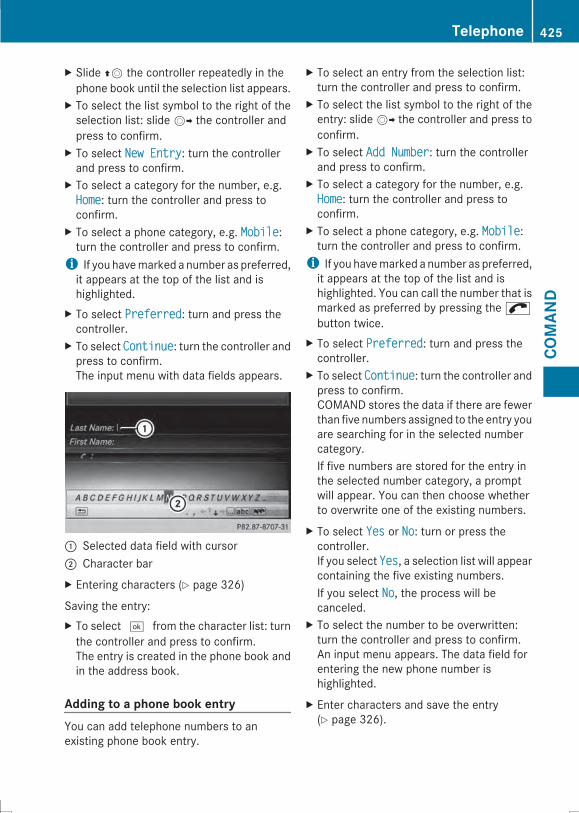
X Slide ZV the controller repeatedly in thephone book until the selection list appears.
X To select the list symbol to the right of theselection list: slideVY the controller andpress to confirm.
X To select New EntryNew Entry: turn the controllerand press to confirm.
X To select a category for the number, e.g.HomeHome: turn the controller and press toconfirm.
X To select a phone category, e.g. MobileMobile:turn the controller and press to confirm.i If you havemarked a number as preferred,it appears at the top of the list and ishighlighted.
X To select PreferredPreferred: turn and press thecontroller.
X To select ContinueContinue: turn the controller andpress to confirm.The input menu with data fields appears.
: Selected data field with cursor; Character barX Entering characters (Y page 326)
Saving the entry:X To select ¬ from the character list: turnthe controller and press to confirm.The entry is created in the phone book andin the address book.
Adding to a phone book entryYou can add telephone numbers to anexisting phone book entry.
X To select an entry from the selection list:turn the controller and press to confirm.
X To select the list symbol to the right of theentry: slideVY the controller and press toconfirm.
X To select Add NumberAdd Number: turn the controllerand press to confirm.
X To select a category for the number, e.g.HomeHome: turn the controller and press toconfirm.
X To select a phone category, e.g. MobileMobile:turn the controller and press to confirm.i If you havemarked a number as preferred,it appears at the top of the list and ishighlighted. You can call the number that ismarked as preferred by pressing the;button twice.
X To select PreferredPreferred: turn and press thecontroller.
X To select ContinueContinue: turn the controller andpress to confirm.COMAND stores the data if there are fewerthan five numbers assigned to the entry youare searching for in the selected numbercategory.If five numbers are stored for the entry inthe selected number category, a promptwill appear. You can then choose whetherto overwrite one of the existing numbers.
X To select YesYes or NoNo: turn or press thecontroller.If you select YesYes, a selection list will appearcontaining the five existing numbers.If you select NoNo, the process will becanceled.
X To select the number to be overwritten:turn the controller and press to confirm.An input menu appears. The data field forentering the new phone number ishighlighted.
X Enter characters and save the entry(Y page 326).
Telephone 425
COMAN
D
Z
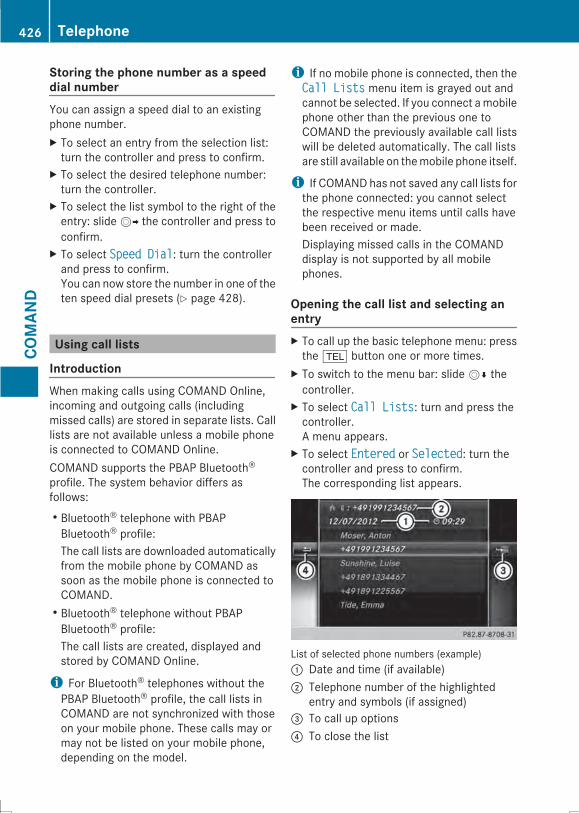
Storing the phone number as a speeddial numberYou can assign a speed dial to an existingphone number.X To select an entry from the selection list:turn the controller and press to confirm.
X To select the desired telephone number:turn the controller.
X To select the list symbol to the right of theentry: slideVY the controller and press toconfirm.
X To select Speed DialSpeed Dial: turn the controllerand press to confirm.You can now store the number in one of theten speed dial presets (Y page 428).
Using call lists
IntroductionWhen making calls using COMAND Online,incoming and outgoing calls (includingmissed calls) are stored in separate lists. Calllists are not available unless a mobile phoneis connected to COMAND Online.COMAND supports the PBAP Bluetooth®profile. The system behavior differs asfollows:RBluetooth® telephone with PBAPBluetooth® profile:The call lists are downloaded automaticallyfrom the mobile phone by COMAND assoon as the mobile phone is connected toCOMAND.RBluetooth® telephone without PBAPBluetooth® profile:The call lists are created, displayed andstored by COMAND Online.
i For Bluetooth® telephones without thePBAP Bluetooth® profile, the call lists inCOMAND are not synchronized with thoseon your mobile phone. These calls may ormay not be listed on your mobile phone,depending on the model.
i If no mobile phone is connected, then theCall ListsCall Lists menu item is grayed out andcannot be selected. If you connect amobilephone other than the previous one toCOMAND the previously available call listswill be deleted automatically. The call listsare still available on themobile phone itself.
i If COMAND has not saved any call lists forthe phone connected: you cannot selectthe respective menu items until calls havebeen received or made.Displaying missed calls in the COMANDdisplay is not supported by all mobilephones.
Opening the call list and selecting anentryX To call up the basic telephone menu: pressthe % button one or more times.
X To switch to the menu bar: slideVÆ thecontroller.
X To select Call ListsCall Lists: turn and press thecontroller.A menu appears.
X To select EnteredEntered or SelectedSelected: turn thecontroller and press to confirm.The corresponding list appears.
List of selected phone numbers (example): Date and time (if available); Telephone number of the highlighted
entry and symbols (if assigned)= To call up options? To close the list
426 TelephoneCO
MAN
D
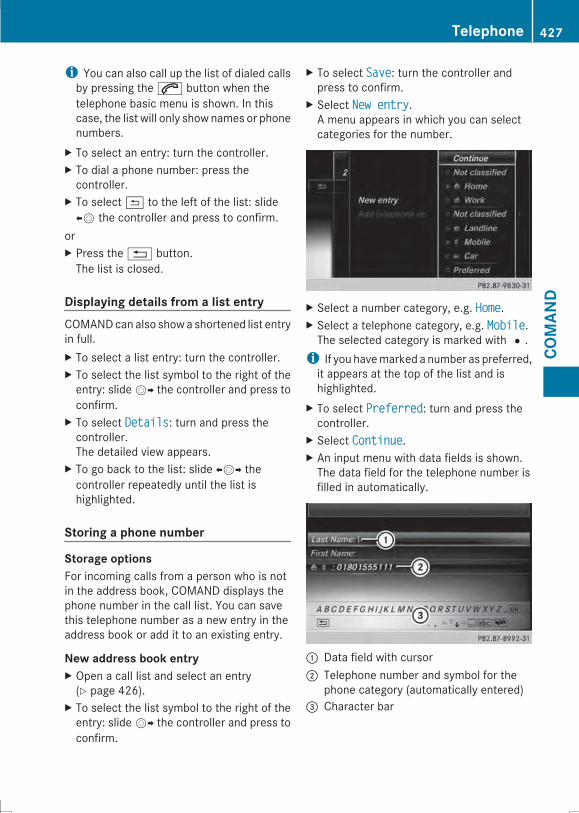
i You can also call up the list of dialed callsby pressing the6 button when thetelephone basic menu is shown. In thiscase, the list will only show names or phonenumbers.
X To select an entry: turn the controller.X To dial a phone number: press thecontroller.
X To select& to the left of the list: slideXV the controller and press to confirm.
orX Press the% button.The list is closed.
Displaying details from a list entryCOMANDcan also showa shortened list entryin full.X To select a list entry: turn the controller.X To select the list symbol to the right of theentry: slideVY the controller and press toconfirm.
X To select DetailsDetails: turn and press thecontroller.The detailed view appears.
X To go back to the list: slide XVY thecontroller repeatedly until the list ishighlighted.
Storing a phone number
Storage optionsFor incoming calls from a person who is notin the address book, COMAND displays thephone number in the call list. You can savethis telephone number as a new entry in theaddress book or add it to an existing entry.
New address book entryX Open a call list and select an entry(Y page 426).
X To select the list symbol to the right of theentry: slideVY the controller and press toconfirm.
X To select SaveSave: turn the controller andpress to confirm.
X Select New entryNew entry.A menu appears in which you can selectcategories for the number.
X Select a number category, e.g. HomeHome.X Select a telephone category, e.g. MobileMobile.The selected category is marked with#.i If you havemarked a number as preferred,it appears at the top of the list and ishighlighted.
X To select PreferredPreferred: turn and press thecontroller.
X Select ContinueContinue.X An input menu with data fields is shown.The data field for the telephone number isfilled in automatically.
: Data field with cursor; Telephone number and symbol for the
phone category (automatically entered)= Character bar
Telephone 427
COMAN
D
Z
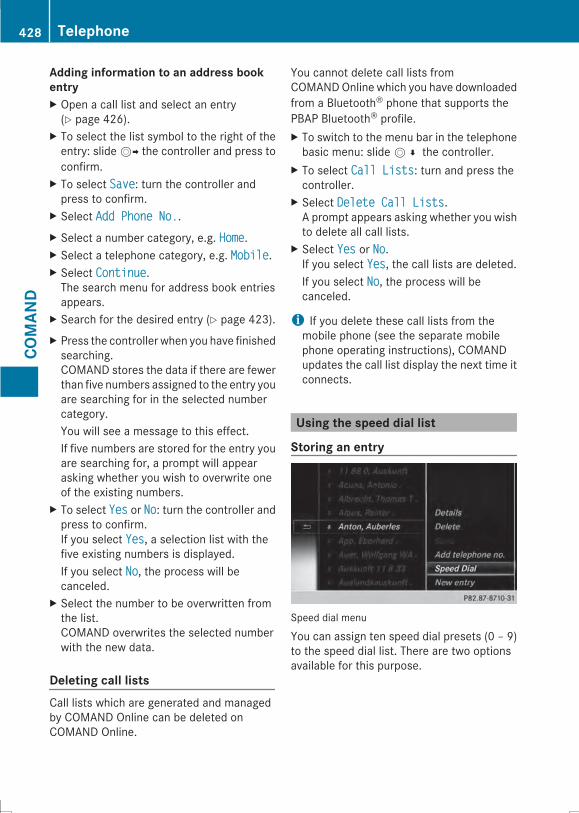
Adding information to an address bookentryX Open a call list and select an entry(Y page 426).
X To select the list symbol to the right of theentry: slideVY the controller and press toconfirm.
X To select SaveSave: turn the controller andpress to confirm.
X Select Add Phone No.Add Phone No..X Select a number category, e.g. HomeHome.X Select a telephone category, e.g. MobileMobile.X Select ContinueContinue.The search menu for address book entriesappears.
X Search for the desired entry (Y page 423).X Press the controller when you have finishedsearching.COMAND stores the data if there are fewerthan five numbers assigned to the entry youare searching for in the selected numbercategory.You will see a message to this effect.If five numbers are stored for the entry youare searching for, a prompt will appearasking whether you wish to overwrite oneof the existing numbers.
X To select YesYes or NoNo: turn the controller andpress to confirm.If you select YesYes, a selection list with thefive existing numbers is displayed.If you select NoNo, the process will becanceled.
X Select the number to be overwritten fromthe list.COMAND overwrites the selected numberwith the new data.
Deleting call listsCall lists which are generated and managedby COMAND Online can be deleted onCOMAND Online.
You cannot delete call lists fromCOMANDOnline which you have downloadedfrom a Bluetooth® phone that supports thePBAP Bluetooth® profile.X To switch to the menu bar in the telephonebasic menu: slideV¬ the controller.
X To select Call ListsCall Lists: turn and press thecontroller.
X Select Delete Call ListsDelete Call Lists.A prompt appears asking whether you wishto delete all call lists.
X Select YesYes or NoNo.If you select YesYes, the call lists are deleted.If you select NoNo, the process will becanceled.
i If you delete these call lists from themobile phone (see the separate mobilephone operating instructions), COMANDupdates the call list display the next time itconnects.
Using the speed dial list
Storing an entry
Speed dial menu
You can assign ten speed dial presets (0 – 9)to the speed dial list. There are two optionsavailable for this purpose.
428 TelephoneCO
MAN
D

Option 1:X Search for a phone book entry in the phonebook (Y page 423).
X If an entry has several phone numbers,select the desired number by turning thecontroller.
X To select the list symbol to the right of theentry: slideVY the controller and press toconfirm.A menu appears.
X To select Speed DialSpeed Dial: turn and press thecontroller.A menu appears.
X To select Assign Speed Dial PresetAssign Speed Dial Preset:turn and press the controller.The speed dial list appears. The selectedphone book entry is at the top. The nextavailable speed dial preset is highlighted.
X Select a speed dial preset.The phone book entry is saved in the speeddial preset.
Option 2:X Call up the telephone basic menu(Y page 417).
X To switch to the menu bar: slideVÆ thecontroller.
X To select Call ListsCall Lists: turn and press thecontroller.
X Select Speed Dial Preset ListSpeed Dial Preset List.The speed dial list appears.
X Select a line in the speed dial list.
i If you select an entry that already existsin the speed dial list, this is overwrittenwiththe new entry.
X To switch to the menu: slideVY thecontroller.
X Select Assign Speed Dial PresetAssign Speed Dial Preset.The phone book appears.
X Select an entry.The phone book entry is assigned to thespeed dial number.
X Select a speed dial preset.The phone book entry is saved in the speeddial preset.
Making a call via speed dialThe speed dial list contains stored phonebook entries (Y page 428).Option 1:X Hold down one of the number keys forlonger than two seconds.The telephone basic menu displays theselected entry. This initiates dialing.
Option 2:X Call up the telephone basic menu(Y page 417).
X To switch to the menu bar: slideVÆ thecontroller.
X To select Call ListsCall Lists: turn and press thecontroller.
Telephone 429
COMAN
D
Z
X Select Speed Dial Preset ListSpeed Dial Preset List.The speed dial list appears.
X Select a preset.The telephone basic menu displays theselected entry. This initiates dialing.
Deleting a speed dial numberDeleting a speed dial preset:X To select an entry: turn the controller.X To switch to the menu: slideVY thecontroller.
X To select Delete Speed Dial PresetDelete Speed Dial Preset:turn the controller and press to confirm.A prompt appears asking whether thespeed dial preset should be deleted.
X Select YesYes or NoNo.If you select YesYes, the speed dial will bedeleted from the speed dial list.If you select NoNo, the process will becanceled.
Deleting all speed dial presets:X To select Delete all Speed DialDelete all Speed DialPresetsPresets in the speed dial menu: turncontroller and press to confirm.You will be asked if you would like to deleteall speed dial presets.
X Select YesYes or NoNo.If you select YesYes, all speed dial presets willbe deleted from the speed dial list.If you select NoNo, the process will becanceled.
Messages (text messages and e-mails)
Information and requirementsThe following conditionsmust bemet in orderto use the message functions (text messagesand e-mails):RFor text messages and e-mails:
The Bluetooth®mobile phone supports theMAP Bluetooth® profile (Message AccessProfile).RFor e-mails:
- The Bluetooth® mobile phone(smartphone) supports the e-mailfunction.
- An e-mail account is set up on themobilephone (see the mobile phone operatinginstructions).
Once the messages have been downloadedfrom the phone, COMAND shows the 100newest text messages and the 100 newest e-mails.Any new messages received during thejourney are indicated by COMAND with anaudible signal and the / symbol. Once youhave read all the messages, the symbol is nolonger displayed. Theú mail symbol isdisplayed if the mobile phone's messagememory is full. The symbol disappears onceyou delete at least one message.
i Not all mobile phones available on themarket are equally suitable. You can obtainmore detailed information about suitablemobile phones on the Internet athttp://www.mbusa-mobile.com. Or callthe Mercedes-Benz Customer AssistanceCenter at1-800-FOR-MERCedes(1-800-367-6372)(for the USA) or Customer Relations at1-800-387-0100 (for Canada).
430 TelephoneCO
MAN
D
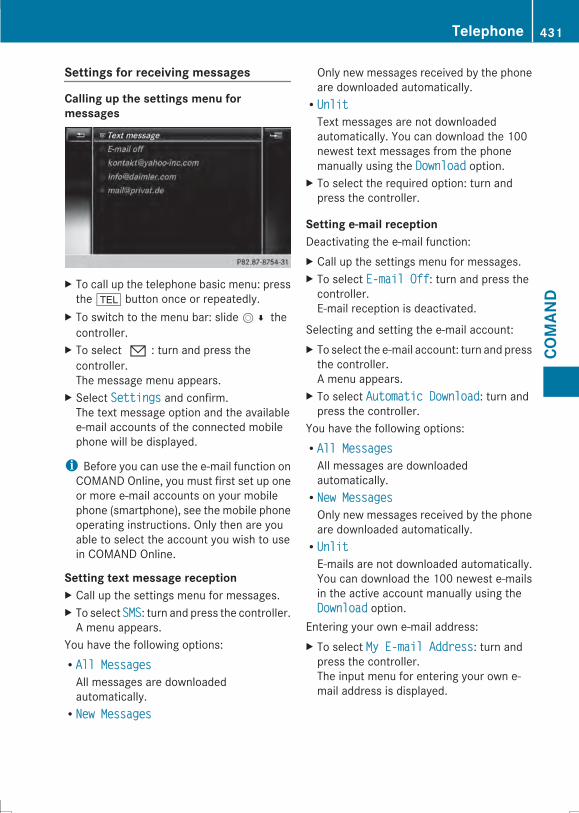
Settings for receiving messages
Calling up the settings menu formessages
X To call up the telephone basic menu: pressthe % button once or repeatedly.
X To switch to the menu bar: slideV¬ thecontroller.
X To select 0: turn and press thecontroller.The message menu appears.
X Select SettingsSettings and confirm.The text message option and the availablee-mail accounts of the connected mobilephone will be displayed.
i Before you can use the e-mail function onCOMAND Online, you must first set up oneor more e-mail accounts on your mobilephone (smartphone), see the mobile phoneoperating instructions. Only then are youable to select the account you wish to usein COMAND Online.
Setting text message receptionX Call up the settings menu for messages.X To select SMSSMS: turn and press the controller.A menu appears.
You have the following options:RAll MessagesAll MessagesAll messages are downloadedautomatically.RNew MessagesNew Messages
Only new messages received by the phoneare downloaded automatically.RUnlitUnlitText messages are not downloadedautomatically. You can download the 100newest text messages from the phonemanually using the DownloadDownload option.
X To select the required option: turn andpress the controller.
Setting e-mail receptionDeactivating the e-mail function:X Call up the settings menu for messages.X To select E-mail OffE-mail Off: turn and press thecontroller.E-mail reception is deactivated.
Selecting and setting the e-mail account:X To select the e-mail account: turn and pressthe controller.A menu appears.
X To select Automatic DownloadAutomatic Download: turn andpress the controller.
You have the following options:RAll MessagesAll MessagesAll messages are downloadedautomatically.RNew MessagesNew MessagesOnly new messages received by the phoneare downloaded automatically.RUnlitUnlitE-mails are not downloaded automatically.You can download the 100 newest e-mailsin the active account manually using theDownloadDownload option.
Entering your own e-mail address:X To select My E-mail AddressMy E-mail Address: turn andpress the controller.The input menu for entering your own e-mail address is displayed.
Telephone 431
COMAN
D
Z
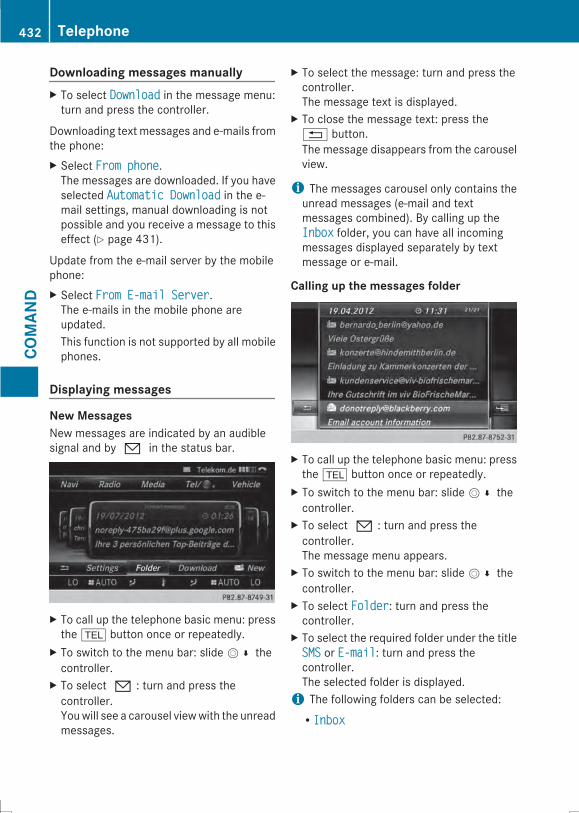
Downloading messages manuallyX To select DownloadDownload in the message menu:turn and press the controller.
Downloading text messages and e-mails fromthe phone:X Select From phoneFrom phone.The messages are downloaded. If you haveselected Automatic DownloadAutomatic Download in the e-mail settings, manual downloading is notpossible and you receive a message to thiseffect (Y page 431).
Update from the e-mail server by the mobilephone:X Select From E-mail ServerFrom E-mail Server.The e-mails in the mobile phone areupdated.This function is not supported by all mobilephones.
Displaying messages
New MessagesNew messages are indicated by an audiblesignal and by 0 in the status bar.
X To call up the telephone basic menu: pressthe % button once or repeatedly.
X To switch to the menu bar: slideV¬ thecontroller.
X To select 0: turn and press thecontroller.Youwill see a carousel viewwith the unreadmessages.
X To select the message: turn and press thecontroller.The message text is displayed.
X To close the message text: press the% button.The message disappears from the carouselview.
i The messages carousel only contains theunread messages (e-mail and textmessages combined). By calling up theInboxInbox folder, you can have all incomingmessages displayed separately by textmessage or e-mail.
Calling up the messages folder
X To call up the telephone basic menu: pressthe % button once or repeatedly.
X To switch to the menu bar: slideV¬ thecontroller.
X To select 0: turn and press thecontroller.The message menu appears.
X To switch to the menu bar: slideV¬ thecontroller.
X To select FolderFolder: turn and press thecontroller.
X To select the required folder under the titleSMSSMS or E-mailE-mail: turn and press thecontroller.The selected folder is displayed.i The following folders can be selected:RInboxInbox
432 TelephoneCO
MAN
D
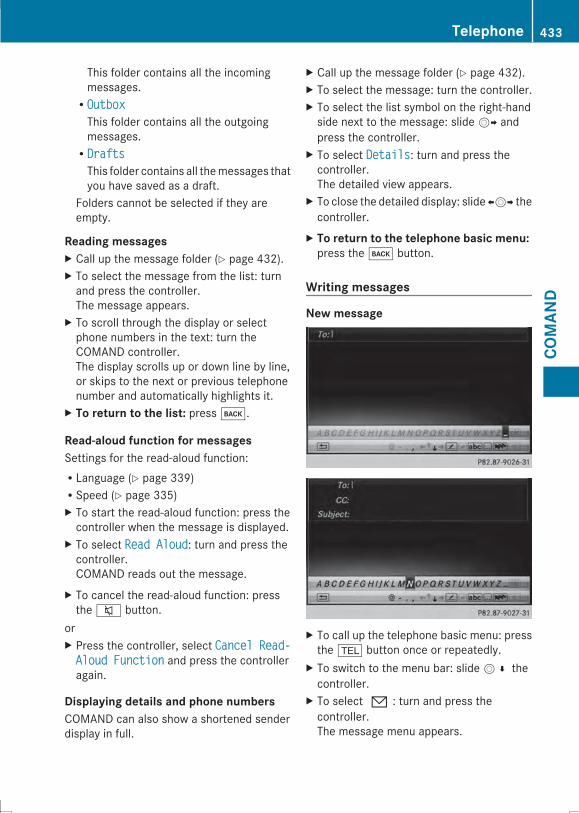
This folder contains all the incomingmessages.ROutboxOutboxThis folder contains all the outgoingmessages.RDraftsDraftsThis folder contains all themessages thatyou have saved as a draft.
Folders cannot be selected if they areempty.
Reading messagesX Call up the message folder (Y page 432).X To select the message from the list: turnand press the controller.The message appears.
X To scroll through the display or selectphone numbers in the text: turn theCOMAND controller.The display scrolls up or down line by line,or skips to the next or previous telephonenumber and automatically highlights it.
X To return to the list: press k.
Read-aloud function for messagesSettings for the read-aloud function:RLanguage (Y page 339)RSpeed (Y page 335)X To start the read-aloud function: press thecontroller when the message is displayed.
X To select Read AloudRead Aloud: turn and press thecontroller.COMAND reads out the message.
X To cancel the read-aloud function: pressthe8 button.
orX Press the controller, select Cancel Read-Cancel Read-Aloud FunctionAloud Function and press the controlleragain.
Displaying details and phone numbersCOMAND can also show a shortened senderdisplay in full.
X Call up the message folder (Y page 432).X To select the message: turn the controller.X To select the list symbol on the right-handside next to the message: slideVY andpress the controller.
X To select DetailsDetails: turn and press thecontroller.The detailed view appears.
X To close the detailed display: slide XVY thecontroller.
X To return to the telephone basic menu:press the k button.
Writing messages
New message
X To call up the telephone basic menu: pressthe % button once or repeatedly.
X To switch to the menu bar: slideV¬ thecontroller.
X To select 0: turn and press thecontroller.The message menu appears.
Telephone 433
COMAN
D
Z
X To switch to the menu bar: slideV¬ thecontroller.
X To select NewNew: turn the controller and pressto confirm.
X To select SMSSMS or E-mailE-mail: turn and press thecontroller.The input menu for a new text message ora new e-mail appears.
X Entering characters (Y page 326)Once you have entered at least onecharacter into the addressee line (To:To:),¬ is active in the first line of thecharacter bar.i When the cursor is in the addressee line,you can call up the address book and selectthe addressee. If you are writing a textmessage, the address book only showsentries which have at least one phonenumber. If you are writing an e-mail, onlyentries with e-mail addresses aredisplayed.
X If required, select the pen symbol: slideV¬ and turn the controller.
X To switch to the addressee field: slideVZthe controller.
X Press the controller.The address book opens.
X To select the desired number or address:turn and press the controller.The number or address is copied to theaddressee line.i COMAND contains templates which youcan use to compile your messages.
Calling up a template:X To switch to the bottom line of thecharacter bar: slideV¬ the controller.
X To select the pen icon: turn and press thecontroller.The list of templates appears.
X To select a template: turn and press thecontroller.The text of the template appears in the textarea of the input menu.
Sending a message:X To select ¬ in the first line of thecharacter bar: turn and press thecontroller.The message is sent. If the message hasbeen sent successfully, the telephonebasic menu appears. If the message fails tobe sent, the Sending Message FailedSending Message Failedmessage is displayed followed by the inputmenu again.
Saving the message as a draft:X Press the% button.The SaveSave thethe messagemessage inin thethe draftsdraftsfolder?folder? prompt appears.
X To select YesYes or NoNo: turn the controller andpress to confirm.If you select YesYes, the message is saved.If you select NoNo, the message is deleted.i Not all MAP-capable mobile phonessupport the saving of messages to thedrafts folder or the sending of messages.
i You can also start sending a messagefrom an address book entry (Y page 438).
Displaying and editing a messagetemplateX To switch to the character bar in the textmessage or e-mail input menu: slideV¬the controller.
X To select the pen icon: turn and press thecontroller.The list of templates appears.
Displaying a template:X To select the desired template: turn andpress the controller.
X To call up options: slideVY the controller.X To select DetailsDetails: turn and press thecontroller.The full text of the template is displayed.
Editing a template:X To select the template: turn the controller.X To call up options: slideVY the controller.
434 TelephoneCO
MAN
D
X To select EditEdit: turn and press thecontroller.The Edit menu appears with the characterbar.
X To save the template: select ¬ in thecharacter bar.
Replying to a messageX Display the message (Y page 432).X Press the controller.A menu appears.
X To select ReplyReply: turn and press thecontroller.The input menu appears. The addressee'sdetails are automatically filled in using thedetails in the original message.For further options such as sending a newmessage, see (Y page 432).
i When replying to an e-mail, you can alsoselect Reply AllReply All instead of ReplyReply. In thiscase, the reply is sent not just to the senderbut to all those who received the originalmessage.
Forwarding messagesX Display the message (Y page 432).X Press the controller.A menu appears.
X To select ForwardForward: turn and press thecontroller.The input menu appears. The subject lineis automatically filled in with the samedetails as those in the original message.For further options such as sending a newmessage, see (Y page 432).
Managing messages
Calling a text message senderX PressW the controller while the textmessage is being displayed.
X To select CallCall SenderSender: turn and press thecontroller.The telephonemakes the call to the sender.
Using phone numbers in the textNumbers in text messages that arehighlighted can be used.X To select a usable phone number while themessage is displayed: turn and press thecontroller.
X To select UseUse: turn and press the controller.X Select CallCall.The phone makes the call.
i It is possible that a highlighted numericalsequence may not contain a telephonenumber.
i You can use the "New entry" or "Add no."functions to save this telephone number orto add it to an existing entry.
Storing a sender as a new entry in theaddress bookX Press the controller while the message isbeing displayed.
X Text messages:To select SaveSave NumberNumber: turn and press thecontroller.
X E-mails:To select Save the Sender's E-mailSave the Sender's E-mailAddressAddress: turn and press the controller.
X To select New EntryNew Entry: turn the controllerand press to confirm.
X Text messages: save the telephonenumber (Y page 427)
X E-mails: save the e-mail address(Y page 438)
Adding the sender to an address bookentryX PressW the controller while the messageis being displayed.
X Text messages:To select SaveSave NumberNumber: turn and press thecontroller.
X E-mails:To select Save the Sender's E-mailSave the Sender's E-mailAddressAddress: turn and press the controller.
Telephone 435
COMAN
D
Z
X To select AddAdd: turn and press the controller.X Proceed from the step "Selecting acategory" (Y page 425).
Deleting messagesX Call up the message folder (Y page 432).X To select the message: turn and press thecontroller.
X To select the list symbol on the right-handside next to the message: slideVY andpress the controller.
X To select DeleteDelete: turn the controller andpress to confirm.A deletion prompt appears.
X To select YesYes or NoNo: turn the controller andpress to confirm.If you select YesYes, the message is deleted.If you select NoNo, the process will becanceled.
i This delete function is not supported byall mobile phones. The Delete FailedDelete Failedmessage appears.
Using the address book
IntroductionAlways pay attention to traffic conditions.Before starting the journey, familiarizeyourself with the address book functions.Only use COMAND when the road and trafficconditions permit. You could otherwisebecome involved in an accident in which youor others could be injured.The address book organizes and storesentries that are entered from differentsources (mobile phone, memory card, USBdevice, COMAND phone book, navigationsystem).You can use these entries to make telephonecalls and for navigation.
i Number of contacts in the addressbook: the address book can store a total of5000 contacts.
Of these:R2000 entries are reserved forpermanently saved contacts andR3000 entries are reserved for contactsthat you can load from themobile phone.
i Display of mobile phone contacts:contacts downloaded from the mobilephone will no longer be displayed in theaddress book if you disconnect the mobilephone from COMAND. The contact datafrom the last twomobile phones connectedis kept in an internal temporary storage andif the relevant mobile phone is detected, itscontacts can be displayed immediately.COMAND downloads the contacts againand updates the address bookautomatically so that any newcontacts thathave been added to the mobile phone canbe displayed. The prerequisite for this isthat automatic download is activated(Y page 441).When the mobile phone is removed, onlythe phone book entries from the mobilephone are removed from the address book.The remaining entries are retained. For thisreason, delete your personal data using thereset function before selling your vehicle,for example (Y page 342).
Calling up the address bookUsing the telephone button:X Press the % button one or more times.
From the telephone basic menu:X To switch to main function bar: slideVZthe controller.
X To select Tel.Tel./®: turn and press thecontroller.
X To select AddressAddress BookBook from the carousel:turn the controller and press to confirm.
436 TelephoneCO
MAN
D
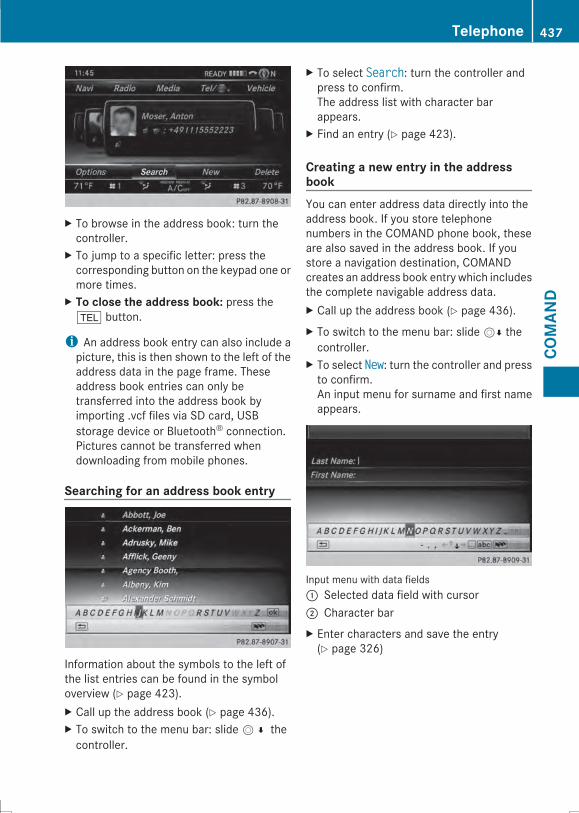
X To browse in the address book: turn thecontroller.
X To jump to a specific letter: press thecorresponding button on the keypad one ormore times.
X To close the address book: press the% button.
i An address book entry can also include apicture, this is then shown to the left of theaddress data in the page frame. Theseaddress book entries can only betransferred into the address book byimporting .vcf files via SD card, USBstorage device or Bluetooth® connection.Pictures cannot be transferred whendownloading from mobile phones.
Searching for an address book entry
Information about the symbols to the left ofthe list entries can be found in the symboloverview (Y page 423).X Call up the address book (Y page 436).X To switch to the menu bar: slideV¬ thecontroller.
X To select SearchSearch: turn the controller andpress to confirm.The address list with character barappears.
X Find an entry (Y page 423).
Creating a new entry in the addressbookYou can enter address data directly into theaddress book. If you store telephonenumbers in the COMAND phone book, theseare also saved in the address book. If youstore a navigation destination, COMANDcreates an address book entry which includesthe complete navigable address data.X Call up the address book (Y page 436).X To switch to the menu bar: slideVÆ thecontroller.
X To select NewNew: turn the controller and pressto confirm.An input menu for surname and first nameappears.
Input menu with data fields: Selected data field with cursor; Character barX Enter characters and save the entry(Y page 326)
Telephone 437
COMAN
D
Z

Deleting an address book entryX Search for the address book entry(Y page 437).
X To select the list symbol to the right of theentry: slideVY the controller and press toconfirm.
X To select DeleteDelete: turn the controller andpress to confirm.A prompt appears.
X To select YesYes or NoNo: turn the controller andpress to confirm.If you select YesYes, the entry will be deleted.If you select NoNo, the process will becanceled.
Displaying the detailed view for anaddress book entry
Selecting an entryi An address book entry can contain thefollowing information:RnameRfirst nameRcompanyRup to five telephone numbersRtwo email addressesRInternet addressRtwo addressesRtwo navigation addresses (transferredfrom navigation(Y page 366))Rgeo-coordinates
Detailed display of address book: To return to the previous menu; List symbol (to call up options)X Call up the address book (Y page 436).X Select an entry: turn and press thecontroller.The address book entry with all data fieldsappears.
The data fields can be categorized as follows:\ Business details6 Home details
Adding information to an address bookentryX To select the required data field (e.g.email): turn the controller.
X To select the "Add..." bar (example: AddAdd E-E-mail Addressmail Address): turn the controller andpress to confirm.Depending on the type of data field, thecorresponding input menu appears.
X Enter characters and save the entry(Y page 326).
Starting route guidance to an addressX To select the address data field: turn thecontroller and press to confirm.The route to the destination address iscalculated and route guidance starts.
Calling a telephone numberX To select the telephone number data field:turn the controller and press to confirm.This initiates dialing and you can thenmakeyour call (Y page 420).
438 TelephoneCO
MAN
D
Sending text messagesX To select a telephone number: turn thecontroller.
X To select the list symbol to the right of thedata field: slideVY the controller andpress to confirm.
X To select Send Text MessageSend Text Message: turn thecontroller and press to confirm.The text message input menu appears(Y page 433).
Sending e-mailX To select the e-mail address: turn thecontroller.
X To select the list symbol to the right of thedata field: slideVY the controller andpress to confirm.
X To select Send E-mailSend E-mail: turn the controllerand press to confirm.The e-mail input menu appears(Y page 433).
Displaying sub-entry informationX To select the desired data field: turn thecontroller.
X To select the list symbol to the right of thedata field: slideVY the controller andpress to confirm.
X To select DetailsDetails: turn and press thecontroller.The display is shown in full.
X To close the detailed display: press the% button.
Changing an address book entryX To select the desired data field: turn thecontroller.
X To select the list symbol to the right of thedata field: slideVY the controller andpress to confirm.
X To select EditEdit: slide the controller andpress to confirm.The input screen for the selected data fieldappears.
Information about character entry(Y page 326).
Changing the category of a data fieldX To select the desired data field: turn thecontroller.
X To select the list symbol to the right of thedata field: slideVY the controller andpress to confirm.
X To select Change CategoryChange Category: turn thecontroller and press to confirm.
X To select a category: turn the controller andpress to confirm.
Storing the phone number as a speeddial numberX Call up the address book (Y page 436).X Select an entry: turn and press thecontroller.The address book entry with all data fieldsappears.
X To select the desired telephone numberdata field: turn the controller.
X To select the list symbol to the right of thedata field: slideVY the controller andpress to confirm.
X To select Speed DialSpeed Dial: turn the controllerand press to confirm.You can now store the number in one of theten speed dial presets (Y page 428).
Assigning an address book entry to afavorites buttonYou can assign an address book entry to afavorites button.X Select an entry: turn and press thecontroller.
X To select the desired data field (phonenumber, address or e-mail address): turnthe controller.
Telephone 439
COMAN
D
Z
X Press the favorites button on the keypad.X Press one of the number keys for at least 2seconds.Depending on the type of entry selected,you can now use the favorites button tomake a call, start route guidance or writean e-mail. For more information aboutfavorites button, see (Y page 339).
Starting route guidance to an entryThis function is available as soon as you havestored a destination in the destinationmemory (Y page 393).X Call up the address book (Y page 436).X To select an entry with theL symbol: turnthe controller and press to confirm.The address book entry with all data fieldsappears.
X To select the desired address data field:turn the controller.
X To select the list symbol to the right of thedata field: slideVY the controller andpress to confirm.
X To select NavigateNavigate: turn the controller andpress to confirm.Route guidance begins.
i Route guidance can also be started for anaddress book entry without theL symbol.If the address data or designations do notmatch the digital map, COMAND promptsyou to re-enter the address.
Voice tags
IntroductionYou can enter voice tags via the Voice ControlSystem (see the separate operatinginstructions). Once you have assigned a voicetag to an address book entry, you can call upthis entry with a voice command and dial aphone number, for example. You can add onevoice tag per address book entry.
Adding or changing a voice tagX Search for an address book entry with orwithout a voice tag (¦) (Y page 437).
X To select the list symbol to the right of theentry: slideVY the controller and press toconfirm.
X To select Voice TagVoice Tag: turn the controllerand press to confirm.
X To select AddAdd or ChangeChange: turn the controllerand press to confirm.Subsequent operation is voice-controlled.The Voice Control System guides youthrough the dialogs.
Deleting a voice tagX Search for an address book entry with avoice tag (Y page 437).
X To select the list symbol to the right of theentry: slideVY the controller and press toconfirm.
X To select Voice TagVoice Tag: turn the controllerand press to confirm.
X To select DeleteDelete: turn the controller andpress to confirm.A deletion prompt appears.
X To select YesYes or NoNo: turn the controller andpress to confirm.If you select YesYes, COMAND deletes thevoice tag.If you select NoNo, the process will becanceled.
Listening to a voice tagX Search for an address book entry with avoice tag (Y page 437).
X To select the list symbol to the right of theentry: slideVY the controller and press toconfirm.
X To select Voice TagVoice Tag: turn the controllerand press to confirm.
X To select Voice TagVoice Tag: turn the controllerand press to confirm.
X Select ListenListen and pressW to confirm.You hear the voice tag.
440 TelephoneCO
MAN
D
Importing phone book entriesThis function allows you to store phone bookentries from the mobile phone in the addressbook.The following can be used as a source:Rthe mobile phoneRthe memory cardRthe USB deviceRthe Bluetooth® InterfaceImported phone book entries are indicated inthe phone book by different symbols(Y page 423).X Search for an entry in the phone book onthe mobile phone d(Y page 423).
X To select the list symbol to the right of theentry: slideVY the controller and press toconfirm.
X Select Do you want to save theDo you want to save theentry?entry? and pressW to confirm.The Data SavedData Saved message appears. Thephone book entry is now saved as anaddress book entry.The d symbol is replaced by the¥symbol.
RContacts marked with the¥ symbol areaccessible to all COMAND usersregardless of the mobile phoneconnected.RSaving or editing the contact data onCOMAND does not change the contactson the mobile phone. If the automaticdownloading of mobile phone contacts isactivated, COMAND therefore shows acopy¥ with changed data beside theoriginal mobile phone contact. To addadditional data, such as additional phonenumbers or e-mail addresses, select thiscontact. In this way, you avoid creatingadditional copies of the mobile phoneentry.
Importing contacts
Information and requirementsYou can import contacts (vCards) from thememory card and a USB device into theaddress book, or receive vCards viaBluetooth®.
i Up to 2000 entries can be imported intothe address book. A message notifies youwhen the maximum number is reached.You then have to delete existing entries inorder to import new entries (Y page 438).
Depending on the source of the contact data,different requirements apply:
Source Prerequisites
Memory card The SD memory card isinserted. It containsimportable contact details.
USB device The USB device is insertedinto the USB port. Itcontains importablecontact details.
Requirements for receiving vCards viaBluetooth®You can receive vCards from devices (e.g.from a PC) that support the sending of vCardsvia Bluetooth®.It is not necessary to authorize the device inCOMAND to do so.Please bear the following in mind:RBluetooth® must be activated in COMANDand on the Bluetooth® device, see theoperating instructions for the device.Rthe Bluetooth® devicemust be able to sendvCards via Bluetooth® (see operatinginstructions for the device).Rthe Bluetooth® device in the vehicle mustbe switched on.
Telephone 441
COMAN
D
Z
Importing from the memory card or USBdeviceEntries imported from the memory card orfrom a USB device have the¯ symbol.The following conditions must be fulfilled inorder to import vCards:RvCards (vcf files)may be located in themaindirectory or in folders. COMAND allows youto select the relevant folders directly.RvCards must have the file extension ".vcf".
i One vcf file may contain several vCards.COMAND supports vCards in versions 2.1and 3.0.
X To change to the menu bar when in theaddress book or the telephone basic menu:slideVÆ the controller.
X To select OptionsOptions: turn and press thecontroller.
X To select Import ContactsImport Contacts: turn thecontroller and press to confirm.A menu appears.
X To select FromFrom MemoryMemory CardCard or FromFrom USBUSBDeviceDevice in themenu: turn the controller andpress to confirm.
Receiving vCards via Bluetooth®X To change to the menu bar when in theaddress book or the telephone basic menu:slideVÆ the controller.
X To select OptionsOptions: turn and press thecontroller.
X To select Import ContactsImport Contacts: turn thecontroller and press to confirm.A menu appears.
X To select From Bluetooth DeviceFrom Bluetooth Device: turnthe controller and press to confirm.This interrupts the Bluetooth® connectionbetween COMAND and your active mobilephone. COMAND is, however, ready toreceive vCards from another Bluetooth®device (PC, mobile phone).
X Start the data transfer on the externalBluetooth® device (see the operatinginstructions for the device).The number of vCards received isdisplayed.
X To end reception: press the controller orthe% button.COMAND then reconnects to the mobilephone.
Received vCards are identified by the®symbol in the address book.
i If you switch to another main function,e.g. navigation, while receiving vCards, thereception of vCards will be terminated.
Deleting contactsX To change to the menu bar when in theaddress book or the basic telephonemenu:slideVÆ the controller.
X To select OptionsOptions: turn and press thecontroller.
X To select Delete ContactsDelete Contacts: turn thecontroller and press to confirm.
X Select one of the following options:RInternal ContactsInternal ContactsRImported From Storage DevicesImported From Storage DevicesRImported via Bluetooth devicesImported via Bluetooth devicesRDownloaded From PhoneDownloaded From PhoneTurn and press the controller.A prompt corresponding to your selectionappears.
X To select YesYes or NoNo: turn the controller andpress to confirm.If you select YesYes, the contacts are deletedaccording to your selection.If you select NoNo, the process will becanceled.
442 TelephoneCO
MAN
D
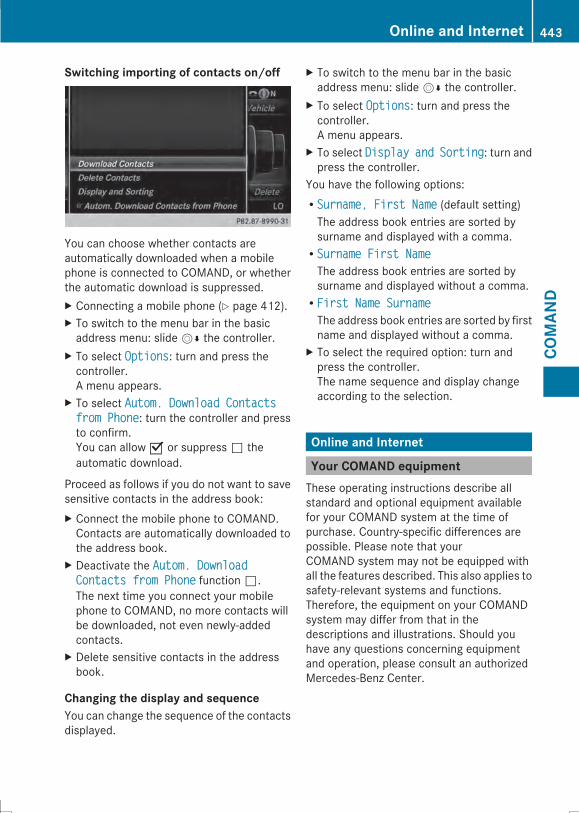
Switching importing of contacts on/off
You can choose whether contacts areautomatically downloaded when a mobilephone is connected to COMAND, or whetherthe automatic download is suppressed.X Connecting a mobile phone (Y page 412).X To switch to the menu bar in the basicaddress menu: slideVÆ the controller.
X To select OptionsOptions: turn and press thecontroller.A menu appears.
X To select Autom. Download ContactsAutom. Download Contactsfrom Phonefrom Phone: turn the controller and pressto confirm.You can allow O or suppress ª theautomatic download.
Proceed as follows if you do not want to savesensitive contacts in the address book:X Connect the mobile phone to COMAND.Contacts are automatically downloaded tothe address book.
X Deactivate the Autom. DownloadAutom. DownloadContacts from PhoneContacts from Phone function ª.The next time you connect your mobilephone to COMAND, no more contacts willbe downloaded, not even newly-addedcontacts.
X Delete sensitive contacts in the addressbook.
Changing the display and sequenceYou can change the sequence of the contactsdisplayed.
X To switch to the menu bar in the basicaddress menu: slideVÆ the controller.
X To select OptionsOptions: turn and press thecontroller.A menu appears.
X To select DisplayDisplay andand SortingSorting: turn andpress the controller.
You have the following options:RSurname, First NameSurname, First Name (default setting)The address book entries are sorted bysurname and displayed with a comma.RSurname First NameSurname First NameThe address book entries are sorted bysurname and displayed without a comma.RFirst Name SurnameFirst Name SurnameThe address book entries are sorted by firstname and displayed without a comma.
X To select the required option: turn andpress the controller.The name sequence and display changeaccording to the selection.
Online and Internet
Your COMAND equipmentThese operating instructions describe allstandard and optional equipment availablefor your COMAND system at the time ofpurchase. Country-specific differences arepossible. Please note that yourCOMAND system may not be equipped withall the features described. This also applies tosafety-relevant systems and functions.Therefore, the equipment on your COMANDsystem may differ from that in thedescriptions and illustrations. Should youhave any questions concerning equipmentand operation, please consult an authorizedMercedes-Benz Center.
Online and Internet 443
COMAN
D
Z
General notes
Conditions for access
G WARNINGIf you operate information systems andcommunication equipment integrated in thevehicle while driving, you will be distractedfrom traffic conditions. You could also losecontrol of the vehicle. There is a risk of anaccident.Only operate the equipment when the trafficsituation permits. If you are not sure that thisis possible, park the vehicle paying attentionto traffic conditions and operate theequipment when the vehicle is stationary.
You must observe the legal requirements forthe country in which you are currently drivingwhen operating COMAND.The COMAND Online Mercedes-Benz Appsand Internet access are available via theBluetooth® interface, the USB interface or viathe data-enabled telephone module withBluetooth® (SAP profile).In order to use the functions, the followingconditions are necessary:RThe mobile phone supports at least one ofthe Bluetooth® profiles DUN (Dial-UpNetworking) or PAN Personal AreaNetwork) and is connected to COMANDOnline via the Bluetooth® interface(Y page 412). The Bluetooth® profiles DUNand PANmake the mobile phone's Internetconnection available to COMAND Onlineand the Rear Seat Entertainment System.RThe mobile phone supports at least one ofthe USB classes CDC/ECM (EthernetControl Model) or CDC/ACM (AccessControl Model) and is connected toCOMAND Online via the USB interface(Y page 495). The USB classes make themobile phone's Internet connection
available to COMAND Online and the RearSeat Entertainment System.Ryou need a valid mobile service contractwith a data option, which is used tocalculate the associated connection costs.
i You can obtain more detailed informationabout suitable mobile phones on theInternet at http://www.mercedes-benz.com/connect or from yourauthorized Mercedes-Benz Center.
i If you use incorrect access data,additional costs may be incurred. This canhappen when you use details that aredifferent from the contract or details fromanother contract/data package.
i The availability of individual Mercedes-Benz Apps may vary depending on thecountry.
i The terms of use are shown whenCOMAND Online is used for the first timeand then once a year thereafter. Only readand accept the terms of use when thevehicle is stationary.
i The driver is not permitted to call upwebsites while driving and use of theMercedes-Benz Apps is restricted.
To use COMANDOnlineMercedes-Benz Appsand Internet access, the following conditionsmust be fulfilled:Rmbrace is activated and operationalRmbrace is activated for COMAND OnlineMercedes-Benz Apps and Internet access
Priority of connections: an emergency callhas the highest priority. When a service call,e.g. a breakdown service call or the MB InfoCall, is active, an emergency call can still beinitiated.A service call, on the other hand, has priorityover a current Internet connection. Therefore,you cannot establish an Internet connectionduring a service call.
444 Online and InternetCO
MAN
D
i The availability of individual COMANDMercedes-Benz Apps may vary dependingon the country.
i The terms of use are shown whenCOMAND Online is used for the first timeand then once a year thereafter. Only readand accept the terms of use when thevehicle is stationary.
i The driver is not permitted to call upwebsites while driving and use of theMercedes-Benz Apps is restricted.
Establishing/ending the connection
Establishing the connectionPreconditions for establishing a connectioncan be found under "General notes"(Y page 444).A connection can be established by:Rentering a web address (Y page 453).Rcalling up the Mercedes-Benz MobileWebsite (Y page 451).Rcalling up a Mercedes-Benz App(Y page 451).Rcalling up a Favorite (Y page 454).Rcalling up the Internet radio (Y page 452).Ending the connectionX Press CancelCancel in the connections window.
Online and Internet 445
COMAN
D
Z
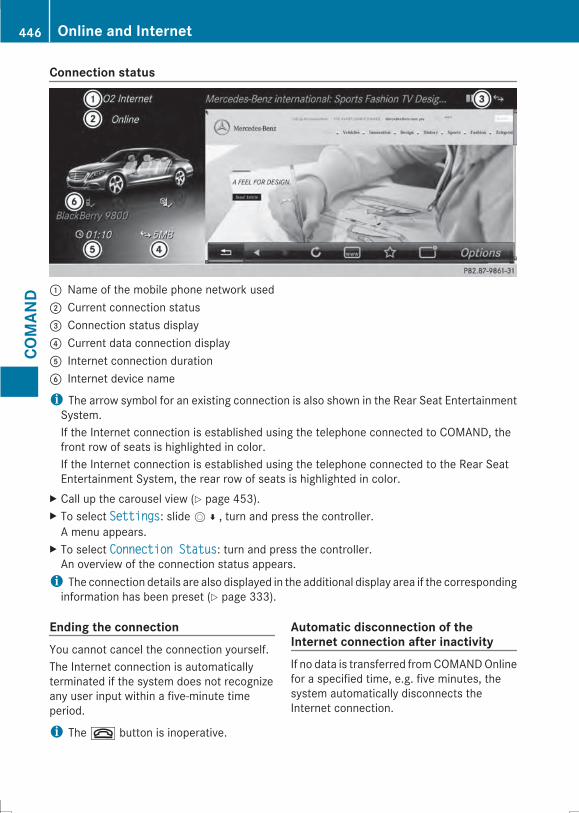
Connection status
: Name of the mobile phone network used; Current connection status= Connection status display? Current data connection displayA Internet connection durationB Internet device name
i The arrow symbol for an existing connection is also shown in the Rear Seat EntertainmentSystem.If the Internet connection is established using the telephone connected to COMAND, thefront row of seats is highlighted in color.If the Internet connection is established using the telephone connected to the Rear SeatEntertainment System, the rear row of seats is highlighted in color.
X Call up the carousel view (Y page 453).X To select SettingsSettings: slideV¬, turn and press the controller.A menu appears.
X To select Connection StatusConnection Status: turn and press the controller.An overview of the connection status appears.i The connection details are also displayed in the additional display area if the correspondinginformation has been preset (Y page 333).
Ending the connectionYou cannot cancel the connection yourself.The Internet connection is automaticallyterminated if the system does not recognizeany user input within a five-minute timeperiod.
i The~ button is inoperative.
Automatic disconnection of theInternet connection after inactivityIf no data is transferred fromCOMANDOnlinefor a specified time, e.g. five minutes, thesystem automatically disconnects theInternet connection.
446 Online and InternetCO
MAN
D
Google™ local search
Calling up the local search menui You do not need a Google™ account touse Local Search.
X Press the % button.The last function called up appears.
X Select TEL/TEL/® in the main function bar bysliding ZV, turning and pressing thecontroller.A carousel menu appears.
X To select InternetInternet: turn and press thecontroller.The carousel menu for the Internetfunctions appears.
X Select the Mercedes-Benz AppsMercedes-Benz Apps tile.The Mercedes-Benz Apps menu isdisplayed.
X Select Google Local SearchGoogle Local Search.Search
Entry restrictionIt is only possible for the driver to enter asearch term in the input menu when thevehicle is stationary.
Selecting the search positionX You can select different destinationsuggestions in the menu.COMAND searches the following availabledestinations:Rnear the current vehicle positionRnear a cityIf a destination has previously beenentered, the following are also available:Rnear the destinationRalong the routei You can also select a destination from thegeneral search history.
X After selecting Near DestinationNear Destination, forexample, enter an address and select¬: turn and press the controller.The search results are displayed.
Entering a search termX Select NearNear DestinationDestination, for example, inthe Local Search menu.The input menu appears.
X To enter using the character bar: enterthe search term.
X To enter characters using the numberpad: press the number keys in rapidsuccession.The character appears when the key ispressed. The first available character ishighlighted.
X Select ¬ after entering the search term.A list with search results appears.i Google™ determines how the searchresults are sorted; this is not necessarilybased on the shortest distance.
Using search resultsX To select an entry from the list of searchresults: turn and press the controller.A menu appears.
X To display details: select DetailsDetails.The address of the selected entry isdisplayed.
X To use a search result as thedestination: select Set asSet asDestinationDestination.You then switch to navigation mode andcan start route calculation.i The search result is stored in the"Last destinations" memory at the sametime (Y page 394). You can take thedestination from this memory and save itpermanently in the contacts (Y page 393).
X To call a destination: select CallCall.You then switch to the telephone functionand make the call (Y page 419).i If there is no phone number available, themenu item cannot be selected.
Online and Internet 447
COMAN
D
Z
X To call up Google™ Street View: selectGoogle Street ViewGoogle Street View.This takes you to Google™ Street View.i If no Google™ Street View information isavailable, a corresponding messageappears.
X To call up Panoramio by Google™: selectPanoramio by GooglePanoramio by Google.This takes you to Panoramio by Google™and youwill see photos of places of interestlocated near the search result.
X To save to the address book: selectImportImport.The entry is stored in the address book.
Popular searchesThis function allows you to search usingpredefined search criteria.X In the Local Search menu, select PopularPopularSearchesSearches: turn and press the controller.A menu displays the available searchcriteria.
X Select the desired search criterion.X Proceed as described in the "Selecting thesearch position" section (Y page 447). Ifthe vehicle is stationary, the search resultscan be supplemented manually, e.g. "HotelAdler".
Search HistoryThis function offers you the previous searchqueries.X To select Search HistorySearch History in the LocalSearchmenu: turn and press the controller.The previous search queries are shownwith the most recent at the top.
X Select the desired search criterion.X Proceed as described in the "Selecting thesearch position" section (Y page 447). Ifthe vehicle is stationary, the search resultscan be supplemented manually, e.g. "HotelAdler".
Selecting options for the local search
Setting the search radiusX Call up the carousel view (Y page 453).X To select the Mercedes-Benz AppsMercedes-Benz Apps tile:turn and press the controller.The list of Mercedes-Benz Apps appears.
X To select theOptionsmenu for the GoogleGoogleLocalLocal SearchSearch app: slideVY and press thecontroller.The menu shows the current settings.
X To select Search RadiusSearch Radius: turn and pressthe controller.A menu appears.
X Select the desired entry.The selected setting is accepted.
X To exit the menu: select&.
Selecting a service providerX Select the Options menu for the GoogleGoogleLocal SearchLocal Search app (Y page 450).The menu shows the current settings.
X To select Service ProviderService Provider: turn andpress the controller.The # dot indicates the currently selectedservice provider.
i If the entry is grayed out, you cannotselect the service provider.
X Select and confirm the entry.The selected service provider is accepted.
X To exit the menu: select&.
Deleting search queriesX Select the Options menu for the GoogleGoogleLocal SearchLocal Search app (Y page 450).The menu shows the current settings.
X To select DeleteDelete allall SearchesSearches: turn andpress the controller.A prompt appears, asking whether youreally wish to delete the search.
X Select YesYes or NoNo.If you select YesYes, the search queries aredeleted.
448 Online and InternetCO
MAN
D
If you select NoNo, the process will becanceled.
Resetting search historyX Select the Options menu for the GoogleGoogleLocal SearchLocal Search app (Y page 450).The menu shows the current settings.
X To select ResetReset SearchSearch HistoryHistory: turn thecontroller and press to confirm.A prompt appears, asking whether youreally wish to reset the search history.
X Select YesYes or NoNo.If you select YesYes, the search history isdeleted.If you select NoNo, the process will becanceled.i The last ten search queries are reset.
Destination/route download
IntroductionYou can send destinations and routes fromGoogle™ maps to the server and downloadthese via this function. You can use thedestinations and routes for route guidanceand save them for further use.In order to use the destination downloadfunction, the mbrace system must be:RactivatedRset upRand activated for COMAND and Internetaccess services.
For information on the mbrace system, seethe separate vehicle Operator's Manual.
Sending destinations/routes toMercedes-BenzX Call up the website for Google™ Maps onthe Internet.
X Select the destination.
X Select "Mercedes-Benz" as the companyentry.
X Confirm "Send" on the Google™ Mapswebsite.The destinations/routes are sent to theserver.i The availability of the destination/routedownload function is country-dependent.
Downloading destinations/routes fromthe serverProceed as follows to use destinations/routes that have been sent to the server:X Press the % button.The last function called up appears.
X Select TEL/TEL/® in the main function bar bysliding ZV, turning and pressing thecontroller.A carousel menu appears.
X To select InternetInternet: turn and press thecontroller.The carousel menu for the Internetfunctions appears.
X Select the Mercedes-Benz AppsMercedes-Benz Apps tile.The Mercedes-Benz Apps menu isdisplayed.
X Select Destination/Route DownloadDestination/Route Downloadfrom the list.Available destinations are shown in the list.
i With ExitExit, you can leave destinationdownload.With OptionsOptions, you can set the options fordestination download (Y page 450).You can also use the navigation to accessthe destination/route download function(Y page 377).
You can save up to 20 routes and 50destinations for your vehicle on the serverand display these in the list. If you sendfurther routes and destinations to the server,the existing entries are deleted from the list.
Online and Internet 449
COMAN
D
Z
Using destinations/routes
Displaying detailsX To select an entry from the list: turn thecontroller and press to confirm.A menu appears.
X Select DetailsDetails in the menu.The destination is displayed.
Using as the destinationX Select Set as DestinationSet as Destination in the menu.You then switch to navigation mode andcan start route calculation (Y page 367).The destination is entered in the list of lastdestinations.
Calling up the destinationX Select CallCall in the menu.You then switch to the telephone functionand make the call (Y page 419).i You can use the function if:Ra mobile phone is connected(Y page 412)Rthe destination address contains atelephone number
Importing destinationsYou can save destinations and routes to theaddress book when importing.X Select an entry from the list.X Select ImportImport.The entry is stored in the address book.
Deleting a destination from the serverX Select an entry from the list.X Select DeleteDelete.A prompt appears asking whether youreally wish to reset.
X Select YesYes or NoNo.If you select YesYes, the settings are reset.If you select NoNo, the process will becanceled.
Setting options for destination/routedownload
Deleting destinations and routes afterimporting to the serverX Select the Options menu for theDestination/Route DownloadDestination/Route Download app(Y page 450).The menu shows the current settings.
X To select Delete after importing toDelete after importing tothethe serverserver: turn and press the controller.Switch the setting on O or off ª.
i Routes and destinations areautomatically deleted from the server afterseven days.
X To exit the menu: press the% button.
Options
Calling up the options menuX Press the % button.The last function called up appears.
X Select TEL/TEL/® in the main function bar bysliding ZV, turning and pressing thecontroller.A carousel menu appears.
X To select InternetInternet: turn and press thecontroller.The carousel menu for the Internetfunctions appears.
X To select the Mercedes-Benz AppsMercedes-Benz Apps pageframe: turn and press the controller.The list of Mercedes-Benz Apps appears.
X Select the desired app, e.g. GoogleGoogleLocal SearchLocal Search.
X To select theÛ Options menu: slideVY and press the controller.The menu shows the current settings.
Resetting adjustmentsWith the reset function, all Mercedes-BenzApps settings are reset to the factorysettings.
450 Online and InternetCO
MAN
D
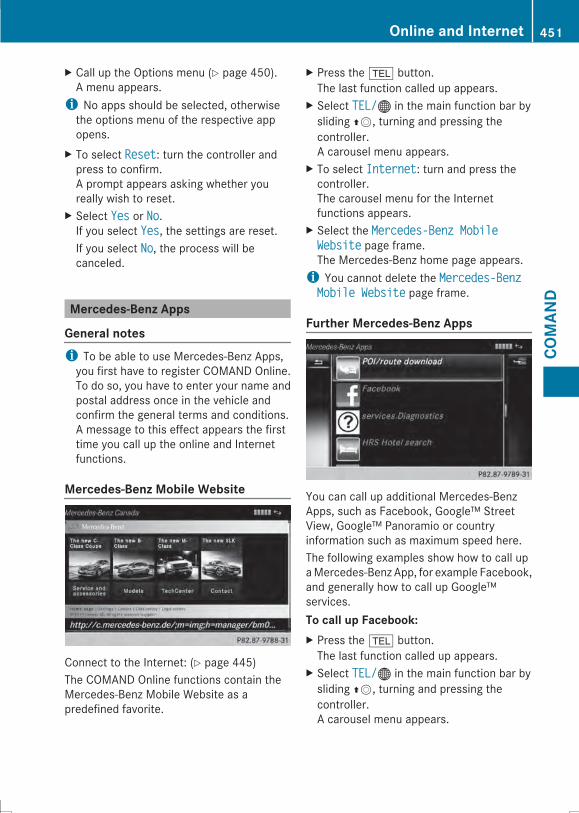
X Call up the Options menu (Y page 450).A menu appears.i No apps should be selected, otherwisethe options menu of the respective appopens.
X To select ResetReset: turn the controller andpress to confirm.A prompt appears asking whether youreally wish to reset.
X Select YesYes or NoNo.If you select YesYes, the settings are reset.If you select NoNo, the process will becanceled.
Mercedes-Benz Apps
General notesi To be able to use Mercedes-Benz Apps,you first have to register COMAND Online.To do so, you have to enter your name andpostal address once in the vehicle andconfirm the general terms and conditions.A message to this effect appears the firsttime you call up the online and Internetfunctions.
Mercedes-Benz Mobile Website
Connect to the Internet: (Y page 445)The COMAND Online functions contain theMercedes-Benz Mobile Website as apredefined favorite.
X Press the % button.The last function called up appears.
X Select TEL/TEL/® in the main function bar bysliding ZV, turning and pressing thecontroller.A carousel menu appears.
X To select InternetInternet: turn and press thecontroller.The carousel menu for the Internetfunctions appears.
X Select the Mercedes-Benz MobileMercedes-Benz MobileWebsiteWebsite page frame.The Mercedes-Benz home page appears.i You cannot delete the Mercedes-BenzMercedes-BenzMobile WebsiteMobile Website page frame.
Further Mercedes-Benz Apps
You can call up additional Mercedes-BenzApps, such as Facebook, Google™ StreetView, Google™ Panoramio or countryinformation such as maximum speed here.The following examples show how to call upaMercedes-Benz App, for example Facebook,and generally how to call up Google™services.To call up Facebook:X Press the % button.The last function called up appears.
X Select TEL/TEL/® in the main function bar bysliding ZV, turning and pressing thecontroller.A carousel menu appears.
Online and Internet 451
COMAN
D
Z
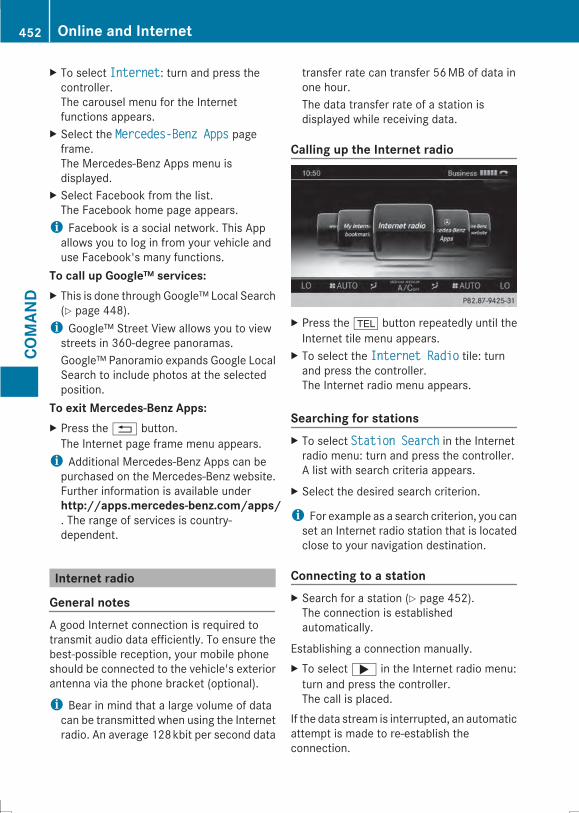
X To select InternetInternet: turn and press thecontroller.The carousel menu for the Internetfunctions appears.
X Select the Mercedes-Benz AppsMercedes-Benz Apps pageframe.The Mercedes-Benz Apps menu isdisplayed.
X Select Facebook from the list.The Facebook home page appears.i Facebook is a social network. This Appallows you to log in from your vehicle anduse Facebook's many functions.
To call up Google™ services:X This is done through Google™ Local Search(Y page 448).i Google™ Street View allows you to viewstreets in 360-degree panoramas.Google™ Panoramio expands Google LocalSearch to include photos at the selectedposition.
To exit Mercedes-Benz Apps:X Press the% button.The Internet page frame menu appears.i Additional Mercedes-Benz Apps can bepurchased on the Mercedes-Benz website.Further information is available underhttp://apps.mercedes-benz.com/apps/. The range of services is country-dependent.
Internet radio
General notesA good Internet connection is required totransmit audio data efficiently. To ensure thebest-possible reception, your mobile phoneshould be connected to the vehicle's exteriorantenna via the phone bracket (optional).
i Bear in mind that a large volume of datacan be transmitted when using the Internetradio. An average 128kbit per second data
transfer rate can transfer 56MB of data inone hour.The data transfer rate of a station isdisplayed while receiving data.
Calling up the Internet radio
X Press the % button repeatedly until theInternet tile menu appears.
X To select the Internet RadioInternet Radio tile: turnand press the controller.The Internet radio menu appears.
Searching for stationsX To select Station SearchStation Search in the Internetradio menu: turn and press the controller.A list with search criteria appears.
X Select the desired search criterion.
i For example as a search criterion, you canset an Internet radio station that is locatedclose to your navigation destination.
Connecting to a stationX Search for a station (Y page 452).The connection is establishedautomatically.
Establishing a connection manually.X To select; in the Internet radio menu:turn and press the controller.The call is placed.
If the data stream is interrupted, an automaticattempt is made to re-establish theconnection.
452 Online and InternetCO
MAN
D
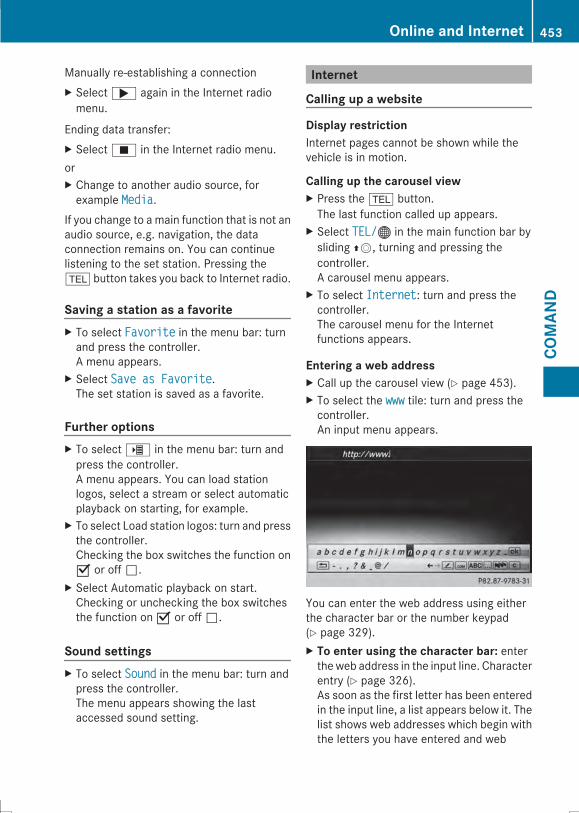
Manually re-establishing a connectionX Select; again in the Internet radiomenu.
Ending data transfer:X SelectÉ in the Internet radio menu.orX Change to another audio source, forexample MediaMedia.
If you change to a main function that is not anaudio source, e.g. navigation, the dataconnection remains on. You can continuelistening to the set station. Pressing the% button takes you back to Internet radio.
Saving a station as a favoriteX To select FavoriteFavorite in the menu bar: turnand press the controller.A menu appears.
X Select Save as FavoriteSave as Favorite.The set station is saved as a favorite.
Further optionsX To selectÛ in the menu bar: turn andpress the controller.A menu appears. You can load stationlogos, select a stream or select automaticplayback on starting, for example.
X To select Load station logos: turn and pressthe controller.Checking the box switches the function onO or off ª.
X Select Automatic playback on start.Checking or unchecking the box switchesthe function on O or off ª.
Sound settingsX To select SoundSound in the menu bar: turn andpress the controller.The menu appears showing the lastaccessed sound setting.
Internet
Calling up a website
Display restrictionInternet pages cannot be shown while thevehicle is in motion.
Calling up the carousel viewX Press the % button.The last function called up appears.
X Select TEL/TEL/® in the main function bar bysliding ZV, turning and pressing thecontroller.A carousel menu appears.
X To select InternetInternet: turn and press thecontroller.The carousel menu for the Internetfunctions appears.
Entering a web addressX Call up the carousel view (Y page 453).X To select the wwwwww tile: turn and press thecontroller.An input menu appears.
You can enter the web address using eitherthe character bar or the number keypad(Y page 329).X To enter using the character bar: entertheweb address in the input line. Characterentry (Y page 326).As soon as the first letter has been enteredin the input line, a list appears below it. Thelist shows web addresses which begin withthe letters you have entered and web
Online and Internet 453
COMAN
D
Z
addresses which have already been calledup.The list is empty the first time you call it up.
X To enter characters using the numberpad: press the number keys in rapidsuccession.The character appears when the key ispressed. The first available letter ishighlighted. Enter the character using thecharacter bar (Y page 326).
X Select ¬ after entering the webaddress.The website is called up.
X To select a web address from the list:slide ZV the controller in the input menuwith character bar.The list is activated.
X Select the desired web address.The web address can still be changed asdesired.
X Select ¬.The website is called up.
Selecting favoritesYou must create at least one favorite in thecarousel view for this function (Y page 457).X Call up the carousel view (Y page 453).X To select the My Internet BookmarksMy Internet Bookmarkstile: turn and press the controller.
X Select a bookmark in the Favoritescarousel display.The favorite is opened.
454 Online and InternetCO
MAN
D

Menu functions
Calling up the menu
: Closes the browser; Back= Forwards? Refreshes/cancelsA URL entryB FavoritesC Closes the windowX To show the menu: press the% button.X To call up the Options menu: select OptionsOptions when the shortcut is displayed: turn andpress the controller.
X To close the website: select&.The Internet browser is closed.
X To call up the previous website: selectt.X To call up the next website: selectu.X To refresh the website: selectÎ.The website is refreshed. This procedure may take some time.i While the website is loading, a cross appears in the menu bar. This can be used to cancelthe loading procedure.
X To enter a URL: selectA.X Enter a web address (URL) (Y page 453).X Favorites: selectg.The Favorites menu appears (Y page 457).
X To close the active window: select2.The current window is closed.
Online and Internet 455
COMAN
D
Z
Options menu
Opening in a new window.i In order to be able to use this function,the cursor must be on a link.
X Call up the menu (Y page 455).X To select Open in New WindowOpen in New Window: turn andpress the controller.The website is opened in a new window.
Adding to bookmarksAdds the current website to the favorites. Thewebsite can then be called up using thecarousel view. You can save up to 20 favoritesin the carousel view.X Call up the menu (Y page 455).X To select Add to BookmarksAdd to Bookmarks: turn andpress the controller.A prompt appears.
X Select Add Bookmark (All Seats)Add Bookmark (All Seats) orAdd Bookmark (Seat)Add Bookmark (Seat).The The website was added toThe website was added tobookmarksbookmarks message appears.
Current URLX Call up the menu (Y page 455).X To select CurrentCurrent URLURL: turn and press thecontroller.The URL appears.
ZoomYou can use this function to enlarge webpages.X Call up the menu (Y page 455).X To select ZoomZoom: turn and press thecontroller.The # dot indicates the current setting.
X To navigate on the web page: slide XVY,ZVÆ or aVb the controller.
X To zoom in on the web page: turn thecontroller.
Jumping from link to linkYou can use this function to skip from one linkto the next on a website.X Call up the menu (Y page 455).X To select Jump from Link to LinkJump from Link to Link: turnand press the controller.The # dot indicates the current setting.
X To skip from link to link: turn the controller.X To select the desired link: press thecontroller.The link is called up.
Directional scrollingYou can use this function to scroll up anddown on the web page.X Call up the menu (Y page 455).X To select Directional ScrollingDirectional Scrolling: turnand press the controller.The # dot indicates the current setting.
X To navigate on the web page: turn thecontroller.
Further settingsThe settings are described in a separatesection (Y page 457).
Favorites
IntroductionFavorites are frequently visited websites.You have the following options for creating afavorite:Rin the carousel view (Y page 457)Rvia the menu item Add toAdd toBookmarksBookmarks(Y page 456)
Before creating a favorite in the carouselview, you must first close active connections(Y page 446).You can select and edit favorites that youhave created.
456 Online and InternetCO
MAN
D
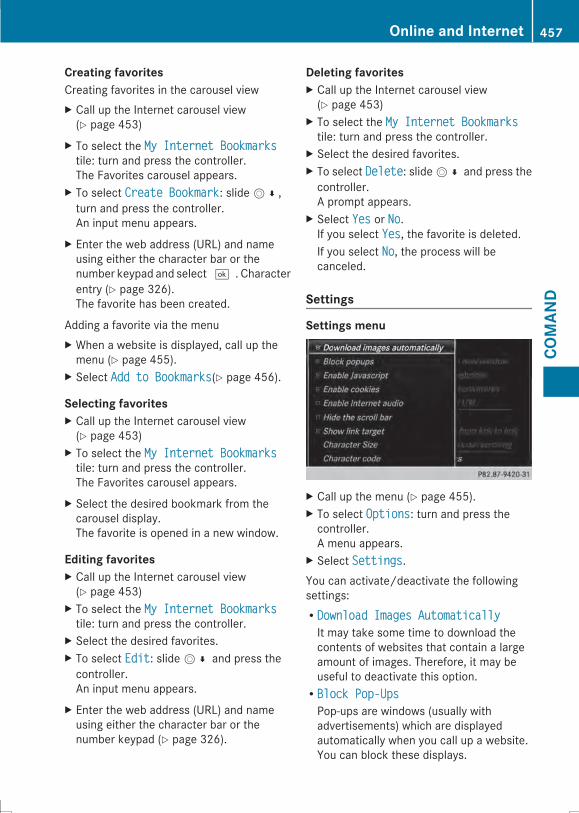
Creating favoritesCreating favorites in the carousel viewX Call up the Internet carousel view(Y page 453)
X To select the My Internet BookmarksMy Internet Bookmarkstile: turn and press the controller.The Favorites carousel appears.
X To select Create BookmarkCreate Bookmark: slideV¬,turn and press the controller.An input menu appears.
X Enter the web address (URL) and nameusing either the character bar or thenumber keypad and select¬. Characterentry (Y page 326).The favorite has been created.
Adding a favorite via the menuX When a website is displayed, call up themenu (Y page 455).
X Select Add to BookmarksAdd to Bookmarks(Y page 456).
Selecting favoritesX Call up the Internet carousel view(Y page 453)
X To select the My Internet BookmarksMy Internet Bookmarkstile: turn and press the controller.The Favorites carousel appears.
X Select the desired bookmark from thecarousel display.The favorite is opened in a new window.
Editing favoritesX Call up the Internet carousel view(Y page 453)
X To select the My Internet BookmarksMy Internet Bookmarkstile: turn and press the controller.
X Select the desired favorites.X To select EditEdit: slideV¬ and press thecontroller.An input menu appears.
X Enter the web address (URL) and nameusing either the character bar or thenumber keypad (Y page 326).
Deleting favoritesX Call up the Internet carousel view(Y page 453)
X To select the My Internet BookmarksMy Internet Bookmarkstile: turn and press the controller.
X Select the desired favorites.X To select DeleteDelete: slideV¬ and press thecontroller.A prompt appears.
X Select YesYes or NoNo.If you select YesYes, the favorite is deleted.If you select NoNo, the process will becanceled.
Settings
Settings menu
X Call up the menu (Y page 455).X To select OptionsOptions: turn and press thecontroller.A menu appears.
X Select SettingsSettings.You can activate/deactivate the followingsettings:RDownload Images AutomaticallyDownload Images AutomaticallyIt may take some time to download thecontents of websites that contain a largeamount of images. Therefore, it may beuseful to deactivate this option.RBlock Pop-UpsBlock Pop-UpsPop-ups are windows (usually withadvertisements) which are displayedautomatically when you call up a website.You can block these displays.
Online and Internet 457
COMAN
D
Z
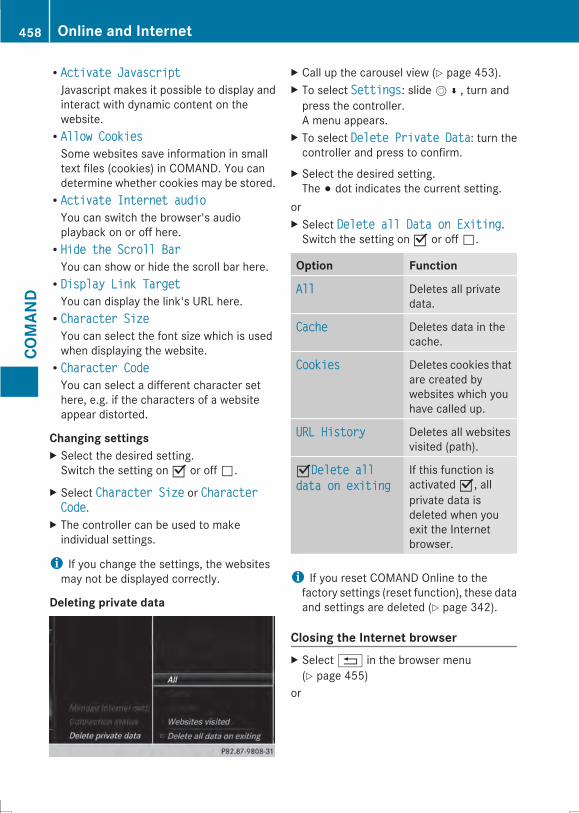
RActivate JavascriptActivate JavascriptJavascript makes it possible to display andinteract with dynamic content on thewebsite.RAllow CookiesAllow CookiesSome websites save information in smalltext files (cookies) in COMAND. You candetermine whether cookies may be stored.RActivate Internet audioActivate Internet audioYou can switch the browser's audioplayback on or off here.RHide the Scroll BarHide the Scroll BarYou can show or hide the scroll bar here.RDisplay Link TargetDisplay Link TargetYou can display the link's URL here.RCharacter SizeCharacter SizeYou can select the font size which is usedwhen displaying the website.RCharacter CodeCharacter CodeYou can select a different character sethere, e.g. if the characters of a websiteappear distorted.
Changing settingsX Select the desired setting.Switch the setting on O or off ª.
X Select Character SizeCharacter Size or CharacterCharacterCodeCode.
X The controller can be used to makeindividual settings.
i If you change the settings, the websitesmay not be displayed correctly.
Deleting private data
X Call up the carousel view (Y page 453).X To select SettingsSettings: slideV¬, turn andpress the controller.A menu appears.
X To select Delete Private DataDelete Private Data: turn thecontroller and press to confirm.
X Select the desired setting.The # dot indicates the current setting.
orX Select Delete all Data on ExitingDelete all Data on Exiting.Switch the setting on O or off ª.
Option Function
AllAll Deletes all privatedata.
CacheCache Deletes data in thecache.
CookiesCookies Deletes cookies thatare created bywebsites which youhave called up.
URL HistoryURL History Deletes all websitesvisited (path).
ODelete allDelete alldata on exitingdata on exiting
If this function isactivated O, allprivate data isdeleted when youexit the Internetbrowser.
i If you reset COMAND Online to thefactory settings (reset function), these dataand settings are deleted (Y page 342).
Closing the Internet browserX Select% in the browser menu(Y page 455)
or
458 Online and InternetCO
MAN
D

X Press the% button for longer than twoseconds.A prompt appears, askingwhether youwishto close the Internet browser.
X Select YesYes or NoNo.After selecting YesYes, the application isclosed.If you select NoNo, the process will becanceled.
Online and Internet 459
COMAN
D
Z

Radio
Radio mode
Radio overviewX To activate the main function and menu bar: in radio mode, slide ZVÆ the controller.
: Main function bar; Status bar with compass display= Main display field with available stations and additional displays? Display of radio station selectedA Radio menu barB Climate control status barC Context display with additional information
Radio menu overviewRadio main function barRHD FM radioHD FM radioHD FM radio modeRHD AM radioHD AM radioHD/SW/MW radio modeRSat radioSat radioSatellite radioRRadio Preset MemoryRadio Preset Memory99 preset positions for radio stationsRRadio InformationRadio InformationDigital Operator's ManualRInternet RadioInternet RadioWeb radio
Radio menu barROptionsOptions/Tag this trackTag this trackSaves track information on an Apple devicefor a later purchase option via iTunesROptionsOptions/Enter frequencyEnter frequencyManual frequency entryROptionsOptions/Current station/channelCurrent station/channellistinglistingList of available stationsROptionsOptions/Start at a different seatStart at a different seatStarts radio at a different seatROptionsOptions/EditEditSelects and edits station presetsRè
Searches for station by nameRWavebandWaveband
460 RadioCO
MAN
D
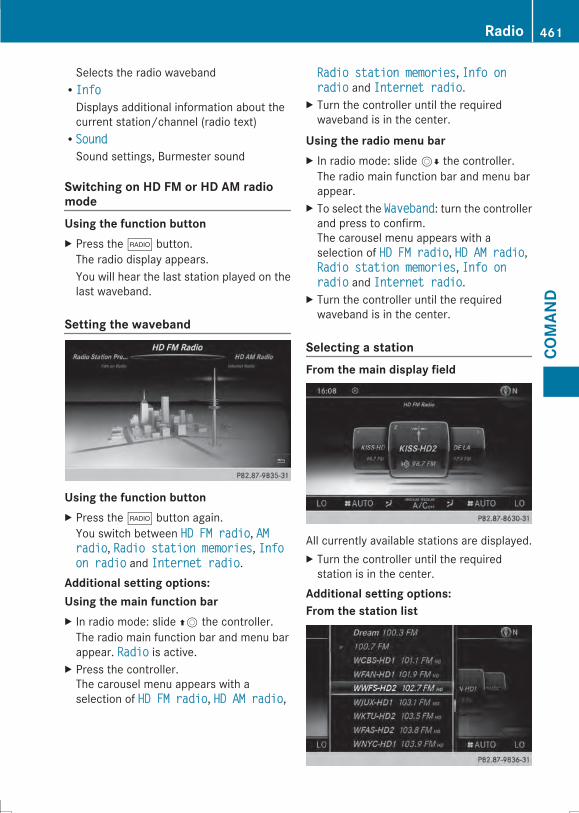
Selects the radio wavebandRInfoInfoDisplays additional information about thecurrent station/channel (radio text)RSoundSoundSound settings, Burmester sound
Switching on HD FM or HD AM radiomodeUsing the function buttonX Press the $ button.The radio display appears.You will hear the last station played on thelast waveband.
Setting the waveband
Using the function buttonX Press the $ button again.You switch between HD FM radioHD FM radio, AMAMradioradio, Radio station memoriesRadio station memories, InfoInfoon radioon radio and Internet radioInternet radio.
Additional setting options:Using the main function barX In radio mode: slide ZV the controller.The radio main function bar and menu barappear. RadioRadio is active.
X Press the controller.The carousel menu appears with aselection of HD FM radioHD FM radio, HD AM radioHD AM radio,
Radio station memoriesRadio station memories, Info onInfo onradioradio and Internet radioInternet radio.
X Turn the controller until the requiredwaveband is in the center.
Using the radio menu barX In radio mode: slideVÆ the controller.The radio main function bar and menu barappear.
X To select the WavebandWaveband: turn the controllerand press to confirm.The carousel menu appears with aselection of HD FM radioHD FM radio, HD AM radioHD AM radio,Radio station memoriesRadio station memories, Info onInfo onradioradio and Internet radioInternet radio.
X Turn the controller until the requiredwaveband is in the center.
Selecting a stationFrom the main display field
All currently available stations are displayed.X Turn the controller until the requiredstation is in the center.
Additional setting options:From the station list
Radio 461
COMAN
D
Z
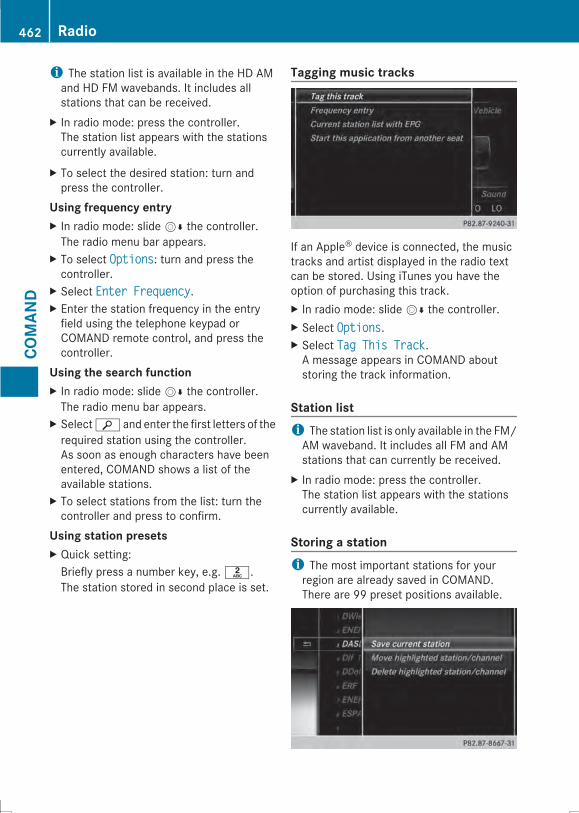
i The station list is available in the HD AMand HD FM wavebands. It includes allstations that can be received.
X In radio mode: press the controller.The station list appears with the stationscurrently available.
X To select the desired station: turn andpress the controller.
Using frequency entryX In radio mode: slideVÆ the controller.The radio menu bar appears.
X To select OptionsOptions: turn and press thecontroller.
X Select Enter FrequencyEnter Frequency.X Enter the station frequency in the entryfield using the telephone keypad orCOMAND remote control, and press thecontroller.
Using the search functionX In radio mode: slideVÆ the controller.The radio menu bar appears.
X Selectè and enter the first letters of therequired station using the controller.As soon as enough characters have beenentered, COMAND shows a list of theavailable stations.
X To select stations from the list: turn thecontroller and press to confirm.
Using station presetsX Quick setting:Briefly press a number key, e.g.l.The station stored in second place is set.
Tagging music tracks
If an Apple® device is connected, the musictracks and artist displayed in the radio textcan be stored. Using iTunes you have theoption of purchasing this track.X In radio mode: slideVÆ the controller.X Select OptionsOptions.X Select Tag This TrackTag This Track.A message appears in COMAND aboutstoring the track information.
Station listi The station list is only available in the FM/AM waveband. It includes all FM and AMstations that can currently be received.
X In radio mode: press the controller.The station list appears with the stationscurrently available.
Storing a stationi The most important stations for yourregion are already saved in COMAND.There are 99 preset positions available.
462 RadioCO
MAN
D
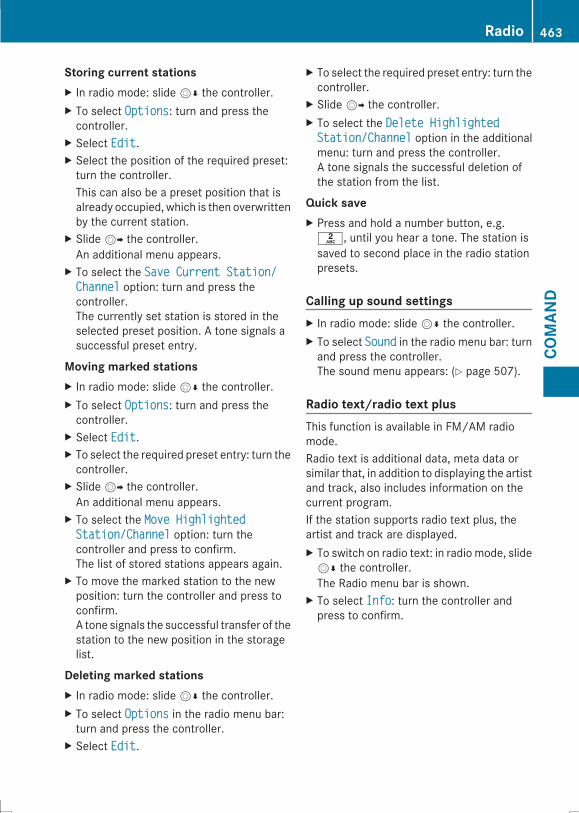
Storing current stationsX In radio mode: slideVÆ the controller.X To select OptionsOptions: turn and press thecontroller.
X Select EditEdit.X Select the position of the required preset:turn the controller.This can also be a preset position that isalready occupied, which is then overwrittenby the current station.
X SlideVY the controller.An additional menu appears.
X To select the Save Current Station/Save Current Station/ChannelChannel option: turn and press thecontroller.The currently set station is stored in theselected preset position. A tone signals asuccessful preset entry.
Moving marked stationsX In radio mode: slideVÆ the controller.X To select OptionsOptions: turn and press thecontroller.
X Select EditEdit.X To select the required preset entry: turn thecontroller.
X SlideVY the controller.An additional menu appears.
X To select the Move HighlightedMove HighlightedStation/ChannelStation/Channel option: turn thecontroller and press to confirm.The list of stored stations appears again.
X To move the marked station to the newposition: turn the controller and press toconfirm.A tone signals the successful transfer of thestation to the new position in the storagelist.
Deleting marked stationsX In radio mode: slideVÆ the controller.X To select OptionsOptions in the radio menu bar:turn and press the controller.
X Select EditEdit.
X To select the required preset entry: turn thecontroller.
X SlideVY the controller.X To select the Delete HighlightedDelete HighlightedStation/ChannelStation/Channel option in the additionalmenu: turn and press the controller.A tone signals the successful deletion ofthe station from the list.
Quick saveX Press and hold a number button, e.g.l, until you hear a tone. The station issaved to second place in the radio stationpresets.
Calling up sound settingsX In radio mode: slideVÆ the controller.X To select SoundSound in the radio menu bar: turnand press the controller.The sound menu appears: (Y page 507).
Radio text/radio text plusThis function is available in FM/AM radiomode.Radio text is additional data, meta data orsimilar that, in addition to displaying the artistand track, also includes information on thecurrent program.If the station supports radio text plus, theartist and track are displayed.X To switch on radio text: in radio mode, slideVÆ the controller.The Radio menu bar is shown.
X To select InfoInfo: turn the controller andpress to confirm.
Radio 463
COMAN
D
Z
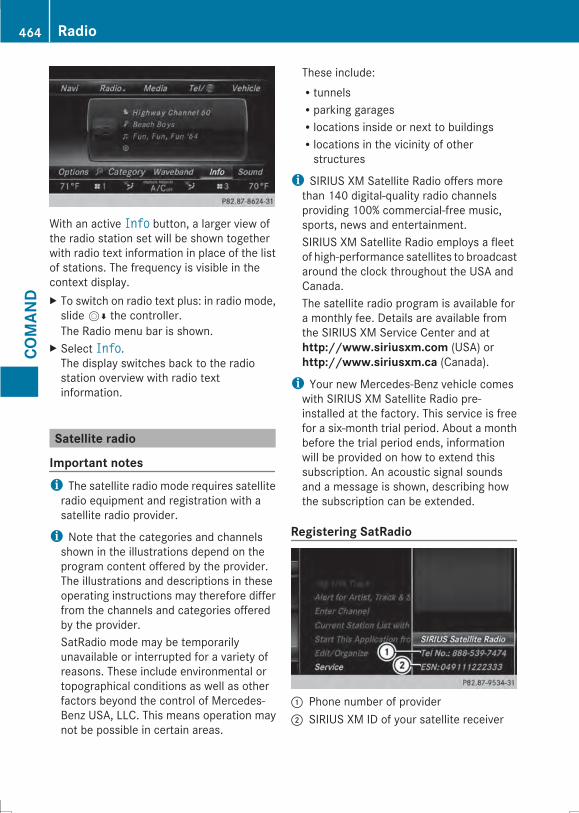
With an active InfoInfo button, a larger view ofthe radio station set will be shown togetherwith radio text information in place of the listof stations. The frequency is visible in thecontext display.X To switch on radio text plus: in radio mode,slideVÆ the controller.The Radio menu bar is shown.
X Select InfoInfo.The display switches back to the radiostation overview with radio textinformation.
Satellite radio
Important notesi The satellite radio mode requires satelliteradio equipment and registration with asatellite radio provider.
i Note that the categories and channelsshown in the illustrations depend on theprogram content offered by the provider.The illustrations and descriptions in theseoperating instructions may therefore differfrom the channels and categories offeredby the provider.SatRadio mode may be temporarilyunavailable or interrupted for a variety ofreasons. These include environmental ortopographical conditions as well as otherfactors beyond the control of Mercedes-Benz USA, LLC. This means operation maynot be possible in certain areas.
These include:RtunnelsRparking garagesRlocations inside or next to buildingsRlocations in the vicinity of otherstructures
i SIRIUS XM Satellite Radio offers morethan 140 digital-quality radio channelsproviding 100% commercial-free music,sports, news and entertainment.SIRIUS XM Satellite Radio employs a fleetof high-performance satellites to broadcastaround the clock throughout the USA andCanada.The satellite radio program is available fora monthly fee. Details are available fromthe SIRIUS XM Service Center and athttp://www.siriusxm.com (USA) orhttp://www.siriusxm.ca (Canada).i Your new Mercedes-Benz vehicle comeswith SIRIUS XM Satellite Radio pre-installed at the factory. This service is freefor a six-month trial period. About a monthbefore the trial period ends, informationwill be provided on how to extend thissubscription. An acoustic signal soundsand a message is shown, describing howthe subscription can be extended.
Registering SatRadio
: Phone number of provider; SIRIUS XM ID of your satellite receiver
464 RadioCO
MAN
D

X Switch on SatRadio mode (Y page 466).The satellite radio main menu appearsshowing the preview channel. You cannotselect any other stations.
X To select OptionsOptions in the menu bar: slideVÆ and press the controller.
X To select ServiceService: turn and press thecontroller.The service information screen appears.
Once the connection has been established:X Follow the instructions of the service staff.The activation process may take up toten minutes. If activation is completedsuccessfully, the Updating ChannelsUpdating Channelsmessage appears in the display, followedby the satellite radio main menu.
i You can also have the satellite serviceactivated online. To do so, visit the SIRIUSXM Radio website athttp://www.siriusxm.com (USA) orhttp://www.siriusxm.ca (Canada).i If registration is not included whenpurchasing the system, your credit carddetails will be required to activate youraccount.If the satellite receiver is not installed or isnot installed correctly, the Device NotDevice NotAvailableAvailable message will appear.
Radio 465
COMAN
D
Z
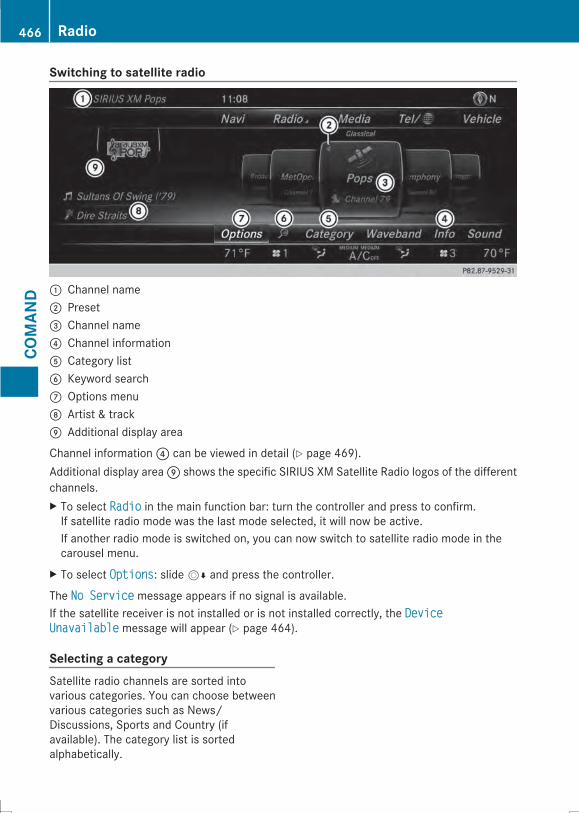
Switching to satellite radio
: Channel name; Preset= Channel name? Channel informationA Category listB Keyword searchC Options menuD Artist & trackE Additional display area
Channel information? can be viewed in detail (Y page 469).Additional display areaE shows the specific SIRIUS XM Satellite Radio logos of the differentchannels.X To select RadioRadio in the main function bar: turn the controller and press to confirm.If satellite radio mode was the last mode selected, it will now be active.If another radio mode is switched on, you can now switch to satellite radio mode in thecarousel menu.
X To select OptionsOptions: slideVÆ and press the controller.
The No ServiceNo Service message appears if no signal is available.If the satellite receiver is not installed or is not installed correctly, the DeviceDeviceUnavailableUnavailable message will appear (Y page 464).
Selecting a categorySatellite radio channels are sorted intovarious categories. You can choose betweenvarious categories such as News/Discussions, Sports and Country (ifavailable). The category list is sortedalphabetically.
466 RadioCO
MAN
D
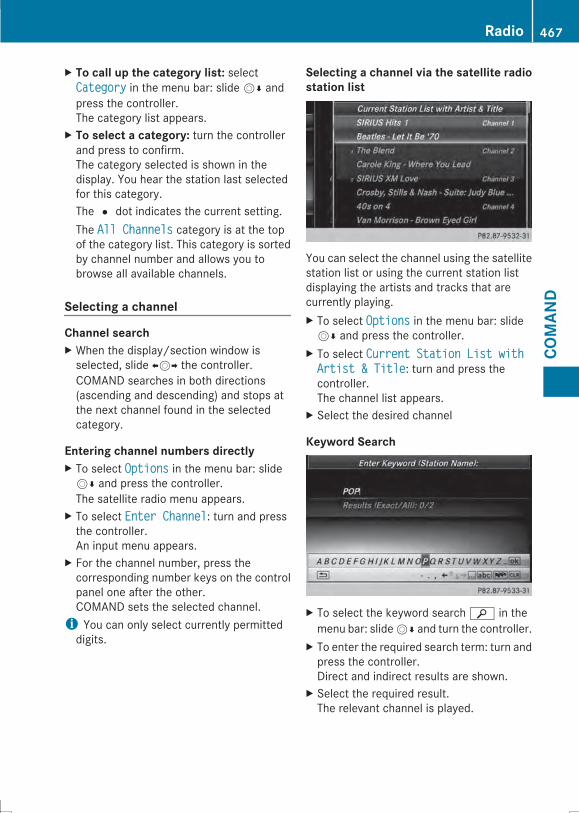
X To call up the category list: selectCategoryCategory in the menu bar: slideVÆ andpress the controller.The category list appears.
X To select a category: turn the controllerand press to confirm.The category selected is shown in thedisplay. You hear the station last selectedfor this category.The# dot indicates the current setting.The All ChannelsAll Channels category is at the topof the category list. This category is sortedby channel number and allows you tobrowse all available channels.
Selecting a channel
Channel searchX When the display/section window isselected, slide XVY the controller.COMAND searches in both directions(ascending and descending) and stops atthe next channel found in the selectedcategory.
Entering channel numbers directlyX To select OptionsOptions in the menu bar: slideVÆ and press the controller.The satellite radio menu appears.
X To select Enter ChannelEnter Channel: turn and pressthe controller.An input menu appears.
X For the channel number, press thecorresponding number keys on the controlpanel one after the other.COMAND sets the selected channel.i You can only select currently permitteddigits.
Selecting a channel via the satellite radiostation list
You can select the channel using the satellitestation list or using the current station listdisplaying the artists and tracks that arecurrently playing.X To select OptionsOptions in the menu bar: slideVÆ and press the controller.
X To select Current Station List withCurrent Station List withArtist & TitleArtist & Title: turn and press thecontroller.The channel list appears.
X Select the desired channel
Keyword Search
X To select the keyword searchè in themenu bar: slideVÆ and turn the controller.
X To enter the required search term: turn andpress the controller.Direct and indirect results are shown.
X Select the required result.The relevant channel is played.
Radio 467
COMAN
D
Z
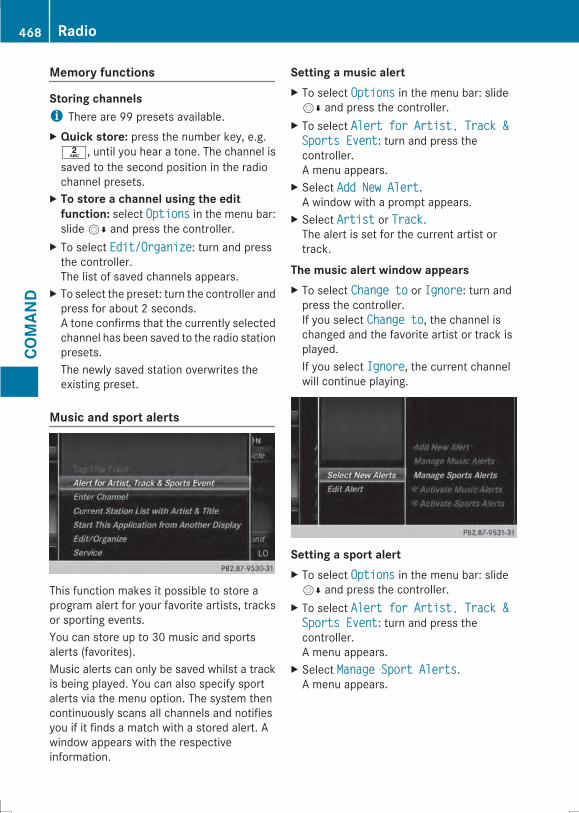
Memory functions
Storing channelsi There are 99 presets available.X Quick store: press the number key, e.g.l, until you hear a tone. The channel issaved to the second position in the radiochannel presets.
X To store a channel using the editfunction: select OptionsOptions in the menu bar:slideVÆ and press the controller.
X To select Edit/OrganizeEdit/Organize: turn and pressthe controller.The list of saved channels appears.
X To select the preset: turn the controller andpress for about 2 seconds.A tone confirms that the currently selectedchannel has been saved to the radio stationpresets.The newly saved station overwrites theexisting preset.
Music and sport alerts
This function makes it possible to store aprogram alert for your favorite artists, tracksor sporting events.You can store up to 30 music and sportsalerts (favorites).Music alerts can only be saved whilst a trackis being played. You can also specify sportalerts via the menu option. The system thencontinuously scans all channels and notifiesyou if it finds a match with a stored alert. Awindow appears with the respectiveinformation.
Setting a music alertX To select OptionsOptions in the menu bar: slideVÆ and press the controller.
X To select Alert for Artist, Track &Alert for Artist, Track &Sports EventSports Event: turn and press thecontroller.A menu appears.
X Select Add New AlertAdd New Alert.A window with a prompt appears.
X Select ArtistArtist or TrackTrack.The alert is set for the current artist ortrack.
The music alert window appearsX To select Change toChange to or IgnoreIgnore: turn andpress the controller.If you select Change toChange to, the channel ischanged and the favorite artist or track isplayed.If you select IgnoreIgnore, the current channelwill continue playing.
Setting a sport alertX To select OptionsOptions in the menu bar: slideVÆ and press the controller.
X To select Alert for Artist, Track &Alert for Artist, Track &Sports EventSports Event: turn and press thecontroller.A menu appears.
X Select Manage Sport AlertsManage Sport Alerts.A menu appears.
468 RadioCO
MAN
D
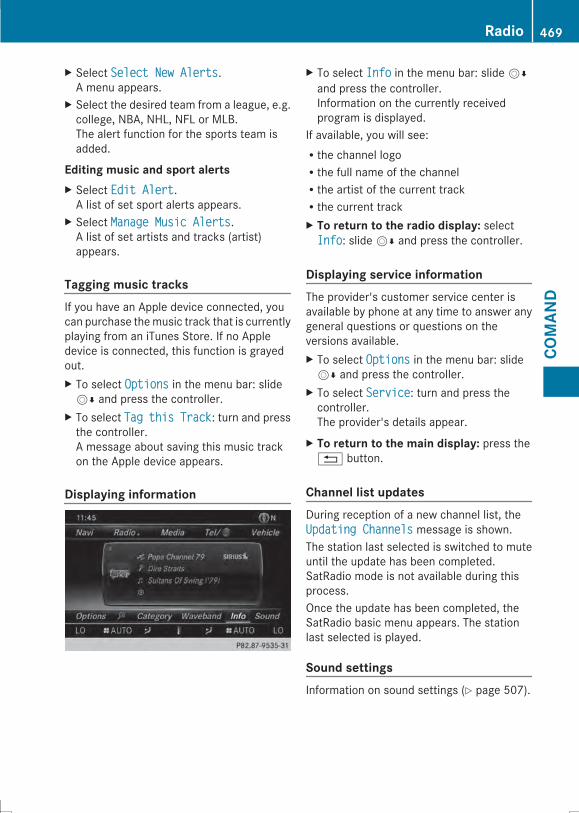
X Select Select New AlertsSelect New Alerts.A menu appears.
X Select the desired team from a league, e.g.college, NBA, NHL, NFL or MLB.The alert function for the sports team isadded.
Editing music and sport alertsX Select Edit AlertEdit Alert.A list of set sport alerts appears.
X Select Manage Music AlertsManage Music Alerts.A list of set artists and tracks (artist)appears.
Tagging music tracksIf you have an Apple device connected, youcan purchase themusic track that is currentlyplaying from an iTunes Store. If no Appledevice is connected, this function is grayedout.X To select OptionsOptions in the menu bar: slideVÆ and press the controller.
X To select TagTag thisthis TrackTrack: turn and pressthe controller.A message about saving this music trackon the Apple device appears.
Displaying information
X To select InfoInfo in the menu bar: slideVÆand press the controller.Information on the currently receivedprogram is displayed.
If available, you will see:Rthe channel logoRthe full name of the channelRthe artist of the current trackRthe current trackX To return to the radio display: selectInfoInfo: slideVÆ and press the controller.
Displaying service informationThe provider's customer service center isavailable by phone at any time to answer anygeneral questions or questions on theversions available.X To select OptionsOptions in the menu bar: slideVÆ and press the controller.
X To select ServiceService: turn and press thecontroller.The provider's details appear.
X To return to the main display: press the% button.
Channel list updatesDuring reception of a new channel list, theUpdating ChannelsUpdating Channels message is shown.The station last selected is switched to muteuntil the update has been completed.SatRadio mode is not available during thisprocess.Once the update has been completed, theSatRadio basic menu appears. The stationlast selected is played.
Sound settingsInformation on sound settings (Y page 507).
Radio 469
COMAN
D
Z
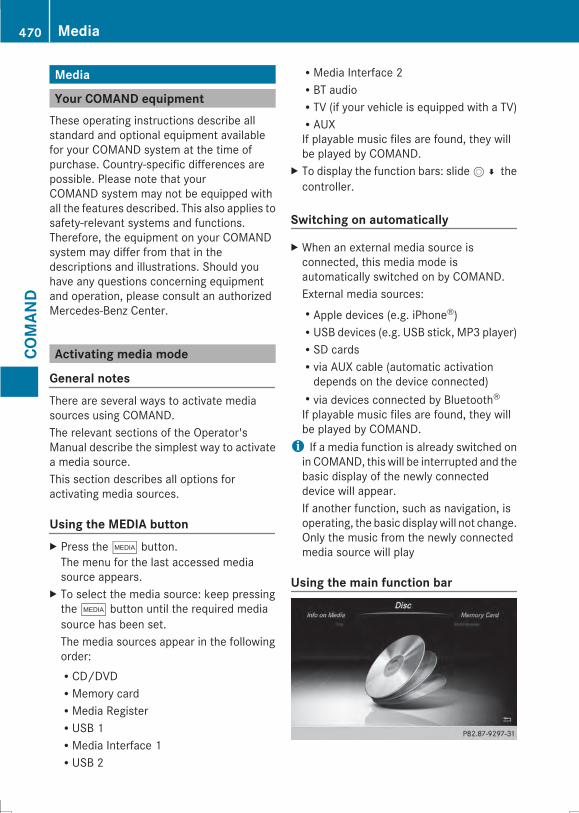
Media
Your COMAND equipmentThese operating instructions describe allstandard and optional equipment availablefor your COMAND system at the time ofpurchase. Country-specific differences arepossible. Please note that yourCOMAND system may not be equipped withall the features described. This also applies tosafety-relevant systems and functions.Therefore, the equipment on your COMANDsystem may differ from that in thedescriptions and illustrations. Should youhave any questions concerning equipmentand operation, please consult an authorizedMercedes-Benz Center.
Activating media mode
General notesThere are several ways to activate mediasources using COMAND.The relevant sections of the Operator'sManual describe the simplest way to activatea media source.This section describes all options foractivating media sources.
Using the MEDIA buttonX Press the Õ button.The menu for the last accessed mediasource appears.
X To select the media source: keep pressingthe Õ button until the required mediasource has been set.The media sources appear in the followingorder:RCD/DVDRMemory cardRMedia RegisterRUSB 1RMedia Interface 1RUSB 2
RMedia Interface 2RBT audioRTV (if your vehicle is equipped with a TV)RAUXIf playable music files are found, they willbe played by COMAND.
X To display the function bars: slideV¬ thecontroller.
Switching on automatically
X When an external media source isconnected, this media mode isautomatically switched on by COMAND.External media sources:RApple devices (e.g. iPhone®)RUSB devices (e.g. USB stick, MP3 player)RSD cardsRvia AUX cable (automatic activationdepends on the device connected)Rvia devices connected by Bluetooth®If playable music files are found, they willbe played by COMAND.i If a media function is already switched onin COMAND, this will be interrupted and thebasic display of the newly connecteddevice will appear.If another function, such as navigation, isoperating, the basic displaywill not change.Only the music from the newly connectedmedia source will play
Using the main function bar
470 MediaCO
MAN
D

X To select MediaMedia: turn the controller andpress to confirm.The menu appears with the available mediasources.
X Select the media source.If themedia source containsmusic or videofiles, these will be played. Thecorresponding basic menu will be shown.
Using the number keypad
i If you touch a key in the touch-sensitivenumber keypad, the number field isdisplayed in the additional display area.
X Touch any number key when in mediamode.The number field is shown. The activemedia source is highlighted.
X To select a media source: press thecorresponding number key.If themedia source containsmusic or videofiles, these will be played. Thecorresponding basic menu will be shown.
X To select a track from the active mediasource: press theg key on the numberkeypad.An input field appears.
X To enter a track number: use the numberkeypad to enter the desired numbers.The track is played.
X To show track information: press the #key on the number keypadAn additional field appears with the trackinformation.
Using the device list
X In media mode, slideVÆ the controller.The media menu bar appears.
X To select DevicesDevices : turn the controller andpress to confirm.The available media sources will be shown.The# dot indicates the current setting.
X Select the media source.If themedia source containsmusic or videofiles, these will be played. Thecorresponding basic menu will be shown.
Start at a different seat
X In media mode, slideVÆ the controller.The media menu bar appears.
X To select OptionsOptions: turn and press thecontroller.
X Select Start Application at OtherStart Application at OtherSeatSeat.Another menu appears with the option ofsetting the media source to RearRear RightRight orRear LeftRear Left.
Media 471
COMAN
D
Z
Use Additional OptionsAdditional Options to operate theparental control screen for selected seats:(Y page 355).
X To set themedia source to RearRear RightRight, forexample: turn and press the controller.
Audio/video mode
Important safety notes
G WARNINGThe CD/DVD drive is a class 1 laser product.If you open the CD/DVD drive housing, youcould be exposed to invisible laser radiation.This laser radiation could damage your retina.There is a risk of injury.Never open the housing. Always havemaintenance and repair work carried out at aqualified specialist workshop.
G WARNINGOnly when the vehicle is stationary shouldyou:Rinsert a data carrierReject a discThere is a risk of being distracted from theroad and traffic conditions if you insert oreject a disc while the vehicle is in motion.
Inserting and removing a disc from thesingle CD/DVD driveBefore inserting a CD/DVD, ensure that thecup holder is empty and the spray guard flapis open.X To insert: press the þ button on thesingle drive.If there is a disc already inserted, it will beejected.
X Insert a disc into the disc slot with theprinted side facing upwards.The drive closes and the disc is played.If the CD/DVD is operated in Media mode,the corresponding basic menu will beshown. If the CD/DVD is started using
another application (e.g. navigation), thedisplay will not change.i The drive may not be able to play discswith copy protection.
X To remove: press the þ button.The drive ejects the disc.
X Remove the ejected disc from the slot.If you do not take the disc out of the slot, itis drawn in again automatically after a shortwhile.
472 MediaCO
MAN
D
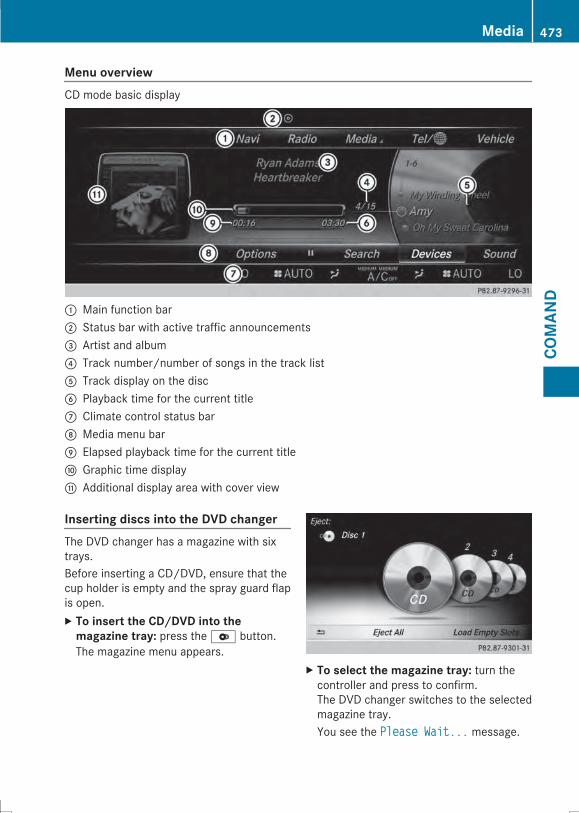
Menu overviewCD mode basic display
: Main function bar; Status bar with active traffic announcements= Artist and album? Track number/number of songs in the track listA Track display on the discB Playback time for the current titleC Climate control status barD Media menu barE Elapsed playback time for the current titleF Graphic time displayG Additional display area with cover view
Inserting discs into the DVD changerThe DVD changer has a magazine with sixtrays.Before inserting a CD/DVD, ensure that thecup holder is empty and the spray guard flapis open.X To insert the CD/DVD into themagazine tray: press the V button.The magazine menu appears.
X To select the magazine tray: turn thecontroller and press to confirm.The DVD changer switches to the selectedmagazine tray.You see the Please Wait...Please Wait... message.
Media 473
COMAN
D
Z
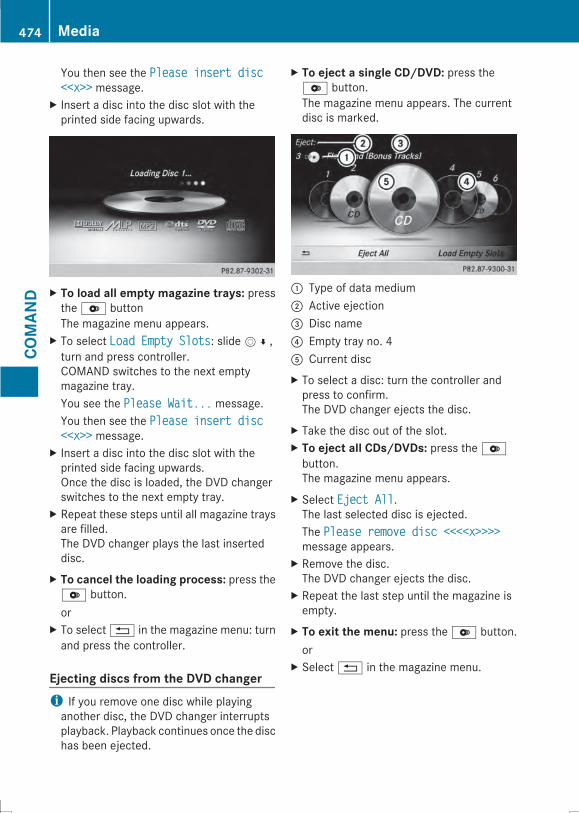
You then see the Please insert discPlease insert disc<<x>><<x>> message.
X Insert a disc into the disc slot with theprinted side facing upwards.
X To load all empty magazine trays: pressthe V buttonThe magazine menu appears.
X To select Load Empty SlotsLoad Empty Slots: slideV¬,turn and press controller.COMAND switches to the next emptymagazine tray.You see the Please Wait...Please Wait... message.You then see the Please insert discPlease insert disc<<x>><<x>> message.
X Insert a disc into the disc slot with theprinted side facing upwards.Once the disc is loaded, the DVD changerswitches to the next empty tray.
X Repeat these steps until all magazine traysare filled.The DVD changer plays the last inserteddisc.
X To cancel the loading process: press theV button.or
X To select% in the magazine menu: turnand press the controller.
Ejecting discs from the DVD changeri If you remove one disc while playinganother disc, the DVD changer interruptsplayback. Playback continues once the dischas been ejected.
X To eject a single CD/DVD: press theV button.The magazine menu appears. The currentdisc is marked.
: Type of data medium; Active ejection= Disc name? Empty tray no. 4A Current discX To select a disc: turn the controller andpress to confirm.The DVD changer ejects the disc.
X Take the disc out of the slot.X To eject all CDs/DVDs: press the Vbutton.The magazine menu appears.
X Select Eject AllEject All.The last selected disc is ejected.The Please remove disc <<<<x>>>>Please remove disc <<<<x>>>>message appears.
X Remove the disc.The DVD changer ejects the disc.
X Repeat the last step until the magazine isempty.
X To exit the menu: press the V button.or
X Select% in the magazine menu.
474 MediaCO
MAN
D
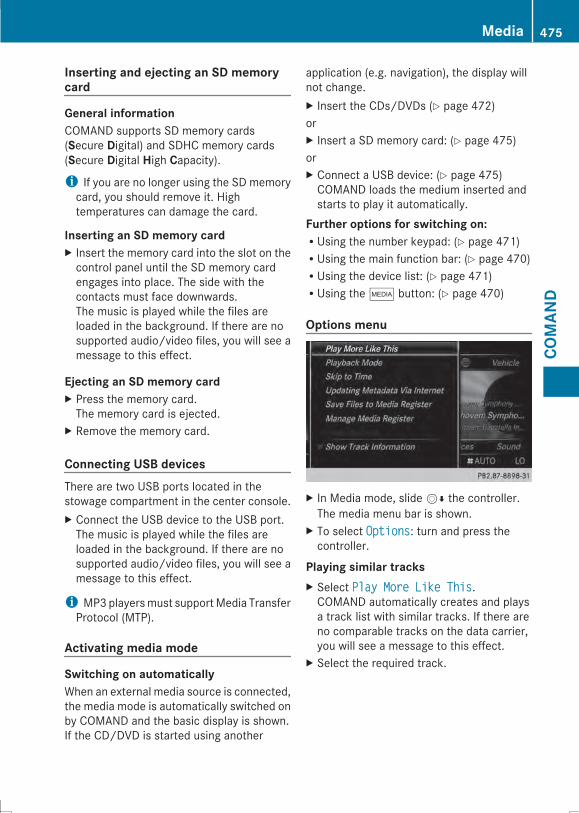
Inserting and ejecting an SD memorycard
General informationCOMAND supports SD memory cards(Secure Digital) and SDHC memory cards(Secure Digital High Capacity).i If you are no longer using the SD memorycard, you should remove it. Hightemperatures can damage the card.
Inserting an SD memory cardX Insert the memory card into the slot on thecontrol panel until the SD memory cardengages into place. The side with thecontacts must face downwards.The music is played while the files areloaded in the background. If there are nosupported audio/video files, you will see amessage to this effect.
Ejecting an SD memory cardX Press the memory card.The memory card is ejected.
X Remove the memory card.
Connecting USB devicesThere are two USB ports located in thestowage compartment in the center console.X Connect the USB device to the USB port.The music is played while the files areloaded in the background. If there are nosupported audio/video files, you will see amessage to this effect.
i MP3playersmust supportMedia TransferProtocol (MTP).
Activating media mode
Switching on automaticallyWhen an external media source is connected,the media mode is automatically switched onby COMAND and the basic display is shown.If the CD/DVD is started using another
application (e.g. navigation), the display willnot change.X Insert the CDs/DVDs (Y page 472)orX Insert a SD memory card: (Y page 475)orX Connect a USB device: (Y page 475)COMAND loads the medium inserted andstarts to play it automatically.
Further options for switching on:RUsing the number keypad: (Y page 471)RUsing the main function bar: (Y page 470)RUsing the device list: (Y page 471)RUsing the Õ button: (Y page 470)
Options menu
X In Media mode, slideVÆ the controller.The media menu bar is shown.
X To select OptionsOptions: turn and press thecontroller.
Playing similar tracksX Select Play More Like ThisPlay More Like This.COMAND automatically creates and playsa track list with similar tracks. If there areno comparable tracks on the data carrier,you will see a message to this effect.
X Select the required track.
Media 475
COMAN
D
Z

Play modeX To select Playback ModePlayback Mode: turn thecontroller and press to confirm.
X Select Normal Track SequenceNormal Track Sequence.The current tracklist is played in the orderit appears on the data medium.
X To select Random Track ListRandom Track List.The current track list is played in randomorder.
X Select Random MediumRandom Medium.All tracks on the data medium are played inrandom order.
Skip to timeX Select Skip to Time PointSkip to Time Point .A pop-up menu appears.
X To set the time: turn the controlleror
X Set the desired time using the numberkeypad.
Select active partitionX With the Select Active PartitionSelect Active Partitionoption, you can select a partition in the USBdata medium.
Save files to Media Registeri With the Save Files to MediaSave Files to MediaRegisterRegister option, you can transfersupported audio/video/image files to theCOMAND hard drive.
X To select the option Save Files toSave Files toMedia RegisterMedia Register: turn and press thecontrollerA menu appears (Y page 484).
Managing the Media RegisterX To select Rename /Rename / DeleteDelete FilesFiles: pressthe controller.The contents are shown. Using thecontroller, files and folders can be renamedor deleted.A pop-up window appears when the file isrenamed. The characters are entered usingthe controller (Y page 326).
X To select Delete all Media FilesDelete all Media Files: turnand press the controller.Files and folders can be completely deletedfrom the Media Register.
X Select Memory InfoMemory Info: importantparameters for your COMAND hard driveare shown.
476 MediaCO
MAN
D
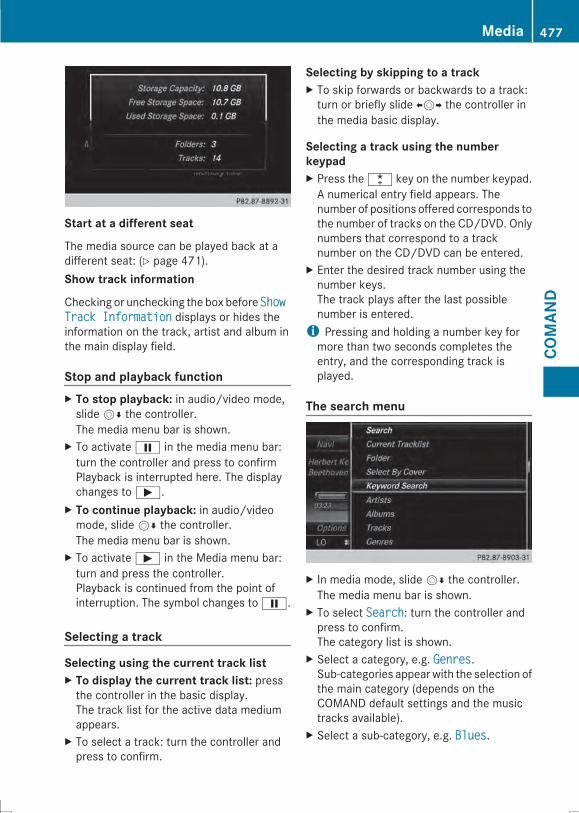
Start at a different seat
The media source can be played back at adifferent seat: (Y page 471).Show track information
Checking or unchecking the box before ShowShowTrack InformationTrack Information displays or hides theinformation on the track, artist and album inthe main display field.
Stop and playback functionX To stop playback: in audio/video mode,slideVÆ the controller.The media menu bar is shown.
X To activateË in the media menu bar:turn the controller and press to confirmPlayback is interrupted here. The displaychanges toÌ.
X To continue playback: in audio/videomode, slideVÆ the controller.The media menu bar is shown.
X To activateÌ in the Media menu bar:turn and press the controller.Playback is continued from the point ofinterruption. The symbol changes toË.
Selecting a track
Selecting using the current track listX To display the current track list: pressthe controller in the basic display.The track list for the active data mediumappears.
X To select a track: turn the controller andpress to confirm.
Selecting by skipping to a trackX To skip forwards or backwards to a track:turn or briefly slide XVY the controller inthe media basic display.
Selecting a track using the numberkeypadX Press the ¯ key on the number keypad.A numerical entry field appears. Thenumber of positions offered corresponds tothe number of tracks on the CD/DVD. Onlynumbers that correspond to a tracknumber on the CD/DVD can be entered.
X Enter the desired track number using thenumber keys.The track plays after the last possiblenumber is entered.i Pressing and holding a number key formore than two seconds completes theentry, and the corresponding track isplayed.
The search menu
X In media mode, slideVÆ the controller.The media menu bar is shown.
X To select SearchSearch: turn the controller andpress to confirm.The category list is shown.
X Select a category, e.g. GenresGenres.Sub-categories appearwith the selection ofthe main category (depends on theCOMAND default settings and the musictracks available).
X Select a sub-category, e.g. BluesBlues.
Media 477
COMAN
D
Z
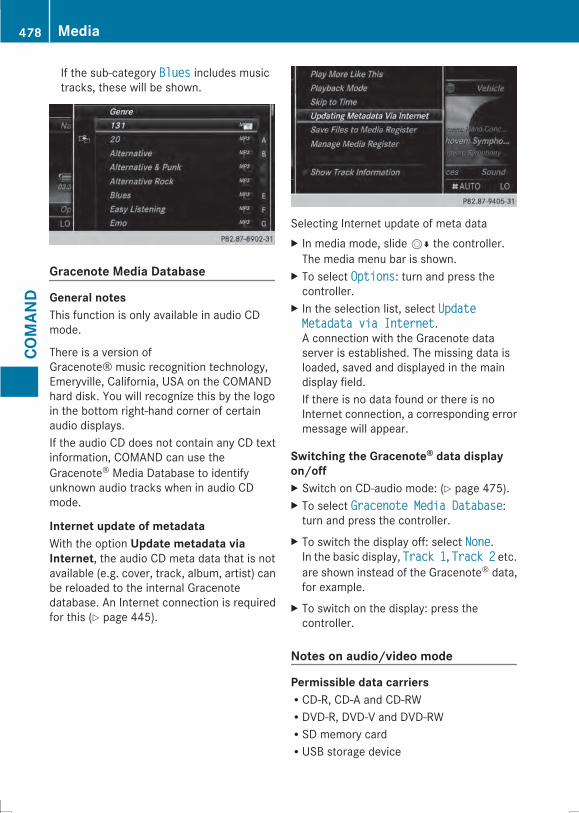
If the sub-category BluesBlues includes musictracks, these will be shown.
Gracenote Media Database
General notesThis function is only available in audio CDmode.
There is a version ofGracenote® music recognition technology,Emeryville, California, USA on the COMANDhard disk. You will recognize this by the logoin the bottom right-hand corner of certainaudio displays.If the audio CD does not contain any CD textinformation, COMAND can use theGracenote® Media Database to identifyunknown audio tracks when in audio CDmode.
Internet update of metadataWith the option Update metadata viaInternet, the audio CD meta data that is notavailable (e.g. cover, track, album, artist) canbe reloaded to the internal Gracenotedatabase. An Internet connection is requiredfor this (Y page 445).
Selecting Internet update of meta dataX In media mode, slideVÆ the controller.The media menu bar is shown.
X To select OptionsOptions: turn and press thecontroller.
X In the selection list, select UpdateUpdateMetadata via InternetMetadata via Internet.A connection with the Gracenote dataserver is established. The missing data isloaded, saved and displayed in the maindisplay field.If there is no data found or there is noInternet connection, a corresponding errormessage will appear.
Switching the Gracenote® data displayon/offX Switch on CD-audio mode: (Y page 475).X To select Gracenote Media DatabaseGracenote Media Database:turn and press the controller.
X To switch the display off: select NoneNone.In the basic display, Track 1Track 1, Track 2Track 2 etc.are shown instead of the Gracenote® data,for example.
X To switch on the display: press thecontroller.
Notes on audio/video mode
Permissible data carriersRCD-R, CD-A and CD-RWRDVD-R, DVD-V and DVD-RWRSD memory cardRUSB storage device
478 MediaCO
MAN
D
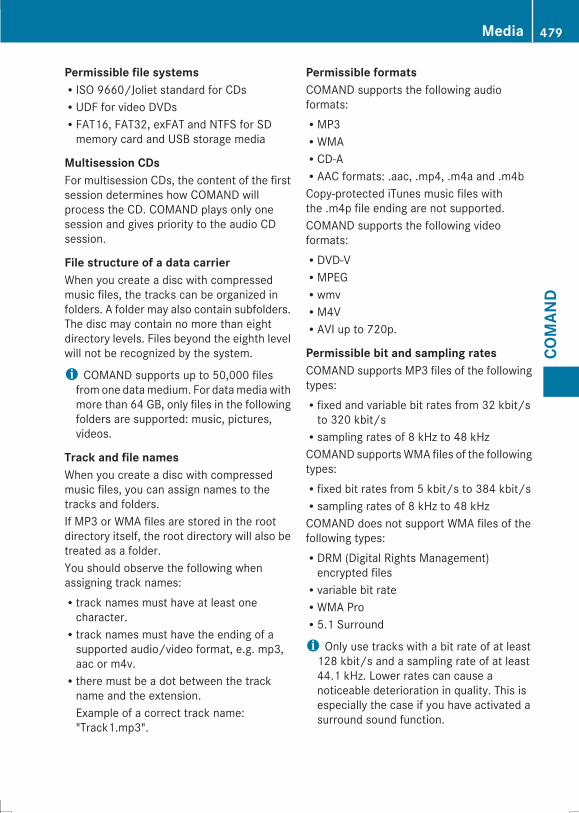
Permissible file systemsRISO 9660/Joliet standard for CDsRUDF for video DVDsRFAT16, FAT32, exFAT and NTFS for SDmemory card and USB storage media
Multisession CDsFor multisession CDs, the content of the firstsession determines how COMAND willprocess the CD. COMAND plays only onesession and gives priority to the audio CDsession.
File structure of a data carrierWhen you create a disc with compressedmusic files, the tracks can be organized infolders. A folder may also contain subfolders.The disc may contain no more than eightdirectory levels. Files beyond the eighth levelwill not be recognized by the system.
i COMAND supports up to 50,000 filesfromone datamedium. For datamediawithmore than 64 GB, only files in the followingfolders are supported: music, pictures,videos.
Track and file namesWhen you create a disc with compressedmusic files, you can assign names to thetracks and folders.If MP3 or WMA files are stored in the rootdirectory itself, the root directory will also betreated as a folder.You should observe the following whenassigning track names:Rtrack names must have at least onecharacter.Rtrack names must have the ending of asupported audio/video format, e.g. mp3,aac or m4v.Rthere must be a dot between the trackname and the extension.Example of a correct track name:"Track1.mp3".
Permissible formatsCOMAND supports the following audioformats:RMP3RWMARCD-ARAAC formats: .aac, .mp4, .m4a and .m4bCopy-protected iTunes music files withthe .m4p file ending are not supported.COMAND supports the following videoformats:RDVD-VRMPEGRwmvRM4VRAVI up to 720p.
Permissible bit and sampling ratesCOMAND supports MP3 files of the followingtypes:Rfixed and variable bit rates from 32 kbit/sto 320 kbit/sRsampling rates of 8 kHz to 48 kHzCOMAND supports WMA files of the followingtypes:Rfixed bit rates from 5 kbit/s to 384 kbit/sRsampling rates of 8 kHz to 48 kHzCOMAND does not support WMA files of thefollowing types:RDRM (Digital Rights Management)encrypted filesRvariable bit rateRWMA ProR5.1 Surround
i Only use tracks with a bit rate of at least128 kbit/s and a sampling rate of at least44.1 kHz. Lower rates can cause anoticeable deterioration in quality. This isespecially the case if you have activated asurround sound function.
Media 479
COMAN
D
Z
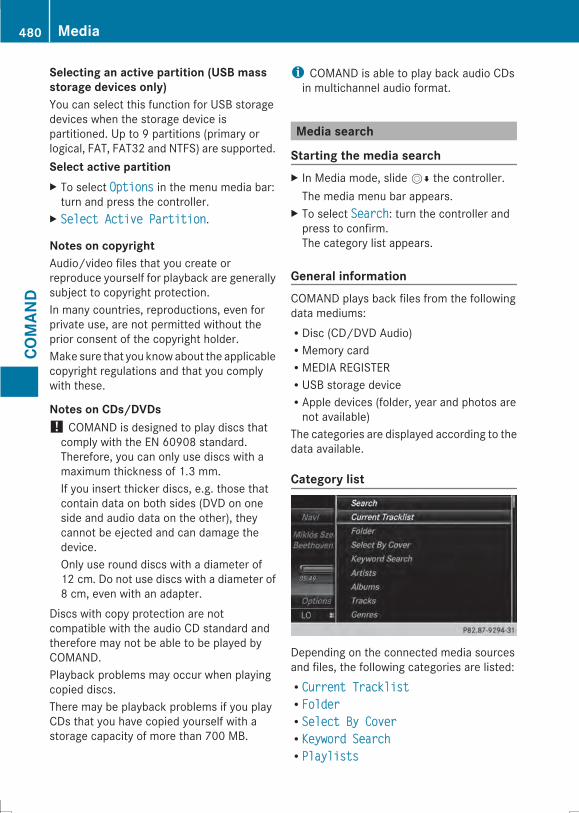
Selecting an active partition (USB massstorage devices only)You can select this function for USB storagedevices when the storage device ispartitioned. Up to 9 partitions (primary orlogical, FAT, FAT32 and NTFS) are supported.Select active partitionX To select OptionsOptions in the menu media bar:turn and press the controller.
X Select Active PartitionSelect Active Partition.Notes on copyrightAudio/video files that you create orreproduce yourself for playback are generallysubject to copyright protection.In many countries, reproductions, even forprivate use, are not permitted without theprior consent of the copyright holder.Make sure that you knowabout the applicablecopyright regulations and that you complywith these.
Notes on CDs/DVDs! COMAND is designed to play discs thatcomply with the EN 60908 standard.Therefore, you can only use discs with amaximum thickness of 1.3 mm.If you insert thicker discs, e.g. those thatcontain data on both sides (DVD on oneside and audio data on the other), theycannot be ejected and can damage thedevice.Only use round discs with a diameter of12 cm. Do not use discs with a diameter of8 cm, even with an adapter.
Discs with copy protection are notcompatible with the audio CD standard andtherefore may not be able to be played byCOMAND.Playback problems may occur when playingcopied discs.There may be playback problems if you playCDs that you have copied yourself with astorage capacity of more than 700 MB.
i COMAND is able to play back audio CDsin multichannel audio format.
Media search
Starting the media searchX In Media mode, slideVÆ the controller.The media menu bar appears.
X To select SearchSearch: turn the controller andpress to confirm.The category list appears.
General informationCOMAND plays back files from the followingdata mediums:RDisc (CD/DVD Audio)RMemory cardRMEDIA REGISTERRUSB storage deviceRApple devices (folder, year and photos arenot available)
The categories are displayed according to thedata available.
Category list
Depending on the connected media sourcesand files, the following categories are listed:RCurrent TracklistCurrent TracklistRFolderFolderRSelect By CoverSelect By CoverRKeyword SearchKeyword SearchRPlaylistsPlaylists
480 MediaCO
MAN
D
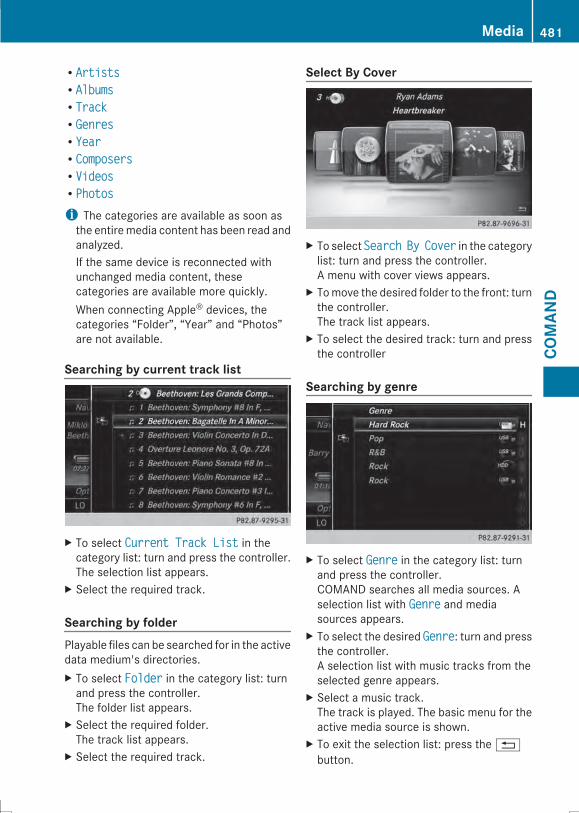
RArtistsArtistsRAlbumsAlbumsRTrackTrackRGenresGenresRYearYearRComposersComposersRVideosVideosRPhotosPhotosi The categories are available as soon asthe entiremedia content has been read andanalyzed.If the same device is reconnected withunchanged media content, thesecategories are available more quickly.When connecting Apple® devices, thecategories “Folder”, “Year” and “Photos”are not available.
Searching by current track list
X To select Current Track ListCurrent Track List in thecategory list: turn and press the controller.The selection list appears.
X Select the required track.
Searching by folderPlayable files can be searched for in the activedata medium's directories.X To select FolderFolder in the category list: turnand press the controller.The folder list appears.
X Select the required folder.The track list appears.
X Select the required track.
Select By Cover
X To select SearchSearch ByBy CoverCover in the categorylist: turn and press the controller.A menu with cover views appears.
X Tomove the desired folder to the front: turnthe controller.The track list appears.
X To select the desired track: turn and pressthe controller
Searching by genre
X To select GenreGenre in the category list: turnand press the controller.COMAND searches all media sources. Aselection list with GenreGenre and mediasources appears.
X To select the desired GenreGenre: turn and pressthe controller.A selection list with music tracks from theselected genre appears.
X Select a music track.The track is played. The basic menu for theactive media source is shown.
X To exit the selection list: press the%button.
Media 481
COMAN
D
Z
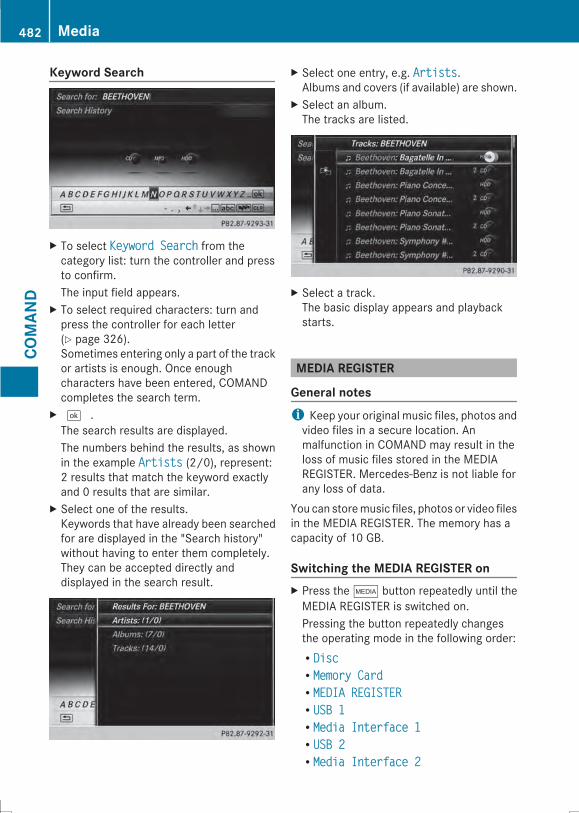
Keyword Search
X To select Keyword SearchKeyword Search from thecategory list: turn the controller and pressto confirm.The input field appears.
X To select required characters: turn andpress the controller for each letter(Y page 326).Sometimes entering only a part of the trackor artists is enough. Once enoughcharacters have been entered, COMANDcompletes the search term.
X ¬ .The search results are displayed.The numbers behind the results, as shownin the example ArtistsArtists (2/0), represent:2 results that match the keyword exactlyand 0 results that are similar.
X Select one of the results.Keywords that have already been searchedfor are displayed in the "Search history"without having to enter them completely.They can be accepted directly anddisplayed in the search result.
X Select one entry, e.g. ArtistsArtists.Albums and covers (if available) are shown.
X Select an album.The tracks are listed.
X Select a track.The basic display appears and playbackstarts.
MEDIA REGISTER
General notesi Keep your original music files, photos andvideo files in a secure location. Anmalfunction in COMAND may result in theloss of music files stored in the MEDIAREGISTER. Mercedes-Benz is not liable forany loss of data.
You can storemusic files, photos or video filesin the MEDIA REGISTER. The memory has acapacity of 10 GB.
Switching the MEDIA REGISTER onX Press the Õ button repeatedly until theMEDIA REGISTER is switched on.Pressing the button repeatedly changesthe operating mode in the following order:RDiscDiscRMemory CardMemory CardRMEDIA REGISTERMEDIA REGISTERRUSB 1USB 1RMedia Interface 1Media Interface 1RUSB 2USB 2RMedia Interface 2Media Interface 2
482 MediaCO
MAN
D
RTVTV (if your vehicle is equipped with a TV)RBluetooth AudioBluetooth AudioRAUXAUX
Playback begins at the point last listened to.If there are no files, you will see a message tothis effect.Further options for switching on:RUsing the number keypad: (Y page 471)RUsing the main function bar: (Y page 470)RUsing the device list: (Y page 471)RUsing the Õ button: (Y page 470)
Media 483
COMAN
D
Z
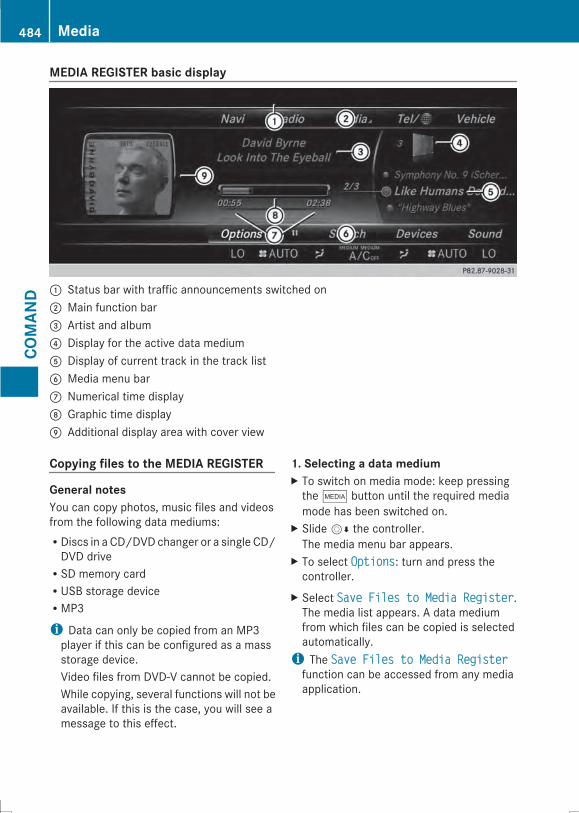
MEDIA REGISTER basic display
: Status bar with traffic announcements switched on; Main function bar= Artist and album? Display for the active data mediumA Display of current track in the track listB Media menu barC Numerical time displayD Graphic time displayE Additional display area with cover view
Copying files to the MEDIA REGISTER
General notesYou can copy photos, music files and videosfrom the following data mediums:RDiscs in a CD/DVD changer or a single CD/DVD driveRSD memory cardRUSB storage deviceRMP3
i Data can only be copied from an MP3player if this can be configured as a massstorage device.Video files from DVD-V cannot be copied.While copying, several functions will not beavailable. If this is the case, you will see amessage to this effect.
1. Selecting a data mediumX To switch on media mode: keep pressingthe Õ button until the required mediamode has been switched on.
X SlideVÆ the controller.The media menu bar appears.
X To select OptionsOptions: turn and press thecontroller.
X Select Save Files to Media RegisterSave Files to Media Register.The media list appears. A data mediumfrom which files can be copied is selectedautomatically.i The Save Files to Media RegisterSave Files to Media Registerfunction can be accessed from any mediaapplication.
484 MediaCO
MAN
D
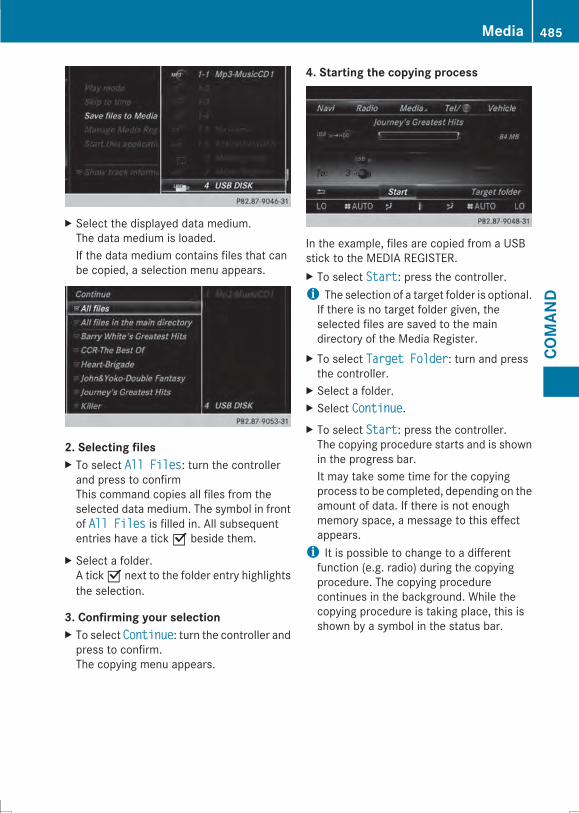
X Select the displayed data medium.The data medium is loaded.If the data medium contains files that canbe copied, a selection menu appears.
2. Selecting filesX To select All FilesAll Files: turn the controllerand press to confirmThis command copies all files from theselected data medium. The symbol in frontof All FilesAll Files is filled in. All subsequententries have a tick O beside them.
X Select a folder.A tick O next to the folder entry highlightsthe selection.
3. Confirming your selectionX To select ContinueContinue: turn the controller andpress to confirm.The copying menu appears.
4. Starting the copying process
In the example, files are copied from a USBstick to the MEDIA REGISTER.X To select StartStart: press the controller.i The selection of a target folder is optional.If there is no target folder given, theselected files are saved to the maindirectory of the Media Register.
X To select Target FolderTarget Folder: turn and pressthe controller.
X Select a folder.X Select ContinueContinue.X To select StartStart: press the controller.The copying procedure starts and is shownin the progress bar.It may take some time for the copyingprocess to be completed, depending on theamount of data. If there is not enoughmemory space, a message to this effectappears.i It is possible to change to a differentfunction (e.g. radio) during the copyingprocedure. The copying procedurecontinues in the background. While thecopying procedure is taking place, this isshown by a symbol in the status bar.
Media 485
COMAN
D
Z
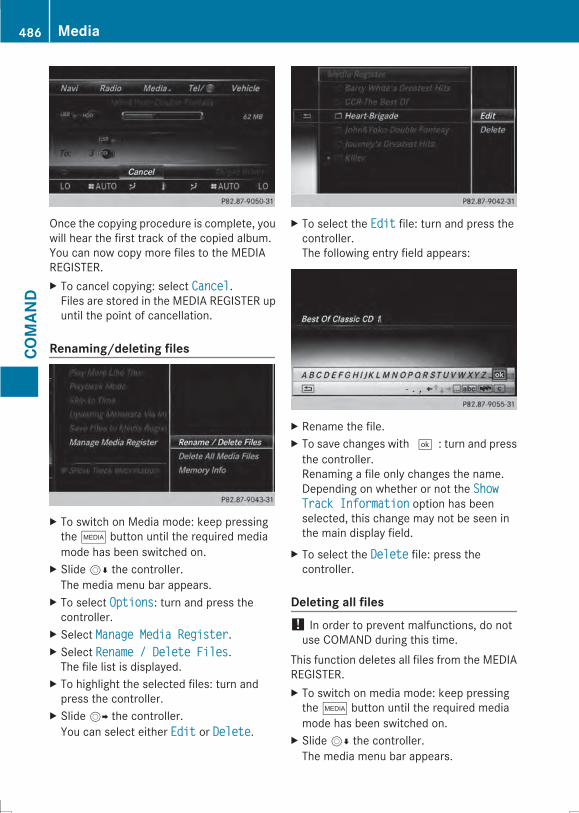
Once the copying procedure is complete, youwill hear the first track of the copied album.You can now copy more files to the MEDIAREGISTER.X To cancel copying: select CancelCancel.Files are stored in the MEDIA REGISTER upuntil the point of cancellation.
Renaming/deleting files
X To switch on Media mode: keep pressingthe Õ button until the required mediamode has been switched on.
X SlideVÆ the controller.The media menu bar appears.
X To select OptionsOptions: turn and press thecontroller.
X Select Manage Media RegisterManage Media Register.X Select Rename / Delete FilesRename / Delete Files.The file list is displayed.
X To highlight the selected files: turn andpress the controller.
X SlideVY the controller.You can select either EditEdit or DeleteDelete.
X To select the EditEdit file: turn and press thecontroller.The following entry field appears:
X Rename the file.X To save changes with ¬: turn and pressthe controller.Renaming a file only changes the name.Depending on whether or not the ShowShowTrack InformationTrack Information option has beenselected, this change may not be seen inthe main display field.
X To select the DeleteDelete file: press thecontroller.
Deleting all files! In order to prevent malfunctions, do notuse COMAND during this time.
This function deletes all files from the MEDIAREGISTER.X To switch on media mode: keep pressingthe Õ button until the required mediamode has been switched on.
X SlideVÆ the controller.The media menu bar appears.
486 MediaCO
MAN
D
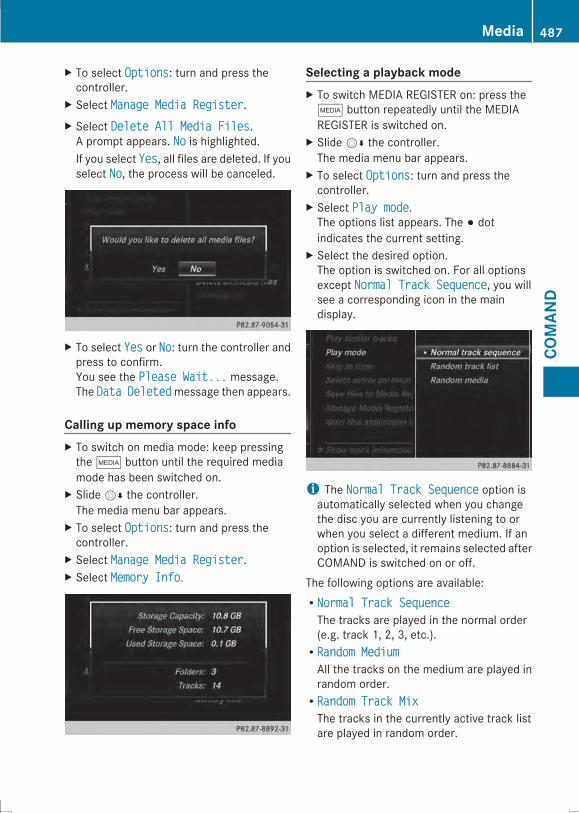
X To select OptionsOptions: turn and press thecontroller.
X Select Manage Media RegisterManage Media Register.X Select Delete All Media FilesDelete All Media Files.A prompt appears. NoNo is highlighted.If you select YesYes, all files are deleted. If youselect NoNo, the process will be canceled.
X To select YesYes or NoNo: turn the controller andpress to confirm.You see the Please Wait...Please Wait... message.The DataData DeletedDeletedmessage then appears.
Calling up memory space infoX To switch on media mode: keep pressingthe Õ button until the required mediamode has been switched on.
X SlideVÆ the controller.The media menu bar appears.
X To select OptionsOptions: turn and press thecontroller.
X Select Manage Media RegisterManage Media Register.X Select Memory InfoMemory Info.
Selecting a playback modeX To switch MEDIA REGISTER on: press the
Õ button repeatedly until the MEDIAREGISTER is switched on.
X SlideVÆ the controller.The media menu bar appears.
X To select OptionsOptions: turn and press thecontroller.
X Select Play modePlay mode.The options list appears. The # dotindicates the current setting.
X Select the desired option.The option is switched on. For all optionsexcept Normal Track SequenceNormal Track Sequence, you willsee a corresponding icon in the maindisplay.
i The Normal Track SequenceNormal Track Sequence option isautomatically selected when you changethe disc you are currently listening to orwhen you select a different medium. If anoption is selected, it remains selected afterCOMAND is switched on or off.
The following options are available:RNormal Track SequenceNormal Track SequenceThe tracks are played in the normal order(e.g. track 1, 2, 3, etc.).RRandom MediumRandom MediumAll the tracks on the medium are played inrandom order.RRandom Track MixRandom Track MixThe tracks in the currently active track listare played in random order.
Media 487
COMAN
D
Z
Bluetooth® audio mode
Connecting Bluetooth® audio devices
PrerequisitesBluetooth® audio mode requires aBluetooth®-capable audio device.Before using Bluetooth® audio mode, youmust check your Bluetooth® audio device forthe following (see the Bluetooth® audiodevice's operating instructions):RBluetooth® audio profileThe Bluetooth® audio device must supportthe A2DP and AVRCP Bluetooth® audioprofiles.RBluetooth® visibilityCertain Bluetooth® audio devices requiremore than simply activating theBluetooth® function. In addition, yourdevice must be made "visible" to otherdevices.RBluetooth® device nameThis device name is predetermined but canusually be changed. To make a clearselection of the Bluetooth® devicepossible, Mercedes-Benz recommendsthat you customize the device name (seethe Bluetooth® audio device's operatinginstructions).
i A2DP (Advanced Audio DistributionProfile): Bluetooth® audio profile for audiodata transmissionAVRCP (Audio Video Remote ControlProfile): Bluetooth® audio profile for audiodata playback.
i The Bluetooth® device must be visible forauthorization. After authorization,COMAND even finds the Bluetooth® devicewhen it is not visible.
COMANDX Activate the Bluetooth® function inCOMAND(Y page 338).
General notesBefore using your Bluetooth® audio devicewith COMAND for the first time, you will needto authorize it.When you authorize a new Bluetooth® audiodevice, it is connected automatically.Connection involves first searching for aBluetooth® audio device and then authorizingit.You can authorize up to fifteen Bluetooth®devices.
i If you authorize a mobile phone thatsupports Bluetooth® audio, the A2DP andAVRCP Bluetooth® audio profiles areconnected automatically.The mobile phone is then entered:Rin the Bluetooth® telephone list(Y page 412)Rin the Bluetooth® device list(Y page 488)
Mercedes-Benz recommends authorizing amobile phone in Bluetooth® telephony(Y page 413).
i If themobile phone that is connected onlysupports two Bluetooth® profiles at thesame time, COMAND functions maybehave as follows:Rwhen connecting to the Internet,playback is stopped on the Bluetooth®audio device (Y page 445).Rwhen starting playback on theBluetooth® audio device, the Internetconnection is ended (Y page 446).
Searching for and authorizing aBluetooth® audio deviceSwitching to Bluetooth® audio modeX Press the Õ button.X To select Bluetooth AudioBluetooth Audio from thecarousel menu: turn and press thecontroller.A menu appears.
488 MediaCO
MAN
D
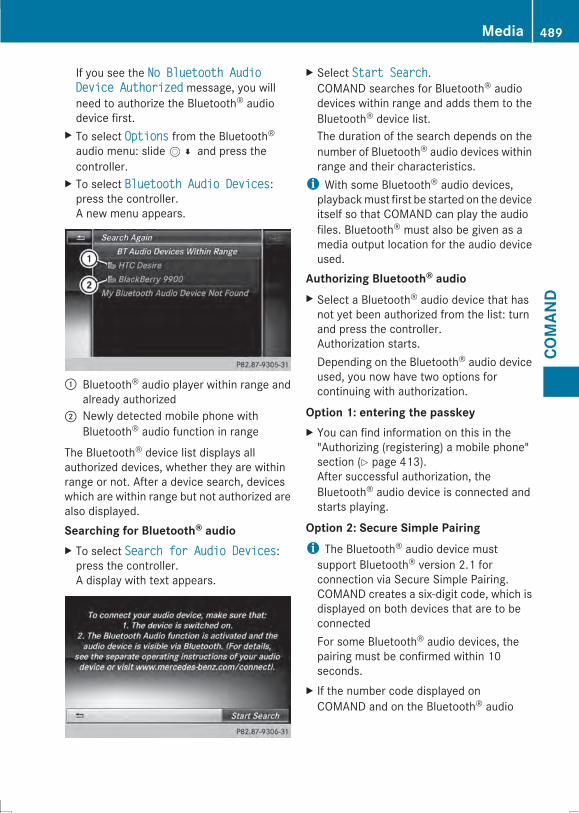
If you see the No Bluetooth AudioNo Bluetooth AudioDevice AuthorizedDevice Authorized message, you willneed to authorize the Bluetooth® audiodevice first.
X To select OptionsOptions from the Bluetooth®audio menu: slideV¬ and press thecontroller.
X To select Bluetooth Audio DevicesBluetooth Audio Devices:press the controller.A new menu appears.
: Bluetooth® audio player within range andalready authorized
; Newly detected mobile phone withBluetooth® audio function in range
The Bluetooth® device list displays allauthorized devices, whether they are withinrange or not. After a device search, deviceswhich are within range but not authorized arealso displayed.Searching for Bluetooth® audioX To select Search for Audio DevicesSearch for Audio Devices:press the controller.A display with text appears.
X Select Start SearchStart Search.COMAND searches for Bluetooth® audiodevices within range and adds them to theBluetooth® device list.The duration of the search depends on thenumber of Bluetooth® audio devices withinrange and their characteristics.i With some Bluetooth® audio devices,playbackmust first be started on the deviceitself so that COMAND can play the audiofiles. Bluetooth® must also be given as amedia output location for the audio deviceused.
Authorizing Bluetooth® audioX Select a Bluetooth® audio device that hasnot yet been authorized from the list: turnand press the controller.Authorization starts.Depending on the Bluetooth® audio deviceused, you now have two options forcontinuing with authorization.
Option 1: entering the passkeyX You can find information on this in the"Authorizing (registering) a mobile phone"section (Y page 413).After successful authorization, theBluetooth® audio device is connected andstarts playing.
Option 2: Secure Simple Pairingi The Bluetooth® audio device mustsupport Bluetooth® version 2.1 forconnection via Secure Simple Pairing.COMAND creates a six-digit code, which isdisplayed on both devices that are to beconnectedFor some Bluetooth® audio devices, thepairing must be confirmed within 10seconds.
X If the number code displayed onCOMAND and on the Bluetooth® audio
Media 489
COMAN
D
Z
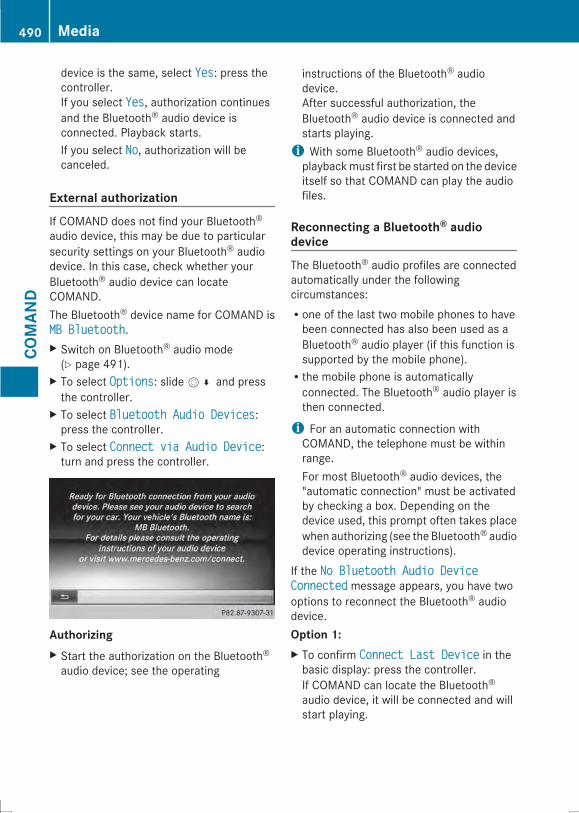
device is the same, select YesYes: press thecontroller.If you select YesYes, authorization continuesand the Bluetooth® audio device isconnected. Playback starts.If you select NoNo, authorization will becanceled.
External authorizationIf COMAND does not find your Bluetooth®audio device, this may be due to particularsecurity settings on your Bluetooth® audiodevice. In this case, check whether yourBluetooth® audio device can locateCOMAND.The Bluetooth® device name for COMAND isMB BluetoothMB Bluetooth.X Switch on Bluetooth® audio mode(Y page 491).
X To select OptionsOptions: slideV¬ and pressthe controller.
X To select Bluetooth Audio DevicesBluetooth Audio Devices:press the controller.
X To select Connect via Audio DeviceConnect via Audio Device:turn and press the controller.
AuthorizingX Start the authorization on the Bluetooth®audio device; see the operating
instructions of the Bluetooth® audiodevice.After successful authorization, theBluetooth® audio device is connected andstarts playing.i With some Bluetooth® audio devices,playbackmust first be started on the deviceitself so that COMAND can play the audiofiles.
Reconnecting a Bluetooth® audiodeviceThe Bluetooth® audio profiles are connectedautomatically under the followingcircumstances:Rone of the last two mobile phones to havebeen connected has also been used as aBluetooth® audio player (if this function issupported by the mobile phone).Rthe mobile phone is automaticallyconnected. The Bluetooth® audio player isthen connected.
i For an automatic connection withCOMAND, the telephone must be withinrange.For most Bluetooth® audio devices, the"automatic connection" must be activatedby checking a box. Depending on thedevice used, this prompt often takes placewhen authorizing (see the Bluetooth® audiodevice operating instructions).
If the No Bluetooth Audio DeviceNo Bluetooth Audio DeviceConnectedConnected message appears, you have twooptions to reconnect the Bluetooth® audiodevice.Option 1:X To confirm Connect Last DeviceConnect Last Device in thebasic display: press the controller.If COMAND can locate the Bluetooth®audio device, it will be connected and willstart playing.
490 MediaCO
MAN
D
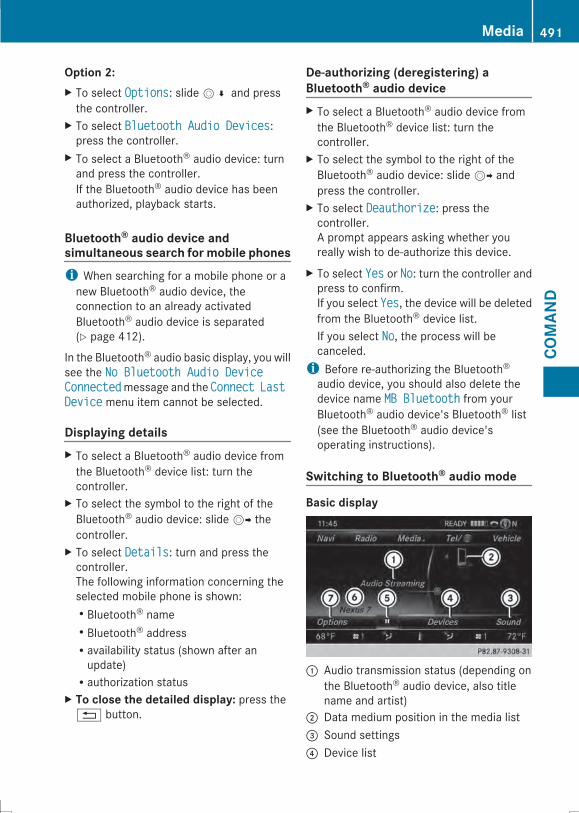
Option 2:X To select OptionsOptions: slideV¬ and pressthe controller.
X To select Bluetooth Audio DevicesBluetooth Audio Devices:press the controller.
X To select a Bluetooth® audio device: turnand press the controller.If the Bluetooth® audio device has beenauthorized, playback starts.
Bluetooth® audio device andsimultaneous search for mobile phonesi When searching for a mobile phone or anew Bluetooth® audio device, theconnection to an already activatedBluetooth® audio device is separated(Y page 412).
In the Bluetooth® audio basic display, you willsee the No Bluetooth Audio DeviceNo Bluetooth Audio DeviceConnectedConnectedmessage and the ConnectConnect LastLastDeviceDevice menu item cannot be selected.
Displaying detailsX To select a Bluetooth® audio device fromthe Bluetooth® device list: turn thecontroller.
X To select the symbol to the right of theBluetooth® audio device: slideVY thecontroller.
X To select DetailsDetails: turn and press thecontroller.The following information concerning theselected mobile phone is shown:RBluetooth® nameRBluetooth® addressRavailability status (shown after anupdate)Rauthorization status
X To close the detailed display: press the% button.
De-authorizing (deregistering) aBluetooth® audio deviceX To select a Bluetooth® audio device fromthe Bluetooth® device list: turn thecontroller.
X To select the symbol to the right of theBluetooth® audio device: slideVY andpress the controller.
X To select DeauthorizeDeauthorize: press thecontroller.A prompt appears asking whether youreally wish to de-authorize this device.
X To select YesYes or NoNo: turn the controller andpress to confirm.If you select YesYes, the device will be deletedfrom the Bluetooth® device list.If you select NoNo, the process will becanceled.i Before re-authorizing the Bluetooth®audio device, you should also delete thedevice name MB BluetoothMB Bluetooth from yourBluetooth® audio device's Bluetooth® list(see the Bluetooth® audio device'soperating instructions).
Switching to Bluetooth® audio mode
Basic display
: Audio transmission status (depending onthe Bluetooth® audio device, also titlename and artist)
; Data medium position in the media list= Sound settings? Device list
Media 491
COMAN
D
Z
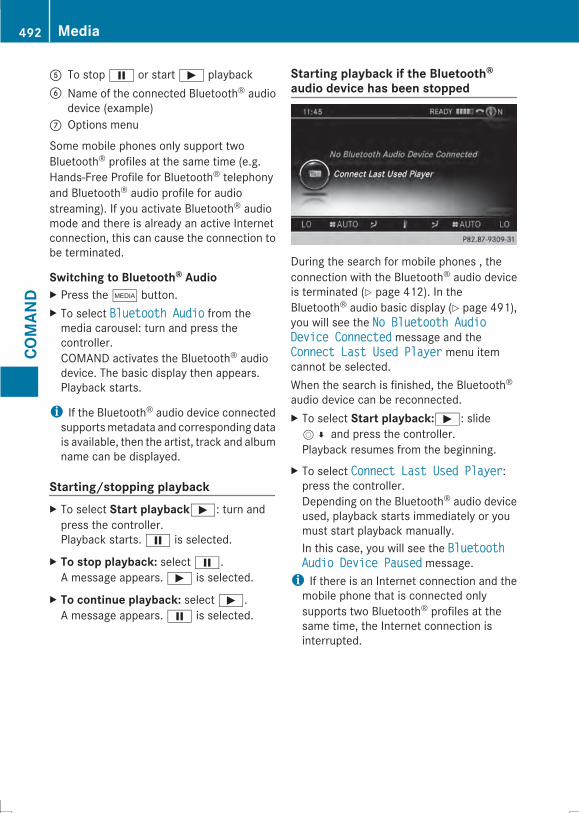
A To stopË or startÌ playbackB Name of the connected Bluetooth® audio
device (example)C Options menu
Some mobile phones only support twoBluetooth® profiles at the same time (e.g.Hands-Free Profile for Bluetooth® telephonyand Bluetooth® audio profile for audiostreaming). If you activate Bluetooth® audiomode and there is already an active Internetconnection, this can cause the connection tobe terminated.
Switching to Bluetooth® AudioX Press the Õ button.X To select Bluetooth AudioBluetooth Audio from themedia carousel: turn and press thecontroller.COMAND activates the Bluetooth® audiodevice. The basic display then appears.Playback starts.
i If the Bluetooth® audio device connectedsupportsmetadata and corresponding datais available, then the artist, track and albumname can be displayed.
Starting/stopping playbackX To select Start playbackÌ: turn andpress the controller.Playback starts.Ë is selected.
X To stop playback: selectË.A message appears.Ì is selected.
X To continue playback: selectÌ.A message appears.Ë is selected.
Starting playback if the Bluetooth®audio device has been stopped
During the search for mobile phones , theconnection with the Bluetooth® audio deviceis terminated (Y page 412). In theBluetooth® audio basic display (Y page 491),you will see the No Bluetooth AudioNo Bluetooth AudioDevice ConnectedDevice Connected message and theConnect Last Used PlayerConnect Last Used Player menu itemcannot be selected.When the search is finished, the Bluetooth®audio device can be reconnected.X To select Start playback:Ì: slideV¬ and press the controller.Playback resumes from the beginning.
X To select Connect Last Used PlayerConnect Last Used Player:press the controller.Depending on the Bluetooth® audio deviceused, playback starts immediately or youmust start playback manually.In this case, you will see the BluetoothBluetoothAudio Device PausedAudio Device Paused message.i If there is an Internet connection and themobile phone that is connected onlysupports two Bluetooth® profiles at thesame time, the Internet connection isinterrupted.
492 MediaCO
MAN
D
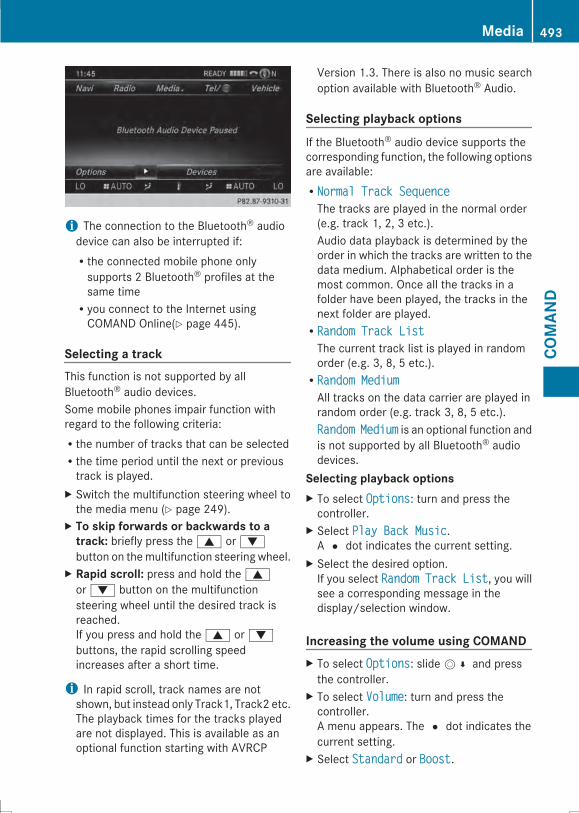
i The connection to the Bluetooth® audiodevice can also be interrupted if:Rthe connected mobile phone onlysupports 2 Bluetooth® profiles at thesame timeRyou connect to the Internet usingCOMAND Online(Y page 445).
Selecting a trackThis function is not supported by allBluetooth® audio devices.Some mobile phones impair function withregard to the following criteria:Rthe number of tracks that can be selectedRthe time period until the next or previoustrack is played.
X Switch the multifunction steering wheel tothe media menu (Y page 249).
X To skip forwards or backwards to atrack: briefly press the9 or:button on themultifunction steering wheel.
X Rapid scroll: press and hold the9or: button on the multifunctionsteering wheel until the desired track isreached.If you press and hold the9 or:buttons, the rapid scrolling speedincreases after a short time.
i In rapid scroll, track names are notshown, but instead only Track1, Track2 etc.The playback times for the tracks playedare not displayed. This is available as anoptional function starting with AVRCP
Version 1.3. There is also no music searchoption available with Bluetooth® Audio.
Selecting playback optionsIf the Bluetooth® audio device supports thecorresponding function, the following optionsare available:RNormal Track SequenceNormal Track SequenceThe tracks are played in the normal order(e.g. track 1, 2, 3 etc.).Audio data playback is determined by theorder in which the tracks are written to thedata medium. Alphabetical order is themost common. Once all the tracks in afolder have been played, the tracks in thenext folder are played.RRandom Track ListRandom Track ListThe current track list is played in randomorder (e.g. 3, 8, 5 etc.).RRandom MediumRandom MediumAll tracks on the data carrier are played inrandom order (e.g. track 3, 8, 5 etc.).RandomRandom MediumMedium is an optional function andis not supported by all Bluetooth® audiodevices.
Selecting playback optionsX To select OptionsOptions: turn and press thecontroller.
X Select Play Back MusicPlay Back Music.A# dot indicates the current setting.
X Select the desired option.If you select RandomRandom TrackTrack ListList, you willsee a corresponding message in thedisplay/selection window.
Increasing the volume using COMANDX To select OptionsOptions: slideV¬ and pressthe controller.
X To select VolumeVolume: turn and press thecontroller.A menu appears. The# dot indicates thecurrent setting.
X Select StandardStandard or BoostBoost.
Media 493
COMAN
D
Z

Information on sound settings(Y page 507).Further information: "Audio AUX mode"(Y page 497).
494 MediaCO
MAN
D

Operation with the Media Interface
PrerequisiteAn iPod®, iPhone®, USB device or MP3 player must be connected to the Media Interface. Youwill find two USB connection sockets in the center console stowage compartment.Basic display once an Apple device is connectedMedia Interface is a universal interface for the connection of mobile audio and video devices.Media Interface in COMAND has two USB connections.
: Additional display area with cover view; Artist and album= Main function bar? Display for the active data mediumA Media menu barB Title display in the media listC Current track/number in track listD Numerical time displayE Graphic time display
Switching to Media InterfaceMedia Interface is a universal interface for theconnection of mobile audio and videodevices. Media Interface in COMAND has twoUSB connections. The USB connectionsockets are located in the stowagecompartment in the center console.Switching on automaticallyX Connect a data medium with a USB port.COMAND switches on the Media Interfaceautomatically. If playable media files arefound, they will be played by COMAND. If a
media source was previously selected, theMedia Interface basicmenuwill appear. Forall other COMAND functions, the displaywill not change.If you remove a device, the No DeviceNo DeviceConnectedConnected message appears.
Further options for switching on:RUsing the number keypad: (Y page 471)RUsing the main function bar: (Y page 470)RUsing the device list: (Y page 471)RUsing the Õ button: (Y page 470)
Media 495
COMAN
D
Z
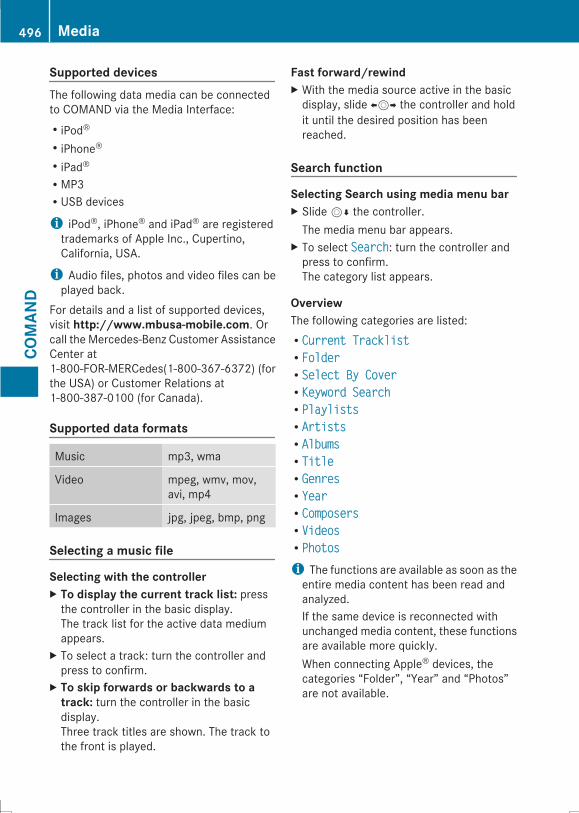
Supported devicesThe following data media can be connectedto COMAND via the Media Interface:RiPod®RiPhone®RiPad®RMP3RUSB devices
i iPod®, iPhone® and iPad® are registeredtrademarks of Apple Inc., Cupertino,California, USA.
i Audio files, photos and video files can beplayed back.
For details and a list of supported devices,visit http://www.mbusa-mobile.com. Orcall the Mercedes-Benz Customer AssistanceCenter at1-800-FOR-MERCedes(1-800-367-6372) (forthe USA) or Customer Relations at1-800-387-0100 (for Canada).
Supported data formats
Music mp3, wma
Video mpeg, wmv, mov,avi, mp4
Images jpg, jpeg, bmp, png
Selecting a music file
Selecting with the controllerX To display the current track list: pressthe controller in the basic display.The track list for the active data mediumappears.
X To select a track: turn the controller andpress to confirm.
X To skip forwards or backwards to atrack: turn the controller in the basicdisplay.Three track titles are shown. The track tothe front is played.
Fast forward/rewindX With the media source active in the basicdisplay, slide XVY the controller and holdit until the desired position has beenreached.
Search function
Selecting Search using media menu barX SlideVÆ the controller.The media menu bar appears.
X To select SearchSearch: turn the controller andpress to confirm.The category list appears.
OverviewThe following categories are listed:RCurrent TracklistCurrent TracklistRFolderFolderRSelect By CoverSelect By CoverRKeyword SearchKeyword SearchRPlaylistsPlaylistsRArtistsArtistsRAlbumsAlbumsRTitleTitleRGenresGenresRYearYearRComposersComposersRVideosVideosRPhotosPhotosi The functions are available as soon as theentire media content has been read andanalyzed.If the same device is reconnected withunchanged media content, these functionsare available more quickly.When connecting Apple® devices, thecategories “Folder”, “Year” and “Photos”are not available.
496 MediaCO
MAN
D
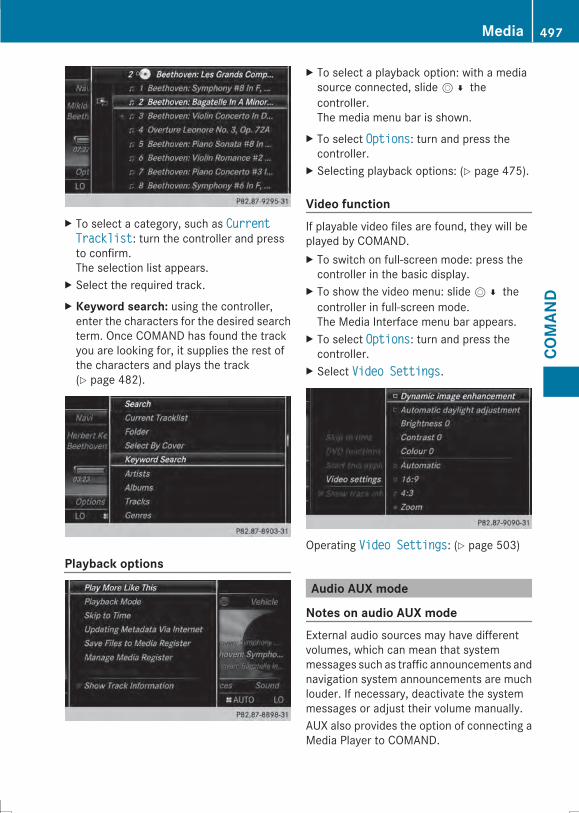
X To select a category, such as CurrentCurrentTracklistTracklist: turn the controller and pressto confirm.The selection list appears.
X Select the required track.X Keyword search: using the controller,enter the characters for the desired searchterm. Once COMAND has found the trackyou are looking for, it supplies the rest ofthe characters and plays the track(Y page 482).
Playback options
X To select a playback option: with a mediasource connected, slideV¬ thecontroller.The media menu bar is shown.
X To select OptionsOptions: turn and press thecontroller.
X Selecting playback options: (Y page 475).
Video functionIf playable video files are found, they will beplayed by COMAND.X To switch on full-screen mode: press thecontroller in the basic display.
X To show the video menu: slideV¬ thecontroller in full-screen mode.The Media Interface menu bar appears.
X To select OptionsOptions: turn and press thecontroller.
X Select Video SettingsVideo Settings.
Operating Video SettingsVideo Settings: (Y page 503)
Audio AUX mode
Notes on audio AUX modeExternal audio sources may have differentvolumes, which can mean that systemmessages such as traffic announcements andnavigation system announcements are muchlouder. If necessary, deactivate the systemmessages or adjust their volume manually.AUX also provides the option of connecting aMedia Player to COMAND.
Media 497
COMAN
D
Z
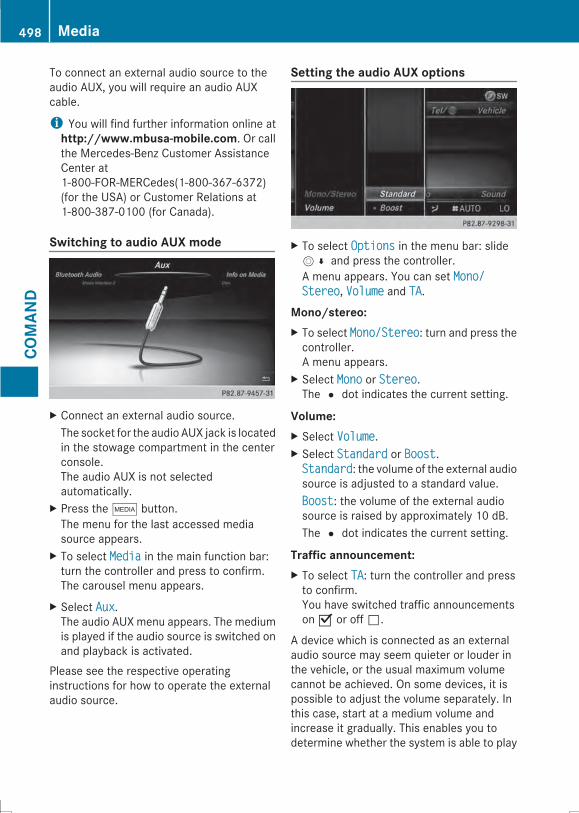
To connect an external audio source to theaudio AUX, you will require an audio AUXcable.
i You will find further information online athttp://www.mbusa-mobile.com. Or callthe Mercedes-Benz Customer AssistanceCenter at1-800-FOR-MERCedes(1-800-367-6372)(for the USA) or Customer Relations at1-800-387-0100 (for Canada).
Switching to audio AUX mode
X Connect an external audio source.The socket for the audio AUX jack is locatedin the stowage compartment in the centerconsole.The audio AUX is not selectedautomatically.
X Press the Õ button.The menu for the last accessed mediasource appears.
X To select MediaMedia in the main function bar:turn the controller and press to confirm.The carousel menu appears.
X Select AuxAux.The audio AUX menu appears. The mediumis played if the audio source is switched onand playback is activated.
Please see the respective operatinginstructions for how to operate the externalaudio source.
Setting the audio AUX options
X To select OptionsOptions in the menu bar: slideV¬ and press the controller.A menu appears. You can set Mono/Mono/StereoStereo, VolumeVolume and TATA.
Mono/stereo:X To select Mono/StereoMono/Stereo: turn and press thecontroller.A menu appears.
X Select MonoMono or StereoStereo.The# dot indicates the current setting.
Volume:X Select VolumeVolume.X Select StandardStandard or BoostBoost.StandardStandard: the volume of the external audiosource is adjusted to a standard value.BoostBoost: the volume of the external audiosource is raised by approximately 10 dB.The# dot indicates the current setting.
Traffic announcement:X To select TATA: turn the controller and pressto confirm.You have switched traffic announcementson O or off ª.
A device which is connected as an externalaudio source may seem quieter or louder inthe vehicle, or the usual maximum volumecannot be achieved. On some devices, it ispossible to adjust the volume separately. Inthis case, start at a medium volume andincrease it gradually. This enables you todetermine whether the system is able to play
498 MediaCO
MAN
D
the music at high volume without distortingit.
AUX video mode
Connecting external video sources
G WARNINGExternal video sources may have differentvolumes, which can mean that systemmessages such as traffic announcements andnavigation system announcements are muchlouder. If necessary, please deactivate thesystem messages or adjust their volumemanually.
Video AUX is a further option for showingvideos via COMAND.To connect an external video source to thevideo AUX, you will require a video AUX cable.
i If you only use an audio AUX cable, youwill only be able to hear the sound from thevideo being played.Videos cannot be shown on the driver'sside while the vehicle is in motion.
Switching to AUX video modeX Connect the external video source.The socket for the video AUX jack is locatedin the stowage compartment in the centerconsole.The video AUX is not selectedautomatically.
X Press the Õ button.The menu for the last accessed mediasource appears.
X To select MediaMedia in the main function bar:turn the controller and press to confirm.The carousel menu appears.
X Select AUXAUX.The AUX video menu appears.
X To select Audio/VideoAudio/Video in the menu bar:slideV¬ and press the controller.A Source Type SelectionSource Type Selection menuappears.
X Select VideoVideo.The# dot indicates the current setting.If the video source is connected andplayback selected, the image from theexternal video source will appear if VideoVideois selected.
Please see the corresponding deviceoperating instructions for information on howto operate the external video source.Information on:RSound settings: (Y page 507)
Switching full-screen mode on/off
X To switch on: slide ZV the controller invideo AUX mode.The menu bars disappear.
X The full-screen symbol appears: press thecontroller.The full screen appears.
X To switch off: press the controller.The menu is displayed.
Media 499
COMAN
D
Z
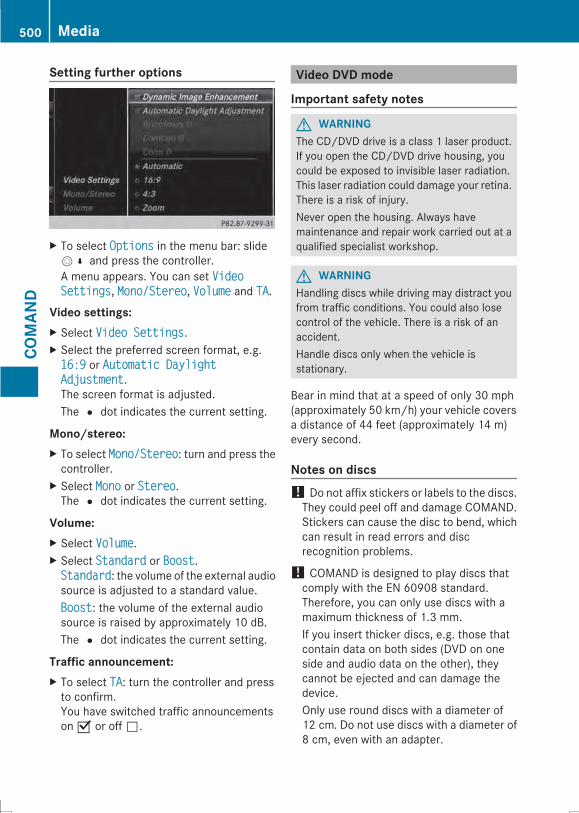
Setting further options
X To select OptionsOptions in the menu bar: slideV¬ and press the controller.A menu appears. You can set VideoVideoSettingsSettings, Mono/StereoMono/Stereo, VolumeVolume and TATA.
Video settings:X Select Video SettingsVideo Settings.X Select the preferred screen format, e.g.16:916:9 or Automatic DaylightAutomatic DaylightAdjustmentAdjustment.The screen format is adjusted.The# dot indicates the current setting.
Mono/stereo:X To select Mono/StereoMono/Stereo: turn and press thecontroller.
X Select MonoMono or StereoStereo.The# dot indicates the current setting.
Volume:X Select VolumeVolume.X Select StandardStandard or BoostBoost.StandardStandard: the volume of the external audiosource is adjusted to a standard value.BoostBoost: the volume of the external audiosource is raised by approximately 10 dB.The# dot indicates the current setting.
Traffic announcement:X To select TATA: turn the controller and pressto confirm.You have switched traffic announcementson O or off ª.
Video DVD mode
Important safety notes
G WARNINGThe CD/DVD drive is a class 1 laser product.If you open the CD/DVD drive housing, youcould be exposed to invisible laser radiation.This laser radiation could damage your retina.There is a risk of injury.Never open the housing. Always havemaintenance and repair work carried out at aqualified specialist workshop.
G WARNINGHandling discs while driving may distract youfrom traffic conditions. You could also losecontrol of the vehicle. There is a risk of anaccident.Handle discs only when the vehicle isstationary.
Bear in mind that at a speed of only 30 mph(approximately 50 km/h) your vehicle coversa distance of 44 feet (approximately 14 m)every second.
Notes on discs! Do not affix stickers or labels to the discs.They could peel off and damage COMAND.Stickers can cause the disc to bend, whichcan result in read errors and discrecognition problems.
! COMAND is designed to play discs thatcomply with the EN 60908 standard.Therefore, you can only use discs with amaximum thickness of 1.3 mm.If you insert thicker discs, e.g. those thatcontain data on both sides (DVD on oneside and audio data on the other), theycannot be ejected and can damage thedevice.Only use round discs with a diameter of12 cm. Do not use discs with a diameter of8 cm, even with an adapter.
500 MediaCO
MAN
D
The variety of data media, burners and burnsoftware means there is no guarantee thatthe system will be able to play discs that youhave copied yourself.
DVD playback conditionsIf video DVDs do not conform to the NTSC orPAL TV standards, they may create picture,sound or other problems during playback.COMAND is capable of playing back videoDVDs produced according to the followingstandards:RRegion code 1 or region code 0 (no regioncode)RPAL or NTSC standardYou will generally find the relevant detailseither on the DVD itself or on the DVD case.
i If you insert a video DVD with a differentregion code, a message to this effectappears.
i COMAND is set to region code 1 at thefactory. This setting can be changed at anauthorizedMercedes-BenzCenter. It is alsopossible to play video DVDs with a differentregion code, provided that they areproduced in accordance with the PAL orNTSC TV standard. The region code can bechanged up to five times.
Control optionsThere are four control menus available invideo DVD mode.Most DVDs have their own control menu.The DVD's control menu is operated directlyusing the controller or DVD functions.
Controlmenu
Function Operation
DVD'scontrolmenu
Title, scene,language,subtitles ...
Operationwith thecontroller
OptionsOptionsmenu
Brightness,contrast,color, format
Operationusing themenu bar/options/videosettings
Video menu Selection ofscene, fastforward/rewind
In full-screenmode, slideV¬ thecontroller.
DVDfunctions
Title, scene,language,subtitles ...
In full-screenmode, pressthecontroller
Function restrictionsDepending on the DVD, certain functions oractions may not function at all. The symbolK appears in the display.
Switching to video DVD modeRInsert and eject a disc from the single drive(Y page 472)RInsert a disc into the DVD changer(Y page 473)REject a disc from the DVD changer(Y page 474)
Further options for switching on:RUse the number keypad (Y page 471)RUse the main function bar (Y page 470)RUse the device list (Y page 471)RUse the Õ button (Y page 470)
Media 501
COMAN
D
Z

DVD overview
: Status bar; Main function bar= Main display field? Media menu barA Climate control status barB Additional display area with title, scene and time display
The DVD basic display appears once the DVD has been inserted.
DVD full-screen modeOnce the DVD has been inserted, the disc isplayed. The video will first appear in theoverview display.X To set full-screen mode: slideVZ thecontroller.The main function bar and menu bar arehidden. A full-screen symbol will be shown.
X Press the controller.The full-screen mode appears.
X Showing the DVD basic display in full-screen mode: slideV¬ the controller.The video menu appears.
X Press the controller.The basic display appears.
Menu options
X To select options: in full-screen mode,slideV¬ the controller.The video menu appears.
X Press the controller.The DVD basic display appears.
X To select OptionsOptions in the menu bar: turnand press the controller.The OptionsOptions menu appears.
502 MediaCO
MAN
D
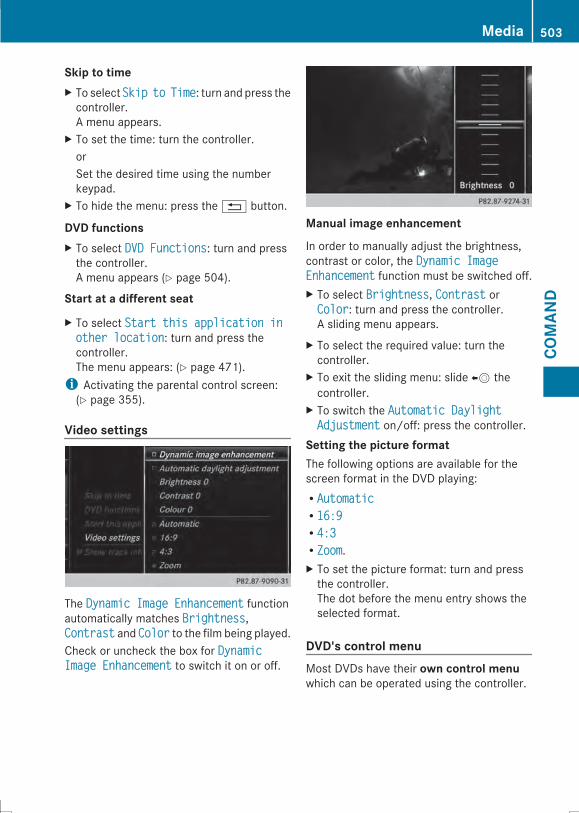
Skip to timeX To select SkipSkip toto TimeTime: turn and press thecontroller.A menu appears.
X To set the time: turn the controller.orSet the desired time using the numberkeypad.
X To hide the menu: press the% button.
DVD functionsX To select DVD FunctionsDVD Functions: turn and pressthe controller.A menu appears (Y page 504).
Start at a different seat
X To select Start this application inStart this application inother locationother location: turn and press thecontroller.The menu appears: (Y page 471).i Activating the parental control screen:(Y page 355).
Video settings
The Dynamic Image EnhancementDynamic Image Enhancement functionautomatically matches BrightnessBrightness,ContrastContrast and ColorColor to the film being played.Check or uncheck the box for DynamicDynamicImage EnhancementImage Enhancement to switch it on or off.
Manual image enhancement
In order to manually adjust the brightness,contrast or color, the Dynamic ImageDynamic ImageEnhancementEnhancement function must be switched off.X To select BrightnessBrightness, ContrastContrast orColorColor: turn and press the controller.A sliding menu appears.
X To select the required value: turn thecontroller.
X To exit the sliding menu: slide XV thecontroller.
X To switch the Automatic DaylightAutomatic DaylightAdjustmentAdjustment on/off: press the controller.
Setting the picture formatThe following options are available for thescreen format in the DVD playing:RAutomaticAutomaticR16:916:9R4:34:3RZoomZoom.X To set the picture format: turn and pressthe controller.The dot before the menu entry shows theselected format.
DVD's control menuMost DVDs have their own control menuwhich can be operated using the controller.
Media 503
COMAN
D
Z
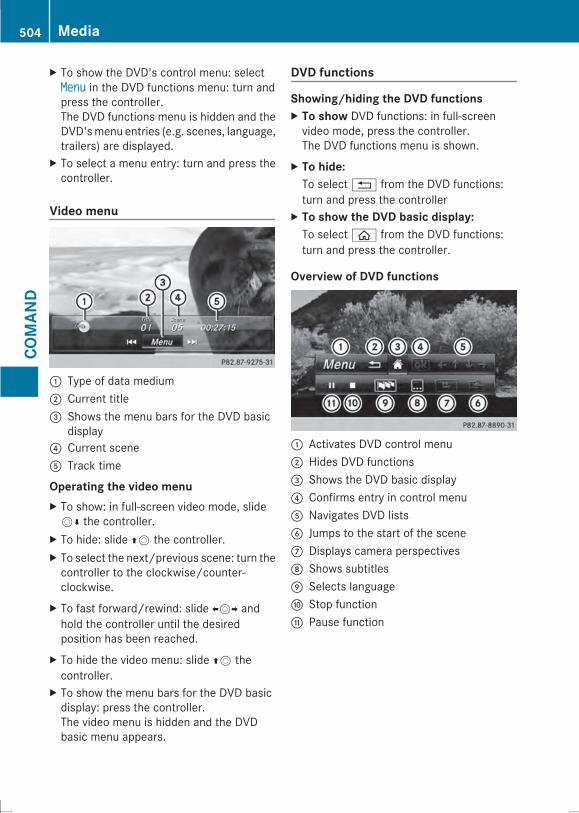
X To show the DVD's control menu: selectMenuMenu in the DVD functions menu: turn andpress the controller.The DVD functions menu is hidden and theDVD'smenu entries (e.g. scenes, language,trailers) are displayed.
X To select a menu entry: turn and press thecontroller.
Video menu
: Type of data medium; Current title= Shows the menu bars for the DVD basic
display? Current sceneA Track time
Operating the video menuX To show: in full-screen video mode, slideVÆ the controller.
X To hide: slide ZV the controller.X To select the next/previous scene: turn thecontroller to the clockwise/counter-clockwise.
X To fast forward/rewind: slide XVY andhold the controller until the desiredposition has been reached.
X To hide the video menu: slide ZV thecontroller.
X To show the menu bars for the DVD basicdisplay: press the controller.The video menu is hidden and the DVDbasic menu appears.
DVD functions
Showing/hiding the DVD functionsX To show DVD functions: in full-screenvideo mode, press the controller.The DVD functions menu is shown.
X To hide:To select% from the DVD functions:turn and press the controller
X To show the DVD basic display:To selectò from the DVD functions:turn and press the controller.
Overview of DVD functions
: Activates DVD control menu; Hides DVD functions= Shows the DVD basic display? Confirms entry in control menuA Navigates DVD listsB Jumps to the start of the sceneC Displays camera perspectivesD Shows subtitlesE Selects languageF Stop functionG Pause function
504 MediaCO
MAN
D
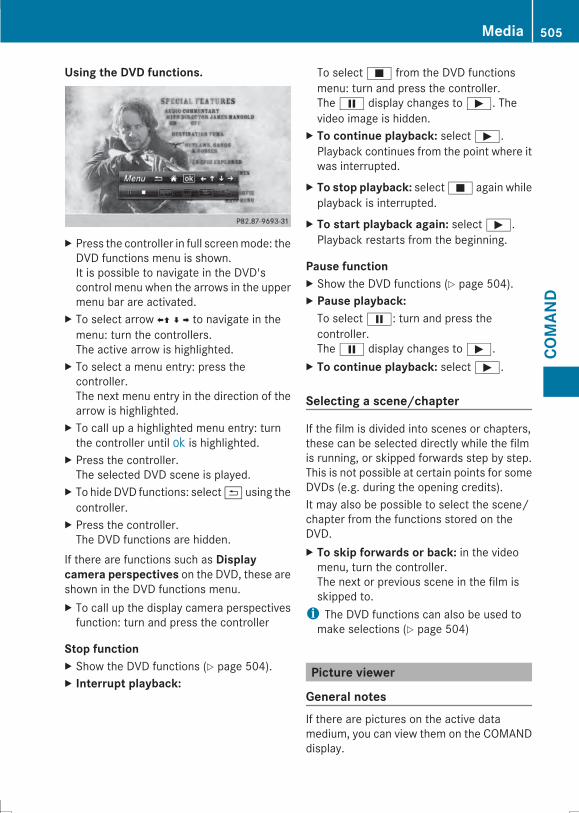
Using the DVD functions.
X Press the controller in full screenmode: theDVD functions menu is shown.It is possible to navigate in the DVD'scontrol menu when the arrows in the uppermenu bar are activated.
X To select arrow XZ¬Y to navigate in themenu: turn the controllers.The active arrow is highlighted.
X To select a menu entry: press thecontroller.The next menu entry in the direction of thearrow is highlighted.
X To call up a highlighted menu entry: turnthe controller until okok is highlighted.
X Press the controller.The selected DVD scene is played.
X To hideDVD functions: select& using thecontroller.
X Press the controller.The DVD functions are hidden.
If there are functions such as Displaycamera perspectives on the DVD, these areshown in the DVD functions menu.X To call up the display camera perspectivesfunction: turn and press the controller
Stop functionX Show the DVD functions (Y page 504).X Interrupt playback:
To selectÉ from the DVD functionsmenu: turn and press the controller.TheË display changes toÌ. Thevideo image is hidden.
X To continue playback: selectÌ.Playback continues from the point where itwas interrupted.
X To stop playback: selectÉ again whileplayback is interrupted.
X To start playback again: selectÌ.Playback restarts from the beginning.
Pause functionX Show the DVD functions (Y page 504).X Pause playback:To selectË: turn and press thecontroller.TheË display changes toÌ.
X To continue playback: selectÌ.
Selecting a scene/chapter
If the film is divided into scenes or chapters,these can be selected directly while the filmis running, or skipped forwards step by step.This is not possible at certain points for someDVDs (e.g. during the opening credits).It may also be possible to select the scene/chapter from the functions stored on theDVD.X To skip forwards or back: in the videomenu, turn the controller.The next or previous scene in the film isskipped to.i The DVD functions can also be used tomake selections (Y page 504)
Picture viewer
General notesIf there are pictures on the active datamedium, you can view them on the COMANDdisplay.
Media 505
COMAN
D
Z
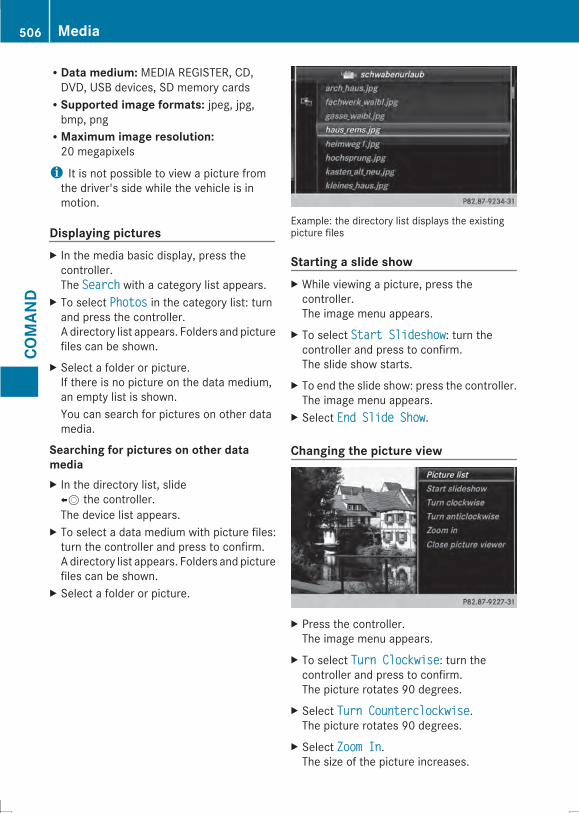
RData medium: MEDIA REGISTER, CD,DVD, USB devices, SD memory cardsRSupported image formats: jpeg, jpg,bmp, pngRMaximum image resolution:20 megapixels
i It is not possible to view a picture fromthe driver's side while the vehicle is inmotion.
Displaying picturesX In the media basic display, press thecontroller.The SearchSearch with a category list appears.
X To select PhotosPhotos in the category list: turnand press the controller.A directory list appears. Folders and picturefiles can be shown.
X Select a folder or picture.If there is no picture on the data medium,an empty list is shown.You can search for pictures on other datamedia.
Searching for pictures on other datamediaX In the directory list, slideXV the controller.The device list appears.
X To select a data medium with picture files:turn the controller and press to confirm.A directory list appears. Folders and picturefiles can be shown.
X Select a folder or picture.
Example: the directory list displays the existingpicture files
Starting a slide showX While viewing a picture, press thecontroller.The image menu appears.
X To select Start SlideshowStart Slideshow: turn thecontroller and press to confirm.The slide show starts.
X To end the slide show: press the controller.The image menu appears.
X Select End Slide ShowEnd Slide Show.Changing the picture view
X Press the controller.The image menu appears.
X To select Turn ClockwiseTurn Clockwise: turn thecontroller and press to confirm.The picture rotates 90 degrees.
X Select Turn CounterclockwiseTurn Counterclockwise.The picture rotates 90 degrees.
X Select Zoom InZoom In.The size of the picture increases.
506 MediaCO
MAN
D
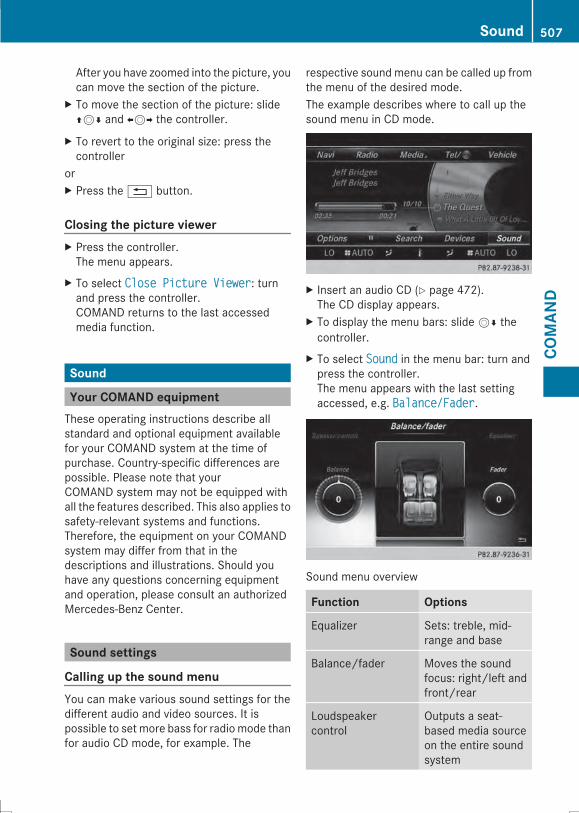
After you have zoomed into the picture, youcan move the section of the picture.
X To move the section of the picture: slideZVÆ and XVY the controller.
X To revert to the original size: press thecontroller
orX Press the% button.
Closing the picture viewerX Press the controller.The menu appears.
X To select Close Picture ViewerClose Picture Viewer: turnand press the controller.COMAND returns to the last accessedmedia function.
Sound
Your COMAND equipmentThese operating instructions describe allstandard and optional equipment availablefor your COMAND system at the time ofpurchase. Country-specific differences arepossible. Please note that yourCOMAND system may not be equipped withall the features described. This also applies tosafety-relevant systems and functions.Therefore, the equipment on your COMANDsystem may differ from that in thedescriptions and illustrations. Should youhave any questions concerning equipmentand operation, please consult an authorizedMercedes-Benz Center.
Sound settings
Calling up the sound menuYou can make various sound settings for thedifferent audio and video sources. It ispossible to set more bass for radiomode thanfor audio CD mode, for example. The
respective sound menu can be called up fromthe menu of the desired mode.The example describes where to call up thesound menu in CD mode.
X Insert an audio CD (Y page 472).The CD display appears.
X To display the menu bars: slideVÆ thecontroller.
X To select SoundSound in the menu bar: turn andpress the controller.The menu appears with the last settingaccessed, e.g. Balance/FaderBalance/Fader.
Sound menu overview
Function Options
Equalizer Sets: treble, mid-range and base
Balance/fader Moves the soundfocus: right/left andfront/rear
Loudspeakercontrol
Outputs a seat-based media sourceon the entire soundsystem
Sound 507
COMAN
D
Z
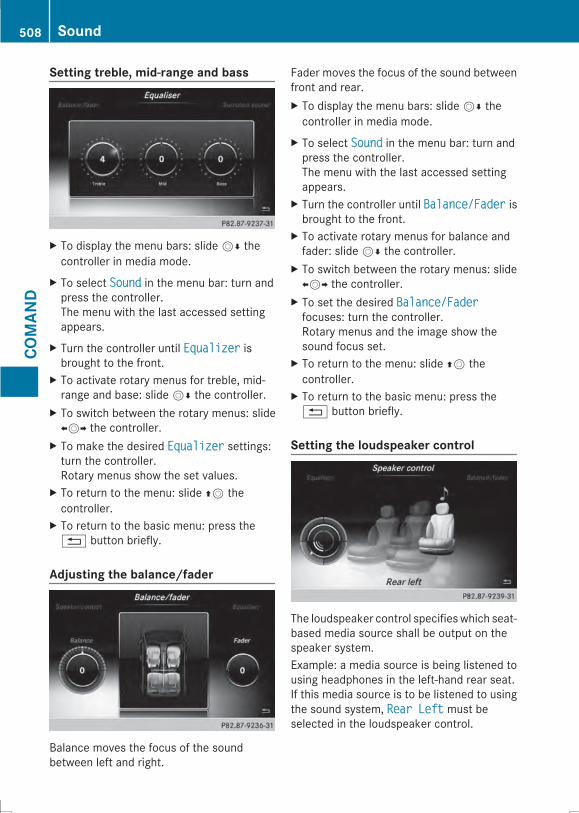
Setting treble, mid-range and bass
X To display the menu bars: slideVÆ thecontroller in media mode.
X To select SoundSound in the menu bar: turn andpress the controller.The menu with the last accessed settingappears.
X Turn the controller until EqualizerEqualizer isbrought to the front.
X To activate rotary menus for treble, mid-range and base: slideVÆ the controller.
X To switch between the rotary menus: slideXVY the controller.
X To make the desired EqualizerEqualizer settings:turn the controller.Rotary menus show the set values.
X To return to the menu: slide ZV thecontroller.
X To return to the basic menu: press the% button briefly.
Adjusting the balance/fader
Balance moves the focus of the soundbetween left and right.
Fader moves the focus of the sound betweenfront and rear.X To display the menu bars: slideVÆ thecontroller in media mode.
X To select SoundSound in the menu bar: turn andpress the controller.The menu with the last accessed settingappears.
X Turn the controller until Balance/FaderBalance/Fader isbrought to the front.
X To activate rotary menus for balance andfader: slideVÆ the controller.
X To switch between the rotary menus: slideXVY the controller.
X To set the desired Balance/FaderBalance/Faderfocuses: turn the controller.Rotary menus and the image show thesound focus set.
X To return to the menu: slide ZV thecontroller.
X To return to the basic menu: press the% button briefly.
Setting the loudspeaker control
The loudspeaker control specifieswhich seat-based media source shall be output on thespeaker system.Example: a media source is being listened tousing headphones in the left-hand rear seat.If this media source is to be listened to usingthe sound system, Rear LeftRear Left must beselected in the loudspeaker control.
508 SoundCO
MAN
D
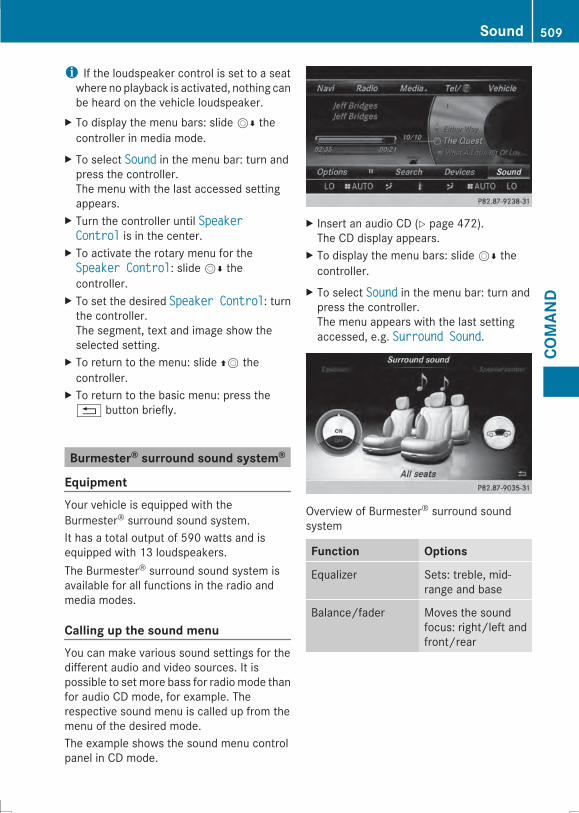
i If the loudspeaker control is set to a seatwhere no playback is activated, nothing canbe heard on the vehicle loudspeaker.
X To display the menu bars: slideVÆ thecontroller in media mode.
X To select SoundSound in the menu bar: turn andpress the controller.The menu with the last accessed settingappears.
X Turn the controller until SpeakerSpeakerControlControl is in the center.
X To activate the rotary menu for theSpeaker ControlSpeaker Control: slideVÆ thecontroller.
X To set the desired Speaker ControlSpeaker Control: turnthe controller.The segment, text and image show theselected setting.
X To return to the menu: slide ZV thecontroller.
X To return to the basic menu: press the% button briefly.
Burmester® surround sound system®
EquipmentYour vehicle is equipped with theBurmester® surround sound system.It has a total output of 590 watts and isequipped with 13 loudspeakers.The Burmester® surround sound system isavailable for all functions in the radio andmedia modes.
Calling up the sound menuYou can make various sound settings for thedifferent audio and video sources. It ispossible to set more bass for radiomode thanfor audio CD mode, for example. Therespective sound menu is called up from themenu of the desired mode.The example shows the sound menu controlpanel in CD mode.
X Insert an audio CD (Y page 472).The CD display appears.
X To display the menu bars: slideVÆ thecontroller.
X To select SoundSound in the menu bar: turn andpress the controller.The menu appears with the last settingaccessed, e.g. Surround SoundSurround Sound.
Overview of Burmester® surround soundsystem
Function Options
Equalizer Sets: treble, mid-range and base
Balance/fader Moves the soundfocus: right/left andfront/rear
Sound 509
COMAN
D
Z
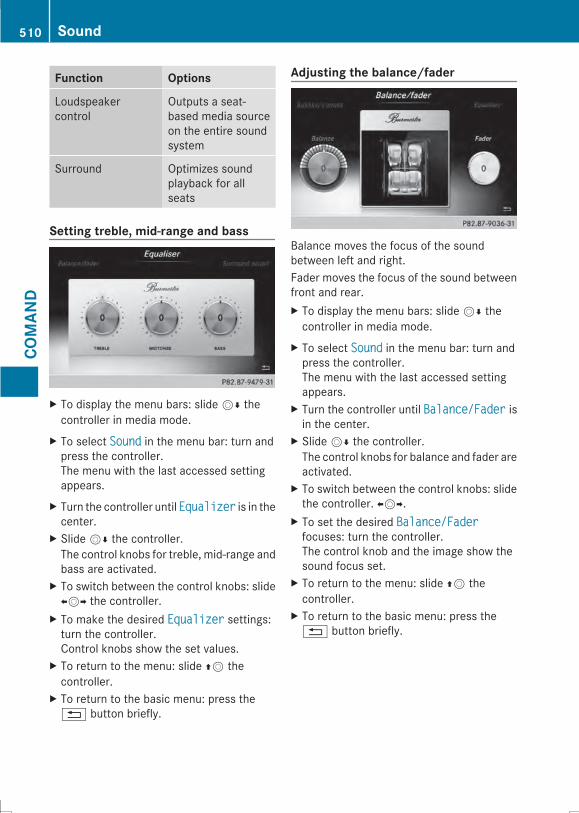
Function Options
Loudspeakercontrol
Outputs a seat-based media sourceon the entire soundsystem
Surround Optimizes soundplayback for allseats
Setting treble, mid-range and bass
X To display the menu bars: slideVÆ thecontroller in media mode.
X To select SoundSound in the menu bar: turn andpress the controller.The menu with the last accessed settingappears.
X Turn the controller until EqualizerEqualizer is in thecenter.
X SlideVÆ the controller.The control knobs for treble, mid-range andbass are activated.
X To switch between the control knobs: slideXVY the controller.
X To make the desired EqualizerEqualizer settings:turn the controller.Control knobs show the set values.
X To return to the menu: slide ZV thecontroller.
X To return to the basic menu: press the% button briefly.
Adjusting the balance/fader
Balance moves the focus of the soundbetween left and right.Fader moves the focus of the sound betweenfront and rear.X To display the menu bars: slideVÆ thecontroller in media mode.
X To select SoundSound in the menu bar: turn andpress the controller.The menu with the last accessed settingappears.
X Turn the controller until Balance/FaderBalance/Fader isin the center.
X SlideVÆ the controller.The control knobs for balance and fader areactivated.
X To switch between the control knobs: slidethe controller. XVY.
X To set the desired Balance/FaderBalance/Faderfocuses: turn the controller.The control knob and the image show thesound focus set.
X To return to the menu: slide ZV thecontroller.
X To return to the basic menu: press the% button briefly.
510 SoundCO
MAN
D
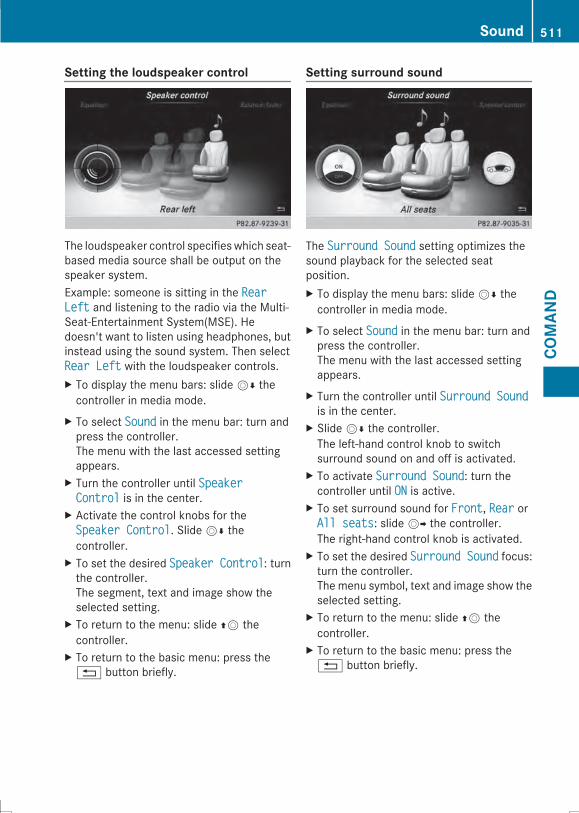
Setting the loudspeaker control
The loudspeaker control specifieswhich seat-based media source shall be output on thespeaker system.Example: someone is sitting in the RearRearLeftLeft and listening to the radio via the Multi-Seat-Entertainment System(MSE). Hedoesn't want to listen using headphones, butinstead using the sound system. Then selectRear LeftRear Left with the loudspeaker controls.X To display the menu bars: slideVÆ thecontroller in media mode.
X To select SoundSound in the menu bar: turn andpress the controller.The menu with the last accessed settingappears.
X Turn the controller until SpeakerSpeakerControlControl is in the center.
X Activate the control knobs for theSpeaker ControlSpeaker Control. SlideVÆ thecontroller.
X To set the desired Speaker ControlSpeaker Control: turnthe controller.The segment, text and image show theselected setting.
X To return to the menu: slide ZV thecontroller.
X To return to the basic menu: press the% button briefly.
Setting surround sound
The Surround SoundSurround Sound setting optimizes thesound playback for the selected seatposition.X To display the menu bars: slideVÆ thecontroller in media mode.
X To select SoundSound in the menu bar: turn andpress the controller.The menu with the last accessed settingappears.
X Turn the controller until Surround SoundSurround Soundis in the center.
X SlideVÆ the controller.The left-hand control knob to switchsurround sound on and off is activated.
X To activate Surround SoundSurround Sound: turn thecontroller until ONON is active.
X To set surround sound for FrontFront, RearRear orAll seatsAll seats: slideVY the controller.The right-hand control knob is activated.
X To set the desired Surround SoundSurround Sound focus:turn the controller.The menu symbol, text and image show theselected setting.
X To return to the menu: slide ZV thecontroller.
X To return to the basic menu: press the% button briefly.
Sound 511
COMAN
D
Z
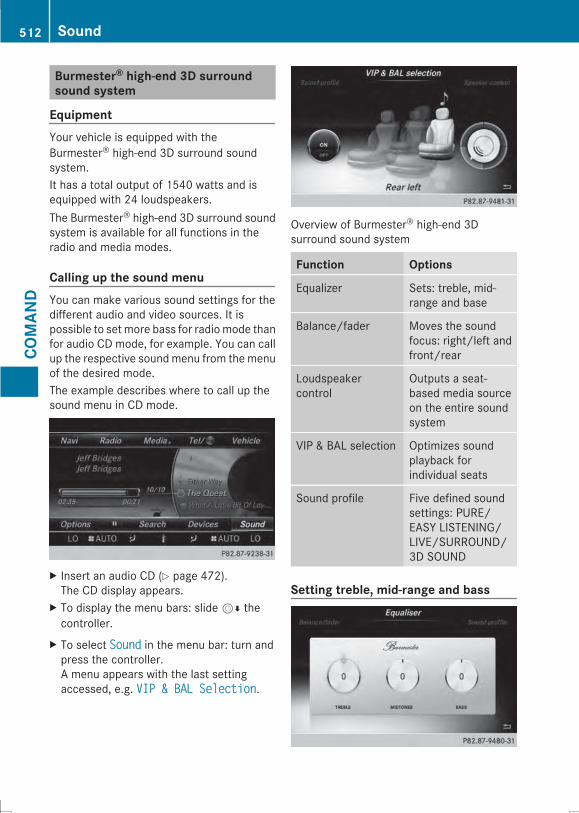
Burmester® high-end 3D surroundsound system
EquipmentYour vehicle is equipped with theBurmester® high-end 3D surround soundsystem.It has a total output of 1540 watts and isequipped with 24 loudspeakers.The Burmester® high-end 3D surround soundsystem is available for all functions in theradio and media modes.
Calling up the sound menuYou can make various sound settings for thedifferent audio and video sources. It ispossible to set more bass for radiomode thanfor audio CD mode, for example. You can callup the respective soundmenu from themenuof the desired mode.The example describes where to call up thesound menu in CD mode.
X Insert an audio CD (Y page 472).The CD display appears.
X To display the menu bars: slideVÆ thecontroller.
X To select SoundSound in the menu bar: turn andpress the controller.A menu appears with the last settingaccessed, e.g. VIP & BAL SelectionVIP & BAL Selection.
Overview of Burmester® high-end 3Dsurround sound system
Function Options
Equalizer Sets: treble, mid-range and base
Balance/fader Moves the soundfocus: right/left andfront/rear
Loudspeakercontrol
Outputs a seat-based media sourceon the entire soundsystem
VIP & BAL selection Optimizes soundplayback forindividual seats
Sound profile Five defined soundsettings: PURE/EASY LISTENING/LIVE/SURROUND/3D SOUND
Setting treble, mid-range and bass
512 SoundCO
MAN
D
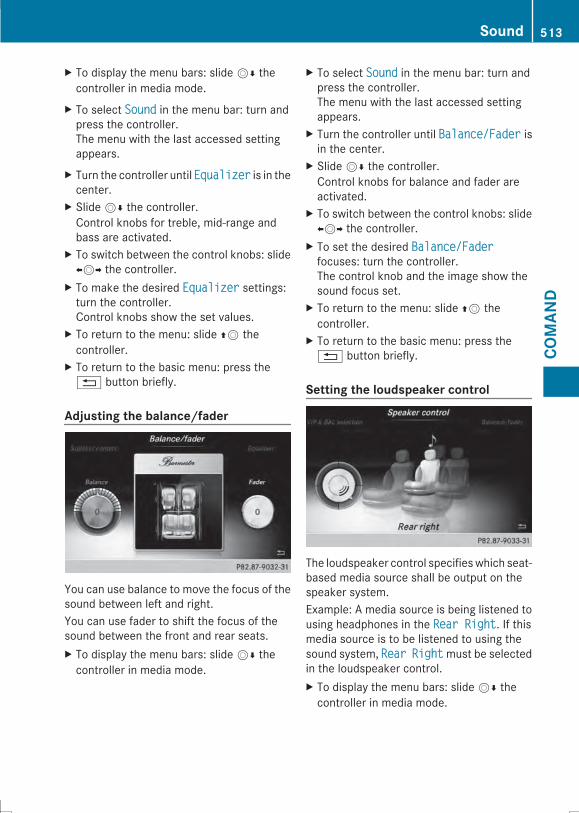
X To display the menu bars: slideVÆ thecontroller in media mode.
X To select SoundSound in the menu bar: turn andpress the controller.The menu with the last accessed settingappears.
X Turn the controller until EqualizerEqualizer is in thecenter.
X SlideVÆ the controller.Control knobs for treble, mid-range andbass are activated.
X To switch between the control knobs: slideXVY the controller.
X To make the desired EqualizerEqualizer settings:turn the controller.Control knobs show the set values.
X To return to the menu: slide ZV thecontroller.
X To return to the basic menu: press the% button briefly.
Adjusting the balance/fader
You can use balance to move the focus of thesound between left and right.You can use fader to shift the focus of thesound between the front and rear seats.X To display the menu bars: slideVÆ thecontroller in media mode.
X To select SoundSound in the menu bar: turn andpress the controller.The menu with the last accessed settingappears.
X Turn the controller until Balance/FaderBalance/Fader isin the center.
X SlideVÆ the controller.Control knobs for balance and fader areactivated.
X To switch between the control knobs: slideXVY the controller.
X To set the desired Balance/FaderBalance/Faderfocuses: turn the controller.The control knob and the image show thesound focus set.
X To return to the menu: slide ZV thecontroller.
X To return to the basic menu: press the% button briefly.
Setting the loudspeaker control
The loudspeaker control specifieswhich seat-based media source shall be output on thespeaker system.Example: A media source is being listened tousing headphones in the Rear RightRear Right. If thismedia source is to be listened to using thesound system, RearRear RightRightmust be selectedin the loudspeaker control.X To display the menu bars: slideVÆ thecontroller in media mode.
Sound 513
COMAN
D
Z
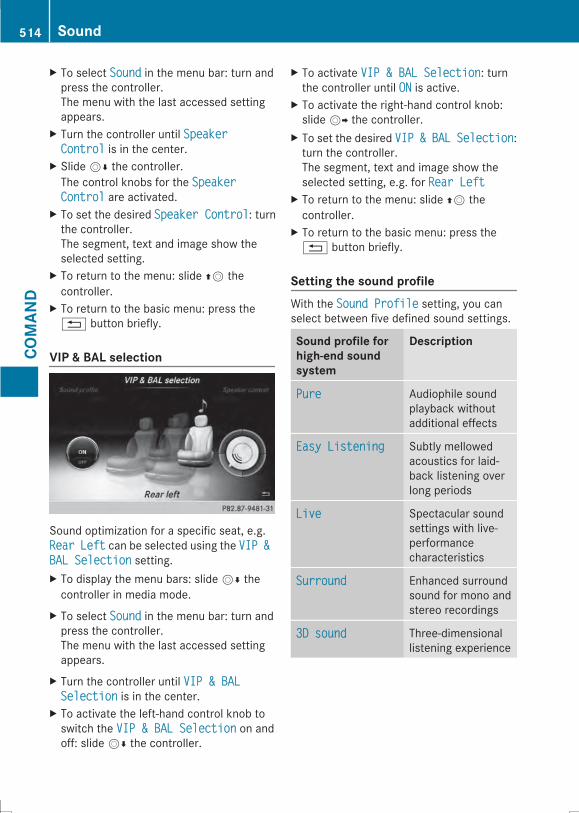
X To select SoundSound in the menu bar: turn andpress the controller.The menu with the last accessed settingappears.
X Turn the controller until SpeakerSpeakerControlControl is in the center.
X SlideVÆ the controller.The control knobs for the SpeakerSpeakerControlControl are activated.
X To set the desired Speaker ControlSpeaker Control: turnthe controller.The segment, text and image show theselected setting.
X To return to the menu: slide ZV thecontroller.
X To return to the basic menu: press the% button briefly.
VIP & BAL selection
Sound optimization for a specific seat, e.g.RearRear LeftLeft can be selected using the VIP &VIP &BAL SelectionBAL Selection setting.X To display the menu bars: slideVÆ thecontroller in media mode.
X To select SoundSound in the menu bar: turn andpress the controller.The menu with the last accessed settingappears.
X Turn the controller until VIP & BALVIP & BALSelectionSelection is in the center.
X To activate the left-hand control knob toswitch the VIP & BAL SelectionVIP & BAL Selection on andoff: slideVÆ the controller.
X To activate VIP & BAL SelectionVIP & BAL Selection: turnthe controller until ONON is active.
X To activate the right-hand control knob:slideVY the controller.
X To set the desired VIP &VIP & BALBAL SelectionSelection:turn the controller.The segment, text and image show theselected setting, e.g. for Rear LeftRear Left
X To return to the menu: slide ZV thecontroller.
X To return to the basic menu: press the% button briefly.
Setting the sound profileWith the Sound ProfileSound Profile setting, you canselect between five defined sound settings.
Sound profile forhigh-end soundsystem
Description
PurePure Audiophile soundplayback withoutadditional effects
Easy ListeningEasy Listening Subtly mellowedacoustics for laid-back listening overlong periods
LiveLive Spectacular soundsettings with live-performancecharacteristics
SurroundSurround Enhanced surroundsound for mono andstereo recordings
3D sound3D sound Three-dimensionallistening experience
514 SoundCO
MAN
D
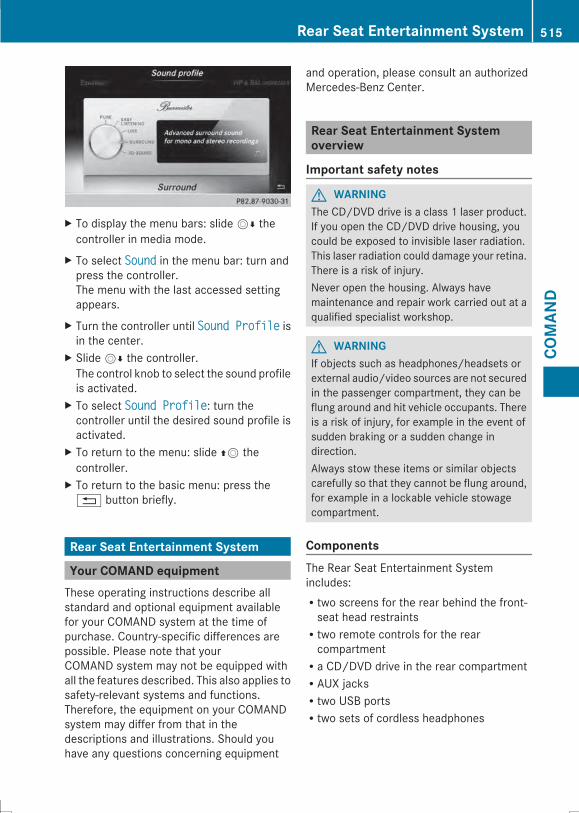
X To display the menu bars: slideVÆ thecontroller in media mode.
X To select SoundSound in the menu bar: turn andpress the controller.The menu with the last accessed settingappears.
X Turn the controller until Sound ProfileSound Profile isin the center.
X SlideVÆ the controller.The control knob to select the sound profileis activated.
X To select Sound ProfileSound Profile: turn thecontroller until the desired sound profile isactivated.
X To return to the menu: slide ZV thecontroller.
X To return to the basic menu: press the% button briefly.
Rear Seat Entertainment System
Your COMAND equipmentThese operating instructions describe allstandard and optional equipment availablefor your COMAND system at the time ofpurchase. Country-specific differences arepossible. Please note that yourCOMAND system may not be equipped withall the features described. This also applies tosafety-relevant systems and functions.Therefore, the equipment on your COMANDsystem may differ from that in thedescriptions and illustrations. Should youhave any questions concerning equipment
and operation, please consult an authorizedMercedes-Benz Center.
Rear Seat Entertainment Systemoverview
Important safety notes
G WARNINGThe CD/DVD drive is a class 1 laser product.If you open the CD/DVD drive housing, youcould be exposed to invisible laser radiation.This laser radiation could damage your retina.There is a risk of injury.Never open the housing. Always havemaintenance and repair work carried out at aqualified specialist workshop.
G WARNINGIf objects such as headphones/headsets orexternal audio/video sources are not securedin the passenger compartment, they can beflung around and hit vehicle occupants. Thereis a risk of injury, for example in the event ofsudden braking or a sudden change indirection.Always stow these items or similar objectscarefully so that they cannot be flung around,for example in a lockable vehicle stowagecompartment.
ComponentsThe Rear Seat Entertainment Systemincludes:Rtwo screens for the rear behind the front-seat head restraintsRtwo remote controls for the rearcompartmentRa CD/DVD drive in the rear compartmentRAUX jacksRtwo USB portsRtwo sets of cordless headphones
Rear Seat Entertainment System 515
COMAN
D
Z
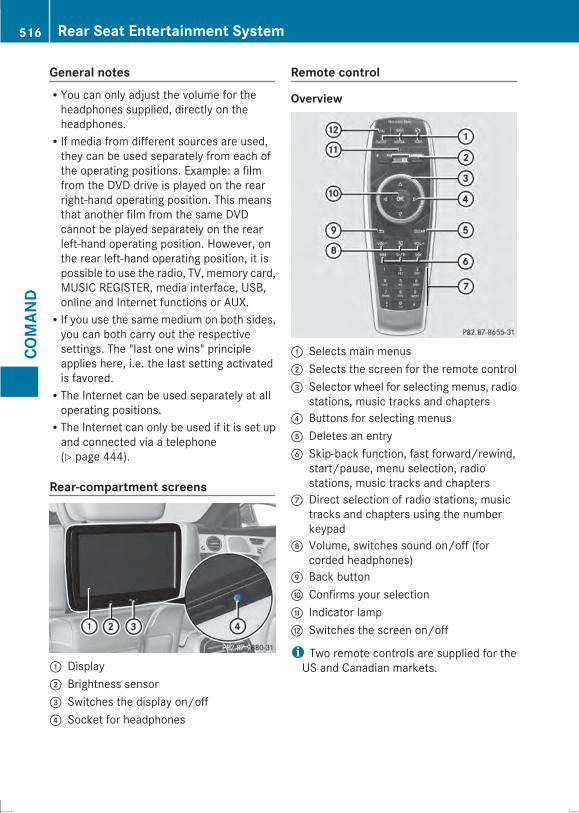
General notesRYou can only adjust the volume for theheadphones supplied, directly on theheadphones.RIf media from different sources are used,they can be used separately from each ofthe operating positions. Example: a filmfrom the DVD drive is played on the rearright-hand operating position. This meansthat another film from the same DVDcannot be played separately on the rearleft-hand operating position. However, onthe rear left-hand operating position, it ispossible to use the radio, TV, memory card,MUSIC REGISTER, media interface, USB,online and Internet functions or AUX.RIf you use the same medium on both sides,you can both carry out the respectivesettings. The "last one wins" principleapplies here, i.e. the last setting activatedis favored.RThe Internet can be used separately at alloperating positions.RThe Internet can only be used if it is set upand connected via a telephone(Y page 444).
Rear-compartment screens
: Display; Brightness sensor= Switches the display on/off? Socket for headphones
Remote control
Overview
: Selects main menus; Selects the screen for the remote control= Selector wheel for selecting menus, radio
stations, music tracks and chapters? Buttons for selecting menusA Deletes an entryB Skip-back function, fast forward/rewind,
start/pause, menu selection, radiostations, music tracks and chapters
C Direct selection of radio stations, musictracks and chapters using the numberkeypad
D Volume, switches sound on/off (forcorded headphones)
E Back buttonF Confirms your selectionG Indicator lampH Switches the screen on/off
i Two remote controls are supplied for theUS and Canadian markets.
516 Rear Seat Entertainment SystemCO
MAN
D
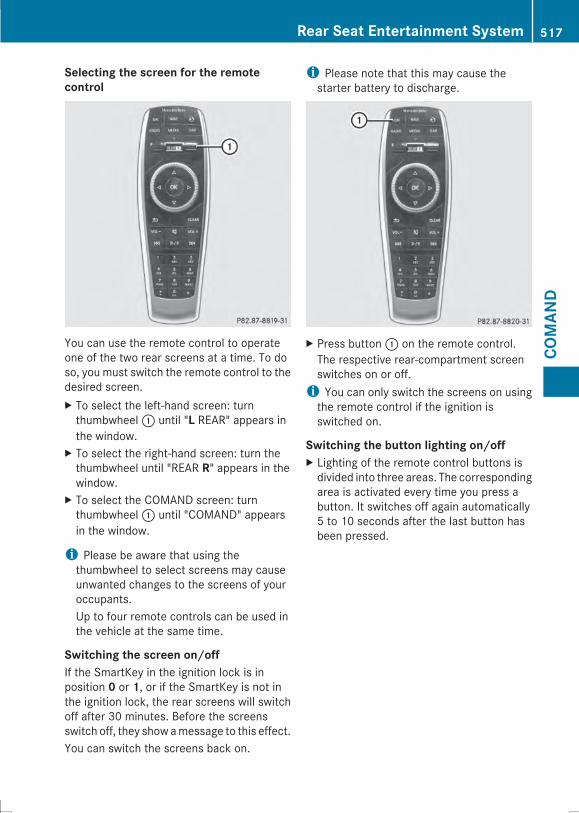
Selecting the screen for the remotecontrol
You can use the remote control to operateone of the two rear screens at a time. To doso, you must switch the remote control to thedesired screen.X To select the left-hand screen: turnthumbwheel: until "L REAR" appears inthe window.
X To select the right-hand screen: turn thethumbwheel until "REAR R" appears in thewindow.
X To select the COMAND screen: turnthumbwheel: until "COMAND" appearsin the window.
i Please be aware that using thethumbwheel to select screens may causeunwanted changes to the screens of youroccupants.Up to four remote controls can be used inthe vehicle at the same time.
Switching the screen on/offIf the SmartKey in the ignition lock is inposition 0 or 1, or if the SmartKey is not inthe ignition lock, the rear screens will switchoff after 30 minutes. Before the screensswitch off, they showamessage to this effect.You can switch the screens back on.
i Please note that this may cause thestarter battery to discharge.
X Press button: on the remote control.The respective rear-compartment screenswitches on or off.i You can only switch the screens on usingthe remote control if the ignition isswitched on.
Switching the button lighting on/offX Lighting of the remote control buttons isdivided into three areas. The correspondingarea is activated every time you press abutton. It switches off again automatically5 to 10 seconds after the last button hasbeen pressed.
Rear Seat Entertainment System 517
COMAN
D
Z
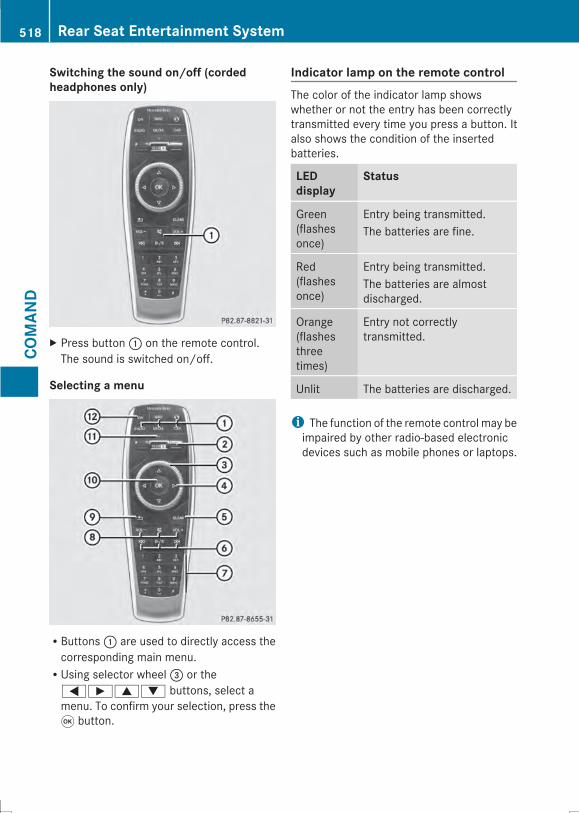
Switching the sound on/off (cordedheadphones only)
X Press button: on the remote control.The sound is switched on/off.
Selecting a menu
RButtons: are used to directly access thecorresponding main menu.RUsing selector wheel= or the=Ì9: buttons, select amenu. To confirm your selection, press the9 button.
Indicator lamp on the remote controlThe color of the indicator lamp showswhether or not the entry has been correctlytransmitted every time you press a button. Italso shows the condition of the insertedbatteries.
LEDdisplay
Status
Green(flashesonce)
Entry being transmitted.The batteries are fine.
Red(flashesonce)
Entry being transmitted.The batteries are almostdischarged.
Orange(flashesthreetimes)
Entry not correctlytransmitted.
Unlit The batteries are discharged.
i The function of the remote control may beimpaired by other radio-based electronicdevices such as mobile phones or laptops.
518 Rear Seat Entertainment SystemCO
MAN
D
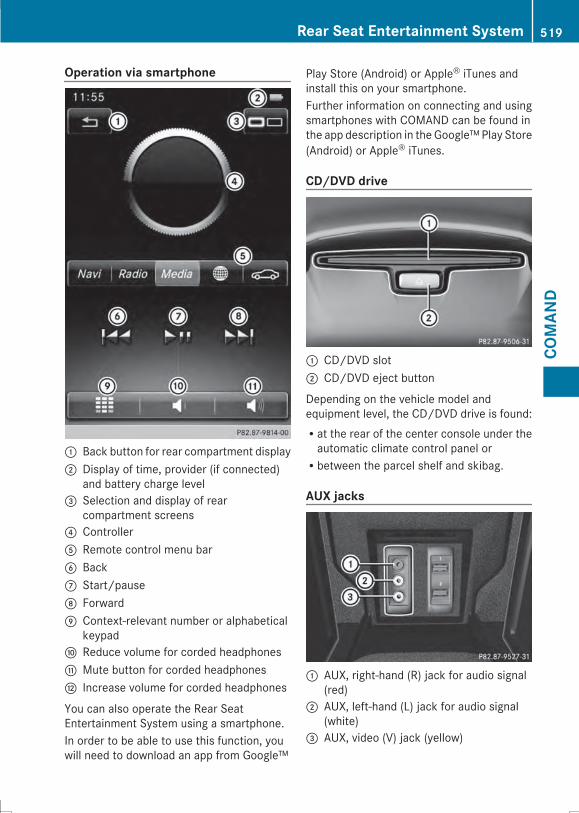
Operation via smartphone
: Back button for rear compartment display; Display of time, provider (if connected)
and battery charge level= Selection and display of rear
compartment screens? ControllerA Remote control menu barB BackC Start/pauseD ForwardE Context-relevant number or alphabetical
keypadF Reduce volume for corded headphonesG Mute button for corded headphonesH Increase volume for corded headphones
You can also operate the Rear SeatEntertainment System using a smartphone.In order to be able to use this function, youwill need to download an app from Google™
Play Store (Android) or Apple® iTunes andinstall this on your smartphone.Further information on connecting and usingsmartphones with COMAND can be found inthe app description in the Google™Play Store(Android) or Apple® iTunes.
CD/DVD drive
: CD/DVD slot; CD/DVD eject button
Depending on the vehicle model andequipment level, the CD/DVD drive is found:Rat the rear of the center console under theautomatic climate control panel orRbetween the parcel shelf and skibag.
AUX jacks
: AUX, right-hand (R) jack for audio signal(red)
; AUX, left-hand (L) jack for audio signal(white)
= AUX, video (V) jack (yellow)
Rear Seat Entertainment System 519
COMAN
D
Z
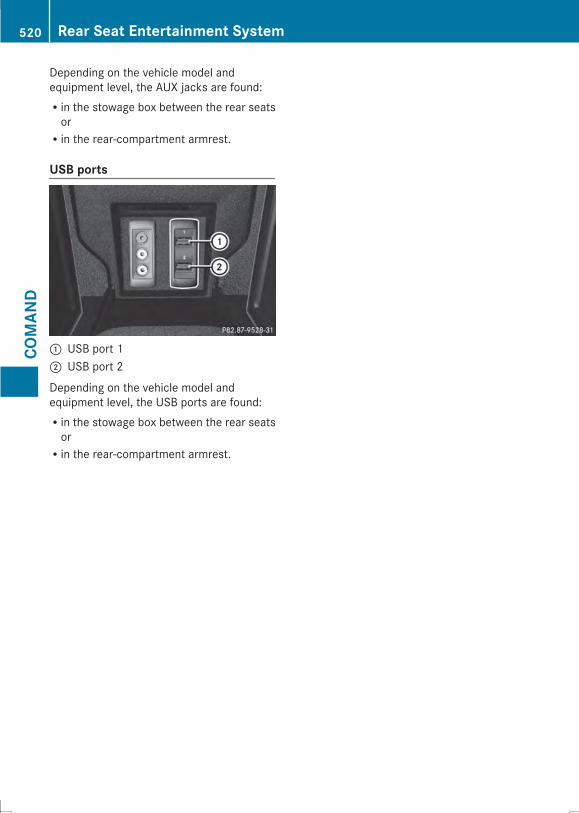
Depending on the vehicle model andequipment level, the AUX jacks are found:Rin the stowage box between the rear seatsorRin the rear-compartment armrest.
USB ports
: USB port 1; USB port 2
Depending on the vehicle model andequipment level, the USB ports are found:Rin the stowage box between the rear seatsorRin the rear-compartment armrest.
520 Rear Seat Entertainment SystemCO
MAN
D
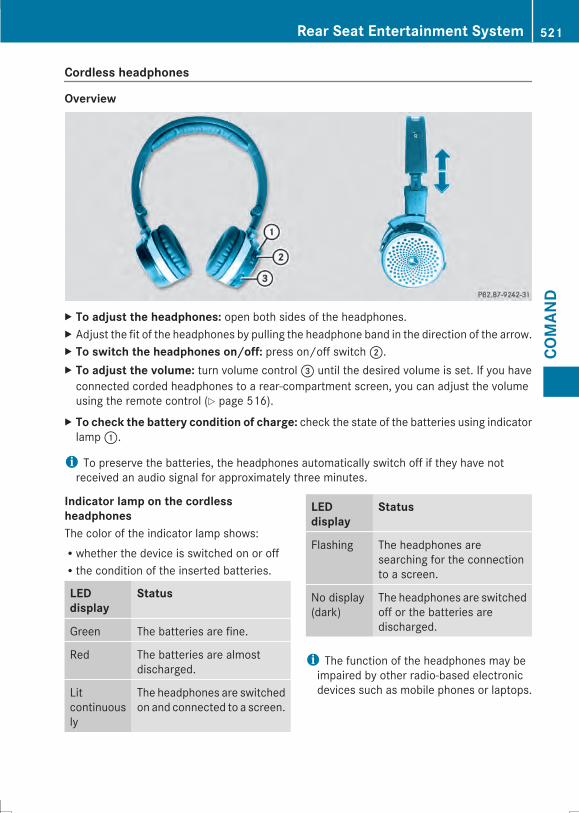
Cordless headphones
Overview
X To adjust the headphones: open both sides of the headphones.X Adjust the fit of the headphones by pulling the headphone band in the direction of the arrow.X To switch the headphones on/off: press on/off switch;.X To adjust the volume: turn volume control= until the desired volume is set. If you haveconnected corded headphones to a rear-compartment screen, you can adjust the volumeusing the remote control (Y page 516).
X To check the battery condition of charge: check the state of the batteries using indicatorlamp:.
i To preserve the batteries, the headphones automatically switch off if they have notreceived an audio signal for approximately three minutes.
Indicator lamp on the cordlessheadphonesThe color of the indicator lamp shows:Rwhether the device is switched on or offRthe condition of the inserted batteries.
LEDdisplay
Status
Green The batteries are fine.
Red The batteries are almostdischarged.
Litcontinuously
The headphones are switchedon and connected to a screen.
LEDdisplay
Status
Flashing The headphones aresearching for the connectionto a screen.
No display(dark)
The headphones are switchedoff or the batteries aredischarged.
i The function of the headphones may beimpaired by other radio-based electronicdevices such as mobile phones or laptops.
Rear Seat Entertainment System 521
COMAN
D
Z
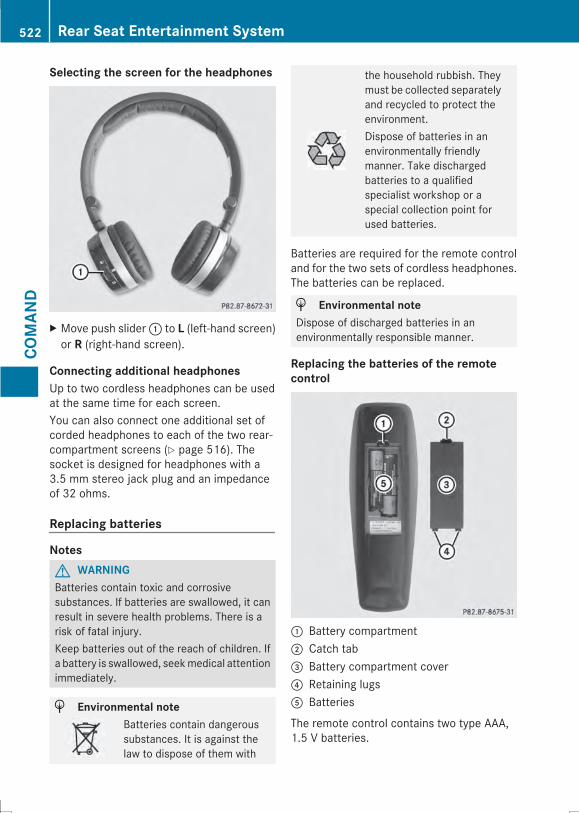
Selecting the screen for the headphones
X Move push slider: to L (left-hand screen)or R (right-hand screen).
Connecting additional headphonesUp to two cordless headphones can be usedat the same time for each screen.You can also connect one additional set ofcorded headphones to each of the two rear-compartment screens (Y page 516). Thesocket is designed for headphones with a3.5 mm stereo jack plug and an impedanceof 32 ohms.
Replacing batteries
NotesG WARNINGBatteries contain toxic and corrosivesubstances. If batteries are swallowed, it canresult in severe health problems. There is arisk of fatal injury.Keep batteries out of the reach of children. Ifa battery is swallowed, seekmedical attentionimmediately.
H Environmental noteBatteries contain dangeroussubstances. It is against thelaw to dispose of them with
the household rubbish. Theymust be collected separatelyand recycled to protect theenvironment.Dispose of batteries in anenvironmentally friendlymanner. Take dischargedbatteries to a qualifiedspecialist workshop or aspecial collection point forused batteries.
Batteries are required for the remote controland for the two sets of cordless headphones.The batteries can be replaced.
H Environmental noteDispose of discharged batteries in anenvironmentally responsible manner.
Replacing the batteries of the remotecontrol
: Battery compartment; Catch tab= Battery compartment cover? Retaining lugsA Batteries
The remote control contains two type AAA,1.5 V batteries.
522 Rear Seat Entertainment SystemCO
MAN
D

X To open the battery compartment:remove battery compartment cover= onthe back of the remote control.
X Push catch tab; down and take offbattery compartment cover=.
X Remove discharged batteriesA from thetray.
X Insert the new batteries. Observe thepolarity markings on the batteries andbattery compartment when doing so.Left-hand battery: the positive pole (+)must face upwards.Right-hand battery: the positive pole (+)must face downwards.
X To close the battery compartment:insert battery compartment cover=starting with retaining lugs? into thebattery compartment and allow catchtab; to engage in place.
Replacing cordless headphone batteries
The battery compartment is located on theleft headphone. The cordless headphonesrequire two type AAA, 1.5 V batteries.X To open the battery compartment: turnbattery compartment cover: in aclockwise direction and remove.
X Remove the discharged batteries from thetray.
X Insert the new batteries. Observe thepolarity markings on the batteries andbattery tray when doing so.
X To close the battery compartment:replace battery housing cover: and turnit counter-clockwise until it engages.If the batteries have been insertedcorrectly, the indicator lamp will light upgreen when the headphones are switchedon.
i The operating duration of the headphoneswith a set of batteries is up to 40 hours.
System settings
NoteYou can adjust all system settings individuallyfor each screen without affecting the otherscreen. To do this, please use the remotecontrol (Y page 516).
Selecting the display languageX Select VehicleVehicle using the9:=; buttons on theremote control and press the 9 button toconfirm.
X Press the: button on the remotecontrol.A menu appears.
X Select System SettingsSystem Settings usingthe:=; buttons on the remotecontrol and press the 9 button to confirm.You see the system settings menu on theselected rear screen.
X Select LanguageLanguage using the9:buttons and press the9button to confirm.The list of languages appears. A# dotindicates the current setting.
X Select the language using the9:buttons and press the9button to confirm.The system activates the correspondinglanguage.
Rear Seat Entertainment System 523
COMAN
D
Z

Switching the display designX Select VehicleVehicle using the9:=; buttons on theremote control and press the 9 button toconfirm.
X Select System SettingsSystem Settings usingthe:=; buttons on the remotecontrol and press the 9 button to confirm.You see the system settings menu on theselected rear screen.
X Select DisplayDisplay using the9:buttons on the remote control and pressthe 9 button to confirm.
X Select Day ModeDay Mode, Night ModeNight Mode orAutomaticAutomatic using the9: buttonsand press the 9 button to confirm.The dot indicates the current setting.
Design Explanation
Day ModeDay Mode The display is setpermanently to daydesign.
Night ModeNight Mode The display is setpermanently to nightdesign.
AutomaticAutomatic The display designchanges depending onthe vehicle instrumentcluster illumination.
Setting the brightnessX Select VehicleVehicle using the9:=; buttons on theremote control and press the 9 button toconfirm.
X Select System SettingsSystem Settings usingthe:=; buttons on the remotecontrol and press the 9 button to confirm.You see the system settings menu on theselected rear screen.
X Select DisplayDisplay using the9:buttons on the remote control and pressthe 9 button to confirm.
X Select BrightnessBrightness using the9:buttons and press the9button to confirm.A scale appears.
X Adjust the brightness using the9:buttons and press the9button to confirm.The brightness bar moves up or down. Thepicture becomes lighter or darker inaccordance with the scale.
Showing/hiding the pictureX Select VehicleVehicle using the9:=; buttons on theremote control and press the 9 button toconfirm.
X Press button: on the remote control.A menu appears.
X Select Display OffDisplay Off using the9:=; buttons and pressthe 9 button to confirm.
X To display the picture: press the 9button.
Adjusting sound settingsYou can select the sound settings in the radio,audio CD/audio DVD/MP3, video DVD andAUX modes.X Select a medium (e.g. audio CD mode)(Y page 529).
X To show the menu: press the: buttonon the remote control.
X Select SoundSound using the:=;buttons on the remote control and pressthe 9 button to confirm.
X Select TrebleTreble, MidMid or BassBass usingthe:=; buttons on the remotecontrol and press the 9 button to confirm.
524 Rear Seat Entertainment SystemCO
MAN
D
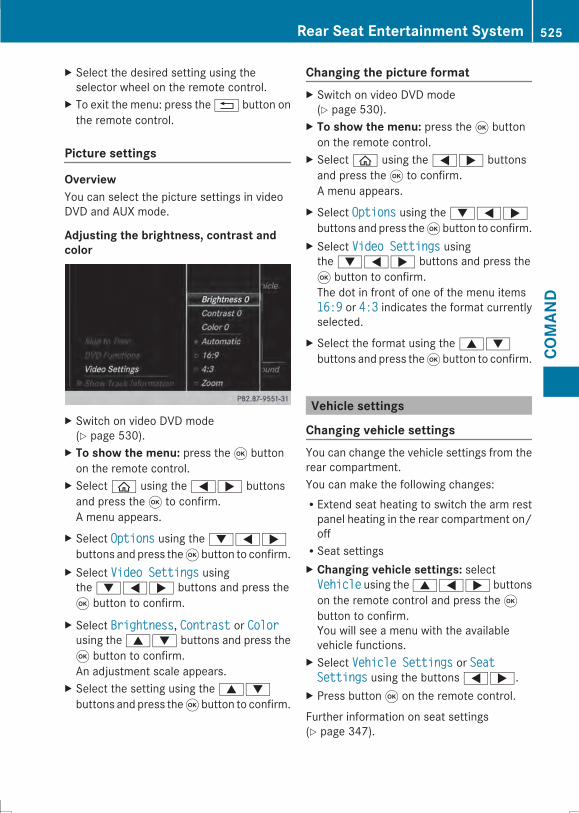
X Select the desired setting using theselector wheel on the remote control.
X To exit the menu: press the% button onthe remote control.
Picture settings
OverviewYou can select the picture settings in videoDVD and AUX mode.
Adjusting the brightness, contrast andcolor
X Switch on video DVD mode(Y page 530).
X To show the menu: press the 9 buttonon the remote control.
X Selectò using the=; buttonsand press the 9 to confirm.A menu appears.
X Select OptionsOptions using the:=;buttons and press the9button to confirm.
X Select Video SettingsVideo Settings usingthe:=; buttons and press the9 button to confirm.
X Select BrightnessBrightness, ContrastContrast or ColorColorusing the9: buttons and press the9 button to confirm.An adjustment scale appears.
X Select the setting using the9:buttons and press the9button to confirm.
Changing the picture formatX Switch on video DVD mode(Y page 530).
X To show the menu: press the 9 buttonon the remote control.
X Selectò using the=; buttonsand press the 9 to confirm.A menu appears.
X Select OptionsOptions using the:=;buttons and press the9button to confirm.
X Select Video SettingsVideo Settings usingthe:=; buttons and press the9 button to confirm.The dot in front of one of the menu items16:916:9 or 4:34:3 indicates the format currentlyselected.
X Select the format using the9:buttons and press the9button to confirm.
Vehicle settings
Changing vehicle settingsYou can change the vehicle settings from therear compartment.You can make the following changes:RExtend seat heating to switch the arm restpanel heating in the rear compartment on/offRSeat settingsX Changing vehicle settings: selectVehicleVehicle using the9=; buttonson the remote control and press the 9button to confirm.You will see a menu with the availablevehicle functions.
X Select Vehicle SettingsVehicle Settings or SeatSeatSettingsSettings using the buttons=;.
X Press button 9 on the remote control.
Further information on seat settings(Y page 347).
Rear Seat Entertainment System 525
COMAN
D
Z

Further information on panel heating(Y page 344).
i The panel heating in the rearcompartment is available if the key in theignition lock is in position 1 or 2.
Navitainment
Navigation modeNavigation functions such as the compasscan be used in the rear compartment.Calling up Drive InformationX Press button Ø on the remote control.You will see the current navigationinformation.
Calling up the compassX Press button Ø on the remote control.X Press button: on the remote control.A menu appears.
X Using the remote control, select MenuMenu.X Using the remote control, select CompassCompass.Calling up the online map displayi An Internet connection is required to usethe online map display (Y page 444).
X Press button Ø on the remote control.X Press button: on the remote control.A menu appears.
X Using the remote control, select MenuMenu.X Using the remote control, select OnlineOnlineMap DisplayMap Display.
Online and Internet functionsYou can use online and Internet functions inthe rear compartment.Internet conditions for access (Y page 444).Options for online and Internet functions(Y page 450).You can choose from the following Internetfunctions:RWeatherRInternetRMercedes-Benz AppsRInternet radioRMercedes-Benz Mobile WebsiteUsing Internet functions:X Press button® on the remote control.A menu appears.
X Select the online/Internet functionrequired.
Calling up the Internet functions menu:X Press the% button on the remotecontrol while using the Internet function.
Exiting the Internet functions:X Press the% button on the remotecontrol.A menu appears.
X Select theÜ symbol in the menu andpress the 9 button on the remote controlto confirm.
orX Select another function (e.g. Media orRadio).
Further information on using online andInternet functions (Y page 444).
Radio mode
Switching to radio modeX Press button $ on the remote control.Radio mode starts.
526 Rear Seat Entertainment SystemCO
MAN
D
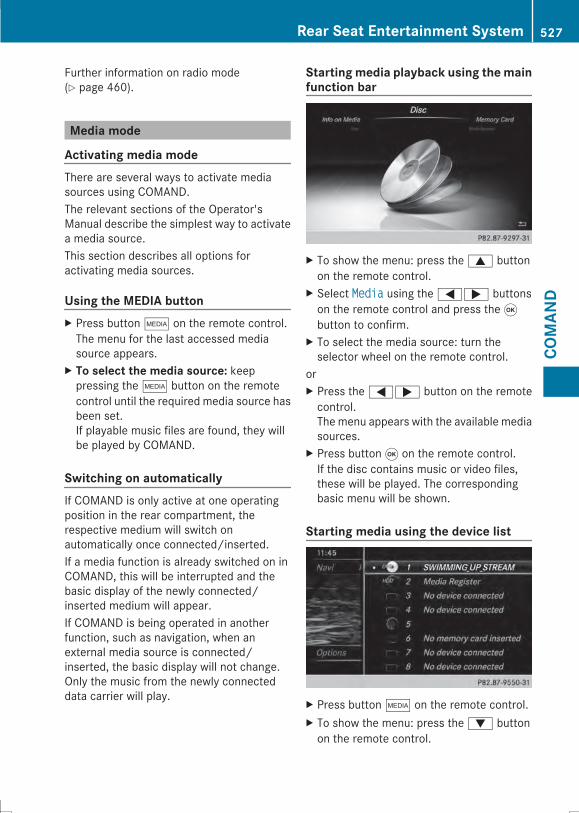
Further information on radio mode(Y page 460).
Media mode
Activating media modeThere are several ways to activate mediasources using COMAND.The relevant sections of the Operator'sManual describe the simplest way to activatea media source.This section describes all options foractivating media sources.
Using the MEDIA buttonX Press button Õ on the remote control.The menu for the last accessed mediasource appears.
X To select the media source: keeppressing the Õ button on the remotecontrol until the required media source hasbeen set.If playable music files are found, they willbe played by COMAND.
Switching on automaticallyIf COMAND is only active at one operatingposition in the rear compartment, therespective medium will switch onautomatically once connected/inserted.If a media function is already switched on inCOMAND, this will be interrupted and thebasic display of the newly connected/inserted medium will appear.If COMAND is being operated in anotherfunction, such as navigation, when anexternal media source is connected/inserted, the basic display will not change.Only the music from the newly connecteddata carrier will play.
Startingmedia playback using themainfunction bar
X To show the menu: press the9 buttonon the remote control.
X Select MediaMedia using the=; buttonson the remote control and press the 9button to confirm.
X To select the media source: turn theselector wheel on the remote control.
orX Press the=; button on the remotecontrol.The menu appears with the available mediasources.
X Press button 9 on the remote control.If the disc contains music or video files,these will be played. The correspondingbasic menu will be shown.
Starting media using the device list
X Press button Õ on the remote control.X To show the menu: press the: buttonon the remote control.
Rear Seat Entertainment System 527
COMAN
D
Z

X Using the:=; buttons on theremote control, select DevicesDevices.The discs/devices available are shown. The# dot indicates the current setting.
X Select the device/disc using the:9 buttons and press the 9 button toconfirm.If the device/disc contains music or videofiles, these will be played.
Music searchThe media source has already beenselected:X Press button: on the remote control.The menu is shown.
X Select SearchSearch using the=; buttonson the remote control and press the 9button to confirm.
The media source has not been selectedyet:X To select the media source: keep pressingtheÕ button on the remote control untilthe desired media source has been set.
X Press button: on the remote control.The menu is shown.
X Select SearchSearch using the=; buttonson the remote control and press the 9button to confirm.
Further information on the music search(Y page 480).
Audio/video mode
Important safety notes
G WARNINGThe CD/DVD drive is a class 1 laser product.If you open the CD/DVD drive housing, youcould be exposed to invisible laser radiation.This laser radiation could damage your retina.There is a risk of injury.
Never open the housing. Always havemaintenance and repair work carried out at aqualified specialist workshop.
General notesYou will find information on the followingtopics in the Audio section:Rnotes on CDs/DVDs (Y page 480)Rnotes on MP3 mode (Y page 478)Rnotes on copyright (Y page 480)
Inserting a CD/DVD
: Disc slot; Disc eject button
Depending on the vehicle model andequipment level, the CD/DVD drive is found:Rat the rear of the center console under theautomatic climate control panel orRbetween the parcel shelf and skibag.The CD/DVD drive is a single disc drive. Ifthere is already a disc inserted, this must beejected before another is inserted.X Insert a disc into the disc slot.The printed side of the disc must faceupwards. If neither side of the disc isprinted, the side you wish to play must facedownwards.The CD/DVD drive draws in the disc.
528 Rear Seat Entertainment SystemCO
MAN
D
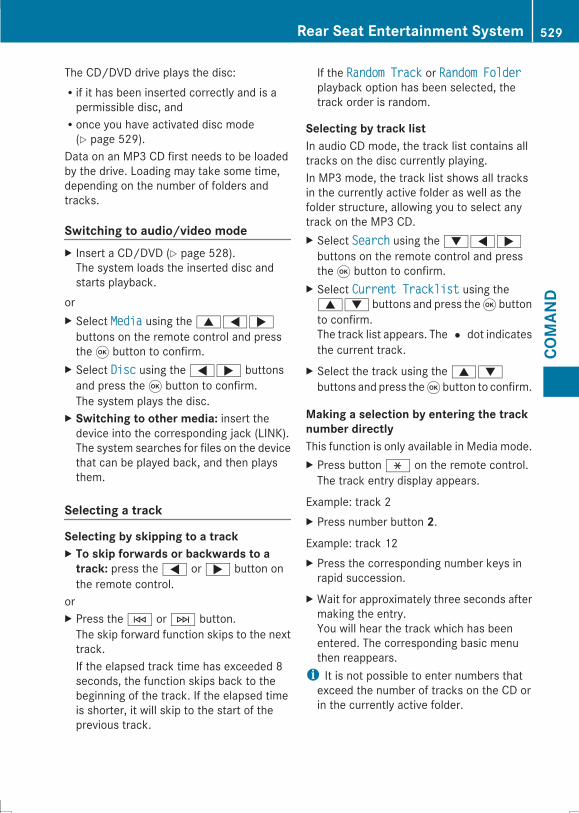
The CD/DVD drive plays the disc:Rif it has been inserted correctly and is apermissible disc, andRonce you have activated disc mode(Y page 529).
Data on an MP3 CD first needs to be loadedby the drive. Loading may take some time,depending on the number of folders andtracks.
Switching to audio/video modeX Insert a CD/DVD (Y page 528).The system loads the inserted disc andstarts playback.
orX Select MediaMedia using the9=;buttons on the remote control and pressthe 9 button to confirm.
X Select DiscDisc using the=; buttonsand press the 9 button to confirm.The system plays the disc.
X Switching to other media: insert thedevice into the corresponding jack (LINK).The system searches for files on the devicethat can be played back, and then playsthem.
Selecting a track
Selecting by skipping to a trackX To skip forwards or backwards to atrack: press the= or; button onthe remote control.
orX Press theE orF button.The skip forward function skips to the nexttrack.If the elapsed track time has exceeded 8seconds, the function skips back to thebeginning of the track. If the elapsed timeis shorter, it will skip to the start of theprevious track.
If the Random TrackRandom Track or Random FolderRandom Folderplayback option has been selected, thetrack order is random.
Selecting by track listIn audio CD mode, the track list contains alltracks on the disc currently playing.In MP3 mode, the track list shows all tracksin the currently active folder as well as thefolder structure, allowing you to select anytrack on the MP3 CD.X Select SearchSearch using the:=;buttons on the remote control and pressthe 9 button to confirm.
X Select Current TracklistCurrent Tracklist using the9: buttons and press the9 buttonto confirm.The track list appears. The# dot indicatesthe current track.
X Select the track using the9:buttons and press the9button to confirm.
Making a selection by entering the tracknumber directlyThis function is only available in Media mode.X Press buttonh on the remote control.The track entry display appears.
Example: track 2X Press number button 2.Example: track 12X Press the corresponding number keys inrapid succession.
X Wait for approximately three seconds aftermaking the entry.You will hear the track which has beenentered. The corresponding basic menuthen reappears.i It is not possible to enter numbers thatexceed the number of tracks on the CD orin the currently active folder.
Rear Seat Entertainment System 529
COMAN
D
Z
Fast forwarding/rewindingX With the display/selection window active,press the= or; button on theremote control repeatedly until you reachthe desired position.
orX Press and hold theE orF buttonuntil the desired position is reached.
Selecting a folderThis function is only available in MP3 mode.X Select SearchSearch using the:=;buttons on the remote control and pressthe 9 button to confirm.
X Select FolderFolder using the:=;buttons and press the9button to confirm.The folder content appears.
X To switch to the next folder up: press the= button on the remote control.The display shows the next folder up.
X Select the folder with the9:buttons and press the9button to confirm.You will see the tracks in the folder.
X Select the track using the9:buttons and press the9button to confirm.The track is played and the correspondingfolder is now the active folder.
Pause/PlaybackX To pause playback: press the; /Ë button on the remote control.TheË display changes toÌ.
X To continue playback: press the; /Ë button.TheÌ display changes toË.
Playback optionsX Select OptionsOptions using the:=;buttons and press the9button to confirm.
X The options list appears. The# dotindicates the option currently selected.
X Select NormalNormal TrackTrack SequenceSequence, RandomRandomTrackTrack or Random FolderRandom Folder using the9: buttons and press the9 buttonto confirm.The option is switched on. For all optionsexcept Normal Track SequenceNormal Track Sequence, you willsee a corresponding display in the display/selection window.i If you switch the data carrier which youare currently listening to, the NormalNormalTrack SequenceTrack Sequence option is activatedautomatically. If an option is selected, itremains selected after the system isswitched on or off.
Switching track information on/offIf the function is switched on, the informationsaved in the audio files, such as track, artistor album, will be shown (if available).If the function is switched off, the names ofthe files and folders on the disc are shown.X Select OptionsOptions using the:=;buttons and press the9button to confirm.
X Select Display Track InformationDisplay Track Informationusing the9: buttons and press the9 button to confirm.The function is switched on O or off ª,depending on the previous status.
Video DVD mode
Important safety notes
G WARNINGThe CD/DVD drive is a class 1 laser product.If you open the CD/DVD drive housing, youcould be exposed to invisible laser radiation.This laser radiation could damage your retina.There is a risk of injury.Never open the housing. Always havemaintenance and repair work carried out at aqualified specialist workshop.
530 Rear Seat Entertainment SystemCO
MAN
D
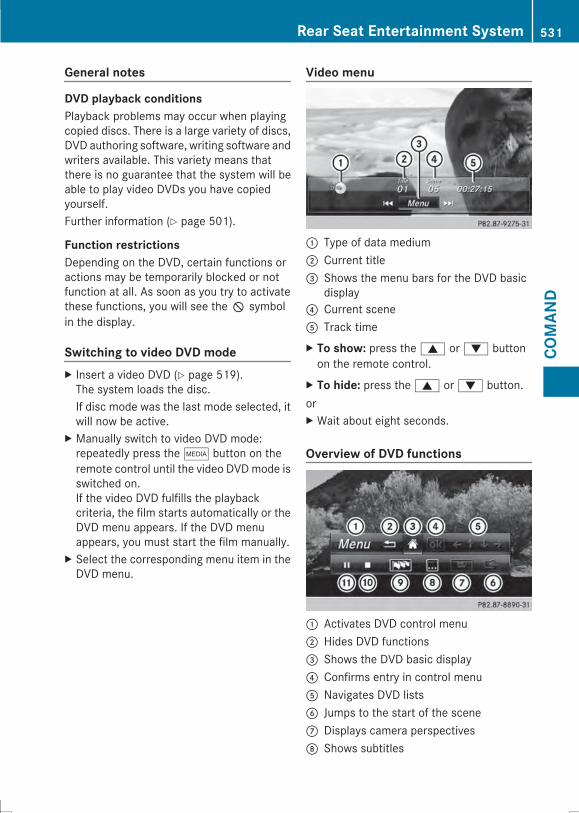
General notes
DVD playback conditionsPlayback problems may occur when playingcopied discs. There is a large variety of discs,DVD authoring software, writing software andwriters available. This variety means thatthere is no guarantee that the system will beable to play video DVDs you have copiedyourself.Further information (Y page 501).
Function restrictionsDepending on the DVD, certain functions oractions may be temporarily blocked or notfunction at all. As soon as you try to activatethese functions, you will see theK symbolin the display.
Switching to video DVD modeX Insert a video DVD (Y page 519).The system loads the disc.If disc mode was the last mode selected, itwill now be active.
X Manually switch to video DVD mode:repeatedly press the Õ button on theremote control until the video DVDmode isswitched on.If the video DVD fulfills the playbackcriteria, the film starts automatically or theDVD menu appears. If the DVD menuappears, you must start the film manually.
X Select the corresponding menu item in theDVD menu.
Video menu
: Type of data medium; Current title= Shows the menu bars for the DVD basic
display? Current sceneA Track timeX To show: press the9 or: buttonon the remote control.
X To hide: press the9 or: button.orX Wait about eight seconds.
Overview of DVD functions
: Activates DVD control menu; Hides DVD functions= Shows the DVD basic display? Confirms entry in control menuA Navigates DVD listsB Jumps to the start of the sceneC Displays camera perspectivesD Shows subtitles
Rear Seat Entertainment System 531
COMAN
D
Z
E Selects languageF Stop functionG Pause functionX To show: press the 9 button on theremote control.
X To hide: press the% button on theremote control.
Fast forwarding/rewindingX Press and hold theE orF button onthe remote control until the desiredposition has been reached.You see the control menu.
Pause functionX To show the menu: press the 9 buttonon the remote control.
X To pause playback: selectË and pressthe 9 button to confirm.TheË display changes toÌ.
X To continue playback: selectÌ andpress the 9 button to confirm.The menu is hidden.
Stop functionX To show the menu: press the 9 buttonon the remote control.
X To interrupt playback: selectÉ andpress the 9 button to confirm.TheË display changes toÌ. Thevideo image is hidden.
X To continue playback: selectÌ andpress the 9 button to confirm.Playback continues from the point where itwas interrupted. The menu is hidden.
X To stop playback: while playback isinterrupted, selectÉ again and press9 to confirm.Playback stops and returns to thebeginning of the DVD.Ì is highlighted.
X To restart playback: selectÌ andpress the 9 button to confirm.Playback starts from the beginning of theDVD.
Selecting a scene/chapter
General notesObserve the information on DVD video mode(Y page 505).
Skipping forwards/backwardsX Press= or; on the remote control.The control menu appears forapproximately eight seconds.
Selecting a scene/chapter directlyThese examples illustrate how to selectscene/chapter 5.X Option 1: while the film is playing, presstheh button on the remote control.
X Press the corresponding number key, suchas 5.
X Option 2: while the film is playing, pressthe 9 button on the remote control andshow the menu.
X Select MenuMenu and press the 9 button toconfirm.The DVD menu appears.
X Select Scene SelectionScene Selection and press the9 button to confirm.
X Using button9 or:, select 55 andpress the 9 button to confirm.In both cases, playback will begin from thefifth scene/chapter after a brief pause.
Selecting a film/titleOption 1:X Press the 9 button on the remote controland show the menu.
X Select MenuMenu using the9:=; buttons on the
532 Rear Seat Entertainment SystemCO
MAN
D
remote control and press the 9 button toconfirm.The DVD menu appears.
X Select Track SelectionTrack Selection using the9:=; buttons on theremote control and press the 9 button toconfirm.
X To call up the selection list: press the9 button.
X Select a film/title.Option 2:Example: selecting film 2X Press button 2.After a brief pause, the second film isplayed.
DVD menu
Calling up the DVD menuTheDVDmenu is themenu stored on theDVDitself. It is structured in various waysaccording to the individual DVD and permitscertain actions and settings.In the case of multi-language DVDs, forexample, you can change the DVD languagein the DVD menu.X Press the 9 button on the remote controland show the menu.
X Select MenuMenu using the9:=; buttons on theremote control and press the 9 button toconfirm.The DVD menu appears.
Selecting menu items in the DVD menuX Select a menu item using the9:=; buttons on theremote control and press the 9 button toconfirm.
X Select SelectSelect using the9:=; buttons on the
remote control and press the 9 button toconfirm.The system executes the function or showsa submenu.
X If available, additional options can now beselected.The system then switches back to the DVDmenu.
i Menu items which cannot be selected areshown in gray.
i Depending on the DVD, certain menuitems may not function. For example, themenu items:RBack (to movie)Back (to movie)RPlayPlayRStopStopRE
RF
RGo UpGo Up.To indicate this, theK symbol thenappears in the display.
Stopping a film or skipping to thebeginning or end of a sceneX Select any menu item from the DVD menu.The menu appears.
X Stopping the film: select the StopStop menuitem and press the9 button on the remotecontrol to confirm.
X To skip to the end of a scene: select theF menu item and press 9 to confirm.
X To skip to the start of a scene: select theE menu item and press 9 to confirm.
Moving up one level in the DVD menuX Show the DVD menu.X Press the% back button on the remotecontrol or select the corresponding menuitem in the DVD menu.
Back to the movieX Press the% button repeatedly until yousee the movie.
Rear Seat Entertainment System 533
COMAN
D
Z
Setting the audio formatThis function is not available on all DVDs. If itis available, you can set the audio languageor the audio format. The number of settingsis determined by the DVD content. It may alsobe possible to access the settings from theDVD menu.X Press the 9 button on the remote controland show the menu.
X Select DVD-VideoDVD-Video using the9:=; buttons on theremote control and press the 9 button toconfirm.
X Select DVD FunctionsDVD Functions and press the 9button to confirm.
X Select Audio LanguageAudio Language and press the 9button to confirm.A menu appears after a short while.The# dot in front of an entry indicates thecurrently selected language.
X Select the language using the9:buttons and press the9button to confirm.
X To exit the menu: press the=or; button.
Subtitles and camera angleThese functions are not available on all DVDs.The number of subtitle languages and cameraangles available depends on the content ofthe DVD. It may also be possible to accessthe settings from the DVD menu.X Press the 9 button on the remote controland show the menu.
X Select DVD-VideoDVD-Video and press the 9 buttonon the remote control to confirm.
X Select DVD FunctionsDVD Functions and press the 9button to confirm.
X Select SubtitlesSubtitles or Camera AngleCamera Angle andpress the 9 button to confirm.In both cases, a menu appears after a fewseconds. The# dot in front of an entryindicates the current setting.
X Select the setting using the9:buttons and press the9button to confirm.
X To exit the menu: press the=or; button.
Interactive contentDVDs can also contain interactive content(e.g. a video game). In a video game, you maybe able to influence events by selecting andtriggering actions. The type and number ofactions depend on the DVD.X Select an action using the9;:= buttons on theremote control and press the 9 button toexecute it.A menu appears and the first entry,SelectSelect, is highlighted.
X Press the 9 button.
AUX mode
General informationYou can connect an external video source inthe rear compartment.Depending on the vehicle model andequipment level, the AUX jacks are found:Rin the stowage box between the rear seatsorRin the rear-compartment armrest(Y page 519).
Please see the corresponding operatinginstructions for information on how tooperate the external video source.For further details about external videosources, please consult an authorizedMercedes-Benz Center.
534 Rear Seat Entertainment SystemCO
MAN
D
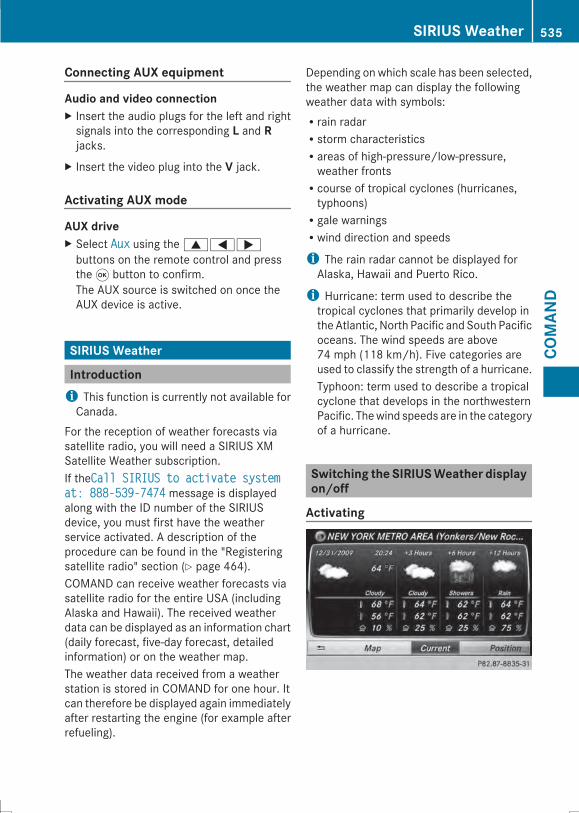
Connecting AUX equipment
Audio and video connectionX Insert the audio plugs for the left and rightsignals into the corresponding L and Rjacks.
X Insert the video plug into the V jack.
Activating AUX mode
AUX driveX Select AuxAux using the9=;buttons on the remote control and pressthe 9 button to confirm.The AUX source is switched on once theAUX device is active.
SIRIUS Weather
Introductioni This function is currently not available forCanada.
For the reception of weather forecasts viasatellite radio, you will need a SIRIUS XMSatellite Weather subscription.If theCall SIRIUS to activate systemCall SIRIUS to activate systemat: 888-539-7474at: 888-539-7474 message is displayedalong with the ID number of the SIRIUSdevice, you must first have the weatherservice activated. A description of theprocedure can be found in the "Registeringsatellite radio" section (Y page 464).COMAND can receive weather forecasts viasatellite radio for the entire USA (includingAlaska and Hawaii). The received weatherdata can be displayed as an information chart(daily forecast, five-day forecast, detailedinformation) or on the weather map.The weather data received from a weatherstation is stored in COMAND for one hour. Itcan therefore be displayed again immediatelyafter restarting the engine (for example afterrefueling).
Depending on which scale has been selected,the weather map can display the followingweather data with symbols:Rrain radarRstorm characteristicsRareas of high-pressure/low-pressure,weather frontsRcourse of tropical cyclones (hurricanes,typhoons)Rgale warningsRwind direction and speeds
i The rain radar cannot be displayed forAlaska, Hawaii and Puerto Rico.
i Hurricane: term used to describe thetropical cyclones that primarily develop inthe Atlantic, North Pacific and South Pacificoceans. The wind speeds are above74 mph (118 km/h). Five categories areused to classify the strength of a hurricane.Typhoon: term used to describe a tropicalcyclone that develops in the northwesternPacific. Thewind speeds are in the categoryof a hurricane.
Switching the SIRIUSWeather displayon/off
Activating
SIRIUS Weather 535
COMAN
D
Z
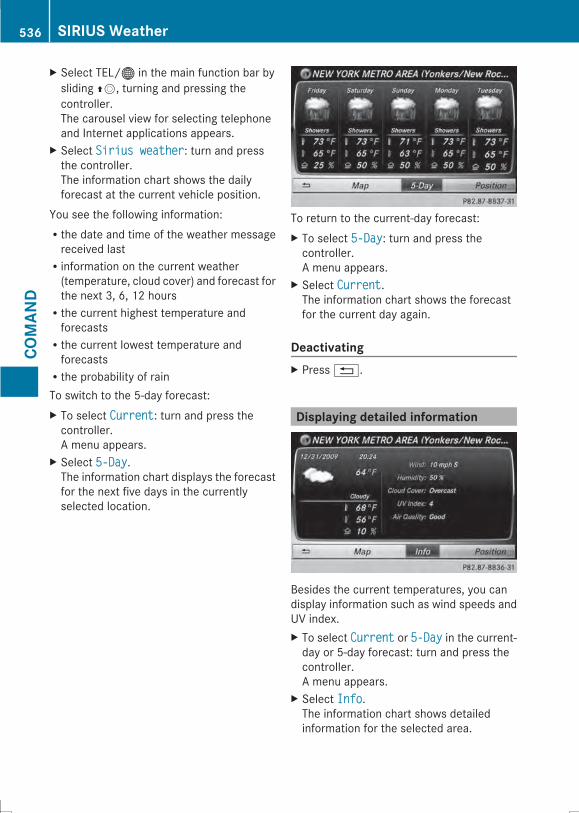
X Select TEL/® in the main function bar bysliding ZV, turning and pressing thecontroller.The carousel view for selecting telephoneand Internet applications appears.
X Select Sirius weatherSirius weather: turn and pressthe controller.The information chart shows the dailyforecast at the current vehicle position.
You see the following information:Rthe date and time of the weather messagereceived lastRinformation on the current weather(temperature, cloud cover) and forecast forthe next 3, 6, 12 hoursRthe current highest temperature andforecastsRthe current lowest temperature andforecastsRthe probability of rainTo switch to the 5-day forecast:X To select CurrentCurrent: turn and press thecontroller.A menu appears.
X Select 5-Day5-Day.The information chart displays the forecastfor the next five days in the currentlyselected location.
To return to the current-day forecast:X To select 5-Day5-Day: turn and press thecontroller.A menu appears.
X Select CurrentCurrent.The information chart shows the forecastfor the current day again.
DeactivatingX Press%.
Displaying detailed information
Besides the current temperatures, you candisplay information such as wind speeds andUV index.X To select CurrentCurrent or 5-Day5-Day in the current-day or 5-day forecast: turn and press thecontroller.A menu appears.
X Select InfoInfo.The information chart shows detailedinformation for the selected area.
536 SIRIUS WeatherCO
MAN
D
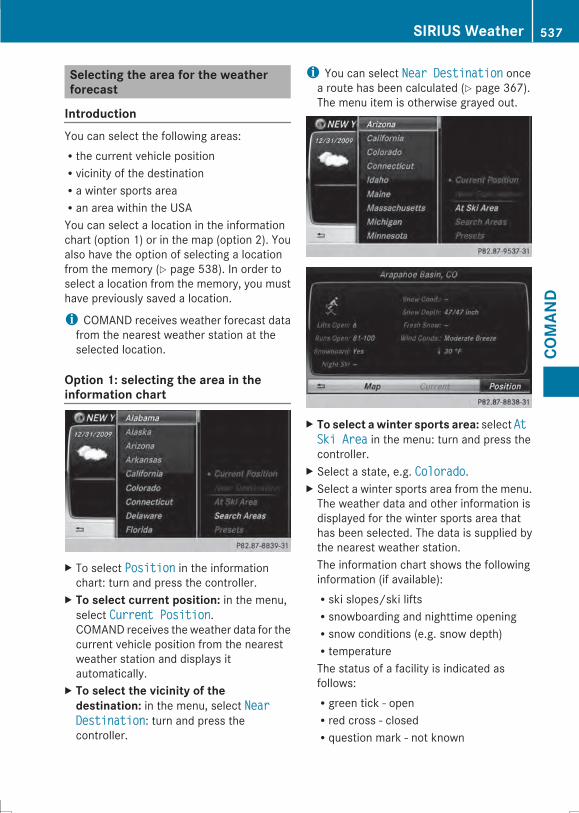
Selecting the area for the weatherforecast
IntroductionYou can select the following areas:Rthe current vehicle positionRvicinity of the destinationRa winter sports areaRan area within the USAYou can select a location in the informationchart (option 1) or in the map (option 2). Youalso have the option of selecting a locationfrom the memory (Y page 538). In order toselect a location from the memory, you musthave previously saved a location.
i COMAND receives weather forecast datafrom the nearest weather station at theselected location.
Option 1: selecting the area in theinformation chart
X To select PositionPosition in the informationchart: turn and press the controller.
X To select current position: in the menu,select Current PositionCurrent Position.COMAND receives the weather data for thecurrent vehicle position from the nearestweather station and displays itautomatically.
X To select the vicinity of thedestination: in the menu, select NearNearDestinationDestination: turn and press thecontroller.
i You can select Near DestinationNear Destination oncea route has been calculated (Y page 367).The menu item is otherwise grayed out.
X To select awinter sports area: select AtAtSki AreaSki Area in the menu: turn and press thecontroller.
X Select a state, e.g. ColoradoColorado.X Select a winter sports area from the menu.The weather data and other information isdisplayed for the winter sports area thathas been selected. The data is supplied bythe nearest weather station.The information chart shows the followinginformation (if available):Rski slopes/ski liftsRsnowboarding and nighttime openingRsnow conditions (e.g. snow depth)RtemperatureThe status of a facility is indicated asfollows:Rgreen tick - openRred cross - closedRquestion mark - not known
SIRIUS Weather 537
COMAN
D
Z
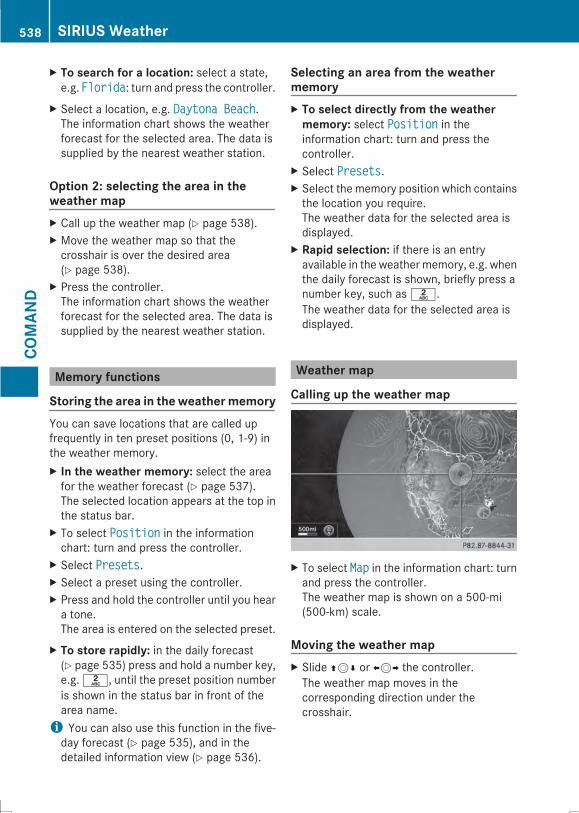
X To search for a location: select a state,e.g. FloridaFlorida: turn and press the controller.
X Select a location, e.g. Daytona BeachDaytona Beach.The information chart shows the weatherforecast for the selected area. The data issupplied by the nearest weather station.
Option 2: selecting the area in theweather mapX Call up the weather map (Y page 538).X Move the weather map so that thecrosshair is over the desired area(Y page 538).
X Press the controller.The information chart shows the weatherforecast for the selected area. The data issupplied by the nearest weather station.
Memory functions
Storing the area in theweathermemoryYou can save locations that are called upfrequently in ten preset positions (0, 1-9) inthe weather memory.X In the weather memory: select the areafor the weather forecast (Y page 537).The selected location appears at the top inthe status bar.
X To select PositionPosition in the informationchart: turn and press the controller.
X Select PresetsPresets.X Select a preset using the controller.X Press and hold the controller until you heara tone.The area is entered on the selected preset.
X To store rapidly: in the daily forecast(Y page 535) press and hold a number key,e.g.l, until the preset position numberis shown in the status bar in front of thearea name.i You can also use this function in the five-day forecast (Y page 535), and in thedetailed information view (Y page 536).
Selecting an area from the weathermemoryX To select directly from the weathermemory: select PositionPosition in theinformation chart: turn and press thecontroller.
X Select PresetsPresets.X Select the memory position which containsthe location you require.The weather data for the selected area isdisplayed.
X Rapid selection: if there is an entryavailable in the weather memory, e.g. whenthe daily forecast is shown, briefly press anumber key, such asl.The weather data for the selected area isdisplayed.
Weather map
Calling up the weather map
X To select MapMap in the information chart: turnand press the controller.The weather map is shown on a 500-mi(500-km) scale.
Moving the weather mapX Slide ZVÆ or XVY the controller.The weather map moves in thecorresponding direction under thecrosshair.
538 SIRIUS WeatherCO
MAN
D
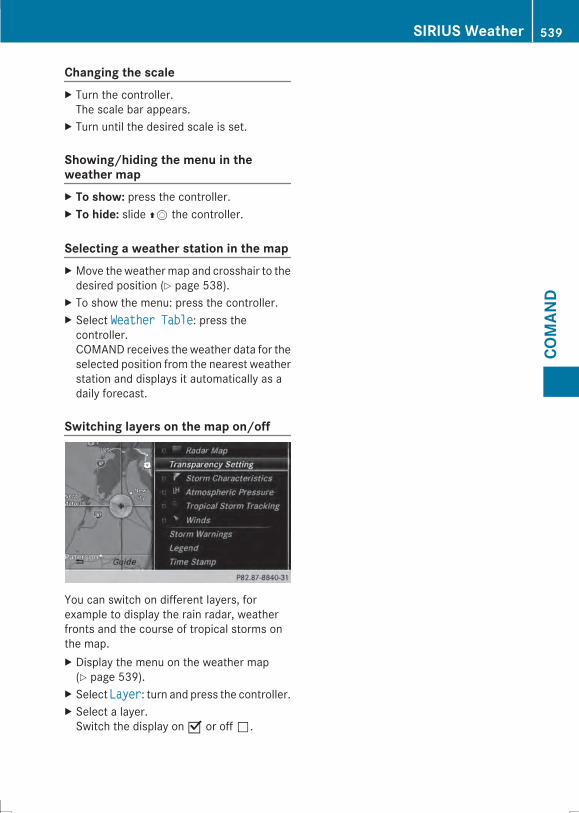
Changing the scaleX Turn the controller.The scale bar appears.
X Turn until the desired scale is set.
Showing/hiding the menu in theweather mapX To show: press the controller.X To hide: slide ZV the controller.
Selecting a weather station in the mapX Move the weathermap and crosshair to thedesired position (Y page 538).
X To show the menu: press the controller.X Select Weather TableWeather Table: press thecontroller.COMAND receives the weather data for theselected position from the nearest weatherstation and displays it automatically as adaily forecast.
Switching layers on the map on/off
You can switch on different layers, forexample to display the rain radar, weatherfronts and the course of tropical storms onthe map.X Display the menu on the weather map(Y page 539).
X Select LayerLayer: turn and press the controller.X Select a layer.Switch the display on O or off ª.
SIRIUS Weather 539
COMAN
D
Z
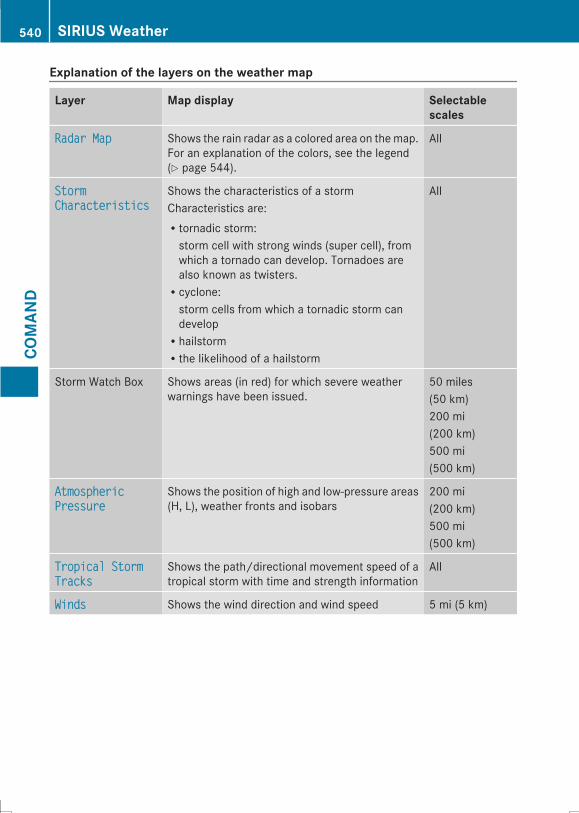
Explanation of the layers on the weather map
Layer Map display Selectablescales
Radar MapRadar Map Shows the rain radar as a colored area on themap.For an explanation of the colors, see the legend(Y page 544).
All
StormStormCharacteristicsCharacteristics
Shows the characteristics of a stormCharacteristics are:Rtornadic storm:storm cell with strong winds (super cell), fromwhich a tornado can develop. Tornadoes arealso known as twisters.Rcyclone:storm cells from which a tornadic storm candevelopRhailstormRthe likelihood of a hailstorm
All
Storm Watch Box Shows areas (in red) for which severe weatherwarnings have been issued.
50 miles(50 km)200 mi(200 km)500 mi(500 km)
AtmosphericAtmosphericPressurePressure
Shows the position of high and low-pressure areas(H, L), weather fronts and isobars
200 mi(200 km)500 mi(500 km)
Tropical StormTropical StormTracksTracks
Shows the path/directional movement speed of atropical storm with time and strength information
All
WindsWinds Shows the wind direction and wind speed 5 mi (5 km)
540 SIRIUS WeatherCO
MAN
D
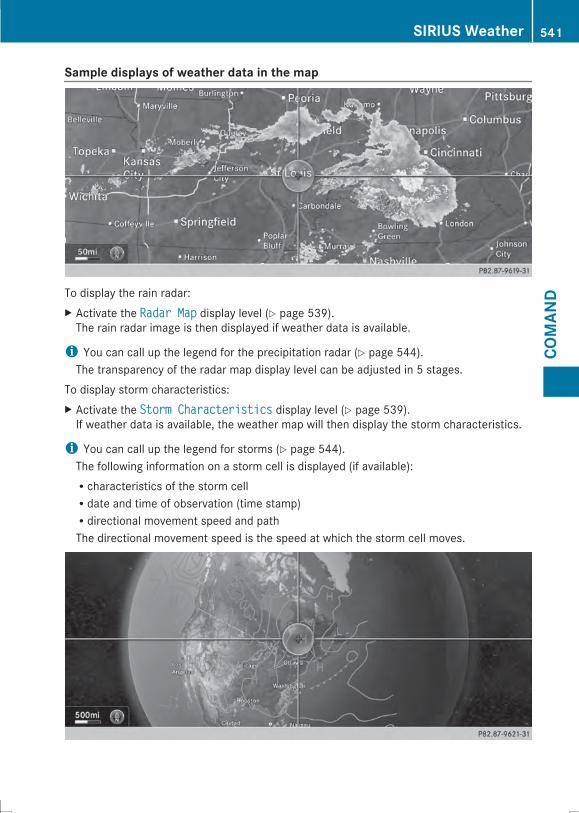
Sample displays of weather data in the map
To display the rain radar:X Activate the Radar MapRadar Map display level (Y page 539).The rain radar image is then displayed if weather data is available.
i You can call up the legend for the precipitation radar (Y page 544).The transparency of the radar map display level can be adjusted in 5 stages.
To display storm characteristics:X Activate the Storm CharacteristicsStorm Characteristics display level (Y page 539).If weather data is available, the weather map will then display the storm characteristics.
i You can call up the legend for storms (Y page 544).The following information on a storm cell is displayed (if available):Rcharacteristics of the storm cellRdate and time of observation (time stamp)Rdirectional movement speed and pathThe directional movement speed is the speed at which the storm cell moves.
SIRIUS Weather 541
COMAN
D
Z
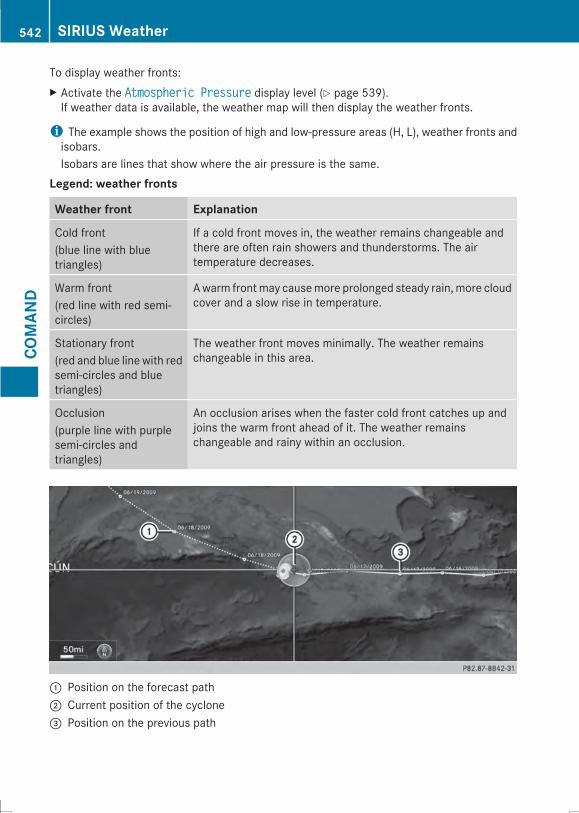
To display weather fronts:X Activate the Atmospheric PressureAtmospheric Pressure display level (Y page 539).If weather data is available, the weather map will then display the weather fronts.
i The example shows the position of high and low-pressure areas (H, L), weather fronts andisobars.Isobars are lines that show where the air pressure is the same.
Legend: weather fronts
Weather front Explanation
Cold front(blue line with bluetriangles)
If a cold front moves in, the weather remains changeable andthere are often rain showers and thunderstorms. The airtemperature decreases.
Warm front(red line with red semi-circles)
Awarm frontmay causemore prolonged steady rain,more cloudcover and a slow rise in temperature.
Stationary front(red and blue line with redsemi-circles and bluetriangles)
The weather front moves minimally. The weather remainschangeable in this area.
Occlusion(purple line with purplesemi-circles andtriangles)
An occlusion arises when the faster cold front catches up andjoins the warm front ahead of it. The weather remainschangeable and rainy within an occlusion.
: Position on the forecast path; Current position of the cyclone= Position on the previous path
542 SIRIUS WeatherCO
MAN
D
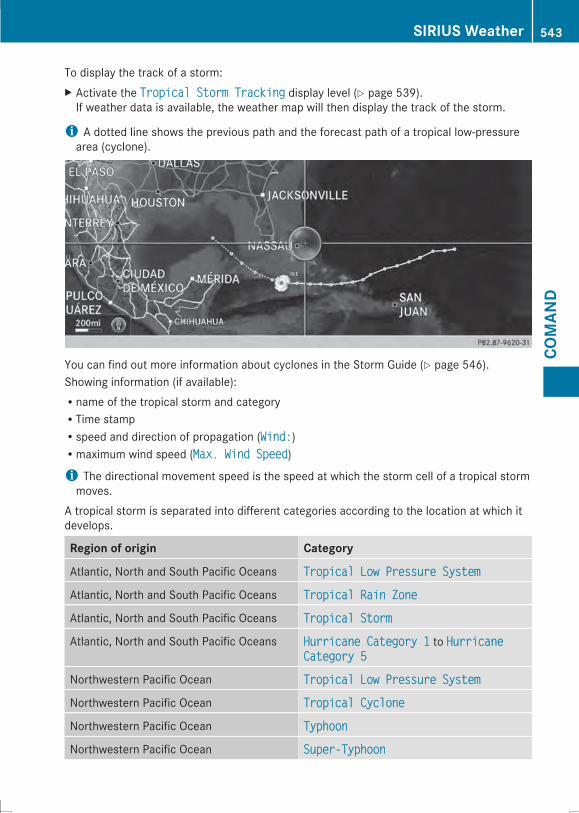
To display the track of a storm:X Activate the Tropical Storm TrackingTropical Storm Tracking display level (Y page 539).If weather data is available, the weather map will then display the track of the storm.
i A dotted line shows the previous path and the forecast path of a tropical low-pressurearea (cyclone).
You can find out more information about cyclones in the Storm Guide (Y page 546).Showing information (if available):Rname of the tropical storm and categoryRTime stampRspeed and direction of propagation (Wind:Wind:)Rmaximum wind speed (Max. Wind SpeedMax. Wind Speed)i The directional movement speed is the speed at which the storm cell of a tropical stormmoves.
A tropical storm is separated into different categories according to the location at which itdevelops.
Region of origin Category
Atlantic, North and South Pacific Oceans Tropical Low Pressure SystemTropical Low Pressure SystemAtlantic, North and South Pacific Oceans Tropical Rain ZoneTropical Rain ZoneAtlantic, North and South Pacific Oceans Tropical StormTropical StormAtlantic, North and South Pacific Oceans Hurricane Category 1Hurricane Category 1 to HurricaneHurricane
Category 5Category 5Northwestern Pacific Ocean Tropical Low Pressure SystemTropical Low Pressure SystemNorthwestern Pacific Ocean Tropical CycloneTropical CycloneNorthwestern Pacific Ocean TyphoonTyphoonNorthwestern Pacific Ocean Super-TyphoonSuper-Typhoon
SIRIUS Weather 543
COMAN
D
Z
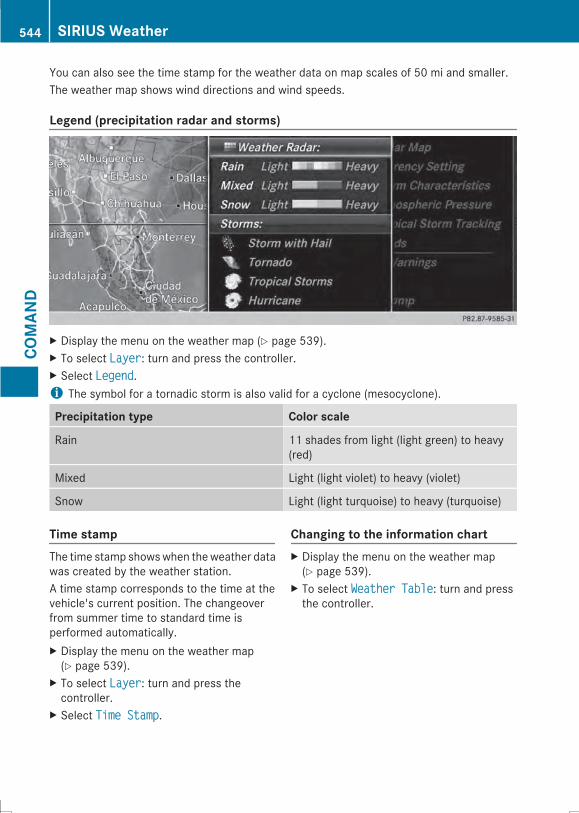
You can also see the time stamp for the weather data on map scales of 50 mi and smaller.The weather map shows wind directions and wind speeds.
Legend (precipitation radar and storms)
X Display the menu on the weather map (Y page 539).X To select LayerLayer: turn and press the controller.X Select LegendLegend.i The symbol for a tornadic storm is also valid for a cyclone (mesocyclone).
Precipitation type Color scale
Rain 11 shades from light (light green) to heavy(red)
Mixed Light (light violet) to heavy (violet)
Snow Light (light turquoise) to heavy (turquoise)
Time stampThe time stamp showswhen theweather datawas created by the weather station.A time stamp corresponds to the time at thevehicle's current position. The changeoverfrom summer time to standard time isperformed automatically.X Display the menu on the weather map(Y page 539).
X To select LayerLayer: turn and press thecontroller.
X Select Time StampTime Stamp.
Changing to the information chartX Display the menu on the weather map(Y page 539).
X To select Weather TableWeather Table: turn and pressthe controller.
544 SIRIUS WeatherCO
MAN
D
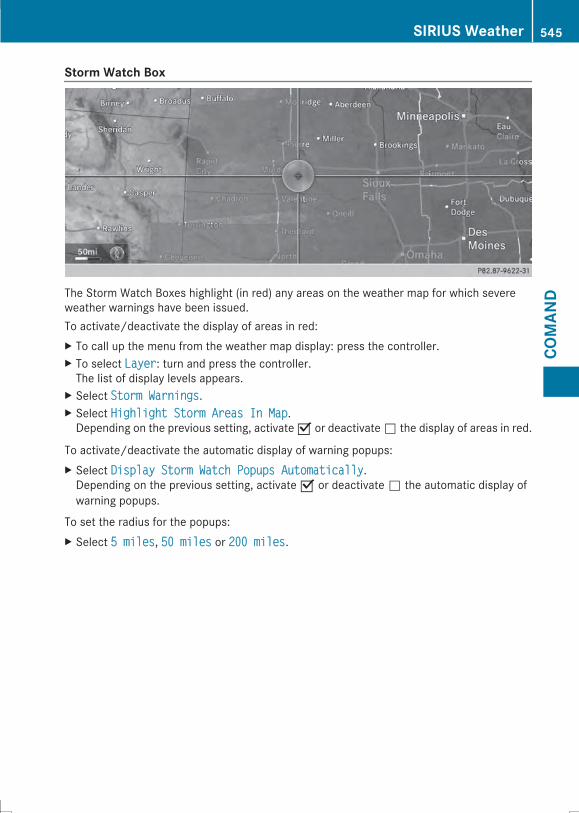
Storm Watch Box
The Storm Watch Boxes highlight (in red) any areas on the weather map for which severeweather warnings have been issued.To activate/deactivate the display of areas in red:X To call up the menu from the weather map display: press the controller.X To select LayerLayer: turn and press the controller.The list of display levels appears.
X Select Storm WarningsStorm Warnings.X Select Highlight Storm Areas In MapHighlight Storm Areas In Map.Depending on the previous setting, activate O or deactivate ª the display of areas in red.
To activate/deactivate the automatic display of warning popups:X Select Display Storm Watch Popups AutomaticallyDisplay Storm Watch Popups Automatically.Depending on the previous setting, activate O or deactivate ª the automatic display ofwarning popups.
To set the radius for the popups:X Select 5 miles5 miles, 50 miles50 miles or 200 miles200 miles.
SIRIUS Weather 545
COMAN
D
Z
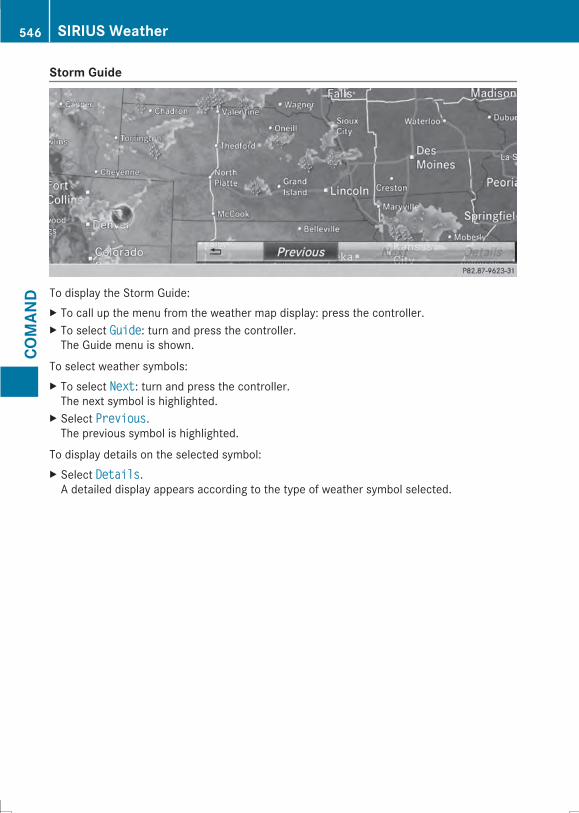
Storm Guide
To display the Storm Guide:X To call up the menu from the weather map display: press the controller.X To select GuideGuide: turn and press the controller.The Guide menu is shown.
To select weather symbols:X To select NextNext: turn and press the controller.The next symbol is highlighted.
X Select PreviousPrevious.The previous symbol is highlighted.
To display details on the selected symbol:X Select DetailsDetails.A detailed display appears according to the type of weather symbol selected.
546 SIRIUS WeatherCO
MAN
D
Useful information ............................ 548Stowage areas .................................. 548Features ............................................. 554
547
Stow
ageandfeatures
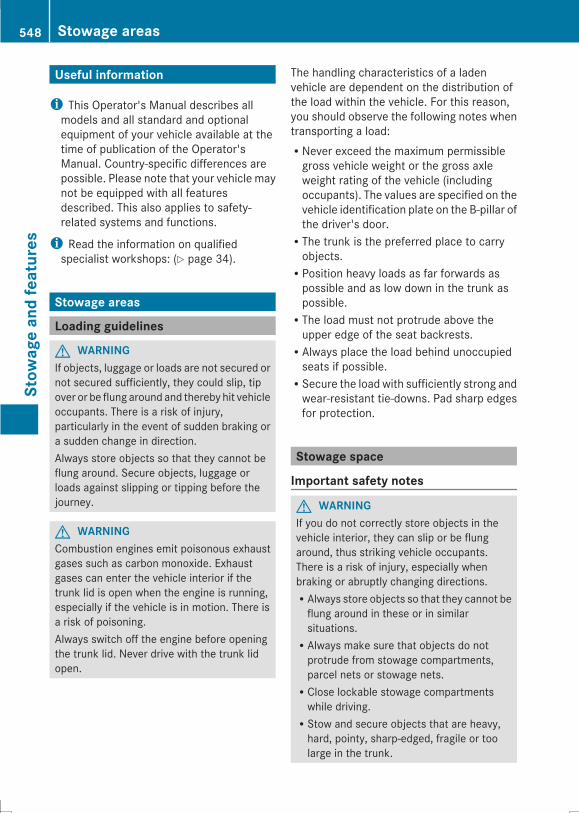
Useful information
i This Operator's Manual describes allmodels and all standard and optionalequipment of your vehicle available at thetime of publication of the Operator'sManual. Country-specific differences arepossible. Please note that your vehicle maynot be equipped with all featuresdescribed. This also applies to safety-related systems and functions.
i Read the information on qualifiedspecialist workshops: (Y page 34).
Stowage areas
Loading guidelines
G WARNINGIf objects, luggage or loads are not secured ornot secured sufficiently, they could slip, tipover or be flung around and thereby hit vehicleoccupants. There is a risk of injury,particularly in the event of sudden braking ora sudden change in direction.Always store objects so that they cannot beflung around. Secure objects, luggage orloads against slipping or tipping before thejourney.
G WARNINGCombustion engines emit poisonous exhaustgases such as carbon monoxide. Exhaustgases can enter the vehicle interior if thetrunk lid is open when the engine is running,especially if the vehicle is in motion. There isa risk of poisoning.Always switch off the engine before openingthe trunk lid. Never drive with the trunk lidopen.
The handling characteristics of a ladenvehicle are dependent on the distribution ofthe load within the vehicle. For this reason,you should observe the following notes whentransporting a load:RNever exceed the maximum permissiblegross vehicle weight or the gross axleweight rating of the vehicle (includingoccupants). The values are specified on thevehicle identification plate on the B-pillar ofthe driver's door.RThe trunk is the preferred place to carryobjects.RPosition heavy loads as far forwards aspossible and as low down in the trunk aspossible.RThe load must not protrude above theupper edge of the seat backrests.RAlways place the load behind unoccupiedseats if possible.RSecure the load with sufficiently strong andwear-resistant tie-downs. Pad sharp edgesfor protection.
Stowage space
Important safety notes
G WARNINGIf you do not correctly store objects in thevehicle interior, they can slip or be flungaround, thus striking vehicle occupants.There is a risk of injury, especially whenbraking or abruptly changing directions.RAlways store objects so that they cannot beflung around in these or in similarsituations.RAlways make sure that objects do notprotrude from stowage compartments,parcel nets or stowage nets.RClose lockable stowage compartmentswhile driving.RStow and secure objects that are heavy,hard, pointy, sharp-edged, fragile or toolarge in the trunk.
548 Stowage areasStow
ageandfeatures

Observe the loading guidelines (Y page 548).
Stowage compartments in the front
Glove box
X Toopen: pull handle: and open glove boxflap;.
X To close: fold glove box flap; upwardsuntil it engages.
i The glove box can be cooled(Y page 171).The glove box contains a coin holder, a penholder, three credit card holders and aholder for the COMAND remote control.
The glove box can only be locked andunlocked using the mechanical key.X To lock: insert the mechanical key into thelock and turn it 90° clockwise to position2.
X To unlock: insert the mechanical key intothe lock and turn it 90° counter-clockwiseto position1.
Eyeglasses compartment
X To open: press marking:.The eyeglasses compartment opensdownwards.
X To close: press marking: again and theeyeglasses compartment returns upwardsand engages.
Make sure that the eyeglasses compartmentis always closedwhile the vehicle is inmotion.
Stowage compartments in the centerconsole
X To open: briefly press marking;.X To close: push stowage compartment:in the direction of the arrow until itengages.
Stowage areas 549
Stow
ageandfeatures
Z

Stowage compartment under the armrest
X To open: press button: or; and foldthe armrest to the left or right.
i Depending on the vehicle's equipment, aUSB port, an AUX-IN jack or a MediaInterface are installed in the stowagecompartment. The Media Interface is auniversal interface for mobile audio orvideo equipment, e.g. for an iPod®,iPhone® or MP3 Player (Y page 495).
Stowage compartment under the driver'sseat and front-passenger seatG WARNINGIf you exceed the maximum load for thestowage compartment, the cover may not beable to restrain the items. Items may bethrown out of the stowage compartment andhit vehicle occupants. There is a risk of injury,particularly in the event of sudden braking ora sudden change in direction.Never exceed the maximum permissible loadfor the stowage compartment. Stow andsecure heavy objects in the trunk.
The maximum permissible load of thestowage compartment is 3.3 lbs (1.5 kg).
X To open: pull handle: up and foldcover; forwards.
Stowage compartments in the doors
You can store items such as a rolled upfluorescent jacket and a small umbrella instowage compartment; in the doors.In doors: you can store bottles with acapacity of up to 34 fl. oz. (1.0 liter).
Stowage space in the rear
Stowage compartment in the rear seatarmrest
550 Stowage areasStow
ageandfeatures
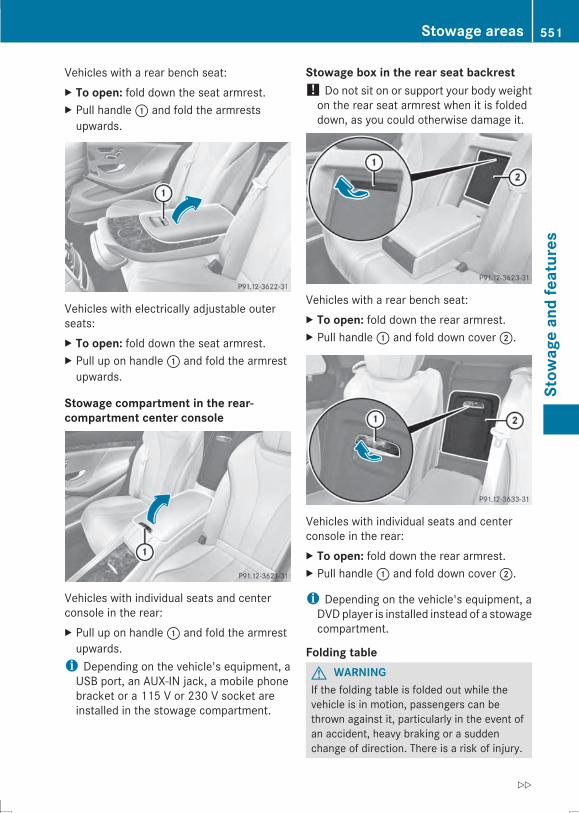
Vehicles with a rear bench seat:X To open: fold down the seat armrest.X Pull handle: and fold the armrestsupwards.
Vehicles with electrically adjustable outerseats:X To open: fold down the seat armrest.X Pull up on handle: and fold the armrestupwards.
Stowage compartment in the rear-compartment center console
Vehicles with individual seats and centerconsole in the rear:X Pull up on handle: and fold the armrestupwards.i Depending on the vehicle's equipment, aUSB port, an AUX-IN jack, a mobile phonebracket or a 115 V or 230 V socket areinstalled in the stowage compartment.
Stowage box in the rear seat backrest! Do not sit on or support your body weighton the rear seat armrest when it is foldeddown, as you could otherwise damage it.
Vehicles with a rear bench seat:X To open: fold down the rear armrest.X Pull handle: and fold down cover;.
Vehicles with individual seats and centerconsole in the rear:X To open: fold down the rear armrest.X Pull handle: and fold down cover;.
i Depending on the vehicle's equipment, aDVDplayer is installed instead of a stowagecompartment.
Folding tableG WARNINGIf the folding table is folded out while thevehicle is in motion, passengers can bethrown against it, particularly in the event ofan accident, heavy braking or a suddenchange of direction. There is a risk of injury.
Stowage areas 551
Stow
ageandfeatures
Z
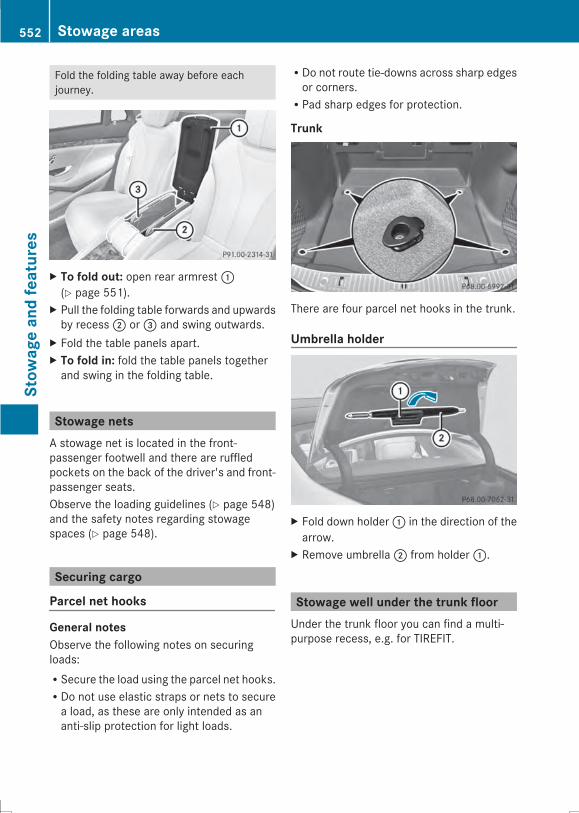
Fold the folding table away before eachjourney.
X To fold out: open rear armrest:(Y page 551).
X Pull the folding table forwards and upwardsby recess; or= and swing outwards.
X Fold the table panels apart.X To fold in: fold the table panels togetherand swing in the folding table.
Stowage netsA stowage net is located in the front-passenger footwell and there are ruffledpockets on the back of the driver's and front-passenger seats.Observe the loading guidelines (Y page 548)and the safety notes regarding stowagespaces (Y page 548).
Securing cargo
Parcel net hooks
General notesObserve the following notes on securingloads:RSecure the load using the parcel net hooks.RDo not use elastic straps or nets to securea load, as these are only intended as ananti-slip protection for light loads.
RDo not route tie-downs across sharp edgesor corners.RPad sharp edges for protection.
Trunk
There are four parcel net hooks in the trunk.
Umbrella holder
X Fold down holder: in the direction of thearrow.
X Remove umbrella; from holder:.
Stowage well under the trunk floorUnder the trunk floor you can find a multi-purpose recess, e.g. for TIREFIT.
552 Stowage areasStow
ageandfeatures
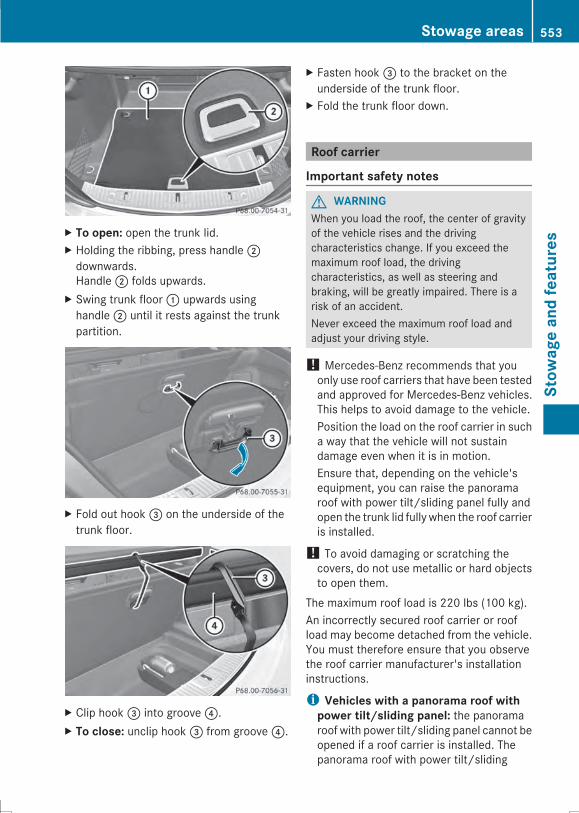
X To open: open the trunk lid.X Holding the ribbing, press handle;downwards.Handle; folds upwards.
X Swing trunk floor: upwards usinghandle; until it rests against the trunkpartition.
X Fold out hook= on the underside of thetrunk floor.
X Clip hook= into groove?.X To close: unclip hook= from groove?.
X Fasten hook= to the bracket on theunderside of the trunk floor.
X Fold the trunk floor down.
Roof carrier
Important safety notes
G WARNINGWhen you load the roof, the center of gravityof the vehicle rises and the drivingcharacteristics change. If you exceed themaximum roof load, the drivingcharacteristics, as well as steering andbraking, will be greatly impaired. There is arisk of an accident.Never exceed the maximum roof load andadjust your driving style.
! Mercedes-Benz recommends that youonly use roof carriers that have been testedand approved for Mercedes-Benz vehicles.This helps to avoid damage to the vehicle.Position the load on the roof carrier in sucha way that the vehicle will not sustaindamage even when it is in motion.Ensure that, depending on the vehicle'sequipment, you can raise the panoramaroof with power tilt/sliding panel fully andopen the trunk lid fully when the roof carrieris installed.
! To avoid damaging or scratching thecovers, do not use metallic or hard objectsto open them.
The maximum roof load is 220 lbs (100 kg).An incorrectly secured roof carrier or roofload may become detached from the vehicle.You must therefore ensure that you observethe roof carrier manufacturer's installationinstructions.
i Vehicles with a panorama roof withpower tilt/sliding panel: the panoramaroof with power tilt/sliding panel cannot beopened if a roof carrier is installed. Thepanorama roof with power tilt/sliding
Stowage areas 553
Stow
ageandfeatures
Z
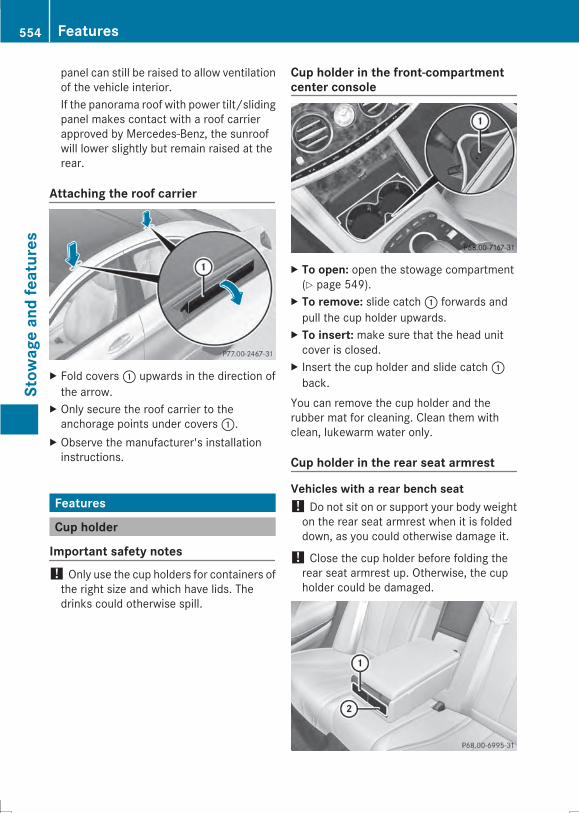
panel can still be raised to allow ventilationof the vehicle interior.If the panorama roof with power tilt/slidingpanel makes contact with a roof carrierapproved by Mercedes-Benz, the sunroofwill lower slightly but remain raised at therear.
Attaching the roof carrier
X Fold covers: upwards in the direction ofthe arrow.
X Only secure the roof carrier to theanchorage points under covers:.
X Observe the manufacturer's installationinstructions.
Features
Cup holder
Important safety notes! Only use the cup holders for containers ofthe right size and which have lids. Thedrinks could otherwise spill.
Cup holder in the front-compartmentcenter console
X To open: open the stowage compartment(Y page 549).
X To remove: slide catch: forwards andpull the cup holder upwards.
X To insert: make sure that the head unitcover is closed.
X Insert the cup holder and slide catch:back.
You can remove the cup holder and therubber mat for cleaning. Clean them withclean, lukewarm water only.
Cup holder in the rear seat armrest
Vehicles with a rear bench seat! Do not sit on or support your body weighton the rear seat armrest when it is foldeddown, as you could otherwise damage it.
! Close the cup holder before folding therear seat armrest up. Otherwise, the cupholder could be damaged.
554 FeaturesStow
ageandfeatures
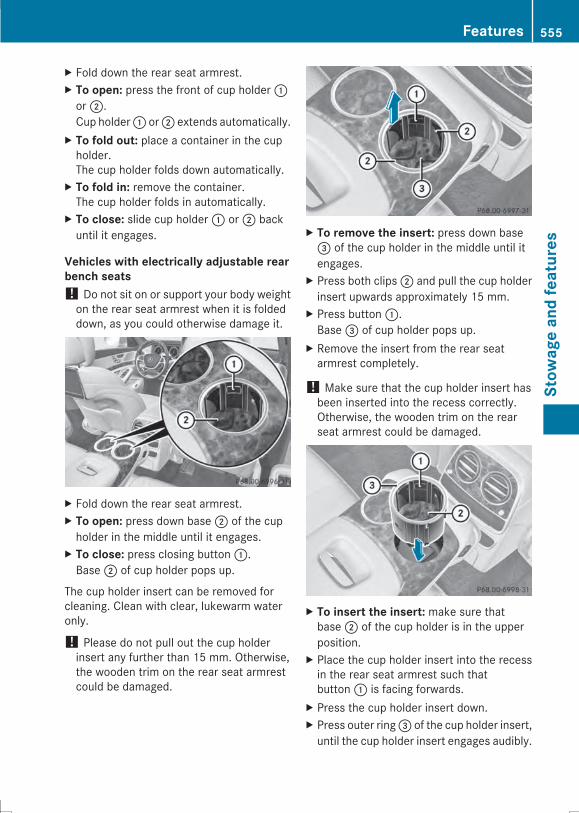
X Fold down the rear seat armrest.X To open: press the front of cup holder:or;.Cup holder: or; extends automatically.
X To fold out: place a container in the cupholder.The cup holder folds down automatically.
X To fold in: remove the container.The cup holder folds in automatically.
X To close: slide cup holder: or; backuntil it engages.
Vehicles with electrically adjustable rearbench seats! Do not sit on or support your body weighton the rear seat armrest when it is foldeddown, as you could otherwise damage it.
X Fold down the rear seat armrest.X To open: press down base; of the cupholder in the middle until it engages.
X To close: press closing button:.Base; of cup holder pops up.
The cup holder insert can be removed forcleaning. Clean with clear, lukewarm wateronly.
! Please do not pull out the cup holderinsert any further than 15 mm. Otherwise,the wooden trim on the rear seat armrestcould be damaged.
X To remove the insert: press down base= of the cup holder in the middle until itengages.
X Press both clips; and pull the cup holderinsert upwards approximately 15 mm.
X Press button:.Base= of cup holder pops up.
X Remove the insert from the rear seatarmrest completely.
! Make sure that the cup holder insert hasbeen inserted into the recess correctly.Otherwise, the wooden trim on the rearseat armrest could be damaged.
X To insert the insert: make sure thatbase; of the cup holder is in the upperposition.
X Place the cup holder insert into the recessin the rear seat armrest such thatbutton: is facing forwards.
X Press the cup holder insert down.X Press outer ring= of the cup holder insert,until the cup holder insert engages audibly.
Features 555
Stow
ageandfeatures
Z
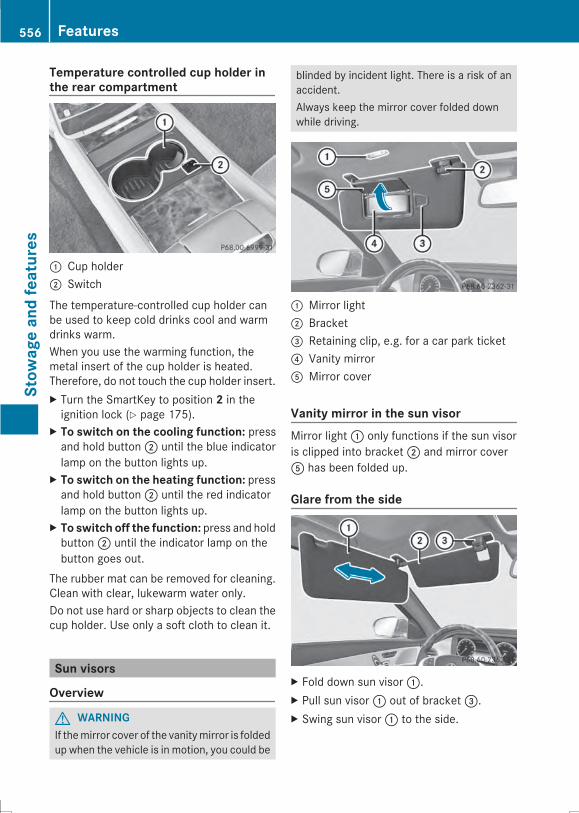
Temperature controlled cup holder inthe rear compartment
: Cup holder; Switch
The temperature-controlled cup holder canbe used to keep cold drinks cool and warmdrinks warm.When you use the warming function, themetal insert of the cup holder is heated.Therefore, do not touch the cup holder insert.X Turn the SmartKey to position 2 in theignition lock (Y page 175).
X To switch on the cooling function: pressand hold button; until the blue indicatorlamp on the button lights up.
X To switch on the heating function: pressand hold button; until the red indicatorlamp on the button lights up.
X To switch off the function: press and holdbutton; until the indicator lamp on thebutton goes out.
The rubber mat can be removed for cleaning.Clean with clear, lukewarm water only.Do not use hard or sharp objects to clean thecup holder. Use only a soft cloth to clean it.
Sun visors
Overview
G WARNINGIf themirror cover of the vanitymirror is foldedup when the vehicle is in motion, you could be
blinded by incident light. There is a risk of anaccident.Always keep the mirror cover folded downwhile driving.
: Mirror light; Bracket= Retaining clip, e.g. for a car park ticket? Vanity mirrorA Mirror cover
Vanity mirror in the sun visorMirror light: only functions if the sun visoris clipped into bracket; and mirror coverA has been folded up.
Glare from the side
X Fold down sun visor:.X Pull sun visor: out of bracket=.X Swing sun visor: to the side.
556 FeaturesStow
ageandfeatures
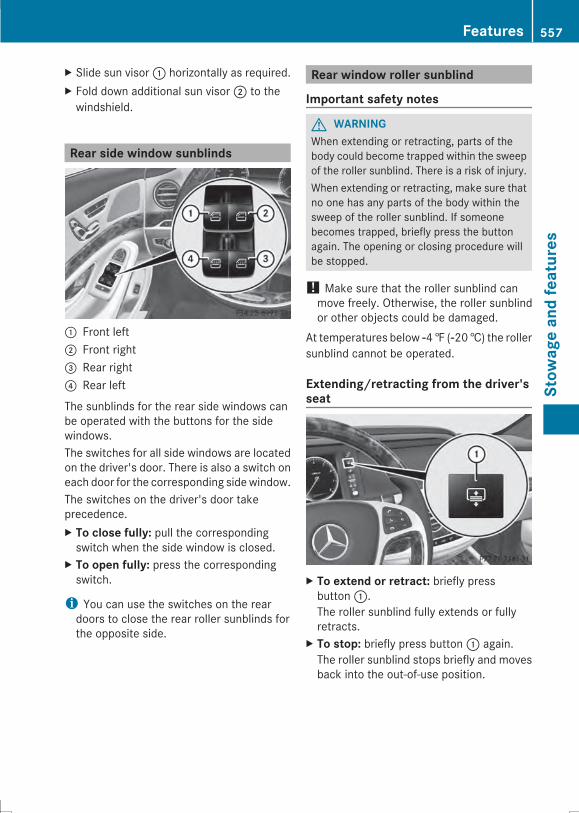
X Slide sun visor: horizontally as required.X Fold down additional sun visor; to thewindshield.
Rear side window sunblinds
: Front left; Front right= Rear right? Rear left
The sunblinds for the rear side windows canbe operated with the buttons for the sidewindows.The switches for all side windows are locatedon the driver's door. There is also a switch oneach door for the corresponding sidewindow.The switches on the driver's door takeprecedence.X To close fully: pull the correspondingswitch when the side window is closed.
X To open fully: press the correspondingswitch.
i You can use the switches on the reardoors to close the rear roller sunblinds forthe opposite side.
Rear window roller sunblind
Important safety notes
G WARNINGWhen extending or retracting, parts of thebody could become trapped within the sweepof the roller sunblind. There is a risk of injury.When extending or retracting, make sure thatno one has any parts of the body within thesweep of the roller sunblind. If someonebecomes trapped, briefly press the buttonagain. The opening or closing procedure willbe stopped.
! Make sure that the roller sunblind canmove freely. Otherwise, the roller sunblindor other objects could be damaged.
At temperatures below Ò4‡ (Ò20†) the rollersunblind cannot be operated.
Extending/retracting from the driver'sseat
X To extend or retract: briefly pressbutton:.The roller sunblind fully extends or fullyretracts.
X To stop: briefly press button: again.The roller sunblind stops briefly and movesback into the out-of-use position.
Features 557
Stow
ageandfeatures
Z
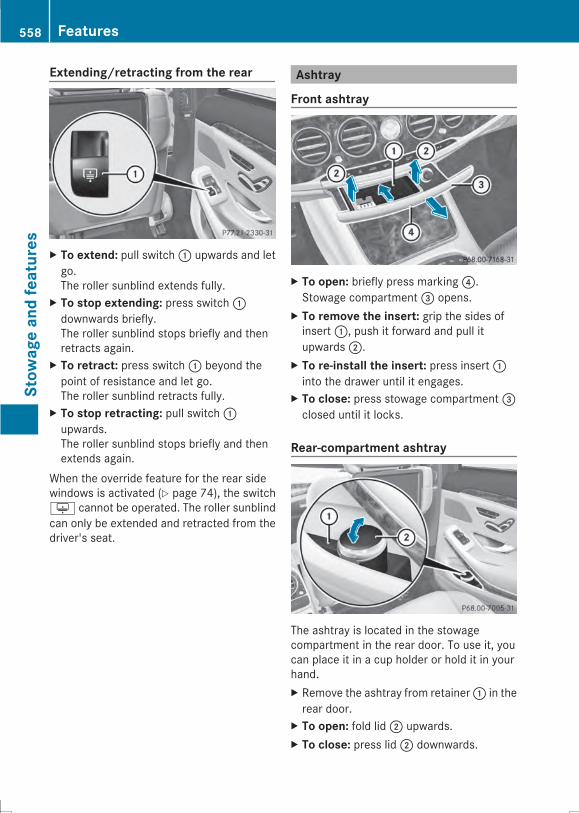
Extending/retracting from the rear
X To extend: pull switch: upwards and letgo.The roller sunblind extends fully.
X To stop extending: press switch:downwards briefly.The roller sunblind stops briefly and thenretracts again.
X To retract: press switch: beyond thepoint of resistance and let go.The roller sunblind retracts fully.
X To stop retracting: pull switch:upwards.The roller sunblind stops briefly and thenextends again.
When the override feature for the rear sidewindows is activated (Y page 74), the switchu cannot be operated. The roller sunblindcan only be extended and retracted from thedriver's seat.
Ashtray
Front ashtray
X To open: briefly press marking?.Stowage compartment= opens.
X To remove the insert: grip the sides ofinsert:, push it forward and pull itupwards;.
X To re-install the insert: press insert:into the drawer until it engages.
X To close: press stowage compartment=closed until it locks.
Rear-compartment ashtray
The ashtray is located in the stowagecompartment in the rear door. To use it, youcan place it in a cup holder or hold it in yourhand.X Remove the ashtray from retainer: in therear door.
X To open: fold lid; upwards.X To close: press lid; downwards.
558 FeaturesStow
ageandfeatures
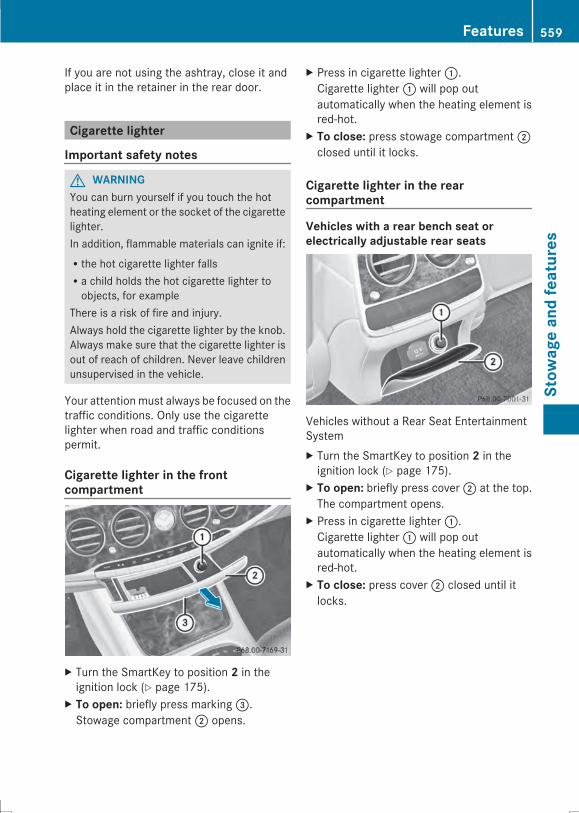
If you are not using the ashtray, close it andplace it in the retainer in the rear door.
Cigarette lighter
Important safety notes
G WARNINGYou can burn yourself if you touch the hotheating element or the socket of the cigarettelighter.In addition, flammable materials can ignite if:Rthe hot cigarette lighter fallsRa child holds the hot cigarette lighter toobjects, for example
There is a risk of fire and injury.Always hold the cigarette lighter by the knob.Always make sure that the cigarette lighter isout of reach of children. Never leave childrenunsupervised in the vehicle.
Your attentionmust always be focused on thetraffic conditions. Only use the cigarettelighter when road and traffic conditionspermit.
Cigarette lighter in the frontcompartment
X Turn the SmartKey to position 2 in theignition lock (Y page 175).
X To open: briefly press marking=.Stowage compartment; opens.
X Press in cigarette lighter:.Cigarette lighter: will pop outautomatically when the heating element isred-hot.
X To close: press stowage compartment;closed until it locks.
Cigarette lighter in the rearcompartment
Vehicles with a rear bench seat orelectrically adjustable rear seats
Vehicles without a Rear Seat EntertainmentSystemX Turn the SmartKey to position 2 in theignition lock (Y page 175).
X To open: briefly press cover; at the top.The compartment opens.
X Press in cigarette lighter:.Cigarette lighter: will pop outautomatically when the heating element isred-hot.
X To close: press cover; closed until itlocks.
Features 559
Stow
ageandfeatures
Z
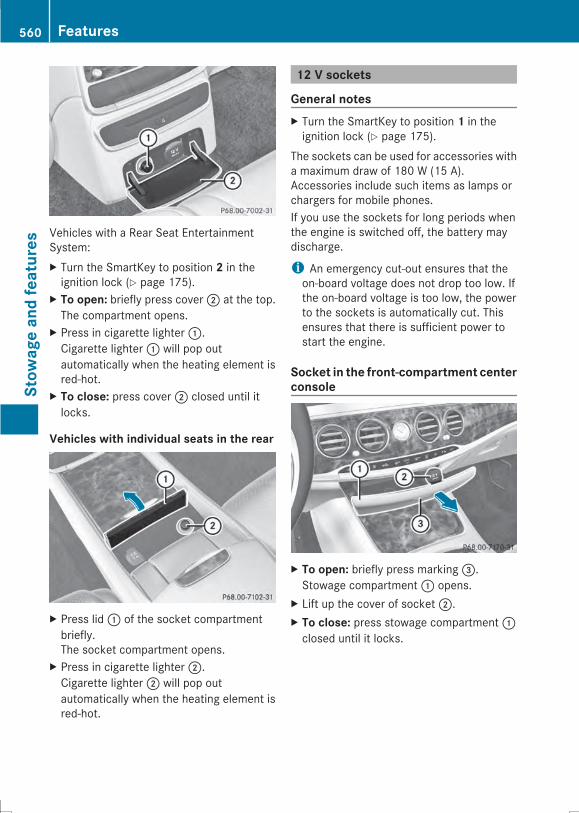
Vehicles with a Rear Seat EntertainmentSystem:X Turn the SmartKey to position 2 in theignition lock (Y page 175).
X To open: briefly press cover; at the top.The compartment opens.
X Press in cigarette lighter:.Cigarette lighter: will pop outautomatically when the heating element isred-hot.
X To close: press cover; closed until itlocks.
Vehicles with individual seats in the rear
X Press lid: of the socket compartmentbriefly.The socket compartment opens.
X Press in cigarette lighter;.Cigarette lighter; will pop outautomatically when the heating element isred-hot.
12 V sockets
General notesX Turn the SmartKey to position 1 in theignition lock (Y page 175).
The sockets can be used for accessories witha maximum draw of 180 W (15 A).Accessories include such items as lamps orchargers for mobile phones.If you use the sockets for long periods whenthe engine is switched off, the battery maydischarge.
i An emergency cut-out ensures that theon-board voltage does not drop too low. Ifthe on-board voltage is too low, the powerto the sockets is automatically cut. Thisensures that there is sufficient power tostart the engine.
Socket in the front-compartment centerconsole
X To open: briefly press marking=.Stowage compartment: opens.
X Lift up the cover of socket;.X To close: press stowage compartment:closed until it locks.
560 FeaturesStow
ageandfeatures
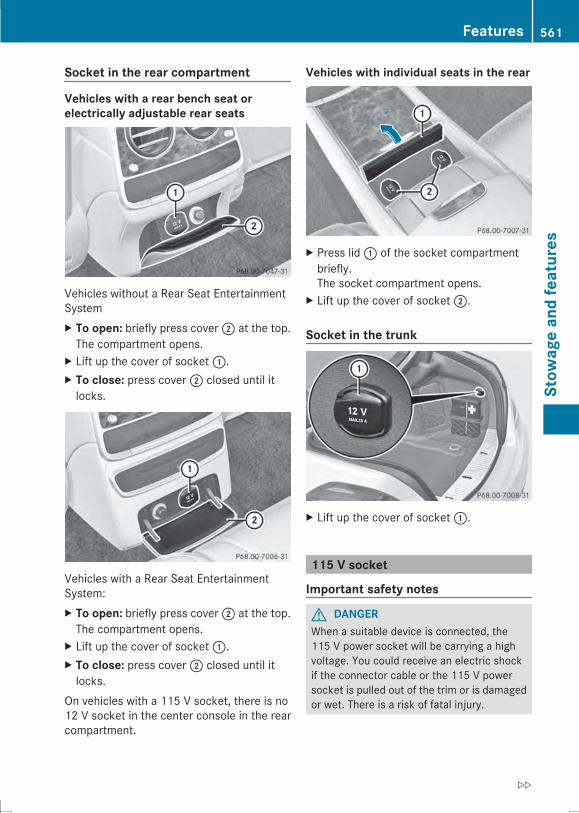
Socket in the rear compartment
Vehicles with a rear bench seat orelectrically adjustable rear seats
Vehicles without a Rear Seat EntertainmentSystemX To open: briefly press cover; at the top.The compartment opens.
X Lift up the cover of socket:.X To close: press cover; closed until itlocks.
Vehicles with a Rear Seat EntertainmentSystem:X To open: briefly press cover; at the top.The compartment opens.
X Lift up the cover of socket:.X To close: press cover; closed until itlocks.
On vehicles with a 115 V socket, there is no12 V socket in the center console in the rearcompartment.
Vehicles with individual seats in the rear
X Press lid: of the socket compartmentbriefly.The socket compartment opens.
X Lift up the cover of socket;.
Socket in the trunk
X Lift up the cover of socket:.
115 V socket
Important safety notes
G DANGERWhen a suitable device is connected, the115 V power socket will be carrying a highvoltage. You could receive an electric shockif the connector cable or the 115 V powersocket is pulled out of the trim or is damagedor wet. There is a risk of fatal injury.
Features 561
Stow
ageandfeatures
Z
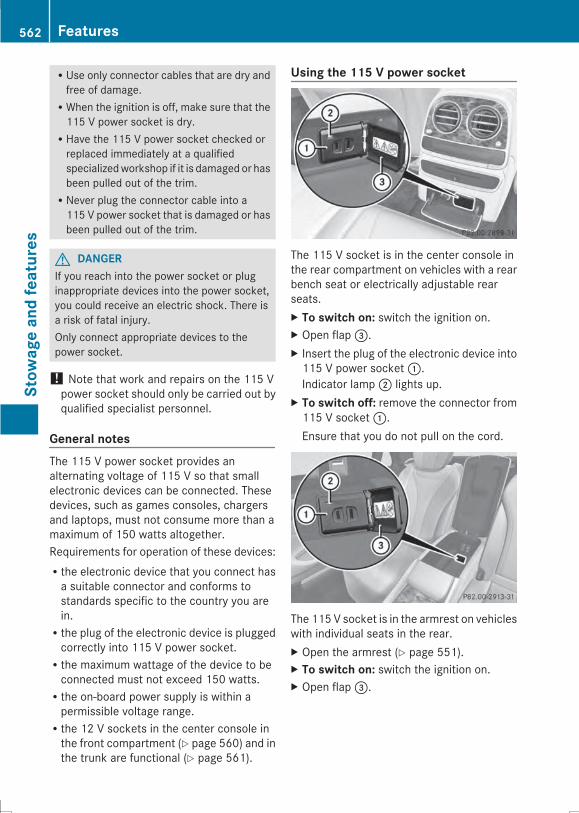
RUse only connector cables that are dry andfree of damage.RWhen the ignition is off, make sure that the115 V power socket is dry.RHave the 115 V power socket checked orreplaced immediately at a qualifiedspecializedworkshop if it is damaged or hasbeen pulled out of the trim.RNever plug the connector cable into a115 V power socket that is damaged or hasbeen pulled out of the trim.
G DANGERIf you reach into the power socket or pluginappropriate devices into the power socket,you could receive an electric shock. There isa risk of fatal injury.Only connect appropriate devices to thepower socket.
! Note that work and repairs on the 115 Vpower socket should only be carried out byqualified specialist personnel.
General notesThe 115 V power socket provides analternating voltage of 115 V so that smallelectronic devices can be connected. Thesedevices, such as games consoles, chargersand laptops, must not consume more than amaximum of 150 watts altogether.Requirements for operation of these devices:Rthe electronic device that you connect hasa suitable connector and conforms tostandards specific to the country you arein.Rthe plug of the electronic device is pluggedcorrectly into 115 V power socket.Rthe maximum wattage of the device to beconnected must not exceed 150 watts.Rthe on-board power supply is within apermissible voltage range.Rthe 12 V sockets in the center console inthe front compartment (Y page 560) and inthe trunk are functional (Y page 561).
Using the 115 V power socket
The 115 V socket is in the center console inthe rear compartment on vehicles with a rearbench seat or electrically adjustable rearseats.X To switch on: switch the ignition on.X Open flap=.X Insert the plug of the electronic device into115 V power socket:.Indicator lamp; lights up.
X To switch off: remove the connector from115 V socket:.Ensure that you do not pull on the cord.
The 115 V socket is in the armrest on vehicleswith individual seats in the rear.X Open the armrest (Y page 551).X To switch on: switch the ignition on.X Open flap=.
562 FeaturesStow
ageandfeatures
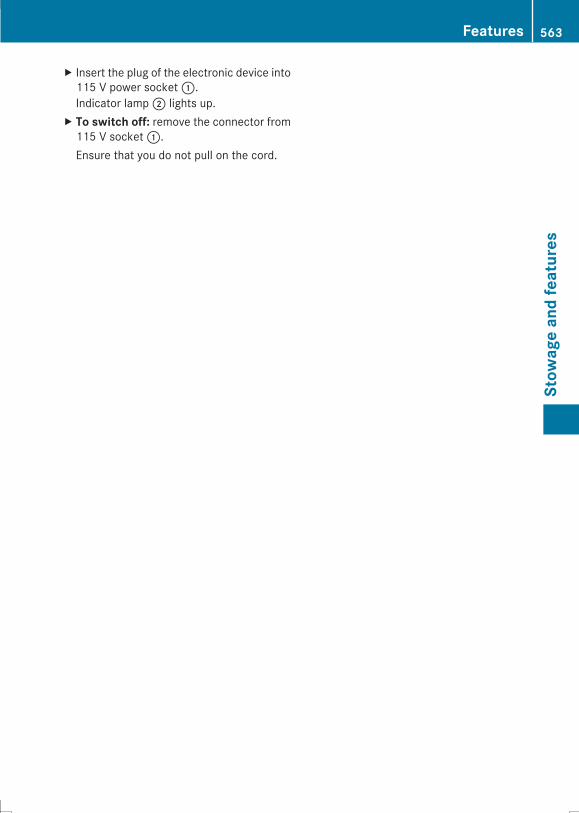
X Insert the plug of the electronic device into115 V power socket:.Indicator lamp; lights up.
X To switch off: remove the connector from115 V socket:.Ensure that you do not pull on the cord.
Features 563
Stow
ageandfeatures
Z
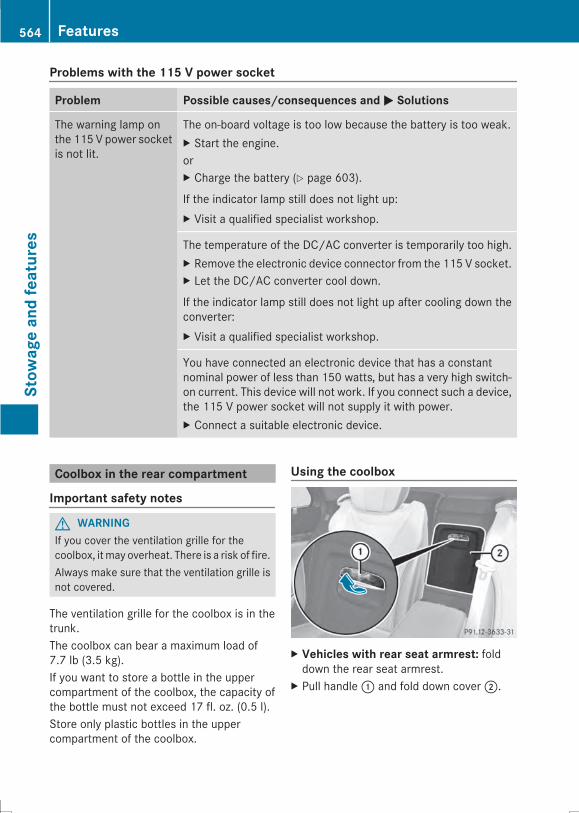
Problems with the 115 V power socket
Problem Possible causes/consequences andMM Solutions
The warning lamp onthe 115 V power socketis not lit.
The on-board voltage is too low because the battery is too weak.X Start the engine.orX Charge the battery (Y page 603).
If the indicator lamp still does not light up:X Visit a qualified specialist workshop.
The temperature of the DC/AC converter is temporarily too high.X Remove the electronic device connector from the 115 V socket.X Let the DC/AC converter cool down.
If the indicator lamp still does not light up after cooling down theconverter:X Visit a qualified specialist workshop.
You have connected an electronic device that has a constantnominal power of less than 150 watts, but has a very high switch-on current. This device will not work. If you connect such a device,the 115 V power socket will not supply it with power.X Connect a suitable electronic device.
Coolbox in the rear compartment
Important safety notes
G WARNINGIf you cover the ventilation grille for thecoolbox, itmay overheat. There is a risk of fire.Always make sure that the ventilation grille isnot covered.
The ventilation grille for the coolbox is in thetrunk.The coolbox can bear a maximum load of7.7 lb (3.5 kg).If you want to store a bottle in the uppercompartment of the coolbox, the capacity ofthe bottle must not exceed 17 fl. oz. (0.5 l).Store only plastic bottles in the uppercompartment of the coolbox.
Using the coolbox
X Vehicles with rear seat armrest: folddown the rear seat armrest.
X Pull handle: and fold down cover;.
564 FeaturesStow
ageandfeatures
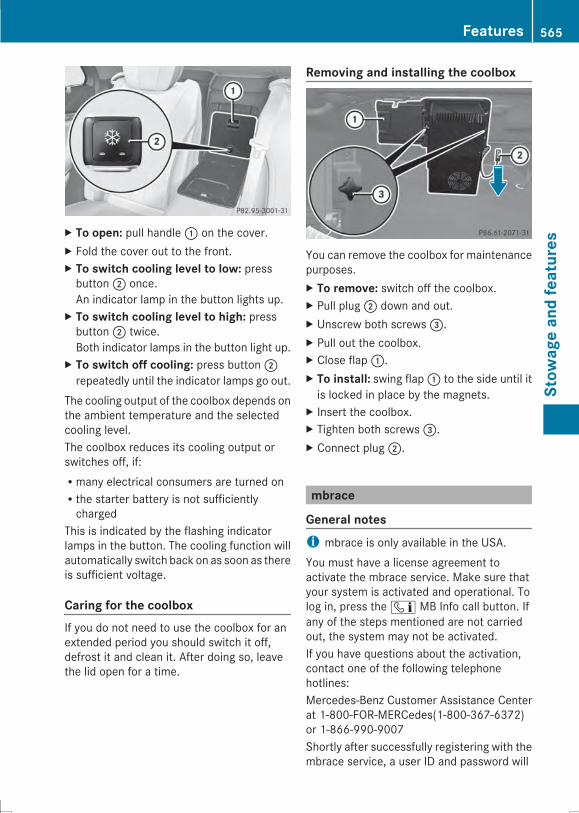
X To open: pull handle: on the cover.X Fold the cover out to the front.X To switch cooling level to low: pressbutton; once.An indicator lamp in the button lights up.
X To switch cooling level to high: pressbutton; twice.Both indicator lamps in the button light up.
X To switch off cooling: press button;repeatedly until the indicator lamps go out.
The cooling output of the coolbox depends onthe ambient temperature and the selectedcooling level.The coolbox reduces its cooling output orswitches off, if:Rmany electrical consumers are turned onRthe starter battery is not sufficientlycharged
This is indicated by the flashing indicatorlamps in the button. The cooling function willautomatically switch back on as soon as thereis sufficient voltage.
Caring for the coolboxIf you do not need to use the coolbox for anextended period you should switch it off,defrost it and clean it. After doing so, leavethe lid open for a time.
Removing and installing the coolbox
You can remove the coolbox for maintenancepurposes.X To remove: switch off the coolbox.X Pull plug; down and out.X Unscrew both screws=.X Pull out the coolbox.X Close flap:.X To install: swing flap: to the side until itis locked in place by the magnets.
X Insert the coolbox.X Tighten both screws=.X Connect plug;.
mbrace
General notesi mbrace is only available in the USA.You must have a license agreement toactivate the mbrace service. Make sure thatyour system is activated and operational. Tolog in, press the ï MB Info call button. Ifany of the steps mentioned are not carriedout, the system may not be activated.If you have questions about the activation,contact one of the following telephonehotlines:Mercedes-Benz Customer Assistance Centerat 1-800-FOR-MERCedes(1-800-367-6372)or 1-866-990-9007Shortly after successfully registering with thembrace service, a user ID and password will
Features 565
Stow
ageandfeatures
Z
be sent to you by mail. You can use thispassword to log onto the mbrace area under"Owners Online" at http://www.mbusa.com.The system is available if:Rit has been activated and is operationalRthe corresponding mobile phone networkis available for transmitting data to theCustomer CenterRa service subscription is availableRthe starter battery is sufficiently charged
i Determining the location of the vehicle ona map is only possible if:RGPS reception is available.Rthe vehicle position can be forwarded tothe Customer Assistance Center.
The mbrace systemTo adjust the volume during a call, proceedas follows:X Press theW orX button on themultifunction steering wheel.
orX Use the volume controller of COMAND.The system offers various services, e.g:RAutomatic and manual emergency callRRoadside Assistance callRMB Info callYou can find information and a description ofall available features under "Owners Online"at http://www.mbusa.com.
System self-testAfter you have switched on the ignition, thesystem carries out a self-diagnosis.
A malfunction in the system has beendetected if one of the following occurs:RThe indicator lamp in the SOS button doesnot come on during the system self-test.RThe indicator lamp in the F RoadsideAssistance button does not light up duringself-diagnosis of the system.RThe indicator lamp in the ï MB Info callbutton does not light up during self-diagnosis of the system.RThe indicator lamp in one or more of thefollowing buttons continues to light up redafter the system self-diagnosis:- SOS button- F Roadside Assistance call button- ï MB Info call buttonRAfter the system self-diagnosis, theInoperativeInoperative or Service NotService NotActivatedActivated message appears in themultifunction display.
If a malfunction is indicated as outlinedabove, the system may not operate asexpected. In the event of an emergency, helpwill have to be summoned by other means.Have the system checked at the nearestauthorized Mercedes-Benz Center or contactthe following service hotlines:Mercedes-Benz Customer Assistance Centerat 1-800-FOR-MERCedes(1-800-367-6372)or 1-866-990-9007
566 FeaturesStow
ageandfeatures
Emergency call
Important safety notesG WARNINGIt can be dangerous to remain in the vehicle,even if you have pressed the SOS button in anemergency if:Ryou see smoke inside or outside of thevehicle, e.g. if there is a fire after anaccidentRthe vehicle is on a dangerous section ofroadRthe vehicle is not visible or cannot easily beseen by other road users, particularly whendark or in poor visibility conditions
There is a risk of an accident and injury.Leave the vehicle immediately in this orsimilar situations as soon as it is safe to doso. Move to a safe location along with othervehicle occupants. In such situations, securethe vehicle in accordance with nationalregulations, e. g. with a warning triangle.
You must have a license agreement toactivate the mbrace service. Make sure thatyour system is activated and operational. Tolog in, press the ï MB Info call button. Ifany of the steps mentioned are not carriedout, the system may not be activated.If you have questions about the activation,contact one of the following telephonehotlines:Mercedes-Benz Customer Assistance Centerat 1-800-FOR-MERCedes(1-800-367-6372)or 1-866-990-9007
General notesAn emergency call is dialed automatically ifan air bag or Emergency Tensioning Device istriggered.
i You cannot end an automaticallytriggered emergency call yourself.
An emergency call can also be initiatedmanually.
As soon as the emergency call has beeninitiated, the indicator lamp in the SOS buttonflashes. The multifunction display shows theConnecting CallConnecting Call message.The audio output is muted.Once the connection has been made, theCall ConnectedCall Connected message appears in themultifunction display.All important information on the emergencyis transmitted, for example:RCurrent location of the vehicle (asdetermined by the GPS system)RVehicle identification numberRInformation on the severity of the accidentShortly after the emergency call has beeninitiated, a voice connection is automaticallyestablished between the CustomerAssistance Center and the vehicle occupants.RIf the vehicle occupants respond, theMercedes-Benz Customer AssistanceCenter attempts to get more informationon the emergency.RIf there is no response from the vehicleoccupants, an ambulance is immediatelysent to the vehicle.
If no voice connection can be established tothe Mercedes-Benz Customer AssistanceCenter, the systemhas been unable to initiatean emergency call.This can occur, for example, if the relevantmobile phone network is not available. Theindicator lamp in the SOS button flashescontinuously.The Call FailedCall Failed message appears in themultifunction display and must be confirmed.In this case, summon assistance by othermeans.
Features 567
Stow
ageandfeatures
Z
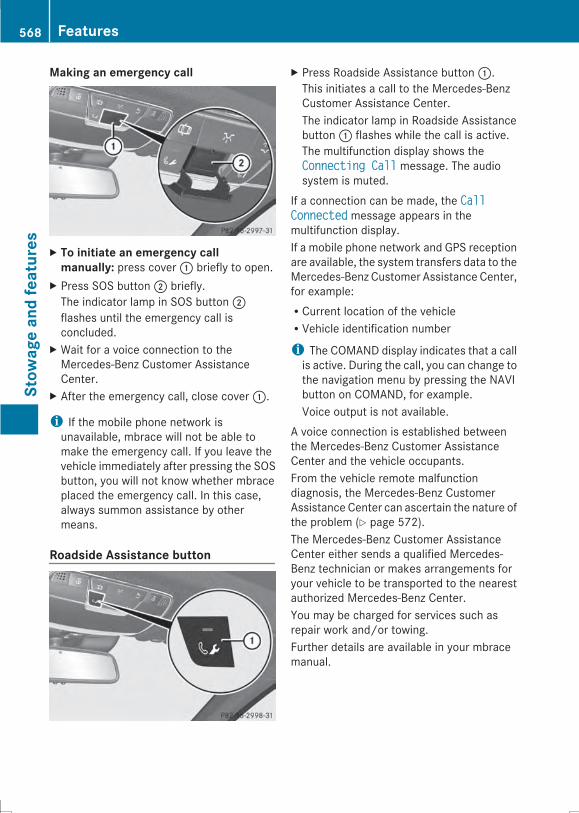
Making an emergency call
X To initiate an emergency callmanually: press cover: briefly to open.
X Press SOS button; briefly.The indicator lamp in SOS button;flashes until the emergency call isconcluded.
X Wait for a voice connection to theMercedes-Benz Customer AssistanceCenter.
X After the emergency call, close cover:.
i If the mobile phone network isunavailable, mbrace will not be able tomake the emergency call. If you leave thevehicle immediately after pressing the SOSbutton, you will not know whether mbraceplaced the emergency call. In this case,always summon assistance by othermeans.
Roadside Assistance button
X Press Roadside Assistance button:.This initiates a call to the Mercedes-BenzCustomer Assistance Center.The indicator lamp in Roadside Assistancebutton: flashes while the call is active.The multifunction display shows theConnecting CallConnecting Call message. The audiosystem is muted.
If a connection can be made, the CallCallConnectedConnected message appears in themultifunction display.If a mobile phone network and GPS receptionare available, the system transfers data to theMercedes-Benz Customer Assistance Center,for example:RCurrent location of the vehicleRVehicle identification number
i The COMAND display indicates that a callis active. During the call, you can change tothe navigation menu by pressing the NAVIbutton on COMAND, for example.Voice output is not available.
A voice connection is established betweenthe Mercedes-Benz Customer AssistanceCenter and the vehicle occupants.From the vehicle remote malfunctiondiagnosis, the Mercedes-Benz CustomerAssistance Center can ascertain the nature ofthe problem (Y page 572).The Mercedes-Benz Customer AssistanceCenter either sends a qualified Mercedes-Benz technician or makes arrangements foryour vehicle to be transported to the nearestauthorized Mercedes-Benz Center.You may be charged for services such asrepair work and/or towing.Further details are available in your mbracemanual.
568 FeaturesStow
ageandfeatures
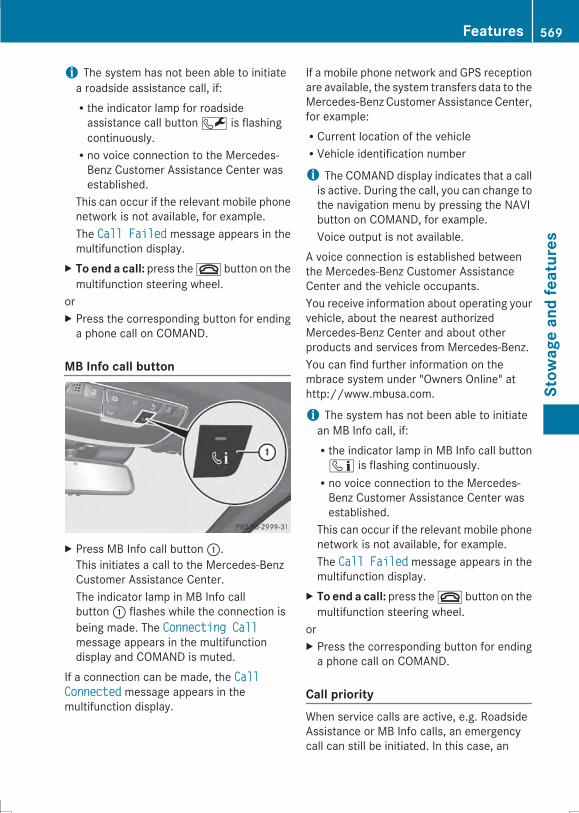
i The system has not been able to initiatea roadside assistance call, if:Rthe indicator lamp for roadsideassistance call button F is flashingcontinuously.Rno voice connection to the Mercedes-Benz Customer Assistance Center wasestablished.
This can occur if the relevant mobile phonenetwork is not available, for example.The Call FailedCall Failed message appears in themultifunction display.
X To end a call: press the~ button on themultifunction steering wheel.
orX Press the corresponding button for endinga phone call on COMAND.
MB Info call button
X Press MB Info call button:.This initiates a call to the Mercedes-BenzCustomer Assistance Center.The indicator lamp in MB Info callbutton: flashes while the connection isbeing made. The Connecting CallConnecting Callmessage appears in the multifunctiondisplay and COMAND is muted.
If a connection can be made, the CallCallConnectedConnected message appears in themultifunction display.
If a mobile phone network and GPS receptionare available, the system transfers data to theMercedes-Benz Customer Assistance Center,for example:RCurrent location of the vehicleRVehicle identification number
i The COMAND display indicates that a callis active. During the call, you can change tothe navigation menu by pressing the NAVIbutton on COMAND, for example.Voice output is not available.
A voice connection is established betweenthe Mercedes-Benz Customer AssistanceCenter and the vehicle occupants.You receive information about operating yourvehicle, about the nearest authorizedMercedes-Benz Center and about otherproducts and services from Mercedes-Benz.You can find further information on thembrace system under "Owners Online" athttp://www.mbusa.com.
i The system has not been able to initiatean MB Info call, if:Rthe indicator lamp in MB Info call button
ï is flashing continuously.Rno voice connection to the Mercedes-Benz Customer Assistance Center wasestablished.
This can occur if the relevant mobile phonenetwork is not available, for example.The Call FailedCall Failed message appears in themultifunction display.
X To end a call: press the~ button on themultifunction steering wheel.
orX Press the corresponding button for endinga phone call on COMAND.
Call priorityWhen service calls are active, e.g. RoadsideAssistance or MB Info calls, an emergencycall can still be initiated. In this case, an
Features 569
Stow
ageandfeatures
Z
emergency call will take priority and overrideall other active calls.The indicator lamp of the respective buttonflashes until the call is ended.An emergency call can only be terminated bythe Mercedes-Benz Customer AssistanceCenter.All other calls can be ended by pressing:Rthe~ button on the multifunctionsteering wheelRor the corresponding COMAND button forending a telephone call
i When a call is initiated, the audio systemis muted. The mobile phone is no longerconnected to COMAND. However, if youwant to use your mobile phone, do so onlywhen the vehicle is stationary and in a safelocation.
Downloading destinations in COMAND
Downloading destinationsDestination Download gives you access to adata bank with over 15 million Points ofInterest (POIs). These can be downloaded onthe navigation system in your vehicle. If youknow the destination, the address can bedownloaded. Alternatively, you can obtain thelocation of Points of Interest (POIs)/important destinations in the vicinity.Furthermore, you can download routes withup to four way points.You are prompted to confirm route guidanceto the address entered.X Select YesYes by turning cVd or slidingXVY the COMAND controller and pressW to confirm.
The system calculates the route andsubsequently starts the route guidance withthe address entered.
i If you select NoNo, the address can be savedin the address book.
i The destination download function isavailable if the relevant mobile phone
network is available and data transfer ispossible.
i The destination download function canonly be used if the vehicle is equipped witha navigation system.
Route AssistanceThis service is part of the mbrace PLUSPackage and cannot be purchasedseparately.
i You can also use the Route Assistancefunction if your vehicle is not equipped witha navigation system.
Within the framework of this service, youreceive a professional and reliable form ofnavigation support without having to leaveyour vehicle.The customer service representative finds asuitable route depending on your vehicle'scurrent position and the desired destination.You will then be guided live through thecurrent route section.
Search & Send
General notesi To use "Search & Send", your vehiclemust be equipped with mbrace and anavigation system. Additionally, an mbraceservice subscription must be completed.
"Search & Send" is a destination entryservice. A destination address which is foundon Google Maps® can be transferred viambrace directly to your vehicle's navigationsystem.
Specifying and sending the destinationaddressX Go to the website http://maps.google.com and enter a destinationaddress into the entry field.
X To send the destination address to thee-mail address of your mbraceaccount: click on the correspondingbutton on the website.i Example:
570 FeaturesStow
ageandfeatures
If you select 'Send to vehicle' and then'Mercedes-Benz', the destination addresswill be sent to your vehicle.
X When the "Send" dialog window appears:Enter the e-mail address you specifiedwhen setting up your mbrace account intothe corresponding field.
X Click "Send".
i Information on specific commands suchas "Address entry" or "Send" can be foundon the website.
Calling up destination addressesX Switch on the ignition.The destination address is loaded into thevehicle's navigation system.A display message appears, askingwhether navigation should be started.
X Select YesYes by turning cVd or slidingXVY the COMAND controller and pressW to confirm.The system calculates the route andsubsequently starts the route guidancewith the address entered.
i If you select NoNo, the address can be savedin the address book.
i If you have sent more than onedestination address, each individualdestination must be confirmed separately.
i Destination addresses are loaded in thesame order as the order in which they weresent.If you own multiple Mercedes-Benzvehicles withmbrace and activatedmbraceaccounts:If multiple vehicles are registered under thesame e-mail address, the destination willbe sent to all the vehicles.
Vehicle remote openingYou can use the vehicle remote opening if youhave unintentionally locked your vehicle anda replacement SmartKey is not available.
The vehicle can be opened by the Mercedes-Benz Customer Assistance Center.The vehicle can be immediately openedremotely within four days of the ignition beingturned off. After this time, the remoteunlocking may be delayed by 15 to60 minutes. After 30 days, the vehicle can nolonger be opened remotely.X Contact the following service hotlines:Mercedes-Benz Customer AssistanceCenter at1-800-FOR-MERCedes(1-800-367-6372)or 1-866-990-9007You will be asked for your password.
X Return to your vehicle at the time agreedupon with the Mercedes-Benz CustomerAssistance Center.
Alternatively, the vehicle can be opened via:Rthe Internet, under the "Owners Online"sectionRthe telephone application (e.g. iPhone®,Blackberry)
To do this, you will need your identificationnumber and password.
i Vehicle remote opening is only possible ifthe corresponding mobile phone networkis accessible.
Vehicle remote closingThe remote closing feature can be used whenyou have forgotten to lock the vehicle and youare no longer nearby.The vehicle can then be locked by theMercedes-Benz Customer AssistanceCenter.The vehicle can be immediately remotelylocked within four days of the ignition beingturned off. After this time, the remote closingmay be delayed by 15 to 60 minutes. After30 days the vehicle can no longer be closedremotely.X Contact the following service hotlines:Mercedes-Benz Customer AssistanceCenter at
Features 571
Stow
ageandfeatures
Z
1-800-FOR-MERCedes(1-800-367-6372)or 1-866-990-9007You will be asked for your PIN.
The next time you are inside the vehicle andyou switch on the ignition, the DoorsDoorsLocked RemotelyLocked Remotely message appears in themultifunction display.Alternatively, the vehicle can be locked via:Rthe Internet, under the "Owners Online"sectionRthe telephone application (e.g. iPhone®,Blackberry)
To do this, you will need your identificationnumber and password.
i The vehicle remote closing feature isavailable when the relevant mobile phonenetwork is available and data connection ispossible.
Stolen vehicle recovery serviceIf your vehicle has been stolen:X Notify the police.The police will issue a numbered incidentreport.
X This number will be forwarded to theMercedes-Benz Customer AssistanceCenter together with your PIN.The Mercedes-Benz Customer AssistanceCenter then tries to locate the system. TheMercedes-Benz Customer AssistanceCenter contacts you and the local lawenforcement agency if the vehicle islocated.However, only the law enforcement agencyis informed of the location of the vehicle.
i If the anti-theft alarm system is activatedfor longer than 30 seconds, the Mercedes-Benz Customer Assistance Center isautomatically informed.
Vehicle remote malfunction diagnosisWith the vehicle remote malfunctiondiagnosis (Vehicle Health Check), the
Customer Assistance center can provideimproved support for problems with yourvehicle. During an existing call, vehicle datais transferred to the Customer Assistancecenter.The customer service representative can usethe received data to decide what kind ofassistance is required. You are then, forexample, guided to the nearest authorizedMercedes-Benz Center or a recovery vehicleis called.If vehicle data needs to be transferred duringan MB Info call or a Roadside Assistance call,this is initiated by the Customer Assistancecenter.You will see the Roadside AssistanceRoadside AssistanceConnectedConnectedmessage in the COMAND display.If the vehicle remote malfunction diagnosiscan be started, the Request for VehicleRequest for VehicleDiagnosis Received Start vehicleDiagnosis Received Start vehiclediagnosis?diagnosis?message appears in the display.X Confirm the message with YesYes.X When the Vehicle Diagnosis PleaseVehicle Diagnosis PleaseStart IgnitionStart Ignition message appears, turnthe SmartKey to position 2 in the ignitionlock (Y page 175).
X When the Please follow thePlease follow theinstructionsinstructions receivedreceived byby phonephone andandmove your vehicle to a safemove your vehicle to a safeposition.position. message appears, follow thecustomer service representative'sinstructions.The message in the display disappears.If you select CancelCancel, the vehicle remotemalfunction diagnosis is canceledcompletely.The vehicle operating state check begins.You will see the Vehicle diagnosisVehicle diagnosisactivated.activated. message.
When the diagnosis is completed, theSending vehicle diagnosis data.Sending vehicle diagnosis data.(Voice connection may be(Voice connection may beinterrupted during data transfer.)interrupted during data transfer.)message appears. The vehicle data can nowbe sent.
572 FeaturesStow
ageandfeatures
X Press OKOK to confirm the message.The voice connection with the CustomerAssistance center is terminated.You will see the Vehicle Diagnostics:Vehicle Diagnostics:Transferring Data...Transferring Data... message.The vehicle data is sent to the CustomerAssistance center.
Depending on what the customer servicerepresentative agreed with you, the voiceconnection is re-established after the transferis complete. If necessary, you will becontacted at a later time by another means,e.g. by e-mail or phone.Further functions of the vehicle remotemalfunction diagnosis include, for example:Rtransfer of service data to the CustomerAssistance center.If a service is overdue, the COMANDdisplay shows a message about variousspecial offers at your workshop.Rmonthly status information e-mail on oillevel, air pressure, maintenance, brakes,etc. If applicable, you will receiveinformation on special offers in the e-mail.This information can also be called upunder "Owners Online" at http://www.mbusa.com.
Information on the data stored in the vehicle(Y page 36).Information on Roadside Assistance(Y page 32).
Downloading routesDownloading routes allows you to transferand save predefined routes in the navigationsystem.A route can be prepared and sent either by acustomer service representative or via thembrace portal on the Internet.Each route can include up to four way points.Once a route has been received by thenavigation system, you will see the TheTheexternal route has been saved toexternal route has been saved to"Previous Destinations". Would you"Previous Destinations". Would you
likelike toto startstart navigation?navigation?message. Theroute is saved to the hard disk.X To start route guidance: select YesYes.An overview of the route is shown in thedisplay.i If you select NoNo, the saved route can becalled up later via the navigation menu.
X Select StartStart.Route guidance is started.
i Downloaded and saved data can be calledup again in COMAND.Further information can be found on(Y page 449).
Speed alertYou can define the upper speed limit, whichmust not be exceeded by the vehicle.If this selected speed is exceeded by thevehicle, a message will be sent to theCustomer Assistance Center. The CustomerAssistance Center then forwards thisinformation to you.You can select the way in which you receivethis information beforehand. Possible optionsinclude text message, e-mail or an automatedcall.The data you receive contains the followinginformation:Rthe location where the speed limit wasexceededRthe time at which the speed limit wasexceededRthe selected speed limit which wasexceeded
Geo fencingGeo fencing allows you to select areas whichthe vehicle should not enter or leave. You willbe informed if the vehicle crosses theboundaries of the selected areas. You canselect the way in which you receive thisinformation beforehand. Possible options
Features 573
Stow
ageandfeatures
Z
include text message, e-mail or an automatedcall.The area can be determined as either a circleor a polygon with a maximum of ten corners.You can specify up to ten areassimultaneously. Different settings arepossible for each area.These settings can be called up under"Owners Online" at http://www.mbusa.com.Alternatively, you can trigger an MB Info calland inform the customer servicerepresentative that you wish to activate geofencing.Currently inactive areas can be activated bytext message.
Triggering the vehicle alarmWith this function, you can trigger thevehicle's panic alarm via text message. Analarm sounds and the exterior lightingflashes. Depending on the setting, the panicalarm lasts five or ten seconds. Afterwards,the alarm switches off.
Garage door opener
Important safety notes
G WARNINGWhen you operate or program the garage doorwith the integrated garage door opener,persons in the range of movement of thegarage door can become trapped or struck bythe garage door. There is a risk of injury.When using the integrated garage dooropener, always make sure that nobody iswithin the range of movement of the garagedoor.
G WARNINGCombustion engines emit poisonous exhaustgases such as carbon monoxide. Inhalingthese exhaust gases leads to poisoning. Thereis a risk of fatal injury. Therefore never leave
the engine running in enclosed spaceswithout sufficient ventilation.
The HomeLink® garage door openerintegrated in the rear-view mirror allows youto operate up to three different door and gatesystems.Use the integrated garage door opener onlyon garage doors that:Rhave safety stop and reverse features andRmeet current U.S. federal safety standardsWhen programming a garage door opener,park the vehicle outside the garage.
i Certain garage door drives areincompatible with the integrated garagedoor opener. If you have difficultyprogramming the integrated garage dooropener, contact an authorized Mercedes-Benz Center.Alternatively, you can call the followingtelephone assistance services:RUSA: Mercedes-Benz CustomerAssistance Center at1-800-FOR-MERCedesRCanada: Customer Service at1-800-387-0100RHomeLink® hotline 1-800-355-3515(free of charge)
More information on HomeLink® and/orcompatible products is also availableonline at http://www.homelink.com.
i Notes on the declaration of conformity(Y page 34).USA: FCC ID: CB2HMIHL4Canada: IC: 279B-HMIHL4
Programing
Programing buttonsPay attention to the "Important safety notes"(Y page 574).
574 FeaturesStow
ageandfeatures
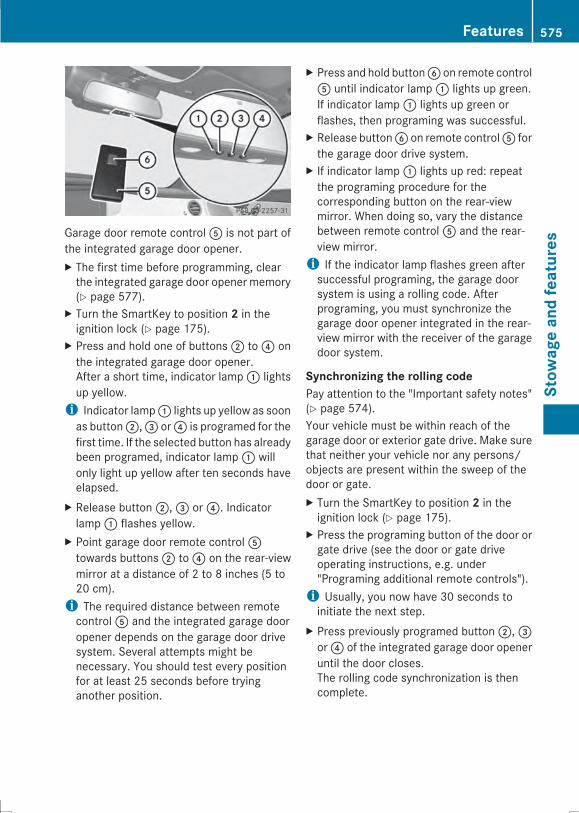
Garage door remote controlA is not part ofthe integrated garage door opener.X The first time before programming, clearthe integrated garage door opener memory(Y page 577).
X Turn the SmartKey to position 2 in theignition lock (Y page 175).
X Press and hold one of buttons; to? onthe integrated garage door opener.After a short time, indicator lamp: lightsup yellow.i Indicator lamp: lights up yellow as soonas button;,= or? is programed for thefirst time. If the selected button has alreadybeen programed, indicator lamp: willonly light up yellow after ten seconds haveelapsed.
X Release button;,= or?. Indicatorlamp: flashes yellow.
X Point garage door remote controlAtowards buttons; to? on the rear-viewmirror at a distance of 2 to 8 inches (5 to20 cm).i The required distance between remotecontrolA and the integrated garage dooropener depends on the garage door drivesystem. Several attempts might benecessary. You should test every positionfor at least 25 seconds before tryinganother position.
X Press and hold buttonB on remote controlA until indicator lamp: lights up green.If indicator lamp: lights up green orflashes, then programing was successful.
X Release buttonB on remote controlA forthe garage door drive system.
X If indicator lamp: lights up red: repeatthe programing procedure for thecorresponding button on the rear-viewmirror. When doing so, vary the distancebetween remote controlA and the rear-view mirror.i If the indicator lamp flashes green aftersuccessful programing, the garage doorsystem is using a rolling code. Afterprograming, you must synchronize thegarage door opener integrated in the rear-view mirror with the receiver of the garagedoor system.
Synchronizing the rolling codePay attention to the "Important safety notes"(Y page 574).Your vehicle must be within reach of thegarage door or exterior gate drive. Make surethat neither your vehicle nor any persons/objects are present within the sweep of thedoor or gate.X Turn the SmartKey to position 2 in theignition lock (Y page 175).
X Press the programing button of the door orgate drive (see the door or gate driveoperating instructions, e.g. under"Programing additional remote controls").i Usually, you now have 30 seconds toinitiate the next step.
X Press previously programed button;,=or? of the integrated garage door openeruntil the door closes.The rolling code synchronization is thencomplete.
Features 575
Stow
ageandfeatures
Z
Notes on programing the remote controlCanadian radio frequency laws require a"break" (or interruption) of the transmissionsignals after broadcasting for a few seconds.Therefore, these signals may not last longenough for the integrated garage dooropener. The signal is not recognized duringprograming. Comparable with Canadian law,some U.S. garage door openers also featurea "break".Proceed as follows:Rif you live in CanadaRif you have difficulties programing thegarage door opener (regardless of whereyou live) when using the programing steps
X Press and hold one of buttons; to? onthe integrated garage door opener.After a short time, indicator lamp: lightsup yellow.
X Release the button.Indicator lamp: flashes yellow.
X Press buttonB of garage door remotecontrolA for two seconds, then release itfor two seconds.
X Press buttonB again for two seconds.X Repeat this sequence on buttonB ofremote controlA until indicator lamp:lights up green.If indicator lamp: turns red, repeat theprocess.
X Continue with the other programing steps(see above).
Problems when programingIf you are experiencing problems programingthe integrated garage door opener on therear-view mirror, take note of the followinginstructions:RCheck the transmitter frequency of garagedoor drive remote controlA. This canusually be found on the back of the remotecontrol.The integrated garage door opener iscompatible with devices that have units
which operate in the frequency range of280 to 433 MHz.RReplace the batteries in garage doorremote controlA. This increases thelikelihood that garage door remote controlA will transmit a strong and precise signalto the integrated garage door opener in therear-view mirror.RWhen programing, hold remote controlAat varying distances and angles from thebutton that you are programing. Try variousangles at a distance between 2and12 inches (5to 30 cm) or at the same anglebut at varying distances.RIf another remote control for the samegarage door drive is available, repeat thesame programing steps with this remotecontrol. Before performing these steps,make sure that new batteries have beeninstalled in garage door drive remotecontrolA.RNote that some remote controls onlytransmit for a limited amount of time (theindicator lamp on the remote control goesout). Press buttonB on remote controlA again before transmission ends.RAlign the antenna cable of the garage dooropener unit. This can improve signalreception/transmission.
Opening/closing the garage doorAfter it has been programmed, the integratedgarage door opener performs the function ofthe garage door system remote control.Please also read the operating instructionsfor the garage door system.X Turn the SmartKey to position 2 in theignition lock (Y page 175).
X Press button;,= or? which you haveprogramed to operate the garage door.Garage door system with a fixed code:indicator lamp: lights up green.Garage door system with a rolling code:indicator lamp: flashes green.
576 FeaturesStow
ageandfeatures
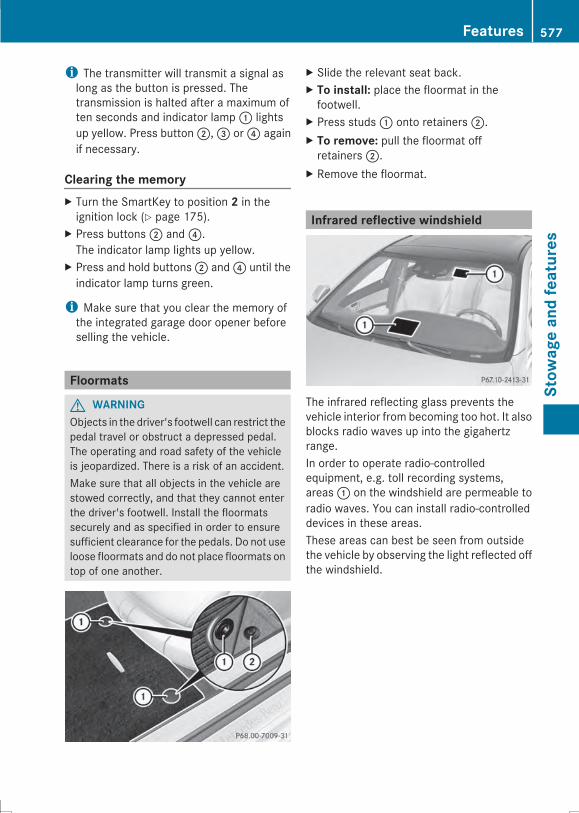
i The transmitter will transmit a signal aslong as the button is pressed. Thetransmission is halted after a maximum often seconds and indicator lamp: lightsup yellow. Press button;,= or? againif necessary.
Clearing the memoryX Turn the SmartKey to position 2 in theignition lock (Y page 175).
X Press buttons; and?.The indicator lamp lights up yellow.
X Press and hold buttons; and? until theindicator lamp turns green.
i Make sure that you clear the memory ofthe integrated garage door opener beforeselling the vehicle.
Floormats
G WARNINGObjects in the driver's footwell can restrict thepedal travel or obstruct a depressed pedal.The operating and road safety of the vehicleis jeopardized. There is a risk of an accident.Make sure that all objects in the vehicle arestowed correctly, and that they cannot enterthe driver's footwell. Install the floormatssecurely and as specified in order to ensuresufficient clearance for the pedals. Do not useloose floormats and do not place floormats ontop of one another.
X Slide the relevant seat back.X To install: place the floormat in thefootwell.
X Press studs: onto retainers;.X To remove: pull the floormat offretainers;.
X Remove the floormat.
Infrared reflective windshield
The infrared reflecting glass prevents thevehicle interior from becoming too hot. It alsoblocks radio waves up into the gigahertzrange.In order to operate radio-controlledequipment, e.g. toll recording systems,areas: on the windshield are permeable toradio waves. You can install radio-controlleddevices in these areas.These areas can best be seen from outsidethe vehicle by observing the light reflected offthe windshield.
Features 577
Stow
ageandfeatures
Z

578
Useful information ............................ 580Engine compartment ........................ 580ASSYST PLUS .................................... 584Care .................................................... 585
579
Maintenance
andcare
Useful information
i This Operator's Manual describes allmodels and all standard and optionalequipment of your vehicle available at thetime of publication of the Operator'sManual. Country-specific differences arepossible. Please note that your vehicle maynot be equipped with all featuresdescribed. This also applies to safety-related systems and functions.
i Read the information on qualifiedspecialist workshops: (Y page 34).
Engine compartment
Hood
Important safety notes
G WARNINGIf the hood is unlatched, it may open up whenthe vehicle is in motion and block your view.There is a risk of an accident.Never unlatch the hood while driving.
G WARNINGWhen opening and closing the hood, it maysuddenly fall into the closed position. There isa risk of injury to persons within range ofmovement of the hood.Open and close the hood only when no one iswithin its range of movement.
G WARNINGOpening the hood when the engine isoverheated or when there is a fire in theengine compartment could expose you to hotgases or other service products. There is arisk of injury.Let an overheated engine cool down beforeopening the hood. If there is a fire in theengine compartment, keep the hood closedand contact the fire department.
G WARNINGThe engine compartment contains movingcomponents. Certain components, such asthe radiator fan, may continue to run or startagain suddenly when the ignition is off. Thereis a risk of injury.If you need to do any work inside the enginecompartment,Rswitch off the ignitionRnever reach into the area where there is arisk of danger from moving components,such as the fan rotation areaRkeep clothing away from moving parts
G WARNINGThe ignition system and the fuel injectionsystem work under high voltage. If you touchcomponents which are under voltage, youcould get an electric shock. There is a risk ofinjury.Never touch components of the ignitionsystem or fuel injection system when theignition is switched on.
Opening the hood
G WARNINGCertain components in the enginecompartment, such as the engine, radiatorand parts of the exhaust system, can becomevery hot. Working in the engine compartmentposes a risk of injury.Where possible, let the engine cool down andtouch only the components described in thefollowing.
G WARNINGWhen the hood is open and the windshieldwipers are set in motion, you can be injuredby the wiper linkage. There is a risk of injury.Always switch off the windshield wipers andthe ignition before opening the hood.
! Make sure that the windshield wipers arenot folded away from the windshield. You
580 Engine compartmentMaintenance
andcare

could otherwise damage the windshieldwipers or the hood.
X Make sure that the windshield wipers areturned off.
X Pull release lever: on the hood.The hood is released.
X Reach into the gap, pull hood catchhandle; up and lift the hood.Once you have lifted the hood about15 inches (40 cm), it is automaticallyopened the rest of the way and held openby the gas-filled struts.
Closing the hoodX Lower the hood and let it fall from a heightof approximately 8 in (20 cm).
X Check that the hood has engaged properly.If the hood can be raised slightly, it is notproperly engaged. Open it again and closeit with a little more force.
Engine oil
General notesDepending on your driving style, the vehicleconsumes up to 0.9 US qt (0.8 liters) of oil per600 miles (1,000 km). The oil consumptionmay be higher than this when the vehicle isnew or if you frequently drive at high enginespeeds.Depending on the engine, the oil dipstick maybe in a different location.When checking the oil level:Rpark the vehicle on a level surface.Rthe engine should be switched off forapproximately five minutes if the engine isat normal operating temperature.Rif the engine is not at normal operatingtemperature, e.g. if the engine was onlystarted briefly, wait about 30 minutesbefore carrying out the measurement.
Checking the oil level using the oildipstick
G WARNINGCertain components in the enginecompartment, such as the engine, radiatorand parts of the exhaust system, can becomevery hot. Working in the engine compartmentposes a risk of injury.Where possible, let the engine cool down andtouch only the components described in thefollowing.
i Example
Engine compartment 581
Maintenance
andcare
Z
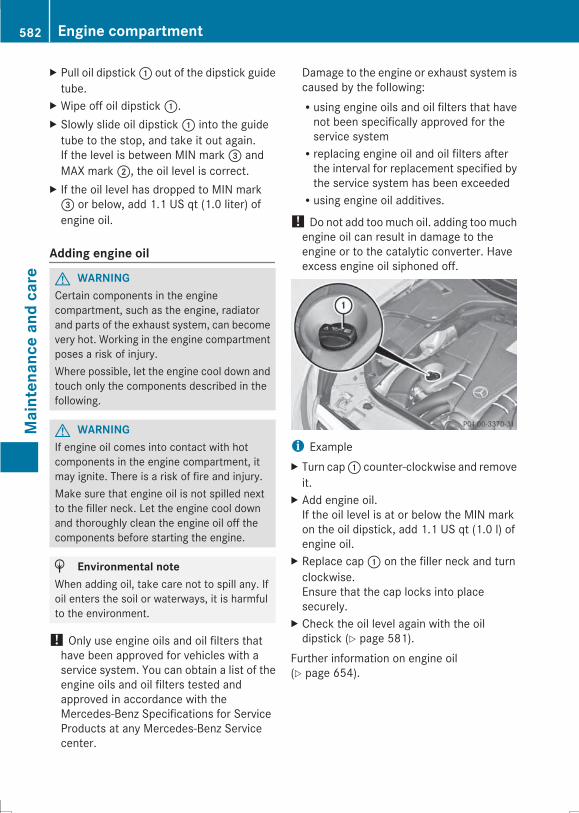
X Pull oil dipstick: out of the dipstick guidetube.
X Wipe off oil dipstick:.X Slowly slide oil dipstick: into the guidetube to the stop, and take it out again.If the level is between MIN mark= andMAX mark;, the oil level is correct.
X If the oil level has dropped to MIN mark= or below, add 1.1 US qt (1.0 liter) ofengine oil.
Adding engine oil
G WARNINGCertain components in the enginecompartment, such as the engine, radiatorand parts of the exhaust system, can becomevery hot. Working in the engine compartmentposes a risk of injury.Where possible, let the engine cool down andtouch only the components described in thefollowing.
G WARNINGIf engine oil comes into contact with hotcomponents in the engine compartment, itmay ignite. There is a risk of fire and injury.Make sure that engine oil is not spilled nextto the filler neck. Let the engine cool downand thoroughly clean the engine oil off thecomponents before starting the engine.
H Environmental noteWhen adding oil, take care not to spill any. Ifoil enters the soil or waterways, it is harmfulto the environment.
! Only use engine oils and oil filters thathave been approved for vehicles with aservice system. You can obtain a list of theengine oils and oil filters tested andapproved in accordance with theMercedes-Benz Specifications for ServiceProducts at any Mercedes-Benz Servicecenter.
Damage to the engine or exhaust system iscaused by the following:Rusing engine oils and oil filters that havenot been specifically approved for theservice systemRreplacing engine oil and oil filters afterthe interval for replacement specified bythe service system has been exceededRusing engine oil additives.
! Do not add toomuch oil. adding toomuchengine oil can result in damage to theengine or to the catalytic converter. Haveexcess engine oil siphoned off.
i ExampleX Turn cap: counter-clockwise and removeit.
X Add engine oil.If the oil level is at or below the MIN markon the oil dipstick, add 1.1 US qt (1.0 l) ofengine oil.
X Replace cap: on the filler neck and turnclockwise.Ensure that the cap locks into placesecurely.
X Check the oil level again with the oildipstick (Y page 581).
Further information on engine oil(Y page 654).
582 Engine compartmentMaintenance
andcare
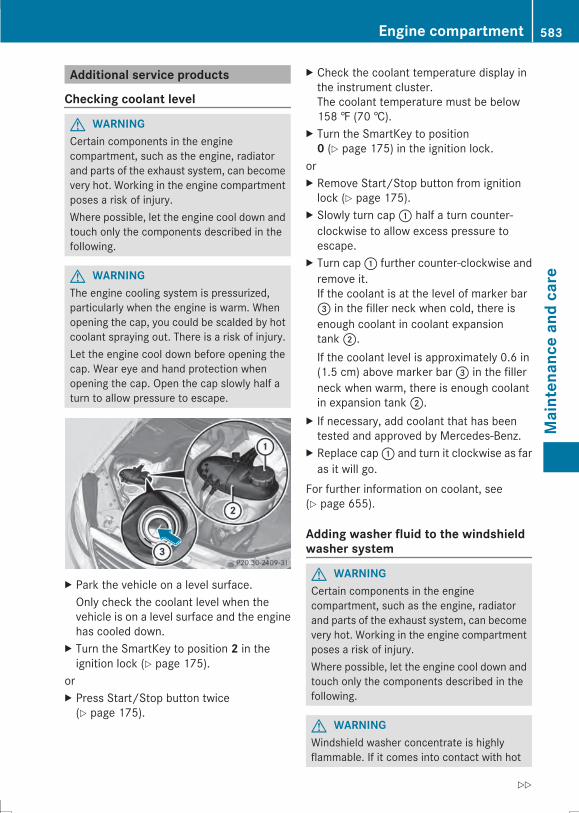
Additional service products
Checking coolant level
G WARNINGCertain components in the enginecompartment, such as the engine, radiatorand parts of the exhaust system, can becomevery hot. Working in the engine compartmentposes a risk of injury.Where possible, let the engine cool down andtouch only the components described in thefollowing.
G WARNINGThe engine cooling system is pressurized,particularly when the engine is warm. Whenopening the cap, you could be scalded by hotcoolant spraying out. There is a risk of injury.Let the engine cool down before opening thecap. Wear eye and hand protection whenopening the cap. Open the cap slowly half aturn to allow pressure to escape.
X Park the vehicle on a level surface.Only check the coolant level when thevehicle is on a level surface and the enginehas cooled down.
X Turn the SmartKey to position 2 in theignition lock (Y page 175).
orX Press Start/Stop button twice(Y page 175).
X Check the coolant temperature display inthe instrument cluster.The coolant temperature must be below158 ‡ (70 †).
X Turn the SmartKey to position0 (Y page 175) in the ignition lock.
orX Remove Start/Stop button from ignitionlock (Y page 175).
X Slowly turn cap: half a turn counter-clockwise to allow excess pressure toescape.
X Turn cap: further counter-clockwise andremove it.If the coolant is at the level of marker bar= in the filler neck when cold, there isenough coolant in coolant expansiontank;.If the coolant level is approximately 0.6 in(1.5 cm) above marker bar= in the fillerneck when warm, there is enough coolantin expansion tank;.
X If necessary, add coolant that has beentested and approved by Mercedes-Benz.
X Replace cap: and turn it clockwise as faras it will go.
For further information on coolant, see(Y page 655).
Adding washer fluid to the windshieldwasher system
G WARNINGCertain components in the enginecompartment, such as the engine, radiatorand parts of the exhaust system, can becomevery hot. Working in the engine compartmentposes a risk of injury.Where possible, let the engine cool down andtouch only the components described in thefollowing.
G WARNINGWindshield washer concentrate is highlyflammable. If it comes into contact with hot
Engine compartment 583
Maintenance
andcare
Z
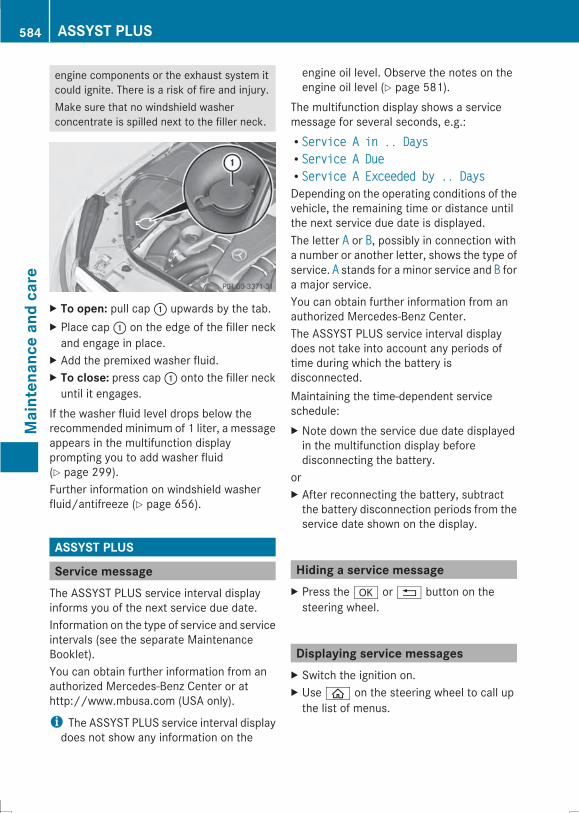
engine components or the exhaust system itcould ignite. There is a risk of fire and injury.Make sure that no windshield washerconcentrate is spilled next to the filler neck.
X To open: pull cap: upwards by the tab.X Place cap: on the edge of the filler neckand engage in place.
X Add the premixed washer fluid.X To close: press cap: onto the filler neckuntil it engages.
If the washer fluid level drops below therecommended minimum of 1 liter, a messageappears in the multifunction displayprompting you to add washer fluid(Y page 299).Further information on windshield washerfluid/antifreeze (Y page 656).
ASSYST PLUS
Service messageThe ASSYST PLUS service interval displayinforms you of the next service due date.Information on the type of service and serviceintervals (see the separate MaintenanceBooklet).You can obtain further information from anauthorized Mercedes-Benz Center or athttp://www.mbusa.com (USA only).
i The ASSYST PLUS service interval displaydoes not show any information on the
engine oil level. Observe the notes on theengine oil level (Y page 581).
The multifunction display shows a servicemessage for several seconds, e.g.:RService A in .. DaysService A in .. DaysRService A DueService A DueRService A Exceeded by .. DaysService A Exceeded by .. DaysDepending on the operating conditions of thevehicle, the remaining time or distance untilthe next service due date is displayed.The letter AA or BB, possibly in connection witha number or another letter, shows the type ofservice. AA stands for a minor service and BB fora major service.You can obtain further information from anauthorized Mercedes-Benz Center.The ASSYST PLUS service interval displaydoes not take into account any periods oftime during which the battery isdisconnected.Maintaining the time-dependent serviceschedule:X Note down the service due date displayedin the multifunction display beforedisconnecting the battery.
orX After reconnecting the battery, subtractthe battery disconnection periods from theservice date shown on the display.
Hiding a service messageX Press thea or% button on thesteering wheel.
Displaying service messagesX Switch the ignition on.X Useò on the steering wheel to call upthe list of menus.
584 ASSYST PLUSMaintenance
andcare
X Press the9 or: button on thesteering wheel to select the ServiceServicemenuand pressa to confirm.
X Press the9 or: button on thesteering wheel to select the ASSYST PLUSASSYST PLUSsubmenu and pressa to confirm.The service due date appears in themultifunction display.
Information about Service
Resetting the ASSYST PLUS serviceinterval display! If the ASSYST PLUS service intervaldisplay has been inadvertently reset, thissetting can be corrected at a qualifiedspecialist workshop.Have service work carried out as describedin the Maintenance Booklet. This mayotherwise lead to increased wear anddamage to the major assemblies or thevehicle.
A qualified specialist workshop, e.g. anauthorized Mercedes-Benz Center, will resetthe ASSYST PLUS service interval displayafter the service work has been carried out.You can also obtain further information onmaintenance work, for example.
Special service requirementsThe specifiedmaintenance interval takes onlythe normal operation of the vehicle intoaccount. Under arduous operating conditionsor increased load on the vehicle,maintenance work must be carried out morefrequently, for example:Rregular city driving with frequentintermediate stopsRif the vehicle is primarily used to travelshort distancesRuse in mountainous terrain or on poor roadsurfacesRif the engine is often left idling for longperiods
Under these or similar conditions, have, forexample, the air filter, engine oil and oil filterreplaced or changed more frequently. Underarduous operating conditions, the tires mustbe checked more often. Further informationcan be obtained at a qualified specialistworkshop, e.g. an authorized Mercedes-BenzCenter.
Driving abroadAn extensiveMercedes-Benz Service networkis also available in other countries. You canobtain further information from anyauthorized Mercedes-Benz Center.
Care
General notes
H Environmental noteDispose of empty packaging and cleaningcloths in an environmentally responsiblemanner.
! For cleaning your vehicle, do not use anyof the following:Rdry, rough or hard clothsRabrasive cleaning agentsRsolventsRcleaning agents containing solventsDo not scrub.Do not touch the surfaces or protectivefilms with hard objects, e.g. a ring or icescraper. You could otherwise scratch ordamage the surfaces and protective film.
! Do not park the vehicle for an extendedperiod straight after cleaning it, particularlyafter having cleaned the wheels with wheelcleaner. Wheel cleaners could causeincreased corrosion of the brake discs andbrake pads/linings. For this reason, youshould drive for a few minutes aftercleaning. Braking heats the brake discs andthe brake pads/linings, thus drying them.The vehicle can then be parked.
Care 585
Maintenance
andcare
Z
Regular care of your vehicle is a condition forretaining the quality in the long term.Use care products and cleaning agentsrecommended and approved by Mercedes-Benz.
Washing the vehicle and cleaning thepaintwork
Automatic car wash
G WARNINGBraking efficiency is reduced after washingthe vehicle. There is a risk of an accident.After the vehicle has been washed, brakecarefully while paying attention to the trafficconditions until full braking power is restored.
! If DISTRONIC PLUS or the HOLD functionis activated, the vehicle brakesautomatically in certain situations. Toprevent damage to the vehicle, deactivateDISTRONIC PLUS and the HOLD function inthe following or other similar situations:Rwhen towing the vehicleRin the car wash
! Never clean your vehicle in a TouchlessAutomatic Car Wash as these use specialcleaning agents. These cleaning agents candamage the paintwork or plastic parts.
! Make sure that:Rthe side windows and the sliding sunroofare fully closed.Rthe ventilation/heating is switched off(the OFF button has been pressed).Rthe windshield wiper switch is in position0.
Otherwise, the vehicle might be damaged.
! If the key is within the rear detectionrange of KEYLESS-GO, the followingsituations, for example, could lead to theunintentional opening of the trunk:Rusing a car washRusing a power washer
Make sure that the key is at least 6.5 ft(2 m) away from the vehicle.
! Make sure that the automatictransmission is in neutral position N whenwashing your vehicle in a tow-through carwash. The vehicle may otherwise bedamaged.ROperating with the SmartKey:Do not remove the SmartKey from theignition lock. Do not open the driver'sdoor when the engine is switched off orat very low speeds. Otherwise, when intransmission position D or R theautomatic transmission willautomatically switch to park position Pand block the wheels.ROperating with the Start/Stop button:Do not open the driver's door when theengine is switched off or at very lowspeeds. Otherwise, when in transmissionposition D or R the automatictransmission will automatically switch topark position P and block the wheels.
Observe the following to make sure that theautomatic transmission stays in position Nneutral:Operating with the SmartKey:X Make sure that the ignition is switched on.X Make sure that the vehicle is stationary.X Depress and hold the brake pedal.X Shift to neutral N.X Release the brake pedal.X Release the electric parking brake, ifnecessary.
X Switch off the ignition and leave theSmartKey in the ignition lock.
Operating with the Start/Stop button:X Make sure that the ignition is switched on.X Make sure that the vehicle is stationary.X Depress and hold the brake pedal.X Engage park position P.X Release the brake pedal.
586 CareMaintenance
andcare
X Remove Start/Stop button from ignitionlock (Y page 175).
X Insert the SmartKey into the ignition lock.X Switch on the ignition.X Depress and hold the brake pedal.X Shift to neutral N.X Release the brake pedal.X Release the electric parking brake, ifnecessary.
X Switch off the ignition and leave theSmartKey in the ignition lock.
You can wash the vehicle in an automatic carwash from the very start.If the vehicle is very dirty, pre-wash it beforecleaning it in an automatic car wash.After using an automatic car wash, wipe offwax from the windshield and the wiperblades. This will prevent smears and reducewiping noises caused by residue on thewindshield.
Washing by handIn some countries, washing by hand is onlyallowed at specially equipped washing bays.Observe the legal requirements in eachcountry.X Do not use hot water and do not wash thevehicle in direct sunlight.
X Use a soft sponge to clean.X Use a mild cleaning agent, such as a carshampoo approved by Mercedes-Benz.
X Thoroughly hose down the vehicle with agentle jet of water.
X Do not point the water jet directly towardsthe air inlet.
X Use plenty of water and rinse out thesponge frequently.
X Rinse the vehicle with clean water and drythoroughly with a chamois.
X Do not let the cleaning agent dry on thepaintwork.
Carefully remove all deposits of road salt assoon as possible when driving in winter.
Power washers
G WARNINGThe water jet from a circular jet nozzle (dirtblasters) can cause invisible exterior damageto the tires or chassis components.Components damaged in this way may failunexpectedly. There is a risk of an accident.Do not use power washers with circular jetnozzles to clean the vehicle. Have damagedtires or chassis components replacedimmediately.
! Always maintain a distance of at least11.8 in (30 cm) between the vehicle and thepower washer nozzle. Information aboutthe correct distance is available from theequipment manufacturer.Move the power washer nozzle aroundwhen cleaning your vehicle.Do not aim directly at any of the following:RtiresRdoor gaps, roof gaps, joints, etc.Relectrical componentsRbatteryRconnectorsRlightsRsealsRtrimRventilation slotsDamaged seals or electrical componentscan lead to leaks or failures.
! If the key is within the rear detectionrange of KEYLESS-GO, the followingsituations, for example, could lead to theunintentional opening of the trunk:Rusing a car washRusing a power washerMake sure that the key is at least 6.5 ft(2 m) away from the vehicle.
Care 587
Maintenance
andcare
Z
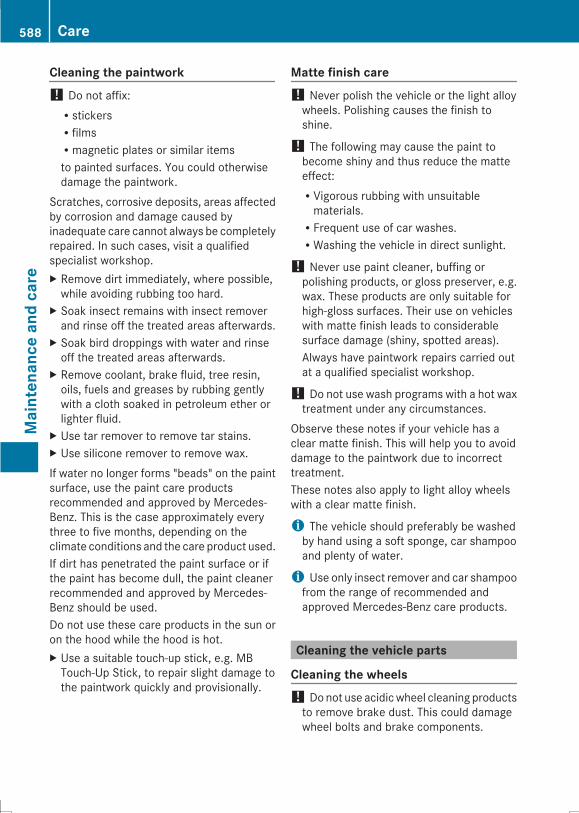
Cleaning the paintwork! Do not affix:RstickersRfilmsRmagnetic plates or similar itemsto painted surfaces. You could otherwisedamage the paintwork.
Scratches, corrosive deposits, areas affectedby corrosion and damage caused byinadequate care cannot always be completelyrepaired. In such cases, visit a qualifiedspecialist workshop.X Remove dirt immediately, where possible,while avoiding rubbing too hard.
X Soak insect remains with insect removerand rinse off the treated areas afterwards.
X Soak bird droppings with water and rinseoff the treated areas afterwards.
X Remove coolant, brake fluid, tree resin,oils, fuels and greases by rubbing gentlywith a cloth soaked in petroleum ether orlighter fluid.
X Use tar remover to remove tar stains.X Use silicone remover to remove wax.If water no longer forms "beads" on the paintsurface, use the paint care productsrecommended and approved by Mercedes-Benz. This is the case approximately everythree to five months, depending on theclimate conditions and the care product used.If dirt has penetrated the paint surface or ifthe paint has become dull, the paint cleanerrecommended and approved by Mercedes-Benz should be used.Do not use these care products in the sun oron the hood while the hood is hot.X Use a suitable touch-up stick, e.g. MBTouch-Up Stick, to repair slight damage tothe paintwork quickly and provisionally.
Matte finish care! Never polish the vehicle or the light alloywheels. Polishing causes the finish toshine.
! The following may cause the paint tobecome shiny and thus reduce the matteeffect:RVigorous rubbing with unsuitablematerials.RFrequent use of car washes.RWashing the vehicle in direct sunlight.
! Never use paint cleaner, buffing orpolishing products, or gloss preserver, e.g.wax. These products are only suitable forhigh-gloss surfaces. Their use on vehicleswith matte finish leads to considerablesurface damage (shiny, spotted areas).Always have paintwork repairs carried outat a qualified specialist workshop.
! Do not use wash programs with a hot waxtreatment under any circumstances.
Observe these notes if your vehicle has aclear matte finish. This will help you to avoiddamage to the paintwork due to incorrecttreatment.These notes also apply to light alloy wheelswith a clear matte finish.
i The vehicle should preferably be washedby hand using a soft sponge, car shampooand plenty of water.
i Use only insect remover and car shampoofrom the range of recommended andapproved Mercedes-Benz care products.
Cleaning the vehicle parts
Cleaning the wheels! Donot use acidicwheel cleaning productsto remove brake dust. This could damagewheel bolts and brake components.
588 CareMaintenance
andcare

! Do not park the vehicle for an extendedperiod straight after cleaning it, particularlyafter having cleaned the wheels with wheelcleaner. Wheel cleaners could causeincreased corrosion of the brake discs andbrake pads/linings. For this reason, youshould drive for a few minutes aftercleaning. Braking heats the brake discs andthe brake pads/linings, thus drying them.The vehicle can then be parked.
Cleaning the windows
G WARNINGYou could become trapped by the windshieldwipers if they start moving while cleaning thewindshield or wiper blades. There is a risk ofinjury.Always switch off the windshield wipers andthe ignition before cleaning the windshield orwiper blades.
! Do not use dry cloths, abrasive products,solvents or cleaning agents containingsolvents to clean the inside of the windows.Do not touch the insides of the windowswith hard objects, e.g. an ice scraper orring. There is otherwise a risk of damagingthe windows.
! Clean the water drainage channels of thewindshield and the rear window at regularintervals. Deposits such as leaves, petalsand pollen may under certaincircumstances prevent water from drainingaway. This can lead to corrosion damageand damage to electronic components.
X Clean the inside and outside of thewindows with a damp cloth and a cleaningproduct that is recommended andapproved by Mercedes-Benz.
Cleaning wiper blades
G WARNINGYou could become trapped by the windshieldwipers if they start moving while cleaning the
windshield or wiper blades. There is a risk ofinjury.Always switch off the windshield wipers andthe ignition before cleaning the windshield orwiper blades.
! Do not pull the wiper blade. Otherwise,the wiper blade could be damaged.
! Do not clean wiper blades too often anddo not rub them too hard. Otherwise, thegraphite coating could be damaged. Thiscould cause wiper noise.
! Hold the wiper arm securely when foldingback. The windshield could be damaged ifthe wiper arm smacks against it suddenly.
X Fold the windshield wiper arms away fromthe windshield.
X Carefully clean the wiper blades with adamp cloth.
X Fold the windshield wiper arms back againbefore switching on the ignition.
Cleaning the exterior lighting! Only use cleaning agents or cleaningcloths which are suitable for plastic lightlenses. Unsuitable cleaning agents orcleaning cloths could scratch or damagethe plastic light lenses.
X Clean the plastic lenses of the exteriorlightswith awet sponge and amild cleaningagent, e.g. Mercedes-Benz car shampoo orcleaning cloths.
Mirror turn signals! Only use cleaning agents or cleaningcloths that are suitable for plastic lenses.Unsuitable cleaning agents or cleaningcloths could scratch or damage the plasticlenses of the mirror turn signals.
X Clean the plastic lenses of the mirror turnsignals in the exterior mirror housing usinga wet sponge and mild cleaning agent, e.g.
Care 589
Maintenance
andcare
Z
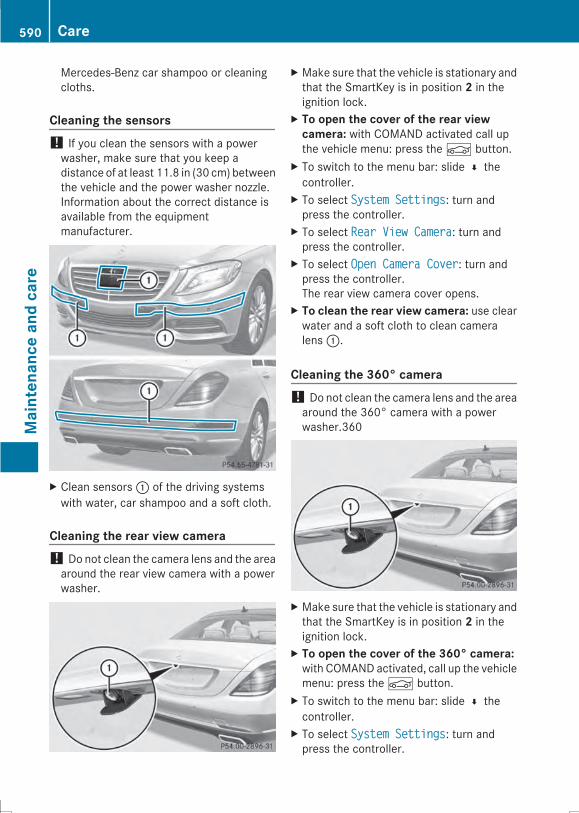
Mercedes-Benz car shampoo or cleaningcloths.
Cleaning the sensors! If you clean the sensors with a powerwasher, make sure that you keep adistance of at least 11.8 in (30 cm) betweenthe vehicle and the power washer nozzle.Information about the correct distance isavailable from the equipmentmanufacturer.
X Clean sensors: of the driving systemswith water, car shampoo and a soft cloth.
Cleaning the rear view camera! Do not clean the camera lens and the areaaround the rear view camera with a powerwasher.
X Make sure that the vehicle is stationary andthat the SmartKey is in position 2 in theignition lock.
X To open the cover of the rear viewcamera: with COMAND activated call upthe vehicle menu: press theÑ button.
X To switch to the menu bar: slide¬ thecontroller.
X To select System SettingsSystem Settings: turn andpress the controller.
X To select Rear View CameraRear View Camera: turn andpress the controller.
X To select Open Camera CoverOpen Camera Cover: turn andpress the controller.The rear view camera cover opens.
X To clean the rear view camera: use clearwater and a soft cloth to clean cameralens:.
Cleaning the 360° camera! Do not clean the camera lens and the areaaround the 360° camera with a powerwasher.360
X Make sure that the vehicle is stationary andthat the SmartKey is in position 2 in theignition lock.
X To open the cover of the 360° camera:with COMAND activated, call up the vehiclemenu: press theÑ button.
X To switch to the menu bar: slide¬ thecontroller.
X To select System SettingsSystem Settings: turn andpress the controller.
590 CareMaintenance
andcare
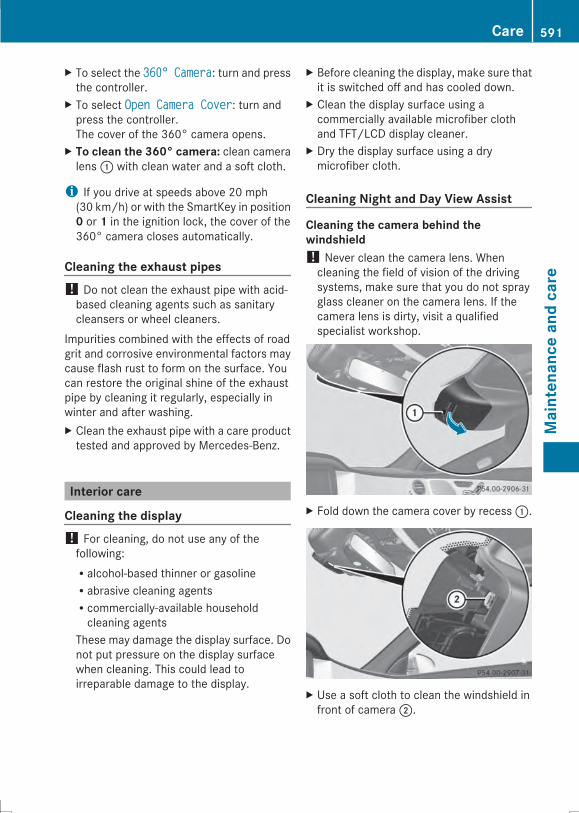
X To select the 360°360° CameraCamera: turn and pressthe controller.
X To select Open Camera CoverOpen Camera Cover: turn andpress the controller.The cover of the 360° camera opens.
X To clean the 360° camera: clean cameralens: with clean water and a soft cloth.
i If you drive at speeds above 20 mph(30 km/h) or with the SmartKey in position0 or 1 in the ignition lock, the cover of the360° camera closes automatically.
Cleaning the exhaust pipes! Do not clean the exhaust pipe with acid-based cleaning agents such as sanitarycleansers or wheel cleaners.
Impurities combined with the effects of roadgrit and corrosive environmental factors maycause flash rust to form on the surface. Youcan restore the original shine of the exhaustpipe by cleaning it regularly, especially inwinter and after washing.X Clean the exhaust pipe with a care producttested and approved by Mercedes-Benz.
Interior care
Cleaning the display! For cleaning, do not use any of thefollowing:Ralcohol-based thinner or gasolineRabrasive cleaning agentsRcommercially-available householdcleaning agents
These may damage the display surface. Donot put pressure on the display surfacewhen cleaning. This could lead toirreparable damage to the display.
X Before cleaning the display, make sure thatit is switched off and has cooled down.
X Clean the display surface using acommercially available microfiber clothand TFT/LCD display cleaner.
X Dry the display surface using a drymicrofiber cloth.
Cleaning Night and Day View Assist
Cleaning the camera behind thewindshield! Never clean the camera lens. Whencleaning the field of vision of the drivingsystems, make sure that you do not sprayglass cleaner on the camera lens. If thecamera lens is dirty, visit a qualifiedspecialist workshop.
X Fold down the camera cover by recess:.
X Use a soft cloth to clean the windshield infront of camera;.
Care 591
Maintenance
andcare
Z
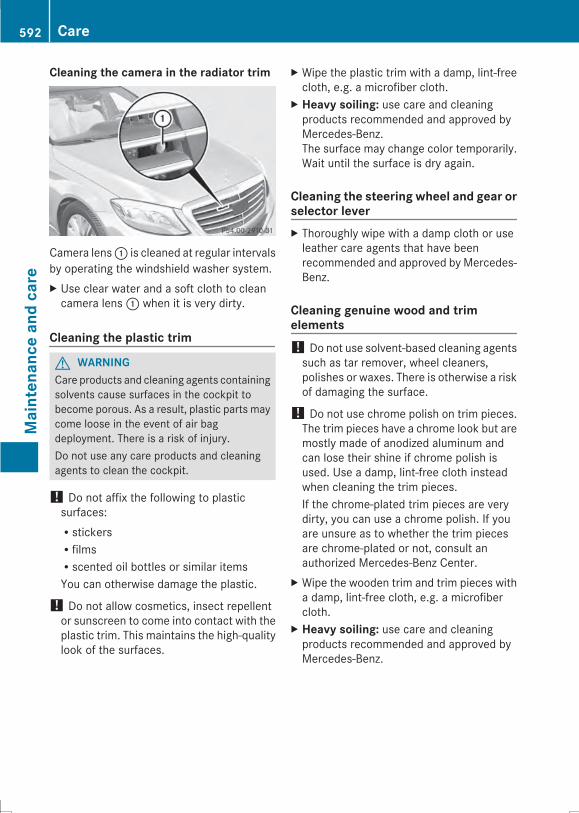
Cleaning the camera in the radiator trim
Camera lens: is cleaned at regular intervalsby operating the windshield washer system.X Use clear water and a soft cloth to cleancamera lens: when it is very dirty.
Cleaning the plastic trim
G WARNINGCare products and cleaning agents containingsolvents cause surfaces in the cockpit tobecome porous. As a result, plastic parts maycome loose in the event of air bagdeployment. There is a risk of injury.Do not use any care products and cleaningagents to clean the cockpit.
! Do not affix the following to plasticsurfaces:RstickersRfilmsRscented oil bottles or similar itemsYou can otherwise damage the plastic.
! Do not allow cosmetics, insect repellentor sunscreen to come into contact with theplastic trim. This maintains the high-qualitylook of the surfaces.
X Wipe the plastic trim with a damp, lint-freecloth, e.g. a microfiber cloth.
X Heavy soiling: use care and cleaningproducts recommended and approved byMercedes-Benz.The surface may change color temporarily.Wait until the surface is dry again.
Cleaning the steering wheel and gear orselector leverX Thoroughly wipe with a damp cloth or useleather care agents that have beenrecommended and approved by Mercedes-Benz.
Cleaning genuine wood and trimelements! Do not use solvent-based cleaning agentssuch as tar remover, wheel cleaners,polishes or waxes. There is otherwise a riskof damaging the surface.
! Do not use chrome polish on trim pieces.The trim pieces have a chrome look but aremostly made of anodized aluminum andcan lose their shine if chrome polish isused. Use a damp, lint-free cloth insteadwhen cleaning the trim pieces.If the chrome-plated trim pieces are verydirty, you can use a chrome polish. If youare unsure as to whether the trim piecesare chrome-plated or not, consult anauthorized Mercedes-Benz Center.
X Wipe the wooden trim and trim pieces witha damp, lint-free cloth, e.g. a microfibercloth.
X Heavy soiling: use care and cleaningproducts recommended and approved byMercedes-Benz.
592 CareMaintenance
andcare
Cleaning the seat covers
General notes! Do not use microfiber cloths to cleangenuine leather, artificial leather orDINAMICA covers. If used often, these candamage the cover.
i Note that regular care is essential toensure that the appearance and comfort ofthe covers is retained over time.
Genuine leather seat covers! To retain the natural appearance of theleather, observe the following cleaninginstructions:RClean genuine leather covers carefullywith a damp cloth and then wipe thecovers down with a dry cloth.RMake sure that the leather does notbecome soaked. It may otherwisebecome rough and cracked.ROnly use leather care agents that havebeen tested and approved by Mercedes-Benz. You can obtain these from aqualified specialist workshop.
Leather is a natural product.It exhibits natural surface characteristics, forexample:RDifferences in the textureRSigns of stretching and markingRSlight nuances of colorThese are characteristics of leather and notmaterial defects.
Seat covers of other materials! Observe the following when cleaning:RClean artificial leather coverswith a clothmoistened with a solution containing1% detergent (e.g. dish washing liquid).RClean cloth covers with a microfibercloth moistened with a solutioncontaining 1% detergent (e.g. dishwashing liquid). Rub carefully and alwayswipe entire seat sections to avoid leavingvisible lines. Leave the seat to dry
afterwards. Cleaning results depend onthe type of dirt and how long it has beenthere.RClean Alcantara® covers with a dampcloth. Make sure that you wipe entireseat sections to avoid leaving visiblelines.
Cleaning the seat belts
G WARNINGSeat belts can become severely weakened ifbleached or dyed. This could cause the seatbelts to tear or fail, for instance, in the eventof an accident. This poses an increased riskof injury or fatal injury.Never bleach or dye the seat belts.
! Donot clean the seat belts using chemicalcleaning agents. Do not dry the seat beltsby heating at temperatures above 176 ‡(80 †) or in direct sunlight.
X Use clean, lukewarm water and soapsolution.
Cleaning the headliner and carpetsX Headliner: if it is very dirty, use a soft brushor dry shampoo.
X Carpets: use the carpet and textilecleaning agents recommended andapproved by Mercedes-Benz.
Care 593
Maintenance
andcare
Z

594

Useful information ............................ 596Where will I find...? ........................... 596Flat tire .............................................. 597Battery (vehicle) ................................ 601Jump-starting .................................... 605Towing and tow-starting .................. 608Fuses .................................................. 611
595
Breakdow
nassistance
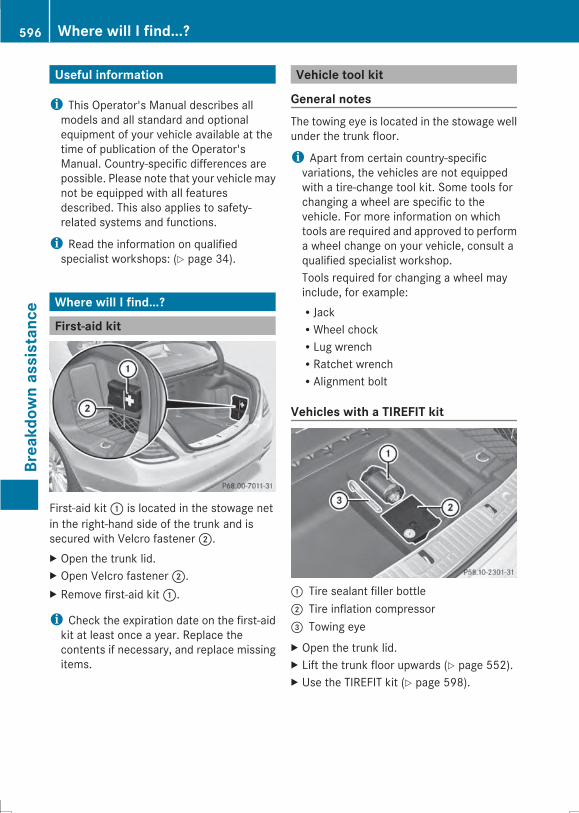
Useful information
i This Operator's Manual describes allmodels and all standard and optionalequipment of your vehicle available at thetime of publication of the Operator'sManual. Country-specific differences arepossible. Please note that your vehicle maynot be equipped with all featuresdescribed. This also applies to safety-related systems and functions.
i Read the information on qualifiedspecialist workshops: (Y page 34).
Where will I find...?
First-aid kit
First-aid kit: is located in the stowage netin the right-hand side of the trunk and issecured with Velcro fastener;.X Open the trunk lid.X Open Velcro fastener;.X Remove first-aid kit:.
i Check the expiration date on the first-aidkit at least once a year. Replace thecontents if necessary, and replace missingitems.
Vehicle tool kit
General notesThe towing eye is located in the stowage wellunder the trunk floor.
i Apart from certain country-specificvariations, the vehicles are not equippedwith a tire-change tool kit. Some tools forchanging a wheel are specific to thevehicle. For more information on whichtools are required and approved to performa wheel change on your vehicle, consult aqualified specialist workshop.Tools required for changing a wheel mayinclude, for example:RJackRWheel chockRLug wrenchRRatchet wrenchRAlignment bolt
Vehicles with a TIREFIT kit
: Tire sealant filler bottle; Tire inflation compressor= Towing eyeX Open the trunk lid.X Lift the trunk floor upwards (Y page 552).X Use the TIREFIT kit (Y page 598).
596 Where will I find...?Breakdow
nassistance
Flat tire
Preparing the vehicleYour vehicle may be equipped with:RMOExtended tires (tires with run-flatproperties) (Y page 597)Vehicle preparation is not necessary onvehicles with MOExtended tires.Ra TIREFIT kit (Y page 596)Information on changing/mounting a wheel(Y page 638).X Stop the vehicle on solid, non-slippery andlevel ground, as far away as possible fromtraffic.
X Switch on the hazard warning lamps.X Secure the vehicle against rolling away(Y page 191).
X If possible, bring the front wheels into thestraight-ahead position.
X Switch off the engine.X Open the driver's door.The on-board electronics now have status0. This is the same as the SmartKey havingbeen removed.
X Remove Start/Stop button from ignitionlock (Y page 175).
or, if the SmartKey is inserted in the ignitionlock:X Remove the SmartKey from the ignitionlock.
X All occupants must get out of the vehicle.Make sure that they are not endangered asthey do so.
X Make sure that no one is near the dangerarea while a wheel is being changed.Anyone who is not directly assisting in thewheel change should, for example, standbehind the barrier.
X Get out of the vehicle. Pay attention totraffic conditions when doing so.
X Close the driver's door.
MOExtended tires (tires with run-flatproperties)
General notesWith MOExtended tires (tires with run flatcharacteristics), you can continue to driveyour vehicle even if there is a total loss ofpressure in one or more tires. The affectedtiremust not show any clearly visible damage.You can recognize MOExtended tires by theMOExtended marking which appears on thesidewall of the tire. You will find this markingnext to the tire size designation, the load-bearing capacity and the speed index(Y page 632).MOExtended tires may only be used inconjunction with an active tire pressure losswarning systemorwith an active tire pressuremonitor.If the pressure loss warning messageappears in the multifunction display:RObserve the instructions in the displaymessages (Y page 294).RCheck the tire for damage.RIf driving on, observe the following notes.The maximum driving distance isapproximately 50 miles (80 km) when thevehicle is partially laden and approximately18 miles (30 km) when the vehicle is fullyladen.In addition to the vehicle load, the drivingdistance possible depends upon:RSpeedRRoad conditionROutside temperatureThe driving distance possible in run-flat modemay be reduced by extreme drivingconditions/maneuvers, or it can be increasedthrough a moderate style of driving.The maximum permissible distance whichcan be driven in run-flatmode is counted fromthe moment the tire pressure loss warningappears in the multifunction display.
Flat tire 597
Breakdow
nassistance
You must not exceed a maximum speed of50 mph (80 km/h).
i When replacing one or all tires, make surethat you use only tires:Rof the size specified for the vehicle andRmarked "MOExtended"If a tire has gone flat and cannot bereplaced with a MOExtended tire, astandard tire may be used as a temporarymeasure. Make sure that you use theproper size and type (summer or wintertire).
i Vehicles equippedwithMOExtended tiresare not equipped with a TIREFIT kit at thefactory. It is therefore recommended thatyou additionally equip your vehicle with aTIREFIT kit if you mount tires that do notfeature run-flat properties, e.g. winter tires.A TIREFIT kit may be obtained from aqualified specialist workshop.
Important safety notes
G WARNINGWhen driving in emergency mode, the drivingcharacteristics deteriorate, e.g. whencornering, accelerating quickly and whenbraking. There is a risk of an accident.Do not exceed the stated maximum speed.Avoid abrupt steering and driving maneuvers,and driving over obstacles (curbs, potholes,off-road). This applies in particular to a ladenvehicle.Stop driving in emergency mode if:Ryou hear banging noises.Rthe vehicle starts to shake.Ryou see smoke and smell rubber.RESP® is intervening constantly.Rthere are tears in the sidewalls of the tire.After driving in emergency mode, have thewheel rims checked at a qualified specialistworkshop with regard to their further use. Thedefective tire must be replaced in every case.
TIREFIT kit
Important safety notesTIREFIT is a tire sealant.You can use TIREFIT to seal punctures of upto 0.16 in (4mm), particularly those in the tiretread. You can use TIREFIT at outsidetemperatures down to Ò4 ‡ (Ò20 †).
G WARNINGIn the following situations, the tire sealant isunable to provide sufficient breakdownassistance, as it is unable to seal the tireproperly:Rthere are cuts or punctures in the tire largerthan those mentioned above.Rthe wheel rim is damaged.Ryou have driven at very low tire pressuresor on a flat tire.
There is a risk of an accident.Do not drive the vehicle. Contact a qualifiedspecialist workshop.
G WARNINGThe tire sealant is harmful and causesirritation. It must not come into contact withyour skin, eyes or clothing or be swallowed.Do not inhale TIREFIT fumes. Keep tire sealantaway from children. There is a risk of injury.If you come into contact with the tire sealant,observe the following:RRinse off the tire sealant from your skinimmediately with water.RIf the tire sealant comes into contact withyour eyes, immediately rinse themthoroughly with clean water.RIf tire sealant is swallowed, immediatelyrinse your mouth out thoroughly and drinkplenty of water. Do not induce vomiting,and seek medical attention immediately.RImmediately change out of clothing whichhas come into contact with tire sealant.RIf an allergic reaction occurs, seek medicalattention immediately.
598 Flat tireBreakdow
nassistance
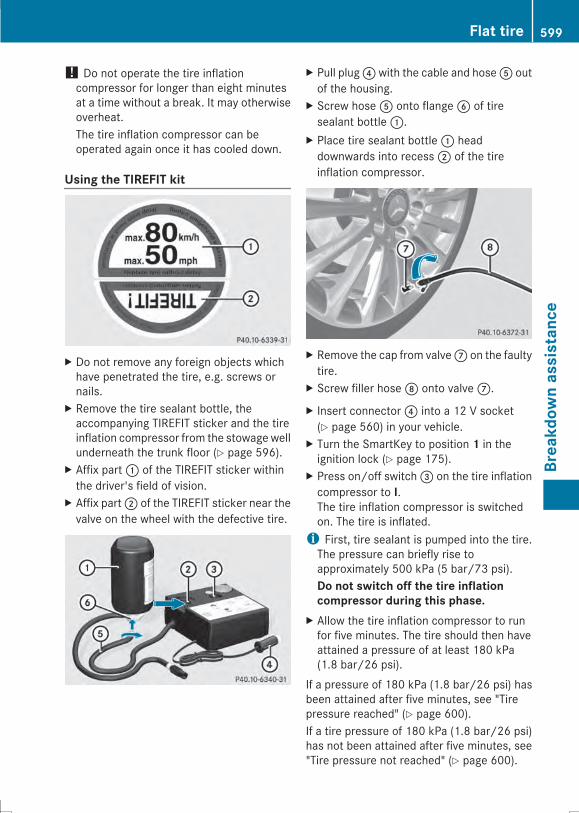
! Do not operate the tire inflationcompressor for longer than eight minutesat a time without a break. It may otherwiseoverheat.The tire inflation compressor can beoperated again once it has cooled down.
Using the TIREFIT kit
X Do not remove any foreign objects whichhave penetrated the tire, e.g. screws ornails.
X Remove the tire sealant bottle, theaccompanying TIREFIT sticker and the tireinflation compressor from the stowage wellunderneath the trunk floor (Y page 596).
X Affix part: of the TIREFIT sticker withinthe driver's field of vision.
X Affix part; of the TIREFIT sticker near thevalve on the wheel with the defective tire.
X Pull plug?with the cable and hoseA outof the housing.
X Screw hoseA onto flangeB of tiresealant bottle:.
X Place tire sealant bottle: headdownwards into recess; of the tireinflation compressor.
X Remove the cap from valveC on the faultytire.
X Screw filler hoseD onto valveC.
X Insert connector? into a 12 V socket(Y page 560) in your vehicle.
X Turn the SmartKey to position 1 in theignition lock (Y page 175).
X Press on/off switch= on the tire inflationcompressor to I.The tire inflation compressor is switchedon. The tire is inflated.i First, tire sealant is pumped into the tire.The pressure can briefly rise toapproximately 500 kPa (5 bar/73 psi).Do not switch off the tire inflationcompressor during this phase.
X Allow the tire inflation compressor to runfor five minutes. The tire should then haveattained a pressure of at least 180 kPa(1.8 bar/26 psi).
If a pressure of 180 kPa (1.8 bar/26 psi) hasbeen attained after five minutes, see "Tirepressure reached" (Y page 600).If a tire pressure of 180 kPa (1.8 bar/26 psi)has not been attained after five minutes, see"Tire pressure not reached" (Y page 600).
Flat tire 599
Breakdow
nassistance
Z
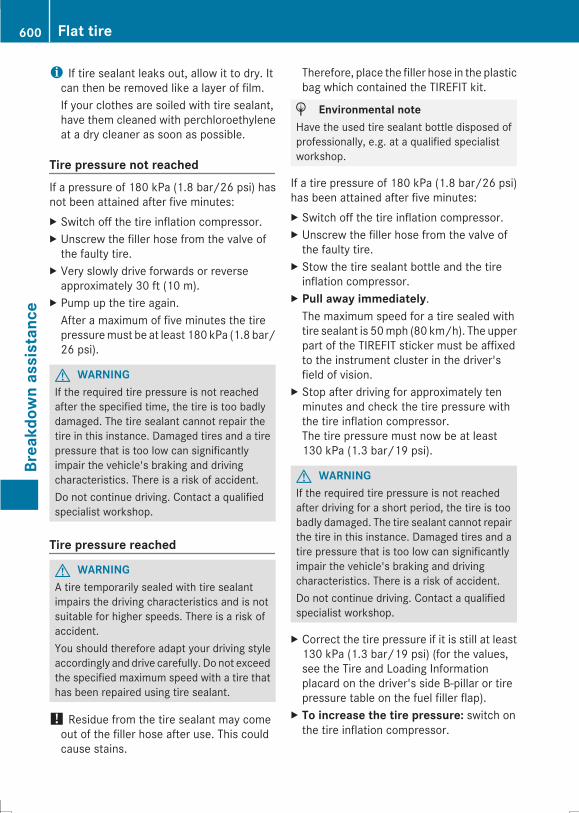
i If tire sealant leaks out, allow it to dry. Itcan then be removed like a layer of film.If your clothes are soiled with tire sealant,have them cleaned with perchloroethyleneat a dry cleaner as soon as possible.
Tire pressure not reachedIf a pressure of 180 kPa (1.8 bar/26 psi) hasnot been attained after five minutes:X Switch off the tire inflation compressor.X Unscrew the filler hose from the valve ofthe faulty tire.
X Very slowly drive forwards or reverseapproximately 30 ft (10 m).
X Pump up the tire again.After a maximum of five minutes the tirepressuremust be at least 180 kPa (1.8 bar/26 psi).
G WARNINGIf the required tire pressure is not reachedafter the specified time, the tire is too badlydamaged. The tire sealant cannot repair thetire in this instance. Damaged tires and a tirepressure that is too low can significantlyimpair the vehicle's braking and drivingcharacteristics. There is a risk of accident.Do not continue driving. Contact a qualifiedspecialist workshop.
Tire pressure reached
G WARNINGA tire temporarily sealed with tire sealantimpairs the driving characteristics and is notsuitable for higher speeds. There is a risk ofaccident.You should therefore adapt your driving styleaccordingly and drive carefully. Do not exceedthe specified maximum speed with a tire thathas been repaired using tire sealant.
! Residue from the tire sealant may comeout of the filler hose after use. This couldcause stains.
Therefore, place the filler hose in the plasticbag which contained the TIREFIT kit.
H Environmental noteHave the used tire sealant bottle disposed ofprofessionally, e.g. at a qualified specialistworkshop.
If a tire pressure of 180 kPa (1.8 bar/26 psi)has been attained after five minutes:X Switch off the tire inflation compressor.X Unscrew the filler hose from the valve ofthe faulty tire.
X Stow the tire sealant bottle and the tireinflation compressor.
X Pull away immediately.The maximum speed for a tire sealed withtire sealant is 50mph (80 km/h). The upperpart of the TIREFIT sticker must be affixedto the instrument cluster in the driver'sfield of vision.
X Stop after driving for approximately tenminutes and check the tire pressure withthe tire inflation compressor.The tire pressure must now be at least130 kPa (1.3 bar/19 psi).
G WARNINGIf the required tire pressure is not reachedafter driving for a short period, the tire is toobadly damaged. The tire sealant cannot repairthe tire in this instance. Damaged tires and atire pressure that is too low can significantlyimpair the vehicle's braking and drivingcharacteristics. There is a risk of accident.Do not continue driving. Contact a qualifiedspecialist workshop.
X Correct the tire pressure if it is still at least130 kPa (1.3 bar/19 psi) (for the values,see the Tire and Loading Informationplacard on the driver's side B-pillar or tirepressure table on the fuel filler flap).
X To increase the tire pressure: switch onthe tire inflation compressor.
600 Flat tireBreakdow
nassistance
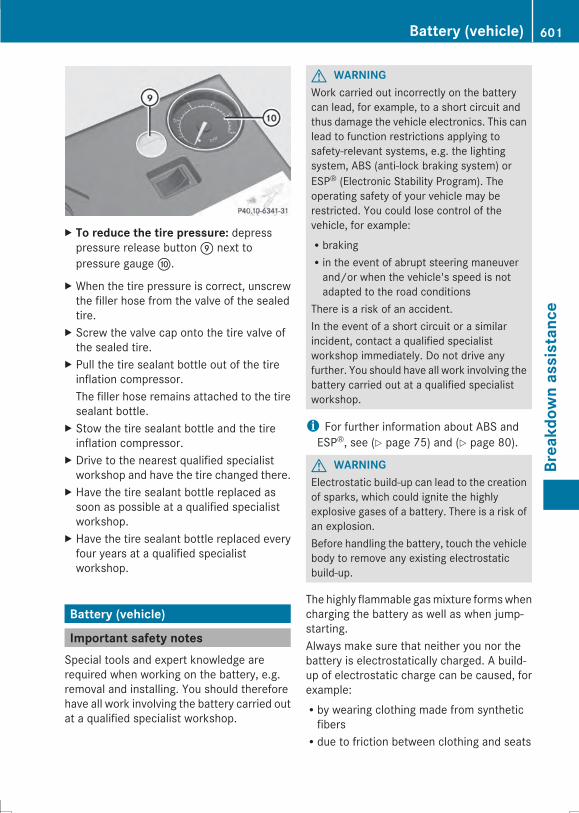
X To reduce the tire pressure: depresspressure release buttonE next topressure gaugeF.
X When the tire pressure is correct, unscrewthe filler hose from the valve of the sealedtire.
X Screw the valve cap onto the tire valve ofthe sealed tire.
X Pull the tire sealant bottle out of the tireinflation compressor.The filler hose remains attached to the tiresealant bottle.
X Stow the tire sealant bottle and the tireinflation compressor.
X Drive to the nearest qualified specialistworkshop and have the tire changed there.
X Have the tire sealant bottle replaced assoon as possible at a qualified specialistworkshop.
X Have the tire sealant bottle replaced everyfour years at a qualified specialistworkshop.
Battery (vehicle)
Important safety notesSpecial tools and expert knowledge arerequired when working on the battery, e.g.removal and installing. You should thereforehave all work involving the battery carried outat a qualified specialist workshop.
G WARNINGWork carried out incorrectly on the batterycan lead, for example, to a short circuit andthus damage the vehicle electronics. This canlead to function restrictions applying tosafety-relevant systems, e.g. the lightingsystem, ABS (anti-lock braking system) orESP® (Electronic Stability Program). Theoperating safety of your vehicle may berestricted. You could lose control of thevehicle, for example:RbrakingRin the event of abrupt steering maneuverand/or when the vehicle's speed is notadapted to the road conditions
There is a risk of an accident.In the event of a short circuit or a similarincident, contact a qualified specialistworkshop immediately. Do not drive anyfurther. You should have all work involving thebattery carried out at a qualified specialistworkshop.
i For further information about ABS andESP®, see (Y page 75) and (Y page 80).
G WARNINGElectrostatic build-up can lead to the creationof sparks, which could ignite the highlyexplosive gases of a battery. There is a risk ofan explosion.Before handling the battery, touch the vehiclebody to remove any existing electrostaticbuild-up.
The highly flammable gasmixture formswhencharging the battery as well as when jump-starting.Always make sure that neither you nor thebattery is electrostatically charged. A build-up of electrostatic charge can be caused, forexample:Rby wearing clothing made from syntheticfibersRdue to friction between clothing and seats
Battery (vehicle) 601
Breakdow
nassistance
Z
Rif you push or pull the battery across thecarpet or other synthetic materialsRif you wipe the battery with a cloth
G WARNINGDuring the charging process, a batteryproduces hydrogen gas. If a short circuitoccurs or sparks are created, the hydrogengas can ignite. There is a risk of an explosion.RMake sure that the positive terminal of aconnected battery does not come intocontact with vehicle parts.RNever place metal objects or tools on abattery.RIt is important that you observe thedescribed order of the battery terminalswhen connecting and disconnecting abattery.RWhen jump-starting, make sure that thebattery poles with identical polarity areconnected.RIt is particularly important to observe thedescribed order when connecting anddisconnecting the jumper cables.RNever connect or disconnect the batteryterminals while the engine is running.
G WARNINGBattery acid is caustic. There is a risk of injury.Avoid contact with the skin, eyes or clothing.Do not inhale any battery gases. Do not leanover the battery. Keep children away frombatteries. Wash battery acid immediately withwater and seek medical attention.
H Environmental noteBatteries contain dangeroussubstances. It is against thelaw to dispose of them withthe household rubbish. Theymust be collected separatelyand recycled to protect theenvironment.Dispose of batteries in anenvironmentally friendlymanner. Take discharged
batteries to a qualifiedspecialist workshop or aspecial collection point forused batteries.
! Have the battery checked regularly at aqualified specialist workshop.Observe the service intervals in theMaintenance Booklet or contact a qualifiedspecialist workshop for more information.
! You should have all work involving thebattery carried out at a qualified specialistworkshop. In the exceptional case that it isnecessary for you to disconnect the batteryyourself, make sure that:Rsecure the vehicle to prevent it fromrolling away.Ryou switch off the engine and remove theSmartKey. Make sure the ignition isswitched off. Check that all the indicatorlamps in the instrument cluster are off.Otherwise, electronic components, suchas the alternator, may be damaged.Ryou first remove the negative terminalclamp and then the positive terminalclamp. Never swap the terminal clamps.Otherwise, the vehicle's electronicsystem may be damaged.Rthe transmission is locked in position Pafter disconnecting the battery. Thevehicle is secured against rolling away.You can then no longer move the vehicle.
The battery and the cover of the positiveterminal clamp must be installed securelyduring operation.
Comply with safety precautions and takeprotective measures when handlingbatteries.
Risk of explosion.
Fire, open flames and smoking areprohibited when handling thebattery. Avoid creating sparks.
602 Battery (vehicle)Breakdow
nassistance
Battery acid is caustic. Avoidcontact with skin, eyes or clothing.Wear suitable protective clothing,especially gloves, apron andfaceguard.Rinse any acid spills immediatelywith clear water. Contact aphysician if necessary.Wear eye protection.
Keep children away.
Observe this Operator's Manual.
For safety reasons, Mercedes-Benzrecommends that you only use batterieswhich have been tested and approved foryour vehicle by Mercedes-Benz. Thesebatteries provide increased impactprotection to prevent vehicle occupants fromsuffering acid burns should the battery bedamaged in the event of an accident.In order for the battery to achieve themaximum possible service life, it must alwaysbe sufficiently charged.The vehicle battery, like other batteries, candischarge over time if you do not use thevehicle. In this case, have the batterydisconnected at a qualified specialistworkshop. You can also charge the batterywith a charger recommended by Mercedes-Benz. Contact a qualified specialist workshopfor further information.Have the battery condition of charge checkedmore frequently if you use the vehicle mainlyfor short trips or if you leave it standing idlefor a lengthy period. Consult a qualifiedspecialist workshop if you wish to leave yourvehicle parked for a long period of time.
i Remove the SmartKey if you park thevehicle and do not require any electrical
consumers. The vehicle will then use verylittle energy, thus conserving batterypower.
Charging the battery
G WARNINGDuring charging and jump-starting, explosivegases can escape from the battery. There is arisk of an explosion.Particularly avoid fire, open flames, creatingsparks and smoking. Ensure there is sufficientventilation while charging and jump-starting.Do not lean over a battery.
G WARNINGBattery acid is caustic. There is a risk of injury.Avoid contact with the skin, eyes or clothing.Do not inhale any battery gases. Do not leanover the battery. Keep children away frombatteries. Wash battery acid immediately withwater and seek medical attention.
G WARNINGA discharged battery can freeze attemperatures below freezing point. Whenjump-starting the vehicle or charging thebattery, gases can escape from the battery.There is a risk of an explosion.Allow the frozen battery to thaw out beforecharging it or jump-starting.
! Only use battery chargers with amaximum charging voltage of 14.8 V.
! Only charge the battery using the jump-starting connection point.
The jump-starting connection point is in theengine compartment (Y page 605).X Open the hood.X Connect the battery charger to the positiveterminal and ground point in the sameorder as when connecting the donorbattery in the jump-starting procedure(Y page 605).
Battery (vehicle) 603
Breakdow
nassistance
Z
Never charge a battery still installed in thevehicle unless a battery charger unitapproved byMercedes-Benz is being used. Anaccessory battery charge unit speciallyadapted for Mercedes-Benz vehicles andtested and approved by Mercedes-Benz isavailable. It permits the charging of thebattery in its installed position. Contact anauthorized Mercedes-Benz Center for furtherinformation and availability. Read the batterycharger's operating instructions beforecharging the battery.If, at low temperatures, the indicator lamps/warning lamps in the instrument cluster donot light up, it is highly likely that thedischarged battery has frozen. In this caseyou may neither jump-start the vehicle norcharge the battery. The service life of athawed-out battery may be shorter. Thestarting characteristics can be impaired,particularly at low temperatures. Have thethawed-out battery checked at a qualifiedspecialist workshop.
604 Battery (vehicle)Breakdow
nassistance

Jump-starting
For the jump-starting procedure, use only the jump-starting connection point, consisting of apositive terminal and a ground point, in the engine compartment.
G WARNINGBattery acid is caustic. There is a risk of injury.Avoid contact with the skin, eyes or clothing. Do not inhale any battery gases. Do not lean overthe battery. Keep children away from batteries. Wash battery acid immediately with water andseek medical attention.
G WARNINGDuring charging and jump-starting, explosive gases can escape from the battery. There is a riskof an explosion.Particularly avoid fire, open flames, creating sparks and smoking. Ensure there is sufficientventilation while charging and jump-starting. Do not lean over a battery.
G WARNINGDuring the charging process, a battery produces hydrogen gas. If a short circuit occurs or sparksare created, the hydrogen gas can ignite. There is a risk of an explosion.RMake sure that the positive terminal of a connected battery does not come into contact withvehicle parts.RNever place metal objects or tools on a battery.RIt is important that you observe the described order of the battery terminals when connectingand disconnecting a battery.RWhen jump-starting, make sure that the battery poles with identical polarity are connected.RIt is particularly important to observe the described order when connecting and disconnectingthe jumper cables.RNever connect or disconnect the battery terminals while the engine is running.
G WARNINGA discharged battery can freeze at temperatures below freezing point. When jump-starting thevehicle or charging the battery, gases can escape from the battery. There is a risk of an explosion.Allow the frozen battery to thaw out before charging it or jump-starting.
! Avoid repeated and lengthy starting attempts. Otherwise, the catalytic converter could bedamaged by the non-combusted fuel.
If, at low temperatures, the indicator lamps/warning lamps in the instrument cluster do notlight up, it is highly likely that the discharged battery has frozen. In this case, you may neithercharge the battery nor jump-start the vehicle. The service life of a thawed-out battery may beshorter. The starting characteristics can be impaired, particularly at low temperatures. Havethe thawed-out battery checked at a qualified specialist workshop.
Jump-starting 605
Breakdow
nassistance
Z
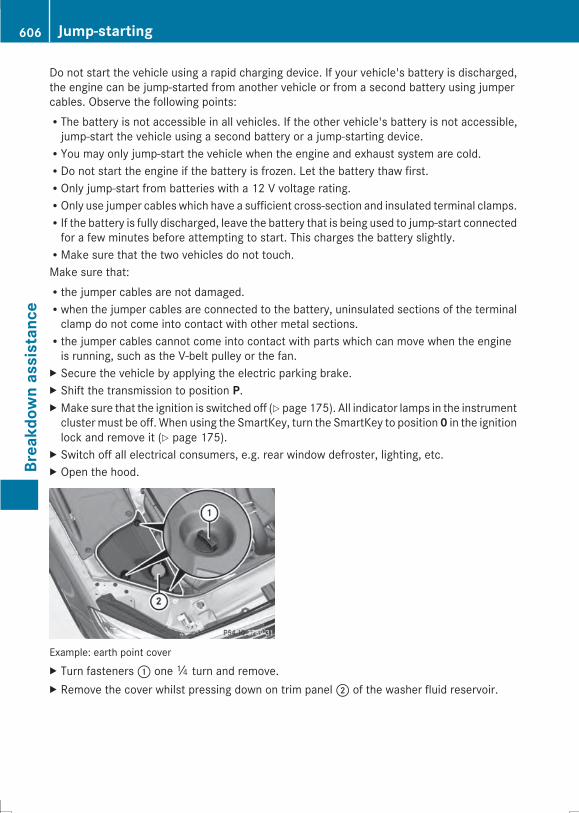
Do not start the vehicle using a rapid charging device. If your vehicle's battery is discharged,the engine can be jump-started from another vehicle or from a second battery using jumpercables. Observe the following points:RThe battery is not accessible in all vehicles. If the other vehicle's battery is not accessible,jump-start the vehicle using a second battery or a jump-starting device.RYou may only jump-start the vehicle when the engine and exhaust system are cold.RDo not start the engine if the battery is frozen. Let the battery thaw first.ROnly jump-start from batteries with a 12 V voltage rating.ROnly use jumper cables which have a sufficient cross-section and insulated terminal clamps.RIf the battery is fully discharged, leave the battery that is being used to jump-start connectedfor a few minutes before attempting to start. This charges the battery slightly.RMake sure that the two vehicles do not touch.Make sure that:Rthe jumper cables are not damaged.Rwhen the jumper cables are connected to the battery, uninsulated sections of the terminalclamp do not come into contact with other metal sections.Rthe jumper cables cannot come into contact with parts which can move when the engineis running, such as the V-belt pulley or the fan.
X Secure the vehicle by applying the electric parking brake.X Shift the transmission to position P.X Make sure that the ignition is switched off (Y page 175). All indicator lamps in the instrumentclustermust be off. When using the SmartKey, turn the SmartKey to position0 in the ignitionlock and remove it (Y page 175).
X Switch off all electrical consumers, e.g. rear window defroster, lighting, etc.X Open the hood.
Example: earth point coverX Turn fasteners: oneÕ turn and remove.X Remove the cover whilst pressing down on trim panel; of the washer fluid reservoir.
606 Jump-startingBreakdow
nassistance
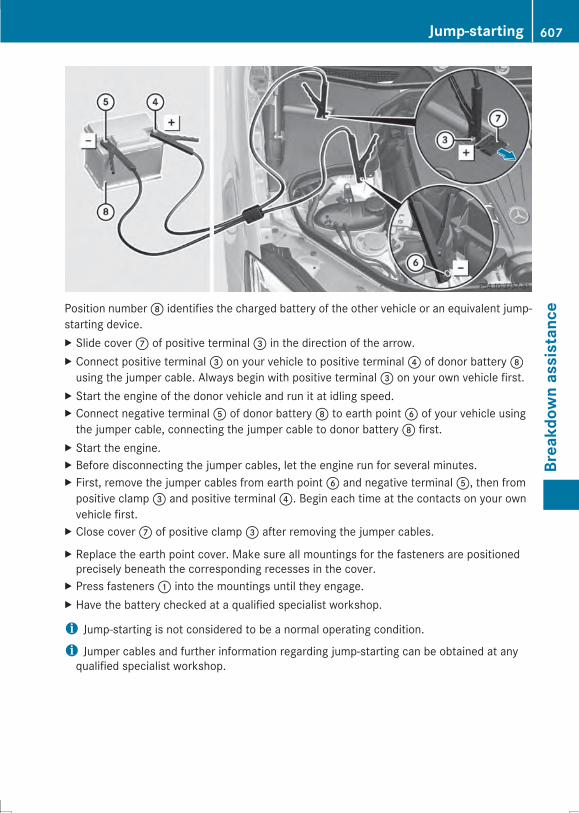
Position numberD identifies the charged battery of the other vehicle or an equivalent jump-starting device.X Slide coverC of positive terminal= in the direction of the arrow.X Connect positive terminal= on your vehicle to positive terminal? of donor batteryDusing the jumper cable. Always begin with positive terminal= on your own vehicle first.
X Start the engine of the donor vehicle and run it at idling speed.X Connect negative terminalA of donor batteryD to earth pointB of your vehicle usingthe jumper cable, connecting the jumper cable to donor batteryD first.
X Start the engine.X Before disconnecting the jumper cables, let the engine run for several minutes.X First, remove the jumper cables from earth pointB and negative terminalA, then frompositive clamp= and positive terminal?. Begin each time at the contacts on your ownvehicle first.
X Close coverC of positive clamp= after removing the jumper cables.
X Replace the earth point cover. Make sure all mountings for the fasteners are positionedprecisely beneath the corresponding recesses in the cover.
X Press fasteners: into the mountings until they engage.X Have the battery checked at a qualified specialist workshop.
i Jump-starting is not considered to be a normal operating condition.
i Jumper cables and further information regarding jump-starting can be obtained at anyqualified specialist workshop.
Jump-starting 607
Breakdow
nassistance
Z
Towing and tow-starting
Important safety notes
G WARNINGFunctions relevant to safety are restricted orno longer available if:Rthe engine is not running.Rthe brake system or the power steering ismalfunctioning.Rthere is a malfunction in the voltage supplyor the vehicle's electrical system.
If your vehicle is being towed, much moreforce may be necessary to steer or brake.There is a risk of an accident.In such cases, use a tow bar. Before towing,make sure that the steering moves freely.
G WARNINGYou can no longer steer the vehicle if thesteering wheel lock has been engaged. Thereis a risk of an accident.Always switch off the ignitionwhen towing thevehicle with a tow cable or a tow bar.
G WARNINGIf the weight of the vehicle to be towed or tow-started is greater than the permissible grossweight of your vehicle:Rthe towing eye could detach itselfRthe vehicle/trailer combination couldrollover.
There is a risk of an accident.When towing or tow-starting another vehicle,its weight should not be greater than thepermissible gross weight of your vehicle.
! If DISTRONIC PLUS or the HOLD functionis activated, the vehicle brakesautomatically in certain situations. Toprevent damage to the vehicle, deactivateDISTRONIC PLUS and the HOLD function inthe following or other similar situations:Rwhen towing the vehicleRin the car wash
! Make sure that the electric parking brakeis released. If the electric parking brake isfaulty, visit a qualified specialist workshop.
! Secure the tow rope or tow bar to thetowing eye only. Otherwise, the vehiclecould become damaged.
! Do not use the towing eye for recovery,this could damage the vehicle. If in doubt,recover the vehicle with a crane.
! When towing, pull away slowly andsmoothly. If the tractive power is too high,the vehicles could be damaged.
! When towing the vehicle, use theSmartKey instead of the Start/Stopbutton. Otherwise, the automatictransmission may shift to position P whenthe driver's or front-passenger door areopened, which could lead to damage to thetransmission.
! Do not tow with sling-type equipment.This could damage the vehicle.
! The vehicle can be towed a maximum of30 miles (50km). The towing speed of30 mph (50 km/h) must not be exceeded.If the vehicle has to be towed more than30miles (50km), the entire vehicle must beraised and transported.
! If you tow or tow-start another vehicle, itsweight must not exceed the maximumpermissible gross vehicle weight of yourvehicle.
Information on your vehicle's gross vehicleweight rating can be found on the vehicleidentification plate (Y page 650).It is better to have the vehicle transportedthan to have it towed.If the vehicle has suffered transmissiondamage, have it transported on a transporteror trailer.The automatic transmission must be inposition N when the vehicle is being towed.
608 Towing and tow-startingBreakdow
nassistance
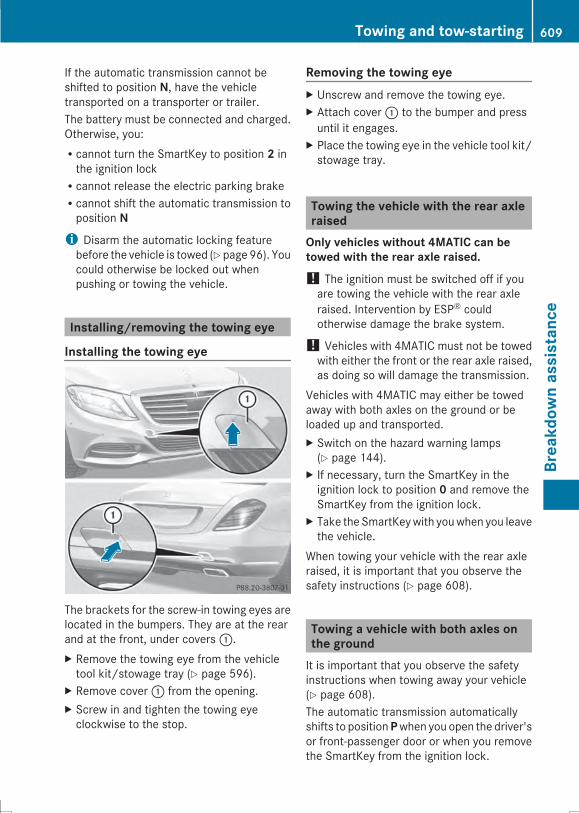
If the automatic transmission cannot beshifted to position N, have the vehicletransported on a transporter or trailer.The battery must be connected and charged.Otherwise, you:Rcannot turn the SmartKey to position 2 inthe ignition lockRcannot release the electric parking brakeRcannot shift the automatic transmission toposition Ni Disarm the automatic locking featurebefore the vehicle is towed (Ypage96). Youcould otherwise be locked out whenpushing or towing the vehicle.
Installing/removing the towing eye
Installing the towing eye
The brackets for the screw-in towing eyes arelocated in the bumpers. They are at the rearand at the front, under covers:.X Remove the towing eye from the vehicletool kit/stowage tray (Y page 596).
X Remove cover: from the opening.X Screw in and tighten the towing eyeclockwise to the stop.
Removing the towing eyeX Unscrew and remove the towing eye.X Attach cover: to the bumper and pressuntil it engages.
X Place the towing eye in the vehicle tool kit/stowage tray.
Towing the vehicle with the rear axleraisedOnly vehicles without 4MATIC can betowed with the rear axle raised.! The ignition must be switched off if youare towing the vehicle with the rear axleraised. Intervention by ESP® couldotherwise damage the brake system.
! Vehicles with 4MATIC must not be towedwith either the front or the rear axle raised,as doing so will damage the transmission.
Vehicles with 4MATIC may either be towedaway with both axles on the ground or beloaded up and transported.X Switch on the hazard warning lamps(Y page 144).
X If necessary, turn the SmartKey in theignition lock to position 0 and remove theSmartKey from the ignition lock.
X Take the SmartKeywith youwhen you leavethe vehicle.
When towing your vehicle with the rear axleraised, it is important that you observe thesafety instructions (Y page 608).
Towing a vehicle with both axles onthe groundIt is important that you observe the safetyinstructions when towing away your vehicle(Y page 608).The automatic transmission automaticallyshifts to positionPwhen you open the driver'sor front-passenger door or when you removethe SmartKey from the ignition lock.
Towing and tow-starting 609
Breakdow
nassistance
Z
In order to ensure that the automatictransmission stays in positionN when towingthe vehicle, you must observe the followingpoints:X You must use the SmartKey instead of theStart/Stop button (Y page 175).
X Make sure that the vehicle is stationary andthe SmartKey in the ignition lock is inposition 0.
X Turn the SmartKey to position 2 in theignition lock.
X Depress and hold the brake pedal.X Shift the automatic transmission toposition N.
X Release the brake pedal.X Release the electric parking brake.X Leave the SmartKey in position 2 in theignition lock.
X Switch on the hazard warning lamps(Y page 144).i In order to signal a change of directionwhen towing the vehicle with the hazardwarning lamps switched on, use thecombination switch as usual. In this case,only the indicator lamps for the direction oftravel flash. After resetting thecombination switch, the hazard warninglamp starts flashing again.
Transporting the vehicle! You may only secure the vehicle by thewheels, not by parts of the vehicle such asaxle or steering components. Otherwise,the vehicle could be damaged.
The towing eyes or trailer tow hitch can beused to pull the vehicle onto a trailer ortransporter if you wish to transport it.X Turn the SmartKey to position 2 in theignition lock.
X Shift the automatic transmission toposition N.
As soon as the vehicle has been loaded:X Prevent the vehicle from rolling away byapplying the electric parking brake.
X Shift the automatic transmission toposition P.
X Turn the SmartKey to position 0 in theignition lock and remove it.
X Secure the vehicle.
Notes on 4MATIC vehicles! Vehicles with 4MATIC must not be towedwith either the front or the rear axle raised,as doing so will damage the transmission.
Vehicles with 4MATIC may either be towedaway with both axles on the ground or beloaded up and transported.If the vehicle's transmission, front, or rearaxle is damaged, have the vehicle transportedon a truck or trailer.In the event of damage to the electricalsystem: if the battery is defective, theautomatic transmission will be locked inposition P. To shift the automatictransmission to position N, you must providepower to the vehicle's electrical system in thesame way as when jump-starting(Y page 605).Have the vehicle transported on a transporteror trailer.
Tow-starting (emergency enginestarting)! Vehicles with automatic transmissionmust not be tow-started. You couldotherwise damage the automatictransmission.
i Information on "Jump-starting"(Y page 605).
610 Towing and tow-startingBreakdow
nassistance

Fuses
Important safety notes
G WARNINGIf you manipulate or bridge a faulty fuse or ifyou replace it with a fuse with a higheramperage, the electric cables could beoverloaded. This could result in a fire. Thereis a risk of an accident and injury.Always replace faulty fuses with the specifiednew fuses having the correct amperage.
! Only use fuses that have been approvedfor Mercedes-Benz vehicles and whichhave the correct fuse rating for the systemconcerned. Otherwise, components orsystems could be damaged.
The fuses in your vehicle serve to close downfaulty circuits. If a fuse blows, all thecomponents on the circuit and their functionsstop operating.Blown fuses must be replaced with fuses ofthe same rating, which you can recognize bythe color and value. The fuse ratings are listedin the fuse allocation chart.If a newly inserted fuse also blows, have thecause traced and rectified at a qualifiedspecialist workshop, e.g. an authorizedMercedes-Benz Center.
Before changing a fuseX Secure the vehicle against rolling away(Y page 191).
X Switch off all electrical consumers.X Make sure that the ignition is switched off(Y page 175).
orX When using the SmartKey, turn theSmartKey to position 0 in the ignition lockand remove it (Y page 175).
All indicator lamps in the instrument clustermust be off.
The fuses are located in various fuse boxes:RFuse box on the driver's side of thedashboardRFuse box in the front-passenger footwellRFuse box in the engine compartment on theleft-hand side of the vehicle, when viewedin the direction of travelRFuse box in the trunk on the right-hand sideof the vehicle, when viewed in the directionof travel
The fuse allocation chart is on the fuse box inthe trunk (Y page 612).
Dashboard fuse box! Do not use a pointed object such as ascrewdriver to open the cover in thedashboard. You could damage thedashboard or the cover.
! Make sure that no moisture can enter thefuse box when the cover is open.
! When closing the cover, make sure that itis lying correctly on the fuse box. Moistureseeping in or dirt could otherwise impairthe operation of the fuses.
X Open the driver's door.
X To open: pull cover: outwards in thedirection of the arrow and remove it.
X To close: clip in cover: on the front ofthe dashboard.
X Fold cover: inwards until it engages.
Fuses 611
Breakdow
nassistance
Z
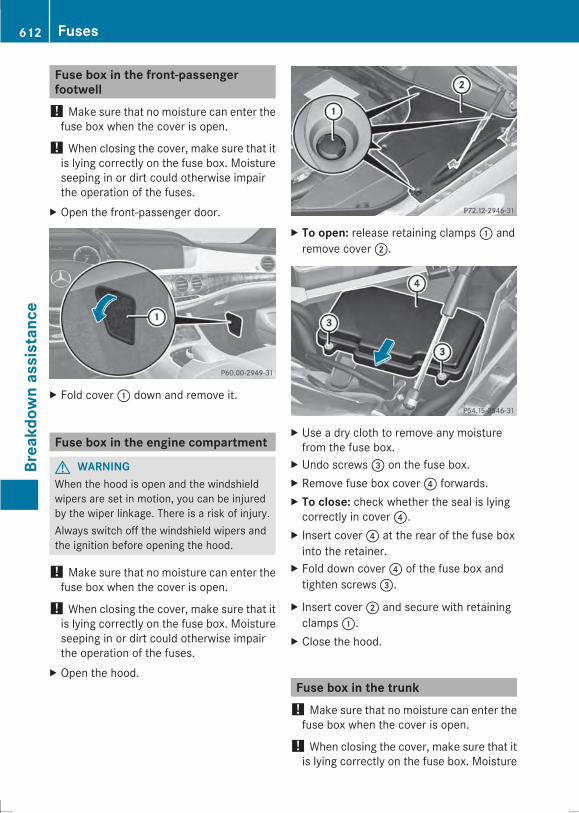
Fuse box in the front-passengerfootwell! Make sure that no moisture can enter thefuse box when the cover is open.
! When closing the cover, make sure that itis lying correctly on the fuse box. Moistureseeping in or dirt could otherwise impairthe operation of the fuses.
X Open the front-passenger door.
X Fold cover: down and remove it.
Fuse box in the engine compartment
G WARNINGWhen the hood is open and the windshieldwipers are set in motion, you can be injuredby the wiper linkage. There is a risk of injury.Always switch off the windshield wipers andthe ignition before opening the hood.
! Make sure that no moisture can enter thefuse box when the cover is open.
! When closing the cover, make sure that itis lying correctly on the fuse box. Moistureseeping in or dirt could otherwise impairthe operation of the fuses.
X Open the hood.
X To open: release retaining clamps: andremove cover;.
X Use a dry cloth to remove any moisturefrom the fuse box.
X Undo screws= on the fuse box.X Remove fuse box cover? forwards.X To close: check whether the seal is lyingcorrectly in cover?.
X Insert cover? at the rear of the fuse boxinto the retainer.
X Fold down cover? of the fuse box andtighten screws=.
X Insert cover; and secure with retainingclamps:.
X Close the hood.
Fuse box in the trunk! Make sure that no moisture can enter thefuse box when the cover is open.
! When closing the cover, make sure that itis lying correctly on the fuse box. Moisture
612 FusesBreakdow
nassistance

seeping in or dirt could otherwise impairthe operation of the fuses.
X Open the trunk lid.
X To open: release cover: at the top rightand left-hand sides with a flat object.
X Open cover: downwards in the directionof the arrow.
i The fuse allocation chart is located in arecess at the side of the fuse box. You canfind the corresponding fuse rating and fusetype on the fuse allocation chart.
Engine emergency offIf the engine cannot be switched off asdescribed, observe the following procedure:X Take the fuse allocation chart from the fusebox in the trunk (Y page 612).
X Search for “Emergency engine shutdown”in the fuse allocation chart.
X Remove the fuses listed under "Emergencyengine shutdown".
Fuses 613
Breakdow
nassistance
Z

614

Useful information ............................ 616Important safety notes .................... 616Operation ........................................... 616Winter operation ............................... 618Tire pressure ..................................... 619Loading the vehicle .......................... 627All about wheels and tires ............... 630Changing a wheel ............................. 638Wheel and tire combinations ........... 642
615
Wheelsandtires
Useful information
i This Operator's Manual describes allmodels and all standard and optionalequipment of your vehicle available at thetime of publication of the Operator'sManual. Country-specific differences arepossible. Please note that your vehicle maynot be equipped with all featuresdescribed. This also applies to safety-related systems and functions.
i Read the information on qualifiedspecialist workshops: (Y page 34).
Important safety notes
G WARNINGIf wheels and tires of the wrong size are used,the wheel brakes or suspension componentsmay be damaged. There is a risk of anaccident.Always replace wheels and tires with thosethat fulfill the specifications of the originalpart.When replacing wheels, make sure to use thecorrect:RdesignationRmodelWhen replacing tires, make sure to use thecorrect:RdesignationRmanufacturerRmodel
G WARNINGA flat tire severely impairs the driving,steering and braking characteristics of thevehicle. There is a risk of accident.Tires without run-flat characteristics:Rdo not drive with a flat tire.Rimmediately replace the flat tire with youremergency spare wheel or spare wheel, orconsult a qualified specialist workshop.
Tires with run-flat characteristics:Rpay attention to the information andwarning notices onMOExtended tires (tireswith run-flat characteristics).
Accessories that are not approved for yourvehicle by Mercedes-Benz or that are notbeing used correctly can impair operatingsafety.Before purchasing and using non-approvedaccessories, visit a qualified specialistworkshop and inquire about:RsuitabilityRlegal stipulationsRfactory recommendationsInformation on the dimensions and types ofwheels and tires for your vehicle can be foundin the "Wheel/tire combinations" section(Y page 642).Information on air pressure for the tires onyour vehicle can be found:Ron the vehicle's Tire and LoadingInformation placard on the B-pillar(Y page 627)Ron the tire pressure label on the fuel fillerflap (Y page 189)Runder "Tire pressure" (Y page 619)
Operation
Information on drivingIf the vehicle is heavily loaded, check the tirepressures and correct them if necessary.While driving, pay attention to vibrations,noises and unusual handling characteristics,e.g. pulling to one side. This may indicate thatthe wheels or tires are damaged. If yoususpect that a tire is defective, reduce yourspeed immediately. Stop the vehicle as soonas possible to check the wheels and tires fordamage. Hidden tire damage could also becausing the unusual handling characteristics.If you find no signs of damage, have the tires
616 OperationWheelsandtires
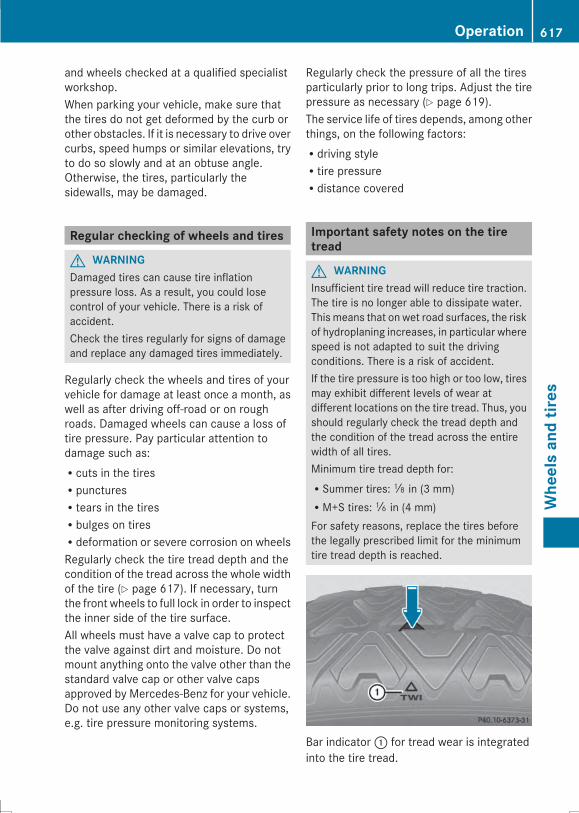
and wheels checked at a qualified specialistworkshop.When parking your vehicle, make sure thatthe tires do not get deformed by the curb orother obstacles. If it is necessary to drive overcurbs, speed humps or similar elevations, tryto do so slowly and at an obtuse angle.Otherwise, the tires, particularly thesidewalls, may be damaged.
Regular checking of wheels and tires
G WARNINGDamaged tires can cause tire inflationpressure loss. As a result, you could losecontrol of your vehicle. There is a risk ofaccident.Check the tires regularly for signs of damageand replace any damaged tires immediately.
Regularly check the wheels and tires of yourvehicle for damage at least once a month, aswell as after driving off-road or on roughroads. Damaged wheels can cause a loss oftire pressure. Pay particular attention todamage such as:Rcuts in the tiresRpuncturesRtears in the tiresRbulges on tiresRdeformation or severe corrosion on wheelsRegularly check the tire tread depth and thecondition of the tread across the whole widthof the tire (Y page 617). If necessary, turnthe front wheels to full lock in order to inspectthe inner side of the tire surface.All wheels must have a valve cap to protectthe valve against dirt and moisture. Do notmount anything onto the valve other than thestandard valve cap or other valve capsapproved by Mercedes-Benz for your vehicle.Do not use any other valve caps or systems,e.g. tire pressure monitoring systems.
Regularly check the pressure of all the tiresparticularly prior to long trips. Adjust the tirepressure as necessary (Y page 619).The service life of tires depends, among otherthings, on the following factors:Rdriving styleRtire pressureRdistance covered
Important safety notes on the tiretread
G WARNINGInsufficient tire tread will reduce tire traction.The tire is no longer able to dissipate water.This means that on wet road surfaces, the riskof hydroplaning increases, in particular wherespeed is not adapted to suit the drivingconditions. There is a risk of accident.If the tire pressure is too high or too low, tiresmay exhibit different levels of wear atdifferent locations on the tire tread. Thus, youshould regularly check the tread depth andthe condition of the tread across the entirewidth of all tires.Minimum tire tread depth for:RSummer tires:â in (3 mm)RM+S tires:ã in (4 mm)For safety reasons, replace the tires beforethe legally prescribed limit for the minimumtire tread depth is reached.
Bar indicator: for tread wear is integratedinto the tire tread.
Operation 617
Wheelsandtires
Z
Treadwear indicators (TWI) are required bylaw. Six indicators are positioned on the tiretread. They are visible once a tread depth ofapproximatelyá in (1.6 mm) has beenreached. If this is the case, the tire is so wornthat it must be replaced.
Selecting, mounting and replacingtiresROnly mount tires and wheels of the sametype and make.Exception: it is permissible to install adifferent type or make in the event of a flattire. Observe the "MOExtended tires (tireswith run-flat characteristics" section(Y page 597).ROnly mount tires of the correct size ontothe wheels.RBreak in new tires at moderate speeds forthe first 60miles (100 km). They only reachtheir full performance after this distance.RDo not drive with tires which have too littletread depth, as this significantly reducesthe traction on wet roads (hydroplaning).RReplace the tires after six years at thelatest, regardless of wear.
MOExtended tires (tires with run-flatproperties)With MOExtended tires (tires with run flatcharacteristics), you can continue to driveyour vehicle even if there is a total loss ofpressure in one or more tires.MOExtended tires may only be used inconjunction with an active tire pressure losswarning systemorwith an active tire pressuremonitor and on wheels specifically tested byMercedes-Benz.Notes on driving with MOExtended tires witha flat tire (Y page 597).
i Vehicles equippedwithMOExtended tiresare not equipped with a TIREFIT kit at thefactory. It is therefore recommended that
you additionally equip your vehicle with aTIREFIT kit if you mount tires that do notfeature run-flat properties, e.g. winter tires.A TIREFIT kit can be obtained from aqualified specialist workshop.
Winter operation
General notesHave your vehicle winterproofed at a qualifiedspecialist workshop at the onset of winter.Observe the notes in the "Changing a wheel"section (Y page 638).
Driving with summer tiresAt temperatures below 45‡ (+7†), summertires lose elasticity and therefore traction andbraking power. Change the tires on yourvehicle to M+S tires. Using summer tires atvery cold temperatures could cause cracks toform, thereby damaging the tirespermanently. Mercedes-Benz cannot acceptresponsibility for this type of damage.
M+S tires
G WARNINGM+S tires with a tire tread depth of less thanã in (4 mm) are not suitable for use in winterand do not provide sufficient traction. Thereis a risk of an accident.M+S tires with a tread depth of less thanãin (4 mm) must be replaced immediately.
At temperatures below 45 ‡ (+7 †), usewinter tires or all-season tires. Both types oftire are identified by the M+S marking.Only winter tires bearing thei snowflakesymbol in addition to the M+S markingprovide the best possible grip in wintry roadconditions. Only these tires will allow drivingsafety systems such as ABS and ESP® tofunction optimally in winter. These tires have
618 Winter operationWheelsandtires
been developed specifically for driving insnow.UseM+S tires of the samemake and tread onall wheels to maintain safe handlingcharacteristics.Always observe the maximum permissiblespeed specified for the M+S tires you havemounted.When you have mounted M+S tires:X Check the tire pressures (Y page 622).X Restart the tire pressure monitor(Y page 625).
Snow chains
G WARNINGIf snow chains are installed to the frontwheels, they may drag against the vehiclebody or chassis components. This couldcause damage to the vehicle or the tires.There is a risk of an accident.To avoid hazardous situations:Rnever install snow chains to the frontwheelsRalways install snow chains in pairs to therear wheels.
For safety reasons, Mercedes-Benzrecommends that you only use snow chainsthat have been specially approved for yourvehicle by Mercedes-Benz, or are of acorresponding standard of quality.If you intend to mount snow chains, pleasebear the following points in mind:RSnow chains may not be mounted on allwheel/tire combinations. Permissiblewheel-tire combinations (Y page 642).ROnly use snow chains when driving onroads completely covered by snow.Remove the snow chains as soon aspossible when you come to a road that isnot snow-covered.RLocal regulations may restrict the use ofsnow chains. Observe the appropriate
regulations if you wish to mount snowchains.RDo not exceed the maximum permissiblespeed of 30 mph (50 km/h).ROn vehicles with AIRMATIC (Y page 217) orActive Body Control (ABC) (Y page 215),you must drive at raised vehicle level ifsnow chains have been installed.
i You may wish to deactivateESP®(Y page 81) when pulling away withsnow chains installed. You can therebyallow the wheels to spin in a controlledmanner, achieving an increased drivingforce (cutting action).
Tire pressure
Tire pressure specifications
Important safety notes
G WARNINGUnderinflated or overinflated tires pose thefollowing risks:Rthe tires may burst, especially as the loadand vehicle speed increase.Rthe tires may wear excessively and/orunevenly, which may greatly impair tiretraction.Rthe driving characteristics, as well assteering and braking, may be greatlyimpaired.
There is a risk of an accident.Follow recommended tire inflation pressuresand check the pressure of all the tiresincluding the spare wheel:Rmonthly, at leastRif the load changesRbefore beginning a long journeyRunder different operating conditions, e.g.off-road driving
If necessary, correct the tire pressure.
i The specifications on the sample Tire andLoading Information placard and tire
Tire pressure 619
Wheelsandtires
Z
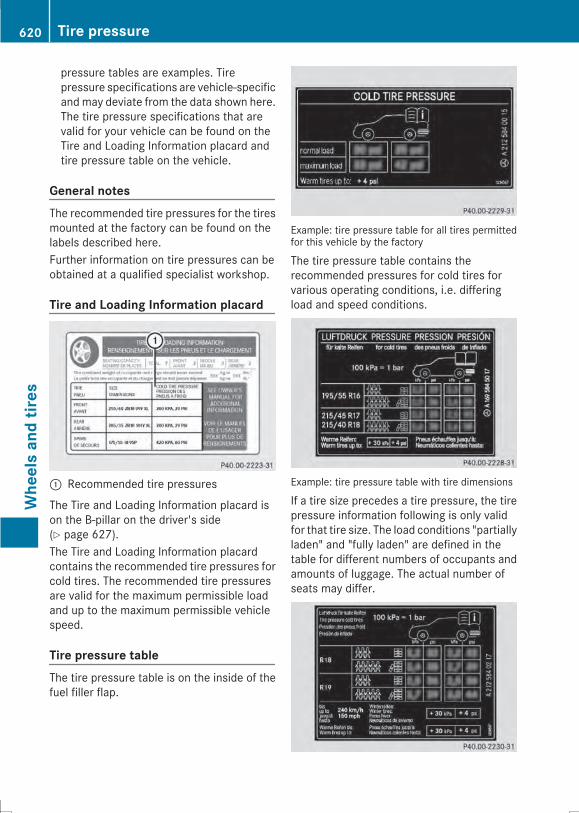
pressure tables are examples. Tirepressure specifications are vehicle-specificandmay deviate from the data shown here.The tire pressure specifications that arevalid for your vehicle can be found on theTire and Loading Information placard andtire pressure table on the vehicle.
General notesThe recommended tire pressures for the tiresmounted at the factory can be found on thelabels described here.Further information on tire pressures can beobtained at a qualified specialist workshop.
Tire and Loading Information placard
: Recommended tire pressures
The Tire and Loading Information placard ison the B-pillar on the driver's side(Y page 627).The Tire and Loading Information placardcontains the recommended tire pressures forcold tires. The recommended tire pressuresare valid for the maximum permissible loadand up to the maximum permissible vehiclespeed.
Tire pressure tableThe tire pressure table is on the inside of thefuel filler flap.
Example: tire pressure table for all tires permittedfor this vehicle by the factory
The tire pressure table contains therecommended pressures for cold tires forvarious operating conditions, i.e. differingload and speed conditions.
Example: tire pressure table with tire dimensions
If a tire size precedes a tire pressure, the tirepressure information following is only validfor that tire size. The load conditions "partiallyladen" and "fully laden" are defined in thetable for different numbers of occupants andamounts of luggage. The actual number ofseats may differ.
620 Tire pressureWheelsandtires
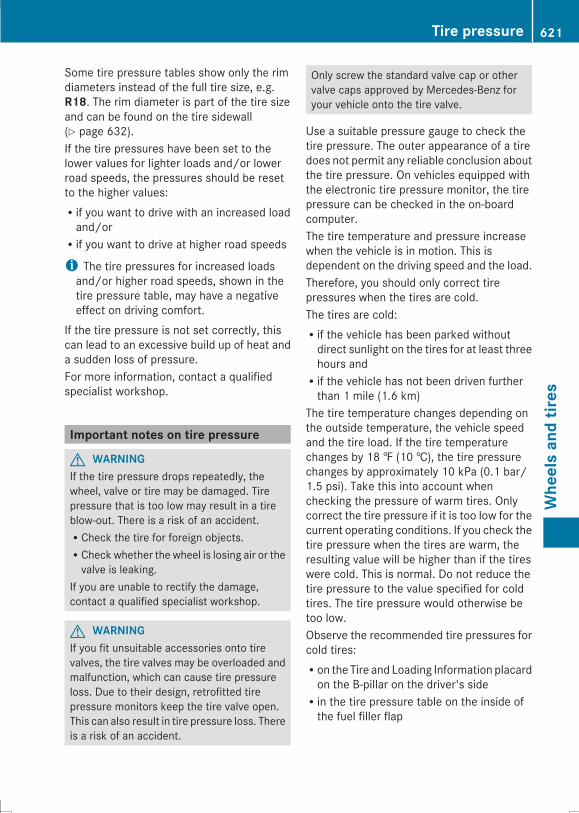
Some tire pressure tables show only the rimdiameters instead of the full tire size, e.g.R18. The rim diameter is part of the tire sizeand can be found on the tire sidewall(Y page 632).If the tire pressures have been set to thelower values for lighter loads and/or lowerroad speeds, the pressures should be resetto the higher values:Rif you want to drive with an increased loadand/orRif you want to drive at higher road speeds
i The tire pressures for increased loadsand/or higher road speeds, shown in thetire pressure table, may have a negativeeffect on driving comfort.
If the tire pressure is not set correctly, thiscan lead to an excessive build up of heat anda sudden loss of pressure.For more information, contact a qualifiedspecialist workshop.
Important notes on tire pressure
G WARNINGIf the tire pressure drops repeatedly, thewheel, valve or tire may be damaged. Tirepressure that is too low may result in a tireblow-out. There is a risk of an accident.RCheck the tire for foreign objects.RCheck whether the wheel is losing air or thevalve is leaking.
If you are unable to rectify the damage,contact a qualified specialist workshop.
G WARNINGIf you fit unsuitable accessories onto tirevalves, the tire valves may be overloaded andmalfunction, which can cause tire pressureloss. Due to their design, retrofitted tirepressure monitors keep the tire valve open.This can also result in tire pressure loss. Thereis a risk of an accident.
Only screw the standard valve cap or othervalve caps approved by Mercedes-Benz foryour vehicle onto the tire valve.
Use a suitable pressure gauge to check thetire pressure. The outer appearance of a tiredoes not permit any reliable conclusion aboutthe tire pressure. On vehicles equipped withthe electronic tire pressure monitor, the tirepressure can be checked in the on-boardcomputer.The tire temperature and pressure increasewhen the vehicle is in motion. This isdependent on the driving speed and the load.Therefore, you should only correct tirepressures when the tires are cold.The tires are cold:Rif the vehicle has been parked withoutdirect sunlight on the tires for at least threehours andRif the vehicle has not been driven furtherthan 1 mile (1.6 km)
The tire temperature changes depending onthe outside temperature, the vehicle speedand the tire load. If the tire temperaturechanges by 18 ‡ (10 †), the tire pressurechanges by approximately 10 kPa (0.1 bar/1.5 psi). Take this into account whenchecking the pressure of warm tires. Onlycorrect the tire pressure if it is too low for thecurrent operating conditions. If you check thetire pressure when the tires are warm, theresulting value will be higher than if the tireswere cold. This is normal. Do not reduce thetire pressure to the value specified for coldtires. The tire pressure would otherwise betoo low.Observe the recommended tire pressures forcold tires:Ron the Tire and Loading Information placardon the B-pillar on the driver's sideRin the tire pressure table on the inside ofthe fuel filler flap
Tire pressure 621
Wheelsandtires
Z
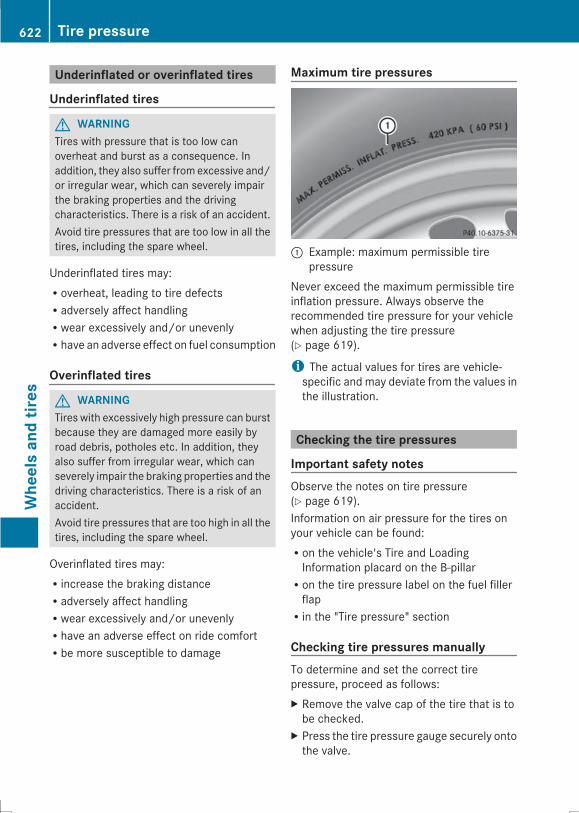
Underinflated or overinflated tires
Underinflated tires
G WARNINGTires with pressure that is too low canoverheat and burst as a consequence. Inaddition, they also suffer from excessive and/or irregular wear, which can severely impairthe braking properties and the drivingcharacteristics. There is a risk of an accident.Avoid tire pressures that are too low in all thetires, including the spare wheel.
Underinflated tires may:Roverheat, leading to tire defectsRadversely affect handlingRwear excessively and/or unevenlyRhave an adverse effect on fuel consumption
Overinflated tires
G WARNINGTires with excessively high pressure can burstbecause they are damaged more easily byroad debris, potholes etc. In addition, theyalso suffer from irregular wear, which canseverely impair the braking properties and thedriving characteristics. There is a risk of anaccident.Avoid tire pressures that are too high in all thetires, including the spare wheel.
Overinflated tires may:Rincrease the braking distanceRadversely affect handlingRwear excessively and/or unevenlyRhave an adverse effect on ride comfortRbe more susceptible to damage
Maximum tire pressures
: Example: maximum permissible tirepressure
Never exceed the maximum permissible tireinflation pressure. Always observe therecommended tire pressure for your vehiclewhen adjusting the tire pressure(Y page 619).
i The actual values for tires are vehicle-specific and may deviate from the values inthe illustration.
Checking the tire pressures
Important safety notesObserve the notes on tire pressure(Y page 619).Information on air pressure for the tires onyour vehicle can be found:Ron the vehicle's Tire and LoadingInformation placard on the B-pillarRon the tire pressure label on the fuel fillerflapRin the "Tire pressure" section
Checking tire pressures manuallyTo determine and set the correct tirepressure, proceed as follows:X Remove the valve cap of the tire that is tobe checked.
X Press the tire pressure gauge securely ontothe valve.
622 Tire pressureWheelsandtires
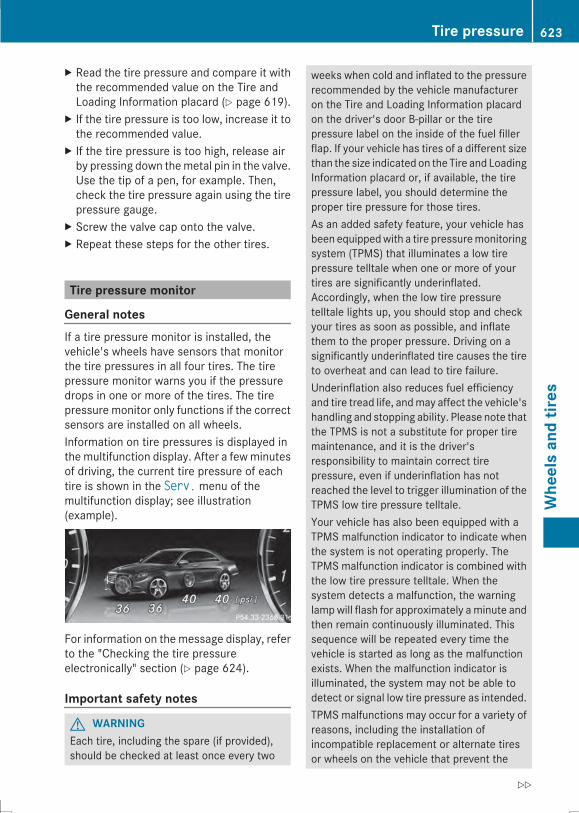
X Read the tire pressure and compare it withthe recommended value on the Tire andLoading Information placard (Y page 619).
X If the tire pressure is too low, increase it tothe recommended value.
X If the tire pressure is too high, release airby pressing down themetal pin in the valve.Use the tip of a pen, for example. Then,check the tire pressure again using the tirepressure gauge.
X Screw the valve cap onto the valve.X Repeat these steps for the other tires.
Tire pressure monitor
General notesIf a tire pressure monitor is installed, thevehicle's wheels have sensors that monitorthe tire pressures in all four tires. The tirepressure monitor warns you if the pressuredrops in one or more of the tires. The tirepressure monitor only functions if the correctsensors are installed on all wheels.Information on tire pressures is displayed inthe multifunction display. After a fewminutesof driving, the current tire pressure of eachtire is shown in the Serv.Serv. menu of themultifunction display; see illustration(example).
For information on the message display, referto the "Checking the tire pressureelectronically" section (Y page 624).
Important safety notes
G WARNINGEach tire, including the spare (if provided),should be checked at least once every two
weeks when cold and inflated to the pressurerecommended by the vehicle manufactureron the Tire and Loading Information placardon the driver's door B-pillar or the tirepressure label on the inside of the fuel fillerflap. If your vehicle has tires of a different sizethan the size indicated on the Tire and LoadingInformation placard or, if available, the tirepressure label, you should determine theproper tire pressure for those tires.As an added safety feature, your vehicle hasbeen equippedwith a tire pressuremonitoringsystem (TPMS) that illuminates a low tirepressure telltale when one or more of yourtires are significantly underinflated.Accordingly, when the low tire pressuretelltale lights up, you should stop and checkyour tires as soon as possible, and inflatethem to the proper pressure. Driving on asignificantly underinflated tire causes the tireto overheat and can lead to tire failure.Underinflation also reduces fuel efficiencyand tire tread life, andmay affect the vehicle'shandling and stopping ability. Please note thatthe TPMS is not a substitute for proper tiremaintenance, and it is the driver'sresponsibility to maintain correct tirepressure, even if underinflation has notreached the level to trigger illumination of theTPMS low tire pressure telltale.Your vehicle has also been equipped with aTPMS malfunction indicator to indicate whenthe system is not operating properly. TheTPMS malfunction indicator is combined withthe low tire pressure telltale. When thesystem detects a malfunction, the warninglampwill flash for approximately aminute andthen remain continuously illuminated. Thissequence will be repeated every time thevehicle is started as long as the malfunctionexists. When the malfunction indicator isilluminated, the system may not be able todetect or signal low tire pressure as intended.TPMS malfunctions may occur for a variety ofreasons, including the installation ofincompatible replacement or alternate tiresor wheels on the vehicle that prevent the
Tire pressure 623
Wheelsandtires
Z
TPMS from functioning properly. Alwayscheck the TPMS malfunction telltale afterreplacing one or more tires or wheels on yourvehicle to ensure that the replacement oralternate Tires and wheels allow the TPMS tocontinue to function properly.
It is the driver's responsibility to set the tirepressure to that recommended for cold tireswhich is suitable for the operating situation(Y page 619). Note that the correct tirepressure for the current operating situationmust first be taught-in to the tire pressuremonitor. If there is a substantial loss ofpressure, the warning threshold for thewarning message is aligned to the referencevalues taught-in. Restart the tire pressuremonitor after adjusting the pressure of thecold tires (Y page 625). The currentpressures are saved as new reference values.As a result, a warning message will appear ifthe tire pressure drops significantly.The tire pressure monitor does not warn youof an incorrectly set tire pressure. Observethe notes on the recommended tire pressure(Y page 619).The tire pressure monitor is not able to warnyou of a sudden loss of pressure, e.g. if thetire is penetrated by a foreign object. In theevent of a sudden loss of pressure, bring thevehicle to a halt by braking carefully. Avoidabrupt steering maneuvers.The tire pressure monitor has a yellowwarning lamp in the instrument cluster forindicating a pressure loss or malfunction.Whether the warning lamp flashes or lights upindicates whether a tire pressure is too low orthe tire pressure monitor is malfunctioning:Rif the warning lamp is lit continuously, thetire pressure on one or more tires issignificantly too low. The tire pressuremonitor is not malfunctioning.Rif the warning lamp flashes for around aminute and then remains lit constantly, thetire pressure monitor is malfunctioning.
i In addition to the warning lamp, amessage appears in the multifunctiondisplay.Further information can be found on(Y page 294).
If the tire pressure monitor is malfunctioning,it may take more than ten minutes for the tirepressure warning lamp to inform you of themalfunction by flashing for approximately oneminute and then remaining lit. When themalfunction has been rectified, the tirepressure warning lamp goes out after a fewminutes of driving.The tire pressure values indicated by the on-board computer may differ from thosemeasured at a gas station with a pressuregauge. The tire pressures shown by the on-board computer refer to those measured atsea level. At high altitudes, the tire pressurevalues indicated by a pressure gauge arehigher than those shown by the on-boardcomputer. In this case, do not reduce the tirepressures.The operation of the tire pressuremonitor canbe affected by interference from radiotransmitting equipment (e.g. radioheadphones, two-way radios) that may bebeing operated in or near the vehicle.
Checking the tire pressureelectronicallyX Make sure that the SmartKey is in position2(Y page 175) in the ignition lock .
X Useò on the steering wheel to call upthe list of menus.
X Press the9 or: button on thesteering wheel to select the ServiceServicemenu.
X Press thea button.X Press the9 or: button to selectTire PressureTire Pressure.
X Press thea button.The current tire pressure of each tire isshown in the multifunction display.
624 Tire pressureWheelsandtires

If the vehicle has been parked for over20 minutes, the Tire pressure will beTire pressure will bedisplayed after driving a fewdisplayed after driving a fewminutesminutes message appears.After a teach-in process, the tire pressuremonitor automatically detects new wheels ornew sensors. As long as a clear allocation ofthe tire pressure value to the individualwheels is not possible, the Tire PressureTire PressureMonitor ActiveMonitor Active display message is showninstead of the tire pressure display. The tirepressures are already being monitored.
Tire pressure monitor warningmessagesIf the tire pressuremonitor detects a pressureloss in one or more tires, a warning messageis shown in the multifunction display and theyellow tire pressure monitor warning lampcomes on.RIf the Please Correct Tire PressurePlease Correct Tire Pressuremessage appears in the multifunctiondisplay, the tire pressure in at least one tireis too low andmust be corrected at the nextopportunity.RIf the CheckCheck TiresTiresmessage appears in themultifunction display, the tire pressure inone or more tires has dropped significantlyand the tires must be checked.RIf the Caution Tire MalfunctionCaution Tire Malfunctionmessage appears in the multifunctiondisplay, the tire pressure in one or moretires has dropped suddenly and the tiresmust be checked.
Observe the instructions and safety notes inthe display messages in the "Tires" section(Y page 294).
i If the wheel positions on the vehicle arerotated, the tire pressures may bedisplayed for the wrong positions for ashort time. This is rectified after a fewminutes of driving, and the tire pressuresare displayed for the correct positions.
Restarting the tire pressure monitorWhen you restart the tire pressure monitor,all existingwarningmessages are deleted andthe warning lamps go out. The monitor usesthe currently set tire pressures as thereference values for monitoring. In mostcases, the tire pressure monitor willautomatically detect the new referencevalues after you have changed the tirepressure. However, you can also definereference values manually as described here.The tire pressure monitor then monitors thenew tire pressure values.X Set the tire pressure to the valuerecommended for the correspondingdriving situation on the Tire and LoadingInformation placard on the driver's sideB-pillar (Y page 619).Additional tire pressure values for differentloads can also be found on the tire pressuretable on the inside of the fuel filler flap(Y page 619).
X Make sure that the tire pressure is correcton all four wheels.
X Make sure that the SmartKey is in position2 in the ignition lock.
X Useò on the steering wheel to call upthe list of menus.
X Press the9 or: button on thesteering wheel to select the ServiceServicemenu.
X Press thea button.X Press the9 or: button to selectTire PressureTire Pressure.
X Press thea button.The multifunction display shows thecurrent tire pressure for the individual tiresor the Tire pressure will beTire pressure will bedisplayed after driving a fewdisplayed after driving a fewminutesminutes message.
X Press the: button.The Use Current Pressures as NewUse Current Pressures as NewReference ValuesReference Values message appears inthe multifunction display.
Tire pressure 625
Wheelsandtires
Z
If you wish to confirm the restart:X Press thea button.The Tire Press. Monitor RestartedTire Press. Monitor Restartedmessage appears in the multifunctiondisplay.After driving for a few minutes, the systemchecks whether the current tire pressuresare within the specified range. The new tirepressures are then accepted as referencevalues and monitored.
If you wish to cancel the restart:X Press the% button.The tire pressure values stored at the lastrestart will continue to be monitored.
Tire pressure loss warning system(Canada only)
General notesWhile the vehicle is in motion, the tirepressure loss warning system monitors theset tire pressure using the rotational speed ofthe wheels. This enables the system to detectsignificant pressure loss in a tire. If the speedof rotation of a wheel changes as a result ofa loss of pressure, a corresponding warningmessage will appear in the multifunctiondisplay.You can recognize the tire pressure losswarning by the Run Flat IndicatorRun Flat IndicatorActive Press 'OK' to RestartActive Press 'OK' to Restart messagewhich appears in the ServiceService menu of themultifunction display. Information on themessage display can be found in the"Restarting the tire pressure loss warningsystem" section (Y page 626).
Important safety notesThe tire pressure warning system does notwarn you of an incorrectly set tire pressure.Observe the notes on the recommended tirepressure (Y page 619).The tire pressure loss warning does notreplace the need to regularly check the tire
pressure. An even loss of pressure on severaltires at the same time cannot be detected bythe tire pressure loss warning system.The tire pressure monitor is not able to warnyou of a sudden loss of pressure, e.g. if thetire is penetrated by a foreign object. In theevent of a sudden loss of pressure, bring thevehicle to a halt by braking carefully. Avoidabrupt steering maneuvers.The function of the tire pressure loss warningsystem is limited or delayed if:Rsnow chains are mounted on your vehicle'stires.Rroad conditions are wintry.Ryou are driving on sand or gravel.Ryou adopt a very sporty driving style(cornering at high speeds or driving withhigh rates of acceleration).Ryou are driving with a heavy load (in thevehicle or on the roof).
Restarting the tire pressure losswarning systemRestart the tire pressure loss warning systemif you have:Rchanged the tire pressureRchanged the wheels or tiresRmounted new wheels or tiresX Before restarting, make sure that the tirepressures are set properly on all four tiresfor the respective operating conditions.The recommended tire pressures can befound on the Tire and Loading Informationplacard on the B-pillar on the driver's sideor the tire pressure table on the fuel fillerflap. The tire pressure loss warning systemcan only give reliable warnings if you haveset the correct tire pressure. If an incorrecttire pressure is set, these incorrect valueswill be monitored.
X Also observe the notes in the section on tirepressures (Y page 619).
X Make sure that the SmartKey is in position2 in the ignition lock (Y page 175).
626 Tire pressureWheelsandtires
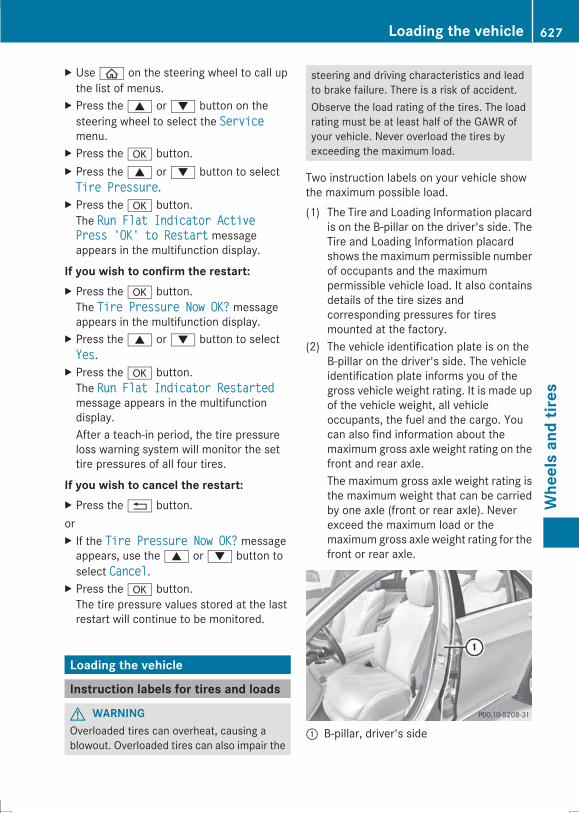
X Useò on the steering wheel to call upthe list of menus.
X Press the9 or: button on thesteering wheel to select the ServiceServicemenu.
X Press thea button.X Press the9 or: button to selectTire PressureTire Pressure.
X Press thea button.The Run Flat Indicator ActiveRun Flat Indicator ActivePress 'OK' to RestartPress 'OK' to Restart messageappears in the multifunction display.
If you wish to confirm the restart:X Press thea button.The Tire Pressure Now OK?Tire Pressure Now OK? messageappears in the multifunction display.
X Press the9 or: button to selectYesYes.
X Press thea button.The Run Flat Indicator RestartedRun Flat Indicator Restartedmessage appears in the multifunctiondisplay.After a teach-in period, the tire pressureloss warning system will monitor the settire pressures of all four tires.
If you wish to cancel the restart:X Press the% button.orX If the Tire Pressure Now OK?Tire Pressure Now OK? messageappears, use the9 or: button toselect CancelCancel.
X Press thea button.The tire pressure values stored at the lastrestart will continue to be monitored.
Loading the vehicle
Instruction labels for tires and loads
G WARNINGOverloaded tires can overheat, causing ablowout. Overloaded tires can also impair the
steering and driving characteristics and leadto brake failure. There is a risk of accident.Observe the load rating of the tires. The loadrating must be at least half of the GAWR ofyour vehicle. Never overload the tires byexceeding the maximum load.
Two instruction labels on your vehicle showthe maximum possible load.(1) The Tire and Loading Information placard
is on the B-pillar on the driver's side. TheTire and Loading Information placardshows themaximum permissible numberof occupants and the maximumpermissible vehicle load. It also containsdetails of the tire sizes andcorresponding pressures for tiresmounted at the factory.
(2) The vehicle identification plate is on theB-pillar on the driver's side. The vehicleidentification plate informs you of thegross vehicle weight rating. It is made upof the vehicle weight, all vehicleoccupants, the fuel and the cargo. Youcan also find information about themaximum gross axle weight rating on thefront and rear axle.The maximum gross axle weight rating isthe maximum weight that can be carriedby one axle (front or rear axle). Neverexceed the maximum load or themaximum gross axle weight rating for thefront or rear axle.
: B-pillar, driver's side
Loading the vehicle 627
Wheelsandtires
Z
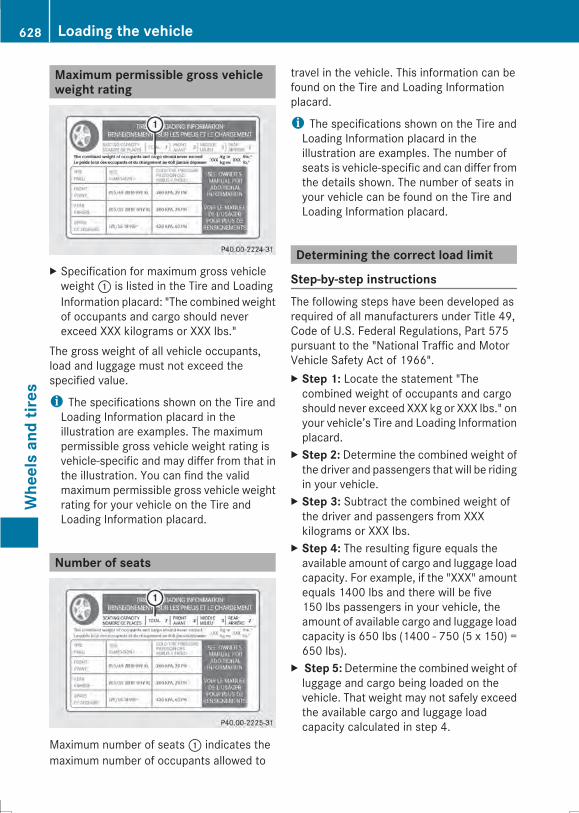
Maximum permissible gross vehicleweight rating
X Specification for maximum gross vehicleweight: is listed in the Tire and LoadingInformation placard: "The combined weightof occupants and cargo should neverexceed XXX kilograms or XXX lbs."
The gross weight of all vehicle occupants,load and luggage must not exceed thespecified value.
i The specifications shown on the Tire andLoading Information placard in theillustration are examples. The maximumpermissible gross vehicle weight rating isvehicle-specific and may differ from that inthe illustration. You can find the validmaximum permissible gross vehicle weightrating for your vehicle on the Tire andLoading Information placard.
Number of seats
Maximum number of seats: indicates themaximum number of occupants allowed to
travel in the vehicle. This information can befound on the Tire and Loading Informationplacard.
i The specifications shown on the Tire andLoading Information placard in theillustration are examples. The number ofseats is vehicle-specific and can differ fromthe details shown. The number of seats inyour vehicle can be found on the Tire andLoading Information placard.
Determining the correct load limit
Step-by-step instructionsThe following steps have been developed asrequired of all manufacturers under Title 49,Code of U.S. Federal Regulations, Part 575pursuant to the "National Traffic and MotorVehicle Safety Act of 1966".X Step 1: Locate the statement "Thecombined weight of occupants and cargoshould never exceed XXX kg or XXX lbs." onyour vehicle’s Tire and Loading Informationplacard.
X Step 2: Determine the combined weight ofthe driver and passengers that will be ridingin your vehicle.
X Step 3: Subtract the combined weight ofthe driver and passengers from XXXkilograms or XXX lbs.
X Step 4: The resulting figure equals theavailable amount of cargo and luggage loadcapacity. For example, if the "XXX" amountequals 1400 lbs and there will be five150 lbs passengers in your vehicle, theamount of available cargo and luggage loadcapacity is 650 lbs (1400 - 750 (5 x 150) =650 lbs).
X Step 5:Determine the combined weight ofluggage and cargo being loaded on thevehicle. That weight may not safely exceedthe available cargo and luggage loadcapacity calculated in step 4.
628 Loading the vehicleWheelsandtires
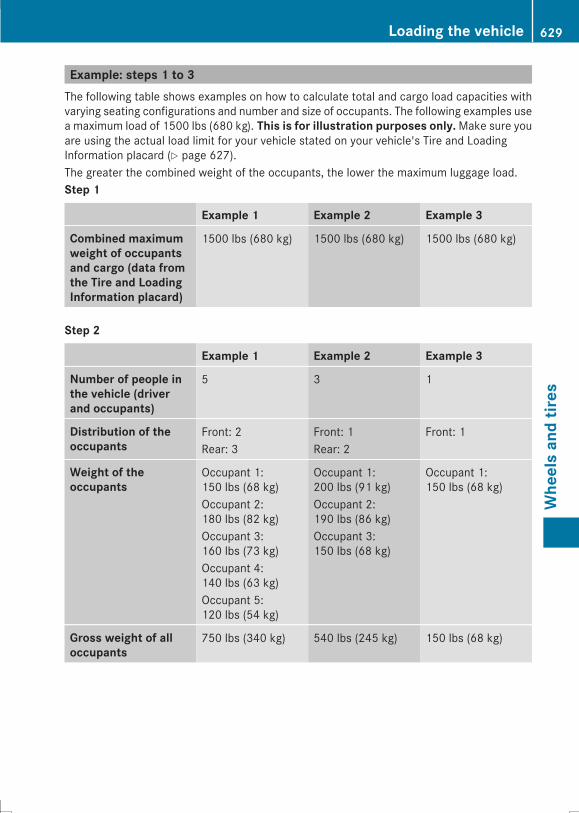
Example: steps 1 to 3The following table shows examples on how to calculate total and cargo load capacities withvarying seating configurations and number and size of occupants. The following examples usea maximum load of 1500 lbs (680 kg). This is for illustration purposes only.Make sure youare using the actual load limit for your vehicle stated on your vehicle's Tire and LoadingInformation placard (Y page 627).The greater the combined weight of the occupants, the lower the maximum luggage load.Step 1
Example 1 Example 2 Example 3
Combined maximumweight of occupantsand cargo (data fromthe Tire and LoadingInformation placard)
1500 lbs (680 kg) 1500 lbs (680 kg) 1500 lbs (680 kg)
Step 2
Example 1 Example 2 Example 3
Number of people inthe vehicle (driverand occupants)
5 3 1
Distribution of theoccupants
Front: 2Rear: 3
Front: 1Rear: 2
Front: 1
Weight of theoccupants
Occupant 1:150 lbs (68 kg)Occupant 2:180 lbs (82 kg)Occupant 3:160 lbs (73 kg)Occupant 4:140 lbs (63 kg)Occupant 5:120 lbs (54 kg)
Occupant 1:200 lbs (91 kg)Occupant 2:190 lbs (86 kg)Occupant 3:150 lbs (68 kg)
Occupant 1:150 lbs (68 kg)
Gross weight of alloccupants
750 lbs (340 kg) 540 lbs (245 kg) 150 lbs (68 kg)
Loading the vehicle 629
Wheelsandtires
Z
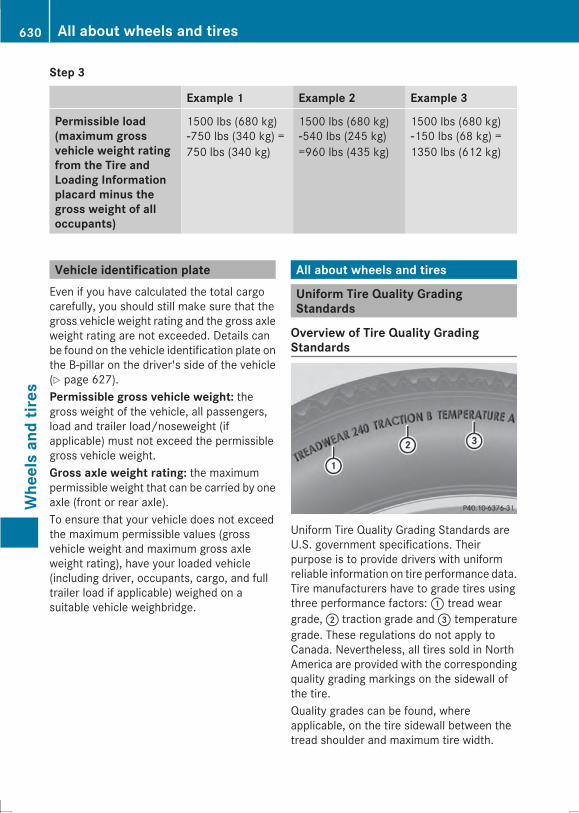
Step 3
Example 1 Example 2 Example 3
Permissible load(maximum grossvehicle weight ratingfrom the Tire andLoading Informationplacard minus thegross weight of alloccupants)
1500 lbs (680 kg)Ò750 lbs (340 kg) =750 lbs (340 kg)
1500 lbs (680 kg)Ò540 lbs (245 kg)=960 lbs (435 kg)
1500 lbs (680 kg)Ò150 lbs (68 kg) =1350 lbs (612 kg)
Vehicle identification plateEven if you have calculated the total cargocarefully, you should still make sure that thegross vehicle weight rating and the gross axleweight rating are not exceeded. Details canbe found on the vehicle identification plate onthe B-pillar on the driver's side of the vehicle(Y page 627).Permissible gross vehicle weight: thegross weight of the vehicle, all passengers,load and trailer load/noseweight (ifapplicable) must not exceed the permissiblegross vehicle weight.Gross axle weight rating: the maximumpermissible weight that can be carried by oneaxle (front or rear axle).To ensure that your vehicle does not exceedthe maximum permissible values (grossvehicle weight and maximum gross axleweight rating), have your loaded vehicle(including driver, occupants, cargo, and fulltrailer load if applicable) weighed on asuitable vehicle weighbridge.
All about wheels and tires
Uniform Tire Quality GradingStandards
Overview of Tire Quality GradingStandards
Uniform Tire Quality Grading Standards areU.S. government specifications. Theirpurpose is to provide drivers with uniformreliable information on tire performance data.Tire manufacturers have to grade tires usingthree performance factors:: tread weargrade,; traction grade and= temperaturegrade. These regulations do not apply toCanada. Nevertheless, all tires sold in NorthAmerica are provided with the correspondingquality grading markings on the sidewall ofthe tire.Quality grades can be found, whereapplicable, on the tire sidewall between thetread shoulder and maximum tire width.
630 All about wheels and tiresWheelsandtires
Example:RTreadwear grade: 200RTraction grade: AARTemperature grade: AAll passenger car tires must conform to thestatutory safety requirements in addition tothese grades.
i The actual values for tires are vehicle-specific and may deviate from the values inthe illustration.
TreadwearThe treadwear grade is a comparative ratingbased on thewear rate of the tire when testedunder controlled conditions on a specifiedU.S. government course. For example, a tiregraded 150 would wear one and one-halftimes as well on the government course as atire graded 100.The relative performance of tires dependsupon the actual conditions of their use,however, and may depart significantly fromthe norm due to variations in driving habits,service practices and differences in roadcharacteristics and climate conditions.
Traction
G WARNINGThe traction grade assigned to this tire isbased on straight-ahead braking tractiontests, and does not include acceleration,cornering, hydroplaning, or peak tractioncharacteristics.
! Avoid wheelspin. This can lead to damageto the drive train.
The traction grades – from highest to lowest– are AA, A, B and C. Those grades representthe tire's ability to stop on wet pavement asmeasured under controlled conditions onspecified government test surfaces of asphaltand concrete. A tire marked C may have poortraction performance.
The safe speed on a wet, snow covered or icyroad is always lower than on dry roadsurfaces.You should pay special attention to roadconditions when temperatures are aroundfreezing point.Mercedes-Benz recommends a minimumtread depth ofã in (4 mm) on all four wintertires. Observe the legally required minimumtire tread depth (Y page 617).Winter tires canreduce the braking distance on snow-coveredsurfaces in comparison with summer tires.The braking distance is still much further thanon surfaces that are not icy or covered withsnow. Take appropriate care when driving.Further information on winter tires (M+Stires) (Y page 618).
Temperature
G WARNINGThe temperature grade for this tire isestablished for a tire that is properly inflatedand not overloaded. Excessive speed,underinflation, or excessive loading, eitherseparately or in combination, can causeexcessive heat build-up and possible tirefailure.
The temperature grades are A (the highest),B, and C. They represent the tire's resistanceto the generation of heat and its ability todissipate heat when tested under controlledconditions on a specified indoor laboratorytest wheel. Sustained high temperature cancause the material of the tire to degenerateand reduce tire life, and excessivetemperature can lead to sudden tire failure.The grade C corresponds to a level ofperformance which all passenger car tiresmust meet under the Federal Motor VehicleSafety Standard No. 109. Grades B and Arepresent higher levels of performance on thelaboratory test wheel than the minimumrequired by law.
All about wheels and tires 631
Wheelsandtires
Z
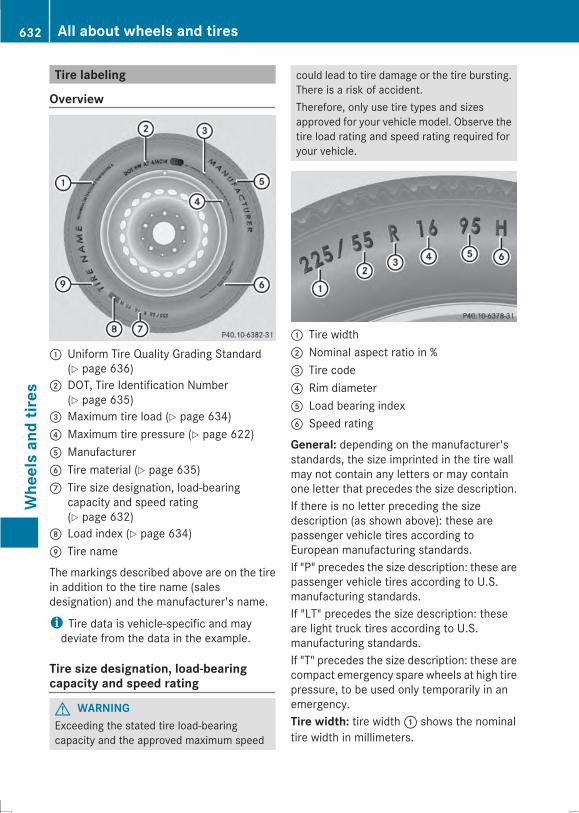
Tire labeling
Overview
: Uniform Tire Quality Grading Standard(Y page 636)
; DOT, Tire Identification Number(Y page 635)
= Maximum tire load (Y page 634)? Maximum tire pressure (Y page 622)A ManufacturerB Tire material (Y page 635)C Tire size designation, load-bearing
capacity and speed rating(Y page 632)
D Load index (Y page 634)E Tire name
The markings described above are on the tirein addition to the tire name (salesdesignation) and the manufacturer's name.
i Tire data is vehicle-specific and maydeviate from the data in the example.
Tire size designation, load-bearingcapacity and speed rating
G WARNINGExceeding the stated tire load-bearingcapacity and the approved maximum speed
could lead to tire damage or the tire bursting.There is a risk of accident.Therefore, only use tire types and sizesapproved for your vehicle model. Observe thetire load rating and speed rating required foryour vehicle.
: Tire width; Nominal aspect ratio in %= Tire code? Rim diameterA Load bearing indexB Speed rating
General: depending on the manufacturer'sstandards, the size imprinted in the tire wallmay not contain any letters or may containone letter that precedes the size description.If there is no letter preceding the sizedescription (as shown above): these arepassenger vehicle tires according toEuropean manufacturing standards.If "P" precedes the size description: these arepassenger vehicle tires according to U.S.manufacturing standards.If "LT" precedes the size description: theseare light truck tires according to U.S.manufacturing standards.If "T" precedes the size description: these arecompact emergency spare wheels at high tirepressure, to be used only temporarily in anemergency.Tire width: tire width: shows the nominaltire width in millimeters.
632 All about wheels and tiresWheelsandtires
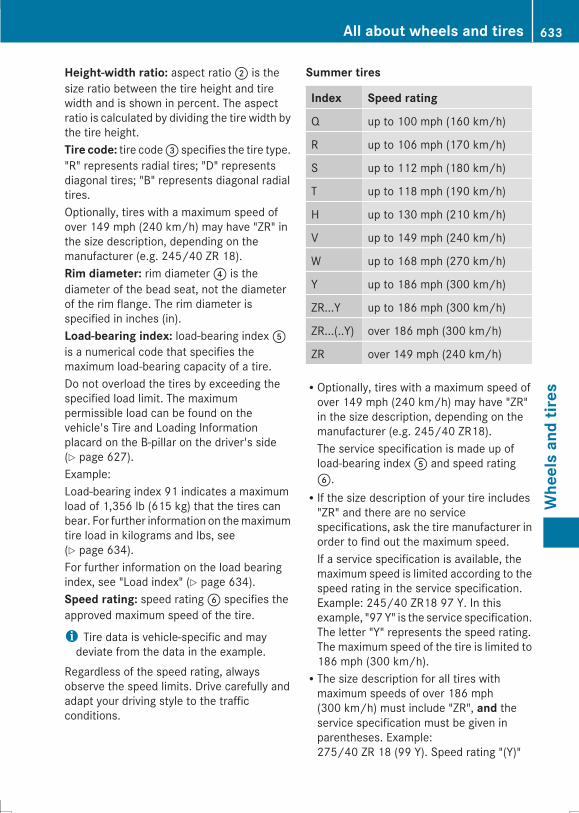
Height-width ratio: aspect ratio; is thesize ratio between the tire height and tirewidth and is shown in percent. The aspectratio is calculated by dividing the tire width bythe tire height.Tire code: tire code= specifies the tire type."R" represents radial tires; "D" representsdiagonal tires; "B" represents diagonal radialtires.Optionally, tires with a maximum speed ofover 149 mph (240 km/h) may have "ZR" inthe size description, depending on themanufacturer (e.g. 245/40 ZR 18).Rim diameter: rim diameter? is thediameter of the bead seat, not the diameterof the rim flange. The rim diameter isspecified in inches (in).Load-bearing index: load-bearing indexAis a numerical code that specifies themaximum load-bearing capacity of a tire.Do not overload the tires by exceeding thespecified load limit. The maximumpermissible load can be found on thevehicle's Tire and Loading Informationplacard on the B-pillar on the driver's side(Y page 627).Example:Load-bearing index 91 indicates a maximumload of 1,356 lb (615 kg) that the tires canbear. For further information on themaximumtire load in kilograms and lbs, see(Y page 634).For further information on the load bearingindex, see "Load index" (Y page 634).Speed rating: speed ratingB specifies theapproved maximum speed of the tire.
i Tire data is vehicle-specific and maydeviate from the data in the example.
Regardless of the speed rating, alwaysobserve the speed limits. Drive carefully andadapt your driving style to the trafficconditions.
Summer tires
Index Speed rating
Q up to 100 mph (160 km/h)
R up to 106 mph (170 km/h)
S up to 112 mph (180 km/h)
T up to 118 mph (190 km/h)
H up to 130 mph (210 km/h)
V up to 149 mph (240 km/h)
W up to 168 mph (270 km/h)
Y up to 186 mph (300 km/h)
ZR...Y up to 186 mph (300 km/h)
ZR...(..Y) over 186 mph (300 km/h)
ZR over 149 mph (240 km/h)
ROptionally, tires with a maximum speed ofover 149 mph (240 km/h) may have "ZR"in the size description, depending on themanufacturer (e.g. 245/40 ZR18).The service specification is made up ofload-bearing indexA and speed ratingB.RIf the size description of your tire includes"ZR" and there are no servicespecifications, ask the tire manufacturer inorder to find out the maximum speed.If a service specification is available, themaximum speed is limited according to thespeed rating in the service specification.Example: 245/40 ZR18 97 Y. In thisexample, "97 Y" is the service specification.The letter "Y" represents the speed rating.The maximum speed of the tire is limited to186 mph (300 km/h).RThe size description for all tires withmaximum speeds of over 186 mph(300 km/h) must include "ZR", and theservice specification must be given inparentheses. Example:275/40 ZR 18 (99 Y). Speed rating "(Y)"
All about wheels and tires 633
Wheelsandtires
Z

indicates that the maximum speed of thetire is over 186 mph (300 km/h). Ask thetire manufacturer about the maximumspeed.
All-weather tires and winter tires
Index Speed rating
Q M+S1 up to 100 mph (160 km/h)
T M+S1 up to 118 mph (190 km/h)
H M+S1 up to 130 mph (210 km/h)
V M+S1 up to 149 mph (240 km/h)
i Not all tires with theM+Smarking providethe driving characteristics of winter tires.In addition to theM+Smarking, winter tiresalso have thei snowflake symbol onthe tire wall. Tires with this marking fulfillthe requirements of the RubberManufacturers Association (RMA) and theRubber Association of Canada (RAC)regarding the tire traction on snow. Theyhave been especially developed for drivingon snow.
An electronic speed limiter prevents yourvehicle from exceeding a speed of 130mph(210km/h).The speed rating of tires mounted at thefactory may be higher than the maximumspeed that the electronic speed limiterpermits.Make sure that your tires have the requiredspeed rating, e.g. when buying new tires. Therequired speed rating for your vehicle can befound in the "Tires" section (Y page 642).Further information about reading tire datacan be obtained from any qualified specialistworkshop.
Load index
In addition to the load-bearing index, loadindex: may also be imprinted on thesidewall of the tire. You will find this after theletter that identifies the speed rating(Y page 632).RIf no specification is given: no text (as in theexample above), represents a standardload (SL) tireRXL or Extra Load: represents a reinforcedtireRLight Load: represents a light load tireRC, D, E: represents a load range thatdepends on the maximum load that the tirecan carry at a certain pressure
i Tire data is vehicle-specific and maydeviate from the data in the example.
Maximum load rating
Maximum tire load: is the maximumpermissible weight for which the tire isapproved.
1 Or M+Si for winter tires.
634 All about wheels and tiresWheelsandtires
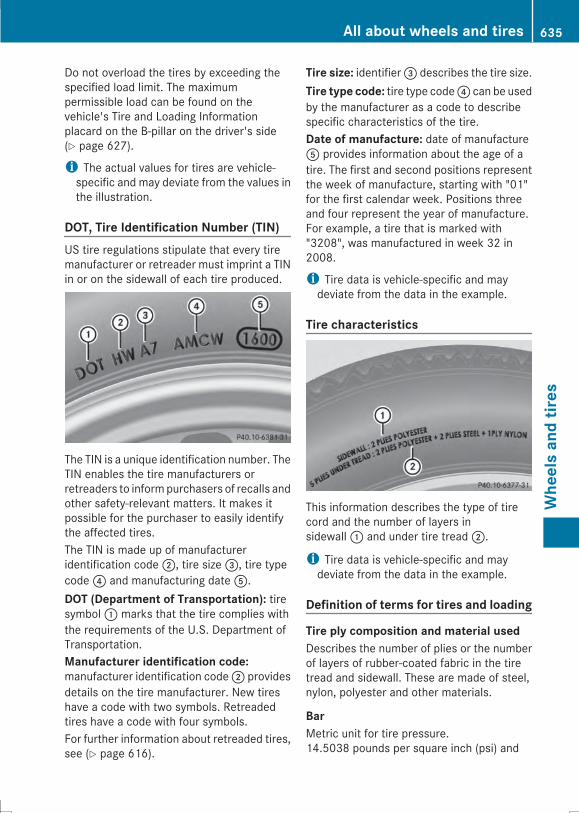
Do not overload the tires by exceeding thespecified load limit. The maximumpermissible load can be found on thevehicle's Tire and Loading Informationplacard on the B-pillar on the driver's side(Y page 627).
i The actual values for tires are vehicle-specific and may deviate from the values inthe illustration.
DOT, Tire Identification Number (TIN)US tire regulations stipulate that every tiremanufacturer or retreader must imprint a TINin or on the sidewall of each tire produced.
The TIN is a unique identification number. TheTIN enables the tire manufacturers orretreaders to informpurchasers of recalls andother safety-relevant matters. It makes itpossible for the purchaser to easily identifythe affected tires.The TIN is made up of manufactureridentification code;, tire size=, tire typecode? and manufacturing dateA.DOT (Department of Transportation): tiresymbol: marks that the tire complies withthe requirements of the U.S. Department ofTransportation.Manufacturer identification code:manufacturer identification code; providesdetails on the tire manufacturer. New tireshave a code with two symbols. Retreadedtires have a code with four symbols.For further information about retreaded tires,see (Y page 616).
Tire size: identifier= describes the tire size.Tire type code: tire type code? can be usedby the manufacturer as a code to describespecific characteristics of the tire.Date of manufacture: date of manufactureA provides information about the age of atire. The first and second positions representthe week of manufacture, starting with "01"for the first calendar week. Positions threeand four represent the year of manufacture.For example, a tire that is marked with"3208", was manufactured in week 32 in2008.
i Tire data is vehicle-specific and maydeviate from the data in the example.
Tire characteristics
This information describes the type of tirecord and the number of layers insidewall: and under tire tread;.
i Tire data is vehicle-specific and maydeviate from the data in the example.
Definition of terms for tires and loading
Tire ply composition and material usedDescribes the number of plies or the numberof layers of rubber-coated fabric in the tiretread and sidewall. These are made of steel,nylon, polyester and other materials.
BarMetric unit for tire pressure.14.5038 pounds per square inch (psi) and
All about wheels and tires 635
Wheelsandtires
Z
100 kilopascals (kPa) are the equivalent of1 bar.
DOT (Department of Transportation)DOT-marked tires fulfill the requirements ofthe U S Department of Transportation.
Normal occupant weightThe number of occupants for which thevehicle is designed multiplied by68 kilograms (150 lbs).
Uniform Tire Quality Grading StandardsA uniform standard to grade the quality oftireswith regards to tread quality, tire tractionand temperature characteristics. The qualitygrading assessment is made by themanufacturer following specifications fromthe U.S. government. The ratings are moldedinto the sidewall of the tire.
Recommended tire pressuresThe recommended tire pressure applies tothe tires mounted at the factory.The Tire and Loading Information placardcontains the recommended tire pressures forcold tires on a fully loaded vehicle and for themaximum permissible vehicle speed.The tire pressure table contains therecommended pressures for cold tires forvarious operating conditions, i.e. differingload and speed conditions.
Increased vehicle weight due to optionalequipmentThe combined weight of all standard andoptional equipment available for the vehicle,regardless of whether it is actually installedon the vehicle or not.
RimThis is the part of the wheel on which the tireis mounted.
GAWR (Gross Axle Weight Rating)The GAWR is the maximum gross axle weightrating. The actual load on an axle must neverexceed the gross axle weight rating. Thegross axle weight rating can be found on the
vehicle identification plate on the B-pillar onthe driver's side.
Speed ratingThe speed rating is part of the tireidentification. It specifies the speed range forwhich the tire is approved.
GVW (Gross Vehicle Weight)The gross vehicle weight includes the weightof the vehicle including fuel, tools, the sparewheel, accessories installed, occupants,luggage and the drawbar noseweight, ifapplicable. The gross vehicle weight must notexceed the gross vehicle weight rating GVWRas specified on the vehicle identification plateon the B-pillar on the driver's side.
GVWR (Gross Vehicle Weight Rating)The GVWR is the maximum permissible grossweight of a fully loaded vehicle (the weight ofthe vehicle including all accessories,occupants, fuel, luggage and the drawbarnoseweight, if applicable). The gross vehicleweight rating is specified on the vehicleidentification plate on the B-pillar on thedriver's side.
Maximum loaded vehicle weightThe maximum weight is the sum of:Rthe curb weight of the vehicleRthe weight of the accessoriesRthe load limitRthe weight of the factory installed optionalequipment
Kilopascal (kPa)Metric unit for tire pressure. 6.9 kPacorresponds to 1 psi. Another unit for tirepressure is bar. 100 kilopascals (kPa) are theequivalent of 1 bar.
Load indexIn addition to the load-bearing index, the loadindex may also be imprinted on the sidewallof the tire. This specifies the load-bearingcapacity more precisely.
636 All about wheels and tiresWheelsandtires
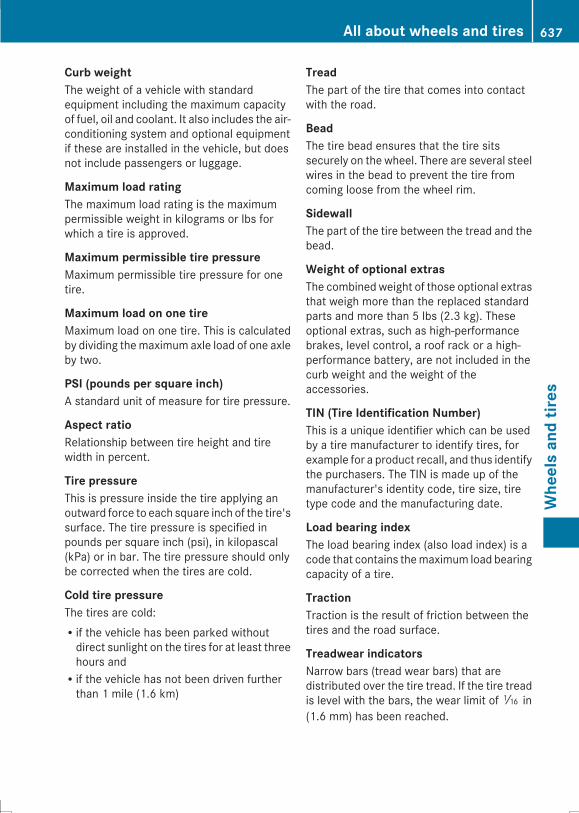
Curb weightThe weight of a vehicle with standardequipment including the maximum capacityof fuel, oil and coolant. It also includes the air-conditioning system and optional equipmentif these are installed in the vehicle, but doesnot include passengers or luggage.
Maximum load ratingThe maximum load rating is the maximumpermissible weight in kilograms or lbs forwhich a tire is approved.
Maximum permissible tire pressureMaximum permissible tire pressure for onetire.
Maximum load on one tireMaximum load on one tire. This is calculatedby dividing themaximum axle load of one axleby two.
PSI (pounds per square inch)A standard unit of measure for tire pressure.
Aspect ratioRelationship between tire height and tirewidth in percent.
Tire pressureThis is pressure inside the tire applying anoutward force to each square inch of the tire'ssurface. The tire pressure is specified inpounds per square inch (psi), in kilopascal(kPa) or in bar. The tire pressure should onlybe corrected when the tires are cold.
Cold tire pressureThe tires are cold:Rif the vehicle has been parked withoutdirect sunlight on the tires for at least threehours andRif the vehicle has not been driven furtherthan 1 mile (1.6 km)
TreadThe part of the tire that comes into contactwith the road.
BeadThe tire bead ensures that the tire sitssecurely on the wheel. There are several steelwires in the bead to prevent the tire fromcoming loose from the wheel rim.
SidewallThe part of the tire between the tread and thebead.
Weight of optional extrasThe combined weight of those optional extrasthat weigh more than the replaced standardparts and more than 5 lbs (2.3 kg). Theseoptional extras, such as high-performancebrakes, level control, a roof rack or a high-performance battery, are not included in thecurb weight and the weight of theaccessories.
TIN (Tire Identification Number)This is a unique identifier which can be usedby a tire manufacturer to identify tires, forexample for a product recall, and thus identifythe purchasers. The TIN is made up of themanufacturer's identity code, tire size, tiretype code and the manufacturing date.
Load bearing indexThe load bearing index (also load index) is acode that contains themaximum load bearingcapacity of a tire.
TractionTraction is the result of friction between thetires and the road surface.
Treadwear indicatorsNarrow bars (tread wear bars) that aredistributed over the tire tread. If the tire treadis level with the bars, the wear limit ofá in(1.6 mm) has been reached.
All about wheels and tires 637
Wheelsandtires
Z
Occupant distributionThe distribution of occupants in a vehicle attheir designated seating positions.
Total load limitNominal load and luggage load plus 68 kg(150 lbs) multiplied by the number of seats inthe vehicle.
Changing a wheel
Flat tireThe "Breakdown assistance" section(Y page 597) contains information and noteson how to deal with a flat tire. Information ondriving with MOExtended tires in the event ofa flat tire can be found under "MOExtendedtires (tires with run-flat characteristics"(Y page 597).
Rotating the wheels
G WARNINGInterchanging the front and rear wheels mayseverely impair the driving characteristics ifthe wheels or tires have different dimensions.The wheel brakes or suspension componentsmay also be damaged. There is a risk ofaccident.Rotate front and rearwheels only if thewheelsand tires are of the same dimensions.
! On vehicles equipped with a tire pressuremonitor, electronic components arelocated in the wheel.Tire-mounting tools should not be usednear the valve. This could damage theelectronic components.Only have tires changed at a qualifiedspecialist workshop.
Always observe the instructions and safetynotes in the "Mounting a wheel" section(Y page 639).The wear patterns on the front and rear tiresdiffer, depending on the operating conditions.
Rotate the wheels before a clear wear patternhas formed on the tires. Front tires typicallywear more on the shoulders and the rear tiresin the center.If your vehicle's tire configuration allows, youcan rotate the wheels according to theintervals in the tire manufacturer's warrantybook in your vehicle documents. If nowarranty book is available, the tires should berotated every 3,000 to 6,000 miles (5,000 to10,000 km), or earlier if tire wear requires.Ensure the direction of rotation ismaintained.Clean the contact surfaces of the wheel andthe brake disc thoroughly every time a wheelis rotated. Check the tire pressure andreactivate the tire pressure monitor ifnecessary.
Direction of rotationTires with a specified direction of rotationhave additional benefits, e.g. if there is a riskof hydroplaning. You will only gain thesebenefits if the correct direction of rotation ismaintained.An arrow on the sidewall of the tire indicatesits correct direction of rotation.
Storing wheelsStorewheels that are not being used in a cool,dry and preferably dark place. Protect thetires from oil, grease, gasoline and diesel.
Cleaning the wheels
G WARNINGThe water jet from a circular jet nozzle (dirtblasters) can cause invisible exterior damageto the tires or chassis components.Components damaged in this way may failunexpectedly. There is a risk of an accident.Do not use power washers with circular jetnozzles to clean the vehicle. Have damaged
638 Changing a wheelWheelsandtires
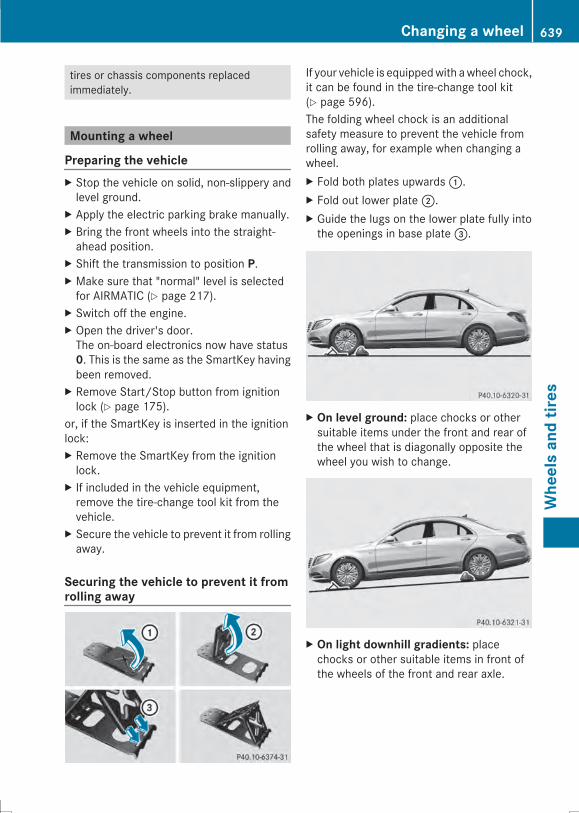
tires or chassis components replacedimmediately.
Mounting a wheel
Preparing the vehicleX Stop the vehicle on solid, non-slippery andlevel ground.
X Apply the electric parking brake manually.X Bring the front wheels into the straight-ahead position.
X Shift the transmission to position P.X Make sure that "normal" level is selectedfor AIRMATIC (Y page 217).
X Switch off the engine.X Open the driver's door.The on-board electronics now have status0. This is the same as the SmartKey havingbeen removed.
X Remove Start/Stop button from ignitionlock (Y page 175).
or, if the SmartKey is inserted in the ignitionlock:X Remove the SmartKey from the ignitionlock.
X If included in the vehicle equipment,remove the tire-change tool kit from thevehicle.
X Secure the vehicle to prevent it from rollingaway.
Securing the vehicle to prevent it fromrolling away
If your vehicle is equippedwith awheel chock,it can be found in the tire-change tool kit(Y page 596).The folding wheel chock is an additionalsafety measure to prevent the vehicle fromrolling away, for example when changing awheel.X Fold both plates upwards:.X Fold out lower plate;.X Guide the lugs on the lower plate fully intothe openings in base plate=.
X On level ground: place chocks or othersuitable items under the front and rear ofthe wheel that is diagonally opposite thewheel you wish to change.
X On light downhill gradients: placechocks or other suitable items in front ofthe wheels of the front and rear axle.
Changing a wheel 639
Wheelsandtires
Z
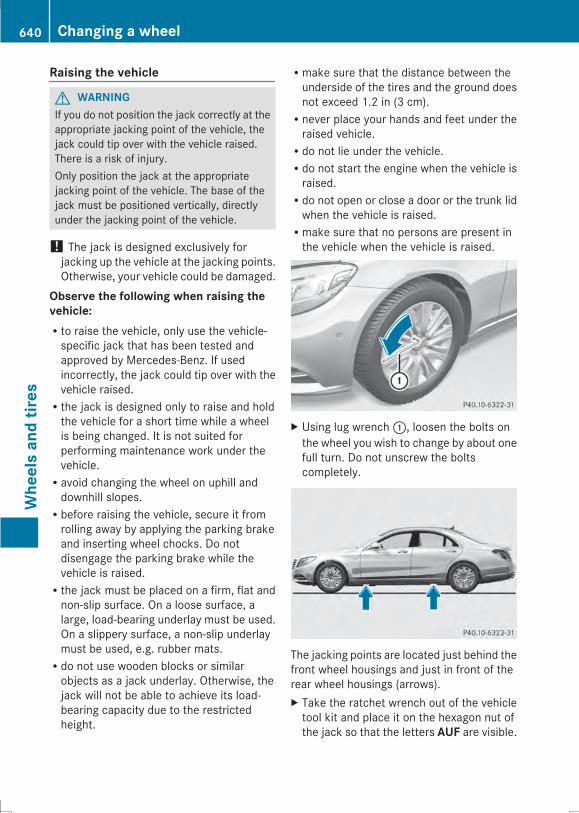
Raising the vehicle
G WARNINGIf you do not position the jack correctly at theappropriate jacking point of the vehicle, thejack could tip over with the vehicle raised.There is a risk of injury.Only position the jack at the appropriatejacking point of the vehicle. The base of thejack must be positioned vertically, directlyunder the jacking point of the vehicle.
! The jack is designed exclusively forjacking up the vehicle at the jacking points.Otherwise, your vehicle could be damaged.
Observe the following when raising thevehicle:Rto raise the vehicle, only use the vehicle-specific jack that has been tested andapproved by Mercedes-Benz. If usedincorrectly, the jack could tip over with thevehicle raised.Rthe jack is designed only to raise and holdthe vehicle for a short time while a wheelis being changed. It is not suited forperforming maintenance work under thevehicle.Ravoid changing the wheel on uphill anddownhill slopes.Rbefore raising the vehicle, secure it fromrolling away by applying the parking brakeand inserting wheel chocks. Do notdisengage the parking brake while thevehicle is raised.Rthe jack must be placed on a firm, flat andnon-slip surface. On a loose surface, alarge, load-bearing underlay must be used.On a slippery surface, a non-slip underlaymust be used, e.g. rubber mats.Rdo not use wooden blocks or similarobjects as a jack underlay. Otherwise, thejack will not be able to achieve its load-bearing capacity due to the restrictedheight.
Rmake sure that the distance between theunderside of the tires and the ground doesnot exceed 1.2 in (3 cm).Rnever place your hands and feet under theraised vehicle.Rdo not lie under the vehicle.Rdo not start the engine when the vehicle israised.Rdo not open or close a door or the trunk lidwhen the vehicle is raised.Rmake sure that no persons are present inthe vehicle when the vehicle is raised.
X Using lug wrench:, loosen the bolts onthe wheel you wish to change by about onefull turn. Do not unscrew the boltscompletely.
The jacking points are located just behind thefront wheel housings and just in front of therear wheel housings (arrows).X Take the ratchet wrench out of the vehicletool kit and place it on the hexagon nut ofthe jack so that the letters AUF are visible.
640 Changing a wheelWheelsandtires
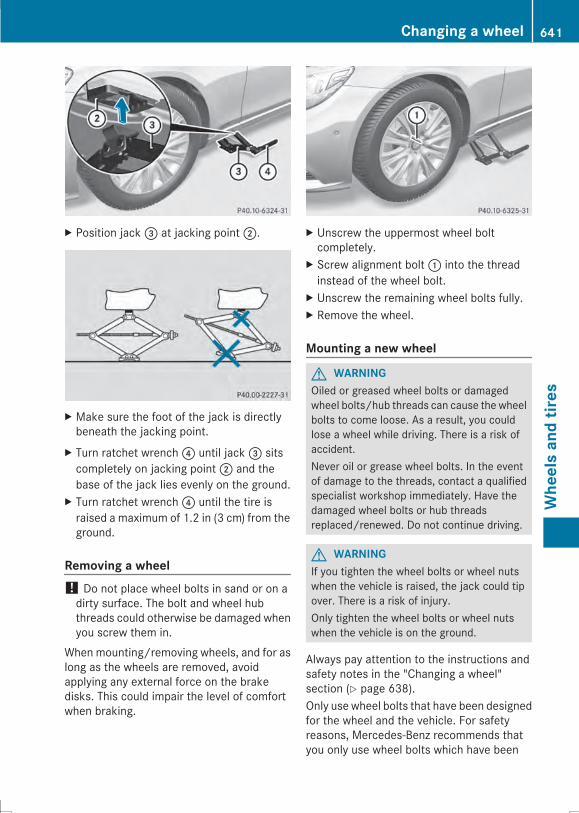
X Position jack= at jacking point;.
X Make sure the foot of the jack is directlybeneath the jacking point.
X Turn ratchet wrench? until jack= sitscompletely on jacking point; and thebase of the jack lies evenly on the ground.
X Turn ratchet wrench? until the tire israised a maximum of 1.2 in (3 cm) from theground.
Removing a wheel! Do not place wheel bolts in sand or on adirty surface. The bolt and wheel hubthreads could otherwise be damaged whenyou screw them in.
When mounting/removing wheels, and for aslong as the wheels are removed, avoidapplying any external force on the brakedisks. This could impair the level of comfortwhen braking.
X Unscrew the uppermost wheel boltcompletely.
X Screw alignment bolt: into the threadinstead of the wheel bolt.
X Unscrew the remaining wheel bolts fully.X Remove the wheel.
Mounting a new wheel
G WARNINGOiled or greased wheel bolts or damagedwheel bolts/hub threads can cause the wheelbolts to come loose. As a result, you couldlose a wheel while driving. There is a risk ofaccident.Never oil or grease wheel bolts. In the eventof damage to the threads, contact a qualifiedspecialist workshop immediately. Have thedamaged wheel bolts or hub threadsreplaced/renewed. Do not continue driving.
G WARNINGIf you tighten the wheel bolts or wheel nutswhen the vehicle is raised, the jack could tipover. There is a risk of injury.Only tighten the wheel bolts or wheel nutswhen the vehicle is on the ground.
Always pay attention to the instructions andsafety notes in the "Changing a wheel"section (Y page 638).Only use wheel bolts that have been designedfor the wheel and the vehicle. For safetyreasons, Mercedes-Benz recommends thatyou only use wheel bolts which have been
Changing a wheel 641
Wheelsandtires
Z

approved forMercedes-Benz vehicles and therespective wheel.
! To prevent damage to the paintwork, holdthe wheel securely against the wheel hubwhile screwing in the first wheel bolt.
X Clean the wheel and wheel hub contactsurfaces.
X Slide the wheel to be mounted onto thealignment bolt and push it on.
X Tighten the wheel bolts until they arefinger-tight.
X Unscrew the alignment bolt.X Tighten the last wheel bolt until it is finger-tight.
Lowering the vehicle
G WARNINGThe wheels could work loose if the wheel nutsand bolts are not tightened to the specifiedtightening torque. There is a risk of accident.Have the tightening torque immediatelychecked at a qualified specialist workshopafter a wheel is changed.
X Place the ratchet wrench onto the hexagonnut of the jack so that the letters AB arevisible.
X Turn the ratchet wrench until the vehicle isonce again standing firmly on the ground.
X Place the jack to one side.X Tighten the wheel bolts evenly in acrosswise pattern in the sequenceindicated (: toA). The tightening torquemust be 110 lb-ft(150 Nm).
X Turn the jack back to its initial position.X Stow the jack and the rest of the vehicletools in the trunk again.
X Check the tire pressure of the newlymounted wheel and adjust it if necessary.Observe the recommended tire pressure(Y page 619).
i All mounted wheels must be equippedwith functioning sensors for the tirepressure monitor.
Wheel and tire combinations
General notes! For safety reasons, Mercedes-Benzrecommends that you only use tires andwheels which have been approved byMercedes-Benz specifically for yourvehicle.
642 Wheel and tire combinationsWheelsandtires
These tires have been specially adapted foruse with the control systems, such as ABSor ESP®, and are marked as follows:RMO = Mercedes-Benz OriginalRMOE=Mercedes-BenzOriginal Extended(tires featuring run-flat characteristics)RMO1 = Mercedes-Benz Original (onlycertain AMG tires)
Mercedes-Benz Original Extended tiresmay only be used on wheels that have beenspecifically approved by Mercedes-Benz.Only use tires, wheels or accessoriestested and approved by Mercedes-Benz.Certain characteristics, e.g. handling,vehicle noise emissions or fuelconsumption, may otherwise be adverselyaffected. In addition, when driving with aload, tire dimension variations could causethe tires to come into contact with thebodywork and axle components. This couldresult in damage to the tires or the vehicle.Mercedes-Benz accepts no liability fordamage resulting from the use of tires,wheels or accessories other than thosetested and approved.Information on tires, wheels and approvedcombinations can be obtained from anyqualified specialist workshop.
Overview of abbreviations used in thefollowing tire tables:RBA: both axlesRFA: front axleRRA: rear axleThe recommended pressures for variousoperating conditions can be found:Ron the Tire and Loading Information placardwith the recommended tire pressures onthe B-pillar on the driver's sideRin the tire pressure table on the inside ofthe fuel filler flap
Observe the notes on recommended tirepressures under various operating conditions(Y page 619).
Check tire pressures regularly, and only whenthe tires are cold. Comply with themaintenance recommendations of the tiremanufacturer in the vehicle document wallet.Notes on the vehicle equipment – alwaysequip the vehicle with:Rtires of the same size on a given axle (left/right)Rthe same type of tires at a given time(summer tires, winter tires, MOExtendedtires)Exception: it is permissible to install adifferent type or make in the event of a flattire. Observe the "MOExtended tires (tireswith run-flat characteristics" section(Y page 597).
Vehicles equipped withMOExtended tires arenot equipped with a TIREFIT kit at the factory.It is therefore recommended that youadditionally equip your vehicle with a TIREFITkit if you mount tires that do not feature run-flat properties, e.g. winter tires. A TIREFIT kitmay be obtained from a qualified specialistworkshop.
i Not all wheel and tire combinations areavailable at the factory for all countries.
i On the following pages, you can findinformation on approved wheel rims andtire sizes for equipping your vehicle withwinter tires. Winter tires are not availableat the factory as standard equipment oroptional extras.If you would like to equip your vehicle withapproved winter tires, you may also, incertain circumstances, require rims of theappropriate size. The size of the approvedwinter tires may deviate from that of thestandard tires. This is dependent on themodel and the equipment installed at thefactory.The tires and wheel rims, as well as furtherinformation, can be obtained at a qualifiedspecialist workshop.
Wheel and tire combinations 643
Wheelsandtires
Z
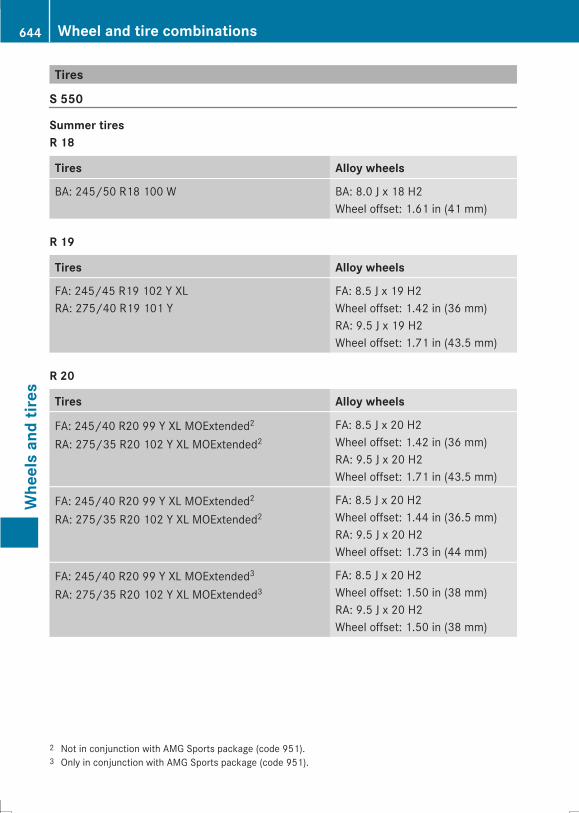
Tires
S 550
Summer tiresR 18
Tires Alloy wheels
BA: 245/50 R18 100 W BA: 8.0 J x 18 H2Wheel offset: 1.61 in (41 mm)
R 19
Tires Alloy wheels
FA: 245/45 R19 102 Y XLRA: 275/40 R19 101 Y
FA: 8.5 J x 19 H2Wheel offset: 1.42 in (36 mm)RA: 9.5 J x 19 H2Wheel offset: 1.71 in (43.5 mm)
R 20
Tires Alloy wheels
FA: 245/40 R20 99 Y XL MOExtended2
RA: 275/35 R20 102 Y XL MOExtended2FA: 8.5 J x 20 H2Wheel offset: 1.42 in (36 mm)RA: 9.5 J x 20 H2Wheel offset: 1.71 in (43.5 mm)
FA: 245/40 R20 99 Y XL MOExtended2
RA: 275/35 R20 102 Y XL MOExtended2FA: 8.5 J x 20 H2Wheel offset: 1.44 in (36.5 mm)RA: 9.5 J x 20 H2Wheel offset: 1.73 in (44 mm)
FA: 245/40 R20 99 Y XL MOExtended3
RA: 275/35 R20 102 Y XL MOExtended3FA: 8.5 J x 20 H2Wheel offset: 1.50 in (38 mm)RA: 9.5 J x 20 H2Wheel offset: 1.50 in (38 mm)
2 Not in conjunction with AMG Sports package (code 951).3 Only in conjunction with AMG Sports package (code 951).
644 Wheel and tire combinationsWheelsandtires
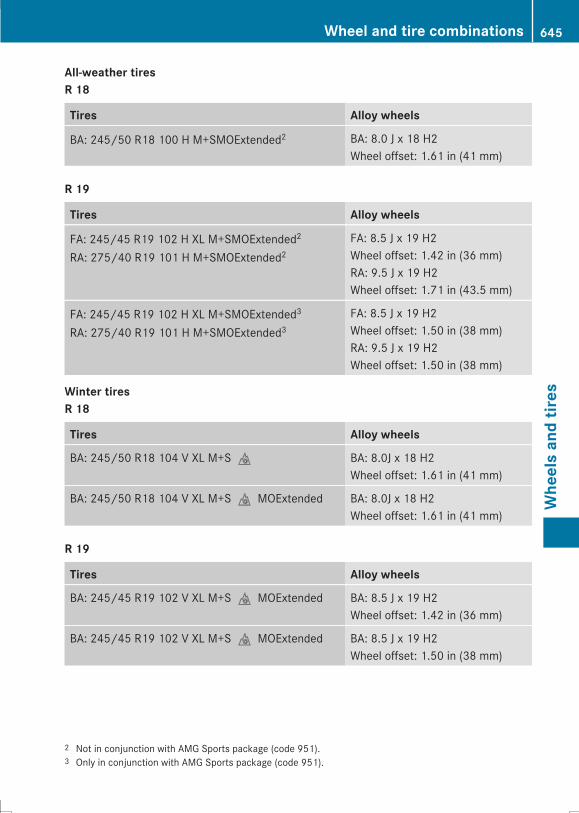
All-weather tiresR 18
Tires Alloy wheels
BA: 245/50 R18 100 H M+SMOExtended2 BA: 8.0 J x 18 H2Wheel offset: 1.61 in (41 mm)
R 19
Tires Alloy wheels
FA: 245/45 R19 102 H XL M+SMOExtended2
RA: 275/40 R19 101 H M+SMOExtended2FA: 8.5 J x 19 H2Wheel offset: 1.42 in (36 mm)RA: 9.5 J x 19 H2Wheel offset: 1.71 in (43.5 mm)
FA: 245/45 R19 102 H XL M+SMOExtended3
RA: 275/40 R19 101 H M+SMOExtended3FA: 8.5 J x 19 H2Wheel offset: 1.50 in (38 mm)RA: 9.5 J x 19 H2Wheel offset: 1.50 in (38 mm)
Winter tiresR 18
Tires Alloy wheels
BA: 245/50 R18 104 V XL M+Si BA: 8.0J x 18 H2Wheel offset: 1.61 in (41 mm)
BA: 245/50 R18 104 V XL M+SiMOExtended BA: 8.0J x 18 H2Wheel offset: 1.61 in (41 mm)
R 19
Tires Alloy wheels
BA: 245/45 R19 102 V XL M+SiMOExtended BA: 8.5 J x 19 H2Wheel offset: 1.42 in (36 mm)
BA: 245/45 R19 102 V XL M+SiMOExtended BA: 8.5 J x 19 H2Wheel offset: 1.50 in (38 mm)
2 Not in conjunction with AMG Sports package (code 951).3 Only in conjunction with AMG Sports package (code 951).
Wheel and tire combinations 645
Wheelsandtires
Z
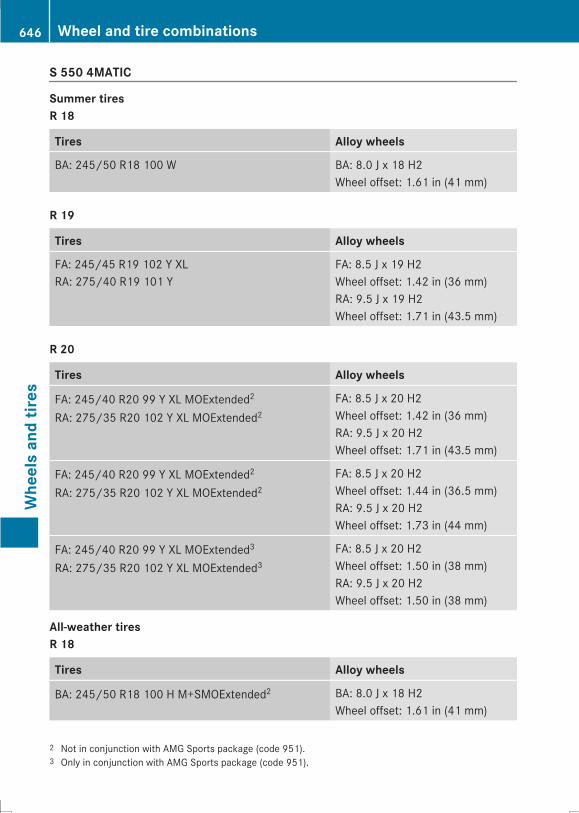
S 550 4MATIC
Summer tiresR 18
Tires Alloy wheels
BA: 245/50 R18 100 W BA: 8.0 J x 18 H2Wheel offset: 1.61 in (41 mm)
R 19
Tires Alloy wheels
FA: 245/45 R19 102 Y XLRA: 275/40 R19 101 Y
FA: 8.5 J x 19 H2Wheel offset: 1.42 in (36 mm)RA: 9.5 J x 19 H2Wheel offset: 1.71 in (43.5 mm)
R 20
Tires Alloy wheels
FA: 245/40 R20 99 Y XL MOExtended2
RA: 275/35 R20 102 Y XL MOExtended2FA: 8.5 J x 20 H2Wheel offset: 1.42 in (36 mm)RA: 9.5 J x 20 H2Wheel offset: 1.71 in (43.5 mm)
FA: 245/40 R20 99 Y XL MOExtended2
RA: 275/35 R20 102 Y XL MOExtended2FA: 8.5 J x 20 H2Wheel offset: 1.44 in (36.5 mm)RA: 9.5 J x 20 H2Wheel offset: 1.73 in (44 mm)
FA: 245/40 R20 99 Y XL MOExtended3
RA: 275/35 R20 102 Y XL MOExtended3FA: 8.5 J x 20 H2Wheel offset: 1.50 in (38 mm)RA: 9.5 J x 20 H2Wheel offset: 1.50 in (38 mm)
All-weather tiresR 18
Tires Alloy wheels
BA: 245/50 R18 100 H M+SMOExtended2 BA: 8.0 J x 18 H2Wheel offset: 1.61 in (41 mm)
2 Not in conjunction with AMG Sports package (code 951).3 Only in conjunction with AMG Sports package (code 951).
646 Wheel and tire combinationsWheelsandtires
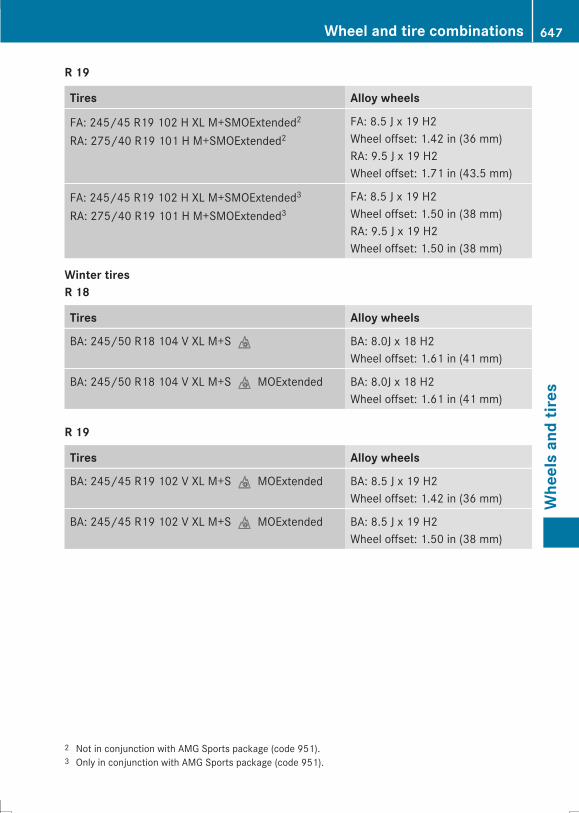
R 19
Tires Alloy wheels
FA: 245/45 R19 102 H XL M+SMOExtended2
RA: 275/40 R19 101 H M+SMOExtended2FA: 8.5 J x 19 H2Wheel offset: 1.42 in (36 mm)RA: 9.5 J x 19 H2Wheel offset: 1.71 in (43.5 mm)
FA: 245/45 R19 102 H XL M+SMOExtended3
RA: 275/40 R19 101 H M+SMOExtended3FA: 8.5 J x 19 H2Wheel offset: 1.50 in (38 mm)RA: 9.5 J x 19 H2Wheel offset: 1.50 in (38 mm)
Winter tiresR 18
Tires Alloy wheels
BA: 245/50 R18 104 V XL M+Si BA: 8.0J x 18 H2Wheel offset: 1.61 in (41 mm)
BA: 245/50 R18 104 V XL M+SiMOExtended BA: 8.0J x 18 H2Wheel offset: 1.61 in (41 mm)
R 19
Tires Alloy wheels
BA: 245/45 R19 102 V XL M+SiMOExtended BA: 8.5 J x 19 H2Wheel offset: 1.42 in (36 mm)
BA: 245/45 R19 102 V XL M+SiMOExtended BA: 8.5 J x 19 H2Wheel offset: 1.50 in (38 mm)
2 Not in conjunction with AMG Sports package (code 951).3 Only in conjunction with AMG Sports package (code 951).
Wheel and tire combinations 647
Wheelsandtires
Z

648

Useful information ............................ 650Information regarding technicaldata .................................................... 650Warranty ............................................ 650Identification plates ......................... 650Service products and filling capaci-ties ..................................................... 651Vehicle data ...................................... 657
649
Technicaldata
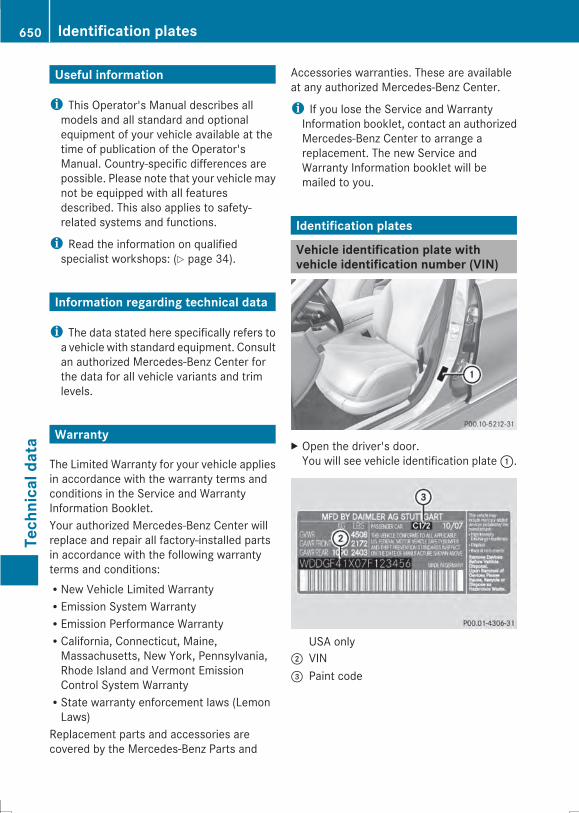
Useful information
i This Operator's Manual describes allmodels and all standard and optionalequipment of your vehicle available at thetime of publication of the Operator'sManual. Country-specific differences arepossible. Please note that your vehicle maynot be equipped with all featuresdescribed. This also applies to safety-related systems and functions.
i Read the information on qualifiedspecialist workshops: (Y page 34).
Information regarding technical data
i The data stated here specifically refers toa vehicle with standard equipment. Consultan authorized Mercedes-Benz Center forthe data for all vehicle variants and trimlevels.
Warranty
The Limited Warranty for your vehicle appliesin accordance with the warranty terms andconditions in the Service and WarrantyInformation Booklet.Your authorized Mercedes-Benz Center willreplace and repair all factory-installed partsin accordance with the following warrantyterms and conditions:RNew Vehicle Limited WarrantyREmission System WarrantyREmission Performance WarrantyRCalifornia, Connecticut, Maine,Massachusetts, New York, Pennsylvania,Rhode Island and Vermont EmissionControl System WarrantyRState warranty enforcement laws (LemonLaws)
Replacement parts and accessories arecovered by the Mercedes-Benz Parts and
Accessories warranties. These are availableat any authorized Mercedes-Benz Center.
i If you lose the Service and WarrantyInformation booklet, contact an authorizedMercedes-Benz Center to arrange areplacement. The new Service andWarranty Information booklet will bemailed to you.
Identification plates
Vehicle identification plate withvehicle identification number (VIN)
X Open the driver's door.You will see vehicle identification plate:.
USA only; VIN= Paint code
650 Identification platesTechnicaldata
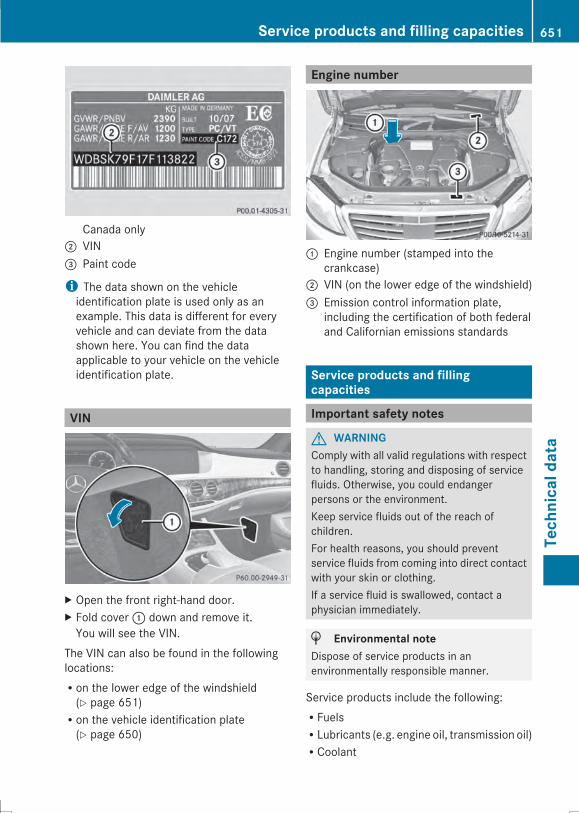
Canada only; VIN= Paint code
i The data shown on the vehicleidentification plate is used only as anexample. This data is different for everyvehicle and can deviate from the datashown here. You can find the dataapplicable to your vehicle on the vehicleidentification plate.
VIN
X Open the front right-hand door.X Fold cover: down and remove it.You will see the VIN.
The VIN can also be found in the followinglocations:Ron the lower edge of the windshield(Y page 651)Ron the vehicle identification plate(Y page 650)
Engine number
: Engine number (stamped into thecrankcase)
; VIN (on the lower edge of the windshield)= Emission control information plate,
including the certification of both federaland Californian emissions standards
Service products and fillingcapacities
Important safety notes
G WARNINGComply with all valid regulations with respectto handling, storing and disposing of servicefluids. Otherwise, you could endangerpersons or the environment.Keep service fluids out of the reach ofchildren.For health reasons, you should preventservice fluids from coming into direct contactwith your skin or clothing.If a service fluid is swallowed, contact aphysician immediately.
H Environmental noteDispose of service products in anenvironmentally responsible manner.
Service products include the following:RFuelsRLubricants (e.g. engine oil, transmission oil)RCoolant
Service products and filling capacities 651
Technicaldata
Z
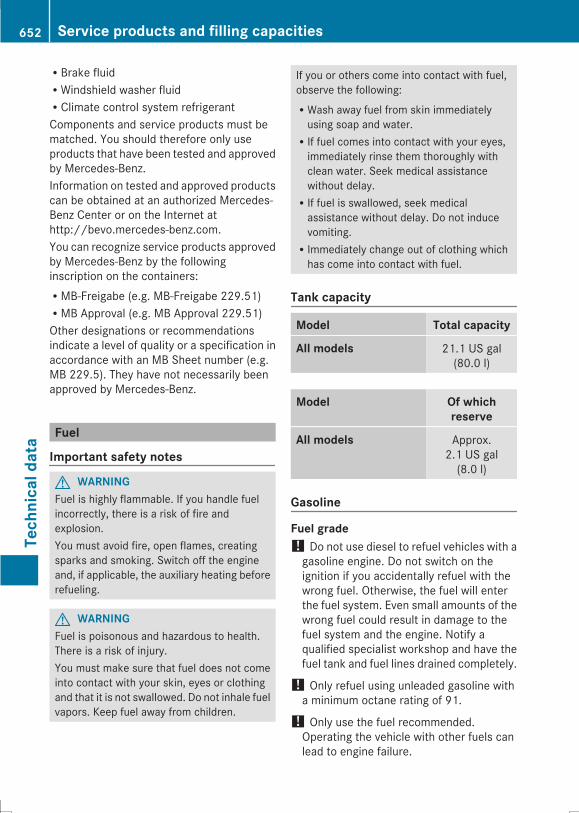
RBrake fluidRWindshield washer fluidRClimate control system refrigerantComponents and service products must bematched. You should therefore only useproducts that have been tested and approvedby Mercedes-Benz.Information on tested and approved productscan be obtained at an authorized Mercedes-Benz Center or on the Internet athttp://bevo.mercedes-benz.com.You can recognize service products approvedby Mercedes-Benz by the followinginscription on the containers:RMB-Freigabe (e.g. MB-Freigabe 229.51)RMB Approval (e.g. MB Approval 229.51)Other designations or recommendationsindicate a level of quality or a specification inaccordance with an MB Sheet number (e.g.MB 229.5). They have not necessarily beenapproved by Mercedes-Benz.
Fuel
Important safety notes
G WARNINGFuel is highly flammable. If you handle fuelincorrectly, there is a risk of fire andexplosion.You must avoid fire, open flames, creatingsparks and smoking. Switch off the engineand, if applicable, the auxiliary heating beforerefueling.
G WARNINGFuel is poisonous and hazardous to health.There is a risk of injury.You must make sure that fuel does not comeinto contact with your skin, eyes or clothingand that it is not swallowed. Do not inhale fuelvapors. Keep fuel away from children.
If you or others come into contact with fuel,observe the following:RWash away fuel from skin immediatelyusing soap and water.RIf fuel comes into contact with your eyes,immediately rinse them thoroughly withclean water. Seek medical assistancewithout delay.RIf fuel is swallowed, seek medicalassistance without delay. Do not inducevomiting.RImmediately change out of clothing whichhas come into contact with fuel.
Tank capacity
Model Total capacity
All models 21.1 US gal(80.0 l)
Model Of whichreserve
All models Approx.2.1 US gal(8.0 l)
Gasoline
Fuel grade! Do not use diesel to refuel vehicles with agasoline engine. Do not switch on theignition if you accidentally refuel with thewrong fuel. Otherwise, the fuel will enterthe fuel system. Even small amounts of thewrong fuel could result in damage to thefuel system and the engine. Notify aqualified specialist workshop and have thefuel tank and fuel lines drained completely.
! Only refuel using unleaded gasoline witha minimum octane rating of 91.
! Only use the fuel recommended.Operating the vehicle with other fuels canlead to engine failure.
652 Service products and filling capacitiesTechnicaldata
! Do not use the following:RE85 (gasoline with 85% ethanol)RE100 (100% ethanol)RM15 (gasoline with 15% methanol)RM30 (gasoline with 30% methanol)RM85 (gasoline with 85% methanol)RM100 (100% methanol)RGasoline with metalliferous additivesRDieselDo not mix such fuels with the fuelrecommended for your vehicle. Do not useadditives. This can otherwise lead to enginedamage. This does not include cleaningadditives for the removal and prevention ofresidue build-up. gasoline may only bemixed with cleaning additivesrecommended by Mercedes-Benz; see"Additives". You can obtain furtherinformation fromany authorizedMercedes-Benz Center.
! To ensure the longevity and fullperformance of the engine, only premium-grade unleaded gasoline must be used.If standard premium-grade unleadedgasoline is unavailable and unleadedgasoline of a lower grade is used forrefueling, observe the followingprecautions:Ronly fill the fuel tank to half full withregular unleaded gasoline and fill the restwith premium-grade unleaded gasolineas soon as possible.Rdo not drive at the maximum speed.Ravoid sudden acceleration and enginespeeds above 3000 rpm.Rnever refuel using fuel with an octanenumber lower than 87. Otherwise,engine failure could occur.
Usingmixtures ofmethanol and ethanol is notpermitted. E10 fuel or E15 fuel (unleadedgasoline with 10% or 15% ethanol) can beused.Youwill usually find information about the fuelgrade on the pump. If you cannot find the
label on the pump, ask the staff forassistance.
i For further information, consult aqualified specialist workshop or on theInternet at http://www.mbusa.com (USAonly).
Information on refueling (Y page 189).
Additives! Operating the engine with fuel additivesadded later can lead to engine failure. Donot mix fuel additives with fuel. This doesnot include additives for the removal andprevention of residue buildup. gasolinemust only be mixed with additivesrecommended by Mercedes-Benz. Complywith the instructions for use on the productlabel. More information aboutrecommended additives can be obtainedfrom any authorized Mercedes-BenzCenter.
Mercedes-Benz recommends that you usefuel brands that have the additives.The quality of the fuel available in somecountries may not be sufficient. Residuecould build up as a result. In such cases, andin consultation with an authorized Mercedes-Benz Center, the gasoline may be mixed withthe cleaning additive recommended byMercedes-Benz (part no. A000989254512).Youmust observe the notes andmixing ratiosspecified on the container.
Diesel
Fuel gradeG WARNINGIf you mix diesel fuel with gasoline, the flashpoint is lower than that of pure diesel fuel.When the engine is running, exhaust systemcomponents could overheat without beingnoticed. There is a risk of fire.Never refuel with gasoline. Nevermix gasolinewith diesel fuel.
Service products and filling capacities 653
Technicaldata
Z
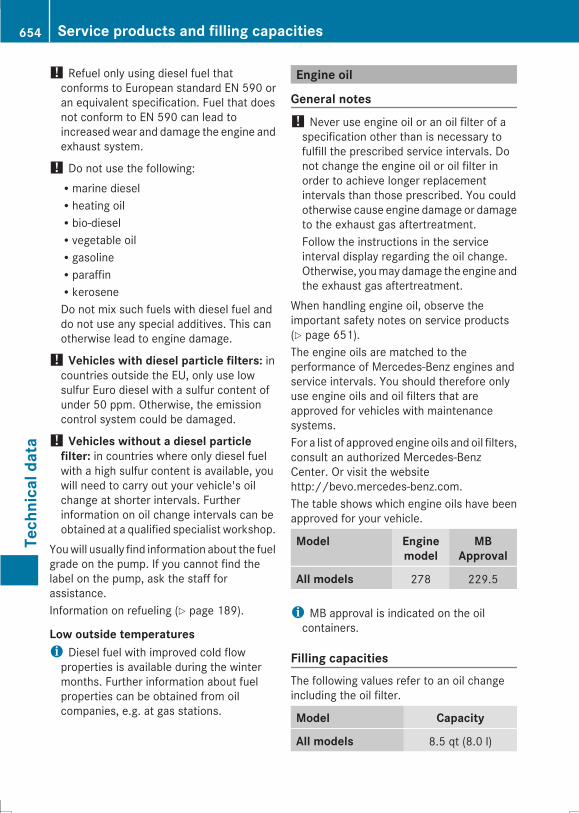
! Refuel only using diesel fuel thatconforms to European standard EN 590 oran equivalent specification. Fuel that doesnot conform to EN 590 can lead toincreasedwear and damage the engine andexhaust system.
! Do not use the following:Rmarine dieselRheating oilRbio-dieselRvegetable oilRgasolineRparaffinRkeroseneDo not mix such fuels with diesel fuel anddo not use any special additives. This canotherwise lead to engine damage.
! Vehicles with diesel particle filters: incountries outside the EU, only use lowsulfur Euro diesel with a sulfur content ofunder 50 ppm. Otherwise, the emissioncontrol system could be damaged.
! Vehicles without a diesel particlefilter: in countries where only diesel fuelwith a high sulfur content is available, youwill need to carry out your vehicle's oilchange at shorter intervals. Furtherinformation on oil change intervals can beobtained at a qualified specialist workshop.
Youwill usually find information about the fuelgrade on the pump. If you cannot find thelabel on the pump, ask the staff forassistance.Information on refueling (Y page 189).
Low outside temperaturesi Diesel fuel with improved cold flowproperties is available during the wintermonths. Further information about fuelproperties can be obtained from oilcompanies, e.g. at gas stations.
Engine oil
General notes! Never use engine oil or an oil filter of aspecification other than is necessary tofulfill the prescribed service intervals. Donot change the engine oil or oil filter inorder to achieve longer replacementintervals than those prescribed. You couldotherwise cause engine damage or damageto the exhaust gas aftertreatment.Follow the instructions in the serviceinterval display regarding the oil change.Otherwise, youmay damage the engine andthe exhaust gas aftertreatment.
When handling engine oil, observe theimportant safety notes on service products(Y page 651).The engine oils are matched to theperformance of Mercedes-Benz engines andservice intervals. You should therefore onlyuse engine oils and oil filters that areapproved for vehicles with maintenancesystems.For a list of approved engine oils and oil filters,consult an authorized Mercedes-BenzCenter. Or visit the websitehttp://bevo.mercedes-benz.com.The table shows which engine oils have beenapproved for your vehicle.
Model Enginemodel
MBApproval
All models 278 229.5
i MB approval is indicated on the oilcontainers.
Filling capacitiesThe following values refer to an oil changeincluding the oil filter.
Model Capacity
All models 8.5 qt (8.0 l)
654 Service products and filling capacitiesTechnicaldata
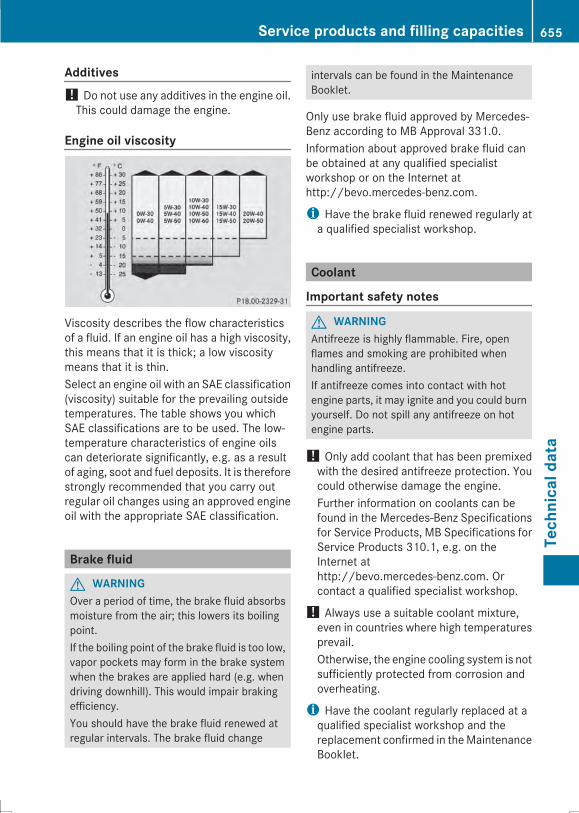
Additives! Do not use any additives in the engine oil.This could damage the engine.
Engine oil viscosity
Viscosity describes the flow characteristicsof a fluid. If an engine oil has a high viscosity,this means that it is thick; a low viscositymeans that it is thin.Select an engine oil with an SAE classification(viscosity) suitable for the prevailing outsidetemperatures. The table shows you whichSAE classifications are to be used. The low-temperature characteristics of engine oilscan deteriorate significantly, e.g. as a resultof aging, soot and fuel deposits. It is thereforestrongly recommended that you carry outregular oil changes using an approved engineoil with the appropriate SAE classification.
Brake fluid
G WARNINGOver a period of time, the brake fluid absorbsmoisture from the air; this lowers its boilingpoint.If the boiling point of the brake fluid is too low,vapor pockets may form in the brake systemwhen the brakes are applied hard (e.g. whendriving downhill). This would impair brakingefficiency.You should have the brake fluid renewed atregular intervals. The brake fluid change
intervals can be found in the MaintenanceBooklet.
Only use brake fluid approved by Mercedes-Benz according to MB Approval 331.0.Information about approved brake fluid canbe obtained at any qualified specialistworkshop or on the Internet athttp://bevo.mercedes-benz.com.
i Have the brake fluid renewed regularly ata qualified specialist workshop.
Coolant
Important safety notes
G WARNINGAntifreeze is highly flammable. Fire, openflames and smoking are prohibited whenhandling antifreeze.If antifreeze comes into contact with hotengine parts, it may ignite and you could burnyourself. Do not spill any antifreeze on hotengine parts.
! Only add coolant that has been premixedwith the desired antifreeze protection. Youcould otherwise damage the engine.Further information on coolants can befound in the Mercedes-Benz Specificationsfor Service Products, MB Specifications forService Products 310.1, e.g. on theInternet athttp://bevo.mercedes-benz.com. Orcontact a qualified specialist workshop.
! Always use a suitable coolant mixture,even in countries where high temperaturesprevail.Otherwise, the engine cooling system is notsufficiently protected from corrosion andoverheating.
i Have the coolant regularly replaced at aqualified specialist workshop and thereplacement confirmed in theMaintenanceBooklet.
Service products and filling capacities 655
Technicaldata
Z
The coolant is a mixture of water andantifreeze/corrosion inhibitor. It performsthe following tasks:Rcorrosion protectionRantifreeze protectionRraising the boiling pointIf the coolant has antifreeze protection downto -35 ‡ (-37 †), the boiling point of thecoolant during operation is approximately266 ‡ (130 †).The antifreeze/corrosion inhibitorconcentration in the engine cooling systemshould:Rbe at least 50%. This will protect the enginecooling system against freezing down toapproximately -35 ‡ (-37 †).Rnot exceed 55% (antifreeze protectiondown to -49 ‡ [-45 †]). Otherwise, heatwill not be dissipated as effectively.
If the vehicle has lost coolant, add equalamounts of water and antifreeze/corrosioninhibitor.Mercedes-Benz recommends an antifreeze/corrosion inhibitor concentrate inaccordance withMBSpecifications for Service Products 310.1.
i When the vehicle is first delivered, it isfilled with a coolant mixture that ensuresadequate antifreeze and corrosionprotection.
i The coolant is checked with everymaintenance interval at a qualifiedspecialist workshop.
Filling capacities
Model Capacity
All models 14.8 US qt (14.0 l)
i Use MB 325.0 or MB 326.0 corrosioninhibitor/antifreeze.
Washer fluid
Important safety notes
G WARNINGWindshield washer concentrate is highlyflammable. If it comes into contact with hotengine components or the exhaust system itcould ignite. There is a risk of fire and injury.Make sure that no windshield washerconcentrate is spilled next to the filler neck.
! Only use washer fluid that is suitable forplastic lamp lenses, e.g. MB SummerFit orMB WinterFit. Unsuitable washer fluidcould damage the plastic lenses of theheadlamps.
! Do not add distilled or de-ionized water tothe washer fluid container. Otherwise, thelevel sensor may be damaged.
! Only MB SummerFit and MB WinterFitwasher fluid should be mixed together. Thespray nozzles may otherwise becomeblocked.
At temperatures above freezing:X Fill the washer fluid reservoir with amixtureof water and windshield washer fluid, e.g.MB SummerFit.
Add 1 part MB SummerFit to 100 parts water.At temperatures below freezing:X Fill the washer fluid reservoir with amixtureof water and washer fluid, e.g. MBWinterFit.
Adapt the mixing ratio to the outsidetemperature.RDown to 14 ‡ (Ò10 †): mix 1 part MBWinterFit to 2 parts water.RDown to Ò4 ‡ (Ò20 †): mix 1 part MBWinterFit to 1 part water.RDown to Ò20.2 ‡ (Ò29 †): mix 2 parts MBWinterFit to 1 part water.
i Add windshield washer fluid, e.g. MBSummerFit or MB WinterFit, to the washerfluid all year round.
656 Service products and filling capacitiesTechnicaldata
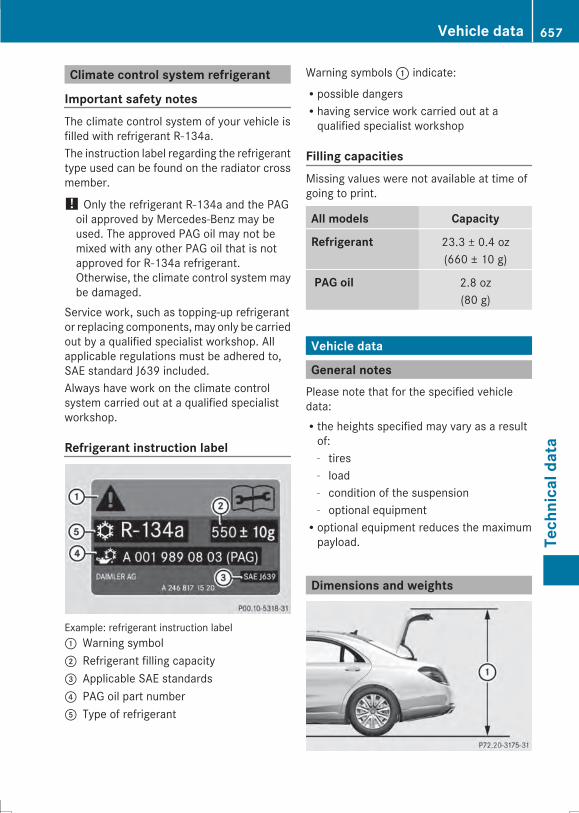
Climate control system refrigerant
Important safety notesThe climate control system of your vehicle isfilled with refrigerant R-134a.The instruction label regarding the refrigeranttype used can be found on the radiator crossmember.
! Only the refrigerant R-134a and the PAGoil approved by Mercedes-Benz may beused. The approved PAG oil may not bemixed with any other PAG oil that is notapproved for R-134a refrigerant.Otherwise, the climate control system maybe damaged.
Service work, such as topping-up refrigerantor replacing components, may only be carriedout by a qualified specialist workshop. Allapplicable regulations must be adhered to,SAE standard J639 included.Always have work on the climate controlsystem carried out at a qualified specialistworkshop.
Refrigerant instruction label
Example: refrigerant instruction label: Warning symbol; Refrigerant filling capacity= Applicable SAE standards? PAG oil part numberA Type of refrigerant
Warning symbols: indicate:Rpossible dangersRhaving service work carried out at aqualified specialist workshop
Filling capacitiesMissing values were not available at time ofgoing to print.
All models Capacity
Refrigerant 23.3 ± 0.4 oz(660 ± 10 g)
PAG oil 2.8 oz(80 g)
Vehicle data
General notesPlease note that for the specified vehicledata:Rthe heights specified may vary as a resultof:- tires- load- condition of the suspension- optional equipmentRoptional equipment reduces the maximumpayload.
Dimensions and weights
Vehicle data 657
Technicaldata
Z
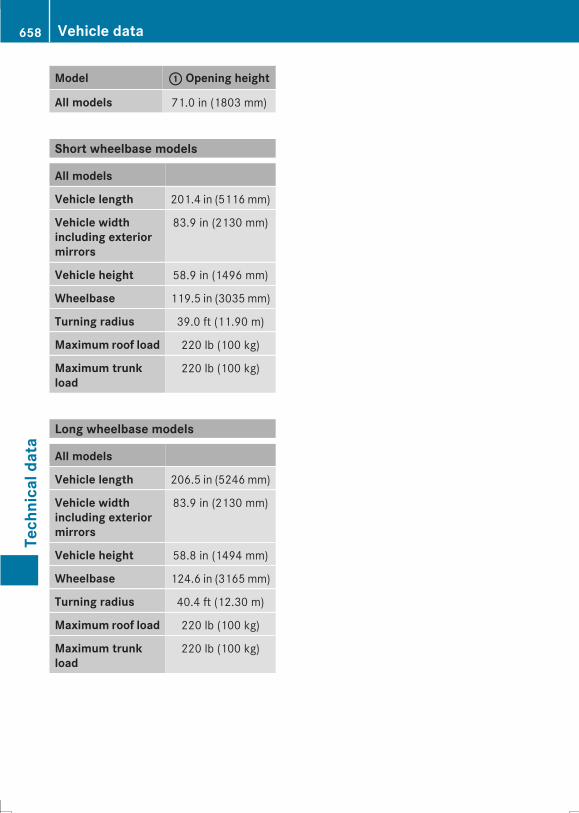
Model :: Opening height
All models 71.0 in (1803 mm)
Short wheelbase models
All models
Vehicle length 201.4 in (5116mm)
Vehicle widthincluding exteriormirrors
83.9 in (2130 mm)
Vehicle height 58.9 in (1496 mm)
Wheelbase 119.5 in (3035mm)
Turning radius 39.0 ft (11.90 m)
Maximum roof load 220 lb (100 kg)
Maximum trunkload
220 lb (100 kg)
Long wheelbase models
All models
Vehicle length 206.5 in (5246mm)
Vehicle widthincluding exteriormirrors
83.9 in (2130 mm)
Vehicle height 58.8 in (1494 mm)
Wheelbase 124.6 in (3165mm)
Turning radius 40.4 ft (12.30 m)
Maximum roof load 220 lb (100 kg)
Maximum trunkload
220 lb (100 kg)
658 Vehicle dataTechnicaldata

659

660