s inspector training program inspection equipment hands … · 3/12/2019 · 1st edition, version...
TRANSCRIPT

Emissions Inspector Training Program I N S P E C T I O N E Q U I P M E N T
H A N D S - O N T R A I N I N G
Georgia’s Clean Air Force (GCAF)
1st Edition, Version 1.93.12.2019

1st Edition, Version 1.9 Inspection Equipment Hands-On Training 3.12.2019 Page 2 of 19
ATTENDANCE AND PARTICIPATION FORM Student’s Name:
Today’s Date:
Training Facility:
Instructor’s Name:
Type of equipment where you work? c BOSCHc OPUSc WEP Worldwide c Other c No place of employment yet I have read and agree to follow the rules of conduct and safety for participation in the hands-on training. Student Signature: Instructor’s Notes:
c Complete/Passed c Complete/Failed (Instructor to provide explanation in the notes above) c Incomplete/Failed
Instructor’s Signature:

1st Edition, Version 1.9 Inspection Equipment Hands-On Training 3.12.2019 Page 3 of 19
IINNTTRROODDUUCCTTIIOONN Welcome to Equipment Training. This part of your training utilizes a “hands-on” approach. The training will be conducted in the shop area. You are required to pay attention to your instructor and follow his/her instructions precisely. Improper operation of the inspection equipment or carelessness could result in injury to self or others and could cause damage to property. Such improper behavior might cause your removal from the shop area and the training class.
TTRRAAIINNIINNGG TTAASSKKSS Your training consists of five tasks. The instructor will cover each of these tasks in detail. Most of the information is generic. It is your responsibility to make notes as appropriate to the test equipment used in the shop where you are currently employed. Task 1 – General Description of the Inspection Equipment Task 2 – Safety-Related Issues Task 3 – Equipment Calibration Task 4 – Equipment Maintenance Task 5 – Equipment Operation
IITTEEMMSS YYOOUU NNEEEEDD You will need the following items during your hands-on training session:
� Hands-on workbook � The Georgia Emission Inspector Training Manual � Pencil or pen
RRUULLEESS OOFF CCOONNDDUUCCTT AANNDD SSAAFFEETTYY FFOORR PPAARRTTIICCIIPPAATTIIOONN IINN TTHHEE HHAANNDDSS--OONN TTRRAAIINNIINNGG Your participation in the hands-on training session is required. While in the shop area you must adhere to all instructions, misconduct and lack of participation will cause you to fail your certification class. The following are the basic requirements and rules of conduct.
� Complete the Attendance and Participation Form, which is attached to this workbook, and write your name on the cover of the workbook.
� You must recognize all safety precautions. Any safety violation will be cause for expulsion from the training session and an overall failure of your certification class.
� Do not leave the shop area or wander around. Remain focused and pay attention to your instructor.
� Smoking, eating and drinking during the session are prohibited. You may smoke, eat and drink only during break time and only in designated areas.
1st Edition, Version 1.9 Inspection Equipment Hands-On Training 3.12.2019 Page 4 of 19
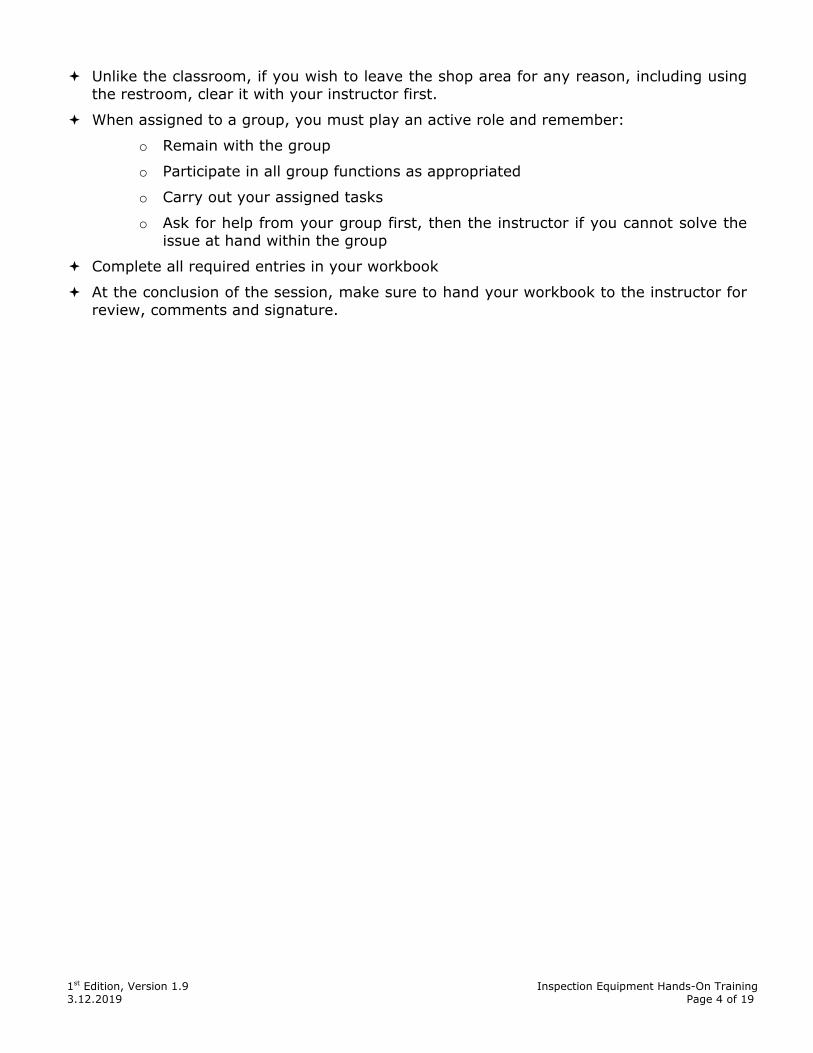
� Unlike the classroom, if you wish to leave the shop area for any reason, including using the restroom, clear it with your instructor first.
� When assigned to a group, you must play an active role and remember:
o Remain with the group
o Participate in all group functions as appropriated
o Carry out your assigned tasks
o Ask for help from your group first, then the instructor if you cannot solve the issue at hand within the group
� Complete all required entries in your workbook
� At the conclusion of the session, make sure to hand your workbook to the instructor for review, comments and signature.

1st Edition, Version 1.9 Inspection Equipment Hands-On Training 3.12.2019 Page 5 of 19
TTAASSKK 11:: GGEENNEERRAALL DDEESSCCRRIIPPTTIIOONN OOFF TTHHEE IINNSSPPEECCTTIIOONN EEQQUUIIPPMMEENNTT Goal: Learn to identify each component (part) of the inspection system
by its common name and know its basic function and use. References: Instructor’s explanation, this workbook, the Georgia Inspector
Certification Training Manual (specifically Chapter 12), and the manuals and reference material supplied by the Equipment Manufacturer with the equipment.
Basic Instructions: Listen to your instructor and make notes, especially note unique
issues relating to the specific equipment you will be using at the station where you are currently employed. Ask questions if something is not clearly understood.
Component Name
Important Notes
Function Student’s Notes
Tamper Proof Cabinet
Do not open cabinet
Houses the computer and the gas analyzer bench
Computer Inside the tamper proof cabinet
Runs the Georgia inspection software and the software to communicate with the VID
Gas Analyzer Bench
Inside the tamper proof cabinet
Collects and analyzes tailpipe emissions and reports the results to the computer
Weather Station
Only required on ASM test system
Measures ambient temperature, humidity and barometric pressure and reports the results to the computer
Filter Assembly
Attached to the exterior of the cabinet and connected to the gas analyzer bench by internal hoses
Two filters to filter out the moisture and large particulates from the vehicle’s exhaust system
Probe Line Attached to the filter assembly at the cabinet
Delivers the vehicle’s tailpipe emissions sample into the gas analyzer bench through the filter assembly
Probe Attached to the probe line
The probe has an insulated grip so the inspector can safely handle the hot probe
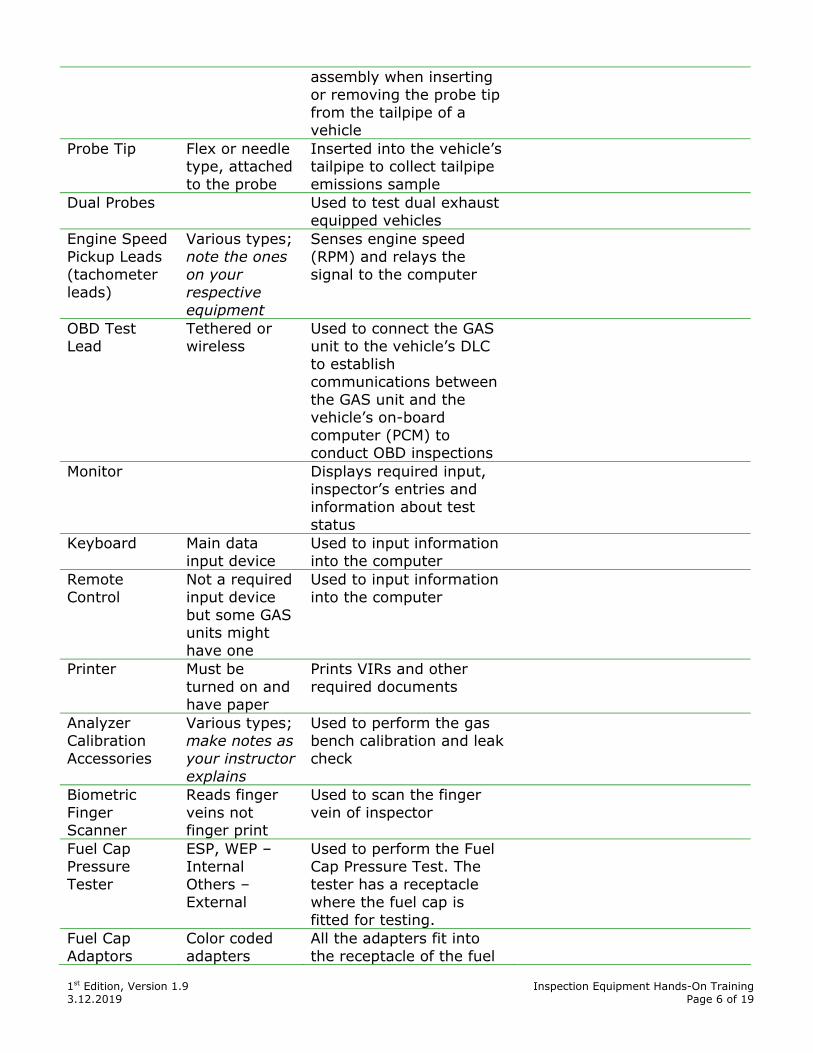
1st Edition, Version 1.9 Inspection Equipment Hands-On Training 3.12.2019 Page 6 of 19
assembly when inserting or removing the probe tip from the tailpipe of a vehicle
Probe Tip Flex or needle type, attached to the probe
Inserted into the vehicle’s tailpipe to collect tailpipe emissions sample
Dual Probes Used to test dual exhaust equipped vehicles
Engine Speed Pickup Leads (tachometer leads)
Various types; note the ones on your respective equipment
Senses engine speed (RPM) and relays the signal to the computer
OBD Test Lead
Tethered or wireless
Used to connect the GAS unit to the vehicle’s DLC to establish communications between the GAS unit and the vehicle’s on-board computer (PCM) to conduct OBD inspections
Monitor Displays required input, inspector’s entries and information about test status
Keyboard Main data input device
Used to input information into the computer
Remote Control
Not a required input device but some GAS units might have one
Used to input information into the computer
Printer Must be turned on and have paper
Prints VIRs and other required documents
Analyzer Calibration Accessories
Various types; make notes as your instructor explains
Used to perform the gas bench calibration and leak check
BiometricFingerScanner
Reads finger veins notfinger print
Used to scan the fingervein of inspector
Fuel Cap Pressure Tester
ESP, WEP – Internal Others – External
Used to perform the Fuel Cap Pressure Test. The tester has a receptacle where the fuel cap is fitted for testing.
Fuel Cap Adaptors
Color coded adapters
All the adapters fit into the receptacle of the fuel

1st Edition, Version 1.9 Inspection Equipment Hands-On Training 3.12.2019 Page 7 of 19
cap pressure tester. Various fuel caps that do not fit the receptacle will fit into the different adapters for testing
Dynamometer (Dyne, Dyno)
In-ground or above ground
Like a treadmill for vehicles. Allows the vehicle to be driven in place. Puts a small load on the vehicle being tested-loaded mode testing.
Dynamometer Electric Motor
Internal; all units have an electric motor except the LAD
Used to spin the dyne rollers during calibration. LAD units use the vehicle to spin rollers for calibration.
Dynamometer Internal Parts
Various units like the absorption unit, gears, belts and load unit
Control the dyne rollers during calibration and during ASM testing
Dynamometer Rollers
Two sets of two rollers each. All geared together; except LAD
Cradle the vehicle’s drive wheels. The wheels of the vehicle spin the rollers during the ASM test. Load is applied to the rollers to create the required resistance to simulate a specific drive condition during an ASM test.
Dynamometer Lifts
Two lifts each positioned between two rollers (a set of rollers)
The vehicle’s drive wheels are positioned on the lifts. The lifts go down allowing the drive wheels to settle between the rollers. When the lift is up, it holds the rollers with a set of brake pads to prevent the rollers from moving allowing the vehicle to be driven on or off the dyne.
Dynamometer Control Panel
Note where the control panel is located
Hosts electrical and electronic devices that communicate with the GAS unit and control the dyne
Restraint Rollers
Moveable parts of the
Manually positioned about a fist-width away from the

1st Edition, Version 1.9 Inspection Equipment Hands-On Training 3.12.2019 Page 8 of 19
dyne chassis assembly
side of each wheel to keep the vehicle from “walking off” the dyne during an ASM test
Cooling Fan Stand-alone unit 3,000 CFM minimum capacity
Used during an ASM test when the GAS prompts for it. The fan is positioned to establish sufficient airflow to the vehicle’s radiator to prevent vehicle overheating.
Wheel Chocks Stand-alone units (various types) – ASM, TSI and OBD testing
Used to ensure safe inspections. In addition to safety, chocking the non-drive wheels helps stabilize the vehicle while being driven on the dyne. Wheel chocks must be used during every inspection, regardless of inspection type.
Lateral Restraint Straps
Stand alone units (various types) – ASM testing
Used to ensure safe ASM testing. Prevent the vehicle from “wandering.” Not used to “tie-down” but to provide lateral stabilization (side to side).
Miscellaneous Maintenance Items
Various types such as filters, probe tips, probe lines, calibration gas, etc.
Used to maintain proper equipment functionality and operation
Calibration Gas: Zero, High
Blend values entered by keyboard or barcode reader - specific to each tank
Used to check accuracy of gas bench and to set calibration points

1st Edition, Version 1.9 Inspection Equipment Hands-On Training 3.12.2019 Page 9 of 19
TTAASSKK 22:: SSAAFFEETTYY--RREELLAATTEEDD IISSSSUUEESS Goal: Recognize all safety-related issues associated with inspecting
vehicles, the use of test equipment and performing any of the Georgia I/M program inspections.
References: Instructor’s explanation, this workbook, the Georgia Inspector
Certification Training Manual (review the safety notes throughout the manual, especially at the end of the TSI and ASM chapters) and the manuals and reference material supplied by the Equipment Manufacturer with the equipment.
Basic Instructions: Listen to your instructor, make notes and adhere to all safety-
related instructions. Ask questions if something is not clearly understood. Violating any safety issue while in the shop area, regardless of how minor it may seem, will cause you to be dismissed and will cause you to fail the certification class.
Exercise Instructions: Complete the following two exercises. Exercise 1: General Safety Issues Assignment Your Response 1. List at least three reasons that
could make working with vehicles, equipment or machinery dangerous.
2. List at least three safety
concerns related to vehicles that you should be aware of prior to, during or after the performance of an inspection.
3. What are some of the dangers
associated with handling calibration gas cylinders?

1st Edition, Version 1.9 Inspection Equipment Hands-On Training 3.12.2019 Page 10 of 19
Exercise 2: Equipment-Related Safety Issues Assignment Your Response 1. Name at least two equipment
components that might be classified as trip hazard and briefly describe methods of prevention.
2. Briefly explain your
understanding of shock hazard as it relates to the inspection equipment.
3. List at least two equipment
components that might cause human injury and give a very brief explanation on each item.
4. List at least two components
used during an inspection to ensure safe testing of vehicles. Give a brief explanation of each component’s function and the role in providing a safe inspection.
5. Briefly explain how poor
housekeeping practices might turn out to be a safety hazard. Give at least one example.
6. Choose the time a
dynamometer operation could be considered most hazardous if people do not pay attention to their surroundings. Briefly explain why.
c During an ASM test c During dyne calibration c When driving the vehicle onto the dyne c When driving the vehicle off the dyne Explanation:

1st Edition, Version 1.9 Inspection Equipment Hands-On Training 3.12.2019 Page 11 of 19
TTAASSKK 33:: EEQQUUIIPPMMEENNTT CCAALLIIBBRRAATTIIOONN Goal: Learn how to calibrate the inspection equipment: Analyzer Gas
Calibration and Leak Check, Fuel Cap Pressure Test Calibration, and Dynamometer Calibration.
References: Instructor’s explanation, this workbook and the manuals and
reference material supplied by the Equipment Manufacturer with the equipment.
Basic Instructions: Listen to your instructor and make notes, especially note unique
issues relating to the specific equipment you will be using at the shop you are currently employed at. Ask questions if something is not clearly understood.
Exercise Instructions: Complete the following three exercises. Exercise 1: Analyzer Calibration Assignment Your Response 1. Look at the calibration gas
cylinder, find the label and fill in the blanks on the opposite side.
Blend Code: Approved by: The CO value is: The HC value is: The NOx value is: Balance: The cylinder expires on:
2. Which of the values you
collected in #1 above did the instructor use during the gas calibration of the analyzer? List them.
3. Do you have to check the
values on the screen against the cylinder every time you perform a gas calibration? Why or why not?
4. Look at the gauge at the
calibration gas cylinder and fill
The pressure of the cylinder is ____________ psi.

1st Edition, Version 1.9 Inspection Equipment Hands-On Training 3.12.2019 Page 12 of 19
in the blanks on the opposite side.
5. What other gas did the
instructor use while performing analyzer calibration?
6. How many probes did the
instructor use while performing analyzer calibration?
7. How often is the gas
calibration and leak check required?
Exercise 2: Fuel Cap Pressure Tester Calibration Assignment Your Response 1. Describe the master
calibration caps the instructor used. Are the caps color-coded? What does each color mean?
2. If the Fuel Cap Pressure Tester
is an external unit, how did the computer in the GAS unit know the fuel cap pressure tester passes or failed calibration?
c The instructor manually entered the Fuel Cap
Pressure Tester calibration results into the GAS unit.
c The Fuel Cap Pressure Tester was connected to the GAS unit and automatically communicated with calibration results to the computer.
3. Are you allowed to use the
master calibration caps during the inspection of a vehicle? If yes, list at least two conditions that require you to use them during a vehicle inspection.

1st Edition, Version 1.9 Inspection Equipment Hands-On Training 3.12.2019 Page 13 of 19
Exercise 3: Dynamometer Calibration Assignment Your Response 1. List the types of calibrations
the instructor went through while calibrating the dynamometer.
2. What was the highest speed
the rollers spun at during the coast down calibration?
3. What does Parasitic Loss
mean?
4. How often is the dynamometer
calibration required?
5. Did the instructor use zero air
to calibrate the dynamometer? Why or why not?
6. Use the picture below to fill in
the blanks on the opposite side.
What is the name of each of the marked components? M are the: S are the: Y are the:

1st Edition, Version 1.9 Inspection Equipment Hands-On Training 3.12.2019 Page 14 of 19
TTAASSKK 44:: MMAAIINNTTEENNAANNCCEE OOFF TTHHEE EEQQUUIIPPMMEENNTT Goal: Become familiar with basic equipment maintenance. References: Instructor’s explanation, this workbook and the manuals and
reference material supplied by the Equipment Manufacturer with the equipment.
Basic Instructions: Listen to your instructor and make notes, especially note unique
issues relating to the specific equipment you will be using at the shop you are currently employed at. Ask questions if something is not clearly understood.
Exercise Instructions: Complete the following exercise. Exercise 1: General Equipment Maintenance Assignment Your Response 1. List at least five items you are
allowed to maintain or replace on the inspection equipment.
1. 2. 3. 4. 5.
2. Explain briefly how can poor
housekeeping (cleaning dirt and dust from equipment, etc.) practices affect equipment. Give at least two examples of equipment failure that can be associated with poor housekeeping practices.
3. What will happen if you
attempt to access the Controlled-Access Area of the GAS unit cabinet?
4. What effect will pinching or
leaving the “O” ring out while replacing the filter in the sampling system have on a GAS unit? Explain your answer.

1st Edition, Version 1.9 Inspection Equipment Hands-On Training 3.12.2019 Page 15 of 19
5. List at least two items that
you are allowed to replace that might cause a “low flow” problem.
6. List at least three components
that cannot be replaced or maintained by the inspector or the shop owner.
1. 2. 3.
7. Are you allowed to alter the
probe tip in any way?

1st Edition, Version 1.9 Inspection Equipment Hands-On Training 3.12.2019 Page 16 of 19
TTAASSKK 55:: EEQQUUIIPPMMEENNTT OOPPEERRAATTIIOONN Goal: Observe and participate in performing an inspection on a vehicle. References: Instructor’s explanation, this workbook, the Georgia Inspector
Certification Training Manual (especially the TSI and ASM chapters) and the manuals and reference material supplied by the Equipment Manufacturer with the equipment.
Basic Instructions: Listen to your instructor, make notes and adhere to all the
safety-related instructions. Ask questions if something is not clearly understood.
Exercise Instructions: Per your instructor’s direction, complete the following two
exercises Exercise 1: Collecting Vehicle Information and Testing the Vehicle Assignment Your Response 1. Vehicle Make
2. Vehicle Model
3. Record the license plate and
issuing state
4. Write the tenth digit of the
VIN
5. According to the tenth digit of
the VIN, what is the model year of the vehicle?
6. Locate the under-hood Vehicle
Emission Control (VEC) label and then answer all of the questions listed on the opposite side.
a. What regulations does this vehicle conform to? b. What model year regulations does this vehicle
conform to? c. Does the year in your answer to item “b” match your
answer to #5 above?

1st Edition, Version 1.9 Inspection Equipment Hands-On Training3.12.2019 Page 17 of 19
d. What is the engine size listed on the label? e. According to the VEC, does this vehicle require a
catalyst?
7. What type of inspection is this
vehicle subject to and why?
8. Does the vehicle pass the
tamper (visual) inspection?
9. What color fuel cap adapter
will you use to perform the Fuel Cap Pressure Test on this vehicle?
10. Does the vehicle have a
single or dual exhaust system?
11. Record the vehicle’s body
type. If the GVWR is required for the inspection, find it and record it.
To complete the below exercise, observe the instructor perform the inspection on a vehicle (this might be a different vehicle than the one you collected the information from), use the appropriate chapter in your training manual to follow the inspection procedures and make notes as needed. After the instructor completes the inspection, complete the assignment below. 12. Did the VID return a match
for the vehicle being tested? Explain briefly if you noticed anything unique about the information received from the VID.

1st Edition, Version 1.9 Inspection Equipment Hands-On Training 3.12.2019 Page 18 of 19
13. Did the instructor perform an
Initial test or an After Repair test?
14. What was the overall test
result? If other than pass, explain what happened.
15. Which tachometer lead did
the instructor use?
Exercise 2: Conduct an OBD Inspection Assignment Your Response 1. Vehicle Make
2. Vehicle Model
3. Write the tenth digit of the
VIN
4. According to the tenth digit of
the VIN, what is the model year of the vehicle?
5. Locate the under-hood Vehicle
Emission Control (VEC) label and then answer all of the questions listed on the opposite side.
a. What regulations does this vehicle conform to? c. Does the year in your answer to item “a” match your
answer to #4 above? e. What is the engine size listed on the label? e. According to the VEC, is this vehicle equipped with
an OBDII system?

1st Edition, Version 1.9 Inspection Equipment Hands-On Training 3.12.2019 Page 19 of 19
6. What type of inspection is this
vehicle subject to and why?
7. Locate the MIL on the vehicle’s
instrument panel and then answer the question on the opposite side.
How is the MIL labeled? You might have to turn the ignition key on without starting the engine to see the MIL. You also may reference the OBD section of the training manual.
8. Make sure the ignition key is
in the off position. Turn the ignition key on, do not start the engine, observe the MIL. Answer the questions on the opposite side.
a. Did the MIL illuminate and remain on? b. Did the MIL illuminate briefly and go off? c. Based on your observation, does the vehicle pass the
visual inspection of the MIL?
9. Using Attachment 4 in your
training manual to locate the DLC on the vehicle, note the information you read in Attachment 4, including listed connector location and access and comments/description.
10. Physically locate the DLC on
the vehicle and plug in the OBD test lead into the DLC.
Is the information in Attachment Four accurate? If not, why?
You are done, review your work and hand your workbook to your instructor as directed.